Embed Size (px)
Citation preview
SECTION: Clinical Procedures REVISED: 05/2017
Section
11 C
LIN
ICA
L P
RO
CE
DU
RE
S
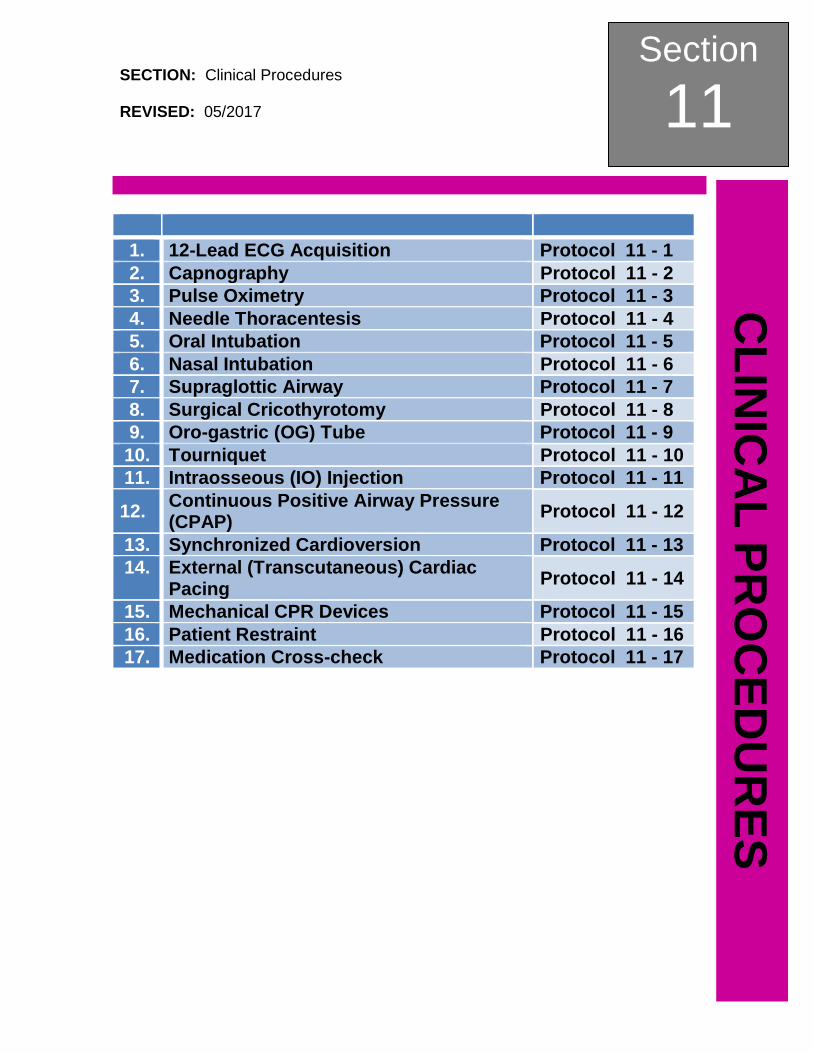
1. 12-Lead ECG Acquisition Protocol 11 - 1
2. Capnography Protocol 11 - 2
3. Pulse Oximetry Protocol 11 - 3
4. Needle Thoracentesis Protocol 11 - 4
5. Oral Intubation Protocol 11 - 5
6. Nasal Intubation Protocol 11 - 6
7. Supraglottic Airway Protocol 11 - 7
8. Surgical Cricothyrotomy Protocol 11 - 8
9. Oro-gastric (OG) Tube Protocol 11 - 9
10. Tourniquet Protocol 11 - 10
11. Intraosseous (IO) Injection Protocol 11 - 11
12. Continuous Positive Airway Pressure (CPAP)
Protocol 11 - 12
13. Synchronized Cardioversion Protocol 11 - 13
14. External (Transcutaneous) Cardiac Pacing
Protocol 11 - 14
15. Mechanical CPR Devices Protocol 11 - 15
16. Patient Restraint Protocol 11 - 16
17. Medication Cross-check Protocol 11 - 17

Section
11 Continued
CL
INIC
AL
PR
OC
ED
UR
ES
This page intentionally left blank.
SECTION: Clinical Procedures PROTOCOL TITLE: 12-Lead ECG Acquisition REVISED: 06/2016
Protocol
11-1 12-L
EA
D E
CG
AC
QU
ISIT
ION
OVERVIEW: The 12-lead ECG analysis is useful in the diagnosis and treatment of patients with acute myocardial infarction (AMI). 12-lead ECG analysis is also useful in the interpretation and documentation of other transient cardiac arrhythmias that may occur. When used in the pre-hospital setting, the 12-lead analysis results can be of assistance in diagnosis and treatment decisions once the patient has arrived in the hospital emergency department.
CLINICAL PRESENTATIONS FOR 12-LEAD ACQUISITION: At a minimum, both ALS and BLS providers should obtain a 12-lead for the following patient complaints:
- Chest pain/tightness - Difficulty Breathing - Nausea - Stroke/neuro symptoms - Altered mental status with no obvious cause - General feelings of malaise in diabetic and/or geriatric and/or female patients
PROTOCOL FOR MANAGEMENT: Electrode Placement
1. Proper skin preparation and use of proper electrodes is essential for good signal quality. If necessary, prepare the patient’s skin for electrode application by shaving excess hair at electrode site, cleaning oily skin with an alcohol pad, or using benzoine tincture for excessive diaphoresis.
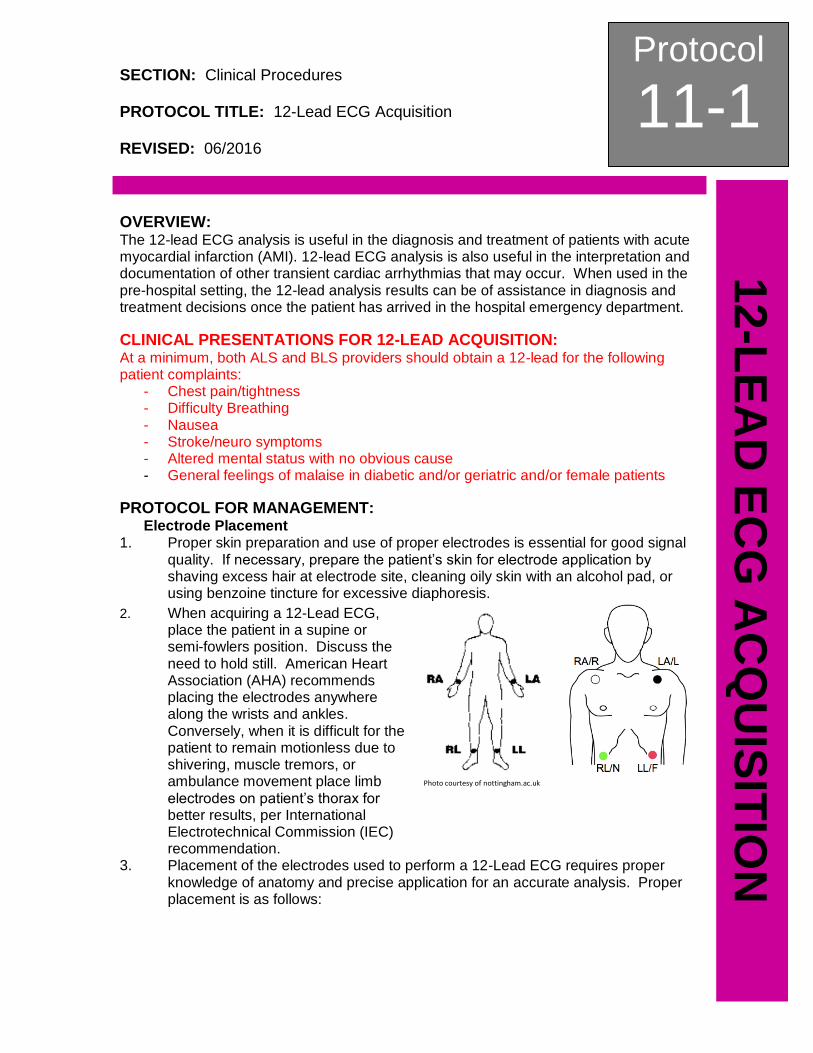
2. When acquiring a 12-Lead ECG, place the patient in a supine or semi-fowlers position. Discuss the need to hold still. American Heart Association (AHA) recommends placing the electrodes anywhere along the wrists and ankles. Conversely, when it is difficult for the patient to remain motionless due to shivering, muscle tremors, or ambulance movement place limb electrodes on patient’s thorax for better results, per International Electrotechnical Commission (IEC) recommendation.
Photo courtesy of nottingham.ac.uk
3. Placement of the electrodes used to perform a 12-Lead ECG requires proper knowledge of anatomy and precise application for an accurate analysis. Proper placement is as follows:
Protocol
11-1 Continued
12-L
EA
D E
CG
AC
QU
ISIT
ION
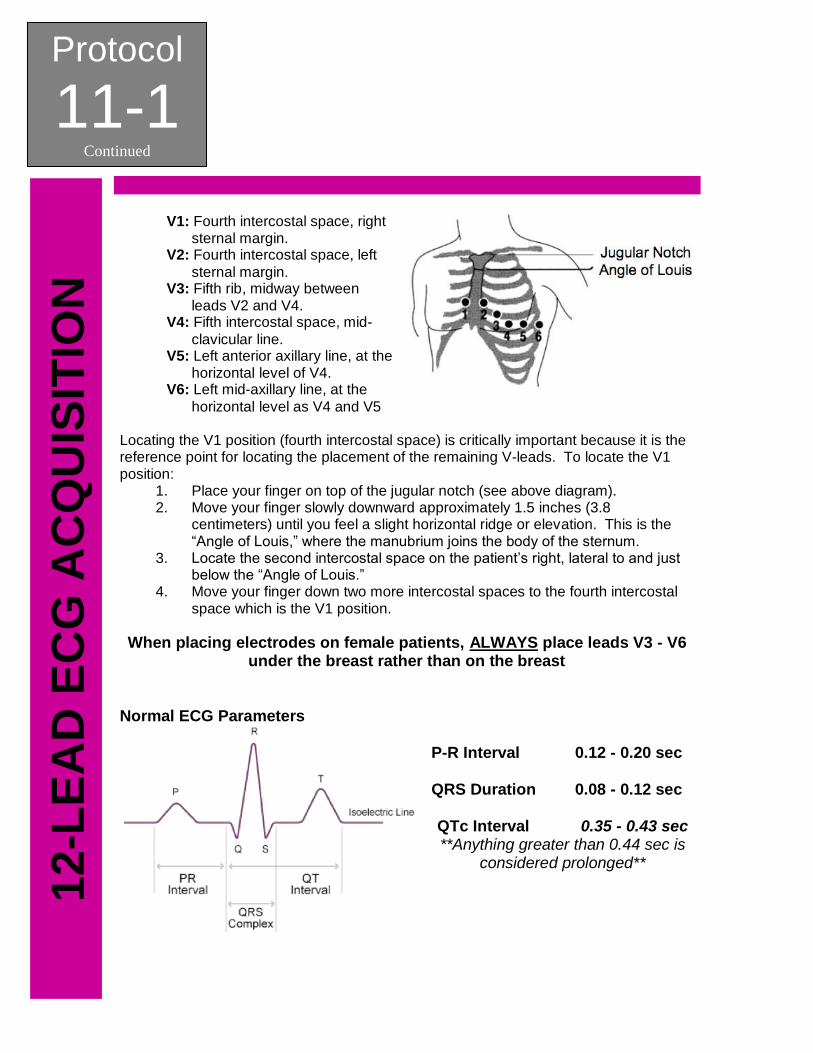
V1: Fourth intercostal space, right sternal margin.
V2: Fourth intercostal space, left
sternal margin. V3: Fifth rib, midway between
leads V2 and V4. V4: Fifth intercostal space, mid-
clavicular line. V5: Left anterior axillary line, at the
horizontal level of V4. V6: Left mid-axillary line, at the
horizontal level as V4 and V5 Locating the V1 position (fourth intercostal space) is critically important because it is the reference point for locating the placement of the remaining V-leads. To locate the V1 position:
1. Place your finger on top of the jugular notch (see above diagram). 2. Move your finger slowly downward approximately 1.5 inches (3.8
centimeters) until you feel a slight horizontal ridge or elevation. This is the “Angle of Louis,” where the manubrium joins the body of the sternum.
3. Locate the second intercostal space on the patient’s right, lateral to and just below the “Angle of Louis.”
4. Move your finger down two more intercostal spaces to the fourth intercostal space which is the V1 position.
When placing electrodes on female patients, ALWAYS place leads V3 - V6 under the breast rather than on the breast
Normal ECG Parameters
P-R Interval 0.12 - 0.20 sec QRS Duration 0.08 - 0.12 sec QTc Interval 0.35 - 0.43 sec **Anything greater than 0.44 sec is
considered prolonged**
Protocol
11-1 Continued
12-L
EA
D E
CG
AC
QU
ISIT
ION
Right-Sided and Posterior 12-Lead Electrode Placement Right ventricular infarct may complicate up to 40-50% of all inferior AMIs and 13% of all anterior AMIs. When assessing a patient presenting with AMI it is important to ascertain whether it involves the right ventricle as this may alter your treatment or the receiving facilities treatment upon your arrival. It is recommended, although not mandatory, that a right-sided and / or posterior 12-Lead ECG be obtained if ST elevation is noted in Leads II, III, AVL, AVF, or V1. Time is muscle and transport should not be delayed to obtain a right-sided or posterior 12-Lead ECGs.
Two ways to obtain a right-sided 12-Lead ECG are noted below, the first being a “quick look” and the second being a full right sided ECG.
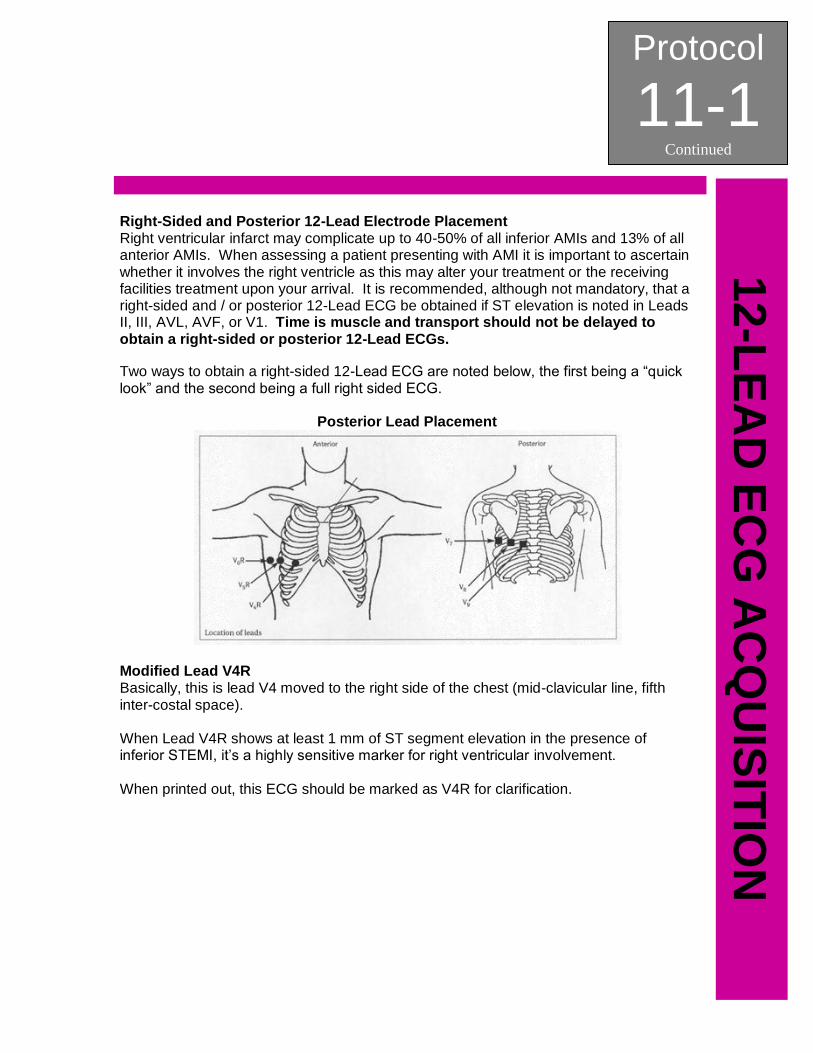
Posterior Lead Placement
Modified Lead V4R
Basically, this is lead V4 moved to the right side of the chest (mid-clavicular line, fifth inter-costal space). When Lead V4R shows at least 1 mm of ST segment elevation in the presence of inferior STEMI, it’s a highly sensitive marker for right ventricular involvement. When printed out, this ECG should be marked as V4R for clarification.
Protocol
11-1 Continued
12-L
EA
D E
CG
AC
QU
ISIT
ION
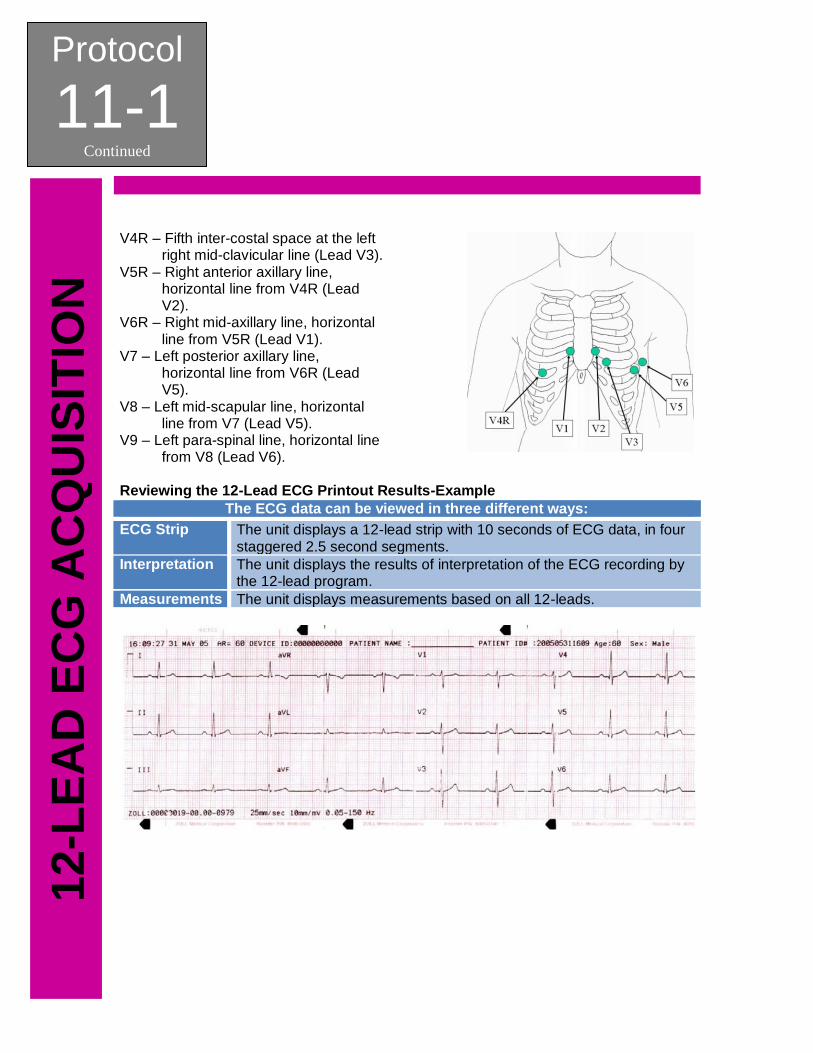
V4R – Fifth inter-costal space at the left
right mid-clavicular line (Lead V3). V5R – Right anterior axillary line,
horizontal line from V4R (Lead V2).
V6R – Right mid-axillary line, horizontal line from V5R (Lead V1).
V7 – Left posterior axillary line, horizontal line from V6R (Lead V5).
V8 – Left mid-scapular line, horizontal line from V7 (Lead V5).
V9 – Left para-spinal line, horizontal line from V8 (Lead V6).
Reviewing the 12-Lead ECG Printout Results-Example
The ECG data can be viewed in three different ways:
ECG Strip The unit displays a 12-lead strip with 10 seconds of ECG data, in four staggered 2.5 second segments.
Interpretation The unit displays the results of interpretation of the ECG recording by the 12-lead program.
Measurements The unit displays measurements based on all 12-leads.

Protocol
11-1 Continued
12-L
EA
D E
CG
AC
QU
ISIT
ION
The global measurements include heart rate, PR interval, QRS duration, QT, and the QTc.
Measurement Description
Heart Rate Frequency is shown in beats per minute. Normal adult range is 60 - 100.
PR Interval This time interval is between the beginning of the P wave and the beginning of the QRS complex. It is sometimes referred to as PQ duration. Smaller values indicate premature excitation of the ventricles and larger values indicate conduction defects in the atrioventricular (AV) node.
QRS Duration
Duration of the QRS complex in milliseconds. Larger values indicate ventricular conduction defects.
QT, QTc Duration
Time in milliseconds from the beginning of the QRS complex to the end of T wave. The QTc value is the QT corrected for heart rate to estimate the value it would have been if the heart rate were 60 beats per minute. Abnormal values can be due to an electrolyte imbalances or drugs. A short QT may be due to hyperkalemia and long QT due to hypocalcemia, or quinidine-like drugs (procainamide, amiodarone).
QRS axis This is the axis of the QRS complex. Smaller than -30 is called left axis deviation; larger than 90 is a right axis deviation. Deviations can be due to conduction blocks or hypertrophy

Protocol
11-1 Continued
12-L
EA
D E
CG
AC
QU
ISIT
ION
This page intentionally left blank.
SECTION: Clinical Procedures PROTOCOL TITLE: Pulse Oximetry REVISED: 05/2012
Protocol
11-3 P
UL
SE
OX
IME
TR
Y
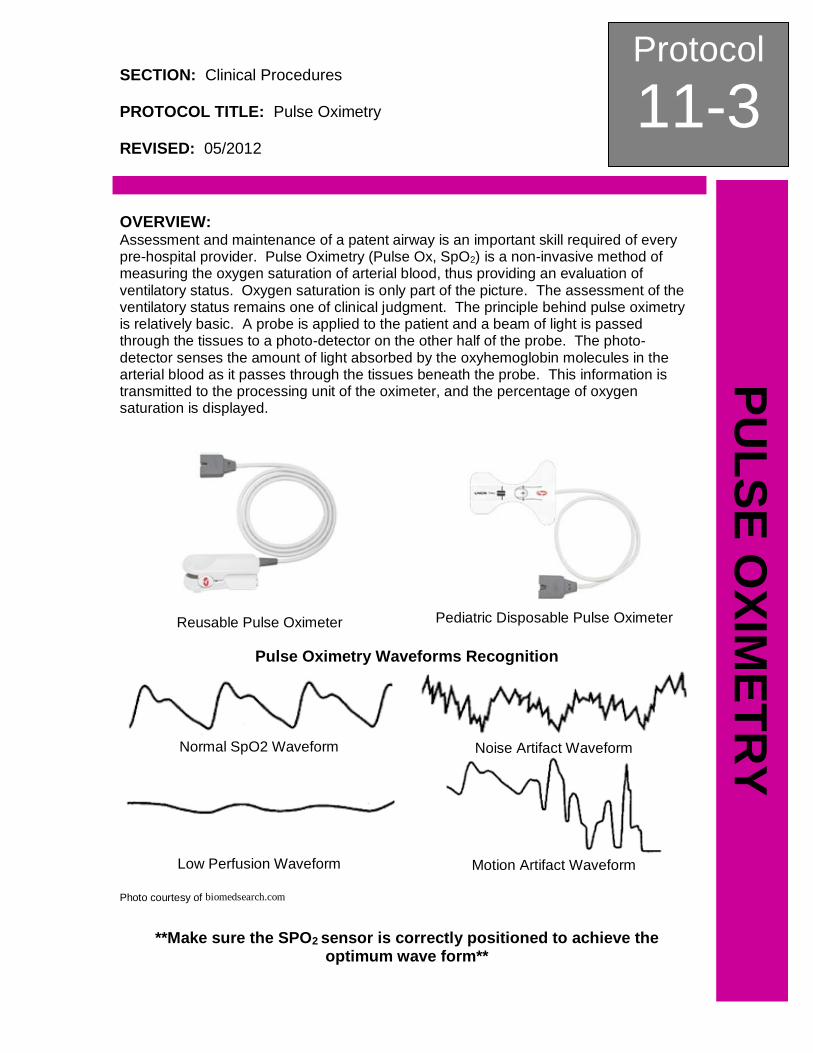
OVERVIEW: Assessment and maintenance of a patent airway is an important skill required of every pre-hospital provider. Pulse Oximetry (Pulse Ox, SpO2) is a non-invasive method of measuring the oxygen saturation of arterial blood, thus providing an evaluation of ventilatory status. Oxygen saturation is only part of the picture. The assessment of the ventilatory status remains one of clinical judgment. The principle behind pulse oximetry is relatively basic. A probe is applied to the patient and a beam of light is passed through the tissues to a photo-detector on the other half of the probe. The photo-detector senses the amount of light absorbed by the oxyhemoglobin molecules in the arterial blood as it passes through the tissues beneath the probe. This information is transmitted to the processing unit of the oximeter, and the percentage of oxygen saturation is displayed.
Reusable Pulse Oximeter
Pediatric Disposable Pulse Oximeter
Pulse Oximetry Waveforms Recognition
Normal SpO2 Waveform
Noise Artifact Waveform
Low Perfusion Waveform
Motion Artifact Waveform
Photo courtesy of biomedsearch.com
**Make sure the SPO2 sensor is correctly positioned to achieve the optimum wave form**
Protocol
11-3 Continued
PU
LS
E O
XIM
ET
RY
PEARLS: 1. ALWAYS TREAT THE PATIENT NOT THE PULSE OXIMETER. Never withhold
oxygen from a patient in respiratory distress regardless of the SpO2 reading. 2. A SpO2 reading and corresponding HR on the monitor should be confirmed with
manual pulse check and visualization of proper SpO2 waveform on monitor. 3. Patients found with possible carbon monoxide poisoning will have an
inaccurately high SpO2 reading due to the binding of carbon monoxide with hemoglobin. Carbon monoxide has a binding affinity for hemoglobin 240 times greater than that of oxygen, causing decreased oxygen delivery to the tissue.
4. Remember that the pulse oximeter only measures arterial oxygen saturation. It does not measure the actual PaO2, nor does it measure the PCO2 or the pH. It also does not assess ventilation. A patient with COPD who has a normal hypoxic drive may have an excellent PaO2 when given 100% oxygen, but will soon hypoventilate and have dangerously high CO2 levels while maintaining a high PO2.
5. Pulse oximetry is considered the “fourth vital sign” and should be assessed and documented when available for use.
6. The device must sense a pulse to calculate the oxygen saturation. States of decreased cardiac output, such as: bradycardia, tachycardia, hypotension, and cardiac arrest will greatly limit the probes ability to sense the pulse. Episodes of vasoconstriction, such as shock of hypothermia will also have a similar effect.
SECTION: Clinical Procedures PROTOCOL TITLE: Needle Thoracentesis REVISED: 05/2012
Protocol
11-4 N
EE
DL
E T
HO
RA
CE
NT
ES
IS
OVERVIEW: A needle decompression is a life saving procedure used to relieve a tension pneumothorax. A tension pneumothorax is usually the result of blunt or penetrating trauma to the chest but may also be spontaneous. A simple pneumothorax develops into a tension pneumothorax as the pressure in the pleural space exceeds the outside atmospheric pressure. This increase of pressure within the pleural space further collapses the lung on the involved side and forces the mediastinum to the unaffected side decreasing the blood flow to the heart and placing pressure on the unaffected lung. INDICATIONS:
1. Any patient exhibiting signs/ symptoms of respiratory distress due to blunt force or penetrating chest trauma that also has a complaint of:
a. Increasing respiratory distress and b. Decreasing or absent breath sounds unilaterally or bilaterally with
respirations and c. Decreased SpO2 despite oxygen therapy and d. Increasing tachycardia
2. Any trauma arrest involving chest trauma that resuscitation is being attempted should have bilateral needle decompression performed as soon as possible to eliminate hemo / pneumothorax as a cause of traumatic arrest.
3. Consider in the setting of refractory pulseless electrical activity (PEA). PROTOCOL FOR MANAGEMENT: 1. Prepare all equipment for needle thoracentesis:
a. Over 8 years old: 14g x 3.75” angiocath with 10 ml syringe attached. b. Under 8 years old: 18g x 1.25” angiocath with 10 ml syringe attached. c. ½” silk tape torn into 5” length to use to stabilize catheter.
2. Once all equipment is prepared, needle thoracentesis should be performed. a. Locate proper insertion site, 2nd inter-costal space at the mid-clavicular
line of the affected side of the chest. b. Prep insertion site with betadine using aseptic technique, if available. c. Insert angiocath with syringe attached into second inter-costal space
just over 3rd rib to avoid inter-costal nerves and vessels located on the inferior portion of the rib border.
d. Advance the catheter 1 - 2 inches (3/4 - 1 inch in patients less than 8 years old) through the chest wall while pulling back gently on plunger of syringe. Tension should be felt on the plunger until the needle enters the pleural space. A “pop” or “give” may also be felt. Once needle has entered pleural space, do not advance needle any further.
e. Advance catheter while withdrawing the needle until the catheter is flush with the skin.
3. Listen for a gush or “hiss” of air, which confirms placement and diagnosis. Note: This may not always be heard due to severity of injury or missed due to surrounding noise.
4. Dispose of needle properly and never reinsert into the catheter. 5. Secure catheter by wrapping strip of tape around hub and taping to chest.
Protocol
11-4 Continued
NE
ED
LE
TH
OR
AC
EN
TE
SIS
6. Reassess lung sounds and document procedure, whether air or blood was expelled, improvement of vital signs, and success/ failure in PPCR.
7. Continue to reassess during transport as tension pneumothorax may reoccur.
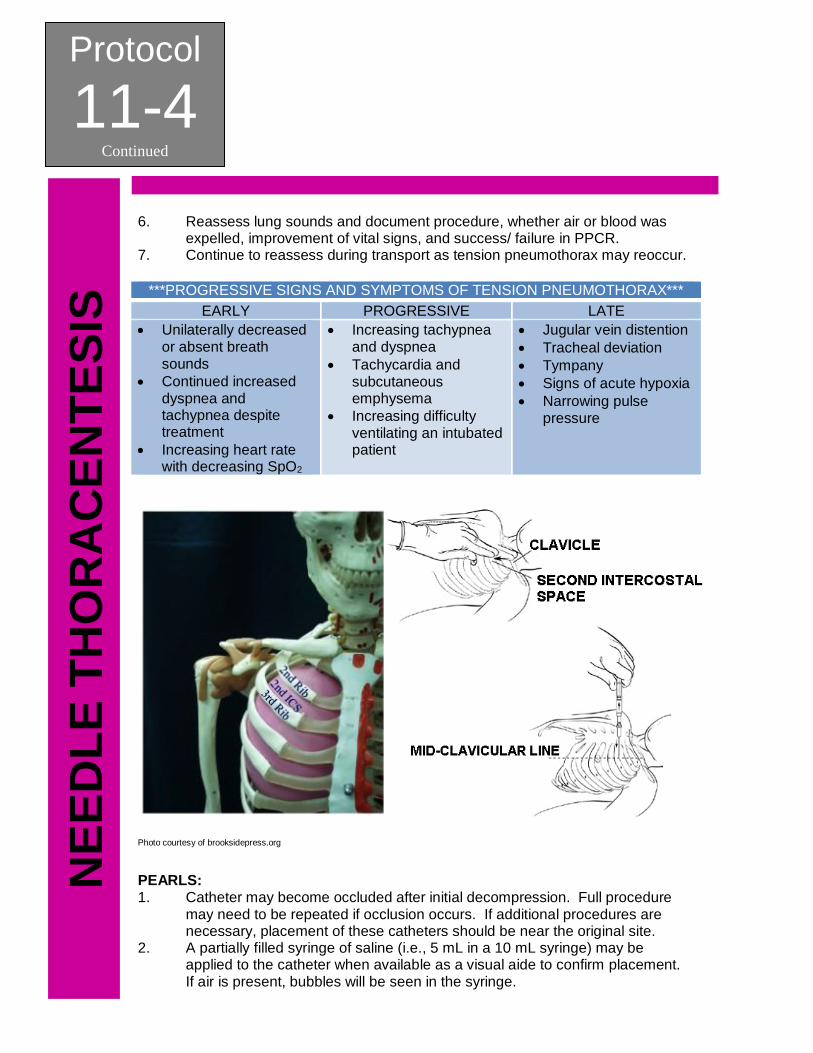
***PROGRESSIVE SIGNS AND SYMPTOMS OF TENSION PNEUMOTHORAX***
EARLY PROGRESSIVE LATE
Unilaterally decreased or absent breath sounds
Continued increased dyspnea and tachypnea despite treatment
Increasing heart rate with decreasing SpO2
Increasing tachypnea and dyspnea
Tachycardia and subcutaneous emphysema
Increasing difficulty ventilating an intubated patient
Jugular vein distention
Tracheal deviation
Tympany
Signs of acute hypoxia
Narrowing pulse pressure
Photo courtesy of brooksidepress.org
PEARLS: 1. Catheter may become occluded after initial decompression. Full procedure
may need to be repeated if occlusion occurs. If additional procedures are necessary, placement of these catheters should be near the original site.
2. A partially filled syringe of saline (i.e., 5 mL in a 10 mL syringe) may be applied to the catheter when available as a visual aide to confirm placement. If air is present, bubbles will be seen in the syringe.
SECTION: Clinical Procedures PROTOCOL TITLE: Oral Intubation REVISED: 05/2012
Protocol
11-5 O
RA
L IN
TU
BA
TIO
N
OVERVIEW: Advanced airway procedures and competency are the cornerstones of paramedicine. True competency involves knowing not only how to control the airway, but when to control the airway, and selecting the best method to do so.
Only one (1) attempt at oral intubation should be attempted. If unsuccessful, an alternative airway device should be inserted without delay.
INDICATIONS: Absolute: 1. Hypoxia or obtunded patients 2. Respiratory Arrest 3. Cardiac Arrest
Strongly Consider With: 1. Any patient with a decreased level of
consciousness with compromised ability to manage their airway
2. Airway burns or edema 3. HF, acute asthma, COPD, or other
respiratory failure 4. with diminished respiratory drive 5. Suspected intracranial hemorrhage
or closed head injury 6. Patients who fail to respond to
positive pressure ventilation 7. GCS < 8 without reversible causes
CONTRAINDICATIONS: 1. An intact gag reflex 2. Patients that have a tracheostomy or stoma PROTOCOL FOR MANAGEMENT: 1. Patient should be pre-oxygenated with appropriately sized Bag Valve Mask at a
rate of 12 - 20 breaths per minute with an appropriately sized oropharyngeal airway in place. The patient’s SpO2 should be raised as much as possible with manual ventilations prior to intubation attempt.
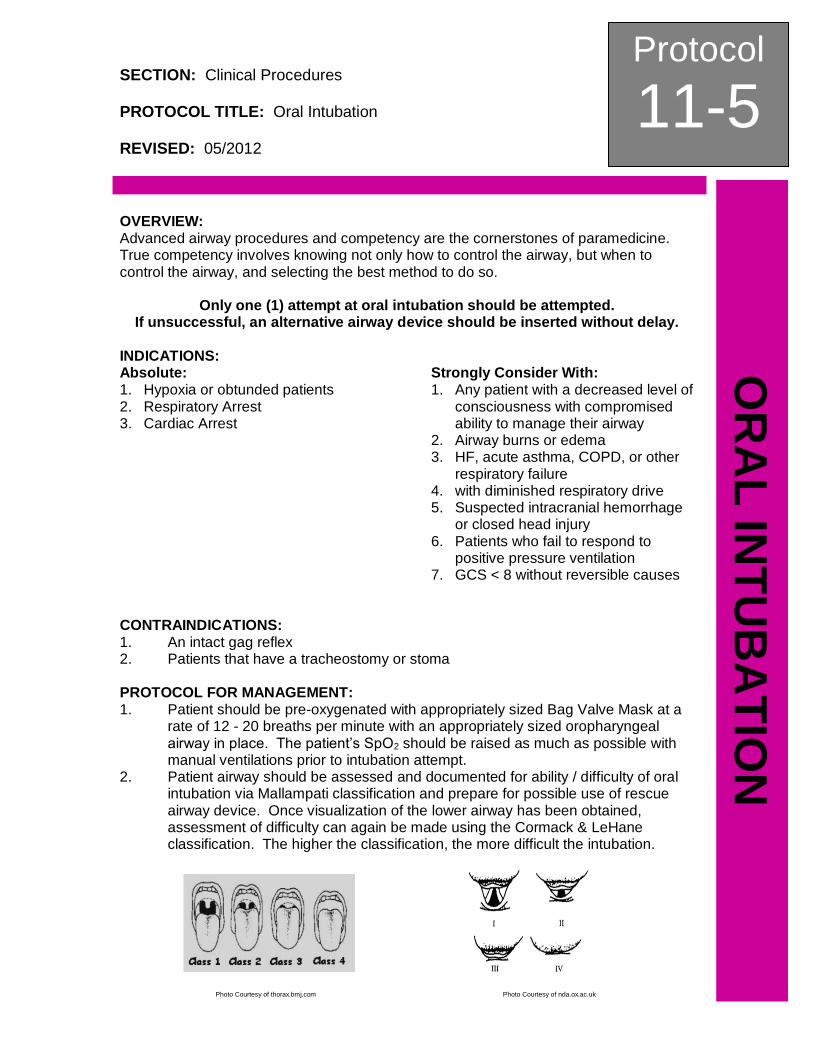
2. Patient airway should be assessed and documented for ability / difficulty of oral intubation via Mallampati classification and prepare for possible use of rescue airway device. Once visualization of the lower airway has been obtained, assessment of difficulty can again be made using the Cormack & LeHane classification. The higher the classification, the more difficult the intubation.
Photo Courtesy of thorax.bmj.com Photo Courtesy of nda.ox.ac.uk
Protocol
11-5 Continued
OR
AL
IN
TU
BA
TIO
N
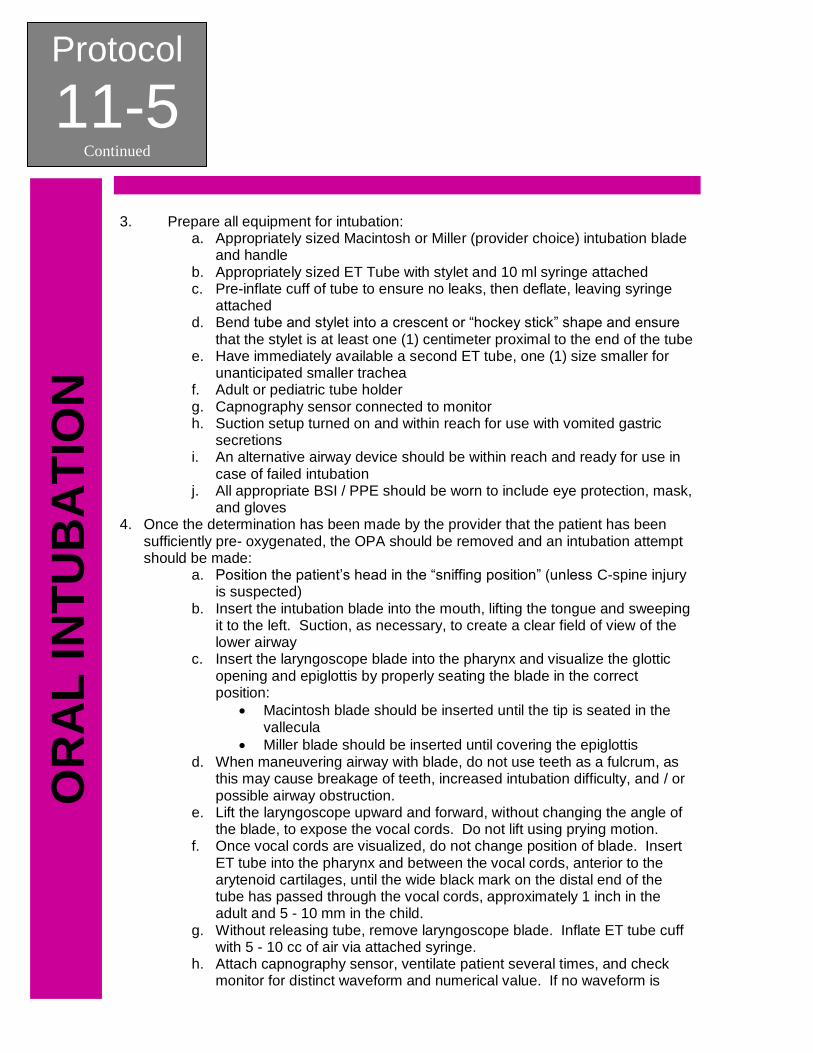
3. Prepare all equipment for intubation: a. Appropriately sized Macintosh or Miller (provider choice) intubation blade
and handle b. Appropriately sized ET Tube with stylet and 10 ml syringe attached c. Pre-inflate cuff of tube to ensure no leaks, then deflate, leaving syringe
attached d. Bend tube and stylet into a crescent or “hockey stick” shape and ensure
that the stylet is at least one (1) centimeter proximal to the end of the tube e. Have immediately available a second ET tube, one (1) size smaller for
unanticipated smaller trachea f. Adult or pediatric tube holder g. Capnography sensor connected to monitor h. Suction setup turned on and within reach for use with vomited gastric
secretions i. An alternative airway device should be within reach and ready for use in
case of failed intubation j. All appropriate BSI / PPE should be worn to include eye protection, mask,
and gloves 4. Once the determination has been made by the provider that the patient has been
sufficiently pre- oxygenated, the OPA should be removed and an intubation attempt should be made:
a. Position the patient’s head in the “sniffing position” (unless C-spine injury is suspected)
b. Insert the intubation blade into the mouth, lifting the tongue and sweeping it to the left. Suction, as necessary, to create a clear field of view of the lower airway
c. Insert the laryngoscope blade into the pharynx and visualize the glottic opening and epiglottis by properly seating the blade in the correct position:
Macintosh blade should be inserted until the tip is seated in the vallecula
Miller blade should be inserted until covering the epiglottis d. When maneuvering airway with blade, do not use teeth as a fulcrum, as
this may cause breakage of teeth, increased intubation difficulty, and / or possible airway obstruction.
e. Lift the laryngoscope upward and forward, without changing the angle of the blade, to expose the vocal cords. Do not lift using prying motion.
f. Once vocal cords are visualized, do not change position of blade. Insert ET tube into the pharynx and between the vocal cords, anterior to the arytenoid cartilages, until the wide black mark on the distal end of the tube has passed through the vocal cords, approximately 1 inch in the adult and 5 - 10 mm in the child.
g. Without releasing tube, remove laryngoscope blade. Inflate ET tube cuff with 5 - 10 cc of air via attached syringe.
h. Attach capnography sensor, ventilate patient several times, and check monitor for distinct waveform and numerical value. If no waveform is
Protocol
11-5 Continued
OR
AL
INT
UB
AT
ION
present, check equipment as outlined in Capnography Clinical Procedure. If capnography is working but no waveform is present, remove ET tube, and immediately insert an alternative airway device.
i. If capnography waveform is present, continue placement confirmation:
Observe chest rise upon ventilation
Auscultate for bilateral lung sounds
Auscultate abdomen for absent epigastric sounds
Note condensation in the tube with passive exhalation
***Continually assess the placement of the ET tube***
j. If breath sounds are not heard equally, deflate cuff and adjust tube for possible left or right main-stem intubation by pulling tube out one (1) centimeter. Inflate cuff and reassess lung sounds. In trauma patients, also assess for possible pneumothorax.
k. Once lung sounds confirmed, document centimeter mark at teeth (depth), and secure ET tube with tube holder and reassess lung sounds and capnography readings.
l. Reassess the tube placement after all movement of patient or change in capnography readings.
Protocol
11-5 Continued
OR
AL
IN
TU
BA
TIO
N
This page intentionally left blank.
SECTION: Clinical Procedures PROTOCOL TITLE: Nasal Intubation REVISED: 05/2012
Protocol
11-6 N
AS
AL
INT
UB
AT
ION
OVERVIEW: Advanced airway procedures and competency are the cornerstones of paramedicine. True competency involves knowing not only how to control the airway, but when to control the airway, and selecting the best method to do so. While orotracheal intubation is the gold standard of securing the airway, it is not the only means available to advanced life support providers. Nasal intubation, if not done correctly may cause hemorrhaging from the nasal passages leading to an uncontrolled airway and aspiration.
INDICATIONS: 1. Respiratory failure with decreasing level of consciousness, signs of hypoxia, or
deep coma. 2. Respiratory failure trismus. 3. Trauma patients without significant mid-facial trauma or mid-face instability. CONTRAINDICATIONS: 1. Patient has mid-face instability or frontal lobe head trauma or suspected basilar
skull fracture. 2. The patient is apneic and / or in cardiac arrest. 3. The patient is known or is suspected to have increased intracranial pressure
(ICP). 4. Diabetic emergency or suspected narcotic overdose unless patient has not
responded to treatment per protocol and the airway is not maintainable with
BLS adjuncts. 5. There is a known ingestion of a caustic substance. PROTOCOL FOR MANAGEMENT:
1. Explain procedure to patient, if appropriate. 2. Patient should be pre-oxygenated, if tolerated, with an appropriately sized Bag
Valve Mask at a rate of 12 - 20 breaths per minute. The patient’s SpO2 should be raised as much as possible with manual ventilations prior to intubation attempt.
3. Visually inspect each nare for foreign bodies or large polyps. Insert an appropriately sized nasopharyngeal airway (NPA), lubricated with a water based lubricant (KY Jelly), into the patient’s larger nare, usually the right nare.
4. Prepare all equipment for intubation: a. Appropriately sized, non-styletted, ET tube with 10 cc syringe
attached b. Pre-inflate cuff of tube to ensure no leaks, then deflate, leaving
syringe attached a. Starting at the distal tip of tube, bevel out, curl tightly around gloved
finger and hold to assist in forming curvature of tube c. Second ET tube, one (1) size smaller for unanticipated smaller nare
passage way d. 1/2” silk tape torn into two 4” strips to secure tube upon successful
intubation e. Capnography sensor connected to monitor
Protocol
11-6 Continued
NA
SA
L I
NT
UB
AT
ION
f. Suction setup turned on and within reach for use with vomited gastric secretions
g. One (1) 15 mL bottle of Neo-Synephrine (if available) h. One (1) 5.0 mL uro-jet of Lidocaine 2% Jelly (if available) i. All appropriate BSI / PPE should be worn, to include eye protection,
mask, and gloves 5. Place patient in position of comfort. 6. Once the determination has been made by the provider that the patient has
been sufficiently pre-oxygenated, the NPA should be removed and an intubation attempt should be made.
7. Remove the NPA and apply two (2) full “squirts” of Neo-Synephrine (if available) in nare determined to be used for intubation ensuring to coat full length of nare.
8. Insert Lidocaine uro-jet (if available) tip in nare determined to be used for intubation, pushing tip into nose to rear of nare and pulling out while injecting jelly solution.
9. Check that capnography sensor is working properly; attach to end of ET tube. 10. Insert the ET tube on a flat plane, bevel up, into nare, advancing tube gently,
but firmly, into nasal pharynx. 11. If resistance is met, cephalad traction or rotation of tube may facilitate passage
of tube past superior turbinate/ sphenoid sinus in rear of nose. Use only gentle, firm pressure to advance the tube. DO NOT FORCE TUBE IF RESISTANCE IS MET.
12. Once tube has passed superior turbinate, continue advancing tube into lower airway until reaching the glottic opening (patient will gag), pull tube back slightly until gagging stops.
13. Hold tube in place and listen to patient respirations through end of tube, watching capnography waveform on monitor.
14. While listening to air movement through the tube, advance tube into trachea when sound is loudest (inspiration). Continue to watch capnography waveform during insertion, as it should not change.
15. If no waveform is present, pull tube back to glottic opening and attempt again. If intubation is unsuccessful a second time, remove tube and continue BLS airway interventions.
16. If capnography waveform is present, inflate tube cuff with 5 - 10cc of, attach BVM and ventilate patient. Attempt to ventilate with patient’s spontaneous respirations.
17. Continue placement confirmation:
Observe chest rise upon ventilation
Auscultate for bilateral lung sounds
Auscultate abdomen for absent epigastric sounds
Note condensation in the tube with passive exhalation 18. If breath sounds are not heard equally, adjust tube for possible left or right
main-stem intubation by pulling tube out one (1) centimeter. Reassess lung sounds. In trauma patients, also assess for possible pneumothorax.
Protocol
11-6 Continued
NA
SA
L IN
TU
BA
TIO
N
19. Once lung sounds confirmed, secure ET tube with strips of tape and reassess lung sounds and capnography readings.
20. Reassess the tube placement after all movement of patient or change in capnography readings.
Protocol
11-6 Continued
NA
SA
L I
NT
UB
AT
ION
This page intentionally left blank.
SECTION: Clinical Procedures PROTOCOL TITLE: Supraglottic Airway REVISED: 05/2012
Protocol
11-7 S
UP
RA
GL
OT
TIC
AIR
WA
Y
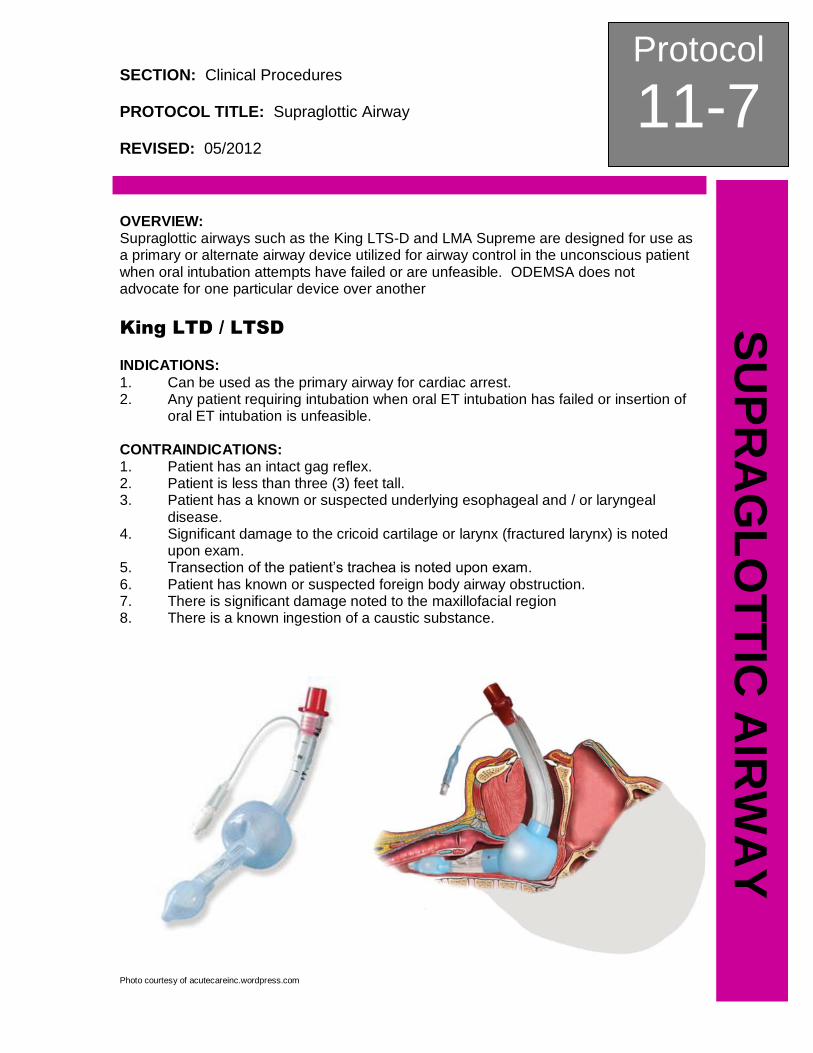
OVERVIEW: Supraglottic airways such as the King LTS-D and LMA Supreme are designed for use as a primary or alternate airway device utilized for airway control in the unconscious patient when oral intubation attempts have failed or are unfeasible. ODEMSA does not advocate for one particular device over another
King LTD / LTSD
INDICATIONS:
1. Can be used as the primary airway for cardiac arrest. 2. Any patient requiring intubation when oral ET intubation has failed or insertion of
oral ET intubation is unfeasible. CONTRAINDICATIONS: 1. Patient has an intact gag reflex. 2. Patient is less than three (3) feet tall. 3. Patient has a known or suspected underlying esophageal and / or laryngeal
disease. 4. Significant damage to the cricoid cartilage or larynx (fractured larynx) is noted
upon exam. 5. Transection of the patient’s trachea is noted upon exam. 6. Patient has known or suspected foreign body airway obstruction. 7. There is significant damage noted to the maxillofacial region 8. There is a known ingestion of a caustic substance.
Photo courtesy of acutecareinc.wordpress.com
Protocol
11-7 Continued
SU
PR
AG
LO
TT
IC A
IRW
AY
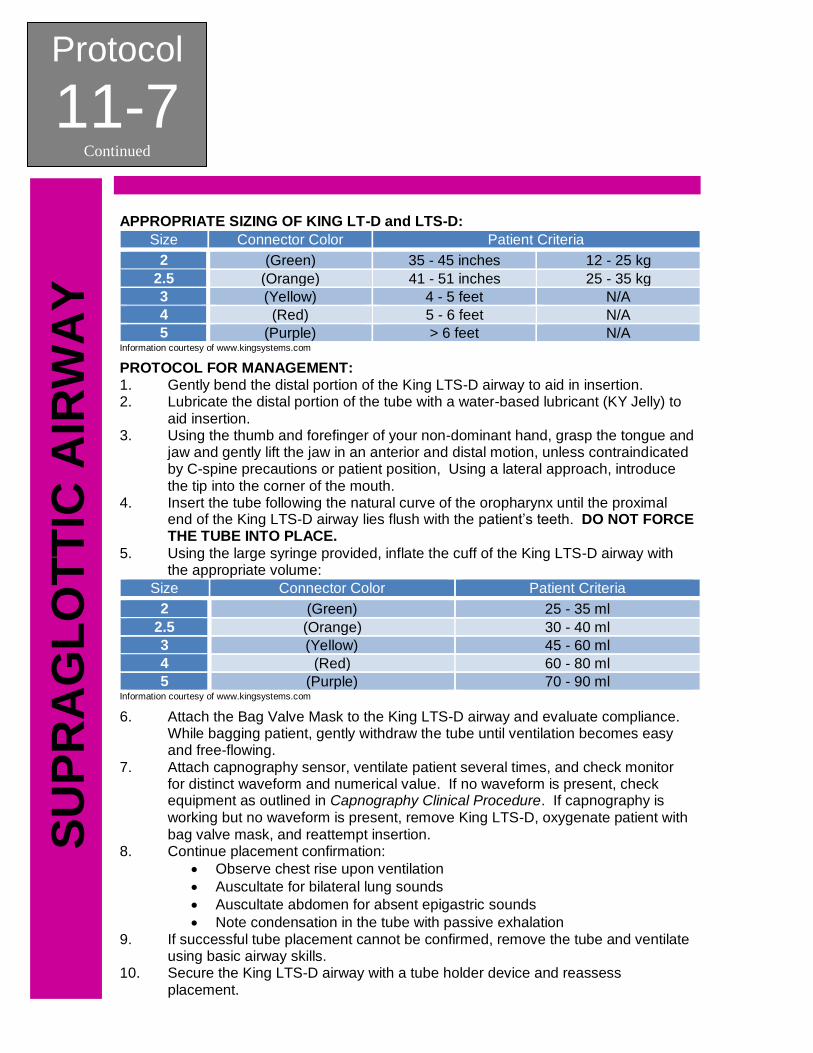
APPROPRIATE SIZING OF KING LT-D and LTS-D:
Size Connector Color Patient Criteria
2 (Green) 35 - 45 inches 12 - 25 kg
2.5 (Orange) 41 - 51 inches 25 - 35 kg
3 (Yellow) 4 - 5 feet N/A
4 (Red) 5 - 6 feet N/A
5 (Purple) > 6 feet N/A Information courtesy of www.kingsystems.com
PROTOCOL FOR MANAGEMENT: 1. Gently bend the distal portion of the King LTS-D airway to aid in insertion. 2. Lubricate the distal portion of the tube with a water-based lubricant (KY Jelly) to
aid insertion. 3. Using the thumb and forefinger of your non-dominant hand, grasp the tongue and
jaw and gently lift the jaw in an anterior and distal motion, unless contraindicated by C-spine precautions or patient position, Using a lateral approach, introduce the tip into the corner of the mouth.
4. Insert the tube following the natural curve of the oropharynx until the proximal end of the King LTS-D airway lies flush with the patient’s teeth. DO NOT FORCE THE TUBE INTO PLACE.
5. Using the large syringe provided, inflate the cuff of the King LTS-D airway with the appropriate volume:
Size Connector Color Patient Criteria
2 (Green) 25 - 35 ml
2.5 (Orange) 30 - 40 ml
3 (Yellow) 45 - 60 ml
4 (Red) 60 - 80 ml
5 (Purple) 70 - 90 ml Information courtesy of www.kingsystems.com
6. Attach the Bag Valve Mask to the King LTS-D airway and evaluate compliance. While bagging patient, gently withdraw the tube until ventilation becomes easy and free-flowing.
7. Attach capnography sensor, ventilate patient several times, and check monitor for distinct waveform and numerical value. If no waveform is present, check equipment as outlined in Capnography Clinical Procedure. If capnography is working but no waveform is present, remove King LTS-D, oxygenate patient with bag valve mask, and reattempt insertion.
8. Continue placement confirmation:
Observe chest rise upon ventilation
Auscultate for bilateral lung sounds
Auscultate abdomen for absent epigastric sounds
Note condensation in the tube with passive exhalation 9. If successful tube placement cannot be confirmed, remove the tube and ventilate
using basic airway skills. 10. Secure the King LTS-D airway with a tube holder device and reassess
placement.
Protocol
11-7 Continued
SU
PR
AG
LO
TT
IC A
IRW
AY
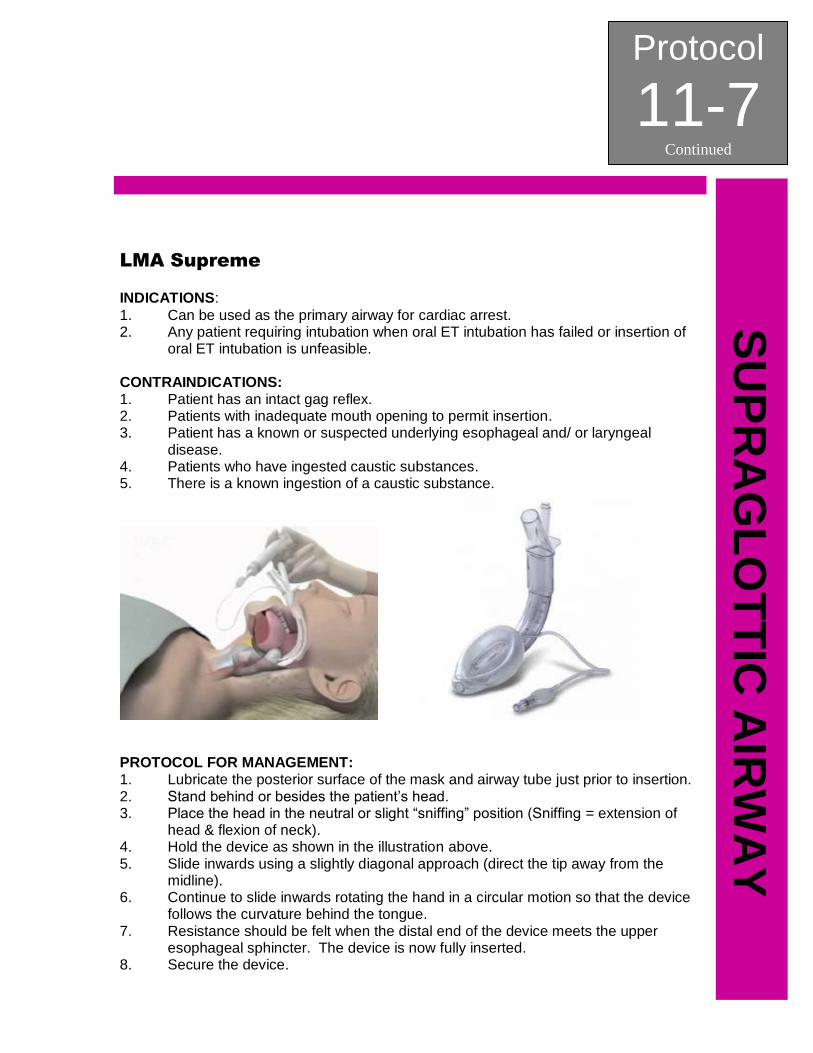
LMA Supreme INDICATIONS:
1. Can be used as the primary airway for cardiac arrest. 2. Any patient requiring intubation when oral ET intubation has failed or insertion of
oral ET intubation is unfeasible. CONTRAINDICATIONS: 1. Patient has an intact gag reflex. 2. Patients with inadequate mouth opening to permit insertion. 3. Patient has a known or suspected underlying esophageal and/ or laryngeal
disease. 4. Patients who have ingested caustic substances. 5. There is a known ingestion of a caustic substance.
PROTOCOL FOR MANAGEMENT: 1. Lubricate the posterior surface of the mask and airway tube just prior to insertion. 2. Stand behind or besides the patient’s head. 3. Place the head in the neutral or slight “sniffing” position (Sniffing = extension of
head & flexion of neck). 4. Hold the device as shown in the illustration above. 5. Slide inwards using a slightly diagonal approach (direct the tip away from the
midline). 6. Continue to slide inwards rotating the hand in a circular motion so that the device
follows the curvature behind the tongue. 7. Resistance should be felt when the distal end of the device meets the upper
esophageal sphincter. The device is now fully inserted. 8. Secure the device.
Protocol
11-7 Continued
SU
PR
AG
LO
TT
IC A
IRW
AY
9. Attach capnography sensor, ventilate patient several times, and check monitor for distinct waveform and numerical value. If no waveform is present, check equipment as outlined in Capnography Clinical Procedure. If capnography is working but no waveform is present, remove LMA Supreme, oxygenate patient with bag valve mask, and reattempt insertion.
10. Continue placement confirmation:
Observe chest rise upon ventilation
Auscultate for bilateral lung sounds
Auscultate abdomen for absent epigastric sounds 11. If successful tube placement cannot be confirmed, remove the tube and ventilate
using basic airway skills.
SECTION: Clinical Procedures PROTOCOL TITLE: Surgical Cricothyrotomy REVISED: 05/2012
Protocol
11-8 S
UR
GIC
AL
CR
ICO
TH
YR
OT
OM
Y
OVERVIEW: Advanced airway procedures and competency are the cornerstones of paramedicine. True competency involves knowing not only how to control the airway, but when to control the airway, and selecting the best method to do so. A surgical cricothyrotomy should be performed only as a last resort when an airway cannot be definitively secured via oral / nasal intubation or rescue airway device insertion AND the airway cannot be maintained with BLS adjuncts or procedures. INDICATIONS: 1. Total airway obstruction not relieved by any other means. 2. Airway compromise from injuries that make oral or nasal intubation
impractical. 3. No alternative airway device / maneuver is successful. 4. The patient cannot be oxygenated or ventilated by any other means. CONTRAINDICATIONS: 1. Patient less than 8 years old (If less than 8 years old, refer to Needle
Cricothyrotomy Clinical Procedure). 2. Airway able to be maintained via BLS airway management procedures. COMPLICATIONS:
Bleeding
Incorrect or unsuccessful tube placement
Pneumothorax and / or pneumomediastinum
Tracheal perforation
Vocal cord injury
Aspiration
Subcutaneous emphysema
Esophageal and / or tracheal perforation
Infection leading to cellulitis and / or sepsis
Phrenic nerve and / or brachial plexus injury
PROTOCOL FOR MANAGEMENT: 1. Prepare all equipment for surgical cricothyrotomy:
a. All appropriate BSI should be worn to include eye protection, mask, and gloves
b. Adult bag valve mask (BVM) connected to 100% oxygen c. Appropriately sized ET tube. Shorten ET tube length by cutting tube
just ABOVE point at which cuff inflation line attaches to tube. Remove BVM hub from discarded portion and attach to shortened tube
d. Attach 10 cc syringe to ET tube and pre-inflate cuff of tube to ensure no leaks, then deflate, leaving syringe attached
e. ½” silk tape, torn into two 8” strips to secure tube upon successful cricothyrotomy
f. Connect capnography sensor to monitor g. Check that capnography sensor is working properly and attach to end of
shortened ET tube h. Suction setup, turned on, and within reach
Protocol
11-8 Continued
SU
RG
ICA
L C
RIC
OT
HY
RO
TO
MY
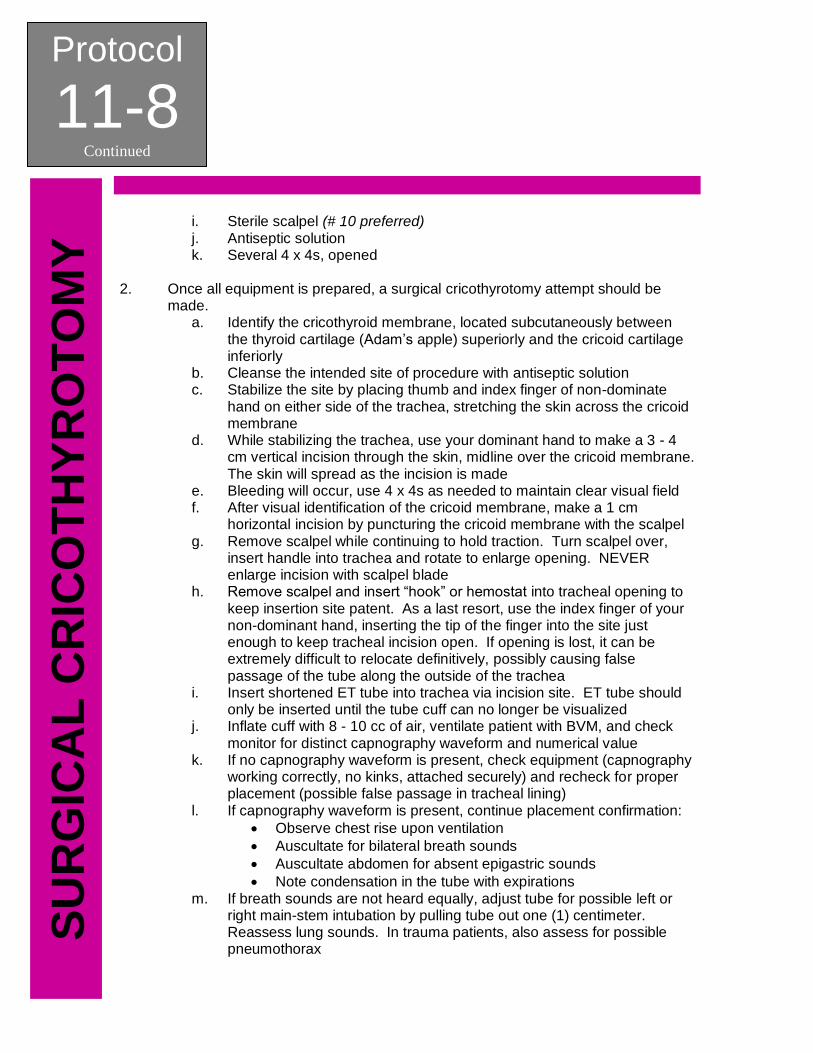
i. Sterile scalpel (# 10 preferred) j. Antiseptic solution k. Several 4 x 4s, opened
2. Once all equipment is prepared, a surgical cricothyrotomy attempt should be
made. a. Identify the cricothyroid membrane, located subcutaneously between
the thyroid cartilage (Adam’s apple) superiorly and the cricoid cartilage inferiorly
b. Cleanse the intended site of procedure with antiseptic solution c. Stabilize the site by placing thumb and index finger of non-dominate
hand on either side of the trachea, stretching the skin across the cricoid membrane
d. While stabilizing the trachea, use your dominant hand to make a 3 - 4 cm vertical incision through the skin, midline over the cricoid membrane. The skin will spread as the incision is made
e. Bleeding will occur, use 4 x 4s as needed to maintain clear visual field f. After visual identification of the cricoid membrane, make a 1 cm
horizontal incision by puncturing the cricoid membrane with the scalpel g. Remove scalpel while continuing to hold traction. Turn scalpel over,
insert handle into trachea and rotate to enlarge opening. NEVER enlarge incision with scalpel blade
h. Remove scalpel and insert “hook” or hemostat into tracheal opening to keep insertion site patent. As a last resort, use the index finger of your non-dominant hand, inserting the tip of the finger into the site just enough to keep tracheal incision open. If opening is lost, it can be extremely difficult to relocate definitively, possibly causing false passage of the tube along the outside of the trachea
i. Insert shortened ET tube into trachea via incision site. ET tube should only be inserted until the tube cuff can no longer be visualized
j. Inflate cuff with 8 - 10 cc of air, ventilate patient with BVM, and check monitor for distinct capnography waveform and numerical value
k. If no capnography waveform is present, check equipment (capnography working correctly, no kinks, attached securely) and recheck for proper placement (possible false passage in tracheal lining)
l. If capnography waveform is present, continue placement confirmation:
Observe chest rise upon ventilation
Auscultate for bilateral breath sounds
Auscultate abdomen for absent epigastric sounds
Note condensation in the tube with expirations m. If breath sounds are not heard equally, adjust tube for possible left or
right main-stem intubation by pulling tube out one (1) centimeter. Reassess lung sounds. In trauma patients, also assess for possible pneumothorax
Protocol
11-8 Continued
SU
RG
ICA
L C
RIC
OT
HY
RO
TO
MY
n. Once lung sounds have been confirmed, secure ET tube with ½” strips of tape crossed around tube and taped to neck. Reassess lung sounds and capnography readings
o. Reassess tube placement after all movement of patient or change in capnography readings
PEARLS:
1. Make incision as small as possible to avoid extensive hemorrhage. 2. If an appropriately sized tracheostomy tube is available, and provider is familiar
with placement, use in place of modified ET tube. Once tracheostomy tube is inserted, remove obturator, attach capnography, and continue procedure as outlined above. Secure tube with included tie strap.

Protocol
11-8 Continued
SU
RG
ICA
L C
RIC
OT
HY
RO
TO
MY
This page intentionally left blank.
SECTION: Clinical Procedures PROTOCOL TITLE: Orogastric Tube REVISED: 05/2012
Protocol
11-9 O
RO
GA
ST
RIC
TU
BE
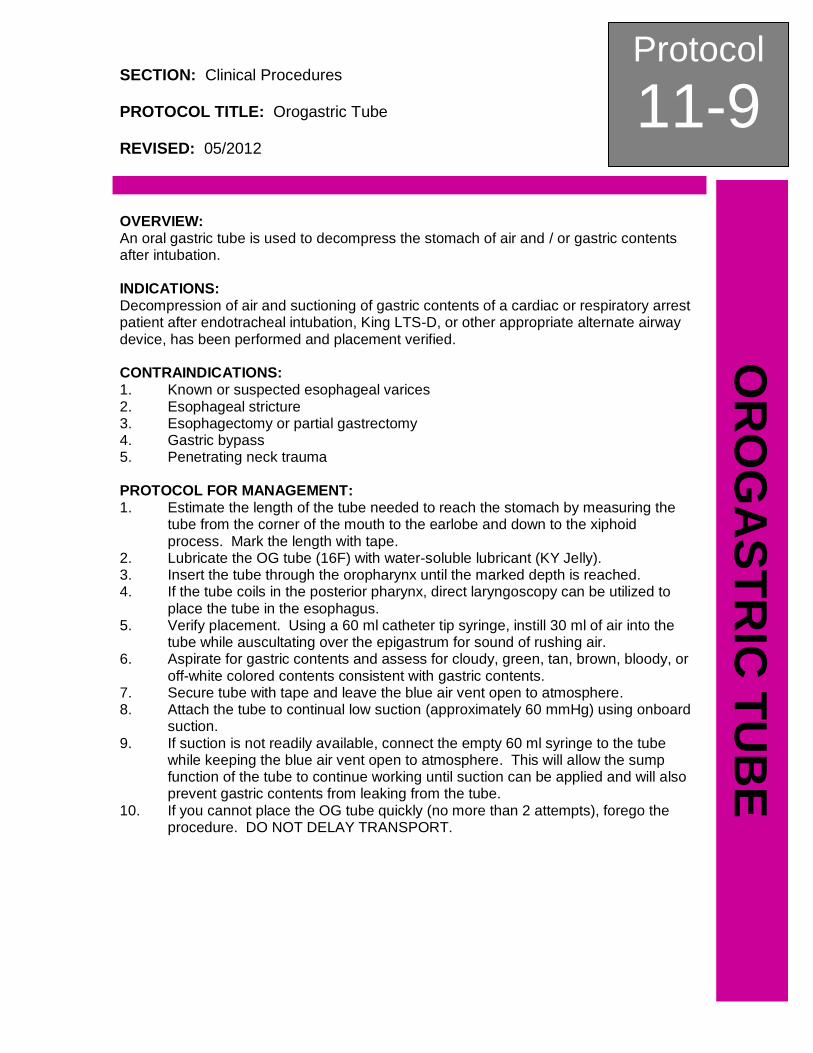
OVERVIEW: An oral gastric tube is used to decompress the stomach of air and / or gastric contents after intubation. INDICATIONS: Decompression of air and suctioning of gastric contents of a cardiac or respiratory arrest patient after endotracheal intubation, King LTS-D, or other appropriate alternate airway device, has been performed and placement verified. CONTRAINDICATIONS: 1. Known or suspected esophageal varices 2. Esophageal stricture 3. Esophagectomy or partial gastrectomy 4. Gastric bypass 5. Penetrating neck trauma PROTOCOL FOR MANAGEMENT: 1. Estimate the length of the tube needed to reach the stomach by measuring the
tube from the corner of the mouth to the earlobe and down to the xiphoid process. Mark the length with tape.
2. Lubricate the OG tube (16F) with water-soluble lubricant (KY Jelly). 3. Insert the tube through the oropharynx until the marked depth is reached. 4. If the tube coils in the posterior pharynx, direct laryngoscopy can be utilized to
place the tube in the esophagus. 5. Verify placement. Using a 60 ml catheter tip syringe, instill 30 ml of air into the
tube while auscultating over the epigastrum for sound of rushing air. 6. Aspirate for gastric contents and assess for cloudy, green, tan, brown, bloody, or
off-white colored contents consistent with gastric contents. 7. Secure tube with tape and leave the blue air vent open to atmosphere. 8. Attach the tube to continual low suction (approximately 60 mmHg) using onboard
suction. 9. If suction is not readily available, connect the empty 60 ml syringe to the tube
while keeping the blue air vent open to atmosphere. This will allow the sump function of the tube to continue working until suction can be applied and will also prevent gastric contents from leaking from the tube.
10. If you cannot place the OG tube quickly (no more than 2 attempts), forego the procedure. DO NOT DELAY TRANSPORT.
Protocol
11-9 Continued
OR
OG
AS
TR
IC T
UB
E
This page intentionally left blank.
SECTION: Clinical Procedures PROTOCOL TITLE: Tourniquet REVISED: 05/2012
Protocol
11-10 T
OU
RN
IQU
ET
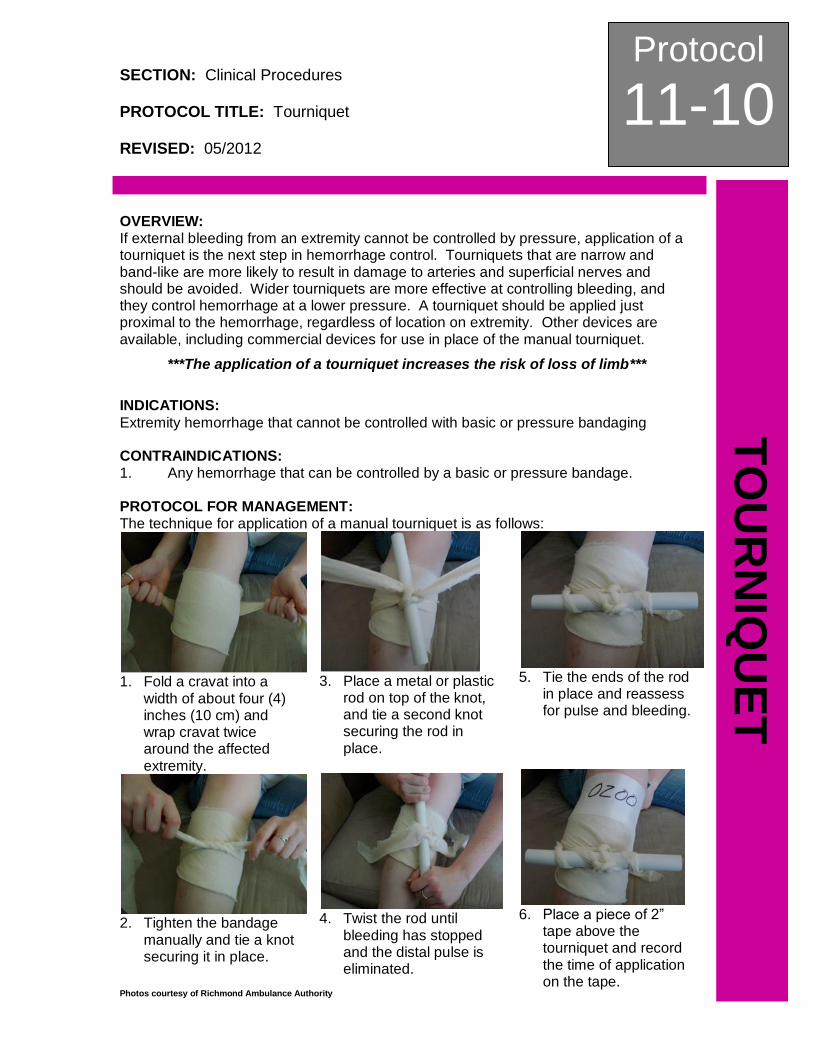
OVERVIEW: If external bleeding from an extremity cannot be controlled by pressure, application of a tourniquet is the next step in hemorrhage control. Tourniquets that are narrow and band-like are more likely to result in damage to arteries and superficial nerves and should be avoided. Wider tourniquets are more effective at controlling bleeding, and they control hemorrhage at a lower pressure. A tourniquet should be applied just proximal to the hemorrhage, regardless of location on extremity. Other devices are available, including commercial devices for use in place of the manual tourniquet.
***The application of a tourniquet increases the risk of loss of limb***
INDICATIONS:
Extremity hemorrhage that cannot be controlled with basic or pressure bandaging CONTRAINDICATIONS: 1. Any hemorrhage that can be controlled by a basic or pressure bandage. PROTOCOL FOR MANAGEMENT: The technique for application of a manual tourniquet is as follows:
1. Fold a cravat into a
width of about four (4) inches (10 cm) and wrap cravat twice around the affected extremity.
2. Tighten the bandage
manually and tie a knot securing it in place.
3. Place a metal or plastic
rod on top of the knot, and tie a second knot securing the rod in place.
4. Twist the rod until
bleeding has stopped and the distal pulse is eliminated.
5. Tie the ends of the rod
in place and reassess for pulse and bleeding.
6. Place a piece of 2”
tape above the tourniquet and record the time of application on the tape.
Photos courtesy of Richmond Ambulance Authority
Protocol
11-10 Continued
TO
UR
NIQ
UE
T
PEARLS: 1. The tourniquet should be placed around a solid piece of bone, if possible,
proximal to the uncontrolled hemorrhage. Placing the tourniquet over a solid piece of bones will aid in the tourniquet’s ability to tamponade the hemorrhage.
2. The tourniquet should be placed as close proximally to the wound as possible to minimize further extremity damage.
3. The tourniquet must be marked with the time of application. Do not write on the actual tourniquet.
4. Consider Pain Management Protocol in conjunction with the application of a tourniquet. Be vigilant of the patient’s hemodynamic status.

SECTION: Clinical Procedures PROTOCOL TITLE: Intraosseous Access REVISED: 05/2012
Protocol
11-11 IN
TR
AO
SS
EO
US
AC
CE
SS
OVERVIEW: Intraosseous vascular infusion is a method of gaining access to the circulatory system by using a specialized trocar that is placed into the cavity of a long bone. Within the bone marrow, is a network of venous sinusoids that drain into the venous system, thereby accepting fluids or medications infused through an intraosseous access site. Although an IO can be used to infuse any fluid or medication, a drawback to its use may include slower than normal infusion rates due to anatomy of the IO space. To improve the infusion flow, a pressure bag should be used with all fluids administered via IO. Proper BSI precautions and aseptic technique should be used at all times. INDICATIONS:
1. Intravenous fluids or medications are needed and a peripheral IV cannot be established in one (1) attempt or ninety (90) seconds AND the patient exhibits one or more of the following:
a. An altered mental status (GCS of 8 or less) b. Respiratory compromise (SpO2 80% after appropriate therapy,
respiratory rate < 10 or > 40 per minute) c. Hemodynamic instability (Systolic BP of < 90 mmHg)
2. Intraosseous access may be considered PRIOR to peripheral IV attempts in the following situations:
a. Cardiac arrest (medical or trauma) b. Profound hypovolemia with altered mental status c. Patient in extremis, with immediate need for delivery of medications,
and / or fluids. CONTRAINDICATIONS: 1. Suspected narcotic overdose and / or hypoglycemia. 2. Fracture of the bone selected for IO insertion. 3. Excessive tissue at insertion site or inability to locate anatomical landmarks. 4. Previous significant orthopedic procedures in area selected for IO insertion (IO
within 24 hours, knee replacement, and surgically implanted hardware). Look for scars.
5. Signs of infection in area selected for IO insertion (redness, skin lesions). 6. Osteogenesis imperfecta (severe congenital bone degenerative disorders if
known). PROTOCOL FOR MANAGEMENT: 1. Assemble and prepare all equipment:
a. IO device b. Cleansing agent c. Syringe for aspiration and flushing d. Fluid and administration tubing e. Materials to secure site
2. Prepare and position the patient. 3. Select a site for insertion of the intraosseous access device. The site should be
readily accessible and should be a site approved for use by the device manufacturer and agency operational medical director.
Protocol
11-11 Continued
INT
RA
OS
SE
OU
S A
CC
ES
S
4. Once the proper area of insertion has been located, clean the site and the immediate surrounding area with betadine, or other acceptable cleansing agent, allowing a large sterile field to work in.
5. Stabilize the site with non-dominant hand, making sure hands and fingers are out of the path of the insertion.
6. Insert the device, according to manufacturer’s instructions for use. 7. Aspirate the site with a syringe, as directed by the device manufacturer, to
ensure accurate placement. Upon aspiration, a small volume of blood or marrow indicated correct medullary placement of the trocar.
8. Flush the site with a small volume of saline (10 – 20 mL). If the patient is alert, you may administer 0.5 mg / kg to a max dosage of 20 - 40mg of lidocaine (or as otherwise approved by the agency medical director) through the IO site for control of pain associated with infusion pressure within the bone cavity.
9. Secure site according to device manufacturer’s recommendations. 10. Infuse fluid at the appropriate rate. A pressure bag may be necessary to obtain
an adequate flow rate.
SECTION: Clinical Procedures PROTOCOL TITLE: Continuous Positive Airway Pressure (CPAP) REVISED: 05/2012
Protocol
11-12 C
PA
P
OVERVIEW: Continuous Positive Airway Pressure (CPAP) has been shown to rapidly improve vital signs and gas exchange, reduce the work of breathing, decrease the sense of dyspnea, and decrease the need for endotracheal intubation in patients who suffer from shortness of breath from asthma, chronic obstructive pulmonary disease (COPD), pulmonary edema, heart failure (HF), and pneumonia. In patients with HF, CPAP improves hemodynamics by reducing left ventricular pre-load and after-load. INDICATIONS: 1. Any patient experiencing dyspnea or hypoxemia secondary to asthma, COPD,
pulmonary edema, HF, pneumonia, or inhalation injury secondary to CO / CN exposure and:
a. Is awake and able to follow commands b. Is > 12 years old and is able to fit the CPAP mask to their face properly c. Has the ability to maintain an open airway d. Has a systolic BP > 90 mmHg e. Exhibits two or more of the following:
Has a spontaneous respiratory rate > 25 breaths per minute
SpO2 < 94% at any time
Use of accessory muscle usage during respiration CONTRAINDICATIONS: 1. Patient < 12 years old. 2. Patient suspected of having a pneumothorax or has suffered trauma to the chest. 3. Respiratory or cardiac arrest. 4. Patient has a tracheostomy. 5. Patient has agonal respirations. 6. Patient showing signs of shock associated with cardiac insufficiency. 7. Unconsciousness. 8. Persistent nausea / vomiting. 9. Facial anomalies / stroke / obtundation / facial trauma. 10. Patient has active vomiting, upper GI bleeding or a history of recent gastric
surgery. PROTOCOL FOR MANAGEMENT: 1. Prepare all equipment for CPAP initiation and application:
a. Connect CPAP to portable/ ambulance oxygen supply b. Connect CPAP mask to airflow hose and airflow hose to CPAP machine c. Connect capnography sensor to monitor d. Do not delay CPAP application to setup in-line nebulizer attachment e. Assure airflow is present and machine is working properly by placing
hand over mask opening and checking pressure f. If not previously initiated, place patient on continuous pulse oximetry
and cardiac monitoring (if provider’s certification allows 2. Once all equipment is prepared, CPAP should be supplied to patient:
Protocol
11-12 Continued
CP
AP
a. Explain the procedure to the patient b. Place mask to patient face assuring proper fit and seal over mouth and
nose c. Refer to manufacturer’s instructions for set up of your specific device d. Hold mask in place and secure with provided straps. Mask / seal should
be tight but not uncomfortable for patient. Check for air leaks, mask / straps may need to be adjusted for proper fit
e. If patient present with wheezing, setup nebulizer medications per protocol and apply as inline treatment
f. Monitor and document the patient’s respiratory response to treatment g. Check monitor for distinct capnography waveform and numerical value. If
no waveform is present, check equipment as outlined in Capnography Clinical Procedure
h. Vital signs should be checked and documented every 5 minutes while on CPAP
i. All medications per applicable medical treatment protocol should be given in conjunction with CPAP use. CPAP does not replace medication use
j. Continue to coach patient as needed to keep mask in place, readjust as needed
k. Notify intended receiving hospital as soon as possible of patient status and CPAP application so a CPAP device can be brought to Emergency Department prior to patient arrival
l. If respiratory status deteriorates, remove CPAP, assist patient spontaneous respirations with Bag Valve Mask, and prepare for nasal / oral intubation
PEARLS:
1. CPAP therapy needs to be continuous and should not be removed once applied unless patient cannot tolerate mask, patient respiratory drive declines, or patient begins to vomit.
2. Upon arrival at hospital, advocate for patient to remain on CPAP and do not remove CPAP until hospital equivalent respiratory therapy is ready to be placed on patient.
3. Watch patient for gastric distention, which may result in vomiting. 4. Procedure may be performed on patient with a valid Pre-Hospital Do Not
Resuscitate order. 5. Due to changes in pre-load and after-load of the heart during CPAP therapy, a
complete set of vital signs must be obtained every five minutes. 6. Due to existing high intra-thoracic pressures present with these types of patients
it is imperative that the lowest possible pressures be used during treatment to prevent possible development of a pneumothorax from lung over inflation.
SECTION: Clinical Procedures PROTOCOL TITLE: Synchronized Cardioversion REVISED: 05/2012
Protocol
11-13 S
YN
CH
RO
NIZ
ED
CA
RD
IOV
ER
SIO
N
OVERVIEW: Synchronized electrical cardioversion uses a therapeutic dose of electric current to the heart, at a specific moment in the cardiac cycle to treat hemodynamically significant supraventricular (or narrow complex) tachycardias, including: atrial fibrillation and atrial flutter. It is also used in the emergent treatment of wide complex tachycardias, including ventricular tachycardia, when a pulse is present. INDICATIONS: Synchronized cardioversion is indicated for any type of unstable tachycardia with serious signs and symptoms directly related to the tachycardia. CONTRAINDICATIONS: 1. Asystole 2. Ventricular Fibrillation 3. Polymorphic Ventricular Tachycardia (Torsades de Pointes) PROTOCOL FOR MANAGEMENT: 1. Remove all clothing covering the patient’s chest and dry if necessary. If the
patient has excessive chest hair, shave hair to ensure proper adhesion. 2. Attach 4 - Lead ECG electrodes for monitoring during cardioversion. 3. Connect the multi function pacing / defibrillation pads to the monitor multi-
function cable (if not already connected). 4. Open the pad packaging and apply one edge of the pad securely to the patient.
Roll the pad smoothly from that edge to the other being careful not to trap any air pockets between the gel and skin. Poor adherence and / or air under the multi-function pads can lead to the possibility of arcing and skin burns.
5. If it is not possible to place the back multi-function pad on the patient’s back, place it on the standard apex position of the apex-sternum configuration. Effective defibrillation will result, but pacing with the device is usually less effective.
6. If possible initiate IV / IO assess patient and consider sedation with Midazolam
0.1 mg / kg slow IVP, maximum single dose 5.0 mg. 7. Prepare for cardioversion to pulseless arrhythmias; prepare for resuscitation /
CPR. 8. Turn the monitor on and select the lead you wish to view. 9. Ready the monitor for defibrillation, and then select the desired energy level. 10. Press the SYNC key. The selected energy level is displayed on the monitor.
Refer to the Cardiac Care Protocols for appropriate energy settings as well as specific manufacturer settings/recommendations.
11. A SYNC marker should be displayed above each detected R-wave to indicate where discharge will occur.
12. Press the CHARGE button and wait for the SHOCK button to enable. 13. Press and hold SHOCK until energy is delivered to the patient. The discharge
will occur with the next marked R-wave. (NOTE: MONITORS AUTOMATICALLY DEFAULT BACK TO DEFIBRILLATION MODE, FOLLOWING EACH SYNCHRONIZED SHOCK).
Protocol
11-13 Continued
SY
NC
HR
ON
IZE
D C
AR
DIO
VE
RS
ION
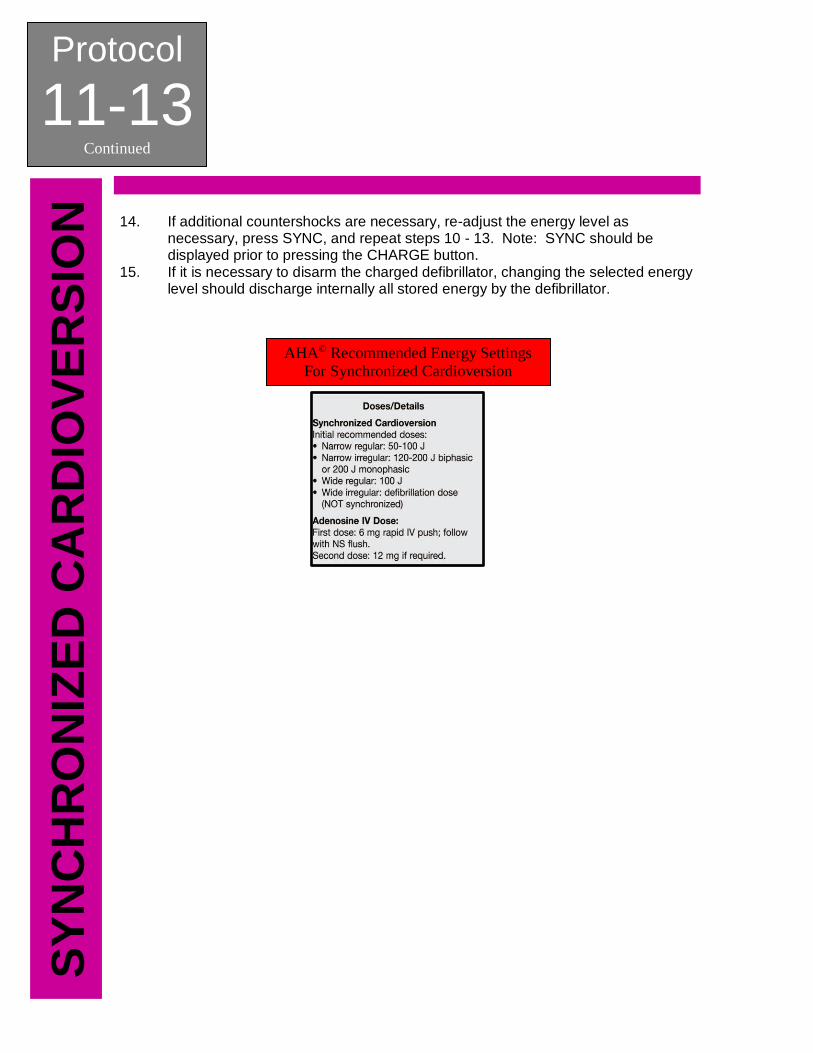
14. If additional countershocks are necessary, re-adjust the energy level as necessary, press SYNC, and repeat steps 10 - 13. Note: SYNC should be displayed prior to pressing the CHARGE button.
15. If it is necessary to disarm the charged defibrillator, changing the selected energy level should discharge internally all stored energy by the defibrillator.
AHA© Recommended Energy Settings For Synchronized Cardioversion
SECTION: Clinical Procedures PROTOCOL TITLE: Transcutaneous Pacing REVISED: 05/2012
Protocol
11-14 T
RA
NS
CU
TA
NE
OU
S P
AC
ING
OVERVIEW: Non-invasive external transcutaneous cardiac pacing is basically providing an electrical signal to make the heart beat when the body’s conduction system fails. The body’s anatomical pacemaker, the sino-atrial node, provides the heart’s “intrinsic” rhythm. When this internal pacemaker fails or is compromised and the body becomes hemodynamically unstable, transcutaneous pacing is the appropriate therapy. It is accomplished by delivering pulses of electric current through the patient’s chest, which stimulates the heart to contract. INDICATIONS: 1. Mobitz Type II second-degree AV block 2. Third-degree AV block 3. Hemodynamically unstable bradycardia with signs and symptoms of low
perfusion or shock. CONTRAINDICATIONS: None in the presence of indications above PROTOCOL FOR MANAGEMENT:
1. Remove all clothing covering the patient’s chest and dry if necessary. If the patient has excessive chest hair, shave hair to ensure proper adhesion.
2. Attach 4 - Lead ECG electrodes for monitoring during pacing. Adjust the ECG size and lead for a convenient waveform display. Verify proper R-wave detection according to the specific indication given by your device.
3. Connect the multi function pacing / defibrillation pads to the monitor multi-function cable (if not already connected).
4. Open the pad packaging and apply one edge of the pad securely to the patient. Roll the pad smoothly from that edge to the other being careful not to trap any air pockets between the gel and skin. Poor adherence and / or air under the multi-function pads can lead to the possibility of arcing and skin burns.
5. Apply the multi-function pads in the apex/ lateral position of the anterior-lateral configuration. Be sure to check your specific manufacturer’s recommendations for pad placement
6. Turn on the pacing function on your device. 7. Set the PACER RATE to a value 10 - 20 ppm higher than the patient’s intrinsic
rate. If no intrinsic rate exists, use 100 ppm. The pacer rate increments or decrements by a value of 2 ppm on the display when you turn the knob.
8. Increase the PACER OUTPUT (mA) until capture is noted. The output mA value will be displayed on the screen.
Protocol
11-14 Continued
TR
AN
SC
UT
AN
EO
US
PA
CIN
G
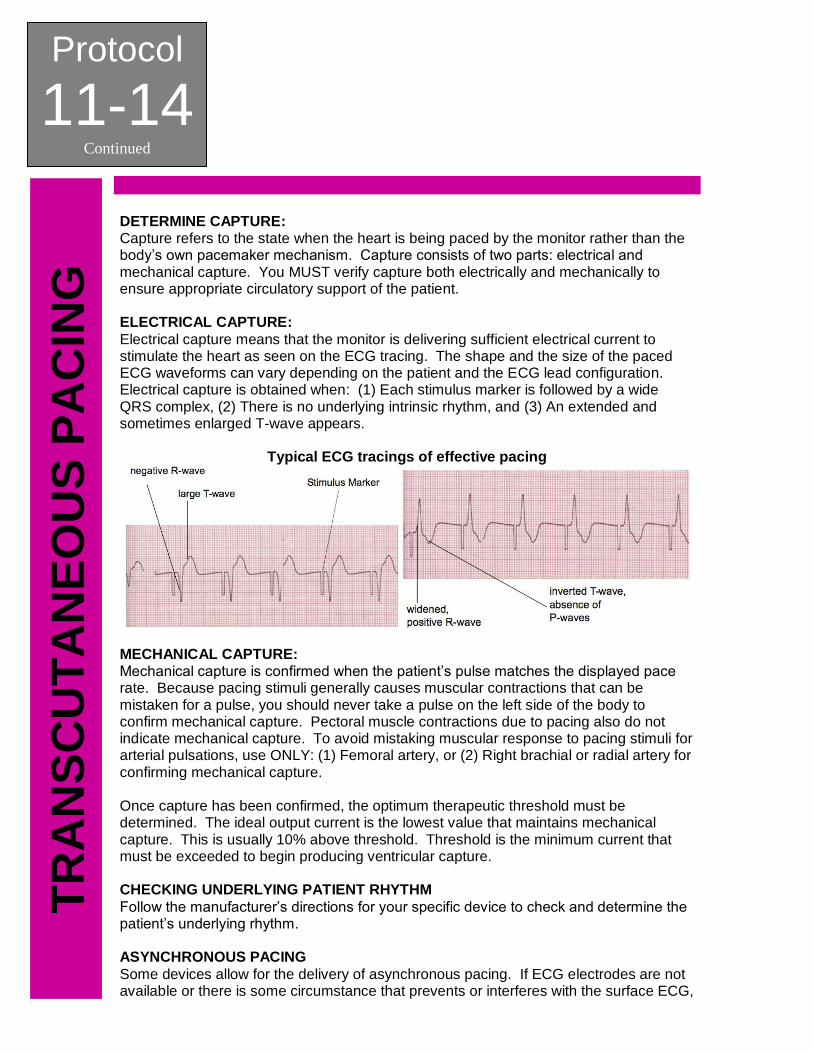
DETERMINE CAPTURE: Capture refers to the state when the heart is being paced by the monitor rather than the body’s own pacemaker mechanism. Capture consists of two parts: electrical and mechanical capture. You MUST verify capture both electrically and mechanically to ensure appropriate circulatory support of the patient. ELECTRICAL CAPTURE:
Electrical capture means that the monitor is delivering sufficient electrical current to stimulate the heart as seen on the ECG tracing. The shape and the size of the paced ECG waveforms can vary depending on the patient and the ECG lead configuration. Electrical capture is obtained when: (1) Each stimulus marker is followed by a wide QRS complex, (2) There is no underlying intrinsic rhythm, and (3) An extended and sometimes enlarged T-wave appears.
Typical ECG tracings of effective pacing
MECHANICAL CAPTURE: Mechanical capture is confirmed when the patient’s pulse matches the displayed pace rate. Because pacing stimuli generally causes muscular contractions that can be mistaken for a pulse, you should never take a pulse on the left side of the body to confirm mechanical capture. Pectoral muscle contractions due to pacing also do not indicate mechanical capture. To avoid mistaking muscular response to pacing stimuli for arterial pulsations, use ONLY: (1) Femoral artery, or (2) Right brachial or radial artery for confirming mechanical capture. Once capture has been confirmed, the optimum therapeutic threshold must be determined. The ideal output current is the lowest value that maintains mechanical capture. This is usually 10% above threshold. Threshold is the minimum current that must be exceeded to begin producing ventricular capture. CHECKING UNDERLYING PATIENT RHYTHM
Follow the manufacturer’s directions for your specific device to check and determine the patient’s underlying rhythm. ASYNCHRONOUS PACING
Some devices allow for the delivery of asynchronous pacing. If ECG electrodes are not available or there is some circumstance that prevents or interferes with the surface ECG,
Protocol
11-14 Continued
TR
AN
SC
UT
AN
EO
US
PA
CIN
G
it may be necessary to operate the pacemaker asynchronously. Asynchronous pacing should ONLY be performed in an emergency when NO OTHER ALTERNATIVES EXIST. Follow the manufacturer’s instructions for your specific device to deliver asynchronous pacing. NOTE: Pace stimuli is also delivered asynchronously whenever there is an ECG lead off condition. Be aware that there is no ECG activity on the display when pacing by this method; you must use other means of determining capture such as checking the patient’s pulse. When pacing asynchronously with an ECG LEAD OFF condition, set the rate and output at the known capture level or high enough (100mA) to presume capture. PEDIATRIC PACING Non-invasive external transcutaneous cardiac pacing of pediatric patients is done in an identical manner to adult pacing. Smaller size pediatric multi-function pads should be used for patients weighing less than 33 lbs / 15 kg. Continuous pacing of neonates can cause skin burns. If it is necessary to pace for more than 30 minutes, periodic inspection of the underlying skin is strongly advised. PEARLS:
1. The outcome of prolonged bradycardic or asystolic cardiac arrest is poor, even with non-invasive pacing. Indiscriminate pacing of this rhythm is unwarranted, particularly as a late effort in the resuscitation.
2. Human studies have shown that the average current necessary for external pacing is between 65 - 100 milliamperes.
3. Pulse duration is the time of impulse stimulation. Early non-invasive pacemakers used short-duration (1 - 2 milliseconds) impulses. The action potential (electrical impulse including depolarizing and repolarizing) of cardiac muscle cells is longer than that for skeletal muscle, requiring 20 - 40 milliseconds to reach maximum effect. Studies have found that increasing the duration from 1 to 4 milliseconds resulted in a three-fold reduction in threshold (the current required for stimulation) to produce capture. Increasing the current from 4 to 40 milliseconds further halves the threshold.
4. Transcutaneous pacing may be uncomfortable for the patient. Sedation and pain management should be considered, as needed.
5. Prolonged transcutaneous pacing may cause burns to the skin. If possible, pacing should not be continued more than 30 minutes if at all possible.

Protocol
11-14 Continued
TR
AN
SC
UT
AN
EO
US
PA
CIN
G
This page intentionally left blank.
SECTION: Clinical Procedures PROTOCOL TITLE: Mechanically-Assisted External Chest Compression Device REVISED: 05/2012
Protocol
11-15 M
EC
HA
NIC
AL
LY
-AS
SIS
TE
D C
PR
OVERVIEW: When treating patients in sudden cardiac arrest, consistent, continuous, high-quality chest compressions are critical to survival. Several devices are now available that provide mechanically-assisted external chest compression, allowing for effective, non-invasive cardiac support during cardiac arrest resuscitation. ODEMSA does not advocate the use of one device over another. INDICATIONS: Medical origin Cardiac Arrest. CONTRAINDICATIONS:
Vary based on the specifics parameters of the device. Follow the manufacturer’s recommendations for contraindications. PROTOCOL FOR MANAGEMENT:
1. After assessing patient’s condition, begin manual CPR. 2. Attach defibrillation / pacing pads. 3. Prepare the mechanically-assisted external chest compression device for
deployment. 4. Apply mechanically-assisted external chest compression device, according to the
manufacturer’s recommendations. WHILE APPLYING DEVICE, ATTEMPT TO LIMIT INTERRUPTIONS IN MANUAL CHEST COMPRESSION TO LESS THAN 10 SECONDS.
5. As quickly as possible, engage operation of the device. 6. Ventilate the patient as directed according to manufacturer’s recommendations. 7. Every effort should be made to not stop compressions unless absolutely
necessary. 8. Positive pressure ventilation can be performed synchronously with any
decompression once an advanced airway is in place. 9. To access the patient, or to pause the device for any reason, press the Stop /
Cancel or pause button. 10. Defibrillate the patient when indicated, according to the manufacturer’s
recommendations. 11. Pause compressions to reassess the patient and check for a pulse.
NOTE: Any time failure occurs, manual external chest compressions should be resumed IMMEDIATELY, whilst troubleshooting the device.

Protocol
11-15 Continued
ME
CH
AN
ICA
LL
Y-A
SS
IST
ED
CP
R
TIT
LE
This page intentionally left blank.
SECTION: Clinical Procedures PROTOCOL TITLE: Patient Restraint (Proposed: Behavioral/Patient Restraint) REVISED: 05/2012
Protocol
11-16 P
AT
IEN
T R
ES
TR
AIN
T
OVERVIEW: This procedure is to be used when it is determined that the only way to administer proper patient care is through the use of restraints. INDICATIONS: 1. Safe & controlled access for medical procedures when involuntary patient
interference or resistance is reasonably anticipated. 2. Evaluation or treatment of combative persons when illness or trauma is
suspected to be the cause of the combativeness. 3. Involuntary treatment of persons without capacity to refuse treatment. CONTRAINDICATIONS: 1. When any other form of transport without restraint is available. PROTOCOL FOR MANAGEMENT:
1. Attempt to obtain verbal control of the situation. 2. Determine if restraints will be needed by provider. 3. Try to identify other causes for combativeness. 4. Request Police response for assistance. 5. INFORM Patient that you intend to restrain them and WHY (do not use this
technique as a threat). 6. The minimum number of providers needed to restrain a patient is three (3);
however five (5) providers are recommended. These five (5) people allow one (1) to control each extremity and one (1) for the patient’s head / airway.
7. Apply restraints. ALL restraints used by EMS will be soft restraints. If police restrain the patient with hard restraints, a police officer MUST ride in the ambulance with the patient to the hospital.
8. Soft restraints should be applied so that the circulation of the extremity is not impaired. It is recommended that providers use triangular bandages. Doubled 6-ply roller gauze (3 inch), sheets, and commercial soft restraint are acceptable alternatives. Document physical assessment findings / injuries discovered before restraints were applied.
9. ALL Patients will be transported in the Supine Position. a. Place patient onto stretcher. b. Apply chest belt first. This belt goes under the patient’s arms. It should
as high as possible on the patient’s chest. c. Apply thigh belt second. This belt should be applied above the patient’s
knees. d. Apply abdominal / waist strap and shoulder straps. e. Insure that once the belt it tightened, it does not cause respiratory
distress and that the patient can still take full inspiratory breaths. f. Apply 4-point restraints last. (Each arm and leg as necessary). The 5-
point belt restraints may be enough restraint to control patient. g. It is recommended to restrain the arms above the wrists and the legs
above the ankles. h. It is recommended that the dominant arm of the patient be restrained
above his head.
Protocol
11-16 Continued
PA
TIE
NT
RE
ST
RA
INT
i. Tie all restraints to “T-Posts” so that the restraint cannot slide. 10. Once restrained, the patient should remain restrained until arrival at the receiving
facility. 11. Circulatory checks should be performed distal to the restraints every 15 minutes. 12. If a patient begins to have a seizure, CUT / RELEASE THE RESTRAINTS
IMMEDIATELY. 13. When a patient is restrained, documentation must include the following:
a. Evidence of patient’s need for restraint. b. That the treatment and necessity of the restraints was in the patient’s
best interest. c. Type of restraint employed and which extremities were restrained. d. Injuries that occurred during or after the restraint. e. Circulation checks every 15 minutes recorded with patient vital signs.
PEARLS:
1. There are reversible, medically treatable conditions that can cause violent behavior in patients. Providers should consider these causes (hypoglycemia, hypovolemia, overdoses, psychosis, etc.) when restraining a patient. Refer to the Medical Patient Care Protocols: Altered Mental Status.
SECTION: Clinical Procedures PROTOCOL TITLE: Medication Administration Cross-Check REVISED: 07/2017
Protocol
11-17 M
ED
ICA
TIO
N C
RO
SS
-CH
EC
K
OVERVIEW: In line with developing a Culture of Safety, the medication cross-check procedure is a critical component of improving the care we deliver, and keeping our patients safe. As providers, we must appreciate that the measures developed to create barriers, redundancy, and recovery are not attempts to “dumb down” the care we provide, but to address the ubiquitous vulnerabilities of human cognition so that our patients are more than one human error away from harm. The Medication Administration Cross-Check is an attempt to do just that; to insert one more layer of protection for the patient from predictable patterns and frequency of human errors.
INDICATIONS: 1. Any time a medication is to be administered. CONTRAINDICATIONS:
1. None
PROTOCOL FOR MANAGEMENT: The AIC initiates the procedure check by stating “Cross-check.” Provider #2 responds that he/she is, “Ready.” It is important to avoid using ambiguous responses like, “Okay,” since they may be interpreted many different ways. Two Providers: The attendant in charge (AIC) obtains intended medication and confirms correct drug.
a. Second Provider verifies and states, “Check.” The attendant in charge (AIC) confirms expiration date.
b. Second Provider verifies and states, “Check.” The attendant in charge (AIC) confirms correct concentration.
c. Second Provider verifies and states, “Check.” The attendant in charge (AIC) confirms correct route of administration.
d. Second Provider verifies and states, “Check.” The attendant in charge (AIC) confirms correct amount of medication to be given.
e. Second Provider verifies and states, “Check.” The attendant in charge (AIC) confirms no allergies or prior reactions to the medication.
f. Second Provider verifies and states, “Check.” The attendant in charge (AIC) confirms V/S are appropriate.
g. Second Provider verifies and states, “Check.” The attendant in charge (AIC) confirms there are no other contraindications.
h. Second Provider verifies and states, “Check.” Upon the cross-check procedure being completed, the AIC should then administer the medication.
Protocol
11-17 Continued
ME
DIC
AT
ION
CR
OS
S-C
HE
CK
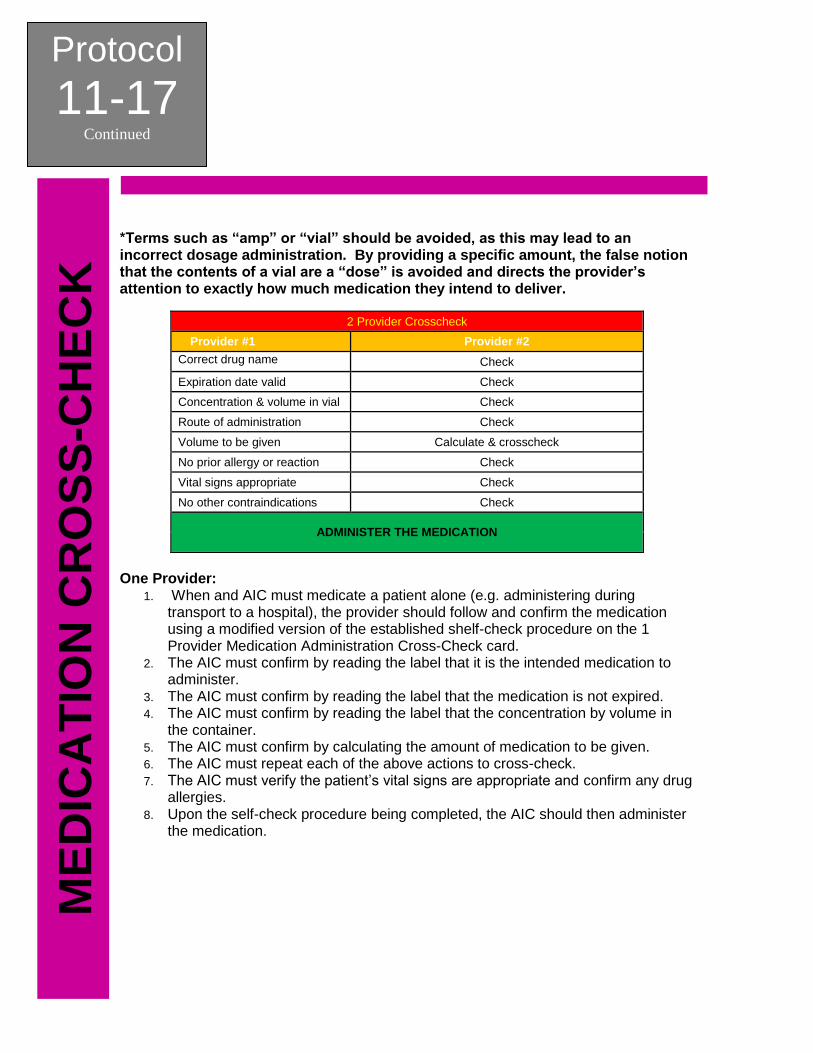
*Terms such as “amp” or “vial” should be avoided, as this may lead to an incorrect dosage administration. By providing a specific amount, the false notion that the contents of a vial are a “dose” is avoided and directs the provider’s attention to exactly how much medication they intend to deliver.
2 Provider Crosscheck
Provider #1 Provider #2
Correct drug name Check
Expiration date valid Check
Concentration & volume in vial Check
Route of administration Check
Volume to be given Calculate & crosscheck
No prior allergy or reaction Check
Vital signs appropriate Check
No other contraindications Check
ADMINISTER THE MEDICATION
One Provider:
1. When and AIC must medicate a patient alone (e.g. administering during transport to a hospital), the provider should follow and confirm the medication using a modified version of the established shelf-check procedure on the 1 Provider Medication Administration Cross-Check card.
2. The AIC must confirm by reading the label that it is the intended medication to administer.
3. The AIC must confirm by reading the label that the medication is not expired. 4. The AIC must confirm by reading the label that the concentration by volume in
the container. 5. The AIC must confirm by calculating the amount of medication to be given. 6. The AIC must repeat each of the above actions to cross-check. 7. The AIC must verify the patient’s vital signs are appropriate and confirm any drug
allergies. 8. Upon the self-check procedure being completed, the AIC should then administer
the medication.
Protocol
11-17 Continued
ME
DIC
AT
ION
CR
OS
S-C
HE
CK
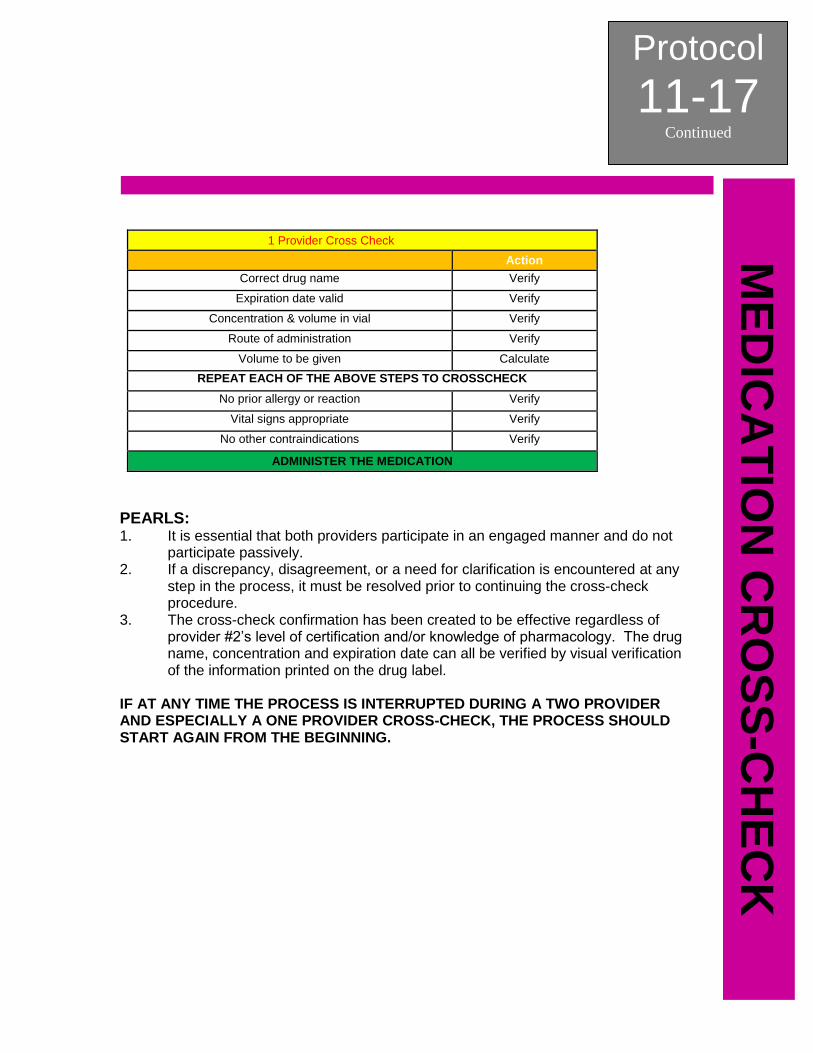
1 Provider Cross Check
Action
Correct drug name Verify
Expiration date valid Verify
Concentration & volume in vial Verify
Route of administration Verify
Volume to be given Calculate
REPEAT EACH OF THE ABOVE STEPS TO CROSSCHECK
No prior allergy or reaction Verify
Vital signs appropriate Verify
No other contraindications Verify
ADMINISTER THE MEDICATION
PEARLS: 1. It is essential that both providers participate in an engaged manner and do not
participate passively. 2. If a discrepancy, disagreement, or a need for clarification is encountered at any
step in the process, it must be resolved prior to continuing the cross-check procedure.
3. The cross-check confirmation has been created to be effective regardless of provider #2’s level of certification and/or knowledge of pharmacology. The drug name, concentration and expiration date can all be verified by visual verification of the information printed on the drug label.
IF AT ANY TIME THE PROCESS IS INTERRUPTED DURING A TWO PROVIDER AND ESPECIALLY A ONE PROVIDER CROSS-CHECK, THE PROCESS SHOULD START AGAIN FROM THE BEGINNING.
Protocol
11-17 Continued
ME
DIC
AT
ION
CR
OS
S-C
HE
CK
This page intentionally left blank.

SECTION: Clinical Procedures PROTOCOL TITLE: Needle Cricothyrotomy REVISED: 11/2018
Protocol
11-18
NE
ED
LE
CR
ICO
TH
YR
OT
OM
Y
OVERVIEW: Advanced airway procedures and competency are the cornerstones of paramedicine. True competency involves knowing not only how to control the airway, but when to control the airway, and selecting the best method to do so. A needle cricothyrotomy should be performed only as a last resort when an airway cannot be definitively secured via oral / nasal intubation or rescue airway device insertion AND the airway cannot be maintained with BLS adjuncts or procedures. INDICATIONS: 1. Total airway obstruction not relieved by any other means. 2. Airway compromise from injuries that make oral or nasal intubation
impractical. 3. No alternative airway device / maneuver is successful. 4. The patient cannot be oxygenated or ventilated by any other means. CONTRAINDICATIONS: 1. Airway able to be maintained via BLS airway management procedures. COMPLICATIONS:
• Bleeding
• Incorrect or unsuccessful tube placement
• Pneumothorax and / or pneumomediastinum
• Tracheal perforation
• Vocal cord injury
• Aspiration
• Subcutaneous emphysema
• Esophageal and / or tracheal perforation
• Infection leading to cellulitis and / or sepsis
• Phrenic nerve and / or brachial plexus injury
PROTOCOL FOR NEEDLE CRICOTHYROTOMY: 1. Prepare all equipment for needle cricothyrotomy:
a. All appropriate BSI should be worn to include eye protection, mask, and gloves b. Appropriately sized bag valve mask (BVM) connected to 100% oxygen. c. Nasal cannula to provide apneic oxygenation d. Large bore IV needle (14 gauge IV) e. 3 cc syringe f. Attachment for bag valve mask from endotracheal tube. g. Connect capnography sensor to monitor. h. Check that capnography sensor is working properly. i. Suction setup, turned on, and within reach. j. Antiseptic solution k. 6.0 to 7.0 ET tube
2. Once all equipment is prepared, a needle cricothyrotomy attempt should be made.
a. Apply nasal cannula for apneic oxygenation. Use BVM as indicated
Protocol
11-18 Continued
NE
ED
LE
CR
ICO
TH
YR
OT
OM
Y
b. Identify the cricothyroid membrane, located subcutaneously between the thyroid cartilage (Adam ’s apple) superiorly and the cricoid cartilage inferiorly. c. Cleanse the intended site of procedure with antiseptic solution. d. Stabilize the site by placing thumb and index finger of non-dominate hand on either side of the trachea, stretching the skin across the cricoid membrane. e. While stabilizing the trachea, use your dominant hand to aim IV catheter at an angle towards feet and insert through cricoid membrane. f. Attach the 3 cc syringe and aspirate air to confirm placement of catheter. g. Remove plunger from 3 cc syringe. Place BVM attachment from ET tube onto end of 3 cc syringe. h. Attach BVM to syringe. Attach capnography and ventilate patient with BVM. Check monitor for distinct capnography waveform and numerical value. i. If no capnography waveform is present, check equipment (capnography working correctly, no kinks, attached securely) and recheck for proper placement. j. If capnography waveform is present, continue placement confirmation:
1. Observe chest rise upon ventilation. 2 Auscultate for bilateral breath sounds.
k. Secure airway. Reassess lung sounds and capnography readings. l. Reassess airway after all movement of patient or change in capnography readings.
PEARLS:
1. Needle cricothyrotomy is a temporary measure only.

Protocol
11-8 Continued
SU
RG
ICA
L C
RIC
OT
HY
RO
TO
MY
This page intentionally left blank.