Embed Size (px)
Citation preview
TECHNICAL WHITE PAPER – AUGUST 2017
REVIEWER’S GUIDE FOR VIEW IN VMWARE HORIZON 7: PREPARING VIRTUAL MACHINES FOR DESKTOP POOLSVMware Horizon 7 version 7.x
T E C H N I C A L W H I T E PA P E R | 2
REVIEWER’S GUIDE FOR VIEW IN VMWARE HORIZON 7: PREPARING VIRTUAL MACHINES FOR DESKTOP POOLS
Table of Contents
Introduction . . . . . . . . . . . . . . . . . . . . . . . . . . . . . . . . . . . . . . . . . . . . . . . . . . . . . . . . . . . . . . . . . . . . . . . . . . . . . . .3
JMP – Next-Generation Desktop and Application Delivery Platform . . . . . . . . . . . . . . . . . . . . . . . . . 3
Purpose of This Guide . . . . . . . . . . . . . . . . . . . . . . . . . . . . . . . . . . . . . . . . . . . . . . . . . . . . . . . . . . . . . . . . . . . . 3
Intended Audience for This Guide . . . . . . . . . . . . . . . . . . . . . . . . . . . . . . . . . . . . . . . . . . . . . . . . . . . . . . . . . 4
Before You Begin . . . . . . . . . . . . . . . . . . . . . . . . . . . . . . . . . . . . . . . . . . . . . . . . . . . . . . . . . . . . . . . . . . . . . . . . 4
Section A: VDI Desktop Pools . . . . . . . . . . . . . . . . . . . . . . . . . . . . . . . . . . . . . . . . . . . . . . . . . . . . . . . . . . . . . . 4
Exercise A1: Creating the Master VM for a VDI Desktop . . . . . . . . . . . . . . . . . . . . . . . . . . . . . . . . . . . . . 4
Exercise A2: Configuring the Guest Operating System . . . . . . . . . . . . . . . . . . . . . . . . . . . . . . . . . . . . . 6
Exercise A3: Installing Horizon Agent . . . . . . . . . . . . . . . . . . . . . . . . . . . . . . . . . . . . . . . . . . . . . . . . . . . . . 7
Exercise A4: Installing the User Environment Manager Agent . . . . . . . . . . . . . . . . . . . . . . . . . . . . . . . 9
Exercise A5: Finalizing the Master Image . . . . . . . . . . . . . . . . . . . . . . . . . . . . . . . . . . . . . . . . . . . . . . . . . . 11
Section B: RDSH Desktop Pools . . . . . . . . . . . . . . . . . . . . . . . . . . . . . . . . . . . . . . . . . . . . . . . . . . . . . . . . . . . . 12
Exercise B1: Creating the RDSH Virtual Machine . . . . . . . . . . . . . . . . . . . . . . . . . . . . . . . . . . . . . . . . . . . .12
Exercise B2: Configuring the RDSH Server Operating System . . . . . . . . . . . . . . . . . . . . . . . . . . . . . . .13
Exercise B3: Installing Windows RDSH Features . . . . . . . . . . . . . . . . . . . . . . . . . . . . . . . . . . . . . . . . . . 14
Exercise B4: Installing Horizon Agent . . . . . . . . . . . . . . . . . . . . . . . . . . . . . . . . . . . . . . . . . . . . . . . . . . . . 14
Exercise B5: (Optional) Installing User Environment Manager and App Volumes Agents . . . . . 15
Summary . . . . . . . . . . . . . . . . . . . . . . . . . . . . . . . . . . . . . . . . . . . . . . . . . . . . . . . . . . . . . . . . . . . . . . . . . . . . . . . . . 16
All Guides . . . . . . . . . . . . . . . . . . . . . . . . . . . . . . . . . . . . . . . . . . . . . . . . . . . . . . . . . . . . . . . . . . . . . . . . . . . . . . . . 16
Appendix: Terminology Used in This Guide . . . . . . . . . . . . . . . . . . . . . . . . . . . . . . . . . . . . . . . . . . . . . . . . . . 17
Additional Resources . . . . . . . . . . . . . . . . . . . . . . . . . . . . . . . . . . . . . . . . . . . . . . . . . . . . . . . . . . . . . . . . . . . . . . 18
About the Authors and Contributor . . . . . . . . . . . . . . . . . . . . . . . . . . . . . . . . . . . . . . . . . . . . . . . . . . . . . . . . . 18
T E C H N I C A L W H I T E PA P E R | 3
REVIEWER’S GUIDE FOR VIEW IN VMWARE HORIZON 7: PREPARING VIRTUAL MACHINES FOR DESKTOP POOLS
IntroductionWelcome to the Reviewer’s Guide for View in VMware Horizon 7: Preparing Virtual Machines for Desktop Pools. This guide walks you through the process of creating and configuring a virtual machine (VM) that you can use as the master image for various types of desktop pools: full-clone pools, linked-clone pools, RDS-hosted desktops, and instant-clone pools.
The View component (formerly the product called Horizon View) of VMware Horizon® 7 offers a virtual desktop infrastructure (VDI) and remote applications through Remote Desktop Session Host (RDSH). This is done through a single platform, which simplifies desktop administration and operations and enhances the user experience. In comparison to physical desktops, delivering View virtual desktops from centralized VMware vSphere® servers enhances security of applications and data and improves IT responsiveness, while reducing costs. The user enjoys a consistent and responsive experience across devices and locations, while maintaining IT-approved levels of customization.
JMP – Next-Generation Desktop and Application Delivery PlatformJMP (pronounced jump), which stands for Just-in-Time Management Platform, represents capabilities in VMware Horizon 7 Enterprise Edition that deliver Just-in-Time Desktops and Apps in a flexible, fast, and personalized manner. JMP is composed of the following VMware technologies:
• VMware Instant Clone Technology for fast desktop and RDSH provisioning
• VMware App Volumes™ for real-time application delivery
• VMware User Environment Manager™ for contextual policy management
JMP allows components of a desktop or RDSH server to be decoupled and managed independently in a centralized manner, yet reconstituted on demand to deliver a personalized user workspace when needed. JMP is supported with both on-premises and cloud-based Horizon 7 deployments, providing a unified and consistent management platform regardless of your deployment topology. The JMP approach provides several key benefits, including simplified desktop and RDSH image management, faster delivery and maintenance of applications, and elimination of the need to manage “full persistent” desktops.
Purpose of This GuideThe Reviewer’s Guide for View in VMware Horizon 7: Preparing Virtual Machines for Desktop Pools is one of a series of guides to help you evaluate the View component of Horizon 7. This guide provides exercises to demonstrate the process of creating a VM, installing and configuring a Windows operating system, and installing the various VMware agents required for desktop pool deployment. For an overview of View in Horizon 7 and information about key features, such as publishing applications and configuring Smart Policies, see All Guides.
Important: This guide is designed for evaluation purposes only. It uses the minimum required resources for a basic deployment and does not explore all possible features. Do not use this evaluation environment as a template for deploying a production environment. To deploy a production environment, see VMware Horizon 7 Documentation.
The exercises in this guide describe how to prepare a VM that is managed by VMware vCenter Server® and used for cloned deployment of single-user Windows virtual desktops. For information about other types of desktop pools, see the following guides:
• To prepare machines that are not managed by vCenter Server, see Preparing Unmanaged Machines in Setting Up Desktop and Application Pools in View. Unmanaged machines can include physical computers and VMs running on virtualization platforms other than vCenter Server.
• To prepare Linux VMs for remote desktop deployment, see Setting Up Horizon 7 for Linux Desktops.
T E C H N I C A L W H I T E PA P E R | 4
REVIEWER’S GUIDE FOR VIEW IN VMWARE HORIZON 7: PREPARING VIRTUAL MACHINES FOR DESKTOP POOLS
Intended Audience for This GuideThis guide is intended for IT administrators and product evaluators who want to install Horizon 7 and deploy a virtual desktop environment. Both current and new users of Horizon 7 can benefit from using this guide. Familiarity with VMware vSphere and VMware vCenter Server is assumed. Some familiarity with other technologies is helpful, including networking and storage in a virtual environment, Active Directory, identity management, directory services, Simple Mail Transfer Protocol (SMTP), and RSA SecurID.
Before You BeginThis guide is part of a series. We recommend that you follow the guides in order. For information about all guides in the series, see All Guides.
Before you can perform the exercises in this guide, you must have the following infrastructure components installed and configured:
• VMware vSphere 6.0 Update 1 or later, including vCenter Server 6.0 Update 1 or later. VMware vSphere 6.5 or later is recommended. For more information, see VMware vSphere 6 Documentation.
• VMware ESXi™ host or hosts configured in the vCenter Server instance.
• An authentication infrastructure that includes Active Directory, DNS, DHCP, and Certificate Authority setup.
• Horizon 7 Connection Server, version 7.0 or later, set up as described in the Reviewer’s Guide for View in VMware Horizon 7: Installation and Configuration.
Note: View Connection Server version 7.2 or later is recommended.
Section A: VDI Desktop PoolsThe types of VDI desktop pools discussed in this document include full-clone, linked-clone, and instant-clone automated desktop pools.
The exercises in this section are sequential and build upon one another, so make sure to complete each exercise before moving on to the next. The exercises cover the following topics:
• Exercise A1: Creating the Master VM for a VDI Desktop
• Exercise A2: Configuring the Guest Operating System
• Exercise A3: Installing Horizon Agent
• Exercise A4: Installing the User Environment Manager Agent
• Exercise A5: Finalizing the Master Image
Exercise A1: Creating the Master VM for a VDI DesktopEach desktop pool uses a master virtual machine (VM), which serves as the model for the deployed virtual desktops. Creating the master VM includes creating the VM using vSphere Web Client, installing the guest operating system, and installing VMware Tools™.
1. Place an ISO image file of the Windows 10 operating system on a datastore on an ESXi server.
For more details about operating systems, see Supported Operating Systems for Horizon Agent in the View Installation document. Also see the VMware knowledge base article Supported Versions of Windows 10 on Horizon 7 Including All VDI Clones (2149393).
T E C H N I C A L W H I T E PA P E R | 5
REVIEWER’S GUIDE FOR VIEW IN VMWARE HORIZON 7: PREPARING VIRTUAL MACHINES FOR DESKTOP POOLS
2. Use vSphere Web Client to log in to vCenter Server and create a new VM.
• Give the VM the following name: Master-IC, for “instant clone.”
• Give the VM 2 vCPUs and 4 GB of RAM, and make the virtual disk size 24 GB.
Note: These desktop specifications are recommended for evaluating a nonproduction deployment. For a production environment, desktop sizing varies based on the types of user workloads. For guidance, see the specifications listed in the VM Tuning Specifications table in the Building a Master VM Template appendix of the VMware Horizon 7 Enterprise Edition Reference Architecture. VMware recommends performing an assessment to determine the appropriate specifications for your use case.
• On the Customize Hardware page, use the following specifications.
ITEM SPECIFICATION
SCSI controller LSI Logic SAS
Network VMXNET3
Video card • Set video memory to Auto-detect settings, and let Horizon handle the settings.
• Select Enable 3D Support if required.
CD/DVD drive To use the Windows ISO file you placed on the ESXi host:1. For Device Type, select Datastore ISO File, and browse to the ISO file.
2. Select the Connect at power on check box.
If you plan to use a different method of installing the guest operating system, for Device Type, select Client Device and ensure that the Connect at power on check box is deselected.
Floppy drive (Optional) In a production environment, remove the floppy drive. Click the X button that appears when you place your mouse pointer in the row next to Floppy drive.
Memory/CPU hotplug (Optional) In a production environment, disable hot plug. • In the CPU settings, ensure that the Enable CPU Hot Add check box
is deselected.
• In the Memory settings, for Memory Hot Plug, ensure that the Enable check box is deselected.
Table 1: Customize Hardware Specifications
Note: These instructions are for vSphere Web Client. To apply some of these settings for the legacy vSphere Client, select Edit the virtual machine settings before completion on the last page of the wizard.
3. (Optional) If you plan to try the NVIDIA GRID vGPU feature for 3D rendering, follow the steps in Chapter 10 of the NVIDIA deployment guide to add the required virtual hardware and driver for GPU-enabled desktops.
4. After you complete the wizard, power on the VM to install the guest operating system.
Because you configured the CD/DVD drive to point to the ISO image of the guest operating system and to connect at power on, the guest operating system installation process begins automatically.
T E C H N I C A L W H I T E PA P E R | 6
REVIEWER’S GUIDE FOR VIEW IN VMWARE HORIZON 7: PREPARING VIRTUAL MACHINES FOR DESKTOP POOLS
5. To access the operating system, click the Console tab in vSphere Client or vSphere Web Client, or open a console window for the VM, and follow the Windows installation prompts.
6. Run Windows Update to apply the latest patches.
7. After installation of the guest operating system is complete, in vSphere Web Client, change the settings for the CD/DVD drive so that it does not point to an ISO file.
For example, for Device Type, select Client Device and ensure that the Connect at power on check box is deselected.
8. Install VMware Tools.
a. Log in to the guest operating system.
b. Use vSphere Client or vSphere Web Client, right-click the VM in the vCenter inventory and select Guest > Install/Upgrade VMware Tools. VMware Tools is mounted as a virtual CD/DVD in the guest operating system.
c. In the guest operating system, if the VMware Tools installation wizard does not automatically start, double-click the VMware Tools CD/DVD drive and follow the wizard prompts.
If you need more assistance, see the vSphere documentation.
9. Configure VMware Tools to synchronize the clock in the VM with the clock on the ESXi host.
a. Select the VM in the vCenter inventory and select Actions > Edit Settings.
b. Click the VM Options tab and expand the VMware Tools settings.
c. Select the Synchronize guest time with host check box.
Exercise A2: Configuring the Guest Operating SystemAfter you create a VM, you must configure networking and firewall settings to enable remote connections from a user’s client device.
Note: In a production environment, you also install antivirus software and other custom applications that your end users need. For the purposes of this exercise, these tasks are not included here.
1. Log in to the guest operating system as an administrator.
2. Join the virtual machine to the Active Directory domain for your remote desktops.
3. Add desktop users to the local Remote Desktop Users group of the VM.
For example, on a Windows 10 system:
a. Go to Control Panel > System and Security > System > Remote Settings.
b. Select the Allow remote connections to this computer check box.
c. Click Select Users, and in the Remote Desktop Users dialog box, click Add.
d. Select a group that contains all possible users, such as the Domain Users group, and click OK.
In a production environment, you would select the Active Directory group or groups that include the end users entitled to the desktop pool.
4. Configure the Windows Firewall Service to restart after failures.
For instructions, see Configure the Windows Firewall Service to Restart After Failures in Setting Up Desktop and Application Pools in View.
5. Go to the Services applet and verify that Remote Desktop Services is started in the guest.
Remote Desktop Services is required for a Horizon Agent installation, single sign-on (SSO), and other View operations.
T E C H N I C A L W H I T E PA P E R | 7
REVIEWER’S GUIDE FOR VIEW IN VMWARE HORIZON 7: PREPARING VIRTUAL MACHINES FOR DESKTOP POOLS
6. Configure Windows Firewall to allow remote desktop connections to the VM.
For example, in a Windows 10 operating system:
a. Go to Control Panel > System and Security > Windows Firewall. b. Click Allow an App or Feature Through Windows Firewall.c. Scroll down the list and verify that Remote Desktop is selected.
d. If Remote Desktop is not selected, click Change Settings and select the check box for Remote Desktop.
7. Set the power option Turn off the display to Never, and do not specify a sleep timer, standby, hibernation, or any other power option that could make the desktop unreachable.
For example, to set Turn off the display to Never, go to Control Panel > System and Security > Power Options, and click Choose when to turn off display.
Important: For a desktop deployment in a production environment, VMware recommends that you use the VMware OS Optimization Tool. This tool includes customizable templates to enable and disable Windows system services and features according to VMware recommendations and best practices.
8. Configure network connection IP properties:
• Specify that an IP address is assigned by a DHCP server.
• Specify that the DNS server address is obtained automatically. If your network environment has a proxy server, configure network proxy settings.
9. (Optional) Configure a Microsoft Windows volume license key using the Key Management Service (KMS), and activate your Windows operating system according to your organization’s procedures.
KMS treats each activated clone as a computer with a newly issued license. In a production environment, you must activate Windows. In an evaluation environment, you can create the VM and log in without activating Windows.
10. Create a full clone of this VM, and give it the following name: Master-LC, for “linked clone.”
Because in later exercises you create various types of desktop pools, which require different Horizon Agent features to be installed, you make a full clone of this VM before you install Horizon Agent. For instructions, see the vSphere Documentation.
You now have two VMs, which you use in a later exercise to create master images for different types of desktop pools. You use the Master-LC VM for a linked-clone pool, and the Master-IC VM for an instant-clone pool. You also use one of these VMs to create a VM template for a full-clone pool.
Exercise A3: Installing Horizon AgentYou must install Horizon Agent on the master VMs so that View servers can communicate with and manage the desktops that you deploy.
1. Log in as a local administrator to the guest operating system of the Master-IC VM.
2. Download the Horizon Agent installer file.
3. To start the Horizon Agent installation wizard, double-click the installer file and follow the prompts until you get to the Custom Setup page.
T E C H N I C A L W H I T E PA P E R | 8
REVIEWER’S GUIDE FOR VIEW IN VMWARE HORIZON 7: PREPARING VIRTUAL MACHINES FOR DESKTOP POOLS
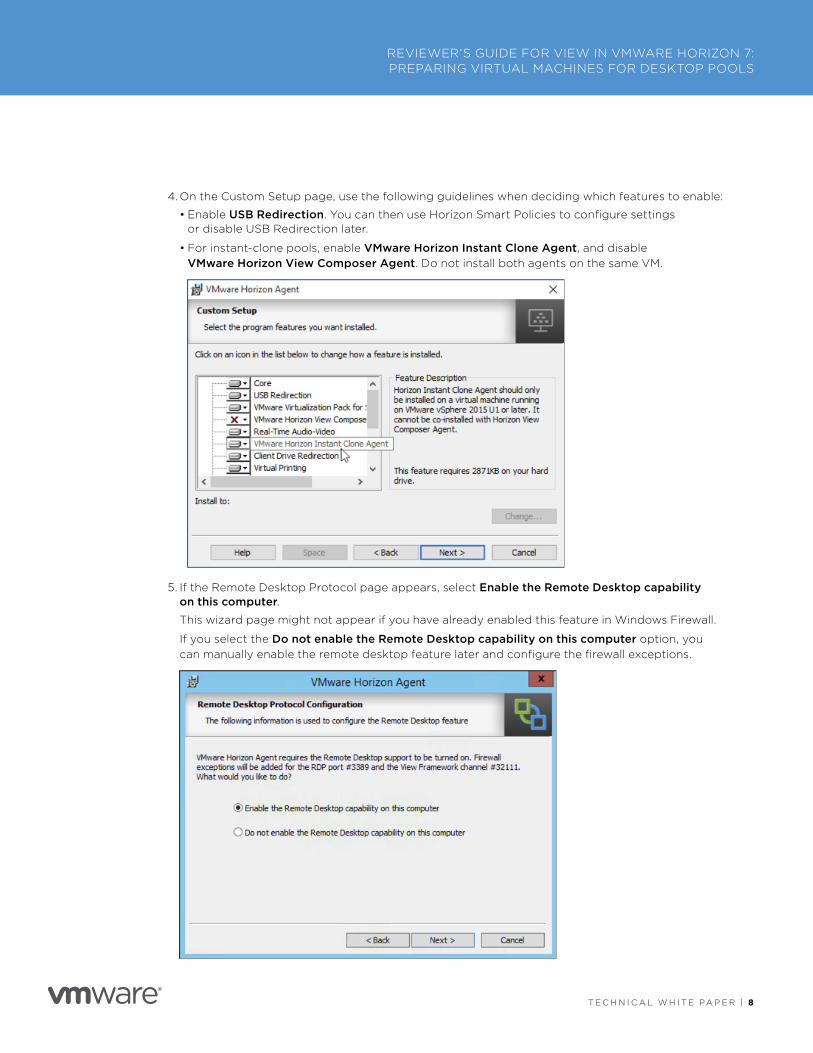
4. On the Custom Setup page, use the following guidelines when deciding which features to enable:
• Enable USB Redirection. You can then use Horizon Smart Policies to configure settings or disable USB Redirection later.
• For instant-clone pools, enable VMware Horizon Instant Clone Agent, and disable VMware Horizon View Composer Agent. Do not install both agents on the same VM.
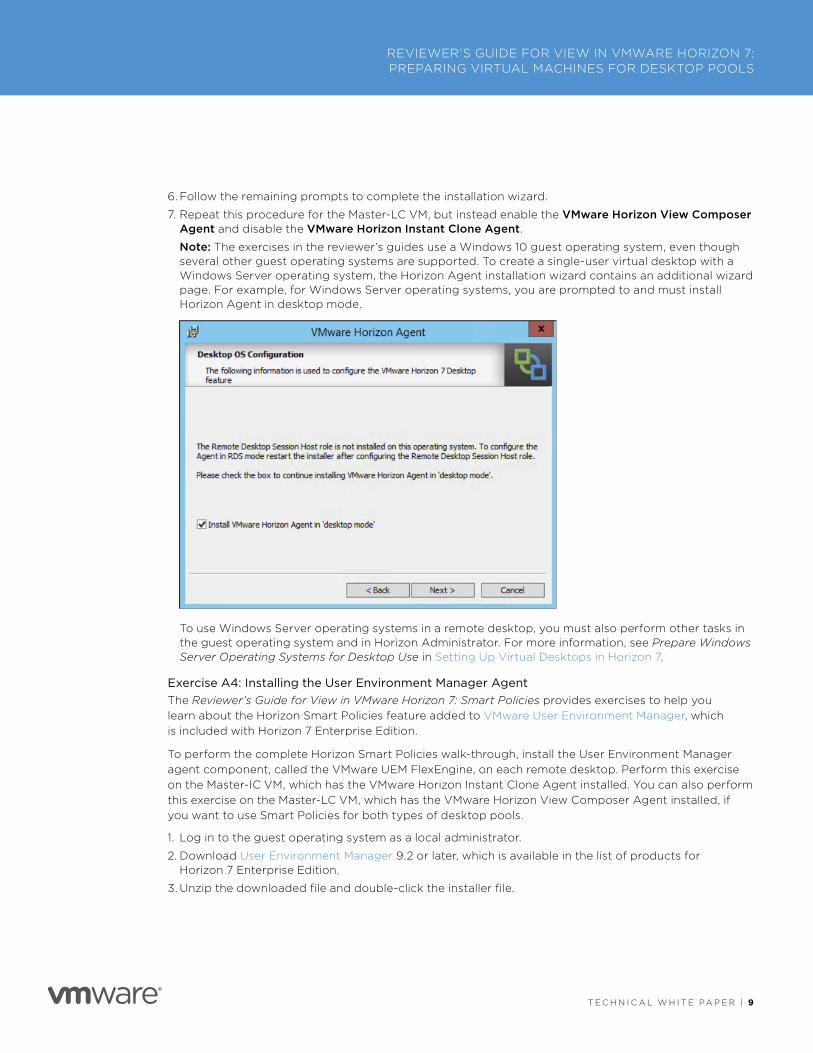
5. If the Remote Desktop Protocol page appears, select Enable the Remote Desktop capability on this computer. This wizard page might not appear if you have already enabled this feature in Windows Firewall.
If you select the Do not enable the Remote Desktop capability on this computer option, you can manually enable the remote desktop feature later and configure the firewall exceptions.
T E C H N I C A L W H I T E PA P E R | 9
REVIEWER’S GUIDE FOR VIEW IN VMWARE HORIZON 7: PREPARING VIRTUAL MACHINES FOR DESKTOP POOLS
6. Follow the remaining prompts to complete the installation wizard.
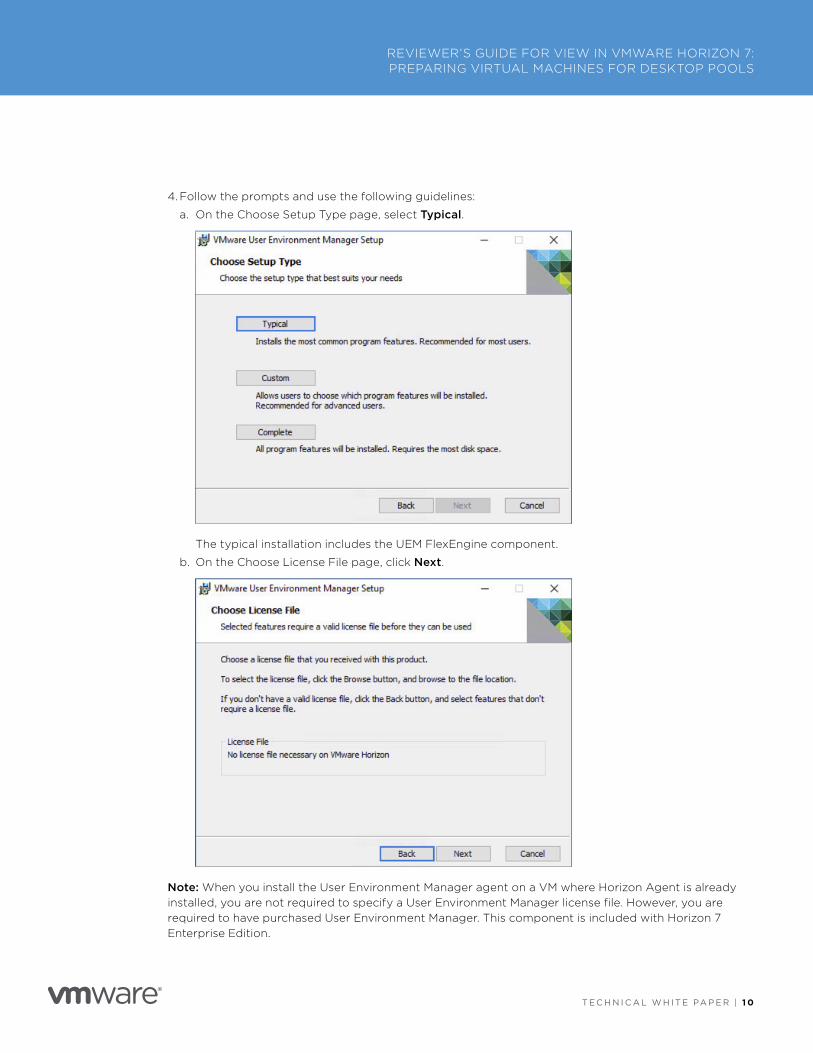
7. Repeat this procedure for the Master-LC VM, but instead enable the VMware Horizon View Composer Agent and disable the VMware Horizon Instant Clone Agent.Note: The exercises in the reviewer’s guides use a Windows 10 guest operating system, even though several other guest operating systems are supported. To create a single-user virtual desktop with a Windows Server operating system, the Horizon Agent installation wizard contains an additional wizard page. For example, for Windows Server operating systems, you are prompted to and must install Horizon Agent in desktop mode.
To use Windows Server operating systems in a remote desktop, you must also perform other tasks in the guest operating system and in Horizon Administrator. For more information, see Prepare Windows Server Operating Systems for Desktop Use in Setting Up Virtual Desktops in Horizon 7.
Exercise A4: Installing the User Environment Manager AgentThe Reviewer’s Guide for View in VMware Horizon 7: Smart Policies provides exercises to help you learn about the Horizon Smart Policies feature added to VMware User Environment Manager, which is included with Horizon 7 Enterprise Edition.
To perform the complete Horizon Smart Policies walk-through, install the User Environment Manager agent component, called the VMware UEM FlexEngine, on each remote desktop. Perform this exercise on the Master-IC VM, which has the VMware Horizon Instant Clone Agent installed. You can also perform this exercise on the Master-LC VM, which has the VMware Horizon View Composer Agent installed, if you want to use Smart Policies for both types of desktop pools.
1. Log in to the guest operating system as a local administrator.
2. Download User Environment Manager 9.2 or later, which is available in the list of products for Horizon 7 Enterprise Edition.
3. Unzip the downloaded file and double-click the installer file.
T E C H N I C A L W H I T E PA P E R | 1 0
REVIEWER’S GUIDE FOR VIEW IN VMWARE HORIZON 7: PREPARING VIRTUAL MACHINES FOR DESKTOP POOLS
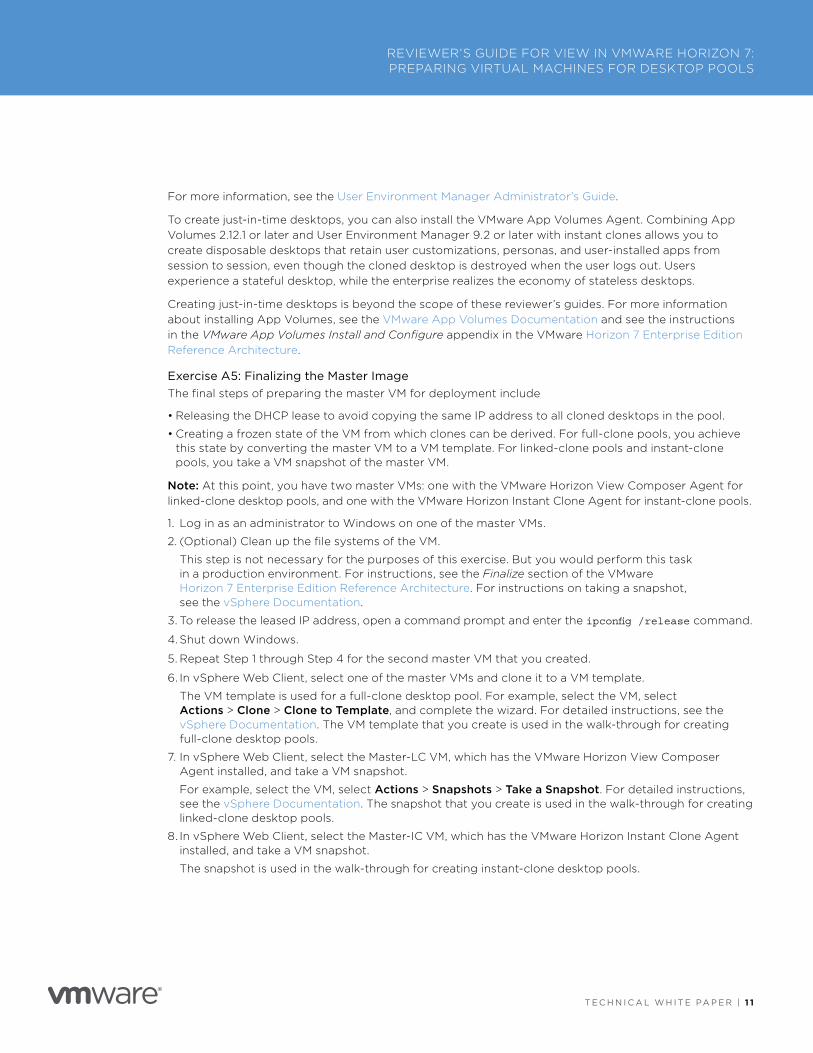
4. Follow the prompts and use the following guidelines:
a. On the Choose Setup Type page, select Typical.
The typical installation includes the UEM FlexEngine component.
b. On the Choose License File page, click Next.
Note: When you install the User Environment Manager agent on a VM where Horizon Agent is already installed, you are not required to specify a User Environment Manager license file. However, you are required to have purchased User Environment Manager. This component is included with Horizon 7 Enterprise Edition.
T E C H N I C A L W H I T E PA P E R | 1 1
REVIEWER’S GUIDE FOR VIEW IN VMWARE HORIZON 7: PREPARING VIRTUAL MACHINES FOR DESKTOP POOLS
For more information, see the User Environment Manager Administrator’s Guide.
To create just-in-time desktops, you can also install the VMware App Volumes Agent. Combining App Volumes 2.12.1 or later and User Environment Manager 9.2 or later with instant clones allows you to create disposable desktops that retain user customizations, personas, and user-installed apps from session to session, even though the cloned desktop is destroyed when the user logs out. Users experience a stateful desktop, while the enterprise realizes the economy of stateless desktops.
Creating just-in-time desktops is beyond the scope of these reviewer’s guides. For more information about installing App Volumes, see the VMware App Volumes Documentation and see the instructions in the VMware App Volumes Install and Configure appendix in the VMware Horizon 7 Enterprise Edition Reference Architecture.
Exercise A5: Finalizing the Master ImageThe final steps of preparing the master VM for deployment include
• Releasing the DHCP lease to avoid copying the same IP address to all cloned desktops in the pool.
• Creating a frozen state of the VM from which clones can be derived. For full-clone pools, you achieve this state by converting the master VM to a VM template. For linked-clone pools and instant-clone pools, you take a VM snapshot of the master VM.
Note: At this point, you have two master VMs: one with the VMware Horizon View Composer Agent for linked-clone desktop pools, and one with the VMware Horizon Instant Clone Agent for instant-clone pools.
1. Log in as an administrator to Windows on one of the master VMs.
2. (Optional) Clean up the file systems of the VM.
This step is not necessary for the purposes of this exercise. But you would perform this task in a production environment. For instructions, see the Finalize section of the VMware Horizon 7 Enterprise Edition Reference Architecture. For instructions on taking a snapshot, see the vSphere Documentation.
3. To release the leased IP address, open a command prompt and enter the ipconfig /release command.
4. Shut down Windows.
5. Repeat Step 1 through Step 4 for the second master VM that you created.
6. In vSphere Web Client, select one of the master VMs and clone it to a VM template.
The VM template is used for a full-clone desktop pool. For example, select the VM, select Actions > Clone > Clone to Template, and complete the wizard. For detailed instructions, see the vSphere Documentation. The VM template that you create is used in the walk-through for creating full-clone desktop pools.
7. In vSphere Web Client, select the Master-LC VM, which has the VMware Horizon View Composer Agent installed, and take a VM snapshot.
For example, select the VM, select Actions > Snapshots > Take a Snapshot. For detailed instructions, see the vSphere Documentation. The snapshot that you create is used in the walk-through for creating linked-clone desktop pools.
8. In vSphere Web Client, select the Master-IC VM, which has the VMware Horizon Instant Clone Agent installed, and take a VM snapshot.
The snapshot is used in the walk-through for creating instant-clone desktop pools.
T E C H N I C A L W H I T E PA P E R | 1 2
REVIEWER’S GUIDE FOR VIEW IN VMWARE HORIZON 7: PREPARING VIRTUAL MACHINES FOR DESKTOP POOLS
Section B: RDSH Desktop PoolsAn RDSH desktop pool has different characteristics than a full-clone, linked-clone, or instant-clone automated desktop pool. An RDSH desktop pool is based on a session to an RDSH server.
This section provides exercises for creating a master VM for a pool of session-based virtual desktops. The exercises are sequential and build upon one another, so make sure to complete each exercise before moving on to the next. The exercises cover the following topics:
• Exercise B1: Creating the RDSH Virtual Machine
• Exercise B2: Configuring the RDSH Server Operating System
• Exercise B3: Installing Windows RDSH Features
• Exercise B4: Installing Horizon Agent
• Exercise B5: (Optional) Installing User Environment Manager and App Volumes Agents
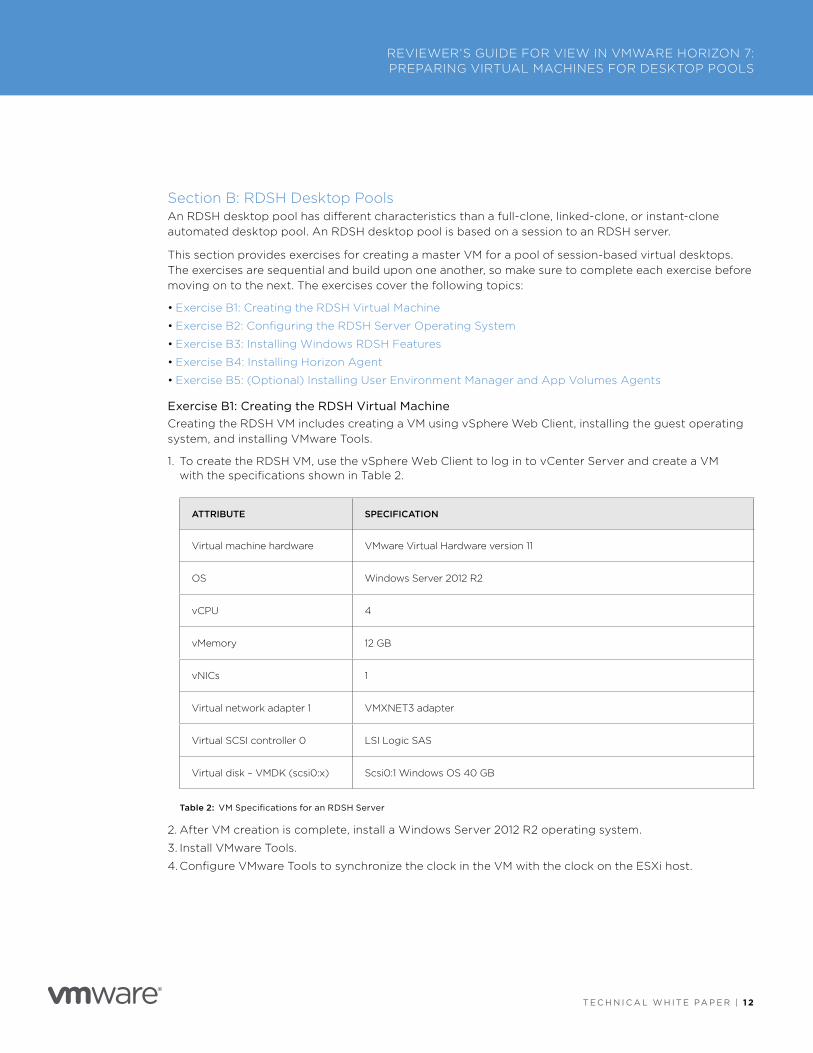
Exercise B1: Creating the RDSH Virtual MachineCreating the RDSH VM includes creating a VM using vSphere Web Client, installing the guest operating system, and installing VMware Tools.
1. To create the RDSH VM, use the vSphere Web Client to log in to vCenter Server and create a VM with the specifications shown in Table 2.
ATTRIBUTE SPECIFICATION
Virtual machine hardware VMware Virtual Hardware version 11
OS Windows Server 2012 R2
vCPU 4
vMemory 12 GB
vNICs 1
Virtual network adapter 1 VMXNET3 adapter
Virtual SCSI controller 0 LSI Logic SAS
Virtual disk – VMDK (scsi0:x) Scsi0:1 Windows OS 40 GB
Table 2: VM Specifications for an RDSH Server
2. After VM creation is complete, install a Windows Server 2012 R2 operating system.
3. Install VMware Tools.
4. Configure VMware Tools to synchronize the clock in the VM with the clock on the ESXi host.

T E C H N I C A L W H I T E PA P E R | 1 3
REVIEWER’S GUIDE FOR VIEW IN VMWARE HORIZON 7: PREPARING VIRTUAL MACHINES FOR DESKTOP POOLS
Exercise B2: Configuring the RDSH Server Operating SystemNow that you have created the RDSH server VM, you must configure networking and firewall settings to enable remote connections from a user’s client device.
Note: If you were configuring the operating system to create an automated farm of RDSH servers, additional steps would be required, as described in the Quick-Start Guide: Publishing Applications in VMware Horizon 7.
1. Log in as an administrator to the operating system.
2. Join the VM to the domain.
3. Configure network connection IP properties:
• Specify that an IP address is assigned by a DHCP server.
• Specify that the DNS server address is obtained automatically.
4. (Optional) Activate Windows using Key Management Service (KMS) and a volume license key.
5. Apply all the latest Windows updates and turn off Windows Updates.
6. Add desktop users to the local Remote Desktop Users group of the VM.
a. Go to Control Panel > System and Security > System > Remote Settings.
b. Select the Allow remote connections to this computer check box.
c. Click Select Users, and in the Remote Desktop Users dialog box, click Add.
d. Select a group that contains all possible users, such as the Domain Users group, and click OK.
In a production environment, you would select the Active Directory group or groups that include the end users entitled to the desktop pool.
7. Configure the Windows Firewall service to restart after failures.
For instructions, see Configure the Windows Firewall Service to Restart After Failures in Setting Up Virtual Desktops in Horizon 7.
8. Go to the Services applet and verify that Remote Desktop Services are started in the guest.
Remote Desktop Services are required for Horizon Agent installation, SSO, and other operations.
9. Configure Windows Firewall to allow remote desktop connections to the VM.
10. Set the power option Turn off the display to Never, and do not specify a sleep timer, standby, hibernation, or any other power option that could make the desktop unreachable.
Important: For desktop deployment in a production environment, VMware recommends that you download and use the VMware OS Optimization Tool. This tool includes customizable templates to enable or disable many additional Windows system services and features according to VMware recommendations and best practices.
11. If your network environment has a proxy server, configure network proxy settings.
T E C H N I C A L W H I T E PA P E R | 1 4
REVIEWER’S GUIDE FOR VIEW IN VMWARE HORIZON 7: PREPARING VIRTUAL MACHINES FOR DESKTOP POOLS
Exercise B3: Installing Windows RDSH FeaturesAlthough the VM you created for the RDSH server has Windows Server 2012 R2 installed as the operating system, you must additionally install the RDS role, the RSDH service, and the Desktop Experience feature in order to create an RDSH image.
Log in to the RDSH server VM as an administrator and start the Server Manager tool. Use the Add Roles and Features wizard, and follow a role-based installation to install the following components:
• Server Role – From the Roles list, select Remote Desktop Services.
• Features – From the Features list, select User Interfaces and Infrastructure > Desktop Experience, and confirm that you want to add the applicable required role services, features, and management tools.
• Role Services – From the Role Services list, select Remote Desktop Session Host, and confirm that you want to add the applicable management tools.
Exercise B4: Installing Horizon AgentThe Horizon Agent enables Horizon 7 servers to communicate with and manage the RDSH servers you deploy. Horizon Agent also provides features such as connection monitoring, virtual printing, and access to local folders and locally connected USB devices.
Note: After installing Horizon Agent, you can also use the Horizon Migration Tool Fling to migrate published applications and desktop settings from Citrix XenApp to Horizon 7. Run from just a single XenApp server in each farm, the tool migrates the configuration required to publish each application and shared desktop into Horizon 7, along with the inventory of users and groups entitled to access them.
1. Log in as a local administrator to the guest operating system of the RDSH server VM.
2. Download the Horizon Agent installer file.
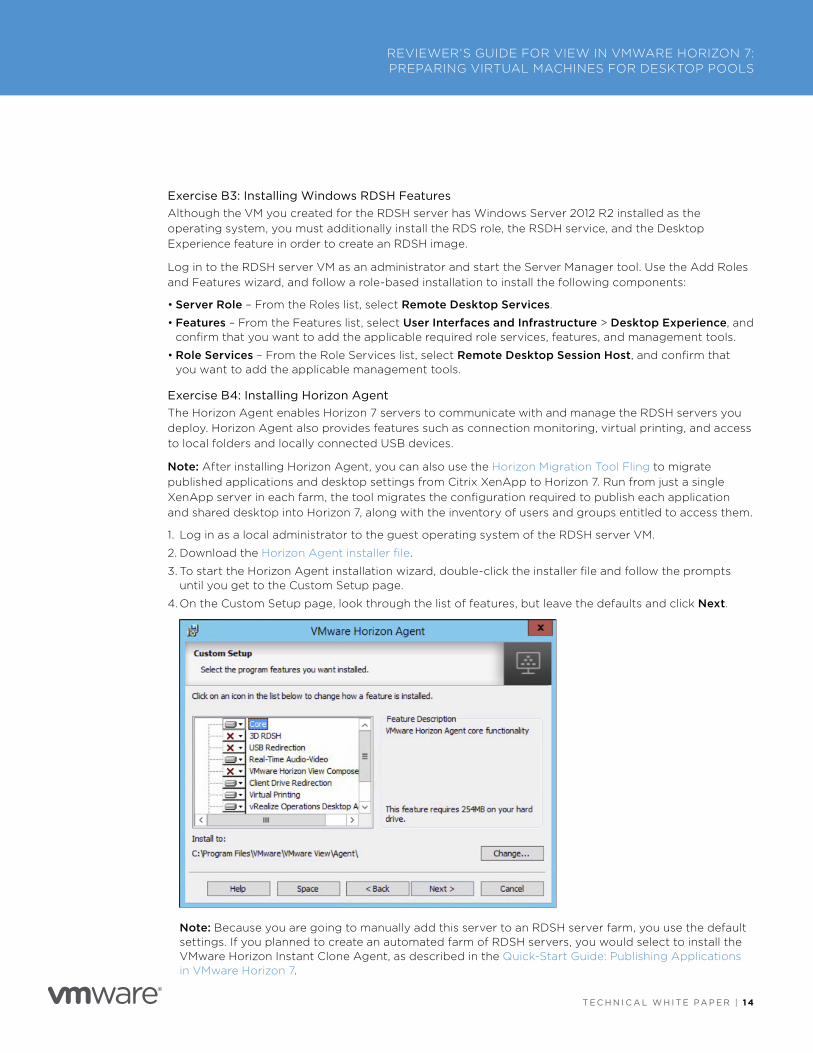
3. To start the Horizon Agent installation wizard, double-click the installer file and follow the prompts until you get to the Custom Setup page.
4. On the Custom Setup page, look through the list of features, but leave the defaults and click Next.
Note: Because you are going to manually add this server to an RDSH server farm, you use the default settings. If you planned to create an automated farm of RDSH servers, you would select to install the VMware Horizon Instant Clone Agent, as described in the Quick-Start Guide: Publishing Applications in VMware Horizon 7.

T E C H N I C A L W H I T E PA P E R | 1 5
REVIEWER’S GUIDE FOR VIEW IN VMWARE HORIZON 7: PREPARING VIRTUAL MACHINES FOR DESKTOP POOLS
5. Complete the Register with Horizon 7 Connection Server page, and click Next.
Your entries on this page are validated. The user account must belong to the Administrators group specified during installation of View Connection Server, as described in the Reviewer’s Guide for View in VMware Horizon 7: Installation and Configuration.
6. On the Ready to Install the Program page, click Install.7. After the installation is complete, click Finish and reboot as directed.
Exercise B5: (Optional) Installing User Environment Manager and App Volumes AgentsVMware User Environment Manager simplifies end-user profile management by offering personalization and dynamic policy configuration. With User Environment Manager, you can configure fine-grained policies for folder redirection, mapping the user’s home drive, configuring location-based printers, and application blocking—all based on user accounts.
You can use the Horizon 7 Smart Polices feature to enable or disable client features based on user device, location, and other defined conditions. Smart Policies are the subject of the Reviewer’s Guide for View in VMware Horizon 7: Smart Policies.
Installing and configuring User Environment Manager, including installing the FlexEngine agent on the RDSH server, is beyond the scope of this guide. For complete installation and configuration instructions, see the VMware User Environment Manager Administration Guide, and see the instructions in the Group Policies appendix and the Smart Policies appendix in the VMware Horizon 7 Enterprise Edition Reference Architecture.
VMware App Volumes allows you to deliver applications that are not installed in the RDSH server. Instead, applications are stored in read-only virtual disks that you attach to an individual RDSH server or to groups of RDSH servers, even when users are already logged in. Applications can also be provisioned, delivered, updated, and retired in real time. You can make those updates available immediately, or on the next login or reboot.
T E C H N I C A L W H I T E PA P E R | 1 6
REVIEWER’S GUIDE FOR VIEW IN VMWARE HORIZON 7: PREPARING VIRTUAL MACHINES FOR DESKTOP POOLS
With App Volumes, you capture and group applications into AppStacks based on the requirements of each use case. The AppStacks are then assigned to the machine account of the RDSH server so that AppStacks are mounted when the App Volumes service starts on the RDSH server.
Installing and configuring App Volumes, including installing the App Volumes Agent on the RDSH server, is beyond the scope of this guide but is the subject of the VMware App Volumes Reviewer’s Guide.
SummaryThe Reviewer’s Guide for View in VMware Horizon 7: Preparing Virtual Machines for Desktop Pools is one of a series of guides that explore the View component of VMware Horizon 7. This guide walked you through the process of creating master images for a desktop pool deployment. Use these master images as you complete the exercises in Reviewer’s Guide for View in VMware Horizon 7: Desktop Pools and Instant Clones. For an overview of View in Horizon 7, and for additional exercises to explore View features such as instant clones, smart policies, and more, see All Guides.
All GuidesYou can explore many key features and capabilities in the Reviewer’s Guide series for View in VMware Horizon 7:
• Overview
• Installation and Configuration
• Preparing Virtual Machines for Desktop Pools
• Instant Clones
• Desktop Pools
• Publishing Applications with VMware Horizon 7
• Smart Policies
• Provisioning Users
Note: For information about features that are not covered in this series of guides, see VMware Horizon 7 Documentation.
T E C H N I C A L W H I T E PA P E R | 1 7
REVIEWER’S GUIDE FOR VIEW IN VMWARE HORIZON 7: PREPARING VIRTUAL MACHINES FOR DESKTOP POOLS
Appendix: Terminology Used in This GuideThe following terms are used in this guide.
Instant clone A rapidly generated and nonpersistent clone of a powered-on virtual machine. An instant clone provides users with a virtual desktop in seconds.
Linked clone A copy of a master virtual machine that shares virtual disks with it by using a snapshot. This conserves disk space and ensures all users receive the same software installation.
Master virtual machine (VM) A single desktop source that is used to deploy a group of virtual desktops or virtual machines. A master virtual machine is sometimes referred to as a master image, desktop image or golden image. In a physical environment, a master virtual machine can be referred to as a disk image file.
Snapshot A set of files that contain the entire state of a virtual machine—its data, memory, and configuration. If you revert to a snapshot, the current state of the virtual machine is lost, and its saved state is restored. Multiple snapshots are differential, and have a parent and child relationship. The files of a child snapshot contain only changes made to its parent snapshot.
Virtual desktop The user interface of a virtual machine that is made available to an end user.
Virtual machine A software-based computer, running an operating system or application environment, that is located in the data center and backed by the resources of a physical computer.
For more information about terms, see the VMware Technical Publications Glossary.
T E C H N I C A L W H I T E PA P E R | 1 8
REVIEWER’S GUIDE FOR VIEW IN VMWARE HORIZON 7: PREPARING VIRTUAL MACHINES FOR DESKTOP POOLS
Additional ResourcesFor more information about the View component of VMware Horizon 7, you can explore the following resources:
• VMware Horizon 7 Hands-On Lab
• VMware Horizon 7 (which includes the View component)
• VMware Horizon 7 Documentation
• VMware Horizon Pricing, Packaging, and Licensing
• VMware Knowledge Base
• VMware Product Evaluation
• VMware Product Guide
• VMware Product Interoperability Matrixes
• What’s New with VMware Horizon 7 (VMware blog post)
• White papers
• Self-help resources
• VMware vSphere and VMware vCenter Server resources
– Product overview
– Product documentation
– White papers and other resources
• VMware consultation and support
– VMware Horizon Support Center
– VMware Consulting Professional Services Organization
About the Authors and ContributorThe Reviewer’s Guide for View in VMware Horizon 7: Preparing Virtual Machines for Desktop Pools was written by Caroline Arakelian, Senior Technical Marketing Manager, and Graeme Gordon, Senior End-User-Computing Architect, End-User-Computing Technical Marketing, VMware.
The Reviewer’s Guide for View was originally written by Marilyn Basanta, Group Manager, End-User-Computing Solution Engineering, VMware.
To comment on this paper, contact VMware End-User-Computing Technical Marketing at [email protected].

VMware, Inc. 3401 Hillview Avenue Palo Alto CA 94304 USA Tel 877-486-9273 Fax 650-427-5001 www .vmware .comCopyright © 2017 VMware, Inc. All rights reserved. This product is protected by U.S. and international copyright and intellectual property laws. VMware products are covered by one or more patents listed at http://www.vmware.com/go/patents. VMware is a registered trademark or trademark of VMware, Inc. in the United States and/or other jurisdictions. All other marks and names mentioned herein may be trademarks of their respective companies. Item No: 5133-VMW-WP-HORIZON72-PREPAIRING-VMS-DESKTOP-POOLS-USLET-20170809 8/17