Embed Size (px)
Citation preview
October 2015 1
Reviewer Guide
Reviewer Guide
You just received your login information to Everlaw... now what?
Watch or attend a training session! You can watch our training video, which walks you through
the core functionalities of the platform at your own pace. If you’d prefer a live training session,
schedule one! We have open training sessions on the first Friday of every month at 10 am PDT, 1 pm
EDT. Just navigate to https://join.me/everlawdemo, then connect using the call information. If that
time is not convenient, email us at [email protected] and we can set up a session for your case.
Use help: If you are confused about a particular feature, do not hesitate to use the help! Click on
the question mark icon in the upper-right hand corner of the screen to access help.
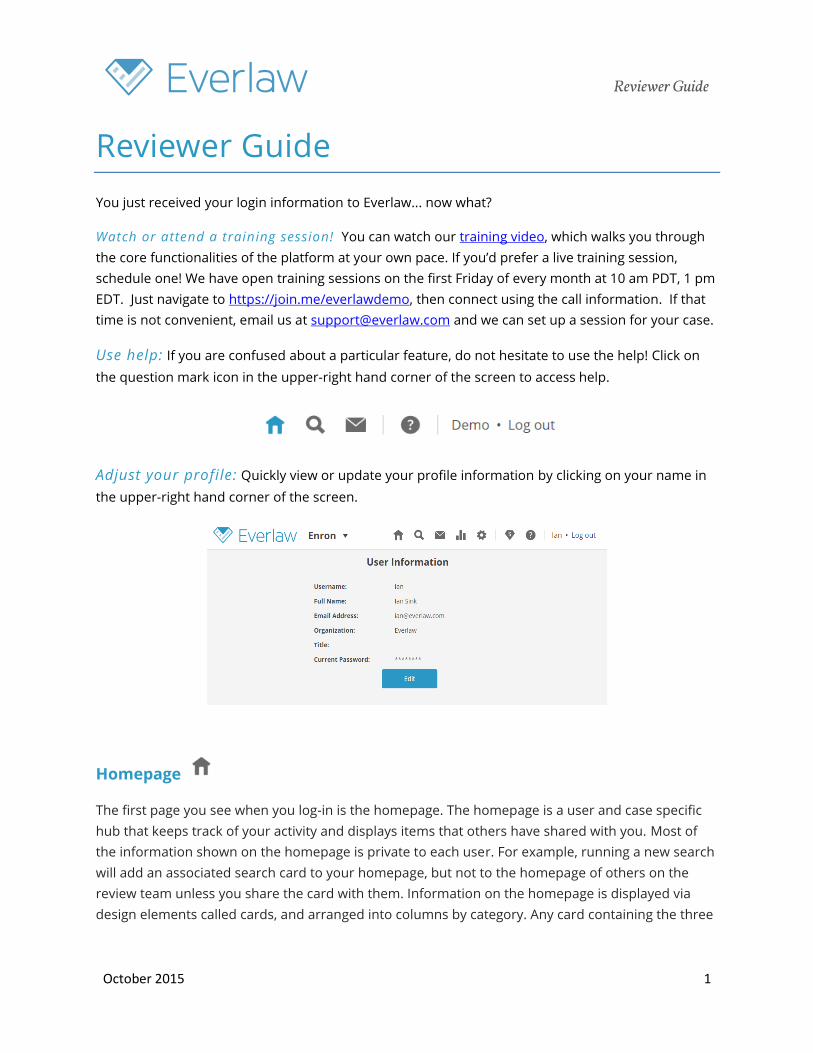
Adjust your profile: Quickly view or update your profile information by clicking on your name in
the upper-right hand corner of the screen.
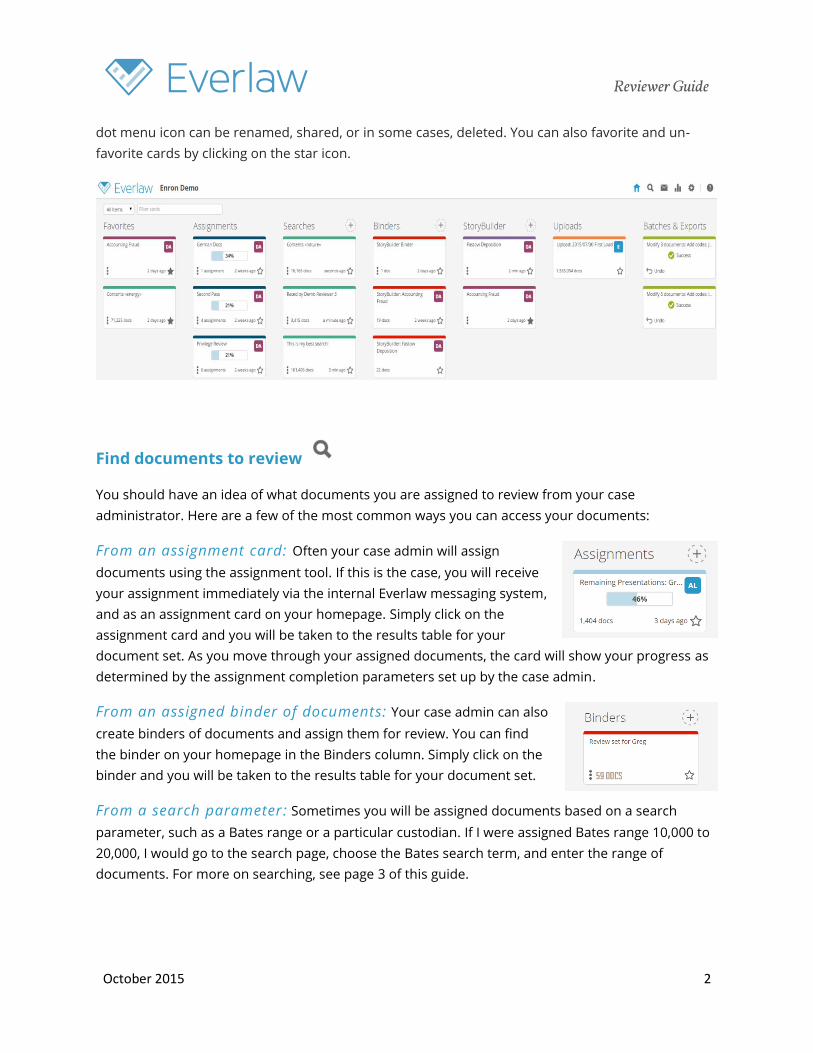
Homepage
The first page you see when you log-in is the homepage. The homepage is a user and case specific
hub that keeps track of your activity and displays items that others have shared with you. Most of
the information shown on the homepage is private to each user. For example, running a new search
will add an associated search card to your homepage, but not to the homepage of others on the
review team unless you share the card with them. Information on the homepage is displayed via
design elements called cards, and arranged into columns by category. Any card containing the three
October 2015 2
Reviewer Guide
dot menu icon can be renamed, shared, or in some cases, deleted. You can also favorite and un-
favorite cards by clicking on the star icon.
Find documents to review
You should have an idea of what documents you are assigned to review from your case
administrator. Here are a few of the most common ways you can access your documents:
From an assignment card: Often your case admin will assign
documents using the assignment tool. If this is the case, you will receive
your assignment immediately via the internal Everlaw messaging system,
and as an assignment card on your homepage. Simply click on the
assignment card and you will be taken to the results table for your
document set. As you move through your assigned documents, the card will show your progress as
determined by the assignment completion parameters set up by the case admin.
From an assigned binder of documents: Your case admin can also
create binders of documents and assign them for review. You can find
the binder on your homepage in the Binders column. Simply click on the
binder and you will be taken to the results table for your document set.
From a search parameter: Sometimes you will be assigned documents based on a search
parameter, such as a Bates range or a particular custodian. If I were assigned Bates range 10,000 to
20,000, I would go to the search page, choose the Bates search term, and enter the range of
documents. For more on searching, see page 3 of this guide.
October 2015 3
Reviewer Guide
Other Homepage Elements
Binders: Binders are simply buckets of documents that allow you to easily share, categorize, and
access sets of documents. They are used to organize documents for a particular purpose either
inside or outside of the Everlaw platform. For example, you can create a binder for documents to
return to in the future. This way if you cannot finish reviewing a document – say you have a question
for your admin or our support – you will be able to find that document again quickly. You can also
create a binder of documents to export as a PDF so that you can print hard copies. Each binder will
be grouped into the Binders column on the homepage.
Uploads: You can see the various collections of documents that have been uploaded to your case
from the homepage. Each upload will be grouped into the Uploads column.
Batches & Exports: You can see all batch actions taken on documents and what documents have
been exported from your case from the homepage. Each batch action and export will be grouped
into the Batches & Exports column.
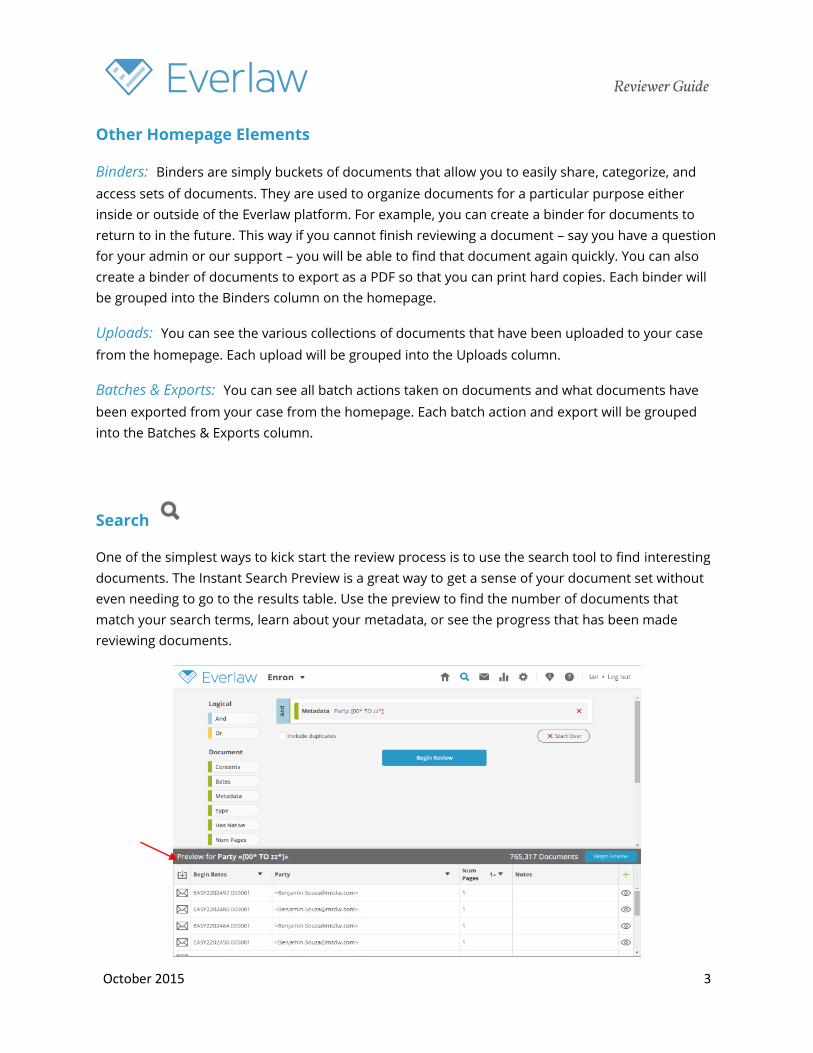
Search
One of the simplest ways to kick start the review process is to use the search tool to find interesting
documents. The Instant Search Preview is a great way to get a sense of your document set without
even needing to go to the results table. Use the preview to find the number of documents that
match your search terms, learn about your metadata, or see the progress that has been made
reviewing documents.
October 2015 4
Reviewer Guide
Examples
Let's take a look at few examples of search in action. First, say I am working on a case for the EPA
and I want to find all the documents that discuss "Environmental Damage". I can run my search of
that phrase, but there might be many documents that discuss the concept but don't contain exactly
that phrase. To find these documents, I can use wildcard and proximity searches. A wildcard is
replaced by any string of characters; for example, “damag*” would find documents with "damage",
"damages", or "damaging" in the contents. I can also use wildcards within a phrase search to find
additional documents. By updating my phrase search to "Environment* Damag*" I will find
documents matching other stems of the same words, such as "Environmentally Damaging". If I want
to expand my search even further, I can use proximity searches to find documents that have both
words in close proximity. For example, "Environment* Damag*"~20 would find documents with both
words (stems included) within 20 words of each other in either order.
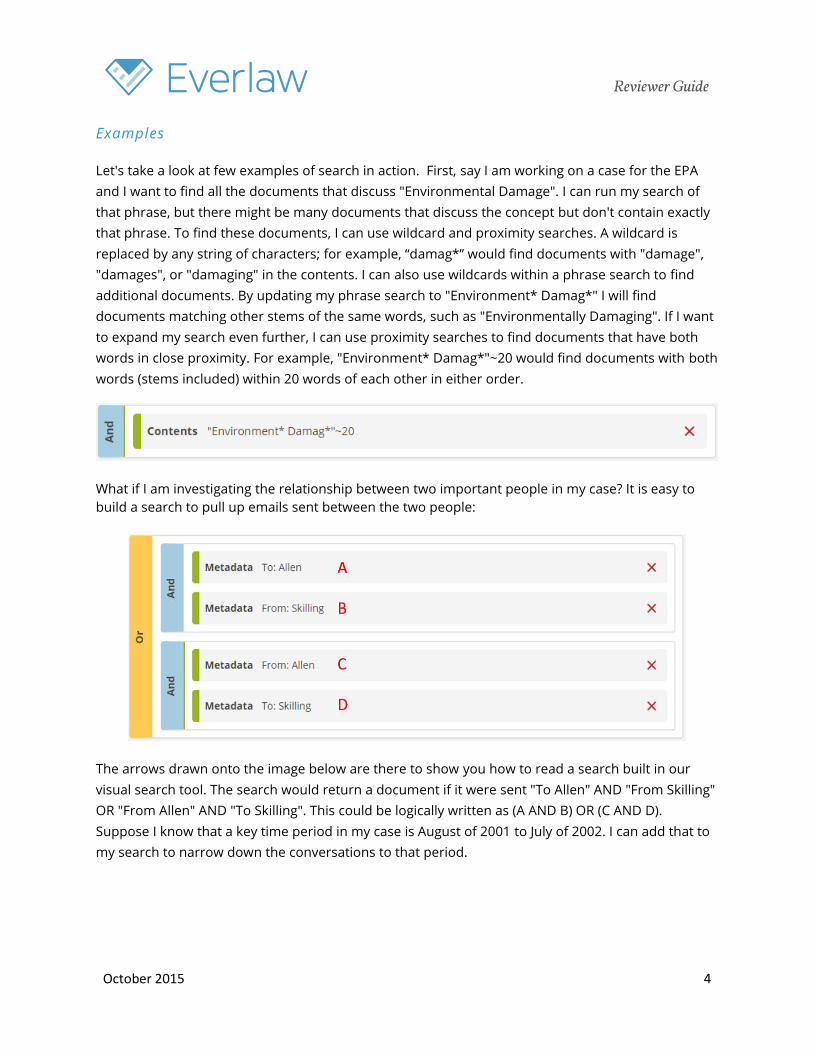
What if I am investigating the relationship between two important people in my case? It is easy to
build a search to pull up emails sent between the two people:
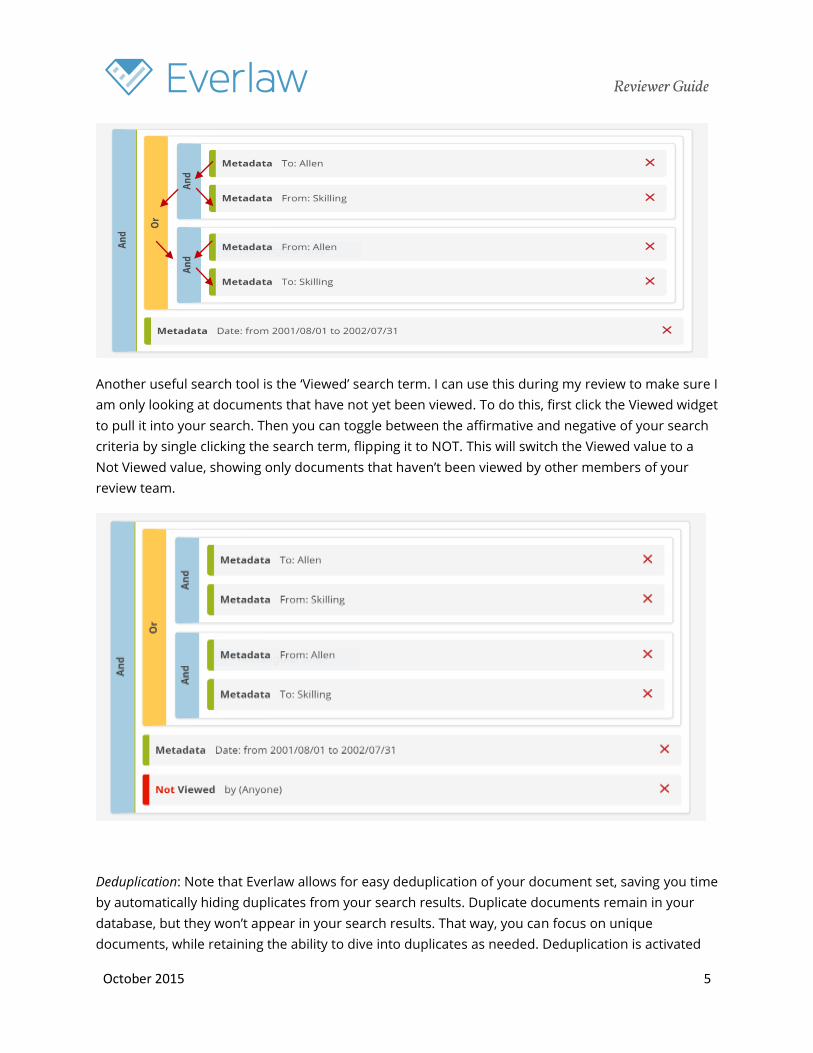
The arrows drawn onto the image below are there to show you how to read a search built in our
visual search tool. The search would return a document if it were sent "To Allen" AND "From Skilling"
OR "From Allen" AND "To Skilling". This could be logically written as (A AND B) OR (C AND D).
Suppose I know that a key time period in my case is August of 2001 to July of 2002. I can add that to
my search to narrow down the conversations to that period.
October 2015 5
Reviewer Guide
Another useful search tool is the ‘Viewed’ search term. I can use this during my review to make sure I
am only looking at documents that have not yet been viewed. To do this, first click the Viewed widget
to pull it into your search. Then you can toggle between the affirmative and negative of your search
criteria by single clicking the search term, flipping it to NOT. This will switch the Viewed value to a
Not Viewed value, showing only documents that haven’t been viewed by other members of your
review team.
Deduplication: Note that Everlaw allows for easy deduplication of your document set, saving you time
by automatically hiding duplicates from your search results. Duplicate documents remain in your
database, but they won’t appear in your search results. That way, you can focus on unique
documents, while retaining the ability to dive into duplicates as needed. Deduplication is activated
October 2015 6
Reviewer Guide
by default, but you can include duplicates in your search results by simply clicking the “include
duplicates” check box.
Review documents
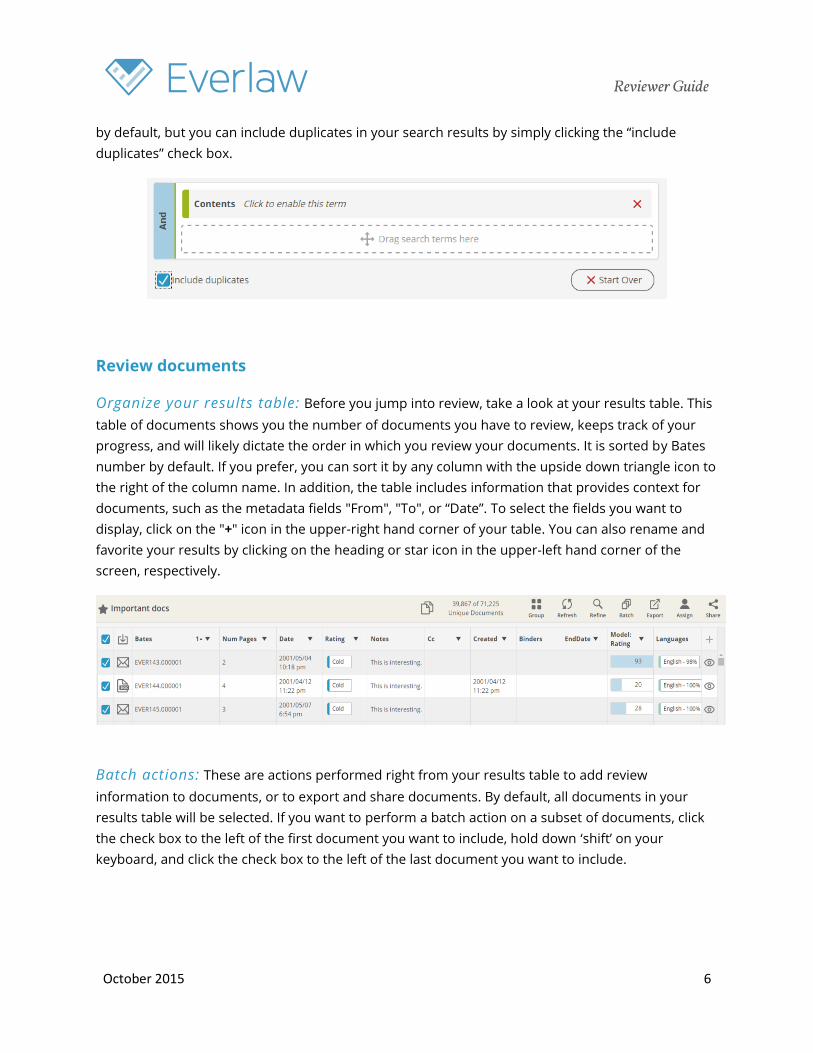
Organize your results table: Before you jump into review, take a look at your results table. This
table of documents shows you the number of documents you have to review, keeps track of your
progress, and will likely dictate the order in which you review your documents. It is sorted by Bates
number by default. If you prefer, you can sort it by any column with the upside down triangle icon to
the right of the column name. In addition, the table includes information that provides context for
documents, such as the metadata fields "From", "To", or “Date”. To select the fields you want to
display, click on the "+" icon in the upper-right hand corner of your table. You can also rename and
favorite your results by clicking on the heading or star icon in the upper-left hand corner of the
screen, respectively.
Batch actions: These are actions performed right from your results table to add review
information to documents, or to export and share documents. By default, all documents in your
results table will be selected. If you want to perform a batch action on a subset of documents, click
the check box to the left of the first document you want to include, hold down ‘shift’ on your
keyboard, and click the check box to the left of the last document you want to include.
October 2015 7
Reviewer Guide
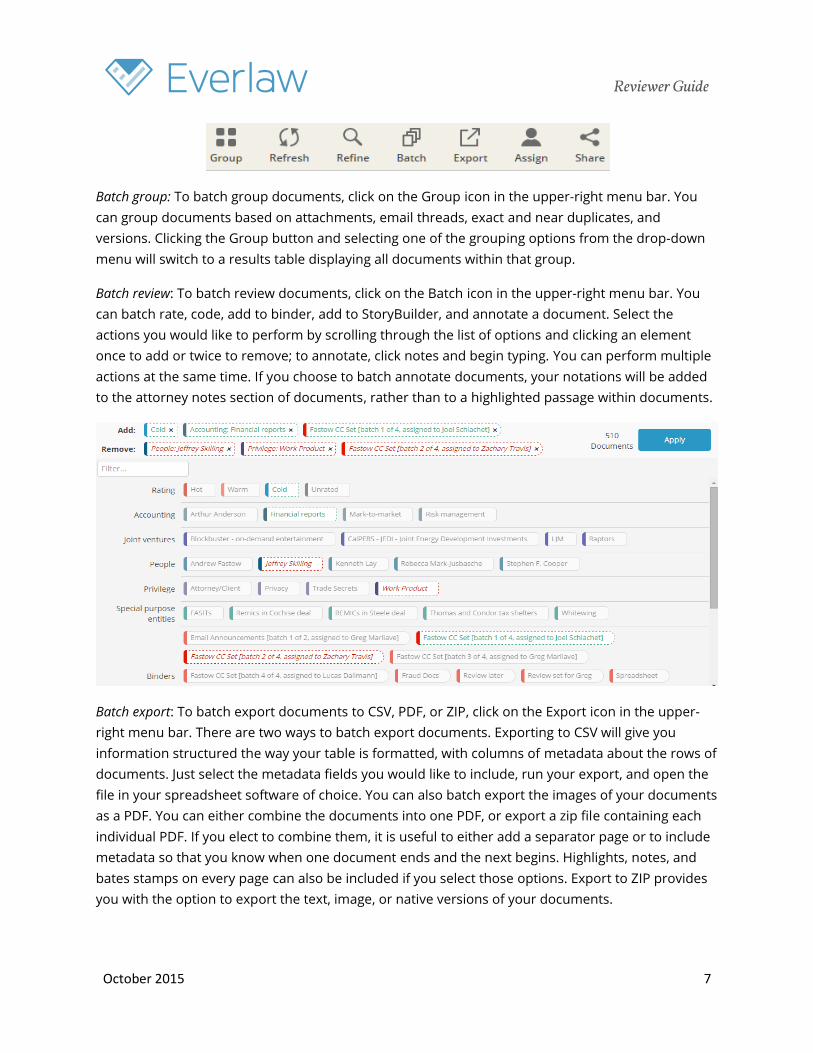
Batch group: To batch group documents, click on the Group icon in the upper-right menu bar. You
can group documents based on attachments, email threads, exact and near duplicates, and
versions. Clicking the Group button and selecting one of the grouping options from the drop-down
menu will switch to a results table displaying all documents within that group.
Batch review: To batch review documents, click on the Batch icon in the upper-right menu bar. You
can batch rate, code, add to binder, add to StoryBuilder, and annotate a document. Select the
actions you would like to perform by scrolling through the list of options and clicking an element
once to add or twice to remove; to annotate, click notes and begin typing. You can perform multiple
actions at the same time. If you choose to batch annotate documents, your notations will be added
to the attorney notes section of documents, rather than to a highlighted passage within documents.
Batch export: To batch export documents to CSV, PDF, or ZIP, click on the Export icon in the upper-
right menu bar. There are two ways to batch export documents. Exporting to CSV will give you
information structured the way your table is formatted, with columns of metadata about the rows of
documents. Just select the metadata fields you would like to include, run your export, and open the
file in your spreadsheet software of choice. You can also batch export the images of your documents
as a PDF. You can either combine the documents into one PDF, or export a zip file containing each
individual PDF. If you elect to combine them, it is useful to either add a separator page or to include
metadata so that you know when one document ends and the next begins. Highlights, notes, and
bates stamps on every page can also be included if you select those options. Export to ZIP provides
you with the option to export the text, image, or native versions of your documents.
October 2015 8
Reviewer Guide
Batch share: To batch share documents, click on the Share icon in the upper-right menu bar. Simply
select the users you would like to share with, attach a message, and click send. For more on Share,
see page 15 of this guide.
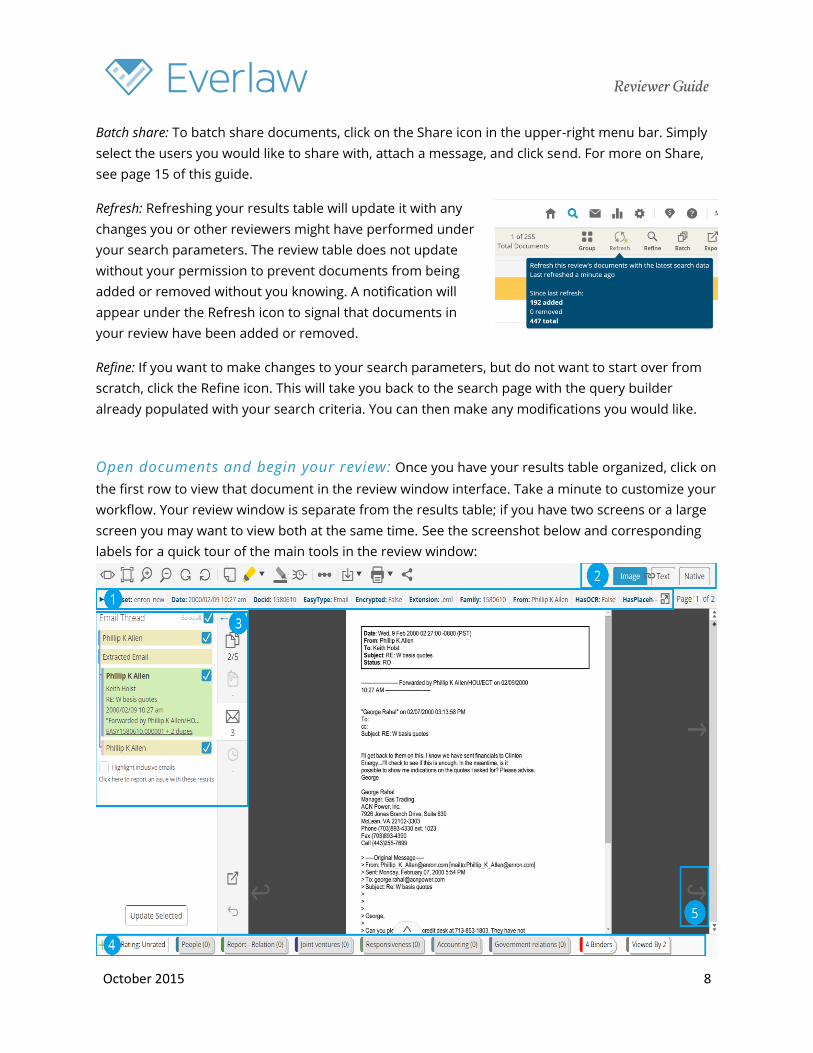
Refresh: Refreshing your results table will update it with any
changes you or other reviewers might have performed under
your search parameters. The review table does not update
without your permission to prevent documents from being
added or removed without you knowing. A notification will
appear under the Refresh icon to signal that documents in
your review have been added or removed.
Refine: If you want to make changes to your search parameters, but do not want to start over from
scratch, click the Refine icon. This will take you back to the search page with the query builder
already populated with your search criteria. You can then make any modifications you would like.
Open documents and begin your review: Once you have your results table organized, click on
the first row to view that document in the review window interface. Take a minute to customize your
workflow. Your review window is separate from the results table; if you have two screens or a large
screen you may want to view both at the same time. See the screenshot below and corresponding
labels for a quick tour of the main tools in the review window:
October 2015 9
Reviewer Guide
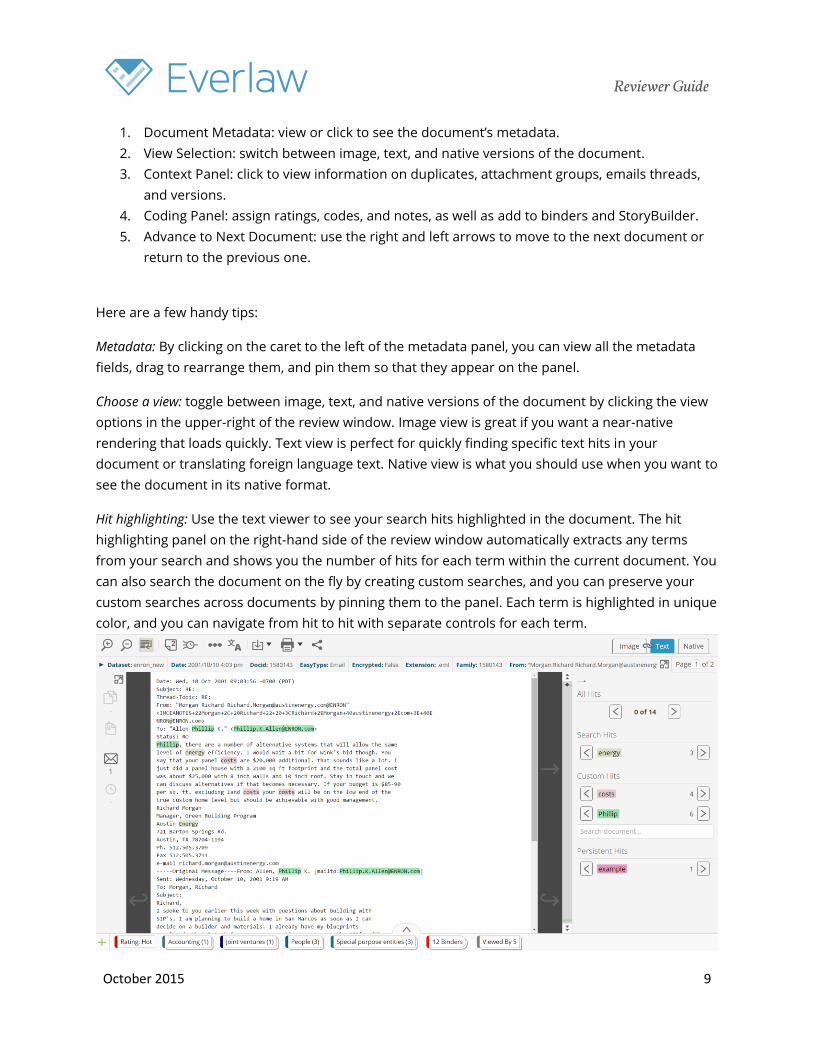
1. Document Metadata: view or click to see the document’s metadata.
2. View Selection: switch between image, text, and native versions of the document.
3. Context Panel: click to view information on duplicates, attachment groups, emails threads,
and versions.
4. Coding Panel: assign ratings, codes, and notes, as well as add to binders and StoryBuilder.
5. Advance to Next Document: use the right and left arrows to move to the next document or
return to the previous one.
Here are a few handy tips:
Metadata: By clicking on the caret to the left of the metadata panel, you can view all the metadata
fields, drag to rearrange them, and pin them so that they appear on the panel.
Choose a view: toggle between image, text, and native versions of the document by clicking the view
options in the upper-right of the review window. Image view is great if you want a near-native
rendering that loads quickly. Text view is perfect for quickly finding specific text hits in your
document or translating foreign language text. Native view is what you should use when you want to
see the document in its native format.
Hit highlighting: Use the text viewer to see your search hits highlighted in the document. The hit
highlighting panel on the right-hand side of the review window automatically extracts any terms
from your search and shows you the number of hits for each term within the current document. You
can also search the document on the fly by creating custom searches, and you can preserve your
custom searches across documents by pinning them to the panel. Each term is highlighted in unique
color, and you can navigate from hit to hit with separate controls for each term.
October 2015 10
Reviewer Guide
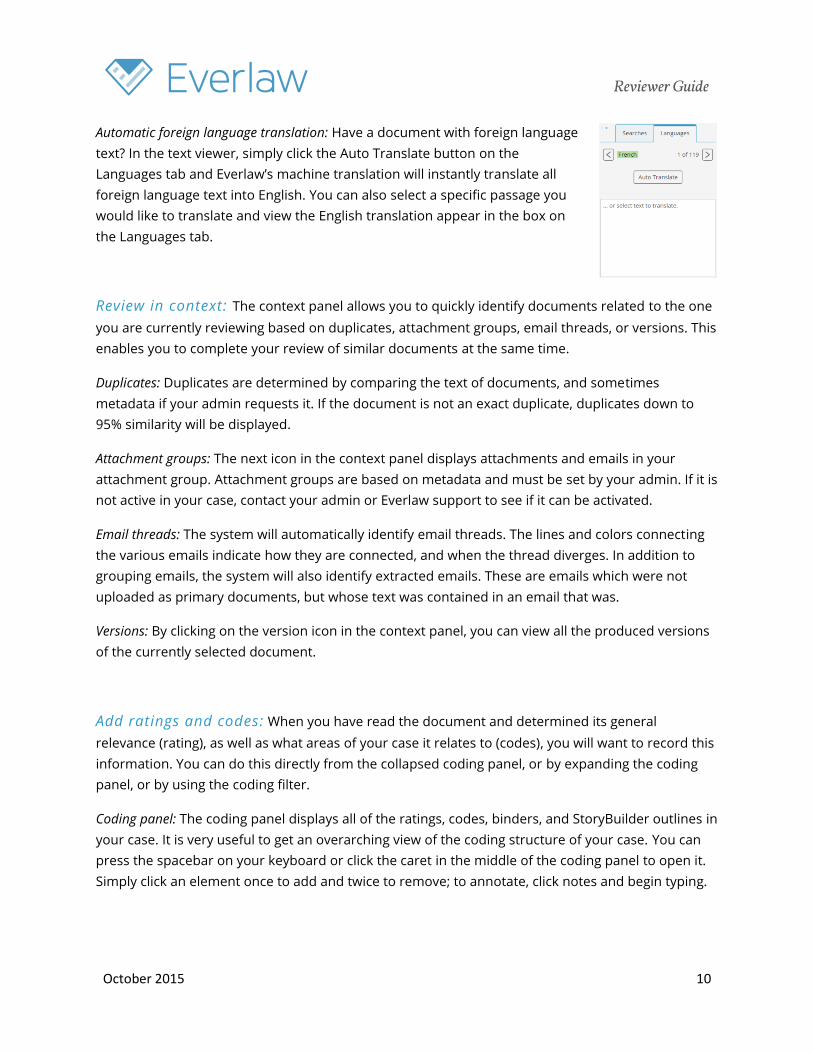
Automatic foreign language translation: Have a document with foreign language
text? In the text viewer, simply click the Auto Translate button on the
Languages tab and Everlaw’s machine translation will instantly translate all
foreign language text into English. You can also select a specific passage you
would like to translate and view the English translation appear in the box on
the Languages tab.
Review in context: The context panel allows you to quickly identify documents related to the one
you are currently reviewing based on duplicates, attachment groups, email threads, or versions. This
enables you to complete your review of similar documents at the same time.
Duplicates: Duplicates are determined by comparing the text of documents, and sometimes
metadata if your admin requests it. If the document is not an exact duplicate, duplicates down to
95% similarity will be displayed.
Attachment groups: The next icon in the context panel displays attachments and emails in your
attachment group. Attachment groups are based on metadata and must be set by your admin. If it is
not active in your case, contact your admin or Everlaw support to see if it can be activated.
Email threads: The system will automatically identify email threads. The lines and colors connecting
the various emails indicate how they are connected, and when the thread diverges. In addition to
grouping emails, the system will also identify extracted emails. These are emails which were not
uploaded as primary documents, but whose text was contained in an email that was.
Versions: By clicking on the version icon in the context panel, you can view all the produced versions
of the currently selected document.
Add ratings and codes: When you have read the document and determined its general
relevance (rating), as well as what areas of your case it relates to (codes), you will want to record this
information. You can do this directly from the collapsed coding panel, or by expanding the coding
panel, or by using the coding filter.
Coding panel: The coding panel displays all of the ratings, codes, binders, and StoryBuilder outlines in
your case. It is very useful to get an overarching view of the coding structure of your case. You can
press the spacebar on your keyboard or click the caret in the middle of the coding panel to open it.
Simply click an element once to add and twice to remove; to annotate, click notes and begin typing.
October 2015 11
Reviewer Guide
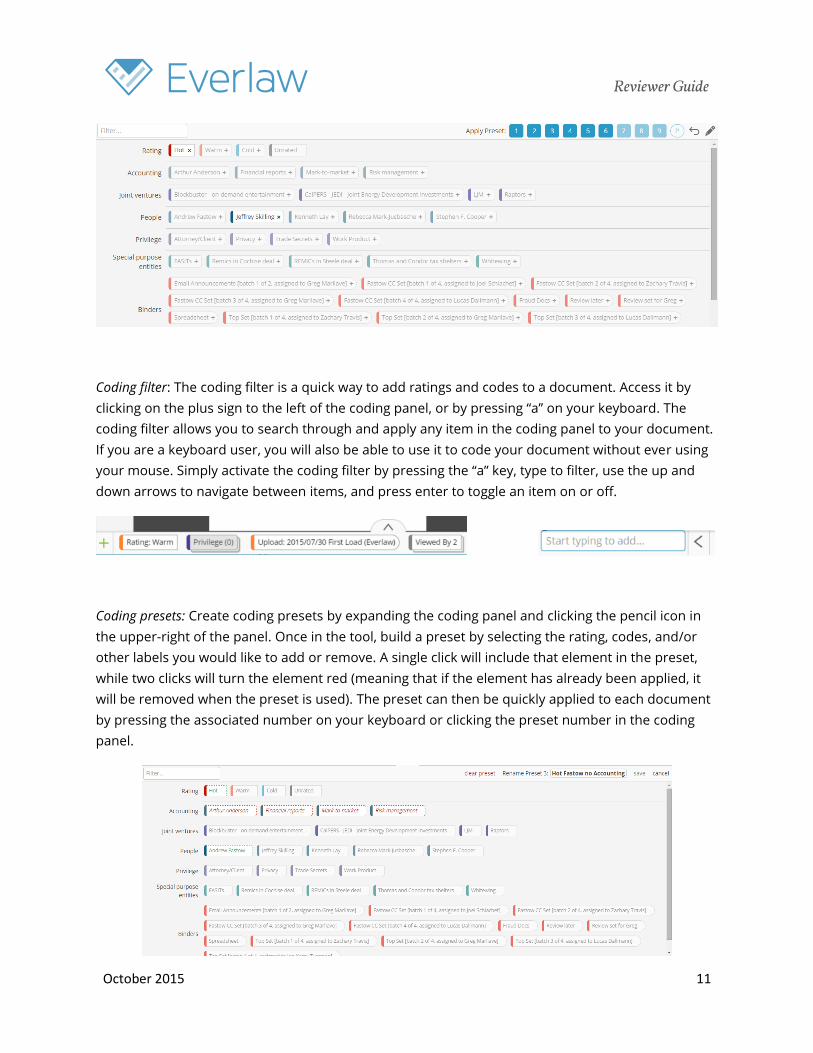
Coding filter: The coding filter is a quick way to add ratings and codes to a document. Access it by
clicking on the plus sign to the left of the coding panel, or by pressing “a” on your keyboard. The
coding filter allows you to search through and apply any item in the coding panel to your document.
If you are a keyboard user, you will also be able to use it to code your document without ever using
your mouse. Simply activate the coding filter by pressing the “a” key, type to filter, use the up and
down arrows to navigate between items, and press enter to toggle an item on or off.
Coding presets: Create coding presets by expanding the coding panel and clicking the pencil icon in
the upper-right of the panel. Once in the tool, build a preset by selecting the rating, codes, and/or
other labels you would like to add or remove. A single click will include that element in the preset,
while two clicks will turn the element red (meaning that if the element has already been applied, it
will be removed when the preset is used). The preset can then be quickly applied to each document
by pressing the associated number on your keyboard or clicking the preset number in the coding
panel.
October 2015 12
Reviewer Guide
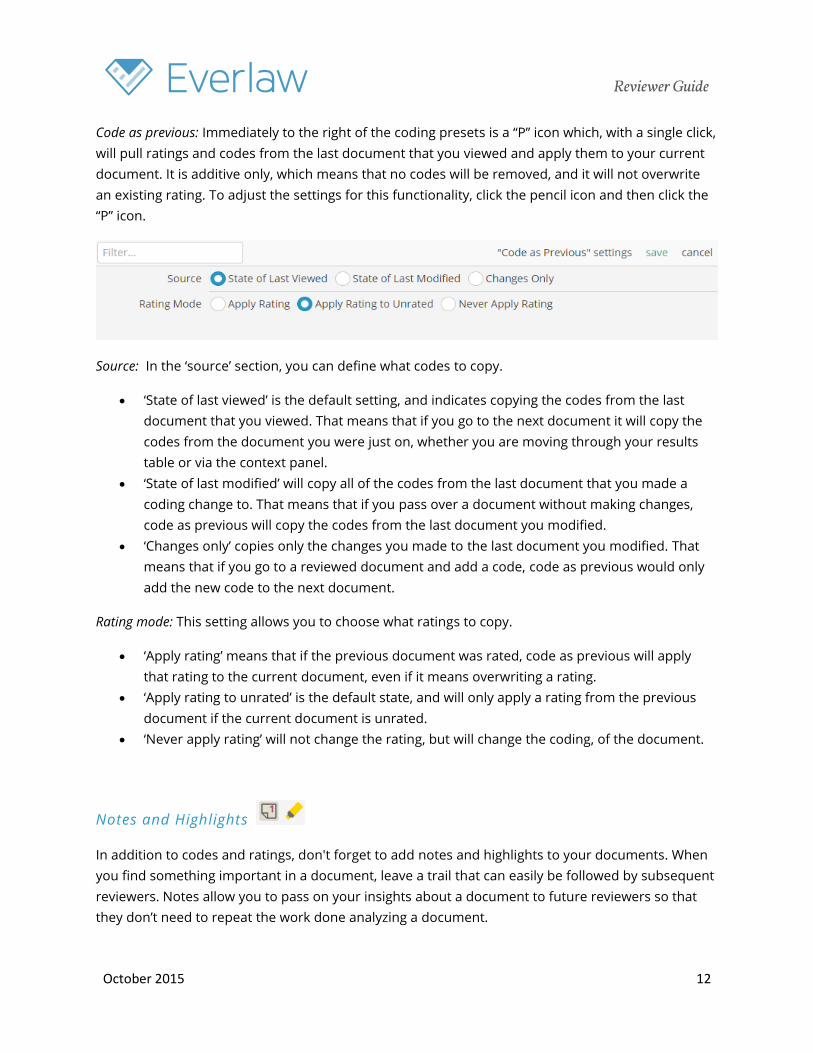
Code as previous: Immediately to the right of the coding presets is a “P” icon which, with a single click,
will pull ratings and codes from the last document that you viewed and apply them to your current
document. It is additive only, which means that no codes will be removed, and it will not overwrite
an existing rating. To adjust the settings for this functionality, click the pencil icon and then click the
“P” icon.
Source: In the ‘source’ section, you can define what codes to copy.
‘State of last viewed’ is the default setting, and indicates copying the codes from the last
document that you viewed. That means that if you go to the next document it will copy the
codes from the document you were just on, whether you are moving through your results
table or via the context panel.
‘State of last modified’ will copy all of the codes from the last document that you made a
coding change to. That means that if you pass over a document without making changes,
code as previous will copy the codes from the last document you modified.
‘Changes only’ copies only the changes you made to the last document you modified. That
means that if you go to a reviewed document and add a code, code as previous would only
add the new code to the next document.
Rating mode: This setting allows you to choose what ratings to copy.
‘Apply rating’ means that if the previous document was rated, code as previous will apply
that rating to the current document, even if it means overwriting a rating.
‘Apply rating to unrated’ is the default state, and will only apply a rating from the previous
document if the current document is unrated.
‘Never apply rating’ will not change the rating, but will change the coding, of the document.
Notes and Highlights
In addition to codes and ratings, don't forget to add notes and highlights to your documents. When
you find something important in a document, leave a trail that can easily be followed by subsequent
reviewers. Notes allow you to pass on your insights about a document to future reviewers so that
they don’t need to repeat the work done analyzing a document.

October 2015 13
Reviewer Guide
Notes are used to make free-form comments about the significance and context of a document or
passages within a document. Attorney notes are applied to the document as a whole, while sticky
notes added to highlights can be used to comment on passages within a document. Make use of the
highlighter, especially for long documents. It will allow the next reviewer to jump directly to
important passages in the document and view any associated notes. In addition, notes can be
searched for by content, author, or date.
Redactions
To apply a redaction to a document, click the redaction marker tool or the text selection tool in the
toolbar above the document. If you select the redaction marker tool, place the cursor anywhere on
the document and hold while dragging the mouse. A gray-colored box will appear over the selected
text. Next, code the document with the appropriate production code to indicate that a redaction has
been made.
If you select the text selection tool, click and drag to select the text
you want to redact. A pop-up panel will appear with three options:
(1) redact the currently highlighted text, (2) redact all appearances
of the highlighted text within the document, or (3) add the
October 2015 14
Reviewer Guide
highlighted text as a custom hit. Redactions allow the next reviewer to jump directly to redacted
passages in the document and view any associated notes. In addition, documents can be searched
for as containing or not containing redactions.
In order to use the redaction functionality, it must be activated in your case. If it is not active, contact
your admin or Everlaw support to see if it can be activated.
Keyboard shortcuts
Shortcuts are your friend. For example, you can page through a document (right and left arrows),
move to the next or previous document (up and down arrows), expand or collapse the coding panel
(spacebar), activate the coding filter (a), toggle your highlighter (h) – and more, all without using your
mouse. And, if you haven’t yet committed them to memory, you can bring up a list of keyboard
shortcuts by pressing the “?” key in the Document Preview, Search Results, Document Review, and
StoryBuilder windows (see the Appendix for a complete list of shortcuts).
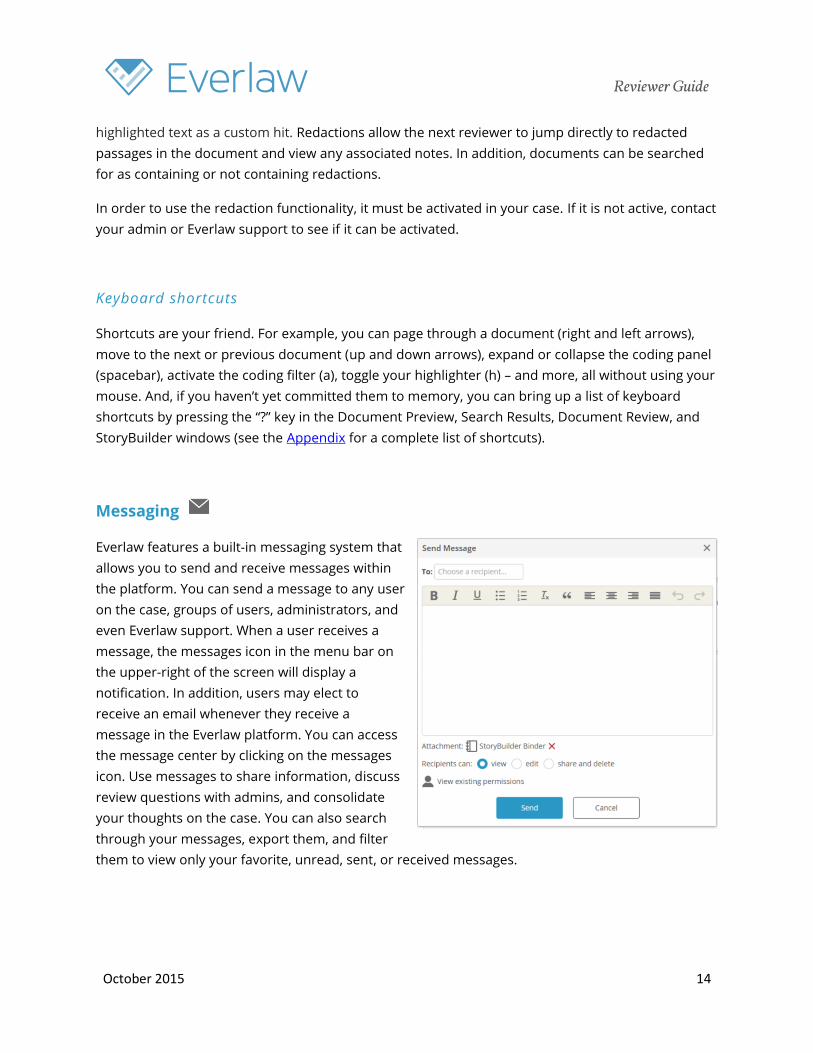
Messaging
Everlaw features a built-in messaging system that
allows you to send and receive messages within
the platform. You can send a message to any user
on the case, groups of users, administrators, and
even Everlaw support. When a user receives a
message, the messages icon in the menu bar on
the upper-right of the screen will display a
notification. In addition, users may elect to
receive an email whenever they receive a
message in the Everlaw platform. You can access
the message center by clicking on the messages
icon. Use messages to share information, discuss
review questions with admins, and consolidate
your thoughts on the case. You can also search
through your messages, export them, and filter
them to view only your favorite, unread, sent, or received messages.
October 2015 15
Reviewer Guide
Sharing
In Everlaw, it is easy to share searches, individual documents, binders, and StoryBuilder outlines.
Simply click on the share icon on the results table to share a search, on the review window to share
a document, or from the menu icon on cards on the homepage to share binders, outlines, and
searches. You can share with any user on the case, groups of users, administrators, and Everlaw
support if you have a support question. You can also write a message to send along with the item
you are sharing. When you share an item with other users, they will receive a message with the item
attached to it.
Note that, if you are sharing a binder or outline, you have three levels of access to grant to the
recipient:
View: Allows the recipient to view the item.
Edit: Allows the recipient to view, add, or remove the item.
Share and delete: Allows all of the above, as well as the ability to share the item with other
users or delete it entirely.
StoryBuilder
StoryBuilder, Everlaw’s post-review toolkit, allows review teams to seamlessly move between their
review and post-review workflows. Two tools comprise StoryBuilder: Chronology and Outline. Take a
look at the Post-Review Guide for more information on StoryBuilder.
Security
We take security seriously, and we know you do too. You can keep your username and password
protected by not sharing them with anyone.
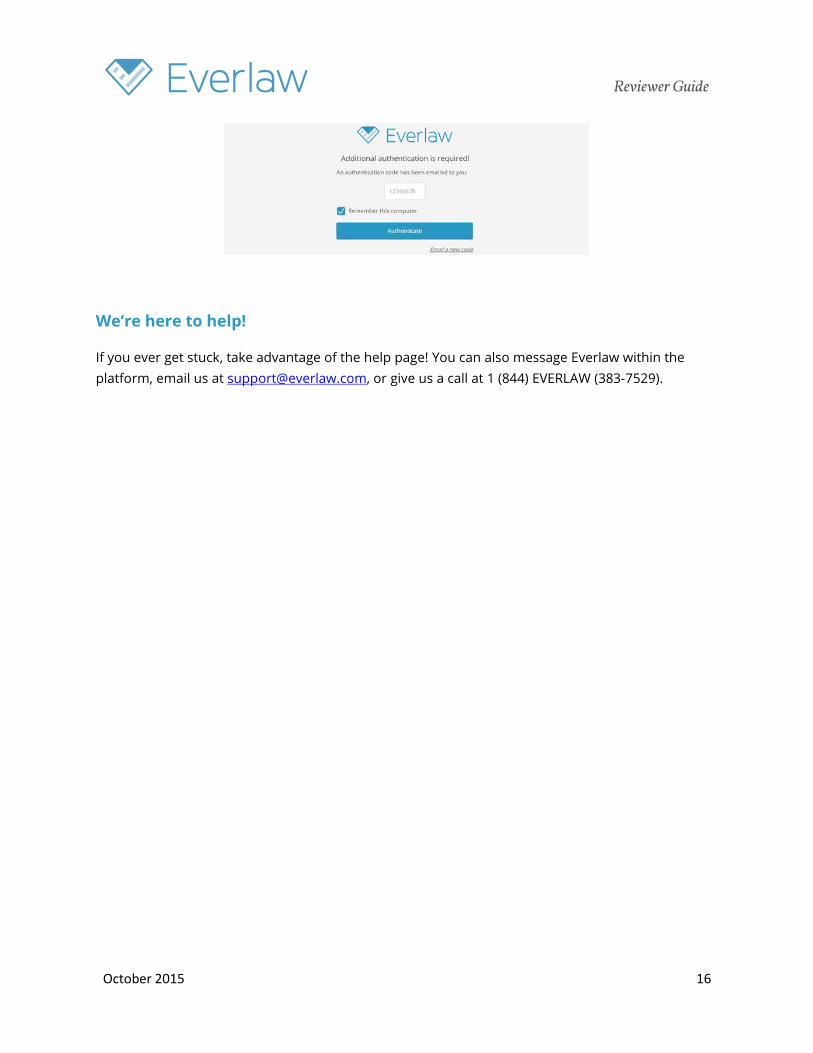
Two-Factor Authentication
If your admin activates two-factor authentication (TFA) for the case, you will be required to
authenticate every computer or device through which you access Everlaw by providing both, your
password (factor one) and another piece of information (factor two). This could either be a one-time
code delivered to your email address or a rolling code from the linked Google Authenticator app on
your mobile device. If you select the “remember this computer” option when logging in, Everlaw will
remember your computer or device for thirty days, during which you can bypass the TFA process.
October 2015 16
Reviewer Guide
We’re here to help!
If you ever get stuck, take advantage of the help page! You can also message Everlaw within the
platform, email us at [email protected], or give us a call at 1 (844) EVERLAW (383-7529).
October 2015 17
Reviewer Guide
Appendix: Keyboard Shortcuts
Keyboard shortcut guides are accessible by pressing the “?” key on your keyboard within the
Document Preview, Search Results, Document Review, and StoryBuilder windows.
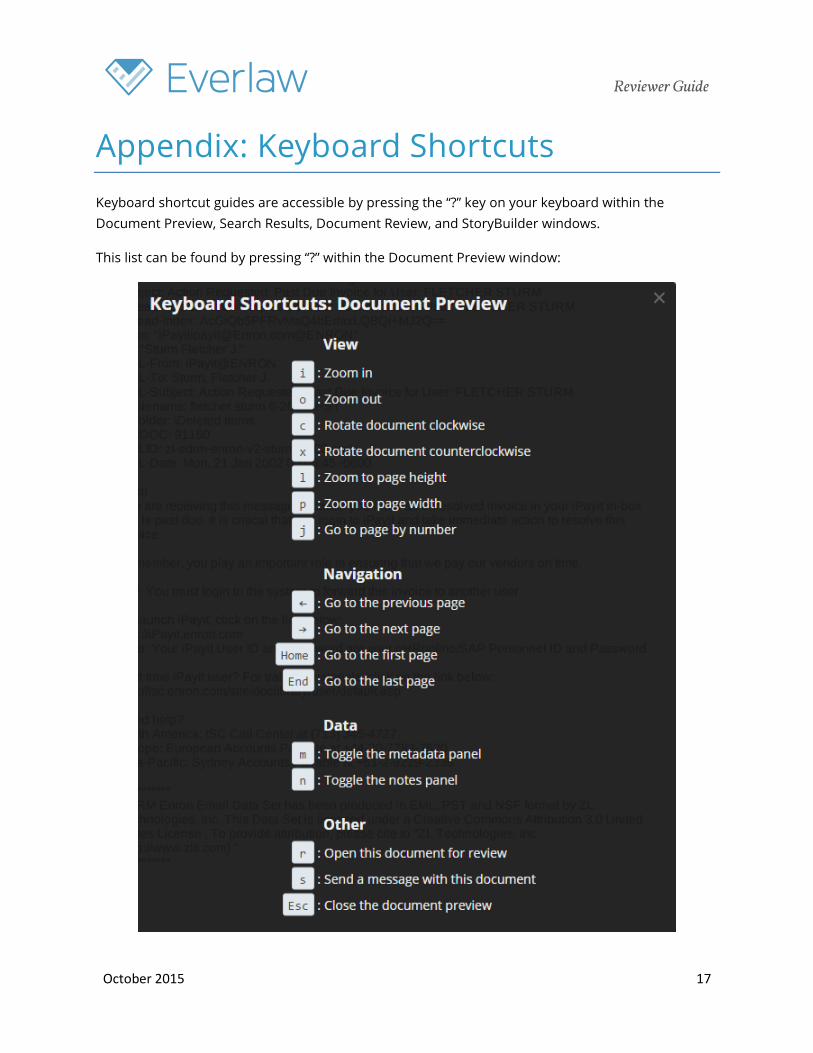
This list can be found by pressing “?” within the Document Preview window:
October 2015 18
Reviewer Guide
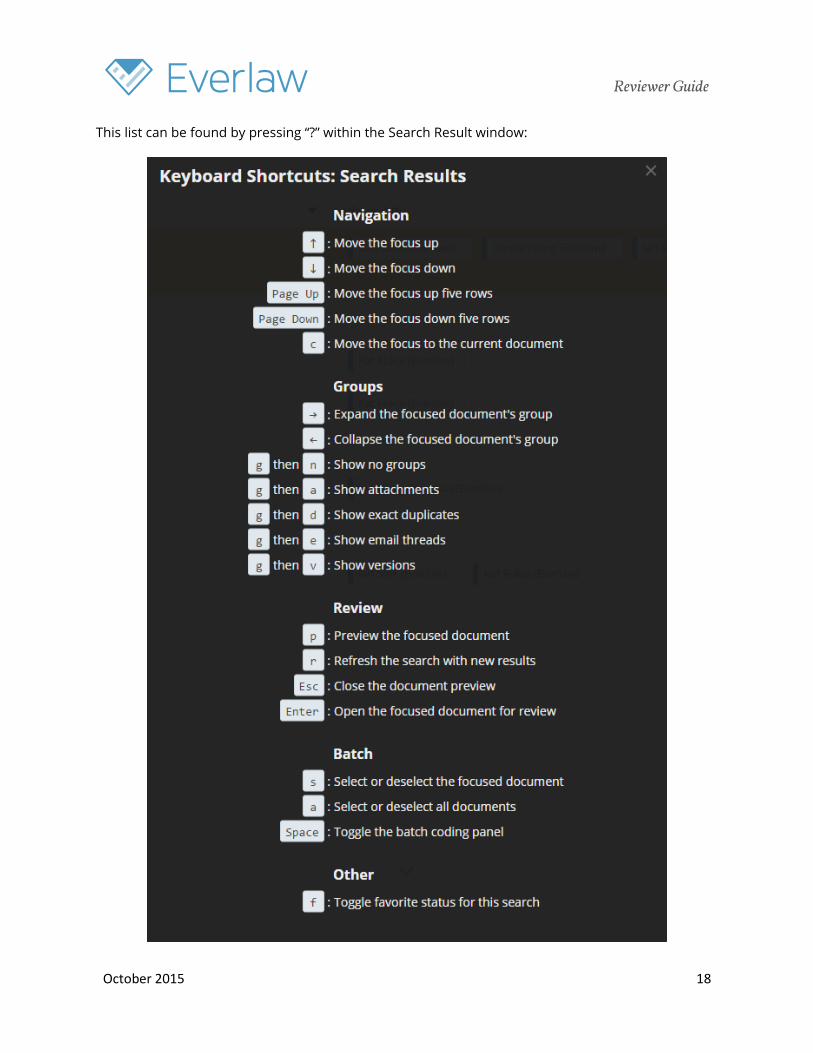
This list can be found by pressing “?” within the Search Result window:
October 2015 19
Reviewer Guide
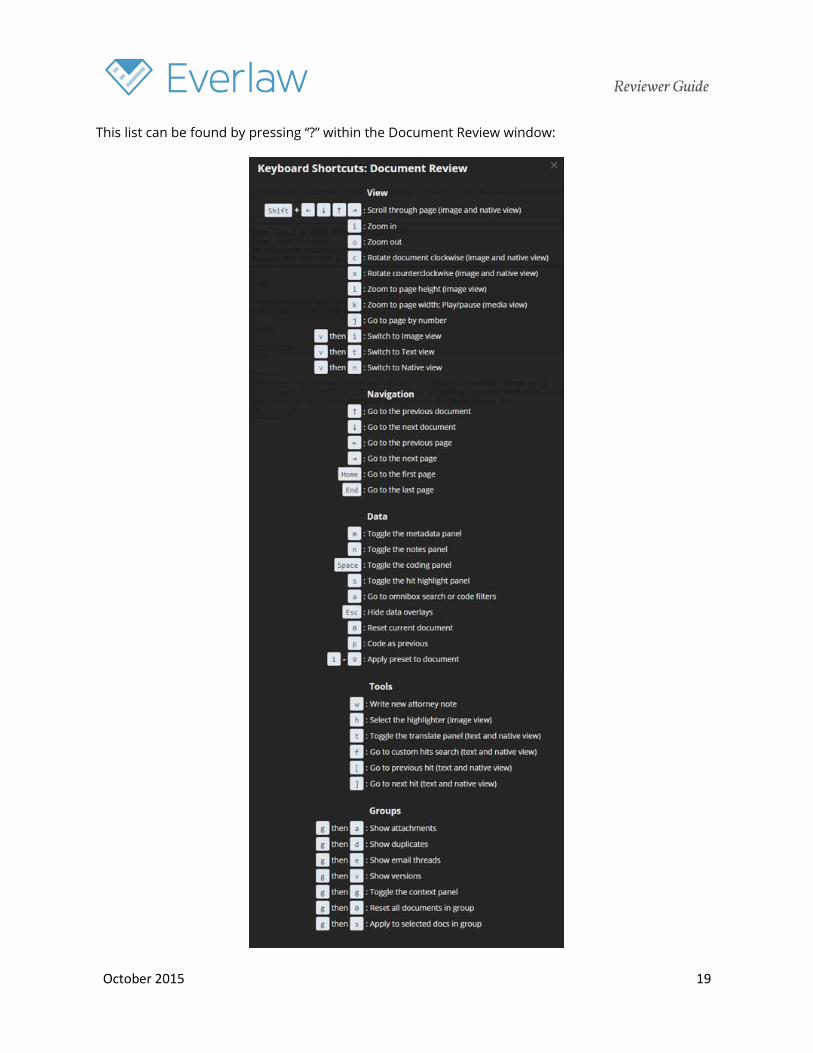
This list can be found by pressing “?” within the Document Review window:
October 2015 20
Reviewer Guide
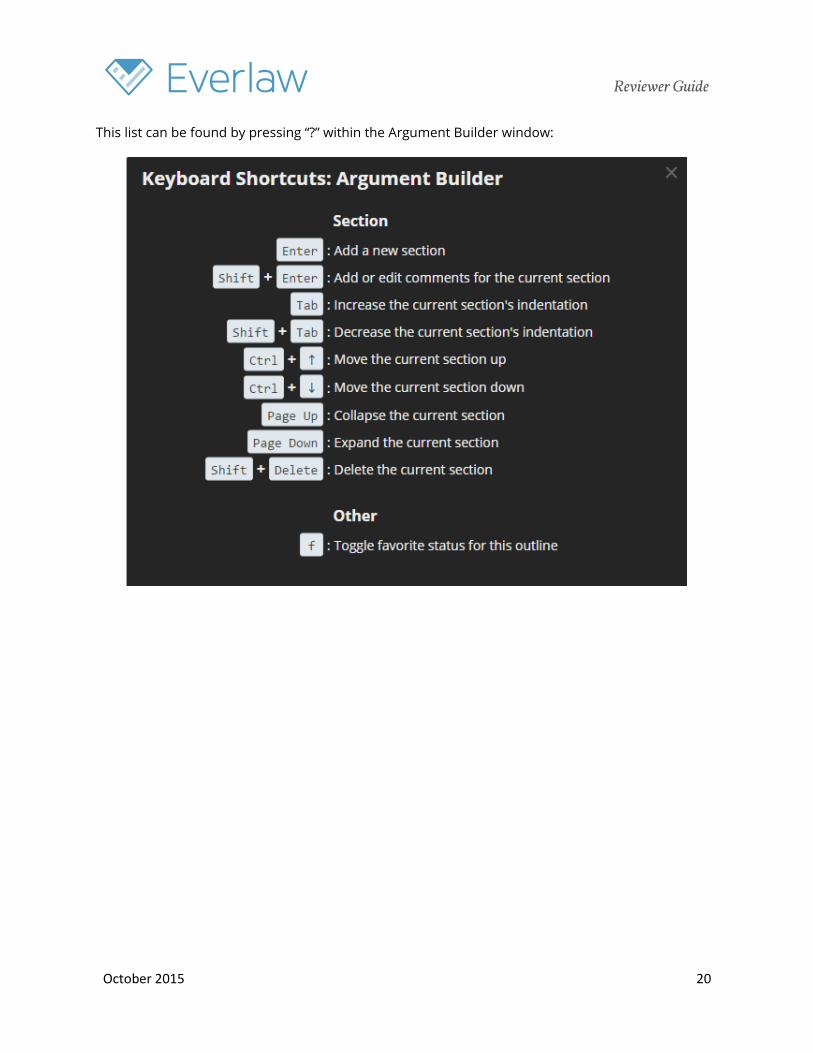
This list can be found by pressing “?” within the Argument Builder window:


![Property 452 Reviewer-[Vena Verga] Property Midterms Reviewer](https://img.pdfslide.us/doc/110x75/55cf8a9355034654898bef13/property-452-reviewer-vena-verga-property-midterms-reviewer.jpg)