Embed Size (px)
Citation preview
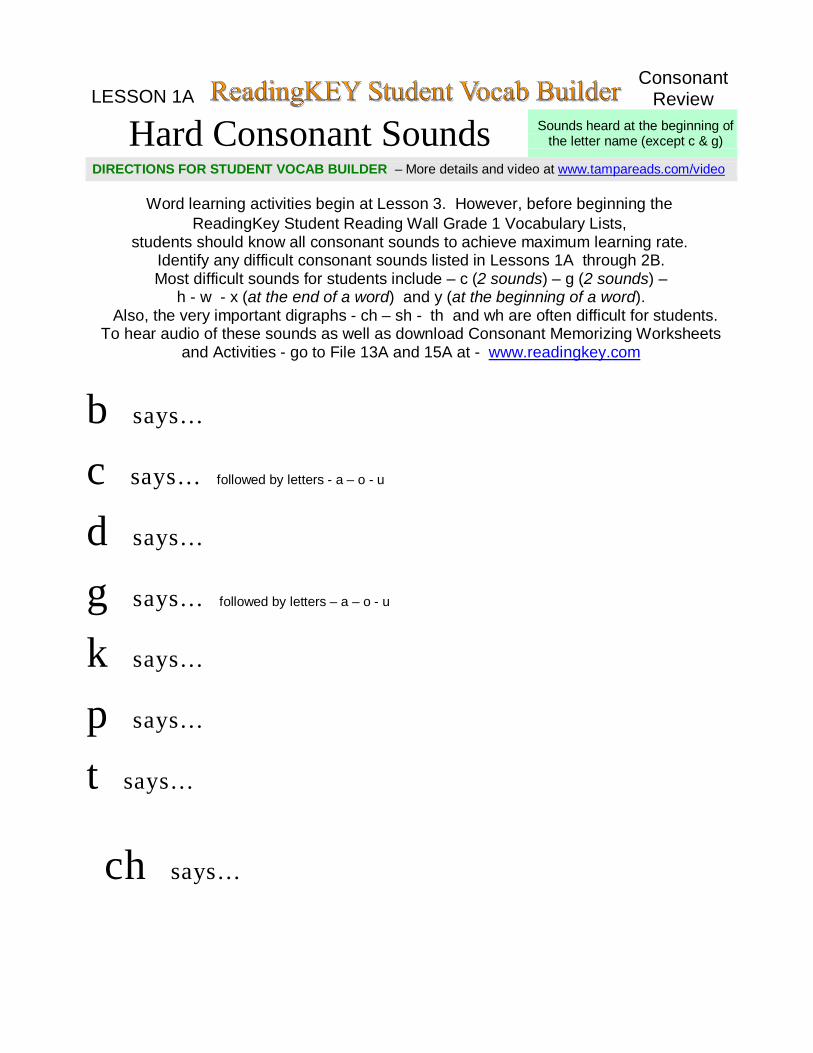
LESSON 1A Consonant Review
Hard Consonant Sounds Sounds heard at the beginning of the letter name (except c & g)
DIRECTIONS FOR STUDENT VOCAB BUILDER – More details and video at www.tampareads.com/video
Word learning activities begin at Lesson 3. However, before beginning the ReadingKey Student Reading Wall Grade 1 Vocabulary Lists,
students should know all consonant sounds to achieve maximum learning rate. Identify any difficult consonant sounds listed in Lessons 1A through 2B. Most difficult sounds for students include – c (2 sounds) – g (2 sounds) –
h - w - x (at the end of a word) and y (at the beginning of a word). Also, the very important digraphs - ch – sh - th and wh are often difficult for students. To hear audio of these sounds as well as download Consonant Memorizing Worksheets
and Activities - go to File 13A and 15A at - www.readingkey.com
b says… c says… followed by letters - a – o - u d says… g says… followed by letters – a – o - u k says… p says… t says…
ch says…
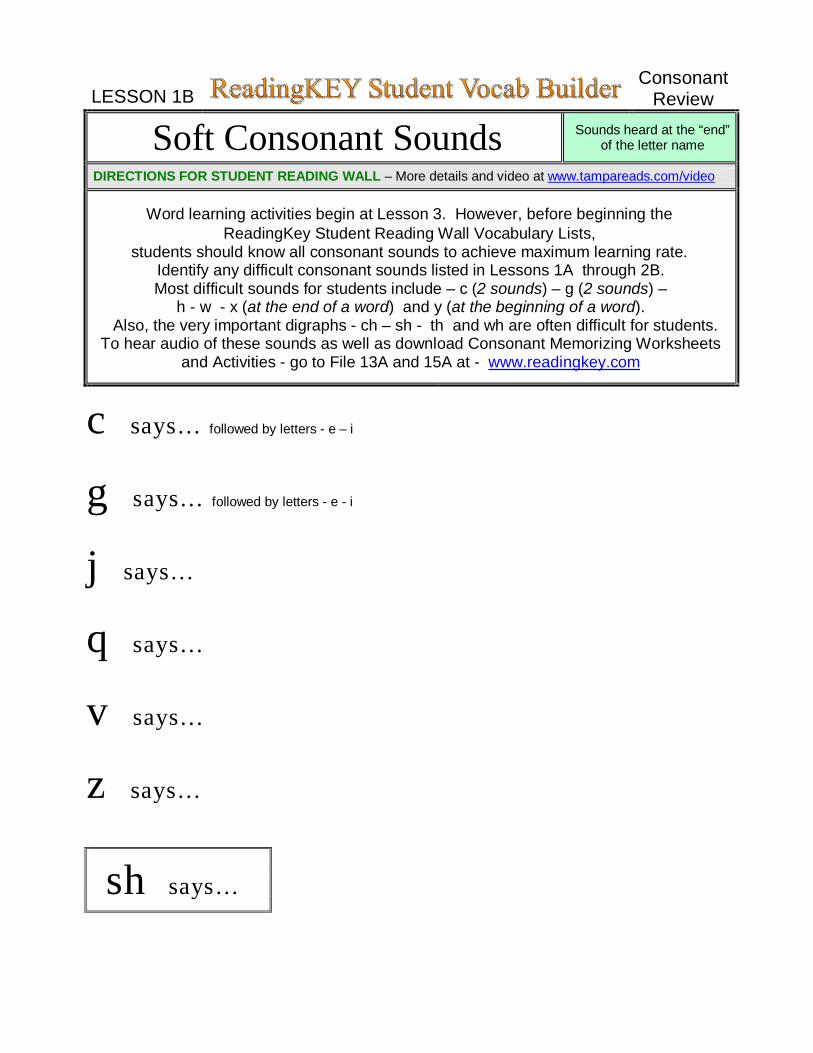
LESSON 1B Consonant Review
Soft Consonant Sounds Sounds heard at the “end” of the letter name
DIRECTIONS FOR STUDENT READING WALL – More details and video at www.tampareads.com/video
Word learning activities begin at Lesson 3. However, before beginning the ReadingKey Student Reading Wall Vocabulary Lists,
students should know all consonant sounds to achieve maximum learning rate. Identify any difficult consonant sounds listed in Lessons 1A through 2B. Most difficult sounds for students include – c (2 sounds) – g (2 sounds) –
h - w - x (at the end of a word) and y (at the beginning of a word). Also, the very important digraphs - ch – sh - th and wh are often difficult for students. To hear audio of these sounds as well as download Consonant Memorizing Worksheets
and Activities - go to File 13A and 15A at - www.readingkey.com
c says… followed by letters - e – i
g says… followed by letters - e - i
j says…
q says…
v says…
z says…
sh says…
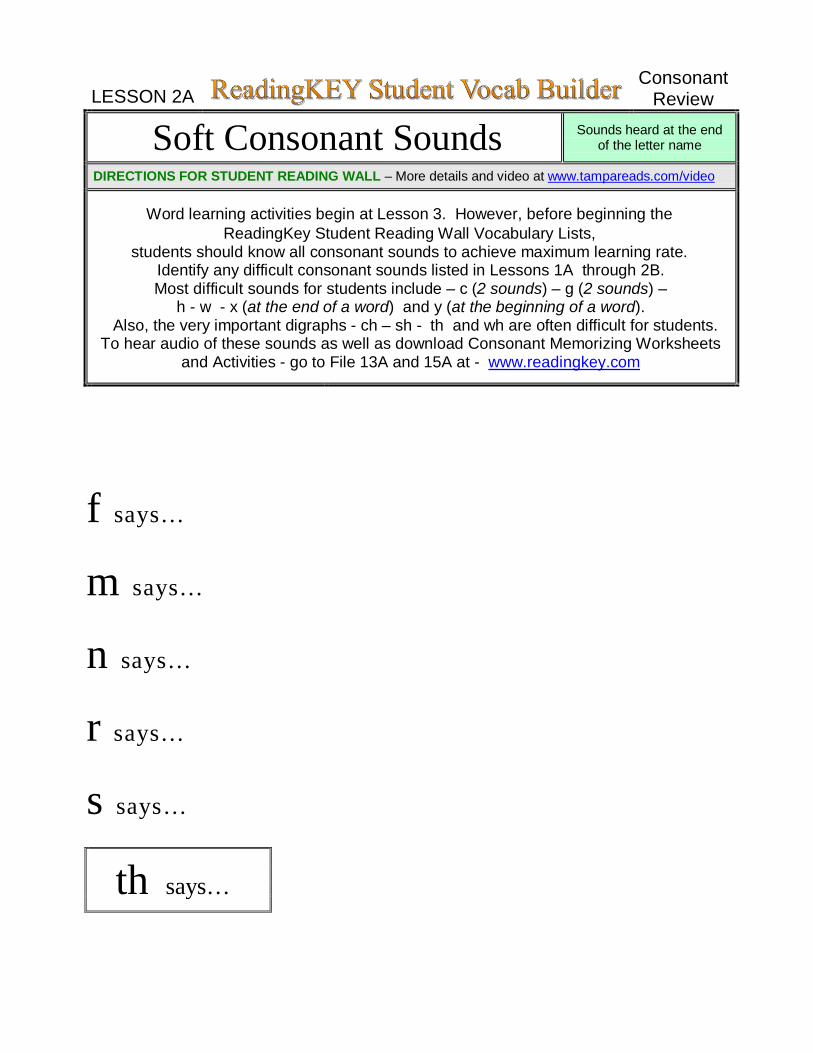
LESSON 2A Consonant Review
Soft Consonant Sounds Sounds heard at the end of the letter name
DIRECTIONS FOR STUDENT READING WALL – More details and video at www.tampareads.com/video
Word learning activities begin at Lesson 3. However, before beginning the ReadingKey Student Reading Wall Vocabulary Lists,
students should know all consonant sounds to achieve maximum learning rate. Identify any difficult consonant sounds listed in Lessons 1A through 2B. Most difficult sounds for students include – c (2 sounds) – g (2 sounds) –
h - w - x (at the end of a word) and y (at the beginning of a word). Also, the very important digraphs - ch – sh - th and wh are often difficult for students. To hear audio of these sounds as well as download Consonant Memorizing Worksheets
and Activities - go to File 13A and 15A at - www.readingkey.com
f says…
m says…
n says…
r says…
s says…
th says…
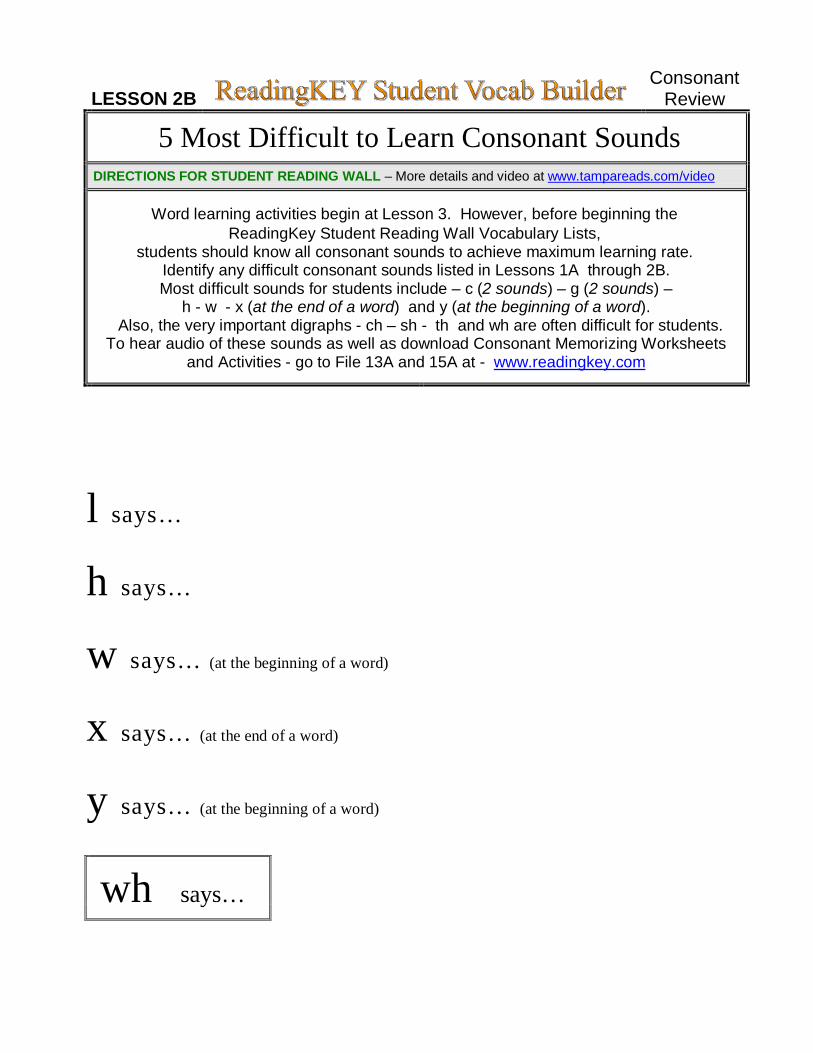
LESSON 2B Consonant Review
5 Most Difficult to Learn Consonant Sounds DIRECTIONS FOR STUDENT READING WALL – More details and video at www.tampareads.com/video
Word learning activities begin at Lesson 3. However, before beginning the ReadingKey Student Reading Wall Vocabulary Lists,
students should know all consonant sounds to achieve maximum learning rate. Identify any difficult consonant sounds listed in Lessons 1A through 2B. Most difficult sounds for students include – c (2 sounds) – g (2 sounds) –
h - w - x (at the end of a word) and y (at the beginning of a word). Also, the very important digraphs - ch – sh - th and wh are often difficult for students. To hear audio of these sounds as well as download Consonant Memorizing Worksheets
and Activities - go to File 13A and 15A at - www.readingkey.com
l says…
h says…
w says… (at the beginning of a word)
x says… (at the end of a word)
y says… (at the beginning of a word)
wh says…
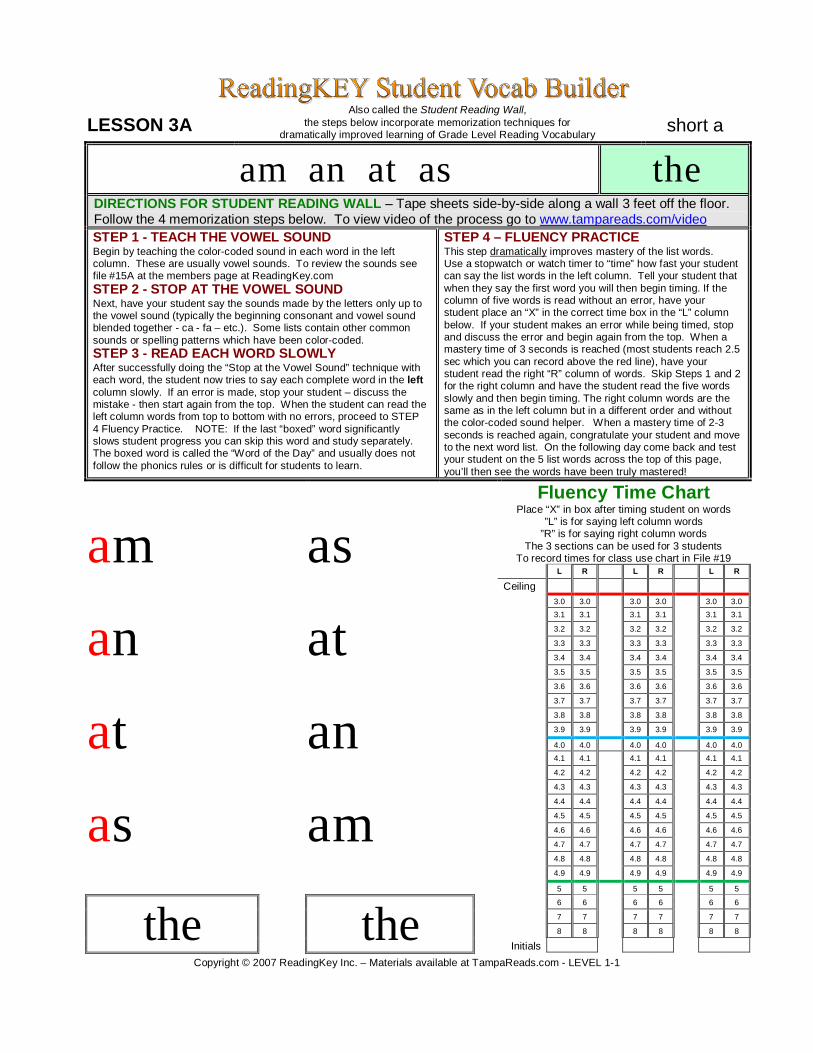
LESSON 3A Also called the Student Reading Wall,
the steps below incorporate memorization techniques for dramatically improved learning of Grade Level Reading Vocabulary short a
am an at as the DIRECTIONS FOR STUDENT READING WALL – Tape sheets side-by-side along a wall 3 feet off the floor. Follow the 4 memorization steps below. To view video of the process go to www.tampareads.com/video STEP 1 - TEACH THE VOWEL SOUND Begin by teaching the color-coded sound in each word in the left column. These are usually vowel sounds. To review the sounds see file #15A at the members page at ReadingKey.com STEP 2 - STOP AT THE VOWEL SOUND Next, have your student say the sounds made by the letters only up to the vowel sound (typically the beginning consonant and vowel sound blended together - ca - fa – etc.). Some lists contain other common sounds or spelling patterns which have been color-coded. STEP 3 - READ EACH WORD SLOWLY After successfully doing the “Stop at the Vowel Sound” technique with each word, the student now tries to say each complete word in the left column slowly. If an error is made, stop your student – discuss the mistake - then start again from the top. When the student can read the left column words from top to bottom with no errors, proceed to STEP 4 Fluency Practice. NOTE: If the last “boxed” word significantly slows student progress you can skip this word and study separately. The boxed word is called the “Word of the Day” and usually does not follow the phonics rules or is difficult for students to learn.
STEP 4 – FLUENCY PRACTICE This step dramatically improves mastery of the list words. Use a stopwatch or watch timer to “time” how fast your student can say the list words in the left column. Tell your student that when they say the first word you will then begin timing. If the column of five words is read without an error, have your student place an “X” in the correct time box in the “L” column below. If your student makes an error while being timed, stop and discuss the error and begin again from the top. When a mastery time of 3 seconds is reached (most students reach 2.5 sec which you can record above the red line), have your student read the right “R” column of words. Skip Steps 1 and 2 for the right column and have the student read the five words slowly and then begin timing. The right column words are the same as in the left column but in a different order and without the color-coded sound helper. When a mastery time of 2-3 seconds is reached again, congratulate your student and move to the next word list. On the following day come back and test your student on the 5 list words across the top of this page, you’ll then see the words have been truly mastered!
am
an
at
as
as
at
an
am
Fluency Time Chart Place “X” in box after timing student on words
”L” is for saying left column words ”R” is for saying right column words
The 3 sections can be used for 3 students To record times for class use chart in File #19
L R L R L R
Ceiling
3.0 3.0 3.0 3.0 3.0 3.0 3.1 3.1 3.1 3.1 3.1 3.1
3.2 3.2 3.2 3.2 3.2 3.2
3.3 3.3 3.3 3.3 3.3 3.3
3.4 3.4 3.4 3.4 3.4 3.4
3.5 3.5 3.5 3.5 3.5 3.5
3.6 3.6 3.6 3.6 3.6 3.6
3.7 3.7 3.7 3.7 3.7 3.7
3.8 3.8 3.8 3.8 3.8 3.8
3.9 3.9 3.9 3.9 3.9 3.9
4.0 4.0 4.0 4.0 4.0 4.0 4.1 4.1 4.1 4.1 4.1 4.1
4.2 4.2 4.2 4.2 4.2 4.2
4.3 4.3 4.3 4.3 4.3 4.3
4.4 4.4 4.4 4.4 4.4 4.4
4.5 4.5 4.5 4.5 4.5 4.5
4.6 4.6 4.6 4.6 4.6 4.6
4.7 4.7 4.7 4.7 4.7 4.7
4.8 4.8 4.8 4.8 4.8 4.8
4.9 4.9 4.9 4.9 4.9 4.9
5 5 5 5 5 5
the
the
6 6 6 6 6 6
7 7 7 7 7 7
8 8 8 8 8 8
Initials
Copyright © 2007 ReadingKey Inc. – Materials available at TampaReads.com - LEVEL 1-1
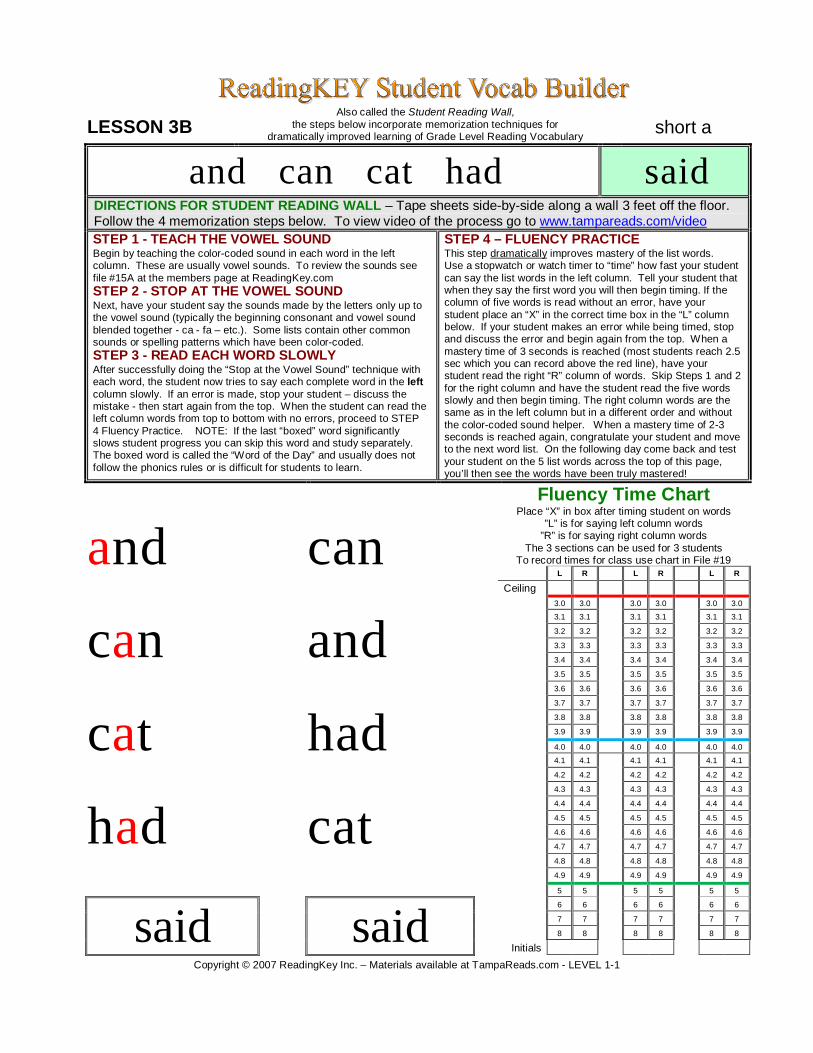
LESSON 3B Also called the Student Reading Wall,
the steps below incorporate memorization techniques for dramatically improved learning of Grade Level Reading Vocabulary short a
and can cat had said DIRECTIONS FOR STUDENT READING WALL – Tape sheets side-by-side along a wall 3 feet off the floor. Follow the 4 memorization steps below. To view video of the process go to www.tampareads.com/video STEP 1 - TEACH THE VOWEL SOUND Begin by teaching the color-coded sound in each word in the left column. These are usually vowel sounds. To review the sounds see file #15A at the members page at ReadingKey.com STEP 2 - STOP AT THE VOWEL SOUND Next, have your student say the sounds made by the letters only up to the vowel sound (typically the beginning consonant and vowel sound blended together - ca - fa – etc.). Some lists contain other common sounds or spelling patterns which have been color-coded. STEP 3 - READ EACH WORD SLOWLY After successfully doing the “Stop at the Vowel Sound” technique with each word, the student now tries to say each complete word in the left column slowly. If an error is made, stop your student – discuss the mistake - then start again from the top. When the student can read the left column words from top to bottom with no errors, proceed to STEP 4 Fluency Practice. NOTE: If the last “boxed” word significantly slows student progress you can skip this word and study separately. The boxed word is called the “Word of the Day” and usually does not follow the phonics rules or is difficult for students to learn.
STEP 4 – FLUENCY PRACTICE This step dramatically improves mastery of the list words. Use a stopwatch or watch timer to “time” how fast your student can say the list words in the left column. Tell your student that when they say the first word you will then begin timing. If the column of five words is read without an error, have your student place an “X” in the correct time box in the “L” column below. If your student makes an error while being timed, stop and discuss the error and begin again from the top. When a mastery time of 3 seconds is reached (most students reach 2.5 sec which you can record above the red line), have your student read the right “R” column of words. Skip Steps 1 and 2 for the right column and have the student read the five words slowly and then begin timing. The right column words are the same as in the left column but in a different order and without the color-coded sound helper. When a mastery time of 2-3 seconds is reached again, congratulate your student and move to the next word list. On the following day come back and test your student on the 5 list words across the top of this page, you’ll then see the words have been truly mastered!
and
can
cat
had
can
and
had
cat
Fluency Time Chart Place “X” in box after timing student on words
”L” is for saying left column words ”R” is for saying right column words
The 3 sections can be used for 3 students To record times for class use chart in File #19
L R L R L R
Ceiling
3.0 3.0 3.0 3.0 3.0 3.0
3.1 3.1 3.1 3.1 3.1 3.1
3.2 3.2 3.2 3.2 3.2 3.2
3.3 3.3 3.3 3.3 3.3 3.3
3.4 3.4 3.4 3.4 3.4 3.4
3.5 3.5 3.5 3.5 3.5 3.5
3.6 3.6 3.6 3.6 3.6 3.6
3.7 3.7 3.7 3.7 3.7 3.7
3.8 3.8 3.8 3.8 3.8 3.8
3.9 3.9 3.9 3.9 3.9 3.9
4.0 4.0 4.0 4.0 4.0 4.0
4.1 4.1 4.1 4.1 4.1 4.1
4.2 4.2 4.2 4.2 4.2 4.2
4.3 4.3 4.3 4.3 4.3 4.3
4.4 4.4 4.4 4.4 4.4 4.4
4.5 4.5 4.5 4.5 4.5 4.5
4.6 4.6 4.6 4.6 4.6 4.6
4.7 4.7 4.7 4.7 4.7 4.7
4.8 4.8 4.8 4.8 4.8 4.8
4.9 4.9 4.9 4.9 4.9 4.9
5 5 5 5 5 5
said
said
6 6 6 6 6 6
7 7 7 7 7 7
8 8 8 8 8 8
Initials
Copyright © 2007 ReadingKey Inc. – Materials available at TampaReads.com - LEVEL 1-1
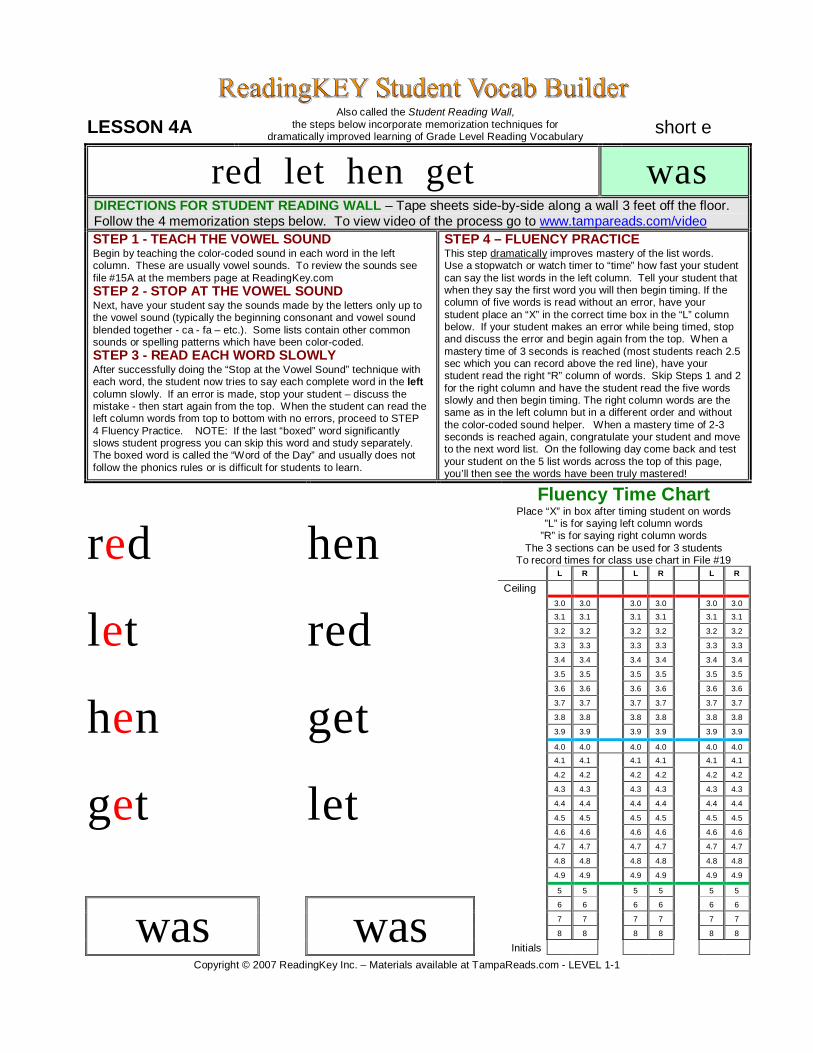
LESSON 4A Also called the Student Reading Wall,
the steps below incorporate memorization techniques for dramatically improved learning of Grade Level Reading Vocabulary short e
red let hen get was DIRECTIONS FOR STUDENT READING WALL – Tape sheets side-by-side along a wall 3 feet off the floor. Follow the 4 memorization steps below. To view video of the process go to www.tampareads.com/video STEP 1 - TEACH THE VOWEL SOUND Begin by teaching the color-coded sound in each word in the left column. These are usually vowel sounds. To review the sounds see file #15A at the members page at ReadingKey.com STEP 2 - STOP AT THE VOWEL SOUND Next, have your student say the sounds made by the letters only up to the vowel sound (typically the beginning consonant and vowel sound blended together - ca - fa – etc.). Some lists contain other common sounds or spelling patterns which have been color-coded. STEP 3 - READ EACH WORD SLOWLY After successfully doing the “Stop at the Vowel Sound” technique with each word, the student now tries to say each complete word in the left column slowly. If an error is made, stop your student – discuss the mistake - then start again from the top. When the student can read the left column words from top to bottom with no errors, proceed to STEP 4 Fluency Practice. NOTE: If the last “boxed” word significantly slows student progress you can skip this word and study separately. The boxed word is called the “Word of the Day” and usually does not follow the phonics rules or is difficult for students to learn.
STEP 4 – FLUENCY PRACTICE This step dramatically improves mastery of the list words. Use a stopwatch or watch timer to “time” how fast your student can say the list words in the left column. Tell your student that when they say the first word you will then begin timing. If the column of five words is read without an error, have your student place an “X” in the correct time box in the “L” column below. If your student makes an error while being timed, stop and discuss the error and begin again from the top. When a mastery time of 3 seconds is reached (most students reach 2.5 sec which you can record above the red line), have your student read the right “R” column of words. Skip Steps 1 and 2 for the right column and have the student read the five words slowly and then begin timing. The right column words are the same as in the left column but in a different order and without the color-coded sound helper. When a mastery time of 2-3 seconds is reached again, congratulate your student and move to the next word list. On the following day come back and test your student on the 5 list words across the top of this page, you’ll then see the words have been truly mastered!
red
let
hen
get
hen
red
get
let
Fluency Time Chart Place “X” in box after timing student on words
”L” is for saying left column words ”R” is for saying right column words
The 3 sections can be used for 3 students To record times for class use chart in File #19
L R L R L R
Ceiling
3.0 3.0 3.0 3.0 3.0 3.0
3.1 3.1 3.1 3.1 3.1 3.1
3.2 3.2 3.2 3.2 3.2 3.2
3.3 3.3 3.3 3.3 3.3 3.3
3.4 3.4 3.4 3.4 3.4 3.4
3.5 3.5 3.5 3.5 3.5 3.5
3.6 3.6 3.6 3.6 3.6 3.6
3.7 3.7 3.7 3.7 3.7 3.7
3.8 3.8 3.8 3.8 3.8 3.8
3.9 3.9 3.9 3.9 3.9 3.9
4.0 4.0 4.0 4.0 4.0 4.0
4.1 4.1 4.1 4.1 4.1 4.1
4.2 4.2 4.2 4.2 4.2 4.2
4.3 4.3 4.3 4.3 4.3 4.3
4.4 4.4 4.4 4.4 4.4 4.4
4.5 4.5 4.5 4.5 4.5 4.5
4.6 4.6 4.6 4.6 4.6 4.6
4.7 4.7 4.7 4.7 4.7 4.7
4.8 4.8 4.8 4.8 4.8 4.8
4.9 4.9 4.9 4.9 4.9 4.9
5 5 5 5 5 5
was
was
6 6 6 6 6 6
7 7 7 7 7 7
8 8 8 8 8 8
Initials
Copyright © 2007 ReadingKey Inc. – Materials available at TampaReads.com - LEVEL 1-1
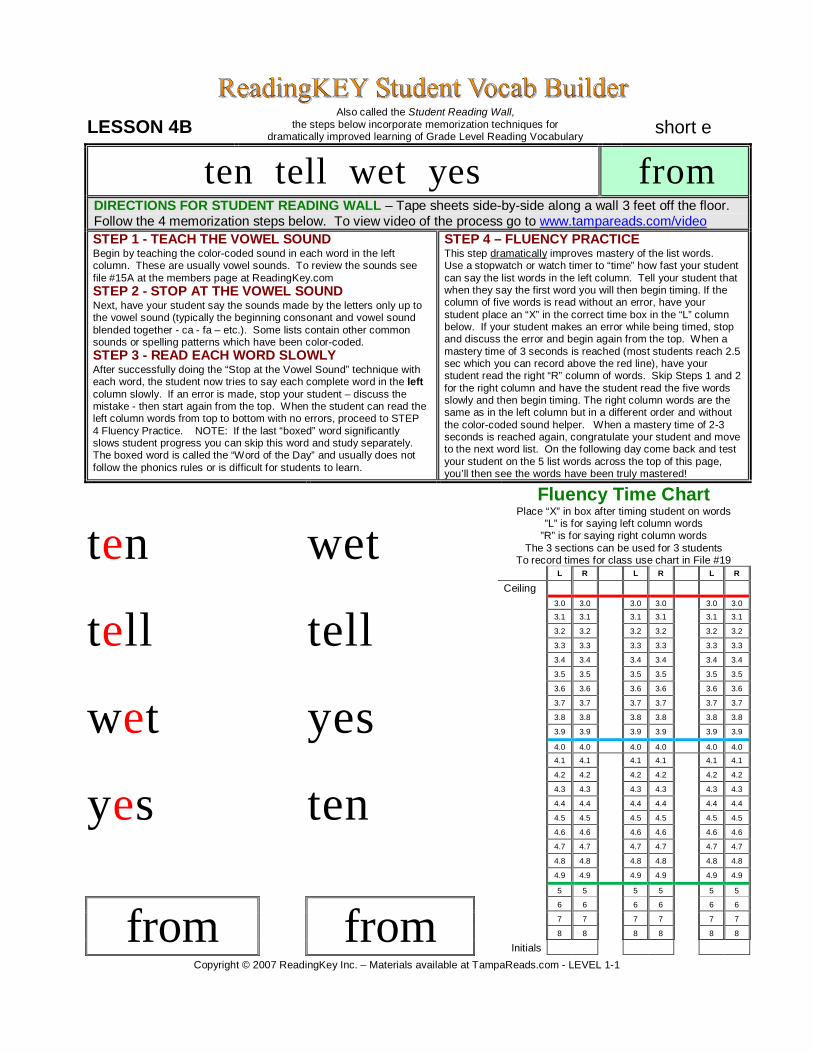
LESSON 4B Also called the Student Reading Wall,
the steps below incorporate memorization techniques for dramatically improved learning of Grade Level Reading Vocabulary short e
ten tell wet yes from DIRECTIONS FOR STUDENT READING WALL – Tape sheets side-by-side along a wall 3 feet off the floor. Follow the 4 memorization steps below. To view video of the process go to www.tampareads.com/video STEP 1 - TEACH THE VOWEL SOUND Begin by teaching the color-coded sound in each word in the left column. These are usually vowel sounds. To review the sounds see file #15A at the members page at ReadingKey.com STEP 2 - STOP AT THE VOWEL SOUND Next, have your student say the sounds made by the letters only up to the vowel sound (typically the beginning consonant and vowel sound blended together - ca - fa – etc.). Some lists contain other common sounds or spelling patterns which have been color-coded. STEP 3 - READ EACH WORD SLOWLY After successfully doing the “Stop at the Vowel Sound” technique with each word, the student now tries to say each complete word in the left column slowly. If an error is made, stop your student – discuss the mistake - then start again from the top. When the student can read the left column words from top to bottom with no errors, proceed to STEP 4 Fluency Practice. NOTE: If the last “boxed” word significantly slows student progress you can skip this word and study separately. The boxed word is called the “Word of the Day” and usually does not follow the phonics rules or is difficult for students to learn.
STEP 4 – FLUENCY PRACTICE This step dramatically improves mastery of the list words. Use a stopwatch or watch timer to “time” how fast your student can say the list words in the left column. Tell your student that when they say the first word you will then begin timing. If the column of five words is read without an error, have your student place an “X” in the correct time box in the “L” column below. If your student makes an error while being timed, stop and discuss the error and begin again from the top. When a mastery time of 3 seconds is reached (most students reach 2.5 sec which you can record above the red line), have your student read the right “R” column of words. Skip Steps 1 and 2 for the right column and have the student read the five words slowly and then begin timing. The right column words are the same as in the left column but in a different order and without the color-coded sound helper. When a mastery time of 2-3 seconds is reached again, congratulate your student and move to the next word list. On the following day come back and test your student on the 5 list words across the top of this page, you’ll then see the words have been truly mastered!
ten
tell
wet
yes
wet
tell
yes
ten
Fluency Time Chart Place “X” in box after timing student on words
”L” is for saying left column words ”R” is for saying right column words
The 3 sections can be used for 3 students To record times for class use chart in File #19
L R L R L R
Ceiling
3.0 3.0 3.0 3.0 3.0 3.0
3.1 3.1 3.1 3.1 3.1 3.1
3.2 3.2 3.2 3.2 3.2 3.2
3.3 3.3 3.3 3.3 3.3 3.3
3.4 3.4 3.4 3.4 3.4 3.4
3.5 3.5 3.5 3.5 3.5 3.5
3.6 3.6 3.6 3.6 3.6 3.6
3.7 3.7 3.7 3.7 3.7 3.7
3.8 3.8 3.8 3.8 3.8 3.8
3.9 3.9 3.9 3.9 3.9 3.9
4.0 4.0 4.0 4.0 4.0 4.0
4.1 4.1 4.1 4.1 4.1 4.1
4.2 4.2 4.2 4.2 4.2 4.2
4.3 4.3 4.3 4.3 4.3 4.3
4.4 4.4 4.4 4.4 4.4 4.4
4.5 4.5 4.5 4.5 4.5 4.5
4.6 4.6 4.6 4.6 4.6 4.6
4.7 4.7 4.7 4.7 4.7 4.7
4.8 4.8 4.8 4.8 4.8 4.8
4.9 4.9 4.9 4.9 4.9 4.9
5 5 5 5 5 5
from
from
6 6 6 6 6 6
7 7 7 7 7 7
8 8 8 8 8 8
Initials
Copyright © 2007 ReadingKey Inc. – Materials available at TampaReads.com - LEVEL 1-1
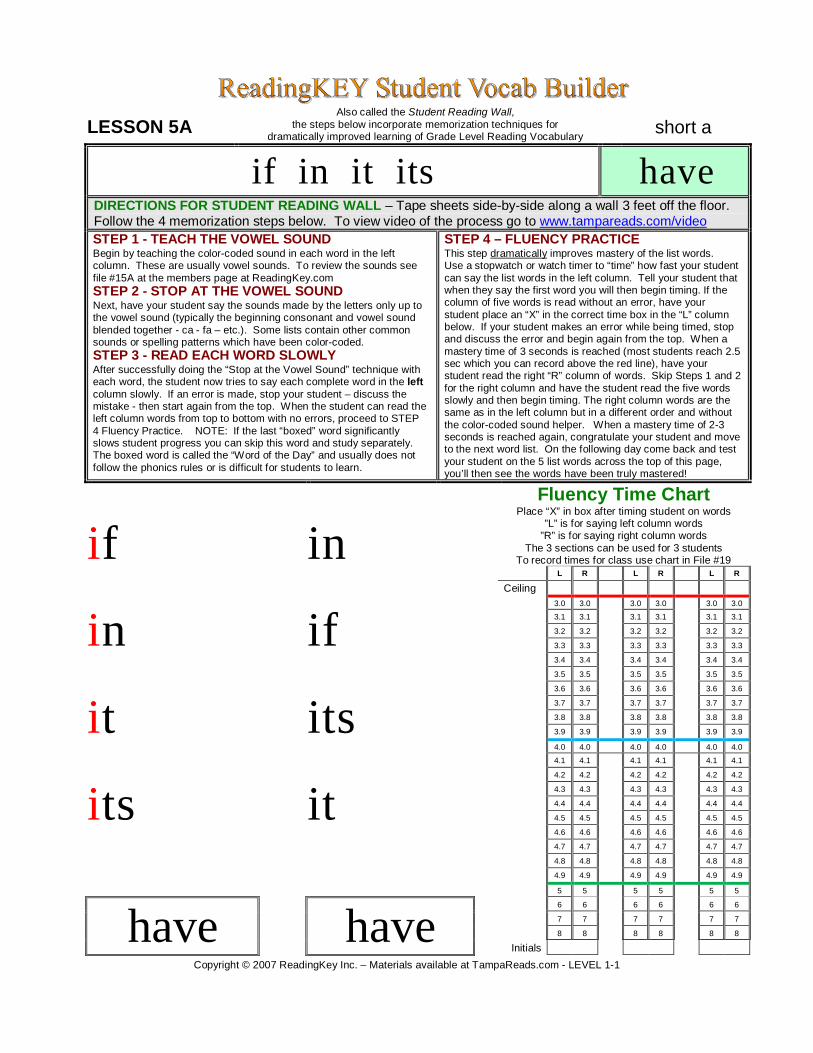
LESSON 5A Also called the Student Reading Wall,
the steps below incorporate memorization techniques for dramatically improved learning of Grade Level Reading Vocabulary short a
if in it its have DIRECTIONS FOR STUDENT READING WALL – Tape sheets side-by-side along a wall 3 feet off the floor. Follow the 4 memorization steps below. To view video of the process go to www.tampareads.com/video STEP 1 - TEACH THE VOWEL SOUND Begin by teaching the color-coded sound in each word in the left column. These are usually vowel sounds. To review the sounds see file #15A at the members page at ReadingKey.com STEP 2 - STOP AT THE VOWEL SOUND Next, have your student say the sounds made by the letters only up to the vowel sound (typically the beginning consonant and vowel sound blended together - ca - fa – etc.). Some lists contain other common sounds or spelling patterns which have been color-coded. STEP 3 - READ EACH WORD SLOWLY After successfully doing the “Stop at the Vowel Sound” technique with each word, the student now tries to say each complete word in the left column slowly. If an error is made, stop your student – discuss the mistake - then start again from the top. When the student can read the left column words from top to bottom with no errors, proceed to STEP 4 Fluency Practice. NOTE: If the last “boxed” word significantly slows student progress you can skip this word and study separately. The boxed word is called the “Word of the Day” and usually does not follow the phonics rules or is difficult for students to learn.
STEP 4 – FLUENCY PRACTICE This step dramatically improves mastery of the list words. Use a stopwatch or watch timer to “time” how fast your student can say the list words in the left column. Tell your student that when they say the first word you will then begin timing. If the column of five words is read without an error, have your student place an “X” in the correct time box in the “L” column below. If your student makes an error while being timed, stop and discuss the error and begin again from the top. When a mastery time of 3 seconds is reached (most students reach 2.5 sec which you can record above the red line), have your student read the right “R” column of words. Skip Steps 1 and 2 for the right column and have the student read the five words slowly and then begin timing. The right column words are the same as in the left column but in a different order and without the color-coded sound helper. When a mastery time of 2-3 seconds is reached again, congratulate your student and move to the next word list. On the following day come back and test your student on the 5 list words across the top of this page, you’ll then see the words have been truly mastered!
if
in
it
its
in
if
its
it
Fluency Time Chart Place “X” in box after timing student on words
”L” is for saying left column words ”R” is for saying right column words
The 3 sections can be used for 3 students To record times for class use chart in File #19
L R L R L R
Ceiling
3.0 3.0 3.0 3.0 3.0 3.0
3.1 3.1 3.1 3.1 3.1 3.1
3.2 3.2 3.2 3.2 3.2 3.2
3.3 3.3 3.3 3.3 3.3 3.3
3.4 3.4 3.4 3.4 3.4 3.4
3.5 3.5 3.5 3.5 3.5 3.5
3.6 3.6 3.6 3.6 3.6 3.6
3.7 3.7 3.7 3.7 3.7 3.7
3.8 3.8 3.8 3.8 3.8 3.8
3.9 3.9 3.9 3.9 3.9 3.9
4.0 4.0 4.0 4.0 4.0 4.0
4.1 4.1 4.1 4.1 4.1 4.1
4.2 4.2 4.2 4.2 4.2 4.2
4.3 4.3 4.3 4.3 4.3 4.3
4.4 4.4 4.4 4.4 4.4 4.4
4.5 4.5 4.5 4.5 4.5 4.5
4.6 4.6 4.6 4.6 4.6 4.6
4.7 4.7 4.7 4.7 4.7 4.7
4.8 4.8 4.8 4.8 4.8 4.8
4.9 4.9 4.9 4.9 4.9 4.9
5 5 5 5 5 5
have
have
6 6 6 6 6 6
7 7 7 7 7 7
8 8 8 8 8 8
Initials
Copyright © 2007 ReadingKey Inc. – Materials available at TampaReads.com - LEVEL 1-1
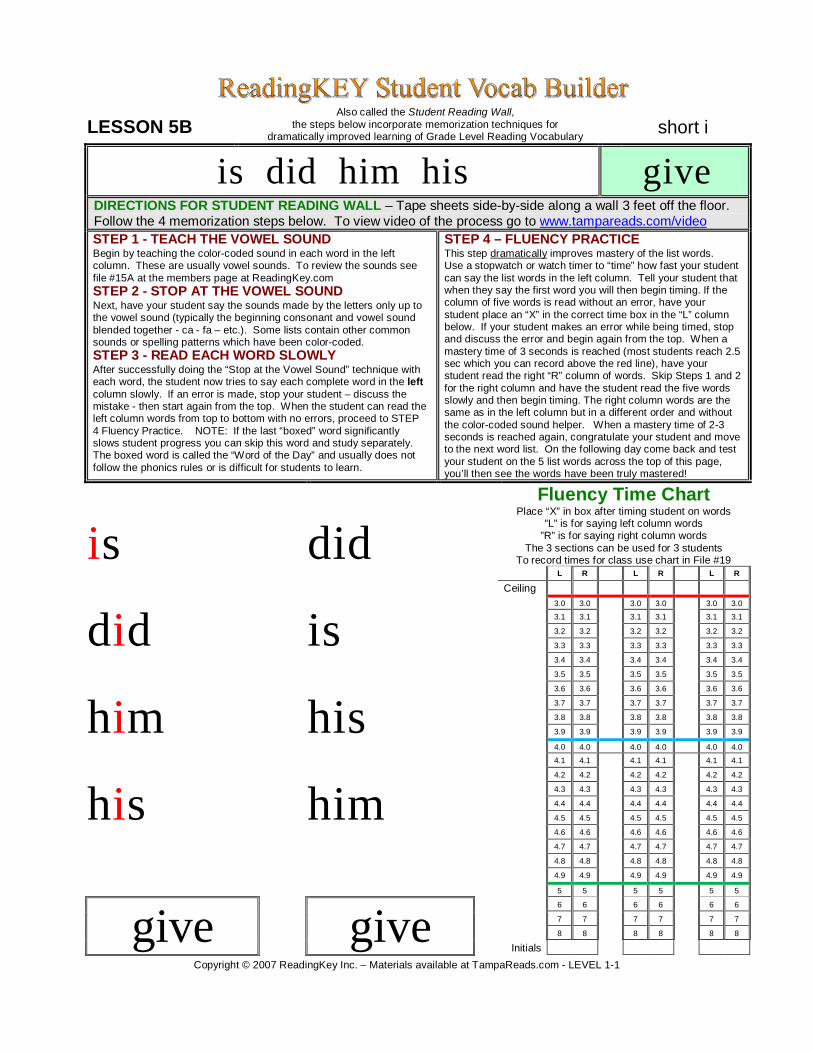
LESSON 5B Also called the Student Reading Wall,
the steps below incorporate memorization techniques for dramatically improved learning of Grade Level Reading Vocabulary short i
is did him his give DIRECTIONS FOR STUDENT READING WALL – Tape sheets side-by-side along a wall 3 feet off the floor. Follow the 4 memorization steps below. To view video of the process go to www.tampareads.com/video STEP 1 - TEACH THE VOWEL SOUND Begin by teaching the color-coded sound in each word in the left column. These are usually vowel sounds. To review the sounds see file #15A at the members page at ReadingKey.com STEP 2 - STOP AT THE VOWEL SOUND Next, have your student say the sounds made by the letters only up to the vowel sound (typically the beginning consonant and vowel sound blended together - ca - fa – etc.). Some lists contain other common sounds or spelling patterns which have been color-coded. STEP 3 - READ EACH WORD SLOWLY After successfully doing the “Stop at the Vowel Sound” technique with each word, the student now tries to say each complete word in the left column slowly. If an error is made, stop your student – discuss the mistake - then start again from the top. When the student can read the left column words from top to bottom with no errors, proceed to STEP 4 Fluency Practice. NOTE: If the last “boxed” word significantly slows student progress you can skip this word and study separately. The boxed word is called the “Word of the Day” and usually does not follow the phonics rules or is difficult for students to learn.
STEP 4 – FLUENCY PRACTICE This step dramatically improves mastery of the list words. Use a stopwatch or watch timer to “time” how fast your student can say the list words in the left column. Tell your student that when they say the first word you will then begin timing. If the column of five words is read without an error, have your student place an “X” in the correct time box in the “L” column below. If your student makes an error while being timed, stop and discuss the error and begin again from the top. When a mastery time of 3 seconds is reached (most students reach 2.5 sec which you can record above the red line), have your student read the right “R” column of words. Skip Steps 1 and 2 for the right column and have the student read the five words slowly and then begin timing. The right column words are the same as in the left column but in a different order and without the color-coded sound helper. When a mastery time of 2-3 seconds is reached again, congratulate your student and move to the next word list. On the following day come back and test your student on the 5 list words across the top of this page, you’ll then see the words have been truly mastered!
is
did
him
his
did
is
his
him
Fluency Time Chart Place “X” in box after timing student on words
”L” is for saying left column words ”R” is for saying right column words
The 3 sections can be used for 3 students To record times for class use chart in File #19
L R L R L R
Ceiling
3.0 3.0 3.0 3.0 3.0 3.0
3.1 3.1 3.1 3.1 3.1 3.1
3.2 3.2 3.2 3.2 3.2 3.2
3.3 3.3 3.3 3.3 3.3 3.3
3.4 3.4 3.4 3.4 3.4 3.4
3.5 3.5 3.5 3.5 3.5 3.5
3.6 3.6 3.6 3.6 3.6 3.6
3.7 3.7 3.7 3.7 3.7 3.7
3.8 3.8 3.8 3.8 3.8 3.8
3.9 3.9 3.9 3.9 3.9 3.9
4.0 4.0 4.0 4.0 4.0 4.0
4.1 4.1 4.1 4.1 4.1 4.1
4.2 4.2 4.2 4.2 4.2 4.2
4.3 4.3 4.3 4.3 4.3 4.3
4.4 4.4 4.4 4.4 4.4 4.4
4.5 4.5 4.5 4.5 4.5 4.5
4.6 4.6 4.6 4.6 4.6 4.6
4.7 4.7 4.7 4.7 4.7 4.7
4.8 4.8 4.8 4.8 4.8 4.8
4.9 4.9 4.9 4.9 4.9 4.9
5 5 5 5 5 5
give
give
6 6 6 6 6 6
7 7 7 7 7 7
8 8 8 8 8 8
Initials
Copyright © 2007 ReadingKey Inc. – Materials available at TampaReads.com - LEVEL 1-1
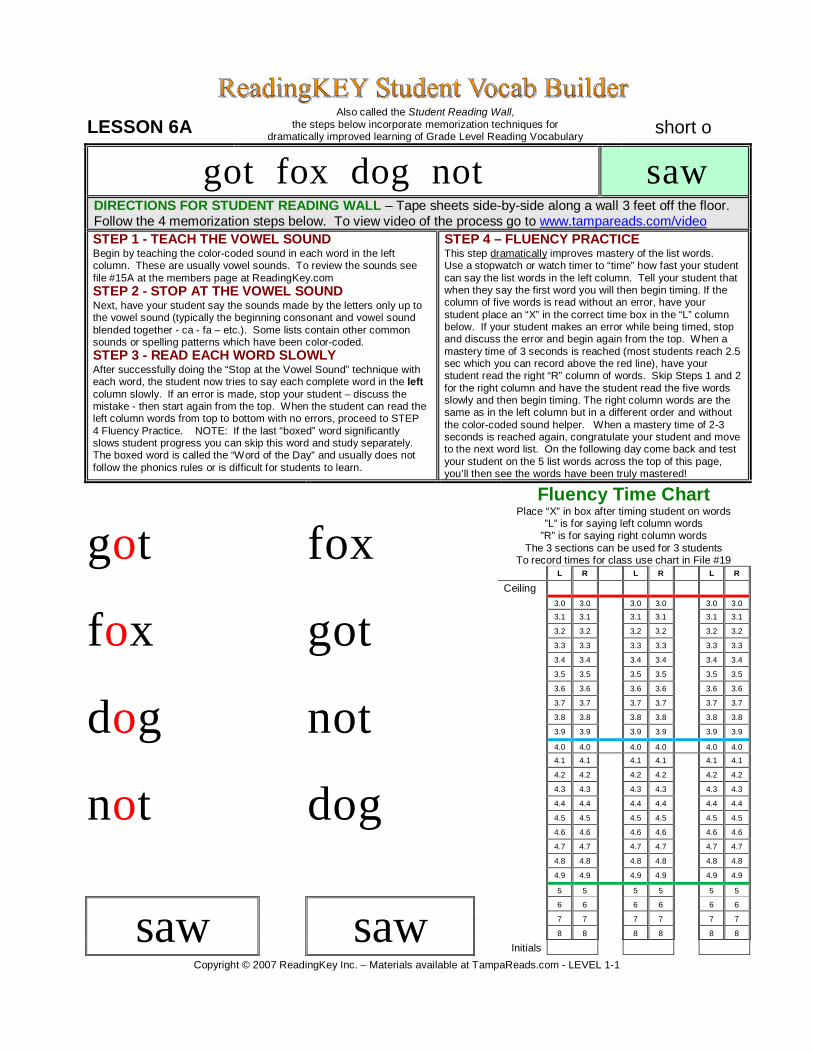
LESSON 6A Also called the Student Reading Wall,
the steps below incorporate memorization techniques for dramatically improved learning of Grade Level Reading Vocabulary short o
got fox dog not saw DIRECTIONS FOR STUDENT READING WALL – Tape sheets side-by-side along a wall 3 feet off the floor. Follow the 4 memorization steps below. To view video of the process go to www.tampareads.com/video STEP 1 - TEACH THE VOWEL SOUND Begin by teaching the color-coded sound in each word in the left column. These are usually vowel sounds. To review the sounds see file #15A at the members page at ReadingKey.com STEP 2 - STOP AT THE VOWEL SOUND Next, have your student say the sounds made by the letters only up to the vowel sound (typically the beginning consonant and vowel sound blended together - ca - fa – etc.). Some lists contain other common sounds or spelling patterns which have been color-coded. STEP 3 - READ EACH WORD SLOWLY After successfully doing the “Stop at the Vowel Sound” technique with each word, the student now tries to say each complete word in the left column slowly. If an error is made, stop your student – discuss the mistake - then start again from the top. When the student can read the left column words from top to bottom with no errors, proceed to STEP 4 Fluency Practice. NOTE: If the last “boxed” word significantly slows student progress you can skip this word and study separately. The boxed word is called the “Word of the Day” and usually does not follow the phonics rules or is difficult for students to learn.
STEP 4 – FLUENCY PRACTICE This step dramatically improves mastery of the list words. Use a stopwatch or watch timer to “time” how fast your student can say the list words in the left column. Tell your student that when they say the first word you will then begin timing. If the column of five words is read without an error, have your student place an “X” in the correct time box in the “L” column below. If your student makes an error while being timed, stop and discuss the error and begin again from the top. When a mastery time of 3 seconds is reached (most students reach 2.5 sec which you can record above the red line), have your student read the right “R” column of words. Skip Steps 1 and 2 for the right column and have the student read the five words slowly and then begin timing. The right column words are the same as in the left column but in a different order and without the color-coded sound helper. When a mastery time of 2-3 seconds is reached again, congratulate your student and move to the next word list. On the following day come back and test your student on the 5 list words across the top of this page, you’ll then see the words have been truly mastered!
got
fox
dog
not
fox
got
not
dog
Fluency Time Chart Place “X” in box after timing student on words
”L” is for saying left column words ”R” is for saying right column words
The 3 sections can be used for 3 students To record times for class use chart in File #19
L R L R L R
Ceiling
3.0 3.0 3.0 3.0 3.0 3.0
3.1 3.1 3.1 3.1 3.1 3.1
3.2 3.2 3.2 3.2 3.2 3.2
3.3 3.3 3.3 3.3 3.3 3.3
3.4 3.4 3.4 3.4 3.4 3.4
3.5 3.5 3.5 3.5 3.5 3.5
3.6 3.6 3.6 3.6 3.6 3.6
3.7 3.7 3.7 3.7 3.7 3.7
3.8 3.8 3.8 3.8 3.8 3.8
3.9 3.9 3.9 3.9 3.9 3.9
4.0 4.0 4.0 4.0 4.0 4.0
4.1 4.1 4.1 4.1 4.1 4.1
4.2 4.2 4.2 4.2 4.2 4.2
4.3 4.3 4.3 4.3 4.3 4.3
4.4 4.4 4.4 4.4 4.4 4.4
4.5 4.5 4.5 4.5 4.5 4.5
4.6 4.6 4.6 4.6 4.6 4.6
4.7 4.7 4.7 4.7 4.7 4.7
4.8 4.8 4.8 4.8 4.8 4.8
4.9 4.9 4.9 4.9 4.9 4.9
5 5 5 5 5 5
saw
saw
6 6 6 6 6 6
7 7 7 7 7 7
8 8 8 8 8 8
Initials
Copyright © 2007 ReadingKey Inc. – Materials available at TampaReads.com - LEVEL 1-1
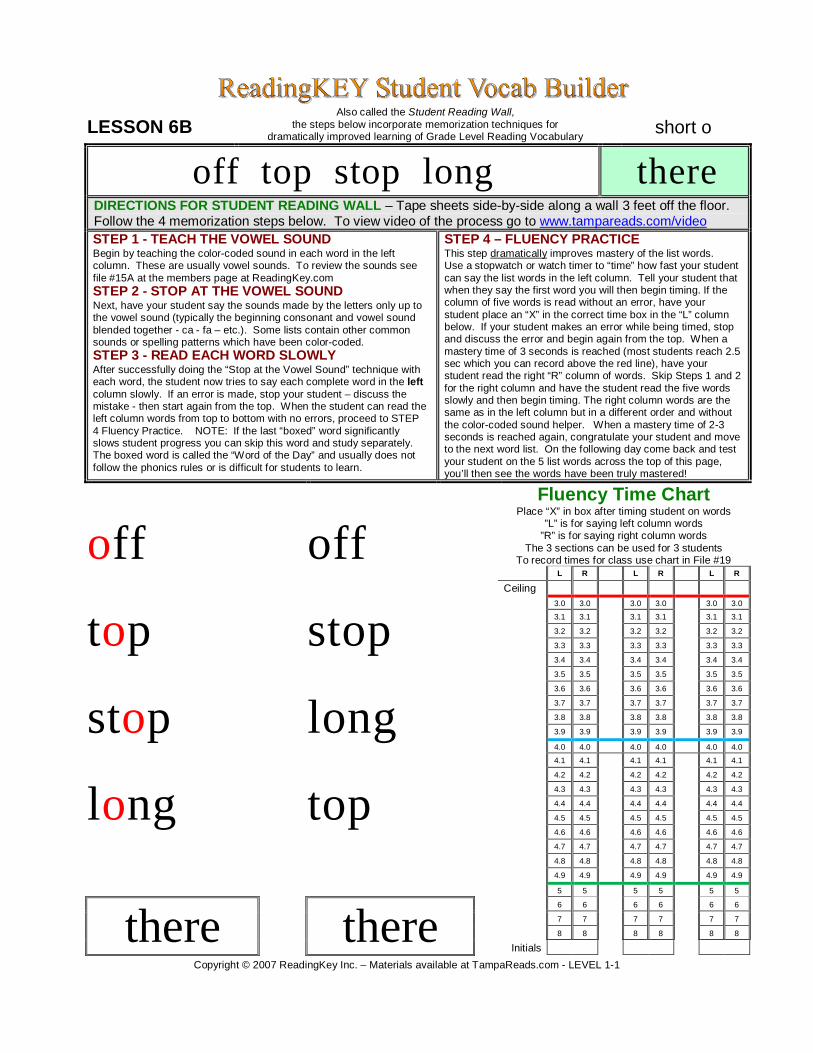
LESSON 6B Also called the Student Reading Wall,
the steps below incorporate memorization techniques for dramatically improved learning of Grade Level Reading Vocabulary short o
off top stop long there DIRECTIONS FOR STUDENT READING WALL – Tape sheets side-by-side along a wall 3 feet off the floor. Follow the 4 memorization steps below. To view video of the process go to www.tampareads.com/video STEP 1 - TEACH THE VOWEL SOUND Begin by teaching the color-coded sound in each word in the left column. These are usually vowel sounds. To review the sounds see file #15A at the members page at ReadingKey.com STEP 2 - STOP AT THE VOWEL SOUND Next, have your student say the sounds made by the letters only up to the vowel sound (typically the beginning consonant and vowel sound blended together - ca - fa – etc.). Some lists contain other common sounds or spelling patterns which have been color-coded. STEP 3 - READ EACH WORD SLOWLY After successfully doing the “Stop at the Vowel Sound” technique with each word, the student now tries to say each complete word in the left column slowly. If an error is made, stop your student – discuss the mistake - then start again from the top. When the student can read the left column words from top to bottom with no errors, proceed to STEP 4 Fluency Practice. NOTE: If the last “boxed” word significantly slows student progress you can skip this word and study separately. The boxed word is called the “Word of the Day” and usually does not follow the phonics rules or is difficult for students to learn.
STEP 4 – FLUENCY PRACTICE This step dramatically improves mastery of the list words. Use a stopwatch or watch timer to “time” how fast your student can say the list words in the left column. Tell your student that when they say the first word you will then begin timing. If the column of five words is read without an error, have your student place an “X” in the correct time box in the “L” column below. If your student makes an error while being timed, stop and discuss the error and begin again from the top. When a mastery time of 3 seconds is reached (most students reach 2.5 sec which you can record above the red line), have your student read the right “R” column of words. Skip Steps 1 and 2 for the right column and have the student read the five words slowly and then begin timing. The right column words are the same as in the left column but in a different order and without the color-coded sound helper. When a mastery time of 2-3 seconds is reached again, congratulate your student and move to the next word list. On the following day come back and test your student on the 5 list words across the top of this page, you’ll then see the words have been truly mastered!
off
top
stop
long
off
stop
long
top
Fluency Time Chart Place “X” in box after timing student on words
”L” is for saying left column words ”R” is for saying right column words
The 3 sections can be used for 3 students To record times for class use chart in File #19
L R L R L R
Ceiling
3.0 3.0 3.0 3.0 3.0 3.0
3.1 3.1 3.1 3.1 3.1 3.1
3.2 3.2 3.2 3.2 3.2 3.2
3.3 3.3 3.3 3.3 3.3 3.3
3.4 3.4 3.4 3.4 3.4 3.4
3.5 3.5 3.5 3.5 3.5 3.5
3.6 3.6 3.6 3.6 3.6 3.6
3.7 3.7 3.7 3.7 3.7 3.7
3.8 3.8 3.8 3.8 3.8 3.8
3.9 3.9 3.9 3.9 3.9 3.9
4.0 4.0 4.0 4.0 4.0 4.0
4.1 4.1 4.1 4.1 4.1 4.1
4.2 4.2 4.2 4.2 4.2 4.2
4.3 4.3 4.3 4.3 4.3 4.3
4.4 4.4 4.4 4.4 4.4 4.4
4.5 4.5 4.5 4.5 4.5 4.5
4.6 4.6 4.6 4.6 4.6 4.6
4.7 4.7 4.7 4.7 4.7 4.7
4.8 4.8 4.8 4.8 4.8 4.8
4.9 4.9 4.9 4.9 4.9 4.9
5 5 5 5 5 5
there
there
6 6 6 6 6 6
7 7 7 7 7 7
8 8 8 8 8 8
Initials
Copyright © 2007 ReadingKey Inc. – Materials available at TampaReads.com - LEVEL 1-1
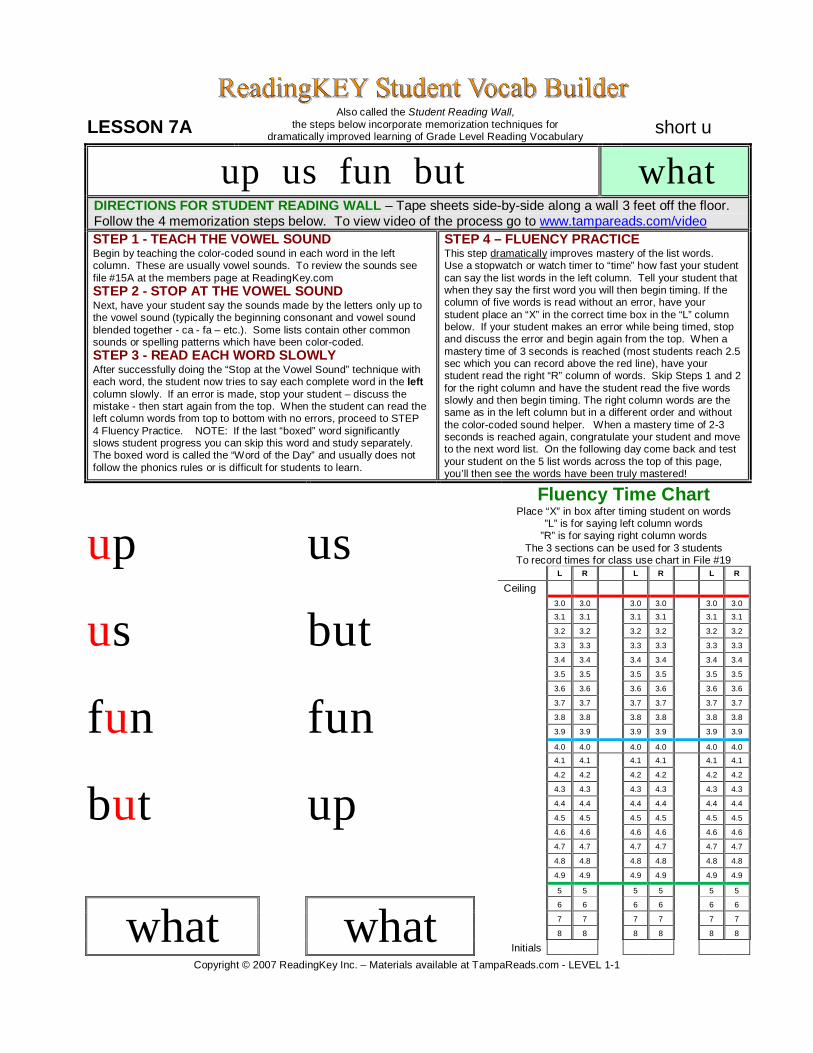
LESSON 7A Also called the Student Reading Wall,
the steps below incorporate memorization techniques for dramatically improved learning of Grade Level Reading Vocabulary short u
up us fun but what DIRECTIONS FOR STUDENT READING WALL – Tape sheets side-by-side along a wall 3 feet off the floor. Follow the 4 memorization steps below. To view video of the process go to www.tampareads.com/video STEP 1 - TEACH THE VOWEL SOUND Begin by teaching the color-coded sound in each word in the left column. These are usually vowel sounds. To review the sounds see file #15A at the members page at ReadingKey.com STEP 2 - STOP AT THE VOWEL SOUND Next, have your student say the sounds made by the letters only up to the vowel sound (typically the beginning consonant and vowel sound blended together - ca - fa – etc.). Some lists contain other common sounds or spelling patterns which have been color-coded. STEP 3 - READ EACH WORD SLOWLY After successfully doing the “Stop at the Vowel Sound” technique with each word, the student now tries to say each complete word in the left column slowly. If an error is made, stop your student – discuss the mistake - then start again from the top. When the student can read the left column words from top to bottom with no errors, proceed to STEP 4 Fluency Practice. NOTE: If the last “boxed” word significantly slows student progress you can skip this word and study separately. The boxed word is called the “Word of the Day” and usually does not follow the phonics rules or is difficult for students to learn.
STEP 4 – FLUENCY PRACTICE This step dramatically improves mastery of the list words. Use a stopwatch or watch timer to “time” how fast your student can say the list words in the left column. Tell your student that when they say the first word you will then begin timing. If the column of five words is read without an error, have your student place an “X” in the correct time box in the “L” column below. If your student makes an error while being timed, stop and discuss the error and begin again from the top. When a mastery time of 3 seconds is reached (most students reach 2.5 sec which you can record above the red line), have your student read the right “R” column of words. Skip Steps 1 and 2 for the right column and have the student read the five words slowly and then begin timing. The right column words are the same as in the left column but in a different order and without the color-coded sound helper. When a mastery time of 2-3 seconds is reached again, congratulate your student and move to the next word list. On the following day come back and test your student on the 5 list words across the top of this page, you’ll then see the words have been truly mastered!
up
us
fun
but
us
but
fun
up
Fluency Time Chart Place “X” in box after timing student on words
”L” is for saying left column words ”R” is for saying right column words
The 3 sections can be used for 3 students To record times for class use chart in File #19
L R L R L R
Ceiling
3.0 3.0 3.0 3.0 3.0 3.0
3.1 3.1 3.1 3.1 3.1 3.1
3.2 3.2 3.2 3.2 3.2 3.2
3.3 3.3 3.3 3.3 3.3 3.3
3.4 3.4 3.4 3.4 3.4 3.4
3.5 3.5 3.5 3.5 3.5 3.5
3.6 3.6 3.6 3.6 3.6 3.6
3.7 3.7 3.7 3.7 3.7 3.7
3.8 3.8 3.8 3.8 3.8 3.8
3.9 3.9 3.9 3.9 3.9 3.9
4.0 4.0 4.0 4.0 4.0 4.0
4.1 4.1 4.1 4.1 4.1 4.1
4.2 4.2 4.2 4.2 4.2 4.2
4.3 4.3 4.3 4.3 4.3 4.3
4.4 4.4 4.4 4.4 4.4 4.4
4.5 4.5 4.5 4.5 4.5 4.5
4.6 4.6 4.6 4.6 4.6 4.6
4.7 4.7 4.7 4.7 4.7 4.7
4.8 4.8 4.8 4.8 4.8 4.8
4.9 4.9 4.9 4.9 4.9 4.9
5 5 5 5 5 5
what
what
6 6 6 6 6 6
7 7 7 7 7 7
8 8 8 8 8 8
Initials
Copyright © 2007 ReadingKey Inc. – Materials available at TampaReads.com - LEVEL 1-1
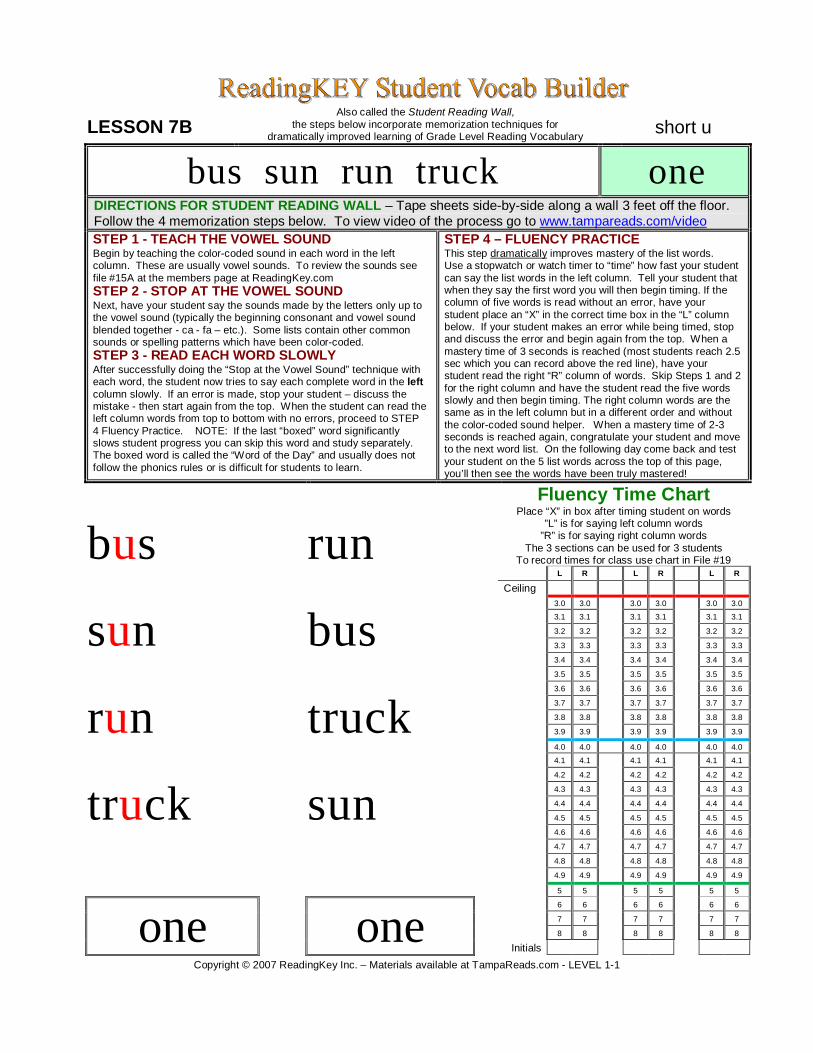
LESSON 7B Also called the Student Reading Wall,
the steps below incorporate memorization techniques for dramatically improved learning of Grade Level Reading Vocabulary short u
bus sun run truck one DIRECTIONS FOR STUDENT READING WALL – Tape sheets side-by-side along a wall 3 feet off the floor. Follow the 4 memorization steps below. To view video of the process go to www.tampareads.com/video STEP 1 - TEACH THE VOWEL SOUND Begin by teaching the color-coded sound in each word in the left column. These are usually vowel sounds. To review the sounds see file #15A at the members page at ReadingKey.com STEP 2 - STOP AT THE VOWEL SOUND Next, have your student say the sounds made by the letters only up to the vowel sound (typically the beginning consonant and vowel sound blended together - ca - fa – etc.). Some lists contain other common sounds or spelling patterns which have been color-coded. STEP 3 - READ EACH WORD SLOWLY After successfully doing the “Stop at the Vowel Sound” technique with each word, the student now tries to say each complete word in the left column slowly. If an error is made, stop your student – discuss the mistake - then start again from the top. When the student can read the left column words from top to bottom with no errors, proceed to STEP 4 Fluency Practice. NOTE: If the last “boxed” word significantly slows student progress you can skip this word and study separately. The boxed word is called the “Word of the Day” and usually does not follow the phonics rules or is difficult for students to learn.
STEP 4 – FLUENCY PRACTICE This step dramatically improves mastery of the list words. Use a stopwatch or watch timer to “time” how fast your student can say the list words in the left column. Tell your student that when they say the first word you will then begin timing. If the column of five words is read without an error, have your student place an “X” in the correct time box in the “L” column below. If your student makes an error while being timed, stop and discuss the error and begin again from the top. When a mastery time of 3 seconds is reached (most students reach 2.5 sec which you can record above the red line), have your student read the right “R” column of words. Skip Steps 1 and 2 for the right column and have the student read the five words slowly and then begin timing. The right column words are the same as in the left column but in a different order and without the color-coded sound helper. When a mastery time of 2-3 seconds is reached again, congratulate your student and move to the next word list. On the following day come back and test your student on the 5 list words across the top of this page, you’ll then see the words have been truly mastered!
bus
sun
run
truck
run
bus
truck
sun
Fluency Time Chart Place “X” in box after timing student on words
”L” is for saying left column words ”R” is for saying right column words
The 3 sections can be used for 3 students To record times for class use chart in File #19
L R L R L R
Ceiling
3.0 3.0 3.0 3.0 3.0 3.0
3.1 3.1 3.1 3.1 3.1 3.1
3.2 3.2 3.2 3.2 3.2 3.2
3.3 3.3 3.3 3.3 3.3 3.3
3.4 3.4 3.4 3.4 3.4 3.4
3.5 3.5 3.5 3.5 3.5 3.5
3.6 3.6 3.6 3.6 3.6 3.6
3.7 3.7 3.7 3.7 3.7 3.7
3.8 3.8 3.8 3.8 3.8 3.8
3.9 3.9 3.9 3.9 3.9 3.9
4.0 4.0 4.0 4.0 4.0 4.0
4.1 4.1 4.1 4.1 4.1 4.1
4.2 4.2 4.2 4.2 4.2 4.2
4.3 4.3 4.3 4.3 4.3 4.3
4.4 4.4 4.4 4.4 4.4 4.4
4.5 4.5 4.5 4.5 4.5 4.5
4.6 4.6 4.6 4.6 4.6 4.6
4.7 4.7 4.7 4.7 4.7 4.7
4.8 4.8 4.8 4.8 4.8 4.8
4.9 4.9 4.9 4.9 4.9 4.9
5 5 5 5 5 5
one
one
6 6 6 6 6 6
7 7 7 7 7 7
8 8 8 8 8 8
Initials
Copyright © 2007 ReadingKey Inc. – Materials available at TampaReads.com - LEVEL 1-1
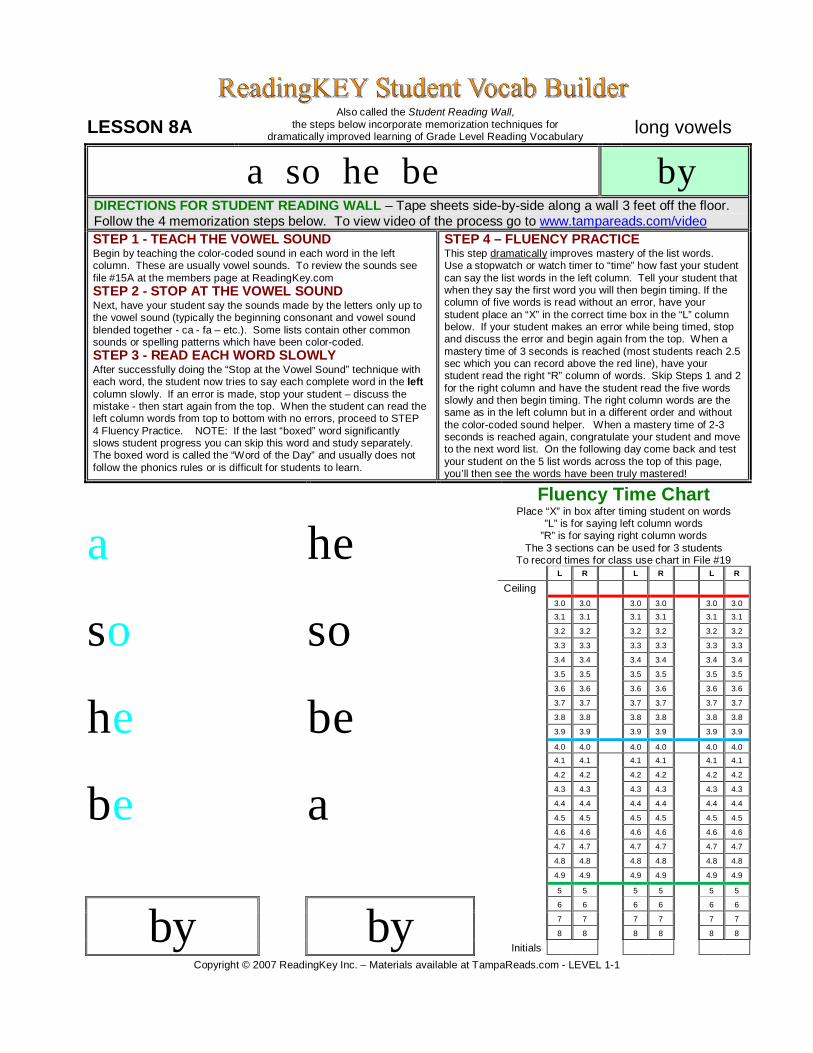
LESSON 8A Also called the Student Reading Wall,
the steps below incorporate memorization techniques for dramatically improved learning of Grade Level Reading Vocabulary long vowels
a so he be by DIRECTIONS FOR STUDENT READING WALL – Tape sheets side-by-side along a wall 3 feet off the floor. Follow the 4 memorization steps below. To view video of the process go to www.tampareads.com/video STEP 1 - TEACH THE VOWEL SOUND Begin by teaching the color-coded sound in each word in the left column. These are usually vowel sounds. To review the sounds see file #15A at the members page at ReadingKey.com STEP 2 - STOP AT THE VOWEL SOUND Next, have your student say the sounds made by the letters only up to the vowel sound (typically the beginning consonant and vowel sound blended together - ca - fa – etc.). Some lists contain other common sounds or spelling patterns which have been color-coded. STEP 3 - READ EACH WORD SLOWLY After successfully doing the “Stop at the Vowel Sound” technique with each word, the student now tries to say each complete word in the left column slowly. If an error is made, stop your student – discuss the mistake - then start again from the top. When the student can read the left column words from top to bottom with no errors, proceed to STEP 4 Fluency Practice. NOTE: If the last “boxed” word significantly slows student progress you can skip this word and study separately. The boxed word is called the “Word of the Day” and usually does not follow the phonics rules or is difficult for students to learn.
STEP 4 – FLUENCY PRACTICE This step dramatically improves mastery of the list words. Use a stopwatch or watch timer to “time” how fast your student can say the list words in the left column. Tell your student that when they say the first word you will then begin timing. If the column of five words is read without an error, have your student place an “X” in the correct time box in the “L” column below. If your student makes an error while being timed, stop and discuss the error and begin again from the top. When a mastery time of 3 seconds is reached (most students reach 2.5 sec which you can record above the red line), have your student read the right “R” column of words. Skip Steps 1 and 2 for the right column and have the student read the five words slowly and then begin timing. The right column words are the same as in the left column but in a different order and without the color-coded sound helper. When a mastery time of 2-3 seconds is reached again, congratulate your student and move to the next word list. On the following day come back and test your student on the 5 list words across the top of this page, you’ll then see the words have been truly mastered!
a
so
he
be
he
so
be
a
Fluency Time Chart Place “X” in box after timing student on words
”L” is for saying left column words ”R” is for saying right column words
The 3 sections can be used for 3 students To record times for class use chart in File #19
L R L R L R
Ceiling
3.0 3.0 3.0 3.0 3.0 3.0
3.1 3.1 3.1 3.1 3.1 3.1
3.2 3.2 3.2 3.2 3.2 3.2
3.3 3.3 3.3 3.3 3.3 3.3
3.4 3.4 3.4 3.4 3.4 3.4
3.5 3.5 3.5 3.5 3.5 3.5
3.6 3.6 3.6 3.6 3.6 3.6
3.7 3.7 3.7 3.7 3.7 3.7
3.8 3.8 3.8 3.8 3.8 3.8
3.9 3.9 3.9 3.9 3.9 3.9
4.0 4.0 4.0 4.0 4.0 4.0
4.1 4.1 4.1 4.1 4.1 4.1
4.2 4.2 4.2 4.2 4.2 4.2
4.3 4.3 4.3 4.3 4.3 4.3
4.4 4.4 4.4 4.4 4.4 4.4
4.5 4.5 4.5 4.5 4.5 4.5
4.6 4.6 4.6 4.6 4.6 4.6
4.7 4.7 4.7 4.7 4.7 4.7
4.8 4.8 4.8 4.8 4.8 4.8
4.9 4.9 4.9 4.9 4.9 4.9
5 5 5 5 5 5
by
by
6 6 6 6 6 6
7 7 7 7 7 7
8 8 8 8 8 8
Initials
Copyright © 2007 ReadingKey Inc. – Materials available at TampaReads.com - LEVEL 1-1
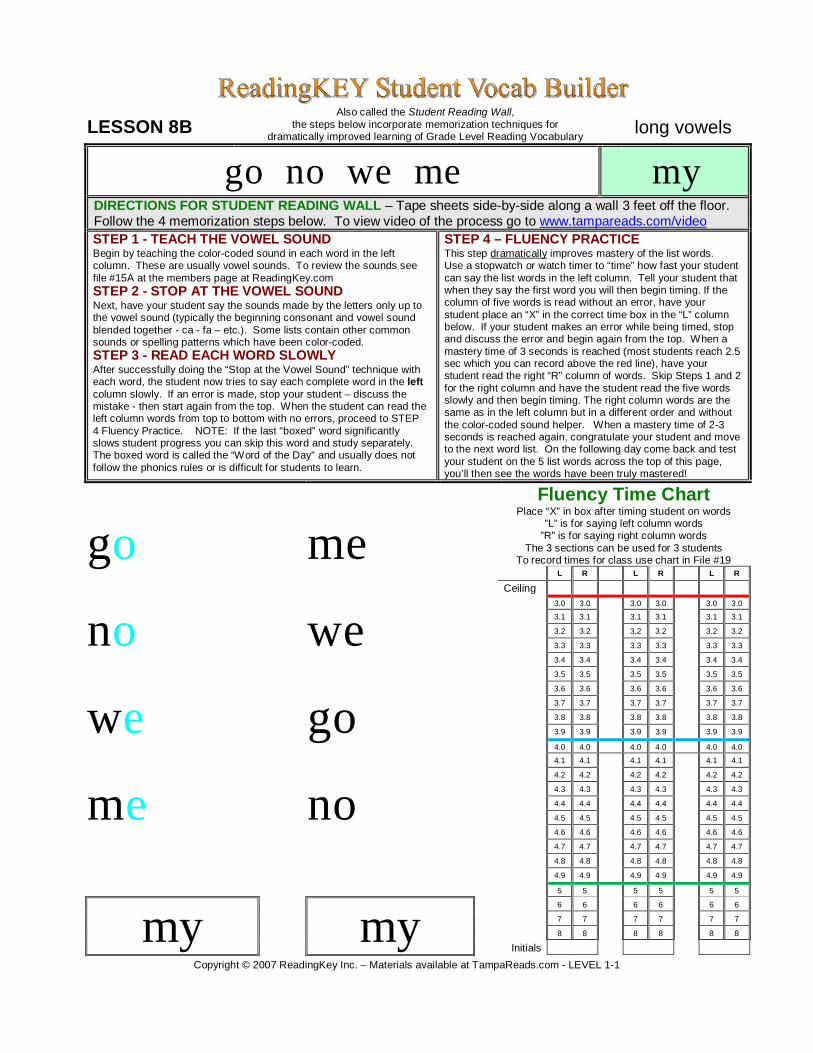
LESSON 8B Also called the Student Reading Wall,
the steps below incorporate memorization techniques for dramatically improved learning of Grade Level Reading Vocabulary long vowels
go no we me my DIRECTIONS FOR STUDENT READING WALL – Tape sheets side-by-side along a wall 3 feet off the floor. Follow the 4 memorization steps below. To view video of the process go to www.tampareads.com/video STEP 1 - TEACH THE VOWEL SOUND Begin by teaching the color-coded sound in each word in the left column. These are usually vowel sounds. To review the sounds see file #15A at the members page at ReadingKey.com STEP 2 - STOP AT THE VOWEL SOUND Next, have your student say the sounds made by the letters only up to the vowel sound (typically the beginning consonant and vowel sound blended together - ca - fa – etc.). Some lists contain other common sounds or spelling patterns which have been color-coded. STEP 3 - READ EACH WORD SLOWLY After successfully doing the “Stop at the Vowel Sound” technique with each word, the student now tries to say each complete word in the left column slowly. If an error is made, stop your student – discuss the mistake - then start again from the top. When the student can read the left column words from top to bottom with no errors, proceed to STEP 4 Fluency Practice. NOTE: If the last “boxed” word significantly slows student progress you can skip this word and study separately. The boxed word is called the “Word of the Day” and usually does not follow the phonics rules or is difficult for students to learn.
STEP 4 – FLUENCY PRACTICE This step dramatically improves mastery of the list words. Use a stopwatch or watch timer to “time” how fast your student can say the list words in the left column. Tell your student that when they say the first word you will then begin timing. If the column of five words is read without an error, have your student place an “X” in the correct time box in the “L” column below. If your student makes an error while being timed, stop and discuss the error and begin again from the top. When a mastery time of 3 seconds is reached (most students reach 2.5 sec which you can record above the red line), have your student read the right “R” column of words. Skip Steps 1 and 2 for the right column and have the student read the five words slowly and then begin timing. The right column words are the same as in the left column but in a different order and without the color-coded sound helper. When a mastery time of 2-3 seconds is reached again, congratulate your student and move to the next word list. On the following day come back and test your student on the 5 list words across the top of this page, you’ll then see the words have been truly mastered!
go
no
we
me
me
we
go
no
Fluency Time Chart Place “X” in box after timing student on words
”L” is for saying left column words ”R” is for saying right column words
The 3 sections can be used for 3 students To record times for class use chart in File #19
L R L R L R
Ceiling
3.0 3.0 3.0 3.0 3.0 3.0
3.1 3.1 3.1 3.1 3.1 3.1
3.2 3.2 3.2 3.2 3.2 3.2
3.3 3.3 3.3 3.3 3.3 3.3
3.4 3.4 3.4 3.4 3.4 3.4
3.5 3.5 3.5 3.5 3.5 3.5
3.6 3.6 3.6 3.6 3.6 3.6
3.7 3.7 3.7 3.7 3.7 3.7
3.8 3.8 3.8 3.8 3.8 3.8
3.9 3.9 3.9 3.9 3.9 3.9
4.0 4.0 4.0 4.0 4.0 4.0
4.1 4.1 4.1 4.1 4.1 4.1
4.2 4.2 4.2 4.2 4.2 4.2
4.3 4.3 4.3 4.3 4.3 4.3
4.4 4.4 4.4 4.4 4.4 4.4
4.5 4.5 4.5 4.5 4.5 4.5
4.6 4.6 4.6 4.6 4.6 4.6
4.7 4.7 4.7 4.7 4.7 4.7
4.8 4.8 4.8 4.8 4.8 4.8
4.9 4.9 4.9 4.9 4.9 4.9
5 5 5 5 5 5
my
my
6 6 6 6 6 6
7 7 7 7 7 7
8 8 8 8 8 8
Initials
Copyright © 2007 ReadingKey Inc. – Materials available at TampaReads.com - LEVEL 1-1
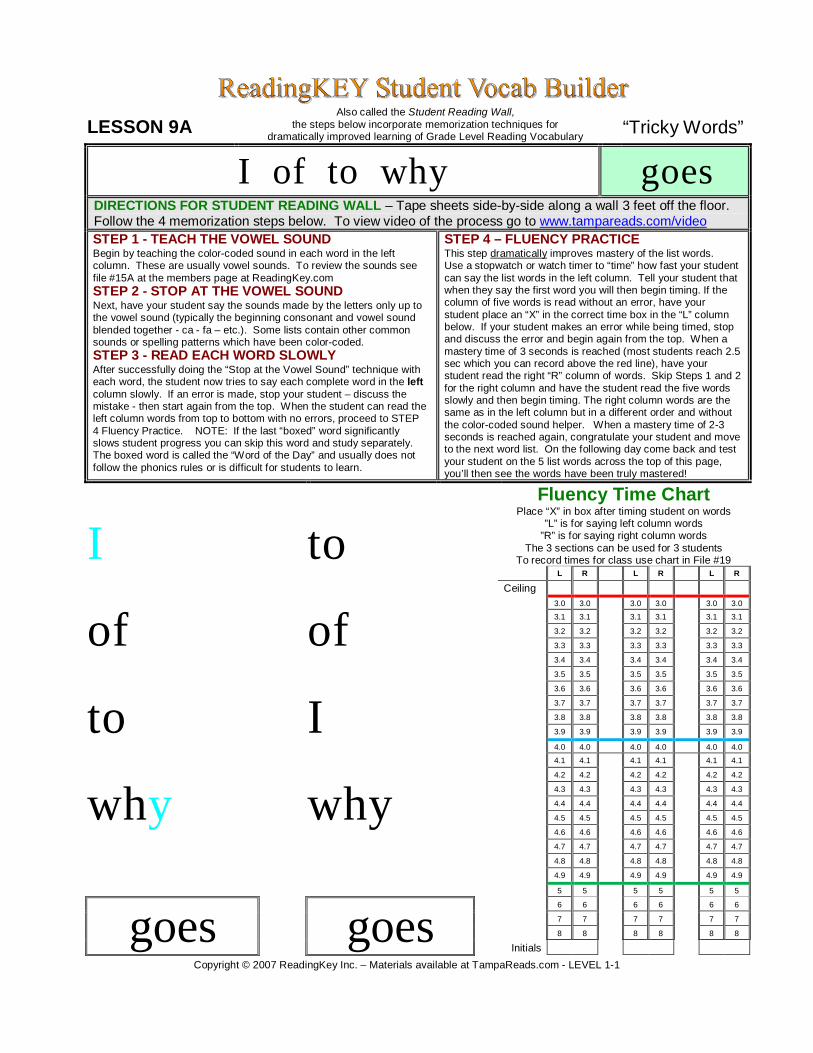
LESSON 9A Also called the Student Reading Wall,
the steps below incorporate memorization techniques for dramatically improved learning of Grade Level Reading Vocabulary “Tricky Words”
I of to why goes DIRECTIONS FOR STUDENT READING WALL – Tape sheets side-by-side along a wall 3 feet off the floor. Follow the 4 memorization steps below. To view video of the process go to www.tampareads.com/video STEP 1 - TEACH THE VOWEL SOUND Begin by teaching the color-coded sound in each word in the left column. These are usually vowel sounds. To review the sounds see file #15A at the members page at ReadingKey.com STEP 2 - STOP AT THE VOWEL SOUND Next, have your student say the sounds made by the letters only up to the vowel sound (typically the beginning consonant and vowel sound blended together - ca - fa – etc.). Some lists contain other common sounds or spelling patterns which have been color-coded. STEP 3 - READ EACH WORD SLOWLY After successfully doing the “Stop at the Vowel Sound” technique with each word, the student now tries to say each complete word in the left column slowly. If an error is made, stop your student – discuss the mistake - then start again from the top. When the student can read the left column words from top to bottom with no errors, proceed to STEP 4 Fluency Practice. NOTE: If the last “boxed” word significantly slows student progress you can skip this word and study separately. The boxed word is called the “Word of the Day” and usually does not follow the phonics rules or is difficult for students to learn.
STEP 4 – FLUENCY PRACTICE This step dramatically improves mastery of the list words. Use a stopwatch or watch timer to “time” how fast your student can say the list words in the left column. Tell your student that when they say the first word you will then begin timing. If the column of five words is read without an error, have your student place an “X” in the correct time box in the “L” column below. If your student makes an error while being timed, stop and discuss the error and begin again from the top. When a mastery time of 3 seconds is reached (most students reach 2.5 sec which you can record above the red line), have your student read the right “R” column of words. Skip Steps 1 and 2 for the right column and have the student read the five words slowly and then begin timing. The right column words are the same as in the left column but in a different order and without the color-coded sound helper. When a mastery time of 2-3 seconds is reached again, congratulate your student and move to the next word list. On the following day come back and test your student on the 5 list words across the top of this page, you’ll then see the words have been truly mastered!
I
of
to
why
to
of
I
why
Fluency Time Chart Place “X” in box after timing student on words
”L” is for saying left column words ”R” is for saying right column words
The 3 sections can be used for 3 students To record times for class use chart in File #19
L R L R L R
Ceiling
3.0 3.0 3.0 3.0 3.0 3.0
3.1 3.1 3.1 3.1 3.1 3.1
3.2 3.2 3.2 3.2 3.2 3.2
3.3 3.3 3.3 3.3 3.3 3.3
3.4 3.4 3.4 3.4 3.4 3.4
3.5 3.5 3.5 3.5 3.5 3.5
3.6 3.6 3.6 3.6 3.6 3.6
3.7 3.7 3.7 3.7 3.7 3.7
3.8 3.8 3.8 3.8 3.8 3.8
3.9 3.9 3.9 3.9 3.9 3.9
4.0 4.0 4.0 4.0 4.0 4.0
4.1 4.1 4.1 4.1 4.1 4.1
4.2 4.2 4.2 4.2 4.2 4.2
4.3 4.3 4.3 4.3 4.3 4.3
4.4 4.4 4.4 4.4 4.4 4.4
4.5 4.5 4.5 4.5 4.5 4.5
4.6 4.6 4.6 4.6 4.6 4.6
4.7 4.7 4.7 4.7 4.7 4.7
4.8 4.8 4.8 4.8 4.8 4.8
4.9 4.9 4.9 4.9 4.9 4.9
5 5 5 5 5 5
goes
goes
6 6 6 6 6 6
7 7 7 7 7 7
8 8 8 8 8 8
Initials
Copyright © 2007 ReadingKey Inc. – Materials available at TampaReads.com - LEVEL 1-1
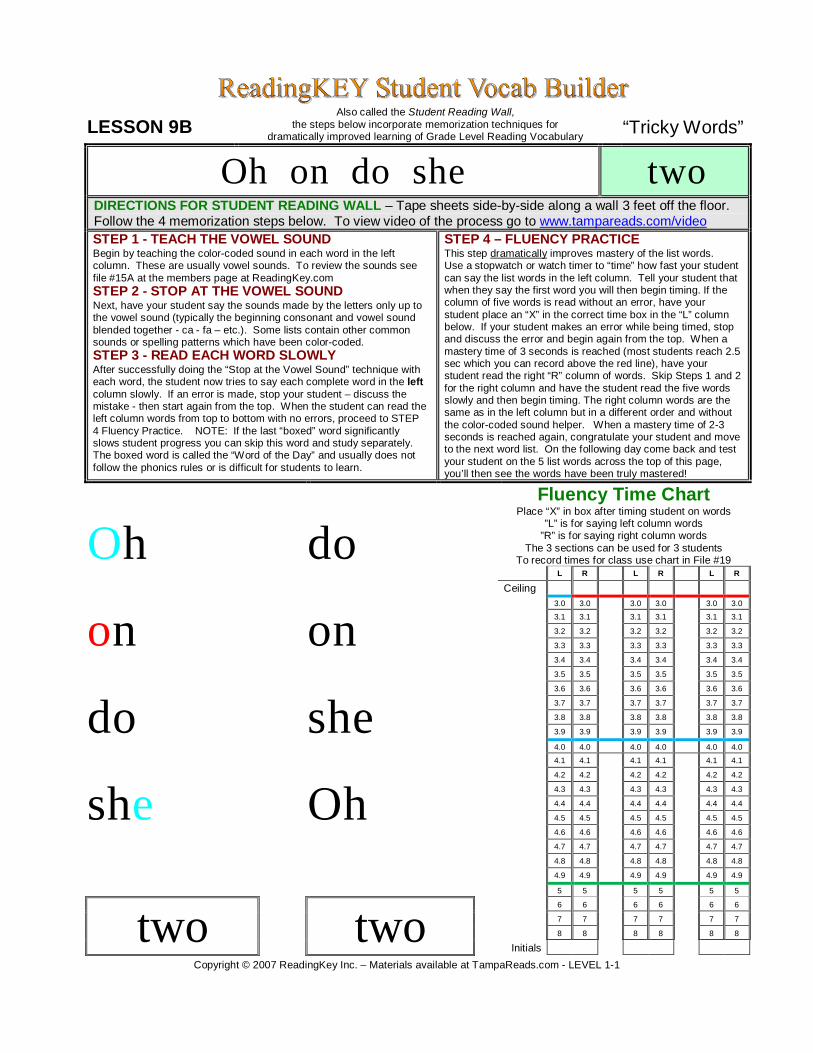
LESSON 9B Also called the Student Reading Wall,
the steps below incorporate memorization techniques for dramatically improved learning of Grade Level Reading Vocabulary “Tricky Words”
Oh on do she two DIRECTIONS FOR STUDENT READING WALL – Tape sheets side-by-side along a wall 3 feet off the floor. Follow the 4 memorization steps below. To view video of the process go to www.tampareads.com/video STEP 1 - TEACH THE VOWEL SOUND Begin by teaching the color-coded sound in each word in the left column. These are usually vowel sounds. To review the sounds see file #15A at the members page at ReadingKey.com STEP 2 - STOP AT THE VOWEL SOUND Next, have your student say the sounds made by the letters only up to the vowel sound (typically the beginning consonant and vowel sound blended together - ca - fa – etc.). Some lists contain other common sounds or spelling patterns which have been color-coded. STEP 3 - READ EACH WORD SLOWLY After successfully doing the “Stop at the Vowel Sound” technique with each word, the student now tries to say each complete word in the left column slowly. If an error is made, stop your student – discuss the mistake - then start again from the top. When the student can read the left column words from top to bottom with no errors, proceed to STEP 4 Fluency Practice. NOTE: If the last “boxed” word significantly slows student progress you can skip this word and study separately. The boxed word is called the “Word of the Day” and usually does not follow the phonics rules or is difficult for students to learn.
STEP 4 – FLUENCY PRACTICE This step dramatically improves mastery of the list words. Use a stopwatch or watch timer to “time” how fast your student can say the list words in the left column. Tell your student that when they say the first word you will then begin timing. If the column of five words is read without an error, have your student place an “X” in the correct time box in the “L” column below. If your student makes an error while being timed, stop and discuss the error and begin again from the top. When a mastery time of 3 seconds is reached (most students reach 2.5 sec which you can record above the red line), have your student read the right “R” column of words. Skip Steps 1 and 2 for the right column and have the student read the five words slowly and then begin timing. The right column words are the same as in the left column but in a different order and without the color-coded sound helper. When a mastery time of 2-3 seconds is reached again, congratulate your student and move to the next word list. On the following day come back and test your student on the 5 list words across the top of this page, you’ll then see the words have been truly mastered!
Oh
on
do
she
do
on
she
Oh
Fluency Time Chart Place “X” in box after timing student on words
”L” is for saying left column words ”R” is for saying right column words
The 3 sections can be used for 3 students To record times for class use chart in File #19
L R L R L R
Ceiling
3.0 3.0 3.0 3.0 3.0 3.0
3.1 3.1 3.1 3.1 3.1 3.1
3.2 3.2 3.2 3.2 3.2 3.2
3.3 3.3 3.3 3.3 3.3 3.3
3.4 3.4 3.4 3.4 3.4 3.4
3.5 3.5 3.5 3.5 3.5 3.5
3.6 3.6 3.6 3.6 3.6 3.6
3.7 3.7 3.7 3.7 3.7 3.7
3.8 3.8 3.8 3.8 3.8 3.8
3.9 3.9 3.9 3.9 3.9 3.9
4.0 4.0 4.0 4.0 4.0 4.0
4.1 4.1 4.1 4.1 4.1 4.1
4.2 4.2 4.2 4.2 4.2 4.2
4.3 4.3 4.3 4.3 4.3 4.3
4.4 4.4 4.4 4.4 4.4 4.4
4.5 4.5 4.5 4.5 4.5 4.5
4.6 4.6 4.6 4.6 4.6 4.6
4.7 4.7 4.7 4.7 4.7 4.7
4.8 4.8 4.8 4.8 4.8 4.8
4.9 4.9 4.9 4.9 4.9 4.9
5 5 5 5 5 5
two
two
6 6 6 6 6 6
7 7 7 7 7 7
8 8 8 8 8 8
Initials
Copyright © 2007 ReadingKey Inc. – Materials available at TampaReads.com - LEVEL 1-1