Embed Size (px)
Citation preview

Review • Practice problems
• Image Processing
• Images – a 2D arrangement of colors
• Color – RGBA
• The color data type
• loadPixels(), getPixel(), setPixel(), updatePixels()
• immediateMode(), redraw(), delay()
• Animating with images
• PImage class, methods
• Examples that manipulate pixels
• Creative image processing – Pointillism

# cat.py
from Processing import *
img = loadImage("cat.jpg")
w, h = img.width(), img.height()
window(w, h)
noStroke()
ellipseMode(CENTER)
# Cover with random shapes
img.loadPixels()
for i in xrange(30000):
# Add a random colored glyphs to recreate the image
x = int(random(w))
y = int(random(h))
c = img.getPixel(x, y)
fill(c)
# Choose a glyph
text("C", x, y)
#ellipse(x, y, 7, 7)
“Creative” Image Processing - Cat made of glyphs


Convert a Color Image to Grayscale
• Average of RGB – Use the average of the red, green and blue color components as gray
• Lightness – Use the average of the max and min of (red + green + blue) as gray
• Luminance: a heuristic based on human perception – Humans are more sensitive to green, less sensitive to red, and even less
sensitive to blue
– Model used by HDTV:
– gray = 0.2126 * red(c) + 0.7152 * green(c) + 0.0722 * blue(c)

# Compute the "lightness" of a color
def lightness( c ):
r = red(c)
g = green(c)
b = blue(c)
return 0.5*(max(r, g, b) + min(r, g, b))
# Compute average of three color components
def average( c ):
return (red(c) + green(c) + blue(c))/3.0
# Compute luminance with model used for HDTV
def luminance( c ):
return 0.2126 * red(c) + 0.7152 * green(c) + 0.0722 * blue(c)
Convert a Color Image to Grayscale

# grayscale.py
# Convert color image to grayscale
from Processing import *
# Load the image to process
img = loadImage("kodim01.png")
# Create a window of the same size
w = int( img.width() )
h = int( img.height() )
window( w, h )
image( img, 0, 0) # Draw the image
Convert a Color Image to Grayscale
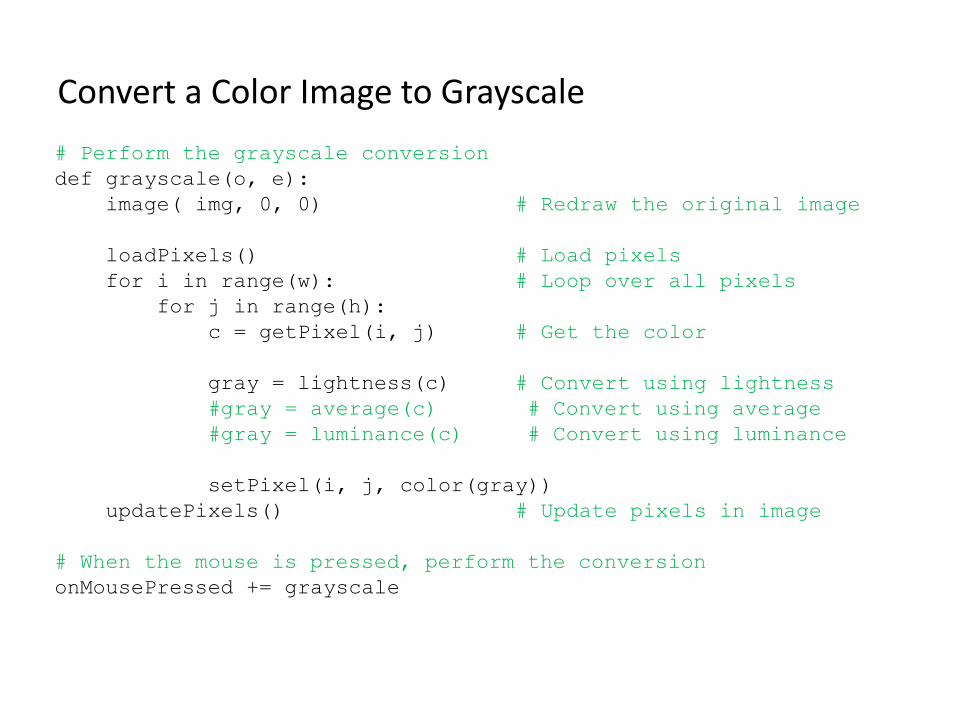
# Perform the grayscale conversion
def grayscale(o, e):
image( img, 0, 0) # Redraw the original image
loadPixels() # Load pixels
for i in range(w): # Loop over all pixels
for j in range(h):
c = getPixel(i, j) # Get the color
gray = lightness(c) # Convert using lightness
#gray = average(c) # Convert using average
#gray = luminance(c) # Convert using luminance
setPixel(i, j, color(gray))
updatePixels() # Update pixels in image
# When the mouse is pressed, perform the conversion
onMousePressed += grayscale
Convert a Color Image to Grayscale

Convert a Color Image to Grayscale - Lightness
grayscale.py

Convert a Color Image to Grayscale - Average
grayscale.py

Convert a Color Image to Grayscale - Luminance
grayscale.py

Thresholding • Pixels below a cutoff value are set to black, white otherwise
threshold.py

# threshold.py
# Demonstrating the threshold function
from Processing import *
# Load the image to process
img = loadImage("kodim01.png")
# Compute luminance with model used for HDTV
def luminance( c ):
return 0.2126 * red(c) + 0.7152 * green(c) + 0.0722 * blue(c)
# Create a window of the same size
w = int( img.width() )
h = int( img.height() )
window( w, h )
# Draw the image
image( img, 0, 0)
threshold.py
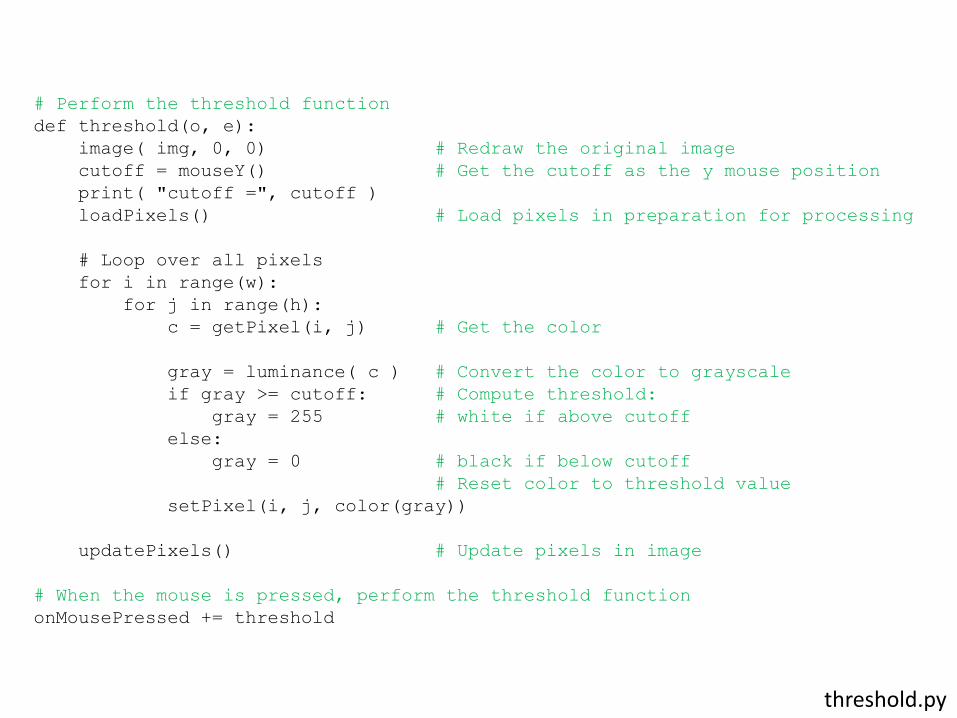
# Perform the threshold function
def threshold(o, e):
image( img, 0, 0) # Redraw the original image
cutoff = mouseY() # Get the cutoff as the y mouse position
print( "cutoff =", cutoff )
loadPixels() # Load pixels in preparation for processing
# Loop over all pixels
for i in range(w):
for j in range(h):
c = getPixel(i, j) # Get the color
gray = luminance( c ) # Convert the color to grayscale
if gray >= cutoff: # Compute threshold:
gray = 255 # white if above cutoff
else:
gray = 0 # black if below cutoff
# Reset color to threshold value
setPixel(i, j, color(gray))
updatePixels() # Update pixels in image
# When the mouse is pressed, perform the threshold function
onMousePressed += threshold
threshold.py

Creative Thresholding

# webicon.py
from Processing import *
# Define colors
darkBlue = color(0, 51, 76)
reddish = color(217, 26, 33)
lightBlue = color(112, 150, 158)
yellow = color(252, 227, 166)
# Load image
img = loadImage("obama.jpg")
w = int( img.width() )
h = int( img.height() )
# Open a window and draw the initial image
window( w, h )
image(img, 0, 0)
# Compute luminance with model used for HDTV
def luminance( c ):
return 0.2126 * red(c) + 0.7152 * green(c) + 0.0722 * blue(c)
# Load pixels so they can be manipulated
loadPixels()
webicon.py

# Loop over all pixels in the images
for i in range(w):
for j in range(h):
c = getPixel(i, j) # Get pixel color
total = luminance( c ) # Compute luminance
if total < 60: # Remap to new color
newColor = darkBlue
elif total < 121:
newColor = reddish
elif total < 147:
newColor = lightBlue
else:
newColor = yellow
setPixel(i, j, newColor) # Update to new color
updatePixels() # Update
webicon.py

webicon.py

Other Single-Pixel Filters
# Negative Filter
def negative( c ):
return color(255-red(c), 255-green(c), 255-blue(c))
# Sepia Filter
def sepia( c ):
r = int( red(c)*0.393 + green(c)*0.769 + blue(c)*0.189 )
g = int( red(c)*0.349 + green(c)*0.686 + blue(c)*0.168 )
b = int( red(c)*0.272 + green(c)*0.534 + blue(c)*0.131 )
r = constrain( r, 0, 255 )
g = constrain( g, 0, 255 )
b = constrain( b, 0, 255 )
return color(r, g, b)
filter.py

filter.py
Original Negative Sepia

Histogram Equalization
• Increases the global contrast of images
• Intensities are better distributed
• Reveals more details in photos that are over or under exposed
• Better views of bone structure in X-rays

histogram.py
Shift to the right implies brighter reds

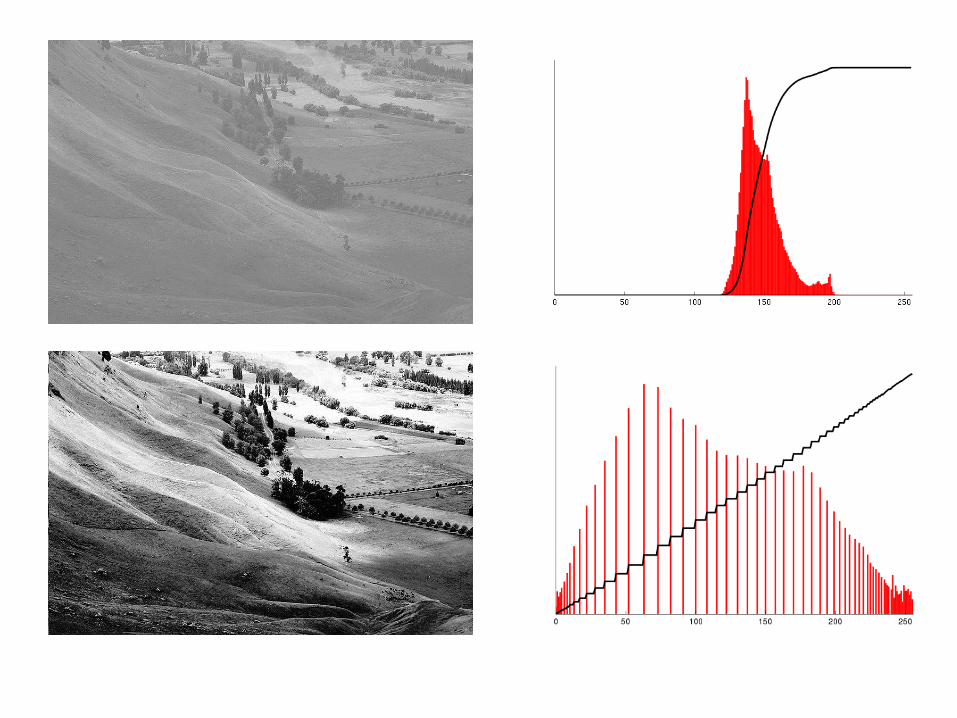

Histogram Equalization
Procedure:
• Calculate color frequencies - count the number of times each pixel color appear in the image
• Calculate the cumulative distribution function (cdf) for each pixel color – the number of times all smaller color values appear in the image
• Normalize over (0, 255)

Sharpen Edge Detection
Gaussian Blur
spatial.py
Spatial Filtering (aka Area-Based Filters)
Original

Spatial Filtering (aka Area-Based Filters)
A B C
D E F
G H I
w1 w2 w3
w4 w5 w6
w7 w8 w9
E'
E' = w1A+w2B+w3C+w4D+w5E+w6F+w7G+w8H+w9I
Input Image Output Image
Spatial Filter Kernel

Spatial Kernel Filters - Identity
• No change
0 0 0
0 1 0
0 0 0
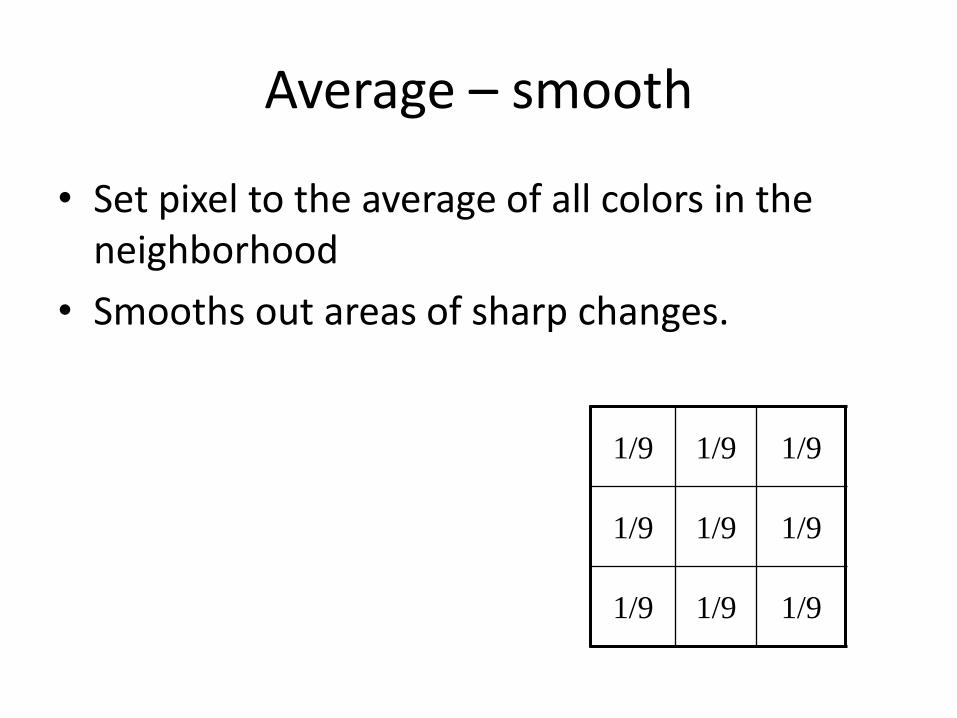
Average – smooth
• Set pixel to the average of all colors in the neighborhood
• Smooths out areas of sharp changes.
1/9 1/9 1/9
1/9 1/9 1/9
1/9 1/9 1/9

Blur – Low Pass Filter
• Softens significant color changes in image
• Creates intermediate colors
• aka Gaussian Blur 1/16 2/16 1/16
2/16 4/16 2/16
1/16 2/16 4/16

Sharpen – High Pass Filter
• Enhances the difference between neighboring pixels
• The greater the difference, the more change in the current pixel
0 -2/3 0
-2/3 11/3 -2/3
0 -2/3 0
-1 -1 -1
-1 9 -1
-1 -1 -1

# spatial.py
from Processing import *
# Sharpen
matrix = [[ -1., -1., -1. ],
[ -1., 9., -1. ],
[ -1., -1., -1. ]]
# Load image and open a window
img = loadImage("moon.jpg")
w = int( img.width() )
h = int( img.height() )
window( w, h )
keepAbove(True)
# Draw the image on the window
img.loadPixels()
image(img,0,0)
# Filter rectangle
loadPixels()
# Apply filter
for r in range( 1, h-1):
for c in range( 1, w-1):
clr = spatialFilter(c, r, matrix, img)
setPixel(c, r, clr)
updatePixels() spatial.py

# Perform spatial filtering on one pixel location
def spatialFilter(c, r, matrix, img):
rtotal = 0.0
gtotal = 0.0
btotal = 0.0
# Loop through filter matrix
for i in range(3):
for j in range(3):
# Get the weight position in the filter
cc = c + j - 1
rr = r + i - 1
# Apply the filter
pix = img.getPixel(cc, rr)
mul = matrix[i][j]
rtotal += red(pix) * mul
gtotal += green(pix) * mul
btotal += blue(pix) * mul
# Make sure RGB is within range
rtotal = constrain(rtotal,0,255)
gtotal = constrain(gtotal,0,255)
btotal = constrain(btotal,0,255)
# Return resulting color
return color(rtotal, gtotal, btotal)
spatial.py

Dilation - Morphology • Set new pixel color to the max color value within
a 3x3 window around original pixel color
• Causes objects to grow in size.
• Brightens and fills in small holes

Erosion - Morphology • Set new pixel color to the min color value within
a 3x3 window around original pixel color
• Causes objects to shrink.
• Darkens and removes small objects

Erode + Dilate to Despeckle
Erode Dilate erodedilate.py

# erodedilate.py
from Processing import *
# Compute luminance with model used for HDTV
def luminance( c ):
return 0.2126 * red(c) + 0.7152 * green(c) + 0.0722 * blue(c)
# Load image three times and open a window
img1 = loadImage("andy-warhol2.jpg")
img2 = loadImage("andy-warhol2.jpg")
img3 = loadImage("andy-warhol2.jpg")
w = img1.width()
h = img1.height()
window( w, h )
keepAbove(True)
image( img1,0,0 ) # Draw the first image on the window
print("Eroding...")
erode( img1, img2 ) # Erode image
image( img2,0,0 ) # Draw eroded image
print("Dilating...")
dilate( img2, img3 ) # Dilate image
image( img3,0,0 ) # Draw dilated image
print("Done")

# Perform erosion on img1 and save to img2
def erode(img1, img2):
# Load pixels and get dimensions
img1.loadPixels()
img2.loadPixels()
w = img1.width()
h = img1.height()
# Loop over all pixels
for r in range( 1, h-1 ):
for c in range( 1, w-1 ):
# Init min luminance and color
minlum = 255
minclr = color(255)
# Loop over analysis region
for i in range(3):
for j in range(3):
# Compute indexes of adjacent pixels
cc = c + j - 1
rr = r + i - 1
# Update if luminance is lower
clr = img1.getPixel(cc, rr)
lum = luminance( clr )
if lum < minlum:
minlum = lum
minclr = clr
# Set minimum color in img2
img2.setPixel(c, r, minclr)
# Copy modified pixels from buffer to image
img2.updatePixels()

# Perform dilation on img1 and save to img2
def dilate(img1, img2):
# Load pixels and get dimensions
img1.loadPixels()
img2.loadPixels()
w = img1.width()
h = img1.height()
# Loop over all pixels
for r in range( 1, h-1):
for c in range( 1, w-1):
# Init max luminance and color
maxlum = 0
maxclr = color(0)
# Loop over analysis region
for i in range(3):
for j in range(3):
# Compute indexes of adjacent pixels
cc = c + j - 1
rr = r + i - 1
# Update if luminance is lower
clr = img1.getPixel(cc, rr)
lum = luminance( clr )
if lum > maxlum:
maxlum = lum
maxclr = clr
# Set maximum color in img2
img2.setPixel(c, r, maxclr)
# Copy modified pixels from buffer to image
img2.updatePixels()

Applications - Feature Extraction
- Region detection – morphology manipulation - Dilate and Erode
- Open
- Erode Dilate
- Small objects are removed
- Close
- Dilate Erode
- Holes are closed
- Skeleton and perimeter
Kun Huang, Ohio State / Digital Image Processing using Matlab, By R.C.Gonzalez, R.E.Woods, and S.L.Eddins
Digtial Image Processing, Spring 2006 40
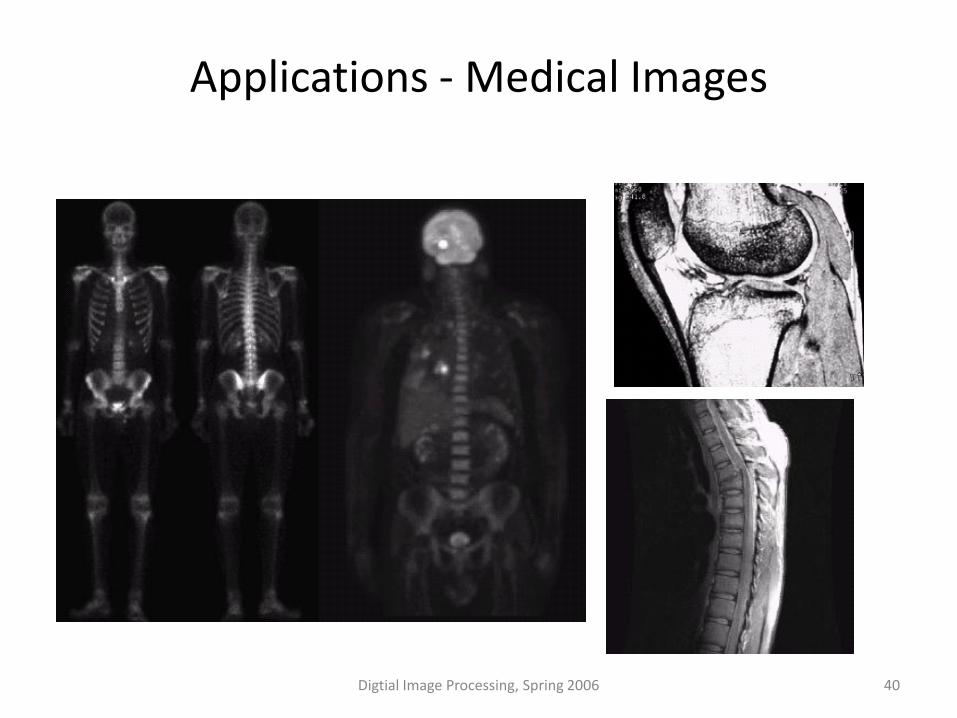
Applications - Medical Images

Digtial Image Processing, Spring 2006 41
Applications - Manufacturing

Measuring Confluency in Cell Culture Biology
• Refers to the coverage of a dish or flask by cell colonies
• 100% confluency = completely covered
• Image Processing Method
1. Mask off unimportant parts of image
2. Threshold image
3. Count pixels of certain color

Blend: Subtract
Original Mask Subtracted

Filter: Theshold
Subtracted Threshold
5.3% Confluency
Count Fraction of Pixels to Quantify

IC50 determination
5M 1.67M 0.56M 0.185M 0.062M DMSO

Vision Guided Robotics Colony Picking
Camera Robot Arm

Image Processing
- =
Compute the
presence of objects
or “particles”
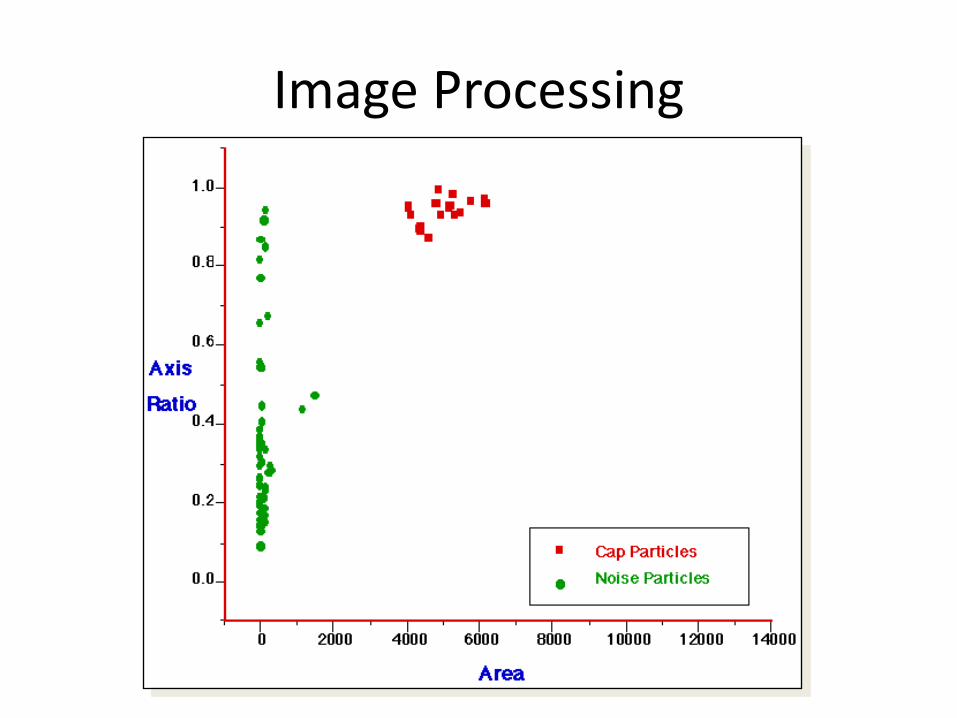
Image Processing

Image Processing

Image Processing
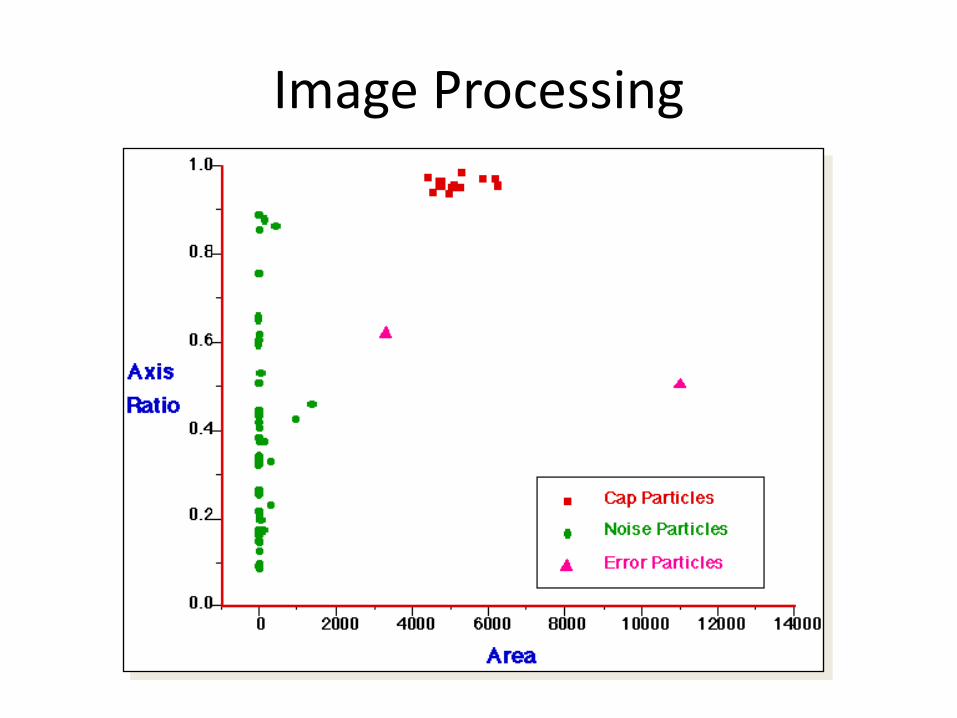
Image Processing

What can you do with Image Processing? Inspect, Measure, and Count using Photos and Video http://www.youtube.com/watch?v=KsTtNWVhpgI Image Processing Software http://www.youtube.com/watch?v=1WJp9mGnWSM Manual Colony Counter http://www.youtube.com/watch?v=7B-9Wf6pENQ Automated Colony counter http://www.youtube.com/watch?v=qtJmQqRHHag Predator algorithm for object tracking with learning http://www.youtube.com/watch?v=1GhNXHCQGsM FACEDEALS http://player.vimeo.com/video/47133014 Video Processing, with Processing http://www.niklasroy.com/project/88/my-little-piece-of-privacy/ http://www.youtube.com/watch?v=rKhbUjVyKIc


![Review Images – an array of colors Color – RGBA Loading, modifying, updating pixels pixels[] as a 2D array Simple filters – tinting, grayscale, negative,](https://img.pdfslide.us/doc/110x75/56649c885503460f949405a2/review-images-an-array-of-colors-color-rgba-loading-modifying-updating.jpg)


![Review - Computer Science | Bryn Mawr College · Review • Images – an array of colors • Color – RGBA • Loading, modifying, updating pixels • pixels[] as a 2D array •](https://img.pdfslide.us/doc/110x75/5cc2945788c993df0d8e18e8/review-computer-science-bryn-mawr-college-review-images-an-array.jpg)