Embed Size (px)
Citation preview

e1.2
003
Kobra 4.5 SR1 Getting Started GuidDocument Number 451010
9 April 2
003
CE sent of te or them n co
R . Li
A ta CEP ters N S
ASH 000 (R . Jalib en In re deM re ord ar and otN of O LO is and ot ere, S S s or re e U CO Intr
A ade na
YP
P
Kobra 4.5 SR1 Getting Started Guide, Document Number 4510101.2, 9 April 2
opyright © 2003 Reuters. All Rights Reserved.xcept as permitted by law, no part of this document may be reproduced or transmitted by any process or means without the prior con Reuters. Reuters, by publishing this document, does not guarantee that any information contained herein is and will remain accuraat use of the information will ensure correct and faultless operation of the relevant service or equipment. Reuters, its agents, and ployees shall not be held liable to or through any user for any loss or damage whatsoever resulting from reliance on the informatio
ntained herein.
euters and the Reuters sphere logo are registered trademarks and trademarks of the Reuters group of companies around the worldpper is a Reuters company.
DFIN, KOBRA, and KONDOR are registered trademarks, and Reuters 3000 Xtra, Reuters Analytic Data System (ADS), Reuters Daontribution Server (DCS), Reuters Data Transformation System (DTS), Reuters Dealing 2000-2, Reuters Dealing 3000, Reuters nterprise Licensing System (ELS), Reuters Integrated Data Network (IDN), Reuters Kondor Global Limits, Reuters Kondor Trade rocessing, Reuters Kondor Value at Risk, Reuters Market Data System (RMDS), Reuters Network Management System (NMS), Reuews 2000, Reuters News Distribution System (NDS), Reuters Optimizing Contribution Server (OCS), Reuters Personalized Deliveryystem (PDS), Reuters PowerPlus Pro, Reuters Triarch are trademarks of the Reuters group of companies around the world.
dobe, Acrobat, FrameMaker, and PostScript are trademarks of Adobe Systems Inc. BEA WebLogic Server is a trademark of BEA ystems. Clearing21 is a registered trademark of CLEARNET S.A. CLS is a trademark of CLS UK Intermediate Holdings Ltd. ewlett-Packard is a registered trademark of Hewlett-Packard Company. IBM is a registered trademark, and IBM AIX, RISC System/6S6000), and Power PC are trademarks of International Business Machines Corporation. Intel is a registered trademark of Intel Corpva, Solaris, Sun, and SunOS are trademarks or registered trademarks of Sun Microsystems Inc. in the U.S.A. and other countries. www: Copyright © 1994-2000 World Wide Web Consortium, (Massachusetts Institute of Technology, Institut National de Rechercheformatique et en Automatique, Keio University). All Rights Reserved. See W3C License http://www.w3.org/Consortium/Legal/ for motails. Copyright © 1995 CERN. Reuters ADS includes computer software created and made available by CERN. Microsoft, C#,
S-DOS, .NET, Visual Basic, Visual Basic for Applications, Windows, Windows 2000, Windows NT, Windows XP, and Intellisense aregistered trademarks, and ActiveX, Microsoft Excel, Microsoft Internet Explorer, Microsoft Office, Microsoft Outlook, and Microsoft We products of Microsoft Corp. in the U.S.A. and other countries. MOTIF is a trademark of the Open Software Foundation in the U.S.A.her countries. Netscape is a registered trademark of Netscape Communications Corporation in the U.S.A. and other countries. uTCRACKER is a registered trademark of MKS. Olectra and Olectra Chart are trademarks of KL Group Inc. Onyx CRM is a productnyx Software Corporation. OPEN LOOK is a registered trademark of Novell Inc. Oracle is a trademark of Oracle Corporation. PASSO a registered trademark of PASS Engineering GmbH in Germany. PowerTier is a trademark of Persistence Software Inc. in the U.S.A.her countries. RiskMetrics is a trademark of J.P. Morgan. SYBASE is a registered trademark, InfoMaker, PowerBuilder, SQL AnywhYBASE SQL, Watcom, and Watcom SQL are trademarks, SYBASE Adaptive Server, SYBASE Open Client, SYBASE Open Server,YBASE Replication Server, and SYBASE RSSD, are products of SYBASE Inc. or its subsidiaries. SPARC trademarks are trademarkgistered trademarks of SPARC International Inc. licensed exclusively to Sun Microsystems Inc. UNIX is a registered trademark in th.S.A. and other countries, licensed exclusively through X/Open Company Limited. TIB and TIBCO are registered trademarks, and TIBformation Cache, TIBCO Hawk, and TIBCO Rendezvous are trademarks of TIBCO Software Inc. Visigenic and VisiBroker are ademarks of Visigenic Software Inc. X Window System is a trademark of Massachusetts Institute of Technology.
cknowledgement is made to all other brand or product names referred to in the text that are registered trademarks, trademarks, or trmes of their respective owners.
our comments are welcomelease provide feedback on the Reuters guides and on-line help by sending your comments by e-mail to: [email protected].
ublished by Reuters, 85 Fleet Street, London, EC4P 4AJ, UK.
Kobra 4.5 SR1 Getting Started Guide
rfs- 3
D
file.
[email protected] 9 April 2003
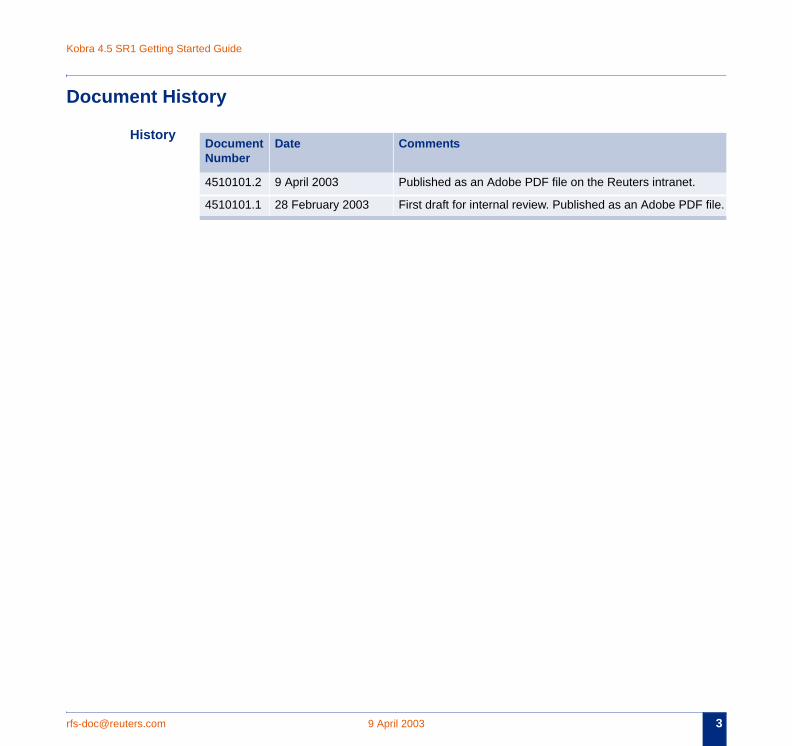
ocument History
History Document Number
Date Comments
4510101.2 9 April 2003 Published as an Adobe PDF file on the Reuters intranet.
4510101.1 28 February 2003 First draft for internal review. Published as an Adobe PDF

Kobra 4.5 SR1 Getting Started Guide
4 .com
9 April 2003 rfs-doc@reuters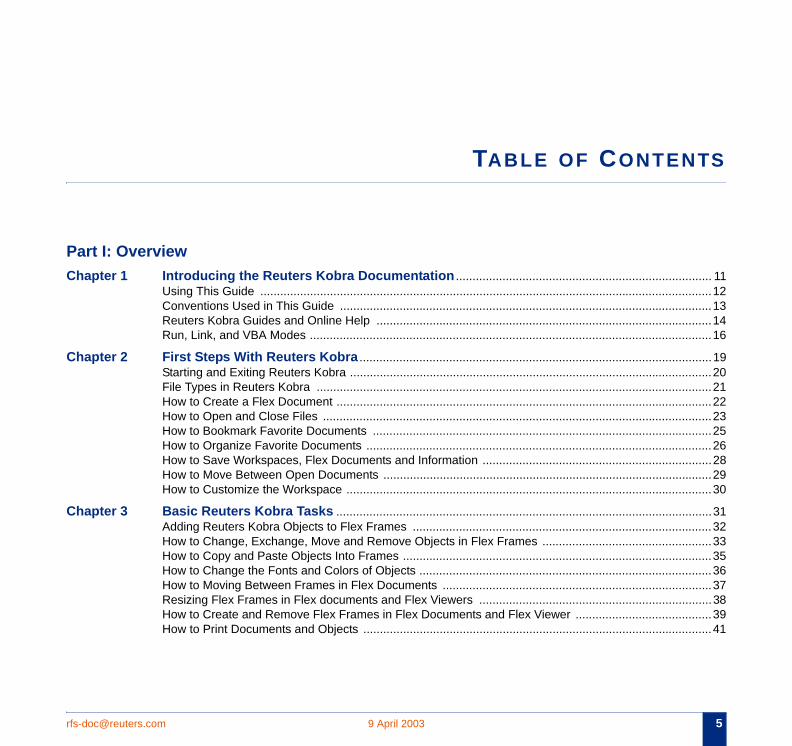
rfs-doc@reuters 5
TS
Part I: OveChapter 1 .... 11
....12
....13
....14
....16
Chapter 2 ....19....20....21....22....23....25....26....28....29....30
Chapter 3 ....31....32....33....35....36....37....38....39....41
.com 9 April 2003
TABLE OF CONTEN
rviewIntroducing the Reuters Kobra Documentation .........................................................................Using This Guide ....................................................................................................................................Conventions Used in This Guide ............................................................................................................Reuters Kobra Guides and Online Help .................................................................................................Run, Link, and VBA Modes .....................................................................................................................
First Steps With Reuters Kobra ......................................................................................................Starting and Exiting Reuters Kobra .........................................................................................................File Types in Reuters Kobra ...................................................................................................................How to Create a Flex Document .............................................................................................................How to Open and Close Files .................................................................................................................How to Bookmark Favorite Documents ..................................................................................................How to Organize Favorite Documents ....................................................................................................How to Save Workspaces, Flex Documents and Information .................................................................How to Move Between Open Documents ...............................................................................................How to Customize the Workspace ..........................................................................................................
Basic Reuters Kobra Tasks .............................................................................................................Adding Reuters Kobra Objects to Flex Frames ......................................................................................How to Change, Exchange, Move and Remove Objects in Flex Frames ...............................................How to Copy and Paste Objects Into Frames .........................................................................................How to Change the Fonts and Colors of Objects ....................................................................................How to Moving Between Frames in Flex Documents .............................................................................Resizing Flex Frames in Flex documents and Flex Viewers ..................................................................How to Create and Remove Flex Frames in Flex Documents and Flex Viewer .....................................How to Print Documents and Objects .....................................................................................................
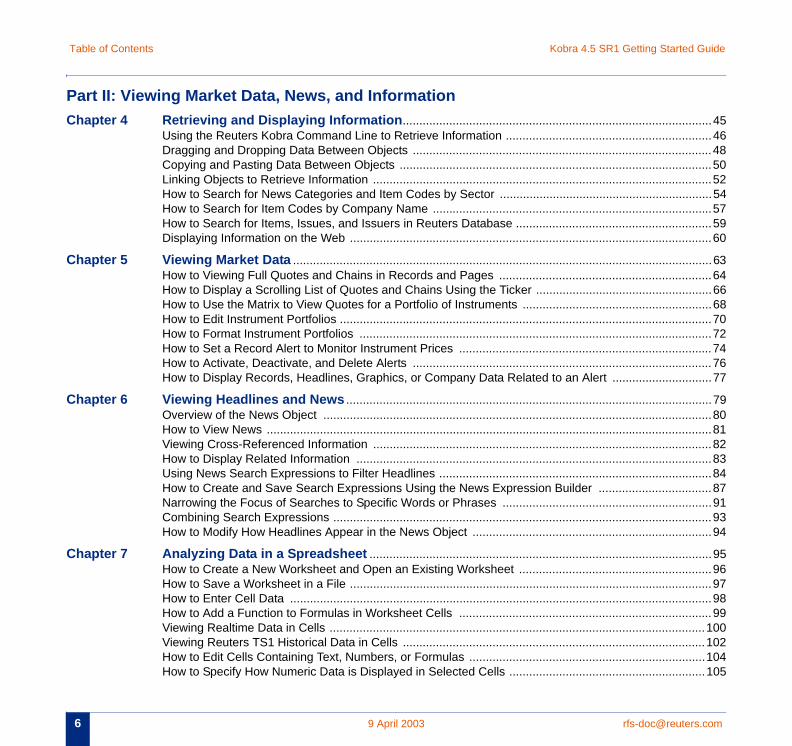
Table of Contents Kobra 4.5 SR1 Getting Started Guide
6 .com
PaCh ....45
....46
....48
....50
....52
....54
....57
....59
....60
Ch ....63....64....66....68....70....72....74....76....77
Ch ....79....80....81....82....83....84....87....91....93....94
Ch ....95....96....97....98....99..100..102..104..105
9 April 2003 rfs-doc@reuters
rt II: Viewing Market Data, News, and Informationapter 4 Retrieving and Displaying Information.........................................................................................
Using the Reuters Kobra Command Line to Retrieve Information ..........................................................Dragging and Dropping Data Between Objects ......................................................................................Copying and Pasting Data Between Objects ..........................................................................................Linking Objects to Retrieve Information ..................................................................................................How to Search for News Categories and Item Codes by Sector ............................................................How to Search for Item Codes by Company Name ................................................................................How to Search for Items, Issues, and Issuers in Reuters Database .......................................................Displaying Information on the Web .........................................................................................................
apter 5 Viewing Market Data ..........................................................................................................................How to Viewing Full Quotes and Chains in Records and Pages ............................................................How to Display a Scrolling List of Quotes and Chains Using the Ticker .................................................How to Use the Matrix to View Quotes for a Portfolio of Instruments .....................................................How to Edit Instrument Portfolios ............................................................................................................How to Format Instrument Portfolios ......................................................................................................How to Set a Record Alert to Monitor Instrument Prices ........................................................................How to Activate, Deactivate, and Delete Alerts ......................................................................................How to Display Records, Headlines, Graphics, or Company Data Related to an Alert ..........................
apter 6 Viewing Headlines and News ..........................................................................................................Overview of the News Object .................................................................................................................How to View News ..................................................................................................................................Viewing Cross-Referenced Information ..................................................................................................How to Display Related Information .......................................................................................................Using News Search Expressions to Filter Headlines ..............................................................................How to Create and Save Search Expressions Using the News Expression Builder ..............................Narrowing the Focus of Searches to Specific Words or Phrases ...........................................................Combining Search Expressions ..............................................................................................................How to Modify How Headlines Appear in the News Object ....................................................................
apter 7 Analyzing Data in a Spreadsheet ...................................................................................................How to Create a New Worksheet and Open an Existing Worksheet ......................................................How to Save a Worksheet in a File .........................................................................................................How to Enter Cell Data ...........................................................................................................................How to Add a Function to Formulas in Worksheet Cells ........................................................................Viewing Realtime Data in Cells ...............................................................................................................Viewing Reuters TS1 Historical Data in Cells .........................................................................................How to Edit Cells Containing Text, Numbers, or Formulas .....................................................................How to Specify How Numeric Data is Displayed in Selected Cells .........................................................
Kobra 4.5 SR1 Getting Started Guide Table of Contents
rfs- 7
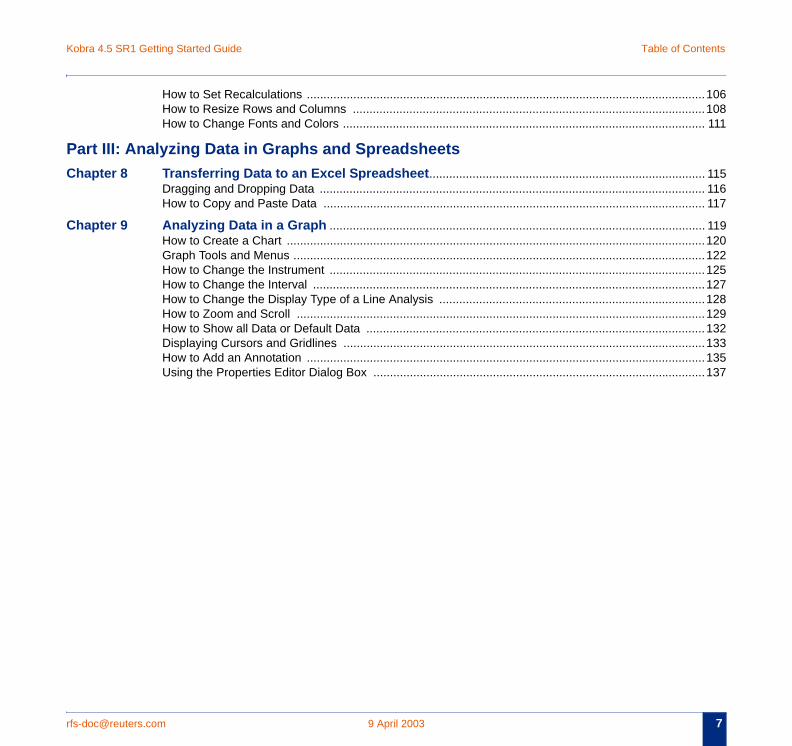
..106
..108
.. 111
PaCh .. 115
.. 116
.. 117
Ch .. 119..120..122..125..127..128..129..132..133..135..137
[email protected] 9 April 2003
How to Set Recalculations ......................................................................................................................How to Resize Rows and Columns ........................................................................................................How to Change Fonts and Colors ...........................................................................................................
rt III: Analyzing Data in Graphs and Spreadsheetsapter 8 Transferring Data to an Excel Spreadsheet.................................................................................
Dragging and Dropping Data ..................................................................................................................How to Copy and Paste Data .................................................................................................................
apter 9 Analyzing Data in a Graph ...............................................................................................................How to Create a Chart ............................................................................................................................Graph Tools and Menus ..........................................................................................................................How to Change the Instrument ...............................................................................................................How to Change the Interval ....................................................................................................................How to Change the Display Type of a Line Analysis ..............................................................................How to Zoom and Scroll .........................................................................................................................How to Show all Data or Default Data ....................................................................................................Displaying Cursors and Gridlines ...........................................................................................................How to Add an Annotation ......................................................................................................................Using the Properties Editor Dialog Box ..................................................................................................

Table of Contents Kobra 4.5 SR1 Getting Started Guide
8 .com
9 April 2003 rfs-doc@reuters
:
PART IOVERVIEW
Overview Kobra 4.5 SR1 Getting Started Guide
10 .com
9 April 2003 rfs-doc@reuters
rfs-doc@reuters 11
CHAPT
Con
.com 9 April 2003
ER 1 INTRODUCING THE REUTERS KOBRA DOCUMENTATION
tents • Using This Guide• Conventions Used in This Guide• Reuters Kobra Guides and Online Help• Run, Link, and VBA Modes
Chapter 1 Introducing the Reuters Kobra Documentation Kobra 4.5 SR1 Getting Started GuideUsi
12 .com
U
W
eate
Ho in
H r in he
ng This Guide
9 April 2003 rfs-doc@reuters
sing This Guide
hat this guideexplains
The Kobra 4.5 SR1 Getting Started Guide explains how to:• use the Reuters Kobra environment• design Flex documents for financial applications
Intendedaudience
The Kobra 4.5 SR1 Getting Started Guide is intended for users with Run Mode licenses who cror use Flex documents in Reuters Kobra. Users must be familiar with the Windows operating system, as well as financial information services.
w this guide isorganized
The Kobra 4.5 SR1 Getting Started Guide is organized in three parts that give an overview of Reuters Kobra, explain how to view market data, news, & information, and how to analyze datagraphs and spreadsheets.
ow to use thisguide
First read “Conventions Used in This Guide” on page 13 to familiarize yourself with the mannewhich information is presented and the terminology used in this guide. Then read the parts in torder they are presented.
Kobra 4.5 SR1 Getting Started Guide Chapter 1 Introducing the Reuters Kobra Documentation Guide
rfs- 13
C
ursor
e the
and
Conventions Used in This
[email protected] 9 April 2003
onventions Used in This Guide
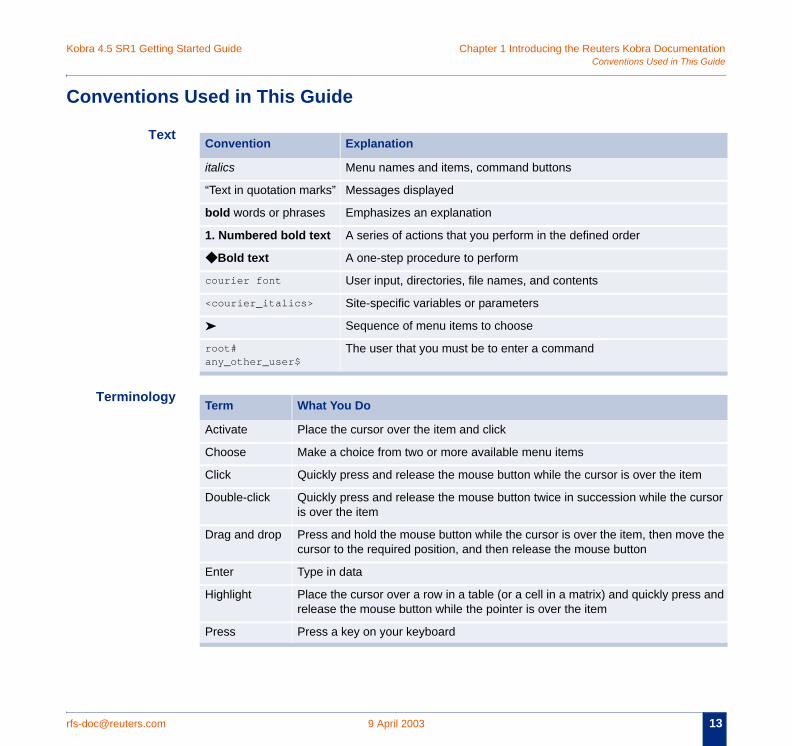
Text
Terminology
Convention Explanation
italics Menu names and items, command buttons
“Text in quotation marks” Messages displayed
bold words or phrases Emphasizes an explanation
1. Numbered bold text A series of actions that you perform in the defined order
◆ Bold text A one-step procedure to perform
courier font User input, directories, file names, and contents
<courier_italics> Site-specific variables or parameters
➤ Sequence of menu items to choose
root#any_other_user$
The user that you must be to enter a command
Term What You Do
Activate Place the cursor over the item and click
Choose Make a choice from two or more available menu items
Click Quickly press and release the mouse button while the cursor is over the item
Double-click Quickly press and release the mouse button twice in succession while the cis over the item
Drag and drop Press and hold the mouse button while the cursor is over the item, then movcursor to the required position, and then release the mouse button
Enter Type in data
Highlight Place the cursor over a row in a table (or a cell in a matrix) and quickly pressrelease the mouse button while the pointer is over the item
Press Press a key on your keyboard
Chapter 1 Introducing the Reuters Kobra Documentation Kobra 4.5 SR1 Getting Started GuideReu
14 .com
R
DF
D
I
er
er
er
er
ters Kobra Guides and Online Help
9 April 2003 rfs-doc@reuters
euters Kobra Guides and Online Help
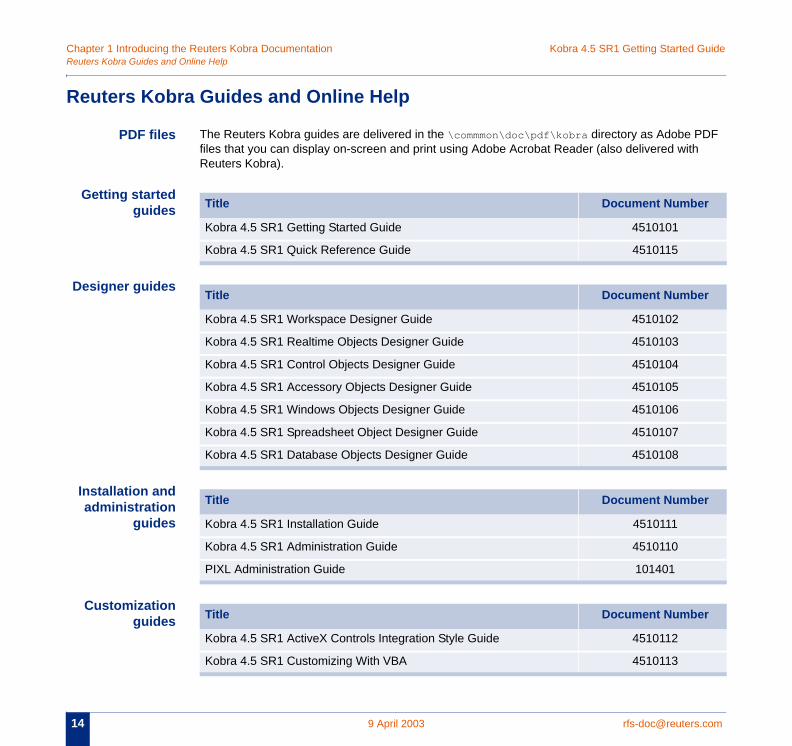
PDF files The Reuters Kobra guides are delivered in the \commmon\doc\pdf\kobra directory as Adobe Pfiles that you can display on-screen and print using Adobe Acrobat Reader (also delivered withReuters Kobra).
Getting startedguides
esigner guides
nstallation andadministration
guides
Customizationguides
Title Document Numb
Kobra 4.5 SR1 Getting Started Guide 4510101
Kobra 4.5 SR1 Quick Reference Guide 4510115
Title Document Numb
Kobra 4.5 SR1 Workspace Designer Guide 4510102
Kobra 4.5 SR1 Realtime Objects Designer Guide 4510103
Kobra 4.5 SR1 Control Objects Designer Guide 4510104
Kobra 4.5 SR1 Accessory Objects Designer Guide 4510105
Kobra 4.5 SR1 Windows Objects Designer Guide 4510106
Kobra 4.5 SR1 Spreadsheet Object Designer Guide 4510107
Kobra 4.5 SR1 Database Objects Designer Guide 4510108
Title Document Numb
Kobra 4.5 SR1 Installation Guide 4510111
Kobra 4.5 SR1 Administration Guide 4510110
PIXL Administration Guide 101401
Title Document Numb
Kobra 4.5 SR1 ActiveX Controls Integration Style Guide 4510112
Kobra 4.5 SR1 Customizing With VBA 4510113
Kobra 4.5 SR1 Getting Started Guide Chapter 1 Introducing the Reuters Kobra Documentatione Help
rfs- 15
g
s of
er
Reuters Kobra Guides and Onlin
[email protected] 9 April 2003
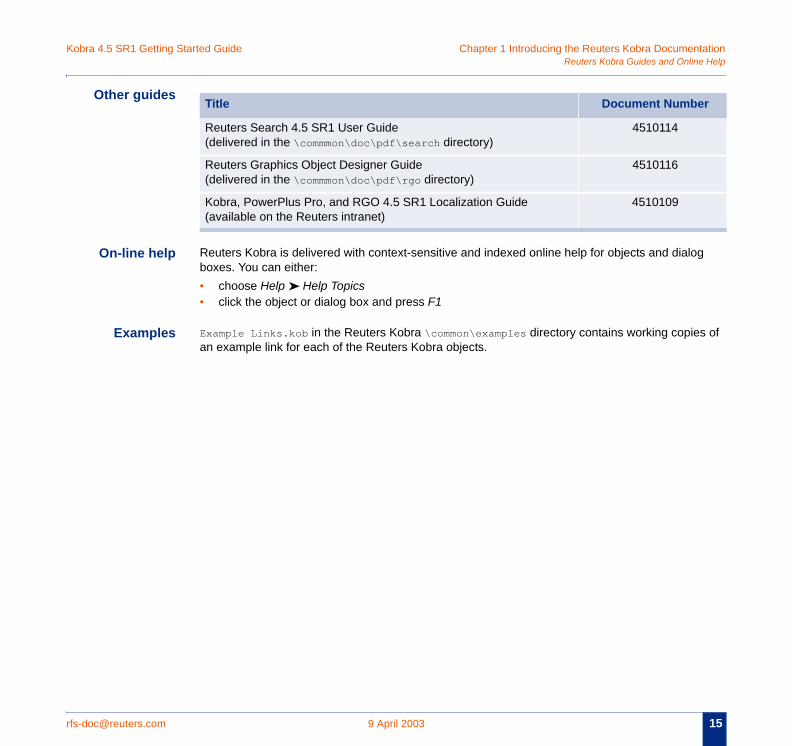
Other guides
On-line help Reuters Kobra is delivered with context-sensitive and indexed online help for objects and dialoboxes. You can either:• choose Help ➤ Help Topics • click the object or dialog box and press F1
Examples Example Links.kob in the Reuters Kobra \common\examples directory contains working copiean example link for each of the Reuters Kobra objects.
Title Document Numb
Reuters Search 4.5 SR1 User Guide(delivered in the \commmon\doc\pdf\search directory)
4510114
Reuters Graphics Object Designer Guide(delivered in the \commmon\doc\pdf\rgo directory)
4510116
Kobra, PowerPlus Pro, and RGO 4.5 SR1 Localization Guide(available on the Reuters intranet)
4510109
Chapter 1 Introducing the Reuters Kobra Documentation Kobra 4.5 SR1 Getting Started GuideRun
16 .com
R
W
W
VBA
■
■
■
■
■
■
■
■
■
■
VBA
■
■
■
■
, Link, and VBA Modes
9 April 2003 rfs-doc@reuters
un, Link, and VBA Modes
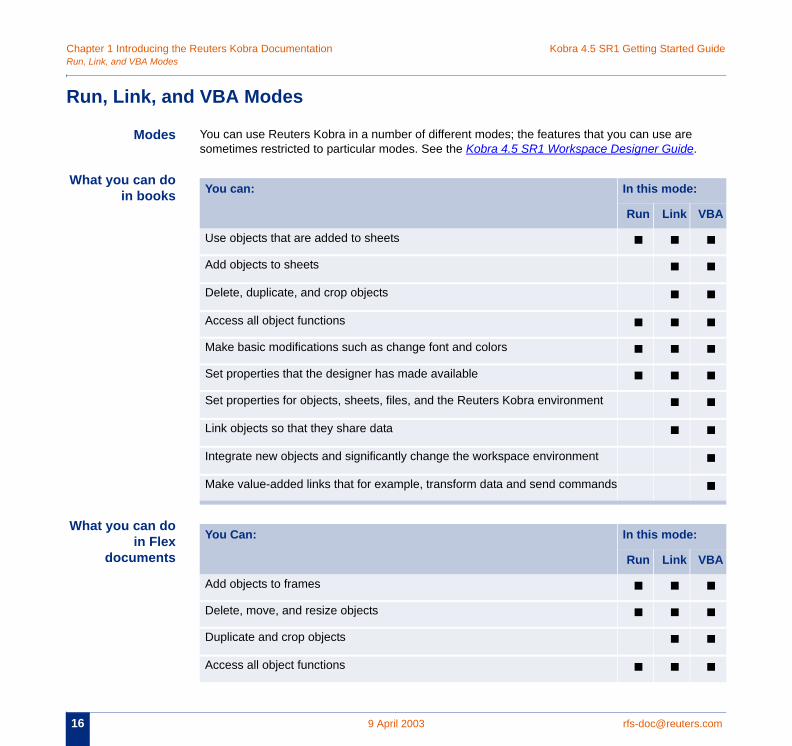
Modes You can use Reuters Kobra in a number of different modes; the features that you can use are sometimes restricted to particular modes. See the Kobra 4.5 SR1 Workspace Designer Guide.
hat you can doin books
hat you can doin Flex
documents
You can: In this mode:
Run Link
Use objects that are added to sheets ■ ■
Add objects to sheets ■
Delete, duplicate, and crop objects ■
Access all object functions ■ ■
Make basic modifications such as change font and colors ■ ■
Set properties that the designer has made available ■ ■
Set properties for objects, sheets, files, and the Reuters Kobra environment ■
Link objects so that they share data ■
Integrate new objects and significantly change the workspace environment
Make value-added links that for example, transform data and send commands
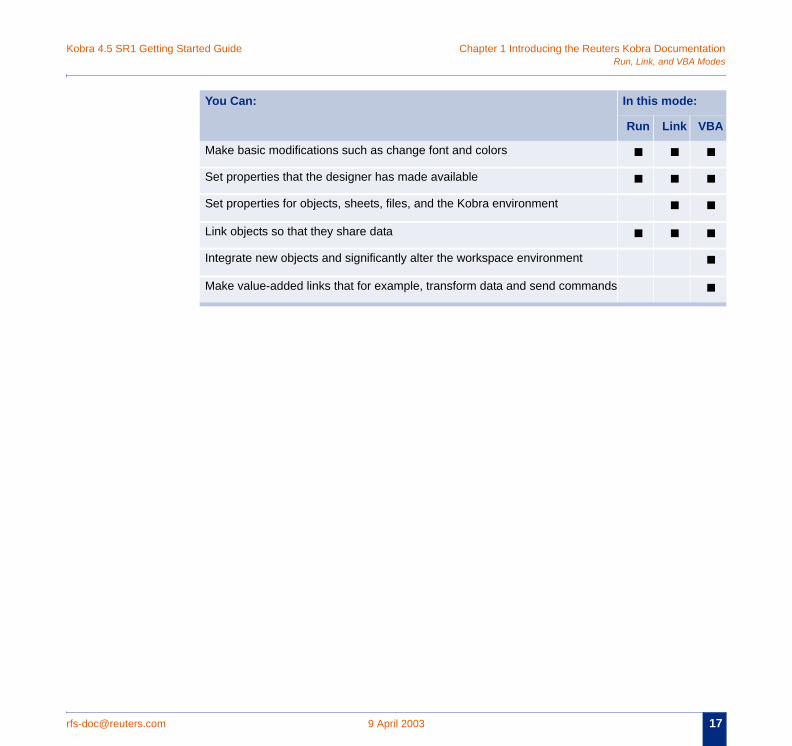
You Can: In this mode:
Run Link
Add objects to frames ■ ■
Delete, move, and resize objects ■ ■
Duplicate and crop objects ■
Access all object functions ■ ■
Kobra 4.5 SR1 Getting Started Guide Chapter 1 Introducing the Reuters Kobra DocumentationModes
rfs- 17
■
■
■
■
■
■
VBA
Run, Link, and VBA
[email protected] 9 April 2003
Make basic modifications such as change font and colors ■ ■
Set properties that the designer has made available ■ ■
Set properties for objects, sheets, files, and the Kobra environment ■
Link objects so that they share data ■ ■
Integrate new objects and significantly alter the workspace environment
Make value-added links that for example, transform data and send commands
You Can: In this mode:
Run Link

Chapter 1 Introducing the Reuters Kobra Documentation Kobra 4.5 SR1 Getting Started GuideRun
18 .com
, Link, and VBA Modes
9 April 2003 rfs-doc@reuters
rfs-doc@reuters 19
CHAPT
Con
.com 9 April 2003
ER 2 FIRST STEPS WITH REUTERS KOBRA
tents • Starting and Exiting Reuters Kobra• File Types in Reuters Kobra• How to Create a Flex Document• How to Open and Close Files• How to Bookmark Favorite Documents• How to Organize Favorite Documents• How to Save Workspaces, Flex Documents and Information• How to Move Between Open Documents• How to Customize the Workspace
Chapter 2 First Steps With Reuters Kobra Kobra 4.5 SR1 Getting Started GuideSta
20 .com
St
s
de
r to
nt. If e
ter
rting and Exiting Reuters Kobra
9 April 2003 rfs-doc@reuters
arting and Exiting Reuters Kobra
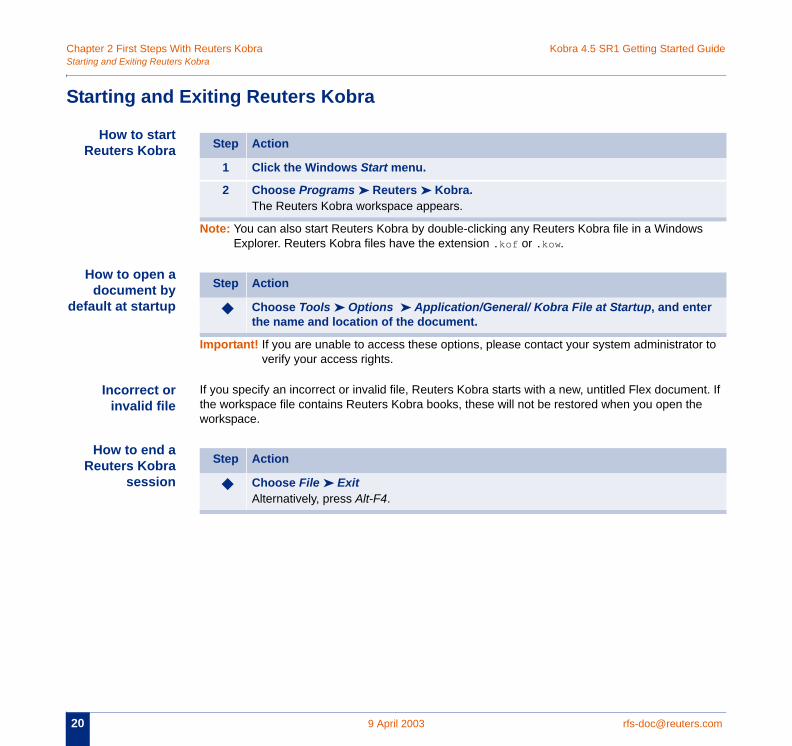
How to startReuters Kobra
Note: You can also start Reuters Kobra by double-clicking any Reuters Kobra file in a WindowExplorer. Reuters Kobra files have the extension .kof or .kow.
How to open adocument by
fault at startup
Important! If you are unable to access these options, please contact your system administratoverify your access rights.
Incorrect orinvalid file
If you specify an incorrect or invalid file, Reuters Kobra starts with a new, untitled Flex documethe workspace file contains Reuters Kobra books, these will not be restored when you open thworkspace.
How to end aReuters Kobra
session
Step Action
1 Click the Windows Start menu.
2 Choose Programs ➤ Reuters ➤ Kobra.The Reuters Kobra workspace appears.
Step Action
◆ Choose Tools ➤ Options ➤ Application/General/ Kobra File at Startup, and enthe name and location of the document.
Step Action
◆ Choose File ➤ ExitAlternatively, press Alt-F4.
Kobra 4.5 SR1 Getting Started Guide Chapter 2 First Steps With Reuters Kobra Kobra
rfs- 21
Fi
file.
ve er
s file
ce:
ame
File Types in Reuters
[email protected] 9 April 2003
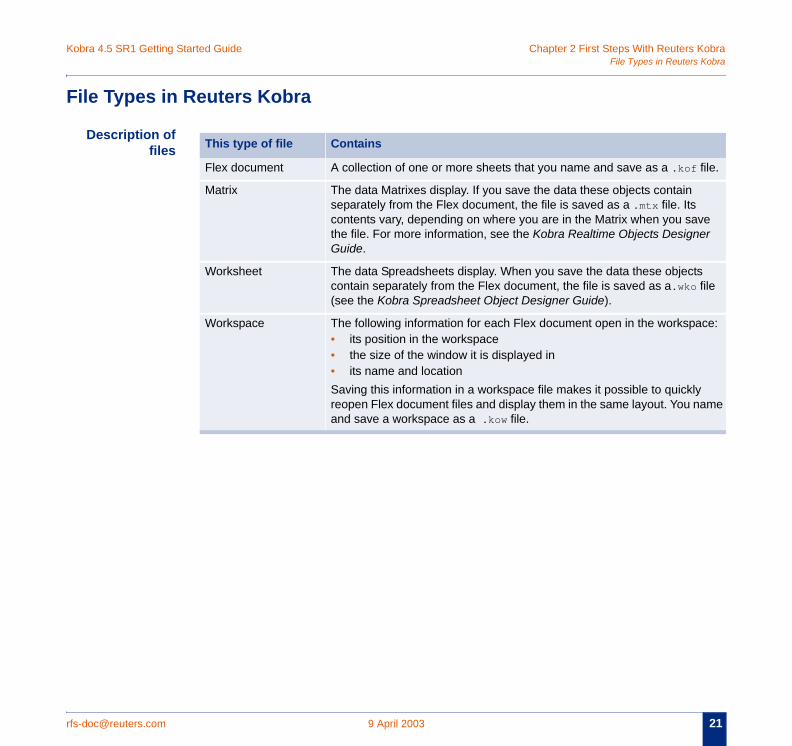
le Types in Reuters Kobra
Description offiles This type of file Contains
Flex document A collection of one or more sheets that you name and save as a .kof
Matrix The data Matrixes display. If you save the data these objects contain separately from the Flex document, the file is saved as a .mtx file. Itscontents vary, depending on where you are in the Matrix when you sathe file. For more information, see the Kobra Realtime Objects DesignGuide.
Worksheet The data Spreadsheets display. When you save the data these objectcontain separately from the Flex document, the file is saved as a.wko(see the Kobra Spreadsheet Object Designer Guide).
Workspace The following information for each Flex document open in the workspa• its position in the workspace• the size of the window it is displayed in• its name and locationSaving this information in a workspace file makes it possible to quicklyreopen Flex document files and display them in the same layout. You nand save a workspace as a .kow file.
Chapter 2 First Steps With Reuters Kobra Kobra 4.5 SR1 Getting Started GuideHow
22 .com
H
H
he
er
to Create a Flex Document
9 April 2003 rfs-doc@reuters
ow to Create a Flex Document
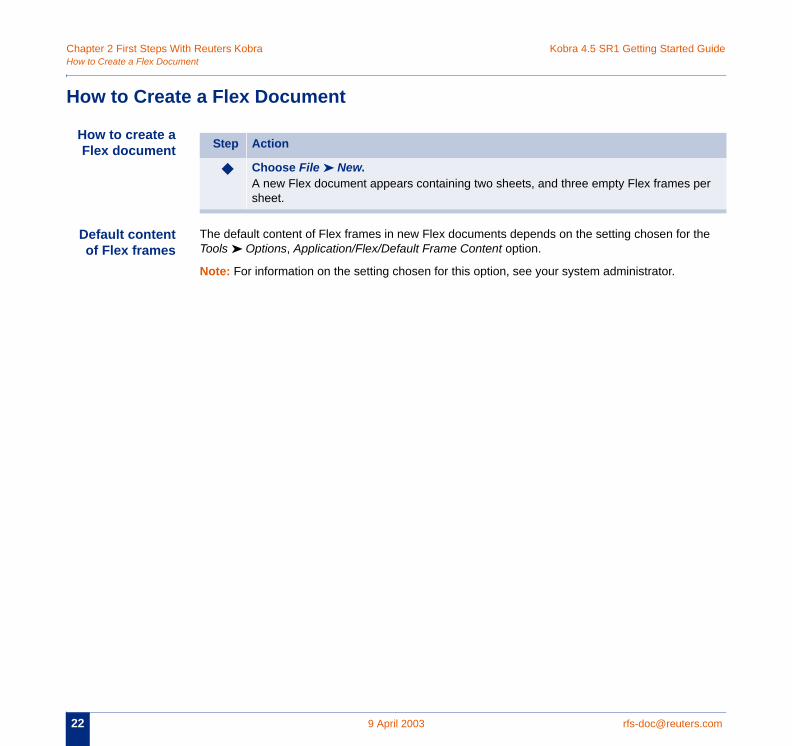
ow to create aFlex document
Default contentof Flex frames
The default content of Flex frames in new Flex documents depends on the setting chosen for tTools ➤ Options, Application/Flex/Default Frame Content option.
Note: For information on the setting chosen for this option, see your system administrator.
Step Action
◆ Choose File ➤ New.A new Flex document appears containing two sheets, and three empty Flex frames psheet.
Kobra 4.5 SR1 Getting Started Guide Chapter 2 First Steps With Reuters Kobrae Files
rfs- 23
H
aved
Op files
Ho
r
n, ns
How to Open and Clos
[email protected] 9 April 2003
ow to Open and Close Files
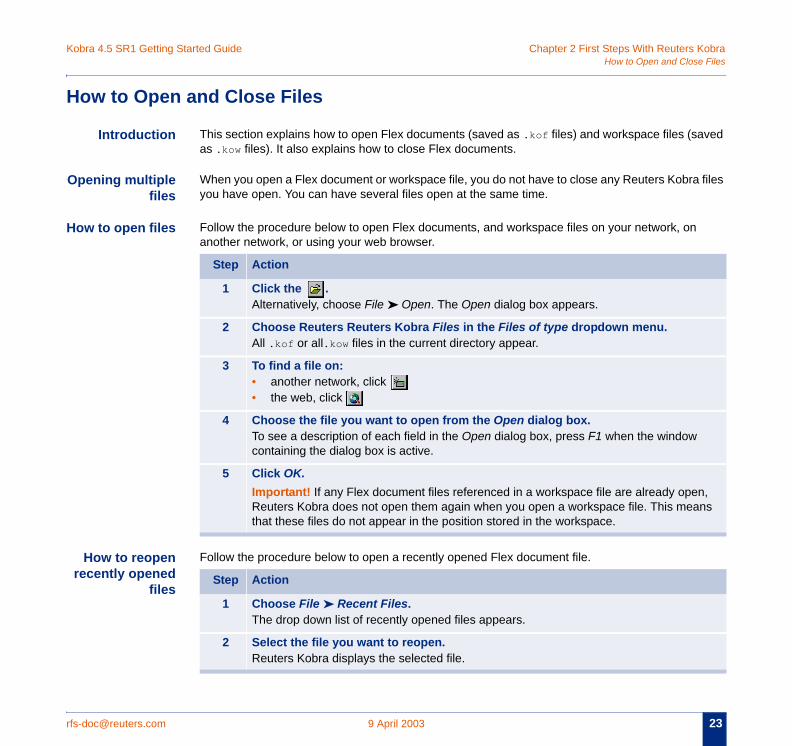
Introduction This section explains how to open Flex documents (saved as .kof files) and workspace files (sas .kow files). It also explains how to close Flex documents.
ening multiplefiles
When you open a Flex document or workspace file, you do not have to close any Reuters Kobrayou have open. You can have several files open at the same time.
w to open files Follow the procedure below to open Flex documents, and workspace files on your network, onanother network, or using your web browser.
How to reopenecently opened
files
Follow the procedure below to open a recently opened Flex document file.
Step Action
1 Click the .Alternatively, choose File ➤ Open. The Open dialog box appears.
2 Choose Reuters Reuters Kobra Files in the Files of type dropdown menu.All .kof or all.kow files in the current directory appear.
3 To find a file on:• another network, click • the web, click
4 Choose the file you want to open from the Open dialog box.To see a description of each field in the Open dialog box, press F1 when the windowcontaining the dialog box is active.
5 Click OK.Important! If any Flex document files referenced in a workspace file are already opeReuters Kobra does not open them again when you open a workspace file. This meathat these files do not appear in the position stored in the workspace.
Step Action
1 Choose File ➤ Recent Files.The drop down list of recently opened files appears.
2 Select the file you want to reopen. Reuters Kobra displays the selected file.
Chapter 2 First Steps With Reuters Kobra Kobra 4.5 SR1 Getting Started GuideHow
24 .com
r
les in f the
bo
e
d the
to Open and Close Files
9 April 2003 rfs-doc@reuters
Maximumnumber in the
ecently openedfiles list
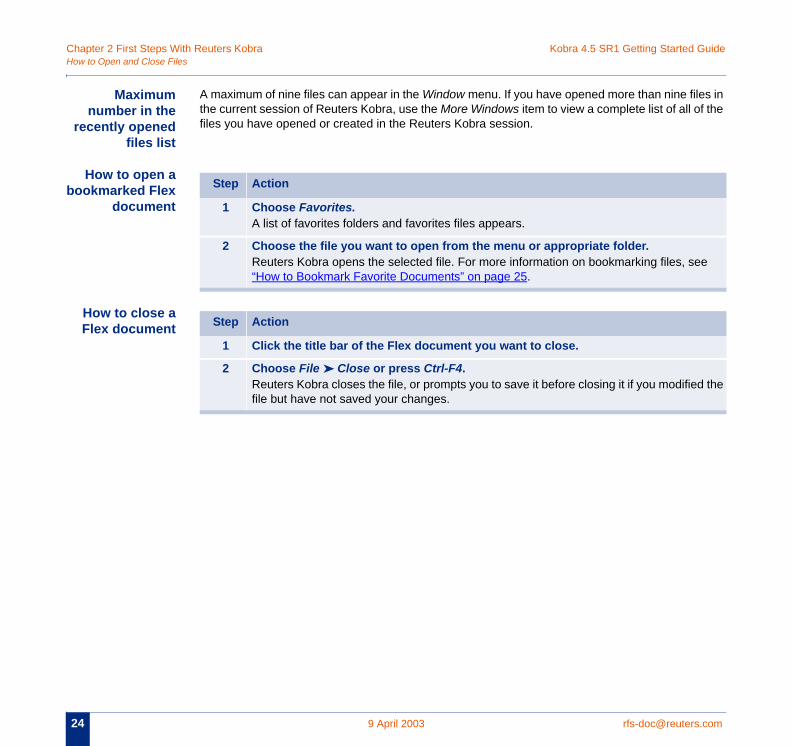
A maximum of nine files can appear in the Window menu. If you have opened more than nine fithe current session of Reuters Kobra, use the More Windows item to view a complete list of all ofiles you have opened or created in the Reuters Kobra session.
How to open aokmarked Flex
document
How to close aFlex document
Step Action
1 Choose Favorites.A list of favorites folders and favorites files appears.
2 Choose the file you want to open from the menu or appropriate folder.Reuters Kobra opens the selected file. For more information on bookmarking files, se“How to Bookmark Favorite Documents” on page 25.
Step Action
1 Click the title bar of the Flex document you want to close.
2 Choose File ➤ Close or press Ctrl-F4.Reuters Kobra closes the file, or prompts you to save it before closing it if you modifiefile but have not saved your changes.
Kobra 4.5 SR1 Getting Started Guide Chapter 2 First Steps With Reuters Kobraments
rfs- 25
H
this arks.
b
H
nt.
How to Bookmark Favorite Docu
[email protected] 9 April 2003
ow to Bookmark Favorite Documents
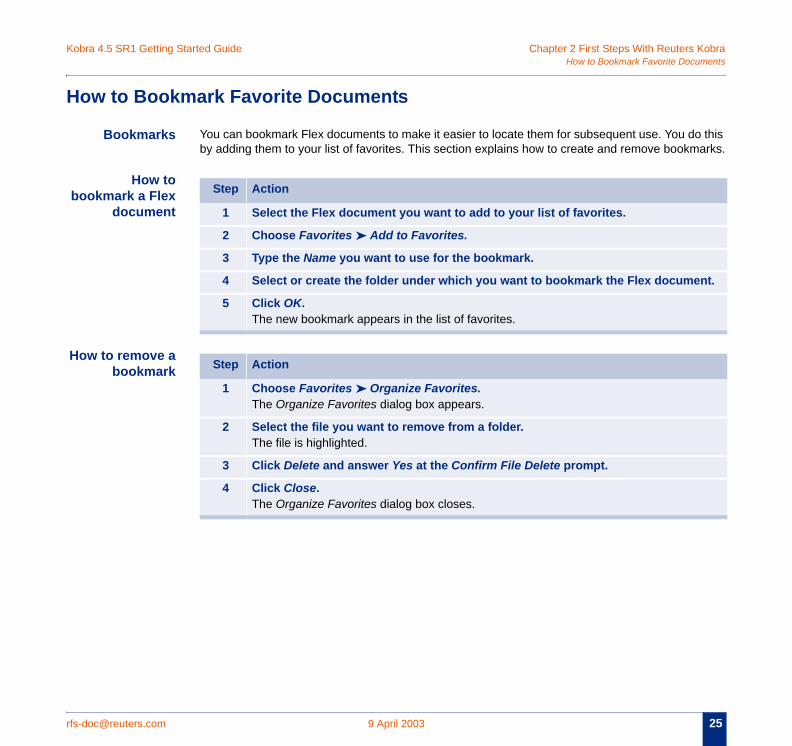
Bookmarks You can bookmark Flex documents to make it easier to locate them for subsequent use. You doby adding them to your list of favorites. This section explains how to create and remove bookm
How toookmark a Flex
document
ow to remove abookmark
Step Action
1 Select the Flex document you want to add to your list of favorites.
2 Choose Favorites ➤ Add to Favorites.
3 Type the Name you want to use for the bookmark.
4 Select or create the folder under which you want to bookmark the Flex docume
5 Click OK.The new bookmark appears in the list of favorites.
Step Action
1 Choose Favorites ➤ Organize Favorites.The Organize Favorites dialog box appears.
2 Select the file you want to remove from a folder.The file is highlighted.
3 Click Delete and answer Yes at the Confirm File Delete prompt.
4 Click Close.The Organize Favorites dialog box closes.
Chapter 2 First Steps With Reuters Kobra Kobra 4.5 SR1 Getting Started GuideHow
26 .com
H
fa
H
F
rites
ss
.
to Organize Favorite Documents
9 April 2003 rfs-doc@reuters
ow to Organize Favorite Documents
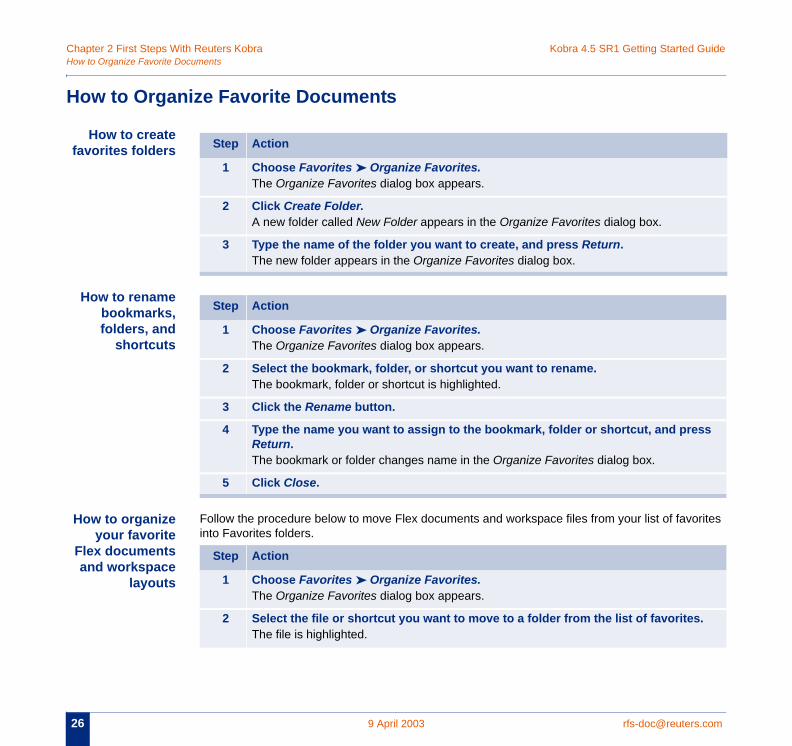
How to createvorites folders
How to renamebookmarks,folders, and
shortcuts
ow to organizeyour favorite
lex documentsand workspace
layouts
Follow the procedure below to move Flex documents and workspace files from your list of favointo Favorites folders.
Step Action
1 Choose Favorites ➤ Organize Favorites.The Organize Favorites dialog box appears.
2 Click Create Folder.A new folder called New Folder appears in the Organize Favorites dialog box.
3 Type the name of the folder you want to create, and press Return.The new folder appears in the Organize Favorites dialog box.
Step Action
1 Choose Favorites ➤ Organize Favorites.The Organize Favorites dialog box appears.
2 Select the bookmark, folder, or shortcut you want to rename.The bookmark, folder or shortcut is highlighted.
3 Click the Rename button.
4 Type the name you want to assign to the bookmark, folder or shortcut, and preReturn.The bookmark or folder changes name in the Organize Favorites dialog box.
5 Click Close.
Step Action
1 Choose Favorites ➤ Organize Favorites.The Organize Favorites dialog box appears.
2 Select the file or shortcut you want to move to a folder from the list of favoritesThe file is highlighted.
Kobra 4.5 SR1 Getting Started Guide Chapter 2 First Steps With Reuters Kobraments
rfs- 27
.
How to Organize Favorite Docu
[email protected] 9 April 2003
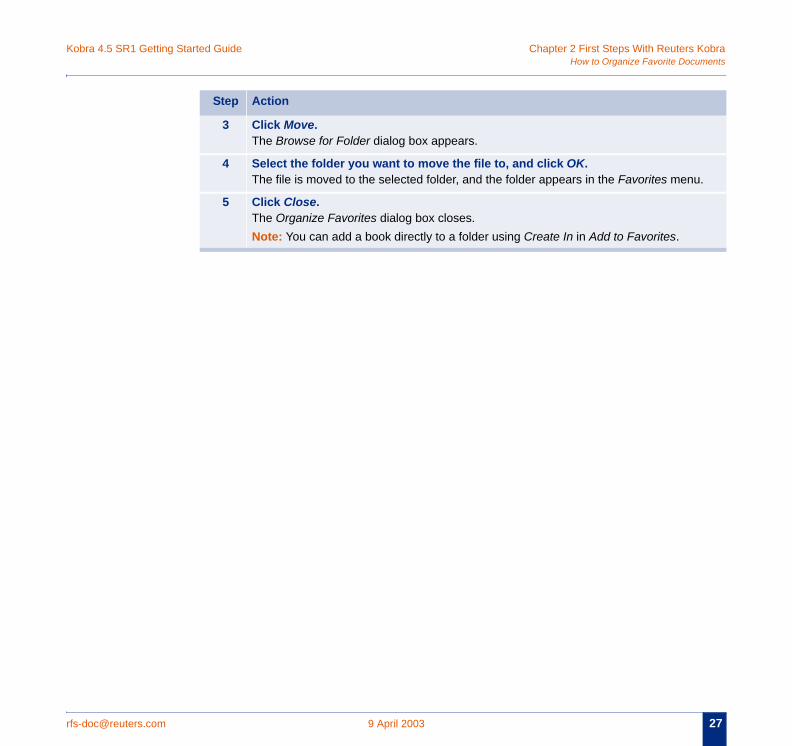
3 Click Move.The Browse for Folder dialog box appears.
4 Select the folder you want to move the file to, and click OK.The file is moved to the selected folder, and the folder appears in the Favorites menu
5 Click Close.The Organize Favorites dialog box closes.Note: You can add a book directly to a folder using Create In in Add to Favorites.
Step Action
Chapter 2 First Steps With Reuters Kobra Kobra 4.5 SR1 Getting Started GuideHow
28 .com
H
hen
r the
K.
the
to Save Workspaces, Flex Documents and Information
9 April 2003 rfs-doc@reuters
ow to Save Workspaces, Flex Documents and Information
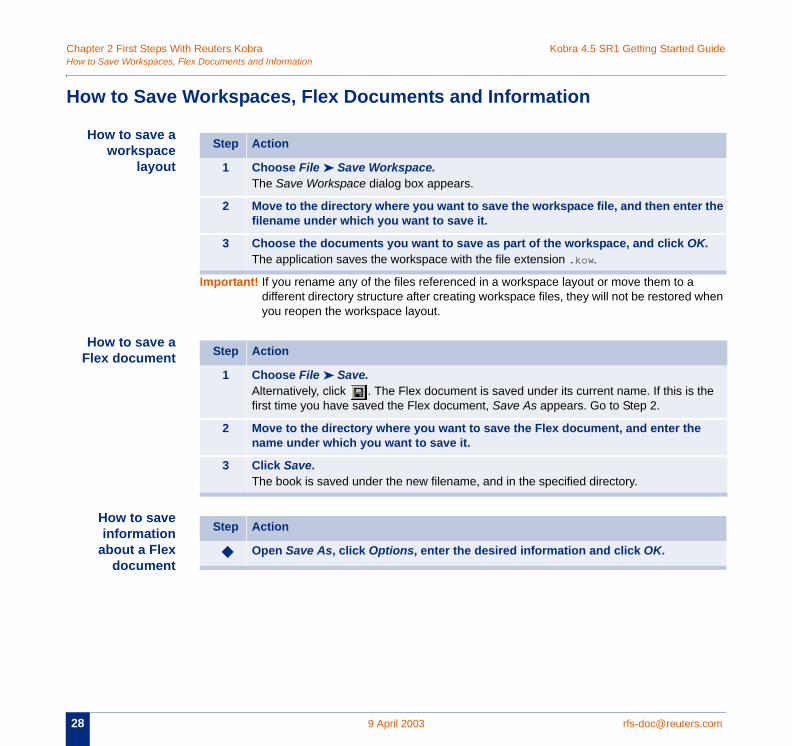
How to save aworkspace
layout
Important! If you rename any of the files referenced in a workspace layout or move them to a different directory structure after creating workspace files, they will not be restored wyou reopen the workspace layout.
How to save aFlex document
How to saveinformation
about a Flexdocument
Step Action
1 Choose File ➤ Save Workspace.The Save Workspace dialog box appears.
2 Move to the directory where you want to save the workspace file, and then entefilename under which you want to save it.
3 Choose the documents you want to save as part of the workspace, and click OThe application saves the workspace with the file extension .kow.
Step Action
1 Choose File ➤ Save.Alternatively, click . The Flex document is saved under its current name. If this is first time you have saved the Flex document, Save As appears. Go to Step 2.
2 Move to the directory where you want to save the Flex document, and enter thename under which you want to save it.
3 Click Save.The book is saved under the new filename, and in the specified directory.
Step Action
◆ Open Save As, click Options, enter the desired information and click OK.
Kobra 4.5 SR1 Getting Started Guide Chapter 2 First Steps With Reuters Kobraments
rfs- 29
H
r
Ho
the ently
r
les in f the
How to Move Between Open Docu
[email protected] 9 April 2003
ow to Move Between Open Documents
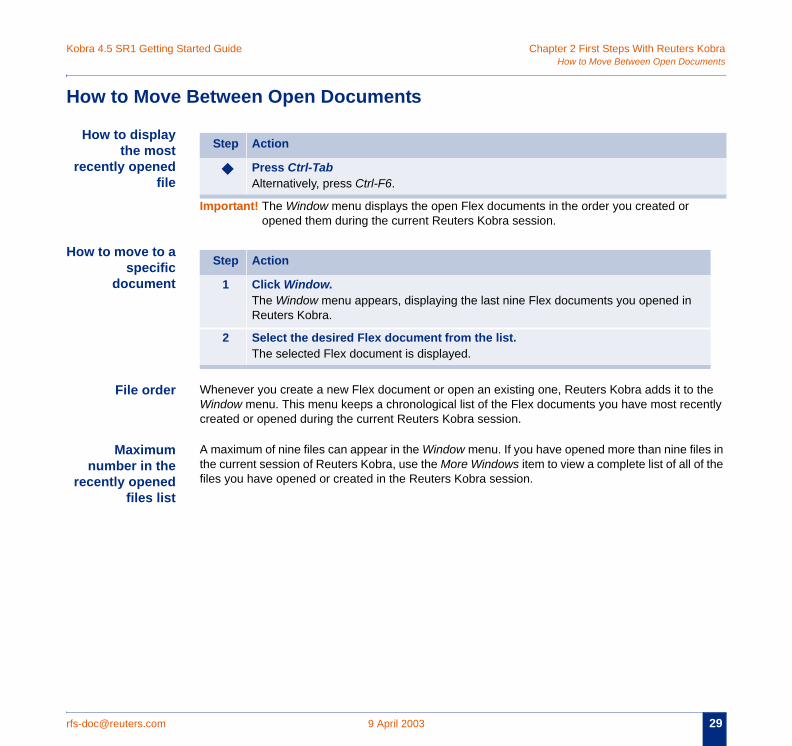
How to displaythe most
ecently openedfile
Important! The Window menu displays the open Flex documents in the order you created or opened them during the current Reuters Kobra session.
w to move to aspecific
document
File order Whenever you create a new Flex document or open an existing one, Reuters Kobra adds it to Window menu. This menu keeps a chronological list of the Flex documents you have most reccreated or opened during the current Reuters Kobra session.
Maximumnumber in the
ecently openedfiles list
A maximum of nine files can appear in the Window menu. If you have opened more than nine fithe current session of Reuters Kobra, use the More Windows item to view a complete list of all ofiles you have opened or created in the Reuters Kobra session.
Step Action
◆ Press Ctrl-TabAlternatively, press Ctrl-F6.
Step Action
1 Click Window.The Window menu appears, displaying the last nine Flex documents you opened in Reuters Kobra.
2 Select the desired Flex document from the list.The selected Flex document is displayed.
Chapter 2 First Steps With Reuters Kobra Kobra 4.5 SR1 Getting Started GuideHow
30 .com
H
H its
Hh
H
.
hat
nu.
to Customize the Workspace
9 April 2003 rfs-doc@reuters
ow to Customize the Workspace
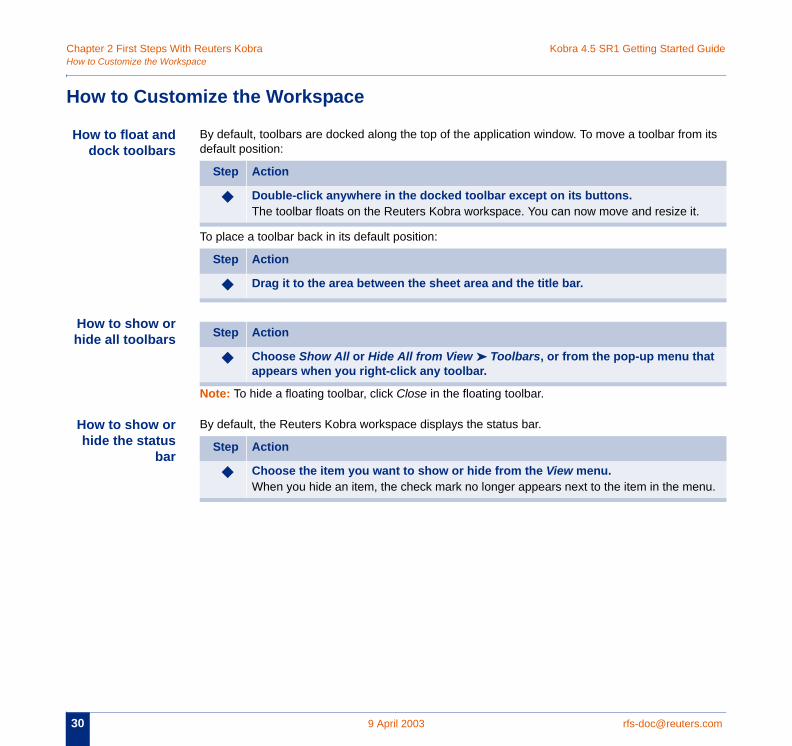
ow to float anddock toolbars
By default, toolbars are docked along the top of the application window. To move a toolbar fromdefault position:
To place a toolbar back in its default position:
ow to show oride all toolbars
Note: To hide a floating toolbar, click Close in the floating toolbar.
ow to show orhide the status
bar
By default, the Reuters Kobra workspace displays the status bar.
Step Action
◆ Double-click anywhere in the docked toolbar except on its buttons.The toolbar floats on the Reuters Kobra workspace. You can now move and resize it
Step Action
◆ Drag it to the area between the sheet area and the title bar.
Step Action
◆ Choose Show All or Hide All from View ➤ Toolbars, or from the pop-up menu tappears when you right-click any toolbar.
Step Action
◆ Choose the item you want to show or hide from the View menu.When you hide an item, the check mark no longer appears next to the item in the me
rfs-doc@reuters 31
CHAPT
Con
.com 9 April 2003
ER 3 BASIC REUTERS KOBRA TASKS
tents • Adding Reuters Kobra Objects to Flex Frames• How to Change, Exchange, Move and Remove Objects in Flex Frames• How to Copy and Paste Objects Into Frames• How to Change the Fonts and Colors of Objects• How to Moving Between Frames in Flex Documents• Resizing Flex Frames in Flex documents and Flex Viewers• How to Create and Remove Flex Frames in Flex Documents and Flex Viewer• How to Print Documents and Objects
Chapter 3 Basic Reuters Kobra Tasks Kobra 4.5 SR1 Getting Started GuideAdd
32 .com
A
t see
Oca
d
W
ing Reuters Kobra Objects to Flex Frames
9 April 2003 rfs-doc@reuters
dding Reuters Kobra Objects to Flex Frames
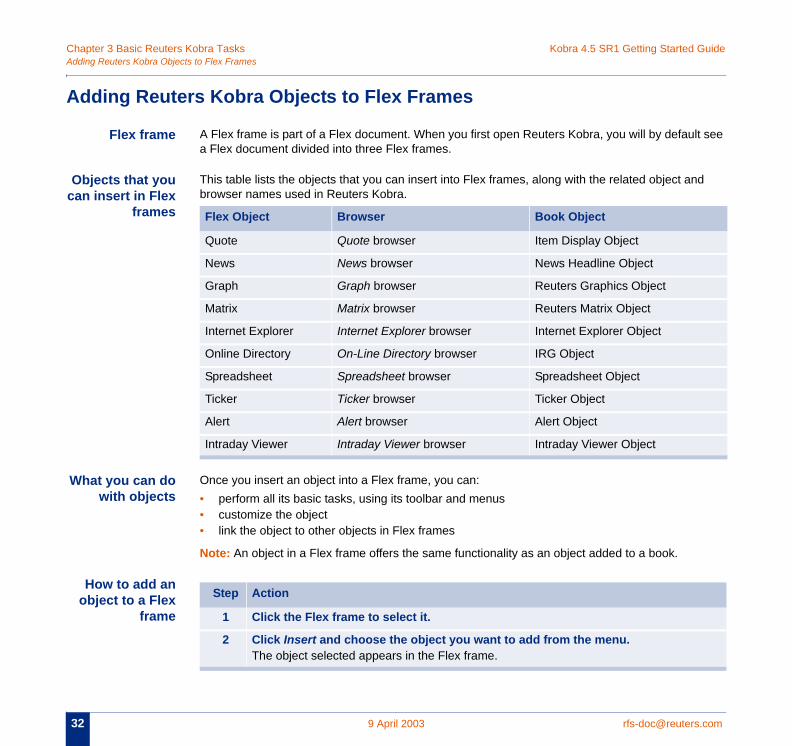
Flex frame A Flex frame is part of a Flex document. When you first open Reuters Kobra, you will by defaula Flex document divided into three Flex frames.
bjects that youn insert in Flex
frames
This table lists the objects that you can insert into Flex frames, along with the related object anbrowser names used in Reuters Kobra.
hat you can dowith objects
Once you insert an object into a Flex frame, you can:• perform all its basic tasks, using its toolbar and menus• customize the object• link the object to other objects in Flex frames
Note: An object in a Flex frame offers the same functionality as an object added to a book.
How to add anobject to a Flex
frame
Flex Object Browser Book Object
Quote Quote browser Item Display Object
News News browser News Headline Object
Graph Graph browser Reuters Graphics Object
Matrix Matrix browser Reuters Matrix Object
Internet Explorer Internet Explorer browser Internet Explorer Object
Online Directory On-Line Directory browser IRG Object
Spreadsheet Spreadsheet browser Spreadsheet Object
Ticker Ticker browser Ticker Object
Alert Alert browser Alert Object
Intraday Viewer Intraday Viewer browser Intraday Viewer Object
Step Action
1 Click the Flex frame to select it.
2 Click Insert and choose the object you want to add from the menu.The object selected appears in the Flex frame.
Kobra 4.5 SR1 Getting Started Guide Chapter 3 Basic Reuters Kobra Tasksrames
rfs- 33
H
be lex
Hob
Hoo
llow,
side
How to Change, Exchange, Move and Remove Objects in Flex F
[email protected] 9 April 2003
ow to Change, Exchange, Move and Remove Objects in Flex Frames
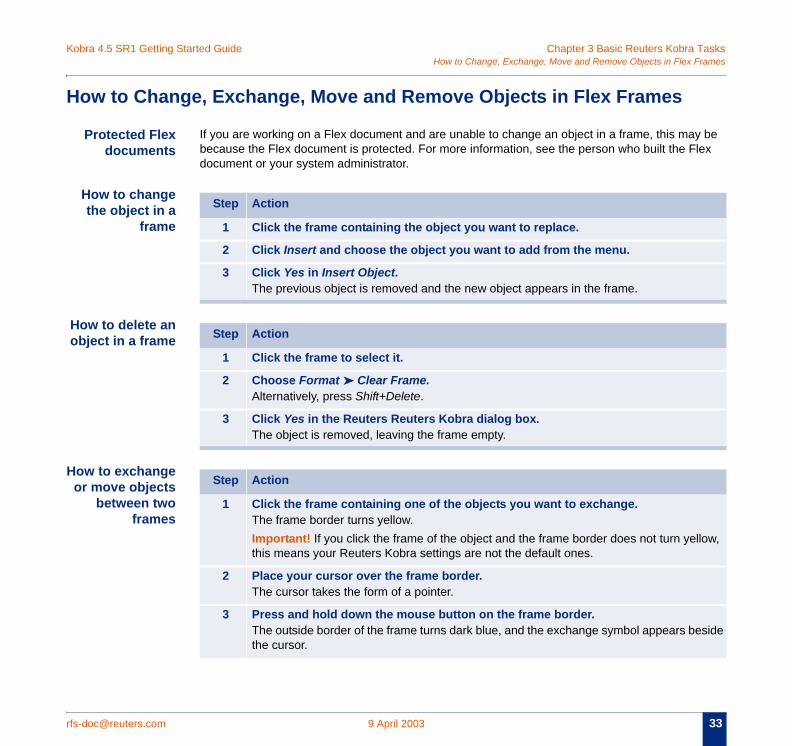
Protected Flexdocuments
If you are working on a Flex document and are unable to change an object in a frame, this maybecause the Flex document is protected. For more information, see the person who built the Fdocument or your system administrator.
How to changethe object in a
frame
ow to delete anject in a frame
w to exchanger move objects
between twoframes
Step Action
1 Click the frame containing the object you want to replace.
2 Click Insert and choose the object you want to add from the menu.
3 Click Yes in Insert Object.The previous object is removed and the new object appears in the frame.
Step Action
1 Click the frame to select it.
2 Choose Format ➤ Clear Frame. Alternatively, press Shift+Delete.
3 Click Yes in the Reuters Reuters Kobra dialog box.The object is removed, leaving the frame empty.
Step Action
1 Click the frame containing one of the objects you want to exchange.The frame border turns yellow.Important! If you click the frame of the object and the frame border does not turn yethis means your Reuters Kobra settings are not the default ones.
2 Place your cursor over the frame border.The cursor takes the form of a pointer.
3 Press and hold down the mouse button on the frame border.The outside border of the frame turns dark blue, and the exchange symbol appears bethe cursor.
Chapter 3 Basic Reuters Kobra Tasks Kobra 4.5 SR1 Getting Started GuideHow
34 .com
n.
to Change, Exchange, Move and Remove Objects in Flex Frames
9 April 2003 rfs-doc@reuters
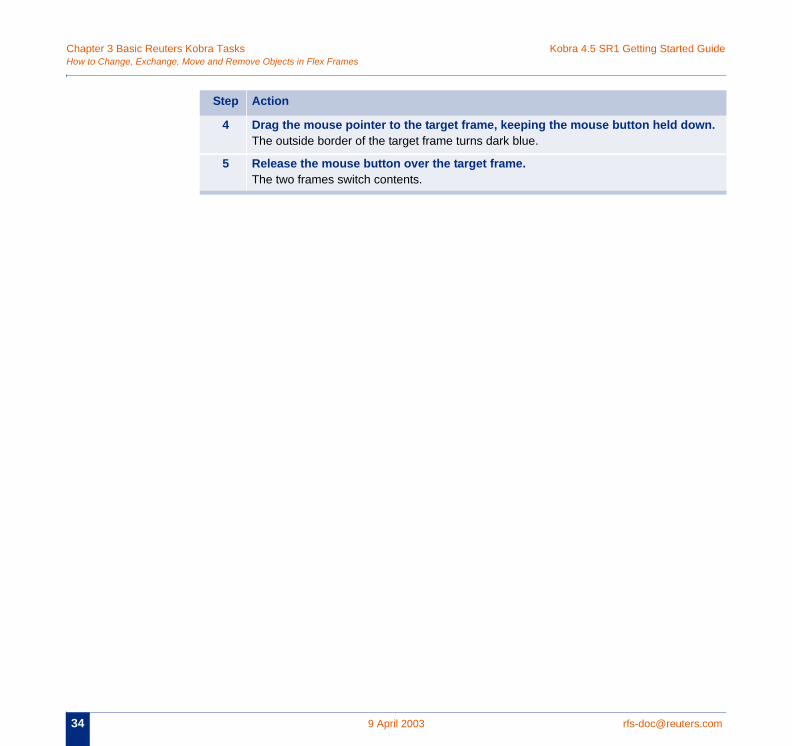
4 Drag the mouse pointer to the target frame, keeping the mouse button held dowThe outside border of the target frame turns dark blue.
5 Release the mouse button over the target frame.The two frames switch contents.
Step Action
Kobra 4.5 SR1 Getting Started Guide Chapter 3 Basic Reuters Kobra Tasksrames
rfs- 35
H
ter.
How to Copy and Paste Objects Into F
[email protected] 9 April 2003
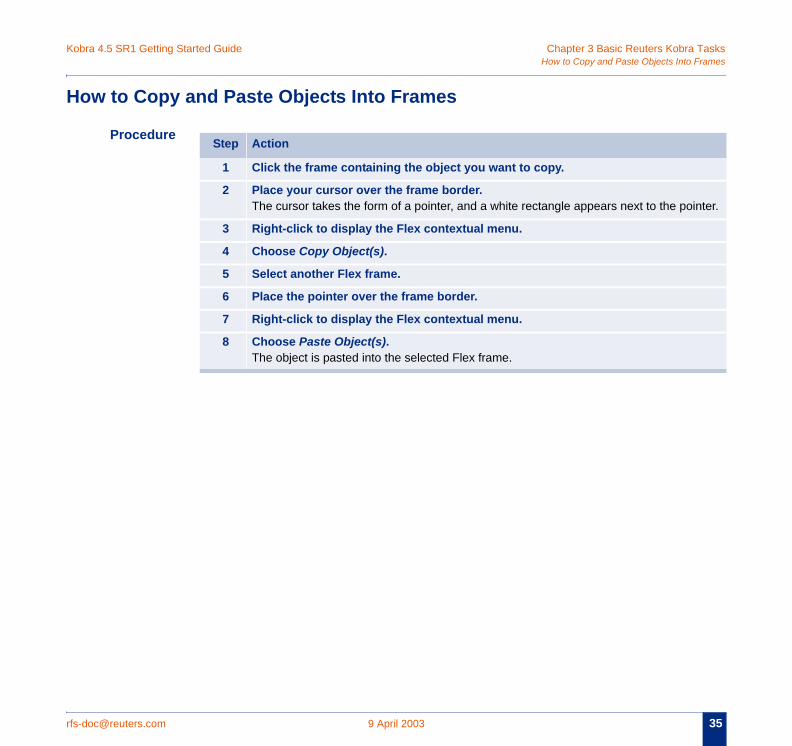
ow to Copy and Paste Objects Into Frames
Procedure Step Action
1 Click the frame containing the object you want to copy.
2 Place your cursor over the frame border.The cursor takes the form of a pointer, and a white rectangle appears next to the poin
3 Right-click to display the Flex contextual menu.
4 Choose Copy Object(s).
5 Select another Flex frame.
6 Place the pointer over the frame border.
7 Right-click to display the Flex contextual menu.
8 Choose Paste Object(s).The object is pasted into the selected Flex frame.
Chapter 3 Basic Reuters Kobra Tasks Kobra 4.5 SR1 Getting Started GuideHow
36 .com
H
F
t
cs.
cs.
to Change the Fonts and Colors of Objects
9 April 2003 rfs-doc@reuters
ow to Change the Fonts and Colors of Objects
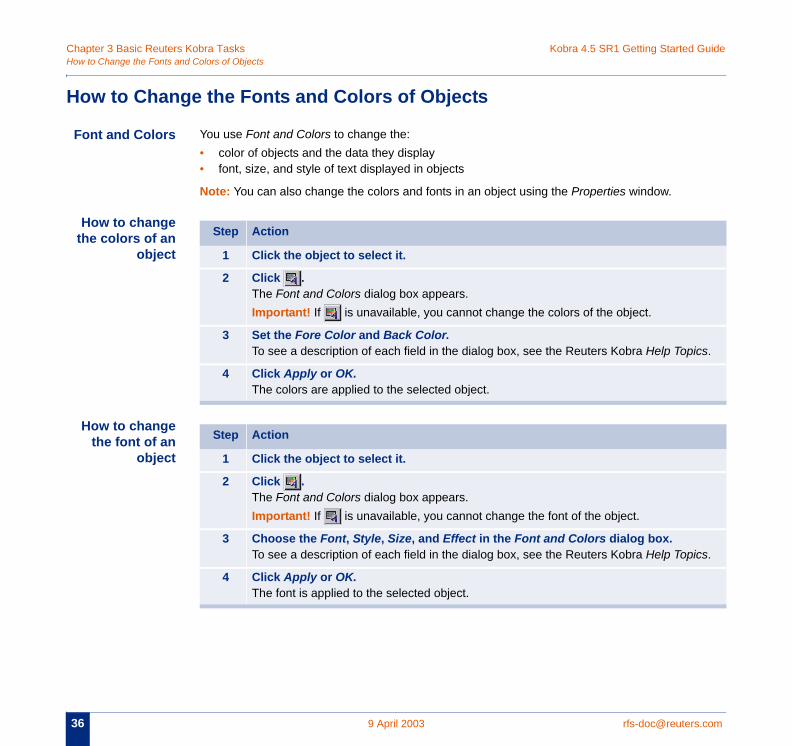
ont and Colors You use Font and Colors to change the:• color of objects and the data they display• font, size, and style of text displayed in objects
Note: You can also change the colors and fonts in an object using the Properties window.
How to changehe colors of an
object
How to changethe font of an
object
Step Action
1 Click the object to select it.
2 Click .The Font and Colors dialog box appears.Important! If is unavailable, you cannot change the colors of the object.
3 Set the Fore Color and Back Color.To see a description of each field in the dialog box, see the Reuters Kobra Help Topi
4 Click Apply or OK.The colors are applied to the selected object.
Step Action
1 Click the object to select it.
2 Click .The Font and Colors dialog box appears.Important! If is unavailable, you cannot change the font of the object.
3 Choose the Font, Style, Size, and Effect in the Font and Colors dialog box.To see a description of each field in the dialog box, see the Reuters Kobra Help Topi
4 Click Apply or OK.The font is applied to the selected object.
Kobra 4.5 SR1 Getting Started Guide Chapter 3 Basic Reuters Kobra Tasksments
rfs- 37
H
Ho
Hth
Hthth
e
ame
How to Moving Between Frames in Flex Docu
[email protected] 9 April 2003
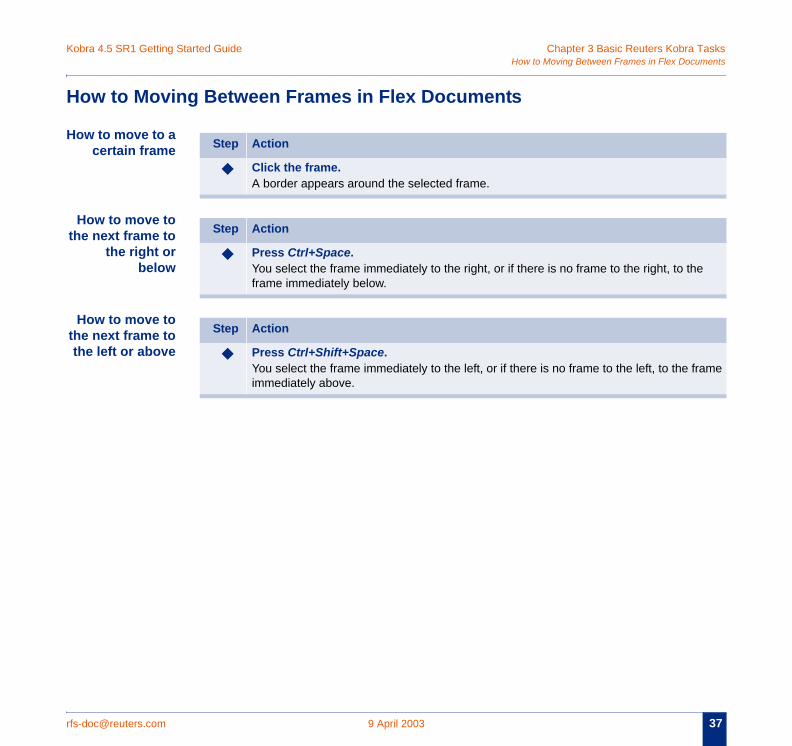
ow to Moving Between Frames in Flex Documents
w to move to acertain frame
ow to move toe next frame to
the right orbelow
ow to move toe next frame toe left or above
Step Action
◆ Click the frame.A border appears around the selected frame.
Step Action
◆ Press Ctrl+Space.You select the frame immediately to the right, or if there is no frame to the right, to thframe immediately below.
Step Action
◆ Press Ctrl+Shift+Space.You select the frame immediately to the left, or if there is no frame to the left, to the frimmediately above.
Chapter 3 Basic Reuters Kobra Tasks Kobra 4.5 SR1 Getting Started GuideRes
38 .com
R
r
m
in
the
n the
de.
izing Flex Frames in Flex documents and Flex Viewers
9 April 2003 rfs-doc@reuters
esizing Flex Frames in Flex documents and Flex Viewers
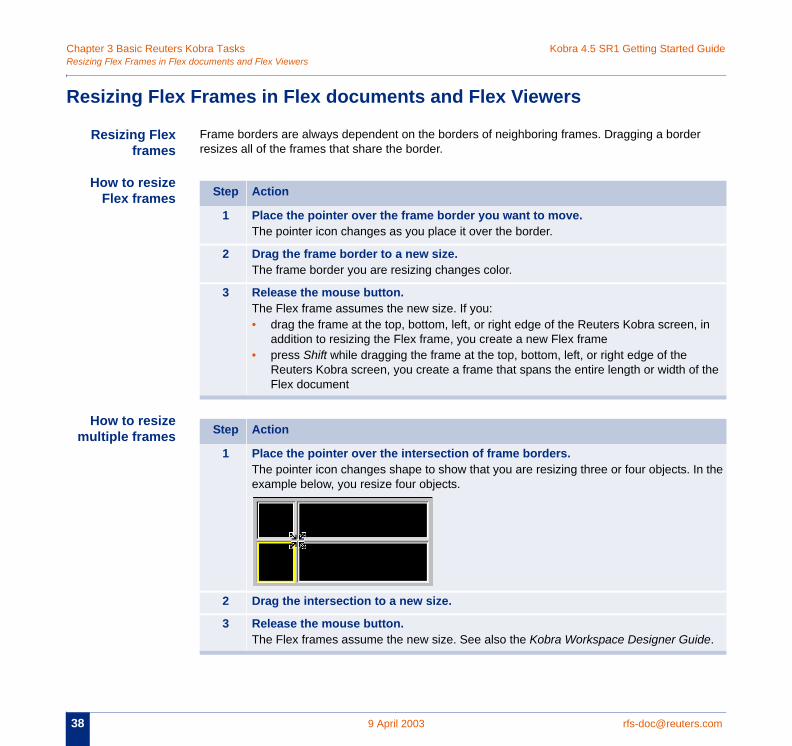
Resizing Flexframes
Frame borders are always dependent on the borders of neighboring frames. Dragging a borderesizes all of the frames that share the border.
How to resizeFlex frames
How to resizeultiple frames
Step Action
1 Place the pointer over the frame border you want to move.The pointer icon changes as you place it over the border.
2 Drag the frame border to a new size.The frame border you are resizing changes color.
3 Release the mouse button.The Flex frame assumes the new size. If you:• drag the frame at the top, bottom, left, or right edge of the Reuters Kobra screen,
addition to resizing the Flex frame, you create a new Flex frame• press Shift while dragging the frame at the top, bottom, left, or right edge of the
Reuters Kobra screen, you create a frame that spans the entire length or width ofFlex document
Step Action
1 Place the pointer over the intersection of frame borders.The pointer icon changes shape to show that you are resizing three or four objects. Iexample below, you resize four objects.
2 Drag the intersection to a new size.
3 Release the mouse button.The Flex frames assume the new size. See also the Kobra Workspace Designer Gui
Kobra 4.5 SR1 Getting Started Guide Chapter 3 Basic Reuters Kobra TasksViewer
rfs- 39
HVi
C u s the
H
r
lly
g it, .
new s
How to Create and Remove Flex Frames in Flex Documents and Flex
[email protected] 9 April 2003
ow to Create and Remove Flex Frames in Flex Documents and Flex ewer
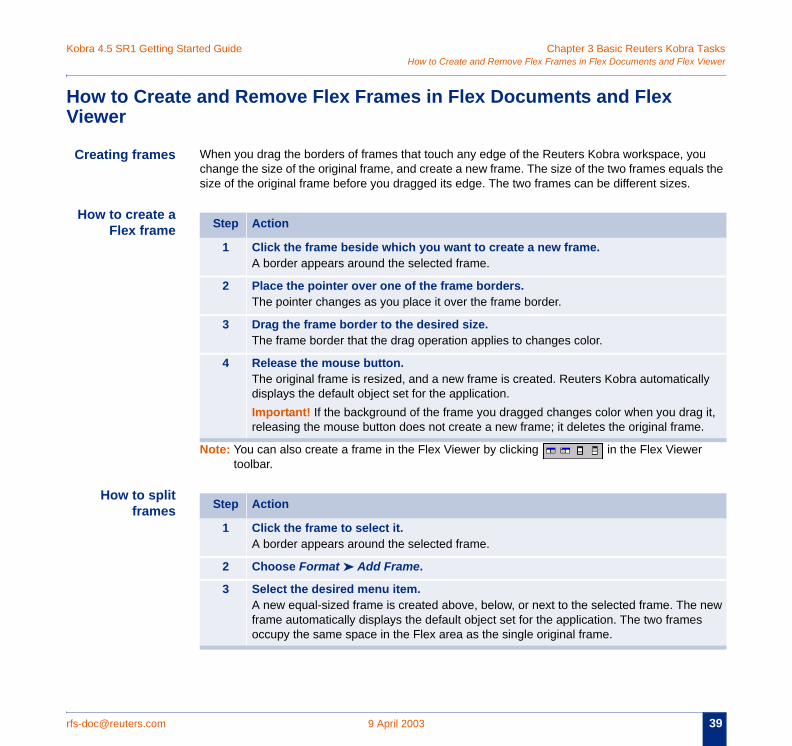
reating frames When you drag the borders of frames that touch any edge of the Reuters Kobra workspace, yochange the size of the original frame, and create a new frame. The size of the two frames equalsize of the original frame before you dragged its edge. The two frames can be different sizes.
ow to create aFlex frame
Note: You can also create a frame in the Flex Viewer by clicking in the Flex Viewetoolbar.
How to splitframes
Step Action
1 Click the frame beside which you want to create a new frame.A border appears around the selected frame.
2 Place the pointer over one of the frame borders.The pointer changes as you place it over the frame border.
3 Drag the frame border to the desired size.The frame border that the drag operation applies to changes color.
4 Release the mouse button.The original frame is resized, and a new frame is created. Reuters Kobra automaticadisplays the default object set for the application.Important! If the background of the frame you dragged changes color when you drareleasing the mouse button does not create a new frame; it deletes the original frame
Step Action
1 Click the frame to select it.A border appears around the selected frame.
2 Choose Format ➤ Add Frame.
3 Select the desired menu item.A new equal-sized frame is created above, below, or next to the selected frame. Theframe automatically displays the default object set for the application. The two frameoccupy the same space in the Flex area as the single original frame.

Chapter 3 Basic Reuters Kobra Tasks Kobra 4.5 SR1 Getting Started GuideHow
40 .com
w
H
ith
to Create and Remove Flex Frames in Flex Documents and Flex Viewer
9 April 2003 rfs-doc@reuters
Default contentof frames
You can set the object that Reuters Kobra displays by default in new Flex documents and in neframes you create. You do this using the Default Frame Content option.
Note: If you cannot access this option, see your system administrator.
ow to remove aframe Step Action
1 Click the frame to select it.A border appears around the selected frame.
2 Drag the frame border until the frame changes color.Alternatively, press Shift+Delete twice, (once if the Flex frame is empty).Important! If the borders of neighboring frames also move as you drag, continuing wthis procedure will delete these frames too.
3 Release the mouse button.The frame is deleted.
Kobra 4.5 SR1 Getting Started Guide Chapter 3 Basic Reuters Kobra Tasksbjects
rfs- 41
H
H
P
cript
How to Print Documents and O
[email protected] 9 April 2003
ow to Print Documents and Objects
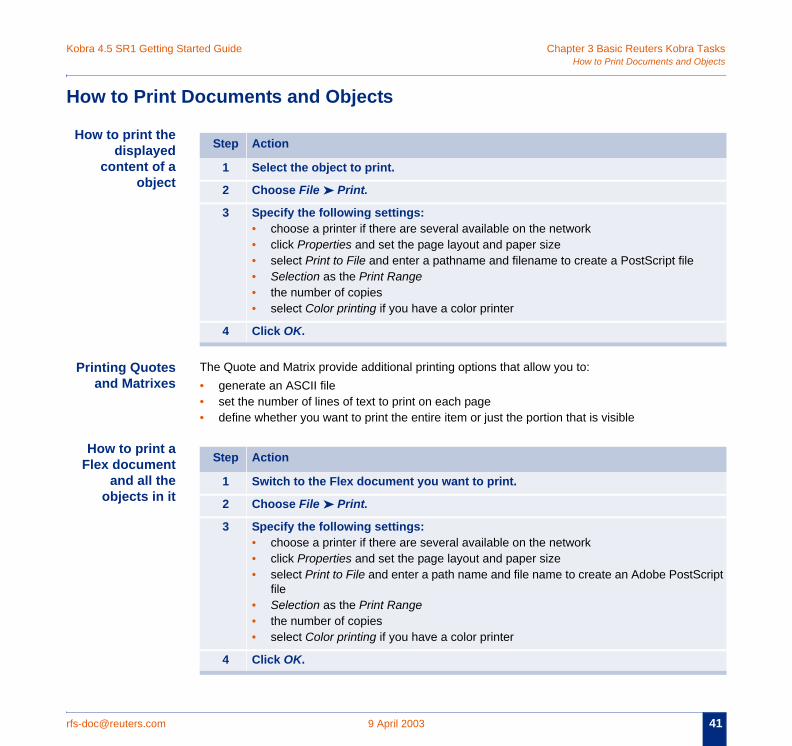
ow to print thedisplayed
content of aobject
rinting Quotesand Matrixes
The Quote and Matrix provide additional printing options that allow you to:• generate an ASCII file• set the number of lines of text to print on each page• define whether you want to print the entire item or just the portion that is visible
How to print aFlex document
and all theobjects in it
Step Action
1 Select the object to print.
2 Choose File ➤ Print.
3 Specify the following settings:• choose a printer if there are several available on the network• click Properties and set the page layout and paper size• select Print to File and enter a pathname and filename to create a PostScript file• Selection as the Print Range • the number of copies• select Color printing if you have a color printer
4 Click OK.
Step Action
1 Switch to the Flex document you want to print.
2 Choose File ➤ Print.
3 Specify the following settings:• choose a printer if there are several available on the network• click Properties and set the page layout and paper size• select Print to File and enter a path name and file name to create an Adobe PostS
file• Selection as the Print Range • the number of copies• select Color printing if you have a color printer
4 Click OK.
Chapter 3 Basic Reuters Kobra Tasks Kobra 4.5 SR1 Getting Started GuideHow
42 .com
to Print Documents and Objects
9 April 2003 rfs-doc@reuters

:T
PART IIVIEWING MARKEDATA, NEWS, AND
INFORMATION

Viewing Market Data, News, and Information Kobra 4.5 SR1 Getting Started Guide
44 .com
9 April 2003 rfs-doc@reuters
rfs-doc@reuters 45
CHAPT
Con
.com 9 April 2003
ER 4 RETRIEVING AND DISPLAYING INFORMATION
tents • Using the Reuters Kobra Command Line to Retrieve Information• Dragging and Dropping Data Between Objects• Copying and Pasting Data Between Objects• Linking Objects to Retrieve Information• How to Search for News Categories and Item Codes by Sector• How to Search for Item Codes by Company Name• How to Search for Items, Issues, and Issuers in Reuters Database• Displaying Information on the Web
Chapter 4 Retrieving and Displaying Information Kobra 4.5 SR1 Getting Started GuideUsi
46 .com
U
enter nd
E ress
ng the Reuters Kobra Command Line to Retrieve Information
9 April 2003 rfs-doc@reuters
sing the Reuters Kobra Command Line to Retrieve Information
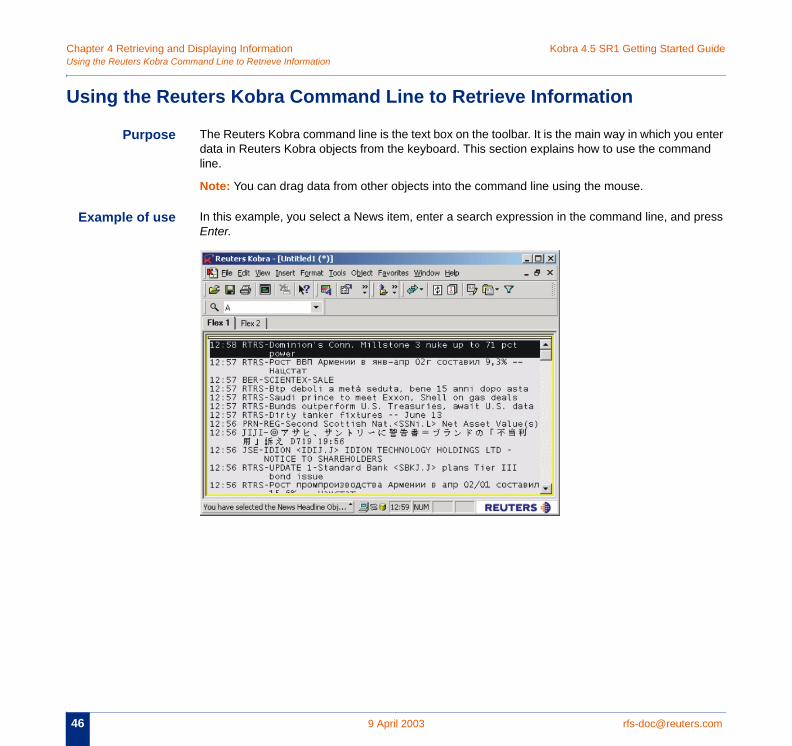
Purpose The Reuters Kobra command line is the text box on the toolbar. It is the main way in which you data in Reuters Kobra objects from the keyboard. This section explains how to use the commaline.
Note: You can drag data from other objects into the command line using the mouse.
xample of use In this example, you select a News item, enter a search expression in the command line, and pEnter.
Kobra 4.5 SR1 Getting Started Guide Chapter 4 Retrieving and Displaying Informationmation
rfs- 47
.
k the
e
ther
in
utton
Using the Reuters Kobra Command Line to Retrieve Infor
[email protected] 9 April 2003
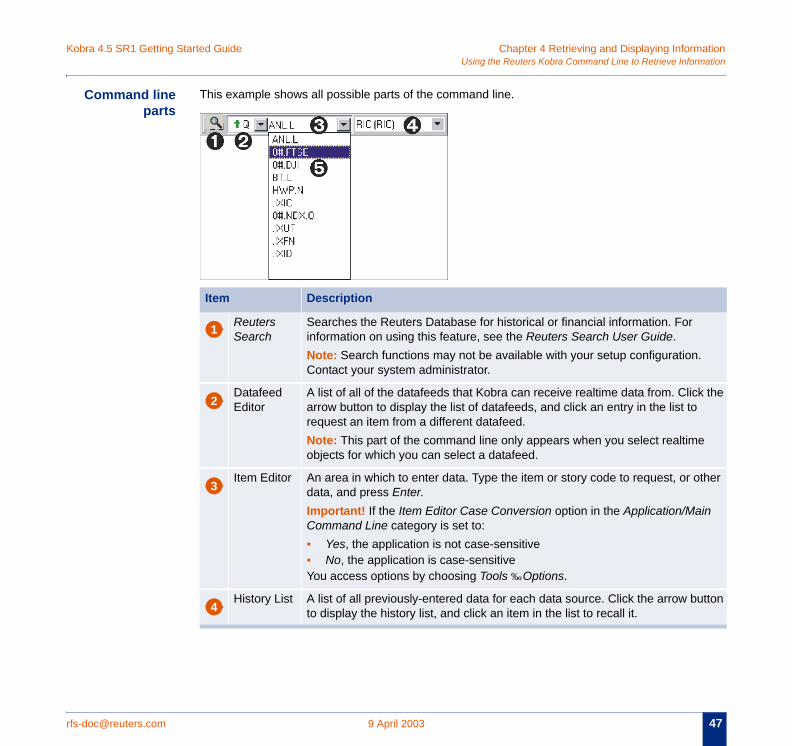
Command lineparts
This example shows all possible parts of the command line.
Item Description
Reuters Search
Searches the Reuters Database for historical or financial information. For information on using this feature, see the Reuters Search User Guide.Note: Search functions may not be available with your setup configurationContact your system administrator.
Datafeed Editor
A list of all of the datafeeds that Kobra can receive realtime data from. Clicarrow button to display the list of datafeeds, and click an entry in the list torequest an item from a different datafeed. Note: This part of the command line only appears when you select realtimobjects for which you can select a datafeed.
Item Editor An area in which to enter data. Type the item or story code to request, or odata, and press Enter.Important! If the Item Editor Case Conversion option in the Application/MaCommand Line category is set to:• Yes, the application is not case-sensitive• No, the application is case-sensitive You access options by choosing Tools ‰Options.
History List A list of all previously-entered data for each data source. Click the arrow bto display the history list, and click an item in the list to recall it.
1
2
3
4

Chapter 4 Retrieving and Displaying Information Kobra 4.5 SR1 Getting Started GuideDra
48 .com
D
into
m
n.
tao feed ers
b
gging and Dropping Data Between Objects
9 April 2003 rfs-doc@reuters
ragging and Dropping Data Between Objects
Introduction This section gives examples of the types of objects you can drop data into. You can drop data other objects besides these shown here; the examples only show the most useful types of destinations.
Important! The successful transfer of data depends on whether the data selected or copied froone object is recognized by the target object or application into which the data is dropped or pasted. See the Kobra Workspace Designer Guide for further informatio
Source andrget datafeeds
When you drag an item code from one object to another, the keyletter the source object uses tretrieve it is not provided to the target object. The target object retrieves the item from the dataspecified in its Default Datafeed property. For information on setting this property, see the ReutKobra online help.
Draggingetween objects
This table shows the data you can drag and drop between objects in Reuters Kobra.
Kobra 4.5 SR1 Getting Started Guide Chapter 4 Retrieving and Displaying Informationbjects
rfs- 49
H
the
C drag
ld
tton.
to
Dragging and Dropping Data Between O
[email protected] 9 April 2003
ow to drag anddrop data
Note: When in a Quote browser, you can select the information to drag and drop using on object or browser toolbar.
opying data inthe Spreadseet
To transfer data from a Spreadsheet to other applications, you must copy and paste, rather thanand drop. See “Copying and Pasting Data Between Objects” on page 50.
Accepted dataformats
See the Kobra Workspace Designer Guide for information on the various data types.
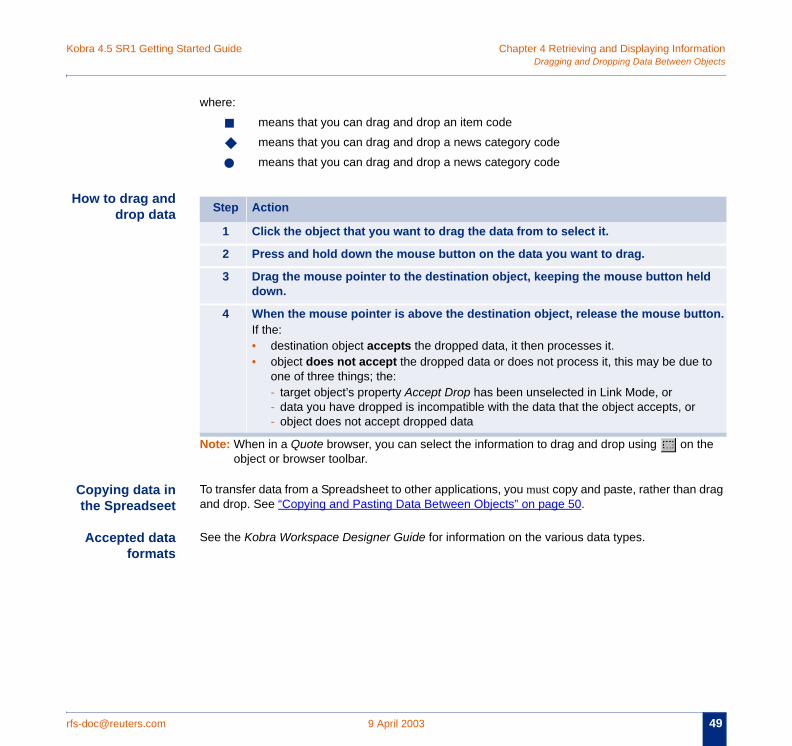
where:
■ means that you can drag and drop an item code
◆ means that you can drag and drop a news category code
● means that you can drag and drop a news category code
Step Action
1 Click the object that you want to drag the data from to select it.
2 Press and hold down the mouse button on the data you want to drag.
3 Drag the mouse pointer to the destination object, keeping the mouse button hedown.
4 When the mouse pointer is above the destination object, release the mouse buIf the:• destination object accepts the dropped data, it then processes it.• object does not accept the dropped data or does not process it, this may be due
one of three things; the:- target object’s property Accept Drop has been unselected in Link Mode, or- data you have dropped is incompatible with the data that the object accepts, or- object does not accept dropped data
Chapter 4 Retrieving and Displaying Information Kobra 4.5 SR1 Getting Started GuideCop
50 .com
C
you
m
n.
H
o
Hpa
:
ying and Pasting Data Between Objects
9 April 2003 rfs-doc@reuters
opying and Pasting Data Between Objects
Introduction You can also copy and paste data between Reuters Kobra objects. When you copy and paste,can:• leave the data format as it is, or• choose another format that is shared by both the source and target objects
Important! The successful transfer of data depends on whether the data selected or copied froone object is recognized by the target object or application into which the data is dropped or pasted. See the Kobra Workspace Designer Guide for further informatio
ow to copy andpaste data
bjects withoutmodifying data
formats
ow to copy andaste data usingspecific format
Step Action
1 Click the object you want to copy the data from to select it.
2 Select the data you want to copy.If the object contains a single data item, you can skip this step.
3 Choose Edit ➤ Copy.
4 Select the object you want to paste data into.
5 Select where in the object you want to paste data.If you cannot select an area in the object, skip this step.
6 Choose Edit ➤ Paste.If the:• destination object accepts the pasted data it then processes it• object does not accept the data or does not process it, this is because either the
- data format used in the source object cannot be interpreted by the target object- object does not accept pasted data
Step Action
1 Click the object you want to copy the data from to select it.
2 Select the data you want to copy.If the object contains a single data item, you can skip this step.
3 Choose Edit ➤ Copy.
Kobra 4.5 SR1 Getting Started Guide Chapter 4 Retrieving and Displaying Informationbjects
rfs- 51
P l...,
Copying and Pasting Data Between O
[email protected] 9 April 2003
asting images You can transfer an image of the news story if you copy the object, choose Edit ➤ Paste Speciaand select the bitmap format.
4 Select the object you want to paste data into.
5 Select where in the object you want to paste data.If you cannot select an area in the object, you can skip this step.
6 Choose Edit ➤ Paste Special.The Paste Special dialog box appears, displaying the formats that are common to thesource and target objects.
7 Select a format, and click OK.The selected data is pasted into the target object using the format specified.
Step Action
Chapter 4 Retrieving and Displaying Information Kobra 4.5 SR1 Getting Started GuideLin
52 .com
Li
ities d
likely how
U the
o
sheet
on
king Objects to Retrieve Information
9 April 2003 rfs-doc@reuters
nking Objects to Retrieve Information
Purpose You can link objects in a Flex document. This means that objects are no longer standalone entbut can communicate with each other. The communication channels that you set up let you sendata from one object to another.
Links in RunMode
When you link objects in a Flex document, Reuters Kobra suggests simple links that are most to be of use to you. To set up more complex links, you must use Link Mode. For information onto link objects in Link Mode, see the Kobra Workspace Designer Guide.
sing links in aFlex document
Once you have linked objects, data is transferred from the source to a target object when you perform a specific task in the source object. Normally you double-click to request data, and seerequested data displayed in the target object.
Examples
How to linkbjects in a Flex
document
When you double-click: In: Then:
A news headline News The news story is displayed in a Quote elsewhere on the
An item Ticker Related company data is displayed in a Quote elsewhere the sheet.
Step Action
1 Add two objects to a Flex document.See “Adding Reuters Kobra Objects to Flex Frames” on page 32.
2 Select a source object.
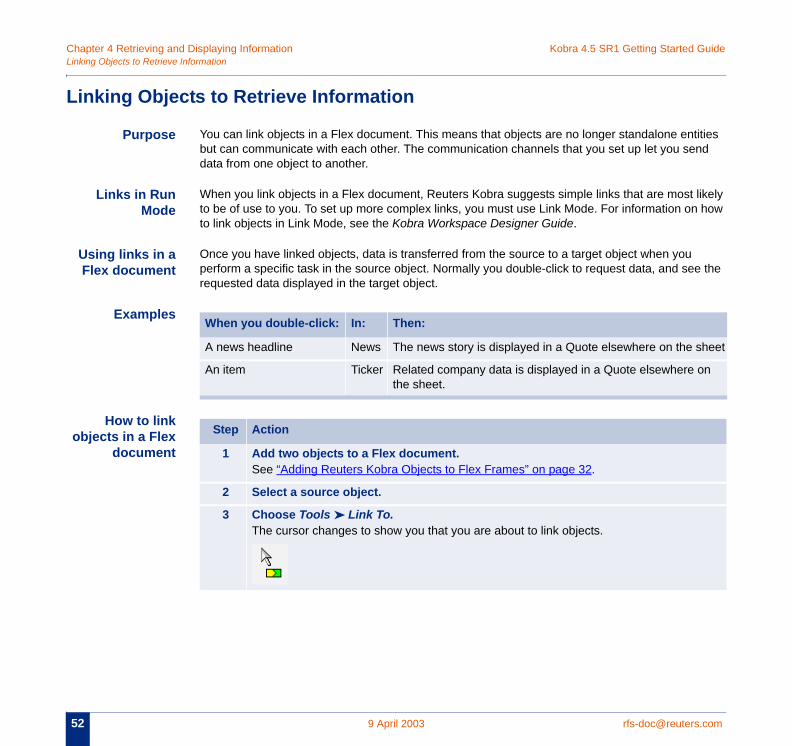
3 Choose Tools ➤ Link To.The cursor changes to show you that you are about to link objects.
Kobra 4.5 SR1 Getting Started Guide Chapter 4 Retrieving and Displaying Informationmation
rfs- 53
is
Linking Objects to Retrieve Infor
[email protected] 9 April 2003
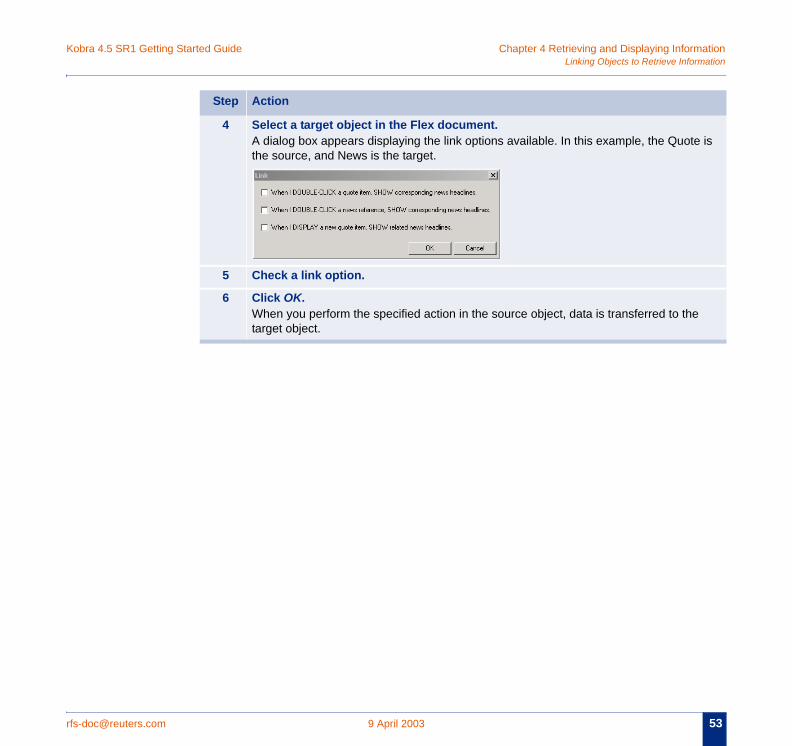
4 Select a target object in the Flex document.A dialog box appears displaying the link options available. In this example, the Quotethe source, and News is the target.
5 Check a link option.
6 Click OK.When you perform the specified action in the source object, data is transferred to thetarget object.
Step Action

Chapter 4 Retrieving and Displaying Information Kobra 4.5 SR1 Getting Started GuideHow
54 .com
H
m
to Search for News Categories and Item Codes by Sector
9 April 2003 rfs-doc@reuters
ow to Search for News Categories and Item Codes by Sector
Reuters SpeedGuide
This section explains how to use the Reuters Speed Guide to find news category codes and itecodes by market sector or country.
How to accessthe Reuters
Speed GuideStep Action
1 Insert a Quote in the Flex document.
2 Click the Quote to select it.
3 Type the code reuters then press Enter.The Reuters Speed Guide Welcome page appears in the Quote (see “Reuters SpeedGuide”). Page codes and item codes appear between chevrons (< >). News categorycodes appear between square brackets ([ ]).
Kobra 4.5 SR1 Getting Started Guide Chapter 4 Retrieving and Displaying Information Sector
rfs- 55
co
o
co
n
How to Search for News Categories and Item Codes by
[email protected] 9 April 2003
How to viewpages, item
des, and newscategories in a
browser
Note: Subsequent double-clicks allow you to view pages and item codes in the same Quote browser.
How to viewpages and item
codes in adifferent Quote
browser Note: You can also select the Quote and type a page code or item code in the command line tdisplay another page in the object.
How to viewpages and itemdes in another
Quote
How to selectews categoriesfrom and view
them
Step Action
◆ Double-click a code between chevrons or brackets.The information appears in a:• Quote browser if you clicked a page code or an item code (for example, <FTSE>) • News browser if you clicked a news category code (for example, [FR])
Step Action
◆ Shift-double-click the page code.The page appears in a different Quote browser.
Step Action
◆ Select and drag the page code to another Quote.
Step Action
1 Insert a Quote and a News in the Flex document.
2 Select the Quote and choose Tools ➤ Link To.
3 Select the News.
4 In the Link dialog box, activate When I double-click a news reference, show corresponding news headlines.
5 Click OK.See “Linking Objects to Retrieve Information” on page 52.
6 Display a Reuters Speed Guide page in the Quote.
7 Double-click a news category code in the page.The news headlines from that category appear in the News.
Chapter 4 Retrieving and Displaying Information Kobra 4.5 SR1 Getting Started GuideHow
56 .com
to Search for News Categories and Item Codes by Sector
9 April 2003 rfs-doc@reuters
For additionalinformation
For more details on using the Reuters Speed Guide, go to one the following pages (either double-click the code or type the code in the command line):• user/help
• speed/guide1
• phone/help

Kobra 4.5 SR1 Getting Started Guide Chapter 4 Retrieving and Displaying Information Name
rfs- 57
H
it
How to Search for Item Codes by Company
[email protected] 9 April 2003
ow to Search for Item Codes by Company Name
How to find anem code in theReuters Online
Directory
Step Action
1 Insert an Online Directory in the Flex document.The Reuters Online Directory Welcome page appears in the Online Directory.

Chapter 4 Retrieving and Displaying Information Kobra 4.5 SR1 Getting Started GuideHow
58 .com
ters
to Search for Item Codes by Company Name
9 April 2003 rfs-doc@reuters
2 With the Online Directory selected, type a company name or part of a name andpress Search.The Online Directory displays a list of companies whose names comprise the characyou typed.
Step Action
Kobra 4.5 SR1 Getting Started Guide Chapter 4 Retrieving and Displaying Informationtabase
rfs- 59
H
R
How to Search for Items, Issues, and Issuers in Reuters Da
[email protected] 9 April 2003
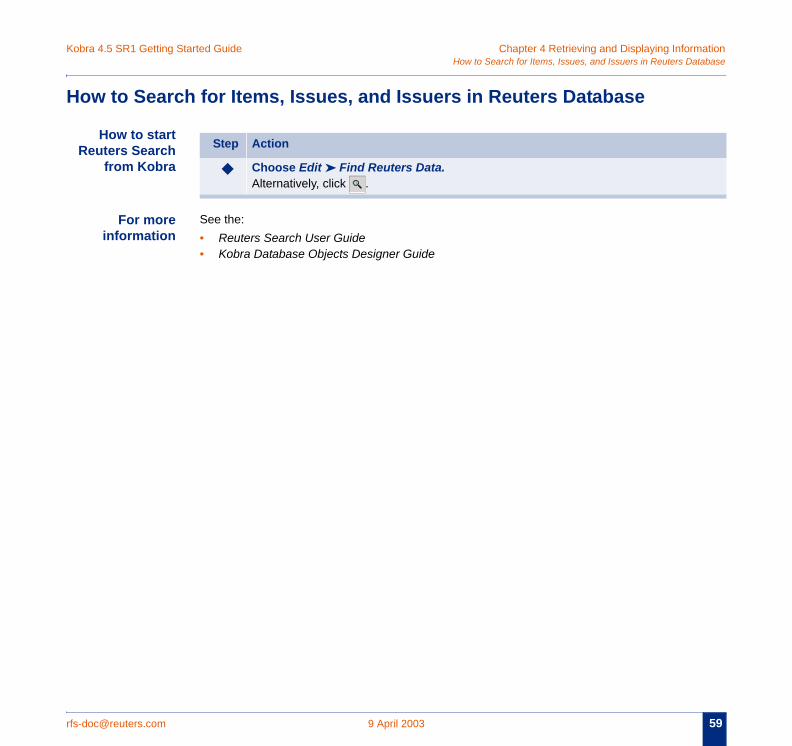
ow to Search for Items, Issues, and Issuers in Reuters Database
How to starteuters Search
from Kobra
For moreinformation
See the:• Reuters Search User Guide• Kobra Database Objects Designer Guide
Step Action
◆ Choose Edit ➤ Find Reuters Data.Alternatively, click .
Chapter 4 Retrieving and Displaying Information Kobra 4.5 SR1 Getting Started GuideDis
60 .com
D
In add from
you
playing Information on the Web
9 April 2003 rfs-doc@reuters
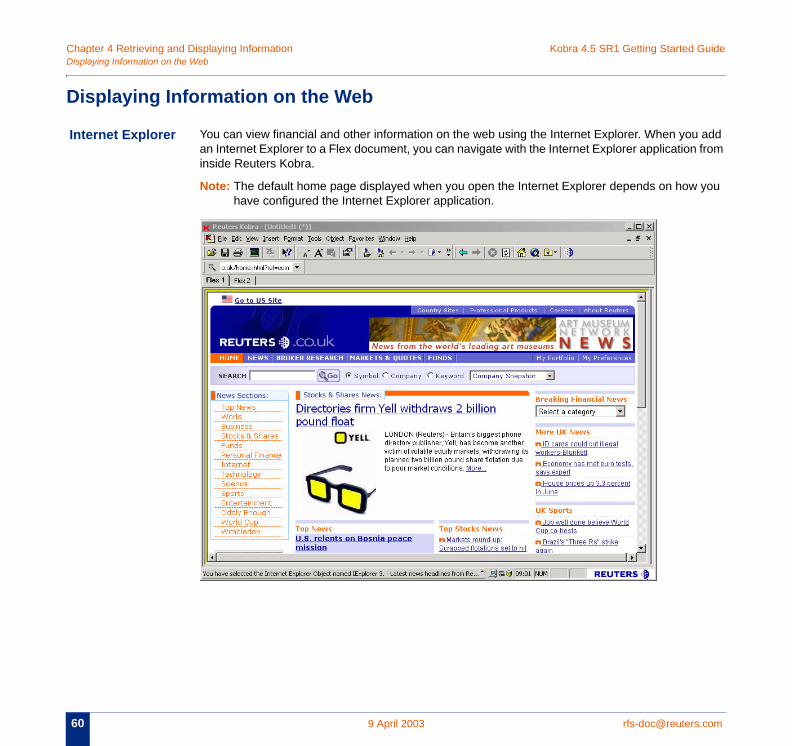
isplaying Information on the Web
ternet Explorer You can view financial and other information on the web using the Internet Explorer. When youan Internet Explorer to a Flex document, you can navigate with the Internet Explorer applicationinside Reuters Kobra.
Note: The default home page displayed when you open the Internet Explorer depends on howhave configured the Internet Explorer application.
Kobra 4.5 SR1 Getting Started Guide Chapter 4 Retrieving and Displaying Informatione Web
rfs- 61
s
Displaying Information on th
[email protected] 9 April 2003
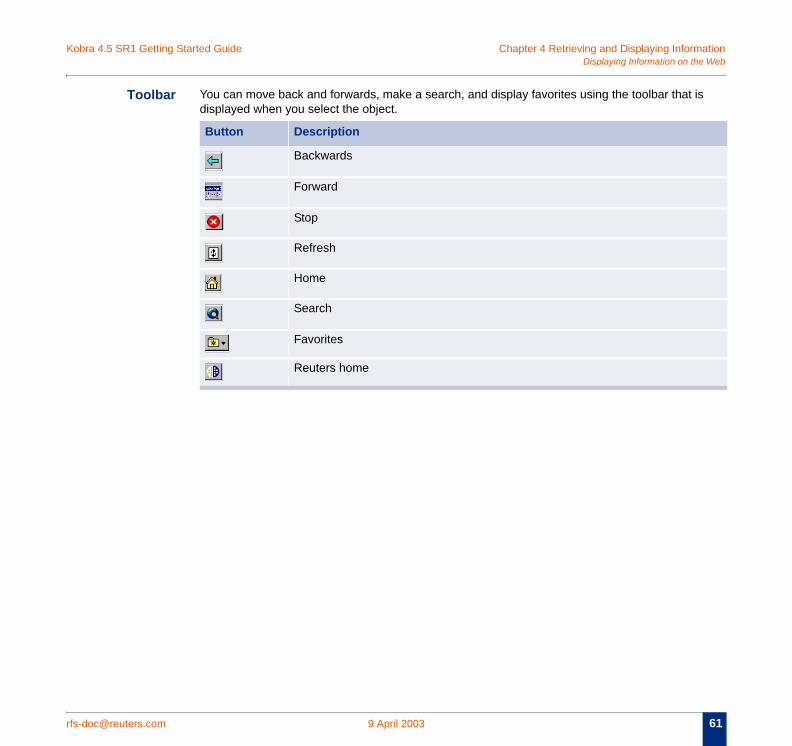
Toolbar You can move back and forwards, make a search, and display favorites using the toolbar that idisplayed when you select the object.
Button Description
Backwards
Forward
Stop
Refresh
Home
Search
Favorites
Reuters home

Chapter 4 Retrieving and Displaying Information Kobra 4.5 SR1 Getting Started GuideDis
62 .com
playing Information on the Web
9 April 2003 rfs-doc@reuters
rfs-doc@reuters 63
CHAPT
Con
.com 9 April 2003
ER 5 VIEWING MARKET DATA
tents • How to Viewing Full Quotes and Chains in Records and Pages• How to Display a Scrolling List of Quotes and Chains Using the Ticker• How to Use the Matrix to View Quotes for a Portfolio of Instruments• How to Edit Instrument Portfolios• How to Format Instrument Portfolios• How to Set a Record Alert to Monitor Instrument Prices• How to Activate, Deactivate, and Delete Alerts• How to Display Records, Headlines, Graphics, or Company Data Related to an Alert
Chapter 5 Viewing Market Data Kobra 4.5 SR1 Getting Started GuideHow
64 .com
H
Vi
ode
to Viewing Full Quotes and Chains in Records and Pages
9 April 2003 rfs-doc@reuters
ow to Viewing Full Quotes and Chains in Records and Pages
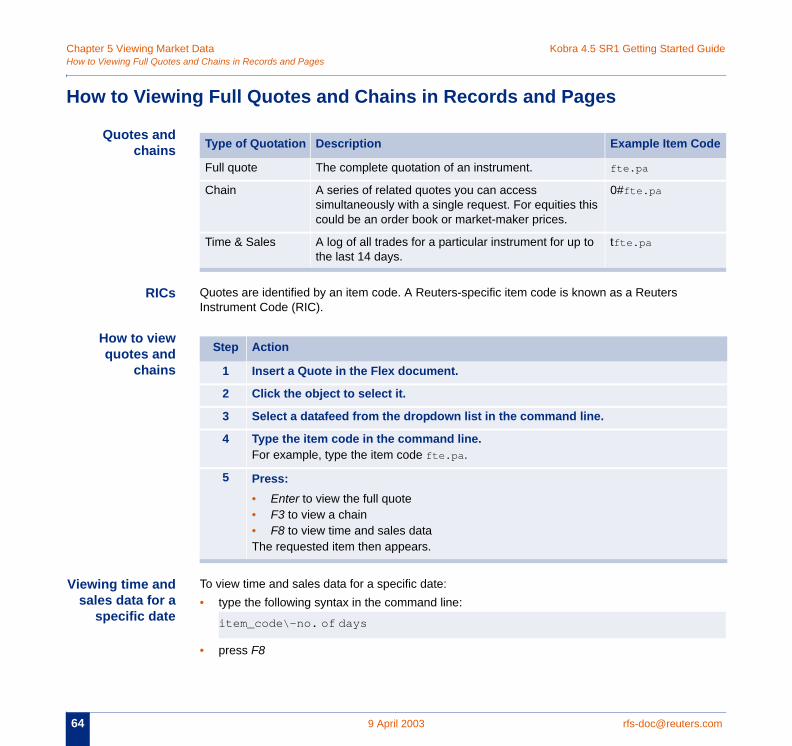
Quotes andchains
RICs Quotes are identified by an item code. A Reuters-specific item code is known as a Reuters Instrument Code (RIC).
How to viewquotes and
chains
ewing time andsales data for a
specific date
To view time and sales data for a specific date: • type the following syntax in the command line:
• press F8
Type of Quotation Description Example Item C
Full quote The complete quotation of an instrument. fte.pa
Chain A series of related quotes you can access simultaneously with a single request. For equities this could be an order book or market-maker prices.
0#fte.pa
Time & Sales A log of all trades for a particular instrument for up to the last 14 days.
tfte.pa
Step Action
1 Insert a Quote in the Flex document.
2 Click the object to select it.
3 Select a datafeed from the dropdown list in the command line.
4 Type the item code in the command line.For example, type the item code fte.pa.
5 Press:• Enter to view the full quote• F3 to view a chain• F8 to view time and sales dataThe requested item then appears.
item_code\-no. of days
Kobra 4.5 SR1 Getting Started Guide Chapter 5 Viewing Market Data Pages
rfs- 65
te
How to Viewing Full Quotes and Chains in Records and
[email protected] 9 April 2003
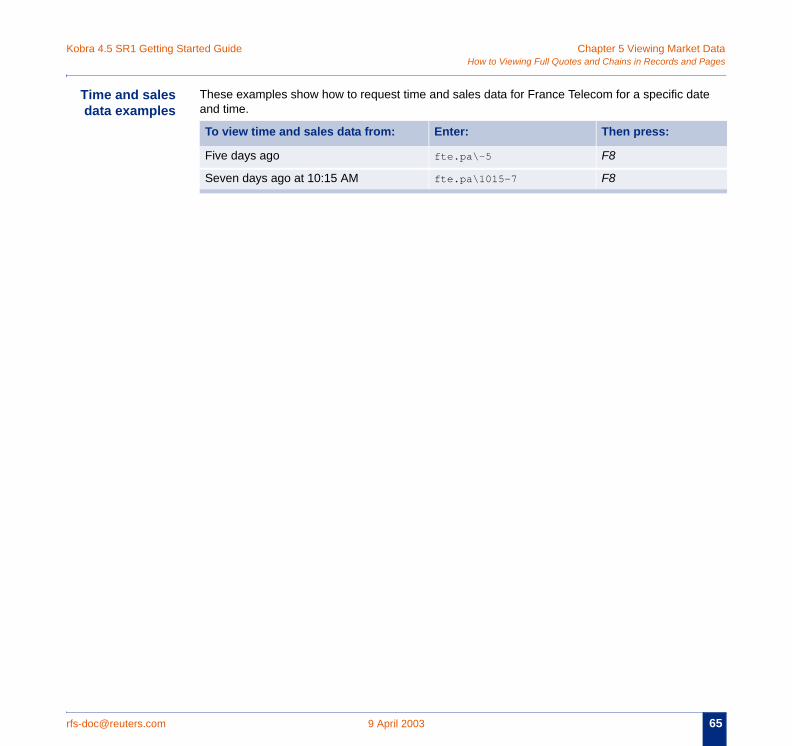
Time and salesdata examples
These examples show how to request time and sales data for France Telecom for a specific daand time.
To view time and sales data from: Enter: Then press:
Five days ago fte.pa\-5 F8
Seven days ago at 10:15 AM fte.pa\1015-7 F8
Chapter 5 Viewing Market Data Kobra 4.5 SR1 Getting Started GuideHow
66 .com
H
n.
rtain
letter
lace
to Display a Scrolling List of Quotes and Chains Using the Ticker
9 April 2003 rfs-doc@reuters
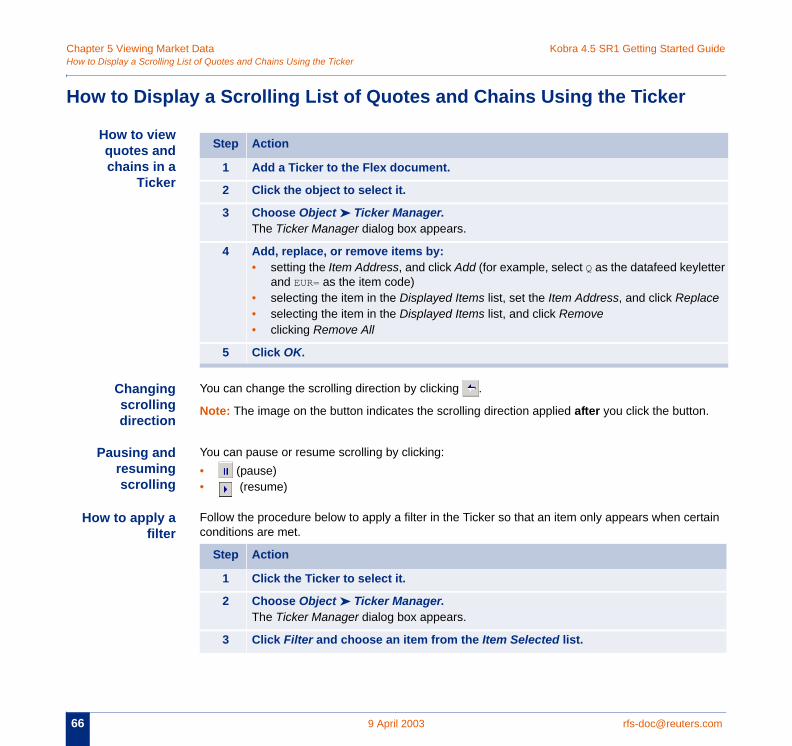
ow to Display a Scrolling List of Quotes and Chains Using the Ticker
How to viewquotes andchains in a
Ticker
Changingscrollingdirection
You can change the scrolling direction by clicking .
Note: The image on the button indicates the scrolling direction applied after you click the butto
Pausing andresumingscrolling
You can pause or resume scrolling by clicking:• (pause) • (resume)
How to apply afilter
Follow the procedure below to apply a filter in the Ticker so that an item only appears when ceconditions are met.
Step Action
1 Add a Ticker to the Flex document.
2 Click the object to select it.
3 Choose Object ➤ Ticker Manager.The Ticker Manager dialog box appears.
4 Add, replace, or remove items by:• setting the Item Address, and click Add (for example, select Q as the datafeed key
and EUR= as the item code)• selecting the item in the Displayed Items list, set the Item Address, and click Rep• selecting the item in the Displayed Items list, and click Remove• clicking Remove All
5 Click OK.
Step Action
1 Click the Ticker to select it.
2 Choose Object ➤ Ticker Manager.The Ticker Manager dialog box appears.
3 Click Filter and choose an item from the Item Selected list.
Kobra 4.5 SR1 Getting Started Guide Chapter 5 Viewing Market Data Ticker
rfs- 67
You
How to Display a Scrolling List of Quotes and Chains Using the
[email protected] 9 April 2003
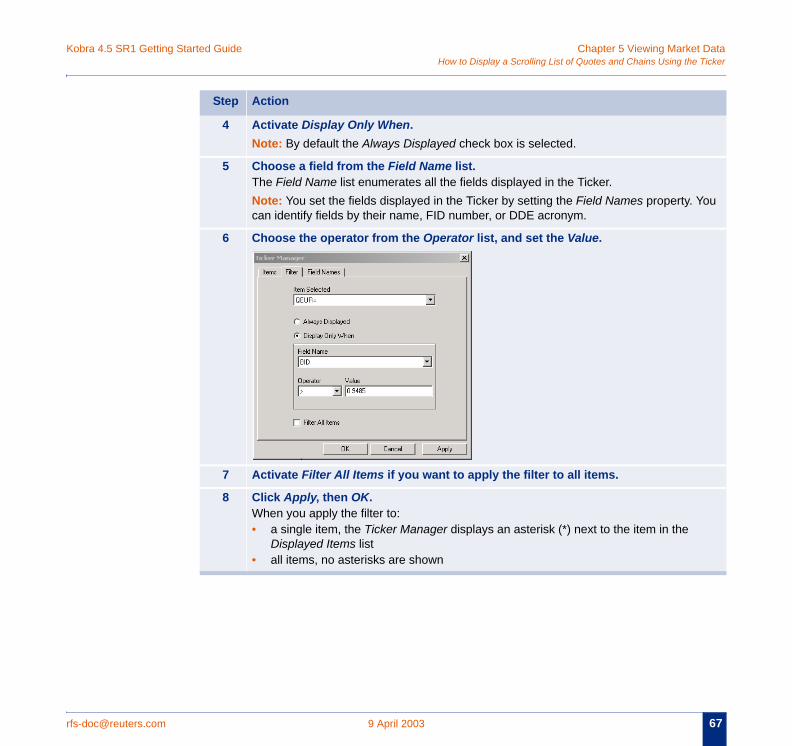
4 Activate Display Only When.Note: By default the Always Displayed check box is selected.
5 Choose a field from the Field Name list.The Field Name list enumerates all the fields displayed in the Ticker.Note: You set the fields displayed in the Ticker by setting the Field Names property. can identify fields by their name, FID number, or DDE acronym.
6 Choose the operator from the Operator list, and set the Value.
7 Activate Filter All Items if you want to apply the filter to all items.
8 Click Apply, then OK.When you apply the filter to:• a single item, the Ticker Manager displays an asterisk (*) next to the item in the
Displayed Items list• all items, no asterisks are shown
Step Action
Chapter 5 Viewing Market Data Kobra 4.5 SR1 Getting Started GuideHow
68 .com
H
H
Cr a e up
r
to Use the Matrix to View Quotes for a Portfolio of Instruments
9 April 2003 rfs-doc@reuters
ow to Use the Matrix to View Quotes for a Portfolio of Instruments
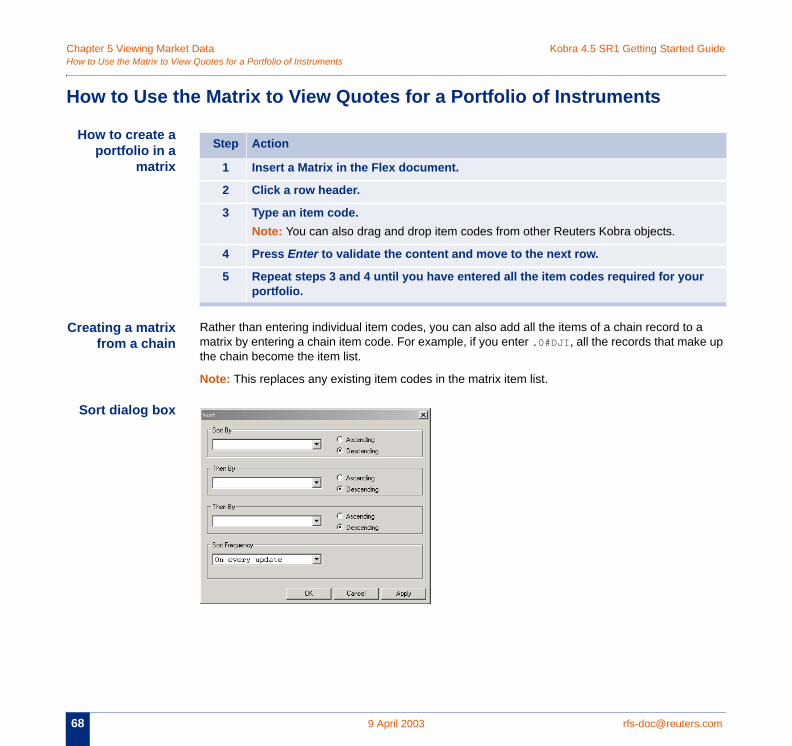
ow to create aportfolio in a
matrix
eating a matrixfrom a chain
Rather than entering individual item codes, you can also add all the items of a chain record to matrix by entering a chain item code. For example, if you enter .0#DJI, all the records that makthe chain become the item list.
Note: This replaces any existing item codes in the matrix item list.
Sort dialog box
Step Action
1 Insert a Matrix in the Flex document.
2 Click a row header.
3 Type an item code. Note: You can also drag and drop item codes from other Reuters Kobra objects.
4 Press Enter to validate the content and move to the next row.
5 Repeat steps 3 and 4 until you have entered all the item codes required for youportfolio.
Kobra 4.5 SR1 Getting Started Guide Chapter 5 Viewing Market Dataments
rfs- 69
H
H ist of
ts.
rom
How to Use the Matrix to View Quotes for a Portfolio of Instru
[email protected] 9 April 2003
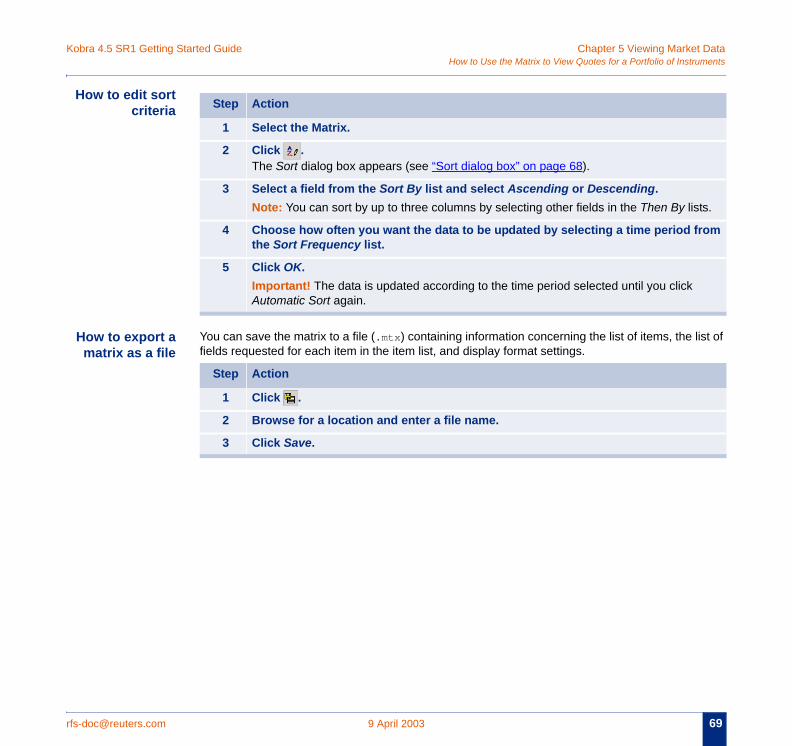
ow to edit sortcriteria
ow to export amatrix as a file
You can save the matrix to a file (.mtx) containing information concerning the list of items, the lfields requested for each item in the item list, and display format settings.
Step Action
1 Select the Matrix.
2 Click .The Sort dialog box appears (see “Sort dialog box” on page 68).
3 Select a field from the Sort By list and select Ascending or Descending.Note: You can sort by up to three columns by selecting other fields in the Then By lis
4 Choose how often you want the data to be updated by selecting a time period fthe Sort Frequency list.
5 Click OK.Important! The data is updated according to the time period selected until you click Automatic Sort again.
Step Action
1 Click .
2 Browse for a location and enter a file name.
3 Click Save.
Chapter 5 Viewing Market Data Kobra 4.5 SR1 Getting Started GuideHow
70 .com
H
H
H ified
H
that
ges
.
ges
to Edit Instrument Portfolios
9 April 2003 rfs-doc@reuters
ow to Edit Instrument Portfolios
ow to modify afield name or
item code
ow to specify adatafeed for a
row
You can choose a datafeed for each row in the matrix. By default, a row uses the datafeed specin the Matrix Default Datafeed property.
ow to specify adatafeed for
multiple rows
Step Action
1 Double-click the column or row header containing the field name or item code you want to modify.The header switches to edit mode.
2 Place the cursor at the desired position, and type the modification.
3 Press Enter.
Step Action
1 Click the Matrix to select it.
2 From the menu, select Object ➤ Rows Header Style ➤ Key Letter and Code.Alternatively, click and select Key Letter and Code. The row header column chanto include the key code.
3 Double-click a row header whose datafeed you want to specify.
4 Select a datafeed from the Datafeed dropdown menu.You can search for an available datafeed by entering its keyletter in Search Datafeed
5 Press Enter.
Step Action
1 Click the Matrix to select it.
2 Select Object ➤ Rows Header Style ➤ Key Letter and Code.Alternatively, click and select Key Letter and Code. The row header column chanto include the key code.
3 Select the row headers whose datafeed you want to specify.
4 Keeping the cursor over the row headers and double-click.The Datafeed menu appears.
Kobra 4.5 SR1 Getting Started Guide Chapter 5 Viewing Market Datartfolios
rfs- 71
d
ta
or
the ter in
ix or
rt a
atrix.
How to Edit Instrument Po
[email protected] 9 April 2003
How to clear,elete, or insert
rows andcolumns
Copying andinserting
The Matrix does not use a standard copy and paste function. Regardless of where you copy dafrom, the object inserts (not pastes) it differently depending on the menu you have chosen.
Important! You can paste information you copied from anywhere in a Matrix to a Spreadsheetanother spreadsheet application, such as Excel.
5 Select a datafeed from the Datafeed menu.The datafeed selected by default is the datafeed that corresponds to the datafeed of top-most row selected. You can search for an available datafeed by entering its keyletthe Search Datafeed text box.
6 Press Enter.
Step Action
Step Action
1 Right-click a row or column header.A pop-up menu appears.
2 Choose:• Clear Row or Clear Column to clear the selected row or column, leaving it empty• Delete Row or Delete Column to delete the selected row or column from the matr• Insert Before Row or Insert Before Column to insert a row before the selected row
insert a column before the selected column• Insert After Row or Insert After Column insert a row after the selected row or inse
column after the selected column
Right-click the: And choose: To insert the:
Matrix selection header Insert Item list and field list from the entire M
Row header Insert Copied Items List of items copied.
Column header Insert Copied Fields List of fields copied.
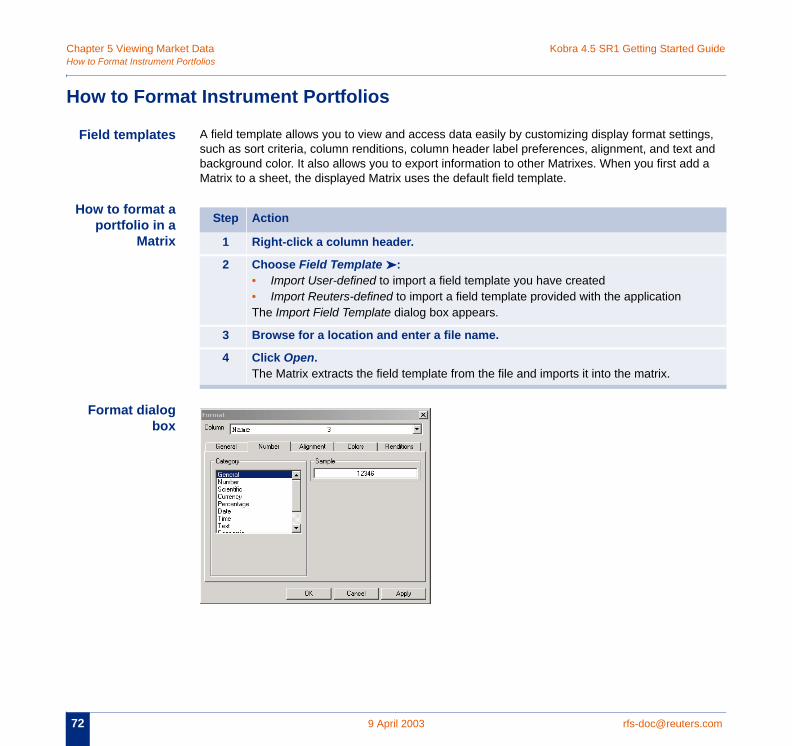
Chapter 5 Viewing Market Data Kobra 4.5 SR1 Getting Started GuideHow
72 .com
H
gs, nd a
H
to Format Instrument Portfolios
9 April 2003 rfs-doc@reuters
ow to Format Instrument Portfolios
Field templates A field template allows you to view and access data easily by customizing display format settinsuch as sort criteria, column renditions, column header label preferences, alignment, and text abackground color. It also allows you to export information to other Matrixes. When you first addMatrix to a sheet, the displayed Matrix uses the default field template.
ow to format aportfolio in a
Matrix
Format dialogbox
Step Action
1 Right-click a column header.
2 Choose Field Template ➤ :• Import User-defined to import a field template you have created• Import Reuters-defined to import a field template provided with the applicationThe Import Field Template dialog box appears.
3 Browse for a location and enter a file name.
4 Click Open.The Matrix extracts the field template from the file and imports it into the matrix.
Kobra 4.5 SR1 Getting Started Guide Chapter 5 Viewing Market Datartfolios
rfs- 73
How to Format Instrument Po
[email protected] 9 April 2003
How to formatcells in the
MatrixStep Action
1 Click the Matrix to select it.
2 Choose Object ➤ Edit Field Template.The Format dialog box is displayed.
3 Use the tabs to access different categories of cell properties, and select the properties you want from the menus.
4 Click OK.The Matrix cells are updated to the formats selected.
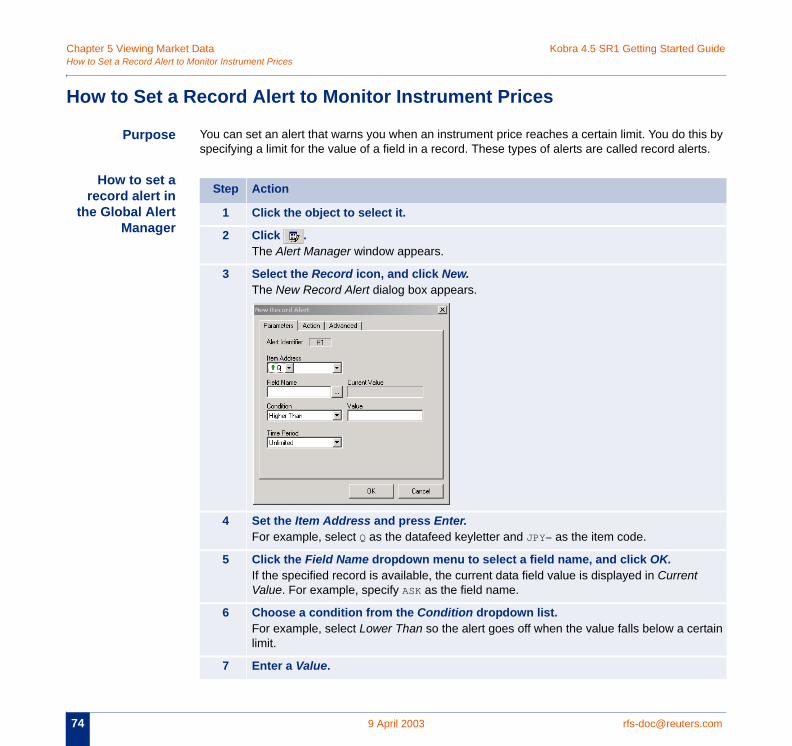
Chapter 5 Viewing Market Data Kobra 4.5 SR1 Getting Started GuideHow
74 .com
H
is by ts.
t
rtain
to Set a Record Alert to Monitor Instrument Prices
9 April 2003 rfs-doc@reuters
ow to Set a Record Alert to Monitor Instrument Prices
Purpose You can set an alert that warns you when an instrument price reaches a certain limit. You do thspecifying a limit for the value of a field in a record. These types of alerts are called record aler
How to set arecord alert in
he Global AlertManager
Step Action
1 Click the object to select it.
2 Click .The Alert Manager window appears.
3 Select the Record icon, and click New.The New Record Alert dialog box appears.
4 Set the Item Address and press Enter.For example, select Q as the datafeed keyletter and JPY= as the item code.
5 Click the Field Name dropdown menu to select a field name, and click OK.If the specified record is available, the current data field value is displayed in CurrentValue. For example, specify ASK as the field name.
6 Choose a condition from the Condition dropdown list.For example, select Lower Than so the alert goes off when the value falls below a celimit.
7 Enter a Value.
Kobra 4.5 SR1 Getting Started Guide Chapter 5 Viewing Market Data Prices
rfs- 75
p
How to Set a Record Alert to Monitor Instrument
[email protected] 9 April 2003
8 Click Action and specify the action to be taken when the alert goes off.For example, select Beep to emit a beep when the alert goes off.
9 Click OK.The Alert Manager displays details of the new alert. When the alert goes off, the beesounds and a message is displayed in the Alert.
Step Action
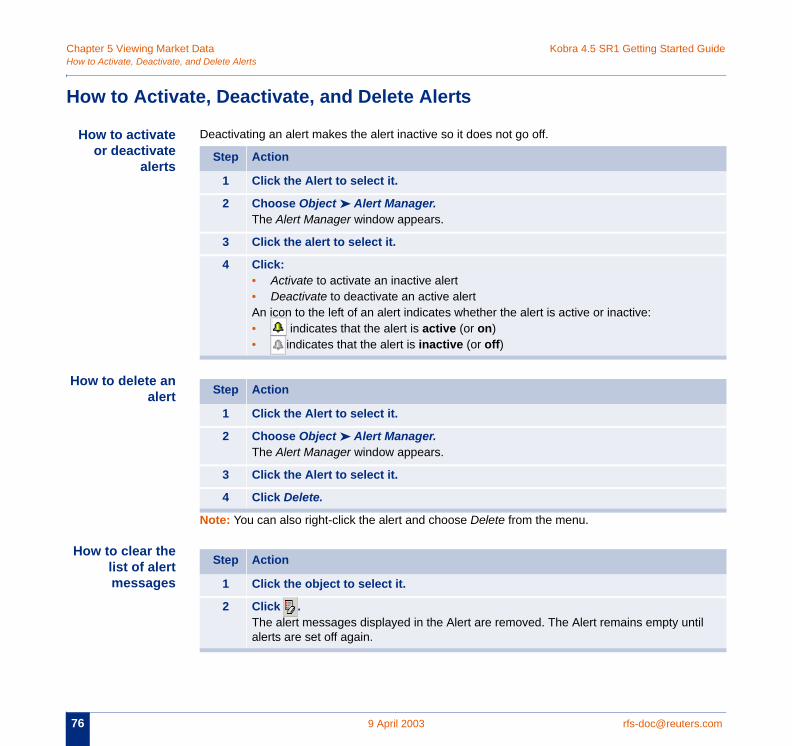
Chapter 5 Viewing Market Data Kobra 4.5 SR1 Getting Started GuideHow
76 .com
H
H
H
H
il
to Activate, Deactivate, and Delete Alerts
9 April 2003 rfs-doc@reuters
ow to Activate, Deactivate, and Delete Alerts
ow to activateor deactivate
alerts
Deactivating an alert makes the alert inactive so it does not go off.
ow to delete analert
Note: You can also right-click the alert and choose Delete from the menu.
ow to clear thelist of alertmessages
Step Action
1 Click the Alert to select it.
2 Choose Object ➤ Alert Manager.The Alert Manager window appears.
3 Click the alert to select it.
4 Click:• Activate to activate an inactive alert• Deactivate to deactivate an active alertAn icon to the left of an alert indicates whether the alert is active or inactive:• indicates that the alert is active (or on)• indicates that the alert is inactive (or off)
Step Action
1 Click the Alert to select it.
2 Choose Object ➤ Alert Manager.The Alert Manager window appears.
3 Click the Alert to select it.
4 Click Delete.
Step Action
1 Click the object to select it.
2 Click .The alert messages displayed in the Alert are removed. The Alert remains empty untalerts are set off again.

Kobra 4.5 SR1 Getting Started Guide Chapter 5 Viewing Market Datan Alert
rfs- 77
H to an
H
(w
How to Display Records, Headlines, Graphics, or Company Data Related to a
[email protected] 9 April 2003
ow to Display Records, Headlines, Graphics, or Company Data Related Alert
ow to display arelated recordfrom a record
alert
How to displayfurther related
informationhen available)
Step Action
1 Click an Alert to select it.
2 Double-click the record alert message.The related record appears in a Quote browser.
Step Action
1 Right-click an alert message and display the Alert menu.
2 Choose from:• Related Quote• Related News (headlines)• Related Graph• Related Company DataThe related information appears in a browser.

Chapter 5 Viewing Market Data Kobra 4.5 SR1 Getting Started GuideHow
78 .com
to Display Records, Headlines, Graphics, or Company Data Related to an Alert
9 April 2003 rfs-doc@reuters

rfs-doc@reuters 79
CHAPT
Con
.com 9 April 2003
ER 6 VIEWING HEADLINES AND NEWS
tents • Overview of the News Object• How to View News• Viewing Cross-Referenced Information• How to Display Related Information• Using News Search Expressions to Filter Headlines• How to Create and Save Search Expressions Using the News Expression Builder• Narrowing the Focus of Searches to Specific Words or Phrases• Combining Search Expressions• How to Modify How Headlines Appear in the News Object
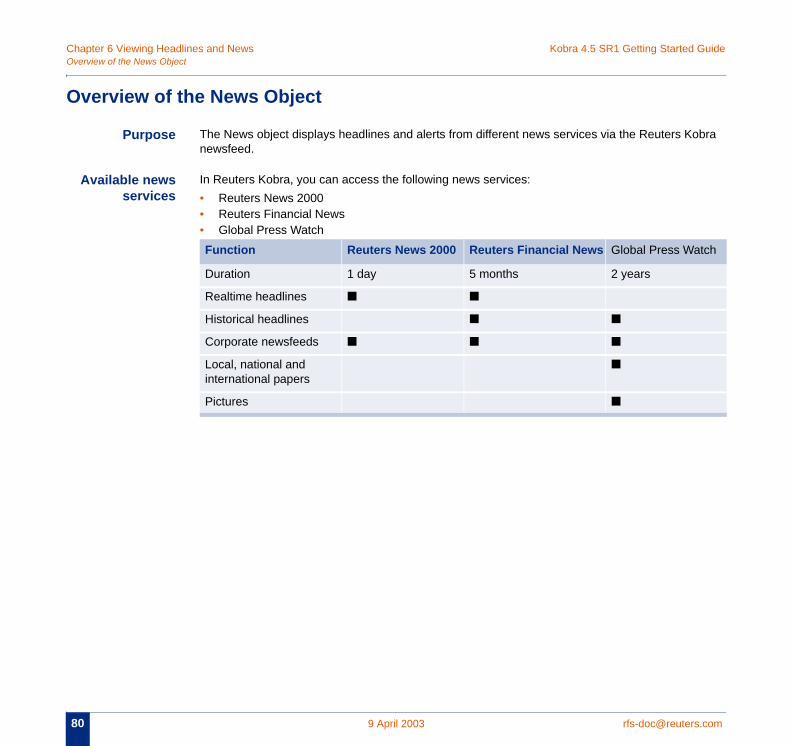
Chapter 6 Viewing Headlines and News Kobra 4.5 SR1 Getting Started GuideOve
80 .com
O
bra
tch
rview of the News Object
9 April 2003 rfs-doc@reuters
verview of the News Object
Purpose The News object displays headlines and alerts from different news services via the Reuters Konewsfeed.
Available newsservices
In Reuters Kobra, you can access the following news services:• Reuters News 2000• Reuters Financial News• Global Press WatchFunction Reuters News 2000 Reuters Financial News Global Press Wa
Duration 1 day 5 months 2 years
Realtime headlines ■ ■
Historical headlines ■ ■
Corporate newsfeeds ■ ■ ■
Local, national and international papers
■
Pictures ■
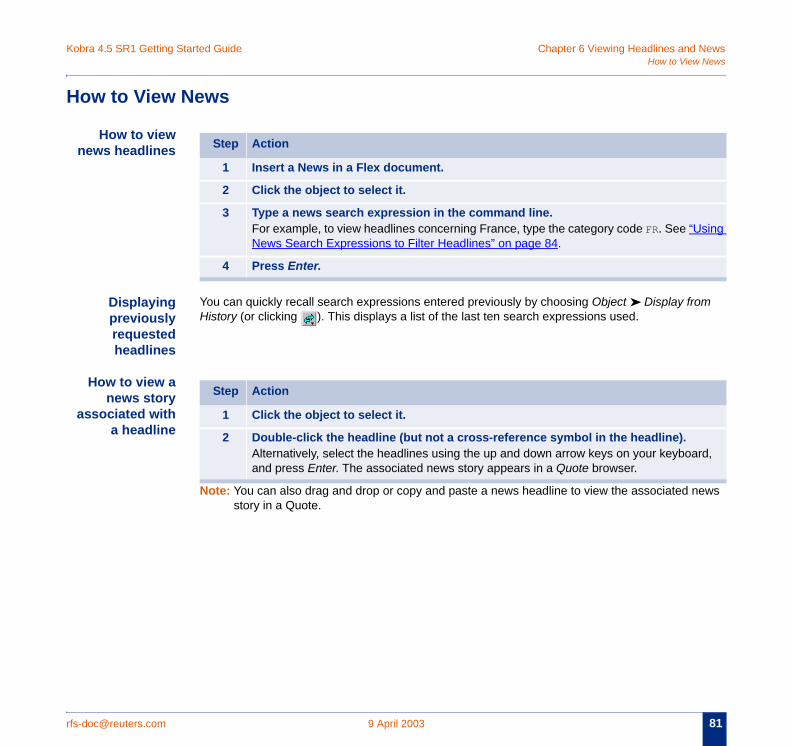
Kobra 4.5 SR1 Getting Started Guide Chapter 6 Viewing Headlines and News News
rfs- 81
H
n
m
a
ews
sing
rd,
How to View
[email protected] 9 April 2003
ow to View News
How to viewews headlines
Displayingpreviouslyrequestedheadlines
You can quickly recall search expressions entered previously by choosing Object ➤ Display froHistory (or clicking ). This displays a list of the last ten search expressions used.
How to view anews story
ssociated witha headline
Note: You can also drag and drop or copy and paste a news headline to view the associated nstory in a Quote.
Step Action
1 Insert a News in a Flex document.
2 Click the object to select it.
3 Type a news search expression in the command line.For example, to view headlines concerning France, type the category code FR. See “UNews Search Expressions to Filter Headlines” on page 84.
4 Press Enter.
Step Action
1 Click the object to select it.
2 Double-click the headline (but not a cross-reference symbol in the headline).Alternatively, select the headlines using the up and down arrow keys on your keyboaand press Enter. The associated news story appears in a Quote browser.
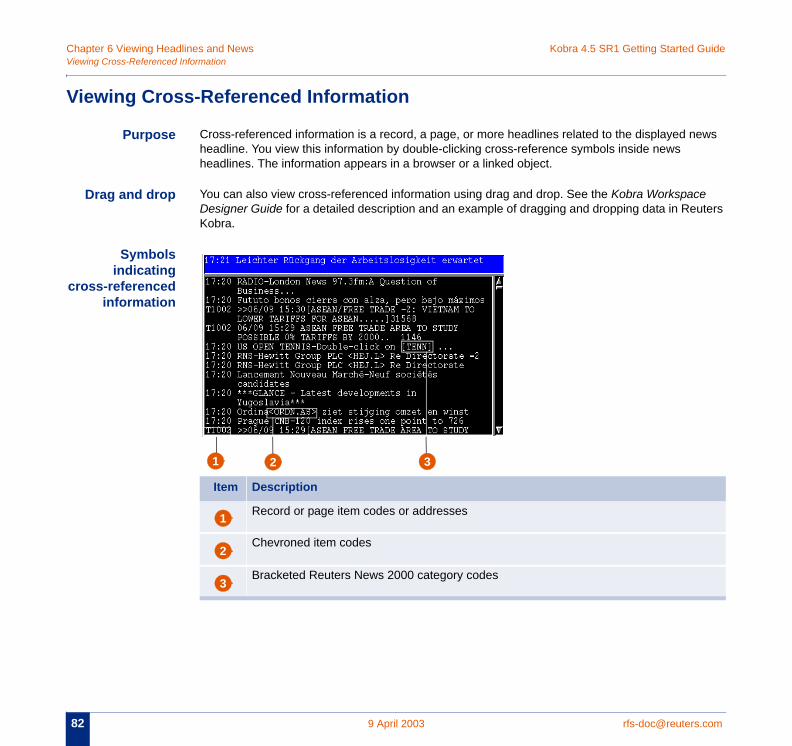
Chapter 6 Viewing Headlines and News Kobra 4.5 SR1 Getting Started GuideVie
82 .com
Vi
ews
e uters
cr
wing Cross-Referenced Information
9 April 2003 rfs-doc@reuters
ewing Cross-Referenced Information
Purpose Cross-referenced information is a record, a page, or more headlines related to the displayed nheadline. You view this information by double-clicking cross-reference symbols inside news headlines. The information appears in a browser or a linked object.
Drag and drop You can also view cross-referenced information using drag and drop. See the Kobra WorkspacDesigner Guide for a detailed description and an example of dragging and dropping data in ReKobra.
Symbolsindicating
oss-referencedinformation
Item Description
Record or page item codes or addresses
Chevroned item codes
Bracketed Reuters News 2000 category codes
2 31
1
2
3

Kobra 4.5 SR1 Getting Started Guide Chapter 6 Viewing Headlines and Newsmation
rfs- 83
H
.
H
How to Display Related Infor
[email protected] 9 April 2003
ow to Display Related Information
How to displayrelated
information
Follow the procedure below to display additional information related to the headlines displayed
ow to navigatein the news
headline list
Step Action
1 Click a News to select it.
2 Right-click a headline.A pop-up menu appears.
3 Choose:• Related Quote• Related News• Related Graph• Related Company DataThe related information appears in a browser.
Step Action
1 Right-click a headline.A menu appears.
2 Choose either: • Go to Latest to move to the most recent headline• Go to Earliest to move to the least recent headline
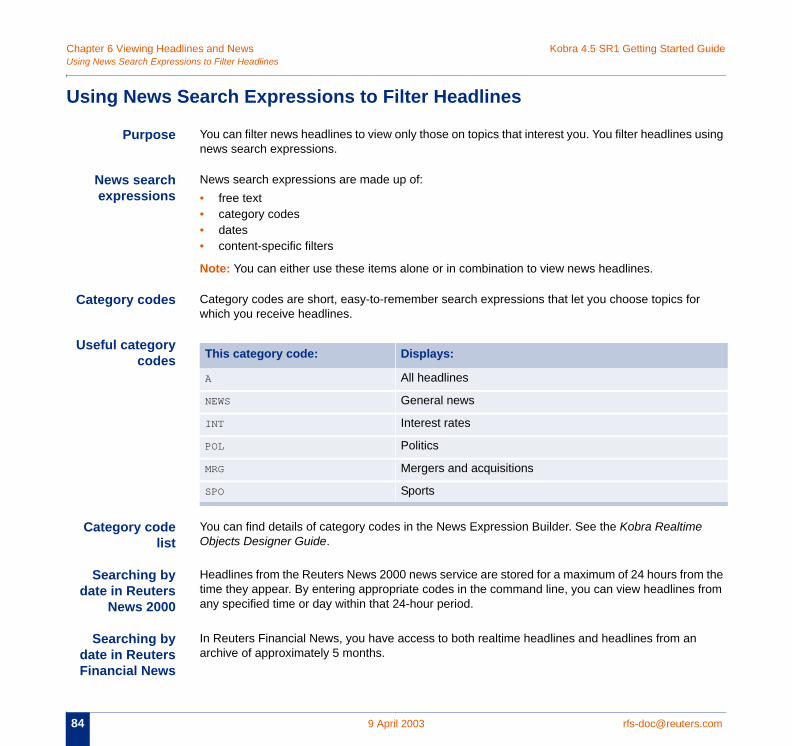
Chapter 6 Viewing Headlines and News Kobra 4.5 SR1 Getting Started GuideUsi
84 .com
U
sing
C r
U
the from
ng News Search Expressions to Filter Headlines
9 April 2003 rfs-doc@reuters
sing News Search Expressions to Filter Headlines
Purpose You can filter news headlines to view only those on topics that interest you. You filter headlines unews search expressions.
News searchexpressions
News search expressions are made up of:• free text• category codes• dates• content-specific filters
Note: You can either use these items alone or in combination to view news headlines.
ategory codes Category codes are short, easy-to-remember search expressions that let you choose topics fowhich you receive headlines.
seful categorycodes
Category codelist
You can find details of category codes in the News Expression Builder. See the Kobra RealtimeObjects Designer Guide.
Searching bydate in Reuters
News 2000
Headlines from the Reuters News 2000 news service are stored for a maximum of 24 hours fromtime they appear. By entering appropriate codes in the command line, you can view headlines any specified time or day within that 24-hour period.
Searching bydate in ReutersFinancial News
In Reuters Financial News, you have access to both realtime headlines and headlines from anarchive of approximately 5 months.
This category code: Displays:
A All headlines
NEWS General news
INT Interest rates
POL Politics
MRG Mergers and acquisitions
SPO Sports
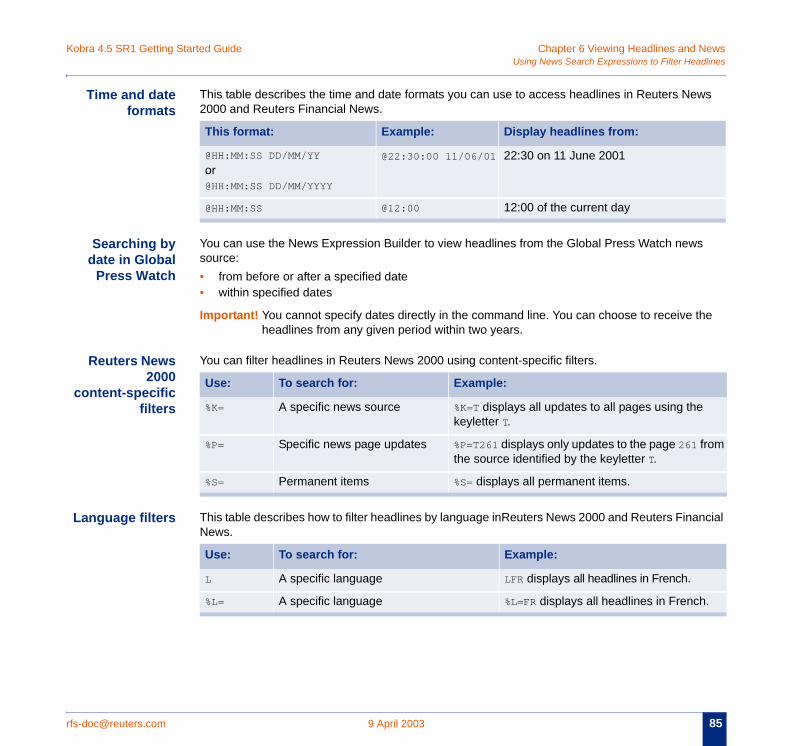
Kobra 4.5 SR1 Getting Started Guide Chapter 6 Viewing Headlines and Newsadlines
rfs- 85
ws
s
he
c
L ncial
e
from
h.
Using News Search Expressions to Filter He
[email protected] 9 April 2003
Time and dateformats
This table describes the time and date formats you can use to access headlines in Reuters Ne2000 and Reuters Financial News.
Searching bydate in Global
Press Watch
You can use the News Expression Builder to view headlines from the Global Press Watch newsource:• from before or after a specified date • within specified dates
Important! You cannot specify dates directly in the command line. You can choose to receive theadlines from any given period within two years.
Reuters News2000
ontent-specificfilters
You can filter headlines in Reuters News 2000 using content-specific filters.
anguage filters This table describes how to filter headlines by language inReuters News 2000 and Reuters FinaNews.
This format: Example: Display headlines from:
@HH:MM:SS DD/MM/YY
or@HH:MM:SS DD/MM/YYYY
@22:30:00 11/06/01 22:30 on 11 June 2001
@HH:MM:SS @12:00 12:00 of the current day
Use: To search for: Example:
%K= A specific news source %K=T displays all updates to all pages using thkeyletter T.
%P= Specific news page updates %P=T261 displays only updates to the page 261the source identified by the keyletter T.
%S= Permanent items %S= displays all permanent items.
Use: To search for: Example:
L A specific language LFR displays all headlines in French.
%L= A specific language %L=FR displays all headlines in Frenc
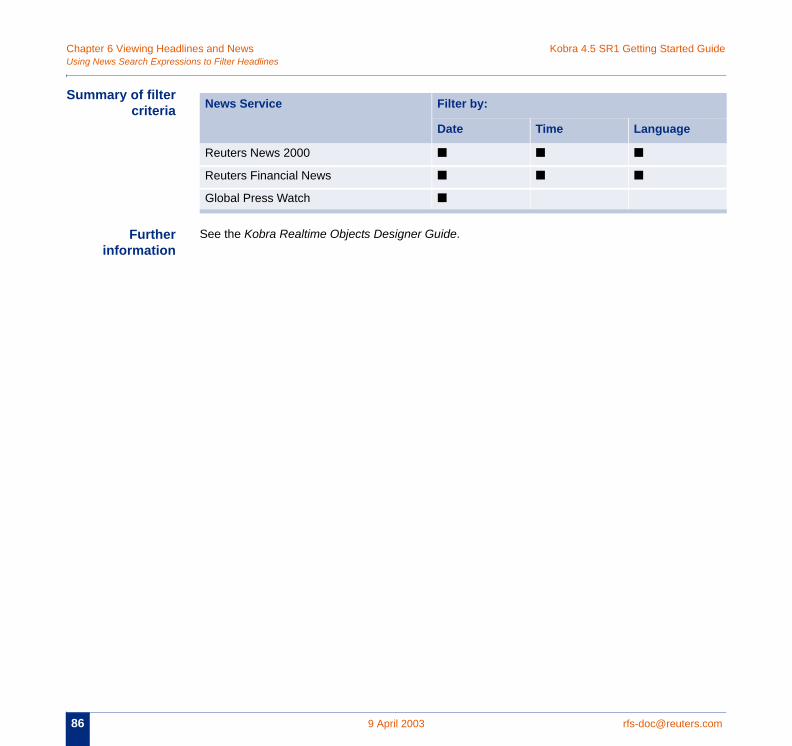
Chapter 6 Viewing Headlines and News Kobra 4.5 SR1 Getting Started GuideUsi
86 .com
Su
ng News Search Expressions to Filter Headlines
9 April 2003 rfs-doc@reuters
mmary of filtercriteria
Furtherinformation
See the Kobra Realtime Objects Designer Guide.
News Service Filter by:
Date Time Language
Reuters News 2000 ■ ■ ■
Reuters Financial News ■ ■ ■
Global Press Watch ■
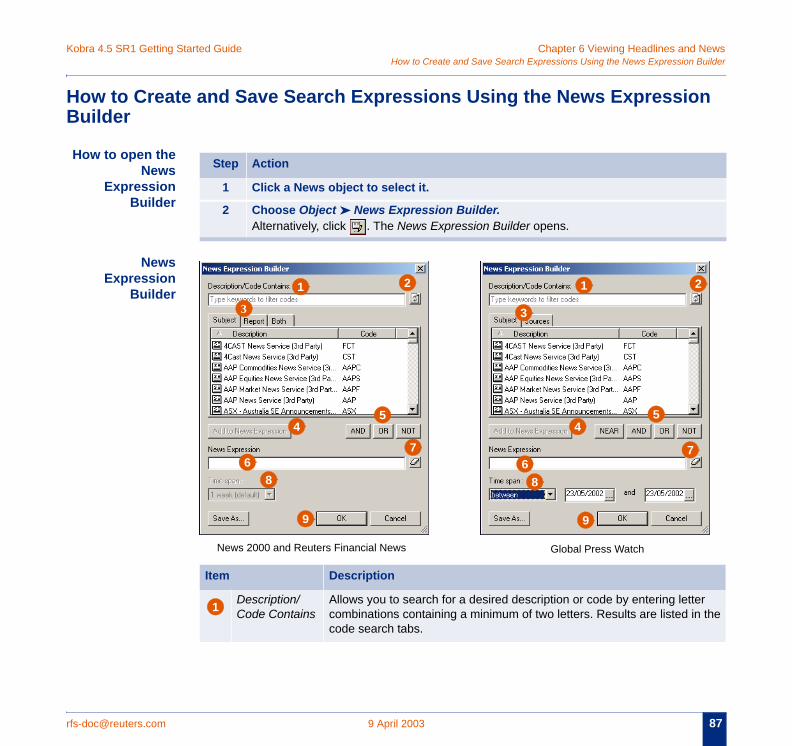
Kobra 4.5 SR1 Getting Started Guide Chapter 6 Viewing Headlines and NewsBuilder
rfs- 87
H n B
H
r the
How to Create and Save Search Expressions Using the News Expression
[email protected] 9 April 2003
ow to Create and Save Search Expressions Using the News Expressiouilder
ow to open theNews
ExpressionBuilder
NewsExpression
Builder
Step Action
1 Click a News object to select it.
2 Choose Object ➤ News Expression Builder.Alternatively, click . The News Expression Builder opens.
Item Description
Description/ Code Contains
Allows you to search for a desired description or code by entering lettecombinations containing a minimum of two letters. Results are listed incode search tabs.
2
3
45
67
8
9
1 1 2
3
45
67
8
9
News 2000 and Reuters Financial News Global Press Watch
1
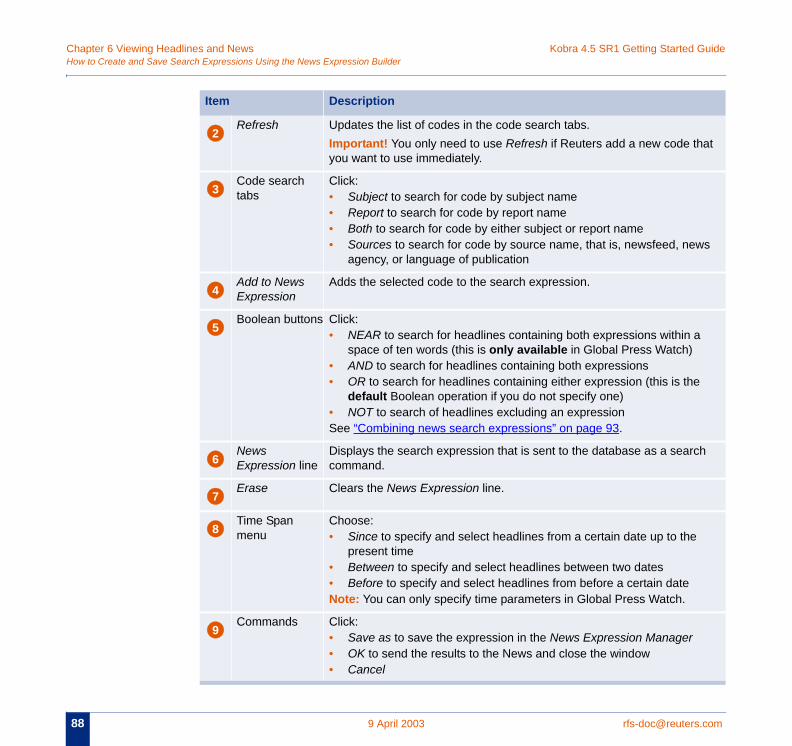
Chapter 6 Viewing Headlines and News Kobra 4.5 SR1 Getting Started GuideHow
88 .com
hat
s
h
to Create and Save Search Expressions Using the News Expression Builder
9 April 2003 rfs-doc@reuters
Refresh Updates the list of codes in the code search tabs.Important! You only need to use Refresh if Reuters add a new code tyou want to use immediately.
Code search tabs
Click:• Subject to search for code by subject name• Report to search for code by report name• Both to search for code by either subject or report name• Sources to search for code by source name, that is, newsfeed, new
agency, or language of publication
Add to News Expression
Adds the selected code to the search expression.
Boolean buttons Click:• NEAR to search for headlines containing both expressions within a
space of ten words (this is only available in Global Press Watch)• AND to search for headlines containing both expressions• OR to search for headlines containing either expression (this is the
default Boolean operation if you do not specify one)• NOT to search of headlines excluding an expressionSee “Combining news search expressions” on page 93.
News Expression line
Displays the search expression that is sent to the database as a searccommand.
Erase Clears the News Expression line.
Time Span menu
Choose:• Since to specify and select headlines from a certain date up to the
present time• Between to specify and select headlines between two dates• Before to specify and select headlines from before a certain dateNote: You can only specify time parameters in Global Press Watch.
Commands Click:• Save as to save the expression in the News Expression Manager• OK to send the results to the News and close the window• Cancel
Item Description
2
3
4
5
6
7
8
9
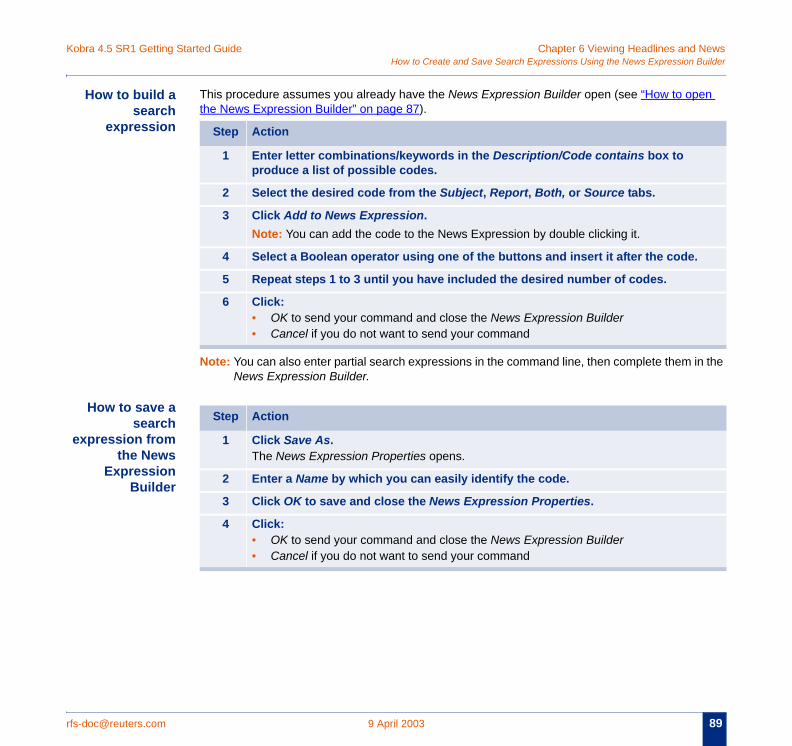
Kobra 4.5 SR1 Getting Started Guide Chapter 6 Viewing Headlines and NewsBuilder
rfs- 89
en
n the
e
How to Create and Save Search Expressions Using the News Expression
[email protected] 9 April 2003
How to build asearch
expression
This procedure assumes you already have the News Expression Builder open (see “How to opthe News Expression Builder” on page 87).
Note: You can also enter partial search expressions in the command line, then complete them iNews Expression Builder.
How to save asearch
xpression fromthe News
ExpressionBuilder
Step Action
1 Enter letter combinations/keywords in the Description/Code contains box to produce a list of possible codes.
2 Select the desired code from the Subject, Report, Both, or Source tabs.
3 Click Add to News Expression.Note: You can add the code to the News Expression by double clicking it.
4 Select a Boolean operator using one of the buttons and insert it after the code.
5 Repeat steps 1 to 3 until you have included the desired number of codes.
6 Click:• OK to send your command and close the News Expression Builder • Cancel if you do not want to send your command
Step Action
1 Click Save As.The News Expression Properties opens.
2 Enter a Name by which you can easily identify the code.
3 Click OK to save and close the News Expression Properties.
4 Click:• OK to send your command and close the News Expression Builder • Cancel if you do not want to send your command
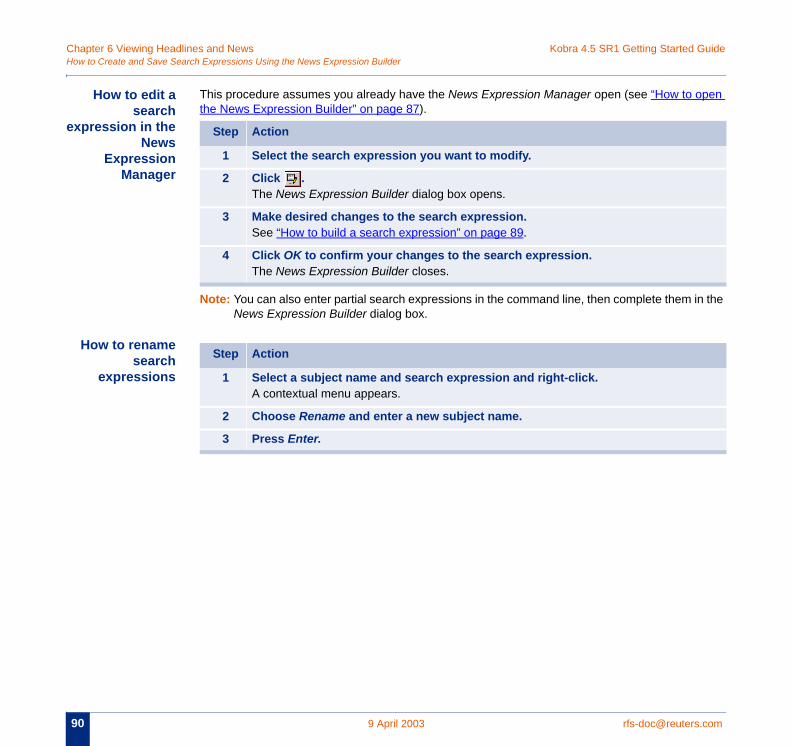
Chapter 6 Viewing Headlines and News Kobra 4.5 SR1 Getting Started GuideHow
90 .com
ex
pen
n the
to Create and Save Search Expressions Using the News Expression Builder
9 April 2003 rfs-doc@reuters
How to edit asearch
pression in theNews
ExpressionManager
This procedure assumes you already have the News Expression Manager open (see “How to othe News Expression Builder” on page 87).
Note: You can also enter partial search expressions in the command line, then complete them iNews Expression Builder dialog box.
How to renamesearch
expressions
Step Action
1 Select the search expression you want to modify.
2 Click .The News Expression Builder dialog box opens.
3 Make desired changes to the search expression.See “How to build a search expression” on page 89.
4 Click OK to confirm your changes to the search expression.The News Expression Builder closes.
Step Action
1 Select a subject name and search expression and right-click.A contextual menu appears.
2 Choose Rename and enter a new subject name.
3 Press Enter.
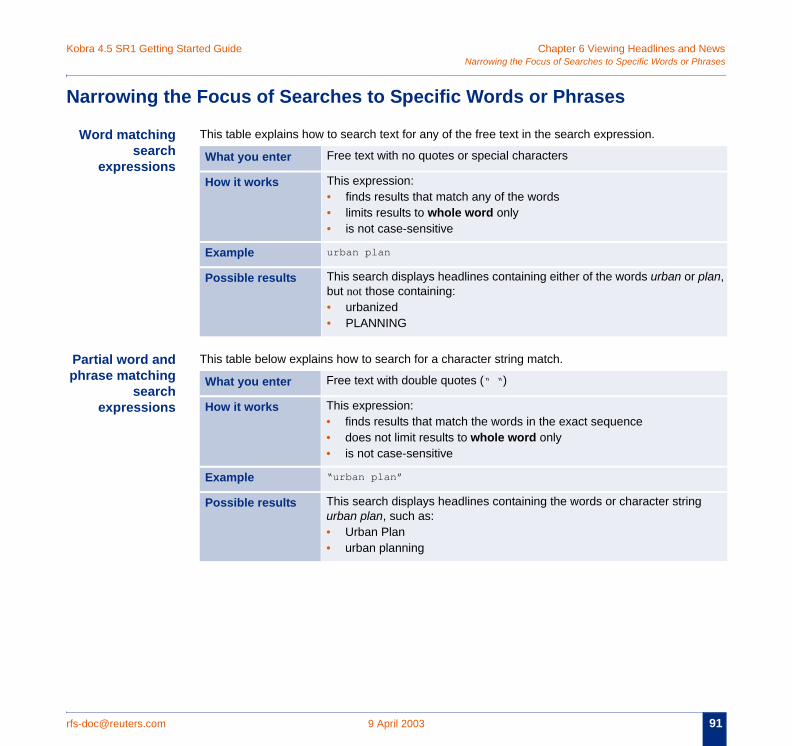
Kobra 4.5 SR1 Getting Started Guide Chapter 6 Viewing Headlines and Newshrases
rfs- 91
N
Pph
plan,
Narrowing the Focus of Searches to Specific Words or P
[email protected] 9 April 2003
arrowing the Focus of Searches to Specific Words or Phrases
Word matchingsearch
expressions
This table explains how to search text for any of the free text in the search expression.
artial word andrase matching
searchexpressions
This table below explains how to search for a character string match.
What you enter Free text with no quotes or special characters
How it works This expression:• finds results that match any of the words• limits results to whole word only• is not case-sensitive
Example urban plan
Possible results This search displays headlines containing either of the words urban or but not those containing:• urbanized• PLANNING
What you enter Free text with double quotes (“ “)
How it works This expression:• finds results that match the words in the exact sequence• does not limit results to whole word only• is not case-sensitive
Example “urban plan”
Possible results This search displays headlines containing the words or character stringurban plan, such as:• Urban Plan• urban planning
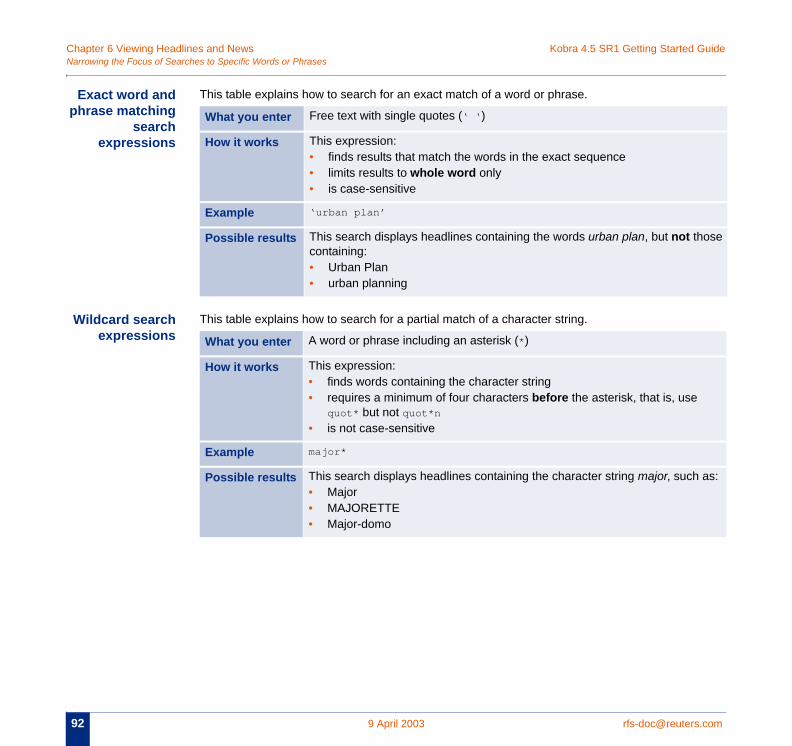
Chapter 6 Viewing Headlines and News Kobra 4.5 SR1 Getting Started GuideNar
92 .com
Eph
W
hose
as:
rowing the Focus of Searches to Specific Words or Phrases
9 April 2003 rfs-doc@reuters
xact word andrase matching
searchexpressions
This table explains how to search for an exact match of a word or phrase.
ildcard searchexpressions
This table explains how to search for a partial match of a character string.
What you enter Free text with single quotes (‘ ‘)
How it works This expression:• finds results that match the words in the exact sequence• limits results to whole word only• is case-sensitive
Example ‘urban plan’
Possible results This search displays headlines containing the words urban plan, but not tcontaining:• Urban Plan• urban planning
What you enter A word or phrase including an asterisk (*)
How it works This expression:• finds words containing the character string• requires a minimum of four characters before the asterisk, that is, use
quot* but not quot*n• is not case-sensitive
Example major*
Possible results This search displays headlines containing the character string major, such• Major• MAJORETTE• Major-domo
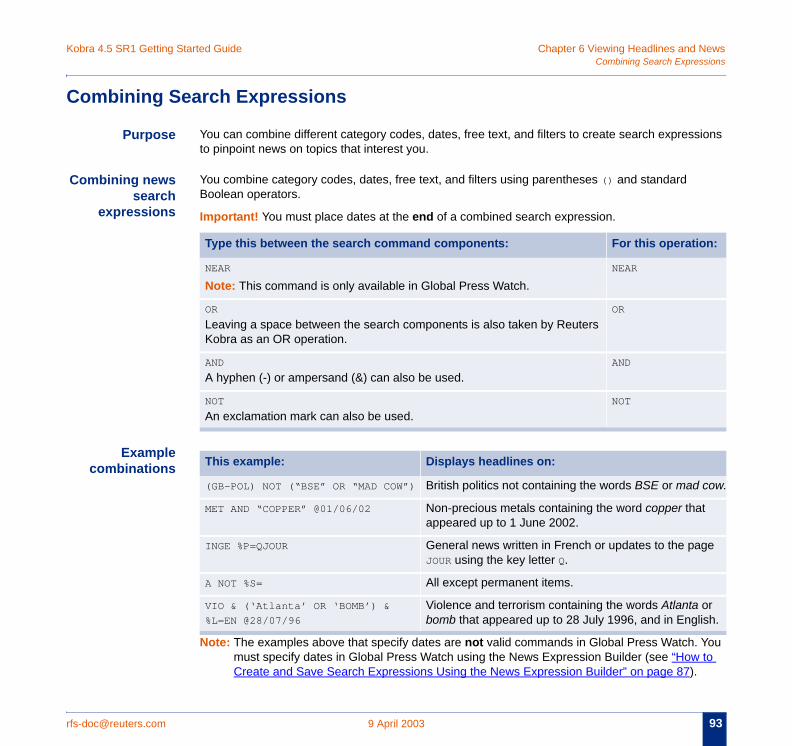
Kobra 4.5 SR1 Getting Started Guide Chapter 6 Viewing Headlines and Newsssions
rfs- 93
C
ions
C
You to
on:
cow.
t
ge
or lish.
Combining Search Expre
[email protected] 9 April 2003
ombining Search Expressions
Purpose You can combine different category codes, dates, free text, and filters to create search expressto pinpoint news on topics that interest you.
ombining newssearch
expressions
You combine category codes, dates, free text, and filters using parentheses () and standard Boolean operators.
Important! You must place dates at the end of a combined search expression.
Examplecombinations
Note: The examples above that specify dates are not valid commands in Global Press Watch.must specify dates in Global Press Watch using the News Expression Builder (see “HowCreate and Save Search Expressions Using the News Expression Builder” on page 87).
Type this between the search command components: For this operati
NEAR
Note: This command is only available in Global Press Watch.NEAR
OR
Leaving a space between the search components is also taken by Reuters Kobra as an OR operation.
OR
AND
A hyphen (-) or ampersand (&) can also be used.AND
NOT
An exclamation mark can also be used.NOT
This example: Displays headlines on:
(GB-POL) NOT (“BSE” OR “MAD COW”) British politics not containing the words BSE or mad
MET AND “COPPER” @01/06/02 Non-precious metals containing the word copper thaappeared up to 1 June 2002.
INGE %P=QJOUR General news written in French or updates to the paJOUR using the key letter Q.
A NOT %S= All except permanent items.
VIO & (‘Atlanta’ OR ‘BOMB’) &
%L=EN @28/07/96
Violence and terrorism containing the words Atlantabomb that appeared up to 28 July 1996, and in Eng
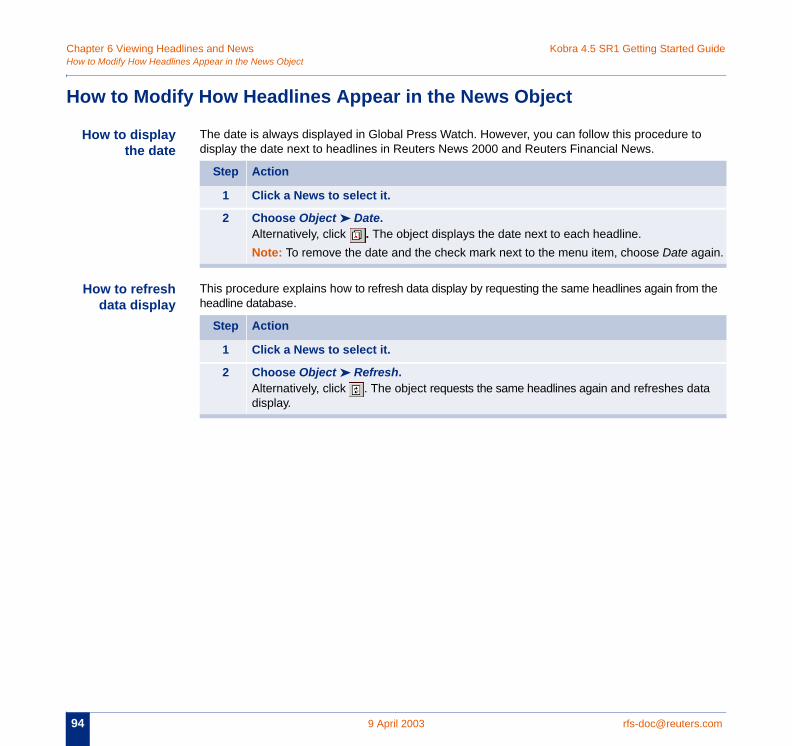
Chapter 6 Viewing Headlines and News Kobra 4.5 SR1 Getting Started GuideHow
94 .com
H
the
gain.
ta
to Modify How Headlines Appear in the News Object
9 April 2003 rfs-doc@reuters
ow to Modify How Headlines Appear in the News Object
How to displaythe date
The date is always displayed in Global Press Watch. However, you can follow this procedure todisplay the date next to headlines in Reuters News 2000 and Reuters Financial News.
How to refreshdata display
This procedure explains how to refresh data display by requesting the same headlines again fromheadline database.
Step Action
1 Click a News to select it.
2 Choose Object ➤ Date.Alternatively, click . The object displays the date next to each headline.Note: To remove the date and the check mark next to the menu item, choose Date a
Step Action
1 Click a News to select it.
2 Choose Object ➤ Refresh.Alternatively, click . The object requests the same headlines again and refreshes dadisplay.
rfs-doc@reuters 95
CHAPT
Con
.com 9 April 2003
ER 7 ANALYZING DATA IN A SPREADSHEET
tents • How to Create a New Worksheet and Open an Existing Worksheet• How to Save a Worksheet in a File• How to Enter Cell Data• How to Add a Function to Formulas in Worksheet Cells• Viewing Realtime Data in Cells• Viewing Reuters TS1 Historical Data in Cells• How to Edit Cells Containing Text, Numbers, or Formulas• How to Specify How Numeric Data is Displayed in Selected Cells• How to Set Recalculations• How to Resize Rows and Columns• How to Change Fonts and Colors
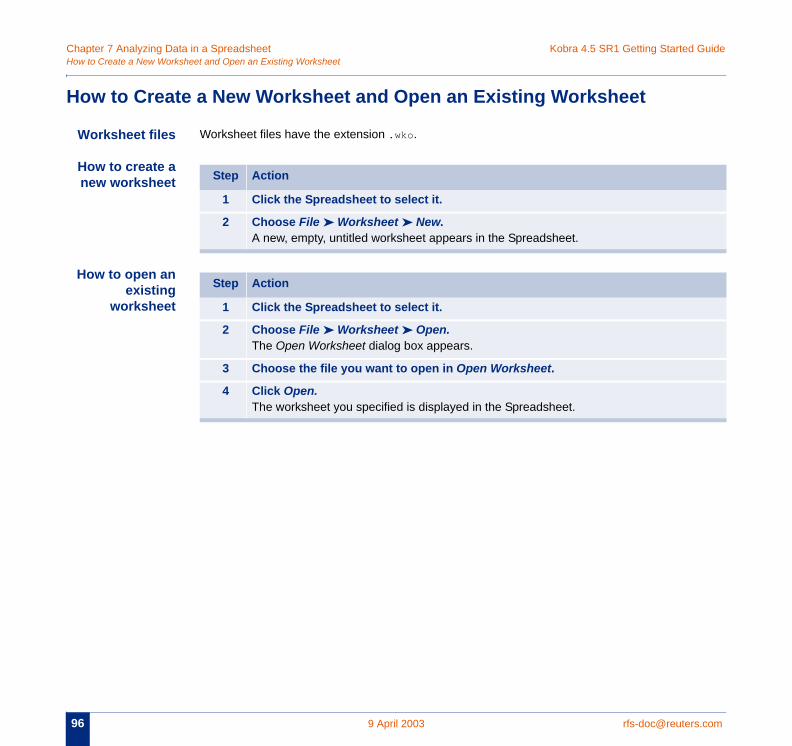
Chapter 7 Analyzing Data in a Spreadsheet Kobra 4.5 SR1 Getting Started GuideHow
96 .com
H
W
H
H
to Create a New Worksheet and Open an Existing Worksheet
9 April 2003 rfs-doc@reuters
ow to Create a New Worksheet and Open an Existing Worksheet
orksheet files Worksheet files have the extension .wko.
ow to create anew worksheet
ow to open anexisting
worksheet
Step Action
1 Click the Spreadsheet to select it.
2 Choose File ➤ Worksheet ➤ New.A new, empty, untitled worksheet appears in the Spreadsheet.
Step Action
1 Click the Spreadsheet to select it.
2 Choose File ➤ Worksheet ➤ Open.The Open Worksheet dialog box appears.
3 Choose the file you want to open in Open Worksheet.
4 Click Open.The worksheet you specified is displayed in the Spreadsheet.
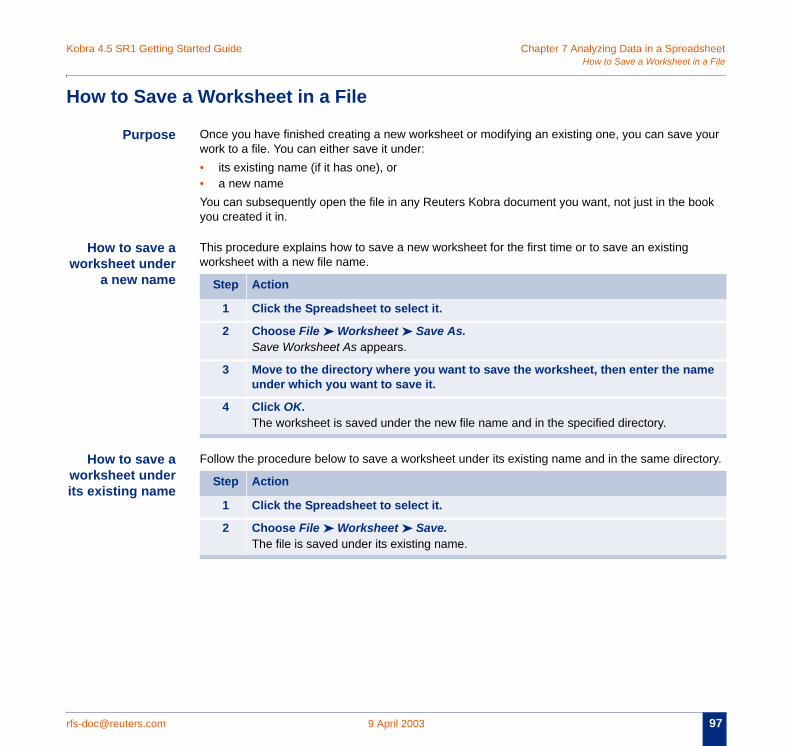
Kobra 4.5 SR1 Getting Started Guide Chapter 7 Analyzing Data in a Spreadsheet a File
rfs- 97
H
your
ok
w
wits
tory.
me
How to Save a Worksheet in
[email protected] 9 April 2003
ow to Save a Worksheet in a File
Purpose Once you have finished creating a new worksheet or modifying an existing one, you can save work to a file. You can either save it under:• its existing name (if it has one), or• a new nameYou can subsequently open the file in any Reuters Kobra document you want, not just in the boyou created it in.
How to save aorksheet under
a new name
This procedure explains how to save a new worksheet for the first time or to save an existing worksheet with a new file name.
How to save aorksheet under existing name
Follow the procedure below to save a worksheet under its existing name and in the same direc
Step Action
1 Click the Spreadsheet to select it.
2 Choose File ➤ Worksheet ➤ Save As.Save Worksheet As appears.
3 Move to the directory where you want to save the worksheet, then enter the naunder which you want to save it.
4 Click OK.The worksheet is saved under the new file name and in the specified directory.
Step Action
1 Click the Spreadsheet to select it.
2 Choose File ➤ Worksheet ➤ Save.The file is saved under its existing name.
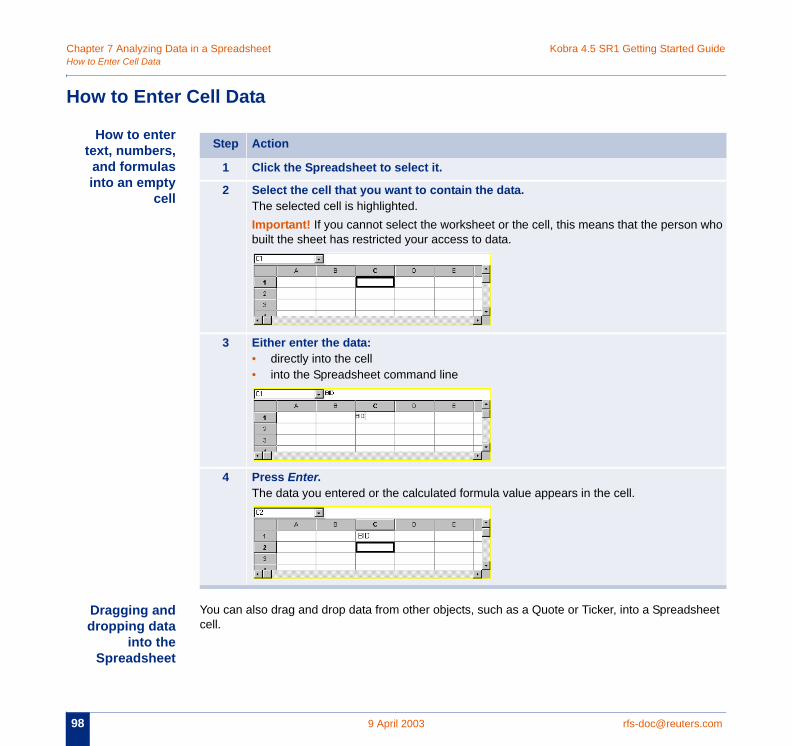
Chapter 7 Analyzing Data in a Spreadsheet Kobra 4.5 SR1 Getting Started GuideHow
98 .com
H
heet
who
to Enter Cell Data
9 April 2003 rfs-doc@reuters
ow to Enter Cell Data
How to entertext, numbers,
and formulasinto an empty
cell
Dragging anddropping data
into theSpreadsheet
You can also drag and drop data from other objects, such as a Quote or Ticker, into a Spreadscell.
Step Action
1 Click the Spreadsheet to select it.
2 Select the cell that you want to contain the data.The selected cell is highlighted.Important! If you cannot select the worksheet or the cell, this means that the personbuilt the sheet has restricted your access to data.
3 Either enter the data:• directly into the cell • into the Spreadsheet command line
4 Press Enter.The data you entered or the calculated formula value appears in the cell.
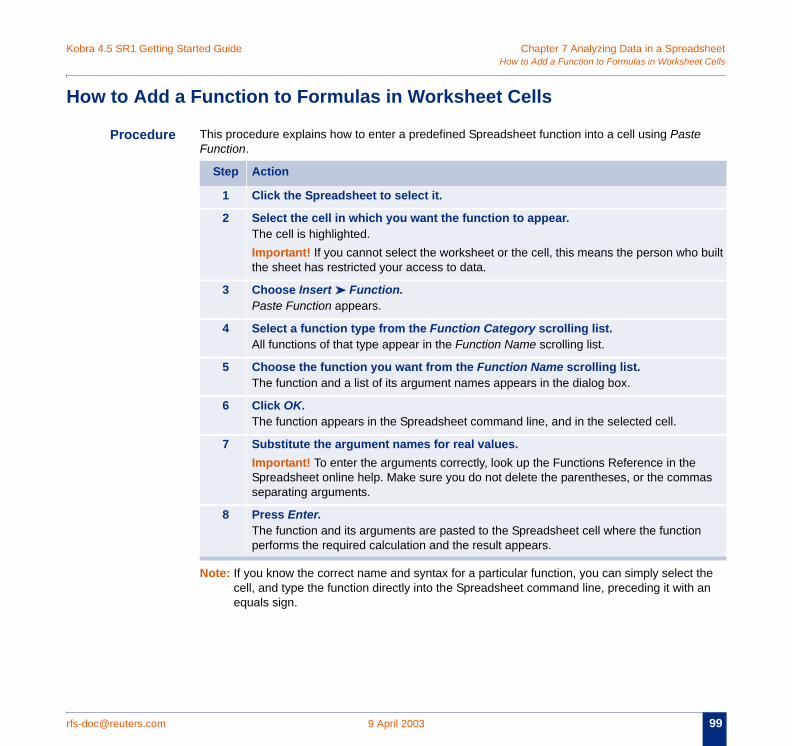
Kobra 4.5 SR1 Getting Started Guide Chapter 7 Analyzing Data in a Spreadsheett Cells
rfs- 99
H
the an
built
as
How to Add a Function to Formulas in Workshee
[email protected] 9 April 2003
ow to Add a Function to Formulas in Worksheet Cells
Procedure This procedure explains how to enter a predefined Spreadsheet function into a cell using PasteFunction.
Note: If you know the correct name and syntax for a particular function, you can simply select cell, and type the function directly into the Spreadsheet command line, preceding it with equals sign.
Step Action
1 Click the Spreadsheet to select it.
2 Select the cell in which you want the function to appear.The cell is highlighted.Important! If you cannot select the worksheet or the cell, this means the person whothe sheet has restricted your access to data.
3 Choose Insert ➤ Function.Paste Function appears.
4 Select a function type from the Function Category scrolling list.All functions of that type appear in the Function Name scrolling list.
5 Choose the function you want from the Function Name scrolling list.The function and a list of its argument names appears in the dialog box.
6 Click OK.The function appears in the Spreadsheet command line, and in the selected cell.
7 Substitute the argument names for real values.Important! To enter the arguments correctly, look up the Functions Reference in theSpreadsheet online help. Make sure you do not delete the parentheses, or the commseparating arguments.
8 Press Enter.The function and its arguments are pasted to the Spreadsheet cell where the functionperforms the required calculation and the result appears.

Chapter 7 Analyzing Data in a Spreadsheet Kobra 4.5 SR1 Getting Started GuideVie
10 .com
Vi
e then ay
e
e
wing Realtime Data in Cells
0 9 April 2003 rfs-doc@reuters
ewing Realtime Data in Cells
Realtimeinformation
The Spreadsheet can access, display, and manipulate realtime information. You can display threaltime values of record fields from record-based servers in the cells of a worksheet. You can integrate these values in user-defined formulas or predefined Spreadsheet functions, and displthe result in a worksheet cell. See also Kobra Workspace Designer Guide.
RECORDfunction
The RECORD function is one of the predefined realtime functions of the Spreadsheet. You use thRECORD function to view realtime data from any realtime server in worksheet cells.
Syntax
Examples
Mandatoryarguments
Optionalargument
=RECORD(RecordName,FidNameNum[,Datafeed])
=RECORD("FRF=","BID")
=RECORD("ICI.L",34)
Argument Represents the: Data Type
RecordName Name of the record that contains the data you want to display. Enclose this argument in double quotes.
Text string
FidNameNum Name or number of the record field whose value you want to display. If you use the FID name, enclose it in double quotes.
Text string ornumeric valu
Argument Represents the: Data Type
Datafeed Service keyletter to retrieve the realtime data from. When you do not specify a keyletter, the formula requests the realtime data from the default datafeed. Enclose this argument in double quotes.
Text string
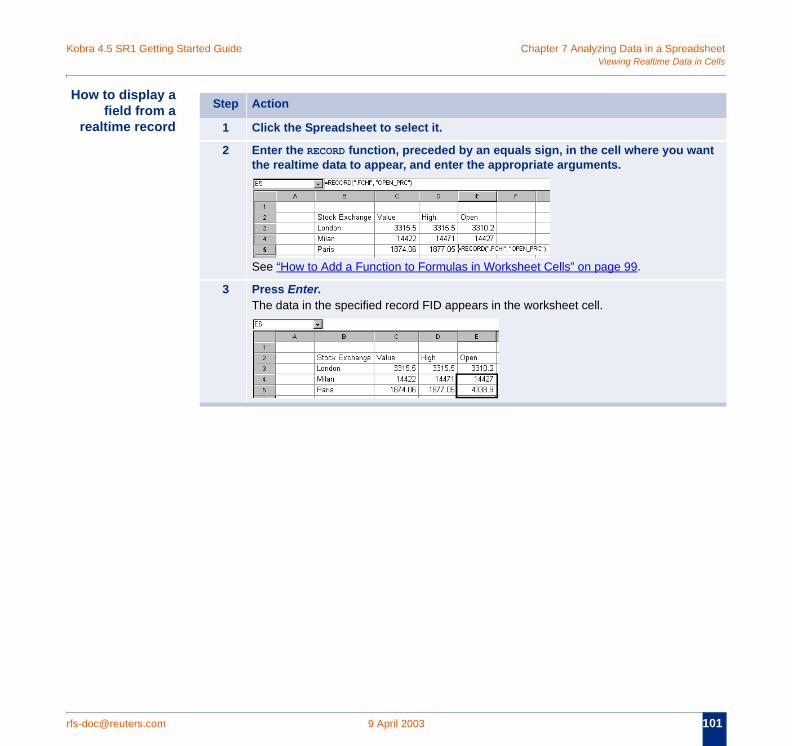
Kobra 4.5 SR1 Getting Started Guide Chapter 7 Analyzing Data in a Spreadsheetn Cells
rfs- 101
H
ant
Viewing Realtime Data i
[email protected] 9 April 2003
ow to display afield from a
realtime recordStep Action
1 Click the Spreadsheet to select it.
2 Enter the RECORD function, preceded by an equals sign, in the cell where you wthe realtime data to appear, and enter the appropriate arguments.
See “How to Add a Function to Formulas in Worksheet Cells” on page 99.
3 Press Enter.The data in the specified record FID appears in the worksheet cell.
Chapter 7 Analyzing Data in a Spreadsheet Kobra 4.5 SR1 Getting Started GuideVie
10 .com
Vi
S ction
. The that
e ield.
ence
wing Reuters TS1 Historical Data in Cells
2 9 April 2003 rfs-doc@reuters
ewing Reuters TS1 Historical Data in Cells
ERIES function This SERIES function is one of the Spreadsheet’s predefined functions. You use the SERIES funto view Reuters TS1 time series record data in worksheet cells.
Usage You use the SERIES function to display the time series data (TS1) for a record in a range of cellstop row in the range displays the FID names of data retrieved from the record. The rows belowwithin the range contain the data values, separated by the time interval that you specify in the function.
Note: A TS1 notes field, containing various information about the data, is also available for somtime series data. You can choose the cell in the worksheet that displays the TS1 Notes f
Syntax
Examples
Mandatoryarguments
=SERIES(RecordName,Period,Range),[Datafeed],[InputRange])
=SERIES(".FCHI", "d", k4:08)
=SERIES("ITL=","w", a2:a2)
Argument Represents the: Data Type
RecordName Name of the record for which you want to display historical data. Enclose this argument in double quotes.
Text string
Period Frequency with which you want to receive data:• d = daily• w = weekly• m = monthlyEnclose this argument in double quotes.
Text string
Range Range reference of the cells receiving historical data, and is only used to specify the number of rows to display data. If Range is a single cell (xn:xn) the Spreadsheet Object retrieves as much data as exists in the TS1 database for that item.Important! Do not use a single cell range (xn:xn) if you define the START DATE and END DATE optional arguments in an input range.
Range refer
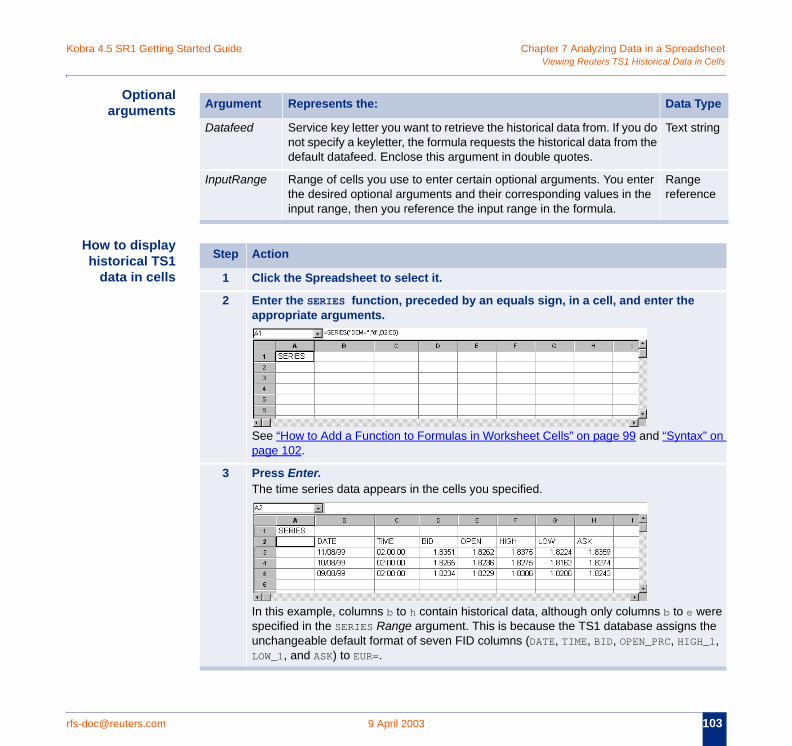
Kobra 4.5 SR1 Getting Started Guide Chapter 7 Analyzing Data in a Spreadsheetn Cells
rfs- 103
ype
tring
nce
x” on
were the H_1,
Viewing Reuters TS1 Historical Data i
[email protected] 9 April 2003
Optionalarguments
How to displayhistorical TS1
data in cells
Argument Represents the: Data T
Datafeed Service key letter you want to retrieve the historical data from. If you do not specify a keyletter, the formula requests the historical data from the default datafeed. Enclose this argument in double quotes.
Text s
InputRange Range of cells you use to enter certain optional arguments. You enter the desired optional arguments and their corresponding values in the input range, then you reference the input range in the formula.
Rangerefere
Step Action
1 Click the Spreadsheet to select it.
2 Enter the SERIES function, preceded by an equals sign, in a cell, and enter the appropriate arguments.
See “How to Add a Function to Formulas in Worksheet Cells” on page 99 and “Syntapage 102.
3 Press Enter.The time series data appears in the cells you specified.
In this example, columns b to h contain historical data, although only columns b to e specified in the SERIES Range argument. This is because the TS1 database assignsunchangeable default format of seven FID columns (DATE, TIME, BID, OPEN_PRC, HIGLOW_1, and ASK) to EUR=.
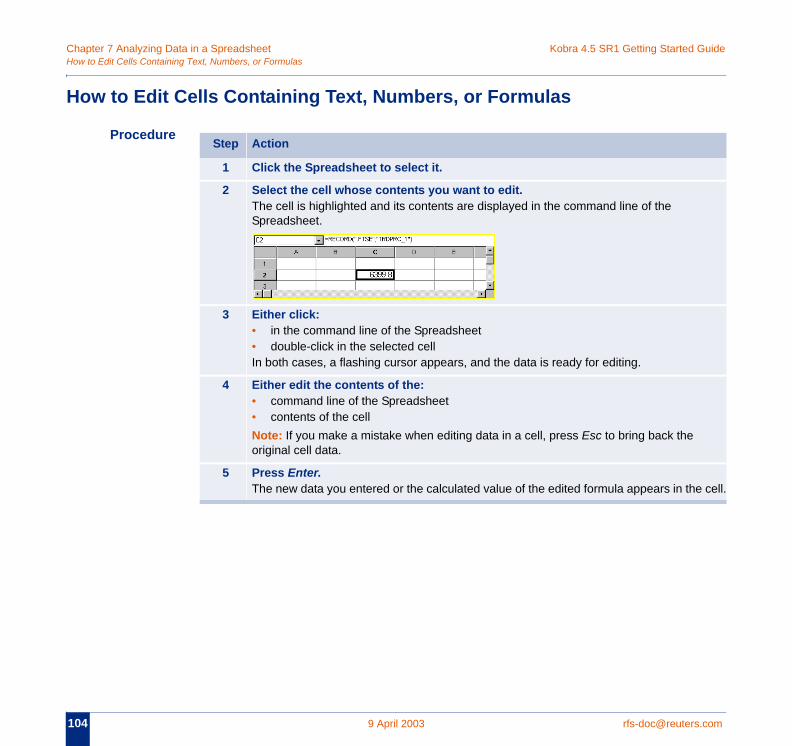
Chapter 7 Analyzing Data in a Spreadsheet Kobra 4.5 SR1 Getting Started GuideHow
10 .com
H
cell.
to Edit Cells Containing Text, Numbers, or Formulas
4 9 April 2003 rfs-doc@reuters
ow to Edit Cells Containing Text, Numbers, or Formulas
Procedure Step Action
1 Click the Spreadsheet to select it.
2 Select the cell whose contents you want to edit.The cell is highlighted and its contents are displayed in the command line of the Spreadsheet.
3 Either click:• in the command line of the Spreadsheet• double-click in the selected cellIn both cases, a flashing cursor appears, and the data is ready for editing.
4 Either edit the contents of the:• command line of the Spreadsheet• contents of the cellNote: If you make a mistake when editing data in a cell, press Esc to bring back the original cell data.
5 Press Enter.The new data you entered or the calculated value of the edited formula appears in the
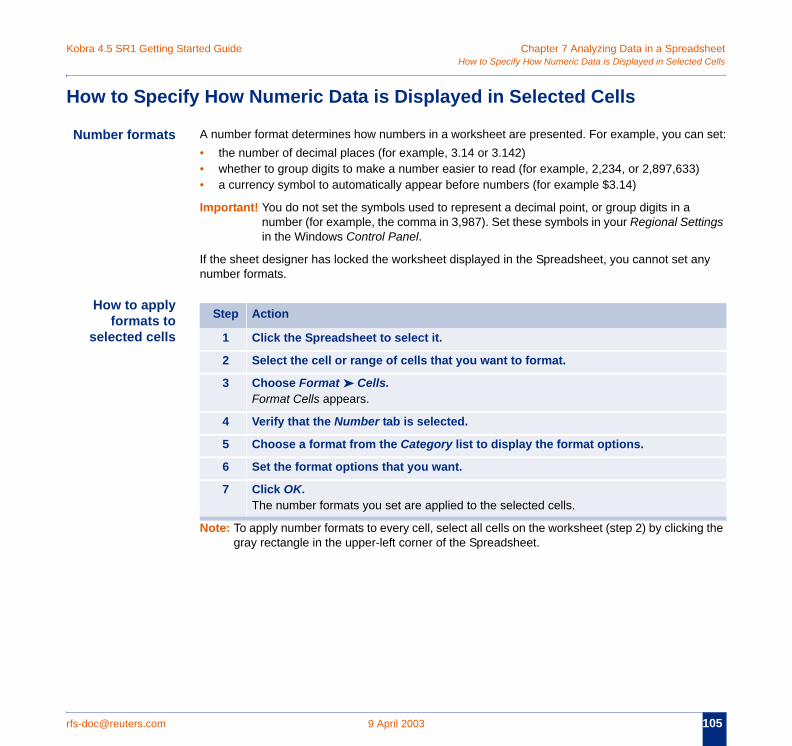
Kobra 4.5 SR1 Getting Started Guide Chapter 7 Analyzing Data in a Spreadsheetd Cells
rfs- 105
H
N n set:
tings
ny
g the
How to Specify How Numeric Data is Displayed in Selecte
[email protected] 9 April 2003
ow to Specify How Numeric Data is Displayed in Selected Cells
umber formats A number format determines how numbers in a worksheet are presented. For example, you ca• the number of decimal places (for example, 3.14 or 3.142)• whether to group digits to make a number easier to read (for example, 2,234, or 2,897,633)• a currency symbol to automatically appear before numbers (for example $3.14)
Important! You do not set the symbols used to represent a decimal point, or group digits in a number (for example, the comma in 3,987). Set these symbols in your Regional Setin the Windows Control Panel.
If the sheet designer has locked the worksheet displayed in the Spreadsheet, you cannot set anumber formats.
How to applyformats to
selected cells
Note: To apply number formats to every cell, select all cells on the worksheet (step 2) by clickingray rectangle in the upper-left corner of the Spreadsheet.
Step Action
1 Click the Spreadsheet to select it.
2 Select the cell or range of cells that you want to format.
3 Choose Format ➤ Cells.Format Cells appears.
4 Verify that the Number tab is selected.
5 Choose a format from the Category list to display the format options.
6 Set the format options that you want.
7 Click OK.The number formats you set are applied to the selected cells.
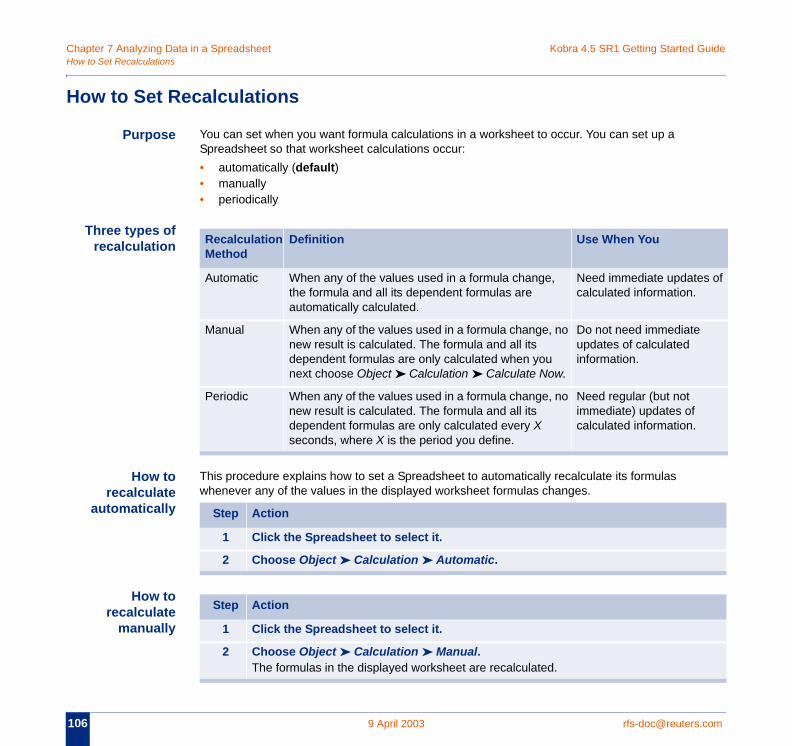
Chapter 7 Analyzing Data in a Spreadsheet Kobra 4.5 SR1 Getting Started GuideHow
10 .com
H
es of
to Set Recalculations
6 9 April 2003 rfs-doc@reuters
ow to Set Recalculations
Purpose You can set when you want formula calculations in a worksheet to occur. You can set up a Spreadsheet so that worksheet calculations occur:• automatically (default)• manually• periodically
Three types ofrecalculation
How torecalculate
automatically
This procedure explains how to set a Spreadsheet to automatically recalculate its formulas whenever any of the values in the displayed worksheet formulas changes.
How torecalculate
manually
Recalculation Method
Definition Use When You
Automatic When any of the values used in a formula change, the formula and all its dependent formulas are automatically calculated.
Need immediate updatcalculated information.
Manual When any of the values used in a formula change, no new result is calculated. The formula and all its dependent formulas are only calculated when you next choose Object ➤ Calculation ➤ Calculate Now.
Do not need immediateupdates of calculated information.
Periodic When any of the values used in a formula change, no new result is calculated. The formula and all its dependent formulas are only calculated every X seconds, where X is the period you define.
Need regular (but not immediate) updates of calculated information.
Step Action
1 Click the Spreadsheet to select it.
2 Choose Object ➤ Calculation ➤ Automatic.
Step Action
1 Click the Spreadsheet to select it.
2 Choose Object ➤ Calculation ➤ Manual.The formulas in the displayed worksheet are recalculated.
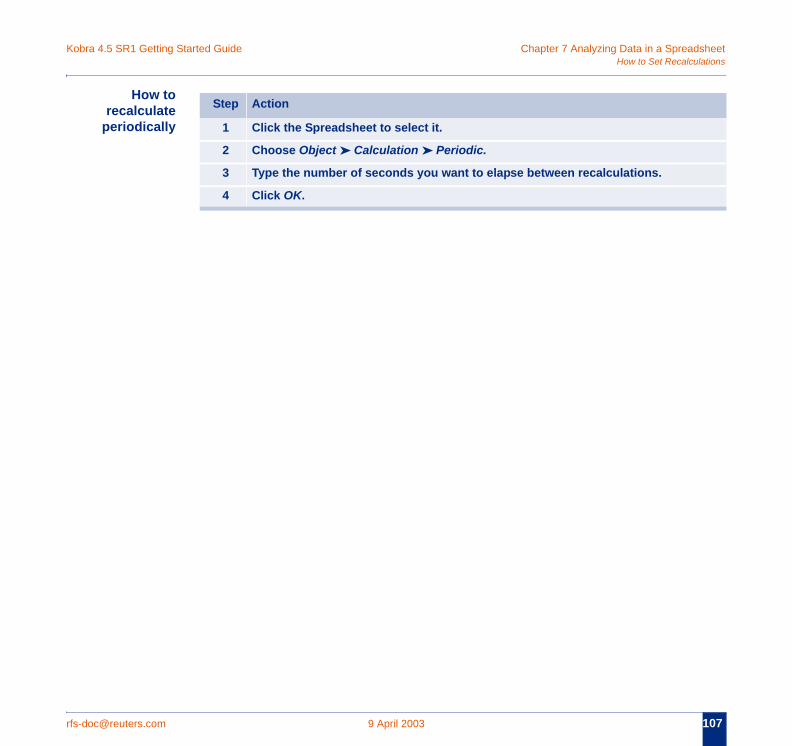
Kobra 4.5 SR1 Getting Started Guide Chapter 7 Analyzing Data in a Spreadsheetlations
rfs- 107
How to Set Recalcu
[email protected] 9 April 2003
How torecalculate
periodicallyStep Action
1 Click the Spreadsheet to select it.
2 Choose Object ➤ Calculation ➤ Periodic.
3 Type the number of seconds you want to elapse between recalculations.
4 Click OK.
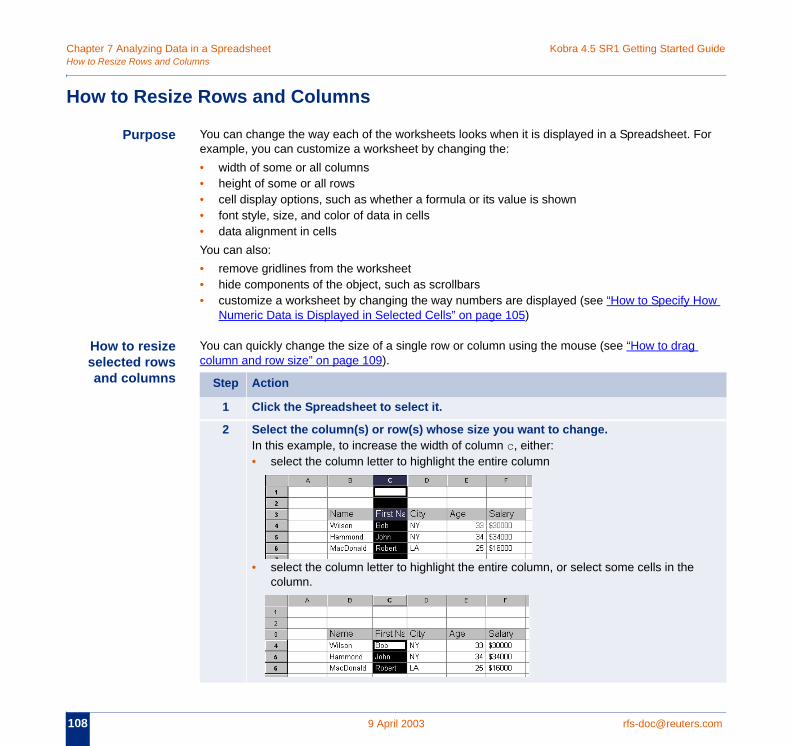
Chapter 7 Analyzing Data in a Spreadsheet Kobra 4.5 SR1 Getting Started GuideHow
10 .com
H
or
ow
to Resize Rows and Columns
8 9 April 2003 rfs-doc@reuters
ow to Resize Rows and Columns
Purpose You can change the way each of the worksheets looks when it is displayed in a Spreadsheet. Fexample, you can customize a worksheet by changing the:• width of some or all columns• height of some or all rows• cell display options, such as whether a formula or its value is shown• font style, size, and color of data in cells• data alignment in cellsYou can also:• remove gridlines from the worksheet• hide components of the object, such as scrollbars• customize a worksheet by changing the way numbers are displayed (see “How to Specify H
Numeric Data is Displayed in Selected Cells” on page 105)
How to resizeselected rowsand columns
You can quickly change the size of a single row or column using the mouse (see “How to drag column and row size” on page 109).
Step Action
1 Click the Spreadsheet to select it.
2 Select the column(s) or row(s) whose size you want to change.In this example, to increase the width of column c, either:• select the column letter to highlight the entire column
• select the column letter to highlight the entire column, or select some cells in the column.
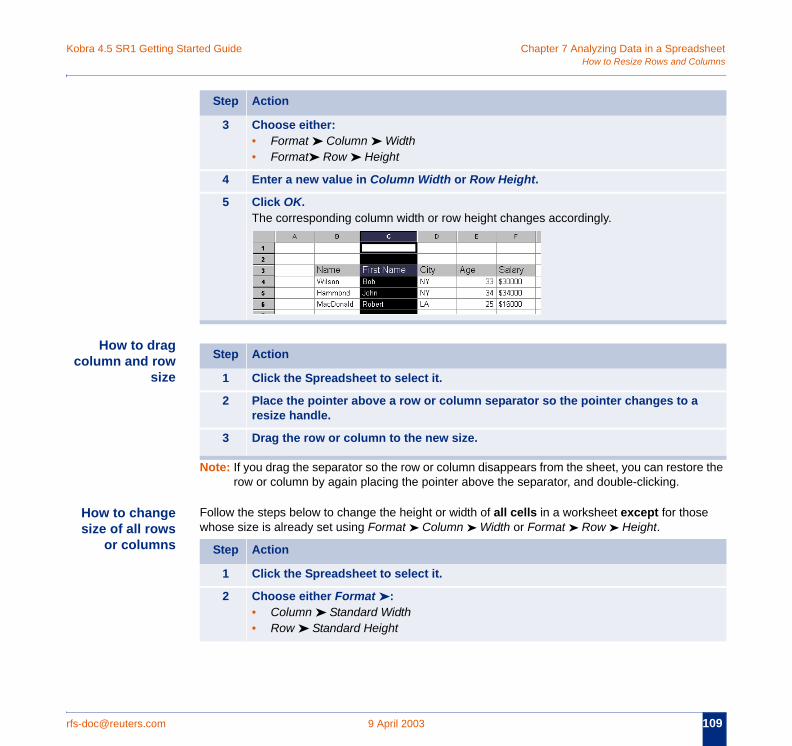
Kobra 4.5 SR1 Getting Started Guide Chapter 7 Analyzing Data in a Spreadsheetlumns
rfs- 109
c
e the
se
How to Resize Rows and Co
[email protected] 9 April 2003
How to dragolumn and row
size
Note: If you drag the separator so the row or column disappears from the sheet, you can restorrow or column by again placing the pointer above the separator, and double-clicking.
How to changesize of all rows
or columns
Follow the steps below to change the height or width of all cells in a worksheet except for thowhose size is already set using Format ➤ Column ➤ Width or Format ➤ Row ➤ Height.
3 Choose either:• Format ➤ Column ➤ Width• Format➤ Row ➤ Height
4 Enter a new value in Column Width or Row Height.
5 Click OK.The corresponding column width or row height changes accordingly.
Step Action
Step Action
1 Click the Spreadsheet to select it.
2 Place the pointer above a row or column separator so the pointer changes to aresize handle.
3 Drag the row or column to the new size.
Step Action
1 Click the Spreadsheet to select it.
2 Choose either Format ➤ :• Column ➤ Standard Width• Row ➤ Standard Height
Chapter 7 Analyzing Data in a Spreadsheet Kobra 4.5 SR1 Getting Started GuideHow
11 .com
sing
to Resize Rows and Columns
0 9 April 2003 rfs-doc@reuters
3 Enter a new value in the dialog box.Important! The maximum value you can enter for row height or column width is 2000pixels.
4 Click OK.The height or width of all rows or columns except for those whose size is already set uColumn Width or Row Height commands change accordingly.
Step Action
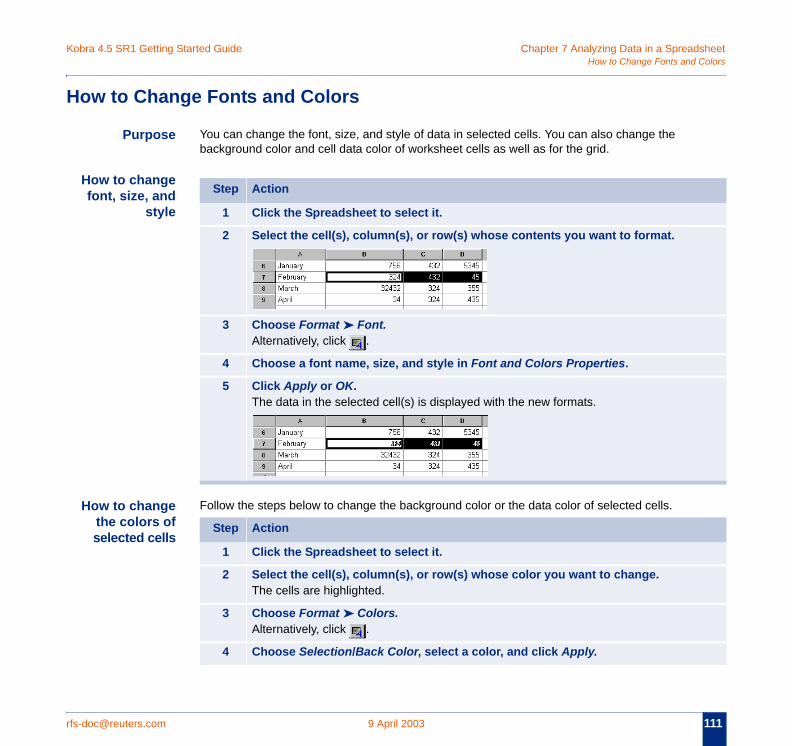
Kobra 4.5 SR1 Getting Started Guide Chapter 7 Analyzing Data in a Spreadsheet Colors
rfs- 111
H
How to Change Fonts and
[email protected] 9 April 2003
ow to Change Fonts and Colors
Purpose You can change the font, size, and style of data in selected cells. You can also change the background color and cell data color of worksheet cells as well as for the grid.
How to changefont, size, and
style
How to changethe colors ofselected cells
Follow the steps below to change the background color or the data color of selected cells.
Step Action
1 Click the Spreadsheet to select it.
2 Select the cell(s), column(s), or row(s) whose contents you want to format.
3 Choose Format ➤ Font.Alternatively, click .
4 Choose a font name, size, and style in Font and Colors Properties.
5 Click Apply or OK.The data in the selected cell(s) is displayed with the new formats.
Step Action
1 Click the Spreadsheet to select it.
2 Select the cell(s), column(s), or row(s) whose color you want to change.The cells are highlighted.
3 Choose Format ➤ Colors.Alternatively, click .
4 Choose Selection/Back Color, select a color, and click Apply.
Chapter 7 Analyzing Data in a Spreadsheet Kobra 4.5 SR1 Getting Started GuideHow
11 .com
co
e tions.
to Change Fonts and Colors
2 9 April 2003 rfs-doc@reuters
How to changethe default
lors of all cells
Follow the steps below to change the default colors of all cells in a worksheet, except for thoswhose color has already been set using the Selection/Back Color and Selection/Fore Color op
How to changethe color of the
grid
5 Choose Selection/Fore Color, select a color, and click Apply.
6 Click OK.The selected cell(s) display the new colors.
Step Action
Step Action
1 Click the Spreadsheet to select it.
2 Choose Format ➤ Colors.Alternatively, click .
3 Choose Appearance/Default Back Color, select a color, and click Apply.
4 Choose Appearance/Default Fore Color, select a color, and click Apply.
5 Click OK.All cells in the worksheet except for those whose color is already set display the newcolors.
Step Action
1 Click the Spreadsheet to select it.
2 Choose Format ➤ Colors.Alternatively, click .
3 Choose Grid Color, select a color, and click Apply.
4 Click OK.The grid displays the new colors.
:
PART IIIANALYZING DATAIN GRAPHS ANDSPREADSHEETS

Analyzing Data in Graphs and Spreadsheets Kobra 4.5 SR1 Getting Started Guide
11 .com
4 9 April 2003 rfs-doc@reuters
rfs-doc@reuters 115
CHAPT
Con
.com 9 April 2003
ER 8 TRANSFERRING DATA TO AN EXCEL SPREADSHEET
tents • Dragging and Dropping Data• How to Copy and Paste Data
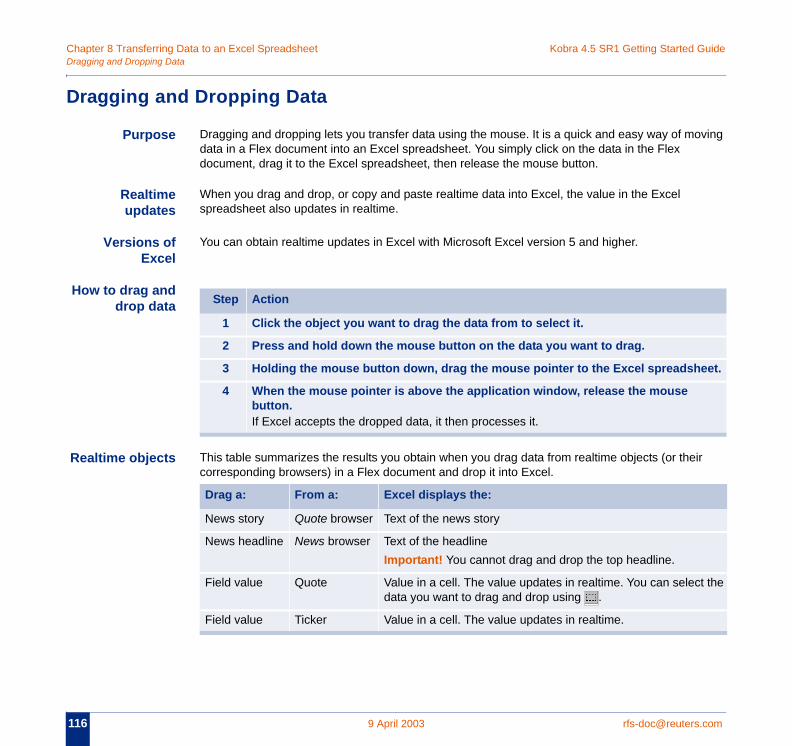
Chapter 8 Transferring Data to an Excel Spreadsheet Kobra 4.5 SR1 Getting Started GuideDra
11 .com
D
ving
H
R ir
eet.
t the
gging and Dropping Data
6 9 April 2003 rfs-doc@reuters
ragging and Dropping Data
Purpose Dragging and dropping lets you transfer data using the mouse. It is a quick and easy way of modata in a Flex document into an Excel spreadsheet. You simply click on the data in the Flex document, drag it to the Excel spreadsheet, then release the mouse button.
Realtimeupdates
When you drag and drop, or copy and paste realtime data into Excel, the value in the Excel spreadsheet also updates in realtime.
Versions ofExcel
You can obtain realtime updates in Excel with Microsoft Excel version 5 and higher.
ow to drag anddrop data
ealtime objects This table summarizes the results you obtain when you drag data from realtime objects (or thecorresponding browsers) in a Flex document and drop it into Excel.
Step Action
1 Click the object you want to drag the data from to select it.
2 Press and hold down the mouse button on the data you want to drag.
3 Holding the mouse button down, drag the mouse pointer to the Excel spreadsh
4 When the mouse pointer is above the application window, release the mouse button.If Excel accepts the dropped data, it then processes it.
Drag a: From a: Excel displays the:
News story Quote browser Text of the news story
News headline News browser Text of the headlineImportant! You cannot drag and drop the top headline.
Field value Quote Value in a cell. The value updates in realtime. You can selecdata you want to drag and drop using .
Field value Ticker Value in a cell. The value updates in realtime.
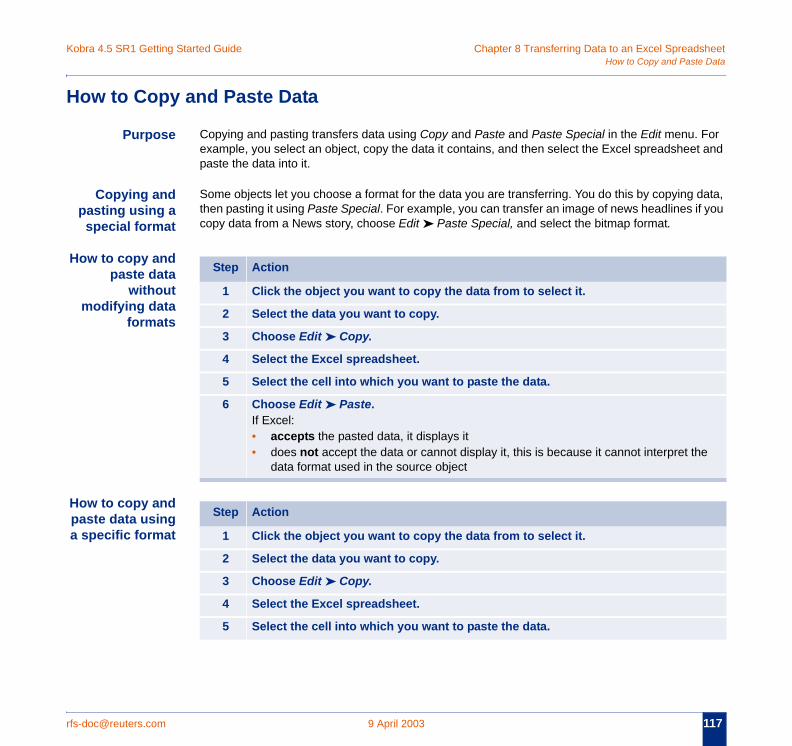
Kobra 4.5 SR1 Getting Started Guide Chapter 8 Transferring Data to an Excel Spreadsheete Data
rfs- 117
H
For t and
pdata, f you
H
Hpa
e
How to Copy and Past
[email protected] 9 April 2003
ow to Copy and Paste Data
Purpose Copying and pasting transfers data using Copy and Paste and Paste Special in the Edit menu.example, you select an object, copy the data it contains, and then select the Excel spreadsheepaste the data into it.
Copying andasting using aspecial format
Some objects let you choose a format for the data you are transferring. You do this by copying then pasting it using Paste Special. For example, you can transfer an image of news headlines icopy data from a News story, choose Edit ➤ Paste Special, and select the bitmap format.
ow to copy andpaste data
withoutmodifying data
formats
ow to copy andaste data usingspecific format
Step Action
1 Click the object you want to copy the data from to select it.
2 Select the data you want to copy.
3 Choose Edit ➤ Copy.
4 Select the Excel spreadsheet.
5 Select the cell into which you want to paste the data.
6 Choose Edit ➤ Paste.If Excel:• accepts the pasted data, it displays it• does not accept the data or cannot display it, this is because it cannot interpret th
data format used in the source object
Step Action
1 Click the object you want to copy the data from to select it.
2 Select the data you want to copy.
3 Choose Edit ➤ Copy.
4 Select the Excel spreadsheet.
5 Select the cell into which you want to paste the data.
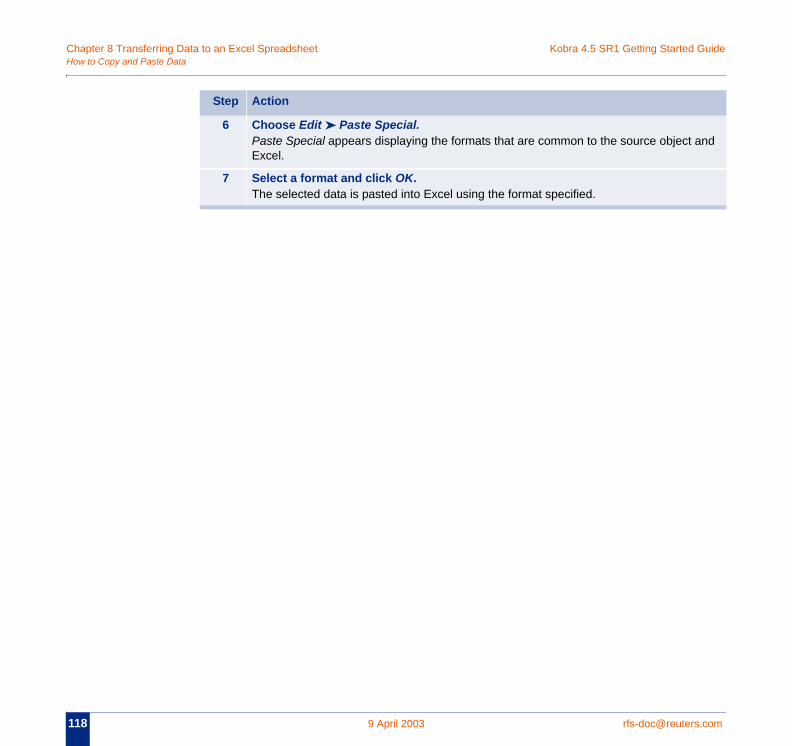
Chapter 8 Transferring Data to an Excel Spreadsheet Kobra 4.5 SR1 Getting Started GuideHow
11 .com
nd
to Copy and Paste Data
8 9 April 2003 rfs-doc@reuters
6 Choose Edit ➤ Paste Special.Paste Special appears displaying the formats that are common to the source object aExcel.
7 Select a format and click OK.The selected data is pasted into Excel using the format specified.
Step Action
rfs-doc@reuters 119
CHAPT
Con
.com 9 April 2003
ER 9 ANALYZING DATA IN A GRAPH
tents • How to Create a Chart• Graph Tools and Menus• How to Change the Instrument• How to Change the Interval• How to Change the Display Type of a Line Analysis• How to Zoom and Scroll• How to Show all Data or Default Data• Displaying Cursors and Gridlines• How to Add an Annotation• Using the Properties Editor Dialog Box
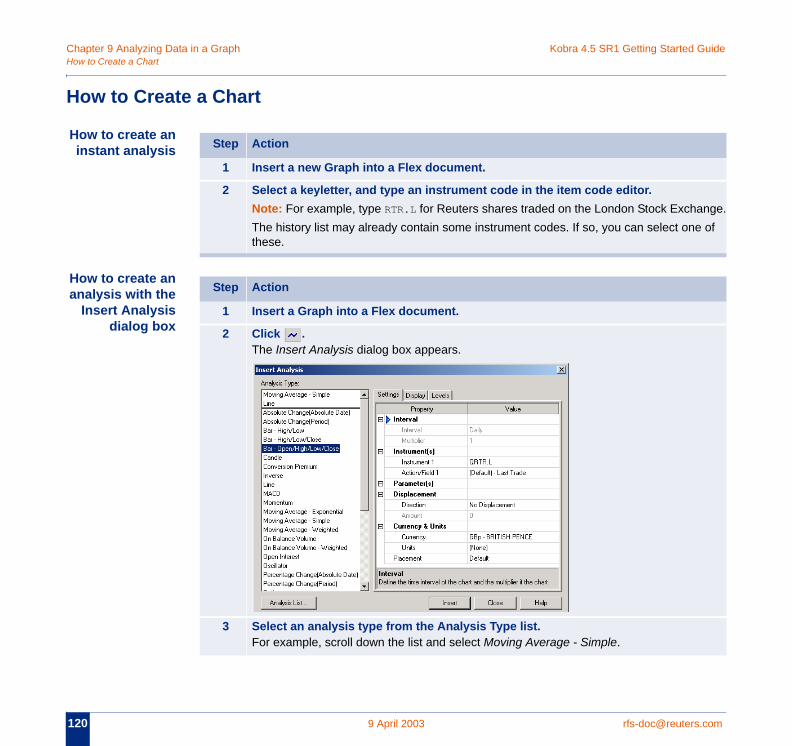
Chapter 9 Analyzing Data in a Graph Kobra 4.5 SR1 Getting Started GuideHow
12 .com
H
Hi
Han
ange. of
to Create a Chart
0 9 April 2003 rfs-doc@reuters
ow to Create a Chart
ow to create annstant analysis
ow to create analysis with theInsert Analysis
dialog box
Step Action
1 Insert a new Graph into a Flex document.
2 Select a keyletter, and type an instrument code in the item code editor.Note: For example, type RTR.L for Reuters shares traded on the London Stock ExchThe history list may already contain some instrument codes. If so, you can select onethese.
Step Action
1 Insert a Graph into a Flex document.
2 Click .The Insert Analysis dialog box appears.
3 Select an analysis type from the Analysis Type list.For example, scroll down the list and select Moving Average - Simple.
Kobra 4.5 SR1 Getting Started Guide Chapter 9 Analyzing Data in a Graph Chart
rfs- 121
dle.
For
sed
ange.
other
How to Create a
[email protected] 9 April 2003
4 Select an Interval by clicking in the Interval Value field, and choosing from the dropdown list.You can choose the interval (for example, Tick, Daily, Weekly, Monthly, Yearly) and amultiplier value.Note: The Tick interval is not available for some analysis types, such as Bar and Can
5 Select an instrument by clicking in the Instrument 1 field, and either:• choosing an instrument from the list• entering an instrument codeNote: If you are typing the instrument code, you must include the datafeed keyletter.example, type QRTR.L to chart Reuters shares on the London Stock Exchange from datafeed Q.
6 Either:• select an Action/Field 1 value from the list if the instrument is used before• leave the Action/Field 1 value as Default if this is the first time the instrument is u
7 Change any other parameters if you wish.For example, a Moving Average analysis has an averaging period, which you can ch
8 Click Insert to complete the analysis.The analysis is drawn on the chart, but Insert Analysis remains open. You can add ananalysis to the chart if you want.
9 Click Close.
Step Action
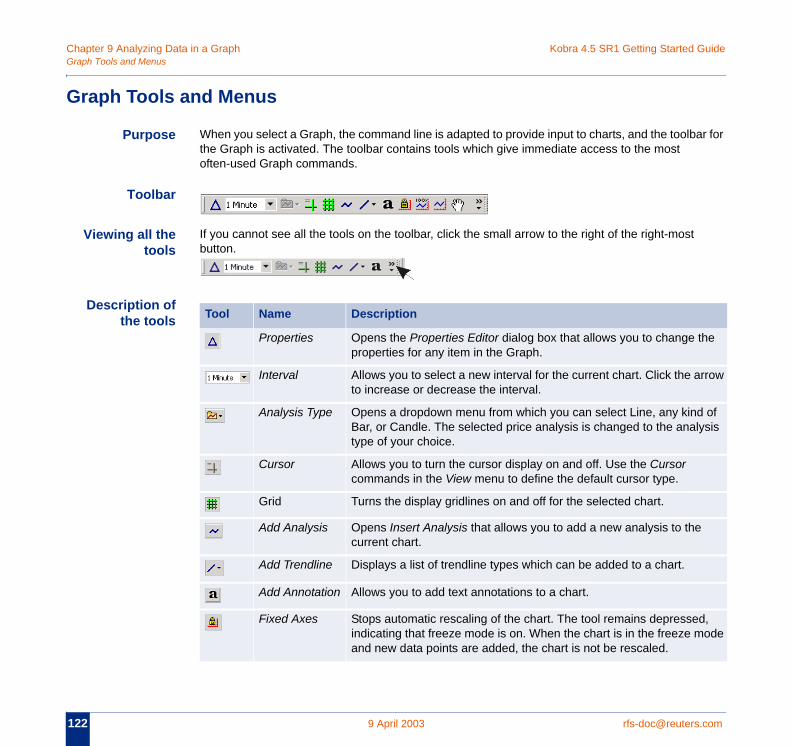
Chapter 9 Analyzing Data in a Graph Kobra 4.5 SR1 Getting Started GuideGra
12 .com
G
ar for
the
rrow
d of lysis
d, ode
ph Tools and Menus
2 9 April 2003 rfs-doc@reuters
raph Tools and Menus
Purpose When you select a Graph, the command line is adapted to provide input to charts, and the toolbthe Graph is activated. The toolbar contains tools which give immediate access to the most often-used Graph commands.
Toolbar
Viewing all thetools
If you cannot see all the tools on the toolbar, click the small arrow to the right of the right-most button.
Description ofthe tools Tool Name Description
Properties Opens the Properties Editor dialog box that allows you to change properties for any item in the Graph.
Interval Allows you to select a new interval for the current chart. Click the ato increase or decrease the interval.
Analysis Type Opens a dropdown menu from which you can select Line, any kinBar, or Candle. The selected price analysis is changed to the anatype of your choice.
Cursor Allows you to turn the cursor display on and off. Use the Cursor commands in the View menu to define the default cursor type.
Grid Turns the display gridlines on and off for the selected chart.
Add Analysis Opens Insert Analysis that allows you to add a new analysis to thecurrent chart.
Add Trendline Displays a list of trendline types which can be added to a chart.
Add Annotation Allows you to add text annotations to a chart.
Fixed Axes Stops automatic rescaling of the chart. The tool remains depresseindicating that freeze mode is on. When the chart is in the freeze mand new data points are added, the chart is not be rescaled.
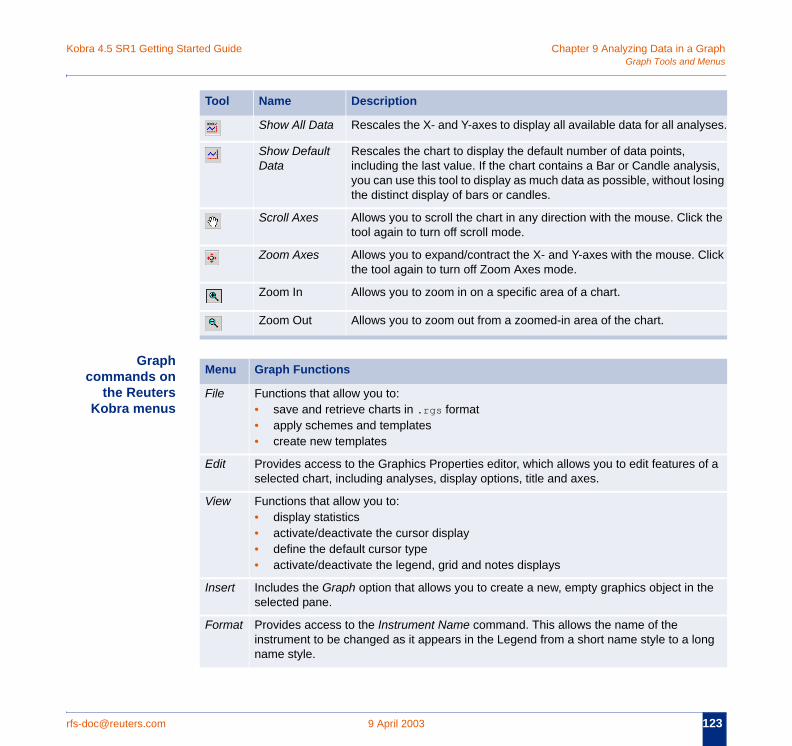
Kobra 4.5 SR1 Getting Started Guide Chapter 9 Analyzing Data in a GraphMenus
rfs- 123
lyses.
ysis, osing
k the
Click
of a
the
ng
Graph Tools and
[email protected] 9 April 2003
Graphcommands on
the ReutersKobra menus
Show All Data Rescales the X- and Y-axes to display all available data for all ana
Show Default Data
Rescales the chart to display the default number of data points, including the last value. If the chart contains a Bar or Candle analyou can use this tool to display as much data as possible, without lthe distinct display of bars or candles.
Scroll Axes Allows you to scroll the chart in any direction with the mouse. Clictool again to turn off scroll mode.
Zoom Axes Allows you to expand/contract the X- and Y-axes with the mouse. the tool again to turn off Zoom Axes mode.
Zoom In Allows you to zoom in on a specific area of a chart.
Zoom Out Allows you to zoom out from a zoomed-in area of the chart.
Tool Name Description
Menu Graph Functions
File Functions that allow you to:• save and retrieve charts in .rgs format• apply schemes and templates• create new templates
Edit Provides access to the Graphics Properties editor, which allows you to edit features selected chart, including analyses, display options, title and axes.
View Functions that allow you to:• display statistics• activate/deactivate the cursor display • define the default cursor type• activate/deactivate the legend, grid and notes displays
Insert Includes the Graph option that allows you to create a new, empty graphics object in selected pane.
Format Provides access to the Instrument Name command. This allows the name of the instrument to be changed as it appears in the Legend from a short name style to a loname style.
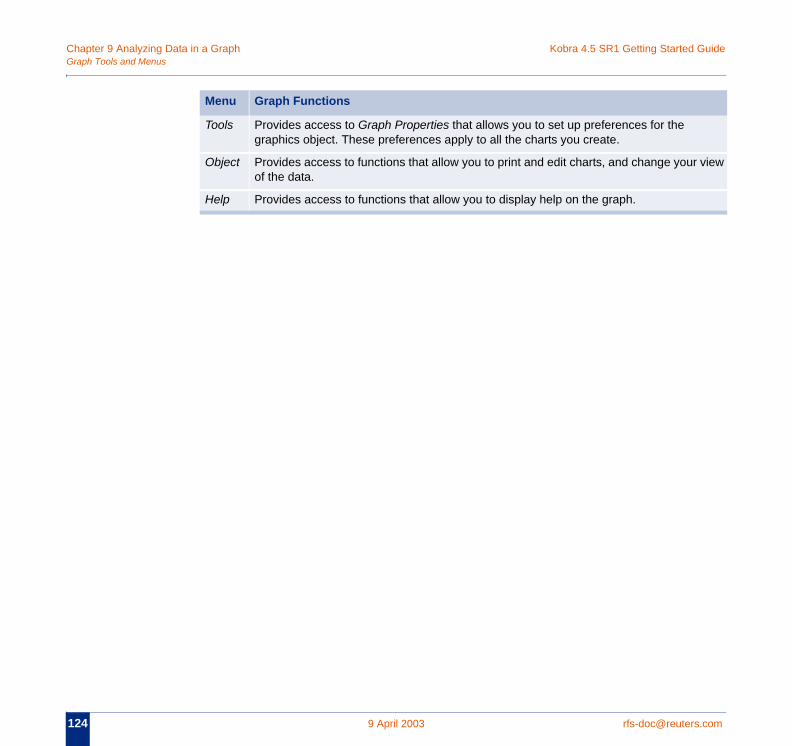
Chapter 9 Analyzing Data in a Graph Kobra 4.5 SR1 Getting Started GuideGra
12 .com
view
ph Tools and Menus
4 9 April 2003 rfs-doc@reuters
Tools Provides access to Graph Properties that allows you to set up preferences for the graphics object. These preferences apply to all the charts you create.
Object Provides access to functions that allow you to print and edit charts, and change yourof the data.
Help Provides access to functions that allow you to display help on the graph.
Menu Graph Functions
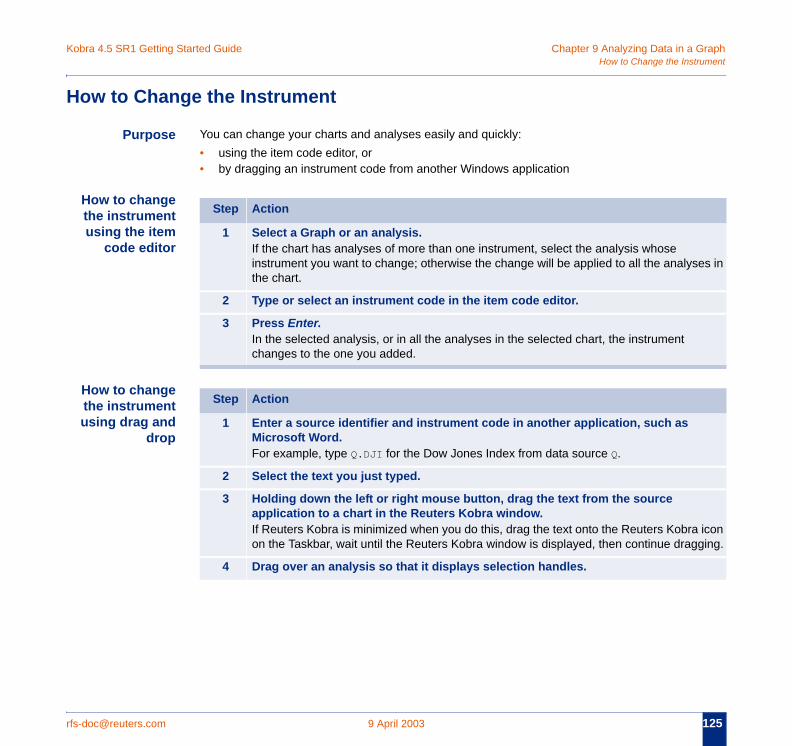
Kobra 4.5 SR1 Getting Started Guide Chapter 9 Analyzing Data in a Graphrument
rfs- 125
H
es in
icon ging.
How to Change the Inst
[email protected] 9 April 2003
ow to Change the Instrument
Purpose You can change your charts and analyses easily and quickly:• using the item code editor, or • by dragging an instrument code from another Windows application
How to changethe instrumentusing the item
code editor
How to changethe instrumentusing drag and
drop
Step Action
1 Select a Graph or an analysis.If the chart has analyses of more than one instrument, select the analysis whose instrument you want to change; otherwise the change will be applied to all the analysthe chart.
2 Type or select an instrument code in the item code editor.
3 Press Enter.In the selected analysis, or in all the analyses in the selected chart, the instrument changes to the one you added.
Step Action
1 Enter a source identifier and instrument code in another application, such as Microsoft Word.For example, type Q.DJI for the Dow Jones Index from data source Q.
2 Select the text you just typed.
3 Holding down the left or right mouse button, drag the text from the source application to a chart in the Reuters Kobra window.If Reuters Kobra is minimized when you do this, drag the text onto the Reuters Kobraon the Taskbar, wait until the Reuters Kobra window is displayed, then continue drag
4 Drag over an analysis so that it displays selection handles.
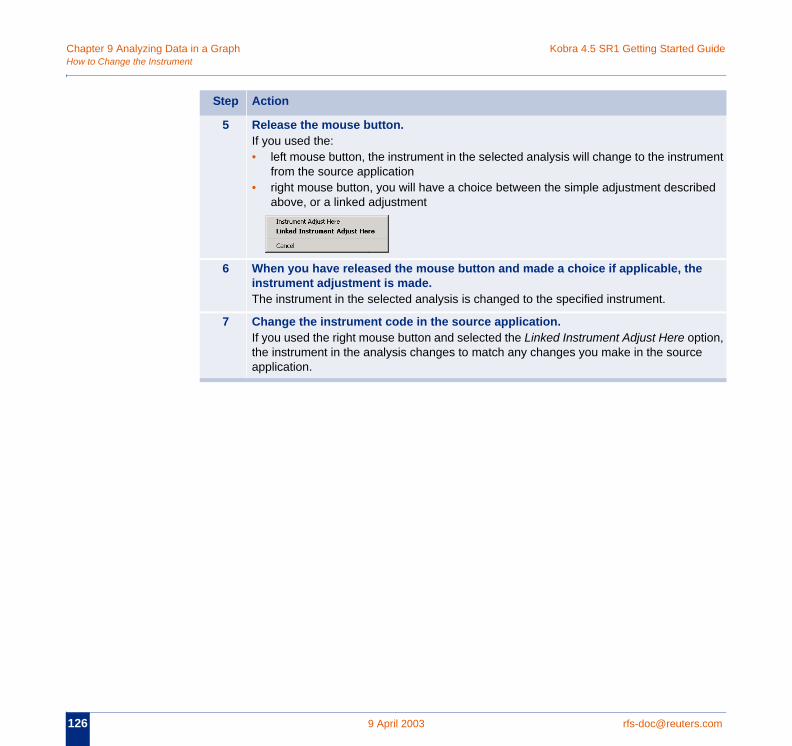
Chapter 9 Analyzing Data in a Graph Kobra 4.5 SR1 Getting Started GuideHow
12 .com
ment
bed
e
tion, e
to Change the Instrument
6 9 April 2003 rfs-doc@reuters
5 Release the mouse button.If you used the:• left mouse button, the instrument in the selected analysis will change to the instru
from the source application• right mouse button, you will have a choice between the simple adjustment descri
above, or a linked adjustment
6 When you have released the mouse button and made a choice if applicable, thinstrument adjustment is made.The instrument in the selected analysis is changed to the specified instrument.
7 Change the instrument code in the source application.If you used the right mouse button and selected the Linked Instrument Adjust Here opthe instrument in the analysis changes to match any changes you make in the sourcapplication.
Step Action

Kobra 4.5 SR1 Getting Started Guide Chapter 9 Analyzing Data in a Graphnterval
rfs- 127
H
ll
th
th
ditor
How to Change the I
[email protected] 9 April 2003
ow to Change the Interval
Purpose You can use either the interval tools on the toolbar, or the item code editor, to change the chartinterval. This change affects all the analyses in the chart. Some intervals are not available for aanalysis type. For example, you cannot select the Tick interval for Bar or Candle charts.
How to changee interval using
the toolbar
How to changee interval using
the item codeeditor
Step Action
1 Select a chart.
2 Click the arrow to the right of the Interval .
3 Select the interval that you want from the list.
Step Action
1 Select the X-axis of the chart.Important! If you have not selected the X-axis, anything you type in the Item Code Ewill be interpreted as an instrument code.
2 Click in the item code editor.
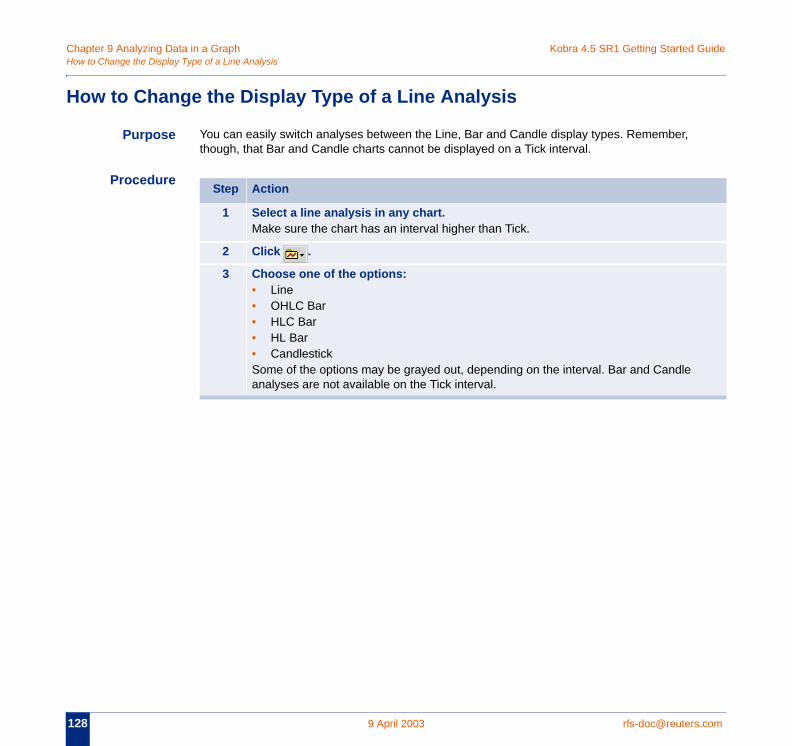
Chapter 9 Analyzing Data in a Graph Kobra 4.5 SR1 Getting Started GuideHow
12 .com
H
to Change the Display Type of a Line Analysis
8 9 April 2003 rfs-doc@reuters
ow to Change the Display Type of a Line Analysis
Purpose You can easily switch analyses between the Line, Bar and Candle display types. Remember, though, that Bar and Candle charts cannot be displayed on a Tick interval.
Procedure Step Action
1 Select a line analysis in any chart.Make sure the chart has an interval higher than Tick.
2 Click .
3 Choose one of the options:• Line• OHLC Bar• HLC Bar• HL Bar• CandlestickSome of the options may be grayed out, depending on the interval. Bar and Candle analyses are not available on the Tick interval.

Kobra 4.5 SR1 Getting Started Guide Chapter 9 Analyzing Data in a Graph Scroll
rfs- 129
H
and
H
Ho
e.
How to Zoom and
[email protected] 9 April 2003
ow to Zoom and Scroll
Purpose You can zoom in and out on a specific area of a chart. The selected area will expand to fill the available space. You can also zoom the X- or Y-axis individually, and you can move backwardsforwards in the chart.
ow to zoom inon the X- and
Y-axes
w to zoom out
Step Action
1 Choose Object ➤ Zoom In.Alternatively, click . The mouse pointer changes to a magnifying glass shape.
2 Click and drag the mouse diagonally over the area you want to enlarge.
3 Release the mouse button. The area you selected will be zoomed to fill the chart area.
4 Repeat to zoom in further if necessary.
Step Action
1 Choose Object ➤ Zoom Out.Alternatively, click .
2 If you zoomed in more than once, zooming out takes you back one step at a tim
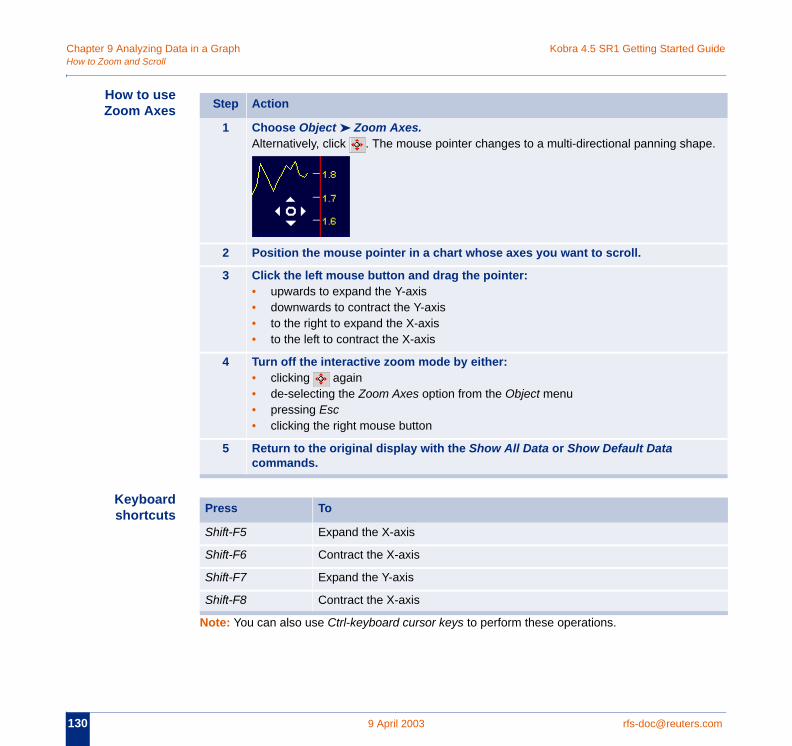
Chapter 9 Analyzing Data in a Graph Kobra 4.5 SR1 Getting Started GuideHow
13 .com
pe.
to Zoom and Scroll
0 9 April 2003 rfs-doc@reuters
How to useZoom Axes
Keyboardshortcuts
Note: You can also use Ctrl-keyboard cursor keys to perform these operations.
Step Action
1 Choose Object ➤ Zoom Axes.Alternatively, click . The mouse pointer changes to a multi-directional panning sha
2 Position the mouse pointer in a chart whose axes you want to scroll.
3 Click the left mouse button and drag the pointer:• upwards to expand the Y-axis• downwards to contract the Y-axis• to the right to expand the X-axis• to the left to contract the X-axis
4 Turn off the interactive zoom mode by either:• clicking again• de-selecting the Zoom Axes option from the Object menu• pressing Esc • clicking the right mouse button
5 Return to the original display with the Show All Data or Show Default Data commands.
Press To
Shift-F5 Expand the X-axis
Shift-F6 Contract the X-axis
Shift-F7 Expand the Y-axis
Shift-F8 Contract the X-axis
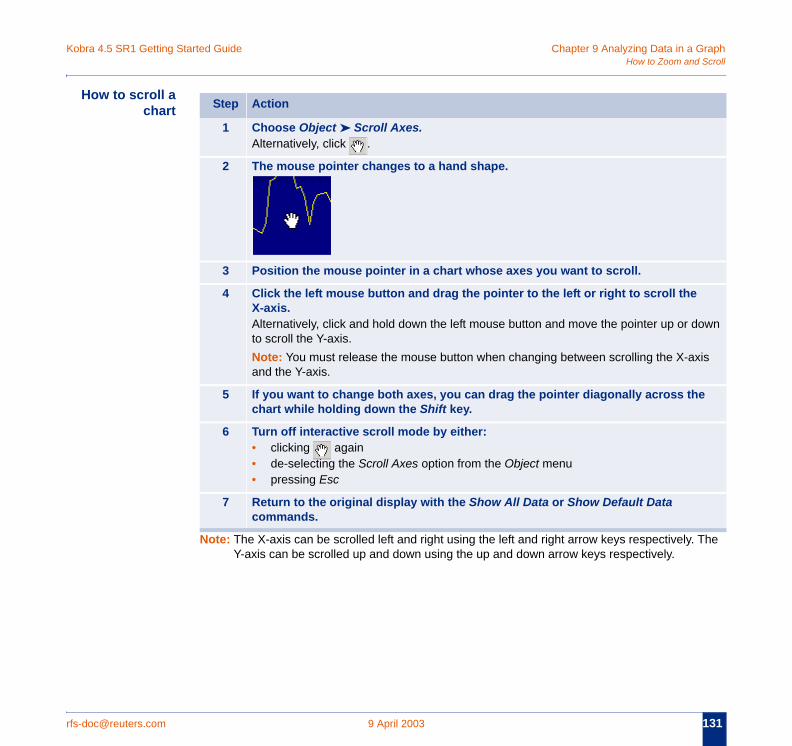
Kobra 4.5 SR1 Getting Started Guide Chapter 9 Analyzing Data in a Graph Scroll
rfs- 131
The
own
is
e
How to Zoom and
[email protected] 9 April 2003
How to scroll achart
Note: The X-axis can be scrolled left and right using the left and right arrow keys respectively. Y-axis can be scrolled up and down using the up and down arrow keys respectively.
Step Action
1 Choose Object ➤ Scroll Axes.Alternatively, click .
2 The mouse pointer changes to a hand shape.
3 Position the mouse pointer in a chart whose axes you want to scroll.
4 Click the left mouse button and drag the pointer to the left or right to scroll theX-axis.Alternatively, click and hold down the left mouse button and move the pointer up or dto scroll the Y-axis.Note: You must release the mouse button when changing between scrolling the X-axand the Y-axis.
5 If you want to change both axes, you can drag the pointer diagonally across thchart while holding down the Shift key.
6 Turn off interactive scroll mode by either:• clicking again• de-selecting the Scroll Axes option from the Object menu• pressing Esc
7 Return to the original display with the Show All Data or Show Default Data commands.
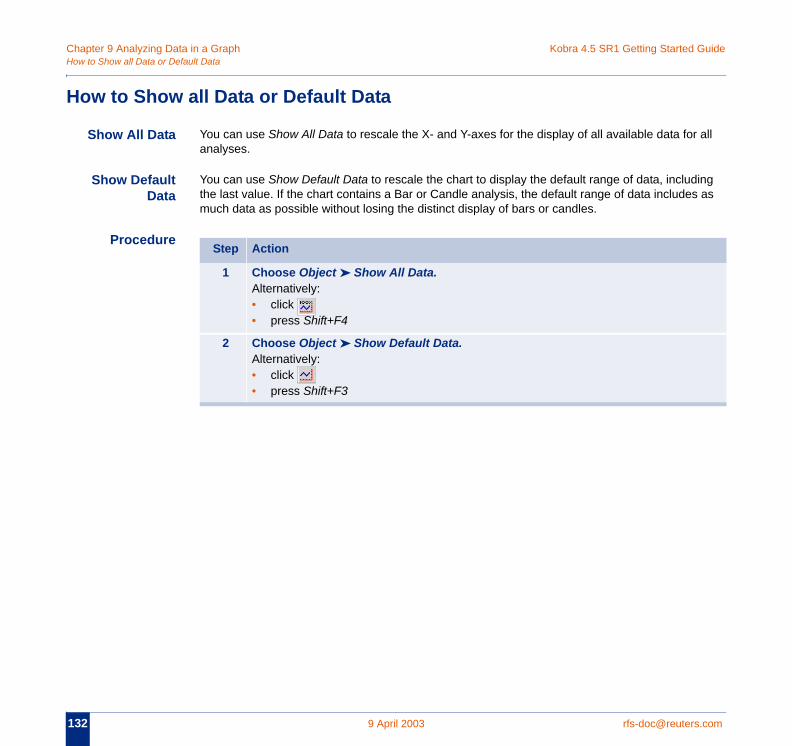
Chapter 9 Analyzing Data in a Graph Kobra 4.5 SR1 Getting Started GuideHow
13 .com
H
all
ing as
to Show all Data or Default Data
2 9 April 2003 rfs-doc@reuters
ow to Show all Data or Default Data
Show All Data You can use Show All Data to rescale the X- and Y-axes for the display of all available data foranalyses.
Show DefaultData
You can use Show Default Data to rescale the chart to display the default range of data, includthe last value. If the chart contains a Bar or Candle analysis, the default range of data includesmuch data as possible without losing the distinct display of bars or candles.
Procedure Step Action
1 Choose Object ➤ Show All Data.Alternatively:• click • press Shift+F4
2 Choose Object ➤ Show Default Data.Alternatively:• click • press Shift+F3
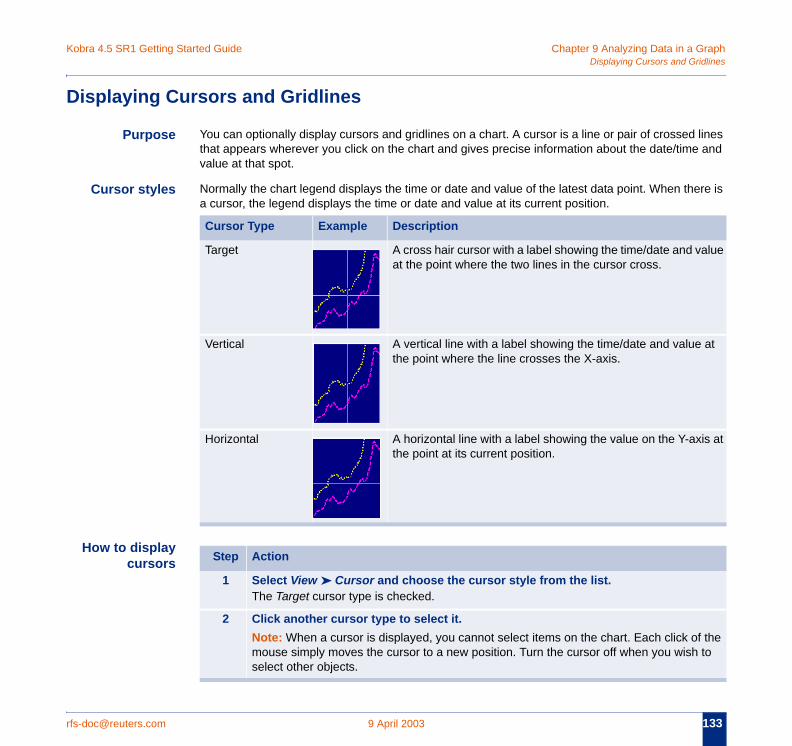
Kobra 4.5 SR1 Getting Started Guide Chapter 9 Analyzing Data in a Graphridlines
rfs- 133
D
lines and
re is
alue
at
is at
f the to
Displaying Cursors and G
[email protected] 9 April 2003
isplaying Cursors and Gridlines
Purpose You can optionally display cursors and gridlines on a chart. A cursor is a line or pair of crossed that appears wherever you click on the chart and gives precise information about the date/timevalue at that spot.
Cursor styles Normally the chart legend displays the time or date and value of the latest data point. When thea cursor, the legend displays the time or date and value at its current position.
How to displaycursors
Cursor Type Example Description
Target A cross hair cursor with a label showing the time/date and vat the point where the two lines in the cursor cross.
Vertical A vertical line with a label showing the time/date and valuethe point where the line crosses the X-axis.
Horizontal A horizontal line with a label showing the value on the Y-axthe point at its current position.
Step Action
1 Select View ➤ Cursor and choose the cursor style from the list.The Target cursor type is checked.
2 Click another cursor type to select it.Note: When a cursor is displayed, you cannot select items on the chart. Each click omouse simply moves the cursor to a new position. Turn the cursor off when you wishselect other objects.
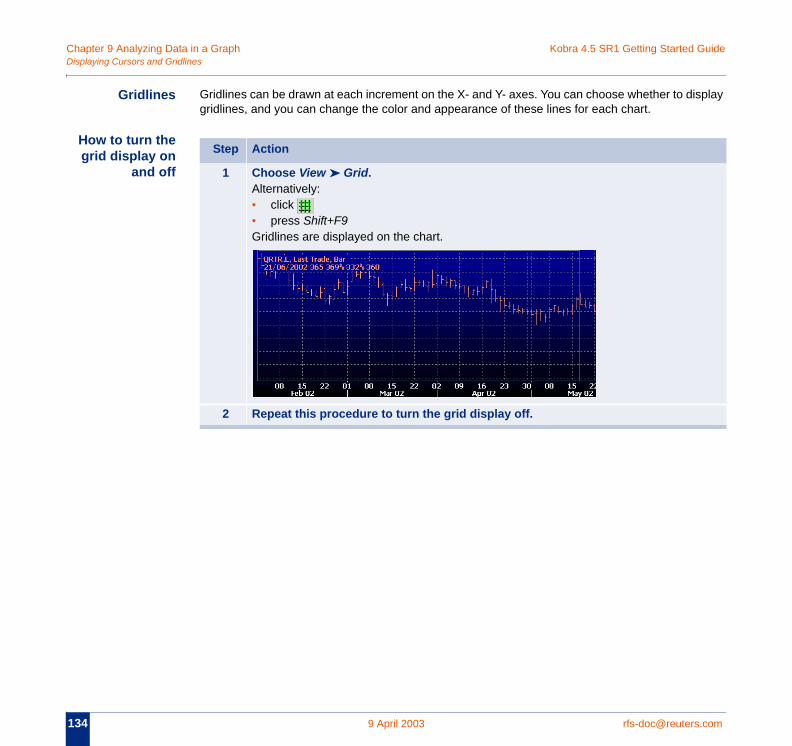
Chapter 9 Analyzing Data in a Graph Kobra 4.5 SR1 Getting Started GuideDis
13 .com
play
H
playing Cursors and Gridlines
4 9 April 2003 rfs-doc@reuters
Gridlines Gridlines can be drawn at each increment on the X- and Y- axes. You can choose whether to disgridlines, and you can change the color and appearance of these lines for each chart.
ow to turn thegrid display on
and offStep Action
1 Choose View ➤ Grid.Alternatively:• click • press Shift+F9Gridlines are displayed on the chart.
2 Repeat this procedure to turn the grid display off.
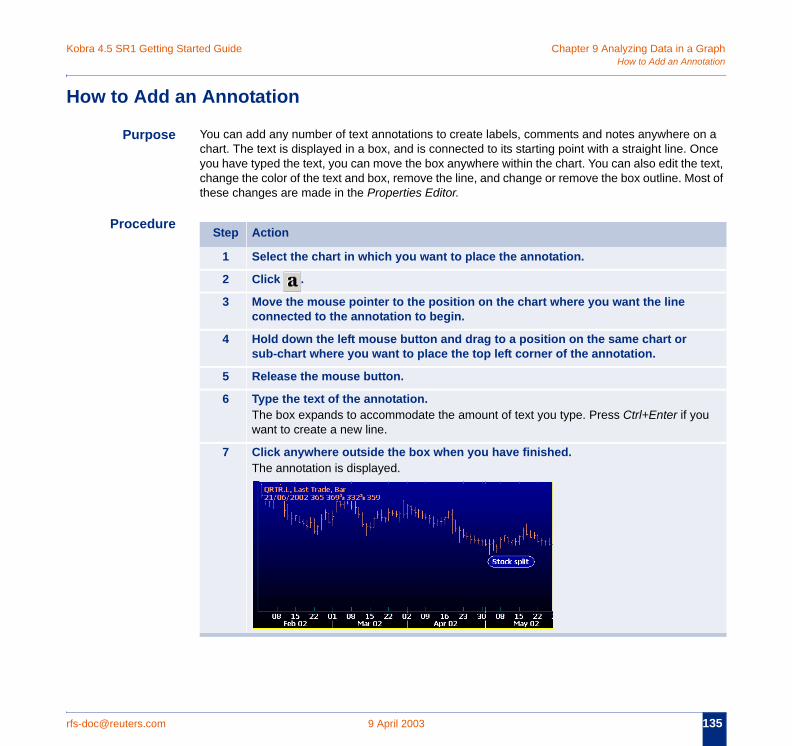
Kobra 4.5 SR1 Getting Started Guide Chapter 9 Analyzing Data in a Graphotation
rfs- 135
H
n a nce text, st of
ou
How to Add an Ann
[email protected] 9 April 2003
ow to Add an Annotation
Purpose You can add any number of text annotations to create labels, comments and notes anywhere ochart. The text is displayed in a box, and is connected to its starting point with a straight line. Oyou have typed the text, you can move the box anywhere within the chart. You can also edit thechange the color of the text and box, remove the line, and change or remove the box outline. Mothese changes are made in the Properties Editor.
Procedure Step Action
1 Select the chart in which you want to place the annotation.
2 Click .
3 Move the mouse pointer to the position on the chart where you want the line connected to the annotation to begin.
4 Hold down the left mouse button and drag to a position on the same chart or sub-chart where you want to place the top left corner of the annotation.
5 Release the mouse button.
6 Type the text of the annotation.The box expands to accommodate the amount of text you type. Press Ctrl+Enter if ywant to create a new line.
7 Click anywhere outside the box when you have finished.The annotation is displayed.
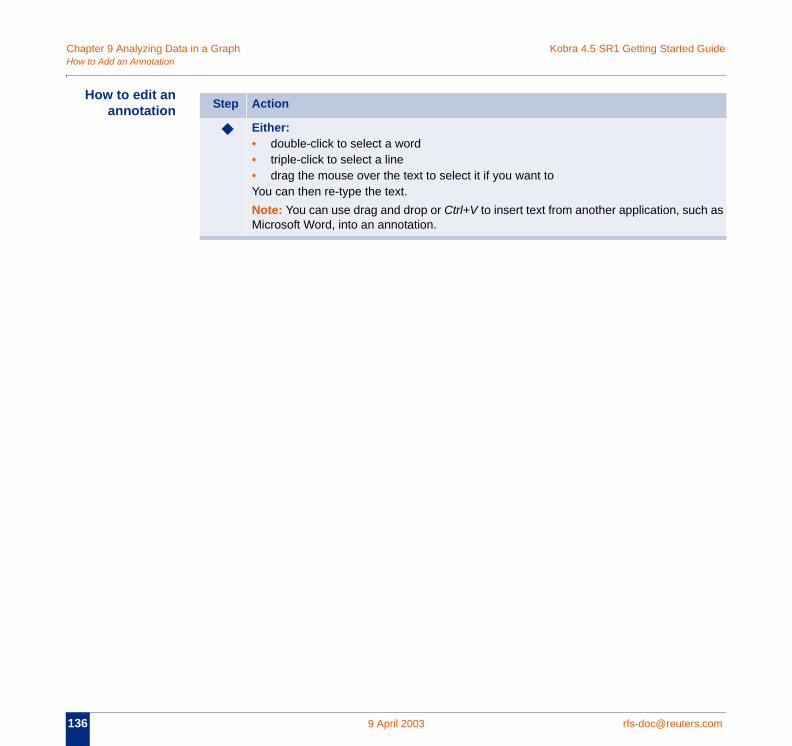
Chapter 9 Analyzing Data in a Graph Kobra 4.5 SR1 Getting Started GuideHow
13 .com
h as
to Add an Annotation
6 9 April 2003 rfs-doc@reuters
How to edit anannotation Step Action
◆ Either:• double-click to select a word• triple-click to select a line• drag the mouse over the text to select it if you want toYou can then re-type the text.Note: You can use drag and drop or Ctrl+V to insert text from another application, sucMicrosoft Word, into an annotation.
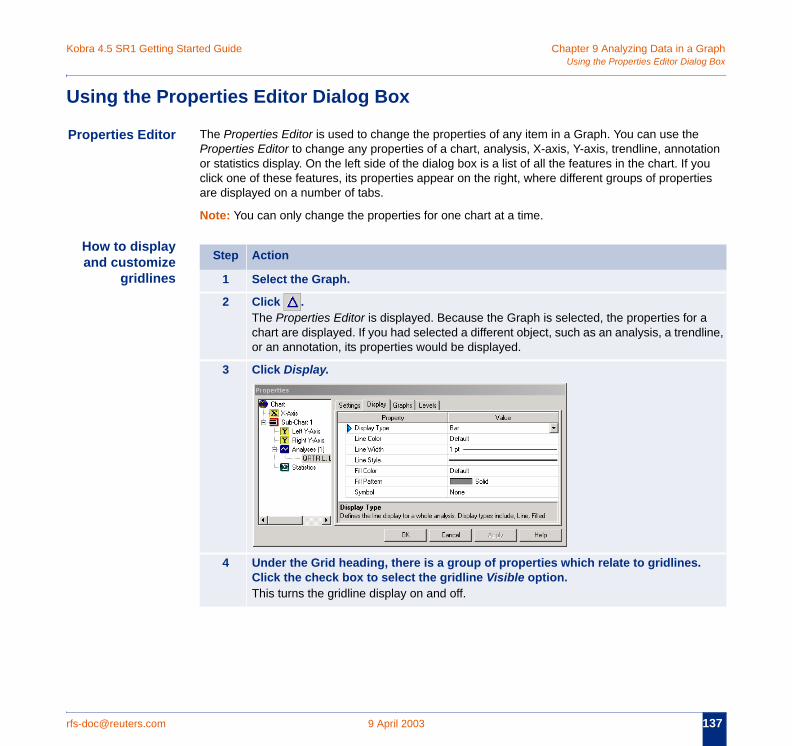
Kobra 4.5 SR1 Getting Started Guide Chapter 9 Analyzing Data in a Graphog Box
rfs- 137
U
Pr tion
ou ies
a line,
.
Using the Properties Editor Dial
[email protected] 9 April 2003
sing the Properties Editor Dialog Box
operties Editor The Properties Editor is used to change the properties of any item in a Graph. You can use theProperties Editor to change any properties of a chart, analysis, X-axis, Y-axis, trendline, annotaor statistics display. On the left side of the dialog box is a list of all the features in the chart. If yclick one of these features, its properties appear on the right, where different groups of propertare displayed on a number of tabs.
Note: You can only change the properties for one chart at a time.
How to displayand customize
gridlinesStep Action
1 Select the Graph.
2 Click .The Properties Editor is displayed. Because the Graph is selected, the properties forchart are displayed. If you had selected a different object, such as an analysis, a trendor an annotation, its properties would be displayed.
3 Click Display.
4 Under the Grid heading, there is a group of properties which relate to gridlinesClick the check box to select the gridline Visible option.This turns the gridline display on and off.

Chapter 9 Analyzing Data in a Graph Kobra 4.5 SR1 Getting Started GuideUsi
13 .com
w
le
ng the Properties Editor Dialog Box
8 9 April 2003 rfs-doc@reuters
5 Click the Line Color list to display the color selection available, and select a necolor for the gridlines.
6 Click the Line Width list to display the line widths available.You can choose a thickness from 1 point to 6 points.
7 Click the Line Style list to display the line styles available, and choose a suitabline style.
8 Click Apply to update the chart with the changes.You can now change other properties of the chart if you want.
9 Click OK.
Step Action