Embed Size (px)
Citation preview

See discussions, stats, and author profiles for this publication at: https://www.researchgate.net/publication/326573584
A Practical Guide to Using Camera Traps for Wildlife Monitoring in Natural
Resource Management Projects.
Technical Report · June 2018
DOI: 10.13140/RG.2.2.28025.57449
CITATIONS
0READS
357
1 author:
Some of the authors of this publication are also working on these related projects:
Micronesian Megapode Project View project
Bird ecology and conservation View project
Shaun William Molloy
Edith Cowan University
15 PUBLICATIONS 27 CITATIONS
SEE PROFILE
All content following this page was uploaded by Shaun William Molloy on 24 July 2018.
The user has requested enhancement of the downloaded file.
A Practical Guide to Using Camera Traps for Wildlife Monitoring in Natural Resource
Management Projects
Written by Dr Shaun W. Molloy, Edith Cowan University, as part of the Bringing them Back
Partnership Project
June 2018

SWCC [Camera Trapping Guide] 2
Bringing them Back Partnership Project
The ‘Bringing Them Back’ partnership project was undertaken from June 2017 – June 2018, in collaboration with the South West Catchments Council, Edith Cowan University, The Western Australian Biodiversity Science Institute, Department of Biodiversity, Conservation and Attractions, Greening Australia and Dumbleyung Landcare. The project aim was to assess the effectiveness of revegetation and corridors, land management actions and the establishment of ecological linkages projects in the Southern Wheatbelt on the region’s unique fauna.
This project focussed on the Dongolocking Catchment, the site of a major conservation project undertaken between 1996 and 2005 where the focal species approach was used to inform broad scale revegetation activities designed to optimise wildlife habitat for a broad range of species.
The knowledge gained through this research will be used to increase the capacity of the regional practitioners, agencies, local governments and the Natural Resource Management (NRM) community to better plan and undertake successful restoration projects that contribute to fauna conservation, including critical weight range fauna. This Camera Trapping Guide is one outcome of the Bringing them Back Partnership Project.
This project is supported by the South West Catchments Council and Edith Cowan University through funding from the Australian Government’s National Landcare Program.
SWCC [Camera Trapping Guide] 3
Table of Contents
1 Purpose ..................................................................................................................................... 4
2 Introduction .............................................................................................................................. 4
3 Context ...................................................................................................................................... 5
4 Legal Requirements and Obligations. ....................................................................................... 5
5 Trigger Mechanisms .................................................................................................................. 5
6 Trigger speeds ........................................................................................................................... 7
7 Camera properties .................................................................................................................... 7
8 Choosing a Camera Trap ........................................................................................................... 8
9 Additional Equipment and Other Options ..............................................................................10
i. Additional Equipment:................................................................................................11
ii. Other Options .............................................................................................................12
10 Setting up the Camera Trap ....................................................................................................12
i. Layout, Grid, Transect or Points .................................................................................12
ii. Site Preparation..........................................................................................................15
iii. Height .........................................................................................................................17
iv. Base ............................................................................................................................17
v. Setting up the Camera Trap .......................................................................................17
vi. To Bait or not to Bait ..................................................................................................18
vii. Days in the Field .........................................................................................................19
11 Data management ..................................................................................................................20
12 Data analyses ..........................................................................................................................22
13 Glossary ...................................................................................................................................24
14 Bibliography ............................................................................................................................26
15 Appendix 1. DBCA camera trapping site sheet .......................................................................28
SWCC [Camera Trapping Guide] 4
1 Purpose
It is the purpose of this guide to assist those working in Natural Resource Management (NRM) to effectively and safely use camera traps. We will do this by discussing the strengths and limitations of camera traps, how they function, what to consider when choosing a camera trap, how to set them up correctly, and the legal and ethical considerations associated with their use.
2 Introduction
Camera trapping refers to the use of remotely triggered cameras that automatically take images and/or videos of animals or other subjects for monitoring and research purposes. Modern camera traps can be triggered by sensing movement and/or thermal signatures, or they can be triggered to operate automatically at predetermined time intervals. NOTE: We will not be discussing devices which use film in this guide as such devices are now (apart from equipment specialised for specific applications) generally considered to be obsolete.
Across the South West Floristic Region (SWAFR) camera traps are commonly used to detect and monitor the indicated/relative abundance of medium to large terrestrial animals (Wayne et al., 2013), they can also be used to observe animal behaviour (Stojanovic et al., 2014) and the effectiveness of management actions such as predator control programs (Comer et al., 2018). They can be applied to studying species as diverse as birds (Suwanrat et al., 2015), as large as elephants (Smit et al., 2017) and as small as invertebrates (Hobbs & Brehme, 2017). Where individuals of a species can be identified from markings, e.g. zebras, tigers and whales, it is even possible to put together population data and demographic data similar to that which could, until recently only be obtained through catch, mark and release projects (Foster & Harmsen, 2012).
In recent years camera traps have become a mainstay in conservation management as they are:
✓ Relatively cheap to buy and deploy,
✓ Highly reliable,
✓ Able to be placed in the field for months at a time,
✓ Low impact, i.e. they provide minimum disturbance to fauna and the environment,
✓ Low skill, i.e. they do not require highly specialist skills to deploy,
✓ Relatively safe for both fauna and project staff in comparison to animal handling.
✓ Able to be used in situations which may be hazardous for people to work in.
✓ Without a need for licencing (although landholders permission and, where applicable, ethics
approvals are still required).
However, camera traps do have limitations in what they can be used for and, if they are not deployed or set up correctly, can yield poor and misleading research results (Newey et al., 2015) and cause harm to fauna (Meek et al., 2015).
SWCC [Camera Trapping Guide] 5
3 Context
Too often, people deploy camera traps without considering how their deployment will address specific research questions, e.g. what is the objective of the deployment, is the deployment capable of providing the desired information, how will the deployment inform the delivery of conservation management outcomes, is the deployment the best possible use of resources, how to analyse, store, disseminate and apply project data? These are all questions which should be addressed in the project planning phase. It should be remembered that by trying to extract a research question from pre-existing data or trying to retrofit data to a research question can be a recipe for disaster. If in doubt on the best way to formulate and address your research questions, speak to an expert.
4 Legal Requirements and Obligations.
In Western Australia the wildlife trapping requirements and obligations associated with the more intrusive forms of wildlife monitoring, such as trapping, are not required. However, the permission of the landholder is still necessary. This means that you must obtain consent from of the Department of Biodiversity Conservation and Attractions (DBCA) regional offices if you will be working on DBCA estate. You will also need to obtain specific permission if you are using baits or attractants on DBCA estate as these have the potential to modify fauna behaviour.
We also note that any research undertaken through, or in association with, a university will be required to comply with the ethics approval processes of that university or organisation.
5 Trigger Mechanisms
Camera traps come with a variety of trigger mechanisms each of which have their own strengths and weaknesses which need to be understood to be able to use them effectively (Table 1).
Table 1: Camera trap trigger mechanisms
System Best suited Least well suited
Non-Triggered
(Continuous filming/photography or operating at a pre-set interval)
Where animals are resident, occur in the open, have high visualisation rates, or where continuous data is required (e.g. to establish absence)
For rare species or infrequent events. Under these circumstances power and memory requirements can seriously limit the time of deployment and photo analyses can become onerous.
Triggered
General
Where camera traps must be left in the field for a long period of time and events are infrequent.
When events of interest are frequent of continuous. Where triggers are complicated or less reliable (as is often the case with cheaper cameras).
Triggered
Mechanical and electrical
When activity requires an animal to physically step in a specific location or pull on a bait, lure or object of interest. Triggering mechanisms can be modified or created to enable cameras to respond to specific cues, e.g. signals pit tags or radio collars, for specialised project applications.
Once a common method of obtaining species specific data, this method is now rarely used outside of highly specialised projects. Most modern camera traps lack this capacity.
SWCC [Camera Trapping Guide] 6
Triggered
Passive infrared(PIR) and motion
Most modern camera traps are triggered by a combination of PIR and movement sensors. The sensitivity of these settings can be adjusted in most camera traps to suit a specific position or requirement. The sensitivity of these sensors can vary greatly between the camera makes and models.
Sensors can be fooled by hot days and movement of vegetation driven by wind or rain. This results in lots of “empty or blank” photographs which can quickly deplete power and memory and make data analyses onerous.
Triggered
Infrared
The use of infrared alone is most effective where wind and rain can fool motion sensors. This allows the camera to be triggered by heat signatures alone.
Hot days can, in some instances, result in nearly continuous photography. This can be a common problem with cheaper cameras. Infrared sensors have problems identifying poikilothermic fauna such as invertebrates, reptiles and amphibians.
Triggered
Motion
When temperatures cause infrared sensors to become unreliable it may become necessary to switch to using movement sensors alone.
The movement of grasses and vegetation, particularly in very windy sites can result in numerous “empty” photographs.
Nearly all modern camera traps are triggered by a combination of Passive infrared (PIR) and motion detectors. PIR sensors respond heat signatures while motion sensors respond to the movement of animals and background objects, e.g. vegetation blowing in the wind. At default settings, most camera traps use a combination of both sensors. However, the sensitivity and effectiveness of these combined sensors can vary greatly between different camera trap makes and/or models. This can bring about a marked change in the effectiveness of different camera traps particularly where there are highly varied climatic and background situations or where physically diverse species are being monitored.
Ideally what is required is a balance between these two sensors that will enable the maximum number of animal records to be obtained while minimising the number of blanks, i.e. photographs taken without intended subjects, usually triggered by abiotic factors such as the movement of vegetation due to wind and/or high temperatures). An over-abundance of blanks is always a problem as blanks waste battery power and fill SD card memory. As such, they can severely limit effective field time for the camera and result in data which is difficult to analyse. For example, an over reliance on motion detection in a rainy or windy situation may result several thousand blank photographs, which all still have to be thoroughly examined during analyses. The resulting blanks can fill the SD card within the first two days of what may be a two month deployment, thereby making the camera trap redundant for the rest of its deployment. Conversely an over reliance of PIR during a spell of hot temperatures may lead to the same result. Furthermore, reducing PIR sensitivity too far may result in fewer species being photographed, particularly smaller and fast moving homeothermic species. Reducing motion sensitivity will result in fewer photographs taken of animals being taken, particularly where smaller, slower moving and poikilothermic species are concerned.
The correct setting of sensors requires an understanding of the strengths and limitations of the camera traps being used, the environmental conditions within which they are to be used, and of the characteristics of the species to be monitored. Learning how to best set up your camera trap requires a familiarity of the strengths and weaknesses of your chosen model. Developing
SWCC [Camera Trapping Guide] 7
this understanding requires familiarity with the instructions provided by the manufacturer, reading the reviews and findings of other users, and practical experience.
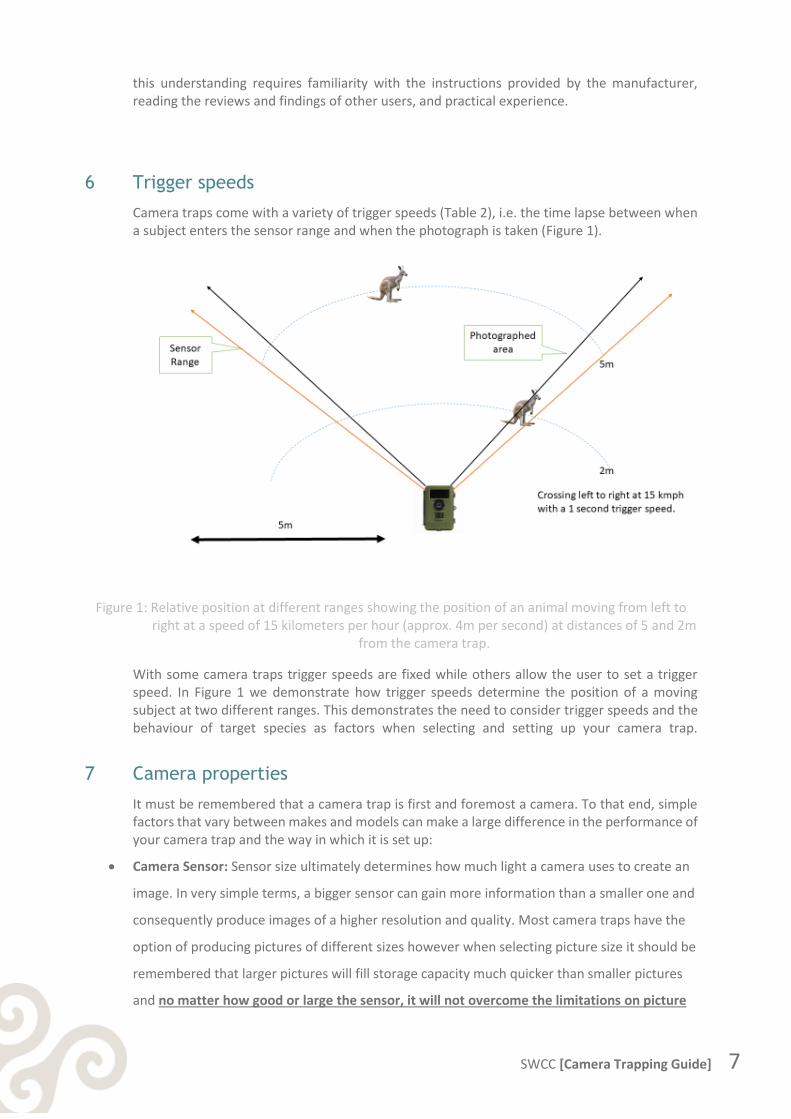
6 Trigger speeds
Camera traps come with a variety of trigger speeds (Table 2), i.e. the time lapse between when a subject enters the sensor range and when the photograph is taken (Figure 1).
Figure 1: Relative position at different ranges showing the position of an animal moving from left to right at a speed of 15 kilometers per hour (approx. 4m per second) at distances of 5 and 2m
from the camera trap.
With some camera traps trigger speeds are fixed while others allow the user to set a trigger speed. In Figure 1 we demonstrate how trigger speeds determine the position of a moving subject at two different ranges. This demonstrates the need to consider trigger speeds and the behaviour of target species as factors when selecting and setting up your camera trap.
7 Camera properties
It must be remembered that a camera trap is first and foremost a camera. To that end, simple factors that vary between makes and models can make a large difference in the performance of your camera trap and the way in which it is set up:
• Camera Sensor: Sensor size ultimately determines how much light a camera uses to create an
image. In very simple terms, a bigger sensor can gain more information than a smaller one and
consequently produce images of a higher resolution and quality. Most camera traps have the
option of producing pictures of different sizes however when selecting picture size it should be
remembered that larger pictures will fill storage capacity much quicker than smaller pictures
and no matter how good or large the sensor, it will not overcome the limitations on picture
SWCC [Camera Trapping Guide] 8
quality imposed by an inferior lens. Cheaper camera traps often have relatively large sensors
but are let down by inferior lenses.
• Shutter Speed: The length of time a camera shutter is open to expose light into the camera
sensor. Shutter speeds are typically measured in fractions of a second, when they are under a
second. Slow shutter speeds allow more light into the camera sensor and are used for low-
light and night photography, while fast shutter speeds help to freeze motion.
• Aperture: Refers to hole within a lens, through which light travels into the camera body. The
larger the hole, the more light that passes to the camera sensor. Aperture also controls
the depth of field, which is the portion of a scene that appears to be sharp. If the aperture is
very small, the depth of field is large, while if the aperture is large, the depth of field is small.
This is fixed on most cameras traps but varies between makes and models.
• ISO: Refers to light sensitivity and adjustments can be used to brighten your photos if you
can’t adjust shutter speed or (as with most camera traps) aperture. It can be adjusted on some
camera traps, is typically measured in numbers, a lower number representing a darker image,
while higher numbers mean a brighter image. However, raising ISO comes at a cost. As the ISO
rises, so does the visibility of graininess/noise in your images.
8 Choosing a Camera Trap
There are many makes and models of camera trap on the market with a range of features and prices ranging from over $1,000 to less than $100, choosing the correct one for your needs can be difficult. As an indication below (Table 2), we show a comparison adapted from Gillespie et al. (2015). We also note that prices for individual models can vary enormously between retailers. When it comes to camera traps it pays to shop around and to negotiate.
Table 2: A comparison of 3 commonly used camera traps. Note that prices are 2015 USD.
Brand Reconyx PC850 Scoutguard KG680v Bushnell Trophy
Price (US$) $650 $230
$303
Trigger speed (seconds)
0.2 0.8-1.2 0.8
PIR sensor range
30 m 15 m 18 m
Video Y/N N Y
Y
Flash type Incandescent Infrared (Dark Flash)
Infrared (Dark Flash)
Image type Colour day and night. Colour day, B&W night. Colour day, B&W night.

SWCC [Camera Trapping Guide] 9
Operating temperature range
-40 to 60 C -20 to 60 C -20 to 60 C
Waterproof- ness
Waterproof Weatherproof Weatherproof
Warranty and support
2 yr warranty. Includes ‘mapview’ software for metadata export and image management.
1 yr warranty. 2 yr warranty.
Programming 3 pre- programmed settings with full manual programming of sensitivity, delay, images and more. Programmable via SD card.
Programmable sensitivity, delay and number of images.
Programmable sensitivity, delay and number of images.
Pro’s Very fast trigger, good degree of programmability, highly durable, good data management capabilities, good support. Widely used in wildlife research.
Good degree of programmability, has built in image viewer.
Price, simple to operate.
Con’s Price, need separate device to view images.
Lower image quality, less durable. B&W night images. Can be sensitive to climatic change.
Lower optical and image quality, less durable, need separate device to view images. B&W night images.
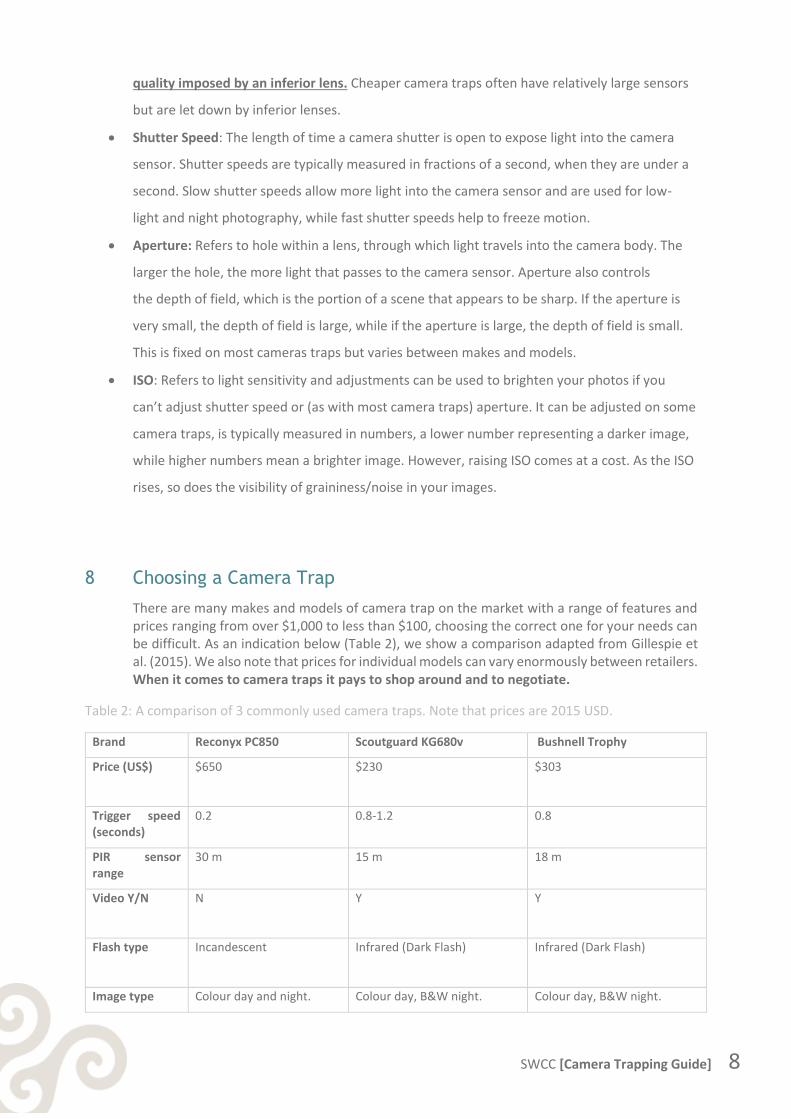
Generally speaking, when purchasing a camera trap, you get what you pay for. Looking at Table 2, we can see that the Reconyx® has a faster trigger, a greater PIR range, takes better quality pictures and is of a more robust construction than the other two examples. Furthermore, experience has shown that the inbuilt trigger algorithm in Reconyx® models usually results in far fewer blanks. In trials undertaken by the Department of Biodiversity Conservation and Attractions (DBCA) Reconyx® cameras have demonstrated that they are much more effective in photographing individual animals but only marginally more effective at identifying the number of species at a site when compared to commonly used competitors (Figure 2). It is for these reasons that, at the time of publication, Reconyx® is generally accepted as the brand of choice for most professional users in Australia (Gillespie et al., 2015).
SWCC [Camera Trapping Guide] 10
Figure 2: Mean number of species detections and images with detections for three camera trap types (Thomas & Cowan, 2016)
However, that does not mean that Reconyx® is always the best choice for your project. For example:
• The Reconyx® PC 850 has an incandescent flash will enable you take colour photographs in the
dark but it may also alarm some animals causing adverse reactions such as camera avoidance,
• Reconyx® models do not have an internal screen display which means that complicated set ups
might require computers being taken into the field, and
• Some Reconyx® models can cost more than four times as much as a cheaper brand such as a
Scoutguard® (which may be quite suitable for the job at hand) meaning that you could put
three or four times as many Scoutguard® camera traps into the field for the same cost.
Furthermore, where theft is a potential problem, a cheaper camera might become a much
more viable option.
Our point is that you need to look at your resources, the behavioural characteristics of target species and your research objectives before purchasing your camera traps.
One thing to note is the continuity of traps in a project. Remember that if you put different models of camera into the field, or have the same camera with different settings, your camera trap data will not be uniform. It will be biased, and bias of this nature is very difficult to compensate for during analyses. This, in turn, can lead to misleading and inaccurate findings in your research.
9 Additional Equipment and Other Options
Although camera traps come with some basic equipment (simple harnesses to tie them to trees, manuals and often SD memory cards) they require additional equipment to function properly and they often come with options that will enable them to better fulfil specific tasks. Here we describe some of the more commonly used equipment and options.
SWCC [Camera Trapping Guide] 11
i. Additional Equipment:
• Batteries: Most modern camera traps require 8-12 (depending on the make and model)
nickel–metal hydride (NiMH) AA rechargeable batteries. As camera traps must be able to
spend lengthy periods in the field, untended and under potentially testing conditions, we
recommend that the best available batteries be used. We have found Eneloop® batteries (and
chargers) to very effective, although somewhat expensive. They last well in the field holding
their charge and being comparatively resistant to moisture, they have, at the time of writing,
given us several years of near constant service without issue. We like to have two sets of
batteries for each camera trap as this enables us to keep cameras constantly in the field with
bi monthly service visits. An appropriate battery charger will also need to be purchased.
• SD Cards: Most camera traps are now capable of taking pictures of 8MB or better. We believe
it better, under most circumstances, to take the best quality pictures that a camera is capable
of as this allows us to better identify and evaluate our photographed subjects. On the down
side, larger sized pictures require more memory and smaller cards can quickly be filled,
particularly where there are many blank photographs. We therefore recommend SD cards of
16GB or better and would also recommend having at least one spare card for each camera
trap, thereby allowing for quick field servicing.
• Security Boxes: These are metal boxes designed to hold camera traps thereby making theft
much more difficult. Some users use security boxes for all jobs, others just use them where the
public may find and steal camera traps. We note that no such device is infallible.
• Python Cables: These are lockable plastic clad metal cables used to hold security boxes to
trees and other solid mountings.
• Concealment and Camo Tape: These are used to make camera traps less noticeable by making
the shape or colour of the camera trap less distinctive. We haven’t seen any evidence that
these are effective. However this is not to say that they may be appropriate for some species
or provide better security.
• Mounts: These are adjustable mountings and/or poles that enable fine scale movement when
setting up camera traps or enable cameras to be securely set up where no other structures are
available. Specialised mounts can also be built or purchased for specific purposes (for example,
a mount that will enable a camera to face downwards at a specified height from the ground)
to enable the monitoring of macro-invertebrates. We would recommend the use of mounts for
specialised situations, but do not see them as suitable for most applications.
• Bait-holders: Manufactured bait holders and lures are available for purchase however for
most applications homemade bait-holders will suffice. These can be jars with many small
perforations in the lid, or a wire covering. What is important is that they allow the scent of the
SWCC [Camera Trapping Guide] 12
bait to escape, that they cannot be opened by animals and that they can be firmly fixed to a
stake or to the ground so that they are not carried off by crows, foxes etc.
ii. Other Options
• External Flash Units: Most camera traps have a flash range of approximately 5m but a sensor
range of up to 30m. This means that animals more than 5m away from the camera trap will
not show up in photographs. External flash units can be fitted to some cameras to provide
additional flash range. These are often used with large animals.
• Remote Sensor Units: These can be fitted to some cameras to enable movement in an area
outside of the normal sensor range to activate the trigger. They can be used to take pictures,
usually of large game or groups of animals, from a distant vantage point.
• Solar Cells: Internal and external solar cell units can be purchased for some camera traps.
These can keep batteries charged almost indefinitely and, when combined with large capacity
SD cards, can greatly increase camera trap service intervals.
• Cell Network Access: Some camera traps such as the Acorn® X-Trail 3GR series can be
purchased Telstra® ready, thereby allowing 2 way access to the Testra® 3G Network. This
enables users to download pictures and video from remote work stations and also to change
camera settings remotely. This can provide a great benefit to users where strong and reliable
3G access is available. However, this may also prove to be an expensive option where many
large photographs are taken.
• Flash type: As previously noted (Table 2) most camera traps come with either dark flash (an
infrared flash that minimises disturbance but limits night photography) or incandescent (a
bright white flash that can disturb some species but provides better photographs). However,
there is a third option. Cameras traps, such as the Moultrie-M880 use a low glow system which
uses an algorithm to combine both dark and incandescent flash to minimise disturbance and
maximise image resolution.
10 Setting up the Camera Trap
i. Layout, Grid, Transect or Points
The choice of grid, transect or point relies largely with identifying to determine the best method for answering your research question, i.e.:
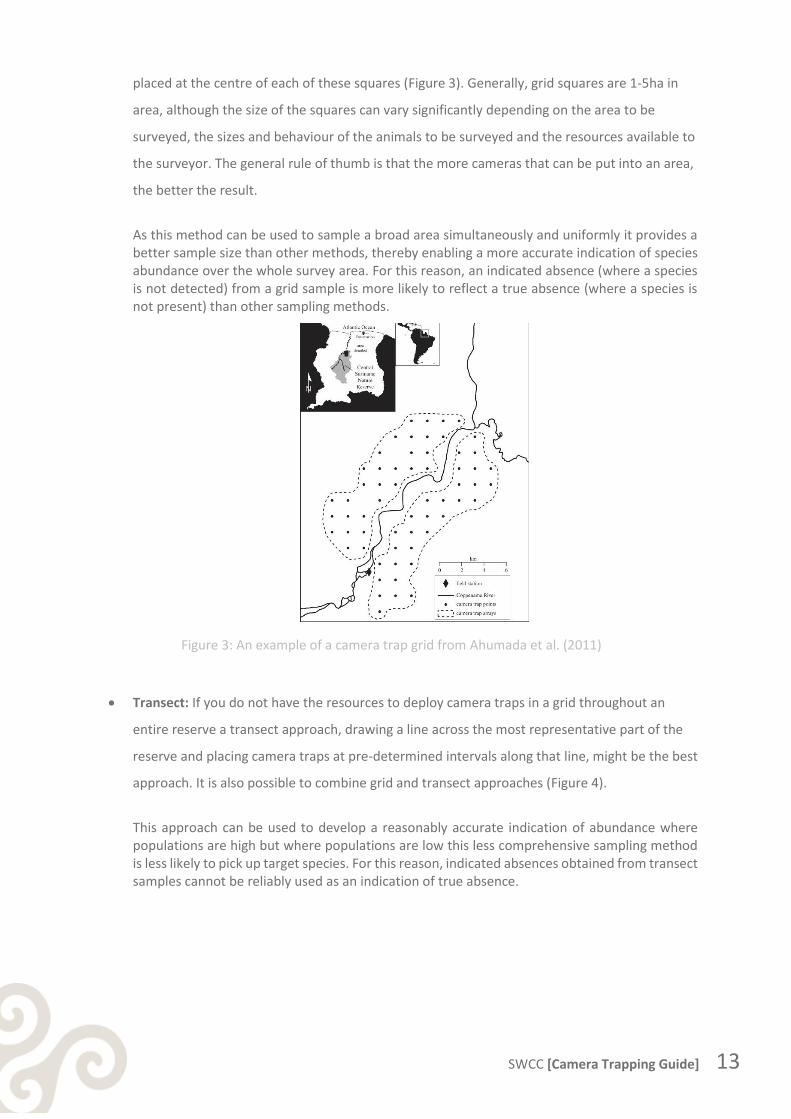
• Grid Sample: If you are undertaking a general survey of the fauna in an area without altering
the behaviour of that fauna, a grid approach would be the most effective methodology. With a
grid, the area in question is divided up into equal squares on a map and camera traps are
SWCC [Camera Trapping Guide] 13
placed at the centre of each of these squares (Figure 3). Generally, grid squares are 1-5ha in
area, although the size of the squares can vary significantly depending on the area to be
surveyed, the sizes and behaviour of the animals to be surveyed and the resources available to
the surveyor. The general rule of thumb is that the more cameras that can be put into an area,
the better the result.
As this method can be used to sample a broad area simultaneously and uniformly it provides a better sample size than other methods, thereby enabling a more accurate indication of species abundance over the whole survey area. For this reason, an indicated absence (where a species is not detected) from a grid sample is more likely to reflect a true absence (where a species is not present) than other sampling methods.
Figure 3: An example of a camera trap grid from Ahumada et al. (2011)
• Transect: If you do not have the resources to deploy camera traps in a grid throughout an
entire reserve a transect approach, drawing a line across the most representative part of the
reserve and placing camera traps at pre-determined intervals along that line, might be the best
approach. It is also possible to combine grid and transect approaches (Figure 4).
This approach can be used to develop a reasonably accurate indication of abundance where populations are high but where populations are low this less comprehensive sampling method is less likely to pick up target species. For this reason, indicated absences obtained from transect samples cannot be reliably used as an indication of true absence.

SWCC [Camera Trapping Guide] 14
Figure 4: A camera trapping project can combine both grid and transect approaches (Ahumada et al., 2013)
• Point sampling: If you are monitoring the behaviour of fauna under a certain set of conditions,
sampling fauna at a specific set of points for experimental purposes (For example, to examine
responses by fauna to differing vegetation or specific landscape parameters), or monitoring
fauna at a place of activity or gathering point such as a trail, water hole or nest site, then
placing your camera in a specific points may be the more effective approach (Figure 5). This
approach allows a researcher to monitor a large area with minimal resources and to answer
specific research questions but a point approach highly susceptible to bias and provides a
limited insight into the ecology of the greater landscape as a whole.
Because of the restricted nature of point sampling, this method is not, by itself, suitable for determining either indicated abundances or absences across a target landscape.
SWCC [Camera Trapping Guide] 15
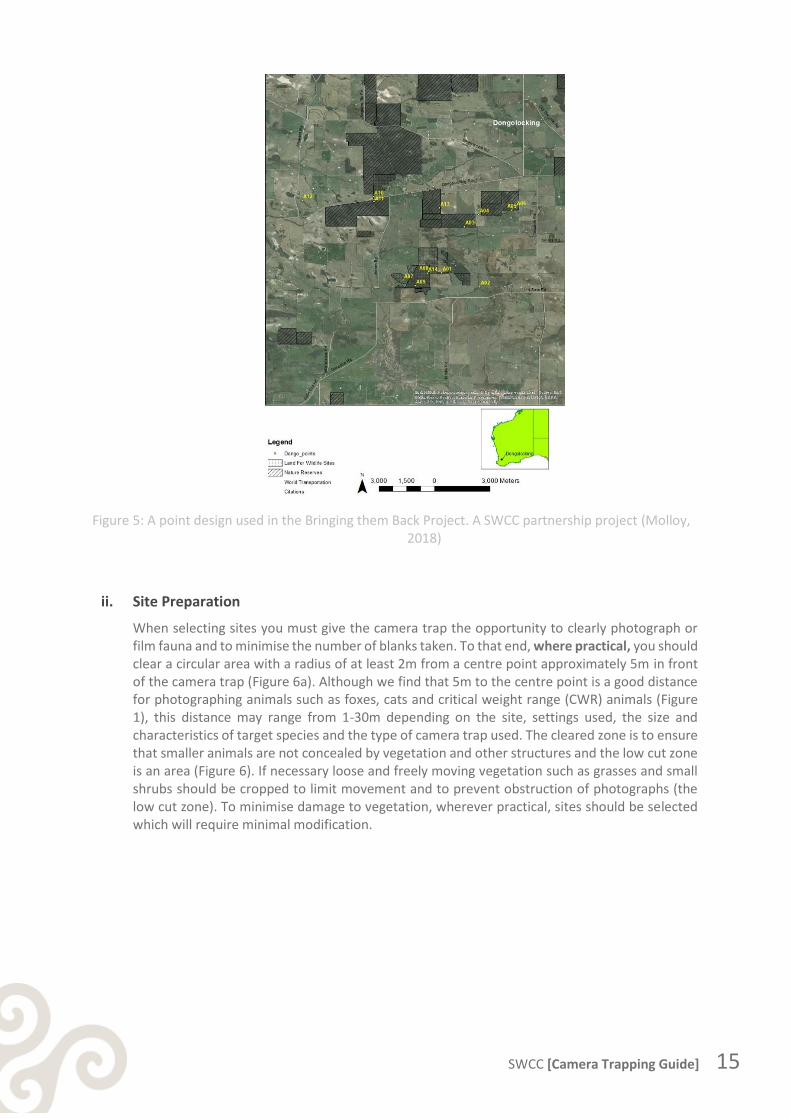
Figure 5: A point design used in the Bringing them Back Project. A SWCC partnership project (Molloy, 2018)
ii. Site Preparation
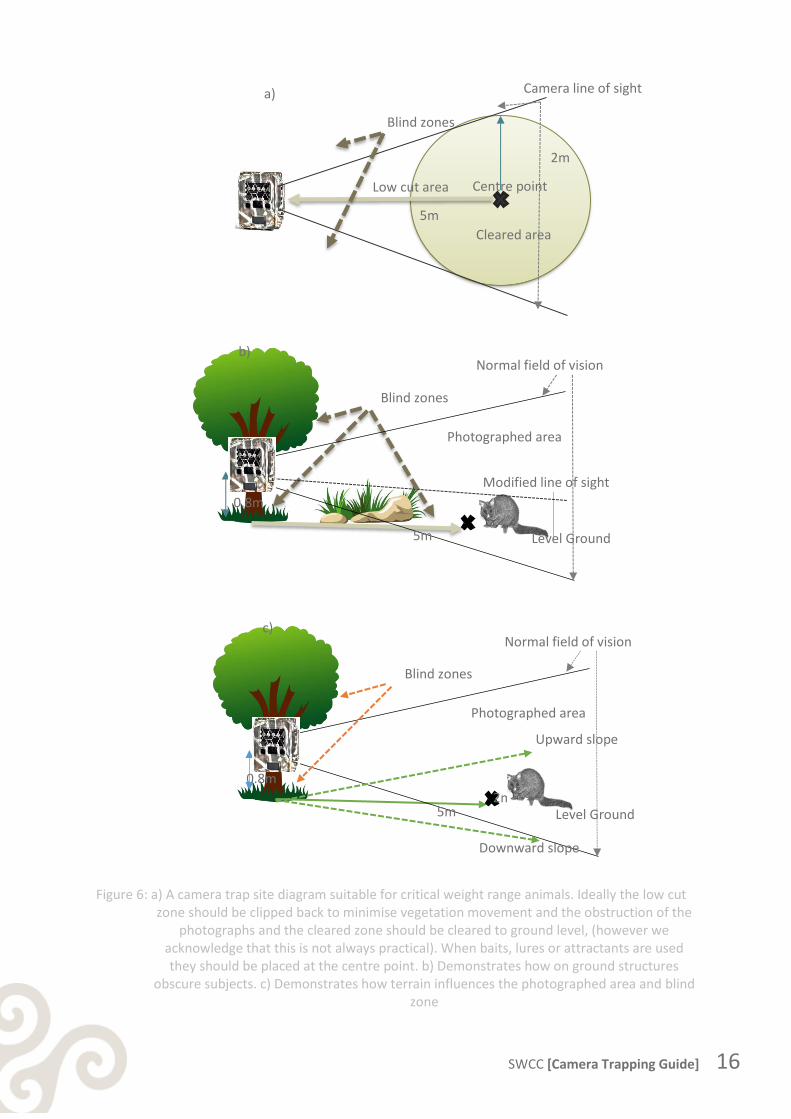
When selecting sites you must give the camera trap the opportunity to clearly photograph or film fauna and to minimise the number of blanks taken. To that end, where practical, you should clear a circular area with a radius of at least 2m from a centre point approximately 5m in front of the camera trap (Figure 6a). Although we find that 5m to the centre point is a good distance for photographing animals such as foxes, cats and critical weight range (CWR) animals (Figure 1), this distance may range from 1-30m depending on the site, settings used, the size and characteristics of target species and the type of camera trap used. The cleared zone is to ensure that smaller animals are not concealed by vegetation and other structures and the low cut zone is an area (Figure 6). If necessary loose and freely moving vegetation such as grasses and small shrubs should be cropped to limit movement and to prevent obstruction of photographs (the low cut zone). To minimise damage to vegetation, wherever practical, sites should be selected which will require minimal modification.
SWCC [Camera Trapping Guide] 16
Figure 6: a) A camera trap site diagram suitable for critical weight range animals. Ideally the low cut zone should be clipped back to minimise vegetation movement and the obstruction of the
photographs and the cleared zone should be cleared to ground level, (however we acknowledge that this is not always practical). When baits, lures or attractants are used they should be placed at the centre point. b) Demonstrates how on ground structures
obscure subjects. c) Demonstrates how terrain influences the photographed area and blind zone
5m
2m
Low cut area
Cleared area
a)
Blind zones
Camera line of sight
5m
0.8m
Photographed area
b)
Blind zones
Level Ground
Normal field of vision
Modified line of sight
5m
0.8m
Photographed area
c)
2m
Blind zones
Level Ground
Upward slope
Downward slope
Normal field of vision
Centre point
SWCC [Camera Trapping Guide] 17
Level sites are preferable as they provide undistorted and unobstructed view of subjects, particularly smaller animals. Downward slopes increase the size of blind zones (although this can be partially rectified by angling the camera trap downward) and upward slopes reduce the photographed area and proved a greater opportunity for concealment by increasing the effect of on ground structures (Figure 6c).
To reduce blanks, sites should ideally be sheltered from high winds and temperatures.
iii. Height
The height at which a camera trap is placed depends on the terrain and the size of the animals to be monitored. For example, if monitoring a large area such as a water-hole, or if monitoring larger animals such as pigs or deer in a clearing, it may be ideal to set your camera trap several meters above ground. However, when monitoring cats, foxes and critical weight range animals using a layout similar to that given in Figure 6a, we have achieved very good results by placing the lens of the camera at ± 0.8m above the height of the centre point at 5m distance. This may be higher where vegetation or slope present problems. If distances from the centre point are shorter (e.g. for monitoring smaller animals or specific situations) then heights should also become proportionately shorter. For example, if the distance becomes 2m then height of the camera lens should be lowered to ± 0.3m.
iv. Base
Camera traps can be attached to anything which provides a solid base. Trees trunks (at a height and width the will minimise movement and therefore blanks) are commonly used however, these are not always available. Under these circumstances items such as star pickets, (heavy duty) fence droppers or manufactured stands and base units may also be used as a base to which your camera trap can be attached. Care should be taken when placing star pickets (etc.) to minimise the danger that these could present to both animals and the public. To that end, they should always be capped and situated safely away from animal trails and walkways.
v. Setting up the Camera Trap
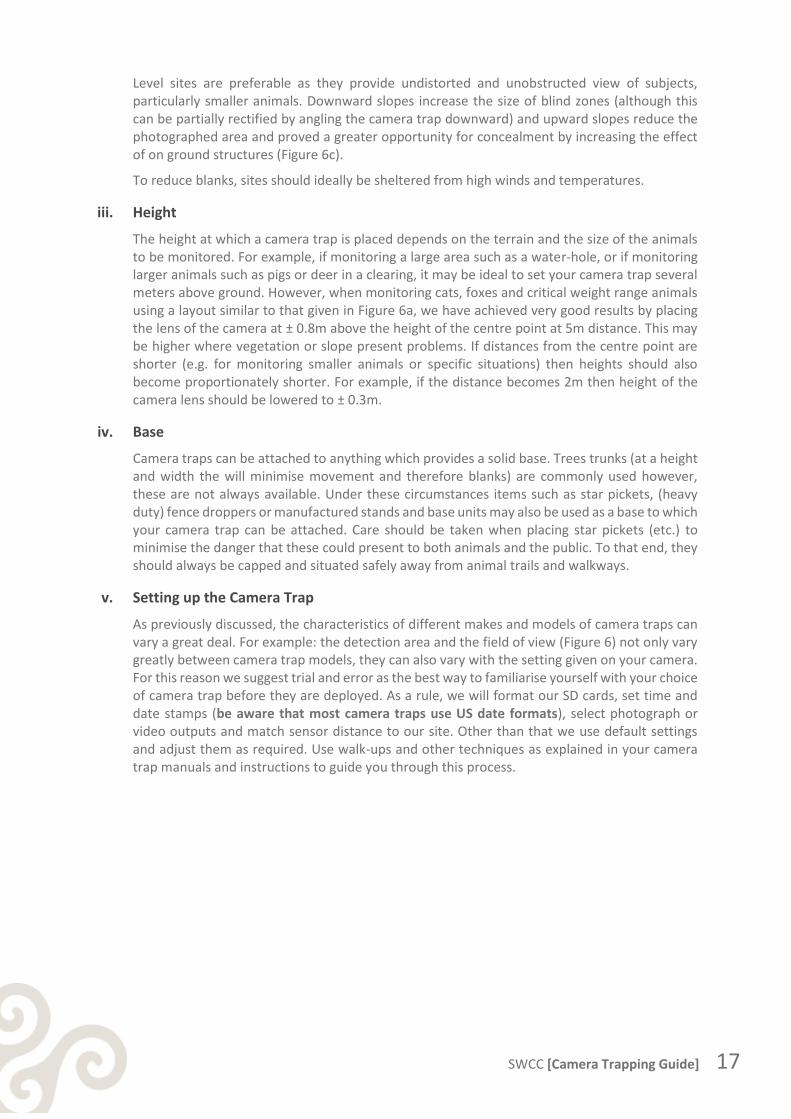
As previously discussed, the characteristics of different makes and models of camera traps can vary a great deal. For example: the detection area and the field of view (Figure 6) not only vary greatly between camera trap models, they can also vary with the setting given on your camera. For this reason we suggest trial and error as the best way to familiarise yourself with your choice of camera trap before they are deployed. As a rule, we will format our SD cards, set time and date stamps (be aware that most camera traps use US date formats), select photograph or video outputs and match sensor distance to our site. Other than that we use default settings and adjust them as required. Use walk-ups and other techniques as explained in your camera trap manuals and instructions to guide you through this process.
SWCC [Camera Trapping Guide] 18
Figure 7: A comparison between detection area and field of view for a Bushnell Trophy camera trap.
Having fixed your camera trap to a base (making sure that it is snugly fitted and will not move if a possum bumps into it when climbing a tree) position it so that the bait is at the centre of the photograph or that the cleared zone is at the bottom centre of the photograph. We note that tree trunks are rarely straight and that you will probably have to place sticks or bark behind your camera trap to position it correctly.
Once set up a GPS should be used to obtain accurate coordinates for the camera trap and coordinates should be recorded along with site details in field notes as soon as possible (see Appendix 1). This prevents the loss of camera equipment (even if a GPS is lost damaged or has data deleted) and enables project findings to be mapped and analysed in a GIS environment. Fluorescent tape should also be used to mark camera positions as this makes finding cameras much easier. You should not rely on tape alone as it often perishes quickly and is frequently removed by people, possums and parrots.
Remember that once deployed, changing the settings of your camera traps can bias results and bring the findings of your project into question so it pays to make the effort to familiarise yourself with your camera traps before you deploy them.
vi. To Bait or not to Bait
Baits, attractants or lures can be effective, particularly over short period, in attracting wildlife to a camera trap. However, choosing to use them will depend on your research question and behaviour of the target species in the study. Species that are arboreal, have unique habitat and/or spatial requirements, or are at low densities, may require a more targeted approach and the use of a lure may increase the likelihood of detecting such species. Lures have the potential to change the behaviour of some species and to bias results. For example, lures have the
SWCC [Camera Trapping Guide] 19
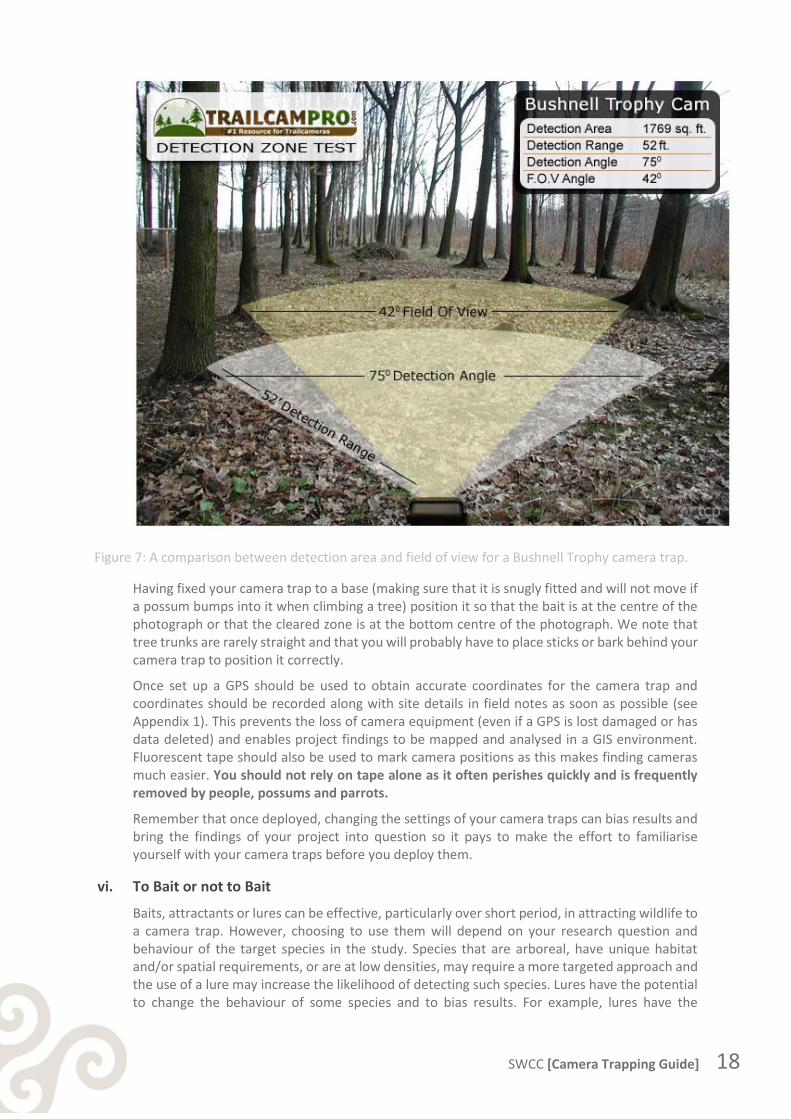
potential to vary in their capacity to attract animals over time as individuals in some species may quickly become de-sensitised and/or habituated to the lure (Figure 7). Additionally, reward lures, such as food items or a carcass, can result in direct conflict with conspecifics or exposure to potential predators. The resulting potential bias is of particular concern in monitoring programs (Thomas & Cowan, 2016).
Figure 8: Average time spent per visit per lure (non- reward) station. Sourced from Thomas & Cowan (2016)
In the ‘Bringing them Back’ project we have opted to bait trap sites with universal bait (a combination of sardines, oats and peanut butter) as we are trying to optimise the number of species being brought to a specific set of points (Molloy, 2018). However, if you are sampling a grid or transect pattern the use of baits would seriously bias results as it would if we used baits at camera traps to monitor behaviour or at activity points such as trails, nest sites or water holes.
vii. Days in the Field
Determining the optimal number of trap days, i.e. the total number of days multiplied by the number of camera traps functioning in the field, depends on your research question, the behaviour of target species and resources available to your project. For example, if you are researching changes in population over a given period of time, or wish to determine if population or activity for your target species change at different times of the year, then you will choose times and dates which will enable you to answer specific research questions.
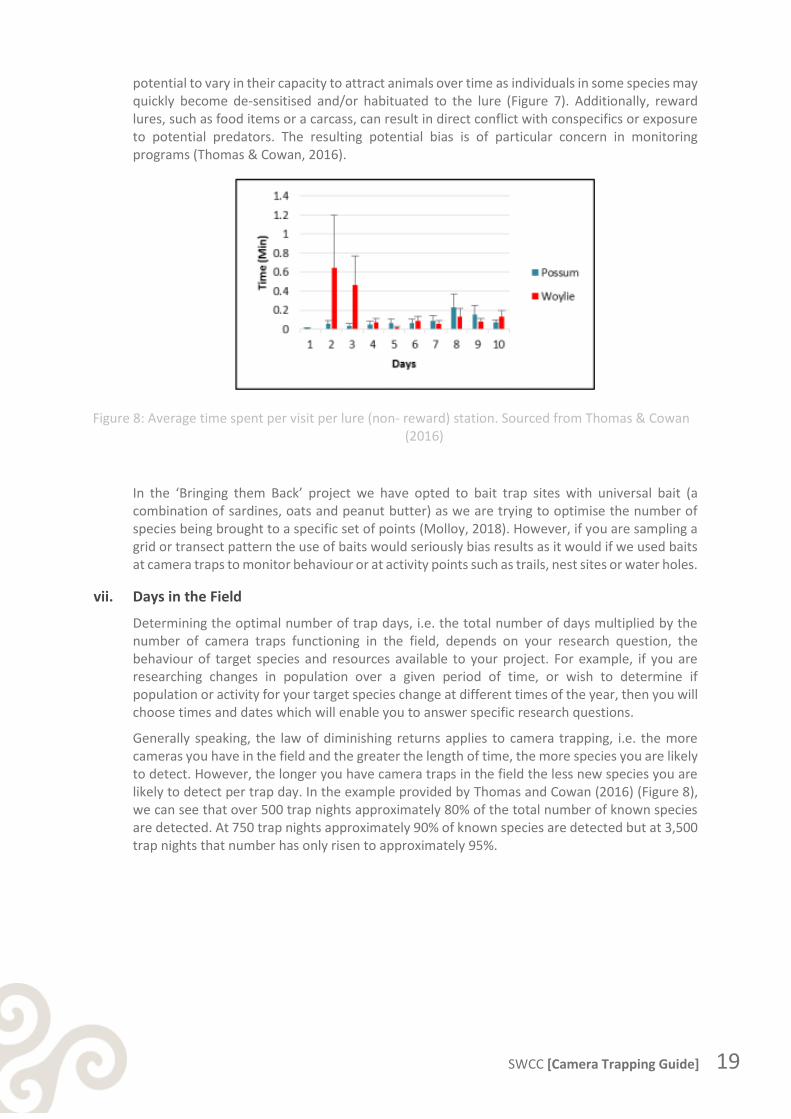
Generally speaking, the law of diminishing returns applies to camera trapping, i.e. the more cameras you have in the field and the greater the length of time, the more species you are likely to detect. However, the longer you have camera traps in the field the less new species you are likely to detect per trap day. In the example provided by Thomas and Cowan (2016) (Figure 8), we can see that over 500 trap nights approximately 80% of the total number of known species are detected. At 750 trap nights approximately 90% of known species are detected but at 3,500 trap nights that number has only risen to approximately 95%.
SWCC [Camera Trapping Guide] 20
Figure 9: Species accumulation curve for camera trap data collected in Dryandra Woodland.
Sourced from Thomas & Cowan (2016)
There are always resource limitations inherent in monitoring projects and this means that perfection (100%) will rarely be attained. However, a good researcher does the best that they can do with what they have available and acknowledges the limitations of the project in their findings. For example, if an effort of 500 trap nights does not capture the presence of species x, it does not mean that species x is not present at that site, just that it has not been recorded. In the example provided a survey of this size will, at best, detect 80% of target species available. Such limitations must be acknowledged in survey reports as they can have a major influence on the development and prioritisation of conservation management initiatives.
11 Data management
The following has been adapted from Gillespie et al. (2015):
Camera traps are capable of collecting large volumes of image data, particularly when arrays of cameras are deployed for several weeks at a time. Keeping track of which images came from which camera and from which site can easily become confusing. The careful management and storage of data will minimise confusion, and facilitate interpretation and data analyses.
When setting up cameras at each site, record the project name, site code, camera code, and date onto a site data sheet (see Appendix 1). Other important information to record onto site data sheets at each camera station includes: the GPS coordinates, and type of bait used. Remote camera settings such as the time delay between photographs, activation, trigger speed and sensitivity should also be recorded. It is important that downloaded images can be linked to the survey, individual camera and site they originate from. Provision should also be made in recording sheets for additional camera data such as humidity, barometric data, temperature and moon phase as these factors all influence fauna activity.
SWCC [Camera Trapping Guide] 21
When recovering cameras after deployment, record the date the camera was retrieved, and whether the camera was functioning on retrieval. Good record keeping will help ensure that remote camera survey data are collected consistently and enable valid comparisons between locations and/or survey occasions. Most modern camera traps allow a label to be programmed that is visible on all images taken. We recommend that the site name is programmed as the label, thus ensuring that every photo has the site name visible with time and date.
When images from remote cameras are downloaded to a computer for storage, it is important that the images from each camera are kept in separate folders labelled with a unique site code. For each new project create a folder on the computer drive where the images are to be downloaded with an identifying label. Make sure the images from each camera are downloaded into the correct folders.
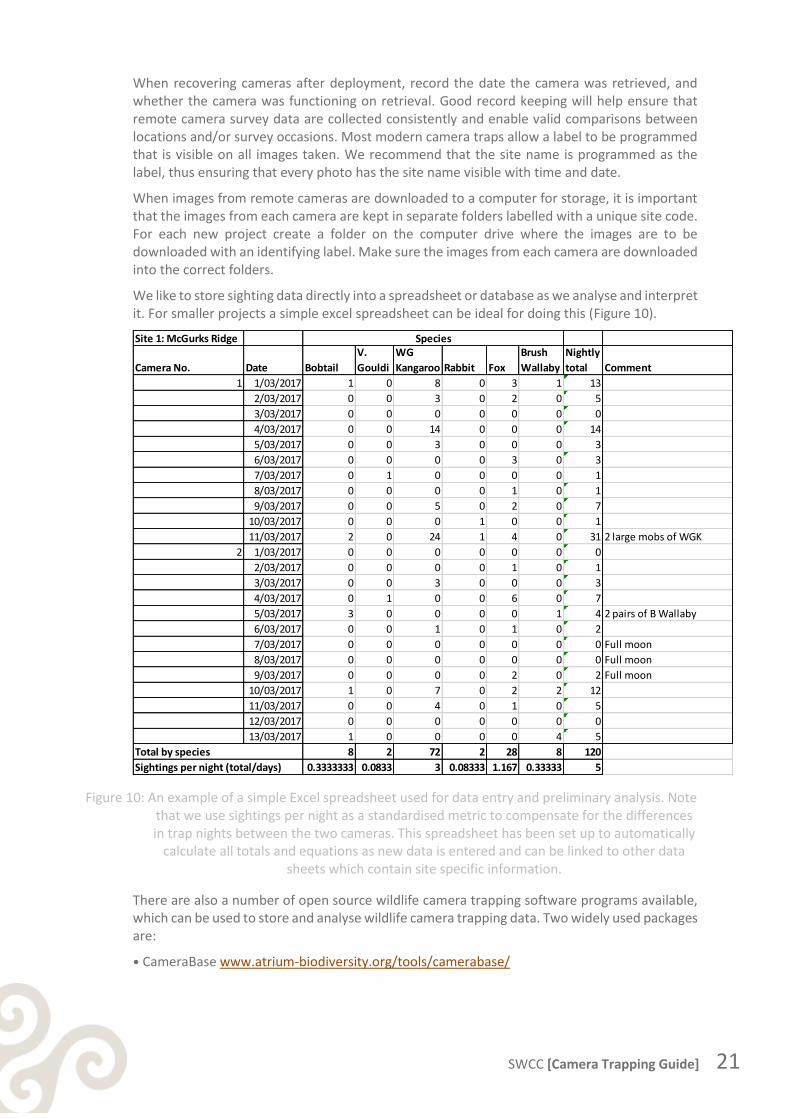
We like to store sighting data directly into a spreadsheet or database as we analyse and interpret it. For smaller projects a simple excel spreadsheet can be ideal for doing this (Figure 10).
Figure 10: An example of a simple Excel spreadsheet used for data entry and preliminary analysis. Note that we use sightings per night as a standardised metric to compensate for the differences in trap nights between the two cameras. This spreadsheet has been set up to automatically
calculate all totals and equations as new data is entered and can be linked to other data sheets which contain site specific information.
There are also a number of open source wildlife camera trapping software programs available, which can be used to store and analyse wildlife camera trapping data. Two widely used packages are:
• CameraBase www.atrium-biodiversity.org/tools/camerabase/
Site 1: McGurks Ridge
Camera No. Date Bobtail
V.
Gouldi
WG
Kangaroo Rabbit Fox
Brush
Wallaby
Nightly
total Comment
1 1/03/2017 1 0 8 0 3 1 13
2/03/2017 0 0 3 0 2 0 5
3/03/2017 0 0 0 0 0 0 0
4/03/2017 0 0 14 0 0 0 14
5/03/2017 0 0 3 0 0 0 3
6/03/2017 0 0 0 0 3 0 3
7/03/2017 0 1 0 0 0 0 1
8/03/2017 0 0 0 0 1 0 1
9/03/2017 0 0 5 0 2 0 7
10/03/2017 0 0 0 1 0 0 1
11/03/2017 2 0 24 1 4 0 31 2 large mobs of WGK
2 1/03/2017 0 0 0 0 0 0 0
2/03/2017 0 0 0 0 1 0 1
3/03/2017 0 0 3 0 0 0 3
4/03/2017 0 1 0 0 6 0 7
5/03/2017 3 0 0 0 0 1 4 2 pairs of B Wallaby
6/03/2017 0 0 1 0 1 0 2
7/03/2017 0 0 0 0 0 0 0 Full moon
8/03/2017 0 0 0 0 0 0 0 Full moon
9/03/2017 0 0 0 0 2 0 2 Full moon
10/03/2017 1 0 7 0 2 2 12
11/03/2017 0 0 4 0 1 0 5
12/03/2017 0 0 0 0 0 0 0
13/03/2017 1 0 0 0 0 4 5
8 2 72 2 28 8 120
0.3333333 0.0833 3 0.08333 1.167 0.33333 5
Species
Sightings per night (total/days)
Total by species
SWCC [Camera Trapping Guide] 22
• CPW Photo Warehouse http://cpw.state.co.us/learn/Pages/ResearchMammalsSoftware.aspx
Images should not be deleted from an SD card until it has been checked that they have been downloaded successfully. Once all data is downloaded and checked, we make a practice of clearing all SD cards, preferably by formatting. This ensures that SD cards are working correctly and prevents full cards from being reloaded into camera traps in future deployments.
All data should also be added to national data bases. This ensures that your hard earned data will not be lost and can ???conservation science. To do this records can be submitted to DPaW https://static.dbca.wa.gov.au/pages/faunasurvey.html , can be submitted directly into data bases such as the Atlas of Living Australia https://www.ala.org.au/ or can be recorded through an app such as the GAIA mammals app. https://www.appbrain.com/app/australian-mammals/info.gaiaguide.android.app.mammals .
12 Data analyses
This is a broad, complex, varied and often a highly specialised subject that we do not have the resources to go into here in any depth. Analyses can vary from simple species and presence counts to full blown experimental designs which incorporate complex geographical and statistical models.
Preparation
Before beginning analyses, it pays to be familiar with the species that may be encountered so that you can recognise captures. Be aware that pictures are often blurred, may ? animals from unusual angles, or may only contain parts of animals, e.g. only a tail or an ear may be distinguishable. To that end, we strongly suggest that you make yourself conversant with the appearance, habitat and behaviour of those animals that you are likely to encounter during your deployment. To do this many great resources now available, e.g.:
• Atlas of Living Australia https://www.ala.org.au/
• Birdlife Australia Atlas Data http://www.birdlife.org.au/projects/atlas-and-birdata
• Naturemap https://naturemap.dpaw.wa.gov.au/
• DBCA Threatened Species database https://www.dpaw.wa.gov.au/plants-and-
animals/threatened-species-and-communities
• EPBC Protected Matters tool http://environment.gov.au/epbc/protected-matters-search-tool
and
• Field guide apps, e.g. https://www.appbrain.com/app/australian-
mammals/info.gaiaguide.android.app.mammals
• Previous surveys, reports, papers and books
Finding subjects
Being that they are often small, fast moving, camouflaged and/or partially obscured, animals are often very difficult to spot in photographs. Furthermore, the task of spotting them may be made much more difficult where we have many blanks. Despite the best of site set ups, finding a few presences amongst literally thousands of blank photographs is a time consuming and arduous activity that many of us have to face. To find animals under these circumstances we recommend a combination of slow, methodical search and quick scrolling through photographs. Scrolling quickly (about 1 frame per second) gives the impression of movement and this attracts
SWCC [Camera Trapping Guide] 23
the eye to a point of interest in the photograph. Being able to do this effectively and efficiently is a skill that is developed through practice. Because of this, and the need to make our presence counts repeatable and consistent, we apply the following rules.
• If you find your concentration slipping, stop and go for a walk. Scrolling through thousands of
photographs can be mind numbing work but a 1 second lapse in concentration may lead to
you missing a significant presence. Take regular breaks away from the computer.
• Search, don’t just look. Make a conscious effort to search photographs. Know what you are
looking for (a colour, movement or shape), where in the frame it likely to be seen and be
aware of concealment in obstacles and shadows.
• Repeat and repeat again. We all make mistakes, scrolling back through a camera output often
reveals presences previously overlooked. Even better, have somebody else go through the
camera output. Other people often see things you miss and vice versa. This is also a good way
to build skills and develop continuity within a group.
Interpreting photographs
There are different ways to record camera trap captures or photographs, some record the number of pictures of each species, other record presences, e.g. three consecutive photographs of an animal taken in a 3 photograph burst could be counted as 3 photographs or one presence. We recommend counting presences as this gives a more accurate indication of abundance, e.g. a group of animals resting or grazing in front of a camera for a protracted period can lead to an inflated indication of abundance. However, counting presences can be tricky as there are often multiple animals and subjects may be moving in and out of shot over a period of time. Because of this, and the need to make our presence counts repeatable and consistent, we apply the following rules.
• If species identification is not certain records should reflect this uncertainty, e.g. if you are
certain that the subject is Macropus fuliginosis it should be recorded as such but if the species
is uncertain then it should be recorded as M. sp. and, if appropriate, a comment added to
explain why it is entered as such.
• If an animal moves out of camera shot for 2 minutes or more before being photographed
again, would be counted as a second presence, even if it is probably the same animal.
• Where there are multiple subjects moving in and out of shot without a time interval exceeding
2 minutes, the number of presences is equal to highest number of animals, fully or partially, in
any one photograph taken during that sequence.
Note:
Finally, and once again, we emphasise that to monitor over extended periods of time without bias, a methodology (the cameras, the sites, the settings, the analyses etc.) must be repeatable. Putting equipment and staff into the field is a high resource exercise. A failure to get the best possible outcome from that exercise is at best, a wasted opportunity.
SWCC [Camera Trapping Guide] 24
13 Glossary
Absences……….……………..Where a species is not present at a site, this can be called an absence or true absence. However, as with most camera trapping deployments, if a species is not detected this cannot be accepted as proof that the species is truly absent. This is referred to as an indicated absence.
Blanks………………………….. Or empty photographs, are those taken without intended subjects. They are usually triggered by abiotic factors such as the movement of vegetation due to wind and/or high temperatures.
CWR…………………..………… Critical Weight Range, i.e. the weight range of fauna species most susceptible to fox and cat predation, given by Burbidge and McKenzie (1989) as 35 to 4,200g.
Dark Flash……………..…….. Refers to camera traps which use an infrared flash to minimise animal disturbance.
DBCA……………………………. Department of Biodiversity Conservation and Attractions
Deployment…………………. This refers to a camera trapping exercise. A repetition of a deployment for ongoing monitoring purposes. This implies, as faithfully as is possible, replicating sites, patterns, camera types and settings, seasons, baits and attractants etc.
Detection Area…………..… The area within which the camera can detect movement.
Field of View………….…….. The area the camera trap can photograph if unobstructed.
Homeothermic………..…… Species which are able to maintain and regulate their own internal body temperature (sometimes referred to as warm-blooded).
Incandescent Flash…...... Refers to camera traps which use a white flash to maximise photograph quality.
Indicated Abundance……. This is an indication of population used as a basis for measuring change where true population data cannot be determined. For example, a camera trap deployment can capture a number of presences (or sightings) of a given species. Although this number is not the actual population of that area, it can be used as a baseline for comparison with the findings of subsequent repetitions of that deployment. This comparison can indicate if populations are stable, increasing or declining.
Low Glow…………………….. Refers to camera traps which use an algorithm to combine both dark and incandescent flash to minimise disturbance and maximise image resolution.
PIR……………………………….. Passive Infrared.
Poikilothermic……………… Species whose internal body temperature varies significantly in response to variations in ambient temperature (formerly referred to as cold-blooded).
Population…………..……….. The actual number of a given species within a nominated area. This can only be determined where individual animals can be recognised. This is not to be confused with indicated abundance.

SWCC [Camera Trapping Guide] 25
Trap days/nights……….…. The total number of days (or nights depending on if you are monitoring only during night hours) that camera traps are deployed multiplied by the number of camera traps used, e.g. 30 camera traps deployed for fourteen days would equal 420 trap days/nights (if all traps remained functional for all fourteen days).
Trigger speed……………….. The time difference between when a subject enters the sensor range and when the first photograph is taken.
SWCC [Camera Trapping Guide] 26
14 Bibliography
Ahumada, J.A., Hurtado, J. & Lizcano, D. (2013) Monitoring the status and trends of tropical
forest terrestrial vertebrate communities from camera trap data: a tool for conservation.
PloS one, 8, e73707.
Ahumada, J.A., Silva, C.E., Gajapersad, K., Hallam, C., Hurtado, J., Martin, E., McWilliam,
A., Mugerwa, B., O'Brien, T. & Rovero, F. (2011) Community structure and diversity
of tropical forest mammals: data from a global camera trap network. Philosophical
Transactions of the Royal Society B: Biological Sciences, 366, 2703-2711.
Burbidge, A.A. & McKenzie, N. (1989) Patterns in the modern decline of Western Australia's
vertebrate fauna: causes and conservation implications. Biological conservation, 50,
143-198.
Comer, S., Speldewinde, P., Tiller, C., Clausen, L., Pinder, J., Cowen, S. & Algar, D. (2018)
Evaluating the efficacy of a landscape scale feral cat control program using camera
traps and occupancy models. Scientific reports, 8, 5335.
Foster, R.J. & Harmsen, B.J. (2012) A critique of density estimation from camera‐trap data.
The Journal of Wildlife Management, 76, 224-236.
Gillespie, G., Brennan, K., Gentles, T., Hill, B., Low Choy, J., Mahney, T., Stevens, A. &
Stokeld, D. (2015) A guide for the use of remote cameras for wildlife survey in northern
Australia. National Environmental Research Program, Northern Australia Hub,
Charles Darwin University.
Hobbs, M.T. & Brehme, C.S. (2017) An improved camera trap for amphibians, reptiles, small
mammals, and large invertebrates. PloS one, 12, e0185026.
Meek, P.D., Ballard, G.-A. & Fleming, P.J.S. (2015) The pitfalls of wildlife camera trapping as
a survey tool in Australia. Australian Mammalogy, 37, 13-22.
Molloy, S.W. (2018) Bringing Them Back: Learning from past strategic restoration programs
in the southern West Australian Wheatbelt. Research Gate.
https://www.researchgate.net/project/Bringing-Them-Back-Learning-from-past-
strategic-restoration-programs-in-the-southern-West-Australian-Wheatbelt [accessed
3/04/2018
Newey, S., Davidson, P., Nazir, S., Fairhurst, G., Verdicchio, F., Irvine, R.J. & van der Wal, R.
(2015) Limitations of recreational camera traps for wildlife management and
conservation research: A practitioner’s perspective. Ambio, 44, 624-635.
Smit, J., Pozo, R.A., Cusack, J.J., Nowak, K. & Jones, T. (2017) Using camera traps to study
the age–sex structure and behaviour of crop-using elephants Loxodonta africana in
Udzungwa Mountains National Park, Tanzania. Oryx, 1-9.
Stojanovic, D., Webb, M.H., Alderman, R., Porfirio, L.L. & Heinsohn, R. (2014) Discovery of
a novel predator reveals extreme but highly variable mortality for an endangered
migratory bird. Diversity and Distributions, 20, 1200-1207.

SWCC [Camera Trapping Guide] 27
Suwanrat, S., Ngoprasert, D., Sutherland, C., Suwanwaree, P. & Savini, T. (2015) Estimating
density of secretive terrestrial birds (Siamese fireback) in pristine and degraded forest
using camera traps and distance sampling. Global Ecology and Conservation, 3, 596-
606.
Thomas, N. & Cowan, M. (2016) Assessment of Camera Traps to detect mammals. Department
of Biodiversity Conservation and Attractions.
https://www.dpaw.wa.gov.au/images/documents/about/science/pubs/infosheets/sdis087.
pdf [accessed 28/03/2018
Wayne, A.F., Maxwell, M.A., Ward, C.G., Vellios, C.V., Wilson, I.J. & Dawson, K.E. (2013)
Woylie Conservation and Research Project: Progress Report 2010–2013. Department of
Parks and Wildlife, Perth.

SWCC [Camera Trapping Guide] 28
15 Appendix 1. DBCA camera trapping site sheet
View publication statsView publication stats


![[SEKE 2014] Practical Human Resource Allocation in Software Projects Using Genetic Algorithm](https://img.pdfslide.us/doc/110x75/558d337cd8b42a3c678b462f/seke-2014-practical-human-resource-allocation-in-software-projects-using-genetic-algorithm.jpg)