Embed Size (px)
Citation preview

IMPROPER INSTALLATION OR DOOR POSITION CAN RESULT IN SERIOUS INJURY OR DEATH. READ AND UNDERSTAND ALL INSTRUCTIONS BEFORE YOU BEGIN WORK. Wear safety goggles. Unplug power door operator and remove the opener travel arm from the door FIRST. Do
not remove more than one part at a time. Do not attempt to raise or lower the door without all components installed securely. This hardware is intended for residential
garage doors only. Springs and attached hardware are under extreme tension at all times. All tension must be released SAFELY from the springs before any work is
performed on the springs, door sections or hardware. If you do not completely understand the installation instructions or are unsure if the replacement component
matches the part being replaced – contact a professional installer.
TORSION SPRINGS CAN BE VERY DANGEROUS IF THEY ARE IMPROPERLY INSTALLED OR MISHANDLED. DO NOT attempt to
install them yourself unless 1) you have the proper tools and reasonable mechanical aptitude or experience and 2) you follow enclosed instructions very
carefully. Professional installation is recommended.
Residential Garage Door
WARNING
REPLACEMENT SPRING INFORMATION
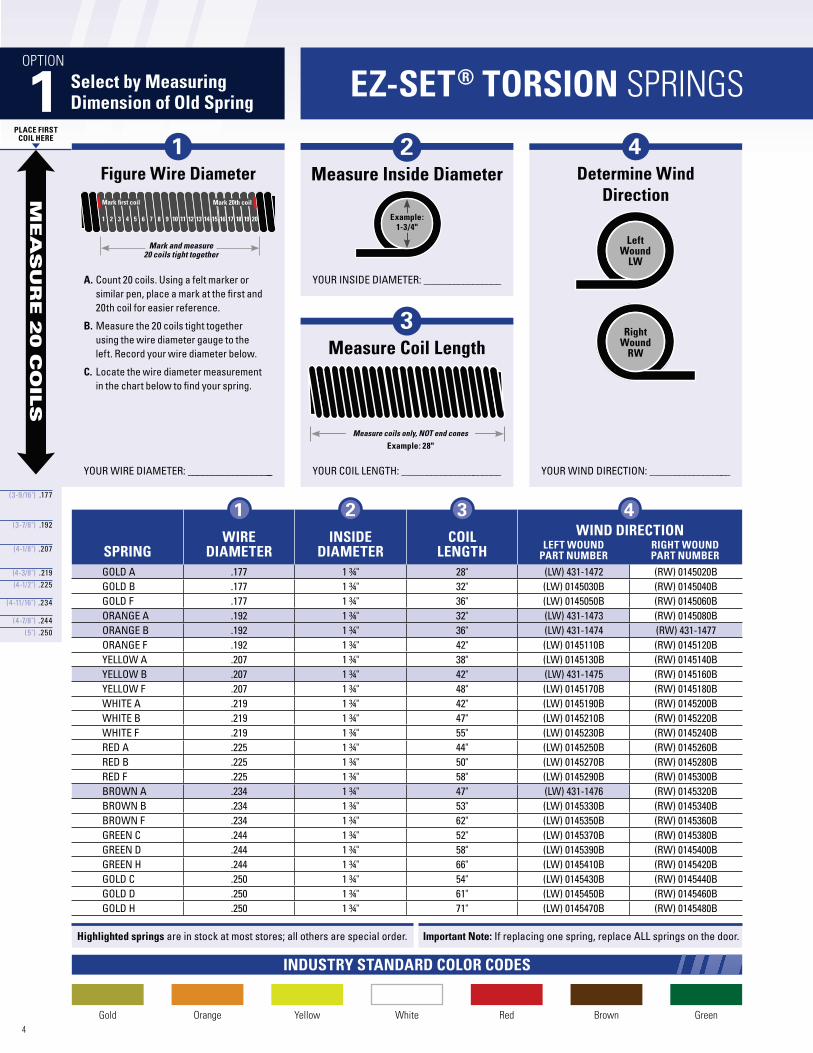
EZ-SET® TORSION SPRINGS
STANDARD TORSION SPRINGS EXTENSION SPRINGS
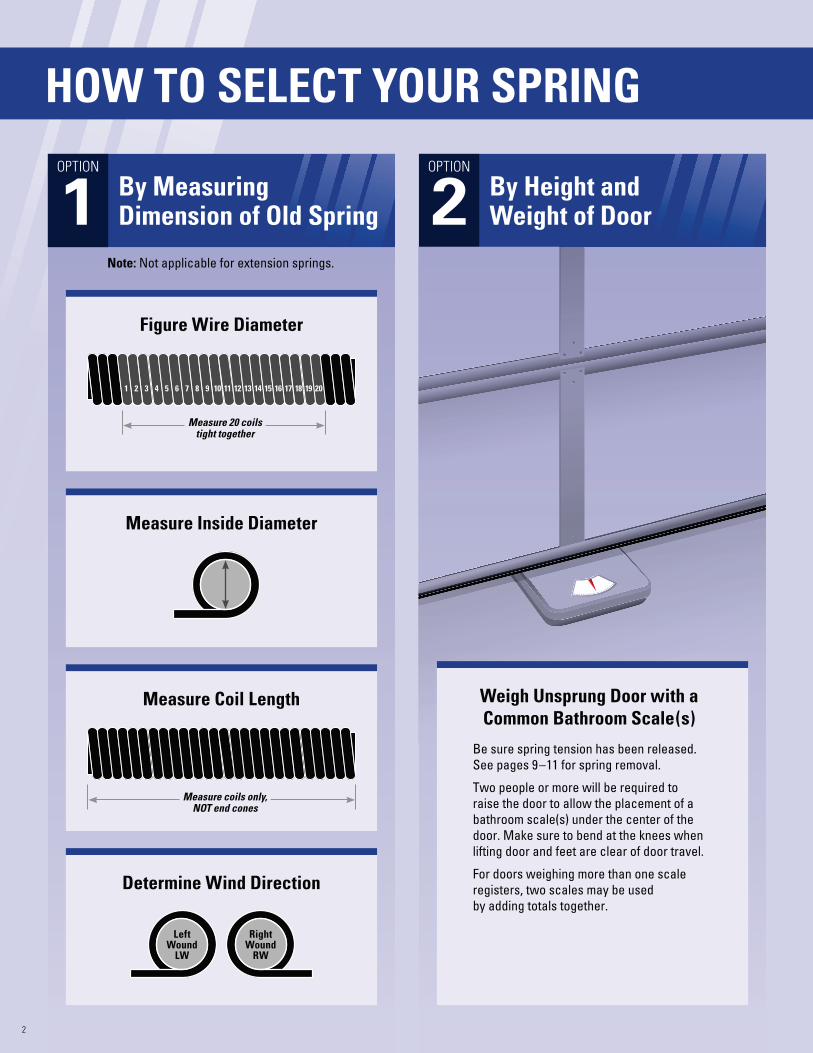
HOW TO SELECT YOUR SPRING
Determine Wind Direction
Left Wound
LW
Right Wound
RW
Measure Inside Diameter
Figure Wire Diameter
Measure Coil Length
2
Note: Not applicable for extension springs.
By Measuring Dimension of Old Spring
By Height and Weight of Door21
OPTION OPTION
Be sure spring tension has been released.
See pages 9–11 for spring removal.
Two people or more will be required to
raise the door to allow the placement of a
bathroom scale(s) under the center of the
door. Make sure to bend at the knees when
lifting door and feet are clear of door travel.
For doors weighing more than one scale
registers, two scales may be used
by adding totals together.
Weigh Unsprung Door with a Common Bathroom Scale(s)
Measure 20 coils tight together
1 2 3 4 5 6 7 8 9 10 11 12 13 14 15 16 17 18 19 20
Measure coils only, NOT end cones
FREQUENTLY
ASKED QUESTIONS
Q: Should both springs be replaced if only one is broken?
A: Yes. If one spring broke, the other will likely
break soon. The amount of work to replace two springs
at the same time is a lot less than changing them out
at different times.
Q: How important is it to be accurate when determining your replacement spring?
A: It is very important to be accurate. A garage
door torsion spring system requires specific spring(s)
based on the height and weight of the door. When the
door is in the up position, it is important that the spring
still has a couple of winds remaining. This ensures that
the cables still have a small amount of tension, thus
keeping them from falling off the drums. Plus, if your
spring is too strong or too weak, it will be very hard to
raise and lower the door.
Q: The door has only one torsion spring mounted. What lifts the other side of the door?
A: The energy from winding the spring is transferred
to the torsion tube, which disperses equal lifting power
to both sides.
Q: Do both springs on the right and left need to be the same?
A: Extension spring systems do need to have the
same springs on both sides of the door, but this may
not be the case for torsion springs. See the expanded
explanation about torsion springs on this page
(“IMPORTANT NOTE: Left and Right Torsion Springs
May Not Match”).
IMPORTANT NOTE:
Left and Right Torsion Springs May Not Match
EZ-SET® Torsion and Standard Torsion systems use a torsion tube that disperses equal lifting power to both sides evenly. The
energy from the wound spring(s) is combined
and transferred to the torsion tube. The torsion
tube, however, doesn’t know the length of the
left or right springs, or if there are one or two
springs (nor does it need to). It responds only
to the amount of energy applied to the tube
that, in turn, lifts both sides equally.
Many different combinations of springs are
needed for the exact height and weight of
every possible door. Therefore, it is only a
coincidence if both sides have matching
springs; it is more likely that they wouldn’t
match. Some doors may have only one spring.
3
If it is an Ideal Door®
and the model number is known,
then use the grid shown on
the spring-specific pages.
*Standard track radius installation.
Left Wound (LW)* Torsion SpringRight Wound (RW)* Torsion Spring
The combined energy from both springs is dispersed
equally through the torsion tube, resulting in equal lift
By Model and Size of Door3
OPTION
4
Gold YellowOrange
INDUSTRY STANDARD COLOR CODES
Red GreenWhite Brown
Important Note: If replacing one spring, replace ALL springs on the door.
GOLD A .177 1 ¾" 28" (LW) 431-1472 (RW) 0145020B
GOLD B .177 1 ¾" 32" (LW) 0145030B (RW) 0145040B
GOLD F .177 1 ¾" 36" (LW) 0145050B (RW) 0145060B
ORANGE A .192 1 ¾" 32" (LW) 431-1473 (RW) 0145080B
ORANGE B .192 1 ¾" 36" (LW) 431-1474 (RW) 431-1477
ORANGE F .192 1 ¾" 42" (LW) 0145110B (RW) 0145120B
YELLOW A .207 1 ¾" 38" (LW) 0145130B (RW) 0145140B
YELLOW B .207 1 ¾" 42" (LW) 431-1475 (RW) 0145160B
YELLOW F .207 1 ¾" 48" (LW) 0145170B (RW) 0145180B
WHITE A .219 1 ¾" 42" (LW) 0145190B (RW) 0145200B
WHITE B .219 1 ¾" 47" (LW) 0145210B (RW) 0145220B
WHITE F .219 1 ¾" 55" (LW) 0145230B (RW) 0145240B
RED A .225 1 ¾" 44" (LW) 0145250B (RW) 0145260B
RED B .225 1 ¾" 50" (LW) 0145270B (RW) 0145280B
RED F .225 1 ¾" 58" (LW) 0145290B (RW) 0145300B
BROWN A .234 1 ¾" 47" (LW) 431-1476 (RW) 0145320B
BROWN B .234 1 ¾" 53" (LW) 0145330B (RW) 0145340B
BROWN F .234 1 ¾" 62" (LW) 0145350B (RW) 0145360B
GREEN C .244 1 ¾" 52" (LW) 0145370B (RW) 0145380B
GREEN D .244 1 ¾" 58" (LW) 0145390B (RW) 0145400B
GREEN H .244 1 ¾" 66" (LW) 0145410B (RW) 0145420B
GOLD C .250 1 ¾" 54" (LW) 0145430B (RW) 0145440B
GOLD D .250 1 ¾" 61" (LW) 0145450B (RW) 0145460B
GOLD H .250 1 ¾" 71" (LW) 0145470B (RW) 0145480B
SPRINGWIRE
DIAMETERINSIDE
DIAMETERCOIL
LENGTHLEFT WOUND
PART NUMBERRIGHT WOUND PART NUMBER
1 2 3 4
WIND DIRECTION
Highlighted springs are in stock at most stores; all others are special order.
Left Wound
LW
Right Wound
RW
Measure Inside Diameter
Measure Coil Length
2
3
Determine Wind Direction
4
YOUR INSIDE DIAMETER: ________________
YOUR COIL LENGTH: _____________________ YOUR WIND DIRECTION: _________________
Example: 1-3/4"
Example: 28"
Measure coils only, NOT end cones
EZ-SET® TORSION SPRINGS
A. Count 20 coils. Using a felt marker or
similar pen, place a mark at the first and
20th coil for easier reference.
B. Measure the 20 coils tight together
using the wire diameter gauge to the
left. Record your wire diameter below.
C. Locate the wire diameter measurement
in the chart below to find your spring.
YOUR WIRE DIAMETER: __________________
Figure Wire Diameter
1
1OPTION
Select by Measuring Dimension of Old Spring
Mark and measure 20 coils tight together
1 2
Mark first coil Mark 20th coil
3 4 5 6 7 8 9 10 11 12 13 14 15 16 17 18 19 20
PLACE FIRST COIL HERE
.177(3-9/16")
.192(3-7/8")
.207(4-1/8")
.219(4-3/8")
.225(4-1/2")
.244(4-7/8")
.250(5")
.234(4-11/16")
ME
AS
UR
E 2
0 C
OILS
5
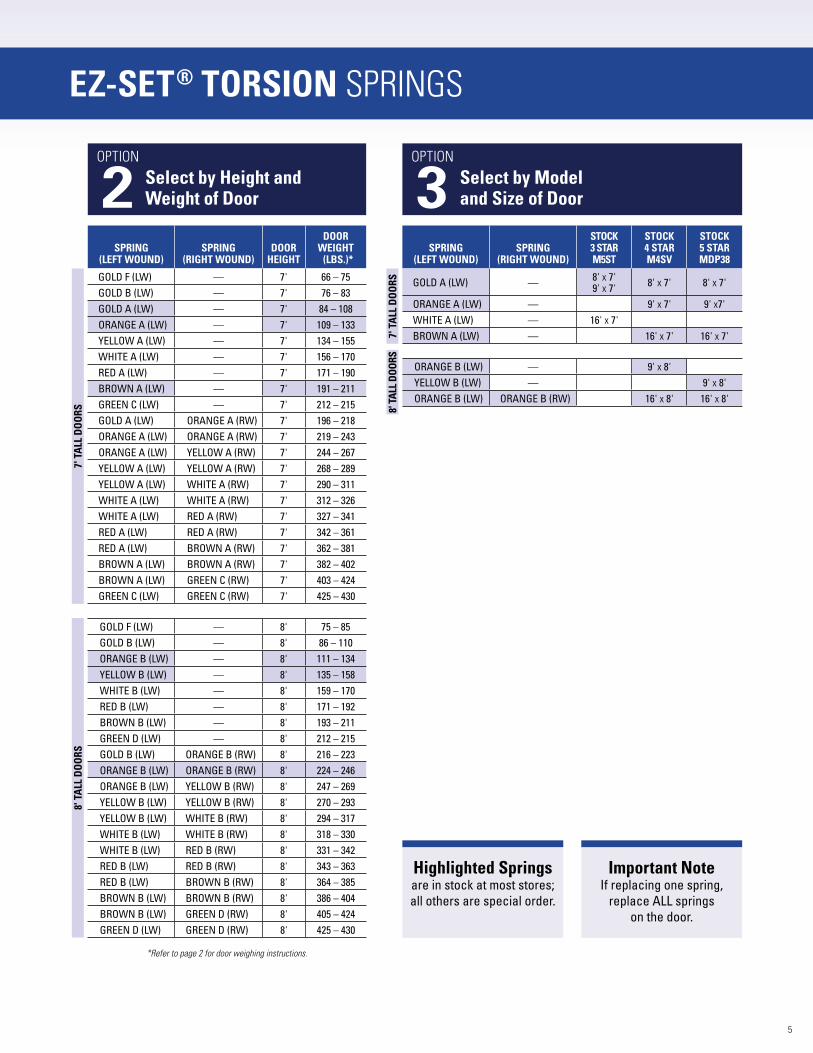
*Refer to page 2 for door weighing instructions.
ORANGE B (LW) — 9' X 8'
YELLOW B (LW) — 9' X 8'
ORANGE B (LW) ORANGE B (RW) 16' X 8' 16' X 8'
SPRING (LEFT WOUND)
SPRING (RIGHT WOUND)
STOCK 3 STAR M5ST
STOCK 4 STAR M4SV
STOCK 5 STAR MDP38
GOLD A (LW) —8' X 7'
9' X 7'8' X 7' 8' X 7'
ORANGE A (LW) — 9' X 7' 9' X7'
WHITE A (LW) — 16' X 7'
BROWN A (LW) — 16' X 7' 16' X 7'
EZ-SET® TORSION SPRINGS
2OPTION
Select by Height and Weight of Door 3
OPTION
Select by Model and Size of Door
SPRING (LEFT WOUND)
SPRING (RIGHT WOUND)
DOOR HEIGHT
DOOR WEIGHT (LBS.)*
GOLD F (LW) — 7' 66 – 75
GOLD B (LW) — 7' 76 – 83
GOLD A (LW) — 7' 84 – 108
ORANGE A (LW) — 7' 109 – 133
YELLOW A (LW) — 7' 134 – 155
WHITE A (LW) — 7' 156 – 170
RED A (LW) — 7' 171 – 190
BROWN A (LW) — 7' 191 – 211
GREEN C (LW) — 7' 212 – 215
GOLD A (LW) ORANGE A (RW) 7' 196 – 218
ORANGE A (LW) ORANGE A (RW) 7' 219 – 243
ORANGE A (LW) YELLOW A (RW) 7' 244 – 267
YELLOW A (LW) YELLOW A (RW) 7' 268 – 289
YELLOW A (LW) WHITE A (RW) 7' 290 – 311
WHITE A (LW) WHITE A (RW) 7' 312 – 326
WHITE A (LW) RED A (RW) 7' 327 – 341
RED A (LW) RED A (RW) 7' 342 – 361
RED A (LW) BROWN A (RW) 7' 362 – 381
BROWN A (LW) BROWN A (RW) 7' 382 – 402
BROWN A (LW) GREEN C (RW) 7' 403 – 424
GREEN C (LW) GREEN C (RW) 7' 425 – 430
7' T
ALL
DO
OR
S
GOLD F (LW) — 8' 75 – 85
GOLD B (LW) — 8' 86 – 110
ORANGE B (LW) — 8' 111 – 134
YELLOW B (LW) — 8' 135 – 158
WHITE B (LW) — 8' 159 – 170
RED B (LW) — 8' 171 – 192
BROWN B (LW) — 8' 193 – 211
GREEN D (LW) — 8' 212 – 215
GOLD B (LW) ORANGE B (RW) 8' 216 – 223
ORANGE B (LW) ORANGE B (RW) 8' 224 – 246
ORANGE B (LW) YELLOW B (RW) 8' 247 – 269
YELLOW B (LW) YELLOW B (RW) 8' 270 – 293
YELLOW B (LW) WHITE B (RW) 8' 294 – 317
WHITE B (LW) WHITE B (RW) 8' 318 – 330
WHITE B (LW) RED B (RW) 8' 331 – 342
RED B (LW) RED B (RW) 8' 343 – 363
RED B (LW) BROWN B (RW) 8' 364 – 385
BROWN B (LW) BROWN B (RW) 8' 386 – 404
BROWN B (LW) GREEN D (RW) 8' 405 – 424
GREEN D (LW) GREEN D (RW) 8' 425 – 430
8' T
ALL
DO
OR
S
7' T
ALL
DO
OR
S8'
TA
LL D
OO
RS
Highlighted Springs are in stock at most stores;
all others are special order.
Important Note If replacing one spring,
replace ALL springs
on the door.

SPRINGWIRE
DIAMETERINSIDE
DIAMETERCOIL
LENGTH
WIND DIRECTION
#1 ORANGE .192 2" 16 ½" (LW) 7000151B (RW) 431-1492
#2 ORANGE .192 2" 18 ½" (LW) 7000153B (RW) 431-1494
#3 ORANGE .192 2" 20 ½" (LW) 7000155B (RW) 7000156B
#10 ORANGE .192 2" 22" (LW) 7000241B (RW) 7000242B
#11 ORANGE .192 2" 24" (LW) 7000243B (RW) 7000244B
#12 ORANGE .192 2" 26 ½" (LW) 7000112B (RW) 7000095B
#1 YELLOW .207 2" 19 ½" (LW) 431-1484 (RW) 7000158B
#2 YELLOW .207 2" 21 ½" (LW) 431-1490 (RW) 431-1495
#3 YELLOW .207 2" 24" (LW) 7000161B (RW) 7000162B
#4 YELLOW .207 2" 26 ½" (LW) 7000163B (RW) 7000164B
#5 YELLOW .207 2" 31" (LW) 7000113B (RW) 7000114B
#1 WHITE .218 2" 22" (LW) 431-1483 (RW) 431-1493
#2 WHITE .218 2" 24 ½" (LW) 431-1489 (RW) 7000168B
#3 WHITE .218 2" 27" (LW) 7000169B (RW) 7000170B
#4 WHITE .218 2" 29 ½" (LW) 7000171B (RW) 7000172B
#10 WHITE .218 2" 35" (LW) 7000115B (RW) 7000116B
#1 RED .225 2" 23 ½" (LW) 431-1482 (RW) 7000174B
#2 RED .225 2" 26" (LW) 431-1488 (RW) 7000176B
#3 RED .225 2" 29" (LW) 7000177B (RW) 7000178B
#4 RED .225 2" 31 ½" (LW) 7000179B (RW) 7000180B
#5 RED .225 2" 37" (LW) 7000117B (RW) 7000118B
#1 BROWN .234 2" 25" (LW) 431-1480 (RW) 431-1491
#2 BROWN .234 2" 28" (LW) 431-1486 (RW) 7000184B
#3 BROWN .234 2" 31" (LW) 7000185B (RW) 7000186B
#4 BROWN .234 2" 34" (LW) 7000187B (RW) 7000188B
#7 BROWN .234 2" 40" (LW) 7000119B (RW) 7000120B
#1 GREEN .243 2" 27 ½" (LW) 431-1481 (RW) 7000190B
#2 GREEN .243 2" 30 ½" (LW) 431-1487 (RW) 7000192B
#3 GREEN .243 2" 34" (LW) 7000193B (RW) 7000194B
#4 GREEN .243 2" 37" (LW) 7000195B (RW) 7000196B
#5 GREEN .243 2" 43 ½" (LW) 7000096B (RW) 7000097B
#1 GOLD .250 2" 29" (LW) 7000197B (RW) 7000198B
#2 GOLD .250 2" 32" (LW) 7000199B (RW) 7000200B
#3 GOLD .250 2" 35 ½" (LW) 7000201B (RW) 7000202B
#4 GOLD .250 2" 39" (LW) 7000203B (RW) 7000204B
#5 GOLD .250 2" 46" (LW) 7000121B (RW) 7000122B
#6 GOLD .250 2.62" 36" (LW) 7000129B (RW) 7000130B
#1 BLUE .262 2" 32" (LW) 7000205B (RW) 7000206B
#2 BLUE .262 2" 35 ½" (LW) 431-1485 (RW) 7000208B
#3 BLUE .262 2" 39" (LW) 7000209B (RW) 7000210B
#4 BLUE .262 2" 43" (LW) 7000211B (RW) 7000212B
#5 BLUE .262 2.62" 40" (LW) 7000098B (RW) 7000099B
#4 ORANGE .273 2" 34 ½" (LW) 7000213B (RW) 7000214B
#5 ORANGE .273 2" 38" (LW) 7000215B (RW) 7000216B
#6 ORANGE .273 2" 43" (LW) 7000217B (RW) 7000218B
#7 ORANGE .273 2" 40" (LW) 7000219B (RW) 7000220B
#8 ORANGE .273 2" 47" (LW) 7000221B (RW) 7000222B
#9 ORANGE .273 2.62" 43 ½" (LW) 7000100B (RW) 7000101B
#3 LT. BLUE .283 2.62" 37" (LW) 7000102B (RW) 7000103B
#4 LT. BLUE .283 2.62" 40" (LW) 7000104B (RW) 7000105B
#5 LT. BLUE .283 2.62" 47" (LW) 7000106B (RW) 7000107B
#7 WHITE .295 2.62" 40" (LW) 7000123B (RW) 7000124B
#8 WHITE .295 2.62" 44" (LW) 7000108B (RW) 7000109B
#9 WHITE .295 2.62" 51" (LW) 7000125B (RW) 7000126B
#8 BROWN .306 2.62" 55" (LW) 7000110B (RW) 7000111B
#6 GREEN .319 2.62" 40 ½" (LW) 7000127B (RW) 7000128B
LEFT WOUND PART NUMBER
RIGHT WOUND PART NUMBER
1 2 3 4
6
2
YOUR INSIDE DIAMETER: ______________________
Measure Inside Diameter
Example: 2"
Left Wound
LW
Right Wound
RW
Determine Wind Direction
4
YOUR WIND DIRECTION: _______________________________
Measure Coil Length
3
YOUR COIL LENGTH: ___________________________________
Example: 26"
Measure coils only, NOT end cones
INDUSTRY STANDARD COLOR CODES
Red
GoldGreen
BrownWhiteYellowOrange
Blue Light Blue
STANDARD TORSION SPRINGS
Highlighted springs are in stock at most stores; all others are special order.
Important Note: If replacing one spring, replace ALL springs on the door.
1OPTION
Select by Measuring Dimension of Old Spring
A. Count 20 coils. Using a felt marker or
similar pen, place a mark at the first and
20th coil for easier reference.
B. Measure the 20 coils tight together
using the wire diameter gauge to the
left. Record your wire diameter below.
C. Locate the wire diameter measurement
in the chart below to find your spring.
Figure Wire Diameter
1
Mark and measure 20 coils tight together
1 2 3 4 5 6 7 8 9 10 11 12 13 14 15 16 17 18 19 20
PLACE FIRST COIL HERE
ME
AS
UR
E 2
0 C
OILS
YOUR WIRE DIAMETER: __________________
Mark first coil Mark 20th coil
.192(3-7/8")
.207(4-1/8")
.218(4-3/8")
.225(4-1/2")
.243(4-7/8")
.250(5")
.262(5-1/4")
.275(5-1/2")
.283(5-11/16")
.295(5-7/8")
.306(6-1/8")
.319(6-3/8")
.234(4-11/16")
7
STANDARD TORSION SPRINGS
#11 ORANGE (LW) — 8' 58 – 63#10 ORANGE (LW) — 8' 64 – 68#3 ORANGE (LW) — 8' 69 – 76#2 ORANGE (LW) — 8' 77 – 84#3 YELLOW (LW) — 8' 85 – 94#2 YELLOW (LW) — 8' 95 – 97#3 WHITE (LW) — 8' 98 – 108#2 WHITE (LW) — 8' 109 – 117#2 RED (LW) — 8' 118 – 131#2 BROWN (LW) — 8' 132 – 142#3 GOLD (LW) — 8' 143 – 146#2 GREEN (LW) — 8' 147 – 158#2 GOLD (LW) — 8' 159 – 163#3 BLUE (LW) — 8' 164 – 170#2 YELLOW (LW) #2 ORANGE (RW) 8' 171 – 184#2 WHITE (LW) #2 ORANGE (RW) 8' 185 – 193#2 RED (LW) #2 ORANGE (RW) 8' 194 – 202#2 WHITE (LW) #2 YELLOW (RW) 8' 203 – 211#2 RED (LW) #2 YELLOW (RW) 8' 212 – 216#2 WHITE (LW) #2 WHITE (RW) 8' 217 – 225#2 BROWN (LW) #2 YELLOW (RW) 8' 226 – 234#2 RED (LW) #2 RED (RW) 8' 235 – 239#2 BROWN (LW) #2 WHITE (RW) 8' 240 – 248#2 BROWN (LW) #2 RED (RW) 8' 249 – 255#2 GREEN (LW) #2 WHITE (RW) 8' 256 – 264#2 GREEN (LW) #2 RED (RW) 8' 265 – 275#2 GOLD (LW) #2 RED (RW) 8' 276 – 289#2 BROWN (LW) #2 GOLD (RW) 8' 290 – 298#2 RED (LW) #2 BLUE (RW) 8' 299 – 304#2 GREEN (LW) #2 GOLD (RW) 8' 305 – 316#2 GOLD (LW) #2 GOLD (RW) 8' 317 – 327#2 GREEN (LW) #2 BLUE (RW) 8' 328 – 338#2 GOLD (LW) #2 BLUE (RW) 8' 339 – 351#2 GREEN (LW) #5 ORANGE (RW) 8' 352 – 362#2 GOLD (LW) #5 ORANGE (RW) 8' 363 – 385#2 BLUE (LW) #5 ORANGE (RW) 8' 386 – 408#5 ORANGE (LW) #5 ORANGE (RW) 8' 409 – 415#8 BROWN (LW) #7 WHITE (RW) 8' 416 – 418#3 LT. BLUE (LW) #7 WHITE (RW) 8' 419 – 423#8 WHITE (LW) #7 WHITE (RW) 8' 424 – 444#7 WHITE (LW) #7 WHITE (RW) 8' 445 – 465
SPRING (LEFT WOUND)
SPRING (RIGHT WOUND)
DOOR HEIGHT
DOOR WEIGHT (LBS.)*
#11 ORANGE (LW) — 7' 52 – 56#10 ORANGE (LW) — 7' 57 – 61#3 ORANGE (LW) — 7' 62 – 68#2 ORANGE (LW) — 7' 69 – 77#1 ORANGE (LW) — 7' 78 – 84#2 YELLOW (LW) — 7' 85 – 93#1 YELLOW (LW) — 7' 94 – 105#2 RED (LW) — 7' 106 – 108#1 WHITE (LW) — 7' 109 – 118#1 RED (LW) — 7' 119 – 132#1 BROWN (LW) — 7' 133 – 146#1 GREEN (LW) — 7' 147 – 157#1 GOLD (LW) — 7' 158 – 162#2 BLUE (LW) — 7' 163 – 170#1 YELLOW (LW) #1 ORANGE (RW) 7' 171 – 185#1 WHITE (LW) #1 ORANGE (RW) 7' 186 – 196#1 RED (LW) #1 ORANGE (RW) 7' 197 – 202#1 YELLOW (LW) #1 WHITE (RW) 7' 203 – 209#1 BROWN (LW) #1 ORANGE (RW) 7' 210 – 216#1 WHITE (LW) #1 WHITE (RW) 7' 217 – 227#1 RED (LW) #1 WHITE (RW) 7' 228 – 241#1 BROWN (LW) #1 WHITE (RW) 7' 242 – 251#1 RED (LW) #1 BROWN (RW) 7' 252 – 255#1 GREEN (LW) #1 WHITE (RW) 7' 256 – 265#1 BROWN (LW) #1 BROWN (RW) 7' 266 – 276#1 RED (LW) B #1 GOLD (RW) 7' 277 – 279#1 GREEN (LW) #1 BROWN (RW) 7' 280 – 289#1 BROWN (LW) #1 GOLD (RW) 7' 290 – 299#1 RED (LW) B #1 BLUE (RW) 7' 300 – 304#1 GREEN (LW) #1 GOLD (RW) 7' 305 – 314#1 GOLD (LW) #1 GOLD (RW) 7' 315 – 327#1 GREEN (LW) #1 BLUE (RW) 7' 328 – 337#1 GOLD (LW) #1 BLUE (RW) 7' 338 – 349#1 GREEN (LW) #4 ORANGE (RW) 7' 350 – 359#1 GOLD (LW) #4 ORANGE (RW) 7' 360 – 383#1 BLUE (LW) #4 ORANGE (RW) 7' 384 – 404#4 ORANGE (LW) #4 ORANGE (RW) 7' 405 – 417#9 ORANGE (LW) #6 GREEN (RW) 7' 418 – 429#5 LT. BLUE (LW) #6 GREEN (RW) 7' 430 – 447#9 WHITE (LW) #6 GREEN (RW) 7' 448 – 454#4 LT. BLUE (LW) #6 GREEN (RW) 7' 455 – 465#8 BROWN (LW) #6 GREEN (RW) 7' 466 – 468#3 LT. BLUE (LW) #6 GREEN (RW) 7' 469 – 472
*Refer to page 2 for door weighing instructions.
2OPTION
Select by Height and Weight of Door 3
Select by Model and Size of Door
7' T
ALL
DO
OR
S8'
TA
LL D
OO
RS
SPRING (LEFT WOUND)
SPRING (RIGHT WOUND)
STOCK 3 STAR M5ST
STOCK 4 STAR M4SV
STOCK 5 STAR MDP38
#2 YELLOW (LW) —8' X 7' 9' X 7'
#1 YELLOW (LW) — 8' X 7'
#2 RED (LW) — 8' X 7'
#1 WHITE (LW) — 9' X 7' 9' X 7'
#2 BLUE (LW) — 16' X 7'
#1 WHITE (LW) #1 ORANGE (RW) 16' X 7'
#1 YELLOW (LW) #1 WHITE (RW) 16' X 7'7'
TA
LL D
OO
RS
#2 RED (LW) — 9' X 8'
#2 BROWN (LW) — 9' X 8'
#2 BROWN (LW) #2 YELLOW (RW) 16' X 8'
#2 RED (LW) #2 RED (RW) 16' X 8'8' T
ALL
DO
OR
S
Highlighted Springs are in stock at most stores;
all others are special order.
Important Note If replacing one spring,
replace ALL springs
on the door.
OPTION
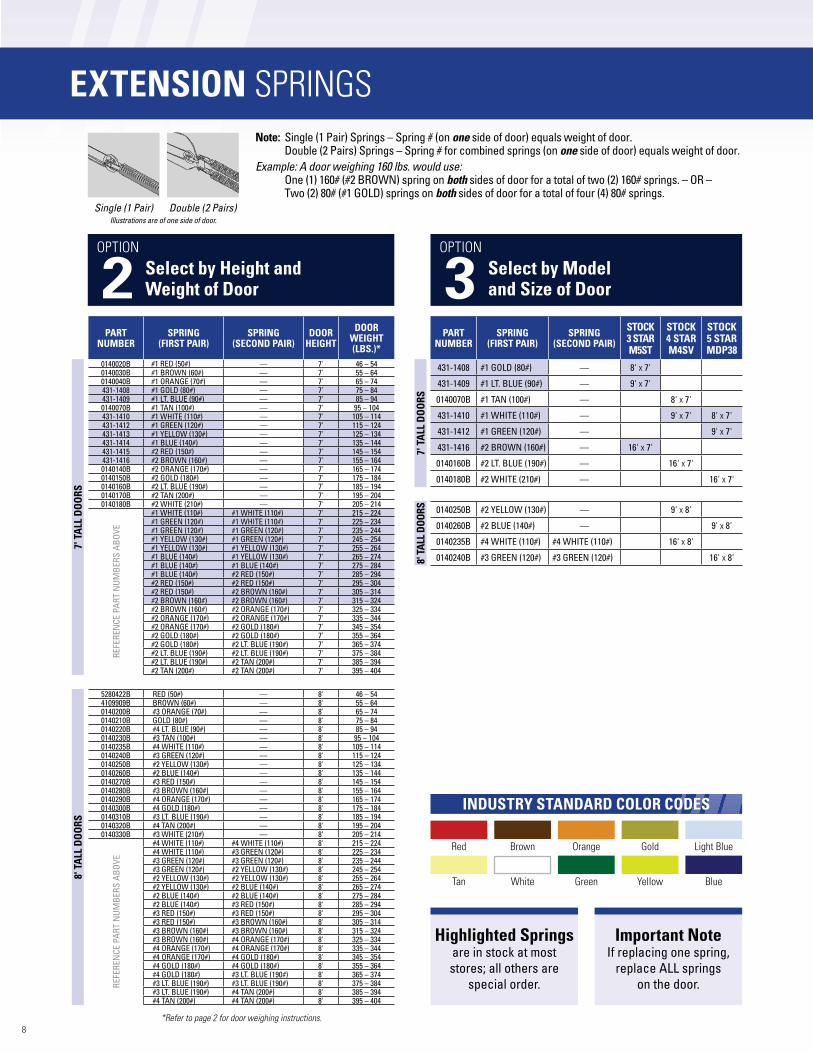
EXTENSION SPRINGS
8
5280422B RED (50#) — 8' 46 – 544109909B BROWN (60#) — 8' 55 – 640140200B #3 ORANGE (70#) — 8' 65 – 740140210B GOLD (80#) — 8' 75 – 840140220B #4 LT. BLUE (90#) — 8' 85 – 940140230B #3 TAN (100#) — 8' 95 – 1040140235B #4 WHITE (110#) — 8' 105 – 1140140240B #3 GREEN (120#) — 8' 115 – 1240140250B #2 YELLOW (130#) — 8' 125 – 1340140260B #2 BLUE (140#) — 8' 135 – 1440140270B #3 RED (150#) — 8' 145 – 1540140280B #3 BROWN (160#) — 8' 155 – 1640140290B #4 ORANGE (170#) — 8' 165 – 1740140300B #4 GOLD (180#) — 8' 175 – 1840140310B #3 LT. BLUE (190#) — 8' 185 – 1940140320B #4 TAN (200#) — 8' 195 – 2040140330B #3 WHITE (210#) — 8' 205 – 214
RE
FER
EN
CE
PA
RT
NU
MB
ER
S A
BO
VE
#4 WHITE (110#) #4 WHITE (110#) 8' 215 – 224#4 WHITE (110#) #3 GREEN (120#) 8' 225 – 234#3 GREEN (120#) #3 GREEN (120#) 8' 235 – 244#3 GREEN (120#) #2 YELLOW (130#) 8' 245 – 254#2 YELLOW (130#) #2 YELLOW (130#) 8' 255 – 264#2 YELLOW (130#) #2 BLUE (140#) 8' 265 – 274#2 BLUE (140#) #2 BLUE (140#) 8' 275 – 284#2 BLUE (140#) #3 RED (150#) 8' 285 – 294#3 RED (150#) #3 RED (150#) 8' 295 – 304#3 RED (150#) #3 BROWN (160#) 8' 305 – 314#3 BROWN (160#) #3 BROWN (160#) 8' 315 – 324#3 BROWN (160#) #4 ORANGE (170#) 8' 325 – 334#4 ORANGE (170#) #4 ORANGE (170#) 8' 335 – 344#4 ORANGE (170#) #4 GOLD (180#) 8' 345 – 354#4 GOLD (180#) #4 GOLD (180#) 8' 355 – 364#4 GOLD (180#) #3 LT. BLUE (190#) 8' 365 – 374#3 LT. BLUE (190#) #3 LT. BLUE (190#) 8' 375 – 384#3 LT. BLUE (190#) #4 TAN (200#) 8' 385 – 394#4 TAN (200#) #4 TAN (200#) 8' 395 – 404
PART NUMBER
SPRING (FIRST PAIR)
SPRING (SECOND PAIR)
STOCK 3 STAR M5ST
STOCK 4 STAR M4SV
STOCK 5 STAR MDP38
431-1408 #1 GOLD (80#) — 8' X 7'
431-1409 #1 LT. BLUE (90#) — 9' X 7'
0140070B #1 TAN (100#) — 8' X 7'
431-1410 #1 WHITE (110#) — 9' X 7' 8' X 7'
431-1412 #1 GREEN (120#) — 9' X 7'
431-1416 #2 BROWN (160#) — 16' X 7'
0140160B #2 LT. BLUE (190#) — 16' X 7'
0140180B #2 WHITE (210#) — 16' X 7'
PART NUMBER
SPRING (FIRST PAIR)
SPRING (SECOND PAIR)
DOOR HEIGHT
DOOR WEIGHT (LBS.)*
0140020B #1 RED (50#) — 7' 46 – 540140030B #1 BROWN (60#) — 7' 55 – 640140040B #1 ORANGE (70#) — 7' 65 – 74431-1408 #1 GOLD (80#) — 7' 75 – 84431-1409 #1 LT. BLUE (90#) — 7' 85 – 940140070B #1 TAN (100#) — 7' 95 – 104431-1410 #1 WHITE (110#) — 7' 105 – 114431-1412 #1 GREEN (120#) — 7' 115 – 124431-1413 #1 YELLOW (130#) — 7' 125 – 134431-1414 #1 BLUE (140#) — 7' 135 – 144431-1415 #2 RED (150#) — 7' 145 – 154431-1416 #2 BROWN (160#) — 7' 155 – 1640140140B #2 ORANGE (170#) — 7' 165 – 1740140150B #2 GOLD (180#) — 7' 175 – 1840140160B #2 LT. BLUE (190#) — 7' 185 – 1940140170B #2 TAN (200#) — 7' 195 – 2040140180B #2 WHITE (210#) — 7' 205 – 214
RE
FER
EN
CE
PA
RT
NU
MB
ER
S A
BO
VE
#1 WHITE (110#) #1 WHITE (110#) 7' 215 – 224#1 GREEN (120#) #1 WHITE (110#) 7' 225 – 234#1 GREEN (120#) #1 GREEN (120#) 7' 235 – 244#1 YELLOW (130#) #1 GREEN (120#) 7' 245 – 254#1 YELLOW (130#) #1 YELLOW (130#) 7' 255 – 264#1 BLUE (140#) #1 YELLOW (130#) 7' 265 – 274#1 BLUE (140#) #1 BLUE (140#) 7' 275 – 284#1 BLUE (140#) #2 RED (150#) 7' 285 – 294#2 RED (150#) #2 RED (150#) 7' 295 – 304#2 RED (150#) #2 BROWN (160#) 7' 305 – 314#2 BROWN (160#) #2 BROWN (160#) 7' 315 – 324#2 BROWN (160#) #2 ORANGE (170#) 7' 325 – 334#2 ORANGE (170#) #2 ORANGE (170#) 7' 335 – 344#2 ORANGE (170#) #2 GOLD (180#) 7' 345 – 354#2 GOLD (180#) #2 GOLD (180#) 7' 355 – 364#2 GOLD (180#) #2 LT. BLUE (190#) 7' 365 – 374#2 LT. BLUE (190#) #2 LT. BLUE (190#) 7' 375 – 384#2 LT. BLUE (190#) #2 TAN (200#) 7' 385 – 394#2 TAN (200#) #2 TAN (200#) 7' 395 – 404
Illustrations are of one side of door.
Double (2 Pairs)Single (1 Pair)
Note: Single (1 Pair) Springs – Spring # (on one side of door) equals weight of door. Double (2 Pairs) Springs – Spring # for combined springs (on one side of door) equals weight of door.
Example: A door weighing 160 lbs. would use: One (1) 160# (#2 BROWN) spring on both sides of door for a total of two (2) 160# springs. – OR – Two (2) 80# (#1 GOLD) springs on both sides of door for a total of four (4) 80# springs.
2OPTION
Select by Height and Weight of Door
Select by Model and Size of Door
7' T
ALL
DO
OR
S8'
TA
LL D
OO
RS
7' T
ALL
DO
OR
S
0140250B #2 YELLOW (130#) — 9' X 8'
0140260B #2 BLUE (140#) — 9' X 8'
0140235B #4 WHITE (110#) #4 WHITE (110#) 16' X 8'
0140240B #3 GREEN (120#) #3 GREEN (120#) 16' X 8'8' T
ALL
DO
OR
S
Highlighted Springs are in stock at most
stores; all others are
special order.
Important Note If replacing one spring,
replace ALL springs
on the door.
*Refer to page 2 for door weighing instructions.
INDUSTRY STANDARD COLOR CODES
Gold
WhiteTan
Light BlueOrangeBrownRed
Green Yellow Blue
3OPTION
9
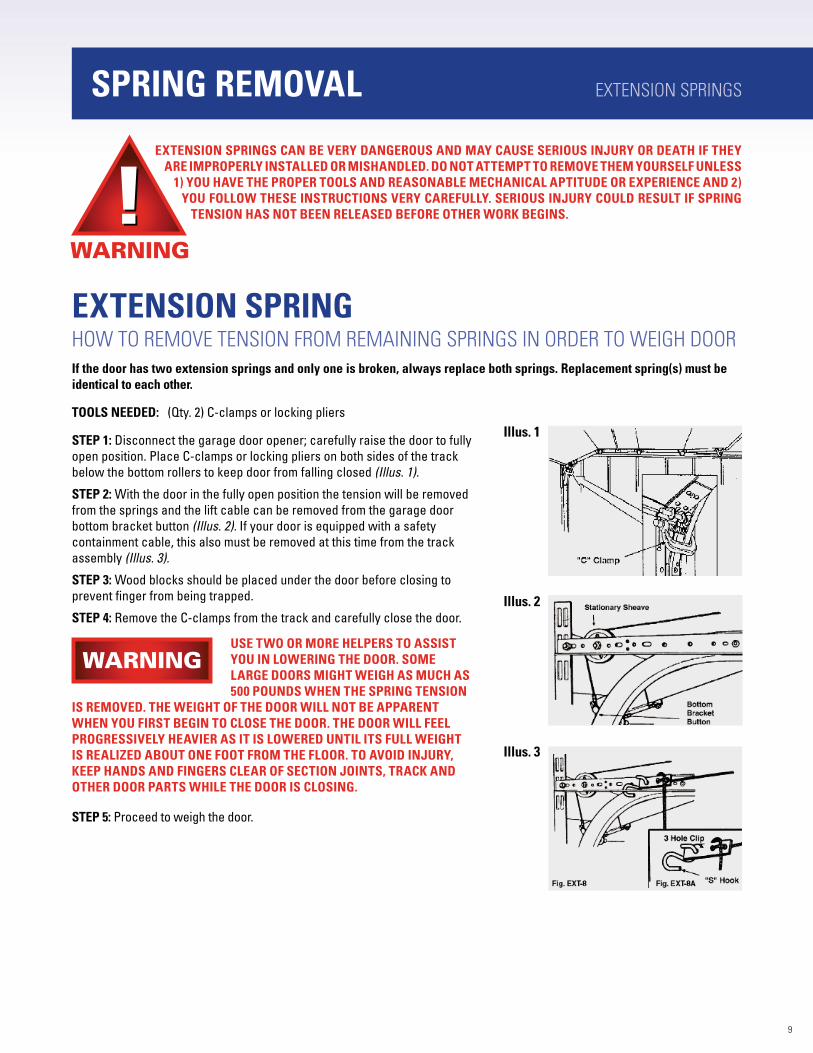
USE TWO OR MORE HELPERS TO ASSIST YOU IN LOWERING THE DOOR. SOME LARGE DOORS MIGHT WEIGH AS MUCH AS 500 POUNDS WHEN THE SPRING TENSION
IS REMOVED. THE WEIGHT OF THE DOOR WILL NOT BE APPARENT WHEN YOU FIRST BEGIN TO CLOSE THE DOOR. THE DOOR WILL FEEL PROGRESSIVELY HEAVIER AS IT IS LOWERED UNTIL ITS FULL WEIGHT IS REALIZED ABOUT ONE FOOT FROM THE FLOOR. TO AVOID INJURY, KEEP HANDS AND FINGERS CLEAR OF SECTION JOINTS, TRACK AND OTHER DOOR PARTS WHILE THE DOOR IS CLOSING.
STEP 5: Proceed to weigh the door.
SPRING REMOVAL EXTENSION SPRINGS
EXTENSION SPRINGS CAN BE VERY DANGEROUS AND MAY CAUSE SERIOUS INJURY OR DEATH IF THEY ARE IMPROPERLY INSTALLED OR MISHANDLED. DO NOT ATTEMPT TO REMOVE THEM YOURSELF UNLESS
1) YOU HAVE THE PROPER TOOLS AND REASONABLE MECHANICAL APTITUDE OR EXPERIENCE AND 2) YOU FOLLOW THESE INSTRUCTIONS VERY CAREFULLY. SERIOUS INJURY COULD RESULT IF SPRING
TENSION HAS NOT BEEN RELEASED BEFORE OTHER WORK BEGINS.
WARNING
EXTENSION SPRING HOW TO REMOVE TENSION FROM REMAINING SPRINGS IN ORDER TO WEIGH DOOR
If the door has two extension springs and only one is broken, always replace both springs. Replacement spring(s) must be identical to each other.
TOOLS NEEDED: (Qty. 2) C-clamps or locking pliers
STEP 1: Disconnect the garage door opener; carefully raise the door to fully
open position. Place C-clamps or locking pliers on both sides of the track
below the bottom rollers to keep door from falling closed (Illus. 1).
STEP 2: With the door in the fully open position the tension will be removed
from the springs and the lift cable can be removed from the garage door
bottom bracket button (Illus. 2). If your door is equipped with a safety
containment cable, this also must be removed at this time from the track
assembly (Illus. 3).
STEP 3: Wood blocks should be placed under the door before closing to
prevent finger from being trapped.
STEP 4: Remove the C-clamps from the track and carefully close the door.
Illus. 1
Illus. 2
Illus. 3
WARNING
10
SPRING REMOVAL
TORSION SPRINGS CAN BE VERY DANGEROUS AND MAY CAUSE SERIOUS INJURY OR DEATH IF THEY ARE IMPROPERLY INSTALLED OR MISHANDLED. DO NOT ATTEMPT TO INSTALL THEM YOURSELF UNLESS
1) YOU HAVE THE PROPER TOOLS AND REASONABLE MECHANICAL APTITUDE OR EXPERIENCE AND 2) YOU FOLLOW THESE INSTRUCTIONS VERY CAREFULLY.
WARNING
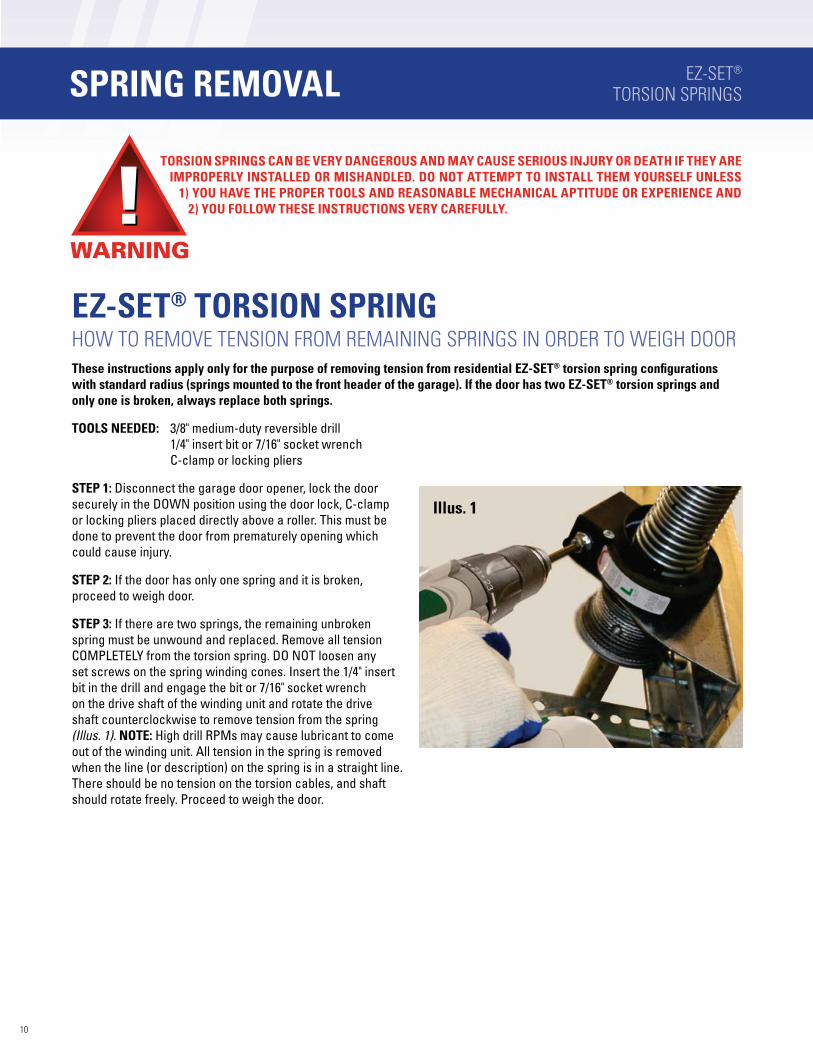
EZ-SET® TORSION SPRING HOW TO REMOVE TENSION FROM REMAINING SPRINGS IN ORDER TO WEIGH DOOR
These instructions apply only for the purpose of removing tension from residential EZ-SET® torsion spring configurations with standard radius (springs mounted to the front header of the garage). If the door has two EZ-SET® torsion springs and only one is broken, always replace both springs.
TOOLS NEEDED: 3/8" medium-duty reversible drill
1/4" insert bit or 7/16" socket wrench
C-clamp or locking pliers
STEP 1: Disconnect the garage door opener, lock the door
securely in the DOWN position using the door lock, C-clamp
or locking pliers placed directly above a roller. This must be
done to prevent the door from prematurely opening which
could cause injury.
STEP 2: If the door has only one spring and it is broken,
proceed to weigh door.
STEP 3: If there are two springs, the remaining unbroken
spring must be unwound and replaced. Remove all tension
COMPLETELY from the torsion spring. DO NOT loosen any
set screws on the spring winding cones. Insert the 1/4" insert
bit in the drill and engage the bit or 7/16" socket wrench
on the drive shaft of the winding unit and rotate the drive
shaft counterclockwise to remove tension from the spring
(Illus. 1). NOTE: High drill RPMs may cause lubricant to come
out of the winding unit. All tension in the spring is removed
when the line (or description) on the spring is in a straight line.
There should be no tension on the torsion cables, and shaft
should rotate freely. Proceed to weigh the door.
Illus. 1
EZ-SET®
TORSION SPRINGS
SPRING REMOVAL STANDARDTORSION SPRINGS
TORSION SPRINGS CAN BE VERY DANGEROUS AND MAY CAUSE SERIOUS INJURY OR DEATH IF THEY ARE IMPROPERLY INSTALLED OR MISHANDLED. DO NOT ATTEMPT TO INSTALL THEM YOURSELF UNLESS
1) YOU HAVE THE PROPER TOOLS, REASONABLE MECHANICAL APTITUDE AND EXPERIENCE, AND UPPER ARM STRENGTH, AND 2) YOU FOLLOW THESE INSTRUCTIONS VERY CAREFULLY. PROFESSIONAL
INSTALLATION IS RECOMMENDED. DO NOT ATTEMPT TO REMOVE TORSION SPRING TENSION IF THE WOOD MOUNTING PAD CONNECTING THE BRACKET TO THE CENTER OF THE SPRINGS IS SPLIT
OR ROTTED, OR IF THE FASTENERS AT THIS POINT ARE LOOSE OR MISSING.
WARNING
TORSION SPRING HOW TO REMOVE TENSION FROM REMAINING SPRINGS IN ORDER TO WEIGH DOOR
These instructions apply only for the purpose of removing tension from torsion springs (springs mounted to the front header of the garage). Use only torsion spring winding bars for removing and adjusting standard torsion spring(s). DO NOT USE ANY OTHER TYPE OF TOOL FOR WINDING OR UNWINDING STANDARD TORSION SPRING(S). If the door has two torsion springs and only one is broken, always replace both springs.
TOOLS NEEDED: Adjustable wrench or 3/8" open end wrench
C-clamp or locking pliers
Two solid steel winding bars (available for sale at Menards)
STEP 1: Disconnect the garage door opener; lock the door securely in the down
position using the door lock, C-clamp or locking pliers placed directly above a
roller. This must be done to prevent the door from prematurely opening which
could cause injury.
STEP 2: If the door has only one spring and it is broken, proceed to weigh door.
If there are two springs, the remaining unbroken spring must be unwound and
replaced. Proceed with Steps 3 through 6.
STEP 3: Remove all tension COMPLETELY from remaining torsion spring. Use a sturdy ladder and stand to the side of the winding bars and insert one winding bar as shown in Illus. 1. Winding bars MUST always be inserted the full depth of the holes in the winding cone and supported (be prepared to handle a large force) before any set screws on the spring winding cones are loosened. Positioning your hand near the end of the winding bar, push up on the winding
bar to allow the second winding bar to be inserted, then slowly allow the second
winding bar to rest against the back of the door, as shown in Illus. 2. Watch out that your fingers do not get pinched between the winding bar and back of the door or that the winding bar does not hit any window glass in the top section. If you cannot push the first winding bar up or feel uncomfortable with the force on the bar, stop, and contact a qualified door service professional.
STEP 4: Loosen the two set screws on the spring winding cone while firmly
holding the lower winding bar and making sure that the lower winding bar is
against the back of the door. When set screws are loose, full spring tension will
be on the lower winding bar. See Illus. 3.
STEP 5: Push up on the upper winding bar slightly and remove the lower winding
bar while holding tight on the upper winding bar. Allow the spring and upper winding bar to slowly rotate downward so that
the upper bar rests against the back of the door. This decreases the tension on the spring in 1/4 turn increments. See Illus. 4.
STEP 6: Repeat this process of inserting a winding bar fully in the upper hole position, push up slightly, removing the lower
winding bar and letting the tension slowly rotate the winding bar until it rests against the back of the door. Repeat this process
until all tension is removed from the torsion spring. There should be no tension on the cables, and the shaft should rotate
freely. Proceed to weigh the door.
Illus. 1
Illus. 2
Illus. 3
Illus. 4
11
Ideal Door® is a trademark of Clopay Building Products Company, Inc. ©2014 Clopay Building Products Company, Inc., a Griffon company. REID-GDSPRINGSELGUIDEWEB-14
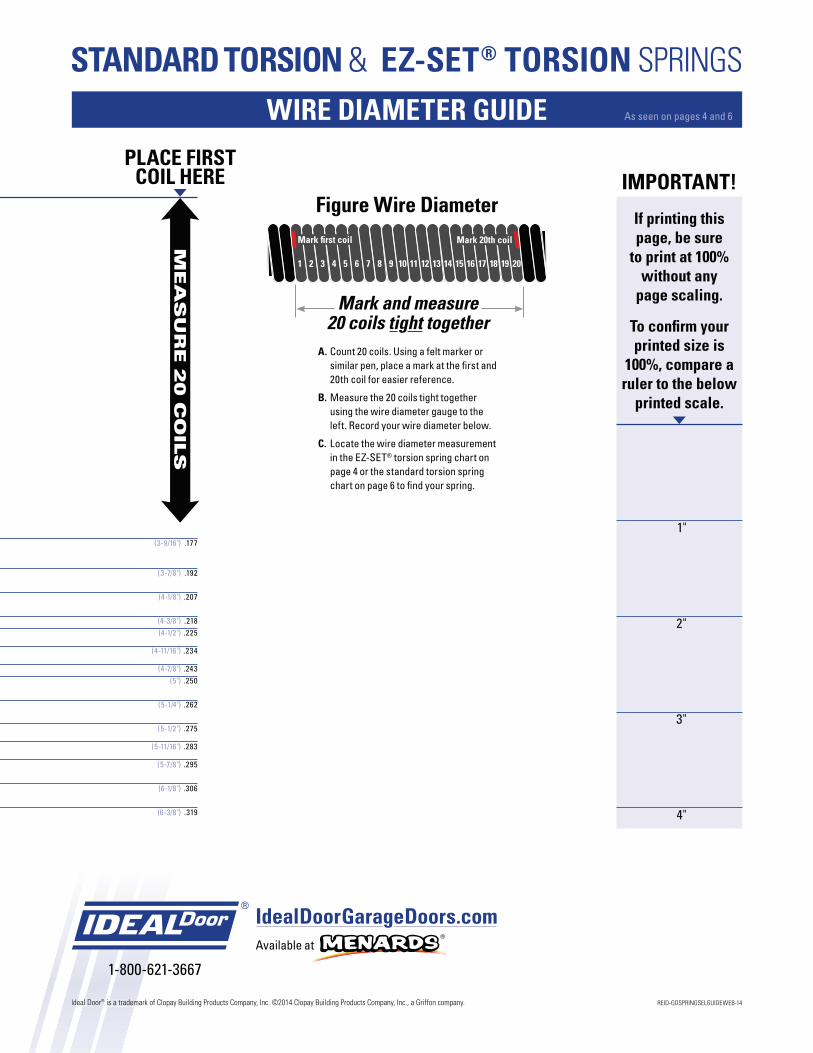
STANDARD TORSION & EZ-SET® TORSION SPRINGS
WIRE DIAMETER GUIDE As seen on pages 4 and 6
PLACE FIRST COIL HERE IMPORTANT!
.192(3-7/8")
.207(4-1/8")
.218(4-3/8")
.225(4-1/2")
.243(4-7/8")
.250(5")
.262(5-1/4")
.275(5-1/2")
.283(5-11/16")
.295(5-7/8")
.306(6-1/8")
.319(6-3/8")
.234(4-11/16")
.177(3-9/16")
ME
AS
UR
E 2
0 C
OILS
is a trademIdeal Door® is Idea
1-800-621-3667
Available at
IdealDoorGarageDoors.com
A. Count 20 coils. Using a felt marker or
similar pen, place a mark at the first and
20th coil for easier reference.
B. Measure the 20 coils tight together
using the wire diameter gauge to the
left. Record your wire diameter below.
C. Locate the wire diameter measurement
in the EZ-SET® torsion spring chart on
page 4 or the standard torsion spring
chart on page 6 to find your spring.
Figure Wire Diameter
Mark and measure 20 coils tight together
1 2 3 4 5 6 7 8 9 10 11 12 13 14 15 16 17 18 19 20
Mark first coil Mark 20th coil
If printing this page, be sure
to print at 100% without any
page scaling.
To confirm your printed size is
100%, compare a ruler to the below
printed scale.
1"
2"
3"
4"