Embed Size (px)
Citation preview

1
RESCUE OF CASUALITIES While it is always desirable to employ the latest models of wheeled stretchers and other carrying devices
for transporting victims, there are occasions when human energy and brute strength must be used.
If there is immediate danger from a spreading fire, toxic gases, basement flooding, or building collapse,
casualties may have to be removed before emergency medical care can be administered or transportation
provided. Victims should be moved only far enough to be out of immediate danger, then given emergency
care and transported properly.
When victims are only slightly injured or must be moved immediately in spite of injuries, one of several
methods may be used. To the extent possible, the type of carry or drag least likely to aggravate the
patient’s injuries should be selected.
METHODS OF TRANSPORTATION
A multitude of problems may arise when sick and injured persons must be conveyed to medical attention.
It is of utmost importance that the victim receive the best emergency care possible before transportation is
attempted, that close attention be devoted to the patient during movement, and that all activities be
conducted in the smoothest and most efficient manner possible to keep casualty morbidity and mortality at
a minimum.
Backboards
Backboards, which are also called spine boards, are designed primarily for immobilizing accident victims
with suspected spinal injuries. Backboards are available in two sizes. The long board is used for
immobilizing the prone or supine patient; the short board serves as an intermediate device for
immobilizing patients in a seated or cramped position, which prohibit the direct movement of the victim
onto a long board.
Spine Board

2
Two handed carry
1. The first person raises the patient to a sitting position at the edge of the bed and places one arm
behind patient’s and places one arm behind patient’s shoulder and the other arm under patient’s
knees.
2. The second person places one arm behind the patient and grasps the first person’s shoulder, then
places the other arm under the patient’s knees and grasps the first person’s wrist.
3. Patient sits on rescuer’s clasped hands and wrists and leans back against their arms.
Three handed carry

3
Four hand Seat Carry
The normal seat carry requires two rescuers. They raise the casualty to a sitting position, each steadying the victim by placing an arm around the back. Each rescuer then slips the other arm under the casualty’s thighs, grasping the wrist of the other rescuer. One pair of arms forms a seat rest, and the other pair a back rest. Both rescuers then slowly rise in unison, lifting the victim from the floor. Another variation of the seat carry, the four-hand seat carry, also requires two rescuers. This is an excellent method of carrying conscious, and not too seriously injured persons a short distance.
A third variation, the saddle- back carry, is a simple and effective method of moving a conscious person a short distance when the injuries are not very serious.
The four hand seat carry is an excellent method for carrying conscious not too seriouslyinjured persons a short distance.
This is an effective method of carrying an unconscious injured person a short distance provided it is not necessary to keep the casualty flat.
The saddle back carry is a simple and effective method of moving an injured person a short distance when the injuries are not serious

4
Fore Arm Lift
Fore and aft carry
1. The first person raises the patient to a sitting position, then, from behind, reaches under the
patient’s armpits and grasps his or her own wrists in front of patient’s chest.
2. The second person moves between the patient’s legs with his or her back to the patient and
encircles the patient’s legs at the knees with each arm.
3. The first person hugs and lifts, the second carries the patient’s legs and patient is moved feet first.

5
Chair Carry
The chair carry is effective where sharp turns or a steep stairway would preclude the use of a stretcher or
backboard. A commercial stair chair or an ordinary household straight-back chair may be used. It is good
idea to test the chair before use to make sure that it is solid and will support the patient.
After the victim has been placed in the chair, the rear paramedic tilts the chair back to enable the other
crew member in front to get into position. If the victim is too large to be picked up and placed in the chair,
then the person is placed face up. The legs are elevated and the chair back slid beneath the buttocks until
the patient is in a seated position, although still lying on the floor. Straps may be used to secure the patient
to the chair. The chair is then tilted upright and the victim is ready for transport.
Three-person Lift and Carry
The three-person lift and carry is often used to handle a severely injured casualty. Even with trained
personnel, this technique does not offer adequate neck and back support. When there is any suspicion than
spinal injuries may be present, a fourth paramedic should support the patient’s head.
Three rescuers line up on one side of the casualty, preferably with the tallest person at the shoulders,
another at the hips, and the third at the knees. The team kneels on their knees nearest to the victim’s feet.
The paramedic at the victim’s shoulders works both hands under the victim’s neck and shoulders; the
person at the hips places both hands under the pelvis and the hips; and the EMT at the knees is responsible
for lifting the knees and ankles.
At the command lift, usually given by the rescuer at the shoulders, the crew gently lifts and rests the
victim on their knees. At a second command, they slowly turn the victim toward them until the casualty
rests in the bends of their elbows. At a third command, the crew rises together to a standing position.
When a stretcher or cot is not immediately available, these procedures allow the crew to move with the
patient through narrow spaces and down winding stairs. Depositing the victim requires the reverse of this
procedure. These steps are also recommended for picking up and placing a victim on a stretcher or cot.
The casualty is raised only high enough to clear the stretcher; the stretcher is then slid under the victim,
and the victim is lowered.
Chair carry. It is very easy for two EMTs to carry a nonambulatory patient down winding stairways or through narrow passageways by placing the patient on an ordinary straight back chair. The EMTs then grasp the chair in the most convenient positions. This method is good to know, as straight back chairs are almost universally available.

6
Blanket Drag
The blanket drag can be used to move a person who, because of injuries, should not be lifted or carried by
one rescuer alone. When properly used, this drag will allow one rescuer to safely and effectively move an
injured or unconscious victim. The blanket is placed lengthwise close to the patient with one-half gathered
next to the body. The victim’s arm opposite the blanket is extended overhead and the person is rolled to
that side. While holding the patient on the side, the gathered folds of the blanket are pulled close to the
body. The casualty is then rolled onto the blanket face up and wrapped snugly in the blanket with the arms
at the sides. The blanket is then arranged to support the patient’s head and neck. The victim is always
pulled head first with the head and shoulders slightly raised, to keep the head form bumping against the
floor. If it is necessary to descend stairs, care must be exercised to protect the victim’s head. A mattress
can also be used, but will require a minimum of two rescue personnel.
The three person carry is often used to carry a seriously injured victim or to pick up a casualty
and place him or her on a stretcher. Three rescuers line up on one side of the patient, preferably
with the tallest at the shoulders, another at the hips, and another at the knees; from this position,
they can move with the casualty through narrow spaces and down winding stairs. The rescuer
nearest the victim’s head is responsible for continuously checking the casualty’

7
Clothing Drag
A casualty may be dragged by sturdy clothing. The clothing must be carefully snugged up around the
victim’s head and neck, but be careful that they do not become so tight around the neck that respiration is
interfered with. The casualty’s head is supported by the rescuer’s forearm; the head must be kept as close
to the floor as possible while travelling so the neck is not bent excessively.
Fire Fighter’s Drag.
The fire fighter’s drag, which enables one person to move a patient with relative ease, is often used to
move an unconscious casualty in an emergency. This method is recommended for use in tunnels and other
limited spaces or in atmospheres where it is necessary to remain close to the floor in order to obtain an
The blanket drag can be used when one rescuer must move an unconscious or seriously injured victim along the floor or ground. The casualty should always be pulled head first with the head and shoulders slightly raised. So the head will not bymp against the floors.
Clothing drag. An unconscious victim dressed in study clothing can be dragged from a structure by grasping the attire at the neck and pulling the victim towards the exit. Arrange the clothing carefully around the head and neck to offer support and prevent the head from dragging on the floor. This drag is especially valuable for removing victims from hot toxic, non breathable atmosphere, where survival is possible only by staying close to the pavement.
8
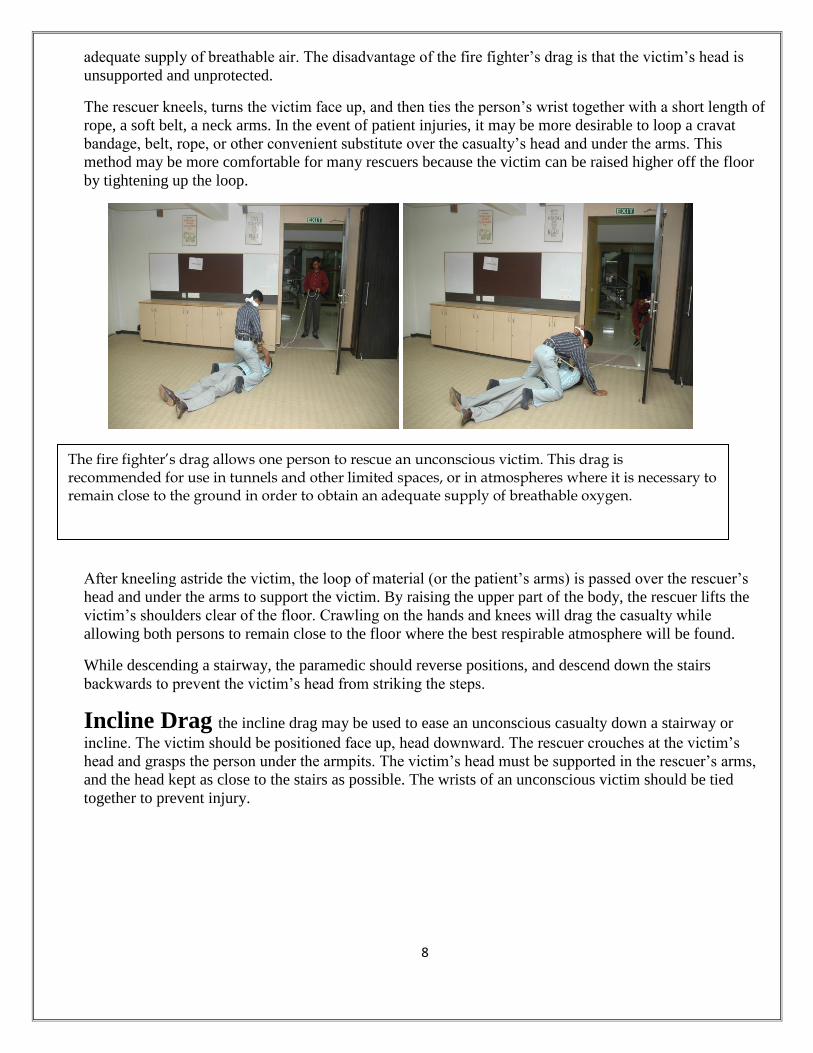
adequate supply of breathable air. The disadvantage of the fire fighter’s drag is that the victim’s head is
unsupported and unprotected.
The rescuer kneels, turns the victim face up, and then ties the person’s wrist together with a short length of
rope, a soft belt, a neck arms. In the event of patient injuries, it may be more desirable to loop a cravat
bandage, belt, rope, or other convenient substitute over the casualty’s head and under the arms. This
method may be more comfortable for many rescuers because the victim can be raised higher off the floor
by tightening up the loop.
After kneeling astride the victim, the loop of material (or the patient’s arms) is passed over the rescuer’s
head and under the arms to support the victim. By raising the upper part of the body, the rescuer lifts the
victim’s shoulders clear of the floor. Crawling on the hands and knees will drag the casualty while
allowing both persons to remain close to the floor where the best respirable atmosphere will be found.
While descending a stairway, the paramedic should reverse positions, and descend down the stairs
backwards to prevent the victim’s head from striking the steps.
Incline Drag the incline drag may be used to ease an unconscious casualty down a stairway or
incline. The victim should be positioned face up, head downward. The rescuer crouches at the victim’s
head and grasps the person under the armpits. The victim’s head must be supported in the rescuer’s arms,
and the head kept as close to the stairs as possible. The wrists of an unconscious victim should be tied
together to prevent injury.
The fire fighter’s drag allows one person to rescue an unconscious victim. This drag is recommended for use in tunnels and other limited spaces, or in atmospheres where it is necessary to remain close to the ground in order to obtain an adequate supply of breathable oxygen.

9
Pack-Strap Carry
The pack-strap carry may be used by one rescuer to carry an unconscious victim if the heat and smoke do
not preclude walking in an upright position. The rescuer makes a loop of any convenient material, such as
triangular bandages, sheets, belts, or rope. Then the casualty is turned face up and the loop is passed
around the victim’s back and chest at the armpits. The rescuer then lies flat on top of the casualty, face up,
and slips both arms through the loop, which of the casualty, face up, and slips both arms through the loop,
which should fit snugly. The rescuer then rolls over so both persons are snugly to together, face down.The
rescuer may then arise to an erect position with the casualty affixed to the back.
The victim may also be positioned back-to-back with the rescuer. In either case, both hands of the rescuer
will be free to ascend or descend a ladder or to perform other tasks. The dangling legs of the victim may
prove awkward while descending a ladder, but travel will be possible by observing every safety
precaution. If sufficient bandage or other material is available, the casualty’s hands may be tied together.
Fire Fighter’s Carry
The incline drag may be used to ease an unconscious or nonambulatory casualty down a stairway or incline. The victim’s head should be supported in the rescuer’s arms to prevent injury. If the victim is unconscious. The wrists should be tied together.
The pack strap carry may be used to carry an unconscious or non ambulatory person when the
atmosphere will permit an upright position. The victim may be positioned either back-to-back or in the
same direction as the rescuer. It is best if the victim is positioned high enough on the rescuer’s back that
the feet dangle clear of the floor. This carry should not be used when the patient has any serious injuries
or breathing difficulties

10
Turn the casuality face down on the ground and kneel on one knee facing the victim’s head, place both hands under the casualty’s armpits and gradually work them down the side and across the back
Raise the casualty to the knees Then take a firmer hold across the casualty’s back and raise victim to standing position. Then take a firmer hold across the casualty.
While holding the casualty around the waist with your right arm, grasp the casualty’s right wrist with your left hand and draw the victim’s arm over your head (if the victim’s injury is such that carrying from the opposite side would be preferable simply substitute right for left in the instructions.

11
One of the easiest ways for one rescuer to carry an unconscious person is by means of the fire fighter’s
carry. This method is effective if there is only one rescuer, if there is not too much smoke and heat to
allow an upright position, if the victim is uninjured and of slight build, and if the distance to be traveled
causes the various drags to be unpractical.
The rescuer turns the casualty face down and kneels on one knee facing the person’s head. The rescuer
then passes both hands.
The procedure for lowering the casualty to the ground is the reverse of the above.
Bend at the waist and knees and pull the casualty’s right arm down over your left shoulder so that his body comes across your shoulders. At the same time. Pass your right arm between the legs and grasp the right knee with your right hand
The casualty is lifted as you straighten up.
Then grasp the casualty’s right wrist with your right hand, leaving your left hand free. This is the position of carry. A person can carry another person some distance in this manner .
The procedure for lowering the casualty to the ground is the reverse of the lifting procedure

12
Types of knots:
Thumb Knot: It is formed by making a loop and passing one and through it.
Half Hitch: This is formed by passing the short end of a rope around the spar or another rope and
under the standing part.
Clove Hitch: This hitch is formed by forming two loops in the center of rope, one in the left hand,
the other in the right, one opposite to each other in the direction. Then the right hand one is
passed in the front of the other loop.

13
Round turn and two half Hitches: This is also useful for securing a rope to a spar or ring and is
formed by a round turn on the spar or ring with two half hitches on the standing part of the rope.
Draw Hitch: It is formed as follows a bight is passed around the spar and a second bight, which is
then formed on the standing part of the rope, is passed through the first bight. The third bight is
formed with the short end and passed through the second bight and whole tightened up by
pulling on the standing part.
Reef Knot: This is useful for joining two ropes of equal sizes. This is tied as two thumb knots tied
in reverse direction, left over right, then right over left.
Single Sheet Bend: This is formed by making a loop in the thicker one of the two ropes, holding
this in the left hand, the end of the thinner rope, is passed upward through the loop forming a
half hitch round the two thickness as of the thicker rope. Useful for uniting two different sizes
rope.

14
Double Sheet Bend: It is formed some what like the single sheet bend, except the after having
made the half hitch with the thinner rope, continue turning its short end to make another round
turn around the two thickness of the thicker rope and towards the bight. Useful when there is
great difference in the size of the rope and when wet.
Chair Knot: It is formed by grasping the rope near its center, in the left hand palm downwards.
About a yard from the left hand take the rope in right hand palm upwards. Turn the left hand
palm upward forming a loop(anti-clockwise) turn the right hand palm down forming a loop. Pass
the standing part through the loops of the opposite hand pooling them through, thus forming two
loops with a knot in the center. Adjust the loop and make a half hitch on each loop.
Bow Line: Take the running end of the rope in the right hand, pull it across the upturned palm of
the left hand, through the fingers of the left hand, forming a loop to a required size, pass the

15
running end, which is held in the right hand, up through the loop in the left hand, then
underneath the standing rope and back down through the loop. Tighten the two ends. Useful for
recovery casualties.
Running Bow Line: It is made by forming a bight in the end of the line and passing it under the
standing part. A bow line is then made at a point “C” on the bight formed, thus making a running
noose.
Bow Line on the Bight: It is formed by first making a bight in the end or center of the line. The
bight is then used in the same way as the free end is used when making an ordinary bow line,
and a half hitch forming on the standing part of the line. The part of the bight which has been past
through the half hitch is then opened and taken out behind the remainder of the knot the then
brought up to the two standing parts. The knot is then hauled out taut.
Ship Shank: It is formed by the gathering up the amount by which it is desired to shortened the
line. Half hitches then thrown around the ends of each bight. The two bights then should be
seized.

16
Lashing: These are mainly used to lash or secure two or more poles together.
Square Lashing: This is used for lashing together two poles that touches and crossed at right
angle. Put a clove hitch to start with around the spar or leg and below the cross head or ledger.
Marry the running end to standing part, take up and around both the poles. Repeat this circuit 3
to 4 times, drawing the rope as taut as possible. Then to take three to four frapping turns around
the whole lashing but between the poles. Draw taut. Finish of with the clove hitch on the vertical
pole above the horizontal.
Diagonal Lashing: This is used for lashing tow poles when they crossed at an angle. Put a timber
hitch on the around both the poles horizontally. Then take four vertical turns and draw them taut.
To finish off put four frapping turns over the lashing and between the poles. Draw them taut and
end with a clove hitch.

17
Figure of Eight Lashing: This is used for lashing three poles together to form a tripod or gyn.
Before lashing, insert spacers between the poles. The thickness of the spacer should be half that of
the poles, marry the ends and working upward continue lashing in the figure of eight fashion
with 6-8 turns. Add two to three frapping turns between each poles and round the lashing. Finish
with the clove hitch above and on the opposite pole to the starting pole.
Round Lashing: This is used for lashing two poles kept parallel to each other. Before starting
insert spacers between the poles. Put a clove hitch around one pole, marry the ends and continue
with 6 – 8 close turns round both the poles going upward. Add two or three frapping turns round
the lashing and between the poles. End with a clove hitch above and on the opposite pole to the
starting pole.
3. Stretcher Lashing: Only two persons are required to carry out this work. The knots used are the clove hitch and the half hitch only. The procedure should be thus:
The main operator sits on the right side of the stretcher near the head end with the rope in his
hands, while his assistant sits facing him on the opposite side.
The clove hitch is tied on the right head side stretcher handle.
The rope is then passed down the side of the stretcher for about 18 inches and taking a complete
turn over the chest of the casualty and under the stretcher a half hitch is formed.

18
Passing the rope further down the right side, a second complete turn is given around the casualty
at a hip level, ending again with a half hitch.
A third turn and a half hitch is similarly placed just below the knees.
The ankles and the feet are then secure with a hitch and the rope passed under the ankles on the
other side.
The rope is now on the other(left) side it is then hitched through each loop formed around the
casualty and the other then tied with a clove hitch on the handled.
On completion of this lashing the left over rope is coiled and placed beneath the blanket under
the heads of the casualty to serve as a rough pillow.


![Strike, Strike, Heavy Blows of the Axe...[1]](https://img.pdfslide.us/doc/110x75/551e01694979594b198b510f/strike-strike-heavy-blows-of-the-axe1.jpg)