Embed Size (px)
Citation preview
Page | 1
Request Central Users Guide
Overview
This user guide describes the procedures for operating the IBM TRIRIGA Request Central module. This user guide goes through a step by step scenario to emulate how the Requestor submits a request
General Guidelines and IBM TRIRIGA Notes General IBM TRIRIGA information provided in the beginning of this document helps guide the Request Central User on getting familiar with the software’s navigation, icons, signs, filters, form actions and other software widgets.
Conventions
Note: A note provides important information that you should know in addition to the standard details.
Tip: A Tip adds insightful information that may help you to use the system better.
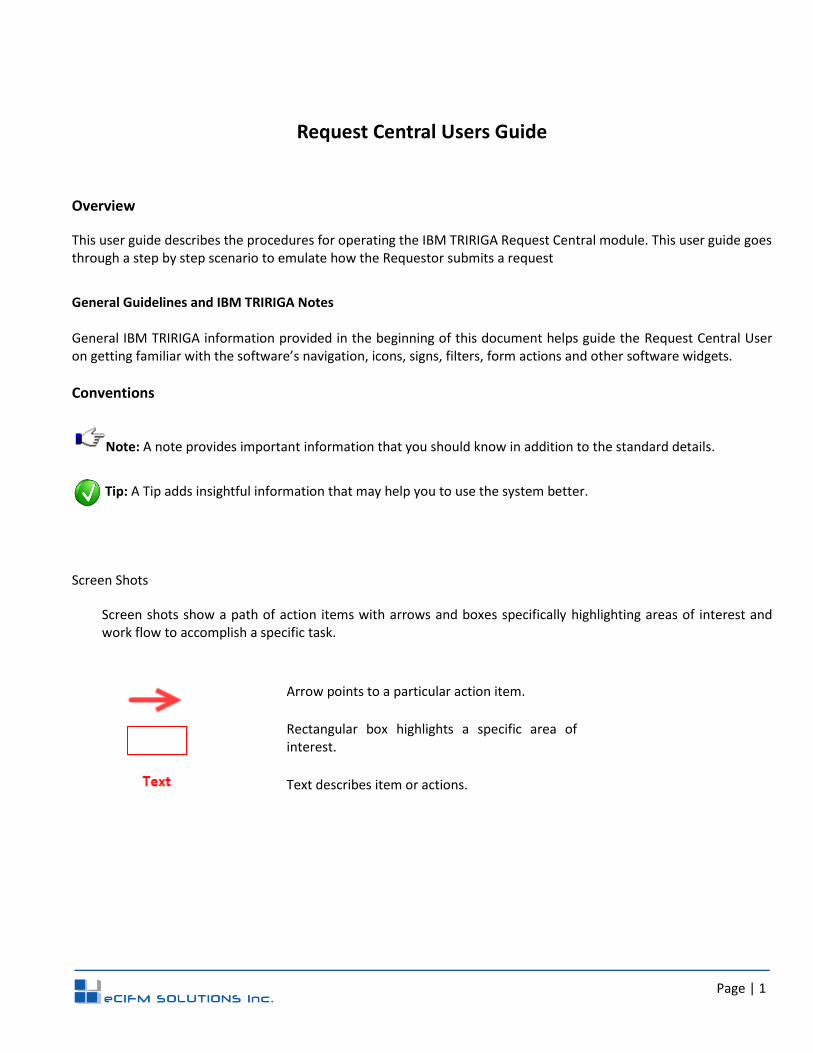
Screen Shots
Screen shots show a path of action items with arrows and boxes specifically highlighting areas of interest and work flow to accomplish a specific task.
Arrow points to a particular action item.
Rectangular box highlights a specific area of interest.
Text describes item or actions.
Page | 2
Typical Screen Shot
Widgets and Alerts
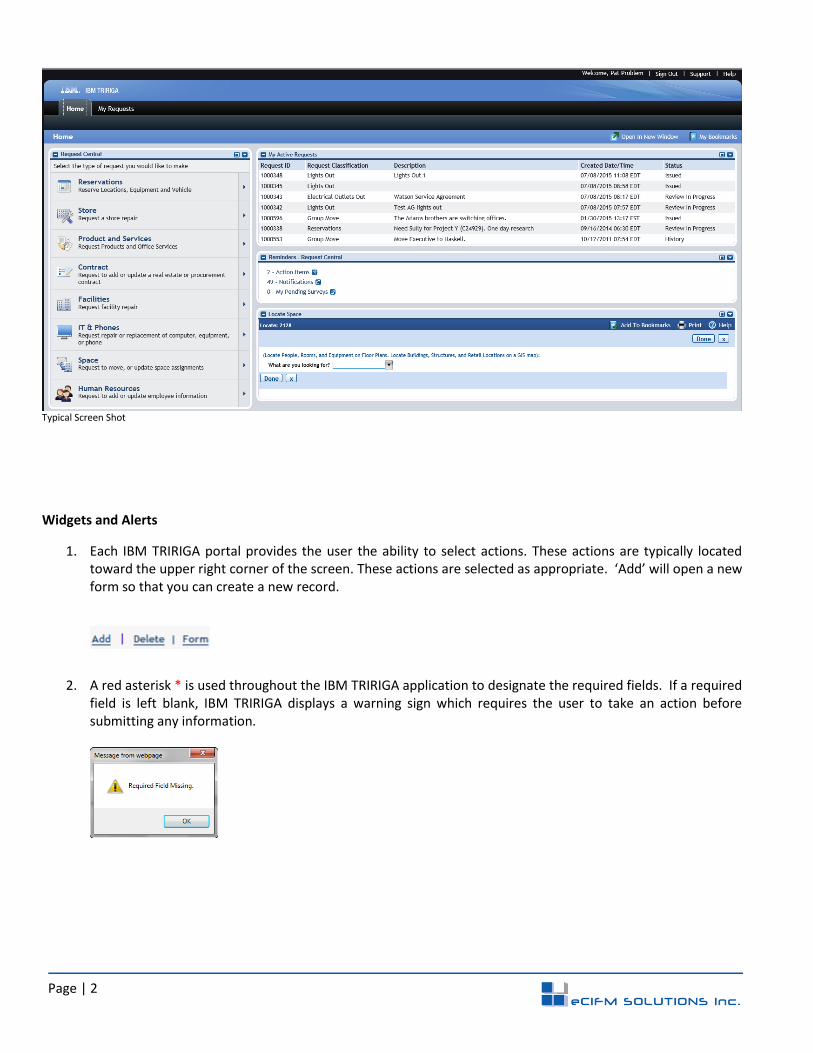
1. Each IBM TRIRIGA portal provides the user the ability to select actions. These actions are typically located toward the upper right corner of the screen. These actions are selected as appropriate. ‘Add’ will open a new form so that you can create a new record.
2. A red asterisk * is used throughout the IBM TRIRIGA application to designate the required fields. If a required field is left blank, IBM TRIRIGA displays a warning sign which requires the user to take an action before submitting any information.
Page | 3
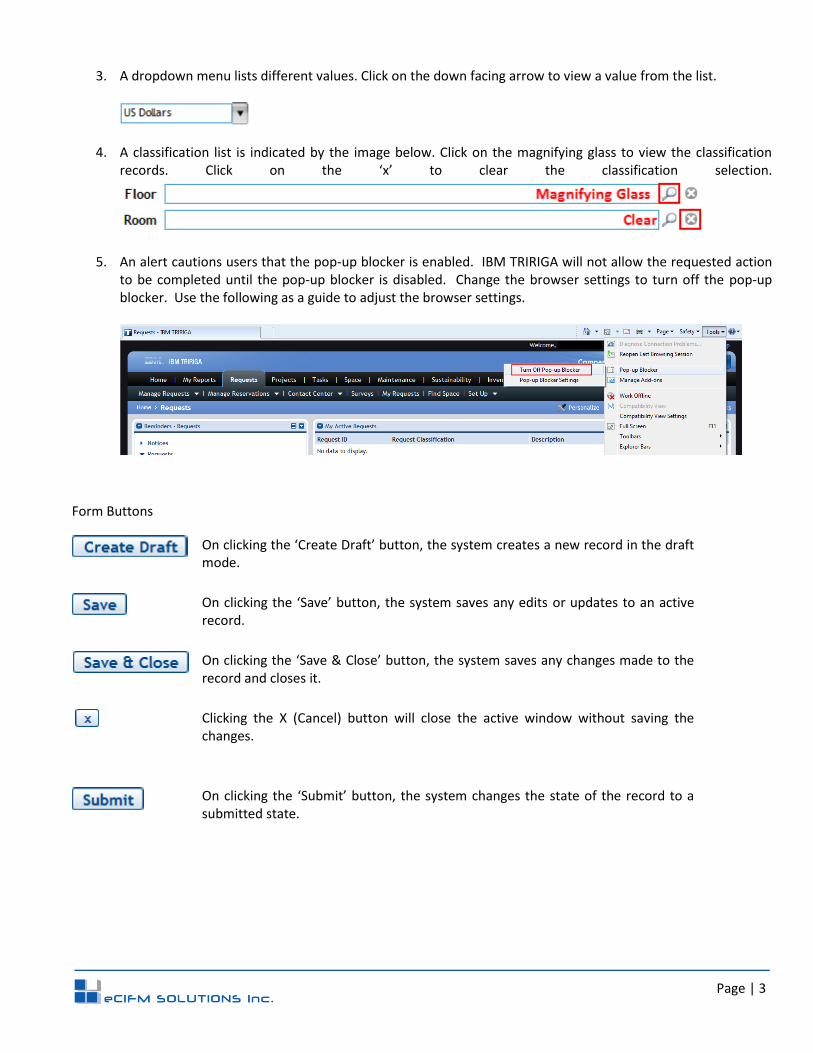
3. A dropdown menu lists different values. Click on the down facing arrow to view a value from the list.
4. A classification list is indicated by the image below. Click on the magnifying glass to view the classification records. Click on the ‘x’ to clear the classification selection.
5. An alert cautions users that the pop-up blocker is enabled. IBM TRIRIGA will not allow the requested action to be completed until the pop-up blocker is disabled. Change the browser settings to turn off the pop-up blocker. Use the following as a guide to adjust the browser settings.
Form Buttons
On clicking the ‘Create Draft’ button, the system creates a new record in the draft mode.
On clicking the ‘Save’ button, the system saves any edits or updates to an active record.
On clicking the ‘Save & Close’ button, the system saves any changes made to the record and closes it.
Clicking the X (Cancel) button will close the active window without saving the changes.
On clicking the ‘Submit’ button, the system changes the state of the record to a submitted state.
Page | 4
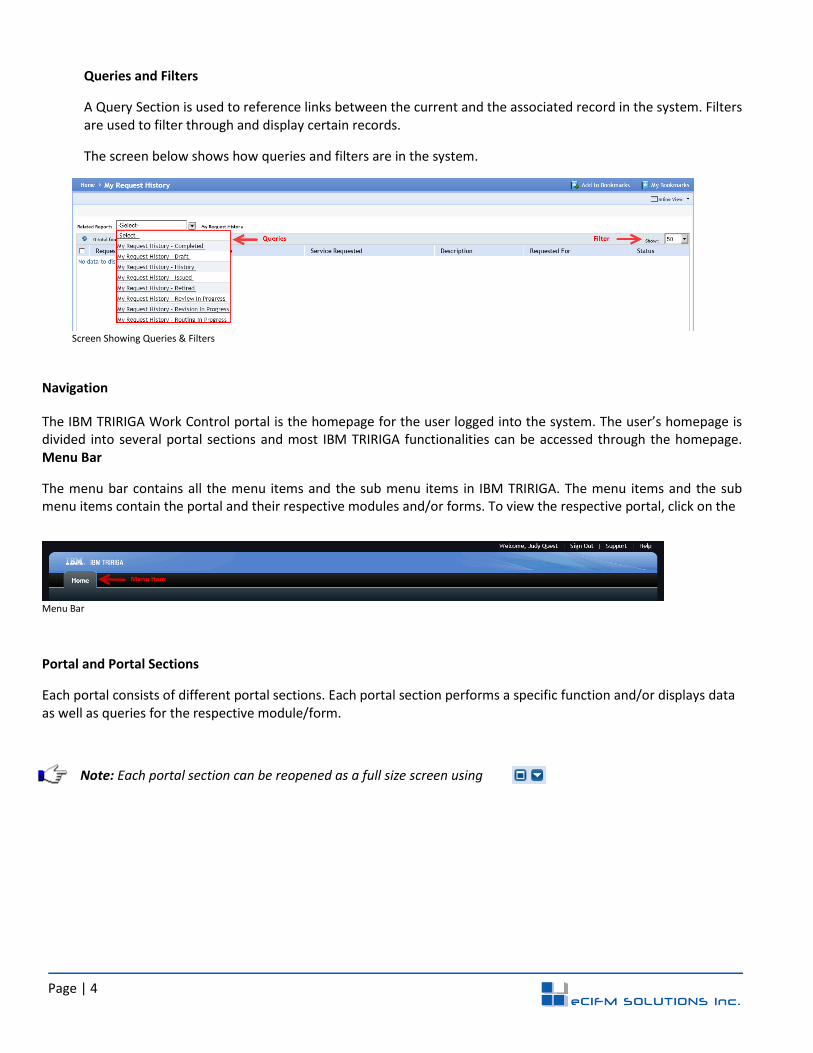
Queries and Filters
A Query Section is used to reference links between the current and the associated record in the system. Filters are used to filter through and display certain records.
The screen below shows how queries and filters are in the system.
Screen Showing Queries & Filters
Navigation
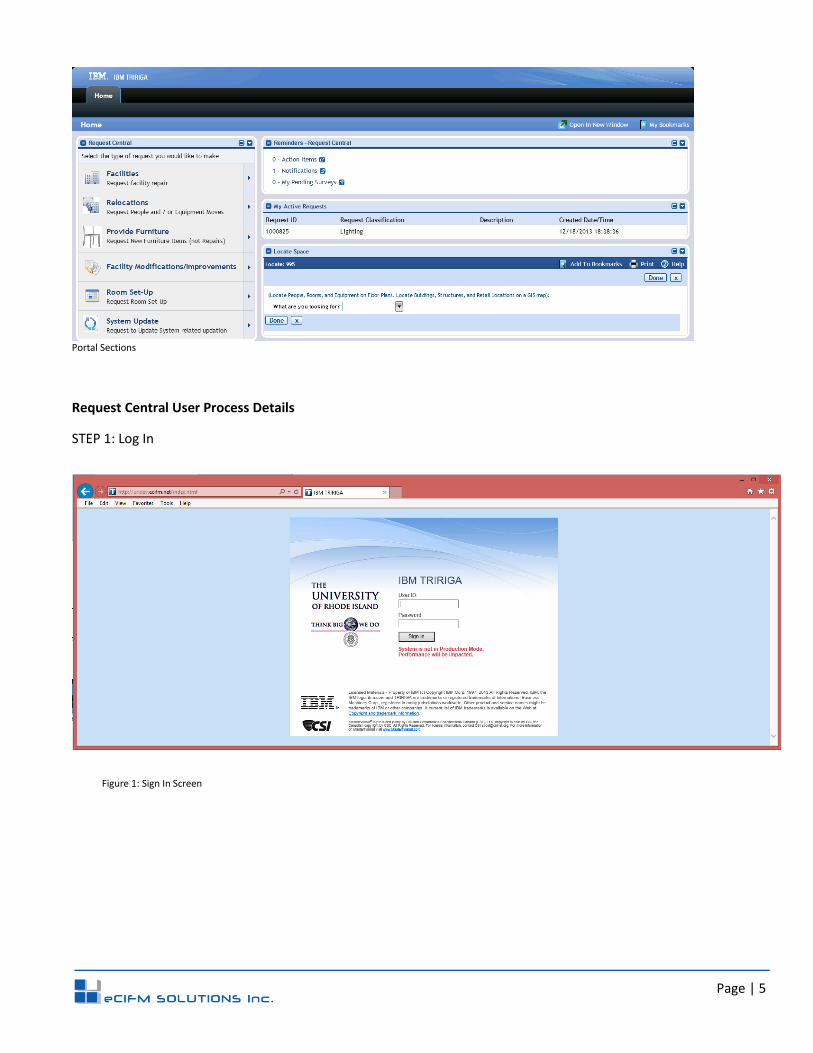
The IBM TRIRIGA Work Control portal is the homepage for the user logged into the system. The user’s homepage is divided into several portal sections and most IBM TRIRIGA functionalities can be accessed through the homepage. Menu Bar
The menu bar contains all the menu items and the sub menu items in IBM TRIRIGA. The menu items and the sub menu items contain the portal and their respective modules and/or forms. To view the respective portal, click on the
Menu Bar
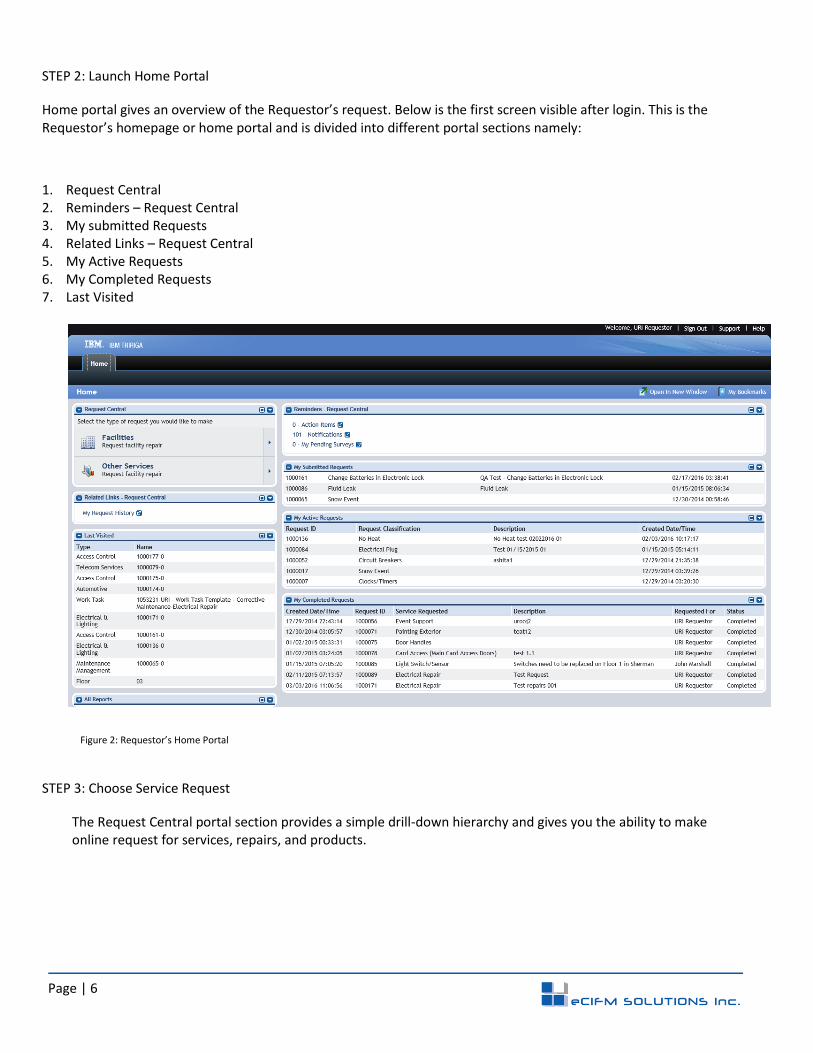
Portal and Portal Sections
Each portal consists of different portal sections. Each portal section performs a specific function and/or displays data as well as queries for the respective module/form.
Note: Each portal section can be reopened as a full size screen using
Page | 5
Portal Sections
Request Central User Process Details
STEP 1: Log In
Figure 1: Sign In Screen
Page | 6
STEP 2: Launch Home Portal
Home portal gives an overview of the Requestor’s request. Below is the first screen visible after login. This is the Requestor’s homepage or home portal and is divided into different portal sections namely:
1. Request Central 2. Reminders – Request Central 3. My submitted Requests 4. Related Links – Request Central 5. My Active Requests 6. My Completed Requests 7. Last Visited
Figure 2: Requestor’s Home Portal
STEP 3: Choose Service Request
The Request Central portal section provides a simple drill-down hierarchy and gives you the ability to make online request for services, repairs, and products.
Page | 7
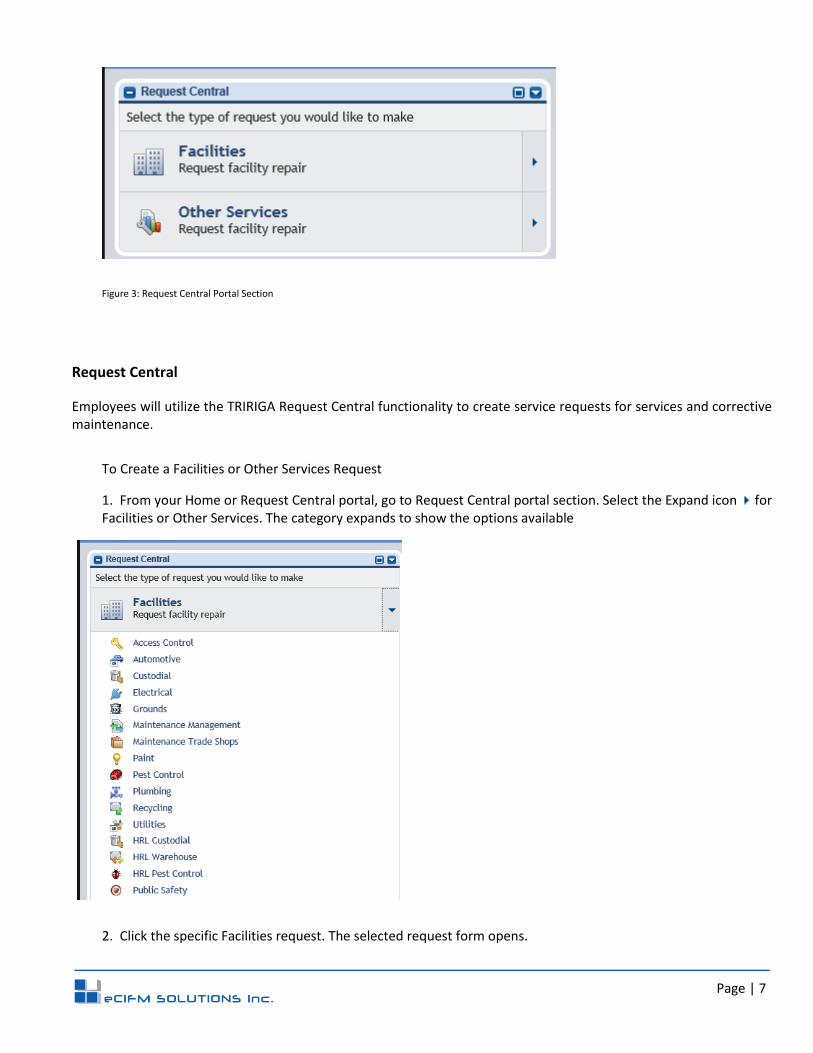
Figure 3: Request Central Portal Section
Request Central
Employees will utilize the TRIRIGA Request Central functionality to create service requests for services and corrective maintenance.
To Create a Facilities or Other Services Request
1. From your Home or Request Central portal, go to Request Central portal section. Select the Expand icon for Facilities or Other Services. The category expands to show the options available
2. Click the specific Facilities request. The selected request form opens.
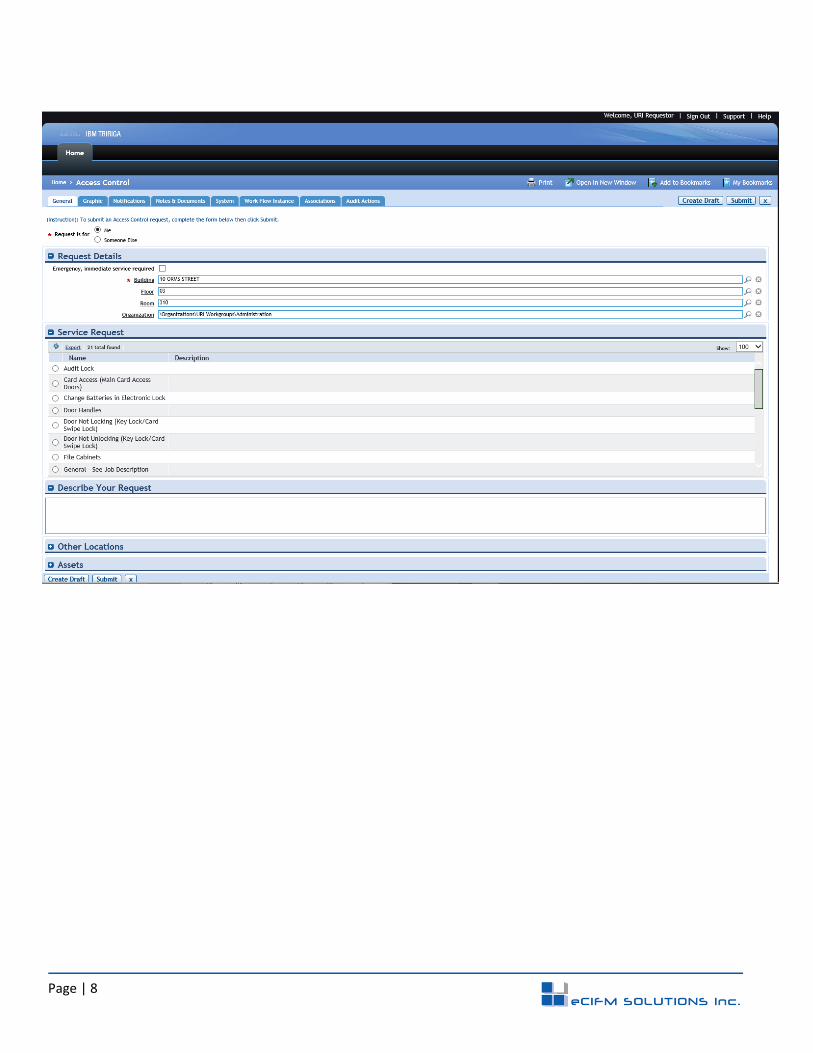
Page | 8

Page | 9
All Facilities Request forms will look similar to the screenshot below. You will notice two things that will change.
The Facilities request name and the Service Request options.
The requestor has two options in the first section. They can choose ‘Me’ or ‘Someone Else’ for the Facilities request. If they choose ‘Someone Else,’ they will see a ‘Requested For’ (ensure you input the person’s name who this is requested for) and ‘Requested By’ section.
Tip: After the required fields are filled in the General Tab, its good practice to click on Create Draft.
1. Select who the Request is for 2. The Building, Floor, Room and Organization fields can be auto populated with the one associated to the users profile. If you are creating the request for someone else, it will show their information.
3. Describe your request 4. Then click on Submit