Embed Size (px)
Citation preview

1
Reports
2
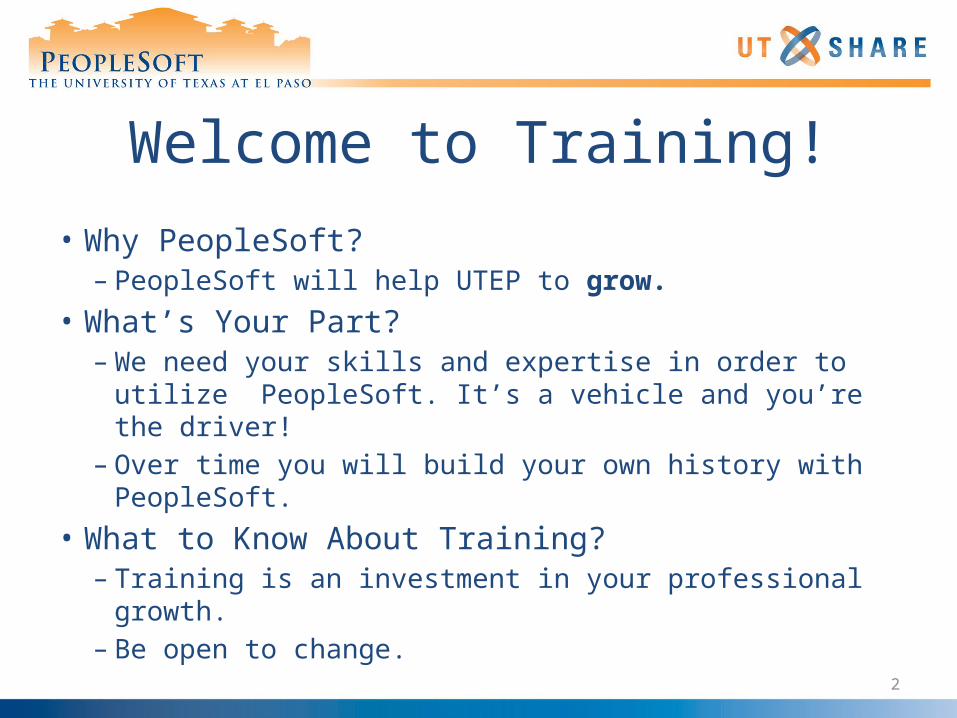
Welcome to Training!
• Why PeopleSoft?– PeopleSoft will help UTEP to grow.
• What’s Your Part?– We need your skills and expertise in order to utilize
PeopleSoft. It’s a vehicle and you’re the driver!– Over time you will build your own history with
PeopleSoft.• What to Know About Training? – Training is an investment in your professional growth.– Be open to change.
3
Setting Expectations
• Only core functionality will be available at go-live.• We’re starting with limited workflow—we’ll be
using interim approval processes outside of PeopleSoft for certain HR & Financial transactions.
• We’ll have to work through the kinks—some functionality may not work smoothly right at implementation.
• We’ll have to be patient—we’ll need additional time to process and enter transactions in the beginning.
4
What Can You Do?
• Feel free to ask questions and take notes.• Contact the Help Desk if you encounter a glitch or
forget how to complete a transaction.• Revisit the training webpage to review training
materials and videos.• Become your office’s “Go-To” person. Be willing to
offer your help. • Attend our Drop-In Help Sessions—open lab time can
be used to process live documents/transactions.
5
Setting up Different Reports
• Reports have unique navigation paths.• A list of available reports with their navigation
paths can be found on the Resources page of the PeopleSoft website.
• Tip: You can save report navigation paths to your Favorites for easy access.
• Most reports will require that you create a Run Control ID prior to running the report.
6
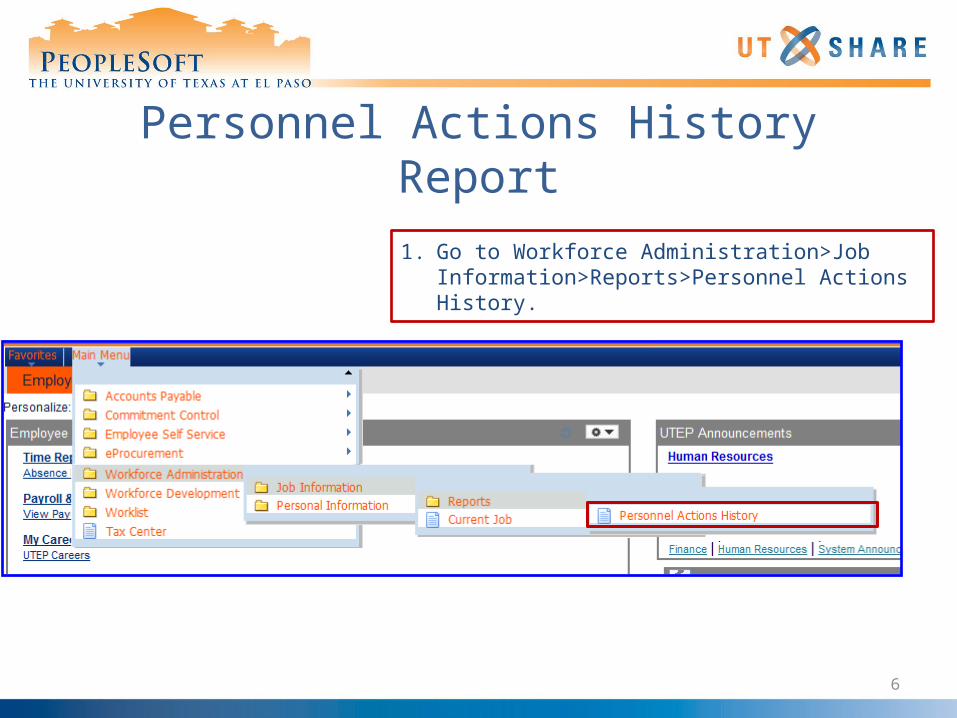
Personnel Actions History Report
1. Go to Workforce Administration>Job Information>Reports>Personnel Actions History.
7
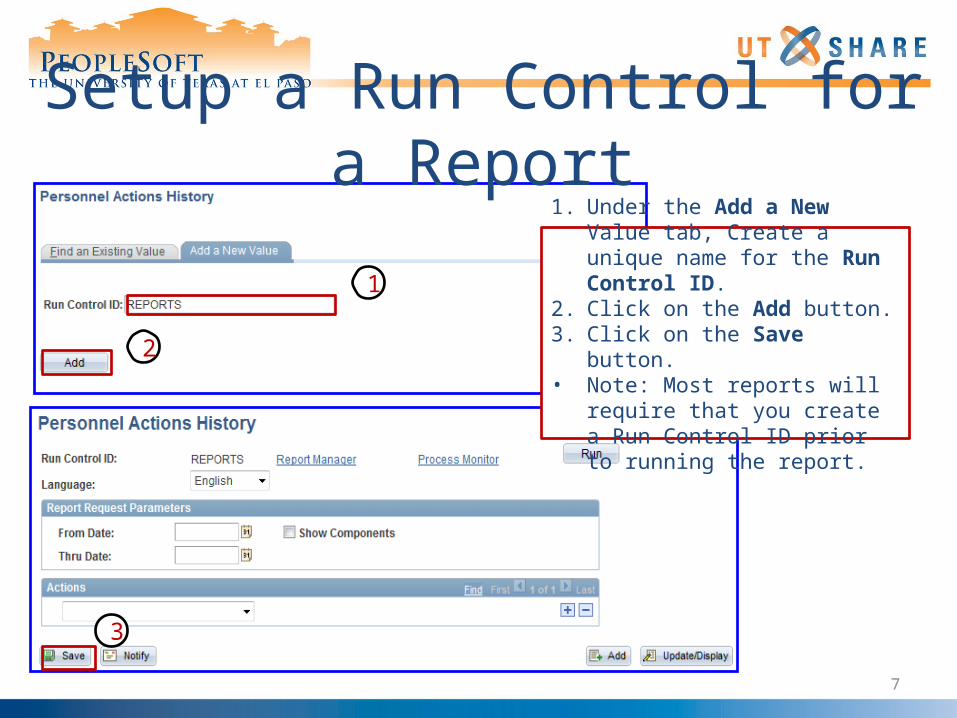
Setup a Run Control for a Report
1
2
3
1. Under the Add a New Value tab, Create a unique name for the Run Control ID.
2. Click on the Add button.3. Click on the Save button.• Note: Most reports will require that
you create a Run Control ID prior to running the report.
8
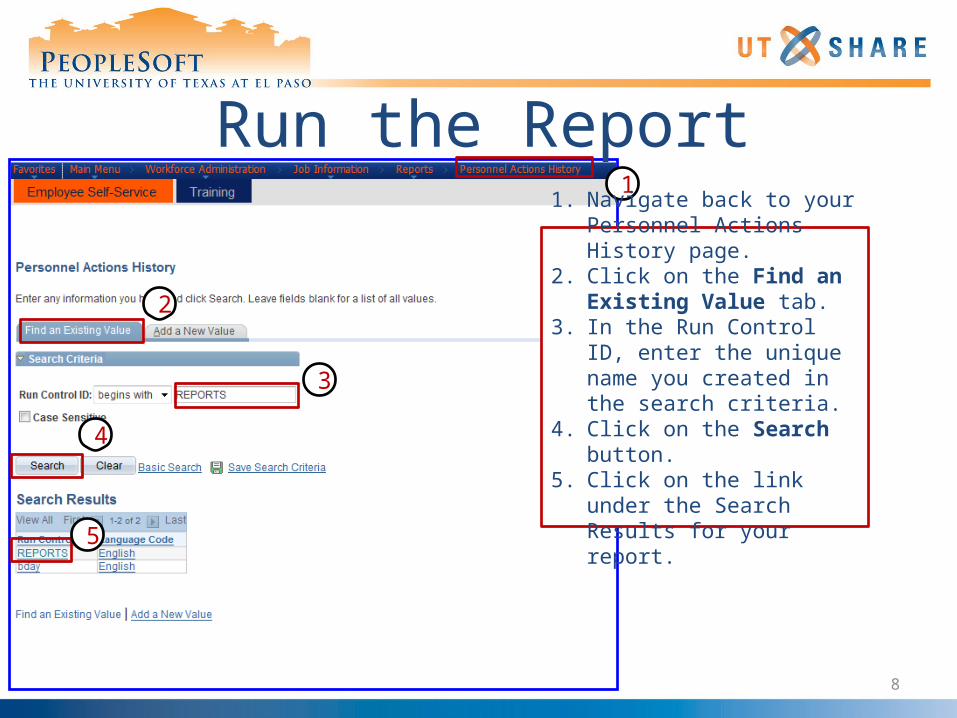
Run the Report1
2
3
1. Navigate back to your Personnel Actions History page.
2. Click on the Find an Existing Value tab.
3. In the Run Control ID, enter the unique name you created in the search criteria.
4. Click on the Search button.5. Click on the link under the
Search Results for your report.
4
5
Run the Report
10
9
7
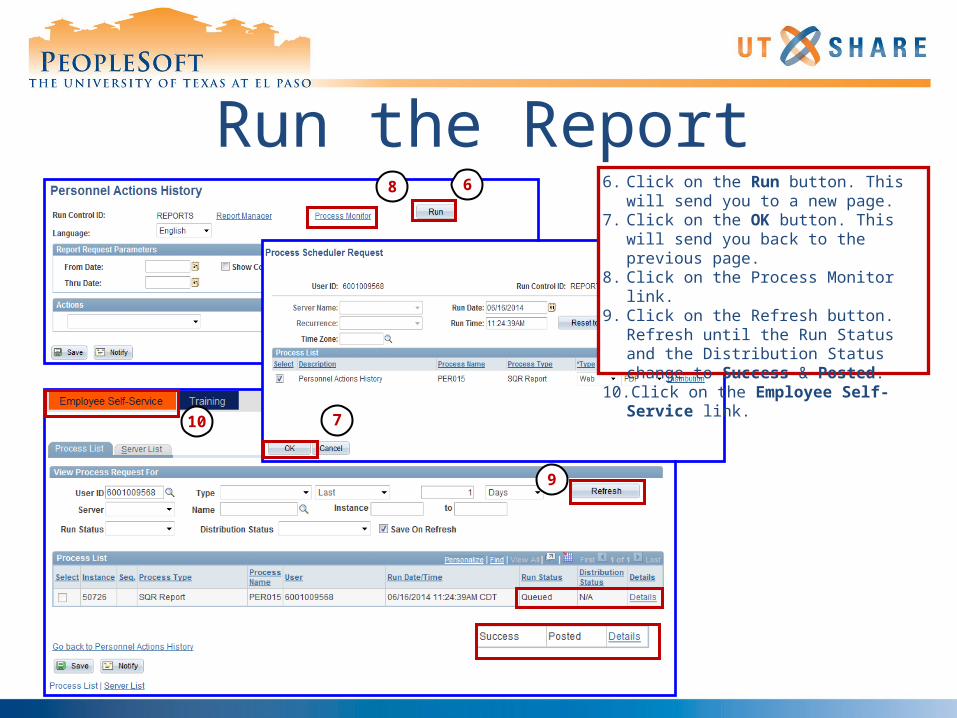
68 6. Click on the Run button. This will send you to a new page.
7. Click on the OK button. This will send you back to the previous page.
8. Click on the Process Monitor link.9. Click on the Refresh button. Refresh until
the Run Status and the Distribution Status change to Success & Posted.
10. Click on the Employee Self-Service link.
Run the Report
11
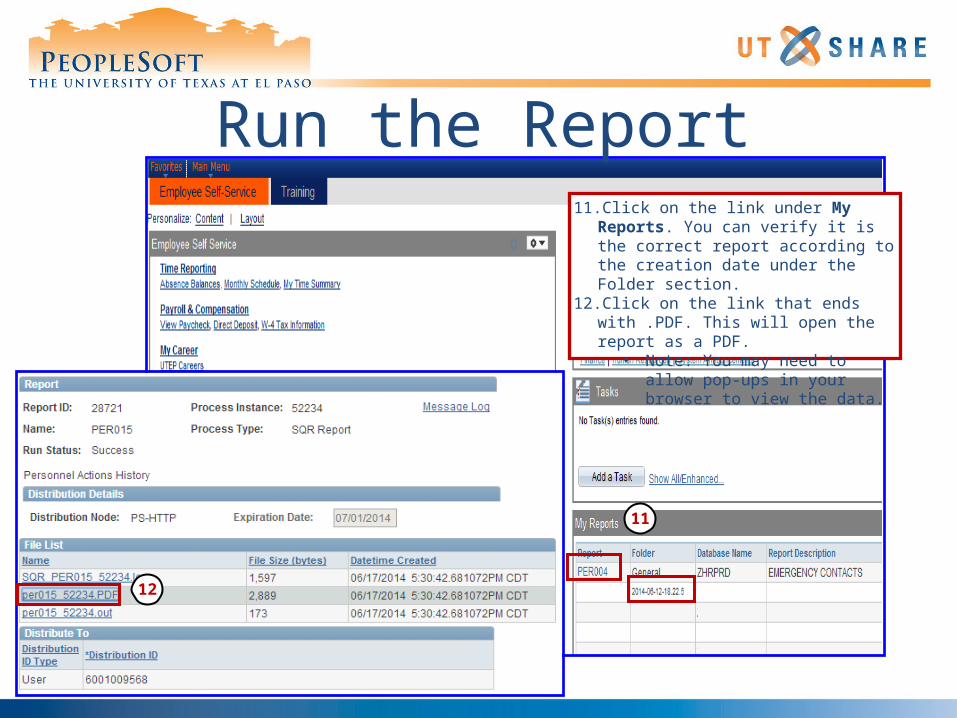
11. Click on the link under My Reports. You can verify it is the correct report according to the creation date under the Folder section.
12. Click on the link that ends with .PDF. This will open the report as a PDF.
• Note: You may need to allow pop-ups in your browser to view the data.
12
11
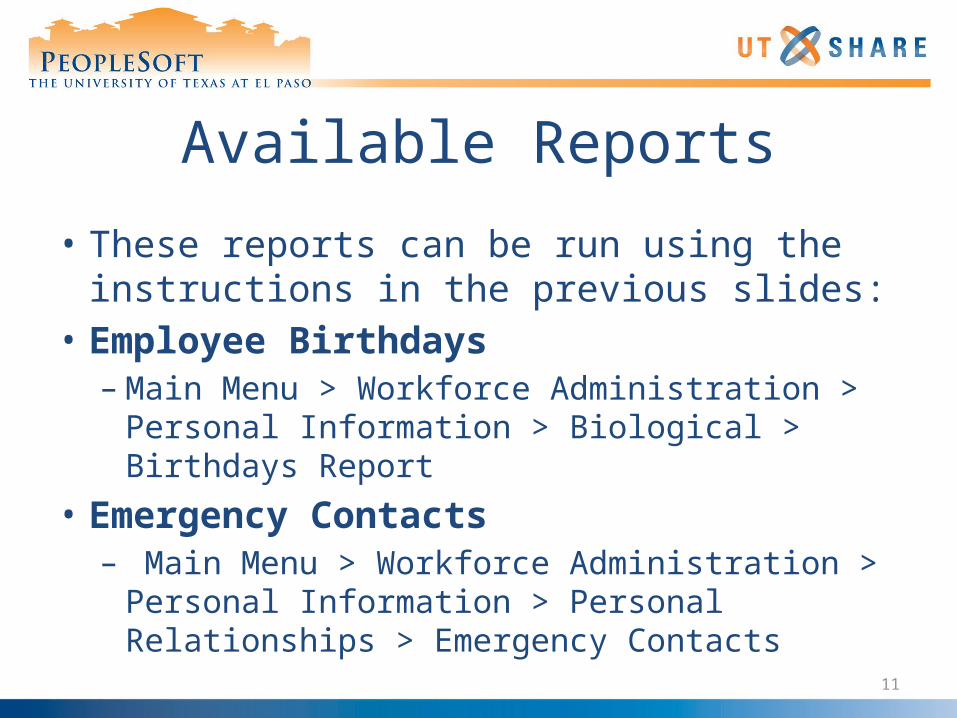
Available Reports
• These reports can be run using the instructions in the previous slides:
• Employee Birthdays– Main Menu > Workforce Administration > Personal
Information > Biological > Birthdays Report• Emergency Contacts– Main Menu > Workforce Administration > Personal
Information > Personal Relationships > Emergency Contacts
12
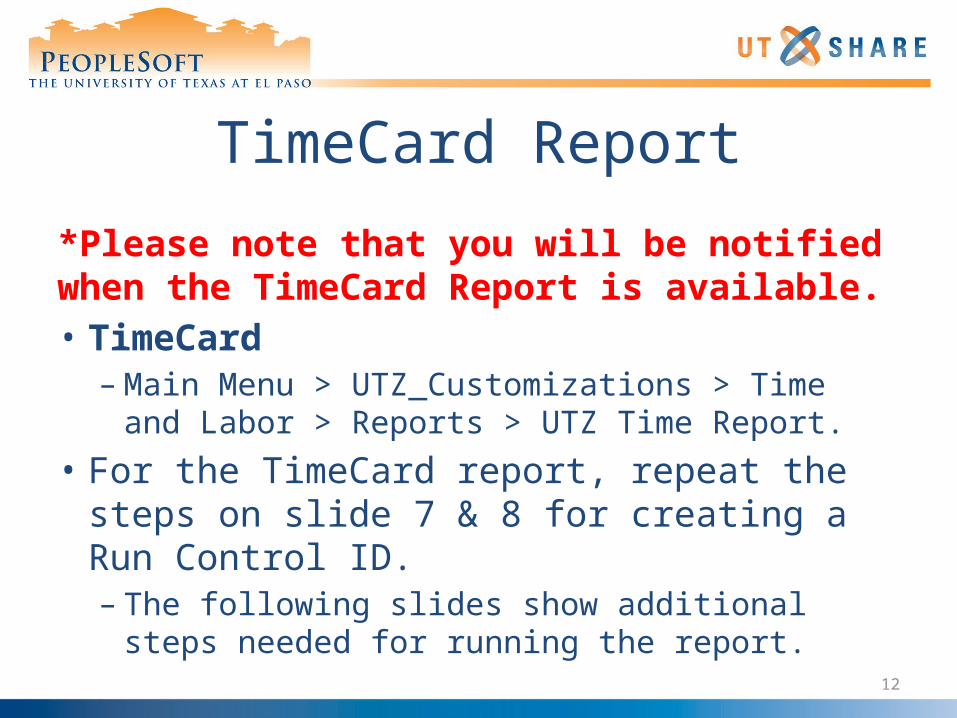
TimeCard Report
*Please note that you will be notified when the TimeCard Report is available.• TimeCard– Main Menu > UTZ_Customizations > Time and
Labor > Reports > UTZ Time Report. • For the TimeCard report, repeat the steps on
slide 7 & 8 for creating a Run Control ID. – The following slides show additional steps needed
for running the report.
13
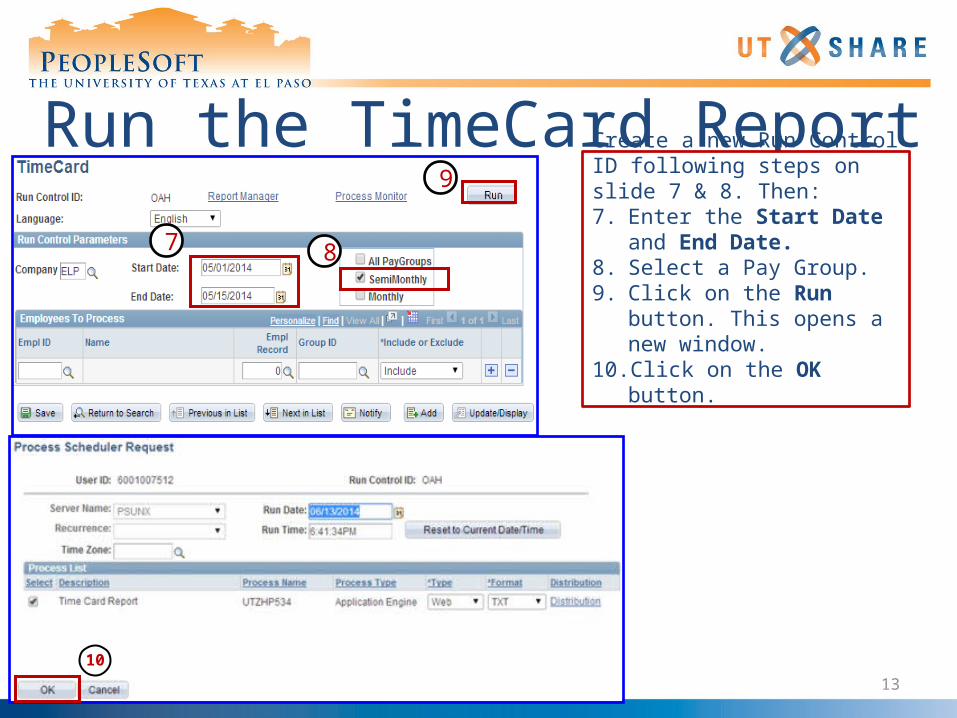
Run the TimeCard Report9
7
Create a new Run Control ID following steps on slide 7 & 8. Then:7. Enter the Start Date and End
Date.8. Select a Pay Group.9. Click on the Run button. This
opens a new window.10. Click on the OK button.
8
10

Run the TimeCard Report
11
12
13
11. Click on the Process Monitor link.12. Click on the Refresh button. Refresh
until the Run Status and the Distribution Status change to Success & Posted on the SQR Report line.
13. Click on the Details link.
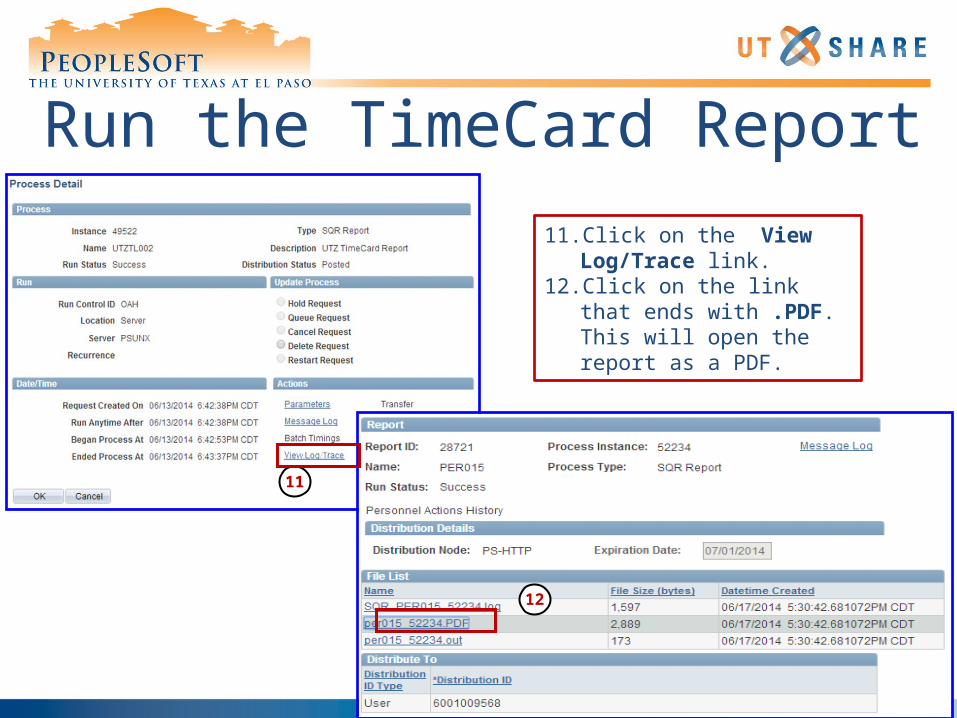
Run the TimeCard Report
11
11. Click on the View Log/Trace link.
12. Click on the link that ends with .PDF. This will open the report as a PDF.
12
16
References• Additional information and resources can be
found on the PeopleSoft website.
Job AidsPower Point slidesQuick GuidesCrosswalkUPKs
17
Questions?

18
Thank You!