Embed Size (px)
Citation preview

User’s Guide
for Commercial Buildings
© COPYRIGHT 1994-2007 AHIT, LTD.
ALL RIGHTS RESERVED
InspectIt ReportPlus for Commercial Buildings User’s Guide 2
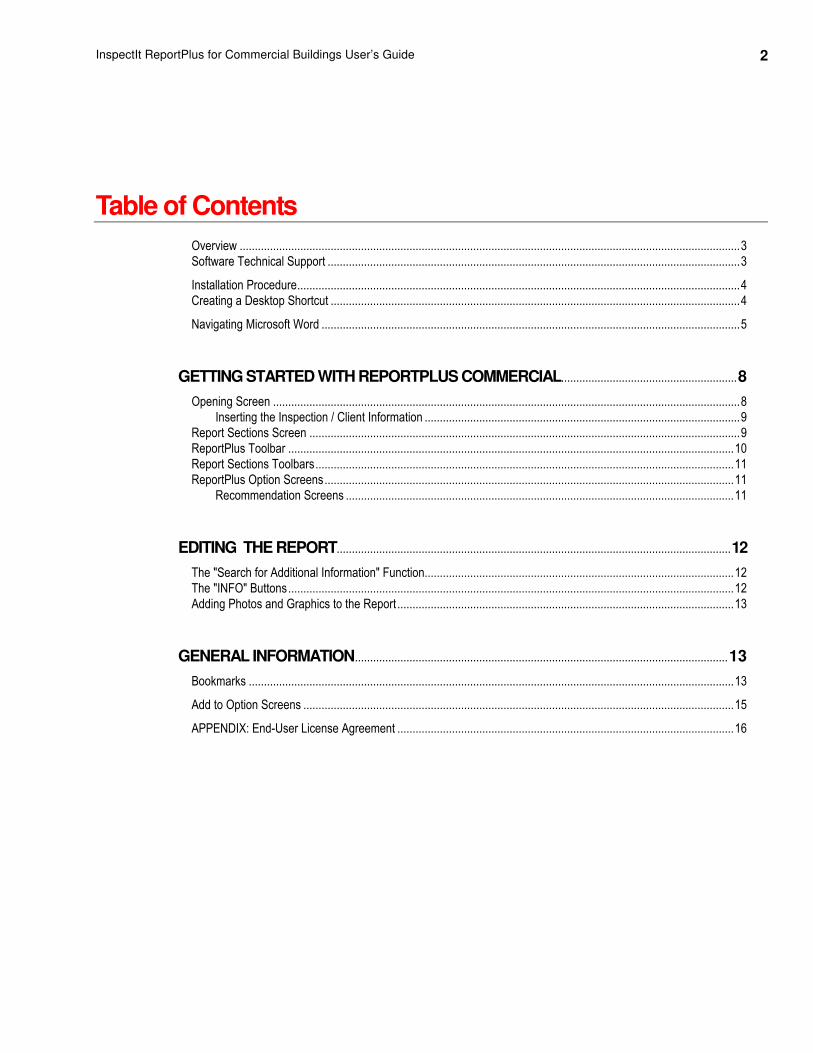
Table of Contents Overview .....................................................................................................................................................................3
Software Technical Support ........................................................................................................................................3
Installation Procedure..................................................................................................................................................4
Creating a Desktop Shortcut .......................................................................................................................................4
Navigating Microsoft Word ..........................................................................................................................................5
GETTING STARTED WITH REPORTPLUS COMMERCIAL..........................................................8
Opening Screen ..........................................................................................................................................................8
Inserting the Inspection / Client Information ........................................................................................................9
Report Sections Screen ..............................................................................................................................................9
ReportPlus Toolbar ...................................................................................................................................................10
Report Sections Toolbars..........................................................................................................................................11
ReportPlus Option Screens.......................................................................................................................................11
Recommendation Screens ................................................................................................................................11
EDITING THE REPORT..................................................................................................................................12
The "Search for Additional Information" Function......................................................................................................12
The "INFO" Buttons...................................................................................................................................................12
Adding Photos and Graphics to the Report ...............................................................................................................13
GENERAL INFORMATION...........................................................................................................................13
Bookmarks ................................................................................................................................................................13
Add to Option Screens ..............................................................................................................................................15
APPENDIX: End-User License Agreement ...............................................................................................................16
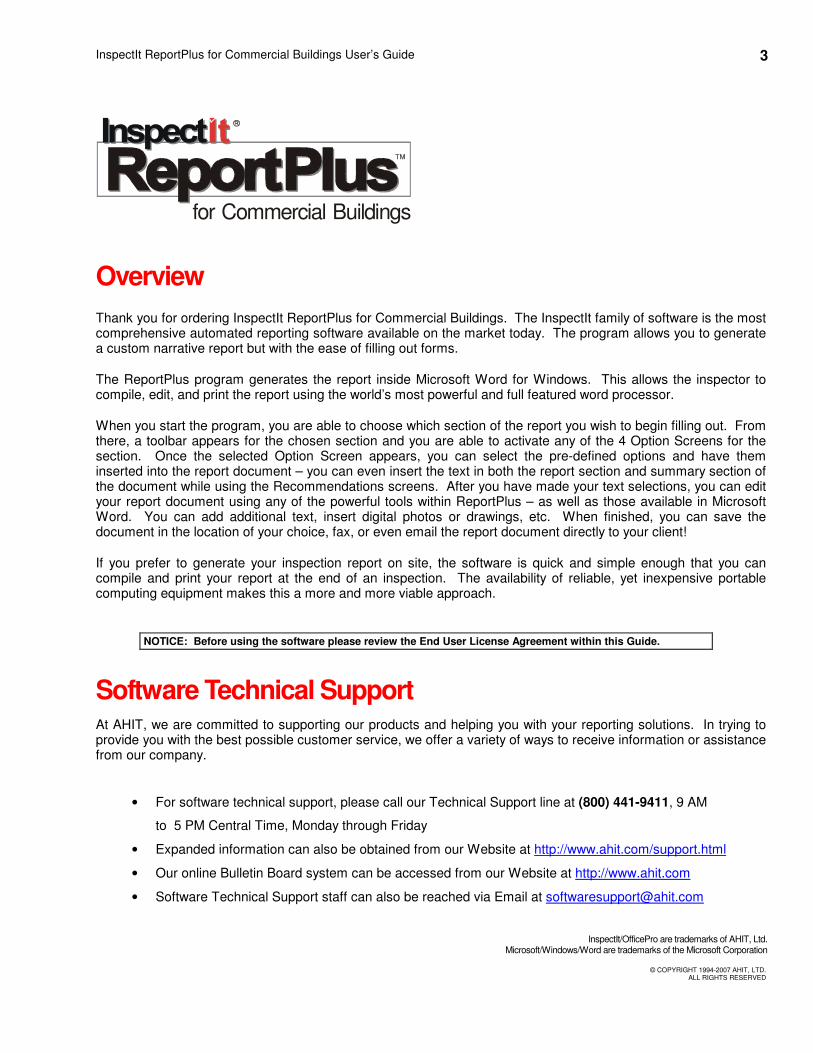
InspectIt ReportPlus for Commercial Buildings User’s Guide 3
for Commercial Buildings
Overview Thank you for ordering InspectIt ReportPlus for Commercial Buildings. The InspectIt family of software is the most comprehensive automated reporting software available on the market today. The program allows you to generate a custom narrative report but with the ease of filling out forms.
The ReportPlus program generates the report inside Microsoft Word for Windows. This allows the inspector to compile, edit, and print the report using the world’s most powerful and full featured word processor.
When you start the program, you are able to choose which section of the report you wish to begin filling out. From there, a toolbar appears for the chosen section and you are able to activate any of the 4 Option Screens for the section. Once the selected Option Screen appears, you can select the pre-defined options and have them inserted into the report document – you can even insert the text in both the report section and summary section of the document while using the Recommendations screens. After you have made your text selections, you can edit your report document using any of the powerful tools within ReportPlus – as well as those available in Microsoft Word. You can add additional text, insert digital photos or drawings, etc. When finished, you can save the document in the location of your choice, fax, or even email the report document directly to your client!
If you prefer to generate your inspection report on site, the software is quick and simple enough that you can compile and print your report at the end of an inspection. The availability of reliable, yet inexpensive portable computing equipment makes this a more and more viable approach.
NOTICE: Before using the software please review the End User License Agreement within this Guide.
Software Technical Support At AHIT, we are committed to supporting our products and helping you with your reporting solutions. In trying to provide you with the best possible customer service, we offer a variety of ways to receive information or assistance from our company.
• For software technical support, please call our Technical Support line at (800) 441-9411, 9 AM
to 5 PM Central Time, Monday through Friday
• Expanded information can also be obtained from our Website at http://www.ahit.com/support.html
• Our online Bulletin Board system can be accessed from our Website at http://www.ahit.com
• Software Technical Support staff can also be reached via Email at [email protected]
InspectIt/OfficePro are trademarks of AHIT, Ltd. Microsoft/Windows/Word are trademarks of the Microsoft Corporation
© COPYRIGHT 1994-2007 AHIT, LTD.
ALL RIGHTS RESERVED
InspectIt ReportPlus for Commercial Buildings User’s Guide 4
Installation Procedure Step-by-step instructions are provided during the installation process for both our installation CD’s and our on-line installation process. Should you have any problems, or require assistance while using the installation programs, please do not hesitate to contact our Software Technical Support. Microsoft Word is required to use our software, so please make sure that Word is closed during the installation process. The installation consists of copying files from the CD to a C:\InspectIt folder. The installation program will then switch the location of your User Templates folder to: C:\InspectIt\ReportPlus (if you are using ReportPlus or standalone) or C:\InspectIt\ReportPro for Texas (if you are using the ReportPro for Texas software). The ReportPlus template will be active the next time Word is run.
If you have existing templates created within Word and still wish to use them, you will need to copy these template files to the new User Templates location of either C:\InspectIt\ReportPlus or C:\InspectIt\ReportPro for Texas System requirements are:
Microsoft® Windows™ 98 or later
Microsoft® Word™ 97 or later
Pentium or higher processor
128 MB RAM (512 MB recommended)
12 MB of free space on hard drive
Internet connection (for report purchasing/synchronizing only)
Creating a Desktop Shortcut
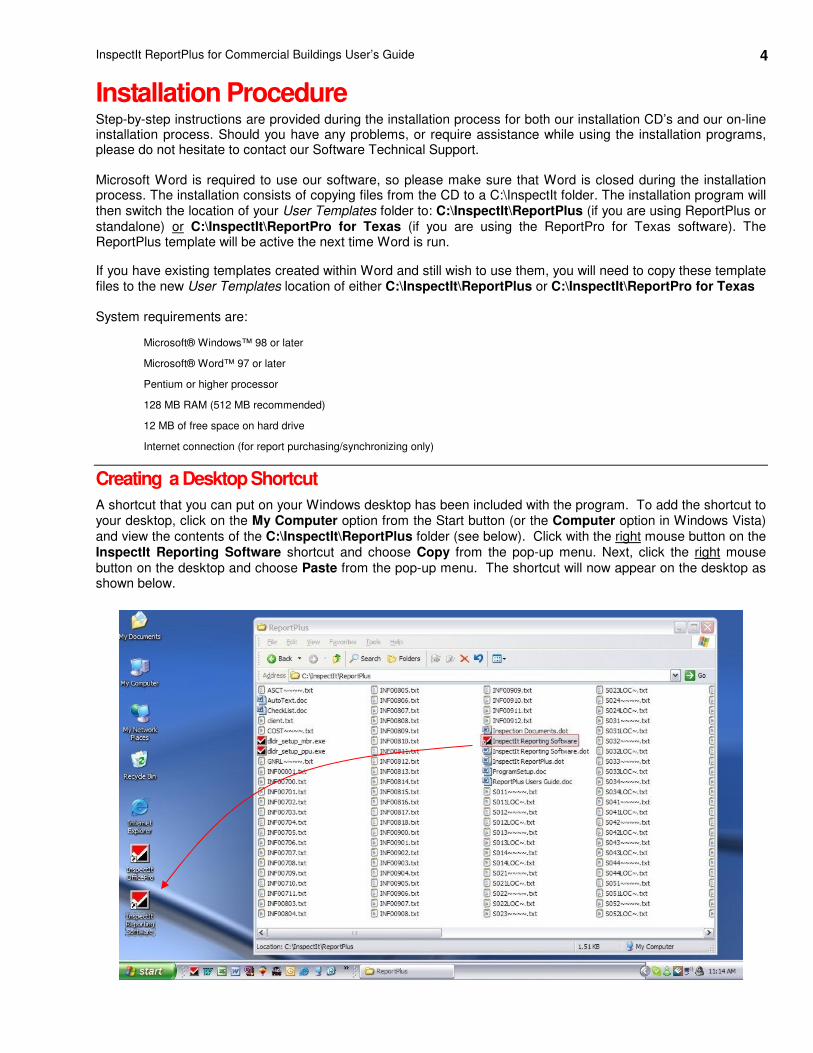
A shortcut that you can put on your Windows desktop has been included with the program. To add the shortcut to your desktop, click on the My Computer option from the Start button (or the Computer option in Windows Vista) and view the contents of the C:\InspectIt\ReportPlus folder (see below). Click with the right mouse button on the InspectIt Reporting Software shortcut and choose Copy from the pop-up menu. Next, click the right mouse button on the desktop and choose Paste from the pop-up menu. The shortcut will now appear on the desktop as shown below.
InspectIt ReportPlus for Commercial Buildings User’s Guide 5
Navigating Microsoft Word Using the ReportPlus software means that you will need to be able to navigate through Microsoft Word. To help you understand Word, we have put together a few of the basic terms and features that we feel you will need to use our program. Additional information can be found in Word from the Help option.
Navigate the Word Screen
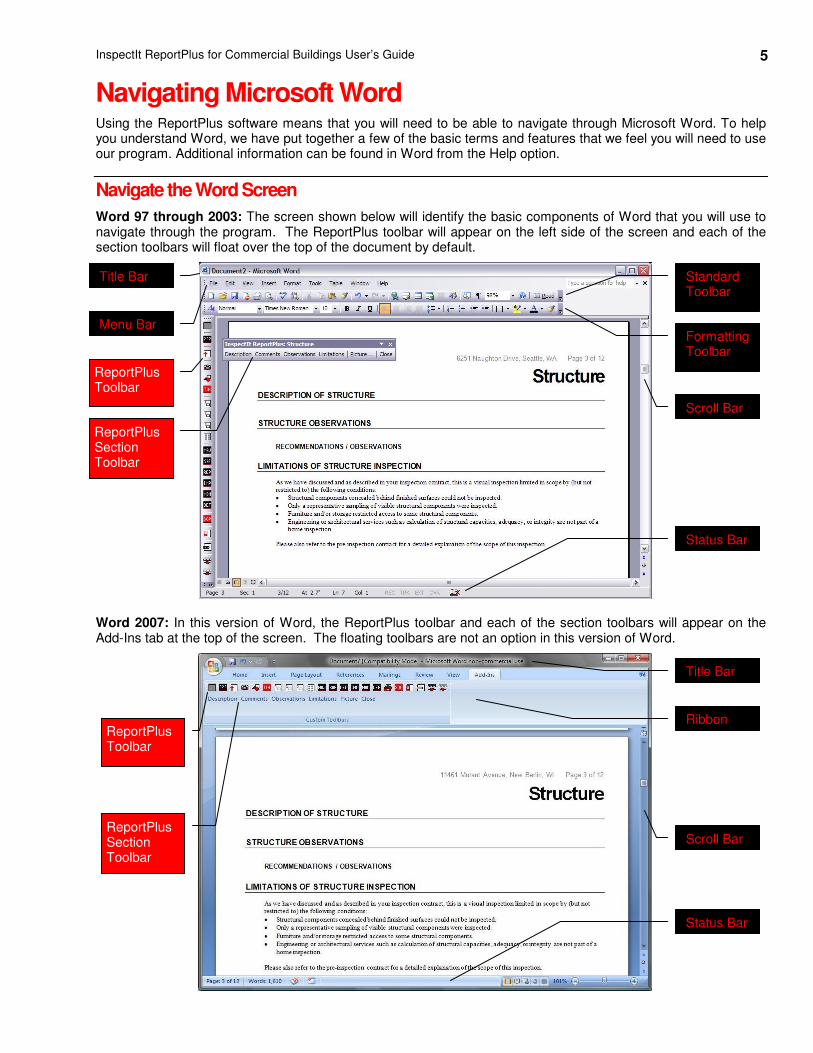
Word 97 through 2003: The screen shown below will identify the basic components of Word that you will use to navigate through the program. The ReportPlus toolbar will appear on the left side of the screen and each of the section toolbars will float over the top of the document by default.
Word 2007: In this version of Word, the ReportPlus toolbar and each of the section toolbars will appear on the Add-Ins tab at the top of the screen. The floating toolbars are not an option in this version of Word.
Title Bar
Menu Bar
Standard Toolbar
Formatting Toolbar
Scroll Bar
Status Bar
ReportPlus Toolbar
ReportPlus Section Toolbar
Title Bar
ReportPlus Toolbar
ReportPlus Section Toolbar
Ribbon
Scroll Bar
Status Bar
InspectIt ReportPlus for Commercial Buildings User’s Guide 6
Using the Keyboard and Highlighting Shortcuts within Word
While Microsoft Windows is thought of as a “point-and-click” interface, the keyboard can also be used to effectively navigate many Windows applications. Microsoft Word is no different and has proven this by the many different ways to navigate within their program. In addition to using the mouse in a point-click fashion, Word also allows you to use the keyboard with what they call keyboard shortcuts. These are key strokes in which you press two or more keys simultaneously to accomplish many functions. In the keyboard combinations shown below, keys pressed at the same time are separated by a plus (+) sign. You may find that, with practice, a combination of keyboard and mouse functions can substantially speed up your work, and working in ReportPlus software will be no exception.
Common tasks done in Word Bold letters Ctrl+B Italic letters Ctrl+I Underlining Ctrl+U Copy Ctrl+C Cut Ctrl+X Paste Ctrl+V Undo Ctrl+Z Select all Ctrl+A Selecting Text by mouse
Any amount of text Drag over the text. A word Double-click the word. A line of text Move the pointer to the left of the line until it changes to a right-
pointing arrow, and then click. A sentence Hold down CTRL, and then click anywhere in the sentence. A paragraph Move the pointer to the left of the paragraph until it changes to a right-
pointing arrow, and then double-click. Or triple-click anywhere in the paragraph.
A graphic Click the graphic. A text box or frame Move the pointer over the border of the frame or text box until the
pointer becomes a four-headed arrow, and then click to see the sizing handles (sizing handle: One of the small circles or squares that appears at the corners and sides of a selected object. You drag these handles to change the size of the object.).
Selecting Text by keyboard
One character to the right SHIFT+RIGHT ARROW
One character to the left SHIFT+LEFT ARROW To the end of a word CTRL+SHIFT+RIGHT ARROW
The beginning of a word CTRL+SHIFT+LEFT ARROW To the end of a line SHIFT+END
To the beginning of a line SHIFT+HOME One line down SHIFT+DOWN ARROW One line up SHIFT+UP ARROW To the end of a paragraph CTRL+SHIFT+DOWN ARROW The beginning of a paragraph CTRL+SHIFT+UP ARROW
One screen down SHIFT+PAGE DOWN One screen up SHIFT+PAGE UP To the beginning of a document CTRL+SHIFT+HOME To the end of a document CTRL+SHIFT+END To the end of a window ALT+CTRL+SHIFT+PAGE DOWN
To include the entire document CTRL+A
NOTE: Many more keyboard shortcuts can be found in the Help menu within Word
InspectIt ReportPlus for Commercial Buildings User’s Guide 7
The “Undo” Feature in Word One of the features of Microsoft Word is the Undo command. This feature can be accessed from the Edit menu (or the Title Bar in Word 2007) or from the Undo button (shown at the beginning of this paragraph).
You can actually undo multiple actions; up to the last 100 that have been performed on the document. If you inserted the wrong text into your report, click on the Undo button until the unwanted text is cleared. The keyboard command for the undo feature is Ctrl+Z.
Deleting Sections or Pages from the Report Document To delete a specific section or page from the report, simply highlight the entire page and press either the Backspace key or Delete key on your keyboard. Be sure to include the page break at the bottom of the page as you are highlighting, if it includes one.
Saving a Word Document In Word, to Save a document, go to File on the menu bar (or the Office Logo in Word 2007) and select Save. You can also use the keyboard shortcut Ctrl+S or select the Save button on the toolbar.
Save your work often! Take advantage of Word’s AutoRecover feature. Go to Tools on the menu toolbar, select Options in the Tools list then click on the Save tab (or click the Office Logo, choose Word Options, then Save in Word 2007). Next, select the ‘Save AutoRecover Info every’ feature and set it to the amount of minutes you wish for the save function to automatically run.
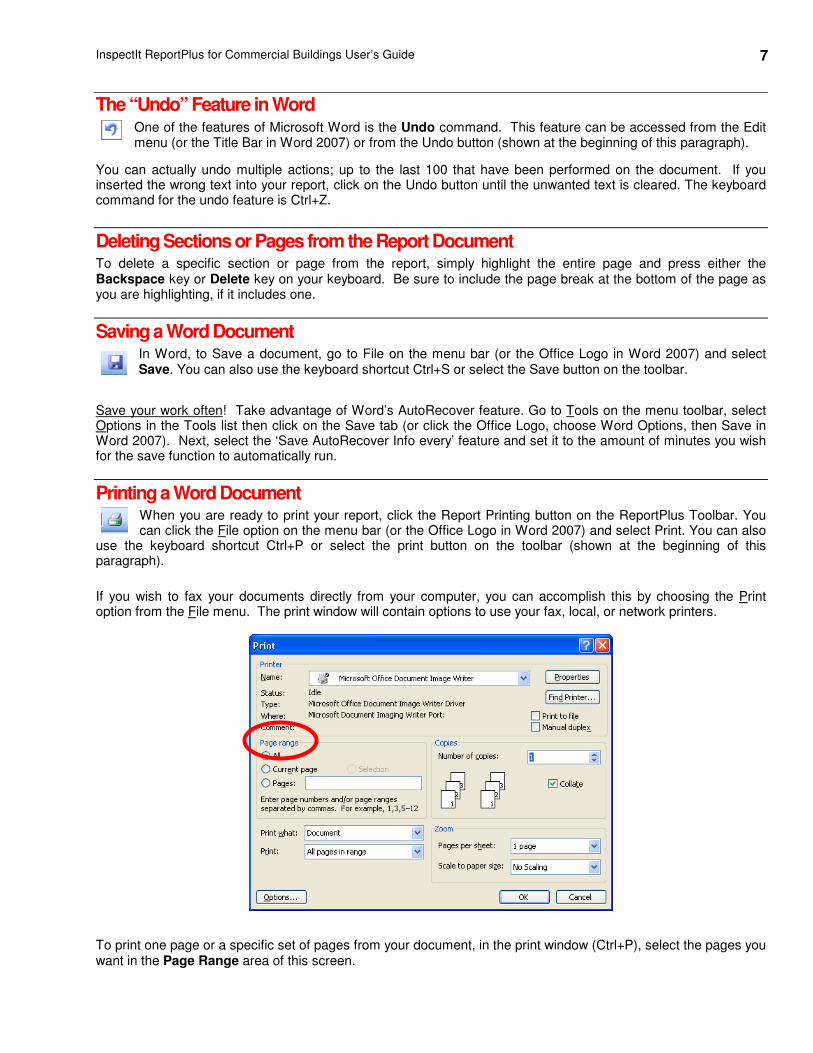
Printing a Word Document When you are ready to print your report, click the Report Printing button on the ReportPlus Toolbar. You can click the File option on the menu bar (or the Office Logo in Word 2007) and select Print. You can also
use the keyboard shortcut Ctrl+P or select the print button on the toolbar (shown at the beginning of this paragraph).
If you wish to fax your documents directly from your computer, you can accomplish this by choosing the Print option from the File menu. The print window will contain options to use your fax, local, or network printers. To print one page or a specific set of pages from your document, in the print window (Ctrl+P), select the pages you want in the Page Range area of this screen.
InspectIt ReportPlus for Commercial Buildings User’s Guide 8
Emailing the Report
If you wish to email your inspection documents, you can attach the inspection document to an email message through your email software. Please look to the documentation or help file within your email software if you are unsure about attaching files.
Should you be using photographs within your Word document, we would suggest converting the Word document to an Adobe Acrobat PDF file as this will decrease the document’s file size by up to 70%.
Note: Word documents can be saved as PDF files directly in Word 2007 by clicking on the Office logo and then choosing Save As. For
earlier versions of Word, you can install free PDF print drivers such as those found at http://www.primopdf.com or http://www.pdf995.com.
Getting Started with ReportPlus™ Commercial
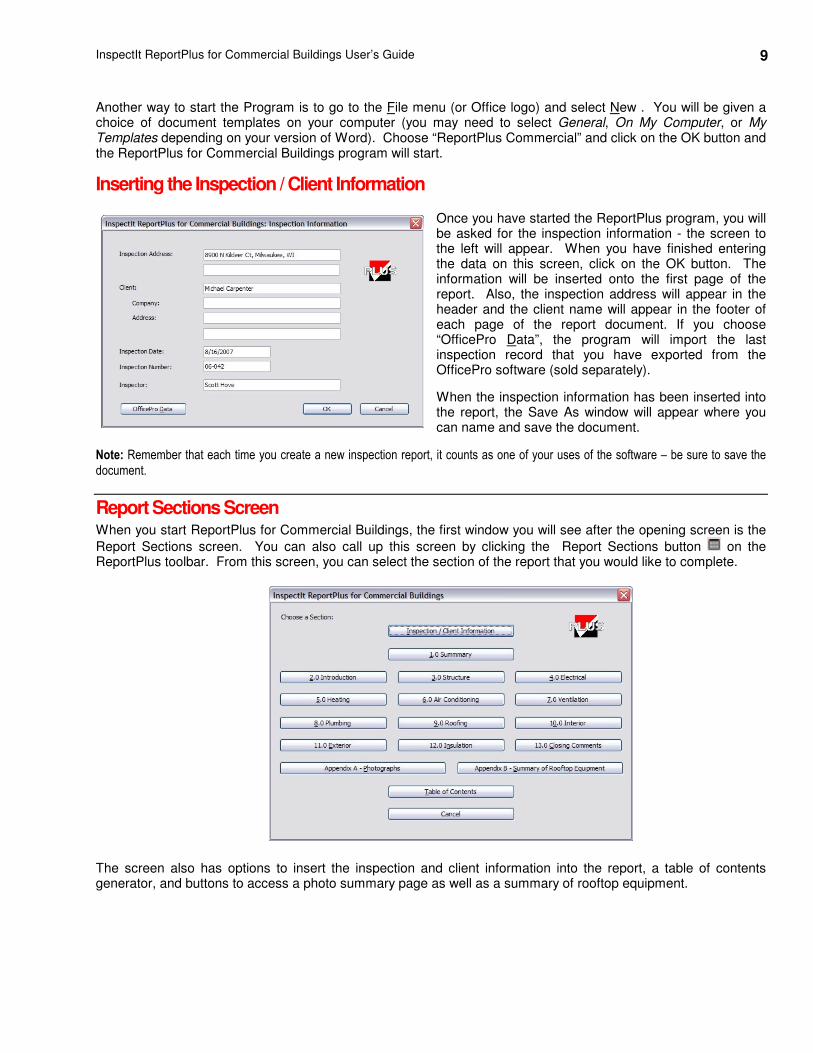
Clicking on the InspectIt Reporting Software shortcut icon will display the screen at right. You will be given the option to “Run ReportPlus” or “Run Commercial” - clicking on these buttons will start either the residential or commercial reporting programs.
If you choose “Open Existing Report”, you will be able to browse your computer to find reports that have already been created. Clicking on the “Report Download” button will cause a screen to appear where you can enter your username and password and download additional reports. If you are Pay-Per-Use, you can download in blocks of 10, 25, or 50 at a time. If you have purchased the software outright, you will just need to enter your username and password once every 50 inspection reports to verify that you are the registered user for the software.
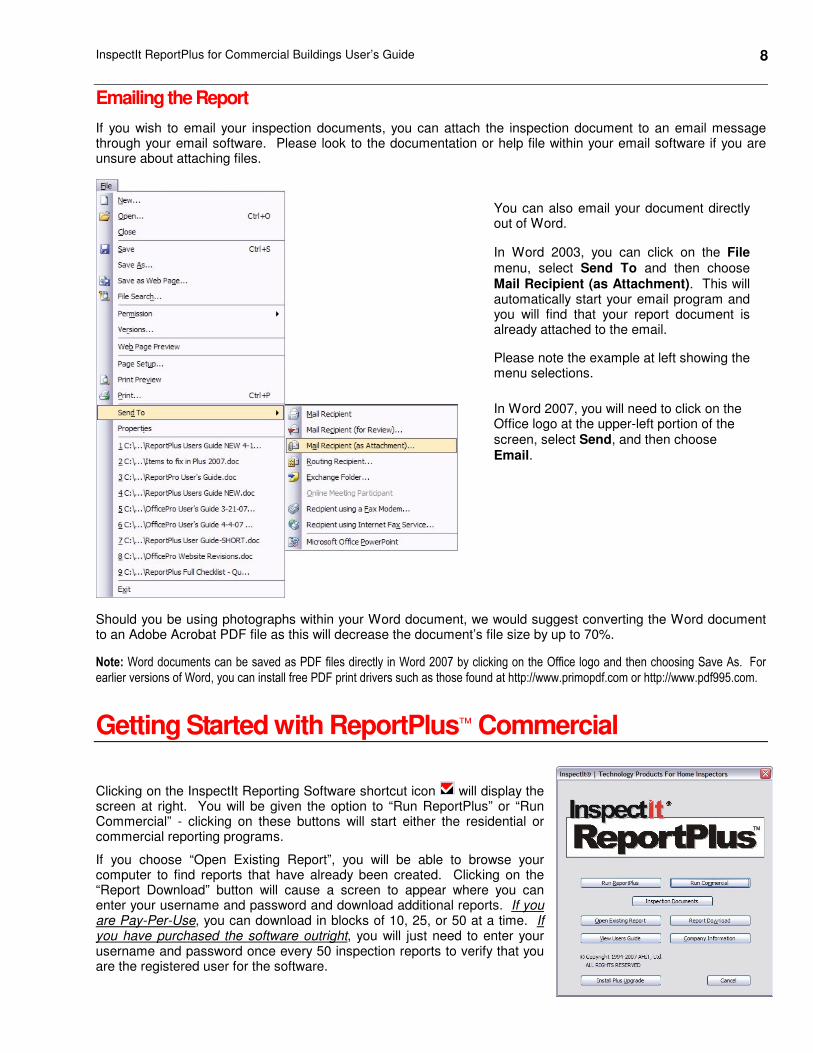
You can also email your document directly out of Word.
In Word 2003, you can click on the File menu, select Send To and then choose Mail Recipient (as Attachment). This will automatically start your email program and you will find that your report document is already attached to the email.
Please note the example at left showing the menu selections.
In Word 2007, you will need to click on the Office logo at the upper-left portion of the screen, select Send, and then choose Email.
InspectIt ReportPlus for Commercial Buildings User’s Guide 9
Another way to start the Program is to go to the File menu (or Office logo) and select New . You will be given a choice of document templates on your computer (you may need to select General, On My Computer, or My Templates depending on your version of Word). Choose “ReportPlus Commercial” and click on the OK button and the ReportPlus for Commercial Buildings program will start.
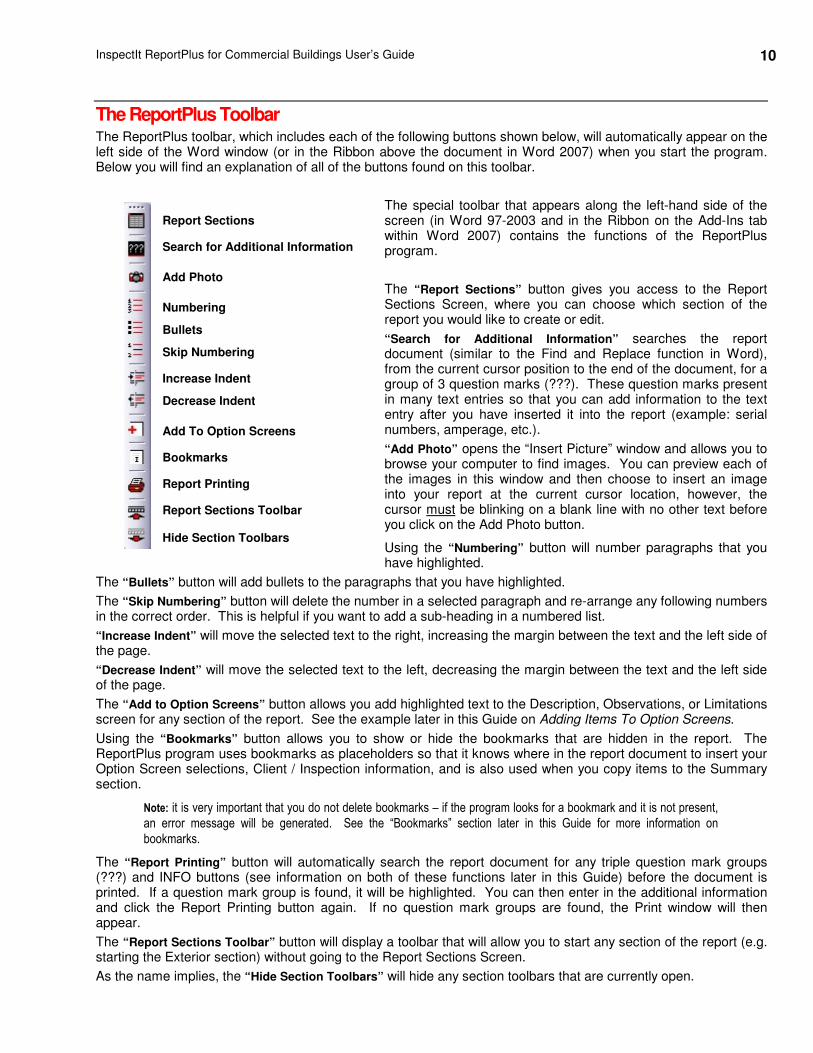
Inserting the Inspection / Client Information
Once you have started the ReportPlus program, you will be asked for the inspection information - the screen to the left will appear. When you have finished entering the data on this screen, click on the OK button. The information will be inserted onto the first page of the report. Also, the inspection address will appear in the header and the client name will appear in the footer of each page of the report document. If you choose “OfficePro Data”, the program will import the last inspection record that you have exported from the OfficePro software (sold separately).
When the inspection information has been inserted into the report, the Save As window will appear where you can name and save the document.
Note: Remember that each time you create a new inspection report, it counts as one of your uses of the software – be sure to save the
document.
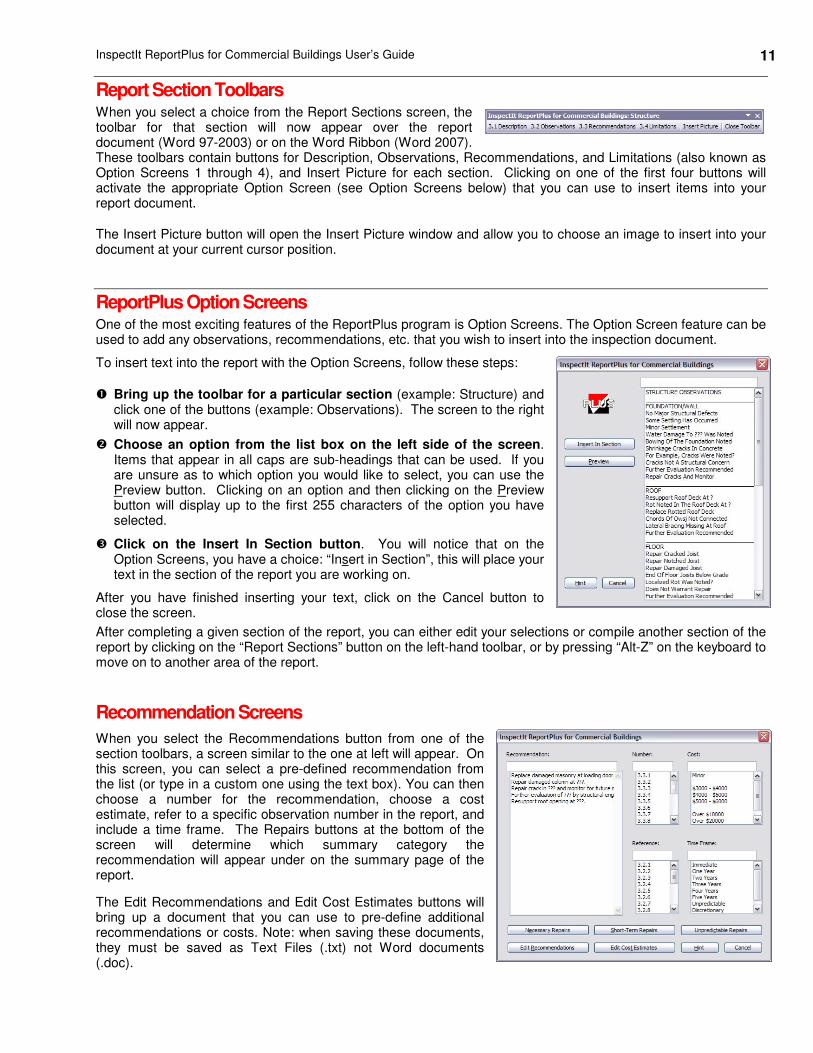
Report Sections Screen When you start ReportPlus for Commercial Buildings, the first window you will see after the opening screen is the
Report Sections screen. You can also call up this screen by clicking the Report Sections button on the ReportPlus toolbar. From this screen, you can select the section of the report that you would like to complete.
The screen also has options to insert the inspection and client information into the report, a table of contents generator, and buttons to access a photo summary page as well as a summary of rooftop equipment.
InspectIt ReportPlus for Commercial Buildings User’s Guide 10
The ReportPlus Toolbar The ReportPlus toolbar, which includes each of the following buttons shown below, will automatically appear on the left side of the Word window (or in the Ribbon above the document in Word 2007) when you start the program. Below you will find an explanation of all of the buttons found on this toolbar.
The special toolbar that appears along the left-hand side of the screen (in Word 97-2003 and in the Ribbon on the Add-Ins tab within Word 2007) contains the functions of the ReportPlus program.
The “Report Sections” button gives you access to the Report Sections Screen, where you can choose which section of the report you would like to create or edit.
“Search for Additional Information” searches the report document (similar to the Find and Replace function in Word), from the current cursor position to the end of the document, for a group of 3 question marks (???). These question marks present in many text entries so that you can add information to the text entry after you have inserted it into the report (example: serial numbers, amperage, etc.).
“Add Photo” opens the “Insert Picture” window and allows you to browse your computer to find images. You can preview each of the images in this window and then choose to insert an image into your report at the current cursor location, however, the cursor must be blinking on a blank line with no other text before you click on the Add Photo button.
Using the “Numbering” button will number paragraphs that you have highlighted.
The “Bullets” button will add bullets to the paragraphs that you have highlighted.
The “Skip Numbering” button will delete the number in a selected paragraph and re-arrange any following numbers in the correct order. This is helpful if you want to add a sub-heading in a numbered list.
“Increase Indent” will move the selected text to the right, increasing the margin between the text and the left side of the page.
“Decrease Indent” will move the selected text to the left, decreasing the margin between the text and the left side of the page.
The “Add to Option Screens” button allows you add highlighted text to the Description, Observations, or Limitations screen for any section of the report. See the example later in this Guide on Adding Items To Option Screens.
Using the “Bookmarks” button allows you to show or hide the bookmarks that are hidden in the report. The ReportPlus program uses bookmarks as placeholders so that it knows where in the report document to insert your Option Screen selections, Client / Inspection information, and is also used when you copy items to the Summary section.
Note: it is very important that you do not delete bookmarks – if the program looks for a bookmark and it is not present,
an error message will be generated. See the “Bookmarks” section later in this Guide for more information on
bookmarks.
The “Report Printing” button will automatically search the report document for any triple question mark groups (???) and INFO buttons (see information on both of these functions later in this Guide) before the document is printed. If a question mark group is found, it will be highlighted. You can then enter in the additional information and click the Report Printing button again. If no question mark groups are found, the Print window will then appear.
The “Report Sections Toolbar” button will display a toolbar that will allow you to start any section of the report (e.g. starting the Exterior section) without going to the Report Sections Screen.
As the name implies, the “Hide Section Toolbars” will hide any section toolbars that are currently open.
Report Sections
Search for Additional Information
Add Photo
Numbering
Bullets
Skip Numbering
Increase Indent
Decrease Indent
Add To Option Screens
Bookmarks
Report Printing
Report Sections Toolbar
Hide Section Toolbars
InspectIt ReportPlus for Commercial Buildings User’s Guide 11
Report Section Toolbars When you select a choice from the Report Sections screen, the toolbar for that section will now appear over the report document (Word 97-2003) or on the Word Ribbon (Word 2007). These toolbars contain buttons for Description, Observations, Recommendations, and Limitations (also known as Option Screens 1 through 4), and Insert Picture for each section. Clicking on one of the first four buttons will activate the appropriate Option Screen (see Option Screens below) that you can use to insert items into your report document.
The Insert Picture button will open the Insert Picture window and allow you to choose an image to insert into your document at your current cursor position.
ReportPlus Option Screens One of the most exciting features of the ReportPlus program is Option Screens. The Option Screen feature can be used to add any observations, recommendations, etc. that you wish to insert into the inspection document.
To insert text into the report with the Option Screens, follow these steps:
� Bring up the toolbar for a particular section (example: Structure) and click one of the buttons (example: Observations). The screen to the right will now appear.
� Choose an option from the list box on the left side of the screen. Items that appear in all caps are sub-headings that can be used. If you are unsure as to which option you would like to select, you can use the Preview button. Clicking on an option and then clicking on the Preview button will display up to the first 255 characters of the option you have selected.
� Click on the Insert In Section button. You will notice that on the Option Screens, you have a choice: “Insert in Section”, this will place your text in the section of the report you are working on.
After you have finished inserting your text, click on the Cancel button to close the screen.
After completing a given section of the report, you can either edit your selections or compile another section of the report by clicking on the “Report Sections” button on the left-hand toolbar, or by pressing “Alt-Z” on the keyboard to move on to another area of the report.
Recommendation Screens
When you select the Recommendations button from one of the section toolbars, a screen similar to the one at left will appear. On this screen, you can select a pre-defined recommendation from the list (or type in a custom one using the text box). You can then choose a number for the recommendation, choose a cost estimate, refer to a specific observation number in the report, and include a time frame. The Repairs buttons at the bottom of the screen will determine which summary category the recommendation will appear under on the summary page of the report.
The Edit Recommendations and Edit Cost Estimates buttons will bring up a document that you can use to pre-define additional recommendations or costs. Note: when saving these documents, they must be saved as Text Files (.txt) not Word documents (.doc).
InspectIt ReportPlus for Commercial Buildings User’s Guide 12
Editing the Report
Each report section is designed to be contained on a single page (this can be altered by eliminating the page breaks between sections). If you have numerous observations, the text will automatically move to a second page and the page numbers will be automatically updated.
As you work through the Option Screens of the ReportPlus software, text will be inserted into the report document. At some point, you will want to edit the document. You can either edit each report section as you complete it or edit all sections when you have completed all Option Screens. The text of the report can be edited using any of the powerful features of Microsoft Word (such as changing the fonts, adding color, changing the layout, etc.). If you are unfamiliar with Microsoft Word, refer to the Word Help menu and documentation.
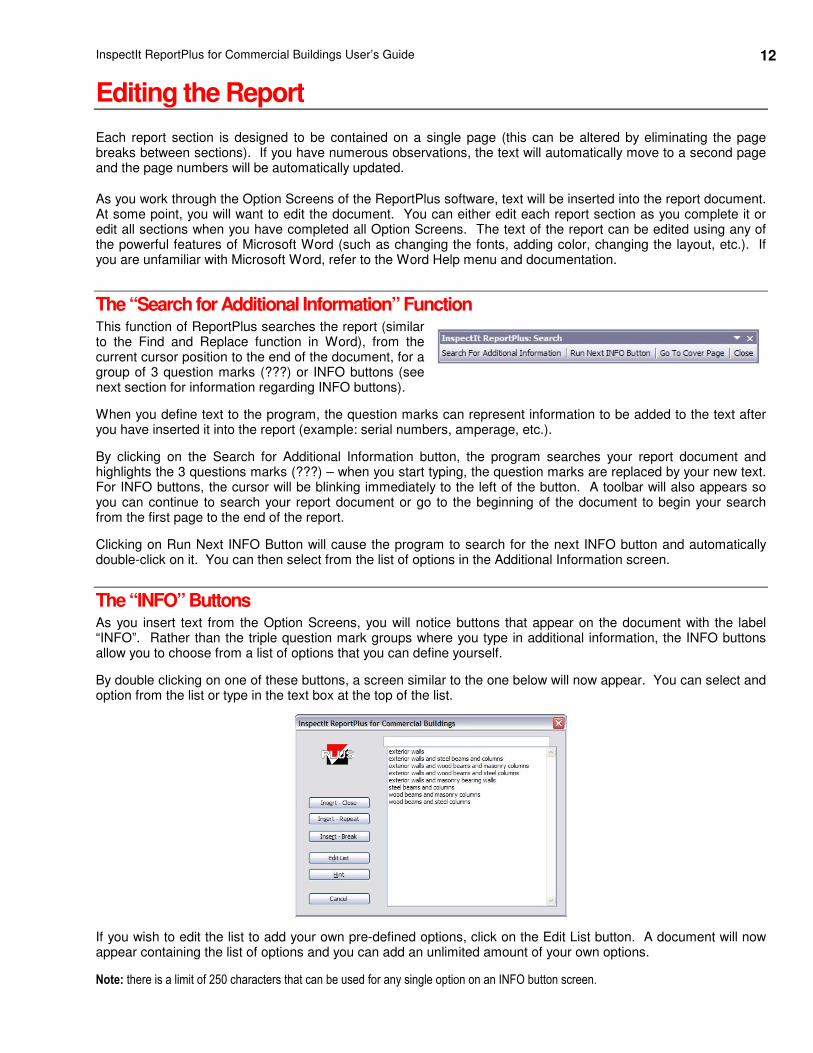
The “Search for Additional Information” Function This function of ReportPlus searches the report (similar to the Find and Replace function in Word), from the current cursor position to the end of the document, for a group of 3 question marks (???) or INFO buttons (see next section for information regarding INFO buttons).
When you define text to the program, the question marks can represent information to be added to the text after you have inserted it into the report (example: serial numbers, amperage, etc.).
By clicking on the Search for Additional Information button, the program searches your report document and highlights the 3 questions marks (???) – when you start typing, the question marks are replaced by your new text. For INFO buttons, the cursor will be blinking immediately to the left of the button. A toolbar will also appears so you can continue to search your report document or go to the beginning of the document to begin your search from the first page to the end of the report.
Clicking on Run Next INFO Button will cause the program to search for the next INFO button and automatically double-click on it. You can then select from the list of options in the Additional Information screen.
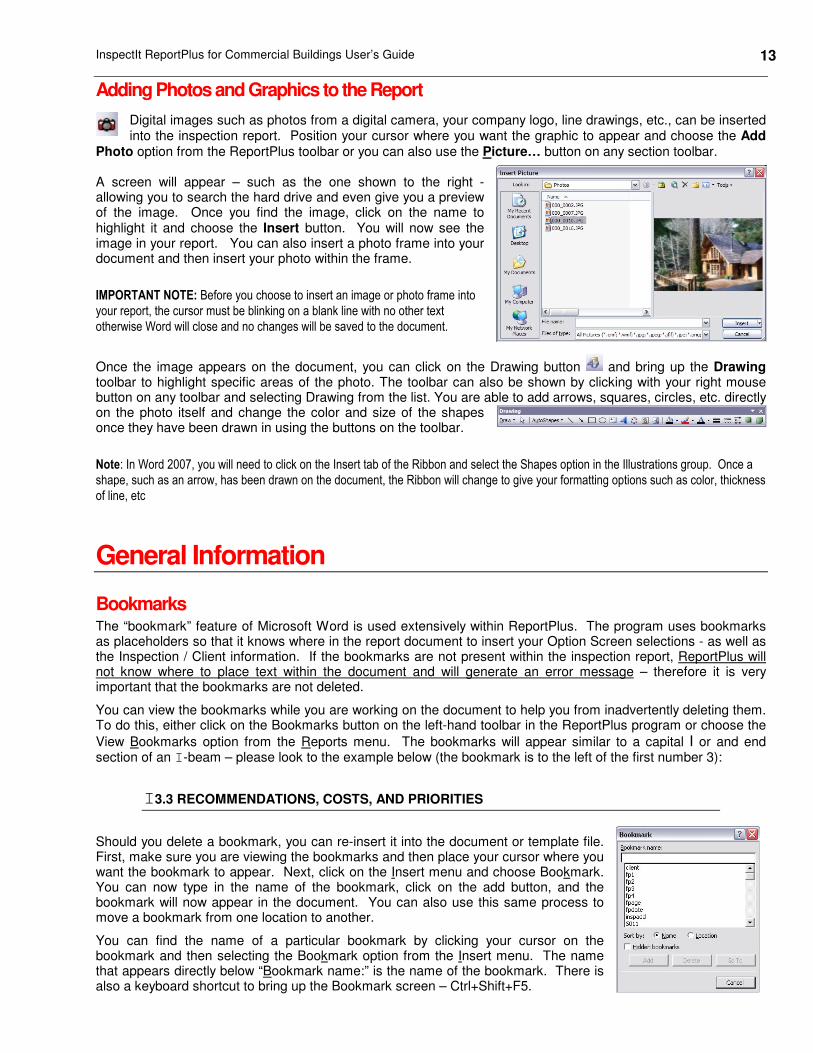
The “INFO” Buttons As you insert text from the Option Screens, you will notice buttons that appear on the document with the label “INFO”. Rather than the triple question mark groups where you type in additional information, the INFO buttons allow you to choose from a list of options that you can define yourself.
By double clicking on one of these buttons, a screen similar to the one below will now appear. You can select and option from the list or type in the text box at the top of the list.
If you wish to edit the list to add your own pre-defined options, click on the Edit List button. A document will now appear containing the list of options and you can add an unlimited amount of your own options.
Note: there is a limit of 250 characters that can be used for any single option on an INFO button screen.
InspectIt ReportPlus for Commercial Buildings User’s Guide 13
Adding Photos and Graphics to the Report
Digital images such as photos from a digital camera, your company logo, line drawings, etc., can be inserted into the inspection report. Position your cursor where you want the graphic to appear and choose the Add
Photo option from the ReportPlus toolbar or you can also use the Picture… button on any section toolbar. A screen will appear – such as the one shown to the right - allowing you to search the hard drive and even give you a preview of the image. Once you find the image, click on the name to highlight it and choose the Insert button. You will now see the image in your report. You can also insert a photo frame into your document and then insert your photo within the frame.
IMPORTANT NOTE: Before you choose to insert an image or photo frame into
your report, the cursor must be blinking on a blank line with no other text
otherwise Word will close and no changes will be saved to the document.
Once the image appears on the document, you can click on the Drawing button and bring up the Drawing toolbar to highlight specific areas of the photo. The toolbar can also be shown by clicking with your right mouse button on any toolbar and selecting Drawing from the list. You are able to add arrows, squares, circles, etc. directly on the photo itself and change the color and size of the shapes once they have been drawn in using the buttons on the toolbar.
Note: In Word 2007, you will need to click on the Insert tab of the Ribbon and select the Shapes option in the Illustrations group. Once a
shape, such as an arrow, has been drawn on the document, the Ribbon will change to give your formatting options such as color, thickness
of line, etc
General Information
Bookmarks The “bookmark” feature of Microsoft Word is used extensively within ReportPlus. The program uses bookmarks as placeholders so that it knows where in the report document to insert your Option Screen selections - as well as the Inspection / Client information. If the bookmarks are not present within the inspection report, ReportPlus will not know where to place text within the document and will generate an error message – therefore it is very important that the bookmarks are not deleted.
You can view the bookmarks while you are working on the document to help you from inadvertently deleting them. To do this, either click on the Bookmarks button on the left-hand toolbar in the ReportPlus program or choose the
View Bookmarks option from the Reports menu. The bookmarks will appear similar to a capital I or and end section of an I-beam – please look to the example below (the bookmark is to the left of the first number 3):
I3.3 RECOMMENDATIONS, COSTS, AND PRIORITIES
Should you delete a bookmark, you can re-insert it into the document or template file. First, make sure you are viewing the bookmarks and then place your cursor where you want the bookmark to appear. Next, click on the Insert menu and choose Bookmark. You can now type in the name of the bookmark, click on the add button, and the bookmark will now appear in the document. You can also use this same process to move a bookmark from one location to another.
You can find the name of a particular bookmark by clicking your cursor on the bookmark and then selecting the Bookmark option from the Insert menu. The name that appears directly below “Bookmark name:” is the name of the bookmark. There is also a keyboard shortcut to bring up the Bookmark screen – Ctrl+Shift+F5.
InspectIt ReportPlus for Commercial Buildings User’s Guide 14
Below is a list of bookmarks that are present within the document template by default. This list shows you which page the bookmark appears on and the purpose of each bookmark. Use this list as a reference in case you delete a bookmark or wish to move a bookmark to a different location.
Name Purpose
Cover Page: Fpage Informs ReportPlus of the location of the Cover Page
InspAdd1 Location of the Inspection address – first line
InspAdd2 Location of the Inspection address – second line
InspDate Location of the Inspection date
ClientName Location of the Client’s name
ClientCompany Location of the Client’s company name
ClientAdd1 Location of the Client’s address – first line
ClientAdd2 Location of the Client’s address – second line
InspNum Location of the Report Number
Inspector Location of the Inspector’s name
Header: Inspadd Location of the Inspection address
Footer: Client Location of the Client’s name
Page 2: Toc Used to generate a Table of Contents
ComSum Location for items chosen from the Summary screen
Summary1-3 Used when copying items to the Summary section
Introduction Page: IntroClient Location of the Client’s name
IntroCompany Location of the Client’s company name
IntroInspDate Location of the Inspection date
ComITR Location for items chosen from the Introduction screen
Report Sections: Note: Each section has 4 bookmarks that correspond to each of the 4 Option Screens
within the section. The naming convention is as follows:
The first 3 characters will always be COM
The second 2 characters indicate the section (ST = Structure, EX = Exterior, etc.)
The fourth character indicates which Option Screen it corresponds to – D,O,R, or L
(for Description, Observations, Recommendations, Limitations)
Therefore, for Structure, the bookmarks would be as follows
ComSTD Location for items chosen from Screen 1 (Description)
ComSTO Location for items chosen from Screen 2 (Observations)
ComSTR Location for items chosen from Screen 3 (Recommendations)
ComSTL Location for items chosen from Screen 4 (Limitations)
In another example, the bookmarks for Exterior would be:
ComEXD Location for items chosen from Screen 1 (Description)
ComEXO Location for items chosen from Screen 2 (Observations)
ComEXR Location for items chosen from Screen 3 (Recommendations)
ComEXL Location for items chosen from Screen 4 (Limitations)
Photo Summary: ComPHO Location for items chosen from the Photo Summary screen
Summary of Rooftop Equip.: RoofSum Used to determine the location of the Rooftop Summary
The bookmarks on the cover page insert text at the location of the bookmark itself. On the report section pages, the program moves to the bookmark location, moves left one space, and then inserts the text into the report. If there is no space immediately to the left of a bookmark on one of the section pages, the program will move to the next line above and then insert the text.
InspectIt ReportPlus for Commercial Buildings User’s Guide 15
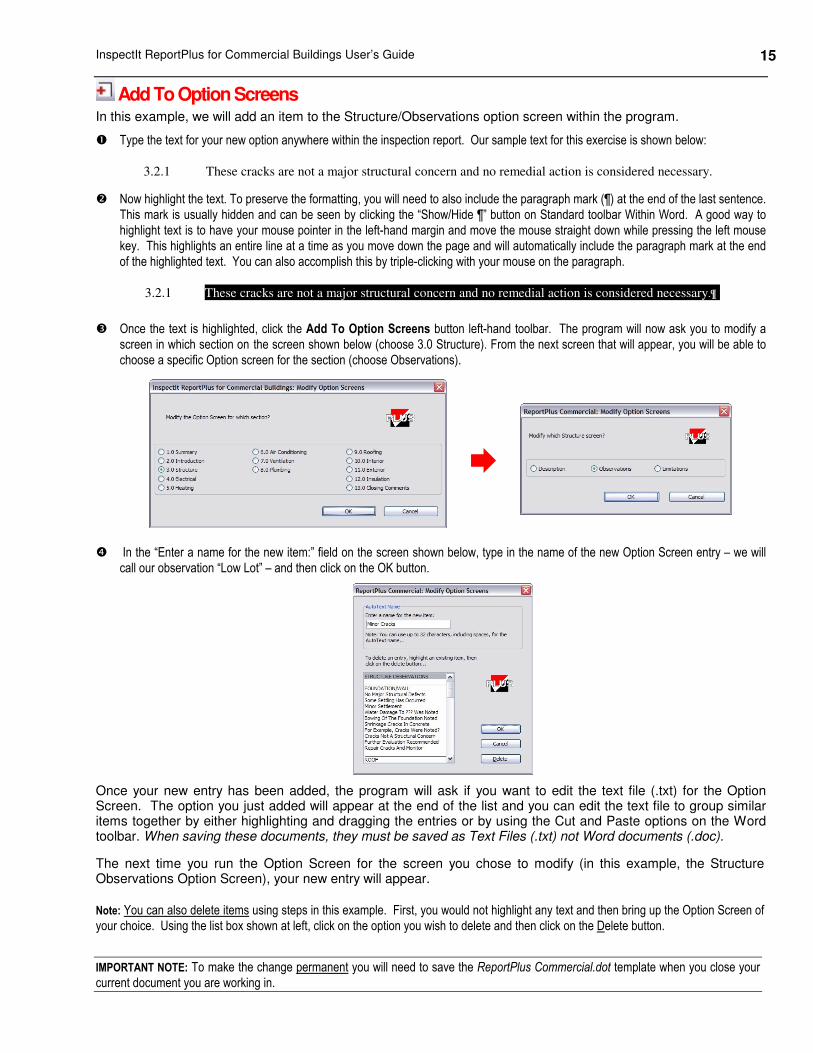
Add To Option Screens In this example, we will add an item to the Structure/Observations option screen within the program.
� Type the text for your new option anywhere within the inspection report. Our sample text for this exercise is shown below:
3.2.1 These cracks are not a major structural concern and no remedial action is considered necessary.
� Now highlight the text. To preserve the formatting, you will need to also include the paragraph mark (¶) at the end of the last sentence.
This mark is usually hidden and can be seen by clicking the “Show/Hide ¶” button on Standard toolbar Within Word. A good way to
highlight text is to have your mouse pointer in the left-hand margin and move the mouse straight down while pressing the left mouse
key. This highlights an entire line at a time as you move down the page and will automatically include the paragraph mark at the end
of the highlighted text. You can also accomplish this by triple-clicking with your mouse on the paragraph.
3.2.1 These cracks are not a major structural concern and no remedial action is considered necessary.¶-
� Once the text is highlighted, click the Add To Option Screens button left-hand toolbar. The program will now ask you to modify a screen in which section on the screen shown below (choose 3.0 Structure). From the next screen that will appear, you will be able to choose a specific Option screen for the section (choose Observations).
�
� In the “Enter a name for the new item:” field on the screen shown below, type in the name of the new Option Screen entry – we will call our observation “Low Lot” – and then click on the OK button.
Once your new entry has been added, the program will ask if you want to edit the text file (.txt) for the Option Screen. The option you just added will appear at the end of the list and you can edit the text file to group similar items together by either highlighting and dragging the entries or by using the Cut and Paste options on the Word toolbar. When saving these documents, they must be saved as Text Files (.txt) not Word documents (.doc).
The next time you run the Option Screen for the screen you chose to modify (in this example, the Structure Observations Option Screen), your new entry will appear.
Note: You can also delete items using steps in this example. First, you would not highlight any text and then bring up the Option Screen of
your choice. Using the list box shown at left, click on the option you wish to delete and then click on the Delete button.
IMPORTANT NOTE: To make the change permanent you will need to save the ReportPlus Commercial.dot template when you close your
current document you are working in.

InspectIt ReportPlus for Commercial Buildings User’s Guide 16
APPENDIX: END-USER LICENSE AGREEMENT This Software, including any documentation and media that accompanies this license, (the "Software") is the property of the American Home Inspectors Training Institute, Ltd. (AHIT) and is protected by copyright law. While AHIT continues to own the Software, you will have certain rights to use the Software after you accept this license. Your rights and obligations to use the Software are as follows: You may: 1) use one copy of the Software on a single computer at a single site at a single time;* 2) use the Software on a network, provided that you have a licensed copy of the Software for each computer that can
access the Software over that network. You can acquire LAN or network packs for this purpose;* 3) after written notice to AHIT, transfer the Software on a permanent basis to another person or entity within your
company, provided that you retain no copies of the Software and the transferee agrees to the terms of this agreement;
4) modify the text or data that accompanies the Software, in the manner that is described in the User's Guide also accompanying the Software; and
5) print the text or data in conjunction with running the Software and supply this print out to other parties in a manner for which the Software is intended.
*PAY-PER-USE PLAN SOFTWARE If you have purchased this software on a Pay-Per-Use plan, you may install this software on as many computers as
you wish provided that you purchase Report Packs (uses of the software) for each computer that the software is installed. Packs are not transferable between computers.
*PURCHASE PLAN SOFTWARE If you have purchased this software on a purchase plan, you may install this software on as many computers as
you wish provided that only the licensed user (whose name appears on documents created by the software) operates the software on each computer that the software is installed. Use of the software by anyone other than the licensed user will require the purchase of an additional license. Violations of this license agreement can lead to suspension and/or cancellation of your license benefits.
You may not: 1) print out or copy databases, documents, text, or any other data that accompany the Software, or a substantial
portion thereof, and supply it to any person or corporation; 2) copy any of the documentation that accompanies the Software; 3) re-sale, rent, lease, or sub-license any portion of the Software; 4) reverse engineer, de-compile, disassemble, modify, translate, make any attempt to discover the source code of the
Software, or create derivative works from the Software; or 5) use the previous version of the Software in addition to an upgraded version received as a replacement of the prior
version. Upon upgrading the Software, all copies of the prior version must be destroyed except for copies retained for archival purposes.
Limited Warranty AHIT warrants that the media on which the Software is distributed will be free from defects for a period of thirty (30) days from the shipping date. Your sole remedy in the event of a breach of this warranty will be that AHIT will, at its option, replace any defective media returned to AHIT within the warranty period or refund the money paid for the Software. AHIT does not warrant that the Software will meet your requirements or that operation of the Software will be uninterrupted or that the Software will be error-free.
THE ABOVE WARRANTY IS EXCLUSIVE AND IN LIEU OF ALL OTHER WARRANTIES, WHETHER EXPRESS OR IMPLIED, INCLUDING THE IMPLIED WARRANTIES OF MERCHANTABILITY, FITNESS FOR A PARTICULAR PURPOSE AND NONINFRINGEMENT. THIS WARRANTY GIVES YOU SPECIFIC LEGAL RIGHTS. YOU MAY HAVE OTHER RIGHTS, WHICH VARY FROM STATE TO STATE. Disclaimer of Damages REGARDLESS OF WHETHER ANY REMEDY SET FORTH HEREIN FAILS OF ITS ESSENTIAL PURPOSE, IN NO EVENT WILL AHIT BE LIABLE TO YOU FOR ANY SPECIAL, CONSEQUENTIAL, INDIRECT OR SIMILAR DAMAGES, INCLUDING ANY LOST PROFITS OR LOST DATA ARISING OUT OF THE USE OR INABILITY TO USE THE SOFTWARE EVEN IF AHIT HAS BEEN ADVISED OF THE POSSIBILITY OF SUCH DAMAGES. SOME STATES DO NOT ALLOW THE LIMITATION OR EXCLUSION OF LIABILITY OR INCIDENTAL OR CONSEQUENTIAL DAMAGES SO THE ABOVE LIMITATION OR EXCLUSION MAY NOT APPLY TO YOU.
IN NO CASE SHALL AHIT’S LIABILITY EXCEED THE PURCHASE PRICE OF THE SOFTWARE. The disclaimers and limitations set forth above will apply regardless of whether you accept the Software. General This Agreement will be governed by the laws of the State of Wisconsin. This Agreement may only be modified by a license addendum which accompanies this license or by a written document which has been signed by both you and AHIT. If you have any questions regarding this Agreement, please write AHIT at the address below:
AHIT, Ltd. N19W24075 Riverwood Drive, Suite 200, Waukesha, WI 53188