Embed Size (px)
Citation preview
BCM 4.0 Business Communications Manager Document Number: NN40010-500
Document Status: Beta
Document Version: 3.03
Part Code: N0060637
January 2006
Reporting for Contact Center Setup and Operations Guide

Copyright © Nortel Networks Limited 2006
All rights reserved.
The information in this document is subject to change without notice. The statements, configurations, technical data, and recommendations in this document are believed to be accurate and reliable, but are presented without express or implied warranty. Users must take full responsibility for their applications of any products specified in this document. The information in this document is proprietary to Nortel Networks.
Trademarks
*Nortel, Nortel (Logo), the Globemark, and This is the way, This is Nortel (Design mark) are trademarks of Nortel Networks.
*Microsoft, MS, MS-DOS, Windows, and Windows NT are registered trademarks of Microsoft Corporation.
All other trademarks and registered trademarks are the property of their respective owners.

Table of Contents
List of Figures ........................................................................................................... vii
List of Tables..............................................................................................................xi
Change History .........................................................................................................xii
How to Use this Guide................................................................................................1 Introduction.....................................................................................................................................1 How This Guide is Organized..........................................................................................................1
Introduction.................................................................................................................3 Web-Based User Interface..............................................................................................................3 Language Support ..........................................................................................................................3 Administrators and Users................................................................................................................4 Assigned Skillsets...........................................................................................................................4 SQL Historical Database.................................................................................................................4 System Software ............................................................................................................................5 PC Requirements ...........................................................................................................................5
Minimum PC Specifications........................................................................................................5 Operating System Compatibility ......................................................................................................6
Installation...................................................................................................................8 Introduction.....................................................................................................................................8 Upgrading to Reporting for Contact Center .....................................................................................8 Upgrading a Previous Version of Reporting for Contact Center .......................................................8
Deleting Temporary Internet Files ..............................................................................................9 Installation prerequisites ...............................................................................................................10
Installing Microsoft Internet Information Services......................................................................10 Port Numbers used by Nortel Reporting for Contact Center................................................16
Installing Nortel Reporting for Contact Center software .................................................................16 TCP/IP Protocol .......................................................................................................................17 Checking Installation of the Windows Networking Component .................................................17 Installing Nortel Reporting for Contact Center for a Business Communications Manager Installation
........................................................................................................................................18 Installing Nortel Reporting for Contact Center for a CallPilot Installation ...................................20 Settings Required for Windows XP Service Pack 2 ..................................................................28 Settings Required for Windows 2003 Server, IIS 6 ...................................................................32
Change 1: Enable Active Server Pages..............................................................................32 Change 2: Allow IIS 6 to see the Path to the RCC Folder ..................................................33 Change 3: Create a new Application pool and add RCC to it ..............................................35
Upgrading Reporting for Contact Center ..................................................................................38
Table of Contents
Reporting for Contact Center Setup and Operations Guide Issue 03 (03)
ii
Administration...........................................................................................................39 Logging In.................................................................................................................................... 39 Changing Default Password ......................................................................................................... 40
Contact Center Connection ..................................................................................................... 42 Administration Menu .................................................................................................................... 46
System Administration............................................................................................................. 47 System Admin Settings ..................................................................................................... 48 User Admin ....................................................................................................................... 50 Skillset Assignment ........................................................................................................... 57
Maintenance ........................................................................................................................... 61 System Status................................................................................................................... 61 Logging............................................................................................................................. 62
Company Details..................................................................................................................... 65 Reporting ................................................................................................................................ 66
Using Reporting for Contact Center........................................................................67 Logging On .................................................................................................................................. 67 Time Bins Setup........................................................................................................................... 71
Answer Time Bins ................................................................................................................... 71 Abandon Time Bins ................................................................................................................. 71
Print Schedules............................................................................................................................ 74 Daily Schedules ...................................................................................................................... 75 Skillset List Selection Methods ................................................................................................ 80 Adding Selections to the Favorites List .................................................................................... 81 Saving your Daily Schedule..................................................................................................... 83 Weekly Schedules................................................................................................................... 87 Weekly Schedules Skillsets ..................................................................................................... 92 Saving Your Weekly Schedule................................................................................................. 93 Monthly Schedules .................................................................................................................. 97 Monthly Schedule Skillsets .................................................................................................... 102 Saving your Monthly Schedule .............................................................................................. 104
Real Time .................................................................................................................................. 109 Using the Real Time Options................................................................................................. 110
Real Time Call Summary................................................................................................. 110 Real Time Agent Summary ............................................................................................. 113 Figure 84: Real Time Agent Summary Real Time Screen shows the Agent Summary Real Time screen............................................................................................................................. 113 Real Time Call Detail....................................................................................................... 114 Real Time Agent Detail ................................................................................................... 116
Agent Alarms ............................................................................................................................. 119 Wallboard Setup ........................................................................................................................ 123
Message Formats ................................................................................................................. 124 Parameter Messages ...................................................................................................... 124 Scrolling Messages ......................................................................................................... 125 Summary Messages ....................................................................................................... 126
Using the Wallboard Options ................................................................................................. 126 Wallboard Assignment Page ........................................................................................... 127 Wallboard Parameters..................................................................................................... 131 Wallboard Messages Page.............................................................................................. 134 Alarms ............................................................................................................................ 139 Schedules ....................................................................................................................... 145 Instant Messages............................................................................................................ 150

Table of Contents iii
Issue 03 (03) Reporting for Contact Center Setup and Operations Guide
Reports ....................................................................................................................154 Reports Introduction ...................................................................................................................154
General..................................................................................................................................154 Fundamental Concepts...............................................................................................................154
In-Progress Calls ...................................................................................................................154 Report Periods.......................................................................................................................154 Skillset Selection....................................................................................................................154 Public Switched Telephone Network Call (PSTN) and Multimedia Calls..................................155 Direct Calls ............................................................................................................................155 Indirect Calls..........................................................................................................................155 Calls and Transactions...........................................................................................................155 Transactions and Direct and Indirect Calls .............................................................................156 Contact Center Transactions and Non-Contact Center Transactions ......................................156
Report Concepts.........................................................................................................................156 Report Headers .....................................................................................................................156 Report Viewer Toolbar ...........................................................................................................157 Printing a Report....................................................................................................................157 Exporting a Report .................................................................................................................158
File Format ......................................................................................................................158 Exported File Name and Location ....................................................................................159 Page Range ....................................................................................................................159 Exporting the Report ........................................................................................................159
Report Magnification ..............................................................................................................159 Report Navigation ..................................................................................................................160 Searching for Text within a Report .........................................................................................160
Using the Reports.......................................................................................................................160 Selecting Skillsets..................................................................................................................169 Selecting Agents....................................................................................................................170 Selecting Activity Codes.........................................................................................................172 Get Latest Contact Center Data link .......................................................................................173
Reports Explained ..................................................................................................175 Overview ....................................................................................................................................175 Explanation of Terms Used within Reporting for Contact Center..................................................176
Report Definitions ..................................................................................................................176 Abandoned Call ...............................................................................................................176 Abandoned Time Bins......................................................................................................176 Answered Time Bins ........................................................................................................176 Activity Code Pegs...........................................................................................................176 Control Directory Number ................................................................................................176 Delayed Call ....................................................................................................................176 Direct Call........................................................................................................................177 Disconnected Call............................................................................................................177 Grade of Service..............................................................................................................177 Indirect Call .....................................................................................................................177 Multimedia Call ................................................................................................................177 Outgoing Calls .................................................................................................................177 Presented Calls ...............................................................................................................177 Presented Calls Abandoned.............................................................................................177 Presented Calls Answered...............................................................................................177 Presented Calls Answered after the Primary Alert (before secondary) ..............................178 Presented Calls Answered before the Primary Alert .........................................................178 Presented Calls Answered after Secondary Alert .............................................................178 Presented Calls Handled in Another Skillset.....................................................................178
Table of Contents
Reporting for Contact Center Setup and Operations Guide Issue 03 (03)
iv
Presented Calls that Left Skillset via Overflow ................................................................. 178 Presented Calls that Left Skillset via Routing Table ......................................................... 178 PSTN Call ....................................................................................................................... 178 Statistical Time Bins ........................................................................................................ 178 Time to Answer ............................................................................................................... 178 Time to Abandon............................................................................................................. 178 Transactions Answered................................................................................................... 178 Transactions Answered by Agent .................................................................................... 179 Transactions Answered by Another Skillset ..................................................................... 179 Transactions Answered by Non Agent ............................................................................. 179 Transactions Answered by Operator................................................................................ 179 Transactions Answered by Overflow Agent...................................................................... 179 Transactions Answered by Voicemail .............................................................................. 179 Unstaffed Calls................................................................................................................ 179
Agent Definitions ................................................................................................................... 179 Available Time ................................................................................................................ 179 Break Time ..................................................................................................................... 179 Incoming Contact Center Time ........................................................................................ 179 Incoming Non-Contact Center Call Time.......................................................................... 179 Internal Call Time............................................................................................................ 179 Not Ready Time .............................................................................................................. 180 Outgoing Call Time ......................................................................................................... 180 Supervisor Monitor Time ................................................................................................. 180
Reports ...................................................................................................................................... 181 Answered Calls Report.......................................................................................................... 181
Summary ........................................................................................................................ 181 Logic............................................................................................................................... 183 FAQ ................................................................................................................................ 183 Report Fields .................................................................................................................. 183 Summary ........................................................................................................................ 184 Logic............................................................................................................................... 185 FAQ ................................................................................................................................ 185 Report Fields .................................................................................................................. 186
Abandoned Calling Line ID Report......................................................................................... 187 Summary ........................................................................................................................ 187 Logic............................................................................................................................... 188 FAQ ................................................................................................................................ 188 Report Fields .................................................................................................................. 188
Agent Capacity Report .......................................................................................................... 190 Summary ........................................................................................................................ 190 Logic............................................................................................................................... 191 Report Fields .................................................................................................................. 191 Formula .......................................................................................................................... 191 Formula .......................................................................................................................... 191
Help Request Report............................................................................................................. 192 Summary ........................................................................................................................ 192 Usage Example............................................................................................................... 192 Logic............................................................................................................................... 193 Report Fields .................................................................................................................. 193
Call Average Report .............................................................................................................. 194 Summary ........................................................................................................................ 194 Usage Example............................................................................................................... 194 Logic............................................................................................................................... 195 FAQ ................................................................................................................................ 195 Report Fields .................................................................................................................. 195
Agent Average Report ........................................................................................................... 197
Table of Contents v
Issue 03 (03) Reporting for Contact Center Setup and Operations Guide
Summary.........................................................................................................................197 Usage Example for Average Incoming Transaction Time .................................................198 Usage Example for Average Break Time..........................................................................198 Logic ...............................................................................................................................198 FAQ.................................................................................................................................198 Report Fields ...................................................................................................................199
Agent Profile Report...............................................................................................................201 Summary.........................................................................................................................201 Logic ...............................................................................................................................202 FAQ.................................................................................................................................202 Report Fields ...................................................................................................................202
Agent Activity Report .............................................................................................................205 Summary.........................................................................................................................205 Logic ...............................................................................................................................206 FAQ.................................................................................................................................206 Report Fields ...................................................................................................................206
Agent Audit Report.................................................................................................................209 Summary.........................................................................................................................209 Logic ...............................................................................................................................209 FAQ.................................................................................................................................210 Report Fields ...................................................................................................................210
Activity Code Report by Skillset..............................................................................................211 Activity Code Report by Skillset..............................................................................................212
Summary.........................................................................................................................212 Logic ...............................................................................................................................213 Report Fields ...................................................................................................................213
Activity Code Report by Agent................................................................................................215 Summary.........................................................................................................................215 Logic...............................................................................................................................215
Report Fields ...................................................................................................................216 Activity Code Report by Number of Pegs................................................................................217
Summary.........................................................................................................................217 Logic ...............................................................................................................................217 Report Fields ...................................................................................................................218
Summary Report....................................................................................................................220 Summary.........................................................................................................................220 Logic ...............................................................................................................................221 FAQ.................................................................................................................................221 Report Fields ...................................................................................................................222
Call Profile Report..................................................................................................................225 Call Profile Report..................................................................................................................226
Summary.........................................................................................................................226 Logic ...............................................................................................................................227 FAQ.................................................................................................................................228 Report Fields ...................................................................................................................228
Incoming Call Report .............................................................................................................231 Summary.........................................................................................................................231 Logic ...............................................................................................................................232 FAQ.................................................................................................................................232 Report Fields ...................................................................................................................232
Unanswered Help Request Report .........................................................................................236 Summary.........................................................................................................................236 Report Fields ...................................................................................................................236
Agent Average Report by Agent.............................................................................................238 Summary.........................................................................................................................238 Logic ...............................................................................................................................238
Table of Contents
Reporting for Contact Center Setup and Operations Guide Issue 03 (03)
vi
Report Fields .................................................................................................................. 239 Agent Activity Report by Skillset ............................................................................................ 241
Summary ........................................................................................................................ 241 Logic............................................................................................................................... 241 FAQ ................................................................................................................................ 242 Report Fields .................................................................................................................. 242
System Configuration Report................................................................................................. 244 Summary ........................................................................................................................ 244
Backing Up the MySQL Database..........................................................................245
Troubleshooting Reporting for Contact Center ...................................................247 Slow Updates on Real Time Screen ........................................................................................... 247
Web Host PC Requires a Host File entry ............................................................................... 247 Anti-Virus Software Slowing Down the File System .................................................................... 247 Cannot Access the Login Page .................................................................................................. 248
Turning off script blocking in Norton Anti-Virus 2001 .............................................................. 248 Turning off script blocking in Norton Anti-Virus 2002 or 2003 ................................................. 249
Norton Internet Security and Personal Firewall ........................................................................... 250 Contact Center connection blocked ....................................................................................... 250
Changing Agent Names ............................................................................................................. 251 Virtual Folders Not Created in Internet Information Services ....................................................... 251 Accessing Networked Printers From the Web Host PC............................................................... 252 Print Schedules require Windows Login ..................................................................................... 253 ipView SoftBoard and Wallboard Summaries.............................................................................. 257 Crystal Reports ActiveX Report Viewer ...................................................................................... 258
Manual Installation of ActiveX Viewer .................................................................................... 258 ActiveX Viewer download blocked ......................................................................................... 260 Conflict of Applications using Crystal Reports ........................................................................ 263
Real Time Screens on Client PCs .............................................................................................. 263 Errors on Generating Reports .................................................................................................... 264 Launching Reporting for Contact Center from a Shortcut ............................................................ 266 Error on Closing Group of Internet Explorer Windows................................................................. 268
Glossary ..................................................................................................................270
References...............................................................................................................274
Index ........................................................................................................................275
List of Figures vii
Issue 03 (03) Reporting for Contact Center Setup and Operations Guide
List of Figures Figure 1: Internet Properties Dialog Box................................................................................................................................. 9 Figure 2: Delete Files Dialog................................................................................................................................................. 10 Figure 3: Add or Remove Programs ...................................................................................................................................... 11 Figure 4: Windows Components Wizard............................................................................................................................... 12 Figure 5: Windows Components Wizard Installation............................................................................................................ 13 Figure 6: Windows Components Wizard Installation Completed ......................................................................................... 14 Figure 7: Internet Information Services test page.................................................................................................................. 15 Figure 8: Download the Reporting for Contact Center Software .......................................................................................... 19 Figure 9: InstallShield Initialization Dialog .......................................................................................................................... 20 Figure 10: Language Selection Dialog .................................................................................................................................. 21 Figure 11: InstallShield Windows Installer Configuration Dialog Box................................................................................. 21 Figure 12: InstallShield Wizard Start Dialog Box................................................................................................................. 22 Figure 13: License Agreement Dialog Box ........................................................................................................................... 23 Figure 14: Choose Destination Location Dialog Box............................................................................................................ 24 Figure 15: Setup Status Dialog Box ...................................................................................................................................... 25 Figure 16: ODBC Driver Installation Dialog......................................................................................................................... 25 Figure 17: MySQL 3 Port Setter Dialog................................................................................................................................ 26 Figure 18: MySQL 4 Port Setter Dialog................................................................................................................................ 26 Figure 19: Database Installation Dialog ................................................................................................................................ 27 Figure 20: Java Installation Dialog........................................................................................................................................ 27 Figure 21: Installation Complete Dialog Box........................................................................................................................ 28 Figure 22: Windows Security Center Window...................................................................................................................... 29 Figure 23: Windows Firewall Dialog Box............................................................................................................................. 30 Figure 24: Advanced Settings Dialog Box ............................................................................................................................ 31 Figure 25: Add a Port Dialog Box ......................................................................................................................................... 32 Figure 26: IIS Main Window with Web Service Extensions Selected .................................................................................. 33 Figure 27: IIS Manager with the RCC Folder Selected ......................................................................................................... 33 Figure 28: RCC Properties Dialog Box ................................................................................................................................. 34 Figure 29: Application Configuration Dialog Box ................................................................................................................ 34 Figure 30: Options Tab.......................................................................................................................................................... 35 Figure 31: Add New Application Pool Dialog Box............................................................................................................... 36 Figure 32: Application Pool Identity Tab .............................................................................................................................. 37 Figure 33: Selecting RCC...................................................................................................................................................... 37 Figure 34: RCC Properties..................................................................................................................................................... 38 Figure 35: Login page............................................................................................................................................................ 40 Figure 36: Change Password Page......................................................................................................................................... 41 Figure 37: Contact Center Connection Page.......................................................................................................................... 43 Figure 38: Connection Security Setting Changed Reboot Message ...................................................................................... 44 Figure 39: Download Status Field ......................................................................................................................................... 45 Figure 40: Administration Menu Page................................................................................................................................... 47 Figure 41: System Administration Menu Page...................................................................................................................... 48 Figure 42: System Administrator Details Page...................................................................................................................... 50 Figure 43: User Admin Page ................................................................................................................................................. 51 Figure 44: Add User Page...................................................................................................................................................... 52 Figure 45: Details for new User Mary Smith......................................................................................................................... 54 Figure 46: Edit User Page...................................................................................................................................................... 56 Figure 47: Skillset Assignment Page..................................................................................................................................... 58 Figure 48: Assigned Skillsets Page........................................................................................................................................ 59 Figure 49: Skillsets Assigned to User Mary Smith................................................................................................................ 60 Figure 50: Maintenance Menu Page ...................................................................................................................................... 61 Figure 51: System Status Page .............................................................................................................................................. 62 Figure 52: Logging Menu Page ............................................................................................................................................. 63
List of Figures
Reporting for Contact Center Setup and Operations Guide Issue 03 (03)
viii
Figure 53: Logging Menu Page, with the Logging Stopped...................................................................................................64 Figure 54: Company Details Page..........................................................................................................................................65 Figure 55: Main Menu Page...................................................................................................................................................66 Figure 56: Login Page ............................................................................................................................................................68 Figure 57: Change Password Page .........................................................................................................................................69 Figure 58: User Main Menu Page ..........................................................................................................................................70 Figure 59: Time Bin Setup Skillset selection page.................................................................................................................72 Figure 60: Time Bins Page.....................................................................................................................................................73 Figure 61: Print Schedules Page.............................................................................................................................................75 Figure 62: Your Daily Schedules Page...................................................................................................................................76 Figure 63: Add Daily Schedule Page .....................................................................................................................................77 Figure 64: Add Daily Schedule Page - Example Settings ......................................................................................................79 Figure 65: Daily Schedule Skillsets Page...............................................................................................................................80 Figure 66: Save Favorites Page ..............................................................................................................................................82 Figure 67: Your Daily Schedules with a Schedule in the List................................................................................................84 Figure 68: Edit Daily Schedules Page ....................................................................................................................................86 Figure 69: Your Weekly Schedules Page ...............................................................................................................................88 Figure 70: Add Weekly Schedule Page..................................................................................................................................89 Figure 71: Calendar for September 2003 ...............................................................................................................................90 Figure 72: Add Weekly Schedule Page - Example Schedule.................................................................................................91 Figure 73: Weekly Schedules - Skillsets ................................................................................................................................92 Figure 74: Your Weekly Schedule Page with a Schedule in the List .....................................................................................94 Figure 75: Edit Weekly Schedule Page ..................................................................................................................................96 Figure 76: Your Monthly Schedules Page..............................................................................................................................98 Figure 77: Add Monthly Schedule Page.................................................................................................................................99 Figure 78: Add Monthly Schedule Page with Example Schedule........................................................................................101 Figure 79: Monthly Schedule - Skillsets Page......................................................................................................................103 Figure 80: Your Monthly Schedules Page with a Schedule in the List ................................................................................105 Figure 81: Edit Monthly Schedule Page...............................................................................................................................107 Figure 82: Real Time Page...................................................................................................................................................109 Figure 83: Real Time Call Summary Real Time Screens.....................................................................................................110 Figure 84: Real Time Agent Summary Real Time Screen ...................................................................................................113 Figure 85: Real Time Call Detail Screen..............................................................................................................................114 Figure 86: Agent Detail Real Time ......................................................................................................................................117 Figure 87: Agent Alarm Menu Page ....................................................................................................................................120 Figure 88: Agent Alarms Setup Page ...................................................................................................................................121 Figure 89: Agent Alarms Values Page .................................................................................................................................123 Figure 90: Wallboard Menu Page.........................................................................................................................................127 Figure 91: Wallboard Assignment Page...............................................................................................................................128 Figure 92: Add Wallboard Page ...........................................................................................................................................129 Figure 93: Wallboard Setup Page with Wallboard Listed ....................................................................................................131 Figure 94: Edit wallboard Page ............................................................................................................................................132 Figure 95: Edit Parameters Page ..........................................................................................................................................133 Figure 96: Assigned Messages Page ....................................................................................................................................135 Figure 97: Add Message Page..............................................................................................................................................136 Figure 98: Add Message Page - Example Text ....................................................................................................................137 Figure 99: Assigned Messages List - Example Messages ....................................................................................................138 Figure 100: Assigned Alarms Page ......................................................................................................................................139 Figure 101: Add Alarm Page................................................................................................................................................140 Figure 102: Example Settings for a Multi Alarm Period Alarm...........................................................................................143 Figure 103: Assigned Alarms Page with an Alarm configured ............................................................................................145 Figure 104: Assigned Schedules Page..................................................................................................................................146 Figure 105: Add Schedule Page ...........................................................................................................................................147 Figure 106: Assigned Schedules Page with Schedule Added...............................................................................................149 Figure 107: Edit Schedule Page ...........................................................................................................................................150 Figure 108: Instant Messages Page ......................................................................................................................................151
List of Figures ix
Issue 03 (03) Reporting for Contact Center Setup and Operations Guide
Figure 109: Composing an Instant Message........................................................................................................................ 152 Figure 110: Example Report Header ................................................................................................................................... 156 Figure 111: Report Viewer Toolbar..................................................................................................................................... 157 Figure 112: Report Printer Selection Window..................................................................................................................... 157 Figure 113: Export Report Window .................................................................................................................................... 158 Figure 114: Report Viewer Export ...................................................................................................................................... 159 Figure 115: Report Menu Page............................................................................................................................................ 161 Figure 116: Selecting a Date Range .................................................................................................................................... 163 Figure 117: Print Status Page .............................................................................................................................................. 165 Figure 118: Exporting Reports Screen................................................................................................................................. 166 Figure 119: Opening Reports Screen................................................................................................................................... 168 Figure 120: Select Skillsets Page......................................................................................................................................... 170 Figure 121: Select Agents Page........................................................................................................................................... 171 Figure 122: Select Activity Code Page................................................................................................................................ 172 Figure 123: Get Latest Contact Center Data........................................................................................................................ 173 Figure 124: Answered Calls Report..................................................................................................................................... 181 Figure 125: Answered Calls Graph ..................................................................................................................................... 182 Figure 126: Abandoned Calls Report .................................................................................................................................. 184 Figure 127: Abandoned Calls Graph ................................................................................................................................... 185 Figure 128: Abandoned Calling Line ID Report ................................................................................................................. 187 Figure 129: Agent Capacity Report ..................................................................................................................................... 190 Figure 130: Help Request Report ........................................................................................................................................ 192 Figure 131: Call Average Report......................................................................................................................................... 194 Figure 132: Agent Average Report...................................................................................................................................... 197 Figure 133: Agent Profile Report ........................................................................................................................................ 201 Figure 134: Agent Activity Report ...................................................................................................................................... 205 Figure 135: Agent Audit Report .......................................................................................................................................... 209 Figure 136: Activity Code Report by Skillset...................................................................................................................... 212 Figure 137: Activity Code Report by Agent........................................................................................................................ 215 Figure 138: Activity Code Report by Number of Pegs........................................................................................................ 217 Figure 139: Summary Report .............................................................................................................................................. 220 Figure 140: Summary Report Graphs Page ......................................................................................................................... 221 Figure 141: Call Profile Report ........................................................................................................................................... 226 Figure 142: Call Profile Report Graph Page........................................................................................................................ 227 Figure 143: Incoming Call Report ....................................................................................................................................... 231 Figure 144: Unanswered Help Request Report ................................................................................................................... 236 Figure 145: Agent Average Report by Agent ...................................................................................................................... 238 Figure 146: Agent Activity Report by Skillset .................................................................................................................... 241 Figure 147: System Configuration Report........................................................................................................................... 244 Figure 148: Example Host File............................................................................................................................................ 247 Figure 149: Norton Anti-Virus Options Screen................................................................................................................... 249 Figure 150: Norton Anti-Virus Options Dialog................................................................................................................... 250 Figure 151: Page Cannot Be Displayed Error Message....................................................................................................... 252 Figure 152: Scheduled Task Control Panel ......................................................................................................................... 253 Figure 153: Scheduled Task Wizard.................................................................................................................................... 254 Figure 154: Schedule Task Wizard Windows Programs ..................................................................................................... 254 Figure 155: Schedule Task Wizard...................................................................................................................................... 255 Figure 156: Schedule Task Wizard...................................................................................................................................... 255 Figure 157: Schedule Task Wizard...................................................................................................................................... 256 Figure 158: Disabling a Schedule Task ............................................................................................................................... 257 Figure 159: Crystal Report ActiveX Viewer Welcome Window ........................................................................................ 258 Figure 160: Crystal Report ActiveX Viewer Continue Installation Message Box .............................................................. 259 Figure 161: Crystal Report ActiveX Viewer Setup Complete Window .............................................................................. 259 Figure 162: Internet Properties Dialog Box......................................................................................................................... 260 Figure 163: Security Tab in Internet Properties Dialog Box ............................................................................................... 261 Figure 164: Trusted sites Dialog Box .................................................................................................................................. 262

List of Figures
Reporting for Contact Center Setup and Operations Guide Issue 03 (03)
x
Figure 165: Entering IP Address of Trusted site ..................................................................................................................262 Figure 166: Page Cannot Be Displayed Error Message in Report Viewer...........................................................................263 Figure 167: Check Tables page ............................................................................................................................................264 Figure 168: Table Summaries page......................................................................................................................................265 Figure 169: Repaired Tables page........................................................................................................................................266 Figure 170: Advanced Tab Settings in Internet Properties dialog box.................................................................................267 Figure 171: Taskbar Properties Dialog Box .........................................................................................................................268 Figure 172: Selecting Close Group option from Internet Explorer Programs taskbar button...............................................269 Figure 173: Internet Explorer Close Group Error.................................................................................................................269

List of Tables xi
Issue 03 (03) Reporting for Contact Center Setup and Operations Guide
List of Tables Table 1: Administrator and User Permissions ....................................................................................................................... 53 Table 2: Available Report Export Formats.......................................................................................................................... 158 Table 3: Abbreviations for Formula Descriptions ............................................................................................................... 176

Change History xii
Issue 03 (03) Reporting for Contact Center Setup and Operations Guide
Change History Issue 01 (11) – March 2004 1. First Public Release. Issue 01 (12) – April 2004 1. Note on Windows 2003 compatibility added. 2. Contact Center Connection Page section expanded. 3. Troubleshooting Section expanded. 4. GOS % Formula changed in Glossary. Issue 02 (2) – August 2004 1. CallPilot 3.0 references added. 2. Deleting temporary internet files added. 3. New report descriptions added. 4. CCRS Installation section added. Issue 02 (3) – August 2004 1. Figure numbers modified in body text. Issue 02 (4) – August 2004 1. Latest CCR installation routine added. Issue 02 (5) – September 2004 1. User and Administrators permissions discussion added. 2. Note adding regarding reboot of the Web Host following the addition of a new Network Interface
Card. Issue 02 (7) – December 2004 1. Backup Section Added. 2. Screenshots updated. 3. Configuration Report section added.
Issue 02 (9) – December 2004 1. Minor formatting changes. 2. Minor grammar changes.
List of Figures xiii
Issue 03 (03) Reporting for Contact Center Setup and Operations Guide
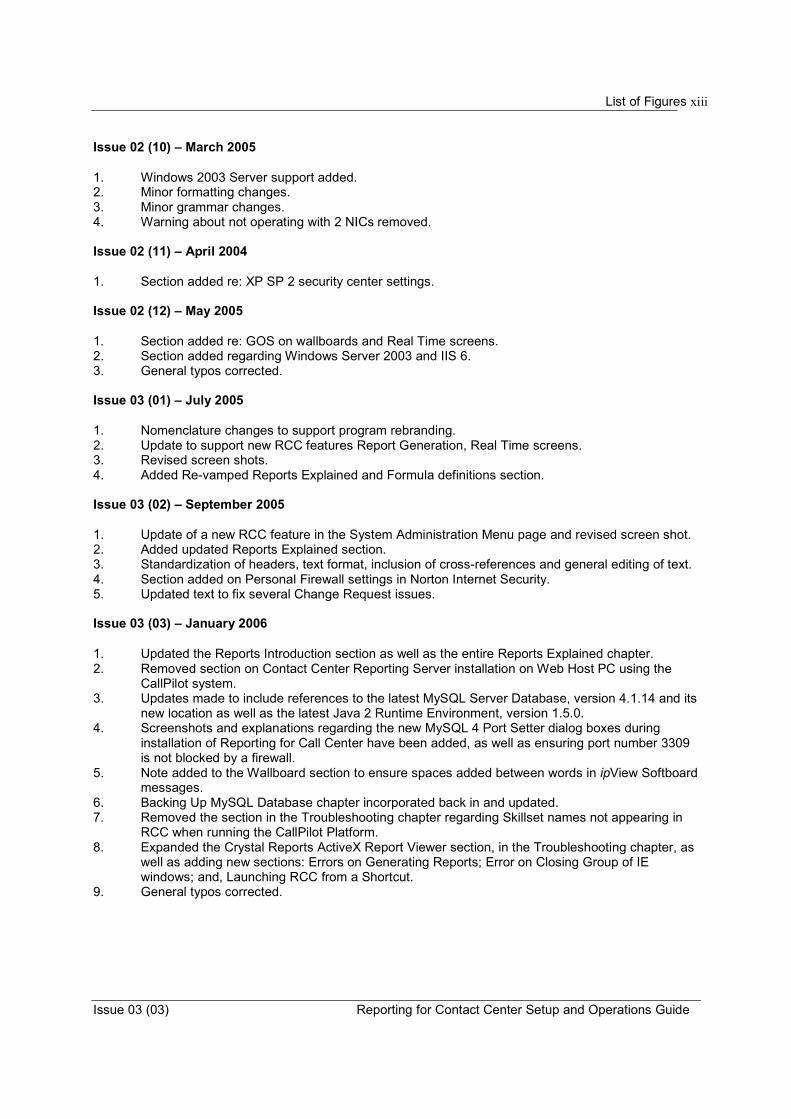
Issue 02 (10) – March 2005 1. Windows 2003 Server support added. 2. Minor formatting changes. 3. Minor grammar changes. 4. Warning about not operating with 2 NICs removed. Issue 02 (11) – April 2004 1. Section added re: XP SP 2 security center settings. Issue 02 (12) – May 2005 1. Section added re: GOS on wallboards and Real Time screens. 2. Section added regarding Windows Server 2003 and IIS 6. 3. General typos corrected. Issue 03 (01) – July 2005 1. Nomenclature changes to support program rebranding. 2. Update to support new RCC features Report Generation, Real Time screens. 3. Revised screen shots. 4. Added Re-vamped Reports Explained and Formula definitions section. Issue 03 (02) – September 2005 1. Update of a new RCC feature in the System Administration Menu page and revised screen shot. 2. Added updated Reports Explained section. 3. Standardization of headers, text format, inclusion of cross-references and general editing of text. 4. Section added on Personal Firewall settings in Norton Internet Security. 5. Updated text to fix several Change Request issues. Issue 03 (03) – January 2006 1. Updated the Reports Introduction section as well as the entire Reports Explained chapter. 2. Removed section on Contact Center Reporting Server installation on Web Host PC using the
CallPilot system. 3. Updates made to include references to the latest MySQL Server Database, version 4.1.14 and its
new location as well as the latest Java 2 Runtime Environment, version 1.5.0. 4. Screenshots and explanations regarding the new MySQL 4 Port Setter dialog boxes during
installation of Reporting for Call Center have been added, as well as ensuring port number 3309 is not blocked by a firewall.
5. Note added to the Wallboard section to ensure spaces added between words in ipView Softboard messages.
6. Backing Up MySQL Database chapter incorporated back in and updated. 7. Removed the section in the Troubleshooting chapter regarding Skillset names not appearing in
RCC when running the CallPilot Platform. 8. Expanded the Crystal Reports ActiveX Report Viewer section, in the Troubleshooting chapter, as
well as adding new sections: Errors on Generating Reports; Error on Closing Group of IE windows; and, Launching RCC from a Shortcut.
9. General typos corrected.


How to Use this Guide 1
Issue 03 (03) Reporting for Contact Center Setup and Operations Guide
How to Use this Guide
Introduction
This guide is designed to allow an Administrator or User to set up and operate Nortel Reporting for Contact Center.
How This Guide is Organized
The Reporting for Contact Center Setup and Operations Guide is organized as follows: How to Use this Document Provides a brief overview identifying the organization of
this guide. Introduction Provides an overview of the conceptual organization of the
Nortel Reporting for Contact Center product. Installation Describes the minimum specification for the Personal
Computer (PC) required to host Nortel Reporting for Contact Center. Describes how to install Nortel Reporting for Contact Center.
Administration Describes the required administration duties and
configuration to ensure that Nortel Reporting for Contact Center operates correctly.
Using Reporting for Describes the use and configuration of Contact Center Nortel Reporting for Contact Center from a user’s
perspective. Reports Describes the reports that are available within Nortel
Reporting for Contact Center. Reports Explained Describes each report available within Nortel Reporting
for Contact Center, with examples of suggested usage, FAQ, and the fields and formulas used in each report.
Backing Up the Database Describes how to back up and restore the MySQL
database used in Nortel Reporting for Contact Center. Troubleshooting Describes how you can troubleshoot Nortel Reporting for
Contact Center.
1

How to Use This Guide
Reporting for Contact Center Setup and Operations Guide Issue 03 (03)
2
Glossary Describes the terms used in this guide.
References Lists documents referenced in this guide. Index Provides a cross-reference of topics in this guide.
Introduction 3
Issue 03 (03) Reporting for Contact Center Setup and Operations Guide
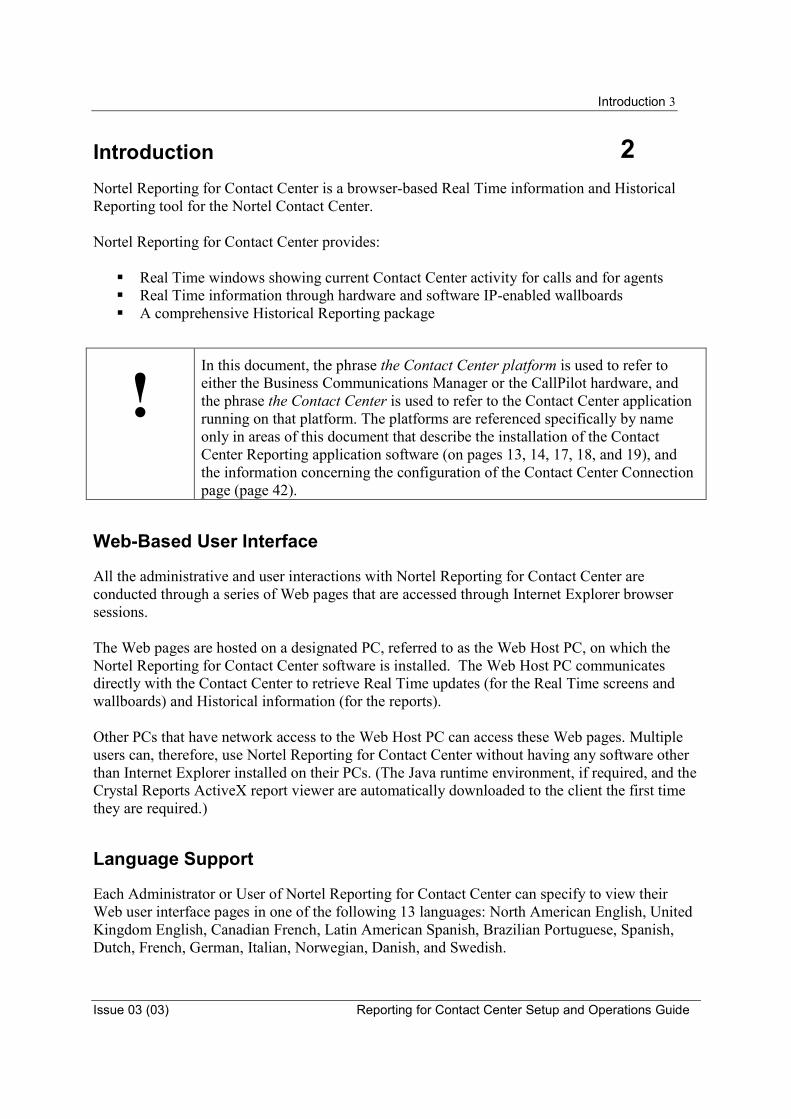
Introduction Nortel Reporting for Contact Center is a browser-based Real Time information and Historical Reporting tool for the Nortel Contact Center. Nortel Reporting for Contact Center provides:
� Real Time windows showing current Contact Center activity for calls and for agents � Real Time information through hardware and software IP-enabled wallboards � A comprehensive Historical Reporting package
!In this document, the phrase the Contact Center platform is used to refer to either the Business Communications Manager or the CallPilot hardware, and the phrase the Contact Center is used to refer to the Contact Center application running on that platform. The platforms are referenced specifically by name only in areas of this document that describe the installation of the Contact Center Reporting application software (on pages 13, 14, 17, 18, and 19), and the information concerning the configuration of the Contact Center Connection page (page 42).
Web-Based User Interface
All the administrative and user interactions with Nortel Reporting for Contact Center are conducted through a series of Web pages that are accessed through Internet Explorer browser sessions. The Web pages are hosted on a designated PC, referred to as the Web Host PC, on which the Nortel Reporting for Contact Center software is installed. The Web Host PC communicates directly with the Contact Center to retrieve Real Time updates (for the Real Time screens and wallboards) and Historical information (for the reports). Other PCs that have network access to the Web Host PC can access these Web pages. Multiple users can, therefore, use Nortel Reporting for Contact Center without having any software other than Internet Explorer installed on their PCs. (The Java runtime environment, if required, and the Crystal Reports ActiveX report viewer are automatically downloaded to the client the first time they are required.)
Language Support
Each Administrator or User of Nortel Reporting for Contact Center can specify to view their Web user interface pages in one of the following 13 languages: North American English, United Kingdom English, Canadian French, Latin American Spanish, Brazilian Portuguese, Spanish, Dutch, French, German, Italian, Norwegian, Danish, and Swedish.
2
Introduction
Reporting for Contact Center Setup and Operations Guide Issue 03 (03)
4
Each Administrator or User can also view individual wallboards in any of these languages.
Administrators and Users
The two types of Nortel Reporting for Contact Center users are Administrators and Users. In addition to having access to all the features of Nortel Reporting for Contact Center, Administrators can specify and change fundamental configuration settings within Nortel Reporting for Contact Center. For security purposes and to maintain system stability, only Users with Administrator capabilities can change the fundamental configuration settings. User interactions with Nortel Reporting for Contact Center are limited to using the features that it provides. While Users cannot modify the core setup of Nortel Reporting for Contact Center, they can specify and change some personal preferences. Users can also configure any aspects of Nortel Reporting for Contact Center that affect only themselves. Administrators and Users view different menus when they log in.
Assigned Skillsets
Administrators create Users by providing details, such as User Name and language, to Nortel Reporting for Contact Center. The Administrator must then assign Skillsets to Users. The process of assigning Skillsets defines the Skillsets that each User can view in the Real Time screens and for which the User can request Historical Reports. Skillsets can be assigned to more than one User. Users can choose to view the Real Time screens or Historical Reports for any of the Skillsets assigned to them, any combination of the allocated Skillsets, or all the assigned Skillsets. Users, including the Administrator, can save frequently used Selections of Skillsets as Favorites and assign names to the Favorites. The User can then, with a single mouse click, quickly locate a Skillset selection. Favorites are unique to each User. Users can create, modify, or delete their Favorites without affecting the Favorites of other Users.
SQL Historical Database
Historical Report information is stored in a standard MySQL database. If Users have reporting requirements that are not available through Nortel Reporting for Contact Center, they can analyze the data using third-party reporting packages.
Introduction 5
Issue 03 (03) Reporting for Contact Center Setup and Operations Guide
System Software
The software that sends data to Nortel Reporting for Contact Center is integral to the Nortel Contact Center. Nortel Reporting for Contact Center software on the Web Host PC communicates directly with the Contact Center to request Contact Center Historical Report statistical data and Real Time data. Users on other PCs can access the Real Time and Historical Report data by pointing their Internet browsers to the Nortel Reporting for Contact Center Web pages on the Web Host PC. Only the Web Host PC needs to communicate with the Contact Center.
!One PC on your network should be designated as the Web Host PC. Install the Nortel Reporting for Contact Center application software onto the designated PC only. All other network PCs from which Users access the Real Time screens, Historical Reports, or the Nortel Reporting for Contact Center user interface must be equipped with Internet Explorer. No other software is required on these PCs.
PC Requirements
The minimum requirements of the PC designated as the Nortel Reporting for Contact Center Web Host PC are as follows:
Minimum PC Specifications IBM™ Compatible PC MicroprocessorIntel® PentiumTM IV (or equivalent) minimum Microprocessor Speed1.7 GHz minimum Memory512 MB minimum Network Interface Card TCP/IP protocol SVGA display Mouse (or other Windows®-compatible pointing device) Microsoft Internet Explorer version 5 or higher
Introduction
Reporting for Contact Center Setup and Operations Guide Issue 03 (03)
6
Operating SystemMicrosoft Windows NT 4 Service Pack 6a Microsoft Windows 2000 Service SP2 Microsoft Windows XP Professional Microsoft Windows 2003 Server Standard Edition Web ServerNortel Reporting for Contact Center has been verified with Microsoft Internet Information Services 4, 5, and 6. Nortel Reporting for Contact Center is supported on a single PC only, which is the designated Web Host PC. Hard Disk Space RequiredFor installation of application on Web Server: 109 MB Storage space required for Historical Data: 4 GB minimum Note that the database will grow through time and, if the diagnostic logging option is turned on, the log files will require extra disk space.
Operating System Compatibility
Nortel Reporting for Contact Center is verified for correct operation on the following operating systems: Operating System Version Windows NT 4.00.1381 Windows 2000 5.00.2195 Windows XP Professional Version 2002 Windows 2003 Standard Edition


Installation
Reporting for Contact Center Setup and Operations Guide Issue 03 (03)
8
Installation
Introduction
This chapter describes the installation prerequisites and the procedure for installing the Nortel Reporting for Contact Center software on the Windows Personal Computer that is designated as the Web Host PC. The Web Host PC communicates with the Nortel Contact Center. The Web Host PC also stores the Contact Center statistical database and the Nortel Reporting for Contact Center user interface, which is configured as a web site. Users of other network PCs can use Internet Explorer to access the Nortel Reporting for Contact Center web site on the Web Host PC. From the web site, Users can access the software features and can obtain Real Time displays and Reports.
Upgrading to Reporting for Contact Center
This section describes the installation of Nortel Reporting for Contact Center from Nortel Networks Call Center Reporting on a Web Host PC. If you are upgrading from Call Center Reporting 2.5, 3.0, or 3.5, refer to the Upgrading from Call Center Reporting to Reporting for Contact Center document. If you are upgrading from a previous version of Nortel Reporting for Contact Center to a newer version of Nortel Reporting for Contact Center, refer to the following section, Upgrading a Previous Version of Reporting for Contact Center.
Upgrading a Previous Version of Reporting for Contact Center
Follow these steps to perform an upgrade of a previous installation of Nortel Reporting for Contact Center. 1. On the Windows taskbar, select Start > Settings and then click Control Panel. The Control
Panel window appears 2. Double-click the Add or Remove Programs icon. 3. From the list of programs select Reporting for Contact Center.4. Click the Change/Remove button under to start InstallShield Wizard.5. The InstallShield Wizard window will open up. Select the Remove option and click the
Next button. 6. Follow the on-screen instructions of InstallShield Wizard to complete the uninstall. 7. To install the latest version of Nortel Reporting for Contact Center, double-click on the
Reporting for Contact Center .exe file. 8. InstallShield Wizard will open up. Follow the on-screen instructions to be guided through
the installation process.
3

Introduction 9
Issue 03 (03) Reporting for Contact Center Setup and Operations Guide
Note: You DO NOT need to uninstall MySQL Servers and Clients 4.1.14 or the Java 2 Runtime Environment SE v.1.5.0.
If required, your Nortel Reporting for Contact Center databases are modified during the installation. There is no loss of statistical data, but new data, tables, columns, and/or indexes may be added to them.
Deleting Temporary Internet Files To prevent Internet Explorer from caching old versions of the Nortel Reporting for Contact Center web pages, delete the temporary Internet files on your computer. Follow these steps to delete temporary Internet files.
1. Click Start, then right-click the Internet Explorer icon, and select Internet Properties.See Figure 1: Internet Properties Dialog Box.
Figure 1: Internet Properties Dialog Box
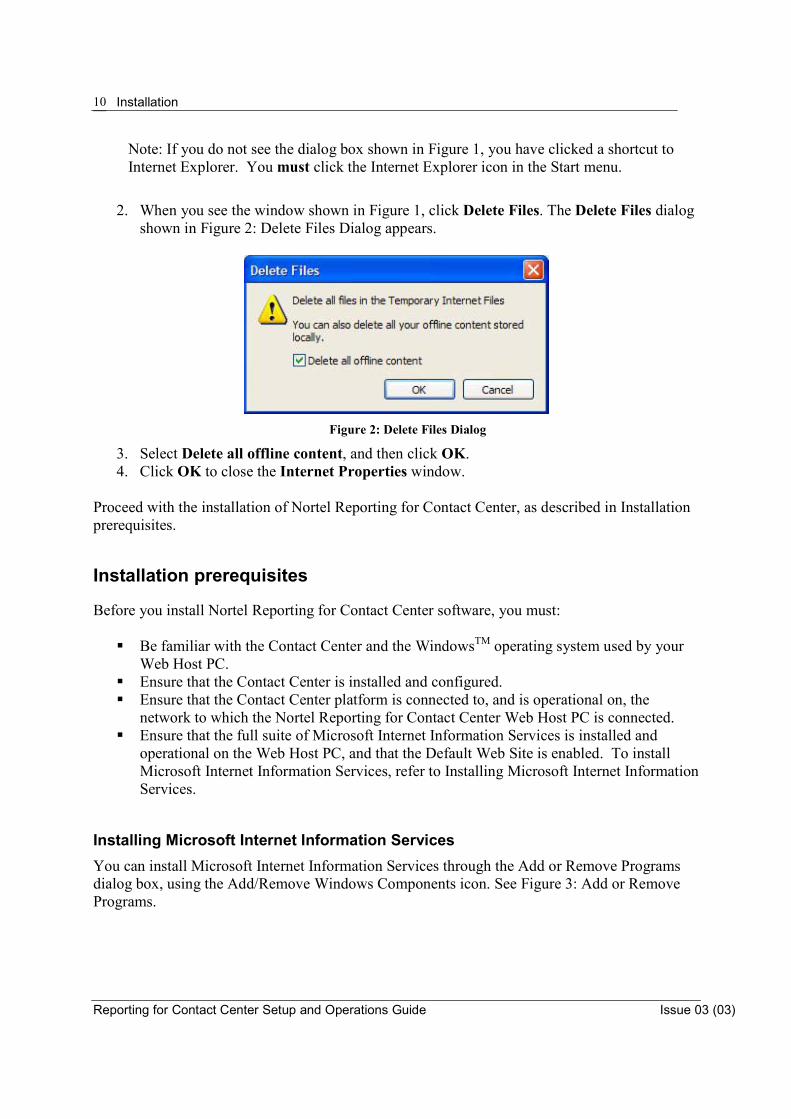
Installation
Reporting for Contact Center Setup and Operations Guide Issue 03 (03)
10
Note: If you do not see the dialog box shown in Figure 1, you have clicked a shortcut to Internet Explorer. You must click the Internet Explorer icon in the Start menu.
2. When you see the window shown in Figure 1, click Delete Files. The Delete Files dialog
shown in Figure 2: Delete Files Dialog appears.
Figure 2: Delete Files Dialog 3. Select Delete all offline content, and then click OK.4. Click OK to close the Internet Properties window.
Proceed with the installation of Nortel Reporting for Contact Center, as described in Installation prerequisites.
Installation prerequisites
Before you install Nortel Reporting for Contact Center software, you must:
� Be familiar with the Contact Center and the WindowsTM operating system used by your Web Host PC.
� Ensure that the Contact Center is installed and configured. � Ensure that the Contact Center platform is connected to, and is operational on, the
network to which the Nortel Reporting for Contact Center Web Host PC is connected. � Ensure that the full suite of Microsoft Internet Information Services is installed and
operational on the Web Host PC, and that the Default Web Site is enabled. To install Microsoft Internet Information Services, refer to Installing Microsoft Internet Information Services.
Installing Microsoft Internet Information Services You can install Microsoft Internet Information Services through the Add or Remove Programs dialog box, using the Add/Remove Windows Components icon. See Figure 3: Add or Remove Programs.
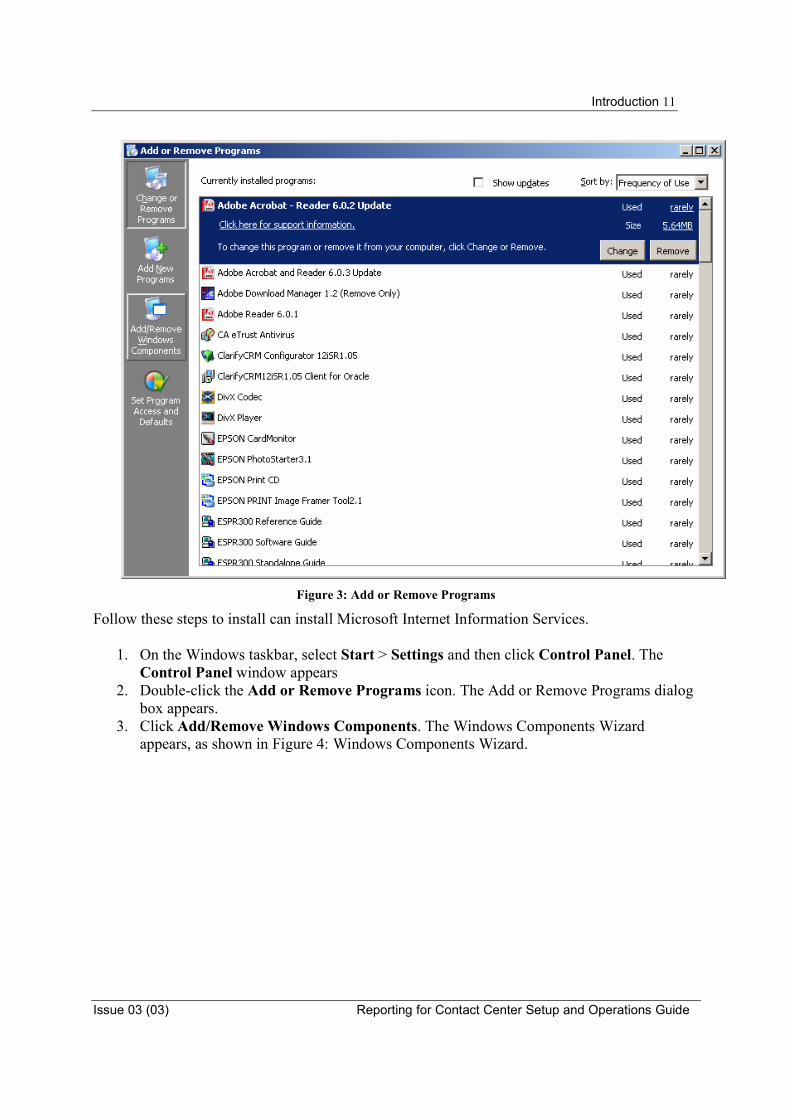
Introduction 11
Issue 03 (03) Reporting for Contact Center Setup and Operations Guide
Figure 3: Add or Remove Programs
Follow these steps to install can install Microsoft Internet Information Services.
1. On the Windows taskbar, select Start > Settings and then click Control Panel. The Control Panel window appears
2. Double-click the Add or Remove Programs icon. The Add or Remove Programs dialog box appears.
3. Click Add/Remove Windows Components. The Windows Components Wizard appears, as shown in Figure 4: Windows Components Wizard.
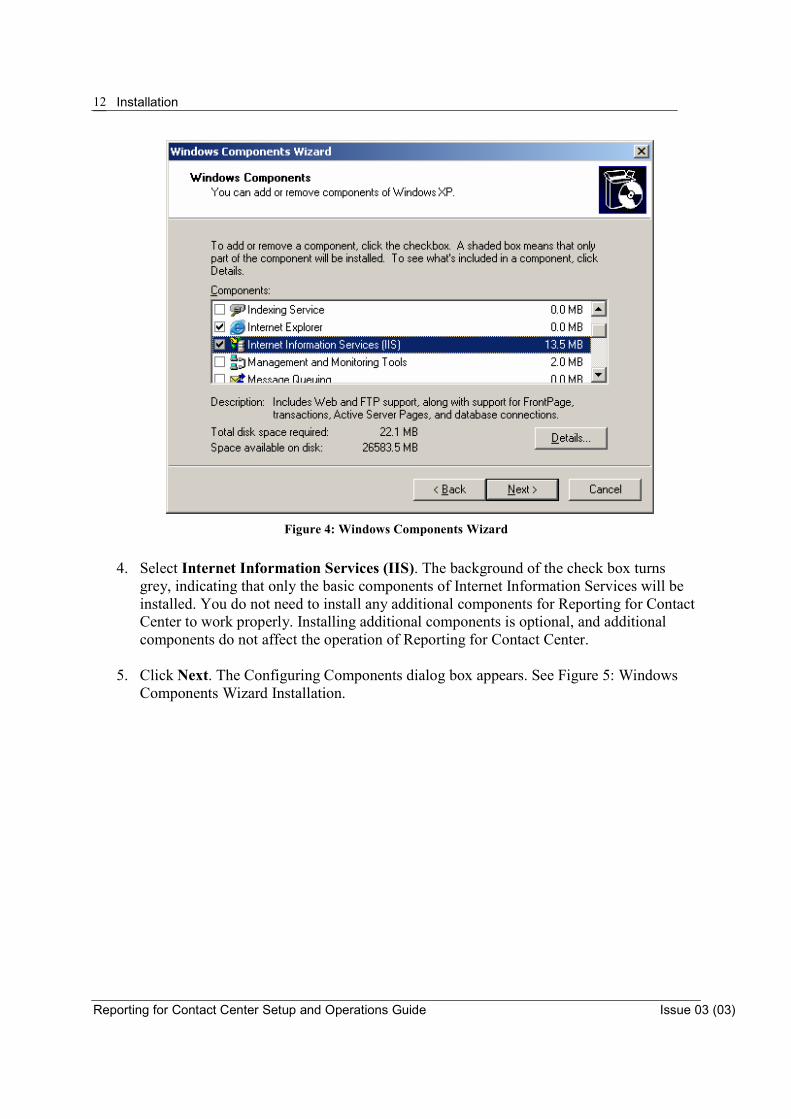
Installation
Reporting for Contact Center Setup and Operations Guide Issue 03 (03)
12
Figure 4: Windows Components Wizard
4. Select Internet Information Services (IIS). The background of the check box turns
grey, indicating that only the basic components of Internet Information Services will be installed. You do not need to install any additional components for Reporting for Contact Center to work properly. Installing additional components is optional, and additional components do not affect the operation of Reporting for Contact Center.
5. Click Next. The Configuring Components dialog box appears. See Figure 5: Windows
Components Wizard Installation.
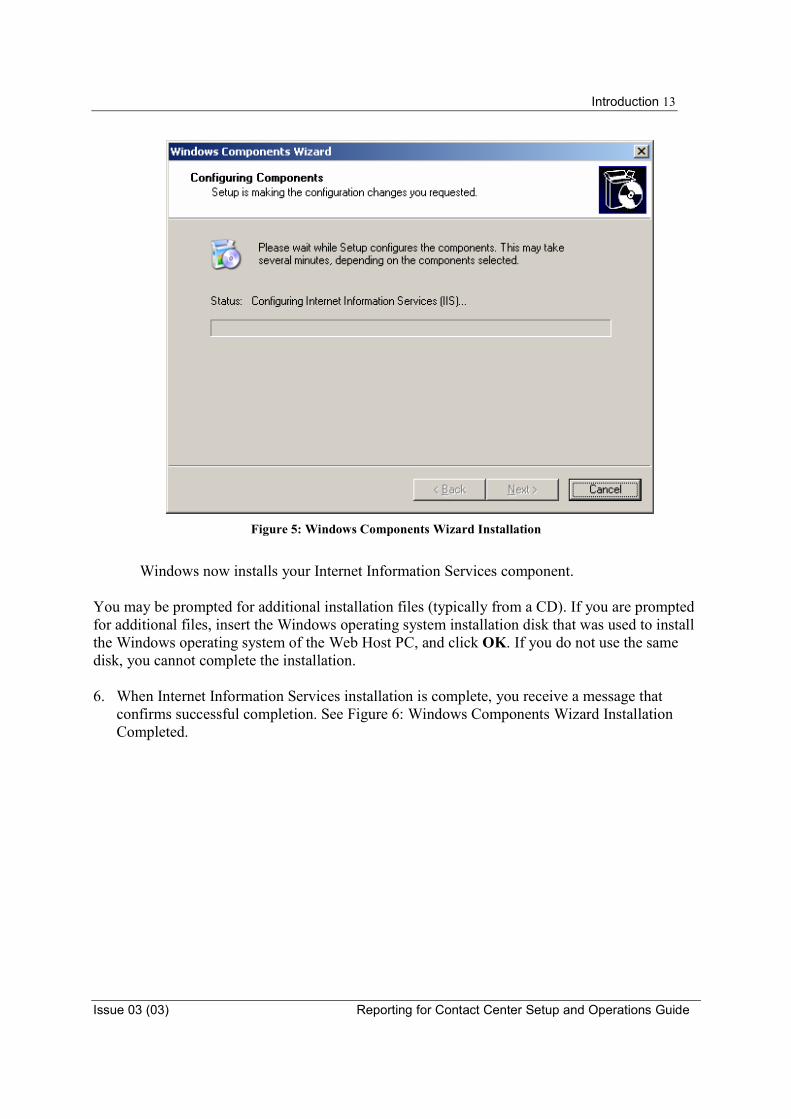
Introduction 13
Issue 03 (03) Reporting for Contact Center Setup and Operations Guide
Figure 5: Windows Components Wizard Installation
Windows now installs your Internet Information Services component.
You may be prompted for additional installation files (typically from a CD). If you are prompted for additional files, insert the Windows operating system installation disk that was used to install the Windows operating system of the Web Host PC, and click OK. If you do not use the same disk, you cannot complete the installation. 6. When Internet Information Services installation is complete, you receive a message that
confirms successful completion. See Figure 6: Windows Components Wizard Installation Completed.
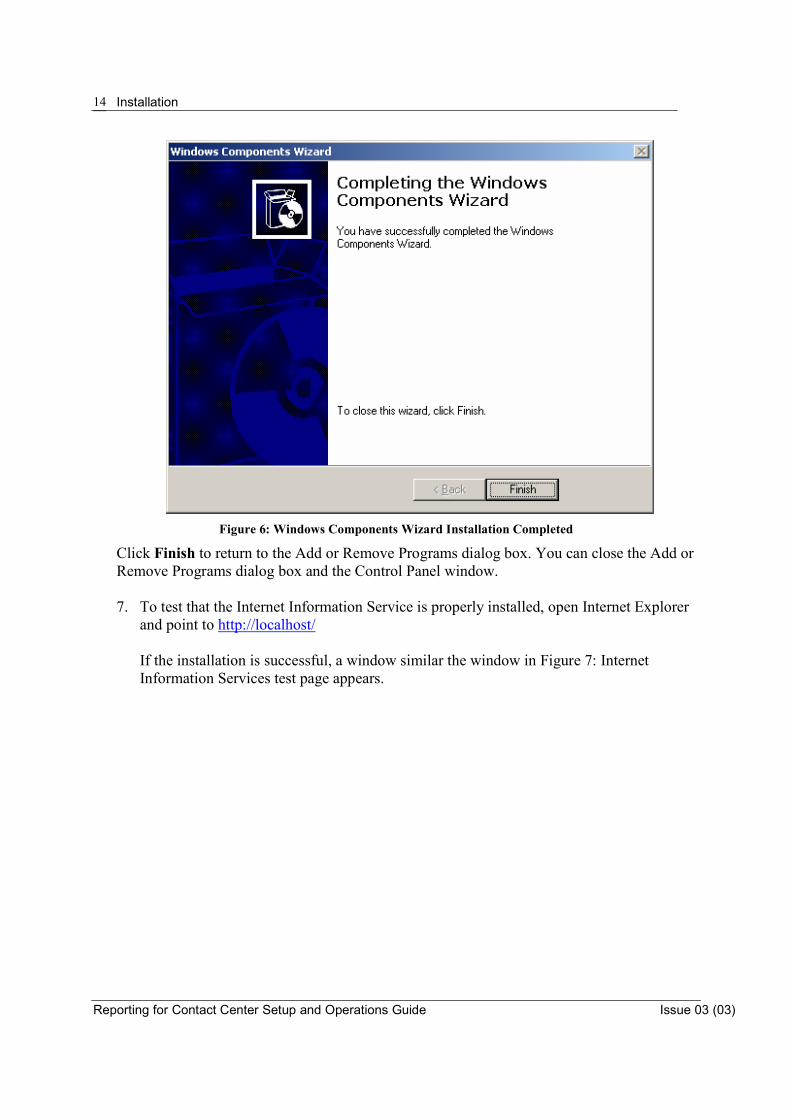
Installation
Reporting for Contact Center Setup and Operations Guide Issue 03 (03)
14
Figure 6: Windows Components Wizard Installation Completed
Click Finish to return to the Add or Remove Programs dialog box. You can close the Add or Remove Programs dialog box and the Control Panel window.
7. To test that the Internet Information Service is properly installed, open Internet Explorer
and point to http://localhost/
If the installation is successful, a window similar the window in Figure 7: Internet Information Services test page appears.
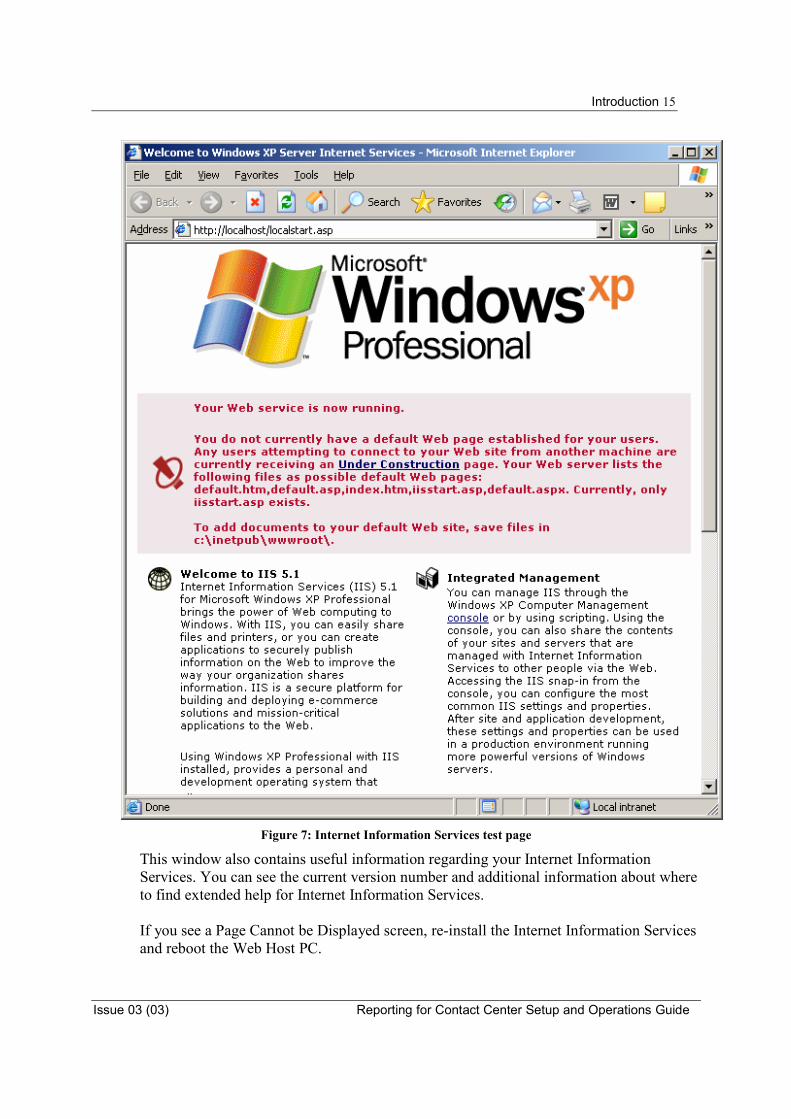
Introduction 15
Issue 03 (03) Reporting for Contact Center Setup and Operations Guide
Figure 7: Internet Information Services test page
This window also contains useful information regarding your Internet Information Services. You can see the current version number and additional information about where to find extended help for Internet Information Services.
If you see a Page Cannot be Displayed screen, re-install the Internet Information Services and reboot the Web Host PC.
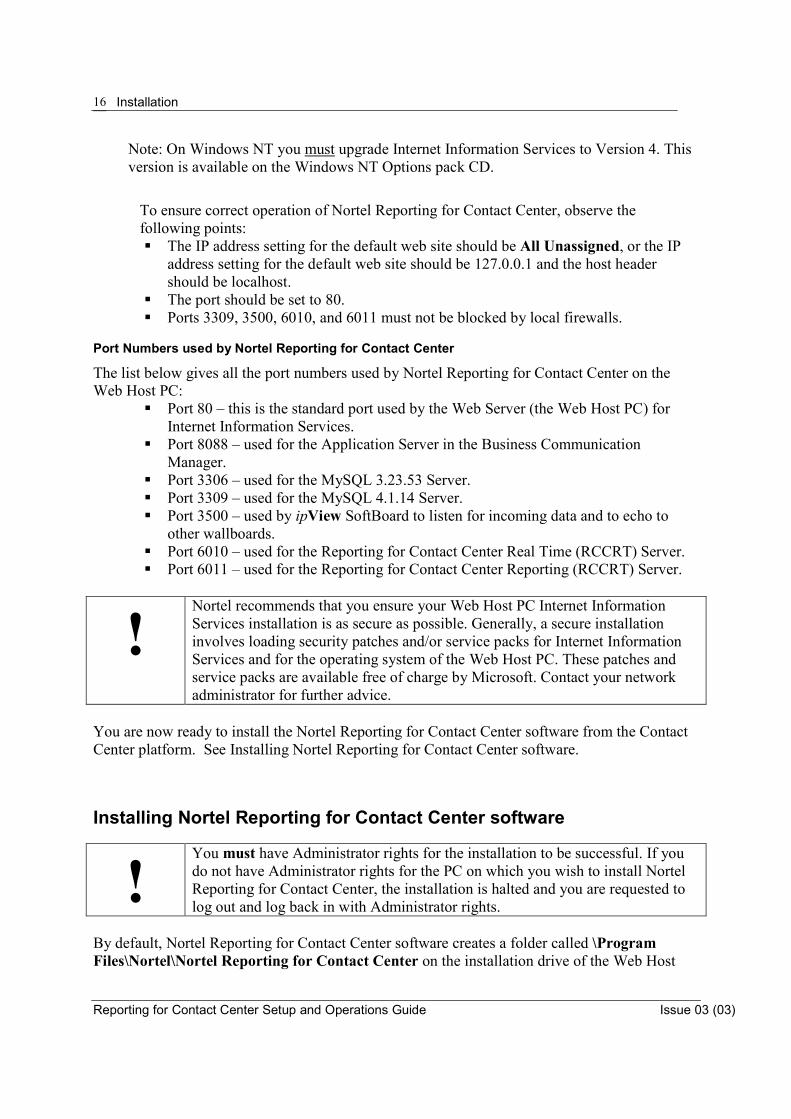
Installation
Reporting for Contact Center Setup and Operations Guide Issue 03 (03)
16
Note: On Windows NT you must upgrade Internet Information Services to Version 4. This version is available on the Windows NT Options pack CD.
To ensure correct operation of Nortel Reporting for Contact Center, observe the following points: � The IP address setting for the default web site should be All Unassigned, or the IP
address setting for the default web site should be 127.0.0.1 and the host header should be localhost.
� The port should be set to 80. � Ports 3309, 3500, 6010, and 6011 must not be blocked by local firewalls.
Port Numbers used by Nortel Reporting for Contact Center
The list below gives all the port numbers used by Nortel Reporting for Contact Center on the Web Host PC:
� Port 80 – this is the standard port used by the Web Server (the Web Host PC) for Internet Information Services.
� Port 8088 – used for the Application Server in the Business Communication Manager.
� Port 3306 – used for the MySQL 3.23.53 Server. � Port 3309 – used for the MySQL 4.1.14 Server. � Port 3500 – used by ipView SoftBoard to listen for incoming data and to echo to
other wallboards. � Port 6010 – used for the Reporting for Contact Center Real Time (RCCRT) Server. � Port 6011 – used for the Reporting for Contact Center Reporting (RCCRT) Server.
!Nortel recommends that you ensure your Web Host PC Internet Information Services installation is as secure as possible. Generally, a secure installation involves loading security patches and/or service packs for Internet Information Services and for the operating system of the Web Host PC. These patches and service packs are available free of charge by Microsoft. Contact your network administrator for further advice.
You are now ready to install the Nortel Reporting for Contact Center software from the Contact Center platform. See Installing Nortel Reporting for Contact Center software.
Installing Nortel Reporting for Contact Center software
!You must have Administrator rights for the installation to be successful. If you do not have Administrator rights for the PC on which you wish to install Nortel Reporting for Contact Center, the installation is halted and you are requested to log out and log back in with Administrator rights.
By default, Nortel Reporting for Contact Center software creates a folder called \Program Files\Nortel\Nortel Reporting for Contact Center on the installation drive of the Web Host
Introduction 17
Issue 03 (03) Reporting for Contact Center Setup and Operations Guide
PC. This folder contains the application files used by Nortel Reporting for Contact Center. The folder also contains the Nortel Reporting for Contact Center configuration and statistical database.
Note: Before Nortel Reporting for Contact Center will operate correctly, you must enable the Contact Center Reporting Software Keycode. For Software Keycode information, refer to the Software Keycode Installation Guide.
TCP/IP Protocol The Contact Center platform and Nortel Reporting for Contact Center use the industry standard TCP/IP protocol for communication between the Contact Center and the Nortel Reporting for Contact Center Web Host PC. The Windows Network component is required for the Nortel Reporting for Contact Center Web Host PC. Refer to Checking Installation of the Windows Networking Component , The Nortel Reporting for Contact Center installation process does not install the Windows Network component. For instructions about installing the Windows Networking component, refer to your network or Windows documentation.
Checking Installation of the Windows Networking Component Follow the steps in this section to check that the Windows Networking component is set up properly on the PC that will operate as a Web Host PC.
Note: If your company has a network administrator, check with your administrator before changing any network configuration parameters.
1. Start the Windows system on the PC where the Nortel Reporting for Contact Center
application is installed. 2. On the Windows taskbar, select Start > Settings and then click Control Panel. The Control
Panel window appears.
If you are using the Windows 2000 operating system, double-click Networking and Dial-up Connections. The Networking and Dial-up Connections window appears. If you are using the Windows XP operating system, select Start > Connect to and then click Show All Connections. The Networking Connections window appears.
3. Double-click the Network icon. The Network window appears with the Configuration tab
displayed.
If you are using the Windows 2000 or Windows XP operating system, right-click the Local Area Connection icon and then click Properties.
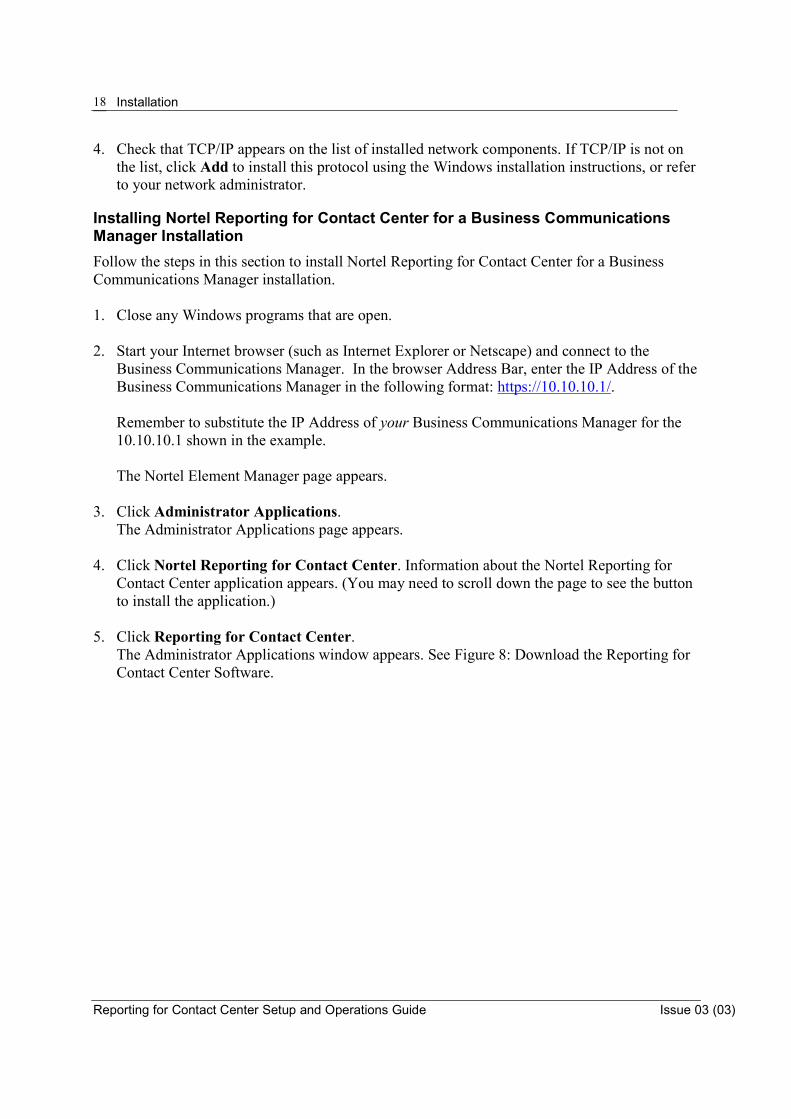
Installation
Reporting for Contact Center Setup and Operations Guide Issue 03 (03)
18
4. Check that TCP/IP appears on the list of installed network components. If TCP/IP is not on the list, click Add to install this protocol using the Windows installation instructions, or refer to your network administrator.
Installing Nortel Reporting for Contact Center for a Business Communications Manager Installation Follow the steps in this section to install Nortel Reporting for Contact Center for a Business Communications Manager installation. 1. Close any Windows programs that are open. 2. Start your Internet browser (such as Internet Explorer or Netscape) and connect to the
Business Communications Manager. In the browser Address Bar, enter the IP Address of the Business Communications Manager in the following format: https://10.10.10.1/.
Remember to substitute the IP Address of your Business Communications Manager for the 10.10.10.1 shown in the example.
The Nortel Element Manager page appears.
3. Click Administrator Applications.
The Administrator Applications page appears. 4. Click Nortel Reporting for Contact Center. Information about the Nortel Reporting for
Contact Center application appears. (You may need to scroll down the page to see the button to install the application.)
5. Click Reporting for Contact Center.
The Administrator Applications window appears. See Figure 8: Download the Reporting for Contact Center Software.

Introduction 19
Issue 03 (03) Reporting for Contact Center Setup and Operations Guide
Figure 8: Download the Reporting for Contact Center Software
6. Click Download Reporting for Contact Center on the right side of the window.
7. In the dialog box that appears, you can select to either Run this program from its current
location or Save this program to disk. The default option is Save this program to disk. Click OK.
8. When the client is downloaded to your PC, go to the location where you downloaded the file. Double-click the file to run it. The Install Wizard shown in Figure 9: InstallShield Initialization Dialog appears. The wizard extracts the installation files required to install the Nortel Reporting for Contact Center files on the Web Host PC. Wait until the files are extracted.
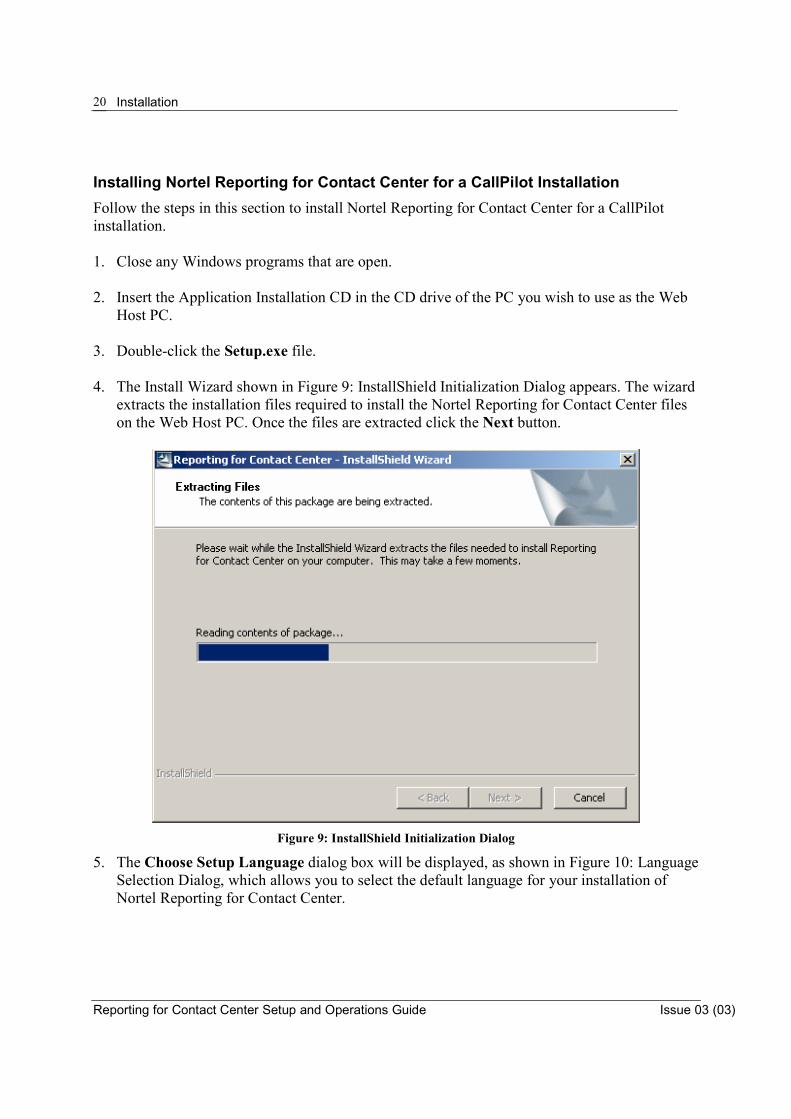
Installation
Reporting for Contact Center Setup and Operations Guide Issue 03 (03)
20
Installing Nortel Reporting for Contact Center for a CallPilot Installation Follow the steps in this section to install Nortel Reporting for Contact Center for a CallPilot installation. 1. Close any Windows programs that are open. 2. Insert the Application Installation CD in the CD drive of the PC you wish to use as the Web
Host PC. 3. Double-click the Setup.exe file. 4. The Install Wizard shown in Figure 9: InstallShield Initialization Dialog appears. The wizard
extracts the installation files required to install the Nortel Reporting for Contact Center files on the Web Host PC. Once the files are extracted click the Next button.
Figure 9: InstallShield Initialization Dialog 5. The Choose Setup Language dialog box will be displayed, as shown in Figure 10: Language
Selection Dialog, which allows you to select the default language for your installation of Nortel Reporting for Contact Center.
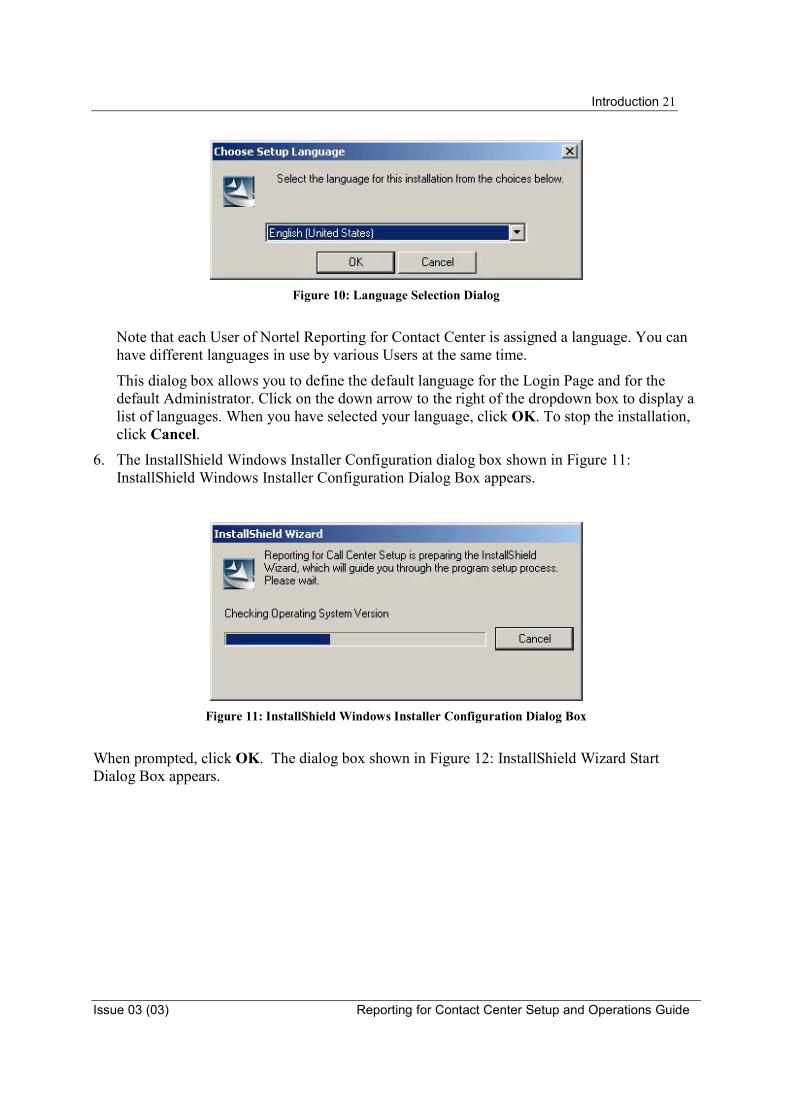
Introduction 21
Issue 03 (03) Reporting for Contact Center Setup and Operations Guide
Figure 10: Language Selection Dialog
Note that each User of Nortel Reporting for Contact Center is assigned a language. You can have different languages in use by various Users at the same time.
This dialog box allows you to define the default language for the Login Page and for the default Administrator. Click on the down arrow to the right of the dropdown box to display a list of languages. When you have selected your language, click OK. To stop the installation, click Cancel.
6. The InstallShield Windows Installer Configuration dialog box shown in Figure 11: InstallShield Windows Installer Configuration Dialog Box appears.
Figure 11: InstallShield Windows Installer Configuration Dialog Box
When prompted, click OK. The dialog box shown in Figure 12: InstallShield Wizard Start Dialog Box appears.

Installation
Reporting for Contact Center Setup and Operations Guide Issue 03 (03)
22
Figure 12: InstallShield Wizard Start Dialog Box
7. To proceed, click Next. The License Agreement dialog box shown in Figure 13: License
Agreement Dialog Box appears. To cancel the installation procedure, click Cancel.
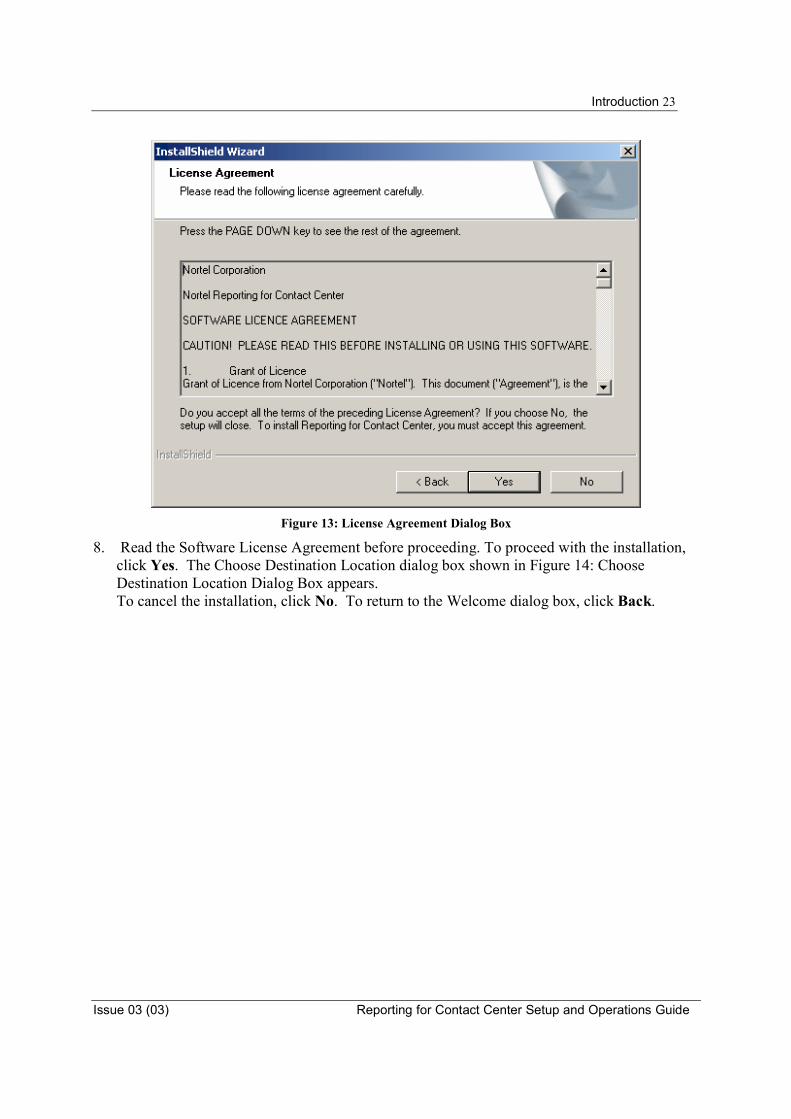
Introduction 23
Issue 03 (03) Reporting for Contact Center Setup and Operations Guide
Figure 13: License Agreement Dialog Box
8. Read the Software License Agreement before proceeding. To proceed with the installation, click Yes. The Choose Destination Location dialog box shown in Figure 14: Choose Destination Location Dialog Box appears. To cancel the installation, click No. To return to the Welcome dialog box, click Back.
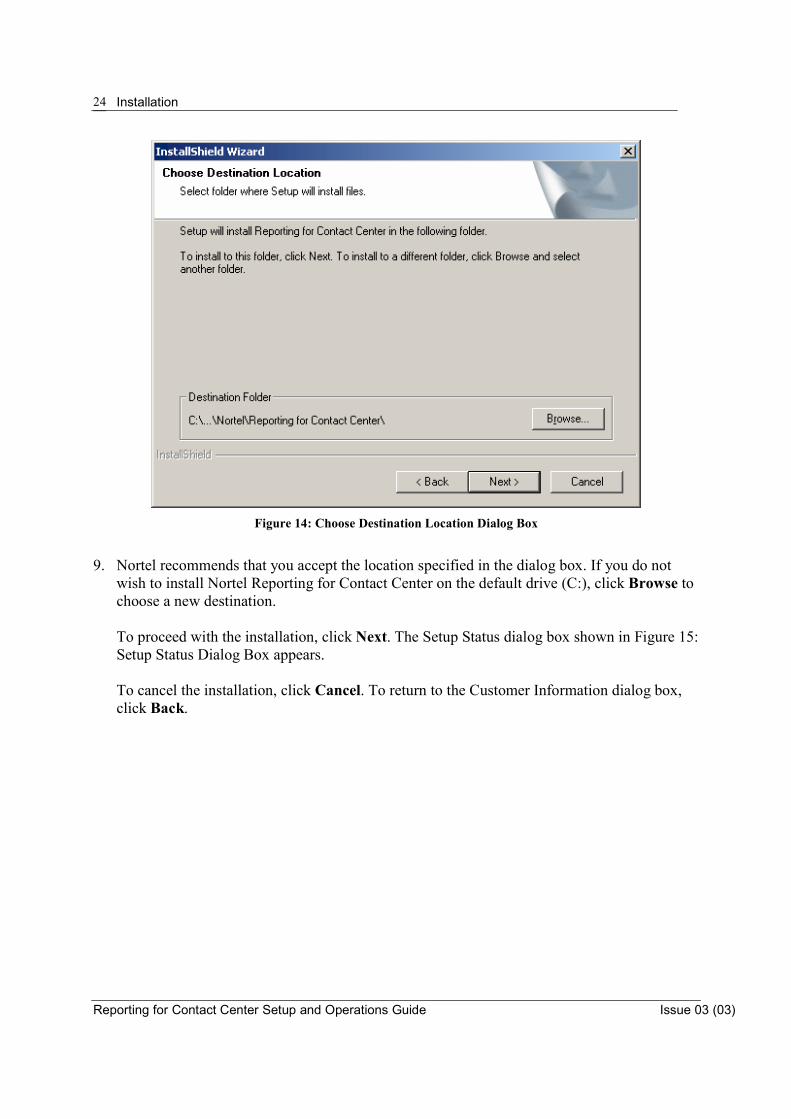
Installation
Reporting for Contact Center Setup and Operations Guide Issue 03 (03)
24
Figure 14: Choose Destination Location Dialog Box
9. Nortel recommends that you accept the location specified in the dialog box. If you do not
wish to install Nortel Reporting for Contact Center on the default drive (C:), click Browse to choose a new destination.
To proceed with the installation, click Next. The Setup Status dialog box shown in Figure 15: Setup Status Dialog Box appears. To cancel the installation, click Cancel. To return to the Customer Information dialog box, click Back.
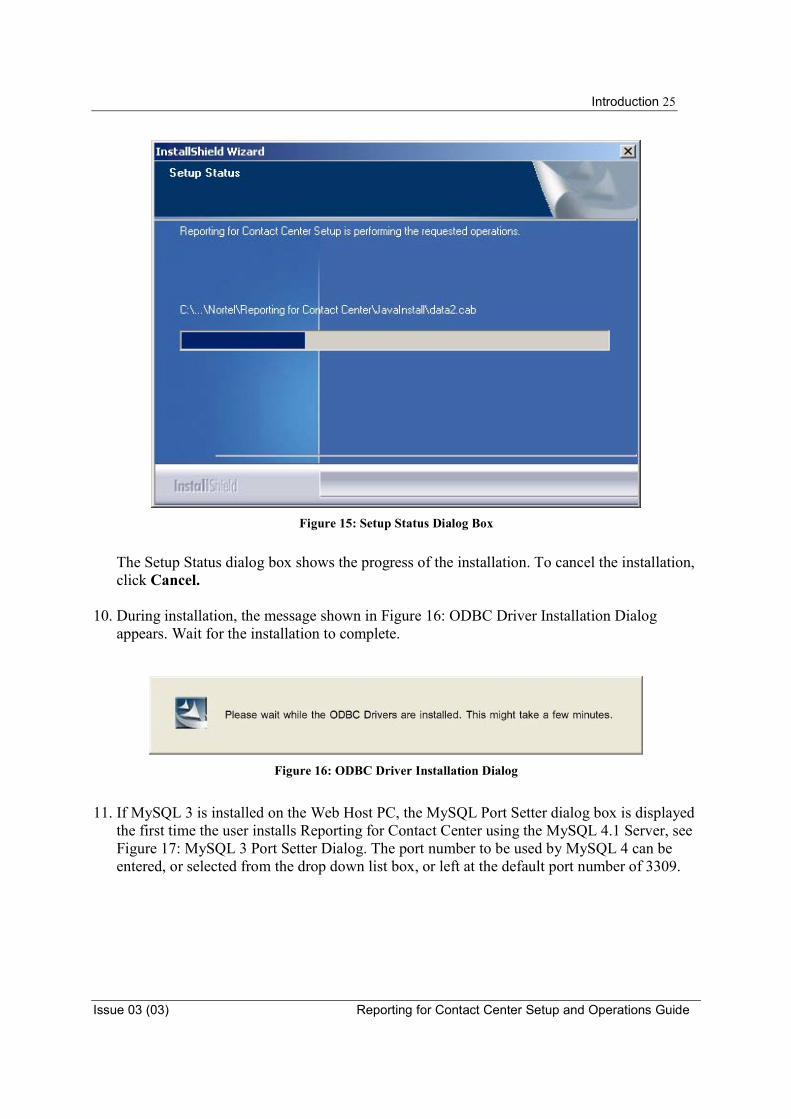
Introduction 25
Issue 03 (03) Reporting for Contact Center Setup and Operations Guide
Figure 15: Setup Status Dialog Box
The Setup Status dialog box shows the progress of the installation. To cancel the installation, click Cancel.
10. During installation, the message shown in Figure 16: ODBC Driver Installation Dialog appears. Wait for the installation to complete.
Figure 16: ODBC Driver Installation Dialog
11. If MySQL 3 is installed on the Web Host PC, the MySQL Port Setter dialog box is displayed
the first time the user installs Reporting for Contact Center using the MySQL 4.1 Server, see Figure 17: MySQL 3 Port Setter Dialog. The port number to be used by MySQL 4 can be entered, or selected from the drop down list box, or left at the default port number of 3309.

Installation
Reporting for Contact Center Setup and Operations Guide Issue 03 (03)
26
Figure 17: MySQL 3 Port Setter Dialog
On first installation of Reporting for Contact Center on a Web Host PC with MySQL 4 already installed, the MySQL Port Setter dialog box appears, as shown in Figure 18: MySQL 4 Port Setter Dialog. Select the port number to be used by the MySQL 4.1 Server from the drop down list box, or enter a new port number, otherwise the port number is set to the defaulted value of 3309.
Figure 18: MySQL 4 Port Setter Dialog
12. Click OK to set the port number for MySQL 4. 13. The message shown in Figure 19: Database Installation Dialog appears. Wait for the
installation to complete.
Introduction 27
Issue 03 (03) Reporting for Contact Center Setup and Operations Guide
Figure 19: Database Installation Dialog
Note: The MySQL database is not installed in the same folders as Nortel Reporting for Contact Center; it is installed in \Program Files\MySQL\MySQl Server 4.1\data\mysql on the target hard drive.
14. The message shown in Figure 20: Java Installation Dialog appears. Wait for the installation
to complete.
Figure 20: Java Installation Dialog
Note: The Java Runtime is not installed into the same folders as Nortel Reporting for Contact Center; it is installed into \Program Files\Java on the target hard drive.
15. When installation is complete, the Installation Complete dialog box shown in Figure 21:
Installation Complete Dialog Box appears.
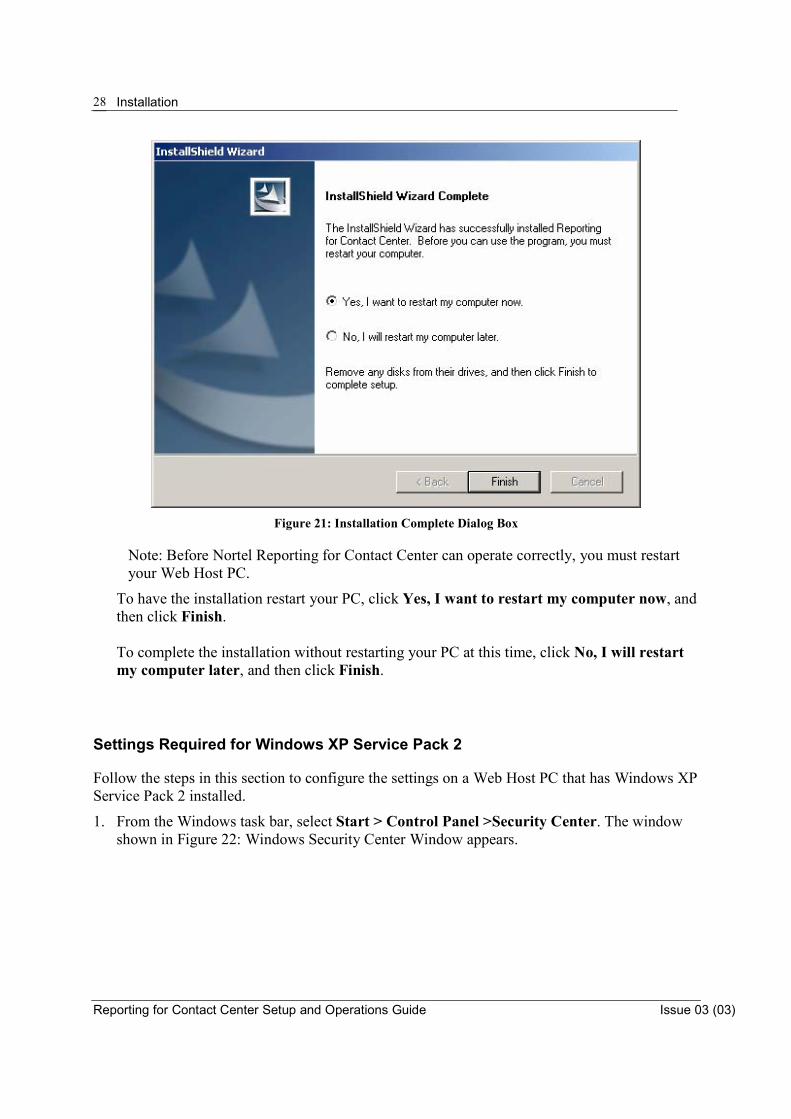
Installation
Reporting for Contact Center Setup and Operations Guide Issue 03 (03)
28
Figure 21: Installation Complete Dialog Box
Note: Before Nortel Reporting for Contact Center can operate correctly, you must restart your Web Host PC.
To have the installation restart your PC, click Yes, I want to restart my computer now, and then click Finish.
To complete the installation without restarting your PC at this time, click No, I will restart my computer later, and then click Finish.
Settings Required for Windows XP Service Pack 2
Follow the steps in this section to configure the settings on a Web Host PC that has Windows XP Service Pack 2 installed.
1. From the Windows task bar, select Start > Control Panel >Security Center. The window shown in Figure 22: Windows Security Center Window appears.

Introduction 29
Issue 03 (03) Reporting for Contact Center Setup and Operations Guide
Figure 22: Windows Security Center Window
2. Click Windows Firewall. The Windows Firewall dialog box appears. See Figure 23: Windows Firewall Dialog Box.
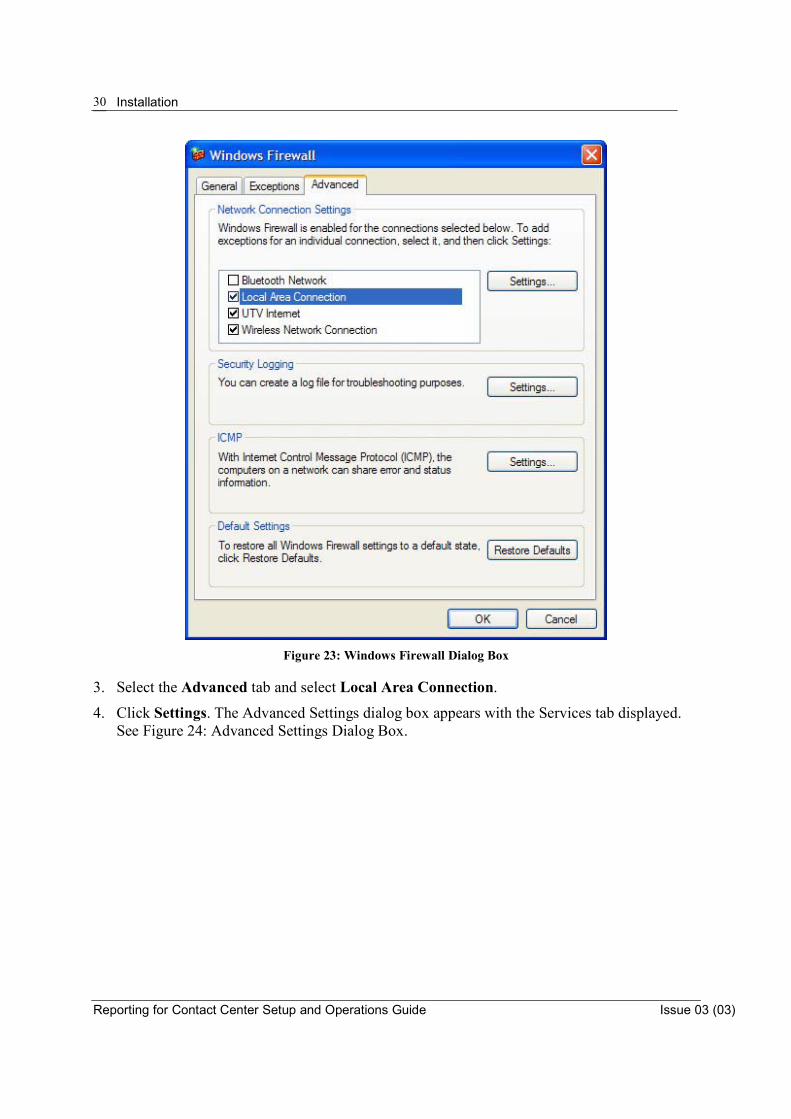
Installation
Reporting for Contact Center Setup and Operations Guide Issue 03 (03)
30
Figure 23: Windows Firewall Dialog Box
3. Select the Advanced tab and select Local Area Connection.
4. Click Settings. The Advanced Settings dialog box appears with the Services tab displayed. See Figure 24: Advanced Settings Dialog Box.
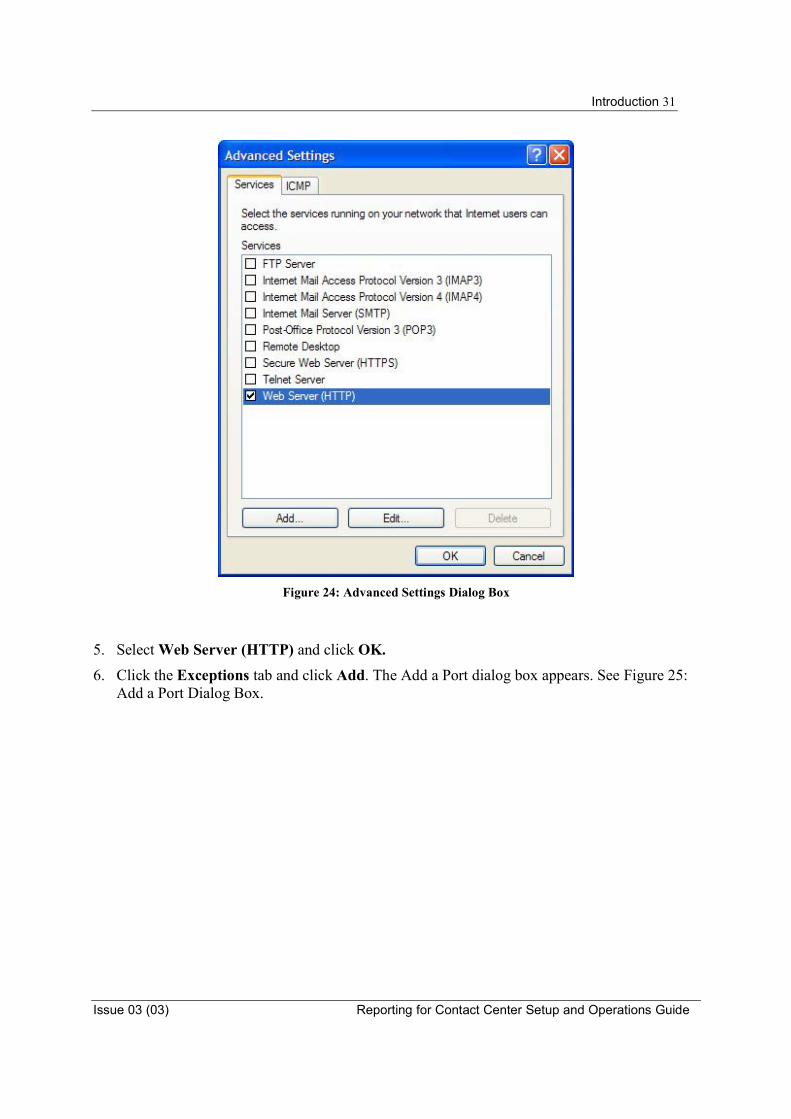
Introduction 31
Issue 03 (03) Reporting for Contact Center Setup and Operations Guide
Figure 24: Advanced Settings Dialog Box
5. Select Web Server (HTTP) and click OK. 6. Click the Exceptions tab and click Add. The Add a Port dialog box appears. See Figure 25:
Add a Port Dialog Box.
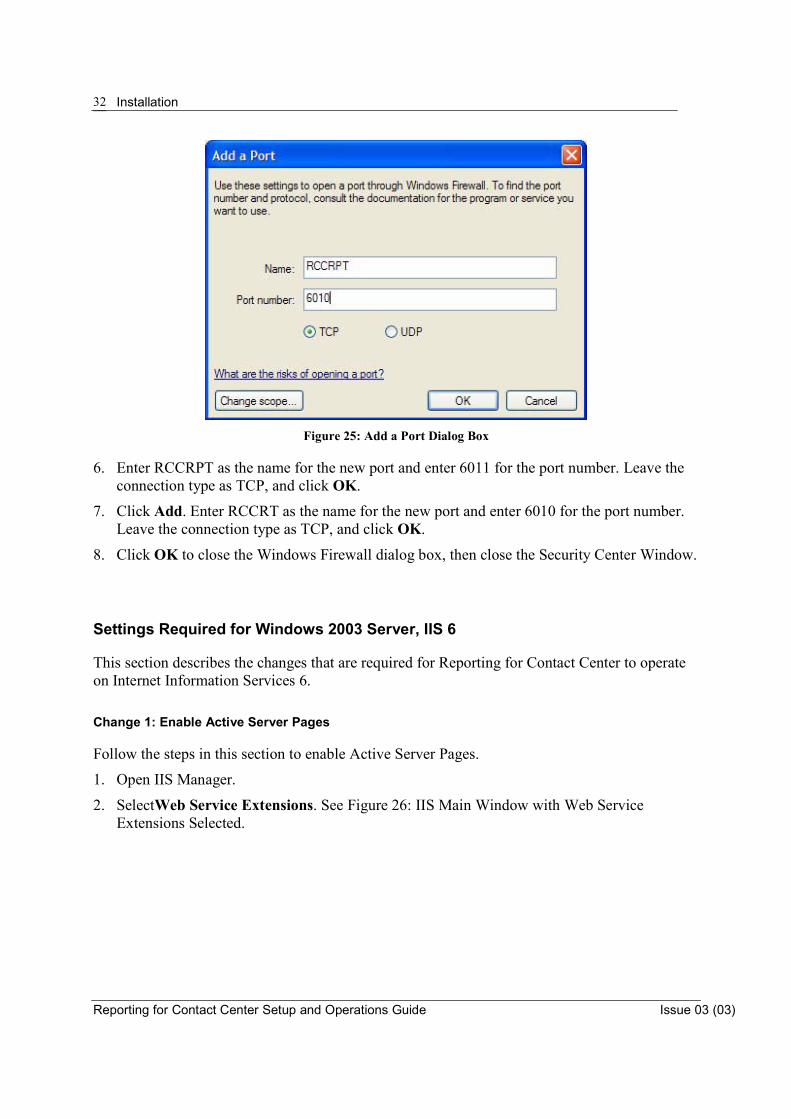
Installation
Reporting for Contact Center Setup and Operations Guide Issue 03 (03)
32
Figure 25: Add a Port Dialog Box
6. Enter RCCRPT as the name for the new port and enter 6011 for the port number. Leave the connection type as TCP, and click OK.
7. Click Add. Enter RCCRT as the name for the new port and enter 6010 for the port number. Leave the connection type as TCP, and click OK.
8. Click OK to close the Windows Firewall dialog box, then close the Security Center Window.
Settings Required for Windows 2003 Server, IIS 6
This section describes the changes that are required for Reporting for Contact Center to operate on Internet Information Services 6.
Change 1: Enable Active Server Pages Follow the steps in this section to enable Active Server Pages.
1. Open IIS Manager.
2. SelectWeb Service Extensions. See Figure 26: IIS Main Window with Web Service Extensions Selected.

Introduction 33
Issue 03 (03) Reporting for Contact Center Setup and Operations Guide
Figure 26: IIS Main Window with Web Service Extensions Selected
3. In the Web Service Extension list, select Active Server Pages. 4. Click Allow.
Change 2: Allow IIS 6 to see the Path to the RCC Folder Follow the steps in this section to allow IIS 6 to see the path to the RCC folder.
1. Open IIS Manager.
2. Double-click Web Sites. 3. Double-click Default Web Site. See Figure 27: IIS Manager with the RCC Folder Selected.
Figure 27: IIS Manager with the RCC Folder Selected

Installation
Reporting for Contact Center Setup and Operations Guide Issue 03 (03)
34
4. Right-click RCC and select Properties. The Properties dialog box appears. See Figure 28: RCC Properties Dialog Box.
Figure 28: RCC Properties Dialog Box
5. Click Configuration. The Application Configuration dialog box appears. See Figure 29: Application Configuration Dialog Box.
Figure 29: Application Configuration Dialog Box
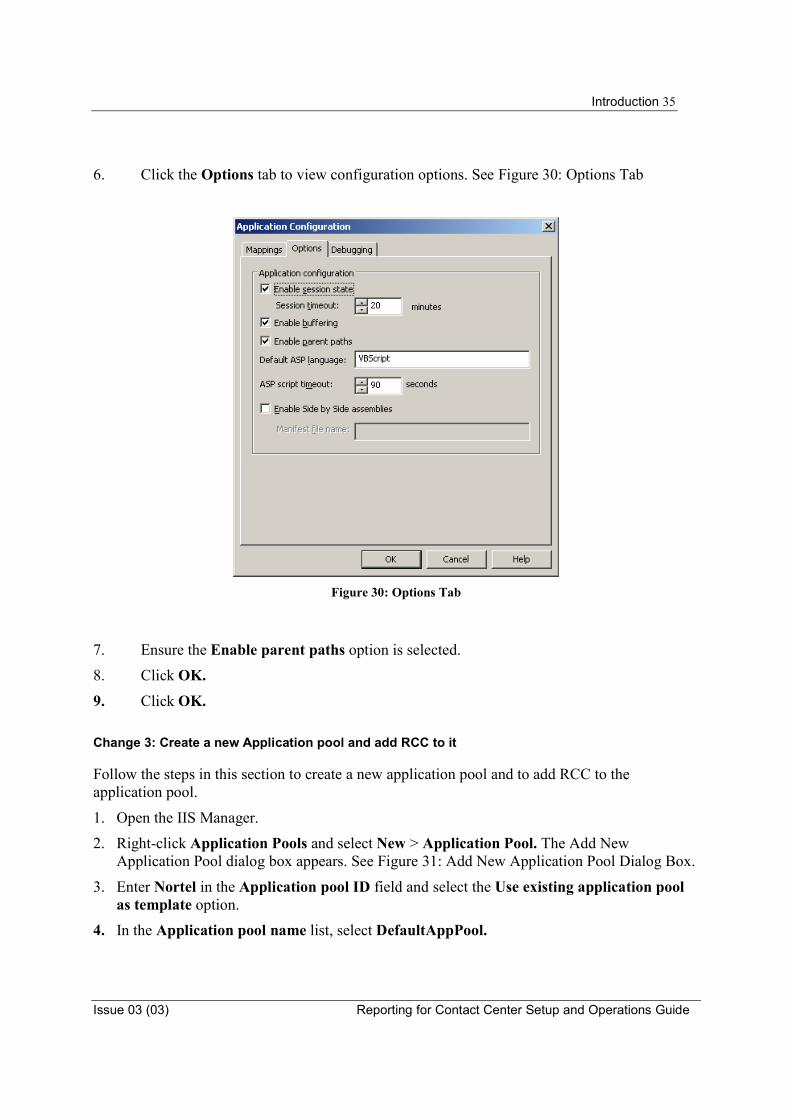
Introduction 35
Issue 03 (03) Reporting for Contact Center Setup and Operations Guide
6. Click the Options tab to view configuration options. See Figure 30: Options Tab
Figure 30: Options Tab
7. Ensure the Enable parent paths option is selected.
8. Click OK. 9. Click OK.
Change 3: Create a new Application pool and add RCC to it Follow the steps in this section to create a new application pool and to add RCC to the application pool.
1. Open the IIS Manager.
2. Right-click Application Pools and select New > Application Pool. The Add New Application Pool dialog box appears. See Figure 31: Add New Application Pool Dialog Box.
3. Enter Nortel in the Application pool ID field and select the Use existing application pool as template option.
4. In the Application pool name list, select DefaultAppPool.
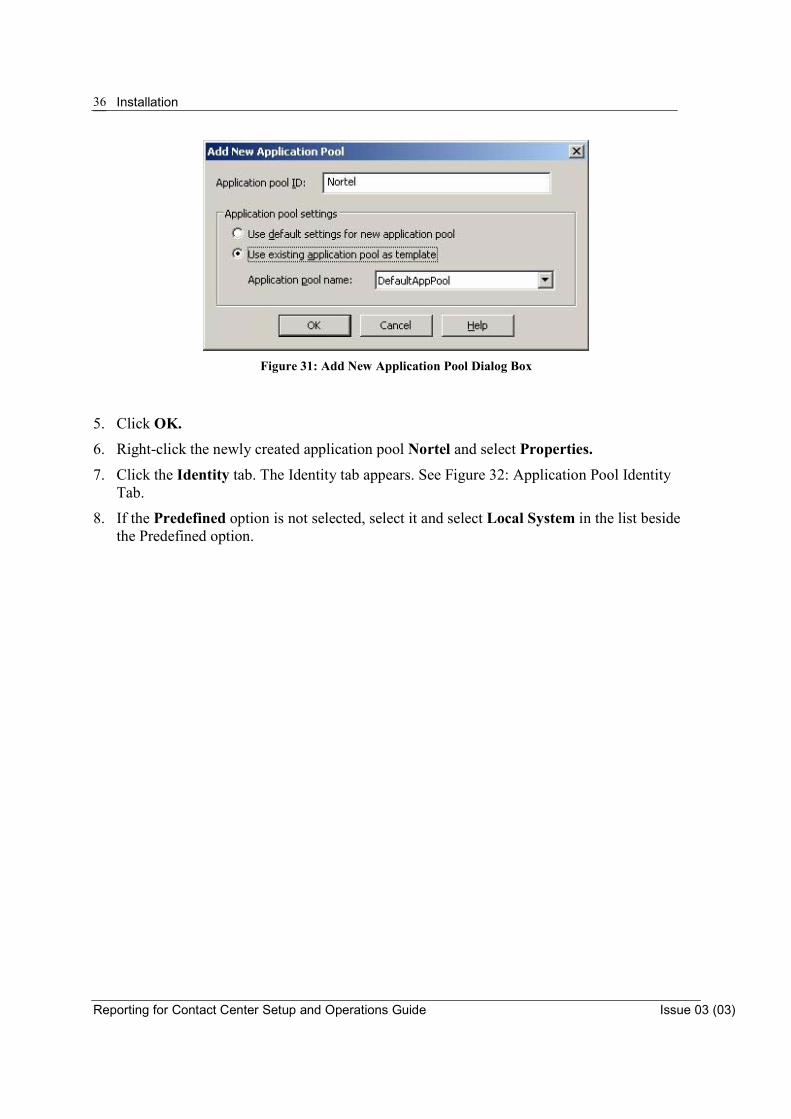
Installation
Reporting for Contact Center Setup and Operations Guide Issue 03 (03)
36
Figure 31: Add New Application Pool Dialog Box
5. Click OK. 6. Right-click the newly created application pool Nortel and select Properties. 7. Click the Identity tab. The Identity tab appears. See Figure 32: Application Pool Identity
Tab.
8. If the Predefined option is not selected, select it and select Local System in the list beside the Predefined option.

Introduction 37
Issue 03 (03) Reporting for Contact Center Setup and Operations Guide
Figure 32: Application Pool Identity Tab
9. Click OK, and then click Yes in the confirmation dialog box that appears.
10. In the IIS Manager window, select Web Sites and double-click Default Web Site. See Figure 33: Selecting RCC.
Figure 33: Selecting RCC
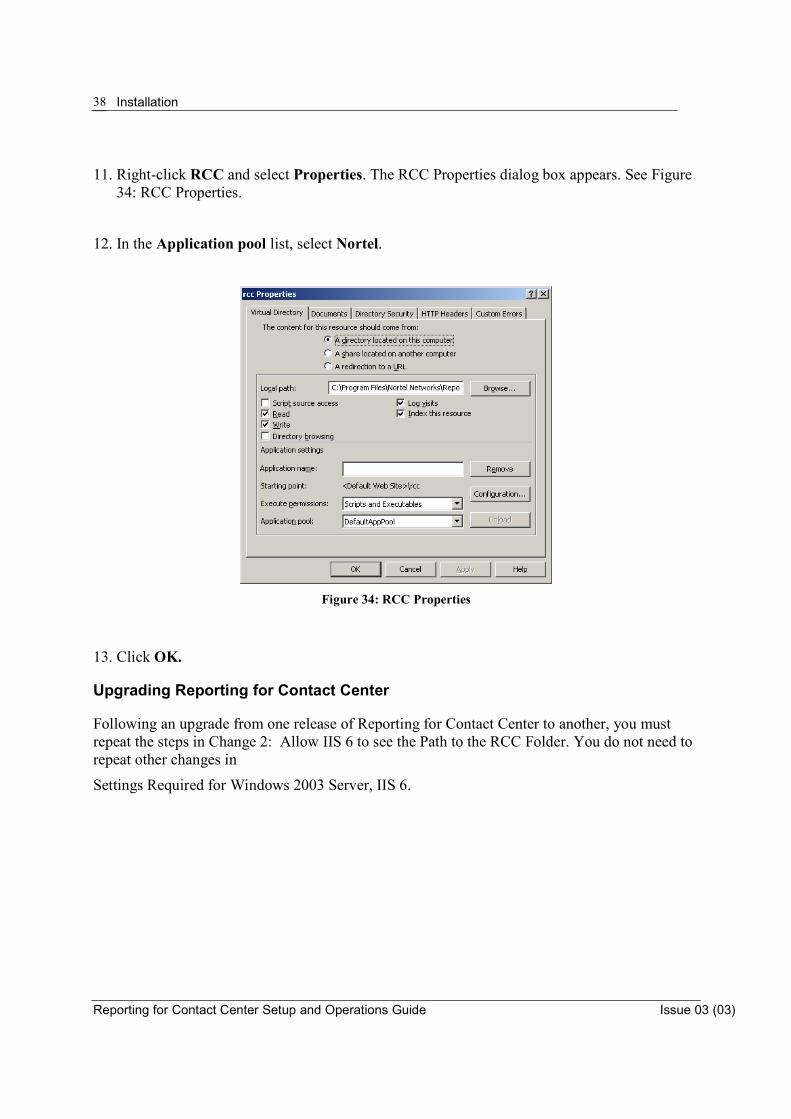
Installation
Reporting for Contact Center Setup and Operations Guide Issue 03 (03)
38
11. Right-click RCC and select Properties. The RCC Properties dialog box appears. See Figure 34: RCC Properties.
12. In the Application pool list, select Nortel.
Figure 34: RCC Properties
13. Click OK.
Upgrading Reporting for Contact Center
Following an upgrade from one release of Reporting for Contact Center to another, you must repeat the steps in Change 2: Allow IIS 6 to see the Path to the RCC Folder. You do not need to repeat other changes in
Settings Required for Windows 2003 Server, IIS 6.

Administration 39
Issue 03 (03) Reporting for Contact Center Setup and Operations Guide
Administration
Logging In
Follow the steps in this section to log on to Nortel Reporting for Contact Center as an Administrator. 1. Using Internet Explorer, go to your Nortel Reporting for Contact Center Web pages Login
page.
The URL is http://NameOfWebHostPC/RCC
Where NameOfWebHostPC is the network name or IP Address of the Web Host PC. The Login page appears. See Figure 35: Login page.
Note: If you are using the browser on the Web Host PC, you can replace NameOfWebHostPC with localhost.
Note: You can add the Login Page to your Internet Favorites. To add this page to your favorites in Internet Explorer, press Ctrl-D when you are at the Login page, or click Favorites, Add to favorites.
4

Administration
Reporting for Contact Center Setup and Operations Guide Issue 03 (03)
40
Figure 35: Login page
2. Enter the username admin and the default password 0000, and click Login.
You must change the default password the first time you log on. See Changing Default Password.
Changing Default Password
You must change the default password the first time you log on. Follow the steps in this section to change the default password.
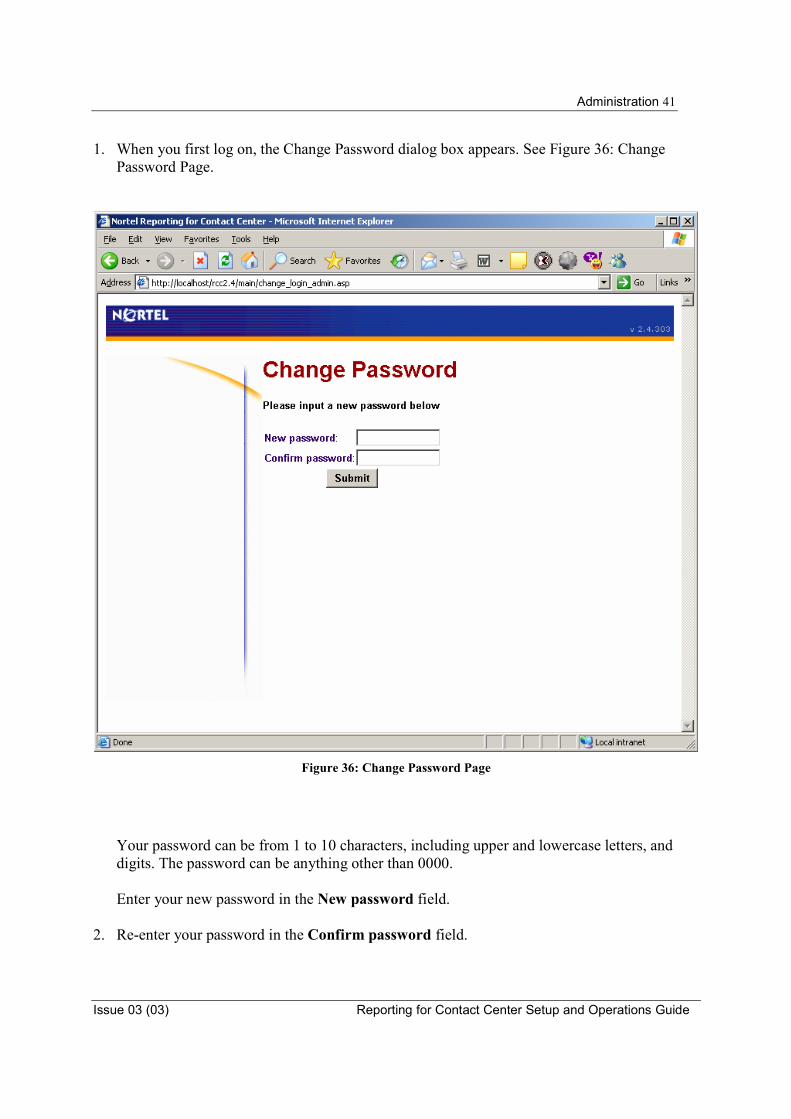
Administration 41
Issue 03 (03) Reporting for Contact Center Setup and Operations Guide
1. When you first log on, the Change Password dialog box appears. See Figure 36: Change Password Page.
Figure 36: Change Password Page
Your password can be from 1 to 10 characters, including upper and lowercase letters, and digits. The password can be anything other than 0000.
Enter your new password in the New password field.
2. Re-enter your password in the Confirm password field.

Administration
Reporting for Contact Center Setup and Operations Guide Issue 03 (03)
42
If the passwords you entered are not the same, you are informed that the password and confirmation do not match, and you must re-enter the password in both fields.
3. Click Submit.
If you successfully entered the new password, the Contact Center Connection page shown in Figure 37: Contact Center Connection Page appears.
Contact Center Connection The Contact Center Connection page allows you to specify the network identifier (IP address or Network name) of the Contact Center platform. Typically, the Contact Center Connection page appears only once, after you first log on as an Administrator. If the Contact Center Connection information is incomplete or incorrect, the Contact Center Connection page appears each time you log on as an Administrator. For example, if you add a new Network Card to the Web Host PC, you must select an IP address for the Web Host PC to communicate with the wallboards. In this case, the Contact Center Connection page appears so that you can select the IP address. If you do not select the Contact Center Connection option from the menu, the page automatically appears after you log on, as shown in Figure 37: Contact Center Connection Page. Follow the steps in this section to configure the Contact Center Connection page.
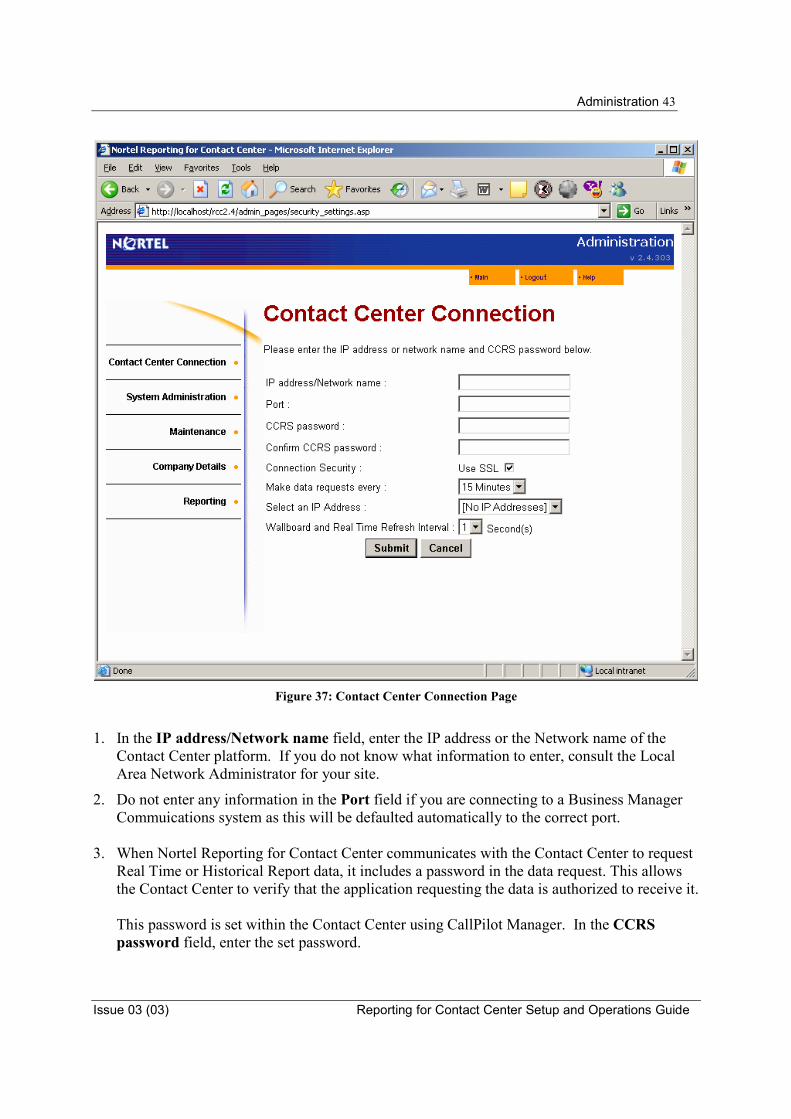
Administration 43
Issue 03 (03) Reporting for Contact Center Setup and Operations Guide
Figure 37: Contact Center Connection Page
1. In the IP address/Network name field, enter the IP address or the Network name of the
Contact Center platform. If you do not know what information to enter, consult the Local Area Network Administrator for your site.
2. Do not enter any information in the Port field if you are connecting to a Business Manager Commuications system as this will be defaulted automatically to the correct port.
3. When Nortel Reporting for Contact Center communicates with the Contact Center to request
Real Time or Historical Report data, it includes a password in the data request. This allows the Contact Center to verify that the application requesting the data is authorized to receive it.
This password is set within the Contact Center using CallPilot Manager. In the CCRS password field, enter the set password.
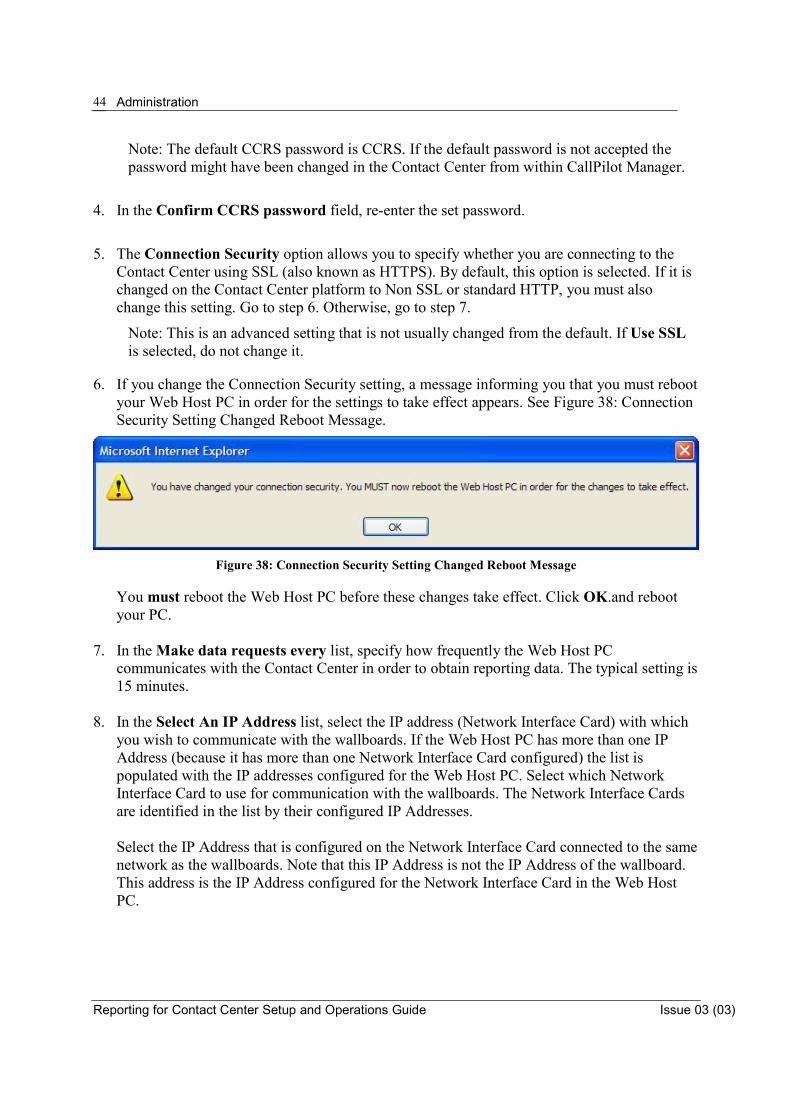
Administration
Reporting for Contact Center Setup and Operations Guide Issue 03 (03)
44
Note: The default CCRS password is CCRS. If the default password is not accepted the password might have been changed in the Contact Center from within CallPilot Manager.
4. In the Confirm CCRS password field, re-enter the set password.
5. The Connection Security option allows you to specify whether you are connecting to the Contact Center using SSL (also known as HTTPS). By default, this option is selected. If it is changed on the Contact Center platform to Non SSL or standard HTTP, you must also change this setting. Go to step 6. Otherwise, go to step 7.
Note: This is an advanced setting that is not usually changed from the default. If Use SSL is selected, do not change it.
6. If you change the Connection Security setting, a message informing you that you must reboot your Web Host PC in order for the settings to take effect appears. See Figure 38: Connection Security Setting Changed Reboot Message.
Figure 38: Connection Security Setting Changed Reboot Message
You must reboot the Web Host PC before these changes take effect. Click OK.and reboot your PC.
7. In the Make data requests every list, specify how frequently the Web Host PC
communicates with the Contact Center in order to obtain reporting data. The typical setting is 15 minutes.
8. In the Select An IP Address list, select the IP address (Network Interface Card) with which
you wish to communicate with the wallboards. If the Web Host PC has more than one IP Address (because it has more than one Network Interface Card configured) the list is populated with the IP addresses configured for the Web Host PC. Select which Network Interface Card to use for communication with the wallboards. The Network Interface Cards are identified in the list by their configured IP Addresses.
Select the IP Address that is configured on the Network Interface Card connected to the same network as the wallboards. Note that this IP Address is not the IP Address of the wallboard. This address is the IP Address configured for the Network Interface Card in the Web Host PC.
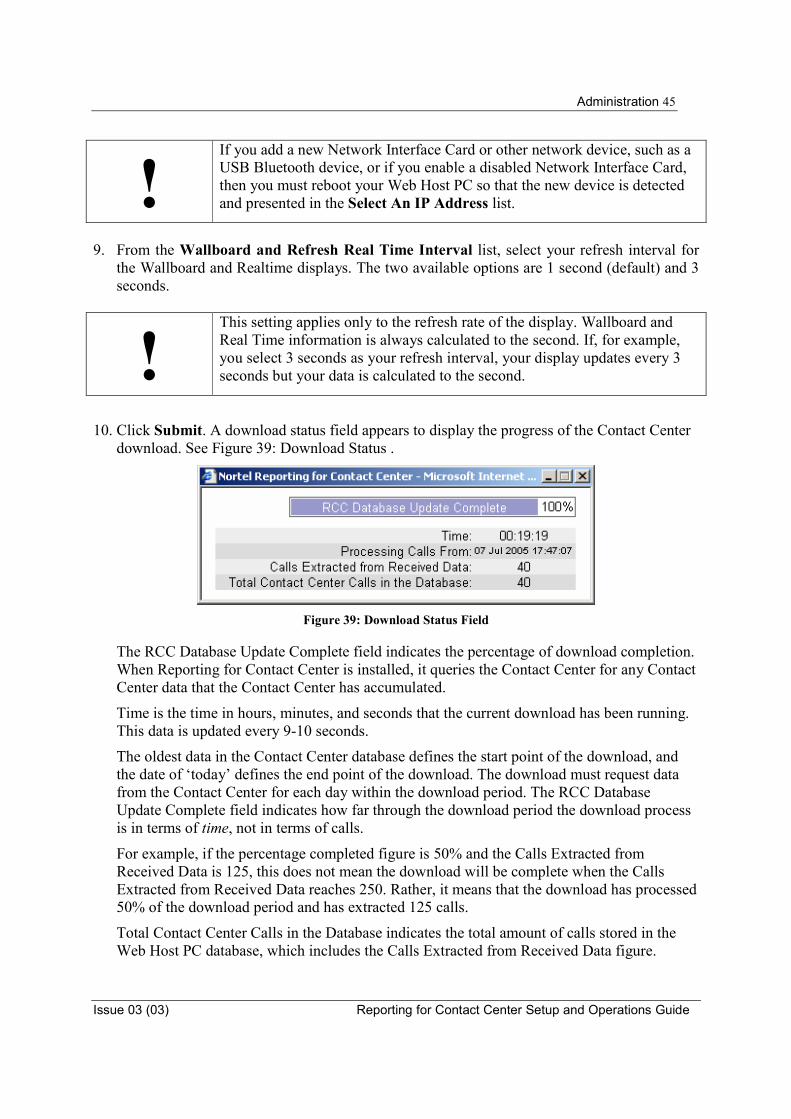
Administration 45
Issue 03 (03) Reporting for Contact Center Setup and Operations Guide
!If you add a new Network Interface Card or other network device, such as a USB Bluetooth device, or if you enable a disabled Network Interface Card, then you must reboot your Web Host PC so that the new device is detected and presented in the Select An IP Address list.
9. From the Wallboard and Refresh Real Time Interval list, select your refresh interval for the Wallboard and Realtime displays. The two available options are 1 second (default) and 3 seconds.
!This setting applies only to the refresh rate of the display. Wallboard and Real Time information is always calculated to the second. If, for example, you select 3 seconds as your refresh interval, your display updates every 3 seconds but your data is calculated to the second.
10. Click Submit. A download status field appears to display the progress of the Contact Center download. See Figure 39: Download Status .
Figure 39: Download Status Field
The RCC Database Update Complete field indicates the percentage of download completion. When Reporting for Contact Center is installed, it queries the Contact Center for any Contact Center data that the Contact Center has accumulated.
Time is the time in hours, minutes, and seconds that the current download has been running. This data is updated every 9-10 seconds.
The oldest data in the Contact Center database defines the start point of the download, and the date of ‘today’ defines the end point of the download. The download must request data from the Contact Center for each day within the download period. The RCC Database Update Complete field indicates how far through the download period the download process is in terms of time, not in terms of calls.
For example, if the percentage completed figure is 50% and the Calls Extracted from Received Data is 125, this does not mean the download will be complete when the Calls Extracted from Received Data reaches 250. Rather, it means that the download has processed 50% of the download period and has extracted 125 calls.
Total Contact Center Calls in the Database indicates the total amount of calls stored in the Web Host PC database, which includes the Calls Extracted from Received Data figure.
Administration
Reporting for Contact Center Setup and Operations Guide Issue 03 (03)
46
Note:The time to download the historical data from the Contact Center and to store it in the Web Host PC database depends on the amount of time the Contact Center has been recording historical data prior to being connected to the Web Host PC and the amount of call traffic that your Contact Center handles.
As a general guide, 30,000 calls take between 6 and 18 hours, depending on the level of network traffic and the speed of your Web Host PC.
Note: You can use your PC as normal during the download, but do not reset it or power it off.
When the download is complete, the download status field shows a 100% complete status.
Your browser page may time out before the download is complete. This is not an error. Microsoft Internet Information Services has a setting that dictates how long it waits before closing a web page. As the download completes, you are informed of the status in the Download Statusfield. The Administration Menu, described in Administration Menu, appears.
Administration Menu
When an Admintrator logs in (unless they are logging in with the default password of 0000), they view the Administration Menu page. See Figure 40: Administration Menu Page.
Note: To remind you that you logged in as an Administrator, Administration appears in the blue bar at the top of each Administration page.

Administration 47
Issue 03 (03) Reporting for Contact Center Setup and Operations Guide
Figure 40: Administration Menu Page
The available Administrator options appear in the nagivation pane on the left side of the page. For information about the Contact Center Connection, refer to Contact Center Connection. The following sections describe the System Administration, Maintenance, Company Details, and Reporting options.
System Administration Select System Administration to view the System Administration Menu page shown in Figure 41: System Administration Menu Page.

Administration
Reporting for Contact Center Setup and Operations Guide Issue 03 (03)
48
Figure 41: System Administration Menu Page
The System Administration Menu provides the following options:
� System Admin Settings — change the username and the password for the default Nortel Reporting for Contact Center Administrator
� User Admin — create Users � Skillset Assignment — assign Skillsets to Users � System Configuration Report — view and print the System Configuration report
System Admin Settings System Admin Settings is a special utility that allows you to change the settings for the single, pre-defined Administrator that is supplied, ready-defined, with Nortel Reporting for Contact

Administration 49
Issue 03 (03) Reporting for Contact Center Setup and Operations Guide
Center. You can use System Admin Settings to change the name of the System Administrator or change their password, or both. In either case, you must enter the current System Administrator password to confirm that you have authority to make these changes.
!Do not use System Admin Settings to change the username and password of other Users who are configured as Administrators. To change the details of those Administrators, use the User Admin Edit feature, described in User Admin.
Select System Admin Settings to view the System Administrator details page, shown in Figure 42: System Administrator Details Page.
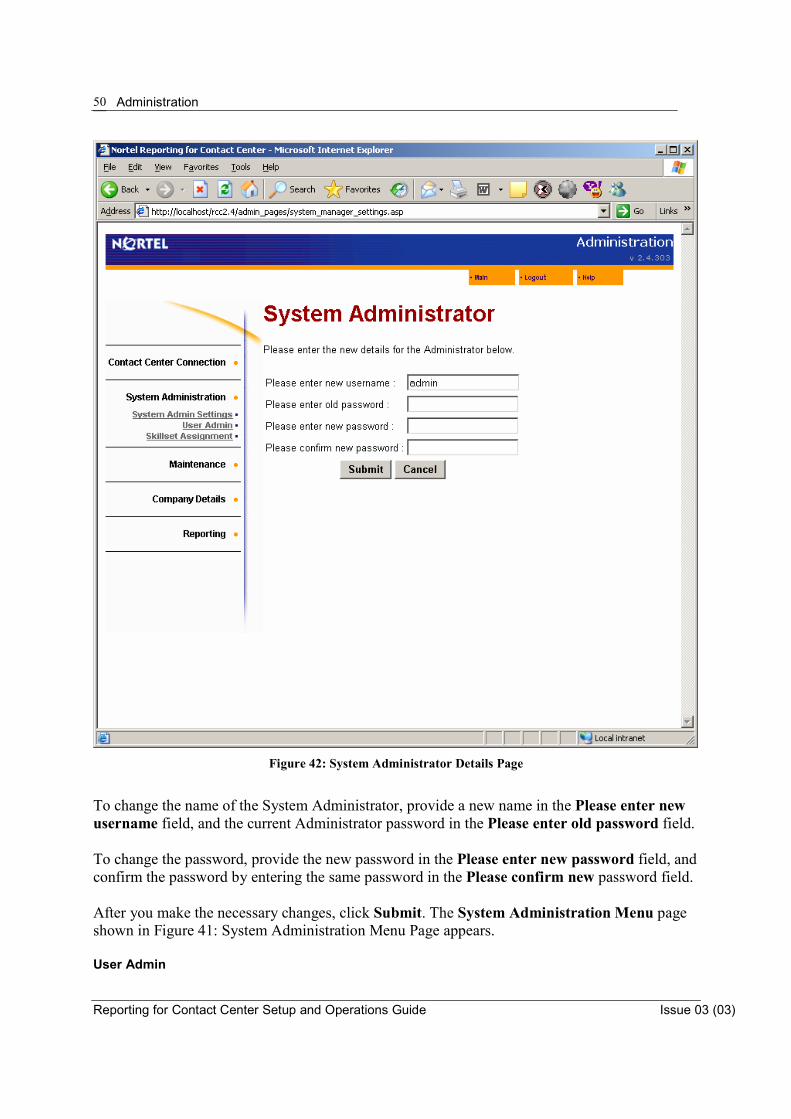
Administration
Reporting for Contact Center Setup and Operations Guide Issue 03 (03)
50
Figure 42: System Administrator Details Page
To change the name of the System Administrator, provide a new name in the Please enter new username field, and the current Administrator password in the Please enter old password field. To change the password, provide the new password in the Please enter new password field, and confirm the password by entering the same password in the Please confirm new password field. After you make the necessary changes, click Submit. The System Administration Menu page shown in Figure 41: System Administration Menu Page appears. User Admin
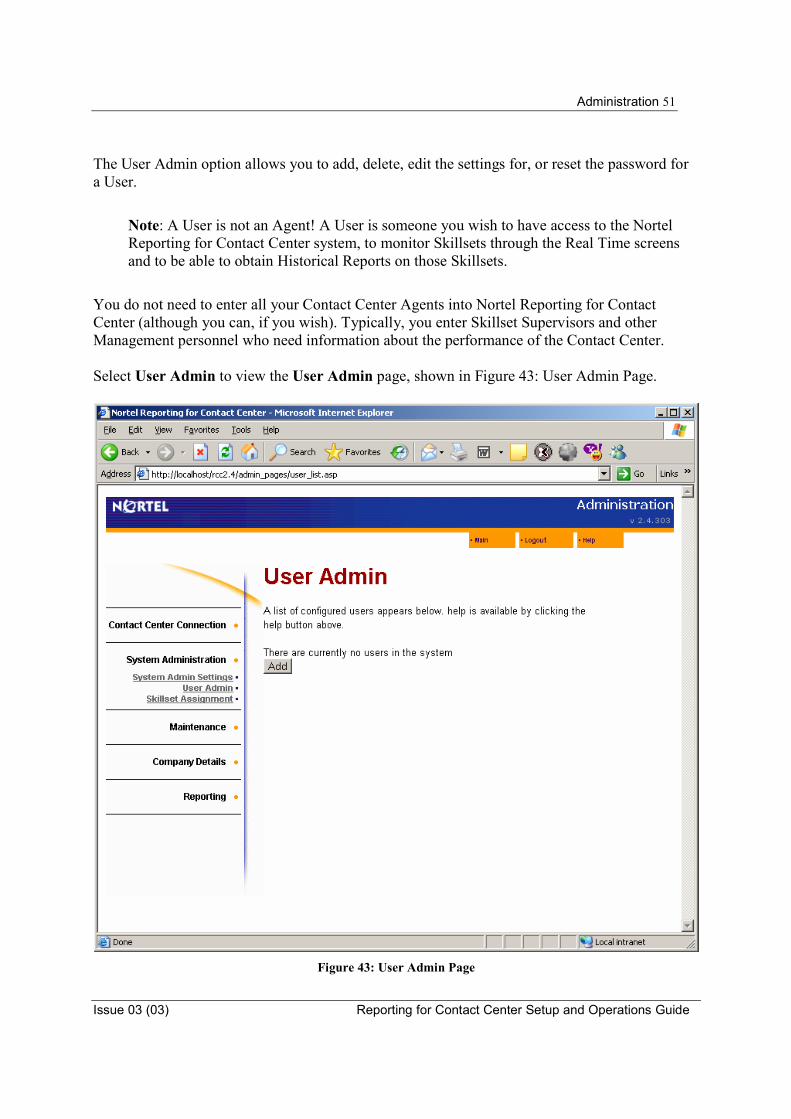
Administration 51
Issue 03 (03) Reporting for Contact Center Setup and Operations Guide
The User Admin option allows you to add, delete, edit the settings for, or reset the password for a User.
Note: A User is not an Agent! A User is someone you wish to have access to the Nortel Reporting for Contact Center system, to monitor Skillsets through the Real Time screens and to be able to obtain Historical Reports on those Skillsets.
You do not need to enter all your Contact Center Agents into Nortel Reporting for Contact Center (although you can, if you wish). Typically, you enter Skillset Supervisors and other Management personnel who need information about the performance of the Contact Center. Select User Admin to view the User Admin page, shown in Figure 43: User Admin Page.
Figure 43: User Admin Page
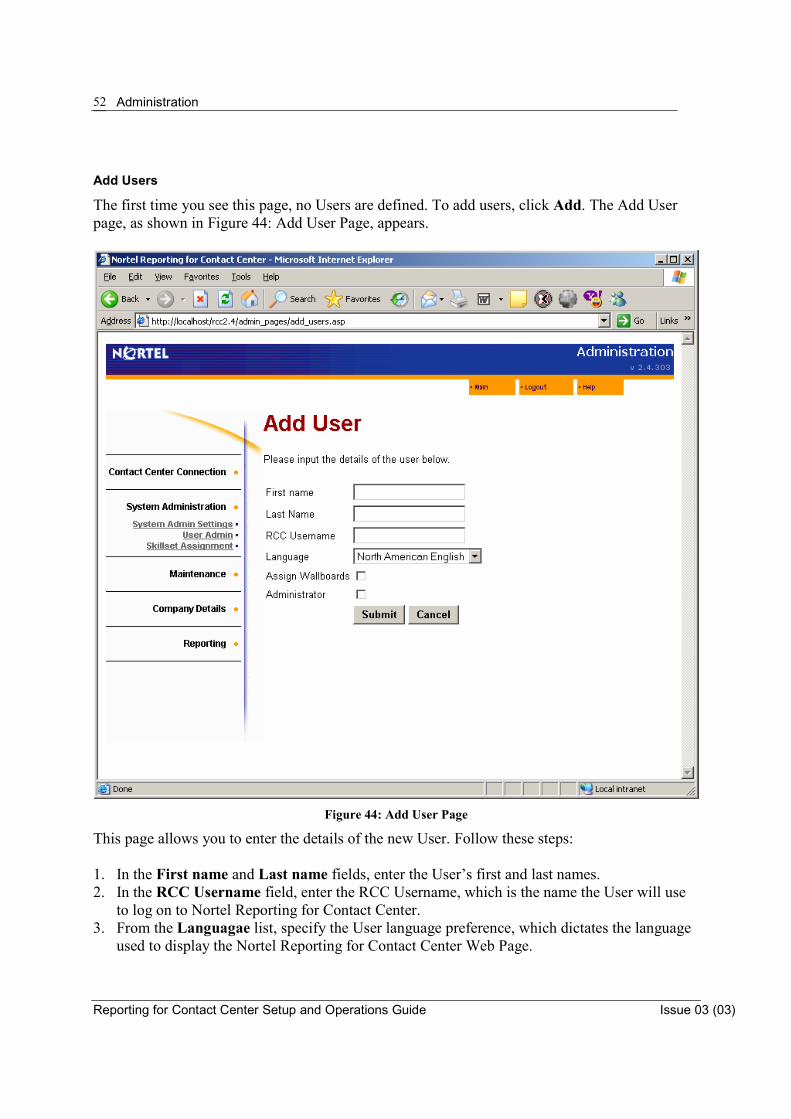
Administration
Reporting for Contact Center Setup and Operations Guide Issue 03 (03)
52
Add Users
The first time you see this page, no Users are defined. To add users, click Add. The Add User page, as shown in Figure 44: Add User Page, appears.
Figure 44: Add User Page
This page allows you to enter the details of the new User. Follow these steps: 1. In the First name and Last name fields, enter the User’s first and last names. 2. In the RCC Username field, enter the RCC Username, which is the name the User will use
to log on to Nortel Reporting for Contact Center. 3. From the Languagae list, specify the User language preference, which dictates the language
used to display the Nortel Reporting for Contact Center Web Page.
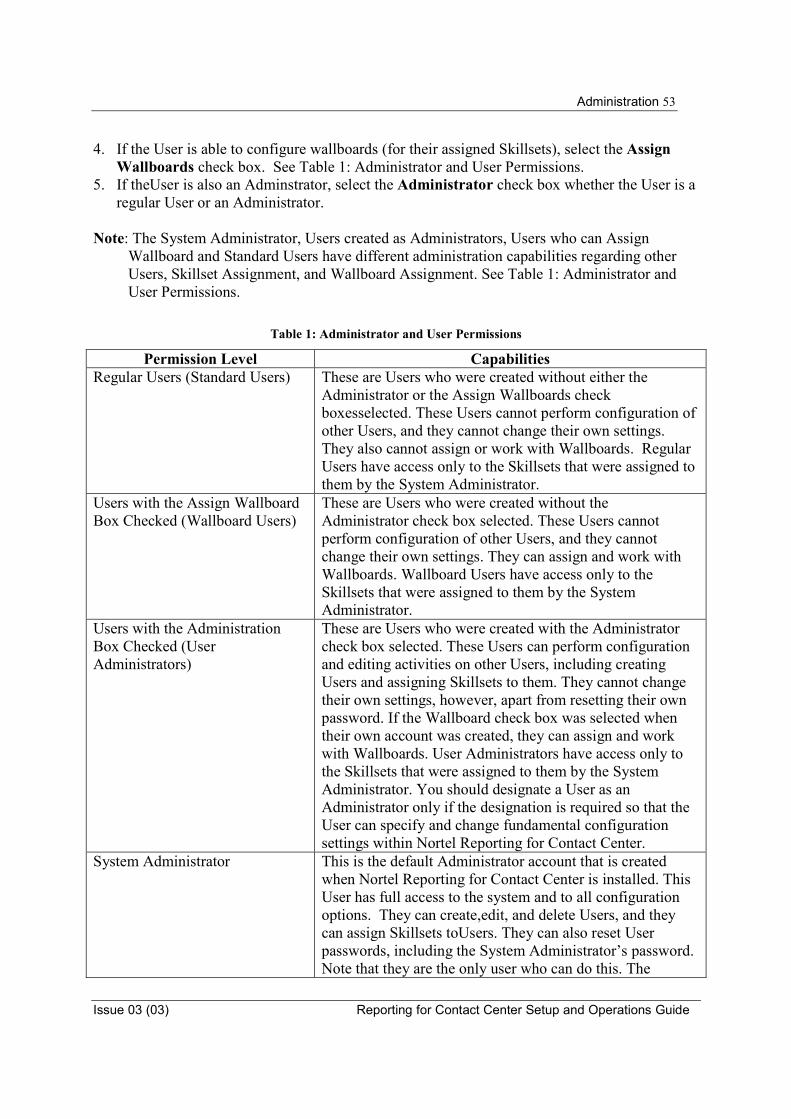
Administration 53
Issue 03 (03) Reporting for Contact Center Setup and Operations Guide
4. If the User is able to configure wallboards (for their assigned Skillsets), select the Assign Wallboards check box. See Table 1: Administrator and User Permissions.
5. If theUser is also an Adminstrator, select the Administrator check box whether the User is a regular User or an Administrator.
Note: The System Administrator, Users created as Administrators, Users who can Assign
Wallboard and Standard Users have different administration capabilities regarding other Users, Skillset Assignment, and Wallboard Assignment. See Table 1: Administrator and User Permissions.
Table 1: Administrator and User Permissions
Permission Level Capabilities Regular Users (Standard Users)
These are Users who were created without either the Administrator or the Assign Wallboards check boxesselected. These Users cannot perform configuration of other Users, and they cannot change their own settings. They also cannot assign or work with Wallboards. Regular Users have access only to the Skillsets that were assigned to them by the System Administrator.
Users with the Assign Wallboard Box Checked (Wallboard Users)
These are Users who were created without the Administrator check box selected. These Users cannot perform configuration of other Users, and they cannot change their own settings. They can assign and work with Wallboards. Wallboard Users have access only to the Skillsets that were assigned to them by the System Administrator.
Users with the Administration Box Checked (User Administrators)
These are Users who were created with the Administrator check box selected. These Users can perform configuration and editing activities on other Users, including creating Users and assigning Skillsets to them. They cannot change their own settings, however, apart from resetting their own password. If the Wallboard check box was selected when their own account was created, they can assign and work with Wallboards. User Administrators have access only to the Skillsets that were assigned to them by the System Administrator. You should designate a User as an Administrator only if the designation is required so that the User can specify and change fundamental configuration settings within Nortel Reporting for Contact Center.
System Administrator
This is the default Administrator account that is created when Nortel Reporting for Contact Center is installed. This User has full access to the system and to all configuration options. They can create,edit, and delete Users, and they can assign Skillsets toUsers. They can also reset User passwords, including the System Administrator’s password. Note that they are the only user who can do this. The

Administration
Reporting for Contact Center Setup and Operations Guide Issue 03 (03)
54
System Administrator has access to any Skillset.
Note: The default password for all new Users is 0000. The first time they login to Nortel Reporting for Contact Center they are prompted to change their password.
In the example shown in Figure 45: Details for new User Mary Smith, the new user Mary Smith has been added, with the RCC Username of MaryS, she is going to receive the Web Pages in English, and, while she can configure wallboards for her assigned Skillsets, she is not a full Administrator.
Figure 45: Details for new User Mary Smith
Administration 55
Issue 03 (03) Reporting for Contact Center Setup and Operations Guide
6. Click Submit to save the details of the newly entered User. 7. A dialog box asks whether you wish to add more Users. If you choose to Add more users,
click on the OK button, otherwise click on Cancel. If you had clicked on OK, the Add User fields are cleared and you can enter the details of your next new User. If you decide not to add more Users at this time, you are returned to the User Admin page shown in Figure 43: User Admin Page.
The newly added User now appears in the list of configured users on the User Admin page. To view details about a specific User, select the User’s name from the list. Click the Edit button next to selected User to Edit the details of the user (see Edit Users). To Delete the User from the system click on the Delete button (see Delete Users). To Reset their password to 0000 if they have forgotten their password click on the Reset Password button (see Reset Password).
Edit Users
To edit User details, select the User from the list of configured users and click Edit. The Edit user page, shown in Figure 46: Edit User Page appears.

Administration
Reporting for Contact Center Setup and Operations Guide Issue 03 (03)
56
Figure 46: Edit User Page
To edit User details, make any necessary changes, and then click Submit. For more information about the fields on the Edit User page, refer to Add Users.
Delete Users
To delete a User, select the User from the list of configured users and click Delete.
Note: After you delete a User, you cannot retrieve the deleted User for later use. For any subsequent inclusion of that User, later you must use the Add User page (see Figure 44: Add User Page) and re-enter User details.
When you click Delete you are prompted to confirm that you wish to remove the User. If you do not wish to remove the User, click Cancel; if you are certain you wish to remove the User, click OK.
In either case, the User Admin page appears. See Figure 43: User Admin Page. If you removed a User, that User name no longer appears in the list of configured Users.

Administration 57
Issue 03 (03) Reporting for Contact Center Setup and Operations Guide
Reset Password
Use the Reset Password option when a User has changed their password and forgotten what the password is. This option allows you to reset the User password to 0000. When the User next logs on, they use the password 0000, and they must then select a new password. Select the User name from the list of configured users and click Reset Password. You are prompted to confirm that you wish to reset the password for the User. If you do not wish to reset the password, click Cancel. To reset the password, click OK.
In either case, the User Admin page appears. See Figure 43: User Admin Page. Skillset Assignment The Skillset Assignment option allows you to assign Skillsets to Users. Assigning Skillsets to a User allows the User to view those Skillsets in the Real Time screens and to obtain Historical Reports on those Skillsets. You can assign multiple Skillsets to a User, and a Skillset can be assigned to multiple Users. Select Skillset Assignment from System Administration Menu shown in Figure 41: System Administration Menu Page. The Skillset Assignment page shown in Figure 47: Skillset Assignment Page appears.
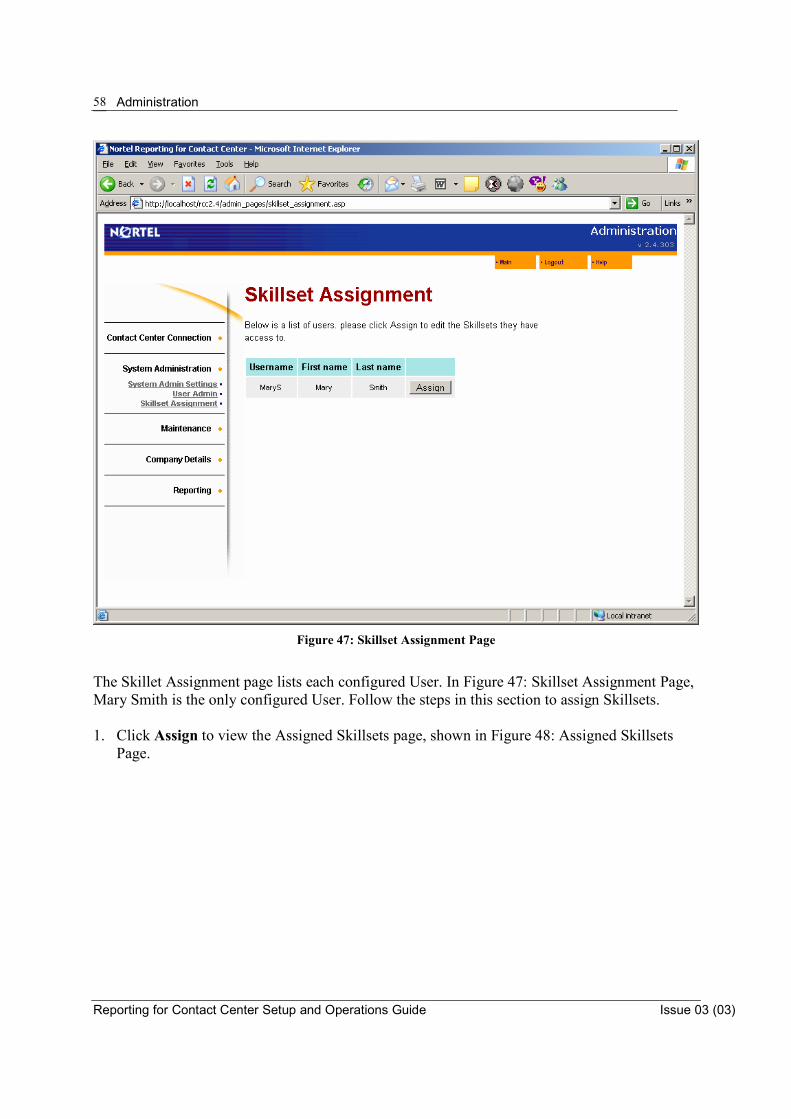
Administration
Reporting for Contact Center Setup and Operations Guide Issue 03 (03)
58
Figure 47: Skillset Assignment Page
The Skillet Assignment page lists each configured User. In Figure 47: Skillset Assignment Page, Mary Smith is the only configured User. Follow the steps in this section to assign Skillsets. 1. Click Assign to view the Assigned Skillsets page, shown in Figure 48: Assigned Skillsets
Page.

Administration 59
Issue 03 (03) Reporting for Contact Center Setup and Operations Guide
Figure 48: Assigned Skillsets Page
Note: The Skillset names shown in Figure 48: Assigned Skillsets Page are intended as examples only. Your copy of Nortel Reporting for Contact Center displays the Skillset names you have set up in the Contact Center using CallPilot Manager.
Note: The Skillset names are obtained automatically from the Contact Center. Your copy of
Nortel Reporting for Contact Center must be connected to the Contact Center for a few moments in order for the Skillset names to appear.
2. To assign a single Skillset, select the Skillset in the Unassigned Skillsets list, then click the
right arrow button ( > ). The assigned Skillset appears in the Assigned Skillsets list. 3. Continue assigning Skillsets until you assign all the Skillsets you wish to assign to this User.
In the example shown in Figure 49: Skillsets Assigned to User Mary Smith, the User Mary Smith is assigned two Skillsets: SKILL1 and SKILL3.
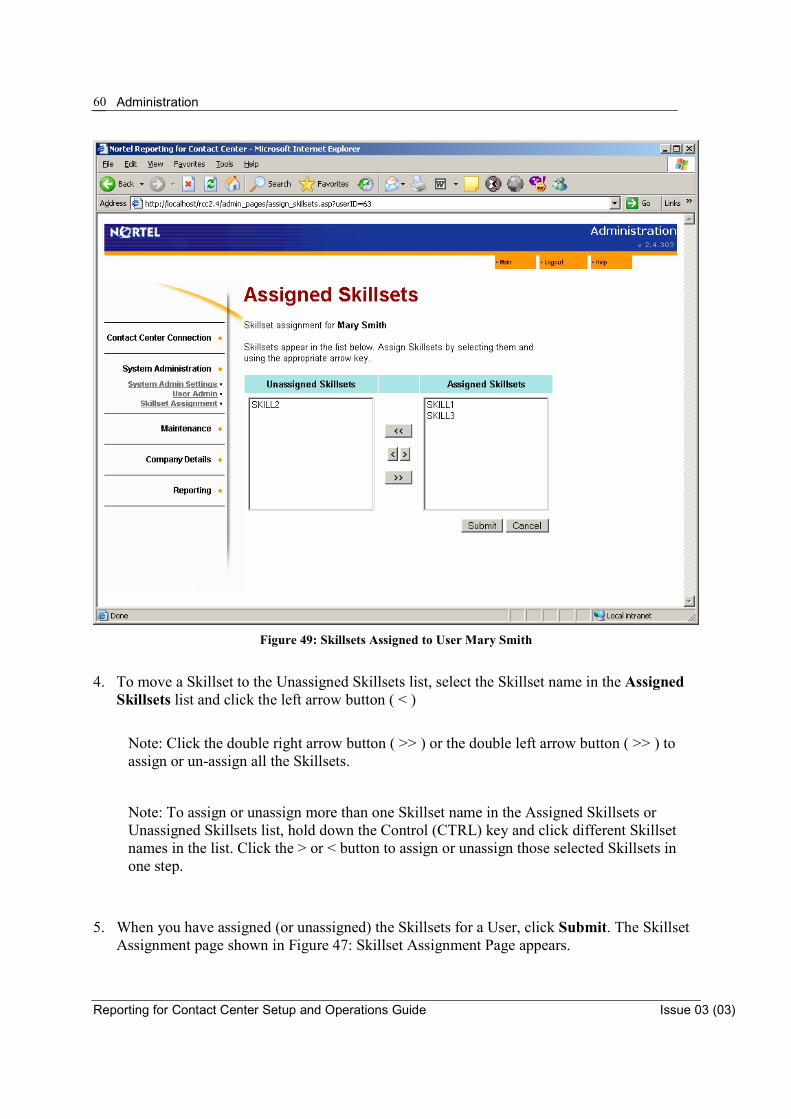
Administration
Reporting for Contact Center Setup and Operations Guide Issue 03 (03)
60
Figure 49: Skillsets Assigned to User Mary Smith
4. To move a Skillset to the Unassigned Skillsets list, select the Skillset name in the Assigned
Skillsets list and click the left arrow button ( < )
Note: Click the double right arrow button ( >> ) or the double left arrow button ( >> ) to assign or un-assign all the Skillsets.
Note: To assign or unassign more than one Skillset name in the Assigned Skillsets or Unassigned Skillsets list, hold down the Control (CTRL) key and click different Skillset names in the list. Click the > or < button to assign or unassign those selected Skillsets in one step.
5. When you have assigned (or unassigned) the Skillsets for a User, click Submit. The Skillset Assignment page shown in Figure 47: Skillset Assignment Page appears.

Administration 61
Issue 03 (03) Reporting for Contact Center Setup and Operations Guide
Maintenance The Maintenance option allows you to check the System Status and to start or stop the XML data feed logging. Select Maintenance to view the Maintenance Menu page, shown in Figure 50: Maintenance Menu Page.
Figure 50: Maintenance Menu Page
The Maintenance Menu provides the following options: � System Status � Logging
System Status Select System Status to view the System Status page shown in Figure 51: System Status Page. This page provides a variety of information relating to the current status of Nortel Reporting for Contact Center.
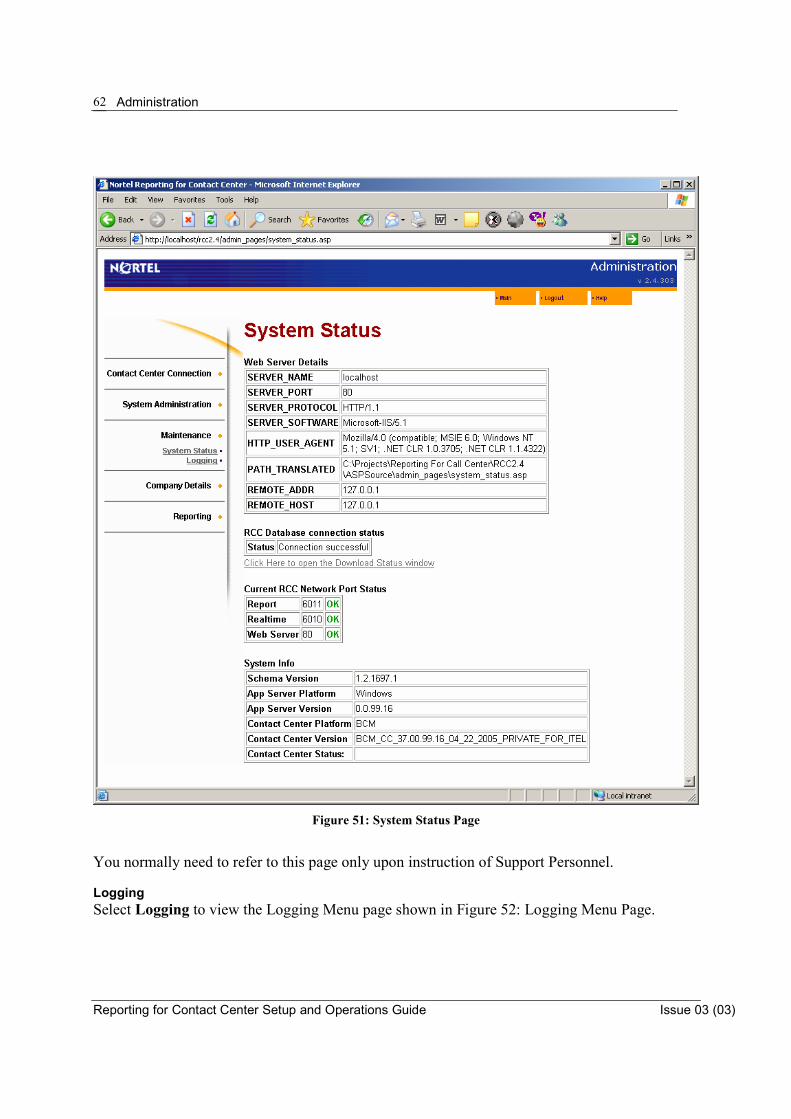
Administration
Reporting for Contact Center Setup and Operations Guide Issue 03 (03)
62
Figure 51: System Status Page
You normally need to refer to this page only upon instruction of Support Personnel. Logging Select Logging to view the Logging Menu page shown in Figure 52: Logging Menu Page.
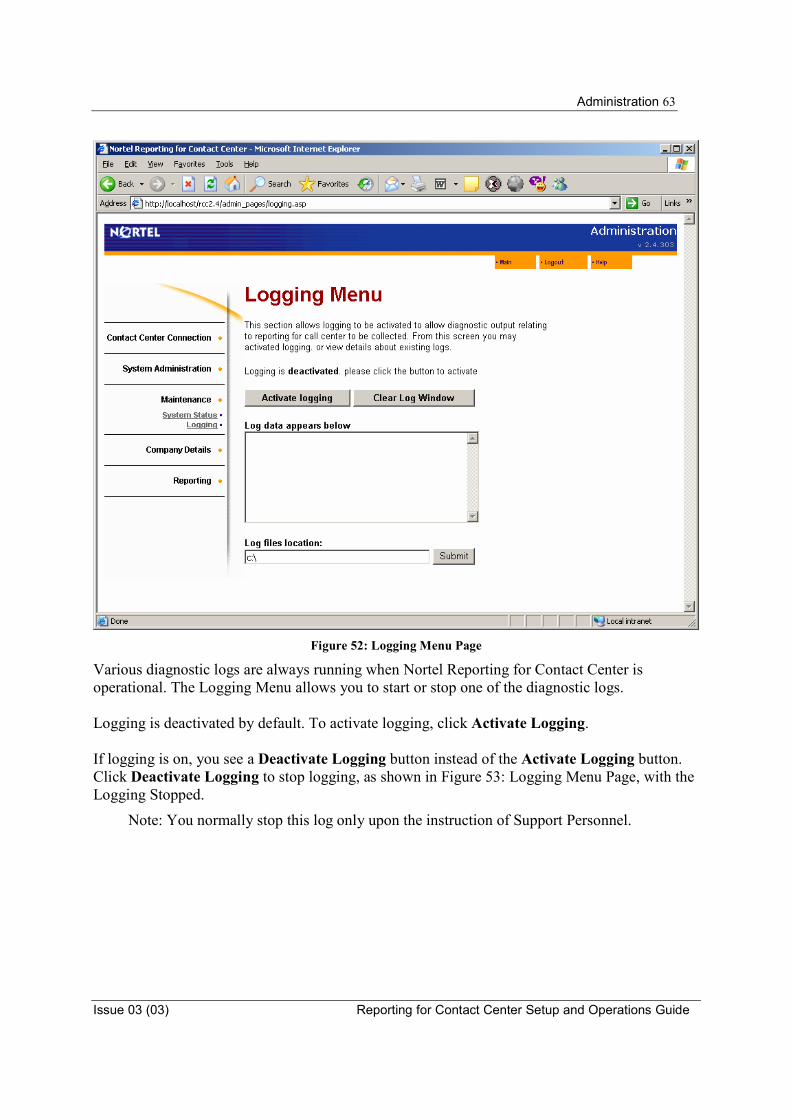
Administration 63
Issue 03 (03) Reporting for Contact Center Setup and Operations Guide
Figure 52: Logging Menu Page
Various diagnostic logs are always running when Nortel Reporting for Contact Center is operational. The Logging Menu allows you to start or stop one of the diagnostic logs. Logging is deactivated by default. To activate logging, click Activate Logging.
If logging is on, you see a Deactivate Logging button instead of the Activate Logging button. Click Deactivate Logging to stop logging, as shown in Figure 53: Logging Menu Page, with the Logging Stopped.
Note: You normally stop this log only upon the instruction of Support Personnel.

Administration
Reporting for Contact Center Setup and Operations Guide Issue 03 (03)
64
Figure 53: Logging Menu Page, with the Logging Stopped
When logging stops, you again see the Activate Logging button. Click Activate Logging to again start logging. Click Clear Log Window to clear any text from the Log Data Window. Clearing the Log Window does not affect the current state of logging. The default log files location is set to the drive which Nortel Reporting for Contact Center was installed to along with the location path. If the installation was on the C:\ drive the default location path would be, C:\Program Files\Nortel\Reporting For Contact Center\Logs. The User is able to change the log files location in the Log files location field. Clicking the Submit button will reset the log files location. To reset the log files location to the default path, perform the following:
1. On the Windows taskbar, select Start > Run and enter the pathway to the file called ModifyDatabase.bat in the RunOnce folder. The RunOnce folder is in the Reporting for Contact Center folder. If you installed Reporting for Contact Center in the default
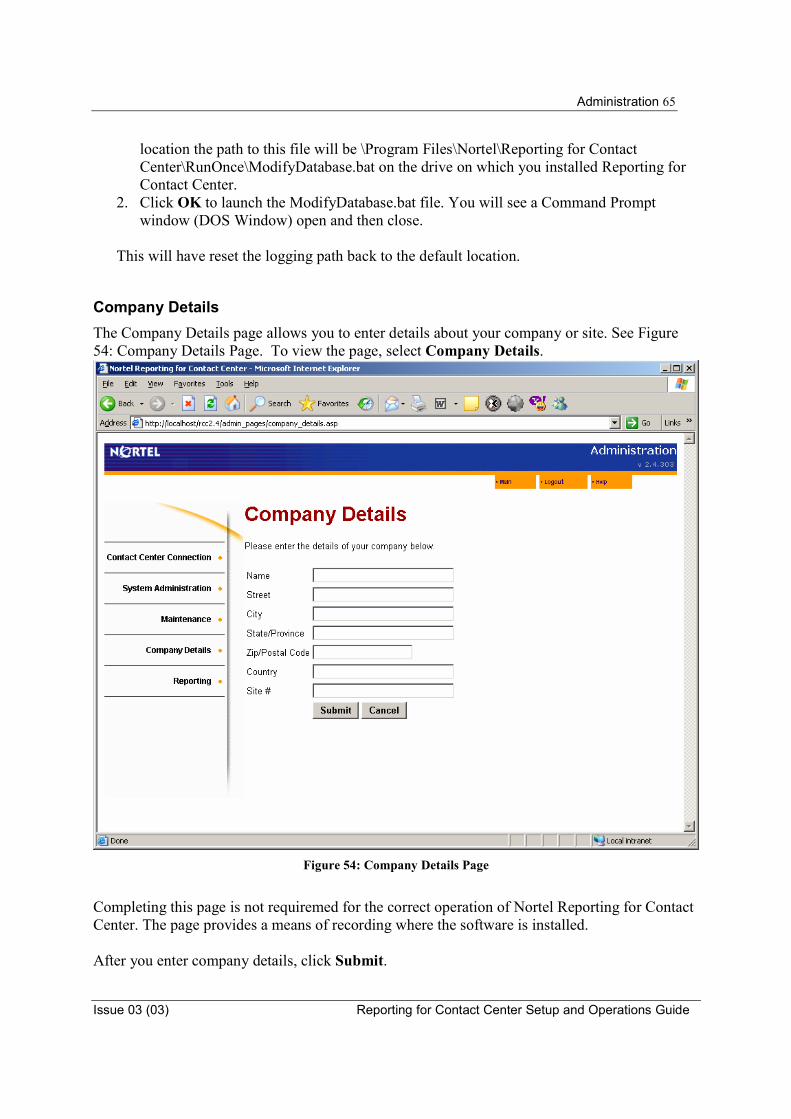
Administration 65
Issue 03 (03) Reporting for Contact Center Setup and Operations Guide
location the path to this file will be \Program Files\Nortel\Reporting for Contact Center\RunOnce\ModifyDatabase.bat on the drive on which you installed Reporting for Contact Center.
2. Click OK to launch the ModifyDatabase.bat file. You will see a Command Prompt window (DOS Window) open and then close.
This will have reset the logging path back to the default location.
Company Details The Company Details page allows you to enter details about your company or site. See Figure 54: Company Details Page. To view the page, select Company Details.
Figure 54: Company Details Page
Completing this page is not requiremed for the correct operation of Nortel Reporting for Contact Center. The page provides a means of recording where the software is installed. After you enter company details, click Submit.

Administration
Reporting for Contact Center Setup and Operations Guide Issue 03 (03)
66
Reporting Click Reporting to view the Main Menu page, shown in Figure 55: Main Menu Page. This is the page all regular Users (that is, non-Administrative Users) view when they log on. This option allows an Administrator to use the Nortel Reporting for Contact Center as though they were a User, to view Real Time screens, and to access the Historical Reports. For more information, refer to Using Reporting for Contact Center.
Figure 55: Main Menu Page

Using Reporting For Contact Center 67
Issue 03 (03) Reporting for Contact Center Setup and Operations Guide
Using Reporting for Contact Center
Logging On
Follow the steps in this section to log on to Nortel Reporting for Contact Center for all Users. 1. Use Internet Explorer to go to the URL of your Nortel Reporting for Contact Center Web
pages Login page.
The URL is http://NameOfWebHostPC/RCC
Where NameOfWebHostPC is the network name or IP Address of the Web Host PC. The Login page appears. See Figure 56: Login Page.
Note: If you are using the browser on the Web Host PC, you can replace NameOfWebHostPC with localhost.
Note: You can add the Login page URL to your Internet Favorites. To add this page to your favorites in Internet Explorer, press Ctrl-D when you are at the Login page, or click Favorites, Add to favorites.
5

Using Reporting for Contact Center
Reporting for Contact Center Setup and Operations Guide Issue 03 (03)
68
Figure 56: Login Page
2. You must provide a valid username and a password to gain access to the features of Nortel Reporting for Contact Center. Before you attempt to log on, ensure that an Administrator has created a username for you.
The first time you log on, your password is set to the default of 0000.
3. In the Username field, enter the Username you have been assigned. In the Password field, enter the default password of 0000.You must change your password after you first log on. The Change Password page shown in Figure 57: Change Password Page appears.
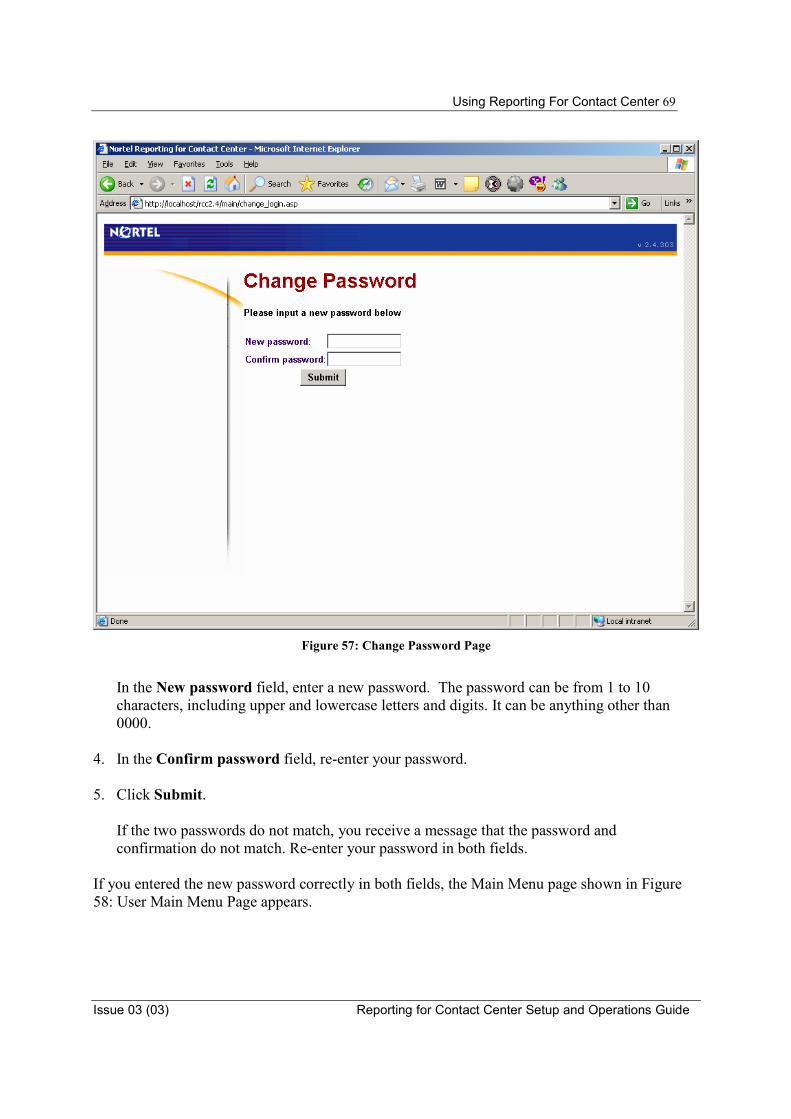
Using Reporting For Contact Center 69
Issue 03 (03) Reporting for Contact Center Setup and Operations Guide
Figure 57: Change Password Page
In the New password field, enter a new password. The password can be from 1 to 10 characters, including upper and lowercase letters and digits. It can be anything other than 0000.
4. In the Confirm password field, re-enter your password. 5. Click Submit.
If the two passwords do not match, you receive a message that the password and confirmation do not match. Re-enter your password in both fields.
If you entered the new password correctly in both fields, the Main Menu page shown in Figure 58: User Main Menu Page appears.
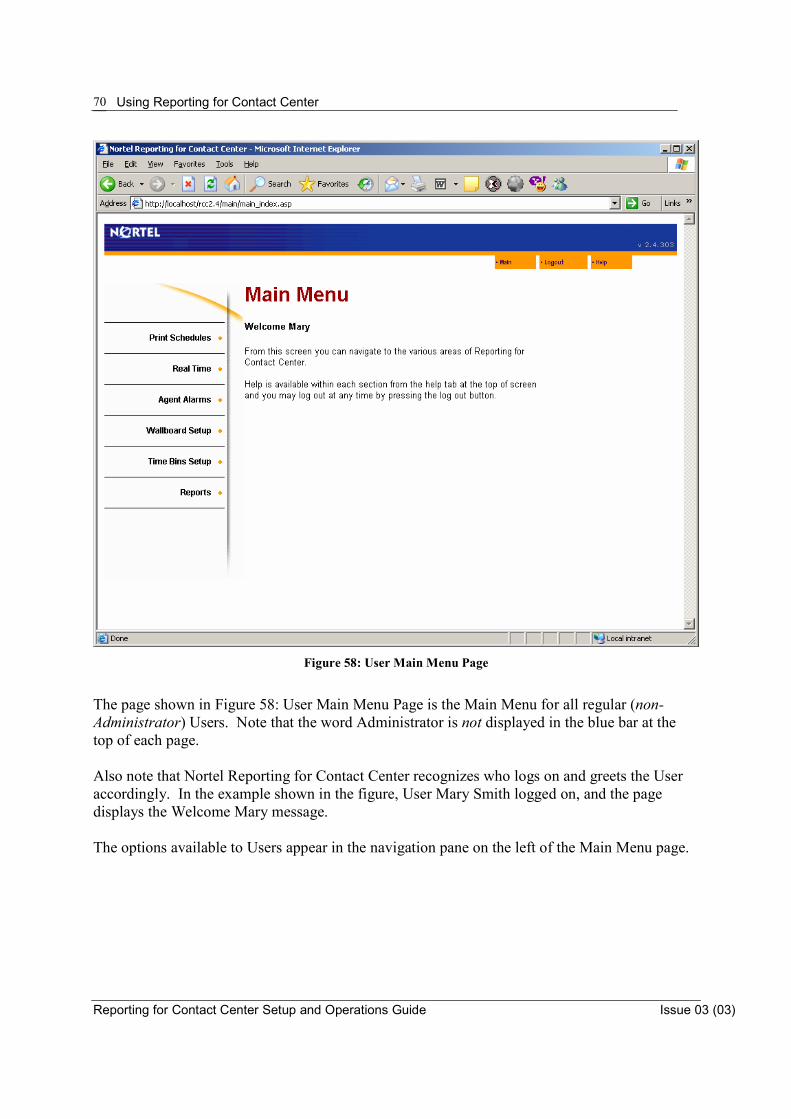
Using Reporting for Contact Center
Reporting for Contact Center Setup and Operations Guide Issue 03 (03)
70
Figure 58: User Main Menu Page
The page shown in Figure 58: User Main Menu Page is the Main Menu for all regular (non-Administrator) Users. Note that the word Administrator is not displayed in the blue bar at the top of each page. Also note that Nortel Reporting for Contact Center recognizes who logs on and greets the User accordingly. In the example shown in the figure, User Mary Smith logged on, and the page displays the Welcome Mary message. The options available to Users appear in the navigation pane on the left of the Main Menu page.

Using Reporting For Contact Center 71
Issue 03 (03) Reporting for Contact Center Setup and Operations Guide
The options are as follows:
� Print Schedules � Real Time � Agent Alarms � Wallboard Setup � Time Bins Setup � Reports
Time Bins Setup
The Time Bins option allows you to specify the settings for the Answer and Abandon Time Bins for the Skillsets that are assigned to you. Answer and Abandon Time Bins are collectively known as the Time Bins.
Answer Time Bins The Answered Time Bins are a series of six time steps used in the statistical analysis of Answered Calls. Nortel Reporting for Contact Center provides statistical reports on the percentage of incoming calls answered within each of the periods specified in the chosen Answered Time Bins. A seventh Answer period is also used in the reports. The seventh period gathers information about all calls that are answered after the period specified by the sixth Answered Time Bin.
Abandon Time Bins The Abandon Time Bins are a series of six time steps used in the statistical analysis of Abandoned Calls. Nortel Reporting for Contact Center provides statistical reports about the percentage of incoming calls abandoned within each of the periods specified in the chosen Abandoned Time Bins. A seventh Abandoned period is also used in the reports.The seventh period gathers information about all calls that are abandoned after the period specified by the sixth Abandoned Time Bin.
Note: If other Users have been assigned these Skillsets, they can change these settings.
Select the Time Bins Setup option to view the Time Bin Setup page, shown in Figure 59: Time Bin Setup Skillset selection page.
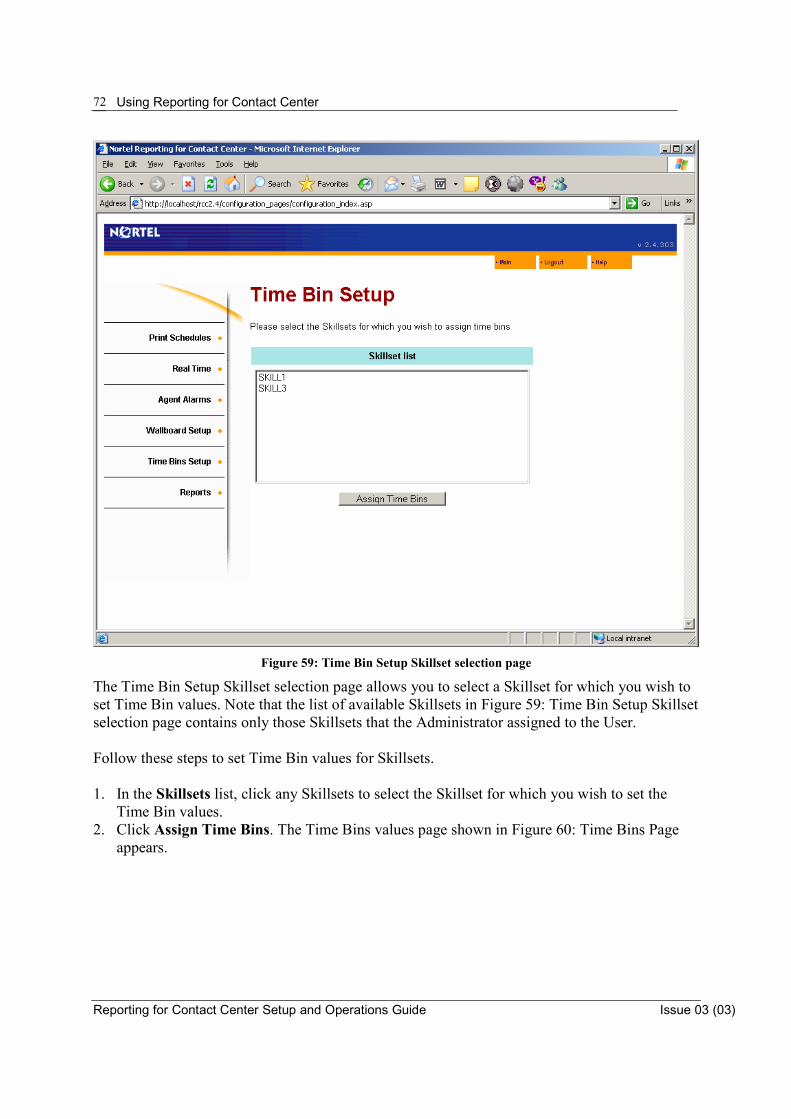
Using Reporting for Contact Center
Reporting for Contact Center Setup and Operations Guide Issue 03 (03)
72
Figure 59: Time Bin Setup Skillset selection page
The Time Bin Setup Skillset selection page allows you to select a Skillset for which you wish to set Time Bin values. Note that the list of available Skillsets in Figure 59: Time Bin Setup Skillset selection page contains only those Skillsets that the Administrator assigned to the User. Follow these steps to set Time Bin values for Skillsets. 1. In the Skillsets list, click any Skillsets to select the Skillset for which you wish to set the
Time Bin values. 2. Click Assign Time Bins. The Time Bins values page shown in Figure 60: Time Bins Page
appears.
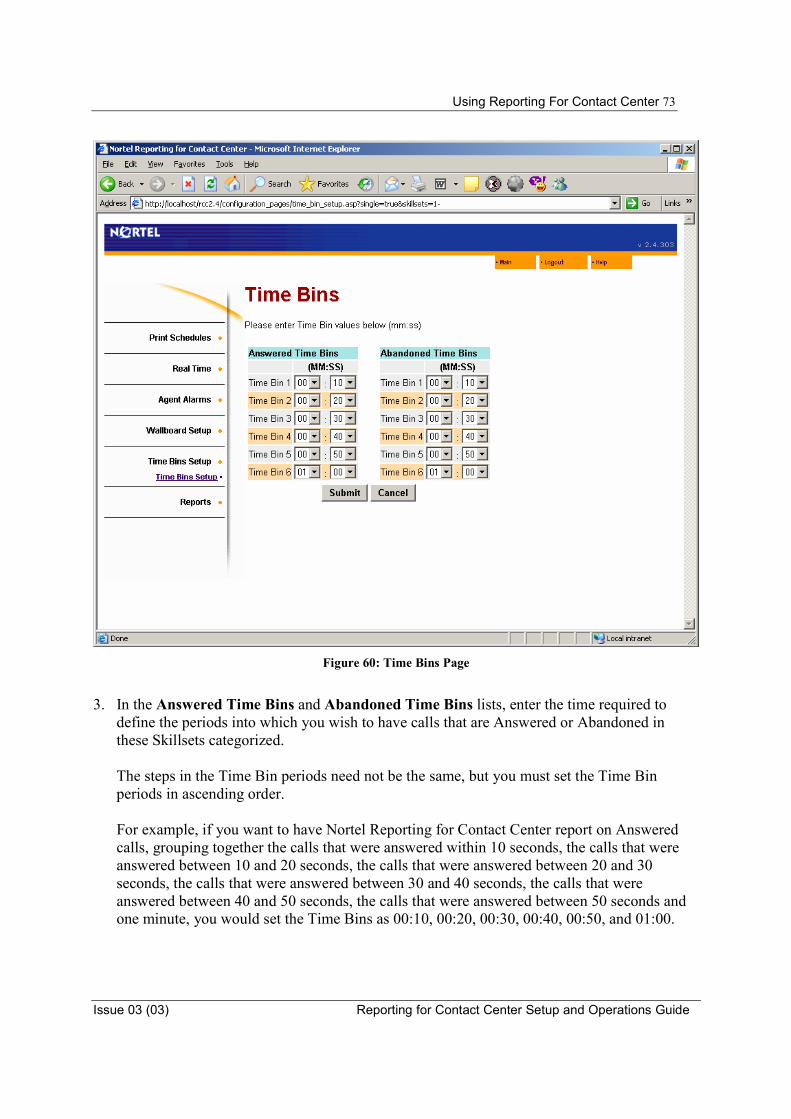
Using Reporting For Contact Center 73
Issue 03 (03) Reporting for Contact Center Setup and Operations Guide
Figure 60: Time Bins Page
3. In the Answered Time Bins and Abandoned Time Bins lists, enter the time required to
define the periods into which you wish to have calls that are Answered or Abandoned in these Skillsets categorized.
The steps in the Time Bin periods need not be the same, but you must set the Time Bin periods in ascending order.
For example, if you want to have Nortel Reporting for Contact Center report on Answered calls, grouping together the calls that were answered within 10 seconds, the calls that were answered between 10 and 20 seconds, the calls that were answered between 20 and 30 seconds, the calls that were answered between 30 and 40 seconds, the calls that were answered between 40 and 50 seconds, the calls that were answered between 50 seconds and one minute, you would set the Time Bins as 00:10, 00:20, 00:30, 00:40, 00:50, and 01:00.
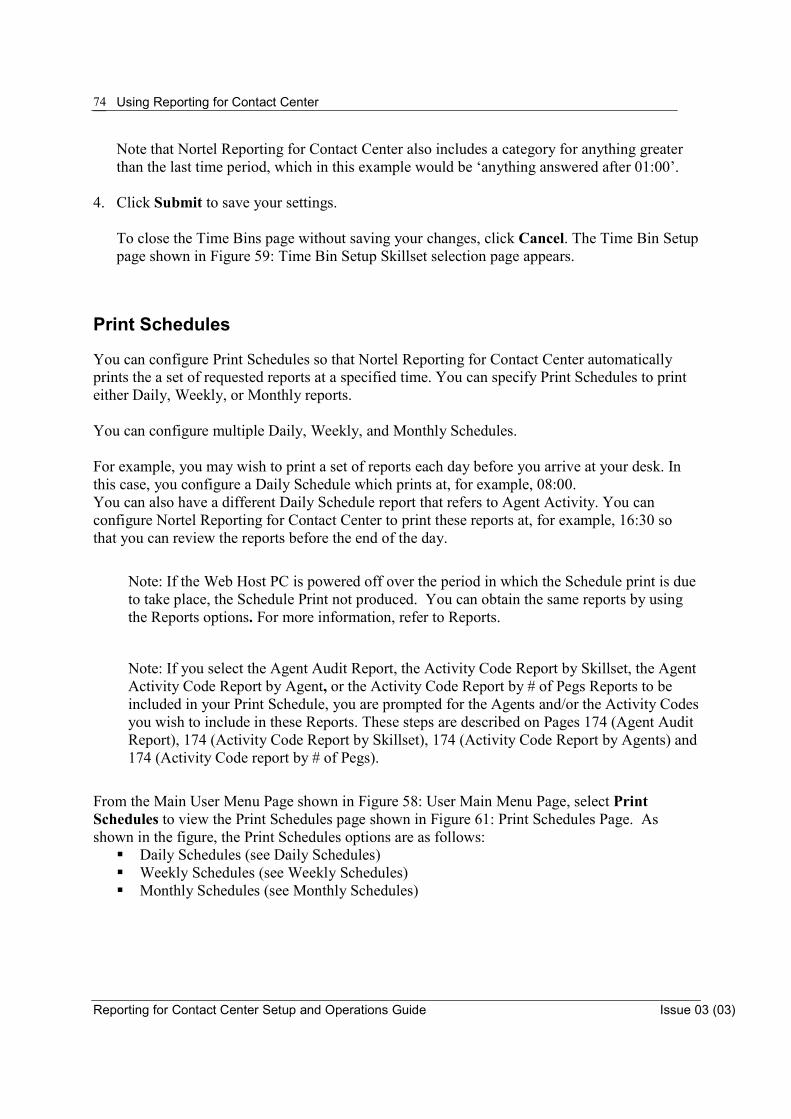
Using Reporting for Contact Center
Reporting for Contact Center Setup and Operations Guide Issue 03 (03)
74
Note that Nortel Reporting for Contact Center also includes a category for anything greater than the last time period, which in this example would be ‘anything answered after 01:00’.
4. Click Submit to save your settings.
To close the Time Bins page without saving your changes, click Cancel. The Time Bin Setup page shown in Figure 59: Time Bin Setup Skillset selection page appears.
Print Schedules
You can configure Print Schedules so that Nortel Reporting for Contact Center automatically prints the a set of requested reports at a specified time. You can specify Print Schedules to print either Daily, Weekly, or Monthly reports. You can configure multiple Daily, Weekly, and Monthly Schedules. For example, you may wish to print a set of reports each day before you arrive at your desk. In this case, you configure a Daily Schedule which prints at, for example, 08:00. You can also have a different Daily Schedule report that refers to Agent Activity. You can configure Nortel Reporting for Contact Center to print these reports at, for example, 16:30 so that you can review the reports before the end of the day.
Note: If the Web Host PC is powered off over the period in which the Schedule print is due to take place, the Schedule Print not produced. You can obtain the same reports by using the Reports options. For more information, refer to Reports.
Note: If you select the Agent Audit Report, the Activity Code Report by Skillset, the Agent Activity Code Report by Agent, or the Activity Code Report by # of Pegs Reports to be included in your Print Schedule, you are prompted for the Agents and/or the Activity Codes you wish to include in these Reports. These steps are described on Pages 174 (Agent Audit Report), 174 (Activity Code Report by Skillset), 174 (Activity Code Report by Agents) and 174 (Activity Code report by # of Pegs).
From the Main User Menu Page shown in Figure 58: User Main Menu Page, select Print Schedules to view the Print Schedules page shown in Figure 61: Print Schedules Page. As shown in the figure, the Print Schedules options are as follows:
� Daily Schedules (see Daily Schedules) � Weekly Schedules (see Weekly Schedules) � Monthly Schedules (see Monthly Schedules)
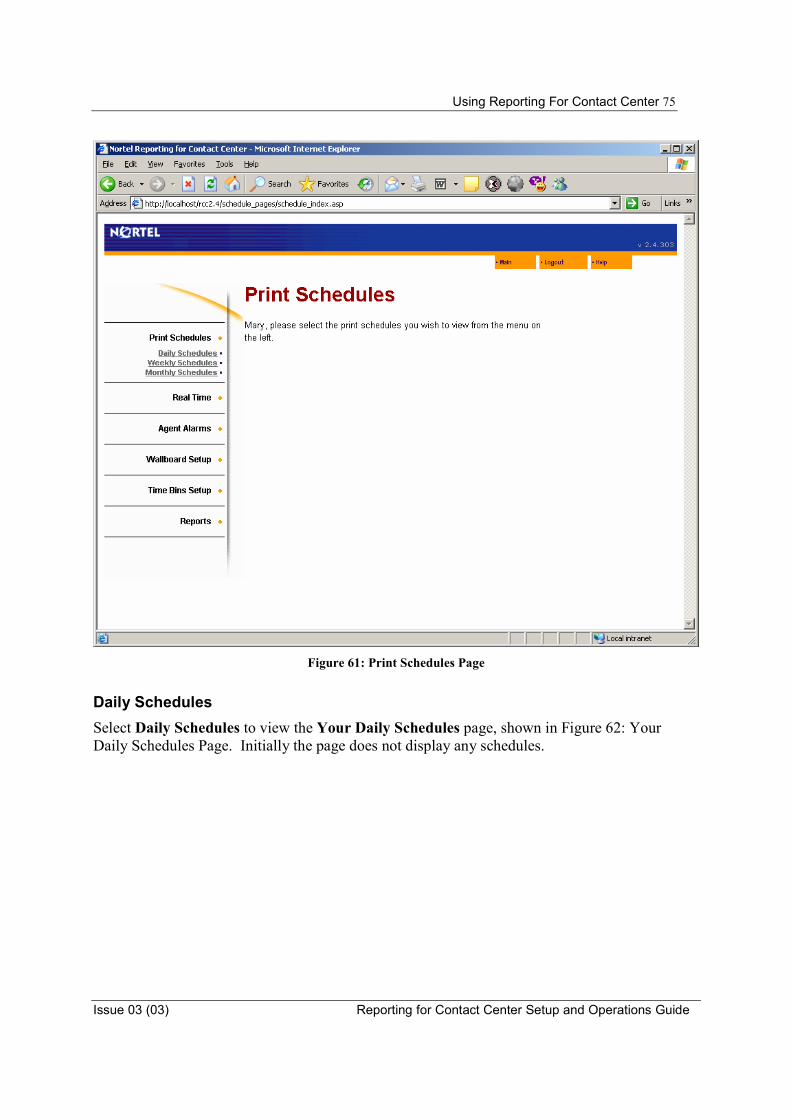
Using Reporting For Contact Center 75
Issue 03 (03) Reporting for Contact Center Setup and Operations Guide
Figure 61: Print Schedules Page
Daily Schedules Select Daily Schedules to view the Your Daily Schedules page, shown in Figure 62: Your Daily Schedules Page. Initially the page does not display any schedules.
Using Reporting for Contact Center
Reporting for Contact Center Setup and Operations Guide Issue 03 (03)
76
Figure 62: Your Daily Schedules Page
Follow the steps in this section to add a Daily Schedule.
1. Click Add. The Add Daily Schedules page shown in Figure 63: Add Daily Schedule Page appears.

Using Reporting For Contact Center 77
Issue 03 (03) Reporting for Contact Center Setup and Operations Guide
Figure 63: Add Daily Schedule Page
The Add Daily Schedule page allows you to specify which reports you wish to have included in the Schedule, which days are to be included in the Schedule, and when to print the reports.
2. To set a name for your Schedule, type the name in the Schedule Name field. This is to help you identify, and distinguish between, the different Schedules you create.
3. To select a report to be included in the Schedule, select the check box beside the report name.
Each selected report has a check mark in the check box beside its name. You can select multiple reports.
Using Reporting for Contact Center
Reporting for Contact Center Setup and Operations Guide Issue 03 (03)
78
4. To include the reports from a particular day in the Schedule, select the check box beside that day. You can select multiple days.
Note: Daily Reports print on the day following the day which is being reported. That is, if you select a Daily Report Schedule for Monday, it prints on Tuesday. This ensures that the report day has completely elapsed when the reports are generated.
5. To specify which printer generates the reports, select a printer name from the Select printer
list. This list includes all the printers that are accessible from the Web Host PC. (The reports are generated from the databases held in the Web Host PC.)
6. The Report Period Start Time and Report Period End Time lists allow you to specify the
period within each day for which the reports are generated. For example, if your Contact Center has a working day that starts at 08:30 and finishes at 17:30, you may wish to specify the Start Time as 08:00 (to see if you have early calls that you are missing by not having the Contact Center open) and 18:00 (to see if a late surge of calls occurs).
Figure 64: Add Daily Schedule Page - Example Settings shows example settings that User Mary Smith configured for her Daily Schedule.
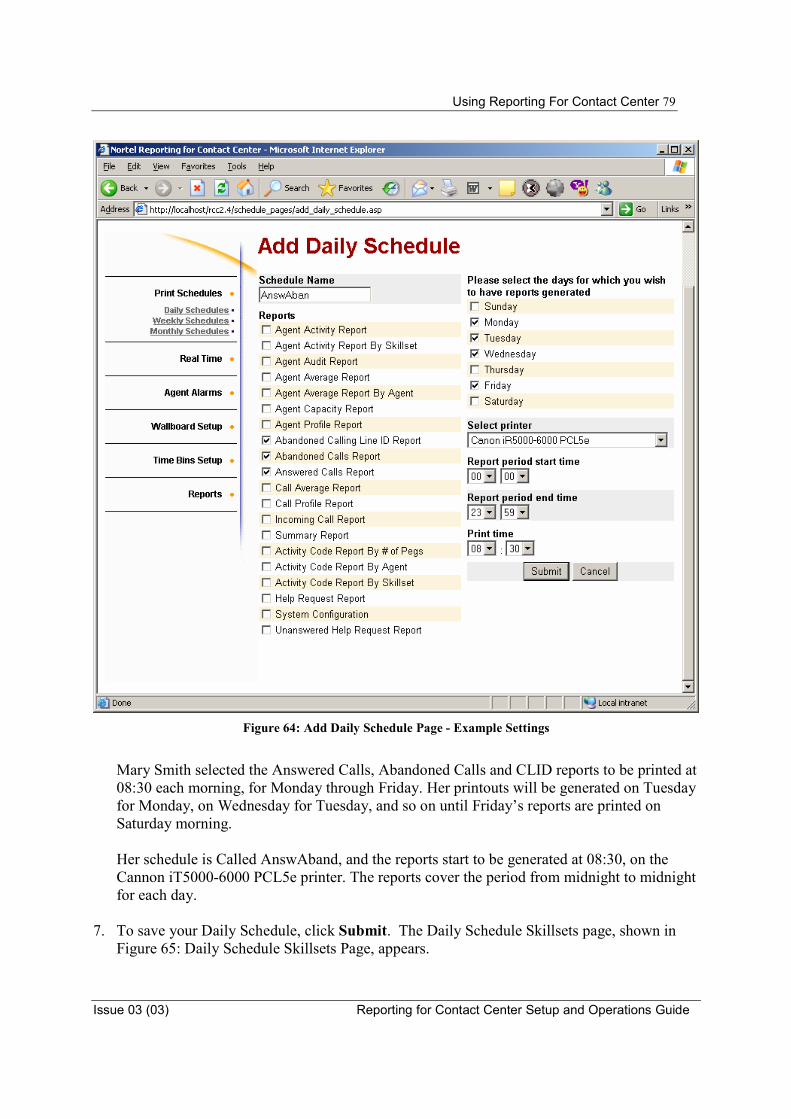
Using Reporting For Contact Center 79
Issue 03 (03) Reporting for Contact Center Setup and Operations Guide
Figure 64: Add Daily Schedule Page - Example Settings
Mary Smith selected the Answered Calls, Abandoned Calls and CLID reports to be printed at 08:30 each morning, for Monday through Friday. Her printouts will be generated on Tuesday for Monday, on Wednesday for Tuesday, and so on until Friday’s reports are printed on Saturday morning.
Her schedule is Called AnswAband, and the reports start to be generated at 08:30, on the Cannon iT5000-6000 PCL5e printer. The reports cover the period from midnight to midnight for each day.
7. To save your Daily Schedule, click Submit. The Daily Schedule Skillsets page, shown in
Figure 65: Daily Schedule Skillsets Page, appears.
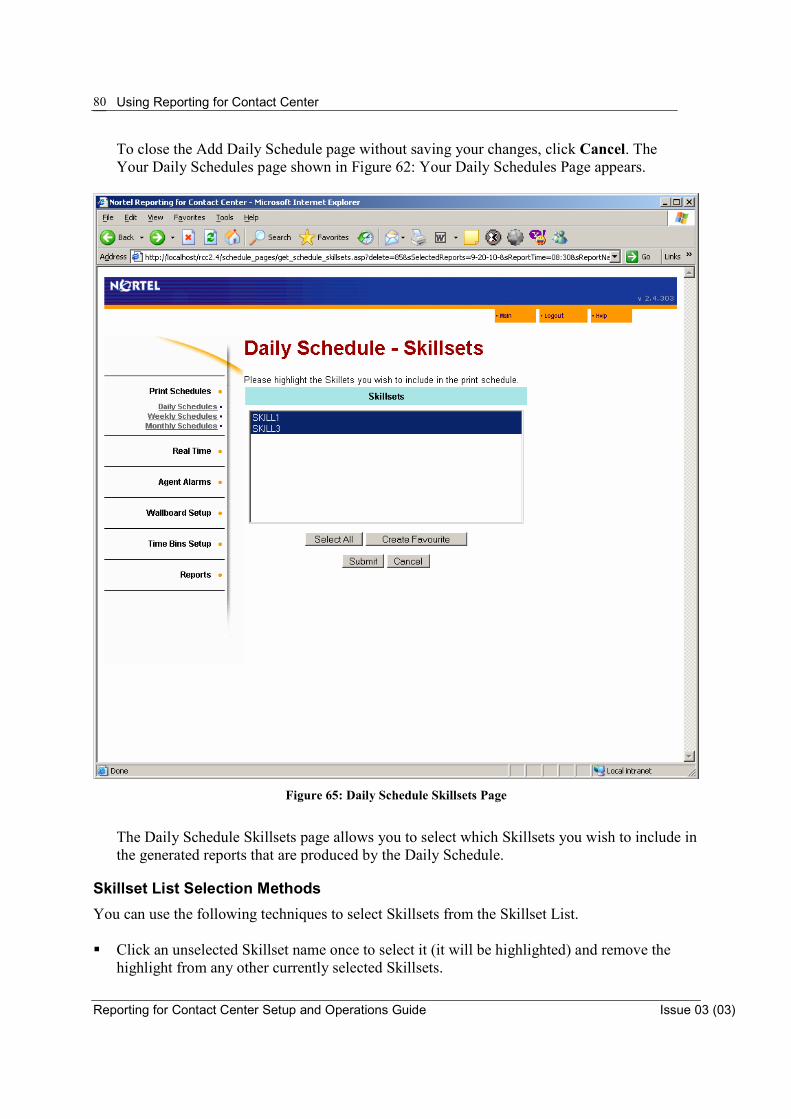
Using Reporting for Contact Center
Reporting for Contact Center Setup and Operations Guide Issue 03 (03)
80
To close the Add Daily Schedule page without saving your changes, click Cancel. The Your Daily Schedules page shown in Figure 62: Your Daily Schedules Page appears.
Figure 65: Daily Schedule Skillsets Page
The Daily Schedule Skillsets page allows you to select which Skillsets you wish to include in the generated reports that are produced by the Daily Schedule.
Skillset List Selection Methods You can use the following techniques to select Skillsets from the Skillset List. � Click an unselected Skillset name once to select it (it will be highlighted) and remove the
highlight from any other currently selected Skillsets.
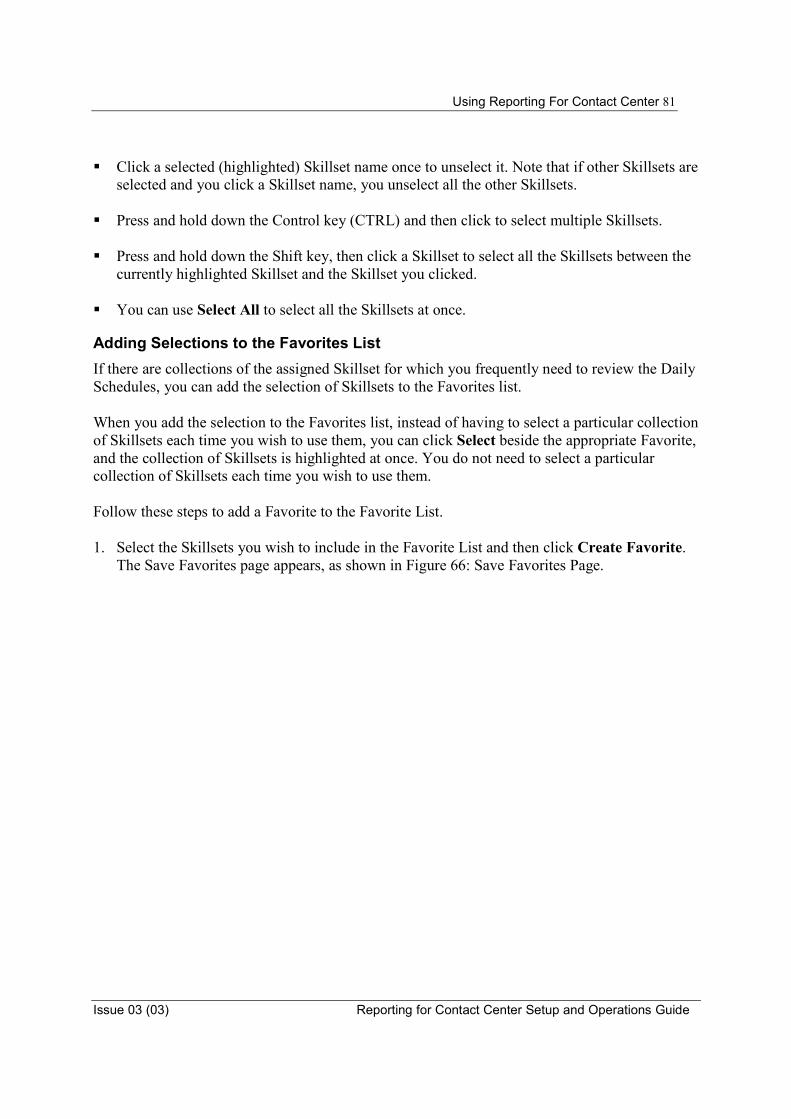
Using Reporting For Contact Center 81
Issue 03 (03) Reporting for Contact Center Setup and Operations Guide
� Click a selected (highlighted) Skillset name once to unselect it. Note that if other Skillsets are selected and you click a Skillset name, you unselect all the other Skillsets.
� Press and hold down the Control key (CTRL) and then click to select multiple Skillsets.
� Press and hold down the Shift key, then click a Skillset to select all the Skillsets between the currently highlighted Skillset and the Skillset you clicked.
� You can use Select All to select all the Skillsets at once.
Adding Selections to the Favorites List If there are collections of the assigned Skillset for which you frequently need to review the Daily Schedules, you can add the selection of Skillsets to the Favorites list. When you add the selection to the Favorites list, instead of having to select a particular collection of Skillsets each time you wish to use them, you can click Select beside the appropriate Favorite, and the collection of Skillsets is highlighted at once. You do not need to select a particular collection of Skillsets each time you wish to use them. Follow these steps to add a Favorite to the Favorite List. 1. Select the Skillsets you wish to include in the Favorite List and then click Create Favorite.
The Save Favorites page appears, as shown in Figure 66: Save Favorites Page.
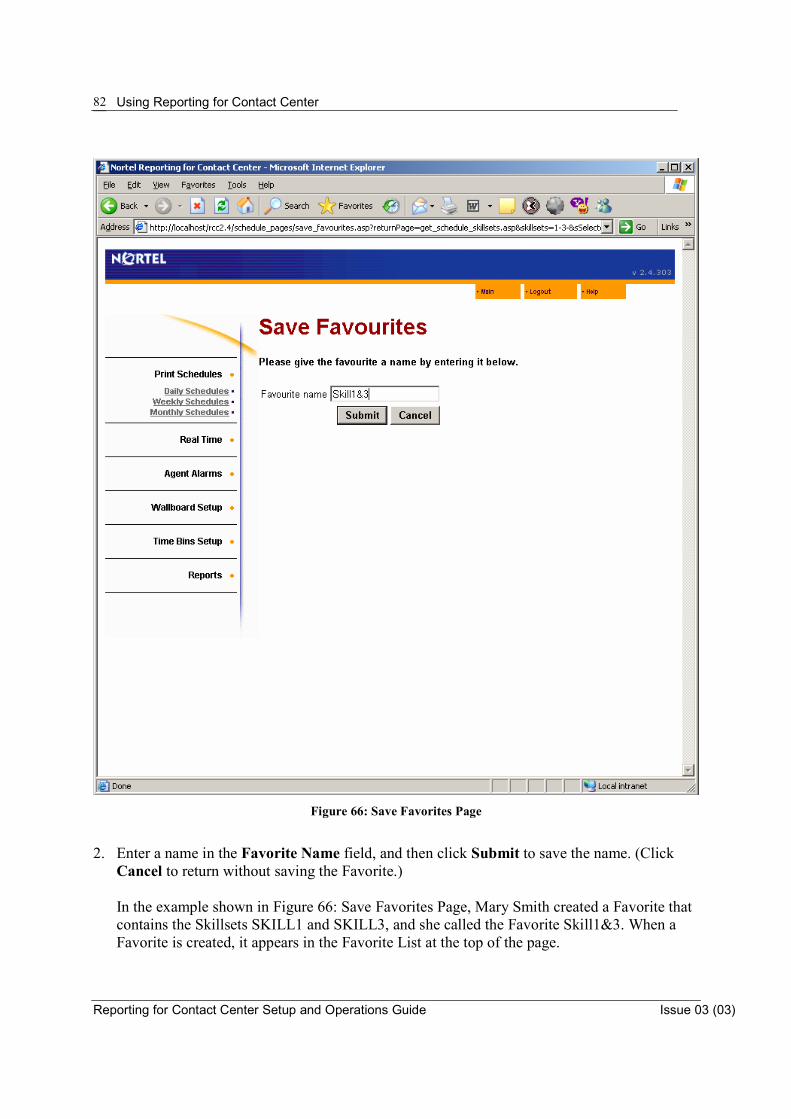
Using Reporting for Contact Center
Reporting for Contact Center Setup and Operations Guide Issue 03 (03)
82
Figure 66: Save Favorites Page
2. Enter a name in the Favorite Name field, and then click Submit to save the name. (Click
Cancel to return without saving the Favorite.)
In the example shown in Figure 66: Save Favorites Page, Mary Smith created a Favorite that contains the Skillsets SKILL1 and SKILL3, and she called the Favorite Skill1&3. When a Favorite is created, it appears in the Favorite List at the top of the page.

Using Reporting For Contact Center 83
Issue 03 (03) Reporting for Contact Center Setup and Operations Guide
Note: Many pages within Nortel Reporting for Contact Center allow you to use S lists and Favorites, and the techniques described here apply also to all those other pages. All the Favorites you create are accessible from any point within Nortel Reporting for Contact Center that allows you to use Favorites.
Mary Smith clicked Select beside her new Favorite (Skill1&3), and the two associated Skillsets are selected for her.
Saving your Daily Schedule 1. To save your Daily Schedule, click Submit. The Your Daily Schedules page shown in Figure
67: Your Daily Schedules with a Schedule in the List appears. The page shows the Daily Schedule that you created.
To leave the Daily Schedule Skillsets page without saving any changes, click Cancel. The Your Daily Schedules page appears. See Figure 62: Your Daily Schedules Page.
Note: If you included the Agent Audit Report, the Activity Code Report by Skillset, Agent Activity Code Report by Agent, or the Activity Code Report by # of Pegs Reports in your Print Schedule, you are prompted for the Agents and/or the Activity Codes you wish to include in these Reports. These steps are described on Pages 174 (Agent Audit Report), 174 (Activity Code Report by Skillset), 174 (Activity Code Report by Agents) and 174 (Activity Code report by # of Pegs).
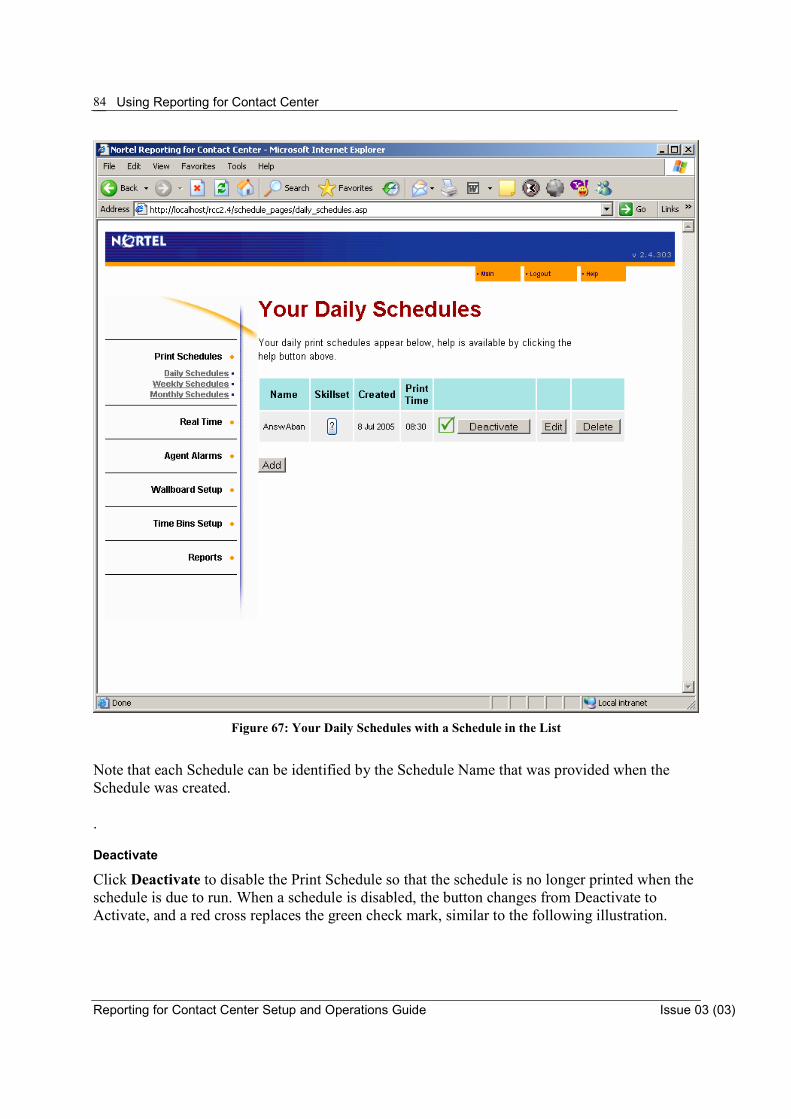
Using Reporting for Contact Center
Reporting for Contact Center Setup and Operations Guide Issue 03 (03)
84
Figure 67: Your Daily Schedules with a Schedule in the List
Note that each Schedule can be identified by the Schedule Name that was provided when the Schedule was created. .
Deactivate
Click Deactivate to disable the Print Schedule so that the schedule is no longer printed when the schedule is due to run. When a schedule is disabled, the button changes from Deactivate to Activate, and a red cross replaces the green check mark, similar to the following illustration.
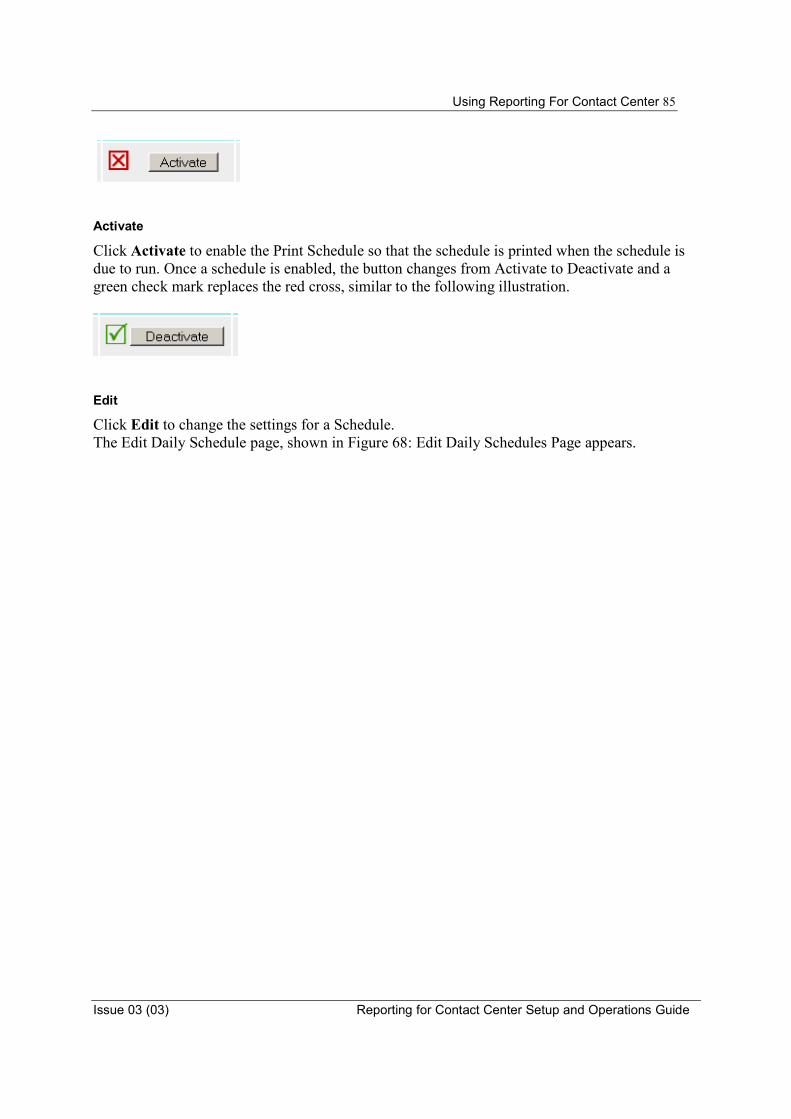
Using Reporting For Contact Center 85
Issue 03 (03) Reporting for Contact Center Setup and Operations Guide
Activate
Click Activate to enable the Print Schedule so that the schedule is printed when the schedule is due to run. Once a schedule is enabled, the button changes from Activate to Deactivate and a green check mark replaces the red cross, similar to the following illustration.
Edit
Click Edit to change the settings for a Schedule. The Edit Daily Schedule page, shown in Figure 68: Edit Daily Schedules Page appears.
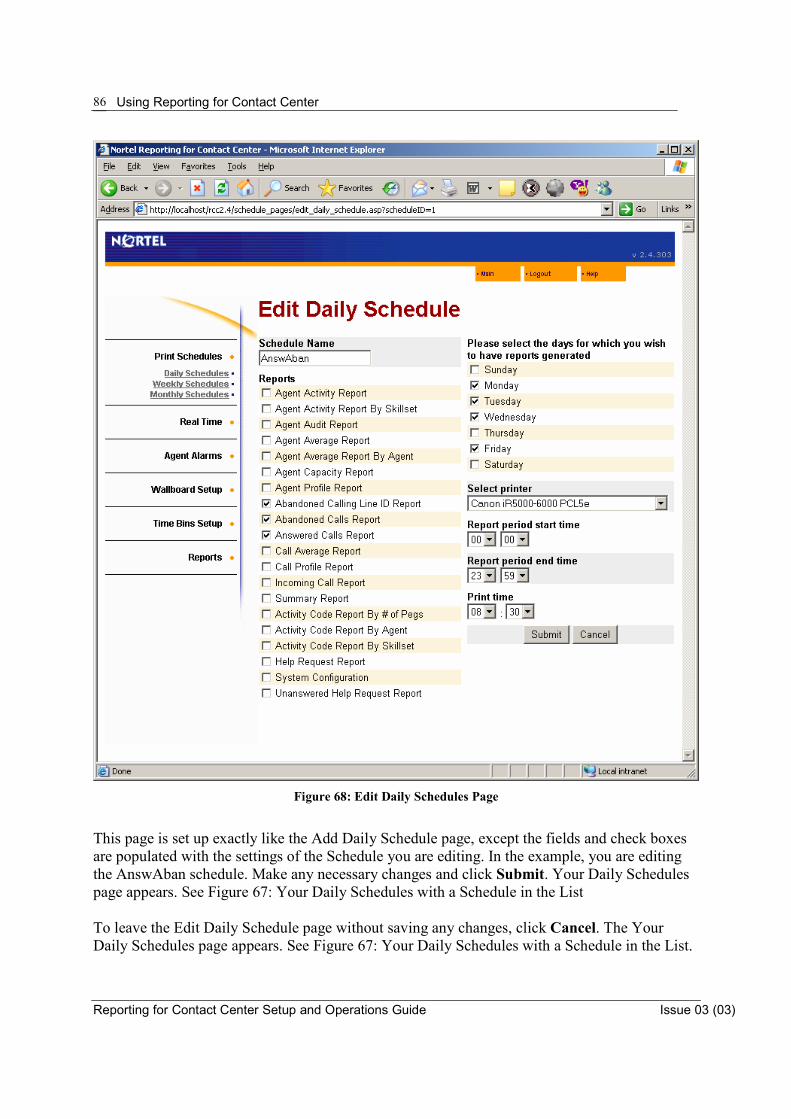
Using Reporting for Contact Center
Reporting for Contact Center Setup and Operations Guide Issue 03 (03)
86
Figure 68: Edit Daily Schedules Page
This page is set up exactly like the Add Daily Schedule page, except the fields and check boxes are populated with the settings of the Schedule you are editing. In the example, you are editing the AnswAban schedule. Make any necessary changes and click Submit. Your Daily Schedules page appears. See Figure 67: Your Daily Schedules with a Schedule in the List To leave the Edit Daily Schedule page without saving any changes, click Cancel. The Your Daily Schedules page appears. See Figure 67: Your Daily Schedules with a Schedule in the List.

Using Reporting For Contact Center 87
Issue 03 (03) Reporting for Contact Center Setup and Operations Guide
Delete
Click Delete to remove the Schedule from the system and to remove its listing from the Your Daily Schedules page. You are prompted to confirm the deletion. When you confirm the deletion, the Your Daily Schedules page appears
Weekly Schedules On the Print Schedules page shown in Figure 61: Print Schedules Page, select Weekly Schedules to view the Your Weekly Schedules page. See Figure 69: Your Weekly Schedules Page. Initially, the page does not show any schedules. The Add Weekly Schedule page allows you to specify which reports you wish to include in the Schedule and when to print the scheduled reports. You can also specify which period of the day the reports contain. You must specify a name for your Schedule and the printer on which you wish to generate the reports.

Using Reporting for Contact Center
Reporting for Contact Center Setup and Operations Guide Issue 03 (03)
88
Figure 69: Your Weekly Schedules Page
Follow the steps in this section to add a Weekly Schedule. 1. Click Add. The Add Weekly Schedules page shown in Figure 70: Add Weekly Schedule
Page appears.

Using Reporting For Contact Center 89
Issue 03 (03) Reporting for Contact Center Setup and Operations Guide
Figure 70: Add Weekly Schedule Page
2. To set a name for your Schedule, enter the name in the Schedule Name field. The name
helps you identify and distinguish between the different Schedules you create. 3. To select a report to include in the Schedule, click the check box beside the report name.
Selected reports have a check mark in the check box beside their name. You can select multiple reports.
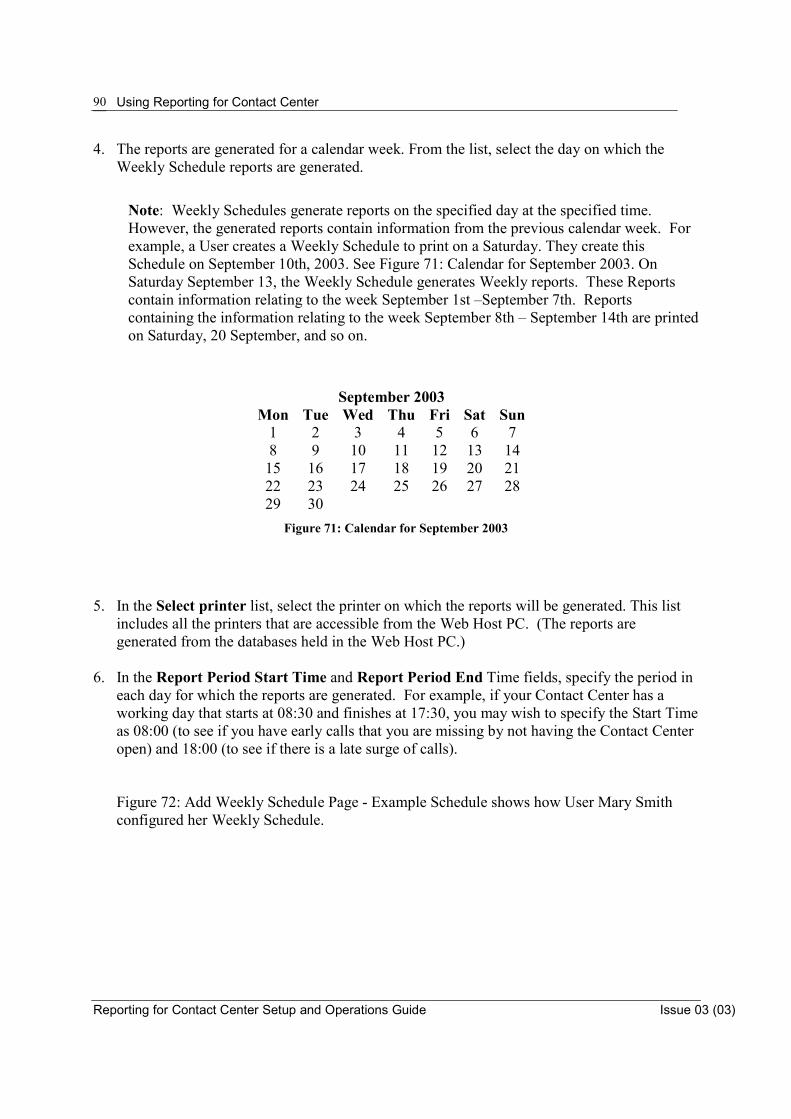
Using Reporting for Contact Center
Reporting for Contact Center Setup and Operations Guide Issue 03 (03)
90
4. The reports are generated for a calendar week. From the list, select the day on which the Weekly Schedule reports are generated.
Note: Weekly Schedules generate reports on the specified day at the specified time. However, the generated reports contain information from the previous calendar week. For example, a User creates a Weekly Schedule to print on a Saturday. They create this Schedule on September 10th, 2003. See Figure 71: Calendar for September 2003. On Saturday September 13, the Weekly Schedule generates Weekly reports. These Reports contain information relating to the week September 1st –September 7th. Reports containing the information relating to the week September 8th – September 14th are printed on Saturday, 20 September, and so on.
September 2003 Mon Tue Wed Thu Fri Sat Sun
1 2 3 4 5 6 78 9 10 11 12 13 14
15 16 17 18 19 20 21 22 23 24 25 26 27 28 29 30
Figure 71: Calendar for September 2003
5. In the Select printer list, select the printer on which the reports will be generated. This list includes all the printers that are accessible from the Web Host PC. (The reports are generated from the databases held in the Web Host PC.)
6. In the Report Period Start Time and Report Period End Time fields, specify the period in
each day for which the reports are generated. For example, if your Contact Center has a working day that starts at 08:30 and finishes at 17:30, you may wish to specify the Start Time as 08:00 (to see if you have early calls that you are missing by not having the Contact Center open) and 18:00 (to see if there is a late surge of calls).
Figure 72: Add Weekly Schedule Page - Example Schedule shows how User Mary Smith configured her Weekly Schedule.
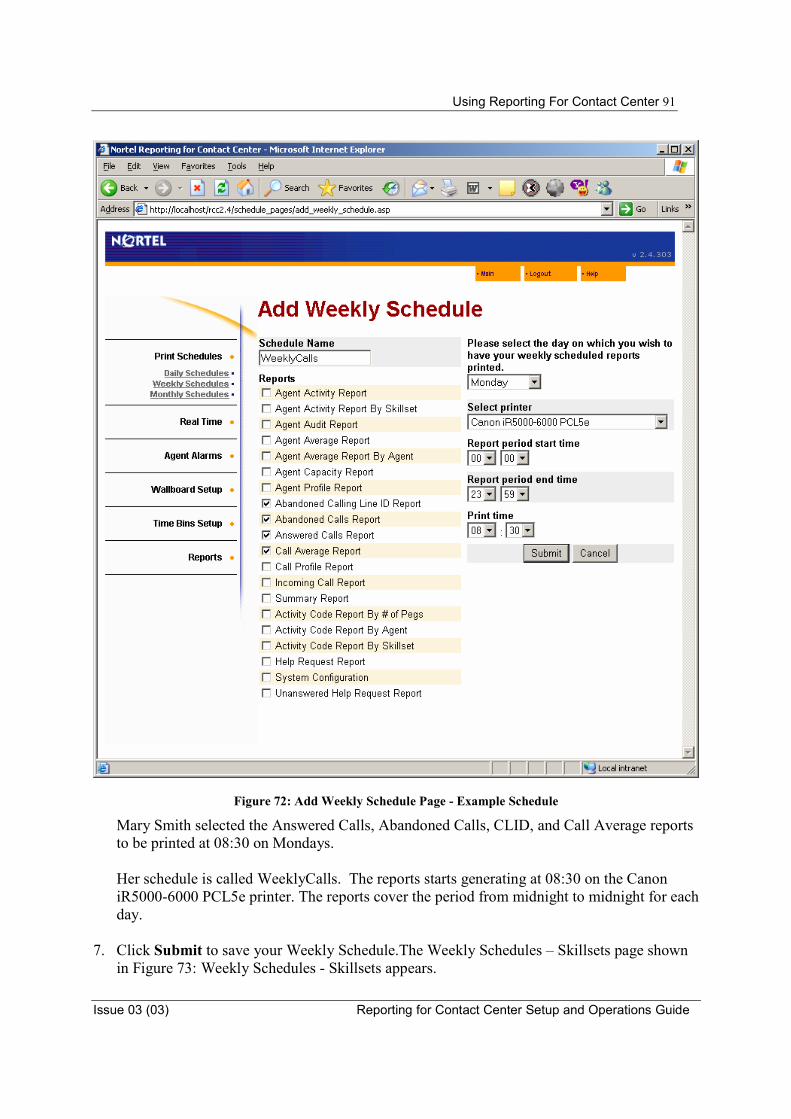
Using Reporting For Contact Center 91
Issue 03 (03) Reporting for Contact Center Setup and Operations Guide
Figure 72: Add Weekly Schedule Page - Example Schedule
Mary Smith selected the Answered Calls, Abandoned Calls, CLID, and Call Average reports to be printed at 08:30 on Mondays. Her schedule is called WeeklyCalls. The reports starts generating at 08:30 on the Canon iR5000-6000 PCL5e printer. The reports cover the period from midnight to midnight for each day.
7. Click Submit to save your Weekly Schedule.The Weekly Schedules – Skillsets page shown
in Figure 73: Weekly Schedules - Skillsets appears.
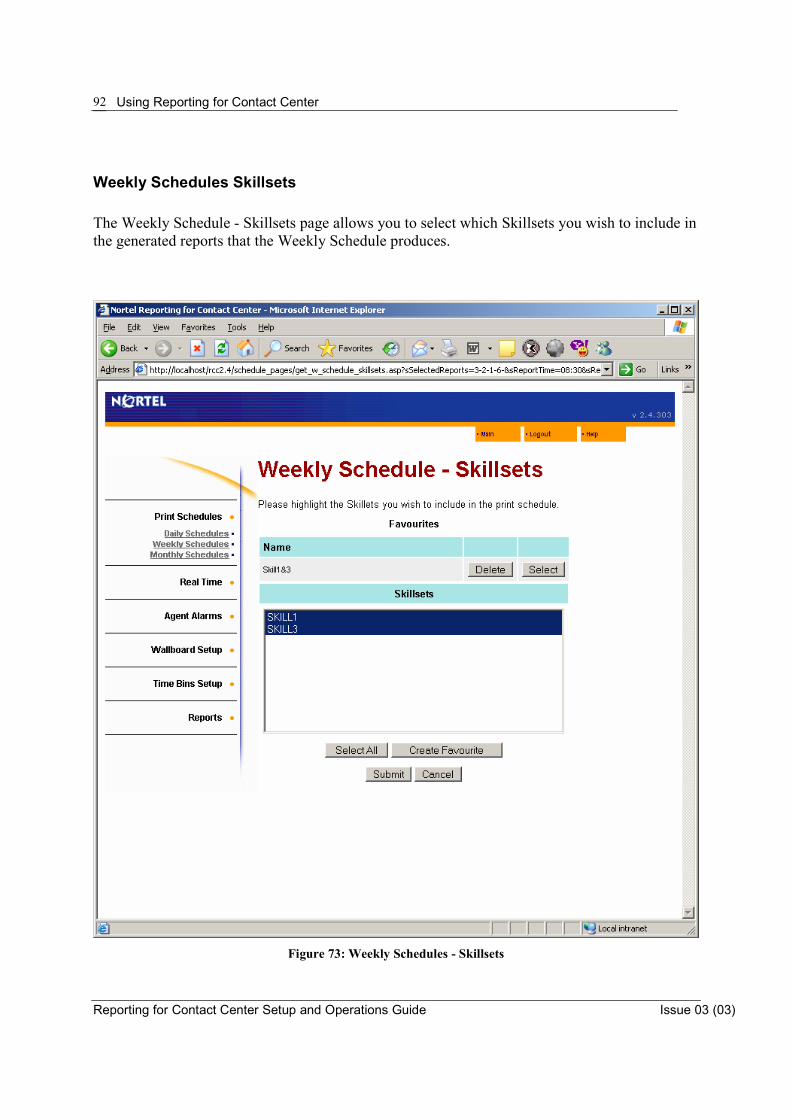
Using Reporting for Contact Center
Reporting for Contact Center Setup and Operations Guide Issue 03 (03)
92
Weekly Schedules Skillsets The Weekly Schedule - Skillsets page allows you to select which Skillsets you wish to include in the generated reports that the Weekly Schedule produces.
Figure 73: Weekly Schedules - Skillsets
Using Reporting For Contact Center 93
Issue 03 (03) Reporting for Contact Center Setup and Operations Guide
• For information about using Skillset selection lists, see page 80. • For information about using Favorites, see page 81. In the example shown in Figure 73: Weekly Schedules - Skillsets, User Mary Smith used her Skill1&3 Favorite to select the Development and Training Skillsets. To save your Weekly Schedule Skillsets selections, click Submit. The Your Weekly Schedules page appears. To leave the Weekly Schedule – Skillsets page without saving any changes, click Cancel. The Your Weekly Schedules page appears.
Saving Your Weekly Schedule To save your Weekly Schedule, click Submit. The Your Weekly Schedules page shown in Figure 74: Your Weekly Schedule Page with a Schedule in the List appears. The page shows the schedule you created. In the example, the schedule name is Weekly Calls.
To leave the Add Weekly Schedule page without saving any changes, click Cancel. You are prompted to confirm that you do not wish to save your changes. After you confirm the deletion, the Your Weekly Schedules page appears. See Figure 69: Your Weekly Schedules Page.
Note: If you include the Agent Audit Report, the Activity Code Report by Skillset, Agent Activity Code Report by Agent, or the Activity Code Report by # of Pegs Reports in your Print Schedule, you are prompted for the Agents and/or the Activity Codes you wish to include with these Reports. These steps are described on Pages 174 (Agent Audit Report), 174 (Activity Code Report by Skillset), 174 (Activity Code Report by Agents) and 174 (Activity Code report by # of Pegs).

Using Reporting for Contact Center
Reporting for Contact Center Setup and Operations Guide Issue 03 (03)
94
Figure 74: Your Weekly Schedule Page with a Schedule in the List
Note that each Schedule can be identified by the Schedule Name that was provided earlier when the Schedule was created.
Deactivate
Click Deactivate to disable the Print Schedule so that the schedule no longer prints when the schedule is due to run. When a schedule is disabled, the Deactivate button changes from
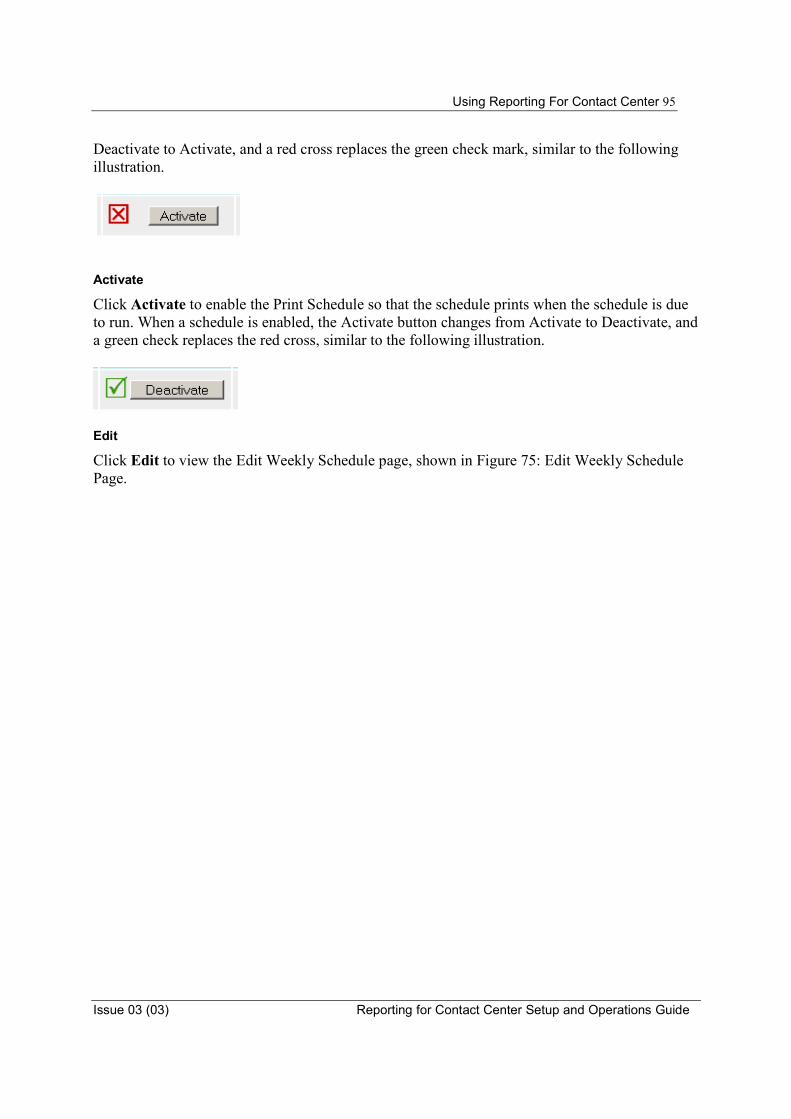
Using Reporting For Contact Center 95
Issue 03 (03) Reporting for Contact Center Setup and Operations Guide
Deactivate to Activate, and a red cross replaces the green check mark, similar to the following illustration.
Activate
Click Activate to enable the Print Schedule so that the schedule prints when the schedule is due to run. When a schedule is enabled, the Activate button changes from Activate to Deactivate, and a green check replaces the red cross, similar to the following illustration.
Edit
Click Edit to view the Edit Weekly Schedule page, shown in Figure 75: Edit Weekly Schedule Page.

Using Reporting for Contact Center
Reporting for Contact Center Setup and Operations Guide Issue 03 (03)
96
Figure 75: Edit Weekly Schedule Page
This page is set up exactly like the Add Weekly Schedule page, except the fields and check boxes are populated with the settings of the Schedule you are editing. In the example, you are editing the Weekly Calls schedule. Make any necessary changes and click Submit. The Your Weekly Schedules page shown in Figure 69: Your Weekly Schedules Page appears.

Using Reporting For Contact Center 97
Issue 03 (03) Reporting for Contact Center Setup and Operations Guide
To leave the Edit Weekly Schedule page without saving any changes, click Cancel. The Your Weekly Schedules page shown in Figure 69: Your Weekly Schedules Page appears.
Delete
Click Delete to remove the Schedule from the system and remove its listing from the Your Weekly Schedules page. You are prompted to confirm the deletion. When you confirm the deletion, the Your Weekly Schedules page shown in Figure 69: Your Weekly Schedules Page appears.
Monthly Schedules On the Print Schedules page shown in Figure 61: Print Schedules Page, select Monthly Schedules to view the Your Monthly Schedules page. See Figure 76: Your Monthly Schedules Page. Initially, the page does not show any schedules. The Add Monthly Schedule page allows you to specify which reports you wish to include in the Schedule and when to print the scheduled reports. You can also specify which period of the day the reports contain. You must specify a name for your Schedule and the printer on which you wish to generate the reports.
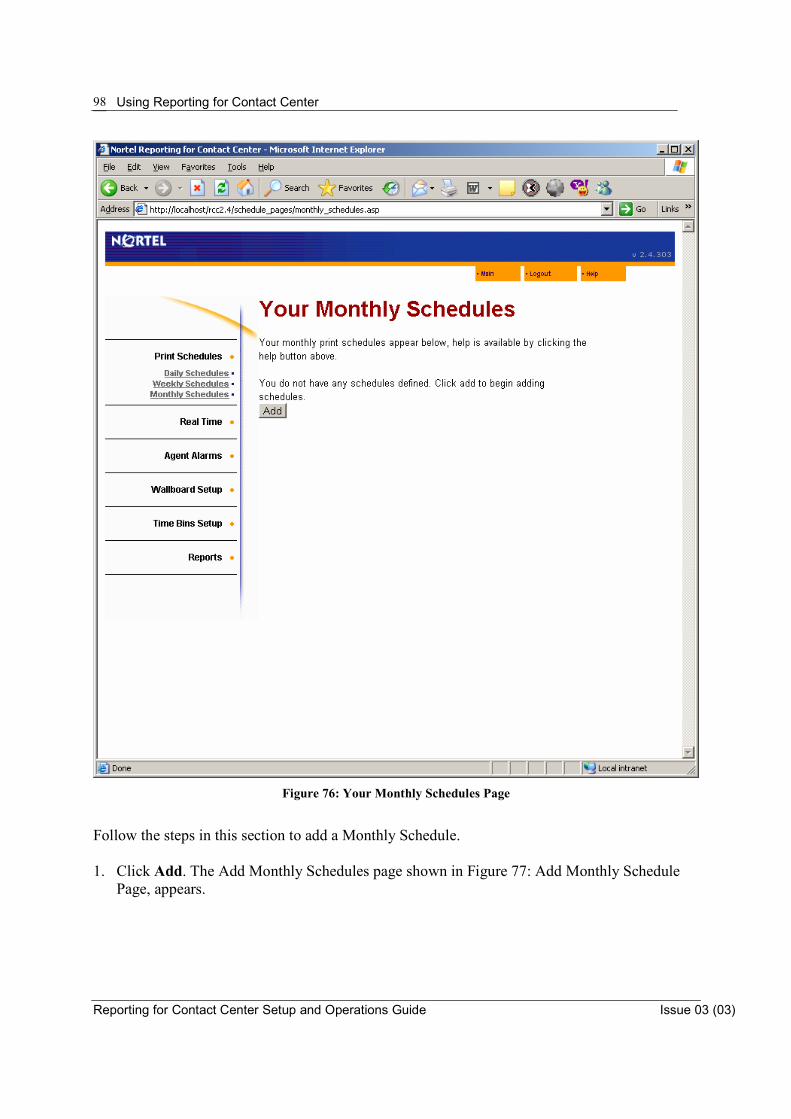
Using Reporting for Contact Center
Reporting for Contact Center Setup and Operations Guide Issue 03 (03)
98
Figure 76: Your Monthly Schedules Page
Follow the steps in this section to add a Monthly Schedule. 1. Click Add. The Add Monthly Schedules page shown in Figure 77: Add Monthly Schedule
Page, appears.
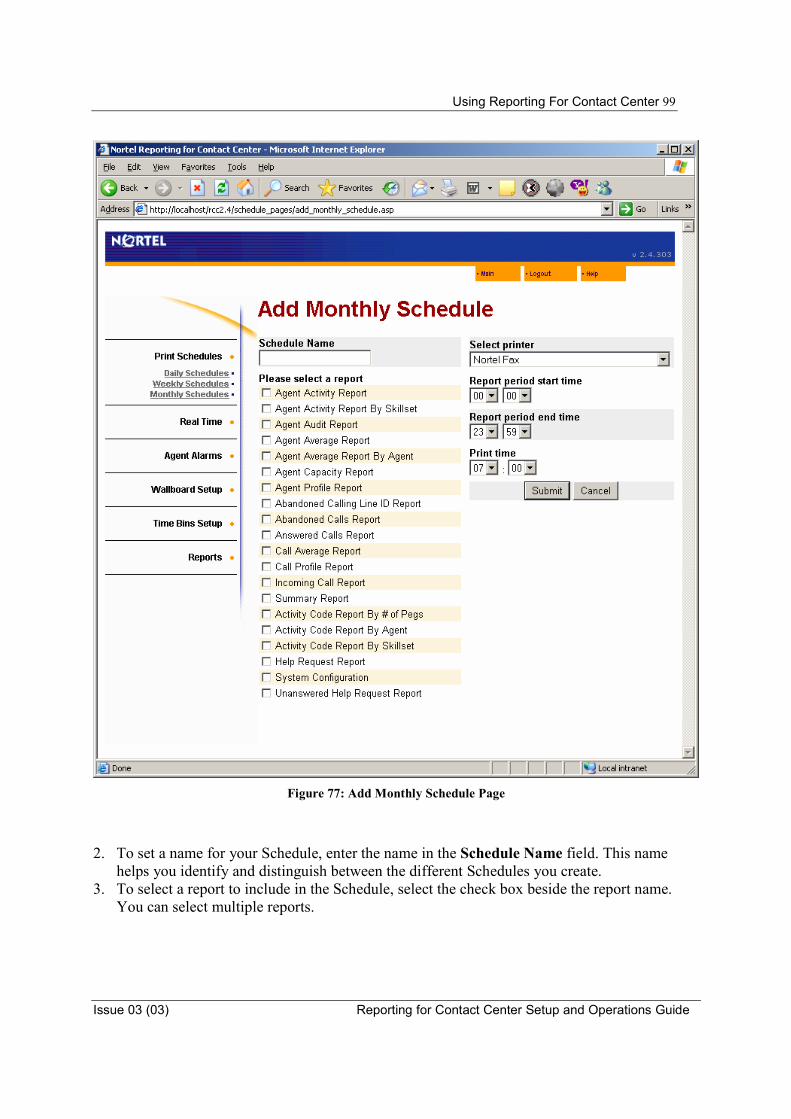
Using Reporting For Contact Center 99
Issue 03 (03) Reporting for Contact Center Setup and Operations Guide
Figure 77: Add Monthly Schedule Page
2. To set a name for your Schedule, enter the name in the Schedule Name field. This name helps you identify and distinguish between the different Schedules you create.
3. To select a report to include in the Schedule, select the check box beside the report name. You can select multiple reports.
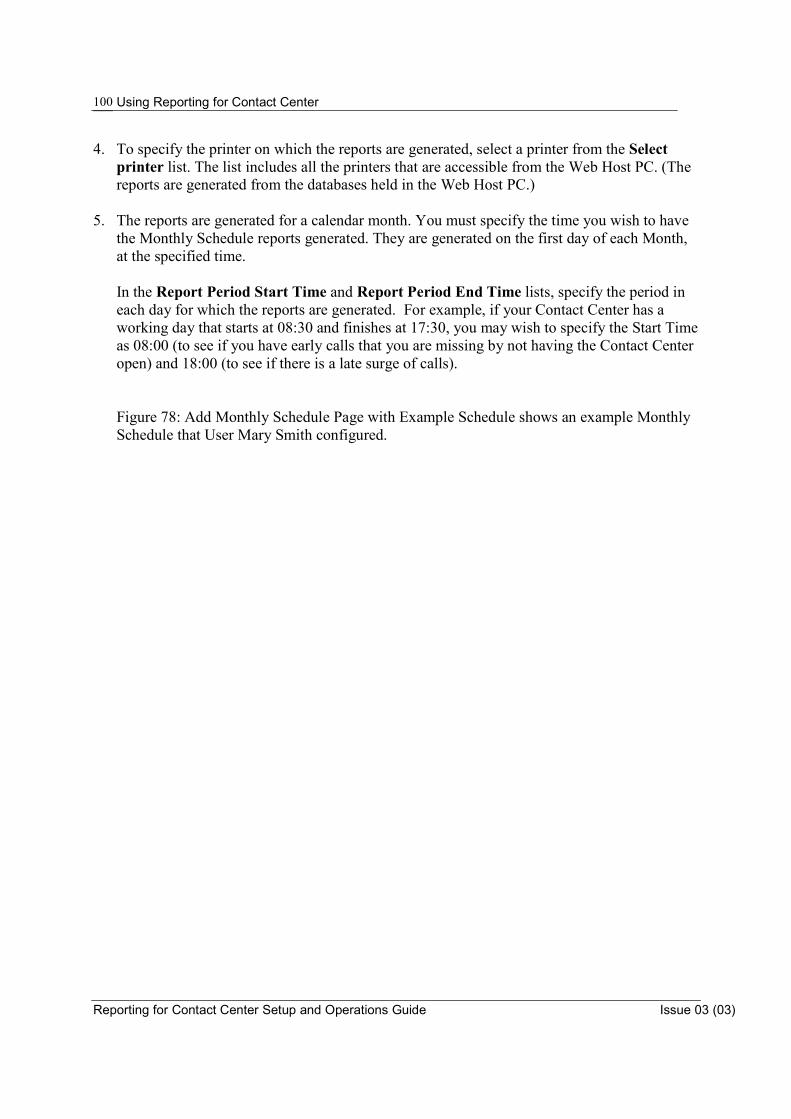
Using Reporting for Contact Center
Reporting for Contact Center Setup and Operations Guide Issue 03 (03)
100
4. To specify the printer on which the reports are generated, select a printer from the Select printer list. The list includes all the printers that are accessible from the Web Host PC. (The reports are generated from the databases held in the Web Host PC.)
5. The reports are generated for a calendar month. You must specify the time you wish to have
the Monthly Schedule reports generated. They are generated on the first day of each Month, at the specified time.
In the Report Period Start Time and Report Period End Time lists, specify the period in each day for which the reports are generated. For example, if your Contact Center has a working day that starts at 08:30 and finishes at 17:30, you may wish to specify the Start Time as 08:00 (to see if you have early calls that you are missing by not having the Contact Center open) and 18:00 (to see if there is a late surge of calls).
Figure 78: Add Monthly Schedule Page with Example Schedule shows an example Monthly Schedule that User Mary Smith configured.
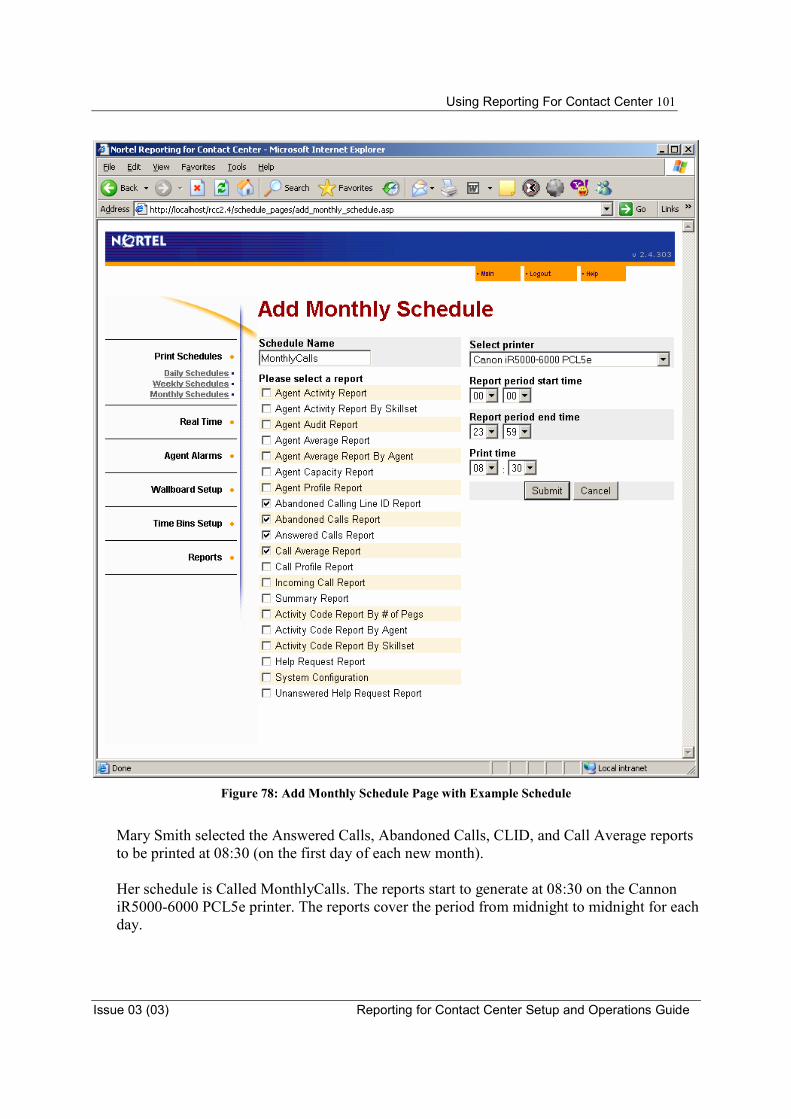
Using Reporting For Contact Center 101
Issue 03 (03) Reporting for Contact Center Setup and Operations Guide
Figure 78: Add Monthly Schedule Page with Example Schedule
Mary Smith selected the Answered Calls, Abandoned Calls, CLID, and Call Average reports to be printed at 08:30 (on the first day of each new month). Her schedule is Called MonthlyCalls. The reports start to generate at 08:30 on the Cannon iR5000-6000 PCL5e printer. The reports cover the period from midnight to midnight for each day.

Using Reporting for Contact Center
Reporting for Contact Center Setup and Operations Guide Issue 03 (03)
102
6. To save your Monthly Schedule click Submit. The Monthly Schedules – Skillsets page, shown in Figure 79: Monthly Schedule - Skillsets Page appears.
To leave the Add Monthly Schedule page without saving any changes, click Cancel. The Your Monthly Schedules page shown in Figure 76: Your Monthly Schedules Page appears.
Monthly Schedule Skillsets The Monthly Schedule - Skillsets page allows you to select which Skillsets you wish to includ in the generated reports that the Monthly Schedule produces.
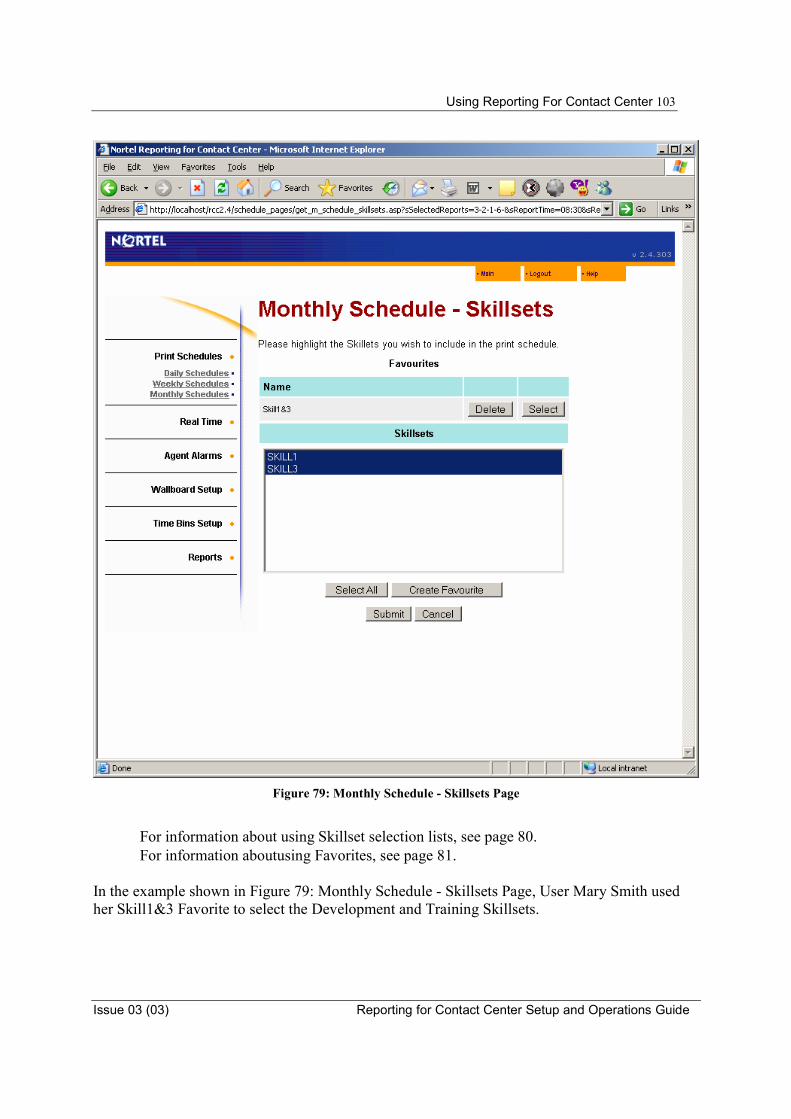
Using Reporting For Contact Center 103
Issue 03 (03) Reporting for Contact Center Setup and Operations Guide
Figure 79: Monthly Schedule - Skillsets Page
• For information about using Skillset selection lists, see page 80. • For information aboutusing Favorites, see page 81.
In the example shown in Figure 79: Monthly Schedule - Skillsets Page, User Mary Smith used her Skill1&3 Favorite to select the Development and Training Skillsets.

Using Reporting for Contact Center
Reporting for Contact Center Setup and Operations Guide Issue 03 (03)
104
Note: If you include the Agent Audit Report, the Activity Code Report by Skillset, Agent Activity Code Report by Agent, or the Activity Code Report by # of Pegs Reports in your Print Schedule, you are prompted for the Agents and/or the Activity Codes you wish to have included within these Reports. These steps are described on Pages 174 (Agent Audit Report), 174 (Activity Code Report by Skillset), 174 (Activity Code Report by Agents) and 174 (Activity Code report by # of Pegs).
To save your Monthly Schedule Skillsets, click Submit. The Your Monthly Schedules page shown in Figure 80: Your Monthly Schedules Page with a Schedule in the List appears. To leave the Monthly Schedule – Skillsets page without saving any changes, click Cancel. The Your Monthly Schedules page appears, as shown in Figure 76: Your Monthly Schedules Page.
Saving your Monthly Schedule To save your Monthly Schedule, click Submit. The Your Monthly Schedules page shown in Figure 80: Your Monthly Schedules Page with a Schedule in the List appears. The page shows the schedule you created. In the example, the schedule name is Monthly Calls.
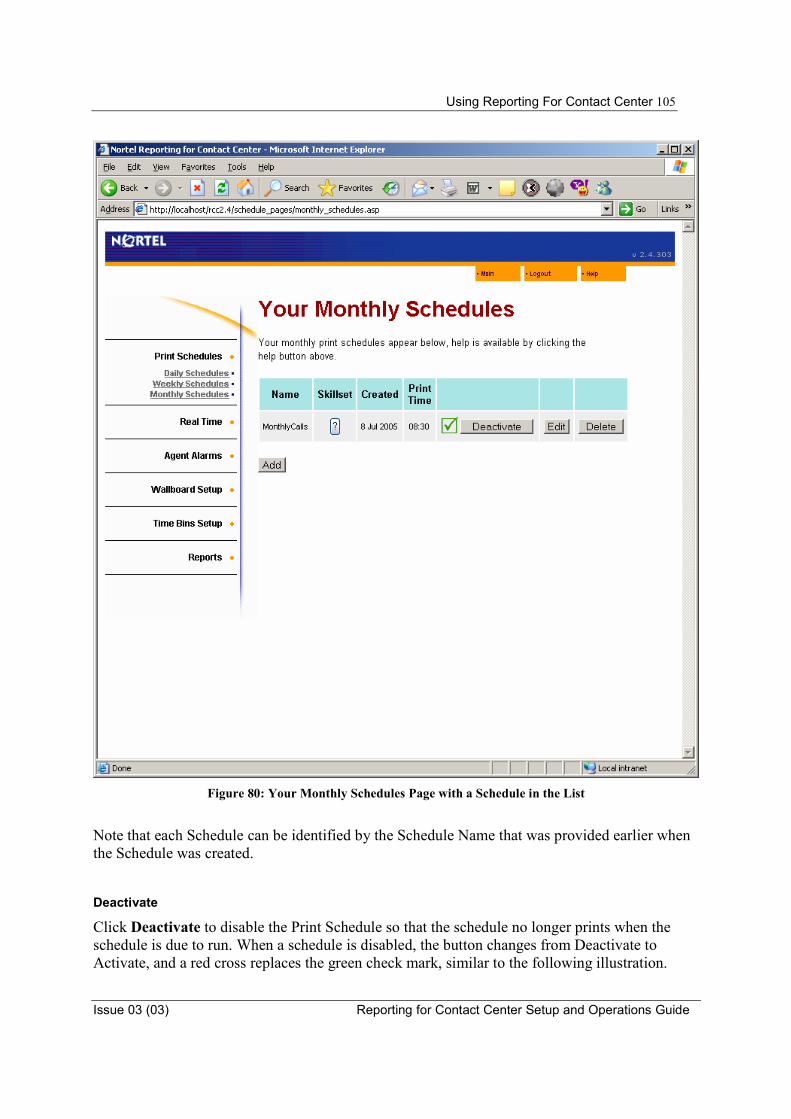
Using Reporting For Contact Center 105
Issue 03 (03) Reporting for Contact Center Setup and Operations Guide
Figure 80: Your Monthly Schedules Page with a Schedule in the List
Note that each Schedule can be identified by the Schedule Name that was provided earlier when the Schedule was created.
Deactivate
Click Deactivate to disable the Print Schedule so that the schedule no longer prints when the schedule is due to run. When a schedule is disabled, the button changes from Deactivate to Activate, and a red cross replaces the green check mark, similar to the following illustration.
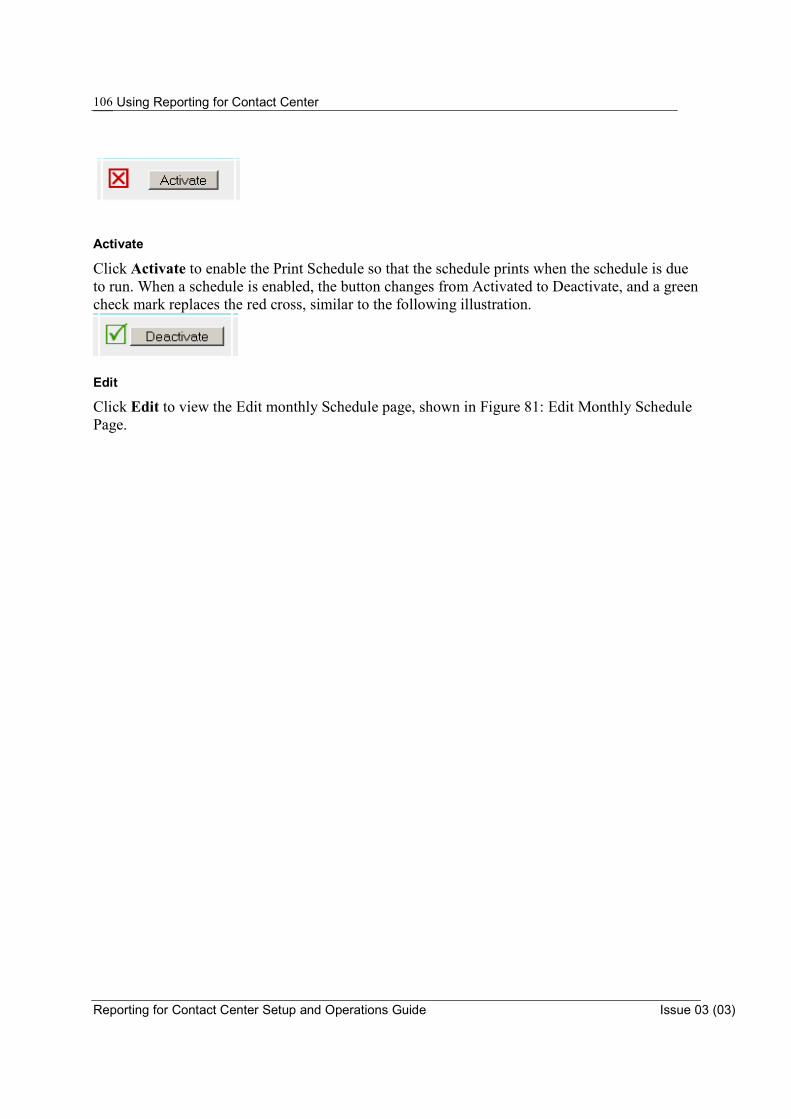
Using Reporting for Contact Center
Reporting for Contact Center Setup and Operations Guide Issue 03 (03)
106
Activate
Click Activate to enable the Print Schedule so that the schedule prints when the schedule is due to run. When a schedule is enabled, the button changes from Activated to Deactivate, and a green check mark replaces the red cross, similar to the following illustration.
Edit
Click Edit to view the Edit monthly Schedule page, shown in Figure 81: Edit Monthly Schedule Page.
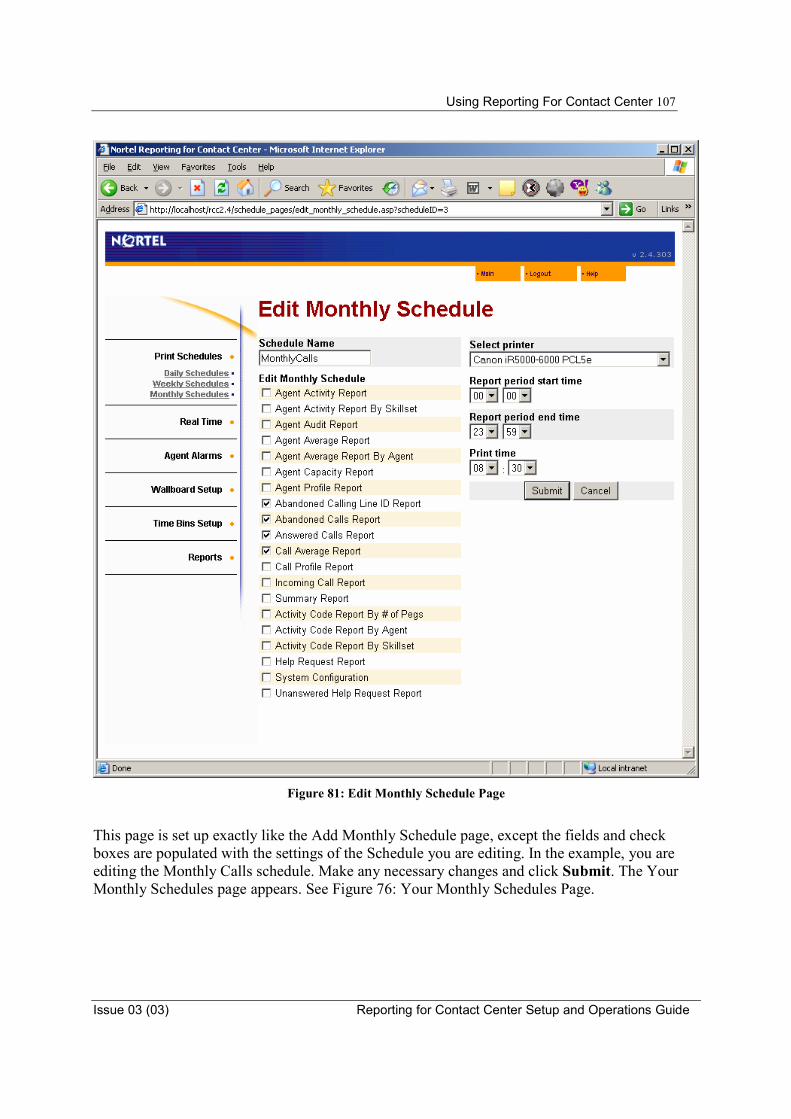
Using Reporting For Contact Center 107
Issue 03 (03) Reporting for Contact Center Setup and Operations Guide
Figure 81: Edit Monthly Schedule Page
This page is set up exactly like the Add Monthly Schedule page, except the fields and check boxes are populated with the settings of the Schedule you are editing. In the example, you are editing the Monthly Calls schedule. Make any necessary changes and click Submit. The Your Monthly Schedules page appears. See Figure 76: Your Monthly Schedules Page.

Using Reporting for Contact Center
Reporting for Contact Center Setup and Operations Guide Issue 03 (03)
108
To leave the Edit Monthly Schedule page without saving any changes, click Cancel. The Your Monthly Schedules page appears. See Figure 76: Your Monthly Schedules Page.
Delete
Click Delete to remove the Schedule from the system and to remove its listing from the Your Monthly Schedules page. You are prompted to confirm the deletion. After you confirm the deletion, the Your Monthly Schedules page appears. See Figure 76: Your Monthly Schedules Page.

Using Reporting For Contact Center 109
Issue 03 (03) Reporting for Contact Center Setup and Operations Guide
Real Time
From the Main User Menu Page shown in Figure 58: User Main Menu Page, select Real Time to view the Real Time page, shown in Figure 82: Real Time Page.
Figure 82: Real Time Page
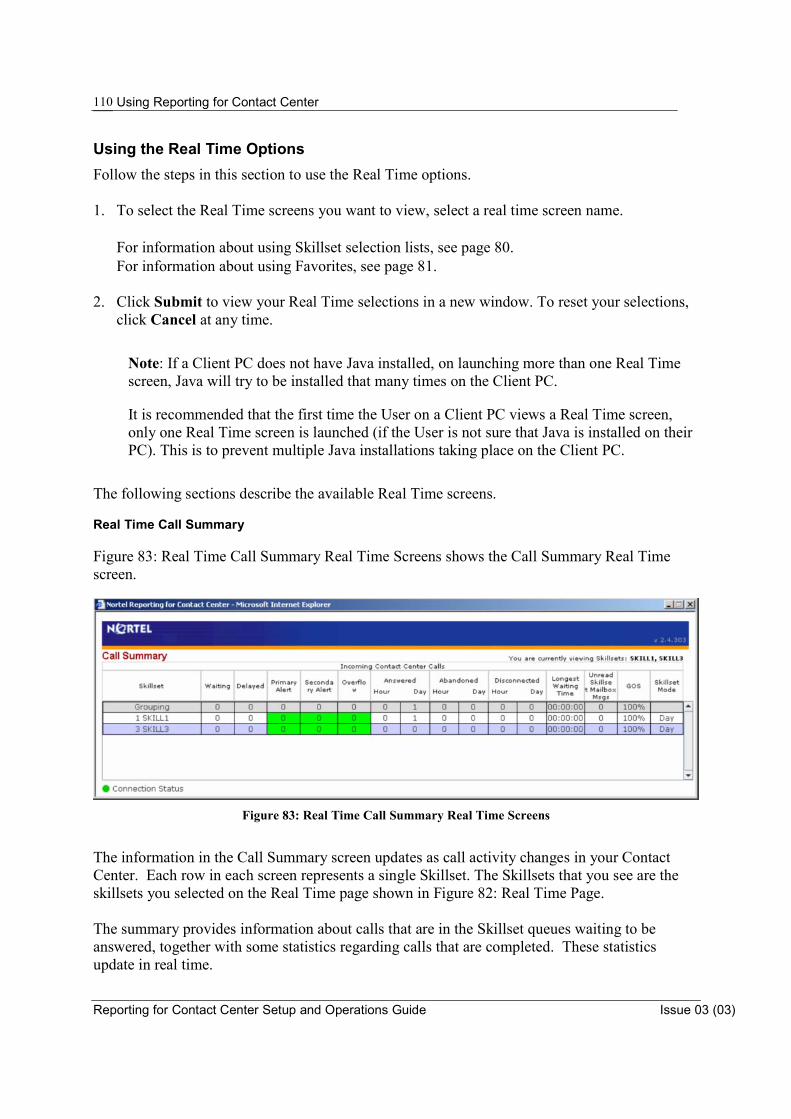
Using Reporting for Contact Center
Reporting for Contact Center Setup and Operations Guide Issue 03 (03)
110
Using the Real Time Options Follow the steps in this section to use the Real Time options. 1. To select the Real Time screens you want to view, select a real time screen name. • For information about using Skillset selection lists, see page 80. • For information about using Favorites, see page 81. 2. Click Submit to view your Real Time selections in a new window. To reset your selections,
click Cancel at any time.
Note: If a Client PC does not have Java installed, on launching more than one Real Time screen, Java will try to be installed that many times on the Client PC.
It is recommended that the first time the User on a Client PC views a Real Time screen, only one Real Time screen is launched (if the User is not sure that Java is installed on their PC). This is to prevent multiple Java installations taking place on the Client PC.
The following sections describe the available Real Time screens. Real Time Call Summary Figure 83: Real Time Call Summary Real Time Screens shows the Call Summary Real Time screen.
Figure 83: Real Time Call Summary Real Time Screens
The information in the Call Summary screen updates as call activity changes in your Contact Center. Each row in each screen represents a single Skillset. The Skillsets that you see are the skillsets you selected on the Real Time page shown in Figure 82: Real Time Page. The summary provides information about calls that are in the Skillset queues waiting to be answered, together with some statistics regarding calls that are completed. These statistics update in real time.

Using Reporting For Contact Center 111
Issue 03 (03) Reporting for Contact Center Setup and Operations Guide
The following sections describe the available information for each of the selected Skillsets.
Waiting
Indicates the number of calls that are currently waiting in the Skillset queues to be answered.
Delayed
Indicates the number of calls that are currently in a delayed state, that is, have reached the contact center but have not been forwarded to a skillset.
Primary Alert
Indicates the number of currently waiting Calls that have waited in excess of the Contact Center Primary Alert. (Note that this is mutually exclusive with the Secondary Alert). If any calls have waited in excess of the Primary Alert, the background to this cell changes to yellow.
Secondary Alert
Indicates the number of currently waiting Calls that have waited in excess of the Contact Center Secondary Alert. (Note that this is mutually exclusive with the Primary Alert). If any calls have waited in excess of the Secondary Alert, the background to this cell changes to red.
Overflow
Indicates the number of currently waiting Calls that have waited in excess of the Contact Center Overflow Threshold. Note that this does not mean the call has overflowed, but the Contact Center is actively looking through the overflow rules that have been defined for this Skillset to find a means of answering the call. That is, this call is liable to overflow shortly. If any calls have waited in excess of the Overflow Threshold, the background to this cell changes to red. Note that if a call had passed the overflow threshold in one Skillset and was then moved to another Skillset due to the call routing that wasconfigured, the call appears in the new Skillset; the cell background will be red because this call has already passed the overflow threshold of its original Skillset.
Abandoned Hour / Day
Indicates the number of calls that were abandoned in the Skillsets, in the current hour and in the current day.
Answered Hour / Day
Indicates the number of calls that were answered by the Agents in the Skillsets, in the current hour and in the current day.
Disconnected Hour / Day
Indicates the number of calls that were disconnected by the call center in the current hour and in the current day.
Longest Waiting Time

Using Reporting for Contact Center
Reporting for Contact Center Setup and Operations Guide Issue 03 (03)
112
Indicates the waiting time of the call that has waited the longest, of the list of currently waiting calls.
Unread Skillset Messages
Indicates the number of voice mail messages in the Skillset Mailbox which have not be listened to. If any messages have not been listened to, the cell background is red.
GOS
Indicates the grade of service currently offered to incoming callers.
Skillset Mode
Indicates whether the mode of operation of the Skillset.
Grade of Service
The first row in the Call Summary Real Time screen is labeled Grouping. This row shows values generated from the data presented for each of the included skillsets. Note that the values might not include all the skillsets in the System because the User viewing the Call Summary screen might not be assigned all the skillsets, or they may be viewing only a selection of their assigned skillsets.
The Grade of Service figure in the Grouping row is a means average of the GOS values of the skillset rows displayed below the Grouping row.
For example, three skillsets are in the view, and they had the following individual skillset values:
Skill 1 GOS = 0%
Skill 2 GOS = 100%
Skill 3 GOS = 100%
The Grouping row shows a GOS of 66%, calculated as follows:
GOS = (0 + 100 + 100) / 3 = 66%
This value shows the User what their average GOS is over all the selected skillsets. This figure is different from the GOS for the System (which includes all the skillsets). The System GOS is not calculated as an average for the skillsets; it is calculated as a single figure GOS for the System.
This is the calculation that is used in the System wallboard parameters SH and SD and in the Call Detail real time. In the Call Detail real time screens and in the System SH and SD wallboard fields, the GOS is calculated using the following formula. (This formula is also described in the Glossary.)
Presented = Total Number of Direct Call transactions Presented to the Skillset(s)
Abandoned = Calls which Abandoned
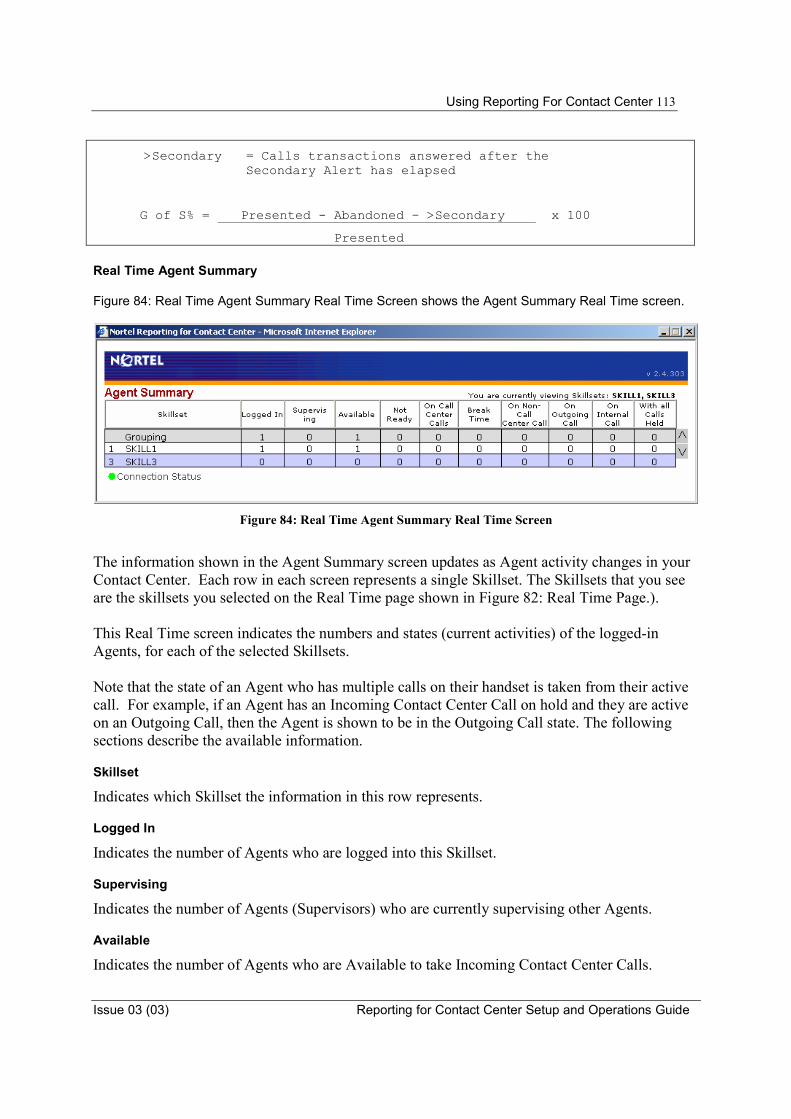
Using Reporting For Contact Center 113
Issue 03 (03) Reporting for Contact Center Setup and Operations Guide
>Secondary = Calls transactions answered after the Secondary Alert has elapsed
G of S% = Presented - Abandoned – >Secondary x 100 Presented
Real Time Agent Summary Figure 84: Real Time Agent Summary Real Time Screen shows the Agent Summary Real Time screen.
Figure 84: Real Time Agent Summary Real Time Screen
The information shown in the Agent Summary screen updates as Agent activity changes in your Contact Center. Each row in each screen represents a single Skillset. The Skillsets that you see are the skillsets you selected on the Real Time page shown in Figure 82: Real Time Page.). This Real Time screen indicates the numbers and states (current activities) of the logged-in Agents, for each of the selected Skillsets. Note that the state of an Agent who has multiple calls on their handset is taken from their active call. For example, if an Agent has an Incoming Contact Center Call on hold and they are active on an Outgoing Call, then the Agent is shown to be in the Outgoing Call state. The following sections describe the available information.
Skillset
Indicates which Skillset the information in this row represents.
Logged In
Indicates the number of Agents who are logged into this Skillset.
Supervising
Indicates the number of Agents (Supervisors) who are currently supervising other Agents.
Available
Indicates the number of Agents who are Available to take Incoming Contact Center Calls.
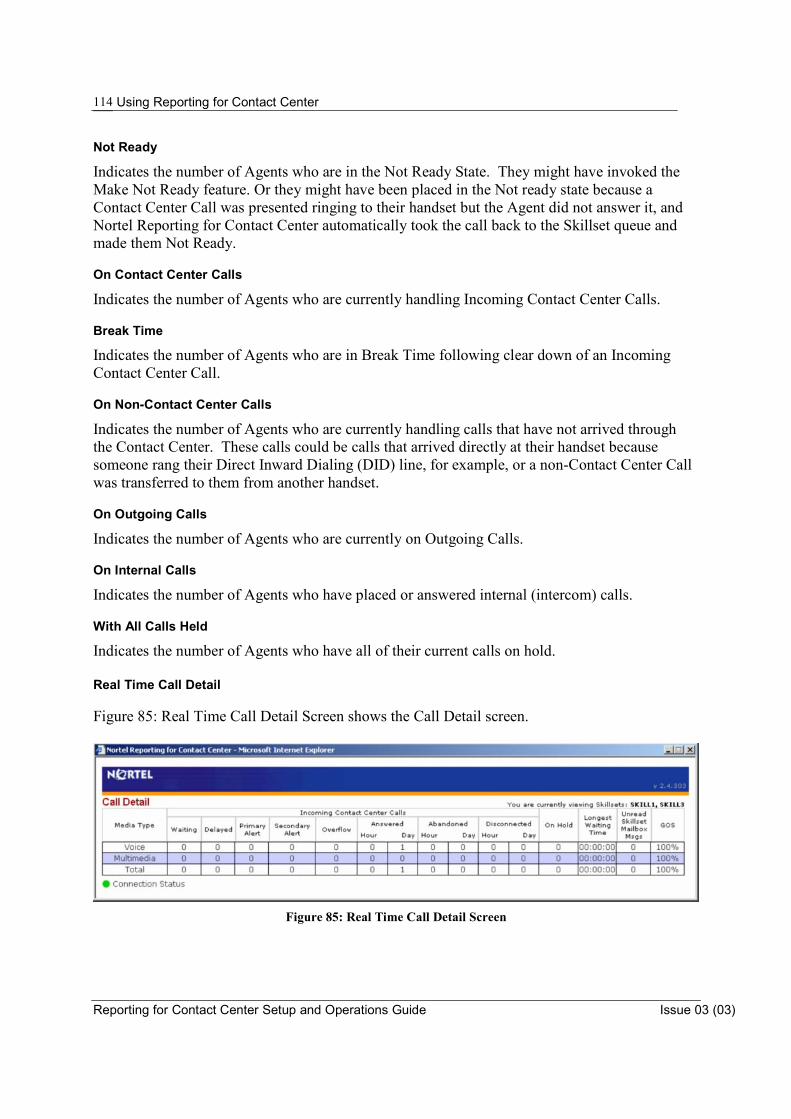
Using Reporting for Contact Center
Reporting for Contact Center Setup and Operations Guide Issue 03 (03)
114
Not Ready
Indicates the number of Agents who are in the Not Ready State. They might have invoked the Make Not Ready feature. Or they might have been placed in the Not ready state because a Contact Center Call was presented ringing to their handset but the Agent did not answer it, and Nortel Reporting for Contact Center automatically took the call back to the Skillset queue and made them Not Ready.
On Contact Center Calls
Indicates the number of Agents who are currently handling Incoming Contact Center Calls.
Break Time
Indicates the number of Agents who are in Break Time following clear down of an Incoming Contact Center Call.
On Non-Contact Center Calls
Indicates the number of Agents who are currently handling calls that have not arrived through the Contact Center. These calls could be calls that arrived directly at their handset because someone rang their Direct Inward Dialing (DID) line, for example, or a non-Contact Center Call was transferred to them from another handset.
On Outgoing Calls
Indicates the number of Agents who are currently on Outgoing Calls.
On Internal Calls
Indicates the number of Agents who have placed or answered internal (intercom) calls.
With All Calls Held
Indicates the number of Agents who have all of their current calls on hold. Real Time Call Detail Figure 85: Real Time Call Detail Screen shows the Call Detail screen.
Figure 85: Real Time Call Detail Screen
Using Reporting For Contact Center 115
Issue 03 (03) Reporting for Contact Center Setup and Operations Guide
The Call Detail Real Time screen presents a detailed display of the status of waiting calls together with statistics relating to completed calls. These statistics update in real time.
The screen displays a separate line of information for Multimedia Calls and for Voice (PSTN) Calls and a total for both types of calls. The following sections describe the available information.
Media Type
Indicates whether the line of statistics relates to Multimedia Call or Voice (PSTN) Calls or a total for both types of call.
Waiting
Indicates the number of calls that are currently waiting in the Skillset queues to be answered.
Delayed
Indicates the number of calls that are currently in a delayed state, that is, have reached the contact center but have not been forwarded to a skillset.
Primary Alert
Indicates the number of currently waiting Calls that have waited in excess of the Contact Center Primary Alert. (Note that this is mutually exclusive with the Secondary Alert). If any calls have waited in excess of the Primary Alert, the background to this cell changes to yellow.
Secondary Alert
Indicates the number of currently waiting Calls that have waited in excess of the Contact Center Secondary Alert. (Note that this is mutually exclusive with the Primary Alert.) If any calls have waited in excess of the Secondary Alert, the background to this cell changes to red.
Overflow
Indicates the number of currently waiting Calls that have waited in excess of the Contact Center Overflow Threshold. Note that this does not mean the call has overflowed, but the Contact Center is actively looking through the overflow rules that were defined for this Skillset to find a means of answering the call. That is, this call is likely to overflow shortly. If any calls have waited in excess of the Overflow Threshold, the background to this cell changes to red. Note that if a call had passed the overflow threshold in one Skillset and was then moved to another Skillset due to the call routing that wasconfigured, the call appears in the new Skillset and the cell background isred because this call has already passed the overflow threshold of the original Skillset.
Abandoned Hour/Day
Indicates the number of calls that wereabandoned in the Skillsets, in the current hour and in the current day.
Answered Hour/Day

Using Reporting for Contact Center
Reporting for Contact Center Setup and Operations Guide Issue 03 (03)
116
Indicates the number of calls that were answered by the Agents in the Skillsets, in the current hour and in the current day.
Disconnected Hour/Day
Indicates the number of calls that were disconnected by the call center in the current hour and in the current day.
On Hold
Indicates how many calls are placed on hold.
Longest Waiting Time
Indicates the waiting time of the call that has waited the longest, of the list of currently waiting calls.
Unread Skillset Mailbox Msgs
Indicates the number of voice mail messages in the Skillset Mailbox that have not be listened to. If any messages have not been listened to, the cell background is red.
GOS
Indicates the Grade of Service being offered to incoming callers. Real Time Agent Detail Figure 86: Agent Detail Real Time shows a detailed display of the individual status of the logged-in Agents, together with statistics relating to calls answered and made by the Agents. These statistics update in real time.

Using Reporting For Contact Center 117
Issue 03 (03) Reporting for Contact Center Setup and Operations Guide
Figure 86: Agent Detail Real Time
Each line of the Agent Detail Real Time screen represents a single Agent. The following sections describe the available information.
ID
Indicates the Contact Center ID of the Agent.
Agent
Indicates the name of the Agent and indicates the state the Agent is in by coloring the cell background. The state of the Agent depends on their current activity. Further detail on the Agent state can be seen in the Status column, as follows:
� Incoming
An Agent is in the Incoming State when they have answered an Incoming Contact Center Call. The information in the Status column indicates the type of call. The Incoming State is represented by light green.
� Break Time
Break Time is the term used to describe the period of time allocated to each Agent to allow post-call completion work, also called wrap-up. Break Time is represented by dark green.
� Outgoing When an Agent makes an Outgoing Call, the Agent is in the Outgoing State. The Outgoing State is represented by yellow.

Using Reporting for Contact Center
Reporting for Contact Center Setup and Operations Guide Issue 03 (03)
118
� Supervisory Monitoring
When an Agent who is created in the Contact Center as a Supervisor undertakes a monitoring session with another Agent, they are represented in the Real Time screen using gold. The Status column displays Monitoring.
� Non-Call Contact Center Call
If the Agent answers a non-Contact Center Call, they are represented using grey.
� Available
Blue represents Available Agents. These are Agents who are available to answer Incoming Contact Center Calls.
� All Calls Held
Magenta indicates an Agent who has placed all of their calls on hold.
� Not Ready
Dark grey represents Agents who are in the Not Ready state.
Logged In SS
Indicates the Skillsets the Agent is currently logged in to.
Status
This column provides additional detail about the Agent state, as follows:
� A phone icon with the wording Multimedia represents a Multimedia voice call. � A phone icon with the wording Voice represents a regular voice call.
� A phone icon with the wording Outgoing represents an outgoing call.
� A phone icon with the wording Intercom represents an internal call.
� The word Available represents an Available Agent.
� The wording BreakTime represents an Agent in Break Time.
� The wording Calls Held represents an Agent with all of their current calls on hold.
� The wording Not Ready represents an Agent who is in the Not Ready state.
� The word Monitoring represents an Agent who is a Supervisor engaged in a Supervisory Monitoring session with another Agent, or in a Help Session.
� A smiley icon represents a Multimedia Chat session.
� A globe icon represents a Multimedia Follow-me browsing session.
� A number accompanies the status description in the form of SSx. This indicates the Skillset associated with the call. For example, SS2 indicates Skillset 2.

Using Reporting For Contact Center 119
Issue 03 (03) Reporting for Contact Center Setup and Operations Guide
Duration
Displays a timer that represents the time the Agent has spent in the current state. If the Agent has been in the current state for a period in excess of the associated Agent Alarm, the background of this cell turns red. See Agent Alarms.
Answered Call Center Calls Hour / Day
Indicates the number of Contact Center Calls that this Agent has answered in the current hour and in the current day.
Outgoing Calls Hour / Day
Indicates the number of Outgoing Calls that this Agent has made in the current hour and in the current day.
Answered Non-Contact Center Calls Hour / Day
Indicates the number of Non-Contact Center Calls that this Agent has answered in the current hour and in the current day.
Check Agent Alarms
Click Check Agent Alarms to update any Agent Alarms that had been set through Reporting for Contact Center after the Agent Detail Real Time screen had been opened.
Agent Alarms
The Agent Alarms option allows you to set Real Time thresholds that operate with reference to the Contact Center activity of the Agents. For example, you can specify average durations of Incoming or Outgoing calls, and Nortel Reporting for Contact Center will highlight Agents who have been on a call longer than the specified threshold. From the Main User Menu Page shown in Figure 58: User Main Menu Page, select Agent Alarms to view the Agent Alarms page shown in Figure 87: Agent Alarm Menu Page.
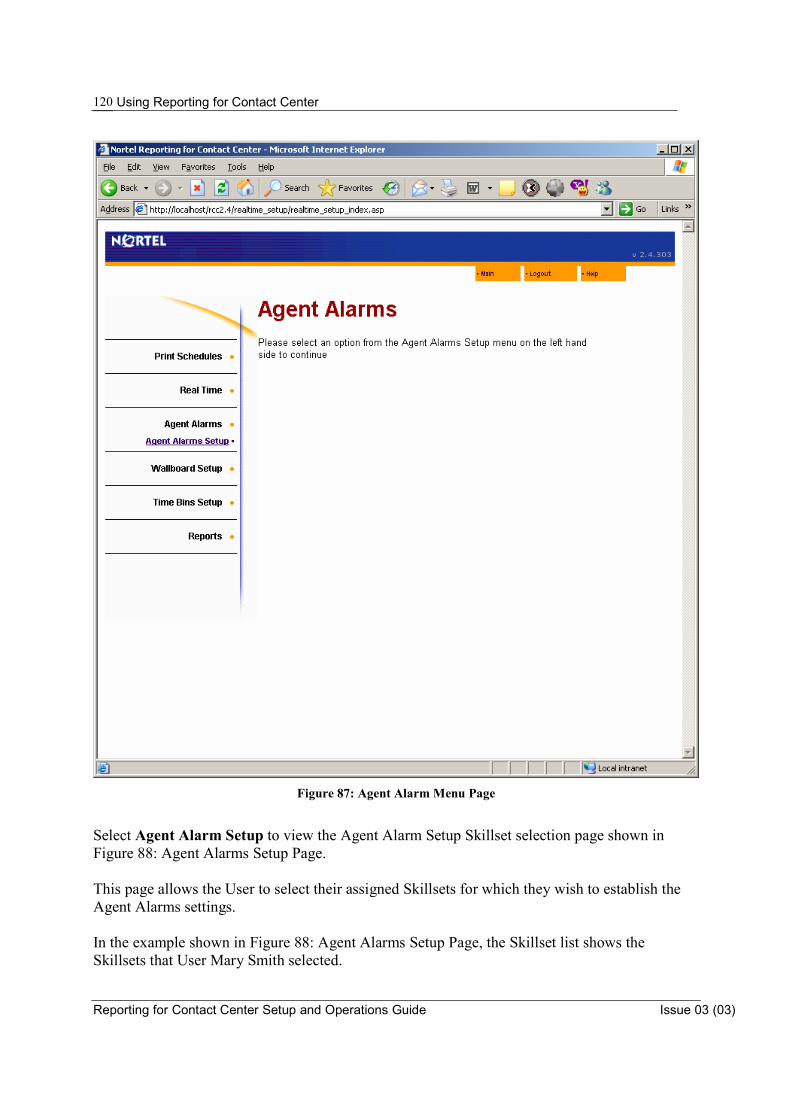
Using Reporting for Contact Center
Reporting for Contact Center Setup and Operations Guide Issue 03 (03)
120
Figure 87: Agent Alarm Menu Page
Select Agent Alarm Setup to view the Agent Alarm Setup Skillset selection page shown in Figure 88: Agent Alarms Setup Page. This page allows the User to select their assigned Skillsets for which they wish to establish the Agent Alarms settings. In the example shown in Figure 88: Agent Alarms Setup Page, the Skillset list shows the Skillsets that User Mary Smith selected.
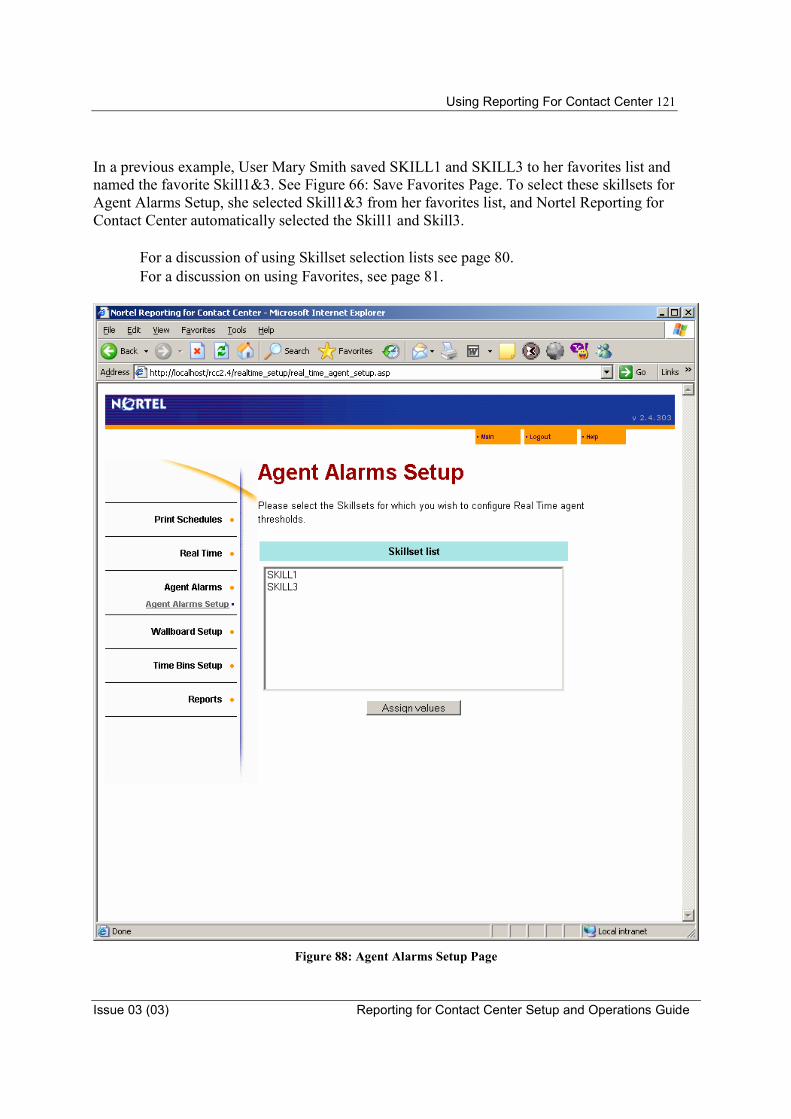
Using Reporting For Contact Center 121
Issue 03 (03) Reporting for Contact Center Setup and Operations Guide
In a previous example, User Mary Smith saved SKILL1 and SKILL3 to her favorites list and named the favorite Skill1&3. See Figure 66: Save Favorites Page. To select these skillsets for Agent Alarms Setup, she selected Skill1&3 from her favorites list, and Nortel Reporting for Contact Center automatically selected the Skill1 and Skill3.
• For a discussion of using Skillset selection lists see page 80. • For a discussion on using Favorites, see page 81.
Figure 88: Agent Alarms Setup Page
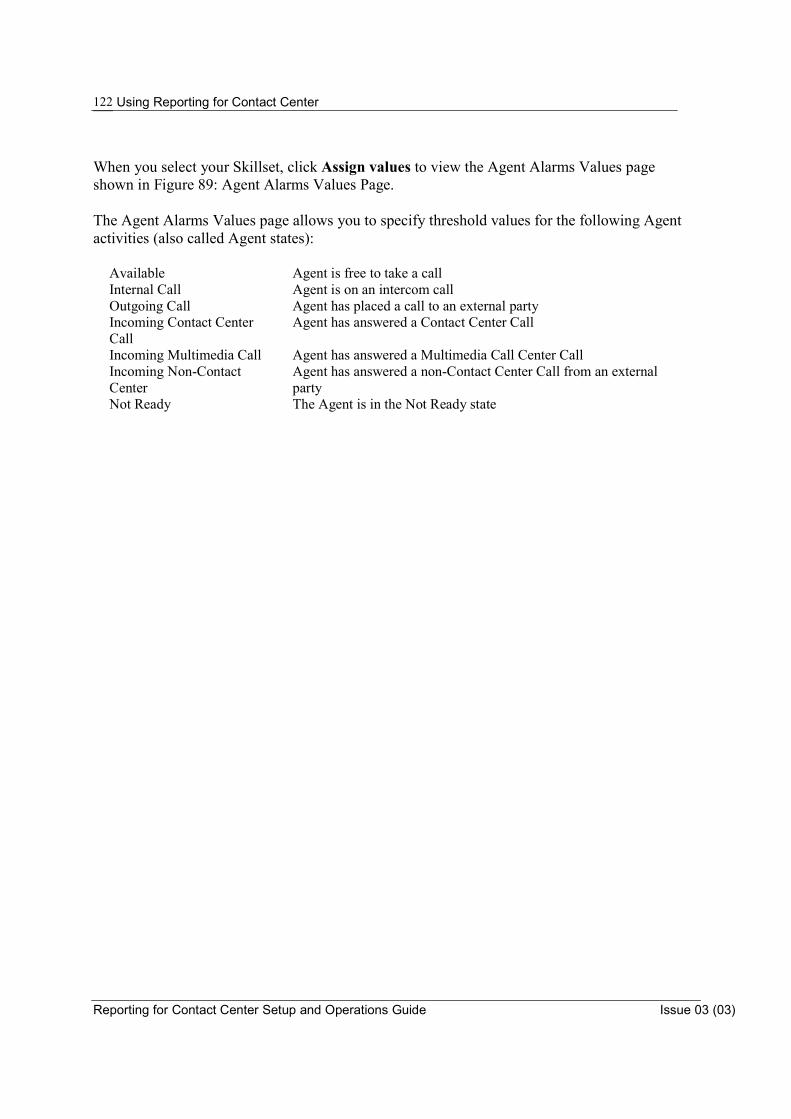
Using Reporting for Contact Center
Reporting for Contact Center Setup and Operations Guide Issue 03 (03)
122
When you select your Skillset, click Assign values to view the Agent Alarms Values page shown in Figure 89: Agent Alarms Values Page. The Agent Alarms Values page allows you to specify threshold values for the following Agent activities (also called Agent states):
Available Agent is free to take a call Internal Call Agent is on an intercom call Outgoing Call Agent has placed a call to an external party Incoming Contact Center Call
Agent has answered a Contact Center Call
Incoming Multimedia Call Agent has answered a Multimedia Call Center Call Incoming Non-Contact Center
Agent has answered a non-Contact Center Call from an external party
Not Ready The Agent is in the Not Ready state
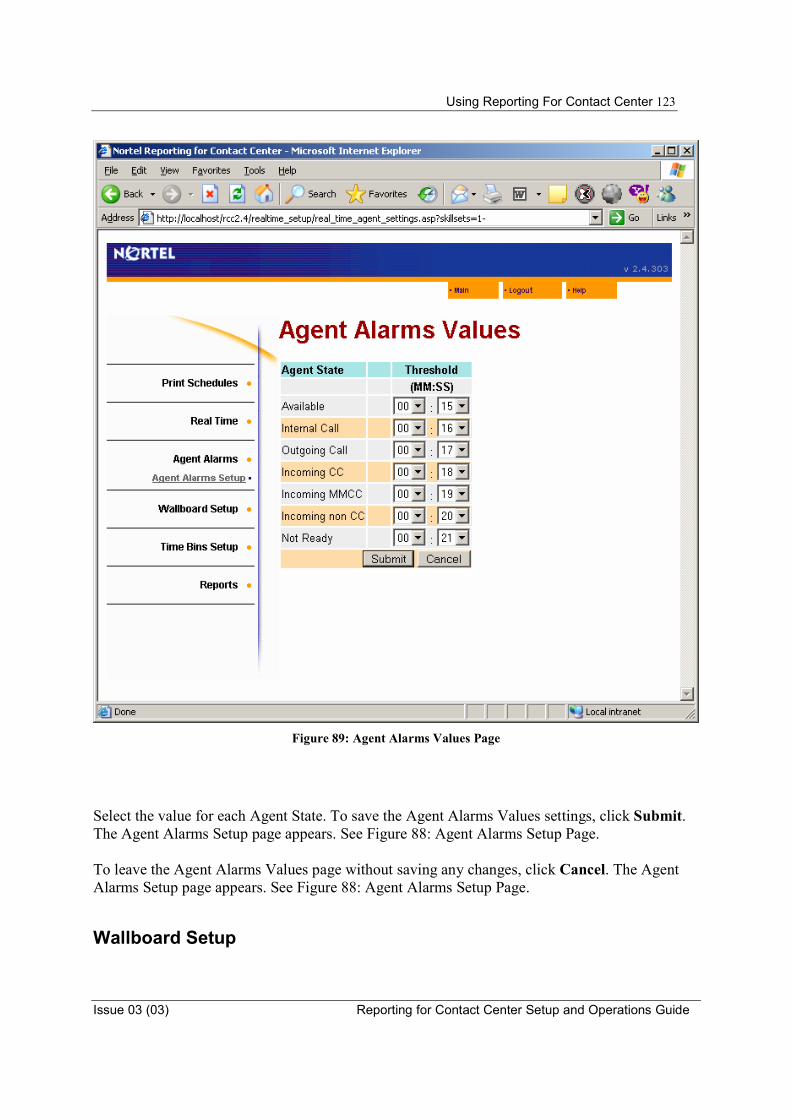
Using Reporting For Contact Center 123
Issue 03 (03) Reporting for Contact Center Setup and Operations Guide
Figure 89: Agent Alarms Values Page
Select the value for each Agent State. To save the Agent Alarms Values settings, click Submit.The Agent Alarms Setup page appears. See Figure 88: Agent Alarms Setup Page. To leave the Agent Alarms Values page without saving any changes, click Cancel. The Agent Alarms Setup page appears. See Figure 88: Agent Alarms Setup Page.
Wallboard Setup
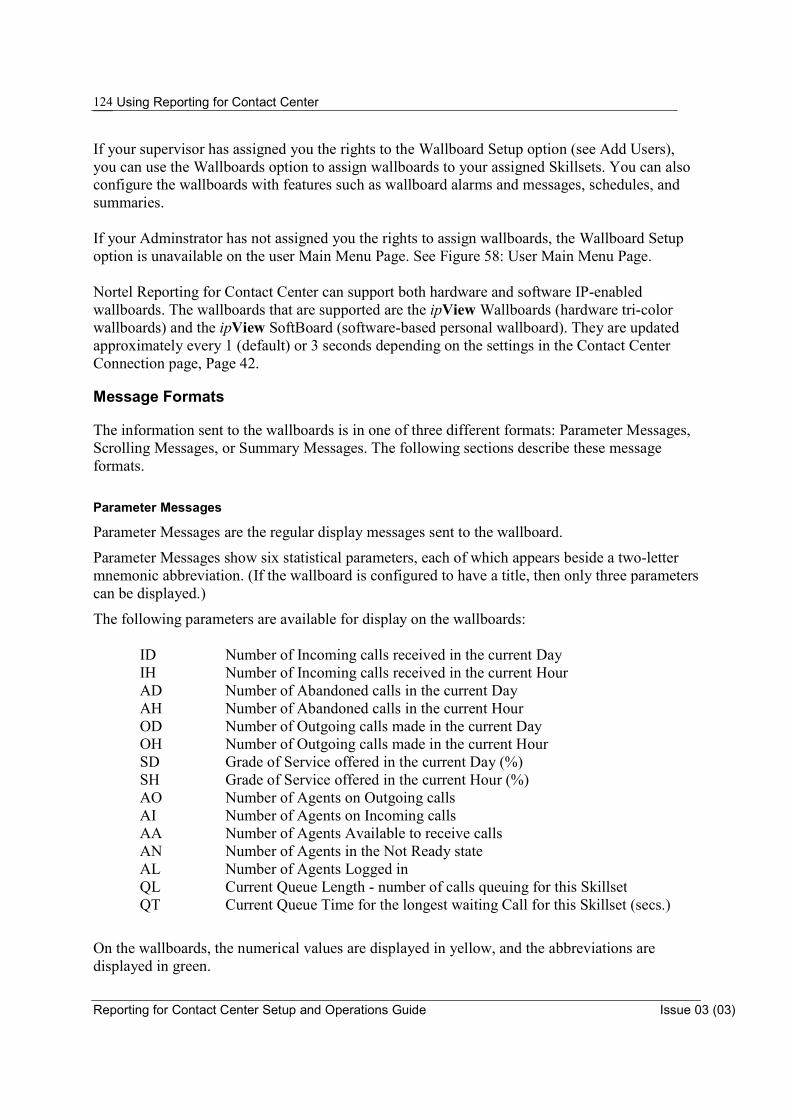
Using Reporting for Contact Center
Reporting for Contact Center Setup and Operations Guide Issue 03 (03)
124
If your supervisor has assigned you the rights to the Wallboard Setup option (see Add Users), you can use the Wallboards option to assign wallboards to your assigned Skillsets. You can also configure the wallboards with features such as wallboard alarms and messages, schedules, and summaries. If your Adminstrator has not assigned you the rights to assign wallboards, the Wallboard Setup option is unavailable on the user Main Menu Page. See Figure 58: User Main Menu Page. Nortel Reporting for Contact Center can support both hardware and software IP-enabled wallboards. The wallboards that are supported are the ipView Wallboards (hardware tri-color wallboards) and the ipView SoftBoard (software-based personal wallboard). They are updated approximately every 1 (default) or 3 seconds depending on the settings in the Contact Center Connection page, Page 42.
Message Formats
The information sent to the wallboards is in one of three different formats: Parameter Messages, Scrolling Messages, or Summary Messages. The following sections describe these message formats.
Parameter Messages
Parameter Messages are the regular display messages sent to the wallboard.
Parameter Messages show six statistical parameters, each of which appears beside a two-letter mnemonic abbreviation. (If the wallboard is configured to have a title, then only three parameters can be displayed.)
The following parameters are available for display on the wallboards:
ID Number of Incoming calls received in the current Day IH Number of Incoming calls received in the current Hour AD Number of Abandoned calls in the current Day AH Number of Abandoned calls in the current Hour OD Number of Outgoing calls made in the current Day OH Number of Outgoing calls made in the current Hour SD Grade of Service offered in the current Day (%) SH Grade of Service offered in the current Hour (%) AO Number of Agents on Outgoing calls AI Number of Agents on Incoming calls AA Number of Agents Available to receive calls AN Number of Agents in the Not Ready state AL Number of Agents Logged in QL Current Queue Length - number of calls queuing for this Skillset QT Current Queue Time for the longest waiting Call for this Skillset (secs.)
On the wallboards, the numerical values are displayed in yellow, and the abbreviations are displayed in green.
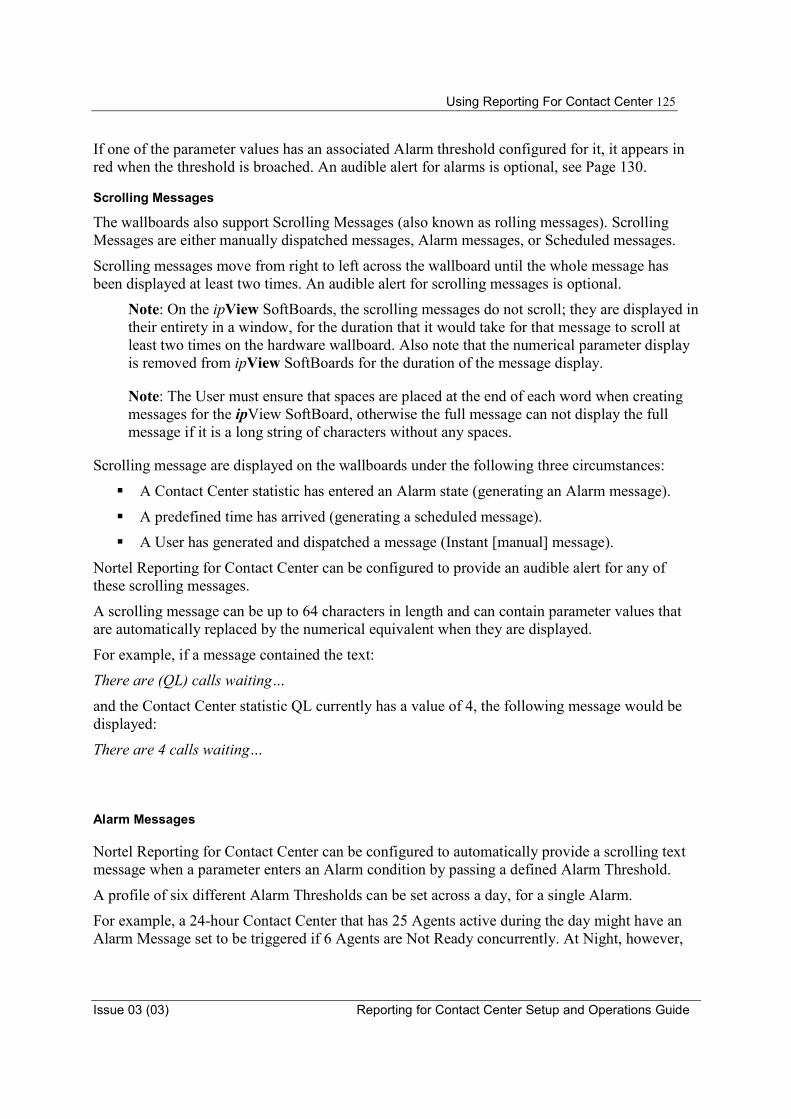
Using Reporting For Contact Center 125
Issue 03 (03) Reporting for Contact Center Setup and Operations Guide
If one of the parameter values has an associated Alarm threshold configured for it, it appears in red when the threshold is broached. An audible alert for alarms is optional, see Page 130. Scrolling Messages
The wallboards also support Scrolling Messages (also known as rolling messages). Scrolling Messages are either manually dispatched messages, Alarm messages, or Scheduled messages.
Scrolling messages move from right to left across the wallboard until the whole message has been displayed at least two times. An audible alert for scrolling messages is optional.
Note: On the ipView SoftBoards, the scrolling messages do not scroll; they are displayed in their entirety in a window, for the duration that it would take for that message to scroll at least two times on the hardware wallboard. Also note that the numerical parameter display is removed from ipView SoftBoards for the duration of the message display.
Note: The User must ensure that spaces are placed at the end of each word when creating messages for the ipView SoftBoard, otherwise the full message can not display the full message if it is a long string of characters without any spaces.
Scrolling message are displayed on the wallboards under the following three circumstances:
� A Contact Center statistic has entered an Alarm state (generating an Alarm message).
� A predefined time has arrived (generating a scheduled message). � A User has generated and dispatched a message (Instant [manual] message).
Nortel Reporting for Contact Center can be configured to provide an audible alert for any of these scrolling messages.
A scrolling message can be up to 64 characters in length and can contain parameter values that are automatically replaced by the numerical equivalent when they are displayed.
For example, if a message contained the text:
There are (QL) calls waiting… and the Contact Center statistic QL currently has a value of 4, the following message would be displayed:
There are 4 calls waiting…
Alarm Messages
Nortel Reporting for Contact Center can be configured to automatically provide a scrolling text message when a parameter enters an Alarm condition by passing a defined Alarm Threshold.
A profile of six different Alarm Thresholds can be set across a day, for a single Alarm.
For example, a 24-hour Contact Center that has 25 Agents active during the day might have an Alarm Message set to be triggered if 6 Agents are Not Ready concurrently. At Night, however,
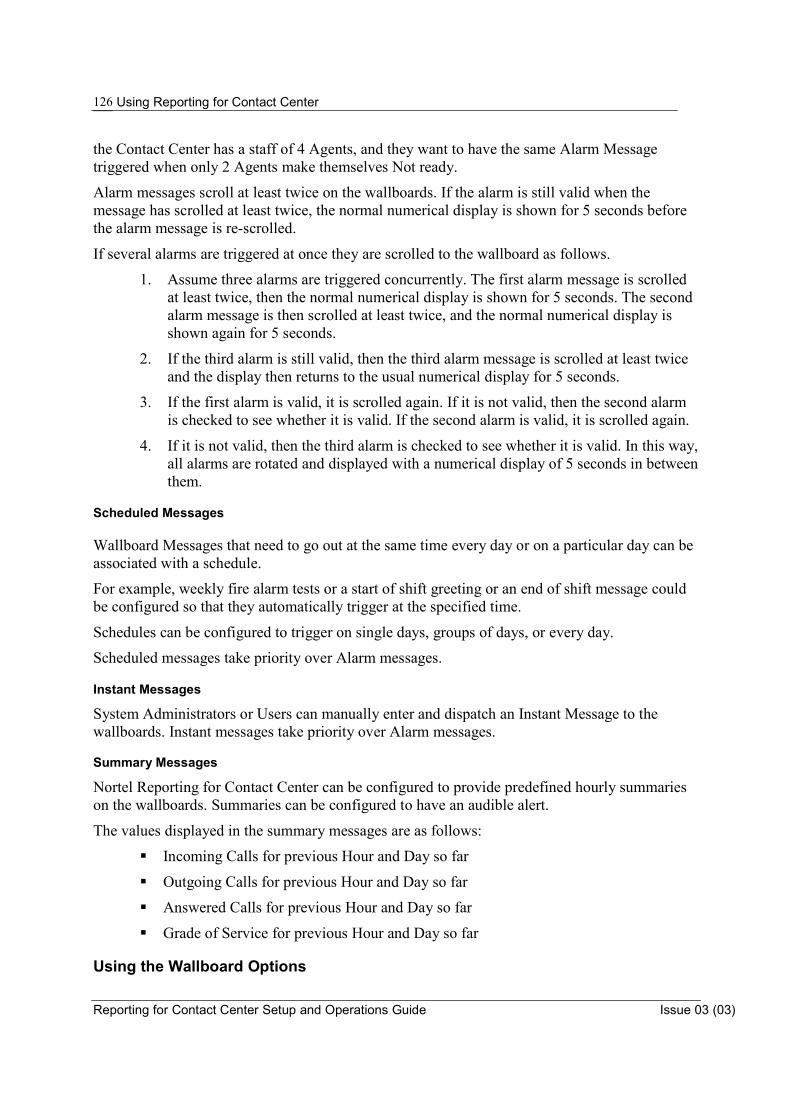
Using Reporting for Contact Center
Reporting for Contact Center Setup and Operations Guide Issue 03 (03)
126
the Contact Center has a staff of 4 Agents, and they want to have the same Alarm Message triggered when only 2 Agents make themselves Not ready.
Alarm messages scroll at least twice on the wallboards. If the alarm is still valid when the message has scrolled at least twice, the normal numerical display is shown for 5 seconds before the alarm message is re-scrolled.
If several alarms are triggered at once they are scrolled to the wallboard as follows.
1. Assume three alarms are triggered concurrently. The first alarm message is scrolled at least twice, then the normal numerical display is shown for 5 seconds. The second alarm message is then scrolled at least twice, and the normal numerical display is shown again for 5 seconds.
2. If the third alarm is still valid, then the third alarm message is scrolled at least twice and the display then returns to the usual numerical display for 5 seconds.
3. If the first alarm is valid, it is scrolled again. If it is not valid, then the second alarm is checked to see whether it is valid. If the second alarm is valid, it is scrolled again.
4. If it is not valid, then the third alarm is checked to see whether it is valid. In this way, all alarms are rotated and displayed with a numerical display of 5 seconds in between them.
Scheduled Messages
Wallboard Messages that need to go out at the same time every day or on a particular day can be associated with a schedule.
For example, weekly fire alarm tests or a start of shift greeting or an end of shift message could be configured so that they automatically trigger at the specified time.
Schedules can be configured to trigger on single days, groups of days, or every day.
Scheduled messages take priority over Alarm messages.
Instant Messages
System Administrators or Users can manually enter and dispatch an Instant Message to the wallboards. Instant messages take priority over Alarm messages. Summary Messages
Nortel Reporting for Contact Center can be configured to provide predefined hourly summaries on the wallboards. Summaries can be configured to have an audible alert.
The values displayed in the summary messages are as follows:
� Incoming Calls for previous Hour and Day so far
� Outgoing Calls for previous Hour and Day so far
� Answered Calls for previous Hour and Day so far
� Grade of Service for previous Hour and Day so far
Using the Wallboard Options
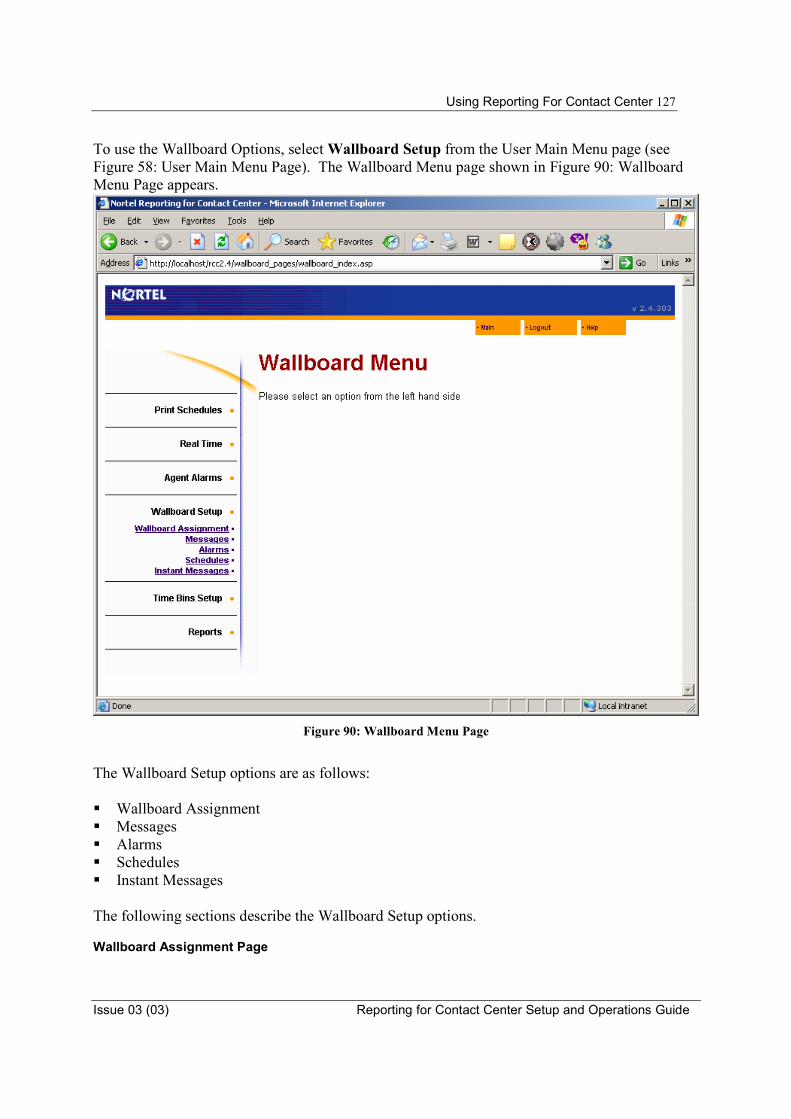
Using Reporting For Contact Center 127
Issue 03 (03) Reporting for Contact Center Setup and Operations Guide
To use the Wallboard Options, select Wallboard Setup from the User Main Menu page (see Figure 58: User Main Menu Page). The Wallboard Menu page shown in Figure 90: Wallboard Menu Page appears.
Figure 90: Wallboard Menu Page
The Wallboard Setup options are as follows: � Wallboard Assignment � Messages � Alarms � Schedules � Instant Messages The following sections describe the Wallboard Setup options. Wallboard Assignment Page
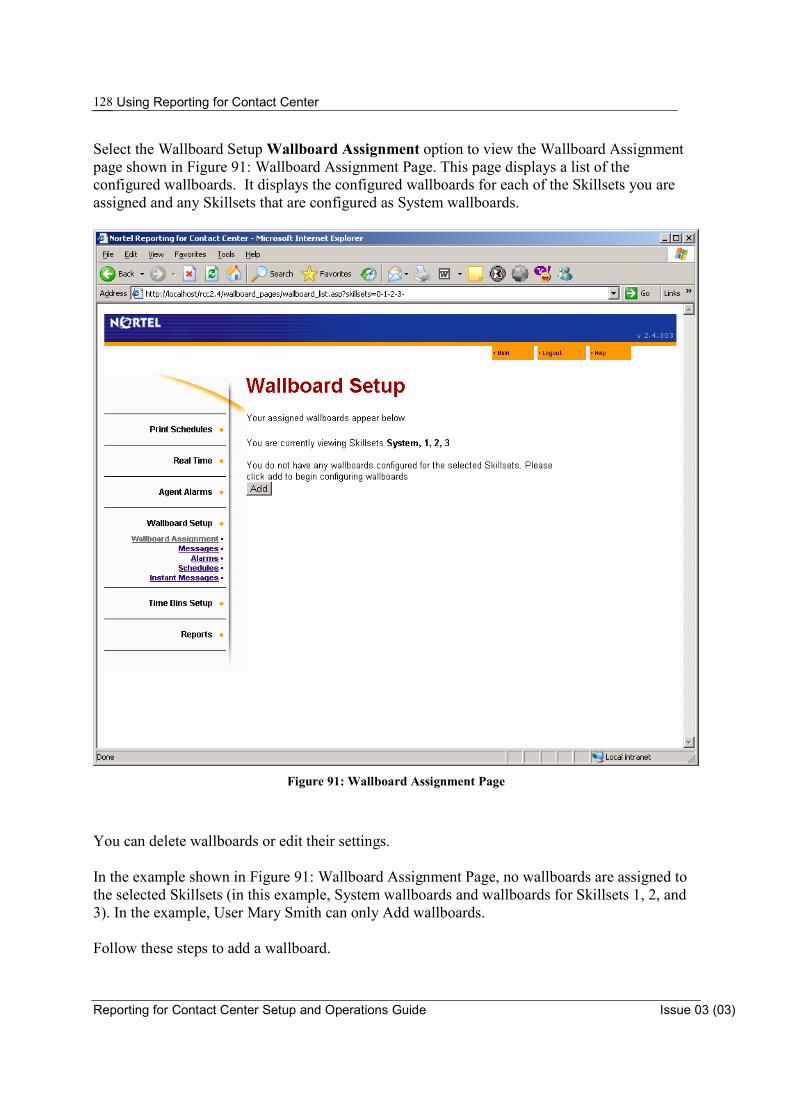
Using Reporting for Contact Center
Reporting for Contact Center Setup and Operations Guide Issue 03 (03)
128
Select the Wallboard Setup Wallboard Assignment option to view the Wallboard Assignment page shown in Figure 91: Wallboard Assignment Page. This page displays a list of the configured wallboards. It displays the configured wallboards for each of the Skillsets you are assigned and any Skillsets that are configured as System wallboards.
Figure 91: Wallboard Assignment Page
You can delete wallboards or edit their settings. In the example shown in Figure 91: Wallboard Assignment Page, no wallboards are assigned to the selected Skillsets (in this example, System wallboards and wallboards for Skillsets 1, 2, and 3). In the example, User Mary Smith can only Add wallboards. Follow these steps to add a wallboard.

Using Reporting For Contact Center 129
Issue 03 (03) Reporting for Contact Center Setup and Operations Guide
1. Click Add to assign wallboards. The Add Wallboard page shown in Figure 92: Add Wallboard Page appears.
Figure 92: Add Wallboard Page
2. In the IP/Network Name field, enter the IP Address or Network Name. (If the wallboard is
an ipView SoftBoard, enter the IP Address or the Network Name of the PC on which the SoftBoard will be running.)
3. The value in the Port is usually left at the default value of 3500. This value might be
changed for an ipView SoftBoard if an Agent wishes to have several copies of ipView SoftBoard running on the same PC to, for example, display different Skillset statistics to a multi-Skillset Agent. Each copy of ipView SoftBoard would be installed on the Agent’s PC with a different Port number. In that case, the corresponding wallboard entry in Nortel Reporting for Contact Center must be configured with the appropriate port number.
Using Reporting for Contact Center
Reporting for Contact Center Setup and Operations Guide Issue 03 (03)
130
4. The Wallboard Skillset selection specifies the Skillset the wallboard is to report on. That is, the named Skillset is the Skillset from which Nortel Reporting for Contact Center extracts the statistical information to display on the wallboard. If you wish to display system-wide totals (that is, to have the information displayed represent totals derived from all Skillsets) select System from the list. In other words, assigning a wallboard to be a System wallboard causes Nortel Reporting for Contact Center to send statistics to that wallboard which represent the system totals. For example, the parameter AN (agents not ready) on a System wallboard shows the total figure for the AN values of all Skillsets added together.
Notice that the only Skillsets available in this list are the ones that our example User Mary Smith was assigned by the Administrator.
5. In the Language list, select the language in which wallboard should be driven. Individual
wallboards can be driven in any of the supported languages that appear in the list. 6. Select a Type option (Hardware or Software) to indicate whether the wallboard is a hardware
wallboard or a software SoftBoard. Any of the available parameters can be used on either the hardware or the software wallboards.
The parameter spacing on the hardware wallboard allows for the display of two 3-digit and one 4-digit parameter per line, giving six parameters in total. The two parameters at the right hand end of the wallboard can display up to 4 digits at a time. Those parameters that are able to reach 4 digits cannot be configured for the positions that can display only 3 digits. See Wallboard Parameters.
7. Select Title if the wallboard is to be configured with a title. A title is a string of text up to 16
characters in length, which is displayed on the top line of a hardware wallboard and above the parameter list on a SoftBoard. In both cases, the title reduces the number of parameters that can be displayed by the wallboard to 3.
8. If you selected Title in the previous step, enter the title in the Title Text field. 9. Select Buzzer if you want the wallboard to emit a short buzzing sound when a Summary
Message or a Scrolling message is sent to it. If Buzzer is selected, you will also hear a buzzing sound when a parameter goes into alarm even if no Alarm Message is associated with the alarm (a static alarm).
10. Select Summary to send Hourly Summaries to the wallboard when each hour passes and
when the Skillset enters Out Mode (that is, there are no Agents Logged In to the Skillset). 11. To save the changes, click Submit. The Wallboard Setup page appears.

Using Reporting For Contact Center 131
Issue 03 (03) Reporting for Contact Center Setup and Operations Guide
To leave the Add Wallboard page without saving any changes, click Cancel. The Wallboard Setup page appears.
Wallboard Parameters Click Wallboard Parameters to view the Wallboard Setup Page. See Figure 93: Wallboard Setup Page with Wallboard Listed. As shown in the figure, after you assign a wallboard, the wallboard appears on the page.
Figure 93: Wallboard Setup Page with Wallboard Listed
Click Edit to view the Edit Wallboard page shown in Figure 94: Edit wallboard Page.
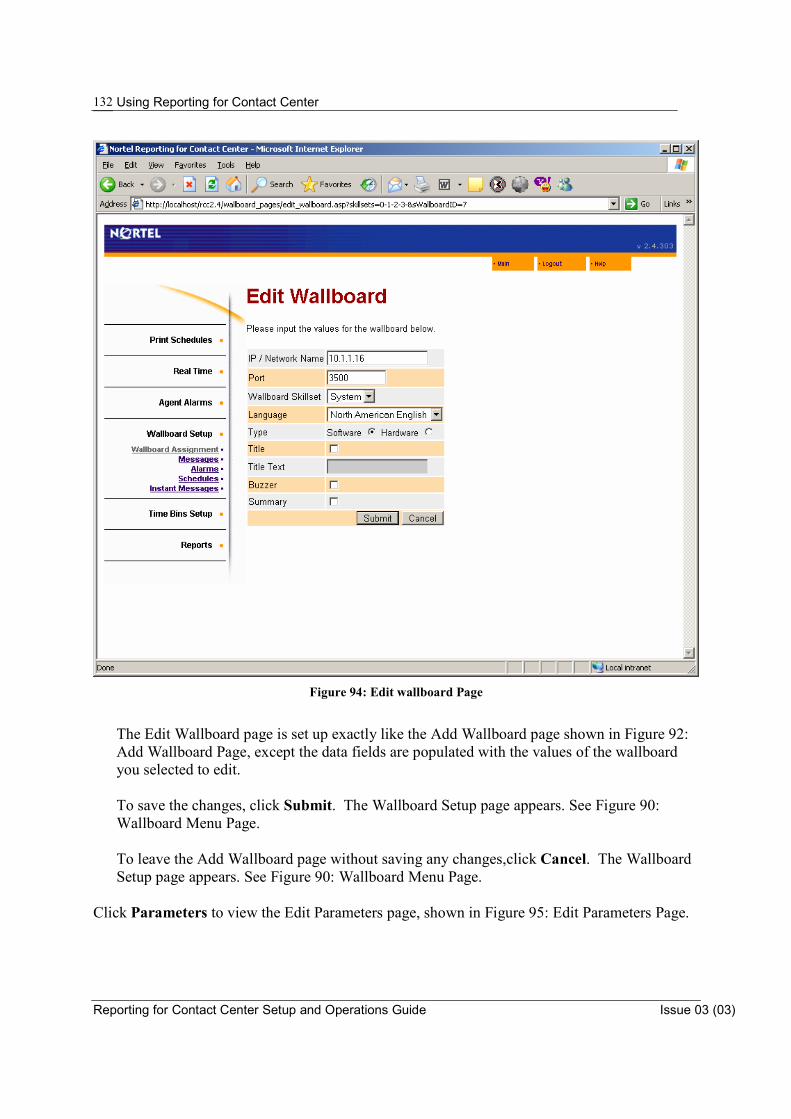
Using Reporting for Contact Center
Reporting for Contact Center Setup and Operations Guide Issue 03 (03)
132
Figure 94: Edit wallboard Page
The Edit Wallboard page is set up exactly like the Add Wallboard page shown in Figure 92: Add Wallboard Page, except the data fields are populated with the values of the wallboard you selected to edit. To save the changes, click Submit. The Wallboard Setup page appears. See Figure 90: Wallboard Menu Page. To leave the Add Wallboard page without saving any changes,click Cancel. The Wallboard Setup page appears. See Figure 90: Wallboard Menu Page.
Click Parameters to view the Edit Parameters page, shown in Figure 95: Edit Parameters Page.
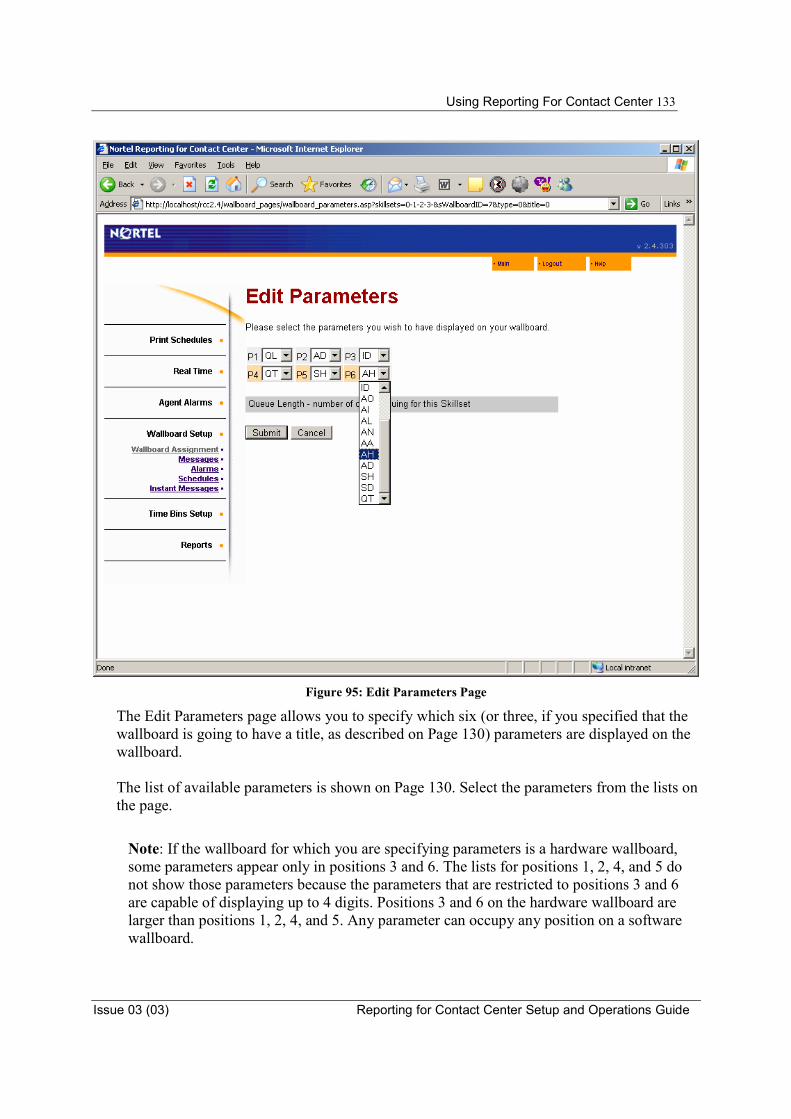
Using Reporting For Contact Center 133
Issue 03 (03) Reporting for Contact Center Setup and Operations Guide
Figure 95: Edit Parameters Page
The Edit Parameters page allows you to specify which six (or three, if you specified that the wallboard is going to have a title, as described on Page 130) parameters are displayed on the wallboard. The list of available parameters is shown on Page 130. Select the parameters from the lists on the page.
Note: If the wallboard for which you are specifying parameters is a hardware wallboard, some parameters appear only in positions 3 and 6. The lists for positions 1, 2, 4, and 5 do not show those parameters because the parameters that are restricted to positions 3 and 6 are capable of displaying up to 4 digits. Positions 3 and 6 on the hardware wallboard are larger than positions 1, 2, 4, and 5. Any parameter can occupy any position on a software wallboard.

Using Reporting for Contact Center
Reporting for Contact Center Setup and Operations Guide Issue 03 (03)
134
When you have selected your parameters, click Submit. The Wallboard Setup page appears. See Figure 90: Wallboard Menu Page. To return to the Wallboard Setup page without saving any changes, click Cancel. You are prompted to confirm that you do not wish to save your changes.
Click Delete to remove the wallboard definition from the system and to remove its listing from the Wallboard Setup page. You are prompted to confirm the deletion. After you confirm the deletion, the Wallboard Setup page appears. See Figure 90: Wallboard Menu Page. Wallboard Messages Page The Messages option allows you to create and store messages that can be used as Alarm or Scheduled messages. Select the Wallboard Setup Messages option to view the Assigned Messages page shown in Figure 96: Assigned Messages Page. This page lists all the messages that are configured. Any message can be used by any Skillset. Initially, the list of Assigned Messages is empty (as shown in the figure).
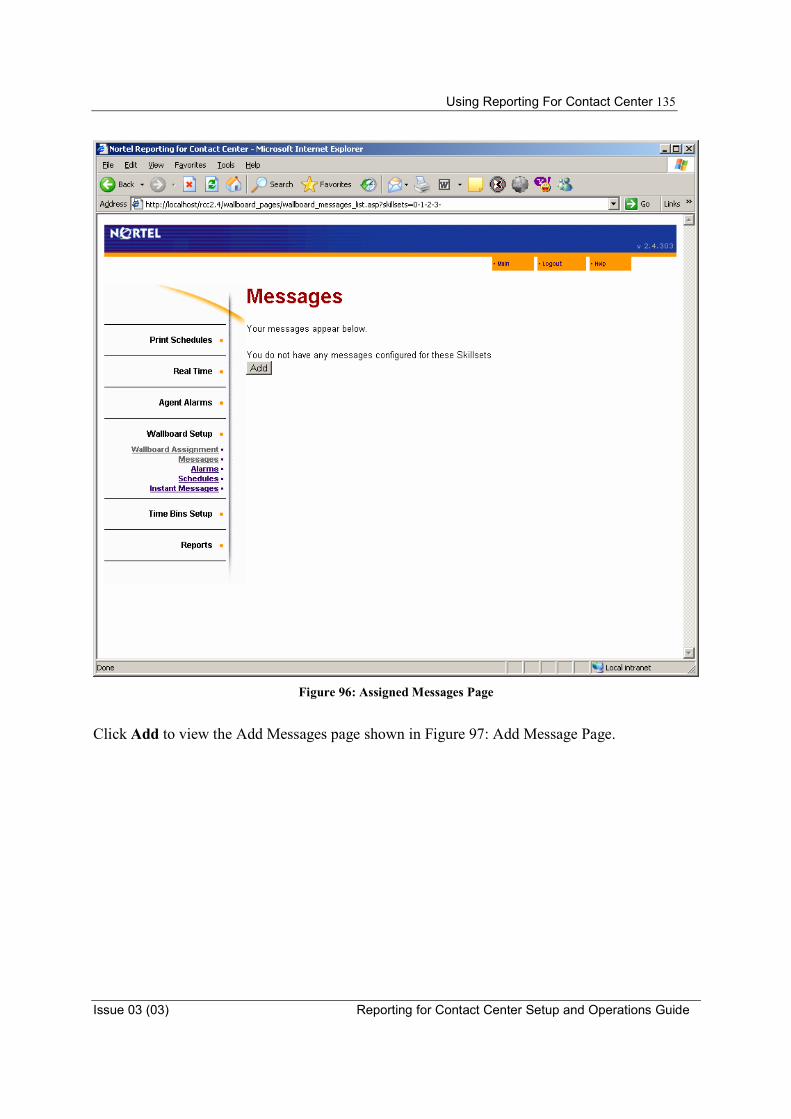
Using Reporting For Contact Center 135
Issue 03 (03) Reporting for Contact Center Setup and Operations Guide
Figure 96: Assigned Messages Page
Click Add to view the Add Messages page shown in Figure 97: Add Message Page.
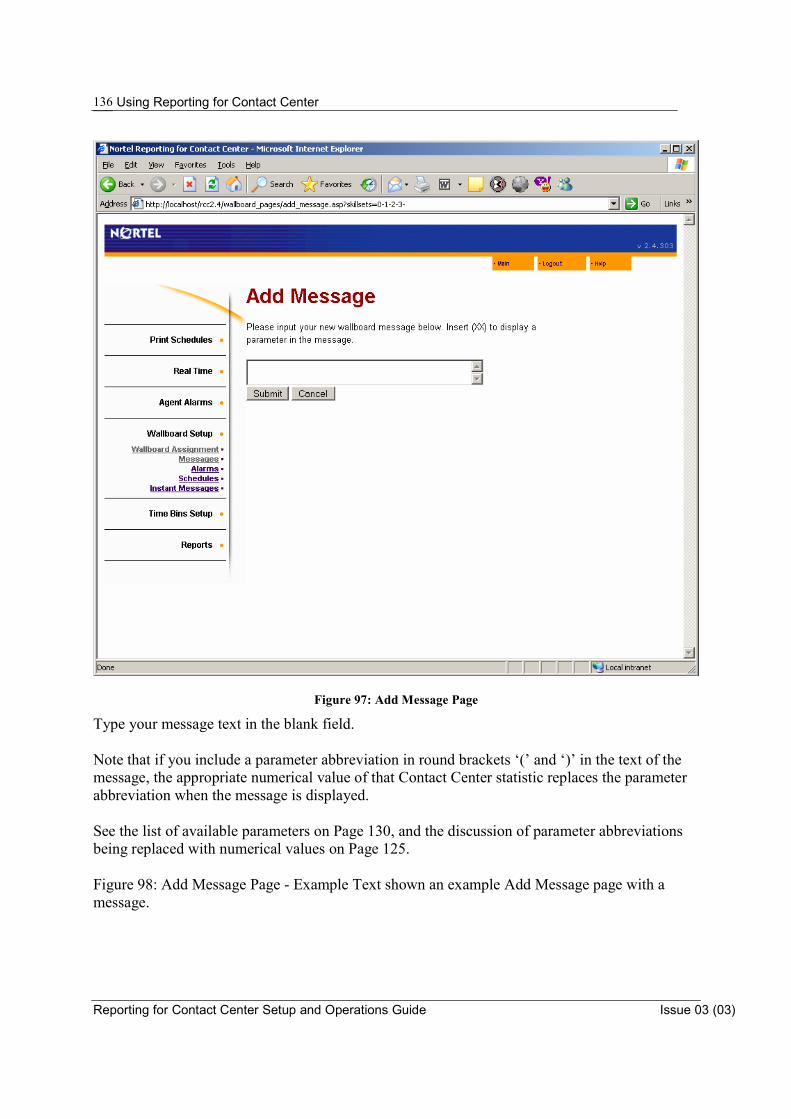
Using Reporting for Contact Center
Reporting for Contact Center Setup and Operations Guide Issue 03 (03)
136
Figure 97: Add Message Page
Type your message text in the blank field. Note that if you include a parameter abbreviation in round brackets ‘(’ and ‘)’ in the text of the message, the appropriate numerical value of that Contact Center statistic replaces the parameter abbreviation when the message is displayed. See the list of available parameters on Page 130, and the discussion of parameter abbreviations being replaced with numerical values on Page 125. Figure 98: Add Message Page - Example Text shown an example Add Message page with a message.

Using Reporting For Contact Center 137
Issue 03 (03) Reporting for Contact Center Setup and Operations Guide
Figure 98: Add Message Page - Example Text
In the example, User Mary Smith entered the following message in the Add Message text field:
There are (AN) Agents Not Ready please return to available The parameter abbreviation AN represents Agents Not Ready. When this message is displayed on the wallboards, the current numerical value of AN is inserted in the message instead of the (AN) symbol. If there were six Agents Not Ready at the time the message was displayed on the wallboard, the following text is displayed:
There are 6 Agents Not Ready please return to available
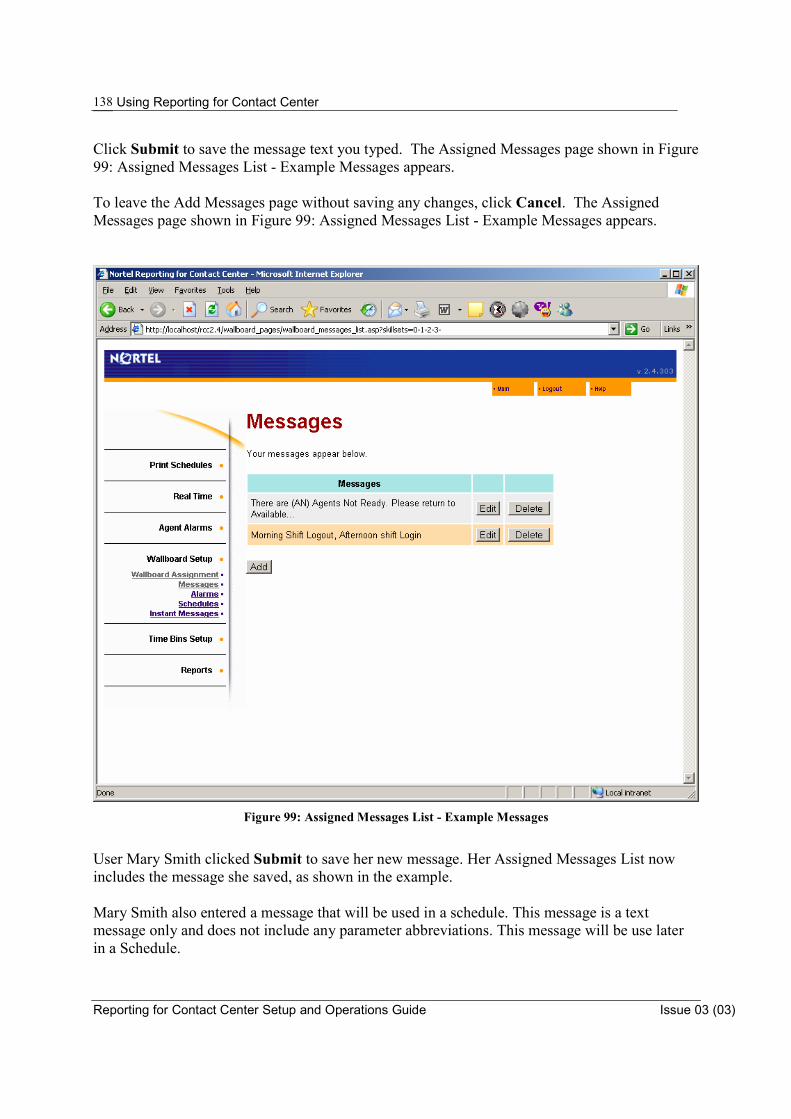
Using Reporting for Contact Center
Reporting for Contact Center Setup and Operations Guide Issue 03 (03)
138
Click Submit to save the message text you typed. The Assigned Messages page shown in Figure 99: Assigned Messages List - Example Messages appears. To leave the Add Messages page without saving any changes, click Cancel. The Assigned Messages page shown in Figure 99: Assigned Messages List - Example Messages appears.
Figure 99: Assigned Messages List - Example Messages
User Mary Smith clicked Submit to save her new message. Her Assigned Messages List now includes the message she saved, as shown in the example. Mary Smith also entered a message that will be used in a schedule. This message is a text message only and does not include any parameter abbreviations. This message will be use later in a Schedule.
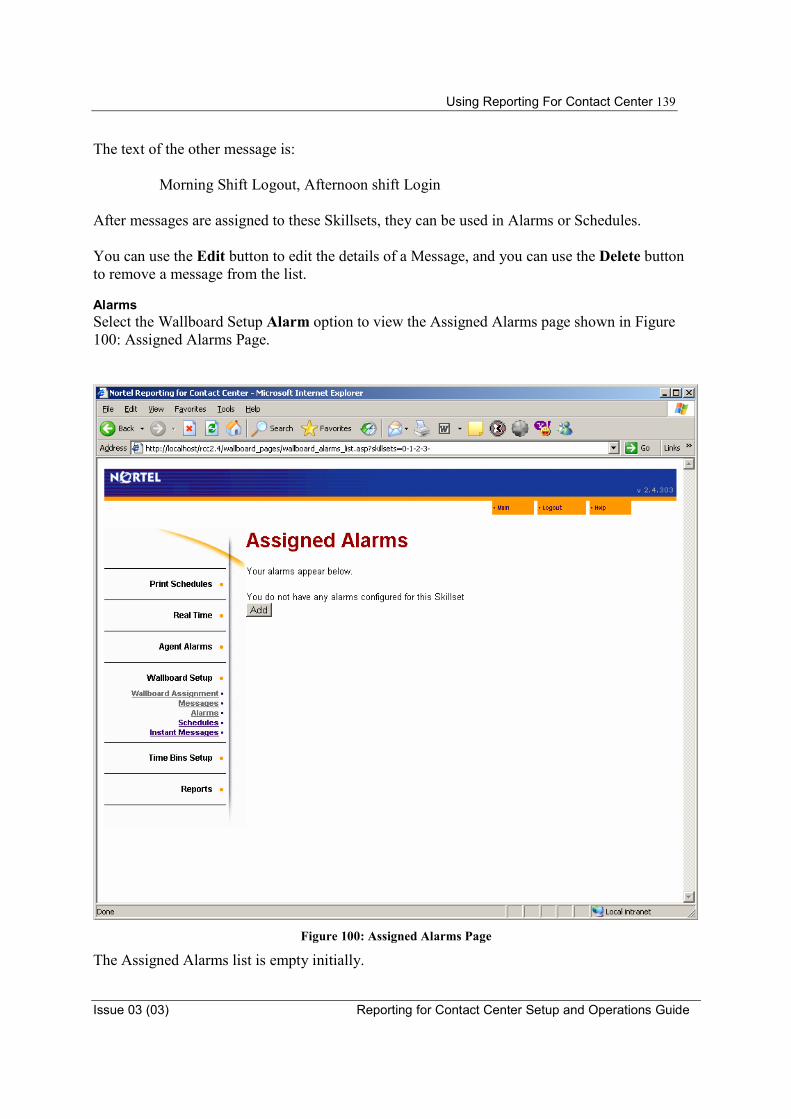
Using Reporting For Contact Center 139
Issue 03 (03) Reporting for Contact Center Setup and Operations Guide
The text of the other message is:
Morning Shift Logout, Afternoon shift Login After messages are assigned to these Skillsets, they can be used in Alarms or Schedules. You can use the Edit button to edit the details of a Message, and you can use the Delete button to remove a message from the list. Alarms Select the Wallboard Setup Alarm option to view the Assigned Alarms page shown in Figure 100: Assigned Alarms Page.
Figure 100: Assigned Alarms Page
The Assigned Alarms list is empty initially.
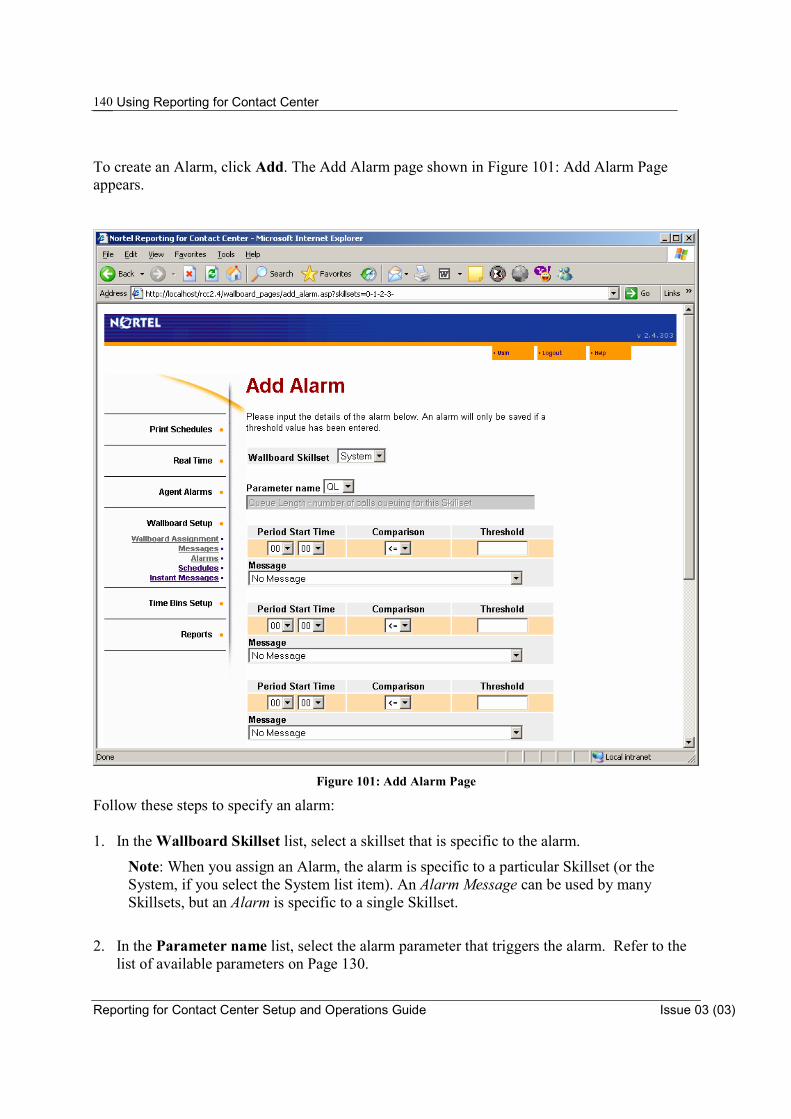
Using Reporting for Contact Center
Reporting for Contact Center Setup and Operations Guide Issue 03 (03)
140
To create an Alarm, click Add. The Add Alarm page shown in Figure 101: Add Alarm Page appears.
Figure 101: Add Alarm Page
Follow these steps to specify an alarm: 1. In the Wallboard Skillset list, select a skillset that is specific to the alarm.
Note: When you assign an Alarm, the alarm is specific to a particular Skillset (or the System, if you select the System list item). An Alarm Message can be used by many Skillsets, but an Alarm is specific to a single Skillset.
2. In the Parameter name list, select the alarm parameter that triggers the alarm. Refer to the
list of available parameters on Page 130.
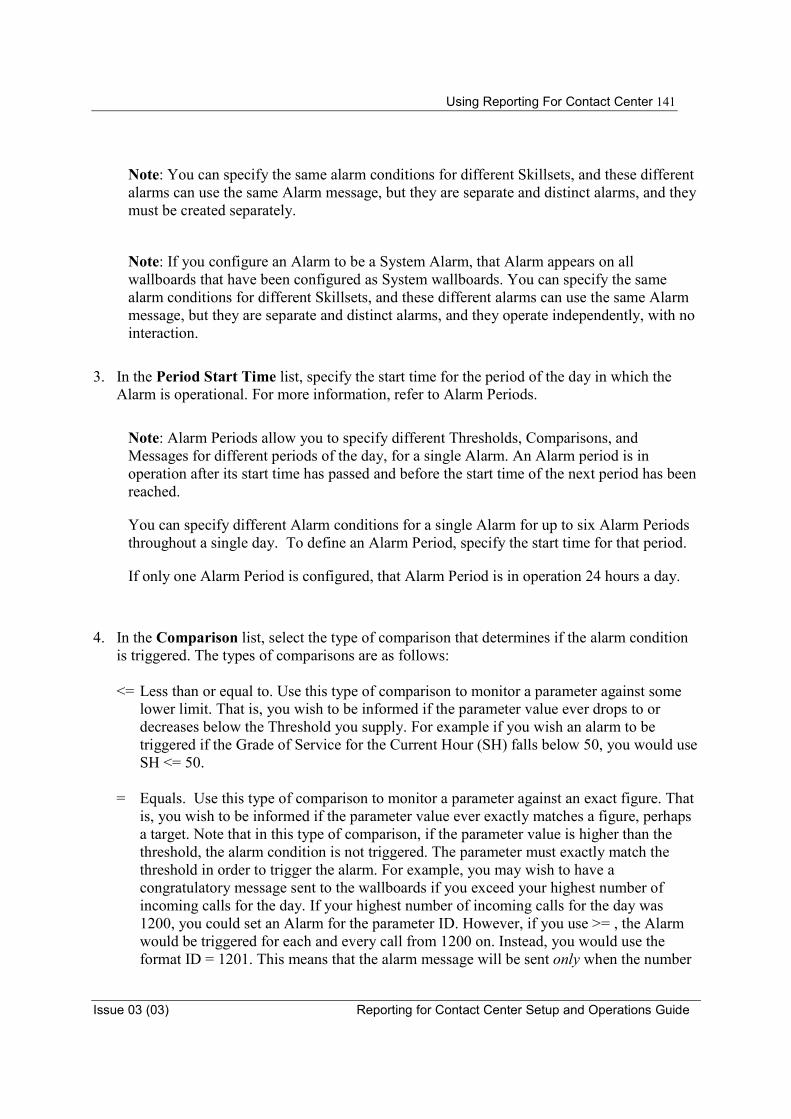
Using Reporting For Contact Center 141
Issue 03 (03) Reporting for Contact Center Setup and Operations Guide
Note: You can specify the same alarm conditions for different Skillsets, and these different alarms can use the same Alarm message, but they are separate and distinct alarms, and they must be created separately.
Note: If you configure an Alarm to be a System Alarm, that Alarm appears on all wallboards that have been configured as System wallboards. You can specify the same alarm conditions for different Skillsets, and these different alarms can use the same Alarm message, but they are separate and distinct alarms, and they operate independently, with no interaction.
3. In the Period Start Time list, specify the start time for the period of the day in which the
Alarm is operational. For more information, refer to Alarm Periods.
Note: Alarm Periods allow you to specify different Thresholds, Comparisons, and Messages for different periods of the day, for a single Alarm. An Alarm period is in operation after its start time has passed and before the start time of the next period has been reached.
You can specify different Alarm conditions for a single Alarm for up to six Alarm Periods throughout a single day. To define an Alarm Period, specify the start time for that period.
If only one Alarm Period is configured, that Alarm Period is in operation 24 hours a day.
4. In the Comparison list, select the type of comparison that determines if the alarm condition is triggered. The types of comparisons are as follows:
<= Less than or equal to. Use this type of comparison to monitor a parameter against some
lower limit. That is, you wish to be informed if the parameter value ever drops to or decreases below the Threshold you supply. For example if you wish an alarm to be triggered if the Grade of Service for the Current Hour (SH) falls below 50, you would use SH <= 50.
= Equals. Use this type of comparison to monitor a parameter against an exact figure. That is, you wish to be informed if the parameter value ever exactly matches a figure, perhaps a target. Note that in this type of comparison, if the parameter value is higher than the threshold, the alarm condition is not triggered. The parameter must exactly match the threshold in order to trigger the alarm. For example, you may wish to have a congratulatory message sent to the wallboards if you exceed your highest number of incoming calls for the day. If your highest number of incoming calls for the day was 1200, you could set an Alarm for the parameter ID. However, if you use >= , the Alarm would be triggered for each and every call from 1200 on. Instead, you would use the format ID = 1201. This means that the alarm message will be sent only when the number
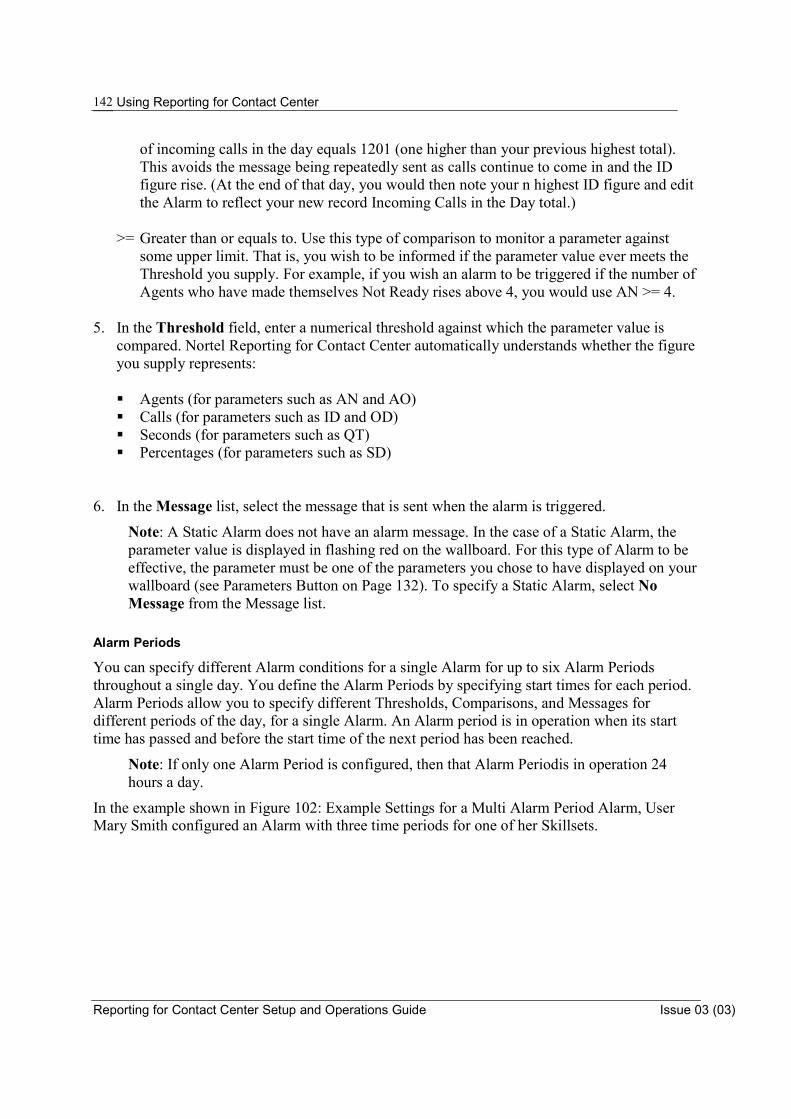
Using Reporting for Contact Center
Reporting for Contact Center Setup and Operations Guide Issue 03 (03)
142
of incoming calls in the day equals 1201 (one higher than your previous highest total). This avoids the message being repeatedly sent as calls continue to come in and the ID figure rise. (At the end of that day, you would then note your n highest ID figure and edit the Alarm to reflect your new record Incoming Calls in the Day total.)
>= Greater than or equals to. Use this type of comparison to monitor a parameter against some upper limit. That is, you wish to be informed if the parameter value ever meets the Threshold you supply. For example, if you wish an alarm to be triggered if the number of Agents who have made themselves Not Ready rises above 4, you would use AN >= 4.
5. In the Threshold field, enter a numerical threshold against which the parameter value is
compared. Nortel Reporting for Contact Center automatically understands whether the figure you supply represents:
� Agents (for parameters such as AN and AO) � Calls (for parameters such as ID and OD) � Seconds (for parameters such as QT) � Percentages (for parameters such as SD)
6. In the Message list, select the message that is sent when the alarm is triggered.
Note: A Static Alarm does not have an alarm message. In the case of a Static Alarm, the parameter value is displayed in flashing red on the wallboard. For this type of Alarm to be effective, the parameter must be one of the parameters you chose to have displayed on your wallboard (see Parameters Button on Page 132). To specify a Static Alarm, select No Message from the Message list.
Alarm Periods
You can specify different Alarm conditions for a single Alarm for up to six Alarm Periods throughout a single day. You define the Alarm Periods by specifying start times for each period. Alarm Periods allow you to specify different Thresholds, Comparisons, and Messages for different periods of the day, for a single Alarm. An Alarm period is in operation when its start time has passed and before the start time of the next period has been reached.
Note: If only one Alarm Period is configured, then that Alarm Periodis in operation 24 hours a day.
In the example shown in Figure 102: Example Settings for a Multi Alarm Period Alarm, User Mary Smith configured an Alarm with three time periods for one of her Skillsets.
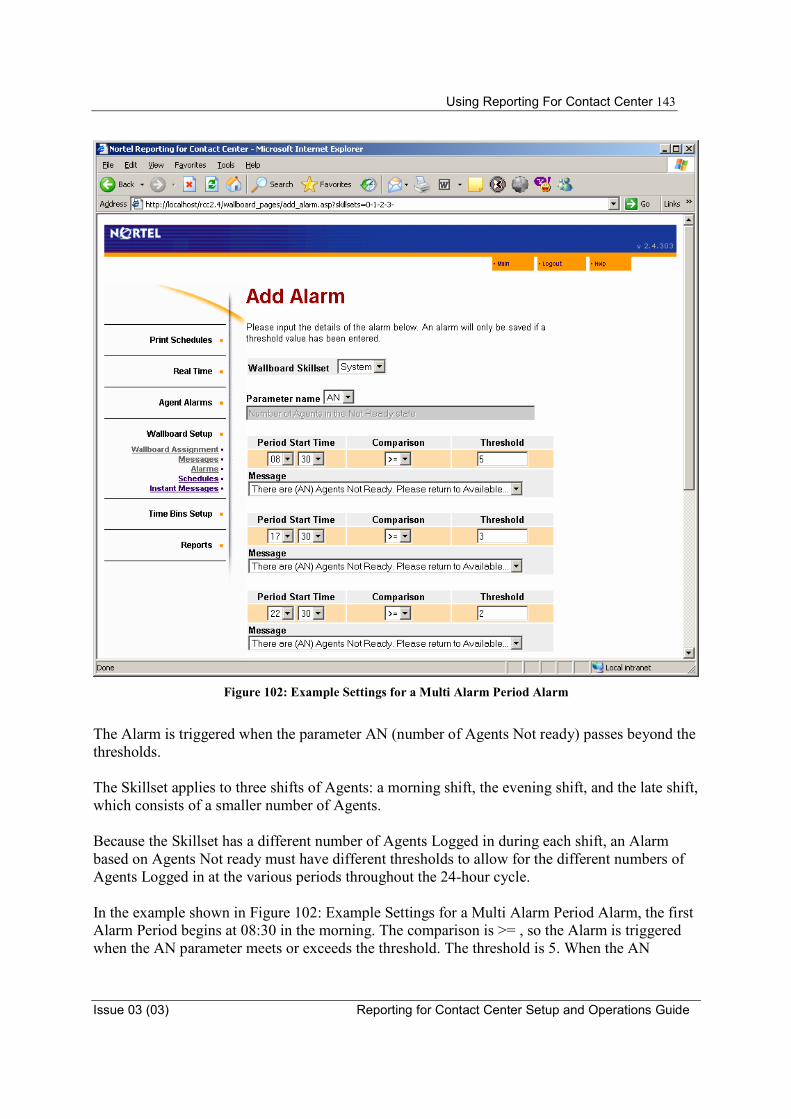
Using Reporting For Contact Center 143
Issue 03 (03) Reporting for Contact Center Setup and Operations Guide
Figure 102: Example Settings for a Multi Alarm Period Alarm
The Alarm is triggered when the parameter AN (number of Agents Not ready) passes beyond the thresholds. The Skillset applies to three shifts of Agents: a morning shift, the evening shift, and the late shift, which consists of a smaller number of Agents. Because the Skillset has a different number of Agents Logged in during each shift, an Alarm based on Agents Not ready must have different thresholds to allow for the different numbers of Agents Logged in at the various periods throughout the 24-hour cycle. In the example shown in Figure 102: Example Settings for a Multi Alarm Period Alarm, the first Alarm Period begins at 08:30 in the morning. The comparison is >= , so the Alarm is triggered when the AN parameter meets or exceeds the threshold. The threshold is 5. When the AN
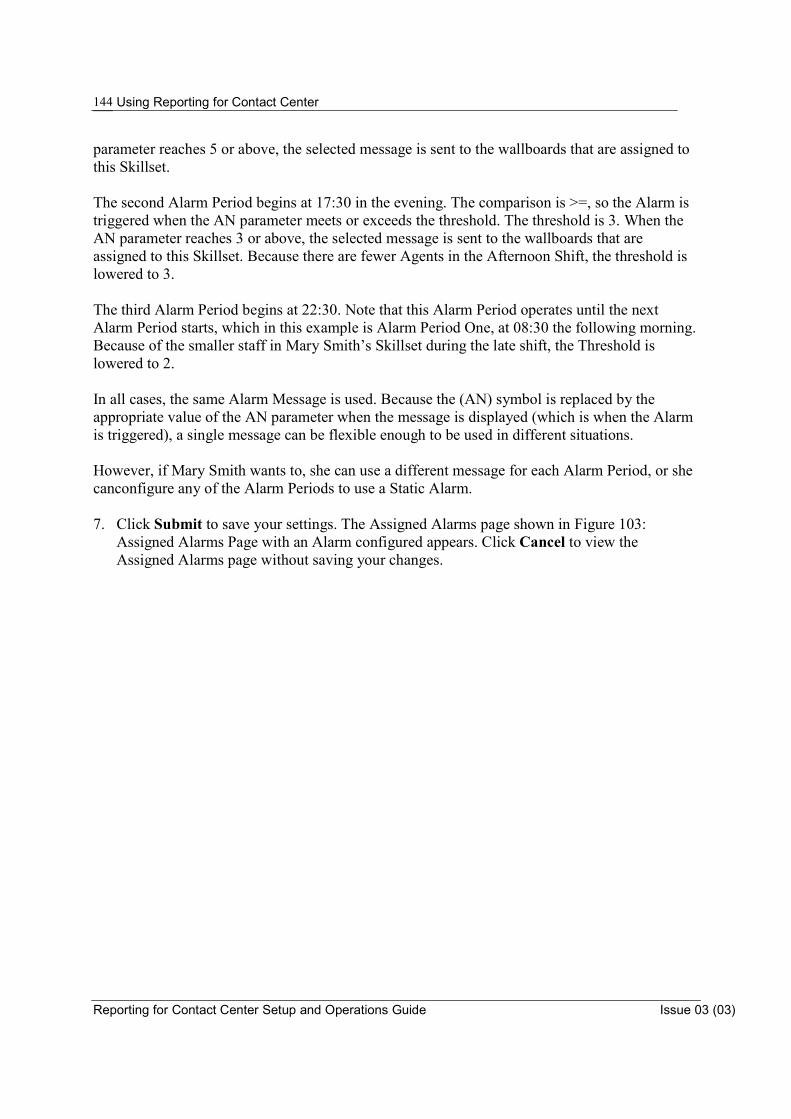
Using Reporting for Contact Center
Reporting for Contact Center Setup and Operations Guide Issue 03 (03)
144
parameter reaches 5 or above, the selected message is sent to the wallboards that are assigned to this Skillset. The second Alarm Period begins at 17:30 in the evening. The comparison is >=, so the Alarm is triggered when the AN parameter meets or exceeds the threshold. The threshold is 3. When the AN parameter reaches 3 or above, the selected message is sent to the wallboards that are assigned to this Skillset. Because there are fewer Agents in the Afternoon Shift, the threshold is lowered to 3. The third Alarm Period begins at 22:30. Note that this Alarm Period operates until the next Alarm Period starts, which in this example is Alarm Period One, at 08:30 the following morning. Because of the smaller staff in Mary Smith’s Skillset during the late shift, the Threshold is lowered to 2. In all cases, the same Alarm Message is used. Because the (AN) symbol is replaced by the appropriate value of the AN parameter when the message is displayed (which is when the Alarm is triggered), a single message can be flexible enough to be used in different situations. However, if Mary Smith wants to, she can use a different message for each Alarm Period, or she canconfigure any of the Alarm Periods to use a Static Alarm. 7. Click Submit to save your settings. The Assigned Alarms page shown in Figure 103:
Assigned Alarms Page with an Alarm configured appears. Click Cancel to view the Assigned Alarms page without saving your changes.
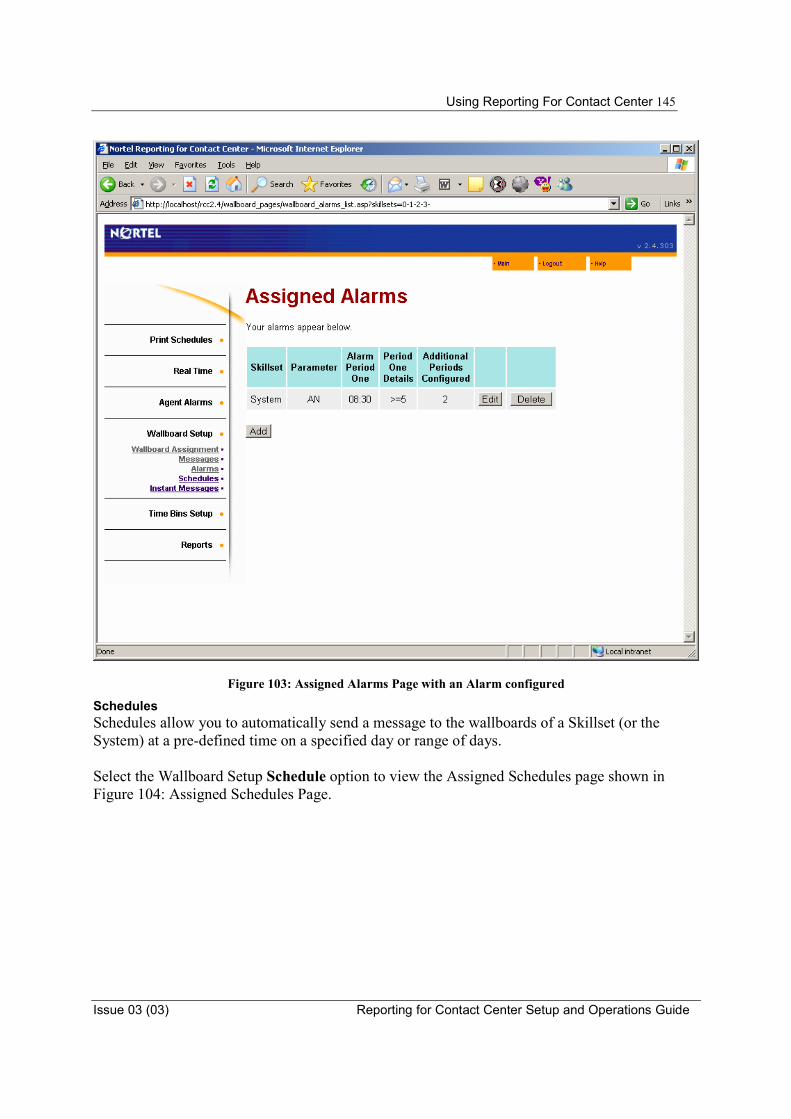
Using Reporting For Contact Center 145
Issue 03 (03) Reporting for Contact Center Setup and Operations Guide
Figure 103: Assigned Alarms Page with an Alarm configured
Schedules Schedules allow you to automatically send a message to the wallboards of a Skillset (or the System) at a pre-defined time on a specified day or range of days. Select the Wallboard Setup Schedule option to view the Assigned Schedules page shown in Figure 104: Assigned Schedules Page.
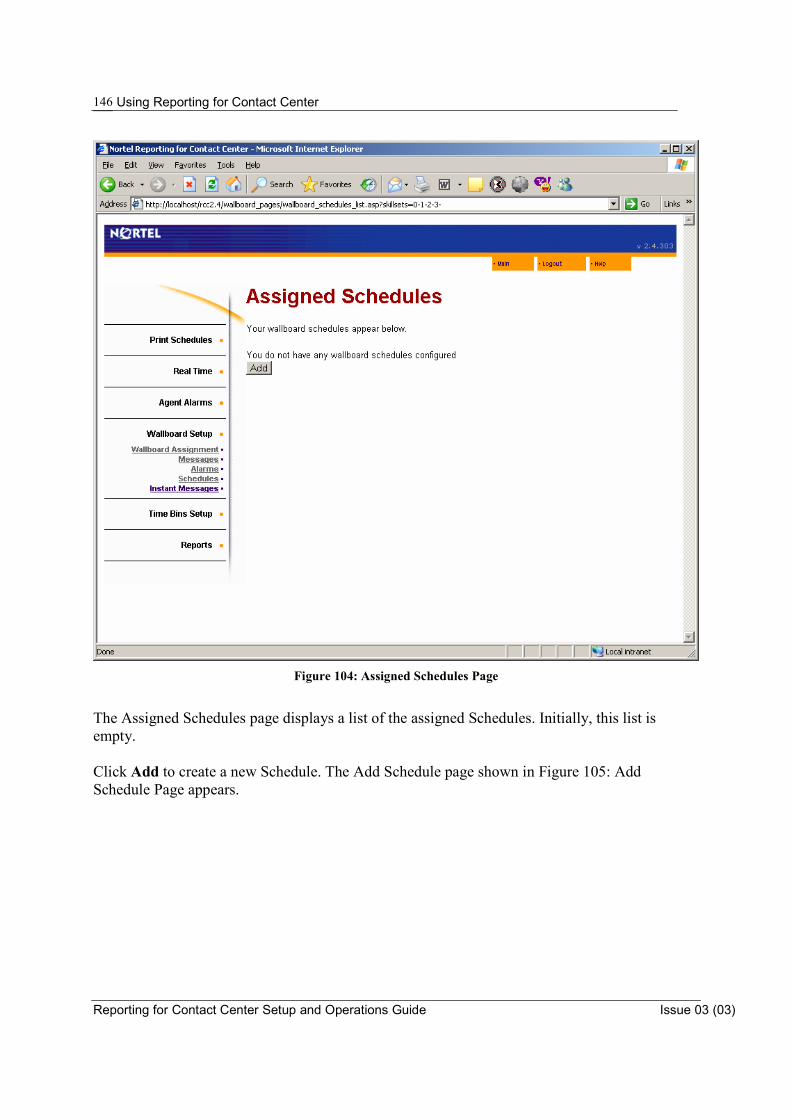
Using Reporting for Contact Center
Reporting for Contact Center Setup and Operations Guide Issue 03 (03)
146
Figure 104: Assigned Schedules Page
The Assigned Schedules page displays a list of the assigned Schedules. Initially, this list is empty. Click Add to create a new Schedule. The Add Schedule page shown in Figure 105: Add Schedule Page appears.
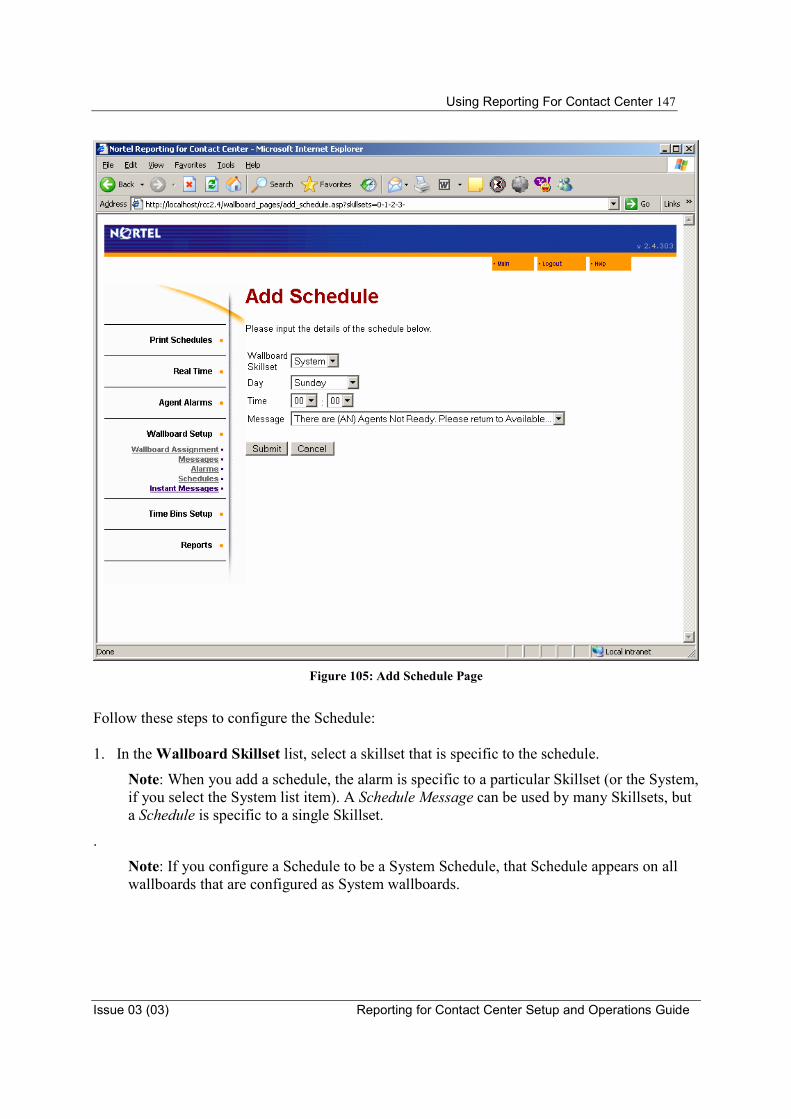
Using Reporting For Contact Center 147
Issue 03 (03) Reporting for Contact Center Setup and Operations Guide
Figure 105: Add Schedule Page
Follow these steps to configure the Schedule: 1. In the Wallboard Skillset list, select a skillset that is specific to the schedule.
Note: When you add a schedule, the alarm is specific to a particular Skillset (or the System, if you select the System list item). A Schedule Message can be used by many Skillsets, but a Schedule is specific to a single Skillset.
.
Note: If you configure a Schedule to be a System Schedule, that Schedule appears on all wallboards that are configured as System wallboards.

Using Reporting for Contact Center
Reporting for Contact Center Setup and Operations Guide Issue 03 (03)
148
Note: You can specify the same Schedule settings for different Skillsets, and these different Schedules can use the same Schedule message, but they are all separate and distinct Schedules, and they must be created separately.
2. From the Day list, select the day on which the Schedule operates. You can set a Schedule
to operate on a specific day of the week, every day from Monday to Friday, every day from Monday to Saturday, or Daily (every day).
3. From the Time list, select the time, in hours and minutes, that the Schedule is triggered.
Note: The Time list uses the 24-hour clock.
Our example User Mary Smith has created a schedule which will operate on each day of the working week, Monday to Friday
4. From the Message list, select the message to send at the specified time on the specified
range of days. The list includes all messages that are assigned to this skillset. 5. Click Submit to save your changes. The Assigned Schedules page shown in Figure 106:
Assigned Schedules Page with Schedule Added appears. Click Cancel to leave the Add Schedules page without saving your changes.
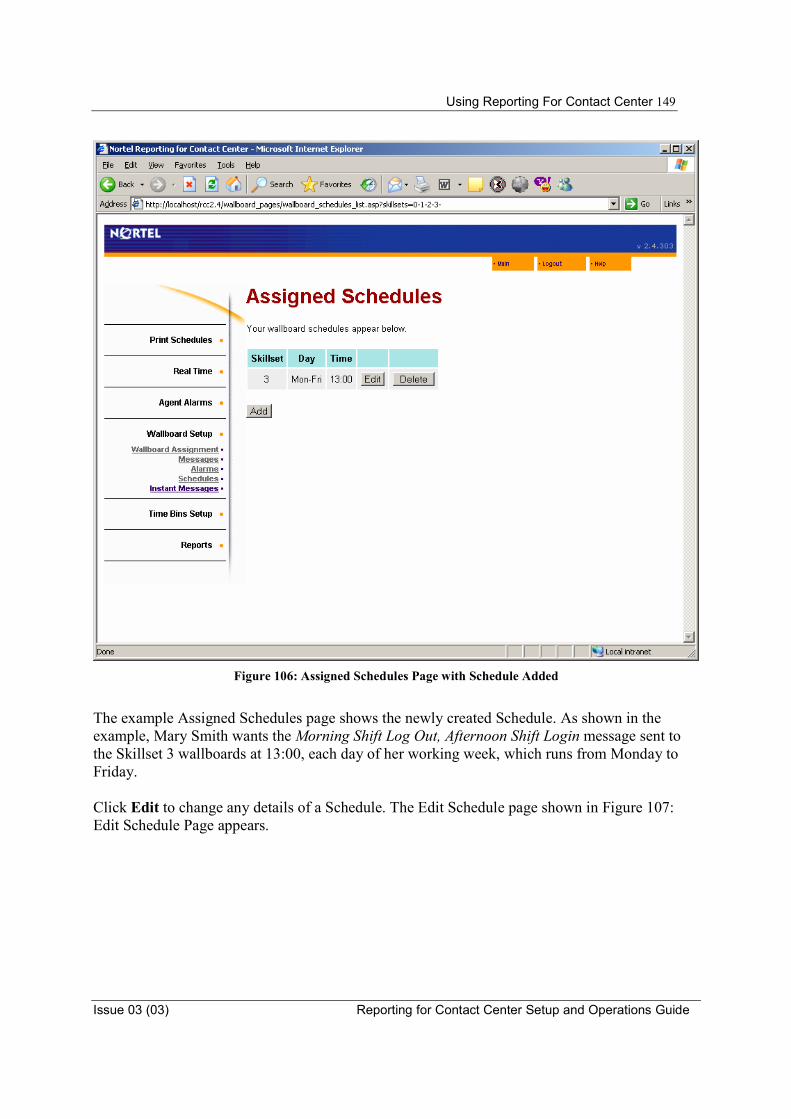
Using Reporting For Contact Center 149
Issue 03 (03) Reporting for Contact Center Setup and Operations Guide
Figure 106: Assigned Schedules Page with Schedule Added
The example Assigned Schedules page shows the newly created Schedule. As shown in the example, Mary Smith wants the Morning Shift Log Out, Afternoon Shift Login message sent to the Skillset 3 wallboards at 13:00, each day of her working week, which runs from Monday to Friday. Click Edit to change any details of a Schedule. The Edit Schedule page shown in Figure 107: Edit Schedule Page appears.

Using Reporting for Contact Center
Reporting for Contact Center Setup and Operations Guide Issue 03 (03)
150
Figure 107: Edit Schedule Page
This Edit Schedule page is set up exactly like the Add Schedule page shown in Figure 105: Add Schedule Page. Click Submit to save your edits. The Assigned Schedule page shown in Figure 106: Assigned Schedules Page with Schedule Added appears. Click Cancel to leave the Edit Schedules page without saving any edits. The Assigned Schedule page shown in Figure 106: Assigned Schedules Page with Schedule Added appears. Instant Messages Instant messages allow Users to manually select any one of the stored wallboard messages and to send them to the wallboards at will. Users can also type any text and have it sent to the wallboards, for one-off requirements. These messages are sent to the wallboards and then discarded. They are not saved. If you wish to save a
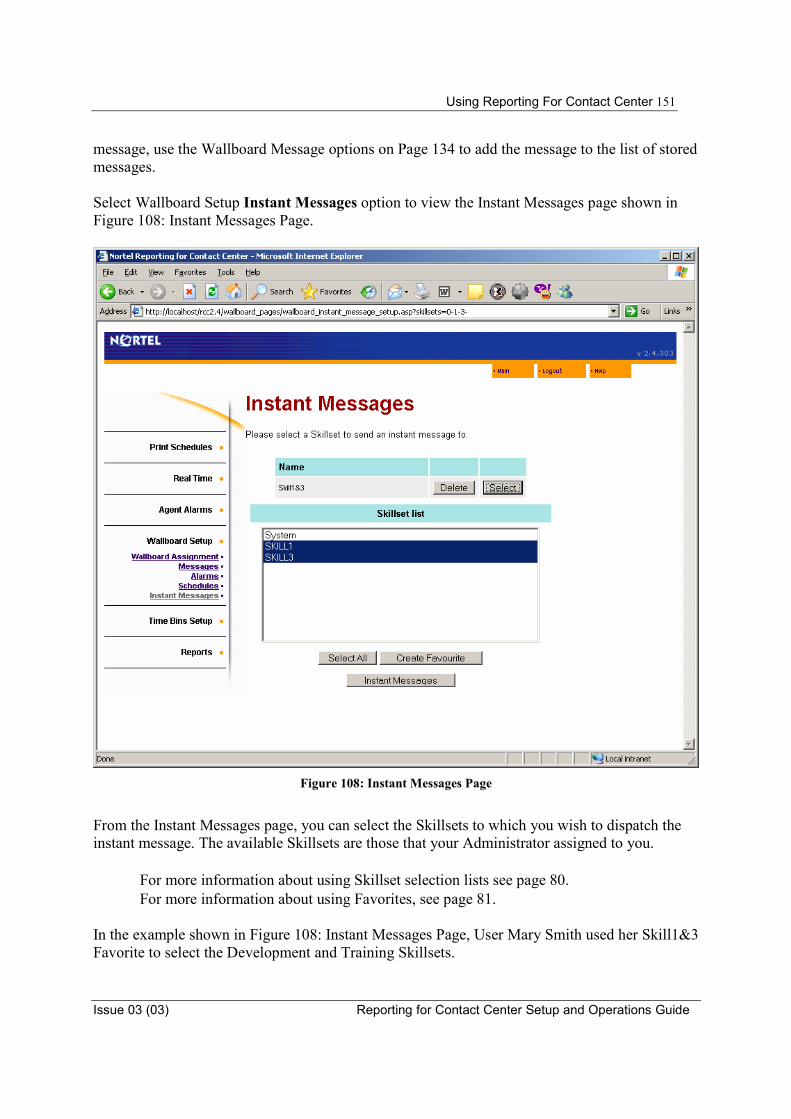
Using Reporting For Contact Center 151
Issue 03 (03) Reporting for Contact Center Setup and Operations Guide
message, use the Wallboard Message options on Page 134 to add the message to the list of stored messages. Select Wallboard Setup Instant Messages option to view the Instant Messages page shown in Figure 108: Instant Messages Page.
Figure 108: Instant Messages Page
From the Instant Messages page, you can select the Skillsets to which you wish to dispatch the instant message. The available Skillsets are those that your Administrator assigned to you.
• For more information about using Skillset selection lists see page 80. • For more information about using Favorites, see page 81.
In the example shown in Figure 108: Instant Messages Page, User Mary Smith used her Skill1&3 Favorite to select the Development and Training Skillsets.
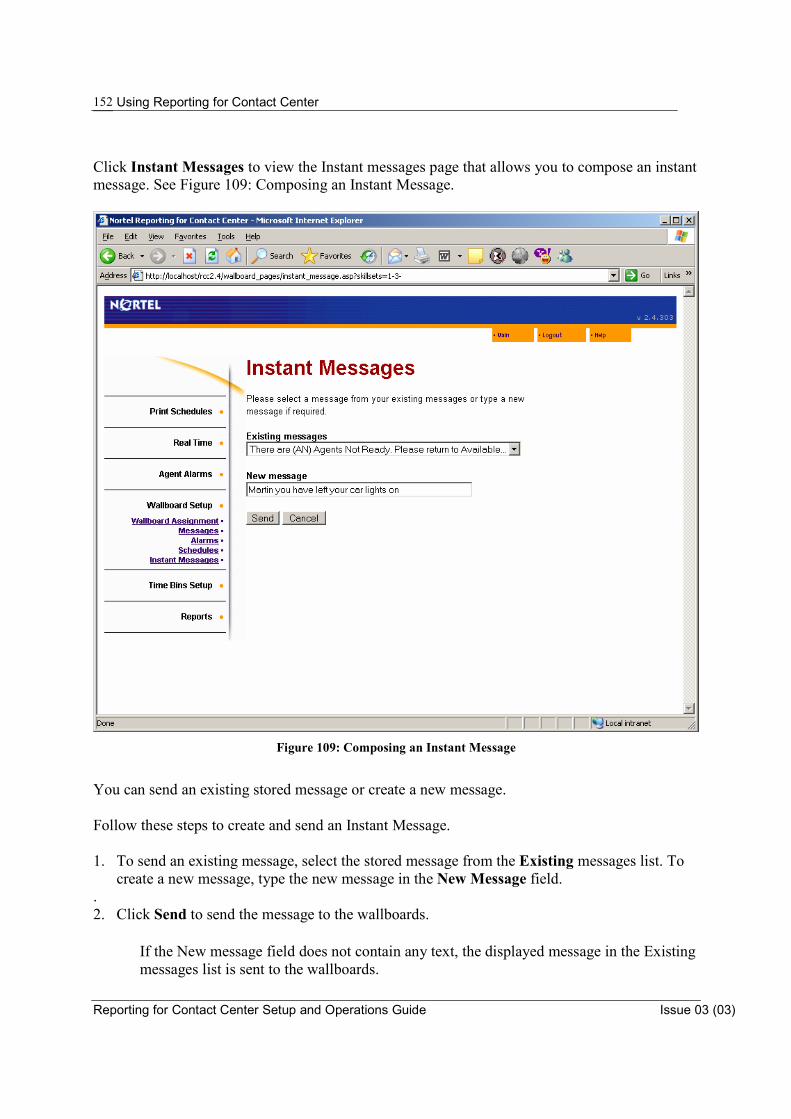
Using Reporting for Contact Center
Reporting for Contact Center Setup and Operations Guide Issue 03 (03)
152
Click Instant Messages to view the Instant messages page that allows you to compose an instant message. See Figure 109: Composing an Instant Message.
Figure 109: Composing an Instant Message
You can send an existing stored message or create a new message. Follow these steps to create and send an Instant Message. 1. To send an existing message, select the stored message from the Existing messages list. To
create a new message, type the new message in the New Message field. .2. Click Send to send the message to the wallboards.
• If the New message field does not contain any text, the displayed message in the Existing messages list is sent to the wallboards.

Using Reporting For Contact Center 153
Issue 03 (03) Reporting for Contact Center Setup and Operations Guide
• If the New message field contains text, that text is sent to the wallboards.
In either case, the Instant Messages page appears after you click Send.
Click Cancel to return to the Instant Messages page without sending an Instant Message.
Note: You can include parameter abbreviations in brackets in the text of the New message. When the message is displayed, the abbreviations are replaced with the correct numerical value for the parameter. (For more information about parameter substitution, refer to Page 125.)
Reports
Reporting for Contact Center Setup and Operations Guide Issue 03 (03)
154
Reports
Reports Introduction
General Nortel Reporting for Contact Center provides a set of flexible and easy-to-understand reports. The reports contain information about the call traffic in and out of your Contact Center and about the activities of your Contact Center Agents.
Fundamental Concepts
The concepts fundamental to understanding the background of the reports in the Nortel Reporting for Contact Center application.
In-Progress Calls
The reports display only information about calls that are completed at the time the report is requested. That is, in-progress calls do not feature in any of the reports.
Report Periods Manually generated reports can be produced for any elapsed period of time, up to a year in length. For example, a report that covers the period from 12:00 p.m. Tuesday to 16:15 p.m. Thursday can be produced. The pre-defined limitation on the time frame a manually generated report can include is a maximum of one year. Note: The Agent Audit, Agent Activity and the Agent Profile reports, however, will generate several reports each in monthly or quarterly time periods if a report period of one year is selected. The Agent Audit report will generate up to a maximum of 12 separate reports of one month intervals. The Agent Activity and Agent Profile reports will generate reports in 3 monthly intervals up to a maximum of 4 reports each for a year’s time frame. Scheduled reports are limited to fixed durations: daily, weekly, or monthly.
Skillset Selection Many reports allow the User to report on any combination of the Skillsets they are assigned.
6

Reports 155
Issue 03 (03) Reporting for Contact Center Setup and Operations Guide
They can report on a single Skillset, a combination of their assigned Skillsets, or all of their assigned Skillsets. Note: Reports may contain more information than requested. For example, a request for an
Agent Profile report for Skillset 1 produces a report that lists all the Agents who were logged in to Skillset 1, including multi-Skillset Agents. The report also includes all Agent activity for each Skillset they were logged in to.
If the report is limited to the Agent activity for the requested Skillset only, you need to request the same report for each Skillset that each of the multi-Skillset Agents is logged in to in order to receive a complete report.
Public Switched Telephone Network Call (PSTN) and Multimedia Calls Nortel Reporting for Contact Center reports on both normal PSTN voice calls and calls conducted through the Nortel Multimedia Contact Center.
Direct Calls Direct Calls are calls answered by the skillset through the “Lines Administration” table in the CallPilot Manager. A layman would think of the direct calls as being the number of calls the Contact Center handles. A person phoning a Contact Center once generates a single Direct Call.
Indirect Calls Every time a direct call is transferred between Skillsets, the call is counted as an Indirect Call. Therefore, a call to a Contact Center generates a single Direct Call and zero or more Indirect Calls. Indirect Calls are those moved to a Skillset by means of the Move to Skillset Call Routing step or manually transferred to the Skillset Control DN.
Calls and Transactions The separate phases of call transfers are known as Transactions. A call can be transferred back and forth between Skillsets and Agents. A call can produce any number of Transactions. For example, an incoming call into Skillset 1 that Agent 1 answers and retains until complete is a single transaction. However, if Agent 1 transfers the call to Agent 2 or Skillset 2, then the call requires two transactions. This is the case whether Agent 2 is in the same Skillset as Agent 1 or in a different Skillset.
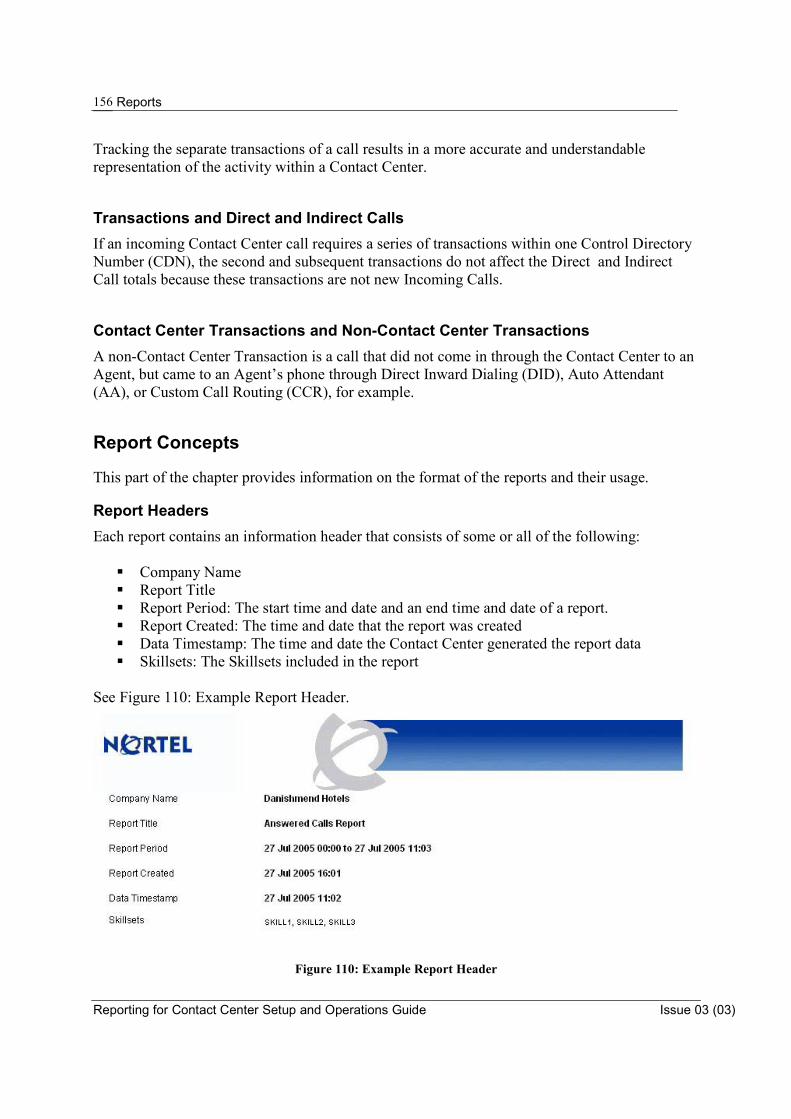
Reports
Reporting for Contact Center Setup and Operations Guide Issue 03 (03)
156
Tracking the separate transactions of a call results in a more accurate and understandable representation of the activity within a Contact Center.
Transactions and Direct and Indirect Calls If an incoming Contact Center call requires a series of transactions within one Control Directory Number (CDN), the second and subsequent transactions do not affect the Direct and Indirect Call totals because these transactions are not new Incoming Calls.
Contact Center Transactions and Non-Contact Center Transactions A non-Contact Center Transaction is a call that did not come in through the Contact Center to an Agent, but came to an Agent’s phone through Direct Inward Dialing (DID), Auto Attendant (AA), or Custom Call Routing (CCR), for example.
Report Concepts
This part of the chapter provides information on the format of the reports and their usage.
Report Headers Each report contains an information header that consists of some or all of the following:
� Company Name � Report Title � Report Period: The start time and date and an end time and date of a report. � Report Created: The time and date that the report was created � Data Timestamp: The time and date the Contact Center generated the report data � Skillsets: The Skillsets included in the report
See Figure 110: Example Report Header.
Figure 110: Example Report Header
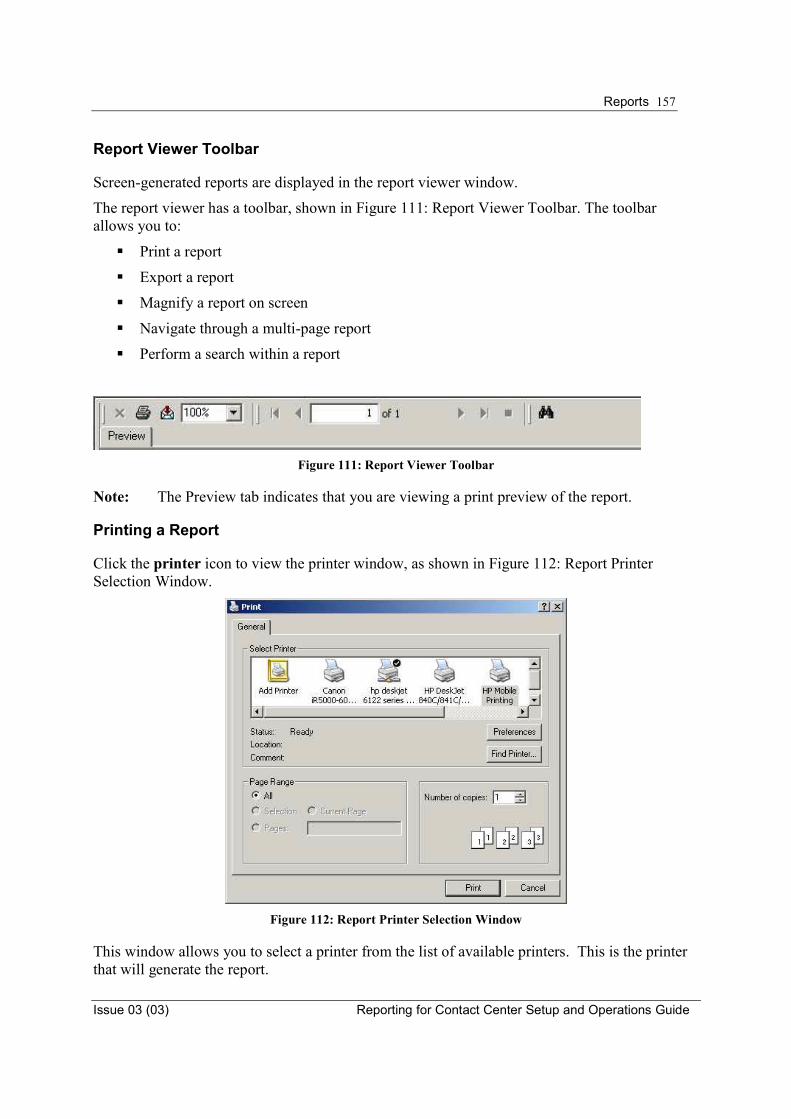
Reports 157
Issue 03 (03) Reporting for Contact Center Setup and Operations Guide
Report Viewer Toolbar
Screen-generated reports are displayed in the report viewer window.
The report viewer has a toolbar, shown in Figure 111: Report Viewer Toolbar. The toolbar allows you to:
� Print a report
� Export a report
� Magnify a report on screen
� Navigate through a multi-page report
� Perform a search within a report
Figure 111: Report Viewer Toolbar
Note: The Preview tab indicates that you are viewing a print preview of the report.
Printing a Report
Click the printer icon to view the printer window, as shown in Figure 112: Report Printer Selection Window.
Figure 112: Report Printer Selection Window
This window allows you to select a printer from the list of available printers. This is the printer that will generate the report.

Reports
Reporting for Contact Center Setup and Operations Guide Issue 03 (03)
158
You can specify the number of copies you want to print, and you can choose to print the whole report, the page you are currently viewing, or a selection of pages.
Click Preferences to specify settings, such as paper orientation and size.
Exporting a Report
Click export report to view the export report window, shown in Figure 113: Export Report Window.
Figure 113: Export Report Window
File Format
Select the desired format from the File Format list.
Table 2: Available Report Export Formats shows the available formats.
Export Format Name Extension Required Viewer
Crystal Reports native format .rpt Crystal Reports
Microsoft Excel .xls Microsoft Excel or Microsoft Excel Viewer
Microsoft Excel (data only) .xls
Microsoft Excel or Microsoft Excel Viewer (same as Microsoft Excel format above, but in a format without the shading, highlighting, and other report formatting)
Microsoft Word .doc Microsoft Word or Word Document Viewer
Rich Text Format .rtf Any RTF aware editor or file viewer
Adobe Acrobat .pdf Adobe Acrobat
Table 2: Available Report Export Formats
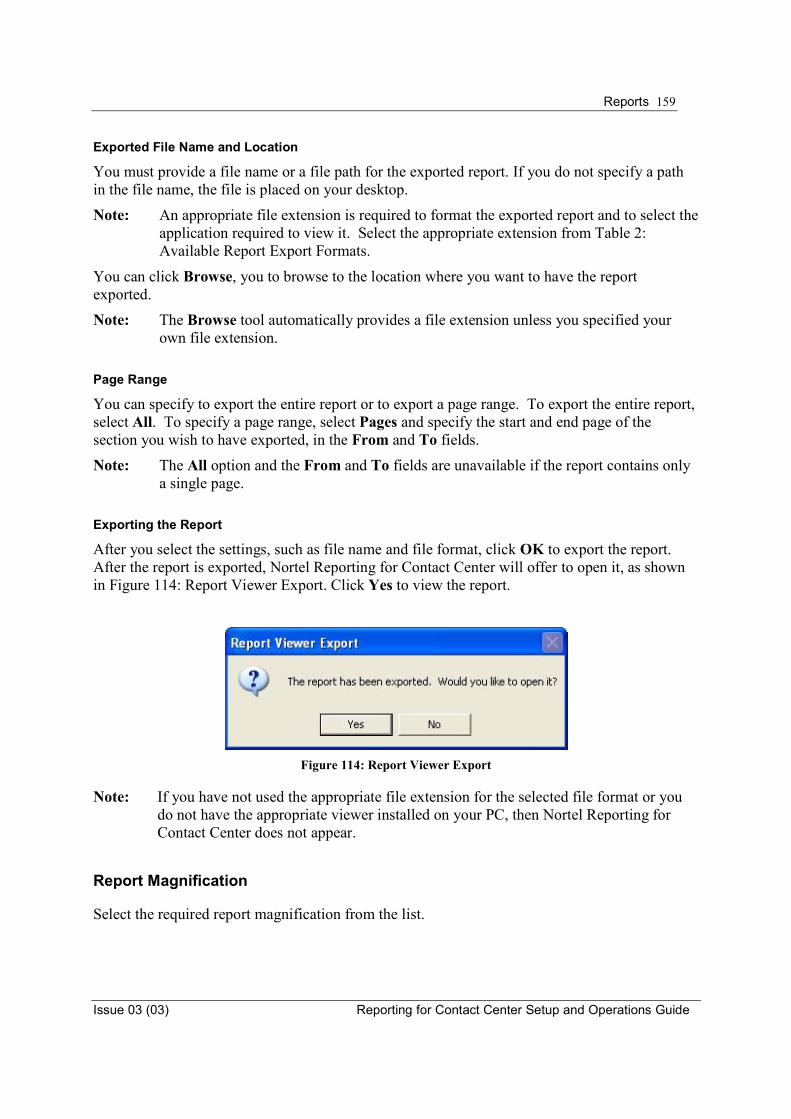
Reports 159
Issue 03 (03) Reporting for Contact Center Setup and Operations Guide
Exported File Name and Location
You must provide a file name or a file path for the exported report. If you do not specify a path in the file name, the file is placed on your desktop.
Note: An appropriate file extension is required to format the exported report and to select the application required to view it. Select the appropriate extension from Table 2: Available Report Export Formats.
You can click Browse, you to browse to the location where you want to have the report exported.
Note: The Browse tool automatically provides a file extension unless you specified your own file extension.
Page Range
You can specify to export the entire report or to export a page range. To export the entire report, select All. To specify a page range, select Pages and specify the start and end page of the section you wish to have exported, in the From and To fields.
Note: The All option and the From and To fields are unavailable if the report contains only a single page.
Exporting the Report
After you select the settings, such as file name and file format, click OK to export the report. After the report is exported, Nortel Reporting for Contact Center will offer to open it, as shown in Figure 114: Report Viewer Export. Click Yes to view the report.
Figure 114: Report Viewer Export
Note: If you have not used the appropriate file extension for the selected file format or you do not have the appropriate viewer installed on your PC, then Nortel Reporting for Contact Center does not appear.
Report Magnification
Select the required report magnification from the list.

Reports
Reporting for Contact Center Setup and Operations Guide Issue 03 (03)
160
Report Navigation
Use the Arrow icons and the Page field to move forwards or backwards one page, directly to the first or last page, or directly to a specific page. Entering a page number into the Page field and pressing Enter moves you directly to that field. A tool tip appears if you position the mouse pointer over the navigation icons and wait for a moment.
Searching for Text within a Report To locate a string or phrase within the report, click Search Text (the binoculars). Enter your search text. Use Searching for Text within a Report to look for a specific Agent in a large Agent Activity report or to locate a particular Calling Line Identification (CLID) in the Abandoned Calling Line ID report, for example.
Using the Reports
From the Main Menu shown in Figure 58: User Main Menu Page, select Reports to view the Report Menu page shown in Figure 115: Report Menu Page.
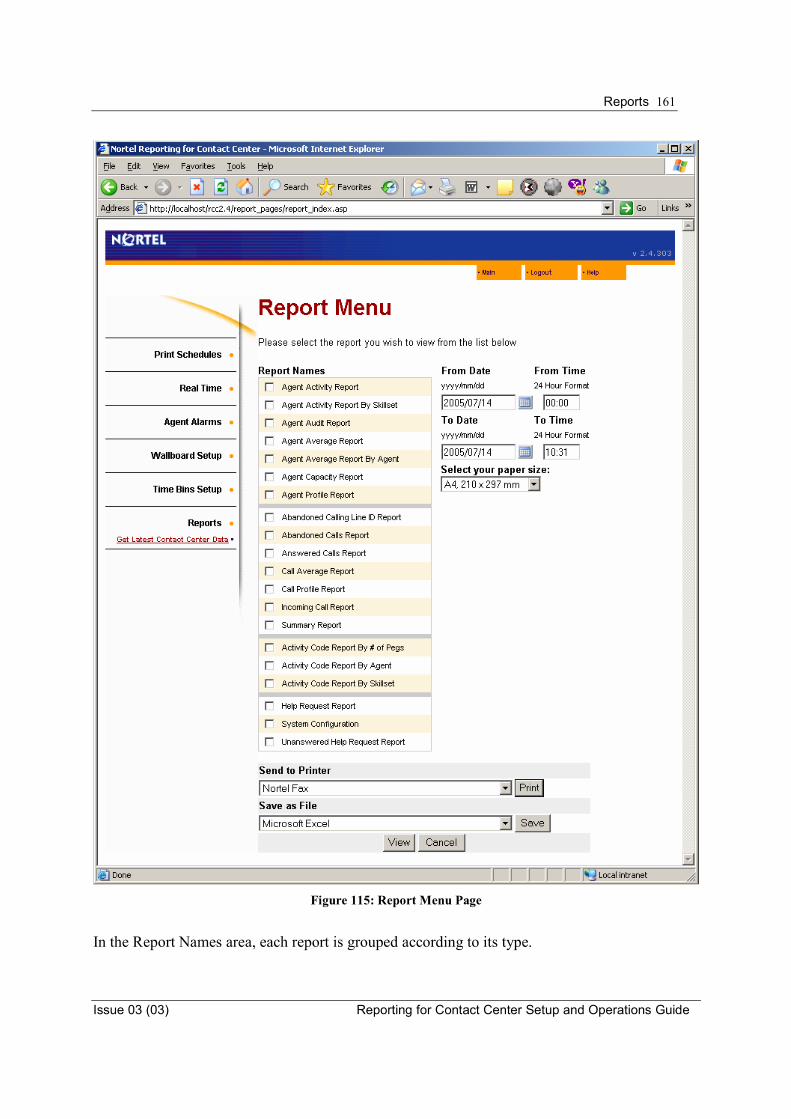
Reports 161
Issue 03 (03) Reporting for Contact Center Setup and Operations Guide
Figure 115: Report Menu Page
In the Report Names area, each report is grouped according to its type.
Reports
Reporting for Contact Center Setup and Operations Guide Issue 03 (03)
162
The groups and their report types are as follows: � Agent: reports related to Agent activity and traffic � Call: reports related to calls � Activity Code: reports related to activity codes � Miscellaneous: all other reports, such as the System Configuration report
Follow these steps to obtain a report.
Note: Due to licensing restrictions, only two Client PCs can view the reports concurrently.
Note: The maximum number of reports that can be generated at a time are five.
1. In the Report Name area, select the appropriate check box for each report you wish to
generate.
Note: Most reports require selecting Skillsets, Agents, Activity Codes, or any combination of these. The only reports that do not require these selections are Help Request Report, Unanswered Help Request Report, and System Configuration. For information about selecting Skillsets, refer to Selecting Skillsets. For information about selecting Agents, refer to Selecting Agents. For information about selecting Activity Codes, refer to Selecting Activity Codes.
2. Beside the From Date and To Date fields, click the calendar icon and specify the date range for the reports. See Figure 116: Selecting a Date Range. A maximum date range of one year can be selected. Use the arrows buttons, such as <<Year, to change the year and month of the calendar.
Note: Most reports will be generated in single reports each if the maximum date range of one year is selected, except for three. These are the Agent Audit, the Agent Activity and the Agent Profile reports. The Agent Audit report will generate up to a maximum of 12 separate reports of one month intervals. The Agent Activity and Agent Profile reports will generate reports in 3 monthly intervals up to a maximum of 4 reports each for a one year date range selection.
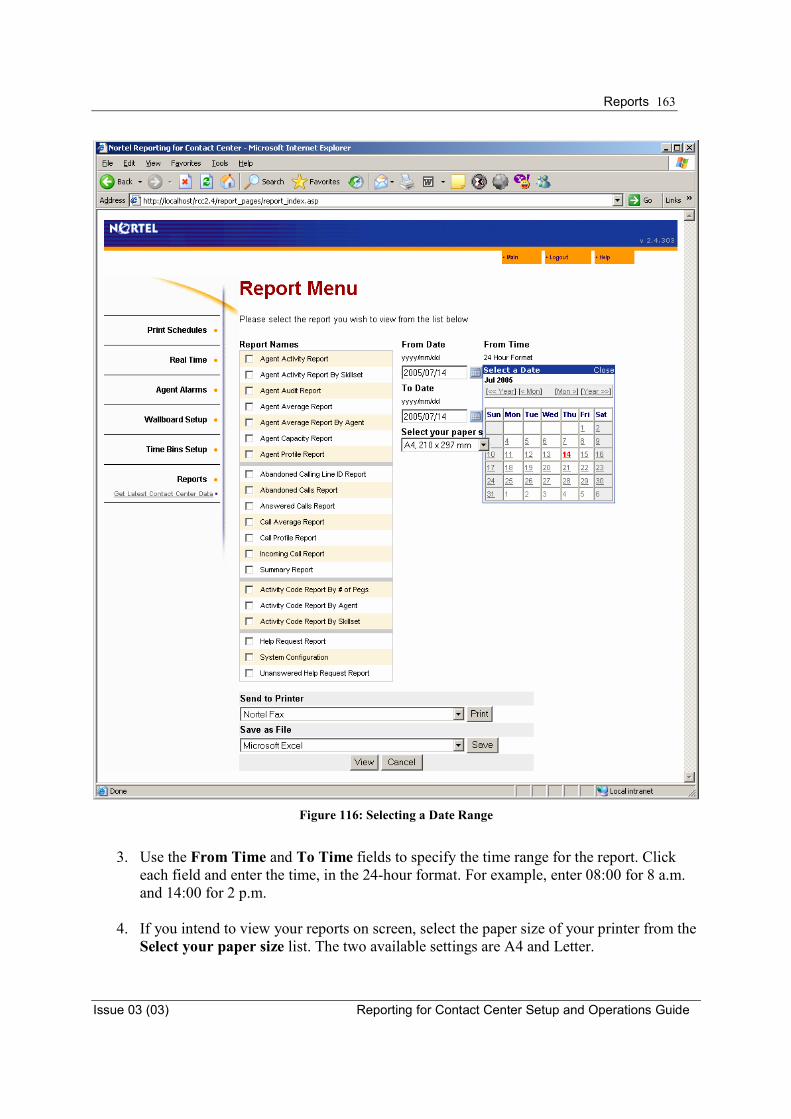
Reports 163
Issue 03 (03) Reporting for Contact Center Setup and Operations Guide
Figure 116: Selecting a Date Range
3. Use the From Time and To Time fields to specify the time range for the report. Click
each field and enter the time, in the 24-hour format. For example, enter 08:00 for 8 a.m. and 14:00 for 2 p.m.
4. If you intend to view your reports on screen, select the paper size of your printer from the
Select your paper size list. The two available settings are A4 and Letter.
Reports
Reporting for Contact Center Setup and Operations Guide Issue 03 (03)
164
You can determine which paper size is applicable by viewing the properties of your printer (Because most printer properties are different, consult your printer documentation or manufacturer for further assistance). Typically, you can locate information about your printer from Control Panel. Select Printers and Faxes, locate your printer, right-click, and select Properties.
Note: Even if you do not have a printer attached to your PC, select a paper size (if this is the case, you can select either paper size).
Note: You do not need to select a paper size if you intend to send your reports directly to the printer or save to file.
5. In the Send to Printer list, select the printer to which you want to send the reports. Click
Print. You can also choose to, save to file or view on screen. After you select Skillsets and (where applicable) agents and activity codes, the Print Status screen shown in Figure 117: Print Status Page appears. This screen displays the print status of your report and the time remaining until the report prints.
Note: Depending on the reports you select, you may be prompted to select Skillsets, Agents, Activity Codes, or any combination of these. The only reports that do not require further input are Help Request Report, Unanswered Help Request Report, and System Configuration. For information about selecting Skillsets, refer to Selecting Skillsets. For information about selecting Agents, refer to Selecting Agents. For information about selecting Activity Codes, refer to Selecting Activity Codes.
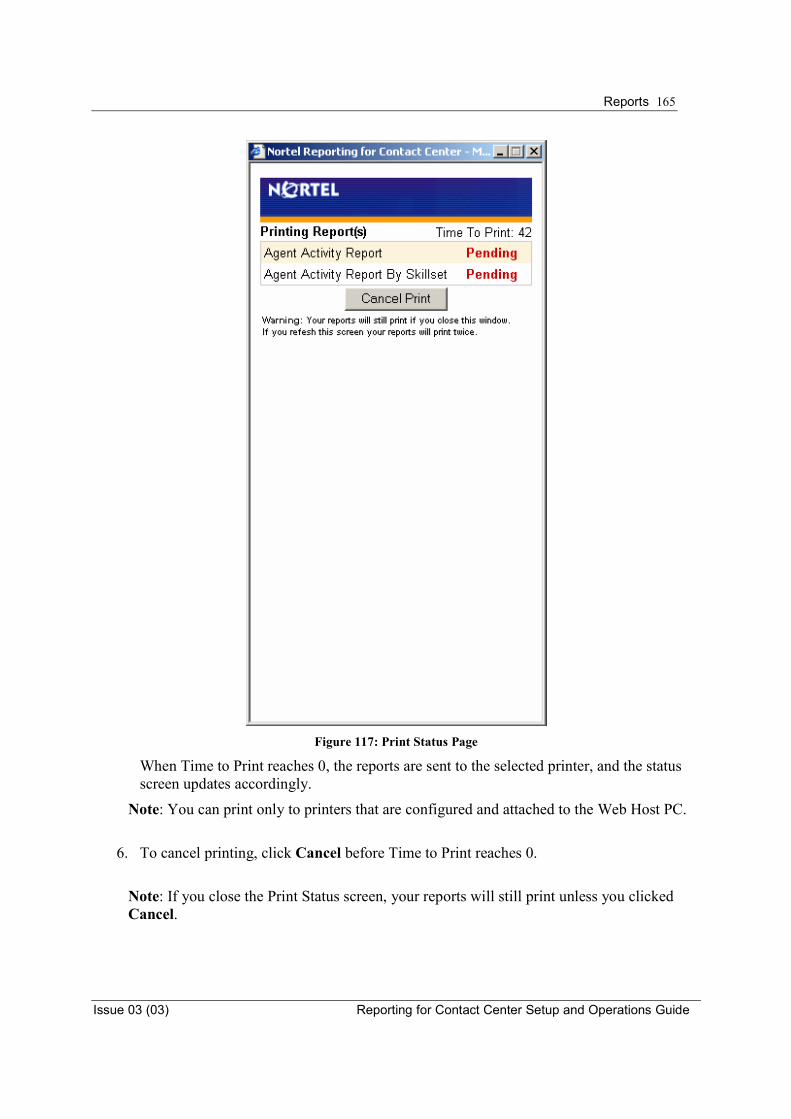
Reports 165
Issue 03 (03) Reporting for Contact Center Setup and Operations Guide
Figure 117: Print Status Page
When Time to Print reaches 0, the reports are sent to the selected printer, and the status screen updates accordingly.
Note: You can print only to printers that are configured and attached to the Web Host PC.
6. To cancel printing, click Cancel before Time to Print reaches 0.
Note: If you close the Print Status screen, your reports will still print unless you clicked Cancel.
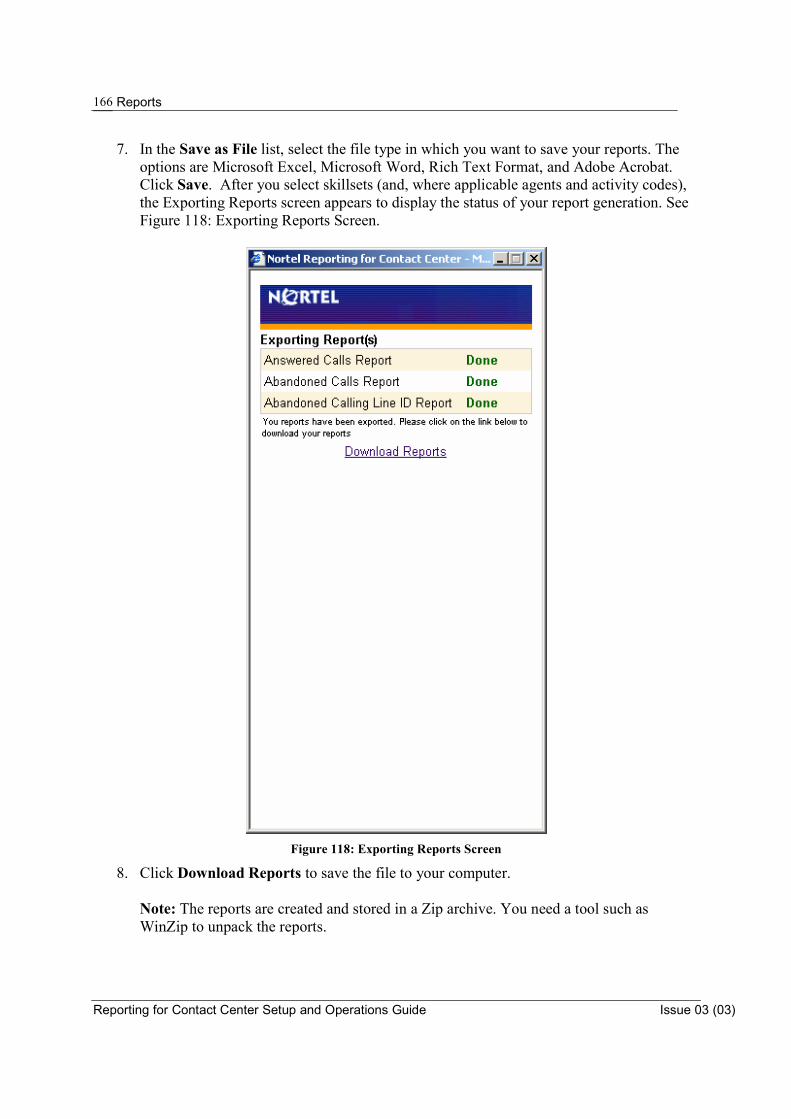
Reports
Reporting for Contact Center Setup and Operations Guide Issue 03 (03)
166
7. In the Save as File list, select the file type in which you want to save your reports. The options are Microsoft Excel, Microsoft Word, Rich Text Format, and Adobe Acrobat. Click Save. After you select skillsets (and, where applicable agents and activity codes), the Exporting Reports screen appears to display the status of your report generation. See Figure 118: Exporting Reports Screen.
Figure 118: Exporting Reports Screen
8. Click Download Reports to save the file to your computer.
Note: The reports are created and stored in a Zip archive. You need a tool such as WinZip to unpack the reports.
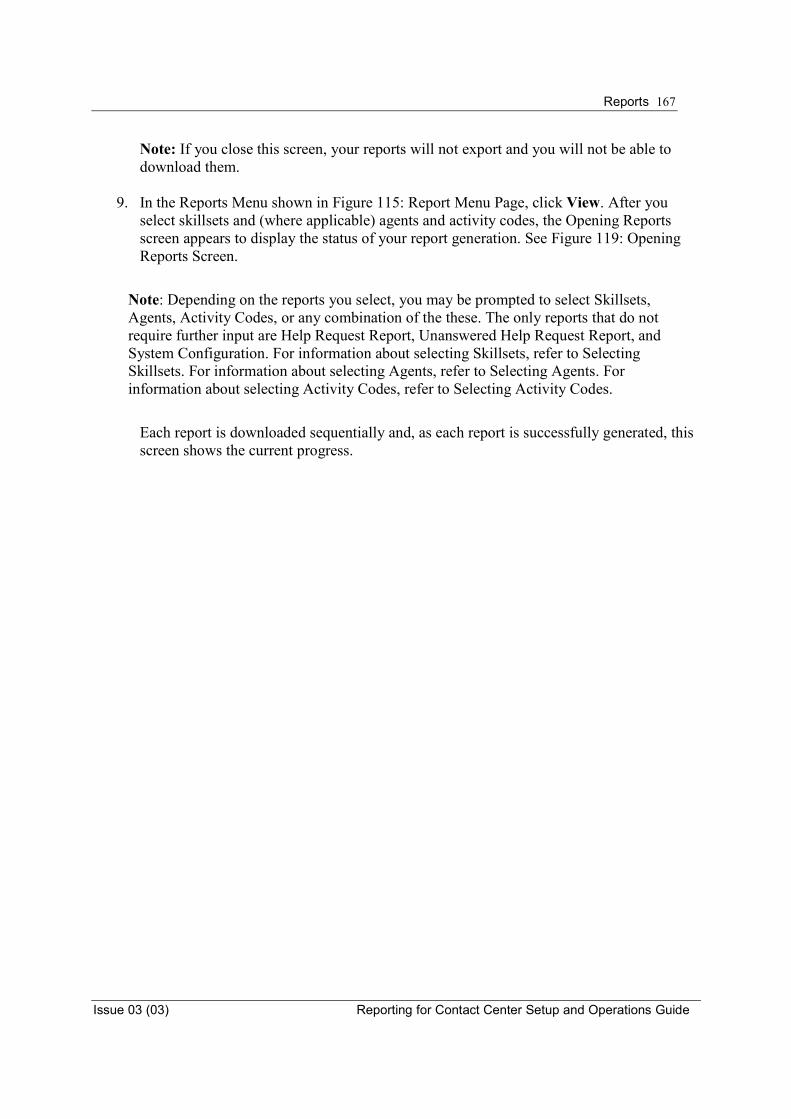
Reports 167
Issue 03 (03) Reporting for Contact Center Setup and Operations Guide
Note: If you close this screen, your reports will not export and you will not be able to download them.
9. In the Reports Menu shown in Figure 115: Report Menu Page, click View. After you select skillsets and (where applicable) agents and activity codes, the Opening Reports screen appears to display the status of your report generation. See Figure 119: Opening Reports Screen.
Note: Depending on the reports you select, you may be prompted to select Skillsets, Agents, Activity Codes, or any combination of the these. The only reports that do not require further input are Help Request Report, Unanswered Help Request Report, and System Configuration. For information about selecting Skillsets, refer to Selecting Skillsets. For information about selecting Agents, refer to Selecting Agents. For information about selecting Activity Codes, refer to Selecting Activity Codes.
Each report is downloaded sequentially and, as each report is successfully generated, this screen shows the current progress.
Reports
Reporting for Contact Center Setup and Operations Guide Issue 03 (03)
168
Figure 119: Opening Reports Screen
Note: If you close this window, your remaining reports will not be generated.
Note: Depending on the reports you select, you may be prompted to select Skillsets, Agents, Activity Codes, or any combination of the these. The only reports that do not require further input are Help Request Report, Unanswered Help Request Report, and System Configuration. For information about selecting Skillsets, refer to Selecting Skillsets. For information about selecting Agents, refer to Selecting Agents. For information about selecting Activity Codes, refer to Selecting Activity Codes.
Reports 169
Issue 03 (03) Reporting for Contact Center Setup and Operations Guide
Selecting Skillsets If you select to generate any of the following reports, you must choose the Skillsets for which you want the reports generated:
� Answered Calls Report � Abandoned Calls Report � Abandoned Calling Line ID Report � Agent Capacity Report � Call Average Report � Agent Average Report � Agent Profile Report � Agent Activity Report � Agent Audit Report � Activity Code Report by Skillset � Activity Code Report by Agent � Activity Code Report by # of Pegs � Summary Report � Call Profile Report � Incoming Call Report � Agent Activity Report By Skillset � Agent Average Report By Agent
If you select to generate one of the reports in the list, the Select Skillsets page shown in Figure 120: Select Skillsets Page appears.

Reports
Reporting for Contact Center Setup and Operations Guide Issue 03 (03)
170
Figure 120: Select Skillsets Page
• For information about using Skillset selection lists, see page 80. • For information about using Favorites, see page 81.
Selecting Agents If you select to generate the Agent Audit Report, you must select the Agents for which you want to generate the report. The Select Agents page shown in Figure 121: Select Agents Page appears.

Reports 171
Issue 03 (03) Reporting for Contact Center Setup and Operations Guide
Figure 121: Select Agents Page
Use the following techniques to select Agents from the Agent List.
� Click an unselected Agent name once to select it (it will be highlighted) and remove the highlight from any other currently selected Agents.
� Click a selected (highlighted) Agent name once to unselect it. Note that if other Agents
are selected and you click an Agent name, you unselect all the other Agents except the Agent name you clicked.
� To select multiple Agents, hold down the Control (CTRL) key while you select multiple
Agents.
� To select a range of Agents, click an Agent at the beginning (or end) of the range, hold down the Shift key, and click the Agent at the end (or beginning) of the range.
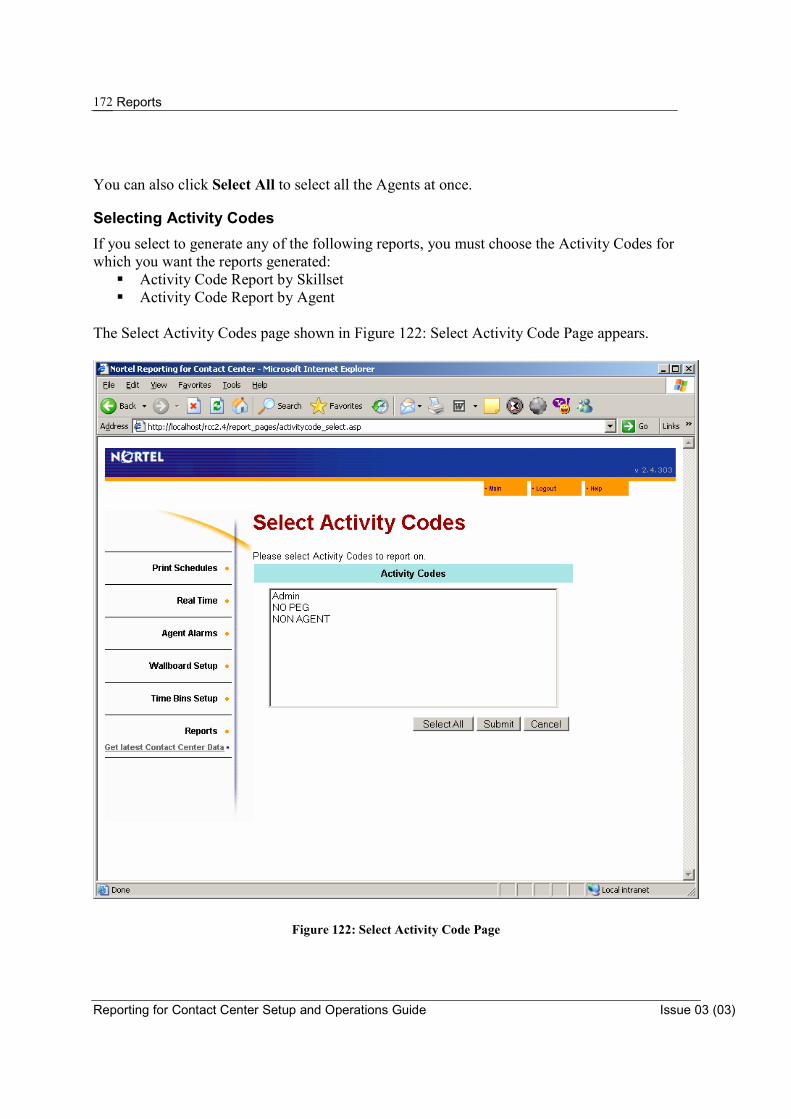
Reports
Reporting for Contact Center Setup and Operations Guide Issue 03 (03)
172
You can also click Select All to select all the Agents at once.
Selecting Activity Codes If you select to generate any of the following reports, you must choose the Activity Codes for which you want the reports generated:
� Activity Code Report by Skillset � Activity Code Report by Agent
The Select Activity Codes page shown in Figure 122: Select Activity Code Page appears.
Figure 122: Select Activity Code Page

Reports 173
Issue 03 (03) Reporting for Contact Center Setup and Operations Guide
Use the following techniques to select Activity Codes from the Activity Code List.
� Click an unselected Activity Code once to select it (it will be highlighted) and remove the highlight from any other currently selected Activity Code.
� Click a selected (highlighted) Activity Code once to unselect it.
Note: If other Activity Codes are selected and you click an Activity Code, you unselect all the other Activity Codes except the Activity Code you clicked.
� To select multiple Activity Codes, hold down the Control (CTRL) key while you select
multiple Activity Codes.
� To select a range of Activity Codes, click an Activity Code at the beginning (or end) of the range, hold down the Shift key, and click the Activity Code at the end (or beginning) of the range.
You can also click Select All to select all the Activity Codes at once.
Get Latest Contact Center Data link Click the Get Latest Contact Center Data link (see Figure 115: Report Menu Page) to request the most recent report data from the Contact Center. For example, if you specified that Nortel Reporting for Contact Center should poll the Contact Center every 30 minutes for report data, clicking Get Latest Contact Center Data ensures that the most recent data is received from the Contact Center before the reports are generated. Any Contact Center activity that has occurred since the last Report Data update is included in the reports. When you click Get Latest Contact Center Data, the screen shown in Figure 123: Get Latest Contact Center Data appears. This screen shows the number of seconds remaining until the latest data is obtained from the Contact Center.
Figure 123: Get Latest Contact Center Data

Reports
Reporting for Contact Center Setup and Operations Guide Issue 03 (03)
174
To reset the timer, click Get Latest Contact Center Data again while the screen is open. By having the data request timer reset in the same screen prevents the User from making multiple repeated and rapid data requests from the Contact Center.

Reports Explained 175
Issue 03 (03) Reporting for Contact Center Setup and Operations Guide
Reports Explained
Overview
This chapter describes each report, examples of suggested usage, a description of the fields within the report, and the formulas used to derive the values displayed in the fields. The chapter also includes examples of call reports. For each report, the following information is provided:
� Summary Provides a brief description of the intent of the report.
� Logic Provides a short description of the content logic of a report.
� FAQ Provides Frequently Asked Questions (FAQ) and answers about the report.
� Report Field Provides a description of each of the fields in the report.
� Formulas Where applicable, the formula that is used to derive the information is included.
Table 3: Abbreviations for Formula Descriptions shows the abbreviations used in the formula descriptions.
Data Item Name Abbreviation Presented Calls Answered AnC Transactions Answered AnCT Transactions Answered by Agent AnCTA Transactions Answered by Voicemail AnCTVM Transactions Answered by Operator AnCTO Transactions Answered by Overflow Agent AnCTOA Transactions Answered by Non Agent AnCTNA Transactions Answered by Another Skillset AnCTAS Presented Calls Unstaffed AnCUS Presented Calls Answered before the Primary Alert AnCLP Presented Calls Answered after the Primary Alert (before secondary) AnCGP Presented Calls Answered after Secondary Alert AnCS Presented Calls Handled in another Skillset AnCOS Presented Calls that Left Skillset Via Overflow LSSOT Presented Calls that Left Skillset Via Routing Table LSSRT Presented Calls Abandoned AbC Outgoing Calls Out Break / Wrap Up BkT Activity Code Pegs ACP Indirect Calls PreI Direct Calls PreD Presented Calls Pre (PreI + PreD) Presented Calls Unstaffed UsC Presented Calls Disconnected Dis
7
Reports Explained
Reporting for Contact Center Setup and Operations Guide Issue 03 (03)
176
Table 3: Abbreviations for Formula Descriptions
Explanation of Terms Used within Reporting for Contact Center
This section describes terms used in Nortel Reporting for Contact Center reports or terms common in Contact Centers.
Report Definitions This part of the section describes all the definitions used within the reports in Reporting for Contact Center. Abandoned Call An abandoned call is a Contact Center call that was terminated by the caller before they were connected to an agent or other endpoint like voicemail or operator for example. Abandoned Time Bins A series of six user-defined time intervals is used in the statistical analysis of Abandoned Calls. Nortel Reporting for Contact Center provides a report on the numbers and percentages of incoming calls abandoned within each of the intervals specified in the Abandoned Time Bins. A seventh Time Bin is also used, to gather information about all calls that are abandoned after the interval specified by the sixth user-defined Abandoned Time Bin. Answered Time Bins A series of six user-defined time intervals used in the statistical analysis of Answered Calls. Nortel Reporting for Contact Center provides a report on the numbers and percentages of incoming calls answered within each of the intervals specified in the Answered Time Bins. A seventh Time Bin is also used to gather information about all calls that are answered after the interval specified by the sixth user-defined Answered Time Bin. Activity Code Pegs Each time an Activity Code is entered it pegs or increases the usage count for that Activity Code in increments of one. Activity Code reports display the usage counts or peg totals for the Activity Codes included within the reports. Control Directory Number The Control Directory Number (Control DN or CDN) is the extension number of a Contact Center Skillset. The Control DN is used to transfer calls to a Skillset. The installer is responsible for assigning a Control DN to each Skillset before the Skillset can be enabled. Delayed Call The Delayed Answer feature reduces Toll Charges for queuing calls. This feature prevents the Contact Center from answering calls and playing greetings when no agents are available. When Delay Answer is activated within a Skillset, waiting callers hear a ring back tone. When a call comes in on a line for a Skillset that does not have any available agents, the call is not answered until either the Delay Answer time elapses or an Agent becomes available, whichever comes first.

Reports Explained 177
Issue 03 (03) Reporting for Contact Center Setup and Operations Guide
These Delayed Calls have reached the Skillset, but the routing table has not answered them. Toll charges do not accrue until the routing table answers the call. Direct Call Direct Calls are calls answered by the skillset through the “Lines Administration” table in the CallPilot Manager. A layman would think of the direct calls as being the number of calls the contact center handles. A person phoning a Contact Center once generates a single Direct Call. Disconnected Call A call terminated by a Disconnect Call Routing Step, or a call that has no more routing steps and has not been routed anywhere (by a poorly configured routing table, for example). Grade of Service A figure that represents the level of service provided to incoming callers based on Contact Center response times. The figure is calculated as follows: ((Pre - AnCS - AbC) / Pre) * 100 Indirect Call Every time a direct call is transferred between Skillsets, the call is counted as an Indirect Call. Therefore, a call to a Contact Center generates a single Direct Call and zero or more Indirect Calls. Indirect Calls are those moved to a Skillset by means of the Move to Skillset Call Routing step or manually transferred to the Skillset Control DN. Note that a non-agent transferring a non-Contact Center call to the Control DN of a Skillset will count as a Direct Call because this call has not been handled by either a human member of another Skillset nor has it been handled by the call routing of another skillset. However, an Agent transferring a non-Contact Center call to the Control DN of another Skillset will count as an Indirect Call because that call has been transferred by a member of another Skillset. Multimedia Call A call generated and processed through the Nortel Multimedia Contact Center. A button can be placed on a business’s website that can be clicked to initiate a multimedia call to a Skillset in the Contact Center. The multimedia call may involve a Follow-me browser session, a Chat session, and may include a real time voice portion. Outgoing Calls Calls made to a number outside the BCM. Not an internal or intercom call. Presented Calls The number of all calls presented to a Skillset. This is the summation of the Direct and Indirect calls. Presented Calls Abandoned Abandoned Calls are calls in which the incoming caller hangs up when the call is held at the Skillset Control DN. Presented Calls Answered
Reports Explained
Reporting for Contact Center Setup and Operations Guide Issue 03 (03)
178
An Answered Call is a Call that was presented to a Skillset and it was neither abandoned nor disconnected and it was answered within this Skillset. It could be answered by an Agent or voicemail. Presented Calls Answered after the Primary Alert (before secondary) The number of calls that are answered after the time specified as the primary alert threshold, but before the time specified as the secondary alert threshold. Presented Calls Answered before the Primary Alert The number of calls that are answered before the time specified as the primary alert threshold. Presented Calls Answered after Secondary Alert The number of calls that are answered after the time specified as the secondary alert threshold. Presented Calls Handled in Another Skillset Calls that left a Skillset and entered another Skillset because of an Overflow Rule or any other Routing Condition or Step, or that were manually transferred to another Skillset. The fate of these calls is recorded in the reports for the Skillset they have moved to, not in the Skillset they leave. Presented Calls that Left Skillset via Overflow Number of calls that leave a particular Skillset due to an overflow rule. The overflow rules that cause a call to leave a Skillset are as follows:
� Move to Skillset � Transfer to Mailbox � Transfer to Auto Attendant � Transfer to Operator � Transfer to CCR
Presented Calls that Left Skillset via Routing Table Number of calls that leave a particular Skillset due to the Routing Table step. This number does not include calls that have left the Skillset because of the Transfer to External or the Transfer to Extension routing steps. PSTN Call Public Switched Telephone Network Call (a “regular” voice call). Statistical Time Bins A collective term for the Abandoned Time Bins and the Answered Time Bins. Time to Answer The total amount of time a call was active in Skillset call routing (queuing) or receiving other call treatments, such as delayed answer. This time also includes the time that a call is ringing on an Agent’s handset before it is answered. Time to Abandon Time elapsed until the call was abandoned, which is displayed in the format: hh:mm:ss Transactions Answered

Reports Explained 179
Issue 03 (03) Reporting for Contact Center Setup and Operations Guide
Each Agent that treats a call is recorded as a separate transaction. For example, if a call is answered by Agent A and transferred to Agent B, each portion of the call is considered a Transaction of the same call. The number of calls is 1, but the number of transactions is 2.
Transactions Answered by Agent The number of Transactions answered by an Agent or Agents. Transactions Answered by Another Skillset The number of Transactions answered in a Skillset other than the one the call arrived in. Transactions Answered by Non Agent The number of Transactions Non Agents (people not logged in to the Contact Center) answer. Transactions Answered by Operator The number of Transactions the Operator answers. Transactions Answered by Overflow Agent The number of Transactions the Overflow Agents answer. Transactions Answered by Voicemail The number of Transactions directed to Voice mail. This includes either the Skillset Mailbox or an Agent Mailbox; the statistics do not distinguish between types of mailbox. Unstaffed Calls Calls presented to a Skillset when no Agents are logged in to handle the calls.
Agent Definitions This part of the section describes terms used for Agents in the Nortel Reporting for Contact Center reports or terms common in Contact Centers. Available Time The length of time that an Agent is available to answer Incoming Calls. Break Time Also known as Post Call Completion, the time allocated to Agents following the end of an Incoming Contact Center Call. Break Time is commonly allocated to Agents to allow them to complete post-call administrative tasks. Incoming Contact Center Time The time an Agent is engaged in an Incoming Contact Center Call, either a PSTN or a Multimedia call. Incoming Non-Contact Center Call Time Time spent on incoming non-Contact Center calls, which are calls that came in directly to the Agent’s DID line and not through the Contact Center. Internal Call Time The time an Agent spends on internal calls.
Reports Explained
Reporting for Contact Center Setup and Operations Guide Issue 03 (03)
180
Not Ready Time The duration of time when either the Agent invoked the Make Not Ready feature to indicate they are not Available to take calls or the Contact Center placed the calls in the Not Ready state because the Agent did not answer a call or is active on an internal call. The Not Ready State occurs when an Agent is accessing their voicemail or in a telset **config session. Additionally, an Agent is in the Not Ready state when making an Outgoing call on a digital line until the call is answered. Outgoing Call Time The time an Agent spends on calls made to a number outside the BCM. It is not the time spent on an internal or intercom call which is the Internal Call Time. Supervisor Monitor Time The time a Supervisor spends monitoring an Agent.

Reports Explained 181
Issue 03 (03) Reporting for Contact Center Setup and Operations Guide
Reports
This section describes reports and provides example reports.
Answered Calls Report Figure 124: Answered Calls Report shows an example of the Answered Calls report.
Figure 124: Answered Calls Report
Summary For each of the Skillsets in a report, the total number of answered calls is displayed. For each Time Bin, the number of calls answered within that Time Bin is displayed. This figure is also presented as a percentage of the total number of answered calls. The Answered Calls report shows how long calls wait before they are connected to an Agent. Voice calls and Multimedia calls are listed separately and totaled for each Skillset, and for the report total.
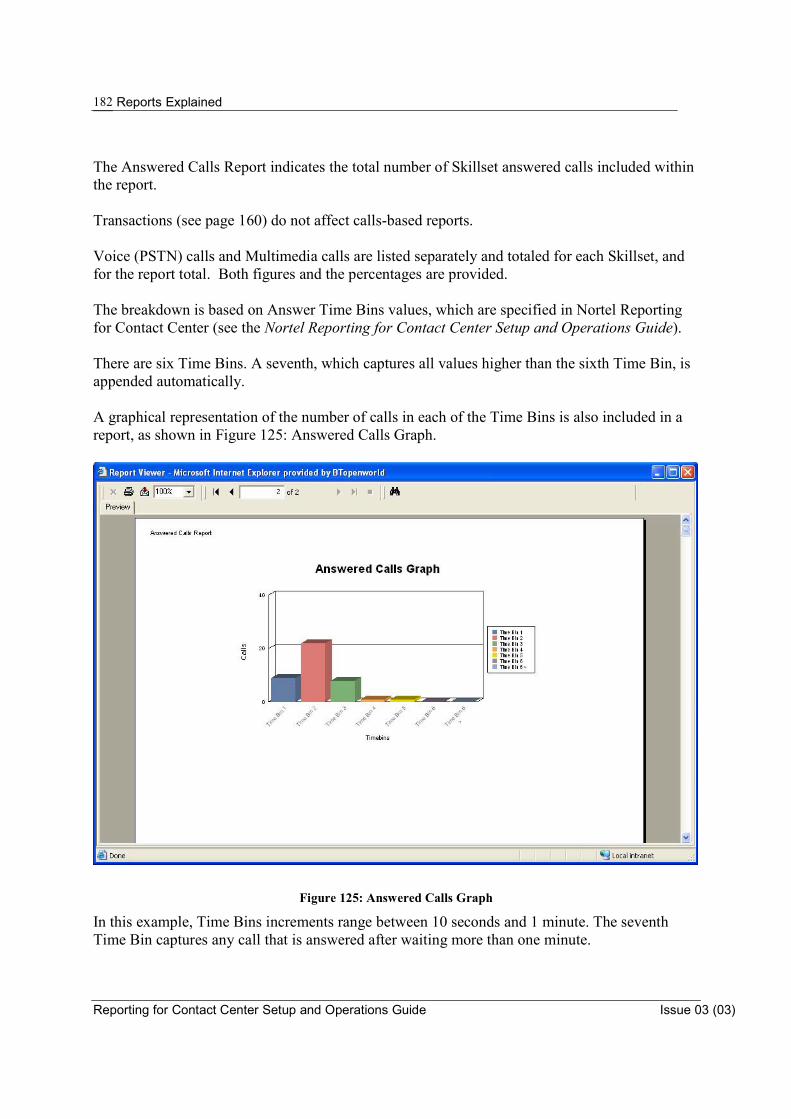
Reports Explained
Reporting for Contact Center Setup and Operations Guide Issue 03 (03)
182
The Answered Calls Report indicates the total number of Skillset answered calls included within the report. Transactions (see page 160) do not affect calls-based reports. Voice (PSTN) calls and Multimedia calls are listed separately and totaled for each Skillset, and for the report total. Both figures and the percentages are provided. The breakdown is based on Answer Time Bins values, which are specified in Nortel Reporting for Contact Center (see the Nortel Reporting for Contact Center Setup and Operations Guide). There are six Time Bins. A seventh, which captures all values higher than the sixth Time Bin, is appended automatically. A graphical representation of the number of calls in each of the Time Bins is also included in a report, as shown in Figure 125: Answered Calls Graph.
Figure 125: Answered Calls Graph
In this example, Time Bins increments range between 10 seconds and 1 minute. The seventh Time Bin captures any call that is answered after waiting more than one minute.

Reports Explained 183
Issue 03 (03) Reporting for Contact Center Setup and Operations Guide
Any Skillset Supervisor can review the figures of an Answered Calls Report to determine how long the calls answered in Skillsets had to wait before they were answered. The report example shows large data values in the first and second Time Bins, indicating that incoming callers are generally answered within 10, 20, or 30 seconds. Very few calls wait longer than 30 seconds to be answered. No callers are required to wait more than a minute. For the average call length, refer to the Call Average Report (see Page 244). Logic Calls that are transferred directly between Agent sets are not included in this report. This report covers only the time that calls waited in the Skillset queues before being answered. It includes Direct and Indirect Contact Center calls. Each Skillset in the report is displayed with the Time Bins that are configured for that report. FAQ
Why are the Time Bin calculations incorrect in the Total rows and columns?
This is by design. There are different Time Bins configured for certain Skillsets. When selecting multiple Skillsets with these different Time Bins the Total row across the top takes the earliest Time Bin, the latest Time Bin and works out even Time Bins between the 2 values. Report Fields A description of each of the fields in the report.
Presented Calls Answered
Number of presented calls answered for that Skillset/total
Formula
Presented Calls Answered = Anc = Anc(direct)+ Anc(indirect)
Time Bins 1 - 6
Each Presented Call that was answered within the time period stipulated in the relevant Time Bin is illustrated in the figure as a percentage of the total number of answered calls.
Formula
Not Applicable (N/A)

Reports Explained
Reporting for Contact Center Setup and Operations Guide Issue 03 (03)
184
Abandoned Calls Report
Figure 126: Abandoned Calls Report shows an example of an Abandoned Calls Report.
Figure 126: Abandoned Calls Report
Summary For each of the Skillsets included in the report, the total number of abandoned calls is displayed. Each Abandoned Call within a Time Bin is also displayed. This figure is also represented as a percentage of the total number of Abandoned Calls. This report indicates the number of calls received and how long Abandoned Calls waited before they hung up. Voice (PSTN) calls and Multimedia calls are listed separately and totaled for each Skillset and for the report total. Both figures and the percentages are provided. The breakdown is based on Abandoned Time Bin values, which are specified in Nortel Reporting for Contact Center (see Abandoned Time Bins in the section, Report Definitions).
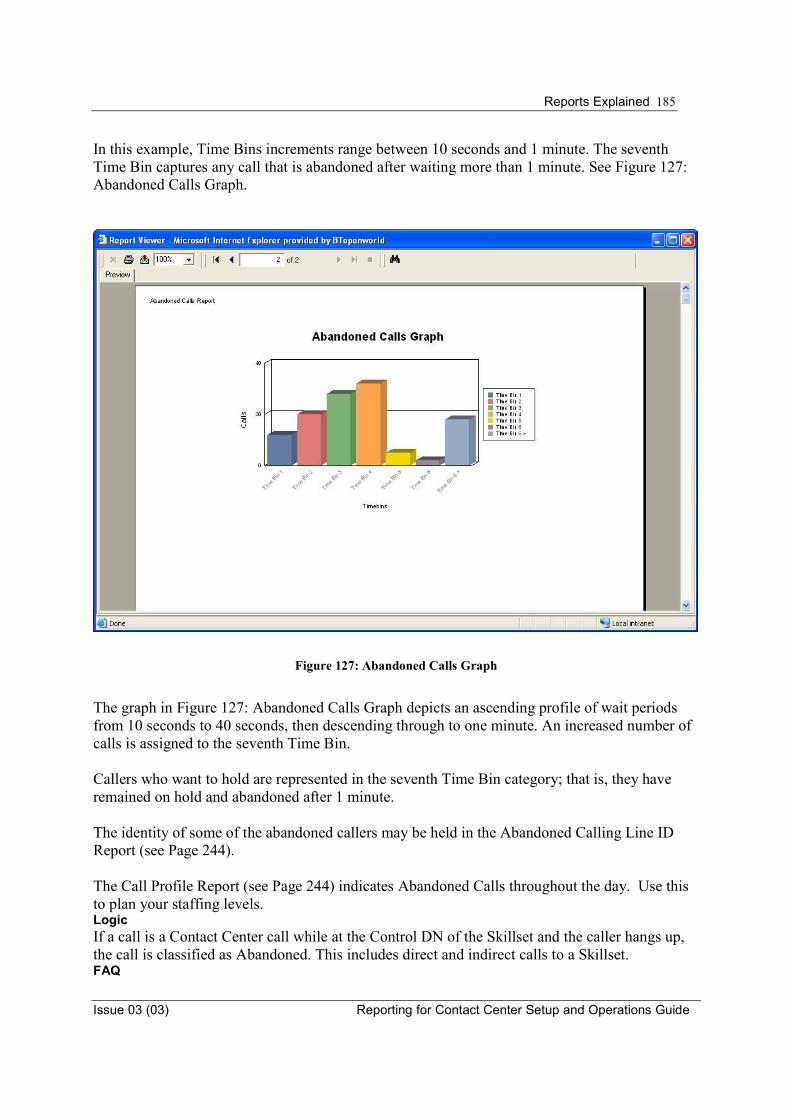
Reports Explained 185
Issue 03 (03) Reporting for Contact Center Setup and Operations Guide
In this example, Time Bins increments range between 10 seconds and 1 minute. The seventh Time Bin captures any call that is abandoned after waiting more than 1 minute. See Figure 127: Abandoned Calls Graph.
Figure 127: Abandoned Calls Graph
The graph in Figure 127: Abandoned Calls Graph depicts an ascending profile of wait periods from 10 seconds to 40 seconds, then descending through to one minute. An increased number of calls is assigned to the seventh Time Bin. Callers who want to hold are represented in the seventh Time Bin category; that is, they have remained on hold and abandoned after 1 minute. The identity of some of the abandoned callers may be held in the Abandoned Calling Line ID Report (see Page 244). The Call Profile Report (see Page 244) indicates Abandoned Calls throughout the day. Use this to plan your staffing levels. Logic If a call is a Contact Center call while at the Control DN of the Skillset and the caller hangs up, the call is classified as Abandoned. This includes direct and indirect calls to a Skillset. FAQ
Reports Explained
Reporting for Contact Center Setup and Operations Guide Issue 03 (03)
186
Why are the Time Bin calculations incorrect in the Total rows and columns?
This is by design. There are different Time Bins configured for certain Skillsets. When selecting multiple Skillsets with these different Time Bins the Total row across the top takes the earliest Time Bin, the latest Time Bin and works out even Time Bins between the 2 values. Report Fields A description of each of the fields in the report.
Presented Calls Abandoned
Number of presented calls abandoned for that Skillset / total
Formula
Presented Calls Abandoned = AbC = AbC(direct) + AbC(indirect)
Time Bins 1 - 6
Each Presented Call that was abandoned within the time period stipulated in the relevant Time Bin is included in the figure and as a percentage of the total number of abandoned calls.
Formula
N/A

Reports Explained 187
Issue 03 (03) Reporting for Contact Center Setup and Operations Guide
Abandoned Calling Line ID Report An example Calling Line ID Report is shown in Figure 10: Calling Line ID Report.
Figure 128: Abandoned Calling Line ID Report
Summary This report displays the Calling Line Identification, if known, of Abandoned Calls. The Abandoned Calling Line ID Report lists various items regarding the Abandoned Calls for the Skillsets included within the report. The data and the time at which each call was abandoned is listed, together with the Calling Line ID of the call (when it is known) and the amount of time the caller waited before hanging up. Calling ID is not always known. When Nortel Reporting for Contact Center does not know the Calling Line ID, it displays the channel or line number on which the call arrived.
Reports Explained
Reporting for Contact Center Setup and Operations Guide Issue 03 (03)
188
This report can be used as the basis for a call-back policy in which abandoned callers are called as a courtesy follow-up. This could be done selectively, so that only the callers who held for the longest times before abandoning were called back (as they were the ones who were most determined to get through and to make use of your services). The report could also be checked for the Calling Line ID of Gold or preferred customers (remember that you can search through on-screen reports, see Page 244). This report can also be used to determine the number of abandoned calls before or after the Contact Center is closed, which can be used as an indicator of whether the Contact Center should be staffed for a longer period, perhaps by a reduced skeleton staff, on a rotational basis. Alternately, early and late callers could be advised of your hours of operation. The Call Profile Report (see Page 244) will also indicate where the peaks of the Abandoned Calls occur throughout the day. The Abandoned Calling Line ID report will also indicate those callers who abandoned. Logic This report only includes Contact Center calls that incoming callers terminate while held on a Control DN and before they have reached an Agent. This includes direct and indirect calls to the Skillset. If there is no Calling Line Identification (CLID), the report displays either the target line (or physical line, if that is not known) that carried the call. FAQ
What is displayed in the CLID column if the Calling Line Identity is not known?
The CLID column in the report will display the: • CLID; • Target Line (if the CLID is not known); or • Physical Line (if the CLID and the Target Line are not known).
Report Fields A description of each of the fields in the report.
Date
Date of Abandoned Call.
Time of Day
Time of Abandoned Call.
CLID

Reports Explained 189
Issue 03 (03) Reporting for Contact Center Setup and Operations Guide
Displays the CLID of the caller. If the CLID is not available, then the Target Line number is displayed and if that is not available, then the Physical Line is displayed. If the Call was a multimedia browser call only, the CLID is presented as the name that was specified in the Multimedia Contact Center Setup page in the Multimedia Contact Center (MMCC).
Time to Abandon
Time elapsed until the call was abandoned, time to abandon. hh:mm:ss
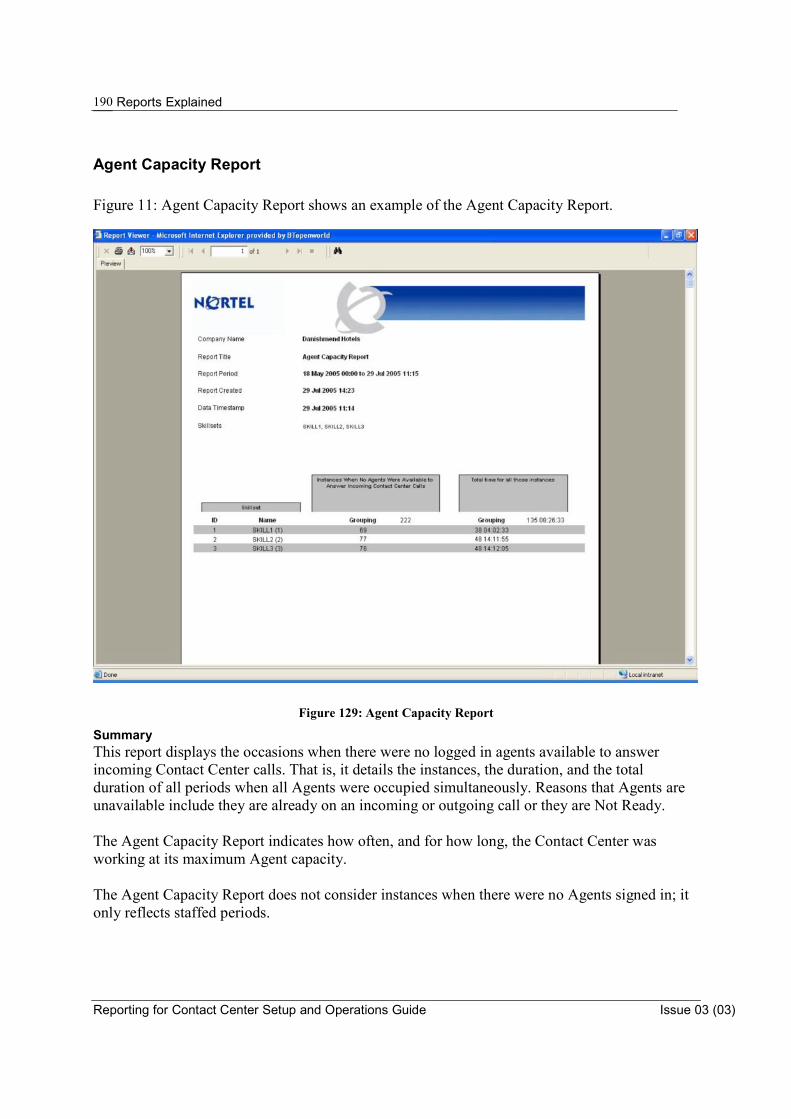
Reports Explained
Reporting for Contact Center Setup and Operations Guide Issue 03 (03)
190
Agent Capacity Report Figure 11: Agent Capacity Report shows an example of the Agent Capacity Report.
Figure 129: Agent Capacity Report
Summary This report displays the occasions when there were no logged in agents available to answer incoming Contact Center calls. That is, it details the instances, the duration, and the total duration of all periods when all Agents were occupied simultaneously. Reasons that Agents are unavailable include they are already on an incoming or outgoing call or they are Not Ready. The Agent Capacity Report indicates how often, and for how long, the Contact Center was working at its maximum Agent capacity. The Agent Capacity Report does not consider instances when there were no Agents signed in; it only reflects staffed periods.
Reports Explained 191
Issue 03 (03) Reporting for Contact Center Setup and Operations Guide
Note: If the Report includes more than one Skillset, the Grouping values represent the cumulative amount of time for those periods that all Agents were unavailable, totalled for all Skillsets, and the number of instances totalled for each Skillset.
Logic The time is noted when all logged-in Agents are unavailable to answer a call and when an Agent becomes available to take a call. The duration between these two times indicates the amount of time that there were no agents available. Report Fields A description of each of the fields in the report.
ID
Skillset ID
Name
Name of Skillset
Instances when No Agents were Available to Answer Incoming Contact Center Calls
The number of separate occasions when there were no agents available to answer incoming Contact Center calls. Formula N/A
Total time for all those instances
Duration of all of the instances when no agents were available to answer an incoming Contact Center call. Formula N/A

Reports Explained
Reporting for Contact Center Setup and Operations Guide Issue 03 (03)
192
Help Request Report Figure 130: Help Request Report shows an example of a Help Request report.
Figure 130: Help Request Report
Summary The Help Request report lists the instances of each help request that a supervisor answered. Arejected request is rejected on an Unanswered Help Request Report. If the Calling Line ID is not shown, the line number is shown. Usage Example The Contact Center Supervisory Help feature is intended for use in ‘emergency’ situations when an Agent is on a call and urgently requires the help of a Supervisor without alerting the caller that a supervisor is being called in. It is not intended for routine consultations or when the Agent is not on a Contact Center call.
Reports Explained 193
Issue 03 (03) Reporting for Contact Center Setup and Operations Guide
However, new Agents to your Contact Center will most likely use the Help feature more frequently during their initial training period. This report can be used to monitor the progress of new Agents, because over time, they should make fewer Help requests. It can also be used to determine if a particular customer has complex or troublesome requirements. The Calling Line ID (where known) is displayed and associated with each Help Request. This provides a record of who phoned into the Contact Center and the Agent who requested the additional help. Logic Every help request a supervisor answers is recorded within the reports database. Report Fields A description of each of the fields in the report.
Supervisor ID
Login ID of the supervisor who answered the help request.
Supervisor Name
Name of the supervisor who answered the help request.
Time of Day
Time at which the help request was made.
Date
Date on which the help request was made.
CLID
Calling Line Identification of the caller, if this is not available then the Target Line number is displayed, if that is not available then the Physical Line number is displayed.
Agent ID
Login ID of the Agent who issued the help request.
Agent Name
Name of the Agent who issued the help request.
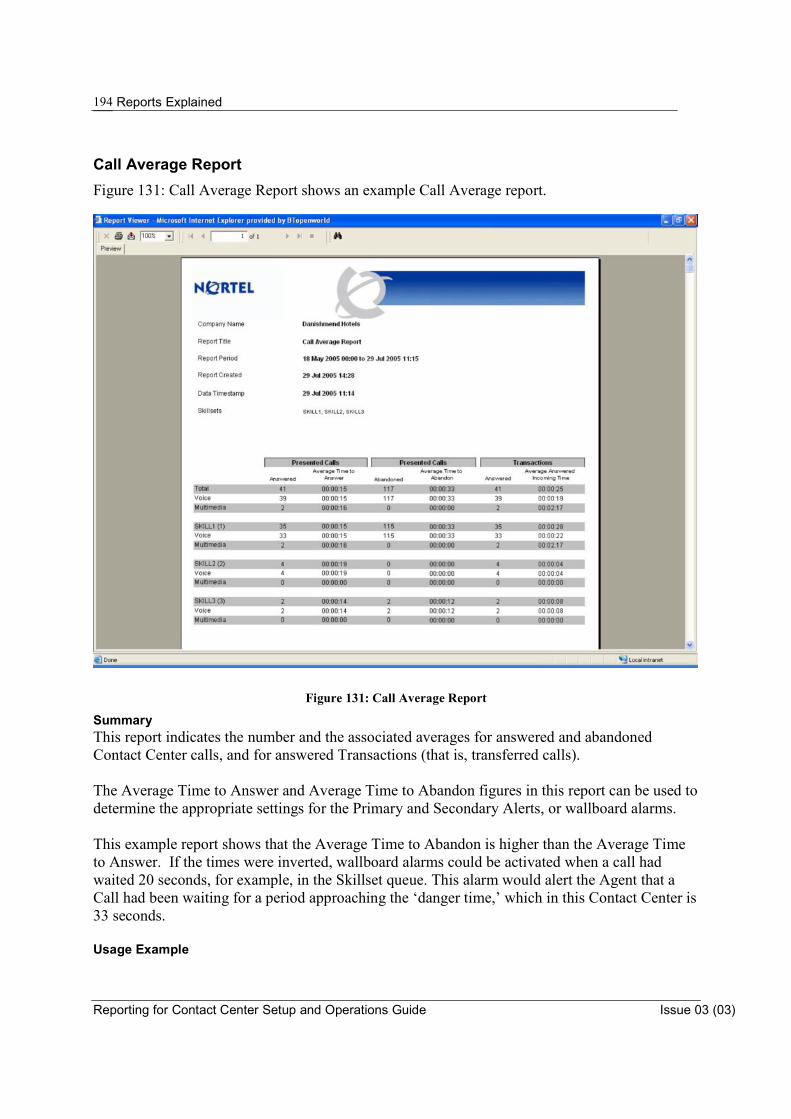
Reports Explained
Reporting for Contact Center Setup and Operations Guide Issue 03 (03)
194
Call Average Report Figure 131: Call Average Report shows an example Call Average report.
Figure 131: Call Average Report
Summary This report indicates the number and the associated averages for answered and abandoned Contact Center calls, and for answered Transactions (that is, transferred calls). The Average Time to Answer and Average Time to Abandon figures in this report can be used to determine the appropriate settings for the Primary and Secondary Alerts, or wallboard alarms. This example report shows that the Average Time to Abandon is higher than the Average Time to Answer. If the times were inverted, wallboard alarms could be activated when a call had waited 20 seconds, for example, in the Skillset queue. This alarm would alert the Agent that a Call had been waiting for a period approaching the ‘danger time,’ which in this Contact Center is 33 seconds. Usage Example
Reports Explained 195
Issue 03 (03) Reporting for Contact Center Setup and Operations Guide
The report can also be used to determine the Average Incoming Call Duration. This can then be used to determine an appropriate Agent Alarm for Incoming Calls, so that an Agent who has a call which lasts longer than the average duration is highlighted on the Agent Details Real Time Screen. The Average Incoming Call Duration can also be compared with the values in the Agent Average Report (see Page 244). Logic This report is devised based on Skillset. Each Skillset is shown on a separate line. Each line displays a total for the field and an average time (to answer, to abandon, and the answered incoming call time) for the call type. FAQ
Why does the number of Answered and Abandoned calls not equal the number of Incoming Call Transactions?
The Incoming Call Transactions are the number of Answered Calls and so does not include the number of Abandoned calls.
Why does the number of Answered calls not equal the number of Incoming Call Transactions?
Each Agent treating a call is recorded as a separate transaction. If a call is answered by Agent A and transferred to Agent B, two transactions will be recorded for the same call. So the number of Answered calls will be 1 but the number of Answered Incoming Call Transactions will be 2. Report Fields A description of each of the fields in the report.
(Presented Calls) Answered
The number of calls answered.
Formula
(Presented Calls) Answered = AnC
(Presented Calls) Average Time to Answer
The average time for a Contact Center call to be answered.
Formula
(Presented Calls) Average Time to Answer = (Total Time To Answer) / AnC
(Presented Calls) Abandoned
The number of Abandoned Calls.
Formula
(Presented Calls) Abandoned = AbC
(Presented Calls) Average Time to Abandon
Reports Explained
Reporting for Contact Center Setup and Operations Guide Issue 03 (03)
196
The average time for a Contact Center call to be Abandoned.
Formula
(Presented Calls) Average Time to Abandon = (Total Time To Abandon) / AbC
(Transactions) Answered
The number of Contact Center transactions.
Formula
(Transactions) Answered = AnCT
(Transactions) Average Answered Incoming Time
The average duration of a Contact Center call.
Formula
(Transactions) Average Answered Incoming Duration = (Total Incoming Call Time) / AnCT
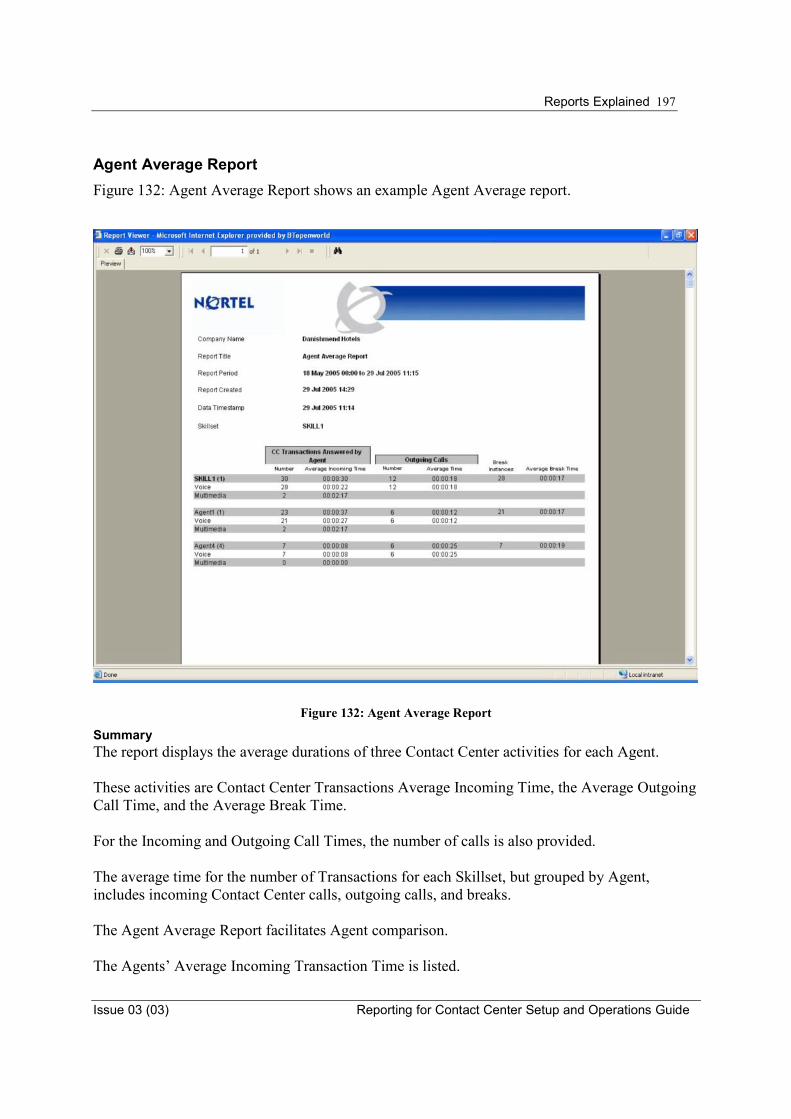
Reports Explained 197
Issue 03 (03) Reporting for Contact Center Setup and Operations Guide
Agent Average Report Figure 132: Agent Average Report shows an example Agent Average report.
Figure 132: Agent Average Report
Summary The report displays the average durations of three Contact Center activities for each Agent. These activities are Contact Center Transactions Average Incoming Time, the Average Outgoing Call Time, and the Average Break Time. For the Incoming and Outgoing Call Times, the number of calls is also provided. The average time for the number of Transactions for each Skillset, but grouped by Agent, includes incoming Contact Center calls, outgoing calls, and breaks. The Agent Average Report facilitates Agent comparison. The Agents’ Average Incoming Transaction Time is listed.

Reports Explained
Reporting for Contact Center Setup and Operations Guide Issue 03 (03)
198
Note: This report covers incoming Transactions, not only Direct and Indirect Incoming Calls (see Page 155).
Usage Example for Average Incoming Transaction Time If an Agent is exceeding the average on Incoming calls, the following factors may exist:
� Perhaps the Agent requires additional training.
� Perhaps the Agent is adept in dealing with difficult or complex calls and the other
Agents are transferring these calls to this Agent because of the Agent’s expertise.
� Perhaps the Agent is more attentive to the incoming callers.
� If an Agent is taking far less than average time to deal with their Incoming Calls, perhaps they have developed their speed are simply fast, or they are less attentive to the incoming caller, or perhaps they are transferring their calls to other Agents.
The Average Break Time indicates which Agents are taking full breaks and which Agents are not. Usage Example for Average Break Time If some Agents are, on average, taking 30 seconds and everyone else is taking 15 seconds, then perhaps the Break Time for everyone could be reduced to 20 seconds, and then, after a period of acclimatisation, reduced to 15 seconds.
! Note: If you request this report for Skillset 1, you receive a report listing all the Agents who were logged in to Skillset 1, including multi-Skillset Agents. The report will include all the activity of those Agents, regardless of the Skillset of the call they answered. If the report is limited to the Agent activity for the requested Skillset only, you need to run the same report for each Skillset that each of the multi-Skillset Agents was logged into, to receive a complete report of their activity.
Logic The report is broken down by Skillset and then grouped by Agent. Activity conducted by any Agent logged in to any of the Skillsets included within the report is shown for all Skillsets in which they were logged, not just the requested Skillsets, during the report time period. The report, therefore, shows the activity for multi-Skillset agents for all of the Skillsets into which they were logged into during the report time period. FAQ
Why is the number of CC Transactions Answered by Agent in this report not the same as the number of Answered Incoming Call Transactions in the Call Average Report?
Reports Explained 199
Issue 03 (03) Reporting for Contact Center Setup and Operations Guide
The main difference between both of the reports is that the Call Average Report displays calls placed in that particular Skillset only, whereas the Agent Average Report displays all Call Transactions for the Agent regardless of what Skillset they have logged into. The advantage of this is that the Agent Average Report enables the User to view Agent activity regardless of what Skillset they were logged in to without having to generate a report for each Skillset. You can use the Agent Average Report By Agent to view a break down for each Skillset only. Report Fields A description of each of the fields in the report.
(CC Transactions Answered by Agent) Number
The instance total for an Agent on a Transaction, this includes all calls including Transfers and overflows.
Formula
(CC Transactions Answered by Agent) Number = AnCTA
(CC Transactions Answered by Agent) Average Incoming Time
The average call time for an Agent on a Transaction, this includes all calls including Transfers and overflows.
Formula
(CC Transactions Answered by Agent) Average Incoming Time = (Total Incoming Call Time) / AnCTA
(Outgoing Calls) Number
The instance total for an Agent on an outgoing call.
Formula
(Outgoing Calls) Number = Out
(Outgoing Calls) Average Time
The average call time for an Agent on an outgoing call
Formula
(Outgoing Calls) Average Time = (Total Outgoing Call Time) / Out
Break Instances

Reports Explained
Reporting for Contact Center Setup and Operations Guide Issue 03 (03)
200
The instance total for an Agent on break (wrap-up) time.
Formula
Break Instances = BkT
Average Break Time
The average time for an Agent on break (wrap-up) time.
Formula
Average Break Time = (Total Break Time) / BkT
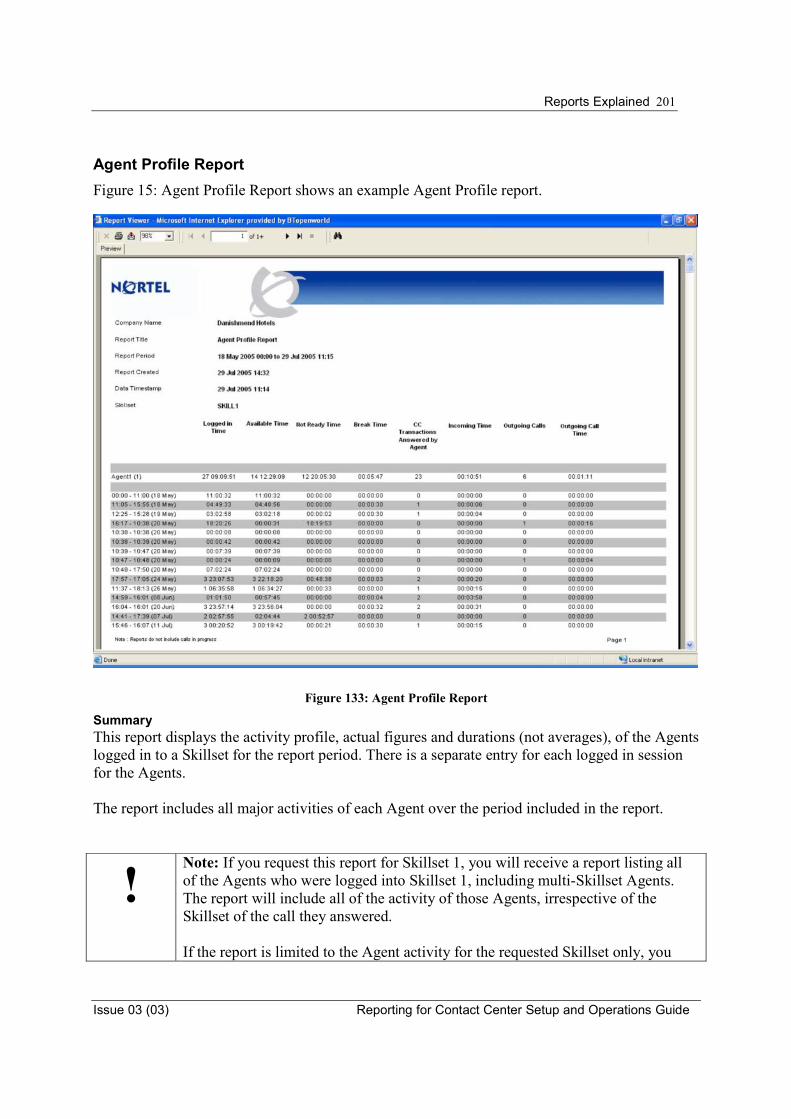
Reports Explained 201
Issue 03 (03) Reporting for Contact Center Setup and Operations Guide
Agent Profile Report Figure 15: Agent Profile Report shows an example Agent Profile report.
Figure 133: Agent Profile Report
Summary This report displays the activity profile, actual figures and durations (not averages), of the Agents logged in to a Skillset for the report period. There is a separate entry for each logged in session for the Agents. The report includes all major activities of each Agent over the period included in the report.
! Note: If you request this report for Skillset 1, you will receive a report listing all of the Agents who were logged into Skillset 1, including multi-Skillset Agents. The report will include all of the activity of those Agents, irrespective of the Skillset of the call they answered. If the report is limited to the Agent activity for the requested Skillset only, you
Reports Explained
Reporting for Contact Center Setup and Operations Guide Issue 03 (03)
202
need to run the same report for each Skillset that each of the multi-Skillset Agents was logged into to receive a complete report of their activity.
Logic The report is generated for a single Skillset, but will display the profile for any Agent activity from any Skillset into which they were logged for the period of the report, even if they were not a multi-Skillset Agent. This activity is displayed for the length of time that an Agent is logged into the selected Skillset. Note: This report does not display all activity for an Agent, therefore totaling all of the
Agent activity times will not equal the logged-in time.
Certain times can overlap. For example, an Agent with an answered call on hold who is also making an outgoing call will accrue incoming and outgoing durations simultaneously. Furthermore, an Agent may log out while on an incoming call. They can, therefore, accrue incoming time beyond their logged in session. Additionally, other activities not included in the report are Ringing State and Not Available state. Ringing State is when calls are ringing on the Agent’s handset and Not Available, or Busy, state is the time when Agents are not available to take calls. These activities do not form part of the logged in time, nor the total logged in time.
!You CANNOT add up the totals in this report and expect them to match the total logged-in time for the Agent.
FAQ
Does the Agent Profile report include activity for each Agent?
Yes, and it will include Agent Activity across all Skillsets they have logged in to. See FAQ under Agent Average Report, Page 198, for an explanation of why the report does this. Note: The activities in this report will not add up to the login time it is not meant to do this,
it is possible for an agent to perform activities outside of their login, that is, Answer a Call, Logout, Disconnect from the call 1 minute later.
Note: This report does not include Ringing, Not Available or Supervisor Monitoring time. Report Fields A description of each of the fields in the report.
(Agent) Logged-in time
Total logged-in time for the Agent in the selected Skillset.
Formula
N/A
Reports Explained 203
Issue 03 (03) Reporting for Contact Center Setup and Operations Guide
(Agent) Available Time
Time available in the selected Skillset.
Formula
N/A
(Agent) Not Ready Time
Total Not Ready time of the logged-in time for the selected Skillset.
Formula
N/A
(Agent) Break Time
The total break time for the logged-in time for the selected Skillset.
Formula
N/A
CC Transactions Answered by Agent
Number of Transactions answered during the total logged-in time for the selected Skillset.
Formula
AnCT
(Agent) Incoming Time
The total incoming Contact Center call time recorded during the total logged-in time for the selected Skillset.
Formula
N/A
(Agent) Outgoing Calls
Number of outgoing call instances during the total logged-in time for the selected Skillset.
Formula
Out
(Agent) Outgoing Call Time

Reports Explained
Reporting for Contact Center Setup and Operations Guide Issue 03 (03)
204
The total outgoing call time recorded during the total logged-in time for the selected Skillset.
Formula
N/A

Reports Explained 205
Issue 03 (03) Reporting for Contact Center Setup and Operations Guide
Agent Activity Report Figure 134: Agent Activity Report shows an example Agent Activity report.
Figure 134: Agent Activity Report
Summary The Agent Activity report displays the activity of Agents grouped by Skillset. It is further broken down based on Agent. This report shows the durations of the range of activities that Agents have performed for the report period. (This list differs from the list in the Agent Profile Report, see Page 201.)
! Note: If you request this report for Skillset 1, you will receive a report listing all of the Agents who were logged into Skillset 1, including multi-Skillset Agents. The report will also include all of the activity of those Agents, irrespective of the Skillset of the call they answered. If the report is limited to the Agent activity for the requested Skillset only, you need to run the same report for each Skillset that each of the multi-Skillset Agents
Reports Explained
Reporting for Contact Center Setup and Operations Guide Issue 03 (03)
206
was logged into to receive a complete report of their activity. Logic The report is generated based on Skillset, but displays Agent activity for other Skillsets they have logged into and not only the selected Skillset in the report generation screen, even if they were not a multi-Skillset Agent. Note: This report does not display all activity for an Agent, therefore totaling all of the
Agent activity times will not equal the logged-in time.
Certain times can overlap. For example, an Agent with an answered call on hold while making an outgoing call will accrue incoming and outgoing durations simultaneously. Furthermore, an Agent may log out while on an incoming call. They can, therefore, accrue incoming time beyond their logged in session. Additionally, other activities not included in the report are Ringing State and Not Available state. Ringing State is when calls are ringing on the Agent’s handset and Not Available or Busy state is the time when Agents are not available to take calls. These activities do not form part of the logged in time nor the total logged in time.
!You CANNOT add up the times in this report up and expect them to match the total logged-in time for the Agent.
FAQ
Does the Agent Activity Report include all Agent activity for whatever Skillset they logged in to?
Yes, except for Ringing and Not Available Time.
The Not Ready Time seems to be very high?
The Not Ready Time value can be high as this can be accumulated by either the Agent invoking the Make Not Ready feature, or the Contact Center placing the calls in the Not Ready state because the Agent did not answer a call or is active on an internal call. Report Fields A description of each of the fields in the report.
(Agent) Logged-in time
Total logged-in time for the Agent in that Skillset.
Formula
N/A
(Agent) Incoming Contact Center Time
Total time spent on incoming Contact Center calls for the logged-in time of that Skillset.

Reports Explained 207
Issue 03 (03) Reporting for Contact Center Setup and Operations Guide
Formula
N/A
(Agent) Incoming Non-Contact Center Time
Total time spent on incoming non-Contact Center calls for the logged-in time of that Skillset and period selected.
Formula
N/A
(Agent) Outgoing Call Time
Total time spent on outgoing calls for the logged-in time of that Skillset.
Formula
N/A
(Agent) Break Time
Total time spent on break (wrap-up) time for the logged-in time of that Skillset.
Formula
N/A
(Agent) Not Ready Time
Total time spent in a Not Ready state for the logged-in time of that Skillset.
Formula
N/A
Supervisor Monitor Time
Total time spent monitoring Agents for the logged-in time of that Skillset.
Formula
N/A
(Agent) Internal Call Time
Total time spent on internal calls for the logged-in time of that Skillset.
Formula
N/A

Reports Explained
Reporting for Contact Center Setup and Operations Guide Issue 03 (03)
208
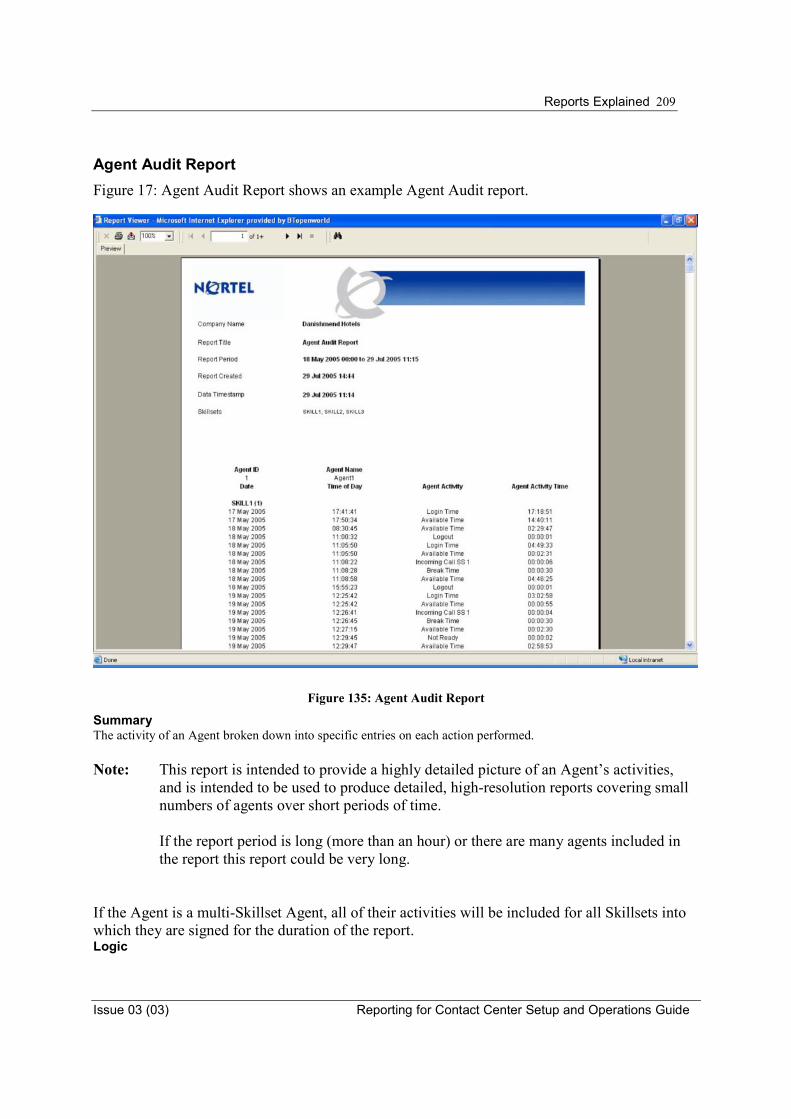
Reports Explained 209
Issue 03 (03) Reporting for Contact Center Setup and Operations Guide
Agent Audit Report Figure 17: Agent Audit Report shows an example Agent Audit report.
Figure 135: Agent Audit Report
Summary The activity of an Agent broken down into specific entries on each action performed. Note: This report is intended to provide a highly detailed picture of an Agent’s activities,
and is intended to be used to produce detailed, high-resolution reports covering small numbers of agents over short periods of time.
If the report period is long (more than an hour) or there are many agents included in the report this report could be very long.
If the Agent is a multi-Skillset Agent, all of their activities will be included for all Skillsets into which they are signed for the duration of the report. Logic
Reports Explained
Reporting for Contact Center Setup and Operations Guide Issue 03 (03)
210
This report is generated for the selected Agents who were active in the selected Skillsets for the duration of the report, and is grouped by Agent.
Note: Certain time frames can overlap. For example, an Agent with a call on hold who is making an outgoing call will accrue incoming and outgoing durations simultaneously.
Furthermore, an Agent may log out while on an incoming call. They can, therefore, accrue incoming time beyond their logged in session. Additionally, other activities not included in the report are Ringing State and Not Available state. Ringing State is when calls are ringing on the Agent’s handset and Not Available or Busy state is the time when Agents are not available to take calls. These activities do not form part of an Agent’s logged in session, therefore, they have not been included as an Agent Activity in the report.
!You CANNOT add up the times in this report and expect them to match the total logged-in time for the Agent.
FAQ
Does the Agent Audit Report include all Agent activity for multiple Skillsets?
No, the Agent Audit Report will break down the activity for each Skillset. If more Skillsets are selected, the Agent’s activities are broken down for those Skillsets too. Report Fields A description of each of the fields in the report.
Agent ID
The login ID of the Agent.
Agent Name
Name of the Agent.
Date
Activity start date.
Time of Day
Activity start time.
Agent Activity
Reports Explained 211
Issue 03 (03) Reporting for Contact Center Setup and Operations Guide
The activity type, for example, Login Time, Incoming Call SS 1, Not Ready, and Break Time.
Agent Activity Time
Duration of the activity, with the exception of Logout, which does not have a duration.
Formula
N/A
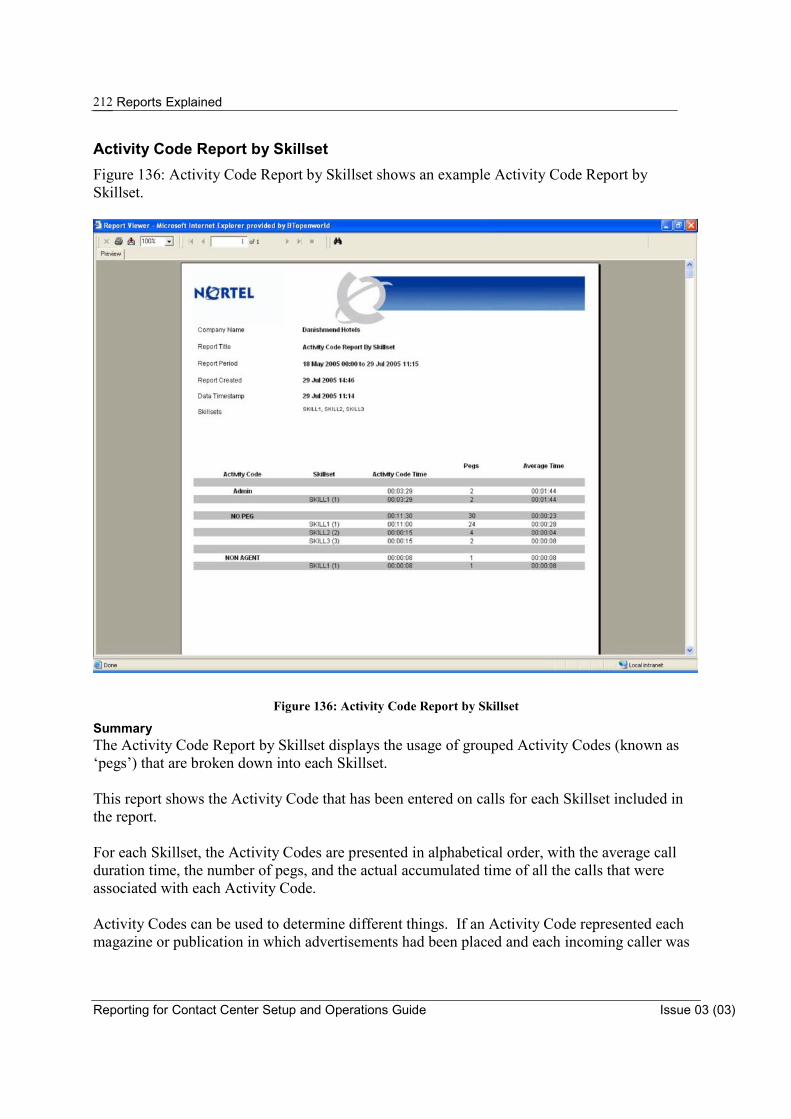
Reports Explained
Reporting for Contact Center Setup and Operations Guide Issue 03 (03)
212
Activity Code Report by Skillset Figure 136: Activity Code Report by Skillset shows an example Activity Code Report by Skillset.
Figure 136: Activity Code Report by Skillset
Summary The Activity Code Report by Skillset displays the usage of grouped Activity Codes (known as ‘pegs’) that are broken down into each Skillset. This report shows the Activity Code that has been entered on calls for each Skillset included in the report. For each Skillset, the Activity Codes are presented in alphabetical order, with the average call duration time, the number of pegs, and the actual accumulated time of all the calls that were associated with each Activity Code. Activity Codes can be used to determine different things. If an Activity Code represented each magazine or publication in which advertisements had been placed and each incoming caller was
Reports Explained 213
Issue 03 (03) Reporting for Contact Center Setup and Operations Guide
asked to indicate where they saw the advertisement they were responding to, this data can be used to indicate which publications are the most effective advertising vehicles. Activity Codes can be used to identify different types of calls. For example, a Help Desk could have Activity Codes for different products that they support. The data can then be examined to determine which products generate the most calls, or which product support calls have the highest average talk time. Activity Codes can be used to represent Agent activity as a result of a call, for example, Activity Codes could be established to represent Credit Account Application Letter Sent, or Catalog Posted, and so on. Logic This report displays Activity Code usage grouped by Activity Codes and grouped again for each included Skillset. Each line of data is a total of Activity Code pegs that were entered over the period selected in the report generation. Report Fields A description of each of the fields in the report.
Activity Code
Name of the Activity Code as entered in the Call Pilot Manager.
Skillset
Skillset the peg is recorded against.
Activity Code Time
The portion of the call when pegging was selected. Time is allocated to a peg proportionally dependent on the number of pegs entered at one time. For example, if 2 pegs are entered at the same time, the Activity Code Time for those 2 pegs will be the length of the call divided by 2. If one peg is entered, call time is recorded and another peg is then entered. The first peg will record activity time up to the point that the second peg is entered. The remainder of call time is allocated to the second peg.
Formula
N/A
Pegs
Number of times that Activity Code was used.
Formula
ACP

Reports Explained
Reporting for Contact Center Setup and Operations Guide Issue 03 (03)
214
Average Time
Average call time associated with that peg within that Skillset.
Formula
(Total Time for each peg) / ACP
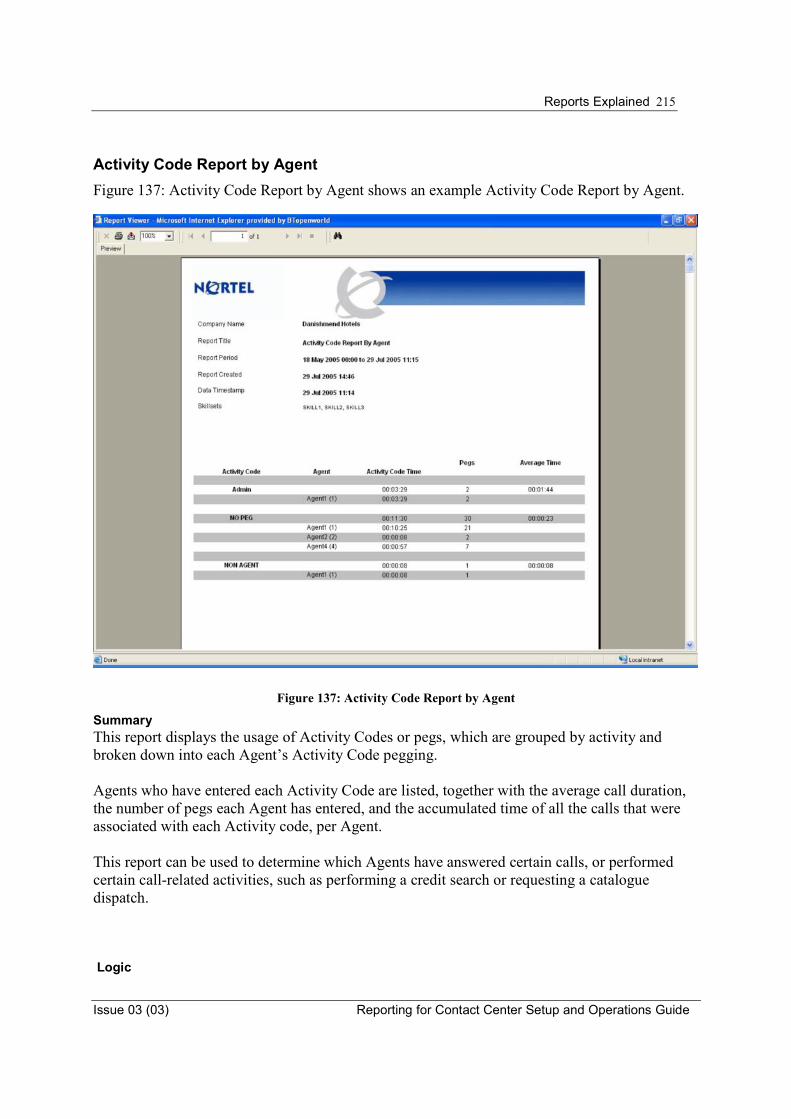
Reports Explained 215
Issue 03 (03) Reporting for Contact Center Setup and Operations Guide
Activity Code Report by Agent Figure 137: Activity Code Report by Agent shows an example Activity Code Report by Agent.
Figure 137: Activity Code Report by Agent
Summary This report displays the usage of Activity Codes or pegs, which are grouped by activity and broken down into each Agent’s Activity Code pegging. Agents who have entered each Activity Code are listed, together with the average call duration, the number of pegs each Agent has entered, and the accumulated time of all the calls that were associated with each Activity code, per Agent. This report can be used to determine which Agents have answered certain calls, or performed certain call-related activities, such as performing a credit search or requesting a catalogue dispatch.
Logic

Reports Explained
Reporting for Contact Center Setup and Operations Guide Issue 03 (03)
216
This report displays the Activity Code usage for those agents who entered any of the selected Activity Codes over the period of the report. Each line of data is the total Activity Code pegs entered over the period selected in the report. Report Fields A description of each of the fields in the report.
Activity Code
Name of the Activity Code as entered in the Call Pilot Manager.
Formula
N/A
Agent
Agent that entered the Activity Code.
Formula
N/A
Activity Code Time
The portion of the call when pegging was selected (see Activity Code Time under the report explanation of the Activity Code Report by Agent).
Formula
N/A
Pegs
Number of times that peg was used.
Formula
ACP
Average Time
Average call time associated with that peg for that Agent.
Formula
(Total Time for each peg) / ACP
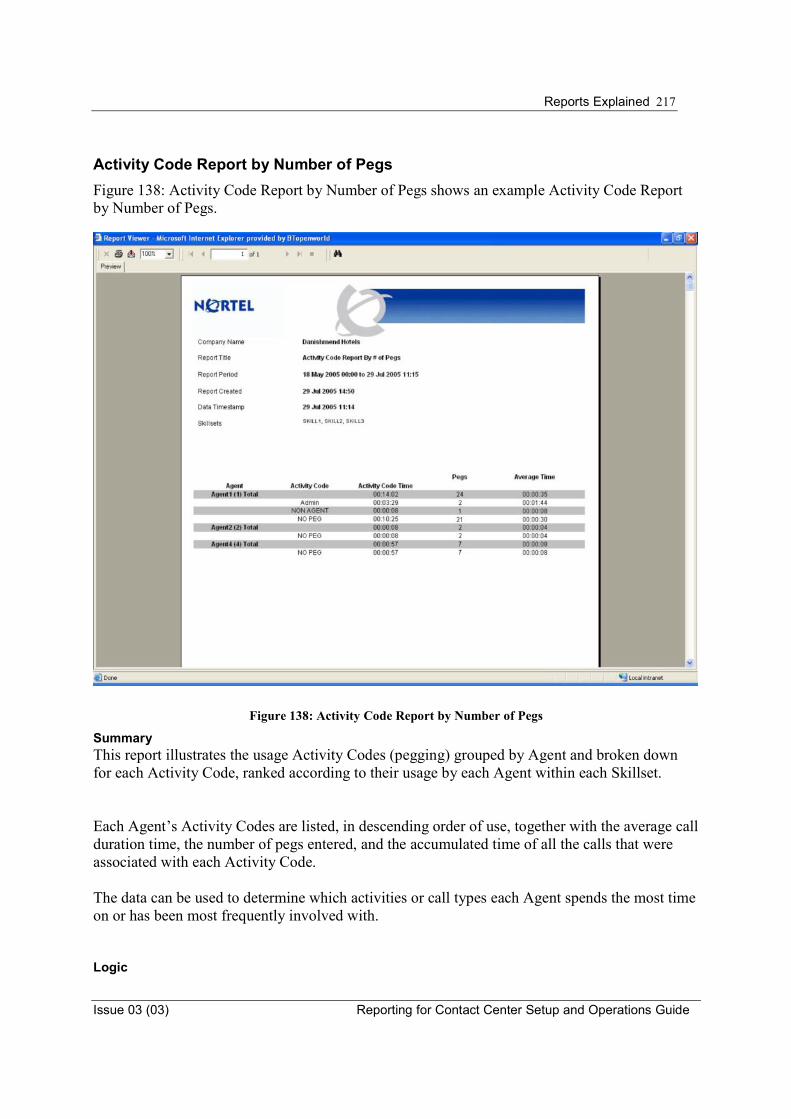
Reports Explained 217
Issue 03 (03) Reporting for Contact Center Setup and Operations Guide
Activity Code Report by Number of Pegs Figure 138: Activity Code Report by Number of Pegs shows an example Activity Code Report by Number of Pegs.
Figure 138: Activity Code Report by Number of Pegs
Summary This report illustrates the usage Activity Codes (pegging) grouped by Agent and broken down for each Activity Code, ranked according to their usage by each Agent within each Skillset.
Each Agent’s Activity Codes are listed, in descending order of use, together with the average call duration time, the number of pegs entered, and the accumulated time of all the calls that were associated with each Activity Code. The data can be used to determine which activities or call types each Agent spends the most time on or has been most frequently involved with.
Logic

Reports Explained
Reporting for Contact Center Setup and Operations Guide Issue 03 (03)
218
This report is generated for a select number of Skillsets. It groups the Activity Code usage of each Agent who entered Activity Codes in the period covered by the report, and then lists the Activity Codes together with their peg count and total durations. Each line of data is a total of Activity Code pegs for a single Activity Code, for a single Agent over the period selected for the report. Report Fields A description of each of the fields in the report.
Agent
Agent that entered the Activity Code.
Formula
N/A
Activity Code
Activity Codes used by the Agent. If this is blank, then the Agent does not have any pegs recorded against them.
Formula
N/A
Activity Code Time
The portion of the call when pegging was selected (see Activity Code Time under the report explanation of the Activity Code Report by Agent).
Formula
N/A
Pegs
Number of times a peg was used.
Formula
ACP
Average Time
Average call time associated with that peg for that Agent.
Formula

Reports Explained 219
Issue 03 (03) Reporting for Contact Center Setup and Operations Guide
(Total Time for each peg) / ACP
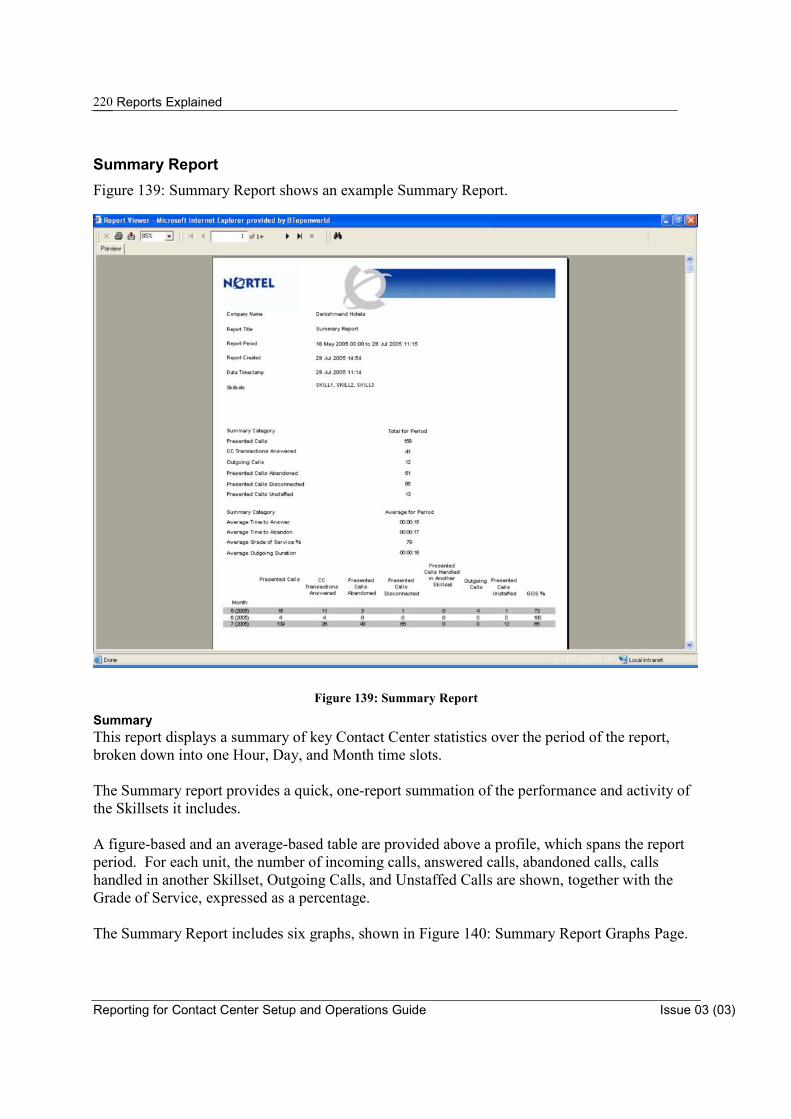
Reports Explained
Reporting for Contact Center Setup and Operations Guide Issue 03 (03)
220
Summary Report Figure 139: Summary Report shows an example Summary Report.
Figure 139: Summary Report
Summary This report displays a summary of key Contact Center statistics over the period of the report, broken down into one Hour, Day, and Month time slots. The Summary report provides a quick, one-report summation of the performance and activity of the Skillsets it includes. A figure-based and an average-based table are provided above a profile, which spans the report period. For each unit, the number of incoming calls, answered calls, abandoned calls, calls handled in another Skillset, Outgoing Calls, and Unstaffed Calls are shown, together with the Grade of Service, expressed as a percentage. The Summary Report includes six graphs, shown in Figure 140: Summary Report Graphs Page.
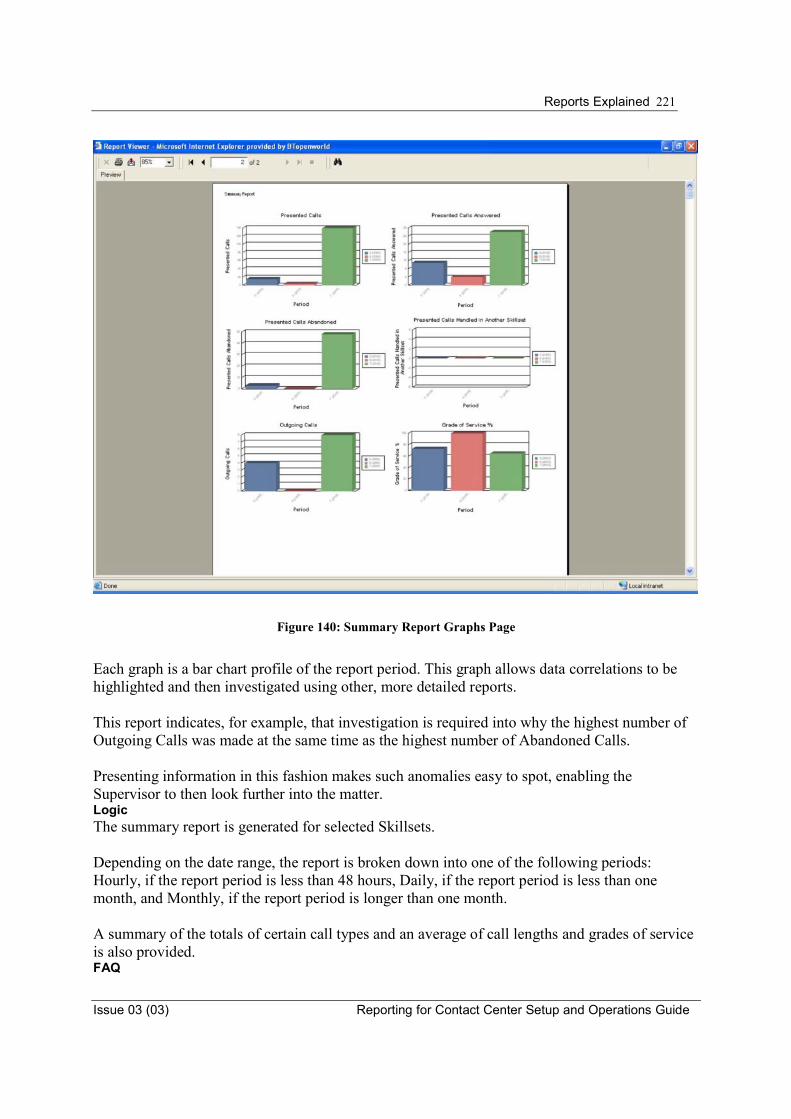
Reports Explained 221
Issue 03 (03) Reporting for Contact Center Setup and Operations Guide
Figure 140: Summary Report Graphs Page
Each graph is a bar chart profile of the report period. This graph allows data correlations to be highlighted and then investigated using other, more detailed reports. This report indicates, for example, that investigation is required into why the highest number of Outgoing Calls was made at the same time as the highest number of Abandoned Calls. Presenting information in this fashion makes such anomalies easy to spot, enabling the Supervisor to then look further into the matter. Logic The summary report is generated for selected Skillsets. Depending on the date range, the report is broken down into one of the following periods: Hourly, if the report period is less than 48 hours, Daily, if the report period is less than one month, and Monthly, if the report period is longer than one month. A summary of the totals of certain call types and an average of call lengths and grades of service is also provided. FAQ

Reports Explained
Reporting for Contact Center Setup and Operations Guide Issue 03 (03)
222
Why is the “Presented Calls Handled in Another Skillset” different to the “CC Transactions Handled In Another Skillset” in the Call Profile Report?
The Calls Handled in Another Skillset column in the Summary Report does not include Manual Transfer to Skillsets when already answered. This column is only interested in calls that have been answered the first time, not when the calls have already been answered.
Which Skillset are “CC Transactions Answered By…” answered by?
The call transactions in this report include all transactions answered in the each of the Skillsets. Remember that a transferred call borrows the Agent in to that Skillset even if they are not logged in to it. For example, AgentA transfers a call from Skillset1 to AgentB who is not logged in to that skillset (Skillset2), they are temporarily borrowed into this Skillset (Skillset2) and the Call Transactions Answered By Agent field is incremented by 2 for each answered transaction of the call.
Why does the Outgoing Calls column display 0, when the Agent Average and Agent Profile reports display outgoing calls made?
Technically outgoing calls are not related to any Skillset. Therefore, if an Agent is logged into multiple Skillsets and makes an outgoing call, since it is not a Skillset activity how do we record that call? If the agent is only logged into one Skillset, it is logged against that Skillset, for multiple-Skillset Agents it is logged against the first Skillset they log into. Report Fields A description of each of the fields in the report.
Presented Calls
Total presented calls (both direct and indirect) the Contact Center received for the selected Skillsets and time period.
Formula
Pre
CC Transactions Answered
Total answered Transactions (including transferred calls) within the Contact Center for the selected Skillsets and time period (this statistic is not the same as answered Contact Center calls)
Formula
AnCT
Outgoing Calls
Total outgoing calls made in the Contact Center for the selected Skillsets and time period.
Formula
Out
Reports Explained 223
Issue 03 (03) Reporting for Contact Center Setup and Operations Guide
Presented Calls Abandoned
Total abandoned calls within the Contact Center for the selected Skillsets and time period.
Formula
AbC
Presented Calls Disconnected
Total disconnected calls in the selected Skillsets and time period.
Formula
Dis
Presented Calls Unstaffed
Total number of calls that came into a Skillset when there were no Agents logged into the Skillset for the selected Skillsets and time period.
Formula
UsC
Average Time to Answer
Average time for calls to be answered in the selected Skillsets and time period.
Formula
(Total Time To Answer) / AnC
Average Time to Abandon
Average time for calls to be abandoned in the selected Skillsets and time period.
Formula
(Total Time to Abandon) / AbC
Average Grade of Service %
Average grade of service for Contact Center calls in the selected Skillsets and time period.
Formula
((Pre - AnCS - AbC) / Pre) * 100
Average Outgoing Duration

Reports Explained
Reporting for Contact Center Setup and Operations Guide Issue 03 (03)
224
Average outgoing call duration in the Contact Center for the selected Skillsets and time period.
Formula
(Total outgoing time) / Out
Presented Calls (Direct and Indirect)
Total presented calls (both direct and indirect) within that time slot and within the selected Skillset and time period.
Formula
Pre
CC Transactions Answered
Total answered Transactions for that time slot and within the selected Skillset and time period.
Formula
AnCT
Presented Calls Abandoned
Total abandoned calls for that time slot and within the selected Skillset and time period.
Formula
AbC
Presented Calls Disconnected
Total disconnected calls within the Contact Center for the selected Skillsets and time period.
Formula
Dis
Presented Calls Handled in Another Skillset
Total calls that arrived into a Skillset, but were moved to another Skillset through the actions of the routing table or transferred to another Skillset Control DN.
Formula
AnCOS
Outgoing Calls
Total outgoing calls for the time slot and within the selected Skillset and time period.
Reports Explained 225
Issue 03 (03) Reporting for Contact Center Setup and Operations Guide
Formula
Out
Presented Calls Unstaffed
Total calls that came into a Skillset when there were no agents logged into the Skillset for the time slot within the selected Skillsets and time period.
Formula
UsC
GOS %
Grade of service for the time slot within the selected Skillsets and time period.
Formula
((Pre - AnCS - AbC) / Pre) * 100

Reports Explained
Reporting for Contact Center Setup and Operations Guide Issue 03 (03)
226
Call Profile Report Figure 141: Call Profile Report shows an example Call Profile report.
Figure 141: Call Profile Report
Summary This report provides a profile of the Transactions within the Contact Center, broken down into Hour, Day, and Month. This report demonstrates numbers of calls presented to the Skillsets in the report, and the number Answered, Abandoned, Disconnected, Answered by Agents, Voicemail, Operator, Overflow Agents, Non-Agents and Other Skillsets during a report period. It also presents the Grade of Service, expressed as a percentage. This report can be used to determine the fate of calls profiled in a report. A Call Profile report can indicate the number of calls in various time slots and if calls are Answered by Agents in a Skillset, for example. The Call Profile Report can also be used to help determine staffing levels and call peaks on a particular day or for a particular period.
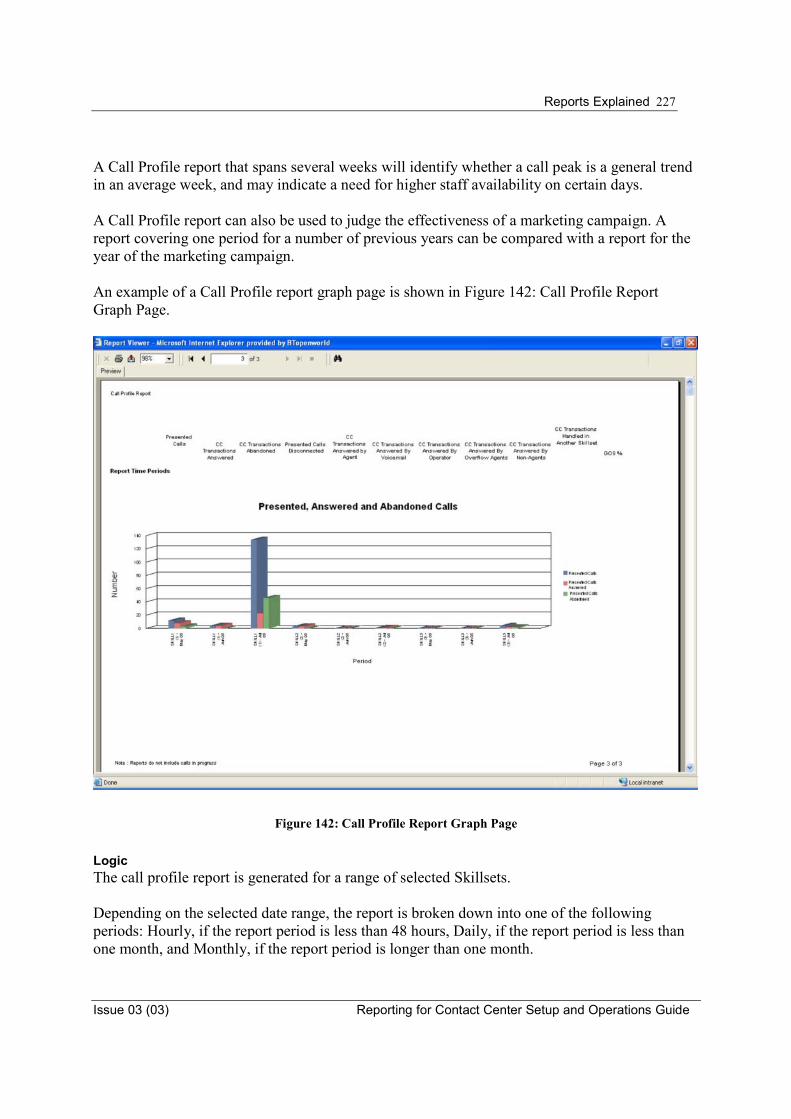
Reports Explained 227
Issue 03 (03) Reporting for Contact Center Setup and Operations Guide
A Call Profile report that spans several weeks will identify whether a call peak is a general trend in an average week, and may indicate a need for higher staff availability on certain days. A Call Profile report can also be used to judge the effectiveness of a marketing campaign. A report covering one period for a number of previous years can be compared with a report for the year of the marketing campaign. An example of a Call Profile report graph page is shown in Figure 142: Call Profile Report Graph Page.
Figure 142: Call Profile Report Graph Page
Logic The call profile report is generated for a range of selected Skillsets. Depending on the selected date range, the report is broken down into one of the following periods: Hourly, if the report period is less than 48 hours, Daily, if the report period is less than one month, and Monthly, if the report period is longer than one month.
Reports Explained
Reporting for Contact Center Setup and Operations Guide Issue 03 (03)
228
Each line of data represents a total of each statistic within the Contact Center for the selected report period. FAQ
How does Voicemail answer calls in the Contact Center?
Voicemail calls are answered if a call has overflowed or transferred to Voicemail, or if the call is transferred to the Auto Attendant after it has been answered by the Contact Center, that is, the CCR Tree.
How does a non-Agent answer a call?
A non-Agent is someone who is not logged into the Contact Center. A non-Agent answers a call that has arrived directly to their DN either through the routing table, or by F70 transfer.
Are “CC Transactions Handled in Another Skillset” calls transferred from one Agent to another, or internal tranfers?
These are call transactions that have been handled in another Skillset regardless of whether it has been answered or not. This can include transferring to a Skillset CDN either through the routing table, or by manual F70 transfer.
Which Skillset are “CC Transactions Answered By…” answered by?
The call transactions in this report include all transactions answered in the each of the Skillsets. Remember that a transferred call borrows the Agent in to that Skillset even if they are not logged in to it. For example, AgentA transfers a call from Skillset1 to AgentB who is not logged in to that skillset (Skillset2), they are temporarily borrowed into this Skillset (Skillset2) and the Call Transactions Answered By Agent field is incremented by 2 for each answered transaction of the call. Report Fields A description of each of the fields in the report.
Calls Presented to Skillset (Direct/Indirect)
Total presented calls (both direct and indirect) to the Contact Center for the selected Skillsets and time period.
Formula
Pre
CC Transactions Answered
Total Answered Transactions (this includes transferred calls) in the Contact Center for the selected Skillsets and time period (this statistic is not the same as answered Contact Center calls)
Formula
AnCT

Reports Explained 229
Issue 03 (03) Reporting for Contact Center Setup and Operations Guide
CC Transactions Abandoned
Total Abandoned Transactions in the Contact Center for the selected Skillsets and time period.
Formula
AbC
Presented Calls Disconnected
Total Disconnected calls for the selected Skillsets and time period.
Formula
Dis
CC Transactions Answered by Agents
Total Agent answered Transactions for the selected Skillset and time period.
Formula
AnCTA
CC Transactions Answered by Voicemail
Total Voicemail Transactions for the selected Skillset and time period.
Formula
AnCTVM
CC Transactions Answered by Operator
Total operator Answered Transactions for the selected Skillset and time period.
Formula
AnCTO
CC Transactions Answered by Overflow Agent
Total Transactions an Agent answered that arrived at the Agent through the action of the overflow rules configured in Call Pilot manager (although the Agent is part of another Skillset the call still belongs to the original Skillset).
Formula
AnCTOA
Reports Explained
Reporting for Contact Center Setup and Operations Guide Issue 03 (03)
230
CC Transactions Answered by Non-Agent
Total non-Agent (someone not logged in) answered Transactions for the selected Skillset and time period.
Formula
AnCTNA
CC Transactions Handled in Another Skillset
Total Transactions handled in another Skillset, including those moved to another Skillset through a routing table.
Formula
AnCTAS
GOS %
Grade of service for the time slot within the selected Skillsets and time period.
Formula
((Pre - AnCS - AbC) / Pre) * 100 Note: (AnCTA + AnCTVM + AnCTO + AnCTOA + AnCTNA) = AnCT
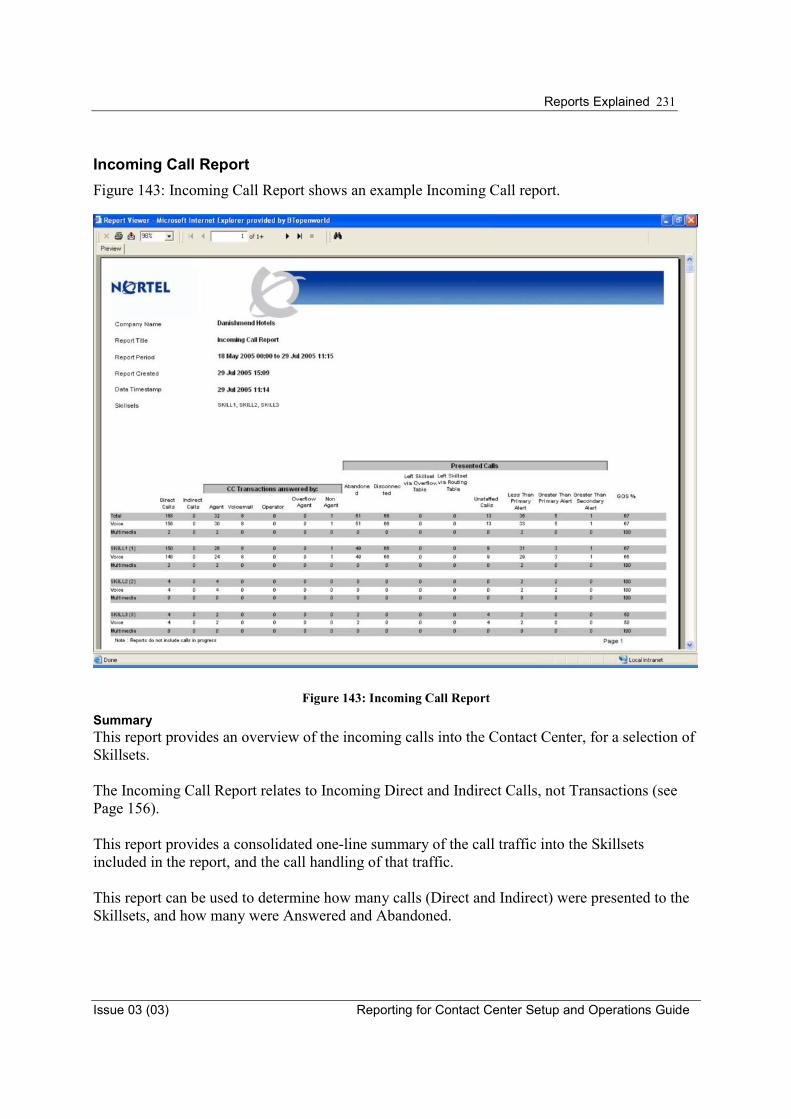
Reports Explained 231
Issue 03 (03) Reporting for Contact Center Setup and Operations Guide
Incoming Call Report Figure 143: Incoming Call Report shows an example Incoming Call report.
Figure 143: Incoming Call Report
Summary This report provides an overview of the incoming calls into the Contact Center, for a selection of Skillsets. The Incoming Call Report relates to Incoming Direct and Indirect Calls, not Transactions (see Page 156). This report provides a consolidated one-line summary of the call traffic into the Skillsets included in the report, and the call handling of that traffic. This report can be used to determine how many calls (Direct and Indirect) were presented to the Skillsets, and how many were Answered and Abandoned.

Reports Explained
Reporting for Contact Center Setup and Operations Guide Issue 03 (03)
232
Location and Agent answering calls, calls answered before the Primary Alert (<P), calls answered after the Primary Alert, but before the Secondary Alert (>P), and calls answered beyond the Secondary Alert (>S) can also be determined. Logic The Incoming Call report is generated for a range of selected Skillsets. Each line of data shows the number of incoming direct and indirect calls, and the other columns show the treatment those calls received. Treatments include being answered by Agent, by Overflow Agent, by Voicemail and calls that left the Skillset by means of the routing table. This reports main focus is on Contact Center calls not transactions. FAQ
Where do Direct Calls come from?
Direct calls are calls placed directly to the Skillset. That is, these calls have not arrived through any other method like F70 transfer to Skillset CDN, or transferred or moved in the routing table.
Are Indirect Calls handled by another Skillset Agent?
No, these are Contact Center calls that have arrived to a Skillset by some other method. In other words, they originated from another Skillset, by F70 transfer, or move to Skillset in the routing table.
Why is the number of Agent calls displayed less than those stated in other reports? Also, the number of Voicemail calls is 0 but the Call Profile Report shows a number of calls answered by Voicemail.
This report does not include manually transferred calls only calls directly presented to an Agent.
Which totals are the “Left Skillset via Overflow Table” calls in?
The report does not say which Skillset eventually handled these calls. However, if you look at your routing table you can find out which Skillset these went to, based on the rules. Report Fields A description of each of the fields in the report.
Direct Calls
Total Direct Calls for a Skillset in the selected Skillsets and time period.
Formula
PreD
Indirect Calls
Total Indirect Calls for a Skillset in the selected Skillsets and time period.
Formula
PreI
Reports Explained 233
Issue 03 (03) Reporting for Contact Center Setup and Operations Guide
(CC Transactions Answered by:) Agent
Total Agent answered Transactions answered for the selected Skillsets and time period.
Formula
AnCTA
(CC Transactions Answered by:) Voicemail
Total Voicemail Answered Transactions for the selected Skillsets and time period.
Formula
AnCTVM
(CC Transactions Answered by:) Operator
Total operator Answered Transactions for the selected Skillsets and time period.
Formula
AnCTO
(CC Transactions Answered by:) Overflow Agent
Total Transactions an Agent answered that were sent through the actions of the overflow rules configured in Call Pilot manager (the Agent maybe part of another Skillset, but the call still belongs to the original Skillset).
Formula
AnCTOA
(CC Transactions Answered by:) Non Agent
Total non Agent answered Transactions for the selected Skillsets and time period. In all cases this will be a call transferred to a non Agent through the actions of the routing table either through the CCR Tree or Caller input rules.
Formula
AnCTNA
(Presented Calls) Abandoned
Total Presented Calls abandoned in the Skillset for the selected Skillset and time period.
Formula
Reports Explained
Reporting for Contact Center Setup and Operations Guide Issue 03 (03)
234
AbC
(Presented Calls) Disconnected
Total Presented Calls disconnected for the selected Skillsets and time period.
Formula
Dis
(Presented Calls (that)) Left Skillset via Overflow Table
Total Presented Calls that have left the Skillset due to a rule in the overflow table, for example, move to Skillset rule, for the selected Skillset and time period.
Formula
LSSOT
(Presented Calls (that)) Left Skillset via Routing Table
Total Presented Calls that have left the Skillset due to a rule in the call routing table for the selected Skillset and time period. The rule includes Move to Skillset and Transfer to Skillset Control DN only; all other scenarios, Transfer to Extension and Transfer to External remain within the Skillset and will not affect this field.
Formula
LSSRT
(Presented Calls) Unstaffed
Total Presented Calls that came into a Skillset when there were no agents logged into the Skillset for the selected Skillsets and time period.
Formula
AnCUS
(Presented Calls) Less than Primary Alert
Total Presented Calls answered before the primary alert threshold for the selected Skillsets and time period.
Formula
AnCLP
(Presented Calls) Greater than Primary Alert
Reports Explained 235
Issue 03 (03) Reporting for Contact Center Setup and Operations Guide
Total Presented Calls answered after the primary alert threshold, but before the secondary alert threshold for the selected Skillsets and time period.
Formula
AnCGP
(Presented Calls) Greater than Secondary Alert
Total Presented Calls answered after the secondary alert threshold for the selected Skillsets and time period.
Formula
AnCS
GOS%
Grade of service for the selected Skillsets and time period.
Formula
((Pre - AnCS - AbC) / Pre) * 100

Reports Explained
Reporting for Contact Center Setup and Operations Guide Issue 03 (03)
236
Unanswered Help Request Report Figure 144: Unanswered Help Request Report shows an example Unanswered Help Request report.
Figure 144: Unanswered Help Request Report
Summary This report displays the instances of each unanswered help request, where the supervisor declined an Agent’s request for help. This report should be read in conjunction with the Help Request Report (see Page 244) to establish the total number of Help Requests an Agent makes. This report can also be used to determine if a Supervisor is refusing too many Help Requests. Report Fields A description of each of the fields in the report.
Agent ID
ID of the Agent whose help request was denied.
Reports Explained 237
Issue 03 (03) Reporting for Contact Center Setup and Operations Guide
Agent Name
Name of the Agent requesting help.
Date
Date of the request.
Time of Day
Time of the request.
CLID
CLID of the caller.
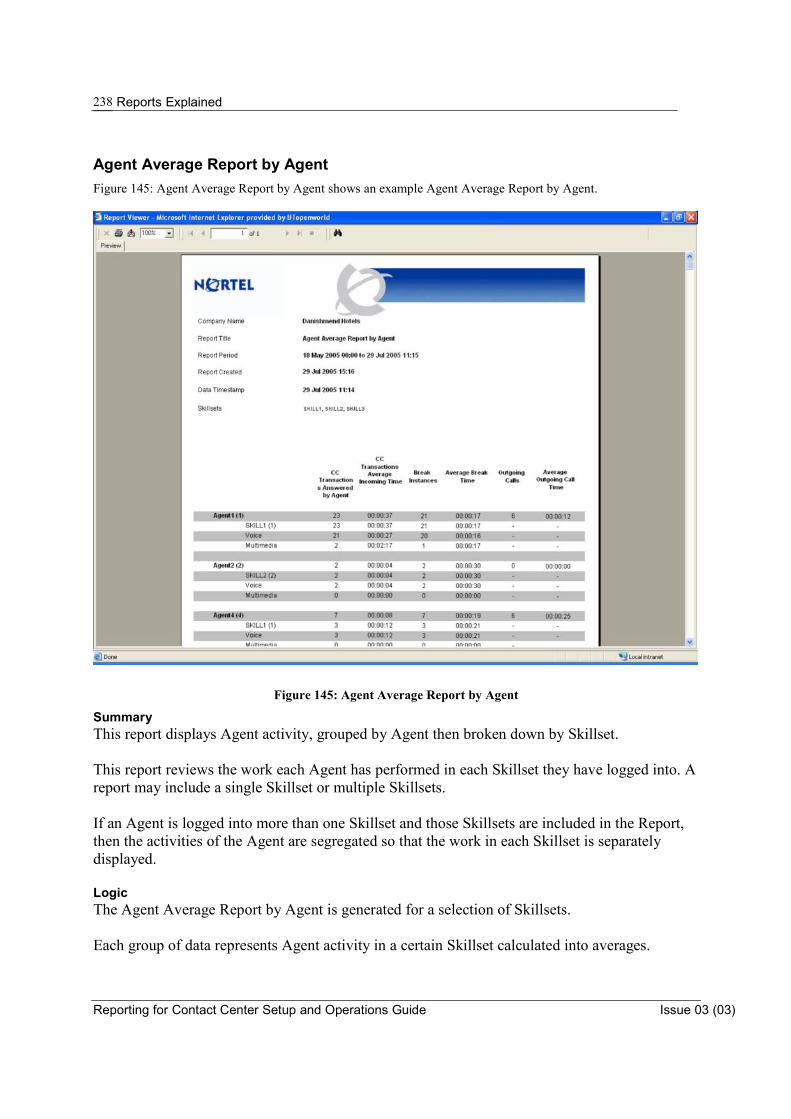
Reports Explained
Reporting for Contact Center Setup and Operations Guide Issue 03 (03)
238
Agent Average Report by Agent Figure 145: Agent Average Report by Agent shows an example Agent Average Report by Agent.
Figure 145: Agent Average Report by Agent
Summary This report displays Agent activity, grouped by Agent then broken down by Skillset. This report reviews the work each Agent has performed in each Skillset they have logged into. A report may include a single Skillset or multiple Skillsets. If an Agent is logged into more than one Skillset and those Skillsets are included in the Report, then the activities of the Agent are segregated so that the work in each Skillset is separately displayed. Logic The Agent Average Report by Agent is generated for a selection of Skillsets. Each group of data represents Agent activity in a certain Skillset calculated into averages.

Reports Explained 239
Issue 03 (03) Reporting for Contact Center Setup and Operations Guide
This report displays the activity of agents who logged into the selected Skillset during the period of the report. Note: If an Agent was not logged into one of the selected Skillsets, they may still have
activity associated with one of the selected Skillsets. For example, they may have received overflow calls or received a call manually transferred to them from an Agent in one of the selected Skillsets, or for any other transfer of call method that temporarily ‘adopts’ the Agent into the Skillset for the duration of the transferred call.
Report Fields A description of each of the fields in the report.
CC Transactions Answered by Agent
Total Agent Answered Transactions for the selected Skillsets and time period.
Formula
AnCT
CC Transactions Average Incoming Time
Average duration of a Transaction for the selected Skillsets and time period.
Formula
(Total Incoming Time) / AnCT
Break Instances
Total breaks taken for the selected Skillsets and time period.
Formula
BkT
Average Break Time
Average duration of a break for the selected Skillsets and time period.
Formula
(Total Break Time) / BkT
Outgoing Calls
Number of outgoing calls made in the selected time period.
Formula
Out

Reports Explained
Reporting for Contact Center Setup and Operations Guide Issue 03 (03)
240
Average Outgoing Call Time
Average duration of an outgoing call during the selected time period .
Formula
(Total Outgoing Time) / Out

Reports Explained 241
Issue 03 (03) Reporting for Contact Center Setup and Operations Guide
Agent Activity Report by Skillset Figure 146: Agent Activity Report by Skillset shows an example Agent Activity Report by Skillset.
Figure 146: Agent Activity Report by Skillset
Summary This report displays Agent activity for a selection of Skillsets grouped by Agent. This report enables a review of the work in each Skillset. All the Agents who have logged in to the Skillsets included in the report are reviewed. Only the activity directly related to the appropriate Skillsets is displayed. In the example in the figure, Agent 4 has been logged into Skillset 1, Skillset 2, and Skillset 3, and so the report reviews Agent 4’s activity for each of these Skillsets. Logic For each Skillset, the average durations of six Contact Center statistics are displayed for each Agent, in turn.
Reports Explained
Reporting for Contact Center Setup and Operations Guide Issue 03 (03)
242
For calls that have been transferred to the Agent, Transferred appears at the start of the line for that Agent. Likewise, if the Transaction was for an overflowed call, Overflow appears at the start of the line for that Agent. Other will be shown for any other transfer call methods that temporarily adopts the Agent into the Skillset for the duration of the transferred call. FAQ
Does the Agent Activity Report By Skillset include transferred calls from other Agents?
Yes.
The Agent Activity Report By Skillset shows one call transfer whereas the Agent Average Report By Agent is displaying 2 call transfers?
The Agent Activity Report By Skillset displays data for each Skillset separately. In the Agent Average Report By Agent you will view all Agent Activity for that Agent in all Skillsets they had logged in to, which is why an extra Transferred Call is seen.
The times are slightly off from other reports?
The Agent Activity Report By Skillset includes activity from the full logged in time, say, for example, from 07:58 to 17:04, as opposed to the Agent Activity Report which caps all activity at the requested time. Using the example, the capped time would be from 08:00 to 17:00. Report Fields A description of each of the fields in the report.
Logged-in time
Total time an Agent is logged into the Skillset (not applicable to agents borrowed into the Skillset) for the selected Skillset and time period.
Formula
N/A
CC Transactions Answered by Agent
Total Agent Answered Transactions for the selected Skillsets and time period.
Formula
AnCT
Incoming CC Time
Total time of incoming Contact Center calls for the Agent within that Skillset and for the selected Skillsets and time period.
Formula
N/A

Reports Explained 243
Issue 03 (03) Reporting for Contact Center Setup and Operations Guide
Break Instances
Total break instances recorded for the Agent while taking calls for that Skillset for the selected Skillsets and time period.
Formula
BkT
Break Time
Total time an Agent spent on breaks while taking calls for that Skillset for the selected Skillsets and time period.
Formula
N/A
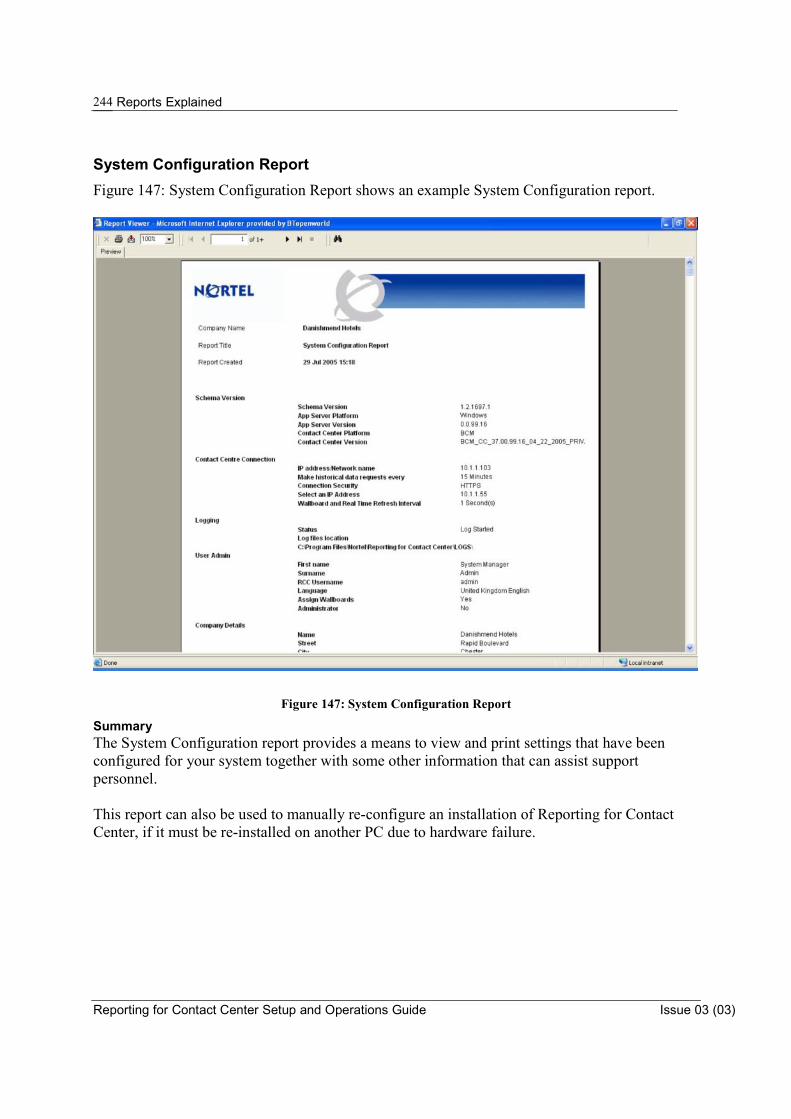
Reports Explained
Reporting for Contact Center Setup and Operations Guide Issue 03 (03)
244
System Configuration Report Figure 147: System Configuration Report shows an example System Configuration report.
Figure 147: System Configuration Report
Summary The System Configuration report provides a means to view and print settings that have been configured for your system together with some other information that can assist support personnel. This report can also be used to manually re-configure an installation of Reporting for Contact Center, if it must be re-installed on another PC due to hardware failure.
Troubleshooting Reporting for Contact Center 245
Issue 03 (03) Reporting for Contact Center Setup and Operations Guide
Backing Up the MySQL Database
The mysqldump Utility
mysqldump is a utility included in the MySQL\MySQL Server 4.1\bin folder of the MySQL installation on the Web Host PC. This can be used to create a file which contains all of the SQL statements required to re-create the Nortel Reporting for Contact Center statistical and configuration database. It can also be used to restore the backed up data.
Backing Up the Database It is highly recommeneded to backup the database. You can use mysqldump to create a backup of your database using the following syntax. Note that the following should all be typed on one line, and should be entered in a Command Prompt window, from the MySQL\MySQL Server 4.1\bin folder. mysqldump --add-drop-table --user=webhost --password=r33CCtgs2? CCRDB > CCRDBbackup.sql CCRDBbackup.sql is the file to which the backup should be written. This can be named whatever you like. Substitute the name you wish to use for CCRDBbackup.sql in the above command.
Restoring from a Backup To restore the contents of a backup to the Nortel Reporting for Contact Center statistical and configuration database use the following command. Note that the following should all be typed on one line, and should be entered in a Command Prompt window, from the MySQL\MySQL Server 4.1\bin folder.
! You should be certain that you wish to restore the backup before you enter this command.
mysql --user=root --password='YR46L43!' CCRDB < CCRDBbackup.sql Note: The restore command uses the word ‘mysql’ but the backup command uses the word
‘mysqldump’. Note: There are single quotes around the password in the restore command, but NOT in the
backup command. Note: There are two hyphens in front of the --user, --password and --add-drop-tables options. Note: Substitute the name of the backup file you wish to restore for the CCRDBbackup.sql in
the example restore command.
8
Backing Up the MySQL Database
Reporting for Contact Center Setup and Operations Guide Issue 03 (03)
246
Note: Alternatively, Microsoft Windows provides a tool for backing up and restoring your files and folders on the Web Host PC. This can be scheduled to back up and restore the MySQL database.
To use the Windows Backup Utility click on Start > All Programs > Accessories > System Tools > Backup. The Backup or Restore Wizard dialog box will open up. Follow the instructions to go through the Wizard. For scheduled jobs click on Advanced from the Completing the Backup Restore Wixard screen. It is important that you first consult your support personnel about your organisation’s back up and restore policies and procedures before attempting to backup the MySQL database.
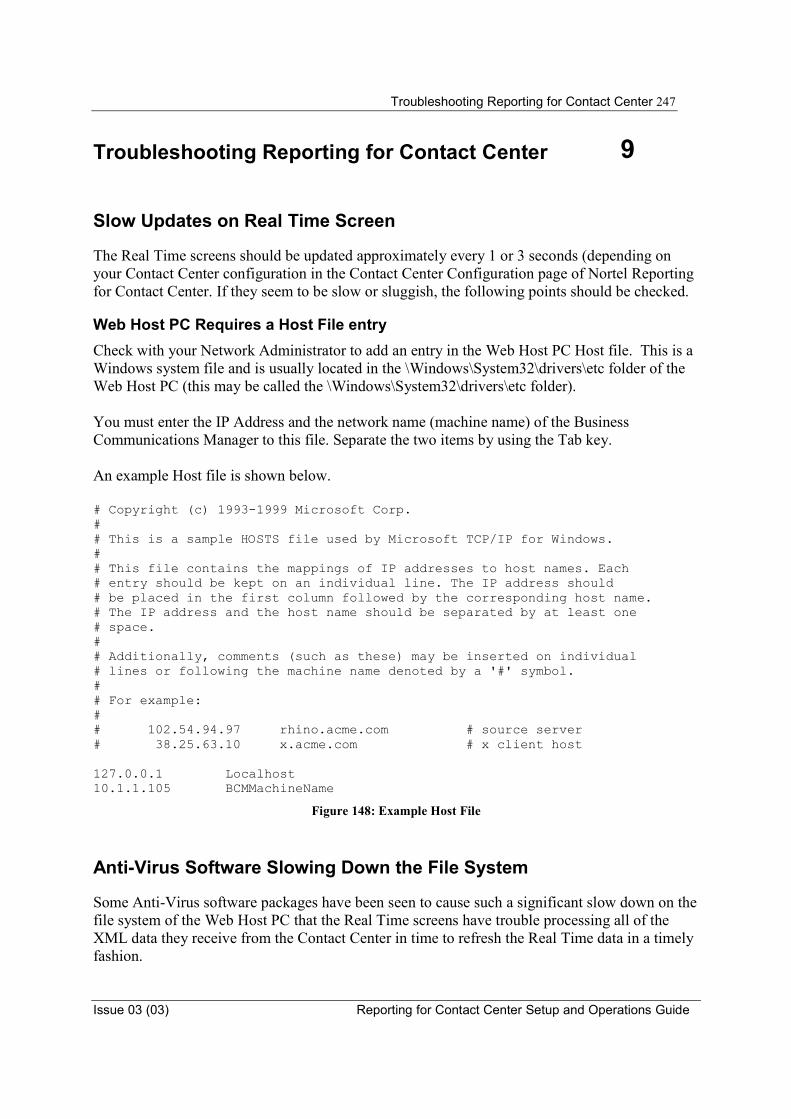
Troubleshooting Reporting for Contact Center 247
Issue 03 (03) Reporting for Contact Center Setup and Operations Guide
Troubleshooting Reporting for Contact Center
Slow Updates on Real Time Screen
The Real Time screens should be updated approximately every 1 or 3 seconds (depending on your Contact Center configuration in the Contact Center Configuration page of Nortel Reporting for Contact Center. If they seem to be slow or sluggish, the following points should be checked.
Web Host PC Requires a Host File entry Check with your Network Administrator to add an entry in the Web Host PC Host file. This is a Windows system file and is usually located in the \Windows\System32\drivers\etc folder of the Web Host PC (this may be called the \Windows\System32\drivers\etc folder). You must enter the IP Address and the network name (machine name) of the Business Communications Manager to this file. Separate the two items by using the Tab key. An example Host file is shown below. # Copyright (c) 1993-1999 Microsoft Corp. ## This is a sample HOSTS file used by Microsoft TCP/IP for Windows. ## This file contains the mappings of IP addresses to host names. Each # entry should be kept on an individual line. The IP address should # be placed in the first column followed by the corresponding host name. # The IP address and the host name should be separated by at least one # space. ## Additionally, comments (such as these) may be inserted on individual # lines or following the machine name denoted by a '#' symbol. ## For example: ## 102.54.94.97 rhino.acme.com # source server # 38.25.63.10 x.acme.com # x client host 127.0.0.1 Localhost 10.1.1.105 BCMMachineName
Figure 148: Example Host File
Anti-Virus Software Slowing Down the File System
Some Anti-Virus software packages have been seen to cause such a significant slow down on the file system of the Web Host PC that the Real Time screens have trouble processing all of the XML data they receive from the Contact Center in time to refresh the Real Time data in a timely fashion.
9

Troubleshooting Reporting for Contact Center
Reporting for Contact Center Setup and Operations Guide Issue 03 (03)
248
Norton Anti-Virus is one anti-virus package known to cause this symptom. By un-checking the Enable File System Real Time Protection option in Norton Anti-Virus the operation of the Real Time screens are no longer restricted and can operate in their usual way. To do this, right click on the Norton Anti-Virus icon in the system tray. If there is a tick by it, select Enable File System Real Time Protection to remove the tick. Alternatively, you can try deactivating the Nortel Reporting for Contact Center diagnostic logging (if it is activated), see Page 63.
Anti-Virus packages vary in their implementations and in the granularity with which you can adjust their operational parameters. Typically, however, the settings which you can adjust that would make the Real Time Screens appear sluggish in updating are the real time file scanning settings.
Note: ‘real time’ in this context means that the Anti-Virus software scans the files on your computer constantly – it does not refer to the Reporting for Contact Center Real Time screens. It is just a coincidence that both applications have features that have the words ‘real time’ in their title.
• Some Anti-Virus packages allow you to specify files with certain extensions which are to
be ignored during virus scans. If this is possible with your Anti-Virus software, instruct it to ignore files with .log extensions.
• Some Anti-Virus packages allow you to specify locations on your hard disk which are to be ignored during virus scans. If this is possible with your Anti-Virus software, instruct it to ignore the location of the Reporting for Contact Center log files. By default this is \Program Files\Nortel\Reporting for Contact Center\Logs.
• Some Anti-Virus packages allow you to disable or fine tune the real time scanning action of files, and to isolate which types of file modification will trigger a re-scan (create a file, modify a file, write to a file, and so on).
Cannot Access the Login Page
This problem has been seen when the Web Host PC has Norton Anti-Virus running. One setting of Norton Anti-Virus (Script Blocking) prevents Nortel Reporting for Contact Center from running normal operations. This option should be disabled in the anti-virus configuration screen on the Web Host PC only.
Turning off script blocking in Norton Anti-Virus 2001
To disable Norton Anti-Virus 2001 Script Blocking:
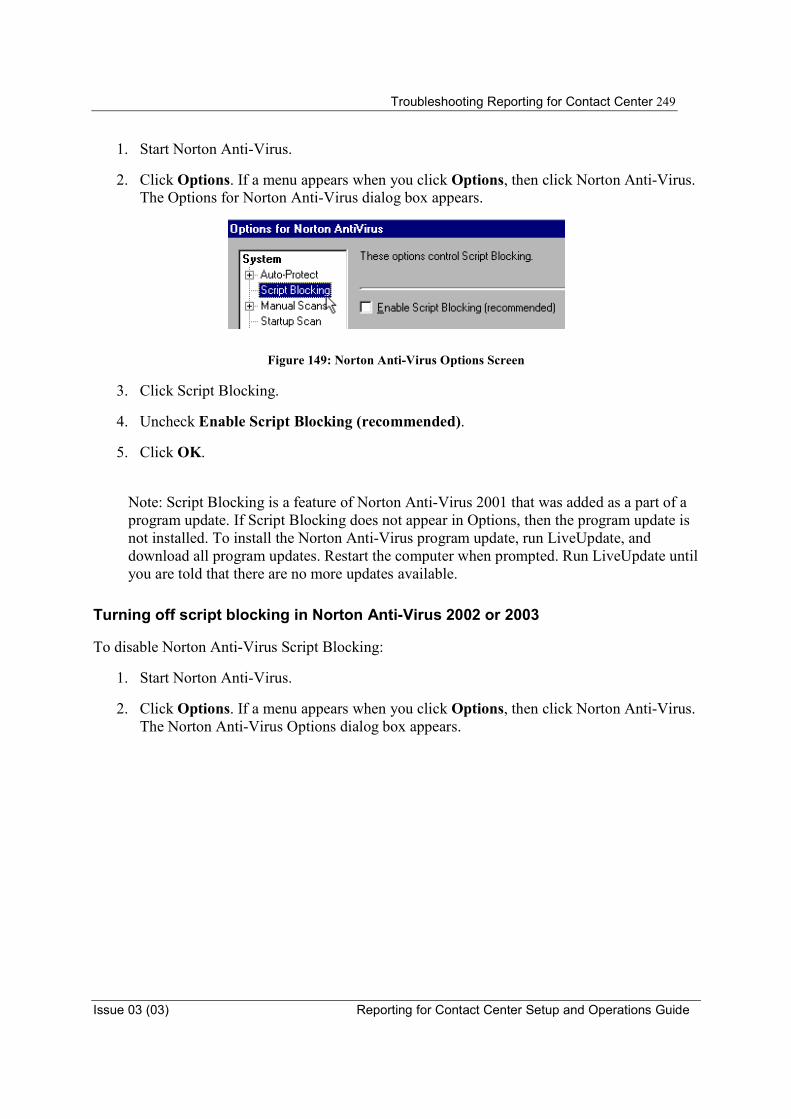
Troubleshooting Reporting for Contact Center 249
Issue 03 (03) Reporting for Contact Center Setup and Operations Guide
1. Start Norton Anti-Virus.
2. Click Options. If a menu appears when you click Options, then click Norton Anti-Virus. The Options for Norton Anti-Virus dialog box appears.
Figure 149: Norton Anti-Virus Options Screen
3. Click Script Blocking.
4. Uncheck Enable Script Blocking (recommended).
5. Click OK.
Note: Script Blocking is a feature of Norton Anti-Virus 2001 that was added as a part of a program update. If Script Blocking does not appear in Options, then the program update is not installed. To install the Norton Anti-Virus program update, run LiveUpdate, and download all program updates. Restart the computer when prompted. Run LiveUpdate until you are told that there are no more updates available.
Turning off script blocking in Norton Anti-Virus 2002 or 2003
To disable Norton Anti-Virus Script Blocking:
1. Start Norton Anti-Virus.
2. Click Options. If a menu appears when you click Options, then click Norton Anti-Virus. The Norton Anti-Virus Options dialog box appears.
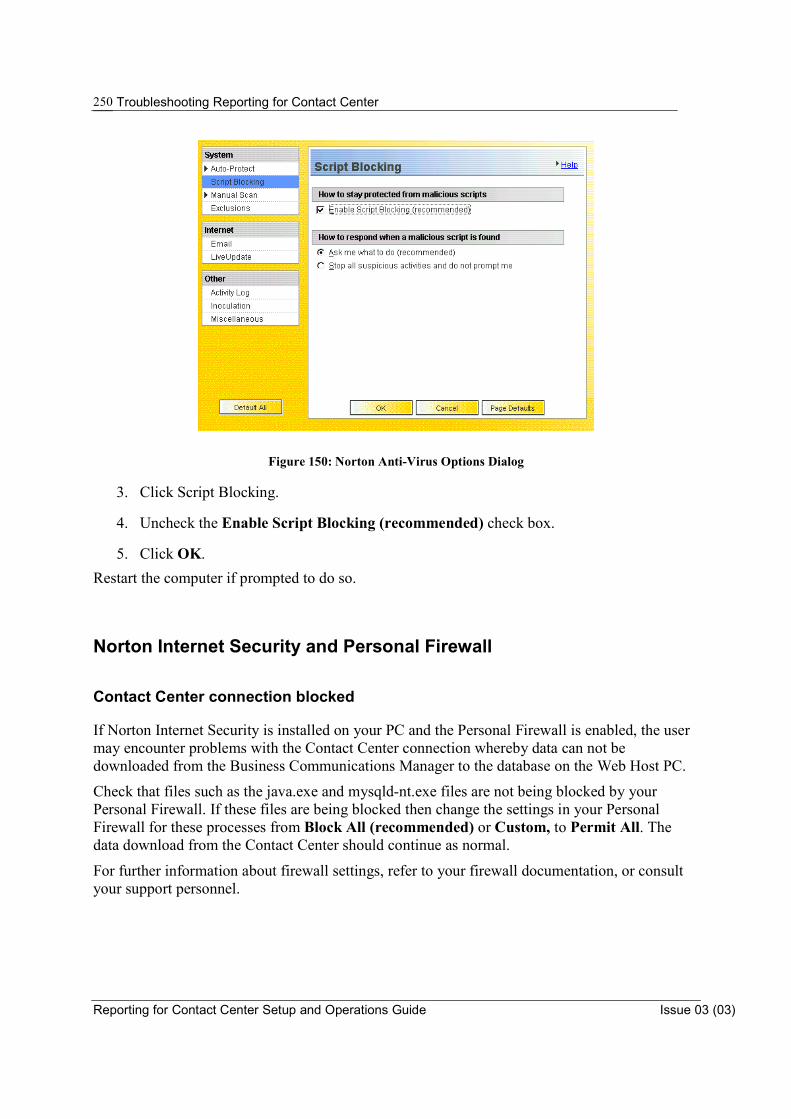
Troubleshooting Reporting for Contact Center
Reporting for Contact Center Setup and Operations Guide Issue 03 (03)
250
Figure 150: Norton Anti-Virus Options Dialog
3. Click Script Blocking.
4. Uncheck the Enable Script Blocking (recommended) check box.
5. Click OK.Restart the computer if prompted to do so.
Norton Internet Security and Personal Firewall
Contact Center connection blocked
If Norton Internet Security is installed on your PC and the Personal Firewall is enabled, the user may encounter problems with the Contact Center connection whereby data can not be downloaded from the Business Communications Manager to the database on the Web Host PC.
Check that files such as the java.exe and mysqld-nt.exe files are not being blocked by your Personal Firewall. If these files are being blocked then change the settings in your Personal Firewall for these processes from Block All (recommended) or Custom, to Permit All. The data download from the Contact Center should continue as normal.
For further information about firewall settings, refer to your firewall documentation, or consult your support personnel.
Troubleshooting Reporting for Contact Center 251
Issue 03 (03) Reporting for Contact Center Setup and Operations Guide
Changing Agent Names
If an Agent changes their name, for example if they marry and take a new surname, or if an Agent leaves and their Contact Center Login ID is allocated to another person, this will affect the way in which Reporting for Contact Center displays information for the Agent in the reports. The reports will distinguish between the two identities associated with the single Contact Center Login ID as follows.
• The Agent Activity Report will list each Agent separately. • The Agent Audit Report will consider that Contact Center Login ID to be the same
person and will show all activity that the Agent with that ID has performed, irrespective of the Agent name in the User Admin screens. In effect, for the same period, reporting on the first Agent name will yield the same information as a report on the second Agent name.
• The Agent Average Report will reference the first Agent name only.
If both Agent names refer to the same person (for example, it is the same person but they have taken a new surname because they have married), these differences do not matter.
However, if the name change is because of an actual change of personnel, then it is easier to isolate the activities of the two Agents in the reports if the new Agent is allocated a distinct Contact Center Login ID, and the old Login ID is no longer used.
Virtual Folders Not Created in Internet Information Services
Reporting for Contact Center relies upon some Virtual Folders which are created during the installation of Reporting for Contact Center on the Web Host PC.
If these Virtual Folders are ever inadvertently removed or altered, or if they are not created during the installation, you will see the following error page.
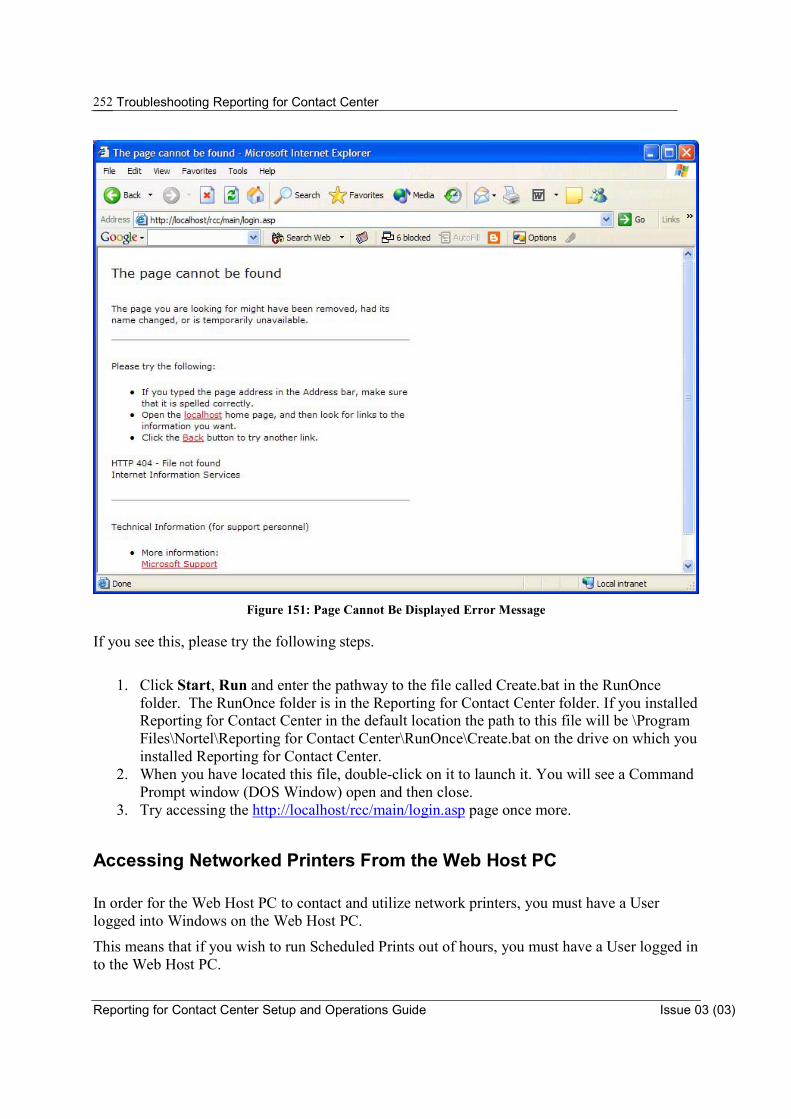
Troubleshooting Reporting for Contact Center
Reporting for Contact Center Setup and Operations Guide Issue 03 (03)
252
Figure 151: Page Cannot Be Displayed Error Message
If you see this, please try the following steps.
1. Click Start, Run and enter the pathway to the file called Create.bat in the RunOnce
folder. The RunOnce folder is in the Reporting for Contact Center folder. If you installed Reporting for Contact Center in the default location the path to this file will be \Program Files\Nortel\Reporting for Contact Center\RunOnce\Create.bat on the drive on which you installed Reporting for Contact Center.
2. When you have located this file, double-click on it to launch it. You will see a Command Prompt window (DOS Window) open and then close.
3. Try accessing the http://localhost/rcc/main/login.asp page once more.
Accessing Networked Printers From the Web Host PC
In order for the Web Host PC to contact and utilize network printers, you must have a User logged into Windows on the Web Host PC.
This means that if you wish to run Scheduled Prints out of hours, you must have a User logged in to the Web Host PC.
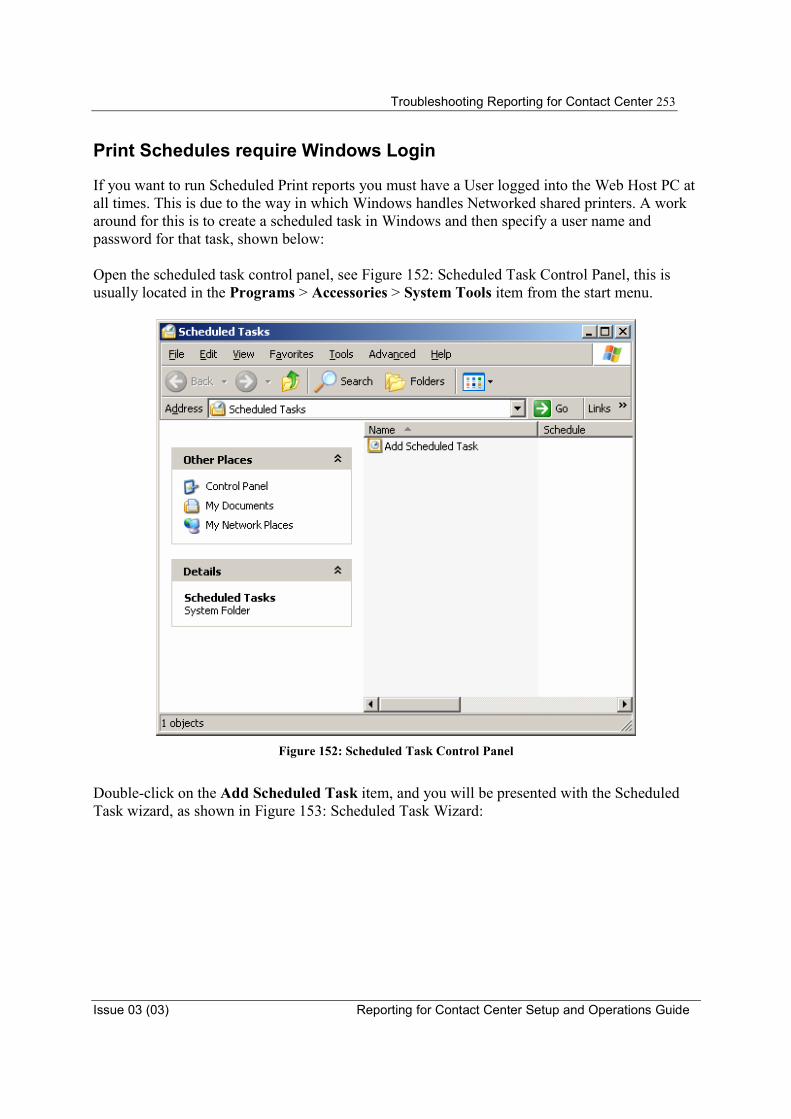
Troubleshooting Reporting for Contact Center 253
Issue 03 (03) Reporting for Contact Center Setup and Operations Guide
Print Schedules require Windows Login
If you want to run Scheduled Print reports you must have a User logged into the Web Host PC at all times. This is due to the way in which Windows handles Networked shared printers. A work around for this is to create a scheduled task in Windows and then specify a user name and password for that task, shown below: Open the scheduled task control panel, see Figure 152: Scheduled Task Control Panel, this is usually located in the Programs > Accessories > System Tools item from the start menu.
Figure 152: Scheduled Task Control Panel
Double-click on the Add Scheduled Task item, and you will be presented with the Scheduled Task wizard, as shown in Figure 153: Scheduled Task Wizard:
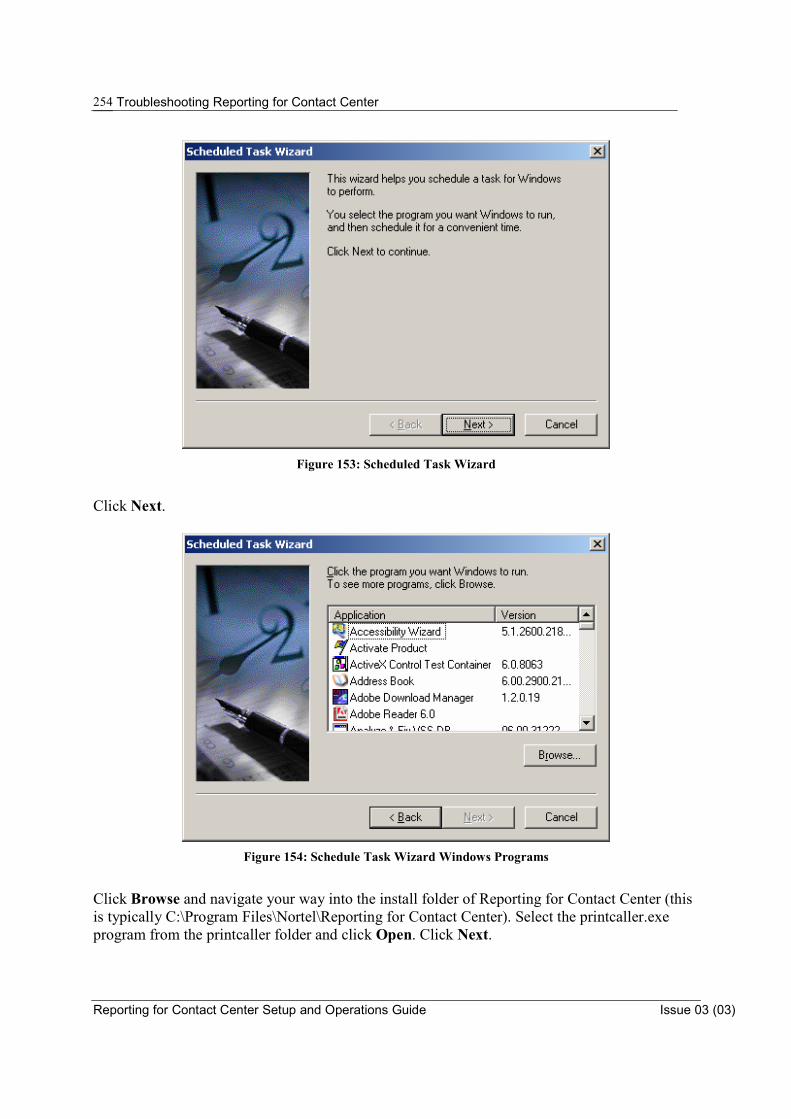
Troubleshooting Reporting for Contact Center
Reporting for Contact Center Setup and Operations Guide Issue 03 (03)
254
Figure 153: Scheduled Task Wizard
Click Next.
Figure 154: Schedule Task Wizard Windows Programs
Click Browse and navigate your way into the install folder of Reporting for Contact Center (this is typically C:\Program Files\Nortel\Reporting for Contact Center). Select the printcaller.exe program from the printcaller folder and click Open. Click Next.

Troubleshooting Reporting for Contact Center 255
Issue 03 (03) Reporting for Contact Center Setup and Operations Guide
Figure 155: Schedule Task Wizard
Select When my computer starts from the list of options. Click Next.
Figure 156: Schedule Task Wizard
Enter your Windows user name into the user name field. If you are on a domain enter that before in the user name in the following way domain\user, if you are unsure if you are on a domain or what your domain is please consult your network technician. Typically your domain is shown on the login screen of Windows. Click Next.
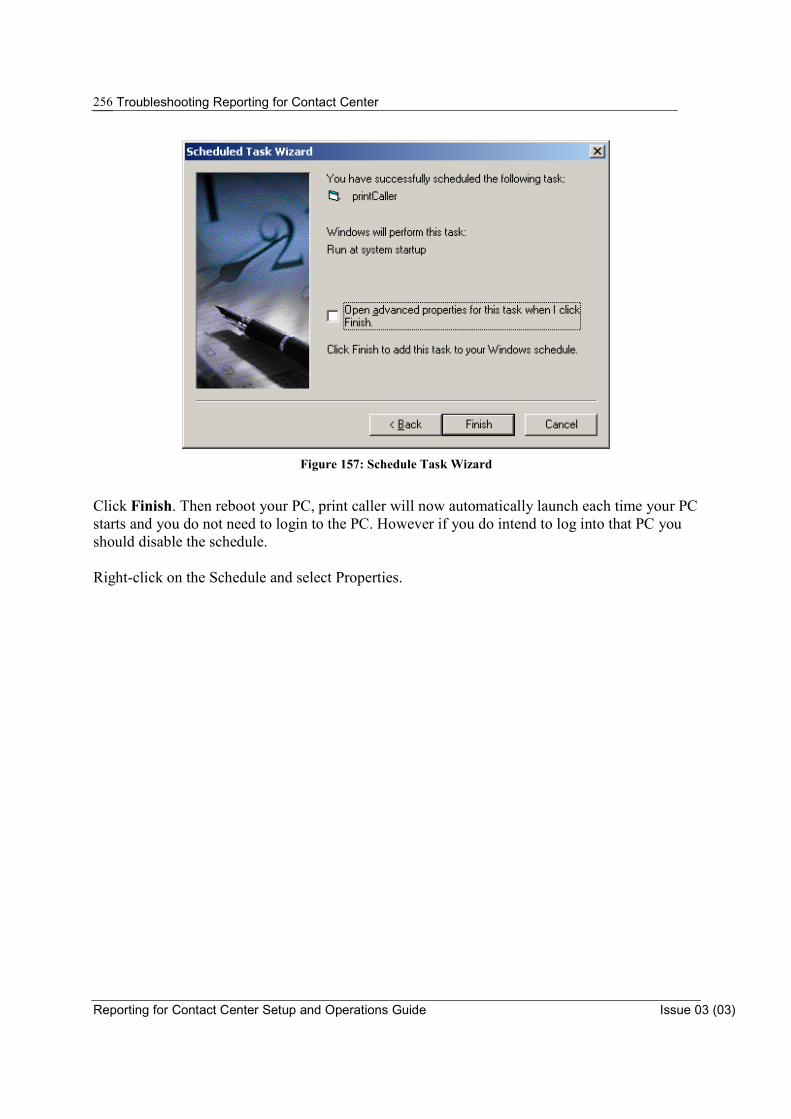
Troubleshooting Reporting for Contact Center
Reporting for Contact Center Setup and Operations Guide Issue 03 (03)
256
Figure 157: Schedule Task Wizard
Click Finish. Then reboot your PC, print caller will now automatically launch each time your PC starts and you do not need to login to the PC. However if you do intend to log into that PC you should disable the schedule. Right-click on the Schedule and select Properties.

Troubleshooting Reporting for Contact Center 257
Issue 03 (03) Reporting for Contact Center Setup and Operations Guide
Figure 158: Disabling a Schedule Task
Uncheck the Enabled (scheduled task runs at specified time) check box, see Figure 158: Disabling a Schedule Task. Click OK.
ipView SoftBoard and Wallboard Summaries
Note that the Wallboard Summaries are sent to the wallboards on the hour, according to the time of the Web Host PC clock. The regular hourly and daily statistics that are sent to the wallboard are governed by the Contact Center platform clock. The hourly statistics are reset to 0 on the hour, according to the clock in the Contact Center platform.
If the clock in the Web Host PC is set to a different time than the clock in the Contact Center platform, the hourly Summaries will not be synchronised with the hourly reset of the regular statistics. To ensure that the wallboard summaries are in time with the hourly resets of the regular wallboard statistics, ensure that your PC and Contact Center platform times are the same.
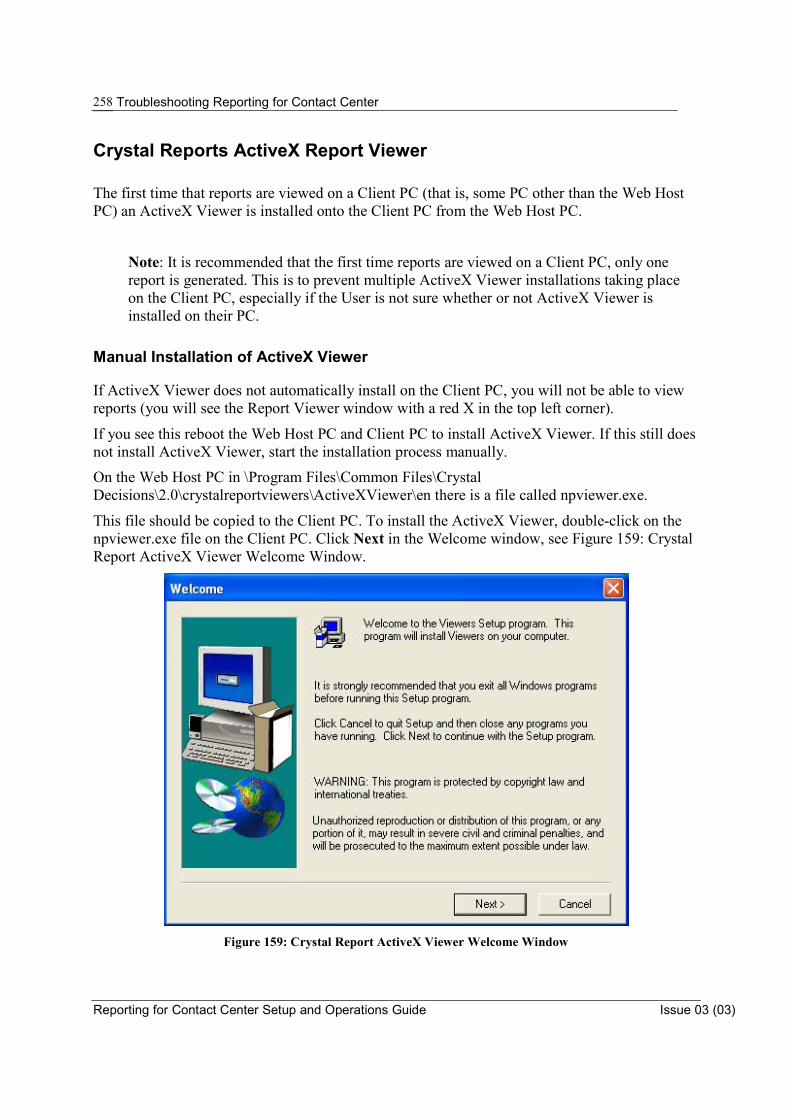
Troubleshooting Reporting for Contact Center
Reporting for Contact Center Setup and Operations Guide Issue 03 (03)
258
Crystal Reports ActiveX Report Viewer
The first time that reports are viewed on a Client PC (that is, some PC other than the Web Host PC) an ActiveX Viewer is installed onto the Client PC from the Web Host PC.
Note: It is recommended that the first time reports are viewed on a Client PC, only one report is generated. This is to prevent multiple ActiveX Viewer installations taking place on the Client PC, especially if the User is not sure whether or not ActiveX Viewer is installed on their PC.
Manual Installation of ActiveX Viewer
If ActiveX Viewer does not automatically install on the Client PC, you will not be able to view reports (you will see the Report Viewer window with a red X in the top left corner).
If you see this reboot the Web Host PC and Client PC to install ActiveX Viewer. If this still does not install ActiveX Viewer, start the installation process manually. On the Web Host PC in \Program Files\Common Files\Crystal Decisions\2.0\crystalreportviewers\ActiveXViewer\en there is a file called npviewer.exe.
This file should be copied to the Client PC. To install the ActiveX Viewer, double-click on the npviewer.exe file on the Client PC. Click Next in the Welcome window, see Figure 159: Crystal Report ActiveX Viewer Welcome Window.
Figure 159: Crystal Report ActiveX Viewer Welcome Window
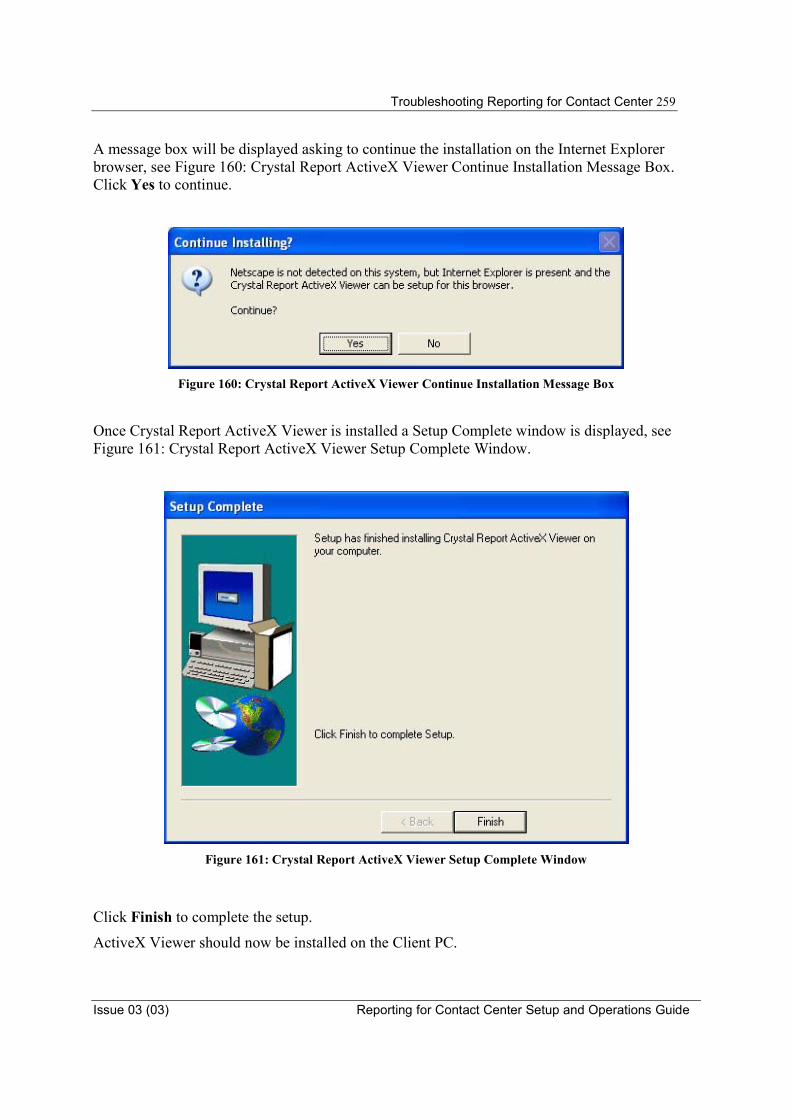
Troubleshooting Reporting for Contact Center 259
Issue 03 (03) Reporting for Contact Center Setup and Operations Guide
A message box will be displayed asking to continue the installation on the Internet Explorer browser, see Figure 160: Crystal Report ActiveX Viewer Continue Installation Message Box. Click Yes to continue.
Figure 160: Crystal Report ActiveX Viewer Continue Installation Message Box
Once Crystal Report ActiveX Viewer is installed a Setup Complete window is displayed, see Figure 161: Crystal Report ActiveX Viewer Setup Complete Window.
Figure 161: Crystal Report ActiveX Viewer Setup Complete Window
Click Finish to complete the setup.
ActiveX Viewer should now be installed on the Client PC.

Troubleshooting Reporting for Contact Center
Reporting for Contact Center Setup and Operations Guide Issue 03 (03)
260
ActiveX Viewer download blocked
If Microsoft Windows blocks the download of the ActiveX Viewer program, npviewer.exe, with the message, “Windows has blocked this software because it cannot verify the publisher”, perform the following:
1. Click Start, then right-click the Internet Explorer icon, and select Internet Properties.See Figure 162: Internet Properties Dialog Box.
Figure 162: Internet Properties Dialog Box
Note: If you do not see the dialog box shown in Figure 162, you have clicked a shortcut to Internet Explorer. You must click the Internet Explorer icon in the Start menu.
2. Click on the Security tab and select Trusted sites from the Web content zones in the top pane, see Figure 163: Security Tab in Internet Properties Dialog Box.
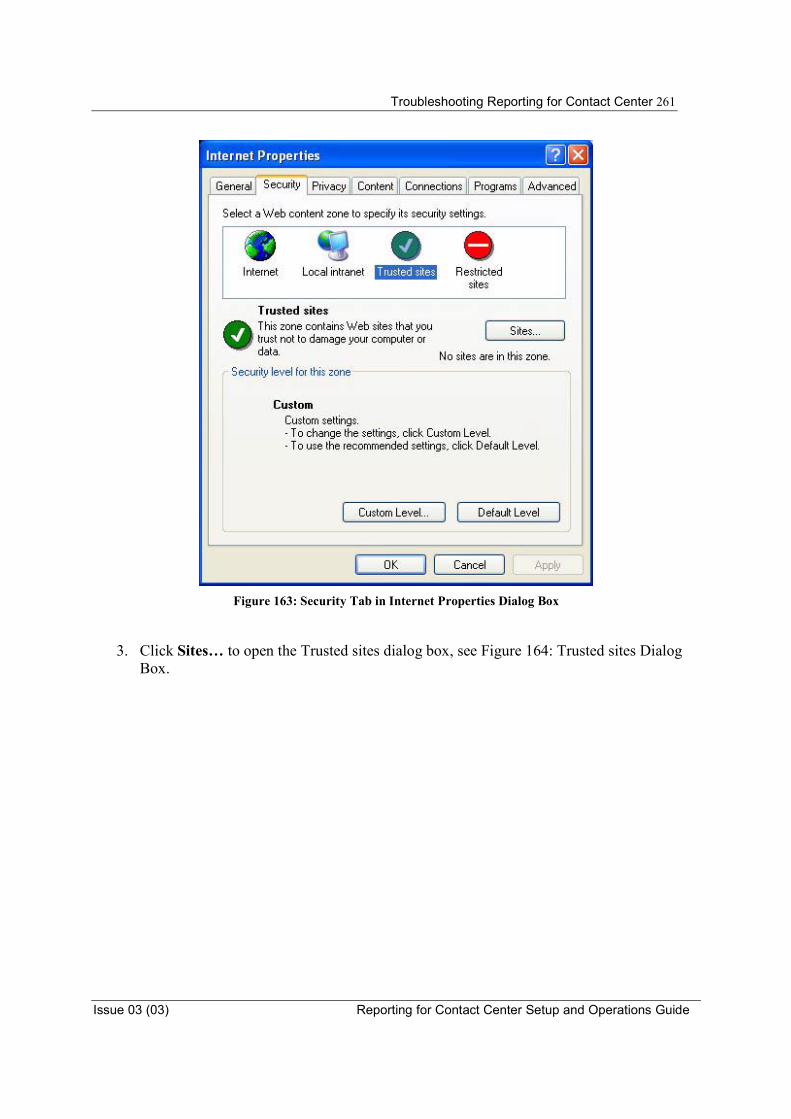
Troubleshooting Reporting for Contact Center 261
Issue 03 (03) Reporting for Contact Center Setup and Operations Guide
Figure 163: Security Tab in Internet Properties Dialog Box
3. Click Sites… to open the Trusted sites dialog box, see Figure 164: Trusted sites Dialog Box.

Troubleshooting Reporting for Contact Center
Reporting for Contact Center Setup and Operations Guide Issue 03 (03)
262
Figure 164: Trusted sites Dialog Box
4. Uncheck Require server verification (https:) for all sites in this zone and enter the IP Address of your Web Host PC. An example is shown in Figure 165: Entering IP Address of Trusted site. Replace the IP Address 10.1.1.55, with that of your Web Host PC.
Figure 165: Entering IP Address of Trusted site
5. Click Add to add the Web Host PC as a trusted site for the download of the ActiveX Viewer program.
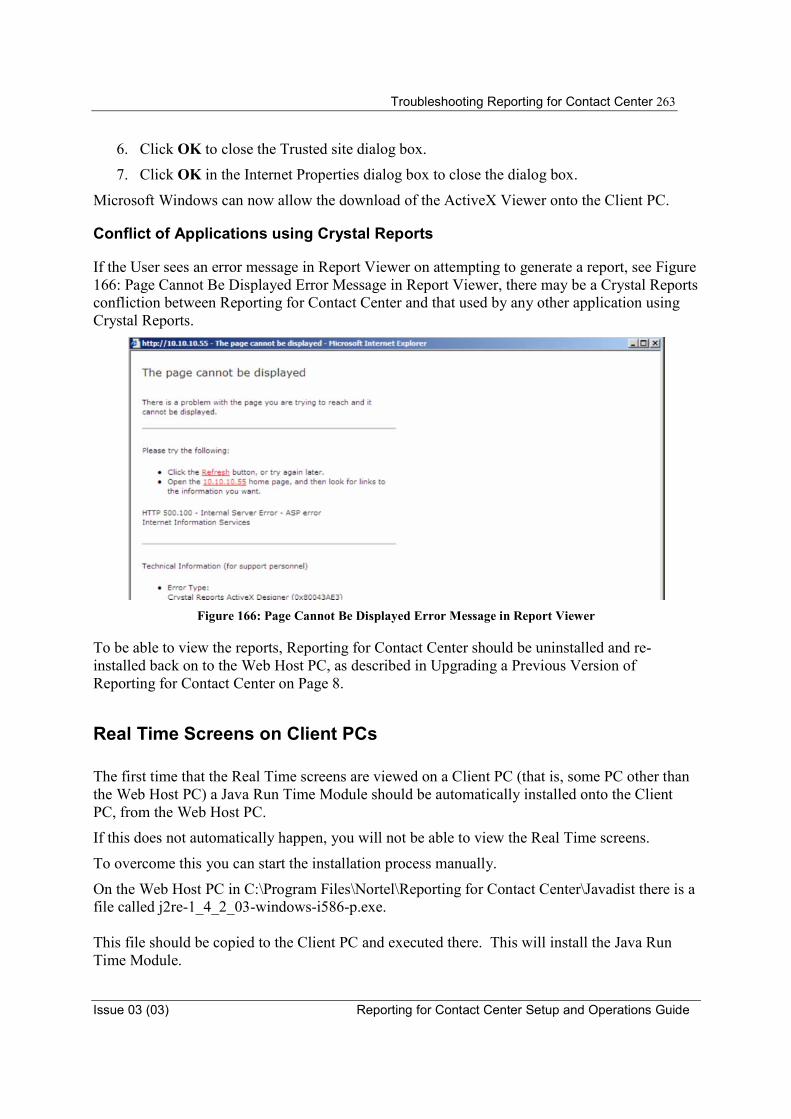
Troubleshooting Reporting for Contact Center 263
Issue 03 (03) Reporting for Contact Center Setup and Operations Guide
6. Click OK to close the Trusted site dialog box.
7. Click OK in the Internet Properties dialog box to close the dialog box.
Microsoft Windows can now allow the download of the ActiveX Viewer onto the Client PC.
Conflict of Applications using Crystal Reports
If the User sees an error message in Report Viewer on attempting to generate a report, see Figure 166: Page Cannot Be Displayed Error Message in Report Viewer, there may be a Crystal Reports confliction between Reporting for Contact Center and that used by any other application using Crystal Reports.
Figure 166: Page Cannot Be Displayed Error Message in Report Viewer
To be able to view the reports, Reporting for Contact Center should be uninstalled and re-installed back on to the Web Host PC, as described in Upgrading a Previous Version of Reporting for Contact Center on Page 8.
Real Time Screens on Client PCs
The first time that the Real Time screens are viewed on a Client PC (that is, some PC other than the Web Host PC) a Java Run Time Module should be automatically installed onto the Client PC, from the Web Host PC.
If this does not automatically happen, you will not be able to view the Real Time screens.
To overcome this you can start the installation process manually.
On the Web Host PC in C:\Program Files\Nortel\Reporting for Contact Center\Javadist there is a file called j2re-1_4_2_03-windows-i586-p.exe. This file should be copied to the Client PC and executed there. This will install the Java Run Time Module.
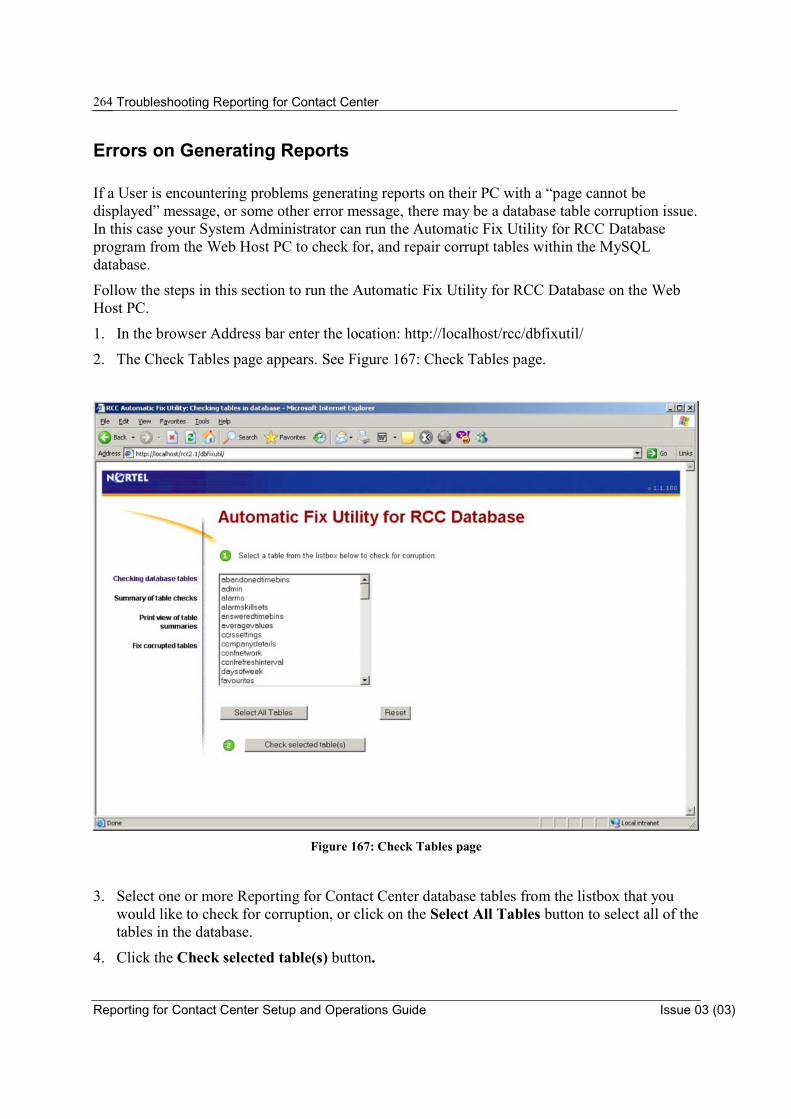
Troubleshooting Reporting for Contact Center
Reporting for Contact Center Setup and Operations Guide Issue 03 (03)
264
Errors on Generating Reports
If a User is encountering problems generating reports on their PC with a “page cannot be displayed” message, or some other error message, there may be a database table corruption issue. In this case your System Administrator can run the Automatic Fix Utility for RCC Database program from the Web Host PC to check for, and repair corrupt tables within the MySQL database.
Follow the steps in this section to run the Automatic Fix Utility for RCC Database on the Web Host PC.
1. In the browser Address bar enter the location: http://localhost/rcc/dbfixutil/
2. The Check Tables page appears. See Figure 167: Check Tables page.
Figure 167: Check Tables page
3. Select one or more Reporting for Contact Center database tables from the listbox that you would like to check for corruption, or click on the Select All Tables button to select all of the tables in the database.
4. Click the Check selected table(s) button.
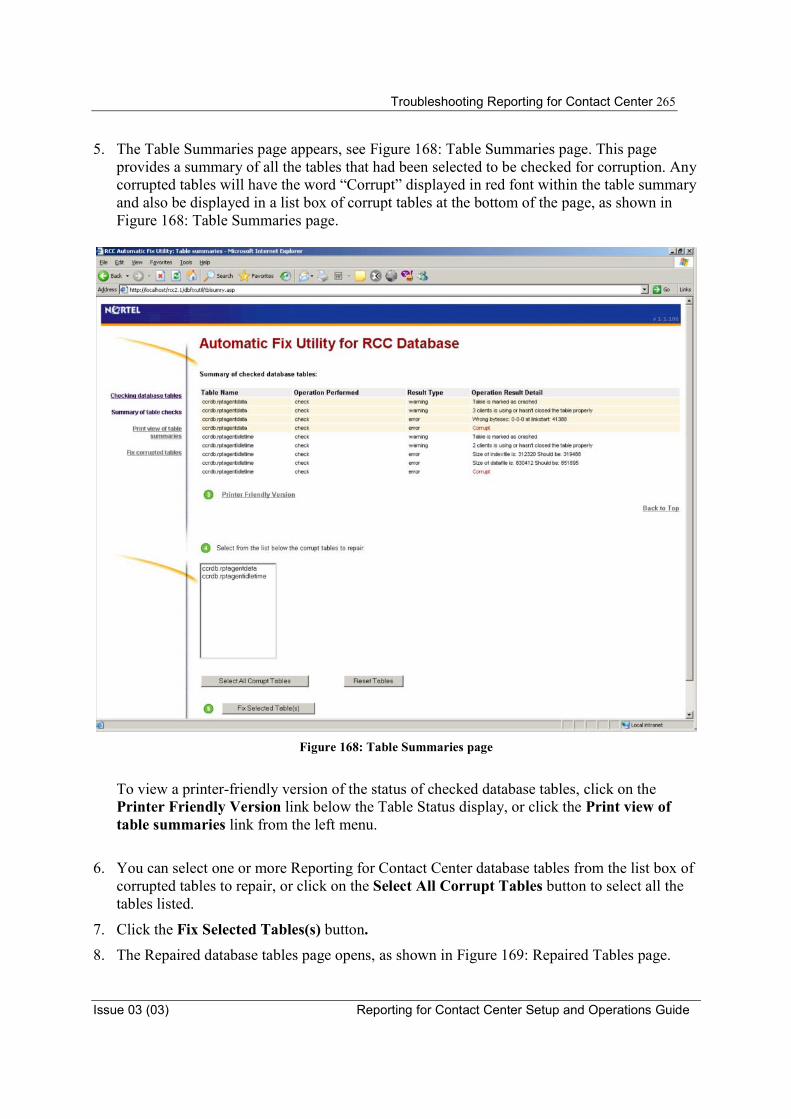
Troubleshooting Reporting for Contact Center 265
Issue 03 (03) Reporting for Contact Center Setup and Operations Guide
5. The Table Summaries page appears, see Figure 168: Table Summaries page. This page provides a summary of all the tables that had been selected to be checked for corruption. Any corrupted tables will have the word “Corrupt” displayed in red font within the table summary and also be displayed in a list box of corrupt tables at the bottom of the page, as shown in Figure 168: Table Summaries page.
Figure 168: Table Summaries page
To view a printer-friendly version of the status of checked database tables, click on the Printer Friendly Version link below the Table Status display, or click the Print view of table summaries link from the left menu.
6. You can select one or more Reporting for Contact Center database tables from the list box of corrupted tables to repair, or click on the Select All Corrupt Tables button to select all the tables listed.
7. Click the Fix Selected Tables(s) button.8. The Repaired database tables page opens, as shown in Figure 169: Repaired Tables page.
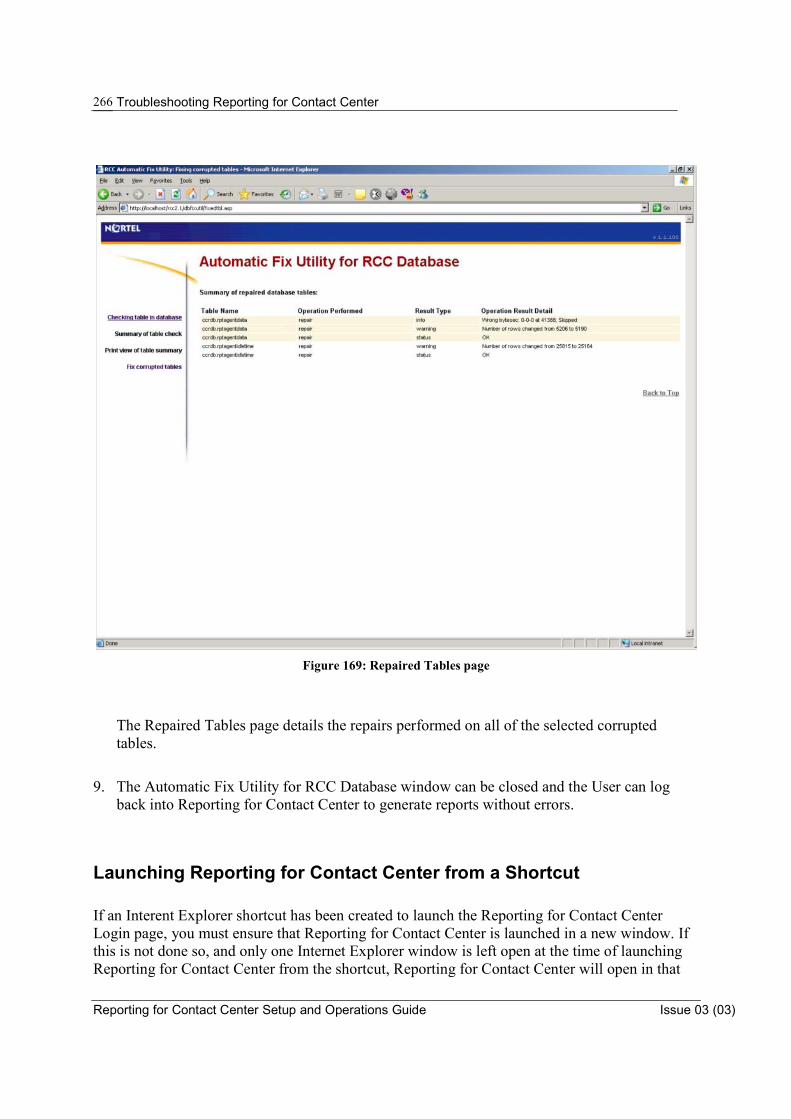
Troubleshooting Reporting for Contact Center
Reporting for Contact Center Setup and Operations Guide Issue 03 (03)
266
Figure 169: Repaired Tables page
The Repaired Tables page details the repairs performed on all of the selected corrupted tables.
9. The Automatic Fix Utility for RCC Database window can be closed and the User can log back into Reporting for Contact Center to generate reports without errors.
Launching Reporting for Contact Center from a Shortcut
If an Interent Explorer shortcut has been created to launch the Reporting for Contact Center Login page, you must ensure that Reporting for Contact Center is launched in a new window. If this is not done so, and only one Internet Explorer window is left open at the time of launching Reporting for Contact Center from the shortcut, Reporting for Contact Center will open in that
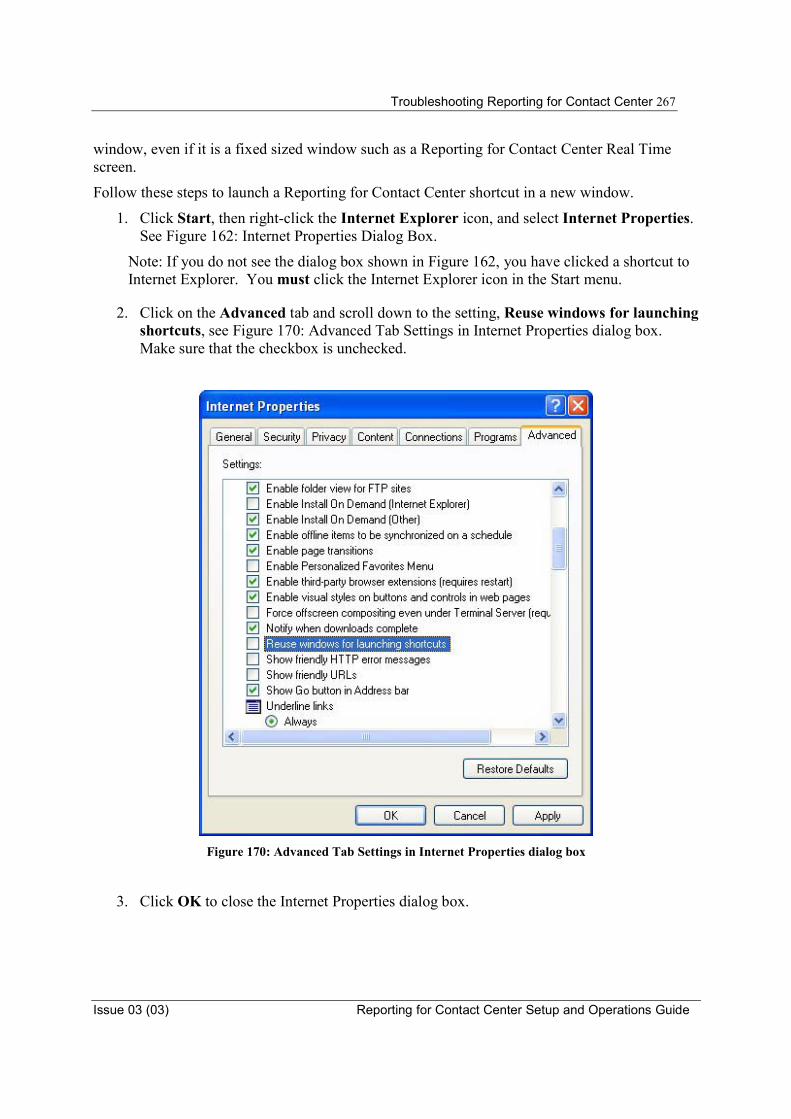
Troubleshooting Reporting for Contact Center 267
Issue 03 (03) Reporting for Contact Center Setup and Operations Guide
window, even if it is a fixed sized window such as a Reporting for Contact Center Real Time screen.
Follow these steps to launch a Reporting for Contact Center shortcut in a new window.
1. Click Start, then right-click the Internet Explorer icon, and select Internet Properties.See Figure 162: Internet Properties Dialog Box.
Note: If you do not see the dialog box shown in Figure 162, you have clicked a shortcut to Internet Explorer. You must click the Internet Explorer icon in the Start menu.
2. Click on the Advanced tab and scroll down to the setting, Reuse windows for launching shortcuts, see Figure 170: Advanced Tab Settings in Internet Properties dialog box. Make sure that the checkbox is unchecked.
Figure 170: Advanced Tab Settings in Internet Properties dialog box
3. Click OK to close the Internet Properties dialog box.

Troubleshooting Reporting for Contact Center
Reporting for Contact Center Setup and Operations Guide Issue 03 (03)
268
Error on Closing Group of Internet Explorer Windows
If similar taskbar buttons are grouped together on the Windows taskbar, the User may encounter problems when closing multiple instances of Internet Explorer programs simultaneously, including Reporting for Contact Center, using the Close Group option.
Note: To check that the Windows taskbar groups similar windows together, right-click on the taskbar and select Properties. The Taskbar and Start Menu Properties dialog box will open, see Figure 171: Taskbar Properties Dialog Box. Under Taskbar appearance, Group similar taskbar buttons will be checked.
Figure 171: Taskbar Properties Dialog Box
If the Reporting for Contact Center window and other Reports are grouped together in an Internet Explorer taskbar button, right-clicking the Internet Explorer taskbar button and selecting Close Group, as shown in Figure 172: Selecting Close Group option from Internet Explorer Programs taskbar button, may cause an Internet Explorer problem.

Troubleshooting Reporting for Contact Center 269
Issue 03 (03) Reporting for Contact Center Setup and Operations Guide
Figure 172: Selecting Close Group option from Internet Explorer Programs taskbar button
If Internet Explorer encounters problems an error message will be shown, as in Figure 173: Internet Explorer Close Group Error.
Figure 173: Internet Explorer Close Group Error
Click Send Error Report to close down all remaining open Internet Explorer windows. This will close Reporting for Contact Center and any Report Viewer windows that were open.

Glossary
Reporting for Contact Center Setup and Operations Guide Issue 03 (03)
270
Glossary Abandoned Calls........ Abandoned Calls are calls that ring in to the system and the incoming
caller clears down the call because they do not wish to wait any longer before they are answered. These calls have not been handled by humans or by voice mail.
Abandon Time Bins ... A series of six time steps used in the statistical analysis of Abandoned
Calls. Nortel Reporting for Contact Center will provide statistical reports on the percentage of incoming calls abandoned within each of the periods specified in the Abandoned Time Bins. A seventh period is also used in the reports, which gathers information on all calls which abandoned after the period specified by the sixth Abandoned Time Bin.
Administrator ............. A Nortel Reporting for Contact Center User who has been awarded
Administration rights. These Users can configure core elements of Nortel Reporting for Contact Center that regular Users can not, and they can perform such actions as creating other Users.
Alarm Threshold ........ Alarms may be set to trigger an alert on the wallboards, to inform your
Agents of some event or circumstance. The value that a parameter must reach, match or exceed to trigger an Alarm is the Alarm Threshold.
All Calls Held ............ If an Agent has placed all of their calls on hold, so that they have no
active calls, they will be shown in Magenta in the Real Time screens. Answered Time Bins.. A series of six time steps used in the statistical analysis of Answered
Calls. Nortel Reporting for Contact Center will provide statistical reports on the percentage of incoming calls answered within each of the periods specified in the Answered Time Bins. A seventh period is also used in the reports, which gathers information on all calls that were answered after the period specified by the sixth Answered Time Bin.
Available State ........... The Agent is ready to take Incoming Calls. The Available State is
shown as Blue in the Real Time Screens. Break Time................. The period allocated to Agents following clear down of an Incoming
Contact Center Call (also known as Wrap Up and Post Call Completion). Break Time is displayed in the Real Time Screens as Dark Green.
Calls Answered .......... ‘Answered’ means the Call was not abandoned, and it did not require the
involvement of another Skillset in the handling of the call
10
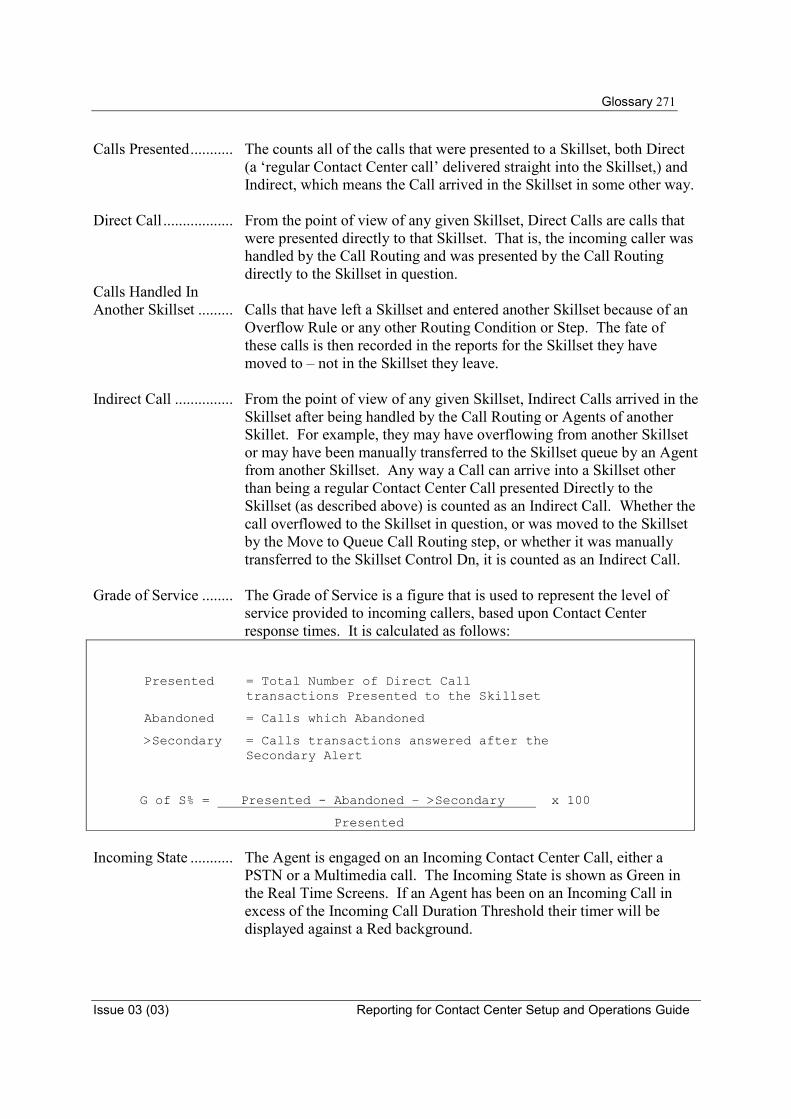
Glossary 271
Issue 03 (03) Reporting for Contact Center Setup and Operations Guide
Calls Presented........... The counts all of the calls that were presented to a Skillset, both Direct (a ‘regular Contact Center call’ delivered straight into the Skillset,) and Indirect, which means the Call arrived in the Skillset in some other way.
Direct Call .................. From the point of view of any given Skillset, Direct Calls are calls that
were presented directly to that Skillset. That is, the incoming caller was handled by the Call Routing and was presented by the Call Routing directly to the Skillset in question.
Calls Handled In Another Skillset ......... Calls that have left a Skillset and entered another Skillset because of an
Overflow Rule or any other Routing Condition or Step. The fate of these calls is then recorded in the reports for the Skillset they have moved to – not in the Skillset they leave.
Indirect Call ............... From the point of view of any given Skillset, Indirect Calls arrived in the
Skillset after being handled by the Call Routing or Agents of another Skillet. For example, they may have overflowing from another Skillset or may have been manually transferred to the Skillset queue by an Agent from another Skillset. Any way a Call can arrive into a Skillset other than being a regular Contact Center Call presented Directly to the Skillset (as described above) is counted as an Indirect Call. Whether the call overflowed to the Skillset in question, or was moved to the Skillset by the Move to Queue Call Routing step, or whether it was manually transferred to the Skillset Control Dn, it is counted as an Indirect Call.
Grade of Service ........ The Grade of Service is a figure that is used to represent the level of
service provided to incoming callers, based upon Contact Center response times. It is calculated as follows:
Presented = Total Number of Direct Call
transactions Presented to the Skillset Abandoned = Calls which Abandoned >Secondary = Calls transactions answered after the
Secondary Alert G of S% = Presented - Abandoned – >Secondary x 100 Presented
Incoming State ........... The Agent is engaged on an Incoming Contact Center Call, either a PSTN or a Multimedia call. The Incoming State is shown as Green in the Real Time Screens. If an Agent has been on an Incoming Call in excess of the Incoming Call Duration Threshold their timer will be displayed against a Red background.
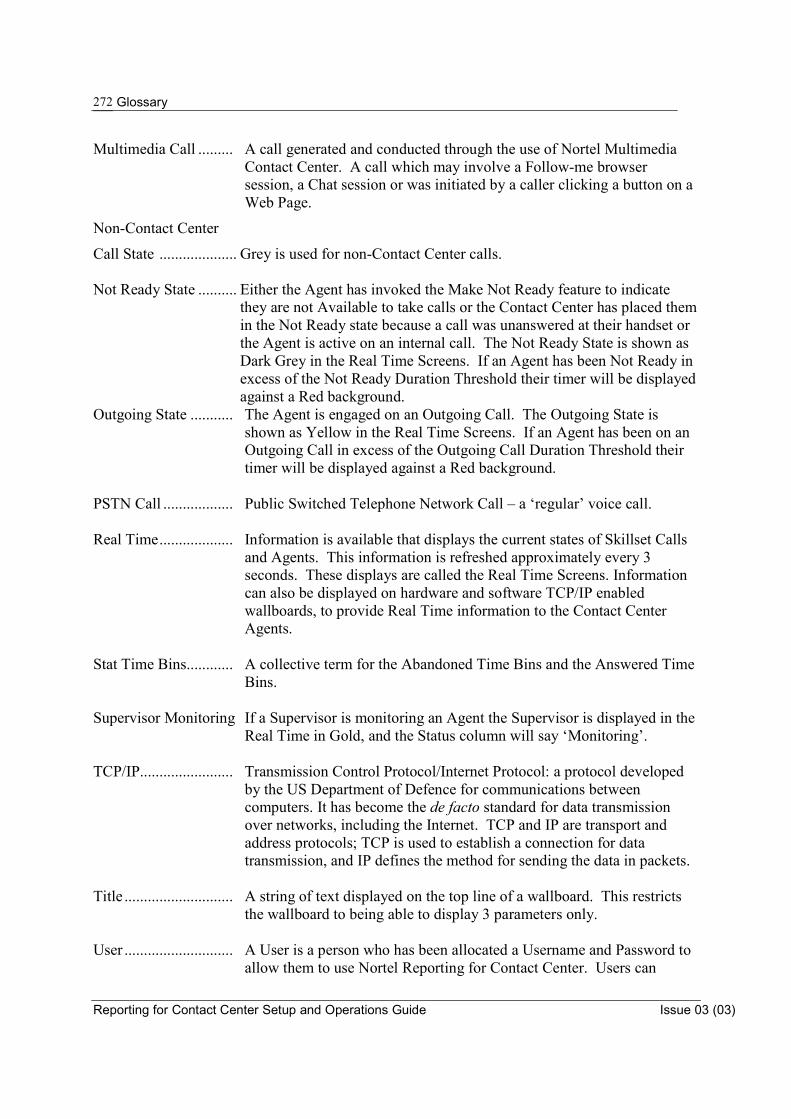
Glossary
Reporting for Contact Center Setup and Operations Guide Issue 03 (03)
272
Multimedia Call ......... A call generated and conducted through the use of Nortel Multimedia Contact Center. A call which may involve a Follow-me browser session, a Chat session or was initiated by a caller clicking a button on a Web Page.
Non-Contact Center
Call State .................... Grey is used for non-Contact Center calls. Not Ready State .......... Either the Agent has invoked the Make Not Ready feature to indicate
they are not Available to take calls or the Contact Center has placed them in the Not Ready state because a call was unanswered at their handset or the Agent is active on an internal call. The Not Ready State is shown as Dark Grey in the Real Time Screens. If an Agent has been Not Ready in excess of the Not Ready Duration Threshold their timer will be displayed against a Red background.
Outgoing State ........... The Agent is engaged on an Outgoing Call. The Outgoing State is shown as Yellow in the Real Time Screens. If an Agent has been on an Outgoing Call in excess of the Outgoing Call Duration Threshold their timer will be displayed against a Red background.
PSTN Call .................. Public Switched Telephone Network Call – a ‘regular’ voice call. Real Time................... Information is available that displays the current states of Skillset Calls
and Agents. This information is refreshed approximately every 3 seconds. These displays are called the Real Time Screens. Information can also be displayed on hardware and software TCP/IP enabled wallboards, to provide Real Time information to the Contact Center Agents.
Stat Time Bins............ A collective term for the Abandoned Time Bins and the Answered Time
Bins. Supervisor Monitoring If a Supervisor is monitoring an Agent the Supervisor is displayed in the
Real Time in Gold, and the Status column will say ‘Monitoring’. TCP/IP........................ Transmission Control Protocol/Internet Protocol: a protocol developed
by the US Department of Defence for communications between computers. It has become the de facto standard for data transmission over networks, including the Internet. TCP and IP are transport and address protocols; TCP is used to establish a connection for data transmission, and IP defines the method for sending the data in packets.
Title ............................ A string of text displayed on the top line of a wallboard. This restricts
the wallboard to being able to display 3 parameters only. User ............................ A User is a person who has been allocated a Username and Password to
allow them to use Nortel Reporting for Contact Center. Users can

Glossary 273
Issue 03 (03) Reporting for Contact Center Setup and Operations Guide
configure some elements of their usage of Nortel Reporting for Contact Center, but they do not have the same scope for configuration as an Administrator.
Unstaffed Calls........... Calls that were presented to the Skillset when there were no Agents
logged In to handle those calls. Wallboard................... A device that is used to display Contact Center statistics and messages to
the Agents and other Contact Center staff. Nortel Reporting for Contact Center TCP/IP enabled hardware WallBoards and SoftBoards from the ipView range of wallboards.

References
Reporting for Contact Center Setup and Operations Guide Issue 03 (03)
274
References
1 Software Keycode Installation Guide 2 McKay, David Reporting for Contact Center Set Up and Operations Guide, Issue 1-10. 3 Martin, Paul FD updates11, 2005.
11
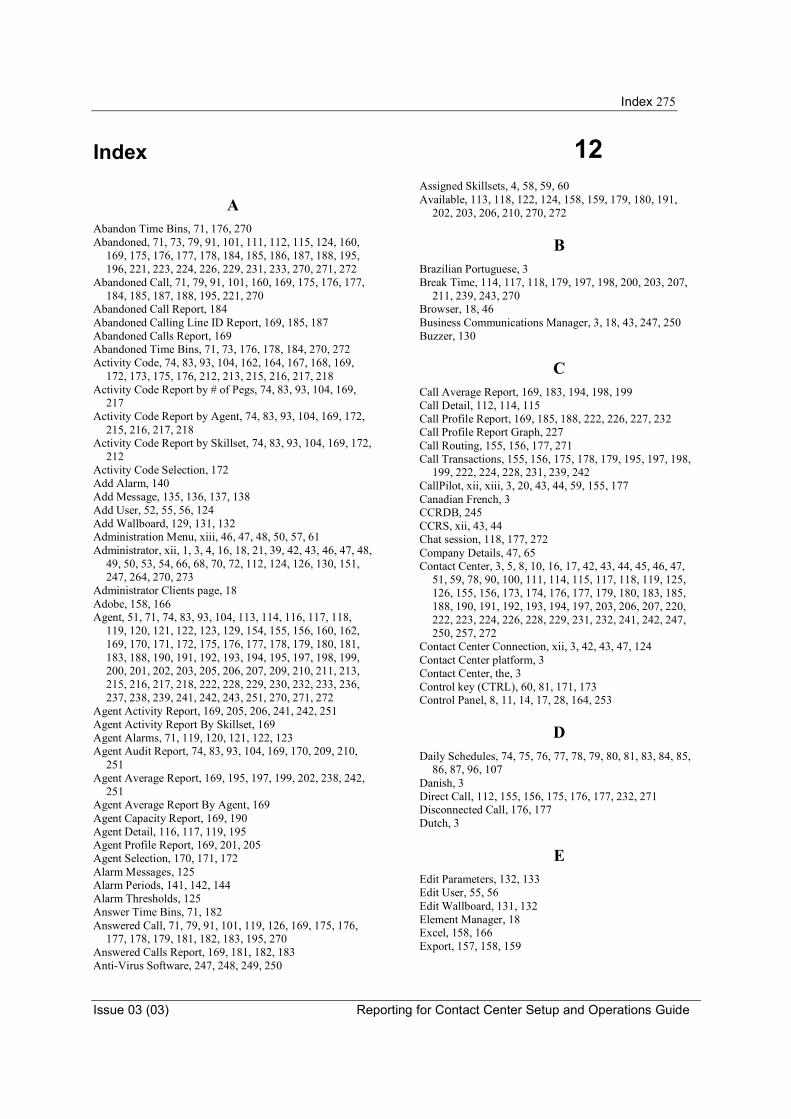
Index 275
Issue 03 (03) Reporting for Contact Center Setup and Operations Guide
Index
AAbandon Time Bins, 71, 176, 270 Abandoned, 71, 73, 79, 91, 101, 111, 112, 115, 124, 160,
169, 175, 176, 177, 178, 184, 185, 186, 187, 188, 195, 196, 221, 223, 224, 226, 229, 231, 233, 270, 271, 272
Abandoned Call, 71, 79, 91, 101, 160, 169, 175, 176, 177, 184, 185, 187, 188, 195, 221, 270
Abandoned Call Report, 184 Abandoned Calling Line ID Report, 169, 185, 187 Abandoned Calls Report, 169 Abandoned Time Bins, 71, 73, 176, 178, 184, 270, 272 Activity Code, 74, 83, 93, 104, 162, 164, 167, 168, 169,
172, 173, 175, 176, 212, 213, 215, 216, 217, 218 Activity Code Report by # of Pegs, 74, 83, 93, 104, 169,
217 Activity Code Report by Agent, 74, 83, 93, 104, 169, 172,
215, 216, 217, 218 Activity Code Report by Skillset, 74, 83, 93, 104, 169, 172,
212 Activity Code Selection, 172 Add Alarm, 140 Add Message, 135, 136, 137, 138 Add User, 52, 55, 56, 124 Add Wallboard, 129, 131, 132 Administration Menu, xiii, 46, 47, 48, 50, 57, 61 Administrator, xii, 1, 3, 4, 16, 18, 21, 39, 42, 43, 46, 47, 48,
49, 50, 53, 54, 66, 68, 70, 72, 112, 124, 126, 130, 151, 247, 264, 270, 273
Administrator Clients page, 18 Adobe, 158, 166 Agent, 51, 71, 74, 83, 93, 104, 113, 114, 116, 117, 118,
119, 120, 121, 122, 123, 129, 154, 155, 156, 160, 162, 169, 170, 171, 172, 175, 176, 177, 178, 179, 180, 181, 183, 188, 190, 191, 192, 193, 194, 195, 197, 198, 199, 200, 201, 202, 203, 205, 206, 207, 209, 210, 211, 213, 215, 216, 217, 218, 222, 228, 229, 230, 232, 233, 236, 237, 238, 239, 241, 242, 243, 251, 270, 271, 272
Agent Activity Report, 169, 205, 206, 241, 242, 251 Agent Activity Report By Skillset, 169 Agent Alarms, 71, 119, 120, 121, 122, 123 Agent Audit Report, 74, 83, 93, 104, 169, 170, 209, 210,
251 Agent Average Report, 169, 195, 197, 199, 202, 238, 242,
251 Agent Average Report By Agent, 169 Agent Capacity Report, 169, 190 Agent Detail, 116, 117, 119, 195 Agent Profile Report, 169, 201, 205 Agent Selection, 170, 171, 172 Alarm Messages, 125 Alarm Periods, 141, 142, 144 Alarm Thresholds, 125 Answer Time Bins, 71, 182 Answered Call, 71, 79, 91, 101, 119, 126, 169, 175, 176,
177, 178, 179, 181, 182, 183, 195, 270 Answered Calls Report, 169, 181, 182, 183 Anti-Virus Software, 247, 248, 249, 250
Assigned Skillsets, 4, 58, 59, 60 Available, 113, 118, 122, 124, 158, 159, 179, 180, 191,
202, 203, 206, 210, 270, 272
BBrazilian Portuguese, 3 Break Time, 114, 117, 118, 179, 197, 198, 200, 203, 207,
211, 239, 243, 270 Browser, 18, 46 Business Communications Manager, 3, 18, 43, 247, 250 Buzzer, 130
CCall Average Report, 169, 183, 194, 198, 199 Call Detail, 112, 114, 115 Call Profile Report, 169, 185, 188, 222, 226, 227, 232 Call Profile Report Graph, 227 Call Routing, 155, 156, 177, 271 Call Transactions, 155, 156, 175, 178, 179, 195, 197, 198,
199, 222, 224, 228, 231, 239, 242 CallPilot, xii, xiii, 3, 20, 43, 44, 59, 155, 177 Canadian French, 3 CCRDB, 245 CCRS, xii, 43, 44 Chat session, 118, 177, 272 Company Details, 47, 65 Contact Center, 3, 5, 8, 10, 16, 17, 42, 43, 44, 45, 46, 47,
51, 59, 78, 90, 100, 111, 114, 115, 117, 118, 119, 125, 126, 155, 156, 173, 174, 176, 177, 179, 180, 183, 185, 188, 190, 191, 192, 193, 194, 197, 203, 206, 207, 220, 222, 223, 224, 226, 228, 229, 231, 232, 241, 242, 247, 250, 257, 272
Contact Center Connection, xii, 3, 42, 43, 47, 124 Contact Center platform, 3 Contact Center, the, 3 Control key (CTRL), 60, 81, 171, 173 Control Panel, 8, 11, 14, 17, 28, 164, 253
DDaily Schedules, 74, 75, 76, 77, 78, 79, 80, 81, 83, 84, 85,
86, 87, 96, 107 Danish, 3 Direct Call, 112, 155, 156, 175, 176, 177, 232, 271 Disconnected Call, 176, 177 Dutch, 3
EEdit Parameters, 132, 133 Edit User, 55, 56 Edit Wallboard, 131, 132 Element Manager, 18 Excel, 158, 166 Export, 157, 158, 159
12

Index
Reporting for Contact Center Setup and Operations Guide Issue 03 (03)
276
FFavorite, 82, 83, 93, 120, 151 Favorites, 4, 39, 67, 81, 82, 83, 93, 103, 110, 120, 121, 151,
170 Follow-me, 118, 177, 272 French, 3
GGerman, 3 Grade of Service, 112, 116, 124, 126, 141, 177, 220, 223,
226, 271 Graph, 182, 185, 227
HHelp Request Report, 162, 164, 167, 168, 192, 236 Help Request Unanswered Report, 236 HTTP, 44
IIBM, 5 Incoming Call Report, 169, 231 Indirect Call, 155, 156, 175, 177, 231, 232, 271 In-Progress Calls, 154 Installation, xii, 1, 8, 10, 12, 13, 14, 17, 18, 20, 25, 26, 27,
28, 258, 259, 274 InstallShield, 8, 19, 20, 21, 22 Instant Messages, 126, 127, 150, 151, 152, 153 Intel, 5 Internet Explorer, 3, 5, 8, 9, 10, 14, 18, 39, 67, 259, 260,
266, 267, 268, 269 Internet Information Services, 6, 10, 11, 12, 13, 14, 15, 16,
32, 46, 251 Introduction, xiii, 1, 3, 8, 154 IP Address, 18, 39, 42, 43, 44, 45, 67, 129, 247, 262 ipView Softboard, xiii, 16, 124, 125, 129, 257, 273 Italian, 3
LLanguage Support, 3 Latin American Spanish, 3 License Agreement, 22, 23 Localhost, 247 Logging Menu, 62, 63, 64 Login, 21, 39, 40, 67, 68, 139, 149, 193, 211, 248, 251,
253, 266 Longest Waiting Time, 111, 116
MMaintenance, 47, 61 Microprocessor, 5 Microsoft, 5, 6, 10, 11, 16, 46, 158, 166, 246, 247, 260, 263 Minimum PC Requirements, 5 Monitoring, 118, 180, 202, 272 Monthly Schedules, 74, 97, 98, 99, 100, 101, 102, 103, 104,
105, 106, 107, 108
Mouse, 5 Multimedia Call, 115, 122, 155, 177, 272 MySQL database, xiii, 4, 9, 16, 25, 26, 27, 245, 246, 264
NNetwork Name, 42, 43, 129 Non-Agent, 226, 230 Nortel Call Center Reporting, 3, 8 Nortel Contact Center Reporting Server, xiii Nortel Networks Reporting for Call Center, xiii Nortel Reporting for Call Center, xiii Nortel Reporting for Contact Center, 1, 3, 4, 5, 6, 8, 9, 10,
12, 16, 17, 18, 19, 20, 21, 24, 25, 26, 27, 28, 32, 38, 39, 43, 45, 48, 49, 51, 52, 53, 54, 59, 61, 63, 64, 65, 66, 67, 68, 70, 71, 73, 74, 83, 114, 119, 121, 124, 125, 126, 129, 130, 142, 154, 155, 159, 173, 176, 179, 182, 184, 187, 244, 245, 247, 248, 251, 252, 254, 263, 264, 265, 266, 267, 268, 269, 270, 272, 273, 274
North American English, 3 Norwegian, 3 Not Ready, 114, 118, 122, 124, 125, 137, 142, 180, 190,
203, 206, 207, 211, 272
OODBC, 25 On Contact Center Calls, 114 On Internal Calls, 114 On Non-Contact Center Calls, 114 On Outgoing Calls, 114 Operating System, 6 Operator, 175, 178, 179, 226, 229, 233 Overflow, 111, 115, 175, 178, 179, 226, 229, 232, 233,
234, 242, 271 Overflow Table, 232, 234
PPage Range, 159 Parameters, 130, 131, 132, 133, 142 Password, 40, 41, 55, 57, 68, 69, 272 Port Number, xiii, 16, 25, 26, 31, 32, 43, 129 Primary Alert, 111, 115, 175, 178, 232, 234 Print Schedules, 71, 74, 75, 87, 97, 109, 253 Printer, 157, 164, 265 Printing a Report, 157
RReal Time Agent Detail, 116 Real Time Agent Summary, 113 Real Time Call Detail, 114 Real Time Call Summary, 110, 113 Real Time screens, xiii, 3, 4, 5, 8, 16, 43, 45, 51, 57, 66, 71,
109, 110, 112, 113, 114, 115, 116, 117, 118, 119, 195, 247, 248, 263, 267, 270, 271, 272
Report Headers, 156 Report Magnification, 159 Report Menu, 160, 161, 167, 173 Report Periods, 154
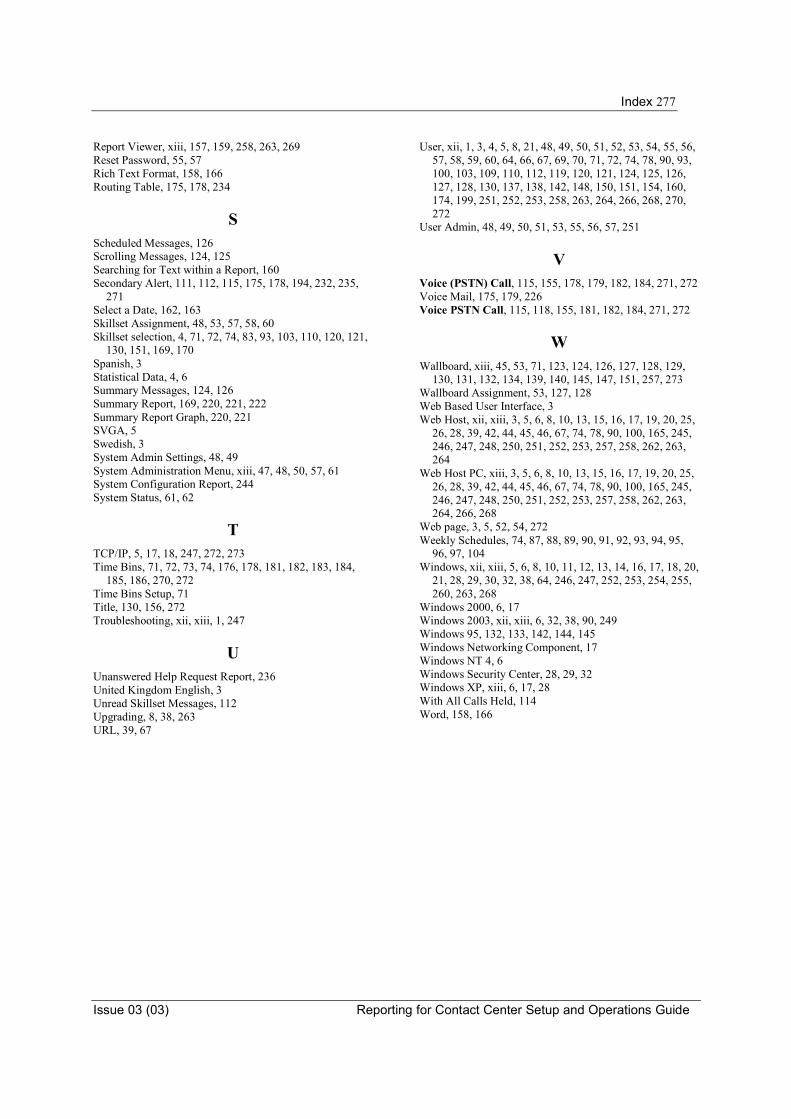
Index 277
Issue 03 (03) Reporting for Contact Center Setup and Operations Guide
Report Viewer, xiii, 157, 159, 258, 263, 269 Reset Password, 55, 57 Rich Text Format, 158, 166 Routing Table, 175, 178, 234
SScheduled Messages, 126 Scrolling Messages, 124, 125 Searching for Text within a Report, 160 Secondary Alert, 111, 112, 115, 175, 178, 194, 232, 235,
271 Select a Date, 162, 163 Skillset Assignment, 48, 53, 57, 58, 60 Skillset selection, 4, 71, 72, 74, 83, 93, 103, 110, 120, 121,
130, 151, 169, 170 Spanish, 3 Statistical Data, 4, 6 Summary Messages, 124, 126 Summary Report, 169, 220, 221, 222 Summary Report Graph, 220, 221 SVGA, 5 Swedish, 3 System Admin Settings, 48, 49 System Administration Menu, xiii, 47, 48, 50, 57, 61 System Configuration Report, 244 System Status, 61, 62
TTCP/IP, 5, 17, 18, 247, 272, 273 Time Bins, 71, 72, 73, 74, 176, 178, 181, 182, 183, 184,
185, 186, 270, 272 Time Bins Setup, 71 Title, 130, 156, 272 Troubleshooting, xii, xiii, 1, 247
UUnanswered Help Request Report, 236 United Kingdom English, 3 Unread Skillset Messages, 112 Upgrading, 8, 38, 263 URL, 39, 67
User, xii, 1, 3, 4, 5, 8, 21, 48, 49, 50, 51, 52, 53, 54, 55, 56, 57, 58, 59, 60, 64, 66, 67, 69, 70, 71, 72, 74, 78, 90, 93, 100, 103, 109, 110, 112, 119, 120, 121, 124, 125, 126, 127, 128, 130, 137, 138, 142, 148, 150, 151, 154, 160, 174, 199, 251, 252, 253, 258, 263, 264, 266, 268, 270, 272
User Admin, 48, 49, 50, 51, 53, 55, 56, 57, 251
VVoice (PSTN) Call, 115, 155, 178, 179, 182, 184, 271, 272 Voice Mail, 175, 179, 226 Voice PSTN Call, 115, 118, 155, 181, 182, 184, 271, 272
WWallboard, xiii, 45, 53, 71, 123, 124, 126, 127, 128, 129,
130, 131, 132, 134, 139, 140, 145, 147, 151, 257, 273 Wallboard Assignment, 53, 127, 128 Web Based User Interface, 3 Web Host, xii, xiii, 3, 5, 6, 8, 10, 13, 15, 16, 17, 19, 20, 25,
26, 28, 39, 42, 44, 45, 46, 67, 74, 78, 90, 100, 165, 245, 246, 247, 248, 250, 251, 252, 253, 257, 258, 262, 263, 264
Web Host PC, xiii, 3, 5, 6, 8, 10, 13, 15, 16, 17, 19, 20, 25, 26, 28, 39, 42, 44, 45, 46, 67, 74, 78, 90, 100, 165, 245, 246, 247, 248, 250, 251, 252, 253, 257, 258, 262, 263, 264, 266, 268
Web page, 3, 5, 52, 54, 272 Weekly Schedules, 74, 87, 88, 89, 90, 91, 92, 93, 94, 95,
96, 97, 104 Windows, xii, xiii, 5, 6, 8, 10, 11, 12, 13, 14, 16, 17, 18, 20,
21, 28, 29, 30, 32, 38, 64, 246, 247, 252, 253, 254, 255, 260, 263, 268
Windows 2000, 6, 17 Windows 2003, xii, xiii, 6, 32, 38, 90, 249 Windows 95, 132, 133, 142, 144, 145 Windows Networking Component, 17 Windows NT 4, 6 Windows Security Center, 28, 29, 32 Windows XP, xiii, 6, 17, 28 With All Calls Held, 114 Word, 158, 166