Embed Size (px)
Citation preview
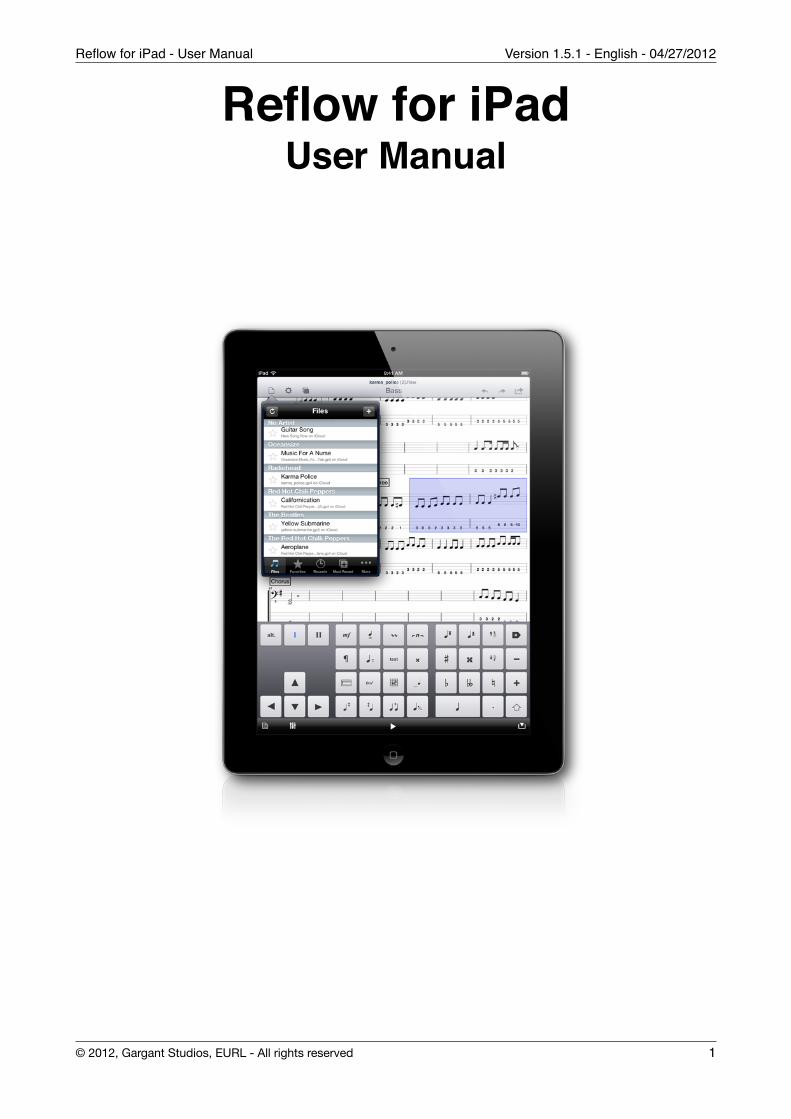
Reflow for iPadUser Manual
Reflow for iPad - User Manual! Version 1.5.1 - English - 04/27/2012
© 2012, Gargant Studios, EURL - All rights reserved! 1
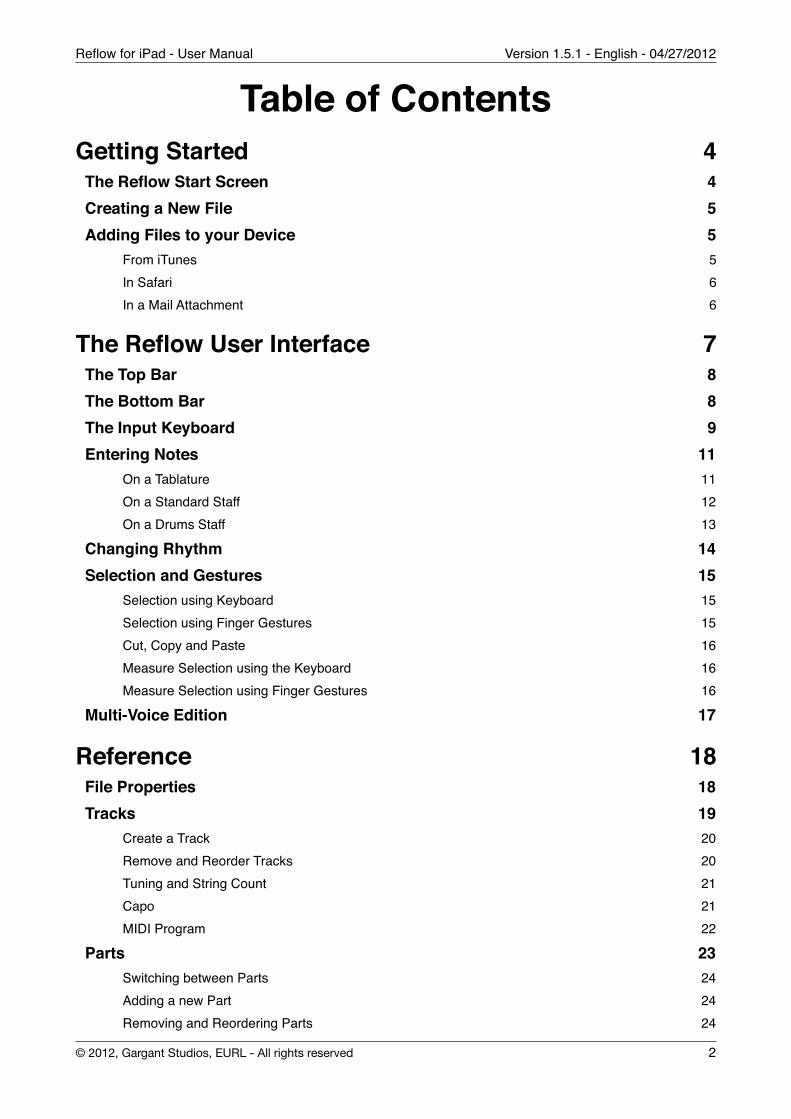
Table of ContentsGetting Started! 4
The Reflow Start Screen! 4Creating a New File! 5Adding Files to your Device! 5
From iTunes! 5In Safari! 6In a Mail Attachment! 6
The Reflow User Interface! 7The Top Bar! 8The Bottom Bar! 8The Input Keyboard! 9Entering Notes! 11
On a Tablature! 11On a Standard Staff! 12On a Drums Staff! 13
Changing Rhythm! 14Selection and Gestures! 15
Selection using Keyboard! 15Selection using Finger Gestures! 15Cut, Copy and Paste! 16Measure Selection using the Keyboard! 16Measure Selection using Finger Gestures! 16
Multi-Voice Edition! 17
Reference! 18File Properties! 18Tracks! 19
Create a Track! 20Remove and Reorder Tracks! 20Tuning and String Count! 21Capo! 21MIDI Program! 22
Parts! 23Switching between Parts! 24Adding a new Part! 24Removing and Reordering Parts! 24
Reflow for iPad - User Manual! Version 1.5.1 - English - 04/27/2012
© 2012, Gargant Studios, EURL - All rights reserved! 2
Measures! 25Manipulating Measures! 25Measure Settings! 25Repeats and Directions! 26Key Signature! 26Clef and Ottavia! 27Rehearsal Signs! 27
Chord Names and Diagrams! 28Insert Chord Names! 28Insert Chord Diagrams! 28
Effects and Articulations! 30Dynamics! 31Accents! 31Staccato! 31Drum Sticking! 32Brush and Arpeggio! 32Dead Note! 32Pickstrokes! 33Hammer-on, Pull-off! 33Tap, Slap, Pop ! 33Vibrato! 34Palm Mute, Let Ring! 34Bends! 35Slides! 35
Share your compositions! 36MIDI Export! 36Guitar Pro™ 5 Export! 36PDF Export! 36
Reflow for iPad - User Manual! Version 1.5.1 - English - 04/27/2012
© 2012, Gargant Studios, EURL - All rights reserved! 3
Getting Started
The Reflow Start Screen
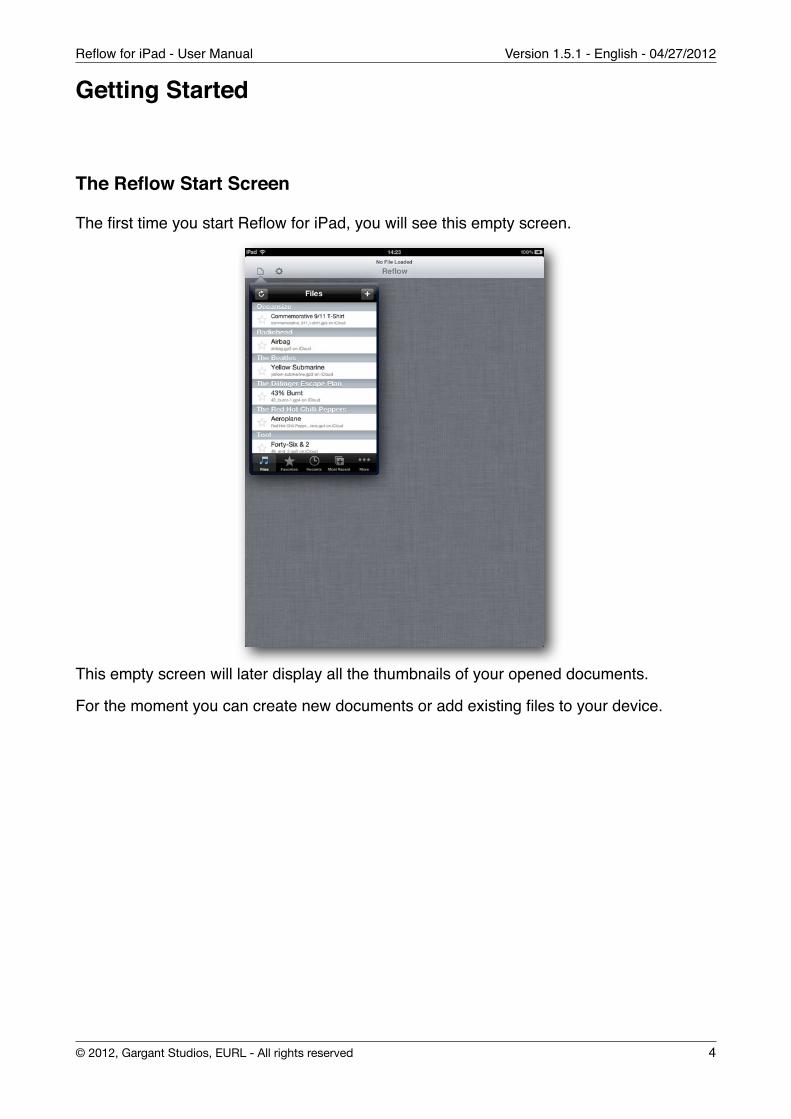
The first time you start Reflow for iPad, you will see this empty screen.
This empty screen will later display all the thumbnails of your opened documents.
For the moment you can create new documents or add existing files to your device.
Reflow for iPad - User Manual! Version 1.5.1 - English - 04/27/2012
© 2012, Gargant Studios, EURL - All rights reserved! 4
Creating a New File
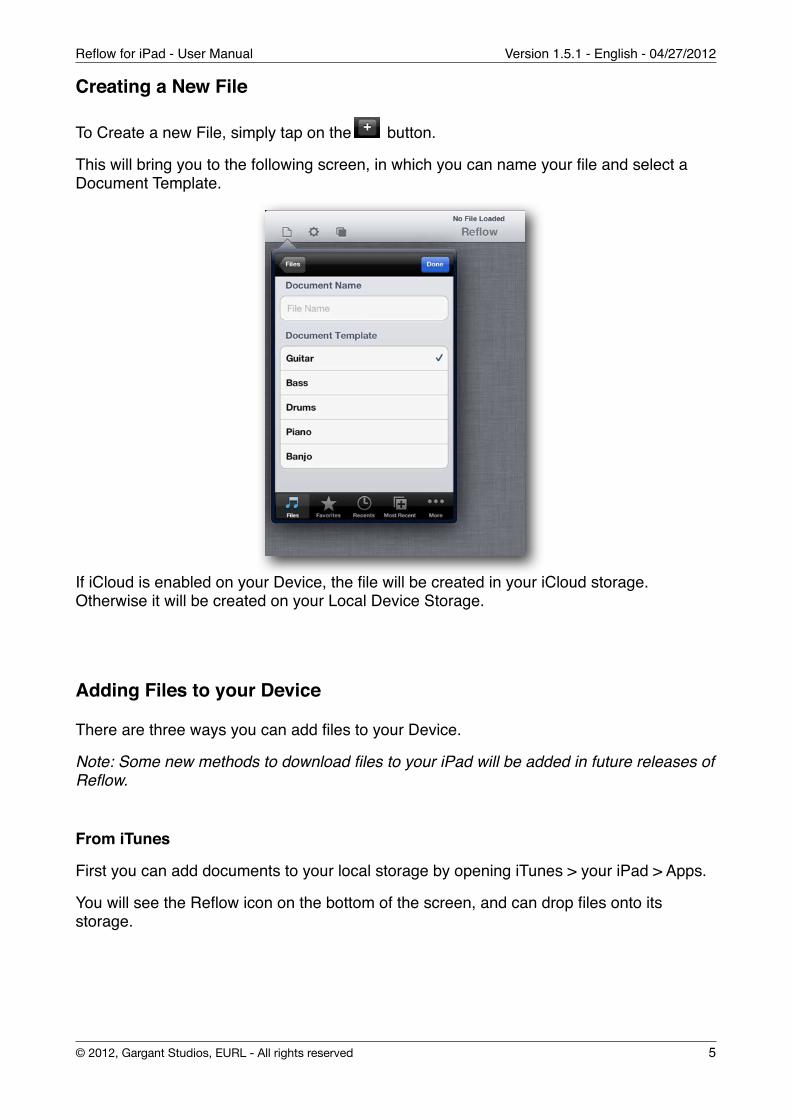
To Create a new File, simply tap on the button.
This will bring you to the following screen, in which you can name your file and select a Document Template.
If iCloud is enabled on your Device, the file will be created in your iCloud storage. Otherwise it will be created on your Local Device Storage.
Adding Files to your Device
There are three ways you can add files to your Device.
Note: Some new methods to download files to your iPad will be added in future releases of Reflow.
From iTunes
First you can add documents to your local storage by opening iTunes > your iPad > Apps.
You will see the Reflow icon on the bottom of the screen, and can drop files onto its storage.
Reflow for iPad - User Manual! Version 1.5.1 - English - 04/27/2012
© 2012, Gargant Studios, EURL - All rights reserved! 5
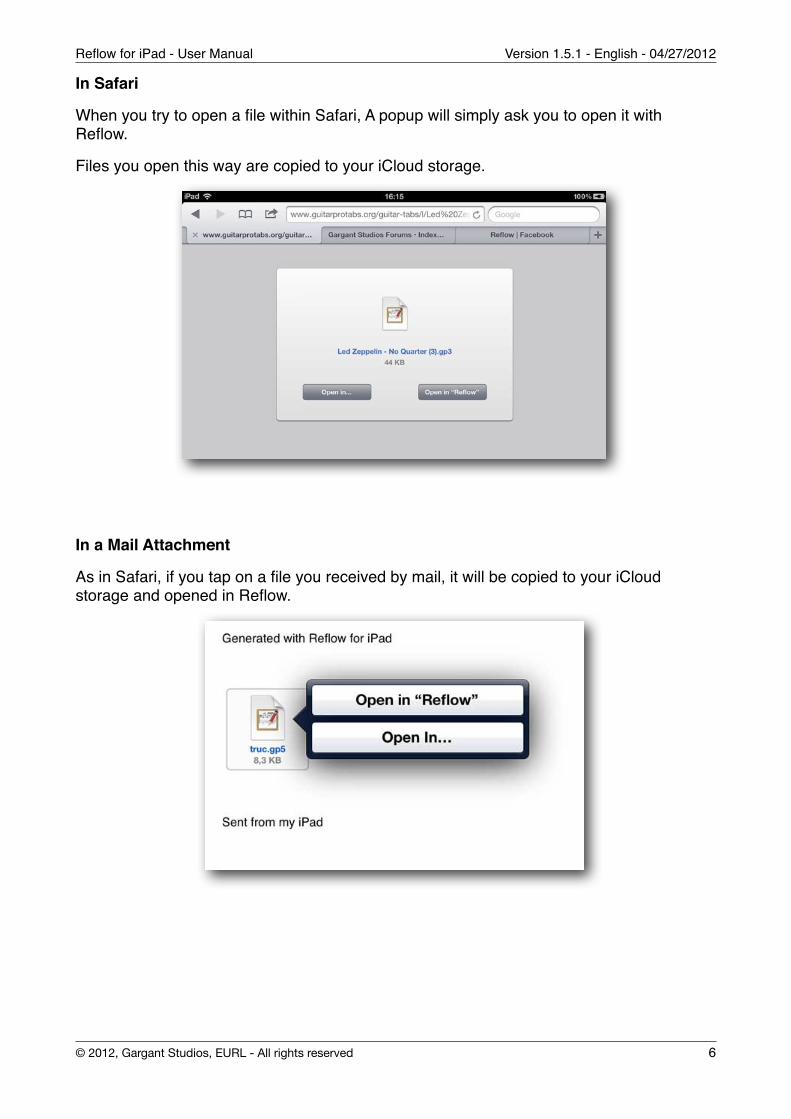
In Safari
When you try to open a file within Safari, A popup will simply ask you to open it with Reflow.
Files you open this way are copied to your iCloud storage.
In a Mail Attachment
As in Safari, if you tap on a file you received by mail, it will be copied to your iCloud storage and opened in Reflow.
Reflow for iPad - User Manual! Version 1.5.1 - English - 04/27/2012
© 2012, Gargant Studios, EURL - All rights reserved! 6
The Reflow User Interface
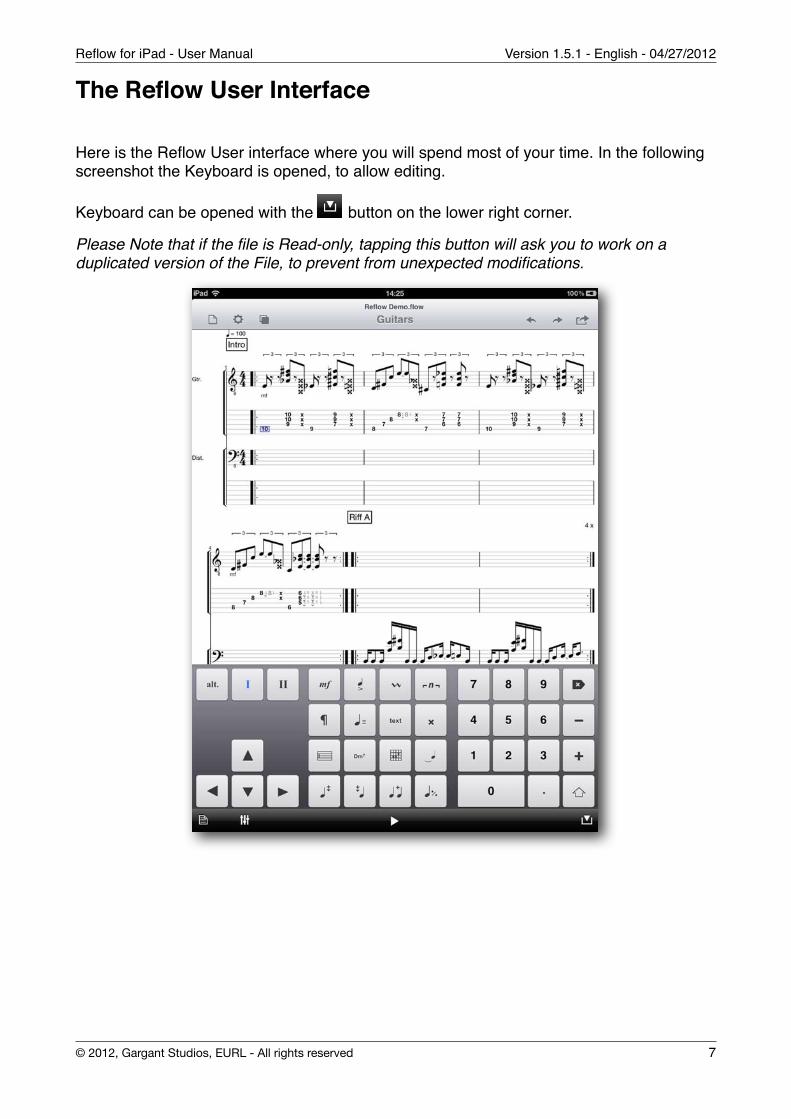
Here is the Reflow User interface where you will spend most of your time. In the following screenshot the Keyboard is opened, to allow editing.
Keyboard can be opened with the button on the lower right corner.
Please Note that if the file is Read-only, tapping this button will ask you to work on a duplicated version of the File, to prevent from unexpected modifications.
Reflow for iPad - User Manual! Version 1.5.1 - English - 04/27/2012
© 2012, Gargant Studios, EURL - All rights reserved! 7
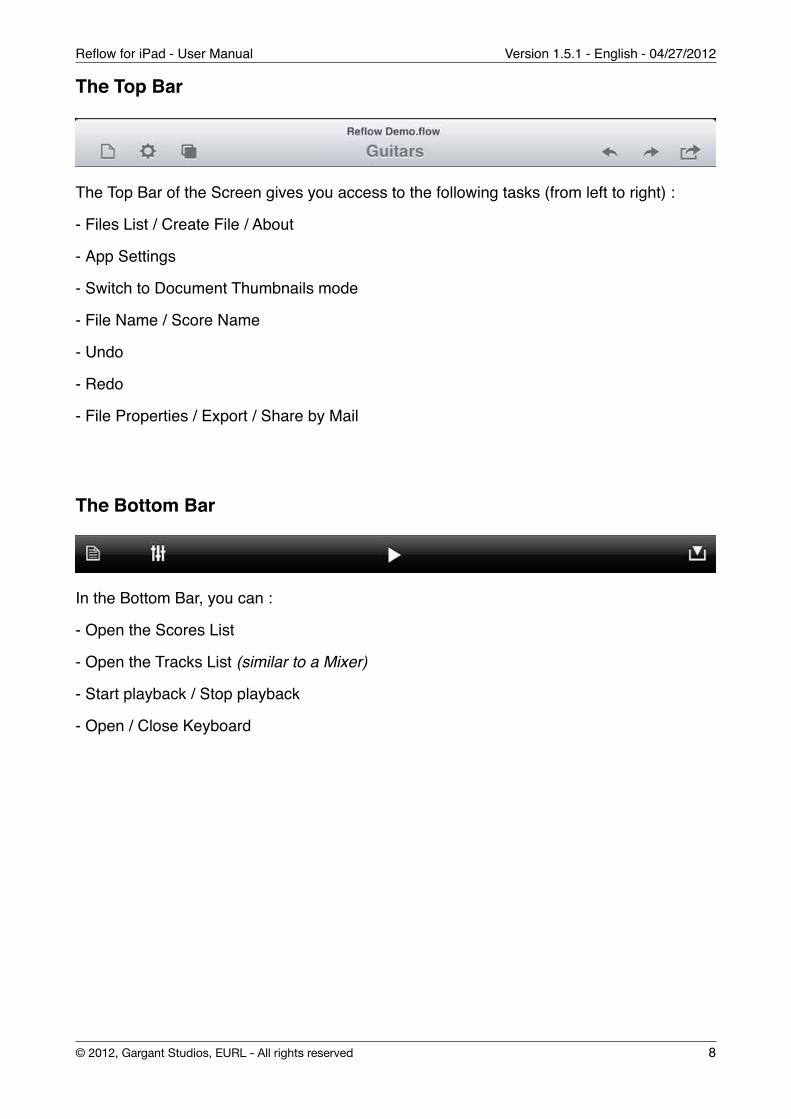
The Top Bar
The Top Bar of the Screen gives you access to the following tasks (from left to right) :
- Files List / Create File / About
- App Settings
- Switch to Document Thumbnails mode
- File Name / Score Name
- Undo
- Redo
- File Properties / Export / Share by Mail
The Bottom Bar
In the Bottom Bar, you can :
- Open the Scores List
- Open the Tracks List (similar to a Mixer)
- Start playback / Stop playback
- Open / Close Keyboard
Reflow for iPad - User Manual! Version 1.5.1 - English - 04/27/2012
© 2012, Gargant Studios, EURL - All rights reserved! 8
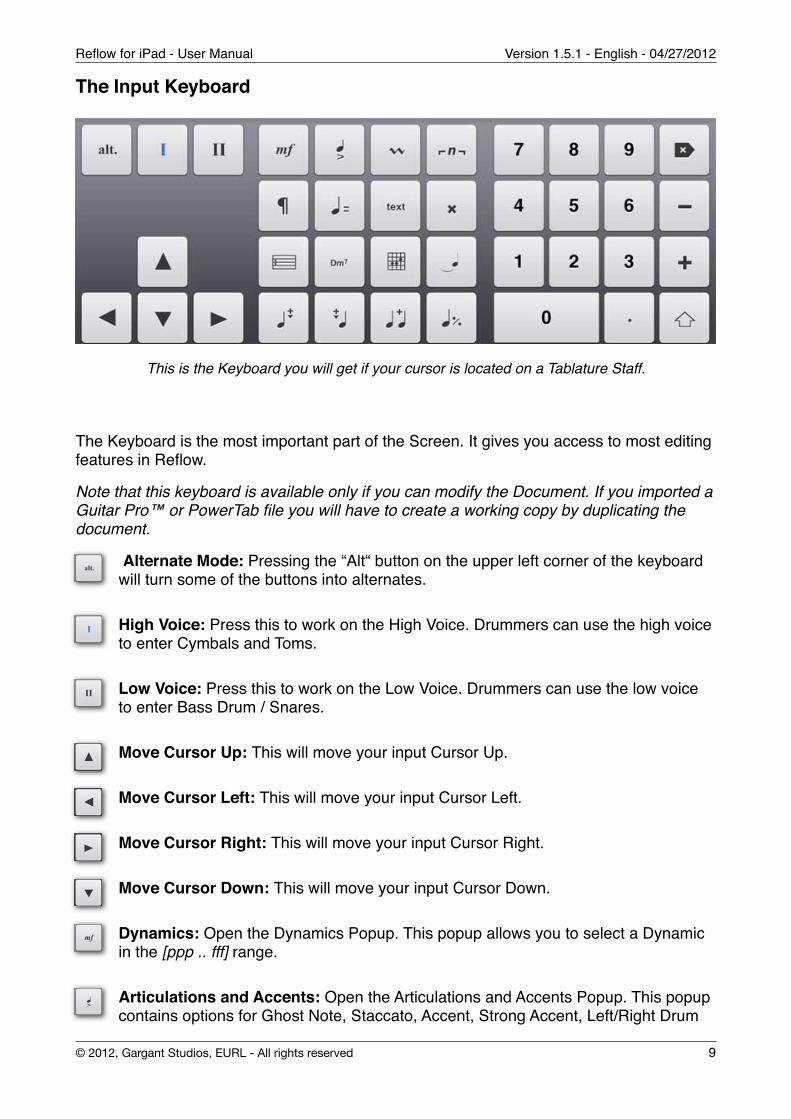
The Input Keyboard
This is the Keyboard you will get if your cursor is located on a Tablature Staff.
The Keyboard is the most important part of the Screen. It gives you access to most editing features in Reflow.
Note that this keyboard is available only if you can modify the Document. If you imported a Guitar Pro™ or PowerTab file you will have to create a working copy by duplicating the document.
Alternate Mode: Pressing the “Alt“ button on the upper left corner of the keyboard will turn some of the buttons into alternates.
High Voice: Press this to work on the High Voice. Drummers can use the high voice to enter Cymbals and Toms.
Low Voice: Press this to work on the Low Voice. Drummers can use the low voice to enter Bass Drum / Snares.
Move Cursor Up: This will move your input Cursor Up.
Move Cursor Left: This will move your input Cursor Left.
Move Cursor Right: This will move your input Cursor Right.
Move Cursor Down: This will move your input Cursor Down.
Dynamics: Open the Dynamics Popup. This popup allows you to select a Dynamic in the [ppp .. fff] range.
Articulations and Accents: Open the Articulations and Accents Popup. This popup contains options for Ghost Note, Staccato, Accent, Strong Accent, Left/Right Drum
Reflow for iPad - User Manual! Version 1.5.1 - English - 04/27/2012
© 2012, Gargant Studios, EURL - All rights reserved! 9
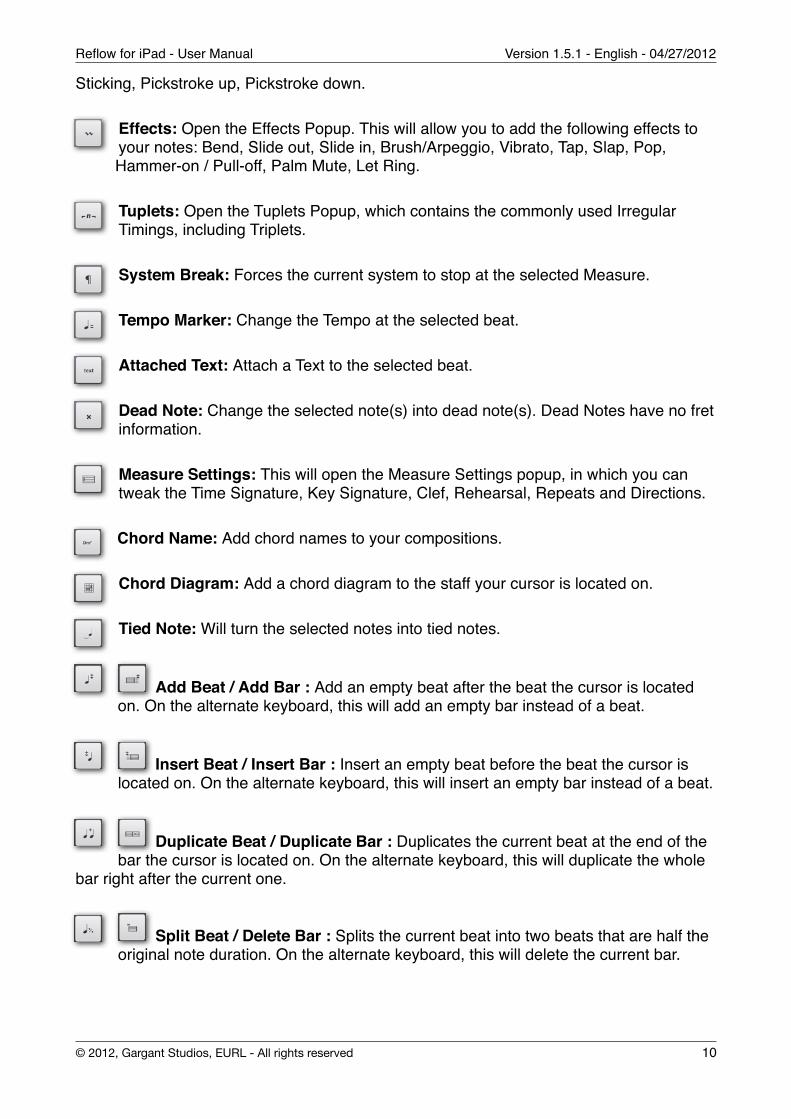
Sticking, Pickstroke up, Pickstroke down.
Effects: Open the Effects Popup. This will allow you to add the following effects to your notes: Bend, Slide out, Slide in, Brush/Arpeggio, Vibrato, Tap, Slap, Pop, Hammer-on / Pull-off, Palm Mute, Let Ring.
Tuplets: Open the Tuplets Popup, which contains the commonly used Irregular Timings, including Triplets.
System Break: Forces the current system to stop at the selected Measure.
Tempo Marker: Change the Tempo at the selected beat.
Attached Text: Attach a Text to the selected beat.
Dead Note: Change the selected note(s) into dead note(s). Dead Notes have no fret information.
Measure Settings: This will open the Measure Settings popup, in which you can tweak the Time Signature, Key Signature, Clef, Rehearsal, Repeats and Directions.
Chord Name: Add chord names to your compositions.
Chord Diagram: Add a chord diagram to the staff your cursor is located on.
Tied Note: Will turn the selected notes into tied notes.
Add Beat / Add Bar : Add an empty beat after the beat the cursor is located on. On the alternate keyboard, this will add an empty bar instead of a beat.
Insert Beat / Insert Bar : Insert an empty beat before the beat the cursor is located on. On the alternate keyboard, this will insert an empty bar instead of a beat.
Duplicate Beat / Duplicate Bar : Duplicates the current beat at the end of the bar the cursor is located on. On the alternate keyboard, this will duplicate the whole
bar right after the current one.
Split Beat / Delete Bar : Splits the current beat into two beats that are half the original note duration. On the alternate keyboard, this will delete the current bar.
Reflow for iPad - User Manual! Version 1.5.1 - English - 04/27/2012
© 2012, Gargant Studios, EURL - All rights reserved! 10
Entering Notes
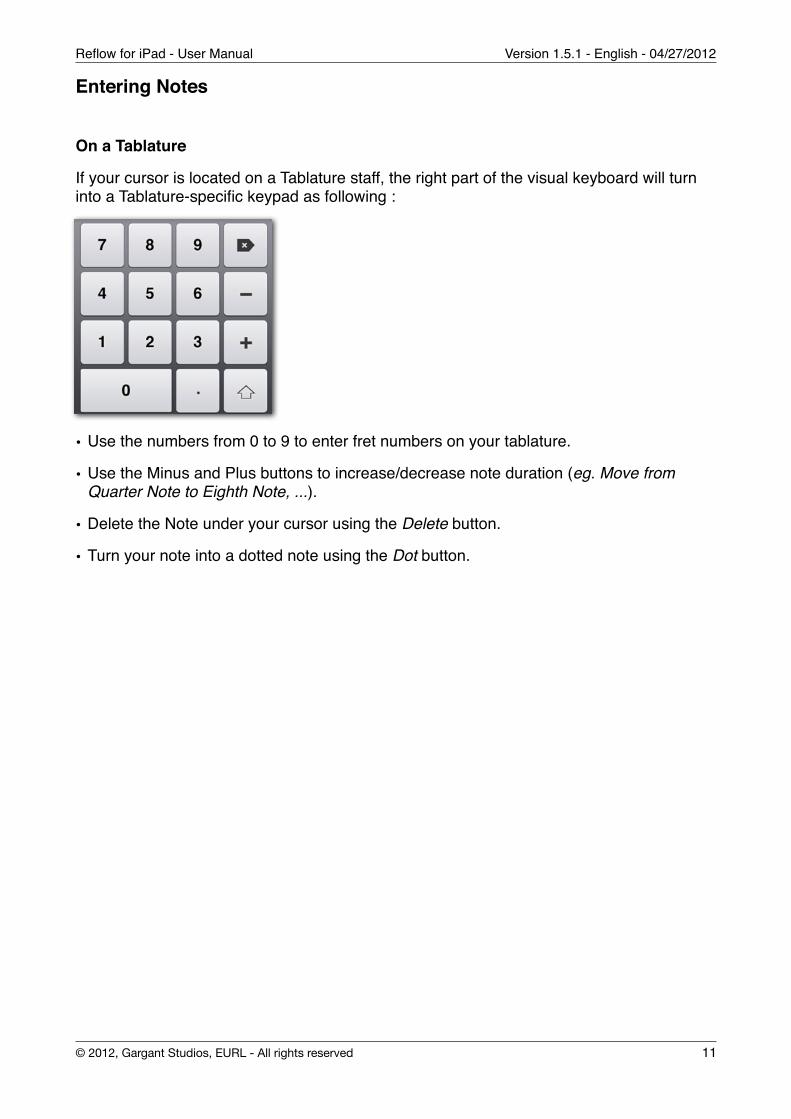
On a Tablature
If your cursor is located on a Tablature staff, the right part of the visual keyboard will turn into a Tablature-specific keypad as following :
• Use the numbers from 0 to 9 to enter fret numbers on your tablature.
• Use the Minus and Plus buttons to increase/decrease note duration (eg. Move from Quarter Note to Eighth Note, ...).
• Delete the Note under your cursor using the Delete button.
• Turn your note into a dotted note using the Dot button.
Reflow for iPad - User Manual! Version 1.5.1 - English - 04/27/2012
© 2012, Gargant Studios, EURL - All rights reserved! 11
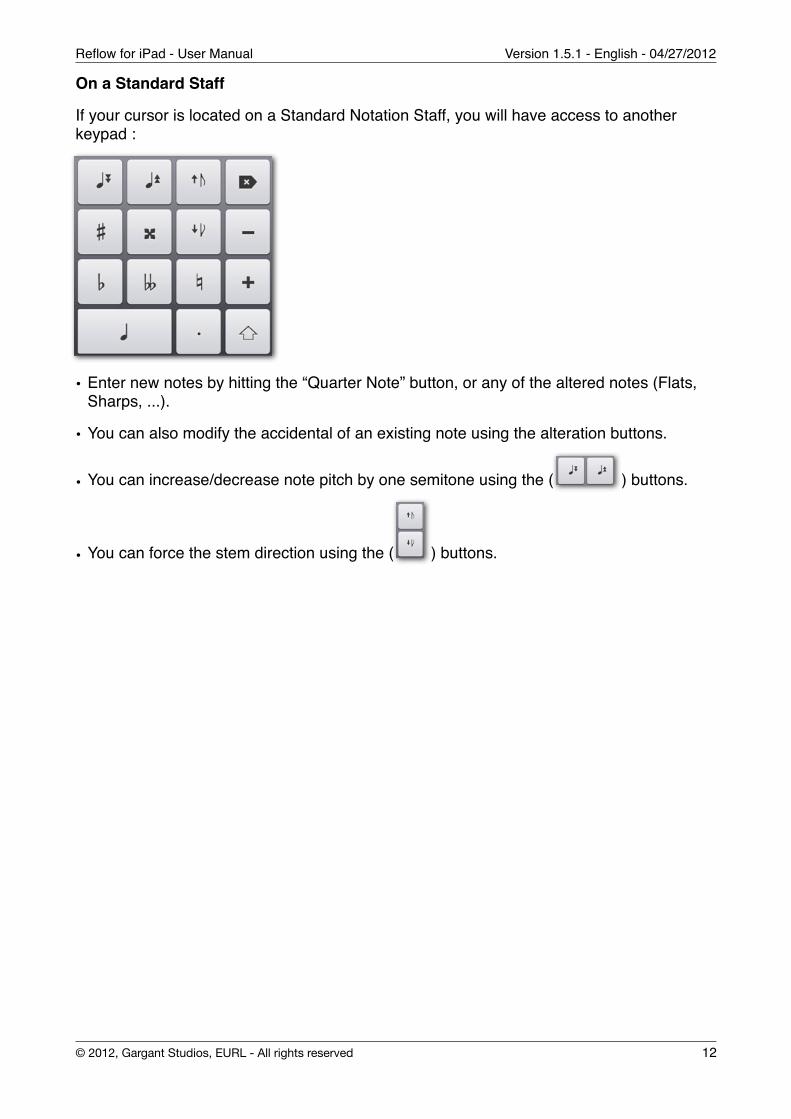
On a Standard Staff
If your cursor is located on a Standard Notation Staff, you will have access to another keypad :
• Enter new notes by hitting the “Quarter Note” button, or any of the altered notes (Flats, Sharps, ...).
• You can also modify the accidental of an existing note using the alteration buttons.
• You can increase/decrease note pitch by one semitone using the ( ) buttons.
• You can force the stem direction using the ( ) buttons.
Reflow for iPad - User Manual! Version 1.5.1 - English - 04/27/2012
© 2012, Gargant Studios, EURL - All rights reserved! 12
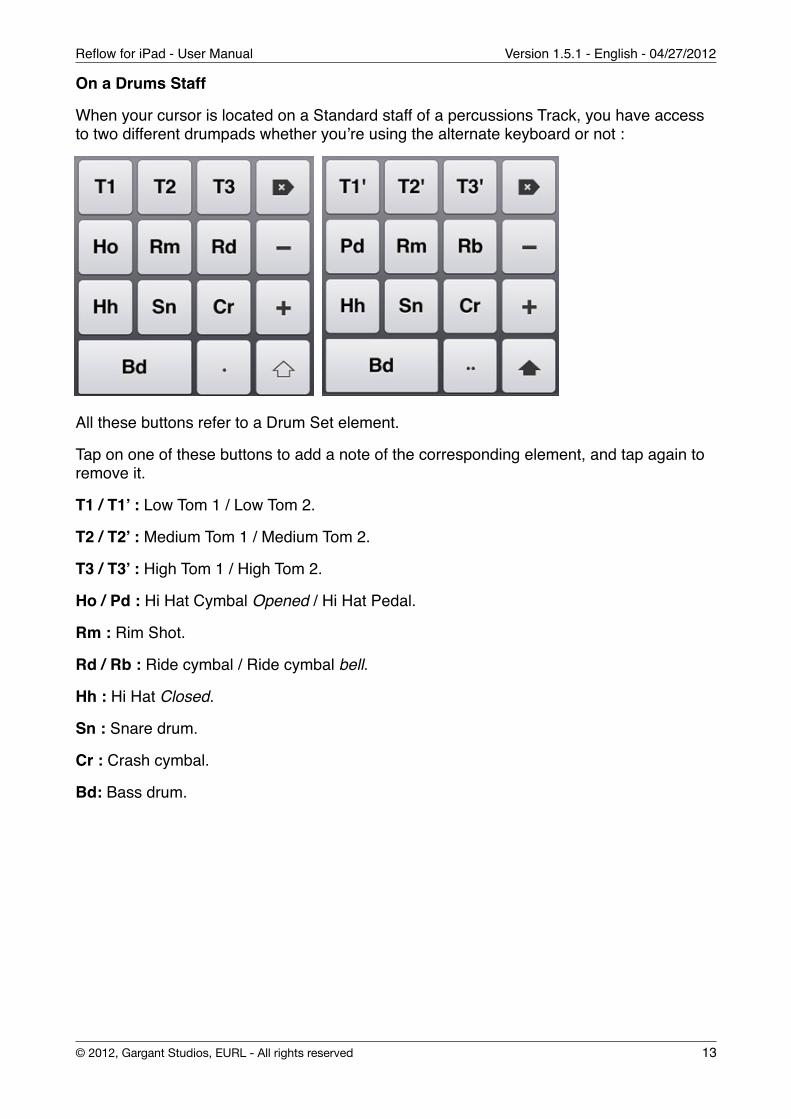
On a Drums Staff
When your cursor is located on a Standard staff of a percussions Track, you have access to two different drumpads whether you’re using the alternate keyboard or not :
All these buttons refer to a Drum Set element.
Tap on one of these buttons to add a note of the corresponding element, and tap again to remove it.
T1 / T1’ : Low Tom 1 / Low Tom 2.
T2 / T2’ : Medium Tom 1 / Medium Tom 2.
T3 / T3’ : High Tom 1 / High Tom 2.
Ho / Pd : Hi Hat Cymbal Opened / Hi Hat Pedal.
Rm : Rim Shot.
Rd / Rb : Ride cymbal / Ride cymbal bell.
Hh : Hi Hat Closed.
Sn : Snare drum.
Cr : Crash cymbal.
Bd: Bass drum.
Reflow for iPad - User Manual! Version 1.5.1 - English - 04/27/2012
© 2012, Gargant Studios, EURL - All rights reserved! 13
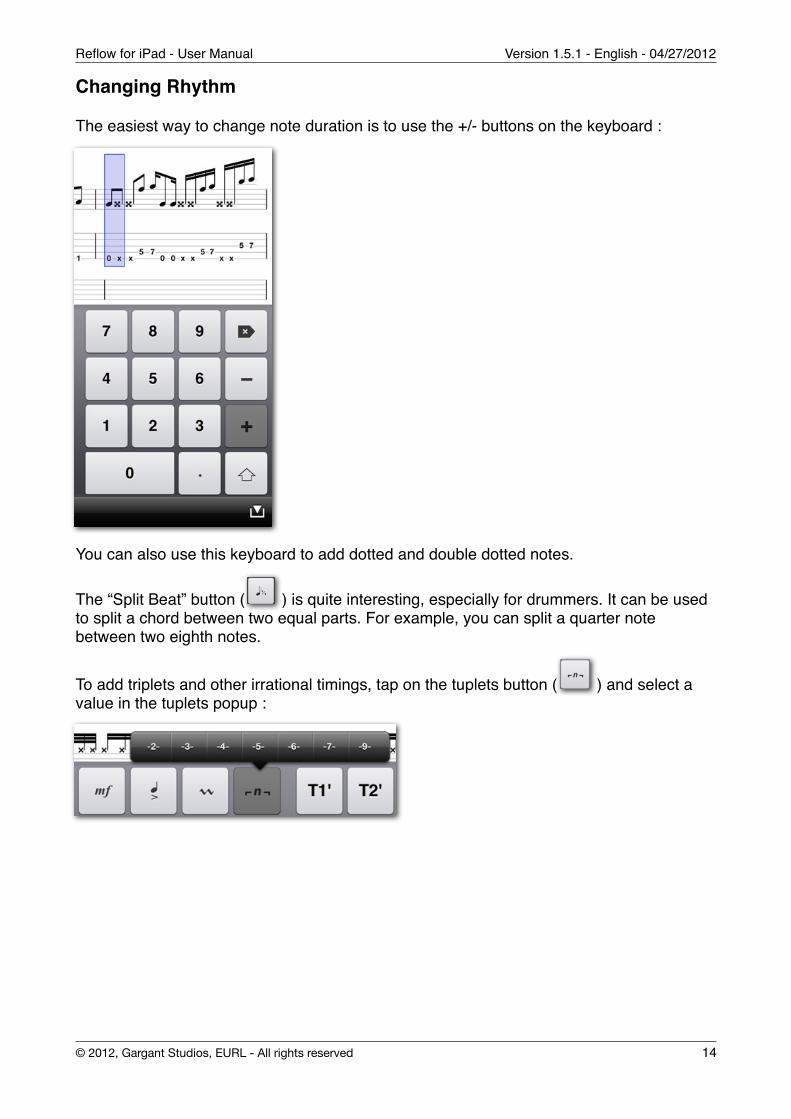
Changing Rhythm
The easiest way to change note duration is to use the +/- buttons on the keyboard :
You can also use this keyboard to add dotted and double dotted notes.
The “Split Beat” button ( ) is quite interesting, especially for drummers. It can be used to split a chord between two equal parts. For example, you can split a quarter note between two eighth notes.
To add triplets and other irrational timings, tap on the tuplets button ( ) and select a value in the tuplets popup :
Reflow for iPad - User Manual! Version 1.5.1 - English - 04/27/2012
© 2012, Gargant Studios, EURL - All rights reserved! 14
Selection and Gestures
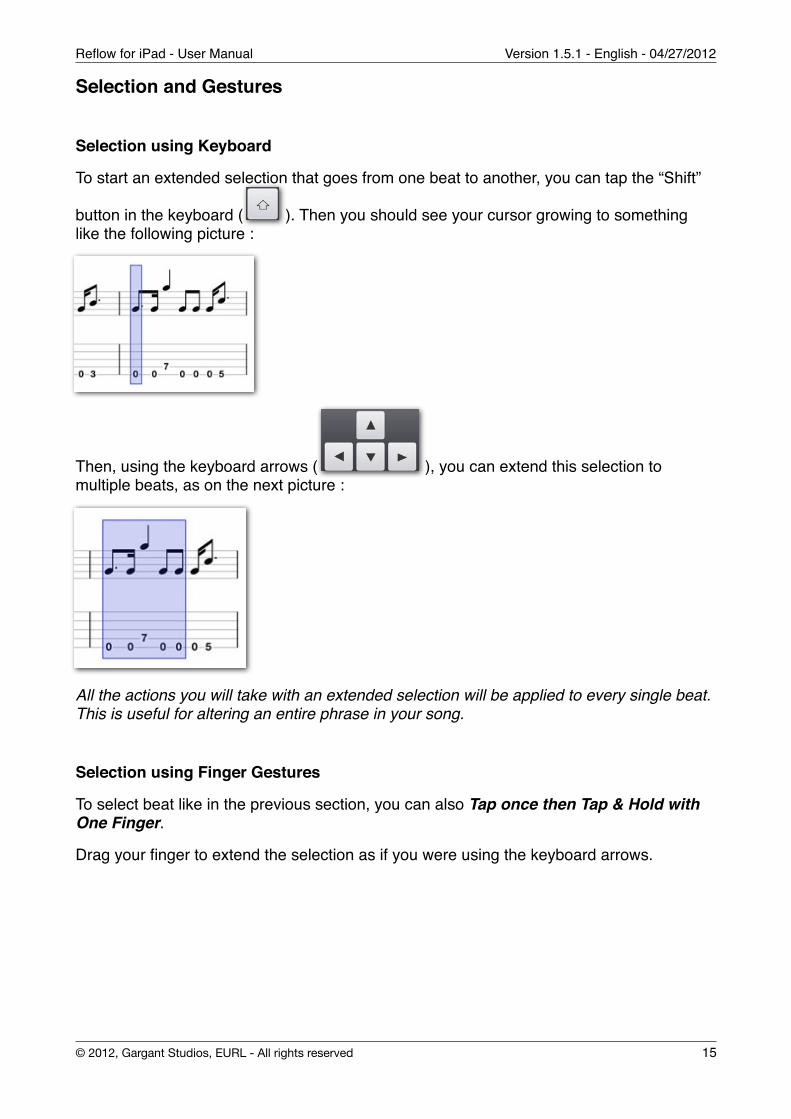
Selection using Keyboard
To start an extended selection that goes from one beat to another, you can tap the “Shift”
button in the keyboard ( ). Then you should see your cursor growing to something like the following picture :
Then, using the keyboard arrows ( ), you can extend this selection to multiple beats, as on the next picture :
All the actions you will take with an extended selection will be applied to every single beat. This is useful for altering an entire phrase in your song.
Selection using Finger Gestures
To select beat like in the previous section, you can also Tap once then Tap & Hold with One Finger.
Drag your finger to extend the selection as if you were using the keyboard arrows.
Reflow for iPad - User Manual! Version 1.5.1 - English - 04/27/2012
© 2012, Gargant Studios, EURL - All rights reserved! 15
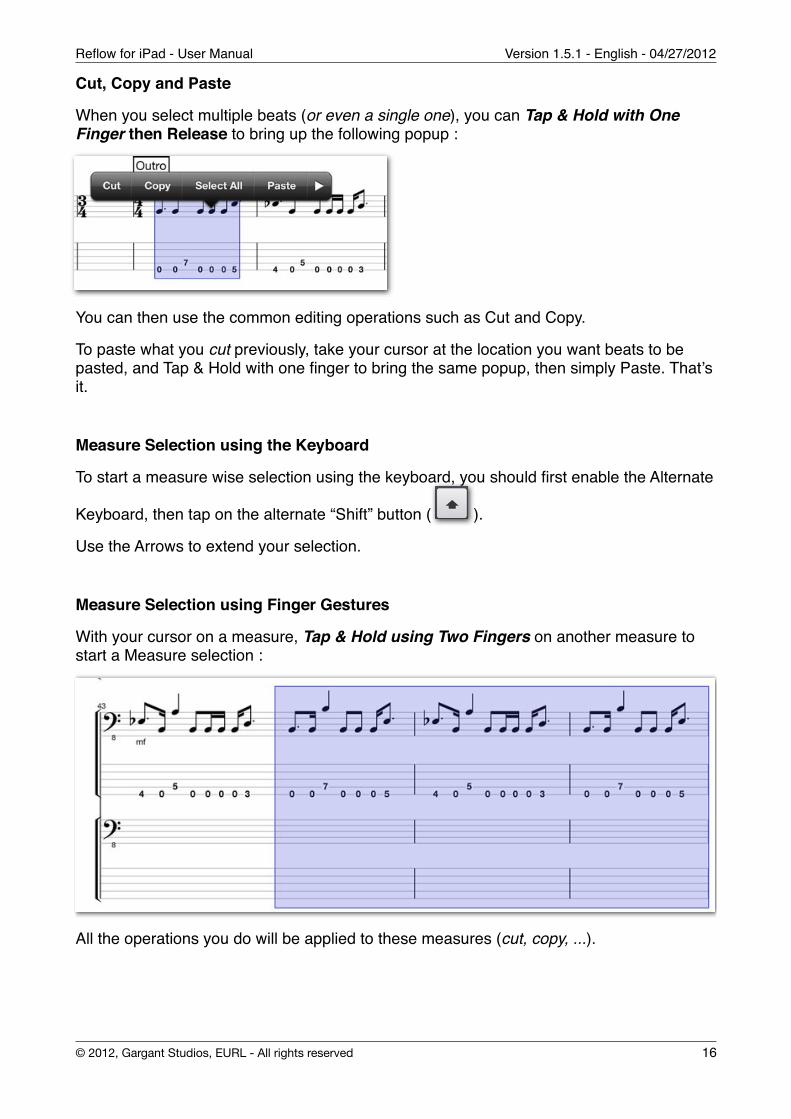
Cut, Copy and Paste
When you select multiple beats (or even a single one), you can Tap & Hold with One Finger then Release to bring up the following popup :
You can then use the common editing operations such as Cut and Copy.
To paste what you cut previously, take your cursor at the location you want beats to be pasted, and Tap & Hold with one finger to bring the same popup, then simply Paste. That’s it.
Measure Selection using the Keyboard
To start a measure wise selection using the keyboard, you should first enable the Alternate
Keyboard, then tap on the alternate “Shift” button ( ).
Use the Arrows to extend your selection.
Measure Selection using Finger Gestures
With your cursor on a measure, Tap & Hold using Two Fingers on another measure to start a Measure selection :
All the operations you do will be applied to these measures (cut, copy, ...).
Reflow for iPad - User Manual! Version 1.5.1 - English - 04/27/2012
© 2012, Gargant Studios, EURL - All rights reserved! 16
Multi-Voice Edition
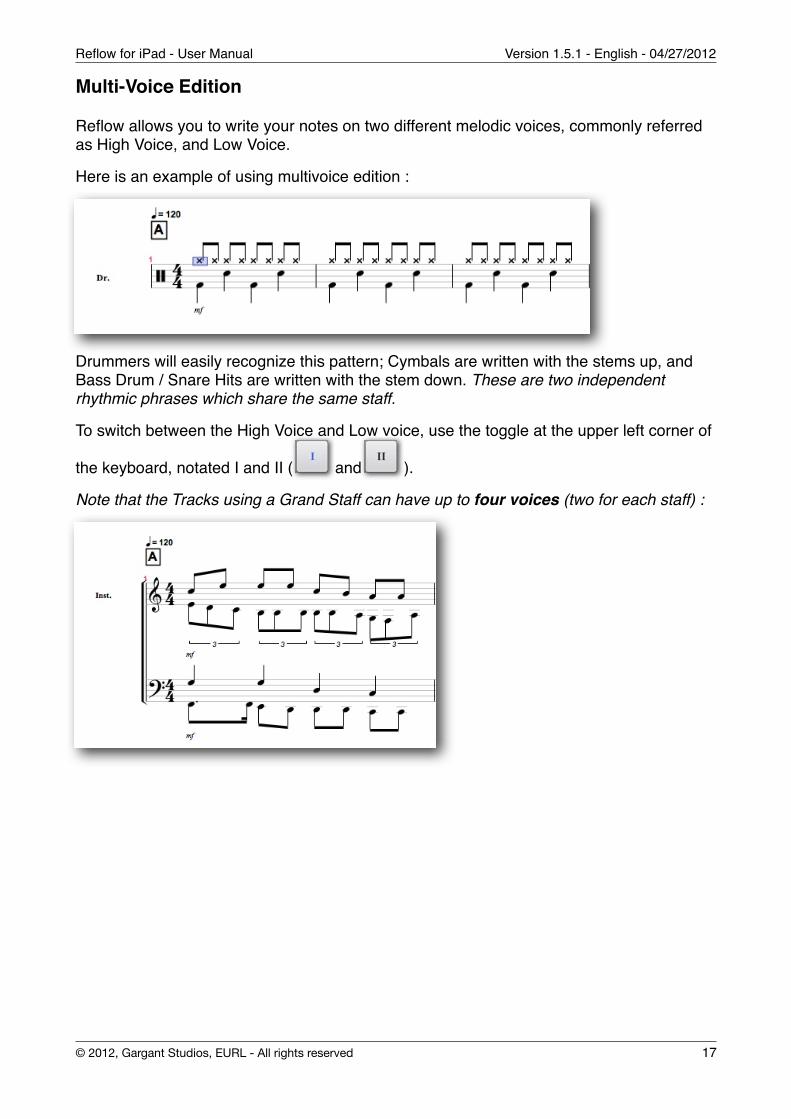
Reflow allows you to write your notes on two different melodic voices, commonly referred as High Voice, and Low Voice.
Here is an example of using multivoice edition :
Drummers will easily recognize this pattern; Cymbals are written with the stems up, and Bass Drum / Snare Hits are written with the stem down. These are two independent rhythmic phrases which share the same staff.
To switch between the High Voice and Low voice, use the toggle at the upper left corner of
the keyboard, notated I and II ( and ).
Note that the Tracks using a Grand Staff can have up to four voices (two for each staff) :
Reflow for iPad - User Manual! Version 1.5.1 - English - 04/27/2012
© 2012, Gargant Studios, EURL - All rights reserved! 17
Reference
File Properties
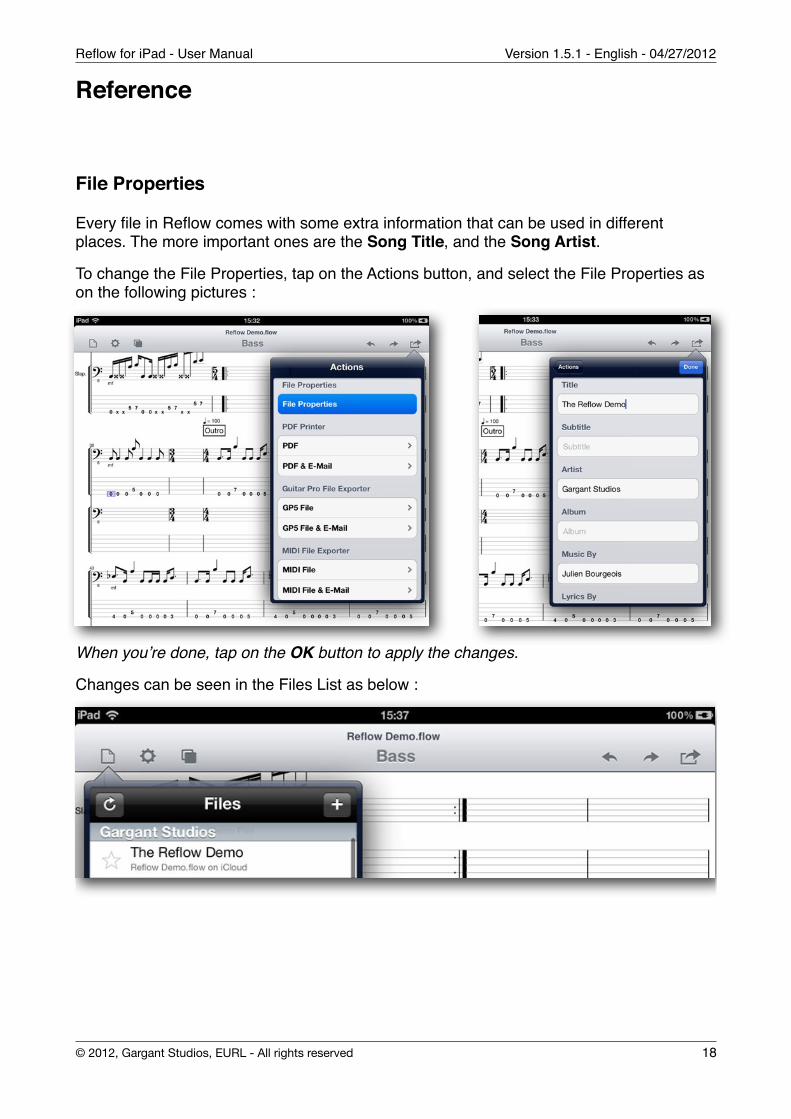
Every file in Reflow comes with some extra information that can be used in different places. The more important ones are the Song Title, and the Song Artist.
To change the File Properties, tap on the Actions button, and select the File Properties as on the following pictures :
When you’re done, tap on the OK button to apply the changes.
Changes can be seen in the Files List as below :
Reflow for iPad - User Manual! Version 1.5.1 - English - 04/27/2012
© 2012, Gargant Studios, EURL - All rights reserved! 18
Tracks
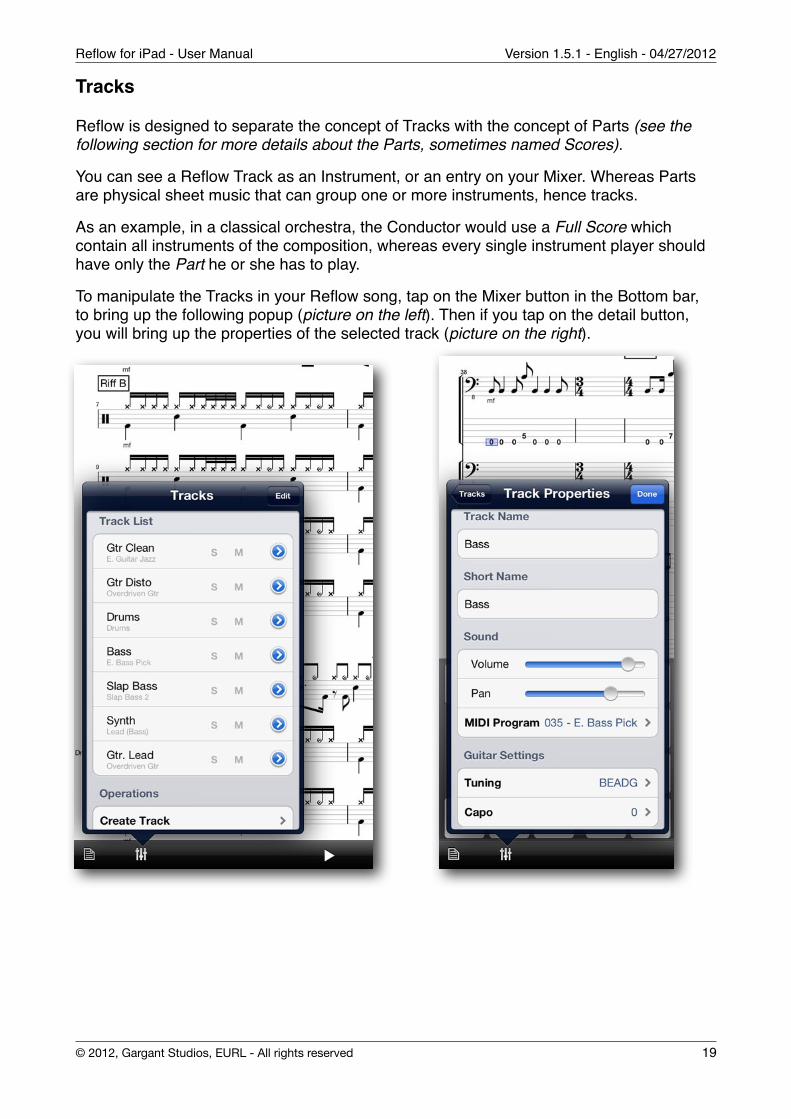
Reflow is designed to separate the concept of Tracks with the concept of Parts (see the following section for more details about the Parts, sometimes named Scores).
You can see a Reflow Track as an Instrument, or an entry on your Mixer. Whereas Parts are physical sheet music that can group one or more instruments, hence tracks.
As an example, in a classical orchestra, the Conductor would use a Full Score which contain all instruments of the composition, whereas every single instrument player should have only the Part he or she has to play.
To manipulate the Tracks in your Reflow song, tap on the Mixer button in the Bottom bar, to bring up the following popup (picture on the left). Then if you tap on the detail button, you will bring up the properties of the selected track (picture on the right).
Reflow for iPad - User Manual! Version 1.5.1 - English - 04/27/2012
© 2012, Gargant Studios, EURL - All rights reserved! 19
Create a Track
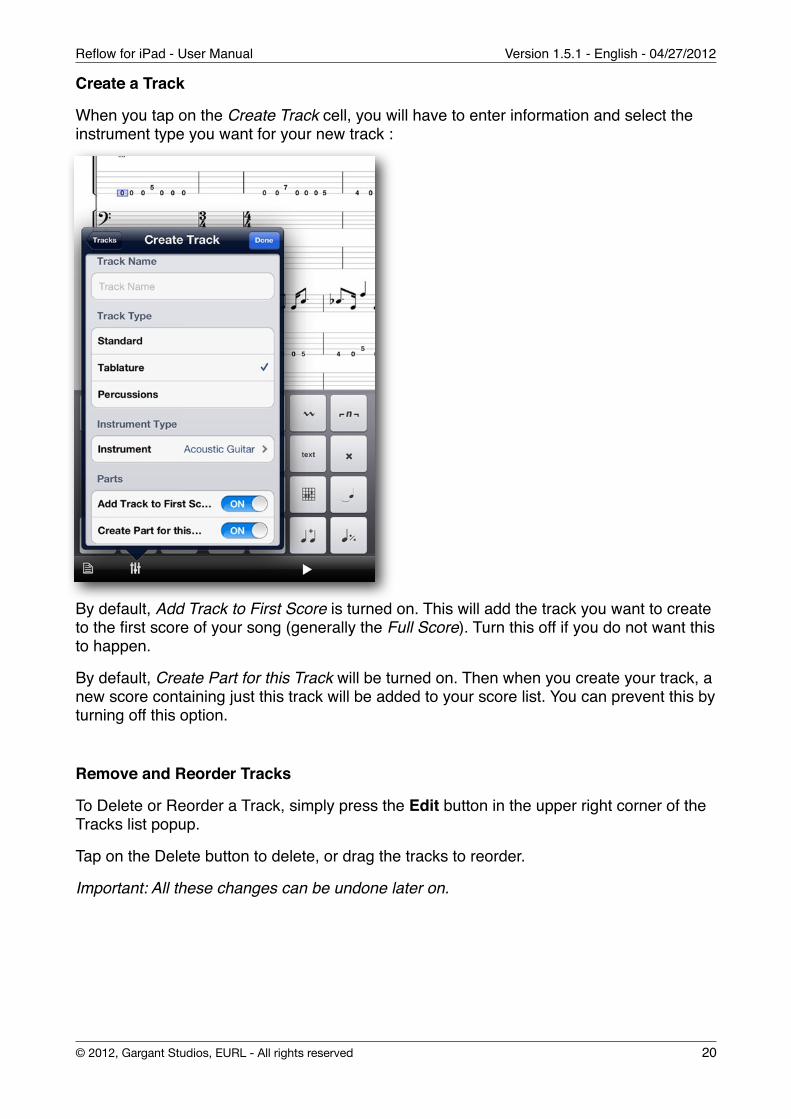
When you tap on the Create Track cell, you will have to enter information and select the instrument type you want for your new track :
By default, Add Track to First Score is turned on. This will add the track you want to create to the first score of your song (generally the Full Score). Turn this off if you do not want this to happen.
By default, Create Part for this Track will be turned on. Then when you create your track, a new score containing just this track will be added to your score list. You can prevent this by turning off this option.
Remove and Reorder Tracks
To Delete or Reorder a Track, simply press the Edit button in the upper right corner of the Tracks list popup.
Tap on the Delete button to delete, or drag the tracks to reorder.
Important: All these changes can be undone later on.
Reflow for iPad - User Manual! Version 1.5.1 - English - 04/27/2012
© 2012, Gargant Studios, EURL - All rights reserved! 20
Tuning and String Count
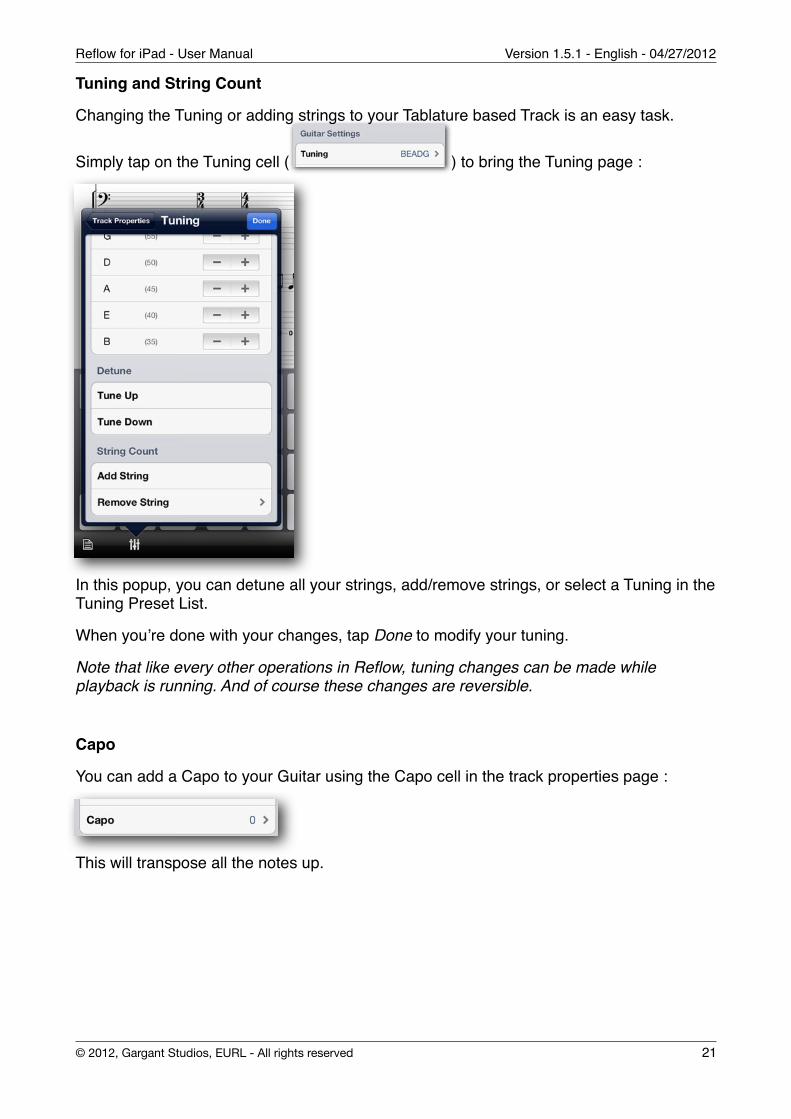
Changing the Tuning or adding strings to your Tablature based Track is an easy task.
Simply tap on the Tuning cell ( ) to bring the Tuning page :
In this popup, you can detune all your strings, add/remove strings, or select a Tuning in the Tuning Preset List.
When you’re done with your changes, tap Done to modify your tuning.
Note that like every other operations in Reflow, tuning changes can be made while playback is running. And of course these changes are reversible.
Capo
You can add a Capo to your Guitar using the Capo cell in the track properties page :
This will transpose all the notes up.
Reflow for iPad - User Manual! Version 1.5.1 - English - 04/27/2012
© 2012, Gargant Studios, EURL - All rights reserved! 21

MIDI Program
Reflow 1.5 comes packed with a SoundFont that gives you access to all the 128 instruments in the General Midi specification, plus a Drumkit.
You can modify it with the MIDI program field ( ), then select a program in the list:
Reflow for iPad - User Manual! Version 1.5.1 - English - 04/27/2012
© 2012, Gargant Studios, EURL - All rights reserved! 22
Parts
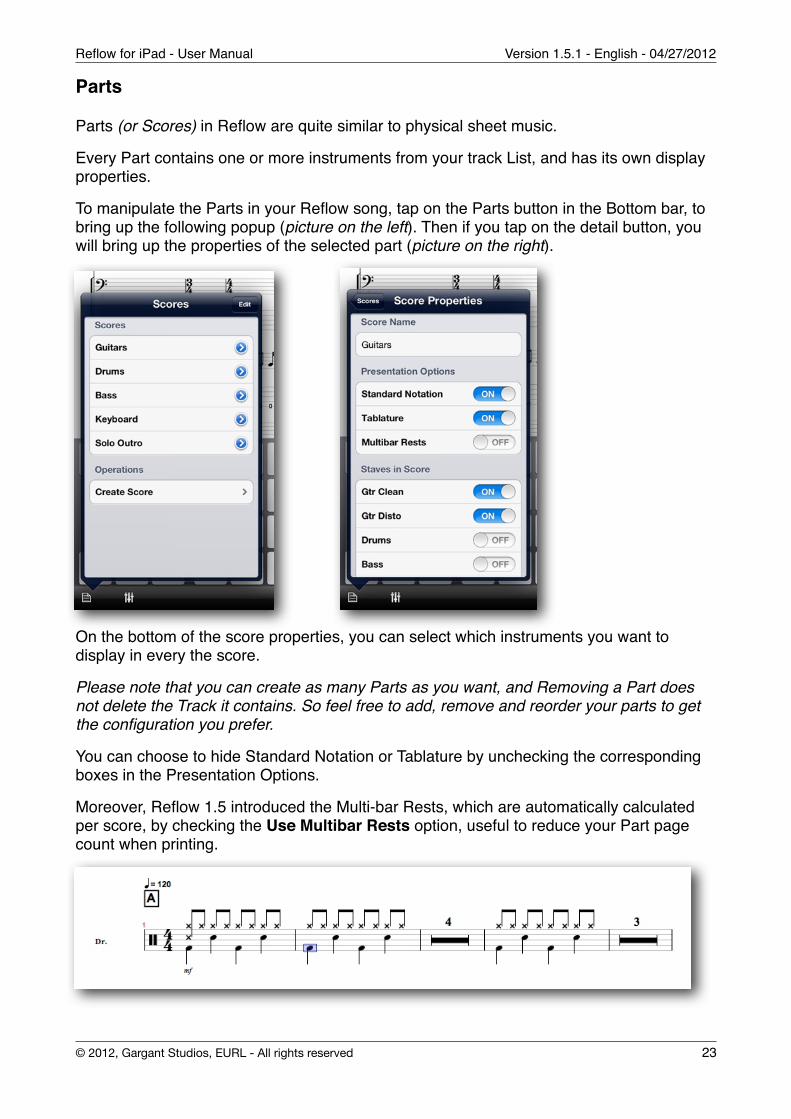
Parts (or Scores) in Reflow are quite similar to physical sheet music.
Every Part contains one or more instruments from your track List, and has its own display properties.
To manipulate the Parts in your Reflow song, tap on the Parts button in the Bottom bar, to bring up the following popup (picture on the left). Then if you tap on the detail button, you will bring up the properties of the selected part (picture on the right).
On the bottom of the score properties, you can select which instruments you want to display in every the score.
Please note that you can create as many Parts as you want, and Removing a Part does not delete the Track it contains. So feel free to add, remove and reorder your parts to get the configuration you prefer.
You can choose to hide Standard Notation or Tablature by unchecking the corresponding boxes in the Presentation Options.
Moreover, Reflow 1.5 introduced the Multi-bar Rests, which are automatically calculated per score, by checking the Use Multibar Rests option, useful to reduce your Part page count when printing.
Reflow for iPad - User Manual! Version 1.5.1 - English - 04/27/2012
© 2012, Gargant Studios, EURL - All rights reserved! 23

Switching between Parts
If you want to work on a different part, you can tap on a part in the Part List popup shown on the previous section.
Adding a new Part
Tapping on the Create Score below the score list, you will create a new empty score.
Removing and Reordering Parts
When you tap on the Edit button in the upper right corner of the Part list popup, you will enter Edit mode, in which you can delete parts or reorder them by dragging.
Reflow for iPad - User Manual! Version 1.5.1 - English - 04/27/2012
© 2012, Gargant Studios, EURL - All rights reserved! 24

Measures
Manipulating Measures
To manipulate Measures in Reflow, you can use the following buttons in the Alternate version of the keyboard :
Add Bar : Add an empty bar after the bar the cursor is located on.
Insert Bar : Insert an empty bar before the bar the cursor is located on.
Duplicate Bar : Duplicate the whole bar right after the current one.
Delete Bar : Delete the bar the cursor is located on.
Measure Settings
To bring up the Measures settings popup, you can Tap Twice on a measure or tap on the
Measure button in the keyboard ( ). This will bring up the following :
Reflow for iPad - User Manual! Version 1.5.1 - English - 04/27/2012
© 2012, Gargant Studios, EURL - All rights reserved! 25
All the fields contained in this popup will be described in the following sections.
Repeats and Directions
All the repeats and musical directions in Reflow are handled in the same popup.
Starting at version 1.5, Reflow now handles the musical symbols and jumps, such as Coda, Segno, D.C., ...
Time Signature
In the Measure settings popup, you can change the Time Signature with the corresponding
cell ( ).
Please Note that if you select a Bar Range before calling this dialog, you will be able to modify the Time Signature from the first selected bar, to the last selected bar.
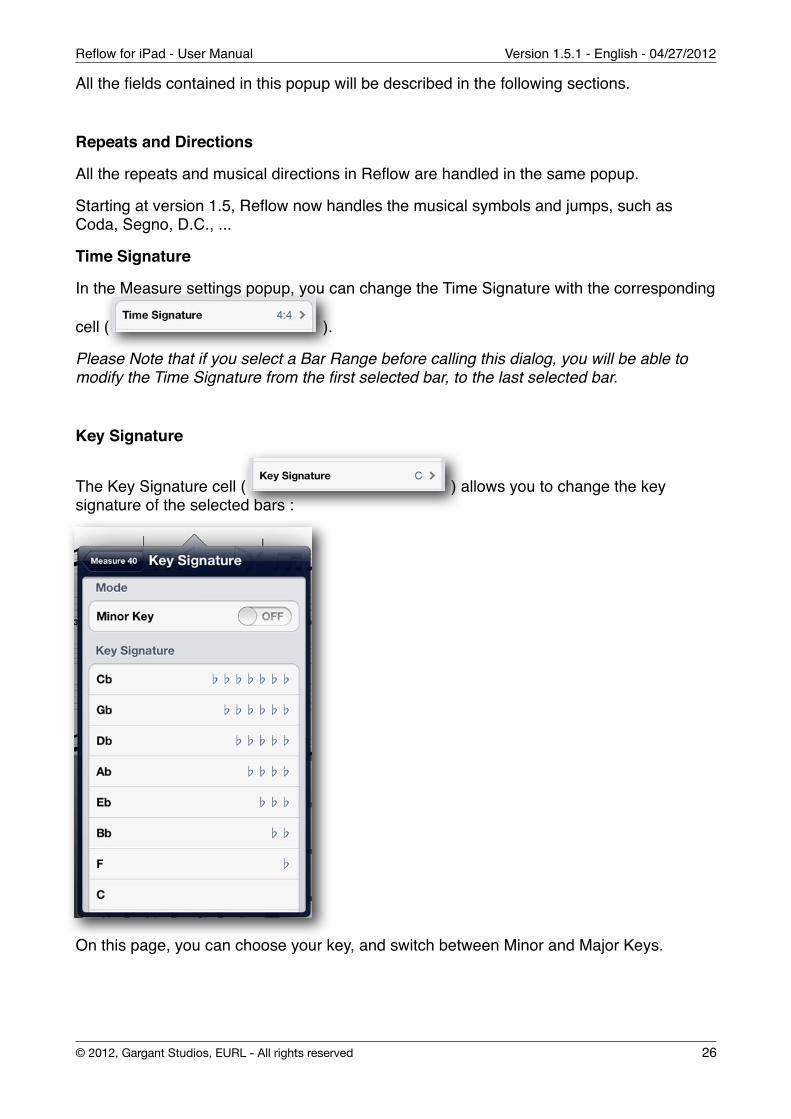
Key Signature
The Key Signature cell ( ) allows you to change the key signature of the selected bars :
On this page, you can choose your key, and switch between Minor and Major Keys.
Reflow for iPad - User Manual! Version 1.5.1 - English - 04/27/2012
© 2012, Gargant Studios, EURL - All rights reserved! 26
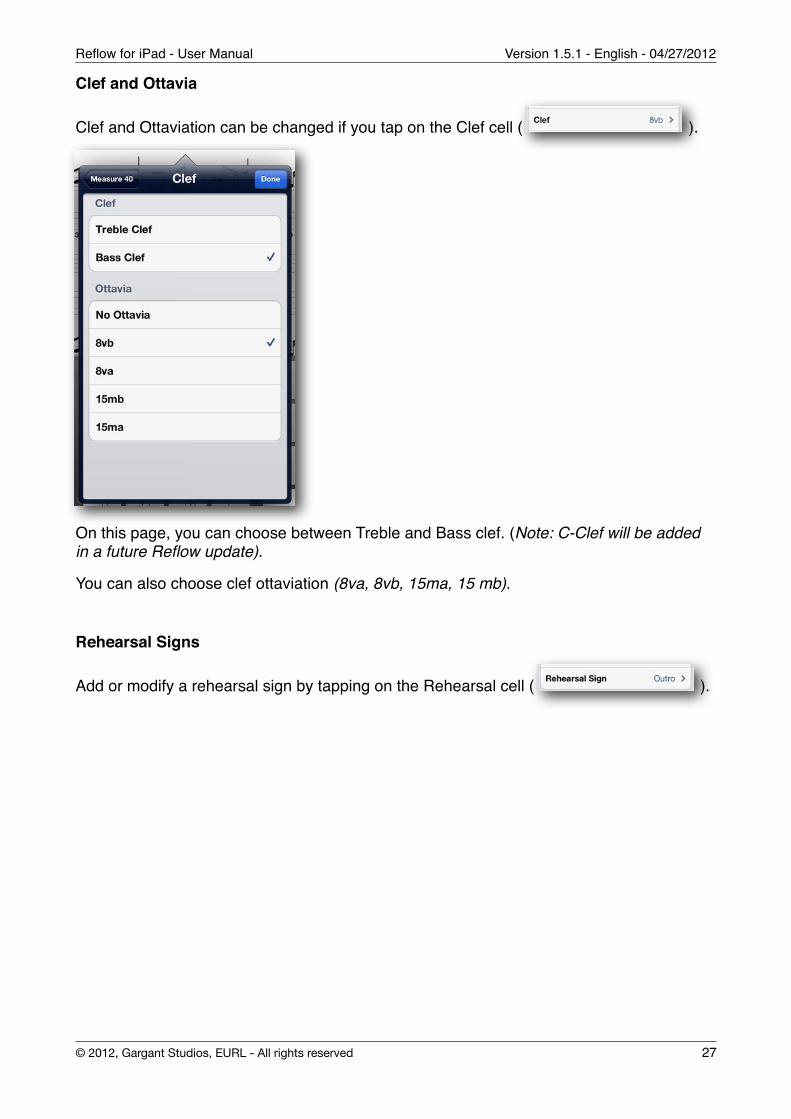
Clef and Ottavia
Clef and Ottaviation can be changed if you tap on the Clef cell ( ).
On this page, you can choose between Treble and Bass clef. (Note: C-Clef will be added in a future Reflow update).
You can also choose clef ottaviation (8va, 8vb, 15ma, 15 mb).
Rehearsal Signs
Add or modify a rehearsal sign by tapping on the Rehearsal cell ( ).
Reflow for iPad - User Manual! Version 1.5.1 - English - 04/27/2012
© 2012, Gargant Studios, EURL - All rights reserved! 27
Chord Names and Diagrams
In Reflow, you can add Chord diagrams to your compositions. And if you don’t need diagrams, you can insert only chord names.
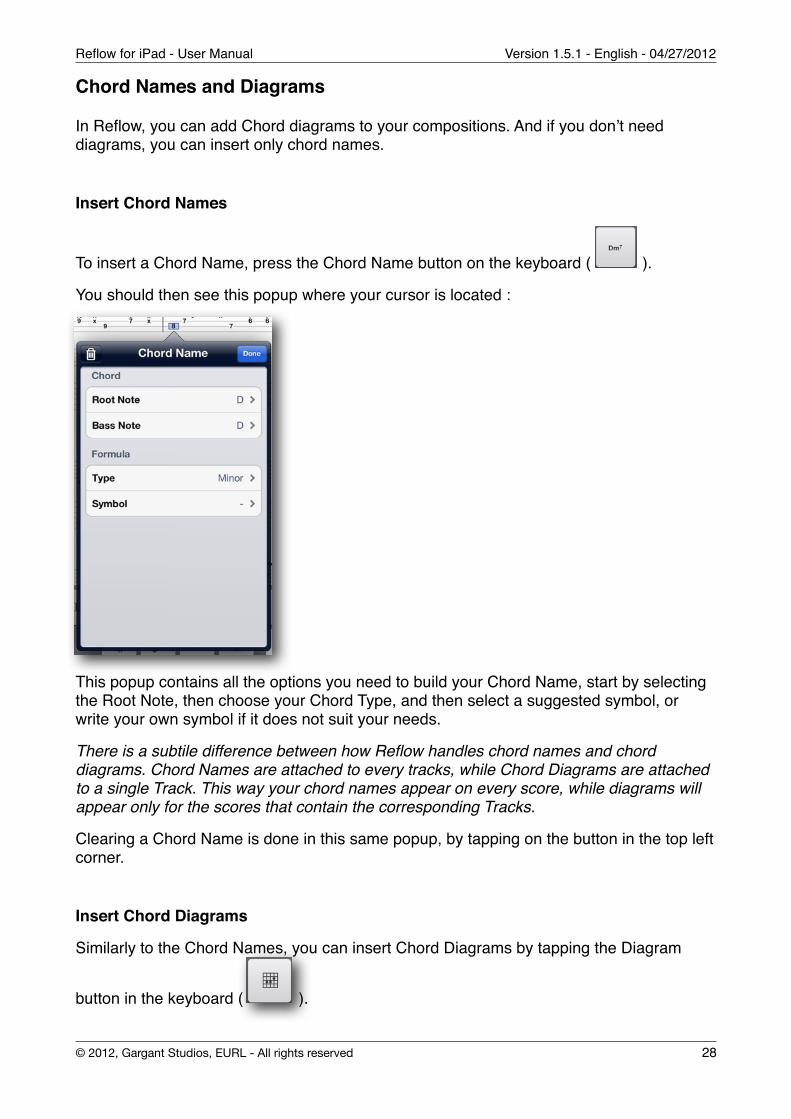
Insert Chord Names
To insert a Chord Name, press the Chord Name button on the keyboard ( ).
You should then see this popup where your cursor is located :
This popup contains all the options you need to build your Chord Name, start by selecting the Root Note, then choose your Chord Type, and then select a suggested symbol, or write your own symbol if it does not suit your needs.
There is a subtile difference between how Reflow handles chord names and chord diagrams. Chord Names are attached to every tracks, while Chord Diagrams are attached to a single Track. This way your chord names appear on every score, while diagrams will appear only for the scores that contain the corresponding Tracks.
Clearing a Chord Name is done in this same popup, by tapping on the button in the top left corner.
Insert Chord Diagrams
Similarly to the Chord Names, you can insert Chord Diagrams by tapping the Diagram
button in the keyboard ( ).
Reflow for iPad - User Manual! Version 1.5.1 - English - 04/27/2012
© 2012, Gargant Studios, EURL - All rights reserved! 28
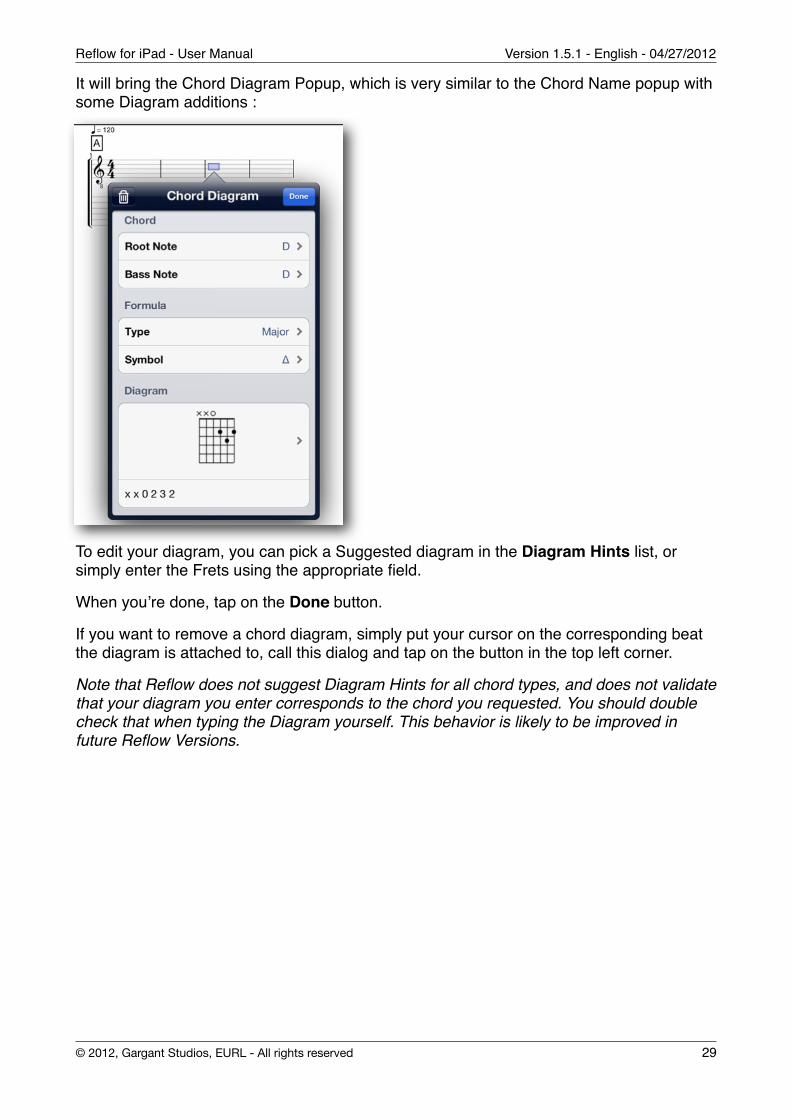
It will bring the Chord Diagram Popup, which is very similar to the Chord Name popup with some Diagram additions :
To edit your diagram, you can pick a Suggested diagram in the Diagram Hints list, or simply enter the Frets using the appropriate field.
When you’re done, tap on the Done button.
If you want to remove a chord diagram, simply put your cursor on the corresponding beat the diagram is attached to, call this dialog and tap on the button in the top left corner.
Note that Reflow does not suggest Diagram Hints for all chord types, and does not validate that your diagram you enter corresponds to the chord you requested. You should double check that when typing the Diagram yourself. This behavior is likely to be improved in future Reflow Versions.
Reflow for iPad - User Manual! Version 1.5.1 - English - 04/27/2012
© 2012, Gargant Studios, EURL - All rights reserved! 29
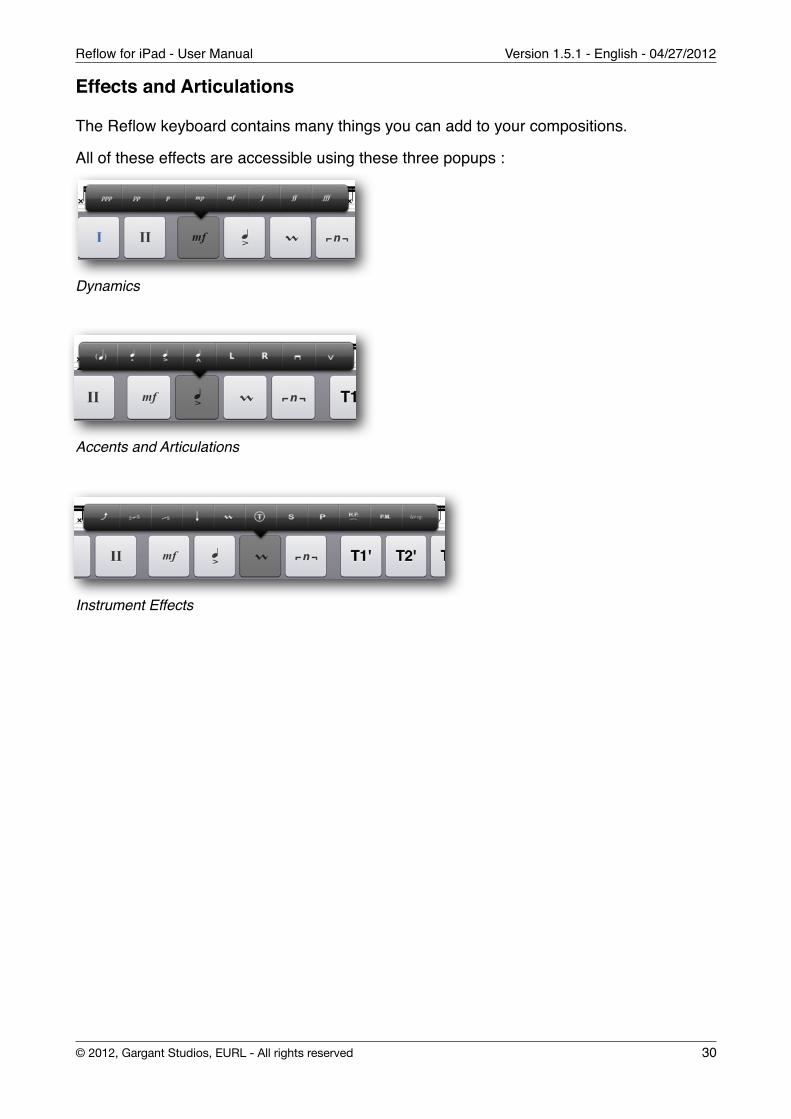
Effects and Articulations
The Reflow keyboard contains many things you can add to your compositions.
All of these effects are accessible using these three popups :
Dynamics
Accents and Articulations
Instrument Effects
Reflow for iPad - User Manual! Version 1.5.1 - English - 04/27/2012
© 2012, Gargant Studios, EURL - All rights reserved! 30
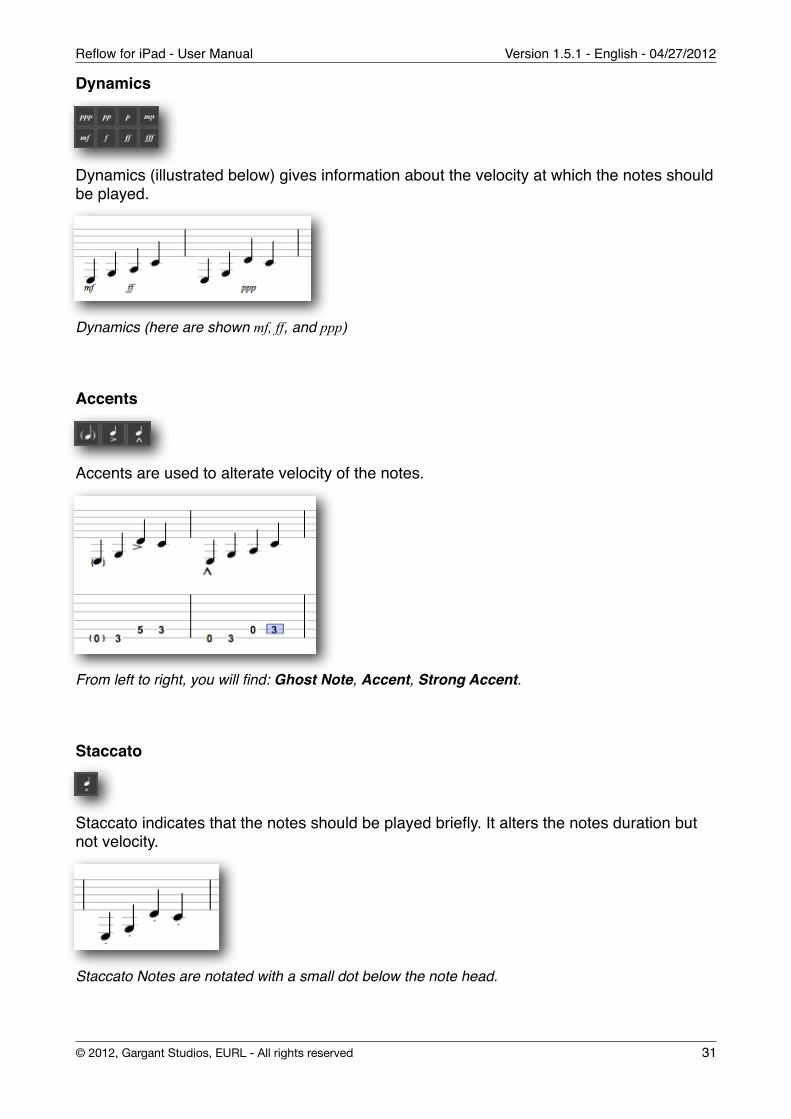
Dynamics
Dynamics (illustrated below) gives information about the velocity at which the notes should be played.
Dynamics (here are shown mf, ff, and ppp)
Accents
Accents are used to alterate velocity of the notes.
From left to right, you will find: Ghost Note, Accent, Strong Accent.
Staccato
Staccato indicates that the notes should be played briefly. It alters the notes duration but not velocity.
Staccato Notes are notated with a small dot below the note head.
Reflow for iPad - User Manual! Version 1.5.1 - English - 04/27/2012
© 2012, Gargant Studios, EURL - All rights reserved! 31
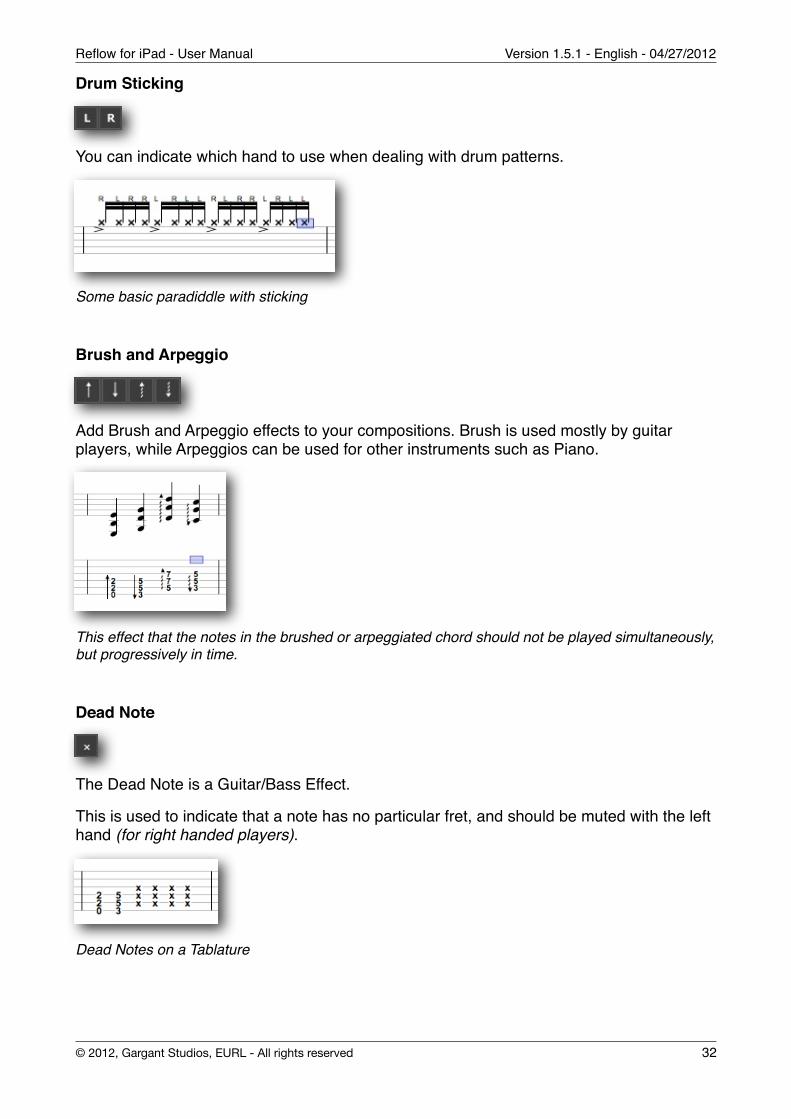
Drum Sticking
You can indicate which hand to use when dealing with drum patterns.
Some basic paradiddle with sticking
Brush and Arpeggio
Add Brush and Arpeggio effects to your compositions. Brush is used mostly by guitar players, while Arpeggios can be used for other instruments such as Piano.
This effect that the notes in the brushed or arpeggiated chord should not be played simultaneously, but progressively in time.
Dead Note
The Dead Note is a Guitar/Bass Effect.
This is used to indicate that a note has no particular fret, and should be muted with the left hand (for right handed players).
Dead Notes on a Tablature
Reflow for iPad - User Manual! Version 1.5.1 - English - 04/27/2012
© 2012, Gargant Studios, EURL - All rights reserved! 32
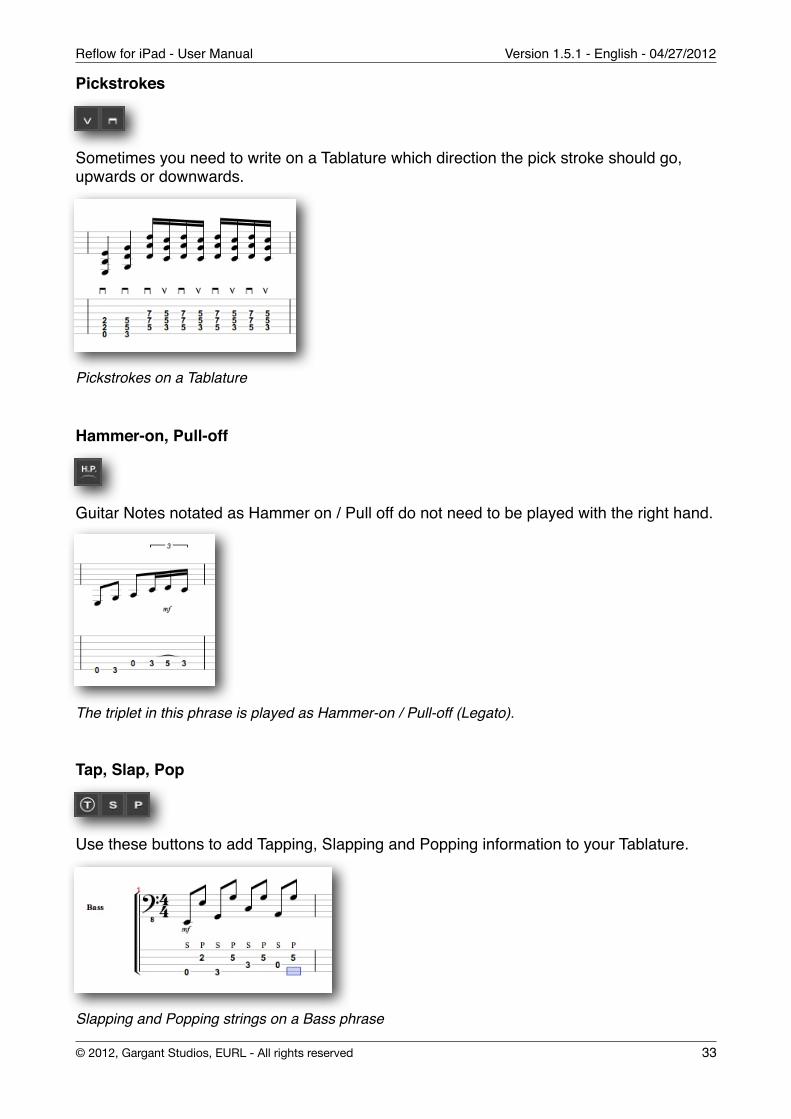
Pickstrokes
Sometimes you need to write on a Tablature which direction the pick stroke should go, upwards or downwards.
Pickstrokes on a Tablature
Hammer-on, Pull-off
Guitar Notes notated as Hammer on / Pull off do not need to be played with the right hand.
The triplet in this phrase is played as Hammer-on / Pull-off (Legato).
Tap, Slap, Pop
Use these buttons to add Tapping, Slapping and Popping information to your Tablature.
Slapping and Popping strings on a Bass phrase
Reflow for iPad - User Manual! Version 1.5.1 - English - 04/27/2012
© 2012, Gargant Studios, EURL - All rights reserved! 33

Vibrato
Vibrato effect is used to slightly alterate pitch up over time.
Left Hand Vibrato on a Guitar Tablature.
Palm Mute, Let Ring
Palm mute is achieved by damping the sound with the right hand. Let Ring means that notes should not be muted from chord to chord, this is used mostly in arpeggiated chords.
Palm Mute and Let Ring on a Tablature
Reflow for iPad - User Manual! Version 1.5.1 - English - 04/27/2012
© 2012, Gargant Studios, EURL - All rights reserved! 34
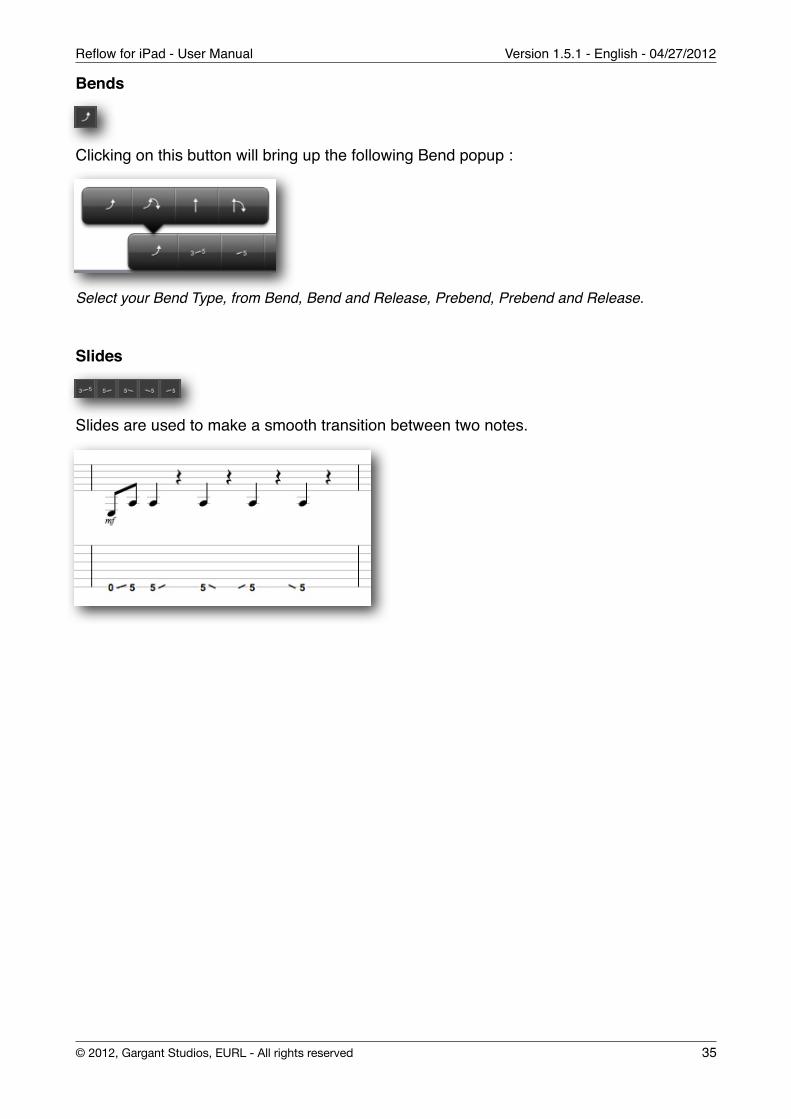
Bends
Clicking on this button will bring up the following Bend popup :
Select your Bend Type, from Bend, Bend and Release, Prebend, Prebend and Release.
Slides
Slides are used to make a smooth transition between two notes.
Reflow for iPad - User Manual! Version 1.5.1 - English - 04/27/2012
© 2012, Gargant Studios, EURL - All rights reserved! 35

Share your compositions
You can bring up the Export popup by tapping on the Actions button, as below :
All the exporters can be used locally or used to share by email. If you choose to export locally, the exported file will be located on your iCloud storage if it is enabled, or in your App’s documents storage, accessible in iTunes.
MIDI Export
Reflow can generate a MIDI file containing your entire song and send it by mail.
You can then easily import this MIDI file in your favorite DAW software such as Garage Band, Logic, Live, Reason, ...
Guitar Pro™ 5 Export
If you wish to share your composition with a Guitar Pro™ user, simply tap on the corresponding field. You can share it by email directly.
Please note that some elements won’t be exported because the file data formats are not fully compatible. We’ll make our best to implement missing features.
PDF Export
Reflow can export the score you are viewing as a PDF, and share it by email with your friends.
Reflow for iPad - User Manual! Version 1.5.1 - English - 04/27/2012
© 2012, Gargant Studios, EURL - All rights reserved! 36