Embed Size (px)
Citation preview

Remote Operation of the 3550R, the 3920B, and the 8800SX Radio Test Sets Using TightVNC

1 © 2018 VIAVI Solutions Inc. viavisolutions.com
TightVNC
• TightVNC is a free remote control software package. With TightVNC, you can see the test set display and operate it remotely.
• By networking the 3550R, the 3920B, or the 8800SX Radio Test Sets, you can access the unit remotely as they all run a VNC server. All our test sets support either Static IP addressing or automatic IP address assignment from a DHCP server.
• You will need to network your test set by connecting through a router or switch, or directly to the computer via a crossover cable.
• You might need to consult your IT Department for help networking the test set.
1. You will need to download and install TightVNC
2. Set the IP mode and address of the test set
3. Connect to the test set using TightVNC

2 © 2018 VIAVI Solutions Inc. viavisolutions.com
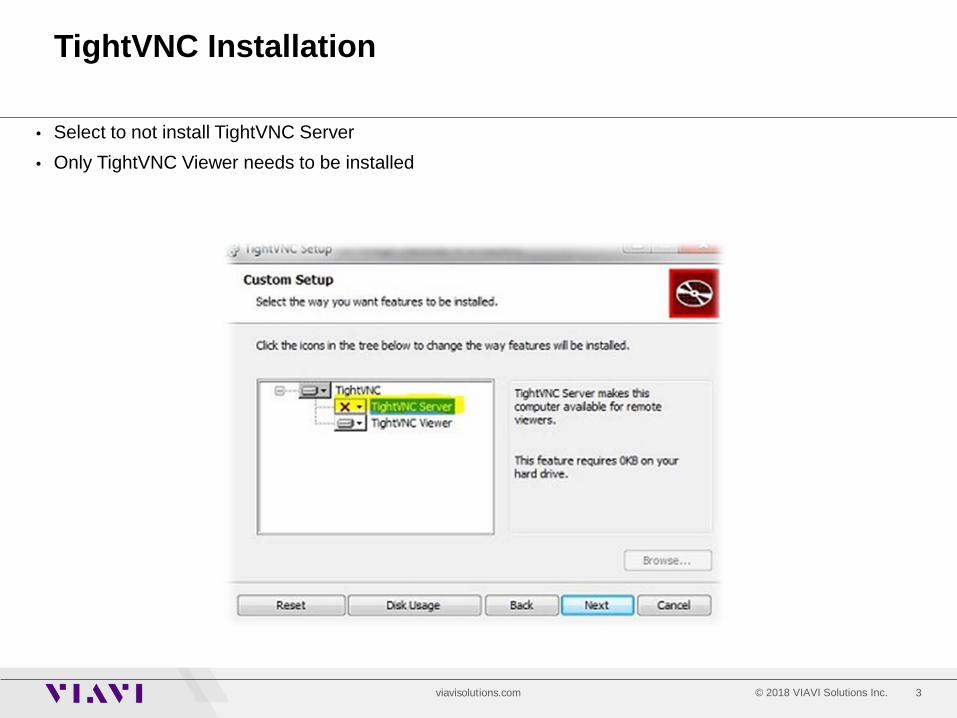
TightVNC Installation
• Go to http://www.tightvnc.com/download.php and download TightVNC for Windows • When installing TightVNC, select Custom under Choose Setup Type
3 © 2018 VIAVI Solutions Inc. viavisolutions.com
TightVNC Installation
• Select to not install TightVNC Server • Only TightVNC Viewer needs to be installed
4 © 2018 VIAVI Solutions Inc. viavisolutions.com
Network Setup
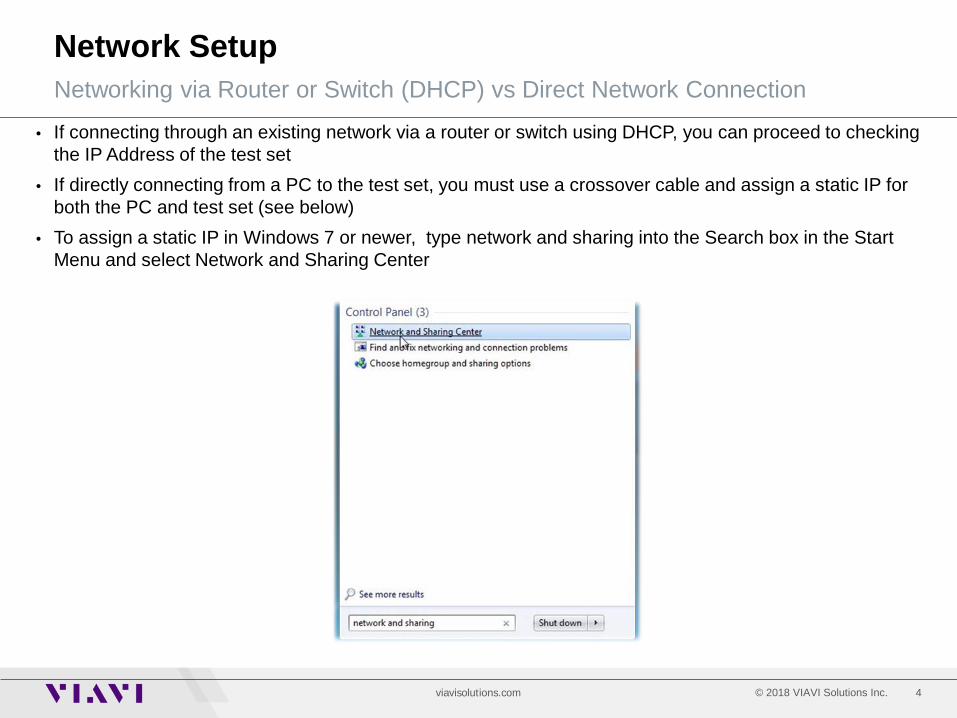
• If connecting through an existing network via a router or switch using DHCP, you can proceed to checking the IP Address of the test set
• If directly connecting from a PC to the test set, you must use a crossover cable and assign a static IP for both the PC and test set (see below)
• To assign a static IP in Windows 7 or newer, type network and sharing into the Search box in the Start Menu and select Network and Sharing Center
Networking via Router or Switch (DHCP) vs Direct Network Connection

5 © 2018 VIAVI Solutions Inc. viavisolutions.com
Network Setup
• Click on Change adapter settings, then right-click on your local adapter and select Properties. • Highlight Internet Protocol Version 4 (TCP/IPv4) and click Properties • Select Use the following IP Address and enter an IP Address (ie 10.200.xxx.x) • The static IP you set for the tester will need to be in the same range (consecutive address work best; if
the PC is 10.200.150.20, set the tester to 10.200.150.22)
Direct Network Connection

6 © 2018 VIAVI Solutions Inc. viavisolutions.com
Checking the IP Address of the Test Set
• On the 8800SX, select Utilities>Software>System
8800SX

7 © 2018 VIAVI Solutions Inc. viavisolutions.com
Checking the IP Address of the Test Set
• Select the Remote Tab, which will display the IP Address of the 8800SX • If directly connecting, set the Network Mode to Static IP and the enter the IP Address
8800SX
8 © 2018 VIAVI Solutions Inc. viavisolutions.com
Checking the IP Address of the Test Set
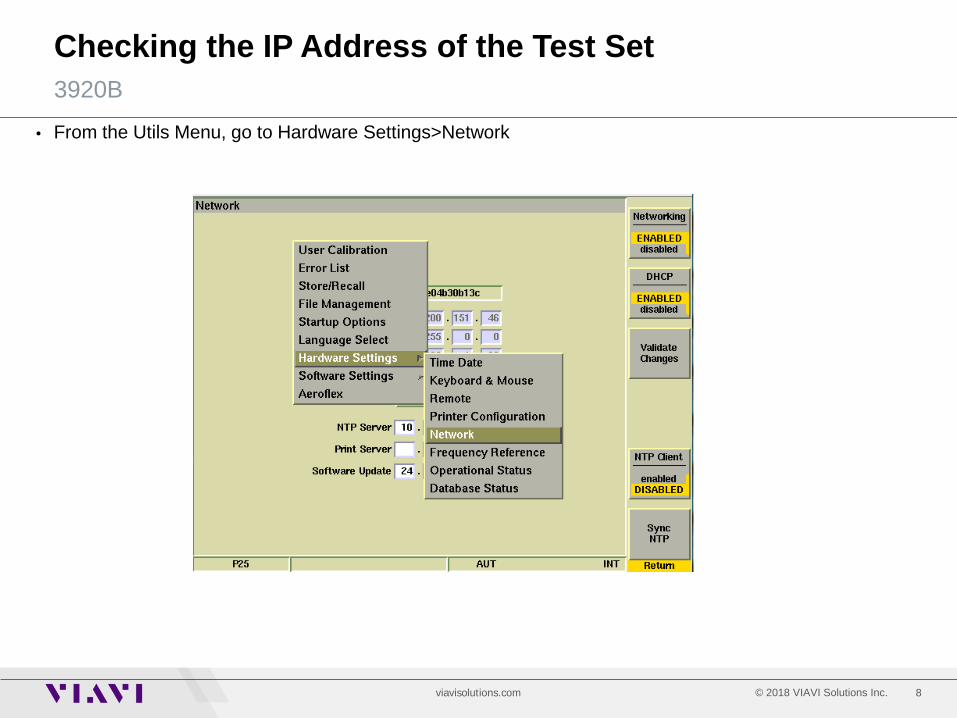
• From the Utils Menu, go to Hardware Settings>Network
3920B

9 © 2018 VIAVI Solutions Inc. viavisolutions.com
Checking the IP Address of the Test Set
• The IP Address is displayed • If directly connecting, set DHCP to disabled and the enter the IP Address • After entering the IP Address, press Validate Changes
3920B
3920 in DHCP Mode (Network assigns the IP)
3920 in Static IP Mode (Operator assigns the IP)

10 © 2018 VIAVI Solutions Inc. viavisolutions.com
Checking the IP Address of the Test Set
• On the 3550R, go to System>System Config
3550R
11 © 2018 VIAVI Solutions Inc. viavisolutions.com
Checking the IP Address of the Test Set
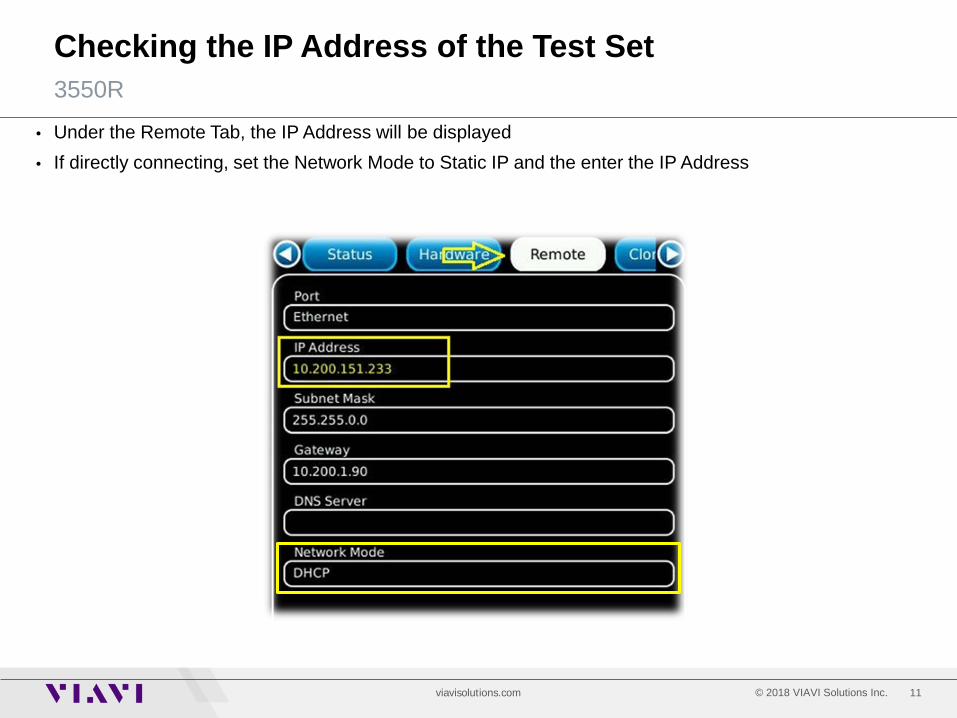
• Under the Remote Tab, the IP Address will be displayed • If directly connecting, set the Network Mode to Static IP and the enter the IP Address
3550R

12 © 2018 VIAVI Solutions Inc. viavisolutions.com
Using TightVNC
• After TightVNC Viewer is installed, enter the IP Address of the unit you wish to connect to and click on the Connect Button.
Note: On the 3920B, the default password is 3900 (VNC Viewer Password can be changed in Utils>Hardware Settings>Remote) Note: On the 3920B, the remote keyboard can be used to access the following front panel keys: ALT+A: Assign Key ALT+T: Test Key ALT+C: Config Key ALT+U: Utils Key PGUP and PGDN: Up and down arrows F1: Help F2-F7: Function key selections F8 - Return Note: On the 8800SX, you cannot connect while a mouse is connected to the test set Note: On the 8800SX and the 3550R, pressing F1 while using TightVNC viewer will pull up the System Menu

13 © 2018 VIAVI Solutions Inc. viavisolutions.com
Questions or Comments?
For information about pricing for our products, contact the sales office by calling VIAVI Solutions at (800) 835-2352 or emailing [email protected]. For technical/product support, calibration, maintenance and general customer service inquiries, you can contact our help desk by clicking here, calling (800) 835-2350, or emailing [email protected]. Click here for more information on the 8800SX and latest software versions and training materials.
Contact Information