Embed Size (px)
Citation preview
REVISED DATE: 10/10/2017 PAGE 1 OF 8
Click on the ‘Computer Name’
tab. Click on ‘Remote
settings’.
Remote Desktop Connection
7/27/2017
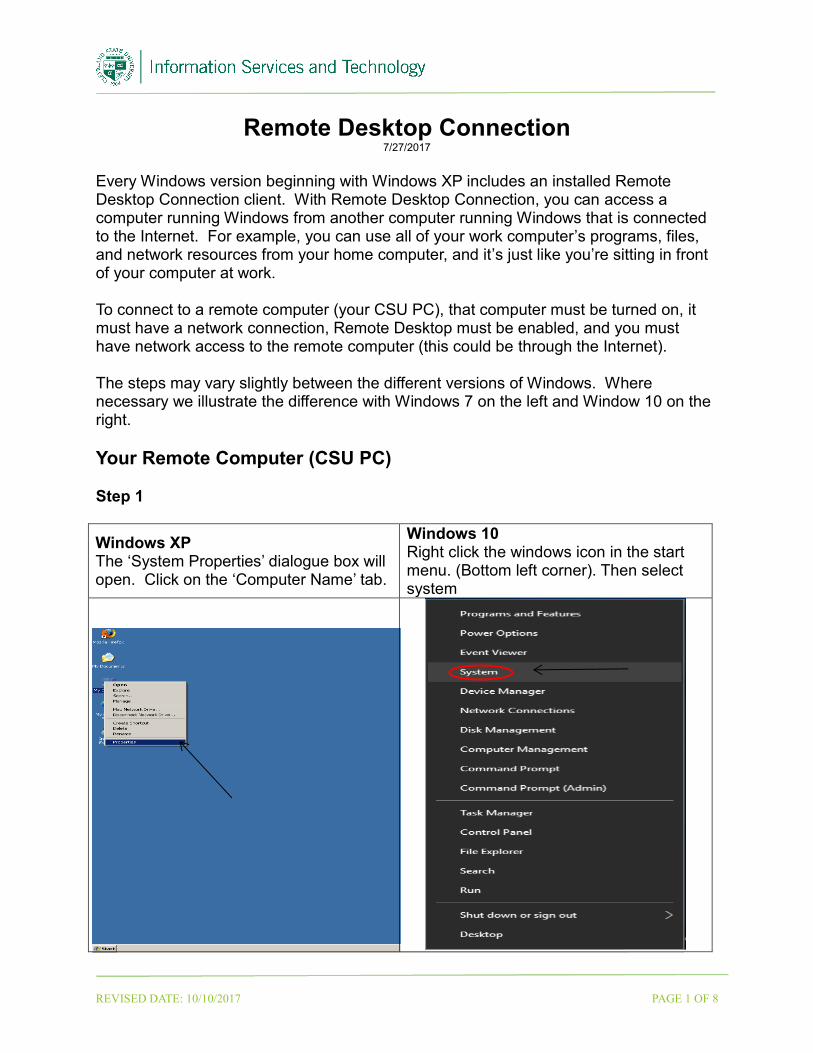
Every Windows version beginning with Windows XP includes an installed Remote Desktop Connection client. With Remote Desktop Connection, you can access a computer running Windows from another computer running Windows that is connected to the Internet. For example, you can use all of your work computer’s programs, files, and network resources from your home computer, and it’s just like you’re sitting in front of your computer at work. To connect to a remote computer (your CSU PC), that computer must be turned on, it must have a network connection, Remote Desktop must be enabled, and you must have network access to the remote computer (this could be through the Internet). The steps may vary slightly between the different versions of Windows. Where necessary we illustrate the difference with Windows 7 on the left and Window 10 on the right.
Your Remote Computer (CSU PC) Step 1
Windows XP The ‘System Properties’ dialogue box will open. Click on the ‘Computer Name’ tab.
Windows 10 Right click the windows icon in the start menu. (Bottom left corner). Then select system

REVISED DATE: 10/10/2017 PAGE 2 OF 8
Click on the
‘Remote’ tab.
Step 2
Windows 7 The ‘System’ dialog box will open. Copy the Full computer name for use later on.
Windows 10 The ‘System’ dialog box will open. Copy the Full computer name for use later on.
Step 3
Windows 7 Click on ‘Remote settings’.
Windows 10 Click on ‘Remote settings’.
Click on ‘Remote
settings’.
Click on ‘Remote
settings’.

REVISED DATE: 10/10/2017 PAGE 3 OF 8
Turn on
Remote
Desktop
checkbox.
Click on OK.
Step 4
Windows 7 Click on the ‘Advanced’ button.
Windows 10 Click on the ‘Advanced’ button.
Step 5
Windows 7 Click on the ‘Allow this computer to be controlled remotely’ checkbox. Then click on ‘OK’.
Windows 10 Make sure the ‘Remote Control’ box is
checked. Then click ‘OK’.
Click on the
Remote control
checkbox then
click ‘OK’.
Click on the
‘Advanced’
button.
Click on the
‘Advanced’
button.

REVISED DATE: 10/10/2017 PAGE 4 OF 8
Your Home Computer You now need to set up your Remote Desktop Connection at home and tell your home PC to which remote PC to connect. Below are the instructions for both Windows 7 and Windows 10. Step 1
Windows 7 Click on ‘Start’, ‘All Progams’, ‘Accessories’, then ‘Remote Desktop Connection’.
Windows 10 In the windows taskbar search remote and
‘Remote Desktop Connection’ will pop up.

REVISED DATE: 10/10/2017 PAGE 5 OF 8
Click on the
‘Remote’ tab.
Step 2
Windows 7 Click on ‘Options.
Windows 10 Click on ‘Options’ dropdown.
Step 3
Enter your Full Computer Name (that you copied down earlier) in the ‘Computer’ field. Enter CSUNET\XXXXXXX in the ‘User name’ field (where XXXXXXX is your CSU ID Number). Click on ‘Save’. Click on ‘Options’ again to collapse the view.
Windows 7 Follow steps above
Windows 10 Follow steps above.

REVISED DATE: 10/10/2017 PAGE 6 OF 8
Step 4
Click on the ‘Connect’ button to connect to your remote PC (CSU PC).
Windows 7 Click on the ‘’Connect’ button
Windows 10 Click on the ‘’Connect’ button
Step 5 Enter your ‘User name’ (7 digit CSU ID), ‘Password’ (CampusPass) and CSUNET in the ‘Log on to’ field to connect to your remote PC (CSU PC). Click on the ‘OK’ button. You will now be connected to your remote PC (CSU PC).
yourcomputer.csunet.csuohio.edu yourcomputer.csunet.csuohio.edu

REVISED DATE: 10/10/2017 PAGE 7 OF 8
Step 6 Once connected to you remote PC, a ‘bar’ will appear across the top of your remote connection screen. On the right side of the ‘bar’ is three buttons. With these buttons you can:
Minimize your remote connection so you may access your home PC. Restore down or maximize the size of your remote connection screen. By clicking on the ‘X’ button you can terminate your remote connection.
Creating a Shortcut on your Home Computer (Windows 7)
1. Left click on ‘Start’ 2. Left click on ‘All Programs’ 3. Left click on ‘Accessories’ 4. Right click on ‘Remote Desktop Connection’ 5. Left click on ‘Send To’ 6. Left click on ‘Desktop (create shortcut)
This will place a shortcut on your desktop to Remote Desktop Connection. Next time you may use this shortcut instead of navigating.
Creating a Shortcut on your Home Computer (Windows 10)
7. Left Click on ‘Start’ 8. Search ‘Remote Desktop Connection 9. Right click on the logo 10. Left click on ‘Pin to Start’
WorkPC

REVISED DATE: 10/10/2017 PAGE 8 OF 8
Reporting Problems
If you have any problems during the use of the Remote Control Desktop, please email [email protected] and include a thorough description of the problem (attaching screen prints would be helpful).


![[MS-RDPECLIP]: Remote Desktop Protocol: Clipboard … · Remote Desktop Protocol: Clipboard Virtual Channel ... Remote Desktop Protocol: Clipboard Virtual ... Remote Desktop Protocol:](https://img.pdfslide.us/doc/110x75/5ae3205b7f8b9a097a8dc1a3/ms-rdpeclip-remote-desktop-protocol-clipboard-desktop-protocol-clipboard.jpg)