Embed Size (px)
Citation preview

Remote Control
Quick Start Guide
Model 54.0
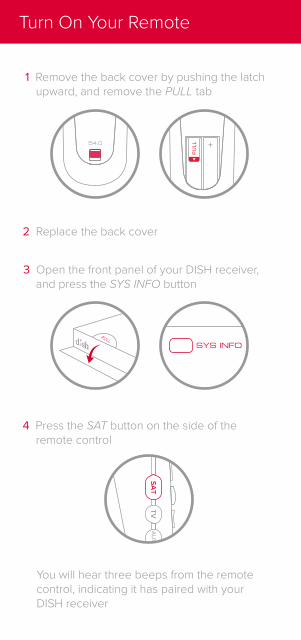
You will hear three beeps from the remote control, indicating it has paired with your DISH receiver
AUX
inputSA
TTV
4 Press the SAT button on the side of the remote control
3 Open the front panel of your DISH receiver, and press the SYS INFO button
SYS INFO
2 Replace the back cover
PULL54.0
1 Remove the back cover by pushing the latch upward, and remove the PULL tab
Turn On Your Remote
TV
Auxiliary Device
CUSTOMIZATIONS
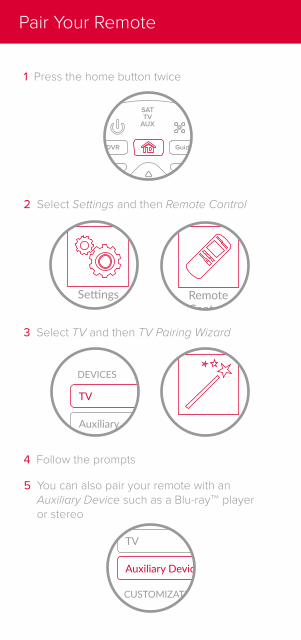
5 You can also pair your remote with an Auxiliary Device such as a Blu-ray™ player or stereo
4 Follow the prompts
TV
Auxiliary
DEVICES
3 Select TV and then TV Pairing Wizard
RemoteControl
Settings
2 Select Settings and then Remote Control
Info
Recall
2 abc
5 jkl
3 def
6 mno4 ghi
7 pqrs 8 tuv 9 wxyz
1
0
CHVOL
Back
Select
Options
DVR
SATTV
AUX
Guide
Live TV Help
1 Press the home button twice
Pair Your Remote

Activate Backlighting
SATTV
AUXinput
To activate the backlighting on your remote control, simply pick it up, move it, or shake it gently in a dark room.
It’s that easy!
To conserve your remote control’s battery life, a light sensor detects the amount of light in the room. If the room is su�ciently dark, backlighting will turn on, allowing you to see the remote’s buttons.

Explore Your Remote
Device ButtonsUse your remote as a universal remote control by pairing it with your TV and an auxiliary device such as a Blu-ray™ player or stereo
InputChange inputs on your TV when in TV mode
When in SAT mode, use this button to swap picture-in-picture or multi-view windows
SAT
TVA
UX
input

Explore Your Remote
Skip BackwardPress to skip back
10 seconds
Press and hold to rewind ( )
PowerTurn your TV,
DISH receiver, and other selected
devices on and o�
Back/Live TVPress to go back
one menu
Press and hold to go to live TV
HomeEasily find movies, sports, and shows
that are live, on your DVR, or on demand—all in
one place
OptionsAccess additional
options and features in the current menu
Recall
2 abc
5 jkl4 ghi
7 pqrs 8 tuv
1
0
VOL
Back
Select
Options
DVR
SATTV
AUX
Live TV
Diamond ButtonCustomize this button to turn closed
captioning on and o�, launch Netflix®, turn on picture in picture, and more
See Personalize Your Remote in this guide
RecallWhile watching TV,
press to see the channels you have
watched recently

Info
Recall
2 abc
5 jkl
3 def
6 mno
8 tuv 9 wxyz
0
CH
Select
SATTV
AUX
Guide
Help
Voice ControlFind what you’re looking for by pressing and holding this button, speaking into the microphone, and releasing it
Light SensorExtends battery life by determining whether backlighting should be activated when you pick up the remote
Info/HelpPress to get more information about a program
Press and hold to get quick tips in most menus
Skip ForwardPress to skip forward 30 seconds
Press and hold to fast-forward ( )
Channel Up & DownIn addition to changing channels, use these buttons to page through menus such as the Guide
Double-Diamond ButtonYou can personalize this button too!
MicrophoneListens to you when you are using voice control
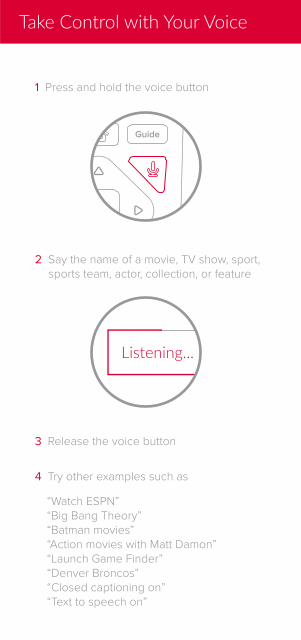
“Watch ESPN”“Big Bang Theory”“Batman movies”“Action movies with Matt Damon”“Launch Game Finder”“Denver Broncos”“Closed captioning on”“Text to speech on”
4 Try other examples such as
3 Release the voice button
2 Say the name of a movie, TV show, sport, sports team, actor, collection, or feature
Info
Recall
2 abc
5 jkl
3 def
6 mno4 ghi
7 pqrs 8 tuv 9 wxyz
1
0
CHVOL
Back
Select
Options
DVR
SATTV
AUX
Guide
Live TV Help
1 Press and hold the voice button
Take Control with Your Voice

That’s it!
3 Select OK
You can turn closed captioning on and o�, launch Netflix®, turn on picture in picture (PiP), record a program with one click, and more
Records Program
Toggles Audio Descrption
Stops Recording or Playback
Launches Netflix
2 Select from the menu what you want the button to do
Info
Recall
2 abc
5 jkl
3 def
6 mno4 ghi
7 pqrs 8 tuv 9 wxyz
1
0
CHVOL
BackLive TV Help
or
Info
Recall
2 abc
5 jkl
3 def
6 mno4 ghi
7 pqrs 8 tuv 9 wxyz
1
0
CHVOL
BackLive TV Help
1 Press and hold the diamond or double-diamond button
Personalize Your Remote

You will hear a series of beeps from your remote, allowing you to find it.
It’s that simple!
LOCATEREMOTE
2 Press the LOCATE REMOTE button
1 Open the front panel of your DISH receiver
Locate Your Remote Anytime

Refer servicing to qualified personnel when a solid object or liquid has fallen onto or into the device.
Do NOT attempt to service this device. Refer all servicing to qualified personnel. Opening covers other than the battery cover will void the warranty.
This device complies with Part 15 of FCC Rules. Operation is subject to the following two conditions:
1. This device may not cause harmful interference,
and
2. This device must accept any interference received, including interference that may cause undesired operation.
This equipment has been tested and found to comply with the limits for a Class B digital device, pursuant to Part 15 of the FCC Rules. These limits are designed to provide protection against harmful interference in a residential installation. This equipment generates, uses, and can radiate radio frequency energy and, if not installed and used in accordance with the instructions, may cause harmful interference to radio communications. However, there is no guarantee that interference will not occur in a particular installation. If this equipment does cause harmful interference to radio or television reception, which can be determined by turning the equipment o� and on, the user is encouraged to try to correct the interference by following one or more of the following measures:
∙ Reorient or relocate the receiving antenna.
∙ Increase the separation between the equipment and receiver.
∙ Connect the equipment into an outlet on a circuit di�erent from that to which the receiver is connected.
∙ Consult the dealer or an experienced radio/TV technician for help.
Changes or modifications to this device may void your authority to operate this equipment.
Safety InstructionsYou must keep safety in mind while using this device. Keep these and any other instructions for future reference.
Observe Warnings: Carefully follow all warnings on the device and in the operating instructions.
Heat: Do NOT place the device near heat sources such as radiators, stoves, heat registers, or other appliances that produce heat.
Case and UseCleaning: Do NOT use liquid, abrasive, solvent, or aerosol cleaners. Use a damp cloth for cleaning.
When Not in Use: Remove the batteries if this device is to be left unattended or unused for a long period of time.
Regulatory Information

Press and hold Info/Help
Channel 103
The Hopper Features Guide
mydish.com/support/remotes
DN00XXXXWarranty, safety, regulatory, and legal information can be found at mydish.com/support/remotes
Need Help?


![7-ENG-HH90 pages 13-14 - USALS sat division/hh90/Instruction Manual [EN].pdfwith Rotor Sat HH90 = Latitude 51,5°N - Dish elevation 37,6° Longitude 0,0° 21,0° anticlockwise 14,2°](https://img.pdfslide.us/doc/110x75/5e2386c4b093ca53754702cd/7-eng-hh90-pages-13-14-sat-divisionhh90instruction-manual-enpdf-with-rotor.jpg)