Embed Size (px)
Citation preview

Remote Backup SoftwareUser Manual

Legal Information
About this ManualThis Manual is subject to domestic and international copyright protection. Hangzhou HikvisionDigital Technology Co., Ltd. ("Hikvision") reserves all rights to this manual. This manual cannot bereproduced, changed, translated, or distributed, partially or wholly, by any means, without theprior written permission of Hikvision.Please use this user manual under the guidance of professionals.
Trademarks
and other Hikvision marks are the property of Hikvision and areregistered trademarks or the subject of applications for the same by Hikvision and/or its affiliates.Other trademarks mentioned in this manual are the properties of their respective owners. No rightof license is given to use such trademarks without express permission.
DisclaimerTO THE MAXIMUM EXTENT PERMITTED BY APPLICABLE LAW, HIKVISION MAKES NO WARRANTIES,EXPRESS OR IMPLIED, INCLUDING WITHOUT LIMITATION THE IMPLIED WARRANTIES OFMERCHANTABILITY AND FITNESS FOR A PARTICULAR PURPOSE, REGARDING THIS MANUAL.HIKVISION DOES NOT WARRANT, GUARANTEE, OR MAKE ANY REPRESENTATIONS REGARDING THEUSE OF THE MANUAL, OR THE CORRECTNESS, ACCURACY, OR RELIABILITY OF INFORMATIONCONTAINED HEREIN. YOUR USE OF THIS MANUAL AND ANY RELIANCE ON THIS MANUAL SHALL BEWHOLLY AT YOUR OWN RISK AND RESPONSIBILITY.REGARDING TO THE PRODUCT WITH INTERNET ACCESS, THE USE OF PRODUCT SHALL BE WHOLLYAT YOUR OWN RISKS. HIKVISION SHALL NOT TAKE ANY RESPONSIBILITIES FOR ABNORMALOPERATION, PRIVACY LEAKAGE OR OTHER DAMAGES RESULTING FROM CYBER ATTACK, HACKERATTACK, VIRUS INSPECTION, OR OTHER INTERNET SECURITY RISKS; HOWEVER, HIKVISION WILLPROVIDE TIMELY TECHNICAL SUPPORT IF REQUIRED.SURVEILLANCE LAWS VARY BY JURISDICTION. PLEASE CHECK ALL RELEVANT LAWS IN YOURJURISDICTION BEFORE USING THIS PRODUCT IN ORDER TO ENSURE THAT YOUR USE CONFORMSTHE APPLICABLE LAW. HIKVISION SHALL NOT BE LIABLE IN THE EVENT THAT THIS PRODUCT IS USEDWITH ILLEGITIMATE PURPOSES.IN THE EVENT OF ANY CONFLICTS BETWEEN THIS MANUAL AND THE APPLICABLE LAW, THE LATERPREVAILS.
Remote Backup Software User Manual
i

Symbol Conventions
The symbols that may be found in this document are defined as follows.
Symbol Description
DangerIndicates a hazardous situation which, if not avoided, will or couldresult in death or serious injury.
CautionIndicates a potentially hazardous situation which, if not avoided, couldresult in equipment damage, data loss, performance degradation, orunexpected results.
NoteProvides additional information to emphasize or supplementimportant points of the main text.
Remote Backup Software User Manual
ii

ContentsChapter 1 Introduction and Overview ......................................................................................... 1
1.1 Running Environment ............................................................................................................ 1
1.2 Summary of Changes ............................................................................................................. 1
Chapter 2 System Configuration ................................................................................................. 2
2.1 Configure General Parameters ............................................................................................... 2
2.2 Configure Backup Disk ........................................................................................................... 2
2.3 Configure Backup Notification ............................................................................................... 3
Chapter 3 Device Management ................................................................................................... 4
3.1 Add Device by IP Address or Domain Name .......................................................................... 4
3.2 Add Device by IP Segment ..................................................................................................... 5
3.3 Add Devices in a Batch ........................................................................................................... 5
Chapter 4 Remote Backup .......................................................................................................... 7
4.1 Manual Backup ...................................................................................................................... 7
4.2 Scheduled Backup .................................................................................................................. 8
4.3 Search Backup Video File ..................................................................................................... 10
4.4 Log Search ............................................................................................................................ 11
Remote Backup Software User Manual
iii

Chapter 1 Introduction and Overview
Remote Backup software can back up the video files stored in the device and save the video files tothe local disk. You can add the devices to the software and configure the backup settings. Then youcan start backup manually, or set backup schedule and the backup will start automaticallyaccording to the schedule.
This user manual describes the function, configuration, and operation steps of the software. Toensure the proper usage and stability of the software, refer to the contents below and read themanual carefully before operation.
1.1 Running EnvironmentThe following is recommended system requirement for running the software.
Operating SystemMicrosoft Windows XP (32-bit), Windows Server 2003 (32-bit), Windows 7 (32/64-bit), WindowsServer 2008 (32/64-bit), Windows 10 (32/64-bit)
CPUIntel Pentium IV @ 3.0 GHz and above
RAM1G and above
Video CardRADEON X700 Series
Display1024*768 resolution and above
1.2 Summary of ChangesThe followings are the changes between this version and the previous version.
• Delete the following two device adding mode: Import from Client and HiDDNS.• Support adding devices to the software by IP segment. See Add Device by IP Segment for details.• Support adding devices in a batch. See Add Devices in a Batch for details.• Support email encryption. See Configure Backup Notification for details.• Support pausing or starting backup, and viewing backup details during backup. See Manual
Backup or Scheduled Backup for details.
Remote Backup Software User Manual
1
Chapter 2 System Configuration
You can configure the general parameters, such as auto-run function, maximum reconnectionnumber, and parallel backup tasks, select the disk for backup, and configure email notification forbackup.
2.1 Configure General ParametersYou can configure the frequently-used parameters, including auto-run function, maximum numberfor reconnecting the device when connecting failed, and the number of backup tasks performed atthe same time.
Perform this task when you need to configure general parameters.
Steps1. Click to enter the System Configuration page.2. Click General Parameters on the right.3. Check Auto-run to enable running the software automatically after the PC startup.4. Set the maximum reconnection number.
The software will connect the device automatically when the device disconnected (due tonetwork disconnected, etc.). If the connection number exceeded the limit, the device will not beconnected and the downloading task of the device will stop.
5. Set the parallel backup number, which indicates the number of backup tasks which can beperformed at the same time.
6. Click OK.
2.2 Configure Backup DiskYou can select the disk in the local PC for storing the video files and set the solution when the diskspace is insufficient.
Perform this task when you need to configure the backup disk.
Steps1. Click to enter the System Configuration page.2. Click Backup Disk.3. Select the solution when the backup disk space is insufficient.
Stop Downloading and PromptThe backup will be stopped and the software will give you a prompt to extend the disk space.
Overwrite Oldest Backup File and Continue to DownloadThe downloaded video files will overwrite the oldest files in the disk.
Remote Backup Software User Manual
2
4. Select the local disk.
NoteYou should select the disk with at least 2GB free space, or the video files will not be saved.
5. Click OK.
2.3 Configure Backup NotificationYou should configure the email notification for backup before sending the backup result (e.g.,backup completed or exception, etc) message to the designate email account.
Perform this task when you need to configure backup notification.
Steps1. Click to enter the System Configuration page.2. Click Backup Notification.3. Check Email Notification to enable sending email notification.4. Select the encryption type.5. Select the prompt type.
DownloadedSend an email notification when the backup task completed and the video files downloaded.
Download ExceptionSend an email notification when the backup exception.
Expired Video Not DownloadedSend an email notification when there's expired video not downloaded.
6. Set the receiver's and sender's information, such as email address, SMTP server, port, etc.User Name
Enter the user name of the sender's email address.Password
Enter the password of the sender's email address.7. Click Test to send an email to the receiver for test.8. Click OK.
Remote Backup Software User Manual
3

Chapter 3 Device Management
You can add device to the software for backing up the device's video files and save the videos tothe local PC.
3.1 Add Device by IP Address or Domain NameWhen you know the IP address or domain name of the device to add, you can add the devices toyour system by specifying the IP address (or domain name), user name, password, and otherrelated parameters. After adding the device, you can back up the video files stored in the device.
Before You StartMake sure the devices (cameras, DVR, etc.) you are going to use are correctly installed andconnected to the network as specified by the manufacturers. Such initial configuration is requiredin order to be able to connect the devices to the software via network.Perform this task when you need to add device by IP address or domain name.
Steps1. Click Device Management to enter the Device Management page.2. Click Add to open Add Device window.3. Select IP or Domain as the adding mode.4. Input the required information, including device name, IP address (or domain name), port, user
name, and password.
NoteBy default, the device port No. is 8000.
CautionThe password strength of the device can be automatically checked. We highly recommend youchange the password of your own choosing (using a minimum of 8 characters, including at leastthree kinds of following categories: upper case letters, lower case letters, numbers, and specialcharacters) in order to increase the security of your product. And we recommend you reset yourpassword regularly, especially in the high security system, resetting the password monthly orweekly can better protect your product.Proper configuration of all passwords and other security settings is the responsibility of theinstaller and/or end-user.
5. Optional: Set the flow speed to control the video downloading speed.6. Click OK.
Remote Backup Software User Manual
4

3.2 Add Device by IP SegmentIf the devices having the same user name and password, and their IP addresses are between the IPsegment, you can specify the start IP address and the end IP address, user name, password, andother related parameters to add them. After adding the device, you can back up the video filesstored in the devices.
Before You StartMake sure the devices (cameras, DVR, etc.) you are going to use are correctly installed andconnected to the network as specified by the manufacturers. Such initial configuration is requiredin order to be able to connect the devices to the software via network.Perform this task when you need to add device by IP segment.
Steps1. Click Device Management to enter the Device Management page.2. Click Add to open Add Device window.3. Select IP Segment as the adding mode.4. Input the required information, including start and end IP address, port, user name, and
password.
NoteBy default, the device port No. is 8000.
CautionThe password strength of the device can be automatically checked. We highly recommend youchange the password of your own choosing (using a minimum of 8 characters, including at leastthree kinds of following categories: upper case letters, lower case letters, numbers, and specialcharacters) in order to increase the security of your product. And we recommend you reset yourpassword regularly, especially in the high security system, resetting the password monthly orweekly can better protect your product.Proper configuration of all passwords and other security settings is the responsibility of theinstaller and/or end-user.
5. Optional: Set the flow speed to control the video downloading speed.6. Click OK.
3.3 Add Devices in a BatchYou can input the device information into the predefined template to add multiple devices at atime. After adding the devices, you can back up the video files stored in the devices.
Remote Backup Software User Manual
5

Before You StartMake sure the devices (cameras, DVR, etc.) you are going to use are correctly installed andconnected to the network as specified by the manufacturers. Such initial configuration is requiredin order to be able to connect the devices to the software via network.Perform this task when you need to add device by importing the template which containsinformation of multiple devices.
Steps1. Click Device Management to enter the Device Management page.2. Click Add to open Add Device window.3. Select Batch Import as the adding mode.4. Click Export and save the predefined template (CSV file) on your PC.5. Open the exported template file and input the required information of the devices to be added
on the corresponding column.6. Click and select the template file.7. Click OK.
Remote Backup Software User Manual
6

Chapter 4 Remote Backup
You can back up the video files of the added devices and store the videos to the local PC. You canalso search the videos which have been saved in the local PC.
Two backup mode are available: Manual and Scheduled.• Manual: You can add backup tasks and start backup manually.• Scheduled: You can add backup schedule and the backup will start automatically according to
the schedule.
4.1 Manual BackupThe video files stored in the device can be backed up to your local disk. You can set the backupconditions and start backup manually.
Before You StartAdd the device to the software first. See Device Management for details.Perform this task when you need to start backup manually.
Steps1. Click Manual Backup to enter the Backup Now page.2. Click Add Schedule.3. Set the backup task name.4. Select the video type you want to back up.
ScheduledThe scheduled video files can be backed up.
AlarmThe alarm triggered video files can be backed up.
Motion DetectionThe motion detection triggered video files can be backed up.
ManualThe manual recorded video files can be backed up.
5. Set the time period for backup.The video files recorded in this time period will be backed up.
6. Select the stream type.
NoteIf you select Self-Adaptive as the stream type, the software will backup the files with mainstream preferentially.
Remote Backup Software User Manual
7
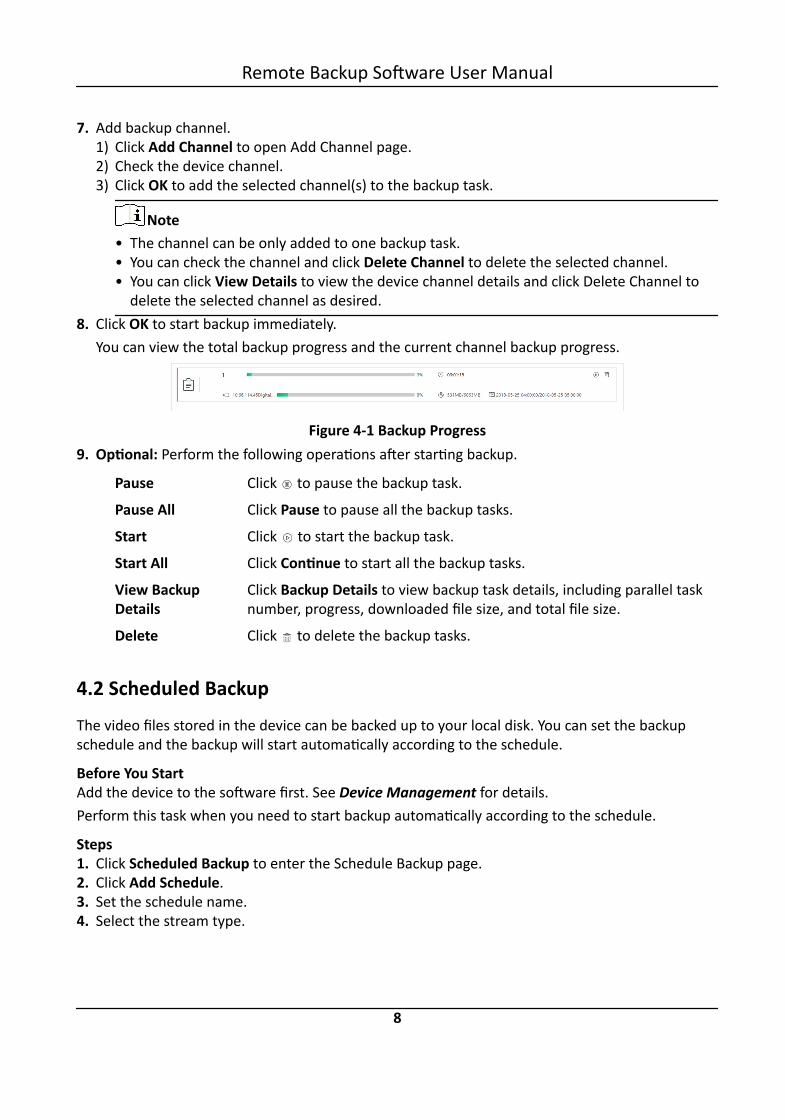
7. Add backup channel.1) Click Add Channel to open Add Channel page.2) Check the device channel.3) Click OK to add the selected channel(s) to the backup task.
Note• The channel can be only added to one backup task.• You can check the channel and click Delete Channel to delete the selected channel.• You can click View Details to view the device channel details and click Delete Channel to
delete the selected channel as desired.8. Click OK to start backup immediately.
You can view the total backup progress and the current channel backup progress.
Figure 4-1 Backup Progress9. Optional: Perform the following operations after starting backup.
Pause Click to pause the backup task.
Pause All Click Pause to pause all the backup tasks.
Start Click to start the backup task.
Start All Click Continue to start all the backup tasks.
View BackupDetails
Click Backup Details to view backup task details, including parallel tasknumber, progress, downloaded file size, and total file size.
Delete Click to delete the backup tasks.
4.2 Scheduled BackupThe video files stored in the device can be backed up to your local disk. You can set the backupschedule and the backup will start automatically according to the schedule.
Before You StartAdd the device to the software first. See Device Management for details.Perform this task when you need to start backup automatically according to the schedule.
Steps1. Click Scheduled Backup to enter the Schedule Backup page.2. Click Add Schedule.3. Set the schedule name.4. Select the stream type.
Remote Backup Software User Manual
8
NoteIf you select Self-Adaptive as the stream type, the software will backup the files with mainstream preferentially.
5. Add backup channel.1) Click Add Channel to open Add Channel page.2) Check the device channel.3) Click OK to add the selected channel(s) to the schedule.
Note• The channel can be only added to one backup task.• You can check the channel and click Delete Channel to delete the selected channel.• You can click View Details to view the device channel details and click Delete Channel to
delete the selected channel as desired.6. Set the backup schedule.
Days of WeekThe days of the week when the backup starts.
Recording TimeThe video files recorded in this time period will be backed up.
Video TypeSelect the video type.Scheduled
The scheduled video files can be backed up.Alarm
The alarm triggered video files can be backed up.Motion Detection
The motion detection triggered video files can be backed up.Manual
The manual recorded video files can be backed up.Backup Time
The time period when the backup will start.Backup Date
The backup date which is away from the backup date.
ExampleIf you set the days of the week to Wednesday, recording time to 18:00-20:00, video type toManual, backup time to 20:00-24:00, and backup date to 2 Day(s) before, then the backup will
Remote Backup Software User Manual
9

start automatically during 20:00 to 24:00 on Wednesday and the video files recorded during18:00 to 20:00 on Monday will be backed up.
7. Optional: Click Copy to to copy the settings to the other defined schedule.8. Click OK.
Result
The backup will start automatically according to the set schedule.
What to do nextYou can pause or start the backup task, and view the backup details, including progress, paralleltask number, downloaded file size, and total file size.
4.3 Search Backup Video FileYou can search the video files which were backed up in the local disk.
Before You StartAdd the device to the software first. See Device Management for details.Perform this task when you need to search backup video files.
Steps1. Click Video Search to enter the Video Search page.2. Select the backup channel.3. Select the video type.
ScheduledThe scheduled video files in the backup channel can be searched.
AlarmAlarm triggered video files in the backup channel can be searched.
Motion DetectionMotion detection event triggered video files in the backup channel can be searched.
ManualManual recorded video files in the backup channel can be searched.
4. Set the time period.5. Click Search.
The matched video files can be displayed in the list. You can view the channel name, video filesize, and so on.
NotePlease narrow the search condition if there are too many video files.
6. Perform the following operation(s) after searching the video files.
Remote Backup Software User Manual
10

Playback Click on Operation column to play the videos.
Location Click on Operation column to enter the video files' saving path.
Export Click on Operation column to save single video file to another file path. Youcan also select one or more video files and click Export above to saving theselected files to another file path.
4.4 Log SearchYou can search and view the log files of the Remote Backup software.
Perform this task when you need to search log files.
Steps1. Click Log Search to enter the Log Search page.2. Select the log type.3. Set the time period.4. Click Search.
The matched log files with details will display in the list.
NotePlease narrow the search condition if there are too many log files.
5. Optional: Click Export and save the selected log files to the local PC.
Remote Backup Software User Manual
11

UD10408B