Embed Size (px)
Citation preview
user guide
iBlot® Dry Blotting SystemFor dry, electroblotting of proteins from mini-, midi-, and e PAge™ gels, electroblotting of nucleic acids from agarose gels, and TBe polyacrylamide gels, and performing Western detection on nitrocellulose or PVdF membranesCatalog Numbers IB1001, IB1001UK, and IB1001EURevision Date 15 May 2012
Publication Part Number 25-0911
MAN0000560
Online Specials


iii
Contents
Product Contents ........................................................................................................................................ iv
iBlot® Gel Transfer Device ......................................................................................................................... vi
About the System .......................................................................................................... 1
Product Description ..................................................................................................................................... 1
Description of Parts ...................................................................................................................................... 5
Description of Programs ............................................................................................................................ 10
Protein Transfer Protocol ........................................................................................... 12
Experimental Overview ............................................................................................................................. 12
General Guidelines ..................................................................................................................................... 13
Using the iBlot® Device with the De-Bubbling Roller ........................................................................... 15
Using the iBlot® Device with the Blotting Roller .................................................................................... 22
Disassembling the iBlot® Gel Transfer Device ........................................................................................ 26
Post Transfer Analysis and Optimizing Blotting ................................................................................... 27
Examples of Results ................................................................................................................................... 29
Troubleshooting .......................................................................................................................................... 31
Nucleic Acid Transfer Protocol .................................................................................. 35
Experimental Overview ............................................................................................................................. 35
General Guidelines ..................................................................................................................................... 36
Using the iBlot® Device for Southern Blotting ........................................................................................ 37
Troubleshooting .......................................................................................................................................... 42
Western Detection Protocol ....................................................................................... 43
Experimental Overview ............................................................................................................................. 43
General Guidelines ..................................................................................................................................... 45
Preparing Solutions .................................................................................................................................... 46
Using the iBlot® Device for Western Detection ...................................................................................... 49
Using Assay Spacers .................................................................................................................................. 59
Troubleshooting .......................................................................................................................................... 61
Appendix ...................................................................................................................... 64
iBlot® Quick Reference Guide ................................................................................................................... 64
Product Specifications ................................................................................................................................ 66
Explanation of Symbols and Warnings ................................................................................................... 69
Accessory Products .................................................................................................................................... 70
Technical Support ....................................................................................................................................... 72

iv
Product Contents
Types of products This manual is supplied with the iBlot® Gel Transfer Device (Cat. nos. IB1001, IB1001UK, IB1001EU).
iBlot® Gel Transfer Device contents
The contents of the iBlot® Gel Transfer Device are listed below. See page 66 for specifications and description of the iBlot® Gel Transfer Device.
Component Quantity iBlot® Gel Transfer Device 1 Specific power cord based on the type of unit ordered (for U.S./Canada/Taiwan/Japan, Europe, or UK)
1
Blotting Roller 1 De-bubbling Roller 1
Upon receiving the instrument
Examine the unit carefully for any damage incurred during transit. File any damage claims with the carrier. The warranty does not cover in-transit damage.
iBlot® Transfer Stacks
In order to use the iBlot® Gel Transfer Device, the appropriate type of iBlot® Transfer Stack for your application is required. Three types of iBlot® Transfer Stacks are sold separately, and available for use with the iBlot® Gel Transfer Device. iBlot® Gel Transfer Stacks are used to transfer proteins from gels onto nitrocellulose or PVDF membranes; iBlot® DNA Transfer Stacks are used to transfer DNA from gels onto nylon membranes; iBlot® Western Detection Stacks are available for performing western detection on previously blotted nitrocellulose or PVDF membranes (see page 70 for ordering information).
Store the iBlot® Transfer Stacks at room temperature. For best results, use the transfer stack before the expiration date printed on the package for each stack. Do not mix components between different types of iBlot® Transfer Stacks. Use iBlot® Transfer Stacks only for their designated application.
iBlot® DNA Transfer Stacks
Use iBlot® DNA Transfer Stacks to transfer DNA from agarose gels (self-poured, or E-Gel®) or TBE polyacrylamide gels using the iBlot® Gel Transfer Device. For iBlot® DNA Transfer Stack specifications, see page 66.
Product Transfer Membrane Catalog no. iBlot® DNA Transfer Stacks Nylon IB8010-01
Components for iBlot® DNA Transfer Stacks are as follow:
Component (iBlot® DNA Transfer Stacks) Quantity iBlot® DNA Cathode Stack, Top 10 iBlot® DNA Anode Stack, Bottom 10 iBlot® DNA Disposable Sponge 10
Continued on next page
v
Product Contents, continued
iBlot® Gel Transfer Stacks
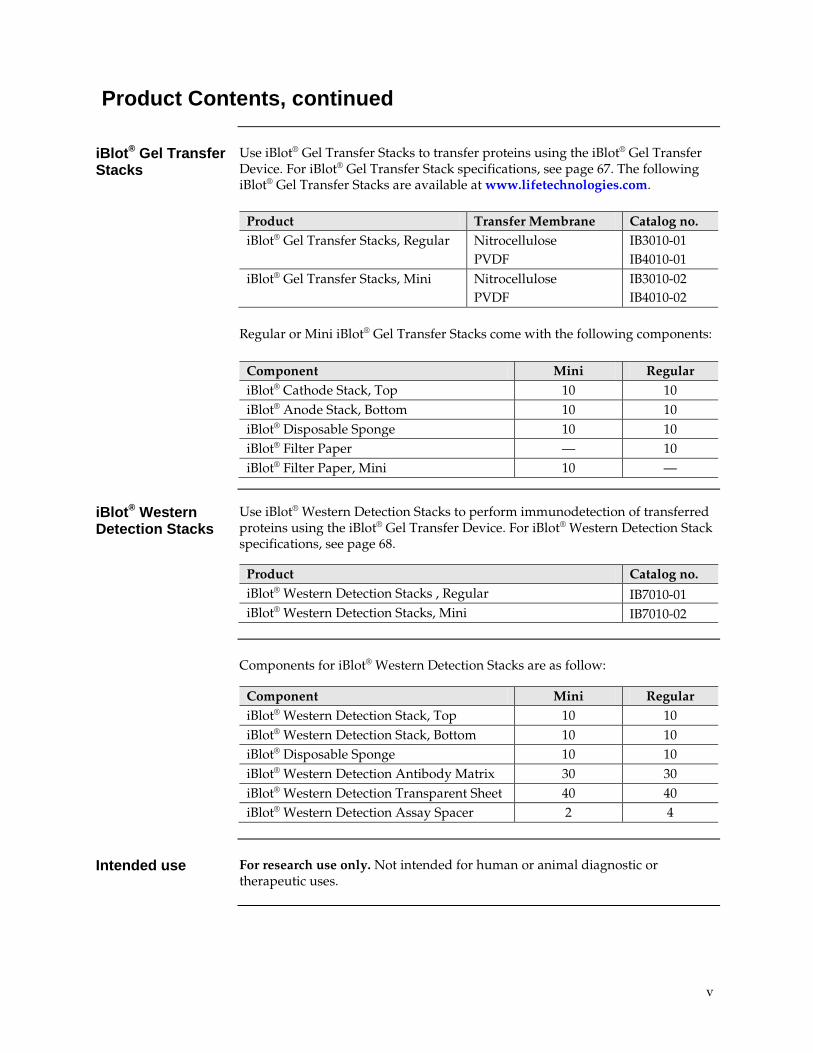
Use iBlot® Gel Transfer Stacks to transfer proteins using the iBlot® Gel Transfer Device. For iBlot® Gel Transfer Stack specifications, see page 67. The following iBlot® Gel Transfer Stacks are available at www.lifetechnologies.com.
Product Transfer Membrane Catalog no. iBlot® Gel Transfer Stacks, Regular Nitrocellulose IB3010-01 PVDF IB4010-01 iBlot® Gel Transfer Stacks, Mini Nitrocellulose IB3010-02 PVDF IB4010-02
Regular or Mini iBlot® Gel Transfer Stacks come with the following components:
Component Mini Regular iBlot® Cathode Stack, Top 10 10 iBlot® Anode Stack, Bottom 10 10 iBlot® Disposable Sponge 10 10 iBlot® Filter Paper — 10 iBlot® Filter Paper, Mini 10 —
iBlot® Western Detection Stacks
Use iBlot® Western Detection Stacks to perform immunodetection of transferred proteins using the iBlot® Gel Transfer Device. For iBlot® Western Detection Stack specifications, see page 68.
Product Catalog no. iBlot® Western Detection Stacks , Regular IB7010-01 iBlot® Western Detection Stacks, Mini IB7010-02
Components for iBlot® Western Detection Stacks are as follow:
Component Mini Regular iBlot® Western Detection Stack, Top 10 10 iBlot® Western Detection Stack, Bottom 10 10 iBlot® Disposable Sponge 10 10 iBlot® Western Detection Antibody Matrix 30 30 iBlot® Western Detection Transparent Sheet 40 40 iBlot® Western Detection Assay Spacer 2 4
Intended use For research use only. Not intended for human or animal diagnostic or
therapeutic uses.
vi
iBlot® Gel Transfer Device
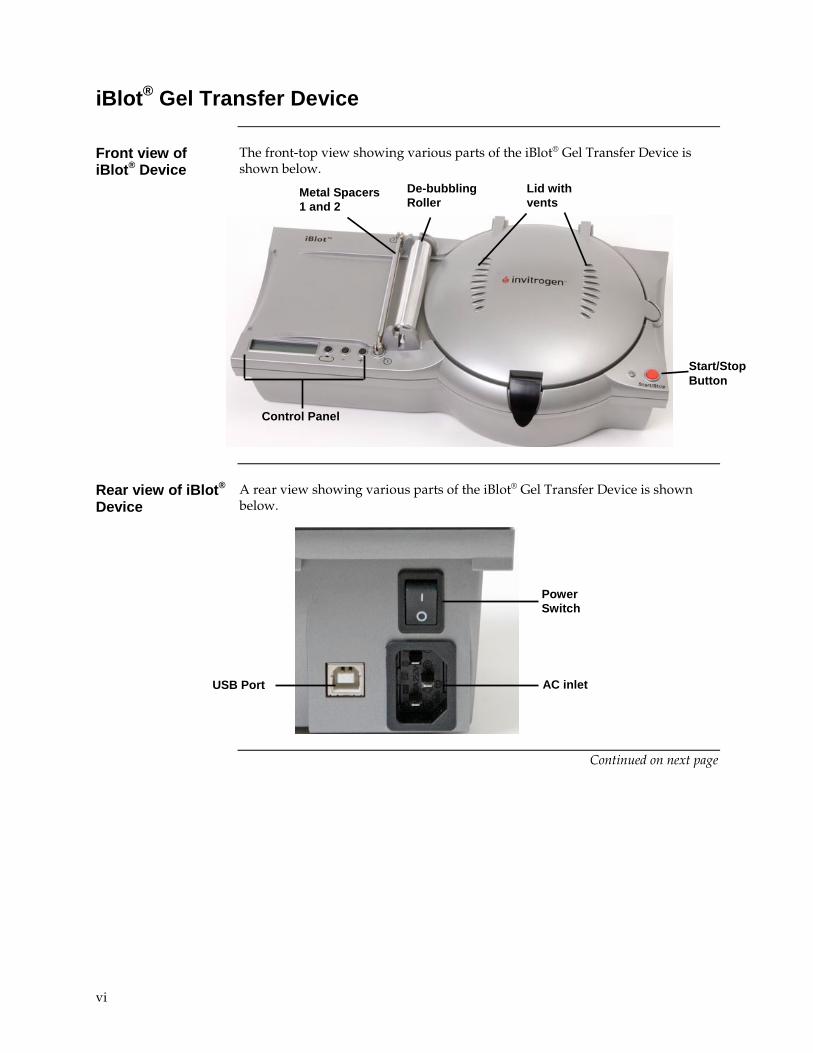
Front view of iBlot® Device
The front-top view showing various parts of the iBlot® Gel Transfer Device is shown below.
Rear view of iBlot® Device
A rear view showing various parts of the iBlot® Gel Transfer Device is shown below.
Continued on next page
Power Switch
AC inlet USB Port
Start/Stop Button
Lid with vents
Metal Spacers 1 and 2
De-bubbling Roller
Control Panel
vii
iBlot® Gel Transfer Device, continued
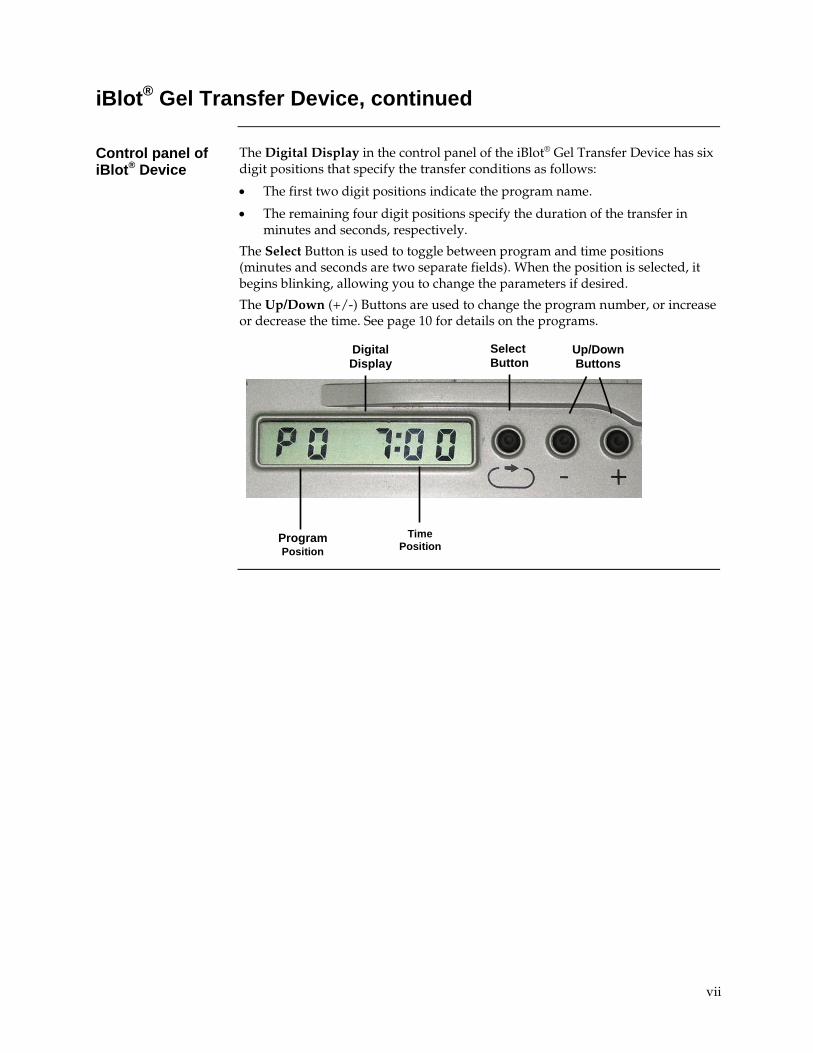
Control panel of iBlot® Device
The Digital Display in the control panel of the iBlot® Gel Transfer Device has six digit positions that specify the transfer conditions as follows:
• The first two digit positions indicate the program name.
• The remaining four digit positions specify the duration of the transfer in minutes and seconds, respectively.
The Select Button is used to toggle between program and time positions (minutes and seconds are two separate fields). When the position is selected, it begins blinking, allowing you to change the parameters if desired.
The Up/Down (+/-) Buttons are used to change the program number, or increase or decrease the time. See page 10 for details on the programs.
Digital Display
Select Button
Up/Down Buttons
Time Position
Program Position
1
About the System
Product Description
iBlot® Dry Blotting System
The iBlot® Dry Blotting System consists of the iBlot® Gel Transfer Device and associated iBlot® Transfer Stacks (sold separately). The iBlot® Gel Transfer Device has a unique design, which, in conjunction with the patented gel matrix technology of the iBlot® Transfer Stacks, results in a shortened distance between electrodes, high field strength, and high currents to reduce transfer times when blotting proteins or DNA onto membranes.
Western blotting of proteins from midi- or mini-sized polyacrylamide gels onto nitrocellulose or PVDF membranes within 7 minutes can be performed with iBlot® Gel Transfer Stacks.
Southern blotting of DNA from agarose or TBE polyacrylamide gels onto nylon membranes within 7 minutes can be performed with the iBlot® DNA Transfer Stacks.
Chemiluminescent or chromogenic immunodetection using nitrocellulose or PVDF membranes can be performed with iBlot® Western Detection Stacks using reagents supplied in the iBlot® Western Detection Kit. Blocking, primary antibody, and secondary antibody steps can be performed in about 8 minutes.
See the next page to understand how the iBlot® Dry Blotting System works and page 5 for details on various parts of the system.
Features • Pre-programmed (iBlot® Gel Transfer Device) with 10 programs for
transfer of proteins or DNA from various gel types, and to perform western detection in 7–8 minutes
• Built-in safety features in the device enhance user safety
• User-friendly iBlot® Gel Transfer Device design with an integrated power supply to avoid inconsistencies associated with the use of an external power supply
• Fast, reliable protein transfer using iBlot® Gel Transfer Stacks with integrated nitrocellulose or PVDF transfer membranes for blotting without the need to prepare buffers
• Compatible for use with NuPAGE® Bis-Tris and Tris-Acetate, Tris-Glycine, Tricine (in mini- and midi-gel formats), and E-PAGE™ gels
• Easy transfer of DNA using iBlot® DNA Transfer Stacks with integrated nylon transfer membrane for blotting without the need to prepare buffers or cut blotting paper
• Unique iBlot® Western Detection Stacks for chemiluminescent or chromogenic immunodetection of proteins on nitrocellulose or PVDF membranes with rapid binding of antibodies to antigens, completed in 3 minutes
Continued on next page

2
Product Description, continued
System components
iBlot® Gel Transfer Device
The iBlot® Gel Transfer Device is a self-contained blotting unit with integrated power supply used for fast, dry blotting of proteins. See page 5 for details. iBlot® Transfer Stacks
The iBlot® Transfer Stacks are disposable stacks that come in three varieties for different applications. iBlot® Gel Transfer Stacks have integrated PVDF or nitrocellulose transfer membranes to perform dry blotting of proteins. iBlot® DNA Transfer Stacks have an integrated nylon transfer membrane to perform dry blotting of DNA. iBlot® Western Detection Stacks are used to perform western detection in conjunction with reagents that come with the iBlot® Western Detection Kit. Each iBlot® Transfer Stack contains a copper electrode and appropriate cathode and anode buffers in the gel matrix to allow fast, reliable transfer of proteins or DNA. See page 7 for details.
System overview The iBlot® Dry Blotting System is based on the dry blotting concept, utilizing
the unique, patented gel matrix technology developed for E-Gel® and E-PAGE™ gels for the iBlot® Transfer Stacks.
The iBlot® Transfer Stack consists of two copper electrodes (anode and cathode) required for electrophoresis, an Anode Stack, and a Cathode Stack. When using the iBlot® Dry Blotting System for protein or DNA transfer, the appropriate iBlot® Transfer Stack is assembled with the appropriate blotting membrane on the anode side, and a pre-run gel on the cathode side.
Schematic of iBlot® Gel/DNA Transfer Stack showing the flow of current
Continued on next page

3
Product Description, continued
System overview, continued
After the stack is assembled on the iBlot® Gel Transfer Device, and the appropriate program is selected, and the run is initiated. Complete transfer of proteins or DNA from the gel to the blotting membrane is accomplished in approximately 7–8 minutes. The rapid transfer without the need for external power supply or premade buffers is possible due to the following features of the iBlot® Dry Blotting System:
• The gel matrix of the Anode and Cathode Stack incorporate the appropriate anode and cathode buffers to act as ion reservoirs. This format eliminates the need for premade buffers or soaked filter paper, and minimizes handling that can lead to inconsistent performance.
• The copper anode does not generate oxygen gas as a result of water electrolysis, resulting in increased transfer consistency. Conventional inert electrodes present in other blotting systems result in oxygen generation, which can result in blotting distortion.
• The design of the iBlot® Gel Transfer Device reduces the distance between the electrodes and the integrated power supply. This unique design combined with the gel matrix technology of iBlot® Transfer Stacks allows the system to generate high field strength and increase the transfer speed.
For western detection, the iBlot® Western Detection Stack is assembled with your pre-blotted membrane on the anode side, and an Antibody Matrix containing blocking reagents and primary or secondary antibody on the cathode side. The iBlot® Gel Transfer Device applies an electric field to transfer charged antibodies towards the membrane, and facilitate antibody-antigen interaction.
Schematic of iBlot® Western Detection Stack showing the flow of current
Continued on next page

4
Product Description, continued
Transfer membrane
The iBlot® Gel Transfer Stacks are assembled with the transfer membrane and are available with:
• Nitrocellulose membrane (0.2 µm)
The nitrocellulose membrane is composed of 100% pure nitrocellulose to provide high-quality transfer. The membrane is compatible with commonly used detection methods such as staining, immunodetection, fluorescence, or radiolabeling. The proteins bind to the membrane due to hydrophobic and electrostatic interactions. The protein binding capacity is 209 µg/cm2.
• PVDF membrane (0.2 µm, low fluorescence)
The PVDF membrane has higher binding capacity than nitrocellulose. The PVDF membrane is preactivated and ready for use without any pretreatment with alcohols. The membrane is compatible with commonly used detection methods such as staining, immunodetection, fluorescence, or radiolabeling. The proteins bind to the membrane due to hydrophobic interactions. The protein binding capacity is 240 µg/cm2.
• Nylon membrane (0.2 µm)
The positively charged nylon membrane has higher binding capacity than nitrocellulose and is physically stronger than nitrocellulose. The membrane is compatible with commonly used detection methods for Southern blot detection. The DNA binds to the membrane due to ion exchange interactions between the positively charged membrane and the negatively charged DNA. The DNA binding capacity is ~500 µg/cm2.

5
Description of Parts
iBlot® Gel Transfer Device
The iBlot® Gel Transfer Device is a blotting device with an integrated power supply capable of producing currents up to 5.5 amp, and supplying voltage up to 25 V. Four printed circuit boards hold the electronic components required to process the systems logic unit, modify voltage and currents for display, and power the blotting process. A pre-installed firmware controls the parameters such as voltage and time, and allows selection of programs (see page 10) for details on each program).
When installing the iBlot® Gel Transfer Device, make sure it is placed on a level surface. Keep the area around the device clear to ensure proper ventilation of the unit. For your safety: Position the device properly such that the Power switch and the AC inlet located at the rear of the unit (page vi) are easily accessible.
A top view of an open iBlot® Gel Transfer Device identifying various parts is shown below. See page vi for front and rear views of the device.
Blotting Surface
The blotting surface is the area where the iBlot® Gel Transfer Stacks containing the gel are placed to perform blotting. An alignment guide marking the left side of the blotting surface, and Gel Barriers to the right are used for proper placement of the transfer stacks to allow correct electrical contact.
Continued on next page
Blotting Surface
De-bubbling Surface
Gel Barriers Gel
Barriers
Electrical Contact
Electrical Contact
Start/Stop Button
Metal Spacer 1
Metal Spacer 2 Lid with vents
Alignment Guide
Power Cord
6
Description of Parts, continued
iBlot® Gel Transfer Device, continued
De-Bubbling Surface
The de-bubbling surface is the area where de-bubbling of E-PAGE™ gels is performed using the De-bubbling Roller. This area contains Metal Spacer 1 and Metal Spacer 2, and hinges to attach the De-bubbling Roller. Barriers are also present on the de-bubbling surface to guide the proper placement of the iBlot® Anode Stack, Bottom and the gel to allow efficient de-bubbling. The iBlot® Anode Stack, Bottom is assembled with the gel, Metal Spacers 1 and 2, the iBlot® Cathode Stack, Top, and the De-bubbling Roller. The entire assembled transfer stack with the gel is pulled together with the pull tab towards the blotting surface resulting in removal of any trapped air bubbles between the gel and the blotting membrane.
Lid
The iBlot® Lid contains ventilation holes to allow for proper ventilation of the unit during the run. The iBlot® Disposable Sponge (page 8) is placed on the inner side of the iBlot® Lid within the small protrusions present on the lid that allow proper placement of the sponge. The Lid also contains the electrical contacts for the copper electrodes on the stack to complete the electrical circuit.
Start/Stop Button
The Start/Stop Button is located near the blotting surface and is used to activate the run, stop the run, or reset the program. The red and green status light indicates the status of the run or errors.
Control Panel
The Control Panel is located near the de-bubbling surface and contains the 6-digit digital display, Select Button, and Up/Down (+/-) Buttons. See page vii for control panel details.
Power Cord
The Power Cord connects the iBlot® Gel Transfer Device directly to an AC electrical outlet. Check the Power Cord supplied with the unit to ensure that the plug is compatible with the local socket format.
Be sure that the AC power switch is in the Off position (page vi) before attaching the power cord. Attach the power cord to the AC inlet of the device first, and then to the electrical outlet. Use only properly grounded AC outlets and power cords.
The maximum voltage and current of the output to the gel stacks is 25 VDC and 5.5 Amp.
Continued on next page
7
Description of Parts, continued
iBlot® Anode Stack, Bottom
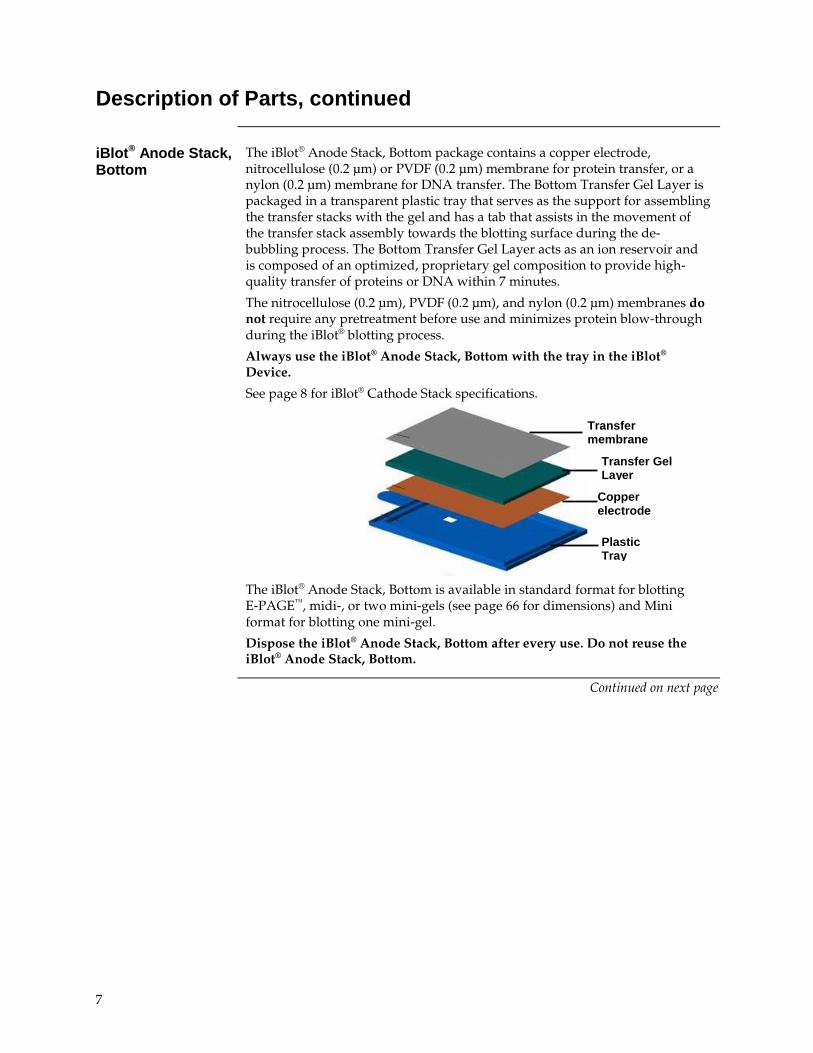
The iBlot® Anode Stack, Bottom package contains a copper electrode, nitrocellulose (0.2 µm) or PVDF (0.2 µm) membrane for protein transfer, or a nylon (0.2 µm) membrane for DNA transfer. The Bottom Transfer Gel Layer is packaged in a transparent plastic tray that serves as the support for assembling the transfer stacks with the gel and has a tab that assists in the movement of the transfer stack assembly towards the blotting surface during the de-bubbling process. The Bottom Transfer Gel Layer acts as an ion reservoir and is composed of an optimized, proprietary gel composition to provide high-quality transfer of proteins or DNA within 7 minutes.
The nitrocellulose (0.2 µm), PVDF (0.2 µm), and nylon (0.2 µm) membranes do not require any pretreatment before use and minimizes protein blow-through during the iBlot® blotting process.
Always use the iBlot® Anode Stack, Bottom with the tray in the iBlot® Device.
See page 8 for iBlot® Cathode Stack specifications.
The iBlot® Anode Stack, Bottom is available in standard format for blotting E-PAGE™, midi-, or two mini-gels (see page 66 for dimensions) and Mini format for blotting one mini-gel.
Dispose the iBlot® Anode Stack, Bottom after every use. Do not reuse the iBlot® Anode Stack, Bottom.
Continued on next page
Plastic Tray
Copper electrode
Transfer Gel Layer
Transfer membrane
8
Description of Parts, continued
iBlot® Cathode Stack, Top
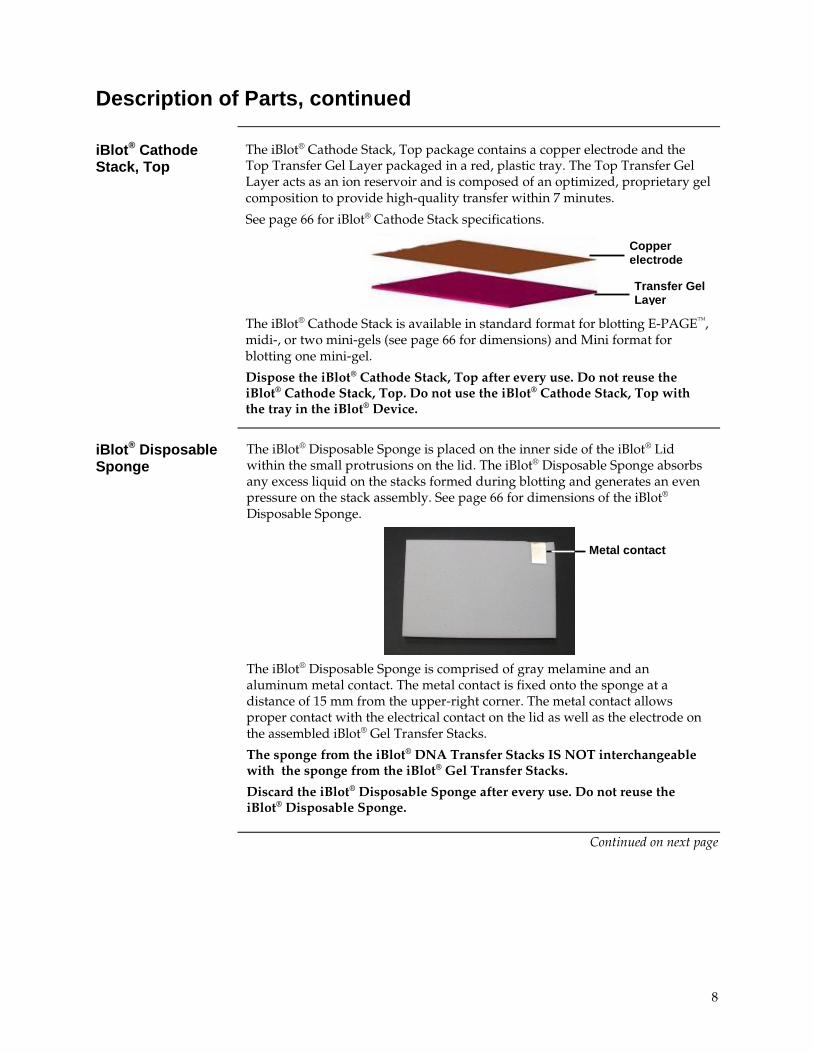
The iBlot® Cathode Stack, Top package contains a copper electrode and the Top Transfer Gel Layer packaged in a red, plastic tray. The Top Transfer Gel Layer acts as an ion reservoir and is composed of an optimized, proprietary gel composition to provide high-quality transfer within 7 minutes.
See page 66 for iBlot® Cathode Stack specifications.
The iBlot® Cathode Stack is available in standard format for blotting E-PAGE™, midi-, or two mini-gels (see page 66 for dimensions) and Mini format for blotting one mini-gel.
Dispose the iBlot® Cathode Stack, Top after every use. Do not reuse the iBlot® Cathode Stack, Top. Do not use the iBlot® Cathode Stack, Top with the tray in the iBlot® Device.
iBlot® Disposable Sponge
The iBlot® Disposable Sponge is placed on the inner side of the iBlot® Lid within the small protrusions on the lid. The iBlot® Disposable Sponge absorbs any excess liquid on the stacks formed during blotting and generates an even pressure on the stack assembly. See page 66 for dimensions of the iBlot® Disposable Sponge.
The iBlot® Disposable Sponge is comprised of gray melamine and an aluminum metal contact. The metal contact is fixed onto the sponge at a distance of 15 mm from the upper-right corner. The metal contact allows proper contact with the electrical contact on the lid as well as the electrode on the assembled iBlot® Gel Transfer Stacks.
The sponge from the iBlot® DNA Transfer Stacks IS NOT interchangeable with the sponge from the iBlot® Gel Transfer Stacks.
Discard the iBlot® Disposable Sponge after every use. Do not reuse the iBlot® Disposable Sponge.
Continued on next page
Copper electrode
Transfer Gel Layer
Metal contact
9
Description of Parts, continued
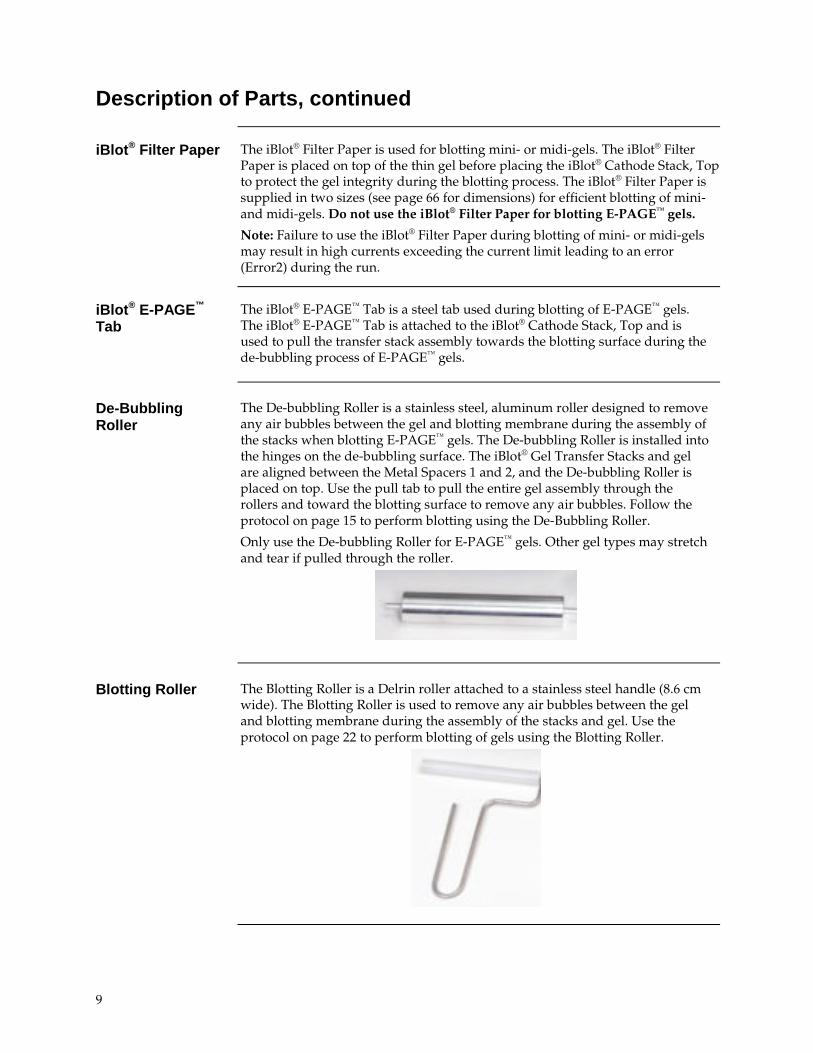
iBlot® Filter Paper The iBlot® Filter Paper is used for blotting mini- or midi-gels. The iBlot® Filter Paper is placed on top of the thin gel before placing the iBlot® Cathode Stack, Top to protect the gel integrity during the blotting process. The iBlot® Filter Paper is supplied in two sizes (see page 66 for dimensions) for efficient blotting of mini- and midi-gels. Do not use the iBlot® Filter Paper for blotting E-PAGE™ gels.
Note: Failure to use the iBlot® Filter Paper during blotting of mini- or midi-gels may result in high currents exceeding the current limit leading to an error (Error2) during the run.
iBlot® E-PAGE™ Tab
The iBlot® E-PAGE™ Tab is a steel tab used during blotting of E-PAGE™ gels. The iBlot® E-PAGE™ Tab is attached to the iBlot® Cathode Stack, Top and is used to pull the transfer stack assembly towards the blotting surface during the de-bubbling process of E-PAGE™ gels.
De-Bubbling Roller
The De-bubbling Roller is a stainless steel, aluminum roller designed to remove any air bubbles between the gel and blotting membrane during the assembly of the stacks when blotting E-PAGE™ gels. The De-bubbling Roller is installed into the hinges on the de-bubbling surface. The iBlot® Gel Transfer Stacks and gel are aligned between the Metal Spacers 1 and 2, and the De-bubbling Roller is placed on top. Use the pull tab to pull the entire gel assembly through the rollers and toward the blotting surface to remove any air bubbles. Follow the protocol on page 15 to perform blotting using the De-Bubbling Roller.
Only use the De-bubbling Roller for E-PAGE™ gels. Other gel types may stretch and tear if pulled through the roller.
Blotting Roller The Blotting Roller is a Delrin roller attached to a stainless steel handle (8.6 cm
wide). The Blotting Roller is used to remove any air bubbles between the gel and blotting membrane during the assembly of the stacks and gel. Use the protocol on page 22 to perform blotting of gels using the Blotting Roller.

10
Description of Programs
Programs The iBlot® Gel Transfer Device is pre-programmed with 10 voltage programs that allow blotting using different combinations of volts and time.
Program Voltage Default Run Time Run Time Limit
P0 20 V for 1 minute 23 V for 4 minutes 25 V for remainder
7 minutes 13 minutes
P1 25 V 6 minutes 10 minutes
P2 23 V 6 minutes 11 minutes
P3 20 V 7 minutes 13 minutes
P4 15 V 7 minutes 16 minutes
P5 10 V 7 minutes 25 minutes
P6 7.5 V 3 minutes 25 minutes
P7 5 V 3 minutes 25 minutes
P8 20 V for 2 minutes 23 V for 2 minutes 25 V for remainder
7 minutes 13 minutes
P9 20 V for 2 minutes 5 V for 3 minutes (× 2)
8 minutes 8 minutes
The Default Run Time is the default time setting for a selected program.
The Run Time Limit is the maximum run time that can be programmed for a selected program.
See page 13 to select an appropriate program for iBlot® Gel Transfer Stacks; select Program P8 for running iBlot® DNA Transfer Stacks (see page 36); select Program P9 for running iBlot® Western Detection Stacks (see page 44).
Continued on next page
11
Description of Programs, continued
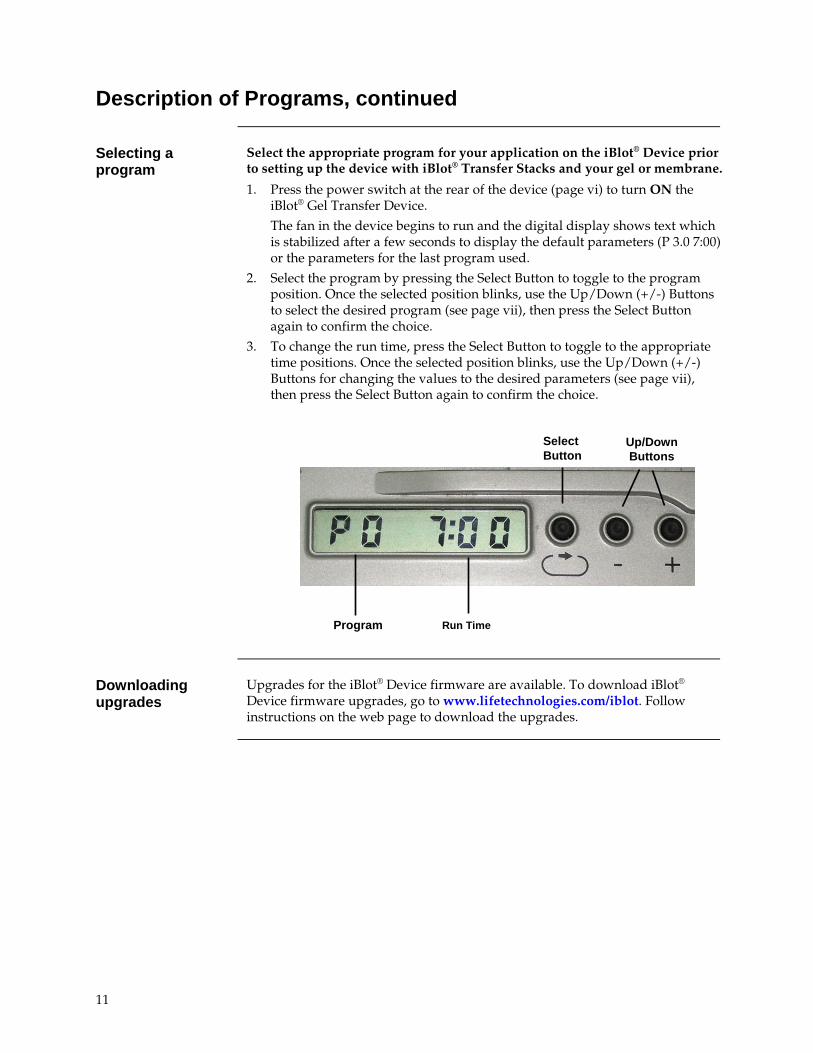
Selecting a program
Select the appropriate program for your application on the iBlot® Device prior to setting up the device with iBlot® Transfer Stacks and your gel or membrane.
1. Press the power switch at the rear of the device (page vi) to turn ON the iBlot® Gel Transfer Device.
The fan in the device begins to run and the digital display shows text which is stabilized after a few seconds to display the default parameters (P 3.0 7:00) or the parameters for the last program used.
2. Select the program by pressing the Select Button to toggle to the program position. Once the selected position blinks, use the Up/Down (+/-) Buttons to select the desired program (see page vii), then press the Select Button again to confirm the choice.
3. To change the run time, press the Select Button to toggle to the appropriate time positions. Once the selected position blinks, use the Up/Down (+/-) Buttons for changing the values to the desired parameters (see page vii), then press the Select Button again to confirm the choice.
Downloading upgrades
Upgrades for the iBlot® Device firmware are available. To download iBlot® Device firmware upgrades, go to www.lifetechnologies.com/iblot. Follow instructions on the web page to download the upgrades.
Select Button
Up/Down Buttons
Run Time Program
12
Protein Transfer Protocol
Experimental Overview
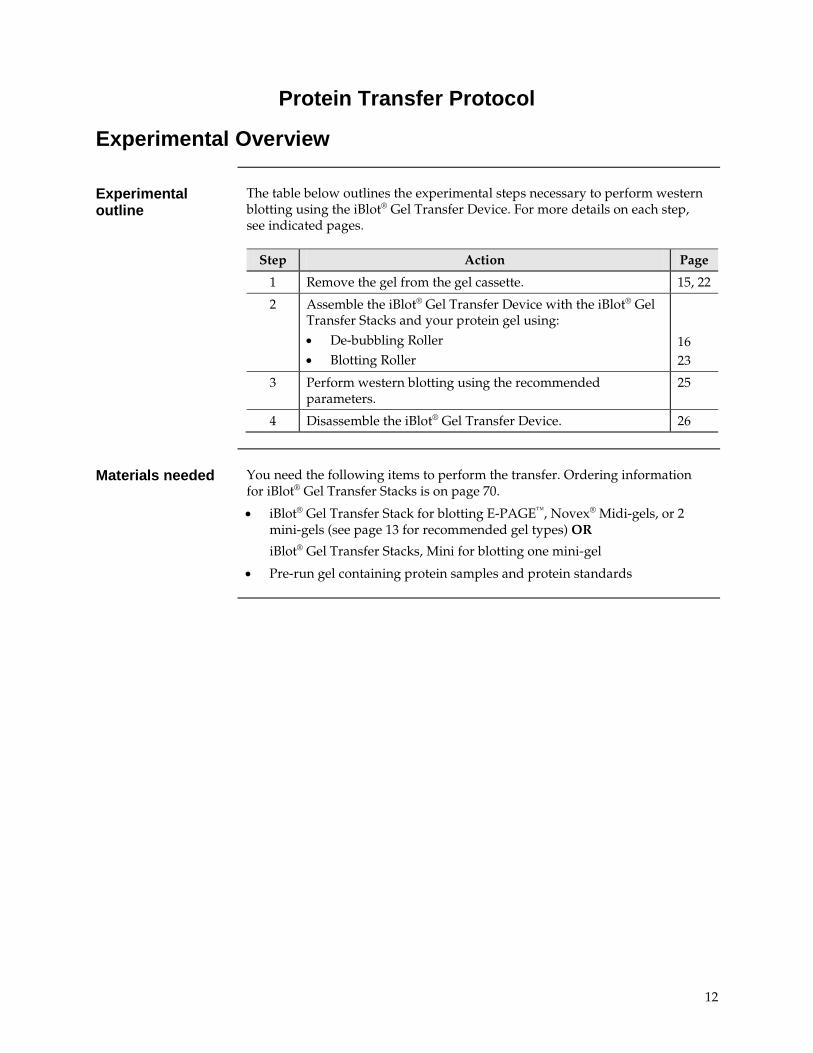
Experimental outline
The table below outlines the experimental steps necessary to perform western blotting using the iBlot® Gel Transfer Device. For more details on each step, see indicated pages.
Step Action Page
1 Remove the gel from the gel cassette. 15, 22
2 Assemble the iBlot® Gel Transfer Device with the iBlot® Gel Transfer Stacks and your protein gel using: • De-bubbling Roller • Blotting Roller
16 23
3 Perform western blotting using the recommended parameters.
25
4 Disassemble the iBlot® Gel Transfer Device. 26
Materials needed You need the following items to perform the transfer. Ordering information
for iBlot® Gel Transfer Stacks is on page 70.
• iBlot® Gel Transfer Stack for blotting E-PAGE™, Novex® Midi-gels, or 2 mini-gels (see page 13 for recommended gel types) OR
iBlot® Gel Transfer Stacks, Mini for blotting one mini-gel
• Pre-run gel containing protein samples and protein standards
13
General Guidelines
Introduction General guidelines for using the iBlot® Gel Transfer Device and iBlot® Gel Transfer Stacks are discussed below.
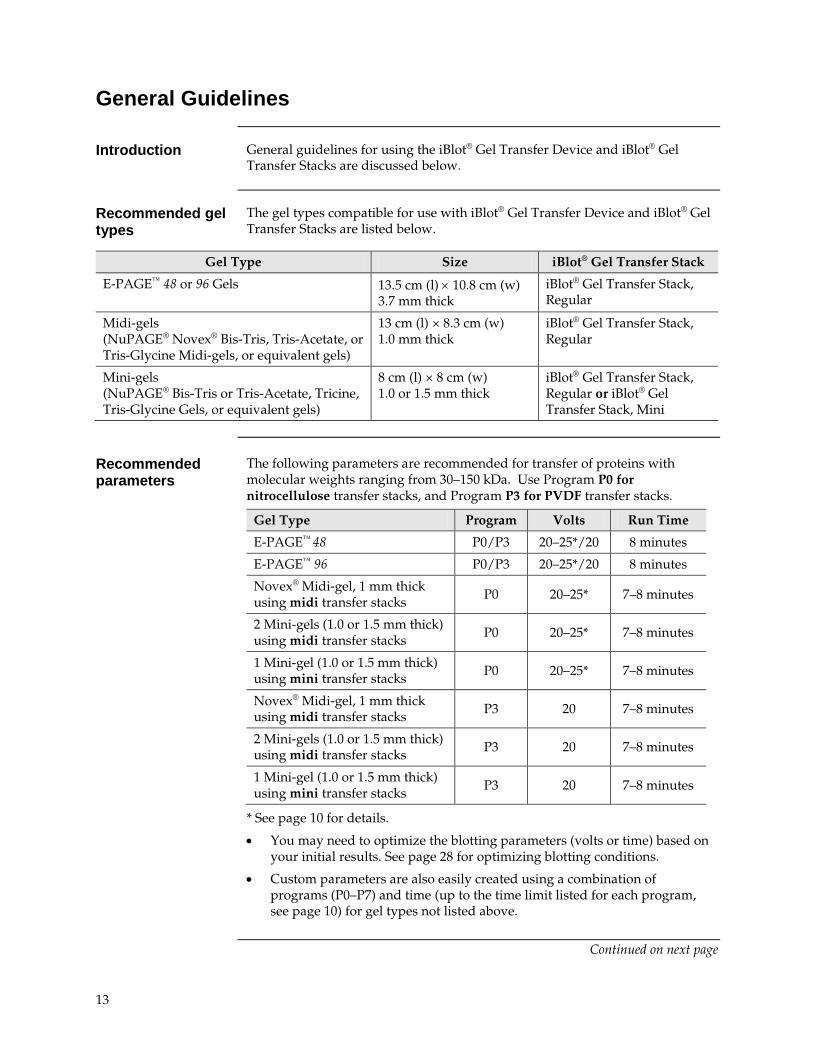
Recommended gel types
The gel types compatible for use with iBlot® Gel Transfer Device and iBlot® Gel Transfer Stacks are listed below.
Gel Type Size iBlot® Gel Transfer Stack
E-PAGE™ 48 or 96 Gels 13.5 cm (l) × 10.8 cm (w) 3.7 mm thick
iBlot® Gel Transfer Stack, Regular
Midi-gels (NuPAGE® Novex® Bis-Tris, Tris-Acetate, or Tris-Glycine Midi-gels, or equivalent gels)
13 cm (l) × 8.3 cm (w) 1.0 mm thick
iBlot® Gel Transfer Stack, Regular
Mini-gels (NuPAGE® Bis-Tris or Tris-Acetate, Tricine, Tris-Glycine Gels, or equivalent gels)
8 cm (l) × 8 cm (w) 1.0 or 1.5 mm thick
iBlot® Gel Transfer Stack, Regular or iBlot® Gel Transfer Stack, Mini
Recommended parameters
The following parameters are recommended for transfer of proteins with molecular weights ranging from 30–150 kDa. Use Program P0 for nitrocellulose transfer stacks, and Program P3 for PVDF transfer stacks.
Gel Type Program Volts Run Time
E-PAGE™ 48 P0/P3 20–25*/20 8 minutes
E-PAGE™ 96 P0/P3 20–25*/20 8 minutes
Novex® Midi-gel, 1 mm thick using midi transfer stacks P0 20–25* 7–8 minutes
2 Mini-gels (1.0 or 1.5 mm thick) using midi transfer stacks P0 20–25* 7–8 minutes
1 Mini-gel (1.0 or 1.5 mm thick) using mini transfer stacks P0 20–25* 7–8 minutes
Novex® Midi-gel, 1 mm thick using midi transfer stacks P3 20 7–8 minutes
2 Mini-gels (1.0 or 1.5 mm thick) using midi transfer stacks P3 20 7–8 minutes
1 Mini-gel (1.0 or 1.5 mm thick) using mini transfer stacks P3 20 7–8 minutes
* See page 10 for details.
• You may need to optimize the blotting parameters (volts or time) based on your initial results. See page 28 for optimizing blotting conditions.
• Custom parameters are also easily created using a combination of programs (P0–P7) and time (up to the time limit listed for each program, see page 10) for gel types not listed above.
Continued on next page

14
General Guidelines, continued
Recommended parameters, continued
• Changes in the Run Time may be necessary for transfer of larger or smaller proteins when using Program P3:
Proteins >150 kDa migrate more slowly, and require more time to transfer. If your protein of interest is in this size range, it may be necessary to use a Run Time of 8–10 minutes for your transfer.
Small proteins <30 kDa migrate more rapidly during electrophoretic separation, and consequently require less time to transfer from the gel matrix to the membrane. If your protein of interest is in this size range, you may need to reduce the Run Time to 5–6 minutes for your transfer.
• Performing an equilibration step prior to transfer may be necessary to improve the transfer of high-molecular weight proteins (see page 28 for details).
Recommended protocols
To transfer protocols are available, based on the type of gel to be blotted:
• For E-PAGE™ gels, use the blotting protocol with the De-bubbling Roller described on page 15.
• For mini- or midi-gels, use the blotting protocol with the Blotting Roller described on page 22.
To obtain the best results, follow these recommendations:
• Wear gloves at all times during the entire blotting procedure to prevent contamination of gels and membranes.
• Do not touch the membrane or gel with bare or gloved hands. This may contaminate the gel or membrane and interfere with further analysis. If you need to adjust the membrane, always use forceps.
• Use the appropriate gel type and iBlot® Gel Transfer Stacks as described on the previous page.
• Avoid using expired iBlot® Gel Transfer Stacks. Always use the transfer stacks before the specified expiration date printed on the package.
• Remove air bubbles as indicated in the protocol using the De-bubbler Roller or Blotting Roller supplied with the device.
• Do not trim the membrane or iBlot® Gel Transfer Stacks to fit your gel size. See previous page for gel sizes that are compatible with iBlot® Device. Note that iBlot® Gel Transfer Stacks, Mini are available for blotting mini-gels (page 70). Maintain the membrane size identical to the transfer stacks to avoid direct contact between the top and bottom transfer stacks.
Using the iBlot® Device for the first time
If you are using the iBlot® Gel Transfer Device for the first time, you may wish to clean Metal Spacers 1 and 2, the De-bubbling Roller, and the blotting surface with a damp cloth before use. Allow the parts to dry before blotting.
15
Using the iBlot® Device with the De-Bubbling Roller
Introduction Instructions are provided in this section to assemble the iBlot® Gel Transfer Device with the De-Bubbling Roller for blotting E-PAGE™ Gels.
If you wish to blot mini-, midi-, or other gels, see page 22 for the blotting protocol.
Materials needed You will need the following items:
• Pre-run E-PAGE™ gel or equivalent containing your protein samples and standards
• iBlot® Gel Transfer Stacks (page 70)
Removing the gel Remove the gel from the cassette for transfer after completion of electrophoresis as described below.
Open the E-PAGE™ cassette using the red plastic Butterfly Opener supplied with the gel to remove the E-PAGE™ gel. For details, refer to the E-PAGE™ manual supplied with the gel.
• There is no need for any pretreatment of the gel after electrophoresis. Wash the E-PAGE™ gel briefly in deionized water to remove any small gel pieces attached to the gel.
• The transfer membrane is supplied in a ready-to-use format in the stacks without any need for pretreatment. Do not treat the PVDF membrane with methanol as the PVDF membrane is preactivated prior to assembly with the transfer stack.
• To obtain the best blotting results with the E-PAGE™ gels, we recommend that you use the De-bubbling Roller. However, you may use the Blotting Roller for de-bubbling E-PAGE™ gels as described on page 22.
Continued on next page

16
Using the iBlot® Device with the De-Bubbling Roller, continued
Assembling the iBlot® Device
1. Open the lid of the device and pull up the Metal Spacers 1 and 2. If you have attached the De-bubbling Roller to the device, then remove the roller as shown in the figure below.
2. Remove the package labeled iBlot® Anode Stack, Bottom from the iBlot® Gel Transfer Stacks Box. Remove the laminated sealing of the iBlot® Anode Stack, Bottom and keep the stack in the transparent plastic tray.
Note: If using a transfer stack with a PVDF membrane, verify that the membrane has not been displaced during handling or shipment before starting your transfer. The activated PVDF membrane is transparent, making it difficult to see. If it is not present on top of the stack, check the aluminum seal of the Anode Stack (clear tray) to make sure the PVDF membrane has not adhered to the seal. If the membrane has adhered to the seal, reactivate the membrane with methanol, then rinse well in distilled water and replace the membrane on the stack. The performance of the stack is not affected by the reactivation process.
Continued on next page
Spacer 2
Roller
Tab
Spacer 1
17
Using the iBlot® Device with the De-Bubbling Roller, continued
Assembling the iBlot® Device
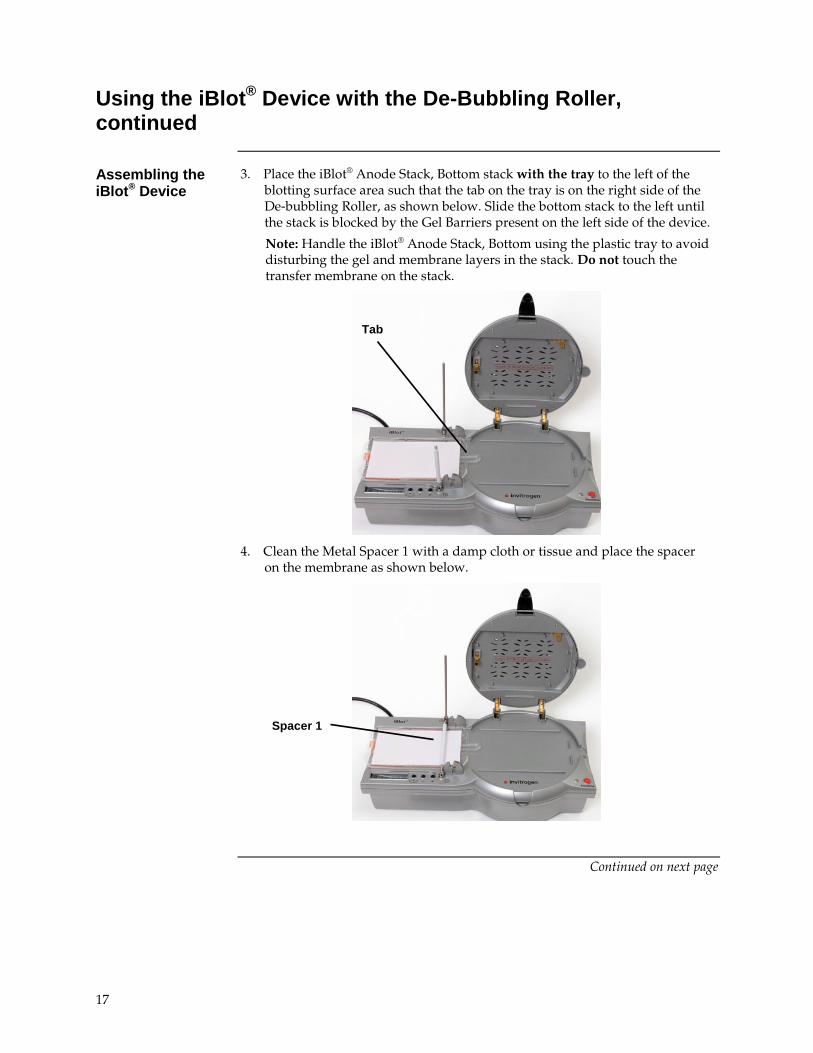
3. Place the iBlot® Anode Stack, Bottom stack with the tray to the left of the blotting surface area such that the tab on the tray is on the right side of the De-bubbling Roller, as shown below. Slide the bottom stack to the left until the stack is blocked by the Gel Barriers present on the left side of the device.
Note: Handle the iBlot® Anode Stack, Bottom using the plastic tray to avoid disturbing the gel and membrane layers in the stack. Do not touch the transfer membrane on the stack.
4. Clean the Metal Spacer 1 with a damp cloth or tissue and place the spacer on the membrane as shown below.
Continued on next page
Tab
Spacer 1
18
Using the iBlot® Device with the De-Bubbling Roller, continued
Assembling the iBlot® Device, continued
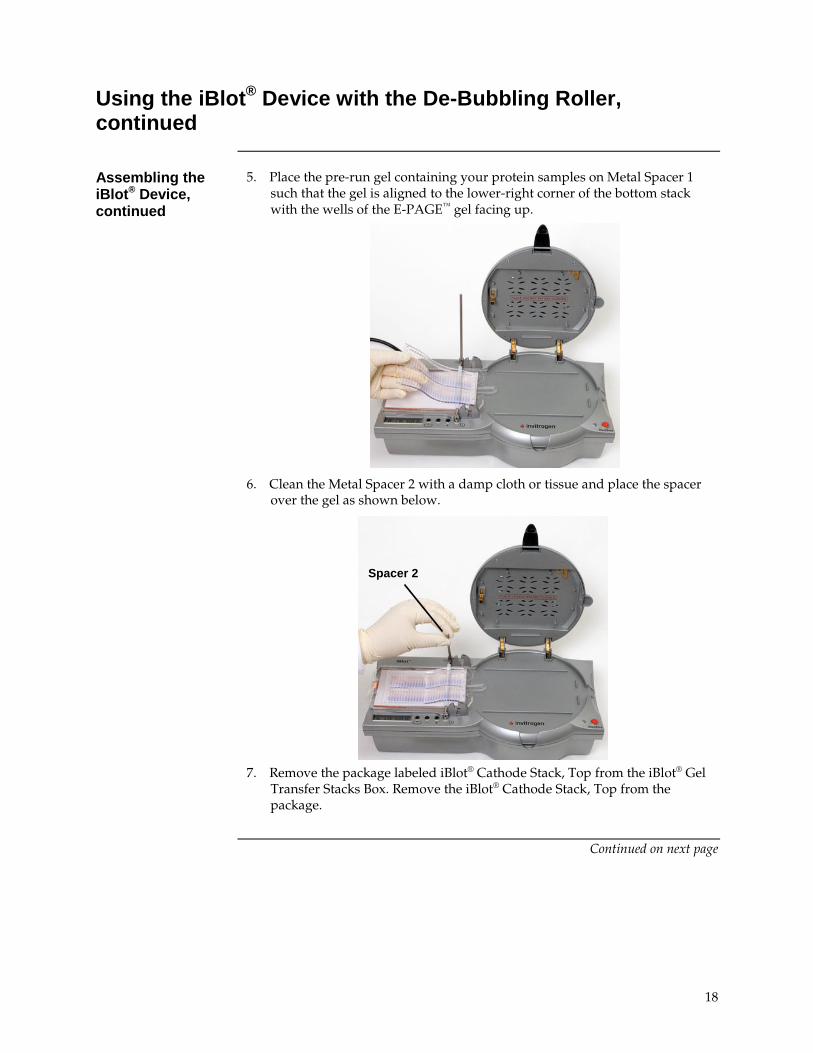
5. Place the pre-run gel containing your protein samples on Metal Spacer 1 such that the gel is aligned to the lower-right corner of the bottom stack with the wells of the E-PAGE™ gel facing up.
6. Clean the Metal Spacer 2 with a damp cloth or tissue and place the spacer over the gel as shown below.
7. Remove the package labeled iBlot® Cathode Stack, Top from the iBlot® Gel
Transfer Stacks Box. Remove the iBlot® Cathode Stack, Top from the package.
Continued on next page
Spacer 2

19
Using the iBlot® Device with the De-Bubbling Roller, continued
Assembling the iBlot® Device, continued
8. Insert the steel iBlot® E-PAGE™ Tab in the plastic tray groove with the tab teeth facing up (figure A). Gently press the iBlot® Cathode Stack over the teeth to allow the teeth to penetrate into the copper electrode (figure B). Remove the iBlot® Cathode Stack, Top from the red plastic tray using the iBlot® E-PAGE™ Tab (figure C).
A B C
9. Place the iBlot® Cathode Stack, Top without the tray on top of Metal Spacer 2 with the copper electrode side facing up (and agarose side facing down). Ensure that all layers are aligned to the right to perform efficient de-bubbling.
Continued on next page
20
Using the iBlot® Device with the De-Bubbling Roller, continued
Assembling the iBlot® Device, continued
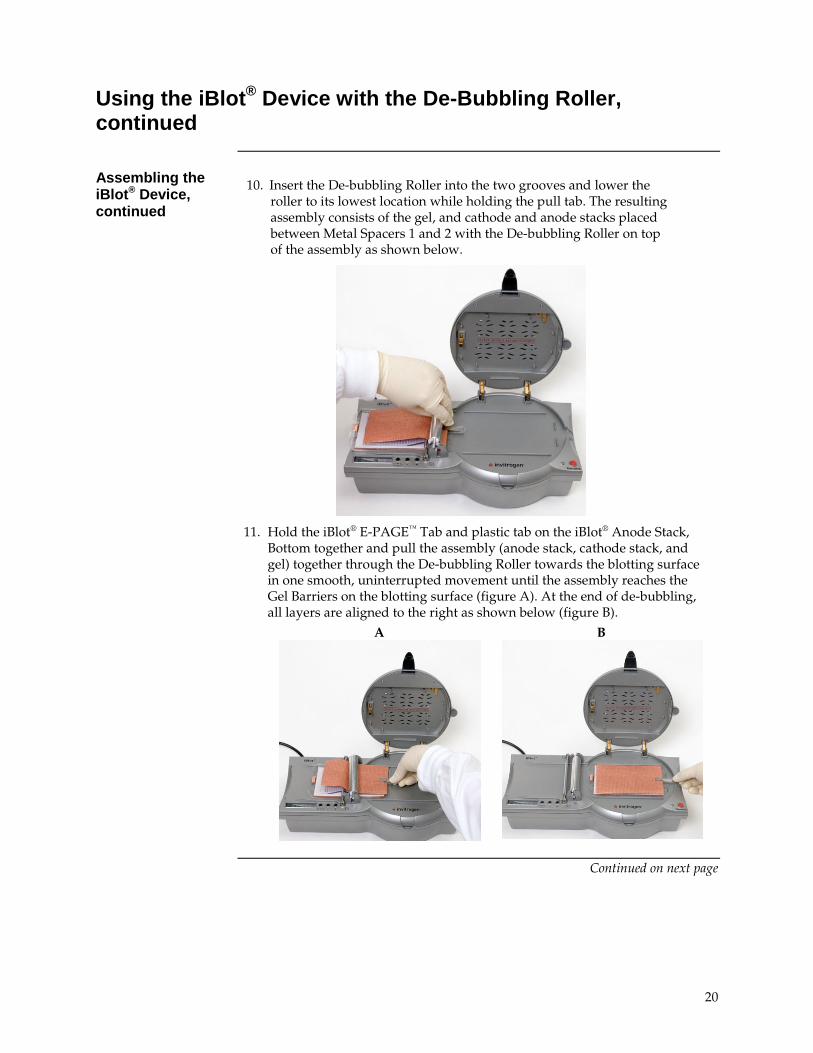
10. Insert the De-bubbling Roller into the two grooves and lower the roller to its lowest location while holding the pull tab. The resulting assembly consists of the gel, and cathode and anode stacks placed between Metal Spacers 1 and 2 with the De-bubbling Roller on top of the assembly as shown below.
11. Hold the iBlot® E-PAGE™ Tab and plastic tab on the iBlot® Anode Stack, Bottom together and pull the assembly (anode stack, cathode stack, and gel) together through the De-bubbling Roller towards the blotting surface in one smooth, uninterrupted movement until the assembly reaches the Gel Barriers on the blotting surface (figure A). At the end of de-bubbling, all layers are aligned to the right as shown below (figure B).
A B
Continued on next page
21
Using the iBlot® Device with the De-Bubbling Roller, continued
Assembling the iBlot® Device, continued
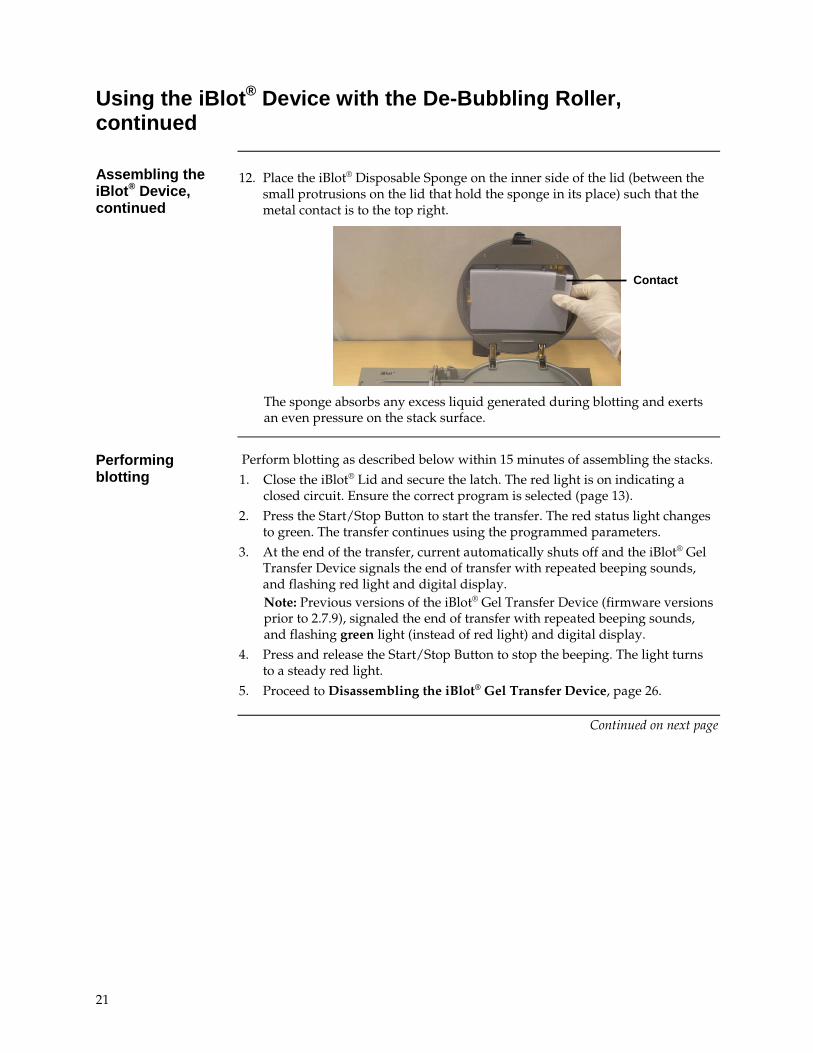
12. Place the iBlot® Disposable Sponge on the inner side of the lid (between the small protrusions on the lid that hold the sponge in its place) such that the metal contact is to the top right.
The sponge absorbs any excess liquid generated during blotting and exerts an even pressure on the stack surface.
Performing blotting
Perform blotting as described below within 15 minutes of assembling the stacks.
1. Close the iBlot® Lid and secure the latch. The red light is on indicating a closed circuit. Ensure the correct program is selected (page 13).
2. Press the Start/Stop Button to start the transfer. The red status light changes to green. The transfer continues using the programmed parameters.
3. At the end of the transfer, current automatically shuts off and the iBlot® Gel Transfer Device signals the end of transfer with repeated beeping sounds, and flashing red light and digital display. Note: Previous versions of the iBlot® Gel Transfer Device (firmware versions prior to 2.7.9), signaled the end of transfer with repeated beeping sounds, and flashing green light (instead of red light) and digital display.
4. Press and release the Start/Stop Button to stop the beeping. The light turns to a steady red light.
5. Proceed to Disassembling the iBlot® Gel Transfer Device, page 26.
Continued on next page
Contact

22
Using the iBlot® Device with the Blotting Roller
Introduction Instructions are provided in this section to assemble the iBlot® Gel Transfer Device without the De-Bubbling Roller for blotting mini-, midi-, or other gels.
If you wish to blot E-PAGE™ gels, see page 15 for the blotting protocol.
Materials needed You will need the following items:
• Pre-run mini- or midi-gel containing your protein samples and standards
• iBlot® Gel Transfer Stacks for blotting 1 midi-gel or 2 mini-gels (page 70)
• iBlot® Gel Transfer Stacks, Mini for blotting 1 mini-gel (page 70)
• Blotting Roller supplied with the device
Removing the gel Remove the gel from the cassette for transfer after completion of electrophoresis as described below.
• Open the mini- or midi-gel cassette using the Gel Knife by inserting the knife into the narrow gap between the two plates of the cassette. Push up and down gently on the handle of the knife to separate the plates. Upon opening the cassette, discard the plate without the gel and slowly remove the gel adhered to the other plate. For details on removing the gel, refer to the manual supplied with the mini- or midi-gel.
• For other gel types, refer to the manufacturer recommendations to remove the gel from the cassette.
• There is generally no need for any pretreatment of the gel after electrophoresis, but equilibration of the gel in 20% ethanol (prepared in deionized water) for 5–10 minutes prior to performing blotting improves the transfer of proteins >150 kDa.
• The transfer membrane is supplied in a ready-to-use format in the stacks without any need for pretreatment. Do not treat the PVDF membrane with methanol as the PVDF membrane is preactivated prior to assembly with the transfer stack.
• You may blot E-PAGE™ gels using the blotting protocol with the Blotting Roller. If you wish to use the Blotting Roller for blotting E-PAGE™ gels be sure to:
• Wash the E-PAGE™ gel briefly in deionized water prior to blotting to remove any small gel pieces attached to the gel.
• Use the Blotting Roller all over the gel including all well areas to obtain efficient blotting.
• When placing an E-PAGE™ gel on the membrane, make sure the open wells face upwards, and that the bottom of the gel is in contact with the membrane.
• If you notice distorted protein bands after using the E-PAGE™ blotting protocol with the Blotting Roller, we recommend that you blot the E-PAGE™ gels using the De-bubbling Roller (page 15).
Continued on next page

23
Using the iBlot® Device with the Blotting Roller, continued
Use the appropriate iBlot® Gel Transfer Stacks based on the gel that you are blotting. Do not trim the membrane or transfer stacks to fit the size of your gel, as the transfer quality is not affected if the pre-run gel is smaller than the transfer stack. Always maintain the membrane size identical to the transfer stacks to avoid accidental contact between the iBlot® Anode and Cathode Stacks.
See page 13 for gel types compatible with the iBlot® Gel Transfer Device.
• Use the iBlot® Gel Transfer Stacks, Regular for blotting two mini-gels or one midi-gel
• Use the iBlot® Gel Transfer Stacks, Mini for blotting one mini-gel.
Assembling the iBlot® Device
Instructions are provided below to assemble the iBlot® Gel Transfer Device with iBlot® Gel Transfer Stacks (Regular or Mini), and mini-, midi-, or other gels. See page 15 for blotting E-PAGE™ gels.
1. Open the lid of the iBlot® Gel Transfer Device. Ensure the blotting surface is clean.
2. Remove the iBlot® Anode Stack, Bottom (or Mini stack) from the package. Remove the laminated sealing of the iBlot® Anode Stack, Bottom and keep the stack in the transparent plastic tray. Place the iBlot® Anode Stack, Bottom with the tray directly on the blotting surface (under the round lid). Align the anode stack to the Gel barriers on right edge of the blotting surface (see figure below) to avoid accidental contact of the electrical contacts on lid with the iBlot® Anode Stack, Bottom. The alignment guide on the left of the blotting surface should be visible and not hidden under the rim of the tray. If the alignment guide is not visible, the Stack tray is not properly positioned, and may fail to make the proper electrical connection.
Note: If using a transfer stack with a PVDF membrane, verify that the membrane has not been displaced during handling or shipment before starting your transfer. The activated PVDF membrane is transparent, making it difficult to see. If it is not present on top of the stack, check the aluminum seal of the Anode Stack (clear tray) to make sure the PVDF membrane has not adhered to the seal. If the membrane has adhered to the seal, reactivate the membrane with methanol, then rinse well in distilled water and replace the membrane on the stack. The performance of the stack is not affected by the reactivation process.
Continued on next page
Alignment Guide
Gel Barriers

24
Using the iBlot® Device with the Blotting Roller, continued
Assembling the iBlot® Device, continued
3. Ensure no bubbles are visible between the membrane and the transfer stack gel below the membrane. Remove any trapped air bubbles using the Blotting Roller.
4. Open the cassette and immerse the pre-run gel briefly in deionized water
(1–10 seconds) to facilitate easy positioning of the gel on top of the transfer membrane.
5. Place the pre-run gel on the transfer membrane of the anode stack as described:
• 1 midi-gel on an iBlot® Gel Transfer Stack
• 2 mini-gels (head-to-head) on an iBlot® Gel Transfer Stack (figure A)
• 1 mini-gel on an iBlot® Gel Transfer Stack, Mini (figure B)
Make sure there are no bubbles trapped between the gel and the membrane.
A B
6. In a clean container, soak one iBlot® Filter Paper (or Mini Filter paper based on the gel type used) in deionized water. iBlot® Filter Paper is included with each iBlot® Gel Transfer Stacks.
7. Place the presoaked iBlot® Filter Paper on the pre-run gel. Use the Blotting Roller to remove any air bubbles between the membrane and gel as shown below for the Transfer Stack.
For E-PAGE™ gels, there is no need to use a filter paper, and be sure to use the Blotting Roller over the well rows to flatten any remaining gel protrusions to ensure even transfer.
8. Remove the iBlot® Cathode Stack, Top (or Cathode Stack, Mini) from the
package. Discard the red plastic tray.
Continued on next page
25
Using the iBlot® Device with the Blotting Roller, continued
Assembling the iBlot® Device, continued
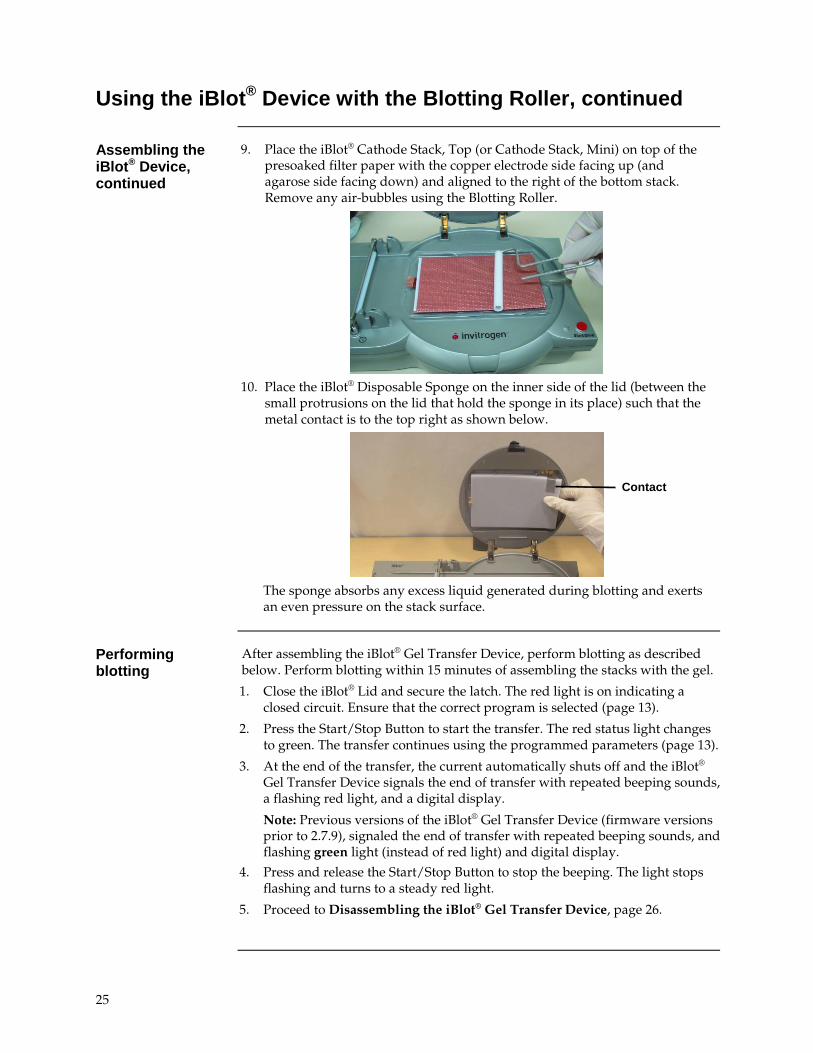
9. Place the iBlot® Cathode Stack, Top (or Cathode Stack, Mini) on top of the presoaked filter paper with the copper electrode side facing up (and agarose side facing down) and aligned to the right of the bottom stack. Remove any air-bubbles using the Blotting Roller.
10. Place the iBlot® Disposable Sponge on the inner side of the lid (between the
small protrusions on the lid that hold the sponge in its place) such that the metal contact is to the top right as shown below.
The sponge absorbs any excess liquid generated during blotting and exerts an even pressure on the stack surface.
Performing blotting
After assembling the iBlot® Gel Transfer Device, perform blotting as described below. Perform blotting within 15 minutes of assembling the stacks with the gel.
1. Close the iBlot® Lid and secure the latch. The red light is on indicating a closed circuit. Ensure that the correct program is selected (page 13).
2. Press the Start/Stop Button to start the transfer. The red status light changes to green. The transfer continues using the programmed parameters (page 13).
3. At the end of the transfer, the current automatically shuts off and the iBlot® Gel Transfer Device signals the end of transfer with repeated beeping sounds, a flashing red light, and a digital display.
Note: Previous versions of the iBlot® Gel Transfer Device (firmware versions prior to 2.7.9), signaled the end of transfer with repeated beeping sounds, and flashing green light (instead of red light) and digital display.
4. Press and release the Start/Stop Button to stop the beeping. The light stops flashing and turns to a steady red light.
5. Proceed to Disassembling the iBlot® Gel Transfer Device, page 26.
Contact
26
Disassembling the iBlot® Gel Transfer Device
Introduction Refer to the instructions below to disassemble the iBlot® Gel Transfer Device.
Procedure To obtain good transfer and detection results, disassemble the device and
stacks within 30 minutes of ending the blotting procedure.
1. Open the lid of the iBlot® Device.
2. Remove the iBlot® E-PAGE™ Tab (used for blotting E-PAGE™ gels only). Rinse the tab with deionized water and store in a dry place for future use. Do not discard the iBlot® E-PAGE™ Tab.
3. Discard the iBlot® Disposable Sponge and iBlot® Cathode Stack, Top.
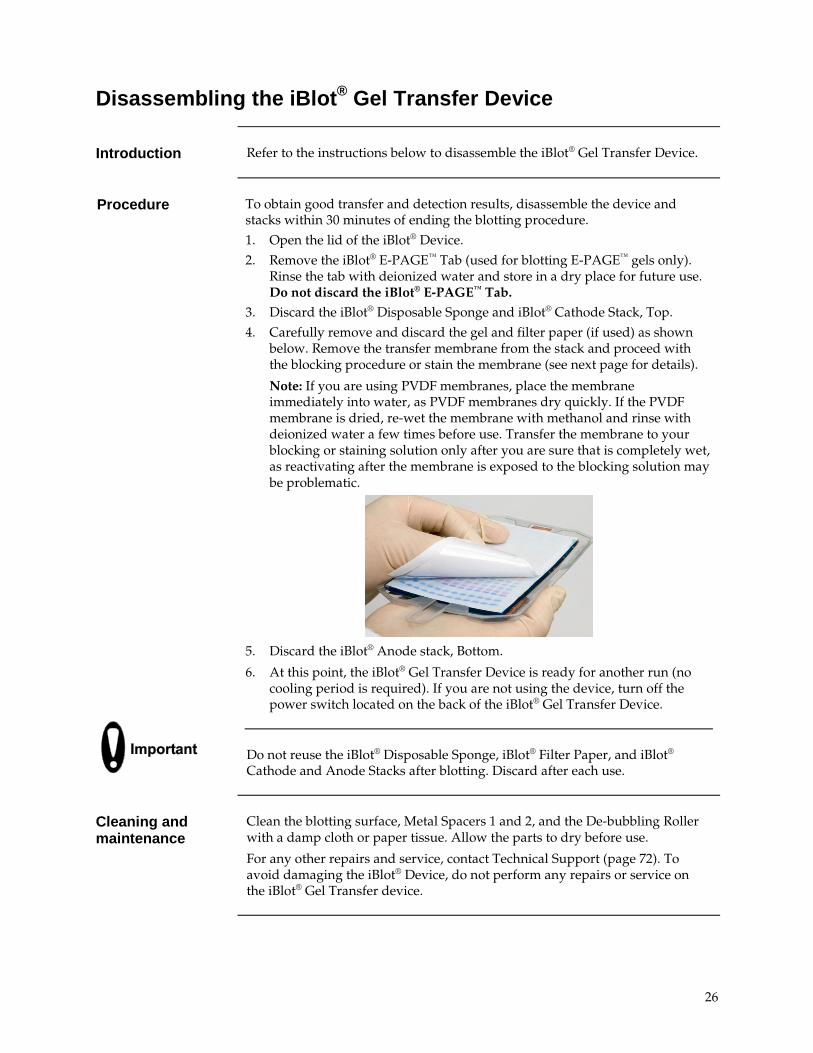
4. Carefully remove and discard the gel and filter paper (if used) as shown below. Remove the transfer membrane from the stack and proceed with the blocking procedure or stain the membrane (see next page for details).
Note: If you are using PVDF membranes, place the membrane immediately into water, as PVDF membranes dry quickly. If the PVDF membrane is dried, re-wet the membrane with methanol and rinse with deionized water a few times before use. Transfer the membrane to your blocking or staining solution only after you are sure that is completely wet, as reactivating after the membrane is exposed to the blocking solution may be problematic.
5. Discard the iBlot® Anode stack, Bottom.
6. At this point, the iBlot® Gel Transfer Device is ready for another run (no cooling period is required). If you are not using the device, turn off the power switch located on the back of the iBlot® Gel Transfer Device.
Do not reuse the iBlot® Disposable Sponge, iBlot® Filter Paper, and iBlot® Cathode and Anode Stacks after blotting. Discard after each use.
Cleaning and maintenance
Clean the blotting surface, Metal Spacers 1 and 2, and the De-bubbling Roller with a damp cloth or paper tissue. Allow the parts to dry before use.
For any other repairs and service, contact Technical Support (page 72). To avoid damaging the iBlot® Device, do not perform any repairs or service on the iBlot® Gel Transfer device.

27
Post Transfer Analysis and Optimizing Blotting
Post transfer analysis
After the transfer, proceed to immunodetection, store the membrane for future use, or stain the membrane.
• For immunodetection of proteins, use the iBlot® Western Detection Kits, or WesternBreeze® Chromogenic or Chemiluminescent Immunodetection Kits available at www.lifetechnologies.com (see page 70–71), or any other immunodetection kit.
Note: When using the iBlot® Dry Blotting System to transfer Proteins from SDS-PAGE gels, the applied field strength can result in the partial depletion of negative ions bound to the proteins. This may result in a slight decrease in the amount of protein migrating from the gel, but it also results in improved binding of the transferred proteins to the membrane. Since the membrane maintains the protein load better, higher sensitivity can be achieved for subsequent immunodetection procedures.
• To store nitrocellulose membranes, air-dry the membrane and store the membrane in an air-tight plastic bag at room temperature or 4°C. Avoid storing nitrocellulose at temperatures below –20°C. Low temperatures cause the nitrocellulose to turn brittle.
• To store PVDF membranes, air-dry the membrane and store the membrane in an air-tight plastic bag at room temperature, 4°C, or –80°C. When you are ready to use the membrane, re-wet the membrane with methanol for a few seconds, then rinse the membrane thoroughly with deionized water to remove methanol.
• To stain membranes after blotting, use any method of staining for total protein visualization, such as Coomassie® Blue R-250, Ponceau S, Amido Black, Novex® Reversible Membrane Protein Stain Kit, or SYPRO® Ruby Blot Stain (page 71). The iBlot® Gel Transfer Device blotting protocol is compatible with most of the staining methods listed above.
Note: The sensitivity of total protein membrane staining after blotting with the iBlot® Gel Transfer Device is slightly lower than the total membrane protein staining obtained with the semi-wet transfer protocol. However, due to the nature of dry blotting, lower transfer does not affect the immunodetection sensitivity.
If you do not detect any proteins on the membrane after immunodetection or staining, refer to Troubleshooting on page 31. Refer to the manufacturer recommendations for optimizing immunodetection.
The immunodetection profile of proteins transferred using the iBlot® Dry Blotting System may differ from what is observed when using other transfer methods, such as traditional semi-dry or wet blotting systems. It is recommended to optimize parameters such as gel protein load, primary and secondary antibody dilution, and exposure time (see page 28 for details) when using the iBlot® Dry Blotting System for the first time with any new combination of antigen and detection reagents.
Continued on next page
28
Post Transfer Analysis and Optimizing Blotting, continued
Optimizing blotting When using the iBlot® Gel Transfer Device, most proteins transfer efficiently using the protocol in this manual. Based on specific properties of a protein or a set of proteins, some optimization of the blotting protocol may be necessary.
Perform optimization of blotting as follows:
• Performing an equilibration step prior to transfer. To improve the transfer of high-molecular weight proteins from mini- or midi- NuPAGE® or Tris-Glycine gels, submerge the gel in 20% ethanol (prepared in deionized water), and equilibrate for 5–10 minutes at room temperature on a shaker prior to transfer. Do not equilibrate for longer than 10 minutes, or sensitivity may be reduced. After equilibration, perform transfer using the iBlot® Device as described in this manual.
• Increasing or decreasing the transfer time.
Based on the initial results, you can increase or decrease the transfer time using the Up/Down Buttons in 30-second increments. Do not perform transfer for more than the time limit indicated for each program (page 10).
• It is normal for some proteins to remain in the gel, because some high molecular weight proteins do not transfer completely using the iBlot® Gel Transfer Device as compared to wet transfer apparatus.
• Since the sensitivity of detection using the iBlot® Gel Transfer Device is higher than that of semi-wet and semi-dry blotting, complete transfer of proteins is not required.
• Near-complete transfer of prestained standard protein bands is observed with the iBlot® Gel Transfer Device. However, note that the complete transfer of prestained protein standards does not indicate complete transfer of other proteins or blow-through of other proteins.

29
Examples of Results
E-PAGE™ Gel results using nitrocellulose
An E-PAGE™ 48 8% Gel was blotted using the iBlot® Gel Transfer Device and iBlot® Gel Transfer Stacks with the De-bubbling Roller as described in this manual. Proteins on the nitrocellulose membrane were detected using the WesternBreeze® Chemiluminescent Anti-Mouse Kit (page 70) with a 1:10,000 dilution of anti-BSA antibody (left side) or 1:10,000 dilution of anti-tubulin antibody (right side).
The gel contains the following samples (rows not indicated are blank):
Lane Sample 2, 3, 4, 5, 6, and 26, 27, 28, 29, 30 BSA (5 ng, 10 ng, 25 ng, 50 ng, and 100 ng) 8, 9, 10, 11, 14, 15, 16, 17, and 32, 33, 34, 35, 38, 39, 40, 41
MagicMark™ XP Western Protein Standard (0.5 µL, 1 µL, 2 µL, and 4 µL)
19, 20, 21, 22, 23, and 43, 44, 45, 46, 47
SW480 Human Colon Cancer cell lysate (0.5 µg, 1 µg, 2 µg, 4 µg, and 8 µg)
Two Mini-gel results using nitrocellulose
Two NuPAGE® Novex® 4-12% Bis-Tris Mini-gels were blotted using the iBlot® Gel Transfer Device and iBlot® Gel Transfer Stacks with the Blotting Roller, as described in this manual. Proteins on the nitrocellulose membrane were detected using the WesternBreeze® Chromogenic Anti-Rabbit Kit (page 70), using a 1:2000 dilution of an anti-E. coli antibody.
Lane Sample 1 SeeBlue® Plus2 Pre-Stained Protein Standard (5 µL) 2–9 Duplicate samples of E. coli lysate diluted 1:16
(0.625 µg, 1.25 µg, 2.5 µg, 5 µg, respectively)
Continued on next page
Contact – Tubulin, 55 kDa
Anti-Tubulin Antibody Anti-BSA Antibody
Program
30
Expected Results, continued
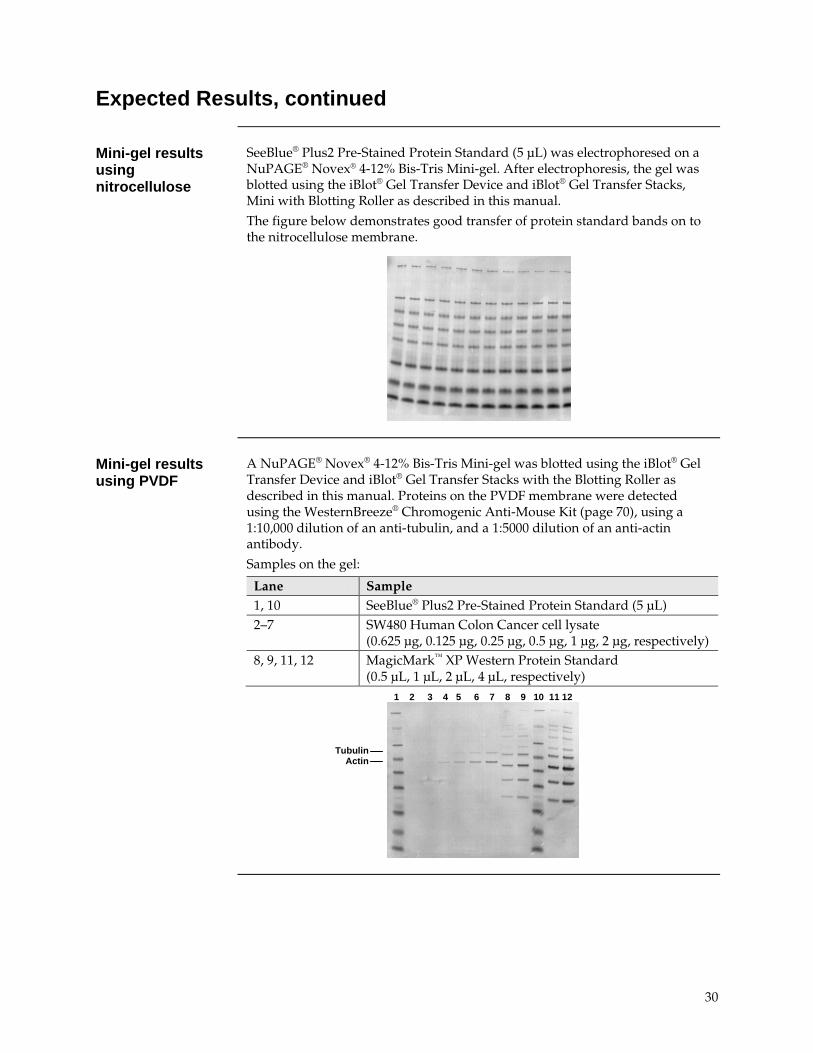
Mini-gel results using nitrocellulose
SeeBlue® Plus2 Pre-Stained Protein Standard (5 µL) was electrophoresed on a NuPAGE® Novex® 4-12% Bis-Tris Mini-gel. After electrophoresis, the gel was blotted using the iBlot® Gel Transfer Device and iBlot® Gel Transfer Stacks, Mini with Blotting Roller as described in this manual.
The figure below demonstrates good transfer of protein standard bands on to the nitrocellulose membrane.
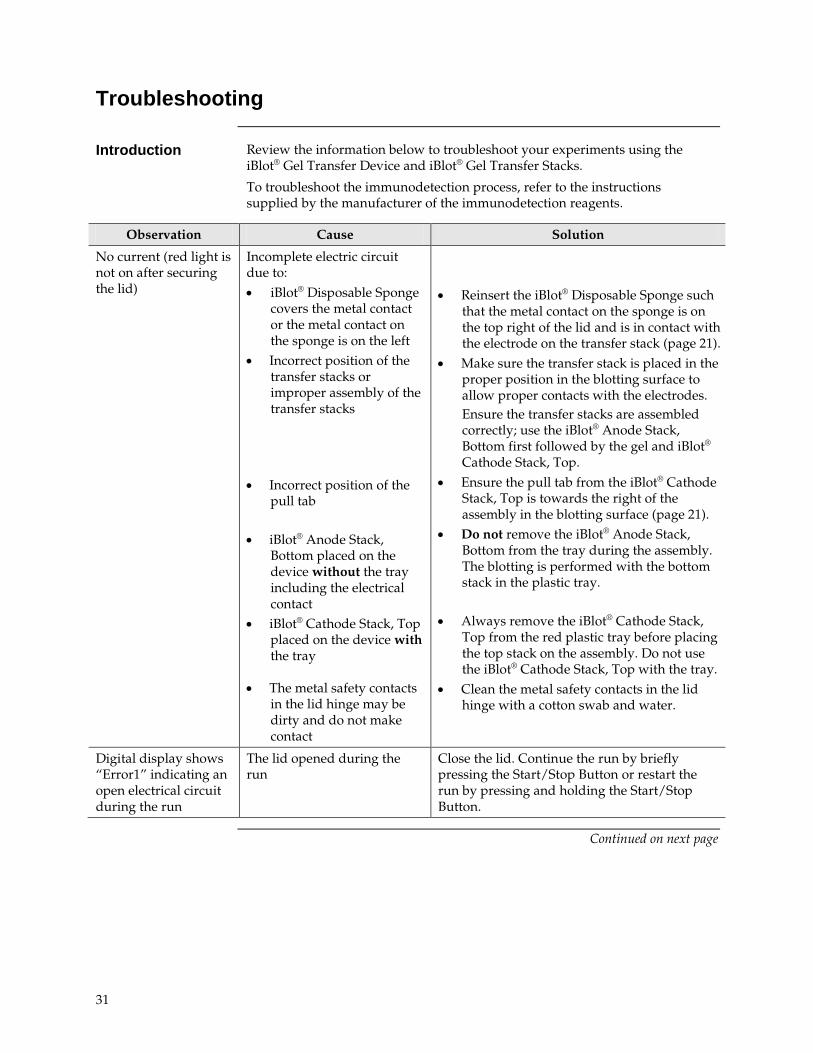
Mini-gel results using PVDF
A NuPAGE® Novex® 4-12% Bis-Tris Mini-gel was blotted using the iBlot® Gel Transfer Device and iBlot® Gel Transfer Stacks with the Blotting Roller as described in this manual. Proteins on the PVDF membrane were detected using the WesternBreeze® Chromogenic Anti-Mouse Kit (page 70), using a 1:10,000 dilution of an anti-tubulin, and a 1:5000 dilution of an anti-actin antibody.
Samples on the gel:
Lane Sample 1, 10 SeeBlue® Plus2 Pre-Stained Protein Standard (5 µL) 2–7 SW480 Human Colon Cancer cell lysate
(0.625 µg, 0.125 µg, 0.25 µg, 0.5 µg, 1 µg, 2 µg, respectively) 8, 9, 11, 12 MagicMark™ XP Western Protein Standard
(0.5 µL, 1 µL, 2 µL, 4 µL, respectively)
1 2 3 4 5 6 7 8 9 10 11 12
Tubulin Actin
31
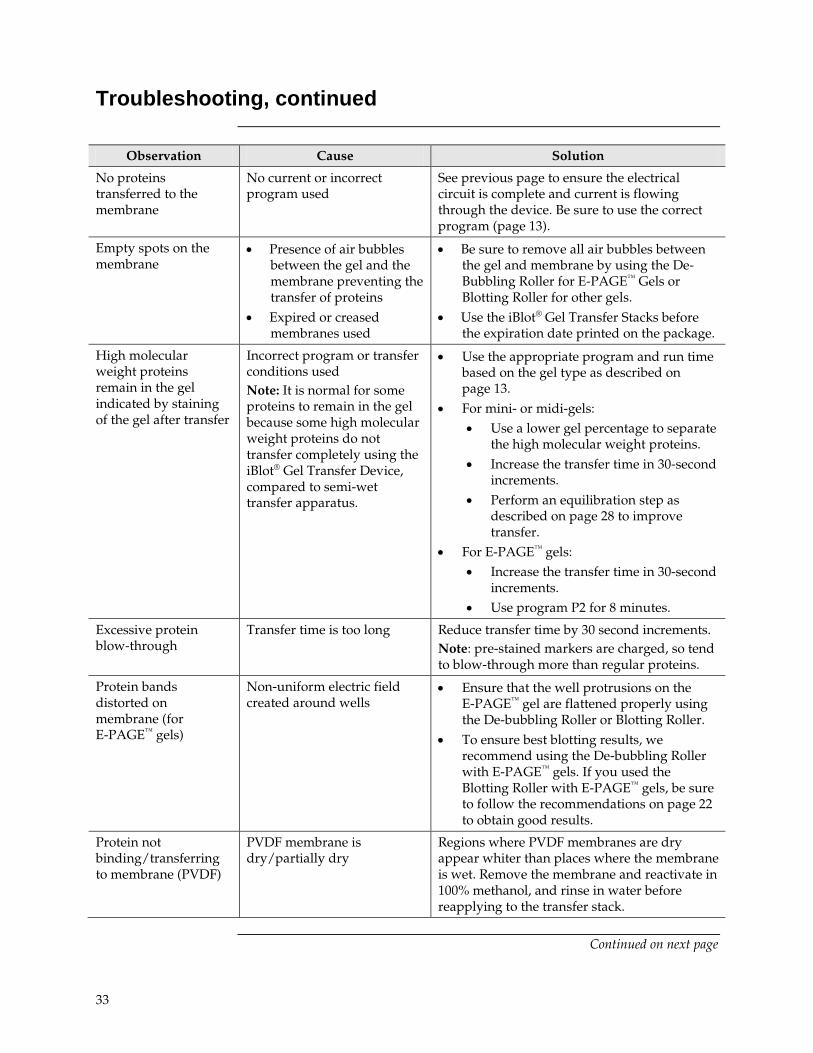
Troubleshooting
Introduction Review the information below to troubleshoot your experiments using the iBlot® Gel Transfer Device and iBlot® Gel Transfer Stacks.
To troubleshoot the immunodetection process, refer to the instructions supplied by the manufacturer of the immunodetection reagents.
Observation Cause Solution
No current (red light is not on after securing the lid)
Incomplete electric circuit due to: • iBlot® Disposable Sponge
covers the metal contact or the metal contact on the sponge is on the left
• Incorrect position of the transfer stacks or improper assembly of the transfer stacks
• Incorrect position of the
pull tab • iBlot® Anode Stack,
Bottom placed on the device without the tray including the electrical contact
• iBlot® Cathode Stack, Top placed on the device with the tray
• The metal safety contacts in the lid hinge may be dirty and do not make contact
• Reinsert the iBlot® Disposable Sponge such
that the metal contact on the sponge is on the top right of the lid and is in contact with the electrode on the transfer stack (page 21).
• Make sure the transfer stack is placed in the proper position in the blotting surface to allow proper contacts with the electrodes. Ensure the transfer stacks are assembled correctly; use the iBlot® Anode Stack, Bottom first followed by the gel and iBlot® Cathode Stack, Top.
• Ensure the pull tab from the iBlot® Cathode Stack, Top is towards the right of the assembly in the blotting surface (page 21).
• Do not remove the iBlot® Anode Stack, Bottom from the tray during the assembly. The blotting is performed with the bottom stack in the plastic tray.
• Always remove the iBlot® Cathode Stack,
Top from the red plastic tray before placing the top stack on the assembly. Do not use the iBlot® Cathode Stack, Top with the tray.
• Clean the metal safety contacts in the lid hinge with a cotton swab and water.
Digital display shows “Error1” indicating an open electrical circuit during the run
The lid opened during the run
Close the lid. Continue the run by briefly pressing the Start/Stop Button or restart the run by pressing and holding the Start/Stop Button.
Continued on next page

32
Troubleshooting, continued
Observation Cause Solution
Digital display shows “Error2” indicating a short circuit
• The iBlot® Cathode Stack, Top is touching the copper electrode on the iBlot® Anode Stack, Bottom
• The layers are not aligned
• Current is above 5.5 amp
• Open the lid and align the iBlot® Cathode Stack, Top to the right. Continue the run by briefly pressing Start/Stop Button or restart the run by pressing and holding the Start/Stop Button.
• Align the layers properly as described in the protocols. Ensure that the electrodes are in contact.
• Select a program with a lower voltage. Open the iBlot® Lid and ensure the stacks are aligned properly. Close the lid and restart the run by subtracting the time already elapsed.
• Replace the iBlot® Gel Transfer Stacks with fresh transfer stacks. Ensure an iBlot® Filter Paper was used during blotting of mini- or midi-gels.
Corrosion of the iBlot® Cathode Stack, Top
Incorrect placement of the top stack
Be sure the iBlot® Cathode Stack, Top is placed correctly with the copper electrode side facing up. Avoid placing the top stack in the inverted position.
Membrane and the gel turns blue
Longer transfer times result in the deposition of copper ions
Be sure to perform the transfer for the recommended time for each gel type.
Green discoloration of membrane edges
Copper ions carried with liquids reach the membrane
These deposits do not interfere with downstream processes. The stained regions can be cut away, but membrane washing typically results in their removal.
iBlot® Anode Stack, Bottom transfer gel melts to a viscous blue solution
Membrane is trimmed to fit the gel size resulting in direct contact between the iBlot® Cathode, Top and Anode Bottom stacks
Always maintain the membrane size identical to the transfer stack. Transfer quality is not affected by smaller gel size compared to the membrane.
Continued on next page
33
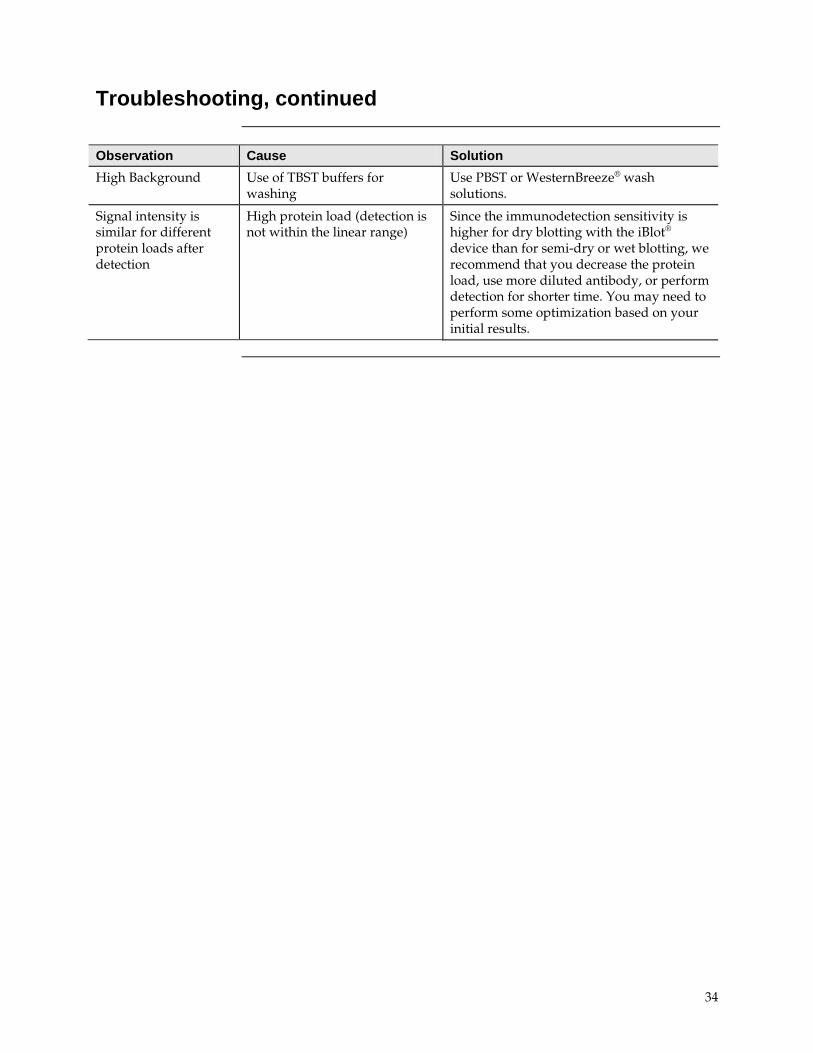
Troubleshooting, continued
Observation Cause Solution
No proteins transferred to the membrane
No current or incorrect program used
See previous page to ensure the electrical circuit is complete and current is flowing through the device. Be sure to use the correct program (page 13).
Empty spots on the membrane
• Presence of air bubbles between the gel and the membrane preventing the transfer of proteins
• Expired or creased membranes used
• Be sure to remove all air bubbles between the gel and membrane by using the De-Bubbling Roller for E-PAGE™ Gels or Blotting Roller for other gels.
• Use the iBlot® Gel Transfer Stacks before the expiration date printed on the package.
High molecular weight proteins remain in the gel indicated by staining of the gel after transfer
Incorrect program or transfer conditions used Note: It is normal for some proteins to remain in the gel because some high molecular weight proteins do not transfer completely using the iBlot® Gel Transfer Device, compared to semi-wet transfer apparatus.
• Use the appropriate program and run time based on the gel type as described on page 13.
• For mini- or midi-gels: • Use a lower gel percentage to separate
the high molecular weight proteins. • Increase the transfer time in 30-second
increments. • Perform an equilibration step as
described on page 28 to improve transfer.
• For E-PAGE™ gels: • Increase the transfer time in 30-second
increments. • Use program P2 for 8 minutes.
Excessive protein blow-through
Transfer time is too long Reduce transfer time by 30 second increments. Note: pre-stained markers are charged, so tend to blow-through more than regular proteins.
Protein bands distorted on membrane (for E-PAGE™ gels)
Non-uniform electric field created around wells
• Ensure that the well protrusions on the E-PAGE™ gel are flattened properly using the De-bubbling Roller or Blotting Roller.
• To ensure best blotting results, we recommend using the De-bubbling Roller with E-PAGE™ gels. If you used the Blotting Roller with E-PAGE™ gels, be sure to follow the recommendations on page 22 to obtain good results.
Protein not binding/transferring to membrane (PVDF)
PVDF membrane is dry/partially dry
Regions where PVDF membranes are dry appear whiter than places where the membrane is wet. Remove the membrane and reactivate in 100% methanol, and rinse in water before reapplying to the transfer stack.
Continued on next page
34
Troubleshooting, continued
Observation Cause Solution High Background
Use of TBST buffers for washing
Use PBST or WesternBreeze® wash solutions.
Signal intensity is similar for different protein loads after detection
High protein load (detection is not within the linear range)
Since the immunodetection sensitivity is higher for dry blotting with the iBlot® device than for semi-dry or wet blotting, we recommend that you decrease the protein load, use more diluted antibody, or perform detection for shorter time. You may need to perform some optimization based on your initial results.
35
Nucleic Acid Transfer Protocol
Experimental Overview
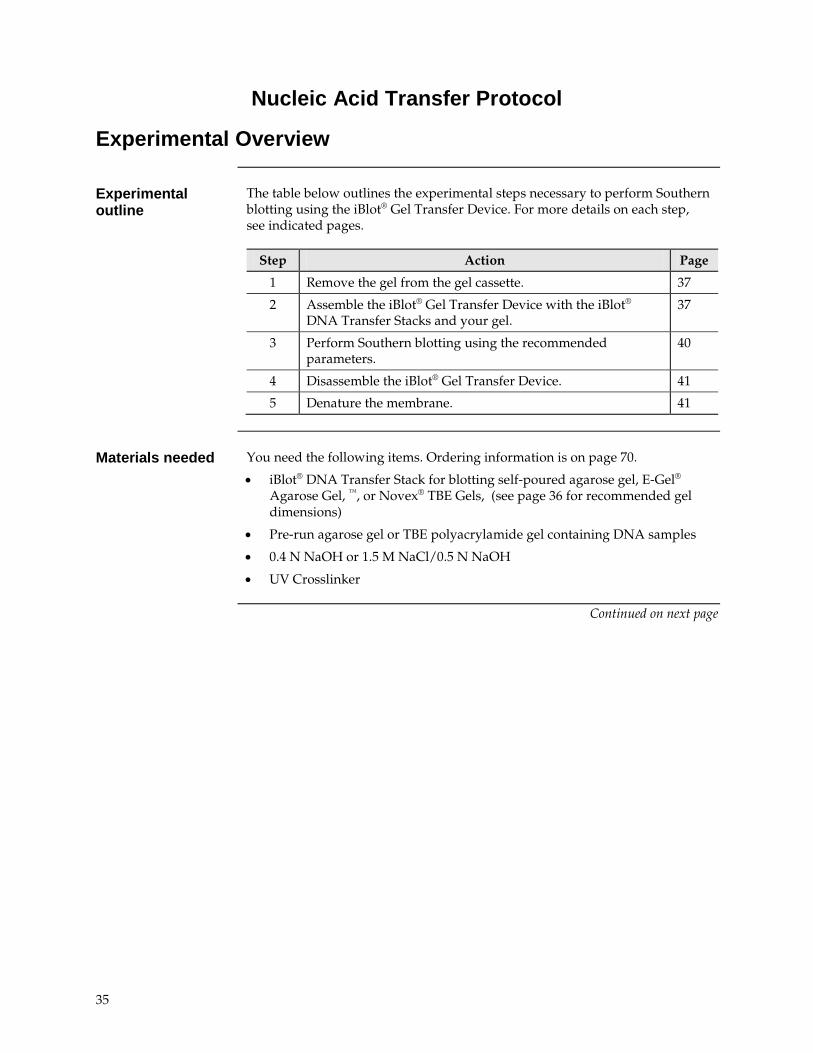
Experimental outline
The table below outlines the experimental steps necessary to perform Southern blotting using the iBlot® Gel Transfer Device. For more details on each step, see indicated pages.
Step Action Page
1 Remove the gel from the gel cassette. 37
2 Assemble the iBlot® Gel Transfer Device with the iBlot® DNA Transfer Stacks and your gel.
37
3 Perform Southern blotting using the recommended parameters.
40
4 Disassemble the iBlot® Gel Transfer Device. 41
5 Denature the membrane. 41
Materials needed You need the following items. Ordering information is on page 70.
• iBlot® DNA Transfer Stack for blotting self-poured agarose gel, E-Gel® Agarose Gel, ™, or Novex® TBE Gels, (see page 36 for recommended gel dimensions)
• Pre-run agarose gel or TBE polyacrylamide gel containing DNA samples
• 0.4 N NaOH or 1.5 M NaCl/0.5 N NaOH
• UV Crosslinker
Continued on next page

36
General Guidelines
Recommended parameters
Use program P8 for the transfer of DNA using iBlot® DNA Transfer Stacks. The default run time is 7 minutes.
Firmware version 2.8.1 or higher with program P8 is required to use the iBlot®
DNA Transfer Stacks. The iBlot® firmware version is displayed on the screen upon powering the device on. For users of the iBlot® Device with older firmware versions lacking program P8, download new iBlot® firmware at www.lifetechnologies.com/iblot. Do not use iBlot® DNA Transfer Stacks if you cannot run program P8.
Gel electrophoresis Prepare DNA sample and separate fragments by size using gel electrophoresis according to your standard protocol. For best results, the agarose gel should not be thicker than 7–8 mm.
After electrophoresis, you may need to cut the gel in order to fit it to the size of the iBlot® Gel Transfer Stack. The maximum size of the gel should not exceed 135 × 77 mm (the blotting surface of the iBlot® Gel Transfer Device). Trim the gel to the correct dimensions by cutting off the wells and edge sections that do not contain your DNA of interest.
General guidelines • Do not denature or depurinate the gel before transfer. • Membranes should not exceed 8 cm × 8 cm for mini-sized iBlot® DNA
Transfer Stacks, or 8 cm × 13 cm for regular-sized iBlot® DNA Transfer Stacks.
• Avoid touching the surface of the membrane. Wear clean gloves and handle the blot only with clean forceps.
• Work quickly to ensure membranes remain wet. • Do not use iBlot® DNA Transfer Stacks for protein transfer.
Using the iBlot® Device for the first time
If you are using the iBlot® Gel Transfer Device for the first time, you may wish to clean the blotting surface with a damp cloth before use. Allow the parts to dry before blotting.
Continued on next page
37
Using the iBlot® Device for Southern Blotting
Introduction Instructions to perform Southern blotting with the iBlot® Gel Transfer Device using iBlot® DNA Transfer Stacks (Catalog no. IB8010-01) are described below.
Removing the gel Remove the gel from the casting tray or cassette for transfer after completion of electrophoresis as described below.
• Loosen self-poured agarose gels from the casting tray and carefully remove the gel slab.
• Open E-Gel® EX Agarose Gel or Novex® TBE Gel cassettes using the Gel Knife by inserting the knife into the narrow gap between the two plates of the cassette. Push up and down gently on the handle of the knife to separate the plates. Upon opening the cassette, discard the plate without the gel and slowly remove the gel adhered to the other plate.
• Open E-Gel® Agarose Gel cassettes using the E-Gel® Opener as directed in the E-Gel® Technical Guide (available at www.lifetechnologies.com).
• For other gel types, refer to the manufacturer recommendations to remove the gel from the cassette.
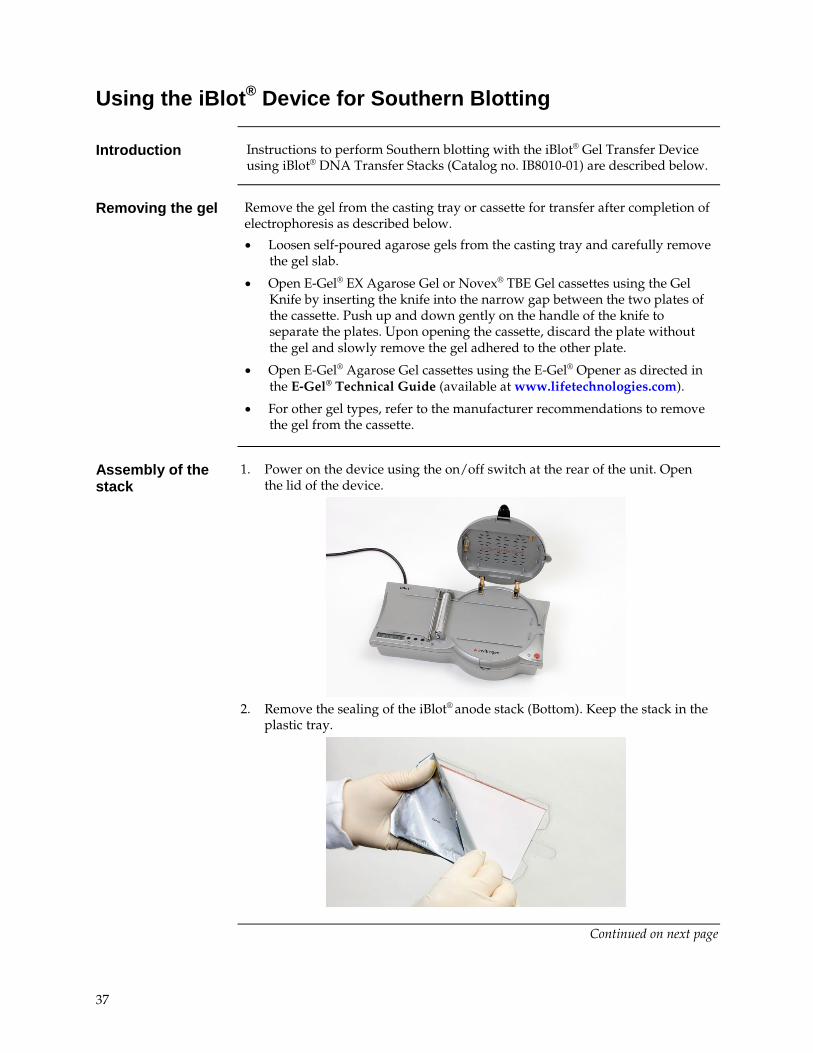
Assembly of the stack
1. Power on the device using the on/off switch at the rear of the unit. Open the lid of the device.
2. Remove the sealing of the iBlot® anode stack (Bottom). Keep the stack in the
plastic tray.
Continued on next page
38
Using the iBlot® Device for Southern Blotting, continued
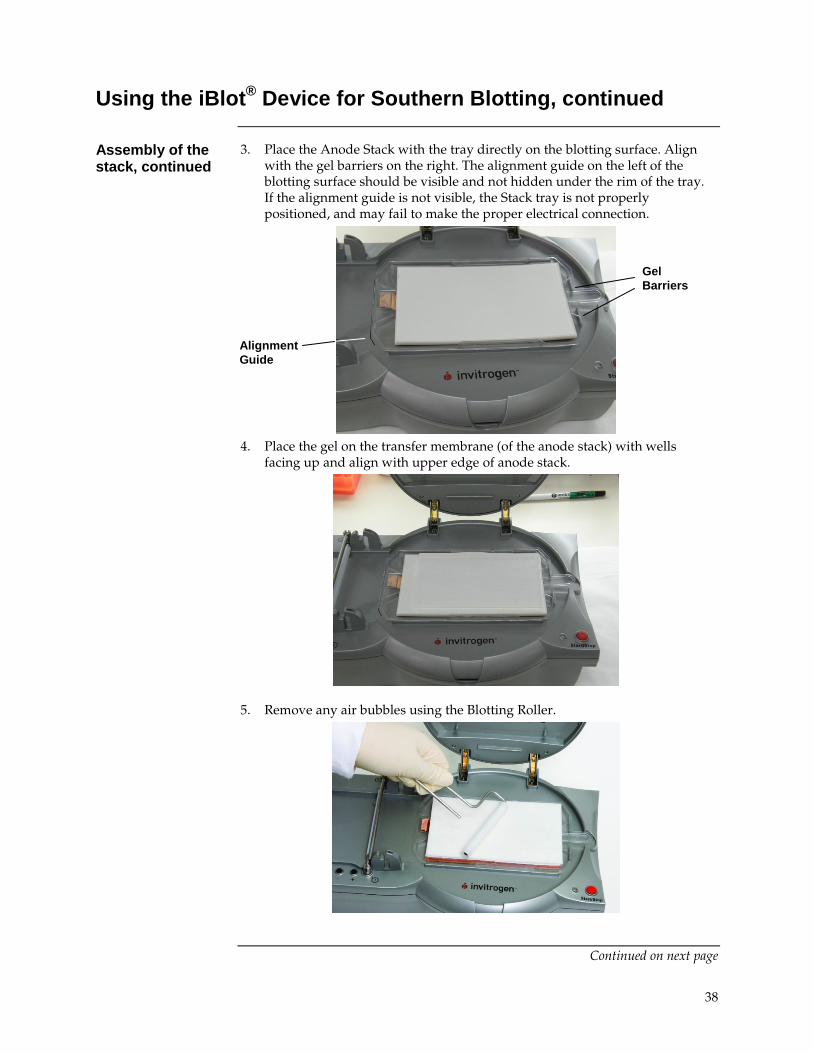
Assembly of the stack, continued
3. Place the Anode Stack with the tray directly on the blotting surface. Align with the gel barriers on the right. The alignment guide on the left of the blotting surface should be visible and not hidden under the rim of the tray. If the alignment guide is not visible, the Stack tray is not properly positioned, and may fail to make the proper electrical connection.
4. Place the gel on the transfer membrane (of the anode stack) with wells
facing up and align with upper edge of anode stack.
5. Remove any air bubbles using the Blotting Roller.
Continued on next page
Gel Barriers
Alignment Guide

39
Using the iBlot® Device for Southern Blotting, continued
Assembly of the stack, continued
6. Remove the sealing of the Cathode Stack (Top). Discard the red plastic tray.
7. Place the Cathode Stack over the gel with the electrode side facing up and
aligned to the right edge. Remove air bubbles using the Blotting Roller.
8. Position the Disposable Sponge so the metal contact is at the upper-right
corner of the lid. Proceed to Performing Blotting.
Continued on next page
Contact
40
Using the iBlot® Device for Southern Blotting, continued
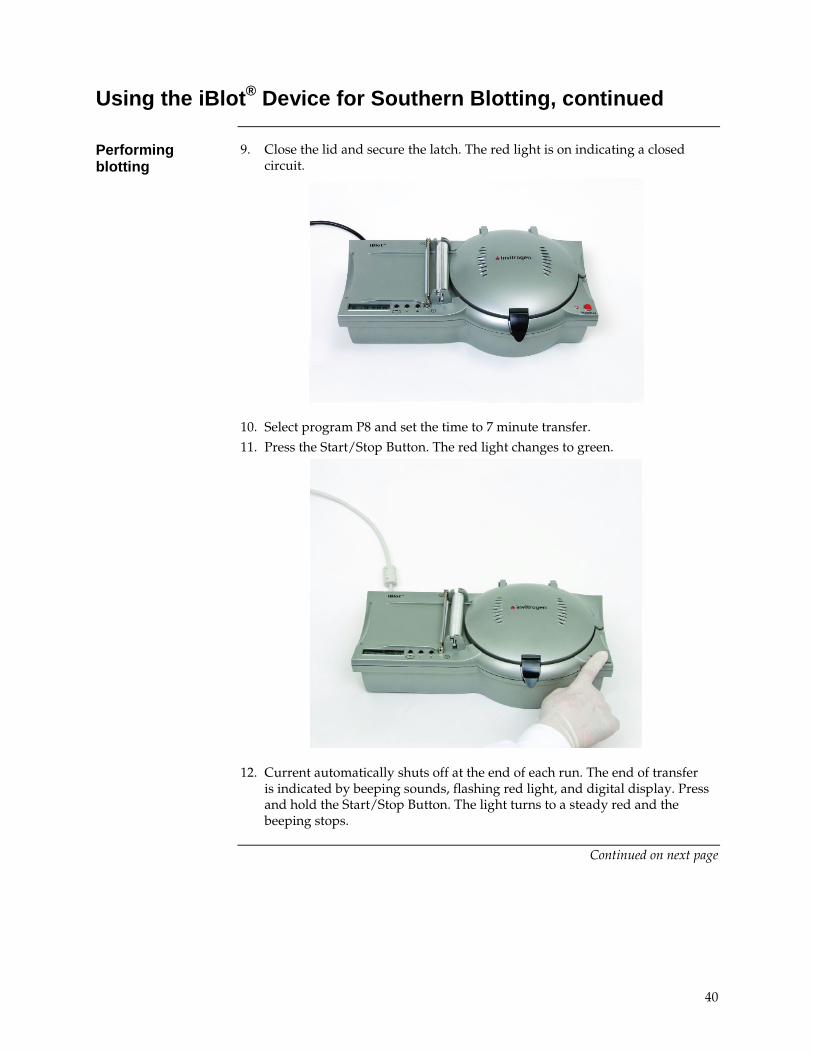
Performing blotting
9. Close the lid and secure the latch. The red light is on indicating a closed circuit.
10. Select program P8 and set the time to 7 minute transfer.
11. Press the Start/Stop Button. The red light changes to green.
12. Current automatically shuts off at the end of each run. The end of transfer is indicated by beeping sounds, flashing red light, and digital display. Press and hold the Start/Stop Button. The light turns to a steady red and the beeping stops.
Continued on next page

41
Using the iBlot® Device for Southern Blotting, continued
Disassembly 1. Open the lid of the iBlot® Device.
2. Discard the iBlot® Disposable Sponge and iBlot® Cathode Stack, Top. 3. Carefully remove and discard the gel. Remove the transfer membrane from
the stack and proceed with the denaturation step.
4. Discard the iBlot® Anode stack, Bottom.
Denaturation step 1. Prepare denaturing solution consisting of 0.4 N NaOH or 1.5 M NaCl/0.5 N NaOH. Make enough to immerse your membrane.
2. Incubate membrane in denaturing solution on a rotary shaker for 10 minutes immediately after transfer. Denaturation of the DNA occurs on the membrane.
3. Air-dry the membrane for 5–10 minutes. 4. UV crosslink the membrane. Store the crosslinked membrane or proceed to
hybridization protocol.
42
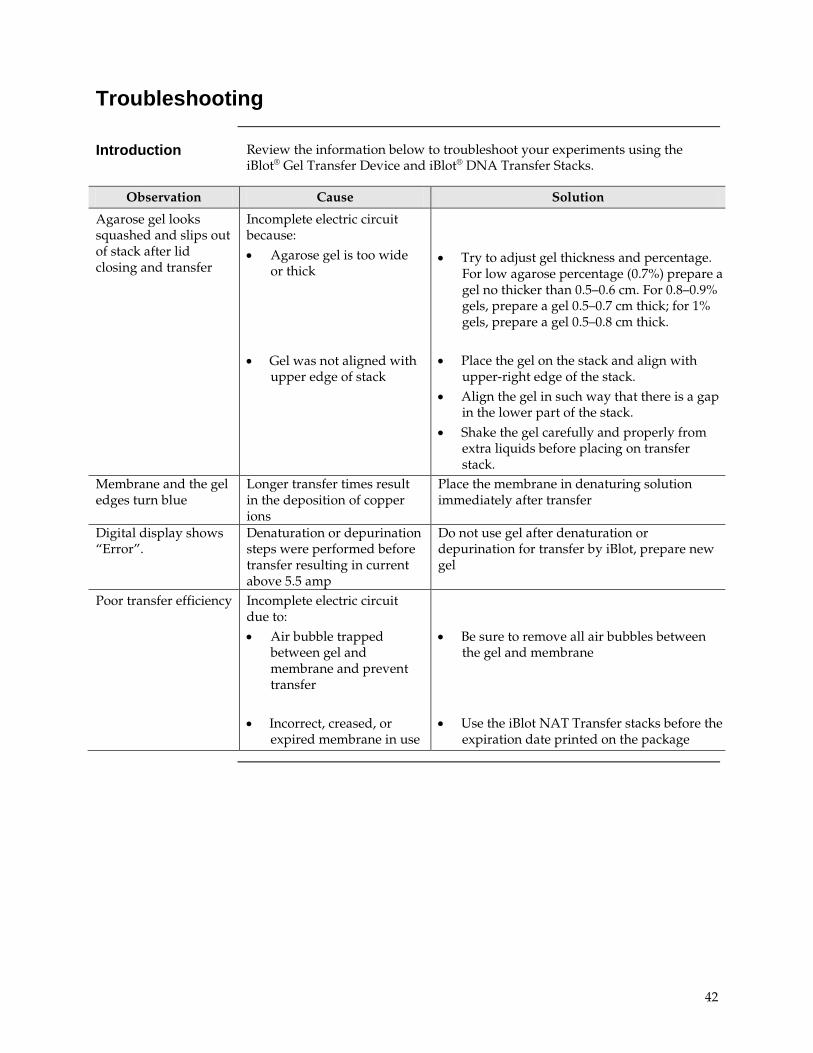
Troubleshooting
Introduction Review the information below to troubleshoot your experiments using the iBlot® Gel Transfer Device and iBlot® DNA Transfer Stacks.
Observation Cause Solution
Agarose gel looks squashed and slips out of stack after lid closing and transfer
Incomplete electric circuit because: • Agarose gel is too wide
or thick • Gel was not aligned with
upper edge of stack
• Try to adjust gel thickness and percentage.
For low agarose percentage (0.7%) prepare a gel no thicker than 0.5–0.6 cm. For 0.8–0.9% gels, prepare a gel 0.5–0.7 cm thick; for 1% gels, prepare a gel 0.5–0.8 cm thick.
• Place the gel on the stack and align with
upper-right edge of the stack. • Align the gel in such way that there is a gap
in the lower part of the stack. • Shake the gel carefully and properly from
extra liquids before placing on transfer stack.
Membrane and the gel edges turn blue
Longer transfer times result in the deposition of copper ions
Place the membrane in denaturing solution immediately after transfer
Digital display shows “Error”.
Denaturation or depurination steps were performed before transfer resulting in current above 5.5 amp
Do not use gel after denaturation or depurination for transfer by iBlot, prepare new gel
Poor transfer efficiency Incomplete electric circuit due to: • Air bubble trapped
between gel and membrane and prevent transfer
• Incorrect, creased, or
expired membrane in use
• Be sure to remove all air bubbles between
the gel and membrane
• Use the iBlot NAT Transfer stacks before the
expiration date printed on the package
43
Western Detection Protocol
Experimental Overview
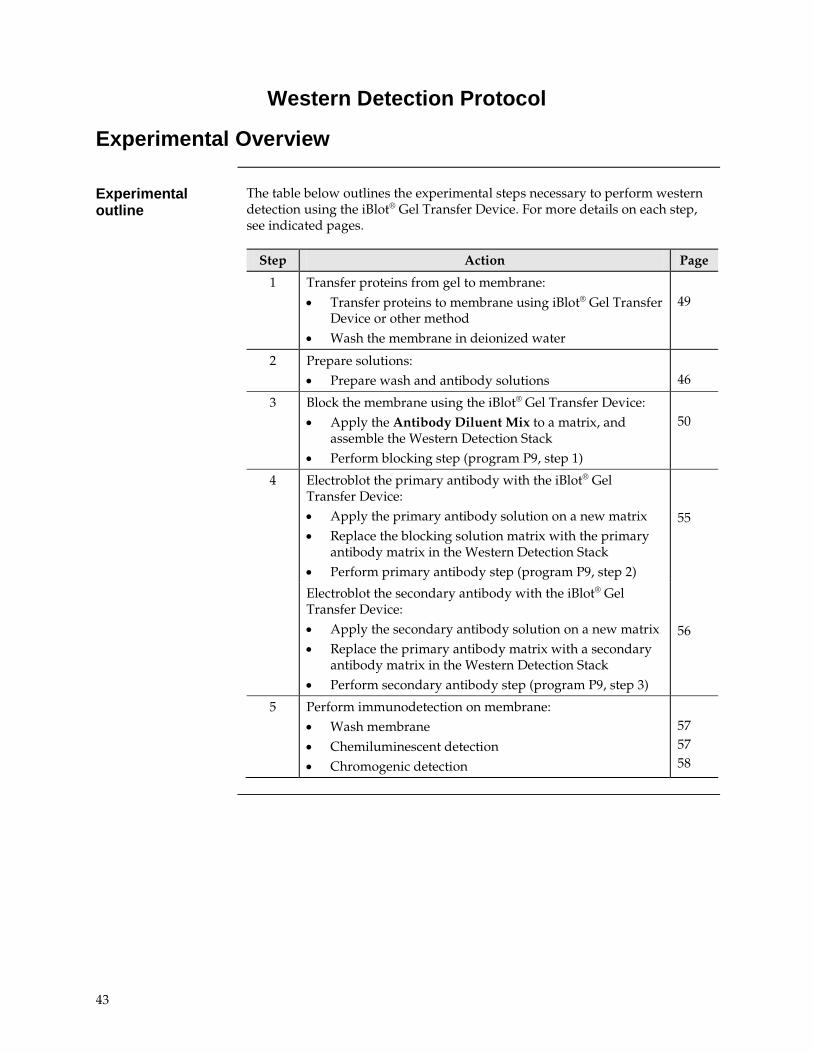
Experimental outline
The table below outlines the experimental steps necessary to perform western detection using the iBlot® Gel Transfer Device. For more details on each step, see indicated pages.
Step Action Page
1 Transfer proteins from gel to membrane: • Transfer proteins to membrane using iBlot® Gel Transfer
Device or other method • Wash the membrane in deionized water
49
2 Prepare solutions: • Prepare wash and antibody solutions
46
3 Block the membrane using the iBlot® Gel Transfer Device: • Apply the Antibody Diluent Mix to a matrix, and
assemble the Western Detection Stack • Perform blocking step (program P9, step 1)
50
4 Electroblot the primary antibody with the iBlot® Gel Transfer Device: • Apply the primary antibody solution on a new matrix • Replace the blocking solution matrix with the primary
antibody matrix in the Western Detection Stack • Perform primary antibody step (program P9, step 2)
55
Electroblot the secondary antibody with the iBlot® Gel Transfer Device: • Apply the secondary antibody solution on a new matrix • Replace the primary antibody matrix with a secondary
antibody matrix in the Western Detection Stack • Perform secondary antibody step (program P9, step 3)
56
5 Perform immunodetection on membrane: • Wash membrane • Chemiluminescent detection • Chromogenic detection
57 57 58
44
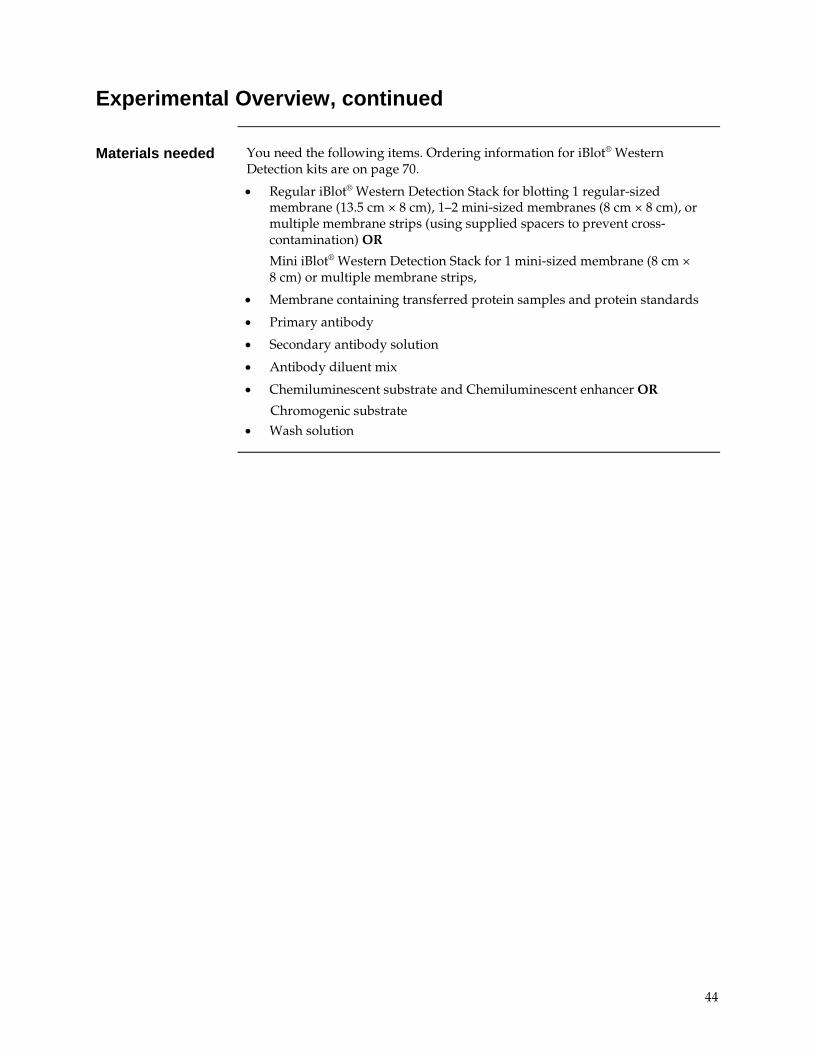
Experimental Overview, continued
Materials needed You need the following items. Ordering information for iBlot® Western Detection kits are on page 70.
• Regular iBlot® Western Detection Stack for blotting 1 regular-sized membrane (13.5 cm × 8 cm), 1–2 mini-sized membranes (8 cm × 8 cm), or multiple membrane strips (using supplied spacers to prevent cross-contamination) OR
Mini iBlot® Western Detection Stack for 1 mini-sized membrane (8 cm × 8 cm) or multiple membrane strips,
• Membrane containing transferred protein samples and protein standards
• Primary antibody
• Secondary antibody solution
• Antibody diluent mix
• Chemiluminescent substrate and Chemiluminescent enhancer OR
Chromogenic substrate • Wash solution

45
General Guidelines
Recommended parameters
Use program P9 for using iBlot® Western Detection Stacks. Program P9 is a 3-step program for the iBlot® Western Detection protocol consisting of a blocking step (20V for 2 minutes), a primary antibody step (5V for 3 minutes), and a secondary antibody step (5V for 3 minutes). The overall time of the program is 8 minutes, and cannot be modified.
Firmware version 2.9.5 or higher with program P9 is required to use the iBlot®
Western Detection Stacks. The iBlot® firmware version is displayed on the screen upon powering the device on. For users of the iBlot® Device with older firmware versions lacking program P9, download new iBlot® firmware with program P9 (version 2.9.5 or higher) at www.lifetechnologies.com/iblot. Do not use iBlot® Western Detection Stacks if you cannot run program P9.
General guidelines • Membranes should not exceed 8 cm × 8 cm for mini-sized iBlot® Western Detection Stacks, or 8 cm × 13 cm for regular-sized iBlot® Western Detection Stacks.
• Use twice the concentration of primary antibody required for a standard immunodetection.
• Use a single, clean dish for each blot. The container must be large enough to allow the membrane to be fully covered by solutions at all times. Note: Western Detection Stacks are supplied with 2 mini-sized Grid Dish Trays.
• Avoid touching the surface of the membrane. Wear clean gloves and handle the blot only with clean forceps.
• Work quickly to ensure membranes remain wet. • Do not expose the substrate working solutions to intense light. Short-term
exposure to laboratory light is not harmful to the substrates. • Do not use iBlot® Western Detection Stacks for protein transfer.
Using the iBlot® Device for the first time
If you are using the iBlot® Gel Transfer Device for the first time, you may wish to clean the blotting surface with a damp cloth before use. Allow the parts to dry before blotting.
To increase the rate of success on the first trial, we recommend running replicates of your sample on a single gel, and preparing multiple strips for simultaneous detection (see Using Assay Spacers, page 59) using different secondary antibody concentrations on a single stack (see page 48).

46
Preparing Solutions
Use water, free from alkaline phosphatase activity, for making wash buffer and rinsing membranes. Fresh ultra-filtered water is preferred. Autoclave or ultra-filter stored water to remove alkaline phosphatase activity.
Preparing Wash Solution
Prepare 96 mL of 1X Wash Solution for each mini-sized membrane to be probed.
Reagent Volume
Wash Solution (16X) 6 mL Deionized water 90 mL
For regular-sized membranes, prepare enough 1X Wash Solution for at least four washes. Adjust the volume of 1X Wash Solution according to the size of the dish used for washing the membrane.
Preparing Antibody Diluent Mix
Prepare an amount of Antibody Diluent Mix appropriate for the size of the membrane to be probed immediately before use. Scale the volumes accordingly if performing immunodetection on multiple membranes.
Reagent Mini Regular
Antibody Diluent Additive* 4.5 mL 9 mL Antibody Diluent Solution 10.5 mL 21 mL Total volume 15 mL 30 mL * The same Antibody Diluent Additive is used for preparing solutions for PVDF and nitrocellulose membranes.
Continued on next page
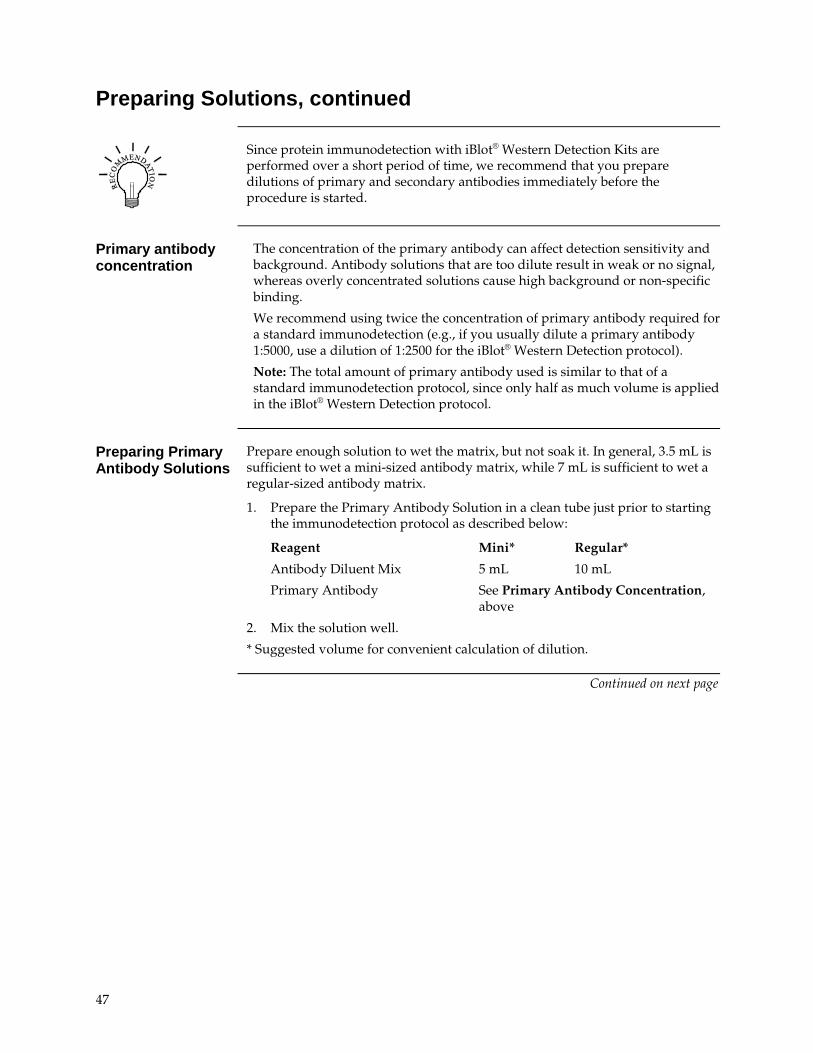
47
Preparing Solutions, continued
Since protein immunodetection with iBlot® Western Detection Kits are performed over a short period of time, we recommend that you prepare dilutions of primary and secondary antibodies immediately before the procedure is started.
Primary antibody concentration
The concentration of the primary antibody can affect detection sensitivity and background. Antibody solutions that are too dilute result in weak or no signal, whereas overly concentrated solutions cause high background or non-specific binding.
We recommend using twice the concentration of primary antibody required for a standard immunodetection (e.g., if you usually dilute a primary antibody 1:5000, use a dilution of 1:2500 for the iBlot® Western Detection protocol).
Note: The total amount of primary antibody used is similar to that of a standard immunodetection protocol, since only half as much volume is applied in the iBlot® Western Detection protocol.
Preparing Primary Antibody Solutions
Prepare enough solution to wet the matrix, but not soak it. In general, 3.5 mL is sufficient to wet a mini-sized antibody matrix, while 7 mL is sufficient to wet a regular-sized antibody matrix.
1. Prepare the Primary Antibody Solution in a clean tube just prior to starting the immunodetection protocol as described below:
Reagent Mini* Regular*
Antibody Diluent Mix 5 mL 10 mL
Primary Antibody See Primary Antibody Concentration, above
2. Mix the solution well.
* Suggested volume for convenient calculation of dilution.
Continued on next page
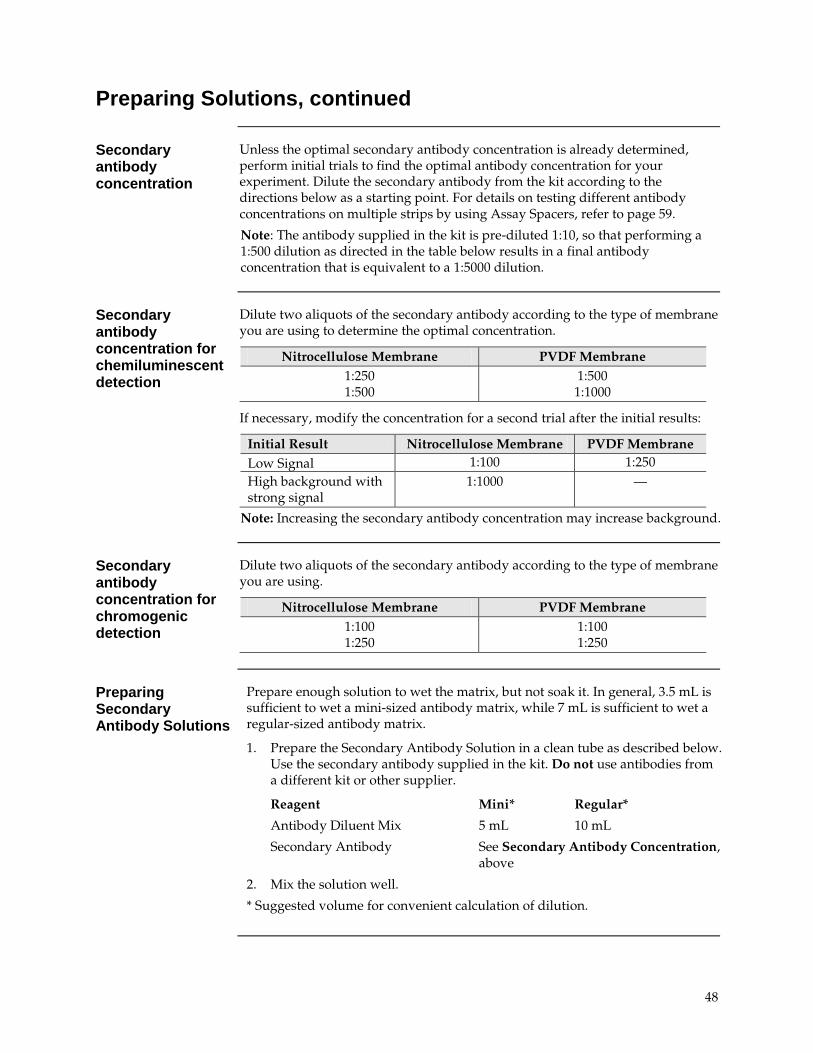
48
Preparing Solutions, continued
Secondary antibody concentration
Unless the optimal secondary antibody concentration is already determined, perform initial trials to find the optimal antibody concentration for your experiment. Dilute the secondary antibody from the kit according to the directions below as a starting point. For details on testing different antibody concentrations on multiple strips by using Assay Spacers, refer to page 59.
Note: The antibody supplied in the kit is pre-diluted 1:10, so that performing a 1:500 dilution as directed in the table below results in a final antibody concentration that is equivalent to a 1:5000 dilution.
Secondary antibody concentration for chemiluminescent detection
Dilute two aliquots of the secondary antibody according to the type of membrane you are using to determine the optimal concentration.
Nitrocellulose Membrane PVDF Membrane 1:250 1:500
1:500 1:1000
If necessary, modify the concentration for a second trial after the initial results:
Initial Result Nitrocellulose Membrane PVDF Membrane Low Signal 1:100 1:250 High background with strong signal
1:1000 —
Note: Increasing the secondary antibody concentration may increase background.
Secondary antibody concentration for chromogenic detection
Dilute two aliquots of the secondary antibody according to the type of membrane you are using.
Nitrocellulose Membrane PVDF Membrane 1:100 1:250
1:100 1:250
Preparing Secondary Antibody Solutions
Prepare enough solution to wet the matrix, but not soak it. In general, 3.5 mL is sufficient to wet a mini-sized antibody matrix, while 7 mL is sufficient to wet a regular-sized antibody matrix.
1. Prepare the Secondary Antibody Solution in a clean tube as described below. Use the secondary antibody supplied in the kit. Do not use antibodies from a different kit or other supplier.
Reagent Mini* Regular*
Antibody Diluent Mix 5 mL 10 mL
Secondary Antibody See Secondary Antibody Concentration, above
2. Mix the solution well.
* Suggested volume for convenient calculation of dilution.

49
Using the iBlot® Device for Western Detection
Before starting • Ensure that the iBlot® Device is set to program P9 (see page 45) for the western detection protocol.
• Prepare solutions before starting the protocol (see page 46).
• Wet membranes if they are dry (see below).
Transferring proteins
Blot proteins onto nitrocellulose or PVDF stacks with the iBlot® Device, or by standard wet, semi-wet, or semi-dry transfer methods appropriate for the protein to be detected.
After transfer, rinse the membrane with water to remove any gel and transfer buffer components.
After transfer and rinsing, membranes can be dried and stored for immunodetection at a later time.
Do not perform immunodetection on dry membranes. Verify that membranes are wet before performing detection. PVDF membranes dry quickly and, must be reactivated with methanol prior to starting the protocol.
Preparing membranes
If starting the protocol with dried membranes, re-wet the membranes using the following steps:
Membrane Procedure
Nitrocellulose Wet the nitrocellulose membrane with distilled water for 1 minute.
PVDF Reactivate the PVDF membrane in 100% methanol for 15 seconds, and rinse twice with water.
Materials required • Blotted membrane with antigen of interest • Purified water free of alkaline phosphatase activity • Clean tubes for preparing solutions • Clean forceps for manipulating blotted membrane • Orbital shaker capable of rotating at 1 revolution/second • 1X Wash buffer (see page 46) • Primary antibody diluted in Antibody Diluent (see page 46)
Continued on next page

50
Using the iBlot® Device for Western Detection, continued
Stack assembly for the blocking step
1. Open the lid of the iBlot® Gel Transfer Device. Ensure the blotting surface is clean.
2. Place the white antibody matrix on a Transparent Sheet.
3. Apply Antibody Diluent Solution with Diluent Additive (described on page 46) evenly on the matrix with a clean pipette for the blocking step.
Mini Regular 3.5 mL 7 mL
4. Remove the sealing from the iBlot® Western Detection Bottom Stack. Leave
the stack in the transparent plastic tray.
Continued on next page

51
Using the iBlot® Device for Western Detection, continued
Stack assembly for the blocking step, continued
5. Place the plastic tray containing the Bottom Stack directly on the blotting surface. Align the tray with the gel barrier on the right. The alignment guide on the left of the blotting surface should be visible and not hidden under the rim of the tray. If the alignment guide is not visible, the Stack tray is not properly positioned, and may fail to make the proper electrical connection.
6. Use forceps to place the pre-wetted membrane on the Bottom Stack with the
protein side facing up.
7. Remove any bubbles using the Blotting Roller.
Note: The Blotting Roller is used several times throughout this protocol, and should be washed between each step.
8. Use forceps to place the matrix soaked with Antibody Diluent Mix (Step 3)
onto the membrane.
Continued on next page
Gel Barriers
Alignment Guide

52
Using the iBlot® Device for Western Detection, continued
Stack assembly for the blocking step, continued
9. Remove any bubbles using the Blotting Roller.
10. Remove the sealing from the iBlot® Western Detection Top Stack. Keep the
red plastic tray for Step 16.
11. Remove the Top Stack from the tray, and place it over the white matrix
with the electrode side facing up.
12. Remove any bubbles with the Blotting Roller.
Continued on next page
Save tray for later use

53
Using the iBlot® Device for Western Detection, continued
Blocking step 1. Position the iBlot® Disposable Sponge so the metal contact is at the upper-right corner of the lid.
2. Close the lid and secure the latch. The red light is on indicating a closed
circuit.
3. Select program P9. This program is a 3-step program for the iBlot® Western
Detection protocol. The complete program runs for 8 minutes, and cannot be modified.
Press the Start/Stop Button. The red light changes to green. A horizontal bar is displayed between the program number and the time in the display.
Do not turn off the iBlot® Device, or change programs at any step during program P9.
4. While the iBlot® Device runs, apply the primary antibody solution
(described on page 47) onto a new matrix.
Mini Regular 3.5 mL 7 mL
Continued on next page
Light
Contact

54
Using the iBlot® Device for Western Detection, continued
Blocking step, continued
5. The first (blocking) step ends after 2 minutes, and is indicated by beeping, and a flashing green light. Open the lid, leaving the sponge in place. Two flashing horizontal bars appear between the program number and the time in the display.
6. Remove the Top Stack and set it aside in the red tray for re-use in the next step. Discard the used blocking soloution matrix.
Continued on next page

55
Using the iBlot® Device for Western Detection, continued
Primary antibody step
1. Use forceps to place the new matrix with the primary antibody onto the membrane. Remove any bubbles with the Blotting Roller
2. Return the Top Stack to its position over the matrix. Remove any air bubbles with the Blotting Roller.
3. Close the lid and secure the latch.
4. Press the Start/Stop Button to start the second (primary antibody) step. The
two horizontal bars stop flashing.
5. While the iBlot® Device runs, apply the secondary antibody solution
(described on page 48) onto a new matrix. Mini Regular
3.5 mL 7 mL
6. After 3 minutes, the device stops. The end of the primary antibody step is indicated by beeping, and a flashing green light. Open the lid, leaving the sponge in place. Three flashing horizontal bars appear in the display between the program number and the time in the display.
7. Remove the Top Stack and set it aside in the red tray for re-use in the next step. Discard the used primary antibody matrix.
Continued on next page
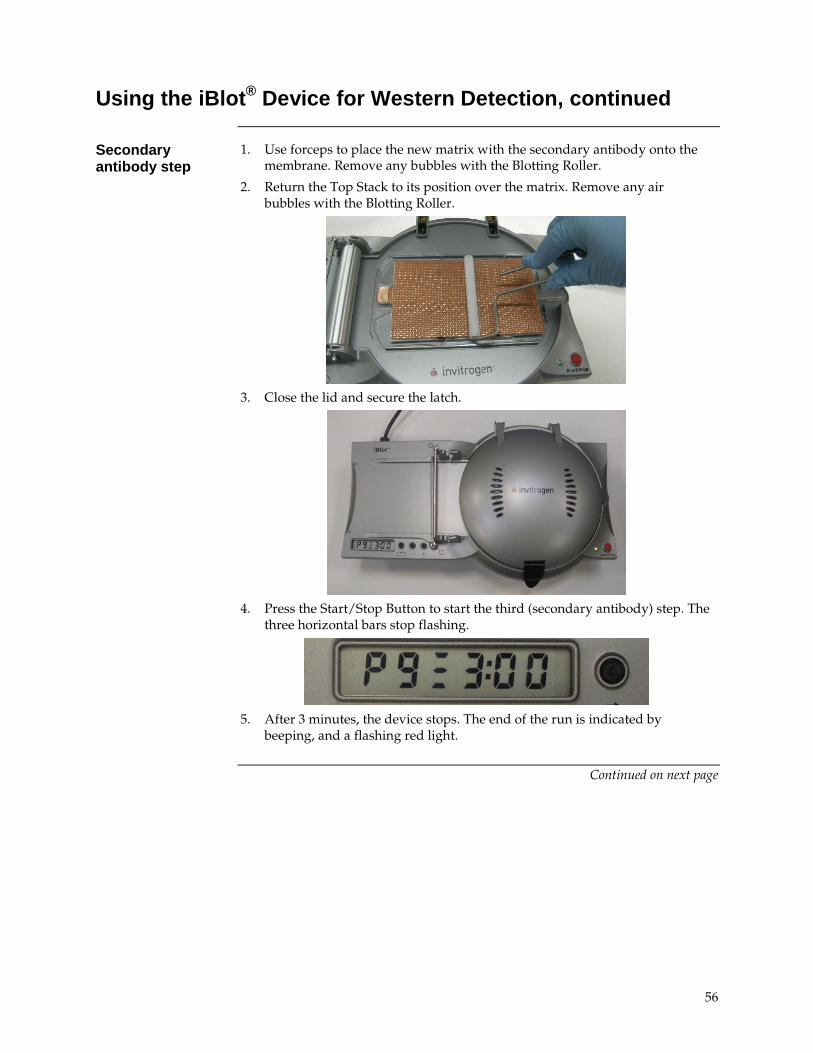
56
Using the iBlot® Device for Western Detection, continued
Secondary antibody step
1. Use forceps to place the new matrix with the secondary antibody onto the membrane. Remove any bubbles with the Blotting Roller.
2. Return the Top Stack to its position over the matrix. Remove any air bubbles with the Blotting Roller.
3. Close the lid and secure the latch.
4. Press the Start/Stop Button to start the third (secondary antibody) step. The
three horizontal bars stop flashing.
5. After 3 minutes, the device stops. The end of the run is indicated by
beeping, and a flashing red light.
Continued on next page

57
Using the iBlot® Device for Western Detection, continued
Disassembling the stack
1. At the end of the transfer procedure, open the lid and discard the sponge.
2. Disassemble the stack and discard the used matrix, Top Stack, and Bottom Stack.
3. Turn off the iBlot® Device.
4. Proceed to Washing the Membrane.
Washing the membrane
Wash volumes are described below for mini-sized membranes. For regular-sized membranes, adjust volumes according to the size of the container being used for the wash.
1. Place the membrane into a dish (a mini-sized dish is provided in the kit) containing 20 mL of 1X Wash Solution (page 46).
2. Rinse the membrane briefly and then discard the solution.
3. Wash the membrane for 5 minutes with 20 mL of 1X Wash Solution, and discard the solution. Repeat this wash step two more times.
4. Rinse the membrane with 20 mL of deionized water, and then decant. Repeat this wash step once.
5. Proceed to Chemiluminescent Detection or Chromogenic Detection.
Chemiluminescent detection
1. Prepare the following amount of Chemiluminescent Substrate per membrane:
Nitrocellulose Membrane Mini Regular
Chemiluminescent Substrate 3 mL 6 mL Chemiluminescent Enhancer 0.125 mL 0.25 mL
PVDF Membrane Mini Regular
Chemiluminescent Substrate 3 mL 6 mL
Mix well. Do not add Chemiluminescent Enhancer for PVDF membranes.
2. Place the membrane with protein-side facing up on a sheet of Transparency plastic (iBlot® Western Detection Transparent Sheet, supplied in the kit). Do not allow the membrane to dry out.
3. Cover the membrane with 3 mL of Chemiluminescent Substrate. Do not touch the membrane surface while adding the substrate. Make sure the membrane is evenly covered for the duration of the reaction.
4. Allow the reaction to develop for 5 minutes.
5. Blot any excess Chemiluminescent Substrate solution from the membrane by placing the membrane on filter paper with protein-side facing up. Do not allow the membrane to dry out.
6. Cover the membrane with plastic wrap to prepare a membrane sandwich for luminography.
7. Expose an X-ray film to the membrane sandwich for anywhere from 1 second to several minutes, or image with an appropriate CCD camera.

58
Using the iBlot® Device for Western Detection, continued
Chromogenic detection
Perform chromogenic development with the supplied Chromogen. Color development is complete in 1–60 minutes. 1. Place the membrane with protein-side facing up in a plastic tray (supplied
in the kit for mini-sized membranes). Do not allow the membrane to dry out.
2. Cover the blot with Chromogenic Substrate as follows:
Reagent Mini Regular
Chromogen 5 mL 10 mL
Note: If yellow precipitate forms after 3 minutes, decant the solution, wash briefly in deionized water, and restart from step 1.
3. Incubate with shaking until the desired purple band intensity is achieved on the membrane. Do not incubate for more than 1 hour. Decant solution.
4. Stop the reaction by rinsing membrane briefly with 20 mL of distilled water for 2 minutes and decanting the wash. Repeat 2 minute water rinse twice.
Note: Stop the reaction with reagent grade water, do not use tap water, buffer, or acid. Buffer or tap water can cause fading, and acid turns the bands yellow.
5. Air-dry the membrane on a clean piece of filter paper and record an image of the blot. Store the membrane protected from light to prevent band fading. Bands remain visible for years when protected from light.

59
Using Assay Spacers
Guidelines for using Assay Spacers
Detection can be performed on multiple membrane strips in a single stack. Stack assembly proceeds as described in the standard protocol (pages 50-56), with the following changes: • Assay spacers can be placed vertically (see picture below), horizontally, or
as a combination of both. • Divide transferred membranes into multiple strips that are equal to, or
smaller in surface area than the type of stack being used for western detection.
• To prevent cross-contamination (e.g., when using different antibodies for each strip), use the supplied Assay Spacers to create a barrier between the strips.
• Membrane strips may need trimming to accommodate multiple strips and spacers in the same transfer stack.
Placing membranes and Assay Spacers
• Place the cut membrane strips over the surface of the Bottom Stack (see page 51, Step 6-7).
• Place the Assay Spacer between membrane strips using forceps or a gloved hand. Leave a boundary region around the membrane. Do not overlap Spacers on the plastic rim of the tray, or on other Spacers.
Using Assay Spacers for secondary antibody optimization
Uncut matrices can be used when membrane strips are treated under identical conditions (e.g., performing the blocking step, and using identical primary antibody conditions). When using an uncut matrix, place the membrane strips on the Bottom Stack with enough room between them to accommodate spacers in later steps. Use cut matrices (see page 60), and add spacers to the stack after the primary antibody step (see page 55) when testing different secondary antibody conditions.
Continued on next page

60
Using Assay Spacers, continued
Preparing the Antibody Matrix
• Cut the antibody matrix using sharp, clean scissors so that the pieces completely cover the membrane surface without overlapping other matrices or the Spacers.
• Apply blocking and antibody solutions in a volume that will completely wet, but not soak the matrix (see page 50, Step 3, page 53, Step 4, and page 55 Step 5).
Using the Blotting Roller
• For all rolling steps, do not roll over the spacer with the hand-held Blotting Roller.
• Assay Spacers are reusable. Rinse with water after each use.
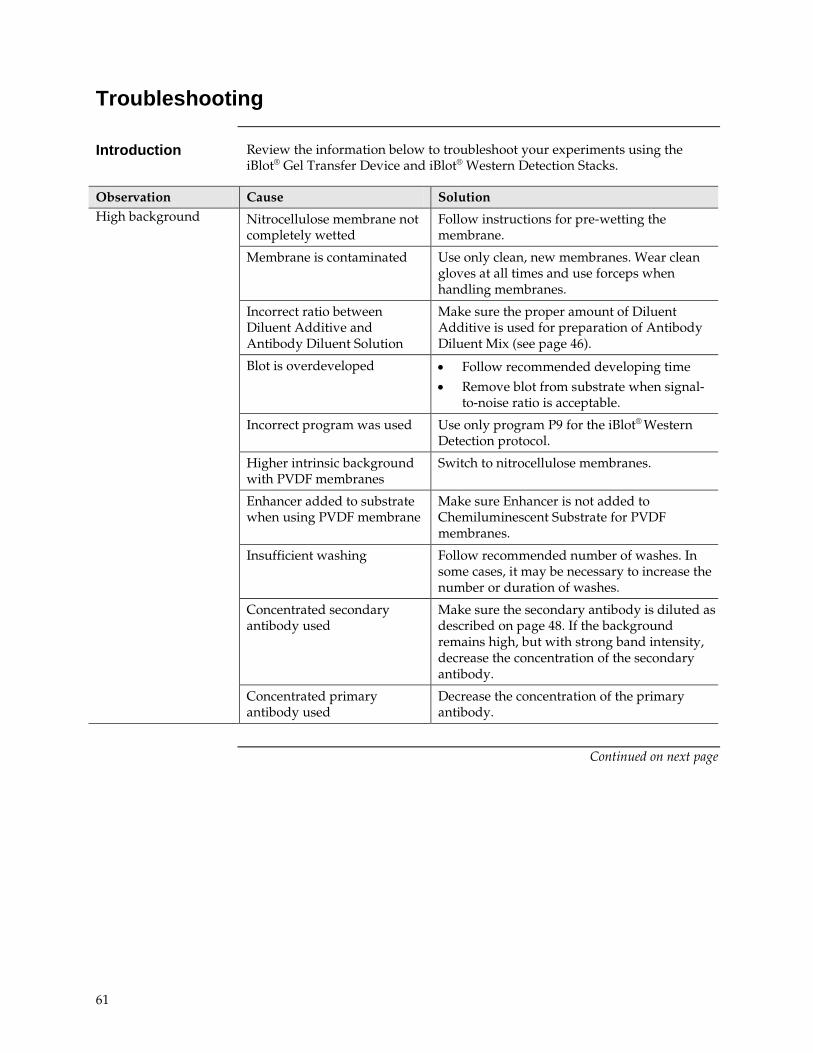
61
Troubleshooting
Introduction Review the information below to troubleshoot your experiments using the iBlot® Gel Transfer Device and iBlot® Western Detection Stacks.
Observation Cause Solution High background Nitrocellulose membrane not
completely wetted Follow instructions for pre-wetting the membrane.
Membrane is contaminated Use only clean, new membranes. Wear clean gloves at all times and use forceps when handling membranes.
Incorrect ratio between Diluent Additive and Antibody Diluent Solution
Make sure the proper amount of Diluent Additive is used for preparation of Antibody Diluent Mix (see page 46).
Blot is overdeveloped • Follow recommended developing time • Remove blot from substrate when signal-
to-noise ratio is acceptable.
Incorrect program was used Use only program P9 for the iBlot® Western Detection protocol.
Higher intrinsic background with PVDF membranes
Switch to nitrocellulose membranes.
Enhancer added to substrate when using PVDF membrane
Make sure Enhancer is not added to Chemiluminescent Substrate for PVDF membranes.
Insufficient washing Follow recommended number of washes. In some cases, it may be necessary to increase the number or duration of washes.
Concentrated secondary antibody used
Make sure the secondary antibody is diluted as described on page 48. If the background remains high, but with strong band intensity, decrease the concentration of the secondary antibody.
Concentrated primary antibody used
Decrease the concentration of the primary antibody.
Continued on next page
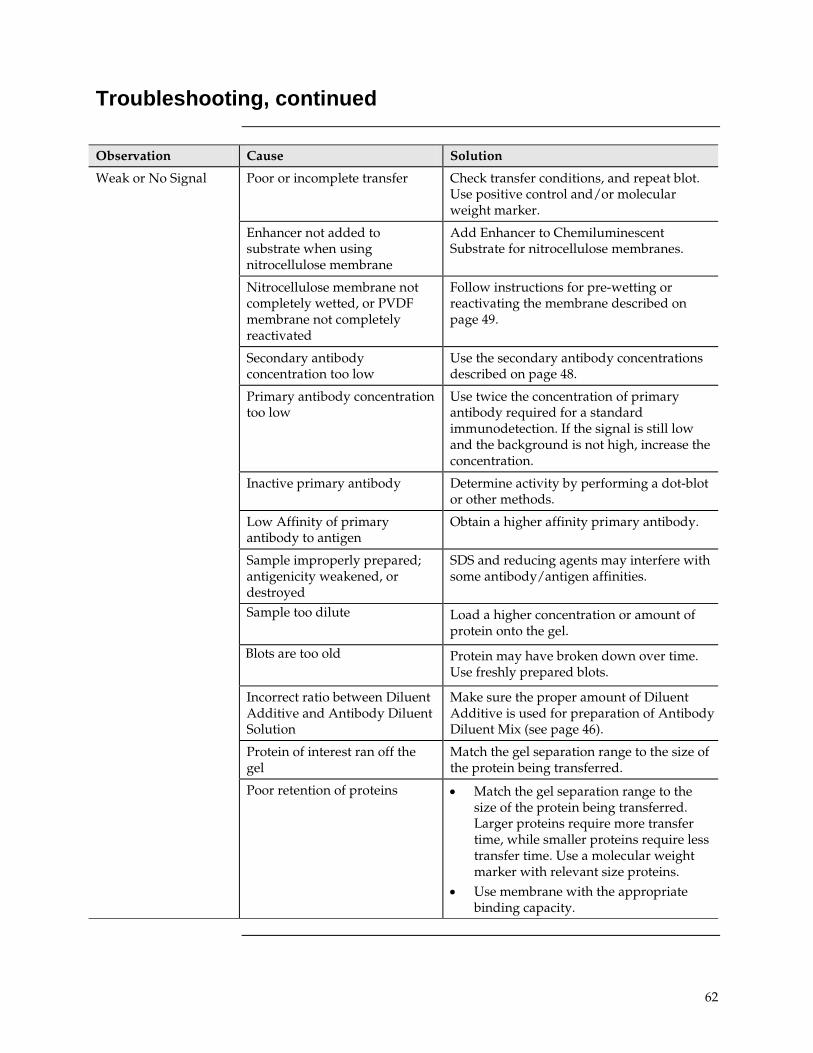
62
Troubleshooting, continued
Observation Cause Solution
Weak or No Signal
Poor or incomplete transfer Check transfer conditions, and repeat blot. Use positive control and/or molecular weight marker.
Enhancer not added to substrate when using nitrocellulose membrane
Add Enhancer to Chemiluminescent Substrate for nitrocellulose membranes.
Nitrocellulose membrane not completely wetted, or PVDF membrane not completely reactivated
Follow instructions for pre-wetting or reactivating the membrane described on page 49.
Secondary antibody concentration too low
Use the secondary antibody concentrations described on page 48.
Primary antibody concentration too low
Use twice the concentration of primary antibody required for a standard immunodetection. If the signal is still low and the background is not high, increase the concentration.
Inactive primary antibody Determine activity by performing a dot-blot or other methods.
Low Affinity of primary antibody to antigen
Obtain a higher affinity primary antibody.
Sample improperly prepared; antigenicity weakened, or destroyed
SDS and reducing agents may interfere with some antibody/antigen affinities.
Sample too dilute
Load a higher concentration or amount of protein onto the gel.
Blots are too old
Protein may have broken down over time. Use freshly prepared blots.
Incorrect ratio between Diluent Additive and Antibody Diluent Solution
Make sure the proper amount of Diluent Additive is used for preparation of Antibody Diluent Mix (see page 46).
Protein of interest ran off the gel
Match the gel separation range to the size of the protein being transferred.
Poor retention of proteins • Match the gel separation range to the size of the protein being transferred. Larger proteins require more transfer time, while smaller proteins require less transfer time. Use a molecular weight marker with relevant size proteins.
• Use membrane with the appropriate binding capacity.

63
Troubleshooting, continued
Observation Cause Solution
Non-Specific Binding
Membrane contaminated by fingerprints or keratin proteins
Wear clean gloves at all times and use forceps when handling membranes. Always handle membranes around the edges.
Concentrated secondary antibody used
Make sure the secondary antibody is diluted as described on page 48. If the background remains high, but with strong band intensity, decrease the concentration of the secondary antibody.
Concentrated Primary antibody used
Decrease the concentration of the primary antibody.
Affinity of the primary antibody for the protein standards
Check with the protein standard manufacturer for homologies with primary antibody.
“Error2” Message Displayed
Short circuit or current exceeding the limits of the device
Open the lid for 15 seconds to allow the system to cool down. Close the lid and resume the run by pressing the Start/Stop Button. If the problem persists, contact Technical Support (see page 72).
Antibody Diluent Additive in the Antibody Diluent Mix exceeds 30% causing increased current and heat
Make sure the Antibody Diluent Mix is prepared as described on page 46.

64
Appendix
iBlot® Quick Reference Guide
Mode Action Sound Light Display
iBlot® plugged in
iBlot® connected to an electrical outlet and power switch is on
— — Version of iBlot® firmware
iBlot® turned on
No transfer stacks detected with lid opened
— — Default setting or the last defined program/time appear
Program selection
Press and release the Select Button
— — Program name blinks
Time selection (minutes)
Press the Select Button and use the Up and Down Buttons (+/-) to change values
— — Minutes blink
Time selection (seconds)
Press the Select Button and use the Up and Down Buttons (+/-) to change values
— — Seconds blink
Ready to run
Transfer stacks placed in the device and lid closed
— Steady red Program and time
Run Press and release the Start/Stop Button
— Steady green Count down time
Running error alert
Open the lid and fix the error (lost contact with stacks or short circuit)
Continuous beeping
Flashing red “Error1” or “Error2”
Error fixed
Close the lid Continuous beeping
Flashing green
“Error1” or “Error2”
Continue after error
Press and release the Start/Stop Button
— Steady green Count down time
Restart after error
Press and hold the Start/Stop Button • Transfer stacks placed in
the device and lid closed • No transfer stacks
detected with lid opened
— • Steady red —
• Program and time • Default setting or
the last defined program/time appear
Continued on next page

65
iBlot® Quick Reference Guide, continued
Mode Action Sound Light Display
End of run Automatic Continuous beeping for 2 minutes (or less if Start/Stop Button is pressed) followed by a single beep every minute
Flashing red Program and time
Run ends after an external power failure
Transfer stacks placed in the device and lid closed
— Steady red Program and time

66
Product Specifications
Intended use For research use only. Not intended for human or animal diagnostic or
therapeutic uses.
iBlot® Gel Transfer Device specifications
Dimensions: 37 cm (l) × 20 cm (w) × 11 cm (h)
Weight: 2.3 kg
Electrical Parameters: 100–240 V, 50/60 Hz, 3.3 A
Built-in Features: Digital display, alarm, light LED
Compatibility: Suitable for transfer of mini- (8 × 8 cm), midi- (8 × 13 cm), and E-PAGE™ Gels
iBlot® Materials: Polycarbonate, Cycoloy, Acrylic, Gold plated copper, Stainless steel, Plasticized silicone, Aluminum
Operating Temperature: 5–40°C
Blotting Roller: Delrin roller (8.6-cm wide) attached to a stainless steel handle
The iBlot® Gel Transfer Device is impervious to alcohol, acid (HCl), alkali (NaOH) but not compatible with acetone, dimethyl sulfoxide, and acetic acid.
iBlot® DNA Transfer Stack specifications
Specifications for the iBlot® DNA Transfer Stacks are listed below. For a more detailed description of the iBlot® Transfer Stacks, see page 7.
iBlot® Cathode Stack, Top
Top Stack Gel Layer: 13.6 cm (l) × 8.5 cm (w) × 0.19 cm (thick)
Top Stack Gel Layer Composition: Proprietary
Electrode: Copper-coated mesh
iBlot® Anode Stack, Bottom
Bottom Stack Gel Layer: 14.1 cm (l) × 8.5 cm (w) × 0.32 cm (thick)
Bottom Stack Gel Layer Composition: Proprietary
Electrode: Copper-coated mesh
Transfer Membrane: Nylon (0.2 µm)
Plastic Tray: 16.8 cm × 10.3 cm (1.7-cm wide copper contact)
iBlot® Disposable Sponge
Dimensions: 15 cm (l) × 9.5 cm (w) × 1.0 cm (thick)
Material: White Melamine
Metal Contact: Aluminum
Continued on next page

67
Product Specifications, continued
iBlot® Gel Transfer Stack specifications
Specifications for the iBlot® Gel Transfer Stacks are listed below. For a more detailed description of the iBlot® Transfer Stacks, see page 7.
iBlot® Cathode Stack, Top Top Stack Gel Layer, Regular: 13.6 cm (l) × 8.5 cm (w) × 0.19 cm (thick) Top Stack Gel Layer, Mini: 8.5 cm (l) × 8.5 cm (w) × 0.19 cm (thick) Top Stack Gel Layer Composition: Proprietary Electrode: Copper-coated mesh iBlot® Anode Stack, Bottom Bottom Stack Gel Layer, Regular: 14.1 cm (l) × 8.5 cm (w) × 0.32 cm (thick) Bottom Stack Gel Layer, Mini: 8.5 cm (l) × 8.5 cm (w) × 0.32 cm (thick) Bottom Stack Gel Layer Composition:
Proprietary
Electrode: Copper-coated mesh Transfer Membrane: Nitrocellulose (0.2 µm) or PVDF (0.2 µm,
low fluorescence) Plastic Tray: 16.8 cm × 10.3 cm (1.7-cm wide copper
contact) iBlot® Disposable Sponge Dimensions: 15 cm (l) × 9.5 cm (w) × 1.1 cm (thick) Material: Gray Melamine Metal Contact: Aluminum iBlot® Filter Paper Regular Filter Paper: 13.5 cm (l) × 8 cm (l) × 0.04 cm (thick) Mini Filter Paper: 8 cm (l) × 8 cm (w) × 0.04 cm (thick)
Continued on next page
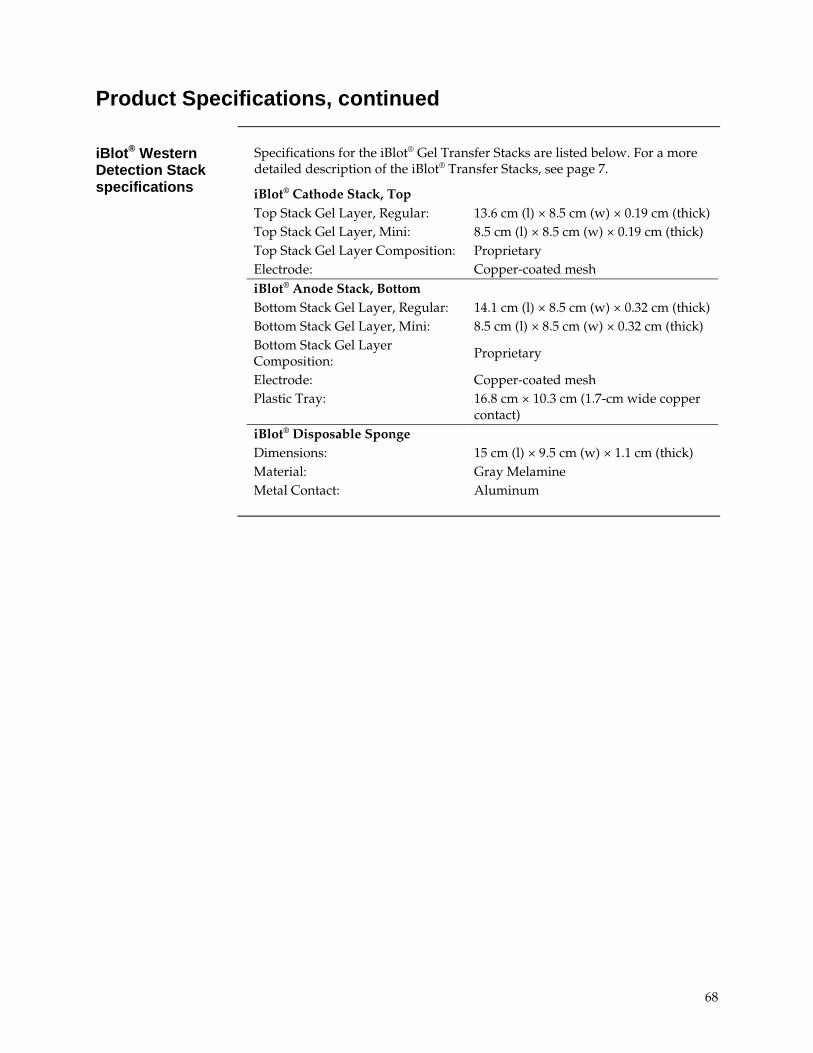
68
Product Specifications, continued
iBlot® Western Detection Stack specifications
Specifications for the iBlot® Gel Transfer Stacks are listed below. For a more detailed description of the iBlot® Transfer Stacks, see page 7.
iBlot® Cathode Stack, Top Top Stack Gel Layer, Regular: 13.6 cm (l) × 8.5 cm (w) × 0.19 cm (thick) Top Stack Gel Layer, Mini: 8.5 cm (l) × 8.5 cm (w) × 0.19 cm (thick) Top Stack Gel Layer Composition: Proprietary Electrode: Copper-coated mesh iBlot® Anode Stack, Bottom Bottom Stack Gel Layer, Regular: 14.1 cm (l) × 8.5 cm (w) × 0.32 cm (thick) Bottom Stack Gel Layer, Mini: 8.5 cm (l) × 8.5 cm (w) × 0.32 cm (thick) Bottom Stack Gel Layer Composition:
Proprietary
Electrode: Copper-coated mesh Plastic Tray: 16.8 cm × 10.3 cm (1.7-cm wide copper
contact) iBlot® Disposable Sponge Dimensions: 15 cm (l) × 9.5 cm (w) × 1.1 cm (thick) Material: Gray Melamine Metal Contact: Aluminum
69
Explanation of Symbols and Warnings
The iBlot® Gel Transfer Device complies with the Underwriters Laboratories Inc. regulation, part 15 of the FCC rules, and the European Community Safety requirements. Operation of the iBlot® Gel Transfer Device is subject to the conditions described in this manual. The protection provided by the equipment may be impaired if the equipment is used in a manner not specified by Life Technologies.
Operation of the iBlot® Gel Transfer Device is subject to the following conditions:
• Indoor use
• Altitude below 2000 meters
• Temperature range: 5 to 40ºC
• Maximum relative humidity: 80%
• Installation categories (over voltage categories) II; Pollution degree 2
• Mains supply voltage fluctuations not to exceed 10% of the nominal voltage (100–240 V, 50/60 Hz, 3.3 A).
• Mains plug is a disconnect device and must be easily accessible.
• Do not attempt to open the iBlot® Gel Transfer Device. To honor the warranty, iBlot® device can only be opened and serviced by Life Technologies.
• The protection provided by the equipment may be impaired if the equipment is used in a manner not specified by Life Technologies.
• The device must be connected to a mains socket outlet with protective earthing connections.
• Ventilation requirements: room ventilation
The iBlot® Gel Transfer Device complies with part 15 of the FCC rules. Operation of the device is subject to the following two conditions:
• The device may not cause harmful interference
• The device must accept any interference received, including interference that may cause undesired operation.
Life Technologies Israel Ltd., is the manufacturer and owner of the UL file. For more information, contact:
Life Technologies Israel Ltd. 12 Hamada St. P.O. Box 4035 Rehovot, Israel 74103
Caution
The Caution symbol denotes a risk of safety hazard. Refer to accompanying documentation.
WEEE
The WEEE (Waste Electrical and Electronic Equipment) symbol indicates that this product should not be disposed of in unsorted municipal waste. Follow local municipal waste ordinances for proper disposal provisions to reduce the environmental impact of WEEE. Visit www.lifetechnologies.com/weee for collection and recycling options.
Continued on next page
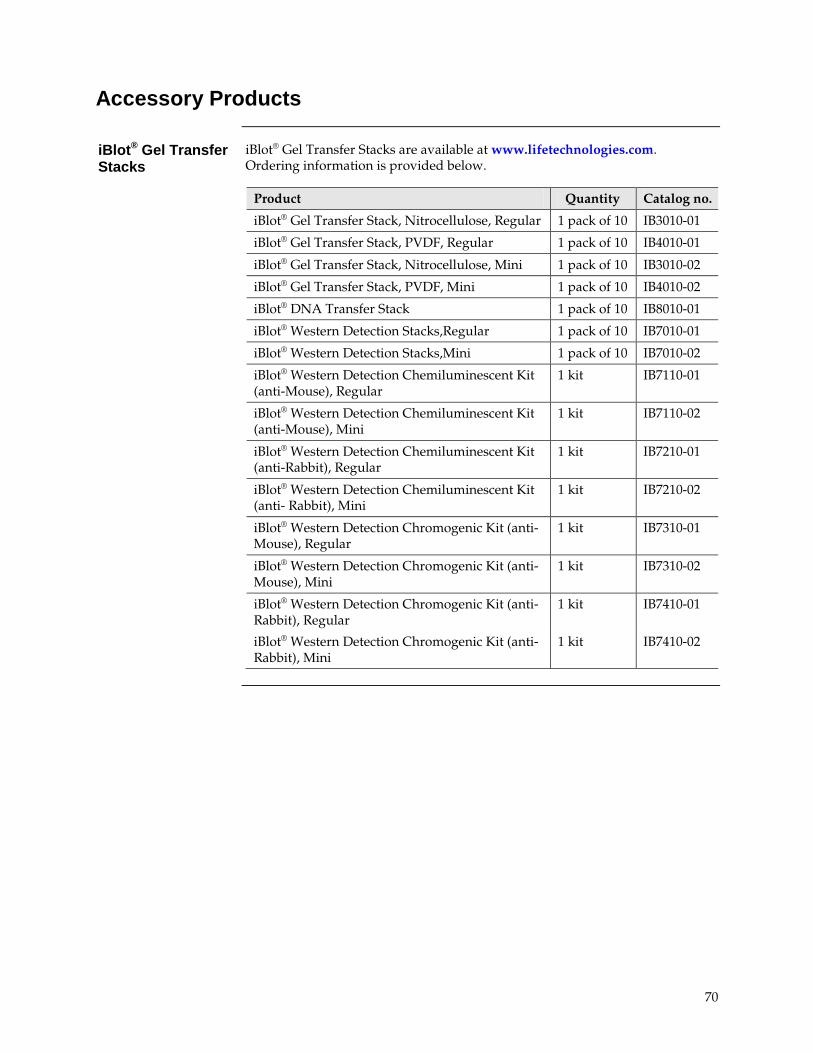
70
Accessory Products
iBlot® Gel Transfer Stacks
iBlot® Gel Transfer Stacks are available at www.lifetechnologies.com. Ordering information is provided below.
Product Quantity Catalog no.
iBlot® Gel Transfer Stack, Nitrocellulose, Regular 1 pack of 10 IB3010-01
iBlot® Gel Transfer Stack, PVDF, Regular 1 pack of 10 IB4010-01
iBlot® Gel Transfer Stack, Nitrocellulose, Mini 1 pack of 10 IB3010-02
iBlot® Gel Transfer Stack, PVDF, Mini 1 pack of 10 IB4010-02
iBlot® DNA Transfer Stack 1 pack of 10 IB8010-01
iBlot® Western Detection Stacks,Regular 1 pack of 10 IB7010-01
iBlot® Western Detection Stacks,Mini 1 pack of 10 IB7010-02
iBlot® Western Detection Chemiluminescent Kit (anti-Mouse), Regular
1 kit IB7110-01
iBlot® Western Detection Chemiluminescent Kit (anti-Mouse), Mini
1 kit IB7110-02
iBlot® Western Detection Chemiluminescent Kit (anti-Rabbit), Regular
1 kit IB7210-01
iBlot® Western Detection Chemiluminescent Kit (anti- Rabbit), Mini
1 kit IB7210-02
iBlot® Western Detection Chromogenic Kit (anti-Mouse), Regular
1 kit IB7310-01
iBlot® Western Detection Chromogenic Kit (anti-Mouse), Mini
1 kit IB7310-02
iBlot® Western Detection Chromogenic Kit (anti-Rabbit), Regular
1 kit IB7410-01
iBlot® Western Detection Chromogenic Kit (anti- Rabbit), Mini
1 kit IB7410-02

71
Accessory Products, continued
Additional products
Additional reagents that may be used for electrophoresis of proteins are available at www.lifetechnologies.com. Ordering information is provided below. For more information, visit www.lifetechnologies.com or call Technical Support (page 72).
Product Quantity Catalog no.
NuPAGE Transfer Buffer (20X) 1 L NP0006-1
NuPAGE Antioxidant 15 mL NP0005
WesternBreeze Chromogenic Kit, Anti-Mouse 1 kit WB7103
WesternBreeze Chromogenic Kit Anti-Rabbit 1 kit WB7105
WesternBreeze Chemiluminescent Kit, Anti-Mouse 1 kit WB7104
WesternBreeze Chemiluminescent Kit, Anti-Rabbit 1 kit WB7106
Blotting Roller 1 LC2100
SeeBlue® Plus2 Pre-Stained Standard 500 µL LC5925
MagicMark™ XP Western Protein Standard 250 µL LC5602
Novex® Reversible Membrane Protein Stain Kit 1 kit IB7710
SYPRO® Ruby Protein Blot Stain 200 mL S-11791
Replacement Parts
iBlot® USB Cable (USB A Male to USB B Male) 1 IB8001-05
iBlot® Device Electrodes 1 set IB1002
iBlot® Device Lid Latch Replacement 1 IB1003
Precast gels and premade buffers
A large variety of precast gels including NuPAGE® Novex®, Tris-Glycine mini- and midi-gels, and E-PAGE™ gels, as well as premade buffers are available at www.lifetechnologies.com.. For details, contact Technical Support (page 72) or visit www.lifetechnologies.com.
72
Technical Support
Obtaining support For the latest services and support information for all locations, go to www.lifetechnologies.com
At the website, you can:
• Access worldwide telephone and fax numbers to contact Technical Support and Sales facilities
• Search through frequently asked questions (FAQs)
• Submit a question directly to Technical Support ([email protected])
• Search for user documents, SDSs, vector maps and sequences, application notes, formulations, handbooks, certificates of analysis, citations, and other product support documents
• Obtain information about customer training
• Download software updates and patches
Safety Data Sheets (SDS)
Safety Data Sheets (SDSs) are available at www.lifetechnologies.com/support
Certificate of Analysis
The Certificate of Analysis provides detailed quality control and product qualification information for each product. Certificates of Analysis are available on our website. Go to www.lifetechnologies.com/support and search for the Certificate of Analysis by product lot number, which is printed on the box.
Limited warranty Life Technologies and/or its affiliate(s) warrant their products as set forth in the Life Technologies General Terms and Conditions of Sale found on the Life Technologies website at http://www.lifetechnologies.com/termsandconditions. If you have any questions, please contact Life Technologies. Life Technologies and/or its affiliate(s) disclaim all warranties with respect to this document, expressed or implied, including but not limited to those of merchantability or fitness for a particular purpose. In no event shall Life Technologies and/or its affiliate(s) be liable, whether in contract, tort, warranty, or under any statute or on any other basis for special, incidental, indirect, punitive, multiple or consequential damages in connection with or arising from this document, including but not limited to the use thereof.

73
Technical Support, continued
iBlot® Gel Transfer Device warranty
Life Technologies warrants that this product will be free from defects in material and workmanship for a period of one (1) year from date of purchase. If a defect is present, Life Technologies will, at its option, repair, replace, or refund the purchase price of this product at no charge to you, provided it is returned during the warranty period. This warranty does not apply if the product has been damaged by accident, abuse, misuse, or misapplication, or from ordinary wear and tear. For your protection, items being returned must be insured against possible damage or loss. This warranty shall be limited to the replacement of defective products. It is expressly agreed that this warranty will be in lieu of all warranties of fitness and in lieu of the warranty of merchantability.

74
Purchaser Notification
Product qualification
The iBlot® Gel Transfer Stacks are qualified using the following criteria:
• Visual Inspection Each component of the iBlot® Gel Transfer Stack is visually inspected as follows: Transfer Gel Layer is inspected for size, integrity, uniformity, absence of bubbles and spots, and must meet the set specifications. Copper Electrodes must be clean without any blue or other spots. Plastic Tray must be clean without any deformations and the electrode contact attached to the bottom plastic tray must be proper without showing any sign of corrosion. Nitrocellulose and PVDF Membrane must be clean and free of spots or bubbles, and must not be dry.
• Functional Test The iBlot® Dry Blotting System is functionally qualified by blotting suitable E-PAGE™ and NuPAGE® gels as described in this manual using pre-stained protein standards and protein samples. The system is tested for initial and final current on the device, detection sensitivity, and the presence of bubbles, smears, and distortions after blotting on the membrane, and must meet the set specifications.
Limited use label license: Research use only
The purchase of this product conveys to the purchaser the limited, non-transferable right to use the purchased amount of the product only to perform internal research for the sole benefit of the purchaser. No right to resell this product or any of its components is conveyed expressly, by implication, or by estoppel. This product is for internal research purposes only and is not for use in commercial services of any kind, including, without limitation, reporting the results of purchaser’s activities for a fee or other form of consideration. For information on obtaining additional rights, please contact [email protected] or Out Licensing, Life Technologies, 5791 Van Allen Way, Carlsbad, California 92008.
©2011 Life Technologies Corporation. All rights reserved. The trademarks mentioned herein are the property of Life Technologies Corporation or their respective owners. Coomassie® is a registered trademark of Imperial Chemical Industries.

75
Notes


Headquarters5791 Van Allen Way | Carlsbad, CA 92008 USA | Phone +1 760 603 7200 | Toll Free in USA 800 955 6288For support visit www.invitrogen.com/support or email [email protected]
www.lifetechnologies.com