Embed Size (px)
Citation preview

OWNER'S MANUAL
REIONATOR®
WHOLE HOUSE WATER CONDITIONER with Triton Electronic Control Valve
Platinum Series Classic Series
ACTIVATE YOUR WARRANTYBY REGISTERING YOUR PRODUCT AT
www.watertech.com or call 888-254-8412
WQA Gold Seal certified to NSF/ANSI Standards 42 and 44 for meeting or exceeding industry standards of aesthetic chlorine reduction and softening efficiency.
Dealer Name:
Dealer Phone Number: Installation Date:
Model Number: Serial Number:
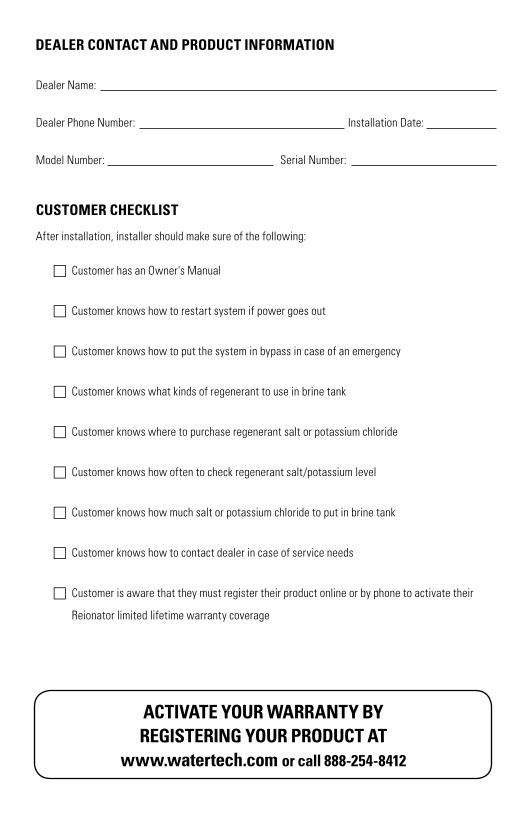
CUSTOMER CHECKLIST
After installation, installer should make sure of the following:
Customer has an Owner's Manual
Customer knows how to restart system if power goes out
Customer knows how to put the system in bypass in case of an emergency
Customer knows what kinds of regenerant to use in brine tank
Customer knows where to purchase regenerant salt or potassium chloride
Customer knows how often to check regenerant salt/potassium level
Customer knows how much salt or potassium chloride to put in brine tank
Customer knows how to contact dealer in case of service needs
Customer is aware that they must register their product online or by phone to activate their
Reionator limited lifetime warranty coverage
DEALER CONTACT AND PRODUCT INFORMATION
ACTIVATE YOUR WARRANTY BYREGISTERING YOUR PRODUCT AT
www.watertech.com or call 888-254-8412
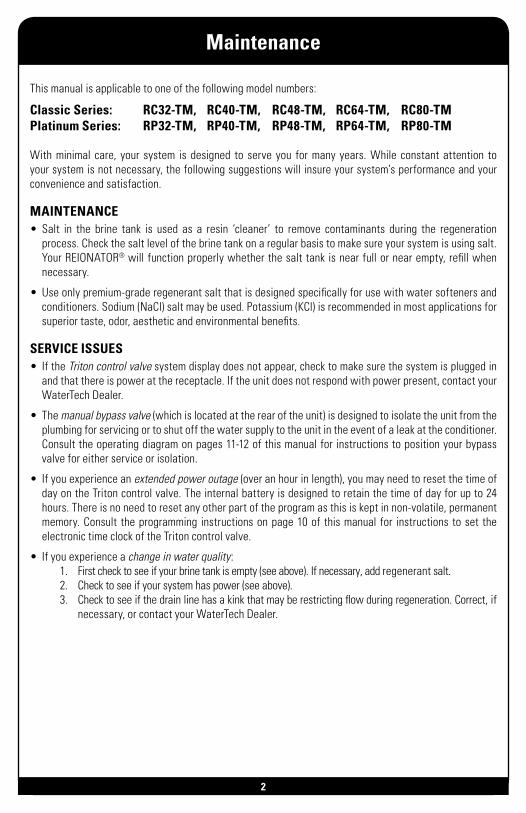
Maintenance
This manual is applicable to one of the following model numbers:
Classic Series: RC32-TM, RC40-TM, RC48-TM, RC64-TM, RC80-TM Platinum Series: RP32-TM, RP40-TM, RP48-TM, RP64-TM, RP80-TM With minimal care, your system is designed to serve you for many years. While constant attention to your system is not necessary, the following suggestions will insure your system’s performance and your convenience and satisfaction.
MAINTENANCE• Salt in the brine tank is used as a resin ‘cleaner’ to remove contaminants during the regeneration
process. Check the salt level of the brine tank on a regular basis to make sure your system is using salt. Your REIONATOR® will function properly whether the salt tank is near full or near empty, refill when necessary.
• Use only premium-grade regenerant salt that is designed specifically for use with water softeners and conditioners. Sodium (NaCl) salt may be used. Potassium (KCl) is recommended in most applications for superior taste, odor, aesthetic and environmental benefits.
SERVICE ISSUES• If the Triton control valve system display does not appear, check to make sure the system is plugged in
and that there is power at the receptacle. If the unit does not respond with power present, contact your WaterTech Dealer.
• The manual bypass valve (which is located at the rear of the unit) is designed to isolate the unit from the plumbing for servicing or to shut off the water supply to the unit in the event of a leak at the conditioner. Consult the operating diagram on pages 11-12 of this manual for instructions to position your bypass valve for either service or isolation.
• If you experience an extended power outage (over an hour in length), you may need to reset the time of day on the Triton control valve. The internal battery is designed to retain the time of day for up to 24 hours. There is no need to reset any other part of the program as this is kept in non-volatile, permanent memory. Consult the programming instructions on page 10 of this manual for instructions to set the electronic time clock of the Triton control valve.
• If you experience a change in water quality:1. First check to see if your brine tank is empty (see above). If necessary, add regenerant salt.2. Check to see if your system has power (see above).3. Check to see if the drain line has a kink that may be restricting flow during regeneration. Correct, if
necessary, or contact your WaterTech Dealer.
2
Do’s and Do Not’s
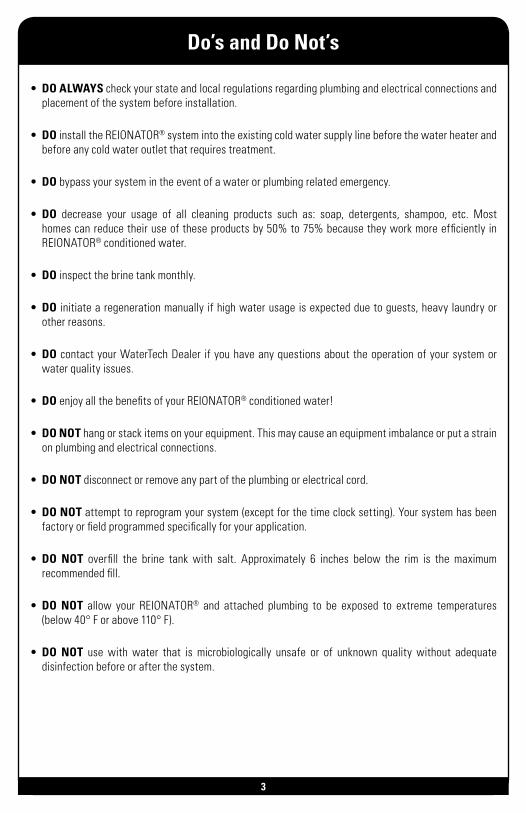
• DO ALWAYS check your state and local regulations regarding plumbing and electrical connections and placement of the system before installation.
• DO install the REIONATOR® system into the existing cold water supply line before the water heater and before any cold water outlet that requires treatment.
• DO bypass your system in the event of a water or plumbing related emergency.
• DO decrease your usage of all cleaning products such as: soap, detergents, shampoo, etc. Most homes can reduce their use of these products by 50% to 75% because they work more efficiently in REIONATOR® conditioned water.
• DO inspect the brine tank monthly.
• DO initiate a regeneration manually if high water usage is expected due to guests, heavy laundry or other reasons.
• DO contact your WaterTech Dealer if you have any questions about the operation of your system or water quality issues.
• DO enjoy all the benefits of your REIONATOR® conditioned water!
• DO NOT hang or stack items on your equipment. This may cause an equipment imbalance or put a strain on plumbing and electrical connections.
• DO NOT disconnect or remove any part of the plumbing or electrical cord.
• DO NOT attempt to reprogram your system (except for the time clock setting). Your system has been factory or field programmed specifically for your application.
• DO NOT overfill the brine tank with salt. Approximately 6 inches below the rim is the maximum recommended fill.
• DO NOT allow your REIONATOR® and attached plumbing to be exposed to extreme temperatures (below 40° F or above 110° F).
• DO NOT use with water that is microbiologically unsafe or of unknown quality without adequate disinfection before or after the system.
3

4
Parts List
Overflow Elbow
Triton Control Valve
PRODUCT DESCRIPTION PART NUMBER
Resin Tank 9" x 48" 09-03-0948BLK
Resin Tank 10" x 47" 09-03-1047BLK
Resin Tank 10" x 54" 09-03-1054BLK
Resin Tank 12" x 52" 09-03-1252BLK
Resin Tank 13" x 54" 09-03-1354BLK
Brine Tank Assembled 18" x 33" 09-04-1833BKC
Brine Grid 18" 09-04-119
Brine Well Assembly (for 18x33) 09-04-242
Brine Overflow Elbow 07-05-004
Triton Control Valve 13-V1CCDM
Resin Tank
Brine Tank
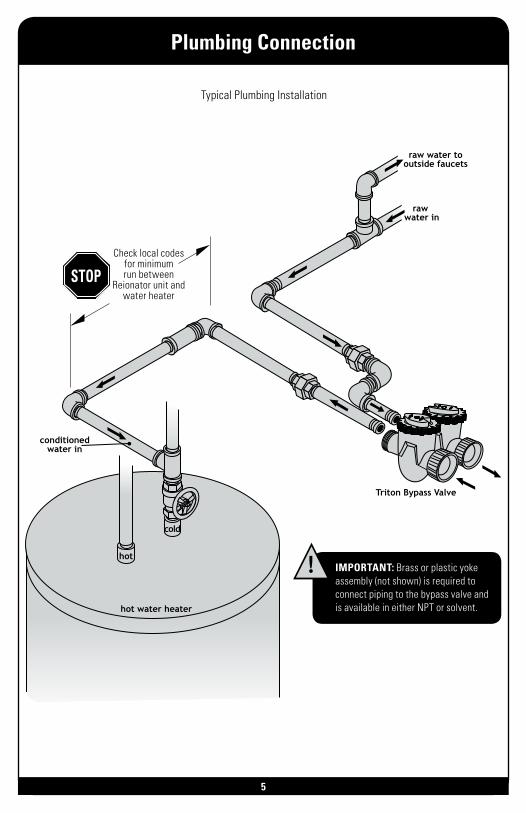
Plumbing Connection
Typical Plumbing Installation
STOPCheck local codes
for minimum run between
Reionator unit and water heater
5
IMPORTANT: Brass or plastic yoke assembly (not shown) is required to connect piping to the bypass valve and is available in either NPT or solvent.
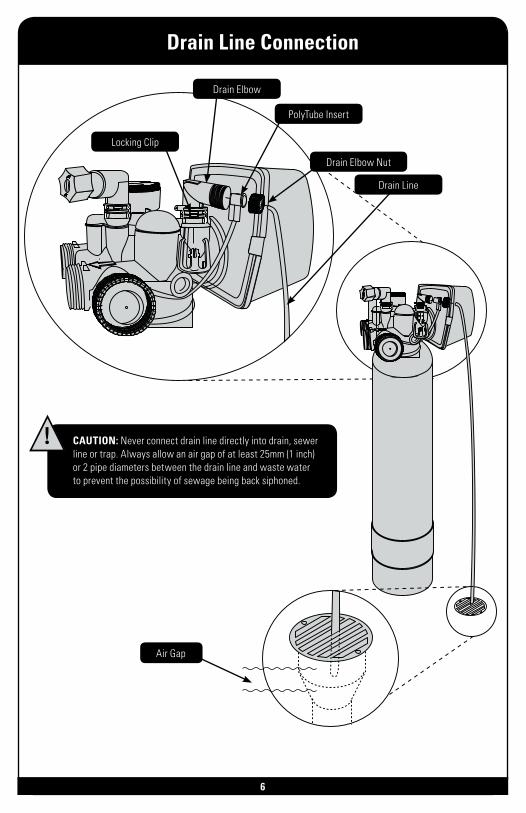
Drain Line Connection
Air Gap
Drain Line
Drain Elbow Nut
PolyTube Insert
Drain Elbow
Locking Clip
6
CAUTION: Never connect drain line directly into drain, sewer line or trap. Always allow an air gap of at least 25mm (1 inch) or 2 pipe diameters between the drain line and waste water to prevent the possibility of sewage being back siphoned.
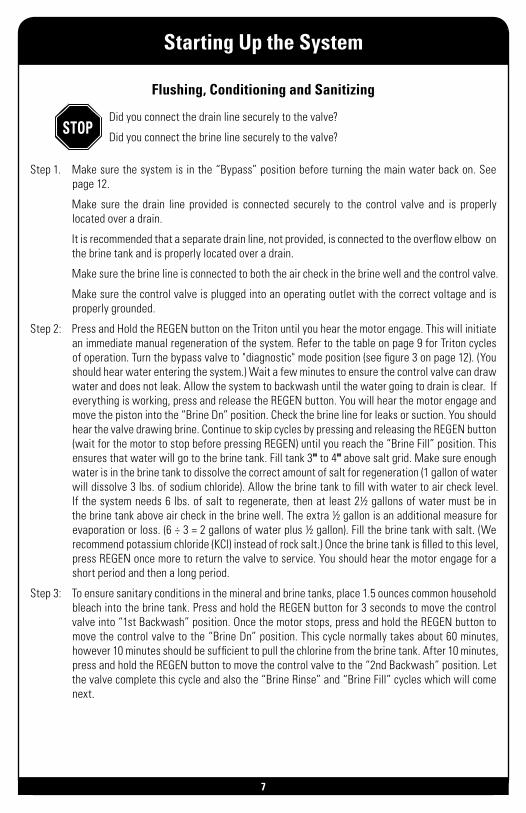
Starting Up the System
Flushing, Conditioning and Sanitizing
Did you connect the drain line securely to the valve?
Did you connect the brine line securely to the valve?
Step 1. Make sure the system is in the “Bypass” position before turning the main water back on. See page 12.
Make sure the drain line provided is connected securely to the control valve and is properly located over a drain.
It is recommended that a separate drain line, not provided, is connected to the overflow elbow on the brine tank and is properly located over a drain.
Make sure the brine line is connected to both the air check in the brine well and the control valve.
Make sure the control valve is plugged into an operating outlet with the correct voltage and is properly grounded.
Step 2: Press and Hold the REGEN button on the Triton until you hear the motor engage. This will initiate an immediate manual regeneration of the system. Refer to the table on page 9 for Triton cycles of operation. Turn the bypass valve to "diagnostic" mode position (see figure 3 on page 12). (You should hear water entering the system.) Wait a few minutes to ensure the control valve can draw water and does not leak. Allow the system to backwash until the water going to drain is clear. If everything is working, press and release the REGEN button. You will hear the motor engage and move the piston into the “Brine Dn” position. Check the brine line for leaks or suction. You should hear the valve drawing brine. Continue to skip cycles by pressing and releasing the REGEN button (wait for the motor to stop before pressing REGEN) until you reach the “Brine Fill” position. This ensures that water will go to the brine tank. Fill tank 3" to 4" above salt grid. Make sure enough water is in the brine tank to dissolve the correct amount of salt for regeneration (1 gallon of water will dissolve 3 lbs. of sodium chloride). Allow the brine tank to fill with water to air check level. If the system needs 6 lbs. of salt to regenerate, then at least 2½ gallons of water must be in the brine tank above air check in the brine well. The extra ½ gallon is an additional measure for evaporation or loss. (6 ÷ 3 = 2 gallons of water plus ½ gallon). Fill the brine tank with salt. (We recommend potassium chloride (KCl) instead of rock salt.) Once the brine tank is filled to this level, press REGEN once more to return the valve to service. You should hear the motor engage for a short period and then a long period.
Step 3: To ensure sanitary conditions in the mineral and brine tanks, place 1.5 ounces common household bleach into the brine tank. Press and hold the REGEN button for 3 seconds to move the control valve into “1st Backwash” position. Once the motor stops, press and hold the REGEN button to move the control valve to the “Brine Dn” position. This cycle normally takes about 60 minutes, however 10 minutes should be sufficient to pull the chlorine from the brine tank. After 10 minutes, press and hold the REGEN button to move the control valve to the “2nd Backwash” position. Let the valve complete this cycle and also the “Brine Rinse” and “Brine Fill” cycles which will come next.
STOP
7
Starting Up the System
Step 3: continued: Once the valve has completed the “Brine Fill” cycle it will automatically return to service. In step 5
you will set the valve to “Regen Today” so that it will regen tonight at the specified time. If there is any residual chlorine, it should be removed tonight.
Step 4: Make sure that the bypass valve is completely set in the “Normal Operation” position. Let the water in the taps of the building run for several minutes to purge the unconditioned water out of the pipes. After several minutes, take a water sample and test for hardness from the running tap. If a hardness test reads “soft” water, the installation is correct.
Step 5: Press and release the REGEN button. You should see “Regen Today” appear on the LCD screen. This will instruct the control valve to regenerate tonight at the specified time (usually 2:00 am).
Step 6: Drain hot water heater and let it refill with conditioned water. We suggest draining the hot water by turning on the hot water taps in the house. We recommend doing this just prior to bedtime.
8
Displays & Programming Instructions
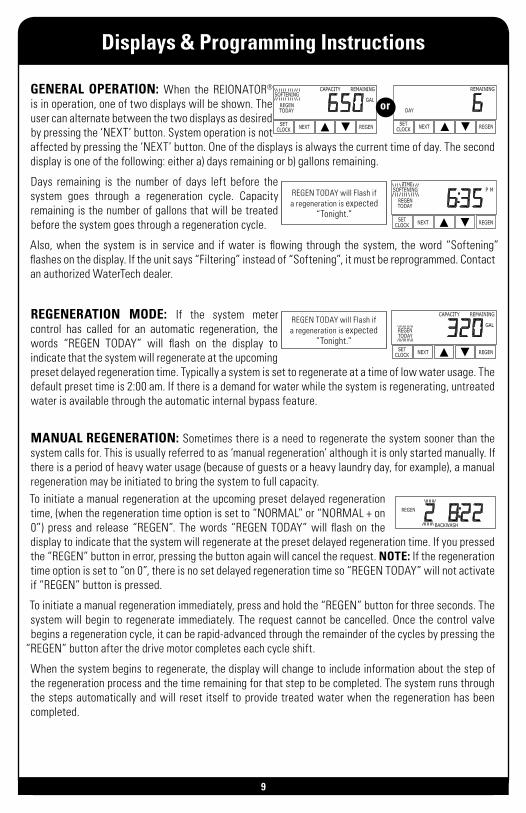
GENERAL OPERATION: When the REIONATOR® is in operation, one of two displays will be shown. The user can alternate between the two displays as desired by pressing the ‘NEXT’ button. System operation is not affected by pressing the ‘NEXT’ button. One of the displays is always the current time of day. The second display is one of the following: either a) days remaining or b) gallons remaining.
Days remaining is the number of days left before the system goes through a regeneration cycle. Capacity remaining is the number of gallons that will be treated before the system goes through a regeneration cycle.
Also, when the system is in service and if water is flowing through the system, the word “Softening” flashes on the display. If the unit says “Filtering” instead of “Softening”, it must be reprogrammed. Contact an authorized WaterTech dealer.
REGENERATION MODE: If the system meter control has called for an automatic regeneration, the words “REGEN TODAY” will flash on the display to indicate that the system will regenerate at the upcoming preset delayed regeneration time. Typically a system is set to regenerate at a time of low water usage. The default preset time is 2:00 am. If there is a demand for water while the system is regenerating, untreated water is available through the automatic internal bypass feature.
MANUAL REGENERATION: Sometimes there is a need to regenerate the system sooner than the system calls for. This is usually referred to as ‘manual regeneration’ although it is only started manually. If there is a period of heavy water usage (because of guests or a heavy laundry day, for example), a manual regeneration may be initiated to bring the system to full capacity.To initiate a manual regeneration at the upcoming preset delayed regeneration time, (when the regeneration time option is set to “NORMAL” or “NORMAL + on 0”) press and release “REGEN”. The words “REGEN TODAY” will flash on the display to indicate that the system will regenerate at the preset delayed regeneration time. If you pressed the “REGEN” button in error, pressing the button again will cancel the request. NOTE: If the regeneration time option is set to “on 0”, there is no set delayed regeneration time so “REGEN TODAY” will not activate if “REGEN” button is pressed.
To initiate a manual regeneration immediately, press and hold the “REGEN” button for three seconds. The system will begin to regenerate immediately. The request cannot be cancelled. Once the control valve begins a regeneration cycle, it can be rapid-advanced through the remainder of the cycles by pressing the
“REGEN” button after the drive motor completes each cycle shift.
When the system begins to regenerate, the display will change to include information about the step of the regeneration process and the time remaining for that step to be completed. The system runs through the steps automatically and will reset itself to provide treated water when the regeneration has been completed.
REGEN TODAY will Flash if a regeneration is expected
“Tonight.”
or
REGEN TODAY will Flash if a regeneration is expected
“Tonight.”
9
Set Time of Day / Power Loss
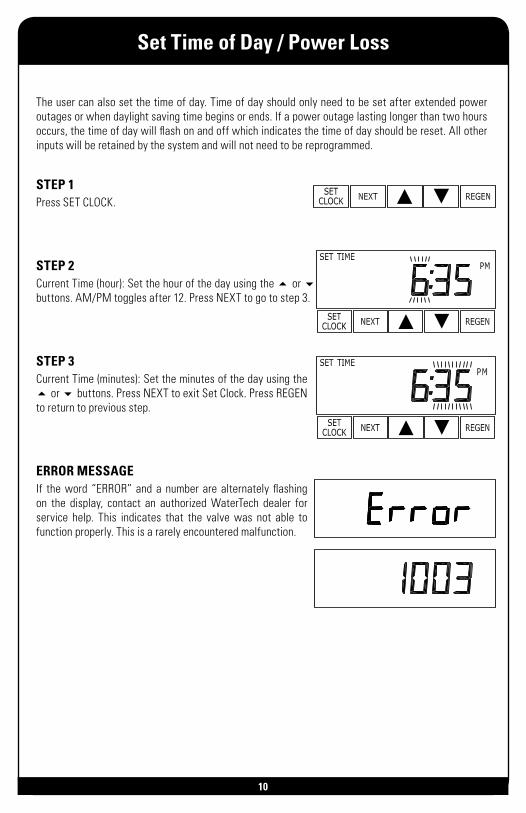
The user can also set the time of day. Time of day should only need to be set after extended power outages or when daylight saving time begins or ends. If a power outage lasting longer than two hours occurs, the time of day will flash on and off which indicates the time of day should be reset. All other inputs will be retained by the system and will not need to be reprogrammed.
STEP 1Press SET CLOCK.
STEP 2Current Time (hour): Set the hour of the day using the 5 or 6 buttons. AM/PM toggles after 12. Press NEXT to go to step 3.
STEP 3Current Time (minutes): Set the minutes of the day using the 5 or 6 buttons. Press NEXT to exit Set Clock. Press REGEN to return to previous step.
ERROR MESSAGEIf the word “ERROR” and a number are alternately flashing on the display, contact an authorized WaterTech dealer for service help. This indicates that the valve was not able to function properly. This is a rarely encountered malfunction.
10
Bypass Valve Operation
The bypass valve is typically used to isolate the control valve from the plumbing system’s water pressure in order to perform control valve repairs or maintenance. The 1" full flow bypass valve incorporates four positions including a diagnostic position that allows service personnel to work on a pressurized system while still providing untreated bypass water to the facility or residence. Its completely non-metallic, all plastic design allows for easy access and serviceability without the need for tools.
The bypass body and rotors are glass-filled Noryl and the nuts and caps are glass- filled polypropylene. All seals are self-lubricating EPDM to help prevent valve seizing after long periods of non-use. Internal o-rings can easily be replaced if service is required.
The bypass consists of two interchangeable plug valves that are operated independently by red arrow-shaped handles. The handles identify the flow direction of the water. The plug valves enable the bypass valve to operate in four positions.
Refer to corresponding bypass valve illustrations on the following page.
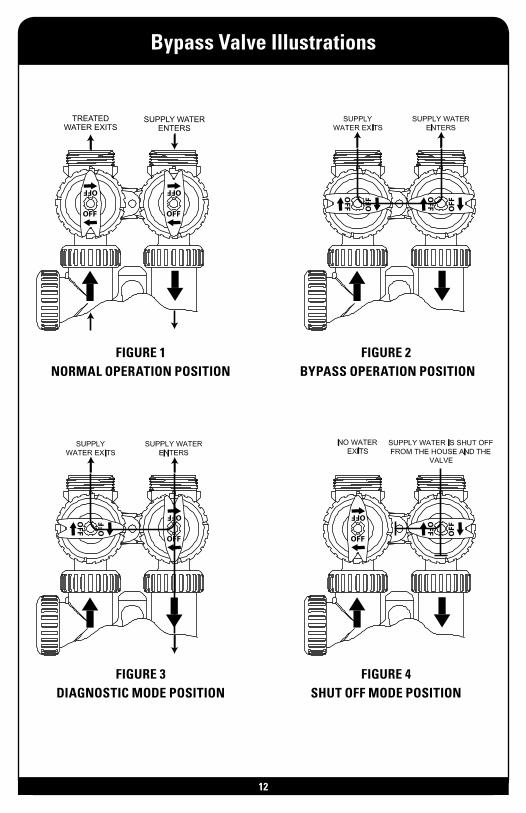
Figure 1. Normal Operation Position: The inlet and outlet handles point in the direction of flow indicated by the engraved arrows on the control valve. Water flows through the control valve during normal operation and this position also allows the control valve to isolate the media bed during the regeneration cycle.
Figure 2. Bypass Position: The inlet and outlet handles point to the center of the bypass, the control valve is isolated from the water pressure contained in the plumbing system. Untreated water is supplied to the plumbing system.
Figure 3. Diagnostic Position: The inlet handle points in the direction of flow and the outlet handle points to the center of bypass valve, system water pressure is allowed to the control valve and the plumbing system while not allowing water to exit from the control valve to the plumbing.
Figure 4. Shut Off Position: The inlet handle points to the center of the bypass valve and the outlet handle points in the direction of flow, the water is shut off to the plumbing system. If water is available, on the outlet side of the softener, it is an indication of water bypassing the system (i.e. a plumbing connection somewhere in the building bypasses the system).
11
Bypass Valve Illustrations
FIGURE 1NORMAL OPERATION POSITION
FIGURE 2 BYPASS OPERATION POSITION
FIGURE 3DIAGNOSTIC MODE POSITION
FIGURE 4SHUT OFF MODE POSITION
12
Specifications
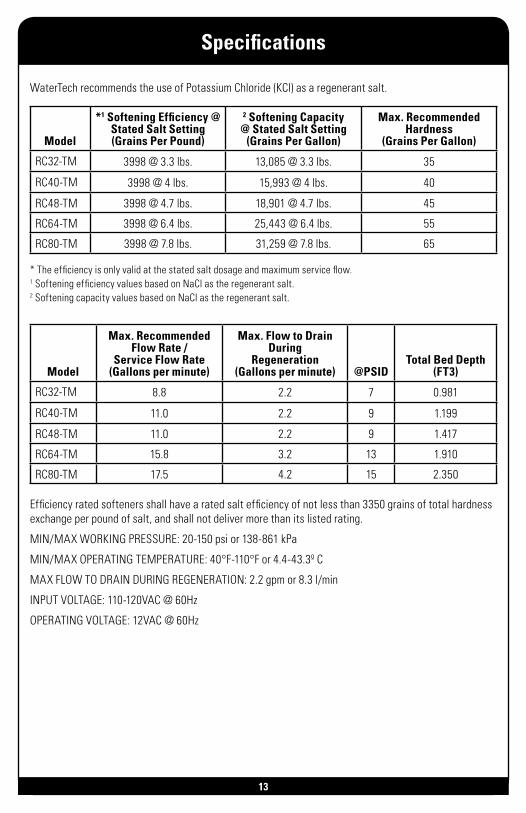
WaterTech recommends the use of Potassium Chloride (KCl) as a regenerant salt.
* The efficiency is only valid at the stated salt dosage and maximum service flow.1 Softening efficiency values based on NaCl as the regenerant salt.2 Softening capacity values based on NaCl as the regenerant salt.
Efficiency rated softeners shall have a rated salt efficiency of not less than 3350 grains of total hardness exchange per pound of salt, and shall not deliver more than its listed rating.
MIN/MAX WORKING PRESSURE: 20-150 psi or 138-861 kPa
MIN/MAX OPERATING TEMPERATURE: 40°F-110°F or 4.4-43.3º C
MAX FLOW TO DRAIN DURING REGENERATION: 2.2 gpm or 8.3 l/min
INPUT VOLTAGE: 110-120VAC @ 60Hz
OPERATING VOLTAGE: 12VAC @ 60Hz
13
Model
*1 Softening Efficiency @ Stated Salt Setting (Grains Per Pound)
2 Softening Capacity @ Stated Salt Setting
(Grains Per Gallon)
Max. Recommended Hardness
(Grains Per Gallon)
RC32-TM 3998 @ 3.3 lbs. 13,085 @ 3.3 lbs. 35
RC40-TM 3998 @ 4 lbs. 15,993 @ 4 lbs. 40
RC48-TM 3998 @ 4.7 lbs. 18,901 @ 4.7 lbs. 45
RC64-TM 3998 @ 6.4 lbs. 25,443 @ 6.4 lbs. 55
RC80-TM 3998 @ 7.8 lbs. 31,259 @ 7.8 lbs. 65
Model
Max. Recommended Flow Rate /
Service Flow Rate (Gallons per minute)
Max. Flow to Drain During
Regeneration (Gallons per minute) @PSID
Total Bed Depth (FT3)
RC32-TM 8.8 2.2 7 0.981
RC40-TM 11.0 2.2 9 1.199
RC48-TM 11.0 2.2 9 1.417
RC64-TM 15.8 3.2 13 1.910
RC80-TM 17.5 4.2 15 2.350
14
Specifications
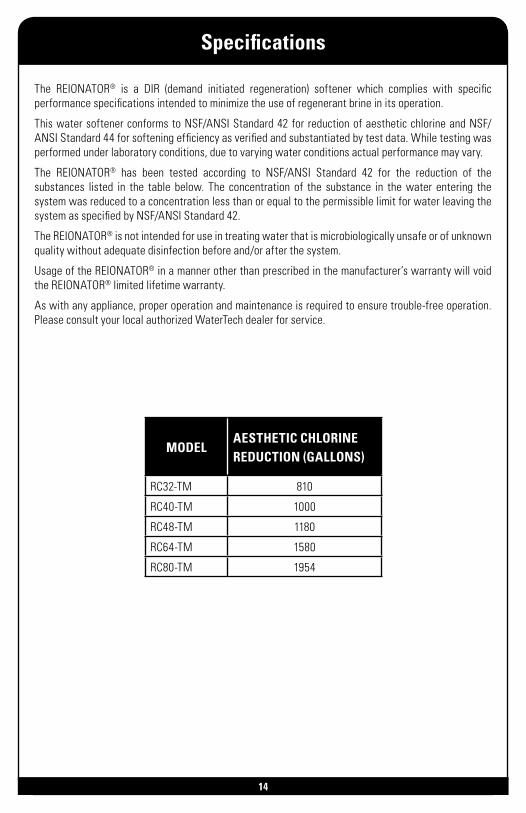
The REIONATOR® is a DIR (demand initiated regeneration) softener which complies with specific performance specifications intended to minimize the use of regenerant brine in its operation.
This water softener conforms to NSF/ANSI Standard 42 for reduction of aesthetic chlorine and NSF/ANSI Standard 44 for softening efficiency as verified and substantiated by test data. While testing was performed under laboratory conditions, due to varying water conditions actual performance may vary.
The REIONATOR® has been tested according to NSF/ANSI Standard 42 for the reduction of the substances listed in the table below. The concentration of the substance in the water entering the system was reduced to a concentration less than or equal to the permissible limit for water leaving the system as specified by NSF/ANSI Standard 42.
The REIONATOR® is not intended for use in treating water that is microbiologically unsafe or of unknown quality without adequate disinfection before and/or after the system.
Usage of the REIONATOR® in a manner other than prescribed in the manufacturer’s warranty will void the REIONATOR® limited lifetime warranty.
As with any appliance, proper operation and maintenance is required to ensure trouble-free operation. Please consult your local authorized WaterTech dealer for service.
MODELAESTHETIC CHLORINEREDUCTION (GALLONS)
RC32-TM 810
RC40-TM 1000
RC48-TM 1180
RC64-TM 1580
RC80-TM 1954
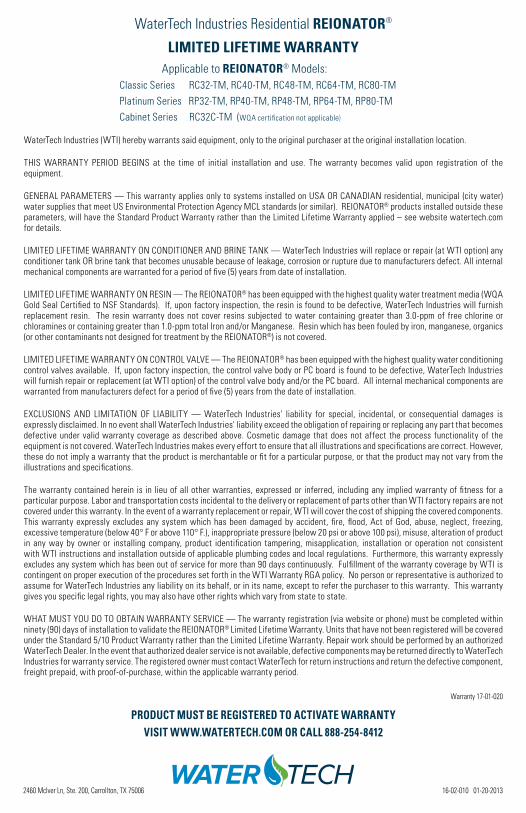
WaterTech Industries Residential REIONATOR®
LIMITED LIFETIME WARRANTY Applicable to REIONATOR® Models: Classic Series RC32-TM, RC40-TM, RC48-TM, RC64-TM, RC80-TM
Platinum Series RP32-TM, RP40-TM, RP48-TM, RP64-TM, RP80-TM
Cabinet Series RC32C-TM (WQA certification not applicable)
WaterTech Industries (WTI) hereby warrants said equipment, only to the original purchaser at the original installation location.
THIS WARRANTY PERIOD BEGINS at the time of initial installation and use. The warranty becomes valid upon registration of the equipment.
GENERAL PARAMETERS — This warranty applies only to systems installed on USA OR CANADIAN residential, municipal (city water) water supplies that meet US Environmental Protection Agency MCL standards (or similar). REIONATOR® products installed outside these parameters, will have the Standard Product Warranty rather than the Limited Lifetime Warranty applied – see website watertech.com for details.
LIMITED LIFETIME WARRANTY ON CONDITIONER AND BRINE TANK — WaterTech Industries will replace or repair (at WTI option) any conditioner tank OR brine tank that becomes unusable because of leakage, corrosion or rupture due to manufacturers defect. All internal mechanical components are warranted for a period of five (5) years from date of installation.
LIMITED LIFETIME WARRANTY ON RESIN — The REIONATOR® has been equipped with the highest quality water treatment media (WQA Gold Seal Certified to NSF Standards). If, upon factory inspection, the resin is found to be defective, WaterTech Industries will furnish replacement resin. The resin warranty does not cover resins subjected to water containing greater than 3.0-ppm of free chlorine or chloramines or containing greater than 1.0-ppm total Iron and/or Manganese. Resin which has been fouled by iron, manganese, organics (or other contaminants not designed for treatment by the REIONATOR®) is not covered.
LIMITED LIFETIME WARRANTY ON CONTROL VALVE — The REIONATOR® has been equipped with the highest quality water conditioning control valves available. If, upon factory inspection, the control valve body or PC board is found to be defective, WaterTech Industries will furnish repair or replacement (at WTI option) of the control valve body and/or the PC board. All internal mechanical components are warranted from manufacturers defect for a period of five (5) years from the date of installation.
EXCLUSIONS AND LIMITATION OF LIABILITY — WaterTech Industries' liability for special, incidental, or consequential damages is expressly disclaimed. In no event shall WaterTech Industries' liability exceed the obligation of repairing or replacing any part that becomes defective under valid warranty coverage as described above. Cosmetic damage that does not affect the process functionality of the equipment is not covered. WaterTech Industries makes every effort to ensure that all illustrations and specifications are correct. However, these do not imply a warranty that the product is merchantable or fit for a particular purpose, or that the product may not vary from the illustrations and specifications.
The warranty contained herein is in lieu of all other warranties, expressed or inferred, including any implied warranty of fitness for a particular purpose. Labor and transportation costs incidental to the delivery or replacement of parts other than WTI factory repairs are not covered under this warranty. In the event of a warranty replacement or repair, WTI will cover the cost of shipping the covered components. This warranty expressly excludes any system which has been damaged by accident, fire, flood, Act of God, abuse, neglect, freezing, excessive temperature (below 40° F or above 110° F.), inappropriate pressure (below 20 psi or above 100 psi), misuse, alteration of product in any way by owner or installing company, product identification tampering, misapplication, installation or operation not consistent with WTI instructions and installation outside of applicable plumbing codes and local regulations. Furthermore, this warranty expressly excludes any system which has been out of service for more than 90 days continuously. Fulfillment of the warranty coverage by WTI is contingent on proper execution of the procedures set forth in the WTI Warranty RGA policy. No person or representative is authorized to assume for WaterTech Industries any liability on its behalf, or in its name, except to refer the purchaser to this warranty. This warranty gives you specific legal rights, you may also have other rights which vary from state to state.
WHAT MUST YOU DO TO OBTAIN WARRANTY SERVICE — The warranty registration (via website or phone) must be completed within ninety (90) days of installation to validate the REIONATOR® Limited Lifetime Warranty. Units that have not been registered will be covered under the Standard 5/10 Product Warranty rather than the Limited Lifetime Warranty. Repair work should be performed by an authorized WaterTech Dealer. In the event that authorized dealer service is not available, defective components may be returned directly to WaterTech Industries for warranty service. The registered owner must contact WaterTech for return instructions and return the defective component, freight prepaid, with proof-of-purchase, within the applicable warranty period.
Warranty 17-01-020
PRODUCT MUST BE REGISTERED TO ACTIVATE WARRANTY VISIT WWW.WATERTECH.COM OR CALL 888-254-8412
16-02-010 01-20-20132460 McIver Ln, Ste. 200, Carrollton, TX 75006


![WEVP 254 Bis - notices.sad-distribution.fr1].pdf · wevp 254 bis vpmn 254 bis + vppl a 254 bis ed. 06-08 v3 guide d’installation et d'utilisation handleiding voor installatie en](https://img.pdfslide.us/doc/110x75/5bda280709d3f2db058c1a59/wevp-254-bis-1pdf-wevp-254-bis-vpmn-254-bis-vppl-a-254-bis-ed-06-08-v3.jpg)