Embed Size (px)
Citation preview
Cocos2D TutorialCocos2D-iphone is a framework for building 2D games and other graphical/interactive apps. It uses Apple’s X-Code Objective-C as the base coding language, much like Flash Builder uses Action Script 3. It is limited to iOS development (unless you want to purchase expensive translation software). That said, many classic iOS games have been authored using it.
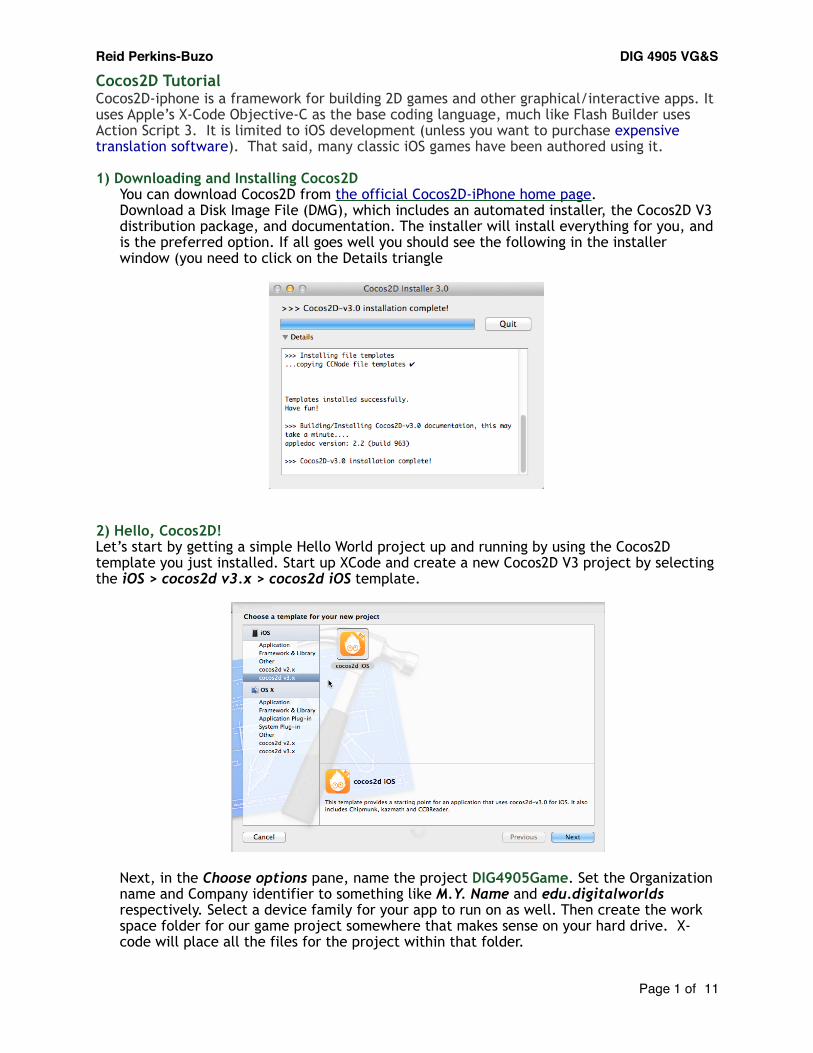
1) Downloading and Installing Cocos2DYou can download Cocos2D from the official Cocos2D-iPhone home page.Download a Disk Image File (DMG), which includes an automated installer, the Cocos2D V3 distribution package, and documentation. The installer will install everything for you, and is the preferred option. If all goes well you should see the following in the installer window (you need to click on the Details triangle
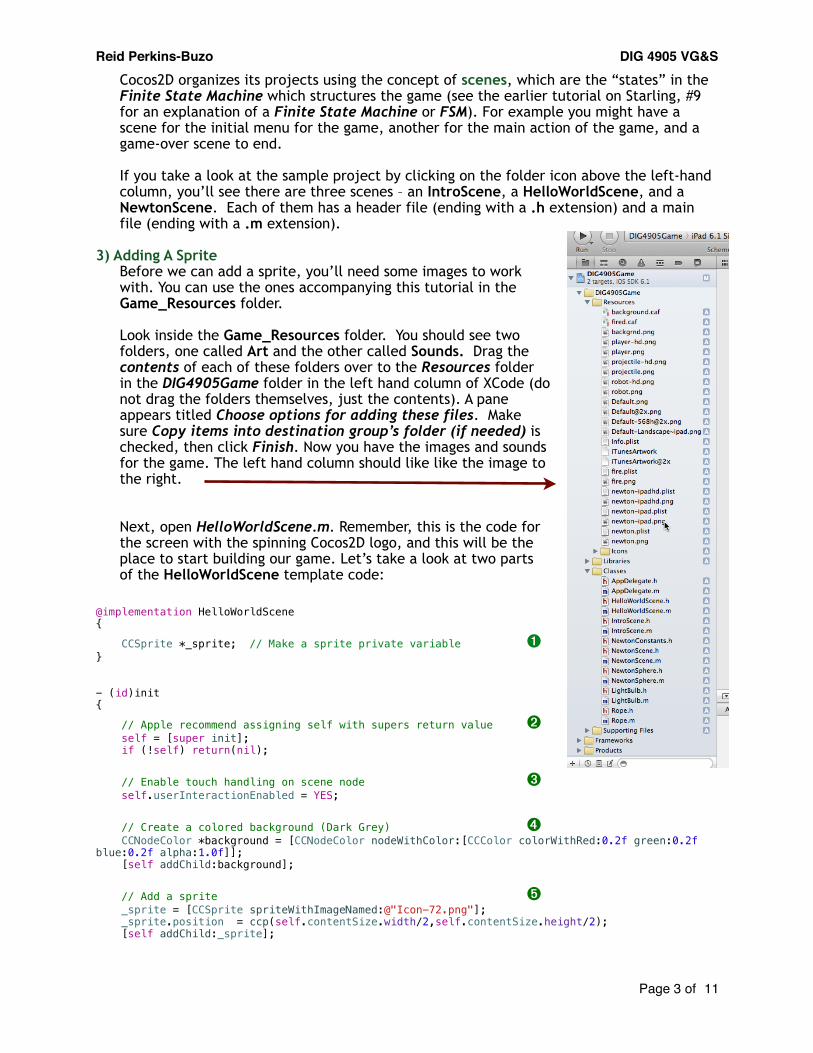
2) Hello, Cocos2D!Let’s start by getting a simple Hello World project up and running by using the Cocos2D template you just installed. Start up XCode and create a new Cocos2D V3 project by selecting the iOS > cocos2d v3.x > cocos2d iOS template.
Next, in the Choose options pane, name the project DIG4905Game. Set the Organization name and Company identifier to something like M.Y. Name and edu.digitalworlds respectively. Select a device family for your app to run on as well. Then create the work space folder for our game project somewhere that makes sense on your hard drive. X-code will place all the files for the project within that folder.
Reid Perkins-Buzo! DIG 4905 VG&S
Page 1 of 11

Go ahead and build and run the template as-is (click on the Run button). If all works OK, you should see the following:
If you click on [Single Sprite] you will see the following:
Click on [Menu] to return to the first scene. Clicking [Newton Physics] shows:
Reid Perkins-Buzo! DIG 4905 VG&S
Page 2 of 11
Cocos2D organizes its projects using the concept of scenes, which are the “states” in the Finite State Machine which structures the game (see the earlier tutorial on Starling, #9 for an explanation of a Finite State Machine or FSM). For example you might have a scene for the initial menu for the game, another for the main action of the game, and a game-over scene to end.
If you take a look at the sample project by clicking on the folder icon above the left-hand column, you’ll see there are three scenes – an IntroScene, a HelloWorldScene, and a NewtonScene. Each of them has a header file (ending with a .h extension) and a main file (ending with a .m extension).
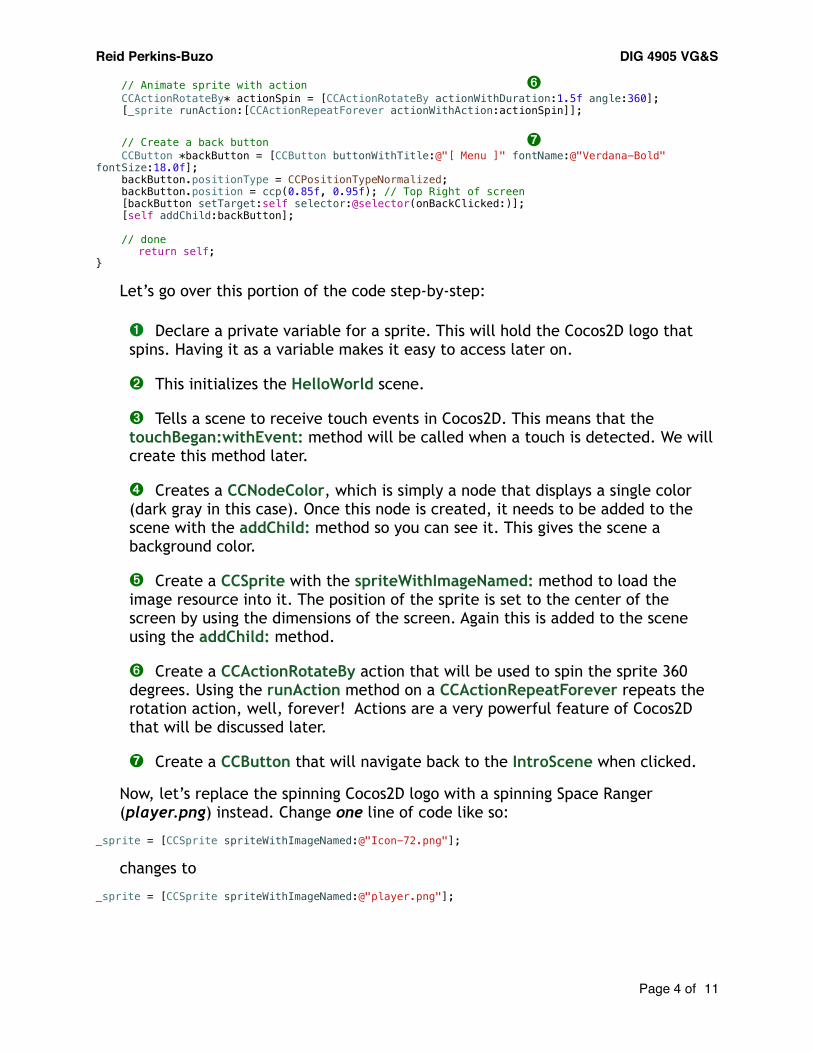
3) Adding A SpriteBefore we can add a sprite, you’ll need some images to work with. You can use the ones accompanying this tutorial in the Game_Resources folder.
Look inside the Game_Resources folder. You should see two folders, one called Art and the other called Sounds. Drag the contents of each of these folders over to the Resources folder in the DIG4905Game folder in the left hand column of XCode (do not drag the folders themselves, just the contents). A pane appears titled Choose options for adding these files. Make sure Copy items into destination group’s folder (if needed) is checked, then click Finish. Now you have the images and sounds for the game. The left hand column should like like the image to the right.
Next, open HelloWorldScene.m. Remember, this is the code for the screen with the spinning Cocos2D logo, and this will be the place to start building our game. Let’s take a look at two parts of the HelloWorldScene template code:
@implementation HelloWorldScene{
CCSprite *_sprite; // Make a sprite private variable! ! ➊}
- (id)init{
// Apple recommend assigning self with supers return value! ➋ self = [super init]; if (!self) return(nil);
// Enable touch handling on scene node! ! ! ! ➌ self.userInteractionEnabled = YES;
// Create a colored background (Dark Grey)! ! ! ➍ CCNodeColor *background = [CCNodeColor nodeWithColor:[CCColor colorWithRed:0.2f green:0.2f blue:0.2f alpha:1.0f]]; [self addChild:background];
// Add a sprite! ! ! ! ! ! ! ➎ _sprite = [CCSprite spriteWithImageNamed:@"Icon-72.png"]; _sprite.position = ccp(self.contentSize.width/2,self.contentSize.height/2); [self addChild:_sprite];
Reid Perkins-Buzo! DIG 4905 VG&S
Page 3 of 11
// Animate sprite with action! ! ! ! ! ➏ CCActionRotateBy* actionSpin = [CCActionRotateBy actionWithDuration:1.5f angle:360]; [_sprite runAction:[CCActionRepeatForever actionWithAction:actionSpin]];
// Create a back button! ! ! ! ! ! ➐ CCButton *backButton = [CCButton buttonWithTitle:@"[ Menu ]" fontName:@"Verdana-Bold" fontSize:18.0f]; backButton.positionType = CCPositionTypeNormalized; backButton.position = ccp(0.85f, 0.95f); // Top Right of screen [backButton setTarget:self selector:@selector(onBackClicked:)]; [self addChild:backButton];
// done! return self;}
Let’s go over this portion of the code step-by-step:
➊ Declare a private variable for a sprite. This will hold the Cocos2D logo that spins. Having it as a variable makes it easy to access later on.
➋ This initializes the HelloWorld scene.
➌ Tells a scene to receive touch events in Cocos2D. This means that the touchBegan:withEvent: method will be called when a touch is detected. We will create this method later.
➍ Creates a CCNodeColor, which is simply a node that displays a single color (dark gray in this case). Once this node is created, it needs to be added to the scene with the addChild: method so you can see it. This gives the scene a background color.
➎ Create a CCSprite with the spriteWithImageNamed: method to load the image resource into it. The position of the sprite is set to the center of the screen by using the dimensions of the screen. Again this is added to the scene using the addChild: method.
➏ Create a CCActionRotateBy action that will be used to spin the sprite 360 degrees. Using the runAction method on a CCActionRepeatForever repeats the rotation action, well, forever! Actions are a very powerful feature of Cocos2D that will be discussed later.
➐ Create a CCButton that will navigate back to the IntroScene when clicked.
Now, let’s replace the spinning Cocos2D logo with a spinning Space Ranger (player.png) instead. Change one line of code like so:
_sprite = [CCSprite spriteWithImageNamed:@"Icon-72.png"];
changes to
_sprite = [CCSprite spriteWithImageNamed:@"player.png"];
Reid Perkins-Buzo! DIG 4905 VG&S
Page 4 of 11
We should change the name of the sprite variable _sprite to something more in line with our game. Let’s change it to _player using XCode’s Refactor command. Select _sprite in line 20 of the HelloWorldScene.m file. Click Edit > Refactor > Rename, then type _player into the text box that says “Rename _sprite to” and uncheck the “Rename related files” check box. Click the Preview button to see what changes will occur.
Make sure that only the HelloWorldScene.m file is listed on the left column, then click Save. You can enable the snapshots feature if you wish.
Build and run the program and when the Intro scene appears, click on [Single Sprite]. You will see our player.png image going for a spin, in place of the old Cocos2D logo.
4) Adding A RobotNext you want to add some Robots into your scene. A static Robot is of course no challenge to an experienced Space Ranger, so to make things a bit more interesting you will add some movement to the Robots. You will create the Robots slightly off screen to the right and set up a CCAction for them, telling them to move from right to left.
Just before the - (id) init function, add the following code to HelloWorldScene.m:
- (void)addRobot:(CCTime)dt { CCSprite *robot = [CCSprite spriteWithImageNamed:@"robot.png"]; // 1 int minY = robot.contentSize.height / 2; int maxY = self.contentSize.height - robot.contentSize.height / 2; int rangeY = maxY - minY; int randomY = (arc4random() % rangeY) + minY; // 2 robot.position = CGPointMake(self.contentSize.width + robot.contentSize.width/2, randomY); [self addChild:robot]; // 3 int minDuration = 2.0; int maxDuration = 4.0; int rangeDuration = maxDuration - minDuration; int randomDuration = (arc4random() % rangeDuration) + minDuration; // 4 CCAction *actionMove = [CCActionMoveTo actionWithDuration:randomDuration position:CGPointMake(-robot.contentSize.width/2, randomY)]; CCAction *actionRemove = [CCActionRemove action]; [robot runAction:[CCActionSequence actionWithArray:@[actionMove,actionRemove]]];}
Let’s go over this code:1. Define a vertical range for the robot to spawn. When you place a sprite, by default
you are placing the center of the sprite. So here you take the screen height and reduce it by the robots height, so the robot doesn’t end up being cut off.
2. Position the robot slightly off screen to the right, take the screen width and add the robot’s width to ensure it’s just hidden off screen.
3. Now you want to decide how long it takes (in seconds) for the robot to move across the screen, let’s randomise it to make the robots less predictable.
Reid Perkins-Buzo! DIG 4905 VG&S
Page 5 of 11

4. You will use the Cocos2D action CCActionMoveTo: to animate moving the robot from the starting point (slightly off screen right) to the target destination point (slightly off screen left) causing it to move quickly across the screen from right to left.
You have already seen actions in action with the spinning however Cocos2D provides a lot of extremely handy built-in actions, such as move actions, rotate actions, fade actions, animation actions and many more. Here you use three actions on the robot:
• CCActionMoveTo: This action is used to control the movement of the robot, in this case moving across the screen from right to left. The duration of the action is also specified which controls how long it takes for the robot to move across the screen. The shorter the duration the faster the robot will appear to move. In this case you randomize the duration between 2 and 4 seconds.
• CCActionRemove: Handy action that removes a node from its parent, effectively “deleting it” from the scene. You use this action to remove the robot from the scene when it is no longer visible (slightly off screen left). This is very important because otherwise you would eventually have tens of thousands of robots trying to take over your iPhone and consume all device resources.
• CCActionSequence: The sequence action allows you to chain together a sequence of actions that are performed in order, one at a time. This way you can have the CCActionMoveTo action perform first and once it is complete perform the next action CCActionRemove. This is a very powerful action allowing you to create complex animation sequences.
Great, so now you have a method to add a robot to your scene. However one robot is hardly a challenge for an experienced ninja, let’s create a timed robot spawn method.Cocos2D features a scheduler that allows you to setup callbacks every X.X seconds, so you can setup a robots spawn generator to add new robots every X seconds.
In HelloWorldScene.m file add the following code just after [super onEnter]; in the onEnter method:
[self schedule:@selector(addRobot:) interval:1.5];
This will add a Cocos2D scheduler timer to call the previously added addRobot: method every 1.5 seconds.
Note that when you created the addRobot method, there was an additional dt parameter. This stands for delta time, and represents the time difference between the previous and the current frame. The scheduler requires that every method it calls takes this as a parameter, however you will not use it in this tutorial.
In order for the game to work correctly, we need to stop the _player sprite from spinning aimlessly (it was nice at first, but now it is unimportant). So in the - (id) init function, change these lines
// Animate sprite with actionCCActionRotateBy* actionSpin = [CCActionRotateBy actionWithDuration:1.5f angle:360];[_player runAction:[CCActionRepeatForever actionWithAction:actionSpin]];
to these lines
// Animate sprite with action//CCActionRotateBy* actionSpin = [CCActionRotateBy actionWithDuration:1.5f angle:360];//[_player runAction:[CCActionRepeatForever actionWithAction:actionSpin]];
Reid Perkins-Buzo! DIG 4905 VG&S
Page 6 of 11

Adding the two slashes // at the start of the lines turns them into comments rather than executable code. So our _player sprite will no longer rotate.
Next we change the position of the _player sprite on the game level.
_player.position = ccp(self.contentSize.width/8,self.contentSize.height/2);
You may wonder why you are dividing the width by 8 (1/8th of the screen). This is because it’s often handy to avoid hardcoding absolute positions, since different devices have different screen sizes and would require you to have different absolute positions per device.
Note that the CCButton uses a different way of positioning, a positionType that declares a normalized resolution, CCPositionTypeNormalized, of (0.1, 0.1) across all devices.
Build and run, and you should now see robots fly across the screen!
5) Building an Attack SystemWe will be using the CCActionMoveTo: to launch projectiles at the robots., However, it’s not quite as simple as moving to the touch point and starting from the _player.position. You want to throw the projectile across the screen in the direction of the touch, but so that it doesn’t stop there, but continues on as if it had some momentum.
So we have to use a little math.
You have a smaller triangle created by the x and y offset from the origin point to the touch point. You just need to make a big triangle with the same ratio – and you know you want one of the endpoints to be off the screen.
To perform these calculations, it really helps if you have some basic vector math routines available (like methods to easily add and subtract vectors). Cocos2D includes a handy set of vector manipulation functions such as ccpAdd and ccpSub vectors.
Reid Perkins-Buzo! DIG 4905 VG&S
Page 7 of 11

We need to set-up a function that can handle shooting a projectile in the direction of the screen touch. The HelloWorldScene template already comes touch enabled as you saw in the init method, so we only need to replace the current touchBegan: method with the following code:
- (void)touchBegan:(UITouch *)touch withEvent:(UIEvent *)event { // 1 CGPoint touchLocation = [touch locationInNode:self]; // 2 CGPoint offset = ccpSub(touchLocation, _player.position); float ratio = offset.y/offset.x; int targetX = _player.contentSize.width/2 + self.contentSize.width; int targetY = (targetX*ratio) + _player.position.y; CGPoint targetPosition = ccp(targetX,targetY); // 3 CCSprite *projectile = [CCSprite spriteWithImageNamed:@"projectile.png"]; projectile.position = _player.position; [self addChild:projectile ]; // 4 CCActionMoveTo *actionMove = [CCActionMoveTo actionWithDuration:1.5f position:targetPosition]; CCActionRemove *actionRemove = [CCActionRemove action]; [projectile runAction:[CCActionSequence actionWithArray:@[actionMove,actionRemove]]];}
Let’s look at this according to the numbers:
1. You need to translate the screen touch into the scene’s coordinate system. There is a handy Cocos2D category on UITouch with locationInNode: that will do this.
2. So as you can see, you have a small triangle created by the x and y offset from the origin point to the touch point. You just need to make a big triangle with the same ratio – and you know you want one of the endpoints to be off the screen.
3. Create the projectile sprite and set it to start at the same position as the player. This is why you made _player a private instance variable so you could access it easily later.
4. You should now be more familiar with the CCActionMoveTo now. You have the previously calculated target point and the duration is the time taken for the projectile to reach this point, so the lower it is, the faster your projectile will travel.
Build and run, and fire at will!
5) Collision DetectionWe have a Space Ranger, Robots and projectiles all over the screen. It looks good but it would be a lot more fun with a bit of impact! And for that you need collision detection between your projectiles and your Robots.
One of the great new features of Cocos2D 3.0 is the deeply integrated physics engine, making this task a breeze. Physics engines are great for simulating realistic movement, however they are also very useful for handling collision detection.You are now going to use the Cocos2D physics engine to determine when robots and projectiles collide. There are four steps to do this:
• Set up the physics world. A physics world is the simulation space for running physics calculations. You will set one up for the scene and modify a few properties like gravity. The physics world is then added to your scene. You will modify the existing game
Reid Perkins-Buzo! DIG 4905 VG&S
Page 8 of 11

objects so they are added to the physics world so they will be part of the physics simulation.
• Create physics bodies for each sprite. In Cocos2D you can associate a physics body to each sprite for collision detection purposes and set certain properties on it. Note that the physics body does not have to be the exact same shape as the sprite. Usually it’s a simpler shape such as a box or circle, rather than a pixel-perfect outline. Since that is generally good enough for most games and offers better physics performance.
• Set CollisionType for each type of sprite. One of the handy features of Cocos2D physics is you don’t have to play around with integer bitmasks to define your collision types. You can set an easily readable string to define your collision types.
• Set a collision handler delegate. By default when two physics bodies collide they will be handled by the physics simulation however you will want to do something when a projectile collides with a robot such as disable the robot. So you will be adding a collision handler delegate to handle the collision between your robot and projectile collision types.
We need to add another private instance variable for the physics world. Ensure you have HelloWorldScene.m open and add the following to the @implementation HelloWorldScene declaration after your CCSprite:
CCPhysicsNode *_physicsWorld;
Next we setup the physics simulation and add it to our scene. To do this add the following code after the CCNodeColor in the init method:
//Add Physics_physicsWorld = [CCPhysicsNode node];_physicsWorld.gravity = ccp(0,0);_physicsWorld.debugDraw = YES;_physicsWorld.collisionDelegate = self;[self addChild:_physicsWorld];
Gravity is set to (0,0) as you are using the physics simulation primarily for collision detection. Cocos2D has some handy debug functionality, the debugDraw flag is really useful to help visualize your physics world. You will be able to see any physics bodies added to the simulation. You are also setting the collisionDelegate to self, this allows you to add collision Handlers to the scene and the physics simulation knows to look in HelloWorldScene for these handlers.
You will notice that Xcode will throw up a warning around the collisionDelegate line; this is easily resolved. Open HelloWorldScene.h and mark the interface as implementing the CCPhysicsCollisionDelegate like so:
@interface HelloWorldScene : CCScene <CCPhysicsCollisionDelegate>
Now you need to set up the player with a physics body and add the player to the _physicsWorld instead of directly to the scene.
Back in HelloWorldScene.m, find the following code in the init method:
[self addChild:_player];
Replace that code with the following:
Reid Perkins-Buzo! DIG 4905 VG&S
Page 9 of 11

_player.physicsBody = [CCPhysicsBody bodyWithRect:(CGRect){CGPointZero, _player.contentSize} cornerRadius:0]; // 1_player.physicsBody.collisionGroup = @"playerGroup"; // 2[_physicsWorld addChild:_player];
Let’s look at this code snippet:
1. Creates a physics body, in this case a box using the player’s contentSize to create an bounding box rectangle around the player.
2. Set physics body collisionGroup, by default everything will collide. If you set physics bodies to the same collisionGroup they will no longer collide with each other, this is handy when you have a player that is made up of multiple bodies but you don’t want these bodies to collide with each other, for example a player holding a weapon. You will use this to ensure the projectile does not collide with the player.
You have setup physics simulation and created a player physics body and added it to the simulation.
Look inside the addRobot: method and locate the following code:
[self addChild:robot];
Replace that code with the following:
robot.physicsBody = [CCPhysicsBody bodyWithRect:(CGRect){CGPointZero, robot.contentSize} cornerRadius:0];robot.physicsBody.collisionGroup = @"robotGroup";robot.physicsBody.collisionType = @"robotCollision";[_physicsWorld addChild:robot];
This is nearly identical to creating the _player physics body, but introduces a new property. This time you are setting the collisionType property, this will be used in setting up a physics simulation collision delegate between the ‘robotCollision’ and the ‘projectileCollsion’ collisionType.
Next we want to update the touchBegan:withEvent method, so inside of it locate the following code:
[self addChild:projectile];
Replace with:
projectile.physicsBody = [CCPhysicsBody bodyWithRect:(CGRect){CGPointZero, projectile.contentSize} cornerRadius:0];projectile.physicsBody.collisionGroup = @"playerGroup";projectile.physicsBody.collisionType = @"projectileCollision";[_physicsWorld addChild:projectile];
Build and run, and you should see pink boxes around all the sprites. The pink boxes around the sprites are created by the _physics property debugDraw (comment out the line in the init method to turn them off). They are handy when you are first setting up your physics, so you can make sure that it’s all working as you expect. Notice that the box around the shuriken doesn’t look so great; it would much better if it used a circle.
There is of course a method you can use to create a circular body shape bodyWithCircleOfRadius: which is a much better fit for your projectile. Replace the projectile body code in the touchBegan:withEvent method with the following:
Reid Perkins-Buzo! DIG 4905 VG&S
Page 10 of 11
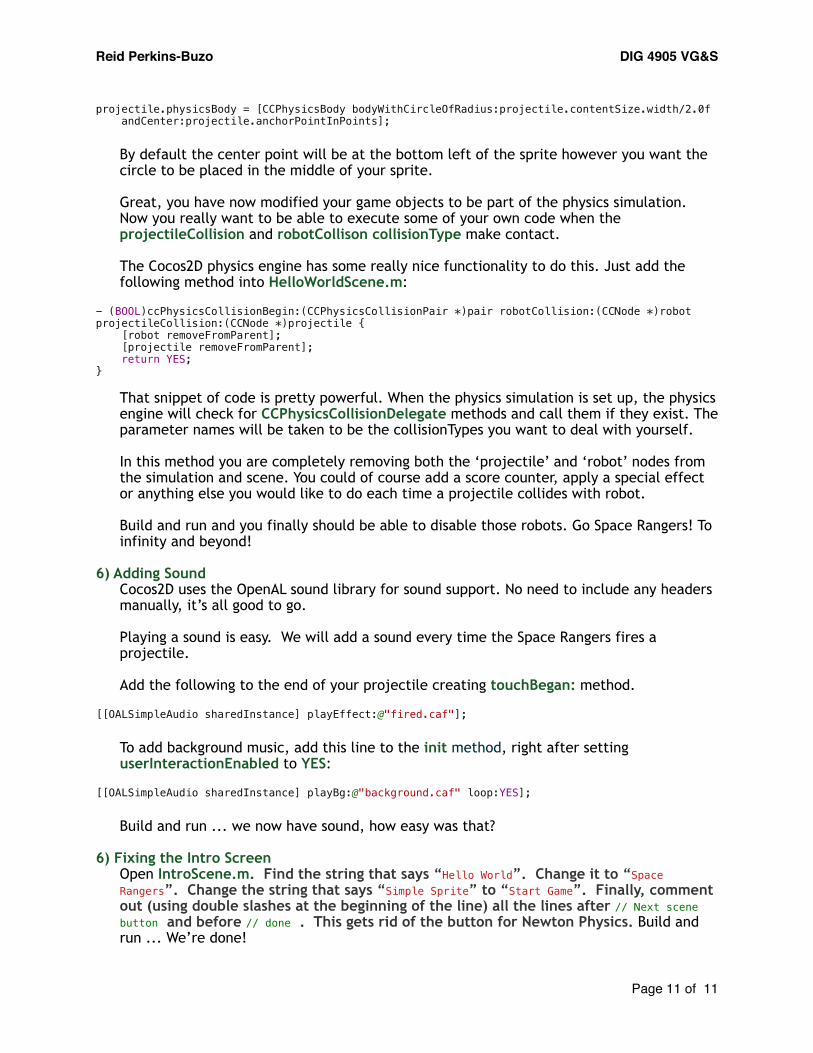
projectile.physicsBody = [CCPhysicsBody bodyWithCircleOfRadius:projectile.contentSize.width/2.0f andCenter:projectile.anchorPointInPoints];
By default the center point will be at the bottom left of the sprite however you want the circle to be placed in the middle of your sprite.
Great, you have now modified your game objects to be part of the physics simulation. Now you really want to be able to execute some of your own code when the projectileCollision and robotCollison collisionType make contact.
The Cocos2D physics engine has some really nice functionality to do this. Just add the following method into HelloWorldScene.m:
- (BOOL)ccPhysicsCollisionBegin:(CCPhysicsCollisionPair *)pair robotCollision:(CCNode *)robot projectileCollision:(CCNode *)projectile { [robot removeFromParent]; [projectile removeFromParent]; return YES;}
That snippet of code is pretty powerful. When the physics simulation is set up, the physics engine will check for CCPhysicsCollisionDelegate methods and call them if they exist. The parameter names will be taken to be the collisionTypes you want to deal with yourself.
In this method you are completely removing both the ‘projectile’ and ‘robot’ nodes from the simulation and scene. You could of course add a score counter, apply a special effect or anything else you would like to do each time a projectile collides with robot.
Build and run and you finally should be able to disable those robots. Go Space Rangers! To infinity and beyond!
6) Adding SoundCocos2D uses the OpenAL sound library for sound support. No need to include any headers manually, it’s all good to go.
Playing a sound is easy. We will add a sound every time the Space Rangers fires a projectile.
Add the following to the end of your projectile creating touchBegan: method.
[[OALSimpleAudio sharedInstance] playEffect:@"fired.caf"];
To add background music, add this line to the init method, right after setting userInteractionEnabled to YES:
[[OALSimpleAudio sharedInstance] playBg:@"background.caf" loop:YES];
Build and run ... we now have sound, how easy was that?
6) Fixing the Intro ScreenOpen IntroScene.m. Find the string that says “Hello World”. Change it to “Space Rangers”. Change the string that says “Simple Sprite” to “Start Game”. Finally, comment out (using double slashes at the beginning of the line) all the lines after // Next scene button and before // done . This gets rid of the button for Newton Physics. Build and run ... We’re done!
Reid Perkins-Buzo! DIG 4905 VG&S
Page 11 of 11