Embed Size (px)
Citation preview

R e g u l a t o r
Ow n e r Ê s
M a n u a l
Regulator OwnerÊs Manual
CopyrightThis owner’s manual is protected by the law of 11 March 1957 concerningliterary and artistic property. It may not, in whole or part, be copied,photocopied, reproduced, without prior consent in writing from Aqua Lung.
© 2013 Aqua Lung International, Inc.Regulator Owner’s Manual, P/N 127861 rev. 08/13
Danger, warnings and Notes
A certain number of icons have been used in order to make this User Manualeasier to understand. They have the following meanings :
DANGER indicates situations of risk or danger that could cause seriousaccidents or death if these indications are not followed correctly.
WARNING indicates features or special situations in diving and aims to avoidrisk situations.
A NOTE is used to indicate information that will allow you to enjoy the best useof your regulator.
2
Summary (to reach directly a chapter, click on the title)1 GENERAL PRECAUTION & WARNINGS
1.2 ENRICHED AIR NITROX USE1.2.1 Enriched Air Nitrox Use – Outside EEC Countries1.2.2 Nitrox use for CEE (European Community) countries – EN-144-3 and EN 13949
2. Introduction2.1 CE Conformity2.2 Features2.3 VANE ADJUSTMENT SWITCH (VAS)2.4 Valve Adjustment Knob (VAK)2.4.1 LEGEND GLACIA Regulator2.4.2 Kronos Second Stage Adjustment: “Dual Cam”.2.4.3 MIKRON Regulator2.4.4 LEGEND LX Regulator2.5 Titan Quick-Connect System (patented)2.5.1 Titan Regulator with hose properly connected2.5.2 Disassembly2.5.3 Reassembly2.6 First Stage Environmental Protection series Titan, Kronos, Legend “supreme”2.7 Registered patents
3. PREPARATION AND SET UP3.1 Mounting the First Stage Onto the Cylinder Valve3.1.1 Yoke Connector3.1.2 DIN Connector or Pr EN 144-3 connector3.2 Pre-Dive Checks3.3 Pressurising the regulator3.4 Divisible mouthpiece
4. DIVING WITH THE REGULATOR4.1. COLD WATER DIVING
5. AFTER THE DIVE5.1 Removal of the Regulator from the Cylinder Valve5.1.1 General Procedures5.1.2 DIN Connector or Pr EN 144-3 connector5.2 Disinfection
6. USER CARE & MAINTENANCE7. DEALER INSPECTION & SERVICE8. WARRANTY INFORMATION
8.1 USA only8.1.1 The Aqua Lung Satisfaction Guarantee™8.1.2 The Aqua Lung Limited Lifetime Warranty8.2 Outside USA8.2.1 The Aqua Lung warranty
9. GUARANTEE COUPON10. Returning Your Regulator For Service11. Contacting Aqua Lung AMERICA via Electronic Mail12. ANNUAL INSPECTION & SERVICE RECORD
3
1 GENERAL PRECAUTION & WARNINGS
• Before using this regulator, you must have successfully received training andcertification in the technique of SCUBA diving from a recognized certificationagency. Use of SCUBA equipment by uncertified, or untrained persons, isdangerous and can result in serious injury, or death.
• This regulator is not configured for commercial use with surface supplied air.
• Always pressurize the regulator gradually by opening the cylinder valveSLOWLY.
• NEVER lubricate any part of the regulator (particularly the O-ring providingthe seal between the cylinder valve and the regulator) with any lubricant.
• DO NOT apply any type of aerosol spray on the regulator. Doing so maycause permanent damage to certain plastic components.
• The user should not undertake any assembly, disassembly or adjustmentother than those prescribed.
WARNING :• DO NOT attempt to disconnect the second stage from the hose while theregulator is pressurized.• DO NOT perform any disassembly while the regulator is under pressure. Anydisassembly, including removing the second stage from the hose should only beperformed by an authorized Aqua Lung Dealer.• DO NOT pressurize the regulator with the second stage disconnected fromthe hose.
• Factory prescribed service for this regulator must be performed at leastonce annually by a factory trained Aqua Lung Service Technician who isemployed by an Authorized Aqua Lung Dealer.
• DO NOT use the regulator first stage as a carrying handle when lifting ortransporting the cylinder as this can damage the regulator or the cylindervalve.
• When diving in cold water (below 50°F, or 10°C), you must have receivedtraining and certification in the techniques of cold water diving from arecognized training agency.
• If you are using a first stage in the Legend series, you are recommended touse a compensated Octopus (LX Octopus, Legend Octopus, Kronos Octopus,Mikron Octopus) to avoid the possibility of a free flow at depth.
4 B a c k t o t h e c o n t e n t s
1.2 ENRICHED AIR NITROX USE
DANGER : This chapter contains important information concerning use withoxygen-enriched air (Nitrox/EAN). Do not attempt to use this product withenriched air without having entirely read and understood this chapter. If you donot do this, you risk serious accident or death.
DANGER : Obtain Nitrox Diving CertificationIn order to gain a complete appreciation of the advantages of diving with Nitrox,it is ABSOLUTELY NECESSARY that you undergo special training and obtaincertification in Nitrox diving from a recognised training agency. The depth andtime limit of the dive depend on the oxygen content of the Nitrox mixture.
5 B a c k t o t h e c o n t e n t s
1.2.1 Enriched Air Nitrox Use – Outside EEC Countries
Your Aqua Lung regulator has been prepared for use with Enriched Air Nitrox(EAN) where the percentage of oxygen in the EAN does not exceed 40%. This ispossible because each regulator is built to a high standard of cleanliness usingEAN compatible components and lubricants. In addition, each regulator designhas passed stringent adiabatic compression testing to ensure its safety andcompatibility with increased percentages of oxygen.
If it is your intention to use your new Aqua Lung regulator with Nitrox EAN (O2not to exceed 40%), it is imperative that you maintain the internal cleanliness ofthe regulator (see section on Care and Maintenance). If it is your intent to usethe regulator interchangeably with breathing air, the breathing air should beoxygen-compatible or “hyperfiltered” whereas the condensed hydrocarbons donot exceed 0.1 mg/m3. Your local authorized Aqua Lung dealer can help youdetermine whether the breathing air that they provide meets this criterion.
Standard compressed breathing air meeting the EN 12021 standard, oftenreferred to as Grade E in the United States, does not necessarily meet thiscriterion. Grade E or EN 12021 breathing air may contain a certain level ofhydrocarbons, including traces of compressor oils that while not consideredharmful to breathe, can pose a risk in the presence of elevated oxygen content.Passing hydrocarbons through a valve and regulator creates a cumulativeeffect where the hydrocarbons build up over time along the internalpassageways of the equipment. When these hydrocarbons come in contactwith high-pressure oxygen enriched air, they can pose a very real hazard thatcan lead to combustion.
Therefore, if a regulator has had use with Grade E or EN 12021 breathing air,it should be returned to an authorized Aqualung dealer for overhaul serviceincluding hydrocarbon cleaning, prior to being put back into nitrox service.
Although second stage components are not exposed to high pressure EAN,Aqua Lung recommends that the same cleaning procedures be followed for thecomplete regulator. This prevents the possibility of cross contamination andguarantees the cleanliness of the entire regulator.
6 B a c k t o t h e c o n t e n t s
1.2.2 Nitrox use for CEE (European Community) countriesEN-144-3 and EN 13949
In CEE countries, diving with Nitrox/O2 is controlled by Standards EN 144-3 –Respiratory protective devices - Gas cylinder valves - Part 3: Outlet connectionsfor diving gases Nitrox and oxygen - and EN 13949 – Respiratory equipment -Open-circuit self-contained diving apparatus for use with compressed Nitroxand oxygen - Requirements, testing, marking.
NOTE : The maximum depth of the dive is determined by the typeof mixture used.
NOTE : Aqua Lung offers a range of regulators designed and manufacturedspecially for use with oxygen-enriched mixtures, over 21% and up to 100%oxygen. This range has been certified according to the EN 144-3 and EN13949 standards and meets the requirements of the adiabatic compressiontests. They have received CE certification for this type. For further informationon this range, contact your Aqua Lung specialist centre.
DANGER : These regulators fitted with special connections should be used onlywith complementary equipment (tank valves, tanks, pressure gauges, etc.)designed and prepared for use with an oxygen-enriched mixture. These itemsare marked Nitrox/O2.
DANGER : If the regulator that you use is fitted with a yoke or DIN connection, itis designed for use only with compressed breathing air (21% oxygen and 79%nitrogen) which meets the EN 12021 standard. DO NOT USE this equipmentwith other mixtures or with gases containing more than 21% oxygen.Disregarding this rule could result in serious accident or death caused by fire orby an explosion.
Every Nitrox/O2 regulator is assembled in a clean workshop, using compatiblecomponents and special lubricants.
It is important to maintain the interior of the regulator in a clean state (seechapter 6 Regular Care). Breathing air used in the production of a mixtureshould be oxygen compatible and double filtered with a hydrocarbon contentnot greater than 0.1 mg/m3. Your Aqua Lung technical specialist should beable to help you determine if the breathing air he supplies meets these criteria.
7 B a c k t o t h e c o n t e n t s
2. INTRODUCTION
Congratulations – and thank you – for choosing Aqua Lung. Your new regulatormeets all existing standards for quality and performance and has beendesigned and manufactured with the greatest care.
Perhaps, more than any other item of equipment that you have bought, thebetter care you take of your regulator, the better it will perform for you. Itsperformance will be guaranteed by regular servicing at an appointed Aqua LungService Centre. Before diving with your new Aqua Lung regulator it is importantthat you read this manual in its entirety so that you can familiarise yourself withits features and the rules for using the regulator before, during and after thedive so as to retain optimum performance for the years to come.
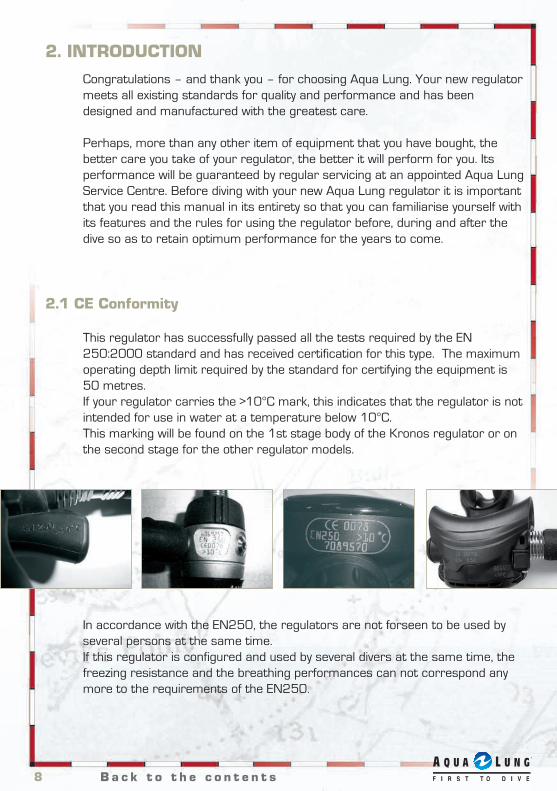
2.1 CE Conformity
This regulator has successfully passed all the tests required by the EN250:2000 standard and has received certification for this type. The maximumoperating depth limit required by the standard for certifying the equipment is50 metres.If your regulator carries the >10°C mark, this indicates that the regulator is notintended for use in water at a temperature below 10°C.This marking will be found on the 1st stage body of the Kronos regulator or onthe second stage for the other regulator models.
In accordance with the EN250, the regulators are not forseen to be used byseveral persons at the same time.If this regulator is configured and used by several divers at the same time, thefreezing resistance and the breathing performances can not correspond anymore to the requirements of the EN250.
8 B a c k t o t h e c o n t e n t s
2.2 Features
Calypso Titan / Mikron / Kronos / Legend
First stage Piston regulator Diaphragm regulatortechnolgy
Maximum working Yoke : 232 bar Yoke : 232 barpressure USA : 3300 PSI USA : 3300 PSI
DIN : 200 bar DIN : 300 bar
Number of ports 1 HP 7/16, 4 MP 3/8 2HP 7/16, 4 MP 3/8
Hose length 730 MM 730 MM
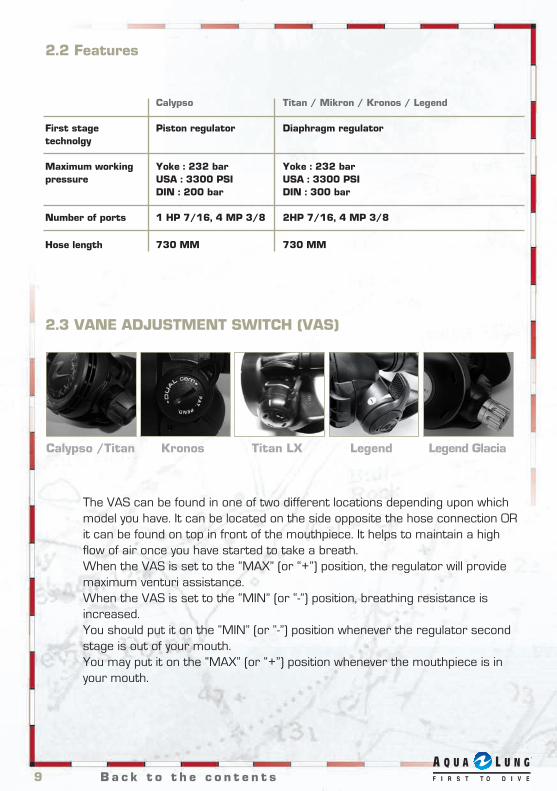
2.3 VANE ADJUSTMENT SWITCH (VAS)
The VAS can be found in one of two different locations depending upon whichmodel you have. It can be located on the side opposite the hose connection ORit can be found on top in front of the mouthpiece. It helps to maintain a highflow of air once you have started to take a breath.When the VAS is set to the “MAX” (or “+”) position, the regulator will providemaximum venturi assistance.When the VAS is set to the “MIN” (or “-”) position, breathing resistance isincreased.You should put it on the “MIN” (or “-”) position whenever the regulator secondstage is out of your mouth.You may put it on the “MAX” (or “+”) position whenever the mouthpiece is inyour mouth.
Legend GlaciaLegendTitan LXKronosCalypso /Titan
9 B a c k t o t h e c o n t e n t s

2.4 Valve Adjustment Knob (VAK)2.4.1 LEGEND GLACIA Regulator
The VAK, located opposite of the hose connection on certain model secondstages, adjusts the effort required to start the air flow at the beginning of the
inhalation cycle. As it is turned “in” (clockwise), theopening effort will increase. This will make the secondstage less sensitive to sudden changes in ambientpressure. Turning the knob “out” (counter-clockwise) willdecrease the opening effort to make breathing easier.This adjustment is particularly useful at deeper depths,or in variable conditions that affect the opening effort of
the second stage, such as strong currents or while using a diver propulsionvehicle (DPV). It will also allow compensation for a difference in the hydrostaticpressure and the centre of your lungs, such as when you are in a head-downposition. You can use the VAK to tune your regulator to maintain its peakperformance throughout the course of your dive, or you can leave it set in itsmid-range position and dive with as you would any non-adjustable second stage.
2.4.2. KRONOS Second Stage Adjustment: „Dual Cam‰.The Dual Cam patented adjustment system combines both the VAS and theVAK.
In the “+” position: the VAS is maximum and the VAK isminimum. This gives optimum performance (average:1.2j/l according EN 250).In the “-“ position : the VAS is minimum and the VAK ismaximum. This reduces performance to the maximumallowed by EN 250 (average: 2.8j/l). This offers a veryeffective pre-dive position.
2.4.3 MIKRON RegulatorThe VAK, located opposite of the hose connection on certain model second stages,adjusts the effort required to start the air flow at the beginning of the inhalationcycle. As it is turned “in” (clockwise), the opening effort will increase. This will make
the second stage less sensitive to sudden changes inambient pressure. Turning the knob “out” (counter-clockwise) will decrease the opening effort to makebreathing easier. This adjustment is particularly useful atdeeper depths, or in variable conditions that affect theopening effort of the second stage, such as strong currentsor while using a diver propulsion vehicle (DPV). It will also
allow compensation for a difference in the hydrostatic pressure and the centre ofyour lungs, such as when you are in a head-down position. You can use the VAK totune your regulator to maintain its peak performance throughout the course of yourdive, or you can leave it set in its mid-range position and dive with as you would anynon-adjustable second stage.When the VAK is completely unscrewed (counter-clockwise), the regulator willprovide maximum performances.When the VAK is completely screwed (clockwise), breathing resistance is increased.
10 B a c k t o t h e c o n t e n t s
11 B a c k t o t h e c o n t e n t s
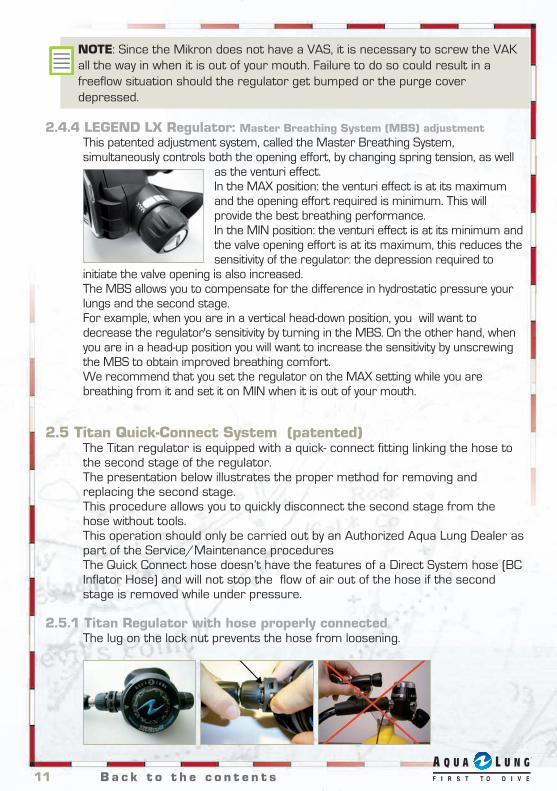
NOTE: Since the Mikron does not have a VAS, it is necessary to screw the VAKall the way in when it is out of your mouth. Failure to do so could result in afreeflow situation should the regulator get bumped or the purge coverdepressed.
2.4.4 LEGEND LX Regulator: Master Breathing System (MBS) adjustmentThis patented adjustment system, called the Master Breathing System,simultaneously controls both the opening effort, by changing spring tension, as well
as the venturi effect.In the MAX position: the venturi effect is at its maximumand the opening effort required is minimum. This willprovide the best breathing performance.In the MIN position: the venturi effect is at its minimum andthe valve opening effort is at its maximum, this reduces thesensitivity of the regulator: the depression required to
initiate the valve opening is also increased.The MBS allows you to compensate for the difference in hydrostatic pressure yourlungs and the second stage.For example, when you are in a vertical head-down position, you will want todecrease the regulator's sensitivity by turning in the MBS. On the other hand, whenyou are in a head-up position you will want to increase the sensitivity by unscrewingthe MBS to obtain improved breathing comfort.We recommend that you set the regulator on the MAX setting while you arebreathing from it and set it on MIN when it is out of your mouth.
2.5 Titan Quick-Connect System (patented)The Titan regulator is equipped with a quick- connect fitting linking the hose tothe second stage of the regulator.The presentation below illustrates the proper method for removing andreplacing the second stage.This procedure allows you to quickly disconnect the second stage from thehose without tools.This operation should only be carried out by an Authorized Aqua Lung Dealer aspart of the Service/Maintenance proceduresThe Quick Connect hose doesn’t have the features of a Direct System hose (BCInflator Hose) and will not stop the flow of air out of the hose if the secondstage is removed while under pressure.
2.5.1 Titan Regulator with hose properly connectedThe lug on the lock nut prevents the hose from loosening.
12 B a c k t o t h e c o n t e n t s
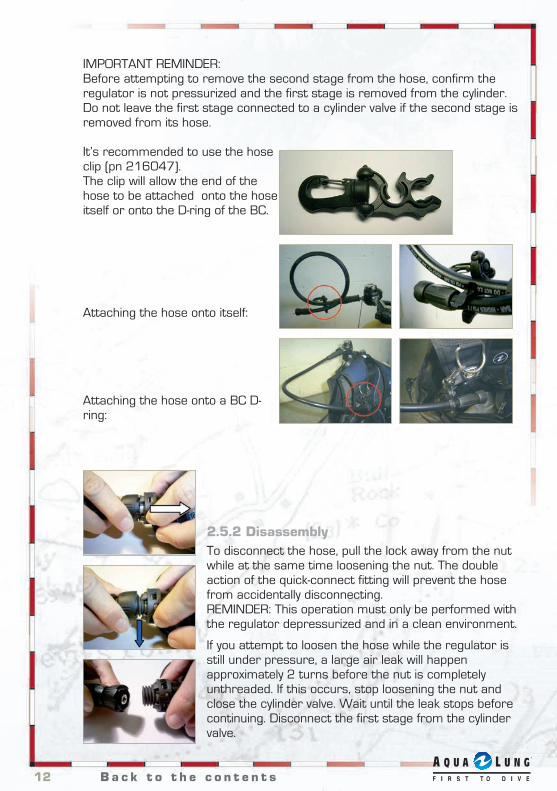
IMPORTANT REMINDER:Before attempting to remove the second stage from the hose, confirm theregulator is not pressurized and the first stage is removed from the cylinder.Do not leave the first stage connected to a cylinder valve if the second stage isremoved from its hose.
It’s recommended to use the hoseclip (pn 216047).The clip will allow the end of thehose to be attached onto the hoseitself or onto the D-ring of the BC.
Attaching the hose onto itself:
Attaching the hose onto a BC D-ring:
2.5.2 DisassemblyTo disconnect the hose, pull the lock away from the nutwhile at the same time loosening the nut. The doubleaction of the quick-connect fitting will prevent the hosefrom accidentally disconnecting.REMINDER: This operation must only be performed withthe regulator depressurized and in a clean environment.
If you attempt to loosen the hose while the regulator isstill under pressure, a large air leak will happenapproximately 2 turns before the nut is completelyunthreaded. If this occurs, stop loosening the nut andclose the cylinder valve. Wait until the leak stops beforecontinuing. Disconnect the first stage from the cylindervalve.
13 B a c k t o t h e c o n t e n t s
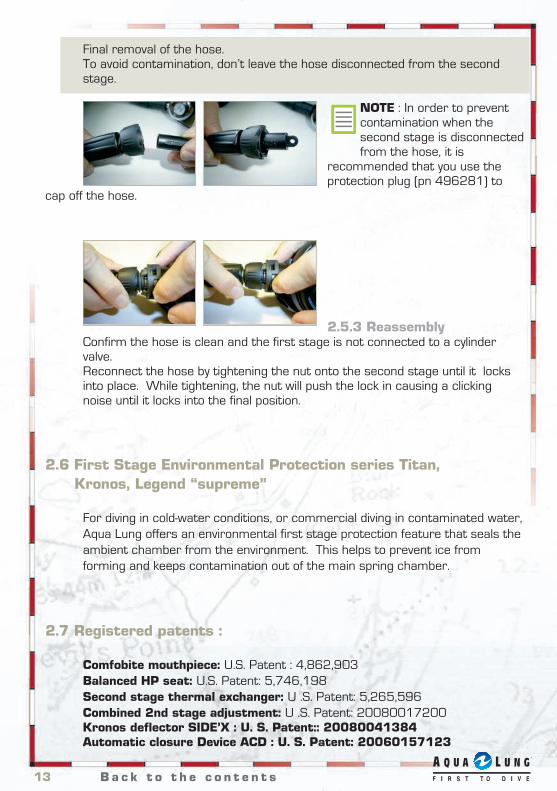
Final removal of the hose.To avoid contamination, don’t leave the hose disconnected from the secondstage.
NOTE : In order to preventcontamination when thesecond stage is disconnectedfrom the hose, it is
recommended that you use theprotection plug (pn 496281) to
cap off the hose.
2.5.3 ReassemblyConfirm the hose is clean and the first stage is not connected to a cylindervalve.Reconnect the hose by tightening the nut onto the second stage until it locksinto place. While tightening, the nut will push the lock in causing a clickingnoise until it locks into the final position.
2.6 First Stage Environmental Protection series Titan,Kronos, Legend „supreme‰
For diving in cold-water conditions, or commercial diving in contaminated water,Aqua Lung offers an environmental first stage protection feature that seals theambient chamber from the environment. This helps to prevent ice fromforming and keeps contamination out of the main spring chamber.
2.7 Registered patents :
Comfobite mouthpiece: U.S. Patent : 4,862,903Balanced HP seat: U.S. Patent: 5,746,198Second stage thermal exchanger: U .S. Patent: 5,265,596Combined 2nd stage adjustment: U .S. Patent: 20080017200Kronos deflector SIDEÊX : U. S. Patent:: 20080041384Automatic closure Device ACD : U. S. Patent: 20060157123
14 B a c k t o t h e c o n t e n t s
3. PREPARATION AND SET UP
Aqua Lung America, Inc. recommends that you bring your regulator to yourAuthorized Aqua Lung Dealer for the installation of any accessory items, includinginstrumentation, LP quick disconnect hoses, and alternate air sources.
DANGER : Whatever the connector, when pressurizing your scuba system, besure to open the cylinder valve slowly to minimize the generation of heat. Failureto do so, with enriched air nitrox (EAN) present, increases the risk ofcombustion that can lead to serious injury or death.
WARNING : It is considered a safe practice, especially when using EAN, to openthe cylinder valve slowly and let the first stage pressurize slowly. Rapidpressurization causes adiabatic compression of the breathing gas, whichgenerates heat inside the first stage. Heat, along with elevated percentages ofoxygen and an ignition source (from contamination) are the ingredients that cancause combustion. This is why it is necessary to keep the interior of theregulator clean and the fraction of oxygen below 40% along with the slowopening of the valve.
3.1 Mounting the First Stage Onto the Cylinder Valve3.1.1 Yoke Connector
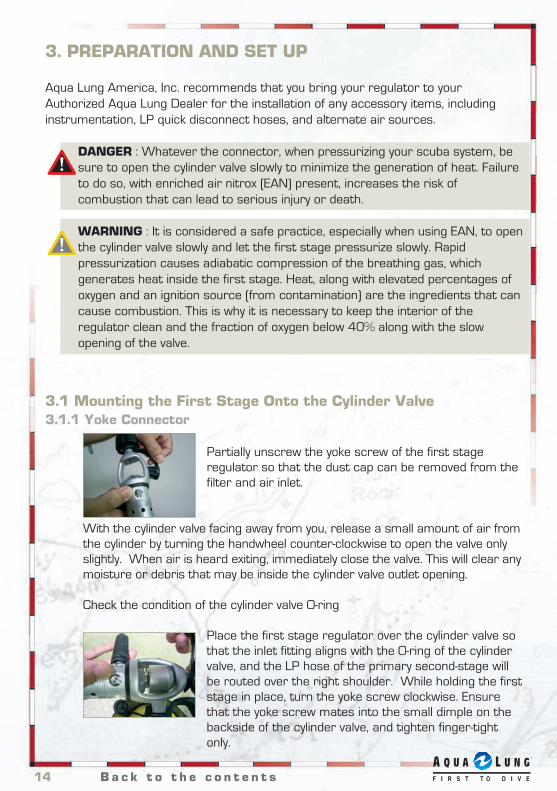
Partially unscrew the yoke screw of the first stageregulator so that the dust cap can be removed from thefilter and air inlet.
With the cylinder valve facing away from you, release a small amount of air fromthe cylinder by turning the handwheel counter-clockwise to open the valve onlyslightly. When air is heard exiting, immediately close the valve. This will clear anymoisture or debris that may be inside the cylinder valve outlet opening.
Check the condition of the cylinder valve O-ring
Place the first stage regulator over the cylinder valve sothat the inlet fitting aligns with the O-ring of the cylindervalve, and the LP hose of the primary second-stage willbe routed over the right shoulder. While holding the firststage in place, turn the yoke screw clockwise. Ensurethat the yoke screw mates into the small dimple on thebackside of the cylinder valve, and tighten finger-tightonly.
15 B a c k t o t h e c o n t e n t s
3.2 Pre-Dive Checks
1. Carefully inspect all hoses at their fittings to ensure they are securelyconnected into their respective ports on the first stage. Inspect the length ofeach hose to ensure that the hoses are not blistered, cut, or otherwisedamaged. If hose protectors are present, slide the protectors back to exposethe hose fittings, and inspect the hoses as described above.
2. Visually inspect both the first and second stage regulators for any signs ofexternal damage.
3. Visually inspect the mouthpiece to ensure that there are no tears or splits.
4. Check that the needle of your submersible pressure gauge is on zero.
5. Check that the Venturi adjustment or the Dual Cam is set on -- .For the Legend LX, check that the Master Breathing System is screwedcompletely in (see chapter 2.4.1).For the Mikron, check that the sensitivity adjustment button System is screwedcompletely in (see chapter 2.4.3).
6. Fit your regulator to the cylinder (see Chapter 3.1), checking that the hosesare oriented correctly.
WARNING:• DO NOT attempt to disconnect the second stage from the hose while theregulator is pressurized.• DO NOT perform any disassembly while the regulator is under pressure. Anydisassembly, including removing the second stage from the hose should only beperformed by an authorized Aqua Lung Dealer.• DO NOT pressurize the regulator with the second stage disconnected fromthe hose.
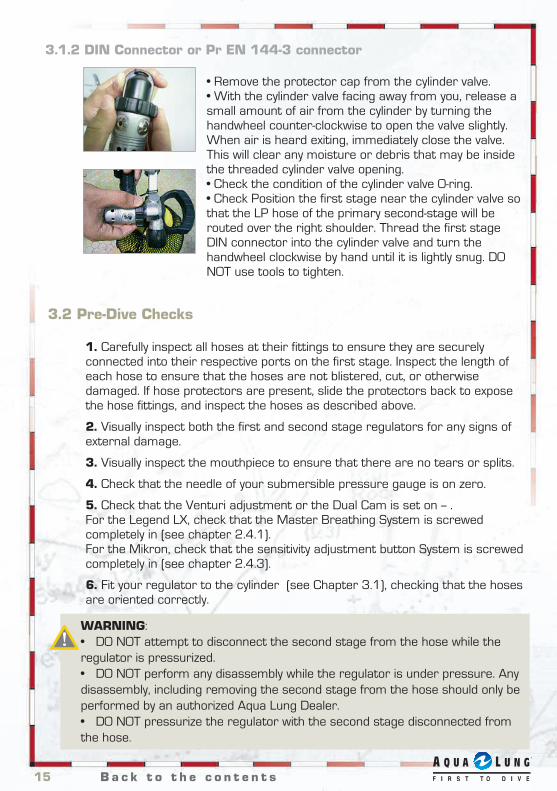
3.1.2 DIN Connector or Pr EN 144-3 connector
• Remove the protector cap from the cylinder valve.• With the cylinder valve facing away from you, release asmall amount of air from the cylinder by turning thehandwheel counter-clockwise to open the valve slightly.When air is heard exiting, immediately close the valve.This will clear any moisture or debris that may be insidethe threaded cylinder valve opening.• Check the condition of the cylinder valve O-ring.• Check Position the first stage near the cylinder valve sothat the LP hose of the primary second-stage will berouted over the right shoulder. Thread the first stageDIN connector into the cylinder valve and turn thehandwheel clockwise by hand until it is lightly snug. DONOT use tools to tighten.

16 B a c k t o t h e c o n t e n t s
3.3 Pressurising the regulator
WARNING : Before pressurizing the regulator check the condition of the hosesfitted to the regulator.
1. If a submersible pressure gauge is fitted check that its dial facesaway from you.
2. SLOWLY open the cylinder valve by unscrewing to pressurize the regulator.When the valve is completely open, screw it back a quarter turn.
3. Check that there are no leaks from any of the hoses or from any otheraccessories fitted. NEVER DIVE with a regulator that shows any leaks whenplaced under pressure. If there is a leak between the regulator and the cylindercheck that the regulator is correctly fitted and that the O-ring is in goodcondition.
WARNING : Never attempt to reposition the hoses once the regulator isunder pressure. If they are not correctly oriented, purge the regulator andreposition them.
WARNING:• DO NOT attempt to disconnect the second stage from the hose while theregulator is pressurized.• DO NOT perform any disassembly while the regulator is under pressure. Anydisassembly, including removing the second stage from the hose should only beperformed by an authorized Aqua Lung Dealer.• DO NOT pressurize the regulator with the second stage disconnected fromthe hose.
4. Check to ensure that the submersible pressure gauge is displaying anaccurate measurement of the air pressure inside the cylinder at the time ofcharging and is appropriate for your planned dive.
5. Depress the purge button momentarily to ensure that sufficient airflow isprovided to blow out any dust or debris which may have entered the second-stage.
6. Place the regulator in your mouth and set the Venturi knob to position "+", forthe Mikron and the Legend LX, completely unscrew the sensitivity adjustmentbutton (anti-clockwise).
7. Inhale slowly and deeply from the regulator several times. The regulator mustdeliver enough air for you to breathe easily without noticeable resistance.
17
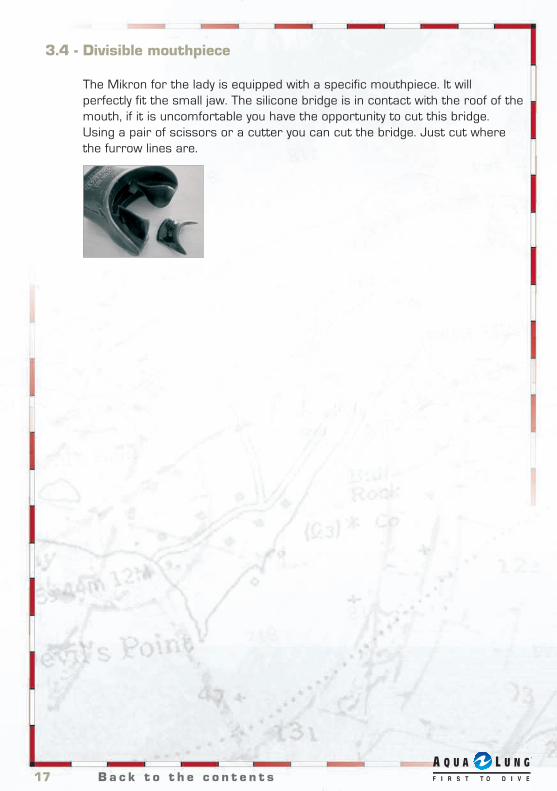
3.4 - Divisible mouthpiece
The Mikron for the lady is equipped with a specific mouthpiece. It willperfectly fit the small jaw. The silicone bridge is in contact with the roof of themouth, if it is uncomfortable you have the opportunity to cut this bridge.Using a pair of scissors or a cutter you can cut the bridge. Just cut wherethe furrow lines are.
B a c k t o t h e c o n t e n t s
4. DIVING WITH THE REGULATOR
If the regulator is used as a secondary breathing system (octopus), it isrecommended that you use a mouth piece plug to prevent the entry of anyobjects and that you set the Venturi knob to position "-", for the Mikron and theLegend LX, screw the sensitivity adjustment button completely in (clockwise).Under water the second stage may start to free-flow when it is not in thediver's mouth. If this occurs, turn the regulator so that the mouthpiece facesdownward.When you replace the mouthpiece in your mouth, set the button to the "+"position so that you obtain improved breathing comfort. For the Mikron and theLegend LX, completely unscrew the sensitivity adjustment button (anti-clockwise).Check your air supply at regular intervals by verifying your cylinder pressure.
4.1. COLD WATER DIVING :
In order to reduce the risks of regulator freezing when diving in cold water(below 50°F or 10°C), consider at least the following recommendations andrespect your dive training program procedure :
1. Protect your regulator from any accidental entrance of water into the firstor second stages.
2. Protect your equipment from cold before the dive. More precisely, keep yourregulator and all its accessories in a warm dry place.
3. Carry out all pre-dive checks of your equipment in a warm dry place, beforeeven going to the dive site.
4. Avoid breathing through the regulator or pressing the purge button in verycold air before entering the water.
5. Avoid removing the regulator from your mouth during the dive, or when onthe surface. This will prevent cold water from entering the regulator secondstage.
6. As far as is possible, avoid excessive effort during the dive.
7. Have your dive store check that the air in your cylinder meets EN 12021and is is dry.
8. As far as is possible, do not purge the second stage during the dive.
18 B a c k t o t h e c o n t e n t s

19 B a c k t o t h e c o n t e n t s
5. AFTER THE DIVE5.1 Removal of the Regulator from the Cylinder Valve
NOTE : If fresh water is available, rinse your regulator completely beforedepressurizing it. This will help to prevent any contaminants from enteringsealing surfaces inside the regulator.
NOTE : When you remove the regulator from the cylinder take care to preventthe entry of water into the regulator, particularly via the filter.
5.1.1 General Procedures
1. Shut off the cylinder gaz supply by turning the cylinder valve handwheelclockwise until it stops.2. While observing the submersible pressure gauge, depress the purge buttonof the second-stage. When the gauge reads zero and gazflow can no longer beheard from the second stage, release the purge button.
5.1.2 DIN Connector or Pr EN 144-3 connector
1. Turn the yoke screw counter-clockwise to loosen and remove the first stagefrom the cylinder valve.2. Dry the dust cap with a towel or other lint-free cloth. While you may use gazfrom your tank valve to blow the water off the dust cap, you run the risk ofblowing water into the filter.3. Place the dust cap over the first stage inlet fitting and seal it securely inplace by tightening down the yoke screw.4. Completely screw home the DIN handwheel onto the dust cap.5. With the cylinder valve facing away from you, open the valve slightly torelease a short burst of gaz, and then immediately close the valve. This willclear any moisture that may have entered the valve opening. Immediately sealthe protector cap securely in place over the opening of the DIN valve to preventthe entrance of moisture or debris.
5.2 Disinfection
Aqua Lung recommend disinfecting the regulator second stage with a 2%solution of glutaraldehyde produced by the Anios company (Sterianos, AquaLung reference 382062) following the procedure described on the package.
20 B a c k t o t h e c o n t e n t s
6. USER CARE & MAINTENANCE
It is important to provide the proper preventative maintenance in order toensure the best possible performance and maximum life of your Aqua LungRegulator. The following maintenance procedures should be performedroutinely after each use to ensure that the regulator is cleaned, inspected, andprepared for the next use or for storage.
As soon as possible after diving, the regulator should be rinsed thoroughly withfresh water while it is attached to a cylinder and pressurized with air.
Rinsing alone, however, will not sufficiently clean the regulator. To clean theregulator as thoroughly as possible Aqua Lung recommends:
. Attach the regulator to a charged SCUBA cylinder, open the cylinder valve topressurize the regulator, and thoroughly soak both the first and second-stagesin a bath of fresh water.
. While the regulator is soaking, move the vane adjustment switch on thesecond stage (if present) back and forth several times from the “MIN” (or “—”)to the “MAX” (or “+”) settings. You may also turn the valve adjustment knob(adjustable models) slightly back and forth—no more than 1/4 turn.
After the regulator has been properly soaked, it is important to rinse itvigorously by flushing the mainspring cavity of the first stage regulator (non-environmentally sealed models only), the second-stage mouthpiece, and theopenings in the second-stage front cover with a pressurized stream of water.This will remove the deposits of salt and minerals that were loosened duringsoaking.
DANGER : if you use a garden hose, do not use the high pressure jet as thiscould damage the diaphragm and the internal valve.
WARNING : DO NOT depress the purge button, loosen the first stage yokescrew, or turn the second stage adjustment knob all the way “out” (adjustablemodels) if the regulator is submerged unpressurized. Doing so will allow theentrance of moisture, and will require that the regulator be returned to anAuthorized Aqua Lung Dealer for service.
• Disconnect the regulator and wipe itr as dry as possible and then hang it bythe first stage to ensure that all remaining moisture drains from the secondstages.
• Do not leave the regulator exposed to direct sunlight for long periods.
• When the regulator is completely dry, store in a clean equipment box, orsealed inside a plastic bag. Do not store it where it may be exposed to extremeheat or an electric motor, which produces ozone. Prolonged exposure toextreme heat, ozone, chlorine, and ultraviolet rays can cause prematuredegradation of rubber parts and components.
• Never store the regulator while it is still connected to the cylinder valve.
DANGER : Do not use any type of solvent or petroleum based substances toclean or lubricate any part of the regulator. Do not expose any part of theregulator to aerosol spray, as some aerosol propellants attack or degraderubber and plastic materials.
7. DEALER INSPECTION & SERVICE
It cannot be assumed that a regulator is in good working order on the basisthat it has received little use since it was last serviced. Remember thatprolonged or improper storage can still result in internal corrosion and/ordeterioration of O-ring seals.
You must obtain factory prescribed service for your regulator at least once ayear from an Authorized Aqua Lung Dealer, regardless of the amount of use ithas received. Your regulator may require this service more frequently,depending on the amount of use it receives and the environmental conditions inwhich it is used.
If the regulator is used for rental or training purposes, it will require completeoverhaul and factory prescribed service every three to six months. Chlorinatedswimming pool water is an especially damaging environment for SCUBAequipment, due to the high levels of chlorine and pH balancing chemicals thatcause certain components to rapidly deteriorate.
Obtain service for your regulator at least once a year, from anAuthorized Aqua Lung dealer. Your personal safety and the mechanical
integrity of your regulator may depend on it.
21 B a c k t o t h e c o n t e n t s
8. WARRANTY INFORMATION8.1 USA onlyAll warranty transactions must be accompanied by proof of original purchase from anAuthorized Aqua Lung Dealer. Be sure to save your sales receipt, and present itwhenever returning your regulator for warranty service.
8.1.1 The Aqua Lung Satisfaction Guarantee™If any Aqua Lung product that you have purchased from an Authorized Aqua LungDealer fails to meet your expectations, Aqua Lung America, Inc. will replace orexchange the product free of charge within thirty (30) days of the originalpurchase. Exchanges will be made through the same Authorized Dealer for AquaLung America, Inc., for merchandise of equal or lesser value, and will be madeonly for Aqua Lung equipment. Aqua Lung America, Inc. makes this guarantee ofsatisfaction a part of all product warranties because of the confidence we have inour products.
8.1.2 The Aqua Lung Limited Lifetime WarrantyAqua Lung America, Inc. warrants to the original purchaser that the productwill remain free from defects in material and workmanship throughout itsuseful life; provided that it recieves normal use, proper care and prescribeddealer service subject to those restrictions stated below.
This limited warranty is extended only to the original purchaser for purchasesmade from an Authorized Aqua Lung Dealer, and is not transferable. Thiswarranty is limited to repair or replacement only at the discretion of Aqua LungAmerica, Inc.
WARNING : It may be dangerous for untrained and uncertified persons to usethe equipment covered by this warranty. Use of SCUBA equipment by anyonewho is not a trained or certified diver, or is not currently receiving trainingthrough a recognized certification agency, may lead to serious injury or death.
This warranty gives you specific legal rights. You may have rights that vary fromstate to state and country to country.
AQUA LUNG AMERICA, INC. DISCLAIMS AND EXCLUDES ANY LIABILITYFOR INCIDENTAL OR CONSEQUENTIAL DAMAGES
Some states in the U.S. and certain foreign countries do not allow exclusions orlimitations of liability for incidental or consequential damages, so this may notapply to you.
22 B a c k t o t h e c o n t e n t s

Restrictions
The following restrictions apply to this warranty:
1. This warranty does not cover normal wear. Factory prescribed service by anAuthorized Aqua Lung Dealer is required at least once annually.
2. This warranty does not extend to damages caused by improper use,improper maintenance, neglect, unauthorized repairs, modifications, accidents,fire, or casualty.
3. Cosmetic damage, such as scratches, dents, and nicks are not covered bythis warranty.
4. This warranty does not extend to equipment used for rental, commercial, ormilitary purposes.
5. This warranty covers products purchased in the United States. Forwarranties that may apply elsewhere, please contact your local representative.
6. Failure to meet any of the above requirements will render the warranty nulland void.
23 B a c k t o t h e c o n t e n t s
8.2 Outside USA
8.2.1 The Aqua Lung warranty
• The operation of a regulator is guaranteed for one year from the date ofpurchase for use in sports diving non-commercial, and non-military.
• The guarantee applies to any part found to be defective by our technicalservice following a manufacturing or material defect, with the exception ofconsumable parts.
• The guarantee does not cover the cost of parts or labour associated withperiodic maintenance of the product. It does not cover damage caused byincorrect use or negligence.
• The operational guarantee excludes deterioration caused by normal use orageing of the product.
• The guarantee does not apply if the product is not used or maintained inaccordance with the instructions in the user’s guide supplied with the product.The guarantee will be voided by any attempt to open the regulator, all servicingand replacement of parts should be carried out exclusively by a Spirotechniqueservice agent.
• The guarantee covers, at the choice of La Spirotechnique, the repair orreplacement at our expense of defective parts, in our workshops, transportbeing at the charge of the purchaser.
• Replaced parts will become the property of the manufacturer. The repair,modification, or replacement of parts during the guarantee period will not havethe effect of extending the guarantee period.
• Our liability as a result of the sale is expressly limited to the above guarantee,and excludes all other penalties, damages and interests.
• In order to benefit from the terms of the current guarantee when making aguarantee claim, you must send the attached coupon, duly completed andstamped by the retailer, together with a proof of purchase (cash registerreceipt noting the date and the equipment purchased).
24 B a c k t o t h e c o n t e n t s

9. GUARANTEE COUPON
(TO BE COMPLETED ON DAY OF PURCHASE)
Serial N° of first stage : _____________________________________________
Serial N° of second stage : ___________________________________________
Regulator model : ________________________________________________
Purchase date : _______________________________________________________
RETAILER STAMP
Name of the purchaser : _________________________________________________
Adress : __________________________________________________________
__________________________________________________________________
__________________________________________________________________
25 B a c k t o t h e c o n t e n t s
26 B a c k t o t h e c o n t e n t s
10. Returning Your Regulator For Service
Whenever your regulator requires annual service or warranty repair, AquaLung requires that you bring it or send it to your nearest Authorized Aqua LungDealer.
If you need to return products covered by this warranty, please provide yourdealer with photocopies of your original sales receipt and receipt from your lastannual service if the product is more than one year old.
NOTE: Aqua Lung America, Inc. reserves the right to substantiatethe validity of the claim.
11. Contacting Aqua Lung AMERICA via Electronic Mail
You can contact Aqua Lung by visiting our website at: www.aqualung.com
27 B a c k t o t h e c o n t e n t s
12. ANNUAL INSPECTION & SERVICE RECORDDate Dealer Name Technician Name Observations Stamp
28 B a c k t o t h e c o n t e n t s
IMPORTANT NOTICE ABOUT MAIL ORDER SALES OFAQUA LUNG AMERICA PRODUCTS
Beware of any retailer that offers to sell and ship our life support products bymail, for orders placed by phone or the internet. These retailers are NOTAuthorized Aqua Lung America dealers. All Authorized Aqua Lung AmericaDealers must execute a Dealer Agreement that does not allow the sale of AquaLung America products except «in store». Many Aqua Lung dealers advertiseon the internet, but they are not allowed to deliver our products other than«over-the counter». This is our assurance that you will receive the proper pre-sale, point of sale, and post-sale assistance.
If you obtain our product from one of these unauthorized retailers, yourwarranty is not valid and we cannot offer you the assurances of quality andsatisfaction afforded by the Aqua Lung America Warranty program. If youwould like to verify whether or not a retailer is an Authorized Aqua LungAmerica Dealer, please call or write to Aqua Lung America, Inc. using theadress or phone number provided on the rear cover of this manual. Or, you canvisit our website at: www.aqualung.com