Embed Size (px)
Citation preview
Regions Bank | Member FDICRevised 031513
It’s time to expect more.
Image Viewer User Guide
Regions Wholesale Lockbox
Wholesale Lockbox Image Viewer Regions Commercial Banking — A Complete Solution Service Overview
Regions Wholesale Lockbox Imaging Services has developed an enhanced Image Viewer to
provide you with improved navigation to store and access images of your remittance checks and
related documents. The CD/DVD you receive contains a date range of captured images based
on your specifications (daily, weekly, monthly, semi-annually or annually).
How It Works
As Regions Lockbox Operations processes your remittances, a black & white image of the
check and a gray scale image of the remittance document(s) is captured and archived on a CD
or DVD (your choice). The CD has the capacity to retain 2,000-7,000 images and data
associated with them; while the DVD has the capacity to retain approximately 12,500-44,000
images and data, depending on the size of the imaged documents.
How You Benefit
Quick retrieval: Simply enter the desired search criteria from the check or remittance documents, and your images are just a mouse click away. Easy-to-read images: Checks and related documents, such as invoices, appear in black and white, so the images are easy to read. You can even use on-screen tools to rotate and zoom in/out to examine images closely. Easy setup: There is no special software to install or maintain, so getting started is easy. Enhanced Security: Security features have been incorporated into the Wholesale Lockbox Image Viewer to help safeguard your confidential information. The CD/DVDs are encrypted and password protected. Archive of Processed Remittances: The CD/DVD provides your company with a method for archiving important receivables information, which will enhance your existing disaster recovery process.
2
Guide Contents
> Getting Started……………………………………………………………………………. 4 > Using the Search Feature……………………………………………………………….. 5 Searching for Items……………………………………………………………………. 6 Example: Searching by Check Account Number……………………………. 7 Example: Searching by Detail Capture Information………………………… 8 > The View Document Screen…………………………………………………………….. 9 > Image Toolbar……………………………………………………………………………... 9 > Printing Images………………………………………………………………………….. 10 Print Options……………………………………………………………………………. 10 > Exporting Document/Payment Images………………………………………………... 11 Export Options…………………………………………………………………………. 11 > Correspondence…………………………………………………………………………… 12 Viewing Correspondence…………………………………………………………….. 12 > Wholesale History Search……………………………………………………………….. 14 > Image Toolbar……………………………………………………………………………… 15 > Frequently Asked Questions……………………………………………………………. 16
3
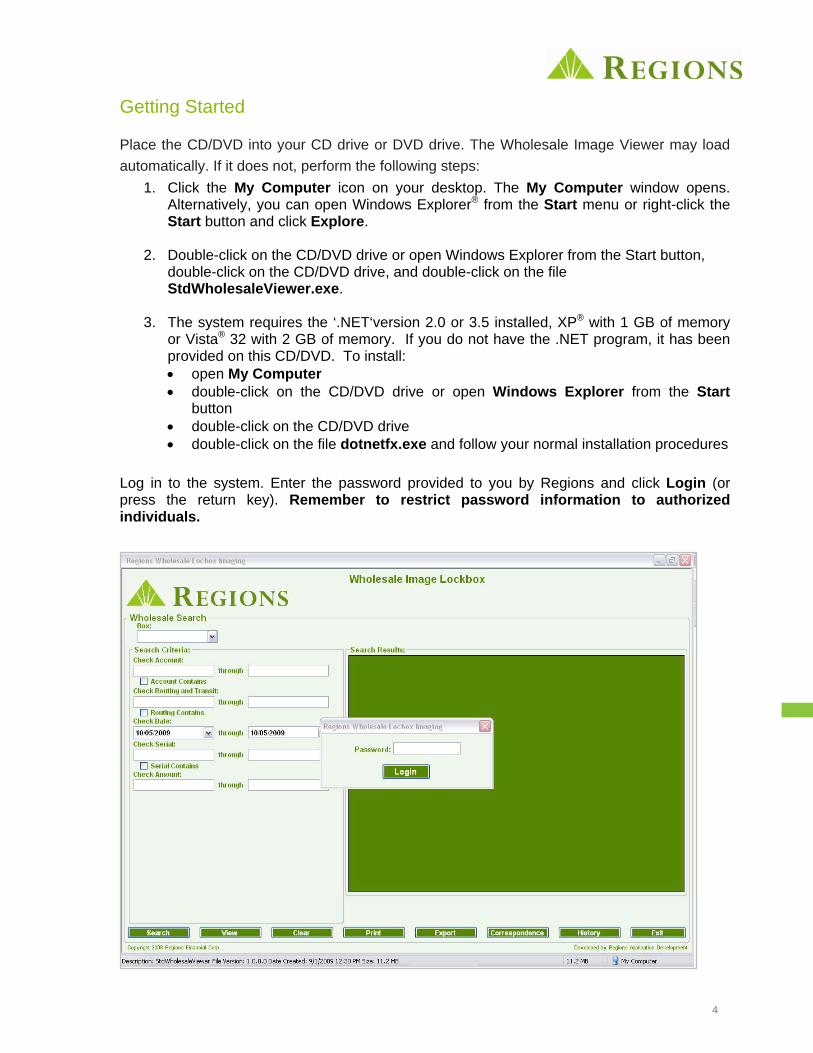
Getting Started
Place the CD/DVD into your CD drive or DVD drive. The Wholesale Image Viewer may load automatically. If it does not, perform the following steps:
1. Click the My Computer icon on your desktop. The My Computer window opens. Alternatively, you can open Windows Explorer® from the Start menu or right-click the Start button and click Explore.
2. Double-click on the CD/DVD drive or open Windows Explorer from the Start button,
double-click on the CD/DVD drive, and double-click on the file StdWholesaleViewer.exe.
3. The system requires the ‘.NET‘version 2.0 or 3.5 installed, XP® with 1 GB of memory
or Vista® 32 with 2 GB of memory. If you do not have the .NET program, it has been provided on this CD/DVD. To install: • open My Computer • double-click on the CD/DVD drive or open Windows Explorer from the Start
button • double-click on the CD/DVD drive • double-click on the file dotnetfx.exe and follow your normal installation procedures
Log in to the system. Enter the password provided to you by Regions and click Login (or press the return key). Remember to restrict password information to authorized individuals.
4
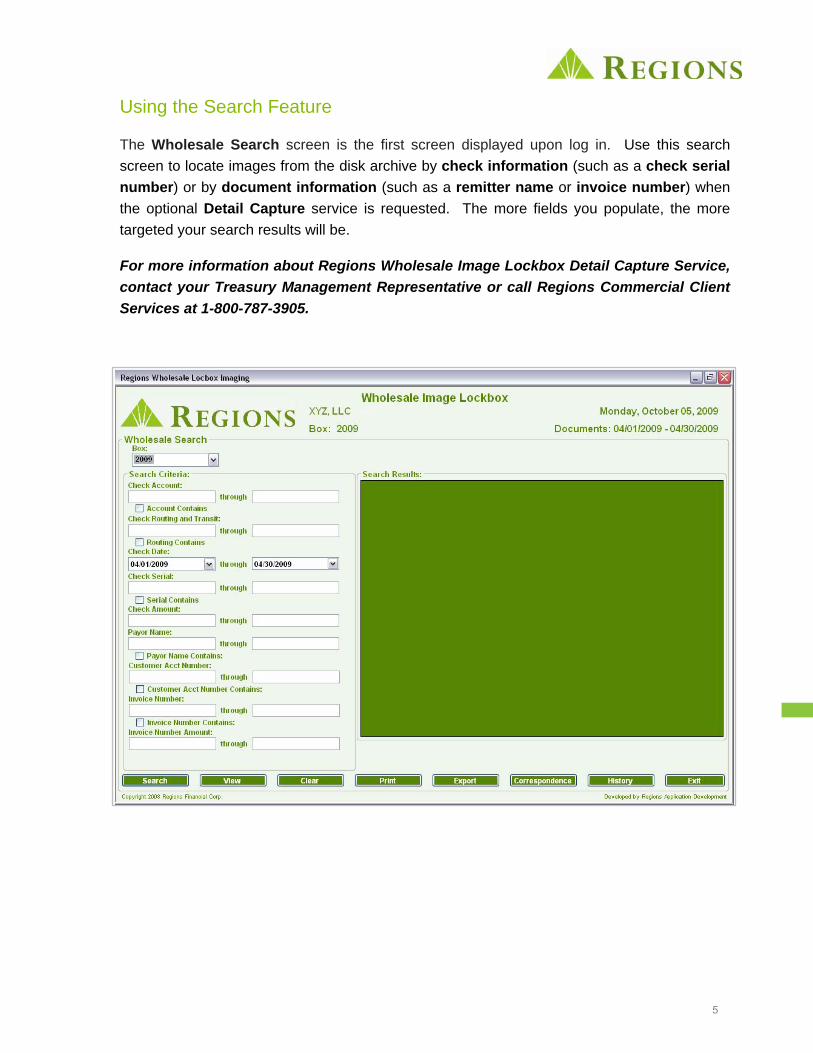
Using the Search Feature The Wholesale Search screen is the first screen displayed upon log in. Use this search screen to locate images from the disk archive by check information (such as a check serial number) or by document information (such as a remitter name or invoice number) when the optional Detail Capture service is requested. The more fields you populate, the more targeted your search results will be.
For more information about Regions Wholesale Image Lockbox Detail Capture Service, contact your Treasury Management Representative or call Regions Commercial Client Services at 1-800-787-3905.
5
Searching for Items
The Wholesale Viewer CD/DVD allows you to search for items based on check data or document data (when the detail capture service has been requested).
1. The Wholesale Viewer Search function enables you search for specific items or a range of items. The guidelines for conducting searches are as follows:
• Equals Search: Enter the same value in the start and end boxes. • Greater Than Search: Enter a starting value in the start box and leave the
end box blank. • Less Than Search: Leave the start box blank and enter an ending value in
the end box. • Range Search: Enter the starting value in the start box and an ending
(greater) value in the end box. • Contains: Enter a value in the start box and check the Contains check-
box.
2. The Wholesale Viewer contains fields that enable you to search using a variety of criteria: • Check Account: The account number contained on a processed check
payment or a range of check account numbers. • Check Routing and Transit: The routing and transit number contained on a
processed check payment or a range of routing and transit numbers. • Check Date: The date or date range for processed check payments. • Check Serial: The specific serial number or range of serial numbers contained
on processed check payments. • Check Amount: The payment amount or a range of payment amounts for
processed check payments. • Click the Search button at the bottom of the screen to perform your search. A
list of transaction information matching your search criteria will appear in the Search Results window.
• In the Search Results window, double-click the payment you wish to view, or highlight the item, and select View.
3. In addition to searching check data, you also have options for searching by document
data, such as:
• Invoice Number • Customer Name • Customer Account Number • Patient Name • Patient Account Number
To search using options from remittance documents such as invoices, you must subscribe to the optional detail capture service offered by Regions Lockbox Operations. For more information, contact your Treasury Management Representative, or call Regions Commercial Client Services at 1-800-787-3905.
6
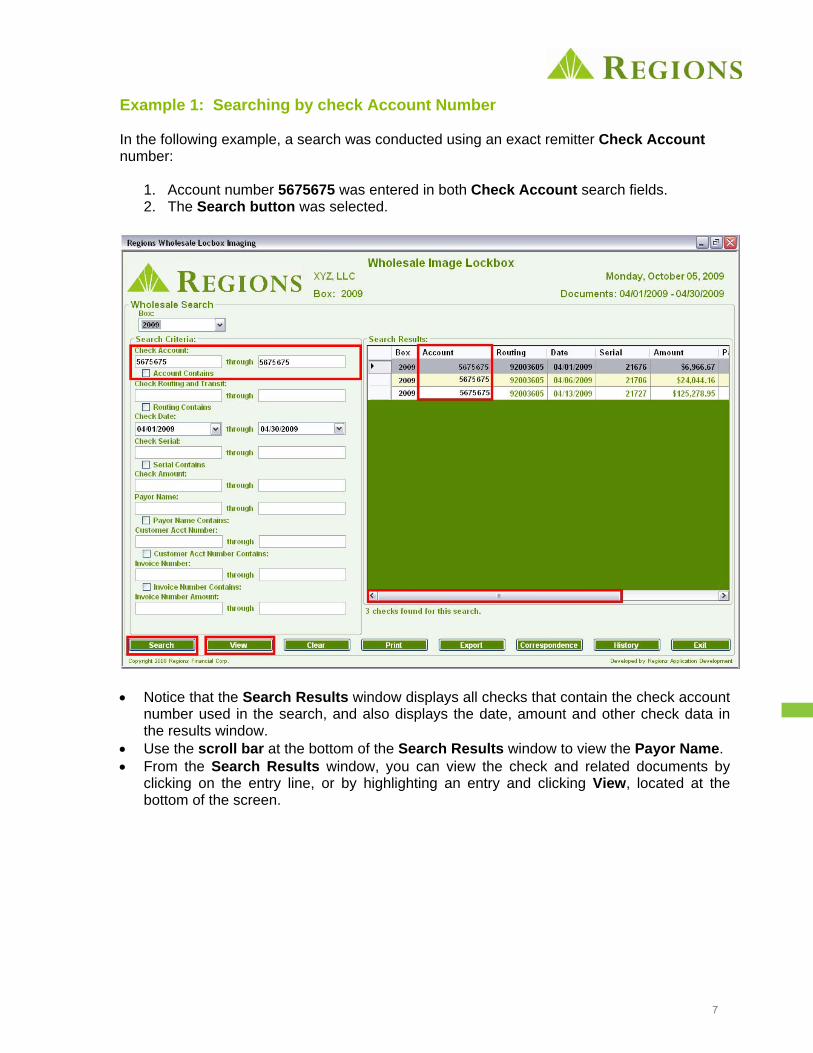
Example 1: Searching by check Account Number In the following example, a search was conducted using an exact remitter Check Account number:
1. Account number 5675675 was entered in both Check Account search fields. 2. The Search button was selected.
• Notice that the Search Results window displays all checks that contain the check account
number used in the search, and also displays the date, amount and other check data in the results window.
• Use the scroll bar at the bottom of the Search Results window to view the Payor Name. • From the Search Results window, you can view the check and related documents by
clicking on the entry line, or by highlighting an entry and clicking View, located at the bottom of the screen.
7
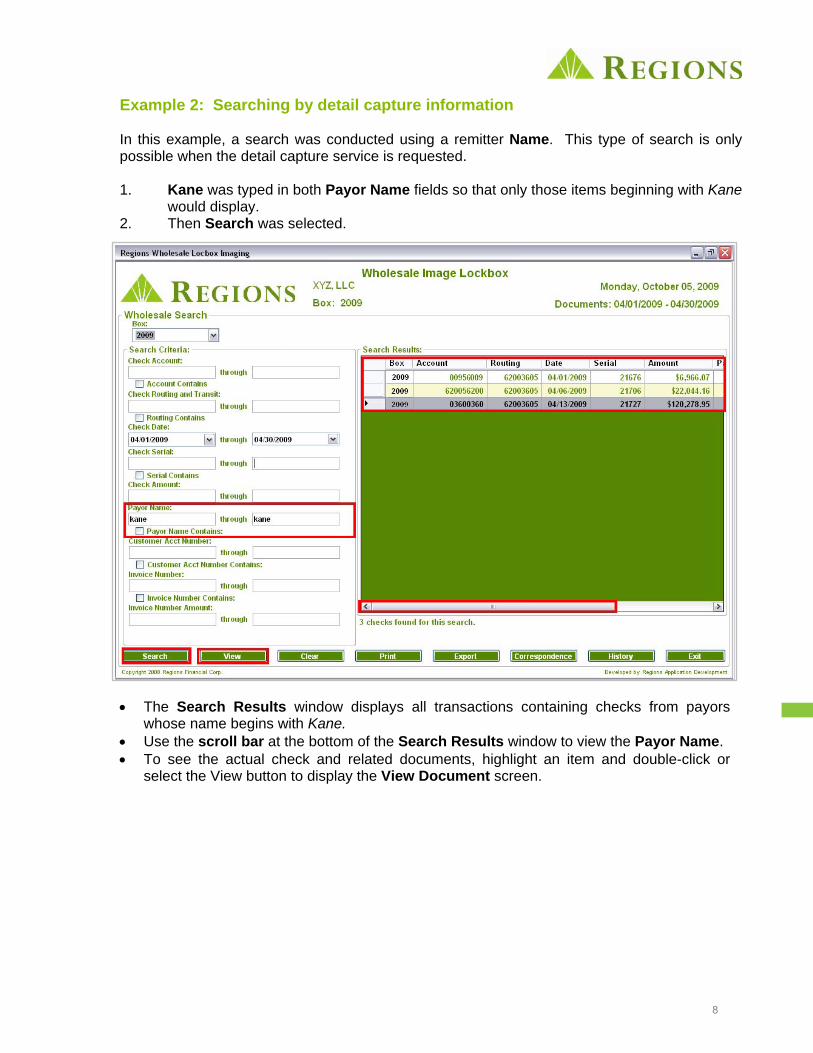
Example 2: Searching by detail capture information In this example, a search was conducted using a remitter Name. This type of search is only possible when the detail capture service is requested. 1. Kane was typed in both Payor Name fields so that only those items beginning with Kane would display. 2. Then Search was selected.
• The Search Results window displays all transactions containing checks from payors
whose name begins with Kane. • Use the scroll bar at the bottom of the Search Results window to view the Payor Name. • To see the actual check and related documents, highlight an item and double-click or
select the View button to display the View Document screen.
8
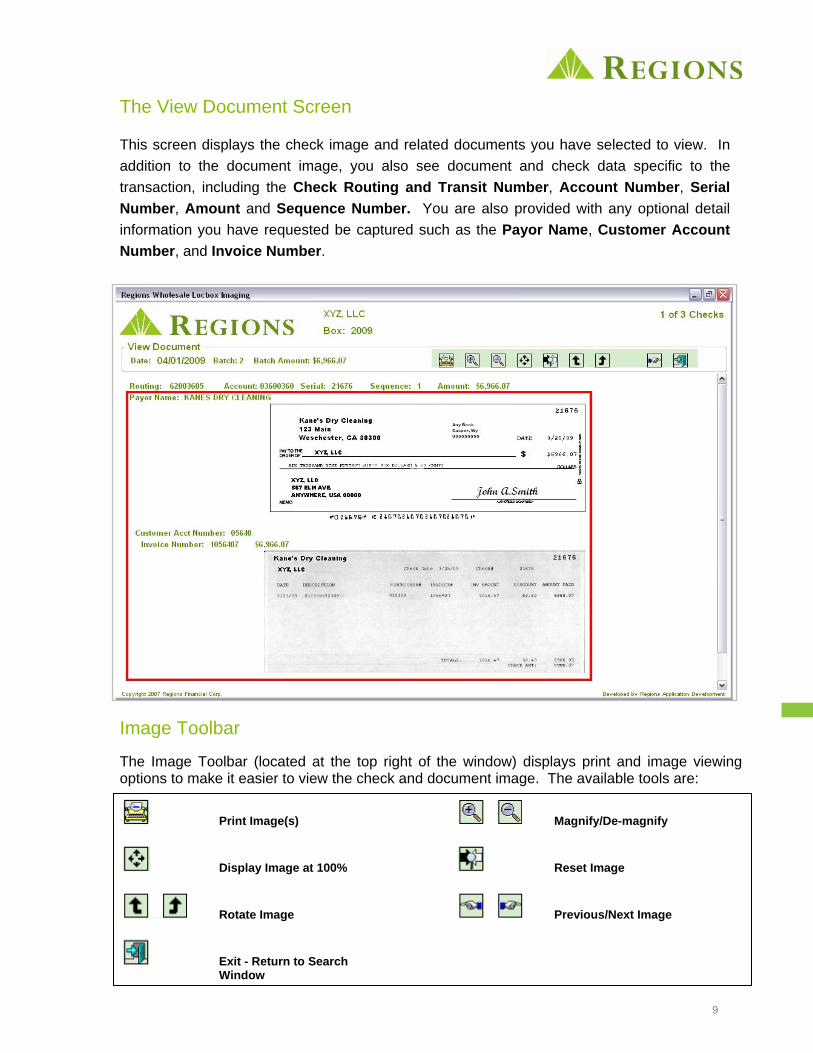
The View Document Screen
This screen displays the check image and related documents you have selected to view. In addition to the document image, you also see document and check data specific to the transaction, including the Check Routing and Transit Number, Account Number, Serial Number, Amount and Sequence Number. You are also provided with any optional detail information you have requested be captured such as the Payor Name, Customer Account Number, and Invoice Number.
Image Toolbar
The Image Toolbar (located at the top right of the window) displays print and image viewing options to make it easier to view the check and document image. The available tools are:
Print Image(s) Magnify/De-magnify
Display Image at 100% Reset Image
Rotate Image Previous/Next Image
Exit - Return to Search Window
9

Printing Images
From the View or Search screen, click the Print icon (located at the bottom of the Search screen and on the Toolbar on the View Document screen). Print Options
Print Options allows you to select how you would like to print items stored on the disk. The options are:
1. Print: Choose Selected Items or All Items in Set. 2. Scope Options: Select to print the Document and Payments, Documents Only, or
Payments Only. 3. Images per Page: The options are two images per page and four images per page. 4. Once your print criteria are selected, you may Print, Print Preview, or Create a PDF
file format.
10
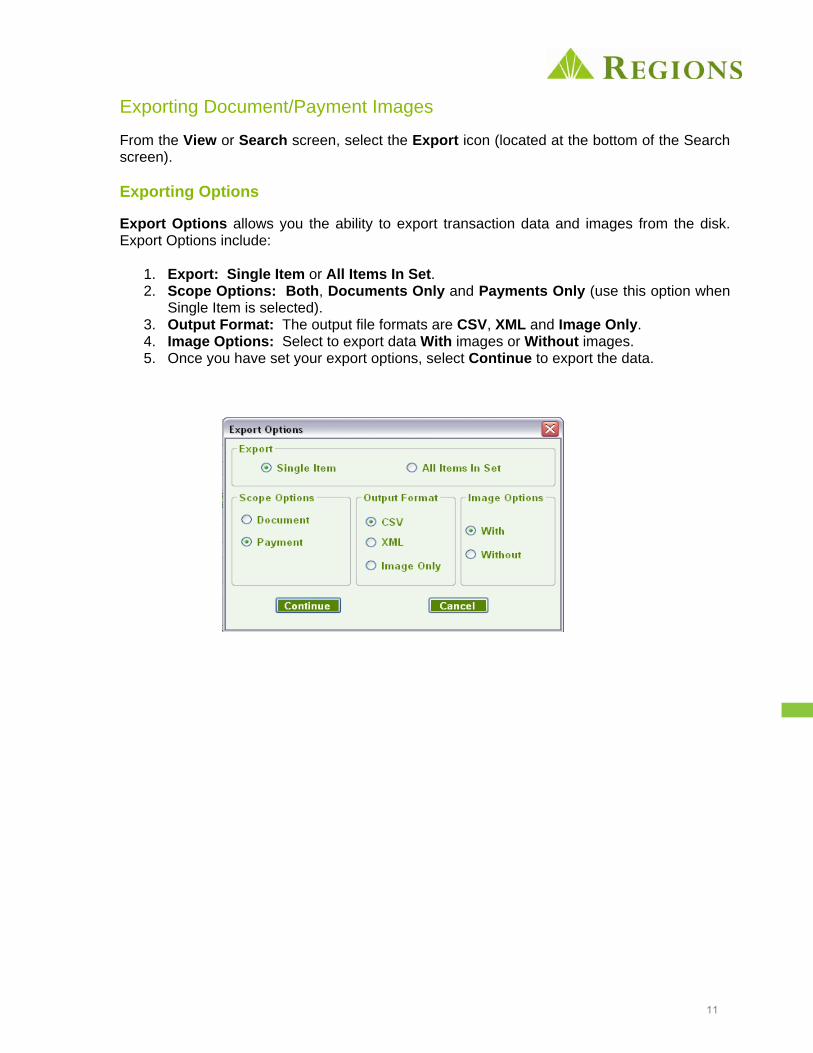
Exporting Document/Payment Images
From the View or Search screen, select the Export icon (located at the bottom of the Search screen). Exporting Options
Export Options allows you the ability to export transaction data and images from the disk. Export Options include:
1. Export: Single Item or All Items In Set. 2. Scope Options: Both, Documents Only and Payments Only (use this option when
Single Item is selected). 3. Output Format: The output file formats are CSV, XML and Image Only. 4. Image Options: Select to export data With images or Without images. 5. Once you have set your export options, select Continue to export the data.
11
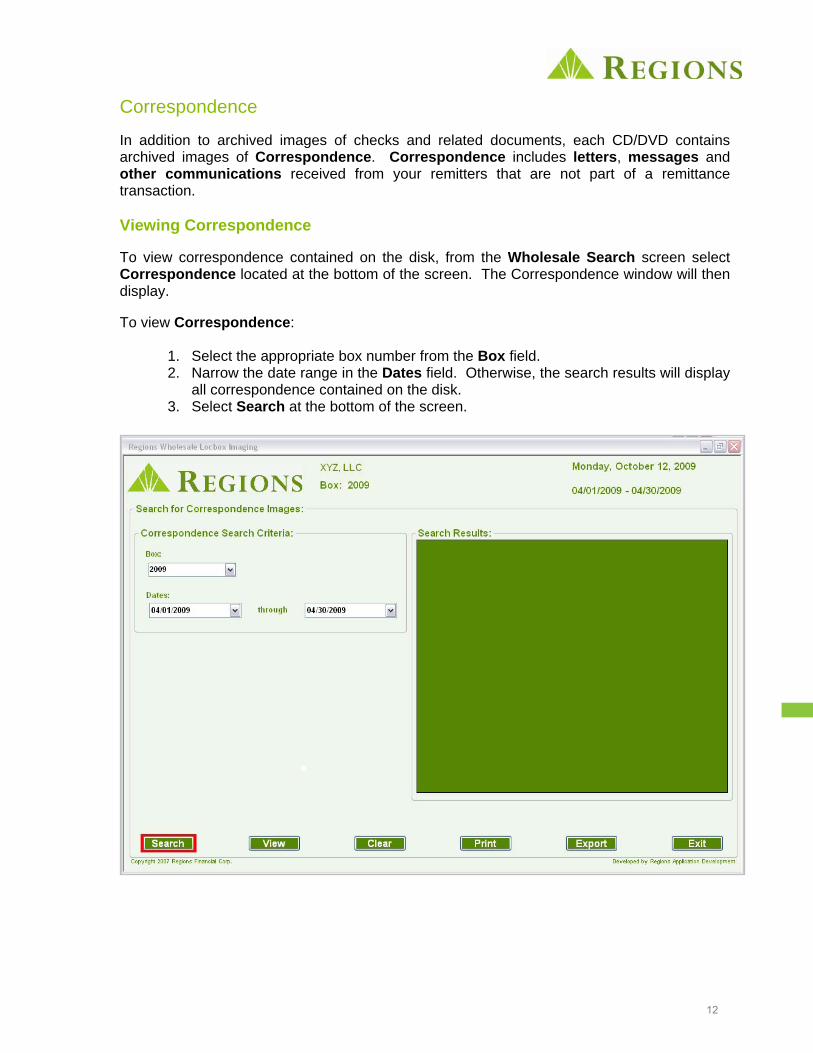
Correspondence
In addition to archived images of checks and related documents, each CD/DVD contains archived images of Correspondence. Correspondence includes letters, messages and other communications received from your remitters that are not part of a remittance transaction. Viewing Correspondence
To view correspondence contained on the disk, from the Wholesale Search screen select Correspondence located at the bottom of the screen. The Correspondence window will then display.
To view Correspondence:
1. Select the appropriate box number from the Box field. 2. Narrow the date range in the Dates field. Otherwise, the search results will display
all correspondence contained on the disk. 3. Select Search at the bottom of the screen.
12
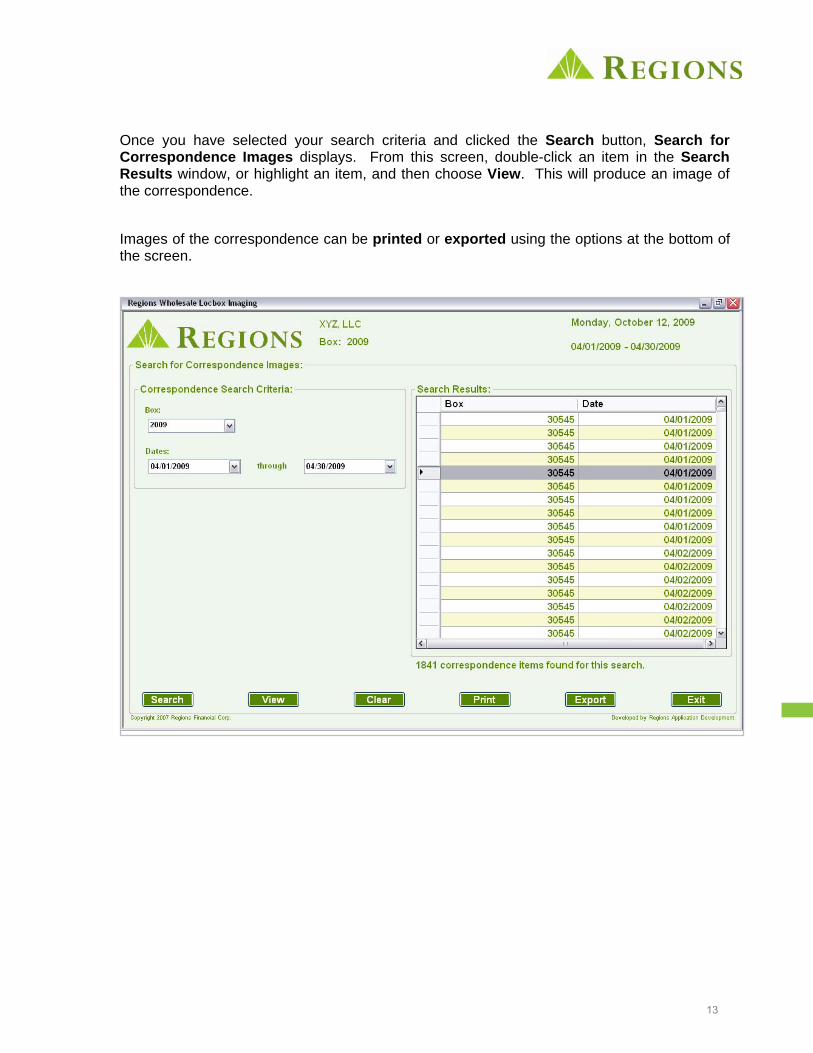
Once you have selected your search criteria and clicked the Search button, Search for Correspondence Images displays. From this screen, double-click an item in the Search Results window, or highlight an item, and then choose View. This will produce an image of the correspondence.
Images of the correspondence can be printed or exported using the options at the bottom of the screen.
13
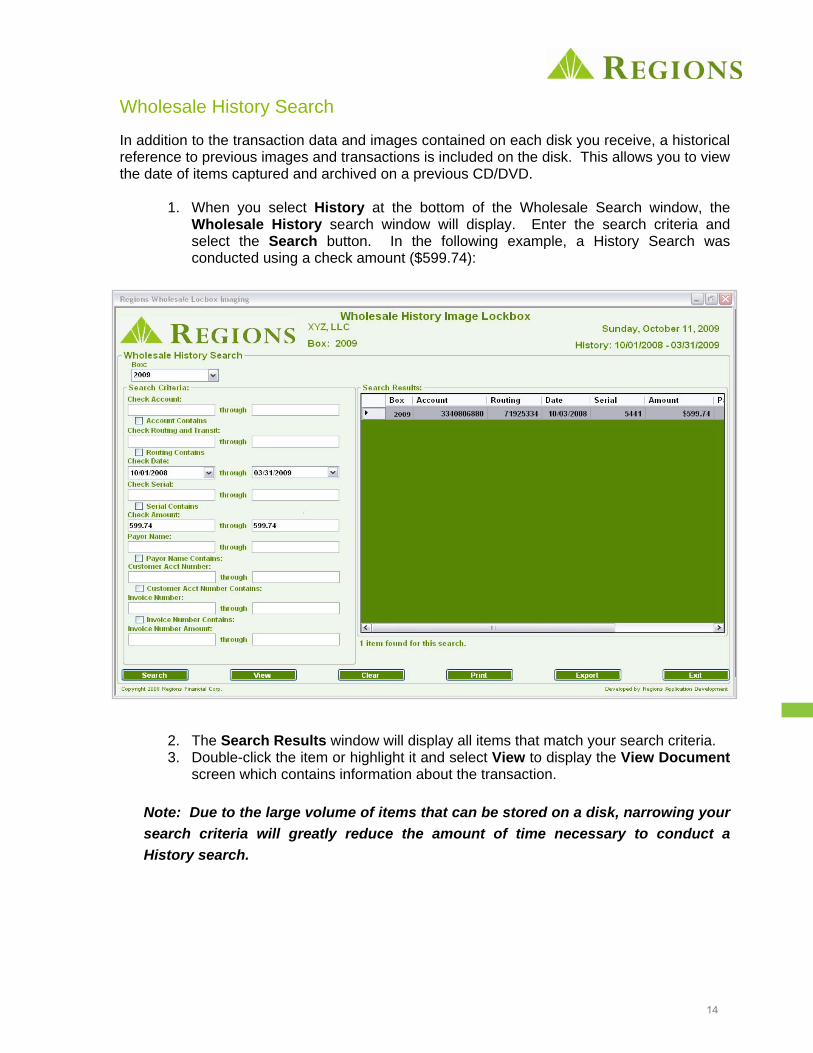
Wholesale History Search
In addition to the transaction data and images contained on each disk you receive, a historical reference to previous images and transactions is included on the disk. This allows you to view the date of items captured and archived on a previous CD/DVD.
1. When you select History at the bottom of the Wholesale Search window, the Wholesale History search window will display. Enter the search criteria and select the Search button. In the following example, a History Search was conducted using a check amount ($599.74):
2. The Search Results window will display all items that match your search criteria. 3. Double-click the item or highlight it and select View to display the View Document
screen which contains information about the transaction.
Note: Due to the large volume of items that can be stored on a disk, narrowing your search criteria will greatly reduce the amount of time necessary to conduct a History search.
14
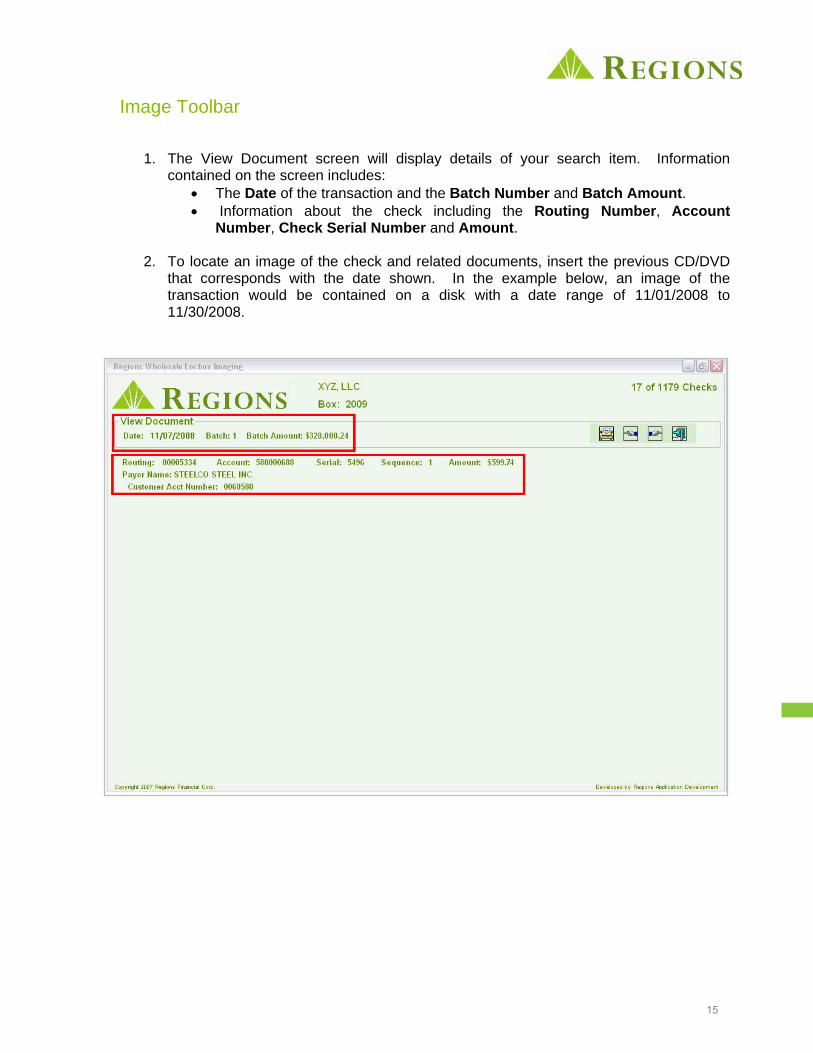
Image Toolbar
1. The View Document screen will display details of your search item. Information
contained on the screen includes: • The Date of the transaction and the Batch Number and Batch Amount. • Information about the check including the Routing Number, Account
Number, Check Serial Number and Amount.
2. To locate an image of the check and related documents, insert the previous CD/DVD that corresponds with the date shown. In the example below, an image of the transaction would be contained on a disk with a date range of 11/01/2008 to 11/30/2008.
15

Frequently Asked Questions (FAQs)
Why am I prompted to enter a Password at log in? Because of Regions’ attention to protecting the security of your account information, the CD/DVDs are password encrypted. This ensures that only authorized individuals will have access to view images and transaction information related to your account, and to the account information of your payment remitters. A password was mailed to you in a previous communication. To obtain a new password, contact Regions Commercial Client Services at 1-800-787-3905. When I enter my password on the login screen, the field resets to blank and I’m unable to log in. Why? If you make a mistake typing your password, the Password field resets to blank. Verify that you are typing the password correctly and try again. Passwords are case sensitive. My queries display “No documents found for this search” or “No items found for this search.” How do I locate the transactions? Try using a broader search to search for the transaction, e.g. a greater dollar amount spread, greater date paid date range, or greater check range. How can I clear data I’ve entered on the Search window so that I can initiate a new search? To initiate a new search, click Clear at the bottom of the Search window. This will restore the fields to the default status. What is the purpose of the icons on the View Document tool bar? By moving your cursor arrow over each button, without clicking, a brief identifier will define the function of each tool. By clicking on the tool’s icon, you enable that tool’s function until the icon is clicked again to deactivate the function. What is the purpose of History button? The History function enables you to determine the location of images previously provided on a particular CD/DVD. When you enter historical transaction information, you are provided with the date of the transaction. You may then identify which previous disk to insert to view the check and document images of the particular transaction. I need additional assistance for a problem that isn’t addressed here. Who can I ask? Email Regions Commercial Client Services at [email protected] or call 1-800-787-3905.
16

© 2013 Regions Bank. Member FDIC.
This guide is for general informational and reference purposes only and is entirely subject and subordinate to the terms of the respective written agreements for the products and services described above. This guide does not constitute a contract or representation or warranty of any kind, express or implied, nor does it in any way supplement, replace, modify, or amend the terms and provisions of the written agreements that govern the products and services. You should review actual product and service agreements carefully to understand the terms that govern the products and services and the rights, responsibilities, and liabilities of parties thereunder.