Embed Size (px)
Citation preview
1
Reflex dimension- Unlimited Dimensions!
Instruction for use Date: October 2010 www.wieland-international.com
22

3
Contents
WIELAND Dental + Technik & WIELAND Dental Ceramics ......................................p. 4
New Dimension Ceramics .....................................................................................p. 7
Reflex dimension Product Ranges ...........................................................................p. 10
The colour dimensions of the etiquettes ...............................................................p. 12
Instructions for use – Preparing the substructure .................................................. p. 15
Reflex dimension One – The processing of the one layer technique .......................p. 16
Reflex dimension – Standard build-up ...................................................................p. 22
Reflex dimension – Professional build-up ...............................................................p. 26
X Stain RZ Module ................................................................................................p. 30
Reflex dimension 3D – The supplement of 3D Master shades* ..............................p. 32
Reflex dimension Bleach Module ...........................................................................p. 33
Reflex dimension Shoulder Materials .....................................................................p. 35
Reflex dimension Gum dentines ............................................................................p. 37
Firing Programmes for Reflex dimension ................................................................p. 39
Troubleshooting ....................................................................................................p. 42
3
0483*Registered brand of the company Vita Zahnfabrik H. Rauter GmbH & Co. KG, 79704 Bad Säckingen, Germany
4
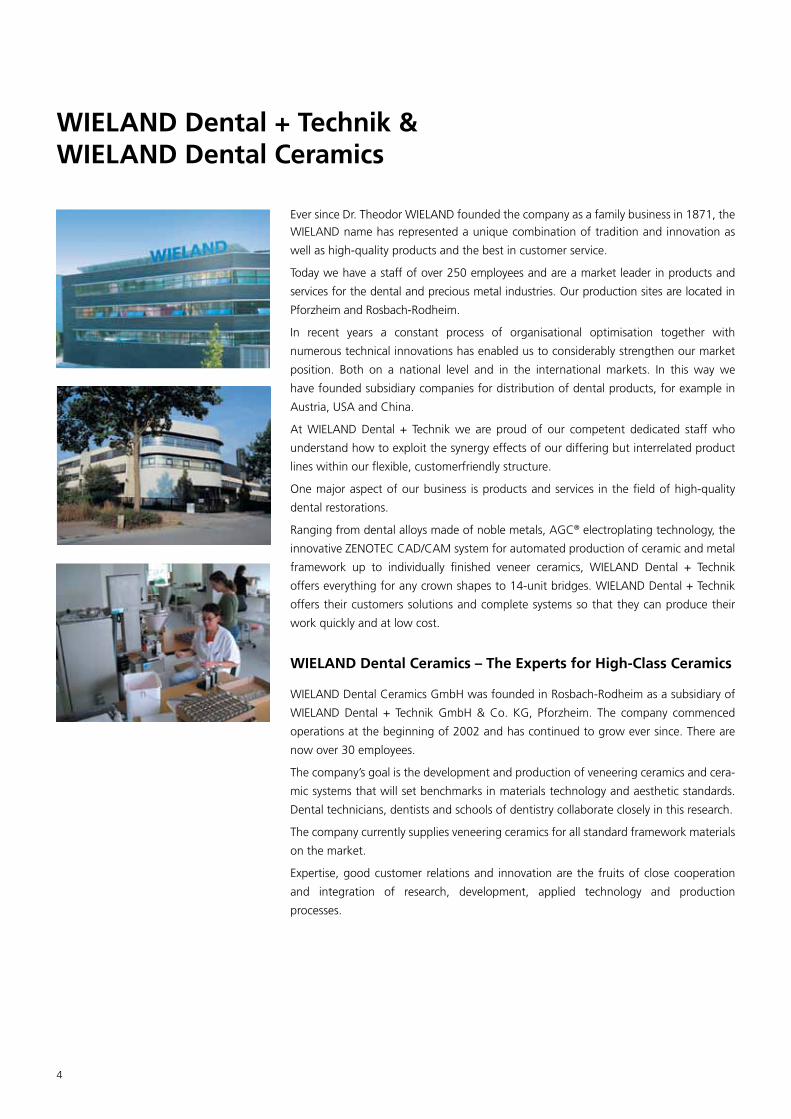
Ever since Dr. Theodor WIELAND founded the company as a family business in 1871, the WIELAND name has represented a unique combination of tradition and innovation as
well as high-quality products and the best in customer service.
Today we have a staff of over 250 employees and are a market leader in products and
services for the dental and precious metal industries. Our production sites are located in
Pforzheim and Rosbach-Rodheim.
In recent years a constant process of organisational optimisation together with
numerous technical innovations has enabled us to considerably strengthen our market
position. Both on a national level and in the international markets. In this way we
have founded subsidiary companies for distribution of dental products, for example in
Austria, USA and China.
At WIELAND Dental + Technik we are proud of our competent dedicated staff who
understand how to exploit the synergy effects of our differing but interrelated product
lines within our flexible, customerfriendly structure.
One major aspect of our business is products and services in the field of high-quality
dental restorations.
Ranging from dental alloys made of noble metals, AGC® electroplating technology, the
innovative ZENOTEC CAD/CAM system for automated production of ceramic and metal
framework up to individually finished veneer ceramics, WIELAND Dental + Technik
offers everything for any crown shapes to 14-unit bridges. WIELAND Dental + Technik
offers their customers solutions and complete systems so that they can produce their
work quickly and at low cost.
WIELAND Dental Ceramics – The Experts for High-Class Ceramics
WIELAND Dental Ceramics GmbH was founded in Rosbach-Rodheim as a subsidiary of
WIELAND Dental + Technik GmbH & Co. KG, Pforzheim. The company commenced
operations at the beginning of 2002 and has continued to grow ever since. There are
now over 30 employees.
The company’s goal is the development and production of veneering ceramics and cera-
mic systems that will set benchmarks in materials technology and aesthetic standards.
Dental technicians, dentists and schools of dentistry collaborate closely in this research.
The company currently supplies veneering ceramics for all standard framework materials
on the market.
Expertise, good customer relations and innovation are the fruits of close cooperation
and integration of research, development, applied technology and production
processes.
WIELAND Dental + Technik & WIELAND Dental Ceramics
5
WIELAND Ceramics – Expect the difference
Mastering aesthetic challenges - WIELAND optimises their successful veneer ceramics
Even successfully tried and tested ceramics with high aesthetic quality can be further developed and refined. Patients and dentists
but also dental technicians in their role of a user of dental ceramics have specific requirement for advanced dental ceramics which are
subject to a large number of criteria - and economic aspects are often in the foreground.
Users and experienced ceramists play a decisive role in creation and development of this new dimension of advanced veneer ceramics.
Beginning with material handling during layering, safe firing properties also for multiple firing up to a brilliant result with a natural
appearance we can create fascination. The emotional aspects of dental aesthetics result in perfection when patients and attending
dentists are equally convinced by the quality of our work. In this way materials and creative working are combined to an inseparable
symbiosis. Safety for the users and clinical performance are the primary concerns of WIELAND.
Already with the development of REFLEX NP safe for almost all non-precious alloys WIELAND made a contribution for more safety.
REFLEX NP safe conditions the substructure surface and thus prevents uncontrolled oxidation processes during firing.
This innovative impetus was consistently applied to other fields, including further development of the highly modern and widely used
Reflex veneer ceramics for metal ceramics. Modifiers that were previously only used for covering of oxide ceramics are now also used
for Reflex dimension ceramics. This allows for even better adaption between all-ceramic and metal ceramic restorations.
The heart and creative storage place for ceramic materials and composites is the Creative Box. It is a compact, variable, and creative
ceramics system offering a high degree of working freedom. Everything is possible - ranging from single-layer ceramics One, to the
classic standard three-layer technology up to individual layering, including Bleach and 3D colours.
This ceramics system is compact, it delivers what you really need and can be individually equipped in a new Dimension.
Reflex dimension – be creative !
*Registered brand of the company Vita Zahnfabrik H. Rauter GmbH & Co. KG, 79704 Bad Säckingen, Germany
6
Indication range:
Reflex dimension veneer ceramic materials are suitable for covering precious alloys in the
CTE range from 13.8 – 15.1 x 10⁻⁶K-1 (25 – 500 °C).
In addition, it is suitable for covering AGC® electroplating gold, Au-reduced, Pd-alloys
and non-precious metal alloys.
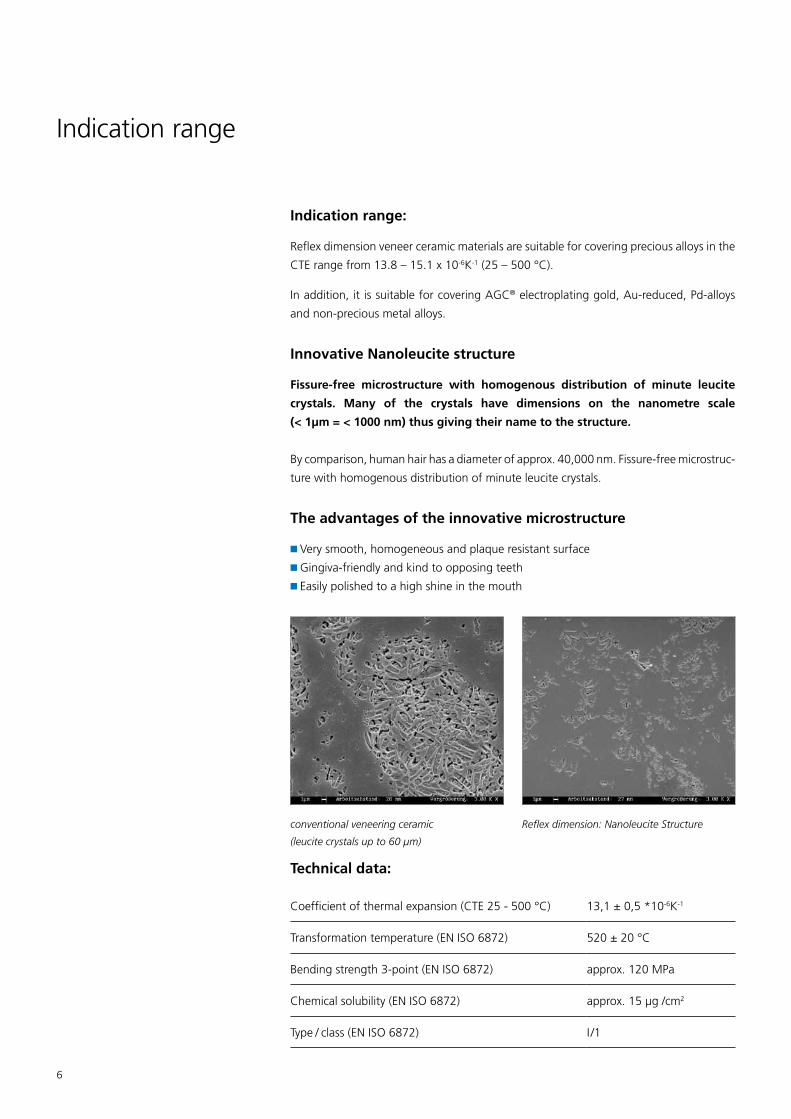
Innovative Nanoleucite structure
Fissure-free microstructure with homogenous distribution of minute leucite
crystals. Many of the crystals have dimensions on the nanometre scale
(< 1μm = < 1000 nm) thus giving their name to the structure.
By comparison, human hair has a diameter of approx. 40,000 nm. Fissure-free microstruc-
ture with homogenous distribution of minute leucite crystals.
The advantages of the innovative microstructure
■ Very smooth, homogeneous and plaque resistant surface
■ Gingiva-friendly and kind to opposing teeth
■ Easily polished to a high shine in the mouth
Technical data:
Coefficient of thermal expansion (CTE 25 - 500 °C) 13,1 ± 0,5 *10-6K-1
Transformation temperature (EN ISO 6872) 520 ± 20 °C
Bending strength 3-point (EN ISO 6872) approx. 120 MPa
Chemical solubility (EN ISO 6872) approx. 15 µg /cm2
Type / class (EN ISO 6872) I /1
Indication range
conventional veneering ceramic
(leucite crystals up to 60 μm)
Reflex dimension: Nanoleucite Structure
7
New Dimension Ceramics – With metal ceramics into new dimensions
Aesthetic
■ Perfect colour match with all WIELAND veneering ceramics
■ Exceptionally natural colour effects
■ Fulfil the highest aesthetic requirements
■ Light dynamics are standard for us
■ Improved colours with more chroma
■ Refined opale incisals with higher translucency and
brilliance
■ Natural fluorescence and opalescence appearance
■ Iridescent opale effect composites for fascinating enamel
effects
■ Ergonomic design of the ceramics system
■ Bleaching colours can now also be created thanks to the new
Bleach module of the WIELAND A-D shade guide
Reliable
■ Bond very well to all the indicated substructures
■ Simple und reliable firing programme cf. T.Klinke, R.Biffar,
Quintessenz Zahntechnik 26 (12) 1317-30 (2000)
■ Slow cooling not usually necessary
■ High fracture strength
■ 3D-colours can now be easily reproduced
Economical
■ Easy and accurate shade reproduction with the logical
two-stage build-up (dentine/incisal)
■ Single layer ceramics Reflex dimension One, a highly
economical solution
■ Robust in application
■ Perfect Handling properties and minimized shrinkage
■ Extremely compact ceramic kit
Innovative
■ Nanoleucite structure
■ Opalescence remains stable even through multiple firings.
■ Easy layering techniques from Standard to Premium
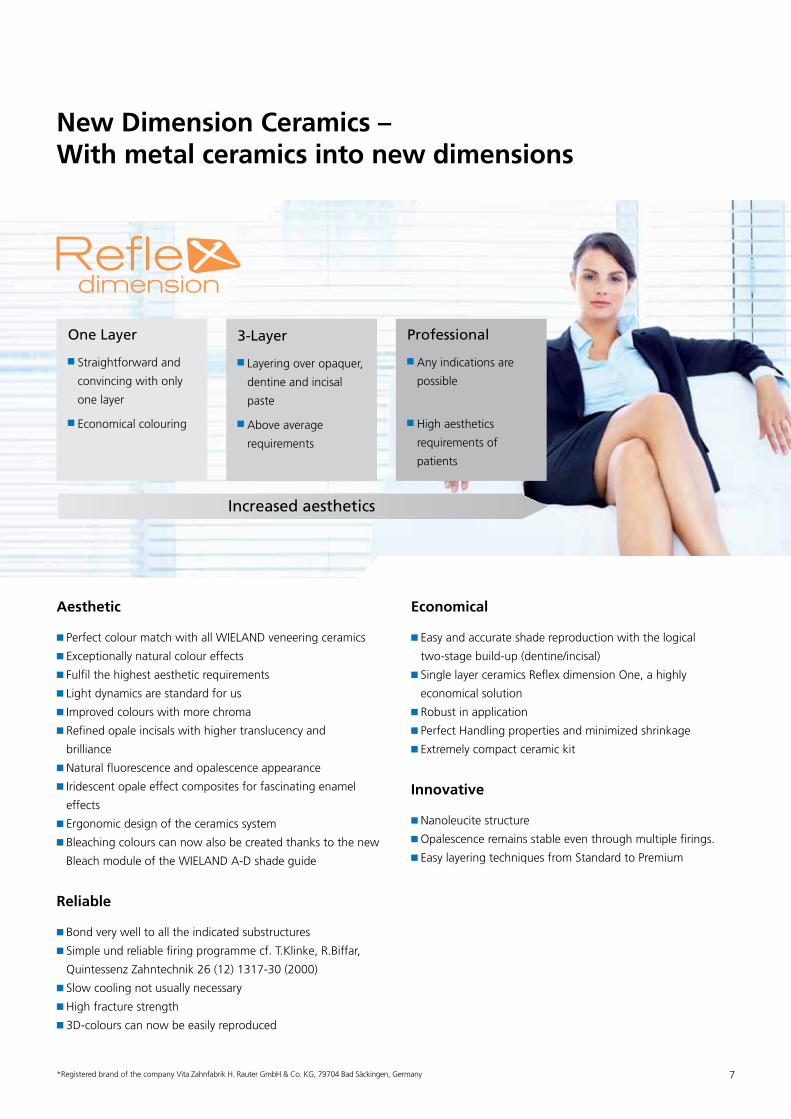
One Layer
Straightforward and
convincing with only
one layer
Economical colouring
3-Layer
Layering over opaquer,
dentine and incisal
paste
Above average
requirements
Professional
Any indications are
possible
High aesthetics
requirements of
patients
Increased aesthetics
*Registered brand of the company Vita Zahnfabrik H. Rauter GmbH & Co. KG, 79704 Bad Säckingen, Germany

8
Reflex dimension One Modul
Reflex dimension Basic I Modul
Reflex dimension Basic II Modul
Bleach 3Ddimension
One Stain Chromatix
3D Stain Chromatix
Bleach 3D Stain Chromatix
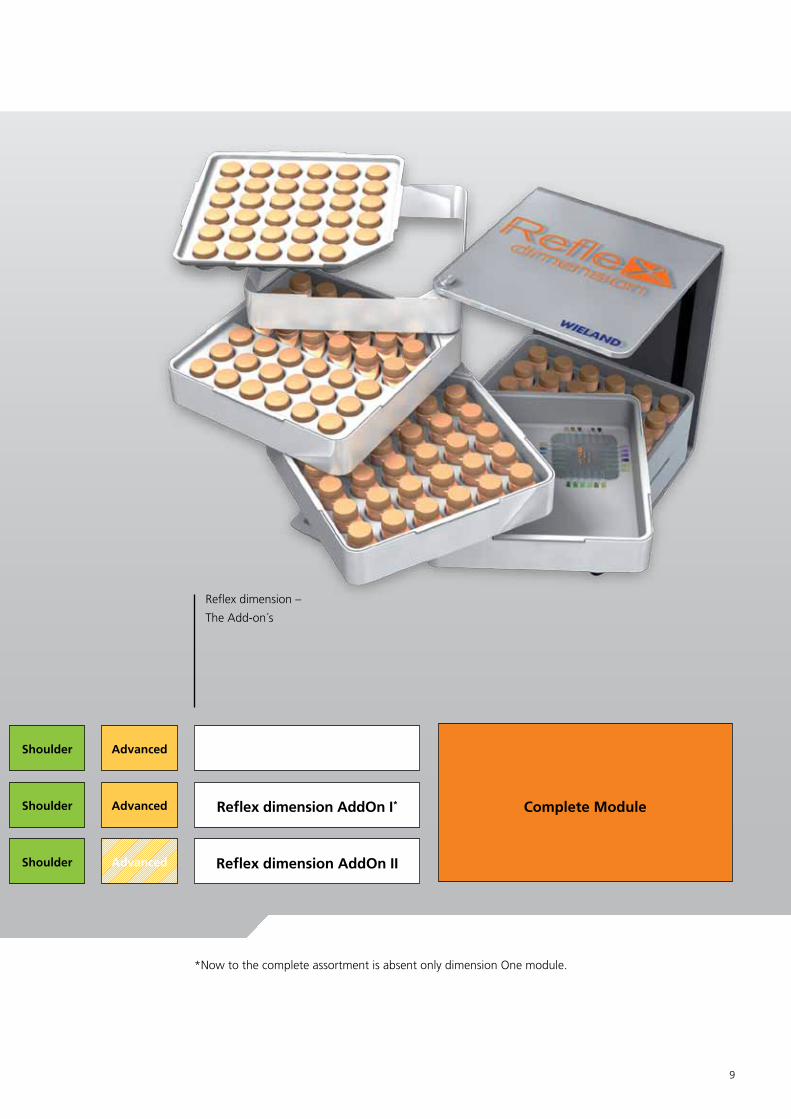
Reflex dimension – The entry Reflex dimension – The modular supplements
Bleach
To complement better with single mass purchase.These supplements are to be recommended
dimension One
dimension One
9
Shoulder Advanced
Shoulder Advanced
Shoulder Advanced
Reflex dimension AddOn I*
Reflex dimension AddOn II
Complete Module
Reflex dimension –
The Add-on´s
*Now to the complete assortment is absent only dimension One module.
10
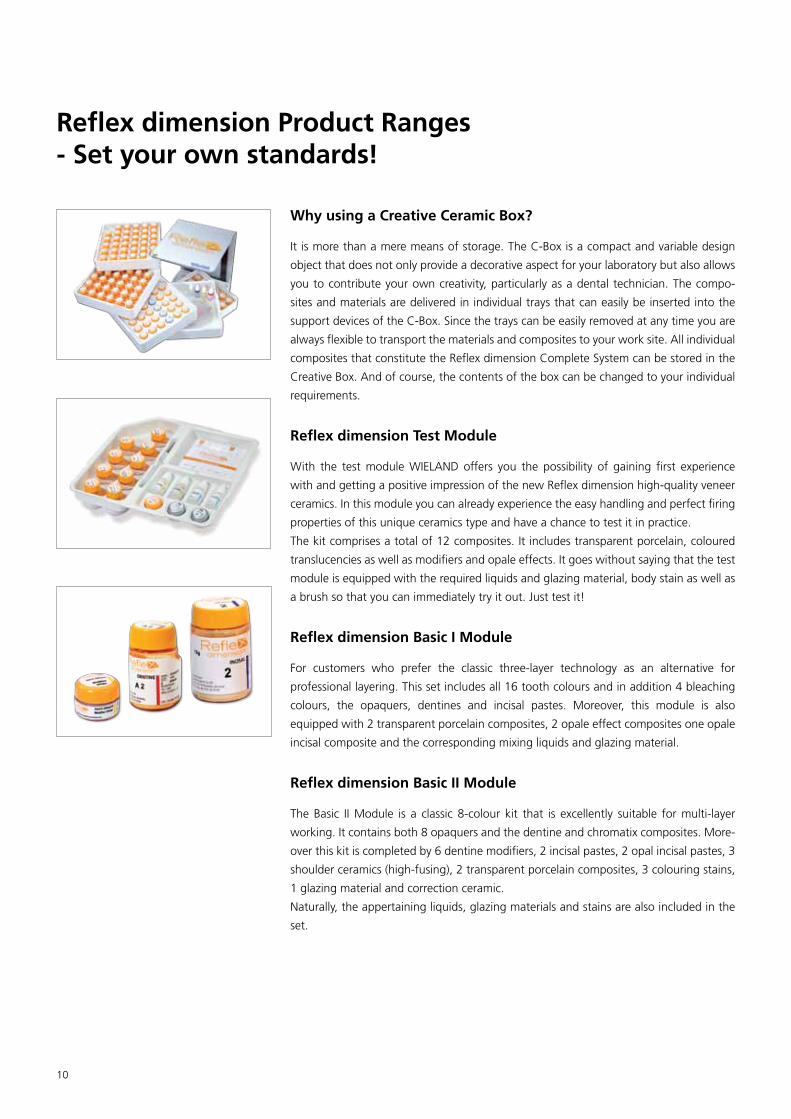
Why using a Creative Ceramic Box?
It is more than a mere means of storage. The C-Box is a compact and variable design
object that does not only provide a decorative aspect for your laboratory but also allows
you to contribute your own creativity, particularly as a dental technician. The compo-
sites and materials are delivered in individual trays that can easily be inserted into the
support devices of the C-Box. Since the trays can be easily removed at any time you are
always flexible to transport the materials and composites to your work site. All individual
composites that constitute the Reflex dimension Complete System can be stored in the
Creative Box. And of course, the contents of the box can be changed to your individual
requirements.
Reflex dimension Test Module
With the test module WIELAND offers you the possibility of gaining first experience
with and getting a positive impression of the new Reflex dimension high-quality veneer
ceramics. In this module you can already experience the easy handling and perfect firing
properties of this unique ceramics type and have a chance to test it in practice.
The kit comprises a total of 12 composites. It includes transparent porcelain, coloured
translucencies as well as modifiers and opale effects. It goes without saying that the test
module is equipped with the required liquids and glazing material, body stain as well as
a brush so that you can immediately try it out. Just test it!
Reflex dimension Basic I Module
For customers who prefer the classic three-layer technology as an alternative for
professional layering. This set includes all 16 tooth colours and in addition 4 bleaching
colours, the opaquers, dentines and incisal pastes. Moreover, this module is also
equipped with 2 transparent porcelain composites, 2 opale effect composites one opale
incisal composite and the corresponding mixing liquids and glazing material.
Reflex dimension Basic II Module
The Basic II Module is a classic 8-colour kit that is excellently suitable for multi-layer
working. It contains both 8 opaquers and the dentine and chromatix composites. More-
over this kit is completed by 6 dentine modifiers, 2 incisal pastes, 2 opal incisal pastes, 3
shoulder ceramics (high-fusing), 2 transparent porcelain composites, 3 colouring stains,
1 glazing material and correction ceramic.
Naturally, the appertaining liquids, glazing materials and stains are also included in the
set.
Reflex dimension Product Ranges - Set your own standards!
11
Reflex dimension One Module
This module represents another method of becoming familiar
with the new Dimension of this ceramic. With only two translu-
cent dentine porcelains and four body stain colours you can
efficiently reproduce all 16 tooth colours of the A-D shade
guide. For this, 16 opaquers are also available. This form of
work represents the low-budget range of dentistry and dental
restoration.
Reflex dimension Bleach Module
The Basic I module already contains the bleaching stains. Should,
however, the entry to the world of Reflex dimension be via the
Basic II module, the assortment must be supplemented by the
Reflex dimension Bleach module. The Bleach module includes
four bleach dentines, three bleach opaquers (Bl1, A1 and B2),
three opal incisal materials (Opale Effect Snow, Opale Effect Mil-
ky und Opale Incisal 1) that are used as bleach incisals, as well as
one bleach shoulder porcelain.
Reflex dimension 3D Module
If the dentist chose 3D colours these can be easily reproduced
with the help of the 3D module. By using the twelve dentines,
two incisal materials and five opaquers you can reproduce the
entire range of 12 3D colours. In order to reproduce the additional
14 3D Master Shades with as easy 1:1 mixture, dentine A2, A3,
A4 and B3 are necessary. (see chart page 32).
X Stain RZ Module
The X Stain RZ module includes 16 staining colours and four
body stains. It also contains the corresponding mixing liquids.
Reflex dimension Chromatix Module
The set contains all chromatix ceramics for support and supple-
mentation of all 16 tooth colours.
Reflex dimension Shoulder Module
Comprising 18 shoulder ceramics this module covers your
working range with regard to shoulder moulding. It includes
six shoulder composites to be fired at 930 °C, six shoulder
composites for a firing temperature of 960 °C and the six correc-
tion shoulder composites to be fired at 720 °C. The specific
shoulder composite liquids are also included in this kit.
Reflex dimension Advanced Module
The Advanced module contains the remaining structural
composites. The advantage of this kit is the price, above all,
since the set price is more economical in contrast to purchasing
the composites individually. Consequently, this kit includes six
gingiva composites, three opal incisal composites, a transparent
composite, 10 coloured translucencies, four opale effect compo-
sites, 10 dentine modifiers, four opaquer modifiers and one
correction ceramic as well as the corresponding mixing fluids.
Reflex dimension AddOn I Module
The AddOn I module is the upgrade kit for Basic I and contains
all modules described above except the Reflex dimension One
Module. With this module customers can easily and comfortably
extend the Basic I module without having to think about indivi-
dual composites.
Reflex dimension AddOn II Module
This AddOn II module contains all the powders and liquids re-
quired to expand the Basic II module to a complete assortment.
Reflex dimension Complete Module
The entire world of Reflex dimension can be accessed with this
complete kit. This module allows for any options of ceramics
working. Covering the entire range from cost-effective veneers
to high-end layering. The Complete module comprises all
composites.
Through the C-Box the Reflex dimension Complete Module
becomes a highly aesthetic, ergonomic, creative and fascinating
tool for any kind of ceramic work. As a reward for your trust in
our products we provide free modern design and storage
ergonomics aspects with the complete kit.
Reflex dimension Freestyle Module
Reflex dimension is committed to creativity without com-
promise. Therefore the C-Box provides the possibility of indivi-
dually equipping it complying with the specific requirement
profile of your field of work. That‘s what we call Freestyle. You
define the contents and we equip your C-Box according to your
creative requirements.
*Registered brand of the company Vita Zahnfabrik H. Rauter GmbH & Co. KG, 79704 Bad Säckingen, Germany
12
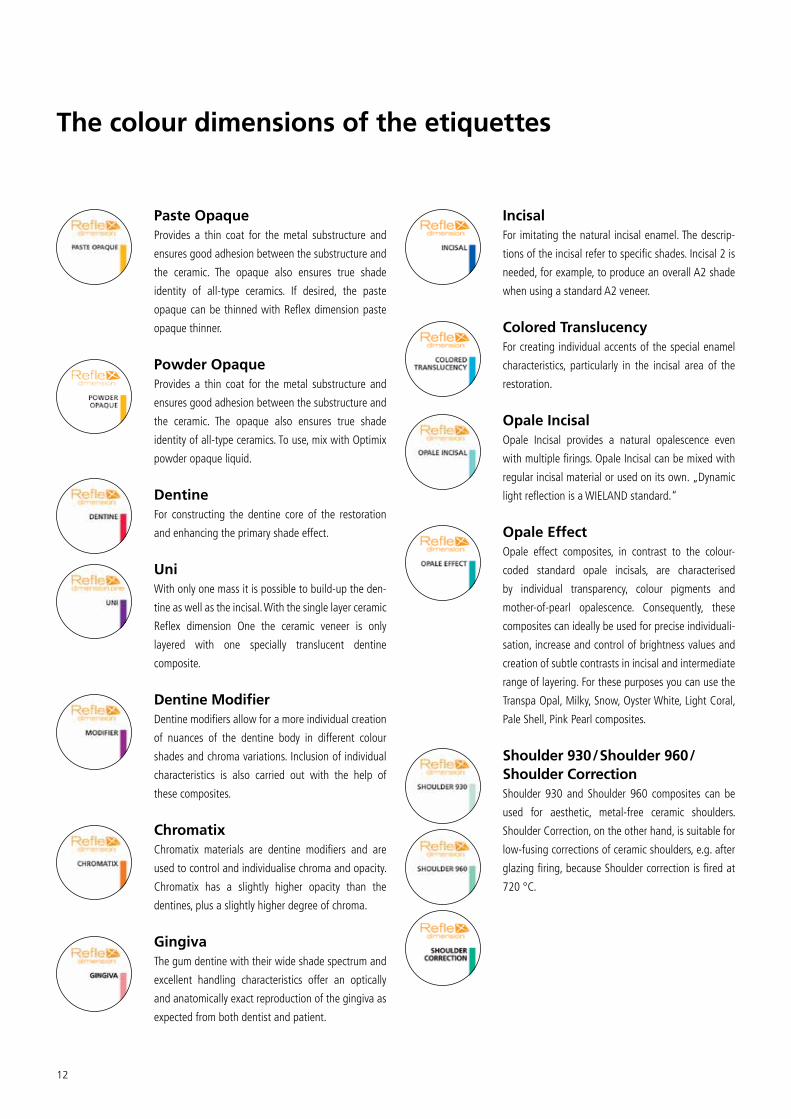
The colour dimensions of the etiquettes
Paste OpaqueProvides a thin coat for the metal substructure and
ensures good adhesion between the substructure and
the ceramic. The opaque also ensures true shade
identity of all-type ceramics. If desired, the paste
opaque can be thinned with Reflex dimension paste
opaque thinner.
Powder OpaqueProvides a thin coat for the metal substructure and
ensures good adhesion between the substructure and
the ceramic. The opaque also ensures true shade
identity of all-type ceramics. To use, mix with Optimix
powder opaque liquid.
DentineFor constructing the dentine core of the restoration
and enhancing the primary shade effect.
UniWith only one mass it is possible to build-up the den-
tine as well as the incisal. With the single layer ceramic
Reflex dimension One the ceramic veneer is only
layered with one specially translucent dentine
composite.
Dentine ModifierDentine modifiers allow for a more individual creation
of nuances of the dentine body in different colour
shades and chroma variations. Inclusion of individual
characteristics is also carried out with the help of
these composites.
ChromatixChromatix materials are dentine modifiers and are
used to control and individualise chroma and opacity.
Chromatix has a slightly higher opacity than the
dentines, plus a slightly higher degree of chroma.
GingivaThe gum dentine with their wide shade spectrum and
excellent handling characteristics offer an optically
and anatomically exact reproduction of the gingiva as
expected from both dentist and patient.
IncisalFor imitating the natural incisal enamel. The descrip-
tions of the incisal refer to specific shades. Incisal 2 is
needed, for example, to produce an overall A2 shade
when using a standard A2 veneer.
Colored TranslucencyFor creating individual accents of the special enamel
characteristics, particularly in the incisal area of the
restoration.
Opale IncisalOpale Incisal provides a natural opalescence even
with multiple firings. Opale Incisal can be mixed with
regular incisal material or used on its own. „Dynamic
light reflection is a WIELAND standard.“
Opale EffectOpale effect composites, in contrast to the colour-
coded standard opale incisals, are characterised
by individual transparency, colour pigments and
mother-of-pearl opalescence. Consequently, these
composites can ideally be used for precise individuali-
sation, increase and control of brightness values and
creation of subtle contrasts in incisal and intermediate
range of layering. For these purposes you can use the
Transpa Opal, Milky, Snow, Oyster White, Light Coral,
Pale Shell, Pink Pearl composites.
Shoulder 930/Shoulder 960/Shoulder CorrectionShoulder 930 and Shoulder 960 composites can be
used for aesthetic, metal-free ceramic shoulders.
Shoulder Correction, on the other hand, is suitable for
low-fusing corrections of ceramic shoulders, e.g. after
glazing firing, because Shoulder correction is fired at
720 °C.
13
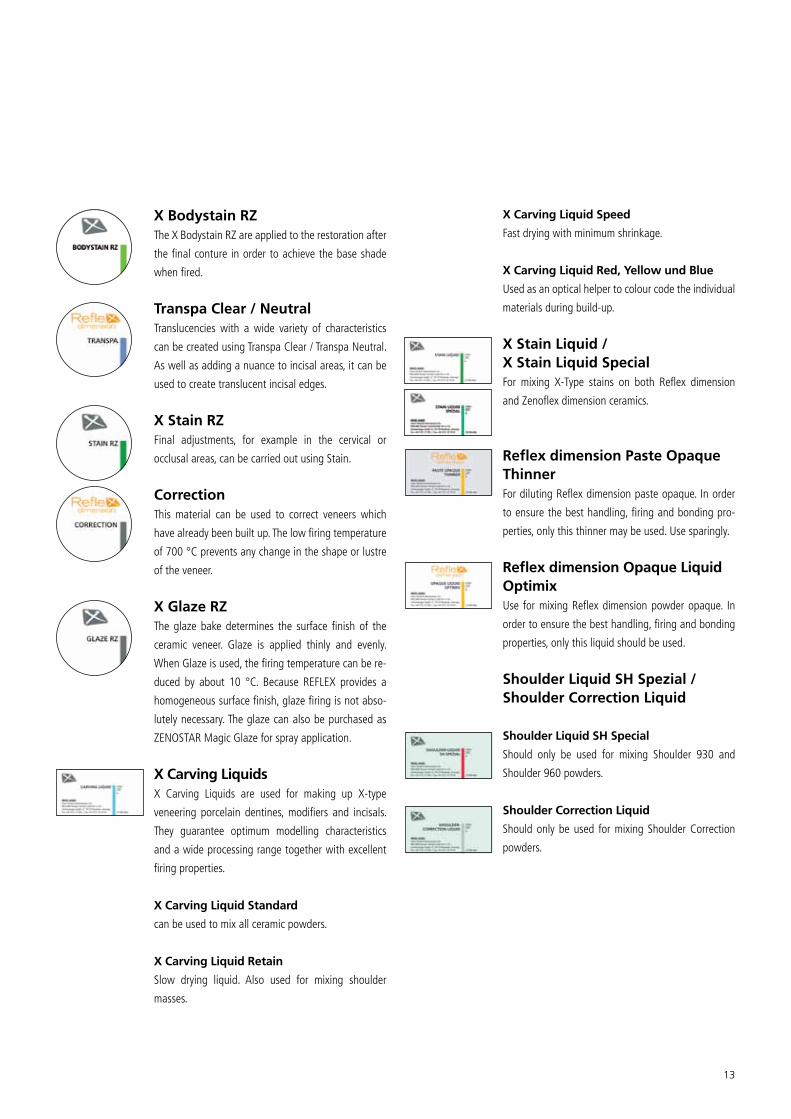
X Bodystain RZThe X Bodystain RZ are applied to the restoration after
the final conture in order to achieve the base shade
when fired.
Transpa Clear / NeutralTranslucencies with a wide variety of characteristics
can be created using Transpa Clear / Transpa Neutral.
As well as adding a nuance to incisal areas, it can be
used to create translucent incisal edges.
X Stain RZFinal adjustments, for example in the cervical or
occlusal areas, can be carried out using Stain.
CorrectionThis material can be used to correct veneers which
have already been built up. The low firing temperature
of 700 °C prevents any change in the shape or lustre
of the veneer.
X Glaze RZThe glaze bake determines the surface finish of the
ceramic veneer. Glaze is applied thinly and evenly.
When Glaze is used, the firing temperature can be re-
duced by about 10 °C. Because REFLEX provides a
homogeneous surface finish, glaze firing is not abso-
lutely necessary. The glaze can also be purchased as
ZENOSTAR Magic Glaze for spray application.
X Carving Liquids X Carving Liquids are used for making up X-type
veneering porcelain dentines, modifiers and incisals.
They guarantee optimum modelling characteristics
and a wide processing range together with excellent
firing properties.
X Carving Liquid Standard
can be used to mix all ceramic powders.
X Carving Liquid Retain
Slow drying liquid. Also used for mixing shoulder
masses.
X Carving Liquid Speed
Fast drying with minimum shrinkage.
X Carving Liquid Red, Yellow und Blue
Used as an optical helper to colour code the individual
materials during build-up.
X Stain Liquid / X Stain Liquid SpecialFor mixing X-Type stains on both Reflex dimension
and Zenoflex dimension ceramics.
Reflex dimension Paste Opaque ThinnerFor diluting Reflex dimension paste opaque. In order
to ensure the best handling, firing and bonding pro-
perties, only this thinner may be used. Use sparingly.
Reflex dimension Opaque Liquid OptimixUse for mixing Reflex dimension powder opaque. In
order to ensure the best handling, firing and bonding
properties, only this liquid should be used.
Shoulder Liquid SH Spezial / Shoulder Correction Liquid
Shoulder Liquid SH Special
Should only be used for mixing Shoulder 930 and
Shoulder 960 powders.
Shoulder Correction Liquid
Should only be used for mixing Shoulder Correction
powders.
14
15
Instructions for use –Preparing the substructure
Indication
Reflex dimension is suitable for veneering all precious metal alloys with a CTE of
13.8 – 15.1 x 10⁻⁶K-1 (25 – 500 °C).
We recommend the use of WIELAND high-gold alloys, AGC® electroforming gold and
all low-gold and Pd-alloys.
Note for the non-precious metal alloys
There is a plethora of non-precious metal substructure materials available. However,
these composites are difficult to cover due to their chemical composition and the
resulting physical properties. We recommend Denta NEM.
The new REFLEX NP safe conditioner is the solution for this problem!
With REFLEX NP safe a 90 % higher success rate can be obtained when veneering non-
precious alloys. That provides security for Reflex dimension that can thus be applied on
any non-precious metal alloy. REFLEX NP safe is thinly applied on the non-precious metal
substructure and fired as a wash. Oxide firing is not required. Subsequently, the Reflex
dimension veneer can be applied.
The following list provides an overview of the REFLEX NP safe advantages:
■ All substructure materials can be covered without long-term cooling
■ High-degree adhesive bond
■ No oxide firing (time saving)
■ Increased veneer adhesion safety on laser-sintered and milled substructure materials
■ One firing programme for al non-precious metal substructure materials
For more detailed processing notes, please see instructions for use of NP safe!
Preparing the substructure
Prepare the substructure according to the manufacturer’s recommendations. When
using WIELAND alloys please also observe the recommendations given in the relevant
instructions for use.

16
Reflex dimension One – The processing of the one layer technique
What is single-layer technology?
Single-layer method is a fast and easy process for production of ceramic restoration
elements. In this process an anatomically shaped crown or bridge is layered using only
one layer composite and is subsequently fired. Aesthetic finishing is created by means of
special stain materials (X Bodystain RZ and X Stain RZ).
Reflex dimension One is a conventionally expanding high-fusing ceramic material for
veneering of alloys with a CTE value of 13.8 – 15.1 x 10⁻⁶K-1 (25 – 500 °C).
Single-layer technology makes layering easier, faster and thus more economical.
Whereas previously a minimum of two ceramic composites (dentine and incisal com-
posite and/or transparent composite) was used for production of a ceramic restoration
element, with this method only one composite, Uni light or Uni intense, is required for
layering of all 16 tooth shades.
For reproduction of the 16 tooth shades of the A-D Shade Guide the metal substruc-
ture is taken as a basis. Opaquer is applied on the substructure in accordance with the
natural tooth colour. These 16 opaquers are identical with the Reflex dimension paste
and powder opaquers. This is the advantage of this complete system. The opaquers are
always the same, regardless of the type of layering. Subsequently, layering of the entire
anatomical structure of the restoration element is carried out using one of the two
supplied dentine composites.
Colour allocation of one layer technique(Uni light = 1, Uni intense = 2)
Tooth colour A-D
Shade Guide
Opaque One layer
technique
Bodystain Stain
A1 A1 1 A
individuell
A2 A2 1 A
A3 A3 2 A
A3,5 A3,5 2 A
A4 A4 2 A
B1 B1 1 B
B2 B2 1 B
B3 B3 2 B
B4 B4 2 B
C1 C1 1 C
C2 C2 1 C
C3 C3 2 C
C4 C4 2 C
D2 D2 1 D
D3 D3 2 D
D4 D4 2 D
17
The Reflex dimension One ceramic materials
Reflex dimension One Dentine
Shade, chroma and translucency of the two dentine materials supplied are adjusted such that a dentine / incisal layering appearance
can be reproduced by staining the Reflex dimension with body stains. It can be distinguished between Uni light for bright tooth colours
and Uni intense for darker tooth colours (see colour alloaction chart on page 16).
X Bodystains RZ
The four Body stains are used to obtain the basic shade of the restoration element. They are easily applied on the layered, fired and
finished work piece as glazing firing.
X Stains RZ
These stain materials can be used to create individual characteristics or colour corrections.
X Stain Liquid and X Stain Liquid Special
For mixing the glaze and stains these liquids are to be used exclusively. Only this guarantees perfect brilliance and surface homogeneity
of the stains and the glaze. Due to the special constitution of X Stain Liquid Special and X Glaze RZ (glazing composite) can be mixed
to produce a mass of gelatinous texture. This makes the stains, body stains and glaze easier to apply.
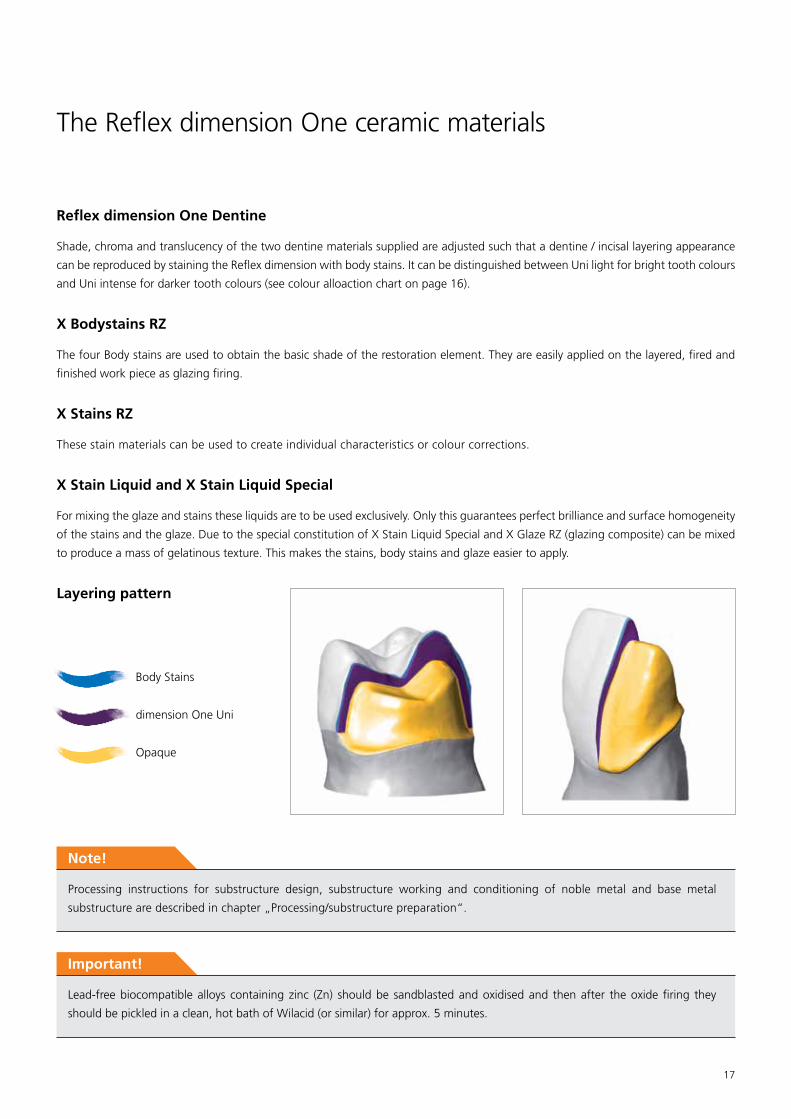
Layering pattern
Note!
Processing instructions for substructure design, substructure working and conditioning of noble metal and base metal
substructure are described in chapter „Processing/substructure preparation“.
Opaque
dimension One Uni
Body Stains
Important!
Lead-free biocompatible alloys containing zinc (Zn) should be sandblasted and oxidised and then after the oxide firing they
should be pickled in a clean, hot bath of Wilacid (or similar) for approx. 5 minutes.
18
Processing steps
1. Opaquer application
a. Opaquer application of powder opaquer
Due to handling requirements, powder opaquer cannot be applied with distilled water. Using Reflex Dimension
Opaque Liquid Optimix prevents running of the opaque powder during application. The powder opaquer is applied
in two evenly covering layers and baked accordingly.
Attention: A so-named wash firing is not carried out.
After the second firing process the opaquer must cover the substructure completely so that uniform shading of the
work piece is guaranteed.
b. Opaquer application of paste opaquer
Before processing, the paste opaquer must be well mixed with a ceramic spatula and a small portion is taken out.
This paste is then applied to the substructure in an evenly covering layer using a brush. Then the first opaquer firing
is carried out.
Subsequently, the process is repeated and the second opaquer firing is carried out. After the second firing process
the opaquer must cover the substructure completely so that uniform shading of the work piece is guaranteed.
2. Dentine layering
a. First single layer firing
The Reflex dimension One single layer Uni light and Uni intense composite is mixed with a carving liquid - X Carving
Liquid or Carving Liquid Retain, in the same way as a dentine composite. Complying with the layering pattern, this
mass is used for layering the entire anatomic shape of the restoration specimen in a slightly larger than natural
dimension. After layering, the ceramic is baked in accordance with the corresponding firing recommendations.
b. Second single layer firing
After shaping the first single layer firing with the help of diamond grinding tools and cleaning (steam cleaning) the
second single layer firing is carried out analogously. Any missing ceramic is corrected by another layer of single
layer mass, if required.
Note!
■ Drying the specimen too fast may cause problems. If the recommended drying times are not adhered to, cracking, small cavities
or peeling of the opaquer may occur. The cause of all that is that the opaquer liquid was transformed from liquid to gaseous
state in too short a time.
■ Do not extensively vibrate the surface and do not have thick opaquer layers flow together in occlusal, approximal or edge
areas. Thick opaquer layers may lead to uncontrolled discharge of liquid during the pre-heating process which may result in
formation of bubbles and consequent cracking during firing.
■ If the temperature is too high or too low, bubbles may form, so please make sure that the radiant temperature at the
workpiece is approx. 130 °C.
Note!
■ If required, the Reflex dimension past opaquer thinning (paste opaque thinner) agent can be used to create the required consis-
tency of the mass. Please do not attempt to thin the paste in the jar. Take out the required amount and thin it on a glass plate.
19
3. Shading characteristics
a. Colouring with body stains
After completed shaping and carving the specimen is cleaned. The Reflex dimension body stains and stains are used
in accordance with the required colour intensity, i.e. the shades are intensified by repeated colouring and firing.
However, extremely thick application of the colouring agents must be prevented since this results in unnatural and
uneven surface appearance. After giving the specimen the required shade characteristics using the body stains and
individual appearance using the stain components, the specimen is baked according to the firing recommenda-
tions.
b. Glazing firing
If required, the restoration piece can subsequently be glazed with ZENOSTAR Magic Glace or X Glaze RZ. This
ensures that the surface is particularly shiny and smooth.
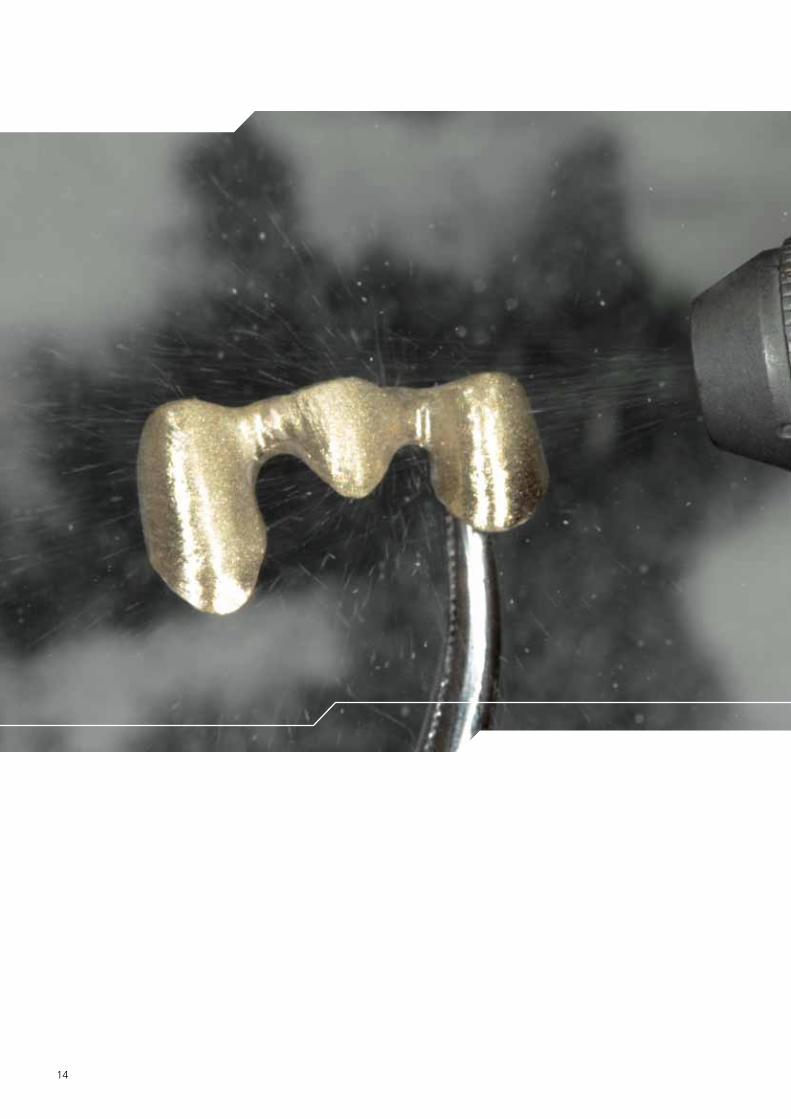
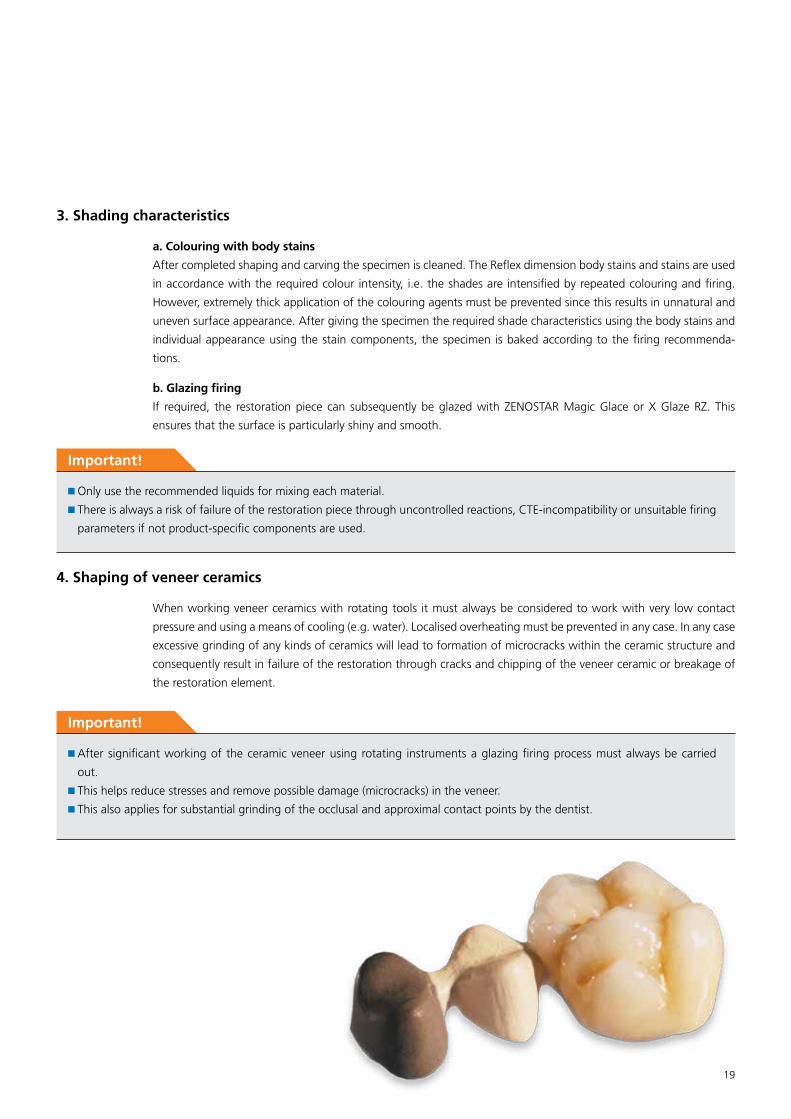
4. Shaping of veneer ceramics
When working veneer ceramics with rotating tools it must always be considered to work with very low contact
pressure and using a means of cooling (e.g. water). Localised overheating must be prevented in any case. In any case
excessive grinding of any kinds of ceramics will lead to formation of microcracks within the ceramic structure and
consequently result in failure of the restoration through cracks and chipping of the veneer ceramic or breakage of
the restoration element.
Important!
■ Only use the recommended liquids for mixing each material.
■ There is always a risk of failure of the restoration piece through uncontrolled reactions, CTE-incompatibility or unsuitable firing
parameters if not product-specific components are used.
Important!
■ After significant working of the ceramic veneer using rotating instruments a glazing firing process must always be carried
out.
■ This helps reduce stresses and remove possible damage (microcracks) in the veneer.
■ This also applies for substantial grinding of the occlusal and approximal contact points by the dentist.
20
Firing recommendations
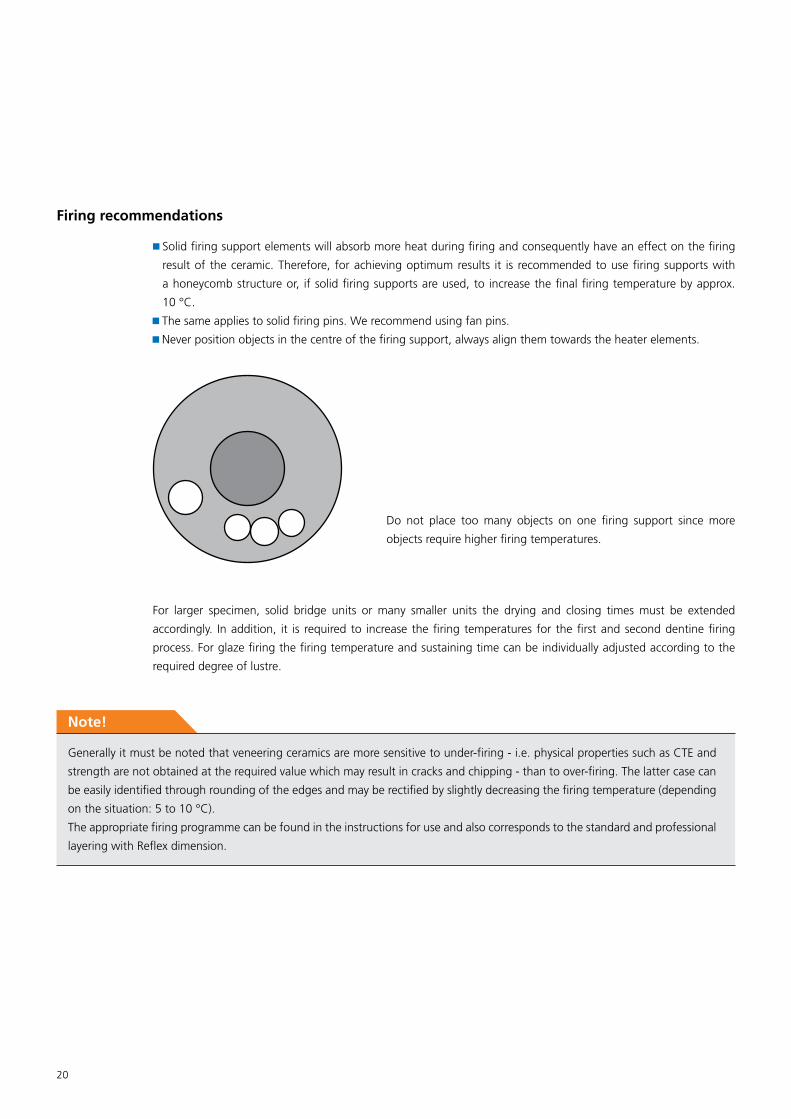
■ Solid firing support elements will absorb more heat during firing and consequently have an effect on the firing
result of the ceramic. Therefore, for achieving optimum results it is recommended to use firing supports with
a honeycomb structure or, if solid firing supports are used, to increase the final firing temperature by approx.
10 °C.
■ The same applies to solid firing pins. We recommend using fan pins.
■ Never position objects in the centre of the firing support, always align them towards the heater elements.
Note!
Generally it must be noted that veneering ceramics are more sensitive to under-firing - i.e. physical properties such as CTE and
strength are not obtained at the required value which may result in cracks and chipping - than to over-firing. The latter case can
be easily identified through rounding of the edges and may be rectified by slightly decreasing the firing temperature (depending
on the situation: 5 to 10 °C).
The appropriate firing programme can be found in the instructions for use and also corresponds to the standard and professional
layering with Reflex dimension.
Do not place too many objects on one firing support since more
objects require higher firing temperatures.
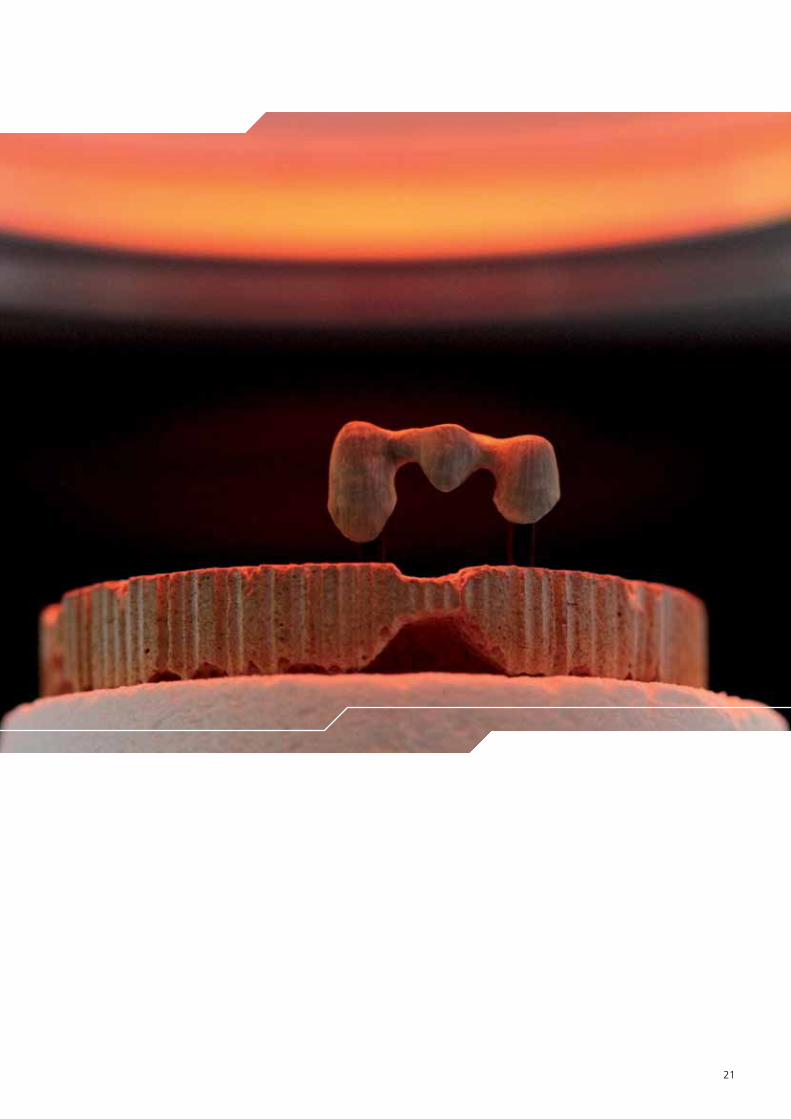
For larger specimen, solid bridge units or many smaller units the drying and closing times must be extended
accordingly. In addition, it is required to increase the firing temperatures for the first and second dentine firing
process. For glaze firing the firing temperature and sustaining time can be individually adjusted according to the
required degree of lustre.
21
22
Reflex dimension – Standard build-up
Processing instructions for substructure design, substructure working and conditio-
ning of precious and non-precious substructure are described in chapter „Processing/
substructure preparation“. In addition, you will find notes on the application of
opaquers in the chapter „Single layer ceramics“.
Colour allocation for standard build-up
Shades Opaque Dentine Incisal Opale Incisal
A1 A1 A1 1 1
A2 A2 A2 2 2
A3 A3 A3 3 3
A3,5 A3,5 A3,5 3 3
A4 A4 A4 4 4
B1 B1 B1 1 1
B2 B2 B2 2 2
B3 B3 B3 3 3
B4 B4 B4 4 4
C1 C1 C1 1 1
C2 C2 C2 2 2
C3 C3 C3 3 3
C4 C4 C4 4 4
D2 D2 D2 2 2
D3 D3 D3 3 3
D4 D4 D4 4 4
The tips to the stratification of 3D colours are in the chapter “Reflex dimension 3D”
Opaque
Dentine
Incisal
23
1. Opaquer application
a. 1st Opaque bake After the substructure has been suitably prepared, the first layer of opaque can be applied.
The opaque is supplied as a paste or a powder. More information on opaquer application is provided in the chapter
„Single layer ceramics“. To apply the opaque, use the paste brush provided or a suitable powder opaque applicator.
The shape and flexibility of the brush are designed to suit the viscosity of paste opaque. For that purpose, WIELAND
offers a comprehensive brush range suitable for optimum working of the specimen. Apply a thin layer of opaque
evenly (semi-coating) to the coping or bridge framework. Please ensure that this first layer is not too thick. If the
paste opaque is applied too thickly, uncontrollable amounts of liquid can evaporate during preheating and cause
bubbles to form.
Then the first opaque bake is carried out. For firing temperatures and times please refer to the firing programmes
given at the end of these instructions.
Crowns after the 2nd opaque bake: The opaque has a smooth and shiny appearance
b. 2nd Opaque bake The second step is to apply opaque once more. Here too, it is important for the reasons given above that the opaque
is not applied too thickly. Even so, the opaque must completely cover the substructure so as to ensure that the
crown is uniform in colour.
Problems can also occur if the opaque is dried too quickly. If the recommended pre-drying and drying times are not
adhered to, small cavities may form or the opaque may flake off. This occurs if the opaque passes too quickly from
a liquid to gaseous state.
Please note!
The opaque should be applied evenly with an applicator or a brush. The consistency should be neither
too thick nor too thin. A “wash bake” is not required. Avoid excessive riffling and do not allow thick layers
of opaque to coalesce in the occlusal, approximal or marginal areas. Thick layers of opaque can crack
during firing.
Important!
Lead-free biocompatible alloys containing zinc (Zn) should be sandblasted and oxidised and then after the
oxide firing they should be pickled in a clean, hot bath of Wilacid (or similar) for approx. 5 minutes.
Powder Opaque
For handling reasons, Reflex dimension powder opaque must not be mixed with distilled water. Reflex
dimension powder opaque liquid ensures that the material stays in place during application.
Processing steps
24
2. Dentine layering
a. 1st Dentine bake
Mix the dentine and incisal powders in the usual manner together with the carving liquid provided.
Then build the crown up, starting with dentine and then completing with the incisal area.
Although the shrinkage of Reflex dimension after firing has been minimized, it is still necessary to build the crown
up in a slightly larger dimension.
Now bake the ceramic according to the recommendations in the table attached
b. 2nd Dentine bake
After the 1st dentine bake, correct the shape by grinding with a medium grain diamond bur. During this stage,
please ensure adequate cooling (using water drops).
Then fill in any missing areas in the shape of the crown by adding a further layer of dentine or incisal materials. Use
the same method as described for the 1st dentine bake.
3. Stains and glazing
After the shape has again been trimmed and corrected, X Stain RZ and/or X Glaze RZ can be used to give the crown
its individual character.
When firing, follow the recommendations shown in the table.
Please note!
The nanoleucite structure of Reflex dimension gives the surface an extremely high shine after the 1st and 2nd
dentine bakes.
Warning!
Do not mix Reflex dimension ceramic materials together with any other types of ceramic material. REFLEX
dimension has a unique nanoleucite structure and is not compatible with other ceramics.
Please note!
Please use only X Stains RZ and X Glaze RZ. If other products are used there is a risk of uncontrolled stress in
the ceramic causing the restoration to fail through tension or pressure cracks. Please mix stains and glaze only
with the stain and glaze liquid supplied. Apply with a conventional staining brush.
Please note!
Avoid applying too much pressure since this can cause localised overheating. As with all ceramics, excessive
grinding causes micro cracks to occur in the ceramic structure and can result in failure through flaking, cracks
or fissures.
Please note – glaze!
By modifying the firing temperature and holding time, the degree of glaze can be varied from matt to a high
shine to suit individual requirements.
25
26
Reflex dimension – Professional build-up
In addition to the standard threelayer technique, it is also possible to produce an
advanced, professional build-up. The following materials are available for this purpose:
■ Chromatix
■ Modifier
■ Opale Incisal
■ Opale Effects
■ Colored Translucency
■ Transpa Neutral / Transpa Clear
■ Stains
Chromatix and Modifier
These modifier composites can be randomly mixed with each other. The preferred fields
of application of these composites are described in the tooth model.
Chromatix
Applications
■ Chromatix materials are dentine modifiers used to control and individualise chroma
and opacity.
■ By increasing opacity the metal framework can be more effectively concealed whilst
simultaneously intensifying the chroma (depth of shade), even with relatively thin
layers of ceramic.
■ Chromatix can be mixed with normal dentine to modify chroma and opacity. Alter-
natively, it may, if the case requires, be used on its own.
Modifier
■ Dentine modifiers allow for a more individual creation of nuances of the dentine body
in different colour shades and chroma variations. Inclusion of individual characteristics
is also carried out with the help of these composites.
Ivory A1 A2 B1 B2
For all shades, to be used for increasing
the brightness value and as mamelons in
bright teeth
Caramel A3,5 A4 B3 B4 D3
Specially for cervical area and approximal,
as well as in the fossa area of the lateral
teeth
Flamingo A1 A2 A3 B1 B2 Ideal for mamelons of young teeth
Creme A2 A3For Chroma increase of the A-shades and
as mamelons
Peach A3 A3,5 A4 For chroma increase and in fossa area
Amber A3,5 A4 For chroma increase and in fossa area
Bamboo B2 B3 For chroma increase and as mamelons
Honey B3 B4 Chroma increase, secondary dentine
Pearl D2 D3 As mamelons and secondary dentine
Taiga C2 C3 C4 Chroma increase, secondary dentine
27
Opale Incisals, Opale Effects and Colored Translucencies
Field of application
■ These composites provide even more options for precise individual creation and
characterisation of ceramic restoration specimen.
■ For that purpose 10 Colored translucencies, 4 opale incisals and 7 opale effects are
available.
■ The various composites can be used on their own or in a mixture, depending on re-
quirements.
Opale Incisal
Colour-coordinated opalescent incisals.
Opale Effect powders
Opale effect composites, in contrast to the colour-coded standard opale incisals, are
characterised by individual transparency, colour shades and opalescence. Consequently,
these composites can ideally be used for precise individualisation, increase and control
of brightness values in the incisal range of layering. For these purposes the Transpa Opal,
Milky, Snow, Oyster White, Light Coral, Pale Shell, Pink Pearl composites are available.
Fascinating light-optical phenomena, such as opalescence and translucency of the natu-
ral enemelum in the surface area of the teeth have been taken as a model for the deve-
lopment of these effect composites. Brightened areas of the tooth as well as cusp tips
and margin ridges in the lateral areas are accentuated.
Transpa Opale Offers the highest transparency and opalescence
Milky With Opale Effect Milky and Snow the brightness value
of the incisal materials can be further controlled.Snow
Oyster White bluish opalescence
Light Coral yellowish/reddish opalescence
Pale Shell yellowish opalescence
Pink Pearl reddish opalescence
All opale effect powders can be individually used without attention of a special
colour allocation for all V-colours.
Transpa
Incisal
Dentine
Chromatix
Opaque
Shoulder
28
Colored Translucencies / Transparent Porcelain
Contrasts created with the warm-shaded Colored Translucencies in the cervical area result in a harmonic blending
to the gingiva and a slightly increased intensity of shade while simultaneously maintaining translucency. (Mandarin,
Melon, Papaya, Orange, Topas, Lemon, Rubin Opal). For use in incisal areas and for framing of discreetly layered
mamelons the various opalescent blueish and greyisch porcelains are best suitable (Amethyst Opal, Aquamarin
Opal, Smokey Opal). The composites can be mixed with any transparent porcelains for thinning purposes.
The various transparent porcelains are only applied in very thin layers and provide better control of translucency and
of the brightness value (Transpa Neutral, Transpa Clear).
Mandarin slightly yellowish
These composites can be used for any shades in accordance
with the desired shade effect without considering any specific
colour-coding.
Melon orange
Papaya khaki
Orange foggy amber
Topas Intensive orange
Lemon yellowish
Rubin Opal reddish
Amethist Opal greyish purple
Aquamarin Opal intensive blue
Smokey Opal greyish
Transpa Neutral transparent
Transpa Clear highly transparent
29
Please note!
Chromatix, Modifier, Opale Incisals, Opale Effects and Colored Translucencies can be used in connection with
the X Carving Liquid, the X Carving Liquid Retain and the X Carving Liquid Speed agents. Only then are you
assured of maximum brightness, translucency and ideal handling properties.
Firing Temperature
For firing programmes please follow the recommendations set out in the firing tables for the 1st and 2nd dentine
bakes on page 39. You will find the firing temperatures and times at the end of these instructions.
Shade guides
The individual colour shades and translucency are shown on the enclosed shade guide. Like all Reflex dimension
shade guides this has colour samples in the original ceramic, which enables you to make an exact colour identifica-
tion of the individual powders in a wide variety of lighting conditions (incident light and transmitted light).
With individual colour matching for a professional ceramic layer, the colour samples can be applied using digital
photography for the optimal colour coordination.
Colour allocation
The modifier of the reflex dimension are an important part of a creative colour harmony system for the design of
individual dental restoration. They can be mixed with dentins to achieve an individual hue or a higher chroma but
can also be inserted as mamelons or secondary dentins.
30
1
0
2
3
4
5
6
12
1318
23
29
34
36
3839
37
35
40
45
51
56
57
62
67
73 78
84
85
86
87
88
8990
79
80
81
82
83
74
75
76
77
6870
7172
6963
64
65
66
46
47
53
54
55
52
58
59
61
60
49
50
4842
43
44
41
30
32 33
31
24 25 26
27
28
19
20
21
22
14
15
16
17
7
8
9
10
11
X Stain RZ Module
Indication
The staining shades can be used for REFLEX, Reflex dimension and for ZIROX, Zenoflex dimension and ZENOSTAR. The firing
temperature of the staining shades and the body stains corresponds to the temperatures for glazing firing of the respective ceramic
powder used.
The shade palette is a logical and easy to use stain mixing system
■ It enables the dental technician to reproduce all the 75 shades depicted on the palette in a simple and logical way, using the eight
colours shown on the angles of the octagon plus white and grey.
■ In addition to the colours shown on the angles, the eight additional most commonly used colours are standard components of the
stain set.
■ Using the measures included in the set (small and large measures) together with the mixing chart ensures an exact reproduction of
the various shades.
■ Select the size of the measure according to the total volume required.
Procedure
■ Select a shade on the shade palette shown on the left.
■ Note the number on the colour tab.
■ Find this number in the chart below.
■ Mix the components according to the chart to obtain the
required shade nuance.
Now the desired colour nuances should have been reached.
Example: Shade No.18
1 x small measure of Peach (No. 15)
1 x small measure of Orange (No. 26)
2 x small measures of White (No. 0)
or ...
1 x large measure of Peach (No. 15)
1 x large measure of Orange (No. 26)
2 x large measures of White (No. 0)
Important!
Do not change the measure during colour mixing since these bear no relationship to one another. Exact reproduction of the
required shade is guaranteed only if measuring is exact.
31
No. on the
shade palette
Mixture of: (p = part(s))
0 white –
1 1 P. blue + 3 P. white
2 1 P. blue + 1 P. white
3 3 P. blue + 1 P. white
4 blue –
5 steel 3 P. blue + 1 P. grey
6 1 P. blue + 1 P. grey
7 1 P. blue + 1 P. peach + 2 P. white
8 3 P. blue + 3 P. peach + 2 P. white
9 1 P. blue + 1 P. peach
10 3 P. blue + 3 P. peach + 2 P. grey
11 1 P. blue + 1 P. peach + 2 P. grey
12 1 P. peach + 3 P. white
13 1 P. peach + 1 P. white
14 melon 3 P. peach + 1 P. white
15 peach –
16 3 P. peach + 1 P. grey
17 1 P. peach + 1 P. grey
18 1 P. peach + 1 P. orange + 2 P. white
19 3 P. peach + 3 P. orange + 2 P. white
20 1 P. peach + 1 P. orange
21 3 P. peach + 3 P. orange + 2 P. grey
22 1 P. peach + 1 P. orange + 2 P. grey
23 1 P. orange + 3 P. white
24 1 P. orange + 1 P. white
25 3 P. orange + 1 P. white
26 orange –
27 3 P. orange + 1 P. grey
28 olive 1 P. orange + 1 P. grey
29 1 P. orange + 1 P. marone + 2 P. white
30 3 P. orange + 3 P. marone + 2 P. white
31 1 P. orange + 1 P. marone
32 3 P. orange + 3 P. marone + 2 P. grey
33 1 P. orange + 1 P. marone + 2 P. grey
34 1P. marone + 3 P. white
35 1 P. marone + 1 P. white
36 3 P. marone + 1 P. white
37 marone –
38 3 P. marone + 1 P. grey
39 1 P. marone + 1 P. grey
40 1 P. marone + 1 P. caramel + 2 P. white
41 3 P. marone + 3 P. caramel + 2 P. white
42 1 P. marone + 1 P. caramel
43 3 P. marone + 3 P. caramel + 2 P. grey
44 1 P. marone + 1 P. caramel + 2 P. grey
45 ivory 1 P. caramel + 3 P. white
No. on the
shade palette
Mixture of: (p = part(s))
46 1 P. caramel + 1 P. white
47 3 P. caramel + 1 P. white
48 caramel –
49 3 P. caramel + 1 P. grey
50 1 P. caramel + 1 P. grey
51 1 P. caramel + 1 P. ocker + 2 P. white
52 3 P. caramel + 3 P. ocker + 2 P. white
53 1 P. caramel + 1 P. ocker
54 3 P. caramel + 3 P. ocker + 2 P. grey
55 1 P. caramel + 1 P. ocker + 2 P. grey
56 1 P. ocker + 3 P. white
57 1 P. ocker + 1 P. white
58 3 P. ocker + 1 P. white
59 ocker –
60 3 P. ocker + 1 P. grey
61 1 P. ocker + 1 P. grey
62 1 P. ocker + 1 P. yellow + 2 P. white
63 3 P. ocker + 3 P. yellow + 2 P. white
64 1 P. ocker + 1 P. yellow
65 3 P. ocker + 3 P. yellow + 2 P. grey
66 1 P. ocker + 1 P. yellow + 2 P. grey
67 1 P. yellow + 3 P. white
68 1 P. yellow + 1 P. white
69 3 P. yellow + 1 P. white
70 yellow –
71 3 P. yellow + 1 P. grey
72 1 P. yellow + 1 P. grey
73 1 P. yellow + 1 P. gum + 2 P. white
74 3 P. yellow + 3 P. gum + 2 P. white
75 1 P. yellow + 1 P. gum
76 3 P. yellow + 3 P. gum + 2 P. grey
77 1 P. yellow + 1 P. gum + 2 P. grey
78 1 P. gum + 3 P. white
79 1 P. gum + 1 P. white
80 3 P. gum + 1 P. white
81 gum –
82 3 P. gum + 1 P. grey
83 1 P. gum + 1 P. grey
84 1 P. gum + 1 P. blue + 2 P. white
85 3 P. gum + 3 P. blue + 2 P. white
86 violett 1 P. gum + 1 P. blue
87 3 P. gum + 3 P. blue + 2 P. grey
88 1 Teil gum + 1 Teil blue + 2 Teile grey
89 grey 1 P. black + 1 P. white
90 black –
32
Reflex dimension 3D – The supplement of 3D Master shades*
Reflex dimension has been extended by the 26 shades of the 3D shades*. These shades are used to easily
reproduce 3D shades* in case of repair. The corresponding ceramic masses have been developed for Reproduction.
With the help of these masses and partially also through 1:1 mixtures with the well-known *Vita A-D – masses
a basic layering of the 3D system is easily possible. With these materials in a 1:1 mixture with Reflex dimension
materials A2, A3, A4 and B3, the shades in the chart below are easily achieved.
V-3D shade* OpaqueUsed dentines
or dentine mixtures 1:1Incisal
1M1 Opaque E Dentine E1 Incisal 5
1M2 Opaque E Dentine E2 Incisal 5
2L1,5 Opaque F 1 P. Dentine B3 : 1 P. Dentine E1 Incisal 5
2L2,5 Opaque F 1 P. Dentine A3 : 1 P. Dentine F5 Incisal 5
2M1 Opaque F Dentine F3 Incisal 5
2M2 Opaque F Dentine F4 Incisal 5
2M3 Opaque F Dentine F5 Incisal 5
2R1,5 Opaque F 1 P. Dentine A3 : 1 P. Dentine F3 Incisal 5
2R2,5 Opaque F 1 P. Dentine A2 : 1 P. Dentine G4 Incisal 5
3L1,5 Opaque G 1 P. Dentine A4 : 1 P. Dentine F3 Incisal 5
3L2,5 Opaque G 1 P. Dentine A3 : 1 P. Dentine G5 Incisal 5
3M1 Opaque G Dentine G3 Incisal 5
3M2 Opaque G Dentine G4 Incisal 5
3M3 Opaque G Dentine G5 Incisal 5
3R1,5 Opaque G 1 P. Dentine A4 : 1 P. Dentine G3 Incisal 5
3R2,5 Opaque G 1 P. Dentine G5 : 1 P. Dentine H6 Incisal 5
4L1,5 Opaque H 1 P. Dentine C3 : 1 P. Dentine G4 Incisal 6
4L2,5 Opaque H 1 P. Dentine H4 : 1 P. Dentine I3 Incisal 6
4M1 Opaque H 1 P. Dentine G3 : 1 P. Dentine I1 Incisal 6
4M2 Opaque H Dentine H4 Incisal 6
4M3 Opaque H 1 Teil Dentine G5 : 1 Teil Dentine I3 Incisal 6
4R1,5 Opaque H Dentine H6 Incisal 6
4R2,5 Opaque H 1 Teil Dentine G3 : 1 Teil Dentine I3 Incisal 6
5M1 Opaque I Dentine I1 Incisal 6
5M2 Opaque I 1 P. Dentine I1 : 1 P. Dentine I3 Incisal 6
5M3 Opaque I Dentine I3 Incisal 6
For any other information please see the instructions on standard or professional layering in these instructions for use.
* VITA System 3D-Master is a registered trade mark of Vita Zahnfabrik H. Rauter GmbH & Co. KG, 79704 Bad Säckingen.
33
Reflex dimension Bleach Module
More and more patients want perfect, bright and white teeth. This may be realised in natural teeth through
bleaching or by means of integration of very bright restoration elements (e.g. veneers). When examining the
brightening result of natural teeth it must be noted that the teeth do not only become whiter but the characteristic
basic shade of the patient‘s teeth is maintained but is extremely brightened. This can be explained by the proces-
sing method for bleaching. The substance acts from the outside to the inside which first results in a brightened
enamelum layer while the dentine remains unaffected and maintains its original shade.
Consequently bleaching shades ban be used to reproduce very bright and white teeth to nature-identical
resemblance of either dentist-bleached teeth or naturally bright and white teeth. Since the bleaching results may
strongly vary in the degree of brightening masses are available in various shades and intensities.
In this way the WIELAND veneering ceramics have been extended by the Bleach Module containing the bleach cera-
mic composites of the A-D Shade Guide. With this module it is possible to adapt to bleaching situations or provide
complete restoration.
The four new bleaching shades can be produced according to the following table:
Shade Opaquer Dentine Incisal paste
BL1 BL1 Dentine BL1 Opale Effect Snow
BL2 A1 Dentine BL2 Opale Effect Milky
BL3 B2 Dentine BL3 Opale Incisal 1
BL4 B2 Dentine BL4 Opale Incisal 1
34
Description of the ceramic composites:
Opaquer
Use the opaque according to the chart on page 33.
Dentines
Dentine BL1 has the brightest chroma and a tendency towards the white shade range. It is used for reproduction
of the BL1 bleach shade (see table).
Dentine BL2 has a slightly more intensive chroma in comparison with Bleach Dentine Light and is used for repro-
duction of the BL2 bleach shade (see table). It is rather attributed to the reddish-brownish range (A range).
Dentine BL3: Dentine BL3 is slightly less intensive than BL4.
Dentine BL4: Dentine BL4 is the most intensive shade of the four bleaching shades (see shade indicator of the
Bleach Module).
Incisal
The incisal comprises merely three composites.
Opale Effect Snow and Opale Effect Milky:
The two Opale Effect incisals each have different degrees of transparency and opalescence. Milky is the more trans-
parent mass with a more distinctive opale effect. These two opale effects are used as standards in accordance with
the bleaching table.
Opale Incisal 1:
The opale incisal 1 is used for bleaching shades BL3 and BL4 and as standard opale incisal for tooth shades A1, B1
and C1.
Transparent porcelains
The system provides two composites in different transparency degrees.
Transpa Clear is highly transparent (glassy) and Transpa Neutral has a slightly lower degree of transparency. With the
help of Transpa Neutral the shade intensity of the used ceramic composites can additionally be controlled. In this
context it must be observed that transparency is increased the higher the transpa neutral proportion and simultane-
ously shade intensity (i.e. chroma) is decreased.
Shoulder composites
In the system whitish shoulder composites - Shoulder 930 Bleach or Shoulder 960 Bleach - are available. If the
natural shade of the shoulder differs distinctly, the compatible Reflex dimension shoulder composites can be used.
Crystal Shoulder Correction is suitable for production and correction of ceramic shoulders after glazing firing.
For any other information please see the chapters Standard or Professional layering in these instructions for use.
35
Reflex dimension Shoulder Materials
Firing temperature
■ The 6 Reflex dimension Shoulder High (high fusing) materials
are baked at a firing temperature of 930 °C with a holding
time of 1 minute before the first dentine bake.
■ The 6 Reflex dimension Shoulder High (high fusing) materials
are baked at a firing temperature of 960 °C with a holding
time of 1 minute before the first dentine bake.
■ The 6 Reflex dimension Shoulder Correction materials are
baked at a firing temperature of 720 °C with a holding time of
1 minute after the glaze bake.
Please note that SH 930 und SH 960 can not be mixed together.
Applications
■ The Shoulder Correction materials are not only suitable for the
fabrication and correction of ceramic shoulders after the glaze
bake. Because of their low firing temperature they can also be
used for all other corrections such as making minor corrections
to the shape or adding contact points. This means that Shoul-
der Correction can be used to make corrections even after
soldering in a furnace.
■ Shoulder 930 Flu / Shoulder 960 Flu and Shoulder Correction
Flu can be used to conceal dark areas such as discoloured
tooth enamel or discoloration at the edges of crowns, to
improve brightness and enhance translucency.
Shoulder High and Shoulder Correction – share these features
■ Minimal shrinkage during firing
■ High form stability even after repeated dentine and glaze
bakes.
■ Excellent marginal fit
■ Perfect colour matching
■ Simple control of translucency, fluorescence and light reflection
Carving liquids
■ Reflex dimension shoulder liquid SH special must only be used
with Shoulder High material.
■ This carving liquid plasticizes the shoulder porcelain and
ensures the greatest stability and reliability. This makes it very
easy to lift the porcelain shoulder from the model.
■ Use Reflex dimension Shoulder Correction Liquid with
Shoulder Correction porcelain!
■ SH special shoulder liquid must not be used with Shoulder
Correction porcelain, as there is no guarantee that firing will
remove the liquid reliably and without trace.
IsoPen
The WIELAND IsoPen is applied to the prepared plaster die.
Properties SH 960
The shoulder 960 special shoulder material has been specially
developed and optimised for use in combination with high tem-
perature stable alloys (solidus temperature > 1060 °C).
This gives the material properties which make it particularly user-
friendly, and include the following benefits:
■ Extremly low shrinkage during firing
■ High form stability, even after several dentine and glazing
bakes
■ Excellent marginal fit
■ Perfect colour harmony
■ Easy to master transparency, fluorescence and light reflection
Note!
We recommend the use of Shoulder High 930 for all alloys
with a solidus temperature below 1060 °C and for AGC®
electroforming gold.
36
important!
Do not use diamond burs. Diamond particles can become
deposited in the alloy and cause bubbles when the ceramic
is fired.
Preparation
To obtain metal-free crown edges the die must be prepared with
a step or pronounced chamfer.
Designing the substructure
In preparation for the attachment of the ceramic shoulder,
(labial or circular), the outer edges of the substructure are redu-
ced to the inner rim of the previously prepared step or cham-
fer. The metal edge resulting from this reduction must then be
smoothed out into a thin layer. Finally condition the substructure
in the usual way and apply the opaque.
Preparing the die
Before creating the ceramic shoulder the die must be thorough-
ly insulated using the “WIELAND IsoPen”.
First Shoulder High layer
Depending on the tooth colour to be obtained make up Shoul-
der High porcelain with SH Special Liquid and apply in the cer-
vical region. After modelling and smoothing the ceramic shoul-
der, dry the shoulder margin carefully with a hand-held dryer
until a uniform white colour is obtained. The coping can then be
removed and fired. Using a drier and SH Special Shoulder Liquid
ensures greater strength and more reliable handling.
Second Shoulder High layer
After firing, check the marginal fit. Correct any changes caused
by sintering. Insulate the die once more. Prepare and make up
the Shoulder High powder as for the first layer. Next smooth out
any unevenness filling the Shoulder powder into the gap crea-
ted during the first firing, ensuring that the ceramic shoulder
is a good fit. Finish off the shoulder and dry. Carefully remove
the substructure with the newly applied Shoulder Powder from
the die and position it on the firing tray. To avoid “baking on”
care must be taken to ensure that the ceramic shoulder does
not come into contact with the tray. If necessary, the shoulder
must be fitted onto the model again after the correction firing.
The final stage is to completely veneer the shoulder with Reflex
dimension.
Colour Table
Shades: Shoulder Mixture
A1 SM 1 + SM Flu / 1:1
A2 SM 1
A3 SM 1
A3,5 SM 2 + SM 3 / 1:1
A4 SM 3 + SM 4 / 1:1
B1 SM 1 + SM Flu / 1:1
B2 SM 2 + SM Flu / 1:1
B3 SM 2
B4 SM 2 + SM 4 / 1:1
C1 SM 4 + SM Flu / 1:1
C2 SM 4 + SM Flu / 1:1
C3 SM 4
C4 SM 4
D2 SM 1 + SM 4 / 1:1
D3 SM 1 + SM 4 / 1:1
D4 SM 2 + SM 4 / 1:1
37
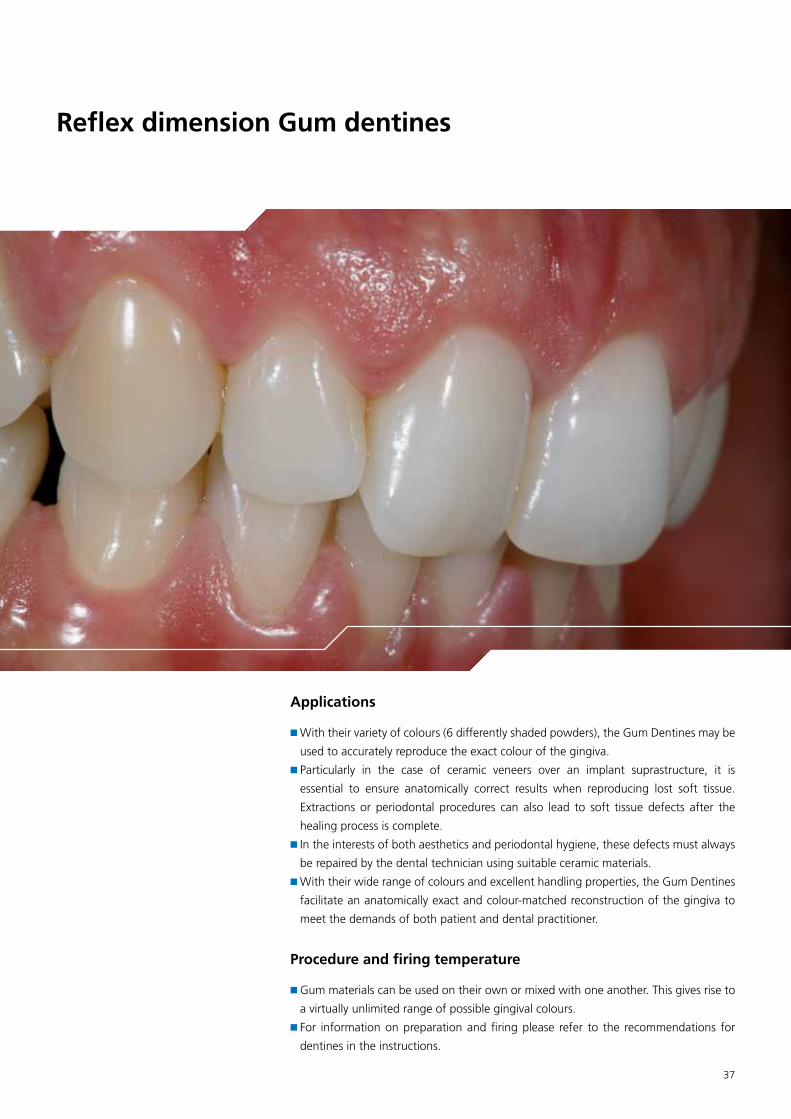
Reflex dimension Gum dentines
Applications
■ With their variety of colours (6 differently shaded powders), the Gum Dentines may be
used to accurately reproduce the exact colour of the gingiva.
■ Particularly in the case of ceramic veneers over an implant suprastructure, it is
essential to ensure anatomically correct results when reproducing lost soft tissue.
Extractions or periodontal procedures can also lead to soft tissue defects after the
healing process is complete.
■ In the interests of both aesthetics and periodontal hygiene, these defects must always
be repaired by the dental technician using suitable ceramic materials.
■ With their wide range of colours and excellent handling properties, the Gum Dentines
facilitate an anatomically exact and colour-matched reconstruction of the gingiva to
meet the demands of both patient and dental practitioner.
Procedure and firing temperature
■ Gum materials can be used on their own or mixed with one another. This gives rise to
a virtually unlimited range of possible gingival colours.
■ For information on preparation and firing please refer to the recommendations for
dentines in the instructions.
38
39
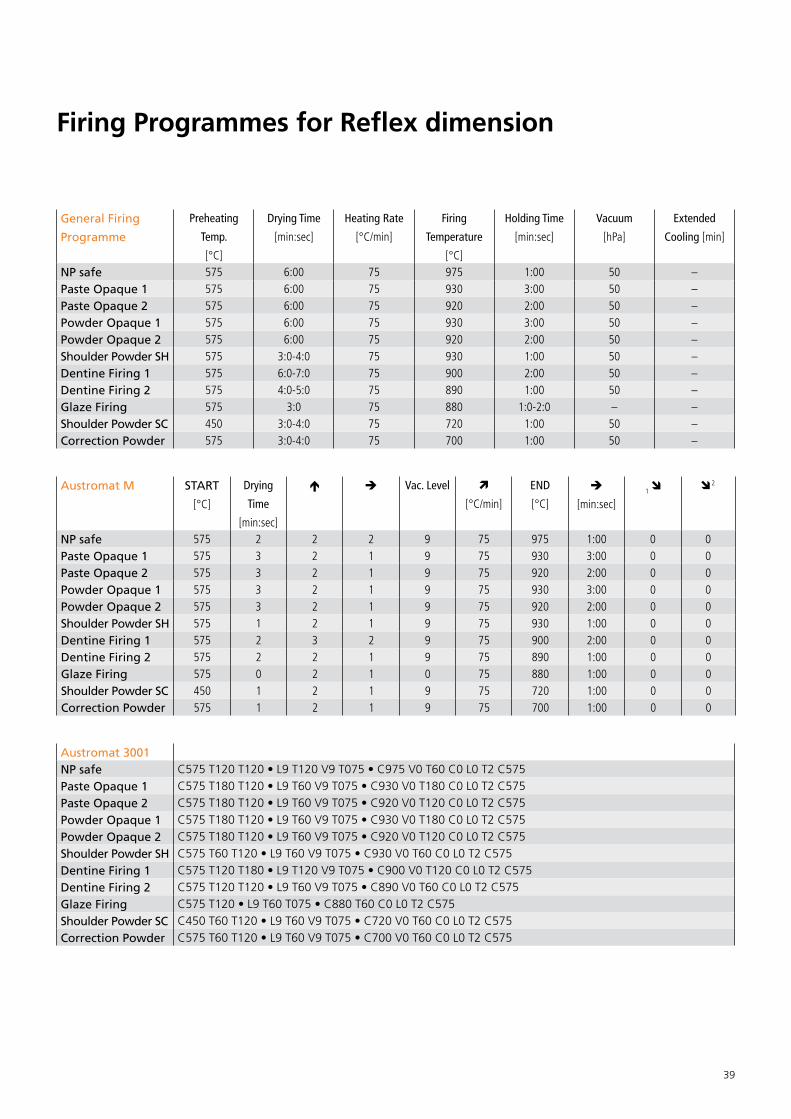
Firing Programmes for Reflex dimension
General Firing
Programme
Preheating
Temp.
[°C]
Drying Time
[min:sec]
Heating Rate
[°C/min]
Firing
Temperature
[°C]
Holding Time
[min:sec]
Vacuum
[hPa]
Extended
Cooling [min]
NP safe 575 6:00 75 975 1:00 50 –Paste Opaque 1 575 6:00 75 930 3:00 50 –Paste Opaque 2 575 6:00 75 920 2:00 50 –Powder Opaque 1 575 6:00 75 930 3:00 50 –Powder Opaque 2 575 6:00 75 920 2:00 50 –Shoulder Powder SH 575 3:0-4:0 75 930 1:00 50 –Dentine Firing 1 575 6:0-7:0 75 900 2:00 50 –Dentine Firing 2 575 4:0-5:0 75 890 1:00 50 –Glaze Firing 575 3:0 75 880 1:0-2:0 – –Shoulder Powder SC 450 3:0-4:0 75 720 1:00 50 –Correction Powder 575 3:0-4:0 75 700 1:00 50 –
Austromat M START
[°C]
Drying
Time
[min:sec]
Vac. Level
[°C/min]
END
[°C]
[min:sec]1
2
NP safe 575 2 2 2 9 75 975 1:00 0 0Paste Opaque 1 575 3 2 1 9 75 930 3:00 0 0Paste Opaque 2 575 3 2 1 9 75 920 2:00 0 0Powder Opaque 1 575 3 2 1 9 75 930 3:00 0 0Powder Opaque 2 575 3 2 1 9 75 920 2:00 0 0Shoulder Powder SH 575 1 2 1 9 75 930 1:00 0 0Dentine Firing 1 575 2 3 2 9 75 900 2:00 0 0Dentine Firing 2 575 2 2 1 9 75 890 1:00 0 0Glaze Firing 575 0 2 1 0 75 880 1:00 0 0Shoulder Powder SC 450 1 2 1 9 75 720 1:00 0 0Correction Powder 575 1 2 1 9 75 700 1:00 0 0
Austromat 3001NP safe C575 T120 T120 • L9 T120 V9 T075 • C975 V0 T60 C0 L0 T2 C575Paste Opaque 1 C575 T180 T120 • L9 T60 V9 T075 • C930 V0 T180 C0 L0 T2 C575Paste Opaque 2 C575 T180 T120 • L9 T60 V9 T075 • C920 V0 T120 C0 L0 T2 C575Powder Opaque 1 C575 T180 T120 • L9 T60 V9 T075 • C930 V0 T180 C0 L0 T2 C575Powder Opaque 2 C575 T180 T120 • L9 T60 V9 T075 • C920 V0 T120 C0 L0 T2 C575Shoulder Powder SH C575 T60 T120 • L9 T60 V9 T075 • C930 V0 T60 C0 L0 T2 C575Dentine Firing 1 C575 T120 T180 • L9 T120 V9 T075 • C900 V0 T120 C0 L0 T2 C575Dentine Firing 2 C575 T120 T120 • L9 T60 V9 T075 • C890 V0 T60 C0 L0 T2 C575Glaze Firing C575 T120 • L9 T60 T075 • C880 T60 C0 L0 T2 C575Shoulder Powder SC C450 T60 T120 • L9 T60 V9 T075 • C720 V0 T60 C0 L0 T2 C575Correction Powder C575 T60 T120 • L9 T60 V9 T075 • C700 V0 T60 C0 L0 T2 C575
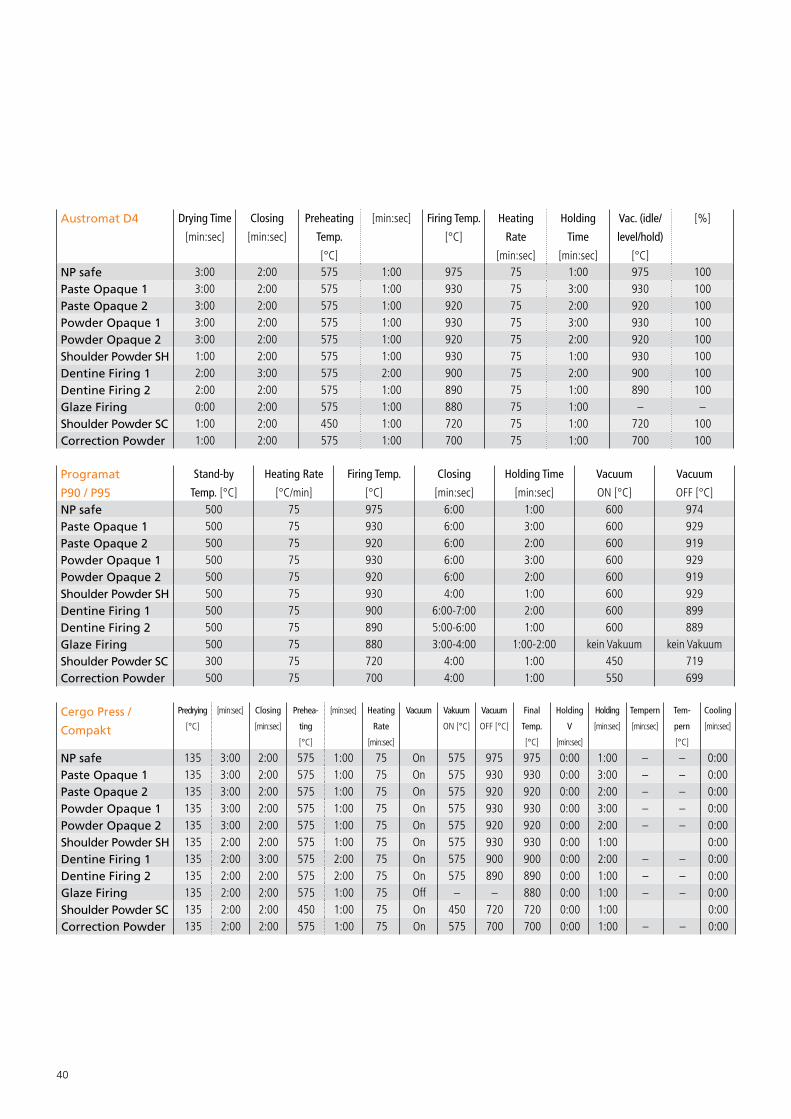
40
Austromat D4 Drying Time
[min:sec]
Closing
[min:sec]
Preheating
Temp.
[°C]
[min:sec] Firing Temp.
[°C]
Heating
Rate
[min:sec]
Holding
Time
[min:sec]
Vac. (idle/
level/hold)
[°C]
[%]
NP safe 3:00 2:00 575 1:00 975 75 1:00 975 100Paste Opaque 1 3:00 2:00 575 1:00 930 75 3:00 930 100Paste Opaque 2 3:00 2:00 575 1:00 920 75 2:00 920 100Powder Opaque 1 3:00 2:00 575 1:00 930 75 3:00 930 100Powder Opaque 2 3:00 2:00 575 1:00 920 75 2:00 920 100Shoulder Powder SH 1:00 2:00 575 1:00 930 75 1:00 930 100Dentine Firing 1 2:00 3:00 575 2:00 900 75 2:00 900 100Dentine Firing 2 2:00 2:00 575 1:00 890 75 1:00 890 100Glaze Firing 0:00 2:00 575 1:00 880 75 1:00 – –Shoulder Powder SC 1:00 2:00 450 1:00 720 75 1:00 720 100Correction Powder 1:00 2:00 575 1:00 700 75 1:00 700 100
Programat
P90 / P95
Stand-by
Temp. [°C]
Heating Rate
[°C/min]
Firing Temp.
[°C]
Closing
[min:sec]
Holding Time
[min:sec]
Vacuum
ON [°C]
Vacuum
OFF [°C]NP safe 500 75 975 6:00 1:00 600 974Paste Opaque 1 500 75 930 6:00 3:00 600 929Paste Opaque 2 500 75 920 6:00 2:00 600 919Powder Opaque 1 500 75 930 6:00 3:00 600 929Powder Opaque 2 500 75 920 6:00 2:00 600 919Shoulder Powder SH 500 75 930 4:00 1:00 600 929Dentine Firing 1 500 75 900 6:00-7:00 2:00 600 899Dentine Firing 2 500 75 890 5:00-6:00 1:00 600 889Glaze Firing 500 75 880 3:00-4:00 1:00-2:00 kein Vakuum kein VakuumShoulder Powder SC 300 75 720 4:00 1:00 450 719Correction Powder 500 75 700 4:00 1:00 550 699
Cergo Press /
Compakt
Predrying
[°C]
[min:sec] Closing
[min:sec]
Prehea-
ting
[°C]
[min:sec] Heating
Rate
[min:sec]
Vacuum Vakuum
ON [°C]
Vacuum
OFF [°C]
Final
Temp.
[°C]
Holding
V
[min:sec]
Holding
[min:sec]
Tempern
[min:sec]
Tem-
pern
[°C]
Cooling
[min:sec]
NP safe 135 3:00 2:00 575 1:00 75 On 575 975 975 0:00 1:00 – – 0:00Paste Opaque 1 135 3:00 2:00 575 1:00 75 On 575 930 930 0:00 3:00 – – 0:00Paste Opaque 2 135 3:00 2:00 575 1:00 75 On 575 920 920 0:00 2:00 – – 0:00Powder Opaque 1 135 3:00 2:00 575 1:00 75 On 575 930 930 0:00 3:00 – – 0:00Powder Opaque 2 135 3:00 2:00 575 1:00 75 On 575 920 920 0:00 2:00 – – 0:00Shoulder Powder SH 135 2:00 2:00 575 1:00 75 On 575 930 930 0:00 1:00 0:00Dentine Firing 1 135 2:00 3:00 575 2:00 75 On 575 900 900 0:00 2:00 – – 0:00Dentine Firing 2 135 2:00 2:00 575 2:00 75 On 575 890 890 0:00 1:00 – – 0:00Glaze Firing 135 2:00 2:00 575 1:00 75 Off – – 880 0:00 1:00 – – 0:00Shoulder Powder SC 135 2:00 2:00 450 1:00 75 On 450 720 720 0:00 1:00 0:00Correction Powder 135 2:00 2:00 575 1:00 75 On 575 700 700 0:00 1:00 – – 0:00

41
Multimat MC II
Multimat C
Mach 2
Preheating
Temp.
[°C]
Drying Time
[min:sec]
Preheating
Time
[min:sec]
Vacuum Time
[min:sec]
Firing Time
[min:sec]
Firing Temp.
[°C]
Heating Rate
[min:sec]
Vacuum
[hPa]
NP safe 575 5:00 1:00 1:00 2:00 975 75 50Paste Opaque 1 575 5:00 1:00 1:00 4:00 930 75 50Paste Opaque 2 575 5:00 1:00 1:00 3:00 920 75 50Powder Opaque 1 575 4:00 1:00 1:00 4:00 930 75 50Powder Opaque 2 575 4:00 1:00 1:00 3:00 920 75 50Shoulder Powder SH 575 2:00 1:00 1:00 2:00 930 75 50Dentine Firing 1 575 4:00 2:00 1:00 3:00 900 75 50Dentine Firing 2 575 3:00 2:00 1:00 2:00 890 75 50Glaze Firing 575 2:00 1:00 0:00 1:0-2:0 880 75 –Shoulder Powder SC 450 2:00 1:00 1:00 2:00 720 75 50Correction Powder 575 2:00 1:00 1:00 2:00 700 75 50
Multimat
Touch & Press
Preheating
Temp.
[°C]
Drying Time
[min:sec]
Preheating
Time
[min:sec]
Vacuum
[hPa]
Heating Rate
[min:sec]
Firing Temp.
[°C]
Vacuum Time
[min:sec]
Firing Time
[min:sec]
NP safe 575 5:00 1:00 50 75 975 1:00 2:00Paste Opaque 1 575 5:00 1:00 50 75 930 1:00 4:00Paste Opaque 2 575 5:00 1:00 50 75 920 1:00 3:00Powder Opaque 1 575 4:00 1:00 50 75 930 1:00 4:00Powder Opaque 2 575 4:00 1:00 50 75 920 1:00 3:00Shoulder Powder SH 575 2:00 1:00 50 75 930 1:00 2:00Dentine Firing 1 575 4:00 2:00 50 75 900 1:00 3:00Dentine Firing 2 575 4:00 1:00 50 75 890 1:00 2:00Glaze Firing 575 2:00 1:00 – 75 880 – 1:0-2:0Shoulder Powder SC 450 2:00 1:00 50 75 720 1:00 2:00Correction Powder 575 2:00 1:00 50 75 700 1:00 2:00
Vacumat
200/250/300
Stand-by Temp.
[°C]
Final Temp.
[min:sec]
Predrying Time
[min:sec]
Heat-up Time
[min:sec]
Holding Time
[min:sec]
Vacuum Time
[min:sec]NP safe 450 975 6:00 6:00 1:00 6:00Paste Opaque 1 450 930 6:00 6:00 3:00 6:00Paste Opaque 2 450 920 6:00 6:00 2:00 6:00Powder Opaque 1 575 930 5:00 6:00 3:00 6:00Powder Opaque 2 575 920 5:00 6:00 2:00 6:00Shoulder Powder SH 575 930 4:00 6:00 1:00 6:00Dentine Firing 1 575 900 7:00 6:00 2:00 6:00Dentine Firing 2 575 890 5:00 6:00 1:00 6:00Glaze Firing 575 880 4:00 3:00 1:00 0:00Shoulder Powder SC 450 720 4:00 6:00 1:00 6:00Correction Powder 575 700 4:00 3:00 1:00 3:00
Warning!
Firing temperatures are given for guidance only. Variations may occur depending on the furnace used and the temperatures may need
to be adjusted accordingly. For larger cases the drying and final cooling times should be extended as necessary. In the case of large-span
bridgework relief cooling (opening the furnace door slowly) may be necessary to avoid thermal tension. With large-span bridge fram
works the geometry (e.g. with solid pontics) may necessitate increasing the end temperatures of the first and second dentine bake by
approx. 10 °C.
42
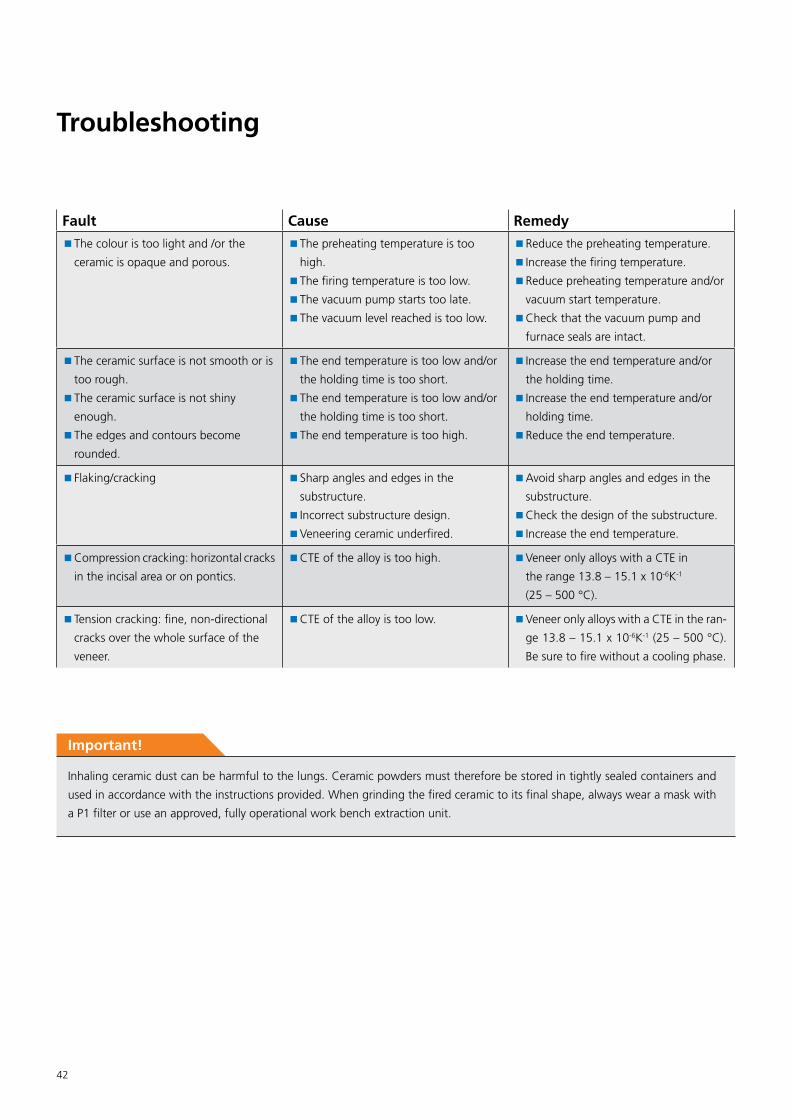
Troubleshooting
Fault Cause Remedy■ The colour is too light and /or the
ceramic is opaque and porous.
■ The preheating temperature is too
high.
■ The firing temperature is too low.
■ The vacuum pump starts too late.
■ The vacuum level reached is too low.
■ Reduce the preheating temperature.
■ Increase the firing temperature.
■ Reduce preheating temperature and/or
vacuum start temperature.
■ Check that the vacuum pump and
furnace seals are intact.
■ The ceramic surface is not smooth or is
too rough.
■ The ceramic surface is not shiny
enough.
■ The edges and contours become
rounded.
■ The end temperature is too low and/or
the holding time is too short.
■ The end temperature is too low and/or
the holding time is too short.
■ The end temperature is too high.
■ Increase the end temperature and/or
the holding time.
■ Increase the end temperature and/or
holding time.
■ Reduce the end temperature.
■ Flaking/cracking ■ Sharp angles and edges in the
substructure.
■ Incorrect substructure design.
■ Veneering ceramic underfired.
■ Avoid sharp angles and edges in the
substructure.
■ Check the design of the substructure.
■ Increase the end temperature.
■ Compression cracking: horizontal cracks
in the incisal area or on pontics.
■ CTE of the alloy is too high. ■ Veneer only alloys with a CTE in
the range 13.8 – 15.1 x 10⁻⁶K-1
(25 – 500 °C).
■Tension cracking: fine, non-directional
cracks over the whole surface of the
veneer.
■ CTE of the alloy is too low. ■ Veneer only alloys with a CTE in the ran-
ge 13.8 – 15.1 x 10⁻⁶K-1 (25 – 500 °C).
Be sure to fire without a cooling phase.
Important!
Inhaling ceramic dust can be harmful to the lungs. Ceramic powders must therefore be stored in tightly sealed containers and
used in accordance with the instructions provided. When grinding the fired ceramic to its final shape, always wear a mask with
a P1 filter or use an approved, fully operational work bench extraction unit.

43
EXPECT THE DIFFERENCE! BY WIELAND.
As a major supplier of dental system solutions, WIELAND embodies both tradition and progress
in matters of dental products and technology. Since our company was founded in 1871, we have
stayed true to our corporate philosophy of combining tradition, innovation and quality with the
best in customer care. Today, our core competencies and key strengths lie in the forward-looking
integration of technologies and materials for dental prosthetics. This ensures that patients can
trust in the quality of their dentures, and our partners in dental practices and laboratories can
continue with confidence on the path to digitalisation and greater competitiveness.
WIELAND offers a wide range of products and services from CAD/CAM technologies and
dental alloys to veneering ceramics and electroforming. Thanks to our worldwide presence and
international network, WIELAND is never far away, and your contact person can always be located
via the Internet.
5300
95e.
01.1
0/10
R
EFLE
X® is
a r
egis
tere
d t
rad
e m
ark
of
WIE
LAN
D.
WIELAND Dental +Technik GmbH & Co. KG
Schwenninger Straße 13, 75179 Pforzheim, Germany
Fon +49 72 31/37 05-0, Fax +49 72 31/35 79 59
X Ceramic-Hotline +49 60 07 / 9 17 62 22www.wieland-international.com