Embed Size (px)
Citation preview

REFLECTIONS COLLECTION
Owner’s Guide

Spa Information
My Spa:
Model Name:
Serial Number:
Date Installed:
Dealer’s Name:

Table of Contents1.0 Important Hot tub Owner Information ........................................ 12.0 FCC Notice .................................................................................... 1
3.0 Important Safety Instructions for all Hot tub Owners............... 23.1 Entrapment Risk ............................................................................ 63.2 Hyperthermia ................................................................................. 73.3 Warning Signs ............................................................................... 83.4 Important CSA safety instructions (Canada only) .......................... 8
4.0 Choosing a Location.................................................................... 94.1 Outdoor Location ........................................................................... 94.2 Indoor Location ............................................................................ 10
5.0 General Electrical Safety Instructions ..................................... 116.0 Electrical Installation Instructions ........................................... 12
7.0 Power Requirements ................................................................. 157.1 North American 240V 60Hz Models............................................. 157.2 Export 230V 50Hz Models ........................................................... 15
8.0 Hot tub Fill Up Procedure .......................................................... 159.0 Hot tub Features......................................................................... 20
10.0 D1 Hub......................................................................................... 2110.1 D1 Hub Control Panel .................................................................. 21
11.0 Operating Instructions............................................................... 2111.1 Light Options................................................................................ 2111.2 Audio System (Operation) ........................................................... 2211.3 Auxiliary Control Switch (On select models) ................................ 2211.4 Audio System (Connect Bluetooth®) ........................................... 2311.5 LIQUID-FX Fountain .................................................................... 2311.6 Water Feature Flow Control ......................................................... 2311.7 Jet Therapy Pillow™ .................................................................... 2311.8 Jet Zone Selector......................................................................... 2311.9 Skirt Lighting (optional feature) .................................................... 2311.10 Dynamic Massage Sequencer™ (on select models) ................... 24
12.0 Programming Instructions ........................................................ 2512.1 Settings Button Menu .................................................................. 2512.2 Water Care .................................................................................. 2512.3 Maintenance Menu ...................................................................... 26

12.4 Date & Time Menu ....................................................................... 2712.5 Keypad Settings........................................................................... 2712.6 About Menu ................................................................................. 27
13.0 Hot tub Maintenance .................................................................. 2813.1 Cleaningthefilters ....................................................................... 2813.2 Surface Care................................................................................ 2913.3 Maintaining the Hot Tub Cabinet ................................................. 2913.4 Pillow Care................................................................................... 2913.5 Draining ....................................................................................... 3013.6 Winterizing ................................................................................... 3013.7 Special Cold Weather Instructions ............................................... 3013.8 Maintaining the Cover .................................................................. 3113.9 Restarting Your Hot Tub in Cold Weather .................................... 32
14.0 Water Quality Maintenance ....................................................... 3214.1 UltraPure™ .................................................................................. 3214.2 pH Control.................................................................................... 3314.3 Sanitizing ..................................................................................... 3314.4 Other Additives ............................................................................ 34
15.0 Troubleshooting ......................................................................... 3416.0 Stereo Cautions ......................................................................... 35

Page 1
Reflections Collection1.0 Important Hot tub Owner InformationYour hot tub is constructed to the highest standards and is capable of providing many years of trouble-free use. However, because heat reten-tivematerialsareutilizedtoinsulatethehottubforefficientoperation,anuncoveredhottubsurfaceandwallfittingsdirectlyexposedtosunlightandhigh temperatures for an extended period are subject to permanent dam-age or discoloration. Damage caused by exposing the hot tub to this abuse is not covered under warranty. We recommend that you always keep the hot tub full of water when it is exposed to direct sunlight and that you keep the insulating cover in place at all times when the hot tub is not in use. Read and carefully follow the requirements for your hot tub’s support base found in the Section 4.0 titled, “Choosing a Location” (page 9).
2.0 FCC NoticeThis device complies with part 15 of the FCC Rules. Operation is subject to the following two conditions: (1) This device may not cause harmful interference, and (2) this device must accept any interference received, including interference that may cause undesired operation.
This equipment has been tested and found to comply with the limits for a Class B Digital Device, pursuant to Part 15 of the FCC Rules. These limits are designed to provide reasonable protection against harmful interference in a residential installation. This equipment generates, uses and can radiate radio frequency energy and, if not installed and used in accordance with the instructions, may cause harmful interference to radio communications. However, there is no guarantee that interference will not occur in a particular installation. If this equipment does cause harmful interference to radio or television reception, which can be determined by turning the equipment off and on, the user is encouraged to try to correct the interference by one or more of the following measures:1. Rearrange or relocate the receiving antenna;2. Increase the separation between the equipment and receiver;3. Connect the equipment into an outlet on a circuit different from the
circuit connected;4. Consult the dealer or an experienced radio/TV technician for help.
(Changesormodificationsnotexpresslyapprovedbythepartyresponsible for FCC compliance could void the user’s authority to operate this equipment.)
Page 2
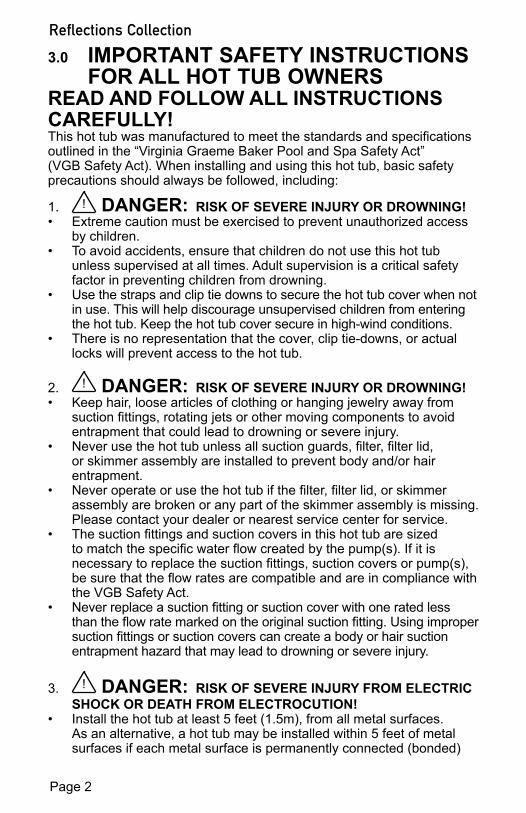
Reflections Collection3.0 IMPORTANT SAFETY INSTRUCTIONS
FOR ALL HOT TUB OWNERSREAD AND FOLLOW ALL INSTRUCTIONS CAREFULLY!Thishottubwasmanufacturedtomeetthestandardsandspecificationsoutlined in the “Virginia Graeme Baker Pool and Spa Safety Act” (VGB Safety Act). When installing and using this hot tub, basic safety precautions should always be followed, including:
1. ! DANGER: RISK OF SEVERE INJURY OR DROWNING! • Extreme caution must be exercised to prevent unauthorized access
by children.• To avoid accidents, ensure that children do not use this hot tub
unless supervised at all times. Adult supervision is a critical safety factor in preventing children from drowning.
• Use the straps and clip tie downs to secure the hot tub cover when not in use. This will help discourage unsupervised children from entering the hot tub. Keep the hot tub cover secure in high-wind conditions.
• There is no representation that the cover, clip tie-downs, or actual locks will prevent access to the hot tub.
2. ! DANGER: RISK OF SEVERE INJURY OR DROWNING!• Keep hair, loose articles of clothing or hanging jewelry away from
suctionfittings,rotatingjetsorothermovingcomponentstoavoidentrapment that could lead to drowning or severe injury.
• Neverusethehottubunlessallsuctionguards,filter,filterlid,or skimmer assembly are installed to prevent body and/or hair entrapment.
• Neveroperateorusethehottubifthefilter,filterlid,orskimmerassembly are broken or any part of the skimmer assembly is missing. Please contact your dealer or nearest service center for service.
• Thesuctionfittingsandsuctioncoversinthishottubaresizedtomatchthespecificwaterflowcreatedbythepump(s).Ifitisnecessarytoreplacethesuctionfittings,suctioncoversorpump(s),besurethattheflowratesarecompatibleandareincompliancewiththe VGB Safety Act.
• Neverreplaceasuctionfittingorsuctioncoverwithoneratedlessthantheflowratemarkedontheoriginalsuctionfitting.Usingimpropersuctionfittingsorsuctioncoverscancreateabodyorhairsuctionentrapment hazard that may lead to drowning or severe injury.
3. ! DANGER: RISK OF SEVERE INJURY FROM ELECTRIC SHOCK OR DEATH FROM ELECTROCUTION!
• Install the hot tub at least 5 feet (1.5m), from all metal surfaces. As an alternative, a hot tub may be installed within 5 feet of metal surfaces if each metal surface is permanently connected (bonded)

Page 3
Reflections Collectionby a minimum No. 8 AWG (8.4 mm²) solid copper conductor attached to the wire connector on the grounding lug, inside the equipment compartment on the equipment box.
• A grounding wire connector is provided on this unit to connect a minimum No. 8 AWG (8.4 mm²) solid copper conductor between this unit and any metal equipment, metal enclosures of electrical equipment, metal water pipe, or conduit within 5 feet (1.5m) of the unit.
• Never permit any electrical appliance, such as a light, telephone, radio, television, etc. within 5 feet (1.5m) of a hot tub unless such appliances are built-in by the manufacturer.
• Never bring any electrical appliances into or near the hot tub.• Never operate any electrical appliances from inside the hot tub or
when you are wet.• The electrical supply for this product must include a suitably rated
switch or circuit breaker to open all ungrounded supply conductors to comply with Section 422-20 of the National Electrical Code/USA, ANSI/NFPA 70. The disconnecting means must be readily accessible and visible to the hot tub occupant but installed at least 5 feet (1.5m), from the hot tub.
• The electrical circuit supplied for the hot tub must include a suitable ground fault circuit interrupter (GFCI) as required by NEC Article 680-42.
4. ! WARNING: RISK OF SEVERE INJURY OR DEATH!• Extreme caution must be exercised to prevent diving or jumping
into the hot tub or slipping and falling, which could result in unconsciousness, drowning, or serious injury. Remember that wet surfaces can be very slippery.
• Never stand, walk or sit on the top railing of the hot tub.
5. ! WARNING: RISK OF HYPERTHERMIA (OVER-HEAT-ING) CAUSING SEVERE INJURY, BURNS, WELTS OR DEATH!
• Water temperature in excess of 104°F (40°C) may be injurious to your health.
• RefertoSection3.2Hyperthermiaforspecificcausesandsymptomsof this condition.
• The water in the hot tub should never exceed 104°F (40°C). Water temperatures between 100°F (38°C) and 104°F (40°C) are considered safe for a healthy adult.
• Lower water temperatures are recommended for young children (children are especially sensitive to hot water) and when hot tub use may exceed 10 minutes.
• The Consumer Products Safety Commission/USA has stated that the water temperature in a hot tub should not exceed 104°F (40°C).
• Always test the hot tub water temperature before entering the hot tub. The user should measure the water temperature with an accurate thermometer since the tolerance of water temperature-regulating devices may vary as much as +/- 5°F (2°C).

Page 4
Reflections Collection
6. ! WARNING: RISK OF SEVERE INJURY OR DEATH!• Since excessive water temperatures have a high potential for causing
fetal damage during the early months of pregnancy, if pregnant or possibly pregnant, consult your physician before using a hot tub.
• Pregnant or possibly pregnant women should limit hot tub water temperatures to 100°F (38°C).
• Persons suffering from obesity or a medical history of heart disease, low or high blood pressure, circulatory system problems, diabetes, infectiousdiseasesorimmunedeficiencysyndromesshouldconsultaphysician before using a hot tub.
• Ifyouexperiencebreathingdifficultiesinassociationwithusingoroperating your hot tub, discontinue use and consult your physician.
• Persons using medication should consult a physician before using a hot tub since some medication may induce drowsiness, while other medication may affect heart rate, blood pressure, and circulation.
• Persons suffering from any condition requiring medical treatment, the elderly, or infants should consult with a physician before using a hot tub.
• The use of alcohol, drugs, or medication before or during hot tub use may lead to unconsciousness with the possibility of drowning.
7. ! WARNING: RISK OF SEVERE INJURY OR DEATH!• Prolonged immersion in a hot tub may be injurious to your health.• Observe a reasonable time limit when using the hot tub. Exposures at
higher temperatures can cause high body temperature (over-heating). Symptoms may include dizziness, nausea, fainting, drowsiness, and reduced awareness. These effects could possibly result in drowning or serious injury.
• Never use a hot tub immediately following strenuous exercise. Enter and exit the hot tub slowly. Wet surfaces can be slippery.
8. ! WARNING: TO DECREASE RISK OF INFECTION OR DISEASE!
• To reduce the risk of contracting a waterborne illness (e.g. an infection, bacteria or virus) and/or respiratory ailments, maintain water chemistry within the parameters listed on the inside cover of this manual and consult with a licensed engineer regarding proper ventilation if installed indoors or in an enclosed area.
• People with infectious diseases should not use a hot tub to avoid water contamination, which could result in spreading infections to others.
• Always shower before and after using your hot tub. Maintain water chemistry in accordance with manufacturer’s instructions. Failure to do so may result in contracting a waterborne illness (e.g. an infection, bacteria or virus).

Page 5
Reflections Collection
9. ! WARNING: Inadditiontomaintenanceoffiltersandwaterchemistry, proper ventilation is recommended to reduce the risk of contracting a waterborne illness (e.g. an infection, bacteria or virus) and/or respiratory ailments that could be present in the air or water. Consult a licensed architect or building contractor to determine your specificneedsifinstallingyourhottubindoors.
10. CAUTION: TO DECREASE RISK OF PRODUCT DAMAGE.• Maintain water chemistry in accordance with manufacturer’s
instructions.• Proper chemical maintenance of hot tub water is necessary to
maintain safe water and prevent possible damage to hot tub components.
11. ! WARNING: RISK OF SEVERE INJURY OR DEATH! The appliance is not intended for use by persons (including children) with reduced physical, sensory or mental capabilities, or lack of expe-rience or knowledge, unless they have been given supervision or instruction concerning use of the appliance by a person responsible for their safety.
12. NOTE: This hot tub is not intended nor designed to be used in a commercial or public application. The hot tub buyer shall determine whether there are any code restrictions on the use or installation of this hot tub since local code requirements vary from one locality to another.
Hot Tub Safety LiteratureTo ensure you have a safe and enjoyable hot tub experience, learn all you can about hot tub safety and emergency procedures. Especially useful are the brochures listed below:• Children Aren’t Waterproof • Pool and Spa Emergency Procedures For Infants and Children• Layers of Protection• The Sensible Way to Enjoy Your Spa or Hot tubThe Association of Pool and Spa Professionals publishes these brochures. To acquire a brochure:• Ask your hot tub dealer (they may have copies)• Go to http://apsp.org• Conduct your own search on the internet• Write to the following address: The Association of Pool and Spa Professionals 2111 Eisenhower Avenue Alexandria VA 22314 703.838.0083
Page 6
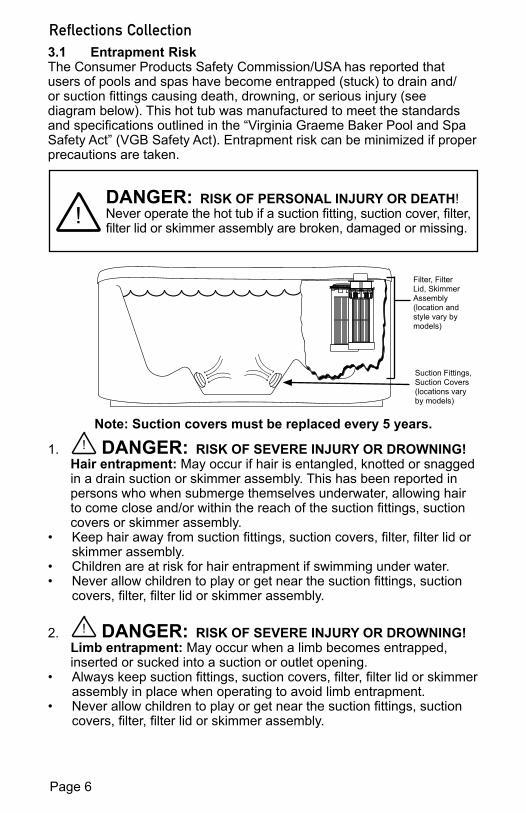
Reflections Collection3.1 Entrapment RiskThe Consumer Products Safety Commission/USA has reported that users of pools and spas have become entrapped (stuck) to drain and/orsuctionfittingscausingdeath,drowning,orseriousinjury(seediagram below). This hot tub was manufactured to meet the standards andspecificationsoutlinedinthe“VirginiaGraemeBakerPoolandSpaSafety Act” (VGB Safety Act). Entrapment risk can be minimized if proper precautions are taken.
DANGER: RISK OF PERSONAL INJURY OR DEATH!Neveroperatethehottubifasuctionfitting,suctioncover,filter,filterlidorskimmerassemblyarebroken,damagedormissing.
!
Note: Suction covers must be replaced every 5 years.
1. ! DANGER: RISK OF SEVERE INJURY OR DROWNING! Hair entrapment: May occur if hair is entangled, knotted or snagged
in a drain suction or skimmer assembly. This has been reported in persons who when submerge themselves underwater, allowing hair to come close and/or within the reach of the suction fittings, suction covers or skimmer assembly.
• Keephairawayfromsuctionfittings,suctioncovers,filter,filterlidorskimmer assembly.
• Children are at risk for hair entrapment if swimming under water.• Neverallowchildrentoplayorgetnearthesuctionfittings,suction
covers,filter,filterlidorskimmerassembly.
2. ! DANGER: RISK OF SEVERE INJURY OR DROWNING! Limb entrapment: May occur when a limb becomes entrapped,
inserted or sucked into a suction or outlet opening.• Alwayskeepsuctionfittings,suctioncovers,filter,filterlidorskimmer
assembly in place when operating to avoid limb entrapment.• Neverallowchildrentoplayorgetnearthesuctionfittings,suction
covers,filter,filterlidorskimmerassembly.
Suction Fittings, Suction Covers (locations vary by models)
Filter, Filter Lid, Skimmer Assembly (location and style vary by models)
Page 7
Reflections Collection
3. ! DANGER: RISK OF SEVERE INJURY OR DROWNING! Body entrapment: May occur when part of the torso becomes
entrapped, inserted or sucked into a suction or outlet opening.• Neverallowchildrentoplayorgetnearthesuctionfittings,suction
covers,filter,filterlidorskimmerassembly.
4. ! DANGER: RISK OF SEVERE INJURY OR DROWNING! Evisceration (disembowelment) entrapment: May occur when the
buttocks becomes entrapped, inserted or sucked into a suction or outlet opening.
• Neversitonsuctionfittings,suctioncovers,filter,filterlidorskimmerassembly.
• Neverallowchildrentoplayorgetnearthesuctionfittings,suctioncovers,filter,filterlidorskimmerassembly.
5. ! DANGER: RISK OF SEVERE INJURY OR DROWNING! Mechanical entrapment: May occur when jewelry, swimsuit, or
hair accessories become entangled, knotted or snagged in a drain suction or skimmer assembly.
• Never allow your jewelry, swimsuit, or hair accessories to come close tothesuctionfittings,suctioncoversorskimmerassembly.
• Neverallowchildrentoplayorgetnearthesuctionfittings,suctioncovers,filter,filterlidorskimmerassembly.
3.2 HyperthermiaProlonged immersion in hot water may induce hyperthermia (over-heating). The use of alcohol or drugs can greatly increase the risk of fatal hyperthermia in spas. A description of the causes, symptoms, and effects of hyperthermia are as follows:
Hyperthermia occurs when the internal temperature of the body reaches a level several degrees above the normal body temperature of 98.6°F (37°C). The symptoms of hyperthermia include drowsiness, lethargy (fatigue), and an increase in the internal temperature of the body (feeling of being too hot). The effects of hyperthermia include:
• Unawareness of impending hazard;• Failure to perceive heat;• Failure to recognize the need to exit hot tub;• Physical inability to exit hot tub;• Fetal damage in pregnant women; and• Unconsciousness and danger of drowning.

Page 8
Reflections Collection3.3 Warning SignsEach hot tub has been provided with a Warning Sign and an Important Notice label. This label outlines safety precautions. This sign should be permanently placed in a location that is visible to the hot tub user. Replacement signs can be obtained from:
3.4 IMPORTANT CSA SAFETY INSTRUC-TIONS (CANADA ONLY)
When using this electrical equipment, basic safety precautions should always be followed, including the following:
1. READ AND FOLLOW ALL INSTRUCTIONS.
2. A green colored terminal or a terminal marked G, Gr, Ground, Grounding or the symbol* is located inside the supply terminal box or compartment. To reduce the risk of electric shock, this terminal must be connected to the grounding means provided in the electric supply service panel with a continuous copper wire equivalent in size to the circuit conductors that supply this equipment. *IEC Publication 417, Symbol 5019.
3. At least two lugs marked “Bonding Lugs” are provided on the external surface or on the inside of the supply terminal box/compartment. To reduce the risk of electric shock, connect the local common bonding grid in the area of the hot tub to these terminals with an insulated or bare copper conductor not smaller than No. 6 AWG (10 mm²).
4. Allfield-installedmetalcomponentssuchasrails,ladders,drainsor other similar hardware within 10 feet (3m) of the hot tub shall be bonded to the equipment grounding buss with copper conductors not smaller than No. 6 AWG (10 mm²).
5. SAVE THESE INSTRUCTIONS.
WARNING
DANGERNO CLIMBING OR WALKING ON TOP RAIL
SHALLOW WATERNO DIVING - NO JUMPINGDIVING OR JUMPING MAY
CAUSE DEATH, PARALYSIS ORPERMANENT INJURY
HOW TO PREVENT DIVING/JUMPING ACCIDENTS• This is a non-diving pool/Aquatic Fitness System.• Do not dive or jump into this pool/Aquatic Fitness System under any circumstances.• Do not utilize sliding equipment with this pool/Aquatic Fitness System.• Do not utilize diving equipment with this pool/Aquatic Fitness System.
HOW TO PREVENT CHILD DROWNING ACCIDENTS• Children must be constantly and closely supervised when using the pool/Aquatic Fitness System.• Children must not be allowed in the pool/Aquatic Fitness System area without an adult being present.• The pool/Aquatic Fitness System gate must be closed and locked when the pool/Aquatic Fitness System is not being used.• Portable ladders must be removed when not in use.• Limited access ladders must be removed or latched in the raised position when not in use.
HOW TO PREVENT OTHER ACCIDENTS• Do not swim alone.• Do not use pool/Aquatic Fitness System if you have taken drugs or drunk alcohol.• Non-swimmers must stay in the shallow end of the pool/Aquatic Fitness System.
EMERGENCY PHONE NUMBERFor additional information read the safety and usage information supplied in the Installer/Owner envelope.
FAILURE TO FOLLOW THESE RULESMAY CAUSE DEATH, PARALYSIS OR PERMANENT INJURY

Page 9
Reflections Collection4.0 Choosing a Location
IMPORTANT: Because of the combined weight of the hot tub, water and users, it is extremely important that the base upon which thehottubrestsbesmooth,flat,levelandcapableofuniformlysupporting this weight, without shifting or settling, for the entire time the hot tub is in place. If the hot tub is placed on a surface, which does not meet these requirements, damage to the skirt and/or the hot tub shell may result. Damage caused by improper support is not covered under warranty. It is the responsibility of the hot tub owner to assure the integrity of the support at all times. We recom-mend a poured, reinforced concrete slab with a minimum thickness of 4 inches (10 cm). Wood decking is also acceptable provided it is constructed so that it meets the requirements outlined above.
WARNING: For spas that are to rest on balconies, roofs orotherplatformsnotspecificallytiedintomainstructuralsupport, consult a professional Structural Engineer with expe-rience in this type of application.
!
The hot tub must be installed in such a manner as to provide drainage away from it. Placing the hot tub in a depression without provisions forproperdrainagecouldallowrain,overflowandothercasualwatertofloodtheequipmentandcreateawetconditioninwhichitwouldsitin.Forspaswhichwillberecessedintoafloorordeck,installsoas to permit access to the equipment, either from above or below, for servicing. Make certain that there are no obstructions, which would prevent removal of all side cabinet side panels and access to the jet components, especially on the side with the equipment bay.
CAUTION: If the hot tub is indoors or located in an enclosed area, proper ventilation should be discussed with an Engineer or authority competent enough to understand the necessary provisions needed to vent moist or heated air and air associated with chemical odors outdoors. When the hot tub is in use considerable amounts of moisture will escape potentially causing mold and mildew. This can cause health risk. Over time, this can damage certain surfaces, surroundings, and equipment.
4.1 Outdoor LocationIn selecting the ideal outdoor location for your hot tub, we suggest that you take into consideration:
• The proximity to changing area and shelter (especially in colder weather).
• The pathway to and from your hot tub (this should be free of debris so that dirt and leaves are not easily tracked into the hot tub).
• The closeness to trees and shrubbery (remember that leaves and birds could create extra work in keeping the hot tub clean).
!
Page 10
Reflections Collection• A sheltered environment (less wind and weather exposure can result
in lowered operation and maintenance costs).• The overall enhancement of your environment. It is preferable not
to place the hot tub under an unguttered roof overhang since run-off water will shorten the life expectancy of the hot tub cover.
• For spas that are to rest on balconies, roofs or other platforms not specificallytiedintomainstructuralsupport,consultaprofessionalStructural Engineer with experience in this type of application.
• In the unlikely event that you should ever need to access or gain entry to any portion of the hot tub for servicing, it is highly recommended that you plan your outdoor installation to provide full access to the entire hot tub. Please take this into consideration when placing the hot tub in a deck or enclosed by a surrounding.
• Considerlocatingyourhottubawayfromanyreflectivesurfaceorglass to prevent any damage to the synthetic skirt.
• Do not shim the hot tub. To ensure proper support the hot tub must sitflatontheintendedfoundation.
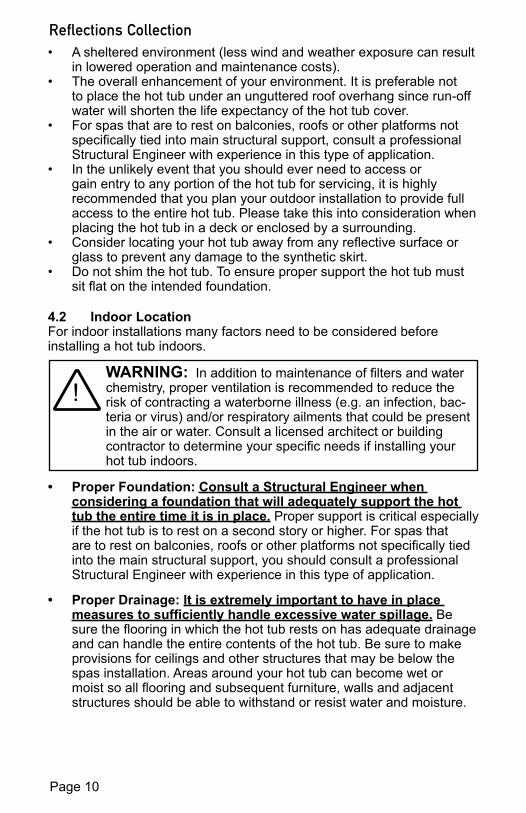
4.2 Indoor LocationFor indoor installations many factors need to be considered before installing a hot tub indoors.
WARNING: Inadditiontomaintenanceoffiltersandwaterchemistry, proper ventilation is recommended to reduce the risk of contracting a waterborne illness (e.g. an infection, bac-teria or virus) and/or respiratory ailments that could be present in the air or water. Consult a licensed architect or building contractortodetermineyourspecificneedsifinstallingyourhot tub indoors.
!
• Proper Foundation: Consult a Structural Engineer when considering a foundation that will adequately support the hot tub the entire time it is in place. Proper support is critical especially if the hot tub is to rest on a second story or higher. For spas that aretorestonbalconies,roofsorotherplatformsnotspecificallytiedinto the main structural support, you should consult a professional Structural Engineer with experience in this type of application.
• Proper Drainage: It is extremely important to have in place measures to sufficiently handle excessive water spillage. Be suretheflooringinwhichthehottubrestsonhasadequatedrainageand can handle the entire contents of the hot tub. Be sure to make provisions for ceilings and other structures that may be below the spas installation. Areas around your hot tub can become wet or moistsoallflooringandsubsequentfurniture,wallsandadjacentstructures should be able to withstand or resist water and moisture.
Page 11
Reflections Collection• Proper Ventilation: Proper ventilation should be discussed with
an Engineer or authority competent enough to understand the necessary provisions needed to vent moist or heated air and air associated with chemical odors outdoors. When the hot tub is in use considerable amounts of moisture will escape, potentially causing mold and mildew over time, which can damage certain surfaces and/or surroundings.
• Sufficient Access: In the unlikely event that you should ever need to access or gain entry to any portion of the hot tub for servicing, it is highly recommended that you plan your indoor installation to provide full access to the entire hot tub.
• Warranty: Damage caused by not following these guidelines or any improper installation not in accordance to local codes or authorities is not covered under the spas warranty. Please consult your local state or city building ordinances.
• Do not shim the hot tub. To ensure proper support the hot tub must sitflatontheintendedfoundation.
5.0 General Electrical Safety InstructionsYour new Dimension One hot tub is equipped with the D1 control system. It contains the most advanced safety and self-protective equipment in the industry. Nonetheless, this hot tub must be installed properly to ensure dependable usage. Please contact your local dealer or local building department should you have any questions regarding your installation. Proper grounding is extremely important. D1® spas are equipped with a current collector system. A pressure wire connector is provided on the surface of the control box to permit connection of a bonding wire between this point and any ground metal equipment, metal water pipe or conduit within 5 feet (1.5m) of the hot tub, or copper clad grounding rod buried within 5 feet (1.5m) of the hot tub. Bonding wire must be at least No. 8 AWG (8.4 mm²) solid copper wire. This is a most important safety assurance feature. Before installing your hot tub, check with your local building department to ensure installation conforms to local building codes.

Page 12
Reflections Collection6.0 Electrical Installation InstructionsIMPORTANT NOTICE: The electrical wiring of this hot tub must meet the requirements of the National Electrical Code/USA (NEC) and any applicable state or local codes. The electrical circuit must be installedbyaqualifiedelectricianandapprovedbyalocalbuilding/electrical inspection authority.
1. ! DANGER: TO DECREASE THE RISK OF SHOCK, PRODUCT DAMAGE OR ELECTRICAL FIRE.
This hot tub must be permanently connected (hard-wired) to the power supply. No plug-in connections or extension cords are to be used in conjunction with the operation of this hot tub. Supplying power to the hot tub, which is not in accordance with these instructions, will void both the independent testing agency listing and the manufacturer’s warranty.
2. The power supplied to this hot tub must be a dedicated circuit with no other appliances or lights sharing the power provided by the circuit.
3. To determine the current, voltage and wire size required, refer to Section 7.0 “Power Requirements” (page 15)foryourspecifichottub model.
• Wire size must be appropriate per NEC and/or local codes.• We recommend type THHN wire. All wiring must be copper to ensure
proper connections. Do not use aluminum wire.• When using wire larger than #6 (10 mm²), add a junction box near
the hot tub and reduce to short lengths of #6 (10 mm²) wire to connect to the hot tub.
4. The electrical supply for this product must include a suitably rated switch or circuit breaker to open all ungrounded supply conductors to comply with Section 422-20 of the National Electrical Code/USA, ANSI/NFPA 70. The disconnecting means must be readily accessible to the hot tub’s occupant but installed at least 5 feet (1.5m) from hot tub water.
5. The electrical supply for this product must include a suitably rated isolating switch and circuit breaker to comply with local electrical regulations. This RCD/GFCI circuit breaker must be installed at the power supply in the house electrical box.
6. The electrical circuit supplied for the hot tub must include a suitable ground fault circuit interrupter (GFCI) as required by NEC Article 680-42/USA.
7. The electrical circuit supplied for the hot tub must include a suitable residual-current device (RCD) as required by local codes and regulations.
8. For Europe, the hot tub should be supplied through a residual current device (RCD) with a rated tripping current not exceeding 30mA (IEC 60335-2-60).
9. For Germany, the hot tub should be supplied through a residual current device (RCD) with a rated tripping current not exceeding 10mA (IEC 60335-2-60).

Page 13
Reflections Collection10. To gain access to the hot tub’s power terminal block, you will need
to remove the center cabinet panel by removing the panel screws, Figure 6.0.
11. Once you remove the panel screws, grab the sides of the panel and gently pull the cabinet forward and then up to remove. Place the panel in a safe location to prevent it from being damaged.
12. Then remove the door screws for the access door on the control box, Figure 6.0a.
13. Now feed the electrical cable through to the terminal pipe ending at the control box, Figure 6.0b.
14. Connect wires to the terminal block (Figures 6.0c-6.0d). ALL WIRES MUST BE SECURELY CONNECTED or equipment damage could result.
15. Install the control access box door and reinstall the cabinet panel(s).
Figure 6.0
Figure 6.0a
Figure 6.0b

Page 14
Reflections CollectionFigure 6.0c
240V 60Hz Wiring
GRL1NL2
Figure 6.0d230V 50Hz Wiring
PJ1 wire connects to:P7 and P13
PJ2 wire connects to: P10 and P74
PJ1 wire connects to:P7 and P10
PJ2 wire connects to: P13 and P74
PJ1 wire connects to:P7 and P10
PJ2 wire connects to: P11 and P13
L1
N
GR
P10
P13
P5
1-Phase Connection
P7
P15P75P74
P14P11
2-Phase Connection
L1
NL2
P10
P13
P5P7
P15P75P74
P14P11
GR
3-Phase Connection with Single Neutral
N
P10
P13
P5P7
P15P75P74
P14P11
L1L2
L3
GR

Page 15
Reflections Collection7.0 Power Requirements7.1 North American 240V 60Hz Models
Model Power Branch CircuitCircuit
ProtectionWire
Gauge
ReflectionsCollection
240V3 wires + Ground
30A #6 awg240V 40A #6 awg240V 50A #6 awg
7.2 Export 230V 50Hz ModelsModel Power Circuit Protection
ReflectionsCollection 230V
1 x 32A2 x 16A3 x 16A
8.0 Hot tub Fill Up ProcedureFor best results, read each step in its entirety before proceeding with this procedure. Make sure all drains are closed before you begin.
IMPORTANT NOTICE: Make sure to install the drain hose bib, that is packaged in the warranty pack, on to the hot tub. Securely screw in and close the drain valve and drain cap.
1. Prepare The Hot tub For Filling• Clear all debris from the hot tub. (Although the hot tub
shell has been polished at the factory, you may want to treat it with a specially formulated hot tub cleaner.) Consult your authorized DimensionOnedealerforadditionalinformationpriortofillinghottub.
• RemovethefiltersasillustratedinSection13.1
CAUTION: Do not leave the spa shell exposed to the sun during thefillingprocess.Leavingitexposedcouldresultinsufacedam-age and not covered under the warranty.
2. Fill Hot tub• Place the end of your garden hose into one of the empty skimming
filterfitting.Removebothoftheairbleedercapstoallowtheairtoescapeasthehottubfills,page20. Fill hot tub half way, then placethegardenhoseintotheoppositefilterfittingwhileaddingtheremainingfillwater.
Figure 10.1a

Page 16
Reflections CollectionCAUTION: TO DECREASE BUILD UP ON COMPONENTS AND MINIMIZE ACRYLIC DAMAGE. Neverfillwithwaterfromawatersoftener.Ifyourwaterisextremely“hard,”itispreferabletofillhalf-way with hard water and the rest of the way with softened water. Water that is too soft can be corrosive to metal components.
• ! WARNING: TO DECREASE RISK OF INFECTION OR DISEASE.
Fill hot tub with clean tap water from garden hose, to reduce risk of contracting a waterborne illness (e.g. an infection, bacteria or virus) and/or respiratory ailments. Fill the spa until the water level is about 6" below the top of the spa. (DO NOT OVERFILL!).
IMPORTANT:Alwaysfillyourhot tubthroughbothfilterfittings after draining. Failure to do so may cause air to be trapped in the pumps, preventing them from circulating water.
3. Turn On Power Turnonpowertohottubatthehome’scircuitbreaker.Thefilter
pumps will turn on for one minute each to blow out the plumbing lines, page 21. Then the heater and circulation pump will automatically activate. Activate Jets Pump 1 to prime the pump, page 26. Let it run for about 10-15 seconds. Repeat this process with all the pumps. Once, all the pumps are primed, cleared of airlocks,andtherearenoflowerrors,reinstallthefiltercartridgesand close the air bleeder caps.
4. Add Start-Up Chemicals Turn on the jet pumps when adding chemicals in order to circulate
the chemicals thoroughly. Add the hot tub water chemicals as recommended by your authorized hot tub dealer. See Section titled “Water Quality Maintenance” for general guidance.
WARNING: RISK OF POISONING OR DEATH.Never leave chemicals opened and accessible to anyone. Use chemicals according to the vendor’s instructions. Always store chemicals in a safe and/or locked location. Keep away from and out of reach of children.
!
5. Establish A Stable Sanitizer Reading Establish a stable sanitizer reading of no less than 3.0-4.0 ppm free
chlorine or 2.0-4.0 ppm bromine. To ensure healthy water conditions, always maintain a constant sanitizer reading within the levels recommended by the Association of Pool and Spa Professionals. If sanitizer levels cannot be stabilized, perform the decontamination procedure steps 8-14 on the following page.

Page 17
Reflections Collection6. Set Hot tub To Heat To warm hot tub water to a comfortable temperature, follow these
steps:• The display on the control panel displays the actual temperature of
the hot tub water. Tap or to increase or decrease the water temperature in 1 degree increments.
Note: The temperature range for the hot tub is 59 to 104°F (15 to 40°C).
7. Place Cover On Hot tub• Keeping the insulating cover in place anytime the hot tub is not in
use will reduce the time required for heating, thereby minimizing operating costs.
• The time required for initial heat-up will vary depending on the starting water temperature.
• Align the cover on the spa and use the included hardware to attached the cover locks to spa cabinet.
DANGER: RISK OF PERSONAL INJURY.Check water temperature carefully before entering hot tub! Ex-cessive water temperature can cause burns, welts and body temperature to rise, hyperthermia (over-heating).
!
Decontamination ProcedureSteps 8-14 below are only required when sanitizer levels are unstable after performing Hot Tub Fill Up Procedures steps 1-5. Disregard steps 8-14 if sanitizer levels remain stable after performing steps 1-5 above.Note: The “Decontamination Procedure” should also be used after the hot tub has been “Winterized” (page 30) or has been sitting without power for an extended period.
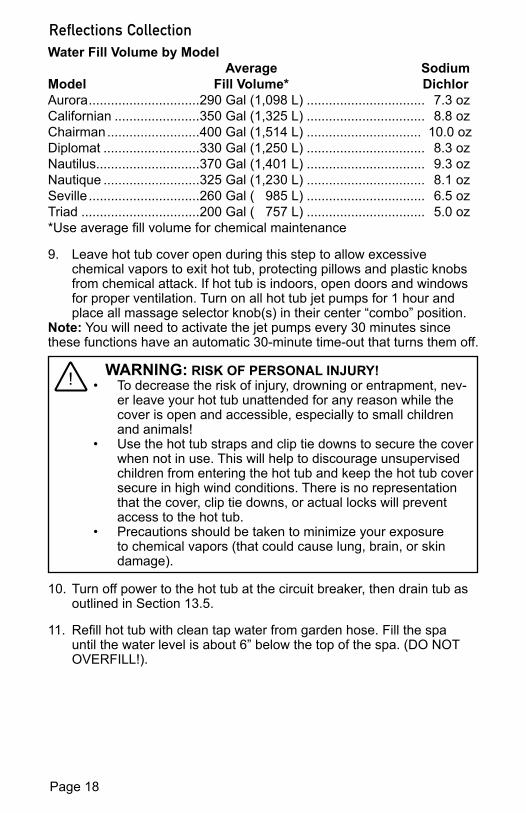
8. Add 2.5 ounces of sodium dichlor for every 100 gallons of water. Refertothetableforapproximatewaterfillvolumebymodel.
CAUTION: RISK OF PERSONAL INJURY OR HOT TUB DAMAGE!Never add chlorine tablets (trichlor) or acid to your hot tub for any reason! These chemicals may damage components within your hot tub, burn or irritate your skin, create a rash, and void the manufacturer warranty for your hot tub.
!
Page 18
Reflections CollectionWater Fill Volume by Model Average SodiumModel Fill Volume* DichlorAurora ..............................290 Gal (1,098 L) ................................ 7.3 ozCalifornian .......................350 Gal (1,325 L) ................................ 8.8 ozChairman .........................400 Gal (1,514 L) ............................... 10.0 oz Diplomat ..........................330 Gal (1,250 L) ................................ 8.3 ozNautilus............................370 Gal (1,401 L) ................................ 9.3 ozNautique ..........................325 Gal (1,230 L) ................................ 8.1 ozSeville ..............................260 Gal ( 985 L) ................................ 6.5 oz Triad ................................200 Gal ( 757 L) ................................ 5.0 oz*Useaveragefillvolumeforchemicalmaintenance
9. Leave hot tub cover open during this step to allow excessive chemical vapors to exit hot tub, protecting pillows and plastic knobs from chemical attack. If hot tub is indoors, open doors and windows for proper ventilation. Turn on all hot tub jet pumps for 1 hour and place all massage selector knob(s) in their center “combo” position.
Note: You will need to activate the jet pumps every 30 minutes since these functions have an automatic 30-minute time-out that turns them off.
WARNING: RISK OF PERSONAL INJURY!• To decrease the risk of injury, drowning or entrapment, nev-
er leave your hot tub unattended for any reason while the cover is open and accessible, especially to small children and animals!
• Use the hot tub straps and clip tie downs to secure the cover when not in use. This will help to discourage unsupervised children from entering the hot tub and keep the hot tub cover secure in high wind conditions. There is no representation that the cover, clip tie downs, or actual locks will prevent access to the hot tub.
• Precautions should be taken to minimize your exposure to chemical vapors (that could cause lung, brain, or skin damage).
!
10. Turn off power to the hot tub at the circuit breaker, then drain tub as outlined in Section 13.5.
11. Refillhottubwithcleantapwaterfromgardenhose.Fill the spa until the water level is about 6” below the top of the spa. (DO NOT OVERFILL!).

Page 19
Reflections CollectionCAUTION: TO DECREASE BUILD UP ON COMPONENTS AND MINIMIZE ACRYLIC DAMAGE.Neverfillwithwaterfromawatersoftener.Ifyourwaterisextremely“hard,”itispreferabletofillhalfwaywithhardwaterandtherestofthe way with softened water. Water that is too soft can be corrosive to metal components.
12. Consult your authorized Dimension One Spas dealer for chemical recommendations, then add chemicals to hot tub water to achieve a constant sanitizer reading within the levels recommended.
13. Turn on jet pumps when adding chemicals to ensure proper mixing and leave your hot tub cover open until the sanitizer level becomes stable to protect pillows and plastic knobs from chemical attack.
WARNING: RISK OF PERSONAL INJURY.• To decrease the risk of injury, entrapment or drowning,
never leave your hot tub unattended for any reason while the cover is open and accessible to small children and animals!
• To decrease the possibility of contracting a waterborne illness (e.g. an infection, bacteria or virus) and/or respirato-ry ailments, maintain water chemistry within step 6 param-eters. If you or other bathers experience such a condition, discontinue use and seek medical attention.
!
14. Establish a sanitizer reading no less than 3.0-4.0 ppm free chlorine or 2.0-4.0 ppm bromine, then allow the hot tub to set undisturbed for 8 hours. Retest water after 8 hours to determine if sanitizer levels are stable. If sanitizer levels are stable, your hot tub is ready for use. To ensure healthy water conditions, always maintain a constant sanitizer reading within the levels recommended on the inside cover of this manual. If sanitizer levels are not stable at this time, it will be necessary to repeat this procedure in its entirety until stable sanitizer readings are achieved.
IMPORTANT: Follow the waterchemistryparametersasdefinedbytheAssociation of Pool and Spa Professionals.
15. After adequate sanitizer levels are achieved, close all hot tub air controls to maximize heat retention when hot tub is not in use.

Page 20
Reflections Collection9.0 Hot tub Features
Hot tub features and operations are subject to change without notice
Chairman Model Shown (features vary by model)
3
3
7
4
4
4
8
9
11
14
14 14
14
14
14
14
12
1313
13 13
10
16
1616
17
17
6
6 6
5
2
1919 20
15
15
1518
1
21 21
1. Control Panel2. Massage Sequencer (if
equipped)3. Massage Selectors (2 ea.)4. Cupholders (3 ea.)5. Liquid FX™ Fountain (1 ea.)6. Jet Therapy Pillows™
(3 ea.)7. UltraPure™ Filter/Skimmer8. Skimmer (Pump 1)9. Fountain Control Valve10. Auxiliary Control Switch11. Main Light12. Floor Drain
13. Suction Covers (4 ea.)14. VCR Mini Storm Rotational Jets
(15 ea.)15. VCR Mini Storm Directional Jets
(6 ea.)16. VCR Power Storm Directional
(8 ea.)17. VCR Power Storm Rotational
(3 ea.)18. VCR Power Storm Dual Rota-
tional (4 ea.)19. VCR Power Storm Multi Port
(2 ea.)20. Typhoon Jet21. Air Relief Valve (2 ea.)

Page 21
Reflections Collection10.0 D1 Hub10.1 D1 Hub Control PanelPress any button to activate the keypad. After 2 minutes without activity, the keypad will go dark.
A. Home Screen FunctionalityThis screen operates the Jets, Fountain, Light and Water Temperature. At the top of the screen you will see the set time. At the bottom of the screen you will see any error, maintenance or water care messages.
To turn functions on and off, press the button with the corresponding icon. The screen icon will become animated when “on”. Press the Jets button a second time to go from low speed to high speed. Press again to turn off. Use the up and down buttons to control temperature.
11.0 Operating Instructions11.1 Light OptionsPress the “Mode” button ONCE to enter the light menu. Use the arrow keys to choose the light color. After 60 seconds without activity, the system will revert to the home screen.• Key 1 operates the main spa light near the bottom of your spa. Press
once to select and change the spa light color using the arrow keys. Press again to set. Press a third time to turn off the spa light.
• Key 2 operates all other points of light in your spa. Press once to select and change the light color using the arrow keys. Press again to set. Press a third time to turn off the lights.
• To set all lights to the same color, press the “connect” button (key 4).• After 60 seconds without activity, the system will revert to the home
screen.
Settings Button Key 4
Key 1 Jets Key 5 Fountain
Key 2 Jets Key 6 Lights on/off
Key 3 Jets Up Button
Mode Button Down Button

Page 22
Reflections Collection11.2 Audio System (Operation)
IMPORTANT:YoumustfirstconnectaBluetoothenableddevicetothe system for the Audio functions to work. The anticipated Bluetooth range is estimated at approximately 50 feet (15.25 meters) from the spa but a variety of factors including building obstructions and weak signals may impact the connection.
Turn on the Bluetooth functionality on your personal device. Once it searches for nearby connections, select the “Gecko in.stream” option. If prompted, enter 5555 as the password to pair your device. The Gecko in.streamcanpairupto8devicesbutitwillconnecttofirstconnecteddevice in range of the hot tub. After you have paired your device, you may connect and disconnect from the in.stream Audio System at any time using your device.
WARNING: RISK OF ELECTRICAL SHOCK HAZARD EX-ISTS AND EQUIPMENT DAMAGE! Never install or remove electrical devices while hands are wet or while sitting partially immersed or fully immersed in hot tub!
Using the upper control, press the “Mode” button TWICE in the bottom left hand corner of the screen to enter Audio Mode (if installed).
• Press the lit Bluetooth button (key 2) to connect to a Bluetooth enabled device in range of the spa.
• Press the lit Play/Pause button (key 5) to start or pause the audio.• Press the lit Last Track (key 3) or Next Track (key 6) buttons to
change tracks.• Press the arrow keys to increase or decrease volume.NOTE: Although an AUX icon is visible on screen, your hot tub audio system does not have an Auxiliary connection.
You may also use your personal device to adjust audio functions, but it is recommended that you keep your device a safe distance away from the spa in case of water damage.
After 60 seconds without activity, the system will revert to the home screen.
11.3 Auxiliary Control Switch (On select models)For added convenience, certain models feature an Auxiliary Jet Switch. Pressing this button will turn on and off the jets in the seat closest to the button, allowing the user to command their experience without accessing the main control.

Page 23
Reflections Collection11.4 Audio System (Connect Bluetooth®)If you chose the optional Audio package, your hot tub is equipped with a Bluetooth enabled sound system. On this screen you can choose to pair/unpair and connect/disconnect your Bluetooth enabled device.
Pairing a device means that the Gecko in.stream audio system will recognize the device when it comes in range of the spa. If you select “unpair” it will delete information about all Bluetooth devices that had been previously paired with the in.stream.
When you are done operating the audio, or if you need to accept a call, make sure to disconnect the device.
11.5 LIQUID-FX FountainThe Liquid-FX fountain can be customized with additional, interchangeable fountainheads available from your spa dealer. To remove a fountainhead, twist the retainer cap, remove the acrylic fountainhead and replace with another, ensuring the rubber “O” ring is in place.
11.6 Water Feature Flow ControlRotatethiscontrolknobtoadjustthepressureofwaterflowcomingfromthe Liquid-FX fountain.NOTE: The valve will not shut the fountain off completely. To turn off the fountain, simply press the fountain button on the control panel.
11.7 Jet Therapy Pillow™D1’spatentedJetTherapyPillowhasfiveadjustableheightpositions.Gently pull the bottom of the pillow forward and slide it up or down the guiderails.Adjustthewaterflowfromthejetsbyrotatingeachnozzle.
11.8 Jet Zone SelectorRotatethejetzoneselectorknob(s)tomovetheflowofwaterfromonegroup of jets to another.Note: It is considered normal for sound levels within the valve to vary betweenpositionsduetothelargeamountsofwaterflowingthroughit.Foroptimumfiltrationbenefits,leavethevalveinthecenterpositionwhen the hot tub is covered.
11.9 Skirt Lighting (optional feature)The optional, factory installed skirt lighting package provides attractive downlighting around the exterior of your spa. The skirt lights are set to turn on and off automatically depending on the time of day. You may manually override this setting by hitting a switch located under the bottom left corner of the spa to turn the lights on and off.
Page 24
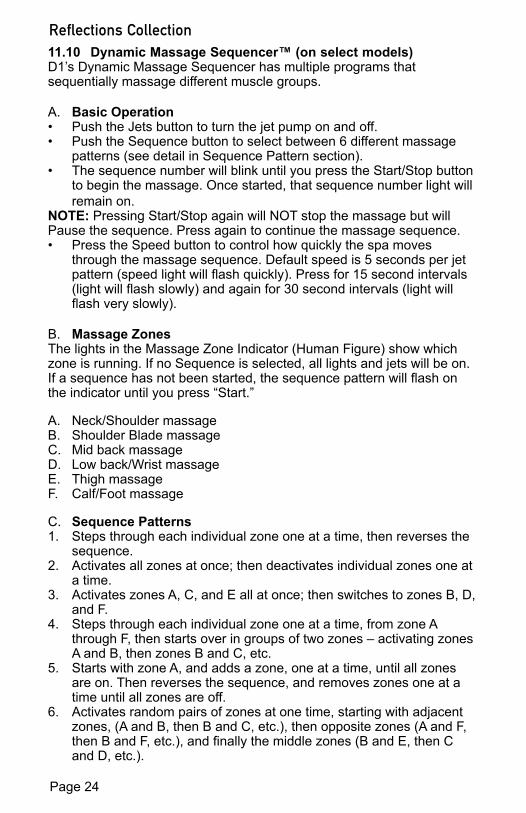
Reflections Collection11.10 Dynamic Massage Sequencer™ (on select models)D1’s Dynamic Massage Sequencer has multiple programs that sequentially massage different muscle groups.
A. Basic Operation• Push the Jets button to turn the jet pump on and off.• Push the Sequence button to select between 6 different massage
patterns (see detail in Sequence Pattern section).• The sequence number will blink until you press the Start/Stop button
to begin the massage. Once started, that sequence number light will remain on.
NOTE: Pressing Start/Stop again will NOT stop the massage but will Pause the sequence. Press again to continue the massage sequence.• Press the Speed button to control how quickly the spa moves
through the massage sequence. Default speed is 5 seconds per jet pattern(speedlightwillflashquickly).Pressfor15secondintervals(lightwillflashslowly)andagainfor30secondintervals(lightwillflashveryslowly).
B. Massage ZonesThe lights in the Massage Zone Indicator (Human Figure) show which zone is running. If no Sequence is selected, all lights and jets will be on. Ifasequencehasnotbeenstarted,thesequencepatternwillflashonthe indicator until you press “Start.”
A. Neck/Shoulder massageB. Shoulder Blade massageC. Mid back massageD. Low back/Wrist massageE. Thigh massageF. Calf/Foot massage
C. Sequence Patterns1. Steps through each individual zone one at a time, then reverses the
sequence.2. Activates all zones at once; then deactivates individual zones one at
a time.3. Activates zones A, C, and E all at once; then switches to zones B, D,
and F.4. Steps through each individual zone one at a time, from zone A
through F, then starts over in groups of two zones – activating zones A and B, then zones B and C, etc.
5. Starts with zone A, and adds a zone, one at a time, until all zones are on. Then reverses the sequence, and removes zones one at a time until all zones are off.
6. Activates random pairs of zones at one time, starting with adjacent zones, (A and B, then B and C, etc.), then opposite zones (A and F, thenBandF,etc.),andfinallythemiddlezones(BandE,thenCand D, etc.).

Page 25
Reflections Collection12.0 Programming Instructions12.1 Settings Button MenuTo access the Settings Menu, press the key in the upper left hand corner of the controller. Use the arrow keys to move up or down in the list. To select an option, press the lit button beside it (key 2).
At any time, you can press the Settings button or Back icon (key 1) to return to the home screen.
12.2 Water CareThewatercaresectionhelpsyousetyouridealfiltrationsettings.Upondelivery,yourhottubwilldefaulttoD1’sfactoryrecommendedfiltrationsettings within “Beginner Mode.”
Use the arrow keys to move up or down in the list. To select an option, press the lit button beside it (key 2) and a check mark will appear next to theicontoconfirm.
A. Water Care Options1. Beginner:Thisfactorydefaultfiltrationsettingwillrunfor10minutes
2x per day at 6:30am and 10:00pm.
2. Away From Home: Use this setting during long periods away from your spa. Reduces temperature by 20 degrees F to save energy. Filters for 10 minutes 2x per day at 6:30am and 10:00pm.
3. Energy Savings: This setting will reduce the temperature of your spa 20 degrees F during the average peak energy hours (M-F 6am – 6pm) Filters for 10 minutes 2x per day at 6:30am and 10:00pm.
4. Super Energy Savings: Use this setting all week to reduce the
temperature of your spa 20 degrees F during average peak energy hours (Every Day 6am – 6pm) Filters for 10 minutes 2x per day at 6:30am and 10:00pm.
5. Weekender: This setting is for spas with high Friday night through Sunday usage. During the week, the spa’s temperature will be reduced by 20 degrees F. On Friday at noon, regular heating will commence and continue through Sunday night. Filters for 10 minutes 2x per day at 6:30am and 10:00pm.
B. Modifying Water Care SchedulesTo modify a water care setting, select the lit button on the right hand side of the screen (key 5) to open the menu.
Modify the programmed schedule by selecting one and adjusting it using the arrow keys. Use key 2 to move between day, start time and duration. The schedule you select will be repeated each week. Once you have set the schedule, press the lit “back” button (key 1).

Page 26
Reflections CollectionIf desired, you may also add or delete custom water care settings. Add a schedule by scrolling down to “Add” and selecting with key 2. Delete a schedule by pressing the lit button next to the garbage icon (key 4).
12.3 Maintenance MenuTo access your desired menu selection, use the arrow keys to go up and down the list. To select, press the lit button beside it (key 2).
A. Maintenance RemindersSelect this option to see how many days remain until you should perform specificspamaintenance.Usethearrowkeystogoupanddownthrough the list. To select, press the lit button beside it (key 2). Once you completethetask,press“confirm”andthetimewillresetuntilyournextscheduled maintenance.
B. Maintenance Prompts:• Rinse Filter with Hose: every 30 days• Rinse Filter in Solution: every 60 days• Change Water: every 120 days• Have a Spa Check Up: every 720 days• Change Ozonator: every 540 days• Vision (if installed and selected): every 180 days
C. StandbyFor extra precaution, use the Standby Mode to turn off all pumps during filtercleaning.Youmayalsousethismodeasa30-minutesoaksetting.Allpumpswillremainofffor30minutesunlessyouhit“confirm”toexitStandby mode.
D. Dealer InfoFor easy access to your dealer’s information, we recommend that an Authorized Dimension One dealer input their contact information on this screen during set up. E. Error LogThe error log notes each time your spa experiences an unexpected condition. Your dealer may ask for this information when troubleshooting spa concerns. To delete all errors press the lit “trash” button (key 4) to reset.Note: D1 recommends that you consult your dealer before deleting the error log.
F. VisionThe optional Vision Cartridge uses Silver (Ag) to provide softer feeling water while using less chlorine and chemicals. If installed, use this screen to activate or deactivate the maintenance reminder. Press and holdthe“confirm”buttonfor5secondstosavethesettingorpressthe“back” key to exit.

Page 27
Reflections Collection12.4 Date & Time MenuUse this screen to set the correct time. Use the arrow keys to move up or down to the setting you want to adjust. To select an option, press the lit button beside it (key 2) and then use the arrow buttons to adjust that optionandpresskey2againtoconfirm.Onceyouhavesetthecorrecttime, press the lit “back” button (key 1).
12.5 Keypad SettingsHere you can modify the Temperature Units and/or Language displayed. Use the arrow keys to move up or down to the setting you want to modify. To select an option, press the lit button beside it (key 2) and then use the arrowbuttonstomakeadjustments.Presskey2againtoconfirm.
You may view temperature units in Fahrenheit or Celsius. You may choose to display these languages: English, French, Spanish, German, Dutch, Swedish, Norwegian and Polish.
12.6 About MenuThissectiondisplaysyoursoftwareconfigurationandrevisionsofequipment components. Your service tech or dealer may ask for this information if you are having technical problems.

Page 28
Reflections Collection13.0 Hot tub MaintenanceProper and regular maintenance of your hot tub will help it retain its beauty and performance. Your authorized Dimension One Spas dealer can supply you with all the information, supplies, and accessory products you will need to accomplish this.
! DANGER: RISK OF SEVERE INJURY OR DROWNING BY ENTRAPMENT!
• Keep hair, loose articles of clothing or hanging jewelry away fromsuctionfittings,rotatingjetsorothermovingcomponentstoavoid entrapment that could lead to drowning or severe injury.
• Neverusethehottubunlessallsuctionguards,filter,filterlid,or skimmer assembly are installed to prevent body and/or hair entrapment.
• Neveroperateorusethehottubifthefilter,filterlid,orskimmerassembly are broken or any part of the skimmer assembly is missing. Please contact your dealer or nearest service center for service.
• Thesuctionfittingsandsuctioncoversinthishottubaresizedtomatchthespecificwaterflowcreatedbythepump(s).Ifitisnecessarytoreplacethesuctionfittings,suctioncoversorpump(s),besurethattheflowratesarecompatibleandareincompliance with the VGB Safety Act, page 6.
• Neverreplaceasuctionfittingorsuctioncoverwithoneratedlessthantheflowratemarkedontheoriginalsuctionfitting.Usingimpropersuctionfittingsorsuctioncoverscancreatea body or hair suction entrapment hazard that may lead to drowning or severe injury.
• Owners must alert all hot tub users to the potential risk of Hair, Limb, Body, Evisceration (disembowelment), and Mechanical Entrapment, page 6.
13.1 Cleaning the filtersIMPORTANT: To prevent debris from getting into the system during filtercleaning,D1recommendsthatyoushutoffthepowerattheGFCI or enter “Standby Mode” – outlined in the Settings section of this manual.
Werecommendthatyoucleanthefiltersonceamonthaspreventativemaintenance.
Yoursystemhastwofilters.Toaccessthefilterundertheskimmerbasket,liftthecenterfloatofftheskimmerassemblyuntilfullyextended.Turncounterclockwiseuntiltheflatsofthebasketlineupwiththesecuring tabs. Pull the assembly straight up to remove. To access theotherfilter,turnlidcounterclockwiseuntiltheflatslineupwiththesecuringtabsandpull.Removeeachfilterbytwistingit¼turncounterclockwise and lifting out of its canister.

Page 29
Reflections CollectionRinsethefilterswithahigh-pressuregardenhose.Everyothercleaning,soakthefiltersinfilter-cleaningsolutionandrinsethoroughly.Reinstallthefiltersbyreversingthestepsforremoval,replacetheskimmerbasketor lid and turn the power back on at the GFCI. Run the pumps for a few minutes at high speed before leaving the system to its normal heating andfiltrationcycles.
Vision CartridgeThe Vision Cartridge offers D1 hot tub users a natural and effective way to reduce the use of chemically-based water sanitation systems. Used in combination with D1 ozone systems, the Vision Cartridge uses silver catalyst technology that kills 99.96% of impurities on contact. One Vision Cartridge lasts up to 6 months and can reduce the need for extra chemicals by 60% for cleaner, healthier and softer water.
13.2 Surface Care
IMPORTANT: Do not use alcohol, ammonia, bleach or any citrus based cleaners on any of your hot tub surfaces. Do not use “409” type cleaners or other caustic solutions as they may damage the hot tub shell surface and void the warranty.
IMPORTANT: Protect the hot tub surface from the sun and the cold! Keep the hot tub covered when empty of water. Sunlight and ex-treme cold can damage the surface and cause it to peel or blister.
Use a hot tub cleaner and a soft rag to clean the inside of your hot tub. Be sure to thoroughly rinse the shell. After cleaning, you will want to restore your hot tub shell’s original luster by using Dimension One Spas’ Poli-Gloss.
13.3 Maintaining the Hot Tub CabinetThe hot tub cabinet requires little or no maintenance of any kind. To clean, wipe cabinet with a clean towel and mild detergent soap solution.
CAUTION: Never spray cabinet with a high-pressure garden hose for any reason since this action may induce an electrical short in the hot tub’s electrical equipment.
13.4 Pillow CareRemove and clean the headrest pillows, as needed, with soapy water us-ing a cloth or soft-bristle brush. Always remove the pillows when adding chemical shock treatment to the spa water. The pillows can be returned to the spa when the sanitizer reading is stable as recommended.

Page 30
Reflections Collection13.5 Draining
IMPORTANT: Keep the hot tub covered when empty of water. Sun-light and extreme cold can damage the surface and cause it to peel or blister.
1. Turn power OFF!2. Locate the hose bib, at the bottom of the hot tub, Figure 13.5a. Make
sure that the valve is in the OFF position.3. Unscrew the cap from the spa drain, Figure 13.5b.4. Attach one end of your garden hose to the drain valve, Figure 13.5c.
Place the other end in an area safe for water runoff.5. Turn the hose bib switch to the open position to release the water,
Figure 13.5d.6. Once the hot tub is drained, turn the switch back to the closed
position, remove the hose and reinstall the cap.
13.6 WinterizingAll D1 spas are designed for year-round use. Your hot tub has an automatic freeze protection mode to circulate water during freezing weather, assuming the system has electrical power and the proper water level. However, if freezing weather prohibits normal use, an authorized service provider should winterize your hot tub. Draining the unit will not prevent freeze damage, as small amounts of water in the plumbing canexpandanddamagethesystem.Winterizingtheunitisspecificallynot covered by the manufacturers’ warranty, so you should contact a professional to both winterize and restart your hot tub if necessary. Freezedamagecausedbywinterizingyoursystemisspecificallynotcovered by your warranty.
13.7 Special Cold Weather InstructionsThe system has a “Smart Winter” freeze protection mode to circulate water during freezing weather, assuming the system has electrical power and the proper water level. It will automatically activate the pump(s) to circulate water. This is a normal hot tub function. No corrective action is necessary. This feature protects the spa from freezing.
However, if there freezing conditions present and shutting down the spa for the winter is unavoidable, or where conditions may get too cold for the spa’s “Smart Winter” mode to prevent freezing, the spa should be Winterized by a professional Dimension One dealer or authorized service representative.
Figure 13.5a Figure 13.5b Figure 13.5c Figure 13.5d
Page 31
Reflections Collection13.8 Maintaining the CoverUltraLast™ and UltraLast™ Extreme Covers: Dimension One Spas® is committed to maintaining the quality of your hot tub. That’s why our patented UltraLast™ and UltraLast™ Extreme Covers have superior durability. They are UV, water, mold and mildew resistant to protect your tub against environmental exposure.
Vinyl Covers: To maintain a “nearly original” appearance on your vinyl cover, it is recommended that a protectant with a high SPF (sun protection factor) is applied at least once a month if exposed to direct sunlight. You will also want to clean and condition your cover monthly or as needed based on exposure. For more information, consult your dealer.
A. To clean and condition the encasement (cover skin):1. Use a garden hose to remove any debris.2. Using a large sponge or soft bristle brush, use diluted or mild soap to
gently scrub the top.3. Rinse and clean and do not allow soap to dry on the cover. Do not
use soap on the underside of the cover.4. Please check with your Dimension One Spas dealer for
recommended cover care and conditioning products. Use non-petroleum based conditioners to keep the vinyl supple.
5. Do not use any solvents, abrasive cleaners or strong detergents. Do not use products that contain silicone or alcohol.
B. Additional Care and Maintenance Instructions:1. Debris can accumulate on the spa cover. Removal of snow or other
debris will help to avoid breakage of the foam cores.2. Be sure to lock the cover straps to secure the cover from unwanted
or accidental entry.3. Do not place heavy objects on the vinyl.4. Do not walk, sit or stand on the cover.5. Donotdragorusetheflaps/skirtorthecoverlockstrapstoremove
the cover.6. Use only recommended cover lift systems.7. Use only chemicals and cleaners recommended by Dimension One
Spas.8. Remember to keep spa covered when not in use.9. Do not expose your spa to the sun for extended periods of time as
UV rays can damage the interior surface.10. Use caution when removing cover. Before removing cover, assure all
locks have been released to avoid lock breakage and/or cover strap damage.
Page 32
Reflections Collection13.9 Restarting Your Hot Tub in Cold WeatherIf you want to start up your hot tub after it has sat empty for a time in freezing temperatures, be aware that the water remaining in certain sections of the piping may still be frozen. This situation will block waterflowpreventingthehottubfromoperatingproperlyandpossiblydamaging the equipment. We recommend you consult your dealer for guidance before attempting to restart your hot tub under these conditions.
14.0 Water Quality MaintenanceTo decrease the risk of contracting a waterborne illness (e.g. an infection, bacteria or virus) and/or respiratory ailments, maintain water quality withinspecifiedlimits.Thiswillenhanceyourenjoymentandprolongthe life of the hot tub’s equipment. Doing so requires regular attention because the water chemistry involved is a balance of several factors. Procrastination regarding water maintenance will result in poor and potentially unhealthful conditions for soaking and even damage to your hottubinvestment.Forspecificguidance,onmaintainingwaterquality,consult your authorized dealer who can recommend the appropriate chemical products.
WARNING: FAILURE TO MAINTAIN WATER QUALITY WILL: • Increase risk of contracting a waterborne illness (e.g. an
infection bacteria or virus) and/or respiratory ailments.• Damage the equipment, components and hot tub shell,
which are not covered under the hot tub’s warranty.
!
CAUTION: Never store hot tub chemicals inside the hot tub’s equipment bay. The equipment bay may reach elevated tempera-tures, this is where high voltage electronic devices are located. This area is not intended for storage of any kind.
14.1 UltraPure™
! WARNING: ALLOW LAMP TO COOL DOWN PRIOR TO REMOVING FROM HOUSING.
! DANGER: NEVER LOOK AT THE LIT BULB. THIS CAN CAUSE SEVERE EYE DAMAGE OR BLINDNESS.
TheUltraPureWaterManagementSystemsilentlypurifiesyourwater,eliminating bacteria by mixing ozone with water. In order to keep the UltraPure System running at its best, it is recommended that you change the UV bulb every 18 months. The UltraPure UV compartment is located within the equipment bay. Contact your authorized Dimension One dealer for replacement parts and/or to service your UltraPure System.
Page 33
Reflections Collection
WARNINGS:
• Do not operate the UV-C emitter when it is removed from the appli-ance enclosure.
• This appliance contains a UV-C emitter.• Unintended use of the appliance or damage to the housing may re-
sult in the escape of dangerous UV-C radiation. UV-C radiation may, even in little doses, cause harm to the eyes and skin.
• Appliances that are obviously damaged must not be operated.• Read the maintenance instructions before opening the appliance.
!
14.2 pH ControlpH is a measure of relative acidity or alkalinity of water and is measured on a scale of 0 to 14. The midpoint of 7 is said to be neutral, above which is alkaline and below which is acidic. In hot tub water, it is very important to maintain a slightly alkaline condition of 7.4 to 7.6. Problems become proportionately severe the further outside of this range the water gets. A low pH will be corrosive to metals in the hot tub equipment. A high pH will cause minerals to deposit on the interior surface (scaling). In addition, the ability of the sanitation agents to keep the hot tub clean is severely affected as the pH moves beyond the ideal range. That is why almost all hot tub water test kits contain a measure for pH as well as sanitizer.
14.3 SanitizingTo destroy bacteria and organic compounds in the hot tub water, a sanitizer must be used regularly. Chlorine and bromine are the two most popular sanitizers used to date. Many other additives are available for your hot tub. Some are necessary to compensate for out-of-balance water; some aid in cosmetic water treatment and others simply alter the feel or smell of the water. When adding hot tub shock (chlorine or non-chlorine) or pH balancing chemicals activate the jet pump(s) and leave the hot tub cover open for a minimum of 20 minutes. By doing this you will allow excessive chemical vapors to exit the hot tub, protecting pillows and plastic knobs from chemical attack.
WARNING: RISK OF PERSONAL INJURY, DROWNING OR ENTRAPMENT! Never leave your hot tub unattended for any reason while the cover is open and accessible, especially to small children and animals!
CAUTION: RISK OF PERSONAL INJURY OR HOT TUB DAMAGE! Never add chlorine tablets (trichlor) or acid to your hot tub for any reason! These chemicals may damage com-ponents within your hot tub, burn or irritate your skin, create a rash and void the manufacturer warranty for your hot tub.
!

Page 34
Reflections Collection14.4 Other AdditivesMany other additives are available for your hot tub. Some are necessary to compensate for out-of-balance water, some aid in cosmetic water treatment and others simply alter the feel or smell of the water. For specificguidance,onmaintainingwaterquality,consultyourauthorizeddealer who can recommend the appropriate chemical products.
15.0 TroubleshootingFor help troubleshooting common occurrences, contact your local dealer. Always insist on genuine Dimension One Spas replacement parts.If you need further assistance, you can email our service department at:
USA: [email protected]
International: [email protected]
Error MessagesTo keep users safe, the following messages may appear on your control whentherearetechnicaldifficulties.
1. If screen reads: DANGER! DO NOT ENTER SPA!Additional lines may read:• Hardware error detected (relay stuck)• Hardware error detected (thermal fuse)Do not enter the water and contact your Authorized D1 dealer immediately for service.
2. If screen reads: WARNING! DO NOT ENTER SPA!Additional lines may read:• High-limit circuit has tripped• Spa temperature is too highSpa water may be very hot. Do not touch or enter the water and contact your Authorized D1 dealer immediately for service.
3. If screen reads: ERRORAdditional lines may read:• No Flow condition for more than 2 hours• Elevated internal temperature• No Flow condition• Unexpectedflowcondition• Hardware error detected (thermistor)It is recommended that you do not enter the water. Contact your Authorized D1 dealer for service.

Page 35
Reflections Collection16.0 Stereo Cautions
WARNING: RISK OF ELECTRICAL SHOCK HAZARD EXISTS AND EQUIPMENT DAM-AGE! Never install or remove electrical devices (e.g. Apple device/MP3/USB/AUX/Bluetooth) while hands are wet or while sitting partially or fully immersed in the hot tub!
1. “CAUTION - Risk of Electric Shock. Do not leave compartment door open.”
2. “CAUTION - Risk of Electric Shock. Replace components only with identical components.”
3. “Do not operate the audio/video controls while inside in the spa.”
4. “WARNING - Risk of Electrocution. Do not connect any auxiliary components (for example cables, additional speakers, headphones, additional audio/video components, etc.) to the system.”
5. These units are not provided with an outdoor antennae; when provided, it should be installed in accordance with Article 810 of the National Electrical Code, ANSI/NFPA 70.
6. Do not service this product yourself as opening or removing covers may expose you to dangerous voltage or other risk of injury. Refer all servicingtoqualifiedservicepersonnel.
7. When the power supply connections or power supply cord(s) are damaged; if water is entering the audio/video compartment or any electrical equipment compartment area; if the protective shields or barriers are showing signs of deterioration; or if there are signs of other potential damage to the unit, turn off the unit and refer servicing toaqualifiedservicepersonnel.
8. This unit should be subjected to periodic routine maintenance (for example, once every 3 months) to make sure that the unit is operating properly.
DANGER!RISK OF SHOCK OR ELECTROCUTION!

REFLECTIONS COLLECTION
www.d1spas.com
© 2017 Dimension One Spas.All trademarks and registered trademarks are the property of their respective owners.
PN: 6530-539 Rev. A