Embed Size (px)
Citation preview
© 2016 ZOOM CORPORATION
Copying or reprinting this manual in part or in whole without permission is prohibited.
Reference guide
— 2 —
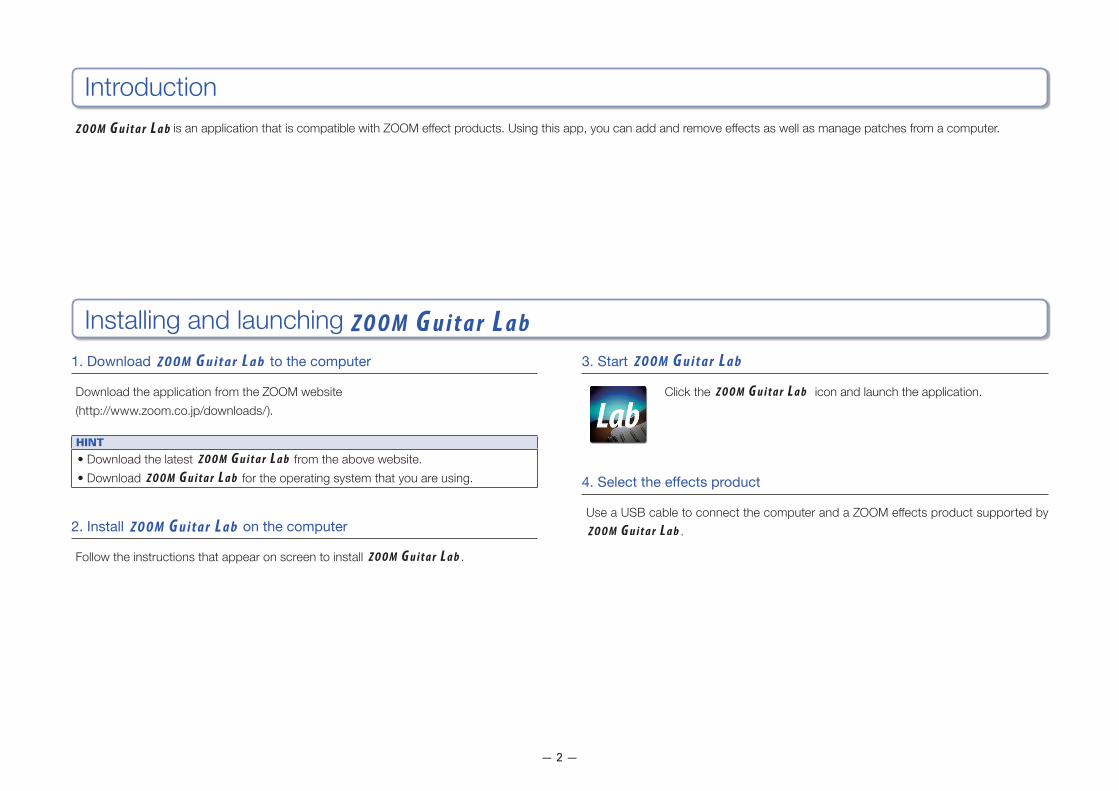
is an application that is compatible with ZOOM effect products. Using this app, you can add and remove effects as well as manage patches from a computer.
Installing and launching
Introduction
1. Download to the computer
Download the application from the ZOOM website (http://www.zoom.co.jp/downloads/).
HINT
• Download the latest from the above website.• Download for the operating system that you are using.
2. Install on the computer
Follow the instructions that appear on screen to install .
3. Start
Click the icon and launch the application.
4. Select the effects product
Use a USB cable to connect the computer and a ZOOM effects product supported by .
— 3 —
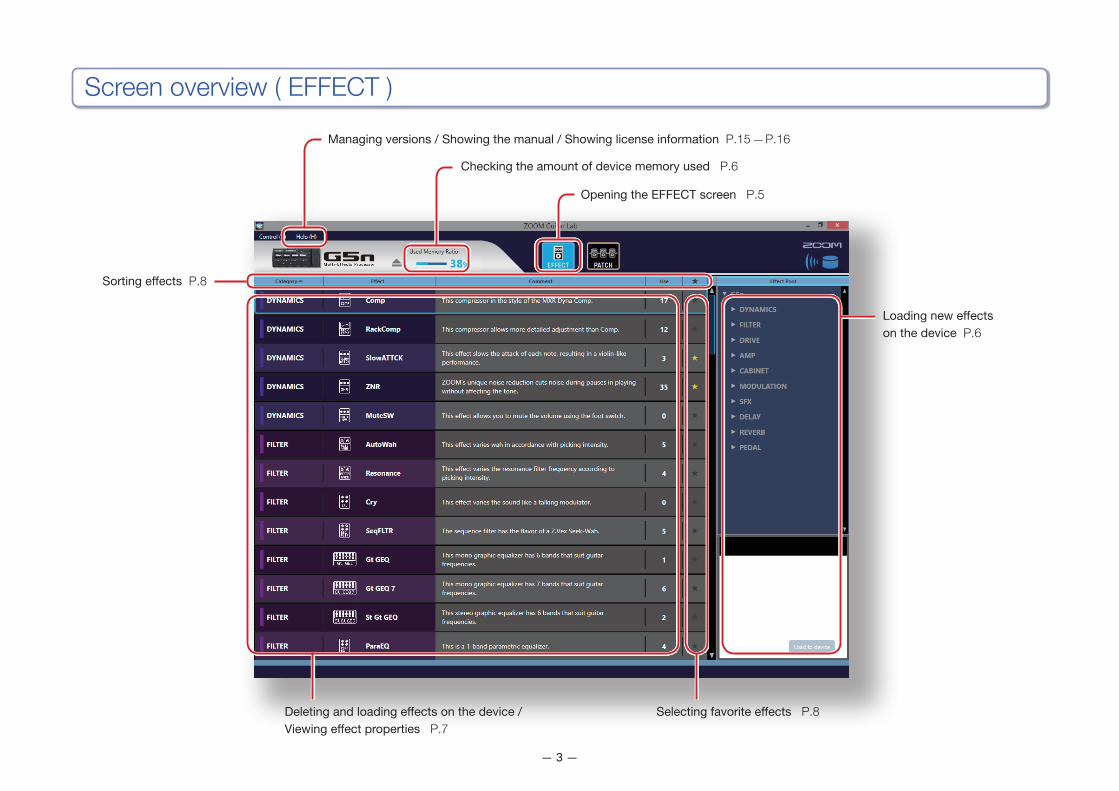
Screen overview ( EFFECT )
Managing versions / Showing the manual / Showing license information P.15 — P.16
Checking the amount of device memory used P.6
Deleting and loading effects on the device / Viewing effect properties P.7
Sorting effects P.8
Opening the EFFECT screen P.5
Loading new effects on the device P.6
Selecting favorite effects P.8
— 4 —
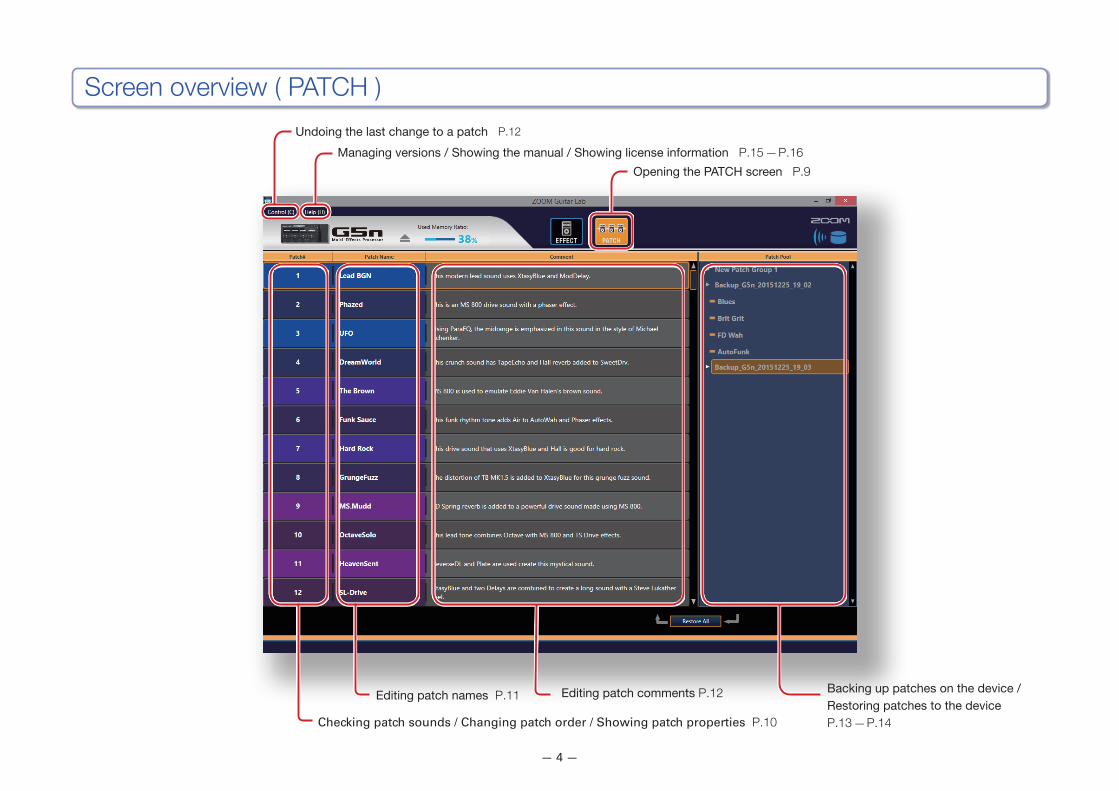
Screen overview ( PATCH )
Undoing the last change to a patch P.12
Checking patch sounds / Changing patch order / Showing patch properties P.10
Editing patch names P.11 Editing patch comments P.12
Managing versions / Showing the manual / Showing license information P.15 — P.16
Opening the PATCH screen P.9
Backing up patches on the device / Restoring patches to the device P.13 — P.14
— 5 —
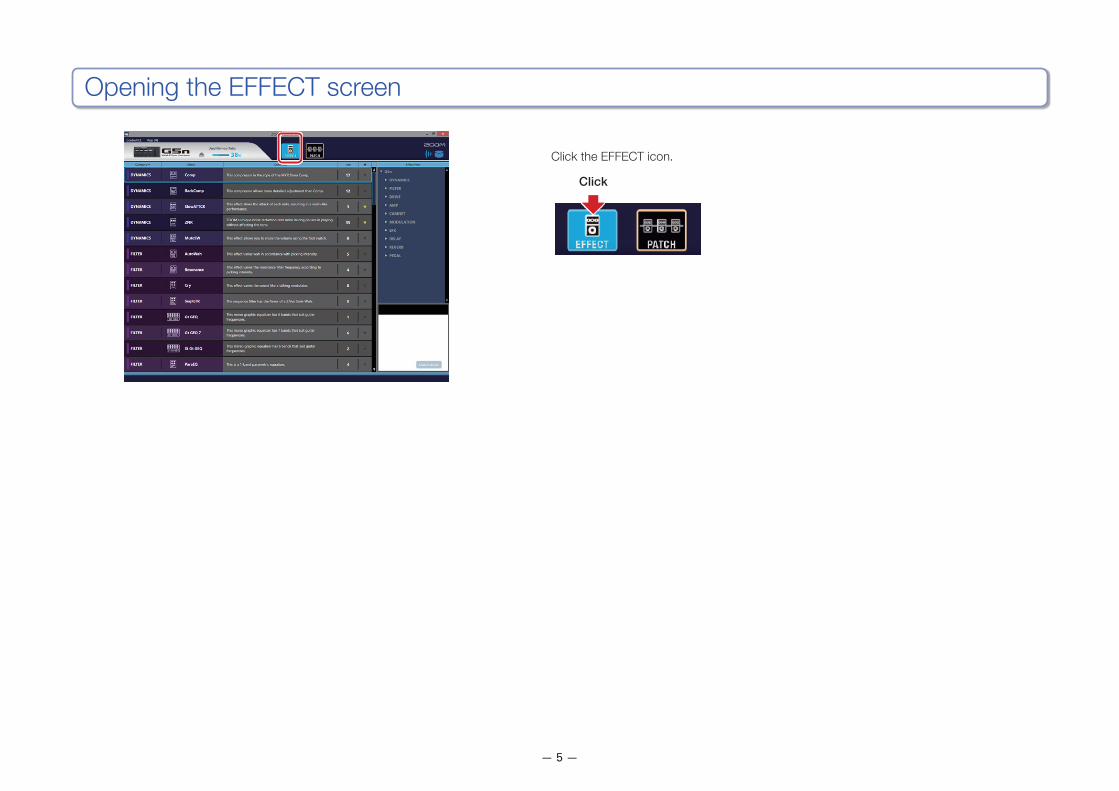
Opening the EFFECT screen
Click the EFFECT icon.
Click
— 6 —
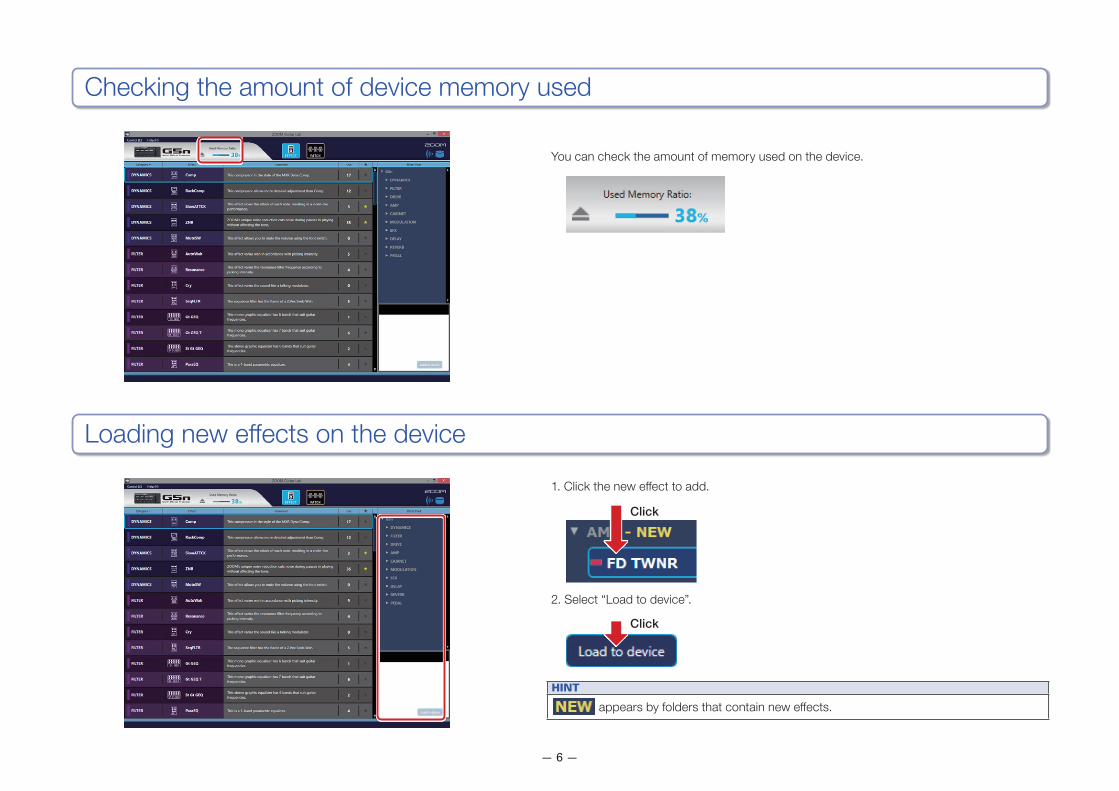
You can check the amount of memory used on the device.
1. Click the new effect to add.
2. Select “Load to device”.
HINT
appears by folders that contain new effects.
Checking the amount of device memory used
Click
Click
Loading new effects on the device
— 7 —
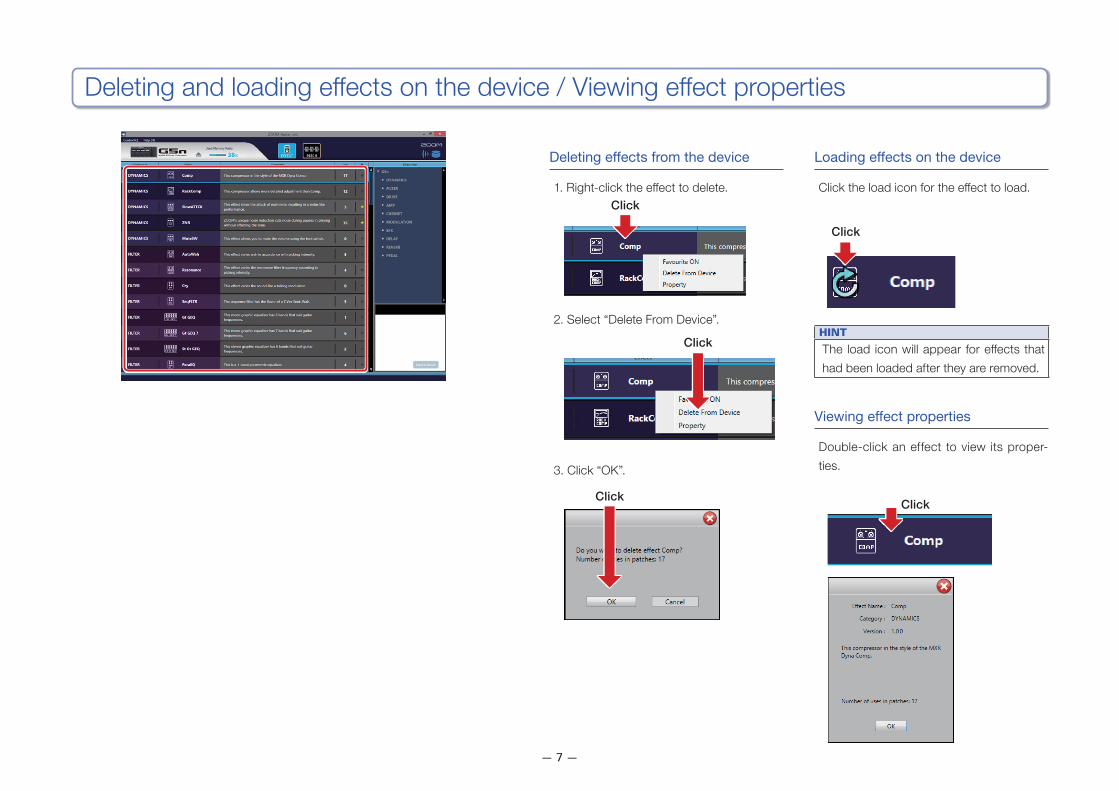
Deleting effects from the device
1. Right-click the effect to delete.
2. Select “Delete From Device”.
3. Click “OK”.
Loading effects on the device
Click the load icon for the effect to load.
HINT
The load icon will appear for effects that had been loaded after they are removed.
Viewing effect properties
Double-click an effect to view its proper-ties.
Deleting and loading effects on the device / Viewing effect properties
Click
Click
Click
Click
Click
— 8 —
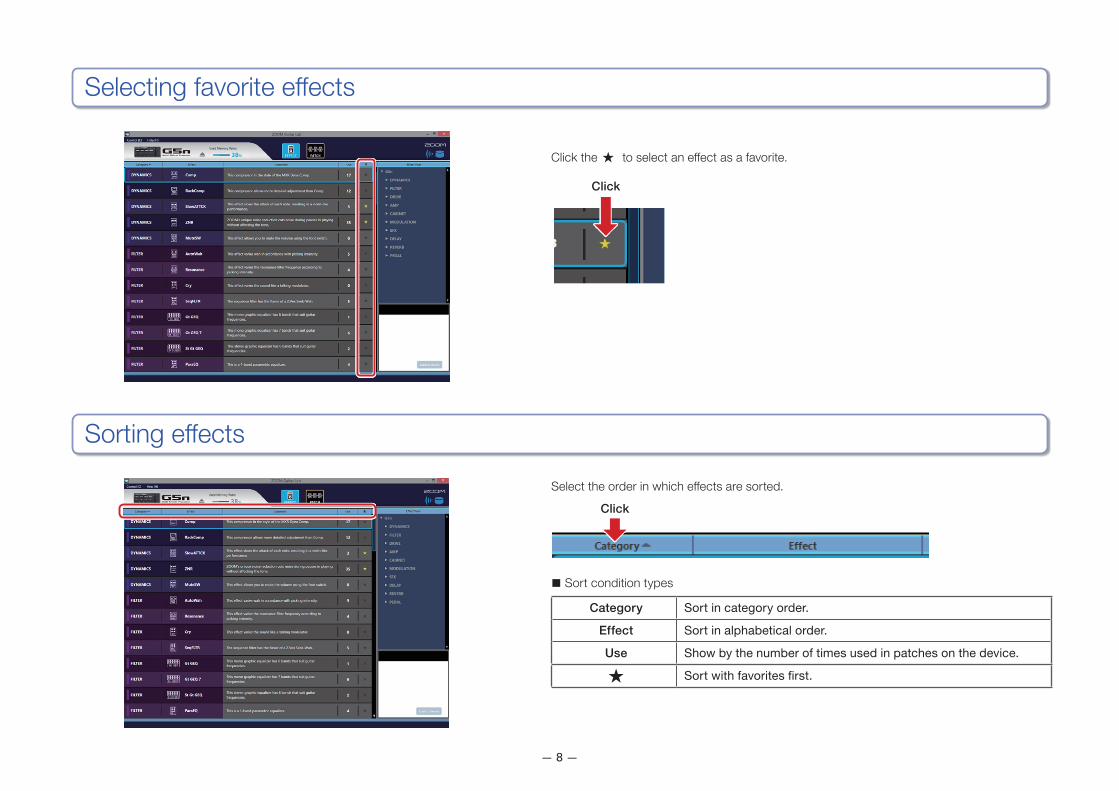
Selecting favorite effects
Sorting effects
Click the to select an effect as a favorite.
Select the order in which effects are sorted.
■ Sort condition types
Category Sort in category order.
Effect Sort in alphabetical order.
Use Show by the number of times used in patches on the device.
Sort with favorites first.
Click
Click

— 9 —
Opening the PATCH screen
Click the PATCH icon.
HINT
appears next to patches that use effects that are not loaded on the device.
Click
— 10 —
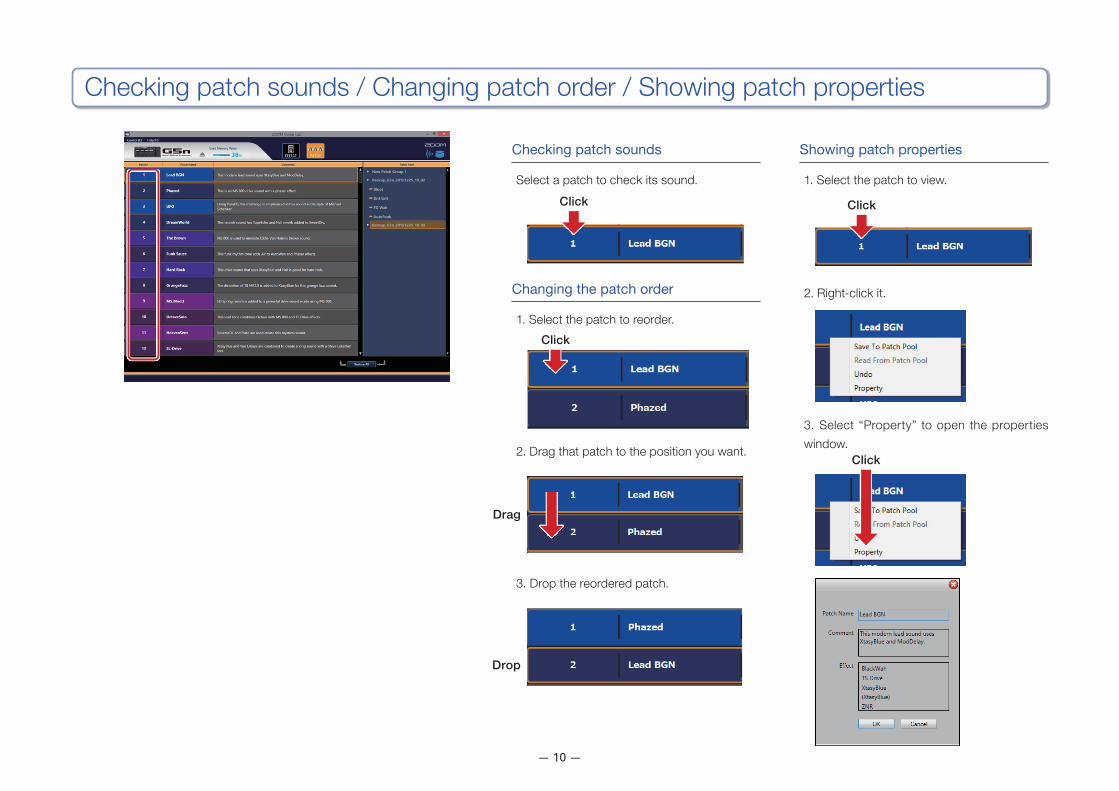
Checking patch sounds / Changing patch order / Showing patch properties
Checking patch sounds
Select a patch to check its sound.
Changing the patch order
1. Select the patch to reorder.
2. Drag that patch to the position you want.
3. Drop the reordered patch.
Showing patch properties
1. Select the patch to view.
2. Right-click it.
3. Select “Property” to open the properties window.
Click Click
Click
Drag
Drop
Click
— 11 —
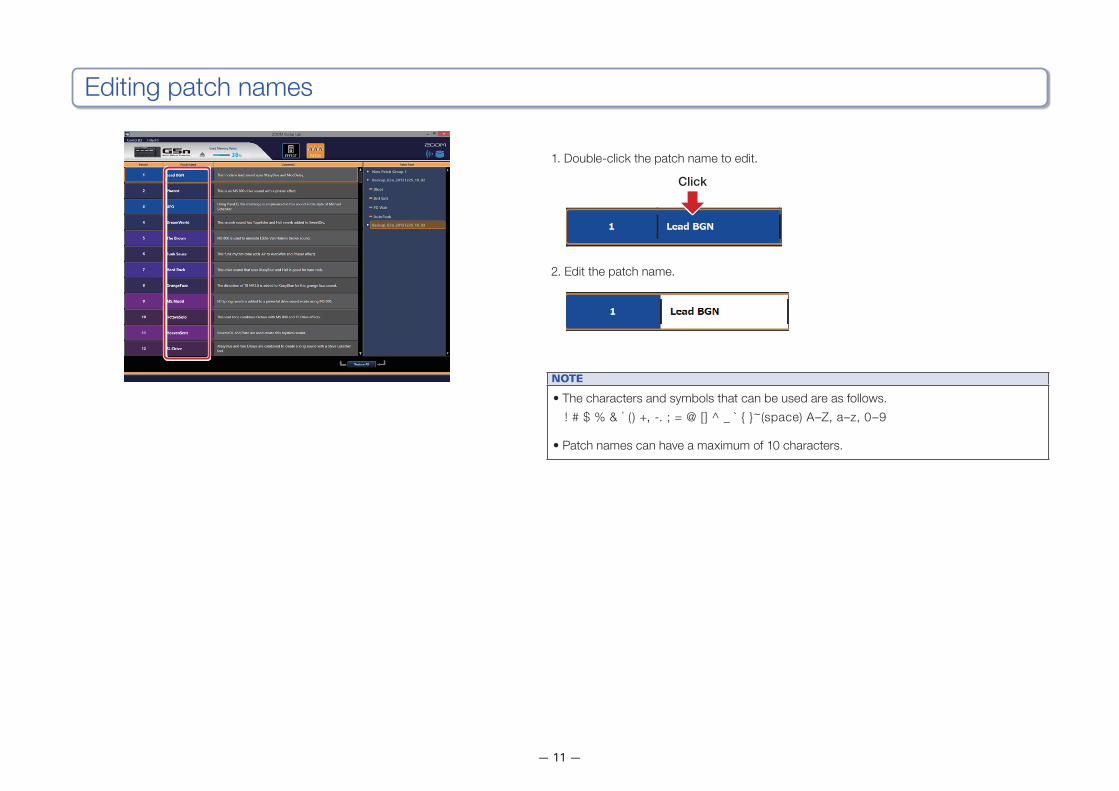
Editing patch names
1. Double-click the patch name to edit.
2. Edit the patch name.
NOTE
• The characters and symbols that can be used are as follows. ! # $ % & ’ ( ) +, -. ; = @ [] ^ _ ` { }~(space) A‒Z, a‒z, 0‒9
• Patch names can have a maximum of 10 characters.
Click
— 12 —
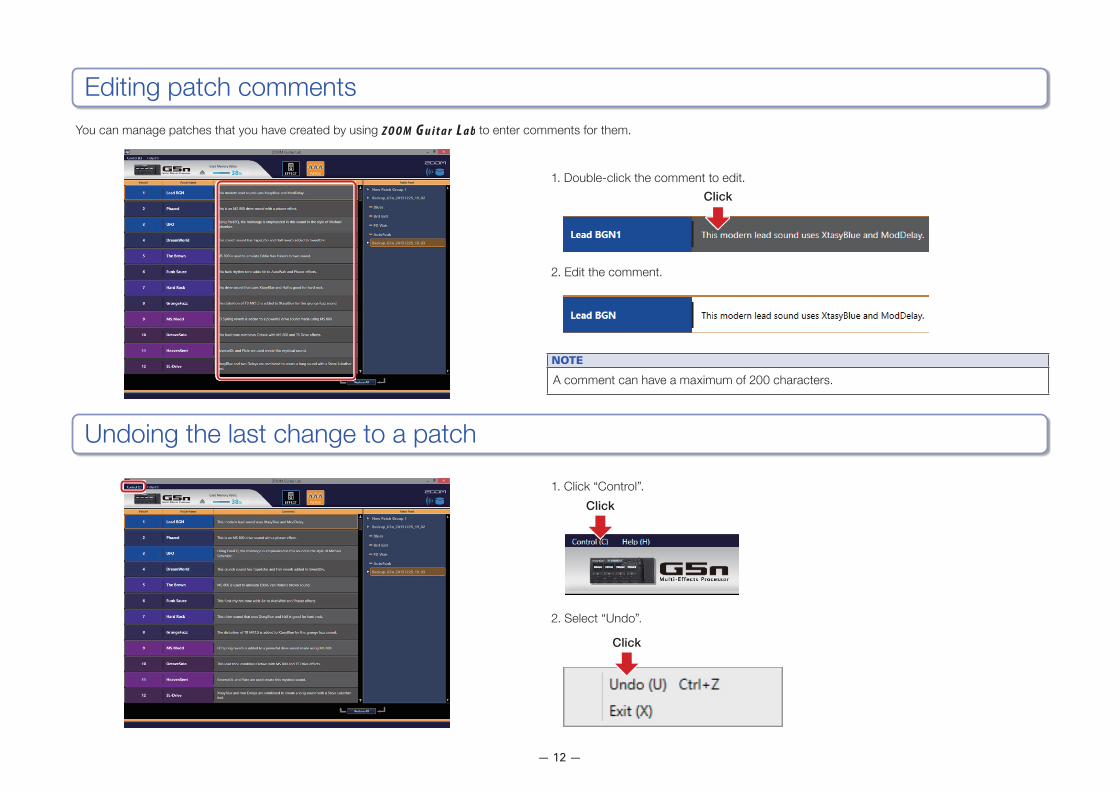
Editing patch comments
1. Double-click the comment to edit.
2. Edit the comment.
NOTE
A comment can have a maximum of 200 characters.
You can manage patches that you have created by using to enter comments for them.
Click
1. Click “Control”.
2. Select “Undo”.
Undoing the last change to a patch
Click
Click
— 13 —
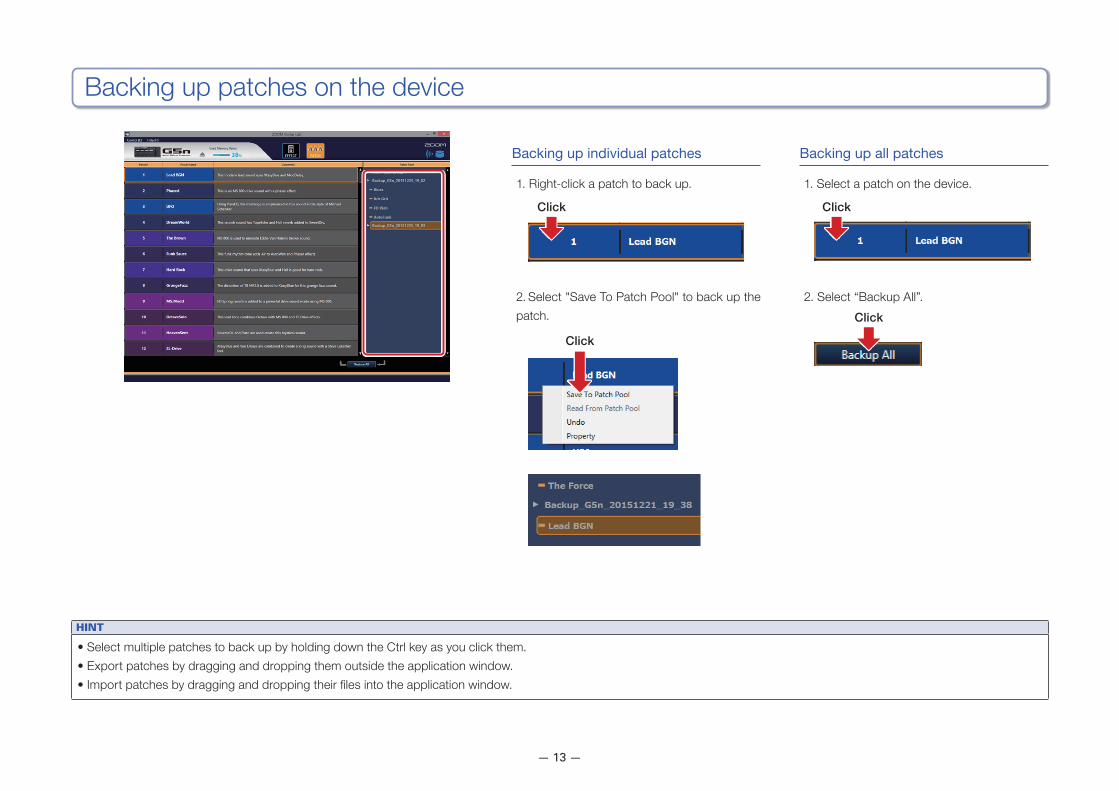
Backing up patches on the device
Backing up individual patches
1. Right-click a patch to back up.
2. Select "Save To Patch Pool" to back up the patch.
Backing up all patches
1. Select a patch on the device.
2. Select “Backup All”.
HINT
• Select multiple patches to back up by holding down the Ctrl key as you click them.• Export patches by dragging and dropping them outside the application window.• Import patches by dragging and dropping their files into the application window.
Click Click
Click
Click
— 14 —
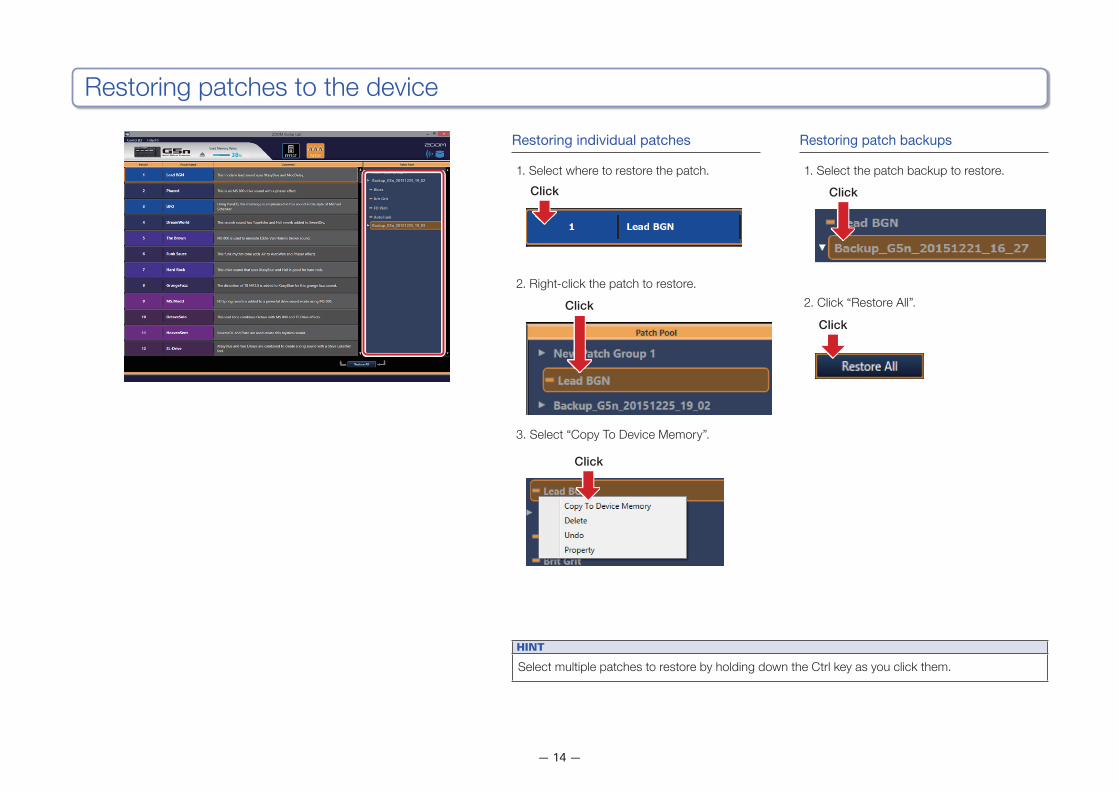
Restoring patches to the device
Restoring individual patches
1. Select where to restore the patch.
2. Right-click the patch to restore.
3. Select “Copy To Device Memory”.
Restoring patch backups
1. Select the patch backup to restore.
2. Click “Restore All”.
HINT
Select multiple patches to restore by holding down the Ctrl key as you click them.
Click
Click
ClickClick
Click
— 15 —
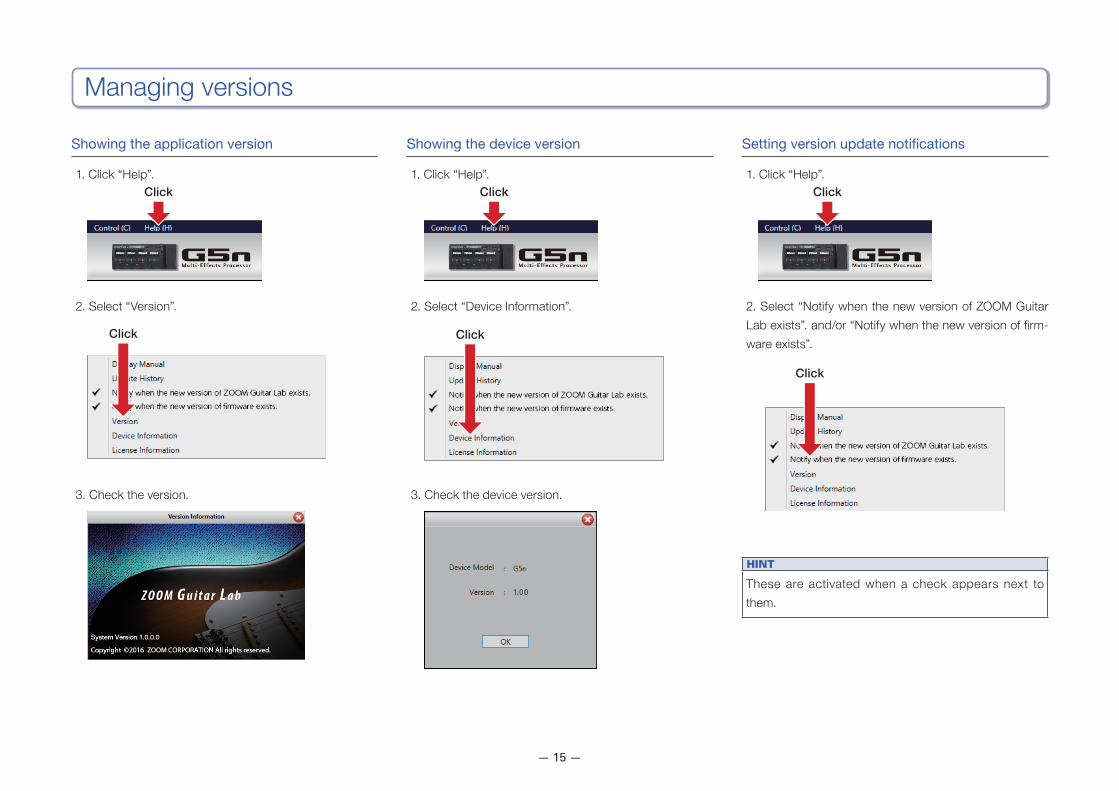
Managing versions
Showing the application version
1. Click “Help”.
2. Select “Version”.
3. Check the version.
Showing the device version
1. Click “Help”.
2. Select “Device Information”.
3. Check the device version.
Setting version update notifications
1. Click “Help”.
2. Select “Notify when the new version of ZOOM Guitar Lab exists”. and/or “Notify when the new version of firm-ware exists”.
HINT
These are activated when a check appears next to them.
Click Click Click
Click
Click
Click
— 16 —
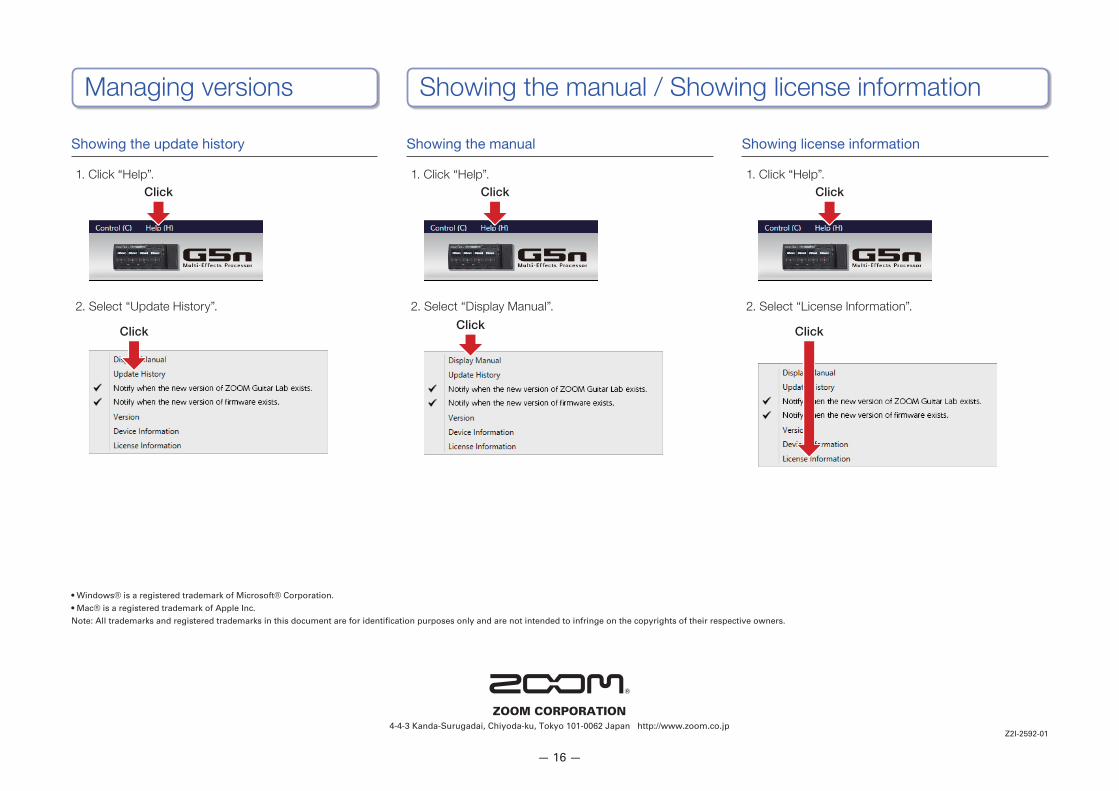
Showing the manual / Showing license information
Showing the update history
1. Click “Help”.
2. Select “Update History”.
Showing the manual
1. Click “Help”.
2. Select “Display Manual”.
Showing license information
1. Click “Help”.
2. Select “License Information”.
Managing versions
Z2I-2592-01
ZOOM CORPORATION4-4-3 Kanda-Surugadai, Chiyoda-ku, Tokyo 101-0062 Japan http://www.zoom.co.jp
Click Click Click
ClickClick Click
• Windows® is a registered trademark of Microsoft® Corporation.
• Mac® is a registered trademark of Apple Inc.
Note: All trademarks and registered trademarks in this document are for identification purposes only and are not intended to infringe on the copyrights of their respective owners.


![ATS Quality Manager - 3d-apps.faro-europe.com · resize panel. Sort list by clicking on headers. Click to hide unused references. […] = unused reference. Right-click Double-click](https://img.pdfslide.us/doc/110x75/5d21462788c993045a8bf1e2/ats-quality-manager-3d-appsfaro-resize-panel-sort-list-by-clicking-on-headers.jpg)