Embed Size (px)
Citation preview

Reference Guide
EC Gateway™ Operations ViewerVersion 4.2
[ Windows ]

DOCUMENT ID: DC36336-01-0420-01
LAST REVISED: November 2004
Copyright © 1999-2004 by Sybase, Inc. All rights reserved.
This publication pertains to Sybase software and to any subsequent release until otherwise indicated in new editions or technical notes. Information in this document is subject to change without notice. The software described herein is furnished under a license agreement, and it may be used or copied only in accordance with the terms of that agreement.
To order additional documents, U.S. and Canadian customers should call Customer Fulfillment at (800) 685-8225, fax (617) 229-9845.
Customers in other countries with a U.S. license agreement may contact Customer Fulfillment via the above fax number. All other international customers should contact their Sybase subsidiary or local distributor. Upgrades are provided only at regularly scheduled software release dates. No part of this publication may be reproduced, transmitted, or translated in any form or by any means, electronic, mechanical, manual, optical, or otherwise, without the prior written permission of Sybase, Inc.
Sybase, the Sybase logo, AccelaTrade, ADA Workbench, Adaptable Windowing Environment, Adaptive Component Architecture, Adaptive Server, Adaptive Server Anywhere, Adaptive Server Enterprise, Adaptive Server Enterprise Monitor, Adaptive Server Enterprise Replication, Adaptive Server Everywhere, Adaptive Server IQ, Adaptive Warehouse, Anywhere Studio, Application Manager, AppModeler, APT Workbench, APT-Build, APT-Edit, APT-Execute, APT-Translator, APT-Library, Backup Server, BizTracker, ClearConnect, Client-Library, Client Services, Convoy/DM, Copernicus, Data Pipeline, Data Workbench, DataArchitect, Database Analyzer, DataExpress, DataServer, DataWindow, DataWindow .NET, DB-Library, dbQueue, Developers Workbench, Direct Connect Anywhere, DirectConnect, Distribution Director, e-ADK, E-Anywhere, e-Biz Impact, e-Biz Integrator, E-Whatever, EC Gateway, ECMAP, ECRTP, eFulfillment Accelerator, Embedded SQL, EMS, Enterprise Application Studio, Enterprise Client/Server, Enterprise Connect, Enterprise Data Studio, Enterprise Manager, Enterprise SQL Server Manager, Enterprise Work Architecture, Enterprise Work Designer, Enterprise Work Modeler, eProcurement Accelerator, EWA, Financial Fusion, Financial Fusion Server, Gateway Manager, GlobalFIX, iAnywhere, iAnywhere Application Alerts, iAnywhere Mobile Delivery, iAnywhere Mobile Document Viewer, iAnywhere Mobile Inspection, iAnywhere Mobile Marketing Channel, iAnywhere Mobile Pharma, iAnywhere Mobile Sales, iAnywhere Pylon, iAnywhere Pylon Application Server, iAnywhere Pylon Conduit, iAnywhere Pylon PIM Server, iAnywhere Pylon Pro, iAnywhere Solutions, ImpactNow, Industry Warehouse Studio, InfoMaker, Information Anywhere, Information Everywhere, InformationConnect, InternetBuilder, iScript, Jaguar CTS, jConnect for JDBC, Mail Anywhere Studio, MainframeConnect, Maintenance Express, Manage Anywhere Studio, M-Business Channel, M-Business Network, M-Business Server, MDI Access Server, MDI Database Gateway, media.splash, MetaWorks, My iAnywhere, My iAnywhere Media Channel, My iAnywhere Mobile Marketing, MySupport, Net-Gateway, Net-Library, New Era of Networks, ObjectConnect, ObjectCycle, OmniConnect, OmniSQL Access Module, OmniSQL Toolkit, Open Biz, Open Client, Open ClientConnect, Open Client/Server, Open Client/Server Interfaces, Open Gateway, Open Server, Open ServerConnect, Open Solutions, Optima++, Orchestration Studio, PB-Gen, PC APT Execute, PC DB-Net, PC Net Library, PocketBuilder, Pocket PowerBuilder, Power++, power.stop, PowerAMC, PowerBuilder, PowerBuilder Foundation Class Library, PowerDesigner, PowerDimensions, PowerDynamo, PowerJ, PowerScript, PowerSite, PowerSocket, Powersoft, PowerStage, PowerStudio, PowerTips, Powersoft Portfolio, Powersoft Professional, PowerWare Desktop, PowerWare Enterprise, ProcessAnalyst, Rapport, RepConnector, Replication Agent, Replication Driver, Replication Server, Replication Server Manager, Replication Toolkit, Report-Execute, Report Workbench, Resource Manager, RW-DisplayLib, RW-Library, S-Designor, SDF, Secure SQL Server, Secure SQL Toolset, Security Guardian, SKILS, smart.partners, smart.parts, smart.script, SQL Advantage, SQL Anywhere, SQL Anywhere Studio, SQL Code Checker, SQL Debug, SQL Edit, SQL Edit/TPU, SQL Everywhere, SQL Modeler, SQL Remote, SQL Server, SQL Server Manager, SQL SMART, SQL Toolset, SQL Server/CFT, SQL Server/DBM, SQL Server SNMP SubAgent, SQL Station, SQLJ, STEP, SupportNow, S.W.I.F.T. Message Format Libraries, Sybase Central, Sybase Client/Server Interfaces, Sybase Financial Server, Sybase Gateways, Sybase MPP, Sybase SQL Desktop, Sybase SQL Lifecycle, Sybase SQL Workgroup, Sybase User Workbench, SybaseWare, Syber Financial, SyberAssist, SyBooks, System 10, System 11, System XI (logo), SystemTools, Tabular Data Stream, TotalFix, TradeForce, Transact-SQL, Translation Toolkit, UltraLite, UltraLite.NET, UNIBOM, Unilib, Uninull, Unisep, Unistring, URK Runtime Kit for UniCode, VisualWriter, VQL, WarehouseArchitect, Warehouse Control Center, Warehouse Studio, Warehouse WORKS, Watcom, Watcom SQL, Watcom SQL Server, Web Deployment Kit, Web.PB, Web.SQL, WebSights, WebViewer, WorkGroup SQL Server, XA-Library, XA-Server and XP Server are trademarks of Sybase, Inc. 05/04
Unicode and the Unicode Logo are registered trademarks of Unicode, Inc.
All other company and product names used herein may be trademarks or registered trademarks of their respective companies.
Use, duplication, or disclosure by the government is subject to the restrictions set forth in subparagraph (c)(1)(ii) of DFARS 52.227-7013 for the DOD and as set forth in FAR 52.227-19(a)-(d) for civilian agencies.
Sybase, Inc., One Sybase Drive, Dublin, CA 94568.
Contents
About This Book ............................................................................................................................ v
CHAPTER 1 Getting Started ................................................................................ 1Accessing the EC Gateway Operations Viewer ............................... 2
User names, passwords, and privileges.................................... 2Modifying user privileges........................................................... 2System Privileges window......................................................... 4
Exiting the EC Gateway Operations Viewer..................................... 4
CHAPTER 2 Configuring the EC Gateway Operations Viewer ......................... 5Configuring the system .................................................................... 6Using the Trading Partner window ................................................... 8
Trading Partner window – General tab...................................... 8Trading Partner window – Contacts tab .................................... 9Trading Partner window – Envelope/Lookup tab..................... 10Trading Partner window – Delimiter/Terminator tab................ 13
Using the Trade Agreements window ............................................ 13Trade Agreements window – General tab............................... 14Trade Agreements window – X12, EDIFACT, and HL7 tabs .. 20
Company ID properties .................................................................. 26Viewing a company identification record ................................. 26
CHAPTER 3 Administrative Process ................................................................ 29EDI Log icon................................................................................... 30
Searching for logs ................................................................... 30Report icon..................................................................................... 31
Exception reports .................................................................... 31Activity reports ......................................................................... 31Management reports ............................................................... 32Other reports ........................................................................... 32User-defined reports................................................................ 32
Archive icon.................................................................................... 34Restore icon ................................................................................... 35
Reference Guide iii

Contents
Index ............................................................................................................................................. 37
iv EC Gateway Operations Viewer
About This Book
Audience EC Gateway™ users are the primary audience for this book. If you use this book to manage the EC Gateway Operations Viewer, you should also be familiar with the contents of the EC Gateway Reference Guide.
How to use this book This document describes how to use the EC Gateway Operations Viewer, which monitors operations of the EC Gateway product. Typically, the person monitoring these operations is a business operations staff person who is in a remote location from where EC Gateway is running.
This book is organized into the following chapters:
• Chapter 1, “Getting Started” provides information on how to run the product, change passwords, and modify a user’s privileges.
• Chapter 2, “Configuring the EC Gateway Operations Viewer” shows you how to configure EC Gateway Operations Viewer, and how to set up trading partners and trade agreements.
• Chapter 3, “Administrative Process” provides information on logs, creating reports, and archiving and restoring files.
Related documents This section describes the available documentation.
Cross-platform documentation The EC Gateway Operations Viewer documentation set includes:
• Installation Guide
• Reference Guide
• Feature Guide
Related documentation Other related documentation is available from New Era of Networks, Sybase, and IBM. Refer to other documentation from each of these companies for more detail about use of applications relevant to this product.
Other sources of information
Use the Sybase Getting Started CD, the SyBooks Bookshelf CD, and the Sybase Product Manuals web site to learn more about your product:
Reference Guide v
• The Getting Started CD contains release bulletins and installation guides in PDF format, and may also contain other documents or updated information not included on the SyBooks Bookshelf CD. It is included with your software. To read or print documents on the Getting Started CD, you need Adobe Acrobat Reader, which you can download at no charge from the Adobe Web site using a link provided on the CD.
• The SyBooks Bookshelf CD is included with your software. It contains product manuals in a platform-independent bookshelf that contains fully searchable, HTML-based documentation.
Some documentation is provided in PDF format, which you can access through the PDF directory on the SyBooks Bookshelf CD. To view the PDF files, you need Adobe Acrobat Reader.
Refer to the README.txt file on the SyBooks Bookshelf CD for instructions on installing and starting SyBooks.
• The Sybase Product Manuals Web site is the online version of the SyBooks Bookshelf CD that you can access using a standard Web browser. In addition to product manuals, you will find links to EBFs/Maintenance, Technical Documents, Case Management, Solved Cases, newsgroups, and the Sybase Developer Network.
To access the Product Manuals Web site, go to Product Manuals at http://www.sybase.com/support/manuals/.
Sybase EBFs and software updates
❖ Finding the latest information on EBFs and software maintenance
1 Point your Web browser to the Sybase Support Page at http://www.sybase.com/support.
2 Select EBFs/Maintenance. If prompted, enter your MySybase user name and password.
3 Select a product.
4 Specify a time frame and click Go. A list of EBF/Maintenance releases is displayed.
Padlock icons indicate that you do not have download authorization for certain EBF/Maintenance releases because you are not registered as a Technical Support Contact. If you have not registered, but have valid information provided by your Sybase representative or through your support contract, click Edit Roles to add the “Technical Support Contact” role to your MySybase profile.
vi EC Gateway Operations Viewer
About This Book
5 Click the Info icon to display the EBF/Maintenance report, or click the product description to download the software.
❖ Creating a personalized view of the Sybase web site (including support pages)
Set up a MySybase profile. MySybase is a free service that allows you to create a personalized view of Sybase web pages.
1 Point your web browser to Technical Documents at http://www.sybase.com/support/techdocs/.
2 Click MySybase and create a MySybase profile.
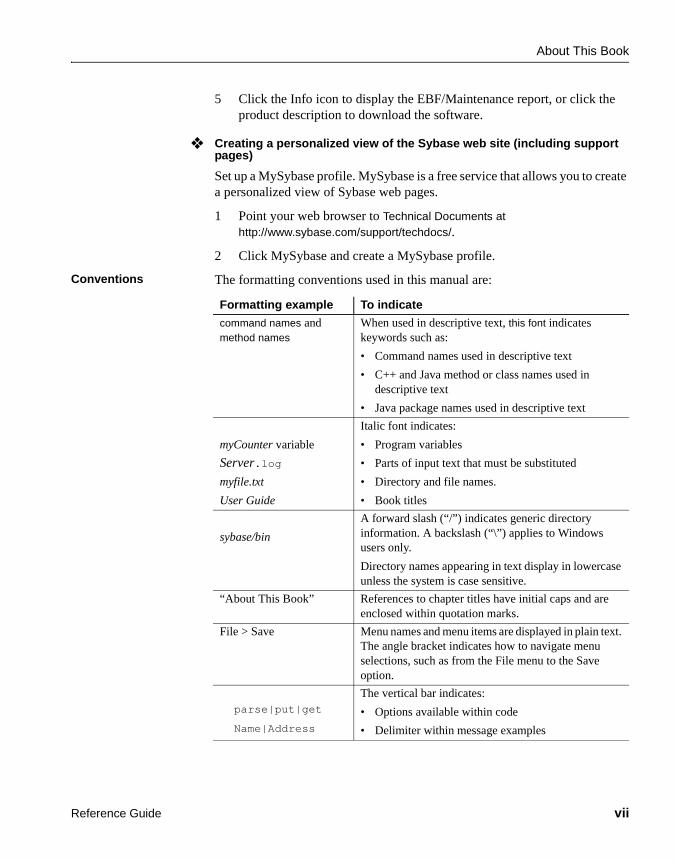
Conventions The formatting conventions used in this manual are:
Formatting example To indicate
command names and method names
When used in descriptive text, this font indicates keywords such as:
• Command names used in descriptive text
• C++ and Java method or class names used in descriptive text
• Java package names used in descriptive text
myCounter variable
Server.log
myfile.txt
User Guide
Italic font indicates:
• Program variables
• Parts of input text that must be substituted
• Directory and file names.
• Book titles
sybase/bin
A forward slash (“/”) indicates generic directory information. A backslash (“\”) applies to Windows users only.
Directory names appearing in text display in lowercase unless the system is case sensitive.
“About This Book” References to chapter titles have initial caps and are enclosed within quotation marks.
File > Save Menu names and menu items are displayed in plain text. The angle bracket indicates how to navigate menu selections, such as from the File menu to the Save option.
parse|put|get
Name|Address
The vertical bar indicates:
• Options available within code
• Delimiter within message examples
Reference Guide vii
If you need help Each Sybase installation that has purchased a support contract has one or more designated people who are authorized to contact Sybase Technical Support. If you cannot resolve a problem using the manuals or online help, please have the designated person contact Sybase Technical Support or the Sybase subsidiary in your area.
For more information on Support Services, education, and consulting services, refer to the Customer Services Reference Guide.
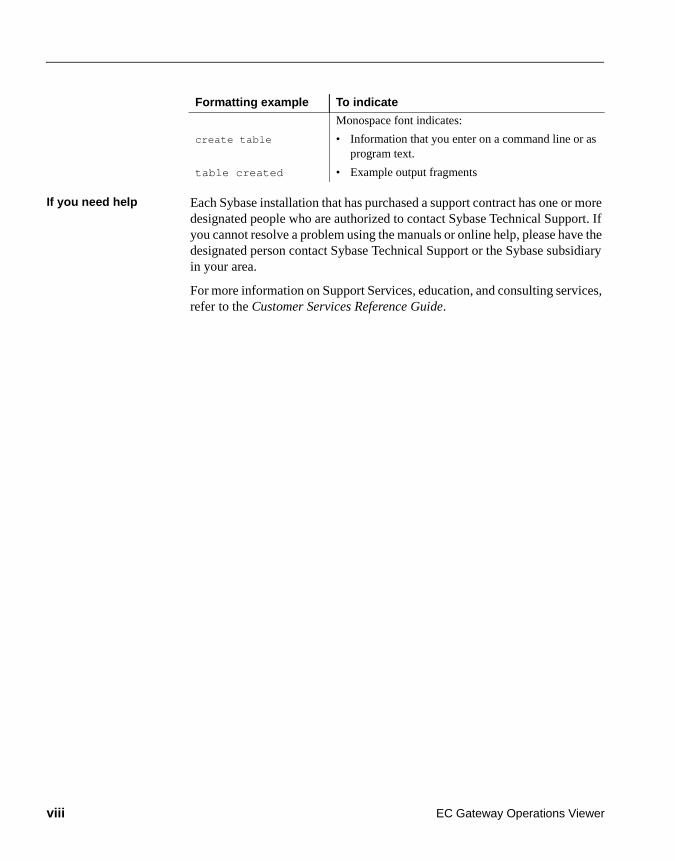
create table
table created
Monospace font indicates:
• Information that you enter on a command line or as program text.
• Example output fragments
Formatting example To indicate
viii EC Gateway Operations Viewer
C H A P T E R 1 Getting Started
The EC Gateway Operations Viewer provides a subset of the features found in the EC Gateway, including:
• Access to trading partner information
• Access to trade agreements information
• Access to log information
• Ability to run and view reports
• Ability to archive and restore archived records
At this point, you should have already installed EC Gateway Operations Viewer by following the instructions in the EC Gateway Installation Guide.
Topic PageAccessing the EC Gateway Operations Viewer 2
Exiting the EC Gateway Operations Viewer 4
Reference Guide 1
Accessing the EC Gateway Operations Viewer
Accessing the EC Gateway Operations ViewerBefore you run the EC Gateway Operations Viewer, define the ODBC DSN “ECEDIGS” as pointed to the access database eeserver.mdb in the install directory.
1 Click the EC Gateway Operations Viewer program icon. The Login window displays.
2 Enter “Admin” as the User Name, and “eeserver” as the Password. Click OK. The EC Gateway Operations Viewer main window displays.
User names, passwords, and privilegesAny user can modify their own password to the EC Gateway Operations Viewer.
1 In the EC Gateway Operations Viewer main window, select File > Change Password.
2 Type your old password in the Old Password field.
3 Type your new password in the New Password field.
4 Confirm your new password in the Confirmation field.
5 Click OK.
Modifying user privilegesThe administrator can modify privileges for any user, in the User Administration window. Do not use this window to change passwords.
❖ Modifying a user’s privileges
1 Log in as the admin user.
2 In the EC Gateway Operations Viewer window, select File > User Administration.
3 Select a user from the list of authorized users.
4 From the Users tab, click Properties. The attributes that were configured according to the user login profile are displayed on the Login tab. The Login tab allows you to modify an existing user name and password.
2 EC Gateway Operations Viewer
Chapter 1 Getting Started
5 The Authorization tab allows you to select the privileges you want to assign to this user. You must authorize one or more of these functions.
6 When you are finished, click OK.
7 To modify the systems that this user can access, go to the System Privileges window.
❖ Adding a new user
1 Log in as the admin user.
2 From the EC Gateway Operations Viewer desktop, select File > User Administration.
3 From the Users tab, click New.
4 The Login tab allows you to assign a new user name and password while the Authorization tab allows you to select the functional privileges you want available to this user.
5 When you are finished, click OK.
6 Go to the System Privileges window to enter the systems authorized for this new user.
❖ Deleting an existing user
1 Log in as the admin user.
2 From the EC Gateway Operations Viewer desktop, select File > User Administration.
3 Select the user to delete, and click Delete.
4 When you are finished, click OK.
5 Go to the System Privileges window to delete the systems authorized for this user.
Reference Guide 3
Exiting the EC Gateway Operations Viewer
System Privileges windowThe System Privileges window authorizes users to access specific systems served by the EC Gateway. This authorization is established for individual users restricting the systems they can access. In addition, local administrators who administer individual systems are authorized on this window. This allows several administrators to control their own local zones. The values for this window are entered by an administrator who has authority to administer all of the systems.
1 Log in as the admin user.
2 Select a system you want to authorize a user to access.
3 From the EC Gateway Operations Viewer desktop, select File > System Privileges.
4 Click New to add new users at the system level. Left-click New to display the New User window. Enter user name, password, and password confirmation information.
5 To delete a user, select the user to be deleted, then click Delete. You cannot delete the Admin user.
6 To change the properties of an existing user, select a user and left-click Properties. You can edit the password, new password and confirmation information.
Exiting the EC Gateway Operations ViewerTo exit the EC Gateway Operations Viewer:
1 Select File > Exit, or click Close.
4 EC Gateway Operations Viewer
C H A P T E R 2 Configuring the EC Gateway Operations Viewer
The EC Gateway Operations Viewer’s graphical interface allows you to control multiple runtime environments (for example, test and production environments). Some EC Gateway Operations Viewer implementations include system definitions for each trading partner, or group of trading partners. Configuring a system establishes connectivity to the configuration, trading partner, and log databases.
Topic Page
Configuring the system 6
Using the Trading Partner window 8
Using the Trade Agreements window 13
Company ID properties 26
Reference Guide 5
Configuring the system
Configuring the systemThe first step in setting up your EC Gateway Operations Viewer is to configure your systems, including defining the servers, server directories, and server databases involved. To access the system configuration menus, left-click the System icon from the EC Gateway Operations Viewer desktop.
1 Right-click the mouse while the cursor is located on the right side of the EC Gateway Operations Viewer desktop.
2 From the pop-up menu that appears, select New.
If you right-click a defined configuration, you can select Properties to edit the properties of that configuration. Select Delete to delete the selected configuration.
After selecting New, the System – New window displays. This window has three tabs: General, Setting, and ODBC.
The General tab allows you to define the name of the system, and all directory and certain high-level path information. Table 2-1 lists the fields on the General tab:
Table 2-1: General tab
The Setting tab allows you to configure one computer controlling execution on either itself or on another machine. You should know the source and destination IP addresses as well as the port numbers for the process-running machines.
Field Description
Map Directory The directory where ECMap transformation maps associated with the system are stored. The default directory is <drive>:\ECEDIGS\Map. You cannot change the information in this field.
Archive Source The directory where files to be archived are located. The default directory is <drive>:\ECEDIGS.
Archive Destination The directory where archived files are stored. The default directory is <drive>:\ECEDIGS\Archive.
System PostOffice The directory where the mailboxes can be found. Each mailbox has five subdirectories (IN, OUT, GOOD, BAD, and OTHER). The default directory is <drive>:\ECEDIGS\PF_PostOffice. You cannot edit this field.
6 EC Gateway Operations Viewer
Chapter 2 Configuring the EC Gateway Operations Viewer
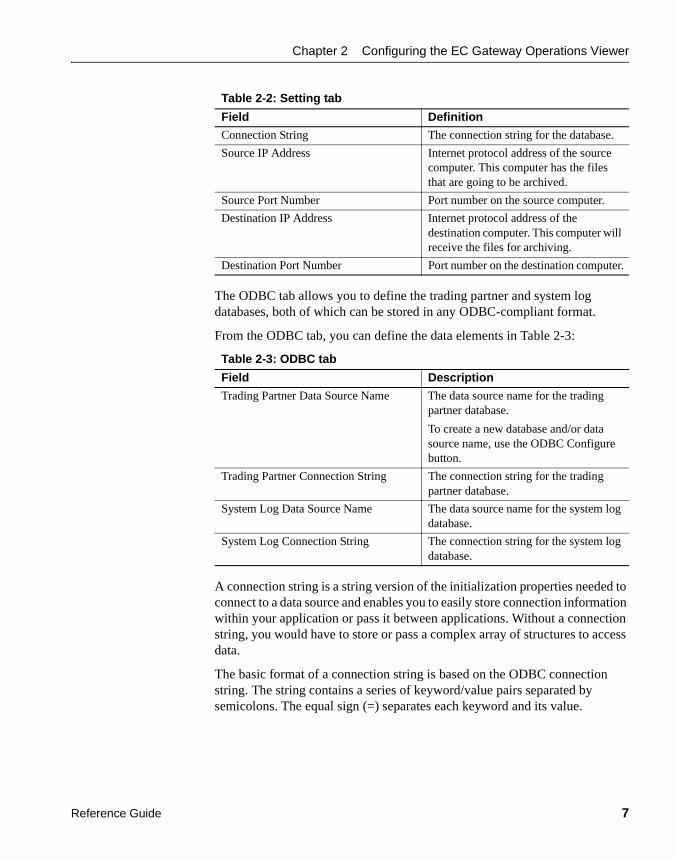
Table 2-2: Setting tab
The ODBC tab allows you to define the trading partner and system log databases, both of which can be stored in any ODBC-compliant format.
From the ODBC tab, you can define the data elements in Table 2-3:
Table 2-3: ODBC tab
A connection string is a string version of the initialization properties needed to connect to a data source and enables you to easily store connection information within your application or pass it between applications. Without a connection string, you would have to store or pass a complex array of structures to access data.
The basic format of a connection string is based on the ODBC connection string. The string contains a series of keyword/value pairs separated by semicolons. The equal sign (=) separates each keyword and its value.
Field Definition
Connection String The connection string for the database.
Source IP Address Internet protocol address of the source computer. This computer has the files that are going to be archived.
Source Port Number Port number on the source computer.
Destination IP Address Internet protocol address of the destination computer. This computer will receive the files for archiving.
Destination Port Number Port number on the destination computer.
Field Description
Trading Partner Data Source Name The data source name for the trading partner database.
To create a new database and/or data source name, use the ODBC Configure button.
Trading Partner Connection String The connection string for the trading partner database.
System Log Data Source Name The data source name for the system log database.
System Log Connection String The connection string for the system log database.
Reference Guide 7
Using the Trading Partner window
Using the Trading Partner windowTo view the trading partner configuration menus:
1 Click the Trade Partner icon in the EC Gateway Operations Viewer main window.
2 Right-click in the right side of the EC Gateway Operations Viewer main window.
3 Select Properties from the pop-up menu that appears.
The Trading Partner – Properties dialog appears. This dialog has four tabs: General, Contacts, Envelope/Lookup, and Delimiter/Terminator.
Use the Back and Next buttons to navigate within this set of tabs.
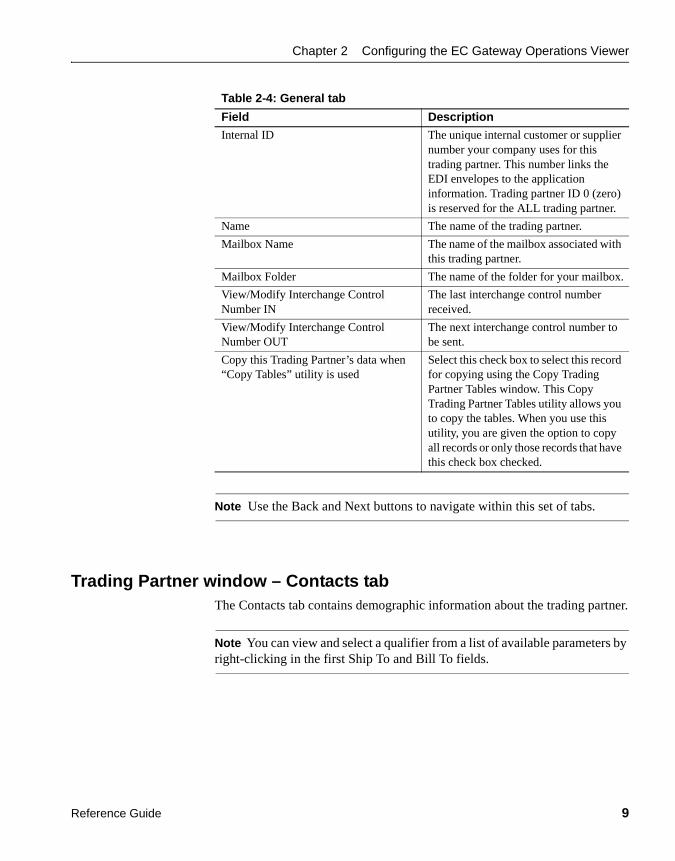
Trading Partner window – General tabThe General tab describes identification information for the trading partner you are viewing.
From the General tab, you can view the data elements listed in Table 2-4:
8 EC Gateway Operations Viewer
Chapter 2 Configuring the EC Gateway Operations Viewer
Table 2-4: General tab
Note Use the Back and Next buttons to navigate within this set of tabs.
Trading Partner window – Contacts tabThe Contacts tab contains demographic information about the trading partner.
Note You can view and select a qualifier from a list of available parameters by right-clicking in the first Ship To and Bill To fields.
Field Description
Internal ID The unique internal customer or supplier number your company uses for this trading partner. This number links the EDI envelopes to the application information. Trading partner ID 0 (zero) is reserved for the ALL trading partner.
Name The name of the trading partner.
Mailbox Name The name of the mailbox associated with this trading partner.
Mailbox Folder The name of the folder for your mailbox.
View/Modify Interchange Control Number IN
The last interchange control number received.
View/Modify Interchange Control Number OUT
The next interchange control number to be sent.
Copy this Trading Partner’s data when “Copy Tables” utility is used
Select this check box to select this record for copying using the Copy Trading Partner Tables window. This Copy Trading Partner Tables utility allows you to copy the tables. When you use this utility, you are given the option to copy all records or only those records that have this check box checked.
Reference Guide 9
Using the Trading Partner window
Trading Partner window – Envelope/Lookup tabThe Envelope/Lookup tab allows you to specify envelope values for the EDI transactions. You can enter both inbound lookup values and outbound envelope values.
From the Envelope/Lookup tab, you can view the fields listed in Table 2-5:
10 EC Gateway Operations Viewer
Chapter 2 Configuring the EC Gateway Operations Viewer
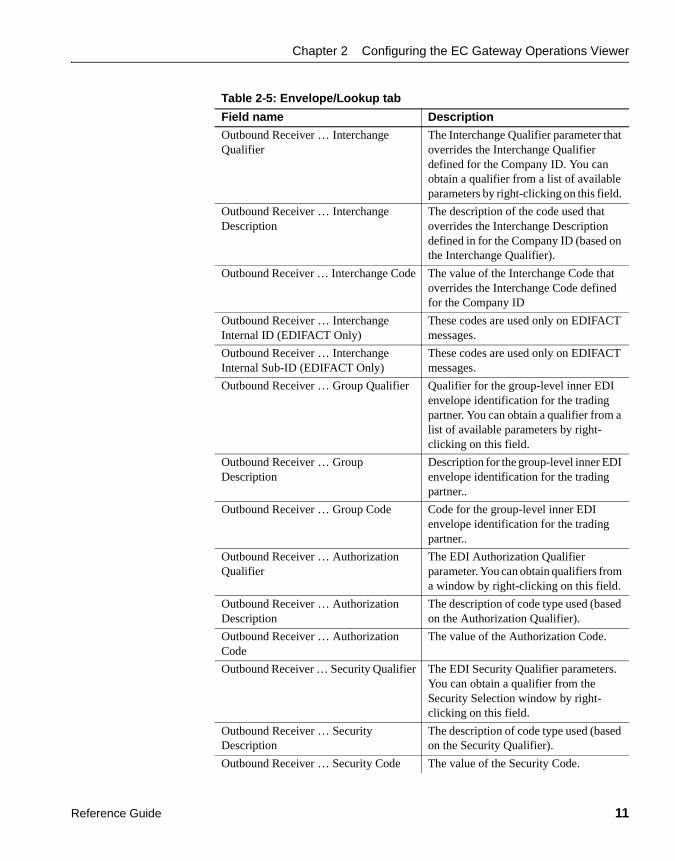
Table 2-5: Envelope/Lookup tab
Field name Description
Outbound Receiver … Interchange Qualifier
The Interchange Qualifier parameter that overrides the Interchange Qualifier defined for the Company ID. You can obtain a qualifier from a list of available parameters by right-clicking on this field.
Outbound Receiver … Interchange Description
The description of the code used that overrides the Interchange Description defined in for the Company ID (based on the Interchange Qualifier).
Outbound Receiver … Interchange Code The value of the Interchange Code that overrides the Interchange Code defined for the Company ID
Outbound Receiver … Interchange Internal ID (EDIFACT Only)
These codes are used only on EDIFACT messages.
Outbound Receiver … Interchange Internal Sub-ID (EDIFACT Only)
These codes are used only on EDIFACT messages.
Outbound Receiver … Group Qualifier Qualifier for the group-level inner EDI envelope identification for the trading partner. You can obtain a qualifier from a list of available parameters by right-clicking on this field.
Outbound Receiver … Group Description
Description for the group-level inner EDI envelope identification for the trading partner..
Outbound Receiver … Group Code Code for the group-level inner EDI envelope identification for the trading partner..
Outbound Receiver … Authorization Qualifier
The EDI Authorization Qualifier parameter. You can obtain qualifiers from a window by right-clicking on this field.
Outbound Receiver … Authorization Description
The description of code type used (based on the Authorization Qualifier).
Outbound Receiver … Authorization Code
The value of the Authorization Code.
Outbound Receiver … Security Qualifier The EDI Security Qualifier parameters. You can obtain a qualifier from the Security Selection window by right-clicking on this field.
Outbound Receiver … Security Description
The description of code type used (based on the Security Qualifier).
Outbound Receiver … Security Code The value of the Security Code.
Reference Guide 11
Using the Trading Partner window
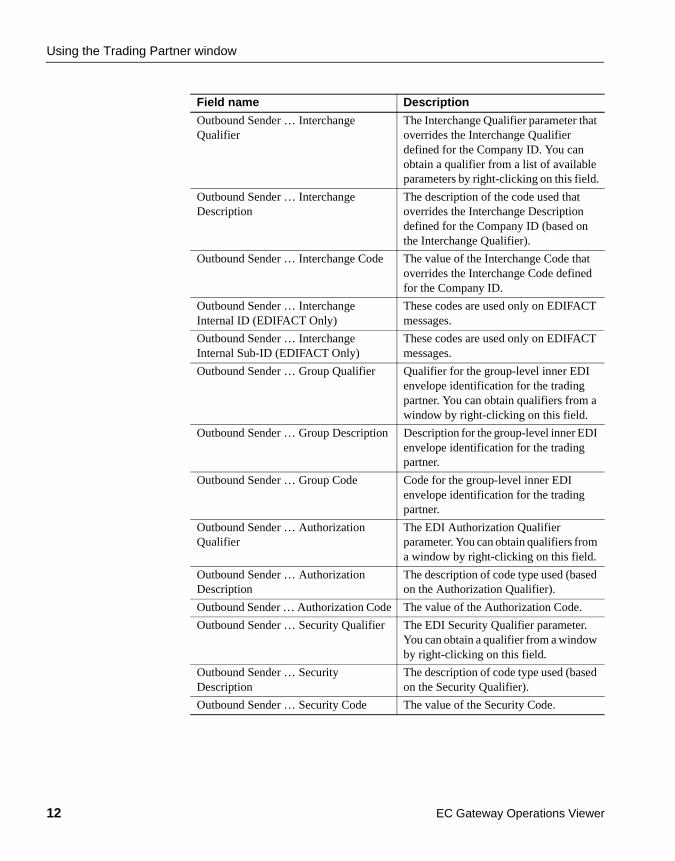
Outbound Sender … Interchange Qualifier
The Interchange Qualifier parameter that overrides the Interchange Qualifier defined for the Company ID. You can obtain a qualifier from a list of available parameters by right-clicking on this field.
Outbound Sender … Interchange Description
The description of the code used that overrides the Interchange Description defined for the Company ID (based on the Interchange Qualifier).
Outbound Sender … Interchange Code The value of the Interchange Code that overrides the Interchange Code defined for the Company ID.
Outbound Sender … Interchange Internal ID (EDIFACT Only)
These codes are used only on EDIFACT messages.
Outbound Sender … Interchange Internal Sub-ID (EDIFACT Only)
These codes are used only on EDIFACT messages.
Outbound Sender … Group Qualifier Qualifier for the group-level inner EDI envelope identification for the trading partner. You can obtain qualifiers from a window by right-clicking on this field.
Outbound Sender … Group Description Description for the group-level inner EDI envelope identification for the trading partner.
Outbound Sender … Group Code Code for the group-level inner EDI envelope identification for the trading partner.
Outbound Sender … Authorization Qualifier
The EDI Authorization Qualifier parameter. You can obtain qualifiers from a window by right-clicking on this field.
Outbound Sender … Authorization Description
The description of code type used (based on the Authorization Qualifier).
Outbound Sender … Authorization Code The value of the Authorization Code.
Outbound Sender … Security Qualifier The EDI Security Qualifier parameter. You can obtain a qualifier from a window by right-clicking on this field.
Outbound Sender … Security Description
The description of code type used (based on the Security Qualifier).
Outbound Sender … Security Code The value of the Security Code.
Field name Description
12 EC Gateway Operations Viewer
Chapter 2 Configuring the EC Gateway Operations Viewer
Trading Partner window – Delimiter/Terminator tabUsing the Delimiter/Terminator tab, you can view and select values for each of these fields from the full list of ASCII codes by right-clicking in the appropriate field. Use the Decimal Indicator drop-down list to specify whether to use a comma or a period to represent a decimal point.
Using the Trade Agreements windowLeft-click the open folder icon from the EC Gateway Operations Viewer main window or press Ctrl+O (the letter “O”) to enter or modify the trade agreements associated with this partner. The Trade Agreements window displays. You can view the properties of a field entry by right-clicking in the appropriate field.
To move from tab to tab on the Trade Agreements window, you can either click the tab label at the top of each tab or click Back and Next at the bottom of the window. When you have entered all the required information on all the tabs of the Trade Agreements window, click OK. Exit all open windows to return to main ECMap window.
Table 2-6 lists the fields that are available from this window.
Reference Guide 13
Using the Trade Agreements window
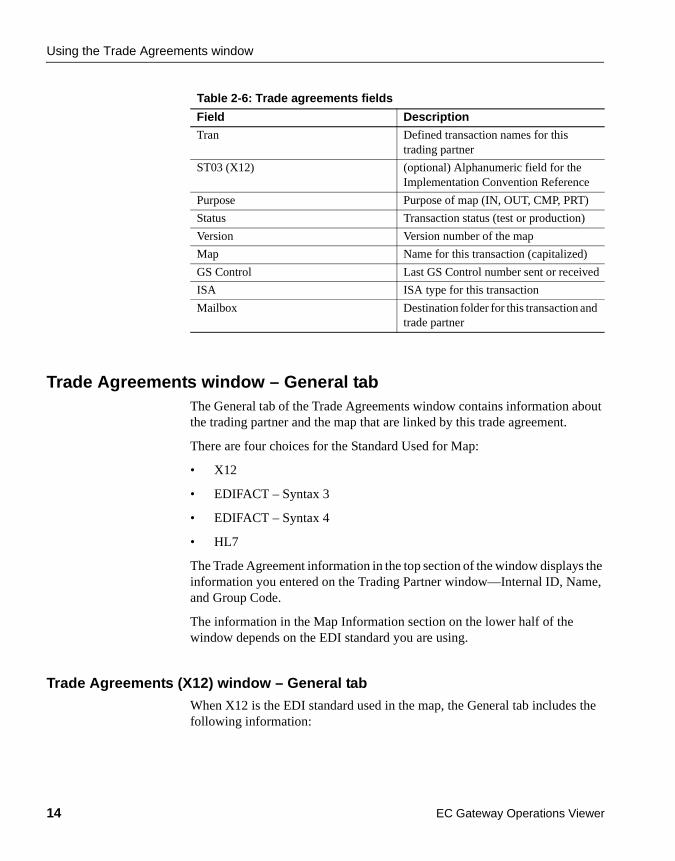
Table 2-6: Trade agreements fields
Trade Agreements window – General tabThe General tab of the Trade Agreements window contains information about the trading partner and the map that are linked by this trade agreement.
There are four choices for the Standard Used for Map:
• X12
• EDIFACT – Syntax 3
• EDIFACT – Syntax 4
• HL7
The Trade Agreement information in the top section of the window displays the information you entered on the Trading Partner window—Internal ID, Name, and Group Code.
The information in the Map Information section on the lower half of the window depends on the EDI standard you are using.
Trade Agreements (X12) window – General tab
When X12 is the EDI standard used in the map, the General tab includes the following information:
Field Description
Tran Defined transaction names for this trading partner
ST03 (X12) (optional) Alphanumeric field for the Implementation Convention Reference
Purpose Purpose of map (IN, OUT, CMP, PRT)
Status Transaction status (test or production)
Version Version number of the map
Map Name for this transaction (capitalized)
GS Control Last GS Control number sent or received
ISA ISA type for this transaction
Mailbox Destination folder for this transaction and trade partner
14 EC Gateway Operations Viewer
Chapter 2 Configuring the EC Gateway Operations Viewer
• Map Name – the name you gave to the map when you set it up. To choose a different map, right-click in the Map Name field to display a list of all the maps defined in the current project. You can select a map by double-clicking it; the fields in the bottom half of the window are populated with the information associated with the map you select.
• Version/Release/Industry Identifier Code – the version of X12 used in the map linked with this trade agreement.
• Transaction Set Identifier Code – the identifier for the X12 transaction set used in the map.
• Map Type – indicates the direction of the map (IN or OUT) or whether it is a print (PRT) or compliance (CMP) map. You specify the same map type on the Run Map window when you are ready to run your map.
• Test Indicator – indicates whether this is test (T), production (P), or informational (I). For X12 maps that use version 4020 and later, the choices for status include T, P, and I. For X12 maps earlier than version 4020, the choices include only T and P.
• The Implementation Convention Reference (ST03) is an optional element that was added in version 4030. When you enter a value in this field, the RTP uses ST03 as part of the trading partner lookup for X12 maps. The default is not to use ST03.
Trade Agreements window – EDIFACT (Syntax 3 and 4 Standard) properties
When EDIFACT is the EDI standard used in the map, the General tab of the Trade Agreement window includes the following information:
• Map Name – the name you gave to the map when you set it up. To choose a different map, right-click in the Map Name field to display a list of all the maps defined in the current project. You can select a map by double-clicking it; the fields in the bottom half of the window are populated with the information associated with the map you select.
• Message Version/Release Number – the version of EDIFACT used in the map linked with this trade agreement.
• 92.1
• 95B
• 96A
• 97
Reference Guide 15
Using the Trade Agreements window
• D97B
• D98A-B
• CONTRL V3
• CONTRL V4
• AUTACK V3
• Message Type – the identifier for the EDIFACT message used in the map.
• Map Type – indicates the direction of the map (IN or OUT) or whether it is a print (PRT) or compliance (CMP) map. You specify the same map type on the Run Map window when you are ready to run your map
• Test Indicator – indicates whether this is used for test or production. Valid choices include 0 – 9 and N. N indicates a production run, and 0 – 9 indicate varying degrees of test runs.
Trade Agreements window – HL7 properties
When HL7 is the EDI standard used in the map, the General tab includes the following information:
• Map Name – the name you gave to the map when you set it up. To choose a different map, right-click in the Map Name field to display a list of all the maps defined in the current project. You can select a map by double-clicking it; the fields in the bottom half of the window are populated with the information associated with the map you select.
• Message Version/Release Number – the version of HL7 used in the map linked with this trade agreement: 2.3
• Message Type – the identifier for the EDIFACT message used in the map.
• Map Type – indicates the direction of the map (IN or OUT) or whether it is a print (PRT) or compliance (CMP) map. You specify the same map type on the Run Map window when you are ready to run your map.
• Test Indicator – indicates whether this is used for test or production. Valid choices include P (production), T (test), and D (debug).
16 EC Gateway Operations Viewer
Chapter 2 Configuring the EC Gateway Operations Viewer
Trade Agreements window – Overrides tab
The Overrides tab of the Trade Agreements window differs for inbound and outbound maps. For inbound maps, the window contains mailbox override information. For outbound maps, it contains both mailbox override information and override information for the receiver on outbound envelopes. For outbound maps, the Overrides tab is the same for X12 and HL7, but slightly different for EDIFACT.
Mailboxes are used for routing. They allow one pass of mapping to create multiple files. The ability to send data to multiple mailboxes eliminates the need for multiple passes over the data. Mailboxes allow you to send different messages for the same trading partner to different mailboxes. This is a capability that is often required by trading partners who have different functions in multiple locations. Mailboxes are also used to route (pass through) inbound messages to different internal mailboxes. For example, you might use this feature to keep test maps or compliance maps separate from production maps.
Mailbox information that you enter in the Trade Agreement window overrides information you enter in the Trading Partner window. (You can also override the use of this mailbox or the trading partner mailbox at runtime by clicking the Ignore Trading Partner Mailbox or Ignore Trade Agreement Mailbox check boxes on the Option 1 tab of the Run Inbound Map window.)
Outbound receiver information that you enter in the Trade Agreement window overrides information you enter in the Trading Partner window. This information is used to populate the outbound EDI envelopes.
Trade Agreements window – Overrides tab – inbound maps
The Overrides tab of the Trade Agreements window for inbound maps contains the following mailbox override information:
• Name – used only for reports and display. An entry in this field overrides the value you entered on the General tab of the Trading Partner window.
• Folder – the directory, or folder, where the runtime engine (RTP) drops off EDI data produced by outbound maps and compliance runs and places inbound EDI data being passed through. It is used for both inbound and outbound routing. An entry in this field overrides the value you entered on the General tab of the Trading Partner window.
• File Name – you can specify the name of an X12, EDIFACT, or HL7 output file for routed data. This file name is used in the IN, OUT, GOOD, BAD, and OTHER mailboxes.
Reference Guide 17
Using the Trade Agreements window
• Map and Route Inbound EDI to Trade Agreement Mailbox – allows both the pass-through (routing) of data and the running of maps if selected. You must select this option to generate bad EDI and place it in the trading partner’s BAD folder. This is always used when running compliance maps.
Trade Agreements window – Overrides tab – outbound X12 and HL7 maps
The Overrides tab of the Trade Agreements window for outbound X12 and HL7 maps contains mailbox override information and override information for the receiver on outbound envelopes.
In the Mailbox Override Values section:
• Name – used only for reports and display. An entry in this field overrides the value you entered on the General tab of the Trading Partner window.
• Folder – the directory, or folder, where the runtime engine drops off EDI data produced by outbound maps and compliance runs and places inbound EDI data being passed through. It is used for both inbound and outbound routing. An entry in this field overrides the value you entered on the General tab of the Trading Partner window.
• File Name – you can specify the name of an X12 or HL7 file for routed data. This file name is used in the IN, OUT, GOOD, BAD, and OTHER mailboxes.
• Map and Route Inbound EDI to Trade Agreement Mailbox – allows both the pass-through (routing) of data and the running of maps if selected. You must select this option to generate bad EDI and place it in the trading partner’s BAD folder. This is always used when running compliance maps.
In the Outbound Receiver Override Envelope Values section:
• Any information you enter in the Interchange Qualifier and Code fields overrides the values entered in the Interchange Qualifier and Code fields in the Outbound Receiver Default Envelope Values and Inbound Sender Lookup Values section of the General tab of the Trading Partner window. For outbound X12 messages, the code and qualifier are the Interchange Receiver ID Code/Qualifier on the ISA segment. For outbound HL7 messages, the code and qualifier is the Receiving Facility on the MSH segment, the File Receiving Facility on the FHS segment, or the Batch Receiving Facility on the BHS segment.
18 EC Gateway Operations Viewer
Chapter 2 Configuring the EC Gateway Operations Viewer
• Any information you enter in the Group Code field overrides the value entered in the Group Code field in the Outbound Receiver Default Envelope Values and Inbound Sender Lookup Values section of the General tab of the Trading Partner window. For outbound X12 messages, this is the Application Receiver’s Code on the GS segment. For outbound HL7 messages, this is the same information as the Receiving Application on the MSH segment, the File Receiving Application on the FHS segment, or the Batch Receiving Application on the BHS segment.
Trade Agreement window – Overrides tab – outbound EDIFACT maps
The Overrides tab of the Trade Agreements window for outbound EDIFACT maps contains mailbox override information and override information for the receiver on outbound envelopes:
In the Mailbox Override Values section:
• Name – used only for reports and display. An entry in this field overrides the value you entered on the General tab of the Trading Partner window.
• Folder – where the runtime engine (RTP) drops off EDI data produced by outbound maps and compliance runs and places inbound EDI data being passed through. It is used for both inbound and outbound routing. An entry in this field overrides the value you entered on the General tab of the Trading Partner window.
• File Name – specify the name of an EDIFACT output file for routed data. This file name is used in the IN, OUT, GOOD, BAD, and OTHER mailboxes.
• Map and Route Inbound EDI to Trade Agreement Mailbox – allows both the pass-through (routing) of data and the running of maps if selected. You must select this option to generate bad EDI and place it in the trading partner’s BAD folder. This is always used when running compliance maps.
In the Outbound Receiver Override Envelope Values section:
• Any information you enter in the Interchange Qualifier and Code fields overrides the values entered in the Interchange Qualifier and Code fields in the Outbound Receiver Default Envelope Values and Inbound Sender Lookup Values section of the General tab of the Trading Partner window. For outbound EDIFACT messages, these are the Interchange Receiver Identification and Identification Code Qualifier on the UNB segment.
Reference Guide 19
Using the Trade Agreements window
• Any information you enter in the Group Qualifier and Code fields overrides the values entered in the Group Qualifier and Code fields in the Outbound Receiver Default Envelope Values and Inbound Sender Lookup Values section of the General tab of the Trading Partner window. For outbound EDIFACT messages, these are the Application Recipient Identification and Identification Code Qualifier on the UNG segment.
Trade Agreements window – X12, EDIFACT, and HL7 tabsThe Trade Agreements window has a specific tab for each of the standards. Only one standard-specific tab is active at a time, and it is the tab for the standard used in the map linked to the trade agreement. The standard-specific tabs differ for inbound and outbound maps for each standard. Each tab contains information that is used only in that standard or in the case of EDIFACT, in that syntax version of the standard.
The X12 tab of the Trade Agreements window contains information that is used only for X12 transaction sets. The EDIFACT tab of the Trade Agreements window contains information that is used only for EDIFACT messages. The HL7 tab of the Trade Agreements window contains information that is used only for HL7 messages.
Trade Agreements window – X12 tab – inbound maps
The X12 tab for inbound maps allows you to enter the version of the X12 standard that is being used in the trade agreement map and to modify the inbound group control number maintained by the system.
• Interchange Control Version Number – the version of the X12 standard used in the map. This value is used to populate ISA 12.
• An entry in the Group Control Number field allows you to override the group count that is automatically incremented each time the transaction is run. Ordinarily, you would not change this number.
• Expect FA 997 Functional Acknowledgement – indicates whether a functional acknowledgement should be returned to the sender of this transaction.
20 EC Gateway Operations Viewer
Chapter 2 Configuring the EC Gateway Operations Viewer
Trade Agreements window – X12 tab – outbound maps
The X12 tab for outbound maps allows you to enter the version of the X12 standard that is being used in the trade agreement map, and to modify the group control number used on the outbound group-level X12 envelope. It also allows you to specify whether a TA1 interchange acknowledgement should be requested or whether a FA 997 functional acknowledgement is expected, and the time within which the 997 should be received.
A TA1 interchange acknowledgement does not guarantee anything about the correctness or completeness of the contents of the ISA envelope—it merely acknowledges that it was received. A TA1 is normally used in test environments to verify the routing of documents.
A FA 997 functional acknowledgement actually performs a syntactical check. When the user indicates on this tab that a 997 is expected for an outbound X12 document, it causes the program to capture certain information in the log during mapping that enables it to process the functional acknowledgement.
The Envelope Information section contains the following information:
• Interchange Control Version Number – the version of the X12 standard used in the map. This value is used to populate ISA 12.
• An entry in the Group Control Number field allows you to override the group count that is automatically incremented each time the transaction is run. Ordinarily, you would not change this number.
The Notification section contains the following information:
• Request TA1 Interchange Acknowledgement – indicates whether there is an agreement between the sender and receiver that the receiver of this EDI message will send a response back to the sender affirming that the ISA envelope was received. If so, the system should expect to receive this acknowledgement.
• Expect FA 997 Functional Acknowledgement – indicates whether a functional acknowledgement is expected back from the receiver of this transaction set. If so, it causes certain information to be written to the log during mapping that will enable it to process the functional acknowledgement.
• Consider Unacknowledged if Not Received After – enter values that tell the program the period of time in which you expect to receive a functional acknowledgement. If an acknowledgement is received after this time period, it is considered overdue. If you use EC Gateway, this allows EC Gateway to report on overdue acknowledgements.
Reference Guide 21
Using the Trade Agreements window
• Time Units specifies the unit of measure (DAYS, HOURS, MINUTES, or SECONDS) for the time period during which an acknowledgement to your outgoing message must be received.
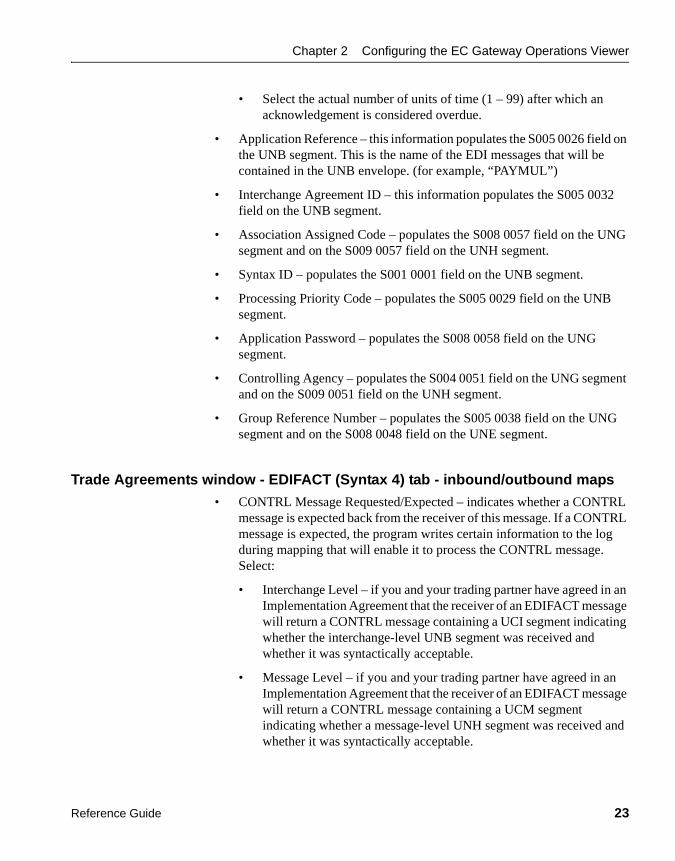
• Select the actual number of units of time (1 – 99) after which an acknowledgement is considered overdue.
Trade Agreements window – EDIFACT tab – inbound maps
The EDIFACT tab is the same for inbound and outbound maps, but it includes more information for Syntax 4 than for Syntax 3. On this tab, you can specify whether a CONTRL message has been requested or is expected; you can also enter EDIFACT-specific information.
Trade Agreements window – EDIFACT (Syntax 3) tab – inbound/outbound maps
The EDIFACT Tab for Syntax 3 contains the following information:
• CONTRL Message Requested/Expected – indicates whether a CONTRL message is expected back from the receiver of this message. If a CONTRL message is expected, the program writes certain information to the log during mapping that enables it to process the CONTRL message. Select:
• Interchange Level – if you and your trading partner have agreed in an Implementation Agreement that the receiver of an EDIFACT message will return a CONTRL message containing a UCI segment indicating whether the interchange-level UNB segment was received and whether it was syntactically acceptable.
• Message Level – if you and your trading partner have agreed in an Implementation Agreement that the receiver of an EDIFACT message will return a CONTRL message containing a UCM segment indicating whether a message-level UNH segment was received and whether it was syntactically acceptable.
• Consider Unacknowledged if Not Received After – enter values that tell the program the period of time in which you expect to receive a CONTRL message. If the CONTRL message is received after this time period, it is considered overdue. If you use EC Gateway, this allows EC Gateway to report on overdue acknowledgements.
• Time Units specifies the unit of measure (DAYS, HOURS, MINUTES, or SECONDS) for the time period during which an acknowledgement to your outgoing message must be received.
22 EC Gateway Operations Viewer
Chapter 2 Configuring the EC Gateway Operations Viewer
• Select the actual number of units of time (1 – 99) after which an acknowledgement is considered overdue.
• Application Reference – this information populates the S005 0026 field on the UNB segment. This is the name of the EDI messages that will be contained in the UNB envelope. (for example, “PAYMUL”)
• Interchange Agreement ID – this information populates the S005 0032 field on the UNB segment.
• Association Assigned Code – populates the S008 0057 field on the UNG segment and on the S009 0057 field on the UNH segment.
• Syntax ID – populates the S001 0001 field on the UNB segment.
• Processing Priority Code – populates the S005 0029 field on the UNB segment.
• Application Password – populates the S008 0058 field on the UNG segment.
• Controlling Agency – populates the S004 0051 field on the UNG segment and on the S009 0051 field on the UNH segment.
• Group Reference Number – populates the S005 0038 field on the UNG segment and on the S008 0048 field on the UNE segment.
Trade Agreements window - EDIFACT (Syntax 4) tab - inbound/outbound maps
• CONTRL Message Requested/Expected – indicates whether a CONTRL message is expected back from the receiver of this message. If a CONTRL message is expected, the program writes certain information to the log during mapping that will enable it to process the CONTRL message. Select:
• Interchange Level – if you and your trading partner have agreed in an Implementation Agreement that the receiver of an EDIFACT message will return a CONTRL message containing a UCI segment indicating whether the interchange-level UNB segment was received and whether it was syntactically acceptable.
• Message Level – if you and your trading partner have agreed in an Implementation Agreement that the receiver of an EDIFACT message will return a CONTRL message containing a UCM segment indicating whether a message-level UNH segment was received and whether it was syntactically acceptable.
Reference Guide 23
Using the Trade Agreements window
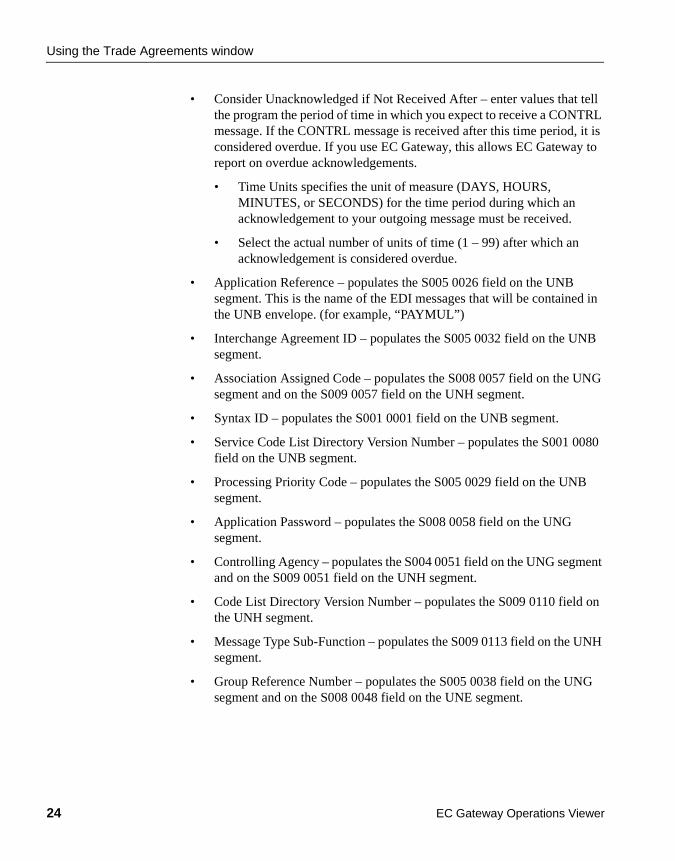
• Consider Unacknowledged if Not Received After – enter values that tell the program the period of time in which you expect to receive a CONTRL message. If the CONTRL message is received after this time period, it is considered overdue. If you use EC Gateway, this allows EC Gateway to report on overdue acknowledgements.
• Time Units specifies the unit of measure (DAYS, HOURS, MINUTES, or SECONDS) for the time period during which an acknowledgement to your outgoing message must be received.
• Select the actual number of units of time (1 – 99) after which an acknowledgement is considered overdue.
• Application Reference – populates the S005 0026 field on the UNB segment. This is the name of the EDI messages that will be contained in the UNB envelope. (for example, “PAYMUL”)
• Interchange Agreement ID – populates the S005 0032 field on the UNB segment.
• Association Assigned Code – populates the S008 0057 field on the UNG segment and on the S009 0057 field on the UNH segment.
• Syntax ID – populates the S001 0001 field on the UNB segment.
• Service Code List Directory Version Number – populates the S001 0080 field on the UNB segment.
• Processing Priority Code – populates the S005 0029 field on the UNB segment.
• Application Password – populates the S008 0058 field on the UNG segment.
• Controlling Agency – populates the S004 0051 field on the UNG segment and on the S009 0051 field on the UNH segment.
• Code List Directory Version Number – populates the S009 0110 field on the UNH segment.
• Message Type Sub-Function – populates the S009 0113 field on the UNH segment.
• Group Reference Number – populates the S005 0038 field on the UNG segment and on the S008 0048 field on the UNE segment.
24 EC Gateway Operations Viewer
Chapter 2 Configuring the EC Gateway Operations Viewer
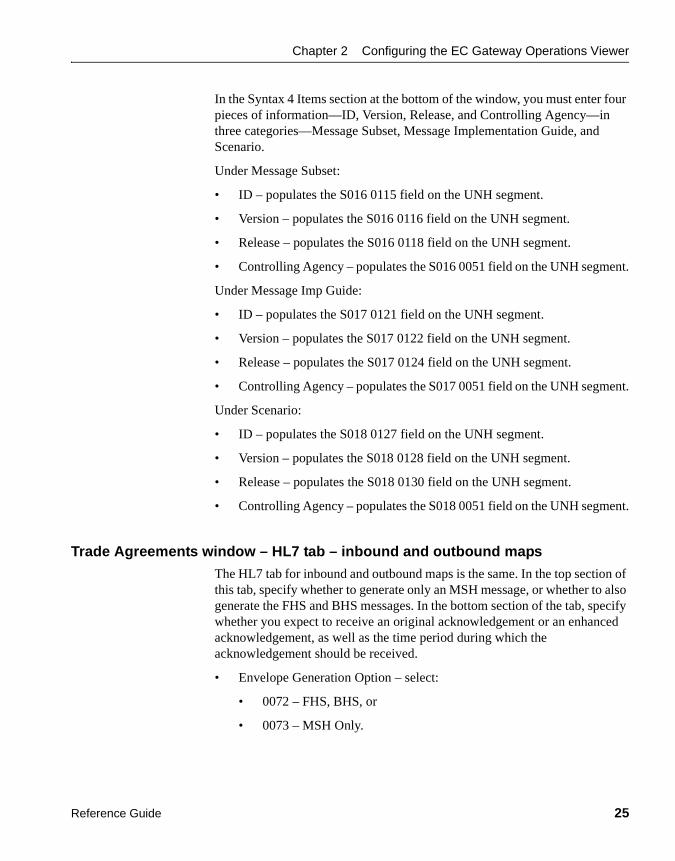
In the Syntax 4 Items section at the bottom of the window, you must enter four pieces of information—ID, Version, Release, and Controlling Agency—in three categories—Message Subset, Message Implementation Guide, and Scenario.
Under Message Subset:
• ID – populates the S016 0115 field on the UNH segment.
• Version – populates the S016 0116 field on the UNH segment.
• Release – populates the S016 0118 field on the UNH segment.
• Controlling Agency – populates the S016 0051 field on the UNH segment.
Under Message Imp Guide:
• ID – populates the S017 0121 field on the UNH segment.
• Version – populates the S017 0122 field on the UNH segment.
• Release – populates the S017 0124 field on the UNH segment.
• Controlling Agency – populates the S017 0051 field on the UNH segment.
Under Scenario:
• ID – populates the S018 0127 field on the UNH segment.
• Version – populates the S018 0128 field on the UNH segment.
• Release – populates the S018 0130 field on the UNH segment.
• Controlling Agency – populates the S018 0051 field on the UNH segment.
Trade Agreements window – HL7 tab – inbound and outbound maps
The HL7 tab for inbound and outbound maps is the same. In the top section of this tab, specify whether to generate only an MSH message, or whether to also generate the FHS and BHS messages. In the bottom section of the tab, specify whether you expect to receive an original acknowledgement or an enhanced acknowledgement, as well as the time period during which the acknowledgement should be received.
• Envelope Generation Option – select:
• 0072 – FHS, BHS, or
• 0073 – MSH Only.
Reference Guide 25

Company ID properties
• Original Acknowledgement – indicates whether there is an agreement between the sender and receiver that the receiver of this EDI message will send a response back to the sender, acknowledging receipt of the message. If so, the system should expect to receive this acknowledgement.
• Enhanced Acknowledgement – indicates whether there is an agreement between the sender and receiver that the receiver of this EDI message will send an enhanced response back to the sender, acknowledging receipt of the message. If so, the system should expect to receive this acknowledgement.
• Consider Unacknowledged if Not Received After – enter values that tell the program the period of time in which you expect to receive a CONTRL message. If the CONTRL message is received after this time period, it is considered overdue. If you use EC Gateway, this allows EC Gateway to report on overdue acknowledgements.
• Time Units specifies the unit of measure (DAYS, HOURS, MINUTES, or SECONDS) for the time period during which an acknowledgement to your outgoing message must be received.
• Select the actual number of units of time (1 – 99) after which an acknowledgement is considered overdue.
Company ID propertiesThe Company window defines data concerning your company, including fields required for successful EDI message management.
Note The Company ID identifies who you are when configuring the envelope. You can use additional IDs for other departments or divisions in your company.
To view the company identification record, right-click a listed company ID, and select Properties from the pop-up menu that appears.
Viewing a company identification recordAfter selecting Properties, the Company window displays.
From the Company window, you can define the elements listed in Table 2-7.
26 EC Gateway Operations Viewer
Chapter 2 Configuring the EC Gateway Operations Viewer
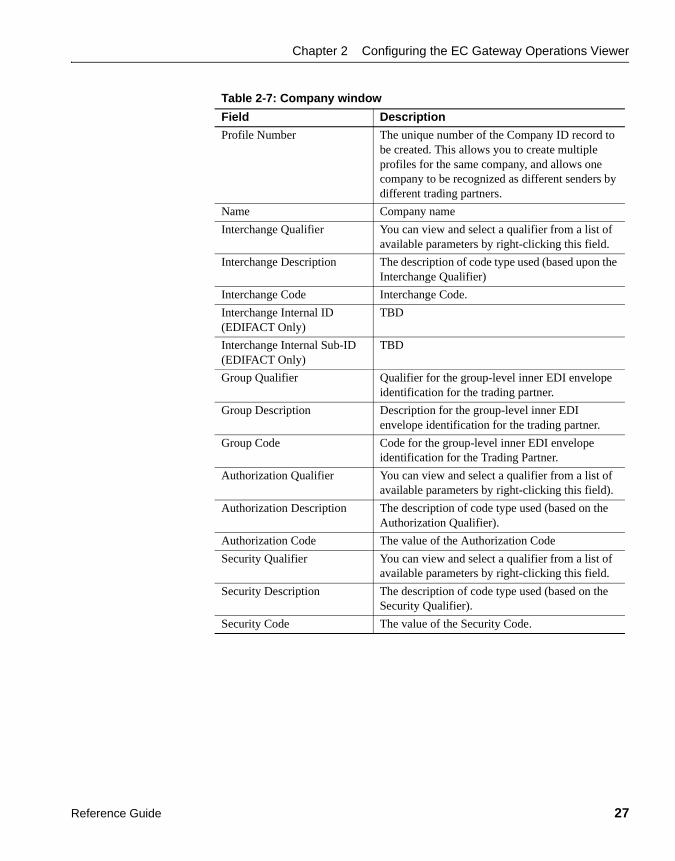
Table 2-7: Company window
Field Description
Profile Number The unique number of the Company ID record to be created. This allows you to create multiple profiles for the same company, and allows one company to be recognized as different senders by different trading partners.
Name Company name
Interchange Qualifier You can view and select a qualifier from a list of available parameters by right-clicking this field.
Interchange Description The description of code type used (based upon the Interchange Qualifier)
Interchange Code Interchange Code.
Interchange Internal ID (EDIFACT Only)
TBD
Interchange Internal Sub-ID (EDIFACT Only)
TBD
Group Qualifier Qualifier for the group-level inner EDI envelope identification for the trading partner.
Group Description Description for the group-level inner EDI envelope identification for the trading partner.
Group Code Code for the group-level inner EDI envelope identification for the Trading Partner.
Authorization Qualifier You can view and select a qualifier from a list of available parameters by right-clicking this field).
Authorization Description The description of code type used (based on the Authorization Qualifier).
Authorization Code The value of the Authorization Code
Security Qualifier You can view and select a qualifier from a list of available parameters by right-clicking this field.
Security Description The description of code type used (based on the Security Qualifier).
Security Code The value of the Security Code.
Reference Guide 27

Company ID properties
28 EC Gateway Operations Viewer

C H A P T E R 3 Administrative Process
The EC Gateway Operations Viewer supports several administrative functions. These include viewing the EDI log file, using the reporting module, managing your mailboxes, and applying the archive/restore functionality.
Topic Page
EDI Log icon 30
Report icon 31
Archive icon 34
Restore icon 35
Reference Guide 29

EDI Log icon
EDI Log iconTo access the EC Gateway Operations Viewer EDI log, click the Log icon from the EC Gateway Operations Viewer menu. This displays the EC/EDI log. To search for specific items within the log file, you can click the Search icon.
Searching for logsThe EC Gateway Operations Viewer allows you to perform a search for logs that contain specific information.
To search for logs:
1 While in the Log mode, select Edit > Find from the EC Gateway Operations Viewer desktop.
The Find Records window displays.
2 Select the criteria that describe the type of log records you want to search for using the Define More Criteria panel. When you are finished, click Add to List to add your new criteria to your search list.
3 You can narrow your search by defining additional specific fields, conditions, and values that are included in the records you want to search for. Do this by repeating step 2 to create each row of criteria. When you are finished, click Add to List to add your new criteria to your search list. Click Remove to delete a highlighted row of criteria from your search list.
4 When you are ready to perform the search, click Find Now. You may then add other criteria as above, using the Define More Criteria panel.
5 To define a new search, click New Search.
30 EC Gateway Operations Viewer
Chapter 3 Administrative Process
Report iconEC Gateway Operations Viewer supports four main types of reports—exception reports, activity reports, management reports, and other reports. To access the reporting module, click the Report icon within the EC Gateway Operations Viewer selection window. The reports are then presented on the right side of the desktop, in a Windows Explorer folder/file format. Once the required report is found, it can be selected by double clicking on its name. After entering pertinent selection criteria, the report will be presented, and can be directed to any Windows printer. Reports in the reporting module can also be exported to a different format or sent to the printer.
The following are the types of available reports:
• Exception reports – provide information about both operational and EDI errors.
• Activity reports – provide information about the daily activity of EDI through the EC Gateway.
• Management reports – provide information about managing your EDI program, activity with trading partners, and variances.
• Other reports – existing user-defined reports.
Exception reportsException reports include:
• Transactions Not Acknowledged
• Error Log Report
Activity reportsTransaction activity reports include:
• Test Production/Information Report
• Monthly Summary by Trading Partner
• Summary by Trading Partner
• Transactions by Trading Partner in Table Format
Trading partner activity reports provided are the following:
Reference Guide 31
Report icon
• Daily Summary by Transactions
• Monthly Transaction & Bytes
• Annual Transactions
• Summary by Transaction
• Transaction Log
Management reportsManagement reports:
• System Information
• Trading Partner Detail
Other reportsOther reports are existing user-defined reports that can be run by EC Gateway Operations Viewer users.
User-defined reportsEC Gateway supports ODBC user-defined reports.
To display a user-defined report:
1 Click the Report icon. The list of available reports displays.
2 Click the New icon on the Menu bar.
3 The Report window displays with its General tab active.
4 Enter the appropriate information in the fields listed in Table 3-1.
32 EC Gateway Operations Viewer
Chapter 3 Administrative Process
Table 3-1: User-defined reports
5 Click the Tables tab.
6 Click Add.
7 The User Report Table window displays.
8 Enter the information, then click OK. Repeat this step for each table that exists in your report. The tables must be defined in the same order as they are used in your report.
Note You cannot add more tables than the number you chose on the General tab of the Report window.
Table 3-2: User Report Table
9 When you have finished step 9, the Tables tab display of the Report window is filled with the information that you entered using the User Report Table window.
10 If you want a table without user-controlled parameters, click OK at the bottom of the Report window to end your report definition. Otherwise, go to the next step.
11 Click the Parameters tab.
12 Click Add.
Field Description
Report File Enter the full path of the report file, or use the Browse button to locate the report.
Title Enter a title for this report.
Number of Tables Select the number of tables included in your report. It should be the same as the number of tables already used in your report.
Number of Parameters (optional) Select the number of parameters used in your report.
Field Description
Data Source Name Enter the data source name (DSN) for the table that will provide the information for your report. Alternatively, you can use the Browse button to locate your DSN.
User ID Enter the user ID that is needed to access the database.
Password Enter the password (if required) to access the database.
Table Name Enter the name of the table in the database that will be accessed for the information.
Reference Guide 33
Archive icon
13 Enter a parameter name and click OK. This parameter must already exist. Each reader of your report can insert specific values into this parameter to set the scope of the report.
14 Repeat steps 12 and 13 for each parameter you want to add to your report. The parameter names must be defined in the same order used in the report. You cannot add more parameters than the number of parameters that you chose on the General tab of the Report window.
15 When you finish adding parameters, click OK. Your report is added to the list of reports displayed by the EC Gateway Operations Viewer.
You can access your report at any time by double-clicking its listing. When you do this, a window displays asking for the value or values for the parameters you established for your report. Follow this procedure to display your report:
1 Double-click the title of a report on the listing of reports. A Parameters window displays.
2 Enter a value for each parameter.
3 Click OK. The selected report displays with its scope set by the specific parameter values entered.
In this example, a user-defined report prompts for the values of a starting date and an ending date. Enter valid values and click OK. The report displays covering the range entered for the parameters. The parameters used are not restricted to starting and ending dates.
Note If no parameters are defined here, but your report uses parameters, the report itself displays windows that prompt for the parameter values.
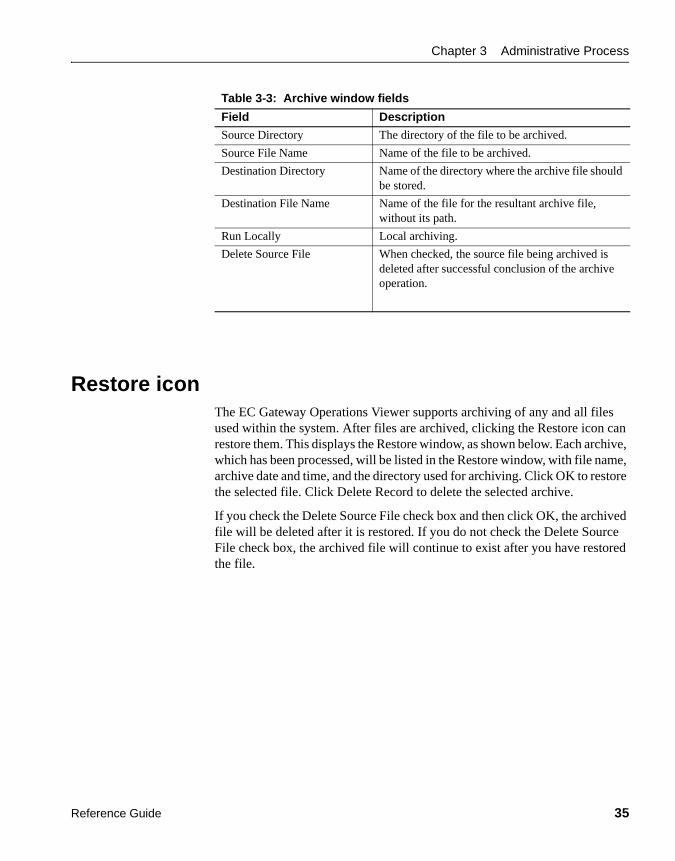
Archive iconThe EC Gateway Operations Viewer supports the archiving of any and all files that are used within the system. To access the archive function, click the Archive icon within the EC Gateway Operations Viewer selection window. This displays the Archive window, which contains the fields described in Table 3-3.
34 EC Gateway Operations Viewer
Chapter 3 Administrative Process
Table 3-3: Archive window fields
Restore iconThe EC Gateway Operations Viewer supports archiving of any and all files used within the system. After files are archived, clicking the Restore icon can restore them. This displays the Restore window, as shown below. Each archive, which has been processed, will be listed in the Restore window, with file name, archive date and time, and the directory used for archiving. Click OK to restore the selected file. Click Delete Record to delete the selected archive.
If you check the Delete Source File check box and then click OK, the archived file will be deleted after it is restored. If you do not check the Delete Source File check box, the archived file will continue to exist after you have restored the file.
Field Description
Source Directory The directory of the file to be archived.
Source File Name Name of the file to be archived.
Destination Directory Name of the directory where the archive file should be stored.
Destination File Name Name of the file for the resultant archive file, without its path.
Run Locally Local archiving.
Delete Source File When checked, the source file being archived is deleted after successful conclusion of the archive operation.
Reference Guide 35

Restore icon
36 EC Gateway Operations Viewer
Index
Aaccessing
the EC Gateway Operations Viewer 2activity reports 31adding
report parameters 34users 3
administrative functions 29application
password 23reference 23
archivedestination 6source 6
Archive icon 34association assigned code 23audience for this book vauthorization
code 27description 27qualifier 27
Ccompany ID record, viewing 26Company information 27company name 27configuring the system 6
ODBC tab 7Setting tab 6
connection string 7definition of 7for trading partner database 7system log 7
Contacts tabTrading Partner window 9
controlling agency 23conventions used in this document vii
Reference Guide
Ddata source name
for trading partner 7system log 7
data source name for reports 33deleting users 3Delimiter/Terminator tab on Trading Partner window
13destination
directory of file to be archived 35IP address 7port number 7
EEDI log icon 30EDIFACT tab
Trade Agreements window 22EDIFACT tab (inbound maps)
Trade Agreements window 22Envelope/Lookup tab
on Trading Partner window 10exception reports 31exiting the program 4
FFeature Guide v
GGeneral tab
Trade Agreements window 14Trading Partner window 8
groupcode 27
37
Index
description 27qualifier 27reference number 23
HHL7 tab
Trade Agreements window 25
Iicons
Archive 34EDI Log 30Report 30
Installation Guide vinterchange
agreement ID 23code 27control number 9description 27qualifier 27
internal ID 9IP address
for destination computer 7for source computer 7
Llogging out of the program 4logs, searching for 30
Mmailbox folder, for trading partner 9mailbox name, for trading partner 9management reports 32map directory 6modifying user privileges 2
38
Nname of
archive file 35file to be archived 35table used in report 33trading partner 9
OODBC tab
for configuring the system 7Overrides tab
Trade Agreements window 17
Pparameters, adding to reports 34password for reports 33passwords, modifying 2port number
for source computer 7of destination computer 7
privileges, modifying 2processing priority code 23profile number 27program, leaving the 4
RReference Guide vrelated documents vreport file 33Report icon 30report title 33reports
activity 31exception 31management 32parameters, adding 34user-defined 32
EC Gateway Operations Viewer
Index
Ssearching for logs 30security
code 27description 27qualifier 27
Setting tabfor configuring the system 6
sourcedirectory of file to be archived 35IP address 7port number 7
syntax ID 23system log
connection string 7data source name 7
system post office 6System Privileges window 4system, configuring the 6
Ttable name used in reports 33tables, number of included in report 33Trade Agreements window 13
EDIFACT tab 22EDIFACT tab (inbound maps) 22for EDIFACT standard 15for HL7 standard 16for X12 standard 14General tab 14HL7 tab 25Overrides tab 17X12 tab (inbound maps) 20X12 tab (outbound maps) 21
trading partnerconnection string 7data source name 7name 9
Trading Partner window 8Contacts tab 9Delimiter/Terminator tab 13Envelope/Lookup tab 10General tab 8
transactions activity reports 31
Reference Guide
typographical conventions used in this book vii
Uuser
ID for reports 33privileges, modifying 2
user names 2user-defined reports 32users
adding new 3deleting 3
Vviewing a company ID record 26
Wwindows
System – New 6Trade Agreements 13Trading Partner 8
XX12 tab (inbound maps)
Trade Agreements window 20X12 tab (outbound maps)
Trade Agreements window 21
39

Index
40
EC Gateway Operations Viewer