Embed Size (px)
Citation preview
Reference DS1 Streaming Transporter
USER MANUAL
ENGLISH
INTRODUCTION
Congratulations on your purchase! Consonance Ref DS1 is an Network Bridge and Streaming
Transporter designed with 3 key pricinples in mind: ease of use, universal compatibility with music
sources and sound quality. To achieve its best potential, please read this manual carefully. If
needed, our support team is there to assist for any doubt or question regarding our products at
QUICK START GUIDE
Ref DS1 is a ready to play device. From Unboxing, the unit is ready to play in less than 5 minutes.
In order to get started please follow those steps:
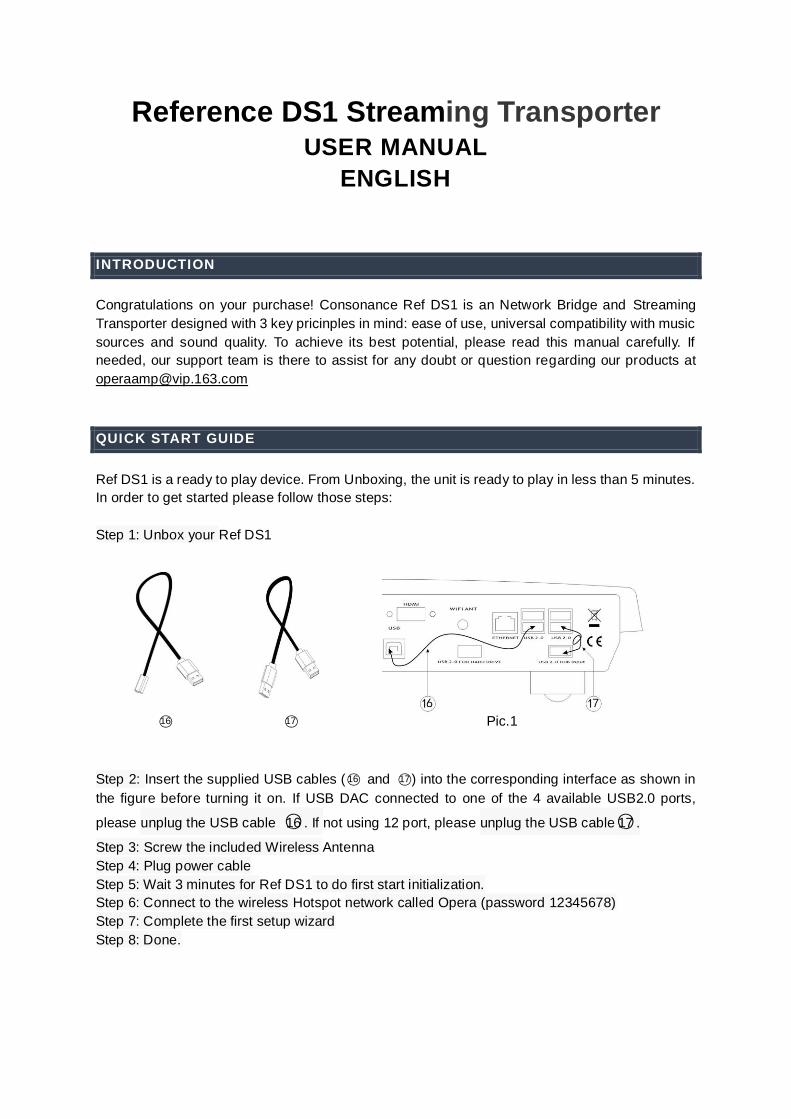
Step 1: Unbox your Ref DS1
○16 ○17 Pic.1
Step 2: Insert the supplied USB cables (○16 and ○17 ) into the corresponding interface as shown in
the figure before turning it on. If USB DAC connected to one of the 4 available USB2.0 ports,
please unplug the USB cable ○16 . If not using 12 port, please unplug the USB cable○17 .
Step 3: Screw the included Wireless Antenna
Step 4: Plug power cable
Step 5: Wait 3 minutes for Ref DS1 to do first start initialization.
Step 6: Connect to the wireless Hotspot network called Opera (password 12345678)
Step 7: Complete the first setup wizard
Step 8: Done.

2
WHAT IT’S IN THE PAGKAGE
Ref DS1
Wireless Antenna
USB cable for Hub and USB cable for Xmos interface
Power cable
User Manual
I \O OVERVIEW
1/2 Front
○1 Power Switch:The switch is on the left and the red LED is on, which is turn off and charging.
The switch is on the right side, the green LED is on, and it is working on the
battery supply.
○2 Charging status indication: The red LED is on, indicating that it is in the charging state, and
the off is indicating that the charging is over.
○3 Battery supply indication: The green LED lights up to indicate that the RDS1 is working on
battery supply.
REAR I \O OVERVIEW
○4 Power Socket: Power input port of the charging device.
○5 AES Digital Output
○6 Coaxial S/PDIF Digital Output
○7 BNC S/PDIF Digital Output
○8 I2S Digital Output
3
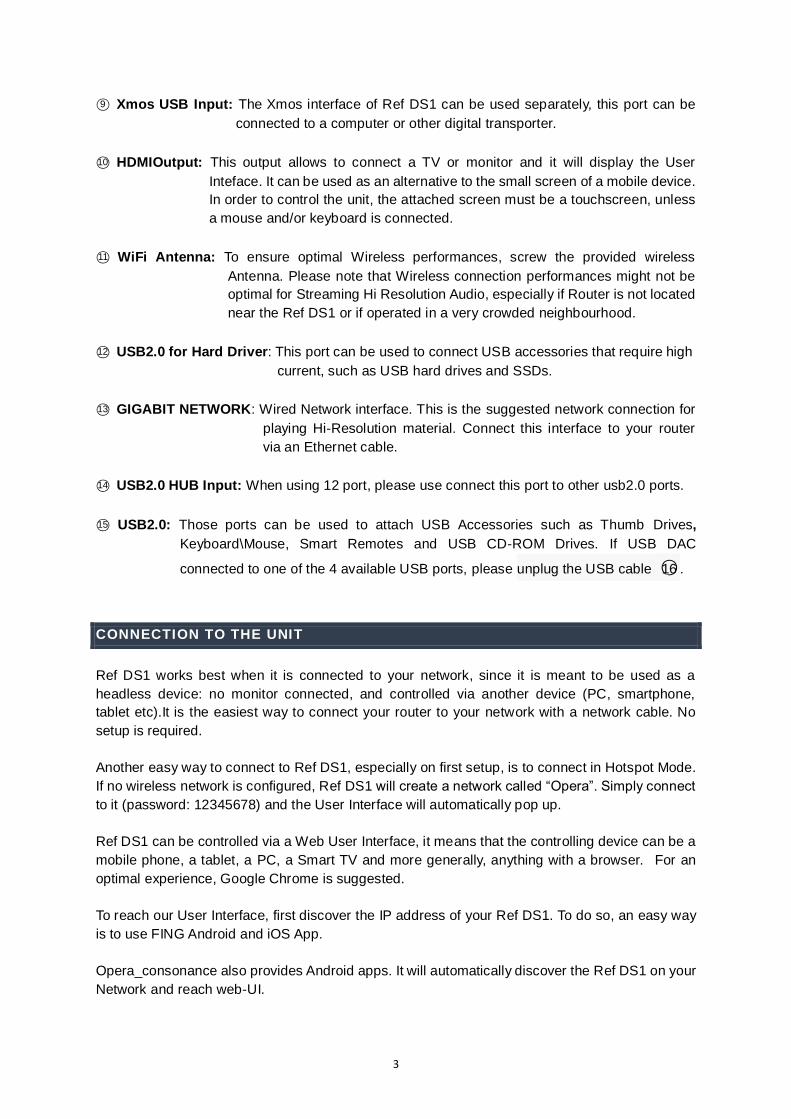
○9 Xmos USB Input: The Xmos interface of Ref DS1 can be used separately, this port can be
connected to a computer or other digital transporter.
○10 HDMIOutput: This output allows to connect a TV or monitor and it will display the User
Inteface. It can be used as an alternative to the small screen of a mobile device.
In order to control the unit, the attached screen must be a touchscreen, unless
a mouse and/or keyboard is connected.
○11 WiFi Antenna: To ensure optimal Wireless performances, screw the provided wireless
Antenna. Please note that Wireless connection performances might not be
optimal for Streaming Hi Resolution Audio, especially if Router is not located
near the Ref DS1 or if operated in a very crowded neighbourhood.
○12 USB2.0 for Hard Driver: This port can be used to connect USB accessories that require high
current, such as USB hard drives and SSDs.
○13 GIGABIT NETWORK: Wired Network interface. This is the suggested network connection for
playing Hi-Resolution material. Connect this interface to your router
via an Ethernet cable.
○14 USB2.0 HUB Input: When using 12 port, please use connect this port to other usb2.0 ports.
○15 USB2.0: Those ports can be used to attach USB Accessories such as Thumb Drives,
Keyboard\Mouse, Smart Remotes and USB CD-ROM Drives. If USB DAC
connected to one of the 4 available USB ports, please unplug the USB cable ○16 .
CONNECTION TO THE UNIT
Ref DS1 works best when it is connected to your network, since it is meant to be used as a
headless device: no monitor connected, and controlled via another device (PC, smartphone,
tablet etc).It is the easiest way to connect your router to your network with a network cable. No
setup is required.
Another easy way to connect to Ref DS1, especially on first setup, is to connect in Hotspot Mode.
If no wireless network is configured, Ref DS1 will create a network called “Opera”. Simply connect
to it (password: 12345678) and the User Interface will automatically pop up.
Ref DS1 can be controlled via a Web User Interface, it means that the controlling device can be a
mobile phone, a tablet, a PC, a Smart TV and more generally, anything with a browser. For an
optimal experience, Google Chrome is suggested.
To reach our User Interface, first discover the IP address of your Ref DS1. To do so, an easy way
is to use FING Android and iOS App.
Opera_consonance also provides Android apps. It will automatically discover the Ref DS1 on your
Network and reach web-UI.
4
Apple system opens Safari browser, enter opera.local/, PC recommends using Google Chrome,
enter opera/ to reach web-UI.
FIRST SETUP
Once the system is operational and you have connected to it through your network or via the
hotspot, you will reach Opera's web-UI.
The first time please click on the cog-wheel in the top right part of the UI, select system and
click on "Run first config Wizard", a helper will assist you to configure Ref DS1. Any configuration
done in this phase can be later reverted.
Those are the first configuration steps:
LANGUAGE: Select your desired operational language.
NAME: Give your Ref DS1 a unique name like “Living Room”, “Studio” etc. This will be useful to
identify your Ref DS1 in case you have more than one. The default name is “Opera”.
OUTPUT: Select the desired audio output: USB DAC.
NETWORK: If you wish to configure your Ref DS1 to connect to your Wireless Network, here you
will be able to see all available wireless network and connect to them. In case of Hotspot
operation, Ref DS1 will connect to the wireless network after the Setup Wizard has been
terminated. In this case, you must find it’s IP address again (see Connection to the Unit section).
MUSIC: You can configure a Network Attached Storage for music retrieval or connect a USB
Drive with your music.
Once the first setup has been completed, your Ref DS1 is ready.
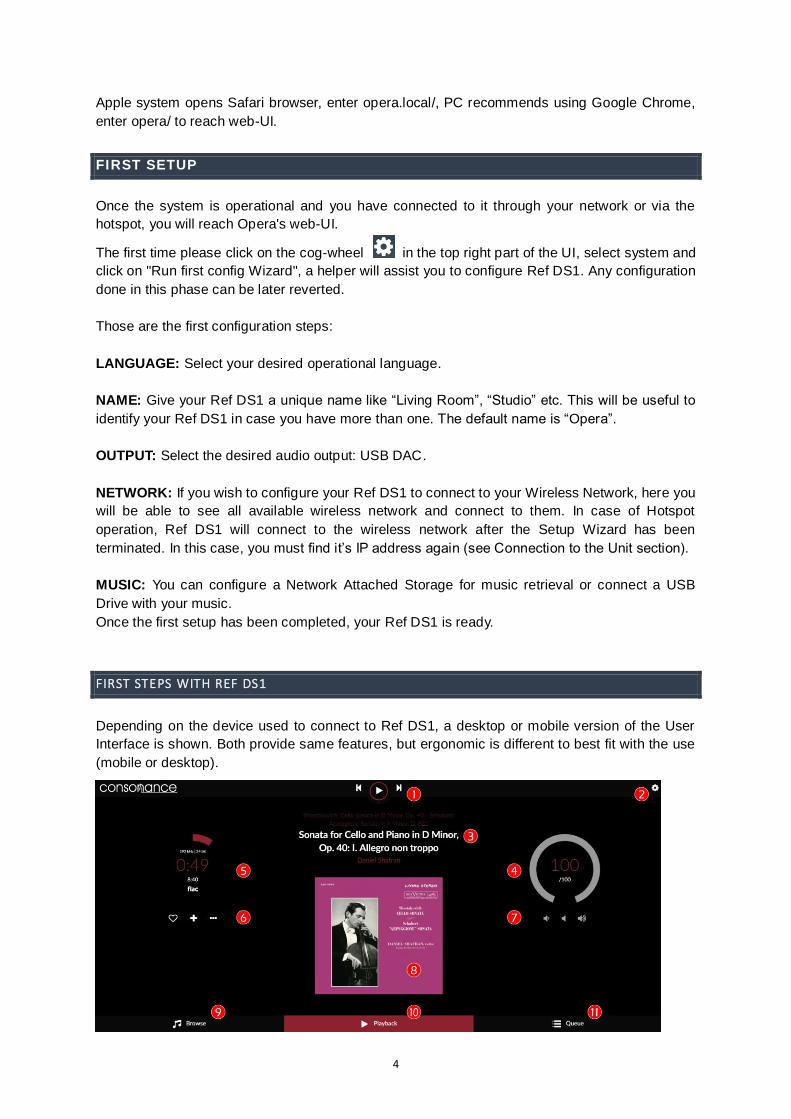
FIRST STEPS WITH REF DS1
Depending on the device used to connect to Ref DS1, a desktop or mobile version of the User
Interface is shown. Both provide same features, but ergonomic is different to best fit with the use
(mobile or desktop).
5
Opera’s User Interface is made up by 4 main components:
Playback Page tab
Browser Page tab
Play Queue tab
Settings pages
1 - Command buttons
Play/Stop
Previous: jump to previous track
Next: jump to next track
2 - Settings gears
Here you'll find all settings for Ref DS1 such
as:
My Music: Music sources (nas, usb and
album art management)
Playback options: Output device settings
(dac, mixer, resampling)
Network : Set your wifi, ethernet, dns
System: To select your language, Name
your device, Run first config Wizard, have
version number and update if available, and
see credits
3 - Track text information
First line: Album name
Second line: Track title
Third line: Artist name
4 - Volume Settings
Inside value: Current volume level
External circle: Graphic volume level.
Change the volume by moving it.
5 - Timer zone
Miscellaneous info about the played track
First line: Sample rate / bit resolution
Second line: Elapsed time
Third line: Total duration
Fourth line: Track source
6 - Track management
Left: Add to favorite
Middle: Add to playlist
Right: Go to - Artist/Album – Twitter
7 - Volume control
Left: Lower volume
Middle: Mute
Right: Higher volume
8 - Album art Display
Display album art for the played track or
radio if available.
9 - Browse page
Clicking here, you access to all available
music on your system (Nas, Usb disk, radio,
Spotify, Youtube etc depending on plugins/
options installed).
10- Playback
The current page
11 - Queue
Here you access to the current queue with
all tracks in it.
6
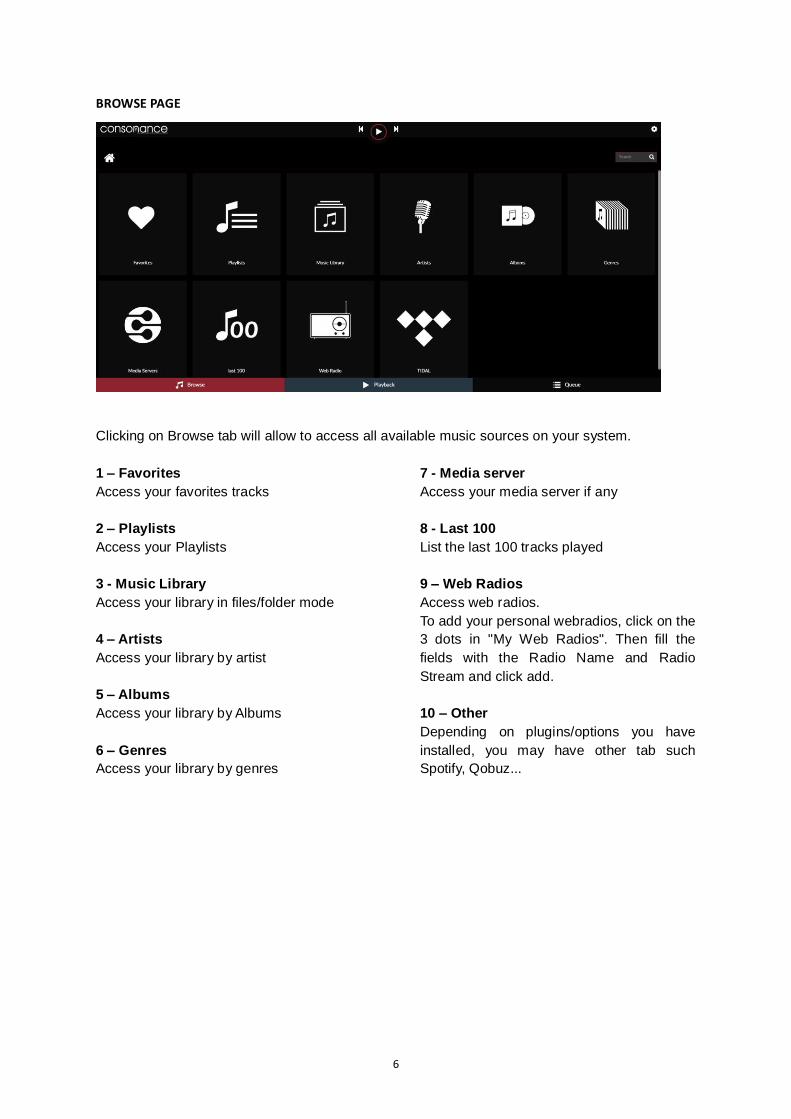
BROWSE PAGE
Clicking on Browse tab will allow to access all available music sources on your system.
1 – Favorites
Access your favorites tracks
2 – Playlists
Access your Playlists
3 - Music Library
Access your library in files/folder mode
4 – Artists
Access your library by artist
5 – Albums
Access your library by Albums
6 – Genres
Access your library by genres
7 - Media server
Access your media server if any
8 - Last 100
List the last 100 tracks played
9 – Web Radios
Access web radios.
To add your personal webradios, click on the
3 dots in "My Web Radios". Then fill the
fields with the Radio Name and Radio
Stream and click add.
10 – Other
Depending on plugins/options you have
installed, you may have other tab such
Spotify, Qobuz...
7
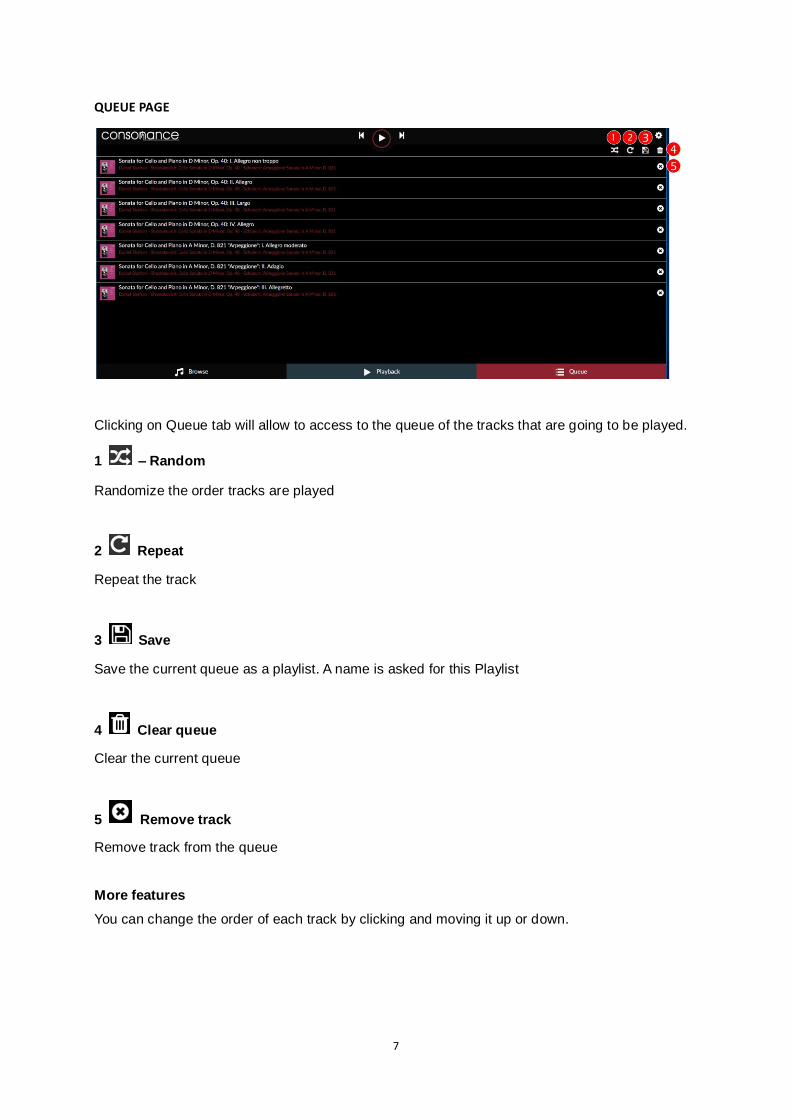
QUEUE PAGE
Clicking on Queue tab will allow to access to the queue of the tracks that are going to be played.
1 – Random
Randomize the order tracks are played
2 Repeat
Repeat the track
3 Save
Save the current queue as a playlist. A name is asked for this Playlist
4 Clear queue
Clear the current queue
5 Remove track
Remove track from the queue
More features
You can change the order of each track by clicking and moving it up or down.
8
SOFTWARE UPDATES
Ref DS1 features an OTA (Over The Air) updater, meant to allow seamless and reliable way to
update to new system versions. It’s strongly suggested to check for updates periodically to ensure
that your system is always at the latest version.
How to check for Updates
Verify that your Ref DS1 is connected to the Internet.
Click on the cog-wheel in the top right part of the UI.
Select system.
Click on "Check Updates".
If an update is available, you'll be presented with the new features.
Click on "Update Now".
System update will start, and depending on the update size it might take up to 20 minutes.
Once Update has finished, you'll be asked to reboot. Do it.
The system will now restart, and the new version will be applied.
IMPORTANT: Do not remove power in this phase, as it might damage the unit.
SPECIFICATIONS
USB output: 4X USB 2.0, PCM 32 bits 768kHz, DSD512
CPU: Quad core 1.8 GHz ARM Cortex-A17 with passive heatsink
RAM: 2GB
Internal Memory: 16GB Emmc
Video Output: HDMI, up to 4K resolution
LAN: Gigabit
Wireless Networking: 802.11 b/g/n Wi-Fi & Bluetooth 4.0 + EDR with External Antenna
Supported audio file formats:
DSD: DSF (DSD), DIFF (DSD)
PCM: FLAC, Apple Lossless (ALAC), WAV, AIFF, APE, MP3, AAC
Supported audio sample rates, bit depths, number of channels:
PCM, 44.1khz-384kHz, 16-32bit, Stereo
DSD, 2.8MHz-22.4MHz, 1bit, Stereo
Digital inputs:
USB2.0
Digital output:
USB, I2S, Support Dop for Coaxial, AES, BNC
Dimensions: 352 ×290 ×80mm (W×D×H)
Weight: 6kg
* Specifications subject to change without notice.
9
WARRANTY
Opera audio guarantees each product manufactured by us to be free from defects in materials and
workmanship under normal use. Our obligation under this warranty is limited to making good at
our factory any part or parts thereof which shall, within 1 year after delivery to the original
purchaser, be returned to us with transportation charges prepaid, and which an examination shall
disclose to have been thus defective; this warranty being expressly in lieu of all other warranties
expressed or implied and of all other obligations or liabilities on our part. This warranty shall not
apply to any Opera audio product which shall have been repaired or altered outside of our factory
in any way so as to affect its stability, nor which has been subject to misuse, negligence or
accident. Warranties of the vacuum tubes are by the respective manufacturers, usually 90 days.
Please mail or e-mail the Registration Card to the address as follows:
The Opera Audio Co., Ltd.
No.2 Jiuxianqiao Road,
Chaoyang District, Beijing, China
Tel: 86 10 59789215
Fax: 86 10 59789265
http://www.opera-consonance.com
Registration Card
Name
Address
City
State
Zip
Telephone
Model
Serial Number
Purchase Date
Dealer