Embed Size (px)
Citation preview
Reel RepairReel RepairAllen TurnerAllen Turner

BackgroundBackground
• When I got my boat I bought some big, When I got my boat I bought some big, inexpensive spinning outfits that didn’t lastinexpensive spinning outfits that didn’t last
• I’ve been downsizing ever since I’ve been downsizing ever since • I’ve bought dozens of high quality but less than I’ve bought dozens of high quality but less than
perfect reels onlineperfect reels online• Along the way I’ve learned a lot about reel Along the way I’ve learned a lot about reel
repairrepair• Tommy Thompson asked if I could share what Tommy Thompson asked if I could share what
I’ve learnedI’ve learned• So here I amSo here I am
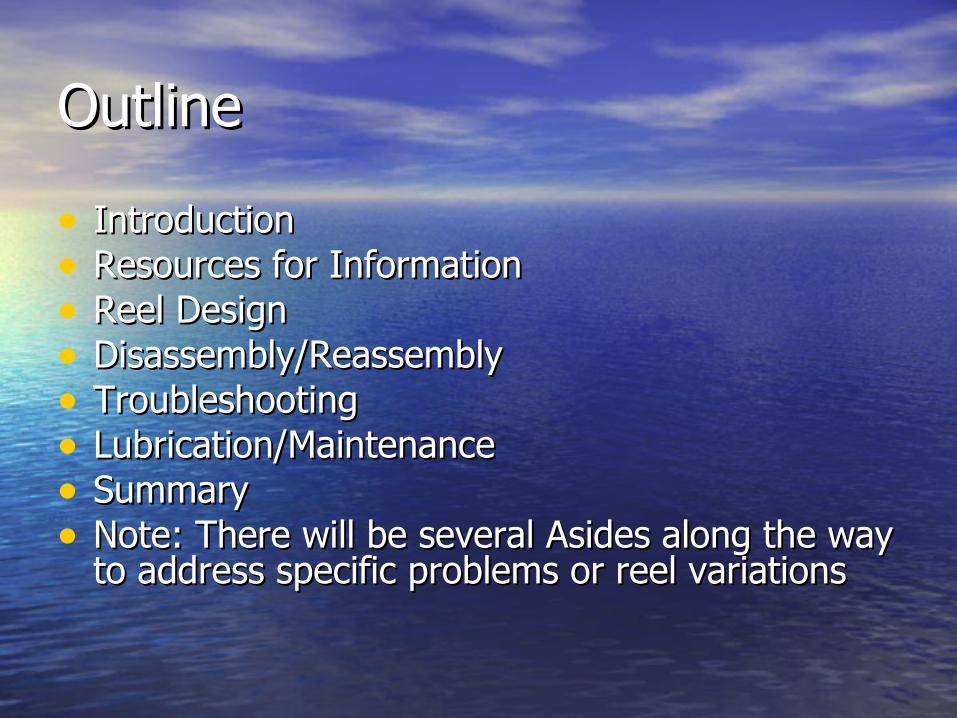
OutlineOutline
• IntroductionIntroduction• Resources for InformationResources for Information• Reel DesignReel Design• Disassembly/ReassemblyDisassembly/Reassembly• TroubleshootingTroubleshooting• Lubrication/MaintenanceLubrication/Maintenance• SummarySummary• Note: There will be several Asides along the way Note: There will be several Asides along the way
to address specific problems or reel variationsto address specific problems or reel variations
IntroductionIntroduction
• Fishing reels are mechanical devices that Fishing reels are mechanical devices that are used in unforgiving environmentsare used in unforgiving environments
• Parts break, bend and rust…Parts break, bend and rust…• Maintenance and Repair are necessary on Maintenance and Repair are necessary on
occasionoccasion• Tonight I’ll Show you how to do both Tonight I’ll Show you how to do both

Resources Resources
• The most important resource is YOU!The most important resource is YOU!• Reel Schematics available on lineReel Schematics available on line
– www.shimano.comwww.shimano.com– www.pennreels.comwww.pennreels.com– www.quantumfishing.comwww.quantumfishing.com
• Reel PartsReel Parts– The Tackle BoxThe Tackle Box– Bass Pro Shops, Reel Parts/Repair (417) 873-5274 Bass Pro Shops, Reel Parts/Repair (417) 873-5274 – Shimano Customer Service (877)-577-0600Shimano Customer Service (877)-577-0600– VXB Bearings www.vxb.comVXB Bearings www.vxb.com
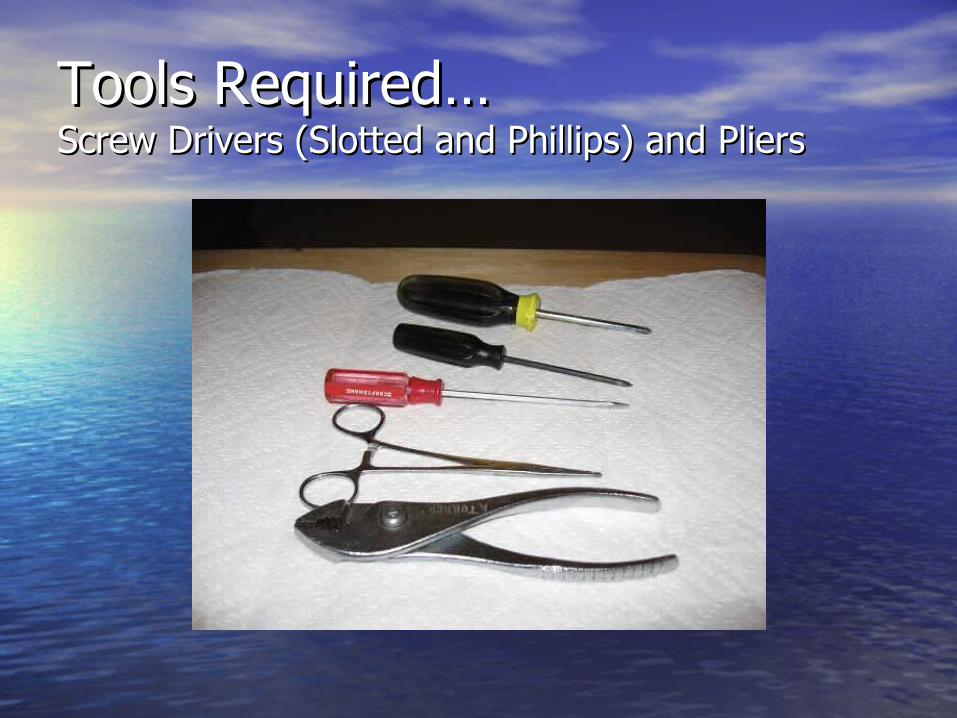
Tools Required…Tools Required…Screw Drivers (Slotted and Phillips) and PliersScrew Drivers (Slotted and Phillips) and Pliers

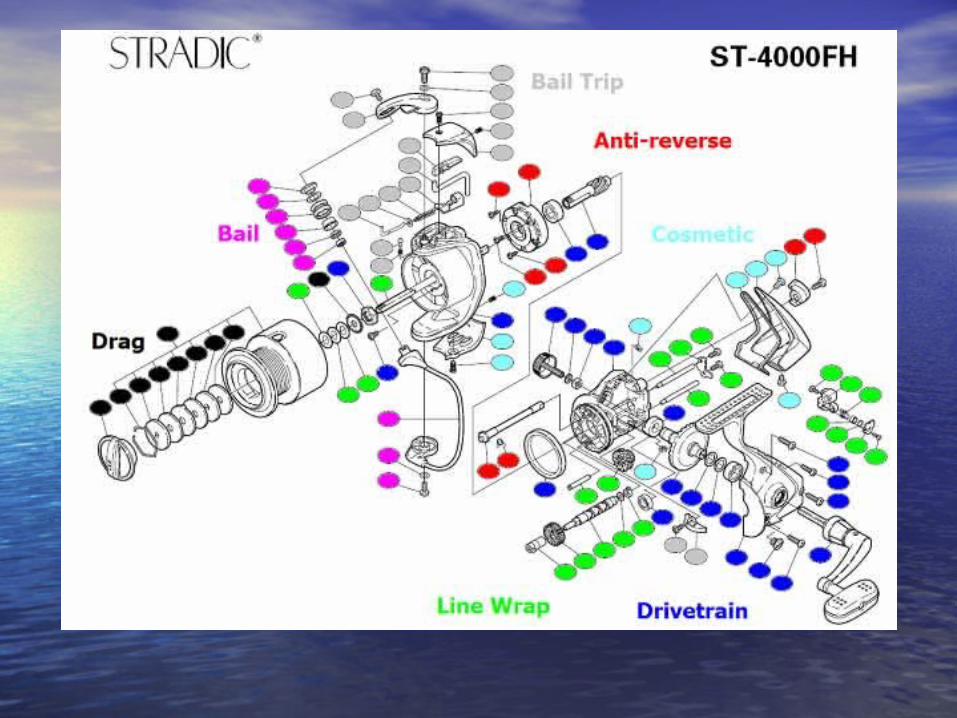
Reel DesignReel Design
• Understanding the functions of a reel allows you to Understanding the functions of a reel allows you to isolate problems when they occurisolate problems when they occur
• Spinning Reel Functions areSpinning Reel Functions are– DrivetrainDrivetrain– Bail/Bail TripBail/Bail Trip– Anti-ReverseAnti-Reverse– Line WrapLine Wrap– DragDrag– CosmeticCosmetic
• All reel parts support one or more of these functionsAll reel parts support one or more of these functions• Primary moving parts are contained in the Drivetrain and Primary moving parts are contained in the Drivetrain and
Line Wrap systemsLine Wrap systems
DrivetrainDrivetrain
• The drivetrain translates the rotation of The drivetrain translates the rotation of the handle into the rotation of the rotorthe handle into the rotation of the rotor
• The drivetrain usually consists ofThe drivetrain usually consists of– Two gears (main, pinion)Two gears (main, pinion)– Two bearings to support each gearTwo bearings to support each gear– Reel body that supports the bearingsReel body that supports the bearings– RotorRotor
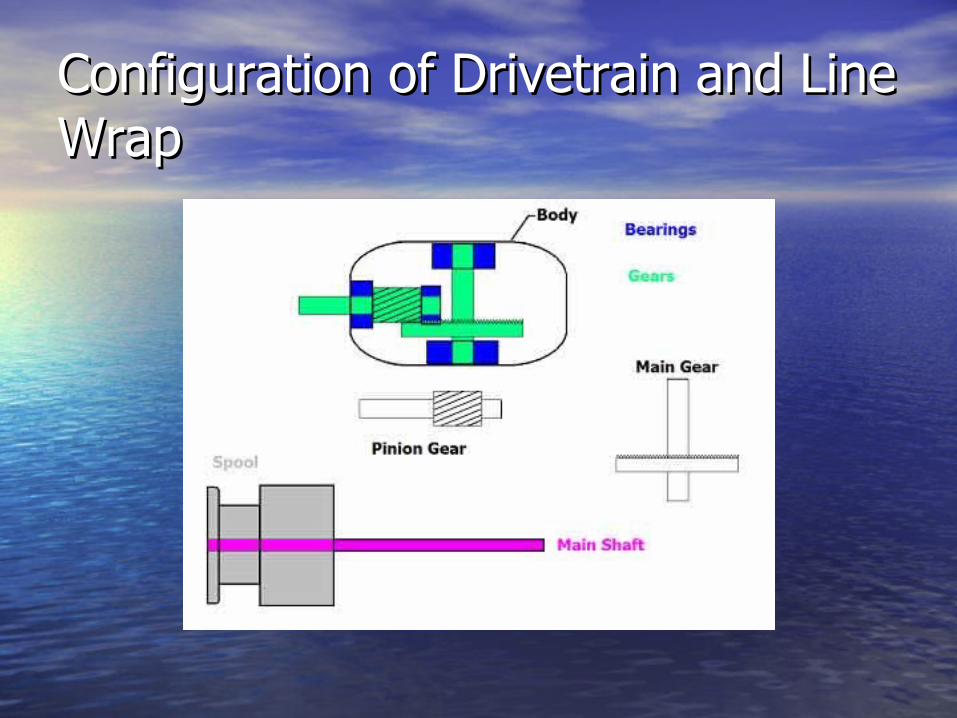
Configuration of Drivetrain and Line Configuration of Drivetrain and Line WrapWrap

Shakesphere DemoShakesphere Demo


Relative ComplexityRelative Complexity
523Line Wrap
1923Drivetrain
-9Cosmetic
88Anti-Reverse
-9Drag
89Bail
1417Bail Trip
Number of Sahara Parts
Number of Stradic Parts
Function
With a Basic Understanding of Reel With a Basic Understanding of Reel Design and FunctionDesign and Function• Need to Isolate ProblemsNeed to Isolate Problems• Disassemble Reel to Access Defective PartsDisassemble Reel to Access Defective Parts• Identify and Replace Defective PartsIdentify and Replace Defective Parts• Reassemble ReelReassemble Reel• In any case you need to be able to take the reel In any case you need to be able to take the reel
apart and put it back together…Here’s how!apart and put it back together…Here’s how!– I’ll use a Shimano Stradic 4000FHI’ll use a Shimano Stradic 4000FH– Typical Complex Line Wrap ReelTypical Complex Line Wrap Reel– Otherwise Similar to most Spinning ReelsOtherwise Similar to most Spinning Reels– Will point out some differences with other models Will point out some differences with other models
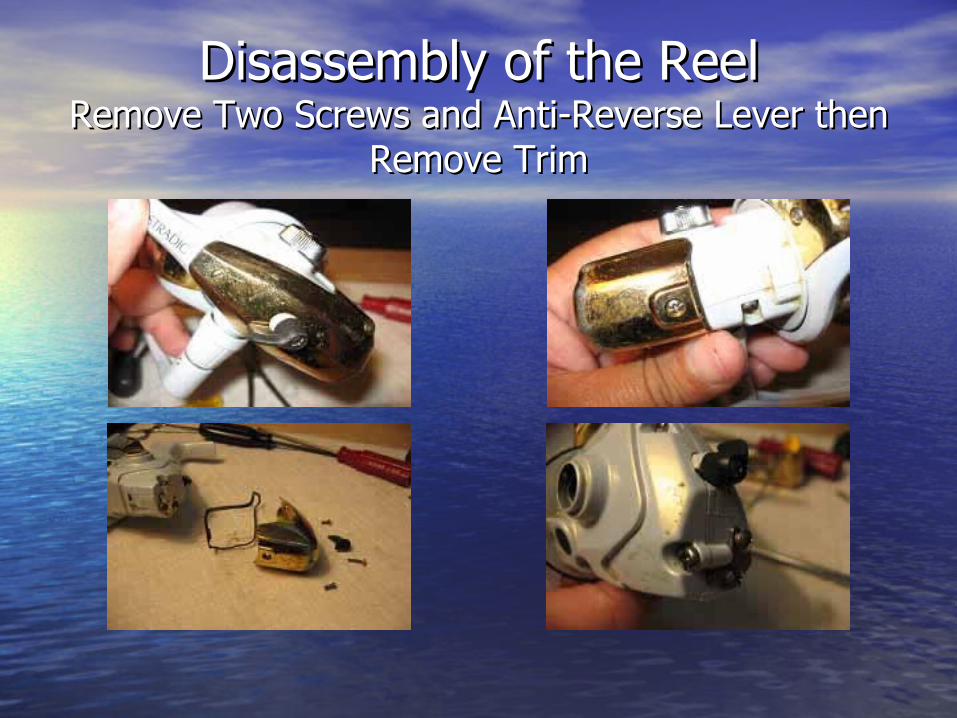
Disassembly of the ReelDisassembly of the ReelRemove Two Screws and Anti-Reverse Lever then Remove Two Screws and Anti-Reverse Lever then
Remove TrimRemove Trim
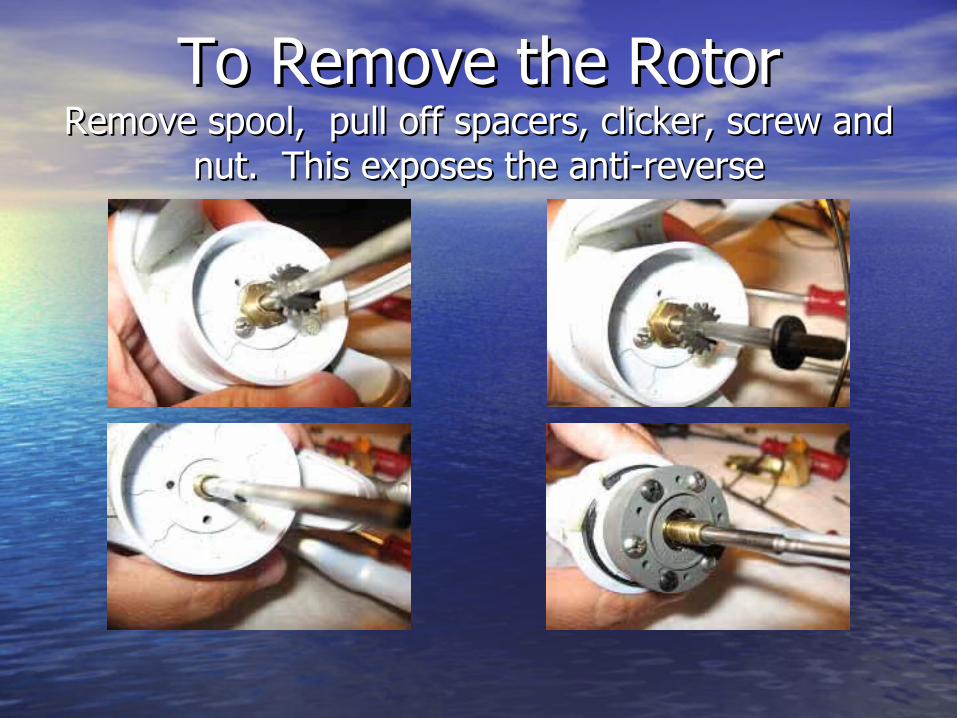
To Remove the RotorTo Remove the RotorRemove spool, pull off spacers, clicker, screw and Remove spool, pull off spacers, clicker, screw and
nut. This exposes the anti-reversenut. This exposes the anti-reverse
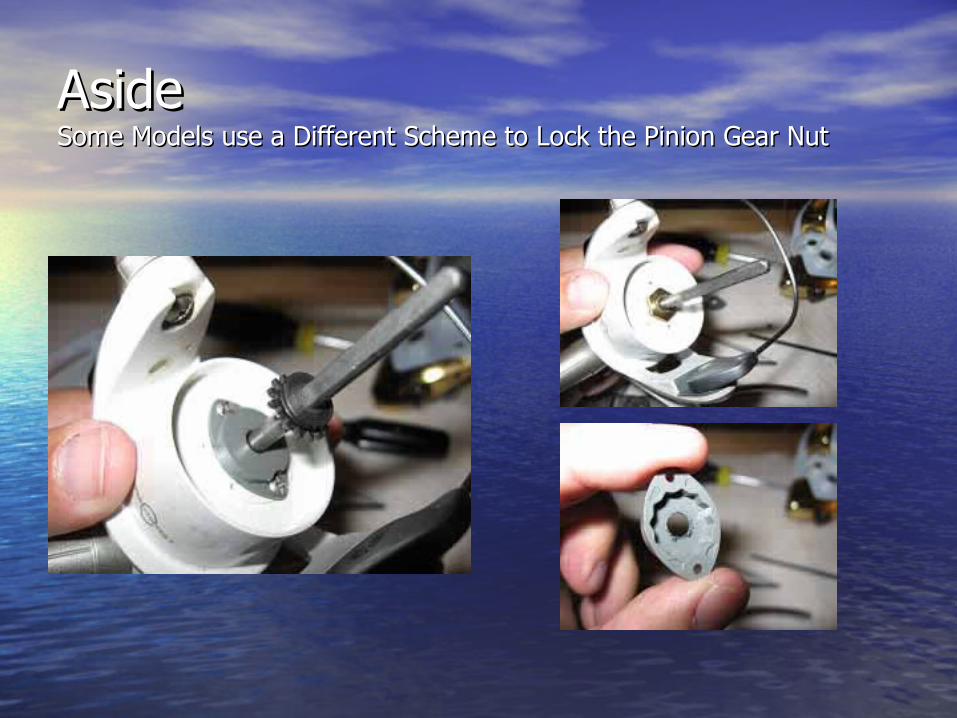
AsideAsideSome Models use a Different Scheme to Lock the Pinion Gear NutSome Models use a Different Scheme to Lock the Pinion Gear Nut
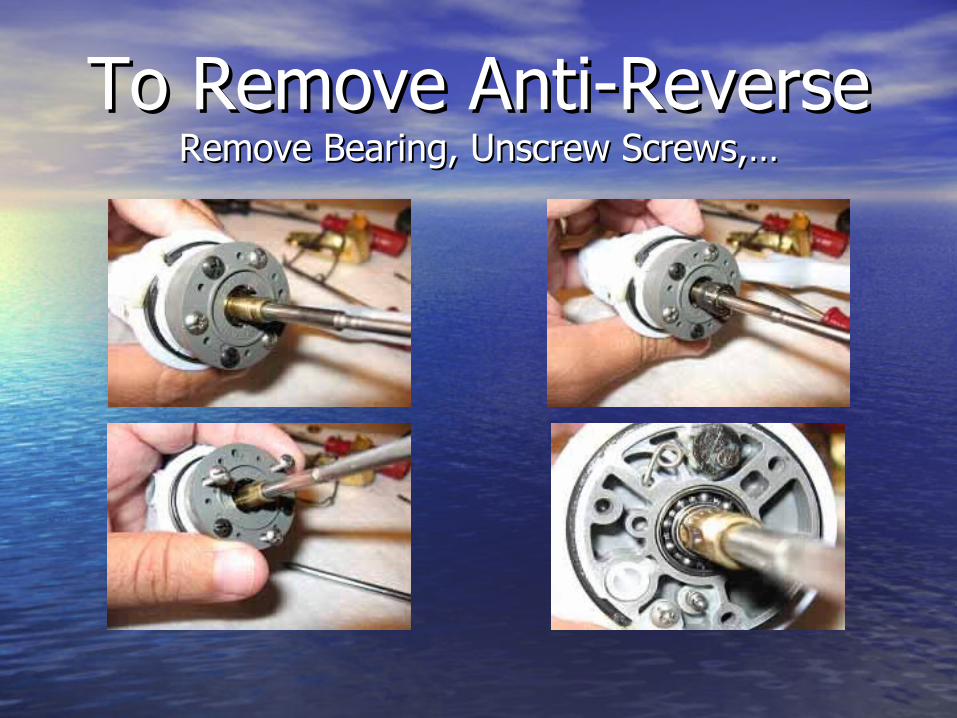
To Remove Anti-ReverseTo Remove Anti-ReverseRemove Bearing, Unscrew Screws,…Remove Bearing, Unscrew Screws,…
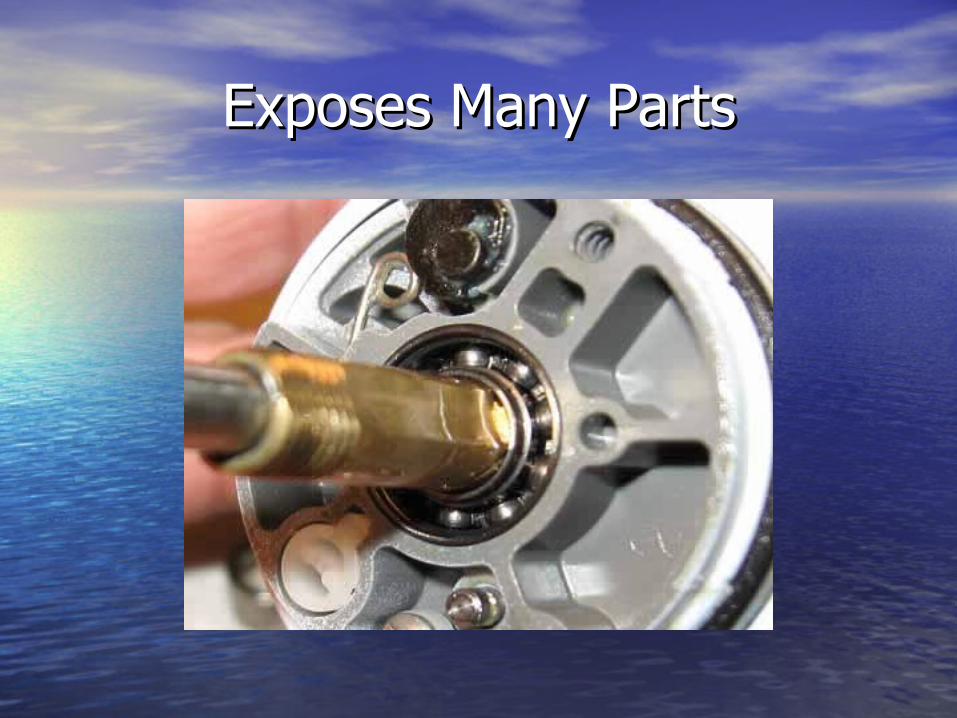
Exposes Many PartsExposes Many Parts
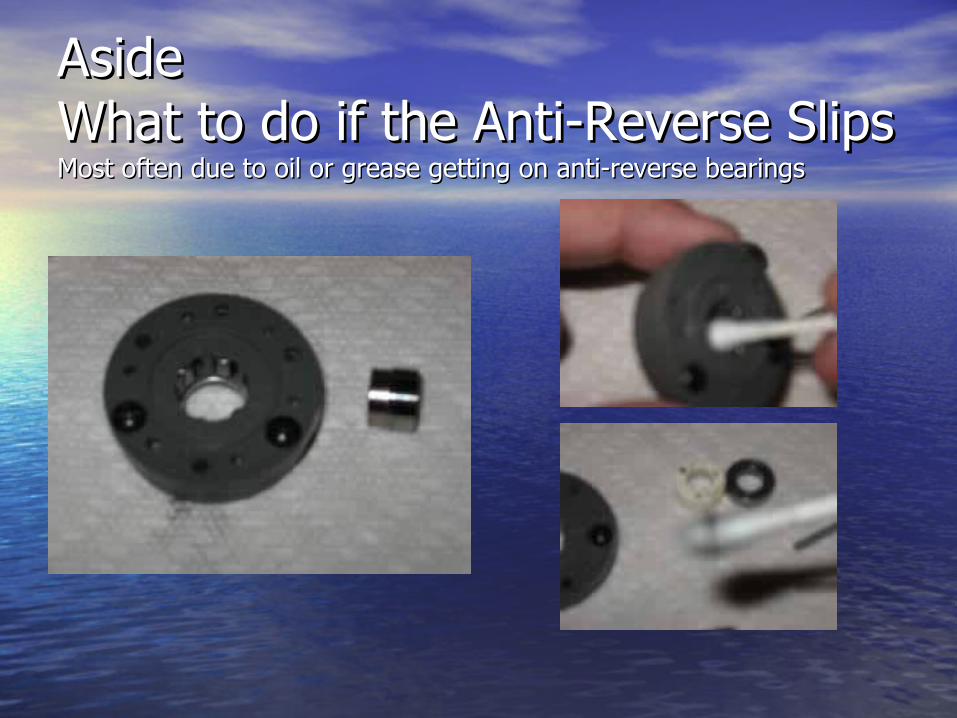
AsideAsideWhat to do if the Anti-Reverse SlipsWhat to do if the Anti-Reverse SlipsMost often due to oil or grease getting on anti-reverse bearingsMost often due to oil or grease getting on anti-reverse bearings
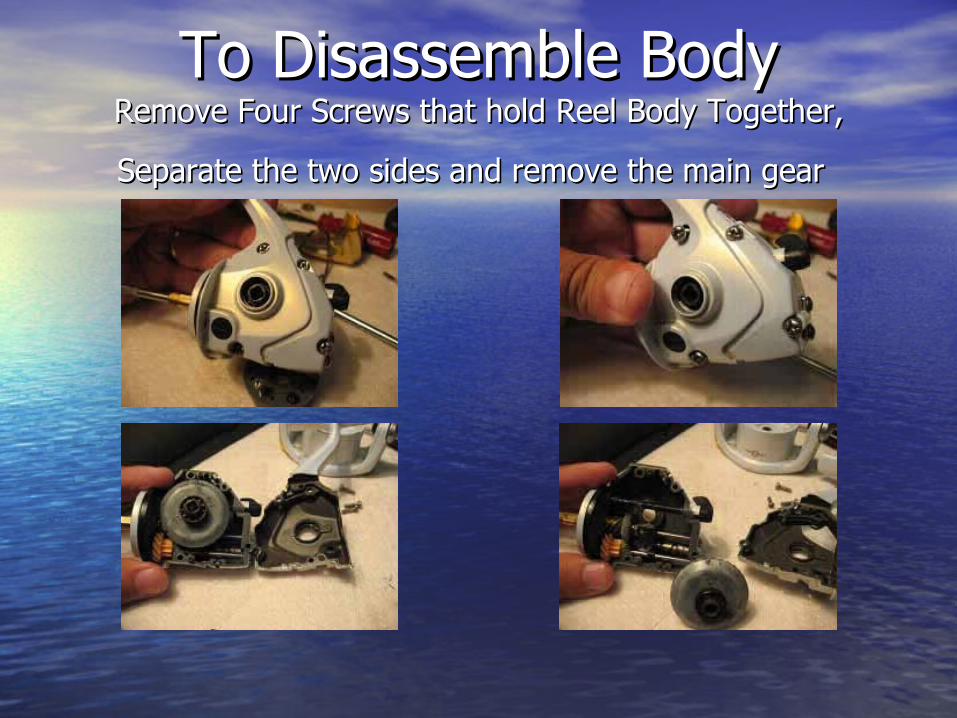
To Disassemble BodyTo Disassemble BodyRemove Four Screws that hold Reel Body Together, Remove Four Screws that hold Reel Body Together,
Separate the two sides and remove the main gearSeparate the two sides and remove the main gear

Rotating Idler Gear Moves Line Rotating Idler Gear Moves Line Wrap Gear and Main ShaftWrap Gear and Main Shaft
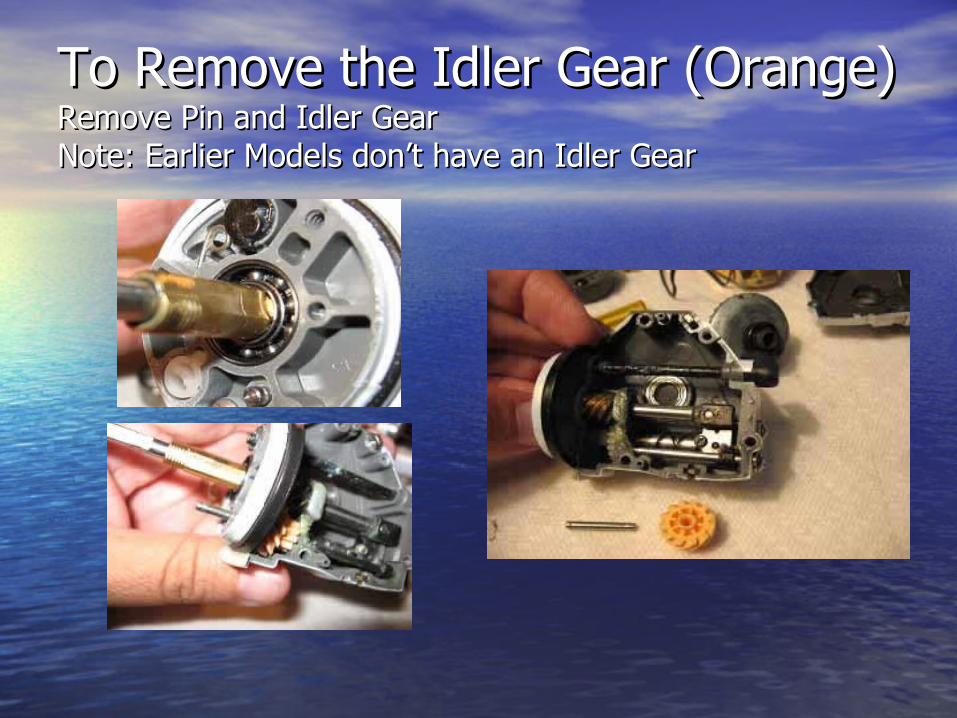
To Remove the Idler Gear (Orange)To Remove the Idler Gear (Orange)Remove Pin and Idler GearRemove Pin and Idler GearNote: Earlier Models don’t have an Idler GearNote: Earlier Models don’t have an Idler Gear
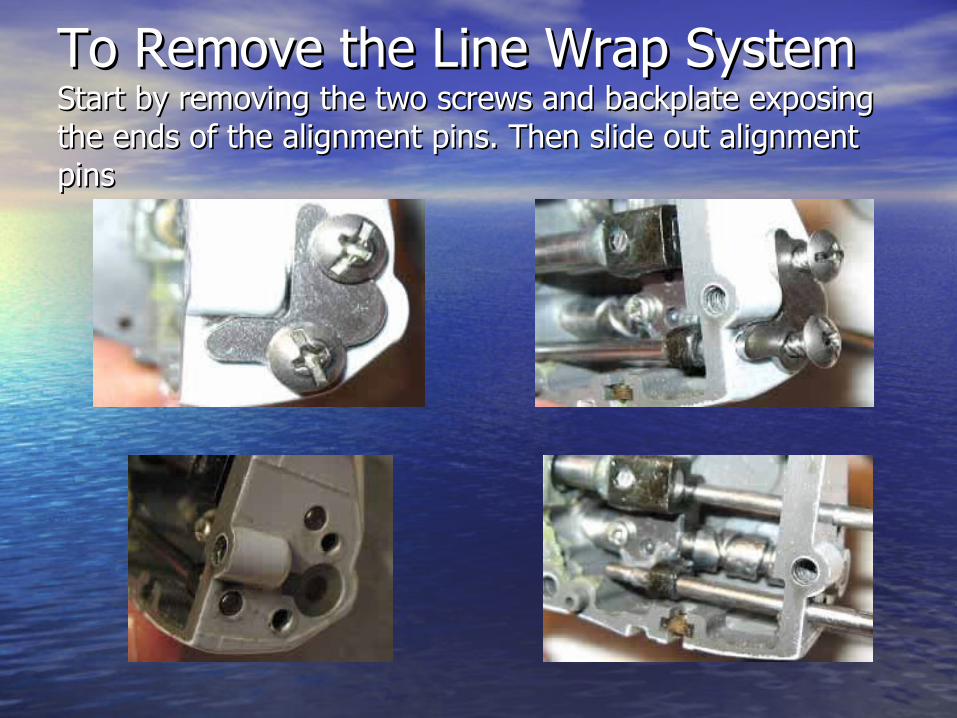
To Remove the Line Wrap System To Remove the Line Wrap System Start by removing the two screws and backplate exposing Start by removing the two screws and backplate exposing the ends of the alignment pins. Then slide out alignment the ends of the alignment pins. Then slide out alignment pinspins
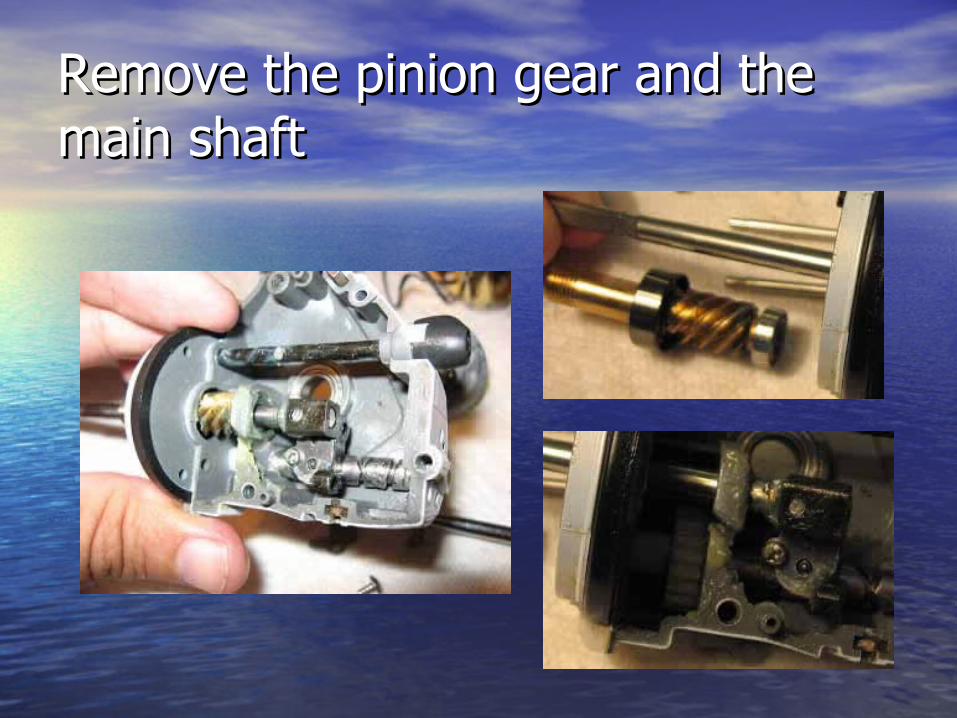
Remove the pinion gear and the Remove the pinion gear and the main shaftmain shaft
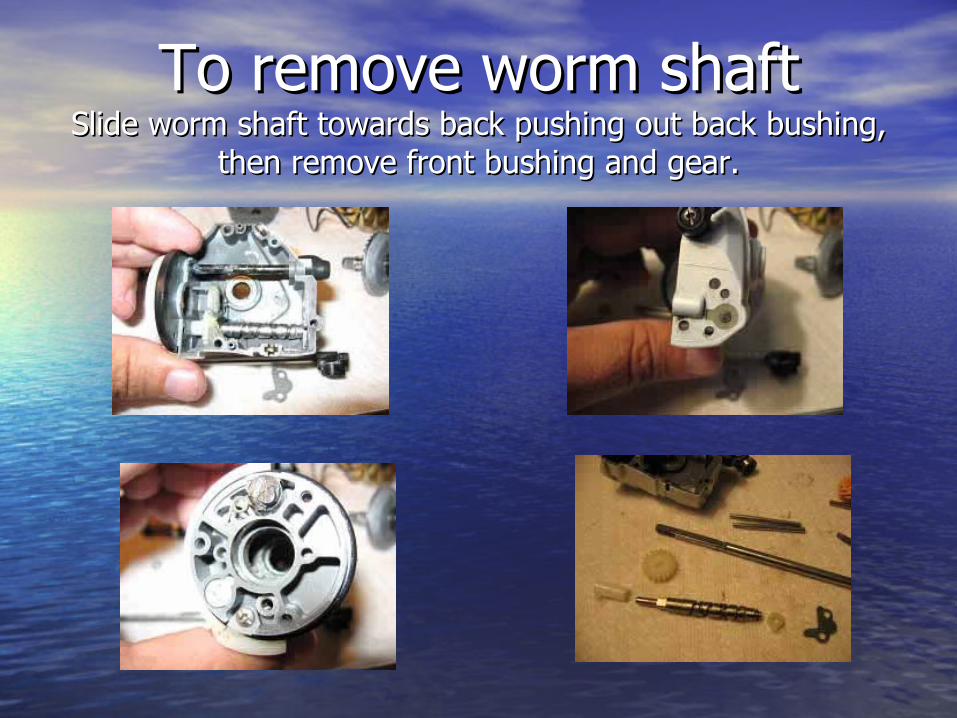
To remove worm shaftTo remove worm shaftSlide worm shaft towards back pushing out back bushing, Slide worm shaft towards back pushing out back bushing,
then remove front bushing and gear.then remove front bushing and gear.
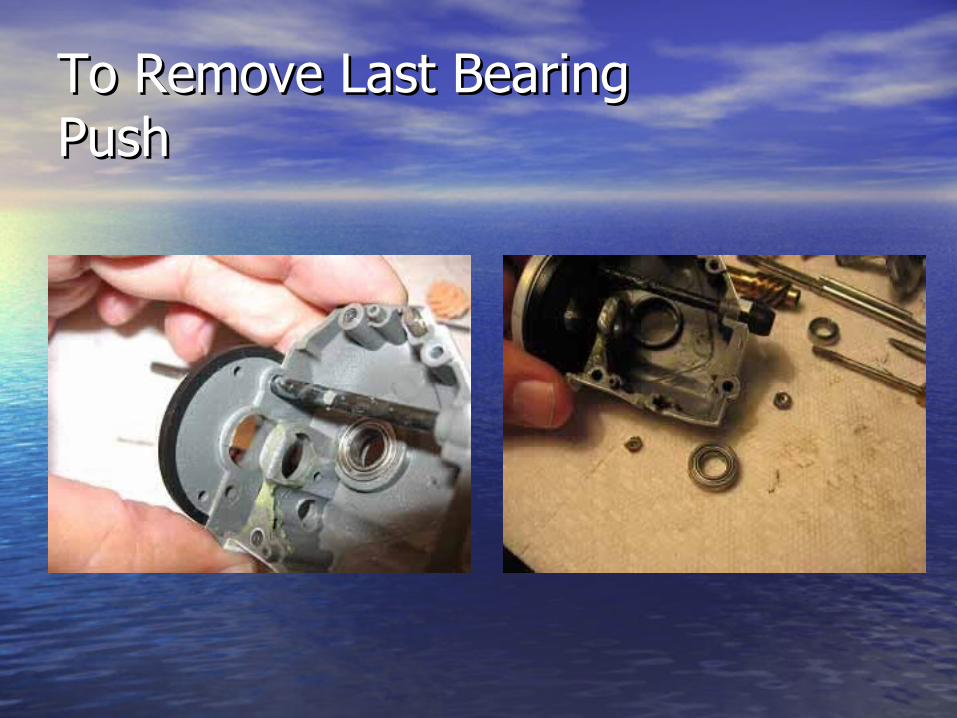
To Remove Last BearingTo Remove Last BearingPushPush
While DisassemblingWhile Disassembling
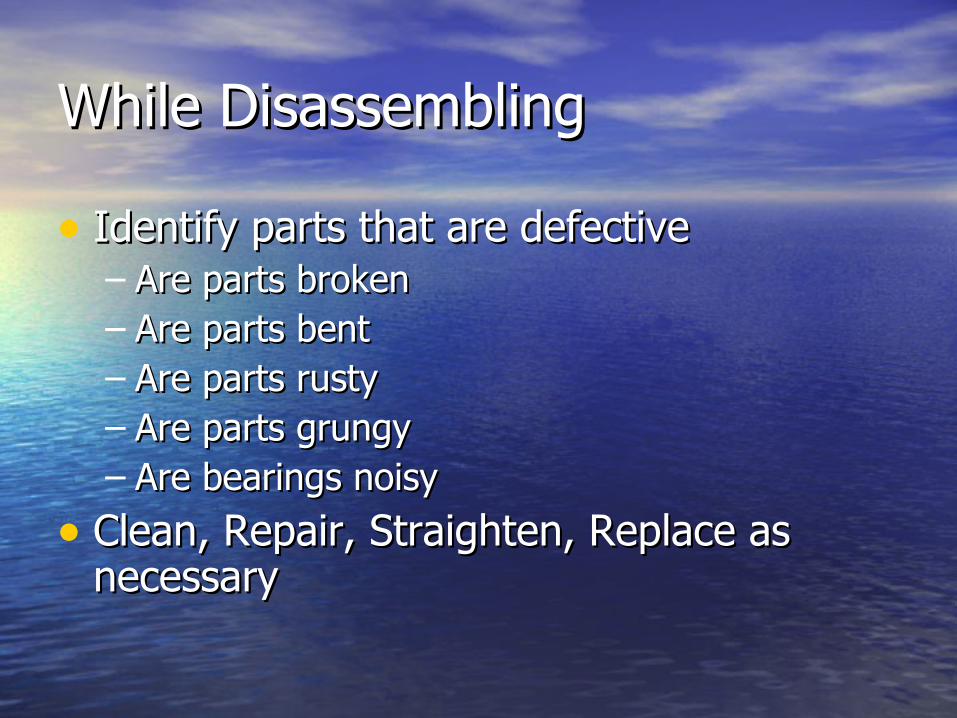
• Identify parts that are defectiveIdentify parts that are defective– Are parts brokenAre parts broken– Are parts bentAre parts bent– Are parts rustyAre parts rusty– Are parts grungyAre parts grungy– Are bearings noisyAre bearings noisy
• Clean, Repair, Straighten, Replace as Clean, Repair, Straighten, Replace as necessarynecessary
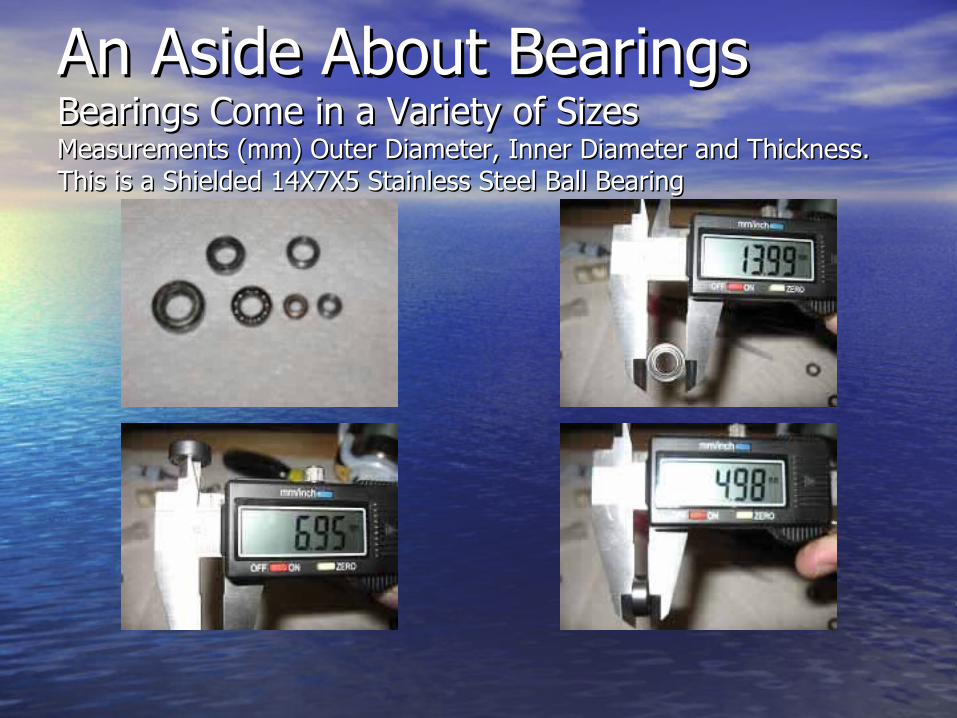
An Aside About BearingsAn Aside About BearingsBearings Come in a Variety of SizesBearings Come in a Variety of SizesMeasurements (mm) Outer Diameter, Inner Diameter and Thickness. Measurements (mm) Outer Diameter, Inner Diameter and Thickness. This is a Shielded 14X7X5 Stainless Steel Ball BearingThis is a Shielded 14X7X5 Stainless Steel Ball Bearing
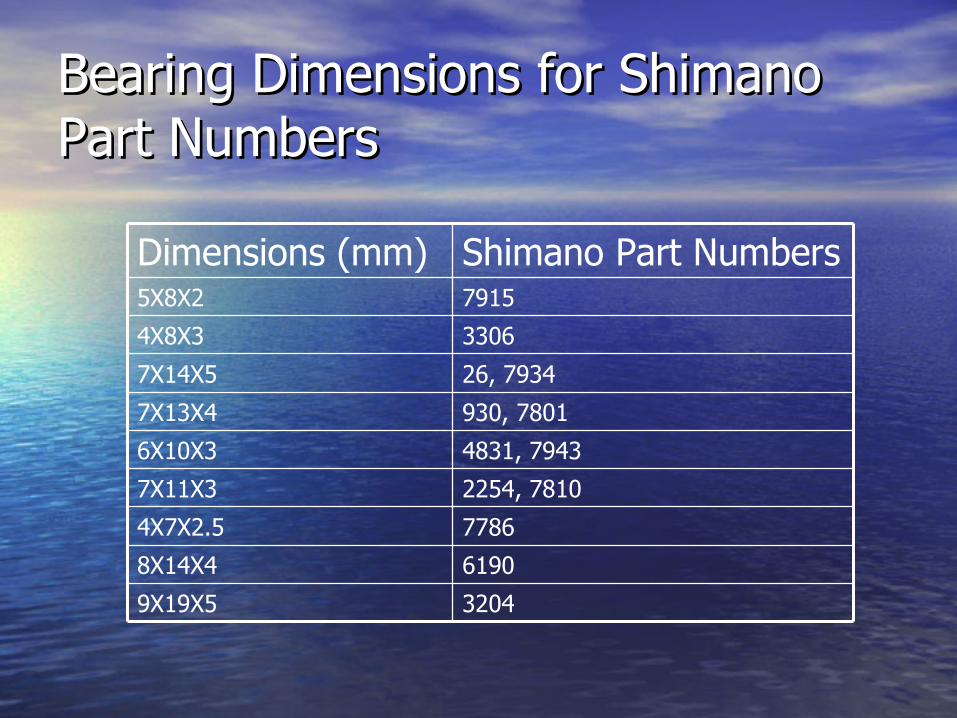
Bearing Dimensions for Shimano Bearing Dimensions for Shimano Part NumbersPart Numbers
61908X14X4
Shimano Part NumbersDimensions (mm)
32049X19X5
77864X7X2.5
2254, 78107X11X3
4831, 79436X10X3
930, 78017X13X4
26, 79347X14X5
33064X8X3
79155X8X2
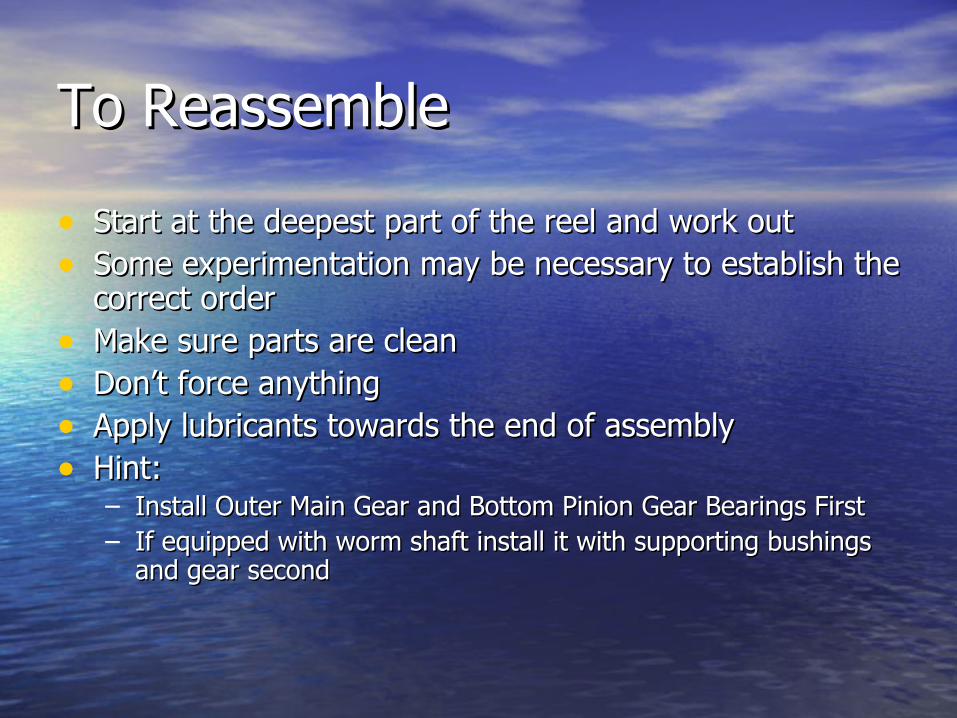
To Reassemble To Reassemble
• Start at the deepest part of the reel and work outStart at the deepest part of the reel and work out• Some experimentation may be necessary to establish the Some experimentation may be necessary to establish the
correct ordercorrect order• Make sure parts are cleanMake sure parts are clean• Don’t force anythingDon’t force anything• Apply lubricants towards the end of assemblyApply lubricants towards the end of assembly• Hint:Hint:
– Install Outer Main Gear and Bottom Pinion Gear Bearings FirstInstall Outer Main Gear and Bottom Pinion Gear Bearings First– If equipped with worm shaft install it with supporting bushings If equipped with worm shaft install it with supporting bushings
and gear secondand gear second
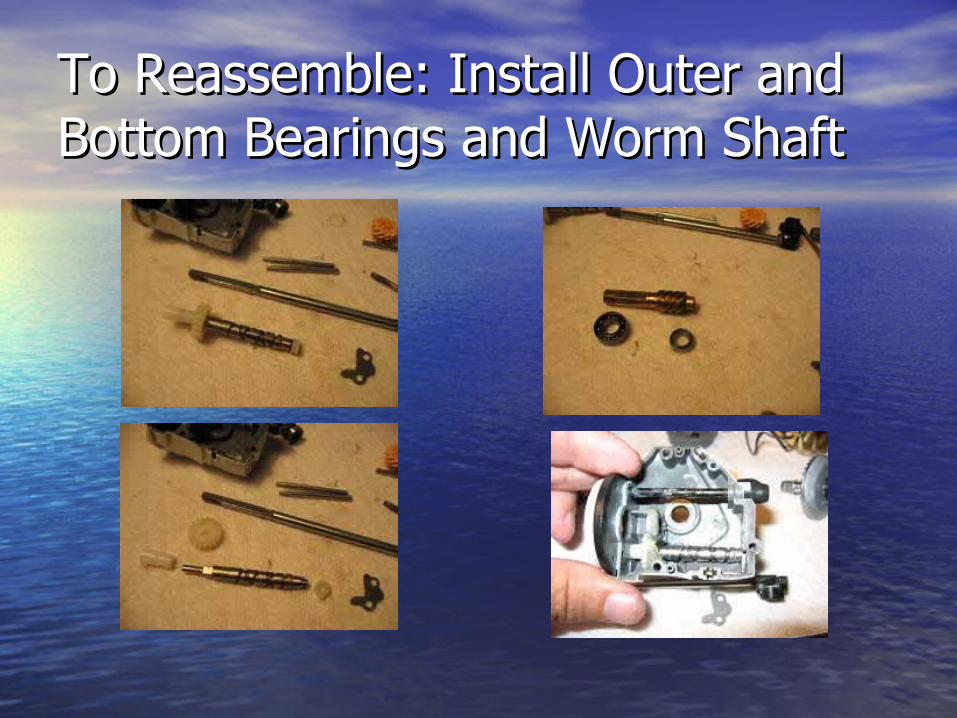
To Reassemble: Install Outer and To Reassemble: Install Outer and Bottom Bearings and Worm ShaftBottom Bearings and Worm Shaft
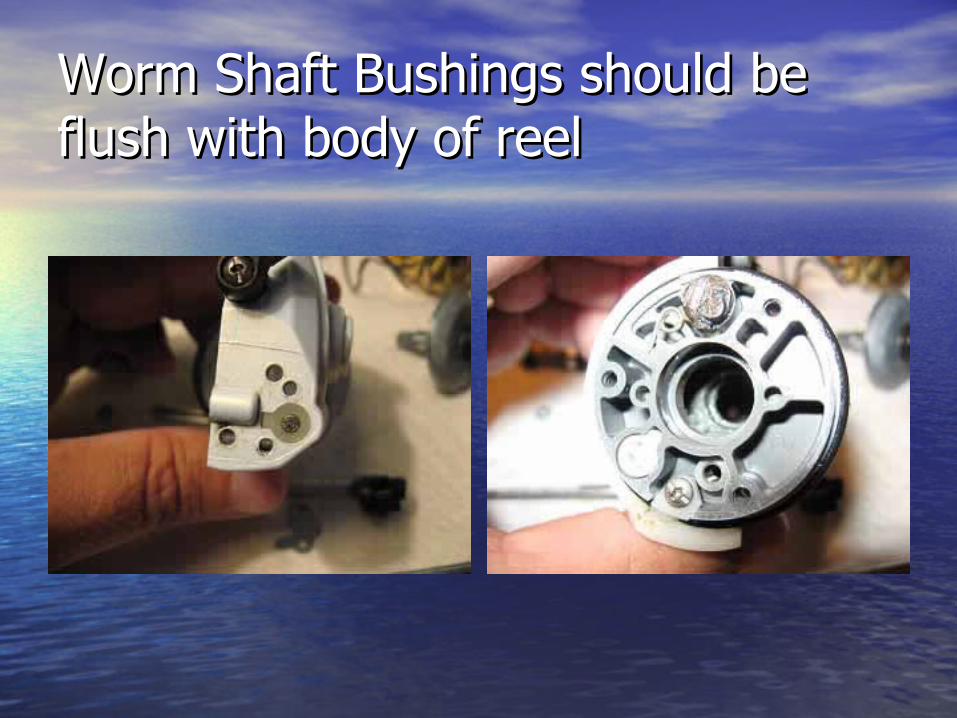
Worm Shaft Bushings should be Worm Shaft Bushings should be flush with body of reelflush with body of reel
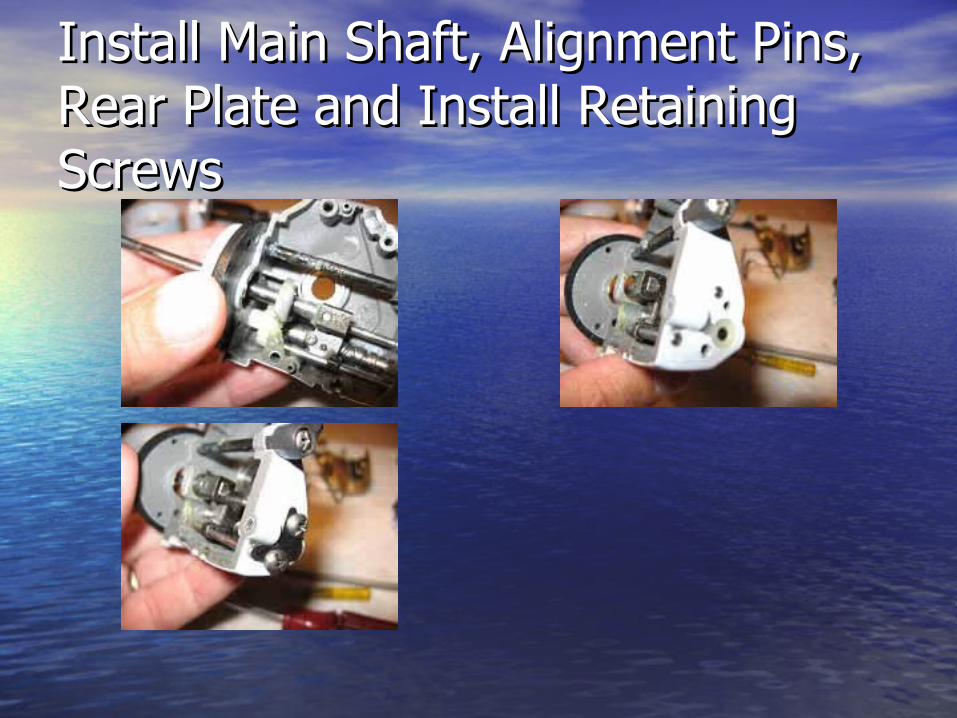
Install Main Shaft, Alignment Pins, Install Main Shaft, Alignment Pins, Rear Plate and Install Retaining Rear Plate and Install Retaining ScrewsScrews
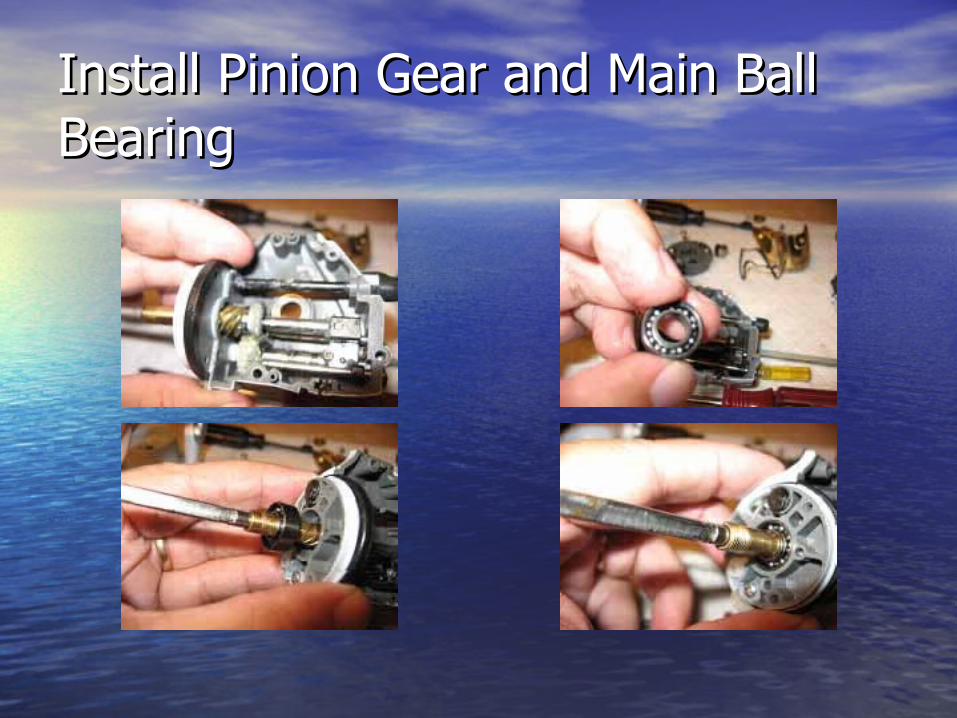
Install Pinion Gear and Main Ball Install Pinion Gear and Main Ball BearingBearing
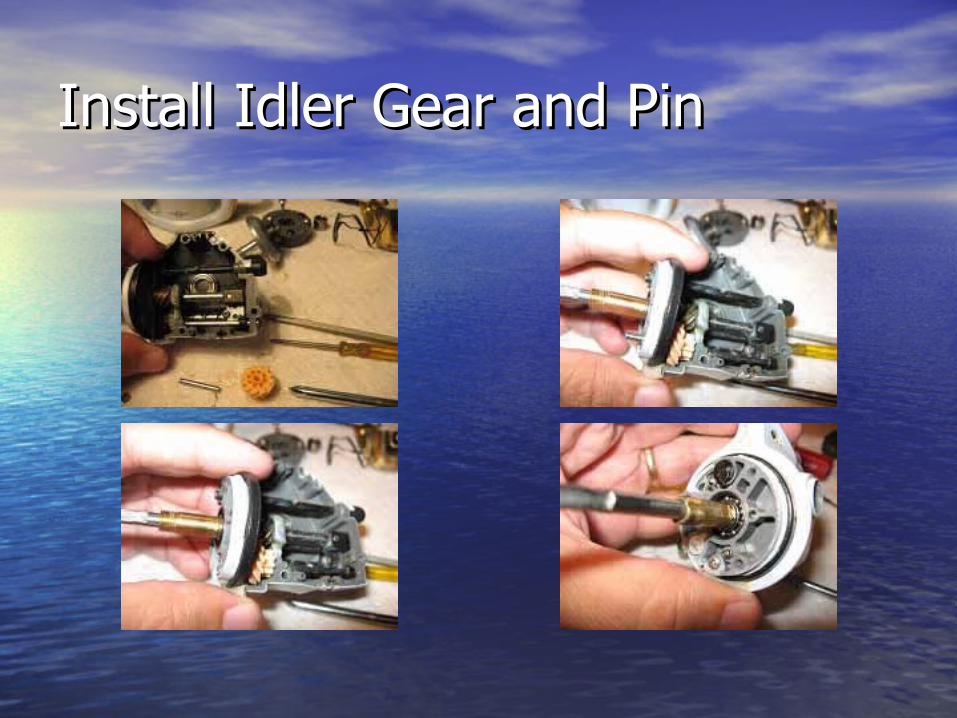
Install Idler Gear and PinInstall Idler Gear and Pin
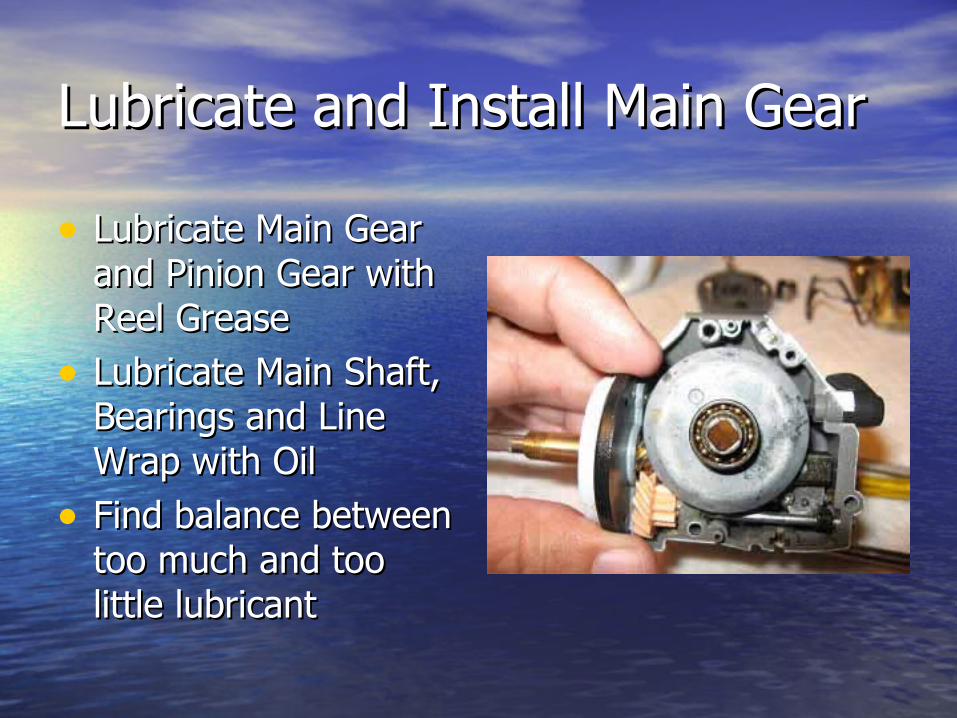
Lubricate and Install Main GearLubricate and Install Main Gear
• Lubricate Main Gear Lubricate Main Gear and Pinion Gear with and Pinion Gear with Reel GreaseReel Grease
• Lubricate Main Shaft, Lubricate Main Shaft, Bearings and Line Bearings and Line Wrap with OilWrap with Oil
• Find balance between Find balance between too much and too too much and too little lubricant little lubricant

Place Trim Nuts in Position, Place Trim Nuts in Position, Assemble Body and SecureAssemble Body and Secure
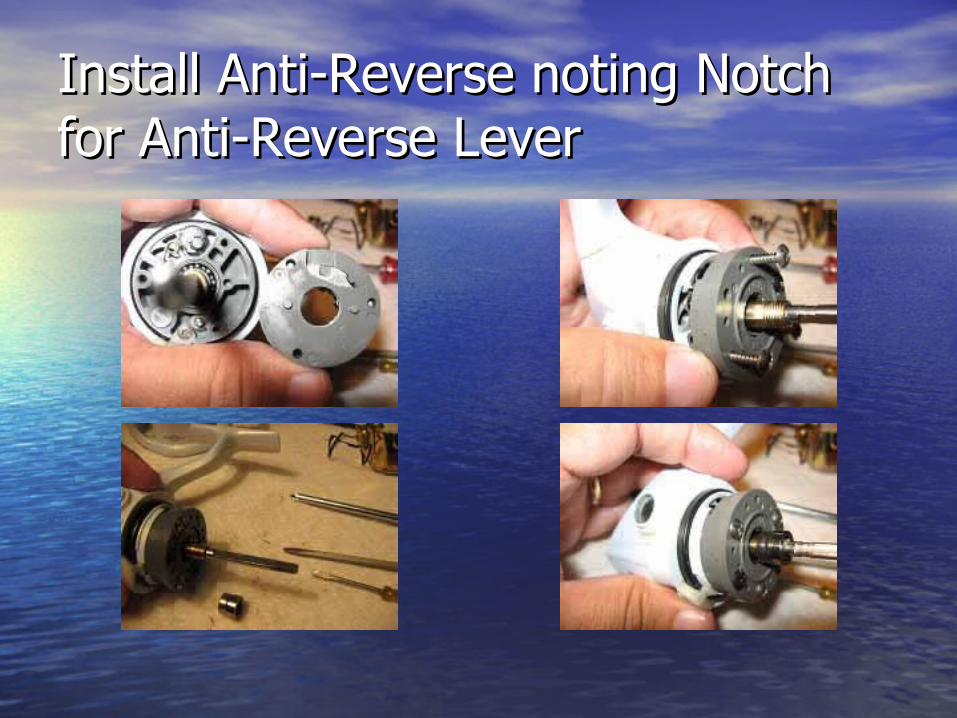
Install Anti-Reverse noting Notch Install Anti-Reverse noting Notch for Anti-Reverse Leverfor Anti-Reverse Lever
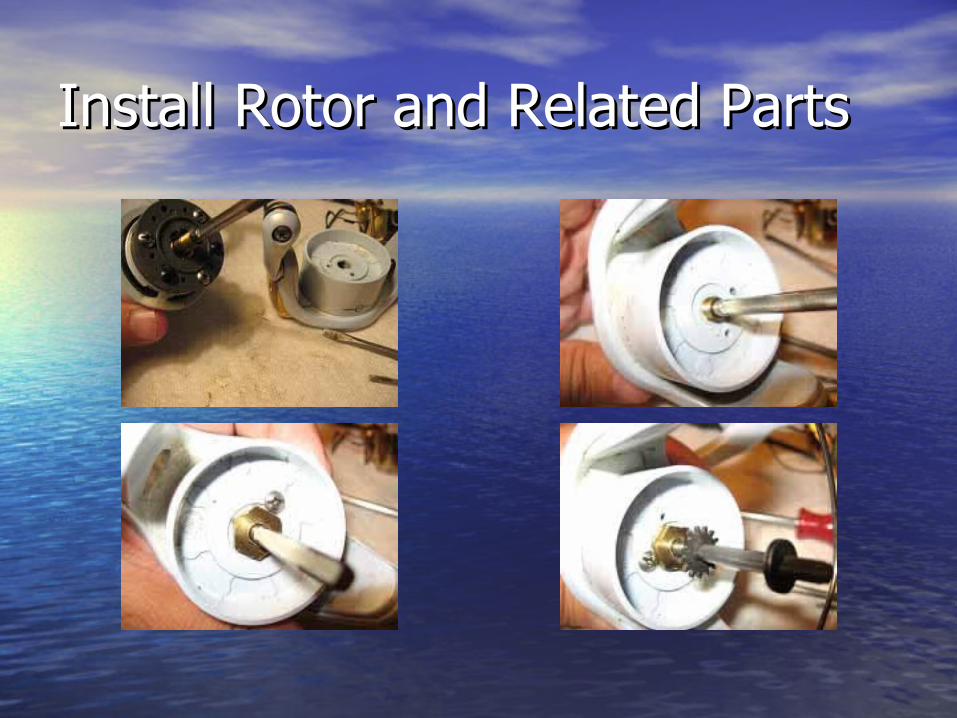
Install Rotor and Related PartsInstall Rotor and Related Parts
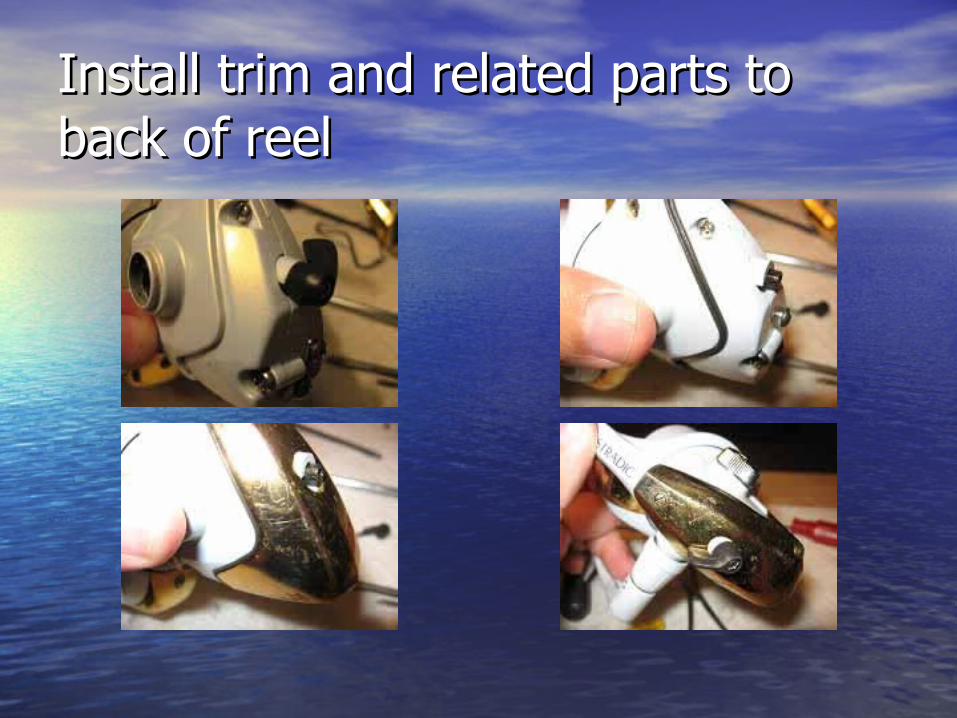
Install trim and related parts to Install trim and related parts to back of reelback of reel
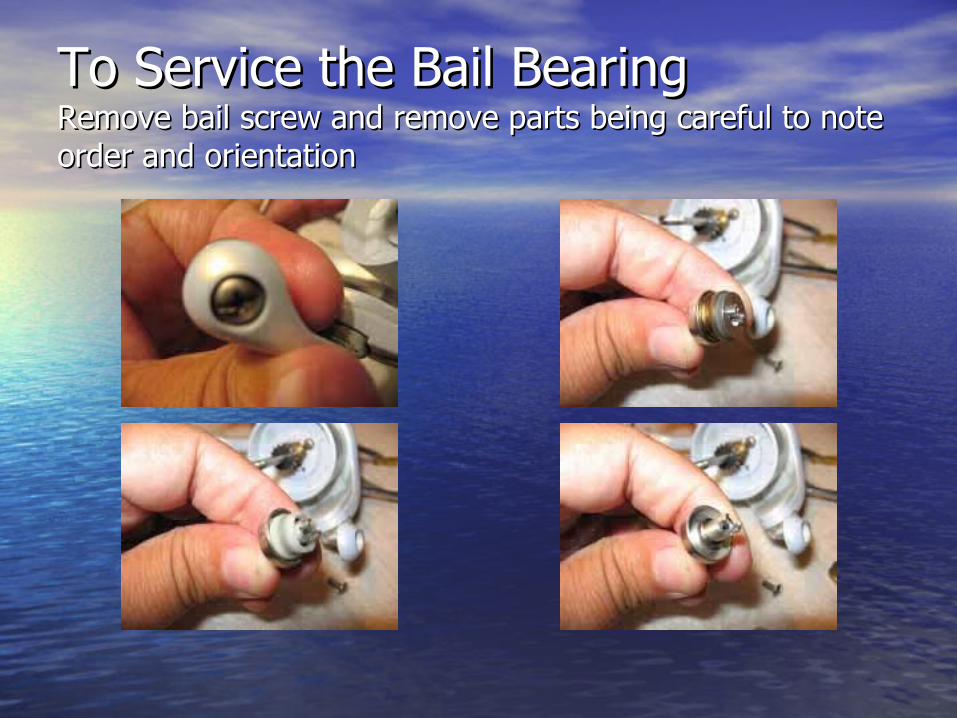
To Service the Bail BearingTo Service the Bail BearingRemove bail screw and remove parts being careful to note Remove bail screw and remove parts being careful to note order and orientationorder and orientation
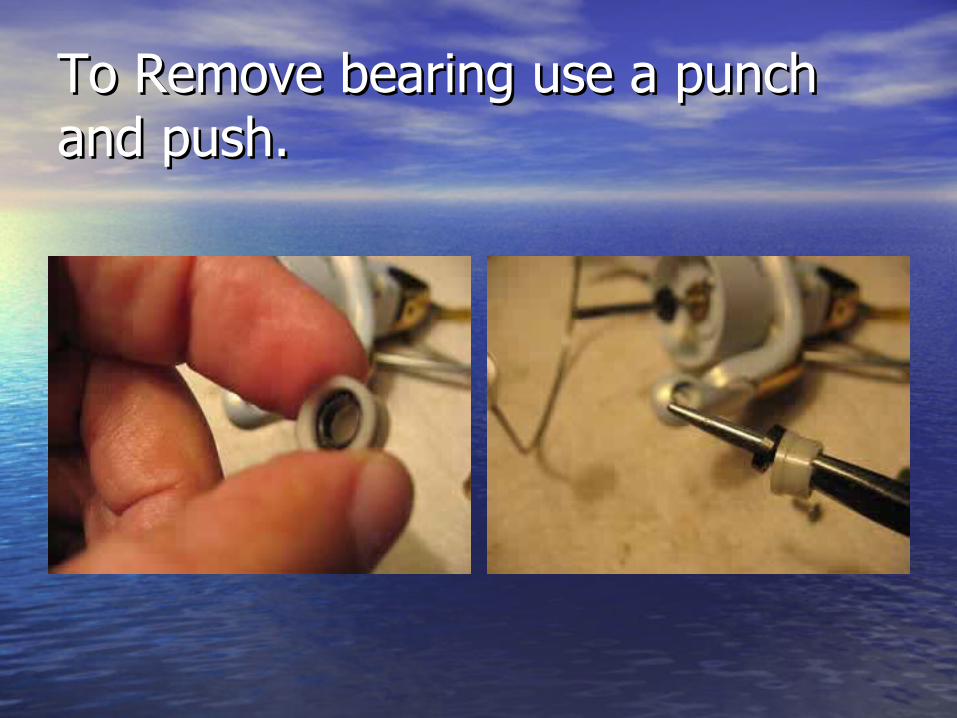
To Remove bearing use a punch To Remove bearing use a punch and push.and push.
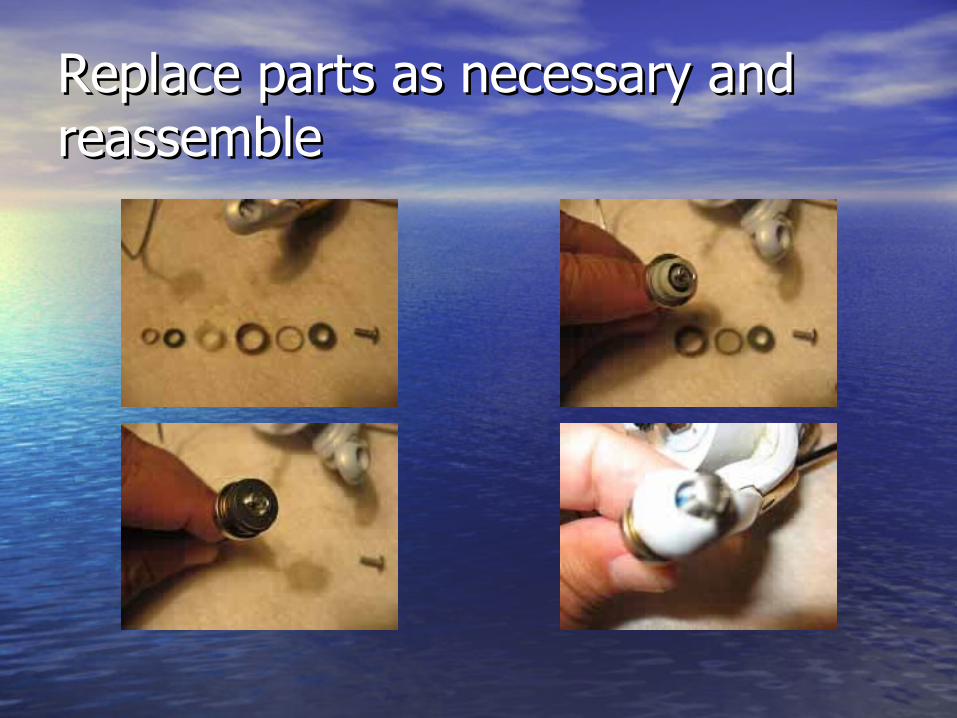
Replace parts as necessary and Replace parts as necessary and reassemblereassemble
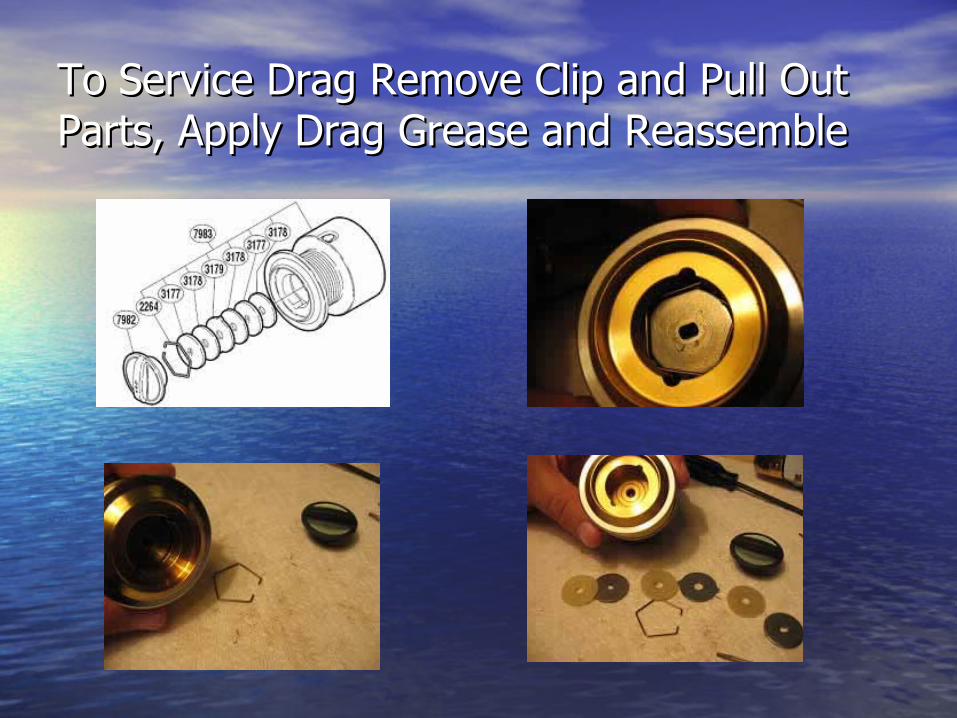
To Service Drag Remove Clip and Pull Out To Service Drag Remove Clip and Pull Out Parts, Apply Drag Grease and ReassembleParts, Apply Drag Grease and Reassemble
Common ProblemsCommon Problems
• Reels smoothly for a time and gets hard briefly and then Reels smoothly for a time and gets hard briefly and then repeatsrepeats
• First try to narrow down when the binding occursFirst try to narrow down when the binding occurs– Does it occur with the handle always at the same angleDoes it occur with the handle always at the same angle– Does it occur when the Rotor is always at the same positionDoes it occur when the Rotor is always at the same position– Does it occur when the Line Wrap is always at the same positionDoes it occur when the Line Wrap is always at the same position
• Handle-Related to main gearHandle-Related to main gear• Rotor-Related to pinion gear or rotorRotor-Related to pinion gear or rotor• Line Wrap-probably a bent main shaftLine Wrap-probably a bent main shaft
Common ProblemsCommon Problems
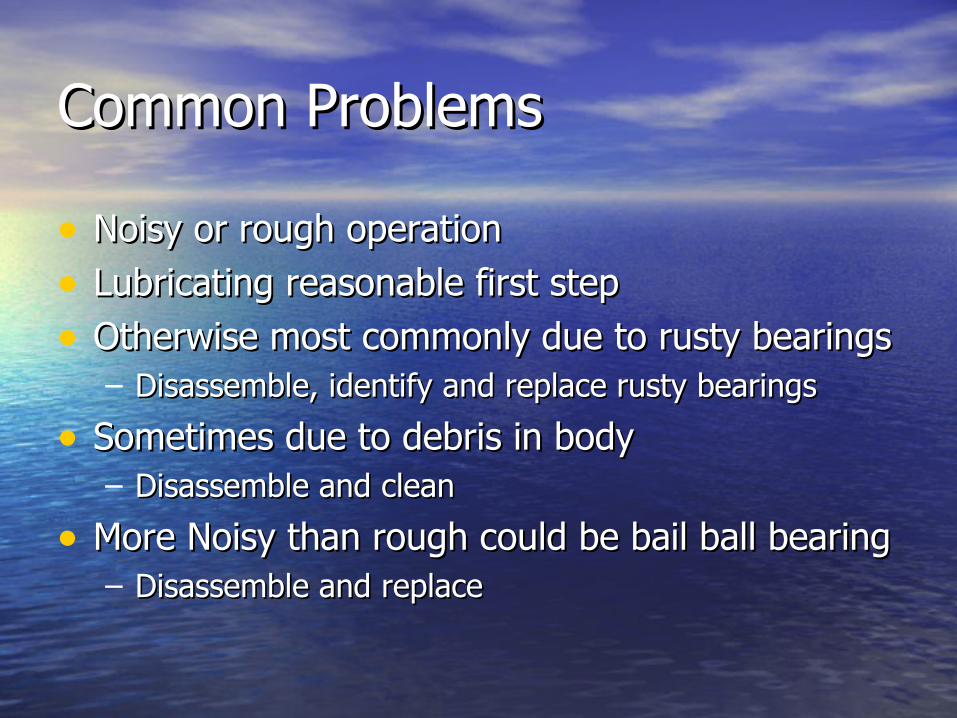
• Noisy or rough operationNoisy or rough operation• Lubricating reasonable first stepLubricating reasonable first step• Otherwise most commonly due to rusty bearingsOtherwise most commonly due to rusty bearings
– Disassemble, identify and replace rusty bearingsDisassemble, identify and replace rusty bearings
• Sometimes due to debris in bodySometimes due to debris in body– Disassemble and cleanDisassemble and clean
• More Noisy than rough could be bail ball bearingMore Noisy than rough could be bail ball bearing– Disassemble and replaceDisassemble and replace
More Common ProblemsMore Common Problems
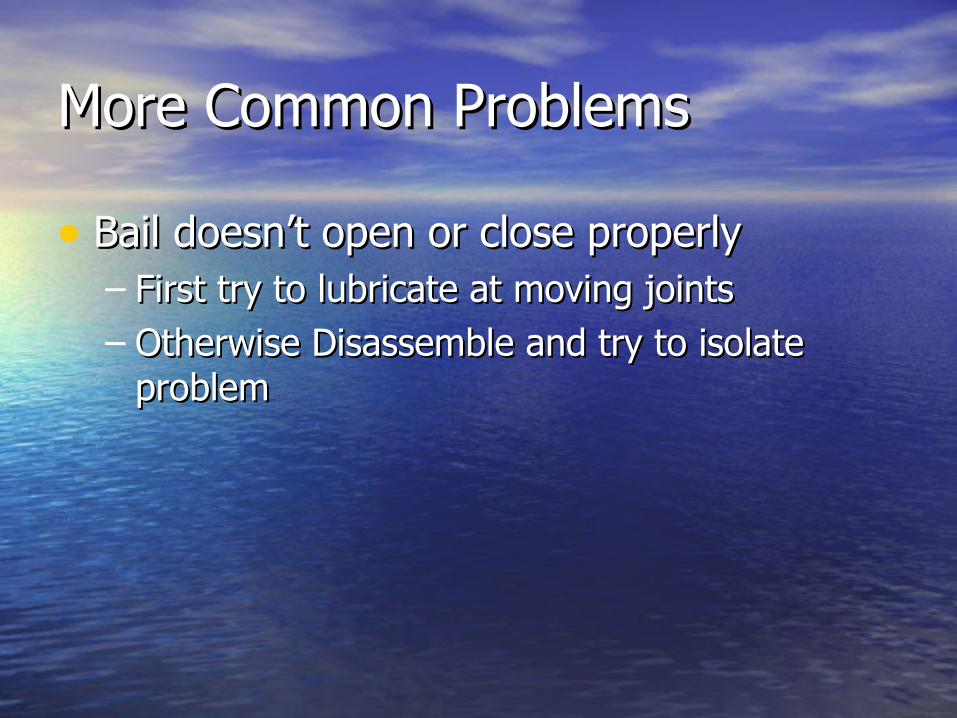
• Bail doesn’t open or close properlyBail doesn’t open or close properly– First try to lubricate at moving jointsFirst try to lubricate at moving joints– Otherwise Disassemble and try to isolate Otherwise Disassemble and try to isolate
problemproblem
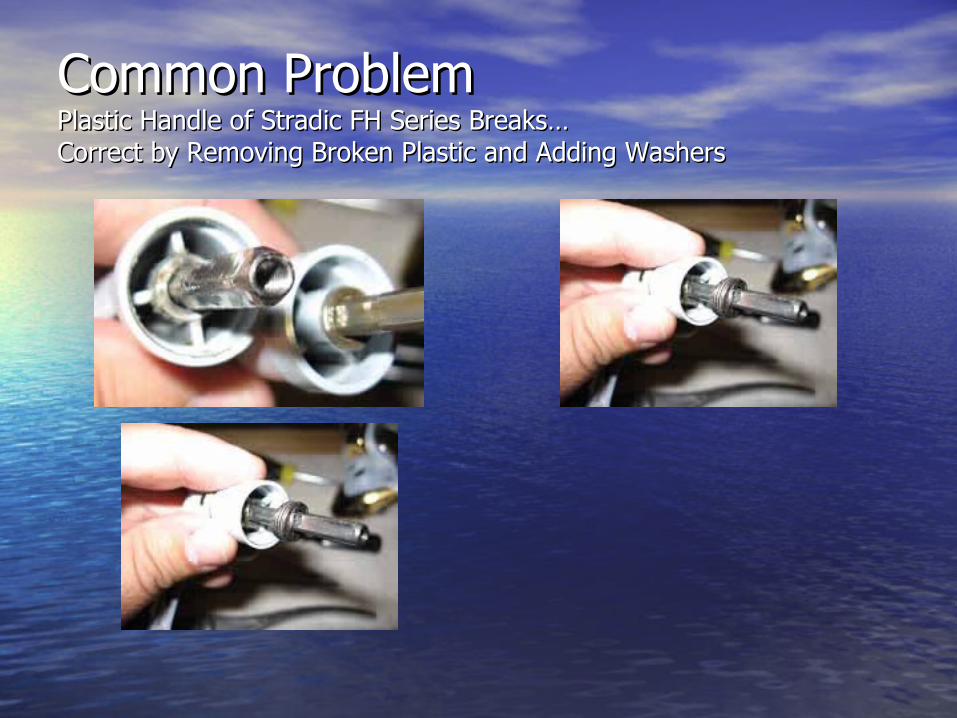
Common ProblemCommon ProblemPlastic Handle of Stradic FH Series Breaks…Plastic Handle of Stradic FH Series Breaks…Correct by Removing Broken Plastic and Adding WashersCorrect by Removing Broken Plastic and Adding Washers
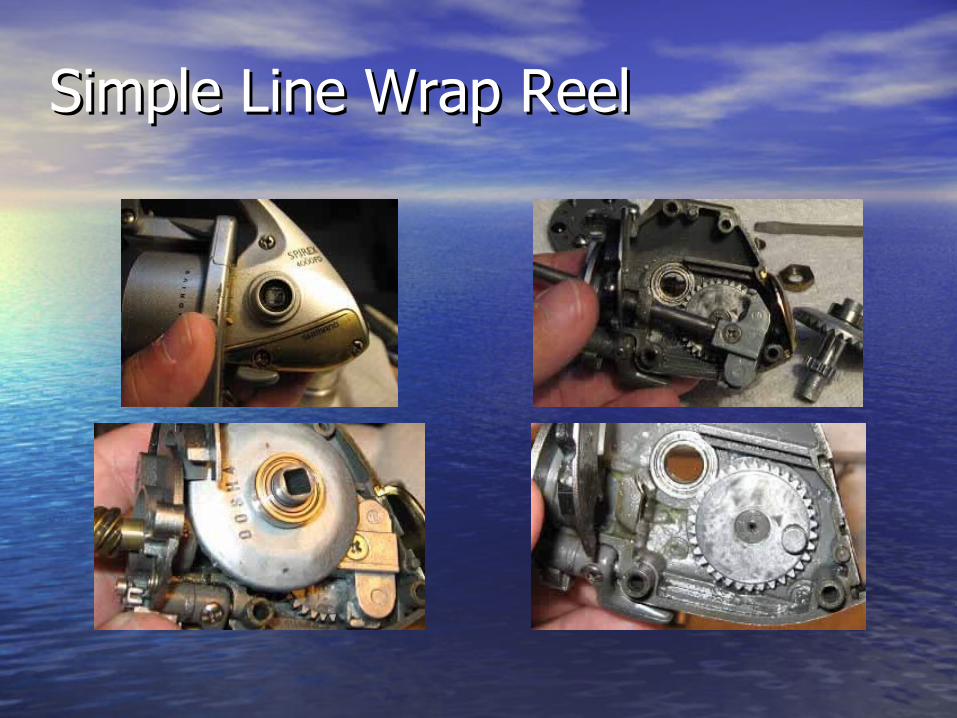
Simple Line Wrap ReelSimple Line Wrap Reel
SummarySummary
• When it comes to Maintenance and Repair When it comes to Maintenance and Repair You are the most important componentYou are the most important component
• Get information about your reelsGet information about your reels• Identify problems, disassemble, Identify problems, disassemble,
repair/replace and reassemblerepair/replace and reassemble• Lubricate as necessaryLubricate as necessary• Most ImportantMost Important

Go FishGo Fish


![BASIC - fw.ky.gov1].pdfFishing poles are named for the reel (or lack of reel) that holds the fishing line. Each type of fishing reel has an appropriate fishing rod that goes with it](https://img.pdfslide.us/doc/110x75/5f697c91adbae5112c39c091/basic-fwkygov-1pdf-fishing-poles-are-named-for-the-reel-or-lack-of-reel.jpg)