Embed Size (px)
Citation preview

RedGum GP160 Splitter
Owner’s Manual
Product Description & Intended Purpose:This Log Splitter / Wood Splitter is an outdoor product that splits
wood logs for use as fuel in a fireplace or a woodstove.
WARNINGRead this manual, before operating RedGum Splitter.
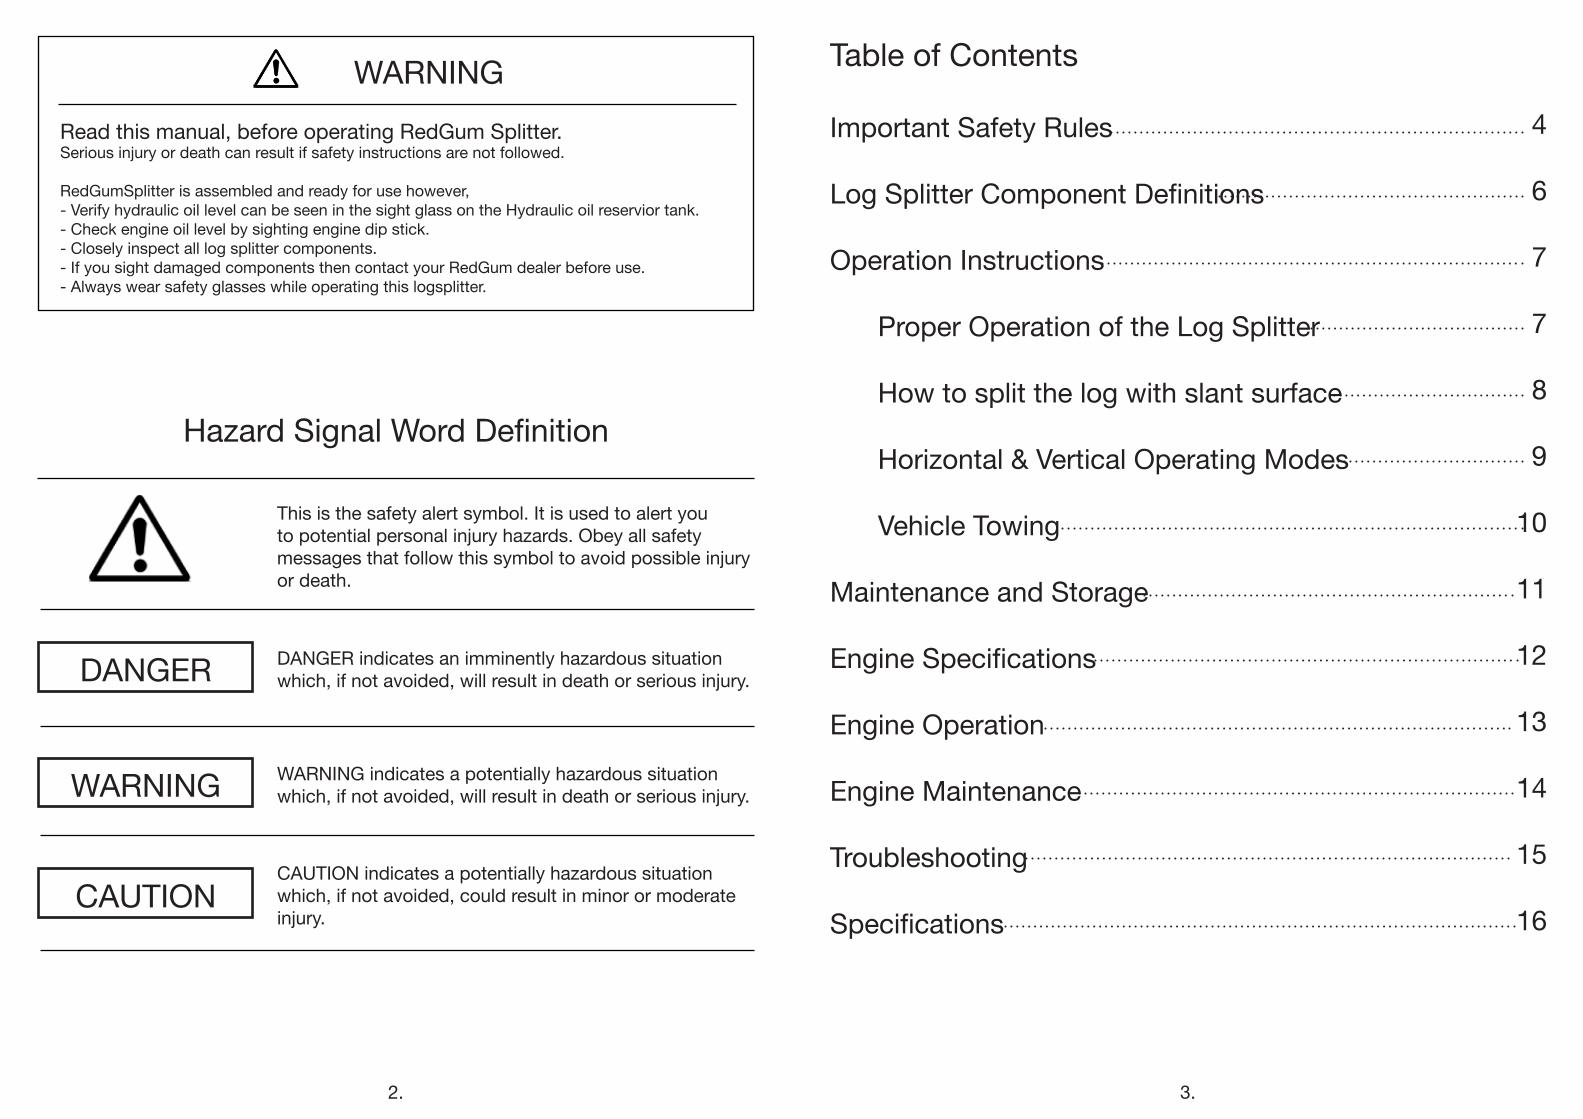
Hazard Signal Word Definition
This is the safety alert symbol. It is used to alert you to potential personal injury hazards. Obey all safety messages that follow this symbol to avoid possible injury or death.
DANGER indicates an imminently hazardous situation which, if not avoided, will result in death or serious injury.
WARNING indicates a potentially hazardous situation which, if not avoided, will result in death or serious injury.
CAUTION indicates a potentially hazardous situation which, if not avoided, could result in minor or moderate injury.
Table of Contents
Important Safety Rules
Log Splitter Component Definitions
Operation Instructions
Proper Operation of the Log Splitter
How to split the log with slant surface
Horizontal & Vertical Operating Modes
Vehicle Towing
Maintenance and Storage
Engine Specifications
Engine Operation
Engine Maintenance
Troubleshooting
Specifications
4
6
7
7
8
9
10
11
12
13
14
15
16
WARNINGRead this manual, before operating RedGum Splitter.Serious injury or death can result if safety instructions are not followed.
RedGumSplitter is assembled and ready for use however,- Verify hydraulic oil level can be seen in the sight glass on the Hydraulic oil reservior tank.- Check engine oil level by sighting engine dip stick.- Closely inspect all log splitter components.- If you sight damaged components then contact your RedGum dealer before use.- Always wear safety glasses while operating this logsplitter.
DANGER
WARNING
CAUTION
2. 3.
IMPORTANT SAFETY RULES
Save these important safety rules for later reference.
1.) Read this manual completely.Serious injury or death can result if safety instructions are not followed. Everyone who operates the log splitter must read and completely understand all safety rules, operating instructions, and maintenance instructions. You must be 16 or older to operate this logsplitter.
2.) Crush Hazard & Work Zone.Splitter wedge (4) can cut through skin and break bones. Keep both hands away from splitter wedge (4) and endplate (7).- Serious accidents can happen when other people are allowed inside the work zone (See Work Zone Diagram page 7). Keep everyone else out of the work zone while operating control valve (3).- Do not wear loose clothing. It can get tangled in moving parts of log splitter.- Only use the log splitter in daylight so you can see what you are doing.
3.) Flying ObjectsPieces of log may fly out while splitting. Wear safety glasses. Serious eye injury can occur.
4.) Skin injection hazard.High pressure fluid can inject under skin resulting in serious injury requiring amputation.- Make sure all hose and control fittings are tight before applying pressure. Relieve system pressure before servicing.- Do not check for leaks with hand. Instead, place a piece of cardboard under the unit to check for leaks.- If skin injection happens, seek immediate ‘Surgical Treatment’. Call 000.
5.) Towing Hazard.Serious injury or death can occur if towing safety rules are not followed.- Review towing safety warnings in your towing vehicle manual.- Drive safely. Be aware of the added length of the log splitter.- Never ride or transport cargo on the log splitter.- Drive the vehicle with the log splitter securely attached.- Turn off the vehicle before leaving the log splitter unattended.- Choose a level surface to operate the log splitter- Block the log splitter wheels to prevent unintended movement.- Never tow or operate this splitter while under the influence of alcohol, drugs or medication.- The RedGumSplitter should not be towed at speeds exceeding 30km per hour.- The RedGumSplitter is designed for towing around owners property and should never be towed on public roads or highways
6.) Breathing Hazard.Poisonous fumes from engine can kill you. Do not operate indoors even if ventilated. For outdoor use only.
7.) Risk of fire and explosion.Hot exhaust fumes from engine can cause fire. Petrol is highly flammable and explosive. You can be burned or seriously injured when handling fuel.- Position muffler at least 2 metres from combustible objects.- Before adding fuel, stop the engine and keep heat, sparks and flame away.- Do not add fuel when engine is running or still hot. No smoking near engine.- Do not pump fuel directly into engine at petrol station. Static charge can build and ignite fuel. Use a ULP approved fuel container to transfer petrol to the engine. Wipe up fuel spills immediately.- Only store and handle fuel outdoors. Petrol vapors can ignite if they collect inside an enclosure. Explosion can result.- Do not change or add to exhaust system. Fire can result.- Do not change or add fuel tanks or fuel lines. Fire can result.- Before each use, check fuel tank and fuel lines for leaks. Any fuel leak is a fire hazard. Fix any fuel leaks before starting engine.- During transportation take precautions to make sure machine will not tip over and cause a fuel leak fire hazard.
WARNING
1.) Hot Muffler.You can be burnt by the muffler. Do not touch.
CAUTION
4. 5.
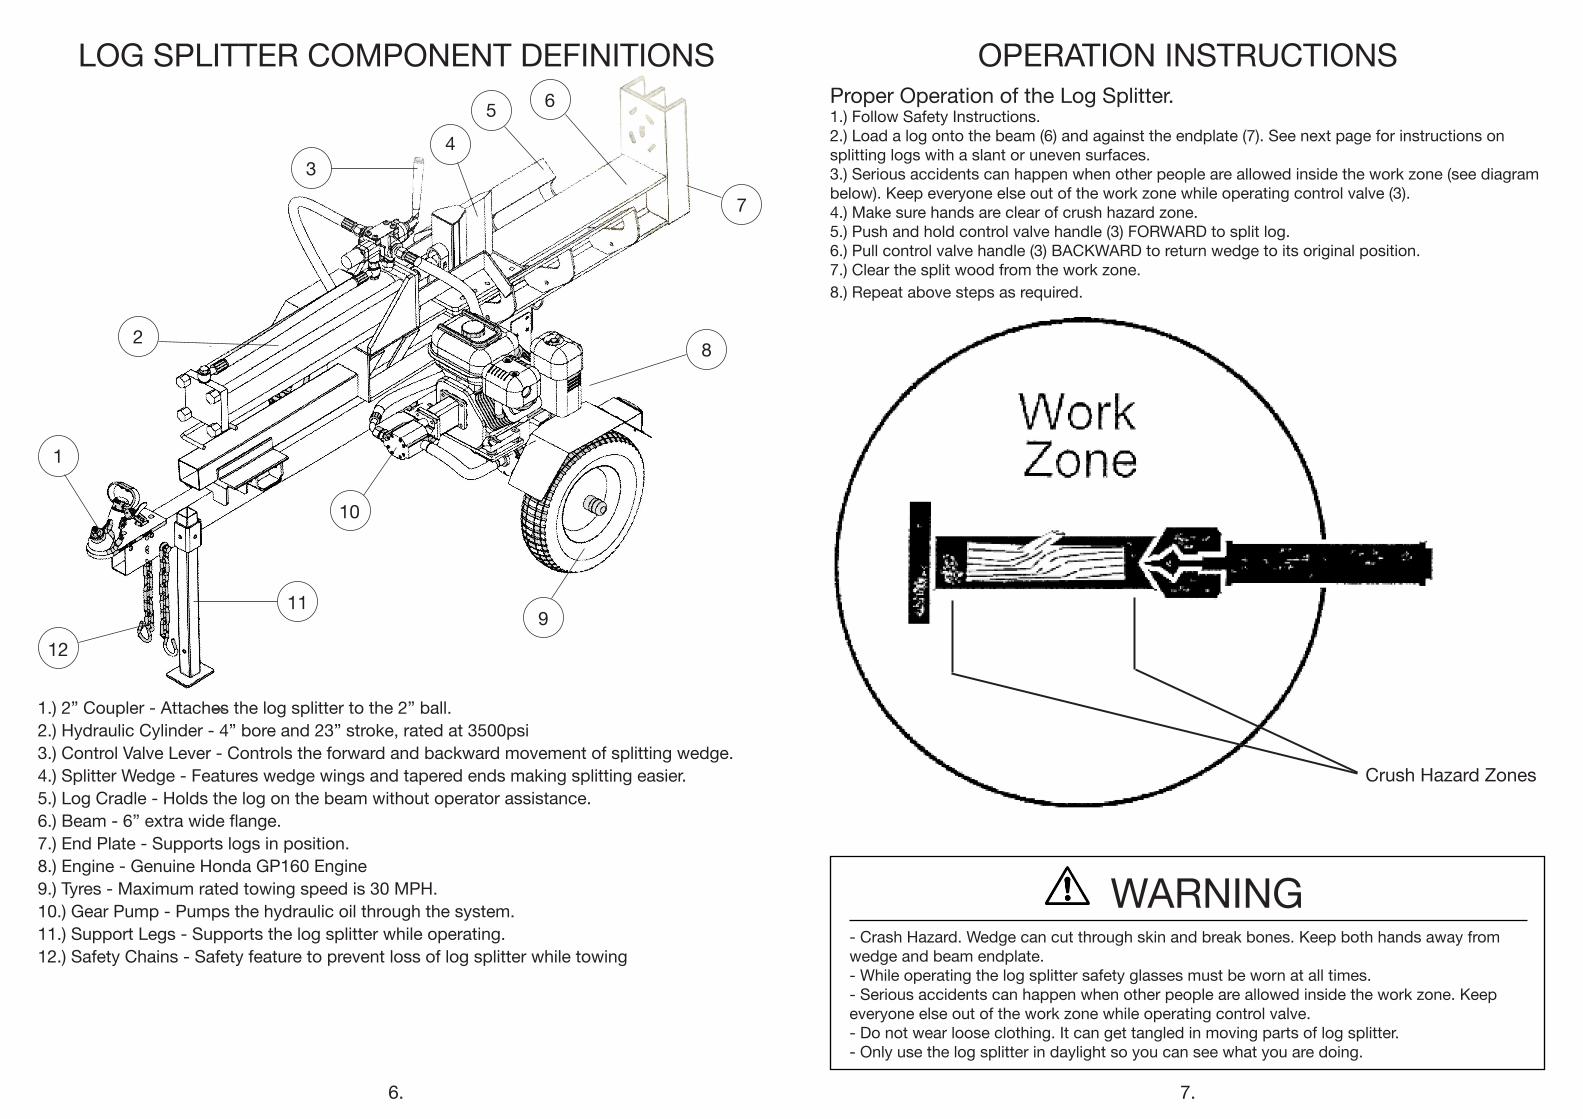
LOG SPLITTER COMPONENT DEFINITIONS
1.) 2” Coupler - Attaches the log splitter to the 2” ball.2.) Hydraulic Cylinder - 4” bore and 23” stroke, rated at 3500psi3.) Control Valve Lever - Controls the forward and backward movement of splitting wedge.4.) Splitter Wedge - Features wedge wings and tapered ends making splitting easier.5.) Log Cradle - Holds the log on the beam without operator assistance.6.) Beam - 6” extra wide flange.7.) End Plate - Supports logs in position.8.) Engine - Genuine Honda GP160 Engine9.) Tyres - Maximum rated towing speed is 30 MPH.10.) Gear Pump - Pumps the hydraulic oil through the system.11.) Support Legs - Supports the log splitter while operating.12.) Safety Chains - Safety feature to prevent loss of log splitter while towing
OPERATION INSTRUCTIONSProper Operation of the Log Splitter. 1.) Follow Safety Instructions.2.) Load a log onto the beam (6) and against the endplate (7). See next page for instructions on splitting logs with a slant or uneven surfaces.3.) Serious accidents can happen when other people are allowed inside the work zone (see diagram below). Keep everyone else out of the work zone while operating control valve (3).4.) Make sure hands are clear of crush hazard zone.5.) Push and hold control valve handle (3) FORWARD to split log.6.) Pull control valve handle (3) BACKWARD to return wedge to its original position.7.) Clear the split wood from the work zone.8.) Repeat above steps as required.
- Crash Hazard. Wedge can cut through skin and break bones. Keep both hands away from wedge and beam endplate.- While operating the log splitter safety glasses must be worn at all times.- Serious accidents can happen when other people are allowed inside the work zone. Keep everyone else out of the work zone while operating control valve.- Do not wear loose clothing. It can get tangled in moving parts of log splitter.- Only use the log splitter in daylight so you can see what you are doing.
Crush Hazard Zones
WARNING
6. 7.
1
12
119
10
8
7
65
43
2
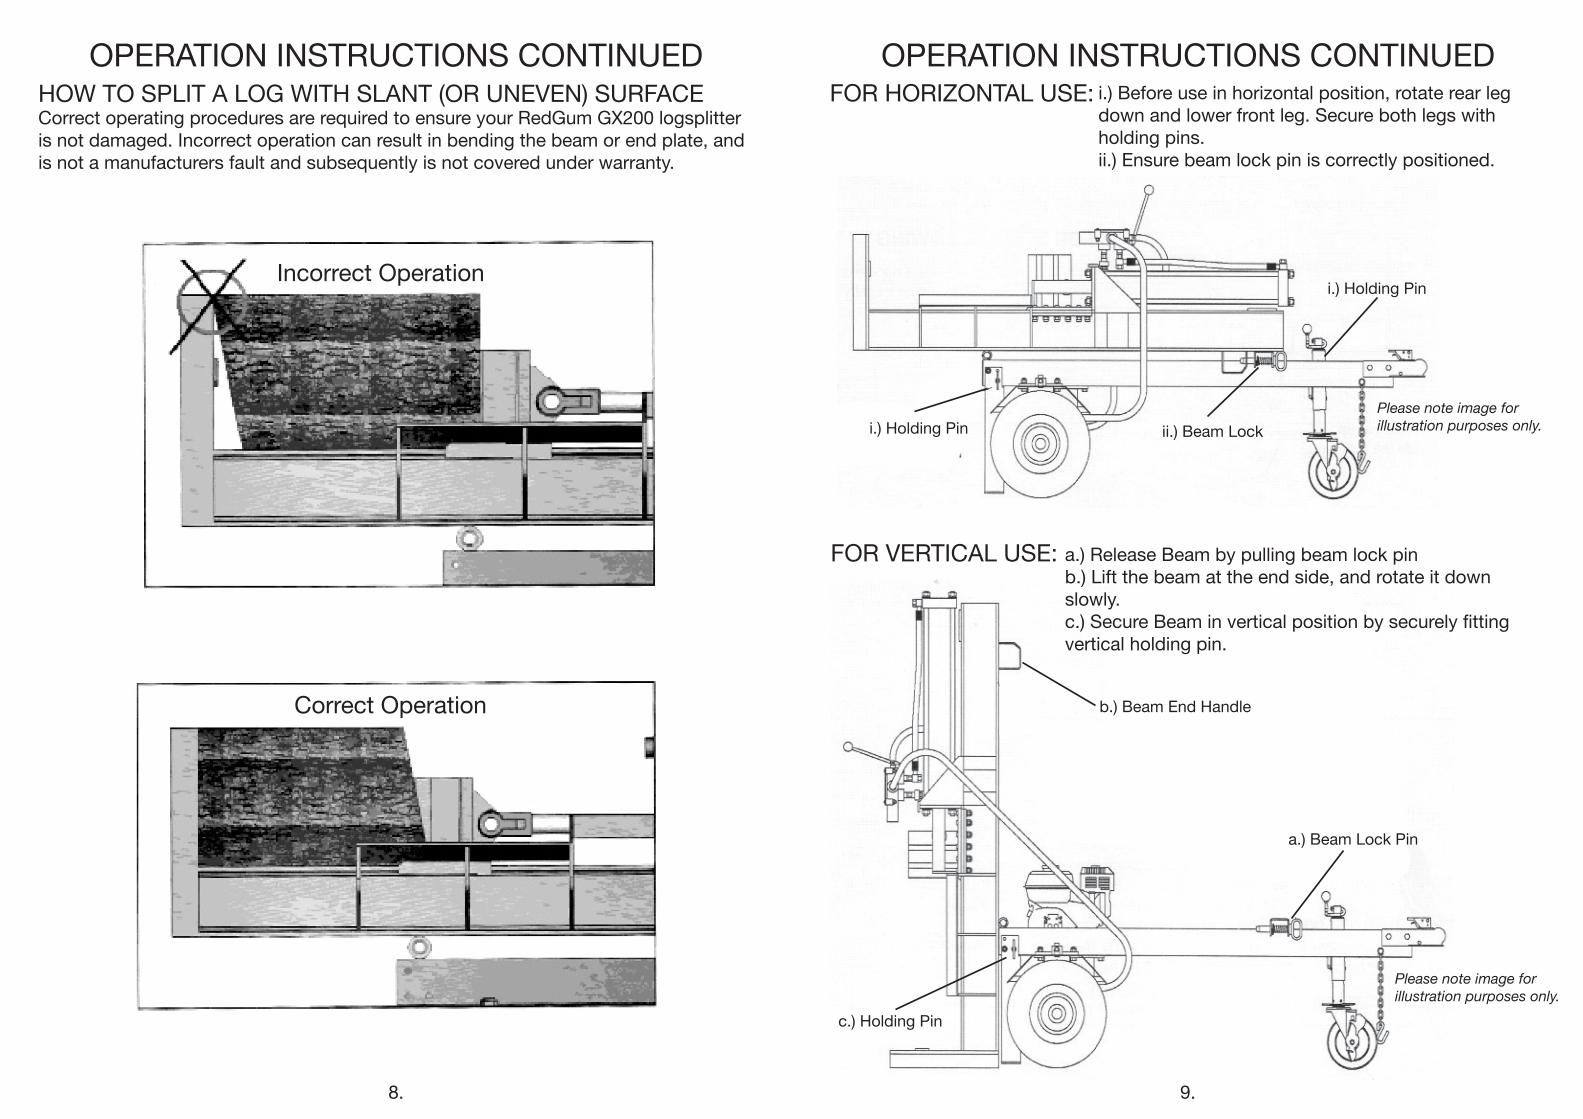
OPERATION INSTRUCTIONS CONTINUEDHOW TO SPLIT A LOG WITH SLANT (OR UNEVEN) SURFACECorrect operating procedures are required to ensure your RedGum GX200 logsplitter is not damaged. Incorrect operation can result in bending the beam or end plate, and is not a manufacturers fault and subsequently is not covered under warranty.
OPERATION INSTRUCTIONS CONTINUEDFOR HORIZONTAL USE:
FOR VERTICAL USE: a.) Release Beam by pulling beam lock pinb.) Lift the beam at the end side, and rotate it down slowly.c.) Secure Beam in vertical position by securely fitting vertical holding pin.
b.) Beam End Handle
c.) Holding Pin
Incorrect Operation
i.) Before use in horizontal position, rotate rear leg down and lower front leg. Secure both legs with holding pins.ii.) Ensure beam lock pin is correctly positioned.
i.) Holding Pin ii.) Beam Lock
8. 9.
i.) Holding Pin
a.) Beam Lock Pin
Correct Operation
Please note image for illustration purposes only.
Please note image for illustration purposes only.
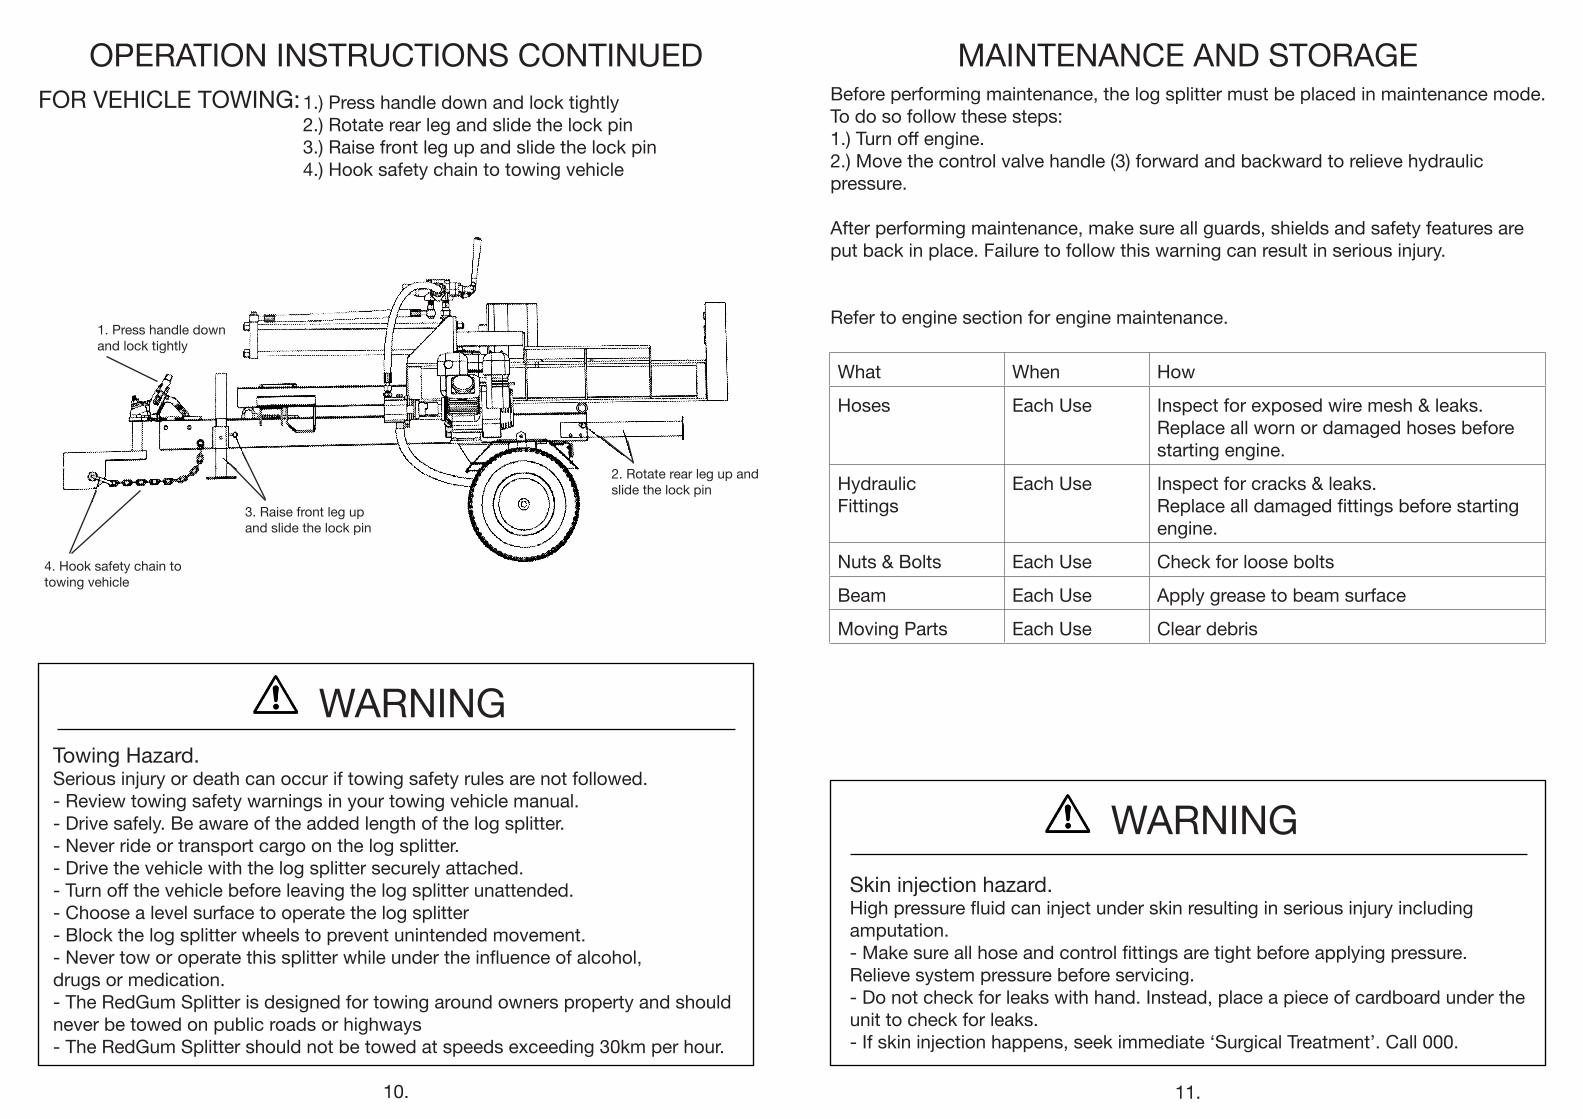
OPERATION INSTRUCTIONS CONTINUEDFOR VEHICLE TOWING:
Towing Hazard.Serious injury or death can occur if towing safety rules are not followed.- Review towing safety warnings in your towing vehicle manual.- Drive safely. Be aware of the added length of the log splitter.- Never ride or transport cargo on the log splitter.- Drive the vehicle with the log splitter securely attached.- Turn off the vehicle before leaving the log splitter unattended.- Choose a level surface to operate the log splitter- Block the log splitter wheels to prevent unintended movement.- Never tow or operate this splitter while under the influence of alcohol, drugs or medication.- The RedGum Splitter is designed for towing around owners property and should never be towed on public roads or highways- The RedGum Splitter should not be towed at speeds exceeding 30km per hour.
MAINTENANCE AND STORAGEBefore performing maintenance, the log splitter must be placed in maintenance mode.To do so follow these steps:1.) Turn off engine.2.) Move the control valve handle (3) forward and backward to relieve hydraulic pressure.
After performing maintenance, make sure all guards, shields and safety features are put back in place. Failure to follow this warning can result in serious injury.
Refer to engine section for engine maintenance.
What When How
Hoses Each Use Inspect for exposed wire mesh & leaks. Replace all worn or damaged hoses before starting engine.
Hydraulic Fittings
Each Use Inspect for cracks & leaks. Replace all damaged fittings before starting engine.
Nuts & Bolts Each Use Check for loose bolts
Beam Each Use Apply grease to beam surface
Moving Parts Each Use Clear debris
WARNING
Skin injection hazard.High pressure fluid can inject under skin resulting in serious injury including amputation.- Make sure all hose and control fittings are tight before applying pressure. Relieve system pressure before servicing.- Do not check for leaks with hand. Instead, place a piece of cardboard under the unit to check for leaks.- If skin injection happens, seek immediate ‘Surgical Treatment’. Call 000.
WARNING
1.) Press handle down and lock tightly2.) Rotate rear leg and slide the lock pin3.) Raise front leg up and slide the lock pin4.) Hook safety chain to towing vehicle
10. 11.
2. Rotate rear leg up and slide the lock pin
3. Raise front leg upand slide the lock pin
4. Hook safety chain to towing vehicle
1. Press handle downand lock tightly
STARTING THE ENGINE COLD
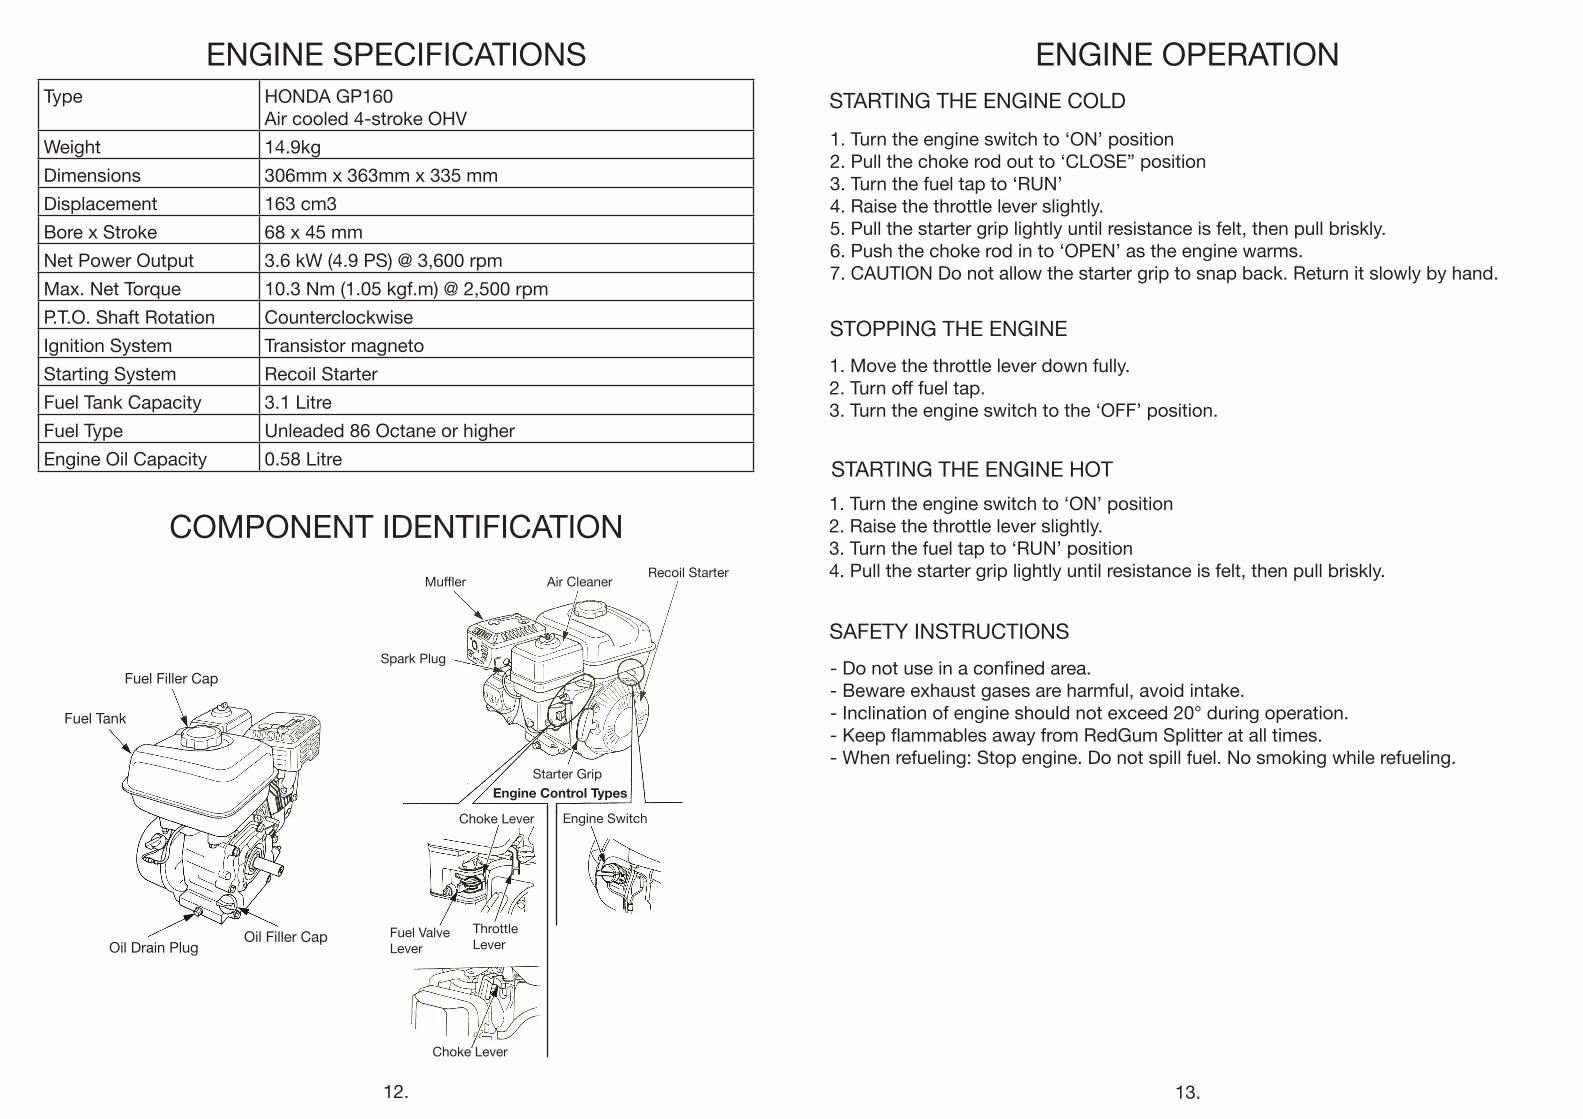
ENGINE SPECIFICATIONSType HONDA GP160
Air cooled 4-stroke OHVWeight 14.9kgDimensions 306mm x 363mm x 335 mmDisplacement 163 cm3Bore x Stroke 68 x 45 mmNet Power Output 3.6 kW (4.9 PS) @ 3,600 rpmMax. Net Torque 10.3 Nm (1.05 kgf.m) @ 2,500 rpmP.T.O. Shaft Rotation CounterclockwiseIgnition System Transistor magnetoStarting System Recoil StarterFuel Tank Capacity 3.1 Litre Fuel Type Unleaded 86 Octane or higherEngine Oil Capacity 0.58 Litre
1. Turn the engine switch to ‘ON’ position2. Pull the choke rod out to ‘CLOSE” position3. Turn the fuel tap to ‘RUN’4. Raise the throttle lever slightly. 5. Pull the starter grip lightly until resistance is felt, then pull briskly.6. Push the choke rod in to ‘OPEN’ as the engine warms.7. CAUTION Do not allow the starter grip to snap back. Return it slowly by hand.
STARTING THE ENGINE HOT1. Turn the engine switch to ‘ON’ position2. Raise the throttle lever slightly. 3. Turn the fuel tap to ‘RUN’ position4. Pull the starter grip lightly until resistance is felt, then pull briskly.
STOPPING THE ENGINE1. Move the throttle lever down fully.2. Turn off fuel tap.3. Turn the engine switch to the ‘OFF’ position.
COMPONENT IDENTIFICATION
ENGINE OPERATION
- Do not use in a confined area.- Beware exhaust gases are harmful, avoid intake.- Inclination of engine should not exceed 20° during operation.- Keep flammables away from RedGum Splitter at all times.- When refueling: Stop engine. Do not spill fuel. No smoking while refueling.
SAFETY INSTRUCTIONS
12. 13.
Fuel Filler Cap
Fuel Tank
Oil Drain PlugOil Filler Cap
Choke Lever
Muffler Air Cleaner Recoil Starter
Spark Plug
Starter GripEngine Control Types
Choke Lever
Fuel Valve Lever
ThrottleLever
Engine Switch
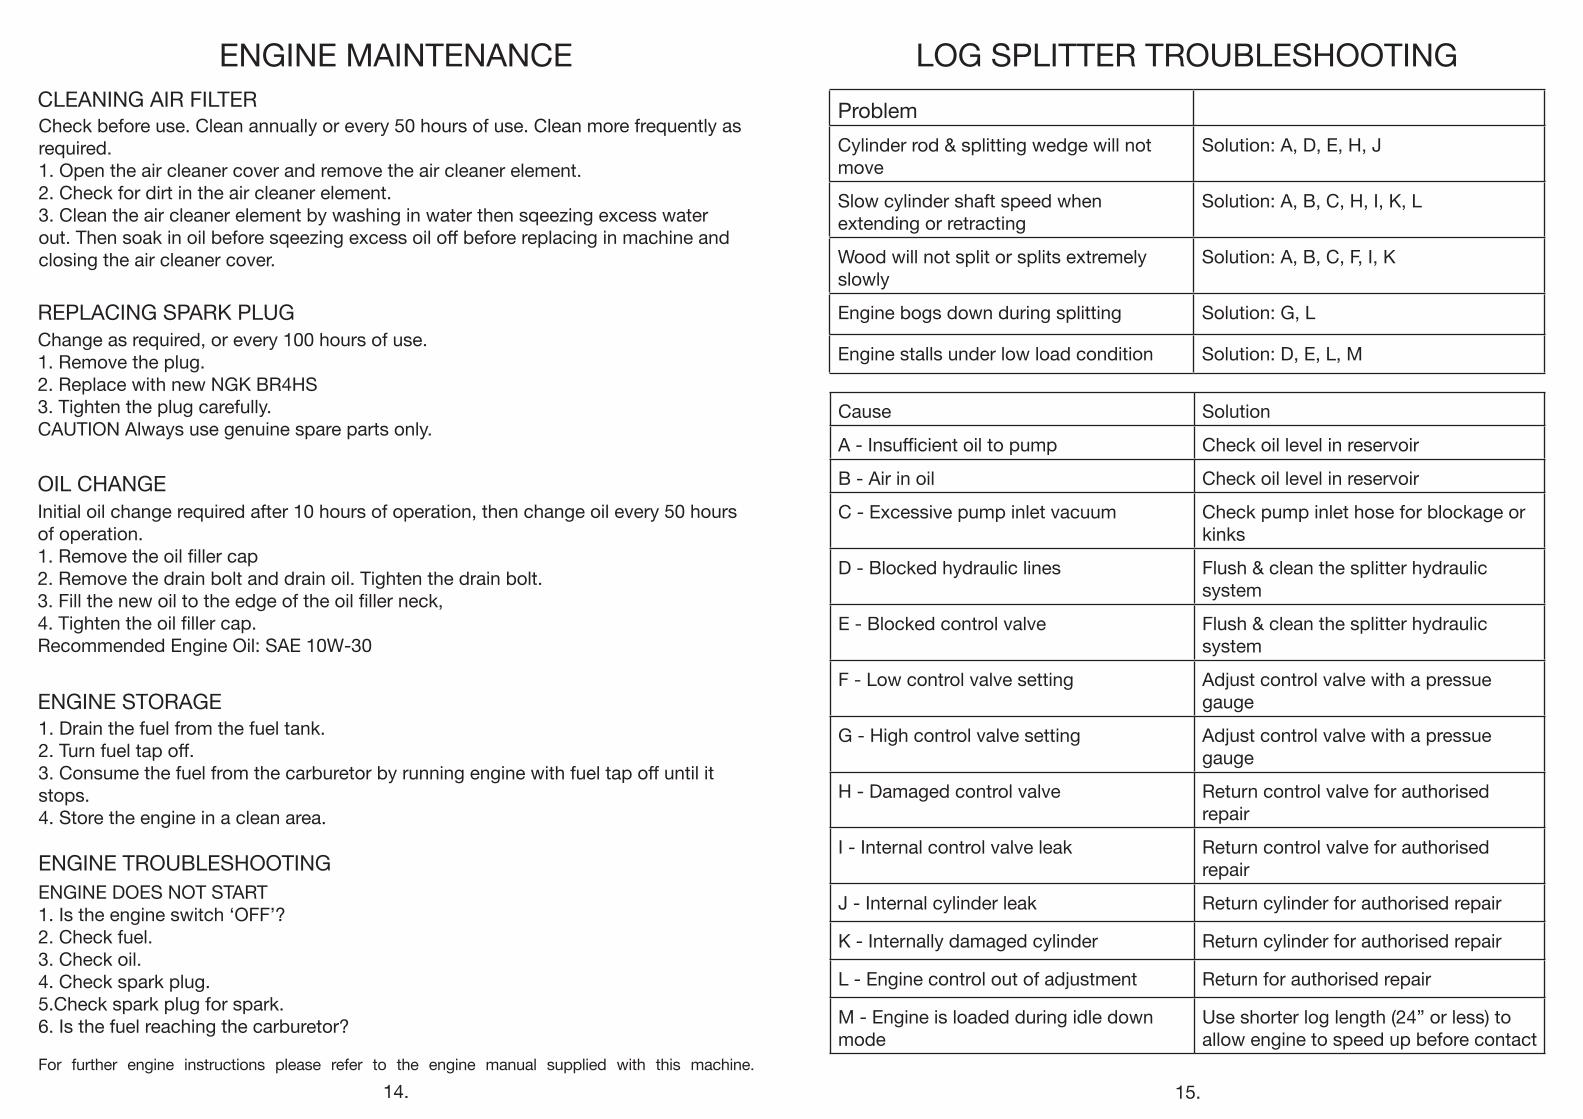
ENGINE STORAGE
Change as required, or every 100 hours of use.1. Remove the plug.2. Replace with new NGK BR4HS3. Tighten the plug carefully.CAUTION Always use genuine spare parts only.
REPLACING SPARK PLUG
1. Drain the fuel from the fuel tank.2. Turn fuel tap off.3. Consume the fuel from the carburetor by running engine with fuel tap off until it stops.4. Store the engine in a clean area.
ENGINE DOES NOT START1. Is the engine switch ‘OFF’?2. Check fuel.3. Check oil.4. Check spark plug.5.Check spark plug for spark.6. Is the fuel reaching the carburetor?
CLEANING AIR FILTERCheck before use. Clean annually or every 50 hours of use. Clean more frequently as required.1. Open the air cleaner cover and remove the air cleaner element.2. Check for dirt in the air cleaner element.3. Clean the air cleaner element by washing in water then sqeezing excess water out. Then soak in oil before sqeezing excess oil off before replacing in machine and closing the air cleaner cover.
Initial oil change required after 10 hours of operation, then change oil every 50 hours of operation.1. Remove the oil filler cap2. Remove the drain bolt and drain oil. Tighten the drain bolt.3. Fill the new oil to the edge of the oil filler neck,4. Tighten the oil filler cap.Recommended Engine Oil: SAE 10W-30
ENGINE MAINTENANCE
OIL CHANGE
ENGINE TROUBLESHOOTING
LOG SPLITTER TROUBLESHOOTINGProblemCylinder rod & splitting wedge will not move
Solution: A, D, E, H, J
Slow cylinder shaft speed when extending or retracting
Solution: A, B, C, H, I, K, L
Wood will not split or splits extremely slowly
Solution: A, B, C, F, I, K
Engine bogs down during splitting Solution: G, L
Engine stalls under low load condition Solution: D, E, L, M
Cause Solution
A - Insufficient oil to pump Check oil level in reservoir
B - Air in oil Check oil level in reservoir
C - Excessive pump inlet vacuum Check pump inlet hose for blockage or kinks
D - Blocked hydraulic lines Flush & clean the splitter hydraulic system
E - Blocked control valve Flush & clean the splitter hydraulic system
F - Low control valve setting Adjust control valve with a pressue gauge
G - High control valve setting Adjust control valve with a pressue gauge
H - Damaged control valve Return control valve for authorised repair
I - Internal control valve leak Return control valve for authorised repair
J - Internal cylinder leak Return cylinder for authorised repair
K - Internally damaged cylinder Return cylinder for authorised repair
L - Engine control out of adjustment Return for authorised repair
M - Engine is loaded during idle down mode
Use shorter log length (24” or less) to allow engine to speed up before contact
14. 15.For further engine instructions please refer to the engine manual supplied with this machine.

SPECIFICATIONS
Ram ForceCycle TimeHydraulic Tank CapacityWedge SizeWheel SizeMax. Log LengthMax. Log WeightMax. Towing SpeedCylinder SizeHydraulic Fluid TypeGear PumpMax. PressureMax. Flow Capacity
Overall DimensionsWeightHeightWidthLength
3000 PSI15 to 20 Seconds10 Litres8” Harden Steel40mm (16”)600mm (24”)45kgs (100Lbs)30Km per hour4” x 23”ISO-32 and ISO-462-Stage3000 psi11 GPM
255Kg (560Lbs)1125mm (45”)1 m (40”)2.2 m (88”)
The manufacturer reserves the right to make improvements in design and/or changes in specifications at any time without incurring any obligation to install them on units previously sold.
16.