Embed Size (px)
Citation preview

Red Hat JBoss Enterprise ApplicationPlatform 7.0
Configuration Guide
For Use with Red Hat JBoss Enterprise Application Platform 7.0
Last Updated: 2018-02-08


Red Hat JBoss Enterprise Application Platform 7.0 Configuration Guide
For Use with Red Hat JBoss Enterprise Application Platform 7.0

Legal Notice
Copyright © 2018 Red Hat, Inc.
The text of and illustrations in this document are licensed by Red Hat under a Creative CommonsAttribution–Share Alike 3.0 Unported license ("CC-BY-SA"). An explanation of CC-BY-SA isavailable athttp://creativecommons.org/licenses/by-sa/3.0/. In accordance with CC-BY-SA, if you distribute this document or an adaptation of it, you mustprovide the URL for the original version.
Red Hat, as the licensor of this document, waives the right to enforce, and agrees not to assert,Section 4d of CC-BY-SA to the fullest extent permitted by applicable law.
Red Hat, Red Hat Enterprise Linux, the Shadowman logo, JBoss, OpenShift, Fedora, the Infinitylogo, and RHCE are trademarks of Red Hat, Inc., registered in the United States and othercountries.
Linux ® is the registered trademark of Linus Torvalds in the United States and other countries.
Java ® is a registered trademark of Oracle and/or its affiliates.
XFS ® is a trademark of Silicon Graphics International Corp. or its subsidiaries in the UnitedStates and/or other countries.
MySQL ® is a registered trademark of MySQL AB in the United States, the European Union andother countries.
Node.js ® is an official trademark of Joyent. Red Hat Software Collections is not formally relatedto or endorsed by the official Joyent Node.js open source or commercial project.
The OpenStack ® Word Mark and OpenStack logo are either registered trademarks/service marksor trademarks/service marks of the OpenStack Foundation, in the United States and othercountries and are used with the OpenStack Foundation's permission. We are not affiliated with,endorsed or sponsored by the OpenStack Foundation, or the OpenStack community.
All other trademarks are the property of their respective owners.
Abstract
This document provides a practical guide for administrators to configure Red Hat JBossEnterprise Application Platform 7.0.
. . . . . . . . . . . . . . . . . . . . . . . . . . . . . . . . . . . . . . . . . . . . . . . . . . . . . . . . . . . . . . . . . . . . . . . . . . . . . . . . . . . . . . . . . . . . . . . . . . . . . . . . . . . . . . . . . . . . . . . . . . . . . . . . . . . . . . . . . . . . . . . . . . . . . . . . . . . . . . . . . . . . . . . . . . . . . . . . . . . . . . . . . . . . . . . . . . . . . . . . . . . . . . . . . . . . . . . . . . . . . . . . . . . . . . . . . . . . . . . . . . . . . . . . . . . . . . . . . . . . . . . . . . . . . . . . . . . . . . . .
. . . . . . . . . . . . . . . . . . . . . . . . . . . . . . . . . . . . . . . . . . . . . . . . . . . . . . . . . . . . . . . . . . . . . . . . . . . . . . . . . . . . . . . . . . . . . . . . . . . . . . . . . . . . . . . . . . . . . . . . . . . . . . . . . . . . . . . . . . . . . . . . . . . . . . . . . . . . . . . . . . . . . . . . . . . . . . . . . . . . . . . . . . . . . . . . . . . . . . . . . . . . . . . . . . . . . . . . . . . . . . . . . . . . . . . . . . . . . . . . . . . . . . . . . . . . . . . . . . . . . . . . . . . . . . . . . . . . . . . .
. . . . . . . . . . . . . . . . . . . . . . . . . . . . . . . . . . . . . . . . . . . . . . . . . . . . . . . . . . . . . . . . . . . . . . . . . . . . . . . . . . . . . . . . . . . . . . . . . . . . . . . . . . . . . . . . . . . . . . . . . . . . . . . . . . . . . . . . . . . . . . . . . . . . . . . . . . . . . . . . . . . . . . . . . . . . . . . . . . . . . . . . . . . . . . . . . . . . . . . . . . . . . . . . . . . . . . . . . . . . . . . . . . . . . . . . . . . . . . . . . . . . . . . . . . . . . . . . . . . . . . . . . . . . . . . . . . . . . . . .
Table of Contents
CHAPTER 1. OVERVIEW
CHAPTER 2. STARTING AND STOPPING JBOSS EAP2.1. STARTING JBOSS EAP
Start JBoss EAP as a Standalone ServerStart JBoss EAP in a Managed Domain
2.2. STOPPING JBOSS EAPStop an Interactive Instance of JBoss EAPStop a Background Instance of JBoss EAP
2.3. RUNNING JBOSS EAP IN ADMIN-ONLY MODEStart JBoss EAP in Admin-Only ModeCheck If JBoss EAP is Running in Admin-Only ModeRestart in a Different Mode from the Management CLI
2.4. SUSPEND AND SHUT DOWN JBOSS EAP GRACEFULLY2.4.1. Suspend Servers
Check the Server Suspend StateSuspendResume
2.4.2. Shut Down Servers Gracefully2.5. STARTING AND STOPPING JBOSS EAP (RPM INSTALLATION)
2.5.1. Starting JBoss EAP (RPM Installation)Start JBoss EAP as a Standalone Server (RPM Installation)Start JBoss EAP in a Managed Domain (RPM Installation)Configure RPM Service Properties
2.5.2. Stopping JBoss EAP (RPM Installation)Stop JBoss EAP as a Standalone Server (RPM Installation)Stop JBoss EAP in a Managed Domain (RPM Installation)
2.6. POWERSHELL SCRIPTS (WINDOWS SERVER)
CHAPTER 3. JBOSS EAP MANAGEMENT3.1. ABOUT SUBSYSTEMS, EXTENSIONS, AND PROFILES
Using the Management Console or the Management CLI3.2. MANAGEMENT USERS
3.2.1. Adding a Management User3.2.2. Running the Add-User Utility Non-Interactively
Create a User Belonging to Multiple GroupsSpecify an Alternative Properties File
3.2.3. Setting Add-User Utility Password Restrictions3.3. MANAGEMENT INTERFACES
3.3.1. Management CLILaunch the Management CLIConnect to a Running ServerDisplay HelpQuit the Management CLIView System SettingsUpdate System SettingsStart Servers
3.3.2. Management Console3.3.2.1. Enable/Disable Management Console3.3.2.2. Change the Language of the Management Console
To Change the Language of the Management Console3.4. MANAGEMENT APIS
17
18181818191919191919
20202121222222232323232325252525
2727272728282829293030303030303031313132323233
Table of Contents
1
. . . . . . . . . . . . . . . . . . . . . . . . . . . . . . . . . . . . . . . . . . . . . . . . . . . . . . . . . . . . . . . . . . . . . . . . . . . . . . . . . . . . . . . . . . . . . . . . . . . . . . . . . . . . . . . . . . . . . . . . . . . . . . . . . . . . . . . . . . . . . . . . . . . . . . . . . . . . . . . . . . . . . . . . . . . . . . . . . . . . . . . . . . . . . . . . . . . . . . . . . . . . . . . . . . . . . . . . . . . . . . . . . . . . . . . . . . . . . . . . . . . . . . . . . . . . . . . . . . . . . . . . . . . . . . . . . . . . . . . .
3.4.1. HTTP APIRead ResourcesUpdate Resources
3.4.2. Native API3.5. CONFIGURATION DATA
3.5.1. Standalone Server Configuration Files3.5.2. Managed Domain Configuration Files3.5.3. Backing Up Configuration Data3.5.4. Configuration File Snapshots
Take a SnapshotList SnapshotsDelete a SnapshotStart the Server with a Snapshot
3.5.5. View Configuration Changes3.5.6. Property Replacement
Nested ExpressionsDescriptor-Based Property Replacement
3.6. FILE SYSTEM PATHS3.6.1. Override a Standard Path
Overriding a Managed Domain’s Standard Paths3.6.2. Add a Custom Path3.6.3. Directory Grouping
Directory Grouping by ServerDirectory Grouping by Type
3.7. SYSTEM PROPERTIESPassing a System Property to the Startup ScriptSetting a System Property Using the Management CLISetting a System Property Using the Management ConsoleSetting a System Property Using JAVA_OPTS
3.8. MANAGEMENT AUDIT LOGGINGStandalone Server Audit LoggingManaged Domain Audit Logging3.8.1. Enable Management Audit Logging
Enable Standalone Server Audit LoggingEnable Managed Domain Audit Logging
3.8.2. Send Management Audit Logging to a Syslog Server3.8.3. Read Audit Log Entries
CHAPTER 4. NETWORK AND PORT CONFIGURATION4.1. INTERFACES
4.1.1. Default Interface Configurations4.1.2. Configuring Interfaces
Add an Interface with a NIC ValueAdd an Interface with Several Conditional ValuesUpdate an Interface AttributeAdd an Interface to a Server in a Managed Domain
4.2. SOCKET BINDINGS4.2.1. Management Ports4.2.2. Default Socket Bindings
Standalone ServerManaged Domain
4.2.3. Configuring Socket Bindings4.2.4. Port Offsets
33333434353536363737373838384040414243434444454546464647474848484949495051
535353535454545455555555565758
Red Hat JBoss Enterprise Application Platform 7.0 Configuration Guide
2
. . . . . . . . . . . . . . . . . . . . . . . . . . . . . . . . . . . . . . . . . . . . . . . . . . . . . . . . . . . . . . . . . . . . . . . . . . . . . . . . . . . . . . . . . . . . . . . . . . . . . . . . . . . . . . . . . . . . . . . . . . . . . . . . . . . . . . . . . . . . . . . . . . . . . . . . . . . . . . . . . . . . . . . . . . . . . . . . . . . . . . . . . . . . . . . . . . . . . . . . . . . . . . . . . . . . . . . . . . . . . . . . . . . . . . . . . . . . . . . . . . . . . . . . . . . . . . . . . . . . . . . . . . . . . . . . . . . . . . . .
. . . . . . . . . . . . . . . . . . . . . . . . . . . . . . . . . . . . . . . . . . . . . . . . . . . . . . . . . . . . . . . . . . . . . . . . . . . . . . . . . . . . . . . . . . . . . . . . . . . . . . . . . . . . . . . . . . . . . . . . . . . . . . . . . . . . . . . . . . . . . . . . . . . . . . . . . . . . . . . . . . . . . . . . . . . . . . . . . . . . . . . . . . . . . . . . . . . . . . . . . . . . . . . . . . . . . . . . . . . . . . . . . . . . . . . . . . . . . . . . . . . . . . . . . . . . . . . . . . . . . . . . . . . . . . . . . . . . . . . .
. . . . . . . . . . . . . . . . . . . . . . . . . . . . . . . . . . . . . . . . . . . . . . . . . . . . . . . . . . . . . . . . . . . . . . . . . . . . . . . . . . . . . . . . . . . . . . . . . . . . . . . . . . . . . . . . . . . . . . . . . . . . . . . . . . . . . . . . . . . . . . . . . . . . . . . . . . . . . . . . . . . . . . . . . . . . . . . . . . . . . . . . . . . . . . . . . . . . . . . . . . . . . . . . . . . . . . . . . . . . . . . . . . . . . . . . . . . . . . . . . . . . . . . . . . . . . . . . . . . . . . . . . . . . . . . . . . . . . . . .
4.3. IPV6 ADDRESSESConfigure the JVM Stack for IPv6 AddressesUpdate Interface Declarations for IPv6 Addresses
CHAPTER 5. JBOSS EAP SECURITY
CHAPTER 6. JBOSS EAP CLASS LOADING6.1. MODULES
Static ModulesDynamic Modules
6.2. MODULE DEPENDENCIESOptional DependenciesExport a DependencyGlobal Modules
6.3. CREATE A CUSTOM MODULECreate a Custom Module ManuallyCreate a Custom Module Using the Management CLIAdd the Module as a Dependency
6.4. REMOVE A CUSTOM MODULERemove a Custom Module ManuallyRemove a Custom Module Using the Management CLI
6.5. DEFINE GLOBAL MODULES6.6. CONFIGURE SUBDEPLOYMENT ISOLATION
Enable Subdeployment Module Isolation for All Deployments6.7. DEFINE AN EXTERNAL JBOSS EAP MODULE DIRECTORY6.8. DYNAMIC MODULE NAMING CONVENTIONS
CHAPTER 7. DEPLOYING APPLICATIONS7.1. DEPLOYING APPLICATIONS USING THE MANAGEMENT CLI
7.1.1. Deploy an Application to a Standalone Server Using the Management CLIDeploy an ApplicationUndeploy an ApplicationList Deployments
7.1.2. Deploy an Application in a Managed Domain Using the Management CLIDeploy an ApplicationUndeploy an ApplicationList Deployments
7.2. DEPLOYING APPLICATIONS USING THE MANAGEMENT CONSOLE7.2.1. Deploy an Application to a Standalone Server Using the Management Console
Deploy an ApplicationUndeploy an ApplicationDisable an ApplicationReplace an Application
7.2.2. Deploy an Application in a Managed Domain Using the Management ConsoleDeploy an ApplicationAssign an Application to a Server GroupUnassign an Application from a Server GroupUndeploy an ApplicationDisable an ApplicationReplace an Application
7.3. DEPLOYING APPLICATIONS USING THE DEPLOYMENT SCANNER7.3.1. Deploy an Application to a Standalone Server Using the Deployment Scanner
Deploy an ApplicationUndeploy an Application
585859
60
6161616262626263636364646565656566666667
6868686868696969707071717171717171
72727272727273737374
Table of Contents
3
. . . . . . . . . . . . . . . . . . . . . . . . . . . . . . . . . . . . . . . . . . . . . . . . . . . . . . . . . . . . . . . . . . . . . . . . . . . . . . . . . . . . . . . . . . . . . . . . . . . . . . . . . . . . . . . . . . . . . . . . . . . . . . . . . . . . . . . . . . . . . . . . . . . . . . . . . . . . . . . . . . . . . . . . . . . . . . . . . . . . . . . . . . . . . . . . . . . . . . . . . . . . . . . . . . . . . . . . . . . . . . . . . . . . . . . . . . . . . . . . . . . . . . . . . . . . . . . . . . . . . . . . . . . . . . . . . . . . . . . .
Redeploy an Application7.3.2. Configure the Deployment Scanner
Disable the Deployment ScannerChange the Scan IntervalChange the Deployment FolderEnable the Automatic Deployment of Exploded ContentDisable the Automatic Deployment of Zipped ContentDisable the Automatic Deployment of XML Content
7.3.3. Define a Custom Deployment Scanner7.4. DEPLOYING APPLICATIONS USING MAVEN
7.4.1. Deploy an Application to a Standalone Server Using MavenDeploy an ApplicationUndeploy an Application
7.4.2. Deploy an Application in a Managed Domain Using MavenDeploy an ApplicationUndeploy an Application
7.5. DEPLOYING APPLICATIONS USING THE HTTP API7.5.1. Deploy an Application to a Standalone Server Using the HTTP API
Deploy an ApplicationUndeploy an Application
7.5.2. Deploy an Application in a Managed Domain Using the HTTP APIDeploy an ApplicationUndeploy an Application
7.6. CUSTOMIZING DEPLOYMENT BEHAVIOR7.6.1. Define a Custom Directory for Deployment Content
Define a Custom Directory for a Standalone ServerDefine a Custom Directory for a Managed Domain
7.6.2. Control the Order of Deployments7.6.3. Override Deployment Content7.6.4. Using Rollout Plans
About Rollout PlansRollout Plan SyntaxDeploy Using a Rollout PlanDeploy Using a Stored Rollout PlanRemove a Stored Rollout PlanDefault Rollout Plan
CHAPTER 8. DOMAIN MANAGEMENT8.1. ABOUT MANAGED DOMAINS
8.1.1. About the Domain Controller8.1.2. About Host Controllers8.1.3. About Process Controllers8.1.4. About Server Groups8.1.5. About Servers
8.2. NAVIGATING DOMAIN CONFIGURATIONSManagement ConsoleManagement CLI
8.3. LAUNCHING A MANAGED DOMAIN8.3.1. Start a Managed Domain
Start the Domain ControllerStart a Host Controller
8.3.2. Configure the Domain ControllerConfigure a Host to Act as the Domain Controller
747474747474757575757576767777787878787979797980808080808182828384848585
86868787888888888889909090919191
Red Hat JBoss Enterprise Application Platform 7.0 Configuration Guide
4
. . . . . . . . . . . . . . . . . . . . . . . . . . . . . . . . . . . . . . . . . . . . . . . . . . . . . . . . . . . . . . . . . . . . . . . . . . . . . . . . . . . . . . . . . . . . . . . . . . . . . . . . . . . . . . . . . . . . . . . . . . . . . . . . . . . . . . . . . . . . . . . . . . . . . . . . . . . . . . . . . . . . . . . . . . . . . . . . . . . . . . . . . . . . . . . . . . . . . . . . . . . . . . . . . . . . . . . . . . . . . . . . . . . . . . . . . . . . . . . . . . . . . . . . . . . . . . . . . . . . . . . . . . . . . . . . . . . . . . . .
. . . . . . . . . . . . . . . . . . . . . . . . . . . . . . . . . . . . . . . . . . . . . . . . . . . . . . . . . . . . . . . . . . . . . . . . . . . . . . . . . . . . . . . . . . . . . . . . . . . . . . . . . . . . . . . . . . . . . . . . . . . . . . . . . . . . . . . . . . . . . . . . . . . . . . . . . . . . . . . . . . . . . . . . . . . . . . . . . . . . . . . . . . . . . . . . . . . . . . . . . . . . . . . . . . . . . . . . . . . . . . . . . . . . . . . . . . . . . . . . . . . . . . . . . . . . . . . . . . . . . . . . . . . . . . . . . . . . . . . .
. . . . . . . . . . . . . . . . . . . . . . . . . . . . . . . . . . . . . . . . . . . . . . . . . . . . . . . . . . . . . . . . . . . . . . . . . . . . . . . . . . . . . . . . . . . . . . . . . . . . . . . . . . . . . . . . . . . . . . . . . . . . . . . . . . . . . . . . . . . . . . . . . . . . . . . . . . . . . . . . . . . . . . . . . . . . . . . . . . . . . . . . . . . . . . . . . . . . . . . . . . . . . . . . . . . . . . . . . . . . . . . . . . . . . . . . . . . . . . . . . . . . . . . . . . . . . . . . . . . . . . . . . . . . . . . . . . . . . . . .
. . . . . . . . . . . . . . . . . . . . . . . . . . . . . . . . . . . . . . . . . . . . . . . . . . . . . . . . . . . . . . . . . . . . . . . . . . . . . . . . . . . . . . . . . . . . . . . . . . . . . . . . . . . . . . . . . . . . . . . . . . . . . . . . . . . . . . . . . . . . . . . . . . . . . . . . . . . . . . . . . . . . . . . . . . . . . . . . . . . . . . . . . . . . . . . . . . . . . . . . . . . . . . . . . . . . . . . . . . . . . . . . . . . . . . . . . . . . . . . . . . . . . . . . . . . . . . . . . . . . . . . . . . . . . . . . . . . . . . . .
8.3.3. Configure Host ControllersConnect to the Domain Controller8.3.3.1. Configure the Name of a Host
8.3.4. Domain Controller Discovery and FailoverPromote a Host Controller to Be the Domain Controller
8.4. MANAGING SERVERS8.4.1. Configure Server Groups
Add a Server GroupUpdate a Server GroupRemove a Server GroupServer Group Attributes
8.4.2. Configure ServersAdd a ServerUpdate a ServerRemove a ServerServer Attributes
8.4.3. Start and Stop ServersStart ServersStop ServersReload Servers
8.5. MANAGED DOMAIN SETUPS8.5.1. Set Up a Managed Domain on a Single Machine8.5.2. Set Up a Managed Domain on Two Machines
Create a Managed Domain on Two Machines8.5.3. Configure a JBoss EAP 7 Domain Controller to Administer JBoss EAP 6 Instances
8.5.3.1. Add the JBoss EAP 6 Configuration to the JBoss EAP 7 Domain Controller8.5.3.2. Update the Behavior for the JBoss EAP 6 Profiles8.5.3.3. Set the Server Group for the JBoss EAP 6 Servers8.5.3.4. Prevent the JBoss EAP 6 Instances from Receiving JBoss EAP 7 Updates
8.6. MANAGING JBOSS EAP PROFILES8.6.1. About Profiles8.6.2. Cloning a Profile8.6.3. Creating Hierarchical Profiles
CHAPTER 9. CONFIGURING JVM SETTINGS9.1. CONFIGURING JVM SETTINGS FOR A STANDALONE SERVER9.2. CONFIGURING JVM SETTINGS FOR A MANAGED DOMAIN
9.2.1. Defining JVM Settings on a Host Controller9.2.2. Applying JVM Settings to a Server Group9.2.3. Applying JVM Settings to an Individual Server
9.3. DISPLAYING THE JVM STATUS9.4. SPECIFYING 32 OR 64-BIT JVM ARCHITECTURE
Specifying 64-Bit Architecture for a Standalone ServerSpecifying 64-Bit Architecture for a Managed Domain
CHAPTER 10. MAIL SUBSYSTEM10.1. CONFIGURING THE MAIL SUBSYSTEM
Configuring SMTP server for use in an application10.2. CONFIGURING CUSTOM TRANSPORTS
CHAPTER 11. CONFIGURING WEB SERVICES
CHAPTER 12. LOGGING WITH JBOSS EAP12.1. ABOUT SERVER LOGGING
919292939494959595959596969696979797979898989999
100101102103103104104104105
106106106107107107108108109109
110110110110
113
114114
Table of Contents
5
12.1.1. Server Logging12.1.2. Bootup Logging
12.1.2.1. View Bootup ErrorsExamine the Server Log FileRead the Boot Errors from the Management CLI
12.1.3. Garbage Collection Logging12.1.4. Default Log File Locations12.1.5. Set the Default Locale of the Server
Set the LanguageSet the Language and CountrySet the Server Locale Using the org.jboss.logging.locale Property
12.2. VIEWING LOG FILESView Logs from the Management ConsoleView Logs from the Management CLI
12.3. ABOUT THE LOGGING SUBSYSTEM12.3.1. Root Logger12.3.2. Log Categories12.3.3. Log Handlers
Log Handler Types12.3.4. Log Levels
Supported Log Levels12.3.5. Log Formatters
Log Formatter Syntax12.3.6. Filter Expressions12.3.7. Implicit Logging Dependencies
12.4. CONFIGURING LOG CATEGORIESAdd a Log CategoryConfigure Log Category SettingsAssign a HandlerRemove a Log Category
12.5. CONFIGURING LOG HANDLERS12.5.1. Configure a Console Log Handler
Add a Console Log HandlerConfigure Console Log Handler SettingsAssign the Console Log Handler to a LoggerRemove a Console Log Handler
12.5.2. Configure a File Log HandlerAdd a File Log HandlerConfigure File Log Handler SettingsAssign the File Log Handler to a LoggerRemove a File Log Handler
12.5.3. Configure a Periodic Rotating Log HandlerAdd a Periodic Log HandlerConfigure Periodic Log Handler SettingsAssign the Periodic Log Handler to a LoggerRemove a Periodic Log Handler
12.5.4. Configure a Size Rotating Log HandlerAdd a Size Log HandlerConfigure Size Log Handler SettingsAssign the Size Log Handler to a LoggerRemove a Size Log Handler
12.5.5. Configure a Periodic Size Rotating Log HandlerAdd a Periodic Size Log Handler
114114114115115116116117117117118118118118119
120120120120121121123123124126126126127127127127128128128129130130130130131132132132132134134134134135136136137137
Red Hat JBoss Enterprise Application Platform 7.0 Configuration Guide
6
. . . . . . . . . . . . . . . . . . . . . . . . . . . . . . . . . . . . . . . . . . . . . . . . . . . . . . . . . . . . . . . . . . . . . . . . . . . . . . . . . . . . . . . . . . . . . . . . . . . . . . . . . . . . . . . . . . . . . . . . . . . . . . . . . . . . . . . . . . . . . . . . . . . . . . . . . . . . . . . . . . . . . . . . . . . . . . . . . . . . . . . . . . . . . . . . . . . . . . . . . . . . . . . . . . . . . . . . . . . . . . . . . . . . . . . . . . . . . . . . . . . . . . . . . . . . . . . . . . . . . . . . . . . . . . . . . . . . . . . .
Configure Periodic Size Log Handler SettingsAssign the Periodic Size Log Handler to a LoggerRemove a Periodic Size Log Handler
12.5.6. Configure a Syslog HandlerAdd a Syslog HandlerConfigure Syslog Handler SettingsAssign the Syslog Handler to a LoggerRemove a Syslog Handler
12.5.7. Configure a Custom Log HandlerAdd a Custom Log HandlerConfigure Custom Log Handler SettingsAssign the Custom Log Handler to a LoggerRemove a Custom Log Handler
12.5.8. Configure an Async Log HandlerAdd an Async Log HandlerAdd a Sub-handlerConfigure Async Log Handler SettingsAssign the Async Log Handler to a LoggerRemove an Async Log Handler
12.6. CONFIGURING THE ROOT LOGGERConfigure the Root Logger
12.7. CONFIGURING LOG FORMATTERS12.7.1. Configure a Named Pattern Formatter
Create a Named FormatterAssign a Named Formatter to a Log Handler
12.7.2. Configure a Custom Log FormatterConfigure a Custom Log FormatterExample Custom XML Formatter
12.8. ABOUT APPLICATION LOGGING12.8.1. Per-deployment Logging
12.8.1.1. Disable Per-deployment Logging12.8.2. Logging Profiles
12.8.2.1. Configure a Logging ProfileCreating and Configuring a Logging Profile
12.8.2.2. Example Logging Profile Configuration12.8.3. Viewing Deployment Logging Configuration
CHAPTER 13. DATASOURCE MANAGEMENT13.1. ABOUT JBOSS EAP DATASOURCES
About JDBCSupported DatabasesDatasource TypesThe ExampleDS datasource
13.2. JDBC DRIVERS13.2.1. Install a JDBC Driver as a Core Module13.2.2. Install a JDBC Driver as a JAR Deployment
Update a JDBC Driver JAR to be JDBC 4-Compliant13.2.3. JDBC Driver Download Locations13.2.4. Access Vendor-Specific Classes
Using the MANIFEST.MF FileUsing a jboss-deployment-structure.xml File
13.3. CREATING DATASOURCES13.3.1. Create a Non-XA Datasource
137139139139140140140141141141141142143143143143143144144144145145145146146146146147147148148148149149150151
153153153153153153153154155156156157157157158158
Table of Contents
7

Datasource Parameters13.3.2. Create an XA Datasource
Datasource Parameters13.4. MODIFYING DATASOURCES
13.4.1. Modify a Non-XA Datasource13.4.2. Modify an XA Datasource
13.5. REMOVING DATASOURCES13.5.1. Remove a Non-XA Datasource13.5.2. Remove an XA Datasource
13.6. TESTING DATASOURCE CONNECTIONS13.7. XA DATASOURCE RECOVERY
13.7.1. Configuring XA Recovery13.7.2. Vendor-Specific XA Recovery
Vendor-Specific ConfigurationKnown Issues
13.8. DATABASE CONNECTION VALIDATION13.9. DATASOURCE SECURITY
Secure a Datasource Using a Security DomainSecure a Datasource Using a Password Vault
13.10. DATASOURCE STATISTICSEnable Datasource StatisticsView Datasource Statistics
13.11. CAPACITY POLICIESMaxPoolSize Incrementer PolicySize Incrementer PolicyWatermark Incrementer PolicyMinPoolSize Decrementer PolicySize Decrementer PolicyTimedOut Decrementer PolicyTimedOut/FIFO Decrementer PolicyWatermark Decrementer Policy
13.12. ENLISTMENT TRACING13.13. EXAMPLE DATASOURCE CONFIGURATIONS
13.13.1. Example MySQL DatasourceExample MySQL Datasource ConfigurationExample MySQL JDBC Driver module.xml FileExample Management CLI Commands
13.13.2. Example MySQL XA DatasourceExample MySQL XA Datasource ConfigurationExample MySQL JDBC Driver module.xml FileExample Management CLI Commands
13.13.3. Example PostgreSQL DatasourceExample PostgreSQL Datasource ConfigurationExample PostgreSQL JDBC Driver module.xml FileExample Management CLI Commands
13.13.4. Example PostgreSQL XA DatasourceExample PostgreSQL XA Datasource ConfigurationExample PostgreSQL JDBC Driver module.xml FileExample Management CLI Commands
13.13.5. Example Oracle DatasourceExample Oracle Datasource ConfigurationExample Oracle JDBC Driver module.xml FileExample Management CLI Commands
159159160161161161162162162162163163164164165166168169169169170170171171
172172172172173173173173174174174174175175175176176177177178178178179179179180180181181
Red Hat JBoss Enterprise Application Platform 7.0 Configuration Guide
8
. . . . . . . . . . . . . . . . . . . . . . . . . . . . . . . . . . . . . . . . . . . . . . . . . . . . . . . . . . . . . . . . . . . . . . . . . . . . . . . . . . . . . . . . . . . . . . . . . . . . . . . . . . . . . . . . . . . . . . . . . . . . . . . . . . . . . . . . . . . . . . . . . . . . . . . . . . . . . . . . . . . . . . . . . . . . . . . . . . . . . . . . . . . . . . . . . . . . . . . . . . . . . . . . . . . . . . . . . . . . . . . . . . . . . . . . . . . . . . . . . . . . . . . . . . . . . . . . . . . . . . . . . . . . . . . . . . . . . . . .
13.13.6. Example Oracle XA DatasourceExample Oracle XA Datasource ConfigurationExample Oracle JDBC Driver module.xml FileExample Management CLI Commands
13.13.7. Example Microsoft SQL Server DatasourceExample Microsoft SQL Server Datasource ConfigurationExample Microsoft SQL Server JDBC Driver module.xml FileExample Management CLI Commands
13.13.8. Example Microsoft SQL Server XA DatasourceExample Microsoft SQL Server XA Datasource ConfigurationExample Microsoft SQL Server JDBC Driver module.xml FileExample Management CLI Commands
13.13.9. Example IBM DB2 DatasourceExample IBM DB2 Datasource ConfigurationExample IBM DB2 JDBC Driver module.xml FileExample Management CLI Commands
13.13.10. Example IBM DB2 XA DatasourceExample IBM DB2 XA Datasource ConfigurationExample IBM DB2 JDBC Driver module.xml FileExample Management CLI Commands
13.13.11. Example Sybase DatasourceExample Sybase Datasource ConfigurationExample Sybase JDBC Driver module.xml FileExample Management CLI Commands
13.13.12. Example Sybase XA DatasourceExample Sybase XA Datasource ConfigurationExample Sybase JDBC Driver module.xml FileExample Management CLI Commands
13.13.13. Example MariaDB DatasourceExample MariaDB Datasource ConfigurationExample MariaDB JDBC Driver module.xml FileExample Management CLI Commands
13.13.14. Example MariaDB XA DatasourceExample MariaDB XA Datasource ConfigurationExample MariaDB JDBC Driver module.xml FileExample Management CLI Commands
CHAPTER 14. CONFIGURING TRANSACTIONS14.1. TRANSACTIONS SUBSYSTEM CONFIGURATION
14.1.1. Configuring the Transaction ManagerConfiguring the Transaction Manager Using the Management ConsoleConfiguring the Transaction Manager Using the Management CLI
14.1.2. Configuring Your Datasource to Use JTAPrerequisitesConfiguring the Datasource to use Java Transaction API
14.1.3. About Transaction Log Messages14.1.4. Configuring Logging for the Transactions Subsystem
Configuring the Transaction Logger Using the Management ConsoleConfiguring the Transaction Logger Using the Management CLI
14.2. TRANSACTION ADMINISTRATION14.2.1. Browse and Manage Transactions
Refresh the Log StoreView All Prepared Transactions
182182183183184184184184185185186186187187188188188189190190191191191191192192193193194194194195195195196196
198198198198198198198198199199
200200200200200201
Table of Contents
9

. . . . . . . . . . . . . . . . . . . . . . . . . . . . . . . . . . . . . . . . . . . . . . . . . . . . . . . . . . . . . . . . . . . . . . . . . . . . . . . . . . . . . . . . . . . . . . . . . . . . . . . . . . . . . . . . . . . . . . . . . . . . . . . . . . . . . . . . . . . . . . . . . . . . . . . . . . . . . . . . . . . . . . . . . . . . . . . . . . . . . . . . . . . . . . . . . . . . . . . . . . . . . . . . . . . . . . . . . . . . . . . . . . . . . . . . . . . . . . . . . . . . . . . . . . . . . . . . . . . . . . . . . . . . . . . . . . . . . . . .
. . . . . . . . . . . . . . . . . . . . . . . . . . . . . . . . . . . . . . . . . . . . . . . . . . . . . . . . . . . . . . . . . . . . . . . . . . . . . . . . . . . . . . . . . . . . . . . . . . . . . . . . . . . . . . . . . . . . . . . . . . . . . . . . . . . . . . . . . . . . . . . . . . . . . . . . . . . . . . . . . . . . . . . . . . . . . . . . . . . . . . . . . . . . . . . . . . . . . . . . . . . . . . . . . . . . . . . . . . . . . . . . . . . . . . . . . . . . . . . . . . . . . . . . . . . . . . . . . . . . . . . . . . . . . . . . . . . . . . . .
. . . . . . . . . . . . . . . . . . . . . . . . . . . . . . . . . . . . . . . . . . . . . . . . . . . . . . . . . . . . . . . . . . . . . . . . . . . . . . . . . . . . . . . . . . . . . . . . . . . . . . . . . . . . . . . . . . . . . . . . . . . . . . . . . . . . . . . . . . . . . . . . . . . . . . . . . . . . . . . . . . . . . . . . . . . . . . . . . . . . . . . . . . . . . . . . . . . . . . . . . . . . . . . . . . . . . . . . . . . . . . . . . . . . . . . . . . . . . . . . . . . . . . . . . . . . . . . . . . . . . . . . . . . . . . . . . . . . . . . .
14.2.1.1. Manage a TransactionView the Attributes of a TransactionView the Details of a Transaction ParticipantDelete a TransactionRecover a Transaction ParticipantRefresh the Status of a Transaction Participant
14.2.2. View Transaction Statistics14.2.3. Transactions Object Store
Use a JDBC Datasource as a Transactions Object StoreTransactions JDBC Store AttributesUse the ActiveMQ Journal Object Store
CHAPTER 15. ORB CONFIGURATION15.1. ABOUT COMMON OBJECT REQUEST BROKER ARCHITECTURE (CORBA)15.2. CONFIGURE THE ORB FOR JTS TRANSACTIONS
Configure the ORB Using the Management CLIEnable the Security InterceptorsEnable Transactions in the IIOP SubsystemEnable JTS in the Transactions Subsystem
Configure the ORB Using the Management Console
CHAPTER 16. JAVA CONNECTOR ARCHITECTURE (JCA) MANAGEMENT16.1. ABOUT THE JAVA CONNECTOR ARCHITECTURE (JCA)16.2. ABOUT RESOURCE ADAPTERS16.3. CONFIGURING THE JCA SUBSYSTEM
Archive ValidationBean ValidationWork ManagersBootstrap ContextsCached Connection Manager
16.4. CONFIGURING RESOURCE ADAPTERS16.4.1. Deploy a Resource Adapter
Deploy a Resource Adapter using the Management CLIDeploy a Resource Adapter using the Management ConsoleDeploy a Resource Adapter Using the Deployment Scanner
16.4.2. Configure a Resource AdapterAdd the Resource Adapter ConfigurationConfigure the Resource Adapter SettingsActivate the Resource Adapter
16.4.3. Deploy and Configure the Websphere MQ Resource Adapter16.4.4. Deploy and Configure the Generic JMS Resource Adapter
16.5. CONFIGURE MANAGED CONNECTION POOLS16.6. VIEW CONNECTION STATISTICS
CHAPTER 17. CONFIGURING THE WEB SERVER (UNDERTOW)17.1. UNDERTOW SUBSYSTEM OVERVIEW
Default Undertow Subsystem Configuration17.2. CONFIGURING BUFFER CACHES
Default Undertow Subsystem ConfigurationUpdating an Existing Buffer CacheCreating a New Buffer CacheDeleting a Buffer Cache
17.3. CONFIGURING A SERVERDefault Undertow Subsystem Configuration
201201201202202202202203203204204
206206206206206206206207
208208208208209210210211211211212212212212212212212214214214214215
216216216217217217217217218218
Red Hat JBoss Enterprise Application Platform 7.0 Configuration Guide
10
. . . . . . . . . . . . . . . . . . . . . . . . . . . . . . . . . . . . . . . . . . . . . . . . . . . . . . . . . . . . . . . . . . . . . . . . . . . . . . . . . . . . . . . . . . . . . . . . . . . . . . . . . . . . . . . . . . . . . . . . . . . . . . . . . . . . . . . . . . . . . . . . . . . . . . . . . . . . . . . . . . . . . . . . . . . . . . . . . . . . . . . . . . . . . . . . . . . . . . . . . . . . . . . . . . . . . . . . . . . . . . . . . . . . . . . . . . . . . . . . . . . . . . . . . . . . . . . . . . . . . . . . . . . . . . . . . . . . . . . .
Updating an Existing ServerCreating a New ServerDeleting a Server
17.4. CONFIGURING A SERVLET CONTAINERDefault Undertow Subsystem ConfigurationUpdating an Existing Servlet ContainerCreating a New Servlet ContainerDeleting a Servlet Container
17.5. CONFIGURING HANDLERSDefault Undertow Subsystem ConfigurationUsing WebDAV for Static ResourcesUpdating an Existing File HandlerCreating a New File HandlerDeleting a File Handler
17.6. CONFIGURING FILTERSDefault Undertow Subsystem ConfigurationUpdating an Existing FilterCreating a New FilterDeleting a Filter
17.7. CONFIGURE THE DEFAULT WELCOME WEB APPLICATIONDefault Undertow Subsystem ConfigurationChanging the welcome-content File HandlerChanging the default-web-moduleDisabling the Default Welcome Web Application
17.8. CONFIGURING HTTPS17.9. CONFIGURING HTTP SESSION TIMEOUT
Configuring the Default Session Timeout17.10. CONFIGURING HTTP-ONLY SESSION MANAGEMENT COOKIES
Configuring host-only for the Servlet Container Session CookieConfiguring host-only for the Host Single Sign-On
17.11. CONFIGURING HTTP/217.11.1. Configuring Undertow to use HTTP/2
Configure Undertow to use HTTPSDownload the ALPN JARAdd the ALPN JAR to the Boot ClasspathEnable HTTP/2 in the HTTPS ListenerVerify HTTP/2 is Being Used
17.12. CONFIGURING A REQUESTDUMPING HANDLER17.12.1. Configuring a RequestDumping Handler on the Server
Create a new Expression Filter with the RequestDumping HandlerEnable the Expression Filter in the Undertow Web ServerConfiguring a RequestDumping Handler for Specific URLs
17.12.2. Configuring a RequestDumping Handler within an Application
CHAPTER 18. CONFIGURING REMOTING18.1. ABOUT THE REMOTING SUBSYSTEM
Default Remoting Subsystem ConfigurationThe Remoting EndpointConnectorOutbound ConnectionsAdditional Configuration
18.2. CONFIGURING THE ENDPOINTUpdating the Existing Endpoint Configuration
218219219219219219
220220220220220221221221221222222222222222223223224224224224225225225226226226226226227227227227227228228228228
230230230230230230230230231
Table of Contents
11

. . . . . . . . . . . . . . . . . . . . . . . . . . . . . . . . . . . . . . . . . . . . . . . . . . . . . . . . . . . . . . . . . . . . . . . . . . . . . . . . . . . . . . . . . . . . . . . . . . . . . . . . . . . . . . . . . . . . . . . . . . . . . . . . . . . . . . . . . . . . . . . . . . . . . . . . . . . . . . . . . . . . . . . . . . . . . . . . . . . . . . . . . . . . . . . . . . . . . . . . . . . . . . . . . . . . . . . . . . . . . . . . . . . . . . . . . . . . . . . . . . . . . . . . . . . . . . . . . . . . . . . . . . . . . . . . . . . . . . . .
. . . . . . . . . . . . . . . . . . . . . . . . . . . . . . . . . . . . . . . . . . . . . . . . . . . . . . . . . . . . . . . . . . . . . . . . . . . . . . . . . . . . . . . . . . . . . . . . . . . . . . . . . . . . . . . . . . . . . . . . . . . . . . . . . . . . . . . . . . . . . . . . . . . . . . . . . . . . . . . . . . . . . . . . . . . . . . . . . . . . . . . . . . . . . . . . . . . . . . . . . . . . . . . . . . . . . . . . . . . . . . . . . . . . . . . . . . . . . . . . . . . . . . . . . . . . . . . . . . . . . . . . . . . . . . . . . . . . . . . .
. . . . . . . . . . . . . . . . . . . . . . . . . . . . . . . . . . . . . . . . . . . . . . . . . . . . . . . . . . . . . . . . . . . . . . . . . . . . . . . . . . . . . . . . . . . . . . . . . . . . . . . . . . . . . . . . . . . . . . . . . . . . . . . . . . . . . . . . . . . . . . . . . . . . . . . . . . . . . . . . . . . . . . . . . . . . . . . . . . . . . . . . . . . . . . . . . . . . . . . . . . . . . . . . . . . . . . . . . . . . . . . . . . . . . . . . . . . . . . . . . . . . . . . . . . . . . . . . . . . . . . . . . . . . . . . . . . . . . . . .
Creating a New Endpoint ConfigurationDeleting an Endpoint Configuration
18.3. CONFIGURING A CONNECTORUpdating the Existing Connector ConfigurationCreating a New ConnectorDeleting a Connector
18.4. CONFIGURING AN HTTP CONNECTORUpdating the Existing HTTP Connector ConfigurationCreating a New HTTP ConnectorDeleting an HTTP Connector
18.5. CONFIGURING AN OUTBOUND CONNECTIONUpdating an Existing Outbound ConnectionCreating a New Outbound ConnectionDeleting an Outbound Connection
18.6. CONFIGURING A REMOTE OUTBOUND CONNECTION18.7. CONFIGURING A LOCAL OUTBOUND CONNECTION
Updating an Existing Local Outbound ConnectionCreating a New Local Outbound ConnectionDeleting a Local Outbound Connection
18.8. ADDITIONAL REMOTING CONFIGURATION
CHAPTER 19. CONFIGURING THE IO SUBSYSTEM19.1. IO SUBSYSTEM OVERVIEW
Default IO Subsystem Configuration19.2. CONFIGURING A WORKER
Updating an Existing WorkerCreating a New WorkerDeleting a Worker
19.3. CONFIGURING A BUFFER POOLUpdating an Existing Buffer PoolCreating a Buffer PoolDeleting a Buffer Pool
CHAPTER 20. CONFIGURING BATCH APPLICATIONS20.1. CONFIGURING BATCH JOBS
20.1.1. Configure Batch Job RepositoriesAdd an In-memory Job RepositoryAdd a JDBC Job RepositorySet a Default Job Repository
20.1.2. Configure Batch Thread PoolsConfigure a Thread PoolUse a Thread FactorySet a Default Thread PoolView Thread Pool Statistics
20.2. MANAGING BATCH JOBSRestart a Batch JobStart a Batch JobStop a Batch JobView Batch Job Execution Details
CHAPTER 21. CONFIGURING THE NAMING SUBSYSTEM21.1. ABOUT THE NAMING SUBSYSTEM21.2. CONFIGURING GLOBAL BINDINGS
Configuring Simple Bindings
231231231231231231232232232232232232232233233233233233233234
236236236236236236236236237237237
238238238238238239239239239240240240241241241241
243243243244
Red Hat JBoss Enterprise Application Platform 7.0 Configuration Guide
12
. . . . . . . . . . . . . . . . . . . . . . . . . . . . . . . . . . . . . . . . . . . . . . . . . . . . . . . . . . . . . . . . . . . . . . . . . . . . . . . . . . . . . . . . . . . . . . . . . . . . . . . . . . . . . . . . . . . . . . . . . . . . . . . . . . . . . . . . . . . . . . . . . . . . . . . . . . . . . . . . . . . . . . . . . . . . . . . . . . . . . . . . . . . . . . . . . . . . . . . . . . . . . . . . . . . . . . . . . . . . . . . . . . . . . . . . . . . . . . . . . . . . . . . . . . . . . . . . . . . . . . . . . . . . . . . . . . . . . . . .
Binding Object FactoriesBinding External ContextsBinding Lookup Aliases
21.3. CONFIGURING THE REMOTE JNDI INTERFACE
CHAPTER 22. CONFIGURING HIGH AVAILABILITY22.1. INTRODUCTION TO HIGH AVAILABILITY22.2. CLUSTER COMMUNICATION WITH JGROUPS
22.2.1. About JGroups22.2.2. Switch the Default JGroups Channel to Use TCP22.2.3. Configure TCPPING22.2.4. Configure TCPGOSSIP22.2.5. Binding JGroups to a Network Interface22.2.6. Securing a Cluster
Configuring AuthenticationConfiguring Encryption
Using Symmetric EncryptionUsing Asymmetric Encryption
22.2.7. Configure JGroups Thread Pools22.2.8. Configure JGroups Send and Receive Buffers
Resolving Buffer Size WarningsConfiguring JGroups Buffer Sizes
22.2.9. JGroups Troubleshooting22.2.9.1. Nodes Do Not Form a Cluster22.2.9.2. Causes of Missing Heartbeats in Failure Detection
22.3. INFINISPAN22.3.1. About Infinispan22.3.2. Cache Containers
22.3.2.1. Configure Cache ContainersConfigure Caches Using the Management ConsoleConfigure Caches Using the Management CLIChange the Default EJB Cache Container
22.3.3. Clustering ModesCache ModesSynchronous and Asynchronous Replication22.3.3.1. Configure the Cache Mode
Change to Replicated Cache ModeChange to Distributed Cache Mode
22.3.3.2. Cache Strategy Performance22.3.4. Configure Infinispan Thread Pools22.3.5. Infinispan Statistics
22.3.5.1. Enable Infinispan Statistics22.3.6. Infinispan Partition Handling
22.3.6.1. Split Brain22.3.6.2. Configuring Partition Handling
22.3.7. Externalize HTTP Sessions to JBoss Data Grid22.4. CONFIGURING JBOSS EAP AS A FRONT-END LOAD BALANCER
22.4.1. Configure Undertow as a Load Balancer Using mod_clusterConfigure the mod_cluster Front-end Load Balancer
22.4.2. Configure Undertow as a Static Load Balancer22.5. USING AN EXTERNAL WEB SERVER AS A PROXY SERVER
22.5.1. Overview of HTTP Connectors22.5.2. Apache HTTP Server
244245246247
248248249249249250251252252252253253254255256256256257257258258258258260260260261261262262262262263264264265265266266267267269270270271272272274
Table of Contents
13

. . . . . . . . . . . . . . . . . . . . . . . . . . . . . . . . . . . . . . . . . . . . . . . . . . . . . . . . . . . . . . . . . . . . . . . . . . . . . . . . . . . . . . . . . . . . . . . . . . . . . . . . . . . . . . . . . . . . . . . . . . . . . . . . . . . . . . . . . . . . . . . . . . . . . . . . . . . . . . . . . . . . . . . . . . . . . . . . . . . . . . . . . . . . . . . . . . . . . . . . . . . . . . . . . . . . . . . . . . . . . . . . . . . . . . . . . . . . . . . . . . . . . . . . . . . . . . . . . . . . . . . . . . . . . . . . . . . . . . . .
22.5.2.1. Installing Apache HTTP Server22.5.3. Accepting Requests from External Web Servers
Update JBoss EAP Configuration22.6. THE MOD_CLUSTER HTTP CONNECTOR
22.6.1. Configure mod_cluster in Apache HTTP ServerConfigure mod_cluster
22.6.2. Disable Advertising for mod_cluster22.6.3. Configure a mod_cluster Worker Node
Configure a Worker Node22.6.4. Configure the mod_cluster fail_on_status Parameter22.6.5. Migrate Traffic Between Clusters
Upgrade Process for Clusters - Load-Balancing GroupsDefault Load-Balancing GroupUsing the Management CLI
22.7. APACHE MOD_JK HTTP CONNECTOR22.7.1. Configure mod_jk in Apache HTTP Server22.7.2. Configure JBoss EAP to Communicate with mod_jk
22.8. APACHE MOD_PROXY HTTP CONNECTOR22.8.1. Configure mod_proxy in Apache HTTP Server
Add a Non-load-balancing ProxyAdd a Load-balancing Proxy
Enable Sticky Sessions22.8.2. Configure JBoss EAP to Communicate with mod_proxy
22.9. MICROSOFT ISAPI CONNECTOR22.9.1. Configure Microsoft IIS to Use the ISAPI Connector22.9.2. Configure the ISAPI Connector to Send Client Requests to JBoss EAP
Create Property Files and Set Up Redirection22.9.3. Configure the ISAPI Connector to Balance Client Requests Across Multiple JBoss EAP Servers
Balance Client Requests Across Multiple Servers22.10. ORACLE NSAPI CONNECTOR
22.10.1. Configure Oracle iPlanet Web Server to use the NSAPI Connector22.10.2. Configure the NSAPI Connector to Send Client Requests to JBoss EAP
Set Up the Basic HTTP Connector22.10.3. Configure the NSAPI Connector to Balance Client Requests Across Multiple JBoss EAP Servers
Configure the Connector for Load Balancing
APPENDIX A. REFERENCE MATERIALA.1. SERVER RUNTIME ARGUMENTSA.2. RPM SERVICE CONFIGURATION FILESA.3. RPM SERVICE CONFIGURATION PROPERTIESA.4. OVERVIEW OF JBOSS EAP SUBSYSTEMSA.5. ADD-USER UTILITY ARGUMENTSA.6. MANAGEMENT AUDIT LOGGING ATTRIBUTESA.7. INTERFACE ATTRIBUTESA.8. SOCKET BINDING ATTRIBUTESA.9. DEFAULT SOCKET BINDINGSA.10. DEPLOYMENT SCANNER MARKER FILESA.11. DEPLOYMENT SCANNER ATTRIBUTESA.12. MAIL SUBSYSTEM ATTRIBUTESA.13. ROOT LOGGER ATTRIBUTESA.14. LOG CATEGORY ATTRIBUTESA.15. LOG HANDLER ATTRIBUTESA.16. DATASOURCE CONNECTION URLS
274274274275276276277278278283283283285285286286289289290290290291292292292294294296296298298300300301302
304304306307308
311312315316317318319
320322322323329
Red Hat JBoss Enterprise Application Platform 7.0 Configuration Guide
14

A.17. DATASOURCE PARAMETERSA.18. DATASOURCE STATISTICSA.19. TRANSACTION MANAGER CONFIGURATION OPTIONSA.20. IIOP SUBSYSTEM ATTRIBUTESA.21. RESOURCE ADAPTER ATTRIBUTESA.22. RESOURCE ADAPTER STATISTICSA.23. UNDERTOW SUBSYSTEM ATTRIBUTES
Buffer Cache AttributesServlet Container Attributes
servlet-container Attributesmime-mapping Attributeswelcome-file Attributescrawler-session-management Attributesjsp Attributespersistent-sessions Attributessession-cookie Attributeswebsockets Attributes
Filter Attributescustom-filter Filterserror-page Filtersexpression-filter Filtersgzip Filtersmod-cluster Filtersrequest-limit Filtersresponse-header Filtersrewrite Filters
Handler Attributesfile AttributesUsing WebDAV for Static Resourcesreverse-proxy attributes
Server Attributesserver Attributeshttp-listener Attributeshttps-listener Attributesajp-listener Attributeshost Attributesfilter-ref Attributesaccess-log Attributessingle-sign-on Attributeslocation Attributes
A.24. DEFAULT BEHAVIOR OF HTTP METHODSA.25. IO SUBSYSTEM ATTRIBUTESA.26. REMOTING SUBSYSTEM ATTRIBUTES
Connector AttributesHTTP Connector AttributesOutbound Connection AttributesRemote Outbound ConnectionLocal Outbound Connection Attributes
A.27. APACHE HTTP SERVER MOD_CLUSTER DIRECTIVESA.28. MODCLUSTER SUBSYSTEM ATTRIBUTESA.29. MOD_JK WORKER PROPERTIESA.30. SECURITY MANAGER SUBSYSTEM ATTRIBUTES
329337340343345350351351352352353353353354355356356357357357357357358361361361362362362362363364364367371
374374374375376376377377380382383383384384388392394
Table of Contents
15

Red Hat JBoss Enterprise Application Platform 7.0 Configuration Guide
16
CHAPTER 1. OVERVIEWThe purpose of this guide is to cover many of the configuration tasks needed for setting up andmaintaining JBoss EAP as well as running applications and other services on it. Before using this guideto configure JBoss EAP, it is assumed that the latest version of JBoss EAP has been downloaded andinstalled. For installation instructions, see the JBoss EAP Installation Guide.
IMPORTANT
Since the installation location of JBoss EAP will vary between host machines, this guiderefers to the installation location as EAP_HOME. The actual location of the JBoss EAPinstallation should be used instead of EAP_HOME when performing administrative tasks.
CHAPTER 1. OVERVIEW
17
CHAPTER 2. STARTING AND STOPPING JBOSS EAP
2.1. STARTING JBOSS EAP
JBoss EAP runs in one of two operating modes: as a standalone server or in a managed domain, and issupported on several platforms: Red Hat Enterprise Linux, Windows Server, Oracle Solaris, andHewlett-Packard HP-UX.
The specific command to start JBoss EAP depends on the underlying platform and the desiredoperating mode.
Start JBoss EAP as a Standalone Server
$ EAP_HOME/bin/standalone.sh
NOTE
For Windows Server, use the EAP_HOME\bin\standalone.bat script.
This startup script uses the EAP_HOME/bin/standalone.conf file (or standalone.conf.bat forWindows Server) to set some default preferences, such as JVM options. You can customize thesettings in this file.
JBoss EAP uses the standalone.xml configuration file by default, but can be started using adifferent one. For details on the available standalone configuration files and how to use them, see theStandalone Server Configuration Files section.
For a complete listing of all available startup script arguments and their purposes, use the --helpargument or see the Server Runtime Arguments section.
Start JBoss EAP in a Managed DomainThe domain controller must be started before the servers in any of the server groups in the domain.Use this script to first start the domain controller, and then for each associated host controller.
$ EAP_HOME/bin/domain.sh
NOTE
For Windows Server, use the EAP_HOME\bin\domain.bat script.
This startup script uses the EAP_HOME/bin/domain.conf file (or domain.conf.bat for WindowsServer) to set some default preferences, such as JVM options. You can customize the settings in thisfile.
JBoss EAP uses the host.xml host configuration file by default, but can be started using a differentone. For details on the available managed domain configuration files and how to use them, see theManaged Domain Configuration Files section.
When setting up a managed domain, additional arguments will need to be passed into the startupscript. For a complete listing of all available startup script arguments and their purposes, use the --help argument or see the Server Runtime Arguments section.
Red Hat JBoss Enterprise Application Platform 7.0 Configuration Guide
18
2.2. STOPPING JBOSS EAP
The way that you stop JBoss EAP depends on how it was started.
Stop an Interactive Instance of JBoss EAPPress Ctrl+C in the terminal where JBoss EAP was started.
Stop a Background Instance of JBoss EAPUse the management CLI to connect to the running instance and shut down the server.
1. Launch the management CLI.
$ EAP_HOME/bin/jboss-cli.sh --connect
2. Issue the shutdown command.
shutdown
NOTE
When running in a managed domain, you must specify the host name to shut down byusing the --host argument with the shutdown command.
2.3. RUNNING JBOSS EAP IN ADMIN-ONLY MODE
JBoss EAP has the ability to be started in admin-only mode. This enables JBoss EAP to run and acceptmanagement requests but not start other runtime services or accept end user requests. Admin-onlymode is available in both standalone servers as well as managed domains. In a managed domain, if adomain controller is started in admin-only mode, it will not accept incoming connections from slavehost controllers.
To start a JBoss EAP instance in admin-only mode, use the --admin-only runtime switch whenstarting the JBoss EAP instance.
NOTE
The management CLI commands shown assume that you are running a JBoss EAPstandalone server. For more details on using the management CLI for a JBoss EAPmanaged domain, please see the JBoss EAP Management CLI Guide.
Start JBoss EAP in Admin-Only Mode
$ EAP_HOME/bin/standalone.sh --admin-only
Check If JBoss EAP is Running in Admin-Only ModeTo determine if a JBoss EAP instance is running in admin-only mode:
NOTE
The management CLI commands shown assume that you are running a JBoss EAPstandalone server. For more details on using the management CLI for a JBoss EAPmanaged domain, please see the JBoss EAP Management CLI Guide.
CHAPTER 2. STARTING AND STOPPING JBOSS EAP
19
:read-attribute(name=running-mode)
If the JBoss EAP instance is running in admin-only mode, the result will be:
{ "outcome" => "success", "result" => "ADMIN_ONLY"}
otherwise, the result will be:
{ "outcome" => "success", "result" => "NORMAL"}
Restart in a Different Mode from the Management CLIIn addition to stopping and starting a JBoss EAP instance with a different runtime switch, themanagement CLI may also be used to reload the server and start it in a different mode. To reload aJBoss EAP instance to start in admin-only mode:
NOTE
The management CLI commands shown assume that you are running a JBoss EAPstandalone server. For more details on using the management CLI for a JBoss EAPmanaged domain, please see the JBoss EAP Management CLI Guide.
reload --admin-only=true
To reload a JBoss EAP instance to start in normal mode:
reload --admin-only=false
NOTE
Separate from the current running mode, the initial running mode may also be checkedwith the following command: /core-service=server-environment:read-attribute(name=initial-running-mode). This command differs from :read-attribute(name=running-mode) by displaying the running mode in which JBossEAP was launched and NOT its current running mode.
2.4. SUSPEND AND SHUT DOWN JBOSS EAP GRACEFULLY
JBoss EAP can be suspended or shut down gracefully. This allows active requests to completenormally, without accepting any new requests. A timeout value specifies how long that the suspend orshut down operation will wait for active requests to complete. While the server is suspended,management requests are still processed.
Graceful shutdown is coordinated at a server-wide level, mostly focused on the entry points at which arequest enters the server. The following subsystems support graceful shutdown:
Undertow
Red Hat JBoss Enterprise Application Platform 7.0 Configuration Guide
20
The undertow subsystem will wait for all requests to finish.
mod_cluster
The modcluster subsystem will notify the load balancer that the server is suspending in the PRE_SUSPEND phase.
EJB
The ejb3 subsystem will wait for all remote EJB requests and MDB message deliveries to finish.Delivery to MDBs is stopped in the PRE_SUSPEND phase. EJB timers are suspended, and missedtimers will be activated when the server is resumed.
EE Concurrency
The server will wait for all active jobs to finish. All queued jobs will be skipped. Currently, since EEConcurrency does not have persistence, those queued jobs that were skipped will be lost.While the server is in a suspended state, scheduled tasks will continue to execute at their scheduledtimes but will throw a java.lang.IllegalStateException. Once the server is resumed,scheduled tasks will continue to execute normally and in most cases, tasks will not need to berescheduled.
Batch
The server will stop all running jobs within the timeout period and defer all scheduled jobs.
NOTE
Graceful shutdown currently will not reject inbound remote distributed transactions ornew inbound JMS messages. EE batch jobs and EE concurrency tasks scheduled byinflight activity are currently allowed to proceed. However, EE concurrency taskssubmitted that pass the timeout window currently error when executed.
Requests are tracked by the request-controller subsystem. Without this subsystem, suspend andresume capabilities are limited and the server will not wait for requests to complete before suspendingor shutting down. However, if you do not need this capability, the request-controller subsystemcan be removed for a small performance improvement.
2.4.1. Suspend Servers
JBoss EAP 7 introduced a suspend mode, which suspends server operations gracefully. This allows allactive requests to complete normally, but will not accept any new requests. Once the server has beensuspended, it can be shut down, returned back to a running state, or left in a suspended state toperform maintenance.
NOTE
The management interfaces are not impacted by suspending the server.
The server can be suspended and resumed using the management console or the management CLI.
Check the Server Suspend StateThe server suspend state can be viewed using the following management CLI commands. The resultingvalue will be one of RUNNING, PRE_SUSPEND, SUSPENDING, or SUSPENDED.
Check the suspend state for a standalone server.
:read-attribute(name=suspend-state)
CHAPTER 2. STARTING AND STOPPING JBOSS EAP
21
Check the suspend state for a server in a managed domain.
/host=master/server=server-one:read-attribute(name=suspend-state)
SuspendUse the following management CLI commands to suspend the server, specifying the timeout value, inseconds, for the server to wait for active requests to complete. The default is 0, which will suspendimmediately. A value of -1 will cause the server to wait indefinitely for all active requests to complete.
Each example waits up to 60 seconds for requests to complete before suspending.
Suspend a standalone server.
:suspend(timeout=60)
Suspend all servers in a managed domain.
:suspend-servers(timeout=60)
Suspend a single server in a managed domain.
/host=master/server-config=server-one:suspend(timeout=60)
Suspend all servers in a server group.
/server-group=main-server-group:suspend-servers(timeout=60)
ResumeThe server can be returned back to a normal running state to accept new requests by using the resume command at the appropriate level (server, server group, entire domain). For example:
:resume
2.4.2. Shut Down Servers Gracefully
A server will be shut down gracefully if an appropriate timeout value is specified when stopping theserver. Once the command is issued, the server will be suspended and will wait up to the specifiedtimeout for all requests to finish before shutting down.
Use the following management CLI commands to shut down the server gracefully. Specify the timeoutvalue, in seconds, for the server to wait for active requests to complete. The default is 0, which will shutdown the server immediately. A value of -1 will cause the server to wait indefinitely for all activerequests to complete before shutting down.
Each example waits up to 60 seconds for requests to complete before shutting down.
Shut down a standalone server gracefully.
:shutdown(timeout=60)
Stop all servers in a managed domain gracefully.
Red Hat JBoss Enterprise Application Platform 7.0 Configuration Guide
22
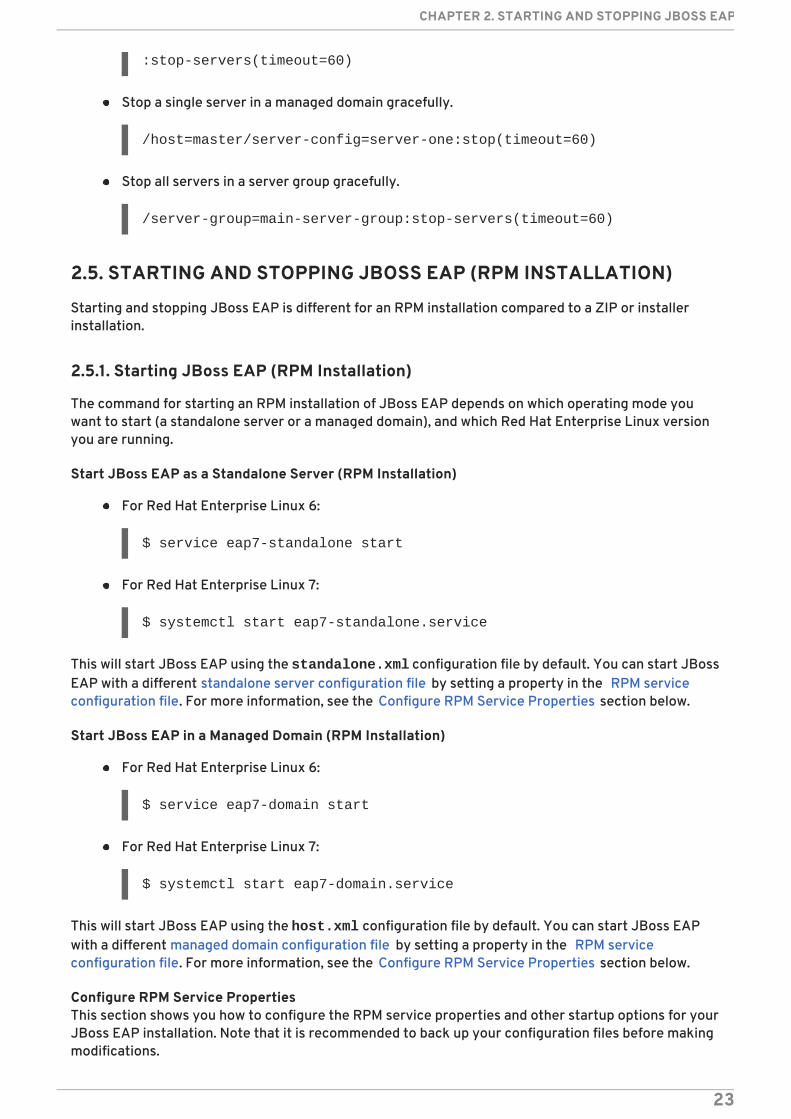
:stop-servers(timeout=60)
Stop a single server in a managed domain gracefully.
/host=master/server-config=server-one:stop(timeout=60)
Stop all servers in a server group gracefully.
/server-group=main-server-group:stop-servers(timeout=60)
2.5. STARTING AND STOPPING JBOSS EAP (RPM INSTALLATION)
Starting and stopping JBoss EAP is different for an RPM installation compared to a ZIP or installerinstallation.
2.5.1. Starting JBoss EAP (RPM Installation)
The command for starting an RPM installation of JBoss EAP depends on which operating mode youwant to start (a standalone server or a managed domain), and which Red Hat Enterprise Linux versionyou are running.
Start JBoss EAP as a Standalone Server (RPM Installation)
For Red Hat Enterprise Linux 6:
$ service eap7-standalone start
For Red Hat Enterprise Linux 7:
$ systemctl start eap7-standalone.service
This will start JBoss EAP using the standalone.xml configuration file by default. You can start JBossEAP with a different standalone server configuration file by setting a property in the RPM serviceconfiguration file. For more information, see the Configure RPM Service Properties section below.
Start JBoss EAP in a Managed Domain (RPM Installation)
For Red Hat Enterprise Linux 6:
$ service eap7-domain start
For Red Hat Enterprise Linux 7:
$ systemctl start eap7-domain.service
This will start JBoss EAP using the host.xml configuration file by default. You can start JBoss EAPwith a different managed domain configuration file by setting a property in the RPM serviceconfiguration file. For more information, see the Configure RPM Service Properties section below.
Configure RPM Service PropertiesThis section shows you how to configure the RPM service properties and other startup options for yourJBoss EAP installation. Note that it is recommended to back up your configuration files before makingmodifications.
CHAPTER 2. STARTING AND STOPPING JBOSS EAP
23
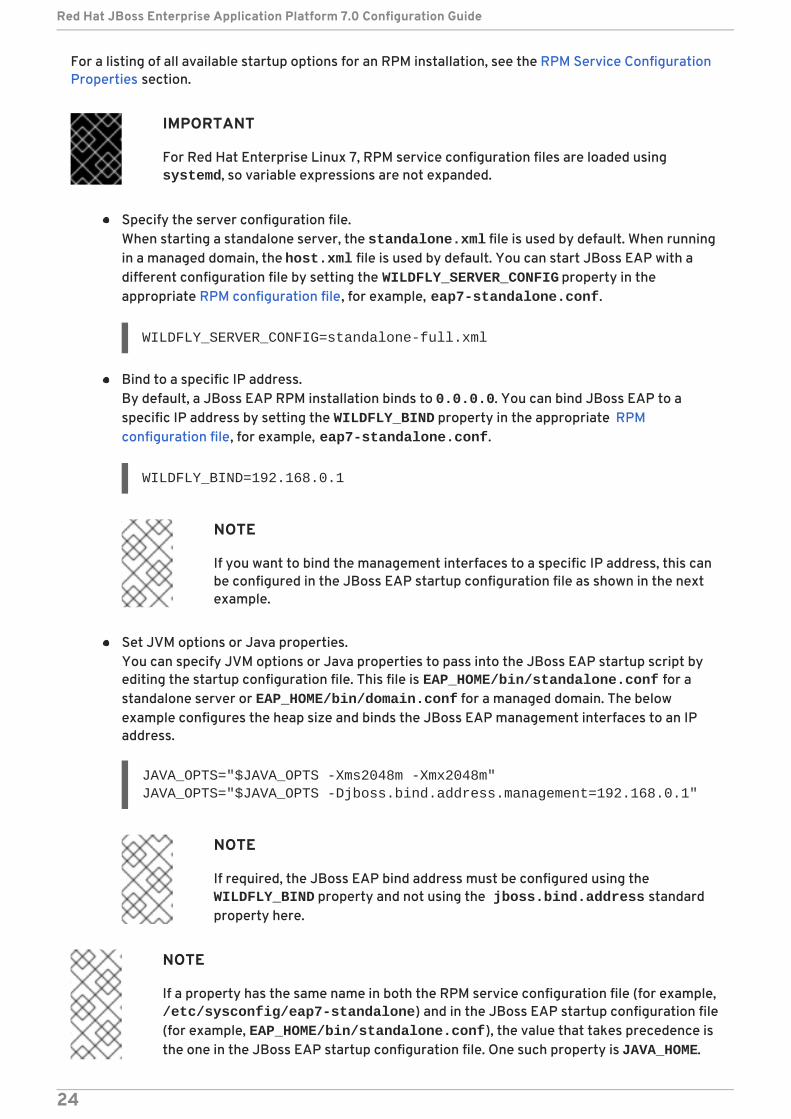
For a listing of all available startup options for an RPM installation, see the RPM Service ConfigurationProperties section.
IMPORTANT
For Red Hat Enterprise Linux 7, RPM service configuration files are loaded using systemd, so variable expressions are not expanded.
Specify the server configuration file.When starting a standalone server, the standalone.xml file is used by default. When runningin a managed domain, the host.xml file is used by default. You can start JBoss EAP with adifferent configuration file by setting the WILDFLY_SERVER_CONFIG property in theappropriate RPM configuration file, for example, eap7-standalone.conf.
WILDFLY_SERVER_CONFIG=standalone-full.xml
Bind to a specific IP address.By default, a JBoss EAP RPM installation binds to 0.0.0.0. You can bind JBoss EAP to aspecific IP address by setting the WILDFLY_BIND property in the appropriate RPMconfiguration file, for example, eap7-standalone.conf.
WILDFLY_BIND=192.168.0.1
NOTE
If you want to bind the management interfaces to a specific IP address, this canbe configured in the JBoss EAP startup configuration file as shown in the nextexample.
Set JVM options or Java properties.You can specify JVM options or Java properties to pass into the JBoss EAP startup script byediting the startup configuration file. This file is EAP_HOME/bin/standalone.conf for astandalone server or EAP_HOME/bin/domain.conf for a managed domain. The belowexample configures the heap size and binds the JBoss EAP management interfaces to an IPaddress.
JAVA_OPTS="$JAVA_OPTS -Xms2048m -Xmx2048m"JAVA_OPTS="$JAVA_OPTS -Djboss.bind.address.management=192.168.0.1"
NOTE
If required, the JBoss EAP bind address must be configured using the WILDFLY_BIND property and not using the jboss.bind.address standardproperty here.
NOTE
If a property has the same name in both the RPM service configuration file (for example, /etc/sysconfig/eap7-standalone) and in the JBoss EAP startup configuration file(for example, EAP_HOME/bin/standalone.conf), the value that takes precedence isthe one in the JBoss EAP startup configuration file. One such property is JAVA_HOME.
Red Hat JBoss Enterprise Application Platform 7.0 Configuration Guide
24
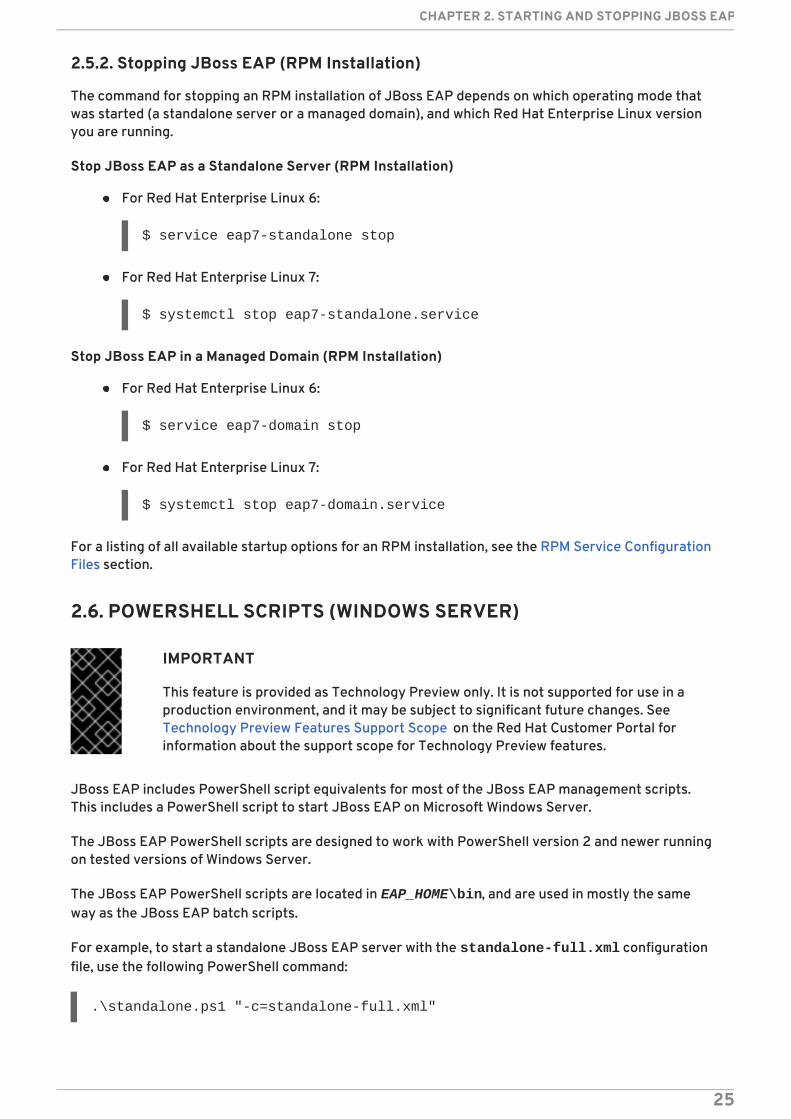
2.5.2. Stopping JBoss EAP (RPM Installation)
The command for stopping an RPM installation of JBoss EAP depends on which operating mode thatwas started (a standalone server or a managed domain), and which Red Hat Enterprise Linux versionyou are running.
Stop JBoss EAP as a Standalone Server (RPM Installation)
For Red Hat Enterprise Linux 6:
$ service eap7-standalone stop
For Red Hat Enterprise Linux 7:
$ systemctl stop eap7-standalone.service
Stop JBoss EAP in a Managed Domain (RPM Installation)
For Red Hat Enterprise Linux 6:
$ service eap7-domain stop
For Red Hat Enterprise Linux 7:
$ systemctl stop eap7-domain.service
For a listing of all available startup options for an RPM installation, see the RPM Service ConfigurationFiles section.
2.6. POWERSHELL SCRIPTS (WINDOWS SERVER)
IMPORTANT
This feature is provided as Technology Preview only. It is not supported for use in aproduction environment, and it may be subject to significant future changes. SeeTechnology Preview Features Support Scope on the Red Hat Customer Portal forinformation about the support scope for Technology Preview features.
JBoss EAP includes PowerShell script equivalents for most of the JBoss EAP management scripts.This includes a PowerShell script to start JBoss EAP on Microsoft Windows Server.
The JBoss EAP PowerShell scripts are designed to work with PowerShell version 2 and newer runningon tested versions of Windows Server.
The JBoss EAP PowerShell scripts are located in EAP_HOME\bin, and are used in mostly the sameway as the JBoss EAP batch scripts.
For example, to start a standalone JBoss EAP server with the standalone-full.xml configurationfile, use the following PowerShell command:
.\standalone.ps1 "-c=standalone-full.xml"
CHAPTER 2. STARTING AND STOPPING JBOSS EAP
25

NOTE
Arguments of the JBoss EAP PowerShell scripts must be in quotes.
Red Hat JBoss Enterprise Application Platform 7.0 Configuration Guide
26
CHAPTER 3. JBOSS EAP MANAGEMENTJBoss EAP uses a simplified configuration, with one configuration file per standalone server ormanaged domain. Default configuration for a standalone server is stored in the EAP_HOME/standalone/configuration/standalone.xml file and default configuration for amanaged domain is stored in the EAP_HOME/domain/configuration/domain.xml file.Additionally, the default configuration for a host controller is stored in the EAP_HOME/domain/configuration/host.xml file.
JBoss EAP can be configured using the command-line management CLI, web-based managementconsole, Java API, or HTTP API. Changes made using these management interfaces persistautomatically and the XML configuration files are overwritten by the Management API. Themanagement CLI and management console are the preferred methods, and it is not recommended toedit the XML configuration files manually.
3.1. ABOUT SUBSYSTEMS, EXTENSIONS, AND PROFILES
Different aspects of JBoss EAP functionality are configured in different subsystems. For example,application and server logging are configured in the logging subsystem.
A subsystem provides configuration options for a particular extension. An extension is a module thatextends the core functionality of the server. Extensions are loaded as they are needed bydeployments, and are unloaded when they are no longer needed.
A collection of subsystem configurations makes up a profile, which is configured to satisfy the needs ofthe server. A standalone server has a single, unnamed profile. A managed domain can define manyprofiles for use by server groups in the domain.
For more information on the available subsystems, see Overview of JBoss EAP Subsystems .
Using the Management Console or the Management CLIBoth the management console and the management CLI are valid, supported ways of updating theconfiguration of a JBoss EAP instance. Deciding between the two is a matter of preference. Those whoprefer to use a graphical, web-based interface should use the management console. Those who prefer acommand-line interface should use the management CLI.
3.2. MANAGEMENT USERS
The default JBoss EAP configuration provides local authentication so that a user can access themanagement CLI on the local host without requiring authentication.
However, you must add a management user if you want to access the management CLI remotely or usethe management console, which is considered remote access even if the traffic originates on the localhost. If you attempt to access the management console before adding a management user, you willreceive an error message.
If JBoss EAP is installed using the graphical installer, then a management user is created during theinstallation process.
This guide covers simple user management for JBoss EAP using the add-user script, which is a utilityfor adding new users to the properties files for out-of-the-box authentication. For more advancedauthentication and authorization options, such as LDAP or Role-Based Access Control (RBAC), see theCore Management Authentication section of the JBoss EAP Security Architecture guide.
CHAPTER 3. JBOSS EAP MANAGEMENT
27
3.2.1. Adding a Management User
1. Run the add-user utility script and follow the prompts.
$ EAP_HOME/bin/add-user.sh
NOTE
For Windows Server, use the EAP_HOME\bin\add-user.bat script.
2. Press ENTER to select the default option a to add a management user.This user will be added to the ManagementRealm and will be authorized to performmanagement operations using the management console or management CLI. The other choice(b) adds a user to the ApplicationRealm, which is used for applications and provides noparticular permissions.
3. Enter the desired username and password. You will be prompted to confirm the password.By default, JBoss EAP allows weak passwords but will issue a warning. See Setting Add-UserUtility Password Restrictions for details on changing this default behavior.
4. Enter a comma-separated list of groups to which the user belongs. If you do not want the userto belong to any groups, press ENTER to leave it blank.
5. Review the information and enter yes to confirm.
6. Determine whether this user represents a remote JBoss EAP server instance. For a basicmanagement user, enter no.One type of user that may need to be added to the ManagementRealm is a user representinganother instance of JBoss EAP, which must be able to authenticate to join as a member of acluster. If this is the case, then answer yes to this prompt and you will be given a hashed secretvalue representing the user’s password, which will need to be added to a differentconfiguration file.
Users can also be created non-interactively by passing parameters to the add-user script. Thisapproach is not recommended on shared systems, because the passwords will be visible in log andhistory files. For more information, see Running the Add-User Utility Non-Interactively.
3.2.2. Running the Add-User Utility Non-Interactively
You can run the add-user script non-interactively by passing in arguments on the command line. At aminimum, the username and password must be provided.
WARNING
This approach is not recommended on shared systems, because the passwords willbe visible in log and history files.
Create a User Belonging to Multiple Groups
Red Hat JBoss Enterprise Application Platform 7.0 Configuration Guide
28
The following command adds a management user (mgmtuser1) with the guest and mgmtgroupgroups.
Specify an Alternative Properties FileBy default, user and group information created using the add-user script are stored in properties fileslocated in the server configuration directory.
User information is stored in the following properties files:
EAP_HOME/standalone/configuration/mgmt-users.properties
EAP_HOME/domain/configuration/mgmt-users.properties
Group information is stored in the following properties files:
EAP_HOME/standalone/configuration/mgmt-groups.properties
EAP_HOME/domain/configuration/mgmt-groups.properties
These default directories and properties file names can be overridden. The following command adds anew user, specifying a different name and location for the user properties files.
The new user was added to the user properties files now located at /path/to/standaloneconfig/newname.properties and /path/to/domainconfig/newname.properties. Note that these files must already exist or youwill see an error.
For a complete listing of all available add-user arguments and their purposes, use the --helpargument or see the Add-User Utility Arguments section.
3.2.3. Setting Add-User Utility Password Restrictions
The password restrictions for the add-user utility script can be configured using the EAP_HOME/bin/add-user.properties file.
By default, JBoss EAP allows weak passwords but will issue a warning. To reject passwords that do notmeet the minimum requirements specified, set the password.restriction property to REJECT.
Additional password requirements that can be configured in the EAP_HOME/bin/add-user.properties file:
Minimum length
Minimum alphabetic characters
Minimum digits
Minimum symbols
$ EAP_HOME/bin/add-user.sh -u 'mgmtuser1' -p 'password1!' -g 'guest,mgmtgroup'
$ EAP_HOME/bin/add-user.sh -u 'mgmtuser2' -p 'password1!' -sc '/path/to/standaloneconfig/' -dc '/path/to/domainconfig/' -up 'newname.properties'
CHAPTER 3. JBOSS EAP MANAGEMENT
29
List of forbidden passwords (such as admin)
Whether to allow a password that matches the username
3.3. MANAGEMENT INTERFACES
3.3.1. Management CLI
The management command-line interface (CLI) is a command-line administration tool for JBoss EAP.
Use the management CLI to start and stop servers, deploy and undeploy applications, configure systemsettings, and perform other administrative tasks. Operations can be performed in batch mode, allowingmultiple tasks to be run as a group.
Many common terminal commands are available, such as ls, cd, and pwd. The management CLI alsosupports tab completion.
For detailed information on using the management CLI, including commands and operations, syntax,and running in batch mode, see the JBoss EAP Management CLI Guide.
Launch the Management CLI
$ EAP_HOME/bin/jboss-cli.sh
NOTE
For Windows Server, use the EAP_HOME\bin\jboss-cli.bat script.
Connect to a Running Server
connect
Or you can launch the management CLI and connect in one step by using the EAP_HOME/bin/jboss-cli.sh --connect command.
Display HelpUse the following command for general help.
help
Use the following command for help on a specific command.
deploy --help
Quit the Management CLI
quit
View System SettingsThe following command uses the read-attribute operation to display whether the exampledatasource is enabled.
Red Hat JBoss Enterprise Application Platform 7.0 Configuration Guide
30
/subsystem=datasources/data-source=ExampleDS:read-attribute(name=enabled){ "outcome" => "success", "result" => true}
When running in a managed domain, you must specify which profile to update by preceding thecommand with /profile=PROFILE_NAME.
/profile=default/subsystem=datasources/data-source=ExampleDS:read-attribute(name=enabled)
Update System SettingsThe following command uses the write-attribute operation to disable the example datasource.
/subsystem=datasources/data-source=ExampleDS:write-attribute(name=enabled,value=false)
Start ServersThe management CLI can also be used to start and stop servers when running in a managed domain.
/host=HOST_NAME/server-config=server-one:start
3.3.2. Management Console
The management console is a web-based administration tool for JBoss EAP.
Use the management console to start and stop servers, deploy and undeploy applications, tune systemsettings, and make persistent modifications to the server configuration. The management console alsohas the ability to perform administrative tasks, with live notifications when any changes performed bythe current user require the server instance to be restarted or reloaded.
In a managed domain, server instances and server groups in the same domain can be centrallymanaged from the management console of the domain controller.
For a JBoss EAP instance running on the local host using the default management port, themanagement console can be accessed through a web browser athttp://localhost:9990/console/App.html. You will need to authenticate with a user that haspermissions to access the management console.
The management console provides the following tabs for navigating and managing your JBoss EAPstandalone server or managed domain.
Home
Learn how to accomplish several common configuration and management tasks. Take a tour tobecome familiar with the JBoss EAP management console.
Deployments
Add, remove, and enable deployments. In a managed domain, assign deployments to server groups.
Configuration
Configure available subsystems, which provide capabilities such as web services, messaging, orhigh availability. In a managed domain, manage the profiles that contain different subsystemconfigurations.
CHAPTER 3. JBOSS EAP MANAGEMENT
31

Runtime
View runtime information, such as server status, JVM usage, and server logs. In a managed domain,manage your hosts, server groups, and servers.
Access Control
Assign roles to users and groups when using Role-Based Access Control.
Patching
Apply patches to your JBoss EAP instances.
NOTE
To take a tour of the updated management console, click the Take a Tour link on themanagement console home page.
To view details about the form fields, click the Need Help? link.
To view the message history of configuration actions you have performed, click theMessages link in the top-right of the management console.
3.3.2.1. Enable/Disable Management Console
You can enable or disable the management console by setting the console-enabled booleanattribute of /core-service=management/management-interface=http-interface resource.For master host in domain mode, /host=master/core-service=management/management-interface=http-interface.
For example, to enable:
/core-service=management/management-interface=http-interface:write-attribute(name=console-enabled,value=true)
For example, to disable:
/core-service=management/management-interface=http-interface:write-attribute(name=console-enabled,value=false)
3.3.2.2. Change the Language of the Management Console
By default, the language settings of the management console is English. You can choose to use one ofthe following languages instead:
German (de)
Simplified Chinese (zh-Hans)
Brazilian Portuguese (pt-BR)
French (fr)
Spanish (es)
Japanese (ja)
To Change the Language of the Management Console
Red Hat JBoss Enterprise Application Platform 7.0 Configuration Guide
32
1. Log in to the management console.
2. Click the Settings link in the lower-right corner of the management console.
3. Select the required language from the Locale selection box.
4. Select Save. A confirmation box informs you that you need to reload the application.
5. Click Confirm. The system refreshes your web browser automatically to use the selectedlocale.
3.4. MANAGEMENT APIS
3.4.1. HTTP API
The HTTP API endpoint is the entry point for management clients that rely on the HTTP protocol tointegrate with the JBoss EAP management layer.
The HTTP API is used by the JBoss EAP management console but offers integration capabilities forother clients as well. By default, the HTTP API is accessible at http://HOST_NAME:9990/management. This URL will display the raw attributes and values exposedto the API.
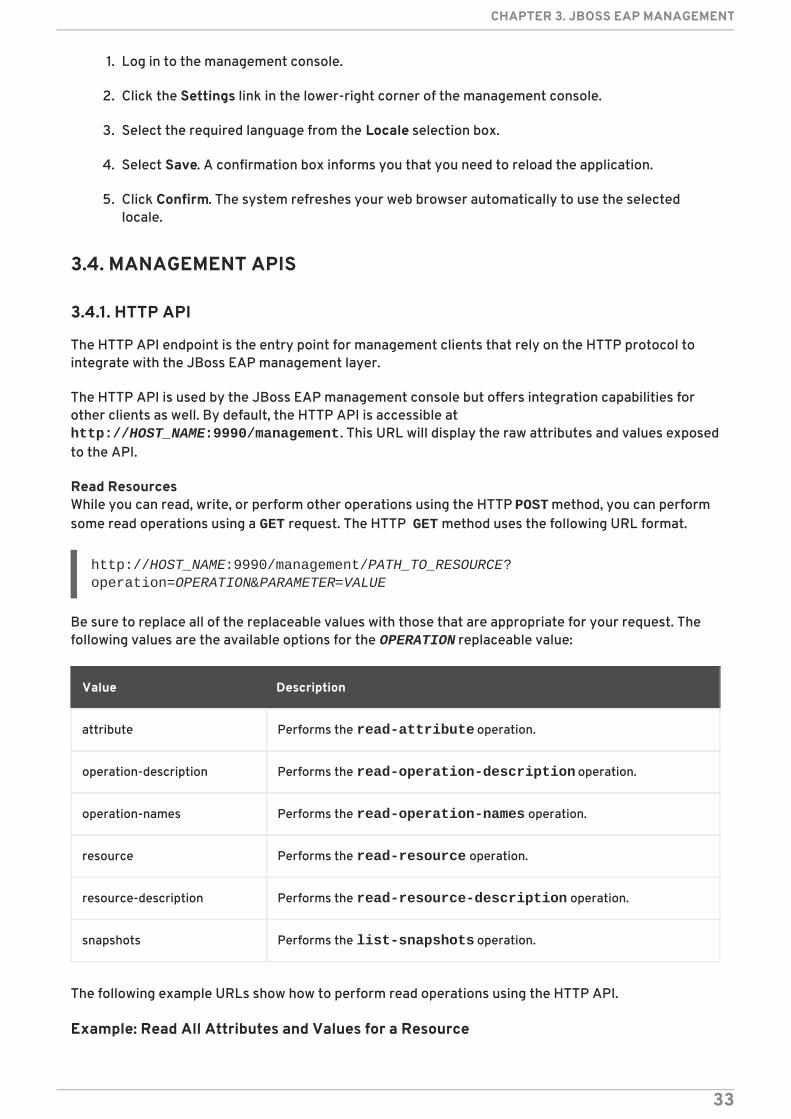
Read ResourcesWhile you can read, write, or perform other operations using the HTTP POST method, you can performsome read operations using a GET request. The HTTP GET method uses the following URL format.
http://HOST_NAME:9990/management/PATH_TO_RESOURCE?operation=OPERATION&PARAMETER=VALUE
Be sure to replace all of the replaceable values with those that are appropriate for your request. Thefollowing values are the available options for the OPERATION replaceable value:
Value Description
attribute Performs the read-attribute operation.
operation-description Performs the read-operation-description operation.
operation-names Performs the read-operation-names operation.
resource Performs the read-resource operation.
resource-description Performs the read-resource-description operation.
snapshots Performs the list-snapshots operation.
The following example URLs show how to perform read operations using the HTTP API.
Example: Read All Attributes and Values for a Resource
CHAPTER 3. JBOSS EAP MANAGEMENT
33
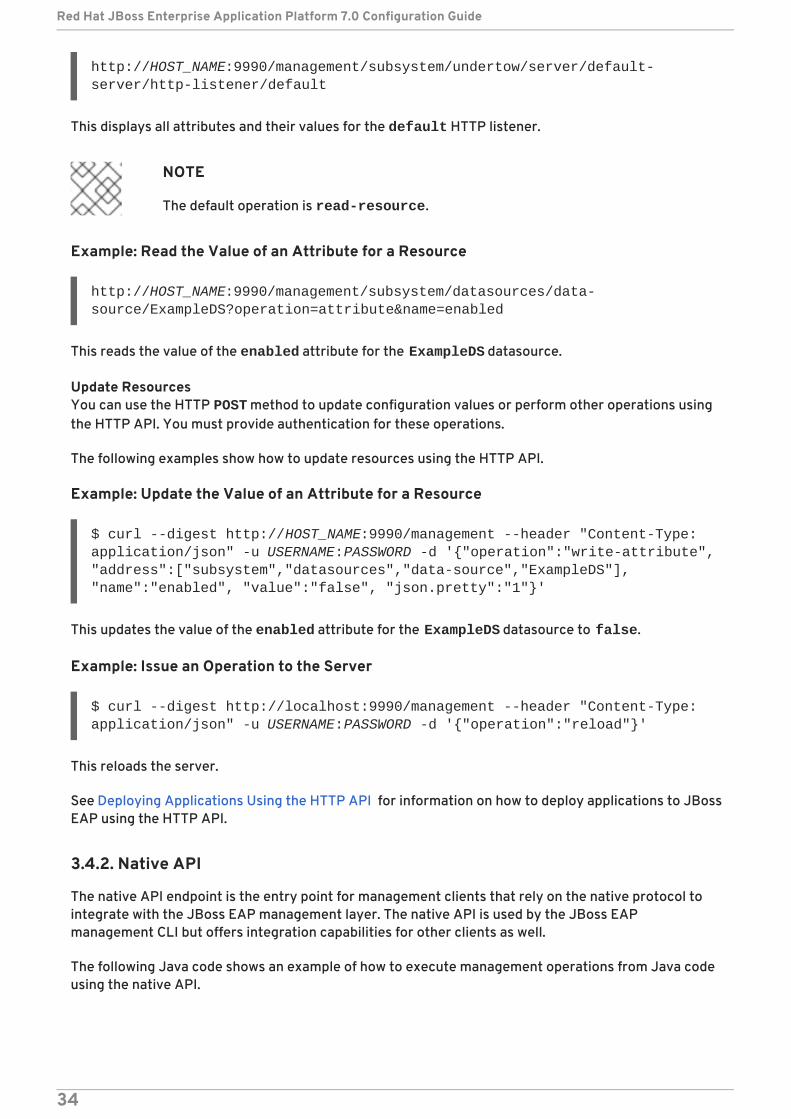
http://HOST_NAME:9990/management/subsystem/undertow/server/default-server/http-listener/default
This displays all attributes and their values for the default HTTP listener.
NOTE
The default operation is read-resource.
Example: Read the Value of an Attribute for a Resource
http://HOST_NAME:9990/management/subsystem/datasources/data-source/ExampleDS?operation=attribute&name=enabled
This reads the value of the enabled attribute for the ExampleDS datasource.
Update ResourcesYou can use the HTTP POST method to update configuration values or perform other operations usingthe HTTP API. You must provide authentication for these operations.
The following examples show how to update resources using the HTTP API.
Example: Update the Value of an Attribute for a Resource
$ curl --digest http://HOST_NAME:9990/management --header "Content-Type: application/json" -u USERNAME:PASSWORD -d '{"operation":"write-attribute", "address":["subsystem","datasources","data-source","ExampleDS"], "name":"enabled", "value":"false", "json.pretty":"1"}'
This updates the value of the enabled attribute for the ExampleDS datasource to false.
Example: Issue an Operation to the Server
$ curl --digest http://localhost:9990/management --header "Content-Type: application/json" -u USERNAME:PASSWORD -d '{"operation":"reload"}'
This reloads the server.
See Deploying Applications Using the HTTP API for information on how to deploy applications to JBossEAP using the HTTP API.
3.4.2. Native API
The native API endpoint is the entry point for management clients that rely on the native protocol tointegrate with the JBoss EAP management layer. The native API is used by the JBoss EAPmanagement CLI but offers integration capabilities for other clients as well.
The following Java code shows an example of how to execute management operations from Java codeusing the native API.
Red Hat JBoss Enterprise Application Platform 7.0 Configuration Guide
34
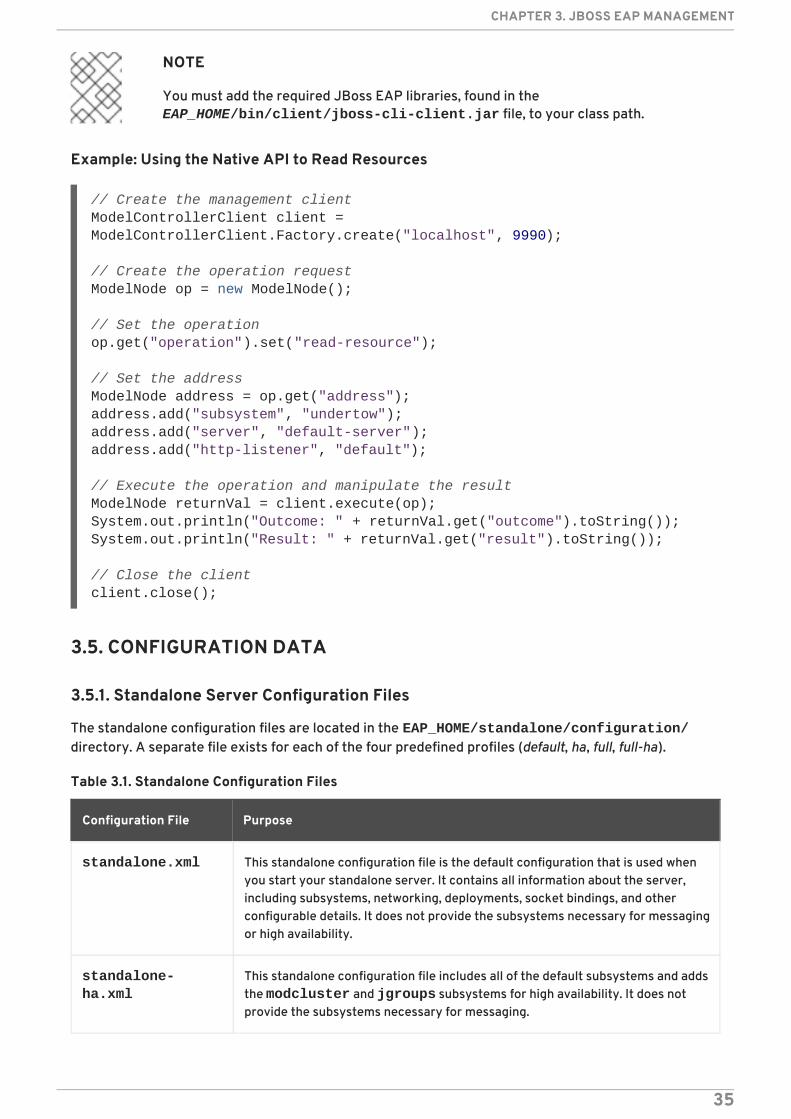
NOTE
You must add the required JBoss EAP libraries, found in the EAP_HOME/bin/client/jboss-cli-client.jar file, to your class path.
Example: Using the Native API to Read Resources
3.5. CONFIGURATION DATA
3.5.1. Standalone Server Configuration Files
The standalone configuration files are located in the EAP_HOME/standalone/configuration/directory. A separate file exists for each of the four predefined profiles (default, ha, full, full-ha).
Table 3.1. Standalone Configuration Files
Configuration File Purpose
standalone.xml This standalone configuration file is the default configuration that is used whenyou start your standalone server. It contains all information about the server,including subsystems, networking, deployments, socket bindings, and otherconfigurable details. It does not provide the subsystems necessary for messagingor high availability.
standalone-ha.xml
This standalone configuration file includes all of the default subsystems and addsthe modcluster and jgroups subsystems for high availability. It does notprovide the subsystems necessary for messaging.
// Create the management clientModelControllerClient client = ModelControllerClient.Factory.create("localhost", 9990);
// Create the operation requestModelNode op = new ModelNode();
// Set the operationop.get("operation").set("read-resource");
// Set the addressModelNode address = op.get("address");address.add("subsystem", "undertow");address.add("server", "default-server");address.add("http-listener", "default");
// Execute the operation and manipulate the resultModelNode returnVal = client.execute(op);System.out.println("Outcome: " + returnVal.get("outcome").toString());System.out.println("Result: " + returnVal.get("result").toString());
// Close the clientclient.close();
CHAPTER 3. JBOSS EAP MANAGEMENT
35
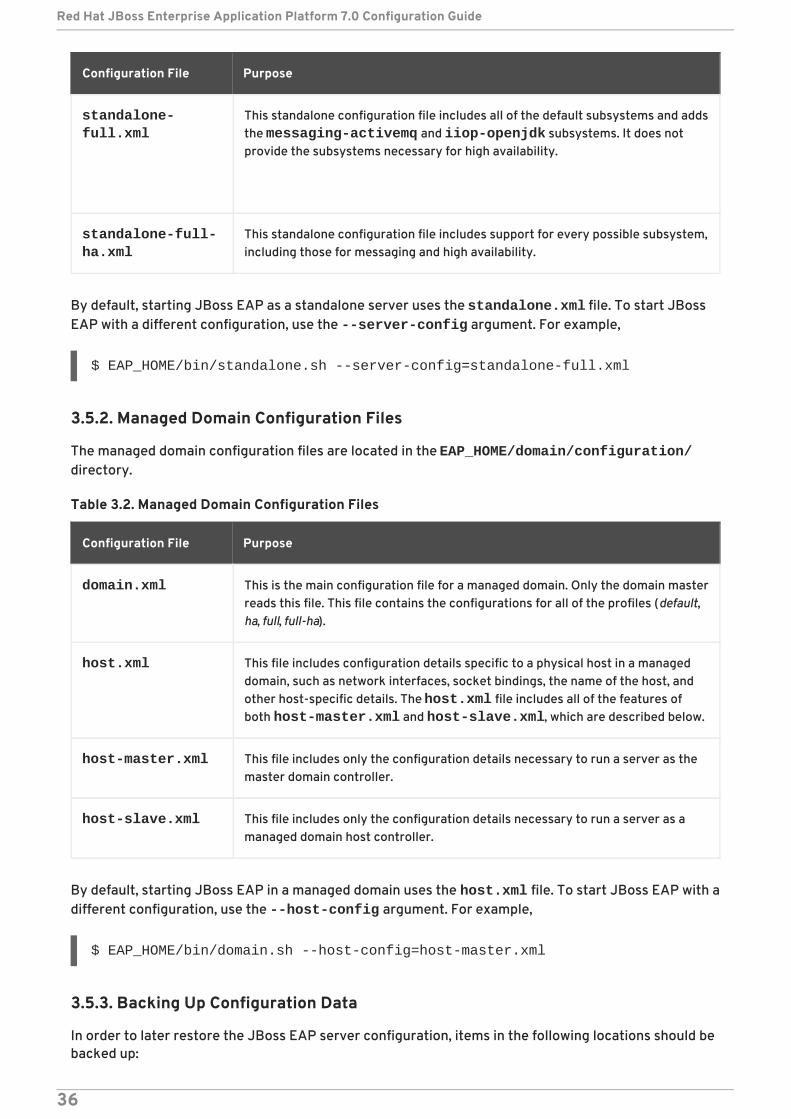
standalone-full.xml
This standalone configuration file includes all of the default subsystems and addsthe messaging-activemq and iiop-openjdk subsystems. It does notprovide the subsystems necessary for high availability.
standalone-full-ha.xml
This standalone configuration file includes support for every possible subsystem,including those for messaging and high availability.
Configuration File Purpose
By default, starting JBoss EAP as a standalone server uses the standalone.xml file. To start JBossEAP with a different configuration, use the --server-config argument. For example,
$ EAP_HOME/bin/standalone.sh --server-config=standalone-full.xml
3.5.2. Managed Domain Configuration Files
The managed domain configuration files are located in the EAP_HOME/domain/configuration/directory.
Table 3.2. Managed Domain Configuration Files
Configuration File Purpose
domain.xml This is the main configuration file for a managed domain. Only the domain masterreads this file. This file contains the configurations for all of the profiles (default,ha, full, full-ha).
host.xml This file includes configuration details specific to a physical host in a manageddomain, such as network interfaces, socket bindings, the name of the host, andother host-specific details. The host.xml file includes all of the features ofboth host-master.xml and host-slave.xml, which are described below.
host-master.xml This file includes only the configuration details necessary to run a server as themaster domain controller.
host-slave.xml This file includes only the configuration details necessary to run a server as amanaged domain host controller.
By default, starting JBoss EAP in a managed domain uses the host.xml file. To start JBoss EAP with adifferent configuration, use the --host-config argument. For example,
$ EAP_HOME/bin/domain.sh --host-config=host-master.xml
3.5.3. Backing Up Configuration Data
In order to later restore the JBoss EAP server configuration, items in the following locations should bebacked up:
Red Hat JBoss Enterprise Application Platform 7.0 Configuration Guide
36
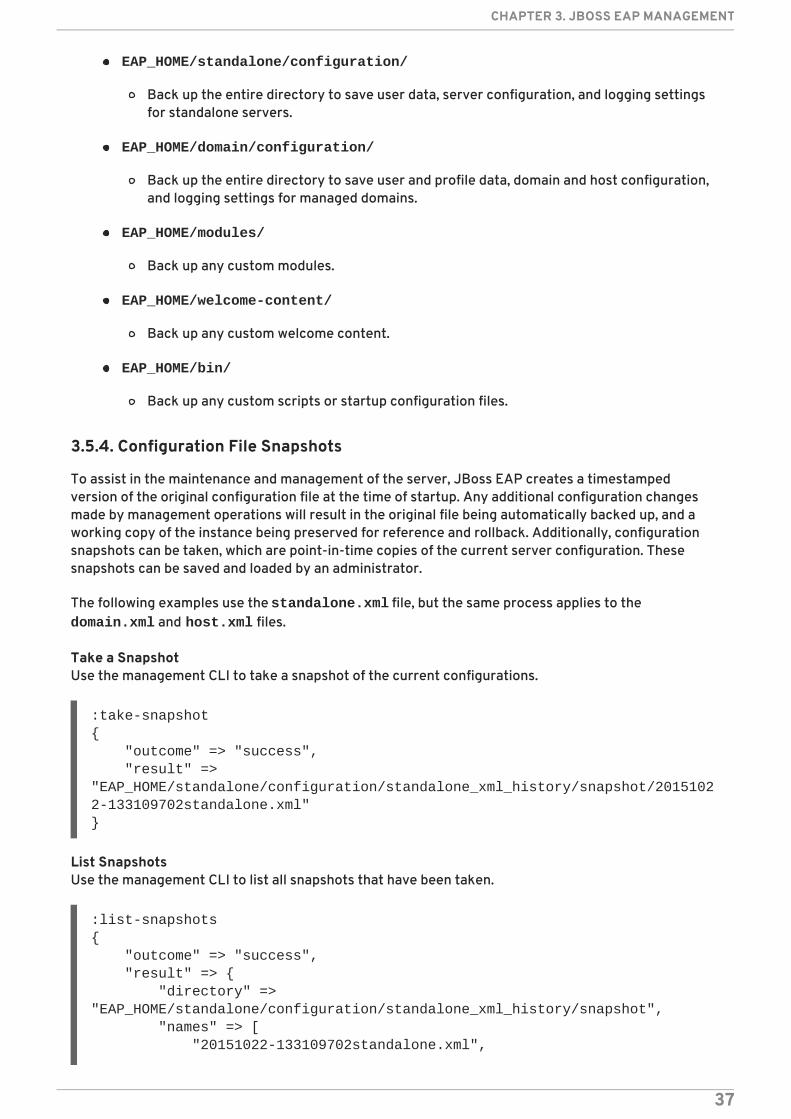
EAP_HOME/standalone/configuration/
Back up the entire directory to save user data, server configuration, and logging settingsfor standalone servers.
EAP_HOME/domain/configuration/
Back up the entire directory to save user and profile data, domain and host configuration,and logging settings for managed domains.
EAP_HOME/modules/
Back up any custom modules.
EAP_HOME/welcome-content/
Back up any custom welcome content.
EAP_HOME/bin/
Back up any custom scripts or startup configuration files.
3.5.4. Configuration File Snapshots
To assist in the maintenance and management of the server, JBoss EAP creates a timestampedversion of the original configuration file at the time of startup. Any additional configuration changesmade by management operations will result in the original file being automatically backed up, and aworking copy of the instance being preserved for reference and rollback. Additionally, configurationsnapshots can be taken, which are point-in-time copies of the current server configuration. Thesesnapshots can be saved and loaded by an administrator.
The following examples use the standalone.xml file, but the same process applies to the domain.xml and host.xml files.
Take a SnapshotUse the management CLI to take a snapshot of the current configurations.
:take-snapshot{ "outcome" => "success", "result" => "EAP_HOME/standalone/configuration/standalone_xml_history/snapshot/20151022-133109702standalone.xml"}
List SnapshotsUse the management CLI to list all snapshots that have been taken.
:list-snapshots{ "outcome" => "success", "result" => { "directory" => "EAP_HOME/standalone/configuration/standalone_xml_history/snapshot", "names" => [ "20151022-133109702standalone.xml",
CHAPTER 3. JBOSS EAP MANAGEMENT
37
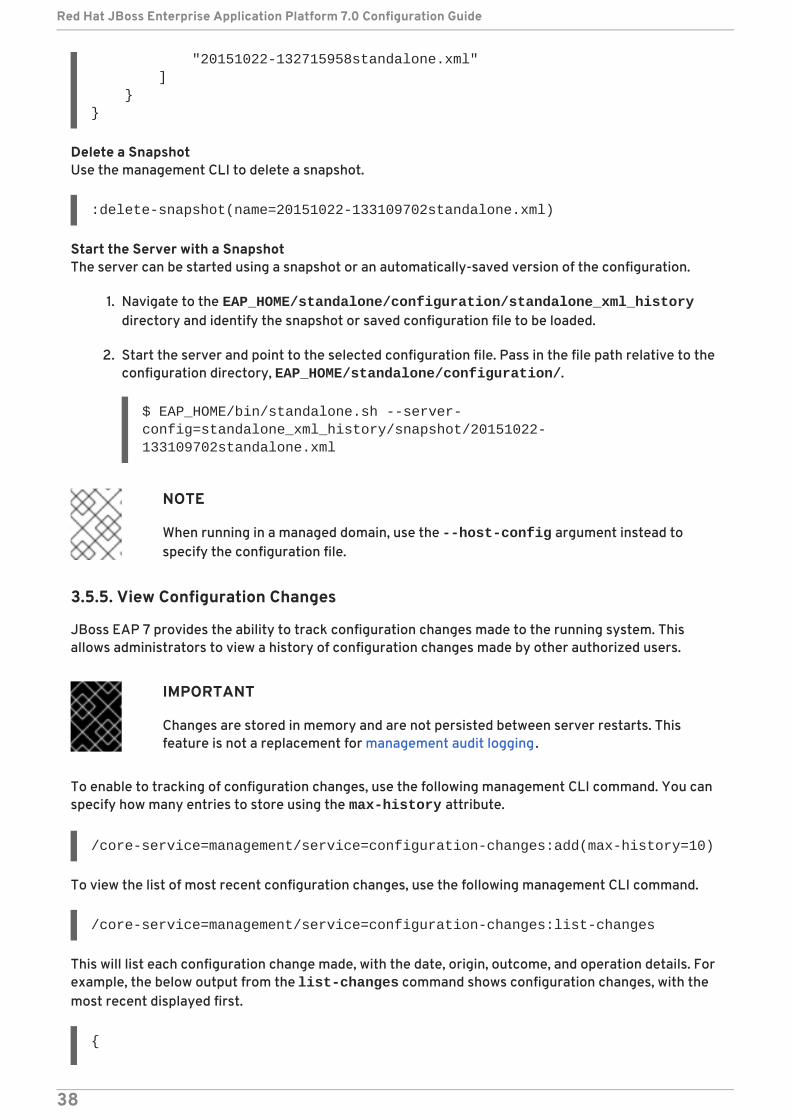
"20151022-132715958standalone.xml" ] }}
Delete a SnapshotUse the management CLI to delete a snapshot.
:delete-snapshot(name=20151022-133109702standalone.xml)
Start the Server with a SnapshotThe server can be started using a snapshot or an automatically-saved version of the configuration.
1. Navigate to the EAP_HOME/standalone/configuration/standalone_xml_historydirectory and identify the snapshot or saved configuration file to be loaded.
2. Start the server and point to the selected configuration file. Pass in the file path relative to theconfiguration directory, EAP_HOME/standalone/configuration/.
$ EAP_HOME/bin/standalone.sh --server-config=standalone_xml_history/snapshot/20151022-133109702standalone.xml
NOTE
When running in a managed domain, use the --host-config argument instead tospecify the configuration file.
3.5.5. View Configuration Changes
JBoss EAP 7 provides the ability to track configuration changes made to the running system. Thisallows administrators to view a history of configuration changes made by other authorized users.
IMPORTANT
Changes are stored in memory and are not persisted between server restarts. Thisfeature is not a replacement for management audit logging.
To enable to tracking of configuration changes, use the following management CLI command. You canspecify how many entries to store using the max-history attribute.
/core-service=management/service=configuration-changes:add(max-history=10)
To view the list of most recent configuration changes, use the following management CLI command.
/core-service=management/service=configuration-changes:list-changes
This will list each configuration change made, with the date, origin, outcome, and operation details. Forexample, the below output from the list-changes command shows configuration changes, with themost recent displayed first.
{
Red Hat JBoss Enterprise Application Platform 7.0 Configuration Guide
38
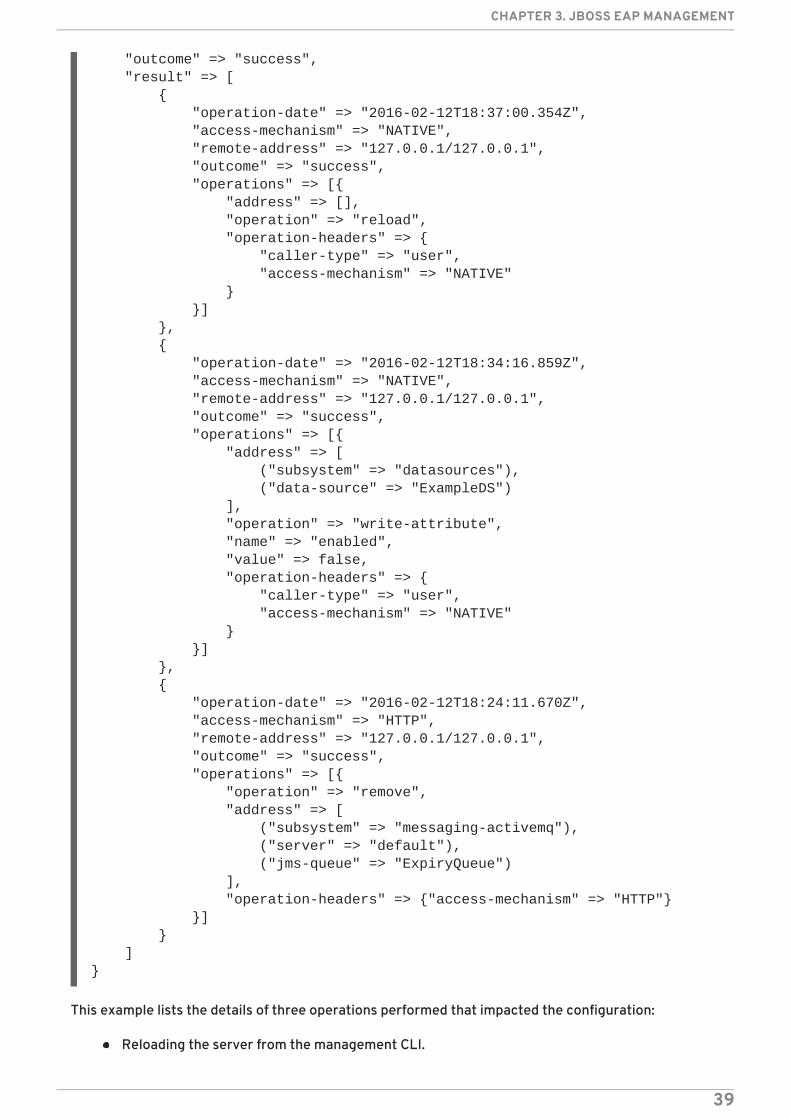
"outcome" => "success", "result" => [ { "operation-date" => "2016-02-12T18:37:00.354Z", "access-mechanism" => "NATIVE", "remote-address" => "127.0.0.1/127.0.0.1", "outcome" => "success", "operations" => [{ "address" => [], "operation" => "reload", "operation-headers" => { "caller-type" => "user", "access-mechanism" => "NATIVE" } }] }, { "operation-date" => "2016-02-12T18:34:16.859Z", "access-mechanism" => "NATIVE", "remote-address" => "127.0.0.1/127.0.0.1", "outcome" => "success", "operations" => [{ "address" => [ ("subsystem" => "datasources"), ("data-source" => "ExampleDS") ], "operation" => "write-attribute", "name" => "enabled", "value" => false, "operation-headers" => { "caller-type" => "user", "access-mechanism" => "NATIVE" } }] }, { "operation-date" => "2016-02-12T18:24:11.670Z", "access-mechanism" => "HTTP", "remote-address" => "127.0.0.1/127.0.0.1", "outcome" => "success", "operations" => [{ "operation" => "remove", "address" => [ ("subsystem" => "messaging-activemq"), ("server" => "default"), ("jms-queue" => "ExpiryQueue") ], "operation-headers" => {"access-mechanism" => "HTTP"} }] } ]}
This example lists the details of three operations performed that impacted the configuration:
Reloading the server from the management CLI.
CHAPTER 3. JBOSS EAP MANAGEMENT
39

Disabling the ExampleDS datasource from the management CLI.
Removing the ExpiryQueue queue from the management console.
3.5.6. Property Replacement
JBoss EAP allows you to use expressions to define replaceable properties in place of literal values inthe configuration. Expressions use the format ${PARAMETER:DEFAULT_VALUE}. If the specifiedparameter is set, then the parameter’s value will be used. Otherwise, the default value provided will beused.
The supported sources for resolving expressions are system properties, environment variables, andthe vault. For deployments only, the source can be properties listed in a META-INF/jboss.properties file in the deployment archive. For deployment types that supportsubdeployments, the resolution is scoped to all subdeployments if the properties file is in the outerdeployment, for example the EAR. If the properties file is in the subdeployment, then the resolution isscoped just to that subdeployment.
The example below from the standalone.xml configuration file sets the inet-address for the public interface to 127.0.0.1 unless the jboss.bind.address parameter is set.
The jboss.bind.address parameter can be set when starting EAP as a standalone server with thefollowing command:
$ EAP_HOME/bin/standalone.sh -Djboss.bind.address=IP_ADDRESS
Nested ExpressionsExpressions can be nested, which allows for more advanced use of expressions in place of fixed values.The format of a nested expression is like that of a normal expression, but one expression is embeddedin the other, for example:
${SYSTEM_VALUE_1${SYSTEM_VALUE_2}}
Nested expressions are evaluated recursively, so the inner expression is first evaluated, then the outerexpression is evaluated. Expressions may also be recursive, where an expression resolves to anotherexpression, which is then resolved. Nested expressions are permitted anywhere that expressions arepermitted, with the exception of management CLI commands.
An example of where a nested expression might be used is if the password used in a datasourcedefinition is masked. The configuration for the datasource might have the following line:
The value of ds_ExampleDS could be replaced with a system property ( datasource_name) using anested expression. The configuration for the datasource could instead have the following line:
<interface name="public"> <inet-address value="${jboss.bind.address:127.0.0.1}"/></interface>
<password>${VAULT::ds_ExampleDS::password::1}</password>
<password>${VAULT::${datasource_name}::password::1}</password>
Red Hat JBoss Enterprise Application Platform 7.0 Configuration Guide
40
JBoss EAP would first evaluate the expression ${datasource_name}, then input this to the largerexpression and evaluate the resulting expression. The advantage of this configuration is that the nameof the datasource is abstracted from the fixed configuration.
Descriptor-Based Property ReplacementApplication configuration, such as datasource connection parameters, typically varies betweendevelopment, testing, and production environments. This variance is sometimes accommodated bybuild system scripts, as the Java EE specification does not contain a method to externalize theseconfigurations. With JBoss EAP, you can use descriptor-based property replacement to manageconfiguration externally.
Descriptor-based property replacement substitutes properties based on descriptors, allowing you toremove assumptions about the environment from the application and the build chain. Environment-specific configurations can be specified in deployment descriptors rather than annotations or buildsystem scripts. You can provide configuration in files or as parameters at the command line.
There are several flags in the ee subsystem that control whether property replacement is applied.
JBoss-specific descriptor replacement is controlled by the jboss-descriptor-property-replacement flag and is enabled by default. When enabled, properties can be replaced in the followingdeployment descriptors:
jboss-ejb3.xml
jboss-app.xml
jboss-web.xml
*-jms.xml
*-ds.xml
The following management CLI command can be used to enable or disable property replacement inJBoss-specific descriptors:
/subsystem=ee:write-attribute(name="jboss-descriptor-property-replacement",value=VALUE)
Java EE descriptor replacement controlled by the spec-descriptor-property-replacement flagand is disabled by default. When enabled, properties can be replaced in the following deploymentdescriptors:
ejb-jar.xml
persistence.xml
application.xml
web.xml
The following management CLI command can be used to enable or disable property replacement inJava EE descriptors:
/subsystem=ee:write-attribute(name="spec-descriptor-property-replacement",value=VALUE)
CHAPTER 3. JBOSS EAP MANAGEMENT
41
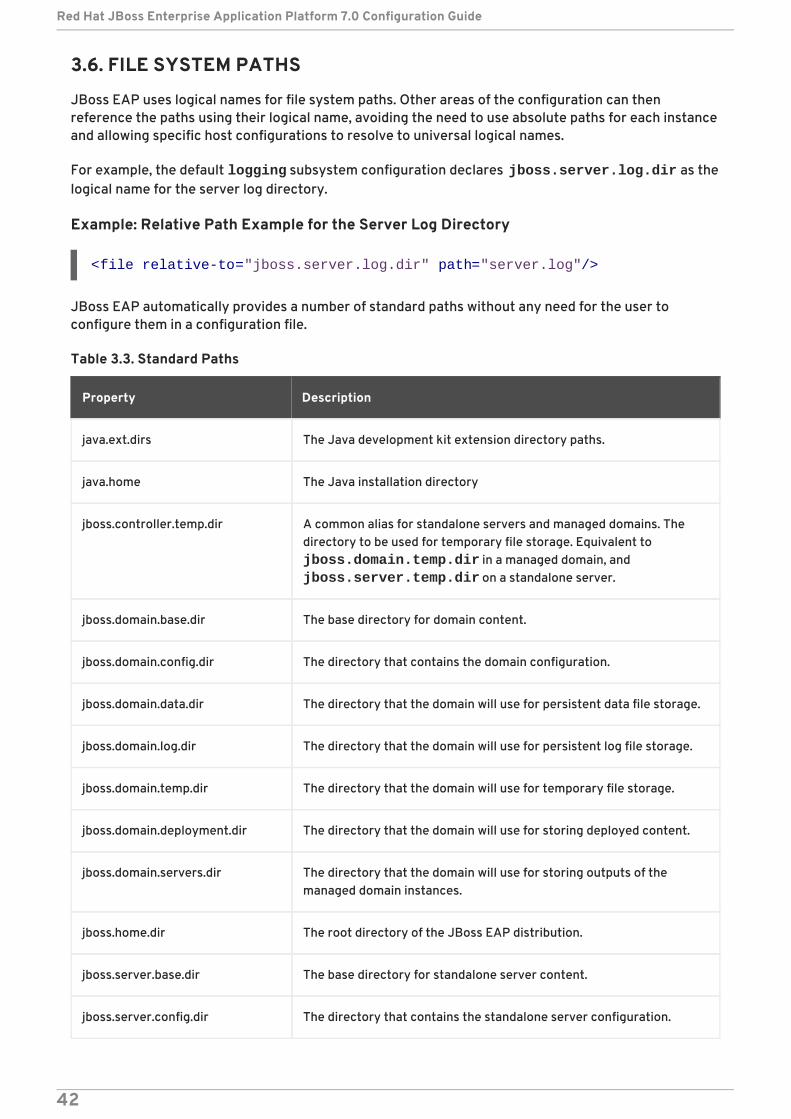
3.6. FILE SYSTEM PATHS
JBoss EAP uses logical names for file system paths. Other areas of the configuration can thenreference the paths using their logical name, avoiding the need to use absolute paths for each instanceand allowing specific host configurations to resolve to universal logical names.
For example, the default logging subsystem configuration declares jboss.server.log.dir as thelogical name for the server log directory.
Example: Relative Path Example for the Server Log Directory
JBoss EAP automatically provides a number of standard paths without any need for the user toconfigure them in a configuration file.
Table 3.3. Standard Paths
Property Description
java.ext.dirs The Java development kit extension directory paths.
java.home The Java installation directory
jboss.controller.temp.dir A common alias for standalone servers and managed domains. Thedirectory to be used for temporary file storage. Equivalent to jboss.domain.temp.dir in a managed domain, and jboss.server.temp.dir on a standalone server.
jboss.domain.base.dir The base directory for domain content.
jboss.domain.config.dir The directory that contains the domain configuration.
jboss.domain.data.dir The directory that the domain will use for persistent data file storage.
jboss.domain.log.dir The directory that the domain will use for persistent log file storage.
jboss.domain.temp.dir The directory that the domain will use for temporary file storage.
jboss.domain.deployment.dir The directory that the domain will use for storing deployed content.
jboss.domain.servers.dir The directory that the domain will use for storing outputs of themanaged domain instances.
jboss.home.dir The root directory of the JBoss EAP distribution.
jboss.server.base.dir The base directory for standalone server content.
jboss.server.config.dir The directory that contains the standalone server configuration.
<file relative-to="jboss.server.log.dir" path="server.log"/>
Red Hat JBoss Enterprise Application Platform 7.0 Configuration Guide
42
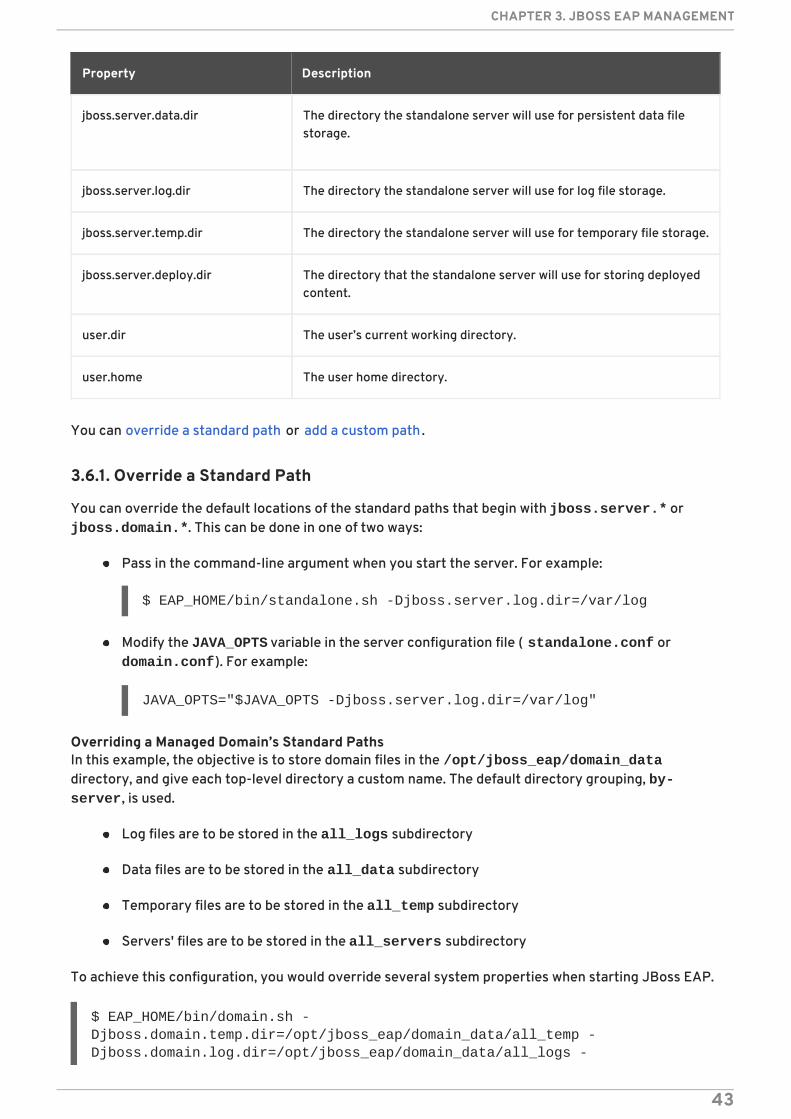
jboss.server.data.dir The directory the standalone server will use for persistent data filestorage.
jboss.server.log.dir The directory the standalone server will use for log file storage.
jboss.server.temp.dir The directory the standalone server will use for temporary file storage.
jboss.server.deploy.dir The directory that the standalone server will use for storing deployedcontent.
user.dir The user’s current working directory.
user.home The user home directory.
Property Description
You can override a standard path or add a custom path .
3.6.1. Override a Standard Path
You can override the default locations of the standard paths that begin with jboss.server.* or jboss.domain.*. This can be done in one of two ways:
Pass in the command-line argument when you start the server. For example:
$ EAP_HOME/bin/standalone.sh -Djboss.server.log.dir=/var/log
Modify the JAVA_OPTS variable in the server configuration file ( standalone.conf or domain.conf). For example:
JAVA_OPTS="$JAVA_OPTS -Djboss.server.log.dir=/var/log"
Overriding a Managed Domain’s Standard PathsIn this example, the objective is to store domain files in the /opt/jboss_eap/domain_datadirectory, and give each top-level directory a custom name. The default directory grouping, by-server, is used.
Log files are to be stored in the all_logs subdirectory
Data files are to be stored in the all_data subdirectory
Temporary files are to be stored in the all_temp subdirectory
Servers' files are to be stored in the all_servers subdirectory
To achieve this configuration, you would override several system properties when starting JBoss EAP.
$ EAP_HOME/bin/domain.sh -Djboss.domain.temp.dir=/opt/jboss_eap/domain_data/all_temp -Djboss.domain.log.dir=/opt/jboss_eap/domain_data/all_logs -
CHAPTER 3. JBOSS EAP MANAGEMENT
43

Djboss.domain.data.dir=/opt/jboss_eap/domain_data/all_data -Djboss.domain.servers.dir=/opt/jboss_eap/domain_data/all_servers
The resulting path structure will be as follows:
/opt/jboss_eap/domain_data/ ├── all_data ├── all_logs ├── all_servers │ ├── server-one │ │ ├── data │ │ ├── log │ │ └── tmp │ └── server-two │ ├── data │ ├── log │ └── tmp └── all_temp
3.6.2. Add a Custom Path
You can add a custom file system path using the management CLI or the management console.
From the management CLI, you can add a new path using the following management CLIcommand.
/path=my.custom.path:add(path=/my/custom/path)
From the management console, you can configure file system paths by navigating to theConfiguration tab and selecting Paths. From there, you can add, modify, and remove paths.
You can then use this custom path in your configuration. For example, the below log handler uses acustom path for its relative path.
3.6.3. Directory Grouping
In a managed domain, each server’s files are stored in the EAP_HOME/domain directory. You canspecify how to organize the subdirectories for servers using the host controller’s directory-grouping attribute. Directories can be grouped either by server or by type. By default, directories aregrouped by server.
<subsystem xmlns="urn:jboss:domain:logging:3.0"> ... <periodic-rotating-file-handler name="FILE" autoflush="true"> <formatter> <named-formatter name="PATTERN"/> </formatter> <file relative-to="my.custom.path" path="server.log"/> <suffix value=".yyyy-MM-dd"/> <append value="true"/> </periodic-rotating-file-handler> ...</subsystem>
Red Hat JBoss Enterprise Application Platform 7.0 Configuration Guide
44
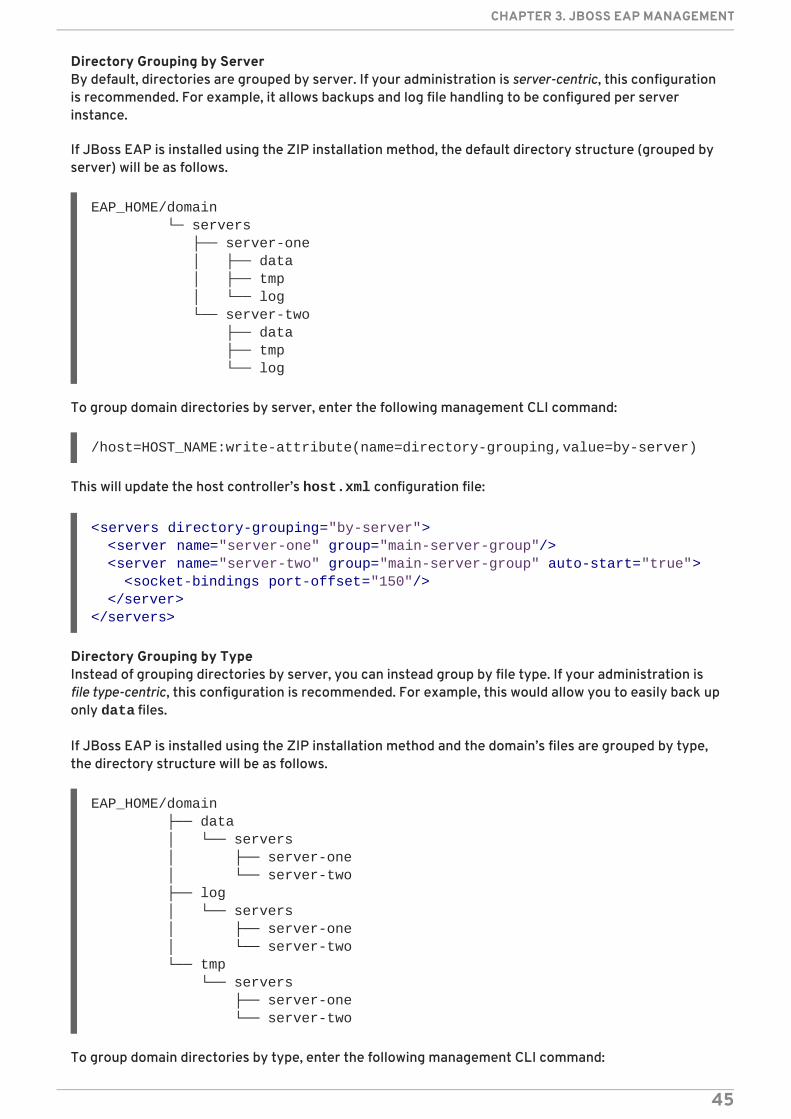
Directory Grouping by ServerBy default, directories are grouped by server. If your administration is server-centric, this configurationis recommended. For example, it allows backups and log file handling to be configured per serverinstance.
If JBoss EAP is installed using the ZIP installation method, the default directory structure (grouped byserver) will be as follows.
EAP_HOME/domain └─ servers ├── server-one │ ├── data │ ├── tmp │ └── log └── server-two ├── data ├── tmp └── log
To group domain directories by server, enter the following management CLI command:
/host=HOST_NAME:write-attribute(name=directory-grouping,value=by-server)
This will update the host controller’s host.xml configuration file:
Directory Grouping by TypeInstead of grouping directories by server, you can instead group by file type. If your administration isfile type-centric, this configuration is recommended. For example, this would allow you to easily back uponly data files.
If JBoss EAP is installed using the ZIP installation method and the domain’s files are grouped by type,the directory structure will be as follows.
EAP_HOME/domain ├── data │ └── servers │ ├── server-one │ └── server-two ├── log │ └── servers │ ├── server-one │ └── server-two └── tmp └── servers ├── server-one └── server-two
To group domain directories by type, enter the following management CLI command:
<servers directory-grouping="by-server"> <server name="server-one" group="main-server-group"/> <server name="server-two" group="main-server-group" auto-start="true"> <socket-bindings port-offset="150"/> </server></servers>
CHAPTER 3. JBOSS EAP MANAGEMENT
45
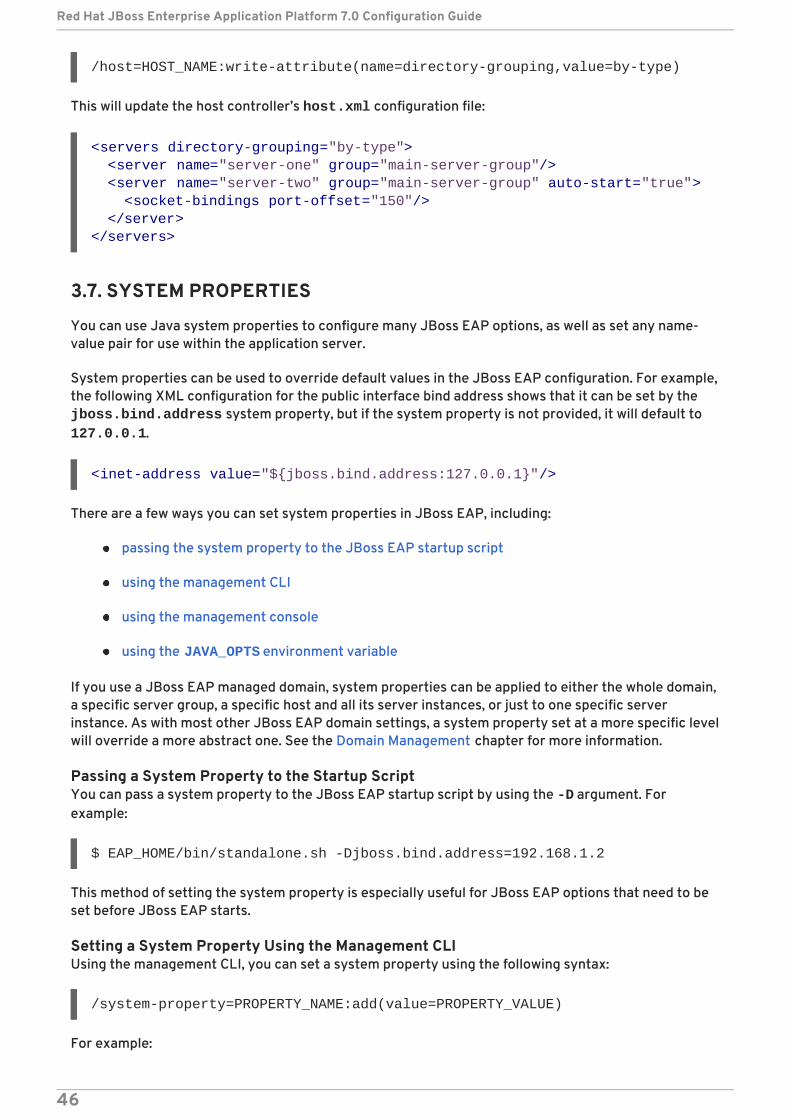
/host=HOST_NAME:write-attribute(name=directory-grouping,value=by-type)
This will update the host controller’s host.xml configuration file:
3.7. SYSTEM PROPERTIES
You can use Java system properties to configure many JBoss EAP options, as well as set any name-value pair for use within the application server.
System properties can be used to override default values in the JBoss EAP configuration. For example,the following XML configuration for the public interface bind address shows that it can be set by the jboss.bind.address system property, but if the system property is not provided, it will default to 127.0.0.1.
There are a few ways you can set system properties in JBoss EAP, including:
passing the system property to the JBoss EAP startup script
using the management CLI
using the management console
using the JAVA_OPTS environment variable
If you use a JBoss EAP managed domain, system properties can be applied to either the whole domain,a specific server group, a specific host and all its server instances, or just to one specific serverinstance. As with most other JBoss EAP domain settings, a system property set at a more specific levelwill override a more abstract one. See the Domain Management chapter for more information.
Passing a System Property to the Startup ScriptYou can pass a system property to the JBoss EAP startup script by using the -D argument. Forexample:
$ EAP_HOME/bin/standalone.sh -Djboss.bind.address=192.168.1.2
This method of setting the system property is especially useful for JBoss EAP options that need to beset before JBoss EAP starts.
Setting a System Property Using the Management CLIUsing the management CLI, you can set a system property using the following syntax:
/system-property=PROPERTY_NAME:add(value=PROPERTY_VALUE)
For example:
<servers directory-grouping="by-type"> <server name="server-one" group="main-server-group"/> <server name="server-two" group="main-server-group" auto-start="true"> <socket-bindings port-offset="150"/> </server></servers>
<inet-address value="${jboss.bind.address:127.0.0.1}"/>
Red Hat JBoss Enterprise Application Platform 7.0 Configuration Guide
46
/system-property=jboss.bind.address:add(value=192.168.1.2)
When setting system properties using the management CLI, some JBoss EAP options, including theabove example of jboss.bind.address, will only take effect after the next server restart.
For a managed domain, the above example configures a system property for the entire domain, but youcan also set or override system properties at more specific levels of the domain configuration.
Setting a System Property Using the Management Console
For a standalone JBoss EAP server, you can configure system properties in the managementconsole under the Configuration tab. Select System Properties , and click the View button.
For a managed domain:
Domain-level system properties can be set in the Configuration tab. Select SystemProperties, and click the View button.
Server group, and server-level system properties can be set in the Runtime tab. Select theserver group or server you want to configure, click the View button next to the servergroup or server name, and select the System Properties tab.
Host-level system properties can be set in the Runtime tab. Select the host you want toconfigure, then using the drop-down menu next to the host name, select Properties.
Setting a System Property Using JAVA_OPTSSystem properties can also be configured using the JAVA_OPTS environment variable. There are manyways to modify JAVA_OPTS, but JBoss EAP provides a configuration file for setting JAVA_OPTS that isused by the JBoss EAP process.
For a standalone server, this file is EAP_HOME/bin/standalone.conf, or for a managed domain, it isEAP_HOME/bin/domain.conf. For Microsoft Windows systems these files have a .bat extension.
NOTE
For an RPM installation, the RPM service configuration file is the preferred location tomodify JAVA_OPTS to configure system properties. For more information, see ConfigureRPM Service Properties.
Add your system property definition to JAVA_OPTS in the relevant configuration file. The examplesbelow demonstrate setting the bind address on a Red Hat Enterprise Linux system.
For standalone.conf, add your JAVA_OPTS system property definition at the end of the file.For example:
...# Set the bind addressJAVA_OPTS="$JAVA_OPTS -Djboss.bind.address=192.168.1.2"
For domain.conf, JAVA_OPTS must be set before the process controller JAVA_OPTS setting.For example:
...# Set the bind addressJAVA_OPTS="$JAVA_OPTS -Djboss.bind.address=192.168.1.2"
CHAPTER 3. JBOSS EAP MANAGEMENT
47
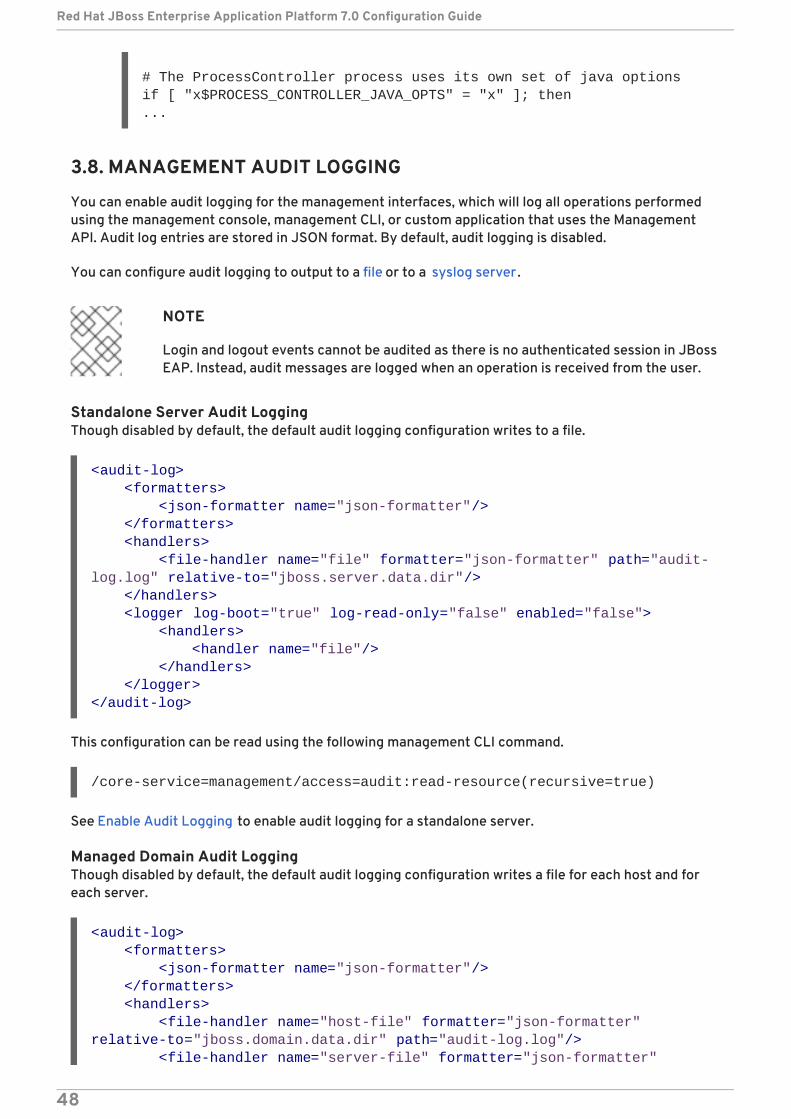
# The ProcessController process uses its own set of java optionsif [ "x$PROCESS_CONTROLLER_JAVA_OPTS" = "x" ]; then...
3.8. MANAGEMENT AUDIT LOGGING
You can enable audit logging for the management interfaces, which will log all operations performedusing the management console, management CLI, or custom application that uses the ManagementAPI. Audit log entries are stored in JSON format. By default, audit logging is disabled.
You can configure audit logging to output to a file or to a syslog server.
NOTE
Login and logout events cannot be audited as there is no authenticated session in JBossEAP. Instead, audit messages are logged when an operation is received from the user.
Standalone Server Audit LoggingThough disabled by default, the default audit logging configuration writes to a file.
This configuration can be read using the following management CLI command.
/core-service=management/access=audit:read-resource(recursive=true)
See Enable Audit Logging to enable audit logging for a standalone server.
Managed Domain Audit LoggingThough disabled by default, the default audit logging configuration writes a file for each host and foreach server.
<audit-log> <formatters> <json-formatter name="json-formatter"/> </formatters> <handlers> <file-handler name="file" formatter="json-formatter" path="audit-log.log" relative-to="jboss.server.data.dir"/> </handlers> <logger log-boot="true" log-read-only="false" enabled="false"> <handlers> <handler name="file"/> </handlers> </logger></audit-log>
<audit-log> <formatters> <json-formatter name="json-formatter"/> </formatters> <handlers> <file-handler name="host-file" formatter="json-formatter" relative-to="jboss.domain.data.dir" path="audit-log.log"/> <file-handler name="server-file" formatter="json-formatter"
Red Hat JBoss Enterprise Application Platform 7.0 Configuration Guide
48
This configuration can be read using the following management CLI command.
/host=HOST_NAME/core-service=management/access=audit:read-resource(recursive=true)
See Enable Audit Logging to enable audit logging for a managed domain.
3.8.1. Enable Management Audit Logging
JBoss EAP is preconfigured with file handlers for audit logging, though audit logging is disabled bydefault. The management CLI command to enable audit logging depends on whether you are runningas a standalone server or in a managed domain. See Management Audit Logging Attributes for filehandler attributes.
To set up syslog audit logging, see Set Up Management Audit Logging to a Syslog Server .
Enable Standalone Server Audit LoggingAudit logging can be enabled using the following command.
/core-service=management/access=audit/logger=audit-log:write-attribute(name=enabled,value=true)
By default, this will write the audit log to EAP_HOME/standalone/data/audit-log.log.
Enable Managed Domain Audit LoggingThe default audit logging configuration for a managed domain is preconfigured to write an audit log foreach host and each server.
Audit logging for each host can be enabled using the following command.
/host=HOST_NAME/core-service=management/access=audit/logger=audit-log:write-attribute(name=enabled,value=true)
By default, this will write the audit logs to EAP_HOME/domain/data/audit-log.log.
Audit logging for each server can be enabled using the following command.
/host=HOST_NAME/core-service=management/access=audit/server-logger=audit-log:write-attribute(name=enabled,value=true)
relative-to="jboss.server.data.dir" path="audit-log.log"/> </handlers> <logger log-boot="true" log-read-only="false" enabled="false"> <handlers> <handler name="host-file"/> </handlers> </logger> <server-logger log-boot="true" log-read-only="false" enabled="false"> <handlers> <handler name="server-file"/> </handlers> </server-logger></audit-log>
CHAPTER 3. JBOSS EAP MANAGEMENT
49
By default, this will write the audit logs to EAP_HOME/domain/servers/SERVER_NAME/data/audit-log.log
3.8.2. Send Management Audit Logging to a Syslog Server
A syslog handler specifies the parameters by which audit log entries are sent to a syslog server,specifically the syslog server’s host name and the port on which the syslog server is listening. Sendingaudit logging to a syslog server provides more security options than logging to a local file or localsyslog server. Multiple syslog handlers can be defined and be active at the same time.
By default, audit logging is preconfigured to output to a file when enabled. Use the following steps toset up and enable audit logging to a syslog server. See Management Audit Logging Attributes forsyslog handler attributes.
1. Add a syslog handler.Create the syslog handler, specifying the host and port of the syslog server. In a manageddomain, you must precede the /core-service commands with /host=HOST_NAME.
batch/core-service=management/access=audit/syslog-handler=SYSLOG_HANDLER_NAME:add(formatter=json-formatter)/core-service=management/access=audit/syslog-handler=SYSLOG_HANDLER_NAME/protocol=udp:add(host=HOST_NAME,port=PORT)run-batch
NOTE
The parameters to pass in differ depending on the protocol specified.
To configure the handler to use TLS to communicate securely with the syslogserver, you must also configure the authentication, for example:
/core-service=management/access=audit/syslog-handler=SYSLOG_HANDLER_NAME/protocol=tls/authentication=truststore:add(keystore-path=PATH_TO_TRUSTSTORE,keystore-password=TRUSTSTORE_PASSWORD)
2. Add a reference to the syslog handler.In a managed domain, you must precede this command with /host=HOST_NAME.
/core-service=management/access=audit/logger=audit-log/handler=SYSLOG_HANDLER_NAME:add
3. Enable audit logging.See Enable Management Audit Logging to enable audit logging.
Red Hat JBoss Enterprise Application Platform 7.0 Configuration Guide
50
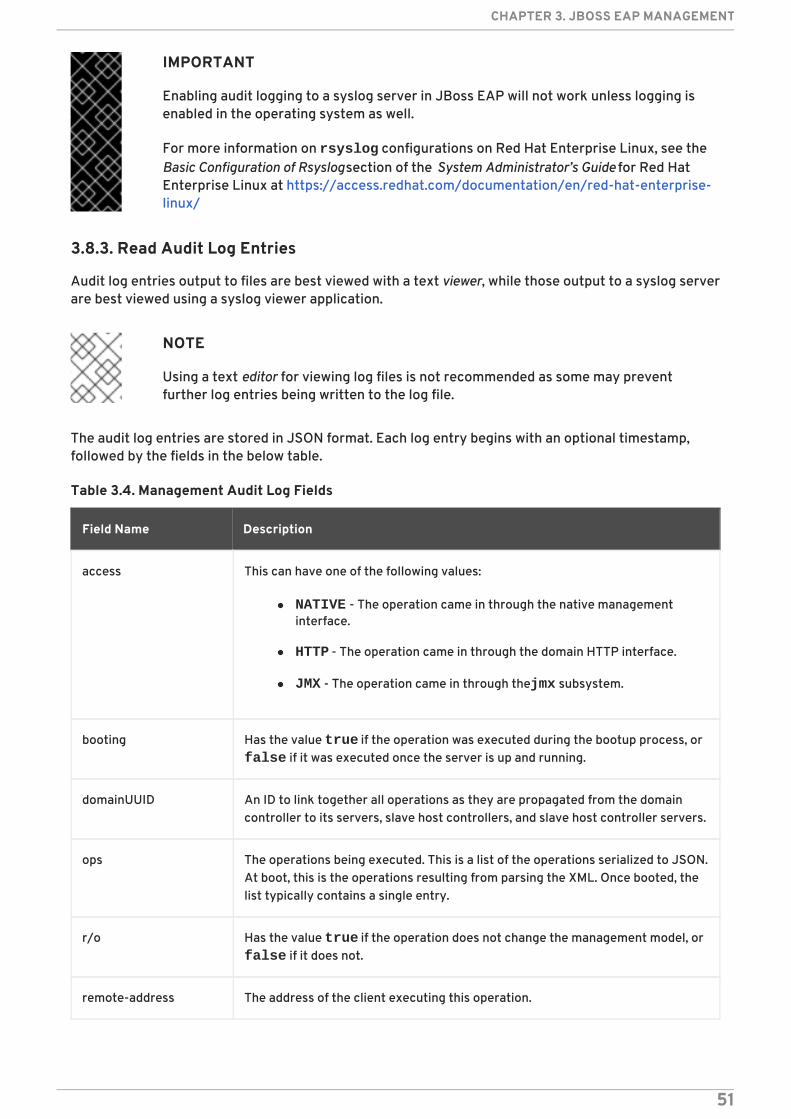
IMPORTANT
Enabling audit logging to a syslog server in JBoss EAP will not work unless logging isenabled in the operating system as well.
For more information on rsyslog configurations on Red Hat Enterprise Linux, see theBasic Configuration of Rsyslog section of the System Administrator’s Guide for Red HatEnterprise Linux at https://access.redhat.com/documentation/en/red-hat-enterprise-linux/
3.8.3. Read Audit Log Entries
Audit log entries output to files are best viewed with a text viewer, while those output to a syslog serverare best viewed using a syslog viewer application.
NOTE
Using a text editor for viewing log files is not recommended as some may preventfurther log entries being written to the log file.
The audit log entries are stored in JSON format. Each log entry begins with an optional timestamp,followed by the fields in the below table.
Table 3.4. Management Audit Log Fields
Field Name Description
access This can have one of the following values:
NATIVE - The operation came in through the native managementinterface.
HTTP - The operation came in through the domain HTTP interface.
JMX - The operation came in through the jmx subsystem.
booting Has the value true if the operation was executed during the bootup process, or false if it was executed once the server is up and running.
domainUUID An ID to link together all operations as they are propagated from the domaincontroller to its servers, slave host controllers, and slave host controller servers.
ops The operations being executed. This is a list of the operations serialized to JSON.At boot, this is the operations resulting from parsing the XML. Once booted, thelist typically contains a single entry.
r/o Has the value true if the operation does not change the management model, or false if it does not.
remote-address The address of the client executing this operation.
CHAPTER 3. JBOSS EAP MANAGEMENT
51
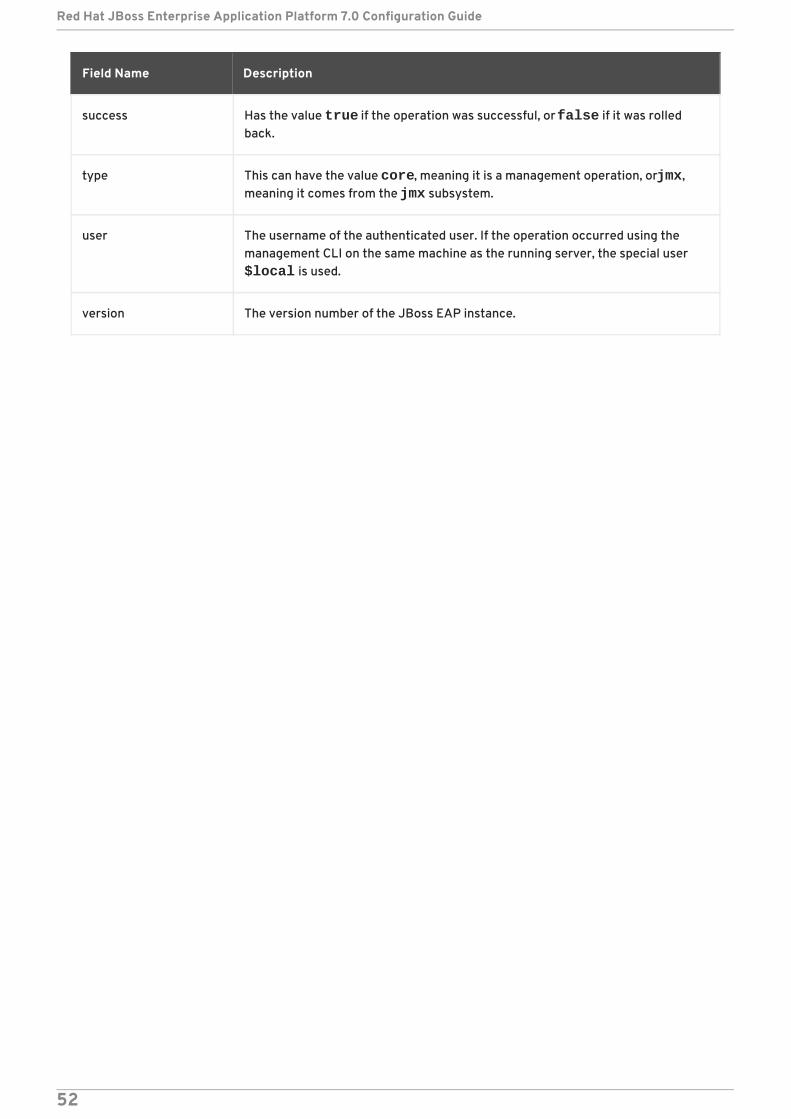
success Has the value true if the operation was successful, or false if it was rolledback.
type This can have the value core, meaning it is a management operation, or jmx,meaning it comes from the jmx subsystem.
user The username of the authenticated user. If the operation occurred using themanagement CLI on the same machine as the running server, the special user $local is used.
version The version number of the JBoss EAP instance.
Field Name Description
Red Hat JBoss Enterprise Application Platform 7.0 Configuration Guide
52
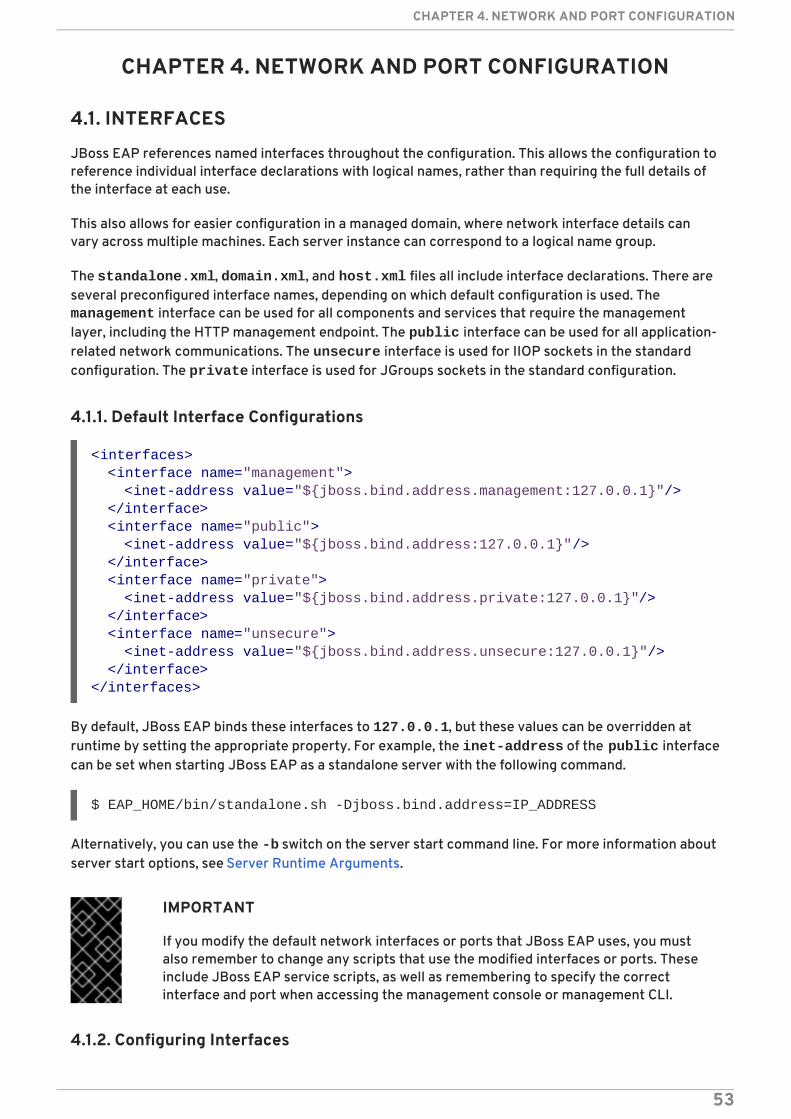
CHAPTER 4. NETWORK AND PORT CONFIGURATION
4.1. INTERFACES
JBoss EAP references named interfaces throughout the configuration. This allows the configuration toreference individual interface declarations with logical names, rather than requiring the full details ofthe interface at each use.
This also allows for easier configuration in a managed domain, where network interface details canvary across multiple machines. Each server instance can correspond to a logical name group.
The standalone.xml, domain.xml, and host.xml files all include interface declarations. There areseveral preconfigured interface names, depending on which default configuration is used. The management interface can be used for all components and services that require the managementlayer, including the HTTP management endpoint. The public interface can be used for all application-related network communications. The unsecure interface is used for IIOP sockets in the standardconfiguration. The private interface is used for JGroups sockets in the standard configuration.
4.1.1. Default Interface Configurations
By default, JBoss EAP binds these interfaces to 127.0.0.1, but these values can be overridden atruntime by setting the appropriate property. For example, the inet-address of the public interfacecan be set when starting JBoss EAP as a standalone server with the following command.
Alternatively, you can use the -b switch on the server start command line. For more information aboutserver start options, see Server Runtime Arguments.
IMPORTANT
If you modify the default network interfaces or ports that JBoss EAP uses, you mustalso remember to change any scripts that use the modified interfaces or ports. Theseinclude JBoss EAP service scripts, as well as remembering to specify the correctinterface and port when accessing the management console or management CLI.
4.1.2. Configuring Interfaces
<interfaces> <interface name="management"> <inet-address value="${jboss.bind.address.management:127.0.0.1}"/> </interface> <interface name="public"> <inet-address value="${jboss.bind.address:127.0.0.1}"/> </interface> <interface name="private"> <inet-address value="${jboss.bind.address.private:127.0.0.1}"/> </interface> <interface name="unsecure"> <inet-address value="${jboss.bind.address.unsecure:127.0.0.1}"/> </interface></interfaces>
$ EAP_HOME/bin/standalone.sh -Djboss.bind.address=IP_ADDRESS
CHAPTER 4. NETWORK AND PORT CONFIGURATION
53
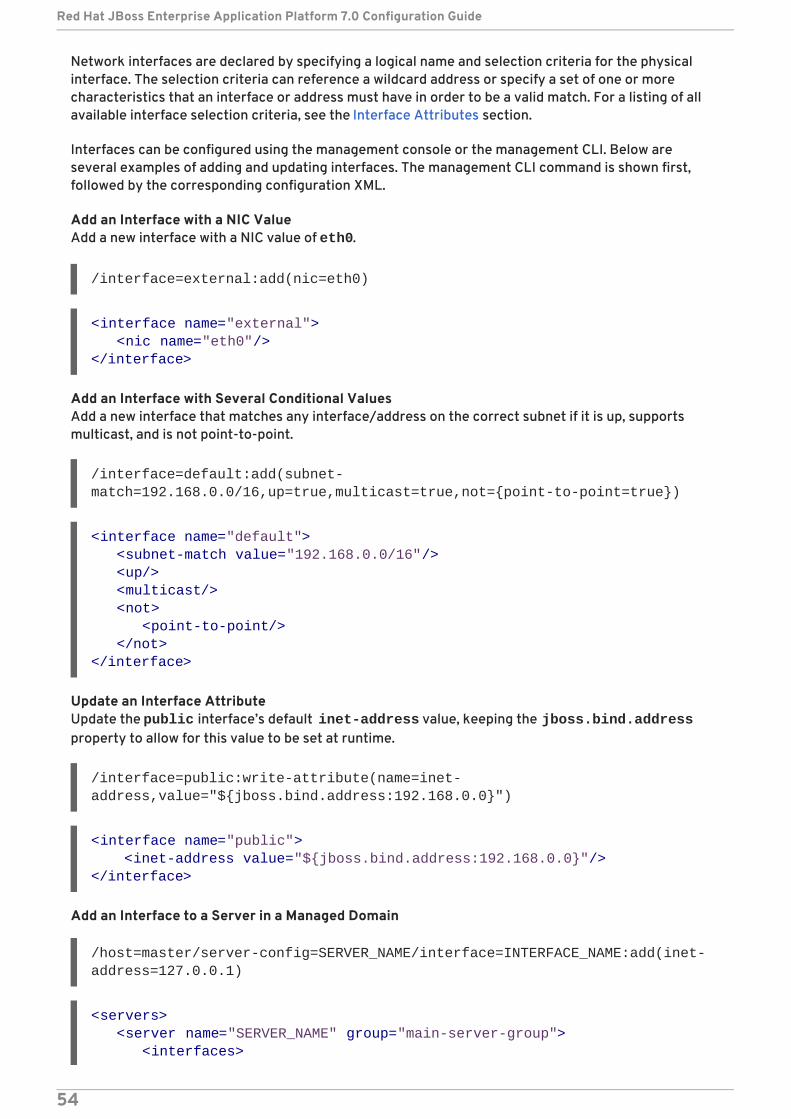
Network interfaces are declared by specifying a logical name and selection criteria for the physicalinterface. The selection criteria can reference a wildcard address or specify a set of one or morecharacteristics that an interface or address must have in order to be a valid match. For a listing of allavailable interface selection criteria, see the Interface Attributes section.
Interfaces can be configured using the management console or the management CLI. Below areseveral examples of adding and updating interfaces. The management CLI command is shown first,followed by the corresponding configuration XML.
Add an Interface with a NIC ValueAdd a new interface with a NIC value of eth0.
/interface=external:add(nic=eth0)
Add an Interface with Several Conditional ValuesAdd a new interface that matches any interface/address on the correct subnet if it is up, supportsmulticast, and is not point-to-point.
/interface=default:add(subnet-match=192.168.0.0/16,up=true,multicast=true,not={point-to-point=true})
Update an Interface AttributeUpdate the public interface’s default inet-address value, keeping the jboss.bind.addressproperty to allow for this value to be set at runtime.
/interface=public:write-attribute(name=inet-address,value="${jboss.bind.address:192.168.0.0}")
Add an Interface to a Server in a Managed Domain
/host=master/server-config=SERVER_NAME/interface=INTERFACE_NAME:add(inet-address=127.0.0.1)
<interface name="external"> <nic name="eth0"/></interface>
<interface name="default"> <subnet-match value="192.168.0.0/16"/> <up/> <multicast/> <not> <point-to-point/> </not></interface>
<interface name="public"> <inet-address value="${jboss.bind.address:192.168.0.0}"/></interface>
<servers> <server name="SERVER_NAME" group="main-server-group"> <interfaces>
Red Hat JBoss Enterprise Application Platform 7.0 Configuration Guide
54
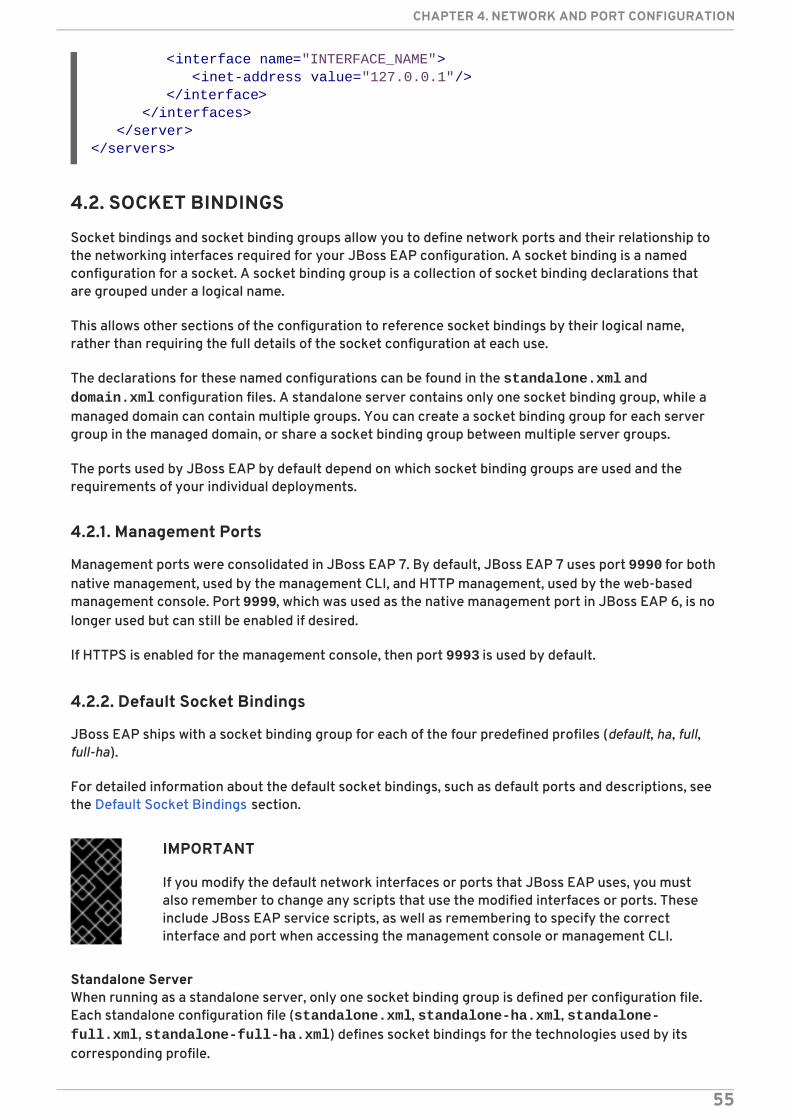
4.2. SOCKET BINDINGS
Socket bindings and socket binding groups allow you to define network ports and their relationship tothe networking interfaces required for your JBoss EAP configuration. A socket binding is a namedconfiguration for a socket. A socket binding group is a collection of socket binding declarations thatare grouped under a logical name.
This allows other sections of the configuration to reference socket bindings by their logical name,rather than requiring the full details of the socket configuration at each use.
The declarations for these named configurations can be found in the standalone.xml and domain.xml configuration files. A standalone server contains only one socket binding group, while amanaged domain can contain multiple groups. You can create a socket binding group for each servergroup in the managed domain, or share a socket binding group between multiple server groups.
The ports used by JBoss EAP by default depend on which socket binding groups are used and therequirements of your individual deployments.
4.2.1. Management Ports
Management ports were consolidated in JBoss EAP 7. By default, JBoss EAP 7 uses port 9990 for bothnative management, used by the management CLI, and HTTP management, used by the web-basedmanagement console. Port 9999, which was used as the native management port in JBoss EAP 6, is nolonger used but can still be enabled if desired.
If HTTPS is enabled for the management console, then port 9993 is used by default.
4.2.2. Default Socket Bindings
JBoss EAP ships with a socket binding group for each of the four predefined profiles (default, ha, full,full-ha).
For detailed information about the default socket bindings, such as default ports and descriptions, seethe Default Socket Bindings section.
IMPORTANT
If you modify the default network interfaces or ports that JBoss EAP uses, you mustalso remember to change any scripts that use the modified interfaces or ports. Theseinclude JBoss EAP service scripts, as well as remembering to specify the correctinterface and port when accessing the management console or management CLI.
Standalone ServerWhen running as a standalone server, only one socket binding group is defined per configuration file.Each standalone configuration file (standalone.xml, standalone-ha.xml, standalone-full.xml, standalone-full-ha.xml) defines socket bindings for the technologies used by itscorresponding profile.
<interface name="INTERFACE_NAME"> <inet-address value="127.0.0.1"/> </interface> </interfaces> </server></servers>
CHAPTER 4. NETWORK AND PORT CONFIGURATION
55
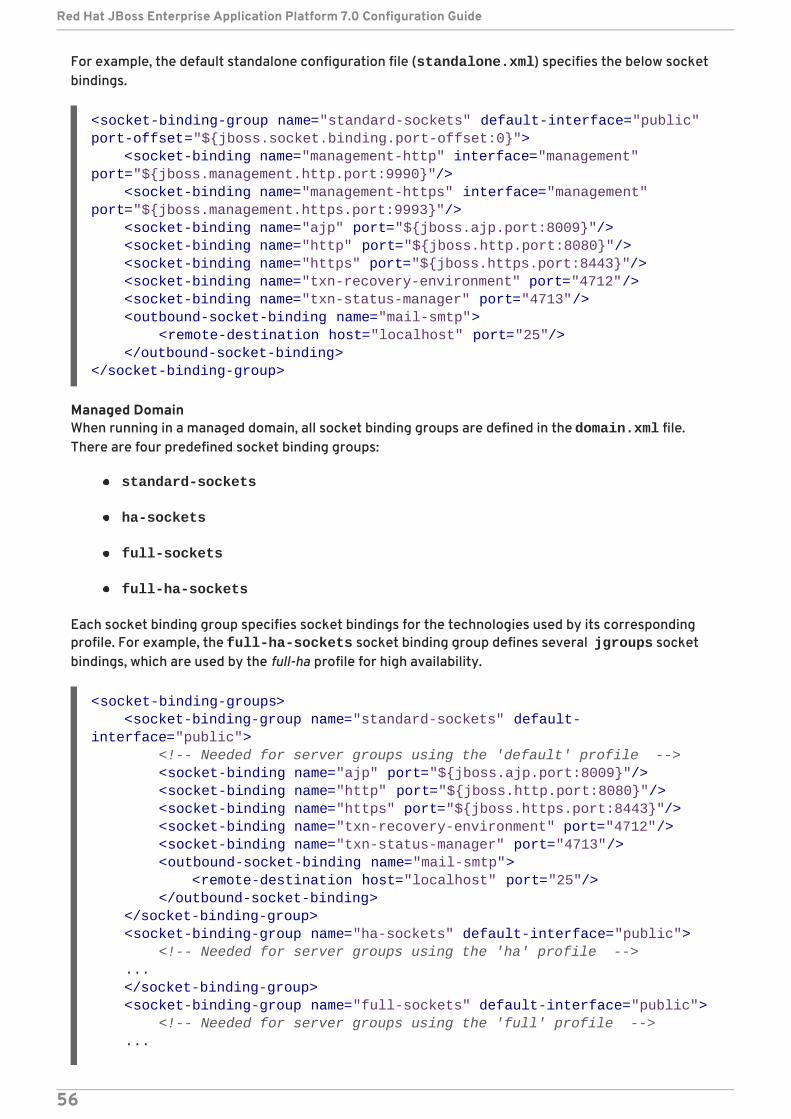
For example, the default standalone configuration file (standalone.xml) specifies the below socketbindings.
Managed DomainWhen running in a managed domain, all socket binding groups are defined in the domain.xml file.There are four predefined socket binding groups:
standard-sockets
ha-sockets
full-sockets
full-ha-sockets
Each socket binding group specifies socket bindings for the technologies used by its correspondingprofile. For example, the full-ha-sockets socket binding group defines several jgroups socketbindings, which are used by the full-ha profile for high availability.
<socket-binding-group name="standard-sockets" default-interface="public" port-offset="${jboss.socket.binding.port-offset:0}"> <socket-binding name="management-http" interface="management" port="${jboss.management.http.port:9990}"/> <socket-binding name="management-https" interface="management" port="${jboss.management.https.port:9993}"/> <socket-binding name="ajp" port="${jboss.ajp.port:8009}"/> <socket-binding name="http" port="${jboss.http.port:8080}"/> <socket-binding name="https" port="${jboss.https.port:8443}"/> <socket-binding name="txn-recovery-environment" port="4712"/> <socket-binding name="txn-status-manager" port="4713"/> <outbound-socket-binding name="mail-smtp"> <remote-destination host="localhost" port="25"/> </outbound-socket-binding></socket-binding-group>
<socket-binding-groups> <socket-binding-group name="standard-sockets" default-interface="public"> <!-- Needed for server groups using the 'default' profile --> <socket-binding name="ajp" port="${jboss.ajp.port:8009}"/> <socket-binding name="http" port="${jboss.http.port:8080}"/> <socket-binding name="https" port="${jboss.https.port:8443}"/> <socket-binding name="txn-recovery-environment" port="4712"/> <socket-binding name="txn-status-manager" port="4713"/> <outbound-socket-binding name="mail-smtp"> <remote-destination host="localhost" port="25"/> </outbound-socket-binding> </socket-binding-group> <socket-binding-group name="ha-sockets" default-interface="public"> <!-- Needed for server groups using the 'ha' profile --> ... </socket-binding-group> <socket-binding-group name="full-sockets" default-interface="public"> <!-- Needed for server groups using the 'full' profile --> ...
Red Hat JBoss Enterprise Application Platform 7.0 Configuration Guide
56
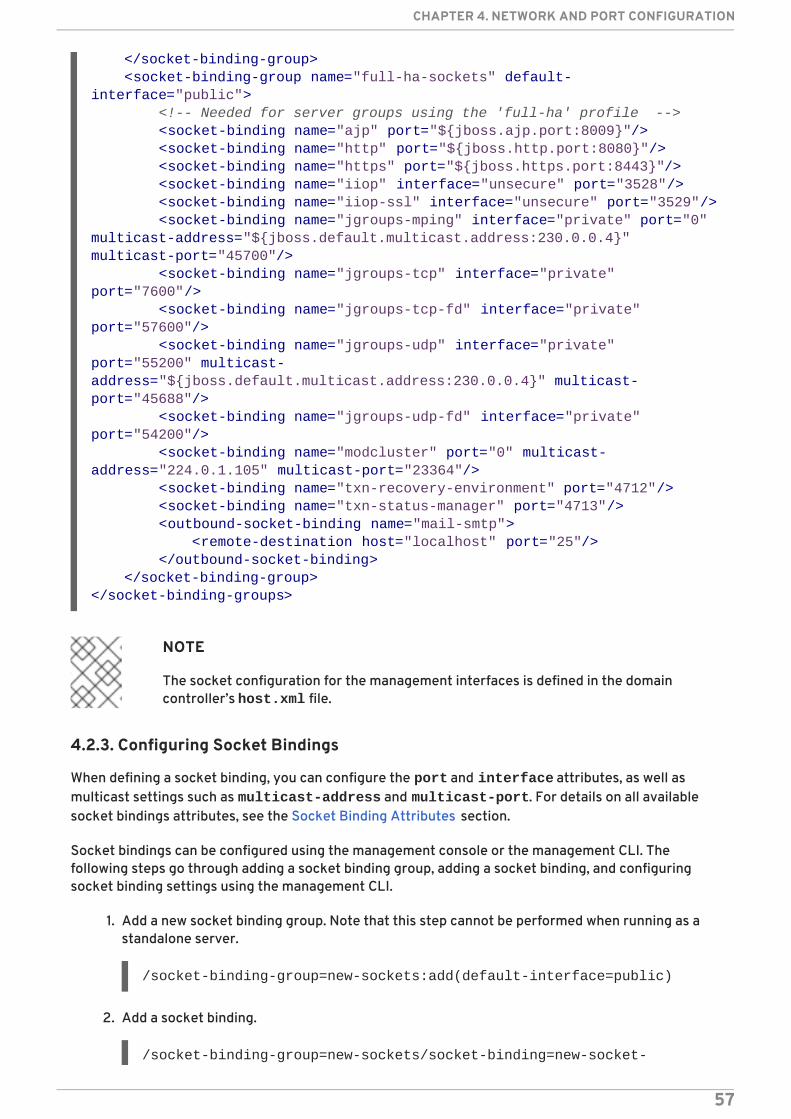
NOTE
The socket configuration for the management interfaces is defined in the domaincontroller’s host.xml file.
4.2.3. Configuring Socket Bindings
When defining a socket binding, you can configure the port and interface attributes, as well asmulticast settings such as multicast-address and multicast-port. For details on all availablesocket bindings attributes, see the Socket Binding Attributes section.
Socket bindings can be configured using the management console or the management CLI. Thefollowing steps go through adding a socket binding group, adding a socket binding, and configuringsocket binding settings using the management CLI.
1. Add a new socket binding group. Note that this step cannot be performed when running as astandalone server.
/socket-binding-group=new-sockets:add(default-interface=public)
2. Add a socket binding.
/socket-binding-group=new-sockets/socket-binding=new-socket-
</socket-binding-group> <socket-binding-group name="full-ha-sockets" default-interface="public"> <!-- Needed for server groups using the 'full-ha' profile --> <socket-binding name="ajp" port="${jboss.ajp.port:8009}"/> <socket-binding name="http" port="${jboss.http.port:8080}"/> <socket-binding name="https" port="${jboss.https.port:8443}"/> <socket-binding name="iiop" interface="unsecure" port="3528"/> <socket-binding name="iiop-ssl" interface="unsecure" port="3529"/> <socket-binding name="jgroups-mping" interface="private" port="0" multicast-address="${jboss.default.multicast.address:230.0.0.4}" multicast-port="45700"/> <socket-binding name="jgroups-tcp" interface="private" port="7600"/> <socket-binding name="jgroups-tcp-fd" interface="private" port="57600"/> <socket-binding name="jgroups-udp" interface="private" port="55200" multicast-address="${jboss.default.multicast.address:230.0.0.4}" multicast-port="45688"/> <socket-binding name="jgroups-udp-fd" interface="private" port="54200"/> <socket-binding name="modcluster" port="0" multicast-address="224.0.1.105" multicast-port="23364"/> <socket-binding name="txn-recovery-environment" port="4712"/> <socket-binding name="txn-status-manager" port="4713"/> <outbound-socket-binding name="mail-smtp"> <remote-destination host="localhost" port="25"/> </outbound-socket-binding> </socket-binding-group></socket-binding-groups>
CHAPTER 4. NETWORK AND PORT CONFIGURATION
57
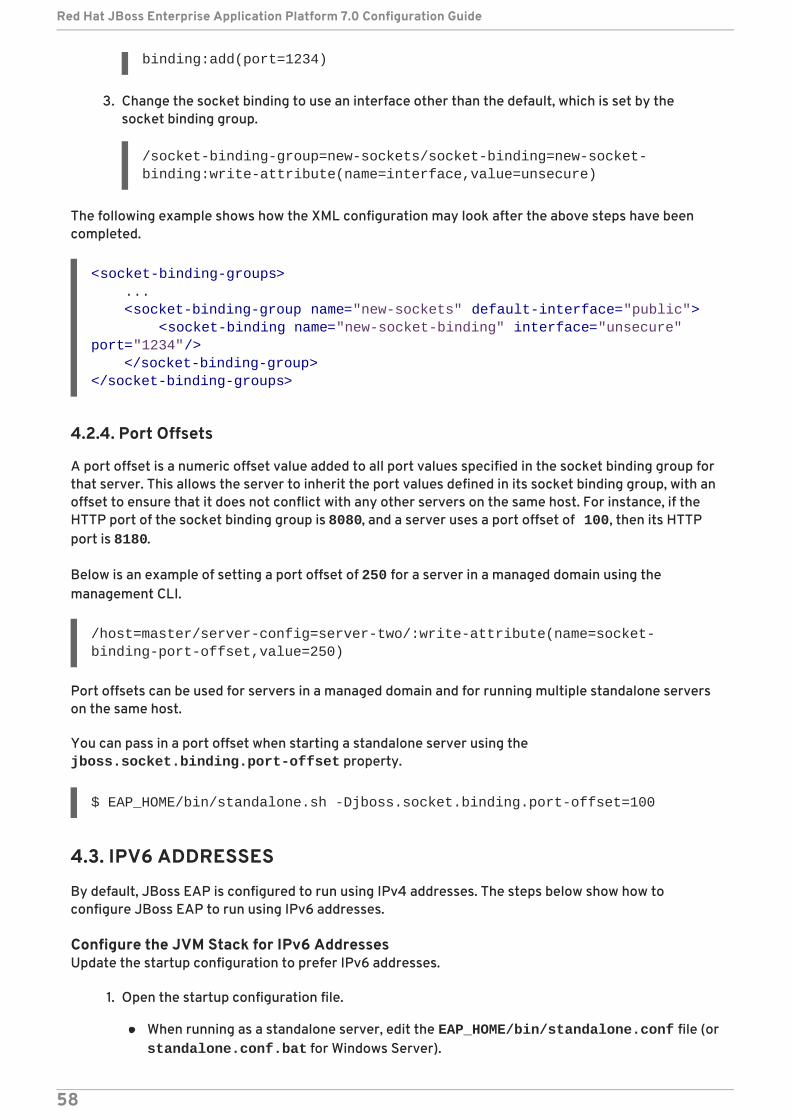
binding:add(port=1234)
3. Change the socket binding to use an interface other than the default, which is set by thesocket binding group.
/socket-binding-group=new-sockets/socket-binding=new-socket-binding:write-attribute(name=interface,value=unsecure)
The following example shows how the XML configuration may look after the above steps have beencompleted.
4.2.4. Port Offsets
A port offset is a numeric offset value added to all port values specified in the socket binding group forthat server. This allows the server to inherit the port values defined in its socket binding group, with anoffset to ensure that it does not conflict with any other servers on the same host. For instance, if theHTTP port of the socket binding group is 8080, and a server uses a port offset of 100, then its HTTPport is 8180.
Below is an example of setting a port offset of 250 for a server in a managed domain using themanagement CLI.
/host=master/server-config=server-two/:write-attribute(name=socket-binding-port-offset,value=250)
Port offsets can be used for servers in a managed domain and for running multiple standalone serverson the same host.
You can pass in a port offset when starting a standalone server using the jboss.socket.binding.port-offset property.
$ EAP_HOME/bin/standalone.sh -Djboss.socket.binding.port-offset=100
4.3. IPV6 ADDRESSES
By default, JBoss EAP is configured to run using IPv4 addresses. The steps below show how toconfigure JBoss EAP to run using IPv6 addresses.
Configure the JVM Stack for IPv6 AddressesUpdate the startup configuration to prefer IPv6 addresses.
1. Open the startup configuration file.
When running as a standalone server, edit the EAP_HOME/bin/standalone.conf file (orstandalone.conf.bat for Windows Server).
<socket-binding-groups> ... <socket-binding-group name="new-sockets" default-interface="public"> <socket-binding name="new-socket-binding" interface="unsecure" port="1234"/> </socket-binding-group></socket-binding-groups>
Red Hat JBoss Enterprise Application Platform 7.0 Configuration Guide
58
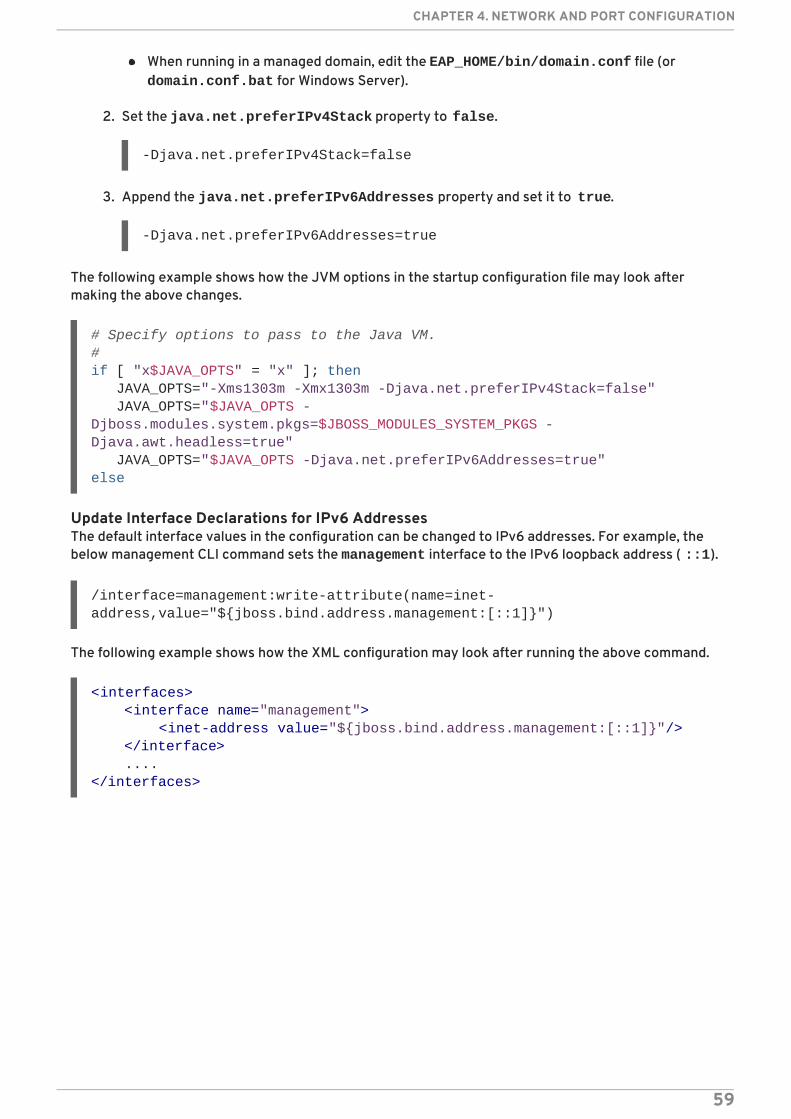
When running in a managed domain, edit the EAP_HOME/bin/domain.conf file (or domain.conf.bat for Windows Server).
2. Set the java.net.preferIPv4Stack property to false.
-Djava.net.preferIPv4Stack=false
3. Append the java.net.preferIPv6Addresses property and set it to true.
-Djava.net.preferIPv6Addresses=true
The following example shows how the JVM options in the startup configuration file may look aftermaking the above changes.
Update Interface Declarations for IPv6 AddressesThe default interface values in the configuration can be changed to IPv6 addresses. For example, thebelow management CLI command sets the management interface to the IPv6 loopback address ( ::1).
/interface=management:write-attribute(name=inet-address,value="${jboss.bind.address.management:[::1]}")
The following example shows how the XML configuration may look after running the above command.
# Specify options to pass to the Java VM.#if [ "x$JAVA_OPTS" = "x" ]; then JAVA_OPTS="-Xms1303m -Xmx1303m -Djava.net.preferIPv4Stack=false" JAVA_OPTS="$JAVA_OPTS -Djboss.modules.system.pkgs=$JBOSS_MODULES_SYSTEM_PKGS -Djava.awt.headless=true" JAVA_OPTS="$JAVA_OPTS -Djava.net.preferIPv6Addresses=true"else
<interfaces> <interface name="management"> <inet-address value="${jboss.bind.address.management:[::1]}"/> </interface> ....</interfaces>
CHAPTER 4. NETWORK AND PORT CONFIGURATION
59
CHAPTER 5. JBOSS EAP SECURITYJBoss EAP offers the ability to configure security for its own interfaces and services as well as providesecurity for applications that are running on it.
See the Security Architecture guide for an overview of general security concepts as well asJBoss EAP-specific security concepts.
See How to Configure Server Security for information on securing JBoss EAP itself.
See How to Configure Identity Management for information on providing security forapplications deployed to JBoss EAP.
See How to Set Up SSO with Kerberos for information on configuring single sign-on for JBossEAP using Kerberos.
See How To Set Up SSO with SAML v2 for information on configuring single sign-on for JBossEAP using SAML v2.
Red Hat JBoss Enterprise Application Platform 7.0 Configuration Guide
60

CHAPTER 6. JBOSS EAP CLASS LOADINGJBoss EAP uses a modular class loading system for controlling the class paths of deployed applications.This system provides more flexibility and control than the traditional system of hierarchical classloaders. Developers have fine-grained control of the classes available to their applications, and canconfigure a deployment to ignore classes provided by the application server in favor of their own.
The modular class loader separates all Java classes into logical groups called modules. Each modulecan define dependencies on other modules in order to have the classes from that module added to itsown class path. Because each deployed JAR and WAR file is treated as a module, developers cancontrol the contents of their application’s class path by adding module configuration to theirapplication.
6.1. MODULES
A module is a logical grouping of classes used for class loading and dependency management. JBossEAP identifies two different types of modules: static and dynamic. The main difference between the twois how they are packaged.
Static ModulesStatic modules are defined in the EAP_HOME/modules/ directory of the application server. Eachmodule exists as a subdirectory, for example EAP_HOME/modules/com/mysql/. Each moduledirectory then contains a slot subdirectory, which defaults to main and contains the module.xmlconfiguration file and any required JAR files. All the application server-provided APIs are provided asstatic modules, including the Java EE APIs as well as other APIs.
Example MySQL JDBC Driver module.xml File
The module name (com.mysql) must match the directory structure for the module, excluding the slotname (main).
Creating custom static modules can be useful if many applications are deployed on the same serverthat use the same third-party libraries. Instead of bundling those libraries with each application, amodule containing these libraries can be created and installed by an administrator. The applicationscan then declare an explicit dependency on the custom static modules.
The modules provided in JBoss EAP distributions are located in the system directory within the EAP_HOME/modules directory. This keeps them separate from any modules provided by third parties.Any Red Hat provided products that layer on top of JBoss EAP also install their modules within the system directory.
Users must ensure that custom modules are installed into the EAP_HOME/modules directory, usingone directory per module. This ensures that custom versions of modules that already exist in the
<?xml version="1.0" ?><module xmlns="urn:jboss:module:1.1" name="com.mysql"> <resources> <resource-root path="mysql-connector-java-5.1.36-bin.jar"/> </resources> <dependencies> <module name="javax.api"/> <module name="javax.transaction.api"/> </dependencies></module>
CHAPTER 6. JBOSS EAP CLASS LOADING
61
system directory are loaded instead of the shipped versions. In this way, user-provided modules willtake precedence over system modules.
If you use the JBOSS_MODULEPATH environment variable to change the locations in which JBoss EAPsearches for modules, then the product will look for a system subdirectory structure within one of thelocations specified. A system structure must exist somewhere in the locations specified with JBOSS_MODULEPATH.
Dynamic ModulesDynamic modules are created and loaded by the application server for each JAR or WAR deployment(or subdeployment in an EAR). The name of a dynamic module is derived from the name of the deployedarchive. Because deployments are loaded as modules, they can configure dependencies and be used asdependencies by other deployments.
Modules are only loaded when required. This usually only occurs when an application is deployed thathas explicit or implicit dependencies.
6.2. MODULE DEPENDENCIES
A module dependency is a declaration that one module requires the classes of one or more othermodules in order to function. When JBoss EAP loads a module, the modular class loader parses thedependencies of that module and adds the classes from each dependency to its class path. If a specifieddependency cannot be found, the module will fail to load.
NOTE
See the Modules section for complete details about modules and the modular classloading system.
Deployed applications (a JAR or WAR, for example) are loaded as dynamic modules and make use ofdependencies to access the APIs provided by JBoss EAP.
There are two types of dependencies: explicit and implicit.
Explicit Dependencies
Explicit dependencies are declared by the developer in a configuration file. A static module candeclare dependencies in its module.xml file. A dynamic module can declare dependencies in thedeployment’s MANIFEST.MF or jboss-deployment-structure.xml deployment descriptor.
Implicit Dependencies
Implicit dependencies are added automatically by JBoss EAP when certain conditions or meta-dataare found in a deployment. The Java EE 7 APIs supplied with JBoss EAP are examples of modulesthat are added by detection of implicit dependencies in deployments.Deployments can also be configured to exclude specific implicit dependencies by using the jboss-deployment-structure.xml deployment descriptor file. This can be useful when an applicationbundles a specific version of a library that JBoss EAP will attempt to add as an implicit dependency.
Optional DependenciesExplicit dependencies can be specified as optional. Failure to load an optional dependency will notcause a module to fail to load. However, if the dependency becomes available later it will not be addedto the module’s class path. Dependencies must be available when the module is loaded.
Export a Dependency
Red Hat JBoss Enterprise Application Platform 7.0 Configuration Guide
62
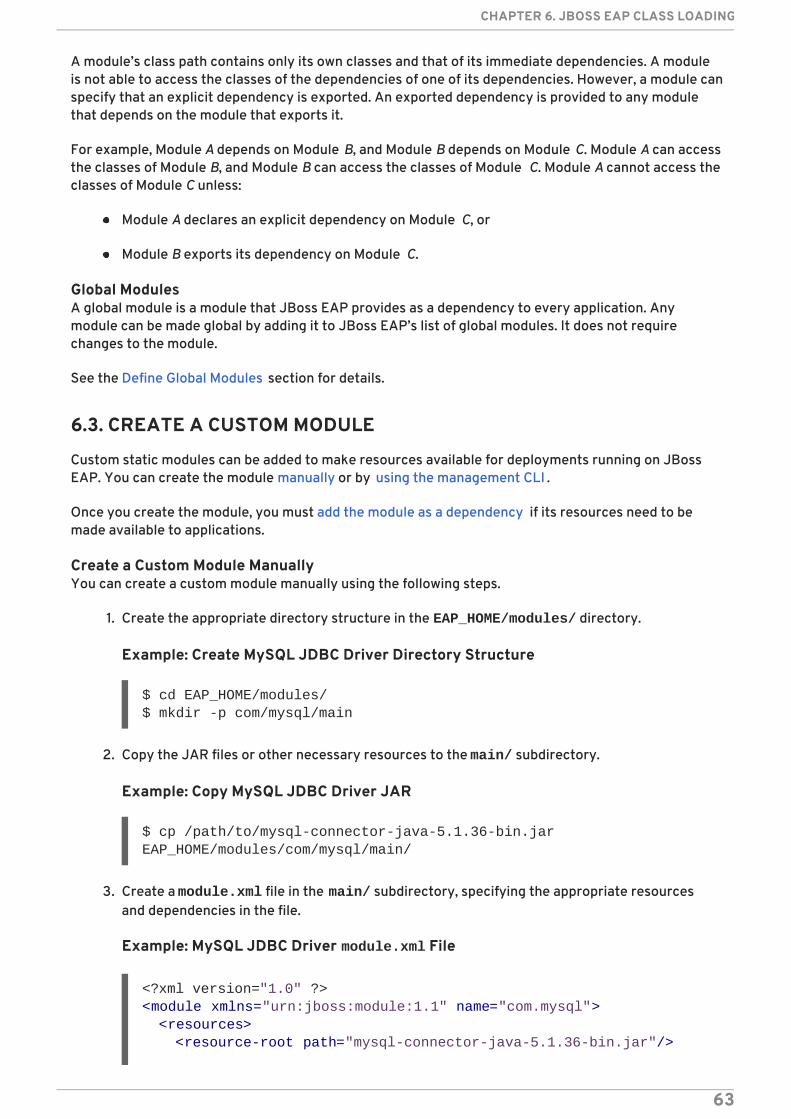
A module’s class path contains only its own classes and that of its immediate dependencies. A moduleis not able to access the classes of the dependencies of one of its dependencies. However, a module canspecify that an explicit dependency is exported. An exported dependency is provided to any modulethat depends on the module that exports it.
For example, Module A depends on Module B, and Module B depends on Module C. Module A can accessthe classes of Module B, and Module B can access the classes of Module C. Module A cannot access theclasses of Module C unless:
Module A declares an explicit dependency on Module C, or
Module B exports its dependency on Module C.
Global ModulesA global module is a module that JBoss EAP provides as a dependency to every application. Anymodule can be made global by adding it to JBoss EAP’s list of global modules. It does not requirechanges to the module.
See the Define Global Modules section for details.
6.3. CREATE A CUSTOM MODULE
Custom static modules can be added to make resources available for deployments running on JBossEAP. You can create the module manually or by using the management CLI .
Once you create the module, you must add the module as a dependency if its resources need to bemade available to applications.
Create a Custom Module ManuallyYou can create a custom module manually using the following steps.
1. Create the appropriate directory structure in the EAP_HOME/modules/ directory.
Example: Create MySQL JDBC Driver Directory Structure
$ cd EAP_HOME/modules/$ mkdir -p com/mysql/main
2. Copy the JAR files or other necessary resources to the main/ subdirectory.
Example: Copy MySQL JDBC Driver JAR
$ cp /path/to/mysql-connector-java-5.1.36-bin.jar EAP_HOME/modules/com/mysql/main/
3. Create a module.xml file in the main/ subdirectory, specifying the appropriate resourcesand dependencies in the file.
Example: MySQL JDBC Driver module.xml File
<?xml version="1.0" ?><module xmlns="urn:jboss:module:1.1" name="com.mysql"> <resources> <resource-root path="mysql-connector-java-5.1.36-bin.jar"/>
CHAPTER 6. JBOSS EAP CLASS LOADING
63
Create a Custom Module Using the Management CLIYou can create a custom module using the module add management CLI command.
IMPORTANT
Using the module management CLI command to add and remove modules is providedas technology preview only. This command is not appropriate for use in a manageddomain or when connecting to the management CLI remotely. Modules should be addedand removed manually in a production environment.
1. Start the JBoss EAP server.
2. Launch the management CLI, but do not use the --connect or -c argument to connect tothe running instance.
$ EAP_HOME/bin/jboss-cli.sh
3. Use the module add management CLI command to add the new core module.
module add --name=MODULE_NAME --resources=PATH_TO_RESOURCE --dependencies=DEPENDENCIES
Execute module --help for more details on using this command to add and remove modules.
Add the Module as a DependencyIn order for your application to be able to access this module’s resources, you will need to add themodule as a dependency.
See the Add an Explicit Module Dependency to a Deployment section of the JBoss EAPDevelopment Guide for adding application-specific dependencies using deploymentdescriptors.
See the Define Global Modules section for instructions on adding modules as dependencies toall applications.
As an example, the following steps add a JAR file containing several properties files as a module anddefine a global module, so that an application can then load these properties.
1. Add the JAR file as a core module.
module add --name=myprops --resources=/path/to/properties.jar
2. Define this module as a global module so that it is made available to all deployments.
/subsystem=ee:list-add(name=global-modules,value={name=myprops})
</resources> <dependencies> <module name="javax.api"/> <module name="javax.transaction.api"/> </dependencies></module>
Red Hat JBoss Enterprise Application Platform 7.0 Configuration Guide
64
3. The application could then retrieve the properties from one of the properties files containedwithin the JAR.
6.4. REMOVE A CUSTOM MODULE
Custom static modules can be removed manually or by using the management CLI .
Remove a Custom Module ManuallyBefore manually removing a module, ensure that it is not required by deployed applications orelsewhere in the server configuration, such as by a datasource.
To remove a custom module, remove the module’s directory under EAP_HOME/modules/, whichincludes its module.xml file and associated JAR files or other resources. For example, remove the EAP_HOME/modules/com/mysql/main/ directory to remove a custom MySQL JDBC driver modulein the main slot.
Remove a Custom Module Using the Management CLIYou can remove a custom module using the module remove management CLI command.
IMPORTANT
Using the module management CLI command to add and remove modules is providedas technology preview only. This command is not appropriate for use in a manageddomain or when connecting to the management CLI remotely. Modules should be addedand removed manually in a production environment.
1. Start the JBoss EAP server.
2. Launch the management CLI, but do not use the --connect or -c argument to connect tothe running instance.
$ EAP_HOME/bin/jboss-cli.sh
3. Use the module remove management CLI command to remove the custom module.
module remove --name=MODULE_NAME
Use the --slot argument if the module to remove is in a slot other than main.
Example: Remove a MySQL Module
module remove --name=com.mysql
Execute module --help for more details on using this command to add and remove modules.
6.5. DEFINE GLOBAL MODULES
A list of global modules can be defined for JBoss EAP, which will add the modules as dependencies toall deployments.
Thread.currentThread().getContextClassLoader().getResource("my.properties");
CHAPTER 6. JBOSS EAP CLASS LOADING
65
NOTE
You must know the name of the modules that are to be configured as global modules.For the complete listing of the included modules and whether they are supported, seeRed Hat JBoss Enterprise Application Platform 7 Included Modules on the Red HatCustomer Portal. See the Dynamic Module Naming section for naming conventions formodules in deployments.
Use the following management CLI command to define the list of global modules.
/subsystem=ee:write-attribute(name=global-modules,value=[{name=MODULE_NAME_1},{name=MODULE_NAME_2}]
Use the following management CLI command to add a single module the list of existing global modules.
/subsystem=ee:list-add(name=global-modules,value={name=MODULE_NAME})
Global modules can also be added and removed using the management console by navigating to theEE subsystem from the Configuration tab and selecting the Global Modules section.
6.6. CONFIGURE SUBDEPLOYMENT ISOLATION
Each subdeployment in an Enterprise Archive (EAR) is a dynamic module with its own class loader.Subdeployments always have an implicit dependency on the parent module, which gives them access toclasses in EAR/lib. By default, a subdeployment can access the resources of other subdeploymentswithin that EAR.
If you do not want a subdeployment to be allowed to access classes belonging to othersubdeployments, then strict subdeployment isolation can be enabled in JBoss EAP. This setting willaffect all deployments.
Enable Subdeployment Module Isolation for All DeploymentsSubdeployment isolation can be enabled or disabled using the management console or themanagement CLI from the ee subsystem. By default, subdeployment isolation is set to false, whichallows the subdeployments to access resources of other subdeployments within an EAR deployment.
Use the following management CLI to enable EAR subdeployment isolation.
/subsystem=ee:write-attribute(name=ear-subdeployments-isolated,value=true)
Subdeployments in an EAR will no longer be able to access resources from other subdeployments.
6.7. DEFINE AN EXTERNAL JBOSS EAP MODULE DIRECTORY
The default directory for JBoss EAP modules is EAP_HOME/modules. You can specify a differentdirectory for JBoss EAP modules using the JBOSS_MODULEPATH variable. Follow the below steps toset this variable in the JBoss EAP startup configuration file.
NOTE
You can also set JBOSS_MODULEPATH as an environment variable instead of setting thisin the JBoss EAP startup configuration files.
Red Hat JBoss Enterprise Application Platform 7.0 Configuration Guide
66
1. Edit the startup configuration file.
When running as a standalone server, edit the EAP_HOME/bin/standalone.conf file (orstandalone.conf.bat for Windows Server).
When running in a managed domain, edit the EAP_HOME/bin/domain.conf file (or domain.conf.bat for Windows Server).
2. Set the JBOSS_MODULEPATH variable, for example:
JBOSS_MODULEPATH="/path/to/modules/directory/"
To specify a list of directories use a colon (:) to delimit the list of directories.
NOTE
For Windows Server, use the following syntax to set the JBOSS_MODULEPATHvariable:
set "JBOSS_MODULEPATH /path/to/modules/directory/"
To specify a list of directories use a semicolon (;) to delimit the list ofdirectories.
6.8. DYNAMIC MODULE NAMING CONVENTIONS
JBoss EAP loads all deployments as modules, which are named according to the following conventions.
Deployments of WAR and JAR files are named using the following format:
deployment.DEPLOYMENT_NAME
For example, inventory.war and store.jar will have the module names of deployment.inventory.war and deployment.store.jar respectively.
Subdeployments within an Enterprise Archive (EAR) are named using the following format:
deployment.EAR_NAME.SUBDEPLOYMENT_NAME
For example, the subdeployment of reports.war within the enterprise archive accounts.ear will have the module name of deployment.accounts.ear.reports.war.
CHAPTER 6. JBOSS EAP CLASS LOADING
67
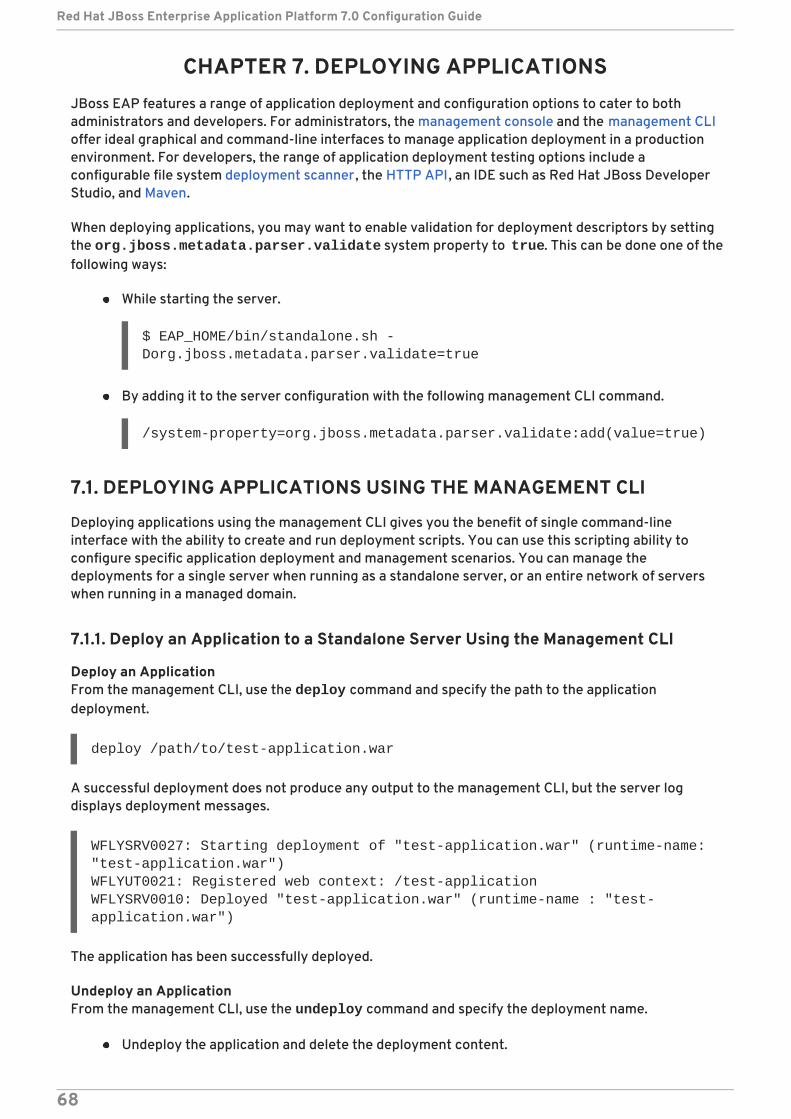
CHAPTER 7. DEPLOYING APPLICATIONSJBoss EAP features a range of application deployment and configuration options to cater to bothadministrators and developers. For administrators, the management console and the management CLIoffer ideal graphical and command-line interfaces to manage application deployment in a productionenvironment. For developers, the range of application deployment testing options include aconfigurable file system deployment scanner, the HTTP API, an IDE such as Red Hat JBoss DeveloperStudio, and Maven.
When deploying applications, you may want to enable validation for deployment descriptors by settingthe org.jboss.metadata.parser.validate system property to true. This can be done one of thefollowing ways:
While starting the server.
$ EAP_HOME/bin/standalone.sh -Dorg.jboss.metadata.parser.validate=true
By adding it to the server configuration with the following management CLI command.
/system-property=org.jboss.metadata.parser.validate:add(value=true)
7.1. DEPLOYING APPLICATIONS USING THE MANAGEMENT CLI
Deploying applications using the management CLI gives you the benefit of single command-lineinterface with the ability to create and run deployment scripts. You can use this scripting ability toconfigure specific application deployment and management scenarios. You can manage thedeployments for a single server when running as a standalone server, or an entire network of serverswhen running in a managed domain.
7.1.1. Deploy an Application to a Standalone Server Using the Management CLI
Deploy an ApplicationFrom the management CLI, use the deploy command and specify the path to the applicationdeployment.
deploy /path/to/test-application.war
A successful deployment does not produce any output to the management CLI, but the server logdisplays deployment messages.
WFLYSRV0027: Starting deployment of "test-application.war" (runtime-name: "test-application.war")WFLYUT0021: Registered web context: /test-applicationWFLYSRV0010: Deployed "test-application.war" (runtime-name : "test-application.war")
The application has been successfully deployed.
Undeploy an ApplicationFrom the management CLI, use the undeploy command and specify the deployment name.
Undeploy the application and delete the deployment content.
Red Hat JBoss Enterprise Application Platform 7.0 Configuration Guide
68
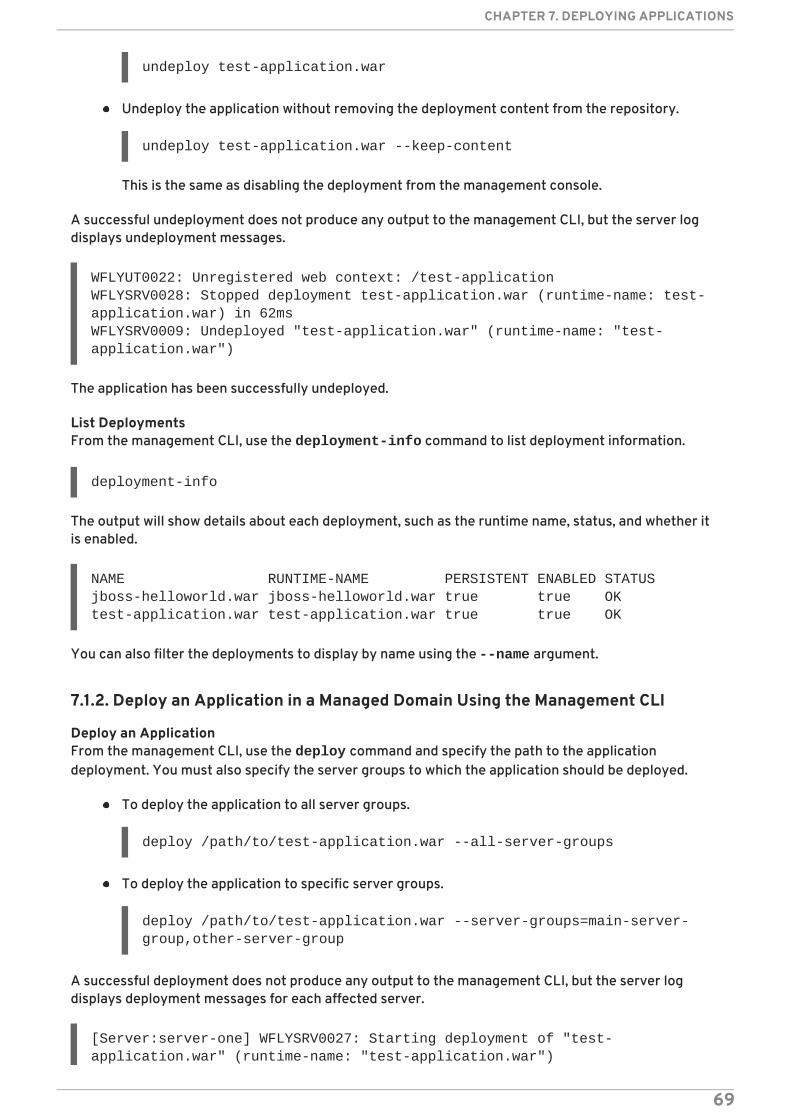
undeploy test-application.war
Undeploy the application without removing the deployment content from the repository.
undeploy test-application.war --keep-content
This is the same as disabling the deployment from the management console.
A successful undeployment does not produce any output to the management CLI, but the server logdisplays undeployment messages.
WFLYUT0022: Unregistered web context: /test-applicationWFLYSRV0028: Stopped deployment test-application.war (runtime-name: test-application.war) in 62msWFLYSRV0009: Undeployed "test-application.war" (runtime-name: "test-application.war")
The application has been successfully undeployed.
List DeploymentsFrom the management CLI, use the deployment-info command to list deployment information.
deployment-info
The output will show details about each deployment, such as the runtime name, status, and whether itis enabled.
NAME RUNTIME-NAME PERSISTENT ENABLED STATUSjboss-helloworld.war jboss-helloworld.war true true OKtest-application.war test-application.war true true OK
You can also filter the deployments to display by name using the --name argument.
7.1.2. Deploy an Application in a Managed Domain Using the Management CLI
Deploy an ApplicationFrom the management CLI, use the deploy command and specify the path to the applicationdeployment. You must also specify the server groups to which the application should be deployed.
To deploy the application to all server groups.
deploy /path/to/test-application.war --all-server-groups
To deploy the application to specific server groups.
deploy /path/to/test-application.war --server-groups=main-server-group,other-server-group
A successful deployment does not produce any output to the management CLI, but the server logdisplays deployment messages for each affected server.
[Server:server-one] WFLYSRV0027: Starting deployment of "test-application.war" (runtime-name: "test-application.war")
CHAPTER 7. DEPLOYING APPLICATIONS
69
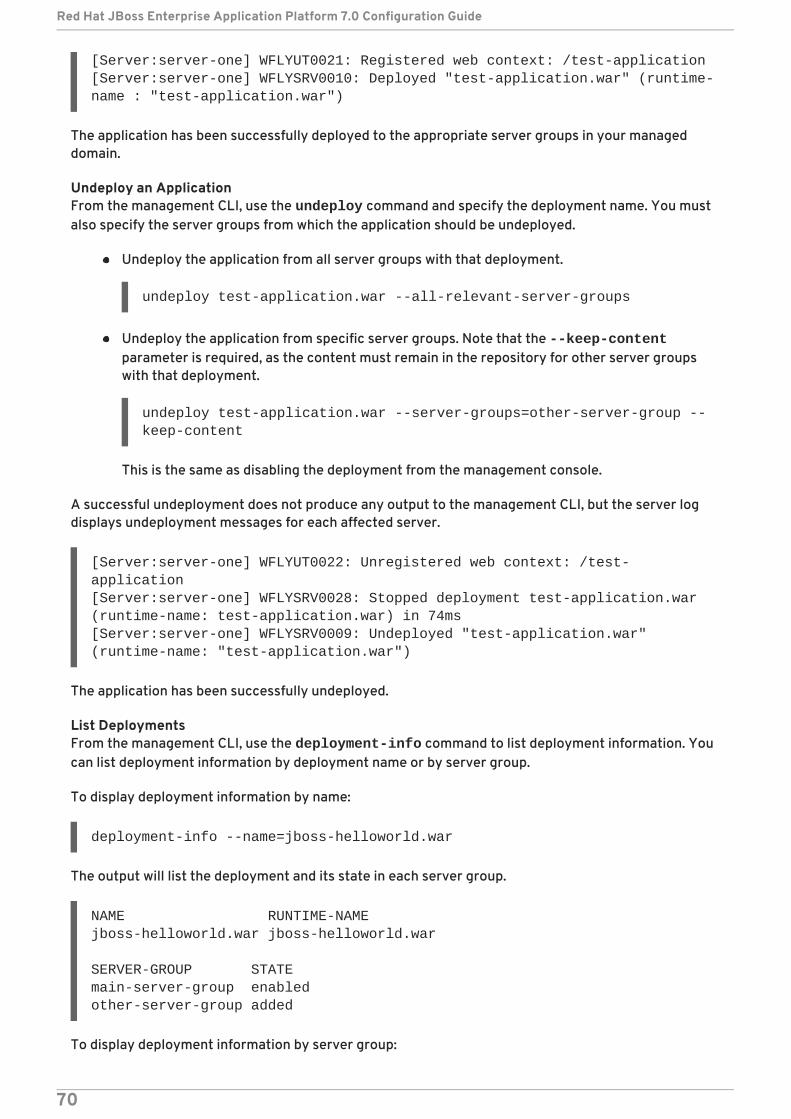
[Server:server-one] WFLYUT0021: Registered web context: /test-application[Server:server-one] WFLYSRV0010: Deployed "test-application.war" (runtime-name : "test-application.war")
The application has been successfully deployed to the appropriate server groups in your manageddomain.
Undeploy an ApplicationFrom the management CLI, use the undeploy command and specify the deployment name. You mustalso specify the server groups from which the application should be undeployed.
Undeploy the application from all server groups with that deployment.
undeploy test-application.war --all-relevant-server-groups
Undeploy the application from specific server groups. Note that the --keep-contentparameter is required, as the content must remain in the repository for other server groupswith that deployment.
undeploy test-application.war --server-groups=other-server-group --keep-content
This is the same as disabling the deployment from the management console.
A successful undeployment does not produce any output to the management CLI, but the server logdisplays undeployment messages for each affected server.
[Server:server-one] WFLYUT0022: Unregistered web context: /test-application[Server:server-one] WFLYSRV0028: Stopped deployment test-application.war (runtime-name: test-application.war) in 74ms[Server:server-one] WFLYSRV0009: Undeployed "test-application.war" (runtime-name: "test-application.war")
The application has been successfully undeployed.
List DeploymentsFrom the management CLI, use the deployment-info command to list deployment information. Youcan list deployment information by deployment name or by server group.
To display deployment information by name:
deployment-info --name=jboss-helloworld.war
The output will list the deployment and its state in each server group.
NAME RUNTIME-NAMEjboss-helloworld.war jboss-helloworld.war
SERVER-GROUP STATEmain-server-group enabledother-server-group added
To display deployment information by server group:
Red Hat JBoss Enterprise Application Platform 7.0 Configuration Guide
70
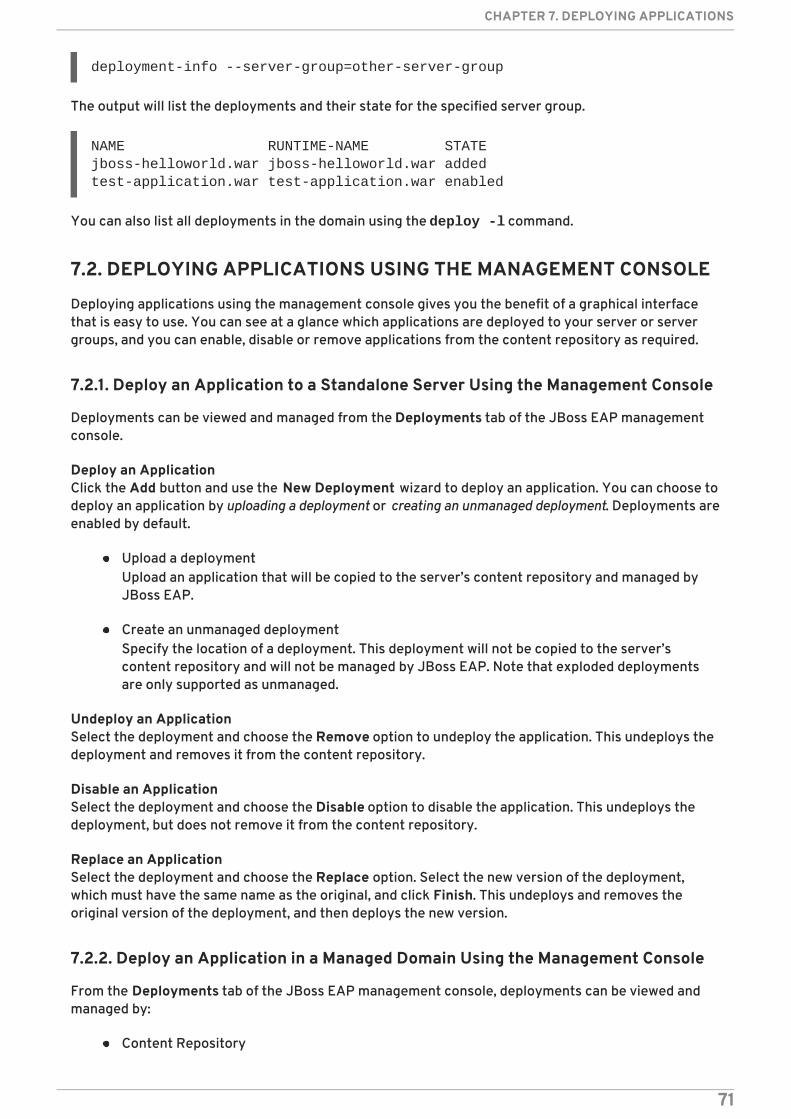
deployment-info --server-group=other-server-group
The output will list the deployments and their state for the specified server group.
NAME RUNTIME-NAME STATEjboss-helloworld.war jboss-helloworld.war addedtest-application.war test-application.war enabled
You can also list all deployments in the domain using the deploy -l command.
7.2. DEPLOYING APPLICATIONS USING THE MANAGEMENT CONSOLE
Deploying applications using the management console gives you the benefit of a graphical interfacethat is easy to use. You can see at a glance which applications are deployed to your server or servergroups, and you can enable, disable or remove applications from the content repository as required.
7.2.1. Deploy an Application to a Standalone Server Using the Management Console
Deployments can be viewed and managed from the Deployments tab of the JBoss EAP managementconsole.
Deploy an ApplicationClick the Add button and use the New Deployment wizard to deploy an application. You can choose todeploy an application by uploading a deployment or creating an unmanaged deployment. Deployments areenabled by default.
Upload a deploymentUpload an application that will be copied to the server’s content repository and managed byJBoss EAP.
Create an unmanaged deploymentSpecify the location of a deployment. This deployment will not be copied to the server’scontent repository and will not be managed by JBoss EAP. Note that exploded deploymentsare only supported as unmanaged.
Undeploy an ApplicationSelect the deployment and choose the Remove option to undeploy the application. This undeploys thedeployment and removes it from the content repository.
Disable an ApplicationSelect the deployment and choose the Disable option to disable the application. This undeploys thedeployment, but does not remove it from the content repository.
Replace an ApplicationSelect the deployment and choose the Replace option. Select the new version of the deployment,which must have the same name as the original, and click Finish. This undeploys and removes theoriginal version of the deployment, and then deploys the new version.
7.2.2. Deploy an Application in a Managed Domain Using the Management Console
From the Deployments tab of the JBoss EAP management console, deployments can be viewed andmanaged by:
Content Repository
CHAPTER 7. DEPLOYING APPLICATIONS
71
All managed and unmanaged deployments are listed in the Content Repository section.Deployments can be added and assigned to server groups here.
Unassigned ContentDeployments that have not been assigned to any server groups are listed in the UnassignedContent section. Deployments can be assigned to server groups or removed here.
Server GroupsDeployments that have been assigned to one or more server groups are listed in the ServerGroups section. Deployments can be enabled and added directly to a server group here.
Deploy an Application
1. From Content Repository, click the Add button.
2. Choose to deploy an application by uploading a deployment or creating an unmanageddeployment.
3. Follow the prompts to deploy the application.Note that a deployment must be assigned to a server group before it can be enabled.
Deployments can also be added, assigned to a server group, and enabled in one step by adding thedeployment from Server Groups .
Assign an Application to a Server Group
1. From Unassigned Content, select a deployment and click the Assign button.
2. Select one or more server groups to which this deployment should be assigned.
3. Optionally, select the option to enable the deployment on the selected server groups.
Unassign an Application from a Server Group
1. From Server Groups , select the appropriate server group.
2. Select the desired deployment and click the Unassign button.
Deployments can also be unassigned from multiple server groups at once by selecting the Unassignbutton for the deployment in Content Repository.
Undeploy an Application
1. If the deployment is still assigned to any server groups, be sure to unassign the deployment.
2. From Content Repository, select the deployment and click the Remove button.
This undeploys the deployment and removes it from the content repository.
Disable an Application
1. From Server Groups , select the appropriate server group.
2. Select the desired deployment and click the Disable button.
This undeploys the deployment, but does not remove it from the content repository.
Replace an Application
Red Hat JBoss Enterprise Application Platform 7.0 Configuration Guide
72
1. From Content Repository, select the deployment and click the Replace button.
2. Select the new version of the deployment, which must have the same name as the original, andclick Finish.
This undeploys and removes the original version of the deployment, and then deploys the new version.
7.3. DEPLOYING APPLICATIONS USING THE DEPLOYMENT SCANNER
The deployment scanner monitors the deployment directory for applications to deploy. By default, thedeployment scanner scans the EAP_HOME/standalone/deployments/ directory every five secondsfor changes. Marker files are used to indicate the status of a deployment and to trigger actions againstdeployments, such as undeploying or redeploying.
While it is recommended to use the management console or management CLI for applicationdeployment in a production environment, deploying using the deployment scanner is provided for theconvenience of developers. This allows users build and test applications in a manner suited for rapiddevelopment cycles. Additionally, the deployment scanner should not be used in conjunction withother deployment methods.
The deployment scanner is only available when running JBoss EAP as a standalone server.
7.3.1. Deploy an Application to a Standalone Server Using the Deployment Scanner
The deployment scanner can be configured to allow or disallow automatic deployment of XML, zipped,and exploded content. If automatic deployment is disabled, you must manually create marker files totrigger deployment actions. For more information about the available marker file types and theirpurposes, see the Deployment Scanner Marker Files section.
By default, automatic deployment for XML and zipped content is enabled. For details on configuringautomatic deployment for each content type, see Configure the Deployment Scanner.
WARNING
Deploying using the deployment scanner is provided for the convenience ofdevelopers and is not recommended for use in a production environment. It shouldalso not be used in conjunction with other deployment methods.
Deploy an ApplicationCopy the content to the deployment folder.
$ cp /path/to/test-application.war EAP_HOME/standalone/deployments/
If auto-deployment is enabled, this file will be picked up automatically, deployed, and a .deployedmarker file will be created. If auto-deployment is not enabled, then you will need to manually add a .dodeploy marker file to trigger deployment.
$ touch EAP_HOME/standalone/deployments/test-application.war.dodeploy
CHAPTER 7. DEPLOYING APPLICATIONS
73
Undeploy an ApplicationTrigger an undeployment by removing the .deployed marker file.
$ rm EAP_HOME/standalone/deployments/test-application.war.deployed
If auto-deployment is enabled, you can also remove the test-application.war file, which willtrigger the undeployment. Note that this does not apply for exploded deployments.
Redeploy an ApplicationCreate a .dodeploy marker file to initiate redeployment.
$ touch EAP_HOME/standalone/deployments/test-application.war.dodeploy
7.3.2. Configure the Deployment Scanner
The deployment scanner can be configured using the management console or the management CLI.You can configure the deployment scanner’s behavior, such as the scan interval, deployment folderlocation, and autodeployment of certain application file types. You can also disable the deploymentscanner entirely.
For details on all available deployment scanner attributes, see the Deployment Scanner Attributessection.
Use the below management CLI commands to configure the default deployment scanner.
Disable the Deployment Scanner
/subsystem=deployment-scanner/scanner=default:write-attribute(name=scan-enabled,value=false)
This disables the default deployment scanner.
Change the Scan Interval
/subsystem=deployment-scanner/scanner=default:write-attribute(name=scan-interval,value=10000)
This updates the scan interval time from 5000 milliseconds (five seconds) to 10000 milliseconds (tenseconds).
Change the Deployment Folder
/subsystem=deployment-scanner/scanner=default:write-attribute(name=path,value=/path/to/deployments)
This changes the location of the deployment folder from the default location of EAP_HOME/standalone/deployments to /path/to/deployments.
The path value will be treated as an absolute path unless the relative-to attribute is specified, inwhich case it will be relative to that path.
Enable the Automatic Deployment of Exploded Content
Red Hat JBoss Enterprise Application Platform 7.0 Configuration Guide
74

/subsystem=deployment-scanner/scanner=default:write-attribute(name=auto-deploy-exploded,value=true)
This enables the automatic deployment of exploded content, which is disabled by default.
Disable the Automatic Deployment of Zipped Content
/subsystem=deployment-scanner/scanner=default:write-attribute(name=auto-deploy-zipped,value=false)
This disables the automatic deployment of zipped content, which is enabled by default.
Disable the Automatic Deployment of XML Content
/subsystem=deployment-scanner/scanner=default:write-attribute(name=auto-deploy-xml,value=false)
This disables the automatic deployment of XML content, which is enabled by default.
7.3.3. Define a Custom Deployment Scanner
A new deployment scanner can be added using the management CLI or by navigating to theDeployment Scanners subsystem from the Configuration tab in the management console. This willdefine a new directory to scan for deployments. The default deployment scanner monitors EAP_HOME/standalone/deployments. See Configure the Deployment Scanner for details onconfiguring an existing deployment scanner.
The following management CLI command adds a new deployment scanner that will check EAP_HOME/standalone/new_deployment_dir every five seconds for deployments.
/subsystem=deployment-scanner/scanner=new-scanner:add(path=new_deployment_dir,relative-to=jboss.server.base.dir,scan-interval=5000)
NOTE
The specified directory must already exist or this command will fail with an error.
A new deployment scanner has been defined and the specified directory will be monitored fordeployments.
7.4. DEPLOYING APPLICATIONS USING MAVEN
Deploying applications using Apache Maven allows you to easily incorporate deployment to JBoss EAPinto your existing development workflow.
You can use Maven to deploy applications to JBoss EAP using the WildFly Maven Plugin, whichprovides simple operations to deploy and undeploy applications to the application server.
7.4.1. Deploy an Application to a Standalone Server Using Maven
The following instructions show how to deploy and undeploy the JBoss EAP helloworld quickstart toa standalone server using Maven.
CHAPTER 7. DEPLOYING APPLICATIONS
75
See Using the Quickstart Examples in the JBoss EAP Getting Started Guide for more information on theJBoss EAP quickstarts.
Deploy an ApplicationInitialize the WildFly Maven Plugin in your Maven pom.xml file. This should already be configured inthe JBoss EAP quickstart pom.xml files.
From the helloworld quickstart directory, execute the following Maven command.
$ mvn clean install wildfly:deploy
After issuing the Maven command to deploy, the terminal window shows the following output indicatinga successful deployment.
[INFO] ------------------------------------------------------------------------[INFO] BUILD SUCCESS[INFO] ------------------------------------------------------------------------[INFO] Total time: 2.981 s[INFO] Finished at: 2015-12-23T15:06:13-05:00[INFO] Final Memory: 21M/231M[INFO] ------------------------------------------------------------------------
The deployment can also be confirmed by viewing the server log of the active server instance.
WFLYSRV0027: Starting deployment of "jboss-helloworld.war" (runtime-name: "jboss-helloworld.war")WFLYUT0021: Registered web context: /jboss-helloworldWFLYSRV0010: Deployed "jboss-helloworld.war" (runtime-name : "jboss-helloworld.war")
Undeploy an ApplicationFrom the helloworld quickstart directory, execute the following Maven command.
$ mvn wildfly:undeploy
After issuing the Maven command to undeploy, the terminal window shows the following outputindicating a successful undeployment.
[INFO] ------------------------------------------------------------------------[INFO] BUILD SUCCESS[INFO] ------------------------------------------------------------------------[INFO] Total time: 1.237 s[INFO] Finished at: 2015-12-23T15:09:10-05:00
<plugin> <groupId>org.wildfly.plugins</groupId> <artifactId>wildfly-maven-plugin</artifactId> <version>${version.wildfly.maven.plugin}</version></plugin>
Red Hat JBoss Enterprise Application Platform 7.0 Configuration Guide
76
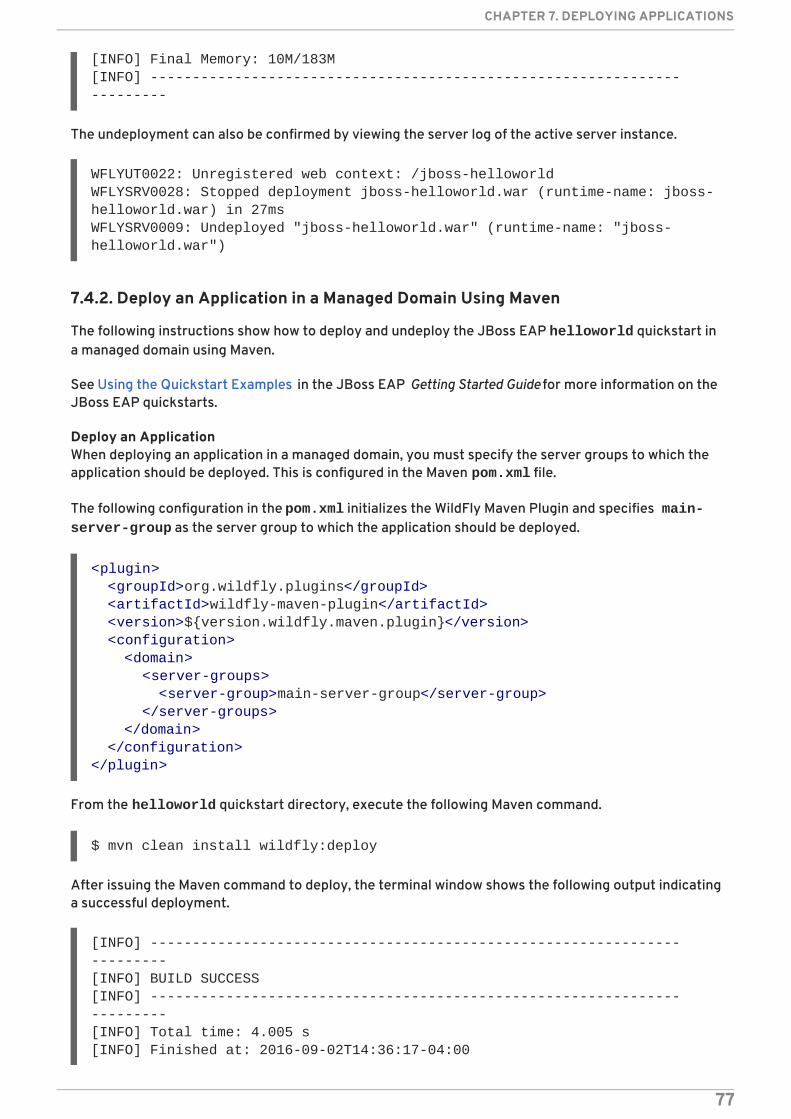
[INFO] Final Memory: 10M/183M[INFO] ------------------------------------------------------------------------
The undeployment can also be confirmed by viewing the server log of the active server instance.
WFLYUT0022: Unregistered web context: /jboss-helloworldWFLYSRV0028: Stopped deployment jboss-helloworld.war (runtime-name: jboss-helloworld.war) in 27msWFLYSRV0009: Undeployed "jboss-helloworld.war" (runtime-name: "jboss-helloworld.war")
7.4.2. Deploy an Application in a Managed Domain Using Maven
The following instructions show how to deploy and undeploy the JBoss EAP helloworld quickstart ina managed domain using Maven.
See Using the Quickstart Examples in the JBoss EAP Getting Started Guide for more information on theJBoss EAP quickstarts.
Deploy an ApplicationWhen deploying an application in a managed domain, you must specify the server groups to which theapplication should be deployed. This is configured in the Maven pom.xml file.
The following configuration in the pom.xml initializes the WildFly Maven Plugin and specifies main-server-group as the server group to which the application should be deployed.
From the helloworld quickstart directory, execute the following Maven command.
$ mvn clean install wildfly:deploy
After issuing the Maven command to deploy, the terminal window shows the following output indicatinga successful deployment.
[INFO] ------------------------------------------------------------------------[INFO] BUILD SUCCESS[INFO] ------------------------------------------------------------------------[INFO] Total time: 4.005 s[INFO] Finished at: 2016-09-02T14:36:17-04:00
<plugin> <groupId>org.wildfly.plugins</groupId> <artifactId>wildfly-maven-plugin</artifactId> <version>${version.wildfly.maven.plugin}</version> <configuration> <domain> <server-groups> <server-group>main-server-group</server-group> </server-groups> </domain> </configuration></plugin>
CHAPTER 7. DEPLOYING APPLICATIONS
77
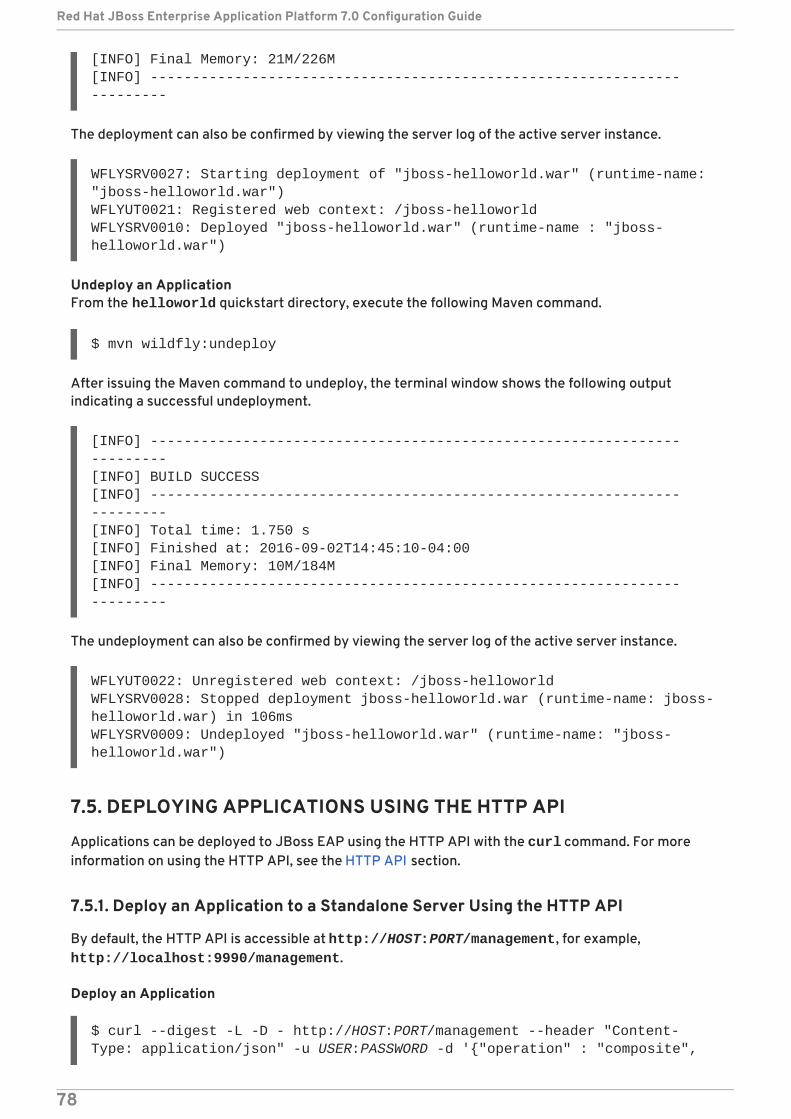
[INFO] Final Memory: 21M/226M[INFO] ------------------------------------------------------------------------
The deployment can also be confirmed by viewing the server log of the active server instance.
WFLYSRV0027: Starting deployment of "jboss-helloworld.war" (runtime-name: "jboss-helloworld.war")WFLYUT0021: Registered web context: /jboss-helloworldWFLYSRV0010: Deployed "jboss-helloworld.war" (runtime-name : "jboss-helloworld.war")
Undeploy an ApplicationFrom the helloworld quickstart directory, execute the following Maven command.
$ mvn wildfly:undeploy
After issuing the Maven command to undeploy, the terminal window shows the following outputindicating a successful undeployment.
[INFO] ------------------------------------------------------------------------[INFO] BUILD SUCCESS[INFO] ------------------------------------------------------------------------[INFO] Total time: 1.750 s[INFO] Finished at: 2016-09-02T14:45:10-04:00[INFO] Final Memory: 10M/184M[INFO] ------------------------------------------------------------------------
The undeployment can also be confirmed by viewing the server log of the active server instance.
WFLYUT0022: Unregistered web context: /jboss-helloworldWFLYSRV0028: Stopped deployment jboss-helloworld.war (runtime-name: jboss-helloworld.war) in 106msWFLYSRV0009: Undeployed "jboss-helloworld.war" (runtime-name: "jboss-helloworld.war")
7.5. DEPLOYING APPLICATIONS USING THE HTTP API
Applications can be deployed to JBoss EAP using the HTTP API with the curl command. For moreinformation on using the HTTP API, see the HTTP API section.
7.5.1. Deploy an Application to a Standalone Server Using the HTTP API
By default, the HTTP API is accessible at http://HOST:PORT/management, for example, http://localhost:9990/management.
Deploy an Application
$ curl --digest -L -D - http://HOST:PORT/management --header "Content-Type: application/json" -u USER:PASSWORD -d '{"operation" : "composite",
Red Hat JBoss Enterprise Application Platform 7.0 Configuration Guide
78
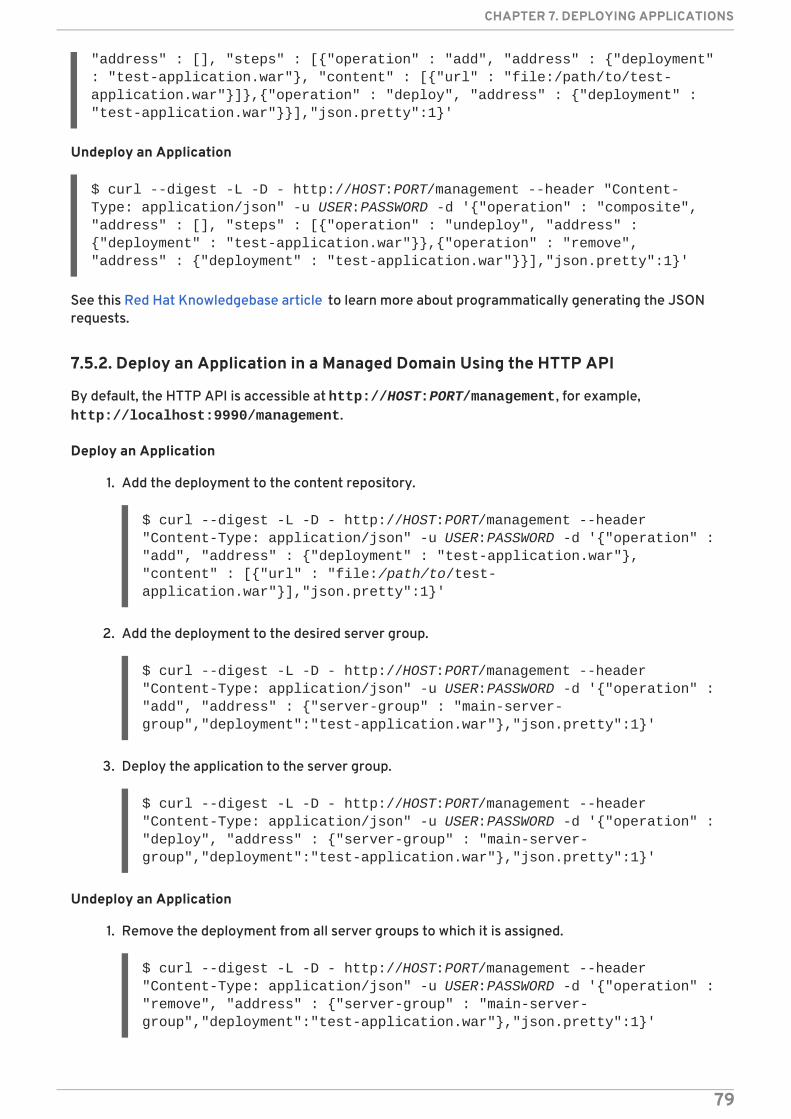
"address" : [], "steps" : [{"operation" : "add", "address" : {"deployment" : "test-application.war"}, "content" : [{"url" : "file:/path/to/test-application.war"}]},{"operation" : "deploy", "address" : {"deployment" : "test-application.war"}}],"json.pretty":1}'
Undeploy an Application
$ curl --digest -L -D - http://HOST:PORT/management --header "Content-Type: application/json" -u USER:PASSWORD -d '{"operation" : "composite", "address" : [], "steps" : [{"operation" : "undeploy", "address" : {"deployment" : "test-application.war"}},{"operation" : "remove", "address" : {"deployment" : "test-application.war"}}],"json.pretty":1}'
See this Red Hat Knowledgebase article to learn more about programmatically generating the JSONrequests.
7.5.2. Deploy an Application in a Managed Domain Using the HTTP API
By default, the HTTP API is accessible at http://HOST:PORT/management, for example, http://localhost:9990/management.
Deploy an Application
1. Add the deployment to the content repository.
$ curl --digest -L -D - http://HOST:PORT/management --header "Content-Type: application/json" -u USER:PASSWORD -d '{"operation" : "add", "address" : {"deployment" : "test-application.war"}, "content" : [{"url" : "file:/path/to/test-application.war"}],"json.pretty":1}'
2. Add the deployment to the desired server group.
$ curl --digest -L -D - http://HOST:PORT/management --header "Content-Type: application/json" -u USER:PASSWORD -d '{"operation" : "add", "address" : {"server-group" : "main-server-group","deployment":"test-application.war"},"json.pretty":1}'
3. Deploy the application to the server group.
$ curl --digest -L -D - http://HOST:PORT/management --header "Content-Type: application/json" -u USER:PASSWORD -d '{"operation" : "deploy", "address" : {"server-group" : "main-server-group","deployment":"test-application.war"},"json.pretty":1}'
Undeploy an Application
1. Remove the deployment from all server groups to which it is assigned.
$ curl --digest -L -D - http://HOST:PORT/management --header "Content-Type: application/json" -u USER:PASSWORD -d '{"operation" : "remove", "address" : {"server-group" : "main-server-group","deployment":"test-application.war"},"json.pretty":1}'
CHAPTER 7. DEPLOYING APPLICATIONS
79
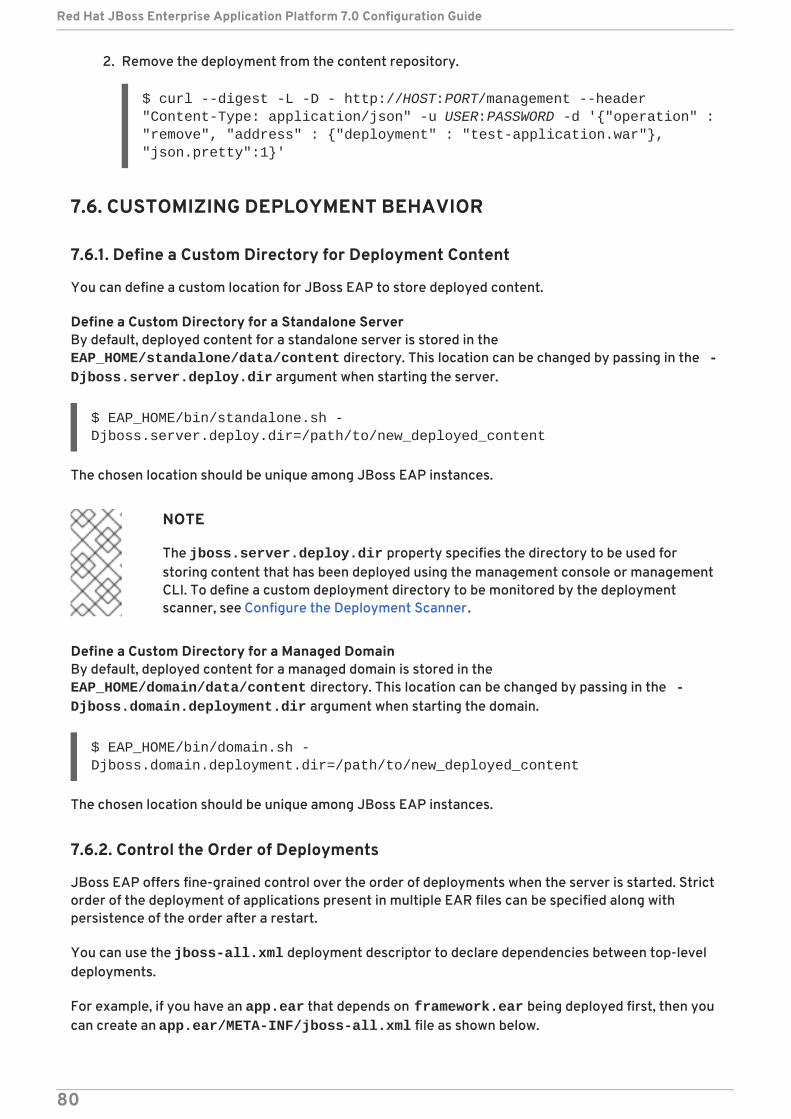
2. Remove the deployment from the content repository.
$ curl --digest -L -D - http://HOST:PORT/management --header "Content-Type: application/json" -u USER:PASSWORD -d '{"operation" : "remove", "address" : {"deployment" : "test-application.war"}, "json.pretty":1}'
7.6. CUSTOMIZING DEPLOYMENT BEHAVIOR
7.6.1. Define a Custom Directory for Deployment Content
You can define a custom location for JBoss EAP to store deployed content.
Define a Custom Directory for a Standalone ServerBy default, deployed content for a standalone server is stored in the EAP_HOME/standalone/data/content directory. This location can be changed by passing in the -Djboss.server.deploy.dir argument when starting the server.
$ EAP_HOME/bin/standalone.sh -Djboss.server.deploy.dir=/path/to/new_deployed_content
The chosen location should be unique among JBoss EAP instances.
NOTE
The jboss.server.deploy.dir property specifies the directory to be used forstoring content that has been deployed using the management console or managementCLI. To define a custom deployment directory to be monitored by the deploymentscanner, see Configure the Deployment Scanner.
Define a Custom Directory for a Managed DomainBy default, deployed content for a managed domain is stored in the EAP_HOME/domain/data/content directory. This location can be changed by passing in the -Djboss.domain.deployment.dir argument when starting the domain.
$ EAP_HOME/bin/domain.sh -Djboss.domain.deployment.dir=/path/to/new_deployed_content
The chosen location should be unique among JBoss EAP instances.
7.6.2. Control the Order of Deployments
JBoss EAP offers fine-grained control over the order of deployments when the server is started. Strictorder of the deployment of applications present in multiple EAR files can be specified along withpersistence of the order after a restart.
You can use the jboss-all.xml deployment descriptor to declare dependencies between top-leveldeployments.
For example, if you have an app.ear that depends on framework.ear being deployed first, then youcan create an app.ear/META-INF/jboss-all.xml file as shown below.
Red Hat JBoss Enterprise Application Platform 7.0 Configuration Guide
80
NOTE
You can use the deployment’s runtime name as the dependency name in the jboss-all.xml file.
This ensures that framework.ear is deployed before app.ear.
IMPORTANT
Although the jboss-all.xml file and other deployment descriptors allow you todeclare dependencies that the server does not otherwise detect, it is not a strictordering feature. JBoss EAP assumes that all dependencies specified in the deploymentdescriptor have already been deployed or are available. If there are missingdependencies, JBoss EAP does not automatically deploy them, and the deployment fails.
7.6.3. Override Deployment Content
A deployment overlay can be used to overlay content into an existing deployment without physicallymodifying the contents of the deployment archive. It allows you to override deployment descriptors,JAR files, classes, JSP pages, and other files at runtime without rebuilding the archive.
This can be useful if you need to adapt a deployment for different environments that need differentconfigurations or settings. For example, when moving a deployment through the application lifecyclefrom development, to testing, to stage, and finally into production, you might want to swap deploymentdescriptors, modify static web resources to change the branding of the application, or even replaceJAR libraries with different versions depending on the target environment. It is also a useful feature forinstallations that need to change a configuration but can not modify or crack an archive due to policyor security restrictions.
When defining a deployment overlay, you specify the file on a file system that will replace the file in thedeployment archive. You must also specify which deployments should be affected by the deploymentoverlay. Any affected deployments must be redeployed in order for the changes to take effect.
Use the deployment-overlay add management CLI command to add a deployment overlay.
deployment-overlay add --name=new-deployment-overlay --content=WEB-INF/web.xml=/path/to/other/web.xml --deployments=test-application.war --redeploy-affected
NOTE
In a managed domain, specify the applicable server groups by using --server-groupsor specify all server groups with --all-server-groups.
<jboss umlns="urn:jboss:1.0"> <jboss-deployment-dependencies xmlns="urn:jboss:deployment-dependencies:1.0"> <dependency name="framework.ear" /> </jboss-deployment-dependencies></jboss>
CHAPTER 7. DEPLOYING APPLICATIONS
81
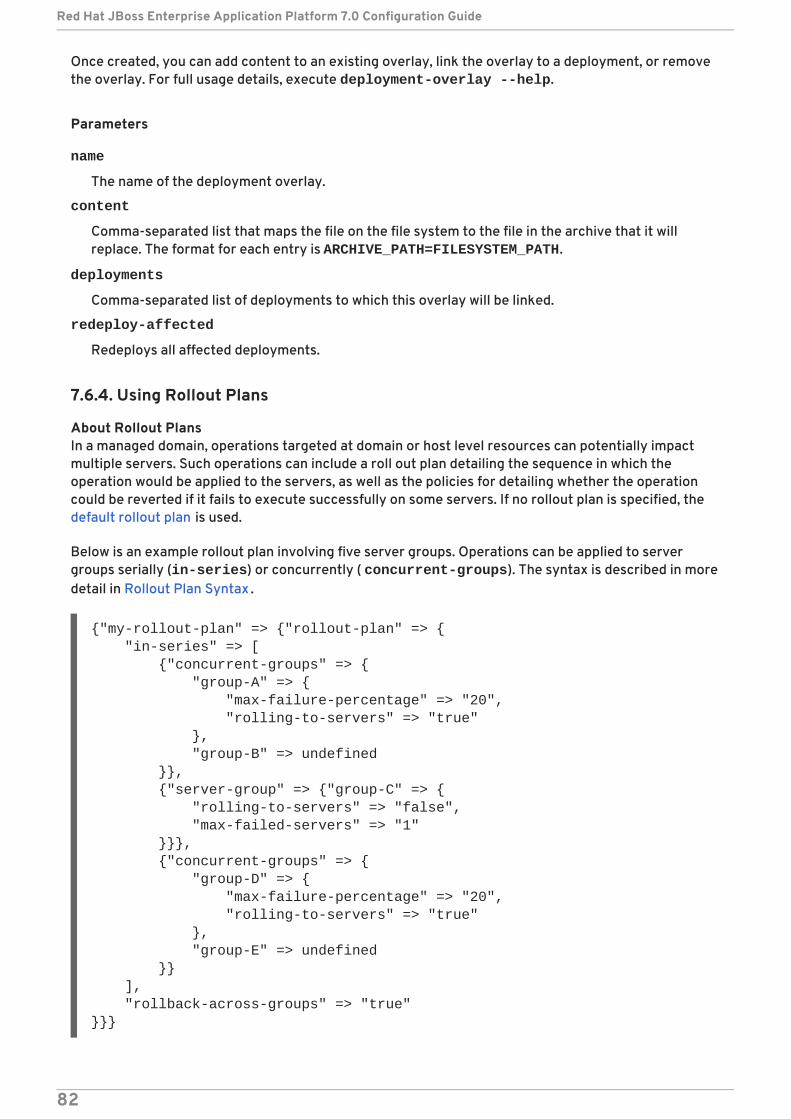
Once created, you can add content to an existing overlay, link the overlay to a deployment, or removethe overlay. For full usage details, execute deployment-overlay --help.
Parameters
name
The name of the deployment overlay.
content
Comma-separated list that maps the file on the file system to the file in the archive that it willreplace. The format for each entry is ARCHIVE_PATH=FILESYSTEM_PATH.
deployments
Comma-separated list of deployments to which this overlay will be linked.
redeploy-affected
Redeploys all affected deployments.
7.6.4. Using Rollout Plans
About Rollout PlansIn a managed domain, operations targeted at domain or host level resources can potentially impactmultiple servers. Such operations can include a roll out plan detailing the sequence in which theoperation would be applied to the servers, as well as the policies for detailing whether the operationcould be reverted if it fails to execute successfully on some servers. If no rollout plan is specified, thedefault rollout plan is used.
Below is an example rollout plan involving five server groups. Operations can be applied to servergroups serially (in-series) or concurrently ( concurrent-groups). The syntax is described in moredetail in Rollout Plan Syntax .
{"my-rollout-plan" => {"rollout-plan" => { "in-series" => [ {"concurrent-groups" => { "group-A" => { "max-failure-percentage" => "20", "rolling-to-servers" => "true" }, "group-B" => undefined }}, {"server-group" => {"group-C" => { "rolling-to-servers" => "false", "max-failed-servers" => "1" }}}, {"concurrent-groups" => { "group-D" => { "max-failure-percentage" => "20", "rolling-to-servers" => "true" }, "group-E" => undefined }} ], "rollback-across-groups" => "true"}}}
Red Hat JBoss Enterprise Application Platform 7.0 Configuration Guide
82
Looking at the example above, applying the operation to the servers in the domain is done in threephases. If the policy for any server group triggers a rollback of the operation across the server group,all other server groups will be rolled back as well.
1. Server groups group-A and group-B will have the operation applied concurrently. Theoperation will be applied to the servers in group-A in series, while all servers in group-B willhandle the operation concurrently. If more than 20% of the servers in group-A fail to apply theoperation, it will be rolled back across that group. If any servers in group-B fail to apply theoperation it will be rolled back across that group.
2. Once all servers in group-A and group-B are complete, the operation will be applied to theservers in group-C. Those servers will handle the operation concurrently. If more than oneserver in group-C fails to apply the operation it will be rolled back across that group.
3. Once all servers in group-C are complete, server groups group-D and group-E will have theoperation applied concurrently. The operation will be applied to the servers in group-D inseries, while all servers in group-E will handle the operation concurrently. If more than 20% ofthe servers in group-D fail to apply the operation, it will be rolled back across that group. If anyservers in group-E fail to apply the operation it will be rolled back across that group.
Rollout Plan SyntaxYou can specify a rollout plan in either of the following ways.
By defining the rollout plan in the deploy command operation headers. See Deploy Using aRollout Plan for details.
By storing the rollout plan using the rollout-plan command and then referencing the planname in the deploy command operation headers. See Deploy Using a Stored Rollout Plan fordetails.
Although each method has a different initial command, both methods use the rollout operationheader to define the rollout plan. This uses the following syntax.
rollout (id=PLAN_NAME | SERVER_GROUP_LIST) [rollback-across-groups]
PLAN_NAME is the name for the rollout plan that was stored using the rollout-plancommand.
SERVER_GROUP_LIST is the list of server groups. Use a comma ( ,) to separate multiple servergroups to indicate that that operations should be performed on each server group sequentially.Use a caret (^) separator to indicate that operations should be performed on each servergroup concurrently.
For each server group, set any of the following policies in parentheses. Comma separatemultiple policies.
rolling-to-servers: A boolean which if set to true, the operation will be appliedto each server in the group in series. If the value is false or not specified, theoperation will be applied to the servers in the group concurrently.
max-failed-servers: An integer which takes the maximum number of servers in thegroup that can fail to apply the operation before it should be reverted on all servers inthe group. The default value if not specified is 0, meaning that a failure on any serverwill trigger rollback across the group.
max-failure-percentage: An integer between 0 and 100 that represents the
CHAPTER 7. DEPLOYING APPLICATIONS
83
maximum percentage of the total number of servers in the group that can fail to applythe operation before it should be reverted on all servers in the group. The default valueif not specified is 0, meaning that a failure on any server will trigger rollback across thegroup.
NOTE
If both max-failed-servers and max-failure-percentage areset to non-zero values, max-failure-percentage takes precedence.
rollback-across-groups: A boolean that indicates whether the need to rollback theoperation on all the servers in one server group triggers a rollback across all the server groups.This defaults to false.
Deploy Using a Rollout PlanYou can provide the full details of a rollout plan directly to the deploy command by passing the rollout settings into the headers argument. See the Rollout Plan Syntax for more information onthe format.
The following management CLI command deploys an application to the main-server-group servergroup using a deployment plan that specifies rolling-to-servers=true for serial deployment.
deploy /path/to/test-application.war --server-groups=main-server-group --headers={rollout main-server-group(rolling-to-servers=true)}
Deploy Using a Stored Rollout PlanSince rollout plans can be complex, you have the option to store the details of a rollout plan. Thisallows you to reference the rollout plan name when you want to use it instead of requiring the fulldetails of the rollout plan each time.
1. Use the rollout-plan management CLI command to store a rollout plan. See the RolloutPlan Syntax for more information on the format.
rollout-plan add --name=my-rollout-plan --content={rollout main-server-group(rolling-to-servers=false,max-failed-servers=1),other-server-group(rolling-to-servers=true,max-failure-percentage=20) rollback-across-groups=true}
This creates the following deployment plan.
"rollout-plan" => { "in-series" => [ {"server-group" => {"main-server-group" => { "rolling-to-servers" => false, "max-failed-servers" => 1 }}}, {"server-group" => {"other-server-group" => { "rolling-to-servers" => true, "max-failure-percentage" => 20 }}} ], "rollback-across-groups" => true}
Red Hat JBoss Enterprise Application Platform 7.0 Configuration Guide
84
2. Specify the stored rollout plan name when deploying the application.The following management CLI command deploys an application to all server groups using the my-rollout-plan stored rollout plan.
deploy /path/to/test-application.war --all-server-groups --headers={rollout id=my-rollout-plan}
Remove a Stored Rollout PlanYou can remove a stored rollout plan using the rollout-plan management CLI command byspecifying the name of the rollout plan to remove.
rollout-plan remove --name=my-rollout-plan
Default Rollout PlanAll operations that impact multiple servers will be executed with a rollout plan. If no rollout plan isspecified in the operation request, a default rollout plan will be generated. The plan will have thefollowing characteristics.
There will only be a single high-level phase. All server groups affected by the operation willhave the operation applied concurrently.
Within each server group, the operation will be applied to all servers concurrently.
Failure on any server in a server group will cause rollback across the group.
Failure of any server group will result in rollback of all other server groups.
CHAPTER 7. DEPLOYING APPLICATIONS
85
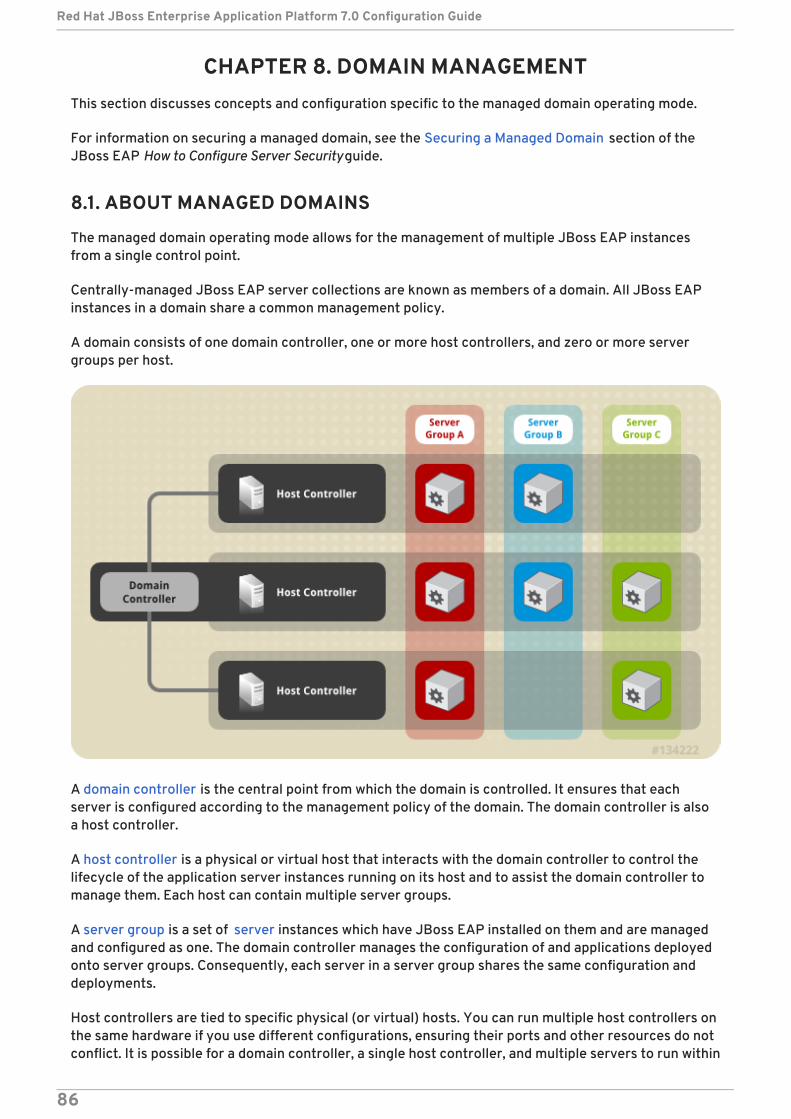
CHAPTER 8. DOMAIN MANAGEMENTThis section discusses concepts and configuration specific to the managed domain operating mode.
For information on securing a managed domain, see the Securing a Managed Domain section of theJBoss EAP How to Configure Server Security guide.
8.1. ABOUT MANAGED DOMAINS
The managed domain operating mode allows for the management of multiple JBoss EAP instancesfrom a single control point.
Centrally-managed JBoss EAP server collections are known as members of a domain. All JBoss EAPinstances in a domain share a common management policy.
A domain consists of one domain controller, one or more host controllers, and zero or more servergroups per host.
A domain controller is the central point from which the domain is controlled. It ensures that eachserver is configured according to the management policy of the domain. The domain controller is alsoa host controller.
A host controller is a physical or virtual host that interacts with the domain controller to control thelifecycle of the application server instances running on its host and to assist the domain controller tomanage them. Each host can contain multiple server groups.
A server group is a set of server instances which have JBoss EAP installed on them and are managedand configured as one. The domain controller manages the configuration of and applications deployedonto server groups. Consequently, each server in a server group shares the same configuration anddeployments.
Host controllers are tied to specific physical (or virtual) hosts. You can run multiple host controllers onthe same hardware if you use different configurations, ensuring their ports and other resources do notconflict. It is possible for a domain controller, a single host controller, and multiple servers to run within
Red Hat JBoss Enterprise Application Platform 7.0 Configuration Guide
86
the same JBoss EAP instance, on the same physical system.
8.1.1. About the Domain Controller
A domain controller is the JBoss EAP server instance that acts as a central management point for adomain. One host controller instance is configured to act as a domain controller.
The primary responsibilities of the domain controller are:
Maintain the domain’s central management policy.
Ensure all host controllers are aware of its current contents.
Assist the host controllers in ensuring that all running JBoss EAP server instances areconfigured in accordance with this policy.
By default, the central management policy is stored in the EAP_HOME/domain/configuration/domain.xml file. This file is required in this directory of thehost controller that is set to run as the domain controller.
The domain.xml file contains profile configurations available for use by the servers in the domain. Aprofile contains the detailed settings of the various subsystems available in that profile. The domainconfiguration also includes the definition of socket groups and the server group definitions.
NOTE
It is possible for a JBoss EAP 7 domain controller to administer JBoss EAP 6 hosts andservers, as long as the hosts and servers are running JBoss EAP 6.2 or later. For moreinformation, see Configure a JBoss EAP 7 Domain Controller to Administer JBoss EAP 6Instances.
For more information, see the Start a Managed Domain and Configure the Domain Controller sections.
8.1.2. About Host Controllers
The primary responsibility of a host controller is server management. It delegates domain managementtasks and is responsible for starting and stopping the individual application server processes that runon its host.
It interacts with the domain controller to help manage the communication between the servers and thedomain controller. Multiple host controllers of a domain can interact with only a single domaincontroller. Hence, all the host controllers and server instances running on a single domain mode have asingle domain controller and must belong to the same domain.
By default, each host controller reads its configuration from the EAP_HOME/domain/configuration/host.xml file located in the unzipped JBoss EAP installationfile on its host’s file system. The host.xml file contains the following configuration information that isspecific to the particular host:
The names of the server instances meant to run from this installation.
Configurations specific to the local physical installation. For example, named interfacedefinitions declared in domain.xml can be mapped to an actual machine-specific IP addressin host.xml. And abstract path names in domain.xml can be mapped to actual file systempaths in host.xml.
CHAPTER 8. DOMAIN MANAGEMENT
87
Any of the following configurations:
How the host controller contacts the domain controller to register itself and access thedomain configuration.
How to find and contact a remote domain controller.
Whether the host controller is to act as the domain controller
For more information, see the Start a Managed Domain and Configure Host Controllers sections.
8.1.3. About Process Controllers
A process controller is a small, lightweight process that is responsible for spawning the host controllerprocess and monitoring its lifecycle. If the host controller crashes, the process controller will restart it.It also starts server processes as directed by the host controller; however, it will not automaticallyrestart server processes that crash.
The process controller logs to the EAP_HOME/domain/log/process-controller.log file. Youcan set JVM options for the process controller in the EAP_HOME/bin/domain.conf file using the PROCESS_CONTROLLER_JAVA_OPTS variable.
8.1.4. About Server Groups
A server group is a collection of server instances that are managed and configured as one. In amanaged domain, every application server instance belongs to a server group, even if it is the onlymember. The server instances in a group share the same profile configuration and deployed content.
A domain controller and a host controller enforce the standard configuration on all server instances ofevery server group in its domain.
A domain can consist of multiple server groups. Different server groups can be configured withdifferent profiles and deployments. A domain can be configured with different server tiers providingdifferent services, for example.
Different server groups can also have the same profile and deployments. This can, for example, allowfor rolling application upgrades where the application is upgraded on one server group and thenupdated on a second server group, avoiding a complete service outage.
For more information, see the Configuring Server Groups section.
8.1.5. About Servers
A server represents an application server instance. In a managed domain, all server instances aremembers of a server group. The host controller launches each server instance in its own JVM process.
For more information, see the Configuring Servers section.
8.2. NAVIGATING DOMAIN CONFIGURATIONS
JBoss EAP provides scalable management interfaces to support both small and large-scale manageddomains.
Management Console
Red Hat JBoss Enterprise Application Platform 7.0 Configuration Guide
88
The JBoss EAP management console provides a graphical view of your domain and allows you to easilymanage hosts, servers, deployments, and profiles for your domain.
Configuration
From the Configuration tab, you can configure the subsystems for each profile used in yourdomain. Different server groups in your domain may use different profiles depending thecapabilities needed.Once you select the desired profile, all available subsystems for that profile are listed. For moreinformation on configuring profiles, see Managing JBoss EAP Profiles.
Runtime
From the Runtime tab, you can manage servers and server groups as well as host configuration.You can browse the domain by host or by server group.From Hosts, you can configure host properties and JVM settings as well as add and configureservers for that host.
From Server Groups , you can add new server groups and configure properties and JVM settings aswell as add and configure servers for that server group. You can perform operations such asstarting, stopping, suspending, and reloading all servers in the selected server group.
From either Hosts or Server Groups , you can add new servers and configure server properties andJVM settings. You can perform operations such as starting, stopping, suspending, and reloading theselected server. You can also view runtime information, such as JVM usage, server logs, andsubsystem-specific information.
Deployments
From the Deployments tab, you can add and assign deployments to server groups. You can view alldeployments in the content repository, view all unassigned deployments, or view deploymentsassigned to a particular server group.For more information on deploying applications using the management console, see Deploy anApplication in a Managed Domain
Management CLIThe JBoss EAP management CLI provides a command-line interface to manage hosts, servers,deployments and profiles for your domain.
Subsystem configuration can be accessed once the appropriate profile is selected.
/profile=PROFILE_NAME/subsystem=SUBSYSTEM_NAME:read-resource(recursive=true)
CHAPTER 8. DOMAIN MANAGEMENT
89
NOTE
Instructions and examples throughout this guide may contain management CLIcommands for subsystem configuration that apply when running as a standalone server,for example:
/subsystem=datasources/data-source=ExampleDS:read-resource
To adjust these management CLI commands to be run in a managed domain, you mustspecify the appropriate profile to configure, for example:
/profile=default/subsystem=datasources/data-source=ExampleDS:read-resource
After specifying the appropriate host, you can configure host settings and perform operations onservers on that host.
/host=HOST_NAME/server=SERVER_NAME:read-resource
After specifying the appropriate host, you can configure servers for that host.
/host=HOST_NAME/server-config=SERVER_NAME:write-attribute(name=ATTRIBUTE_NAME,value=VALUE)
After specifying the appropriate server group, you can configure server group settings and performoperations on all servers in the selected server group.
/server-group=SERVER_GROUP_NAME:read-resource
You can deploy applications in a managed domain by using the deploy management CLI commandand specifying the appropriate server groups. For instructions, see Deploy an Application in a ManagedDomain
8.3. LAUNCHING A MANAGED DOMAIN
8.3.1. Start a Managed Domain
Domain and host controllers can be started using the domain.sh or domain.bat script provided withJBoss EAP. For a complete listing of all available startup script arguments and their purposes, use the --help argument or see the Server Runtime Arguments section.
The domain controller must be started before any slave servers in any server groups in the domain.Start the domain controller first, then start any other associated host controllers in the domain.
Start the Domain ControllerStart the domain controller with the host-master.xml configuration file, which is preconfigured for adedicated domain controller.
$ EAP_HOME/bin/domain.sh --host-config=host-master.xml
Depending on your domain setup, you will need to make additional configurations to allow hostcontrollers to connect. Also see the following example domain setups:
Red Hat JBoss Enterprise Application Platform 7.0 Configuration Guide
90
Set Up a Managed Domain on a Single Machine
Set Up a Managed Domain on Two Machines
Start a Host ControllerStart the host controller with the host-slave.xml configuration file, which is preconfigured for aslave host controller.
$ EAP_HOME/bin/domain.sh --host-config=host-slave.xml
Depending on your domain setup, you will need to make additional configurations connect to, and notconflict with, the domain controller. Also see the following example domain setups:
Set Up a Managed Domain on a Single Machine
Set Up a Managed Domain on Two Machines
8.3.2. Configure the Domain Controller
IMPORTANT
It is not supported to configure multiple domain or host controllers on the same machinewhen using the RPM installation method to install JBoss EAP.
Configure a Host to Act as the Domain ControllerA host is designated to be the domain controller if it includes the <local/> element in the <domain-controller> declaration.
The host acting as the domain controller must expose a management interface that is accessible toother hosts in the domain. It is not required to expose an HTTP(S) management interface, but isrecommended as it allows access to the management console.
The EAP_HOME/domain/configuration/host-master.xml file is already preconfigured withthese settings to act as the domain controller.
8.3.3. Configure Host Controllers
<domain-controller> <local/></domain-controller>
<management-interfaces> <native-interface security-realm="ManagementRealm"> <socket interface="management" port="${jboss.management.native.port:9999}"/> </native-interface> <http-interface security-realm="ManagementRealm" http-upgrade-enabled="true"> <socket interface="management" port="${jboss.management.http.port:9990}"/> </http-interface></management-interfaces>
CHAPTER 8. DOMAIN MANAGEMENT
91
IMPORTANT
It is not supported to configure multiple domain or host controllers on the same machinewhen using the RPM installation method to install JBoss EAP.
Connect to the Domain ControllerA host controller must be provided with the means to connect to the domain controller so that it canregister itself with the domain. This is configured in the <domain-controller> element of theconfiguration.
The EAP_HOME/domain/configuration/host-slave.xml file is already preconfigured with thesesettings to connect to the domain controller. You will need to provide the jboss.domain.master.address property when starting the host controller.
$ EAP_HOME/bin/domain.sh --host-config=host-slave.xml -Djboss.domain.master.address=IP_ADDRESS
For more information on domain controller discovery, see the Domain Controller Discovery andFailover section.
Depending on your domain setup, you may also need to provide authentication for the host controllerto be authenticated by the domain controller. See Set Up a Managed Domain on Two Machines fordetails on generating a management user with a secret value and updating the host controllerconfiguration with that value.
8.3.3.1. Configure the Name of a Host
Every host running in a managed domain must have a unique host name. To ease administration andallow for the use of the same host configuration files on multiple hosts, the server uses the followingprecedence for determining the host name.
1. If set, the host element name attribute in the host.xml configuration file.
2. The value of the jboss.host.name system property.
3. The value that follows the final period (.) character in the jboss.qualified.host.namesystem property, or the entire value if there is no final period (.) character.
4. The value that follows the period (.) character in the HOSTNAME environment variable forPOSIX-based operating systems, the COMPUTERNAME environment variable for MicrosoftWindows, or the entire value if there is no final period (.) character.
<domain-controller> <remote security-realm="ManagementRealm"> <discovery-options> <static-discovery name="primary" protocol="${jboss.domain.master.protocol:remote}" host="${jboss.domain.master.address}" port="${jboss.domain.master.port:9999}"/> </discovery-options> </remote></domain-controller>
Red Hat JBoss Enterprise Application Platform 7.0 Configuration Guide
92
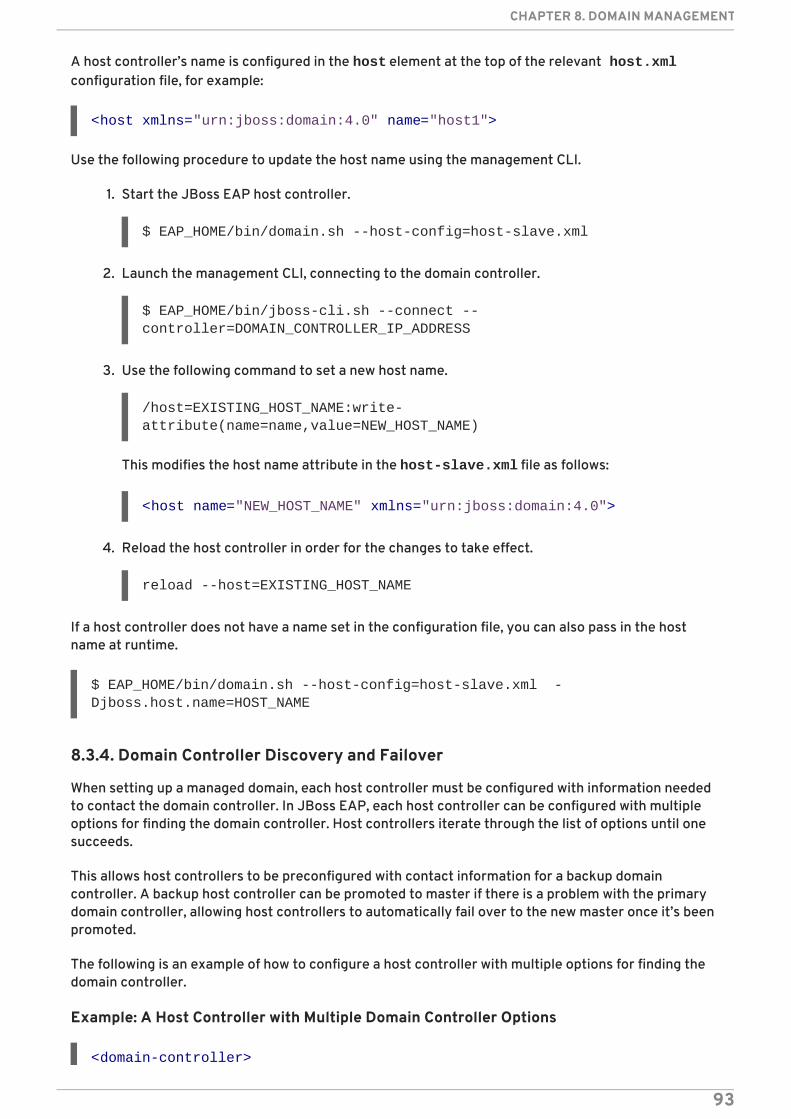
A host controller’s name is configured in the host element at the top of the relevant host.xmlconfiguration file, for example:
Use the following procedure to update the host name using the management CLI.
1. Start the JBoss EAP host controller.
$ EAP_HOME/bin/domain.sh --host-config=host-slave.xml
2. Launch the management CLI, connecting to the domain controller.
$ EAP_HOME/bin/jboss-cli.sh --connect --controller=DOMAIN_CONTROLLER_IP_ADDRESS
3. Use the following command to set a new host name.
/host=EXISTING_HOST_NAME:write-attribute(name=name,value=NEW_HOST_NAME)
This modifies the host name attribute in the host-slave.xml file as follows:
4. Reload the host controller in order for the changes to take effect.
reload --host=EXISTING_HOST_NAME
If a host controller does not have a name set in the configuration file, you can also pass in the hostname at runtime.
$ EAP_HOME/bin/domain.sh --host-config=host-slave.xml -Djboss.host.name=HOST_NAME
8.3.4. Domain Controller Discovery and Failover
When setting up a managed domain, each host controller must be configured with information neededto contact the domain controller. In JBoss EAP, each host controller can be configured with multipleoptions for finding the domain controller. Host controllers iterate through the list of options until onesucceeds.
This allows host controllers to be preconfigured with contact information for a backup domaincontroller. A backup host controller can be promoted to master if there is a problem with the primarydomain controller, allowing host controllers to automatically fail over to the new master once it’s beenpromoted.
The following is an example of how to configure a host controller with multiple options for finding thedomain controller.
Example: A Host Controller with Multiple Domain Controller Options
<host xmlns="urn:jboss:domain:4.0" name="host1">
<host name="NEW_HOST_NAME" xmlns="urn:jboss:domain:4.0">
<domain-controller>
CHAPTER 8. DOMAIN MANAGEMENT
93
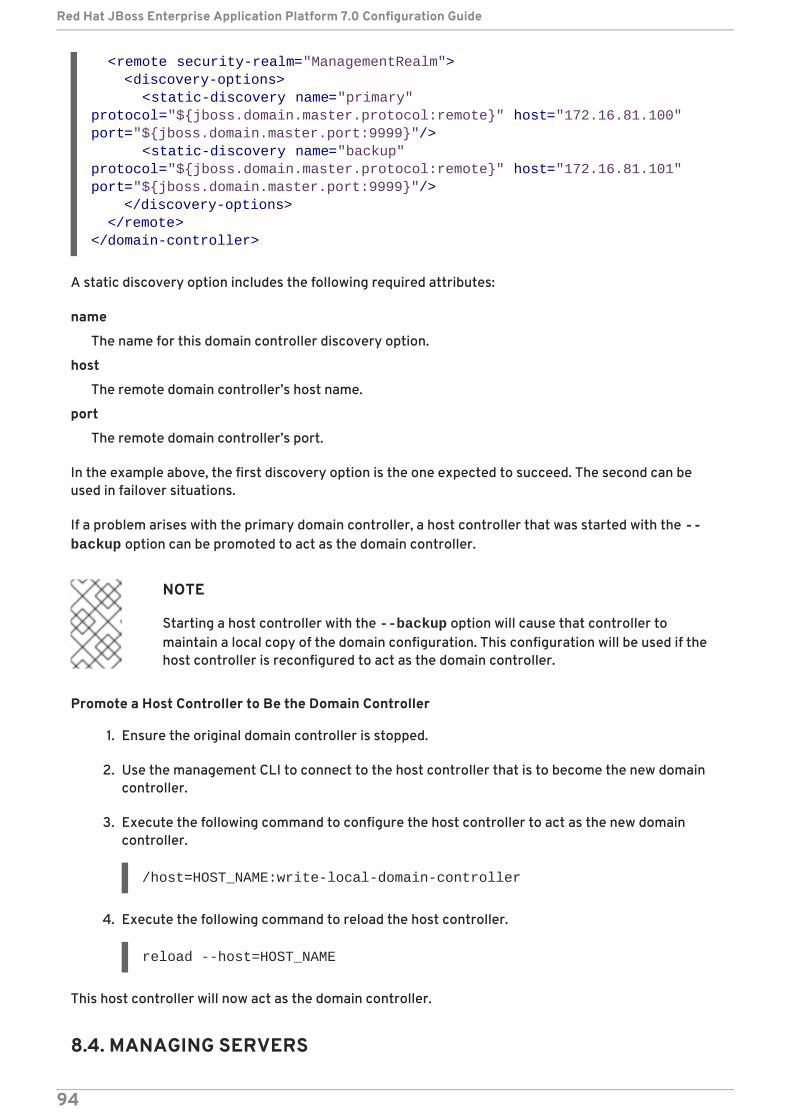
A static discovery option includes the following required attributes:
name
The name for this domain controller discovery option.
host
The remote domain controller’s host name.
port
The remote domain controller’s port.
In the example above, the first discovery option is the one expected to succeed. The second can beused in failover situations.
If a problem arises with the primary domain controller, a host controller that was started with the --backup option can be promoted to act as the domain controller.
NOTE
Starting a host controller with the --backup option will cause that controller tomaintain a local copy of the domain configuration. This configuration will be used if thehost controller is reconfigured to act as the domain controller.
Promote a Host Controller to Be the Domain Controller
1. Ensure the original domain controller is stopped.
2. Use the management CLI to connect to the host controller that is to become the new domaincontroller.
3. Execute the following command to configure the host controller to act as the new domaincontroller.
/host=HOST_NAME:write-local-domain-controller
4. Execute the following command to reload the host controller.
reload --host=HOST_NAME
This host controller will now act as the domain controller.
8.4. MANAGING SERVERS
<remote security-realm="ManagementRealm"> <discovery-options> <static-discovery name="primary" protocol="${jboss.domain.master.protocol:remote}" host="172.16.81.100" port="${jboss.domain.master.port:9999}"/> <static-discovery name="backup" protocol="${jboss.domain.master.protocol:remote}" host="172.16.81.101" port="${jboss.domain.master.port:9999}"/> </discovery-options> </remote></domain-controller>
Red Hat JBoss Enterprise Application Platform 7.0 Configuration Guide
94

8.4.1. Configure Server Groups
The following is an example of a server group definition:
Server groups can be configured using the management CLI or from the management consoleRuntime tab.
Add a Server GroupThe following management CLI command can be used to add a server group.
/server-group=SERVER_GROUP_NAME:add(profile=PROFILE_NAME,socket-binding-group=SOCKET_BINDING_GROUP_NAME)
Update a Server GroupThe following management CLI command can be used to update server group attributes.
/server-group=SERVER_GROUP_NAME:write-attribute(name=ATTRIBUTE_NAME,value=VALUE)
Remove a Server GroupThe following management CLI command can be used to remove a server group.
/server-group=SERVER_GROUP_NAME:remove
Server Group AttributesA server group requires the following attributes:
name: The server group name.
profile: The server group profile name.
socket-binding-group: The default socket binding group used for servers in the group.This can be overridden on a per-server basis.
A server group includes the following optional attributes:
management-subsystem-endpoint: Set to true to have servers belonging to the servergroup connect back to the host controller using the endpoint from their remoting subsystem(the remoting subsystem must be present for this to work).
socket-binding-default-interface: The socket binding group default interface for thisserver.
<server-group name="main-server-group" profile="full"> <jvm name="default"> <heap size="64m" max-size="512m"/> </jvm> <socket-binding-group ref="full-sockets"/> <deployments> <deployment name="test-application.war" runtime-name="test-application.war"/> <deployment name="jboss-helloworld.war" runtime-name="jboss-helloworld.war" enabled="false"/> </deployments></server-group>
CHAPTER 8. DOMAIN MANAGEMENT
95
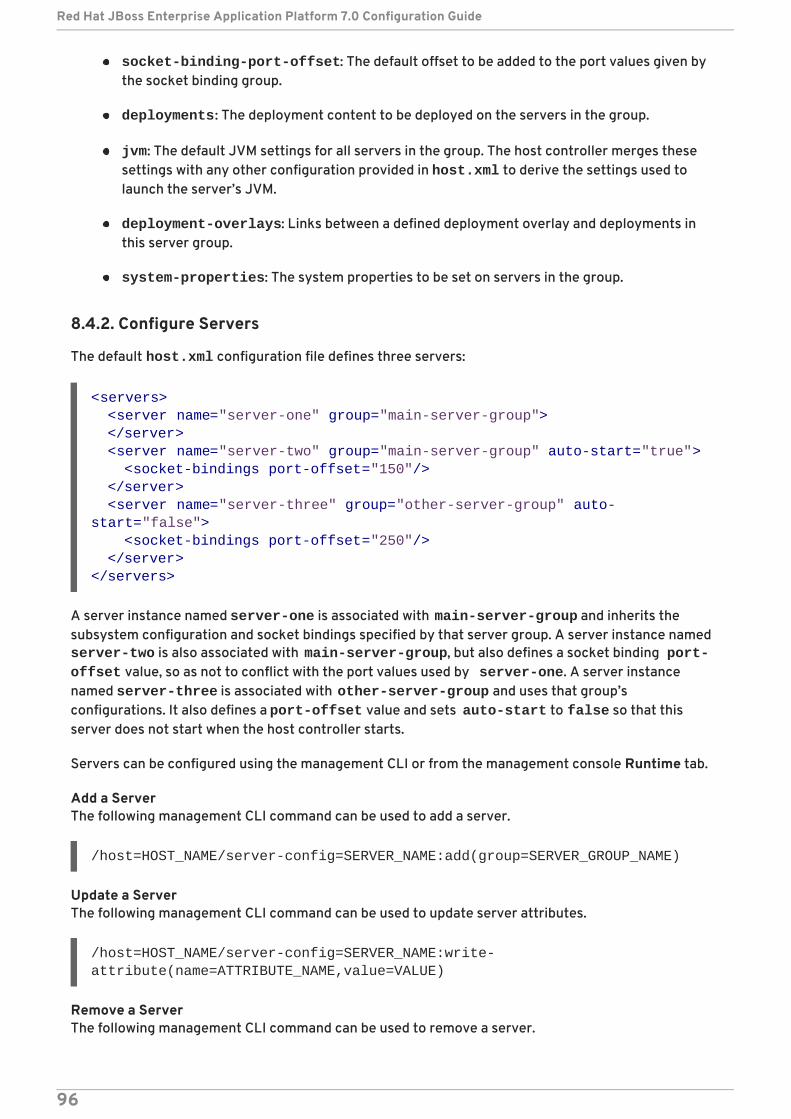
socket-binding-port-offset: The default offset to be added to the port values given bythe socket binding group.
deployments: The deployment content to be deployed on the servers in the group.
jvm: The default JVM settings for all servers in the group. The host controller merges thesesettings with any other configuration provided in host.xml to derive the settings used tolaunch the server’s JVM.
deployment-overlays: Links between a defined deployment overlay and deployments inthis server group.
system-properties: The system properties to be set on servers in the group.
8.4.2. Configure Servers
The default host.xml configuration file defines three servers:
A server instance named server-one is associated with main-server-group and inherits thesubsystem configuration and socket bindings specified by that server group. A server instance named server-two is also associated with main-server-group, but also defines a socket binding port-offset value, so as not to conflict with the port values used by server-one. A server instancenamed server-three is associated with other-server-group and uses that group’sconfigurations. It also defines a port-offset value and sets auto-start to false so that thisserver does not start when the host controller starts.
Servers can be configured using the management CLI or from the management console Runtime tab.
Add a ServerThe following management CLI command can be used to add a server.
/host=HOST_NAME/server-config=SERVER_NAME:add(group=SERVER_GROUP_NAME)
Update a ServerThe following management CLI command can be used to update server attributes.
/host=HOST_NAME/server-config=SERVER_NAME:write-attribute(name=ATTRIBUTE_NAME,value=VALUE)
Remove a ServerThe following management CLI command can be used to remove a server.
<servers> <server name="server-one" group="main-server-group"> </server> <server name="server-two" group="main-server-group" auto-start="true"> <socket-bindings port-offset="150"/> </server> <server name="server-three" group="other-server-group" auto-start="false"> <socket-bindings port-offset="250"/> </server></servers>
Red Hat JBoss Enterprise Application Platform 7.0 Configuration Guide
96
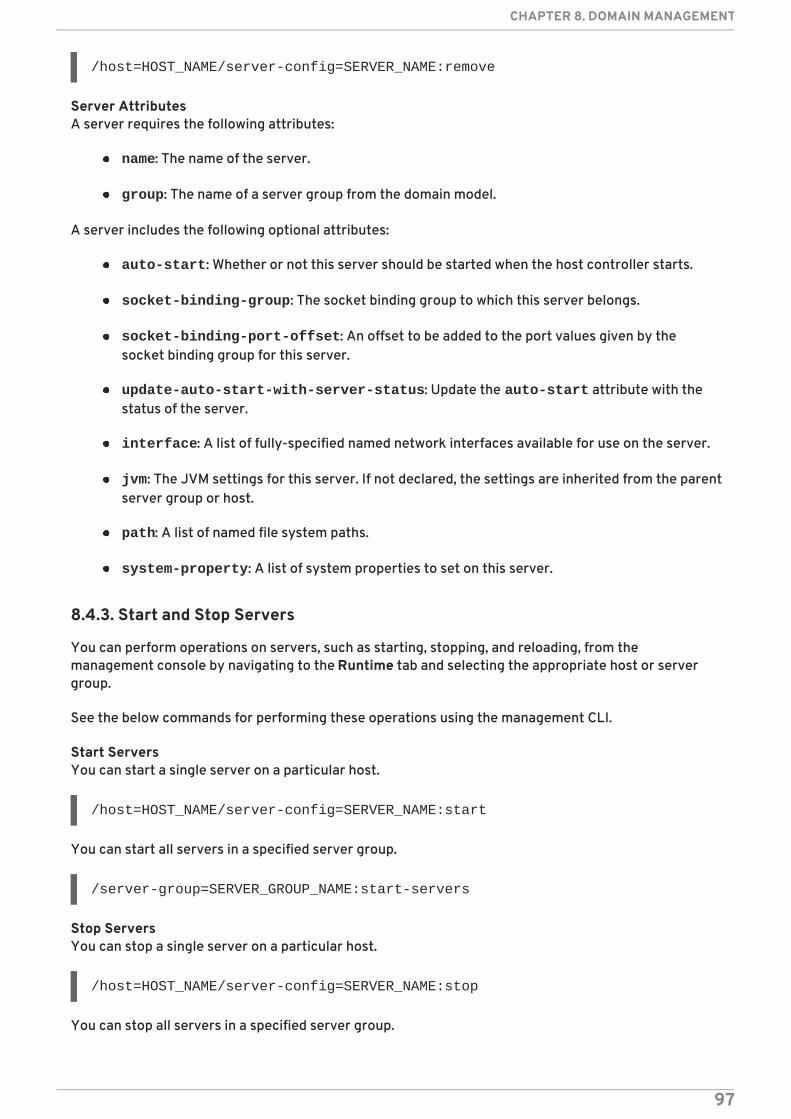
/host=HOST_NAME/server-config=SERVER_NAME:remove
Server AttributesA server requires the following attributes:
name: The name of the server.
group: The name of a server group from the domain model.
A server includes the following optional attributes:
auto-start: Whether or not this server should be started when the host controller starts.
socket-binding-group: The socket binding group to which this server belongs.
socket-binding-port-offset: An offset to be added to the port values given by thesocket binding group for this server.
update-auto-start-with-server-status: Update the auto-start attribute with thestatus of the server.
interface: A list of fully-specified named network interfaces available for use on the server.
jvm: The JVM settings for this server. If not declared, the settings are inherited from the parentserver group or host.
path: A list of named file system paths.
system-property: A list of system properties to set on this server.
8.4.3. Start and Stop Servers
You can perform operations on servers, such as starting, stopping, and reloading, from themanagement console by navigating to the Runtime tab and selecting the appropriate host or servergroup.
See the below commands for performing these operations using the management CLI.
Start ServersYou can start a single server on a particular host.
/host=HOST_NAME/server-config=SERVER_NAME:start
You can start all servers in a specified server group.
/server-group=SERVER_GROUP_NAME:start-servers
Stop ServersYou can stop a single server on a particular host.
/host=HOST_NAME/server-config=SERVER_NAME:stop
You can stop all servers in a specified server group.
CHAPTER 8. DOMAIN MANAGEMENT
97
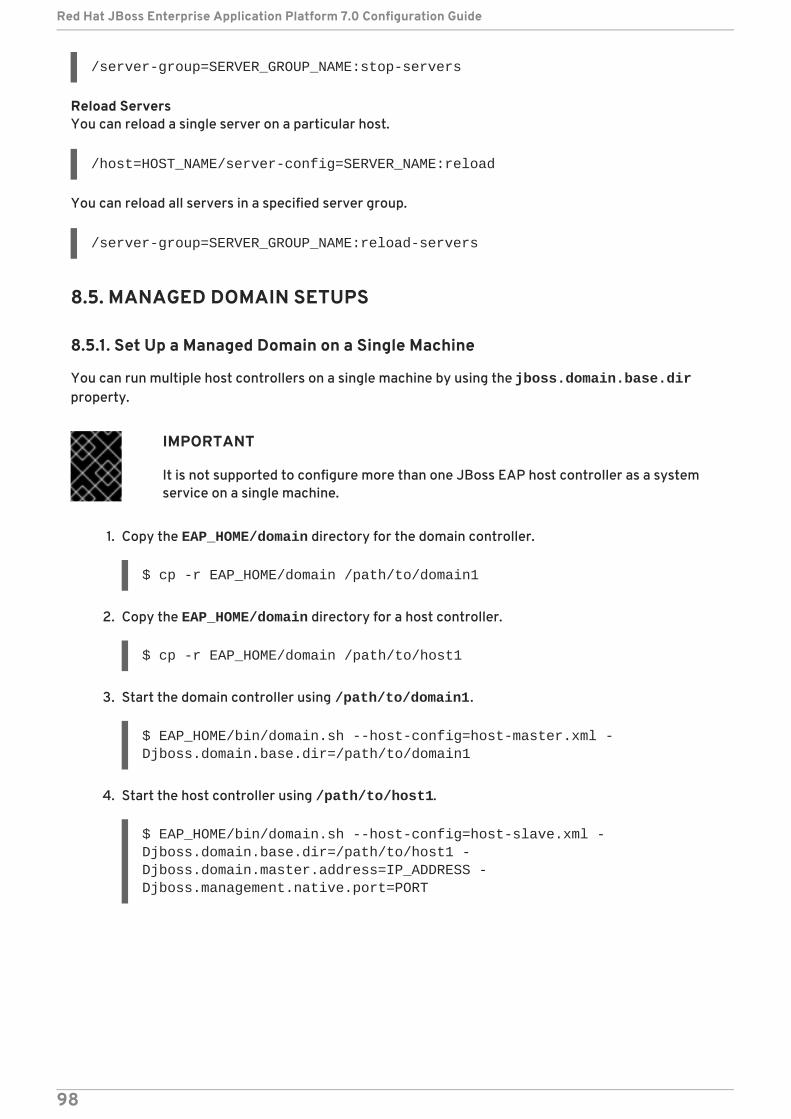
/server-group=SERVER_GROUP_NAME:stop-servers
Reload ServersYou can reload a single server on a particular host.
/host=HOST_NAME/server-config=SERVER_NAME:reload
You can reload all servers in a specified server group.
/server-group=SERVER_GROUP_NAME:reload-servers
8.5. MANAGED DOMAIN SETUPS
8.5.1. Set Up a Managed Domain on a Single Machine
You can run multiple host controllers on a single machine by using the jboss.domain.base.dirproperty.
IMPORTANT
It is not supported to configure more than one JBoss EAP host controller as a systemservice on a single machine.
1. Copy the EAP_HOME/domain directory for the domain controller.
$ cp -r EAP_HOME/domain /path/to/domain1
2. Copy the EAP_HOME/domain directory for a host controller.
$ cp -r EAP_HOME/domain /path/to/host1
3. Start the domain controller using /path/to/domain1.
$ EAP_HOME/bin/domain.sh --host-config=host-master.xml -Djboss.domain.base.dir=/path/to/domain1
4. Start the host controller using /path/to/host1.
$ EAP_HOME/bin/domain.sh --host-config=host-slave.xml -Djboss.domain.base.dir=/path/to/host1 -Djboss.domain.master.address=IP_ADDRESS -Djboss.management.native.port=PORT
Red Hat JBoss Enterprise Application Platform 7.0 Configuration Guide
98
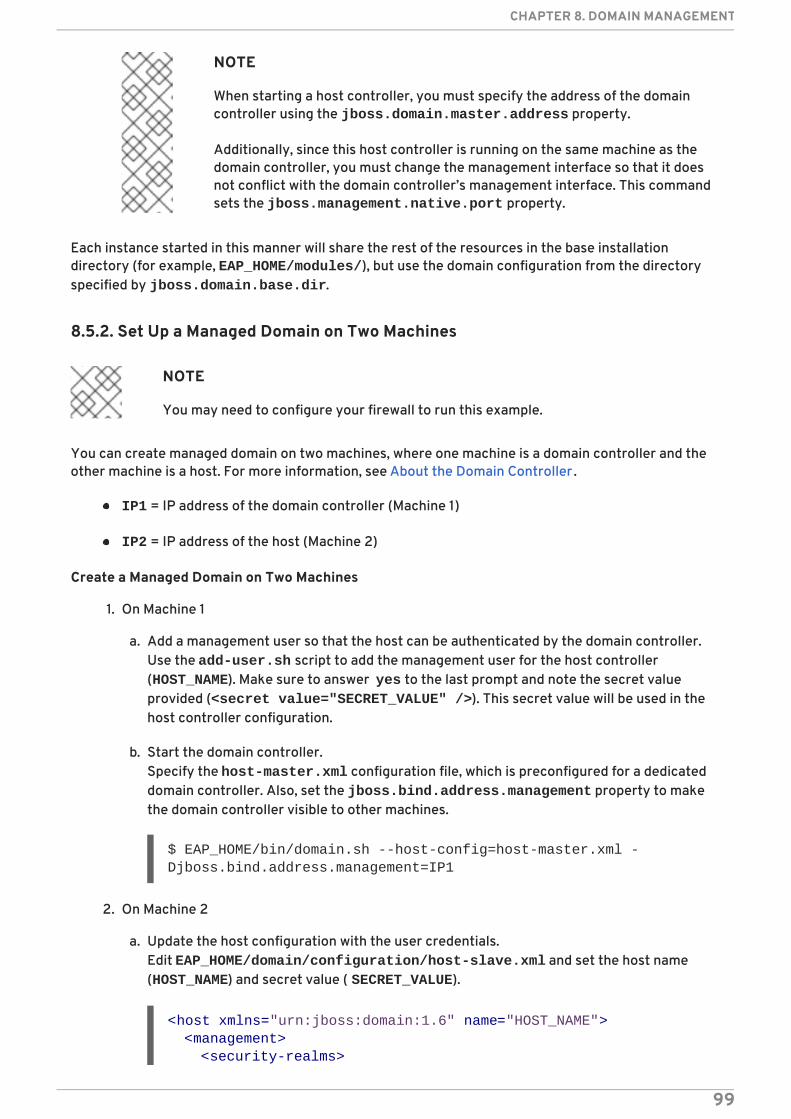
NOTE
When starting a host controller, you must specify the address of the domaincontroller using the jboss.domain.master.address property.
Additionally, since this host controller is running on the same machine as thedomain controller, you must change the management interface so that it doesnot conflict with the domain controller’s management interface. This commandsets the jboss.management.native.port property.
Each instance started in this manner will share the rest of the resources in the base installationdirectory (for example, EAP_HOME/modules/), but use the domain configuration from the directoryspecified by jboss.domain.base.dir.
8.5.2. Set Up a Managed Domain on Two Machines
NOTE
You may need to configure your firewall to run this example.
You can create managed domain on two machines, where one machine is a domain controller and theother machine is a host. For more information, see About the Domain Controller .
IP1 = IP address of the domain controller (Machine 1)
IP2 = IP address of the host (Machine 2)
Create a Managed Domain on Two Machines
1. On Machine 1
a. Add a management user so that the host can be authenticated by the domain controller.Use the add-user.sh script to add the management user for the host controller(HOST_NAME). Make sure to answer yes to the last prompt and note the secret valueprovided (<secret value="SECRET_VALUE" />). This secret value will be used in thehost controller configuration.
b. Start the domain controller.Specify the host-master.xml configuration file, which is preconfigured for a dedicateddomain controller. Also, set the jboss.bind.address.management property to makethe domain controller visible to other machines.
$ EAP_HOME/bin/domain.sh --host-config=host-master.xml -Djboss.bind.address.management=IP1
2. On Machine 2
a. Update the host configuration with the user credentials.Edit EAP_HOME/domain/configuration/host-slave.xml and set the host name(HOST_NAME) and secret value ( SECRET_VALUE).
<host xmlns="urn:jboss:domain:1.6" name="HOST_NAME"> <management> <security-realms>
CHAPTER 8. DOMAIN MANAGEMENT
99
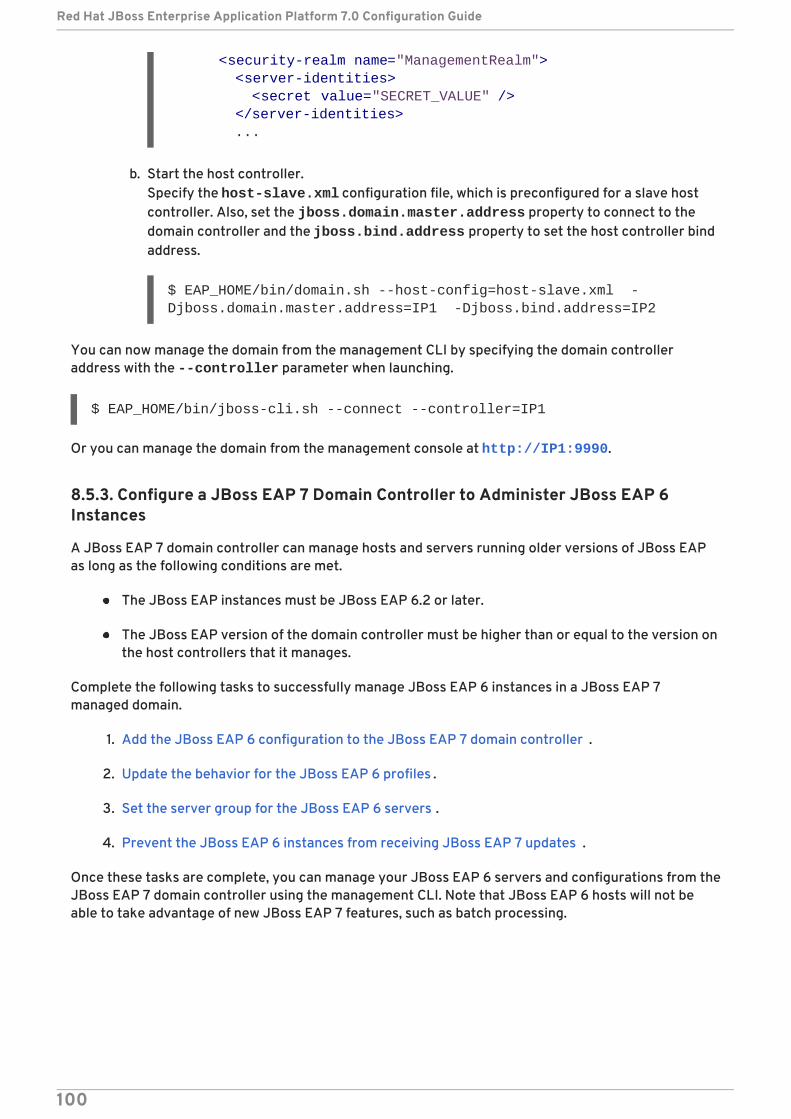
b. Start the host controller.Specify the host-slave.xml configuration file, which is preconfigured for a slave hostcontroller. Also, set the jboss.domain.master.address property to connect to thedomain controller and the jboss.bind.address property to set the host controller bindaddress.
$ EAP_HOME/bin/domain.sh --host-config=host-slave.xml -Djboss.domain.master.address=IP1 -Djboss.bind.address=IP2
You can now manage the domain from the management CLI by specifying the domain controlleraddress with the --controller parameter when launching.
$ EAP_HOME/bin/jboss-cli.sh --connect --controller=IP1
Or you can manage the domain from the management console at http://IP1:9990.
8.5.3. Configure a JBoss EAP 7 Domain Controller to Administer JBoss EAP 6Instances
A JBoss EAP 7 domain controller can manage hosts and servers running older versions of JBoss EAPas long as the following conditions are met.
The JBoss EAP instances must be JBoss EAP 6.2 or later.
The JBoss EAP version of the domain controller must be higher than or equal to the version onthe host controllers that it manages.
Complete the following tasks to successfully manage JBoss EAP 6 instances in a JBoss EAP 7managed domain.
1. Add the JBoss EAP 6 configuration to the JBoss EAP 7 domain controller .
2. Update the behavior for the JBoss EAP 6 profiles .
3. Set the server group for the JBoss EAP 6 servers .
4. Prevent the JBoss EAP 6 instances from receiving JBoss EAP 7 updates .
Once these tasks are complete, you can manage your JBoss EAP 6 servers and configurations from theJBoss EAP 7 domain controller using the management CLI. Note that JBoss EAP 6 hosts will not beable to take advantage of new JBoss EAP 7 features, such as batch processing.
<security-realm name="ManagementRealm"> <server-identities> <secret value="SECRET_VALUE" /> </server-identities> ...
Red Hat JBoss Enterprise Application Platform 7.0 Configuration Guide
100
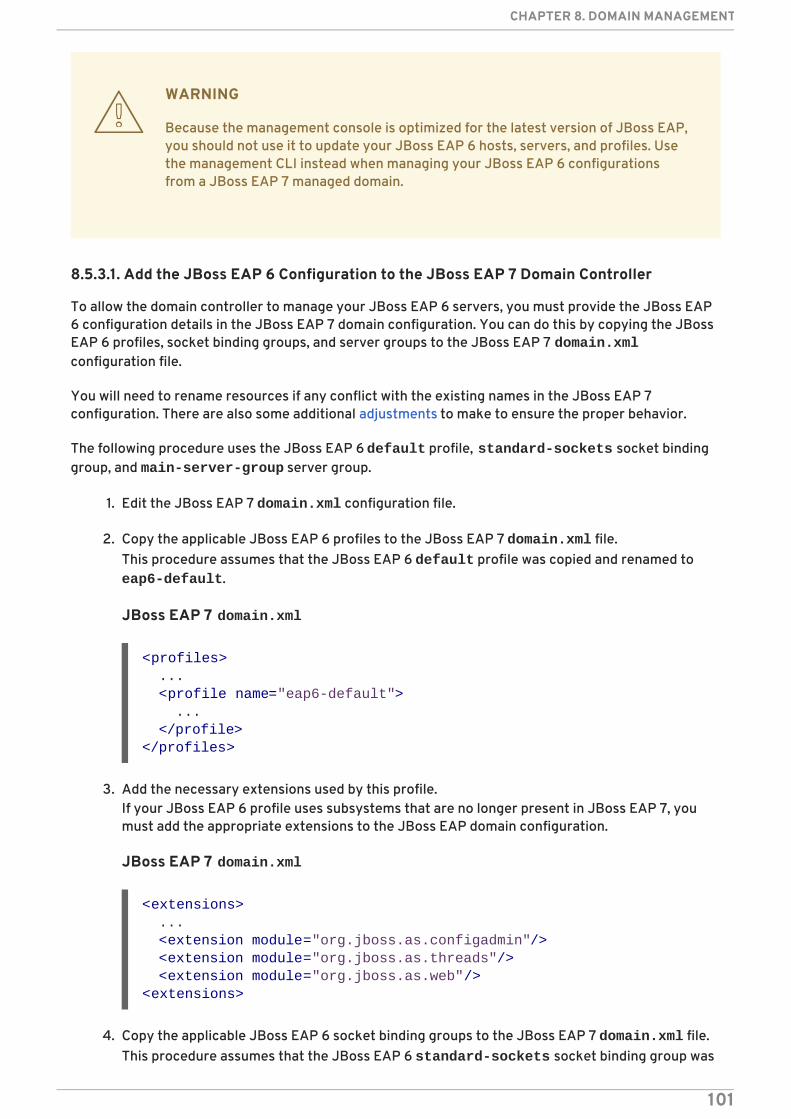
WARNING
Because the management console is optimized for the latest version of JBoss EAP,you should not use it to update your JBoss EAP 6 hosts, servers, and profiles. Usethe management CLI instead when managing your JBoss EAP 6 configurationsfrom a JBoss EAP 7 managed domain.
8.5.3.1. Add the JBoss EAP 6 Configuration to the JBoss EAP 7 Domain Controller
To allow the domain controller to manage your JBoss EAP 6 servers, you must provide the JBoss EAP6 configuration details in the JBoss EAP 7 domain configuration. You can do this by copying the JBossEAP 6 profiles, socket binding groups, and server groups to the JBoss EAP 7 domain.xmlconfiguration file.
You will need to rename resources if any conflict with the existing names in the JBoss EAP 7configuration. There are also some additional adjustments to make to ensure the proper behavior.
The following procedure uses the JBoss EAP 6 default profile, standard-sockets socket bindinggroup, and main-server-group server group.
1. Edit the JBoss EAP 7 domain.xml configuration file.
2. Copy the applicable JBoss EAP 6 profiles to the JBoss EAP 7 domain.xml file.This procedure assumes that the JBoss EAP 6 default profile was copied and renamed to eap6-default.
JBoss EAP 7 domain.xml
3. Add the necessary extensions used by this profile.If your JBoss EAP 6 profile uses subsystems that are no longer present in JBoss EAP 7, youmust add the appropriate extensions to the JBoss EAP domain configuration.
JBoss EAP 7 domain.xml
4. Copy the applicable JBoss EAP 6 socket binding groups to the JBoss EAP 7 domain.xml file.This procedure assumes that the JBoss EAP 6 standard-sockets socket binding group was
<profiles> ... <profile name="eap6-default"> ... </profile></profiles>
<extensions> ... <extension module="org.jboss.as.configadmin"/> <extension module="org.jboss.as.threads"/> <extension module="org.jboss.as.web"/><extensions>
CHAPTER 8. DOMAIN MANAGEMENT
101
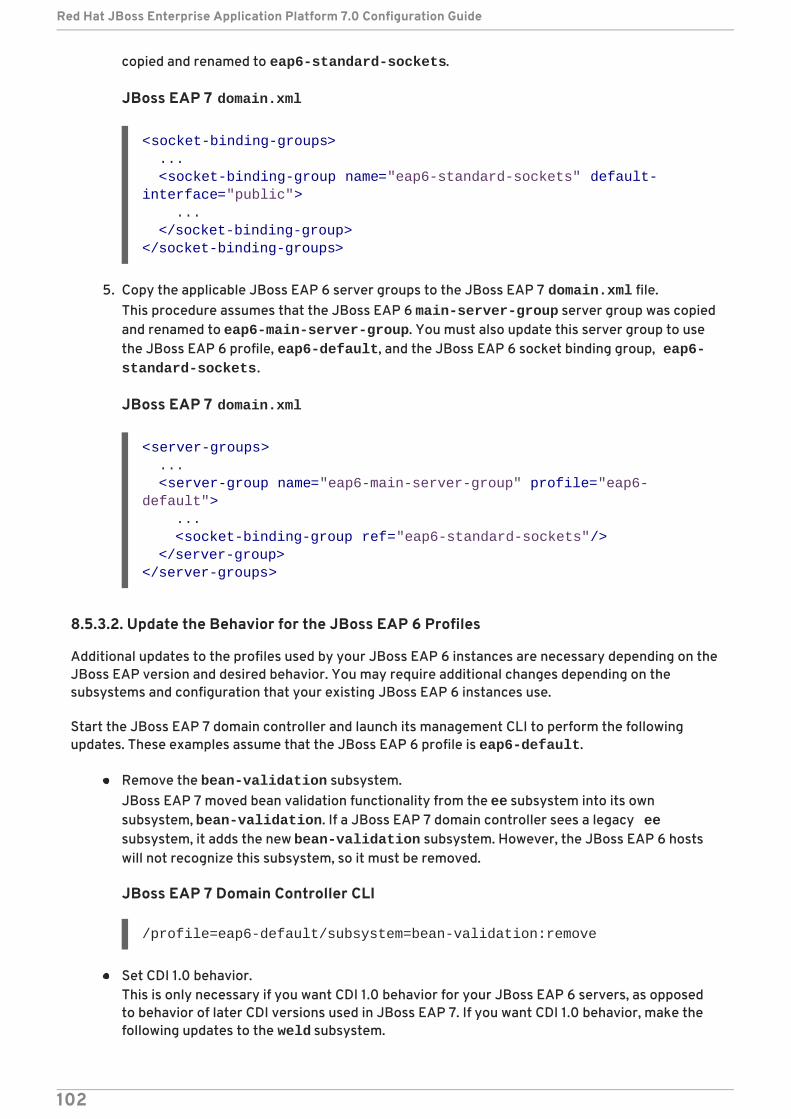
copied and renamed to eap6-standard-sockets.
JBoss EAP 7 domain.xml
5. Copy the applicable JBoss EAP 6 server groups to the JBoss EAP 7 domain.xml file.This procedure assumes that the JBoss EAP 6 main-server-group server group was copiedand renamed to eap6-main-server-group. You must also update this server group to usethe JBoss EAP 6 profile, eap6-default, and the JBoss EAP 6 socket binding group, eap6-standard-sockets.
JBoss EAP 7 domain.xml
8.5.3.2. Update the Behavior for the JBoss EAP 6 Profiles
Additional updates to the profiles used by your JBoss EAP 6 instances are necessary depending on theJBoss EAP version and desired behavior. You may require additional changes depending on thesubsystems and configuration that your existing JBoss EAP 6 instances use.
Start the JBoss EAP 7 domain controller and launch its management CLI to perform the followingupdates. These examples assume that the JBoss EAP 6 profile is eap6-default.
Remove the bean-validation subsystem.JBoss EAP 7 moved bean validation functionality from the ee subsystem into its ownsubsystem, bean-validation. If a JBoss EAP 7 domain controller sees a legacy eesubsystem, it adds the new bean-validation subsystem. However, the JBoss EAP 6 hostswill not recognize this subsystem, so it must be removed.
JBoss EAP 7 Domain Controller CLI
/profile=eap6-default/subsystem=bean-validation:remove
Set CDI 1.0 behavior.This is only necessary if you want CDI 1.0 behavior for your JBoss EAP 6 servers, as opposedto behavior of later CDI versions used in JBoss EAP 7. If you want CDI 1.0 behavior, make thefollowing updates to the weld subsystem.
<socket-binding-groups> ... <socket-binding-group name="eap6-standard-sockets" default-interface="public"> ... </socket-binding-group></socket-binding-groups>
<server-groups> ... <server-group name="eap6-main-server-group" profile="eap6-default"> ... <socket-binding-group ref="eap6-standard-sockets"/> </server-group></server-groups>
Red Hat JBoss Enterprise Application Platform 7.0 Configuration Guide
102

JBoss EAP 7 Domain Controller CLI
/profile=eap6-default/subsystem=weld:write-attribute(name=require-bean-descriptor,value=true)
/profile=eap6-default/subsystem=weld:write-attribute(name=non-portable-mode,value=true)
Enable datasource statistics for JBoss EAP 6.2.This is only necessary if your profile is being used by JBoss EAP 6.2 servers. JBoss EAP 6.3introduced the statistics-enabled attribute, which defaults to false to not collectstatistics; however, the JBoss EAP 6.2 behavior was to collect statistics. If this profile is usedby a JBoss EAP 6.2 host and a host running a newer JBoss EAP version, the behavior would beinconsistent between hosts, which is not allowed. Therefore, profiles intended for use by aJBoss EAP 6.2 host should make the following change for their datasources.
JBoss EAP 7 Domain Controller CLI
/profile=eap6-default/subsystem=datasources/data-source=ExampleDS:write-attribute(name=statistics-enabled,value=true)
8.5.3.3. Set the Server Group for the JBoss EAP 6 Servers
If you renamed server groups, you will need to update the JBoss EAP 6 host configuration to use thenew server groups specified in the JBoss EAP 7 configuration. This example uses the eap6-main-server-group server group specified in the JBoss EAP 7 domain.xml.
JBoss EAP 6 host-slave.xml
NOTE
A host cannot use features or configuration settings that were introduced in a newerversion of JBoss EAP than the one the host is running.
8.5.3.4. Prevent the JBoss EAP 6 Instances from Receiving JBoss EAP 7 Updates
The domain controller in a managed domain forwards configuration updates to its host controllers. Youmust use the host-exclude configuration to specify the resources that should be hidden fromparticular versions. Choose the appropriate preconfigured host-exclude option for your JBoss EAP6 version: EAP62, EAP63, EAP64, or EAP64z.
The active-server-groups attribute of the host-exclude configuration specifies the list ofserver groups that are used by a particular version. These server groups and their associated profiles,socket binding groups, and deployment resources will be available to hosts of this version, but allothers will be hidden from these hosts.
<servers> <server name="server-one" group="eap6-main-server-group"/> <server name="server-two" group="eap6-main-server-group"> <socket-bindings port-offset="150"/> </server></servers>
CHAPTER 8. DOMAIN MANAGEMENT
103
This example assumes that the version is JBoss EAP 6.4.z and adds the JBoss EAP 6 server group, eap6-main-server-group as an active server group.
JBoss EAP 7 Domain Controller CLI
If necessary, you can specify additional socket binding groups used by your servers using the active-socket-binding-groups attribute. This is only required for socket binding groups that are notassociated with the server groups specified in active-server-groups.
8.6. MANAGING JBOSS EAP PROFILES
8.6.1. About Profiles
JBoss EAP uses profiles as a way to organize which subsystems are available to a server. A profileconsists of a collection of available subsystems along with each subsystem’s specific configuration. Aprofile with a large number of subsystems results in a server with a large set of capabilities. A profilewith a small, focused set of subsystems will have fewer capabilities but a smaller footprint.
JBoss EAP comes with four predefined profiles that should satisfy most use cases:
default
Includes commonly used subsystems, such as logging, security, datasources, infinispan, webservices, ee, ejb3, transactions, and so on.
ha
Includes the subsystems provided in the default profile with the addition of the jgroups and modcluster subsystems for high availability
full
Includes the subsystems provided in the default profile with the addition of the messaging-activemq and iiop-openjdk subsystems
full-ha
Includes the subsystems provided in the full profile with the addition of the jgroups and modcluster subsystems for high availability
NOTE
JBoss EAP offers the ability to disable extensions or unload drivers and other servicesmanually by removing the subsystems from the configuration of existing profiles.However, for most cases this is unnecessary. Since JBoss EAP dynamically loadssubsystems as they are needed, if the server or an application never use a subsystem, itwill not be loaded.
In cases where the existing profiles do not provide the necessary capabilities, JBoss EAP also providesthe ability to define custom profiles as well.
8.6.2. Cloning a Profile
/host-exclude=EAP64z:write-attribute(name=active-server-groups,value=[eap6-main-server-group])
Red Hat JBoss Enterprise Application Platform 7.0 Configuration Guide
104
JBoss EAP allows you to create a new profile in a managed domain by cloning an existing profile. Thiswill create a copy of the original profile’s configuration and subsystems.
A profile can be cloned using the management CLI by using the clone operation on the desired profileto clone.
/profile=full-ha:clone(to-profile=cloned-profile)
You can also clone a profile from the management console by selecting the desired profile to cloneand clicking Clone.
8.6.3. Creating Hierarchical Profiles
In a managed domain, you can create a hierarchy of profiles. This allows you to create a base profilewith common extensions that other profiles can inherit.
The managed domain defines several profiles in domain.xml. If multiple profiles use the sameconfiguration for a particular subsystem, you can configure it in just one place instead of differentprofiles. The values in parent profiles cannot be overridden.
A profile can include other profiles in a hierarchy using the management CLI by using the list-addoperation and providing the profile to include.
/profile=new-profile:list-add(name=includes, value=PROFILE_NAME)
CHAPTER 8. DOMAIN MANAGEMENT
105
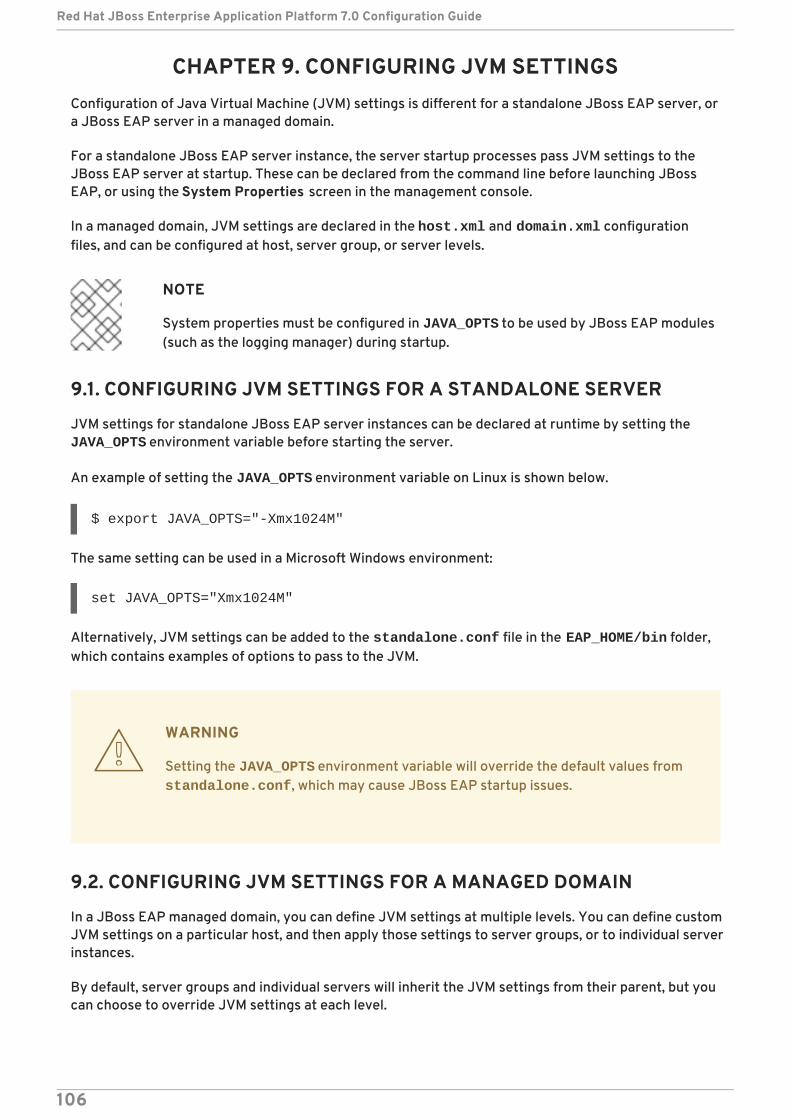
CHAPTER 9. CONFIGURING JVM SETTINGSConfiguration of Java Virtual Machine (JVM) settings is different for a standalone JBoss EAP server, ora JBoss EAP server in a managed domain.
For a standalone JBoss EAP server instance, the server startup processes pass JVM settings to theJBoss EAP server at startup. These can be declared from the command line before launching JBossEAP, or using the System Properties screen in the management console.
In a managed domain, JVM settings are declared in the host.xml and domain.xml configurationfiles, and can be configured at host, server group, or server levels.
NOTE
System properties must be configured in JAVA_OPTS to be used by JBoss EAP modules(such as the logging manager) during startup.
9.1. CONFIGURING JVM SETTINGS FOR A STANDALONE SERVER
JVM settings for standalone JBoss EAP server instances can be declared at runtime by setting the JAVA_OPTS environment variable before starting the server.
An example of setting the JAVA_OPTS environment variable on Linux is shown below.
$ export JAVA_OPTS="-Xmx1024M"
The same setting can be used in a Microsoft Windows environment:
set JAVA_OPTS="Xmx1024M"
Alternatively, JVM settings can be added to the standalone.conf file in the EAP_HOME/bin folder,which contains examples of options to pass to the JVM.
WARNING
Setting the JAVA_OPTS environment variable will override the default values from standalone.conf, which may cause JBoss EAP startup issues.
9.2. CONFIGURING JVM SETTINGS FOR A MANAGED DOMAIN
In a JBoss EAP managed domain, you can define JVM settings at multiple levels. You can define customJVM settings on a particular host, and then apply those settings to server groups, or to individual serverinstances.
By default, server groups and individual servers will inherit the JVM settings from their parent, but youcan choose to override JVM settings at each level.
Red Hat JBoss Enterprise Application Platform 7.0 Configuration Guide
106
NOTE
The JVM settings in domain.conf are applied to the Java process of the JBoss EAPhost controller, and not the individual JBoss EAP server instances controlled by thathost controller.
9.2.1. Defining JVM Settings on a Host Controller
You can define JVM settings on a host controller, and apply those settings to server groups orindividual servers. JBoss EAP comes with a default JVM setting, but the following management CLIcommand demonstrates creating a new JVM setting named production_jvm with some custom JVMsettings and options.
/host=HOST_NAME/jvm=production_jvm:add( heap-size=2048m, max-heap-size=2048m, max-permgen-size=512m, stack-size=1024k, jvm-options=["-XX:-UseParallelGC"])
You can also create and edit JVM settings in the JBoss EAP management console by selecting theRuntime tab, selecting Hosts, and clicking JVM on the host you want to edit.
These settings are stored in the within the <jvm> tag in host.xml.
9.2.2. Applying JVM Settings to a Server Group
When creating a server group, you can specify a JVM configuration that all servers in the group willuse. The following management CLI commands demonstrate creating a server group name groupAthat uses the production_jvm JVM settings that were shown in the previous example.
/server-group=groupA:add(profile=default, socket-binding-group=standard-sockets)/server-group=groupA/jvm=production_jvm:add()
All servers in the server group will inherit JVM settings from production_jvm.
You can also override specific JVM settings at the server group level. For example, to set a differentheap size, you can use the following command:
/server-group=groupA/jvm=production_jvm:write-attribute(name=heap-size,value="1024m")
After applying the above command, the server group groupA will inherit the JVM settings from production_jvm, except for the heap size which has an overridden value of 1024m.
You can also edit server group JVM settings in the JBoss EAP management console by selecting theRuntime tab, selecting Server Groups , and clicking View for the server group you want to edit.
These settings for a server group are stored in domain.xml.
9.2.3. Applying JVM Settings to an Individual Server
CHAPTER 9. CONFIGURING JVM SETTINGS
107
By default, an individual JBoss EAP server instance will inherit the JVM settings of the server group itbelongs to. However, you can choose to override the inherited settings with another complete JVMsetting definition from the host controller, or choose to override specific JVM settings.
For example, the following command overrides the JVM definition of the server group in the previousexample, and sets the JVM settings for server-one to the default JVM definition:
/host=HOST_NAME/server-config=server-one/jvm=default:add()
Also, similar to server groups, you can override specific JVM settings at the server level. For example,to set a different heap size, you can use the following command:
/host=HOST_NAME/server-config=server-one/jvm=default:write-attribute(name=heap-size,value="1024m")
You can also edit server JVM settings in the JBoss EAP management console by selecting theRuntime tab, selecting Hosts, selecting the relevant host. Then select the relevant server, and clickView for the server you want to edit.
These settings for an individual server are stored in host.xml.
9.3. DISPLAYING THE JVM STATUS
You can view the status of JVM resources, such as heap and thread usage, for standalone or manageddomain servers from the management console. While statistics are not displayed in real time, you canclick Refresh Results to provide an up-to-date overview of JVM resources.
To display the JVM status for a standalone JBoss EAP server:
Select the Runtime tab, and then select Standalone Server. In the Monitor column, selectJVM and click View.
To display the JVM status for a JBoss EAP server in a managed domain:
Select the Runtime tab, and then select the server group and server that you want to view. Inthe Monitor column, select JVM and click View.
This shows the following heap usage information:
Max
The maximum amount of memory that can be used for memory management.
Used
The amount of used memory.
Committed
The amount of memory that is committed for the Java Virtual Machine to use.
Other information, such as JVM uptime and thread usage, is also available.
9.4. SPECIFYING 32 OR 64-BIT JVM ARCHITECTURE
In some environments, such as Hewlett-Packard HP-UX and Solaris, the -d32 or -d64 switch is usedto specify whether to run in a 32-bit or 64-bit JVM. The default is 32-bit if neither option is indicated.
Red Hat JBoss Enterprise Application Platform 7.0 Configuration Guide
108
Specifying 64-Bit Architecture for a Standalone Server
1. Open EAP_HOME/bin/standalone.conf.
2. Add the following line to append the -d64 option to JAVA_OPTS.
JAVA_OPTS="$JAVA_OPTS -d64"
Specifying 64-Bit Architecture for a Managed DomainWhen running a managed domain, you can specify the 64-bit environment for host and processcontrollers in addition to server instances.
1. Set the host and process controllers to run in the 64-bit JVM.
a. Open EAP_HOME/bin/domain.conf.
b. Add the following line to append the -d64 option to JAVA_OPTS. Ensure that this isinserted before where PROCESS_CONTROLLER_JAVA_OPTS and HOST_CONTROLLER_JAVA_OPTS are set.
JAVA_OPTS="$JAVA_OPTS -d64"
Example JVM options in domain.conf
## Specify options to pass to the Java VM.#if [ "x$JAVA_OPTS" = "x" ]; then JAVA_OPTS="-Xms64m -Xmx512m -XX:MaxPermSize=256m -Djava.net.preferIPv4Stack=true" JAVA_OPTS="$JAVA_OPTS -Djboss.modules.system.pkgs=$JBOSS_MODULES_SYSTEM_PKGS -Djava.awt.headless=true" JAVA_OPTS="$JAVA_OPTS -Djboss.modules.policy-permissions=true" JAVA_OPTS="$JAVA_OPTS -d64"else echo "JAVA_OPTS already set in environment; overriding default settings with values: $JAVA_OPTS"fi
2. Set the server instances to run in the 64-bit JVM.Add -d64 as a JVM option in your appropriate JVM configuration. The command below showsit being added to the default JVM configuration.
/host=HOST_NAME/jvm=default:add-jvm-option(jvm-option="-d64")
CHAPTER 9. CONFIGURING JVM SETTINGS
109

CHAPTER 10. MAIL SUBSYSTEM
10.1. CONFIGURING THE MAIL SUBSYSTEM
The mail subsystem allows you to configure mail sessions in JBoss EAP and then inject thosesessions into applications using JNDI. It also supports configuration using Java EE 7 @MailSessionDefinition and @MailSessionDefinitions annotations.
Configuring SMTP server for use in an application
1. Configure the SMTP server and the outbound socket binding using the following CLIcommands, for example:
/socket-binding-group=standard-sockets/remote-destination-outbound-socket-binding=my-smtp:add(host=localhost, port=25)
/subsystem=mail/mail-session=mySession:add(jndi-name=java:jboss/mail/MySession)
/subsystem=mail/mail-session=mySession/server=smtp:add(outbound-socket-binding-ref=my-smtp, username=user, password=pass, tls=true)
2. Call the configured mail session within an application
For a full list of the attributes available for configuring mail sessions and servers, see Mail SubsystemAttributes.
10.2. CONFIGURING CUSTOM TRANSPORTS
When using a standard mail server, such as POP3 or IMAP, the mail server has a set of attributes thatcan be defined. Some of these attributes are mandatory. The most important of these is the outbound-socket-binding-ref, which is a reference to the outbound mail socket binding and isdefined with a host address and port number.
Defining the outbound-socket-binding-ref may not be the most effective solution for users whohave their host configuration using multiple hosts for load balancing purposes. Standard JavaMail doesnot support host configuration using multiple hosts for load balancing. Therefore, users who have thisconfiguration using multiple hosts are required to implement custom mail transports. These custommail transports do not require the outbound-socket-binding-ref and allow custom host propertyformats.
You can configure custom mail transports from the management CLI.
1. Add a new mail session and specify the JNDI name.
/subsystem=mail/mail-session=mySession:add(jndi-name=java:jboss/mail/MySession)
2. Add an outbound socket binding and specify the host and port.
@Resource(lookup="java:jboss/mail/MySession")private Session session;
Red Hat JBoss Enterprise Application Platform 7.0 Configuration Guide
110
/socket-binding-group=standard-sockets/remote-destination-outbound-socket-binding=my-smtp-binding:add(host=localhost, port=25)
3. Add an SMTP server and specify the outbound socket binding, username, and password.
/subsystem=mail/mail-session=mySession/server=smtp:add(outbound-socket-binding-ref=my-smtp-binding, username=user, password=pass, tls=true)
NOTE
You can configure a POP3 or IMAP server using similar steps.
POP3 Server
/socket-binding-group=standard-sockets/remote-destination-outbound-socket-binding=my-pop3-binding:add(host=localhost, port=110)/subsystem=mail/mail-session=mySession/server=pop3:add(outbound-socket-binding-ref=my-pop3-binding, username=user, password=pass)
IMAP Server
/socket-binding-group=standard-sockets/remote-destination-outbound-socket-binding=my-imap-binding:add(host=localhost, port=143)/subsystem=mail/mail-session=mySession/server=imap:add(outbound-socket-binding-ref=my-imap-binding, username=user, password=pass)
To use a custom server, create a custom mail server without an outbound socket binding. You canspecify the host information in the properties definition of the custom mail server. For example:
/subsystem=mail/mail-session=mySession/custom=myCustomServer:add(username=user,password=pass, properties={"host" => "myhost", "my-property" =>"value"})
If you define a custom protocol, any property name that includes a period (.) is considered a fully-qualified name and is passed directly. Any other format, such as my-property, is translated in thefollowing format: mail.server-name.my-property.
The following XML is an example mail configuration that includes custom servers.
<subsystem xmlns="urn:jboss:domain:mail:2.0"> <mail-session name="default" jndi-name="java:jboss/mail/Default"> <smtp-server outbound-socket-binding-ref="mail-smtp"/> </mail-session> <mail-session name="myMail" from="[email protected]" jndi-name="java:/Mail"> <smtp-server password="password" username="user" tls="true" outbound-socket-binding-ref="mail-smtp"/>
CHAPTER 10. MAIL SUBSYSTEM
111

<pop3-server outbound-socket-binding-ref="mail-pop3"/> <imap-server password="password" username="nobody" outbound-socket-binding-ref="mail-imap"/> </mail-session> <mail-session name="custom" jndi-name="java:jboss/mail/Custom" debug="true"> <custom-server name="smtp" password="password" username="username"> <property name="host" value="mail.example.com"/> </custom-server> </mail-session> <mail-session name="custom2" jndi-name="java:jboss/mail/Custom2" debug="true"> <custom-server name="pop3" outbound-socket-binding-ref="mail-pop3"> <property name="custom-prop" value="some-custom-prop-value"/> </custom-server> </mail-session></subsystem>
Red Hat JBoss Enterprise Application Platform 7.0 Configuration Guide
112
CHAPTER 11. CONFIGURING WEB SERVICESJBoss EAP offers the ability to configure the behavior of deployed web services through the webservices subsystem using the management console or the management CLI. You can configurepublished endpoint addresses and handler chains. You can also enable the collection of runtimestatistics for web services.
For more information, see Configuring the Web Services Subsystem in Developing Web ServicesApplications for JBoss EAP.
CHAPTER 11. CONFIGURING WEB SERVICES
113
CHAPTER 12. LOGGING WITH JBOSS EAPJBoss EAP provides highly-configurable logging facilities for both its own internal use and for use bydeployed applications. The logging subsystem is based on JBoss LogManager and supports severalthird-party application logging frameworks in addition to JBoss Logging.
12.1. ABOUT SERVER LOGGING
12.1.1. Server Logging
By default, all JBoss EAP log entries are written to the server.log file. The location of this filedepends on your operating mode.
Standalone server: EAP_HOME/standalone/log/server.log
Managed domain: EAP_HOME/domain/servers/SERVER_NAME/log/server.log
This file is often referred to as the server log. For more information, see the Root Logger section.
12.1.2. Bootup Logging
During bootup, JBoss EAP logs information about the Java environment and the startup of eachservice. This log can be useful when troubleshooting. By default, all log entries are written to the serverlog.
Bootup logging configuration is specified in the logging.properties configuration file, which isactive until the JBoss EAP logging subsystem is started and takes over. The location of this filedepends on your operating mode.
Standalone server: EAP_HOME/standalone/configuration/logging.properties
Managed domain:There is a logging.properties file for the domain controller and for each server.
Domain controller: EAP_HOME/domain/configuration/logging.properties
Server: EAP_HOME/domain/servers/SERVER_NAME/data/logging.properties
WARNING
It is recommended that you do not directly edit the logging.properties fileunless you know of a specific use case that requires it. Before doing so, it isrecommended that you open a support case from the Red Hat Customer Portal .
Changes made manually to the logging.properties file are overwritten onstartup.
12.1.2.1. View Bootup Errors
Red Hat JBoss Enterprise Application Platform 7.0 Configuration Guide
114
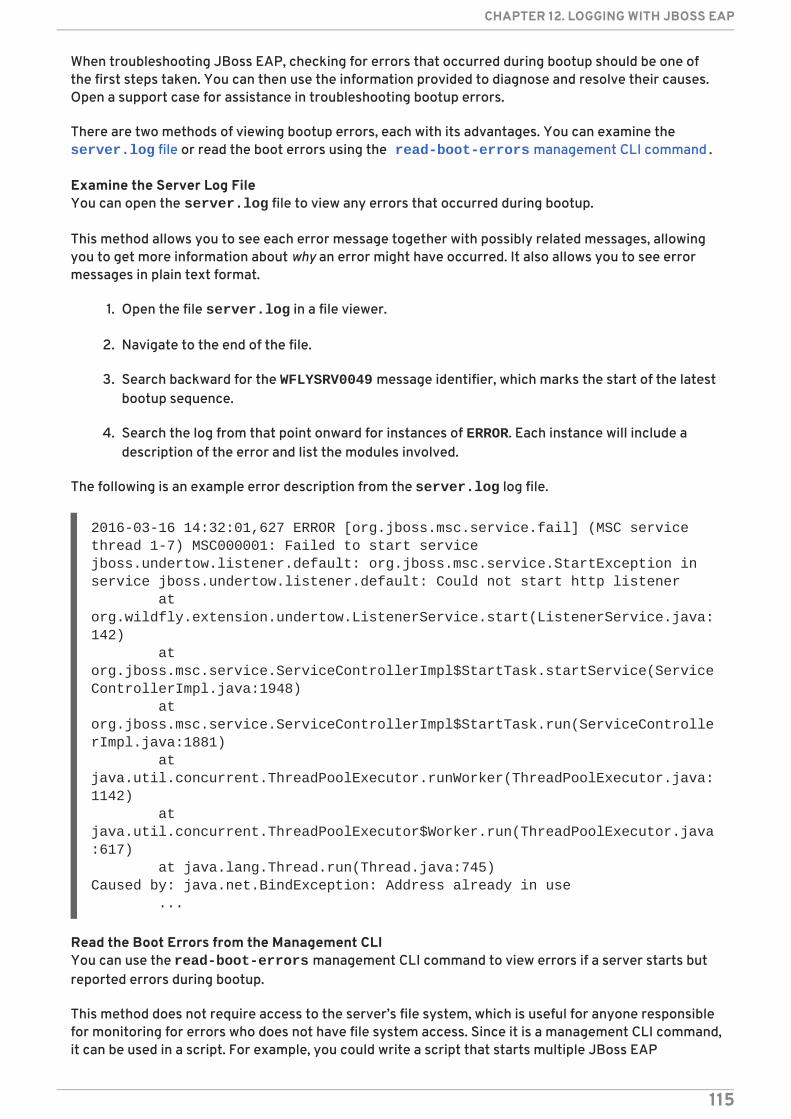
When troubleshooting JBoss EAP, checking for errors that occurred during bootup should be one ofthe first steps taken. You can then use the information provided to diagnose and resolve their causes.Open a support case for assistance in troubleshooting bootup errors.
There are two methods of viewing bootup errors, each with its advantages. You can examine the server.log file or read the boot errors using the read-boot-errors management CLI command .
Examine the Server Log FileYou can open the server.log file to view any errors that occurred during bootup.
This method allows you to see each error message together with possibly related messages, allowingyou to get more information about why an error might have occurred. It also allows you to see errormessages in plain text format.
1. Open the file server.log in a file viewer.
2. Navigate to the end of the file.
3. Search backward for the WFLYSRV0049 message identifier, which marks the start of the latestbootup sequence.
4. Search the log from that point onward for instances of ERROR. Each instance will include adescription of the error and list the modules involved.
The following is an example error description from the server.log log file.
2016-03-16 14:32:01,627 ERROR [org.jboss.msc.service.fail] (MSC service thread 1-7) MSC000001: Failed to start service jboss.undertow.listener.default: org.jboss.msc.service.StartException in service jboss.undertow.listener.default: Could not start http listener at org.wildfly.extension.undertow.ListenerService.start(ListenerService.java:142) at org.jboss.msc.service.ServiceControllerImpl$StartTask.startService(ServiceControllerImpl.java:1948) at org.jboss.msc.service.ServiceControllerImpl$StartTask.run(ServiceControllerImpl.java:1881) at java.util.concurrent.ThreadPoolExecutor.runWorker(ThreadPoolExecutor.java:1142) at java.util.concurrent.ThreadPoolExecutor$Worker.run(ThreadPoolExecutor.java:617) at java.lang.Thread.run(Thread.java:745)Caused by: java.net.BindException: Address already in use ...
Read the Boot Errors from the Management CLIYou can use the read-boot-errors management CLI command to view errors if a server starts butreported errors during bootup.
This method does not require access to the server’s file system, which is useful for anyone responsiblefor monitoring for errors who does not have file system access. Since it is a management CLI command,it can be used in a script. For example, you could write a script that starts multiple JBoss EAP
CHAPTER 12. LOGGING WITH JBOSS EAP
115
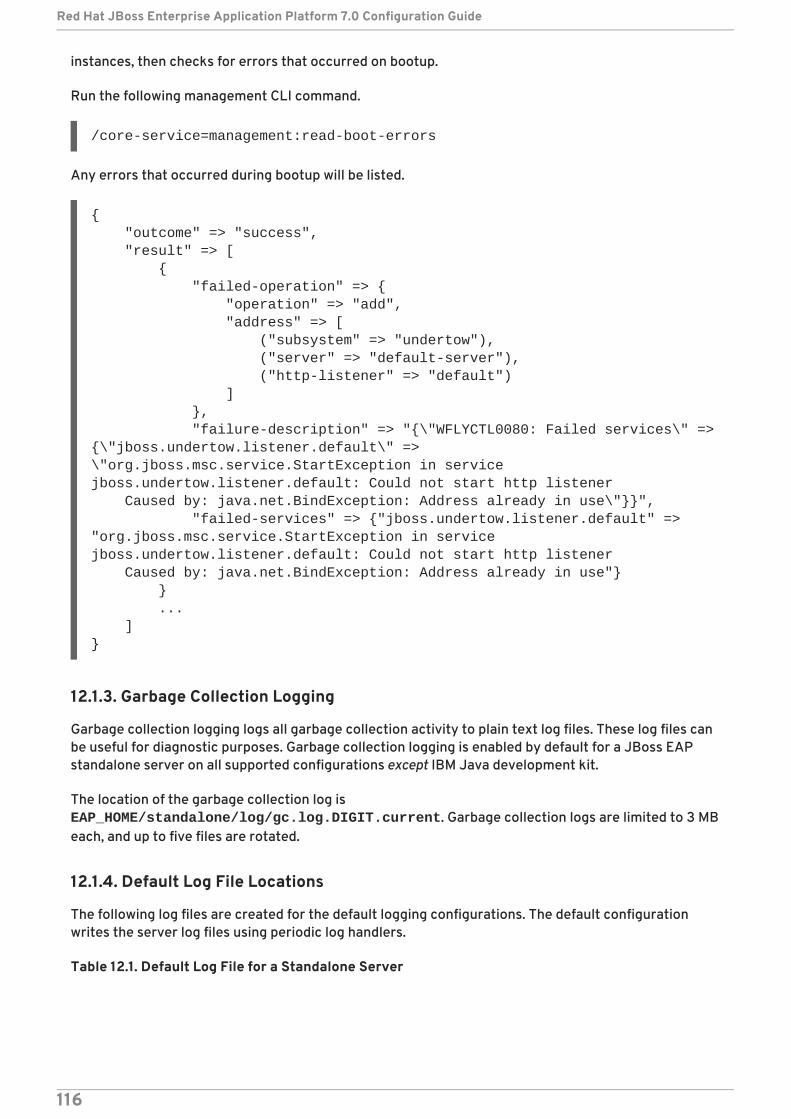
instances, then checks for errors that occurred on bootup.
Run the following management CLI command.
/core-service=management:read-boot-errors
Any errors that occurred during bootup will be listed.
{ "outcome" => "success", "result" => [ { "failed-operation" => { "operation" => "add", "address" => [ ("subsystem" => "undertow"), ("server" => "default-server"), ("http-listener" => "default") ] }, "failure-description" => "{\"WFLYCTL0080: Failed services\" => {\"jboss.undertow.listener.default\" => \"org.jboss.msc.service.StartException in service jboss.undertow.listener.default: Could not start http listener Caused by: java.net.BindException: Address already in use\"}}", "failed-services" => {"jboss.undertow.listener.default" => "org.jboss.msc.service.StartException in service jboss.undertow.listener.default: Could not start http listener Caused by: java.net.BindException: Address already in use"} } ... ]}
12.1.3. Garbage Collection Logging
Garbage collection logging logs all garbage collection activity to plain text log files. These log files canbe useful for diagnostic purposes. Garbage collection logging is enabled by default for a JBoss EAPstandalone server on all supported configurations except IBM Java development kit.
The location of the garbage collection log is EAP_HOME/standalone/log/gc.log.DIGIT.current. Garbage collection logs are limited to 3 MBeach, and up to five files are rotated.
12.1.4. Default Log File Locations
The following log files are created for the default logging configurations. The default configurationwrites the server log files using periodic log handlers.
Table 12.1. Default Log File for a Standalone Server
Red Hat JBoss Enterprise Application Platform 7.0 Configuration Guide
116
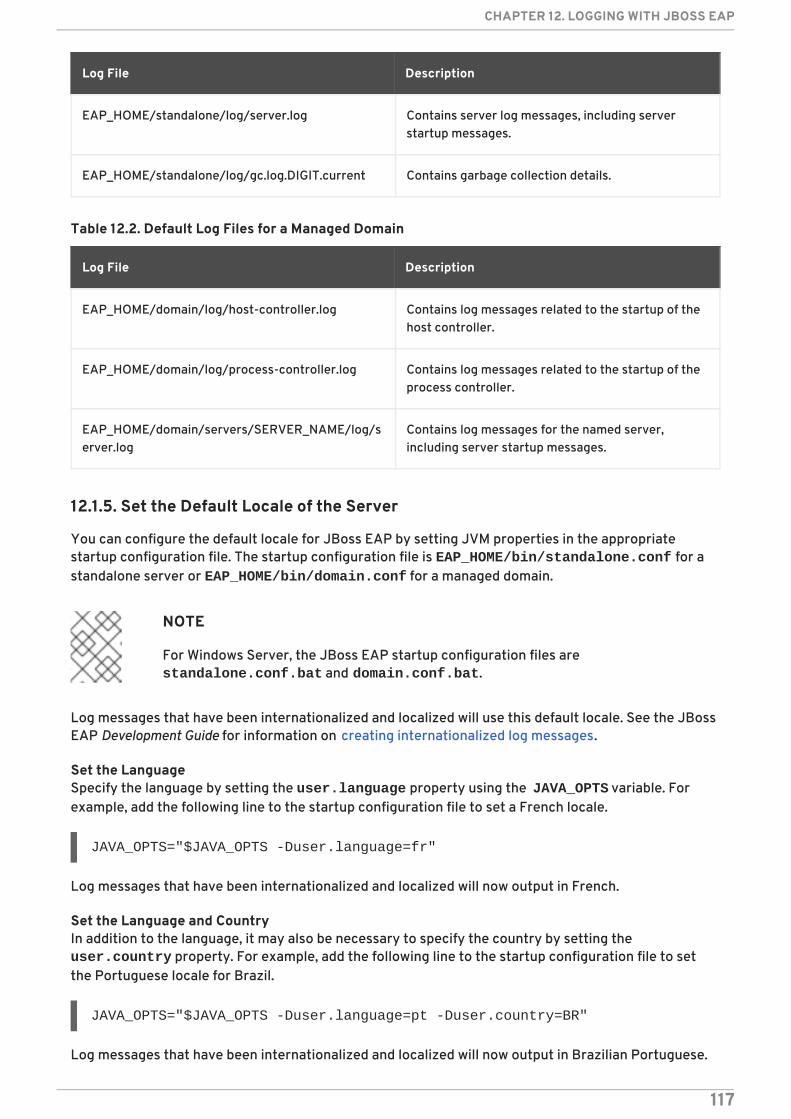
Log File Description
EAP_HOME/standalone/log/server.log Contains server log messages, including serverstartup messages.
EAP_HOME/standalone/log/gc.log.DIGIT.current Contains garbage collection details.
Table 12.2. Default Log Files for a Managed Domain
Log File Description
EAP_HOME/domain/log/host-controller.log Contains log messages related to the startup of thehost controller.
EAP_HOME/domain/log/process-controller.log Contains log messages related to the startup of theprocess controller.
EAP_HOME/domain/servers/SERVER_NAME/log/server.log
Contains log messages for the named server,including server startup messages.
12.1.5. Set the Default Locale of the Server
You can configure the default locale for JBoss EAP by setting JVM properties in the appropriatestartup configuration file. The startup configuration file is EAP_HOME/bin/standalone.conf for astandalone server or EAP_HOME/bin/domain.conf for a managed domain.
NOTE
For Windows Server, the JBoss EAP startup configuration files are standalone.conf.bat and domain.conf.bat.
Log messages that have been internationalized and localized will use this default locale. See the JBossEAP Development Guide for information on creating internationalized log messages.
Set the LanguageSpecify the language by setting the user.language property using the JAVA_OPTS variable. Forexample, add the following line to the startup configuration file to set a French locale.
JAVA_OPTS="$JAVA_OPTS -Duser.language=fr"
Log messages that have been internationalized and localized will now output in French.
Set the Language and CountryIn addition to the language, it may also be necessary to specify the country by setting the user.country property. For example, add the following line to the startup configuration file to setthe Portuguese locale for Brazil.
JAVA_OPTS="$JAVA_OPTS -Duser.language=pt -Duser.country=BR"
Log messages that have been internationalized and localized will now output in Brazilian Portuguese.
CHAPTER 12. LOGGING WITH JBOSS EAP
117
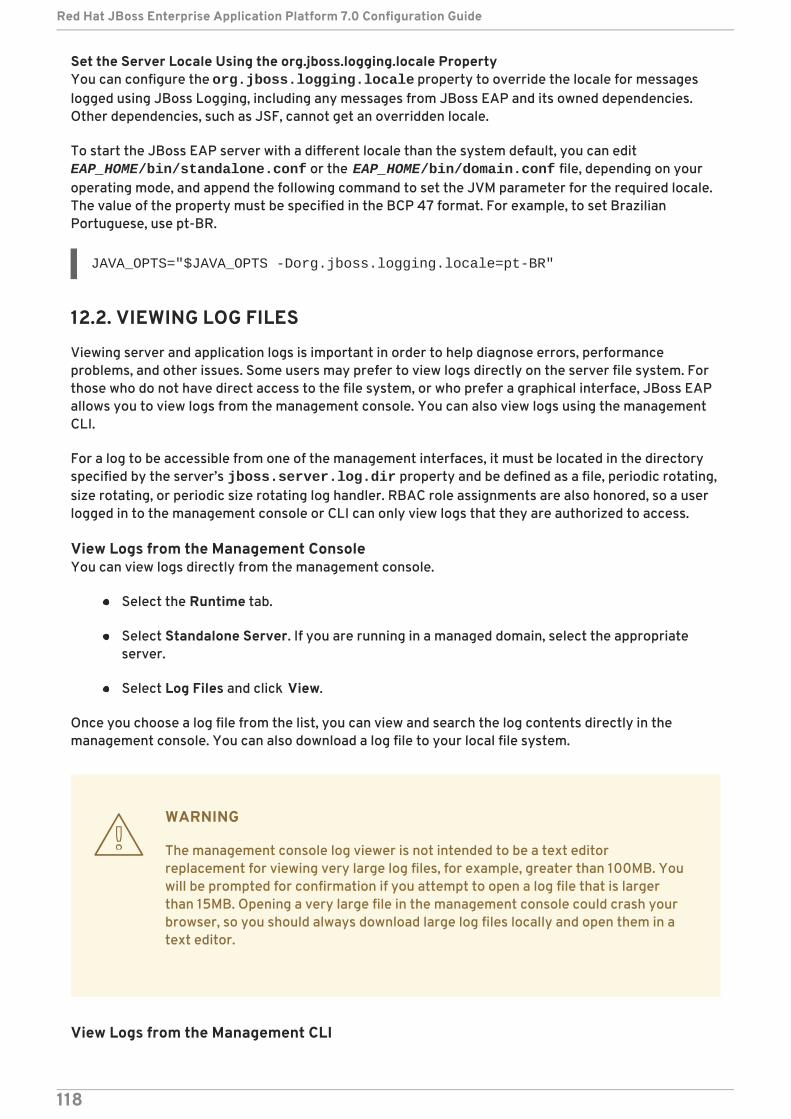
Set the Server Locale Using the org.jboss.logging.locale PropertyYou can configure the org.jboss.logging.locale property to override the locale for messageslogged using JBoss Logging, including any messages from JBoss EAP and its owned dependencies.Other dependencies, such as JSF, cannot get an overridden locale.
To start the JBoss EAP server with a different locale than the system default, you can edit EAP_HOME/bin/standalone.conf or the EAP_HOME/bin/domain.conf file, depending on youroperating mode, and append the following command to set the JVM parameter for the required locale.The value of the property must be specified in the BCP 47 format. For example, to set BrazilianPortuguese, use pt-BR.
JAVA_OPTS="$JAVA_OPTS -Dorg.jboss.logging.locale=pt-BR"
12.2. VIEWING LOG FILES
Viewing server and application logs is important in order to help diagnose errors, performanceproblems, and other issues. Some users may prefer to view logs directly on the server file system. Forthose who do not have direct access to the file system, or who prefer a graphical interface, JBoss EAPallows you to view logs from the management console. You can also view logs using the managementCLI.
For a log to be accessible from one of the management interfaces, it must be located in the directoryspecified by the server’s jboss.server.log.dir property and be defined as a file, periodic rotating,size rotating, or periodic size rotating log handler. RBAC role assignments are also honored, so a userlogged in to the management console or CLI can only view logs that they are authorized to access.
View Logs from the Management ConsoleYou can view logs directly from the management console.
Select the Runtime tab.
Select Standalone Server. If you are running in a managed domain, select the appropriateserver.
Select Log Files and click View.
Once you choose a log file from the list, you can view and search the log contents directly in themanagement console. You can also download a log file to your local file system.
WARNING
The management console log viewer is not intended to be a text editorreplacement for viewing very large log files, for example, greater than 100MB. Youwill be prompted for confirmation if you attempt to open a log file that is largerthan 15MB. Opening a very large file in the management console could crash yourbrowser, so you should always download large log files locally and open them in atext editor.
View Logs from the Management CLI
Red Hat JBoss Enterprise Application Platform 7.0 Configuration Guide
118
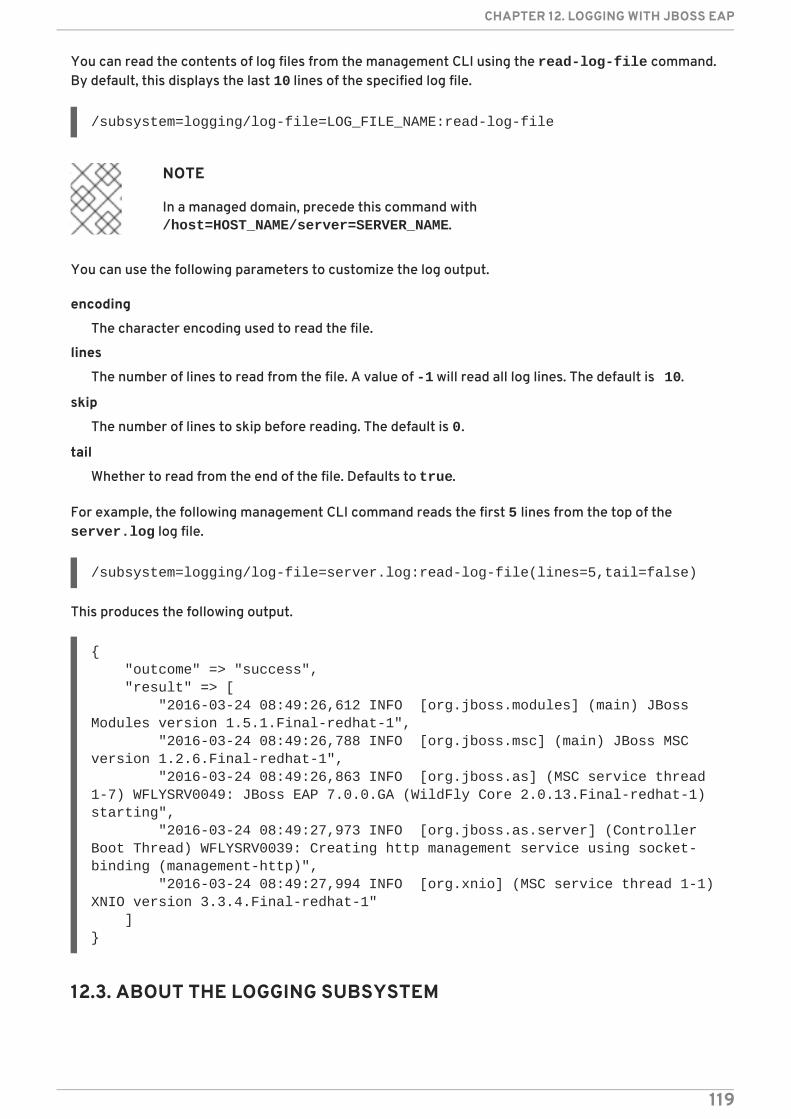
You can read the contents of log files from the management CLI using the read-log-file command.By default, this displays the last 10 lines of the specified log file.
/subsystem=logging/log-file=LOG_FILE_NAME:read-log-file
NOTE
In a managed domain, precede this command with /host=HOST_NAME/server=SERVER_NAME.
You can use the following parameters to customize the log output.
encoding
The character encoding used to read the file.
lines
The number of lines to read from the file. A value of -1 will read all log lines. The default is 10.
skip
The number of lines to skip before reading. The default is 0.
tail
Whether to read from the end of the file. Defaults to true.
For example, the following management CLI command reads the first 5 lines from the top of the server.log log file.
/subsystem=logging/log-file=server.log:read-log-file(lines=5,tail=false)
This produces the following output.
{ "outcome" => "success", "result" => [ "2016-03-24 08:49:26,612 INFO [org.jboss.modules] (main) JBoss Modules version 1.5.1.Final-redhat-1", "2016-03-24 08:49:26,788 INFO [org.jboss.msc] (main) JBoss MSC version 1.2.6.Final-redhat-1", "2016-03-24 08:49:26,863 INFO [org.jboss.as] (MSC service thread 1-7) WFLYSRV0049: JBoss EAP 7.0.0.GA (WildFly Core 2.0.13.Final-redhat-1) starting", "2016-03-24 08:49:27,973 INFO [org.jboss.as.server] (Controller Boot Thread) WFLYSRV0039: Creating http management service using socket-binding (management-http)", "2016-03-24 08:49:27,994 INFO [org.xnio] (MSC service thread 1-1) XNIO version 3.3.4.Final-redhat-1" ]}
12.3. ABOUT THE LOGGING SUBSYSTEM
CHAPTER 12. LOGGING WITH JBOSS EAP
119
The JBoss EAP logging subsystem is configured using a system of log categories and log handlers.Log categories define what messages to capture. Log handlers define how to deal with those messages,for example, writing to a disk or sending to the console.
Logging profiles allow uniquely-named sets of logging configuration to be created and assigned toapplications independent of any other logging configuration. The configuration of logging profiles isalmost identical to the main logging subsystem.
12.3.1. Root Logger
The JBoss EAP root logger captures all log messages, of the specified log level or higher, sent to theserver that are not captured by a log category.
By default, the root logger is configured to use a console and a periodic log handler. The periodic loghandler is configured to write to the server.log file. This file is often referred to as the server log.
See Configuring the Root Logger for more information.
12.3.2. Log Categories
A log category defines a set of log messages to capture and one or more log handlers that will processthe messages.
The log messages to capture are defined by the specified Java package of origin and log level.Messages from classes in that package and of that log level or higher are captured by the log categoryand sent to the specified log handlers.
NOTE
Although the log category is typically the Java package and class name, it can be anyname specified by the Logger.getLogger(LOGGER_NAME) method.
Log categories can optionally use the log handlers of the root logger instead of their own handlers.
See Configuring Log Categories for more information.
12.3.3. Log Handlers
Log handlers define how captured log messages are recorded. The available log handler types areconsole, file, periodic, size, periodic size, syslog, custom, and async.
NOTE
A log handler must be added to at least one logger in order to be active.
Log Handler Types
Console
A console log handler writes log messages to either the host operating system’s standard out(stdout) or standard error ( stderr) stream. These messages are displayed when JBoss EAP isrun from a command line prompt. The messages from a console log handler are not saved unless theoperating system is configured to capture the standard out or standard error stream.
File
Red Hat JBoss Enterprise Application Platform 7.0 Configuration Guide
120
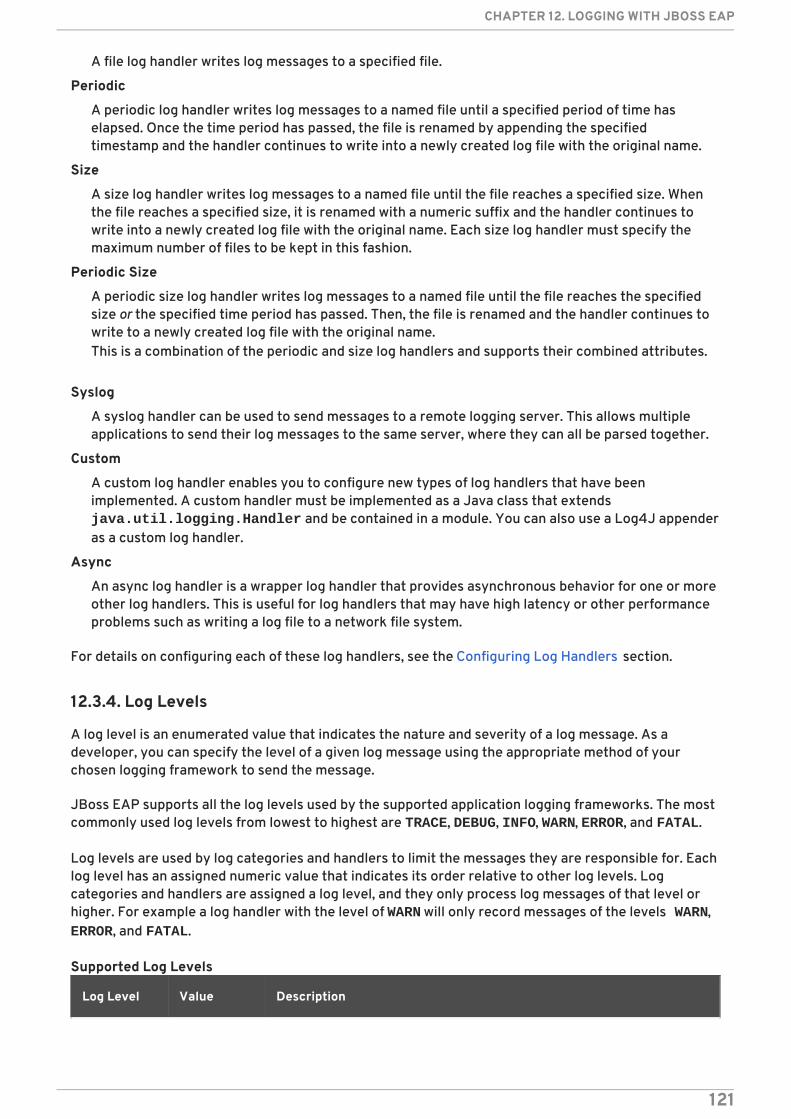
A file log handler writes log messages to a specified file.
Periodic
A periodic log handler writes log messages to a named file until a specified period of time haselapsed. Once the time period has passed, the file is renamed by appending the specifiedtimestamp and the handler continues to write into a newly created log file with the original name.
Size
A size log handler writes log messages to a named file until the file reaches a specified size. Whenthe file reaches a specified size, it is renamed with a numeric suffix and the handler continues towrite into a newly created log file with the original name. Each size log handler must specify themaximum number of files to be kept in this fashion.
Periodic Size
A periodic size log handler writes log messages to a named file until the file reaches the specifiedsize or the specified time period has passed. Then, the file is renamed and the handler continues towrite to a newly created log file with the original name.This is a combination of the periodic and size log handlers and supports their combined attributes.
Syslog
A syslog handler can be used to send messages to a remote logging server. This allows multipleapplications to send their log messages to the same server, where they can all be parsed together.
Custom
A custom log handler enables you to configure new types of log handlers that have beenimplemented. A custom handler must be implemented as a Java class that extends java.util.logging.Handler and be contained in a module. You can also use a Log4J appenderas a custom log handler.
Async
An async log handler is a wrapper log handler that provides asynchronous behavior for one or moreother log handlers. This is useful for log handlers that may have high latency or other performanceproblems such as writing a log file to a network file system.
For details on configuring each of these log handlers, see the Configuring Log Handlers section.
12.3.4. Log Levels
A log level is an enumerated value that indicates the nature and severity of a log message. As adeveloper, you can specify the level of a given log message using the appropriate method of yourchosen logging framework to send the message.
JBoss EAP supports all the log levels used by the supported application logging frameworks. The mostcommonly used log levels from lowest to highest are TRACE, DEBUG, INFO, WARN, ERROR, and FATAL.
Log levels are used by log categories and handlers to limit the messages they are responsible for. Eachlog level has an assigned numeric value that indicates its order relative to other log levels. Logcategories and handlers are assigned a log level, and they only process log messages of that level orhigher. For example a log handler with the level of WARN will only record messages of the levels WARN, ERROR, and FATAL.
Supported Log Levels
Log Level Value Description
CHAPTER 12. LOGGING WITH JBOSS EAP
121
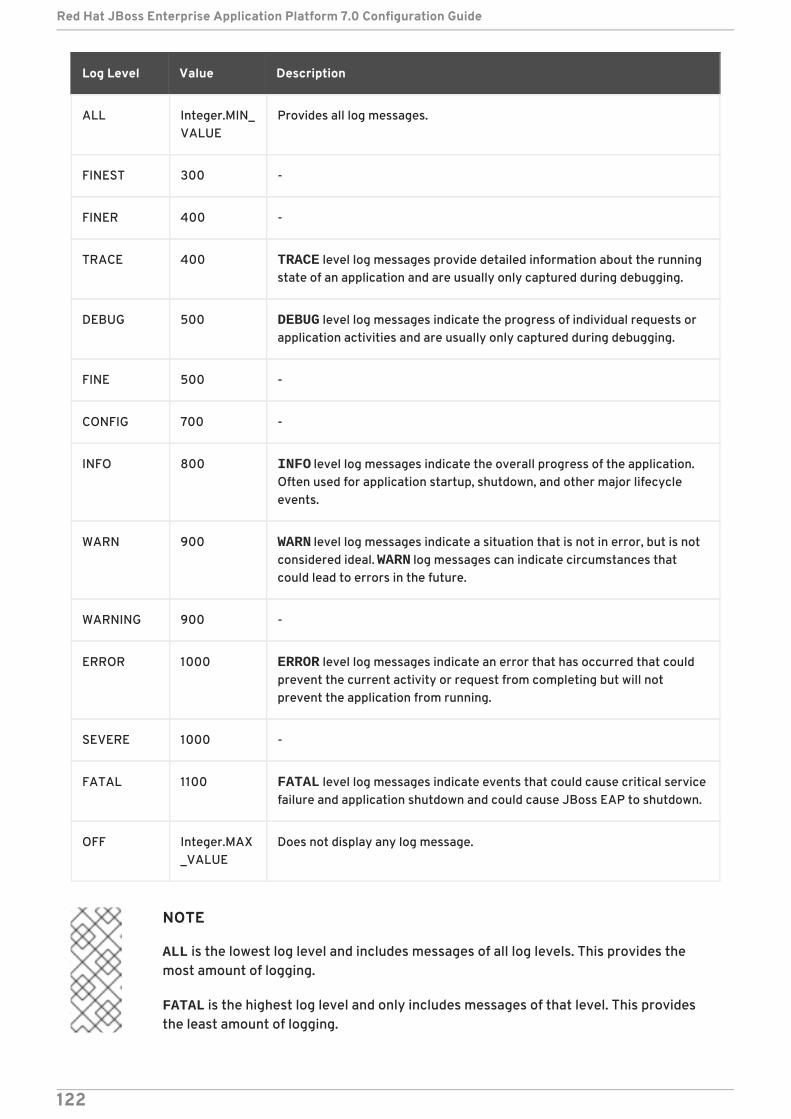
ALL Integer.MIN_VALUE
Provides all log messages.
FINEST 300 -
FINER 400 -
TRACE 400 TRACE level log messages provide detailed information about the runningstate of an application and are usually only captured during debugging.
DEBUG 500 DEBUG level log messages indicate the progress of individual requests orapplication activities and are usually only captured during debugging.
FINE 500 -
CONFIG 700 -
INFO 800 INFO level log messages indicate the overall progress of the application.Often used for application startup, shutdown, and other major lifecycleevents.
WARN 900 WARN level log messages indicate a situation that is not in error, but is notconsidered ideal. WARN log messages can indicate circumstances thatcould lead to errors in the future.
WARNING 900 -
ERROR 1000 ERROR level log messages indicate an error that has occurred that couldprevent the current activity or request from completing but will notprevent the application from running.
SEVERE 1000 -
FATAL 1100 FATAL level log messages indicate events that could cause critical servicefailure and application shutdown and could cause JBoss EAP to shutdown.
OFF Integer.MAX_VALUE
Does not display any log message.
Log Level Value Description
NOTE
ALL is the lowest log level and includes messages of all log levels. This provides themost amount of logging.
FATAL is the highest log level and only includes messages of that level. This providesthe least amount of logging.
Red Hat JBoss Enterprise Application Platform 7.0 Configuration Guide
122
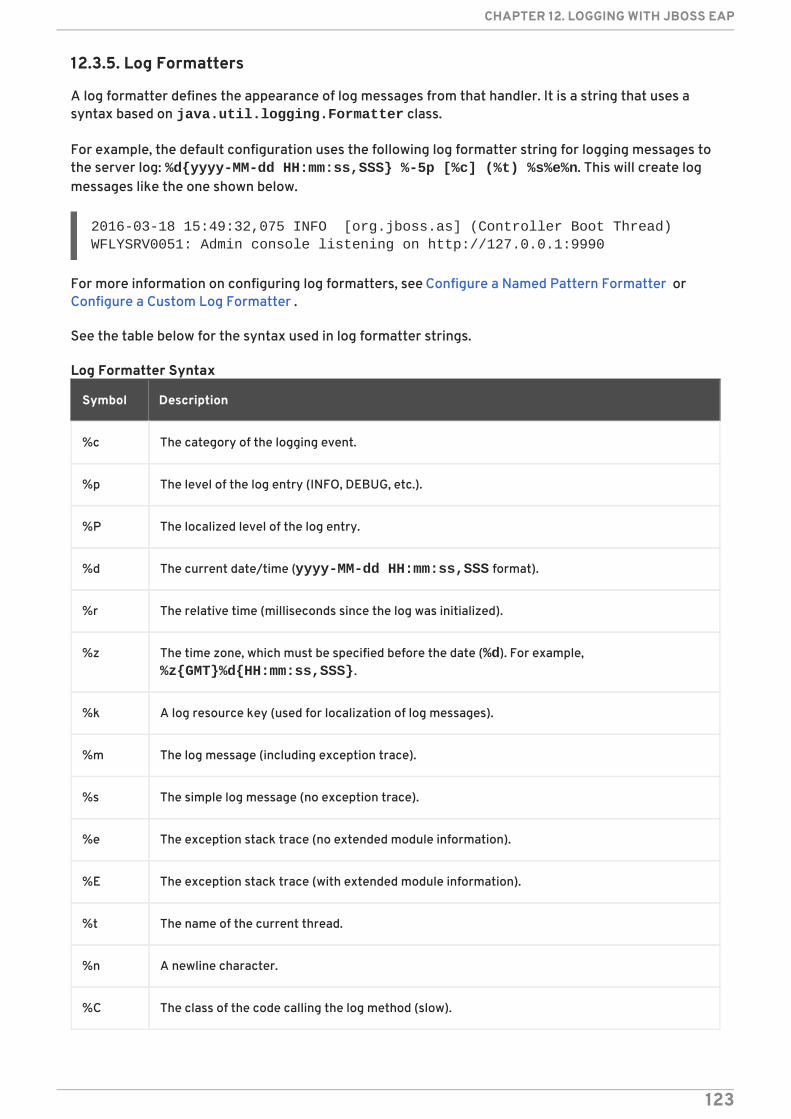
12.3.5. Log Formatters
A log formatter defines the appearance of log messages from that handler. It is a string that uses asyntax based on java.util.logging.Formatter class.
For example, the default configuration uses the following log formatter string for logging messages tothe server log: %d{yyyy-MM-dd HH:mm:ss,SSS} %-5p [%c] (%t) %s%e%n. This will create logmessages like the one shown below.
2016-03-18 15:49:32,075 INFO [org.jboss.as] (Controller Boot Thread) WFLYSRV0051: Admin console listening on http://127.0.0.1:9990
For more information on configuring log formatters, see Configure a Named Pattern Formatter orConfigure a Custom Log Formatter .
See the table below for the syntax used in log formatter strings.
Log Formatter Syntax
Symbol Description
%c The category of the logging event.
%p The level of the log entry (INFO, DEBUG, etc.).
%P The localized level of the log entry.
%d The current date/time (yyyy-MM-dd HH:mm:ss,SSS format).
%r The relative time (milliseconds since the log was initialized).
%z The time zone, which must be specified before the date (%d). For example, %z{GMT}%d{HH:mm:ss,SSS}.
%k A log resource key (used for localization of log messages).
%m The log message (including exception trace).
%s The simple log message (no exception trace).
%e The exception stack trace (no extended module information).
%E The exception stack trace (with extended module information).
%t The name of the current thread.
%n A newline character.
%C The class of the code calling the log method (slow).
CHAPTER 12. LOGGING WITH JBOSS EAP
123
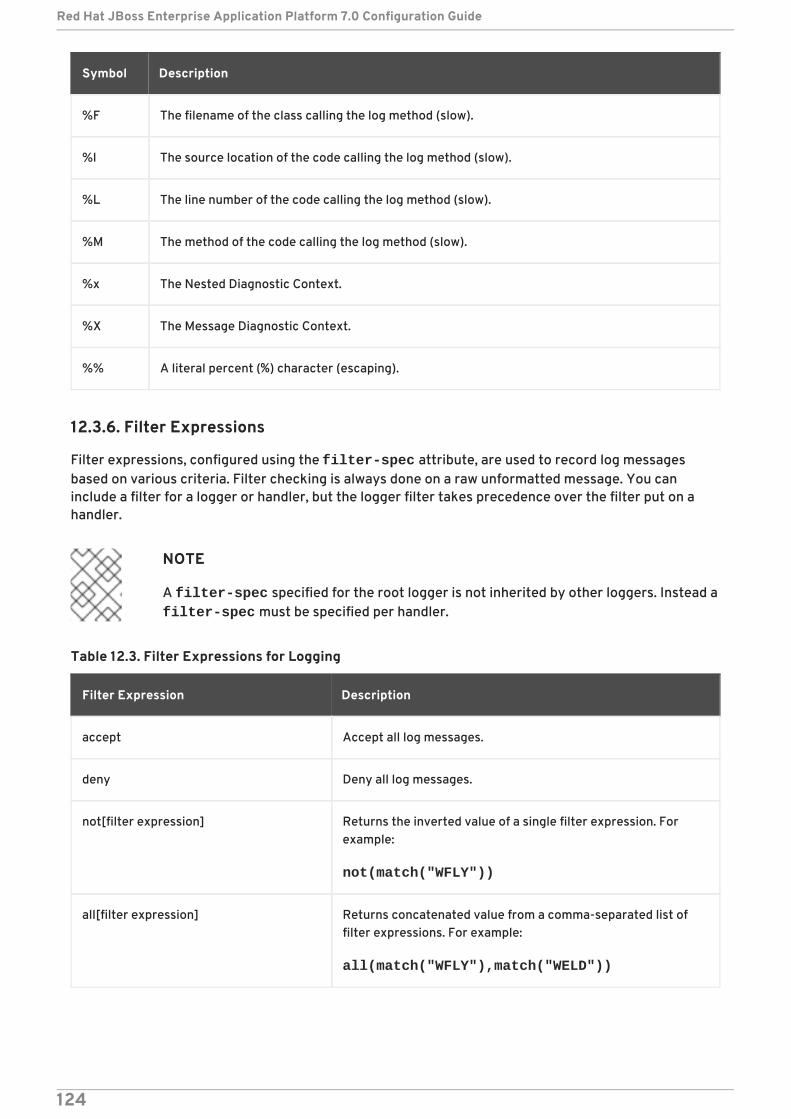
%F The filename of the class calling the log method (slow).
%l The source location of the code calling the log method (slow).
%L The line number of the code calling the log method (slow).
%M The method of the code calling the log method (slow).
%x The Nested Diagnostic Context.
%X The Message Diagnostic Context.
%% A literal percent (%) character (escaping).
Symbol Description
12.3.6. Filter Expressions
Filter expressions, configured using the filter-spec attribute, are used to record log messagesbased on various criteria. Filter checking is always done on a raw unformatted message. You caninclude a filter for a logger or handler, but the logger filter takes precedence over the filter put on ahandler.
NOTE
A filter-spec specified for the root logger is not inherited by other loggers. Instead afilter-spec must be specified per handler.
Table 12.3. Filter Expressions for Logging
Filter Expression Description
accept Accept all log messages.
deny Deny all log messages.
not[filter expression] Returns the inverted value of a single filter expression. Forexample:
not(match("WFLY"))
all[filter expression] Returns concatenated value from a comma-separated list offilter expressions. For example:
all(match("WFLY"),match("WELD"))
Red Hat JBoss Enterprise Application Platform 7.0 Configuration Guide
124
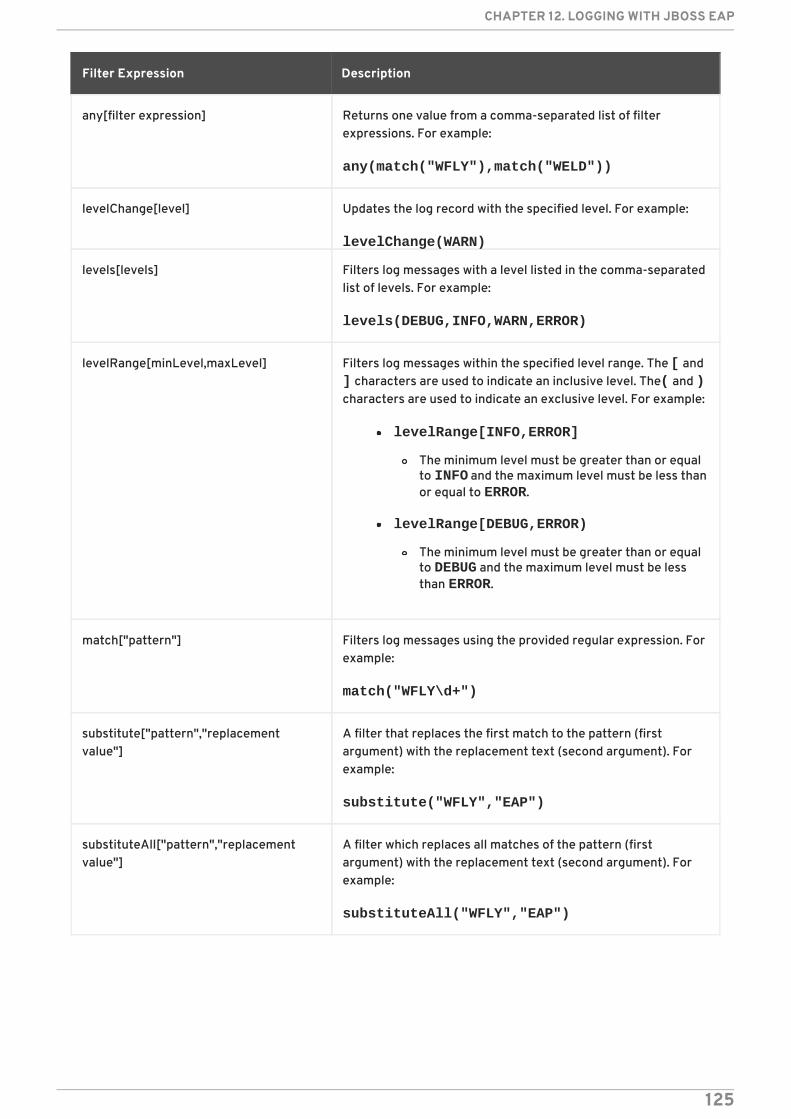
any[filter expression] Returns one value from a comma-separated list of filterexpressions. For example:
any(match("WFLY"),match("WELD"))
levelChange[level] Updates the log record with the specified level. For example:
levelChange(WARN)
levels[levels] Filters log messages with a level listed in the comma-separatedlist of levels. For example:
levels(DEBUG,INFO,WARN,ERROR)
levelRange[minLevel,maxLevel] Filters log messages within the specified level range. The [ and ] characters are used to indicate an inclusive level. The ( and )characters are used to indicate an exclusive level. For example:
levelRange[INFO,ERROR]
The minimum level must be greater than or equalto INFO and the maximum level must be less thanor equal to ERROR.
levelRange[DEBUG,ERROR)
The minimum level must be greater than or equalto DEBUG and the maximum level must be lessthan ERROR.
match["pattern"] Filters log messages using the provided regular expression. Forexample:
match("WFLY\d+")
substitute["pattern","replacementvalue"]
A filter that replaces the first match to the pattern (firstargument) with the replacement text (second argument). Forexample:
substitute("WFLY","EAP")
substituteAll["pattern","replacementvalue"]
A filter which replaces all matches of the pattern (firstargument) with the replacement text (second argument). Forexample:
substituteAll("WFLY","EAP")
Filter Expression Description
CHAPTER 12. LOGGING WITH JBOSS EAP
125
NOTE
When configuring the filter expression using the management CLI, be sure to escapecommas and quotation marks in the filter text so that the value is correctly processedas a string. You must precede commas and quotation marks with a backslash (\) andwrap the entire expression in quotation marks. Below is an example that properlyescapes substituteAll("WFLY","YLFW").
/subsystem=logging/console-handler=CONSOLE:write-attribute(name=filter-spec, value="substituteAll(\"WFLY\"\,\"YLFW\")")
12.3.7. Implicit Logging Dependencies
By default, the JBoss EAP logging subsystem adds implicit logging API dependencies todeployments. You can control whether these implicit dependencies are added to deployments by usingthe add-logging-api-dependencies attribute, which is true by default.
Using the management CLI, you can set the add-logging-api-dependencies attribute to falseso that the implicit logging API dependencies will not be added to deployments.
/subsystem=logging:write-attribute(name=add-logging-api-dependencies, value=false)
For information on the implicit dependencies for the logging subsystem, see the Implicit ModuleDependencies section in the JBoss EAP Development Guide.
12.4. CONFIGURING LOG CATEGORIES
This section shows you how to configure log categories using the management CLI. You can alsoconfigure log categories using the management console by navigating to the Logging subsystem fromthe Configuration tab and selecting the Log Categories tab.
The main tasks you will perform to configure a log category are:
Add a new log category.
Configure the log category settings.
Assign a log handler to the log category .
IMPORTANT
If you are configuring this log category for a logging profile, the start of the commandwould be /subsystem=logging/logging-profile=LOGGING_PROFILE_NAME/instead of /subsystem=logging/.
Additionally, if you are running in a managed domain, precede the commands with /profile=PROFILE_NAME.
Add a Log CategoryThe log category name is defined by the Java package of origin. Messages from classes in thatpackage will be captured as long as they adhere to the other settings, for example, the log level.
Red Hat JBoss Enterprise Application Platform 7.0 Configuration Guide
126
/subsystem=logging/logger=LOG_CATEGORY:add
Configure Log Category SettingsDepending on your needs, you may need to set one or more of the following log category attributes.For a full list of available log category attributes and their descriptions, see Log Category Attributes .
Set the log level.Set the appropriate log level for the log category. The default is ALL. See Log Levels for allavailable options.
/subsystem=logging/logger=LOG_CATEGORY:write-attribute(name=level,value=LEVEL)
Set whether this category should use the log handlers of the root logger.By default, log categories will use the handlers of the root logger in addition to its own. Set the use-parent-handlers attribute to false if the log category should use only its assignedhandlers.
/subsystem=logging/logger=LOG_CATEGORY:write-attribute(name=use-parent-handlers,value=USE_PARENT_HANDLERS)
Set the filter expression.Set the expression for filtering log messages for the log category. Be sure to escape anycommas and quotation marks and surround with quotation marks. For example, the FILTER_EXPRESSION replaceable variable below would need to be replaced with "not(match(\"WFLY\"))" for a filter expression of not(match("WFLY")).
/subsystem=logging/logger=LOG_CATEGORY:write-attribute(name=filter-spec, value=FILTER_EXPRESSION)
See the Filter Expressions section for more information on available filter expressions.
Assign a HandlerAssign a log handler to the log category.
/subsystem=logging/logger=LOG_CATEGORY:add-handler(name=LOG_HANDLER_NAME)
Remove a Log CategoryA log category can be removed with the remove operation.
/subsystem=logging/logger=LOG_CATEGORY:remove
12.5. CONFIGURING LOG HANDLERS
Log handlers define how captured log messages are recorded. See the appropriate section forconfiguring the type of log handler that you need.
Console log handler
File log handler
Periodic rotating log handler
CHAPTER 12. LOGGING WITH JBOSS EAP
127
Size rotating log handler
Periodic size rotating log handler
Syslog handler
Custom log handler
Async log handler
12.5.1. Configure a Console Log Handler
This section shows you how to configure a console log handler using the management CLI. You canalso configure console log handlers using the management console by navigating to the Loggingsubsystem from the Configuration tab, selecting the Handler tab, and selecting Console from the left-hand menu.
The main tasks you will perform to configure a console log handler are:
Add a new console log handler .
Configure the console log handler settings .
Assign the console log handler to a logger .
IMPORTANT
If you are configuring this log handler for a logging profile, the start of the commandwould be /subsystem=logging/logging-profile=LOGGING_PROFILE_NAME/instead of /subsystem=logging/.
Additionally, if you are running in a managed domain, precede the commands with /profile=PROFILE_NAME.
Add a Console Log Handler
/subsystem=logging/console-handler=CONSOLE_HANDLER_NAME:add
Configure Console Log Handler SettingsDepending on your needs, you may need to set one or more of the following console log handlerattributes. For a full list of available console log handler attributes and their descriptions, see ConsoleLog Handler Attributes.
Set the log level.Set the appropriate log level for the handler. The default is ALL. See Log Levels for allavailable options.
/subsystem=logging/console-handler=CONSOLE_HANDLER_NAME:write-attribute(name=level,value=LEVEL)
Set the target.Set the target for the handler, which can be one of System.out, System.err, or console.The default is System.out.
Red Hat JBoss Enterprise Application Platform 7.0 Configuration Guide
128

/subsystem=logging/console-handler=CONSOLE_HANDLER_NAME:write-attribute(name=target,value=TARGET)
Set the encoding.Set the encoding for the handler, for example, utf-8.
/subsystem=logging/console-handler=CONSOLE_HANDLER_NAME:write-attribute(name=encoding,value=ENCODING)
Set the log formatter.Set the formatter string for the handler. For example, the default format string is %d{HH:mm:ss,SSS} %-5p [%c] (%t) %s%e%n. Be sure to enclose the FORMAT value inquotation marks.
/subsystem=logging/console-handler=CONSOLE_HANDLER_NAME:write-attribute(name=formatter,value=FORMAT)
NOTE
Use the named-formatter attribute if you want to reference a savedformatter.
Set auto flush.Set whether to automatically flush after each write. The default value is true.
/subsystem=logging/console-handler=CONSOLE_HANDLER_NAME:write-attribute(name=autoflush,value=AUTO_FLUSH)
Set the filter expression.Set the expression for filtering log messages for the handler. Be sure to escape any commasand quotation marks and surround with quotation marks. For example, the FILTER_EXPRESSION replaceable variable below would need to be replaced with "not(match(\"WFLY\"))" for a filter expression of not(match("WFLY")).
/subsystem=logging/console-handler=CONSOLE_HANDLER_NAME:write-attribute(name=filter-spec, value=FILTER_EXPRESSION)
See the Filter Expressions section for more information on available filter expressions.
Assign the Console Log Handler to a LoggerIn order for a log handler to be active, you must assign it to a logger.
The following management CLI command assigns the console log handler to the root logger.
/subsystem=logging/root-logger=ROOT:add-handler(name=CONSOLE_HANDLER_NAME)
The following management CLI command assigns the console log handler to a logger whose name isspecified by CATEGORY.
/subsystem=logging/logger=CATEGORY:add-handler(name=CONSOLE_HANDLER_NAME)
CHAPTER 12. LOGGING WITH JBOSS EAP
129
Remove a Console Log HandlerA log handler can be removed with the remove operation. A log handler cannot be removed if it iscurrently assigned to a logger or async log handler.
/subsystem=logging/console-handler=CONSOLE_HANDLER_NAME:remove
12.5.2. Configure a File Log Handler
This section shows you how to configure a file log handler using the management CLI. You can alsoconfigure file log handlers using the management console by navigating to the Logging subsystemfrom the Configuration tab, selecting the Handler tab, and selecting File from the left-hand menu.
The main tasks you will perform to configure a file log handler are:
Add a new file log handler .
Configure the file log handler settings .
Assign the file log handler to a logger .
IMPORTANT
If you are configuring this log handler for a logging profile, the start of the commandwould be /subsystem=logging/logging-profile=LOGGING_PROFILE_NAME/instead of /subsystem=logging/.
Additionally, if you are running in a managed domain, precede the commands with /profile=PROFILE_NAME.
Add a File Log HandlerWhen adding a file log handler, you must specify the file path using the file attribute, which iscomprised of the path and relative-to attributes. Use the path attribute to set the file path for thelog, including the name, for example my-log.log. Optionally, use the relative-to attribute to setthat the path is relative to a named path, for example jboss.server.log.dir.
/subsystem=logging/file-handler=FILE_HANDLER_NAME:add(file={path=FILE_PATH,relative-to=RELATIVE_TO_PATH})
Configure File Log Handler SettingsDepending on your needs, you may need to set one or more of the following file log handler attributes.For a full list of available file log handler attributes and their descriptions, see File Log HandlerAttributes.
Set the log level.Set the appropriate log level for the handler. The default is ALL. See Log Levels for allavailable options.
/subsystem=logging/file-handler=FILE_HANDLER_NAME:write-attribute(name=level,value=LEVEL)
Set the append behavior.By default, JBoss EAP will append log messages to the same file when the server is restarted.You can set the append attribute to false to have the file overwritten upon server restart.
Red Hat JBoss Enterprise Application Platform 7.0 Configuration Guide
130
/subsystem=logging/file-handler=FILE_HANDLER_NAME:write-attribute(name=append,value=APPEND)
Set the encoding.Set the encoding for the handler, for example, utf-8.
/subsystem=logging/file-handler=FILE_HANDLER_NAME:write-attribute(name=encoding,value=ENCODING)
Set the log formatter.Set the formatter string for the handler. For example, the default format string is %d{HH:mm:ss,SSS} %-5p [%c] (%t) %s%e%n. Be sure to enclose the FORMAT value inquotation marks.
/subsystem=logging/file-handler=FILE_HANDLER_NAME:write-attribute(name=formatter,value=FORMAT)
NOTE
Use the named-formatter attribute if you want to reference a savedformatter.
Set auto flush.Set whether to automatically flush after each write. The default value is true.
/subsystem=logging/file-handler=FILE_HANDLER_NAME:write-attribute(name=autoflush,value=AUTO_FLUSH)
Set the filter expression.Set the expression for filtering log messages for the handler. Be sure to escape any commasand quotation marks and surround with quotation marks. For example, the FILTER_EXPRESSION replaceable variable below would need to be replaced with "not(match(\"WFLY\"))" for a filter expression of not(match("WFLY")).
/subsystem=logging/file-handler=FILE_HANDLER_NAME:write-attribute(name=filter-spec, value=FILTER_EXPRESSION)
See the Filter Expressions section for more information on available filter expressions.
Assign the File Log Handler to a LoggerIn order for a log handler to be active, you must assign it to a logger.
The following management CLI command assigns the file log handler to the root logger.
/subsystem=logging/root-logger=ROOT:add-handler(name=FILE_HANDLER_NAME)
The following management CLI command assigns the file log handler to a logger whose name isspecified by CATEGORY.
/subsystem=logging/logger=CATEGORY:add-handler(name=FILE_HANDLER_NAME)
CHAPTER 12. LOGGING WITH JBOSS EAP
131
Remove a File Log HandlerA log handler can be removed with the remove operation. A log handler cannot be removed if it iscurrently assigned to a logger or async log handler.
/subsystem=logging/file-handler=FILE_HANDLER_NAME:remove
12.5.3. Configure a Periodic Rotating Log Handler
This section shows you how to configure a periodic rotating log handler using the management CLI.You can also configure periodic log handlers using the management console by navigating to theLogging subsystem from the Configuration tab, selecting the Handler tab, and selecting Periodicfrom the left-hand menu.
The main tasks you will perform to configure a periodic log handler are:
Add a new periodic log handler .
Configure the periodic log handler settings .
Assign the periodic log handler to a logger .
IMPORTANT
If you are configuring this log handler for a logging profile, the start of the commandwould be /subsystem=logging/logging-profile=LOGGING_PROFILE_NAME/instead of /subsystem=logging/.
Additionally, if you are running in a managed domain, precede the commands with /profile=PROFILE_NAME.
Add a Periodic Log HandlerWhen adding a periodic log handler, you must specify the file path using the file attribute, which iscomprised of the path and relative-to attributes. Use the path attribute to set the file path for thelog, including the name, for example my-log.log. Optionally, use the relative-to attribute to setthat the path is relative to a named path, for example jboss.server.log.dir.
You must also set the suffix for rotated logs using the suffix attribute. This must be in a format thatcan be understood by java.text.SimpleDateFormat, for example .yyyy-MM-dd-HH. The periodof the rotation is automatically calculated based on this suffix.
/subsystem=logging/periodic-rotating-file-handler=PERIODIC_HANDLER_NAME:add(file={path=FILE_PATH,relative-to=RELATIVE_TO_PATH},suffix=SUFFIX)
Configure Periodic Log Handler SettingsDepending on your needs, you may need to set one or more of the following periodic log handlerattributes. For a full list of available periodic log handler attributes and their descriptions, see PeriodicLog Handler Attributes.
Set the log level.Set the appropriate log level for the handler. The default is ALL. See Log Levels for allavailable options.
Red Hat JBoss Enterprise Application Platform 7.0 Configuration Guide
132
/subsystem=logging/periodic-rotating-file-handler=PERIODIC_HANDLER_NAME:write-attribute(name=level,value=LEVEL)
Set the append behavior.By default, JBoss EAP will append log messages to the same file when the server is restarted.You can set the append attribute to false to have the file overwritten upon server restart.
/subsystem=logging/periodic-rotating-file-handler=PERIODIC_HANDLER_NAME:write-attribute(name=append,value=APPEND)
Set the encoding.Set the encoding for the handler, for example, utf-8.
/subsystem=logging/periodic-rotating-file-handler=PERIODIC_HANDLER_NAME:write-attribute(name=encoding,value=ENCODING)
Set the log formatter.Set the formatter string for the handler. For example, the default format string is %d{HH:mm:ss,SSS} %-5p [%c] (%t) %s%e%n. Be sure to enclose the FORMAT value inquotation marks.
/subsystem=logging/periodic-rotating-file-handler=PERIODIC_HANDLER_NAME:write-attribute(name=formatter,value=FORMAT)
NOTE
Use the named-formatter attribute if you want to reference a savedformatter.
Set auto flush.Set whether to automatically flush after each write. The default value is true.
/subsystem=logging/periodic-rotating-file-handler=PERIODIC_HANDLER_NAME:write-attribute(name=autoflush,value=AUTO_FLUSH)
Set the filter expression.Set the expression for filtering log messages for the handler. Be sure to escape any commasand quotation marks and surround with quotation marks. For example, the FILTER_EXPRESSION replaceable variable below would need to be replaced with "not(match(\"WFLY\"))" for a filter expression of not(match("WFLY")).
/subsystem=logging/periodic-rotating-file-handler=PERIODIC_HANDLER_NAME:write-attribute(name=filter-spec, value=FILTER_EXPRESSION)
See the Filter Expressions section for more information on available filter expressions.
CHAPTER 12. LOGGING WITH JBOSS EAP
133
Assign the Periodic Log Handler to a LoggerIn order for a log handler to be active, you must assign it to a logger.
The following management CLI command assigns the periodic log handler to the root logger.
/subsystem=logging/root-logger=ROOT:add-handler(name=PERIODIC_HANDLER_NAME)
The following management CLI command assigns the periodic log handler to a logger whose name isspecified by CATEGORY.
/subsystem=logging/logger=CATEGORY:add-handler(name=PERIODIC_HANDLER_NAME)
Remove a Periodic Log HandlerA log handler can be removed with the remove operation. A log handler cannot be removed if it iscurrently assigned to a logger or async log handler.
/subsystem=logging/periodic-rotating-file-handler=PERIODIC_HANDLER_NAME:remove
12.5.4. Configure a Size Rotating Log Handler
This section shows you how to configure a size rotating log handler using the management CLI. Youcan also configure size log handlers using the management console by navigating to the Loggingsubsystem from the Configuration tab, selecting the Handler tab, and selecting Size from the left-hand menu.
The main tasks you will perform to configure a size log handler are:
Add a new size log handler .
Configure the size log handler settings .
Assign the size log handler to a logger .
IMPORTANT
If you are configuring this log handler for a logging profile, the start of the commandwould be /subsystem=logging/logging-profile=LOGGING_PROFILE_NAME/instead of /subsystem=logging/.
Additionally, if you are running in a managed domain, precede the commands with /profile=PROFILE_NAME.
Add a Size Log HandlerWhen adding a size log handler, you must specify the file path using the file attribute, which iscomprised of the path and relative-to attributes. Use the path attribute to set the file path for thelog, including the name, for example my-log.log. Optionally, use the relative-to attribute to setthat the path is relative to a named path, for example jboss.server.log.dir.
/subsystem=logging/size-rotating-file-handler=SIZE_HANDLER_NAME:add(file={path=FILE_PATH,relative-to=RELATIVE_TO_PATH})
Red Hat JBoss Enterprise Application Platform 7.0 Configuration Guide
134
Configure Size Log Handler SettingsDepending on your needs, you may need to set one or more of the following size log handler attributes.For a full list of available size log handler attributes and their descriptions, see Size Log HandlerAttributes.
Set the log level.Set the appropriate log level for the handler. The default is ALL. See Log Levels for allavailable options.
/subsystem=logging/size-rotating-file-handler=SIZE_HANDLER_NAME:write-attribute(name=level,value=LEVEL)
Set the suffix for rotated logs.Set the suffix string, which is in a format which can be understood by java.text.SimpleDateFormat, for example .yyyy-MM-dd-HH . The period of the rotationis automatically calculated based on this suffix.
/subsystem=logging/size-rotating-file-handler=SIZE_HANDLER_NAME:write-attribute(name=suffix, value=SUFFIX)
Set the rotation size.Set the maximum size that the file can reach before being rotated. The default is 2m for 2megabytes.
/subsystem=logging/size-rotating-file-handler=SIZE_HANDLER_NAME:write-attribute(name=rotate-size, value=ROTATE_SIZE)
Set the maximum number of backup logs to keep.Set the number of backups to keep. The default is 1.
/subsystem=logging/size-rotating-file-handler=SIZE_HANDLER_NAME:write-attribute(name=max-backup-index, value=MAX_BACKUPS)
Set whether to rotate the log on boot.By default, a new log file is not created on server restart. You can set this to true to rotate thelog on server restart.
/subsystem=logging/size-rotating-file-handler=SIZE_HANDLER_NAME:write-attribute(name=rotate-on-boot, value=ROTATE_ON_BOOT)
Set the append behavior.By default, JBoss EAP will append log messages to the same file when the server is restarted.You can set the append attribute to false to have the file overwritten upon server restart.
/subsystem=logging/size-rotating-file-handler=SIZE_HANDLER_NAME:write-attribute(name=append,value=APPEND)
Set the encoding.Set the encoding for the handler, for example, utf-8.
CHAPTER 12. LOGGING WITH JBOSS EAP
135
/subsystem=logging/size-rotating-file-handler=SIZE_HANDLER_NAME:write-attribute(name=encoding,value=ENCODING)
Set the log formatter.Set the formatter string for the handler. For example, the default format string is %d{HH:mm:ss,SSS} %-5p [%c] (%t) %s%e%n. Be sure to enclose the FORMAT value inquotation marks.
/subsystem=logging/size-rotating-file-handler=SIZE_HANDLER_NAME:write-attribute(name=formatter,value=FORMAT)
NOTE
Use the named-formatter attribute if you want to reference a savedformatter.
Set auto flush.Set whether to automatically flush after each write. The default value is true.
/subsystem=logging/size-rotating-file-handler=SIZE_HANDLER_NAME:write-attribute(name=autoflush,value=AUTO_FLUSH)
Set the filter expression.Set the expression for filtering log messages for the handler. Be sure to escape any commasand quotation marks and surround with quotation marks. For example, the FILTER_EXPRESSION replaceable variable below would need to be replaced with "not(match(\"WFLY\"))" for a filter expression of not(match("WFLY")).
/subsystem=logging/size-rotating-file-handler=SIZE_HANDLER_NAME:write-attribute(name=filter-spec, value=FILTER_EXPRESSION)
See the Filter Expressions section for more information on available filter expressions.
Assign the Size Log Handler to a LoggerIn order for a log handler to be active, you must assign it to a logger.
The following management CLI command assigns the size log handler to the root logger.
/subsystem=logging/root-logger=ROOT:add-handler(name=SIZE_HANDLER_NAME)
The following management CLI command assigns the size log handler to a logger whose name isspecified by CATEGORY.
/subsystem=logging/logger=CATEGORY:add-handler(name=SIZE_HANDLER_NAME)
Remove a Size Log HandlerA log handler can be removed with the remove operation. A log handler cannot be removed if it iscurrently assigned to a logger or async log handler.
Red Hat JBoss Enterprise Application Platform 7.0 Configuration Guide
136
/subsystem=logging/size-rotating-file-handler=SIZE_HANDLER_NAME:remove
12.5.5. Configure a Periodic Size Rotating Log Handler
This section shows you how to configure a periodic size rotating log handler using the managementCLI. You can also configure periodic size log handlers using the management console by navigating tothe Logging subsystem, selecting the Handler tab, and selecting Periodic Size from the left-handmenu.
The main tasks you will perform to configure a periodic size log handler are:
Add a new periodic size log handler .
Configure the periodic size log handler settings .
Assign the periodic size log handler to a logger .
IMPORTANT
If you are configuring this log handler for a logging profile, the start of the commandwould be /subsystem=logging/logging-profile=LOGGING_PROFILE_NAME/instead of /subsystem=logging/.
Additionally, if you are running in a managed domain, precede the commands with /profile=PROFILE_NAME.
Add a Periodic Size Log HandlerWhen adding a periodic size log handler, you must specify the file path using the file attribute, whichis comprised of the path and relative-to attributes. Use the path attribute to set the file path forthe log, including the name, for example my-log.log. Optionally, use the relative-to attribute toset that the path is relative to a named path, for example jboss.server.log.dir.
You must also set the suffix for rotated logs using the suffix attribute. This must be in a format thatcan be understood by java.text.SimpleDateFormat, for example .yyyy-MM-dd-HH. The periodof the rotation is automatically calculated based on this suffix.
/subsystem=logging/periodic-size-rotating-file-handler=PERIODIC_SIZE_HANDLER_NAME:add(file={path=FILE_PATH,relative-to=RELATIVE_TO_PATH},suffix=SUFFIX)
Configure Periodic Size Log Handler SettingsDepending on your needs, you may need to set one or more of the following periodic size log handlerattributes. For a full list of available periodic size log handler attributes and their descriptions, seePeriodic Size Log Handler Attributes .
Set the log level.Set the appropriate log level for the handler. The default is ALL. See Log Levels for allavailable options.
/subsystem=logging/periodic-size-rotating-file-handler=PERIODIC_SIZE_HANDLER_NAME:write-attribute(name=level,value=LEVEL)
CHAPTER 12. LOGGING WITH JBOSS EAP
137
Set the rotation size.Set the maximum size that the file can reach before being rotated. The default is 2m for 2megabytes.
/subsystem=logging/periodic-size-rotating-file-handler=PERIODIC_SIZE_HANDLER_NAME:write-attribute(name=rotate-size, value=ROTATE_SIZE)
Set the maximum number of backup logs to keep.Set the number of backups to keep. The default is 1.
/subsystem=logging/periodic-size-rotating-file-handler=PERIODIC_SIZE_HANDLER_NAME:write-attribute(name=max-backup-index, value=MAX_BACKUPS)
Set whether to rotate the log on boot.By default, a new log file is not created on server restart. You can set this to true to rotate thelog on server restart.
/subsystem=logging/periodic-size-rotating-file-handler=PERIODIC_SIZE_HANDLER_NAME:write-attribute(name=rotate-on-boot, value=ROTATE_ON_BOOT)
Set the append behavior.By default, JBoss EAP will append log messages to the same file when the server is restarted.You can set the append attribute to false to have the file overwritten upon server restart.
/subsystem=logging/periodic-size-rotating-file-handler=PERIODIC_SIZE_HANDLER_NAME:write-attribute(name=append,value=APPEND)
Set the encoding.Set the encoding for the handler, for example, utf-8.
/subsystem=logging/periodic-size-rotating-file-handler=PERIODIC_SIZE_HANDLER_NAME:write-attribute(name=encoding,value=ENCODING)
Set the log formatter.Set the formatter string for the handler. For example, the default format string is %d{HH:mm:ss,SSS} %-5p [%c] (%t) %s%e%n. Be sure to enclose the FORMAT value inquotation marks.
/subsystem=logging/periodic-size-rotating-file-handler=PERIODIC_SIZE_HANDLER_NAME:write-attribute(name=formatter,value=FORMAT)
NOTE
Use the named-formatter attribute if you want to reference a savedformatter.
Red Hat JBoss Enterprise Application Platform 7.0 Configuration Guide
138
Set auto flush.Set whether to automatically flush after each write. The default value is true.
/subsystem=logging/periodic-size-rotating-file-handler=PERIODIC_SIZE_HANDLER_NAME:write-attribute(name=autoflush,value=AUTO_FLUSH)
Set the filter expression.Set the expression for filtering log messages for the handler. Be sure to escape any commasand quotation marks and surround with quotation marks. For example, the FILTER_EXPRESSION replaceable variable below would need to be replaced with "not(match(\"WFLY\"))" for a filter expression of not(match("WFLY")).
/subsystem=logging/periodic-size-rotating-file-handler=PERIODIC_SIZE_HANDLER_NAME:write-attribute(name=filter-spec, value=FILTER_EXPRESSION)
See the Filter Expressions section for more information on available filter expressions.
Assign the Periodic Size Log Handler to a LoggerIn order for a log handler to be active, you must assign it to a logger.
The following management CLI command assigns the periodic size log handler to the root logger.
/subsystem=logging/root-logger=ROOT:add-handler(name=PERIODIC_SIZE_HANDLER_NAME)
The following management CLI command assigns the periodic size log handler to a logger whose nameis specified by CATEGORY.
/subsystem=logging/logger=CATEGORY:add-handler(name=PERIODIC_SIZE_HANDLER_NAME)
Remove a Periodic Size Log HandlerA log handler can be removed with the remove operation. A log handler cannot be removed if it iscurrently assigned to a logger or async log handler.
/subsystem=logging/periodic-size-rotating-file-handler=PERIODIC_SIZE_HANDLER_NAME:remove
12.5.6. Configure a Syslog Handler
This section shows you how to configure a syslog handler using the management CLI, which can beused to send messages to a remote logging server that supports the Syslog protocol (RFC-3164 orRFC-5424). You can also configure syslog handlers using the management console by navigating tothe Logging subsystem from the Configuration tab, selecting the Handler tab, and selecting Syslogfrom the left-hand menu.
The main tasks you will perform to configure a syslog handler are:
Add a new syslog handler .
Configure the syslog handler settings .
CHAPTER 12. LOGGING WITH JBOSS EAP
139

Assign the syslog handler to a logger .
IMPORTANT
If you are configuring this log handler for a logging profile, the start of the commandwould be /subsystem=logging/logging-profile=LOGGING_PROFILE_NAME/instead of /subsystem=logging/.
Additionally, if you are running in a managed domain, precede the commands with /profile=PROFILE_NAME.
Add a Syslog Handler
/subsystem=logging/syslog-handler=SYSLOG_HANDLER_NAME:add
Configure Syslog Handler SettingsDepending on your needs, you may need to set one or more of the following syslog handler attributes.For a full list of available syslog handler attributes and their descriptions, see Syslog HandlerAttributes.
Set the log level for the handler. The default level is ALL. See Log Levels for all availableoptions.
/subsystem=logging/syslog-handler=SYSLOG_HANDLER_NAME:write-attribute(name=level,value=LEVEL)
Set the name of the application that is logging. The default name is java.
/subsystem=logging/syslog-handler=SYSLOG_HANDLER_NAME:write-attribute(name=app-name,value=APP_NAME)
Set the address of the syslog server. The default address is localhost.
/subsystem=logging/syslog-handler=SYSLOG_HANDLER_NAME:write-attribute(name=server-address,value=SERVER_ADDRESS)
Set the port of the syslog server. The default port is 514.
/subsystem=logging/syslog-handler=SYSLOG_HANDLER_NAME:write-attribute(name=port,value=PORT)
Set the syslog format, as defined by an RFC specification. The default format is RFC5424.
/subsystem=logging/syslog-handler=SYSLOG_HANDLER_NAME:write-attribute(name=syslog-format,value=SYSLOG_FORMAT)
Assign the Syslog Handler to a LoggerIn order for a log handler to be active, you must assign it to a logger.
The following management CLI command assigns the syslog handler to the root logger.
/subsystem=logging/root-logger=ROOT:add-handler(name=SYSLOG_HANDLER_NAME)
Red Hat JBoss Enterprise Application Platform 7.0 Configuration Guide
140
The following management CLI command assigns the syslog handler to a logger whose name isspecified by CATEGORY.
/subsystem=logging/logger=CATEGORY:add-handler(name=SYSLOG_HANDLER_NAME)
Remove a Syslog HandlerA log handler can be removed with the remove operation. A log handler cannot be removed if it iscurrently assigned to a logger or async log handler.
/subsystem=logging/syslog-handler=SYSLOG_HANDLER_NAME:remove
12.5.7. Configure a Custom Log Handler
This section shows you how to configure a custom log handler using the management CLI. You can alsoconfigure custom log handlers using the management console by navigating to the Logging subsystemfrom the Configuration tab, selecting the Handler tab, and selecting Custom from the left-hand menu.
The main tasks you will perform to configure a custom log handler are:
Add a new custom log handler .
Configure the custom log handler settings .
Assign the custom log handler to a logger .
IMPORTANT
If you are configuring this log handler for a logging profile, the start of the commandwould be /subsystem=logging/logging-profile=LOGGING_PROFILE_NAME/instead of /subsystem=logging/.
Additionally, if you are running in a managed domain, precede the commands with /profile=PROFILE_NAME.
Add a Custom Log HandlerWhen adding a custom log handler, you must specify the Java class of the handler and the JBoss EAPmodule in which it is contained. The class must extend java.util.logging.Handler.
NOTE
You must have already created a module containing the custom logger or this commandwill fail.
/subsystem=logging/custom-handler=CUSTOM_HANDLER_NAME:add(class=CLASS_NAME,module=MODULE_NAME)
Configure Custom Log Handler SettingsDepending on your needs, you may need to set one or more of the following custom log handlerattributes. For a full list of available custom log handler attributes and their descriptions, see CustomLog Handler Attributes.
Set the log level.
CHAPTER 12. LOGGING WITH JBOSS EAP
141

Set the appropriate log level for the handler. The default is ALL. See Log Levels for allavailable options.
/subsystem=logging/custom-handler=CUSTOM_HANDLER_NAME:write-attribute(name=level,value=LEVEL)
Set the properties.Set the necessary properties for the log handler. The properties must be accessible using asetter method.
/subsystem=logging/custom-handler=CUSTOM_HANDLER_NAME:write-attribute(name=properties.PROPERTY_NAME,value=PROPERTY_VALUE)
Set the encoding.Set the encoding for the handler, for example, utf-8.
/subsystem=logging/custom-handler=CUSTOM_HANDLER_NAME:write-attribute(name=encoding,value=ENCODING)
Set the log formatter.Set the formatter string for the handler. For example, the default format string is %d{HH:mm:ss,SSS} %-5p [%c] (%t) %s%e%n. Be sure to enclose the FORMAT value inquotation marks.
/subsystem=logging/custom-handler=CUSTOM_HANDLER_NAME:write-attribute(name=formatter,value=FORMAT)
NOTE
Use the named-formatter attribute if you want to reference a savedformatter.
Set the filter expression.Set the expression for filtering log messages for the handler. Be sure to escape any commasand quotation marks and surround with quotation marks. For example, the FILTER_EXPRESSION replaceable variable below would need to be replaced with "not(match(\"WFLY\"))" for a filter expression of not(match("WFLY")).
/subsystem=logging/custom-handler=CUSTOM_HANDLER_NAME:write-attribute(name=filter-spec, value=FILTER_EXPRESSION)
See the Filter Expressions section for more information on available filter expressions.
Assign the Custom Log Handler to a LoggerIn order for a log handler to be active, you must assign it to a logger.
The following management CLI command assigns the custom log handler to the root logger.
/subsystem=logging/root-logger=ROOT:add-handler(name=CUSTOM_HANDLER_NAME)
The following management CLI command assigns the custom log handler to a logger whose name isspecified by CATEGORY.
Red Hat JBoss Enterprise Application Platform 7.0 Configuration Guide
142
/subsystem=logging/logger=CATEGORY:add-handler(name=CUSTOM_HANDLER_NAME)
Remove a Custom Log HandlerA log handler can be removed with the remove operation. A log handler cannot be removed if it iscurrently assigned to a logger or async log handler.
/subsystem=logging/custom-handler=CUSTOM_HANDLER_NAME:remove
12.5.8. Configure an Async Log Handler
This section shows you how to configure an async log handler using the management CLI. You can alsoconfigure async log handlers using the management console by navigating to the Logging subsystemfrom the Configuration tab, selecting the Handler tab, and selecting Async from the left-hand menu.
The main tasks you will perform to configure an async log handler are:
Add a new async log handler .
Add sub-handlers to the async log handler .
Configure the async log handler settings .
Assign the async log handler to a logger .
IMPORTANT
If you are configuring this log handler for a logging profile, the start of the commandwould be /subsystem=logging/logging-profile=LOGGING_PROFILE_NAME/instead of /subsystem=logging/.
Additionally, if you are running in a managed domain, precede the commands with /profile=PROFILE_NAME.
Add an Async Log HandlerWhen adding an async log handler, you must specify the queue length. This is the maximum number oflog requests that can be held in queue.
/subsystem=logging/async-handler=ASYNC_HANDLER_NAME:add(queue-length=QUEUE_LENGTH)
Add a Sub-handlerYou can add one or more handlers as sub-handlers for this async log handler. Note that the handlersmust already exist in the configuration or this command will fail.
/subsystem=logging/async-handler=ASYNC_HANDLER_NAME:add-handler(name=HANDLER_NAME)
Configure Async Log Handler SettingsDepending on your needs, you may need to set one or more of the following async log handlerattributes. For a full list of available async log handler attributes and their descriptions, see Async LogHandler Attributes.
Set the log level.
CHAPTER 12. LOGGING WITH JBOSS EAP
143
Set the appropriate log level for the handler. The default is ALL. See Log Levels for allavailable options.
/subsystem=logging/async-handler=ASYNC_HANDLER_NAME:write-attribute(name=level,value=LEVEL)
Set the overflow action.Set the action to take when overflowing. The default value is BLOCK, which means that threadswill block in the event of a full queue. You can change this value to DISCARD, which means thatlog messages will be discarded in the event of a full queue.
/subsystem=logging/async-handler=ASYNC_HANDLER_NAME:write-attribute(name=overflow-action,value=OVERFLOW_ACTION)
Set the filter expression.Set the expression for filtering log messages for the handler. Be sure to escape any commasand quotation marks and surround with quotation marks. For example, the FILTER_EXPRESSION replaceable variable below would need to be replaced with "not(match(\"WFLY\"))" for a filter expression of not(match("WFLY")).
/subsystem=logging/async-handler=ASYNC_HANDLER_NAME:write-attribute(name=filter-spec, value=FILTER_EXPRESSION)
See the Filter Expressions section for more information on available filter expressions.
Assign the Async Log Handler to a LoggerIn order for a log handler to be active, you must assign it to a logger.
The following management CLI command assigns the async log handler to the root logger.
/subsystem=logging/root-logger=ROOT:add-handler(name=ASYNC_HANDLER_NAME)
The following management CLI command assigns the async log handler to a logger whose name isspecified by CATEGORY.
/subsystem=logging/logger=CATEGORY:add-handler(name=ASYNC_HANDLER_NAME)
Remove an Async Log HandlerA log handler can be removed with the remove operation. A log handler cannot be removed if it iscurrently assigned to a logger.
/subsystem=logging/async-handler=ASYNC_HANDLER_NAME:remove
12.6. CONFIGURING THE ROOT LOGGER
The root logger captures all log messages, of the specified log level or higher, sent to the server thatare not captured by a log category.
This section shows you how to configure the root logger using the management CLI. You can alsoconfigure the root logger using the management console by navigating to the Logging subsystem fromthe Configuration tab and selecting the Root Logger tab.
Red Hat JBoss Enterprise Application Platform 7.0 Configuration Guide
144
Configure the Root Logger
IMPORTANT
If you are configuring this log handler for a logging profile, the start of the commandwould be /subsystem=logging/logging-profile=LOGGING_PROFILE_NAME/instead of /subsystem=logging/.
Additionally, if you are running in a managed domain, precede the commands with /profile=PROFILE_NAME.
1. Assign log handlers to the root logger.Add a log handler.
/subsystem=logging/root-logger=ROOT:add-handler(name=LOG_HANDLER_NAME)
Remove a log handler.
/subsystem=logging/root-logger=ROOT:remove-handler(name=LOG_HANDLER_NAME)
2. Set the log level.
/subsystem=logging/root-logger=ROOT:write-attribute(name=level,value=LEVEL)
For a full list of available root logger attributes and their descriptions, see Root Logger Attributes.
12.7. CONFIGURING LOG FORMATTERS
A log formatter defines the appearance of log messages from that handler. You can configure a namedpattern formatter or a custom log formatter.
12.7.1. Configure a Named Pattern Formatter
You can create a named pattern formatter that can be used across log handlers to format logmessages.
This section shows you how to configure a log formatter using the management CLI. You can alsoconfigure log formatters using the management console by navigating to the Logging subsystem fromthe Configuration tab, selecting the Formatter tab, and selecting Pattern from the left-hand menu.
IMPORTANT
If you are configuring this log formatter for a logging profile, the start of the commandwould be /subsystem=logging/logging-profile=LOGGING_PROFILE_NAME/instead of /subsystem=logging/.
Additionally, if you are running in a managed domain, precede the commands with /profile=PROFILE_NAME.
CHAPTER 12. LOGGING WITH JBOSS EAP
145
Create a Named FormatterWhen defining a formatter, you provide a pattern string to use to format log messages. See logformatters for more information on the pattern syntax.
/subsystem=logging/pattern-formatter=PATTERN_FORMATTER_NAME:add(pattern=PATTERN_STRING)
You can also define a color map to assign a color to different log levels. The format is a comma-separated list of LEVEL:COLOR.
Valid levels: finest, finer, fine, config, trace, debug, info, warning, warn, error, fatal, severe
Valid colors: black, green, red, yellow, blue, magenta, cyan, white, brightblack, brightred, brightgreen, brightblue, brightyellow, brightmagenta, brightcyan, brightwhite
/subsystem=logging/pattern-formatter=PATTERN_FORMATTER_NAME:write-attribute(name=color-map,value="LEVEL:COLOR,LEVEL:COLOR")
Assign a Named Formatter to a Log HandlerThe following management CLI command assigns a pattern formatter to be used by a periodic rotatingfile handler.
/subsystem=logging/periodic-rotating-file-handler=FILE_HANDLER_NAME:write-attribute(name=named-formatter,value=PATTERN_FORMATTER_NAME)
12.7.2. Configure a Custom Log Formatter
You can create a custom log formatter that can be used across log handlers to format log messages.
This section shows you how to configure a custom log formatter using the management CLI. You canalso configure log formatters using the management console by navigating to the Logging subsystemfrom the Configuration tab, selecting the Formatter tab, and selecting Custom from the left-handmenu.
Configure a Custom Log Formatter
IMPORTANT
If you are configuring this log formatter for a logging profile, the start of the commandwould be /subsystem=logging/logging-profile=LOGGING_PROFILE_NAME/instead of /subsystem=logging/.
Additionally, if you are running in a managed domain, precede the commands with /profile=PROFILE_NAME.
1. Add the custom log formatter.When adding a custom log formatter, you must specify the Java class of the formatter and theJBoss EAP module in which it is contained. The class must extend java.util.logging.Formatter.
Red Hat JBoss Enterprise Application Platform 7.0 Configuration Guide
146
NOTE
You must have already created a module containing the custom formatter orthis command will fail.
/subsystem=logging/custom-formatter=CUSTOM_FORMATTER_NAME:add(class=CLASS_NAME, module=MODULE_NAME)
2. Set the necessary properties for the log formatter.The properties must be accessible using a setter method.
/subsystem=logging/custom-formatter=CUSTOM_FORMATTER_NAME:write-attribute(name=properties.PROPERTY_NAME,value=PROPERTY_VALUE)
3. Assign the custom formatter to a log handler.The following management CLI command assigns a custom formatter to be used by a periodicrotating file handler.
/subsystem=logging/periodic-rotating-file-handler=FILE_HANDLER_NAME:write-attribute(name=named-formatter, value=CUSTOM_FORMATTER_NAME)
Example Custom XML FormatterThe following example configures a custom XML formatter. It uses the java.util.logging.XMLFormatter class provided in the org.jboss.logmanager module andassigns it to the console log handler.
/subsystem=logging/custom-formatter=custom-xml-formatter:add(class=java.util.logging.XMLFormatter, module=org.jboss.logmanager)/subsystem=logging/console-handler=CONSOLE:write-attribute(name=named-formatter, value=custom-xml-formatter)
A log message using this formatter would be formatted as below.
<record> <date>2016-03-23T12:58:13</date> <millis>1458752293091</millis> <sequence>93963</sequence> <logger>org.jboss.as</logger> <level>INFO</level> <class>org.jboss.as.server.BootstrapListener</class> <method>logAdminConsole</method> <thread>22</thread> <message>WFLYSRV0051: Admin console listening on http://%s:%d</message> <param>127.0.0.1</param> <param>9990</param></record>
12.8. ABOUT APPLICATION LOGGING
CHAPTER 12. LOGGING WITH JBOSS EAP
147

Logging for applications can be configured using the JBoss EAP logging subsystem or on a per-deployment basis.
See About the Logging Subsystem for using JBoss EAP log categories and handlers for capturing logmessages.
For more information on application logging, such as supported application logging frameworks andconfiguring per-deployment logging, see the Logging chapter in the JBoss EAP Development Guide.
12.8.1. Per-deployment Logging
Per-deployment logging allows a developer to configure the logging configuration for their applicationin advance. When the application is deployed, logging begins according to the defined configuration.The log files created through this configuration contain information only about the behavior of theapplication.
NOTE
If the per-deployment logging configuration is not done, the configuration from logging subsystem is used for all the applications as well as the server.
This approach has advantages and disadvantages over using system-wide logging. An advantage isthat the administrator of the JBoss EAP instance does not need to configure any other logging thanthe server logging. A disadvantage is that the per-deployment logging configuration is read only onserver startup, and so cannot be changed at runtime.
For instructions on using per-deployment logging in your applications, see Add Per-deploymentLogging to an Application in the JBoss EAP Development Guide.
12.8.1.1. Disable Per-deployment Logging
You can disable per-deployment logging in one of the following ways:
Set the use-deployment-logging-config attribute to false.The use-deployment-logging-config attribute controls whether or not your deploymentis scanned for per-deployment logging. This defaults to true by default. You can set thisattribute to false to disable per-deployment logging.
/subsystem=logging:write-attribute(name=use-deployment-logging-config,value=false)
Exclude the logging subsystem using a jboss-deployment-structure.xml file.For instructions, see Exclude a Subsystem from a Deployment in the JBoss EAP DevelopmentGuide.
12.8.2. Logging Profiles
Logging profiles are independent sets of logging configurations that can be assigned to deployedapplications. As with the regular logging subsystem, a logging profile can define handlers, categories,and a root logger, but it cannot refer to configurations in other profiles or the main loggingsubsystem. The design of logging profiles mimics the logging subsystem for ease of configuration.
Logging profiles allow administrators to create logging configurations that are specific to one or more
Red Hat JBoss Enterprise Application Platform 7.0 Configuration Guide
148
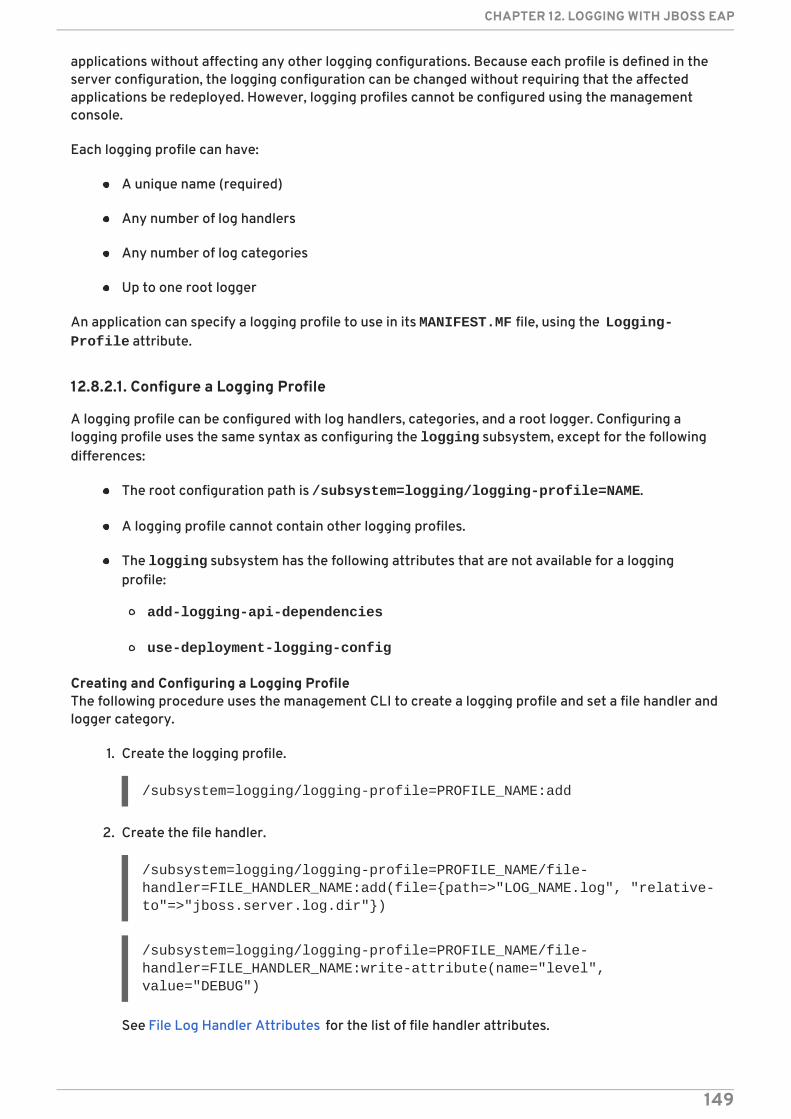
applications without affecting any other logging configurations. Because each profile is defined in theserver configuration, the logging configuration can be changed without requiring that the affectedapplications be redeployed. However, logging profiles cannot be configured using the managementconsole.
Each logging profile can have:
A unique name (required)
Any number of log handlers
Any number of log categories
Up to one root logger
An application can specify a logging profile to use in its MANIFEST.MF file, using the Logging-Profile attribute.
12.8.2.1. Configure a Logging Profile
A logging profile can be configured with log handlers, categories, and a root logger. Configuring alogging profile uses the same syntax as configuring the logging subsystem, except for the followingdifferences:
The root configuration path is /subsystem=logging/logging-profile=NAME.
A logging profile cannot contain other logging profiles.
The logging subsystem has the following attributes that are not available for a loggingprofile:
add-logging-api-dependencies
use-deployment-logging-config
Creating and Configuring a Logging ProfileThe following procedure uses the management CLI to create a logging profile and set a file handler andlogger category.
1. Create the logging profile.
/subsystem=logging/logging-profile=PROFILE_NAME:add
2. Create the file handler.
/subsystem=logging/logging-profile=PROFILE_NAME/file-handler=FILE_HANDLER_NAME:add(file={path=>"LOG_NAME.log", "relative-to"=>"jboss.server.log.dir"})
/subsystem=logging/logging-profile=PROFILE_NAME/file-handler=FILE_HANDLER_NAME:write-attribute(name="level", value="DEBUG")
See File Log Handler Attributes for the list of file handler attributes.
CHAPTER 12. LOGGING WITH JBOSS EAP
149
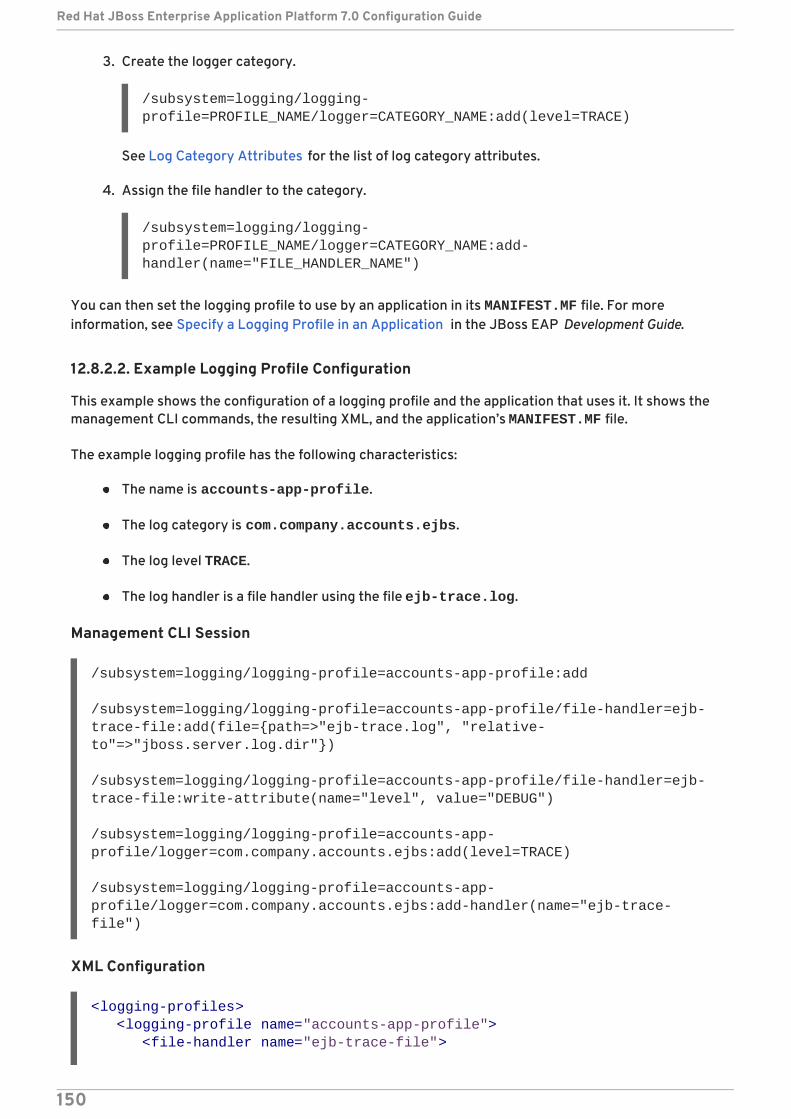
3. Create the logger category.
/subsystem=logging/logging-profile=PROFILE_NAME/logger=CATEGORY_NAME:add(level=TRACE)
See Log Category Attributes for the list of log category attributes.
4. Assign the file handler to the category.
/subsystem=logging/logging-profile=PROFILE_NAME/logger=CATEGORY_NAME:add-handler(name="FILE_HANDLER_NAME")
You can then set the logging profile to use by an application in its MANIFEST.MF file. For moreinformation, see Specify a Logging Profile in an Application in the JBoss EAP Development Guide.
12.8.2.2. Example Logging Profile Configuration
This example shows the configuration of a logging profile and the application that uses it. It shows themanagement CLI commands, the resulting XML, and the application’s MANIFEST.MF file.
The example logging profile has the following characteristics:
The name is accounts-app-profile.
The log category is com.company.accounts.ejbs.
The log level TRACE.
The log handler is a file handler using the file ejb-trace.log.
Management CLI Session
/subsystem=logging/logging-profile=accounts-app-profile:add
/subsystem=logging/logging-profile=accounts-app-profile/file-handler=ejb-trace-file:add(file={path=>"ejb-trace.log", "relative-to"=>"jboss.server.log.dir"})
/subsystem=logging/logging-profile=accounts-app-profile/file-handler=ejb-trace-file:write-attribute(name="level", value="DEBUG")
/subsystem=logging/logging-profile=accounts-app-profile/logger=com.company.accounts.ejbs:add(level=TRACE)
/subsystem=logging/logging-profile=accounts-app-profile/logger=com.company.accounts.ejbs:add-handler(name="ejb-trace-file")
XML Configuration
<logging-profiles> <logging-profile name="accounts-app-profile"> <file-handler name="ejb-trace-file">
Red Hat JBoss Enterprise Application Platform 7.0 Configuration Guide
150
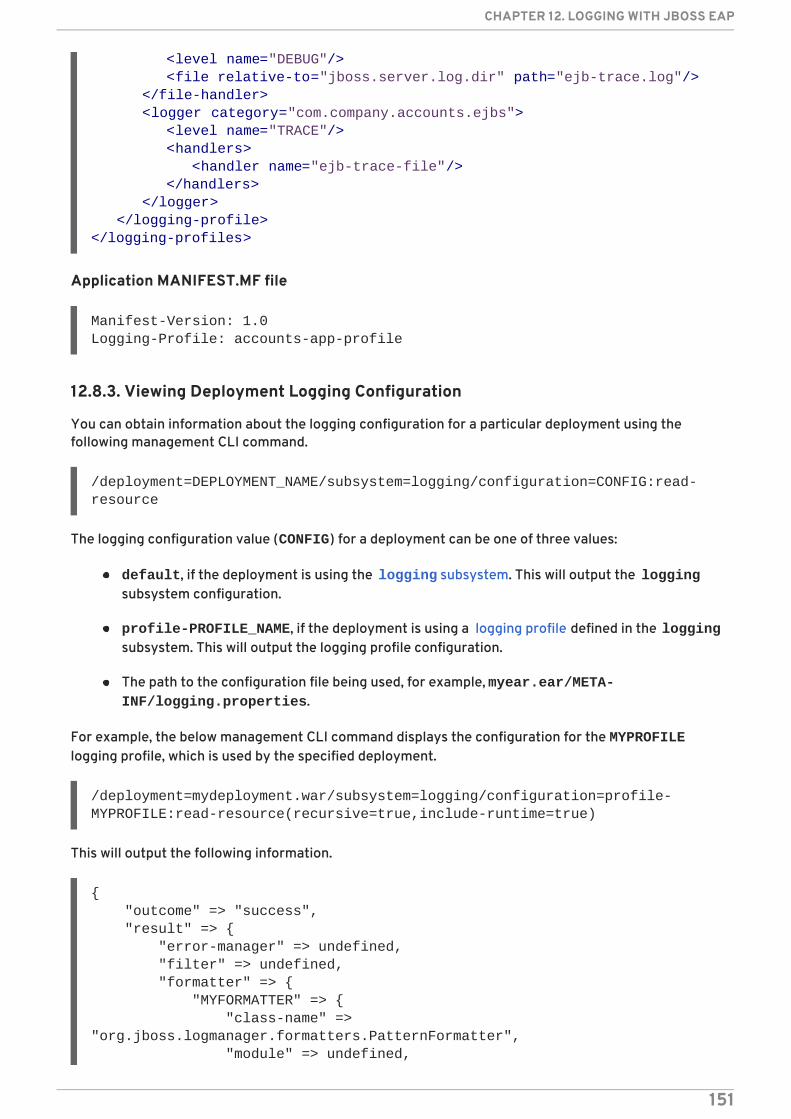
Application MANIFEST.MF file
Manifest-Version: 1.0Logging-Profile: accounts-app-profile
12.8.3. Viewing Deployment Logging Configuration
You can obtain information about the logging configuration for a particular deployment using thefollowing management CLI command.
/deployment=DEPLOYMENT_NAME/subsystem=logging/configuration=CONFIG:read-resource
The logging configuration value (CONFIG) for a deployment can be one of three values:
default, if the deployment is using the logging subsystem. This will output the loggingsubsystem configuration.
profile-PROFILE_NAME, if the deployment is using a logging profile defined in the loggingsubsystem. This will output the logging profile configuration.
The path to the configuration file being used, for example, myear.ear/META-INF/logging.properties.
For example, the below management CLI command displays the configuration for the MYPROFILElogging profile, which is used by the specified deployment.
/deployment=mydeployment.war/subsystem=logging/configuration=profile-MYPROFILE:read-resource(recursive=true,include-runtime=true)
This will output the following information.
{ "outcome" => "success", "result" => { "error-manager" => undefined, "filter" => undefined, "formatter" => { "MYFORMATTER" => { "class-name" => "org.jboss.logmanager.formatters.PatternFormatter", "module" => undefined,
<level name="DEBUG"/> <file relative-to="jboss.server.log.dir" path="ejb-trace.log"/> </file-handler> <logger category="com.company.accounts.ejbs"> <level name="TRACE"/> <handlers> <handler name="ejb-trace-file"/> </handlers> </logger> </logging-profile></logging-profiles>
CHAPTER 12. LOGGING WITH JBOSS EAP
151
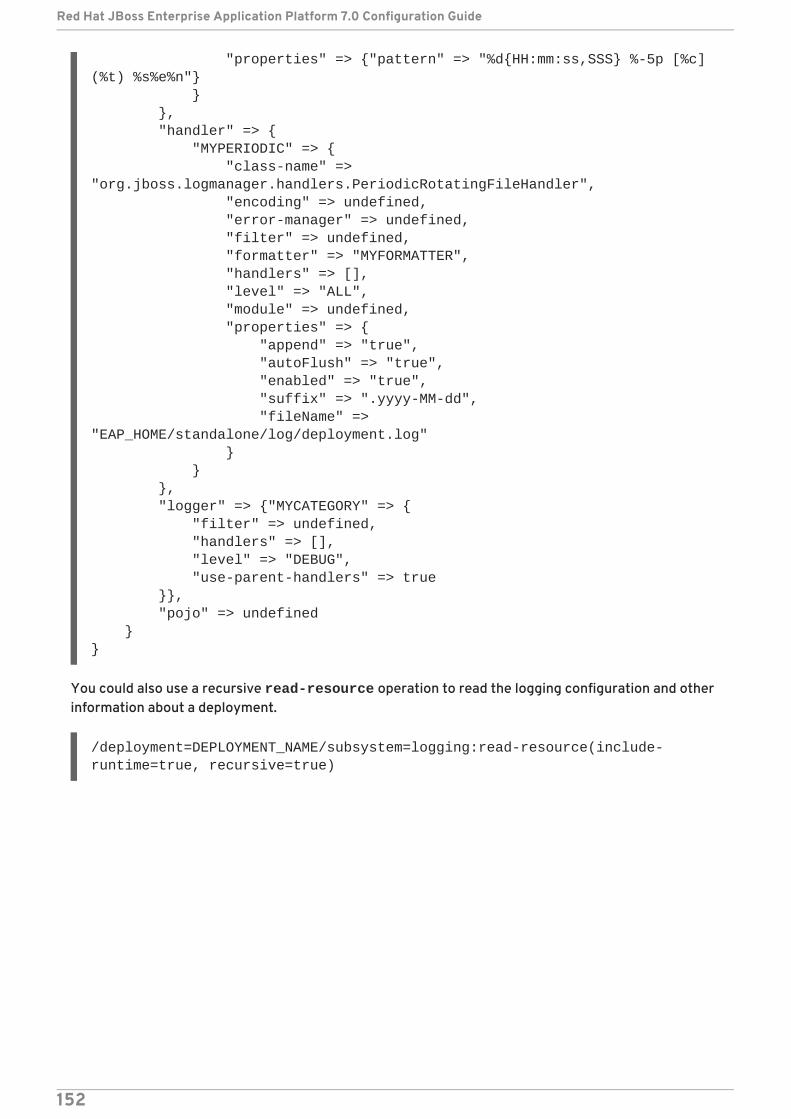
"properties" => {"pattern" => "%d{HH:mm:ss,SSS} %-5p [%c] (%t) %s%e%n"} } }, "handler" => { "MYPERIODIC" => { "class-name" => "org.jboss.logmanager.handlers.PeriodicRotatingFileHandler", "encoding" => undefined, "error-manager" => undefined, "filter" => undefined, "formatter" => "MYFORMATTER", "handlers" => [], "level" => "ALL", "module" => undefined, "properties" => { "append" => "true", "autoFlush" => "true", "enabled" => "true", "suffix" => ".yyyy-MM-dd", "fileName" => "EAP_HOME/standalone/log/deployment.log" } } }, "logger" => {"MYCATEGORY" => { "filter" => undefined, "handlers" => [], "level" => "DEBUG", "use-parent-handlers" => true }}, "pojo" => undefined }}
You could also use a recursive read-resource operation to read the logging configuration and otherinformation about a deployment.
/deployment=DEPLOYMENT_NAME/subsystem=logging:read-resource(include-runtime=true, recursive=true)
Red Hat JBoss Enterprise Application Platform 7.0 Configuration Guide
152
CHAPTER 13. DATASOURCE MANAGEMENT
13.1. ABOUT JBOSS EAP DATASOURCES
About JDBCThe JDBC API is the standard that defines how databases are accessed by Java applications. Anapplication configures a datasource that references a JDBC driver. Application code can then bewritten against the driver, rather than the database. The driver converts the code to the databaselanguage. This means that if the correct driver is installed, an application can be used with anysupported database.
For more information, see the JDBC 4.0 specification.
Supported DatabasesSee JBoss EAP supported configurations for the list of JDBC-compliant databases supported by JBossEAP 7.
Datasource TypesThe two general types of resources are referred to as datasources and XA datasources.
Non-XA datasources
Used for applications that do not use transactions, or applications that use transactions with asingle database.
XA datasources
Used by applications that use multiple databases or other XA resources as part of one XAtransaction. XA datasources introduce additional overhead.
You specify which type of datasource to use when creating the datasource using the JBoss EAPmanagement interfaces.
The ExampleDS datasourceJBoss EAP ships with an example datasource configuration (ExampleDS), which is provided todemonstrate how datasources are defined. This datasource uses an H2 database, which is alightweight, relational database management system that provides developers with the ability toquickly build applications.
WARNING
The ExampleDS datasource and the H2 database should not be used in aproduction environment. This is a very small, self-contained datasource thatsupports all of the standards needed for testing and building applications, but isnot robust or scalable enough for production use.
13.2. JDBC DRIVERS
Before defining datasources in JBoss EAP for your applications to use, you must first install theappropriate JDBC driver.
CHAPTER 13. DATASOURCE MANAGEMENT
153
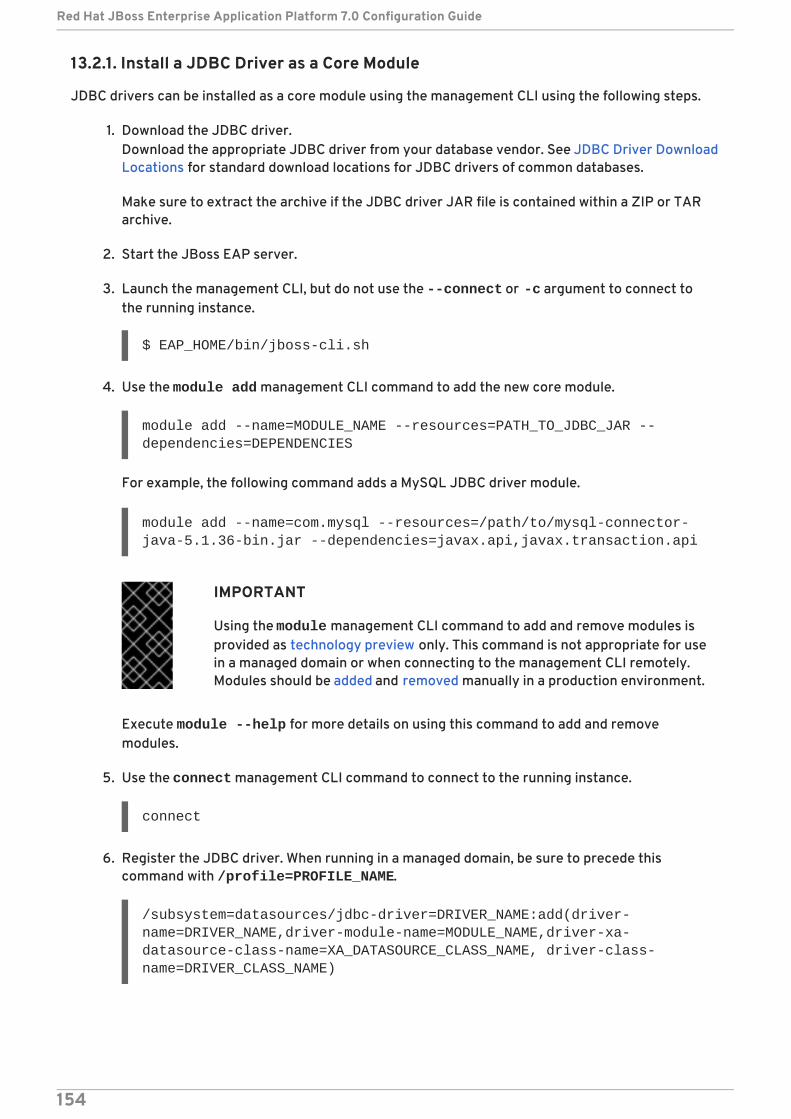
13.2.1. Install a JDBC Driver as a Core Module
JDBC drivers can be installed as a core module using the management CLI using the following steps.
1. Download the JDBC driver.Download the appropriate JDBC driver from your database vendor. See JDBC Driver DownloadLocations for standard download locations for JDBC drivers of common databases.
Make sure to extract the archive if the JDBC driver JAR file is contained within a ZIP or TARarchive.
2. Start the JBoss EAP server.
3. Launch the management CLI, but do not use the --connect or -c argument to connect tothe running instance.
$ EAP_HOME/bin/jboss-cli.sh
4. Use the module add management CLI command to add the new core module.
module add --name=MODULE_NAME --resources=PATH_TO_JDBC_JAR --dependencies=DEPENDENCIES
For example, the following command adds a MySQL JDBC driver module.
module add --name=com.mysql --resources=/path/to/mysql-connector-java-5.1.36-bin.jar --dependencies=javax.api,javax.transaction.api
IMPORTANT
Using the module management CLI command to add and remove modules isprovided as technology preview only. This command is not appropriate for usein a managed domain or when connecting to the management CLI remotely.Modules should be added and removed manually in a production environment.
Execute module --help for more details on using this command to add and removemodules.
5. Use the connect management CLI command to connect to the running instance.
connect
6. Register the JDBC driver. When running in a managed domain, be sure to precede thiscommand with /profile=PROFILE_NAME.
/subsystem=datasources/jdbc-driver=DRIVER_NAME:add(driver-name=DRIVER_NAME,driver-module-name=MODULE_NAME,driver-xa-datasource-class-name=XA_DATASOURCE_CLASS_NAME, driver-class-name=DRIVER_CLASS_NAME)
Red Hat JBoss Enterprise Application Platform 7.0 Configuration Guide
154

NOTE
The driver-class-name parameter is only required if the JDBC driver jardefines more than one class in its /META-INF/services/java.sql.Driverfile.
For example, the /META-INF/services/java.sql.Driver file in theMySQL 5.1.36 JDBC driver JAR defines two classes:
com.mysql.jdbc.Driver
com.mysql.fabric.jdbc.FabricMySQLDriver
For this case, you would pass in driver-class-name=com.mysql.jdbc.Driver.
For example, the following command registers a MySQL JDBC driver.
/subsystem=datasources/jdbc-driver=mysql:add(driver-name=mysql,driver-module-name=com.mysql,driver-xa-datasource-class-name=com.mysql.jdbc.jdbc2.optional.MysqlXADataSource, driver-class-name=com.mysql.jdbc.Driver)
The JDBC driver is now available to be referenced by application datasources.
13.2.2. Install a JDBC Driver as a JAR Deployment
JDBC drivers can be installed as a JAR deployment using either the management CLI or themanagement console. As long as the driver is JDBC 4-compliant, it will automatically be recognizedand installed as a JDBC driver upon deployment.
The following steps describe how to install a JDBC driver using the management CLI.
NOTE
The recommended installation method for JDBC drivers is to install them as a coremodule.
1. Download the JDBC driver.Download the appropriate JDBC driver from your database vendor. See JDBC Driver DownloadLocations for standard download locations for JDBC drivers of common databases.
Make sure to extract the archive if the JDBC driver JAR file is contained within a ZIP or TARarchive.
2. If the JDBC driver is not JDBC 4-compliant, see the steps to Update a JDBC Driver JAR to beJDBC 4-Compliant.
3. Deploy the JAR to JBoss EAP.
deploy PATH_TO_JDBC_JAR
CHAPTER 13. DATASOURCE MANAGEMENT
155

NOTE
In a managed domain, specify the appropriate server groups.
For example, the following command deploys a MySQL JDBC driver.
deploy /path/to/mysql-connector-java-5.1.36-bin.jar
A message will be displayed in the JBoss EAP server log that displays the deployed drivername, which will be used when defining datasources.
WFLYJCA0018: Started Driver service with driver-name = mysql-connector-java-5.1.36-bin.jar_com.mysql.jdbc.Driver_5_1
The JDBC driver is now available to be referenced by application datasources.
Update a JDBC Driver JAR to be JDBC 4-CompliantIf the JDBC driver JAR is not JDBC 4-compliant, it can be made deployable using the following steps.
1. Create an empty temporary directory.
2. Create a META-INF subdirectory.
3. Create a META-INF/services subdirectory.
4. Create a META-INF/services/java.sql.Driver file and add one line to indicate the fully-qualified class name of the JDBC driver.For example, the below line would be added for a MySQL JDBC driver.
com.mysql.jdbc.Driver
5. Use the JAR command-line tool to add this new file to the JAR.
jar \-uf jdbc-driver.jar META-INF/services/java.sql.Driver
13.2.3. JDBC Driver Download Locations
The following table gives the standard download locations for JDBC drivers of common databases usedwith JBoss EAP.
NOTE
These links point to third-party websites which are not controlled or actively monitoredby Red Hat. For the most up-to-date drivers for your database, check your databasevendor’s documentation and website.
Table 13.1. JDBC Driver Download Locations
Vendor Download Location
MySQL http://www.mysql.com/products/connector/
Red Hat JBoss Enterprise Application Platform 7.0 Configuration Guide
156
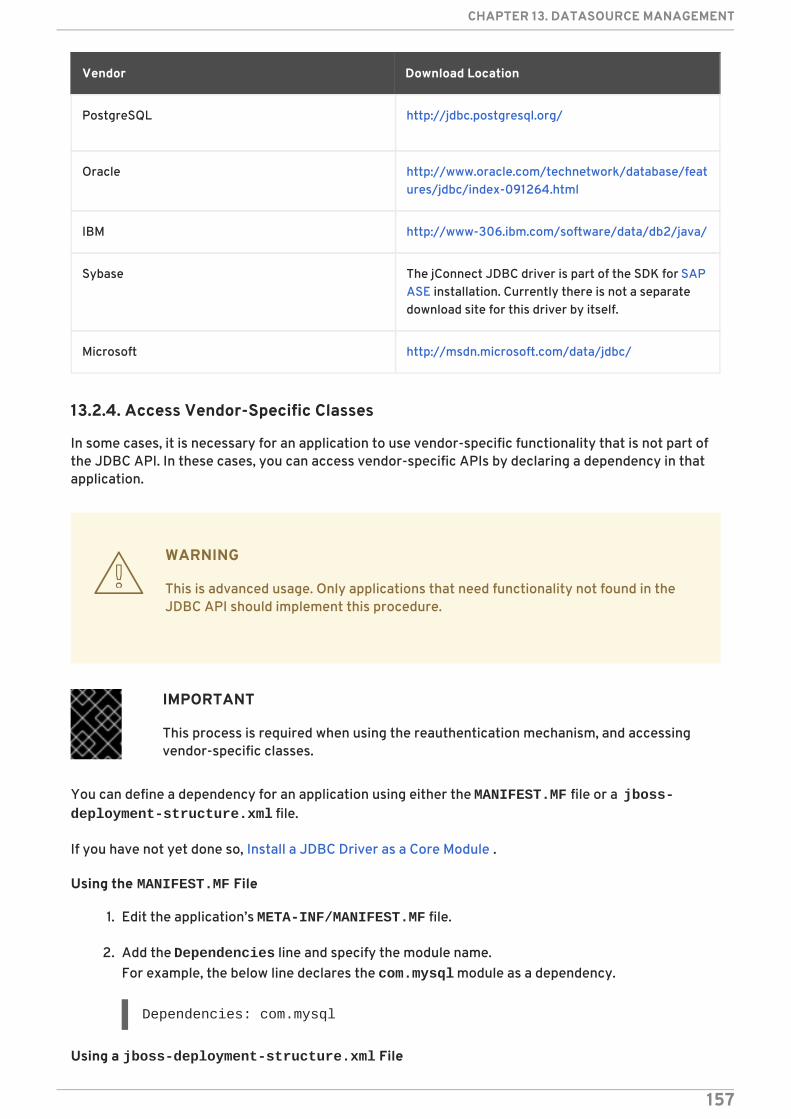
PostgreSQL http://jdbc.postgresql.org/
Oracle http://www.oracle.com/technetwork/database/features/jdbc/index-091264.html
IBM http://www-306.ibm.com/software/data/db2/java/
Sybase The jConnect JDBC driver is part of the SDK for SAPASE installation. Currently there is not a separatedownload site for this driver by itself.
Microsoft http://msdn.microsoft.com/data/jdbc/
Vendor Download Location
13.2.4. Access Vendor-Specific Classes
In some cases, it is necessary for an application to use vendor-specific functionality that is not part ofthe JDBC API. In these cases, you can access vendor-specific APIs by declaring a dependency in thatapplication.
WARNING
This is advanced usage. Only applications that need functionality not found in theJDBC API should implement this procedure.
IMPORTANT
This process is required when using the reauthentication mechanism, and accessingvendor-specific classes.
You can define a dependency for an application using either the MANIFEST.MF file or a jboss-deployment-structure.xml file.
If you have not yet done so, Install a JDBC Driver as a Core Module .
Using the MANIFEST.MF File
1. Edit the application’s META-INF/MANIFEST.MF file.
2. Add the Dependencies line and specify the module name.For example, the below line declares the com.mysql module as a dependency.
Dependencies: com.mysql
Using a jboss-deployment-structure.xml File
CHAPTER 13. DATASOURCE MANAGEMENT
157
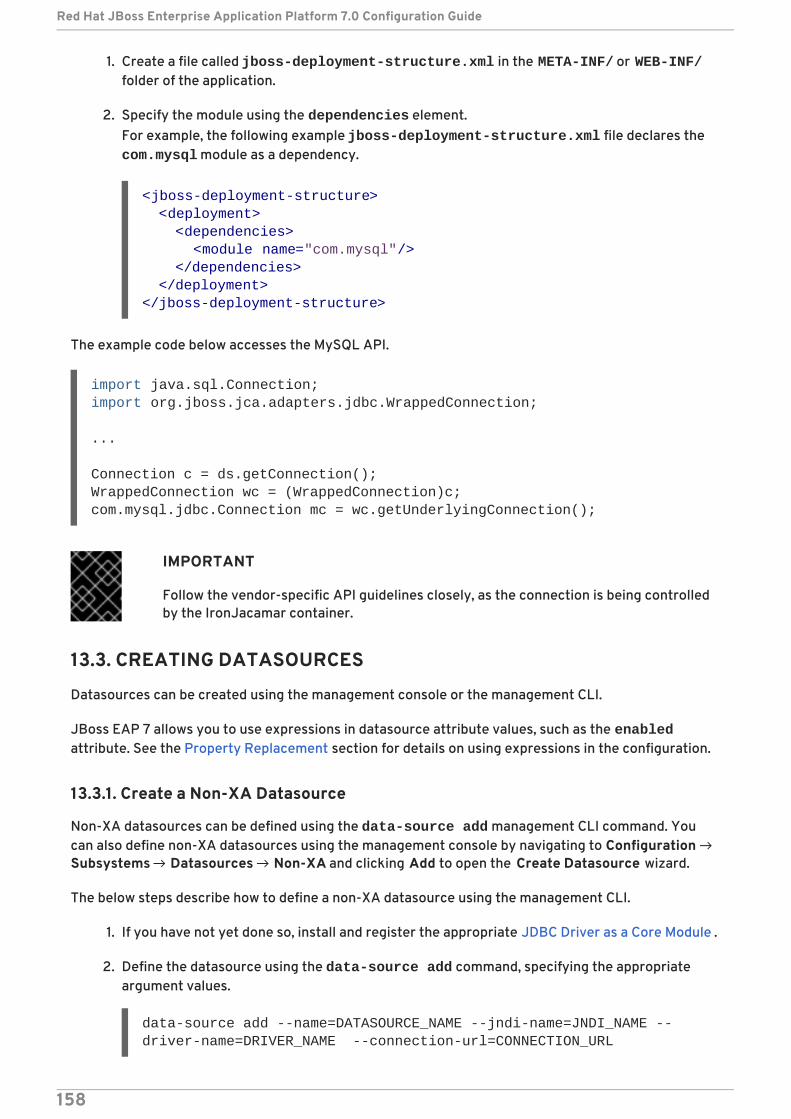
1. Create a file called jboss-deployment-structure.xml in the META-INF/ or WEB-INF/folder of the application.
2. Specify the module using the dependencies element.For example, the following example jboss-deployment-structure.xml file declares the com.mysql module as a dependency.
The example code below accesses the MySQL API.
IMPORTANT
Follow the vendor-specific API guidelines closely, as the connection is being controlledby the IronJacamar container.
13.3. CREATING DATASOURCES
Datasources can be created using the management console or the management CLI.
JBoss EAP 7 allows you to use expressions in datasource attribute values, such as the enabledattribute. See the Property Replacement section for details on using expressions in the configuration.
13.3.1. Create a Non-XA Datasource
Non-XA datasources can be defined using the data-source add management CLI command. Youcan also define non-XA datasources using the management console by navigating to Configuration →Subsystems → Datasources → Non-XA and clicking Add to open the Create Datasource wizard.
The below steps describe how to define a non-XA datasource using the management CLI.
1. If you have not yet done so, install and register the appropriate JDBC Driver as a Core Module .
2. Define the datasource using the data-source add command, specifying the appropriateargument values.
data-source add --name=DATASOURCE_NAME --jndi-name=JNDI_NAME --driver-name=DRIVER_NAME --connection-url=CONNECTION_URL
<jboss-deployment-structure> <deployment> <dependencies> <module name="com.mysql"/> </dependencies> </deployment></jboss-deployment-structure>
import java.sql.Connection;import org.jboss.jca.adapters.jdbc.WrappedConnection;
...
Connection c = ds.getConnection();WrappedConnection wc = (WrappedConnection)c;com.mysql.jdbc.Connection mc = wc.getUnderlyingConnection();
Red Hat JBoss Enterprise Application Platform 7.0 Configuration Guide
158
NOTE
In a managed domain, you must specify the --profile=PROFILE_NAME argument.
See the Datasource Parameters section below for tips on these parameter values.
For detailed examples, see the Example Datasource Configurations for the supported databases.
Datasource Parameters
jndi-name
The JNDI name for the datasource must start with java:/ or java:jboss/. For example, java:jboss/datasources/ExampleDS.
driver-name
The driver name value depends on whether the JDBC driver was installed as a core module or a JARdeployment.
1. For a core module, the driver name value will be the name given to the JDBC driver when itwas registered.
2. For a JAR deployment, the driver name is the name of the JAR if there is only one classlisted in its /META-INF/services/java.sql.Driver file. If there are multiple classeslisted, then the value is JAR_NAME + "_" + DRIVER_CLASS_NAME + "_" +MAJOR_VERSION + "_" + MINOR_VERSION (for example mysql-connector-java-5.1.36-bin.jar_com.mysql.jdbc.Driver_5_1).You can also see the driver name listed in the JBoss EAP server log when the JDBC JAR isdeployed.
WFLYJCA0018: Started Driver service with driver-name = mysql-connector-java-5.1.36-bin.jar_com.mysql.jdbc.Driver_5_1
connection-url
For details on the connection URL formats for the supported databases, see the list of DatasourceConnection URLs.
For a complete listing of all available datasource parameters, see the Datasource Parameters section.
13.3.2. Create an XA Datasource
XA datasources can be defined using the xa-data-source add management CLI command. You canalso define XA datasources using the management console by navigating to Configuration →Subsystems → Datasources → XA and clicking Add to open the Create XA Datasource wizard.
The below steps describe how to define an XA datasource using the management CLI.
NOTE
In a managed domain, you will need to specify the profile to use. Depending on theformat of the management CLI command, you will either precede the command with /profile=PROFILE_NAME or pass in the --profile=PROFILE_NAME argument.
1. If you have not yet done so, install and register the appropriate JDBC Driver as a Core Module .
CHAPTER 13. DATASOURCE MANAGEMENT
159

2. Define the datasource using the xa-data-source add command, specifying the appropriateargument values.
xa-data-source add --name=XA_DATASOURCE_NAME --jndi-name=JNDI_NAME --driver-name=DRIVER_NAME --xa-datasource-class=XA_DATASOURCE_CLASS --xa-datasource-properties={"ServerName"=>"HOSTNAME","DatabaseName"=>"DATABASE_NAME"}
See the Datasource Parameters section below for tips on these parameter values.
3. Set XA datasource properties.At least one XA datasource property is required when defining an XA datasource or you willreceive an error when adding the datasource in the previous step. Any properties that werenot set when defining the XA datasource can be set individually afterward.
a. Set the server name.
/subsystem=datasources/xa-data-source=XA_DATASOURCE_NAME/xa-datasource-properties=ServerName:add(value=HOSTNAME)
b. Set the database name.
/subsystem=datasources/xa-data-source=XA_DATASOURCE_NAME/xa-datasource-properties=DatabaseName:add(value=DATABASE_NAME)
For detailed examples, see the Example Datasource Configurations for the supported databases.
Datasource Parameters
jndi-name
The JNDI name for the datasource must start with java:/ or java:jboss/. For example, java:jboss/datasources/ExampleDS.
driver-name
The driver name value depends on whether the JDBC driver was installed as a core module or a JARdeployment.
1. For a core module, the driver name value will be the name given to the JDBC driver when itwas registered.
2. For a JAR deployment, the driver name is the name of the JAR if there is only one classlisted in its /META-INF/services/java.sql.Driver file. If there are multiple classeslisted, then the value is JAR_NAME + "_" + DRIVER_CLASS_NAME + "_" +MAJOR_VERSION + "_" + MINOR_VERSION (for example mysql-connector-java-5.1.36-bin.jar_com.mysql.jdbc.Driver_5_1).You can also see the driver name listed in the JBoss EAP server log when the JDBC JAR isdeployed.
WFLYJCA0018: Started Driver service with driver-name = mysql-connector-java-5.1.36-bin.jar_com.mysql.jdbc.Driver_5_1
xa-datasource-class
Specify the XA datasource class for the JDBC driver’s implementation of the javax.sql.XADataSource class.
Red Hat JBoss Enterprise Application Platform 7.0 Configuration Guide
160
xa-datasource-properties
At least one XA datasource property is required when defining an XA datasource or you will receivean error when attempting to add it. Additional properties can also be added to the XA datasourceafter it has been defined.
For a complete listing of all available datasource parameters, see the Datasource Parameters section.
13.4. MODIFYING DATASOURCES
Datasources settings can be configured using the management console or the management CLI.
JBoss EAP 7 allows you to use expressions in datasource attribute values, such as the enabledattribute. See the Property Replacement section for details on using expressions in the configuration.
13.4.1. Modify a Non-XA Datasource
Non-XA datasource settings can be updated using the data-source management CLI command. Youcan also update datasource attributes from the datasources subsystem in the management console.
NOTE
Non-XA datasources can be integrated with JTA transactions. To integrate thedatasource with JTA, ensure that the jta parameter is set to true.
Settings for a datasource can be updated by using the following management CLI command.
data-source --name=DATASOURCE_NAME --ATTRIBUTE_NAME=ATTRIBUTE_VALUE
NOTE
In a managed domain, you must specify the --profile=PROFILE_NAME argument.
A server reload may be required for the changes to take effect.
13.4.2. Modify an XA Datasource
XA datasource settings can be updated using the xa-data-source management CLI command. Youcan also update datasource attributes from the datasources subsystem in the management console.
Settings for an XA datasource can be updated by using the following management CLIcommand.
xa-data-source --name=XA_DATASOURCE_NAME --ATTRIBUTE_NAME=ATTRIBUTE_VALUE
NOTE
In a managed domain, you must specify the --profile=PROFILE_NAMEargument.
An XA datasource property can be added using the following management CLI command.
CHAPTER 13. DATASOURCE MANAGEMENT
161
/subsystem=datasources/xa-data-source=XA_DATASOURCE_NAME/xa-datasource-properties=PROPERTY:add(value=VALUE)
NOTE
In a managed domain, you must precede this command with /profile=PROFILE_NAME.
A server reload may be required for the changes to take effect.
13.5. REMOVING DATASOURCES
Datasources can be removed using the management console or the management CLI.
13.5.1. Remove a Non-XA Datasource
Non-XA datasources can be removed using the data-source remove management CLI command.You can also remove datasources from the datasources subsystem in the management console.
data-source remove --name=DATASOURCE_NAME
NOTE
In a managed domain, you must specify the --profile=PROFILE_NAME argument.
The server will require a reload after the datasource is removed.
13.5.2. Remove an XA Datasource
XA datasources can be removed using the xa-data-source remove management CLI command.You can also remove XA datasources from the datasources subsystem in the management console.
xa-data-source remove --name=XA_DATASOURCE_NAME
NOTE
In a managed domain, you must specify the --profile=PROFILE_NAME argument.
The server will require a reload after the XA datasource is removed.
13.6. TESTING DATASOURCE CONNECTIONS
Once a datasource has been added to JBoss EAP, you can test the connection to verify that thesettings are correct. Datasource connections can be tested either using a management CLI commandor from the management console with the Test Connection button in the datasourcessubsystem.
The following management CLI command can be used to test a datasource’s connection.
Red Hat JBoss Enterprise Application Platform 7.0 Configuration Guide
162
/subsystem=datasources/data-source=DATASOURCE_NAME:test-connection-in-pool
NOTE
In a managed domain, you must precede this command with /host=HOSTNAME/server=SERVER_NAME.
13.7. XA DATASOURCE RECOVERY
An XA datasource is a datasource that can participate in an XA global transaction, which is coordinatedby the transaction manager and can span multiple resources in a single transaction. If one of theparticipants fails to commit its changes, the other participants abort the transaction and restore theirstate as it was before the transaction occurred. This is to maintain consistency and avoid potentialdata loss or corruption.
XA recovery is the process of ensuring that all resources affected by a transaction are updated orrolled back, even if any of the resources or transaction participants crash or become unavailable. XArecovery happens without user intervention.
Each XA resource needs to have a recovery module associated with its configuration. The recoverymodule is the code that is executed when recovery is being performed. JBoss EAP automaticallyregisters recovery modules for JDBC XA resources. You can register a custom module with your XAdatasource if you wish to implement custom recovery code. The recovery module must extend class com.arjuna.ats.jta.recovery.XAResourceRecovery.
13.7.1. Configuring XA Recovery
For most JDBC resources, the recovery module is automatically associated with the resource. In thesecases, you only need to configure the options that allow the recovery module to connect to yourresource to perform recovery.
The following table describes the XA datasource parameters specific to XA recovery. Each of theseconfiguration attributes can be set during datasource creation or afterward. You can set them usingeither the management console or the management CLI. See Modify an XA Datasource for informationon configuring XA datasources.
Table 13.2. Datasource Parameters for XA Recovery
Attribute Description
recovery-username The user name to use to connect to the resource for recovery. Note that ifthis is not specified, the datasource security settings will be used.
recovery-password The password to use to connect to the resource for recovery. Note that ifthis is not specified, the datasource security settings will be used.
recovery-security-domain The security domain to use to connect to the resource for recovery.
recovery-plugin-class-name If you need to use a custom recovery module, set this attribute to the fully-qualified class name of the module. The module should extend class com.arjuna.ats.jta.recovery.XAResourceRecovery.
CHAPTER 13. DATASOURCE MANAGEMENT
163
recovery-plugin-properties If you use a custom recovery module which requires properties to be set,set this attribute to the list of comma-separated KEY=VALUE pairs for theproperties.
Attribute Description
Disable XA Recovery
If multiple XA datasources connect to the same physical database, then XA recovery typically needs tobe configured for only one of them.
Use the following management CLI command to disable recovery for an XA datasource:
/subsystem=datasources/xa-data-source=XA_DATASOURCE_NAME:write-attribute(name=no-recovery,value=true)
13.7.2. Vendor-Specific XA Recovery
Vendor-Specific ConfigurationSome databases require specific configurations in order to cooperate in XA transactions managed bythe JBoss EAP transaction manager. For detailed and up-to-date information, see your databasevendor’s documentation.
MySQL
No special configuration is required. For more information, see the MySQL documentation.
PostgreSQL and Postgres Plus Advanced Server
For PostgreSQL to be able to handle XA transactions, change the configuration parameter max_prepared_transactions to a value greater than 0 and equal to or greater than max_connections.
Oracle
Ensure that the Oracle user (USER) has access to the tables needed for recovery.
If the Oracle user does not have the proper permissions, you may see an error such as thefollowing:
WARN [com.arjuna.ats.jta.logging.loggerI18N] [com.arjuna.ats.internal.jta.recovery.xarecovery1] Local XARecoveryModule.xaRecovery got XA exception javax.transaction.xa.XAException, XAException.XAER_RMERR
Microsoft SQL Server
For more information, see the Microsoft SQL Server documentation, includinghttp://msdn.microsoft.com/en-us/library/aa342335.aspx.
IBM DB2
GRANT SELECT ON sys.dba_pending_transactions TO USER;GRANT SELECT ON sys.pending_trans$ TO USER;GRANT SELECT ON sys.dba_2pc_pending TO USER;GRANT EXECUTE ON sys.dbms_xa TO USER;
Red Hat JBoss Enterprise Application Platform 7.0 Configuration Guide
164
No special configuration is required. For more information, see the IBM DB2 documentation.
Sybase
Sybase expects XA transactions to be enabled on the database. Without correct databaseconfiguration, XA transactions will not work. The enable xact coordination parameterenables or disables Adaptive Server transaction coordination services. When this parameter isenabled, Adaptive Server ensures that updates to remote Adaptive Server data commit or roll backwith the original transaction.To enable transaction coordination, use:
sp_configure 'enable xact coordination', 1
MariaDB
No special configuration is required. For more information, see the MariaDB documentation.
Known IssuesThese known issues with handling XA transactions are for the specific database and JDBC driverversions supported with JBoss EAP 7. For up-to-date information on the supported databases, seeJBoss EAP supported configurations .
MySQL
MySQL is not fully capable of handling XA transactions. If a client is disconnected from MySQL, thenall the information about such transactions is lost. See this MySQL bug for more information. Notethat this issue was fixed in MySQL 5.7.
PostgreSQL and Postgres Plus Advanced Server
The JDBC driver returns the XAER_RMERR XAException error code when a network failure occursduring the commit phase of two-phase commit (2PC). This error signals an unrecoverablecatastrophic event to the transaction manager, but the transaction is left in the in-doubt state onthe database side and could be easily corrected after network connection is established again. Thecorrect return code should be XAER_RMFAIL or XAER_RETRY. The incorrect error code causes thetransaction to be left in the Heuristic state on the JBoss EAP side and holding locks in thedatabase which requires manual intervention. See this PostgreSQL bug for more information.If a connection failure happens when the one-phase commit optimization is used, the JDBC driverreturns XAER_RMERR, but the XAER_RMFAIL error code should be returned. This could lead to datainconsistency if the database commits data during one-phase commit and the connection goesdown at that moment, then the client is informed that transaction was rolled back.
The Postgres Plus JDBC driver returns XIDs for all prepared transactions that exist in the PostgresPlus Server, so there is no way to determine the database to which the XID belongs. If you definemore than one data source for the same database in JBoss EAP, an in-doubt transaction recoveryattempt could be run under wrong account, which causes the recovery to fail.
Oracle
The JDBC driver returns XIDs belonging to all users on the database instance, when the RecoveryManager calls recovery using datasource configured with some user credentials. The JDBC driverthrows the exception ORA-24774: cannot switch to specified transaction because ittries to recover XIDs belonging to other users.The workaround for this issue is to grant FORCE ANY TRANSACTION privilege to the user whosecredentials are used in recovery datasource configuration. More information about configuring theprivilege can be found here:http://docs.oracle.com/database/121/ADMIN/ds_txnman.htm#ADMIN12259
Microsoft SQL Server
CHAPTER 13. DATASOURCE MANAGEMENT
165
The JDBC driver returns the XAER_RMERR XAException error code when a network failure occursduring the commit phase of two-phase commit (2PC). This error signals an unrecoverablecatastrophic event to the transaction manager, but the transaction is left in the in-doubt state onthe database side and could be easily corrected after network connection is established again. Thecorrect return code should be XAER_RMFAIL or XAER_RETRY. The incorrect error code causes thetransaction to be left in the Heuristic state on the JBoss EAP side and holding locks in thedatabase which requires manual intervention. See this Microsoft SQL Server issue report for moreinformation.If a connection failure happens when the one-phase commit optimization is used, the JDBC driverreturns XAER_RMERR, but the XAER_RMFAIL error code should be returned. This could lead to datainconsistency if the database commits data during one-phase commit and the connection goesdown at that moment, then the client is informed that transaction was rolled back.
IBM DB2
If a connection failure happens during a one-phase commit, the JDBC driver returns XAER_RETRY,but the XAER_RMFAIL error code should be returned. This could lead to data inconsistency if thedatabase commits data during one-phase commit and the connection goes down at that moment,then the client is informed that transaction was rolled back.
Sybase
The JDBC driver returns the XAER_RMERR XAException error code when a network failure occursduring the commit phase of two-phase commit (2PC). This error signals an unrecoverablecatastrophic event to the transaction manager, but the transaction is left in the in-doubt state onthe database side and could be easily corrected after network connection is established again. Thecorrect return code should be XAER_RMFAIL or XAER_RETRY. The incorrect error code causes thetransaction to be left in the Heuristic state on the JBoss EAP side and holding locks in thedatabase which requires manual intervention.If a connection failure happens when the one-phase commit optimization is used, the JDBC driverreturns XAER_RMERR, but the XAER_RMFAIL error code should be returned. This could lead to datainconsistency if the database commits data during one-phase commit and the connection goesdown at that moment, then the client is informed that transaction was rolled back.
MariaDB
MariaDB is not fully capable of handling XA transactions. If a client is disconnected from MariaDB,then all the information about such transactions is lost.
13.8. DATABASE CONNECTION VALIDATION
Database maintenance, network problems, or other outage events may cause JBoss EAP to lose theconnection to the database. In order to recover from these situations, you can enable databaseconnection validation for your datasources.
To configure database connection validation, you specify the validation timing method (when thevalidation occurs), the validation mechanism (how the validation is performed), and the exceptionsorter (how exceptions are handled).
1. Choose one of the validation timing methods.
validate-on-match
When the validate-on-match option is set to true, the database connection is validatedevery time it is checked out from the connection pool using the validation mechanismspecified in the next step.If a connection is not valid, a warning is written to the log and the next connection in thepool is retrieved. This process continues until a valid connection is found. If you prefer not
Red Hat JBoss Enterprise Application Platform 7.0 Configuration Guide
166
to cycle through every connection in the pool, you can use the use-fast-fail option. If avalid connection is not found in the pool, a new connection is created. If the connectioncreation fails, an exception is returned to the requesting application.
This setting results in the quickest recovery but creates the highest load on the database.However, this is the safest selection if the minimal performance hit is not a concern.
background-validation
When the background-validation option is set to true, connections are validatedperiodically in a background thread prior to use. The frequency of the validation is specifiedby the background-validation-millis property. The default value of background-validation-millis is 0, meaning that it is disabled.When determining the value of the background-validation-millis property, considerthe following:
This value should not be set to the same value as your idle-timeout-minutessetting.
The lower the value, the more frequently the pool is validated and the sooner invalidconnections are removed from the pool.
Lower values take more database resources. Higher values result in less frequentconnection validation checks and use less database resources, but dead connectionsare undetected for longer periods of time.
NOTE
These options are mutually exclusive. If validate-on-match is set to true,then background-validation must be set to false. If background-validation is set to true, then validate-on-match must be set to false.
2. Choose one of the validation mechanisms.
valid-connection-checker-class-name
Using valid-connection-checker-class-name is the preferred validationmechanism. This specifies a connection checker class that is used to validate connectionsfor the particular database in use. JBoss EAP provides the following connection checkers:
org.jboss.jca.adapters.jdbc.extensions.db2.DB2ValidConnectionChecker
org.jboss.jca.adapters.jdbc.extensions.mssql.MSSQLValidConnectionChecker
org.jboss.jca.adapters.jdbc.extensions.mysql.MySQLReplicationValidConnectionChecker
org.jboss.jca.adapters.jdbc.extensions.mysql.MySQLValidConnectionChecker
org.jboss.jca.adapters.jdbc.extensions.novendor.JDBC4ValidConnectionChecker
CHAPTER 13. DATASOURCE MANAGEMENT
167
org.jboss.jca.adapters.jdbc.extensions.novendor.NullValidConnectionChecker
org.jboss.jca.adapters.jdbc.extensions.oracle.OracleValidConnectionChecker
org.jboss.jca.adapters.jdbc.extensions.postgres.PostgreSQLValidConnectionChecker
org.jboss.jca.adapters.jdbc.extensions.sybase.SybaseValidConnectionChecker
check-valid-connection-sql
Using check-valid-connection-sql, you provide the SQL statement that will be usedto validate the connection.The following is an example SQL statement that you might use to validate Oracleconnections.
The following is an example SQL statement that you might use to validate MySQL orPostgreSQL connections.
3. Set the exception sorter class name.When an exception is marked as fatal, the connection is closed immediately, even if theconnection is participating in a transaction. Use the exception sorter class option to properlydetect and clean up after fatal connection exceptions. Choose the appropriate JBoss EAPexception sorter for your datasource type.
org.jboss.jca.adapters.jdbc.extensions.db2.DB2ExceptionSorter
org.jboss.jca.adapters.jdbc.extensions.informix.InformixExceptionSorter
org.jboss.jca.adapters.jdbc.extensions.mssql.MSSQLExceptionSorter
org.jboss.jca.adapters.jdbc.extensions.mysql.MySQLExceptionSorter
org.jboss.jca.adapters.jdbc.extensions.novendor.NullExceptionSorter
org.jboss.jca.adapters.jdbc.extensions.oracle.OracleExceptionSorter
org.jboss.jca.adapters.jdbc.extensions.postgres.PostgreSQLExceptionSorter
org.jboss.jca.adapters.jdbc.extensions.sybase.SybaseExceptionSorter
13.9. DATASOURCE SECURITY
Datasource security refers to encrypting or obscuring passwords for datasource connections. Thesepasswords can be stored in plain text in configuration files, however this represents a security risk.
select 1 from dual
select 1
Red Hat JBoss Enterprise Application Platform 7.0 Configuration Guide
168
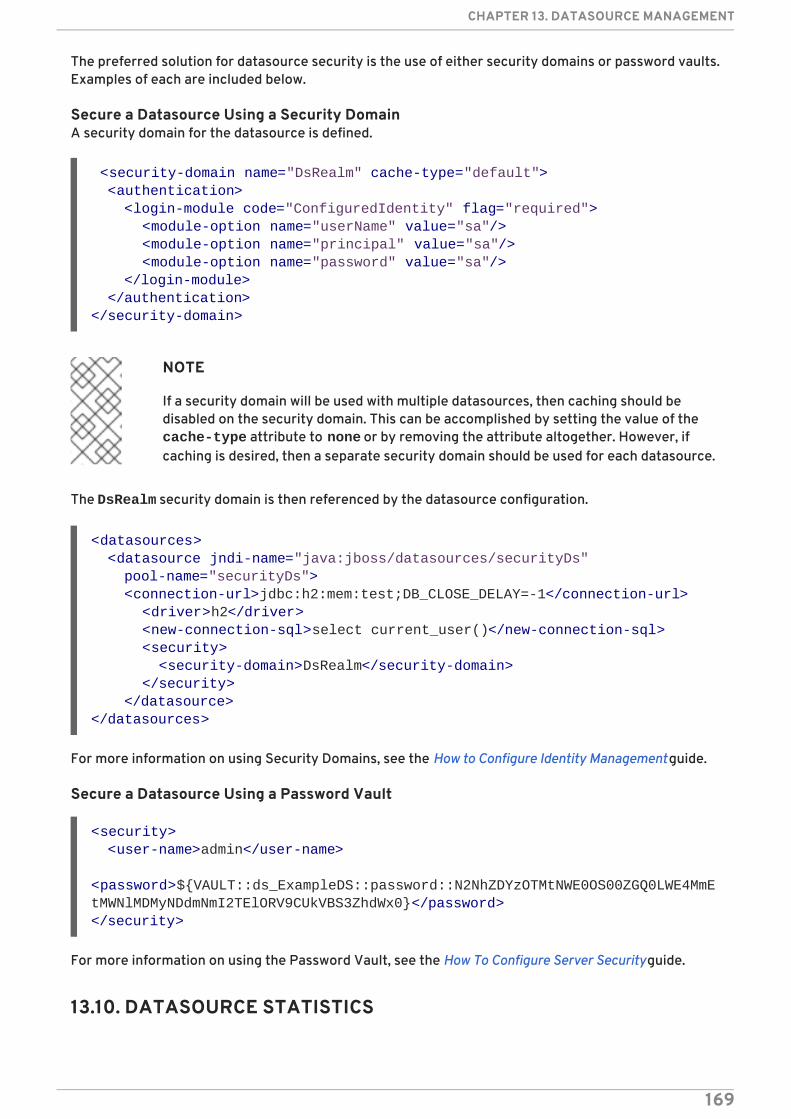
The preferred solution for datasource security is the use of either security domains or password vaults.Examples of each are included below.
Secure a Datasource Using a Security DomainA security domain for the datasource is defined.
NOTE
If a security domain will be used with multiple datasources, then caching should bedisabled on the security domain. This can be accomplished by setting the value of the cache-type attribute to none or by removing the attribute altogether. However, ifcaching is desired, then a separate security domain should be used for each datasource.
The DsRealm security domain is then referenced by the datasource configuration.
For more information on using Security Domains, see the How to Configure Identity Management guide.
Secure a Datasource Using a Password Vault
For more information on using the Password Vault, see the How To Configure Server Security guide.
13.10. DATASOURCE STATISTICS
<security-domain name="DsRealm" cache-type="default"> <authentication> <login-module code="ConfiguredIdentity" flag="required"> <module-option name="userName" value="sa"/> <module-option name="principal" value="sa"/> <module-option name="password" value="sa"/> </login-module> </authentication></security-domain>
<datasources> <datasource jndi-name="java:jboss/datasources/securityDs" pool-name="securityDs"> <connection-url>jdbc:h2:mem:test;DB_CLOSE_DELAY=-1</connection-url> <driver>h2</driver> <new-connection-sql>select current_user()</new-connection-sql> <security> <security-domain>DsRealm</security-domain> </security> </datasource></datasources>
<security> <user-name>admin</user-name> <password>${VAULT::ds_ExampleDS::password::N2NhZDYzOTMtNWE0OS00ZGQ0LWE4MmEtMWNlMDMyNDdmNmI2TElORV9CUkVBS3ZhdWx0}</password></security>
CHAPTER 13. DATASOURCE MANAGEMENT
169
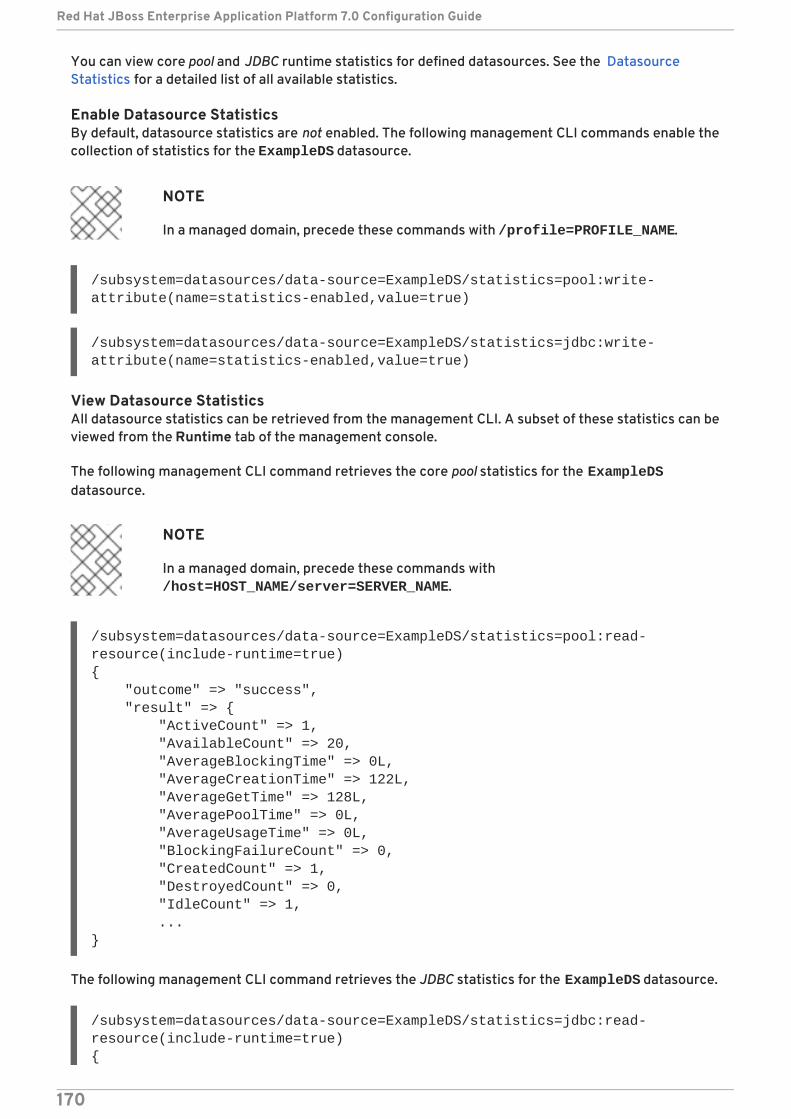
You can view core pool and JDBC runtime statistics for defined datasources. See the DatasourceStatistics for a detailed list of all available statistics.
Enable Datasource StatisticsBy default, datasource statistics are not enabled. The following management CLI commands enable thecollection of statistics for the ExampleDS datasource.
NOTE
In a managed domain, precede these commands with /profile=PROFILE_NAME.
/subsystem=datasources/data-source=ExampleDS/statistics=pool:write-attribute(name=statistics-enabled,value=true)
/subsystem=datasources/data-source=ExampleDS/statistics=jdbc:write-attribute(name=statistics-enabled,value=true)
View Datasource StatisticsAll datasource statistics can be retrieved from the management CLI. A subset of these statistics can beviewed from the Runtime tab of the management console.
The following management CLI command retrieves the core pool statistics for the ExampleDSdatasource.
NOTE
In a managed domain, precede these commands with /host=HOST_NAME/server=SERVER_NAME.
/subsystem=datasources/data-source=ExampleDS/statistics=pool:read-resource(include-runtime=true){ "outcome" => "success", "result" => { "ActiveCount" => 1, "AvailableCount" => 20, "AverageBlockingTime" => 0L, "AverageCreationTime" => 122L, "AverageGetTime" => 128L, "AveragePoolTime" => 0L, "AverageUsageTime" => 0L, "BlockingFailureCount" => 0, "CreatedCount" => 1, "DestroyedCount" => 0, "IdleCount" => 1, ...}
The following management CLI command retrieves the JDBC statistics for the ExampleDS datasource.
/subsystem=datasources/data-source=ExampleDS/statistics=jdbc:read-resource(include-runtime=true){
Red Hat JBoss Enterprise Application Platform 7.0 Configuration Guide
170
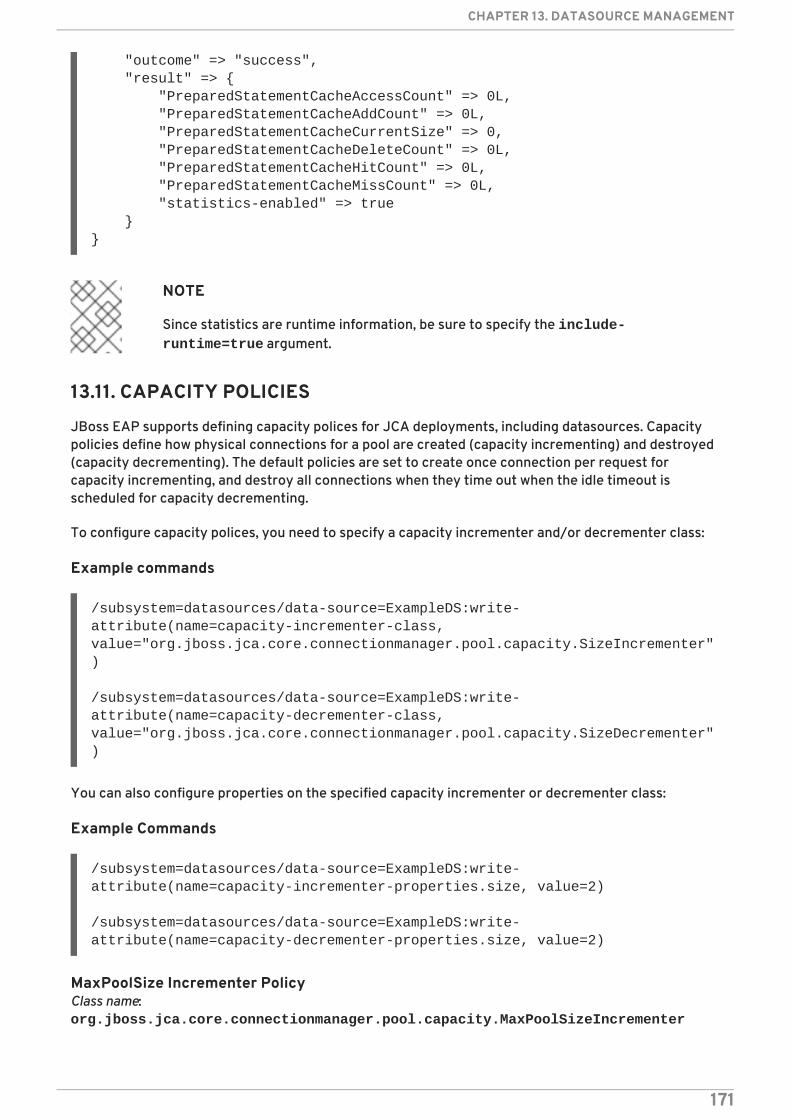
"outcome" => "success", "result" => { "PreparedStatementCacheAccessCount" => 0L, "PreparedStatementCacheAddCount" => 0L, "PreparedStatementCacheCurrentSize" => 0, "PreparedStatementCacheDeleteCount" => 0L, "PreparedStatementCacheHitCount" => 0L, "PreparedStatementCacheMissCount" => 0L, "statistics-enabled" => true }}
NOTE
Since statistics are runtime information, be sure to specify the include-runtime=true argument.
13.11. CAPACITY POLICIES
JBoss EAP supports defining capacity polices for JCA deployments, including datasources. Capacitypolicies define how physical connections for a pool are created (capacity incrementing) and destroyed(capacity decrementing). The default policies are set to create once connection per request forcapacity incrementing, and destroy all connections when they time out when the idle timeout isscheduled for capacity decrementing.
To configure capacity polices, you need to specify a capacity incrementer and/or decrementer class:
Example commands
/subsystem=datasources/data-source=ExampleDS:write-attribute(name=capacity-incrementer-class, value="org.jboss.jca.core.connectionmanager.pool.capacity.SizeIncrementer")
/subsystem=datasources/data-source=ExampleDS:write-attribute(name=capacity-decrementer-class, value="org.jboss.jca.core.connectionmanager.pool.capacity.SizeDecrementer")
You can also configure properties on the specified capacity incrementer or decrementer class:
Example Commands
/subsystem=datasources/data-source=ExampleDS:write-attribute(name=capacity-incrementer-properties.size, value=2)
/subsystem=datasources/data-source=ExampleDS:write-attribute(name=capacity-decrementer-properties.size, value=2)
MaxPoolSize Incrementer PolicyClass name: org.jboss.jca.core.connectionmanager.pool.capacity.MaxPoolSizeIncrementer
CHAPTER 13. DATASOURCE MANAGEMENT
171

The MaxPoolSize incrementer policy will fill the pool to its max size for each request. This policy isuseful when you want to keep the maximum number of connections available all the time.
Size Incrementer PolicyClass name: org.jboss.jca.core.connectionmanager.pool.capacity.SizeIncrementer
The Size incrementer policy will fill the pool by the specified number of connections for each request.This policy is useful when you want to increment with an additional number of connections per requestin anticipation that the next request will also need a connection.
Table 13.3. Size policy properties
Name Description
Size The number of connections that should be created
NOTE
This is the default increment policy with a size value of 1.
Watermark Incrementer PolicyClass name: org.jboss.jca.core.connectionmanager.pool.capacity.WatermarkIncrementer
The Watermark incrementer policy will fill the pool to the specified number of connections for eachrequest. This policy is useful when you want to keep a specified number of connections in the pool atall time.
Table 13.4. Watermark policy properties
Name Description
Watermark The watermark level for the number of connections
MinPoolSize Decrementer PolicyClass name: org.jboss.jca.core.connectionmanager.pool.capacity.MinPoolSizeDecrementer
The MinPoolSize decrementer policy will decrement the pool to its min size for each request. Thispolicy is useful when you want to limit the number of connections after each idle timeout request. Thepool will operate in a First In First Out (FIFO) manner.
Size Decrementer PolicyClass name: org.jboss.jca.core.connectionmanager.pool.capacity.SizeDecrementer
The Size decrementer policy will decrement the pool by the specified number of connections for eachidle timeout request.
Table 13.5. Size policy properties
Red Hat JBoss Enterprise Application Platform 7.0 Configuration Guide
172
Name Description
Size The number of connections that should be destroyed
This policy is useful when you want to decrement an additional number of connections per idle timeoutrequest in anticipation that the pool usage will lower over time.
The pool will operate in a First In First Out (FIFO) manner.
TimedOut Decrementer PolicyClass name: org.jboss.jca.core.connectionmanager.pool.capacity.TimedOutDecrementer
The TimedOut decrementer policy will removed all connections that have timed out from the pool foreach idle timeout request. The pool will operate in a First In Last Out (FILO) manner.
NOTE
This policy is the default decrement policy.
TimedOut/FIFO Decrementer PolicyClass name: org.jboss.jca.core.connectionmanager.pool.capacity.TimedOutFIFODecrementer
The TimedOutFIFO decrementer policy will removed all connections that have timed out from the poolfor each idle timeout request. The pool will operate in a First In First Out (FIFO) manner.
Watermark Decrementer PolicyClass name: org.jboss.jca.core.connectionmanager.pool.capacity.WatermarkDecrementer
The Watermark decrementer policy will decrement the pool to the specified number of connections foreach idle timeout request. This policy is useful when you want to keep a specified number ofconnections in the pool at all time. The pool will operate in a First In First Out (FIFO) manner.
Table 13.6. Watermark policy properties
Name Description
Watermark The watermark level for the number of connections
13.12. ENLISTMENT TRACING
Enlistment traces are recorded in order to help locate error situations that happens during enlistmentof XAResource instances. This does have a performance overhead, so in certain situations you maywant to disable these traces.
You can disable the recording of enlistment traces for a datasource using the management CLI bysetting the enlistment-trace attribute to false.
Disable enlistment trace for a non-XA datasource.
CHAPTER 13. DATASOURCE MANAGEMENT
173
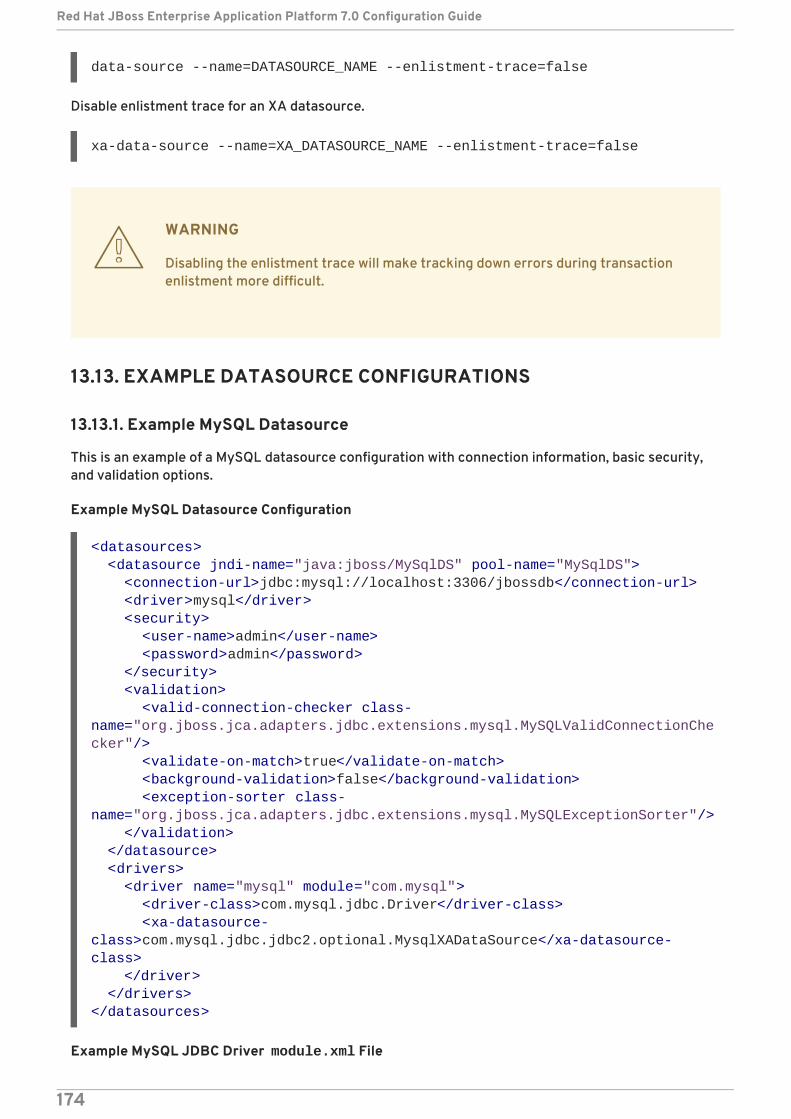
data-source --name=DATASOURCE_NAME --enlistment-trace=false
Disable enlistment trace for an XA datasource.
xa-data-source --name=XA_DATASOURCE_NAME --enlistment-trace=false
WARNING
Disabling the enlistment trace will make tracking down errors during transactionenlistment more difficult.
13.13. EXAMPLE DATASOURCE CONFIGURATIONS
13.13.1. Example MySQL Datasource
This is an example of a MySQL datasource configuration with connection information, basic security,and validation options.
Example MySQL Datasource Configuration
Example MySQL JDBC Driver module.xml File
<datasources> <datasource jndi-name="java:jboss/MySqlDS" pool-name="MySqlDS"> <connection-url>jdbc:mysql://localhost:3306/jbossdb</connection-url> <driver>mysql</driver> <security> <user-name>admin</user-name> <password>admin</password> </security> <validation> <valid-connection-checker class-name="org.jboss.jca.adapters.jdbc.extensions.mysql.MySQLValidConnectionChecker"/> <validate-on-match>true</validate-on-match> <background-validation>false</background-validation> <exception-sorter class-name="org.jboss.jca.adapters.jdbc.extensions.mysql.MySQLExceptionSorter"/> </validation> </datasource> <drivers> <driver name="mysql" module="com.mysql"> <driver-class>com.mysql.jdbc.Driver</driver-class> <xa-datasource-class>com.mysql.jdbc.jdbc2.optional.MysqlXADataSource</xa-datasource-class> </driver> </drivers></datasources>
Red Hat JBoss Enterprise Application Platform 7.0 Configuration Guide
174

Example Management CLI CommandsThis example configuration can be achieved by using the following management CLI commands.
1. Add the MySQL JDBC driver as a core module.
module add --name=com.mysql --resources=/path/to/mysql-connector-java-5.1.36-bin.jar --dependencies=javax.api,javax.transaction.api
IMPORTANT
Using the module management CLI command to add and remove modules isprovided as technology preview only. This command is not appropriate for usein a managed domain or when connecting to the management CLI remotely.Modules should be added and removed manually in a production environment.
2. Register the MySQL JDBC driver.
/subsystem=datasources/jdbc-driver=mysql:add(driver-name=mysql,driver-module-name=com.mysql,driver-xa-datasource-class-name=com.mysql.jdbc.jdbc2.optional.MysqlXADataSource, driver-class-name=com.mysql.jdbc.Driver)
3. Add the MySQL datasource.
data-source add --name=MySqlDS --jndi-name=java:jboss/MySqlDS --driver-name=mysql --connection-url=jdbc:mysql://localhost:3306/jbossdb --user-name=admin --password=admin --validate-on-match=true --background-validation=false --valid-connection-checker-class-name=org.jboss.jca.adapters.jdbc.extensions.mysql.MySQLValidConnectionChecker --exception-sorter-class-name=org.jboss.jca.adapters.jdbc.extensions.mysql.MySQLExceptionSorter
13.13.2. Example MySQL XA Datasource
This is an example of a MySQL XA datasource configuration with XA datasource properties, basicsecurity, and validation options.
Example MySQL XA Datasource Configuration
<?xml version="1.0" ?><module xmlns="urn:jboss:module:1.1" name="com.mysql"> <resources> <resource-root path="mysql-connector-java-5.1.36-bin.jar"/> </resources> <dependencies> <module name="javax.api"/> <module name="javax.transaction.api"/> </dependencies></module>
<datasources>
CHAPTER 13. DATASOURCE MANAGEMENT
175
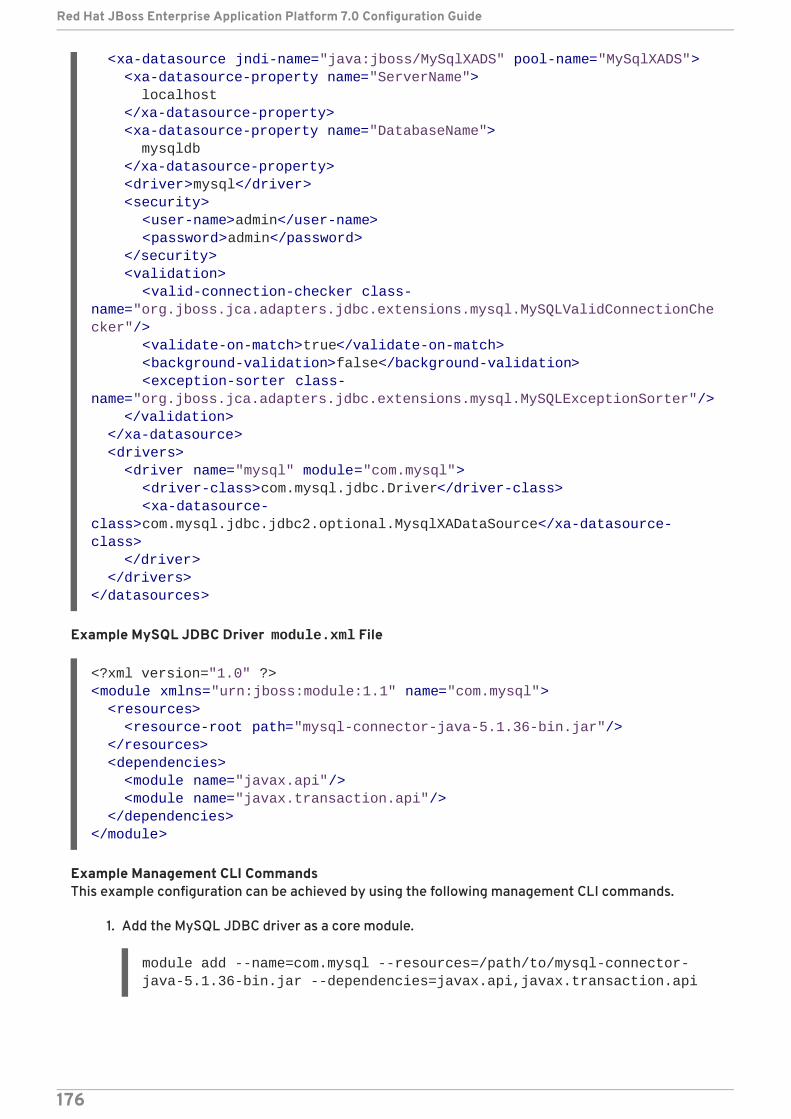
Example MySQL JDBC Driver module.xml File
Example Management CLI CommandsThis example configuration can be achieved by using the following management CLI commands.
1. Add the MySQL JDBC driver as a core module.
module add --name=com.mysql --resources=/path/to/mysql-connector-java-5.1.36-bin.jar --dependencies=javax.api,javax.transaction.api
<xa-datasource jndi-name="java:jboss/MySqlXADS" pool-name="MySqlXADS"> <xa-datasource-property name="ServerName"> localhost </xa-datasource-property> <xa-datasource-property name="DatabaseName"> mysqldb </xa-datasource-property> <driver>mysql</driver> <security> <user-name>admin</user-name> <password>admin</password> </security> <validation> <valid-connection-checker class-name="org.jboss.jca.adapters.jdbc.extensions.mysql.MySQLValidConnectionChecker"/> <validate-on-match>true</validate-on-match> <background-validation>false</background-validation> <exception-sorter class-name="org.jboss.jca.adapters.jdbc.extensions.mysql.MySQLExceptionSorter"/> </validation> </xa-datasource> <drivers> <driver name="mysql" module="com.mysql"> <driver-class>com.mysql.jdbc.Driver</driver-class> <xa-datasource-class>com.mysql.jdbc.jdbc2.optional.MysqlXADataSource</xa-datasource-class> </driver> </drivers></datasources>
<?xml version="1.0" ?><module xmlns="urn:jboss:module:1.1" name="com.mysql"> <resources> <resource-root path="mysql-connector-java-5.1.36-bin.jar"/> </resources> <dependencies> <module name="javax.api"/> <module name="javax.transaction.api"/> </dependencies></module>
Red Hat JBoss Enterprise Application Platform 7.0 Configuration Guide
176
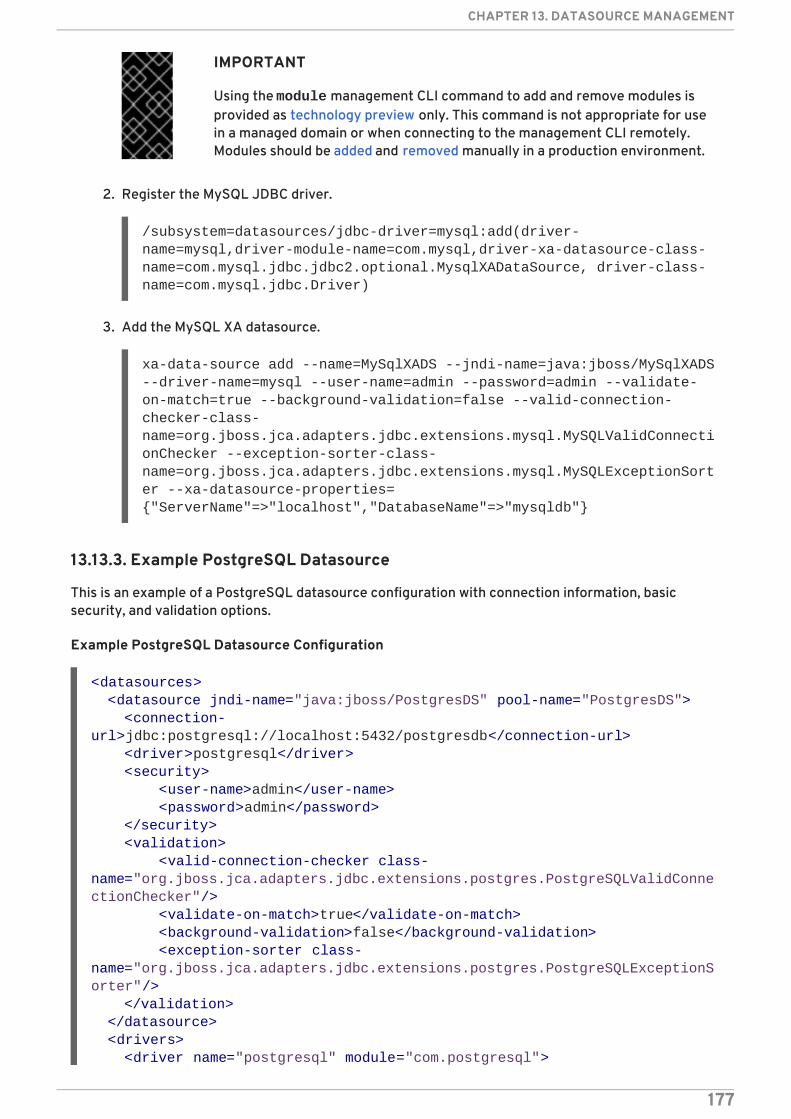
IMPORTANT
Using the module management CLI command to add and remove modules isprovided as technology preview only. This command is not appropriate for usein a managed domain or when connecting to the management CLI remotely.Modules should be added and removed manually in a production environment.
2. Register the MySQL JDBC driver.
/subsystem=datasources/jdbc-driver=mysql:add(driver-name=mysql,driver-module-name=com.mysql,driver-xa-datasource-class-name=com.mysql.jdbc.jdbc2.optional.MysqlXADataSource, driver-class-name=com.mysql.jdbc.Driver)
3. Add the MySQL XA datasource.
xa-data-source add --name=MySqlXADS --jndi-name=java:jboss/MySqlXADS --driver-name=mysql --user-name=admin --password=admin --validate-on-match=true --background-validation=false --valid-connection-checker-class-name=org.jboss.jca.adapters.jdbc.extensions.mysql.MySQLValidConnectionChecker --exception-sorter-class-name=org.jboss.jca.adapters.jdbc.extensions.mysql.MySQLExceptionSorter --xa-datasource-properties={"ServerName"=>"localhost","DatabaseName"=>"mysqldb"}
13.13.3. Example PostgreSQL Datasource
This is an example of a PostgreSQL datasource configuration with connection information, basicsecurity, and validation options.
Example PostgreSQL Datasource Configuration
<datasources> <datasource jndi-name="java:jboss/PostgresDS" pool-name="PostgresDS"> <connection-url>jdbc:postgresql://localhost:5432/postgresdb</connection-url> <driver>postgresql</driver> <security> <user-name>admin</user-name> <password>admin</password> </security> <validation> <valid-connection-checker class-name="org.jboss.jca.adapters.jdbc.extensions.postgres.PostgreSQLValidConnectionChecker"/> <validate-on-match>true</validate-on-match> <background-validation>false</background-validation> <exception-sorter class-name="org.jboss.jca.adapters.jdbc.extensions.postgres.PostgreSQLExceptionSorter"/> </validation> </datasource> <drivers> <driver name="postgresql" module="com.postgresql">
CHAPTER 13. DATASOURCE MANAGEMENT
177
Example PostgreSQL JDBC Driver module.xml File
Example Management CLI CommandsThis example configuration can be achieved by using the following management CLI commands.
1. Add the PostgreSQL JDBC driver as a core module.
module add --name=com.postgresql --resources=/path/to/postgresql-9.3-1102.jdbc4.jar --dependencies=javax.api,javax.transaction.api
IMPORTANT
Using the module management CLI command to add and remove modules isprovided as technology preview only. This command is not appropriate for usein a managed domain or when connecting to the management CLI remotely.Modules should be added and removed manually in a production environment.
2. Register the PostgreSQL JDBC driver.
/subsystem=datasources/jdbc-driver=postgresql:add(driver-name=postgresql,driver-module-name=com.postgresql,driver-xa-datasource-class-name=org.postgresql.xa.PGXADataSource)
3. Add the PostgreSQL datasource.
data-source add --name=PostgresDS --jndi-name=java:jboss/PostgresDS --driver-name=postgresql --connection-url=jdbc:postgresql://localhost:5432/postgresdb --user-name=admin --password=admin --validate-on-match=true --background-validation=false --valid-connection-checker-class-name=org.jboss.jca.adapters.jdbc.extensions.postgres.PostgreSQLValidConnectionChecker --exception-sorter-class-name=org.jboss.jca.adapters.jdbc.extensions.postgres.PostgreSQLExceptionSorter
13.13.4. Example PostgreSQL XA Datasource
<xa-datasource-class>org.postgresql.xa.PGXADataSource</xa-datasource-class> </driver> </drivers></datasources>
<?xml version="1.0" ?><module xmlns="urn:jboss:module:1.1" name="com.postgresql"> <resources> <resource-root path="postgresql-9.3-1102.jdbc4.jar"/> </resources> <dependencies> <module name="javax.api"/> <module name="javax.transaction.api"/> </dependencies></module>
Red Hat JBoss Enterprise Application Platform 7.0 Configuration Guide
178
This is an example of a PostgreSQL XA datasource configuration with XA datasource properties, basicsecurity, and validation options.
Example PostgreSQL XA Datasource Configuration
Example PostgreSQL JDBC Driver module.xml File
Example Management CLI CommandsThis example configuration can be achieved by using the following management CLI commands.
<datasources> <xa-datasource jndi-name="java:jboss/PostgresXADS" pool-name="PostgresXADS"> <xa-datasource-property name="ServerName"> localhost </xa-datasource-property> <xa-datasource-property name="PortNumber"> 5432 </xa-datasource-property> <xa-datasource-property name="DatabaseName"> postgresdb </xa-datasource-property> <driver>postgresql</driver> <security> <user-name>admin</user-name> <password>admin</password> </security> <validation> <valid-connection-checker class-name="org.jboss.jca.adapters.jdbc.extensions.postgres.PostgreSQLValidConnectionChecker"/> <validate-on-match>true</validate-on-match> <background-validation>false</background-validation> <exception-sorter class-name="org.jboss.jca.adapters.jdbc.extensions.postgres.PostgreSQLExceptionSorter"/> </validation> </xa-datasource> <drivers> <driver name="postgresql" module="com.postgresql"> <xa-datasource-class>org.postgresql.xa.PGXADataSource</xa-datasource-class> </driver> </drivers></datasources>
<?xml version="1.0" ?><module xmlns="urn:jboss:module:1.1" name="com.postgresql"> <resources> <resource-root path="postgresql-9.3-1102.jdbc4.jar"/> </resources> <dependencies> <module name="javax.api"/> <module name="javax.transaction.api"/> </dependencies></module>
CHAPTER 13. DATASOURCE MANAGEMENT
179
1. Add the PostgreSQL JDBC driver as a core module.
module add --name=com.postgresql --resources=/path/to/postgresql-9.3-1102.jdbc4.jar --dependencies=javax.api,javax.transaction.api
IMPORTANT
Using the module management CLI command to add and remove modules isprovided as technology preview only. This command is not appropriate for usein a managed domain or when connecting to the management CLI remotely.Modules should be added and removed manually in a production environment.
2. Register the PostgreSQL JDBC driver.
/subsystem=datasources/jdbc-driver=postgresql:add(driver-name=postgresql,driver-module-name=com.postgresql,driver-xa-datasource-class-name=org.postgresql.xa.PGXADataSource)
3. Add the PostgreSQL XA datasource.
xa-data-source add --name=PostgresXADS --jndi-name=java:jboss/PostgresXADS --driver-name=postgresql --user-name=admin --password=admin --validate-on-match=true --background-validation=false --valid-connection-checker-class-name=org.jboss.jca.adapters.jdbc.extensions.postgres.PostgreSQLValidConnectionChecker --exception-sorter-class-name=org.jboss.jca.adapters.jdbc.extensions.postgres.PostgreSQLExceptionSorter --xa-datasource-properties={"ServerName"=>"localhost","PortNumber"=>"5432","DatabaseName"=>"postgresdb"}
13.13.5. Example Oracle Datasource
This is an example of an Oracle datasource configuration with connection information, basic security,and validation options.
Example Oracle Datasource Configuration
<datasources> <datasource jndi-name="java:jboss/OracleDS" pool-name="OracleDS"> <connection-url>jdbc:oracle:thin:@localhost:1521:XE</connection-url> <driver>oracle</driver> <security> <user-name>admin</user-name> <password>admin</password> </security> <validation> <valid-connection-checker class-name="org.jboss.jca.adapters.jdbc.extensions.oracle.OracleValidConnectionChecker"/> <validate-on-match>true</validate-on-match> <background-validation>false</background-validation> <stale-connection-checker class-name="org.jboss.jca.adapters.jdbc.extensions.oracle.OracleStaleConnectionC
Red Hat JBoss Enterprise Application Platform 7.0 Configuration Guide
180
Example Oracle JDBC Driver module.xml File
Example Management CLI CommandsThis example configuration can be achieved by using the following management CLI commands.
1. Add the Oracle JDBC driver as a core module.
module add --name=com.oracle --resources=/path/to/misc/jdbc_drivers/oracle/ojdbc7.jar --dependencies=javax.api,javax.transaction.api
IMPORTANT
Using the module management CLI command to add and remove modules isprovided as technology preview only. This command is not appropriate for usein a managed domain or when connecting to the management CLI remotely.Modules should be added and removed manually in a production environment.
2. Register the Oracle JDBC driver.
/subsystem=datasources/jdbc-driver=oracle:add(driver-name=oracle,driver-module-name=com.oracle,driver-xa-datasource-class-name=oracle.jdbc.xa.client.OracleXADataSource)
3. Add the Oracle datasource.
data-source add --name=OracleDS --jndi-name=java:jboss/OracleDS --driver-name=oracle --connection-url=jdbc:oracle:thin:@localhost:1521:XE --user-name=admin --
hecker"/> <exception-sorter class-name="org.jboss.jca.adapters.jdbc.extensions.oracle.OracleExceptionSorter"/> </validation> </datasource> <drivers> <driver name="oracle" module="com.oracle"> <xa-datasource-class>oracle.jdbc.xa.client.OracleXADataSource</xa-datasource-class> </driver> </drivers></datasources>
<?xml version="1.0" ?><module xmlns="urn:jboss:module:1.1" name="com.oracle"> <resources> <resource-root path="ojdbc7.jar"/> </resources> <dependencies> <module name="javax.api"/> <module name="javax.transaction.api"/> </dependencies></module>
CHAPTER 13. DATASOURCE MANAGEMENT
181
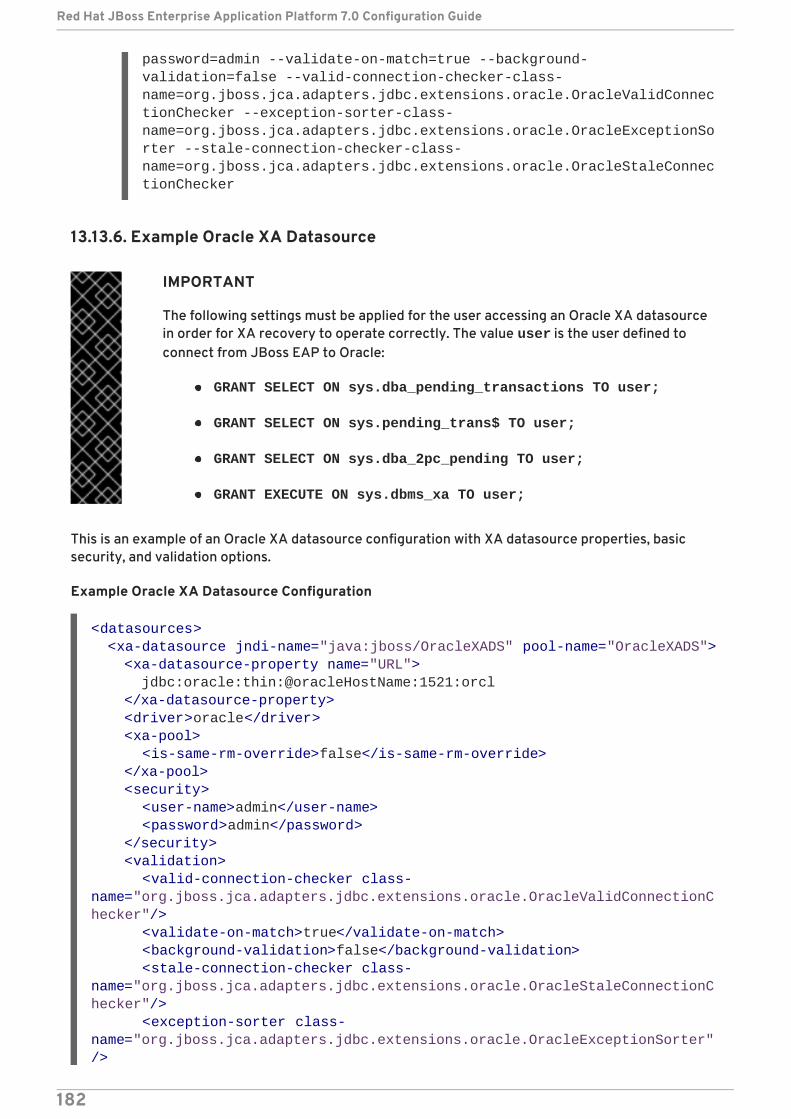
password=admin --validate-on-match=true --background-validation=false --valid-connection-checker-class-name=org.jboss.jca.adapters.jdbc.extensions.oracle.OracleValidConnectionChecker --exception-sorter-class-name=org.jboss.jca.adapters.jdbc.extensions.oracle.OracleExceptionSorter --stale-connection-checker-class-name=org.jboss.jca.adapters.jdbc.extensions.oracle.OracleStaleConnectionChecker
13.13.6. Example Oracle XA Datasource
IMPORTANT
The following settings must be applied for the user accessing an Oracle XA datasourcein order for XA recovery to operate correctly. The value user is the user defined toconnect from JBoss EAP to Oracle:
GRANT SELECT ON sys.dba_pending_transactions TO user;
GRANT SELECT ON sys.pending_trans$ TO user;
GRANT SELECT ON sys.dba_2pc_pending TO user;
GRANT EXECUTE ON sys.dbms_xa TO user;
This is an example of an Oracle XA datasource configuration with XA datasource properties, basicsecurity, and validation options.
Example Oracle XA Datasource Configuration
<datasources> <xa-datasource jndi-name="java:jboss/OracleXADS" pool-name="OracleXADS"> <xa-datasource-property name="URL"> jdbc:oracle:thin:@oracleHostName:1521:orcl </xa-datasource-property> <driver>oracle</driver> <xa-pool> <is-same-rm-override>false</is-same-rm-override> </xa-pool> <security> <user-name>admin</user-name> <password>admin</password> </security> <validation> <valid-connection-checker class-name="org.jboss.jca.adapters.jdbc.extensions.oracle.OracleValidConnectionChecker"/> <validate-on-match>true</validate-on-match> <background-validation>false</background-validation> <stale-connection-checker class-name="org.jboss.jca.adapters.jdbc.extensions.oracle.OracleStaleConnectionChecker"/> <exception-sorter class-name="org.jboss.jca.adapters.jdbc.extensions.oracle.OracleExceptionSorter"/>
Red Hat JBoss Enterprise Application Platform 7.0 Configuration Guide
182
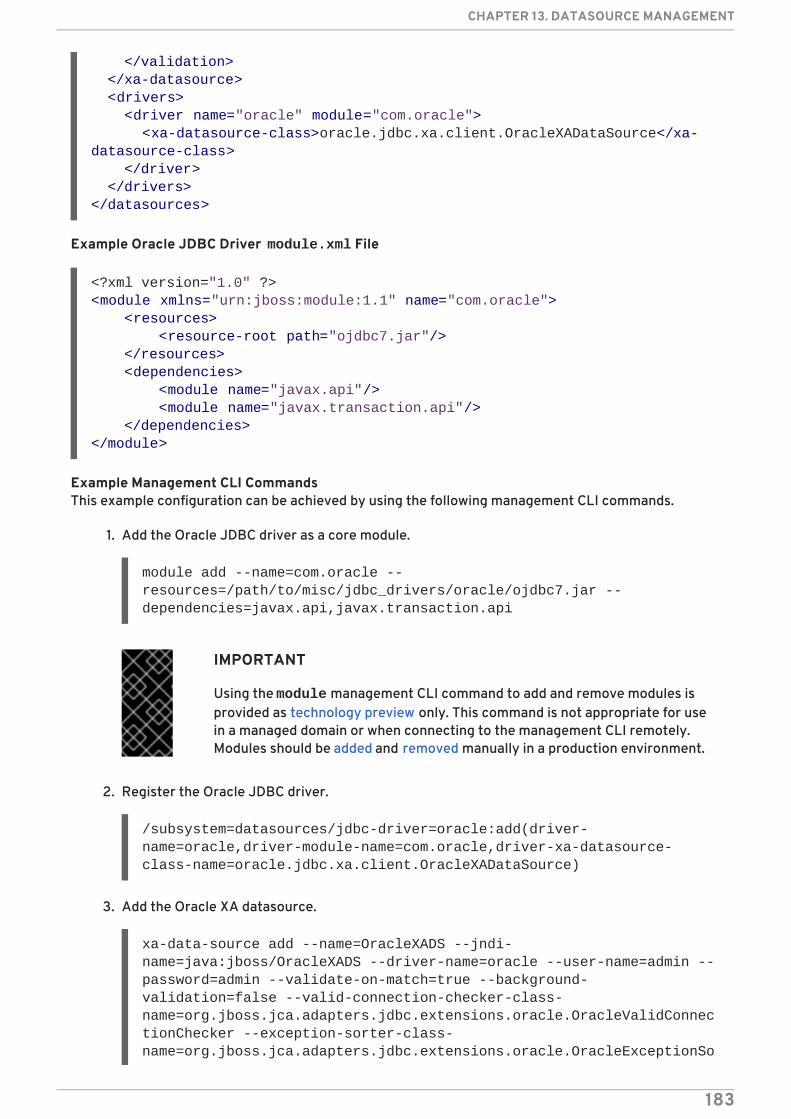
Example Oracle JDBC Driver module.xml File
Example Management CLI CommandsThis example configuration can be achieved by using the following management CLI commands.
1. Add the Oracle JDBC driver as a core module.
module add --name=com.oracle --resources=/path/to/misc/jdbc_drivers/oracle/ojdbc7.jar --dependencies=javax.api,javax.transaction.api
IMPORTANT
Using the module management CLI command to add and remove modules isprovided as technology preview only. This command is not appropriate for usein a managed domain or when connecting to the management CLI remotely.Modules should be added and removed manually in a production environment.
2. Register the Oracle JDBC driver.
/subsystem=datasources/jdbc-driver=oracle:add(driver-name=oracle,driver-module-name=com.oracle,driver-xa-datasource-class-name=oracle.jdbc.xa.client.OracleXADataSource)
3. Add the Oracle XA datasource.
xa-data-source add --name=OracleXADS --jndi-name=java:jboss/OracleXADS --driver-name=oracle --user-name=admin --password=admin --validate-on-match=true --background-validation=false --valid-connection-checker-class-name=org.jboss.jca.adapters.jdbc.extensions.oracle.OracleValidConnectionChecker --exception-sorter-class-name=org.jboss.jca.adapters.jdbc.extensions.oracle.OracleExceptionSo
</validation> </xa-datasource> <drivers> <driver name="oracle" module="com.oracle"> <xa-datasource-class>oracle.jdbc.xa.client.OracleXADataSource</xa-datasource-class> </driver> </drivers></datasources>
<?xml version="1.0" ?><module xmlns="urn:jboss:module:1.1" name="com.oracle"> <resources> <resource-root path="ojdbc7.jar"/> </resources> <dependencies> <module name="javax.api"/> <module name="javax.transaction.api"/> </dependencies></module>
CHAPTER 13. DATASOURCE MANAGEMENT
183
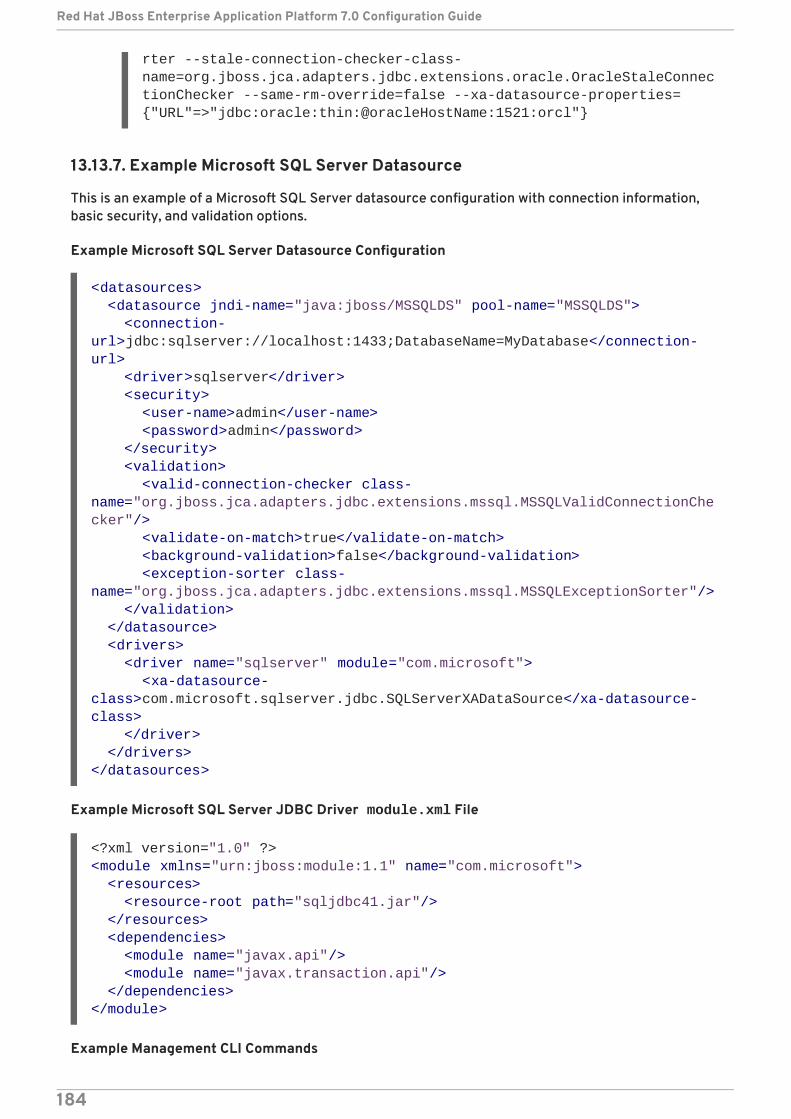
rter --stale-connection-checker-class-name=org.jboss.jca.adapters.jdbc.extensions.oracle.OracleStaleConnectionChecker --same-rm-override=false --xa-datasource-properties={"URL"=>"jdbc:oracle:thin:@oracleHostName:1521:orcl"}
13.13.7. Example Microsoft SQL Server Datasource
This is an example of a Microsoft SQL Server datasource configuration with connection information,basic security, and validation options.
Example Microsoft SQL Server Datasource Configuration
Example Microsoft SQL Server JDBC Driver module.xml File
Example Management CLI Commands
<datasources> <datasource jndi-name="java:jboss/MSSQLDS" pool-name="MSSQLDS"> <connection-url>jdbc:sqlserver://localhost:1433;DatabaseName=MyDatabase</connection-url> <driver>sqlserver</driver> <security> <user-name>admin</user-name> <password>admin</password> </security> <validation> <valid-connection-checker class-name="org.jboss.jca.adapters.jdbc.extensions.mssql.MSSQLValidConnectionChecker"/> <validate-on-match>true</validate-on-match> <background-validation>false</background-validation> <exception-sorter class-name="org.jboss.jca.adapters.jdbc.extensions.mssql.MSSQLExceptionSorter"/> </validation> </datasource> <drivers> <driver name="sqlserver" module="com.microsoft"> <xa-datasource-class>com.microsoft.sqlserver.jdbc.SQLServerXADataSource</xa-datasource-class> </driver> </drivers></datasources>
<?xml version="1.0" ?><module xmlns="urn:jboss:module:1.1" name="com.microsoft"> <resources> <resource-root path="sqljdbc41.jar"/> </resources> <dependencies> <module name="javax.api"/> <module name="javax.transaction.api"/> </dependencies></module>
Red Hat JBoss Enterprise Application Platform 7.0 Configuration Guide
184
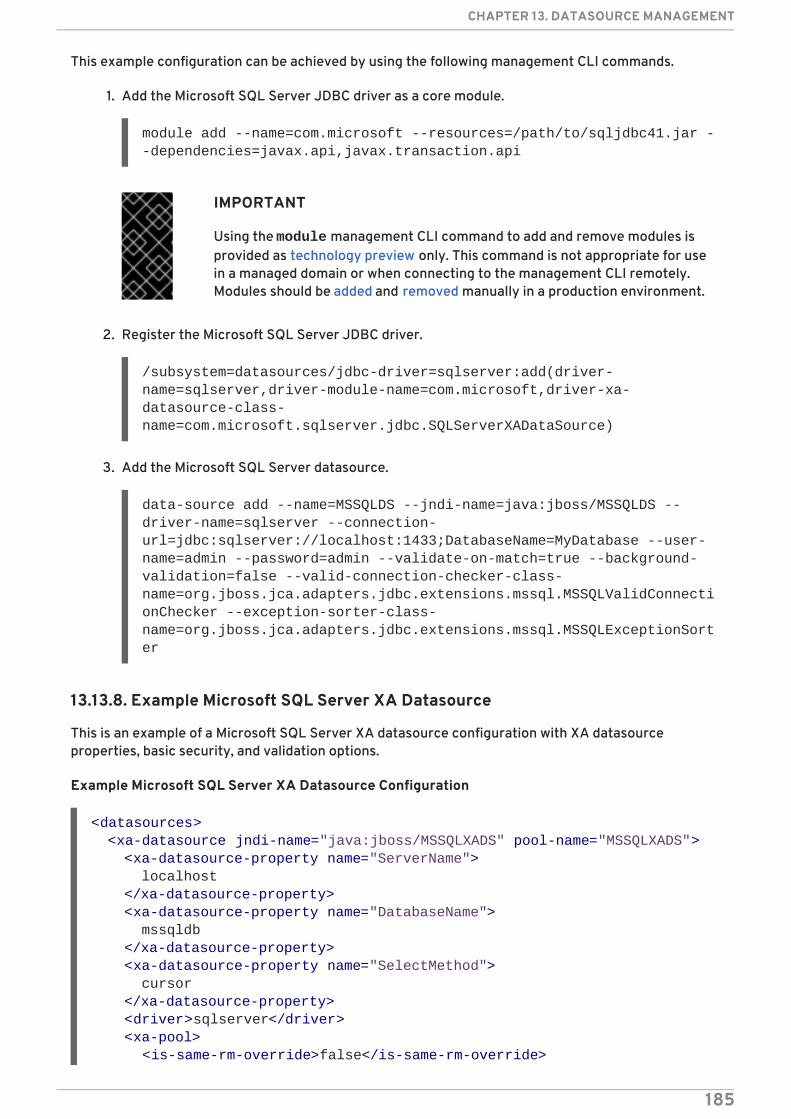
This example configuration can be achieved by using the following management CLI commands.
1. Add the Microsoft SQL Server JDBC driver as a core module.
module add --name=com.microsoft --resources=/path/to/sqljdbc41.jar --dependencies=javax.api,javax.transaction.api
IMPORTANT
Using the module management CLI command to add and remove modules isprovided as technology preview only. This command is not appropriate for usein a managed domain or when connecting to the management CLI remotely.Modules should be added and removed manually in a production environment.
2. Register the Microsoft SQL Server JDBC driver.
/subsystem=datasources/jdbc-driver=sqlserver:add(driver-name=sqlserver,driver-module-name=com.microsoft,driver-xa-datasource-class-name=com.microsoft.sqlserver.jdbc.SQLServerXADataSource)
3. Add the Microsoft SQL Server datasource.
data-source add --name=MSSQLDS --jndi-name=java:jboss/MSSQLDS --driver-name=sqlserver --connection-url=jdbc:sqlserver://localhost:1433;DatabaseName=MyDatabase --user-name=admin --password=admin --validate-on-match=true --background-validation=false --valid-connection-checker-class-name=org.jboss.jca.adapters.jdbc.extensions.mssql.MSSQLValidConnectionChecker --exception-sorter-class-name=org.jboss.jca.adapters.jdbc.extensions.mssql.MSSQLExceptionSorter
13.13.8. Example Microsoft SQL Server XA Datasource
This is an example of a Microsoft SQL Server XA datasource configuration with XA datasourceproperties, basic security, and validation options.
Example Microsoft SQL Server XA Datasource Configuration
<datasources> <xa-datasource jndi-name="java:jboss/MSSQLXADS" pool-name="MSSQLXADS"> <xa-datasource-property name="ServerName"> localhost </xa-datasource-property> <xa-datasource-property name="DatabaseName"> mssqldb </xa-datasource-property> <xa-datasource-property name="SelectMethod"> cursor </xa-datasource-property> <driver>sqlserver</driver> <xa-pool> <is-same-rm-override>false</is-same-rm-override>
CHAPTER 13. DATASOURCE MANAGEMENT
185
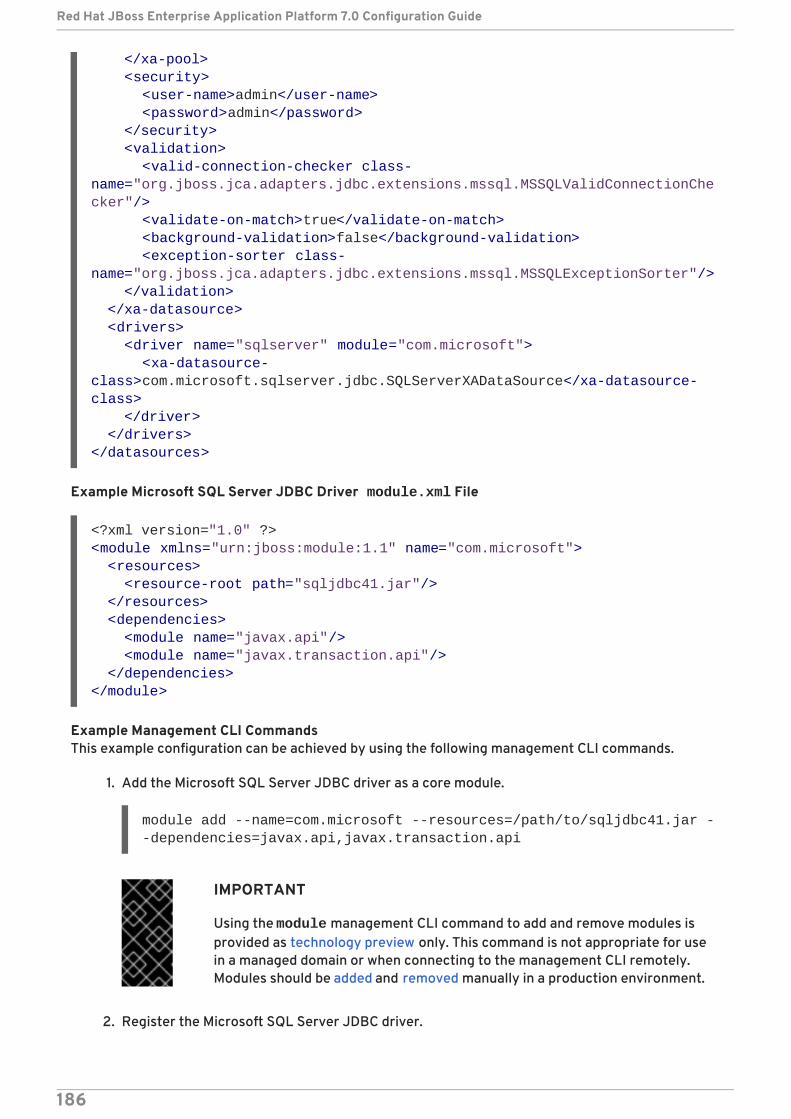
Example Microsoft SQL Server JDBC Driver module.xml File
Example Management CLI CommandsThis example configuration can be achieved by using the following management CLI commands.
1. Add the Microsoft SQL Server JDBC driver as a core module.
module add --name=com.microsoft --resources=/path/to/sqljdbc41.jar --dependencies=javax.api,javax.transaction.api
IMPORTANT
Using the module management CLI command to add and remove modules isprovided as technology preview only. This command is not appropriate for usein a managed domain or when connecting to the management CLI remotely.Modules should be added and removed manually in a production environment.
2. Register the Microsoft SQL Server JDBC driver.
</xa-pool> <security> <user-name>admin</user-name> <password>admin</password> </security> <validation> <valid-connection-checker class-name="org.jboss.jca.adapters.jdbc.extensions.mssql.MSSQLValidConnectionChecker"/> <validate-on-match>true</validate-on-match> <background-validation>false</background-validation> <exception-sorter class-name="org.jboss.jca.adapters.jdbc.extensions.mssql.MSSQLExceptionSorter"/> </validation> </xa-datasource> <drivers> <driver name="sqlserver" module="com.microsoft"> <xa-datasource-class>com.microsoft.sqlserver.jdbc.SQLServerXADataSource</xa-datasource-class> </driver> </drivers></datasources>
<?xml version="1.0" ?><module xmlns="urn:jboss:module:1.1" name="com.microsoft"> <resources> <resource-root path="sqljdbc41.jar"/> </resources> <dependencies> <module name="javax.api"/> <module name="javax.transaction.api"/> </dependencies></module>
Red Hat JBoss Enterprise Application Platform 7.0 Configuration Guide
186
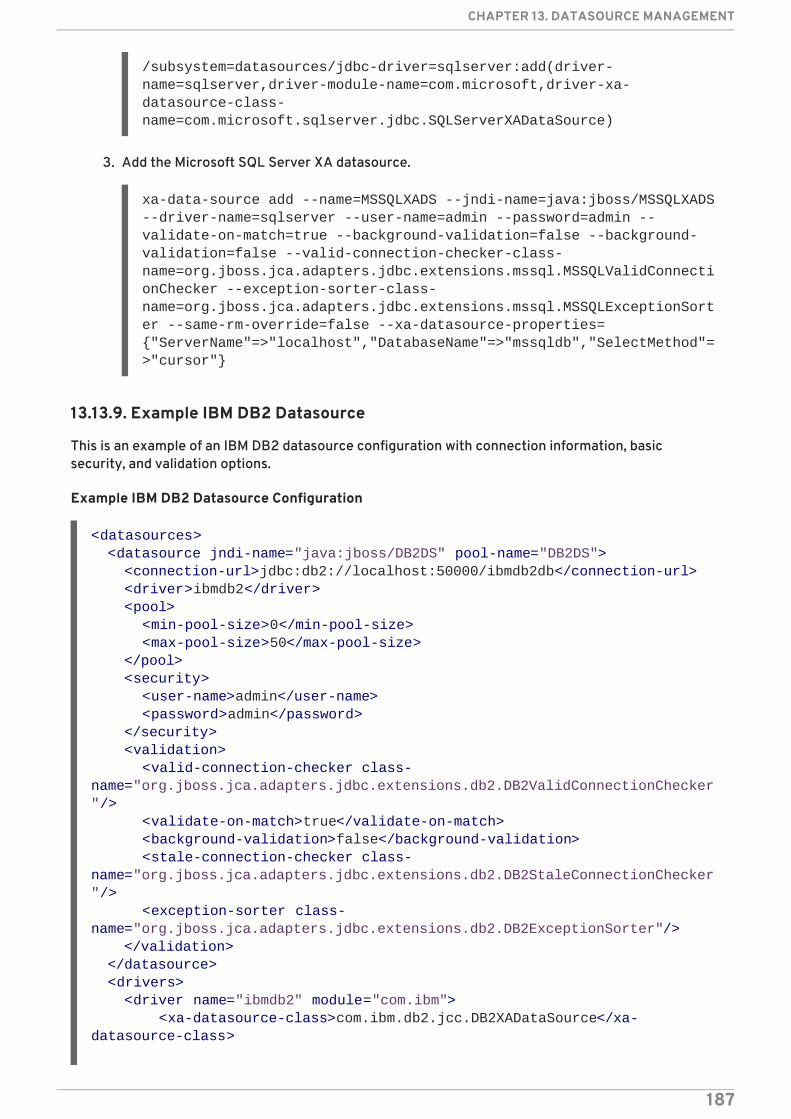
/subsystem=datasources/jdbc-driver=sqlserver:add(driver-name=sqlserver,driver-module-name=com.microsoft,driver-xa-datasource-class-name=com.microsoft.sqlserver.jdbc.SQLServerXADataSource)
3. Add the Microsoft SQL Server XA datasource.
xa-data-source add --name=MSSQLXADS --jndi-name=java:jboss/MSSQLXADS --driver-name=sqlserver --user-name=admin --password=admin --validate-on-match=true --background-validation=false --background-validation=false --valid-connection-checker-class-name=org.jboss.jca.adapters.jdbc.extensions.mssql.MSSQLValidConnectionChecker --exception-sorter-class-name=org.jboss.jca.adapters.jdbc.extensions.mssql.MSSQLExceptionSorter --same-rm-override=false --xa-datasource-properties={"ServerName"=>"localhost","DatabaseName"=>"mssqldb","SelectMethod"=>"cursor"}
13.13.9. Example IBM DB2 Datasource
This is an example of an IBM DB2 datasource configuration with connection information, basicsecurity, and validation options.
Example IBM DB2 Datasource Configuration
<datasources> <datasource jndi-name="java:jboss/DB2DS" pool-name="DB2DS"> <connection-url>jdbc:db2://localhost:50000/ibmdb2db</connection-url> <driver>ibmdb2</driver> <pool> <min-pool-size>0</min-pool-size> <max-pool-size>50</max-pool-size> </pool> <security> <user-name>admin</user-name> <password>admin</password> </security> <validation> <valid-connection-checker class-name="org.jboss.jca.adapters.jdbc.extensions.db2.DB2ValidConnectionChecker"/> <validate-on-match>true</validate-on-match> <background-validation>false</background-validation> <stale-connection-checker class-name="org.jboss.jca.adapters.jdbc.extensions.db2.DB2StaleConnectionChecker"/> <exception-sorter class-name="org.jboss.jca.adapters.jdbc.extensions.db2.DB2ExceptionSorter"/> </validation> </datasource> <drivers> <driver name="ibmdb2" module="com.ibm"> <xa-datasource-class>com.ibm.db2.jcc.DB2XADataSource</xa-datasource-class>
CHAPTER 13. DATASOURCE MANAGEMENT
187
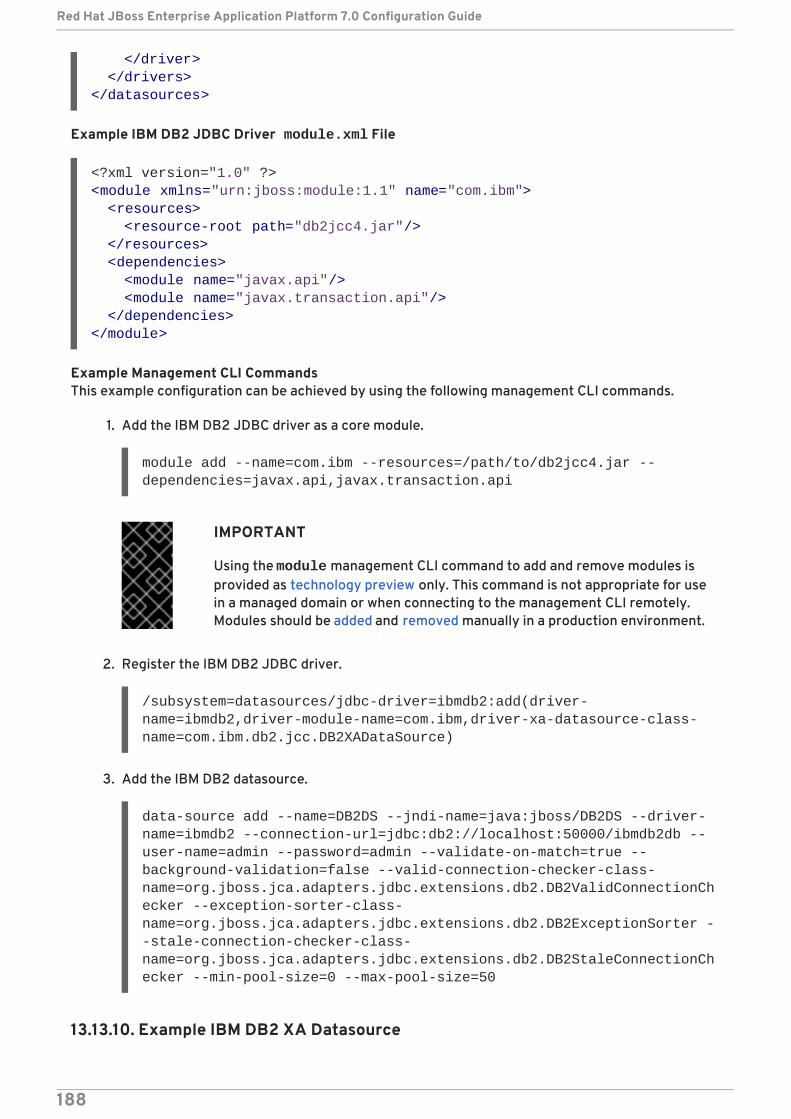
Example IBM DB2 JDBC Driver module.xml File
Example Management CLI CommandsThis example configuration can be achieved by using the following management CLI commands.
1. Add the IBM DB2 JDBC driver as a core module.
module add --name=com.ibm --resources=/path/to/db2jcc4.jar --dependencies=javax.api,javax.transaction.api
IMPORTANT
Using the module management CLI command to add and remove modules isprovided as technology preview only. This command is not appropriate for usein a managed domain or when connecting to the management CLI remotely.Modules should be added and removed manually in a production environment.
2. Register the IBM DB2 JDBC driver.
/subsystem=datasources/jdbc-driver=ibmdb2:add(driver-name=ibmdb2,driver-module-name=com.ibm,driver-xa-datasource-class-name=com.ibm.db2.jcc.DB2XADataSource)
3. Add the IBM DB2 datasource.
data-source add --name=DB2DS --jndi-name=java:jboss/DB2DS --driver-name=ibmdb2 --connection-url=jdbc:db2://localhost:50000/ibmdb2db --user-name=admin --password=admin --validate-on-match=true --background-validation=false --valid-connection-checker-class-name=org.jboss.jca.adapters.jdbc.extensions.db2.DB2ValidConnectionChecker --exception-sorter-class-name=org.jboss.jca.adapters.jdbc.extensions.db2.DB2ExceptionSorter --stale-connection-checker-class-name=org.jboss.jca.adapters.jdbc.extensions.db2.DB2StaleConnectionChecker --min-pool-size=0 --max-pool-size=50
13.13.10. Example IBM DB2 XA Datasource
</driver> </drivers></datasources>
<?xml version="1.0" ?><module xmlns="urn:jboss:module:1.1" name="com.ibm"> <resources> <resource-root path="db2jcc4.jar"/> </resources> <dependencies> <module name="javax.api"/> <module name="javax.transaction.api"/> </dependencies></module>
Red Hat JBoss Enterprise Application Platform 7.0 Configuration Guide
188
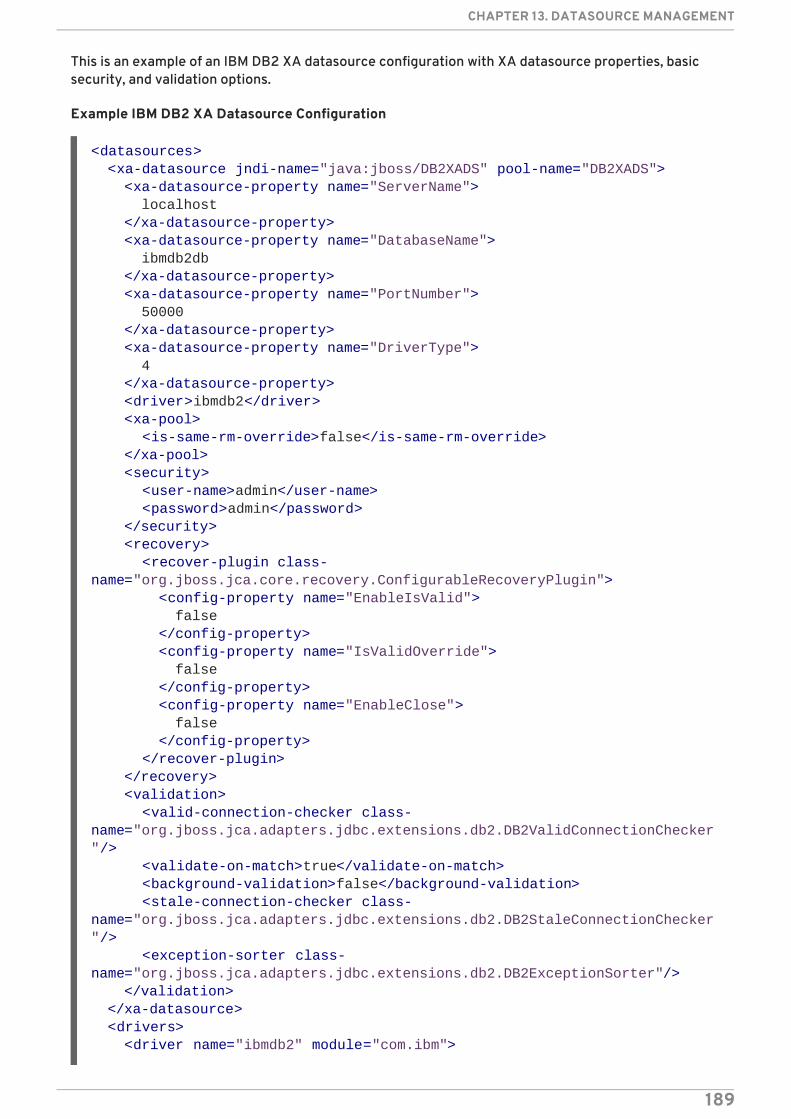
This is an example of an IBM DB2 XA datasource configuration with XA datasource properties, basicsecurity, and validation options.
Example IBM DB2 XA Datasource Configuration
<datasources> <xa-datasource jndi-name="java:jboss/DB2XADS" pool-name="DB2XADS"> <xa-datasource-property name="ServerName"> localhost </xa-datasource-property> <xa-datasource-property name="DatabaseName"> ibmdb2db </xa-datasource-property> <xa-datasource-property name="PortNumber"> 50000 </xa-datasource-property> <xa-datasource-property name="DriverType"> 4 </xa-datasource-property> <driver>ibmdb2</driver> <xa-pool> <is-same-rm-override>false</is-same-rm-override> </xa-pool> <security> <user-name>admin</user-name> <password>admin</password> </security> <recovery> <recover-plugin class-name="org.jboss.jca.core.recovery.ConfigurableRecoveryPlugin"> <config-property name="EnableIsValid"> false </config-property> <config-property name="IsValidOverride"> false </config-property> <config-property name="EnableClose"> false </config-property> </recover-plugin> </recovery> <validation> <valid-connection-checker class-name="org.jboss.jca.adapters.jdbc.extensions.db2.DB2ValidConnectionChecker"/> <validate-on-match>true</validate-on-match> <background-validation>false</background-validation> <stale-connection-checker class-name="org.jboss.jca.adapters.jdbc.extensions.db2.DB2StaleConnectionChecker"/> <exception-sorter class-name="org.jboss.jca.adapters.jdbc.extensions.db2.DB2ExceptionSorter"/> </validation> </xa-datasource> <drivers> <driver name="ibmdb2" module="com.ibm">
CHAPTER 13. DATASOURCE MANAGEMENT
189

Example IBM DB2 JDBC Driver module.xml File
Example Management CLI CommandsThis example configuration can be achieved by using the following management CLI commands.
1. Add the IBM DB2 JDBC driver as a core module.
module add --name=com.ibm --resources=/path/to/db2jcc4.jar --dependencies=javax.api,javax.transaction.api
IMPORTANT
Using the module management CLI command to add and remove modules isprovided as technology preview only. This command is not appropriate for usein a managed domain or when connecting to the management CLI remotely.Modules should be added and removed manually in a production environment.
2. Register the IBM DB2 JDBC driver.
/subsystem=datasources/jdbc-driver=ibmdb2:add(driver-name=ibmdb2,driver-module-name=com.ibm,driver-xa-datasource-class-name=com.ibm.db2.jcc.DB2XADataSource)
3. Add the IBM DB2 XA datasource.
xa-data-source add --name=DB2XADS --jndi-name=java:jboss/DB2XADS --driver-name=ibmdb2 --user-name=admin --password=admin --validate-on-match=true --background-validation=false --background-validation=false --valid-connection-checker-class-name=org.jboss.jca.adapters.jdbc.extensions.db2.DB2ValidConnectionChecker --exception-sorter-class-name=org.jboss.jca.adapters.jdbc.extensions.db2.DB2ExceptionSorter --stale-connection-checker-class-name=org.jboss.jca.adapters.jdbc.extensions.db2.DB2StaleConnectionChecker --same-rm-override=false --recovery-plugin-class-name=org.jboss.jca.core.recovery.ConfigurableRecoveryPlugin --recovery-plugin-properties=
<xa-datasource-class>com.ibm.db2.jcc.DB2XADataSource</xa-datasource-class> </driver> </drivers></datasources>
<?xml version="1.0" ?><module xmlns="urn:jboss:module:1.1" name="com.ibm"> <resources> <resource-root path="db2jcc4.jar"/> </resources> <dependencies> <module name="javax.api"/> <module name="javax.transaction.api"/> </dependencies></module>
Red Hat JBoss Enterprise Application Platform 7.0 Configuration Guide
190
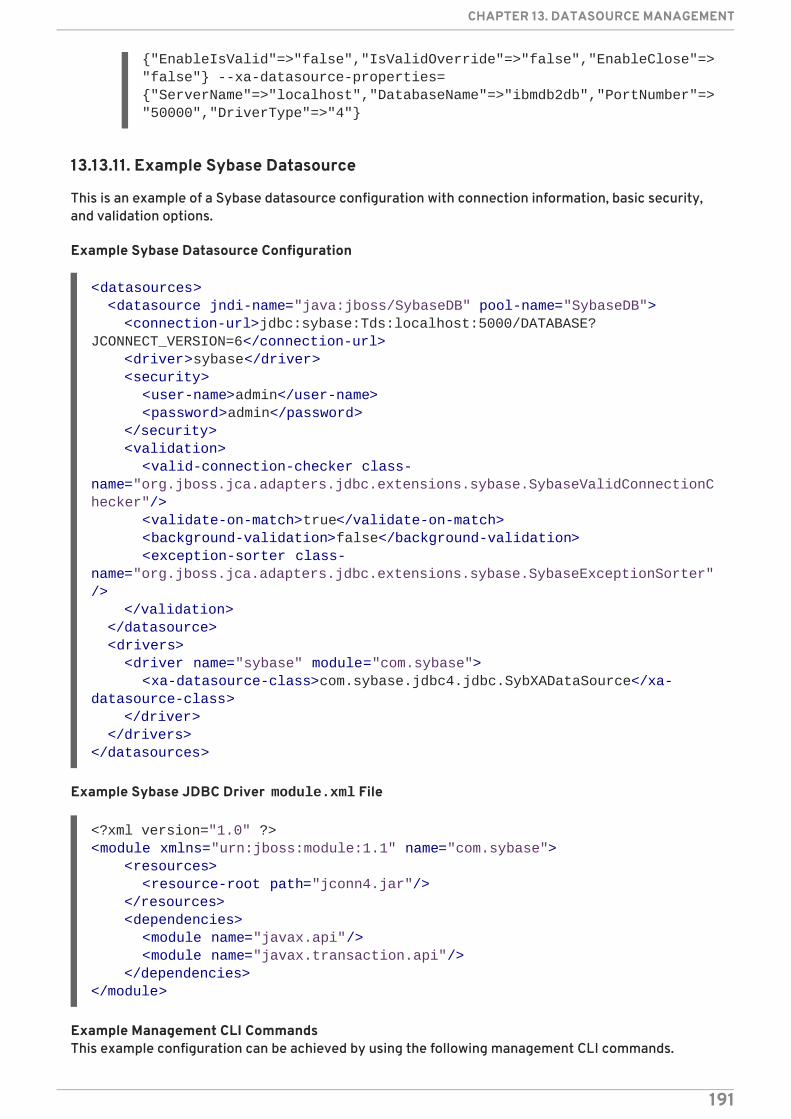
{"EnableIsValid"=>"false","IsValidOverride"=>"false","EnableClose"=>"false"} --xa-datasource-properties={"ServerName"=>"localhost","DatabaseName"=>"ibmdb2db","PortNumber"=>"50000","DriverType"=>"4"}
13.13.11. Example Sybase Datasource
This is an example of a Sybase datasource configuration with connection information, basic security,and validation options.
Example Sybase Datasource Configuration
Example Sybase JDBC Driver module.xml File
Example Management CLI CommandsThis example configuration can be achieved by using the following management CLI commands.
<datasources> <datasource jndi-name="java:jboss/SybaseDB" pool-name="SybaseDB"> <connection-url>jdbc:sybase:Tds:localhost:5000/DATABASE?JCONNECT_VERSION=6</connection-url> <driver>sybase</driver> <security> <user-name>admin</user-name> <password>admin</password> </security> <validation> <valid-connection-checker class-name="org.jboss.jca.adapters.jdbc.extensions.sybase.SybaseValidConnectionChecker"/> <validate-on-match>true</validate-on-match> <background-validation>false</background-validation> <exception-sorter class-name="org.jboss.jca.adapters.jdbc.extensions.sybase.SybaseExceptionSorter"/> </validation> </datasource> <drivers> <driver name="sybase" module="com.sybase"> <xa-datasource-class>com.sybase.jdbc4.jdbc.SybXADataSource</xa-datasource-class> </driver> </drivers></datasources>
<?xml version="1.0" ?><module xmlns="urn:jboss:module:1.1" name="com.sybase"> <resources> <resource-root path="jconn4.jar"/> </resources> <dependencies> <module name="javax.api"/> <module name="javax.transaction.api"/> </dependencies></module>
CHAPTER 13. DATASOURCE MANAGEMENT
191
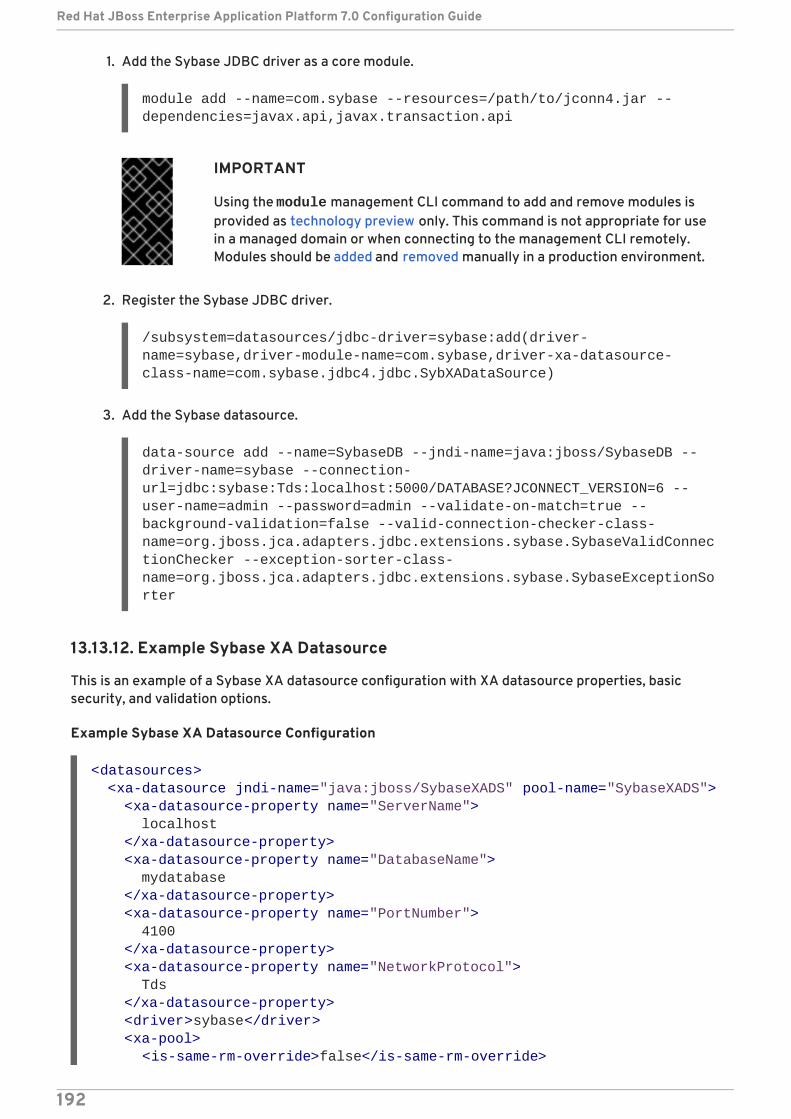
1. Add the Sybase JDBC driver as a core module.
module add --name=com.sybase --resources=/path/to/jconn4.jar --dependencies=javax.api,javax.transaction.api
IMPORTANT
Using the module management CLI command to add and remove modules isprovided as technology preview only. This command is not appropriate for usein a managed domain or when connecting to the management CLI remotely.Modules should be added and removed manually in a production environment.
2. Register the Sybase JDBC driver.
/subsystem=datasources/jdbc-driver=sybase:add(driver-name=sybase,driver-module-name=com.sybase,driver-xa-datasource-class-name=com.sybase.jdbc4.jdbc.SybXADataSource)
3. Add the Sybase datasource.
data-source add --name=SybaseDB --jndi-name=java:jboss/SybaseDB --driver-name=sybase --connection-url=jdbc:sybase:Tds:localhost:5000/DATABASE?JCONNECT_VERSION=6 --user-name=admin --password=admin --validate-on-match=true --background-validation=false --valid-connection-checker-class-name=org.jboss.jca.adapters.jdbc.extensions.sybase.SybaseValidConnectionChecker --exception-sorter-class-name=org.jboss.jca.adapters.jdbc.extensions.sybase.SybaseExceptionSorter
13.13.12. Example Sybase XA Datasource
This is an example of a Sybase XA datasource configuration with XA datasource properties, basicsecurity, and validation options.
Example Sybase XA Datasource Configuration
<datasources> <xa-datasource jndi-name="java:jboss/SybaseXADS" pool-name="SybaseXADS"> <xa-datasource-property name="ServerName"> localhost </xa-datasource-property> <xa-datasource-property name="DatabaseName"> mydatabase </xa-datasource-property> <xa-datasource-property name="PortNumber"> 4100 </xa-datasource-property> <xa-datasource-property name="NetworkProtocol"> Tds </xa-datasource-property> <driver>sybase</driver> <xa-pool> <is-same-rm-override>false</is-same-rm-override>
Red Hat JBoss Enterprise Application Platform 7.0 Configuration Guide
192
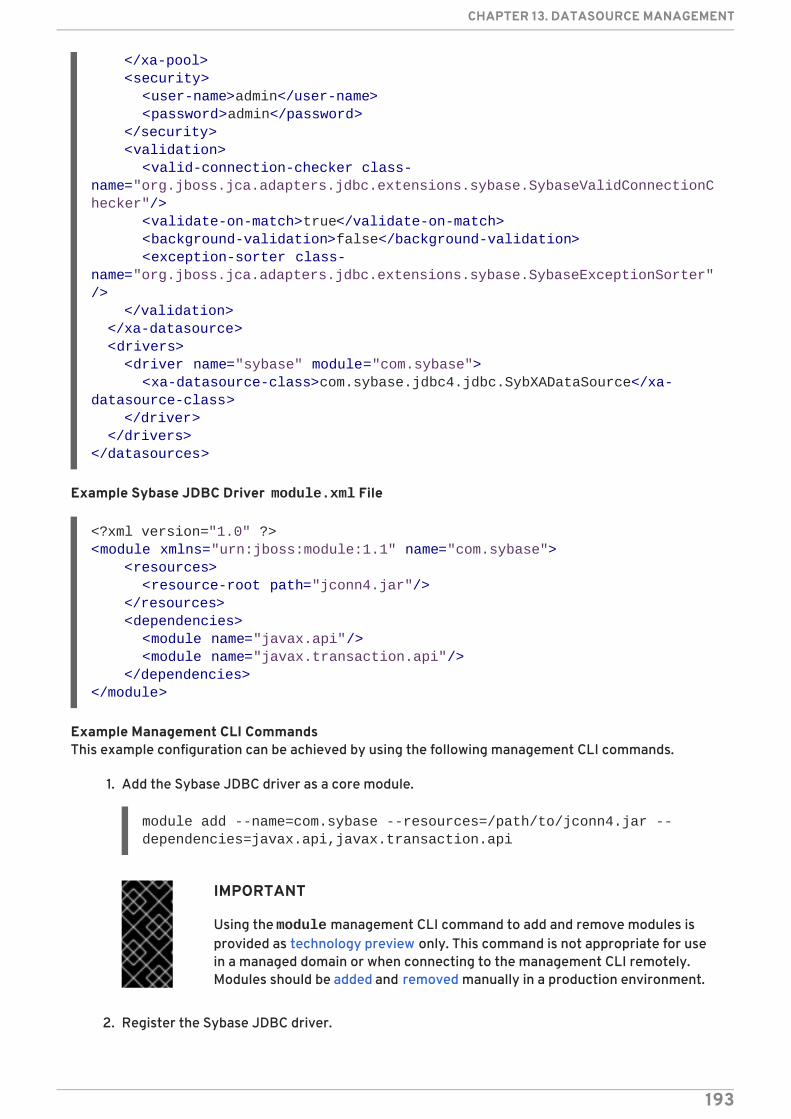
Example Sybase JDBC Driver module.xml File
Example Management CLI CommandsThis example configuration can be achieved by using the following management CLI commands.
1. Add the Sybase JDBC driver as a core module.
module add --name=com.sybase --resources=/path/to/jconn4.jar --dependencies=javax.api,javax.transaction.api
IMPORTANT
Using the module management CLI command to add and remove modules isprovided as technology preview only. This command is not appropriate for usein a managed domain or when connecting to the management CLI remotely.Modules should be added and removed manually in a production environment.
2. Register the Sybase JDBC driver.
</xa-pool> <security> <user-name>admin</user-name> <password>admin</password> </security> <validation> <valid-connection-checker class-name="org.jboss.jca.adapters.jdbc.extensions.sybase.SybaseValidConnectionChecker"/> <validate-on-match>true</validate-on-match> <background-validation>false</background-validation> <exception-sorter class-name="org.jboss.jca.adapters.jdbc.extensions.sybase.SybaseExceptionSorter"/> </validation> </xa-datasource> <drivers> <driver name="sybase" module="com.sybase"> <xa-datasource-class>com.sybase.jdbc4.jdbc.SybXADataSource</xa-datasource-class> </driver> </drivers></datasources>
<?xml version="1.0" ?><module xmlns="urn:jboss:module:1.1" name="com.sybase"> <resources> <resource-root path="jconn4.jar"/> </resources> <dependencies> <module name="javax.api"/> <module name="javax.transaction.api"/> </dependencies></module>
CHAPTER 13. DATASOURCE MANAGEMENT
193
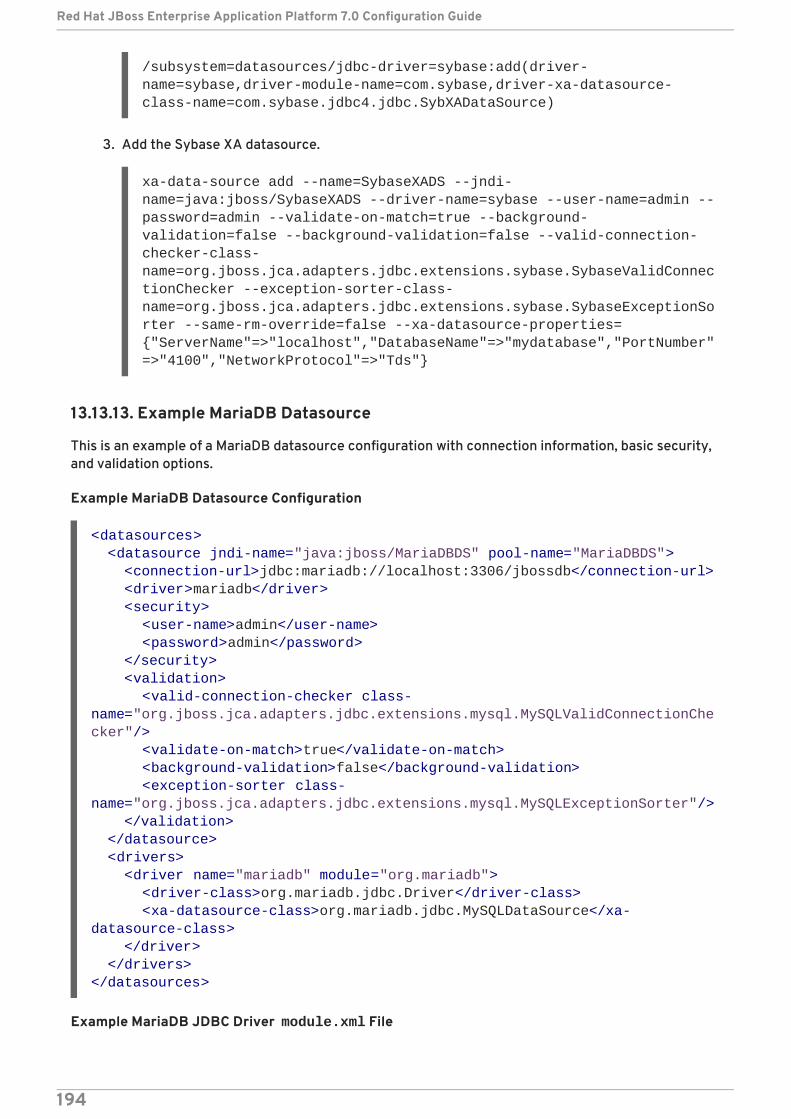
/subsystem=datasources/jdbc-driver=sybase:add(driver-name=sybase,driver-module-name=com.sybase,driver-xa-datasource-class-name=com.sybase.jdbc4.jdbc.SybXADataSource)
3. Add the Sybase XA datasource.
xa-data-source add --name=SybaseXADS --jndi-name=java:jboss/SybaseXADS --driver-name=sybase --user-name=admin --password=admin --validate-on-match=true --background-validation=false --background-validation=false --valid-connection-checker-class-name=org.jboss.jca.adapters.jdbc.extensions.sybase.SybaseValidConnectionChecker --exception-sorter-class-name=org.jboss.jca.adapters.jdbc.extensions.sybase.SybaseExceptionSorter --same-rm-override=false --xa-datasource-properties={"ServerName"=>"localhost","DatabaseName"=>"mydatabase","PortNumber"=>"4100","NetworkProtocol"=>"Tds"}
13.13.13. Example MariaDB Datasource
This is an example of a MariaDB datasource configuration with connection information, basic security,and validation options.
Example MariaDB Datasource Configuration
Example MariaDB JDBC Driver module.xml File
<datasources> <datasource jndi-name="java:jboss/MariaDBDS" pool-name="MariaDBDS"> <connection-url>jdbc:mariadb://localhost:3306/jbossdb</connection-url> <driver>mariadb</driver> <security> <user-name>admin</user-name> <password>admin</password> </security> <validation> <valid-connection-checker class-name="org.jboss.jca.adapters.jdbc.extensions.mysql.MySQLValidConnectionChecker"/> <validate-on-match>true</validate-on-match> <background-validation>false</background-validation> <exception-sorter class-name="org.jboss.jca.adapters.jdbc.extensions.mysql.MySQLExceptionSorter"/> </validation> </datasource> <drivers> <driver name="mariadb" module="org.mariadb"> <driver-class>org.mariadb.jdbc.Driver</driver-class> <xa-datasource-class>org.mariadb.jdbc.MySQLDataSource</xa-datasource-class> </driver> </drivers></datasources>
Red Hat JBoss Enterprise Application Platform 7.0 Configuration Guide
194
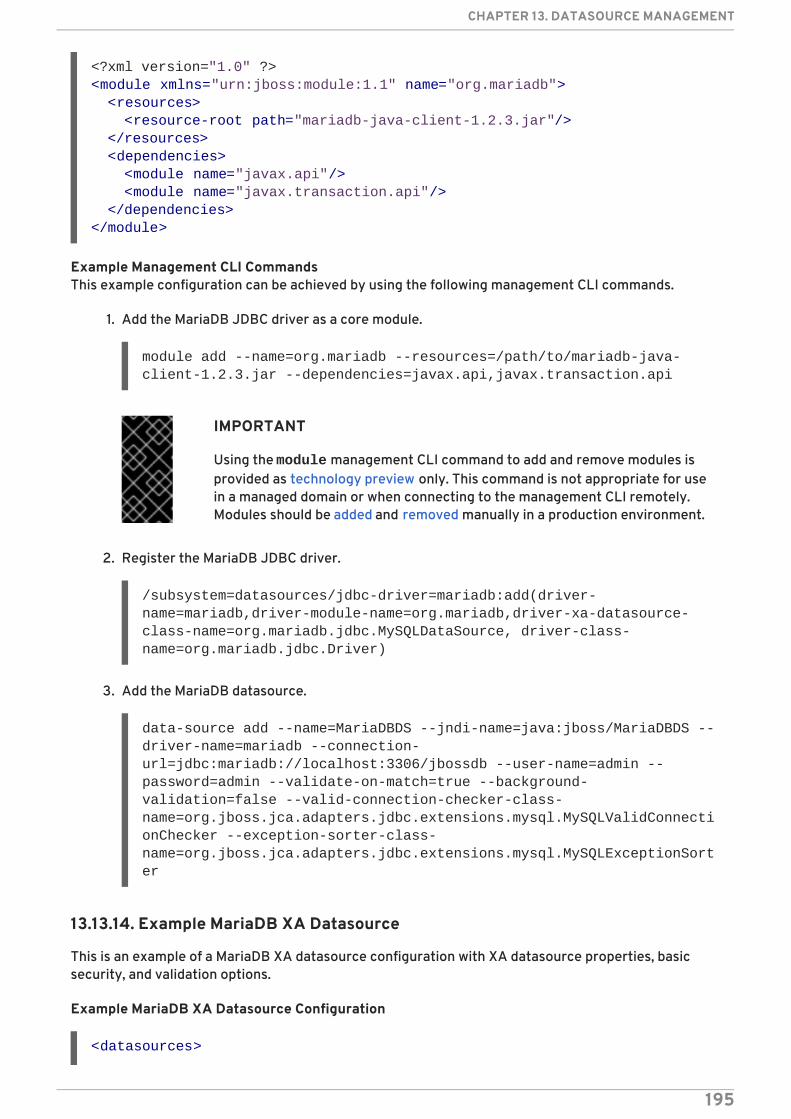
Example Management CLI CommandsThis example configuration can be achieved by using the following management CLI commands.
1. Add the MariaDB JDBC driver as a core module.
module add --name=org.mariadb --resources=/path/to/mariadb-java-client-1.2.3.jar --dependencies=javax.api,javax.transaction.api
IMPORTANT
Using the module management CLI command to add and remove modules isprovided as technology preview only. This command is not appropriate for usein a managed domain or when connecting to the management CLI remotely.Modules should be added and removed manually in a production environment.
2. Register the MariaDB JDBC driver.
/subsystem=datasources/jdbc-driver=mariadb:add(driver-name=mariadb,driver-module-name=org.mariadb,driver-xa-datasource-class-name=org.mariadb.jdbc.MySQLDataSource, driver-class-name=org.mariadb.jdbc.Driver)
3. Add the MariaDB datasource.
data-source add --name=MariaDBDS --jndi-name=java:jboss/MariaDBDS --driver-name=mariadb --connection-url=jdbc:mariadb://localhost:3306/jbossdb --user-name=admin --password=admin --validate-on-match=true --background-validation=false --valid-connection-checker-class-name=org.jboss.jca.adapters.jdbc.extensions.mysql.MySQLValidConnectionChecker --exception-sorter-class-name=org.jboss.jca.adapters.jdbc.extensions.mysql.MySQLExceptionSorter
13.13.14. Example MariaDB XA Datasource
This is an example of a MariaDB XA datasource configuration with XA datasource properties, basicsecurity, and validation options.
Example MariaDB XA Datasource Configuration
<?xml version="1.0" ?><module xmlns="urn:jboss:module:1.1" name="org.mariadb"> <resources> <resource-root path="mariadb-java-client-1.2.3.jar"/> </resources> <dependencies> <module name="javax.api"/> <module name="javax.transaction.api"/> </dependencies></module>
<datasources>
CHAPTER 13. DATASOURCE MANAGEMENT
195
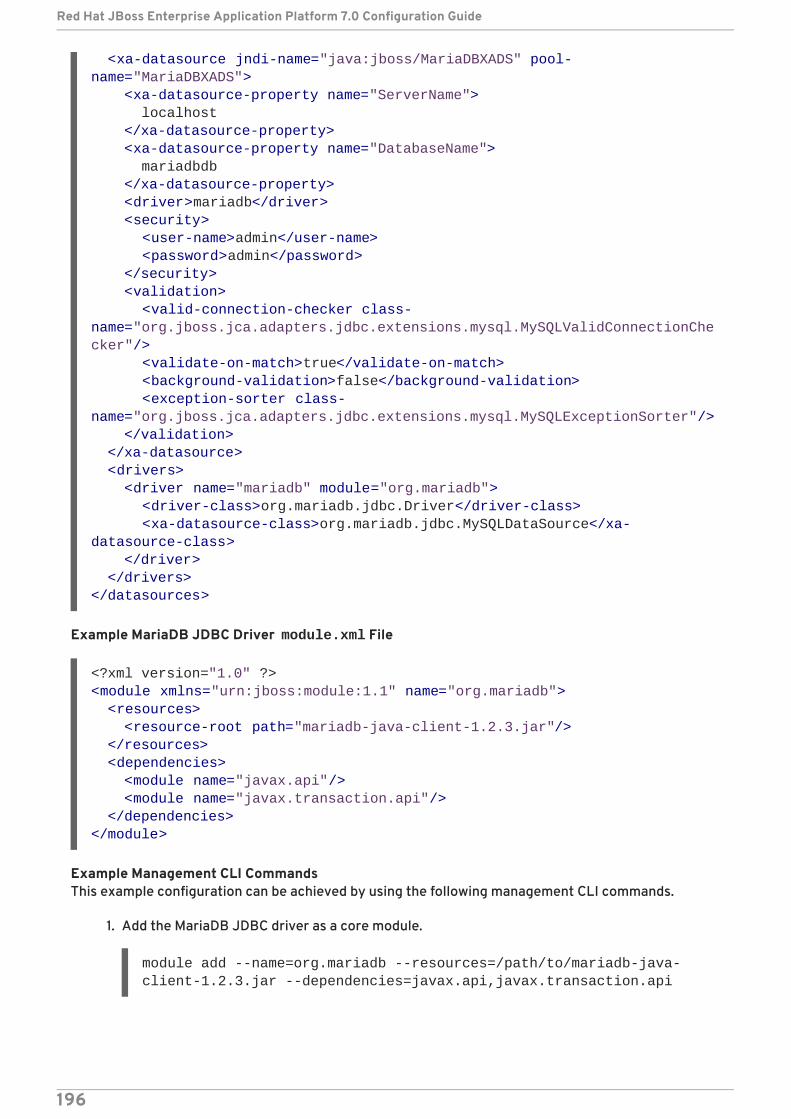
Example MariaDB JDBC Driver module.xml File
Example Management CLI CommandsThis example configuration can be achieved by using the following management CLI commands.
1. Add the MariaDB JDBC driver as a core module.
module add --name=org.mariadb --resources=/path/to/mariadb-java-client-1.2.3.jar --dependencies=javax.api,javax.transaction.api
<xa-datasource jndi-name="java:jboss/MariaDBXADS" pool-name="MariaDBXADS"> <xa-datasource-property name="ServerName"> localhost </xa-datasource-property> <xa-datasource-property name="DatabaseName"> mariadbdb </xa-datasource-property> <driver>mariadb</driver> <security> <user-name>admin</user-name> <password>admin</password> </security> <validation> <valid-connection-checker class-name="org.jboss.jca.adapters.jdbc.extensions.mysql.MySQLValidConnectionChecker"/> <validate-on-match>true</validate-on-match> <background-validation>false</background-validation> <exception-sorter class-name="org.jboss.jca.adapters.jdbc.extensions.mysql.MySQLExceptionSorter"/> </validation> </xa-datasource> <drivers> <driver name="mariadb" module="org.mariadb"> <driver-class>org.mariadb.jdbc.Driver</driver-class> <xa-datasource-class>org.mariadb.jdbc.MySQLDataSource</xa-datasource-class> </driver> </drivers></datasources>
<?xml version="1.0" ?><module xmlns="urn:jboss:module:1.1" name="org.mariadb"> <resources> <resource-root path="mariadb-java-client-1.2.3.jar"/> </resources> <dependencies> <module name="javax.api"/> <module name="javax.transaction.api"/> </dependencies></module>
Red Hat JBoss Enterprise Application Platform 7.0 Configuration Guide
196
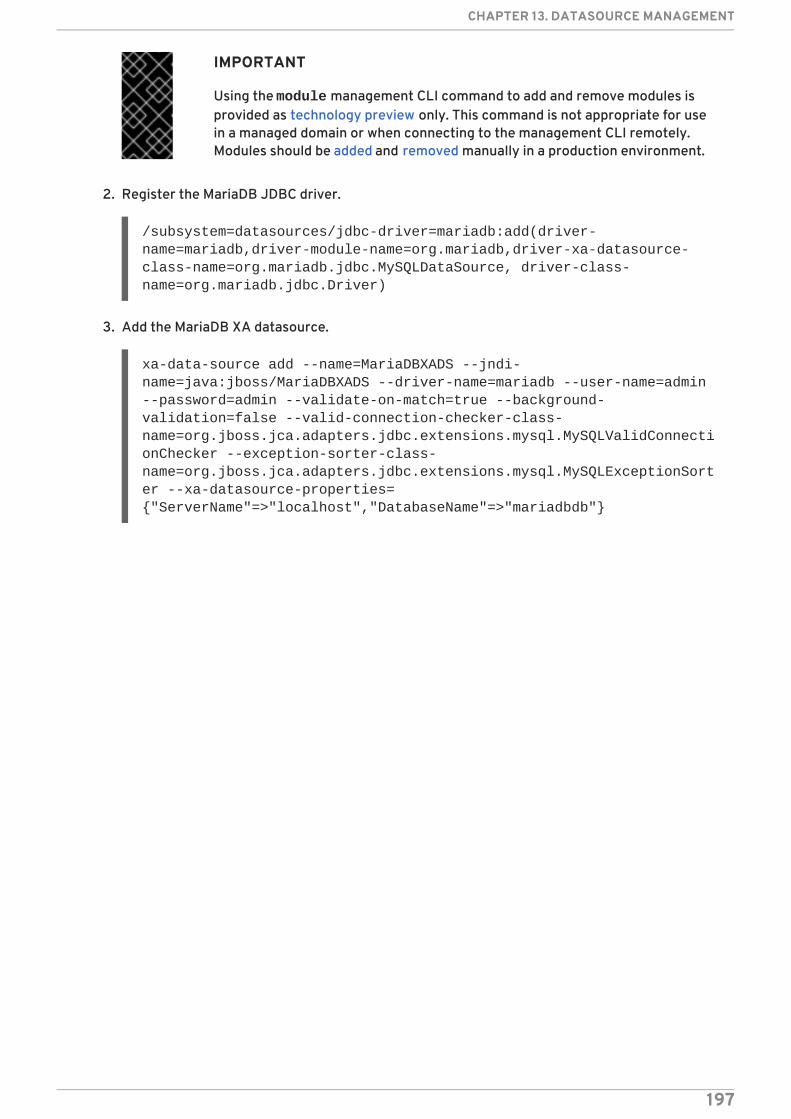
IMPORTANT
Using the module management CLI command to add and remove modules isprovided as technology preview only. This command is not appropriate for usein a managed domain or when connecting to the management CLI remotely.Modules should be added and removed manually in a production environment.
2. Register the MariaDB JDBC driver.
/subsystem=datasources/jdbc-driver=mariadb:add(driver-name=mariadb,driver-module-name=org.mariadb,driver-xa-datasource-class-name=org.mariadb.jdbc.MySQLDataSource, driver-class-name=org.mariadb.jdbc.Driver)
3. Add the MariaDB XA datasource.
xa-data-source add --name=MariaDBXADS --jndi-name=java:jboss/MariaDBXADS --driver-name=mariadb --user-name=admin --password=admin --validate-on-match=true --background-validation=false --valid-connection-checker-class-name=org.jboss.jca.adapters.jdbc.extensions.mysql.MySQLValidConnectionChecker --exception-sorter-class-name=org.jboss.jca.adapters.jdbc.extensions.mysql.MySQLExceptionSorter --xa-datasource-properties={"ServerName"=>"localhost","DatabaseName"=>"mariadbdb"}
CHAPTER 13. DATASOURCE MANAGEMENT
197
CHAPTER 14. CONFIGURING TRANSACTIONS
14.1. TRANSACTIONS SUBSYSTEM CONFIGURATION
14.1.1. Configuring the Transaction Manager
You can configure the transaction manager using the web-based management console or thecommand line management CLI.
Configuring the Transaction Manager Using the Management ConsoleThe following steps explain how to configure the transaction manager using the web-basedmanagement console:
1. Select the Configuration tab from the top of the screen.
2. If you are running JBoss EAP as a managed domain, choose the desired profile to modify.
3. From the Subsystem list, select Transactions and click View.
4. Click Edit on the appropriate tab for the settings that you want to edit, such as Recovery forrecovery options.
5. Make the necessary changes and click Save to save the changes.
6. Click Need Help? to display help text.
Configuring the Transaction Manager Using the Management CLIUsing the management CLI, you can configure the transaction manager using a series of commands.The commands all begin with /subsystem=transactions for a standalone server or /profile=default/subsystem=transactions/ for the default profile in a managed domain.
For a detailed listing of all the transaction manager configuration options, see the Transaction ManagerConfiguration Options for JBoss EAP.
14.1.2. Configuring Your Datasource to Use JTA
This task shows you how to enable Java Transaction API (JTA) on your datasource.
Prerequisites
Your database must support Java Transaction API. If in doubt, consult the documentation foryour database.
Create a non-XA datasource.
NOTE
XA datasources are already JTA capable by default.
Configuring the Datasource to use Java Transaction API
1. Use the following management CLI command to set the jta attribute to true.
Red Hat JBoss Enterprise Application Platform 7.0 Configuration Guide
198
/subsystem=datasources/data-source=DATASOURCE_NAME:write-attribute(name=jta,value=true)
NOTE
In a managed domain, precede this command with /profile=PROFILE_NAME.
2. Reload the server for the changes to take effect.
reload
Your datasource is now configured to use JTA.
14.1.3. About Transaction Log Messages
You can track the transaction status while keeping the log files readable by using the DEBUG log levelfor the transaction logger. For detailed debugging, use the TRACE log level. Refer to ConfiguringLogging for the Transactions Subsystem for information on configuring the transaction logger.
Transaction Manager (TM) can generate a lot of logging information when configured to log in the TRACE log level. Following are some of the most commonly-seen messages. This list is notcomprehensive, so you may see messages other than these.
Table 14.1. Transaction State Change
Transaction Begin When a transaction begins, a method Begin of class com.arjuna.ats.arjuna.coordinator.BasicAction isexecuted and presented in the log with the message BasicAction::Begin() for action-id <transaction uid>.
Transaction Commit When a transaction commits, a method Commit of class com.arjuna.ats.arjuna.coordinator.BasicAction isexecuted and presented in the log with the message BasicAction::Commit() for action-id <transaction uid>.
Transaction Rollback When a transaction rolls back, a method Rollback of class com.arjuna.ats.arjuna.coordinator.BasicAction isexecuted and presented in the log with the message BasicAction::Rollback() for action-id <transaction uid>.
Transaction Timeout When a transaction times out, a method doCancellations of com.arjuna.ats.arjuna.coordinator.TransactionReaperis executed and presented in log as Reaper Worker <thread id> attempting to cancel <transaction uid>. You will then seethe same thread rolling back the transaction as shown above.
14.1.4. Configuring Logging for the Transactions Subsystem
CHAPTER 14. CONFIGURING TRANSACTIONS
199
You can control the amount of information logged about transactions, independent of other loggingsettings in JBoss EAP. You can configure the logging settings using the management console or themanagement CLI.
Configuring the Transaction Logger Using the Management Console
1. Navigate to the Logging subsystem configuration.
a. In the management console, click the Configuration tab. If you use a managed domain, youmust first choose the appropriate server profile.
b. Select the Logging subsystem and click View.
2. Edit the com.arjuna attributes.Select the Log Categories tab. The com.arjuna entry is already present. Select com.arjunaand click Edit in the Attributes section. You can change the log level and choose whether touse parent handlers or not.
Log Level:As transactions can produce a lot of logging output, the default logging level is set to WARNso that the server log is not overwhelmed by transaction output. If you need to checktransaction processing details, use the TRACE log level so that transaction IDs are shown.
Use Parent Handlers:Parent handler indicates whether the logger should send its output to its parent logger.The default behavior is true.
3. Click Save to save the changes.
Configuring the Transaction Logger Using the Management CLIUse the following command to set the logging level from the management CLI. For a standalone server,remove the /profile=default from the command.
/profile=default/subsystem=logging/logger=com.arjuna:write-attribute(name=level,value=VALUE)
14.2. TRANSACTION ADMINISTRATION
14.2.1. Browse and Manage Transactions
The management CLI supports the ability to browse and manipulate transaction records. Thisfunctionality is provided by the interaction between the TM and the management API of JBoss EAP.
The TM stores information about each pending transaction and the participants involved thetransaction, in a persistent storage called the object store. The management API exposes the objectstore as a resource called the log-store. The probe operation reads the transaction logs andcreates a node path for each record. You can call the probe operation manually, whenever you need torefresh the log-store. It is normal for transaction logs to appear and disappear quickly.
Refresh the Log StoreThe following command refreshes the log store for server groups which use the profile default in amanaged domain. For a standalone server, remove the profile=default from the command.
/profile=default/subsystem=transactions/log-store=log-store:probe
Red Hat JBoss Enterprise Application Platform 7.0 Configuration Guide
200
View All Prepared TransactionsTo view all prepared transactions, first refresh the log store (see Refresh the Log Store), then run thefollowing command, which functions similarly to a file system ls command.
ls /profile=default/subsystem=transactions/log-store=log-store/transactions
Or
/host=master/server=server-one/subsystem=transactions/log-store=log-store:read-children-names(child-type=transactions)
Each transaction is shown, along with its unique identifier. Individual operations can be run against anindividual transaction (see Manage a Transaction).
14.2.1.1. Manage a Transaction
View the Attributes of a TransactionTo view information about a transaction, such as its JNDI name, EIS product name and version, or itsstatus, use the read-resource operation.
/profile=default/subsystem=transactions/log-store=log-store/transactions=0\:ffff7f000001\:-b66efc2\:4f9e6f8f\:9:read-resource
View the Details of a Transaction ParticipantEach transaction log contains a child element called participants. Use the read-resourceoperation on this element to see the details of a participant of the transaction. Participants areidentified by their JNDI names.
/profile=default/subsystem=transactions/log-store=log-store/transactions=0\:ffff7f000001\:-b66efc2\:4f9e6f8f\:9/participants=java\:\/JmsXA:read-resource
The result may look similar to this:
{ "outcome" => "success", "result" => { "eis-product-name" => "ActiveMQ", "eis-product-version" => "2.0", "jndi-name" => "java:/JmsXA", "status" => "HEURISTIC", "type" => "/StateManager/AbstractRecord/XAResourceRecord" }}
The outcome status shown here is in a HEURISTIC state and is eligible for recovery. See Recover aTransaction Participant for more details.
In special cases it is possible to create orphan records in the object store, that is XAResourceRecords,which do not have any corresponding transaction record in the log. For example, XA resource preparedbut crashed before the TM recorded and is inaccessible for the domain management API. To accesssuch records you need to set management option expose-all-logs to true. This option is not savedin management model and is restored to false when the server is restarted.
CHAPTER 14. CONFIGURING TRANSACTIONS
201
/profile=default/subsystem=transactions/log-store=log-store:write-attribute(name=expose-all-logs, value=true)
You can use this alternate command, which shows participant IDs of transaction in an aggregated form.
/host=master/server=server-one/subsystem=transactions/log-store=log-store/transactions=0\:ffff7f000001\:-b66efc2\:4f9e6f8f\:9:read-children-names(child-type=participants)
Delete a TransactionEach transaction log supports a delete operation, to delete the transaction log representing thetransaction.
/profile=default/subsystem=transactions/log-store=log-store/transactions=0\:ffff7f000001\:-b66efc2\:4f9e6f8f\:9:delete
This deletes all participants in the transaction as well.
Recover a Transaction ParticipantEach transaction participant supports recovery by using the recover operation.
/profile=default/subsystem=transactions/log-store=log-store/transactions=0\:ffff7f000001\:-b66efc2\:4f9e6f8f\:9/participants=2:recover
If the transaction participant’s status is HEURISTIC, the recover operation switches the status to PREPARE and asks the periodic recovery process to replay the commit.
If the commit is successful, the participant is removed from the transaction log. You can verify this byrunning the probe operation on the log-store and checking that the participant is no longer listed. Ifthis is the last participant, the transaction is also deleted.
Refresh the Status of a Transaction ParticipantIf a transaction needs recovery, you can use the refresh operation to be sure it still requires recovery,before attempting the recovery.
/profile=default/subsystem=transactions/log-store=log-store/transactions=0\:ffff7f000001\:-b66efc2\:4f9e6f8f\:9/participants=2:refresh
14.2.2. View Transaction Statistics
If transaction manager statistics are enabled, you can view statistics on processed transactions by thetransaction manager. See Configuring the Transaction Manager for information about how to enabletransaction manager statistics.
You can view statistics using either the management console or the management CLI. In themanagement console, transaction statistics are available by navigating to the Transactions subsystemfrom the Runtime tab. From the management CLI, you can view statistics by using include-runtime=true to the read-resource operation. For example:
/subsystem=transactions:read-resource(include-runtime=true)
Red Hat JBoss Enterprise Application Platform 7.0 Configuration Guide
202
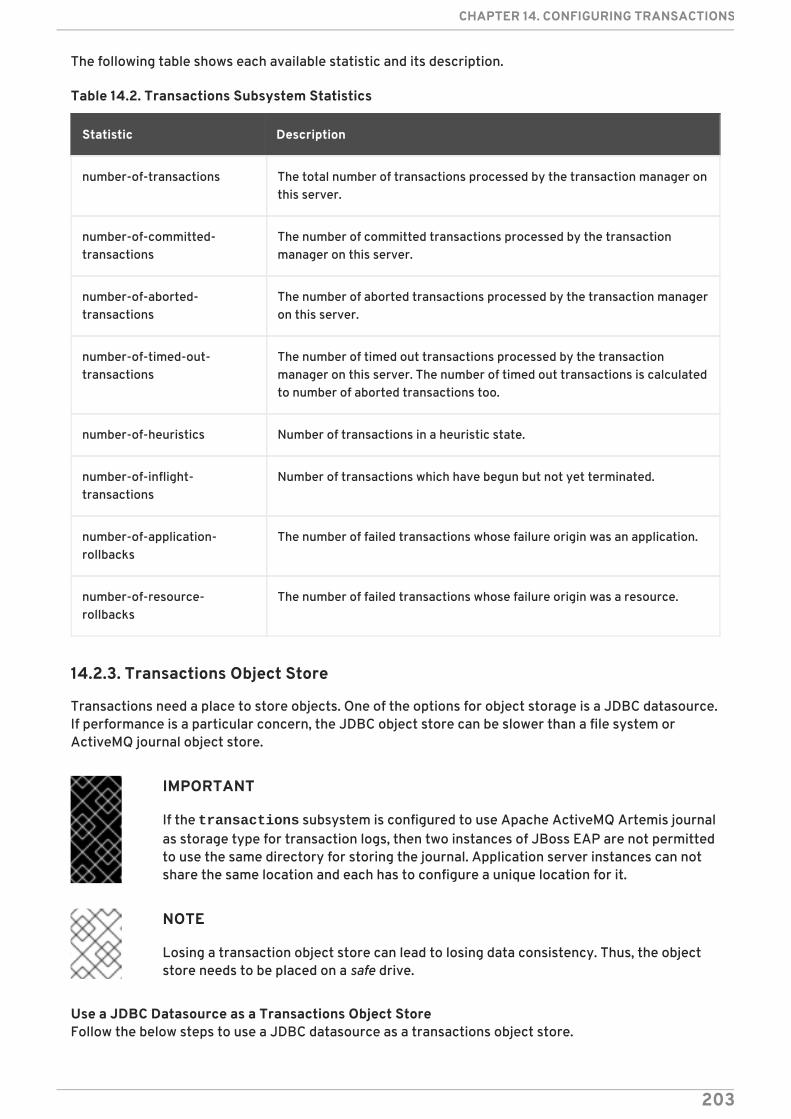
The following table shows each available statistic and its description.
Table 14.2. Transactions Subsystem Statistics
Statistic Description
number-of-transactions The total number of transactions processed by the transaction manager onthis server.
number-of-committed-transactions
The number of committed transactions processed by the transactionmanager on this server.
number-of-aborted-transactions
The number of aborted transactions processed by the transaction manageron this server.
number-of-timed-out-transactions
The number of timed out transactions processed by the transactionmanager on this server. The number of timed out transactions is calculatedto number of aborted transactions too.
number-of-heuristics Number of transactions in a heuristic state.
number-of-inflight-transactions
Number of transactions which have begun but not yet terminated.
number-of-application-rollbacks
The number of failed transactions whose failure origin was an application.
number-of-resource-rollbacks
The number of failed transactions whose failure origin was a resource.
14.2.3. Transactions Object Store
Transactions need a place to store objects. One of the options for object storage is a JDBC datasource.If performance is a particular concern, the JDBC object store can be slower than a file system orActiveMQ journal object store.
IMPORTANT
If the transactions subsystem is configured to use Apache ActiveMQ Artemis journalas storage type for transaction logs, then two instances of JBoss EAP are not permittedto use the same directory for storing the journal. Application server instances can notshare the same location and each has to configure a unique location for it.
NOTE
Losing a transaction object store can lead to losing data consistency. Thus, the objectstore needs to be placed on a safe drive.
Use a JDBC Datasource as a Transactions Object StoreFollow the below steps to use a JDBC datasource as a transactions object store.
CHAPTER 14. CONFIGURING TRANSACTIONS
203
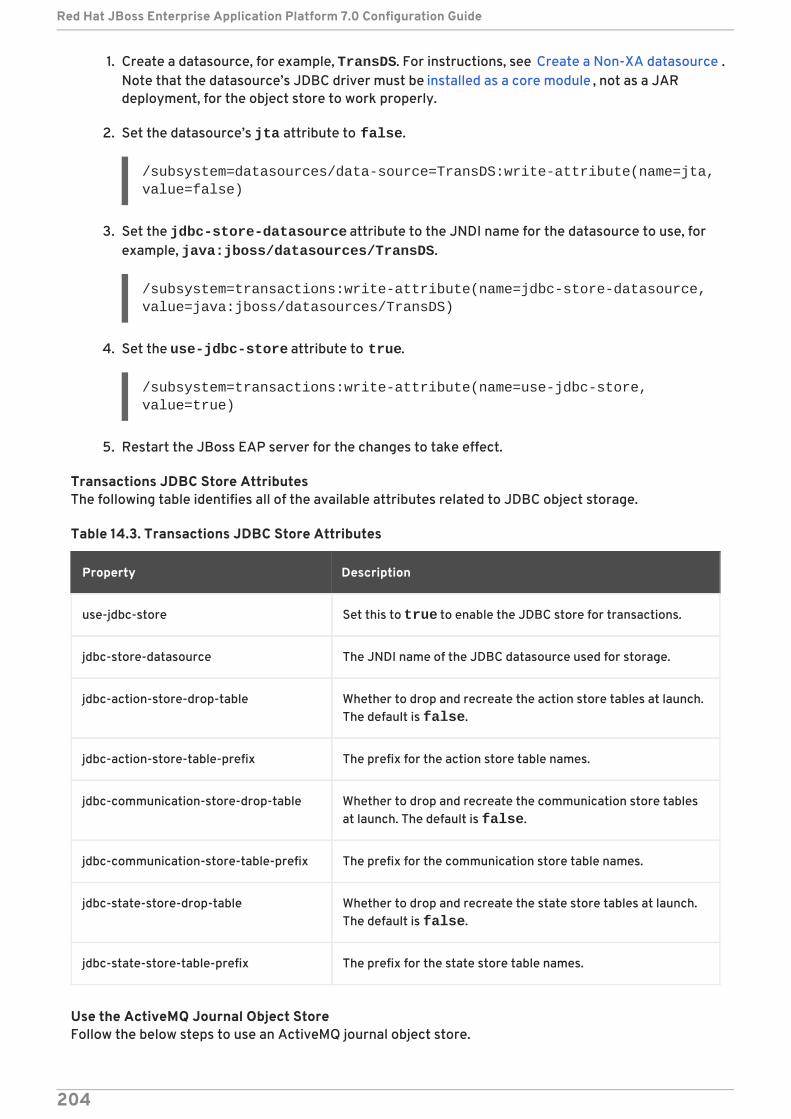
1. Create a datasource, for example, TransDS. For instructions, see Create a Non-XA datasource .Note that the datasource’s JDBC driver must be installed as a core module , not as a JARdeployment, for the object store to work properly.
2. Set the datasource’s jta attribute to false.
/subsystem=datasources/data-source=TransDS:write-attribute(name=jta, value=false)
3. Set the jdbc-store-datasource attribute to the JNDI name for the datasource to use, forexample, java:jboss/datasources/TransDS.
4. Set the use-jdbc-store attribute to true.
/subsystem=transactions:write-attribute(name=use-jdbc-store, value=true)
5. Restart the JBoss EAP server for the changes to take effect.
Transactions JDBC Store AttributesThe following table identifies all of the available attributes related to JDBC object storage.
Table 14.3. Transactions JDBC Store Attributes
Property Description
use-jdbc-store Set this to true to enable the JDBC store for transactions.
jdbc-store-datasource The JNDI name of the JDBC datasource used for storage.
jdbc-action-store-drop-table Whether to drop and recreate the action store tables at launch.The default is false.
jdbc-action-store-table-prefix The prefix for the action store table names.
jdbc-communication-store-drop-table Whether to drop and recreate the communication store tablesat launch. The default is false.
jdbc-communication-store-table-prefix The prefix for the communication store table names.
jdbc-state-store-drop-table Whether to drop and recreate the state store tables at launch.The default is false.
jdbc-state-store-table-prefix The prefix for the state store table names.
Use the ActiveMQ Journal Object StoreFollow the below steps to use an ActiveMQ journal object store.
/subsystem=transactions:write-attribute(name=jdbc-store-datasource, value=java:jboss/datasources/TransDS)
Red Hat JBoss Enterprise Application Platform 7.0 Configuration Guide
204
1. Set the use-journal-store attribute to true.
/subsystem=transactions:write-attribute(name=use-journal-store,value=true)
2. Restart the JBoss EAP server for the changes to take effect.
CHAPTER 14. CONFIGURING TRANSACTIONS
205
CHAPTER 15. ORB CONFIGURATION
15.1. ABOUT COMMON OBJECT REQUEST BROKER ARCHITECTURE(CORBA)
Common Object Request Broker Architecture (CORBA) is a standard that enables applications andservices to work together even when they are written in multiple, otherwise-incompatible, languagesor hosted on separate platforms. CORBA requests are brokered by a server-side component called anObject Request Broker (ORB). JBoss EAP provides an ORB instance, by means of the Open JDK ORBcomponent.
The ORB is used internally for Java Transaction Service (JTS) transactions, and is also available foruse by your own applications.
15.2. CONFIGURE THE ORB FOR JTS TRANSACTIONS
In a default installation of JBoss EAP, the ORB support for transactions is disabled. You can configureORB settings in the iiop-openjdk subsystem using the management CLI or the managementconsole.
NOTE
The iiop-openjdk subsystem is available when using the full or full-ha profile in amanaged domain, or the standalone-full.xml or standalone-full-ha.xmlconfiguration file for a standalone server.
For a listing of the available configuration options for the iiop-openjdk subsystem, see IIOPSubsystem Attributes.
Configure the ORB Using the Management CLIYou can configure each aspect of the ORB using the management CLI. This is the minimumconfiguration for the ORB to be used with JTS.
The following management CLI commands are configured for a managed domain using the fullprofile. If necessary, change the profile to suit the one you need to configure. If you are using astandalone server, omit the /profile=full portion of the commands.
Enable the Security InterceptorsEnable the security attribute by setting the value to identity.
/profile=full/subsystem=iiop-openjdk:write-attribute(name=security,value=identity)
Enable Transactions in the IIOP SubsystemTo enable the ORB for JTS, set the value of transactions attribute to full, rather than the default spec.
/profile=full/subsystem=iiop-openjdk:write-attribute(name=transactions, value=full)
Enable JTS in the Transactions Subsystem
Red Hat JBoss Enterprise Application Platform 7.0 Configuration Guide
206
/profile=full/subsystem=transactions:write-attribute(name=jts,value=true)
NOTE
For JTS activation, the server must be restarted as reload is not enough.
Configure the ORB Using the Management Console
1. Select the Configuration tab from the top of the management console.
2. Select Subsystems. In a managed domain, you will need to select the appropriate profile first.
3. Select the IIOP subsystem and click View.
4. Click the Edit button and modify the attributes as needed. Click on the Need Help? link fordetailed explanations of each field.
5. Click Save to save the changes.
CHAPTER 15. ORB CONFIGURATION
207
CHAPTER 16. JAVA CONNECTOR ARCHITECTURE (JCA)MANAGEMENT
16.1. ABOUT THE JAVA CONNECTOR ARCHITECTURE (JCA)
The Java EE Connector Architecture (JCA) defines a standard architecture for Java EE systems toexternal heterogeneous Enterprise Information Systems (EIS). Examples of EISs include EnterpriseResource Planning (ERP) systems, mainframe transaction processing (TP), databases, and messagingsystems. A resource adapter is a component that implements the Java EE Connector API architecture.
JCA 1.7 provides features for managing:
connections
transactions
security
life-cycle
work instances
transaction inflow
message inflow
JCA 1.7 was developed under the Java Community Process as JSR-322.
16.2. ABOUT RESOURCE ADAPTERS
A resource adapter is a deployable Java EE component that provides communication between a JavaEE application and an Enterprise Information System (EIS) using the Java Connector Architecture(JCA) specification. A resource adapter is often provided by EIS vendors to allow easy integration oftheir products with Java EE applications.
An Enterprise Information System can be any other software system within an organization. Examplesinclude Enterprise Resource Planning (ERP) systems, database systems, e-mail servers andproprietary messaging systems.
A resource adapter is packaged in a Resource Adapter Archive (RAR) file which can be deployed toJBoss EAP. A RAR file may also be included in an Enterprise Archive (EAR) deployment.
16.3. CONFIGURING THE JCA SUBSYSTEM
The jca subsystem controls the general settings for the JCA container and resource adapterdeployments. You can configure the jca subsystem using the management console or themanagement CLI.
The main JCA elements to configure are:
Archive validation
Bean validation
Red Hat JBoss Enterprise Application Platform 7.0 Configuration Guide
208
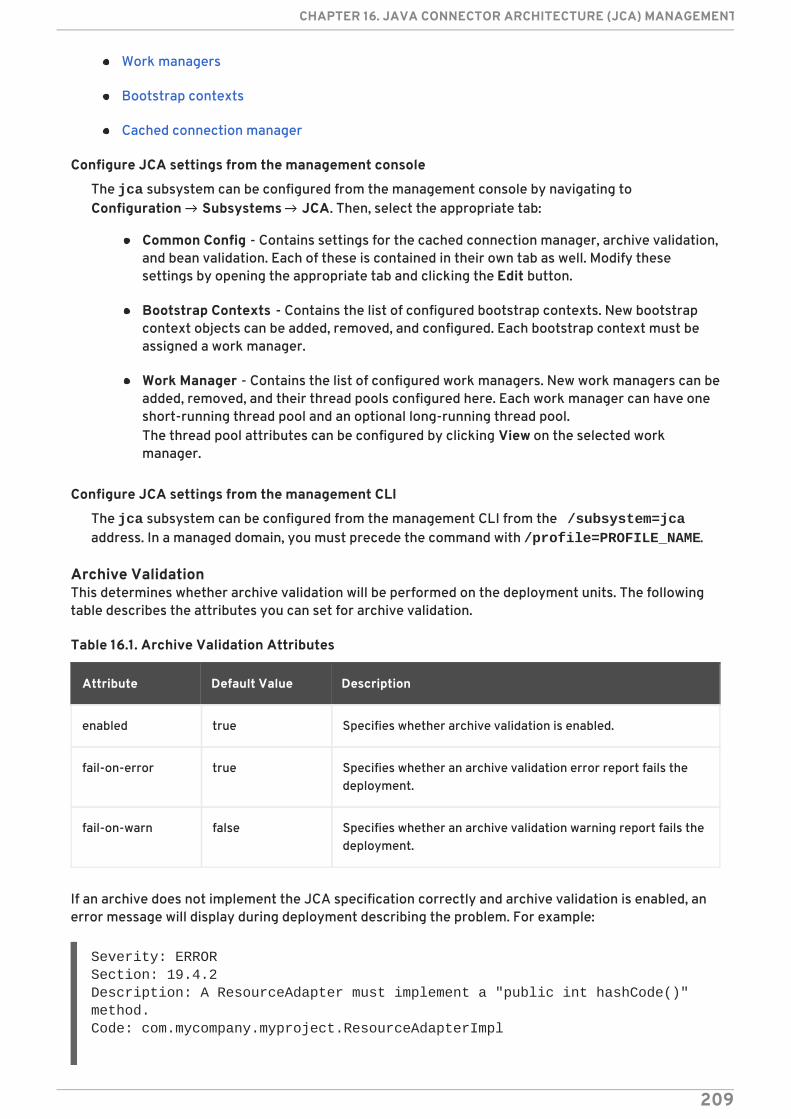
Work managers
Bootstrap contexts
Cached connection manager
Configure JCA settings from the management console
The jca subsystem can be configured from the management console by navigating toConfiguration → Subsystems → JCA. Then, select the appropriate tab:
Common Config - Contains settings for the cached connection manager, archive validation,and bean validation. Each of these is contained in their own tab as well. Modify thesesettings by opening the appropriate tab and clicking the Edit button.
Bootstrap Contexts - Contains the list of configured bootstrap contexts. New bootstrapcontext objects can be added, removed, and configured. Each bootstrap context must beassigned a work manager.
Work Manager - Contains the list of configured work managers. New work managers can beadded, removed, and their thread pools configured here. Each work manager can have oneshort-running thread pool and an optional long-running thread pool.The thread pool attributes can be configured by clicking View on the selected workmanager.
Configure JCA settings from the management CLI
The jca subsystem can be configured from the management CLI from the /subsystem=jcaaddress. In a managed domain, you must precede the command with /profile=PROFILE_NAME.
Archive ValidationThis determines whether archive validation will be performed on the deployment units. The followingtable describes the attributes you can set for archive validation.
Table 16.1. Archive Validation Attributes
Attribute Default Value Description
enabled true Specifies whether archive validation is enabled.
fail-on-error true Specifies whether an archive validation error report fails thedeployment.
fail-on-warn false Specifies whether an archive validation warning report fails thedeployment.
If an archive does not implement the JCA specification correctly and archive validation is enabled, anerror message will display during deployment describing the problem. For example:
Severity: ERRORSection: 19.4.2Description: A ResourceAdapter must implement a "public int hashCode()" method.Code: com.mycompany.myproject.ResourceAdapterImpl
CHAPTER 16. JAVA CONNECTOR ARCHITECTURE (JCA) MANAGEMENT
209
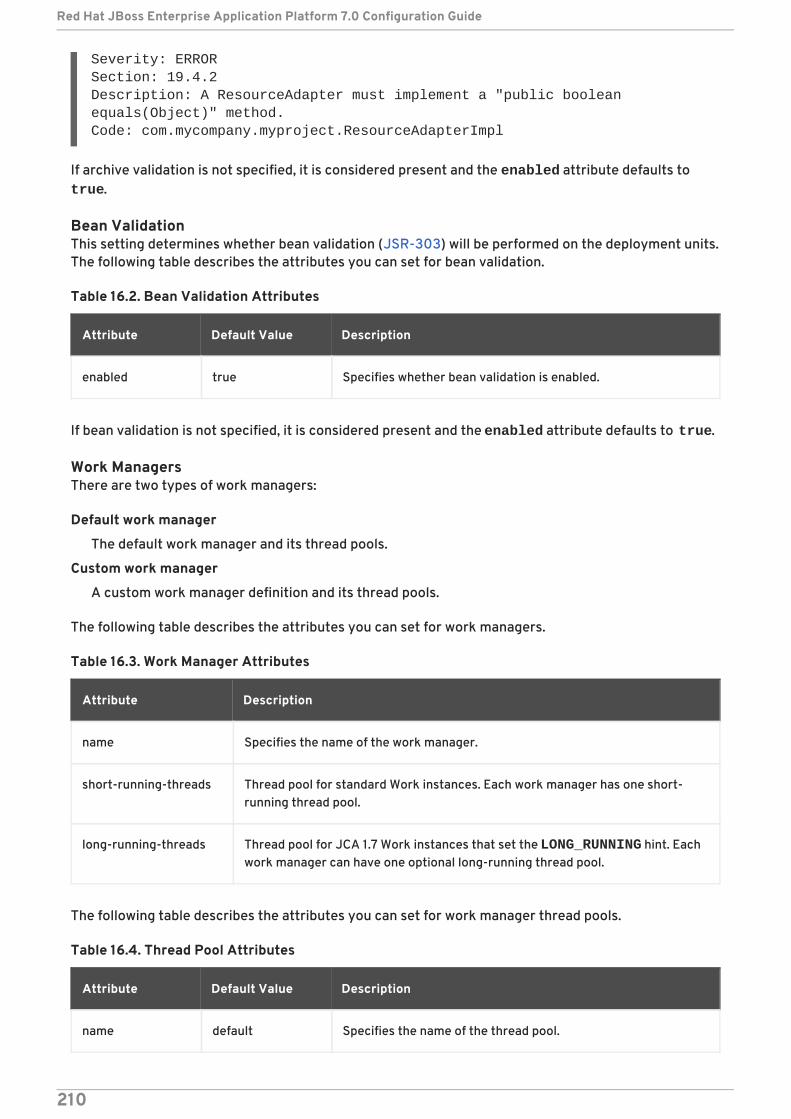
Severity: ERRORSection: 19.4.2Description: A ResourceAdapter must implement a "public boolean equals(Object)" method.Code: com.mycompany.myproject.ResourceAdapterImpl
If archive validation is not specified, it is considered present and the enabled attribute defaults to true.
Bean ValidationThis setting determines whether bean validation (JSR-303) will be performed on the deployment units.The following table describes the attributes you can set for bean validation.
Table 16.2. Bean Validation Attributes
Attribute Default Value Description
enabled true Specifies whether bean validation is enabled.
If bean validation is not specified, it is considered present and the enabled attribute defaults to true.
Work ManagersThere are two types of work managers:
Default work manager
The default work manager and its thread pools.
Custom work manager
A custom work manager definition and its thread pools.
The following table describes the attributes you can set for work managers.
Table 16.3. Work Manager Attributes
Attribute Description
name Specifies the name of the work manager.
short-running-threads Thread pool for standard Work instances. Each work manager has one short-running thread pool.
long-running-threads Thread pool for JCA 1.7 Work instances that set the LONG_RUNNING hint. Eachwork manager can have one optional long-running thread pool.
The following table describes the attributes you can set for work manager thread pools.
Table 16.4. Thread Pool Attributes
Attribute Default Value Description
name default Specifies the name of the thread pool.
Red Hat JBoss Enterprise Application Platform 7.0 Configuration Guide
210
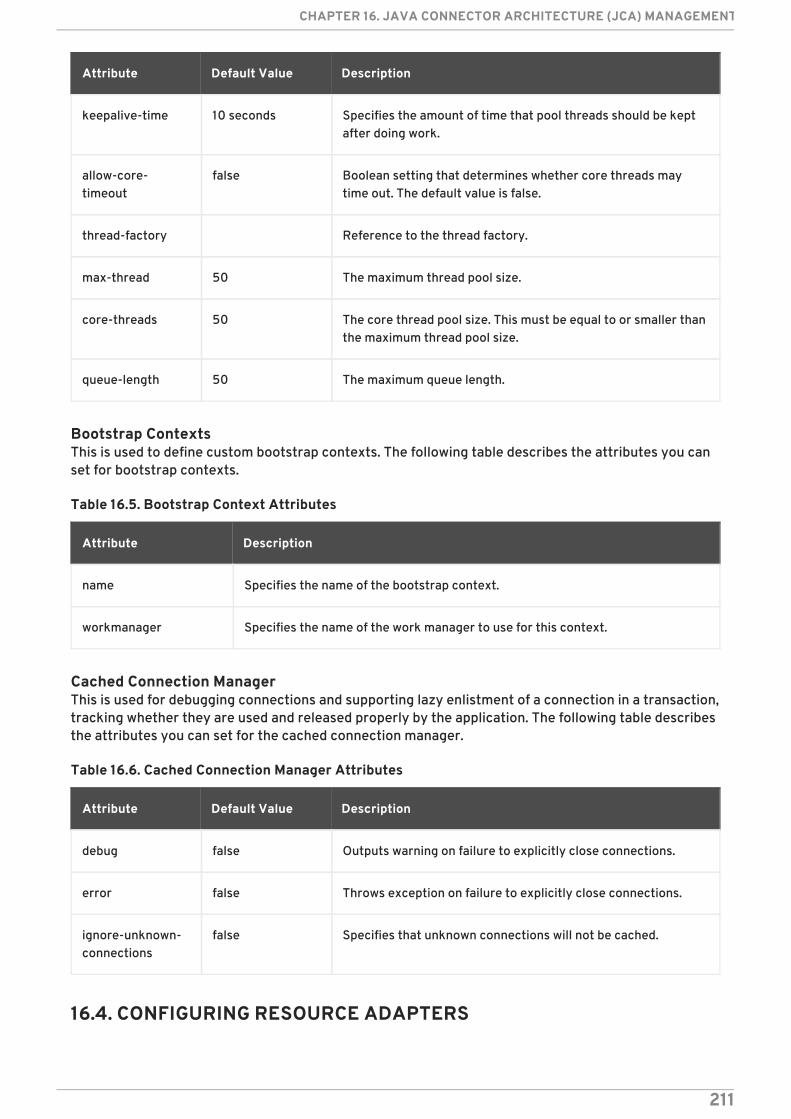
keepalive-time 10 seconds Specifies the amount of time that pool threads should be keptafter doing work.
allow-core-timeout
false Boolean setting that determines whether core threads maytime out. The default value is false.
thread-factory Reference to the thread factory.
max-thread 50 The maximum thread pool size.
core-threads 50 The core thread pool size. This must be equal to or smaller thanthe maximum thread pool size.
queue-length 50 The maximum queue length.
Attribute Default Value Description
Bootstrap ContextsThis is used to define custom bootstrap contexts. The following table describes the attributes you canset for bootstrap contexts.
Table 16.5. Bootstrap Context Attributes
Attribute Description
name Specifies the name of the bootstrap context.
workmanager Specifies the name of the work manager to use for this context.
Cached Connection ManagerThis is used for debugging connections and supporting lazy enlistment of a connection in a transaction,tracking whether they are used and released properly by the application. The following table describesthe attributes you can set for the cached connection manager.
Table 16.6. Cached Connection Manager Attributes
Attribute Default Value Description
debug false Outputs warning on failure to explicitly close connections.
error false Throws exception on failure to explicitly close connections.
ignore-unknown-connections
false Specifies that unknown connections will not be cached.
16.4. CONFIGURING RESOURCE ADAPTERS
CHAPTER 16. JAVA CONNECTOR ARCHITECTURE (JCA) MANAGEMENT
211
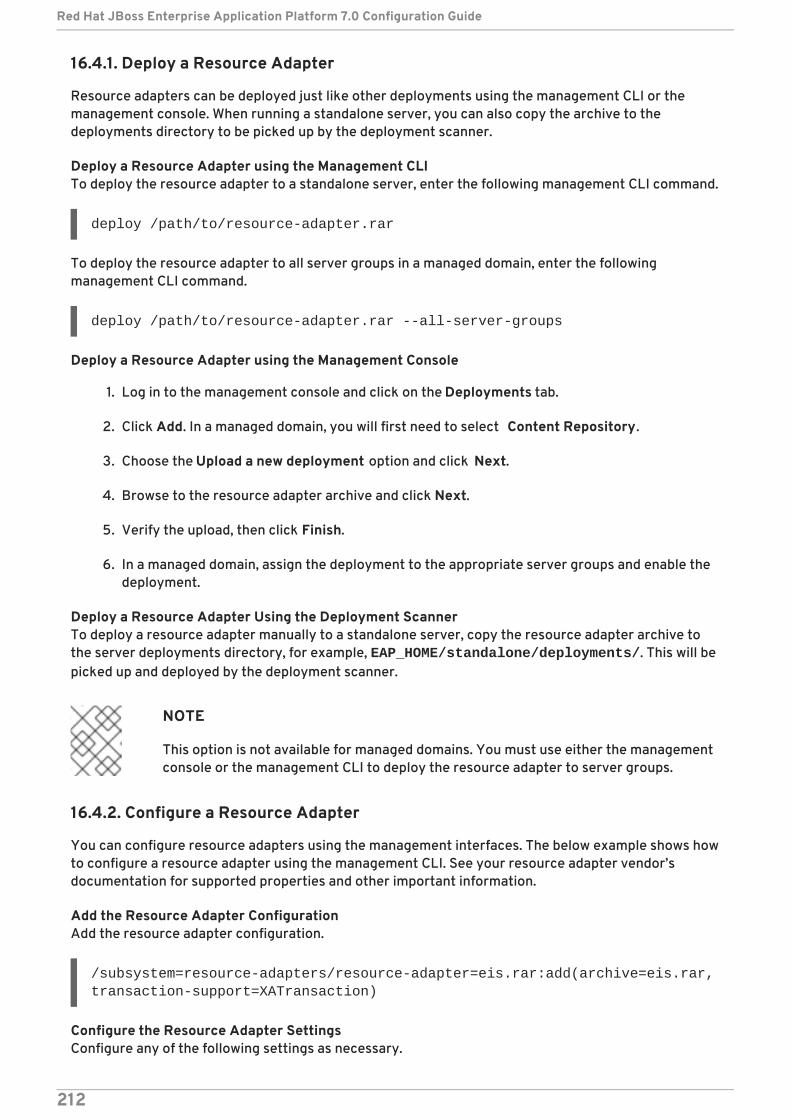
16.4.1. Deploy a Resource Adapter
Resource adapters can be deployed just like other deployments using the management CLI or themanagement console. When running a standalone server, you can also copy the archive to thedeployments directory to be picked up by the deployment scanner.
Deploy a Resource Adapter using the Management CLITo deploy the resource adapter to a standalone server, enter the following management CLI command.
deploy /path/to/resource-adapter.rar
To deploy the resource adapter to all server groups in a managed domain, enter the followingmanagement CLI command.
deploy /path/to/resource-adapter.rar --all-server-groups
Deploy a Resource Adapter using the Management Console
1. Log in to the management console and click on the Deployments tab.
2. Click Add. In a managed domain, you will first need to select Content Repository.
3. Choose the Upload a new deployment option and click Next.
4. Browse to the resource adapter archive and click Next.
5. Verify the upload, then click Finish.
6. In a managed domain, assign the deployment to the appropriate server groups and enable thedeployment.
Deploy a Resource Adapter Using the Deployment ScannerTo deploy a resource adapter manually to a standalone server, copy the resource adapter archive tothe server deployments directory, for example, EAP_HOME/standalone/deployments/. This will bepicked up and deployed by the deployment scanner.
NOTE
This option is not available for managed domains. You must use either the managementconsole or the management CLI to deploy the resource adapter to server groups.
16.4.2. Configure a Resource Adapter
You can configure resource adapters using the management interfaces. The below example shows howto configure a resource adapter using the management CLI. See your resource adapter vendor’sdocumentation for supported properties and other important information.
Add the Resource Adapter ConfigurationAdd the resource adapter configuration.
/subsystem=resource-adapters/resource-adapter=eis.rar:add(archive=eis.rar, transaction-support=XATransaction)
Configure the Resource Adapter SettingsConfigure any of the following settings as necessary.
Red Hat JBoss Enterprise Application Platform 7.0 Configuration Guide
212
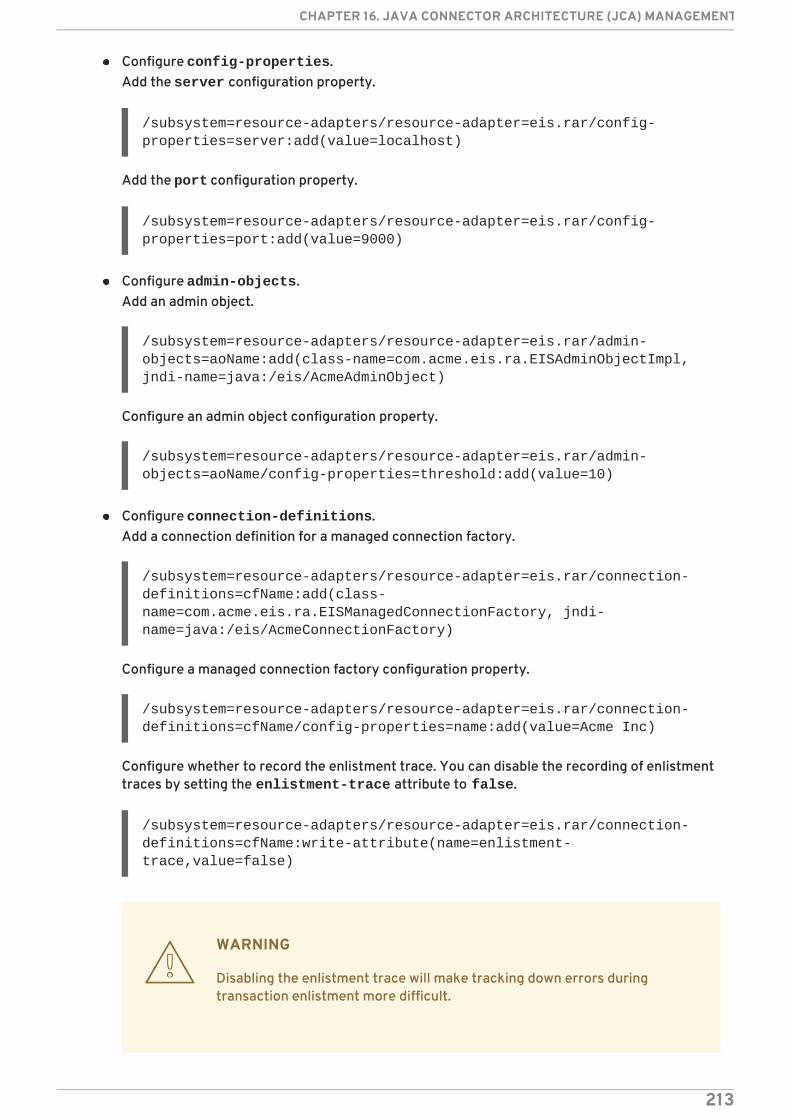
Configure config-properties.Add the server configuration property.
/subsystem=resource-adapters/resource-adapter=eis.rar/config-properties=server:add(value=localhost)
Add the port configuration property.
/subsystem=resource-adapters/resource-adapter=eis.rar/config-properties=port:add(value=9000)
Configure admin-objects.Add an admin object.
/subsystem=resource-adapters/resource-adapter=eis.rar/admin-objects=aoName:add(class-name=com.acme.eis.ra.EISAdminObjectImpl, jndi-name=java:/eis/AcmeAdminObject)
Configure an admin object configuration property.
/subsystem=resource-adapters/resource-adapter=eis.rar/admin-objects=aoName/config-properties=threshold:add(value=10)
Configure connection-definitions.Add a connection definition for a managed connection factory.
/subsystem=resource-adapters/resource-adapter=eis.rar/connection-definitions=cfName:add(class-name=com.acme.eis.ra.EISManagedConnectionFactory, jndi-name=java:/eis/AcmeConnectionFactory)
Configure a managed connection factory configuration property.
/subsystem=resource-adapters/resource-adapter=eis.rar/connection-definitions=cfName/config-properties=name:add(value=Acme Inc)
Configure whether to record the enlistment trace. You can disable the recording of enlistmenttraces by setting the enlistment-trace attribute to false.
/subsystem=resource-adapters/resource-adapter=eis.rar/connection-definitions=cfName:write-attribute(name=enlistment-trace,value=false)
WARNING
Disabling the enlistment trace will make tracking down errors duringtransaction enlistment more difficult.
CHAPTER 16. JAVA CONNECTOR ARCHITECTURE (JCA) MANAGEMENT
213
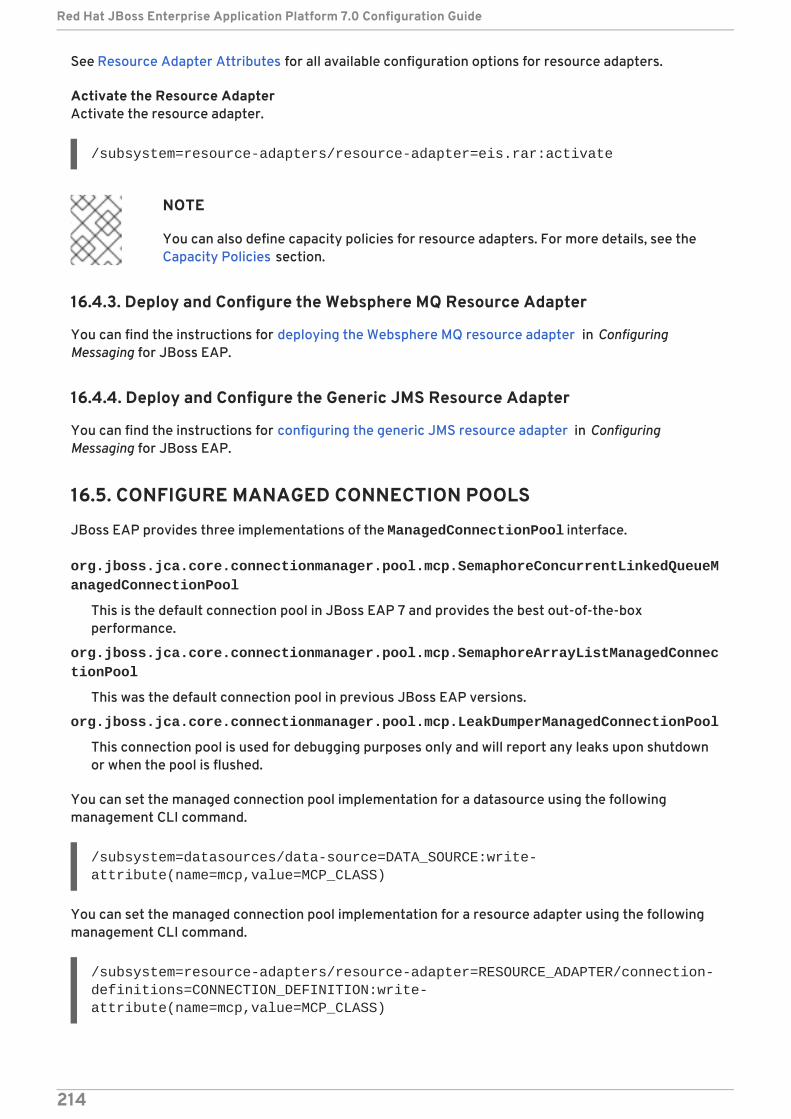
See Resource Adapter Attributes for all available configuration options for resource adapters.
Activate the Resource AdapterActivate the resource adapter.
/subsystem=resource-adapters/resource-adapter=eis.rar:activate
NOTE
You can also define capacity policies for resource adapters. For more details, see theCapacity Policies section.
16.4.3. Deploy and Configure the Websphere MQ Resource Adapter
You can find the instructions for deploying the Websphere MQ resource adapter in ConfiguringMessaging for JBoss EAP.
16.4.4. Deploy and Configure the Generic JMS Resource Adapter
You can find the instructions for configuring the generic JMS resource adapter in ConfiguringMessaging for JBoss EAP.
16.5. CONFIGURE MANAGED CONNECTION POOLS
JBoss EAP provides three implementations of the ManagedConnectionPool interface.
org.jboss.jca.core.connectionmanager.pool.mcp.SemaphoreConcurrentLinkedQueueManagedConnectionPool
This is the default connection pool in JBoss EAP 7 and provides the best out-of-the-boxperformance.
org.jboss.jca.core.connectionmanager.pool.mcp.SemaphoreArrayListManagedConnectionPool
This was the default connection pool in previous JBoss EAP versions.
org.jboss.jca.core.connectionmanager.pool.mcp.LeakDumperManagedConnectionPool
This connection pool is used for debugging purposes only and will report any leaks upon shutdownor when the pool is flushed.
You can set the managed connection pool implementation for a datasource using the followingmanagement CLI command.
/subsystem=datasources/data-source=DATA_SOURCE:write-attribute(name=mcp,value=MCP_CLASS)
You can set the managed connection pool implementation for a resource adapter using the followingmanagement CLI command.
/subsystem=resource-adapters/resource-adapter=RESOURCE_ADAPTER/connection-definitions=CONNECTION_DEFINITION:write-attribute(name=mcp,value=MCP_CLASS)
Red Hat JBoss Enterprise Application Platform 7.0 Configuration Guide
214
You can set the managed connection pool implementation for a messaging server using the followingmanagement CLI command.
/subsystem=messaging-activemq/server=SERVER/pooled-connection-factory=CONNECTION_FACTORY:write-attribute(name=managed-connection-pool,value=MCP_CLASS)
16.6. VIEW CONNECTION STATISTICS
You can read statistics for a defined connection from the /deployment=NAME.rar subtree. This is sothat you can access statistics for any RAR, even if it not defined in a standalone.xml or domain.xmlconfiguration.
/deployment=NAME.rar/subsystem=resource-adapters/statistics=statistics/connection-definitions=java\:\/testMe:read-resource(include-runtime=true)
NOTE
Be sure to specify the include-runtime=true argument, as all statistics are runtime-only information.
See Resource Adapter Statistics for information on the available statistics.
CHAPTER 16. JAVA CONNECTOR ARCHITECTURE (JCA) MANAGEMENT
215
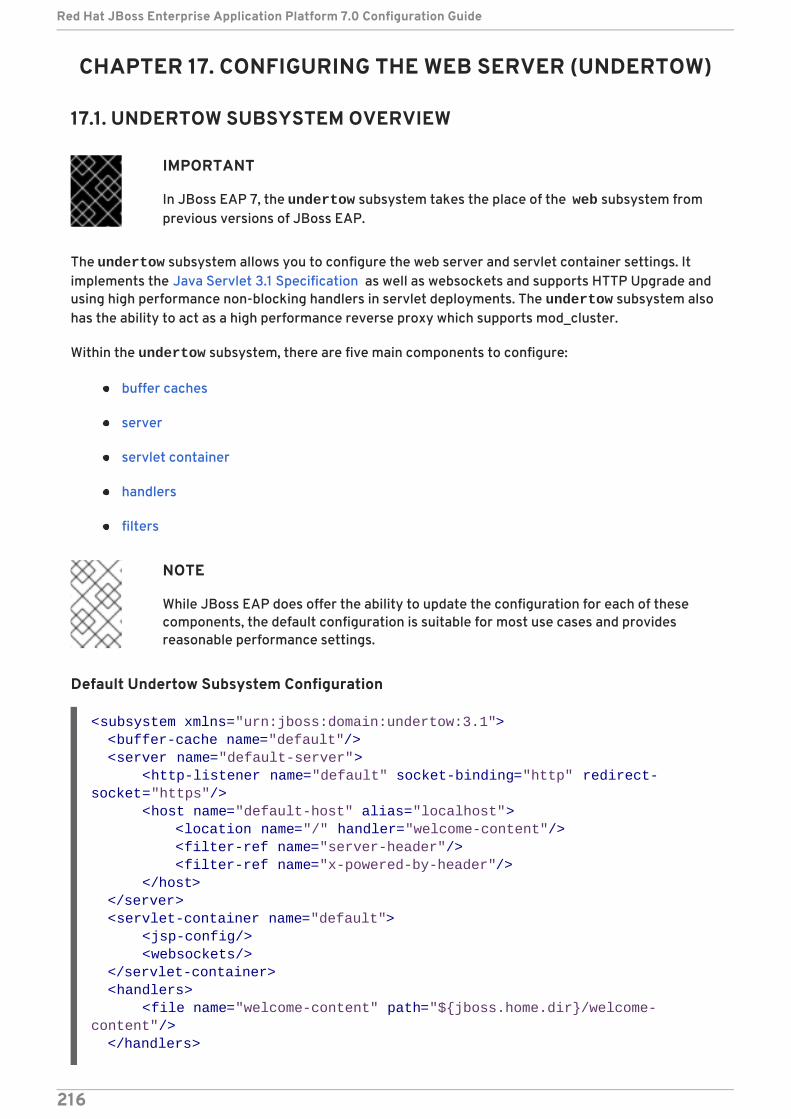
CHAPTER 17. CONFIGURING THE WEB SERVER (UNDERTOW)
17.1. UNDERTOW SUBSYSTEM OVERVIEW
IMPORTANT
In JBoss EAP 7, the undertow subsystem takes the place of the web subsystem fromprevious versions of JBoss EAP.
The undertow subsystem allows you to configure the web server and servlet container settings. Itimplements the Java Servlet 3.1 Specification as well as websockets and supports HTTP Upgrade andusing high performance non-blocking handlers in servlet deployments. The undertow subsystem alsohas the ability to act as a high performance reverse proxy which supports mod_cluster.
Within the undertow subsystem, there are five main components to configure:
buffer caches
server
servlet container
handlers
filters
NOTE
While JBoss EAP does offer the ability to update the configuration for each of thesecomponents, the default configuration is suitable for most use cases and providesreasonable performance settings.
Default Undertow Subsystem Configuration
<subsystem xmlns="urn:jboss:domain:undertow:3.1"> <buffer-cache name="default"/> <server name="default-server"> <http-listener name="default" socket-binding="http" redirect-socket="https"/> <host name="default-host" alias="localhost"> <location name="/" handler="welcome-content"/> <filter-ref name="server-header"/> <filter-ref name="x-powered-by-header"/> </host> </server> <servlet-container name="default"> <jsp-config/> <websockets/> </servlet-container> <handlers> <file name="welcome-content" path="${jboss.home.dir}/welcome-content"/> </handlers>
Red Hat JBoss Enterprise Application Platform 7.0 Configuration Guide
216
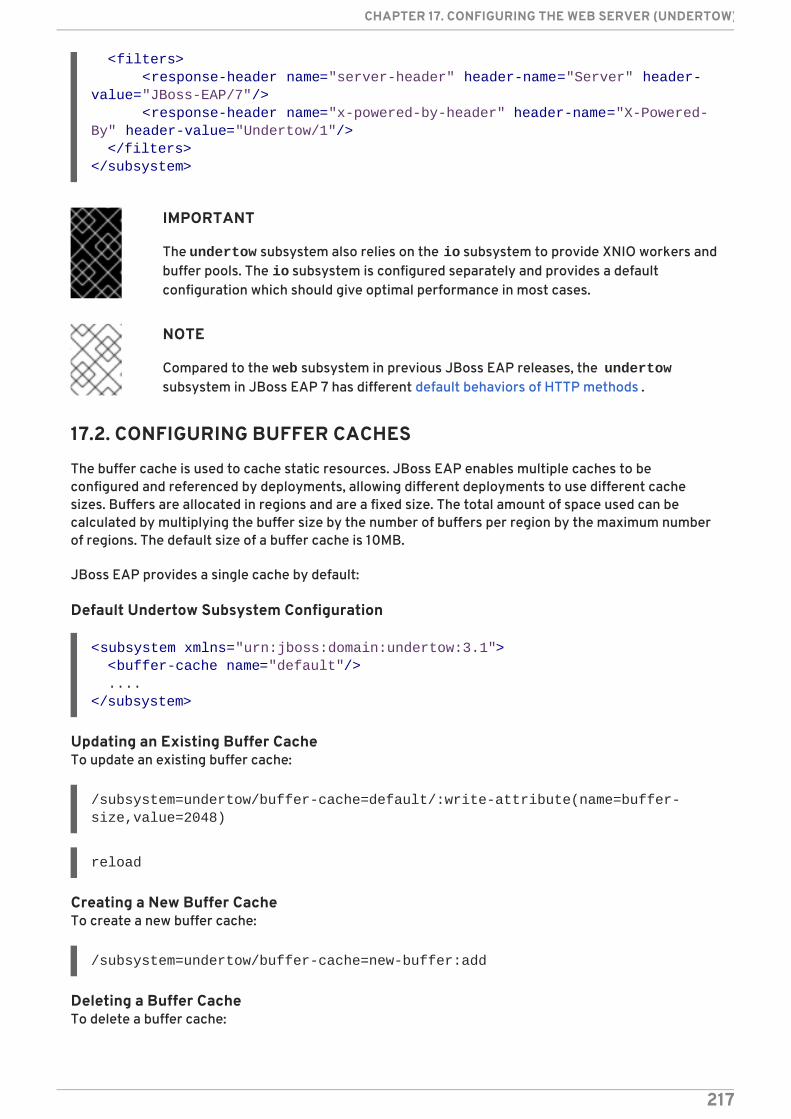
IMPORTANT
The undertow subsystem also relies on the io subsystem to provide XNIO workers andbuffer pools. The io subsystem is configured separately and provides a defaultconfiguration which should give optimal performance in most cases.
NOTE
Compared to the web subsystem in previous JBoss EAP releases, the undertowsubsystem in JBoss EAP 7 has different default behaviors of HTTP methods .
17.2. CONFIGURING BUFFER CACHES
The buffer cache is used to cache static resources. JBoss EAP enables multiple caches to beconfigured and referenced by deployments, allowing different deployments to use different cachesizes. Buffers are allocated in regions and are a fixed size. The total amount of space used can becalculated by multiplying the buffer size by the number of buffers per region by the maximum numberof regions. The default size of a buffer cache is 10MB.
JBoss EAP provides a single cache by default:
Default Undertow Subsystem Configuration
Updating an Existing Buffer CacheTo update an existing buffer cache:
/subsystem=undertow/buffer-cache=default/:write-attribute(name=buffer-size,value=2048)
reload
Creating a New Buffer CacheTo create a new buffer cache:
/subsystem=undertow/buffer-cache=new-buffer:add
Deleting a Buffer CacheTo delete a buffer cache:
<filters> <response-header name="server-header" header-name="Server" header-value="JBoss-EAP/7"/> <response-header name="x-powered-by-header" header-name="X-Powered-By" header-value="Undertow/1"/> </filters></subsystem>
<subsystem xmlns="urn:jboss:domain:undertow:3.1"> <buffer-cache name="default"/> ....</subsystem>
CHAPTER 17. CONFIGURING THE WEB SERVER (UNDERTOW)
217
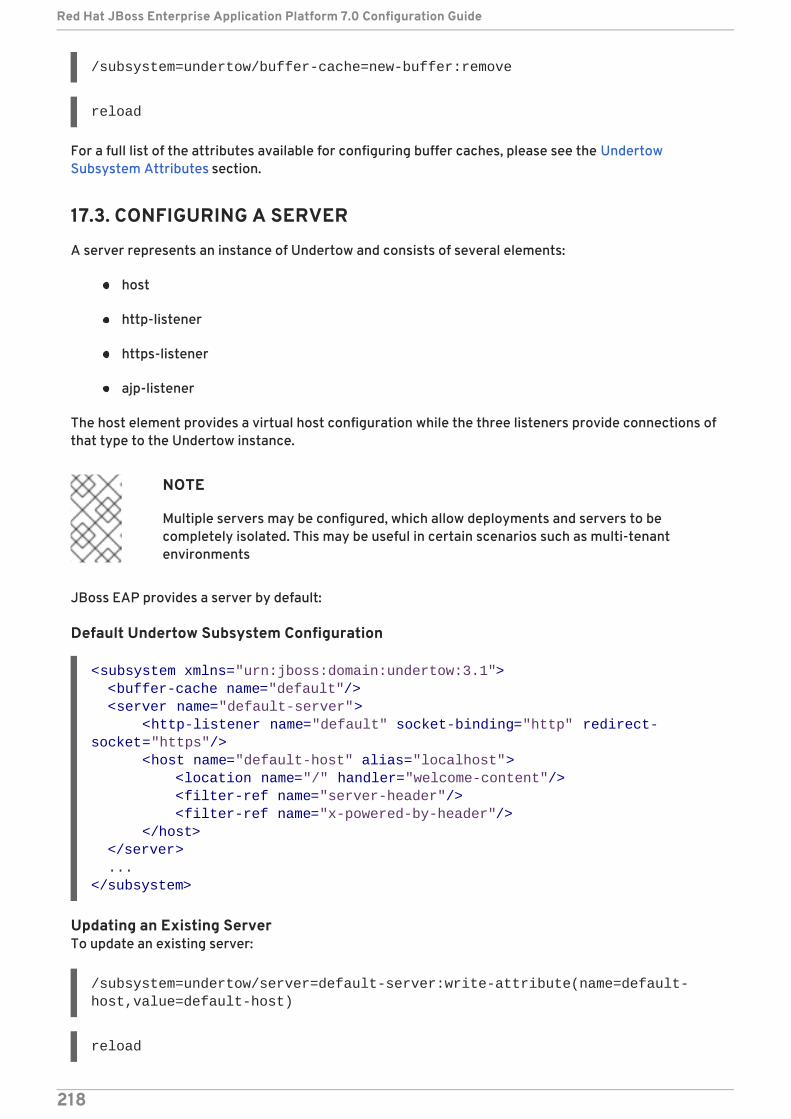
/subsystem=undertow/buffer-cache=new-buffer:remove
reload
For a full list of the attributes available for configuring buffer caches, please see the UndertowSubsystem Attributes section.
17.3. CONFIGURING A SERVER
A server represents an instance of Undertow and consists of several elements:
host
http-listener
https-listener
ajp-listener
The host element provides a virtual host configuration while the three listeners provide connections ofthat type to the Undertow instance.
NOTE
Multiple servers may be configured, which allow deployments and servers to becompletely isolated. This may be useful in certain scenarios such as multi-tenantenvironments
JBoss EAP provides a server by default:
Default Undertow Subsystem Configuration
Updating an Existing ServerTo update an existing server:
/subsystem=undertow/server=default-server:write-attribute(name=default-host,value=default-host)
reload
<subsystem xmlns="urn:jboss:domain:undertow:3.1"> <buffer-cache name="default"/> <server name="default-server"> <http-listener name="default" socket-binding="http" redirect-socket="https"/> <host name="default-host" alias="localhost"> <location name="/" handler="welcome-content"/> <filter-ref name="server-header"/> <filter-ref name="x-powered-by-header"/> </host> </server> ...</subsystem>
Red Hat JBoss Enterprise Application Platform 7.0 Configuration Guide
218
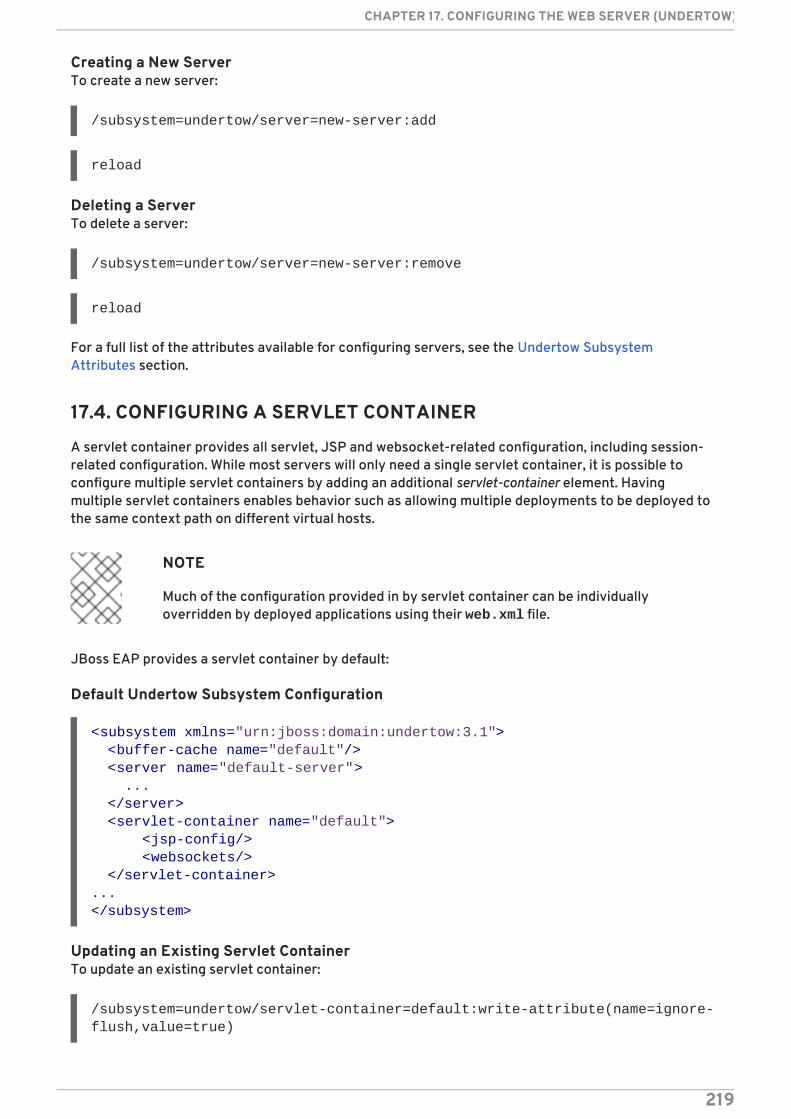
Creating a New ServerTo create a new server:
/subsystem=undertow/server=new-server:add
reload
Deleting a ServerTo delete a server:
/subsystem=undertow/server=new-server:remove
reload
For a full list of the attributes available for configuring servers, see the Undertow SubsystemAttributes section.
17.4. CONFIGURING A SERVLET CONTAINER
A servlet container provides all servlet, JSP and websocket-related configuration, including session-related configuration. While most servers will only need a single servlet container, it is possible toconfigure multiple servlet containers by adding an additional servlet-container element. Havingmultiple servlet containers enables behavior such as allowing multiple deployments to be deployed tothe same context path on different virtual hosts.
NOTE
Much of the configuration provided in by servlet container can be individuallyoverridden by deployed applications using their web.xml file.
JBoss EAP provides a servlet container by default:
Default Undertow Subsystem Configuration
Updating an Existing Servlet ContainerTo update an existing servlet container:
/subsystem=undertow/servlet-container=default:write-attribute(name=ignore-flush,value=true)
<subsystem xmlns="urn:jboss:domain:undertow:3.1"> <buffer-cache name="default"/> <server name="default-server"> ... </server> <servlet-container name="default"> <jsp-config/> <websockets/> </servlet-container>...</subsystem>
CHAPTER 17. CONFIGURING THE WEB SERVER (UNDERTOW)
219
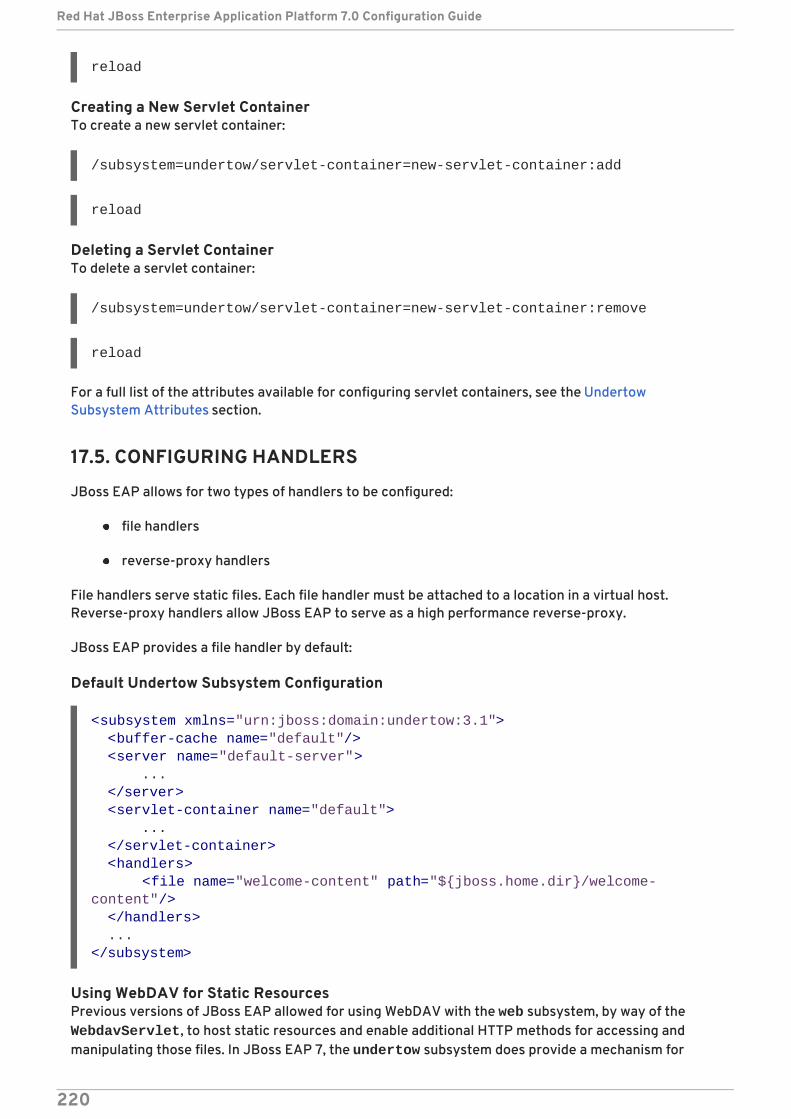
reload
Creating a New Servlet ContainerTo create a new servlet container:
/subsystem=undertow/servlet-container=new-servlet-container:add
reload
Deleting a Servlet ContainerTo delete a servlet container:
/subsystem=undertow/servlet-container=new-servlet-container:remove
reload
For a full list of the attributes available for configuring servlet containers, see the UndertowSubsystem Attributes section.
17.5. CONFIGURING HANDLERS
JBoss EAP allows for two types of handlers to be configured:
file handlers
reverse-proxy handlers
File handlers serve static files. Each file handler must be attached to a location in a virtual host.Reverse-proxy handlers allow JBoss EAP to serve as a high performance reverse-proxy.
JBoss EAP provides a file handler by default:
Default Undertow Subsystem Configuration
Using WebDAV for Static ResourcesPrevious versions of JBoss EAP allowed for using WebDAV with the web subsystem, by way of the WebdavServlet, to host static resources and enable additional HTTP methods for accessing andmanipulating those files. In JBoss EAP 7, the undertow subsystem does provide a mechanism for
<subsystem xmlns="urn:jboss:domain:undertow:3.1"> <buffer-cache name="default"/> <server name="default-server"> ... </server> <servlet-container name="default"> ... </servlet-container> <handlers> <file name="welcome-content" path="${jboss.home.dir}/welcome-content"/> </handlers> ...</subsystem>
Red Hat JBoss Enterprise Application Platform 7.0 Configuration Guide
220
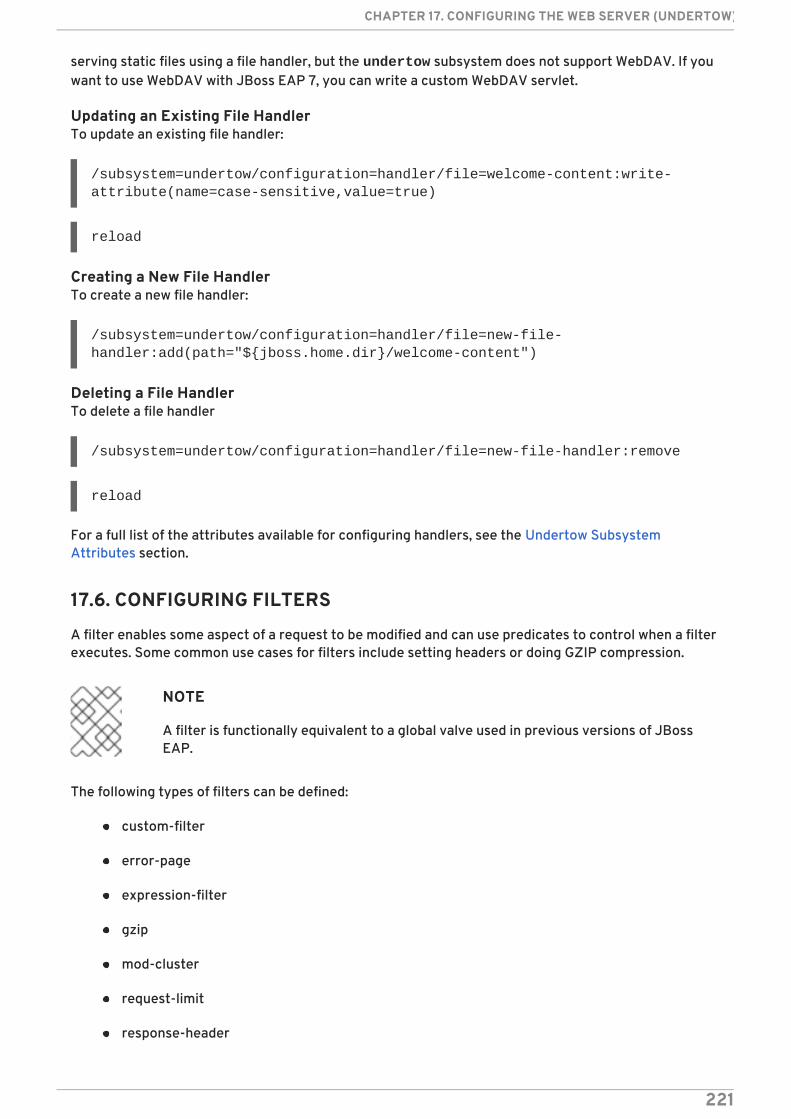
serving static files using a file handler, but the undertow subsystem does not support WebDAV. If youwant to use WebDAV with JBoss EAP 7, you can write a custom WebDAV servlet.
Updating an Existing File HandlerTo update an existing file handler:
/subsystem=undertow/configuration=handler/file=welcome-content:write-attribute(name=case-sensitive,value=true)
reload
Creating a New File HandlerTo create a new file handler:
/subsystem=undertow/configuration=handler/file=new-file-handler:add(path="${jboss.home.dir}/welcome-content")
Deleting a File HandlerTo delete a file handler
/subsystem=undertow/configuration=handler/file=new-file-handler:remove
reload
For a full list of the attributes available for configuring handlers, see the Undertow SubsystemAttributes section.
17.6. CONFIGURING FILTERS
A filter enables some aspect of a request to be modified and can use predicates to control when a filterexecutes. Some common use cases for filters include setting headers or doing GZIP compression.
NOTE
A filter is functionally equivalent to a global valve used in previous versions of JBossEAP.
The following types of filters can be defined:
custom-filter
error-page
expression-filter
gzip
mod-cluster
request-limit
response-header
CHAPTER 17. CONFIGURING THE WEB SERVER (UNDERTOW)
221
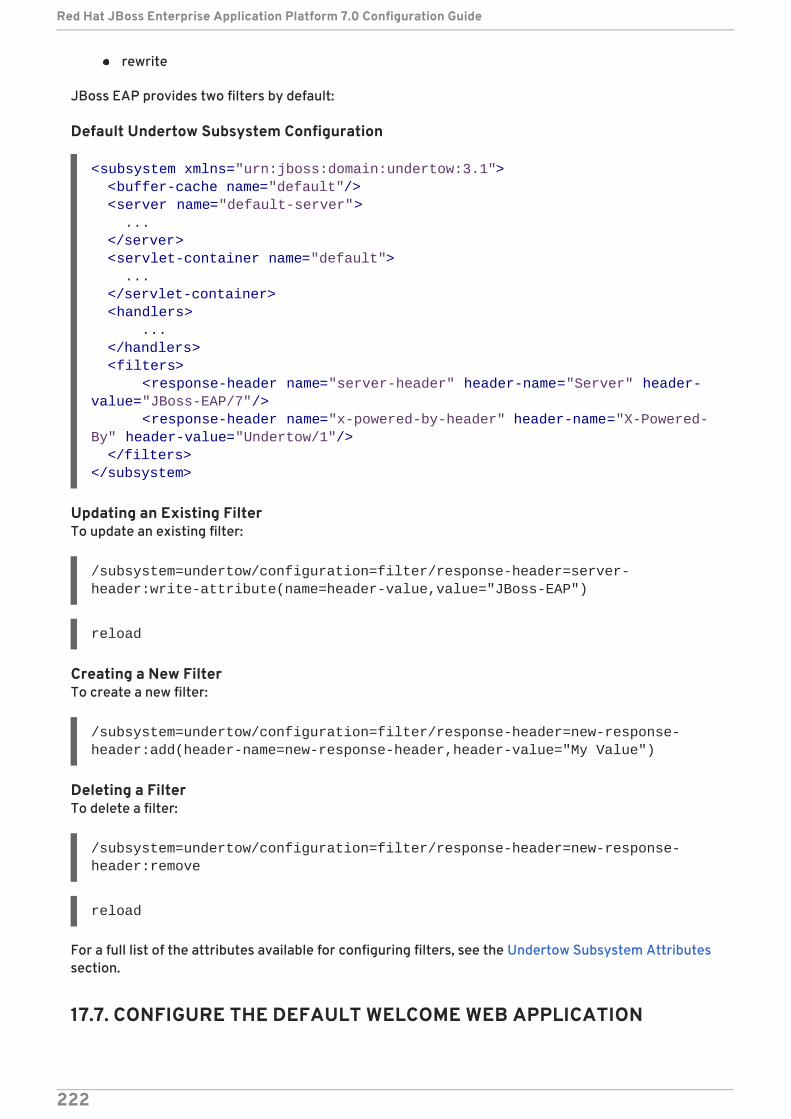
rewrite
JBoss EAP provides two filters by default:
Default Undertow Subsystem Configuration
Updating an Existing FilterTo update an existing filter:
/subsystem=undertow/configuration=filter/response-header=server-header:write-attribute(name=header-value,value="JBoss-EAP")
reload
Creating a New FilterTo create a new filter:
/subsystem=undertow/configuration=filter/response-header=new-response-header:add(header-name=new-response-header,header-value="My Value")
Deleting a FilterTo delete a filter:
/subsystem=undertow/configuration=filter/response-header=new-response-header:remove
reload
For a full list of the attributes available for configuring filters, see the Undertow Subsystem Attributessection.
17.7. CONFIGURE THE DEFAULT WELCOME WEB APPLICATION
<subsystem xmlns="urn:jboss:domain:undertow:3.1"> <buffer-cache name="default"/> <server name="default-server"> ... </server> <servlet-container name="default"> ... </servlet-container> <handlers> ... </handlers> <filters> <response-header name="server-header" header-name="Server" header-value="JBoss-EAP/7"/> <response-header name="x-powered-by-header" header-name="X-Powered-By" header-value="Undertow/1"/> </filters></subsystem>
Red Hat JBoss Enterprise Application Platform 7.0 Configuration Guide
222
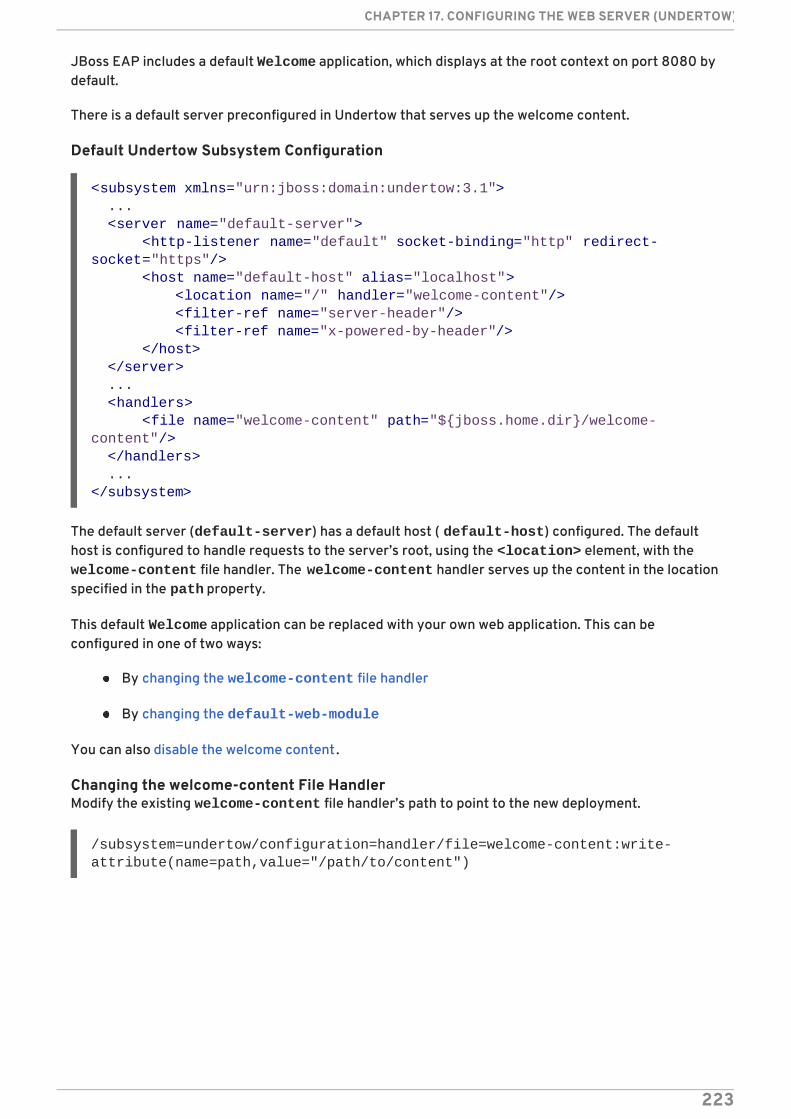
JBoss EAP includes a default Welcome application, which displays at the root context on port 8080 bydefault.
There is a default server preconfigured in Undertow that serves up the welcome content.
Default Undertow Subsystem Configuration
The default server (default-server) has a default host ( default-host) configured. The defaulthost is configured to handle requests to the server’s root, using the <location> element, with the welcome-content file handler. The welcome-content handler serves up the content in the locationspecified in the path property.
This default Welcome application can be replaced with your own web application. This can beconfigured in one of two ways:
By changing the welcome-content file handler
By changing the default-web-module
You can also disable the welcome content .
Changing the welcome-content File HandlerModify the existing welcome-content file handler’s path to point to the new deployment.
/subsystem=undertow/configuration=handler/file=welcome-content:write-attribute(name=path,value="/path/to/content")
<subsystem xmlns="urn:jboss:domain:undertow:3.1"> ... <server name="default-server"> <http-listener name="default" socket-binding="http" redirect-socket="https"/> <host name="default-host" alias="localhost"> <location name="/" handler="welcome-content"/> <filter-ref name="server-header"/> <filter-ref name="x-powered-by-header"/> </host> </server> ... <handlers> <file name="welcome-content" path="${jboss.home.dir}/welcome-content"/> </handlers> ...</subsystem>
CHAPTER 17. CONFIGURING THE WEB SERVER (UNDERTOW)
223
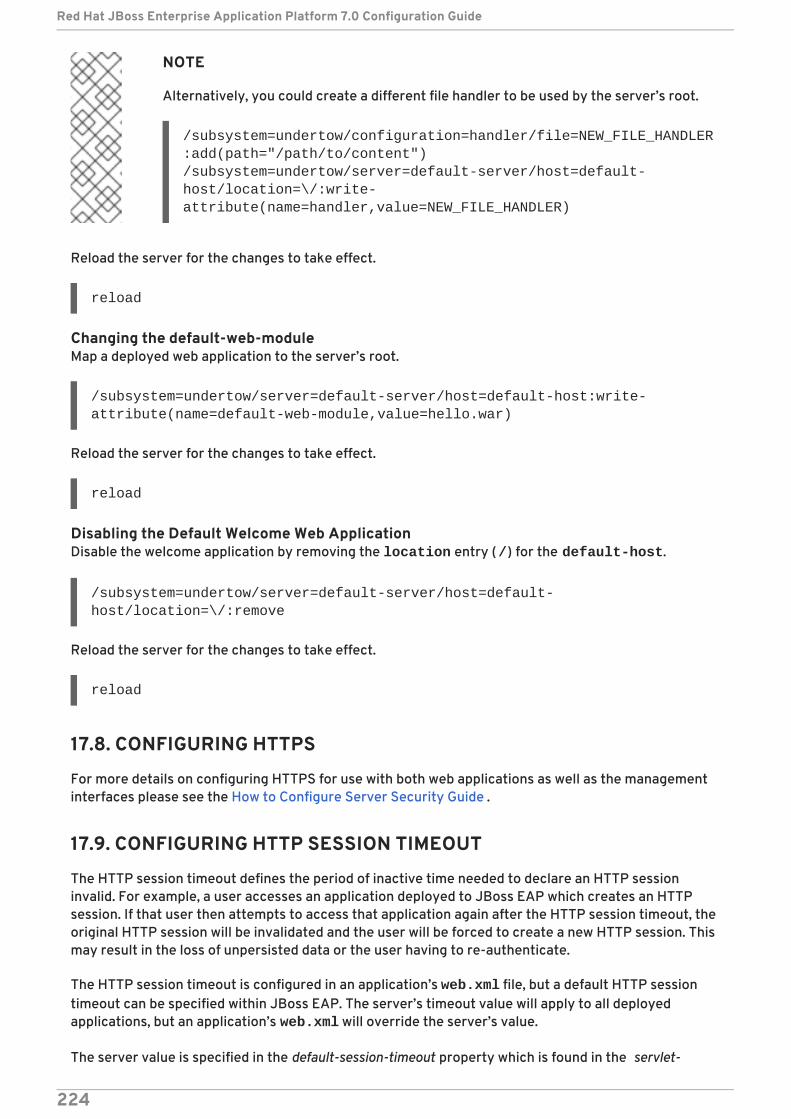
NOTE
Alternatively, you could create a different file handler to be used by the server’s root.
/subsystem=undertow/configuration=handler/file=NEW_FILE_HANDLER:add(path="/path/to/content")/subsystem=undertow/server=default-server/host=default-host/location=\/:write-attribute(name=handler,value=NEW_FILE_HANDLER)
Reload the server for the changes to take effect.
reload
Changing the default-web-moduleMap a deployed web application to the server’s root.
/subsystem=undertow/server=default-server/host=default-host:write-attribute(name=default-web-module,value=hello.war)
Reload the server for the changes to take effect.
reload
Disabling the Default Welcome Web ApplicationDisable the welcome application by removing the location entry (/) for the default-host.
/subsystem=undertow/server=default-server/host=default-host/location=\/:remove
Reload the server for the changes to take effect.
reload
17.8. CONFIGURING HTTPS
For more details on configuring HTTPS for use with both web applications as well as the managementinterfaces please see the How to Configure Server Security Guide .
17.9. CONFIGURING HTTP SESSION TIMEOUT
The HTTP session timeout defines the period of inactive time needed to declare an HTTP sessioninvalid. For example, a user accesses an application deployed to JBoss EAP which creates an HTTPsession. If that user then attempts to access that application again after the HTTP session timeout, theoriginal HTTP session will be invalidated and the user will be forced to create a new HTTP session. Thismay result in the loss of unpersisted data or the user having to re-authenticate.
The HTTP session timeout is configured in an application’s web.xml file, but a default HTTP sessiontimeout can be specified within JBoss EAP. The server’s timeout value will apply to all deployedapplications, but an application’s web.xml will override the server’s value.
The server value is specified in the default-session-timeout property which is found in the servlet-
Red Hat JBoss Enterprise Application Platform 7.0 Configuration Guide
224
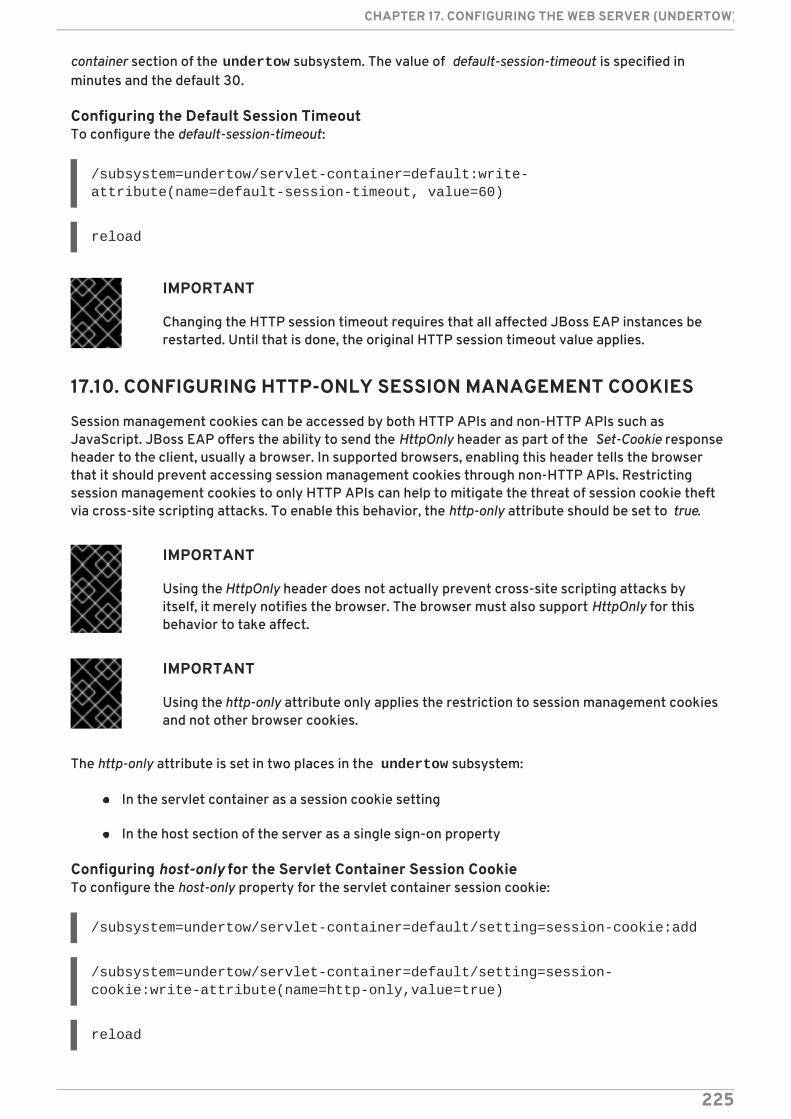
container section of the undertow subsystem. The value of default-session-timeout is specified inminutes and the default 30.
Configuring the Default Session TimeoutTo configure the default-session-timeout:
/subsystem=undertow/servlet-container=default:write-attribute(name=default-session-timeout, value=60)
reload
IMPORTANT
Changing the HTTP session timeout requires that all affected JBoss EAP instances berestarted. Until that is done, the original HTTP session timeout value applies.
17.10. CONFIGURING HTTP-ONLY SESSION MANAGEMENT COOKIES
Session management cookies can be accessed by both HTTP APIs and non-HTTP APIs such asJavaScript. JBoss EAP offers the ability to send the HttpOnly header as part of the Set-Cookie responseheader to the client, usually a browser. In supported browsers, enabling this header tells the browserthat it should prevent accessing session management cookies through non-HTTP APIs. Restrictingsession management cookies to only HTTP APIs can help to mitigate the threat of session cookie theftvia cross-site scripting attacks. To enable this behavior, the http-only attribute should be set to true.
IMPORTANT
Using the HttpOnly header does not actually prevent cross-site scripting attacks byitself, it merely notifies the browser. The browser must also support HttpOnly for thisbehavior to take affect.
IMPORTANT
Using the http-only attribute only applies the restriction to session management cookiesand not other browser cookies.
The http-only attribute is set in two places in the undertow subsystem:
In the servlet container as a session cookie setting
In the host section of the server as a single sign-on property
Configuring host-only for the Servlet Container Session CookieTo configure the host-only property for the servlet container session cookie:
/subsystem=undertow/servlet-container=default/setting=session-cookie:add
/subsystem=undertow/servlet-container=default/setting=session-cookie:write-attribute(name=http-only,value=true)
reload
CHAPTER 17. CONFIGURING THE WEB SERVER (UNDERTOW)
225
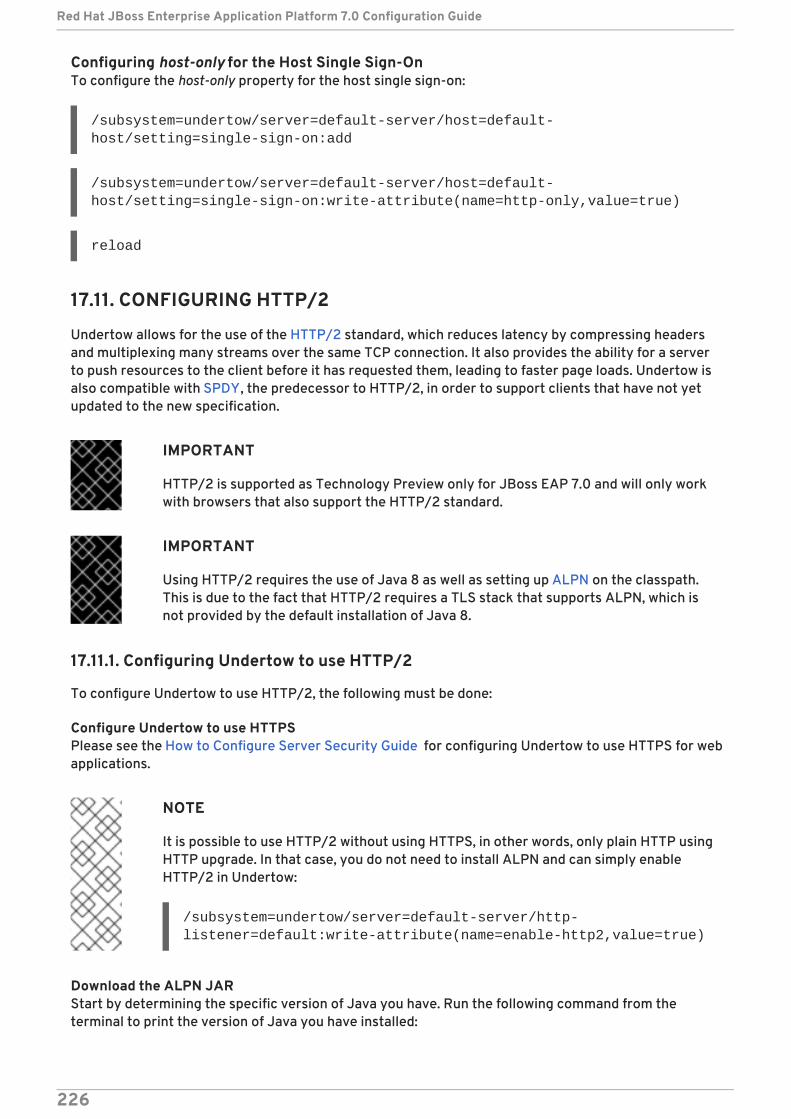
Configuring host-only for the Host Single Sign-OnTo configure the host-only property for the host single sign-on:
/subsystem=undertow/server=default-server/host=default-host/setting=single-sign-on:add
/subsystem=undertow/server=default-server/host=default-host/setting=single-sign-on:write-attribute(name=http-only,value=true)
reload
17.11. CONFIGURING HTTP/2
Undertow allows for the use of the HTTP/2 standard, which reduces latency by compressing headersand multiplexing many streams over the same TCP connection. It also provides the ability for a serverto push resources to the client before it has requested them, leading to faster page loads. Undertow isalso compatible with SPDY, the predecessor to HTTP/2, in order to support clients that have not yetupdated to the new specification.
IMPORTANT
HTTP/2 is supported as Technology Preview only for JBoss EAP 7.0 and will only workwith browsers that also support the HTTP/2 standard.
IMPORTANT
Using HTTP/2 requires the use of Java 8 as well as setting up ALPN on the classpath.This is due to the fact that HTTP/2 requires a TLS stack that supports ALPN, which isnot provided by the default installation of Java 8.
17.11.1. Configuring Undertow to use HTTP/2
To configure Undertow to use HTTP/2, the following must be done:
Configure Undertow to use HTTPSPlease see the How to Configure Server Security Guide for configuring Undertow to use HTTPS for webapplications.
NOTE
It is possible to use HTTP/2 without using HTTPS, in other words, only plain HTTP usingHTTP upgrade. In that case, you do not need to install ALPN and can simply enableHTTP/2 in Undertow:
/subsystem=undertow/server=default-server/http-listener=default:write-attribute(name=enable-http2,value=true)
Download the ALPN JARStart by determining the specific version of Java you have. Run the following command from theterminal to print the version of Java you have installed:
Red Hat JBoss Enterprise Application Platform 7.0 Configuration Guide
226
java -version
Based on your version, consult this page to determine the correct version of the ALPN JAR todownload from this page. For example, if you were running Java version 1.8.0_51, you would useALPN version 8.1.4.v20150727 and download alpn-boot-8.1.4.v20150727.jar.
Add the ALPN JAR to the Boot ClasspathOnce you have downloaded the correct version of the ALPN JAR, copy it to EAP_HOME/bin. You alsomust add the following to bin/standalone.conf (or bin/domain.conf if running in a manageddomain) replacing $JBOSS_HOME and $ALPN_VERSION with the appropriate values.
JAVA_OPTS="$JAVA_OPTS -Xbootclasspath/p:$JBOSS_HOME/bin/alpn-boot-$ALPN_VERSION.jar"
IMPORTANT
You must restart JBoss EAP for the classpath changes to take affect.
Enable HTTP/2 in the HTTPS ListenerTo enable the HTTPS listener in Undertow to use HTTP/2, you must set the enable-http2 attribute totrue:
/subsystem=undertow/server=default-server/https-listener=https:write-attribute(name=enable-http2,value=true)
Verify HTTP/2 is Being UsedTo verify that Undertow is using HTTP/2, you will need to inspect the headers coming from Undertow.Navigate to your JBoss EAP instance using https, for example https://localhost:8443, and use yourbrowser’s developer tools to inspect the headers. Some browsers, for example Google Chrome, willshow HTTP/2 pseudo headers (:path, :authority, :method and :scheme) when using HTTP/2, while otherbrowsers, for example Firefox and Safari, will report the status or version of the header as HTTP/2.0.
17.12. CONFIGURING A REQUESTDUMPING HANDLER
The RequestDumping handler ( io.undertow.server.handlers.RequestDumpingHandler) logs the details of arequest and corresponding response objects handled by Undertow within JBoss EAP.
IMPORTANT
While this handler can be useful for debugging, it may also log sensitive information.Please keep this in mind when enabling this handler.
NOTE
The RequestDumping handler replaces the RequestDumperValve from previous versionsof JBoss EAP.
You can configure a RequestDumping handler at either at the server level directly in JBoss EAP orwithin an individual application.
17.12.1. Configuring a RequestDumping Handler on the Server
CHAPTER 17. CONFIGURING THE WEB SERVER (UNDERTOW)
227
A RequestDumping handler should be configured as an expression filter. To configure aRequestDumping handler as an expression filter, you need to do the following:
Create a new Expression Filter with the RequestDumping Handler
/subsystem=undertow/configuration=filter/expression-filter=requestDumperExpression:add(expression="dump-request")
Enable the Expression Filter in the Undertow Web Server
/subsystem=undertow/server=default-server/host=default-host/filter-ref=requestDumperExpression:add
IMPORTANT
All requests and corresponding responses handled by the Undertow web server will belogged when enabling the RequestDumping handler as a expression filter in this manner.
Configuring a RequestDumping Handler for Specific URLsIn addition to logging all requests, you can also use an expression filter to only log requests andcorresponding responses for specific URLs. This can be accomplished using a predicate in yourexpression such as path, path-prefix, or path-suffix. For example, if you want to log all requests andcorresponding responses to /myApplication/test, you can use the expression "path(/myApplication/test) -> dump-request" instead of the expression "dump-request"when creating your expression filter. This will only direct requests with a path exactly matching/myApplication/test to the RequestDumping handler.
17.12.2. Configuring a RequestDumping Handler within an Application
In addition to configuring a RequestDumping handler at the server, you can also configure it withinindividual applications. This will limit the scope of the handler to only that specific application. ARequestDumping handler should be configured in WEB-INF/undertow-handlers.conf.
To configure the RequestDumping handler in WEB-INF/undertow-handlers.conf to log allrequests and corresponding responses for this application, add the following expression to WEB-INF/undertow-handlers.conf:
Example WEB-INF/undertow-handlers.conf
dump-request
To configure the RequestDumping handler in WEB-INF/undertow-handlers.conf to only logrequests and corresponding responses to specific URLs within this application, you can use a predicatein your expression such as path, path-prefix, or path-suffix. For example, to log all requests andcorresponding responses to test in your application, the following expression with the path predicatecould be used:
Example WEB-INF/undertow-handlers.conf
path(/test) -> dump-request
Red Hat JBoss Enterprise Application Platform 7.0 Configuration Guide
228
NOTE
When using the predicates such as path, path-prefix, or path-suffix in expressions definedin the application’s WEB-INF/undertow-handlers.conf, the value used will berelative to the context root of the application. For example, if the application’s contextroot is myApplication with an expression path(/test) -> dump-request configuredin WEB-INF/undertow-handlers.conf, it will only log requests and correspondingresponses to /myApplication/test.
CHAPTER 17. CONFIGURING THE WEB SERVER (UNDERTOW)
229
CHAPTER 18. CONFIGURING REMOTING
18.1. ABOUT THE REMOTING SUBSYSTEM
The remoting subsystem allows you to configure inbound and outbound connections for local andremote services as well as the settings for those connections.
JBoss Remoting includes the following configurable elements: the endpoint, connectors, and a seriesof local and remote connection URIs. Most people will not need to configure the remoting subsystemat all, unless they use custom connectors for their own applications. Applications that act as remotingclients, such as EJBs, need separate configuration to connect to a specific connector.
Default Remoting Subsystem Configuration
See Remoting Subsystem Attributes for a full list of the attributes available for the remotingsubsystem.
The Remoting EndpointThe remoting endpoint uses the XNIO worker declared and configured by the io subsystem.
See Configuring the Endpoint for details on how to configure the remoting endpoint.
ConnectorThe connector is the main remoting configuration element. Multiple connectors are allowed. Eachconnector consists of a <connector> element with several sub-elements, and few other attributes.The default connector is used by several JBoss EAP subsystems. Specific settings for the elementsand attributes of your custom connectors depend on your applications. Contact Red Hat GlobalSupport Services for more information.
See Configuring a Connector for details on how to configure connectors.
Outbound ConnectionsYou can specify three different types of outbound connections:
An outbound connection, specified by a URI
A local outbound connection , which connects to a local resource such as a socket
A remote outbound connection, which connects to a remote resource and authenticates usinga security realm
Additional ConfigurationRemoting depends on several elements that are configured outside of the remoting subsystem, suchas the network interface and IO worker.
For more information, see Additional Remoting Configuration.
18.2. CONFIGURING THE ENDPOINT
<subsystem xmlns="urn:jboss:domain:remoting:3.0"> <endpoint/> <http-connector name="http-remoting-connector" connector-ref="default" security-realm="ApplicationRealm"/></subsystem>
Red Hat JBoss Enterprise Application Platform 7.0 Configuration Guide
230
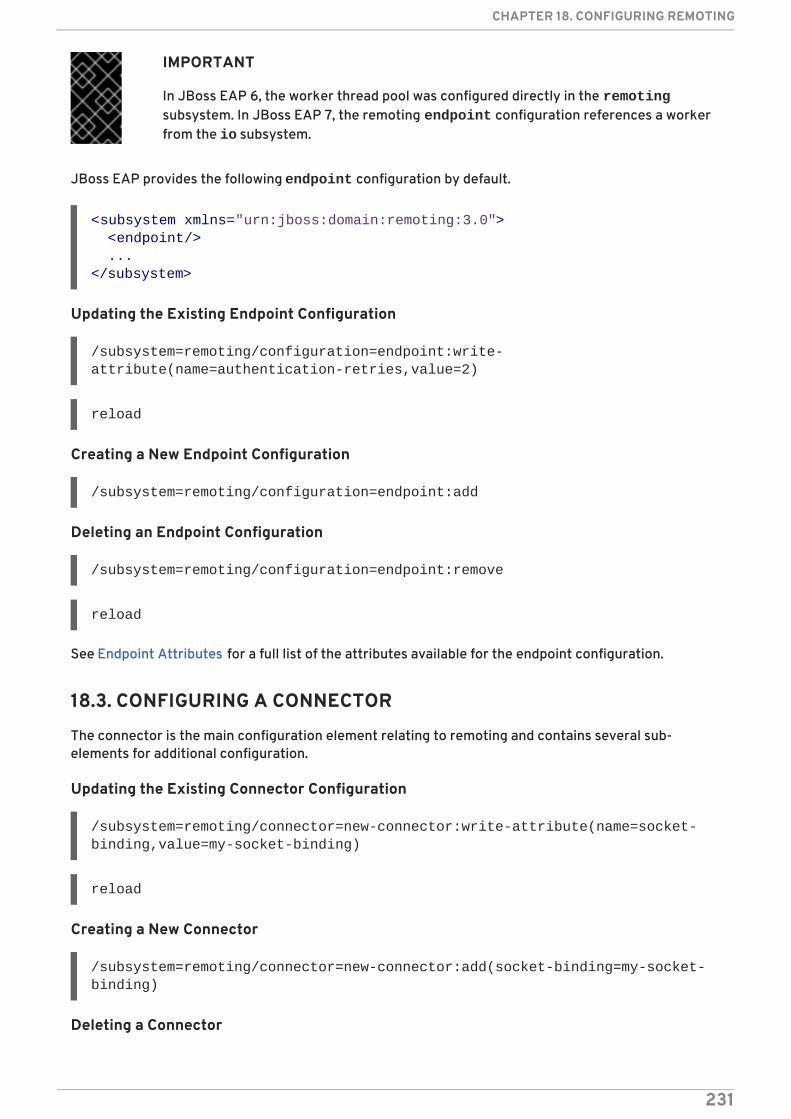
IMPORTANT
In JBoss EAP 6, the worker thread pool was configured directly in the remotingsubsystem. In JBoss EAP 7, the remoting endpoint configuration references a workerfrom the io subsystem.
JBoss EAP provides the following endpoint configuration by default.
Updating the Existing Endpoint Configuration
/subsystem=remoting/configuration=endpoint:write-attribute(name=authentication-retries,value=2)
reload
Creating a New Endpoint Configuration
/subsystem=remoting/configuration=endpoint:add
Deleting an Endpoint Configuration
/subsystem=remoting/configuration=endpoint:remove
reload
See Endpoint Attributes for a full list of the attributes available for the endpoint configuration.
18.3. CONFIGURING A CONNECTOR
The connector is the main configuration element relating to remoting and contains several sub-elements for additional configuration.
Updating the Existing Connector Configuration
/subsystem=remoting/connector=new-connector:write-attribute(name=socket-binding,value=my-socket-binding)
reload
Creating a New Connector
/subsystem=remoting/connector=new-connector:add(socket-binding=my-socket-binding)
Deleting a Connector
<subsystem xmlns="urn:jboss:domain:remoting:3.0"> <endpoint/> ...</subsystem>
CHAPTER 18. CONFIGURING REMOTING
231
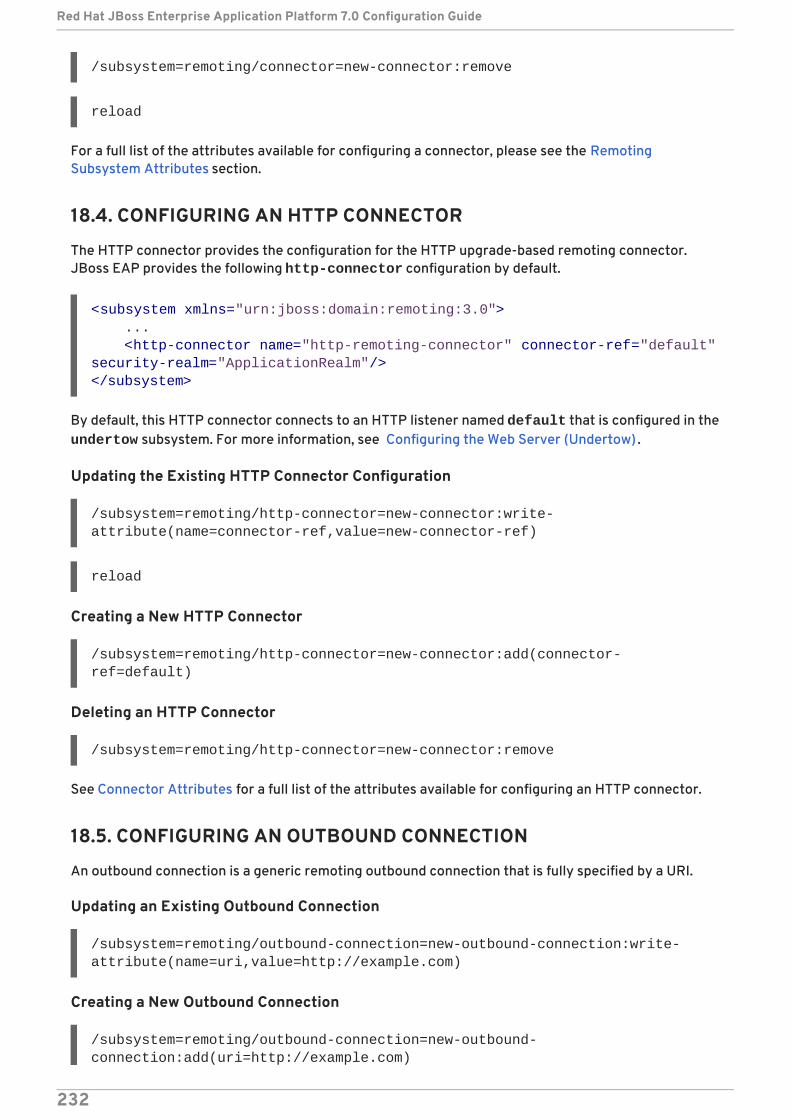
/subsystem=remoting/connector=new-connector:remove
reload
For a full list of the attributes available for configuring a connector, please see the RemotingSubsystem Attributes section.
18.4. CONFIGURING AN HTTP CONNECTOR
The HTTP connector provides the configuration for the HTTP upgrade-based remoting connector.JBoss EAP provides the following http-connector configuration by default.
By default, this HTTP connector connects to an HTTP listener named default that is configured in theundertow subsystem. For more information, see Configuring the Web Server (Undertow) .
Updating the Existing HTTP Connector Configuration
/subsystem=remoting/http-connector=new-connector:write-attribute(name=connector-ref,value=new-connector-ref)
reload
Creating a New HTTP Connector
/subsystem=remoting/http-connector=new-connector:add(connector-ref=default)
Deleting an HTTP Connector
/subsystem=remoting/http-connector=new-connector:remove
See Connector Attributes for a full list of the attributes available for configuring an HTTP connector.
18.5. CONFIGURING AN OUTBOUND CONNECTION
An outbound connection is a generic remoting outbound connection that is fully specified by a URI.
Updating an Existing Outbound Connection
/subsystem=remoting/outbound-connection=new-outbound-connection:write-attribute(name=uri,value=http://example.com)
Creating a New Outbound Connection
/subsystem=remoting/outbound-connection=new-outbound-connection:add(uri=http://example.com)
<subsystem xmlns="urn:jboss:domain:remoting:3.0"> ... <http-connector name="http-remoting-connector" connector-ref="default" security-realm="ApplicationRealm"/></subsystem>
Red Hat JBoss Enterprise Application Platform 7.0 Configuration Guide
232
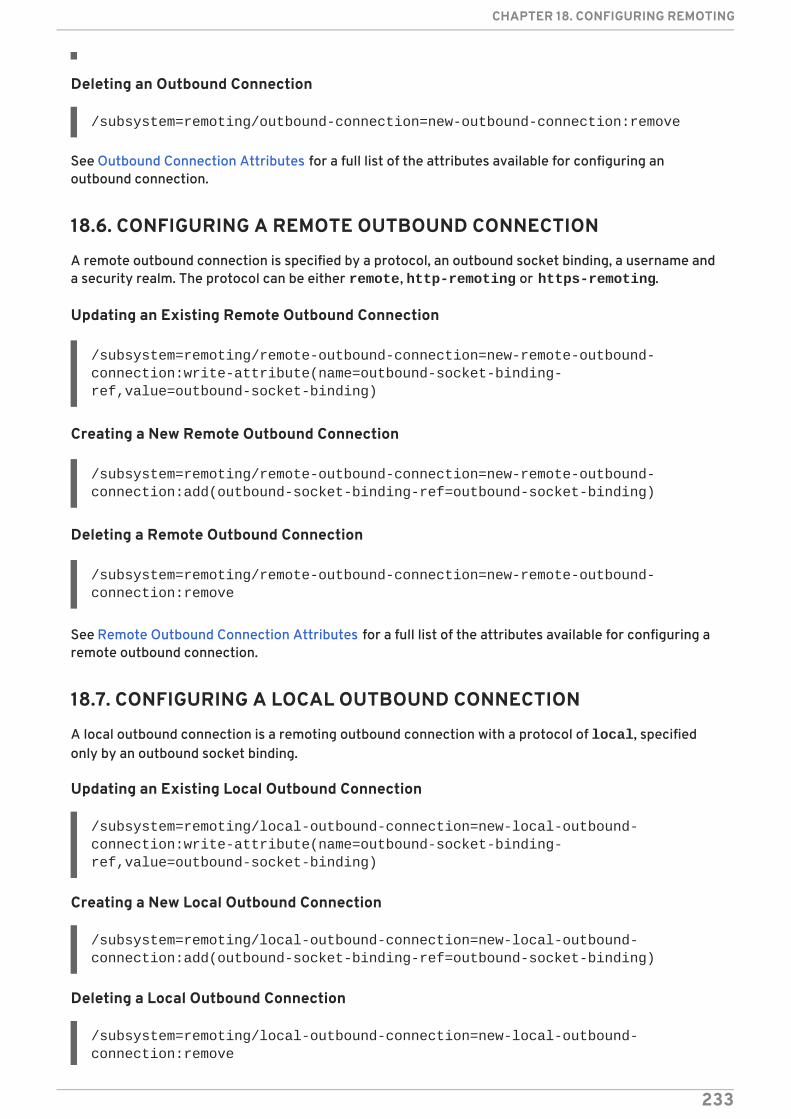
Deleting an Outbound Connection
/subsystem=remoting/outbound-connection=new-outbound-connection:remove
See Outbound Connection Attributes for a full list of the attributes available for configuring anoutbound connection.
18.6. CONFIGURING A REMOTE OUTBOUND CONNECTION
A remote outbound connection is specified by a protocol, an outbound socket binding, a username anda security realm. The protocol can be either remote, http-remoting or https-remoting.
Updating an Existing Remote Outbound Connection
/subsystem=remoting/remote-outbound-connection=new-remote-outbound-connection:write-attribute(name=outbound-socket-binding-ref,value=outbound-socket-binding)
Creating a New Remote Outbound Connection
/subsystem=remoting/remote-outbound-connection=new-remote-outbound-connection:add(outbound-socket-binding-ref=outbound-socket-binding)
Deleting a Remote Outbound Connection
/subsystem=remoting/remote-outbound-connection=new-remote-outbound-connection:remove
See Remote Outbound Connection Attributes for a full list of the attributes available for configuring aremote outbound connection.
18.7. CONFIGURING A LOCAL OUTBOUND CONNECTION
A local outbound connection is a remoting outbound connection with a protocol of local, specifiedonly by an outbound socket binding.
Updating an Existing Local Outbound Connection
/subsystem=remoting/local-outbound-connection=new-local-outbound-connection:write-attribute(name=outbound-socket-binding-ref,value=outbound-socket-binding)
Creating a New Local Outbound Connection
/subsystem=remoting/local-outbound-connection=new-local-outbound-connection:add(outbound-socket-binding-ref=outbound-socket-binding)
Deleting a Local Outbound Connection
/subsystem=remoting/local-outbound-connection=new-local-outbound-connection:remove
CHAPTER 18. CONFIGURING REMOTING
233
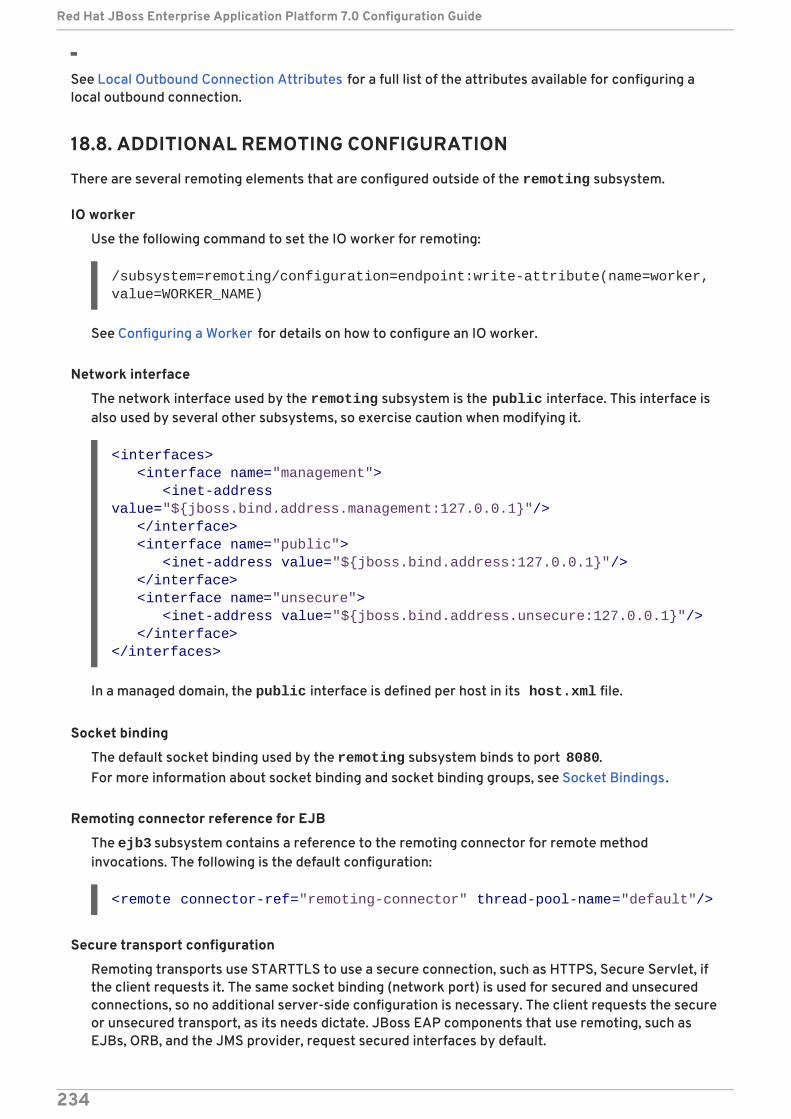
See Local Outbound Connection Attributes for a full list of the attributes available for configuring alocal outbound connection.
18.8. ADDITIONAL REMOTING CONFIGURATION
There are several remoting elements that are configured outside of the remoting subsystem.
IO worker
Use the following command to set the IO worker for remoting:
/subsystem=remoting/configuration=endpoint:write-attribute(name=worker, value=WORKER_NAME)
See Configuring a Worker for details on how to configure an IO worker.
Network interface
The network interface used by the remoting subsystem is the public interface. This interface isalso used by several other subsystems, so exercise caution when modifying it.
In a managed domain, the public interface is defined per host in its host.xml file.
Socket binding
The default socket binding used by the remoting subsystem binds to port 8080.For more information about socket binding and socket binding groups, see Socket Bindings.
Remoting connector reference for EJB
The ejb3 subsystem contains a reference to the remoting connector for remote methodinvocations. The following is the default configuration:
Secure transport configuration
Remoting transports use STARTTLS to use a secure connection, such as HTTPS, Secure Servlet, ifthe client requests it. The same socket binding (network port) is used for secured and unsecuredconnections, so no additional server-side configuration is necessary. The client requests the secureor unsecured transport, as its needs dictate. JBoss EAP components that use remoting, such asEJBs, ORB, and the JMS provider, request secured interfaces by default.
<interfaces> <interface name="management"> <inet-address value="${jboss.bind.address.management:127.0.0.1}"/> </interface> <interface name="public"> <inet-address value="${jboss.bind.address:127.0.0.1}"/> </interface> <interface name="unsecure"> <inet-address value="${jboss.bind.address.unsecure:127.0.0.1}"/> </interface></interfaces>
<remote connector-ref="remoting-connector" thread-pool-name="default"/>
Red Hat JBoss Enterprise Application Platform 7.0 Configuration Guide
234
WARNING
STARTTLS works by activating a secure connection if the client requests it, andotherwise defaults to an unsecured connection. It is inherently susceptible to aman-in-the-middle exploit, where an attacker intercepts the request of theclient and modifies it to request an unsecured connection. Clients must bewritten to fail appropriately if they do not receive a secure connection, unlessan unsecured connection is an appropriate fall-back.
CHAPTER 18. CONFIGURING REMOTING
235
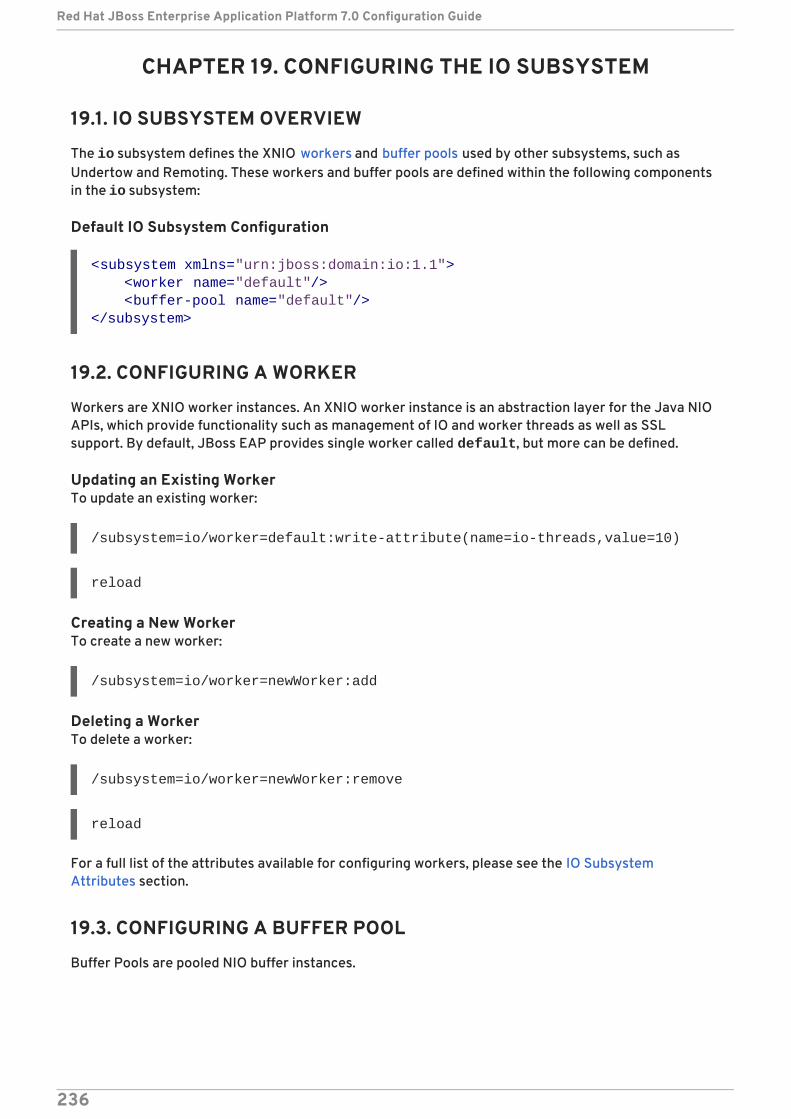
CHAPTER 19. CONFIGURING THE IO SUBSYSTEM
19.1. IO SUBSYSTEM OVERVIEW
The io subsystem defines the XNIO workers and buffer pools used by other subsystems, such asUndertow and Remoting. These workers and buffer pools are defined within the following componentsin the io subsystem:
Default IO Subsystem Configuration
19.2. CONFIGURING A WORKER
Workers are XNIO worker instances. An XNIO worker instance is an abstraction layer for the Java NIOAPIs, which provide functionality such as management of IO and worker threads as well as SSLsupport. By default, JBoss EAP provides single worker called default, but more can be defined.
Updating an Existing WorkerTo update an existing worker:
/subsystem=io/worker=default:write-attribute(name=io-threads,value=10)
reload
Creating a New WorkerTo create a new worker:
/subsystem=io/worker=newWorker:add
Deleting a WorkerTo delete a worker:
/subsystem=io/worker=newWorker:remove
reload
For a full list of the attributes available for configuring workers, please see the IO SubsystemAttributes section.
19.3. CONFIGURING A BUFFER POOL
Buffer Pools are pooled NIO buffer instances.
<subsystem xmlns="urn:jboss:domain:io:1.1"> <worker name="default"/> <buffer-pool name="default"/></subsystem>
Red Hat JBoss Enterprise Application Platform 7.0 Configuration Guide
236
IMPORTANT
Changing the buffer size has a big impact on application performance. For most servers,the ideal size is usually 16k.
Updating an Existing Buffer PoolTo update an existing buffer pool:
/subsystem=io/buffer-pool=default:write-attribute(name=direct-buffers,value=true)
reload
Creating a Buffer PoolTo create a new buffer pool:
/subsystem=io/buffer-pool=newBuffer:add
Deleting a Buffer PoolTo delete a buffer pool:
/subsystem=io/buffer-pool=newBuffer:remove
reload
For a full list of the attributes available for configuring buffer pools, please see the IO SubsystemAttributes section.
CHAPTER 19. CONFIGURING THE IO SUBSYSTEM
237
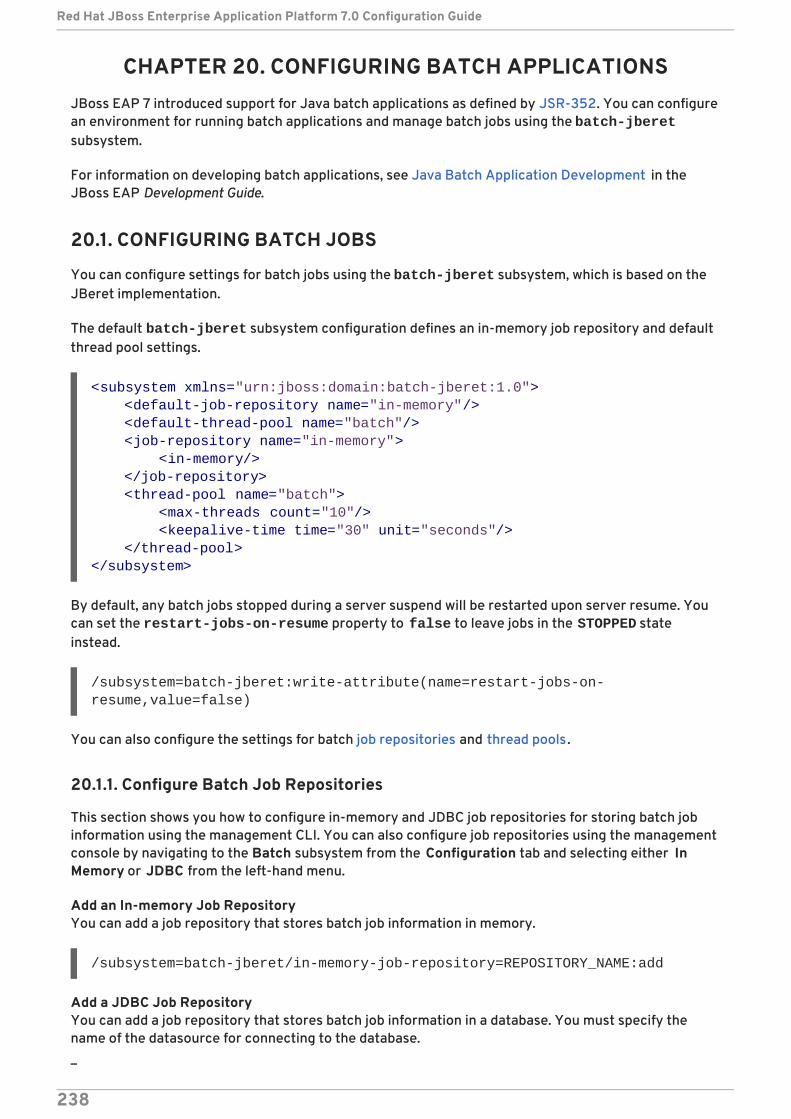
CHAPTER 20. CONFIGURING BATCH APPLICATIONSJBoss EAP 7 introduced support for Java batch applications as defined by JSR-352. You can configurean environment for running batch applications and manage batch jobs using the batch-jberetsubsystem.
For information on developing batch applications, see Java Batch Application Development in theJBoss EAP Development Guide.
20.1. CONFIGURING BATCH JOBS
You can configure settings for batch jobs using the batch-jberet subsystem, which is based on theJBeret implementation.
The default batch-jberet subsystem configuration defines an in-memory job repository and defaultthread pool settings.
By default, any batch jobs stopped during a server suspend will be restarted upon server resume. Youcan set the restart-jobs-on-resume property to false to leave jobs in the STOPPED stateinstead.
/subsystem=batch-jberet:write-attribute(name=restart-jobs-on-resume,value=false)
You can also configure the settings for batch job repositories and thread pools.
20.1.1. Configure Batch Job Repositories
This section shows you how to configure in-memory and JDBC job repositories for storing batch jobinformation using the management CLI. You can also configure job repositories using the managementconsole by navigating to the Batch subsystem from the Configuration tab and selecting either InMemory or JDBC from the left-hand menu.
Add an In-memory Job RepositoryYou can add a job repository that stores batch job information in memory.
/subsystem=batch-jberet/in-memory-job-repository=REPOSITORY_NAME:add
Add a JDBC Job RepositoryYou can add a job repository that stores batch job information in a database. You must specify thename of the datasource for connecting to the database.
<subsystem xmlns="urn:jboss:domain:batch-jberet:1.0"> <default-job-repository name="in-memory"/> <default-thread-pool name="batch"/> <job-repository name="in-memory"> <in-memory/> </job-repository> <thread-pool name="batch"> <max-threads count="10"/> <keepalive-time time="30" unit="seconds"/> </thread-pool></subsystem>
Red Hat JBoss Enterprise Application Platform 7.0 Configuration Guide
238
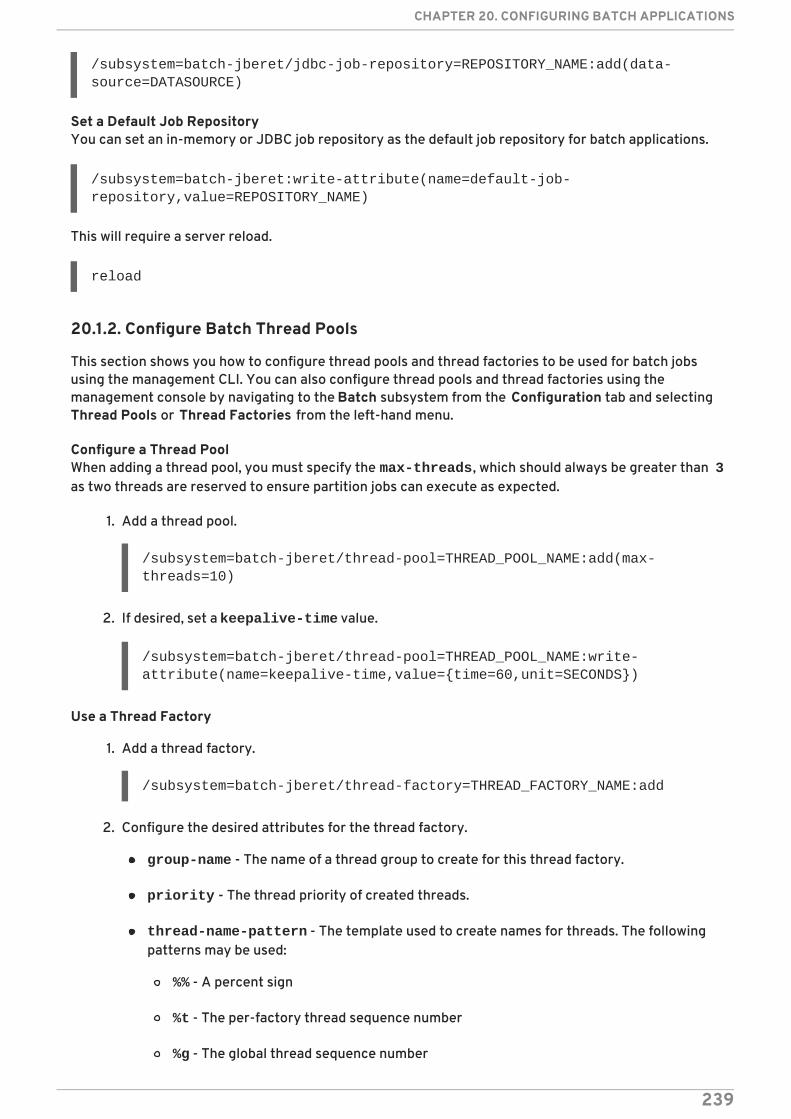
/subsystem=batch-jberet/jdbc-job-repository=REPOSITORY_NAME:add(data-source=DATASOURCE)
Set a Default Job RepositoryYou can set an in-memory or JDBC job repository as the default job repository for batch applications.
/subsystem=batch-jberet:write-attribute(name=default-job-repository,value=REPOSITORY_NAME)
This will require a server reload.
reload
20.1.2. Configure Batch Thread Pools
This section shows you how to configure thread pools and thread factories to be used for batch jobsusing the management CLI. You can also configure thread pools and thread factories using themanagement console by navigating to the Batch subsystem from the Configuration tab and selectingThread Pools or Thread Factories from the left-hand menu.
Configure a Thread PoolWhen adding a thread pool, you must specify the max-threads, which should always be greater than 3as two threads are reserved to ensure partition jobs can execute as expected.
1. Add a thread pool.
/subsystem=batch-jberet/thread-pool=THREAD_POOL_NAME:add(max-threads=10)
2. If desired, set a keepalive-time value.
/subsystem=batch-jberet/thread-pool=THREAD_POOL_NAME:write-attribute(name=keepalive-time,value={time=60,unit=SECONDS})
Use a Thread Factory
1. Add a thread factory.
/subsystem=batch-jberet/thread-factory=THREAD_FACTORY_NAME:add
2. Configure the desired attributes for the thread factory.
group-name - The name of a thread group to create for this thread factory.
priority - The thread priority of created threads.
thread-name-pattern - The template used to create names for threads. The followingpatterns may be used:
%% - A percent sign
%t - The per-factory thread sequence number
%g - The global thread sequence number
CHAPTER 20. CONFIGURING BATCH APPLICATIONS
239
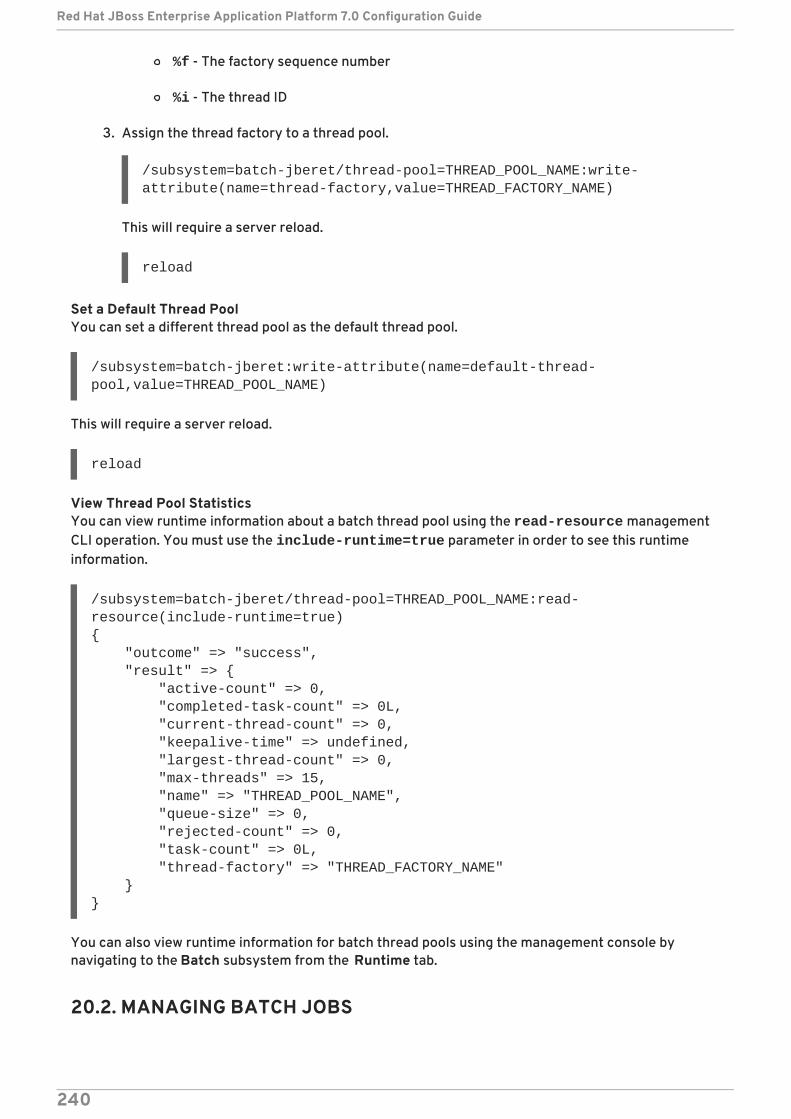
%f - The factory sequence number
%i - The thread ID
3. Assign the thread factory to a thread pool.
/subsystem=batch-jberet/thread-pool=THREAD_POOL_NAME:write-attribute(name=thread-factory,value=THREAD_FACTORY_NAME)
This will require a server reload.
reload
Set a Default Thread PoolYou can set a different thread pool as the default thread pool.
/subsystem=batch-jberet:write-attribute(name=default-thread-pool,value=THREAD_POOL_NAME)
This will require a server reload.
reload
View Thread Pool StatisticsYou can view runtime information about a batch thread pool using the read-resource managementCLI operation. You must use the include-runtime=true parameter in order to see this runtimeinformation.
/subsystem=batch-jberet/thread-pool=THREAD_POOL_NAME:read-resource(include-runtime=true){ "outcome" => "success", "result" => { "active-count" => 0, "completed-task-count" => 0L, "current-thread-count" => 0, "keepalive-time" => undefined, "largest-thread-count" => 0, "max-threads" => 15, "name" => "THREAD_POOL_NAME", "queue-size" => 0, "rejected-count" => 0, "task-count" => 0L, "thread-factory" => "THREAD_FACTORY_NAME" }}
You can also view runtime information for batch thread pools using the management console bynavigating to the Batch subsystem from the Runtime tab.
20.2. MANAGING BATCH JOBS
Red Hat JBoss Enterprise Application Platform 7.0 Configuration Guide
240

The batch-jberet subsystem resource for deployments allows you to start, stop, and restart batchjobs. You can also view the details of job executions.
Restart a Batch JobYou can restart a job that is in a STOPPED or FAILED state by providing its execution ID and optionallyany properties to use when restarting the batch job.
/deployment=DEPLOYMENT_NAME/subsystem=batch-jberet:restart-job(execution-id=EXECUTION_ID,properties={PROPERTY=VALUE})
The execution ID must be the most recent execution of the job instance.
Start a Batch JobYou can start a batch job by providing the job XML file and optionally any properties to use whenstarting the batch job.
/deployment=DEPLOYMENT_NAME/subsystem=batch-jberet:start-job(job-xml-name=JOB_XML_NAME,properties={PROPERTY=VALUE})
Stop a Batch JobYou can stop a running batch job by providing its execution ID.
/deployment=DEPLOYMENT_NAME/subsystem=batch-jberet:stop-job(execution-id=EXECUTION_ID)
View Batch Job Execution DetailsYou can view the details of batch job executions. You must use the include-runtime=trueparameter in order to see this runtime information.
/deployment=DEPLOYMENT_NAME/subsystem=batch-jberet:read-resource(recursive=true,include-runtime=true){ "outcome" => "success", "result" => {"job" => {"import-file" => { "instance-count" => 2, "running-executions" => 0, "execution" => { "2" => { "batch-status" => "COMPLETED", "create-time" => "2016-04-11T22:03:12.708-0400", "end-time" => "2016-04-11T22:03:12.718-0400", "exit-status" => "COMPLETED", "instance-id" => 58L, "last-updated-time" => "2016-04-11T22:03:12.719-0400", "start-time" => "2016-04-11T22:03:12.708-0400" }, "1" => { "batch-status" => "FAILED", "create-time" => "2016-04-11T21:57:17.567-0400", "end-time" => "2016-04-11T21:57:17.596-0400", "exit-status" => "Error : org.hibernate.exception.ConstraintViolationException: could not execute statement", "instance-id" => 15L,
CHAPTER 20. CONFIGURING BATCH APPLICATIONS
241
"last-updated-time" => "2016-04-11T21:57:17.597-0400", "start-time" => "2016-04-11T21:57:17.567-0400" } } }}}}
Red Hat JBoss Enterprise Application Platform 7.0 Configuration Guide
242
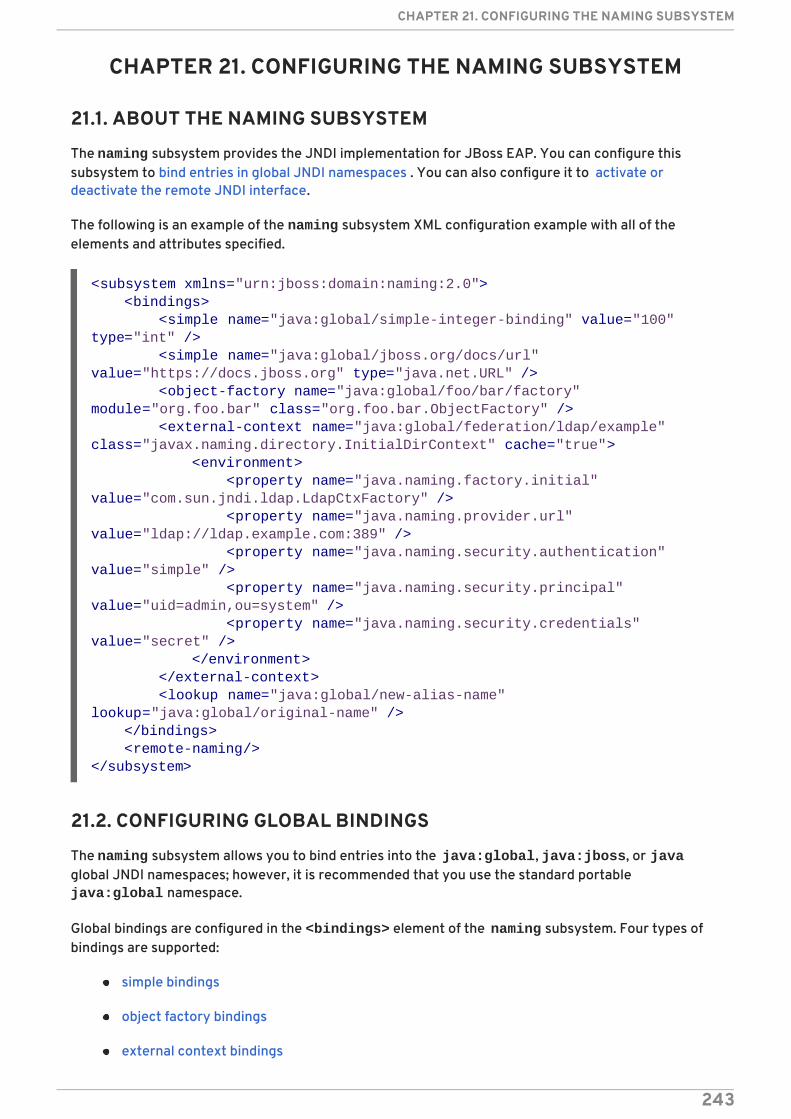
CHAPTER 21. CONFIGURING THE NAMING SUBSYSTEM
21.1. ABOUT THE NAMING SUBSYSTEM
The naming subsystem provides the JNDI implementation for JBoss EAP. You can configure thissubsystem to bind entries in global JNDI namespaces . You can also configure it to activate ordeactivate the remote JNDI interface.
The following is an example of the naming subsystem XML configuration example with all of theelements and attributes specified.
21.2. CONFIGURING GLOBAL BINDINGS
The naming subsystem allows you to bind entries into the java:global, java:jboss, or javaglobal JNDI namespaces; however, it is recommended that you use the standard portable java:global namespace.
Global bindings are configured in the <bindings> element of the naming subsystem. Four types ofbindings are supported:
simple bindings
object factory bindings
external context bindings
<subsystem xmlns="urn:jboss:domain:naming:2.0"> <bindings> <simple name="java:global/simple-integer-binding" value="100" type="int" /> <simple name="java:global/jboss.org/docs/url" value="https://docs.jboss.org" type="java.net.URL" /> <object-factory name="java:global/foo/bar/factory" module="org.foo.bar" class="org.foo.bar.ObjectFactory" /> <external-context name="java:global/federation/ldap/example" class="javax.naming.directory.InitialDirContext" cache="true"> <environment> <property name="java.naming.factory.initial" value="com.sun.jndi.ldap.LdapCtxFactory" /> <property name="java.naming.provider.url" value="ldap://ldap.example.com:389" /> <property name="java.naming.security.authentication" value="simple" /> <property name="java.naming.security.principal" value="uid=admin,ou=system" /> <property name="java.naming.security.credentials" value="secret" /> </environment> </external-context> <lookup name="java:global/new-alias-name" lookup="java:global/original-name" /> </bindings> <remote-naming/></subsystem>
CHAPTER 21. CONFIGURING THE NAMING SUBSYSTEM
243
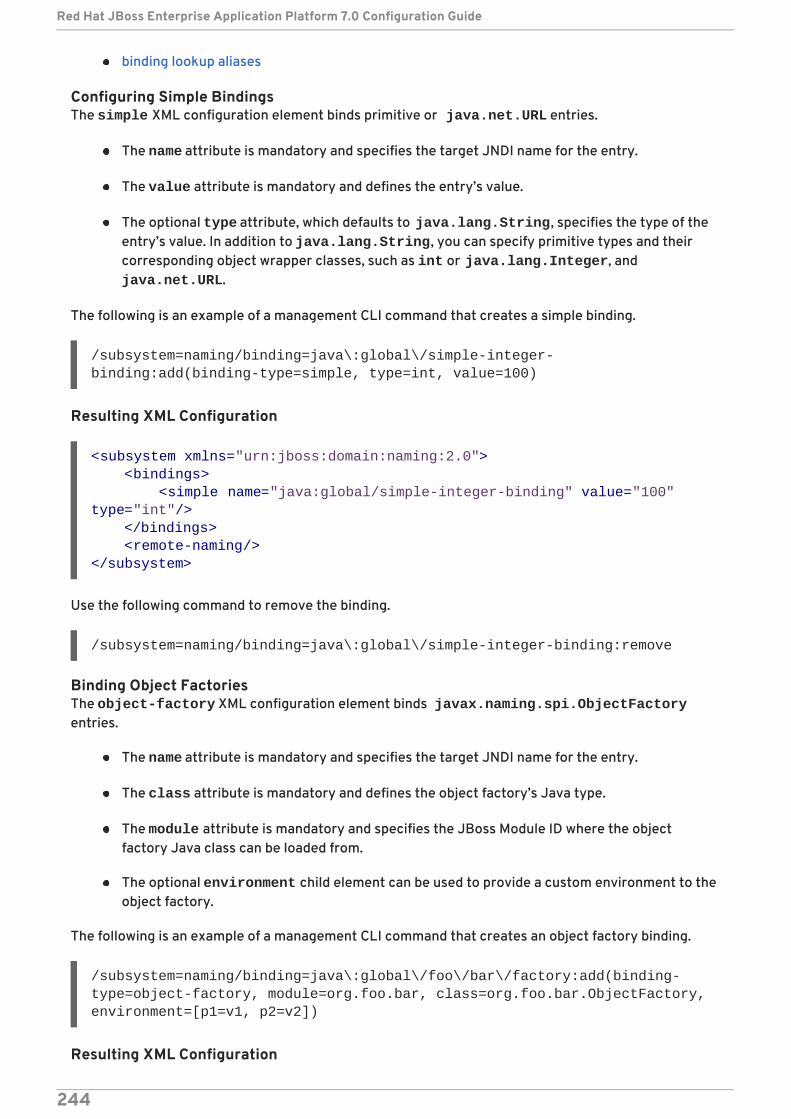
binding lookup aliases
Configuring Simple BindingsThe simple XML configuration element binds primitive or java.net.URL entries.
The name attribute is mandatory and specifies the target JNDI name for the entry.
The value attribute is mandatory and defines the entry’s value.
The optional type attribute, which defaults to java.lang.String, specifies the type of theentry’s value. In addition to java.lang.String, you can specify primitive types and theircorresponding object wrapper classes, such as int or java.lang.Integer, and java.net.URL.
The following is an example of a management CLI command that creates a simple binding.
/subsystem=naming/binding=java\:global\/simple-integer-binding:add(binding-type=simple, type=int, value=100)
Resulting XML Configuration
Use the following command to remove the binding.
/subsystem=naming/binding=java\:global\/simple-integer-binding:remove
Binding Object FactoriesThe object-factory XML configuration element binds javax.naming.spi.ObjectFactoryentries.
The name attribute is mandatory and specifies the target JNDI name for the entry.
The class attribute is mandatory and defines the object factory’s Java type.
The module attribute is mandatory and specifies the JBoss Module ID where the objectfactory Java class can be loaded from.
The optional environment child element can be used to provide a custom environment to theobject factory.
The following is an example of a management CLI command that creates an object factory binding.
/subsystem=naming/binding=java\:global\/foo\/bar\/factory:add(binding-type=object-factory, module=org.foo.bar, class=org.foo.bar.ObjectFactory, environment=[p1=v1, p2=v2])
Resulting XML Configuration
<subsystem xmlns="urn:jboss:domain:naming:2.0"> <bindings> <simple name="java:global/simple-integer-binding" value="100" type="int"/> </bindings> <remote-naming/></subsystem>
Red Hat JBoss Enterprise Application Platform 7.0 Configuration Guide
244

Use the following command to remove the binding.
/subsystem=naming/binding=java\:global\/foo\/bar\/factory:remove
Binding External ContextsFederation of external JNDI contexts, such as LDAP context, are achieved using the external-context XML configuration element.
The name attribute is mandatory and specifies the target JNDI name for the entry.
The class attribute is mandatory and indicates the Java initial naming context type used tocreate the federated context. Note that such type must have a constructor with a singleenvironment map argument.
The optional module attribute specifies the JBoss Module ID where any classes required bythe external JNDI context can be loaded from.
The optional cache attribute, which defaults to false, indicates whether the external contextinstance should be cached.
The optional environment child element can be used to provide the custom environmentneeded to look up the external context.
The following is an example of a management CLI command that creates an external context binding.
/subsystem=naming/binding=java\:global\/federation\/ldap\/example:add(binding-type=external-context, cache=true, class=javax.naming.directory.InitialDirContext, module=org.jboss.as.naming, environment=[java.naming.factory.initial=com.sun.jndi.ldap.LdapCtxFactory, java.naming.provider.url="ldap://ldap.example.com:389", java.naming.security.authentication=simple, java.naming.security.principal="uid=admin,ou=system", java.naming.security.credentials=secret]
Resulting XML Configuration
<subsystem xmlns="urn:jboss:domain:naming:2.0"> <bindings> <object-factory name="java:global/foo/bar/factory" module="org.foo.bar" class="org.foo.bar.ObjectFactory"> <environment> <property name="p1" value="v1" /> <property name="p2" value="v2" /> </environment> </object-factory> </bindings> </subsystem>
<subsystem xmlns="urn:jboss:domain:naming:2.0"> <bindings> <external-context name="java:global/federation/ldap/example" module="org.jboss.as.naming" class="javax.naming.directory.InitialDirContext" cache="true">
CHAPTER 21. CONFIGURING THE NAMING SUBSYSTEM
245
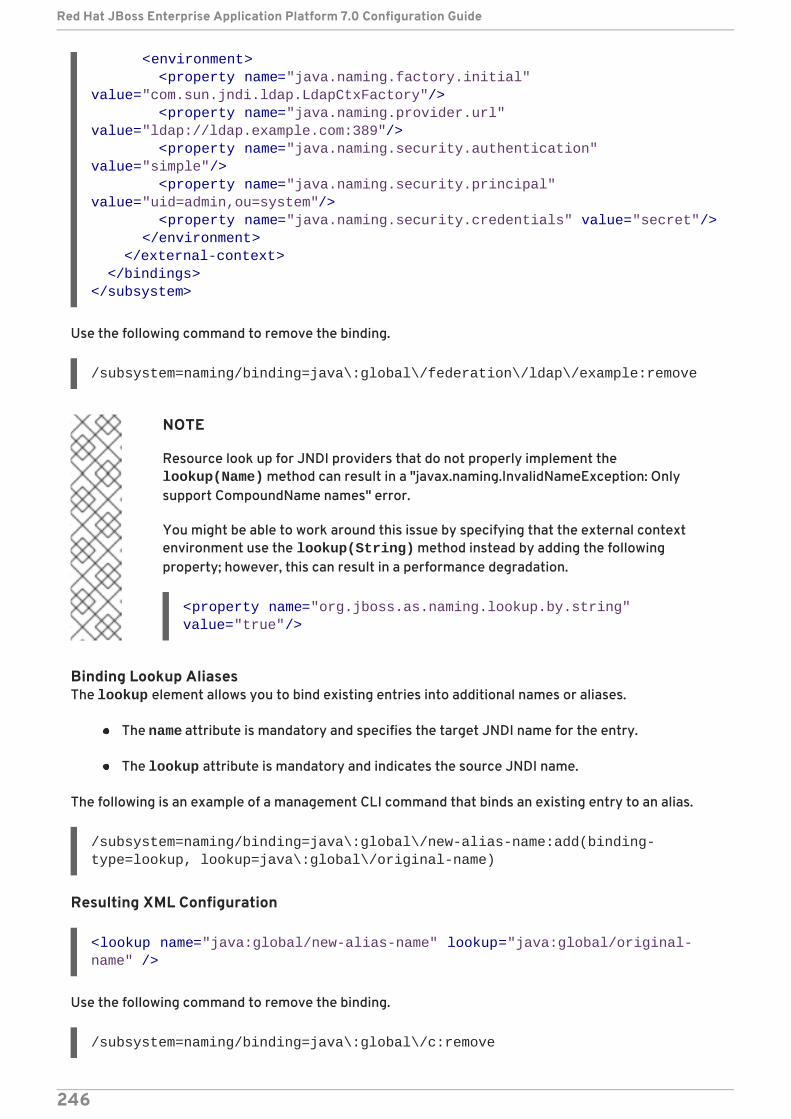
Use the following command to remove the binding.
/subsystem=naming/binding=java\:global\/federation\/ldap\/example:remove
NOTE
Resource look up for JNDI providers that do not properly implement the lookup(Name) method can result in a "javax.naming.InvalidNameException: Onlysupport CompoundName names" error.
You might be able to work around this issue by specifying that the external contextenvironment use the lookup(String) method instead by adding the followingproperty; however, this can result in a performance degradation.
Binding Lookup AliasesThe lookup element allows you to bind existing entries into additional names or aliases.
The name attribute is mandatory and specifies the target JNDI name for the entry.
The lookup attribute is mandatory and indicates the source JNDI name.
The following is an example of a management CLI command that binds an existing entry to an alias.
/subsystem=naming/binding=java\:global\/new-alias-name:add(binding-type=lookup, lookup=java\:global\/original-name)
Resulting XML Configuration
Use the following command to remove the binding.
/subsystem=naming/binding=java\:global\/c:remove
<environment> <property name="java.naming.factory.initial" value="com.sun.jndi.ldap.LdapCtxFactory"/> <property name="java.naming.provider.url" value="ldap://ldap.example.com:389"/> <property name="java.naming.security.authentication" value="simple"/> <property name="java.naming.security.principal" value="uid=admin,ou=system"/> <property name="java.naming.security.credentials" value="secret"/> </environment> </external-context> </bindings></subsystem>
<property name="org.jboss.as.naming.lookup.by.string" value="true"/>
<lookup name="java:global/new-alias-name" lookup="java:global/original-name" />
Red Hat JBoss Enterprise Application Platform 7.0 Configuration Guide
246
21.3. CONFIGURING THE REMOTE JNDI INTERFACE
The remote JNDI interface allows clients to look up entries in remote JBoss EAP instances. The naming subsystem can be configured to deactivate or activate this interface, which is activated bydefault. The remote JNDI interface is configured using the <remote-naming> element.
Use the following management CLI command to activate or reactivate the remote JNDI interface.
/subsystem=naming/service=remote-naming:add
Use the following management CLI command to deactivate the remote JNDI interface.
/subsystem=naming/service=remote-naming:remove
NOTE
Only entries within the java:jboss/exported context are accessible over remoteJNDI.
CHAPTER 21. CONFIGURING THE NAMING SUBSYSTEM
247
CHAPTER 22. CONFIGURING HIGH AVAILABILITY
22.1. INTRODUCTION TO HIGH AVAILABILITY
JBoss EAP provides the following high availability services to guarantee the availability of deployedJava EE applications.
Load balancing
This allows a service to handle a large number of requests by spreading the workload acrossmultiple servers. A client can have timely responses from the service even in the event of a highvolume of requests.
Failover
This allows a client to have uninterrupted access to a service even in the event of hardware ornetwork failures. If the service fails, another cluster member takes over the client’s requests so thatit can continue processing.
Clustering is a term that encompasses all of these capabilities. Members of a cluster can be configuredto share workloads (load balancing) and pick up client processing in the event of a failure of anothercluster member (failover).
NOTE
It is important to keep in mind that the JBoss EAP operating mode chosen (standaloneserver or managed domain) pertains to how you want to manage your servers. Highavailability services can be configured in JBoss EAP regardless of its operating mode.
JBoss EAP supports high availability at several different levels using various components. Some ofthose components of the runtime and your applications that can be made highly-available are:
Instances of the application server
Web applications, when used in conjunction with the internal JBoss Web Server, Apache HTTPServer, Microsoft IIS, or Oracle iPlanet Web Server
Stateful and stateless session Enterprise JavaBeans (EJBs)
Single sign-on (SSO) mechanisms
HTTP sessions
JMS services and message-driven beans (MDBs)
Singleton MSC services
Singleton deployments
Clustering is made available to JBoss EAP by the jgroups, infinispan, and modclustersubsystems. The ha and full-ha profiles have these systems enabled. In JBoss EAP, these services startup and shut down on demand, but they will only start up if an application configured as distributable isdeployed on the servers.
See the JBoss EAP Development Guide for how to mark an application as distributable .
Red Hat JBoss Enterprise Application Platform 7.0 Configuration Guide
248
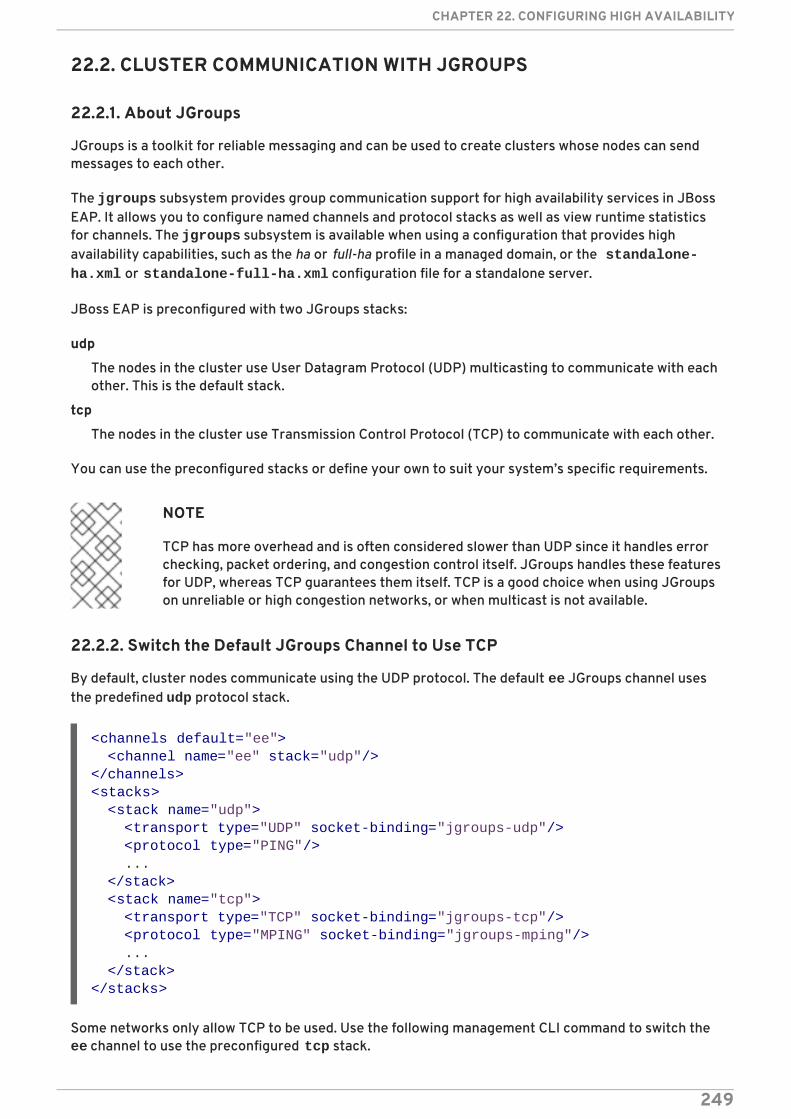
22.2. CLUSTER COMMUNICATION WITH JGROUPS
22.2.1. About JGroups
JGroups is a toolkit for reliable messaging and can be used to create clusters whose nodes can sendmessages to each other.
The jgroups subsystem provides group communication support for high availability services in JBossEAP. It allows you to configure named channels and protocol stacks as well as view runtime statisticsfor channels. The jgroups subsystem is available when using a configuration that provides highavailability capabilities, such as the ha or full-ha profile in a managed domain, or the standalone-ha.xml or standalone-full-ha.xml configuration file for a standalone server.
JBoss EAP is preconfigured with two JGroups stacks:
udp
The nodes in the cluster use User Datagram Protocol (UDP) multicasting to communicate with eachother. This is the default stack.
tcp
The nodes in the cluster use Transmission Control Protocol (TCP) to communicate with each other.
You can use the preconfigured stacks or define your own to suit your system’s specific requirements.
NOTE
TCP has more overhead and is often considered slower than UDP since it handles errorchecking, packet ordering, and congestion control itself. JGroups handles these featuresfor UDP, whereas TCP guarantees them itself. TCP is a good choice when using JGroupson unreliable or high congestion networks, or when multicast is not available.
22.2.2. Switch the Default JGroups Channel to Use TCP
By default, cluster nodes communicate using the UDP protocol. The default ee JGroups channel usesthe predefined udp protocol stack.
Some networks only allow TCP to be used. Use the following management CLI command to switch the ee channel to use the preconfigured tcp stack.
<channels default="ee"> <channel name="ee" stack="udp"/></channels><stacks> <stack name="udp"> <transport type="UDP" socket-binding="jgroups-udp"/> <protocol type="PING"/> ... </stack> <stack name="tcp"> <transport type="TCP" socket-binding="jgroups-tcp"/> <protocol type="MPING" socket-binding="jgroups-mping"/> ... </stack></stacks>
CHAPTER 22. CONFIGURING HIGH AVAILABILITY
249
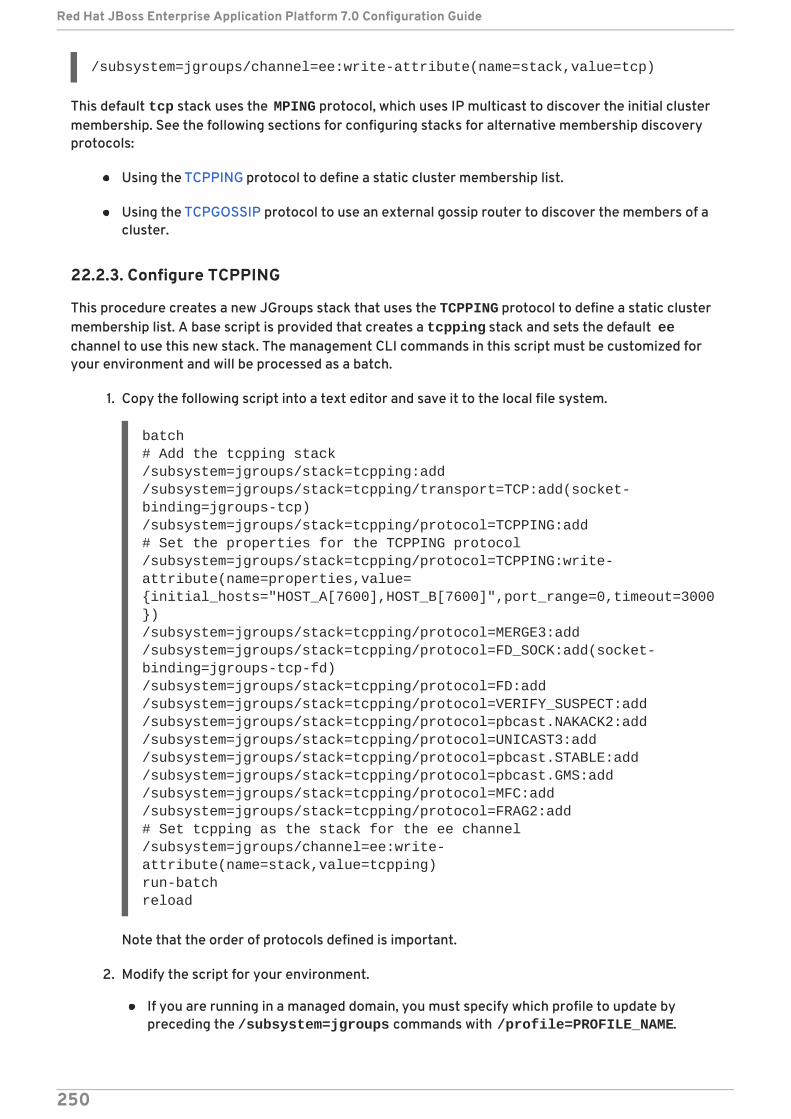
/subsystem=jgroups/channel=ee:write-attribute(name=stack,value=tcp)
This default tcp stack uses the MPING protocol, which uses IP multicast to discover the initial clustermembership. See the following sections for configuring stacks for alternative membership discoveryprotocols:
Using the TCPPING protocol to define a static cluster membership list.
Using the TCPGOSSIP protocol to use an external gossip router to discover the members of acluster.
22.2.3. Configure TCPPING
This procedure creates a new JGroups stack that uses the TCPPING protocol to define a static clustermembership list. A base script is provided that creates a tcpping stack and sets the default eechannel to use this new stack. The management CLI commands in this script must be customized foryour environment and will be processed as a batch.
1. Copy the following script into a text editor and save it to the local file system.
batch# Add the tcpping stack/subsystem=jgroups/stack=tcpping:add/subsystem=jgroups/stack=tcpping/transport=TCP:add(socket-binding=jgroups-tcp)/subsystem=jgroups/stack=tcpping/protocol=TCPPING:add# Set the properties for the TCPPING protocol/subsystem=jgroups/stack=tcpping/protocol=TCPPING:write-attribute(name=properties,value={initial_hosts="HOST_A[7600],HOST_B[7600]",port_range=0,timeout=3000})/subsystem=jgroups/stack=tcpping/protocol=MERGE3:add/subsystem=jgroups/stack=tcpping/protocol=FD_SOCK:add(socket-binding=jgroups-tcp-fd)/subsystem=jgroups/stack=tcpping/protocol=FD:add/subsystem=jgroups/stack=tcpping/protocol=VERIFY_SUSPECT:add/subsystem=jgroups/stack=tcpping/protocol=pbcast.NAKACK2:add/subsystem=jgroups/stack=tcpping/protocol=UNICAST3:add/subsystem=jgroups/stack=tcpping/protocol=pbcast.STABLE:add/subsystem=jgroups/stack=tcpping/protocol=pbcast.GMS:add/subsystem=jgroups/stack=tcpping/protocol=MFC:add/subsystem=jgroups/stack=tcpping/protocol=FRAG2:add# Set tcpping as the stack for the ee channel/subsystem=jgroups/channel=ee:write-attribute(name=stack,value=tcpping)run-batchreload
Note that the order of protocols defined is important.
2. Modify the script for your environment.
If you are running in a managed domain, you must specify which profile to update bypreceding the /subsystem=jgroups commands with /profile=PROFILE_NAME.
Red Hat JBoss Enterprise Application Platform 7.0 Configuration Guide
250
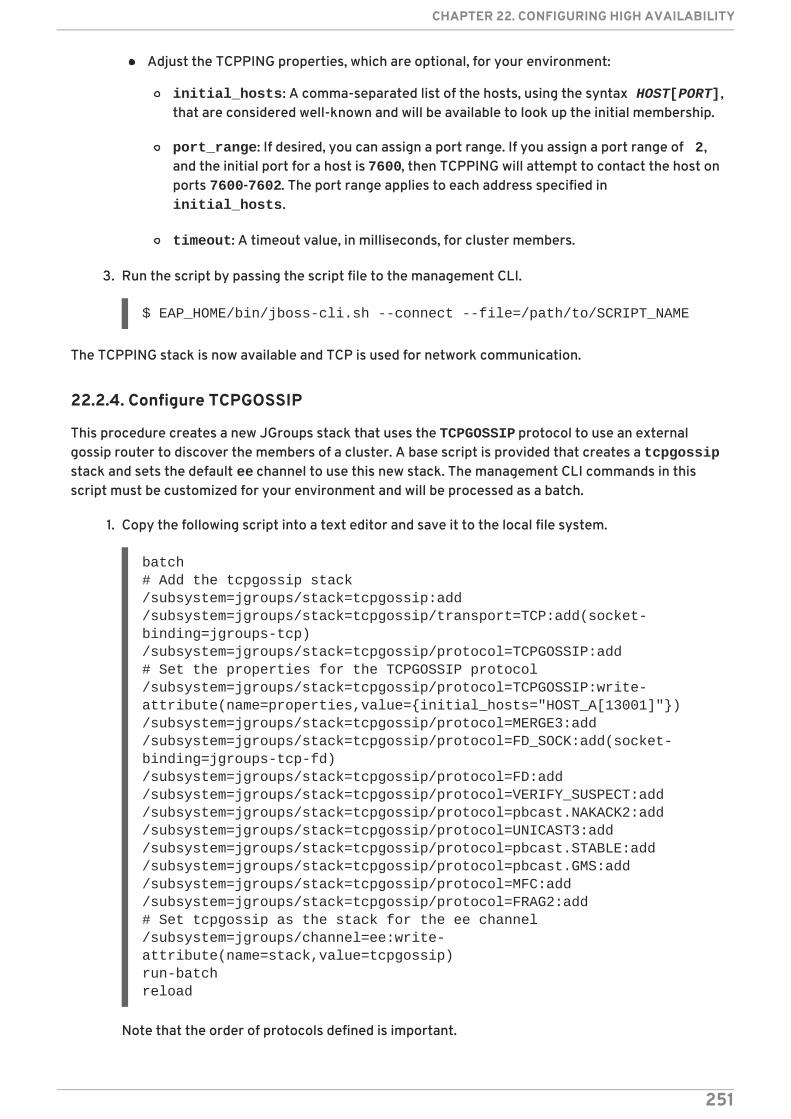
Adjust the TCPPING properties, which are optional, for your environment:
initial_hosts: A comma-separated list of the hosts, using the syntax HOST[PORT],that are considered well-known and will be available to look up the initial membership.
port_range: If desired, you can assign a port range. If you assign a port range of 2,and the initial port for a host is 7600, then TCPPING will attempt to contact the host onports 7600-7602. The port range applies to each address specified in initial_hosts.
timeout: A timeout value, in milliseconds, for cluster members.
3. Run the script by passing the script file to the management CLI.
$ EAP_HOME/bin/jboss-cli.sh --connect --file=/path/to/SCRIPT_NAME
The TCPPING stack is now available and TCP is used for network communication.
22.2.4. Configure TCPGOSSIP
This procedure creates a new JGroups stack that uses the TCPGOSSIP protocol to use an externalgossip router to discover the members of a cluster. A base script is provided that creates a tcpgossipstack and sets the default ee channel to use this new stack. The management CLI commands in thisscript must be customized for your environment and will be processed as a batch.
1. Copy the following script into a text editor and save it to the local file system.
batch# Add the tcpgossip stack/subsystem=jgroups/stack=tcpgossip:add/subsystem=jgroups/stack=tcpgossip/transport=TCP:add(socket-binding=jgroups-tcp)/subsystem=jgroups/stack=tcpgossip/protocol=TCPGOSSIP:add# Set the properties for the TCPGOSSIP protocol/subsystem=jgroups/stack=tcpgossip/protocol=TCPGOSSIP:write-attribute(name=properties,value={initial_hosts="HOST_A[13001]"})/subsystem=jgroups/stack=tcpgossip/protocol=MERGE3:add/subsystem=jgroups/stack=tcpgossip/protocol=FD_SOCK:add(socket-binding=jgroups-tcp-fd)/subsystem=jgroups/stack=tcpgossip/protocol=FD:add/subsystem=jgroups/stack=tcpgossip/protocol=VERIFY_SUSPECT:add/subsystem=jgroups/stack=tcpgossip/protocol=pbcast.NAKACK2:add/subsystem=jgroups/stack=tcpgossip/protocol=UNICAST3:add/subsystem=jgroups/stack=tcpgossip/protocol=pbcast.STABLE:add/subsystem=jgroups/stack=tcpgossip/protocol=pbcast.GMS:add/subsystem=jgroups/stack=tcpgossip/protocol=MFC:add/subsystem=jgroups/stack=tcpgossip/protocol=FRAG2:add# Set tcpgossip as the stack for the ee channel/subsystem=jgroups/channel=ee:write-attribute(name=stack,value=tcpgossip)run-batchreload
Note that the order of protocols defined is important.
CHAPTER 22. CONFIGURING HIGH AVAILABILITY
251
2. Modify the script for your environment.
If you are running in a managed domain, you must specify which profile to update bypreceding the /subsystem=jgroups commands with /profile=PROFILE_NAME.
Adjust the TCPGOSSIP properties, which are optional, for your environment:
initial_hosts: A comma-separated list of the hosts, using the syntax HOST[PORT],that are considered well-known and will be available to look up the initial membership.
reconnect_interval: The interval in milliseconds by which a disconnected stubattempts to reconnect to the gossip router.
sock_conn_timeout: The maximum time for socket creation. The default is 1000milliseconds.
sock_read_timeout: The maximum time in milliseconds to block on a read. A valueof 0 will block indefinitely.
3. Run the script by passing the script file to the management CLI.
$ EAP_HOME/bin/jboss-cli.sh --connect --file=/path/to/SCRIPT_NAME
The TCPGOSSIP stack is now available and TCP is used for network communication. This stack isconfigured for use with a gossip router so that JGroups cluster members can find other clustermembers.
22.2.5. Binding JGroups to a Network Interface
By default, JGroups only binds to the private network interface, which points to localhost in thedefault configuration. For security reasons, JGroups will not bind to the network interface defined bythe -b argument specified during JBoss EAP startup, as clustering traffic should not be exposed on apublic network interface.
See the Network and Port Configuration chapter in this guide for information about how to configurenetwork interfaces.
IMPORTANT
For security reasons, JGroups should only be bound to a non-public network interface.For performance reasons, we also recommend that the network interface for JGroupstraffic should be part of a dedicated Virtual Local Area Network (VLAN).
22.2.6. Securing a Cluster
There are several concerns to address in order to run a cluster securely:
Preventing unauthorized nodes from joining the cluster. This is addressed by requiringauthentication.
Preventing non-members from communicating with cluster members. This is addressed byencrypting messages.
Configuring Authentication
Red Hat JBoss Enterprise Application Platform 7.0 Configuration Guide
252
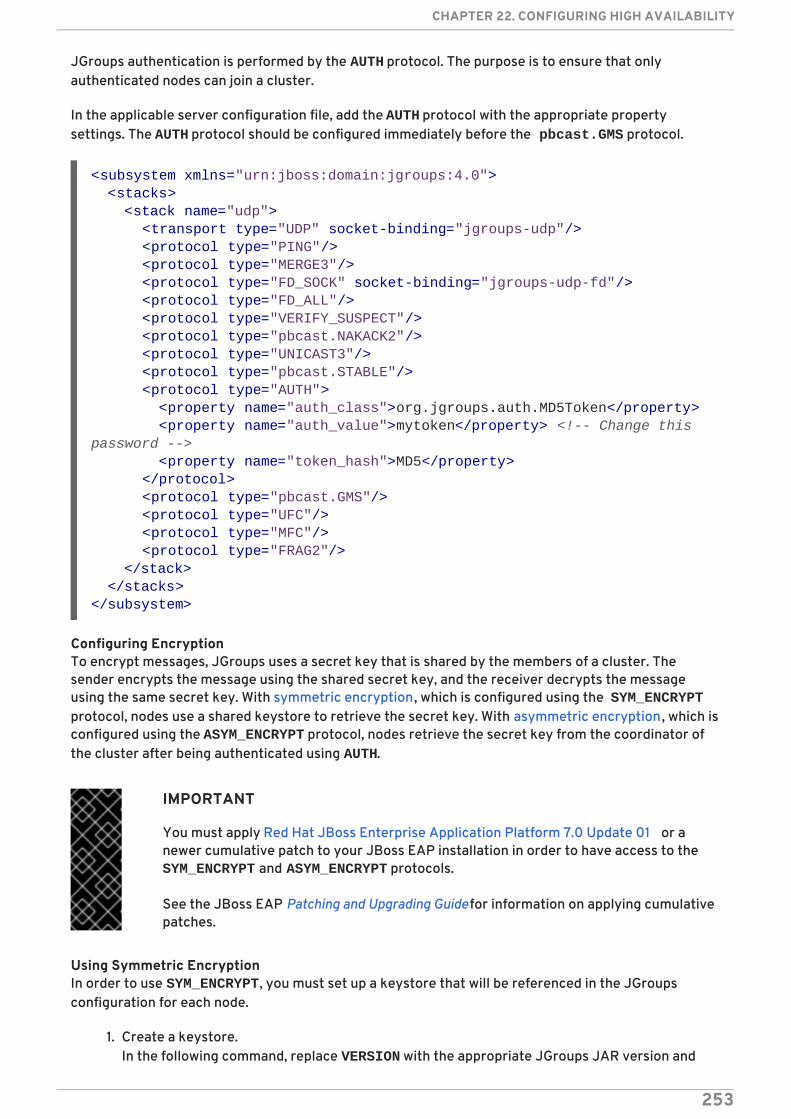
JGroups authentication is performed by the AUTH protocol. The purpose is to ensure that onlyauthenticated nodes can join a cluster.
In the applicable server configuration file, add the AUTH protocol with the appropriate propertysettings. The AUTH protocol should be configured immediately before the pbcast.GMS protocol.
Configuring EncryptionTo encrypt messages, JGroups uses a secret key that is shared by the members of a cluster. Thesender encrypts the message using the shared secret key, and the receiver decrypts the messageusing the same secret key. With symmetric encryption, which is configured using the SYM_ENCRYPTprotocol, nodes use a shared keystore to retrieve the secret key. With asymmetric encryption, which isconfigured using the ASYM_ENCRYPT protocol, nodes retrieve the secret key from the coordinator ofthe cluster after being authenticated using AUTH.
IMPORTANT
You must apply Red Hat JBoss Enterprise Application Platform 7.0 Update 01 or anewer cumulative patch to your JBoss EAP installation in order to have access to the SYM_ENCRYPT and ASYM_ENCRYPT protocols.
See the JBoss EAP Patching and Upgrading Guide for information on applying cumulativepatches.
Using Symmetric EncryptionIn order to use SYM_ENCRYPT, you must set up a keystore that will be referenced in the JGroupsconfiguration for each node.
1. Create a keystore.In the following command, replace VERSION with the appropriate JGroups JAR version and
<subsystem xmlns="urn:jboss:domain:jgroups:4.0"> <stacks> <stack name="udp"> <transport type="UDP" socket-binding="jgroups-udp"/> <protocol type="PING"/> <protocol type="MERGE3"/> <protocol type="FD_SOCK" socket-binding="jgroups-udp-fd"/> <protocol type="FD_ALL"/> <protocol type="VERIFY_SUSPECT"/> <protocol type="pbcast.NAKACK2"/> <protocol type="UNICAST3"/> <protocol type="pbcast.STABLE"/> <protocol type="AUTH"> <property name="auth_class">org.jgroups.auth.MD5Token</property> <property name="auth_value">mytoken</property> <!-- Change this password --> <property name="token_hash">MD5</property> </protocol> <protocol type="pbcast.GMS"/> <protocol type="UFC"/> <protocol type="MFC"/> <protocol type="FRAG2"/> </stack> </stacks></subsystem>
CHAPTER 22. CONFIGURING HIGH AVAILABILITY
253
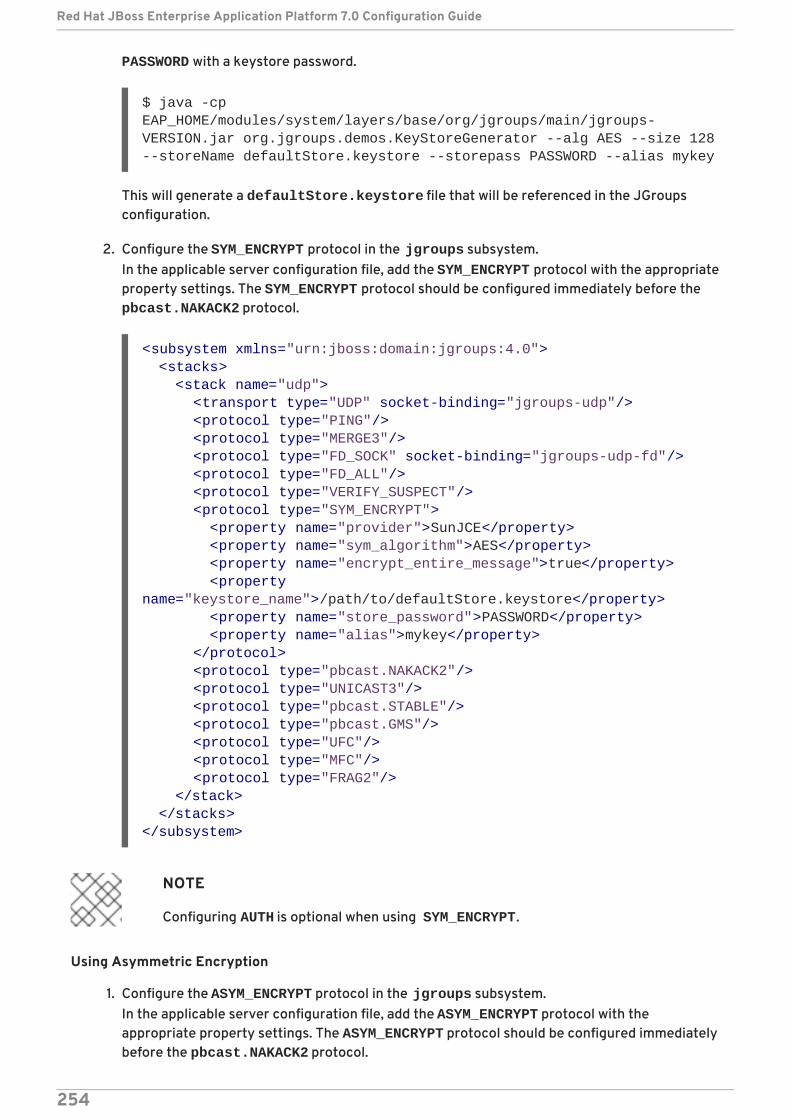
PASSWORD with a keystore password.
$ java -cp EAP_HOME/modules/system/layers/base/org/jgroups/main/jgroups-VERSION.jar org.jgroups.demos.KeyStoreGenerator --alg AES --size 128 --storeName defaultStore.keystore --storepass PASSWORD --alias mykey
This will generate a defaultStore.keystore file that will be referenced in the JGroupsconfiguration.
2. Configure the SYM_ENCRYPT protocol in the jgroups subsystem.In the applicable server configuration file, add the SYM_ENCRYPT protocol with the appropriateproperty settings. The SYM_ENCRYPT protocol should be configured immediately before the pbcast.NAKACK2 protocol.
NOTE
Configuring AUTH is optional when using SYM_ENCRYPT.
Using Asymmetric Encryption
1. Configure the ASYM_ENCRYPT protocol in the jgroups subsystem.In the applicable server configuration file, add the ASYM_ENCRYPT protocol with theappropriate property settings. The ASYM_ENCRYPT protocol should be configured immediatelybefore the pbcast.NAKACK2 protocol.
<subsystem xmlns="urn:jboss:domain:jgroups:4.0"> <stacks> <stack name="udp"> <transport type="UDP" socket-binding="jgroups-udp"/> <protocol type="PING"/> <protocol type="MERGE3"/> <protocol type="FD_SOCK" socket-binding="jgroups-udp-fd"/> <protocol type="FD_ALL"/> <protocol type="VERIFY_SUSPECT"/> <protocol type="SYM_ENCRYPT"> <property name="provider">SunJCE</property> <property name="sym_algorithm">AES</property> <property name="encrypt_entire_message">true</property> <property name="keystore_name">/path/to/defaultStore.keystore</property> <property name="store_password">PASSWORD</property> <property name="alias">mykey</property> </protocol> <protocol type="pbcast.NAKACK2"/> <protocol type="UNICAST3"/> <protocol type="pbcast.STABLE"/> <protocol type="pbcast.GMS"/> <protocol type="UFC"/> <protocol type="MFC"/> <protocol type="FRAG2"/> </stack> </stacks></subsystem>
Red Hat JBoss Enterprise Application Platform 7.0 Configuration Guide
254
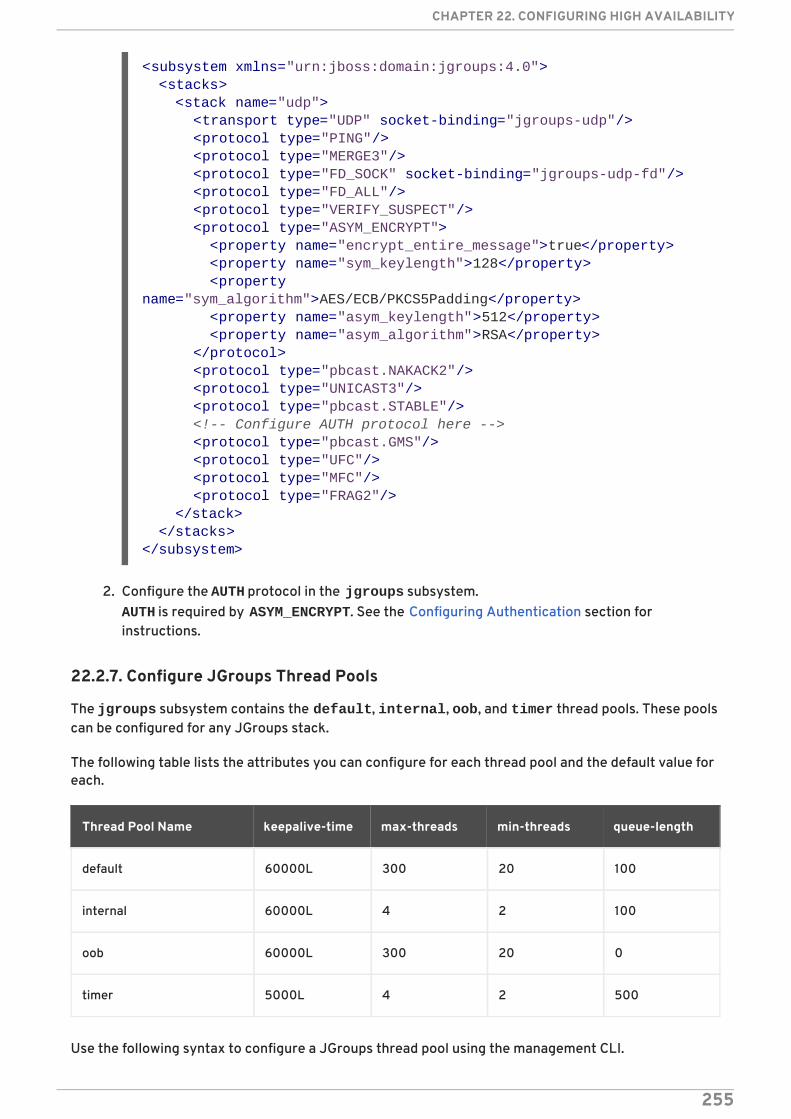
2. Configure the AUTH protocol in the jgroups subsystem.AUTH is required by ASYM_ENCRYPT. See the Configuring Authentication section forinstructions.
22.2.7. Configure JGroups Thread Pools
The jgroups subsystem contains the default, internal, oob, and timer thread pools. These poolscan be configured for any JGroups stack.
The following table lists the attributes you can configure for each thread pool and the default value foreach.
Thread Pool Name keepalive-time max-threads min-threads queue-length
default 60000L 300 20 100
internal 60000L 4 2 100
oob 60000L 300 20 0
timer 5000L 4 2 500
Use the following syntax to configure a JGroups thread pool using the management CLI.
<subsystem xmlns="urn:jboss:domain:jgroups:4.0"> <stacks> <stack name="udp"> <transport type="UDP" socket-binding="jgroups-udp"/> <protocol type="PING"/> <protocol type="MERGE3"/> <protocol type="FD_SOCK" socket-binding="jgroups-udp-fd"/> <protocol type="FD_ALL"/> <protocol type="VERIFY_SUSPECT"/> <protocol type="ASYM_ENCRYPT"> <property name="encrypt_entire_message">true</property> <property name="sym_keylength">128</property> <property name="sym_algorithm">AES/ECB/PKCS5Padding</property> <property name="asym_keylength">512</property> <property name="asym_algorithm">RSA</property> </protocol> <protocol type="pbcast.NAKACK2"/> <protocol type="UNICAST3"/> <protocol type="pbcast.STABLE"/> <!-- Configure AUTH protocol here --> <protocol type="pbcast.GMS"/> <protocol type="UFC"/> <protocol type="MFC"/> <protocol type="FRAG2"/> </stack> </stacks></subsystem>
CHAPTER 22. CONFIGURING HIGH AVAILABILITY
255

/subsystem=jgroups/stack=STACK_TYPE/transport=TRANSPORT_TYPE/thread-pool=THREAD_POOL_NAME:write-attribute(name=ATTRIBUTE_NAME, value=ATTRIBUTE_VALUE)
The following is an example of the management CLI command to set the max-threads value to 500 inthe default thread pool for the udp stack.
/subsystem=jgroups/stack=udp/transport=UDP/thread-pool=default:write-attribute(name="max-threads", value="500")
22.2.8. Configure JGroups Send and Receive Buffers
Resolving Buffer Size WarningsBy default, JGroups is configured with certain send and receive buffer values. However, your operatingsystem may limit the available buffer sizes and JBoss EAP may not be able to use its configured buffervalues. In this situation you will see warnings in the JBoss EAP logs similar to the following:
WARNING [org.jgroups.protocols.UDP] (ServerService Thread Pool -- 68)JGRP000015: the send buffer of socket DatagramSocket was set to 640KB, but the OS only allocated 212.99KB.This might lead to performance problems. Please set your max send buffer in the OS correctly (e.g. net.core.wmem_max on Linux)WARNING [org.jgroups.protocols.UDP] (ServerService Thread Pool -- 68)JGRP000015: the receive buffer of socket DatagramSocket was set to 20MB, but the OS only allocated 212.99KB.This might lead to performance problems. Please set your max receive buffer in the OS correctly (e.g. net.core.rmem_max on Linux)
To resolve this, consult your operating system documentation for instructions on how to increase thebuffer size. For Red Hat Enterprise Linux systems, edit /etc/sysctl.conf as the root user toconfigure maximum values for buffer sizes that will survive system restarts. For example:
# Allow a 25MB UDP receive buffer for JGroupsnet.core.rmem_max = 26214400# Allow a 1MB UDP send buffer for JGroupsnet.core.wmem_max = 1048576
After modifying /etc/sysctl.conf, run sysctl -p for the changes to take effect.
Configuring JGroups Buffer SizesYou can configure the JGroups buffer sizes that JBoss EAP uses by setting the following transportproperties on the UDP and TCP JGroups stacks.
UDP Stack
ucast_recv_buf_size
ucast_send_buf_size
mcast_recv_buf_size
mcast_send_buf_size
TCP Stack
Red Hat JBoss Enterprise Application Platform 7.0 Configuration Guide
256
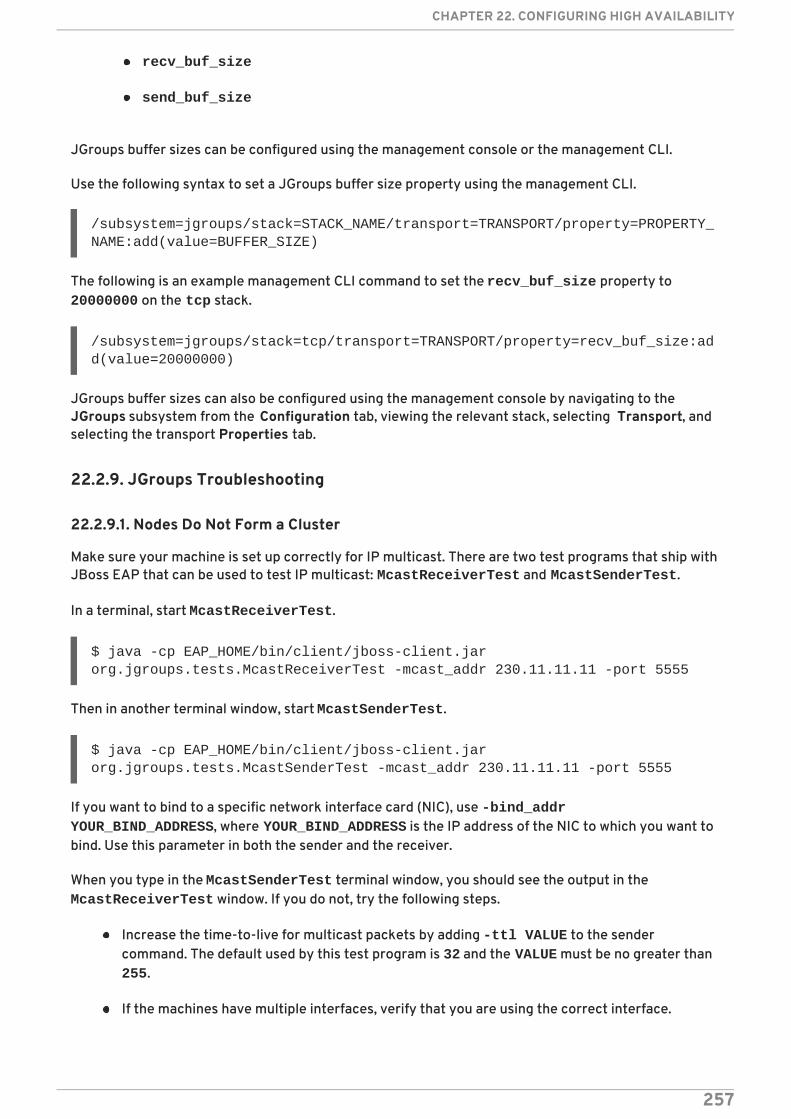
recv_buf_size
send_buf_size
JGroups buffer sizes can be configured using the management console or the management CLI.
Use the following syntax to set a JGroups buffer size property using the management CLI.
/subsystem=jgroups/stack=STACK_NAME/transport=TRANSPORT/property=PROPERTY_NAME:add(value=BUFFER_SIZE)
The following is an example management CLI command to set the recv_buf_size property to 20000000 on the tcp stack.
/subsystem=jgroups/stack=tcp/transport=TRANSPORT/property=recv_buf_size:add(value=20000000)
JGroups buffer sizes can also be configured using the management console by navigating to theJGroups subsystem from the Configuration tab, viewing the relevant stack, selecting Transport, andselecting the transport Properties tab.
22.2.9. JGroups Troubleshooting
22.2.9.1. Nodes Do Not Form a Cluster
Make sure your machine is set up correctly for IP multicast. There are two test programs that ship withJBoss EAP that can be used to test IP multicast: McastReceiverTest and McastSenderTest.
In a terminal, start McastReceiverTest.
$ java -cp EAP_HOME/bin/client/jboss-client.jar org.jgroups.tests.McastReceiverTest -mcast_addr 230.11.11.11 -port 5555
Then in another terminal window, start McastSenderTest.
$ java -cp EAP_HOME/bin/client/jboss-client.jar org.jgroups.tests.McastSenderTest -mcast_addr 230.11.11.11 -port 5555
If you want to bind to a specific network interface card (NIC), use -bind_addr YOUR_BIND_ADDRESS, where YOUR_BIND_ADDRESS is the IP address of the NIC to which you want tobind. Use this parameter in both the sender and the receiver.
When you type in the McastSenderTest terminal window, you should see the output in the McastReceiverTest window. If you do not, try the following steps.
Increase the time-to-live for multicast packets by adding -ttl VALUE to the sendercommand. The default used by this test program is 32 and the VALUE must be no greater than 255.
If the machines have multiple interfaces, verify that you are using the correct interface.
CHAPTER 22. CONFIGURING HIGH AVAILABILITY
257
Contact a system administrator to make sure that multicast will work on the interface you havechosen.
Once you know multicast is working properly on each machine in your cluster, you can repeat theabove test to test the network, putting the sender on one machine and the receiver on another.
22.2.9.2. Causes of Missing Heartbeats in Failure Detection
Sometimes a cluster member is suspected by failure detection (FD) because a heartbeatacknowledgement has not been received for some time T, which is defined by timeout and max_tries.
For an example cluster of nodes A, B, C, and D, where A pings B, B pings C, C pings D, and D pings A, Ccan be suspected for any of the following reasons:
B or C are running at 100% CPU for more than T seconds. So even if C sends a heartbeatacknowledgement to B, B may not be able to process it because it is at 100% CPU usage.
B or C are garbage collecting, which results in the same situation as above.
A combination of the two cases above.
The network loses packets. This usually happens when there is a lot of traffic on the network,and the switch starts dropping packets, usually broadcasts first, then IP multicasts, and TCPpackets last.
B or C are processing a callback. For example, if C received a remote method call over itschannel that takes T + 1 seconds to process, during this time, C will not process any othermessages, including heartbeats. Therefore, B will not receive the heartbeat acknowledgementand will suspect C.
22.3. INFINISPAN
22.3.1. About Infinispan
Infinispan is a Java data grid platform that provides a JSR-107-compatible cache interface formanaging cached data. For more information about Infinispan functionality and configuration optionssee the Infinispan Documentation.
The infinispan subsystem provides caching support for JBoss EAP. It allows you to configure andview runtime metrics for named cache containers and caches.
When using a configuration that provides high availability capabilities, such as the ha or full-ha profilein a managed domain, or the standalone-ha.xml or standalone-full-ha.xml configuration filefor a standalone server, the infinispan subsystem provides caching, state replication, and statedistribution support. In non-high-availability configurations, the infinispan subsystem provideslocal caching support.
IMPORTANT
Infinispan is delivered as a private module in JBoss EAP to provide the cachingcapabilities of JBoss EAP. Infinispan is not supported for direct use by applications.
22.3.2. Cache Containers
Red Hat JBoss Enterprise Application Platform 7.0 Configuration Guide
258
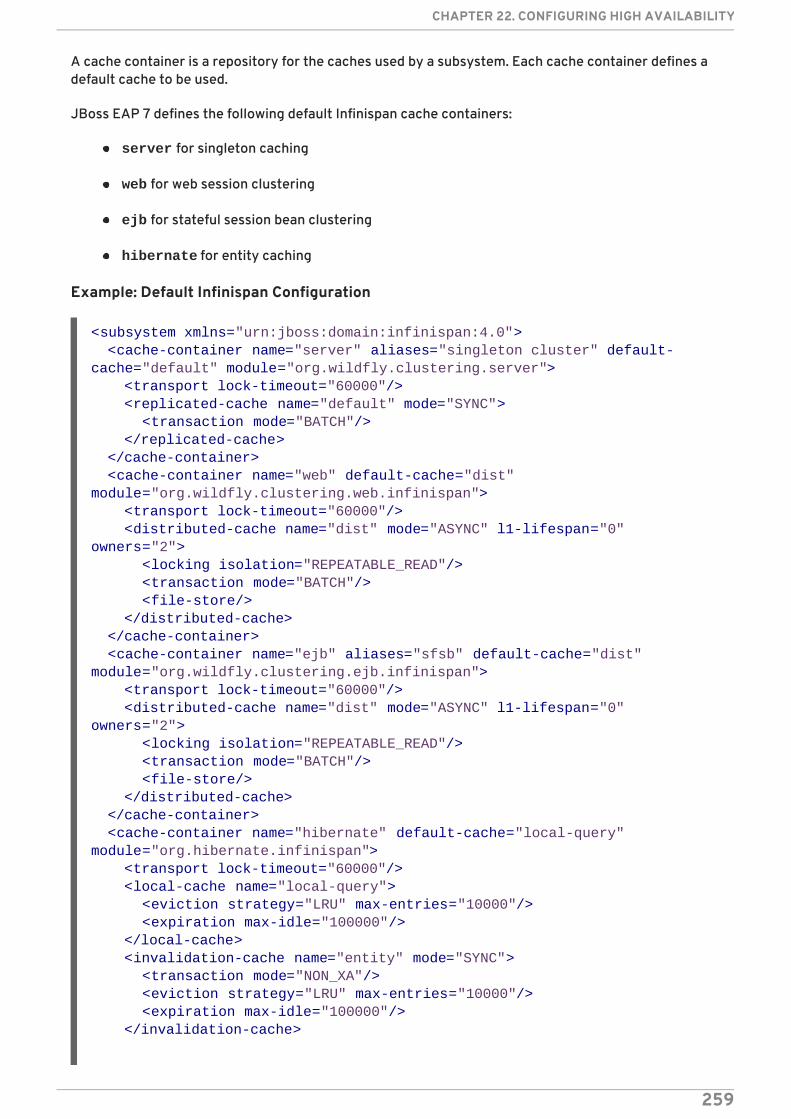
A cache container is a repository for the caches used by a subsystem. Each cache container defines adefault cache to be used.
JBoss EAP 7 defines the following default Infinispan cache containers:
server for singleton caching
web for web session clustering
ejb for stateful session bean clustering
hibernate for entity caching
Example: Default Infinispan Configuration
<subsystem xmlns="urn:jboss:domain:infinispan:4.0"> <cache-container name="server" aliases="singleton cluster" default-cache="default" module="org.wildfly.clustering.server"> <transport lock-timeout="60000"/> <replicated-cache name="default" mode="SYNC"> <transaction mode="BATCH"/> </replicated-cache> </cache-container> <cache-container name="web" default-cache="dist" module="org.wildfly.clustering.web.infinispan"> <transport lock-timeout="60000"/> <distributed-cache name="dist" mode="ASYNC" l1-lifespan="0" owners="2"> <locking isolation="REPEATABLE_READ"/> <transaction mode="BATCH"/> <file-store/> </distributed-cache> </cache-container> <cache-container name="ejb" aliases="sfsb" default-cache="dist" module="org.wildfly.clustering.ejb.infinispan"> <transport lock-timeout="60000"/> <distributed-cache name="dist" mode="ASYNC" l1-lifespan="0" owners="2"> <locking isolation="REPEATABLE_READ"/> <transaction mode="BATCH"/> <file-store/> </distributed-cache> </cache-container> <cache-container name="hibernate" default-cache="local-query" module="org.hibernate.infinispan"> <transport lock-timeout="60000"/> <local-cache name="local-query"> <eviction strategy="LRU" max-entries="10000"/> <expiration max-idle="100000"/> </local-cache> <invalidation-cache name="entity" mode="SYNC"> <transaction mode="NON_XA"/> <eviction strategy="LRU" max-entries="10000"/> <expiration max-idle="100000"/> </invalidation-cache>
CHAPTER 22. CONFIGURING HIGH AVAILABILITY
259
Note the default cache defined in each cache container. For example, the web cache container definesthe dist distributed cache as the default. The dist cache will therefore be used when clustering websessions.
IMPORTANT
You can add additional caches and cache containers, for example, for HTTP sessions,stateful session beans, or singleton services or deployments. It is not supported to usethese caches directly by user applications.
22.3.2.1. Configure Cache Containers
Cache containers and cache attributes can be configured using the management console ormanagement CLI.
WARNING
You should avoid changing cache or cache container names, as other componentsin the configuration may reference them.
Configure Caches Using the Management ConsoleOnce you navigate to the Infinispan subsystem from the Configuration tab in the managementconsole, you can configure caches and cache containers. In a managed domain, make sure to select theappropriate profile to configure.
Add a cache container.Click the Add button next to the Cache Container heading and enter the settings for the newcache container.
Update cache container settings.Choose the appropriate cache container and select Container Settings from the drop down.Configure the cache container settings as necessary.
Update cache container transport settings.Choose the appropriate cache container and select Transport Settings from the drop down.Configure the cache container transport settings as necessary.
Configure caches.Choose the appropriate cache container and select View. From the appropriate cache tab (forexample, Replicated Caches), you can add, update, and remove caches.
Configure Caches Using the Management CLIYou can configure caches and cache containers using the management CLI. In a managed domain, youmust specify the profile to update by preceding these commands with /profile=PROFILE_NAME.
Add a cache container.
<replicated-cache name="timestamps" mode="ASYNC"/> </cache-container></subsystem>
Red Hat JBoss Enterprise Application Platform 7.0 Configuration Guide
260

/subsystem=infinispan/cache-container=CACHE_CONTAINER:add
Add a replicated cache.
/subsystem=infinispan/cache-container=CACHE_CONTAINER/replicated-cache=CACHE:add(mode=MODE)
Set the default cache for a cache container.
/subsystem=infinispan/cache-container=CACHE_CONTAINER:write-attribute(name=default-cache,value=CACHE)
Configure batching for a replicated cache.
/subsystem=infinispan/cache-container=CACHE_CONTAINER/replicated-cache=CACHE/component=transaction:write-attribute(name=mode,value=BATCH)
Change the Default EJB Cache ContainerYou can use cache containers in the ejb3 subsystem as described below:
To support passivation of EJB session beans, you can use the ejb cache container defined inthe infinispan subsystem to store the sessions.
For remote EJB clients connecting to a clustered deployment on a server, you must providethe cluster topology information to these clients, so that they can fail over to other nodes inthe cluster if the node they are interacting with fails.
If you are changing or renaming the default cache container, named ejb, which supports passivationand the provision of topology information, you must add the cache-container attribute to the passivation-stores element and the cluster attribute to the remote element, as shown in theexample below. If you are just adding a new cache for your own use, you need not make those changes.
22.3.3. Clustering Modes
Clustering can be configured in two different ways in JBoss EAP using Infinispan. The best method foryour application will depend on your requirements. There is a trade-off between availability,
<subsystem xmlns="urn:jboss:domain:ejb3:4.0"> <passivation-stores> <passivation-store name="infinispan" cache-container="ejb-cltest" max-size="10000"/> </passivation-stores>
<remote cluster="ejb-cltest" connector-ref="http-remoting-connector" thread-pool-name="default"/></subsystem>
<subsystem xmlns="urn:jboss:domain:infinispan:4.0"> ... <cache-container name="ejb-cltest" aliases="sfsb" default-cache="dist" module="org.wildfly.clustering.ejb.infinispan"></subsystem>
CHAPTER 22. CONFIGURING HIGH AVAILABILITY
261

consistency, reliability and scalability with each mode. Before choosing a clustering mode, you mustidentify what are the most important features of your network for you, and balance thoserequirements.
Cache Modes
Replicated
Replicated mode automatically detects and adds new instances on the cluster. Changes made tothese instances will be replicated to all nodes on the cluster. Replicated mode typically works bestin small clusters because of the amount of information that has to be replicated over the network.Infinispan can be configured to use UDP multicast, which alleviates network traffic congestion to adegree.
Distributed
Distributed mode allows Infinispan to scale the cluster linearly. Distributed mode uses a consistenthash algorithm to determine where in a cluster a new node should be placed. The number of copies(owners) of information to be kept is configurable. There is a trade-off between the number ofcopies kept, durability of the data, and performance. The more copies that are kept, the moreimpact on performance, but the less likely you are to lose data in a server failure. The hashalgorithm also works to reduce network traffic by locating entries without multicasting or storingmetadata.You should consider using distributed mode as a caching strategy when the cluster size exceeds 6-8nodes. With distributed mode, data is distributed to only a subset of nodes within the cluster, asopposed to all nodes.
Synchronous and Asynchronous ReplicationReplication can be performed either in synchronous or asynchronous mode, and the mode chosendepends on your requirements and your application.
Synchronous replication
With synchronous replication, the thread that handles the user request is blocked until replicationhas been successful. When the replication is successful, a response is sent back to the client, andonly then is the thread is released. Synchronous replication has an impact on network trafficbecause it requires a response from each node in the cluster. It has the advantage, however, ofensuring that all modifications have been made to all nodes in the cluster.
Asynchronous replication
With asynchronous replication, Infinispan uses a thread pool to carry out replication in thebackground. The sender does not wait for replies from other nodes in the cluster. However, cachereads for the same session will block until the previous replication completes so that stale data isnot read. Replication is triggered either on a time basis or by queue size. Failed replication attemptsare written to a log, not notified in real time.
22.3.3.1. Configure the Cache Mode
You can change the default cache using the management CLI.
NOTE
This section shows instructions specific to configuring the web session cache, whichdefaults to distributed mode. The steps and management CLI commands can easily beadjusted to apply to other cache containers.
Change to Replicated Cache Mode
Red Hat JBoss Enterprise Application Platform 7.0 Configuration Guide
262
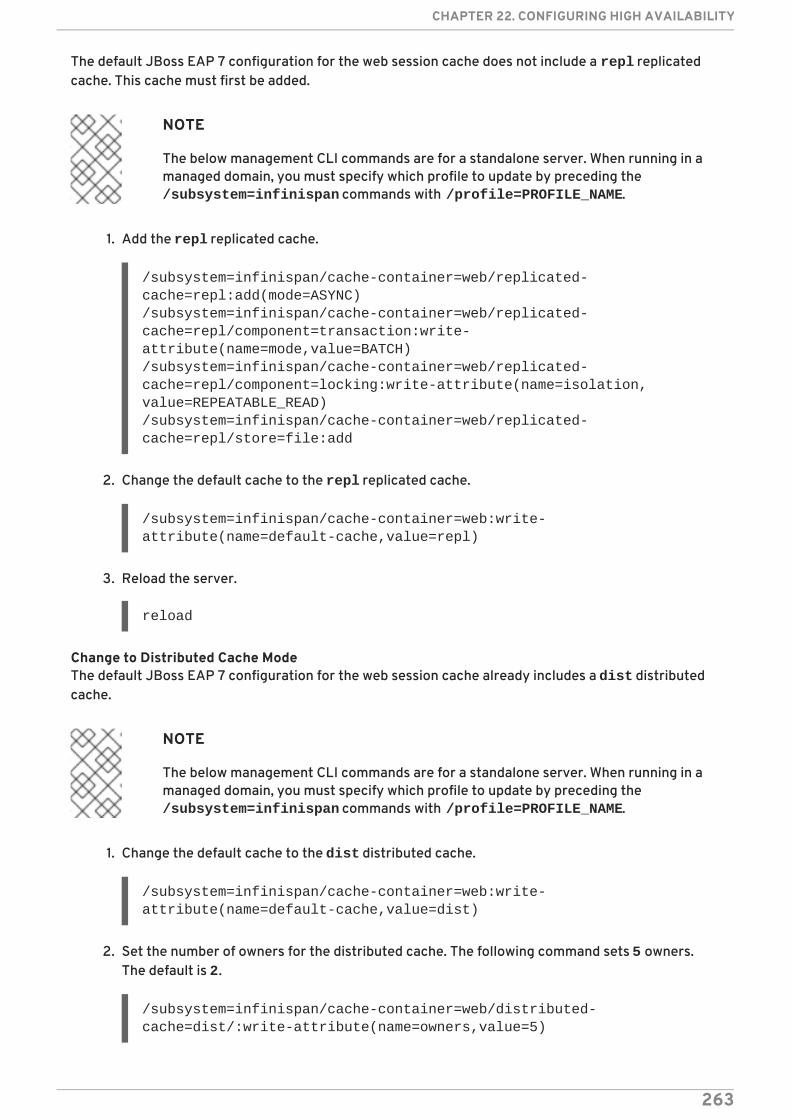
The default JBoss EAP 7 configuration for the web session cache does not include a repl replicatedcache. This cache must first be added.
NOTE
The below management CLI commands are for a standalone server. When running in amanaged domain, you must specify which profile to update by preceding the /subsystem=infinispan commands with /profile=PROFILE_NAME.
1. Add the repl replicated cache.
/subsystem=infinispan/cache-container=web/replicated-cache=repl:add(mode=ASYNC)/subsystem=infinispan/cache-container=web/replicated-cache=repl/component=transaction:write-attribute(name=mode,value=BATCH)/subsystem=infinispan/cache-container=web/replicated-cache=repl/component=locking:write-attribute(name=isolation, value=REPEATABLE_READ)/subsystem=infinispan/cache-container=web/replicated-cache=repl/store=file:add
2. Change the default cache to the repl replicated cache.
/subsystem=infinispan/cache-container=web:write-attribute(name=default-cache,value=repl)
3. Reload the server.
reload
Change to Distributed Cache ModeThe default JBoss EAP 7 configuration for the web session cache already includes a dist distributedcache.
NOTE
The below management CLI commands are for a standalone server. When running in amanaged domain, you must specify which profile to update by preceding the /subsystem=infinispan commands with /profile=PROFILE_NAME.
1. Change the default cache to the dist distributed cache.
/subsystem=infinispan/cache-container=web:write-attribute(name=default-cache,value=dist)
2. Set the number of owners for the distributed cache. The following command sets 5 owners.The default is 2.
/subsystem=infinispan/cache-container=web/distributed-cache=dist/:write-attribute(name=owners,value=5)
CHAPTER 22. CONFIGURING HIGH AVAILABILITY
263
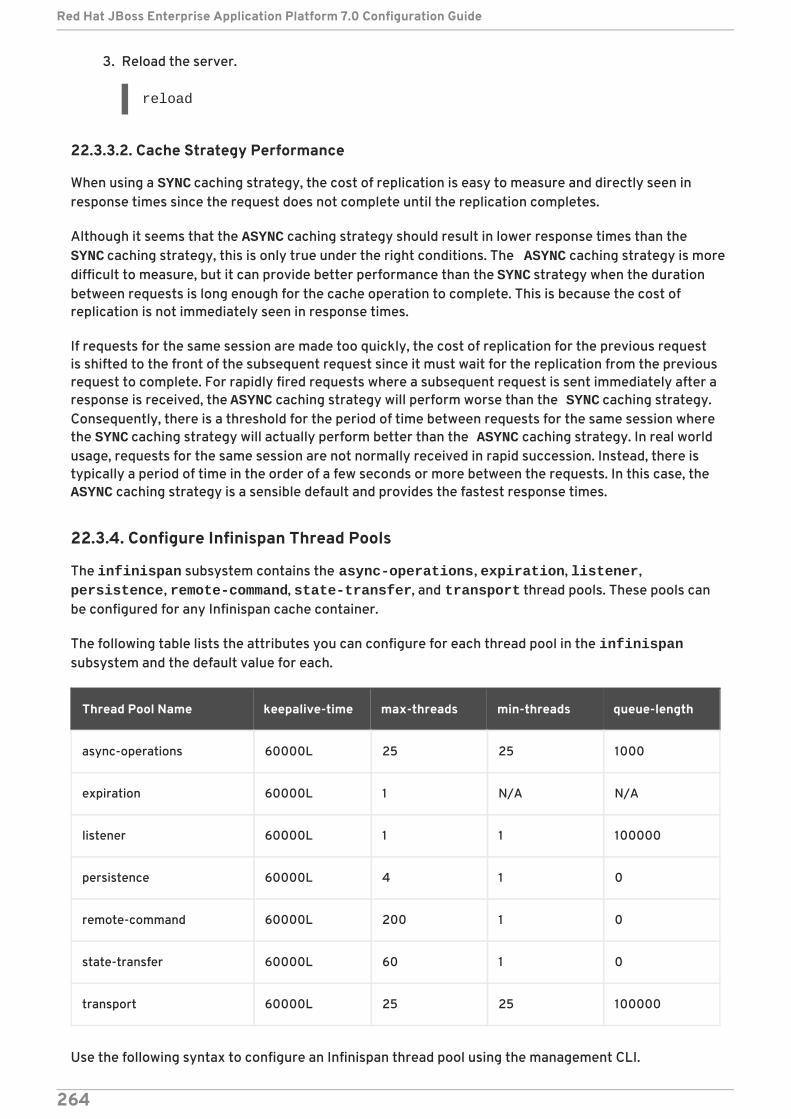
3. Reload the server.
reload
22.3.3.2. Cache Strategy Performance
When using a SYNC caching strategy, the cost of replication is easy to measure and directly seen inresponse times since the request does not complete until the replication completes.
Although it seems that the ASYNC caching strategy should result in lower response times than the SYNC caching strategy, this is only true under the right conditions. The ASYNC caching strategy is moredifficult to measure, but it can provide better performance than the SYNC strategy when the durationbetween requests is long enough for the cache operation to complete. This is because the cost ofreplication is not immediately seen in response times.
If requests for the same session are made too quickly, the cost of replication for the previous requestis shifted to the front of the subsequent request since it must wait for the replication from the previousrequest to complete. For rapidly fired requests where a subsequent request is sent immediately after aresponse is received, the ASYNC caching strategy will perform worse than the SYNC caching strategy.Consequently, there is a threshold for the period of time between requests for the same session wherethe SYNC caching strategy will actually perform better than the ASYNC caching strategy. In real worldusage, requests for the same session are not normally received in rapid succession. Instead, there istypically a period of time in the order of a few seconds or more between the requests. In this case, the ASYNC caching strategy is a sensible default and provides the fastest response times.
22.3.4. Configure Infinispan Thread Pools
The infinispan subsystem contains the async-operations, expiration, listener, persistence, remote-command, state-transfer, and transport thread pools. These pools canbe configured for any Infinispan cache container.
The following table lists the attributes you can configure for each thread pool in the infinispansubsystem and the default value for each.
Thread Pool Name keepalive-time max-threads min-threads queue-length
async-operations 60000L 25 25 1000
expiration 60000L 1 N/A N/A
listener 60000L 1 1 100000
persistence 60000L 4 1 0
remote-command 60000L 200 1 0
state-transfer 60000L 60 1 0
transport 60000L 25 25 100000
Use the following syntax to configure an Infinispan thread pool using the management CLI.
Red Hat JBoss Enterprise Application Platform 7.0 Configuration Guide
264
/subsystem=infinispan/cache-container=CACHE_CONTAINER_NAME/thread-pool=THREAD_POOL_NAME:write-attribute(name=ATTRIBUTE_NAME, value=ATTRIBUTE_VALUE)
The following is an example of the management CLI command to set the max-threads value to 10 inthe persistence thread pool for the server cache container.
/subsystem=infinispan/cache-container=server/thread-pool=persistence:write-attribute(name="max-threads", value="10")
22.3.5. Infinispan Statistics
Runtime statistics about Infinispan caches and cache containers can be enabled for monitoringpurposes. Statistics collection is not enabled by default for performance reasons.
Statistics collection can be enabled for each cache container, cache, or both. The statistics option foreach cache overrides the option for the cache container. Enabling or disabling statistics collection for acache container will cause all caches in that container to inherit the setting, unless they explicitlyspecify their own.
22.3.5.1. Enable Infinispan Statistics
WARNING
Enabling Infinispan statistics may have a negative impact on the performance ofthe infinispan subsystem. Statistics should be enabled only when required.
You can enable or disable the collection of Infinispan statistics using the management console or themanagement CLI. From the management console, navigate to the Infinispan subsystem from theConfiguration tab, select the appropriate cache or cache container, and edit the Statistics enabledattribute. Use the below commands to enable statistics using the management CLI.
Enable statistics collection for a cache container. A server reload will be required.
/subsystem=infinispan/cache-container=CACHE_CONTAINER:write-attribute(name=statistics-enabled,value=true)
Enable statistics collection for a cache. A server reload will be required.
/subsystem=infinispan/cache-container=CACHE_CONTAINER/CACHE_TYPE=CACHE:write-attribute(name=statistics-enabled,value=true)
CHAPTER 22. CONFIGURING HIGH AVAILABILITY
265
NOTE
You can use the following command to undefine the statistics-enabled attribute ofa cache so that it will inherit the settings of its cache container’s statistics-enabled attribute.
/subsystem=infinispan/cache-container=CACHE_CONTAINER/CACHE_TYPE=CACHE:undefine-attribute(name=statistics-enabled)
22.3.6. Infinispan Partition Handling
An Infinispan cluster is built out of several nodes where data is stored. To prevent data loss if multiplenodes fail, Infinispan copies the same data over multiple nodes. This level of data redundancy isconfigured using the owners attribute. As long as fewer than the configured number of nodes crashsimultaneously, Infinispan will have a copy of the data available.
However, there are potential catastrophic situations that could occur when too many nodes disappearfrom the cluster:
Split brain
This splits the cluster in two or more partitions, or sub-clusters, that operate independently. Inthese circumstances, multiple clients reading and writing from different partitions see differentversions of the same cache entry, which for many applications is problematic.
NOTE
There are ways to alleviate the possibility for the split brain to happen, such asredundant networks or IP bonding. However, these only reduce the window of timefor the problem to occur.
Multiple nodes crash in sequence
If multiple nodes, specifically the number of owners, crash in rapid sequence and Infinispan does nothave the time to properly rebalance its state between crashes, the result is partial data loss.
The goal is to avoid situations in which incorrect data is returned to the user as a result of either splitbrain or multiple nodes crashing in rapid sequence.
22.3.6.1. Split Brain
In a split brain situation, each network partition will install its own JGroups view, removing the nodesfrom the other partitions. We do not have a direct way to determine whether the cluster has been splitinto two or more partitions, since the partitions are unaware of each other. Instead, we assume thecluster has split when one or more nodes disappear from the JGroups cluster without sending anexplicit leave message.
With partition handling disabled, each such partition would continue to function as an independentcluster. Each partition may only see a part of the data, and each partition could write conflictingupdates in the cache.
With partition handling enabled, if we detect a split, each partition does not start a rebalanceimmediately, but first checks whether it should enter degraded mode instead:
Red Hat JBoss Enterprise Application Platform 7.0 Configuration Guide
266
If at least one segment has lost all its owners, meaning that at least the number of ownersspecified has left since the last rebalance ended, the partition enters degraded mode.
If the partition does not contain a simple majority of the nodes (floor(numNodes/2) + 1) in thelatest stable topology, the partition also enters degraded mode.
Otherwise, the partition keeps functioning normally and starts a rebalance.
The stable topology is updated every time a rebalance operation ends and the coordinator determinesthat another rebalance is not necessary. These rules ensure that at most, one partition stays inavailable mode, and the other partitions enter degraded mode.
When a partition is in degraded mode, it only allows access to the keys that are wholly owned:
Requests (reads and writes) for entries that have all the copies on nodes within this partitionare honored.
Requests for entries that are partially or totally owned by nodes that have disappeared arerejected with an AvailabilityException.
This guarantees that partitions cannot write different values for the same key (cache is consistent),and also that one partition can not read keys that have been updated in the other partitions (no staledata).
NOTE
Two partitions could start up isolated, and as long as they do not merge, they can readand write inconsistent data. In the future, we may allow custom availability strategies(e.g. check that a certain node is part of the cluster, or check that an external machine isaccessible) that could handle that situation as well.
22.3.6.2. Configuring Partition Handling
Currently the partition handling is disabled by default. Use the following management CLI command toenable partition handling:
/subsystem=infinispan/cache-container=web/distributed-cache=dist/component=partition-handling:write-attribute(name=enabled, value=true)
22.3.7. Externalize HTTP Sessions to JBoss Data Grid
NOTE
You will need a Red Hat JBoss Data Grid subscription to use this functionality.
Red Hat JBoss Data Grid can be used as an external cache container for application-specific data inJBoss EAP, such as HTTP sessions. This allows scaling of the data layer independent of the application,and enables different JBoss EAP clusters, which may reside in various domains, to access data fromthe same JBoss Data Grid cluster. Additionally, other applications can interface with the cachespresented by Red Hat JBoss Data Grid.
The following example shows how to externalize HTTP sessions. It applies to both standalone instancesof JBoss EAP as well as managed domains. However, in a managed domain, each server group requires
CHAPTER 22. CONFIGURING HIGH AVAILABILITY
267
a unique remote cache configured. While multiple server groups can utilize the same Red Hat JBossData Grid cluster, the respective remote caches will be unique to the JBoss EAP server group.
NOTE
For each distributable application, an entirely new cache must be created. It can becreated in an existing cache container, for example, web.
To externalize HTTP sessions:
1. Define the location of the remote Red Hat JBoss Data Grid server by adding the networkinginformation to the socket-binding-group.
Example Adding Remote Socket Bindings
/socket-binding-group=standard-sockets/remote-destination-outbound-socket-binding=remote-jdg-server1:add(host=JDGHostName1, port=11222)
/socket-binding-group=standard-sockets/remote-destination-outbound-socket-binding=remote-jdg-server2:add(host=JDGHostName2, port=11222)
Resulting XML
NOTE
You will need a remote socket binding configured for each Red Hat JBoss DataGrid server.
2. Ensure the remote cache containers are defined in JBoss EAP’s infinispan subsystem; inthe example below the cache attribute in the remote-store element defines the cachename on the remote JBoss Data Grid server.If you are running in a managed domain, precede these commands with /profile=PROFILE_NAME.
Example Adding a Remote Cache Container
/subsystem=infinispan/cache-container=web/invalidation-cache=jdg:add(mode=SYNC)
/subsystem=infinispan/cache-container=web/invalidation-cache=jdg/component=locking:write-attribute(name=isolation,value=REPEATABLE_READ)
<socket-binding-group name="standard-sockets" ... > ... <outbound-socket-binding name="remote-jdg-server1"> <remote-destination host="JDGHostName1" port="11222"/> </outbound-socket-binding> <outbound-socket-binding name="remote-jdg-server2"> <remote-destination host="JDGHostName2" port="11222"/> </outbound-socket-binding></socket-binding-group>
Red Hat JBoss Enterprise Application Platform 7.0 Configuration Guide
268
/subsystem=infinispan/cache-container=web/invalidation-cache=jdg/component=transaction:write-attribute(name=mode,value=BATCH)
/subsystem=infinispan/cache-container=web/invalidation-cache=jdg/store=remote:add(remote-servers=["remote-jdg-server1","remote-jdg-server2"], cache=default, socket-timeout=60000, passivation=false, purge=false, shared=true)
Resulting XML
3. Add cache information into the application’s jboss-web.xml. In the following example, web isthe name of the cache container and jdg is the name of the appropriate cache located in thiscontainer.
Example jboss-web.xml File
22.4. CONFIGURING JBOSS EAP AS A FRONT-END LOAD BALANCER
You can configure JBoss EAP and the undertow subsystem to act as a front-end load balancer toproxy requests to back-end JBoss EAP servers. Since Undertow makes use of asynchronous IO, the IOthread that is responsible for the connection is the only thread that is involved in the request. Thatsame thread is also used for the connection made to the back-end server.
You can use the following protocols:
<subsystem xmlns="urn:jboss:domain:infinispan:4.0"> ... <cache-container name="web" default-cache="dist" module="org.wildfly.clustering.web.infinispan" statistics-enabled="true"> <transport lock-timeout="60000"/> <invalidation-cache name="jdg" mode="SYNC"> <locking isolation="REPEATABLE_READ"/> <transaction mode="BATCH"/> <remote-store cache="default" socket-timeout="60000" remote-servers="remote-jdg-server1 remote-jdg-server2" passivation="false" purge="false" shared="true"/> </invalidation-cache> ... </cache-container></subsystem>
<?xml version="1.0" encoding="UTF-8"?><jboss-web xmlns="http://www.jboss.com/xml/ns/javaee" xmlns:xsi="http://www.w3.org/2001/XMLSchema-instance" xsi:schemaLocation="http://www.jboss.com/xml/ns/javaee http://www.jboss.org/j2ee/schema/jboss-web_10_0.xsd" version="10.0"> <replication-config> <replication-granularity>SESSION</replication-granularity> <cache-name>web.jdg</cache-name> </replication-config></jboss-web>
CHAPTER 22. CONFIGURING HIGH AVAILABILITY
269
HTTP over plain text (http), supporting HTTP/1 and HTTP/2 ( h2c)
NOTE
HTTP/2 is provided as technology preview only.
HTTP over secured connection (https), supporting HTTP/1 and HTTP/2 ( h2)
NOTE
HTTP/2 is provided as technology preview only.
AJP (ajp)
You can either define a static load balancer and specify the back-end hosts in your configuration, oruse the mod_cluster front end to dynamically update the hosts.
22.4.1. Configure Undertow as a Load Balancer Using mod_cluster
You can use the built-in mod_cluster front-end load balancer to load balance other JBoss EAPinstances.
This procedure assumes that you are running in a managed domain and already have the followingconfigured:
A JBoss EAP server that will act as the load balancer.
This server uses the default profile, which is bound to the standard-sockets socketbinding group.
Two JBoss EAP servers, which will act as the back-end servers.
These servers are running in a cluster and use the ha profile, which is bound to the ha-sockets socket binding group.
The distributable application to be load balanced deployed to the back-end servers.
Configure the mod_cluster Front-end Load BalancerThe below steps load balance servers in a managed domain, but they can be adjusted to apply to a setof standalone servers. Be sure to update the management CLI command values to suit yourenvironment.
1. Set the mod_cluster advertise security key.Adding the advertise security key allows the load balancer and servers to authenticate duringdiscovery.
Use the following management CLI command to set the mod_cluster advertise security key.
/profile=ha/subsystem=modcluster/mod-cluster-config=configuration:write-attribute(name=advertise-security-key, value=mypassword)
2. Create a socket binding with the multicast address and port for mod_cluster.
Red Hat JBoss Enterprise Application Platform 7.0 Configuration Guide
270
You need to create a socket configuration for mod_cluster to use for discovery andcommunication with the servers that it is going to load balance.
Use the following management CLI command to add a modcluster socket binding with theappropriate multicast address and port configured.
/socket-binding-group=standard-sockets/socket-binding=modcluster:add(multicast-port=23364, multicast-address=224.0.1.105)
3. Include the mod_cluster load balancer.Once you have the advertise security key and socket binding set up, you need to add themod_cluster filter to Undertow for the load balancer instance of JBoss EAP.
Use the following management CLI command to add the mod_cluster filter.
/profile=default/subsystem=undertow/configuration=filter/mod-cluster=modcluster:add(management-socket-binding=http, advertise-socket-binding=modcluster, security-key=mypassword)
Use the following management CLI command to bind the mod_cluster filter to the default host.
/profile=default/subsystem=undertow/server=default-server/host=default-host/filter-ref=modcluster:add
IMPORTANT
It is recommended that the management and advertise socket bindings used bymod_cluster only be exposed to the internal network, not a public IP address.
The load balancer JBoss EAP server can now load balance the two back-end JBoss EAP servers.
22.4.2. Configure Undertow as a Static Load Balancer
To configure a static load balancer with Undertow, you need to configure a proxy handler in the undertow subsystem. To configure a proxy handler in Undertow, you need to do the following on yourJBoss EAP instance that will serve as your static load balancer:
1. Add a reverse proxy handler
2. Define the outbound socket bindings for each remote host
3. Add each remote host to the reverse proxy handler
4. Add the reverse proxy location
The following example shows how to configure a JBoss EAP instance to be a static load balancer. TheJBoss EAP instance is located at lb.example.com and will load balance between two additionalservers: server1.example.com and server2.example.com. The load balancer will reverse-proxyto the location /app and will the AJP protocol.
1. To add a reverse proxy handler:
/subsystem=undertow/configuration=handler/reverse-proxy=my-
CHAPTER 22. CONFIGURING HIGH AVAILABILITY
271
handler:add
2. To define the outbound socket bindings for each remote host:
/socket-binding-group=standard-sockets/remote-destination-outbound-socket-binding=remote-host1/:add(host=server1.example.com, port=8009)
/socket-binding-group=standard-sockets/remote-destination-outbound-socket-binding=remote-host2/:add(host=server2.example.com, port=8009)
3. To add each remote host to the reverse proxy handler:
/subsystem=undertow/configuration=handler/reverse-proxy=my-handler/host=host1:add(outbound-socket-binding=remote-host1, scheme=ajp, instance-id=myroute, path=/test)
/subsystem=undertow/configuration=handler/reverse-proxy=my-handler/host=host2:add(outbound-socket-binding=remote-host2, scheme=ajp, instance-id=myroute, path=/test)
4. To add the reverse proxy location:
/subsystem=undertow/server=default-server/host=default-host/location=\/app:add(handler=my-handler)
When accessing lb.example.com:8080/app, you will now see the content proxied from server1.example.com and server2.example.com.
22.5. USING AN EXTERNAL WEB SERVER AS A PROXY SERVER
JBoss EAP can accept requests from an external web server using the supported HTTP, HTTPS, or AJPprotocol, depending on the external web server configuration.
See Overview of HTTP Connectors for details on the supported HTTP connectors for each web server.Once you have decided which web server and HTTP connector to use, see the appropriate section forinformation on configuring your connector:
See the mod_cluster, mod_jk, or mod_proxy section for Apache HTTP Server .
See the ISAPI connector section for Microsoft IIS.
See the NSAPI connector section for Oracle iPlanet Web Server.
For the most current information about supported configurations for HTTP connectors, see JBoss EAPsupported configurations.
You also will need to make sure that JBoss EAP is configured to accept requests from external webservers.
22.5.1. Overview of HTTP Connectors
JBoss EAP has the ability to use load-balancing and clustering mechanisms built into external web
Red Hat JBoss Enterprise Application Platform 7.0 Configuration Guide
272
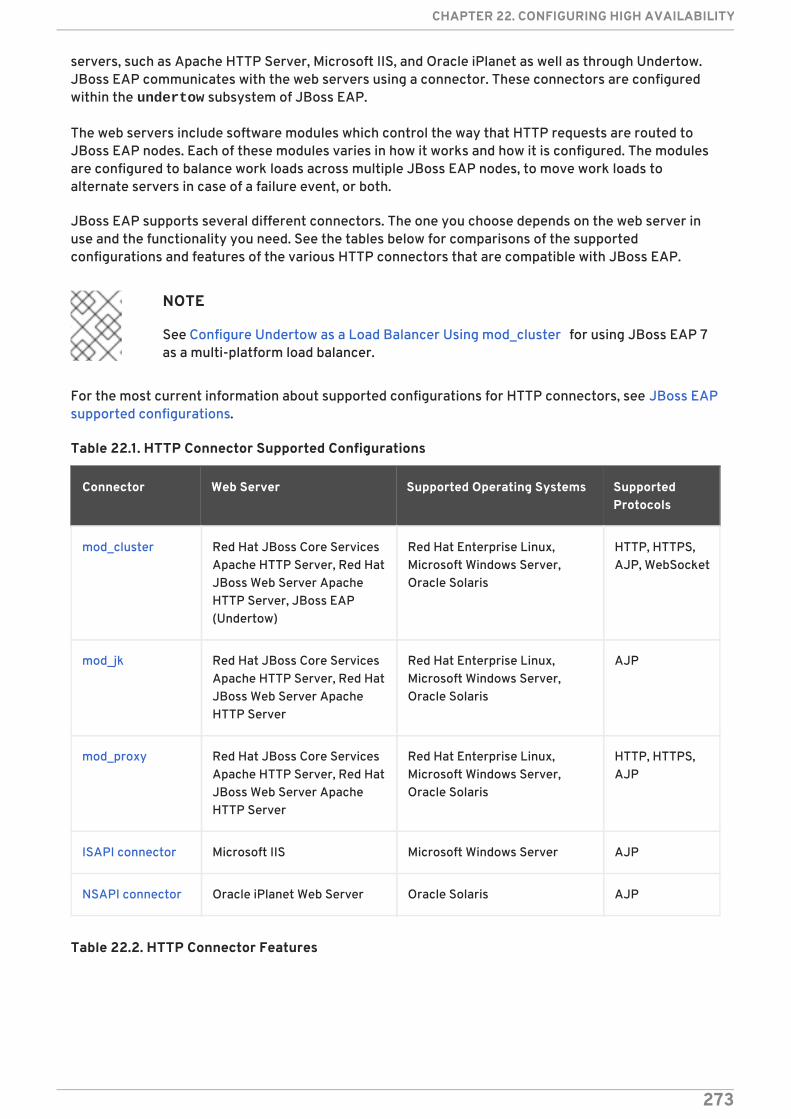
servers, such as Apache HTTP Server, Microsoft IIS, and Oracle iPlanet as well as through Undertow.JBoss EAP communicates with the web servers using a connector. These connectors are configuredwithin the undertow subsystem of JBoss EAP.
The web servers include software modules which control the way that HTTP requests are routed toJBoss EAP nodes. Each of these modules varies in how it works and how it is configured. The modulesare configured to balance work loads across multiple JBoss EAP nodes, to move work loads toalternate servers in case of a failure event, or both.
JBoss EAP supports several different connectors. The one you choose depends on the web server inuse and the functionality you need. See the tables below for comparisons of the supportedconfigurations and features of the various HTTP connectors that are compatible with JBoss EAP.
NOTE
See Configure Undertow as a Load Balancer Using mod_cluster for using JBoss EAP 7as a multi-platform load balancer.
For the most current information about supported configurations for HTTP connectors, see JBoss EAPsupported configurations.
Table 22.1. HTTP Connector Supported Configurations
Connector Web Server Supported Operating Systems SupportedProtocols
mod_cluster Red Hat JBoss Core ServicesApache HTTP Server, Red HatJBoss Web Server ApacheHTTP Server, JBoss EAP(Undertow)
Red Hat Enterprise Linux,Microsoft Windows Server,Oracle Solaris
HTTP, HTTPS,AJP, WebSocket
mod_jk Red Hat JBoss Core ServicesApache HTTP Server, Red HatJBoss Web Server ApacheHTTP Server
Red Hat Enterprise Linux,Microsoft Windows Server,Oracle Solaris
AJP
mod_proxy Red Hat JBoss Core ServicesApache HTTP Server, Red HatJBoss Web Server ApacheHTTP Server
Red Hat Enterprise Linux,Microsoft Windows Server,Oracle Solaris
HTTP, HTTPS,AJP
ISAPI connector Microsoft IIS Microsoft Windows Server AJP
NSAPI connector Oracle iPlanet Web Server Oracle Solaris AJP
Table 22.2. HTTP Connector Features
CHAPTER 22. CONFIGURING HIGH AVAILABILITY
273
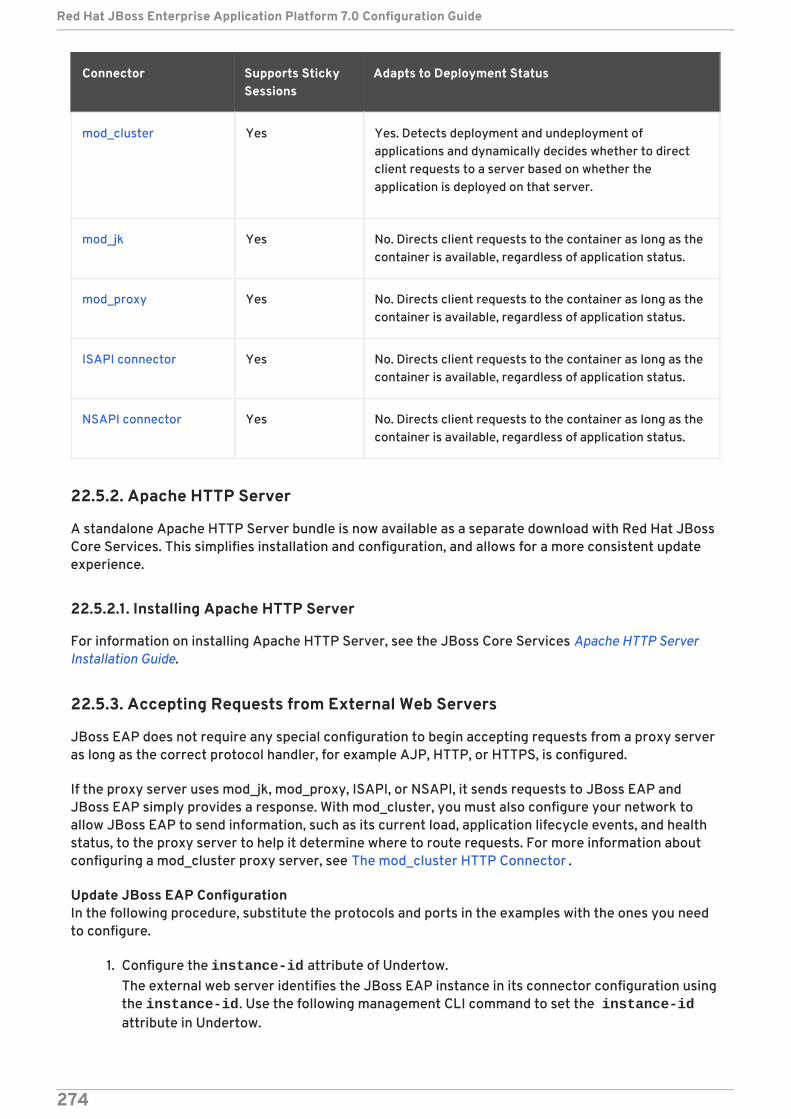
Connector Supports StickySessions
Adapts to Deployment Status
mod_cluster Yes Yes. Detects deployment and undeployment ofapplications and dynamically decides whether to directclient requests to a server based on whether theapplication is deployed on that server.
mod_jk Yes No. Directs client requests to the container as long as thecontainer is available, regardless of application status.
mod_proxy Yes No. Directs client requests to the container as long as thecontainer is available, regardless of application status.
ISAPI connector Yes No. Directs client requests to the container as long as thecontainer is available, regardless of application status.
NSAPI connector Yes No. Directs client requests to the container as long as thecontainer is available, regardless of application status.
22.5.2. Apache HTTP Server
A standalone Apache HTTP Server bundle is now available as a separate download with Red Hat JBossCore Services. This simplifies installation and configuration, and allows for a more consistent updateexperience.
22.5.2.1. Installing Apache HTTP Server
For information on installing Apache HTTP Server, see the JBoss Core Services Apache HTTP ServerInstallation Guide.
22.5.3. Accepting Requests from External Web Servers
JBoss EAP does not require any special configuration to begin accepting requests from a proxy serveras long as the correct protocol handler, for example AJP, HTTP, or HTTPS, is configured.
If the proxy server uses mod_jk, mod_proxy, ISAPI, or NSAPI, it sends requests to JBoss EAP andJBoss EAP simply provides a response. With mod_cluster, you must also configure your network toallow JBoss EAP to send information, such as its current load, application lifecycle events, and healthstatus, to the proxy server to help it determine where to route requests. For more information aboutconfiguring a mod_cluster proxy server, see The mod_cluster HTTP Connector .
Update JBoss EAP ConfigurationIn the following procedure, substitute the protocols and ports in the examples with the ones you needto configure.
1. Configure the instance-id attribute of Undertow.The external web server identifies the JBoss EAP instance in its connector configuration usingthe instance-id. Use the following management CLI command to set the instance-idattribute in Undertow.
Red Hat JBoss Enterprise Application Platform 7.0 Configuration Guide
274
/subsystem=undertow:write-attribute(name=instance-id,value=node1)
In the above example, the external web server identifies the current JBoss EAP instance as node1.
2. Add the necessary listeners to Undertow.In order for an external web server to be able to connect to JBoss EAP, Undertow needs alistener. Each protocol needs its own listener, which is tied to a socket binding.
NOTE
Depending on your desired protocol and port configuration, this step may not benecessary. An HTTP listener is configured in all default JBoss EAPconfigurations, and an AJP listener is configured if you are using the ha or full-ha profile.
You can check whether the required listeners are already configured by readingthe default server configuration:
/subsystem=undertow/server=default-server:read-resource
To add a listener to Undertow, it must have a socket binding. The socket binding is added to thesocket binding group used by your server or server group. The following management CLIcommand adds an ajp socket binding, bound to port 8009, to the standard-sockets socketbinding group
/socket-binding-group=standard-sockets/socket-binding=ajp:add(port=8009)
The following management CLI command adds an ajp listener to Undertow, using the ajpsocket binding.
/subsystem=undertow/server=default-server/ajp-listener=ajp:add(socket-binding=ajp)
22.6. THE MOD_CLUSTER HTTP CONNECTOR
The mod_cluster connector is an Apache HTTP Server-based load balancer. It uses a communicationchannel to forward requests from the Apache HTTP Server to one of a set of application server nodes.
The mod_cluster connector has several advantages over other connectors.
The mod_cluster Management Protocol (MCMP) is an additional connection between theJBoss EAP servers and the Apache HTTP Server with the mod_cluster module enabled. It isused by the JBoss EAP servers to transmit server-side load-balance factors and lifecycleevents back to the Apache HTTP Server via a custom set of HTTP methods.
Dynamic configuration of Apache HTTP Server with mod_cluster allows JBoss EAP servers tojoin the load-balancing arrangement without manual configuration.
JBoss EAP performs the load-balancing factor calculations, rather than relying on the ApacheHTTP Server with mod_cluster. This makes load-balancing metrics more accurate than otherconnectors.
CHAPTER 22. CONFIGURING HIGH AVAILABILITY
275
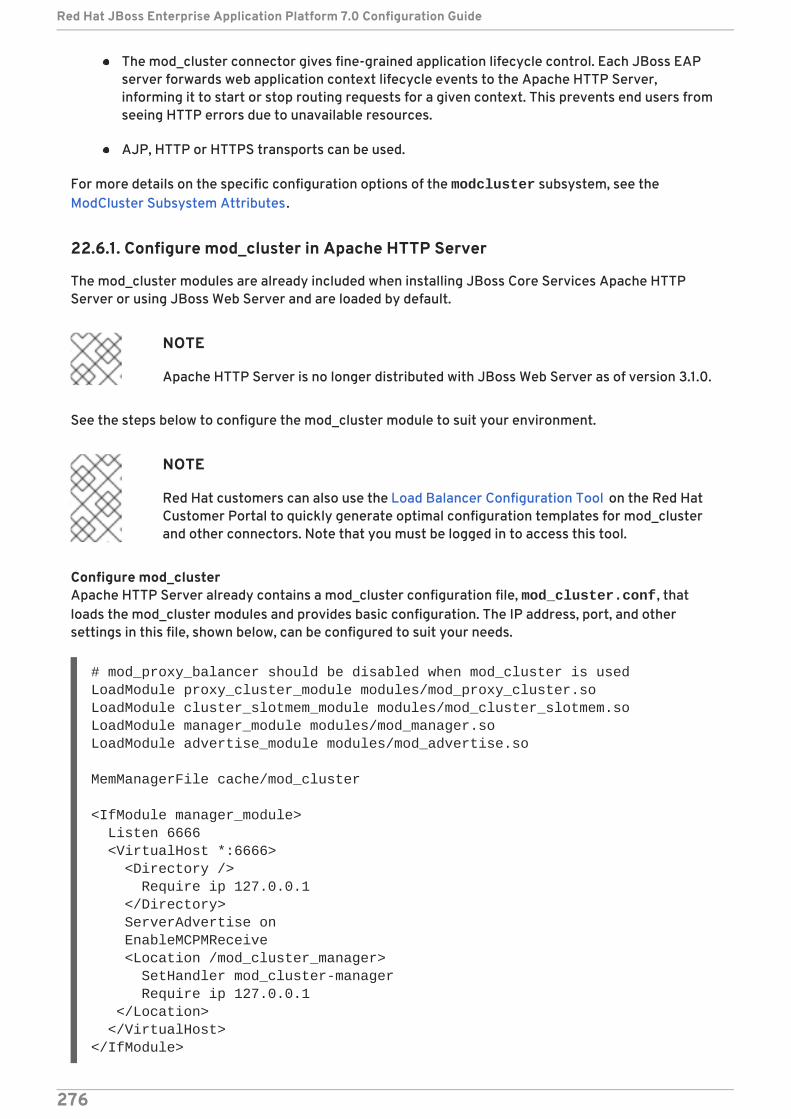
The mod_cluster connector gives fine-grained application lifecycle control. Each JBoss EAPserver forwards web application context lifecycle events to the Apache HTTP Server,informing it to start or stop routing requests for a given context. This prevents end users fromseeing HTTP errors due to unavailable resources.
AJP, HTTP or HTTPS transports can be used.
For more details on the specific configuration options of the modcluster subsystem, see theModCluster Subsystem Attributes.
22.6.1. Configure mod_cluster in Apache HTTP Server
The mod_cluster modules are already included when installing JBoss Core Services Apache HTTPServer or using JBoss Web Server and are loaded by default.
NOTE
Apache HTTP Server is no longer distributed with JBoss Web Server as of version 3.1.0.
See the steps below to configure the mod_cluster module to suit your environment.
NOTE
Red Hat customers can also use the Load Balancer Configuration Tool on the Red HatCustomer Portal to quickly generate optimal configuration templates for mod_clusterand other connectors. Note that you must be logged in to access this tool.
Configure mod_clusterApache HTTP Server already contains a mod_cluster configuration file, mod_cluster.conf, thatloads the mod_cluster modules and provides basic configuration. The IP address, port, and othersettings in this file, shown below, can be configured to suit your needs.
# mod_proxy_balancer should be disabled when mod_cluster is usedLoadModule proxy_cluster_module modules/mod_proxy_cluster.soLoadModule cluster_slotmem_module modules/mod_cluster_slotmem.soLoadModule manager_module modules/mod_manager.soLoadModule advertise_module modules/mod_advertise.so
MemManagerFile cache/mod_cluster
<IfModule manager_module> Listen 6666 <VirtualHost *:6666> <Directory /> Require ip 127.0.0.1 </Directory> ServerAdvertise on EnableMCPMReceive <Location /mod_cluster_manager> SetHandler mod_cluster-manager Require ip 127.0.0.1 </Location> </VirtualHost></IfModule>
Red Hat JBoss Enterprise Application Platform 7.0 Configuration Guide
276
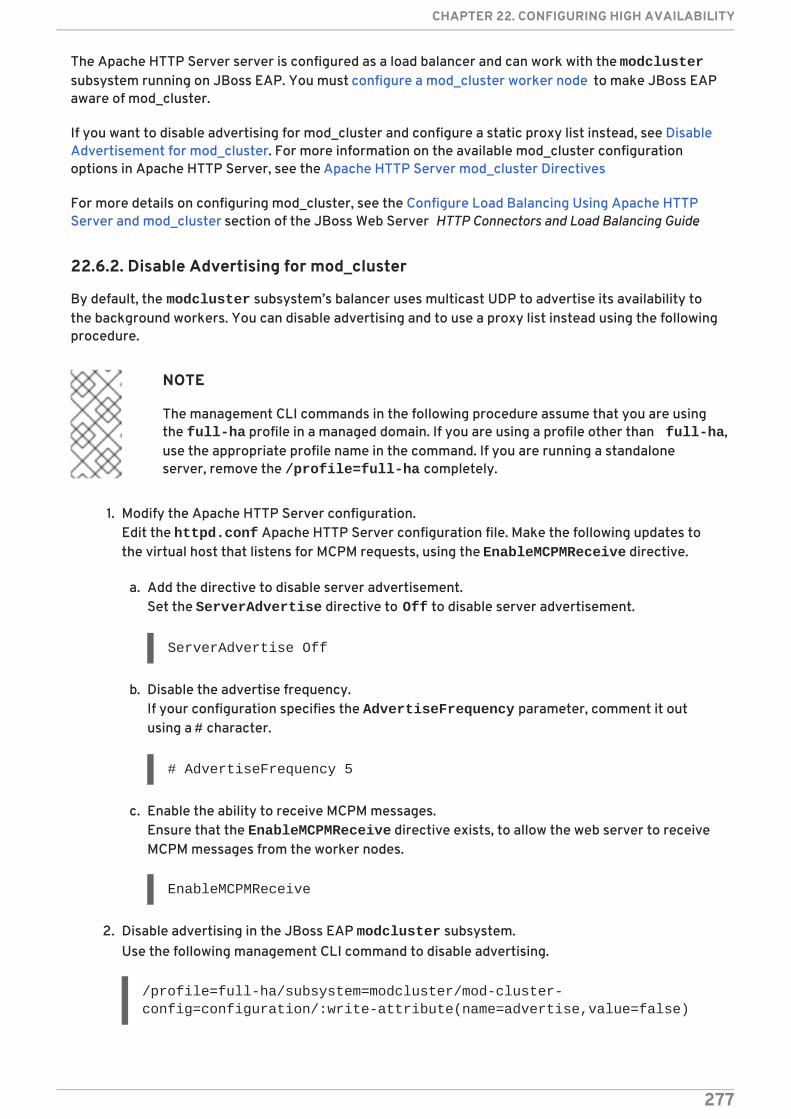
The Apache HTTP Server server is configured as a load balancer and can work with the modclustersubsystem running on JBoss EAP. You must configure a mod_cluster worker node to make JBoss EAPaware of mod_cluster.
If you want to disable advertising for mod_cluster and configure a static proxy list instead, see DisableAdvertisement for mod_cluster. For more information on the available mod_cluster configurationoptions in Apache HTTP Server, see the Apache HTTP Server mod_cluster Directives
For more details on configuring mod_cluster, see the Configure Load Balancing Using Apache HTTPServer and mod_cluster section of the JBoss Web Server HTTP Connectors and Load Balancing Guide.
22.6.2. Disable Advertising for mod_cluster
By default, the modcluster subsystem’s balancer uses multicast UDP to advertise its availability tothe background workers. You can disable advertising and to use a proxy list instead using the followingprocedure.
NOTE
The management CLI commands in the following procedure assume that you are usingthe full-ha profile in a managed domain. If you are using a profile other than full-ha,use the appropriate profile name in the command. If you are running a standaloneserver, remove the /profile=full-ha completely.
1. Modify the Apache HTTP Server configuration.Edit the httpd.conf Apache HTTP Server configuration file. Make the following updates tothe virtual host that listens for MCPM requests, using the EnableMCPMReceive directive.
a. Add the directive to disable server advertisement.Set the ServerAdvertise directive to Off to disable server advertisement.
ServerAdvertise Off
b. Disable the advertise frequency.If your configuration specifies the AdvertiseFrequency parameter, comment it outusing a # character.
# AdvertiseFrequency 5
c. Enable the ability to receive MCPM messages.Ensure that the EnableMCPMReceive directive exists, to allow the web server to receiveMCPM messages from the worker nodes.
EnableMCPMReceive
2. Disable advertising in the JBoss EAP modcluster subsystem.Use the following management CLI command to disable advertising.
/profile=full-ha/subsystem=modcluster/mod-cluster-config=configuration/:write-attribute(name=advertise,value=false)
CHAPTER 22. CONFIGURING HIGH AVAILABILITY
277
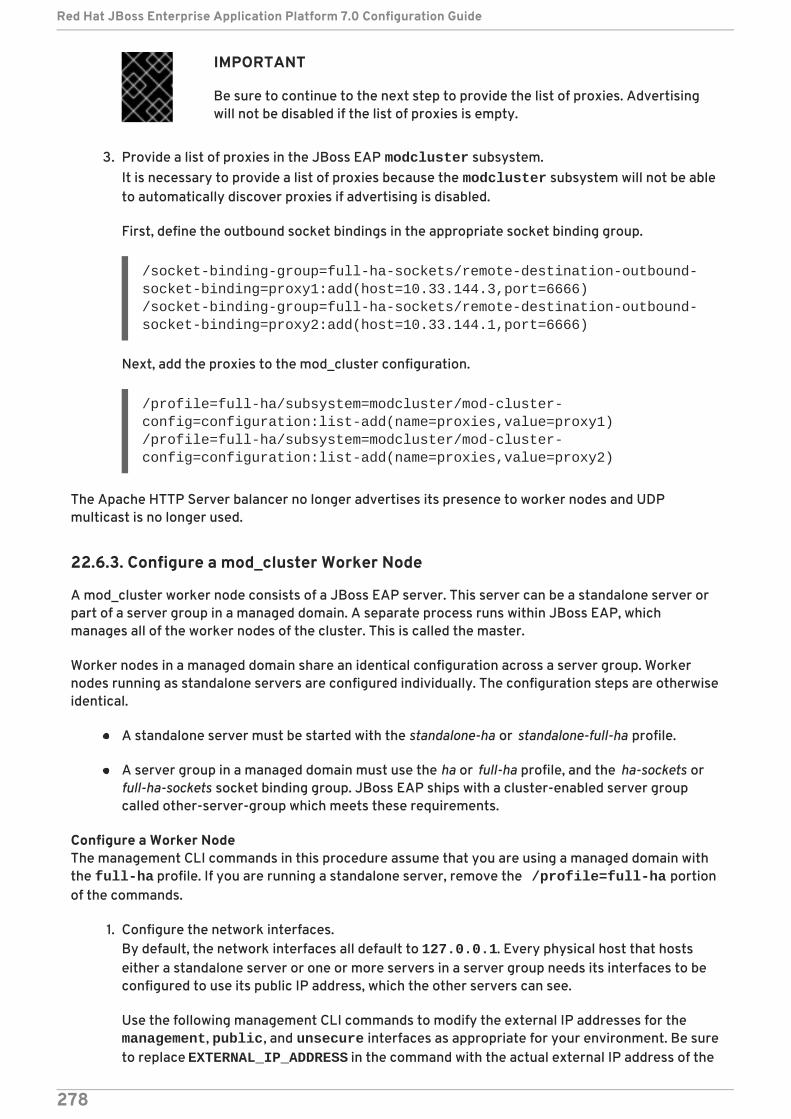
IMPORTANT
Be sure to continue to the next step to provide the list of proxies. Advertisingwill not be disabled if the list of proxies is empty.
3. Provide a list of proxies in the JBoss EAP modcluster subsystem.It is necessary to provide a list of proxies because the modcluster subsystem will not be ableto automatically discover proxies if advertising is disabled.
First, define the outbound socket bindings in the appropriate socket binding group.
/socket-binding-group=full-ha-sockets/remote-destination-outbound-socket-binding=proxy1:add(host=10.33.144.3,port=6666)/socket-binding-group=full-ha-sockets/remote-destination-outbound-socket-binding=proxy2:add(host=10.33.144.1,port=6666)
Next, add the proxies to the mod_cluster configuration.
/profile=full-ha/subsystem=modcluster/mod-cluster-config=configuration:list-add(name=proxies,value=proxy1)/profile=full-ha/subsystem=modcluster/mod-cluster-config=configuration:list-add(name=proxies,value=proxy2)
The Apache HTTP Server balancer no longer advertises its presence to worker nodes and UDPmulticast is no longer used.
22.6.3. Configure a mod_cluster Worker Node
A mod_cluster worker node consists of a JBoss EAP server. This server can be a standalone server orpart of a server group in a managed domain. A separate process runs within JBoss EAP, whichmanages all of the worker nodes of the cluster. This is called the master.
Worker nodes in a managed domain share an identical configuration across a server group. Workernodes running as standalone servers are configured individually. The configuration steps are otherwiseidentical.
A standalone server must be started with the standalone-ha or standalone-full-ha profile.
A server group in a managed domain must use the ha or full-ha profile, and the ha-sockets orfull-ha-sockets socket binding group. JBoss EAP ships with a cluster-enabled server groupcalled other-server-group which meets these requirements.
Configure a Worker NodeThe management CLI commands in this procedure assume that you are using a managed domain withthe full-ha profile. If you are running a standalone server, remove the /profile=full-ha portionof the commands.
1. Configure the network interfaces.By default, the network interfaces all default to 127.0.0.1. Every physical host that hostseither a standalone server or one or more servers in a server group needs its interfaces to beconfigured to use its public IP address, which the other servers can see.
Use the following management CLI commands to modify the external IP addresses for the management, public, and unsecure interfaces as appropriate for your environment. Be sureto replace EXTERNAL_IP_ADDRESS in the command with the actual external IP address of the
Red Hat JBoss Enterprise Application Platform 7.0 Configuration Guide
278
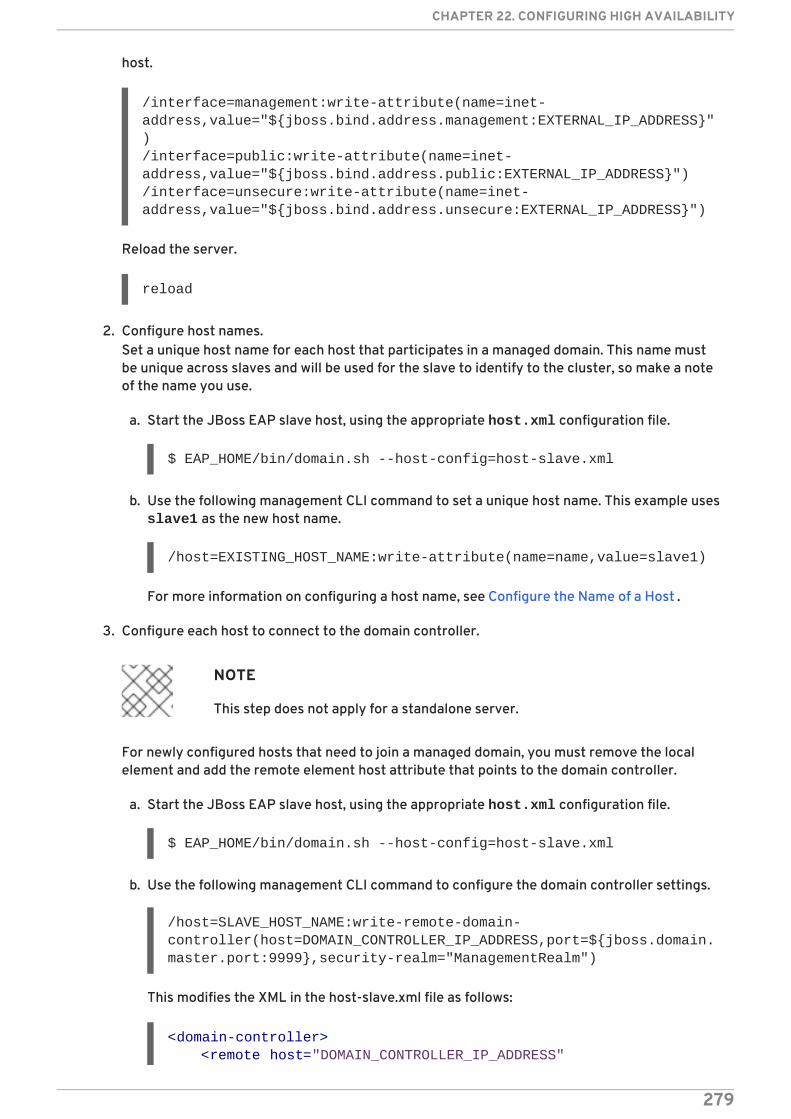
host.
/interface=management:write-attribute(name=inet-address,value="${jboss.bind.address.management:EXTERNAL_IP_ADDRESS}")/interface=public:write-attribute(name=inet-address,value="${jboss.bind.address.public:EXTERNAL_IP_ADDRESS}")/interface=unsecure:write-attribute(name=inet-address,value="${jboss.bind.address.unsecure:EXTERNAL_IP_ADDRESS}")
Reload the server.
reload
2. Configure host names.Set a unique host name for each host that participates in a managed domain. This name mustbe unique across slaves and will be used for the slave to identify to the cluster, so make a noteof the name you use.
a. Start the JBoss EAP slave host, using the appropriate host.xml configuration file.
$ EAP_HOME/bin/domain.sh --host-config=host-slave.xml
b. Use the following management CLI command to set a unique host name. This example usesslave1 as the new host name.
/host=EXISTING_HOST_NAME:write-attribute(name=name,value=slave1)
For more information on configuring a host name, see Configure the Name of a Host .
3. Configure each host to connect to the domain controller.
NOTE
This step does not apply for a standalone server.
For newly configured hosts that need to join a managed domain, you must remove the localelement and add the remote element host attribute that points to the domain controller.
a. Start the JBoss EAP slave host, using the appropriate host.xml configuration file.
$ EAP_HOME/bin/domain.sh --host-config=host-slave.xml
b. Use the following management CLI command to configure the domain controller settings.
/host=SLAVE_HOST_NAME:write-remote-domain-controller(host=DOMAIN_CONTROLLER_IP_ADDRESS,port=${jboss.domain.master.port:9999},security-realm="ManagementRealm")
This modifies the XML in the host-slave.xml file as follows:
<domain-controller> <remote host="DOMAIN_CONTROLLER_IP_ADDRESS"
CHAPTER 22. CONFIGURING HIGH AVAILABILITY
279
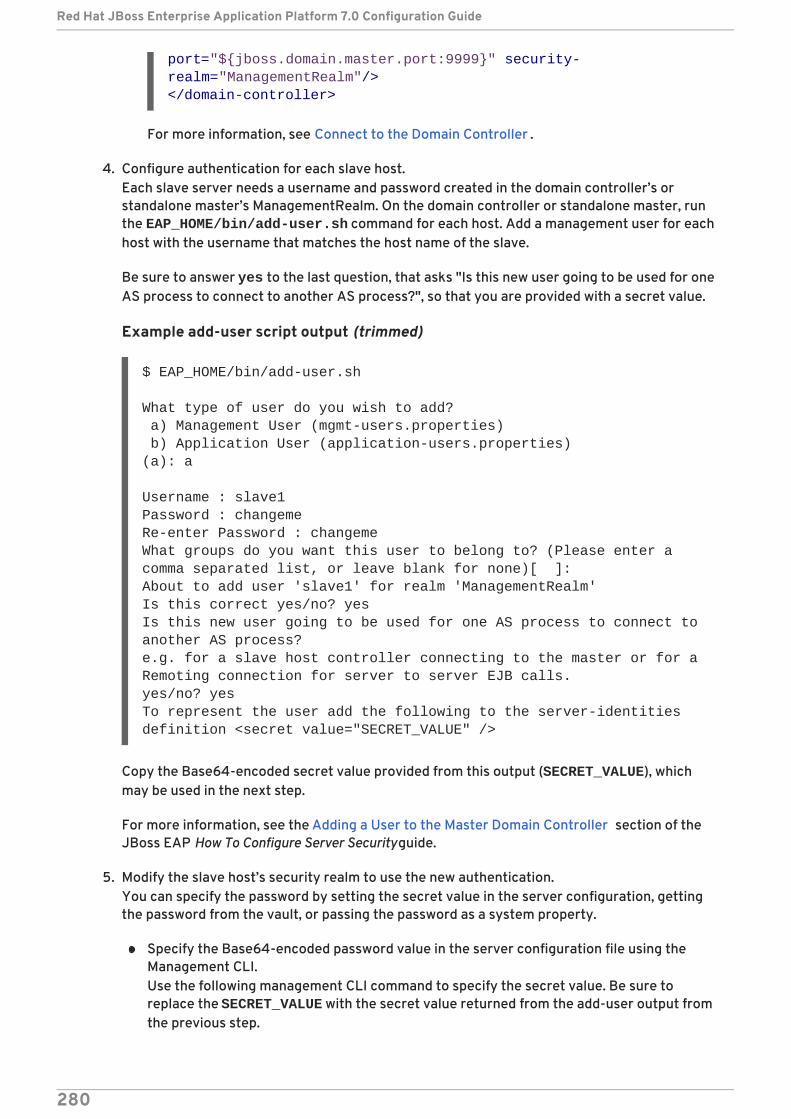
For more information, see Connect to the Domain Controller .
4. Configure authentication for each slave host.Each slave server needs a username and password created in the domain controller’s orstandalone master’s ManagementRealm. On the domain controller or standalone master, runthe EAP_HOME/bin/add-user.sh command for each host. Add a management user for eachhost with the username that matches the host name of the slave.
Be sure to answer yes to the last question, that asks "Is this new user going to be used for oneAS process to connect to another AS process?", so that you are provided with a secret value.
Example add-user script output (trimmed)
$ EAP_HOME/bin/add-user.sh
What type of user do you wish to add? a) Management User (mgmt-users.properties) b) Application User (application-users.properties)(a): a
Username : slave1Password : changemeRe-enter Password : changemeWhat groups do you want this user to belong to? (Please enter a comma separated list, or leave blank for none)[ ]:About to add user 'slave1' for realm 'ManagementRealm'Is this correct yes/no? yesIs this new user going to be used for one AS process to connect to another AS process?e.g. for a slave host controller connecting to the master or for a Remoting connection for server to server EJB calls.yes/no? yesTo represent the user add the following to the server-identities definition <secret value="SECRET_VALUE" />
Copy the Base64-encoded secret value provided from this output (SECRET_VALUE), whichmay be used in the next step.
For more information, see the Adding a User to the Master Domain Controller section of theJBoss EAP How To Configure Server Security guide.
5. Modify the slave host’s security realm to use the new authentication.You can specify the password by setting the secret value in the server configuration, gettingthe password from the vault, or passing the password as a system property.
Specify the Base64-encoded password value in the server configuration file using theManagement CLI.Use the following management CLI command to specify the secret value. Be sure toreplace the SECRET_VALUE with the secret value returned from the add-user output fromthe previous step.
port="${jboss.domain.master.port:9999}" security-realm="ManagementRealm"/></domain-controller>
Red Hat JBoss Enterprise Application Platform 7.0 Configuration Guide
280
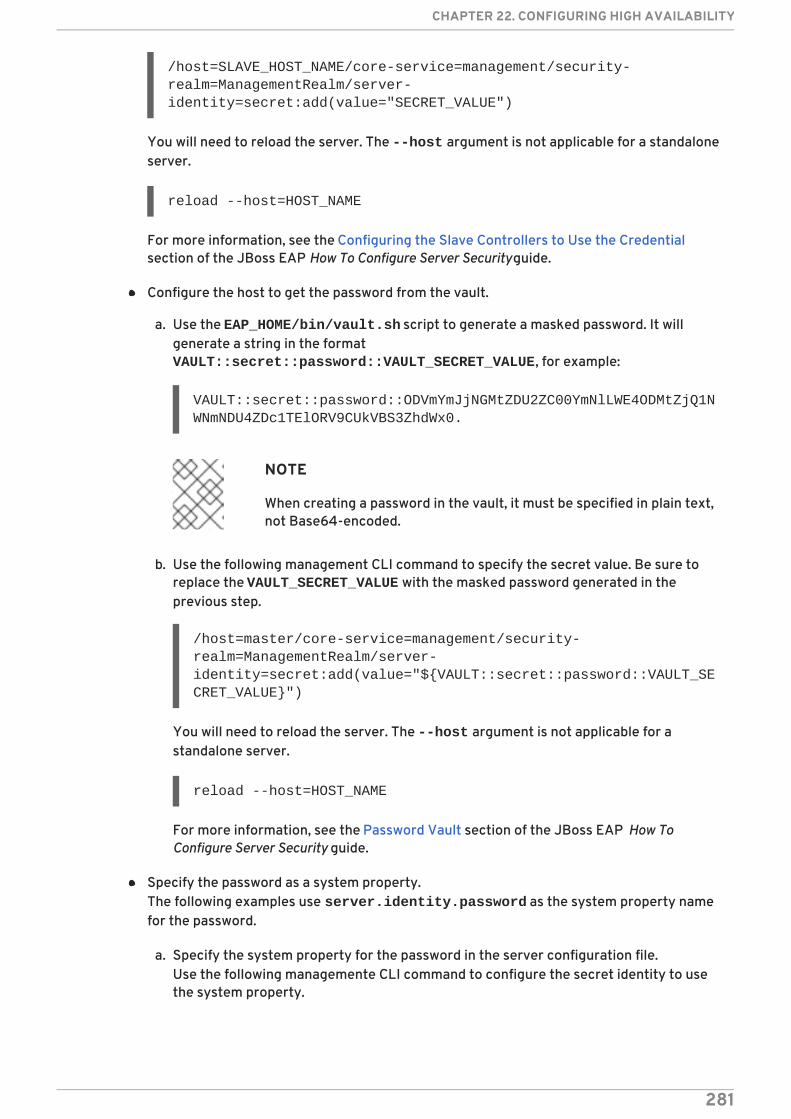
/host=SLAVE_HOST_NAME/core-service=management/security-realm=ManagementRealm/server-identity=secret:add(value="SECRET_VALUE")
You will need to reload the server. The --host argument is not applicable for a standaloneserver.
reload --host=HOST_NAME
For more information, see the Configuring the Slave Controllers to Use the Credentialsection of the JBoss EAP How To Configure Server Security guide.
Configure the host to get the password from the vault.
a. Use the EAP_HOME/bin/vault.sh script to generate a masked password. It willgenerate a string in the format VAULT::secret::password::VAULT_SECRET_VALUE, for example:
VAULT::secret::password::ODVmYmJjNGMtZDU2ZC00YmNlLWE4ODMtZjQ1NWNmNDU4ZDc1TElORV9CUkVBS3ZhdWx0.
NOTE
When creating a password in the vault, it must be specified in plain text,not Base64-encoded.
b. Use the following management CLI command to specify the secret value. Be sure toreplace the VAULT_SECRET_VALUE with the masked password generated in theprevious step.
/host=master/core-service=management/security-realm=ManagementRealm/server-identity=secret:add(value="${VAULT::secret::password::VAULT_SECRET_VALUE}")
You will need to reload the server. The --host argument is not applicable for astandalone server.
reload --host=HOST_NAME
For more information, see the Password Vault section of the JBoss EAP How ToConfigure Server Security guide.
Specify the password as a system property.The following examples use server.identity.password as the system property namefor the password.
a. Specify the system property for the password in the server configuration file.Use the following managemente CLI command to configure the secret identity to usethe system property.
CHAPTER 22. CONFIGURING HIGH AVAILABILITY
281
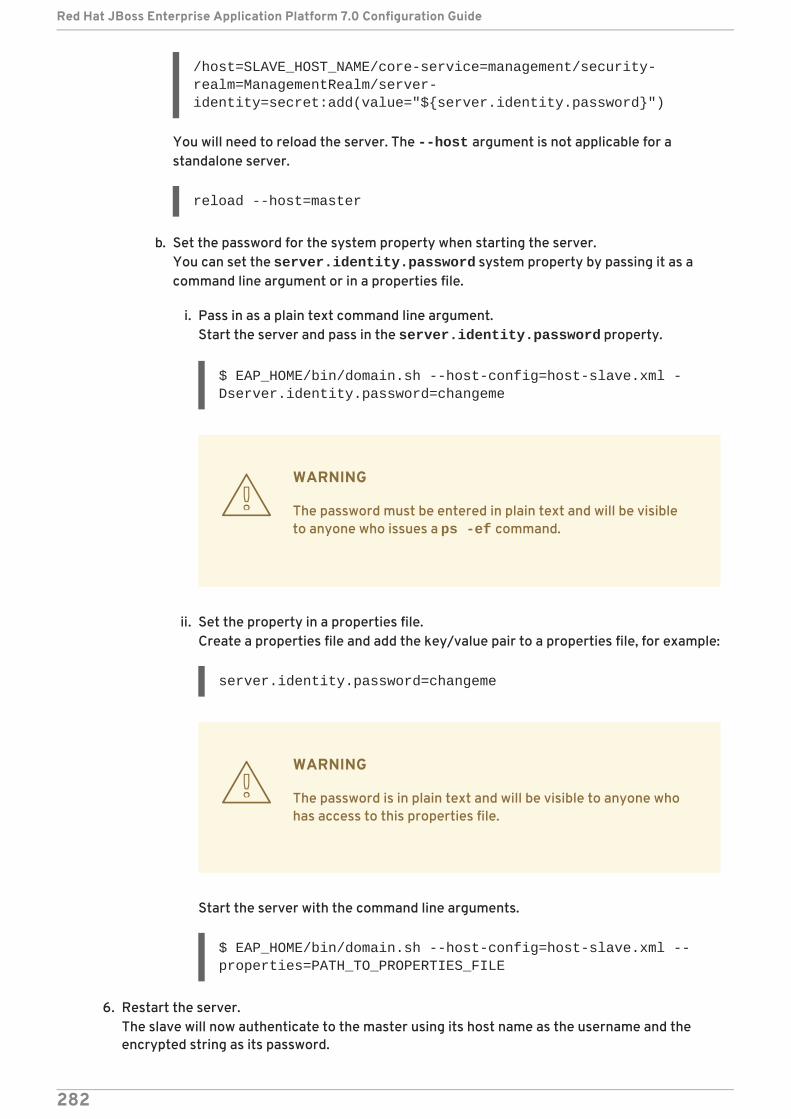
/host=SLAVE_HOST_NAME/core-service=management/security-realm=ManagementRealm/server-identity=secret:add(value="${server.identity.password}")
You will need to reload the server. The --host argument is not applicable for astandalone server.
reload --host=master
b. Set the password for the system property when starting the server.You can set the server.identity.password system property by passing it as acommand line argument or in a properties file.
i. Pass in as a plain text command line argument.Start the server and pass in the server.identity.password property.
$ EAP_HOME/bin/domain.sh --host-config=host-slave.xml -Dserver.identity.password=changeme
WARNING
The password must be entered in plain text and will be visibleto anyone who issues a ps -ef command.
ii. Set the property in a properties file.Create a properties file and add the key/value pair to a properties file, for example:
server.identity.password=changeme
WARNING
The password is in plain text and will be visible to anyone whohas access to this properties file.
Start the server with the command line arguments.
$ EAP_HOME/bin/domain.sh --host-config=host-slave.xml --properties=PATH_TO_PROPERTIES_FILE
6. Restart the server.The slave will now authenticate to the master using its host name as the username and theencrypted string as its password.
Red Hat JBoss Enterprise Application Platform 7.0 Configuration Guide
282
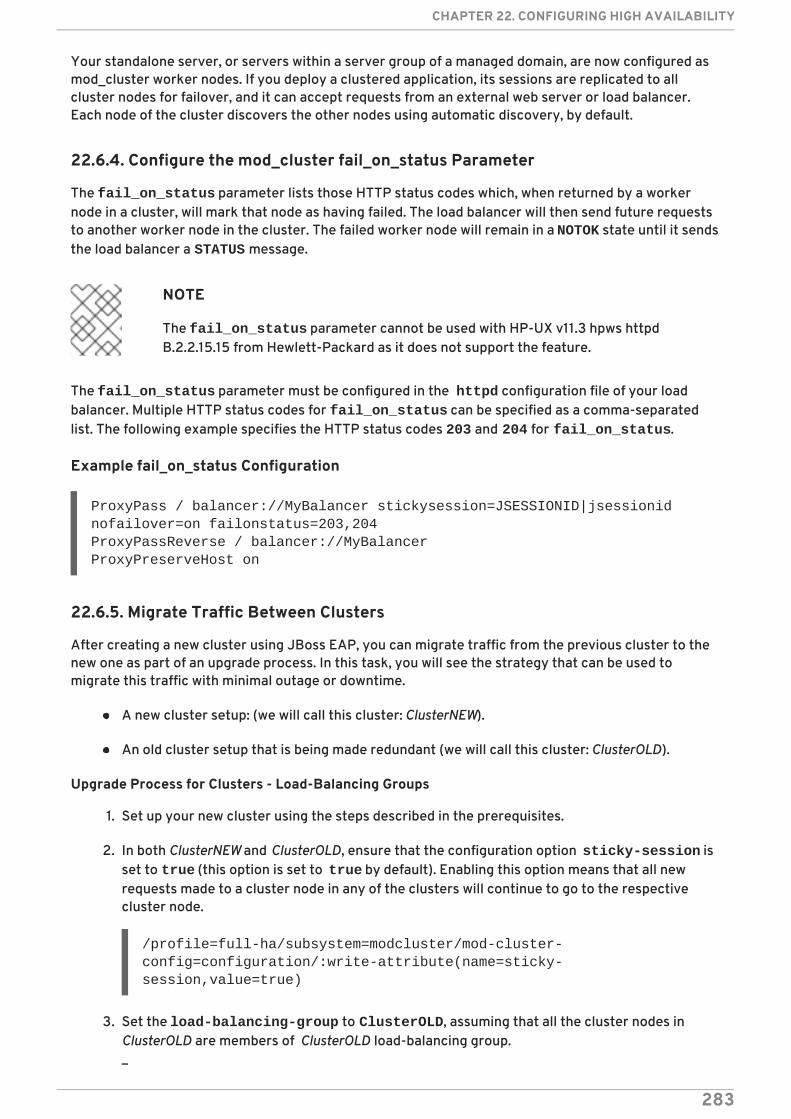
Your standalone server, or servers within a server group of a managed domain, are now configured asmod_cluster worker nodes. If you deploy a clustered application, its sessions are replicated to allcluster nodes for failover, and it can accept requests from an external web server or load balancer.Each node of the cluster discovers the other nodes using automatic discovery, by default.
22.6.4. Configure the mod_cluster fail_on_status Parameter
The fail_on_status parameter lists those HTTP status codes which, when returned by a workernode in a cluster, will mark that node as having failed. The load balancer will then send future requeststo another worker node in the cluster. The failed worker node will remain in a NOTOK state until it sendsthe load balancer a STATUS message.
NOTE
The fail_on_status parameter cannot be used with HP-UX v11.3 hpws httpdB.2.2.15.15 from Hewlett-Packard as it does not support the feature.
The fail_on_status parameter must be configured in the httpd configuration file of your loadbalancer. Multiple HTTP status codes for fail_on_status can be specified as a comma-separatedlist. The following example specifies the HTTP status codes 203 and 204 for fail_on_status.
Example fail_on_status Configuration
ProxyPass / balancer://MyBalancer stickysession=JSESSIONID|jsessionid nofailover=on failonstatus=203,204ProxyPassReverse / balancer://MyBalancerProxyPreserveHost on
22.6.5. Migrate Traffic Between Clusters
After creating a new cluster using JBoss EAP, you can migrate traffic from the previous cluster to thenew one as part of an upgrade process. In this task, you will see the strategy that can be used tomigrate this traffic with minimal outage or downtime.
A new cluster setup: (we will call this cluster: ClusterNEW).
An old cluster setup that is being made redundant (we will call this cluster: ClusterOLD).
Upgrade Process for Clusters - Load-Balancing Groups
1. Set up your new cluster using the steps described in the prerequisites.
2. In both ClusterNEW and ClusterOLD, ensure that the configuration option sticky-session isset to true (this option is set to true by default). Enabling this option means that all newrequests made to a cluster node in any of the clusters will continue to go to the respectivecluster node.
/profile=full-ha/subsystem=modcluster/mod-cluster-config=configuration/:write-attribute(name=sticky-session,value=true)
3. Set the load-balancing-group to ClusterOLD, assuming that all the cluster nodes inClusterOLD are members of ClusterOLD load-balancing group.
CHAPTER 22. CONFIGURING HIGH AVAILABILITY
283
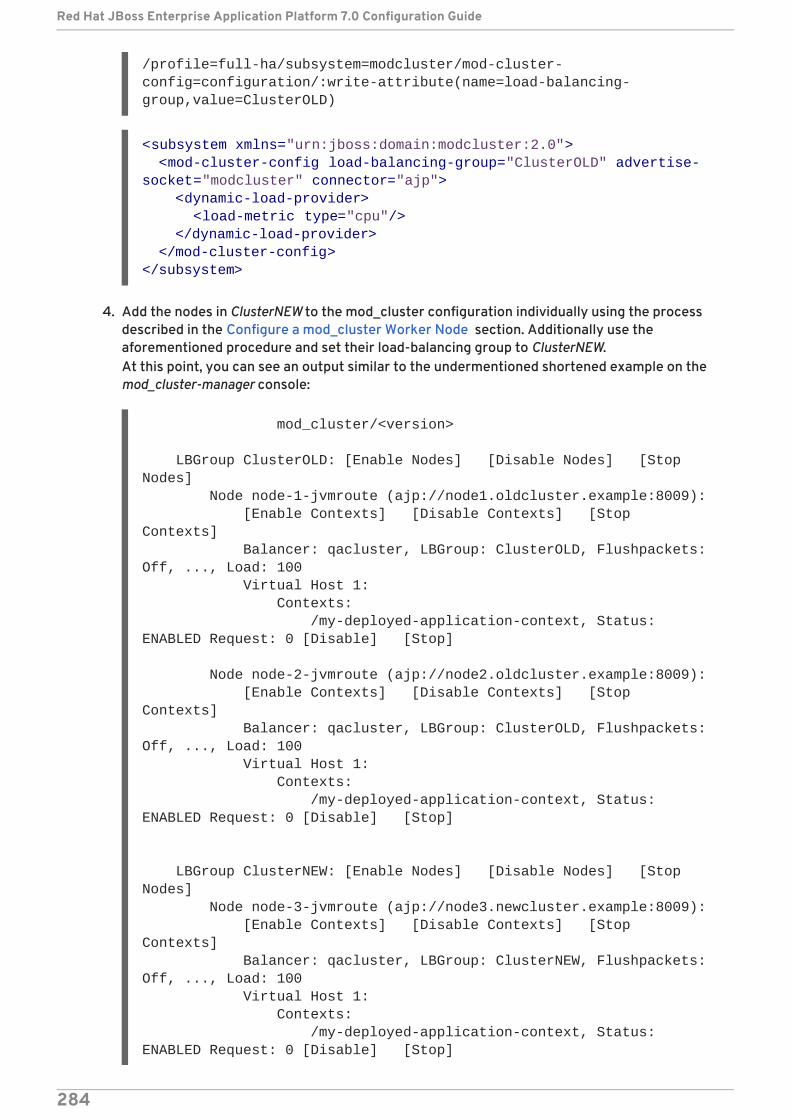
/profile=full-ha/subsystem=modcluster/mod-cluster-config=configuration/:write-attribute(name=load-balancing-group,value=ClusterOLD)
4. Add the nodes in ClusterNEW to the mod_cluster configuration individually using the processdescribed in the Configure a mod_cluster Worker Node section. Additionally use theaforementioned procedure and set their load-balancing group to ClusterNEW.At this point, you can see an output similar to the undermentioned shortened example on themod_cluster-manager console:
mod_cluster/<version>
LBGroup ClusterOLD: [Enable Nodes] [Disable Nodes] [Stop Nodes] Node node-1-jvmroute (ajp://node1.oldcluster.example:8009): [Enable Contexts] [Disable Contexts] [Stop Contexts] Balancer: qacluster, LBGroup: ClusterOLD, Flushpackets: Off, ..., Load: 100 Virtual Host 1: Contexts: /my-deployed-application-context, Status: ENABLED Request: 0 [Disable] [Stop]
Node node-2-jvmroute (ajp://node2.oldcluster.example:8009): [Enable Contexts] [Disable Contexts] [Stop Contexts] Balancer: qacluster, LBGroup: ClusterOLD, Flushpackets: Off, ..., Load: 100 Virtual Host 1: Contexts: /my-deployed-application-context, Status: ENABLED Request: 0 [Disable] [Stop]
LBGroup ClusterNEW: [Enable Nodes] [Disable Nodes] [Stop Nodes] Node node-3-jvmroute (ajp://node3.newcluster.example:8009): [Enable Contexts] [Disable Contexts] [Stop Contexts] Balancer: qacluster, LBGroup: ClusterNEW, Flushpackets: Off, ..., Load: 100 Virtual Host 1: Contexts: /my-deployed-application-context, Status: ENABLED Request: 0 [Disable] [Stop]
<subsystem xmlns="urn:jboss:domain:modcluster:2.0"> <mod-cluster-config load-balancing-group="ClusterOLD" advertise-socket="modcluster" connector="ajp"> <dynamic-load-provider> <load-metric type="cpu"/> </dynamic-load-provider> </mod-cluster-config></subsystem>
Red Hat JBoss Enterprise Application Platform 7.0 Configuration Guide
284
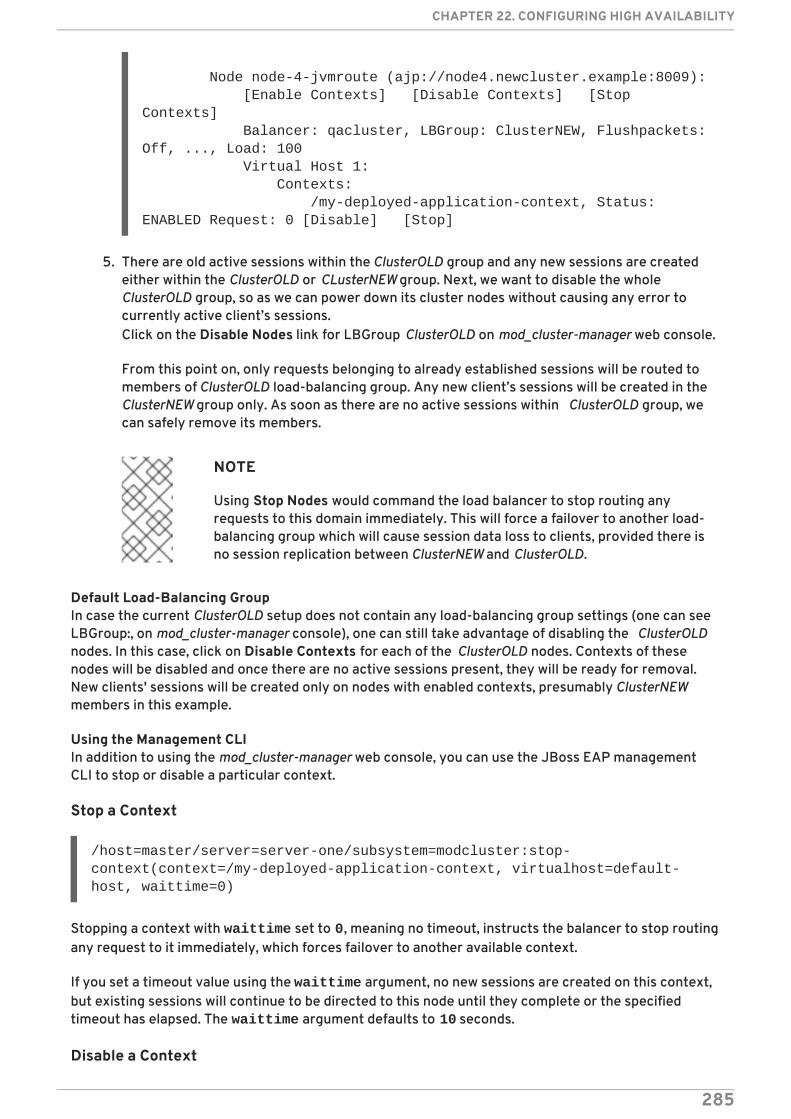
Node node-4-jvmroute (ajp://node4.newcluster.example:8009): [Enable Contexts] [Disable Contexts] [Stop Contexts] Balancer: qacluster, LBGroup: ClusterNEW, Flushpackets: Off, ..., Load: 100 Virtual Host 1: Contexts: /my-deployed-application-context, Status: ENABLED Request: 0 [Disable] [Stop]
5. There are old active sessions within the ClusterOLD group and any new sessions are createdeither within the ClusterOLD or CLusterNEW group. Next, we want to disable the wholeClusterOLD group, so as we can power down its cluster nodes without causing any error tocurrently active client’s sessions.Click on the Disable Nodes link for LBGroup ClusterOLD on mod_cluster-manager web console.
From this point on, only requests belonging to already established sessions will be routed tomembers of ClusterOLD load-balancing group. Any new client’s sessions will be created in theClusterNEW group only. As soon as there are no active sessions within ClusterOLD group, wecan safely remove its members.
NOTE
Using Stop Nodes would command the load balancer to stop routing anyrequests to this domain immediately. This will force a failover to another load-balancing group which will cause session data loss to clients, provided there isno session replication between ClusterNEW and ClusterOLD.
Default Load-Balancing GroupIn case the current ClusterOLD setup does not contain any load-balancing group settings (one can seeLBGroup:, on mod_cluster-manager console), one can still take advantage of disabling the ClusterOLDnodes. In this case, click on Disable Contexts for each of the ClusterOLD nodes. Contexts of thesenodes will be disabled and once there are no active sessions present, they will be ready for removal.New clients' sessions will be created only on nodes with enabled contexts, presumably ClusterNEWmembers in this example.
Using the Management CLIIn addition to using the mod_cluster-manager web console, you can use the JBoss EAP managementCLI to stop or disable a particular context.
Stop a Context
/host=master/server=server-one/subsystem=modcluster:stop-context(context=/my-deployed-application-context, virtualhost=default-host, waittime=0)
Stopping a context with waittime set to 0, meaning no timeout, instructs the balancer to stop routingany request to it immediately, which forces failover to another available context.
If you set a timeout value using the waittime argument, no new sessions are created on this context,but existing sessions will continue to be directed to this node until they complete or the specifiedtimeout has elapsed. The waittime argument defaults to 10 seconds.
Disable a Context
CHAPTER 22. CONFIGURING HIGH AVAILABILITY
285
/host=master/server=server-one/subsystem=modcluster:disable-context(context=/my-deployed-application-context, virtualhost=default-host)
Disabling a context tells the balancer that no new sessions should be created on this context.
22.7. APACHE MOD_JK HTTP CONNECTOR
Apache mod_jk is an HTTP connector that is provided for customers who need it for compatibilitypurposes.
JBoss EAP can accept workloads from an Apache HTTP proxy server. The proxy server accepts clientrequests from the web front end, and passes the work to participating JBoss EAP servers. If stickysessions are enabled, the same client request always goes to the same JBoss EAP server, unless theserver is unavailable.
mod_jk communicates over the AJP 1.3 protocol. Other protocols can be used with mod_cluster ormod_proxy. See the Overview of HTTP Connectors for more information.
NOTE
mod_cluster is a more advanced load balancer than mod_jk and is the recommendedHTTP connector. mod_cluster provides all of the functionality of mod_jk, plus additionalfeatures. Unlike the JBoss EAP mod_cluster HTTP connector, an Apache mod_jk HTTPconnector does not know the status of deployments on servers or server groups, andcannot adapt where it sends its work accordingly.
See the Apache mod_jk documentation for more information.
22.7.1. Configure mod_jk in Apache HTTP Server
The mod_jk module (mod_jk.so) is already included when installing JBoss Core Services ApacheHTTP Server or using JBoss Web Server, however, it is not loaded by default.
NOTE
Apache HTTP Server is no longer distributed with JBoss Web Server as of version 3.1.0.
Use the following steps to load and configure mod_jk in Apache HTTP Server. Note that these stepsassume that you have already navigated to the httpd/ directory for Apache HTTP Server, which willvary depending on your platform. For more information, see the installation instructions for yourplatform in the JBoss Core Services Apache HTTP Server Installation Guide.
NOTE
Red Hat customers can also use the Load Balancer Configuration Tool on the Red HatCustomer Portal to quickly generate optimal configuration templates for mod_jk andother connectors. Note that you must be logged in to access this tool.
1. Configure the mod_jk module.
Red Hat JBoss Enterprise Application Platform 7.0 Configuration Guide
286
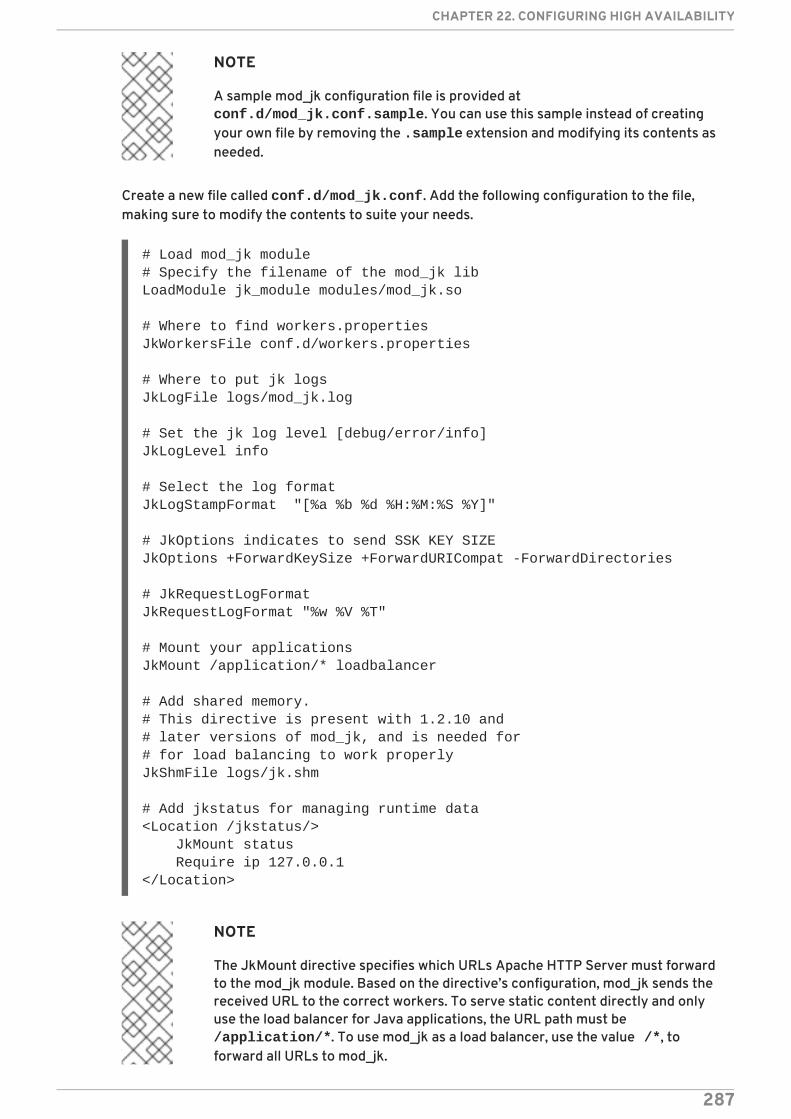
NOTE
A sample mod_jk configuration file is provided at conf.d/mod_jk.conf.sample. You can use this sample instead of creatingyour own file by removing the .sample extension and modifying its contents asneeded.
Create a new file called conf.d/mod_jk.conf. Add the following configuration to the file,making sure to modify the contents to suite your needs.
# Load mod_jk module# Specify the filename of the mod_jk libLoadModule jk_module modules/mod_jk.so
# Where to find workers.propertiesJkWorkersFile conf.d/workers.properties
# Where to put jk logsJkLogFile logs/mod_jk.log
# Set the jk log level [debug/error/info]JkLogLevel info
# Select the log formatJkLogStampFormat "[%a %b %d %H:%M:%S %Y]"
# JkOptions indicates to send SSK KEY SIZEJkOptions +ForwardKeySize +ForwardURICompat -ForwardDirectories
# JkRequestLogFormatJkRequestLogFormat "%w %V %T"
# Mount your applicationsJkMount /application/* loadbalancer
# Add shared memory.# This directive is present with 1.2.10 and# later versions of mod_jk, and is needed for# for load balancing to work properlyJkShmFile logs/jk.shm
# Add jkstatus for managing runtime data<Location /jkstatus/> JkMount status Require ip 127.0.0.1</Location>
NOTE
The JkMount directive specifies which URLs Apache HTTP Server must forwardto the mod_jk module. Based on the directive’s configuration, mod_jk sends thereceived URL to the correct workers. To serve static content directly and onlyuse the load balancer for Java applications, the URL path must be /application/*. To use mod_jk as a load balancer, use the value /*, toforward all URLs to mod_jk.
CHAPTER 22. CONFIGURING HIGH AVAILABILITY
287
Aside from general mod_jk configuration, this file specifies to load the mod_jk.so module,and defines where to find the workers.properties file.
2. Configure the mod_jk worker nodes.
NOTE
A sample workers configuration file is provided at conf.d/workers.properties.sample. You can use this sample instead ofcreating your own file by removing the .sample extension and modifying itscontents as needed.
Create a new file called conf.d/workers.properties. Add the following configuration tothe file, making sure to modify the contents to suite your needs.
# Define list of workers that will be used# for mapping requestsworker.list=loadbalancer,status
# Define Node1# modify the host as your host IP or DNS name.worker.node1.port=8009worker.node1.host=node1.mydomain.comworker.node1.type=ajp13worker.node1.ping_mode=Aworker.node1.lbfactor=1
# Define Node2# modify the host as your host IP or DNS name.worker.node2.port=8009worker.node2.host=node2.mydomain.comworker.node2.type=ajp13worker.node2.ping_mode=Aworker.node2.lbfactor=1
# Load-balancing behaviorworker.loadbalancer.type=lbworker.loadbalancer.balance_workers=node1,node2worker.loadbalancer.sticky_session=1
# Status worker for managing load balancerworker.status.type=status
For details on the syntax of the mod_jk workers.properties file and other advancedconfiguration options, see mod_jk Worker Properties .
3. Optionally, specify a JKMountFile directive.In addition to the JKMount directive in the mod-jk.conf, you can specify a file which containsmultiple URL patterns to be forwarded to mod_jk.
a. Create a uriworkermap.properties file.
Red Hat JBoss Enterprise Application Platform 7.0 Configuration Guide
288
NOTE
A sample URI worker map configuration file is provided at conf.d/uriworkermap.properties.sample. You can use this sampleinstead of creating your own file by removing the .sample extension andmodifying its contents as needed.
Create a new file called conf.d/uriworkermap.properties. Add a line for each URLpattern to be matched, for example:
# Simple worker configuration file/*=loadbalancer
b. Update the configuration to point to uriworkermap.properties file.Append the following to conf.d/mod_jk.conf.
# Use external file for mount points.# It will be checked for updates each 60 seconds.# The format of the file is: /url=worker# /examples/*=loadbalancerJkMountFile conf.d/uriworkermap.properties
For more details on configuring mod_jk, see the Configuring Apache HTTP Server to Load mod_jksection of the JBoss Web Server HTTP Connectors and Load Balancing Guide.
22.7.2. Configure JBoss EAP to Communicate with mod_jk
The JBoss EAP undertow subsystem needs to specify a listener in order to accept requests from andsend replies back to an external web server. Since mod_jk uses the AJP protocol, an AJP listener mustbe configured.
If you are using one of the default high availability configurations (ha or full-ha), an AJP listener isalready configured.
For instructions, see Accepting Requests From External Web Servers .
22.8. APACHE MOD_PROXY HTTP CONNECTOR
Apache mod_proxy is an HTTP connector that supports connections over AJP, HTTP, and HTTPSprotocols. mod_proxy can be configured in load-balanced or non-load-balanced configurations, and itsupports the notion of sticky sessions.
The mod_proxy module requires JBoss EAP to have the HTTP, HTTPS or AJP listener configured in theundertow subsystem, depending on which protocol you plan to use.
NOTE
mod_cluster is a more advanced load balancer than mod_proxy and is the recommendedHTTP connector. mod_cluster provides all of the functionality of mod_proxy, plusadditional features. Unlike the JBoss EAP mod_cluster HTTP connector, an Apachemod_proxy HTTP connector does not know the status of deployments on servers orserver groups, and cannot adapt where it sends its work accordingly.
CHAPTER 22. CONFIGURING HIGH AVAILABILITY
289
See the Apache mod_proxy documentation for more information.
22.8.1. Configure mod_proxy in Apache HTTP Server
The mod_proxy modules are already included when installing JBoss Core Services Apache HTTPServer or using JBoss Web Server and are loaded by default.
NOTE
Apache HTTP Server is no longer distributed with JBoss Web Server as of version 3.1.0.
See the appropriate section below to configure a basic load-balancing or non-load-balancing proxy.These steps assume that you have already navigated to the httpd/ directory for Apache HTTP Server,which will vary depending on your platform. For more information, see the installation instructions foryour platform in the JBoss Core Services Apache HTTP Server Installation Guide. These steps alsoassume that the necessary HTTP listener has already been configured in the JBoss EAP undertowsubsystem.
NOTE
Red Hat customers can also use the Load Balancer Configuration Tool on the Red HatCustomer Portal to quickly generate optimal configuration templates for mod_proxy andother connectors. Note that you must be logged in to access this tool.
Add a Non-load-balancing ProxyAdd the following configuration to your conf/httpd.conf file, directly beneath any other <VirtualHost> directives you may have. Replace the values with ones appropriate to your setup.
<VirtualHost *:80># Your domain nameServerName YOUR_DOMAIN_NAME
ProxyPreserveHost On
# The IP and port of JBoss# These represent the default values, if your httpd is on the same host# as your JBoss managed domain or server
ProxyPass / http://localhost:8080/ProxyPassReverse / http://localhost:8080/
# The location of the HTML files, and access control informationDocumentRoot /var/www<Directory /var/www>Options -IndexesOrder allow,denyAllow from all</Directory></VirtualHost>
Add a Load-balancing Proxy
Red Hat JBoss Enterprise Application Platform 7.0 Configuration Guide
290

NOTE
The default Apache HTTP Server configuration has the mod_proxy_balancer.somodule disabled, as it is incompatible with mod_cluster. In order to complete this task,you will need to load this module and disable the mod_cluster modules.
To use mod_proxy as a load balancer, and send work to multiple JBoss EAP instances, add thefollowing configuration to your conf/httpd.conf file. The example IP addresses are fictional.Replace them with the appropriate values for your environment.
<Proxy balancer://mycluster>
Order deny,allowAllow from all
# Add each JBoss Enterprise Application Server by IP address and port.# If the route values are unique like this, one node will not fail over to the other.BalancerMember http://192.168.1.1:8080 route=node1BalancerMember http://192.168.1.2:8180 route=node2</Proxy>
<VirtualHost *:80> # Your domain name ServerName YOUR_DOMAIN_NAME
ProxyPreserveHost On ProxyPass / balancer://mycluster/
# The location of the HTML files, and access control information DocumentRoot /var/www <Directory /var/www> Options -Indexes Order allow,deny Allow from all </Directory>
</VirtualHost>
The examples above all communicate using the HTTP protocol. You can use AJP or HTTPS protocolsinstead, if you load the appropriate mod_proxy modules. See the Apache mod_proxy documentationfor more details.
Enable Sticky SessionsA sticky session means that if a client request originally goes to a specific JBoss EAP worker, all futurerequests will be sent to the same worker, unless it becomes unavailable. This is almost always therecommended behavior.
To enable sticky sessions for mod_proxy, add the stickysession parameter to the ProxyPassstatement.
ProxyPass / balancer://mycluster stickysession=JSESSIONID
CHAPTER 22. CONFIGURING HIGH AVAILABILITY
291
You can specify additional parameters to the ProxyPass statement, such as lbmethod and nofailover. See the Apache mod_proxy documentation for more information on the availableparameters.
22.8.2. Configure JBoss EAP to Communicate with mod_proxy
The JBoss EAP undertow subsystem needs to specify a listener in order to accept requests from andsend replies back to an external web server. Depending on the protocol that you will be using, you mayneed to configure a listener.
An HTTP listener is configured in the JBoss EAP default configuration. If you are using one of thedefault high availability configurations (ha or full-ha), an AJP listener is also preconfigured.
For instructions, see Accepting Requests From External Web Servers .
22.9. MICROSOFT ISAPI CONNECTOR
The Internet Server API (ISAPI) is a set of APIs used to write OLE Server extensions and filters for webservers such as Microsoft’s Internet Information Services (IIS). isapi_redirect.dll is an extensionof mod_jk adjusted to IIS. isapi_redirect.dll enables you to configure JBoss EAP instances asworker nodes with IIS as a load balancer.
NOTE
See JBoss EAP supported configurations for information on the supportedconfigurations of Windows Server and IIS.
22.9.1. Configure Microsoft IIS to Use the ISAPI Connector
Download the ISAPI connector from the Red Hat Customer Portal:
1. Open a browser and log in to the Red Hat Customer Portal JBoss Software Downloads page.
2. Select Web Connectors in the Product drop-down menu.
3. Select the latest JBoss Core Services version from the Version drop-down menu.
4. Find the Red Hat JBoss Core Services ISAPI Connector in the list, and click the Downloadlink.
5. Extract the archive and copy the contents of the sbin directory to a location on your server.The instructions below assume that the contents were copied to C:\connectors\.
To configure the IIS Redirector Using the IIS Manager (IIS 7):
1. Open the IIS manager by clicking Start → Run, and typing inetmgr.
2. In the tree view pane at the left, expand IIS 7.
3. Double-click ISAPI and CGI Registrations to open it in a new window.
4. In the Actions pane, click Add. The Add ISAPI or CGI Restriction window opens.
5. Specify the following values:
Red Hat JBoss Enterprise Application Platform 7.0 Configuration Guide
292
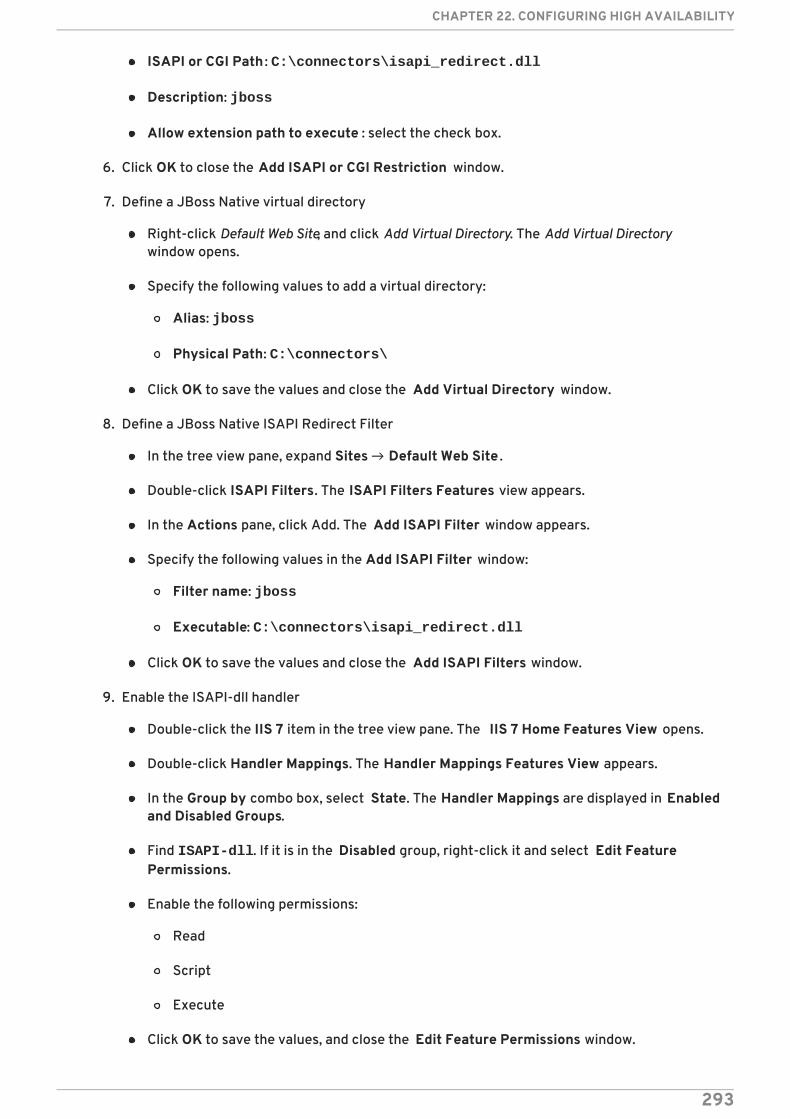
ISAPI or CGI Path : C:\connectors\isapi_redirect.dll
Description: jboss
Allow extension path to execute : select the check box.
6. Click OK to close the Add ISAPI or CGI Restriction window.
7. Define a JBoss Native virtual directory
Right-click Default Web Site, and click Add Virtual Directory. The Add Virtual Directorywindow opens.
Specify the following values to add a virtual directory:
Alias: jboss
Physical Path: C:\connectors\
Click OK to save the values and close the Add Virtual Directory window.
8. Define a JBoss Native ISAPI Redirect Filter
In the tree view pane, expand Sites → Default Web Site .
Double-click ISAPI Filters. The ISAPI Filters Features view appears.
In the Actions pane, click Add. The Add ISAPI Filter window appears.
Specify the following values in the Add ISAPI Filter window:
Filter name: jboss
Executable: C:\connectors\isapi_redirect.dll
Click OK to save the values and close the Add ISAPI Filters window.
9. Enable the ISAPI-dll handler
Double-click the IIS 7 item in the tree view pane. The IIS 7 Home Features View opens.
Double-click Handler Mappings. The Handler Mappings Features View appears.
In the Group by combo box, select State. The Handler Mappings are displayed in Enabledand Disabled Groups.
Find ISAPI-dll. If it is in the Disabled group, right-click it and select Edit FeaturePermissions.
Enable the following permissions:
Read
Script
Execute
Click OK to save the values, and close the Edit Feature Permissions window.
CHAPTER 22. CONFIGURING HIGH AVAILABILITY
293
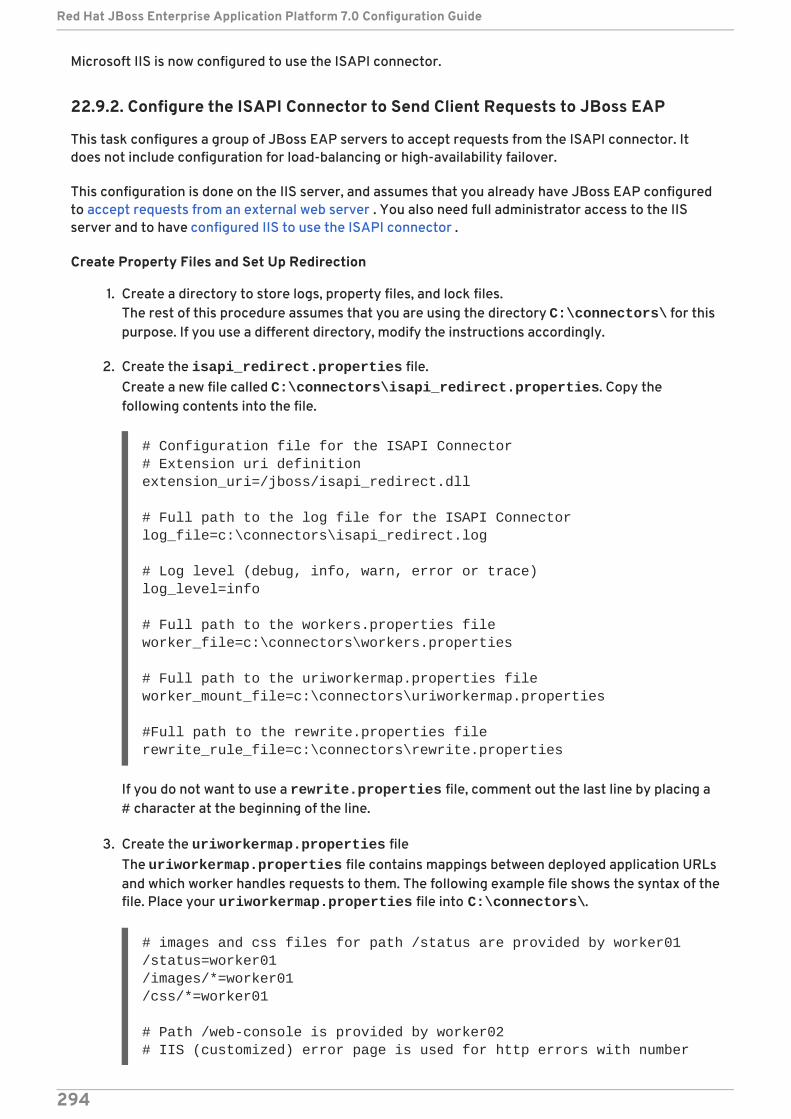
Microsoft IIS is now configured to use the ISAPI connector.
22.9.2. Configure the ISAPI Connector to Send Client Requests to JBoss EAP
This task configures a group of JBoss EAP servers to accept requests from the ISAPI connector. Itdoes not include configuration for load-balancing or high-availability failover.
This configuration is done on the IIS server, and assumes that you already have JBoss EAP configuredto accept requests from an external web server . You also need full administrator access to the IISserver and to have configured IIS to use the ISAPI connector .
Create Property Files and Set Up Redirection
1. Create a directory to store logs, property files, and lock files.The rest of this procedure assumes that you are using the directory C:\connectors\ for thispurpose. If you use a different directory, modify the instructions accordingly.
2. Create the isapi_redirect.properties file.Create a new file called C:\connectors\isapi_redirect.properties. Copy thefollowing contents into the file.
# Configuration file for the ISAPI Connector# Extension uri definitionextension_uri=/jboss/isapi_redirect.dll
# Full path to the log file for the ISAPI Connectorlog_file=c:\connectors\isapi_redirect.log
# Log level (debug, info, warn, error or trace)log_level=info
# Full path to the workers.properties fileworker_file=c:\connectors\workers.properties
# Full path to the uriworkermap.properties fileworker_mount_file=c:\connectors\uriworkermap.properties
#Full path to the rewrite.properties filerewrite_rule_file=c:\connectors\rewrite.properties
If you do not want to use a rewrite.properties file, comment out the last line by placing a # character at the beginning of the line.
3. Create the uriworkermap.properties fileThe uriworkermap.properties file contains mappings between deployed application URLsand which worker handles requests to them. The following example file shows the syntax of thefile. Place your uriworkermap.properties file into C:\connectors\.
# images and css files for path /status are provided by worker01/status=worker01/images/*=worker01/css/*=worker01
# Path /web-console is provided by worker02# IIS (customized) error page is used for http errors with number
Red Hat JBoss Enterprise Application Platform 7.0 Configuration Guide
294
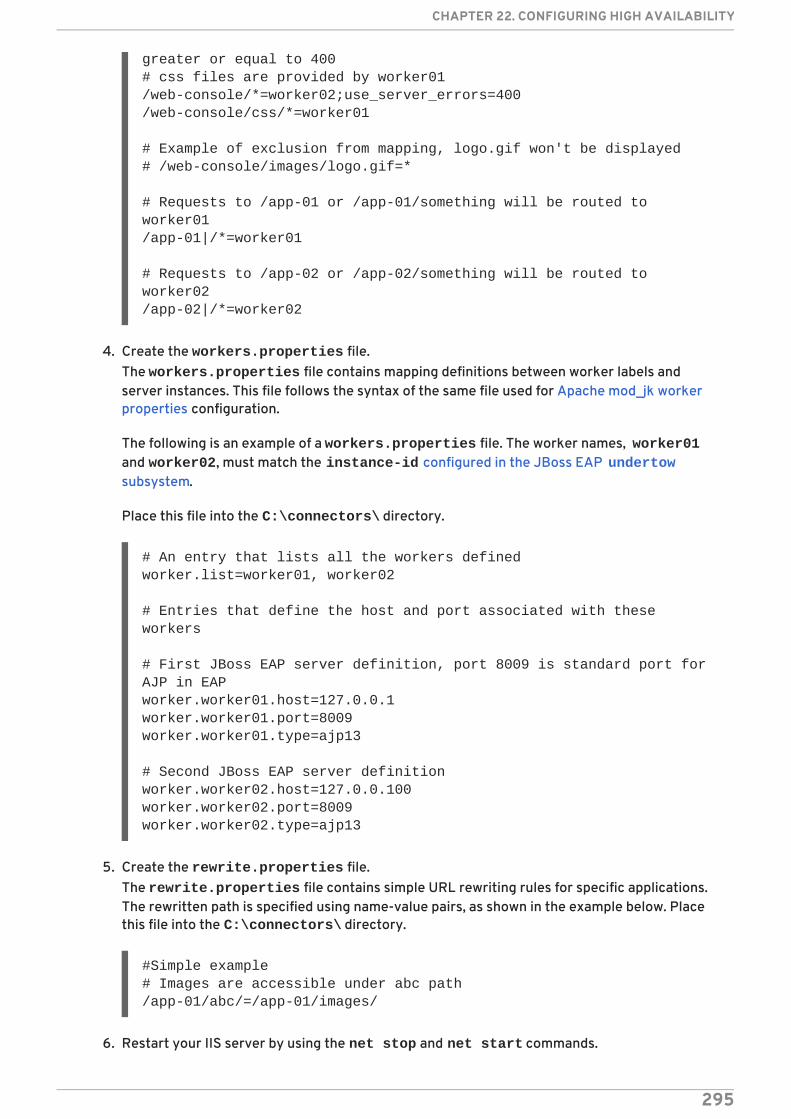
greater or equal to 400# css files are provided by worker01/web-console/*=worker02;use_server_errors=400/web-console/css/*=worker01
# Example of exclusion from mapping, logo.gif won't be displayed# /web-console/images/logo.gif=*
# Requests to /app-01 or /app-01/something will be routed to worker01/app-01|/*=worker01
# Requests to /app-02 or /app-02/something will be routed to worker02/app-02|/*=worker02
4. Create the workers.properties file.The workers.properties file contains mapping definitions between worker labels andserver instances. This file follows the syntax of the same file used for Apache mod_jk workerproperties configuration.
The following is an example of a workers.properties file. The worker names, worker01and worker02, must match the instance-id configured in the JBoss EAP undertowsubsystem.
Place this file into the C:\connectors\ directory.
# An entry that lists all the workers definedworker.list=worker01, worker02
# Entries that define the host and port associated with these workers
# First JBoss EAP server definition, port 8009 is standard port for AJP in EAPworker.worker01.host=127.0.0.1worker.worker01.port=8009worker.worker01.type=ajp13
# Second JBoss EAP server definitionworker.worker02.host=127.0.0.100worker.worker02.port=8009worker.worker02.type=ajp13
5. Create the rewrite.properties file.The rewrite.properties file contains simple URL rewriting rules for specific applications.The rewritten path is specified using name-value pairs, as shown in the example below. Placethis file into the C:\connectors\ directory.
#Simple example# Images are accessible under abc path/app-01/abc/=/app-01/images/
6. Restart your IIS server by using the net stop and net start commands.
CHAPTER 22. CONFIGURING HIGH AVAILABILITY
295
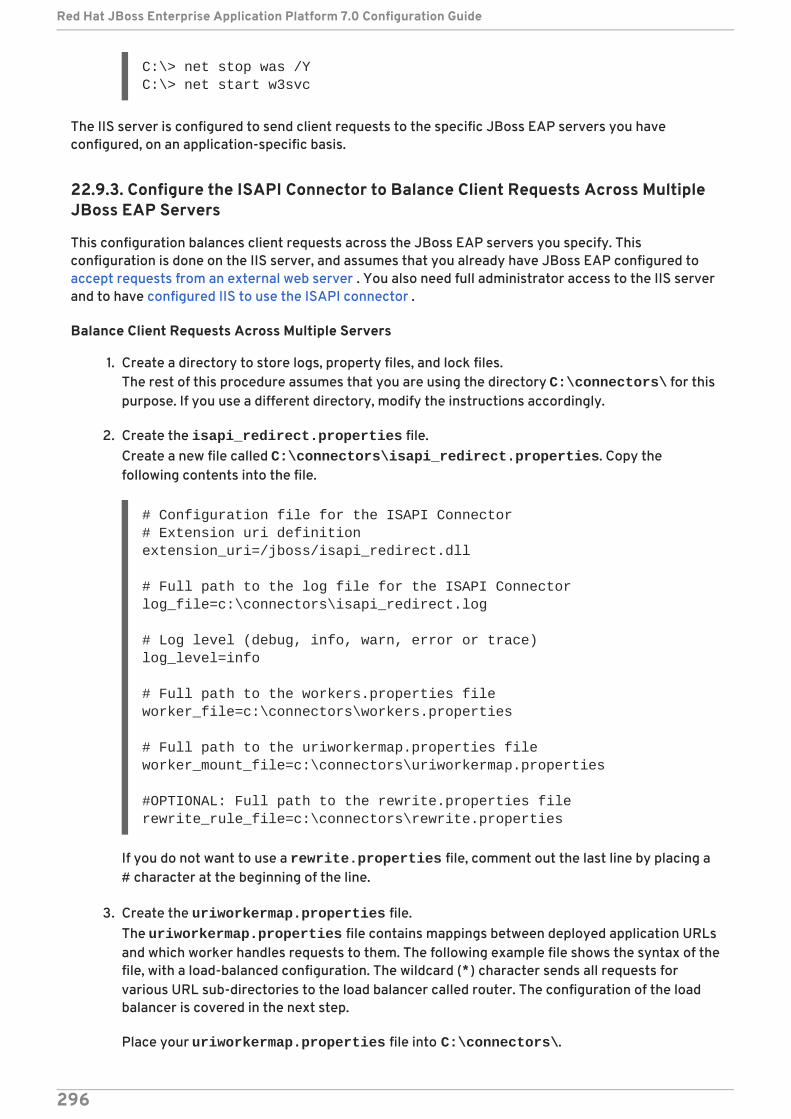
C:\> net stop was /YC:\> net start w3svc
The IIS server is configured to send client requests to the specific JBoss EAP servers you haveconfigured, on an application-specific basis.
22.9.3. Configure the ISAPI Connector to Balance Client Requests Across MultipleJBoss EAP Servers
This configuration balances client requests across the JBoss EAP servers you specify. Thisconfiguration is done on the IIS server, and assumes that you already have JBoss EAP configured toaccept requests from an external web server . You also need full administrator access to the IIS serverand to have configured IIS to use the ISAPI connector .
Balance Client Requests Across Multiple Servers
1. Create a directory to store logs, property files, and lock files.The rest of this procedure assumes that you are using the directory C:\connectors\ for thispurpose. If you use a different directory, modify the instructions accordingly.
2. Create the isapi_redirect.properties file.Create a new file called C:\connectors\isapi_redirect.properties. Copy thefollowing contents into the file.
# Configuration file for the ISAPI Connector# Extension uri definitionextension_uri=/jboss/isapi_redirect.dll
# Full path to the log file for the ISAPI Connectorlog_file=c:\connectors\isapi_redirect.log
# Log level (debug, info, warn, error or trace)log_level=info
# Full path to the workers.properties fileworker_file=c:\connectors\workers.properties
# Full path to the uriworkermap.properties fileworker_mount_file=c:\connectors\uriworkermap.properties
#OPTIONAL: Full path to the rewrite.properties filerewrite_rule_file=c:\connectors\rewrite.properties
If you do not want to use a rewrite.properties file, comment out the last line by placing a # character at the beginning of the line.
3. Create the uriworkermap.properties file.The uriworkermap.properties file contains mappings between deployed application URLsand which worker handles requests to them. The following example file shows the syntax of thefile, with a load-balanced configuration. The wildcard (*) character sends all requests forvarious URL sub-directories to the load balancer called router. The configuration of the loadbalancer is covered in the next step.
Place your uriworkermap.properties file into C:\connectors\.
Red Hat JBoss Enterprise Application Platform 7.0 Configuration Guide
296
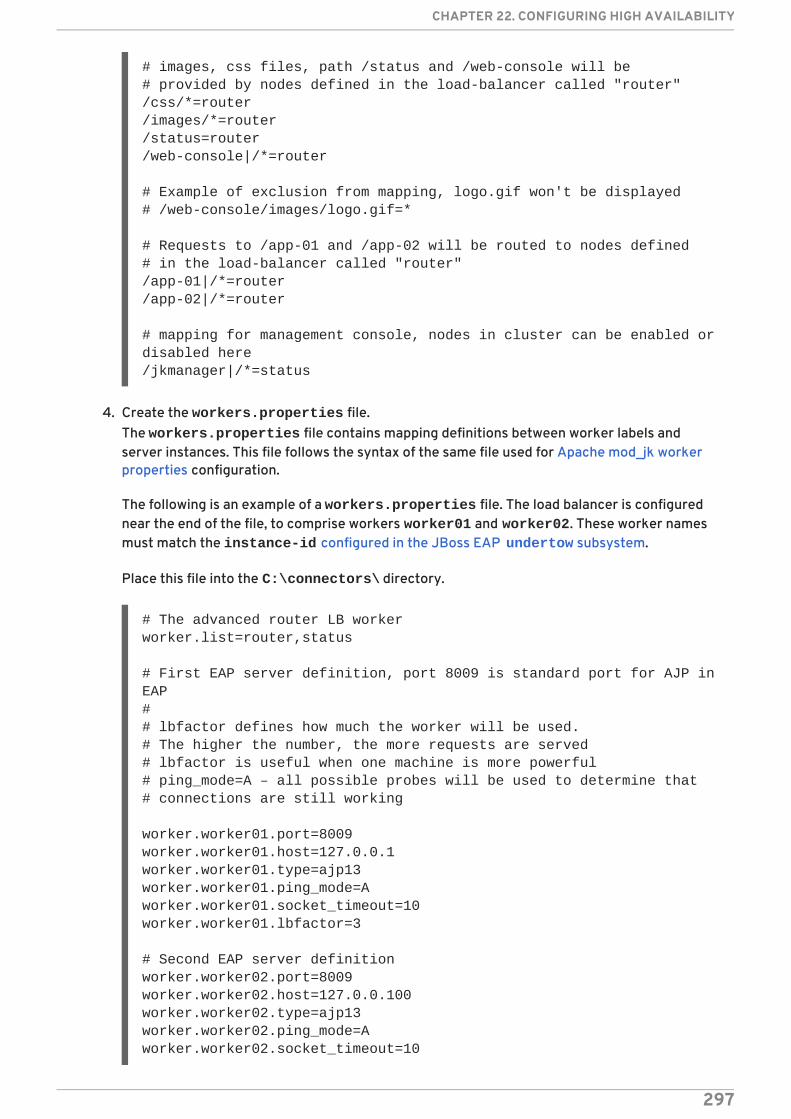
# images, css files, path /status and /web-console will be# provided by nodes defined in the load-balancer called "router"/css/*=router/images/*=router/status=router/web-console|/*=router
# Example of exclusion from mapping, logo.gif won't be displayed# /web-console/images/logo.gif=*
# Requests to /app-01 and /app-02 will be routed to nodes defined# in the load-balancer called "router"/app-01|/*=router/app-02|/*=router
# mapping for management console, nodes in cluster can be enabled or disabled here/jkmanager|/*=status
4. Create the workers.properties file.The workers.properties file contains mapping definitions between worker labels andserver instances. This file follows the syntax of the same file used for Apache mod_jk workerproperties configuration.
The following is an example of a workers.properties file. The load balancer is configurednear the end of the file, to comprise workers worker01 and worker02. These worker namesmust match the instance-id configured in the JBoss EAP undertow subsystem.
Place this file into the C:\connectors\ directory.
# The advanced router LB workerworker.list=router,status
# First EAP server definition, port 8009 is standard port for AJP in EAP## lbfactor defines how much the worker will be used.# The higher the number, the more requests are served# lbfactor is useful when one machine is more powerful# ping_mode=A – all possible probes will be used to determine that# connections are still working
worker.worker01.port=8009worker.worker01.host=127.0.0.1worker.worker01.type=ajp13worker.worker01.ping_mode=Aworker.worker01.socket_timeout=10worker.worker01.lbfactor=3
# Second EAP server definitionworker.worker02.port=8009worker.worker02.host=127.0.0.100worker.worker02.type=ajp13worker.worker02.ping_mode=Aworker.worker02.socket_timeout=10
CHAPTER 22. CONFIGURING HIGH AVAILABILITY
297

worker.worker02.lbfactor=1
# Define the LB workerworker.router.type=lbworker.router.balance_workers=worker01,worker02
# Define the status worker for jkmanagerworker.status.type=status
5. Create the rewrite.properties file.The rewrite.properties file contains simple URL rewriting rules for specific applications.The rewritten path is specified using name-value pairs, as shown in the example below. Placethis file into the C:\connectors\ directory.
#Simple example# Images are accessible under abc path/app-01/abc/=/app-01/images/Restart the IIS server.
Restart your IIS server by using the net stop and net start commands.C:\> net stop was /YC:\> net start w3svc
The IIS server is configured to send client requests to the JBoss EAP servers referenced in the workers.properties file, spreading the load across the servers in a 1:3 ratio. This ratio is derivedfrom the load-balancing factor (lbfactor) assigned to each server.
22.10. ORACLE NSAPI CONNECTOR
The Netscape Server API (NSAPI) is an API provided by Oracle iPlanet Web Server, formerly NetscapeWeb Server, for implementing extensions to the server. These extensions are known as server plugins.The NSAPI connector is used in nsapi_redirector.so, which is an extension of mod_jk adjusted toOracle iPlanet Web Server. The NSAPI connector enables you to configure JBoss EAP instances asworker nodes with Oracle iPlanet Web Server as a load balancer.
NOTE
See the JBoss EAP supported configurations for information on the supportedconfigurations of Solaris and Oracle iPlanet Web Server.
22.10.1. Configure Oracle iPlanet Web Server to use the NSAPI Connector
Prerequisites
JBoss EAP is installed and configured on each server that will serve as a worker.
Download the NSAPI connector from the Red Hat Customer Portal:
1. Open a browser and log in to the Red Hat Customer Portal JBoss Software Downloads page.
2. Select Web Connectors in the Product drop-down menu.
Red Hat JBoss Enterprise Application Platform 7.0 Configuration Guide
298
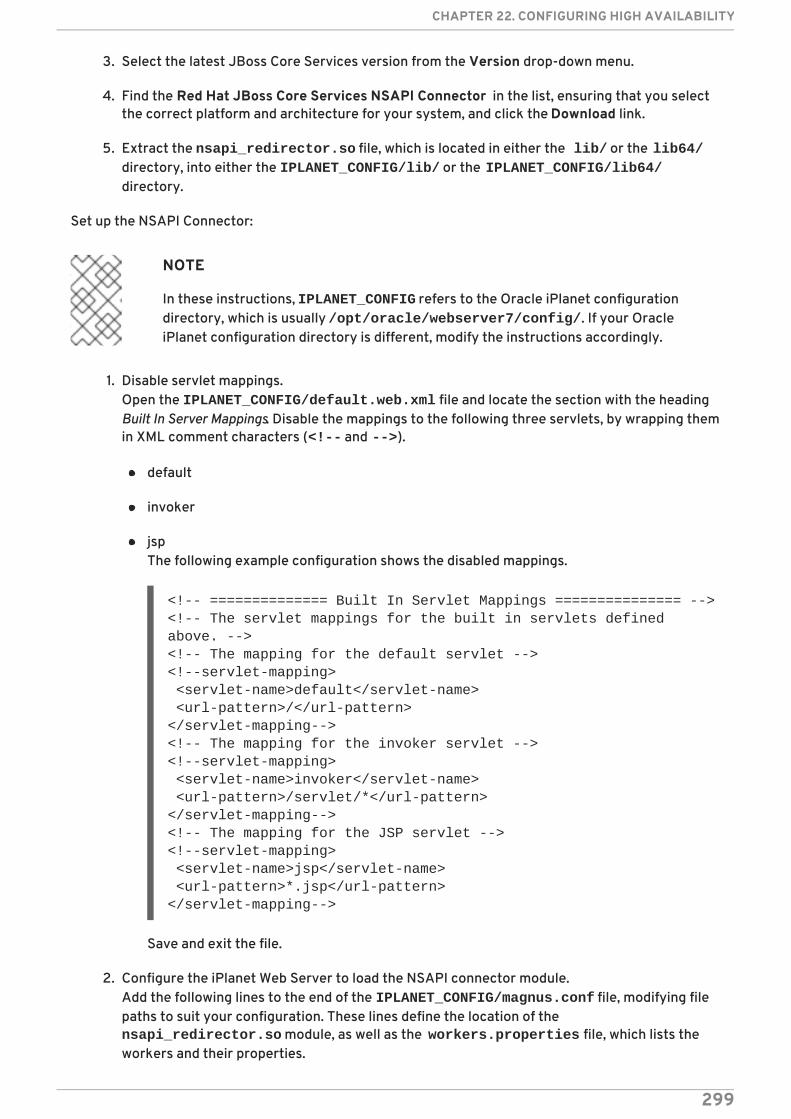
3. Select the latest JBoss Core Services version from the Version drop-down menu.
4. Find the Red Hat JBoss Core Services NSAPI Connector in the list, ensuring that you selectthe correct platform and architecture for your system, and click the Download link.
5. Extract the nsapi_redirector.so file, which is located in either the lib/ or the lib64/directory, into either the IPLANET_CONFIG/lib/ or the IPLANET_CONFIG/lib64/directory.
Set up the NSAPI Connector:
NOTE
In these instructions, IPLANET_CONFIG refers to the Oracle iPlanet configurationdirectory, which is usually /opt/oracle/webserver7/config/. If your OracleiPlanet configuration directory is different, modify the instructions accordingly.
1. Disable servlet mappings.Open the IPLANET_CONFIG/default.web.xml file and locate the section with the headingBuilt In Server Mappings. Disable the mappings to the following three servlets, by wrapping themin XML comment characters (<!-- and -->).
default
invoker
jspThe following example configuration shows the disabled mappings.
<!-- ============== Built In Servlet Mappings =============== --><!-- The servlet mappings for the built in servlets defined above. --><!-- The mapping for the default servlet --><!--servlet-mapping> <servlet-name>default</servlet-name> <url-pattern>/</url-pattern></servlet-mapping--><!-- The mapping for the invoker servlet --><!--servlet-mapping> <servlet-name>invoker</servlet-name> <url-pattern>/servlet/*</url-pattern></servlet-mapping--><!-- The mapping for the JSP servlet --><!--servlet-mapping> <servlet-name>jsp</servlet-name> <url-pattern>*.jsp</url-pattern></servlet-mapping-->
Save and exit the file.
2. Configure the iPlanet Web Server to load the NSAPI connector module.Add the following lines to the end of the IPLANET_CONFIG/magnus.conf file, modifying filepaths to suit your configuration. These lines define the location of the nsapi_redirector.so module, as well as the workers.properties file, which lists theworkers and their properties.
CHAPTER 22. CONFIGURING HIGH AVAILABILITY
299
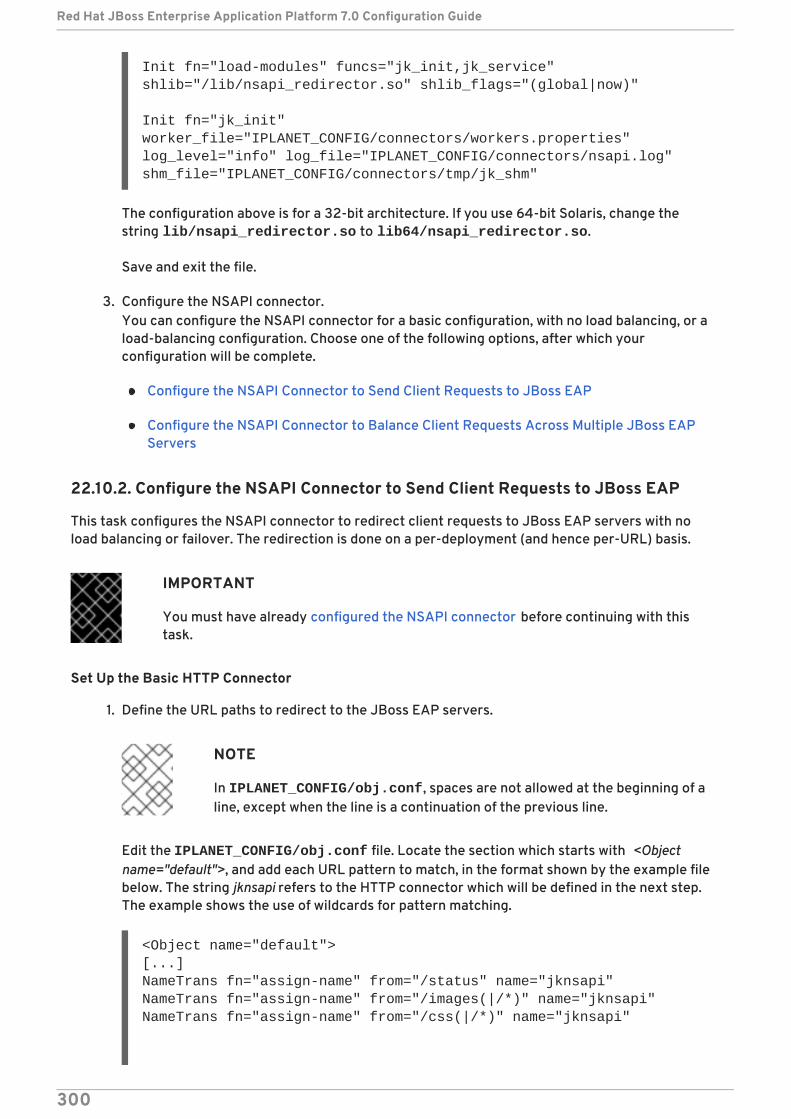
Init fn="load-modules" funcs="jk_init,jk_service" shlib="/lib/nsapi_redirector.so" shlib_flags="(global|now)"
Init fn="jk_init" worker_file="IPLANET_CONFIG/connectors/workers.properties" log_level="info" log_file="IPLANET_CONFIG/connectors/nsapi.log" shm_file="IPLANET_CONFIG/connectors/tmp/jk_shm"
The configuration above is for a 32-bit architecture. If you use 64-bit Solaris, change thestring lib/nsapi_redirector.so to lib64/nsapi_redirector.so.
Save and exit the file.
3. Configure the NSAPI connector.You can configure the NSAPI connector for a basic configuration, with no load balancing, or aload-balancing configuration. Choose one of the following options, after which yourconfiguration will be complete.
Configure the NSAPI Connector to Send Client Requests to JBoss EAP
Configure the NSAPI Connector to Balance Client Requests Across Multiple JBoss EAPServers
22.10.2. Configure the NSAPI Connector to Send Client Requests to JBoss EAP
This task configures the NSAPI connector to redirect client requests to JBoss EAP servers with noload balancing or failover. The redirection is done on a per-deployment (and hence per-URL) basis.
IMPORTANT
You must have already configured the NSAPI connector before continuing with thistask.
Set Up the Basic HTTP Connector
1. Define the URL paths to redirect to the JBoss EAP servers.
NOTE
In IPLANET_CONFIG/obj.conf, spaces are not allowed at the beginning of aline, except when the line is a continuation of the previous line.
Edit the IPLANET_CONFIG/obj.conf file. Locate the section which starts with <Objectname="default">, and add each URL pattern to match, in the format shown by the example filebelow. The string jknsapi refers to the HTTP connector which will be defined in the next step.The example shows the use of wildcards for pattern matching.
<Object name="default">[...]NameTrans fn="assign-name" from="/status" name="jknsapi"NameTrans fn="assign-name" from="/images(|/*)" name="jknsapi"NameTrans fn="assign-name" from="/css(|/*)" name="jknsapi"
Red Hat JBoss Enterprise Application Platform 7.0 Configuration Guide
300
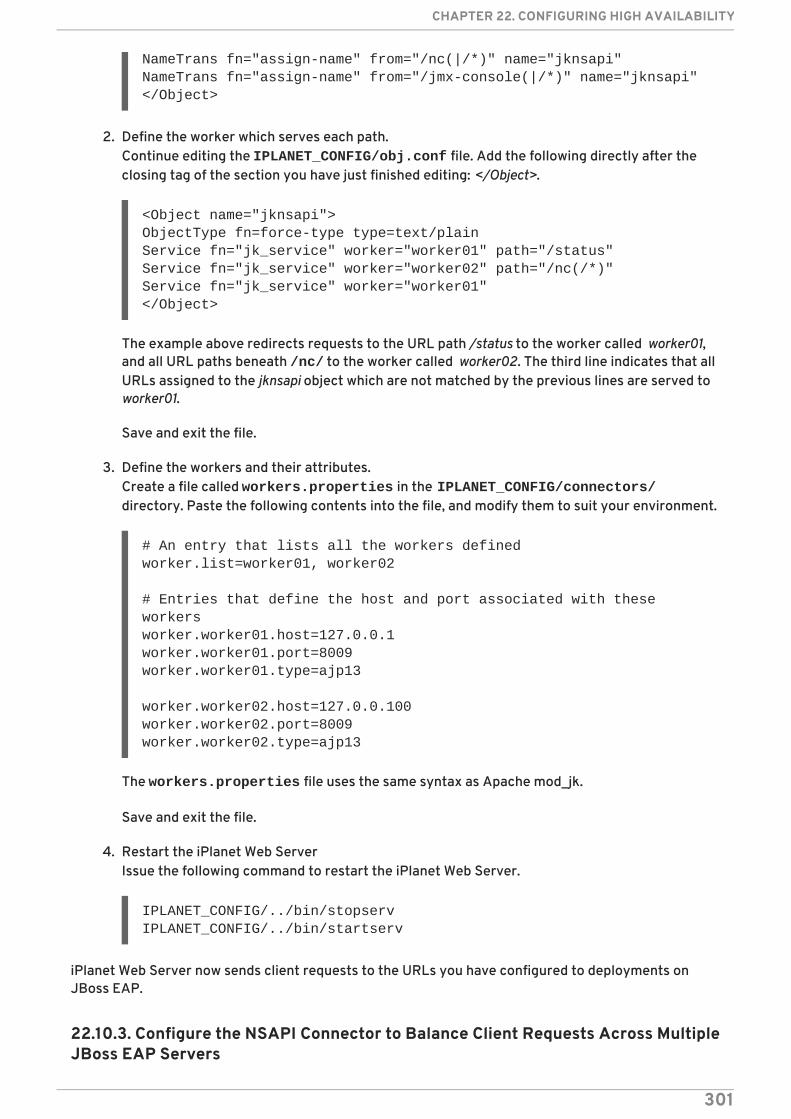
NameTrans fn="assign-name" from="/nc(|/*)" name="jknsapi"NameTrans fn="assign-name" from="/jmx-console(|/*)" name="jknsapi"</Object>
2. Define the worker which serves each path.Continue editing the IPLANET_CONFIG/obj.conf file. Add the following directly after theclosing tag of the section you have just finished editing: </Object>.
<Object name="jknsapi">ObjectType fn=force-type type=text/plainService fn="jk_service" worker="worker01" path="/status"Service fn="jk_service" worker="worker02" path="/nc(/*)"Service fn="jk_service" worker="worker01"</Object>
The example above redirects requests to the URL path /status to the worker called worker01,and all URL paths beneath /nc/ to the worker called worker02. The third line indicates that allURLs assigned to the jknsapi object which are not matched by the previous lines are served toworker01.
Save and exit the file.
3. Define the workers and their attributes.Create a file called workers.properties in the IPLANET_CONFIG/connectors/directory. Paste the following contents into the file, and modify them to suit your environment.
# An entry that lists all the workers definedworker.list=worker01, worker02
# Entries that define the host and port associated with these workersworker.worker01.host=127.0.0.1worker.worker01.port=8009worker.worker01.type=ajp13
worker.worker02.host=127.0.0.100worker.worker02.port=8009worker.worker02.type=ajp13
The workers.properties file uses the same syntax as Apache mod_jk.
Save and exit the file.
4. Restart the iPlanet Web ServerIssue the following command to restart the iPlanet Web Server.
IPLANET_CONFIG/../bin/stopservIPLANET_CONFIG/../bin/startserv
iPlanet Web Server now sends client requests to the URLs you have configured to deployments onJBoss EAP.
22.10.3. Configure the NSAPI Connector to Balance Client Requests Across MultipleJBoss EAP Servers
CHAPTER 22. CONFIGURING HIGH AVAILABILITY
301
This task configures the NSAPI connector to send client requests to JBoss EAP servers in a load-balancing configuration.
IMPORTANT
You must have already configured the NSAPI connector before continuing with thistask.
Configure the Connector for Load Balancing
1. Define the URL paths to redirect to the JBoss EAP servers.
NOTE
In IPLANET_CONFIG/obj.conf, spaces are not allowed at the beginning of aline, except when the line is a continuation of the previous line.
Edit the IPLANET_CONFIG/obj.conf file. Locate the section which starts with <Object name="default">, and add each URL pattern to match, in the format shown by the examplefile below. The string jknsapi refers to the HTTP connector that will be defined in the nextstep. The example shows the use of wildcards for pattern matching.
<Object name="default">[...]NameTrans fn="assign-name" from="/status" name="jknsapi"NameTrans fn="assign-name" from="/images(|/*)" name="jknsapi"NameTrans fn="assign-name" from="/css(|/*)" name="jknsapi"NameTrans fn="assign-name" from="/nc(|/*)" name="jknsapi"NameTrans fn="assign-name" from="/jmx-console(|/*)" name="jknsapi"NameTrans fn="assign-name" from="/jkmanager/*" name="jknsapi"</Object>
2. Define the worker that serves each path.Continue editing the IPLANET_CONFIG/obj.conf file. Directly after the closing tag for thesection you modified in the previous step (</Object>), add the following new section andmodify it to your needs:
<Object name="jknsapi">ObjectType fn=force-type type=text/plainService fn="jk_service" worker="status" path="/jkmanager(/*)"Service fn="jk_service" worker="router"</Object>
This jksnapi object defines the worker nodes used to serve each path that was mapped tothe name="jksnapi" mapping in the default object. Everything except for URLs matching /jkmanager/* is redirected to the worker called router.
3. Define the workers and their attributes.Create a file called workers.properties in IPLANET_CONFIG/connector/. Paste thefollowing contents into the file, and modify them to suit your environment.
# The advanced router LB worker# A list of each worker
Red Hat JBoss Enterprise Application Platform 7.0 Configuration Guide
302

worker.list=router,status
# First JBoss EAP server# (worker node) definition.# Port 8009 is the standard port for AJP#
worker.worker01.port=8009worker.worker01.host=127.0.0.1worker.worker01.type=ajp13worker.worker01.ping_mode=Aworker.worker01.socket_timeout=10worker.worker01.lbfactor=3
# Second JBoss EAP serverworker.worker02.port=8009worker.worker02.host=127.0.0.100worker.worker02.type=ajp13worker.worker02.ping_mode=Aworker.worker02.socket_timeout=10worker.worker02.lbfactor=1
# Define the load-balancer called "router"worker.router.type=lbworker.router.balance_workers=worker01,worker02
# Define the status workerworker.status.type=status
The workers.properties file uses the same syntax as Apache mod_jk.
Save and exit the file.
4. Restart the iPlanet Web Server 7.0.
IPLANET_CONFIG/../bin/stopservIPLANET_CONFIG/../bin/startserv
The iPlanet Web Server redirects the URL patterns you have configured to your JBoss EAP servers ina load-balancing configuration.
CHAPTER 22. CONFIGURING HIGH AVAILABILITY
303
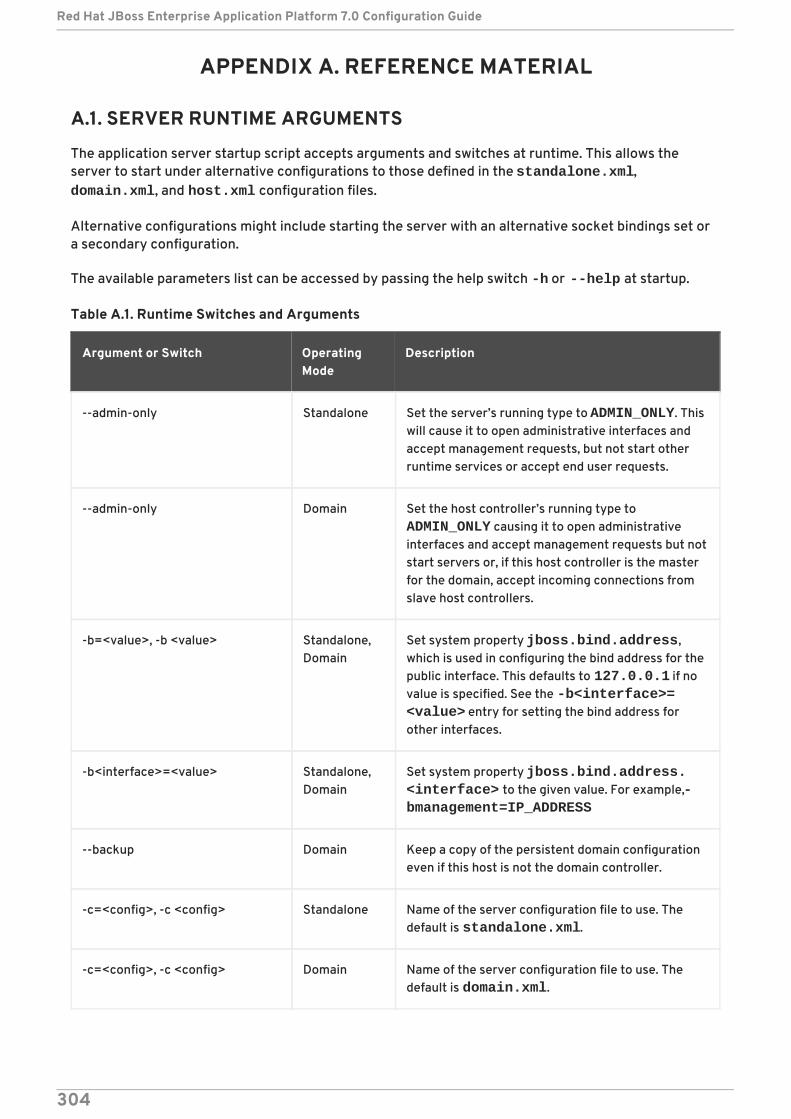
APPENDIX A. REFERENCE MATERIAL
A.1. SERVER RUNTIME ARGUMENTS
The application server startup script accepts arguments and switches at runtime. This allows theserver to start under alternative configurations to those defined in the standalone.xml, domain.xml, and host.xml configuration files.
Alternative configurations might include starting the server with an alternative socket bindings set ora secondary configuration.
The available parameters list can be accessed by passing the help switch -h or --help at startup.
Table A.1. Runtime Switches and Arguments
Argument or Switch OperatingMode
Description
--admin-only Standalone Set the server’s running type to ADMIN_ONLY. Thiswill cause it to open administrative interfaces andaccept management requests, but not start otherruntime services or accept end user requests.
--admin-only Domain Set the host controller’s running type to ADMIN_ONLY causing it to open administrativeinterfaces and accept management requests but notstart servers or, if this host controller is the masterfor the domain, accept incoming connections fromslave host controllers.
-b=<value>, -b <value> Standalone,Domain
Set system property jboss.bind.address,which is used in configuring the bind address for thepublic interface. This defaults to 127.0.0.1 if novalue is specified. See the -b<interface>=<value> entry for setting the bind address forother interfaces.
-b<interface>=<value> Standalone,Domain
Set system property jboss.bind.address.<interface> to the given value. For example, -bmanagement=IP_ADDRESS
--backup Domain Keep a copy of the persistent domain configurationeven if this host is not the domain controller.
-c=<config>, -c <config> Standalone Name of the server configuration file to use. Thedefault is standalone.xml.
-c=<config>, -c <config> Domain Name of the server configuration file to use. Thedefault is domain.xml.
Red Hat JBoss Enterprise Application Platform 7.0 Configuration Guide
304
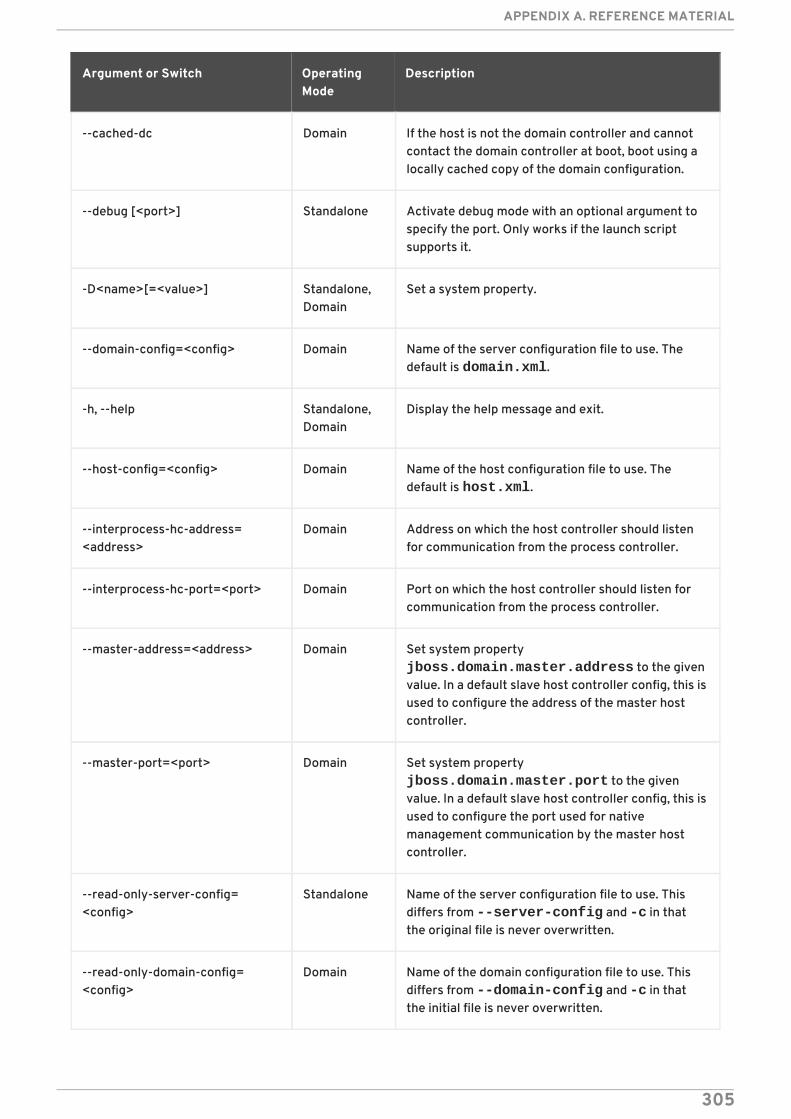
--cached-dc Domain If the host is not the domain controller and cannotcontact the domain controller at boot, boot using alocally cached copy of the domain configuration.
--debug [<port>] Standalone Activate debug mode with an optional argument tospecify the port. Only works if the launch scriptsupports it.
-D<name>[=<value>] Standalone,Domain
Set a system property.
--domain-config=<config> Domain Name of the server configuration file to use. Thedefault is domain.xml.
-h, --help Standalone,Domain
Display the help message and exit.
--host-config=<config> Domain Name of the host configuration file to use. Thedefault is host.xml.
--interprocess-hc-address=<address>
Domain Address on which the host controller should listenfor communication from the process controller.
--interprocess-hc-port=<port> Domain Port on which the host controller should listen forcommunication from the process controller.
--master-address=<address> Domain Set system property jboss.domain.master.address to the givenvalue. In a default slave host controller config, this isused to configure the address of the master hostcontroller.
--master-port=<port> Domain Set system property jboss.domain.master.port to the givenvalue. In a default slave host controller config, this isused to configure the port used for nativemanagement communication by the master hostcontroller.
--read-only-server-config=<config>
Standalone Name of the server configuration file to use. Thisdiffers from --server-config and -c in thatthe original file is never overwritten.
--read-only-domain-config=<config>
Domain Name of the domain configuration file to use. Thisdiffers from --domain-config and -c in thatthe initial file is never overwritten.
Argument or Switch OperatingMode
Description
APPENDIX A. REFERENCE MATERIAL
305
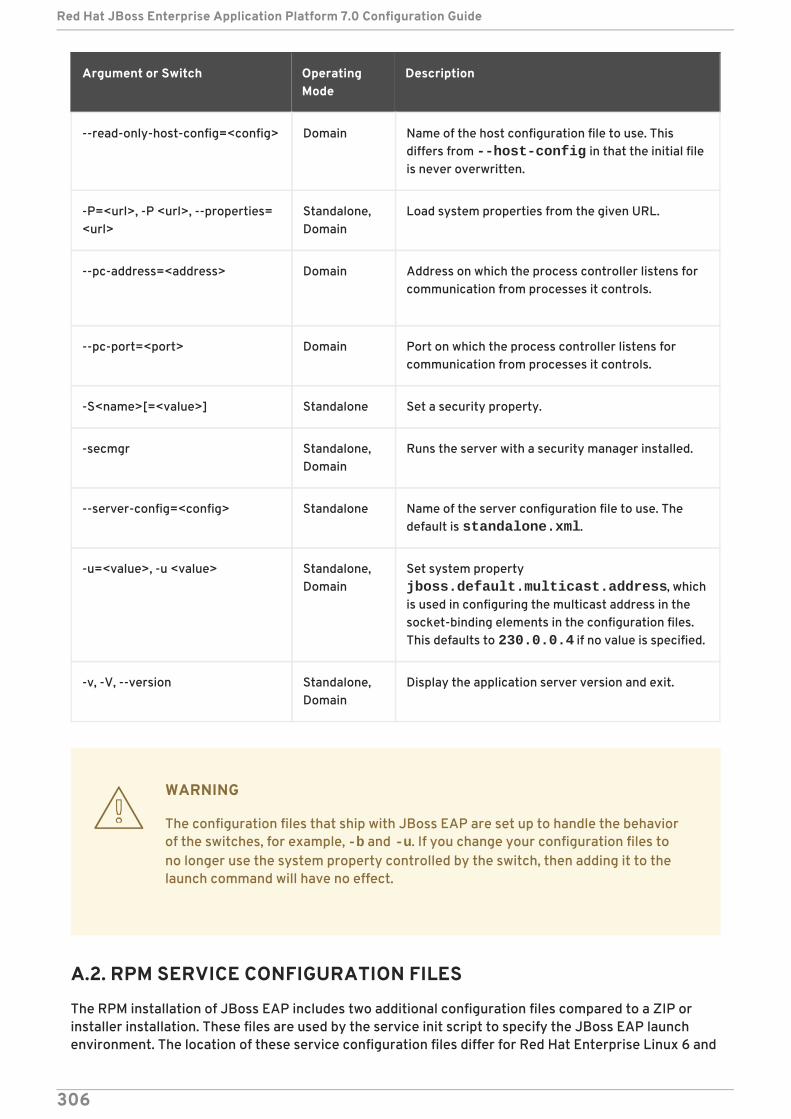
--read-only-host-config=<config> Domain Name of the host configuration file to use. Thisdiffers from --host-config in that the initial fileis never overwritten.
-P=<url>, -P <url>, --properties=<url>
Standalone,Domain
Load system properties from the given URL.
--pc-address=<address> Domain Address on which the process controller listens forcommunication from processes it controls.
--pc-port=<port> Domain Port on which the process controller listens forcommunication from processes it controls.
-S<name>[=<value>] Standalone Set a security property.
-secmgr Standalone,Domain
Runs the server with a security manager installed.
--server-config=<config> Standalone Name of the server configuration file to use. Thedefault is standalone.xml.
-u=<value>, -u <value> Standalone,Domain
Set system property jboss.default.multicast.address, whichis used in configuring the multicast address in thesocket-binding elements in the configuration files.This defaults to 230.0.0.4 if no value is specified.
-v, -V, --version Standalone,Domain
Display the application server version and exit.
Argument or Switch OperatingMode
Description
WARNING
The configuration files that ship with JBoss EAP are set up to handle the behaviorof the switches, for example, -b and -u. If you change your configuration files tono longer use the system property controlled by the switch, then adding it to thelaunch command will have no effect.
A.2. RPM SERVICE CONFIGURATION FILES
The RPM installation of JBoss EAP includes two additional configuration files compared to a ZIP orinstaller installation. These files are used by the service init script to specify the JBoss EAP launchenvironment. The location of these service configuration files differ for Red Hat Enterprise Linux 6 and
Red Hat JBoss Enterprise Application Platform 7.0 Configuration Guide
306
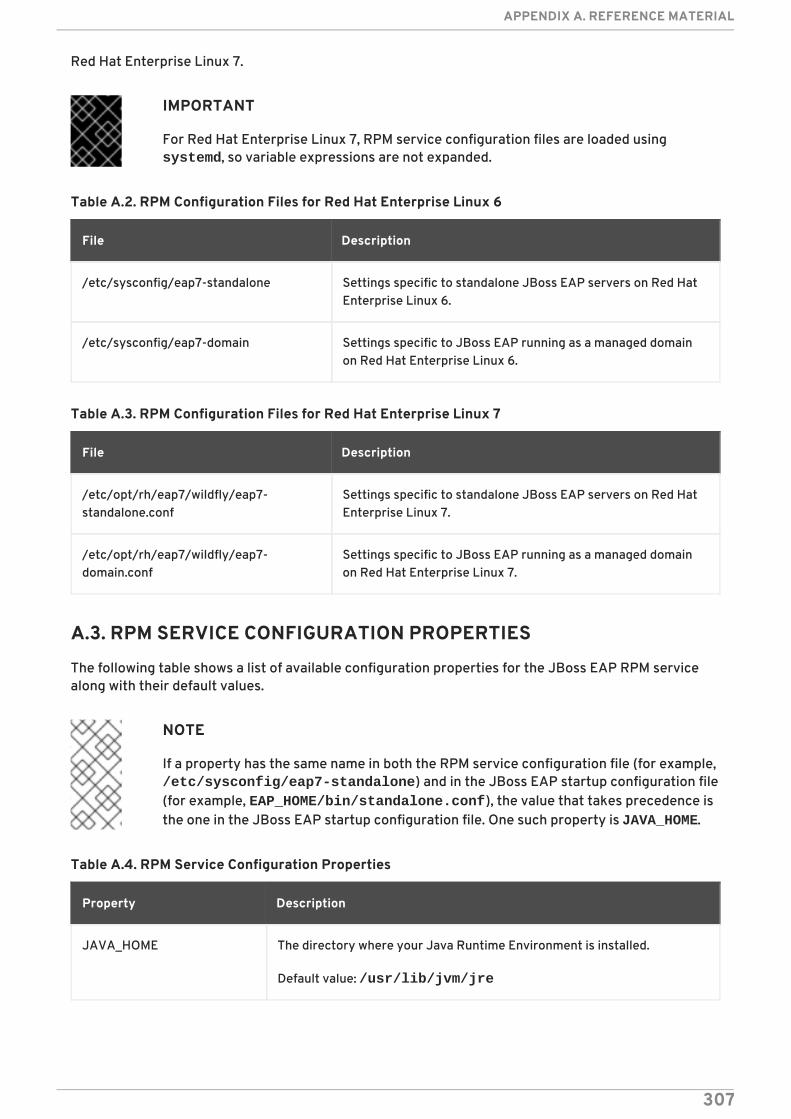
Red Hat Enterprise Linux 7.
IMPORTANT
For Red Hat Enterprise Linux 7, RPM service configuration files are loaded using systemd, so variable expressions are not expanded.
Table A.2. RPM Configuration Files for Red Hat Enterprise Linux 6
File Description
/etc/sysconfig/eap7-standalone Settings specific to standalone JBoss EAP servers on Red HatEnterprise Linux 6.
/etc/sysconfig/eap7-domain Settings specific to JBoss EAP running as a managed domainon Red Hat Enterprise Linux 6.
Table A.3. RPM Configuration Files for Red Hat Enterprise Linux 7
File Description
/etc/opt/rh/eap7/wildfly/eap7-standalone.conf
Settings specific to standalone JBoss EAP servers on Red HatEnterprise Linux 7.
/etc/opt/rh/eap7/wildfly/eap7-domain.conf
Settings specific to JBoss EAP running as a managed domainon Red Hat Enterprise Linux 7.
A.3. RPM SERVICE CONFIGURATION PROPERTIES
The following table shows a list of available configuration properties for the JBoss EAP RPM servicealong with their default values.
NOTE
If a property has the same name in both the RPM service configuration file (for example, /etc/sysconfig/eap7-standalone) and in the JBoss EAP startup configuration file(for example, EAP_HOME/bin/standalone.conf), the value that takes precedence isthe one in the JBoss EAP startup configuration file. One such property is JAVA_HOME.
Table A.4. RPM Service Configuration Properties
Property Description
JAVA_HOME The directory where your Java Runtime Environment is installed.
Default value: /usr/lib/jvm/jre
APPENDIX A. REFERENCE MATERIAL
307
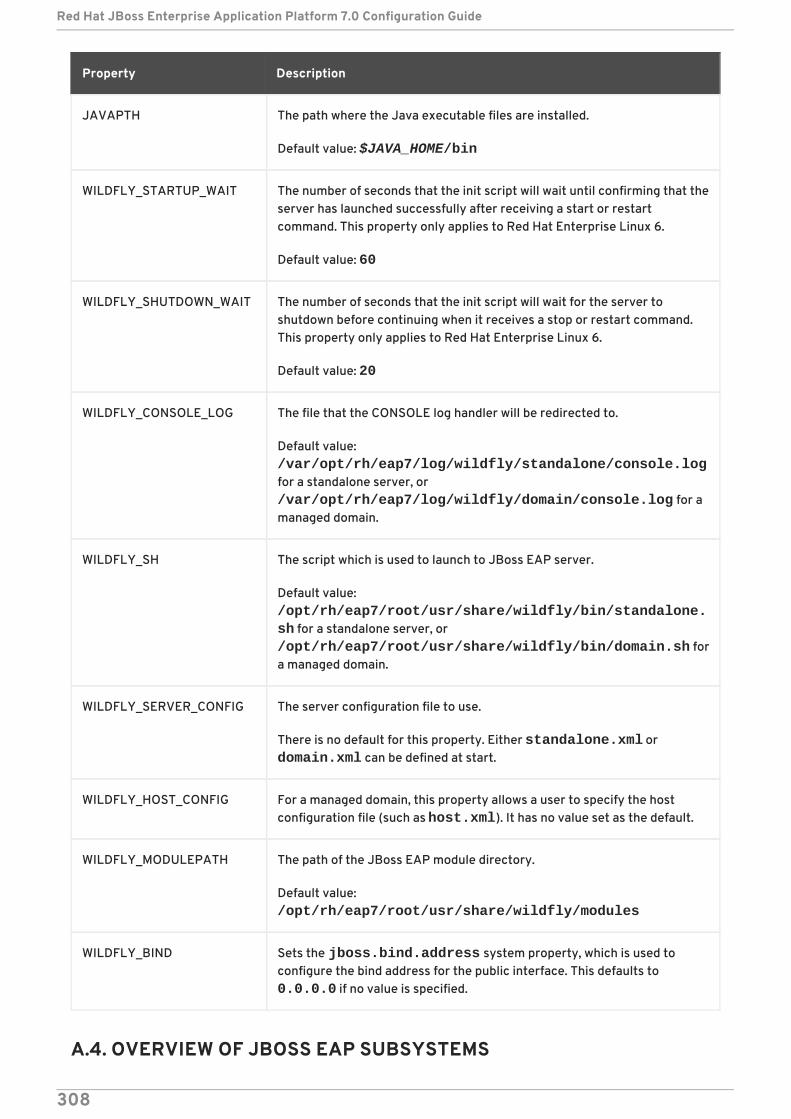
JAVAPTH The path where the Java executable files are installed.
Default value: $JAVA_HOME/bin
WILDFLY_STARTUP_WAIT The number of seconds that the init script will wait until confirming that theserver has launched successfully after receiving a start or restartcommand. This property only applies to Red Hat Enterprise Linux 6.
Default value: 60
WILDFLY_SHUTDOWN_WAIT The number of seconds that the init script will wait for the server toshutdown before continuing when it receives a stop or restart command.This property only applies to Red Hat Enterprise Linux 6.
Default value: 20
WILDFLY_CONSOLE_LOG The file that the CONSOLE log handler will be redirected to.
Default value: /var/opt/rh/eap7/log/wildfly/standalone/console.logfor a standalone server, or /var/opt/rh/eap7/log/wildfly/domain/console.log for amanaged domain.
WILDFLY_SH The script which is used to launch to JBoss EAP server.
Default value: /opt/rh/eap7/root/usr/share/wildfly/bin/standalone.sh for a standalone server, or /opt/rh/eap7/root/usr/share/wildfly/bin/domain.sh fora managed domain.
WILDFLY_SERVER_CONFIG The server configuration file to use.
There is no default for this property. Either standalone.xml or domain.xml can be defined at start.
WILDFLY_HOST_CONFIG For a managed domain, this property allows a user to specify the hostconfiguration file (such as host.xml). It has no value set as the default.
WILDFLY_MODULEPATH The path of the JBoss EAP module directory.
Default value: /opt/rh/eap7/root/usr/share/wildfly/modules
WILDFLY_BIND Sets the jboss.bind.address system property, which is used toconfigure the bind address for the public interface. This defaults to 0.0.0.0 if no value is specified.
Property Description
A.4. OVERVIEW OF JBOSS EAP SUBSYSTEMS
Red Hat JBoss Enterprise Application Platform 7.0 Configuration Guide
308
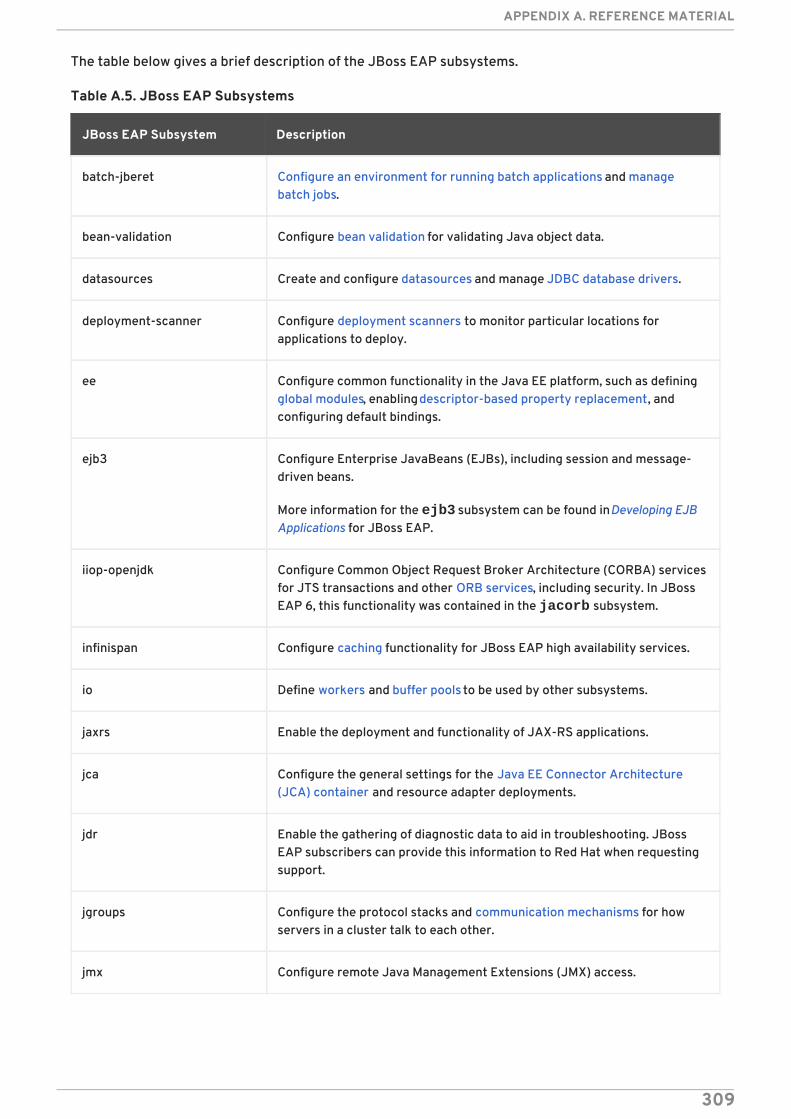
The table below gives a brief description of the JBoss EAP subsystems.
Table A.5. JBoss EAP Subsystems
JBoss EAP Subsystem Description
batch-jberet Configure an environment for running batch applications and managebatch jobs.
bean-validation Configure bean validation for validating Java object data.
datasources Create and configure datasources and manage JDBC database drivers.
deployment-scanner Configure deployment scanners to monitor particular locations forapplications to deploy.
ee Configure common functionality in the Java EE platform, such as definingglobal modules, enabling descriptor-based property replacement, andconfiguring default bindings.
ejb3 Configure Enterprise JavaBeans (EJBs), including session and message-driven beans.
More information for the ejb3 subsystem can be found in Developing EJBApplications for JBoss EAP.
iiop-openjdk Configure Common Object Request Broker Architecture (CORBA) servicesfor JTS transactions and other ORB services, including security. In JBossEAP 6, this functionality was contained in the jacorb subsystem.
infinispan Configure caching functionality for JBoss EAP high availability services.
io Define workers and buffer pools to be used by other subsystems.
jaxrs Enable the deployment and functionality of JAX-RS applications.
jca Configure the general settings for the Java EE Connector Architecture(JCA) container and resource adapter deployments.
jdr Enable the gathering of diagnostic data to aid in troubleshooting. JBossEAP subscribers can provide this information to Red Hat when requestingsupport.
jgroups Configure the protocol stacks and communication mechanisms for howservers in a cluster talk to each other.
jmx Configure remote Java Management Extensions (JMX) access.
APPENDIX A. REFERENCE MATERIAL
309
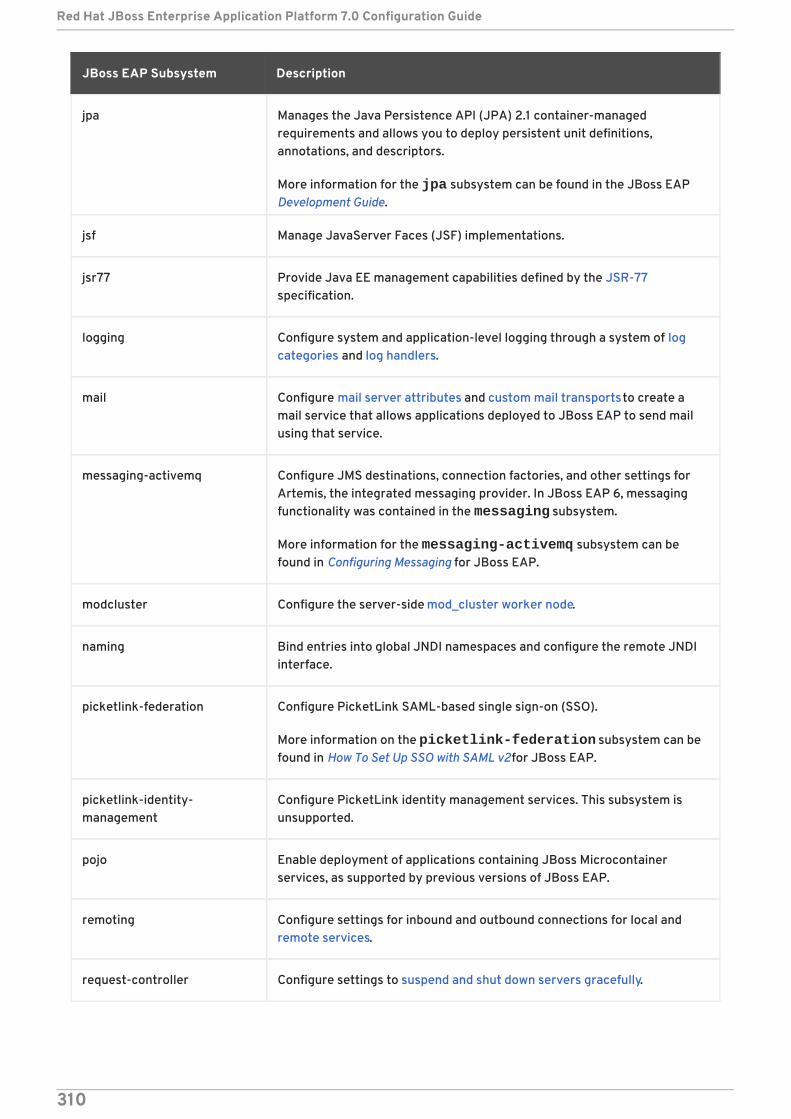
jpa Manages the Java Persistence API (JPA) 2.1 container-managedrequirements and allows you to deploy persistent unit definitions,annotations, and descriptors.
More information for the jpa subsystem can be found in the JBoss EAPDevelopment Guide.
jsf Manage JavaServer Faces (JSF) implementations.
jsr77 Provide Java EE management capabilities defined by the JSR-77specification.
logging Configure system and application-level logging through a system of logcategories and log handlers.
mail Configure mail server attributes and custom mail transports to create amail service that allows applications deployed to JBoss EAP to send mailusing that service.
messaging-activemq Configure JMS destinations, connection factories, and other settings forArtemis, the integrated messaging provider. In JBoss EAP 6, messagingfunctionality was contained in the messaging subsystem.
More information for the messaging-activemq subsystem can befound in Configuring Messaging for JBoss EAP.
modcluster Configure the server-side mod_cluster worker node.
naming Bind entries into global JNDI namespaces and configure the remote JNDIinterface.
picketlink-federation Configure PicketLink SAML-based single sign-on (SSO).
More information on the picketlink-federation subsystem can befound in How To Set Up SSO with SAML v2 for JBoss EAP.
picketlink-identity-management
Configure PicketLink identity management services. This subsystem isunsupported.
pojo Enable deployment of applications containing JBoss Microcontainerservices, as supported by previous versions of JBoss EAP.
remoting Configure settings for inbound and outbound connections for local andremote services.
request-controller Configure settings to suspend and shut down servers gracefully.
JBoss EAP Subsystem Description
Red Hat JBoss Enterprise Application Platform 7.0 Configuration Guide
310
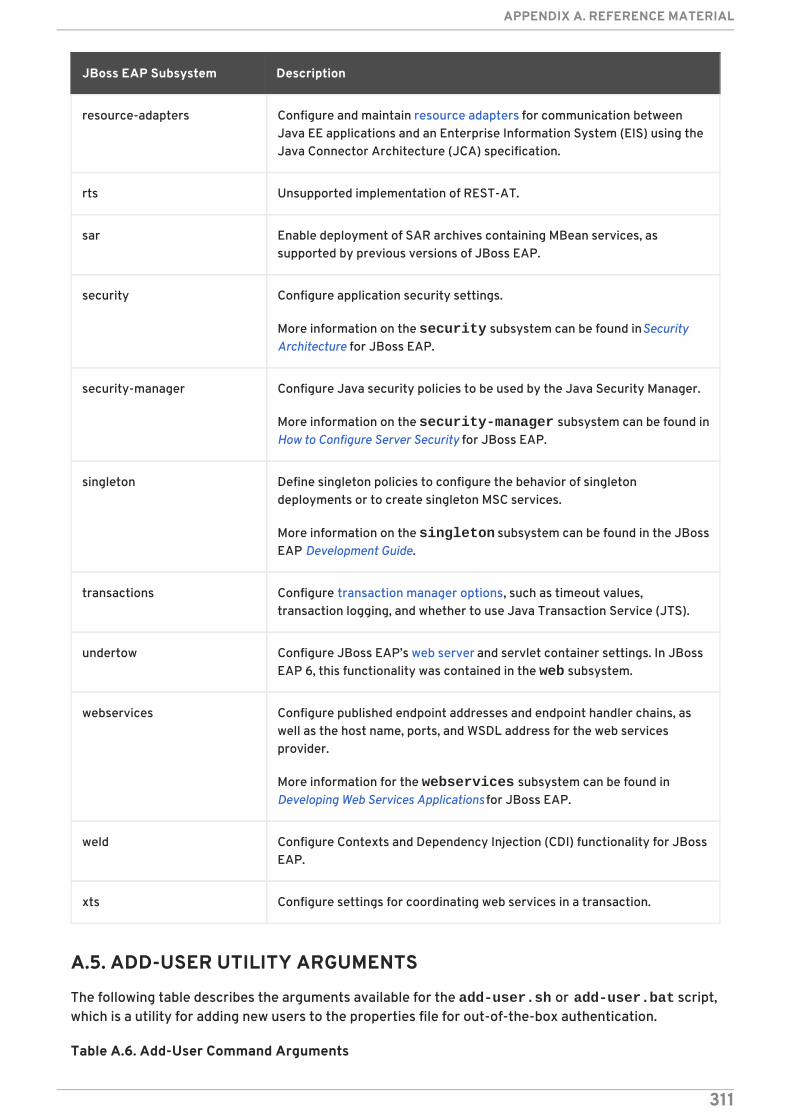
resource-adapters Configure and maintain resource adapters for communication betweenJava EE applications and an Enterprise Information System (EIS) using theJava Connector Architecture (JCA) specification.
rts Unsupported implementation of REST-AT.
sar Enable deployment of SAR archives containing MBean services, assupported by previous versions of JBoss EAP.
security Configure application security settings.
More information on the security subsystem can be found in SecurityArchitecture for JBoss EAP.
security-manager Configure Java security policies to be used by the Java Security Manager.
More information on the security-manager subsystem can be found inHow to Configure Server Security for JBoss EAP.
singleton Define singleton policies to configure the behavior of singletondeployments or to create singleton MSC services.
More information on the singleton subsystem can be found in the JBossEAP Development Guide.
transactions Configure transaction manager options, such as timeout values,transaction logging, and whether to use Java Transaction Service (JTS).
undertow Configure JBoss EAP’s web server and servlet container settings. In JBossEAP 6, this functionality was contained in the web subsystem.
webservices Configure published endpoint addresses and endpoint handler chains, aswell as the host name, ports, and WSDL address for the web servicesprovider.
More information for the webservices subsystem can be found inDeveloping Web Services Applications for JBoss EAP.
weld Configure Contexts and Dependency Injection (CDI) functionality for JBossEAP.
xts Configure settings for coordinating web services in a transaction.
JBoss EAP Subsystem Description
A.5. ADD-USER UTILITY ARGUMENTS
The following table describes the arguments available for the add-user.sh or add-user.bat script,which is a utility for adding new users to the properties file for out-of-the-box authentication.
Table A.6. Add-User Command Arguments
APPENDIX A. REFERENCE MATERIAL
311
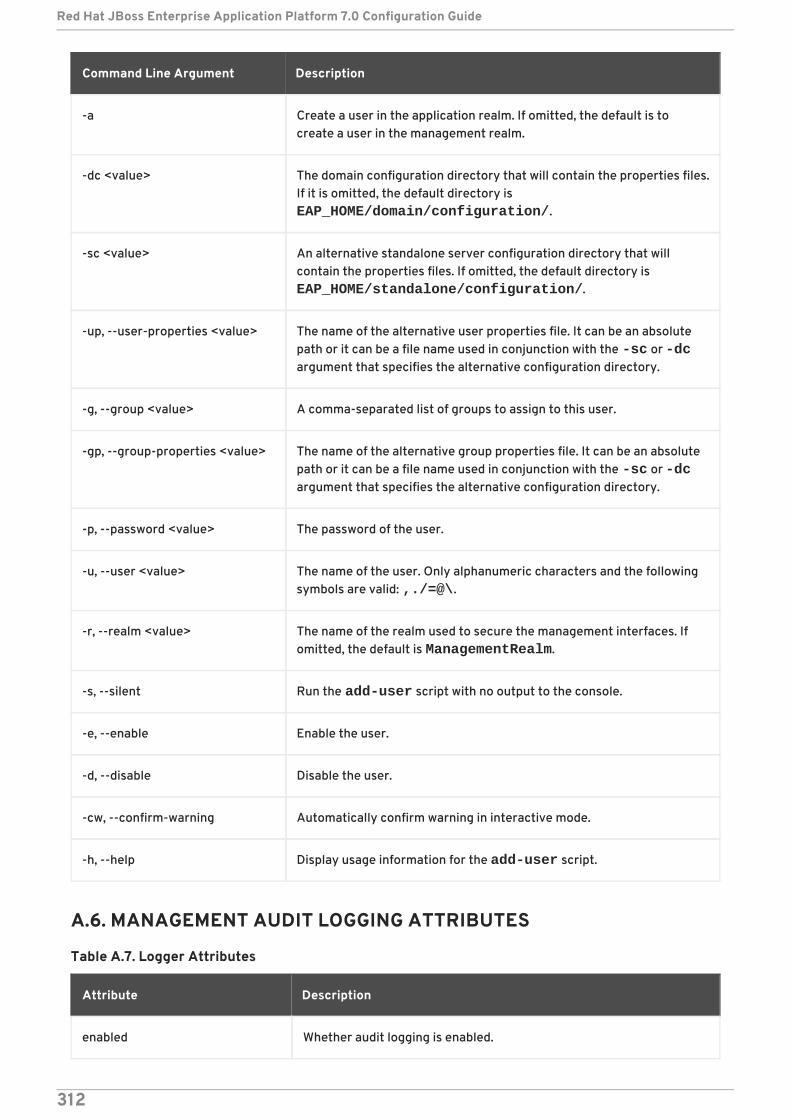
Command Line Argument Description
-a Create a user in the application realm. If omitted, the default is tocreate a user in the management realm.
-dc <value> The domain configuration directory that will contain the properties files.If it is omitted, the default directory is EAP_HOME/domain/configuration/.
-sc <value> An alternative standalone server configuration directory that willcontain the properties files. If omitted, the default directory is EAP_HOME/standalone/configuration/.
-up, --user-properties <value> The name of the alternative user properties file. It can be an absolutepath or it can be a file name used in conjunction with the -sc or -dcargument that specifies the alternative configuration directory.
-g, --group <value> A comma-separated list of groups to assign to this user.
-gp, --group-properties <value> The name of the alternative group properties file. It can be an absolutepath or it can be a file name used in conjunction with the -sc or -dcargument that specifies the alternative configuration directory.
-p, --password <value> The password of the user.
-u, --user <value> The name of the user. Only alphanumeric characters and the followingsymbols are valid: ,./=@\.
-r, --realm <value> The name of the realm used to secure the management interfaces. Ifomitted, the default is ManagementRealm.
-s, --silent Run the add-user script with no output to the console.
-e, --enable Enable the user.
-d, --disable Disable the user.
-cw, --confirm-warning Automatically confirm warning in interactive mode.
-h, --help Display usage information for the add-user script.
A.6. MANAGEMENT AUDIT LOGGING ATTRIBUTES
Table A.7. Logger Attributes
Attribute Description
enabled Whether audit logging is enabled.
Red Hat JBoss Enterprise Application Platform 7.0 Configuration Guide
312
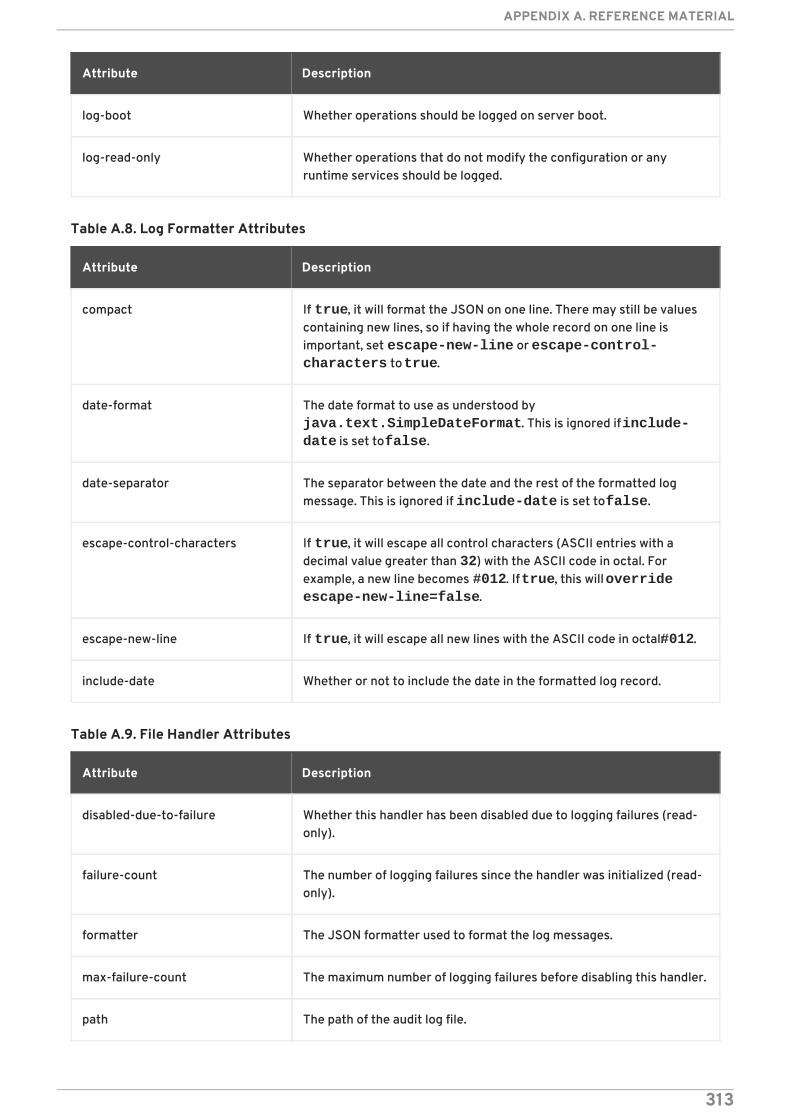
log-boot Whether operations should be logged on server boot.
log-read-only Whether operations that do not modify the configuration or anyruntime services should be logged.
Attribute Description
Table A.8. Log Formatter Attributes
Attribute Description
compact If true, it will format the JSON on one line. There may still be valuescontaining new lines, so if having the whole record on one line isimportant, set escape-new-line or escape-control-characters to true.
date-format The date format to use as understood by java.text.SimpleDateFormat. This is ignored if include-date is set to false.
date-separator The separator between the date and the rest of the formatted logmessage. This is ignored if include-date is set to false.
escape-control-characters If true, it will escape all control characters (ASCII entries with adecimal value greater than 32) with the ASCII code in octal. Forexample, a new line becomes #012. If true, this will override escape-new-line=false.
escape-new-line If true, it will escape all new lines with the ASCII code in octal: #012.
include-date Whether or not to include the date in the formatted log record.
Table A.9. File Handler Attributes
Attribute Description
disabled-due-to-failure Whether this handler has been disabled due to logging failures (read-only).
failure-count The number of logging failures since the handler was initialized (read-only).
formatter The JSON formatter used to format the log messages.
max-failure-count The maximum number of logging failures before disabling this handler.
path The path of the audit log file.
APPENDIX A. REFERENCE MATERIAL
313
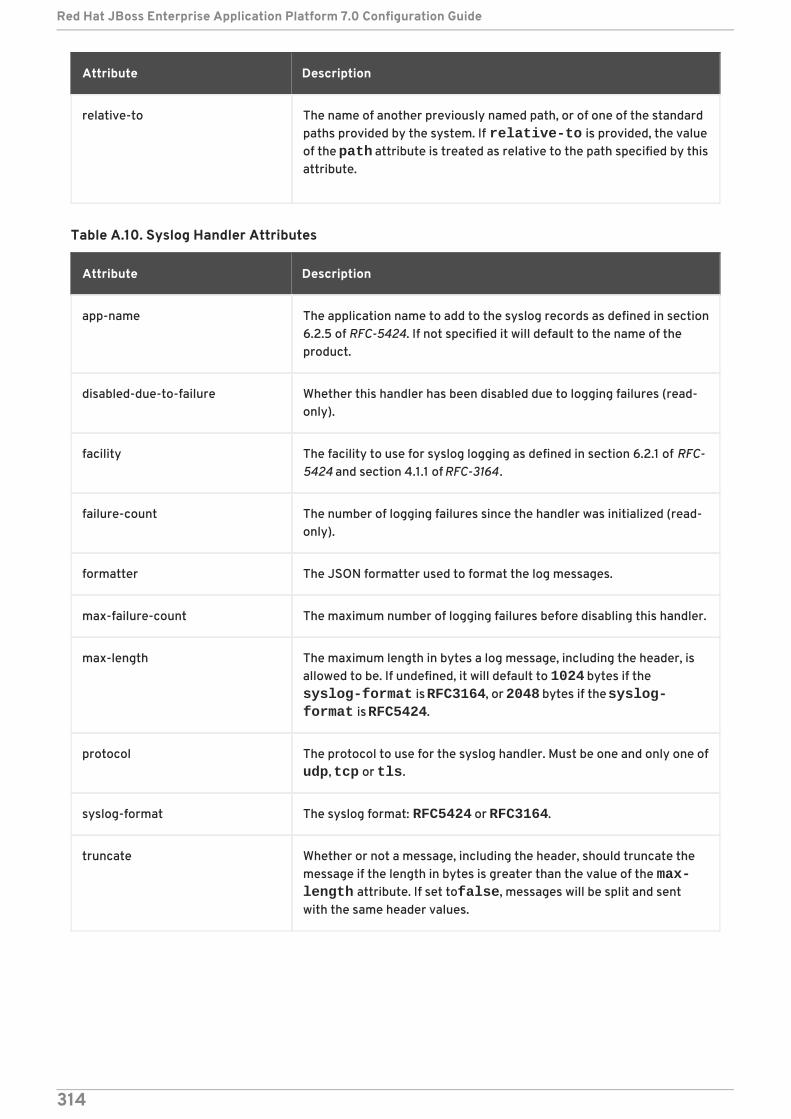
relative-to The name of another previously named path, or of one of the standardpaths provided by the system. If relative-to is provided, the valueof the path attribute is treated as relative to the path specified by thisattribute.
Attribute Description
Table A.10. Syslog Handler Attributes
Attribute Description
app-name The application name to add to the syslog records as defined in section6.2.5 of RFC-5424. If not specified it will default to the name of theproduct.
disabled-due-to-failure Whether this handler has been disabled due to logging failures (read-only).
facility The facility to use for syslog logging as defined in section 6.2.1 of RFC-5424 and section 4.1.1 of RFC-3164 .
failure-count The number of logging failures since the handler was initialized (read-only).
formatter The JSON formatter used to format the log messages.
max-failure-count The maximum number of logging failures before disabling this handler.
max-length The maximum length in bytes a log message, including the header, isallowed to be. If undefined, it will default to 1024 bytes if the syslog-format is RFC3164, or 2048 bytes if the syslog-format is RFC5424.
protocol The protocol to use for the syslog handler. Must be one and only one ofudp, tcp or tls.
syslog-format The syslog format: RFC5424 or RFC3164.
truncate Whether or not a message, including the header, should truncate themessage if the length in bytes is greater than the value of the max-length attribute. If set to false, messages will be split and sentwith the same header values.
Red Hat JBoss Enterprise Application Platform 7.0 Configuration Guide
314
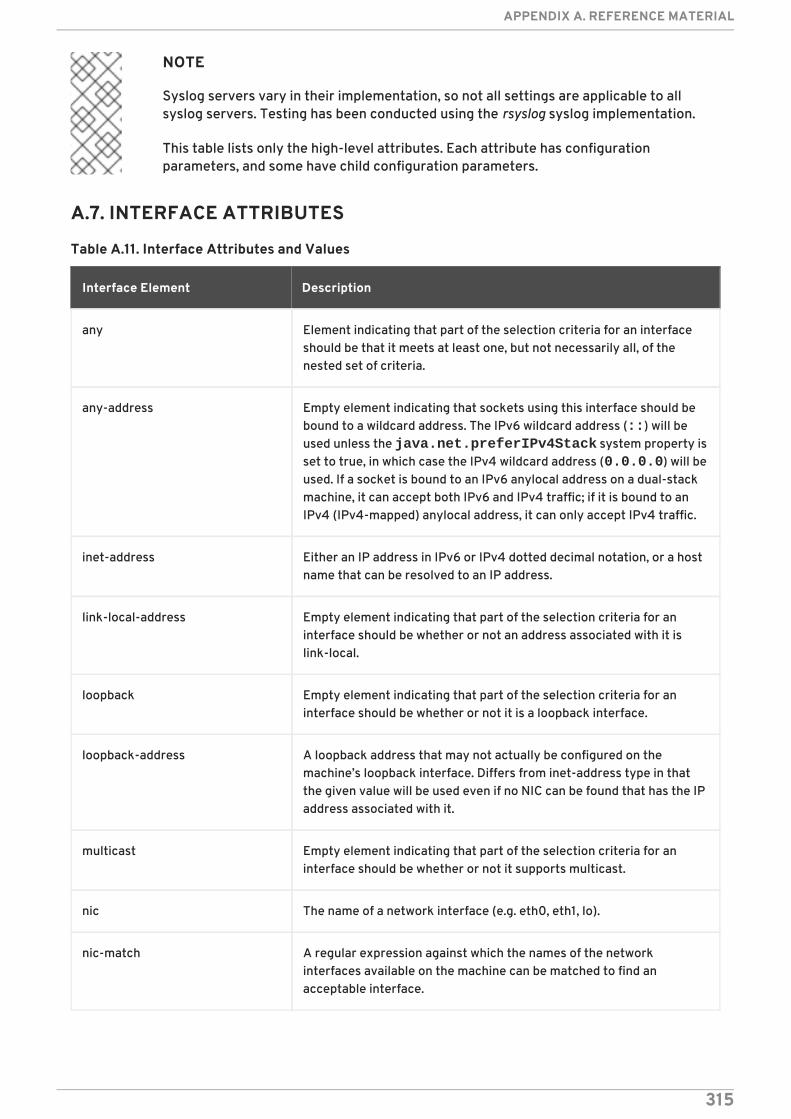
NOTE
Syslog servers vary in their implementation, so not all settings are applicable to allsyslog servers. Testing has been conducted using the rsyslog syslog implementation.
This table lists only the high-level attributes. Each attribute has configurationparameters, and some have child configuration parameters.
A.7. INTERFACE ATTRIBUTES
Table A.11. Interface Attributes and Values
Interface Element Description
any Element indicating that part of the selection criteria for an interfaceshould be that it meets at least one, but not necessarily all, of thenested set of criteria.
any-address Empty element indicating that sockets using this interface should bebound to a wildcard address. The IPv6 wildcard address (::) will beused unless the java.net.preferIPv4Stack system property isset to true, in which case the IPv4 wildcard address (0.0.0.0) will beused. If a socket is bound to an IPv6 anylocal address on a dual-stackmachine, it can accept both IPv6 and IPv4 traffic; if it is bound to anIPv4 (IPv4-mapped) anylocal address, it can only accept IPv4 traffic.
inet-address Either an IP address in IPv6 or IPv4 dotted decimal notation, or a hostname that can be resolved to an IP address.
link-local-address Empty element indicating that part of the selection criteria for aninterface should be whether or not an address associated with it islink-local.
loopback Empty element indicating that part of the selection criteria for aninterface should be whether or not it is a loopback interface.
loopback-address A loopback address that may not actually be configured on themachine’s loopback interface. Differs from inet-address type in thatthe given value will be used even if no NIC can be found that has the IPaddress associated with it.
multicast Empty element indicating that part of the selection criteria for aninterface should be whether or not it supports multicast.
nic The name of a network interface (e.g. eth0, eth1, lo).
nic-match A regular expression against which the names of the networkinterfaces available on the machine can be matched to find anacceptable interface.
APPENDIX A. REFERENCE MATERIAL
315
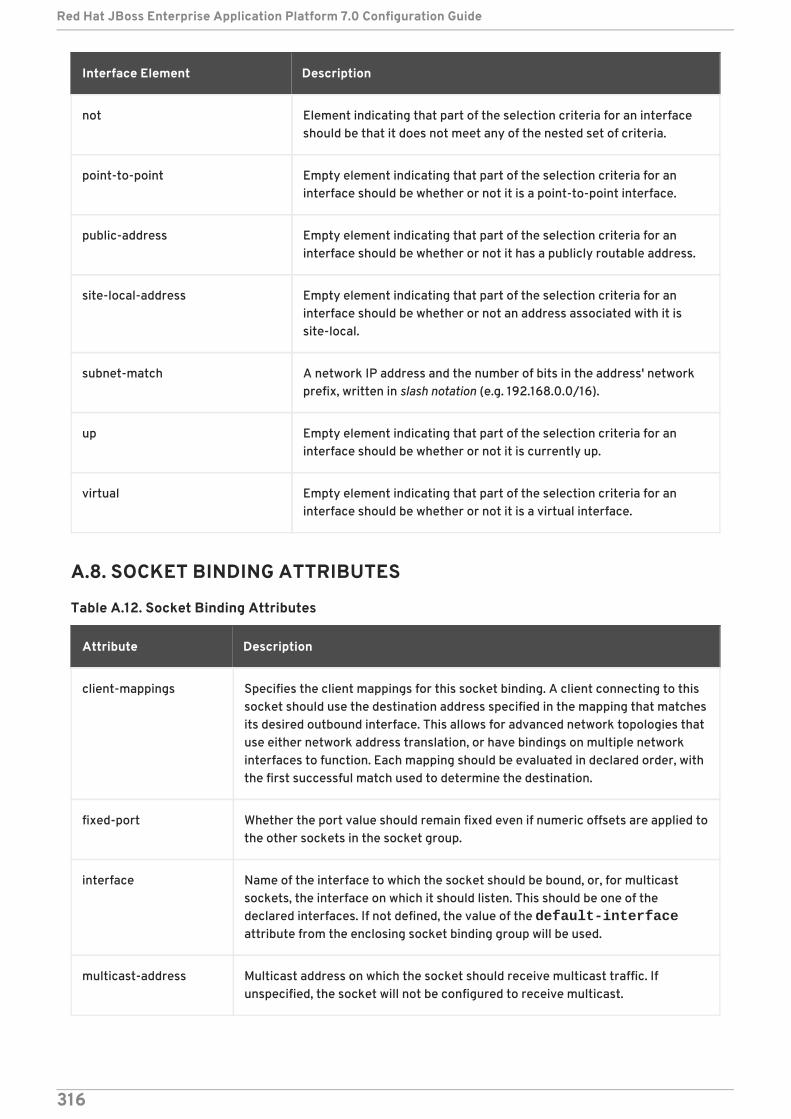
not Element indicating that part of the selection criteria for an interfaceshould be that it does not meet any of the nested set of criteria.
point-to-point Empty element indicating that part of the selection criteria for aninterface should be whether or not it is a point-to-point interface.
public-address Empty element indicating that part of the selection criteria for aninterface should be whether or not it has a publicly routable address.
site-local-address Empty element indicating that part of the selection criteria for aninterface should be whether or not an address associated with it issite-local.
subnet-match A network IP address and the number of bits in the address' networkprefix, written in slash notation (e.g. 192.168.0.0/16).
up Empty element indicating that part of the selection criteria for aninterface should be whether or not it is currently up.
virtual Empty element indicating that part of the selection criteria for aninterface should be whether or not it is a virtual interface.
Interface Element Description
A.8. SOCKET BINDING ATTRIBUTES
Table A.12. Socket Binding Attributes
Attribute Description
client-mappings Specifies the client mappings for this socket binding. A client connecting to thissocket should use the destination address specified in the mapping that matchesits desired outbound interface. This allows for advanced network topologies thatuse either network address translation, or have bindings on multiple networkinterfaces to function. Each mapping should be evaluated in declared order, withthe first successful match used to determine the destination.
fixed-port Whether the port value should remain fixed even if numeric offsets are applied tothe other sockets in the socket group.
interface Name of the interface to which the socket should be bound, or, for multicastsockets, the interface on which it should listen. This should be one of thedeclared interfaces. If not defined, the value of the default-interfaceattribute from the enclosing socket binding group will be used.
multicast-address Multicast address on which the socket should receive multicast traffic. Ifunspecified, the socket will not be configured to receive multicast.
Red Hat JBoss Enterprise Application Platform 7.0 Configuration Guide
316
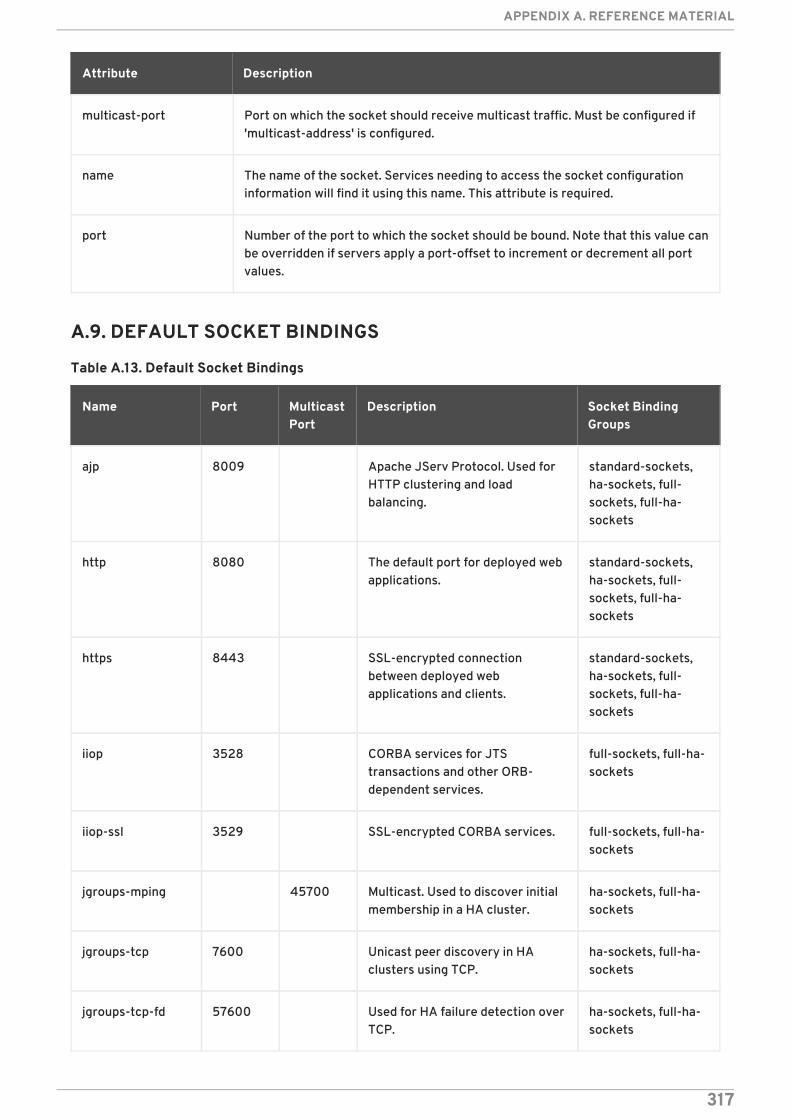
multicast-port Port on which the socket should receive multicast traffic. Must be configured if'multicast-address' is configured.
name The name of the socket. Services needing to access the socket configurationinformation will find it using this name. This attribute is required.
port Number of the port to which the socket should be bound. Note that this value canbe overridden if servers apply a port-offset to increment or decrement all portvalues.
Attribute Description
A.9. DEFAULT SOCKET BINDINGS
Table A.13. Default Socket Bindings
Name Port MulticastPort
Description Socket BindingGroups
ajp 8009 Apache JServ Protocol. Used forHTTP clustering and loadbalancing.
standard-sockets,ha-sockets, full-sockets, full-ha-sockets
http 8080 The default port for deployed webapplications.
standard-sockets,ha-sockets, full-sockets, full-ha-sockets
https 8443 SSL-encrypted connectionbetween deployed webapplications and clients.
standard-sockets,ha-sockets, full-sockets, full-ha-sockets
iiop 3528 CORBA services for JTStransactions and other ORB-dependent services.
full-sockets, full-ha-sockets
iiop-ssl 3529 SSL-encrypted CORBA services. full-sockets, full-ha-sockets
jgroups-mping 45700 Multicast. Used to discover initialmembership in a HA cluster.
ha-sockets, full-ha-sockets
jgroups-tcp 7600 Unicast peer discovery in HAclusters using TCP.
ha-sockets, full-ha-sockets
jgroups-tcp-fd 57600 Used for HA failure detection overTCP.
ha-sockets, full-ha-sockets
APPENDIX A. REFERENCE MATERIAL
317
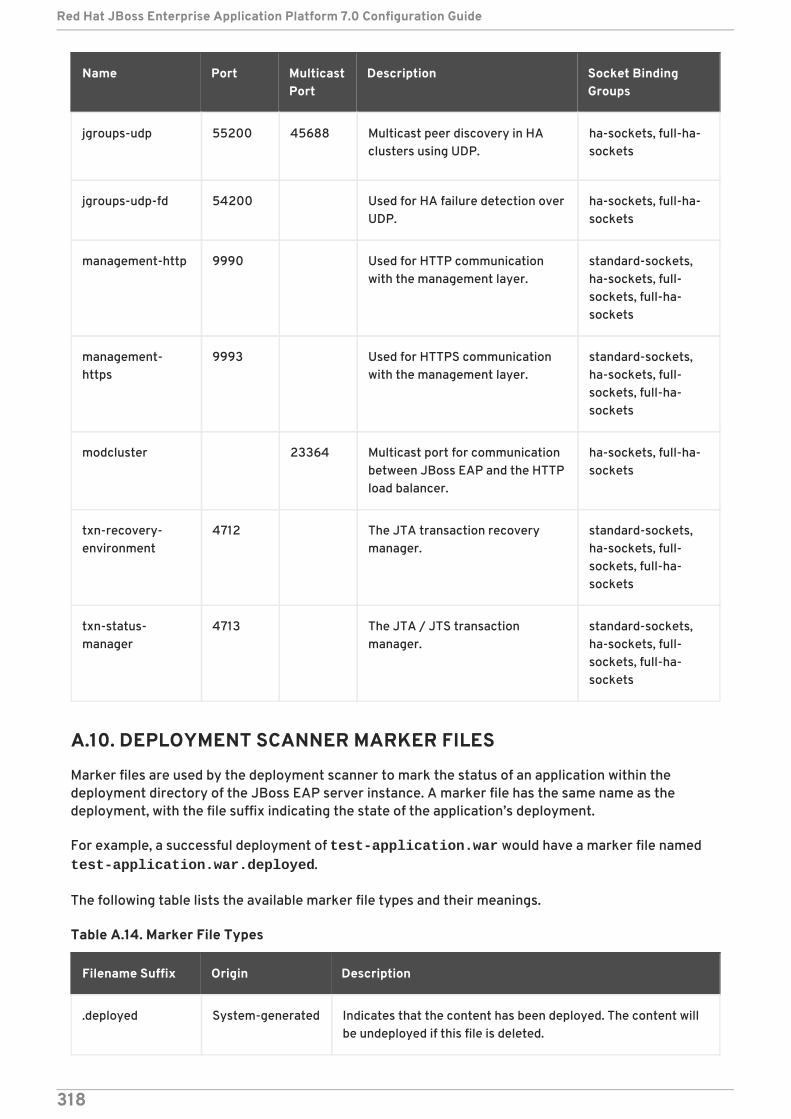
jgroups-udp 55200 45688 Multicast peer discovery in HAclusters using UDP.
ha-sockets, full-ha-sockets
jgroups-udp-fd 54200 Used for HA failure detection overUDP.
ha-sockets, full-ha-sockets
management-http 9990 Used for HTTP communicationwith the management layer.
standard-sockets,ha-sockets, full-sockets, full-ha-sockets
management-https
9993 Used for HTTPS communicationwith the management layer.
standard-sockets,ha-sockets, full-sockets, full-ha-sockets
modcluster 23364 Multicast port for communicationbetween JBoss EAP and the HTTPload balancer.
ha-sockets, full-ha-sockets
txn-recovery-environment
4712 The JTA transaction recoverymanager.
standard-sockets,ha-sockets, full-sockets, full-ha-sockets
txn-status-manager
4713 The JTA / JTS transactionmanager.
standard-sockets,ha-sockets, full-sockets, full-ha-sockets
Name Port MulticastPort
Description Socket BindingGroups
A.10. DEPLOYMENT SCANNER MARKER FILES
Marker files are used by the deployment scanner to mark the status of an application within thedeployment directory of the JBoss EAP server instance. A marker file has the same name as thedeployment, with the file suffix indicating the state of the application’s deployment.
For example, a successful deployment of test-application.war would have a marker file named test-application.war.deployed.
The following table lists the available marker file types and their meanings.
Table A.14. Marker File Types
Filename Suffix Origin Description
.deployed System-generated Indicates that the content has been deployed. The content willbe undeployed if this file is deleted.
Red Hat JBoss Enterprise Application Platform 7.0 Configuration Guide
318
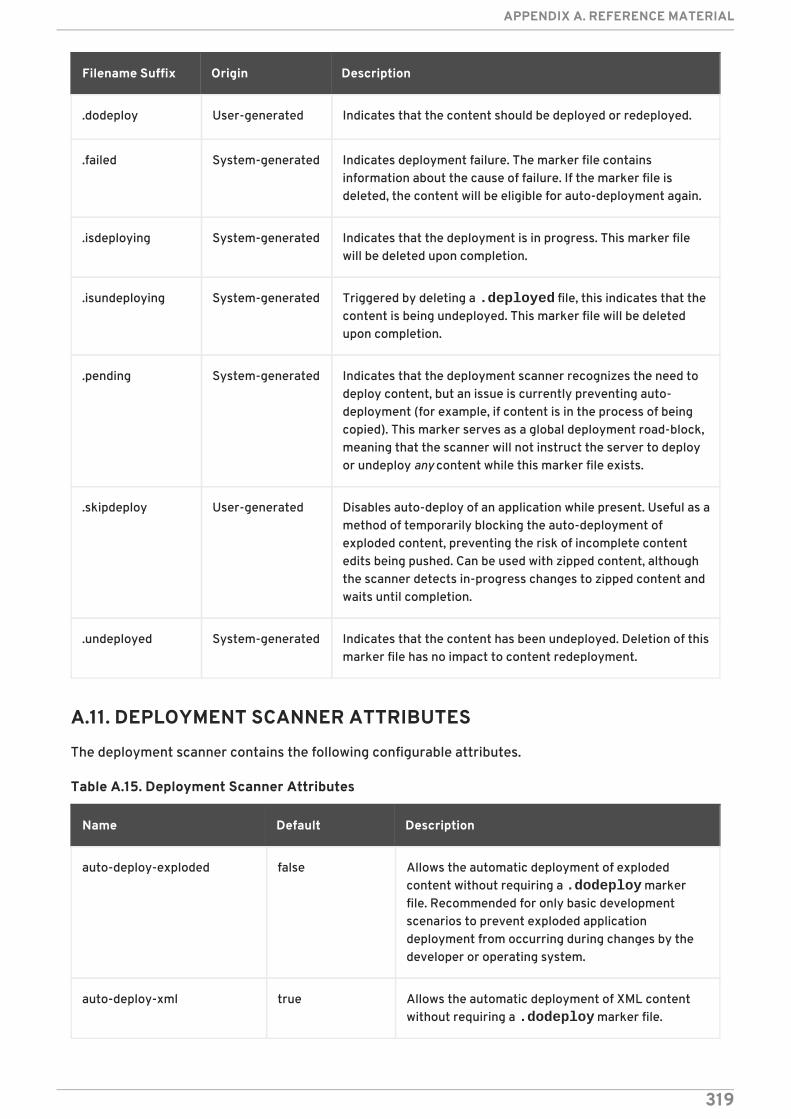
.dodeploy User-generated Indicates that the content should be deployed or redeployed.
.failed System-generated Indicates deployment failure. The marker file containsinformation about the cause of failure. If the marker file isdeleted, the content will be eligible for auto-deployment again.
.isdeploying System-generated Indicates that the deployment is in progress. This marker filewill be deleted upon completion.
.isundeploying System-generated Triggered by deleting a .deployed file, this indicates that thecontent is being undeployed. This marker file will be deletedupon completion.
.pending System-generated Indicates that the deployment scanner recognizes the need todeploy content, but an issue is currently preventing auto-deployment (for example, if content is in the process of beingcopied). This marker serves as a global deployment road-block,meaning that the scanner will not instruct the server to deployor undeploy any content while this marker file exists.
.skipdeploy User-generated Disables auto-deploy of an application while present. Useful as amethod of temporarily blocking the auto-deployment ofexploded content, preventing the risk of incomplete contentedits being pushed. Can be used with zipped content, althoughthe scanner detects in-progress changes to zipped content andwaits until completion.
.undeployed System-generated Indicates that the content has been undeployed. Deletion of thismarker file has no impact to content redeployment.
Filename Suffix Origin Description
A.11. DEPLOYMENT SCANNER ATTRIBUTES
The deployment scanner contains the following configurable attributes.
Table A.15. Deployment Scanner Attributes
Name Default Description
auto-deploy-exploded false Allows the automatic deployment of explodedcontent without requiring a .dodeploy markerfile. Recommended for only basic developmentscenarios to prevent exploded applicationdeployment from occurring during changes by thedeveloper or operating system.
auto-deploy-xml true Allows the automatic deployment of XML contentwithout requiring a .dodeploy marker file.
APPENDIX A. REFERENCE MATERIAL
319
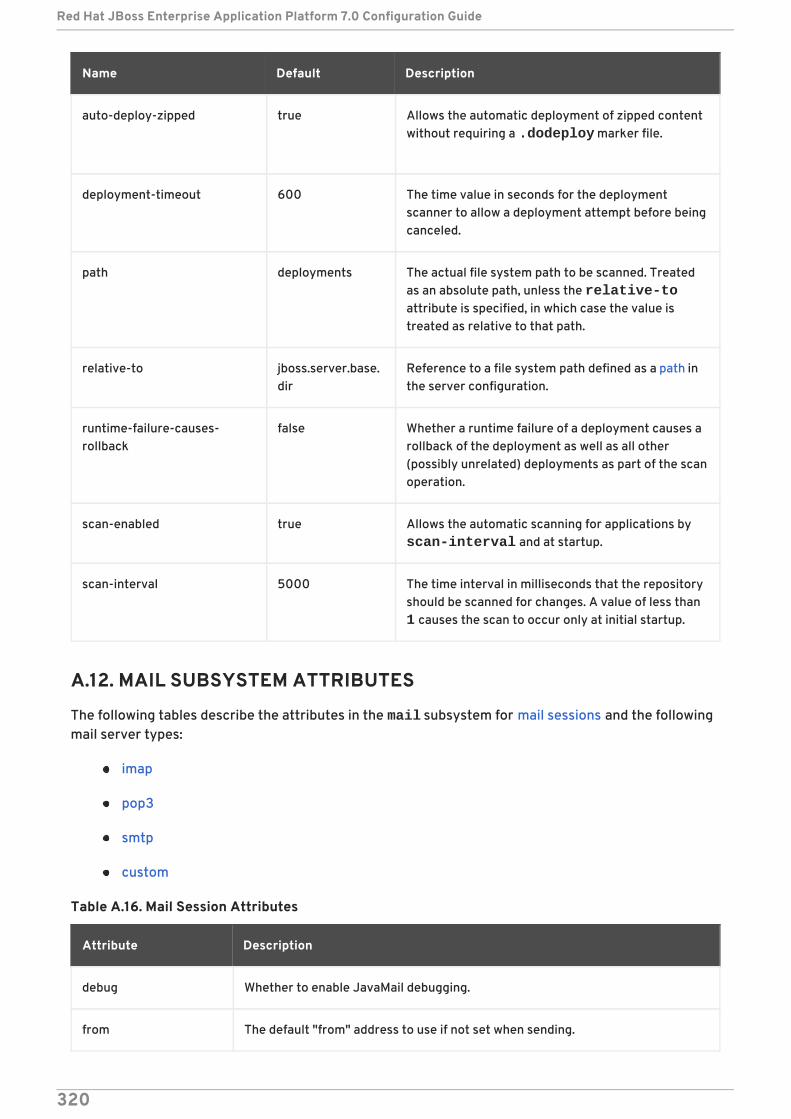
auto-deploy-zipped true Allows the automatic deployment of zipped contentwithout requiring a .dodeploy marker file.
deployment-timeout 600 The time value in seconds for the deploymentscanner to allow a deployment attempt before beingcanceled.
path deployments The actual file system path to be scanned. Treatedas an absolute path, unless the relative-toattribute is specified, in which case the value istreated as relative to that path.
relative-to jboss.server.base.dir
Reference to a file system path defined as a path inthe server configuration.
runtime-failure-causes-rollback
false Whether a runtime failure of a deployment causes arollback of the deployment as well as all other(possibly unrelated) deployments as part of the scanoperation.
scan-enabled true Allows the automatic scanning for applications by scan-interval and at startup.
scan-interval 5000 The time interval in milliseconds that the repositoryshould be scanned for changes. A value of less than 1 causes the scan to occur only at initial startup.
Name Default Description
A.12. MAIL SUBSYSTEM ATTRIBUTES
The following tables describe the attributes in the mail subsystem for mail sessions and the followingmail server types:
imap
pop3
smtp
custom
Table A.16. Mail Session Attributes
Attribute Description
debug Whether to enable JavaMail debugging.
from The default "from" address to use if not set when sending.
Red Hat JBoss Enterprise Application Platform 7.0 Configuration Guide
320
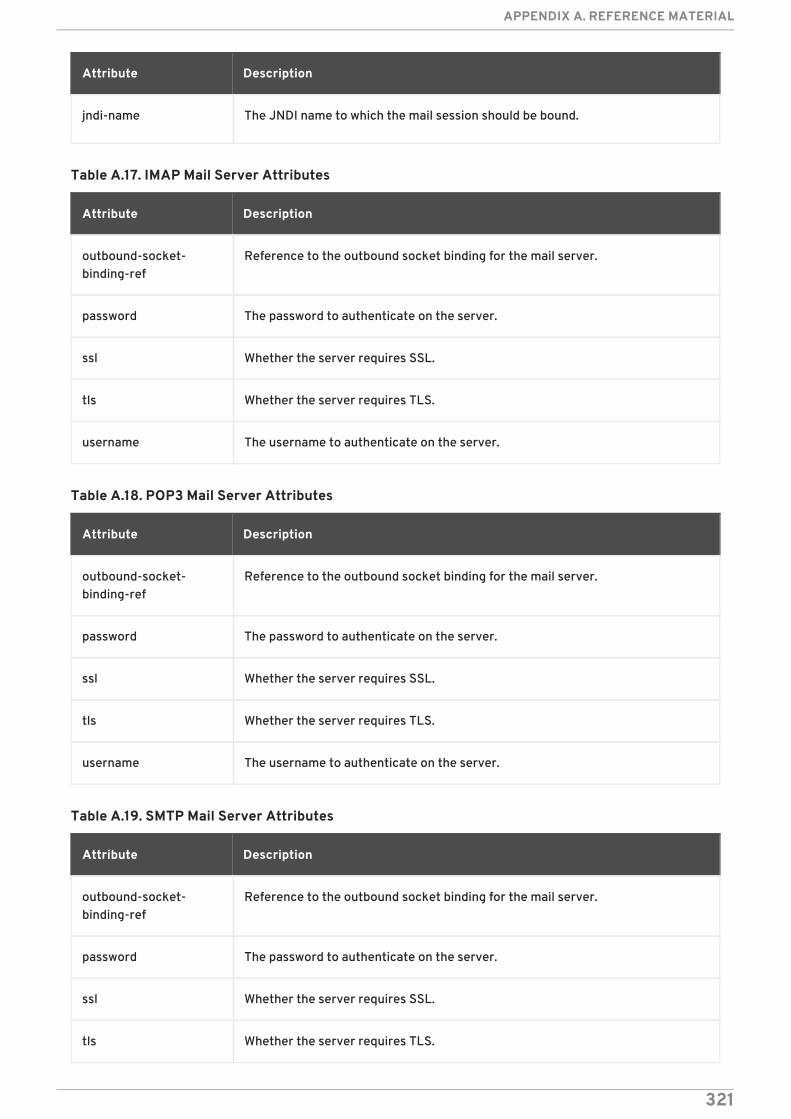
jndi-name The JNDI name to which the mail session should be bound.
Attribute Description
Table A.17. IMAP Mail Server Attributes
Attribute Description
outbound-socket-binding-ref
Reference to the outbound socket binding for the mail server.
password The password to authenticate on the server.
ssl Whether the server requires SSL.
tls Whether the server requires TLS.
username The username to authenticate on the server.
Table A.18. POP3 Mail Server Attributes
Attribute Description
outbound-socket-binding-ref
Reference to the outbound socket binding for the mail server.
password The password to authenticate on the server.
ssl Whether the server requires SSL.
tls Whether the server requires TLS.
username The username to authenticate on the server.
Table A.19. SMTP Mail Server Attributes
Attribute Description
outbound-socket-binding-ref
Reference to the outbound socket binding for the mail server.
password The password to authenticate on the server.
ssl Whether the server requires SSL.
tls Whether the server requires TLS.
APPENDIX A. REFERENCE MATERIAL
321
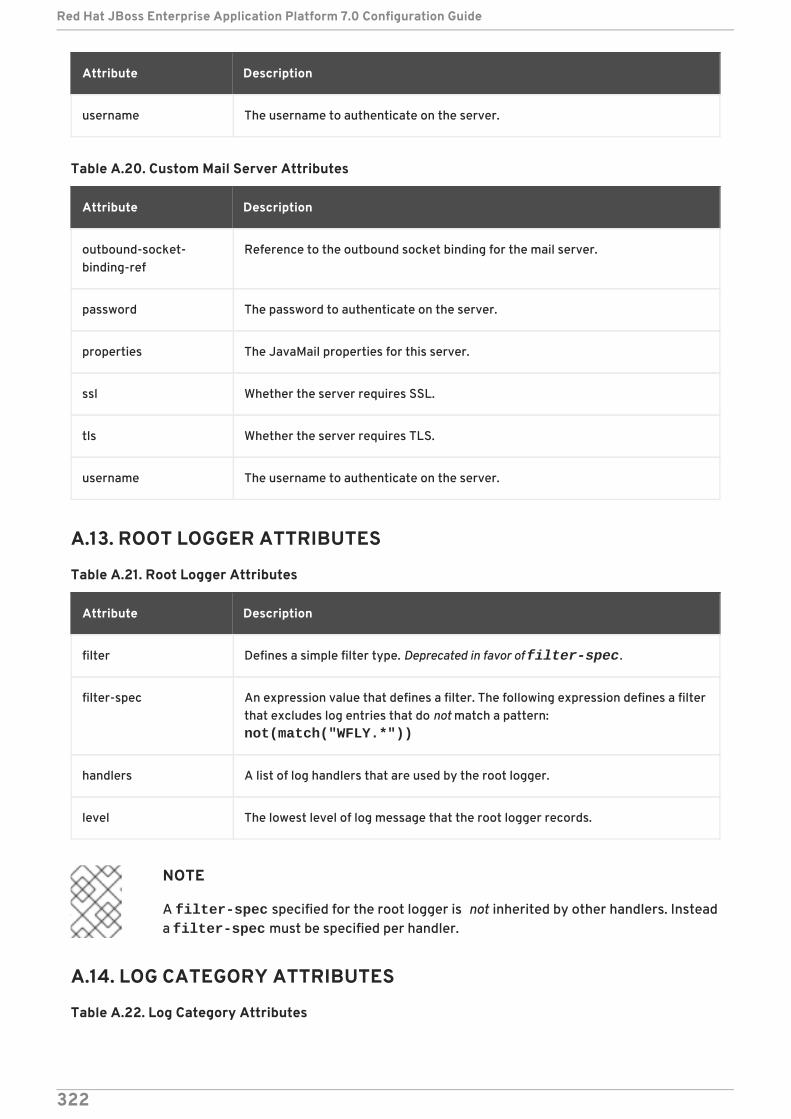
username The username to authenticate on the server.
Attribute Description
Table A.20. Custom Mail Server Attributes
Attribute Description
outbound-socket-binding-ref
Reference to the outbound socket binding for the mail server.
password The password to authenticate on the server.
properties The JavaMail properties for this server.
ssl Whether the server requires SSL.
tls Whether the server requires TLS.
username The username to authenticate on the server.
A.13. ROOT LOGGER ATTRIBUTES
Table A.21. Root Logger Attributes
Attribute Description
filter Defines a simple filter type. Deprecated in favor of filter-spec.
filter-spec An expression value that defines a filter. The following expression defines a filterthat excludes log entries that do not match a pattern: not(match("WFLY.*"))
handlers A list of log handlers that are used by the root logger.
level The lowest level of log message that the root logger records.
NOTE
A filter-spec specified for the root logger is not inherited by other handlers. Insteada filter-spec must be specified per handler.
A.14. LOG CATEGORY ATTRIBUTES
Table A.22. Log Category Attributes
Red Hat JBoss Enterprise Application Platform 7.0 Configuration Guide
322
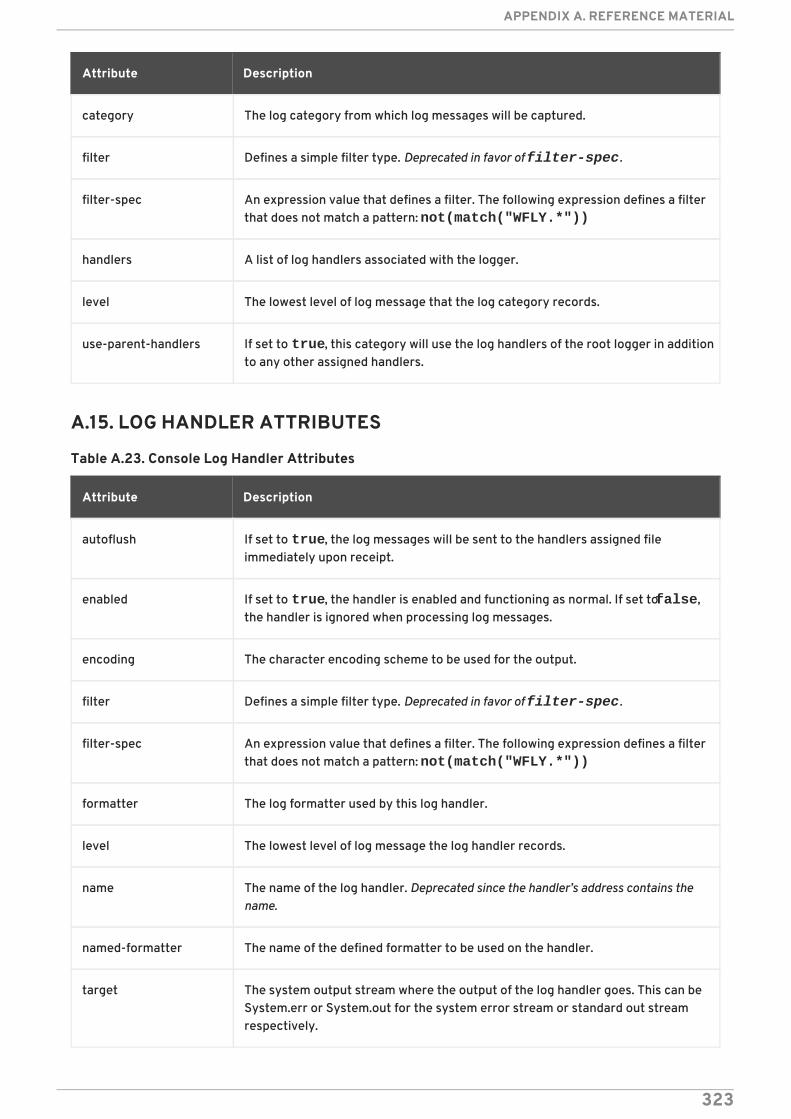
Attribute Description
category The log category from which log messages will be captured.
filter Defines a simple filter type. Deprecated in favor of filter-spec.
filter-spec An expression value that defines a filter. The following expression defines a filterthat does not match a pattern: not(match("WFLY.*"))
handlers A list of log handlers associated with the logger.
level The lowest level of log message that the log category records.
use-parent-handlers If set to true, this category will use the log handlers of the root logger in additionto any other assigned handlers.
A.15. LOG HANDLER ATTRIBUTES
Table A.23. Console Log Handler Attributes
Attribute Description
autoflush If set to true, the log messages will be sent to the handlers assigned fileimmediately upon receipt.
enabled If set to true, the handler is enabled and functioning as normal. If set to false,the handler is ignored when processing log messages.
encoding The character encoding scheme to be used for the output.
filter Defines a simple filter type. Deprecated in favor of filter-spec.
filter-spec An expression value that defines a filter. The following expression defines a filterthat does not match a pattern: not(match("WFLY.*"))
formatter The log formatter used by this log handler.
level The lowest level of log message the log handler records.
name The name of the log handler. Deprecated since the handler’s address contains thename.
named-formatter The name of the defined formatter to be used on the handler.
target The system output stream where the output of the log handler goes. This can beSystem.err or System.out for the system error stream or standard out streamrespectively.
APPENDIX A. REFERENCE MATERIAL
323
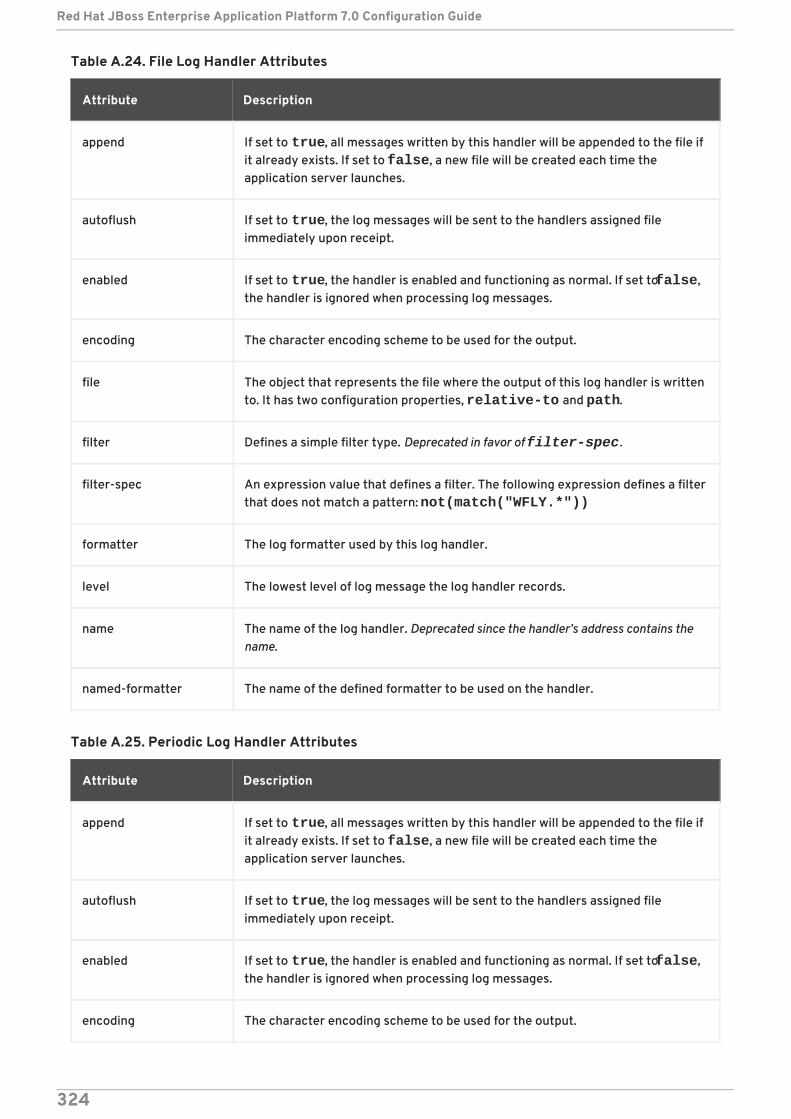
Table A.24. File Log Handler Attributes
Attribute Description
append If set to true, all messages written by this handler will be appended to the file ifit already exists. If set to false, a new file will be created each time theapplication server launches.
autoflush If set to true, the log messages will be sent to the handlers assigned fileimmediately upon receipt.
enabled If set to true, the handler is enabled and functioning as normal. If set to false,the handler is ignored when processing log messages.
encoding The character encoding scheme to be used for the output.
file The object that represents the file where the output of this log handler is writtento. It has two configuration properties, relative-to and path.
filter Defines a simple filter type. Deprecated in favor of filter-spec.
filter-spec An expression value that defines a filter. The following expression defines a filterthat does not match a pattern: not(match("WFLY.*"))
formatter The log formatter used by this log handler.
level The lowest level of log message the log handler records.
name The name of the log handler. Deprecated since the handler’s address contains thename.
named-formatter The name of the defined formatter to be used on the handler.
Table A.25. Periodic Log Handler Attributes
Attribute Description
append If set to true, all messages written by this handler will be appended to the file ifit already exists. If set to false, a new file will be created each time theapplication server launches.
autoflush If set to true, the log messages will be sent to the handlers assigned fileimmediately upon receipt.
enabled If set to true, the handler is enabled and functioning as normal. If set to false,the handler is ignored when processing log messages.
encoding The character encoding scheme to be used for the output.
Red Hat JBoss Enterprise Application Platform 7.0 Configuration Guide
324
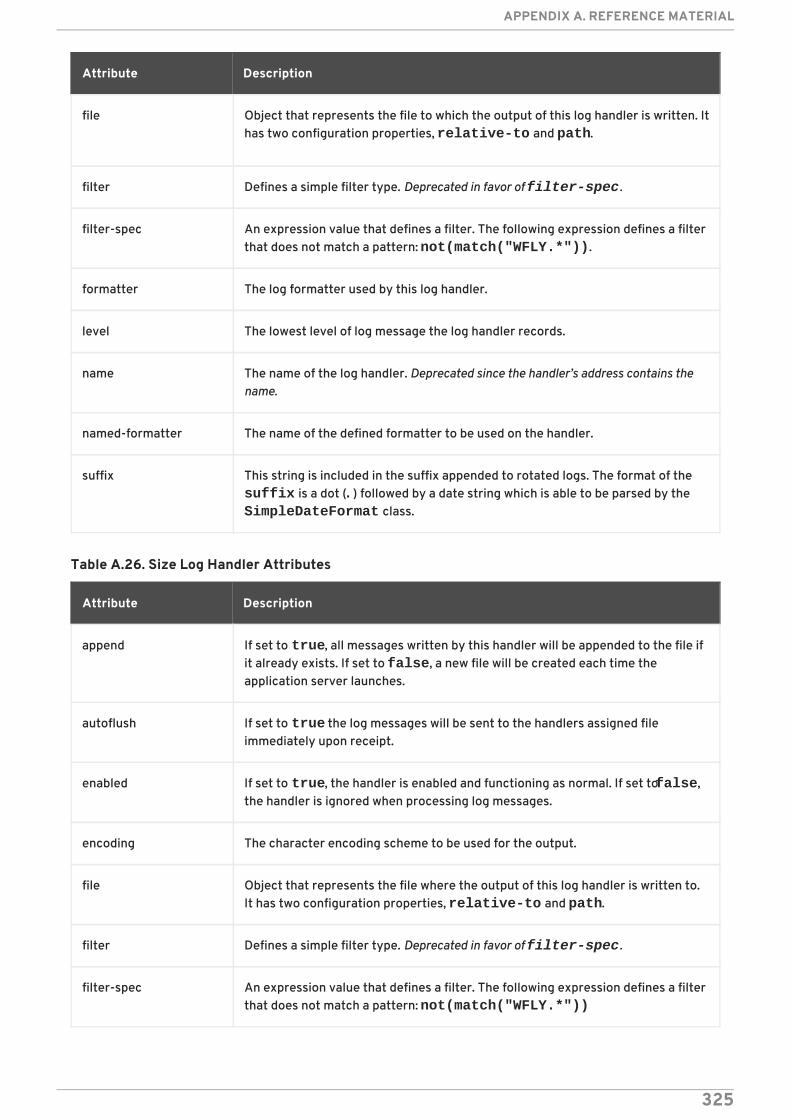
file Object that represents the file to which the output of this log handler is written. Ithas two configuration properties, relative-to and path.
filter Defines a simple filter type. Deprecated in favor of filter-spec.
filter-spec An expression value that defines a filter. The following expression defines a filterthat does not match a pattern: not(match("WFLY.*")).
formatter The log formatter used by this log handler.
level The lowest level of log message the log handler records.
name The name of the log handler. Deprecated since the handler’s address contains thename.
named-formatter The name of the defined formatter to be used on the handler.
suffix This string is included in the suffix appended to rotated logs. The format of the suffix is a dot (.) followed by a date string which is able to be parsed by the SimpleDateFormat class.
Attribute Description
Table A.26. Size Log Handler Attributes
Attribute Description
append If set to true, all messages written by this handler will be appended to the file ifit already exists. If set to false, a new file will be created each time theapplication server launches.
autoflush If set to true the log messages will be sent to the handlers assigned fileimmediately upon receipt.
enabled If set to true, the handler is enabled and functioning as normal. If set to false,the handler is ignored when processing log messages.
encoding The character encoding scheme to be used for the output.
file Object that represents the file where the output of this log handler is written to.It has two configuration properties, relative-to and path.
filter Defines a simple filter type. Deprecated in favor of filter-spec.
filter-spec An expression value that defines a filter. The following expression defines a filterthat does not match a pattern: not(match("WFLY.*"))
APPENDIX A. REFERENCE MATERIAL
325
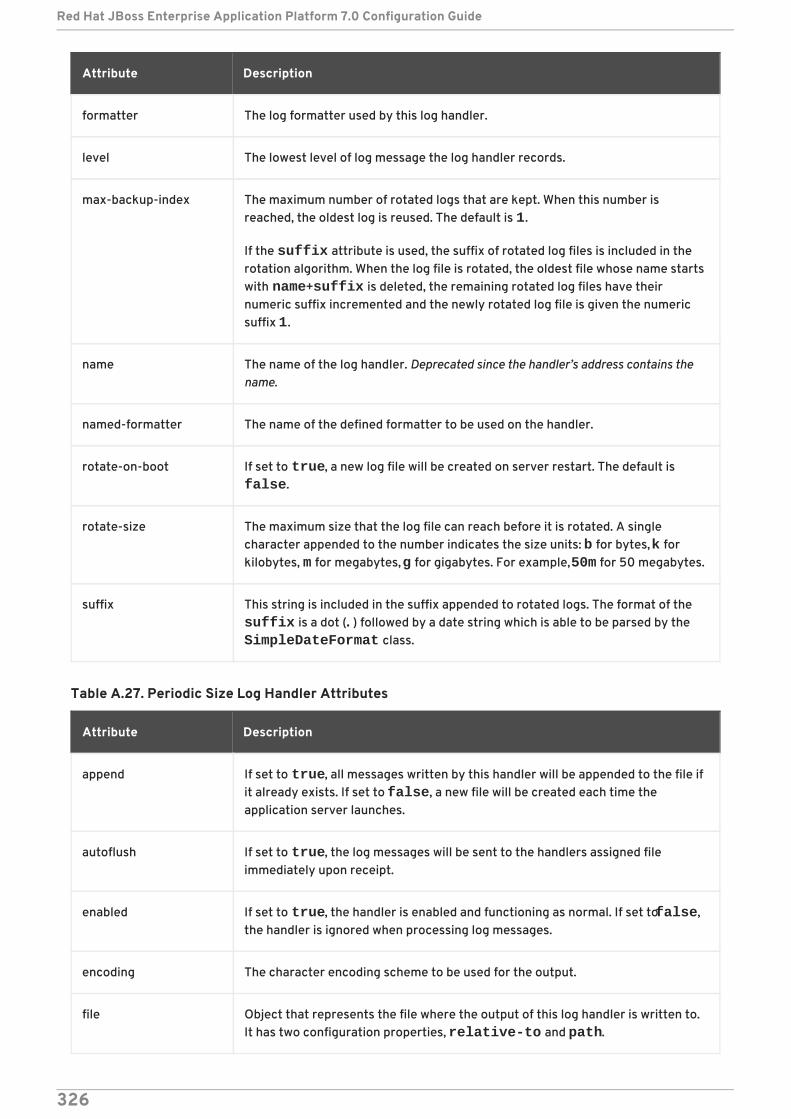
formatter The log formatter used by this log handler.
level The lowest level of log message the log handler records.
max-backup-index The maximum number of rotated logs that are kept. When this number isreached, the oldest log is reused. The default is 1.
If the suffix attribute is used, the suffix of rotated log files is included in therotation algorithm. When the log file is rotated, the oldest file whose name startswith name+suffix is deleted, the remaining rotated log files have theirnumeric suffix incremented and the newly rotated log file is given the numericsuffix 1.
name The name of the log handler. Deprecated since the handler’s address contains thename.
named-formatter The name of the defined formatter to be used on the handler.
rotate-on-boot If set to true, a new log file will be created on server restart. The default is false.
rotate-size The maximum size that the log file can reach before it is rotated. A singlecharacter appended to the number indicates the size units: b for bytes, k forkilobytes, m for megabytes, g for gigabytes. For example, 50m for 50 megabytes.
suffix This string is included in the suffix appended to rotated logs. The format of the suffix is a dot (.) followed by a date string which is able to be parsed by the SimpleDateFormat class.
Attribute Description
Table A.27. Periodic Size Log Handler Attributes
Attribute Description
append If set to true, all messages written by this handler will be appended to the file ifit already exists. If set to false, a new file will be created each time theapplication server launches.
autoflush If set to true, the log messages will be sent to the handlers assigned fileimmediately upon receipt.
enabled If set to true, the handler is enabled and functioning as normal. If set to false,the handler is ignored when processing log messages.
encoding The character encoding scheme to be used for the output.
file Object that represents the file where the output of this log handler is written to.It has two configuration properties, relative-to and path.
Red Hat JBoss Enterprise Application Platform 7.0 Configuration Guide
326

filter-spec An expression value that defines a filter. The following expression defines a filterthat does not match a pattern: not(match("WFLY.*"))
formatter The log formatter used by this log handler.
level The lowest level of log message the log handler records.
max-backup-index The maximum number of rotated logs that are kept. When this number isreached, the oldest log is reused. The default is 1.
If the suffix attribute is used, the suffix of rotated log files is included in therotation algorithm. When the log file is rotated, the oldest file whose name startswith name+suffix is deleted, the remaining rotated log files have theirnumeric suffix incremented and the newly rotated log file is given the numericsuffix 1.
name The name of the log handler. Deprecated since the handler’s address contains thename.
named-formatter The name of the defined formatter to be used on the handler.
rotate-on-boot If set to true, a new log file will be created on server restart. The default is false.
rotate-size The maximum size that the log file can reach before it is rotated. A singlecharacter appended to the number indicates the size units: b for bytes, k forkilobytes, m for megabytes, g for gigabytes. For example, 50m for 50 megabytes.
suffix This string is included in the suffix appended to rotated logs. The format of the suffix is a dot (.) followed by a date string which is able to be parsed by the SimpleDateFormat class.
Attribute Description
Table A.28. Syslog Handler Attributes
Attribute Description
app-name The app name used when formatting the message in RFC5424 format. By defaultthe app name is java.
enabled If set to true, the handler is enabled and functioning as normal. If set to false,the handler is ignored when processing log messages.
facility The facility as defined by RFC-5424 and RFC-3164.
hostname The name of the host from which the messages are being sent. For example, thename of the host the application server is running on.
APPENDIX A. REFERENCE MATERIAL
327
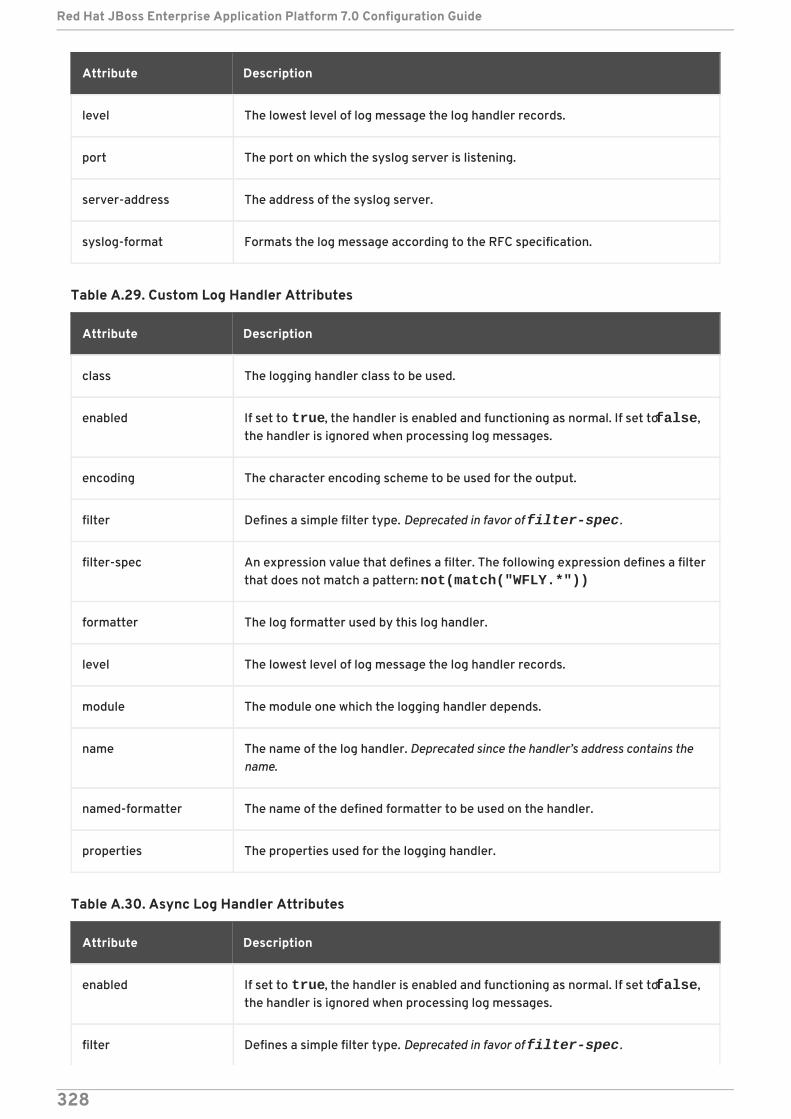
level The lowest level of log message the log handler records.
port The port on which the syslog server is listening.
server-address The address of the syslog server.
syslog-format Formats the log message according to the RFC specification.
Attribute Description
Table A.29. Custom Log Handler Attributes
Attribute Description
class The logging handler class to be used.
enabled If set to true, the handler is enabled and functioning as normal. If set to false,the handler is ignored when processing log messages.
encoding The character encoding scheme to be used for the output.
filter Defines a simple filter type. Deprecated in favor of filter-spec.
filter-spec An expression value that defines a filter. The following expression defines a filterthat does not match a pattern: not(match("WFLY.*"))
formatter The log formatter used by this log handler.
level The lowest level of log message the log handler records.
module The module one which the logging handler depends.
name The name of the log handler. Deprecated since the handler’s address contains thename.
named-formatter The name of the defined formatter to be used on the handler.
properties The properties used for the logging handler.
Table A.30. Async Log Handler Attributes
Attribute Description
enabled If set to true, the handler is enabled and functioning as normal. If set to false,the handler is ignored when processing log messages.
filter Defines a simple filter type. Deprecated in favor of filter-spec.
Red Hat JBoss Enterprise Application Platform 7.0 Configuration Guide
328
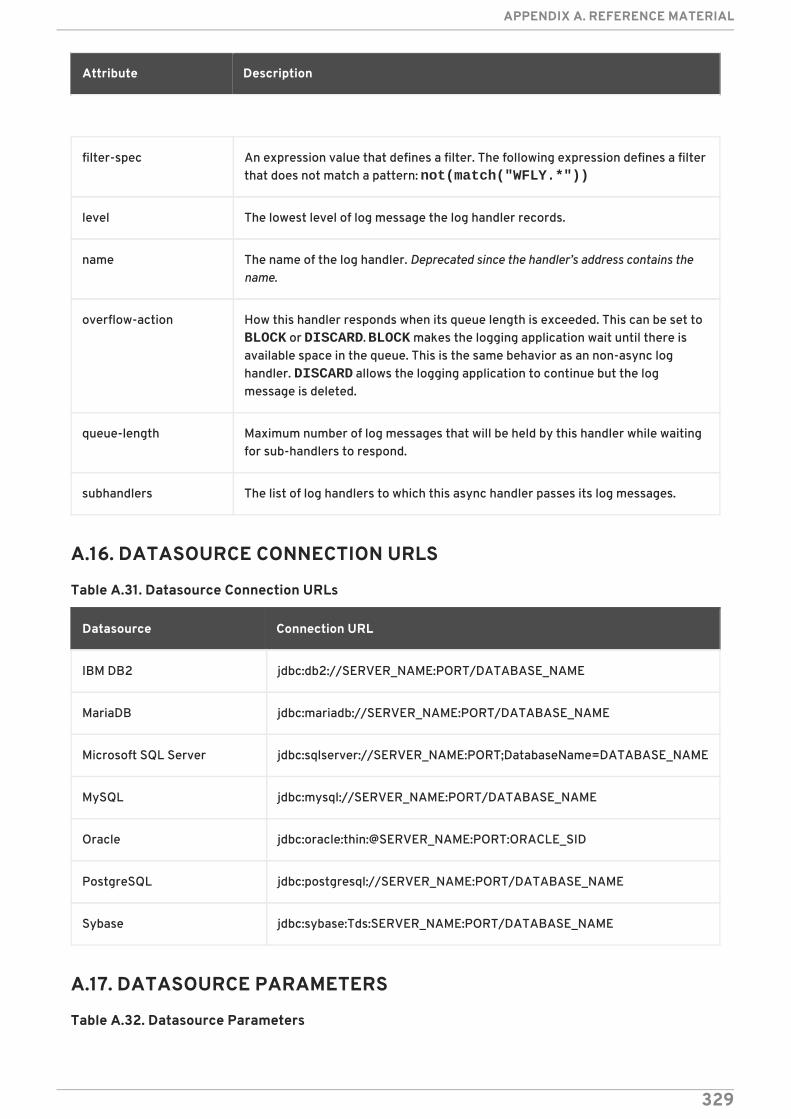
filter-spec An expression value that defines a filter. The following expression defines a filterthat does not match a pattern: not(match("WFLY.*"))
level The lowest level of log message the log handler records.
name The name of the log handler. Deprecated since the handler’s address contains thename.
overflow-action How this handler responds when its queue length is exceeded. This can be set to BLOCK or DISCARD. BLOCK makes the logging application wait until there isavailable space in the queue. This is the same behavior as an non-async loghandler. DISCARD allows the logging application to continue but the logmessage is deleted.
queue-length Maximum number of log messages that will be held by this handler while waitingfor sub-handlers to respond.
subhandlers The list of log handlers to which this async handler passes its log messages.
Attribute Description
A.16. DATASOURCE CONNECTION URLS
Table A.31. Datasource Connection URLs
Datasource Connection URL
IBM DB2 jdbc:db2://SERVER_NAME:PORT/DATABASE_NAME
MariaDB jdbc:mariadb://SERVER_NAME:PORT/DATABASE_NAME
Microsoft SQL Server jdbc:sqlserver://SERVER_NAME:PORT;DatabaseName=DATABASE_NAME
MySQL jdbc:mysql://SERVER_NAME:PORT/DATABASE_NAME
Oracle jdbc:oracle:thin:@SERVER_NAME:PORT:ORACLE_SID
PostgreSQL jdbc:postgresql://SERVER_NAME:PORT/DATABASE_NAME
Sybase jdbc:sybase:Tds:SERVER_NAME:PORT/DATABASE_NAME
A.17. DATASOURCE PARAMETERS
Table A.32. Datasource Parameters
APPENDIX A. REFERENCE MATERIAL
329
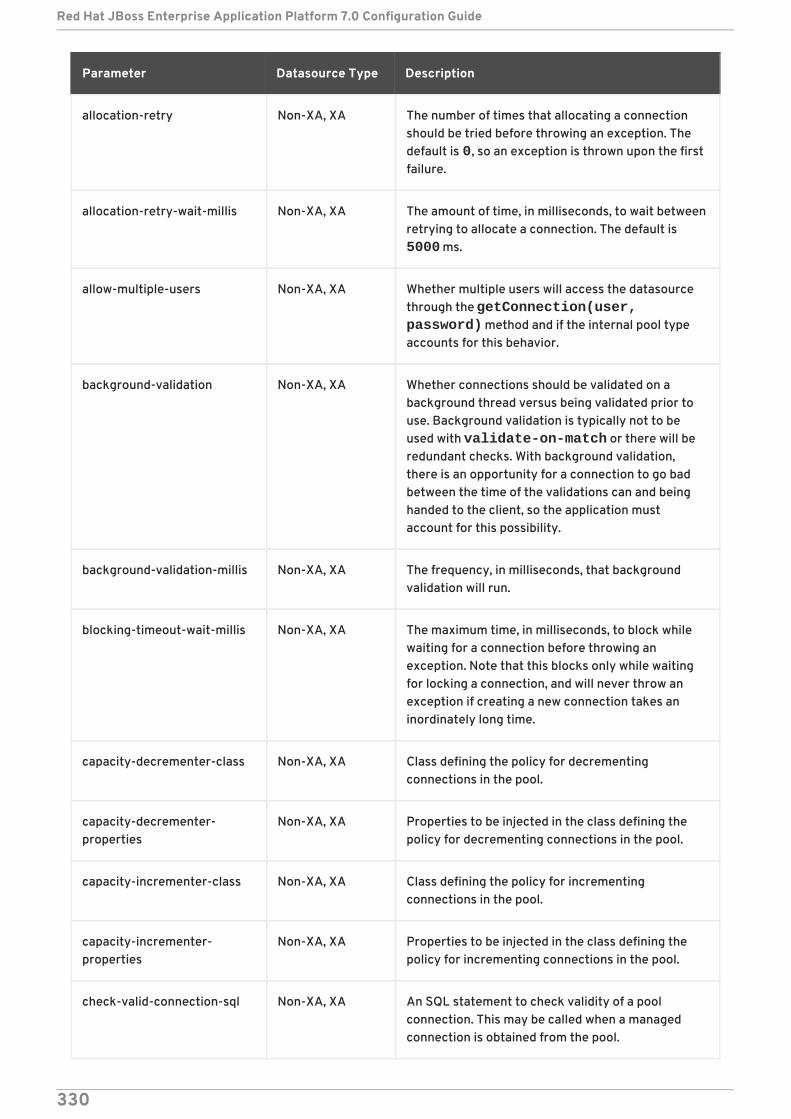
Parameter Datasource Type Description
allocation-retry Non-XA, XA The number of times that allocating a connectionshould be tried before throwing an exception. Thedefault is 0, so an exception is thrown upon the firstfailure.
allocation-retry-wait-millis Non-XA, XA The amount of time, in milliseconds, to wait betweenretrying to allocate a connection. The default is 5000 ms.
allow-multiple-users Non-XA, XA Whether multiple users will access the datasourcethrough the getConnection(user, password) method and if the internal pool typeaccounts for this behavior.
background-validation Non-XA, XA Whether connections should be validated on abackground thread versus being validated prior touse. Background validation is typically not to beused with validate-on-match or there will beredundant checks. With background validation,there is an opportunity for a connection to go badbetween the time of the validations can and beinghanded to the client, so the application mustaccount for this possibility.
background-validation-millis Non-XA, XA The frequency, in milliseconds, that backgroundvalidation will run.
blocking-timeout-wait-millis Non-XA, XA The maximum time, in milliseconds, to block whilewaiting for a connection before throwing anexception. Note that this blocks only while waitingfor locking a connection, and will never throw anexception if creating a new connection takes aninordinately long time.
capacity-decrementer-class Non-XA, XA Class defining the policy for decrementingconnections in the pool.
capacity-decrementer-properties
Non-XA, XA Properties to be injected in the class defining thepolicy for decrementing connections in the pool.
capacity-incrementer-class Non-XA, XA Class defining the policy for incrementingconnections in the pool.
capacity-incrementer-properties
Non-XA, XA Properties to be injected in the class defining thepolicy for incrementing connections in the pool.
check-valid-connection-sql Non-XA, XA An SQL statement to check validity of a poolconnection. This may be called when a managedconnection is obtained from the pool.
Red Hat JBoss Enterprise Application Platform 7.0 Configuration Guide
330
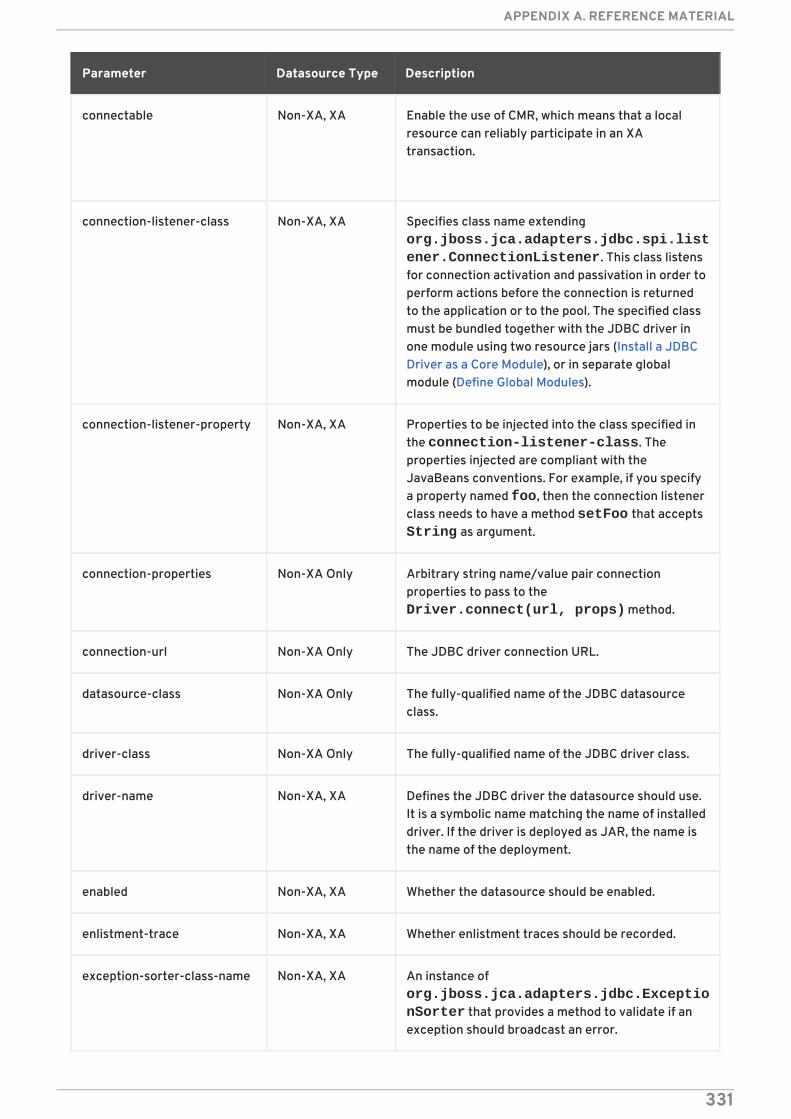
connectable Non-XA, XA Enable the use of CMR, which means that a localresource can reliably participate in an XAtransaction.
connection-listener-class Non-XA, XA Specifies class name extending org.jboss.jca.adapters.jdbc.spi.listener.ConnectionListener. This class listensfor connection activation and passivation in order toperform actions before the connection is returnedto the application or to the pool. The specified classmust be bundled together with the JDBC driver inone module using two resource jars (Install a JDBCDriver as a Core Module), or in separate globalmodule (Define Global Modules).
connection-listener-property Non-XA, XA Properties to be injected into the class specified inthe connection-listener-class. Theproperties injected are compliant with theJavaBeans conventions. For example, if you specifya property named foo, then the connection listenerclass needs to have a method setFoo that accepts String as argument.
connection-properties Non-XA Only Arbitrary string name/value pair connectionproperties to pass to the Driver.connect(url, props) method.
connection-url Non-XA Only The JDBC driver connection URL.
datasource-class Non-XA Only The fully-qualified name of the JDBC datasourceclass.
driver-class Non-XA Only The fully-qualified name of the JDBC driver class.
driver-name Non-XA, XA Defines the JDBC driver the datasource should use.It is a symbolic name matching the name of installeddriver. If the driver is deployed as JAR, the name isthe name of the deployment.
enabled Non-XA, XA Whether the datasource should be enabled.
enlistment-trace Non-XA, XA Whether enlistment traces should be recorded.
exception-sorter-class-name Non-XA, XA An instance of org.jboss.jca.adapters.jdbc.ExceptionSorter that provides a method to validate if anexception should broadcast an error.
Parameter Datasource Type Description
APPENDIX A. REFERENCE MATERIAL
331
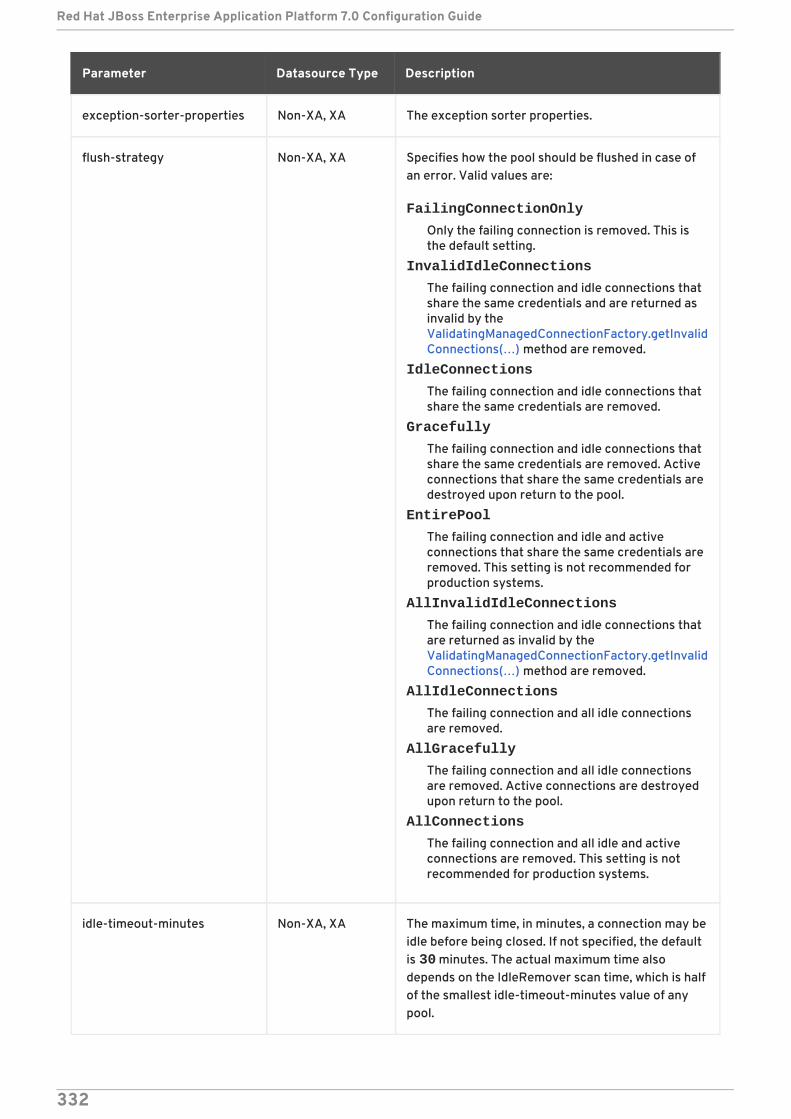
exception-sorter-properties Non-XA, XA The exception sorter properties.
flush-strategy Non-XA, XA Specifies how the pool should be flushed in case ofan error. Valid values are:
FailingConnectionOnly
Only the failing connection is removed. This isthe default setting.
InvalidIdleConnections
The failing connection and idle connections thatshare the same credentials and are returned asinvalid by theValidatingManagedConnectionFactory.getInvalidConnections(… ) method are removed.
IdleConnections
The failing connection and idle connections thatshare the same credentials are removed.
Gracefully
The failing connection and idle connections thatshare the same credentials are removed. Activeconnections that share the same credentials aredestroyed upon return to the pool.
EntirePool
The failing connection and idle and activeconnections that share the same credentials areremoved. This setting is not recommended forproduction systems.
AllInvalidIdleConnections
The failing connection and idle connections thatare returned as invalid by theValidatingManagedConnectionFactory.getInvalidConnections(… ) method are removed.
AllIdleConnections
The failing connection and all idle connectionsare removed.
AllGracefully
The failing connection and all idle connectionsare removed. Active connections are destroyedupon return to the pool.
AllConnections
The failing connection and all idle and activeconnections are removed. This setting is notrecommended for production systems.
idle-timeout-minutes Non-XA, XA The maximum time, in minutes, a connection may beidle before being closed. If not specified, the defaultis 30 minutes. The actual maximum time alsodepends on the IdleRemover scan time, which is halfof the smallest idle-timeout-minutes value of anypool.
Parameter Datasource Type Description
Red Hat JBoss Enterprise Application Platform 7.0 Configuration Guide
332
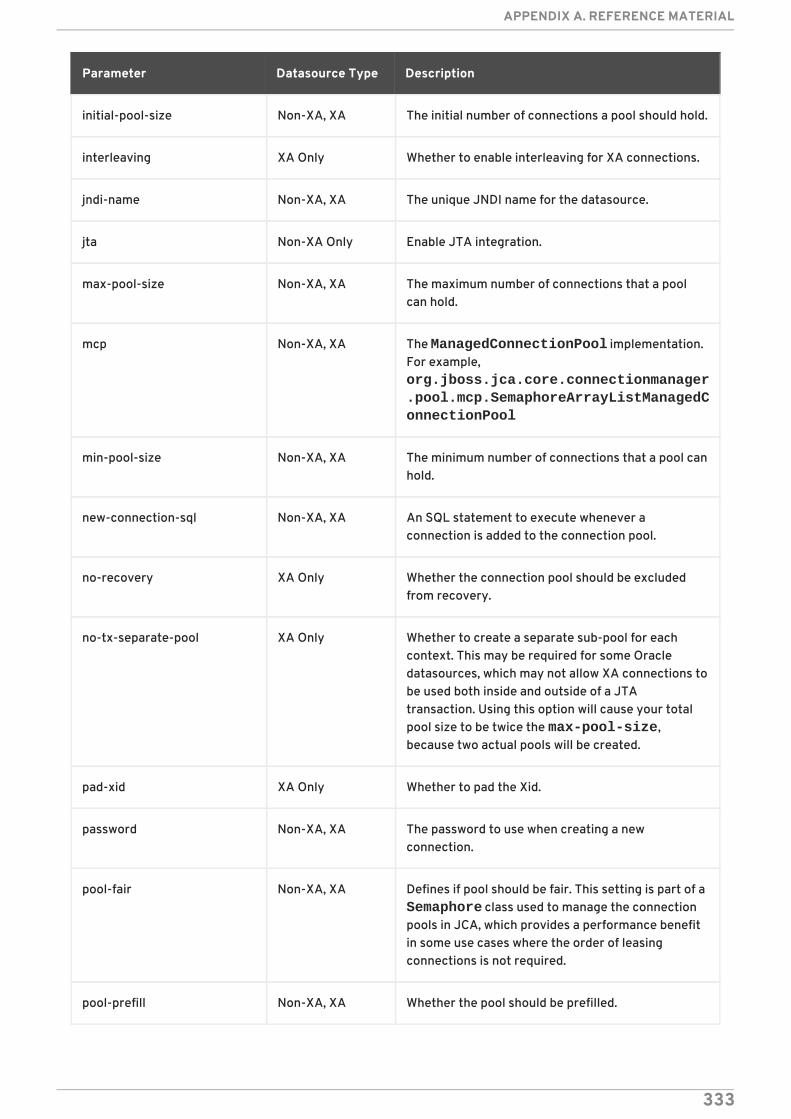
initial-pool-size Non-XA, XA The initial number of connections a pool should hold.
interleaving XA Only Whether to enable interleaving for XA connections.
jndi-name Non-XA, XA The unique JNDI name for the datasource.
jta Non-XA Only Enable JTA integration.
max-pool-size Non-XA, XA The maximum number of connections that a poolcan hold.
mcp Non-XA, XA The ManagedConnectionPool implementation.For example, org.jboss.jca.core.connectionmanager.pool.mcp.SemaphoreArrayListManagedConnectionPool
min-pool-size Non-XA, XA The minimum number of connections that a pool canhold.
new-connection-sql Non-XA, XA An SQL statement to execute whenever aconnection is added to the connection pool.
no-recovery XA Only Whether the connection pool should be excludedfrom recovery.
no-tx-separate-pool XA Only Whether to create a separate sub-pool for eachcontext. This may be required for some Oracledatasources, which may not allow XA connections tobe used both inside and outside of a JTAtransaction. Using this option will cause your totalpool size to be twice the max-pool-size,because two actual pools will be created.
pad-xid XA Only Whether to pad the Xid.
password Non-XA, XA The password to use when creating a newconnection.
pool-fair Non-XA, XA Defines if pool should be fair. This setting is part of a Semaphore class used to manage the connectionpools in JCA, which provides a performance benefitin some use cases where the order of leasingconnections is not required.
pool-prefill Non-XA, XA Whether the pool should be prefilled.
Parameter Datasource Type Description
APPENDIX A. REFERENCE MATERIAL
333
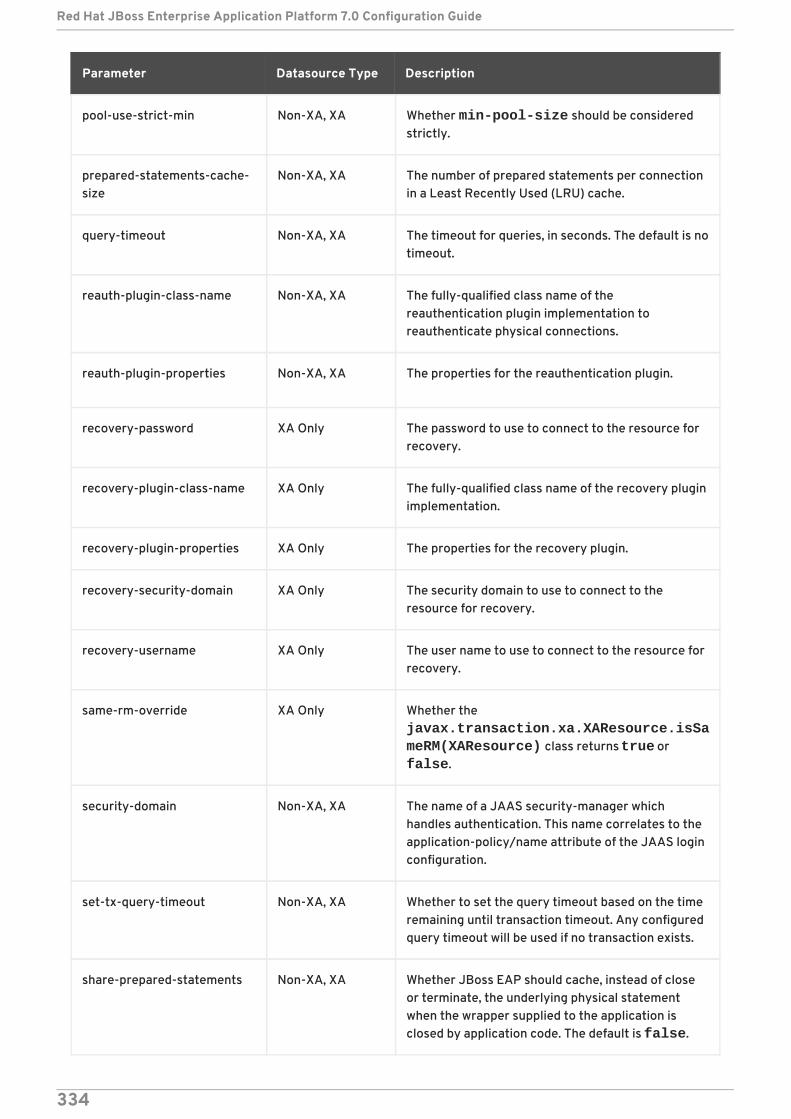
pool-use-strict-min Non-XA, XA Whether min-pool-size should be consideredstrictly.
prepared-statements-cache-size
Non-XA, XA The number of prepared statements per connectionin a Least Recently Used (LRU) cache.
query-timeout Non-XA, XA The timeout for queries, in seconds. The default is notimeout.
reauth-plugin-class-name Non-XA, XA The fully-qualified class name of thereauthentication plugin implementation toreauthenticate physical connections.
reauth-plugin-properties Non-XA, XA The properties for the reauthentication plugin.
recovery-password XA Only The password to use to connect to the resource forrecovery.
recovery-plugin-class-name XA Only The fully-qualified class name of the recovery pluginimplementation.
recovery-plugin-properties XA Only The properties for the recovery plugin.
recovery-security-domain XA Only The security domain to use to connect to theresource for recovery.
recovery-username XA Only The user name to use to connect to the resource forrecovery.
same-rm-override XA Only Whether the javax.transaction.xa.XAResource.isSameRM(XAResource) class returns true or false.
security-domain Non-XA, XA The name of a JAAS security-manager whichhandles authentication. This name correlates to theapplication-policy/name attribute of the JAAS loginconfiguration.
set-tx-query-timeout Non-XA, XA Whether to set the query timeout based on the timeremaining until transaction timeout. Any configuredquery timeout will be used if no transaction exists.
share-prepared-statements Non-XA, XA Whether JBoss EAP should cache, instead of closeor terminate, the underlying physical statementwhen the wrapper supplied to the application isclosed by application code. The default is false.
Parameter Datasource Type Description
Red Hat JBoss Enterprise Application Platform 7.0 Configuration Guide
334
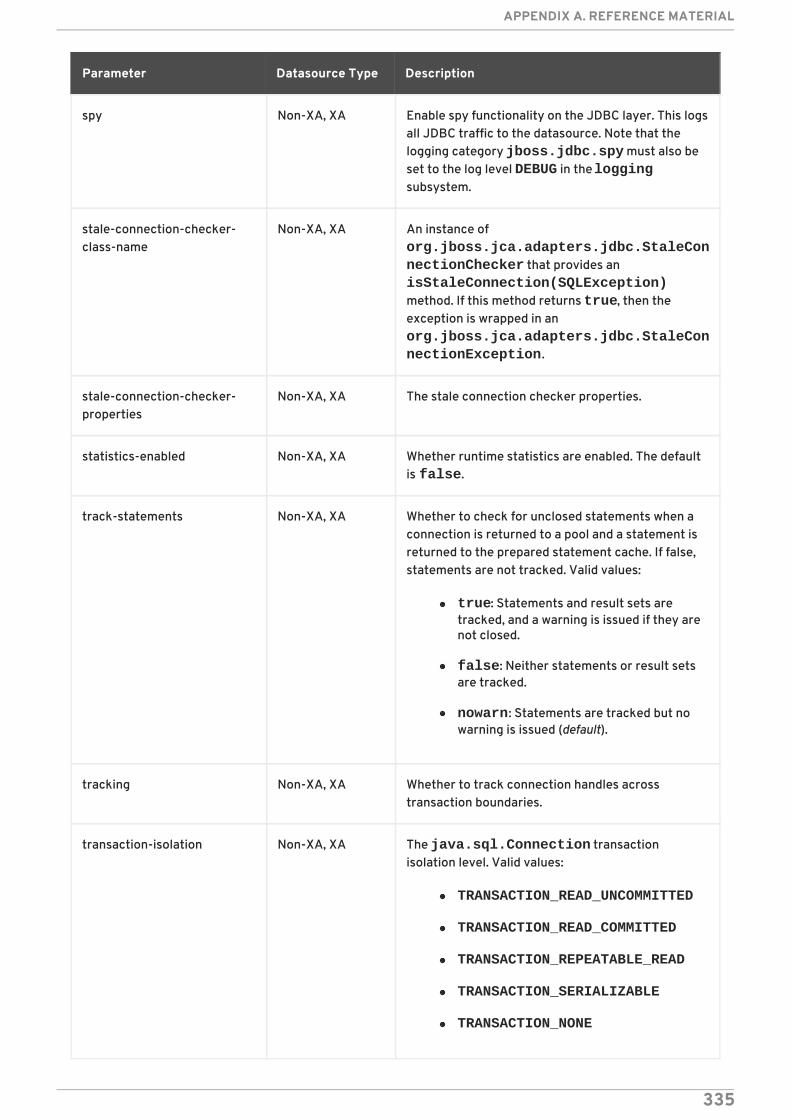
spy Non-XA, XA Enable spy functionality on the JDBC layer. This logsall JDBC traffic to the datasource. Note that thelogging category jboss.jdbc.spy must also beset to the log level DEBUG in the loggingsubsystem.
stale-connection-checker-class-name
Non-XA, XA An instance of org.jboss.jca.adapters.jdbc.StaleConnectionChecker that provides an isStaleConnection(SQLException)method. If this method returns true, then theexception is wrapped in an org.jboss.jca.adapters.jdbc.StaleConnectionException.
stale-connection-checker-properties
Non-XA, XA The stale connection checker properties.
statistics-enabled Non-XA, XA Whether runtime statistics are enabled. The defaultis false.
track-statements Non-XA, XA Whether to check for unclosed statements when aconnection is returned to a pool and a statement isreturned to the prepared statement cache. If false,statements are not tracked. Valid values:
true: Statements and result sets aretracked, and a warning is issued if they arenot closed.
false: Neither statements or result setsare tracked.
nowarn: Statements are tracked but nowarning is issued (default).
tracking Non-XA, XA Whether to track connection handles acrosstransaction boundaries.
transaction-isolation Non-XA, XA The java.sql.Connection transactionisolation level. Valid values:
TRANSACTION_READ_UNCOMMITTED
TRANSACTION_READ_COMMITTED
TRANSACTION_REPEATABLE_READ
TRANSACTION_SERIALIZABLE
TRANSACTION_NONE
Parameter Datasource Type Description
APPENDIX A. REFERENCE MATERIAL
335
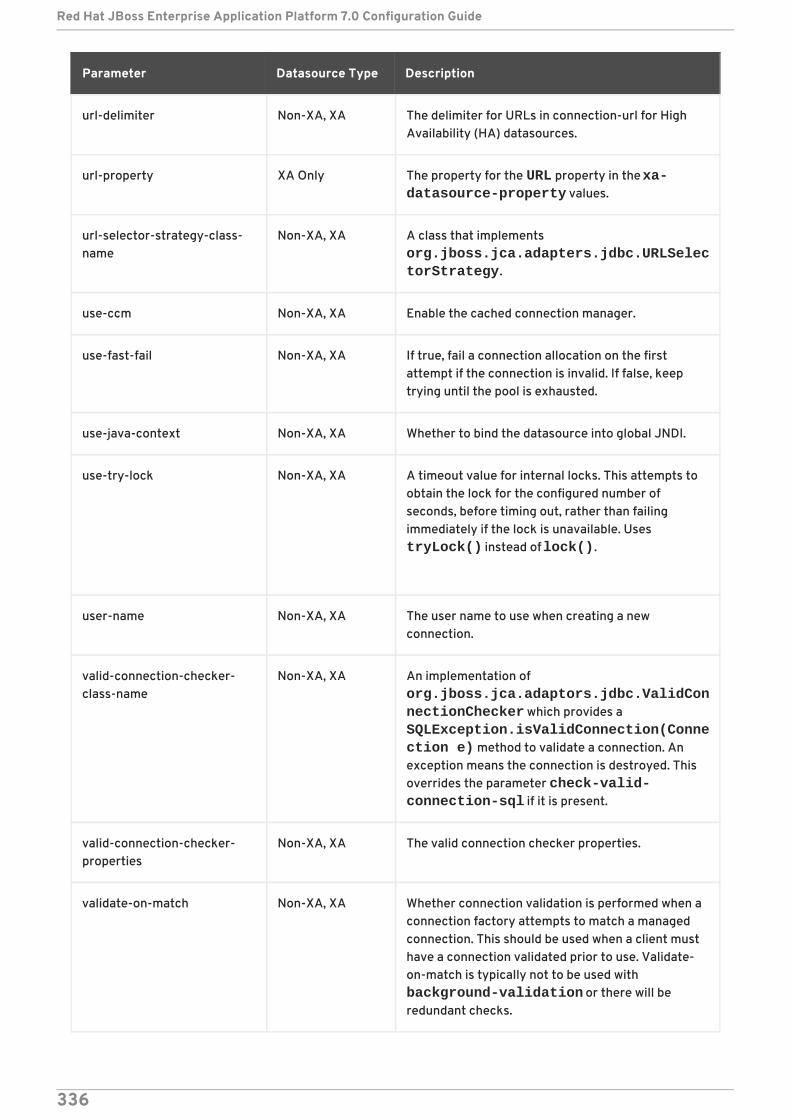
url-delimiter Non-XA, XA The delimiter for URLs in connection-url for HighAvailability (HA) datasources.
url-property XA Only The property for the URL property in the xa-datasource-property values.
url-selector-strategy-class-name
Non-XA, XA A class that implements org.jboss.jca.adapters.jdbc.URLSelectorStrategy.
use-ccm Non-XA, XA Enable the cached connection manager.
use-fast-fail Non-XA, XA If true, fail a connection allocation on the firstattempt if the connection is invalid. If false, keeptrying until the pool is exhausted.
use-java-context Non-XA, XA Whether to bind the datasource into global JNDI.
use-try-lock Non-XA, XA A timeout value for internal locks. This attempts toobtain the lock for the configured number ofseconds, before timing out, rather than failingimmediately if the lock is unavailable. Uses tryLock() instead of lock().
user-name Non-XA, XA The user name to use when creating a newconnection.
valid-connection-checker-class-name
Non-XA, XA An implementation of org.jboss.jca.adaptors.jdbc.ValidConnectionChecker which provides a SQLException.isValidConnection(Connection e) method to validate a connection. Anexception means the connection is destroyed. Thisoverrides the parameter check-valid-connection-sql if it is present.
valid-connection-checker-properties
Non-XA, XA The valid connection checker properties.
validate-on-match Non-XA, XA Whether connection validation is performed when aconnection factory attempts to match a managedconnection. This should be used when a client musthave a connection validated prior to use. Validate-on-match is typically not to be used with background-validation or there will beredundant checks.
Parameter Datasource Type Description
Red Hat JBoss Enterprise Application Platform 7.0 Configuration Guide
336
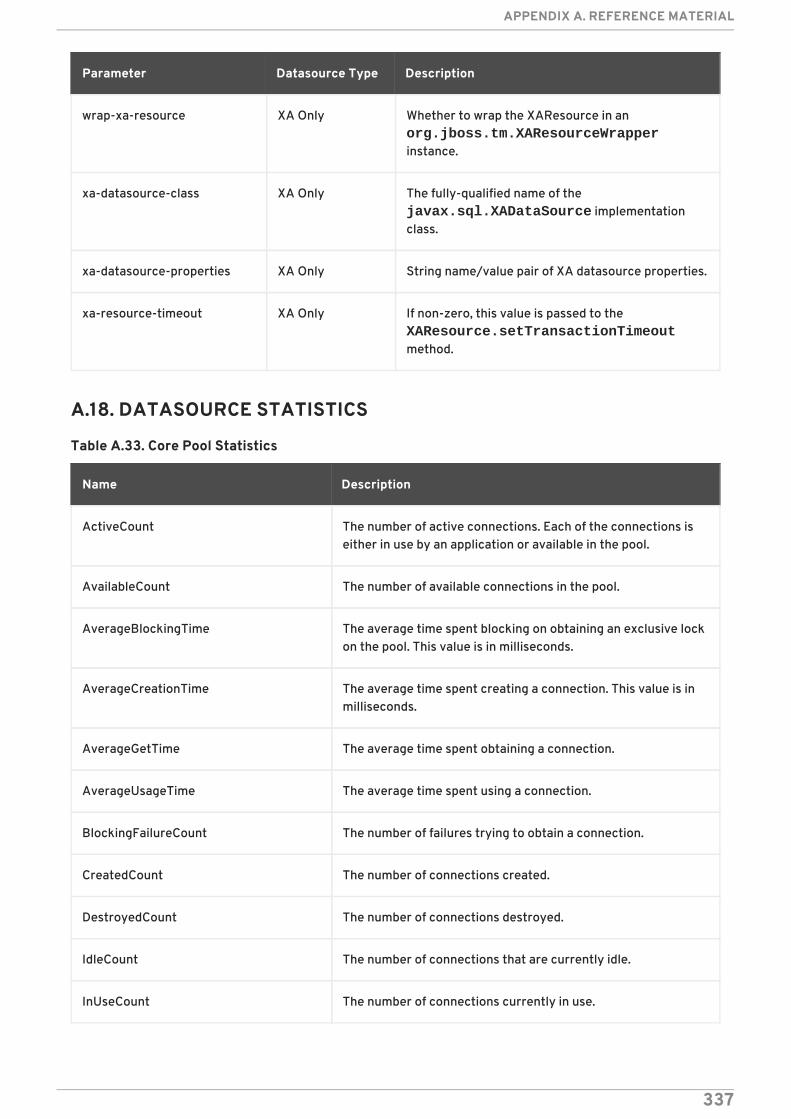
wrap-xa-resource XA Only Whether to wrap the XAResource in an org.jboss.tm.XAResourceWrapperinstance.
xa-datasource-class XA Only The fully-qualified name of the javax.sql.XADataSource implementationclass.
xa-datasource-properties XA Only String name/value pair of XA datasource properties.
xa-resource-timeout XA Only If non-zero, this value is passed to the XAResource.setTransactionTimeoutmethod.
Parameter Datasource Type Description
A.18. DATASOURCE STATISTICS
Table A.33. Core Pool Statistics
Name Description
ActiveCount The number of active connections. Each of the connections iseither in use by an application or available in the pool.
AvailableCount The number of available connections in the pool.
AverageBlockingTime The average time spent blocking on obtaining an exclusive lockon the pool. This value is in milliseconds.
AverageCreationTime The average time spent creating a connection. This value is inmilliseconds.
AverageGetTime The average time spent obtaining a connection.
AverageUsageTime The average time spent using a connection.
BlockingFailureCount The number of failures trying to obtain a connection.
CreatedCount The number of connections created.
DestroyedCount The number of connections destroyed.
IdleCount The number of connections that are currently idle.
InUseCount The number of connections currently in use.
APPENDIX A. REFERENCE MATERIAL
337
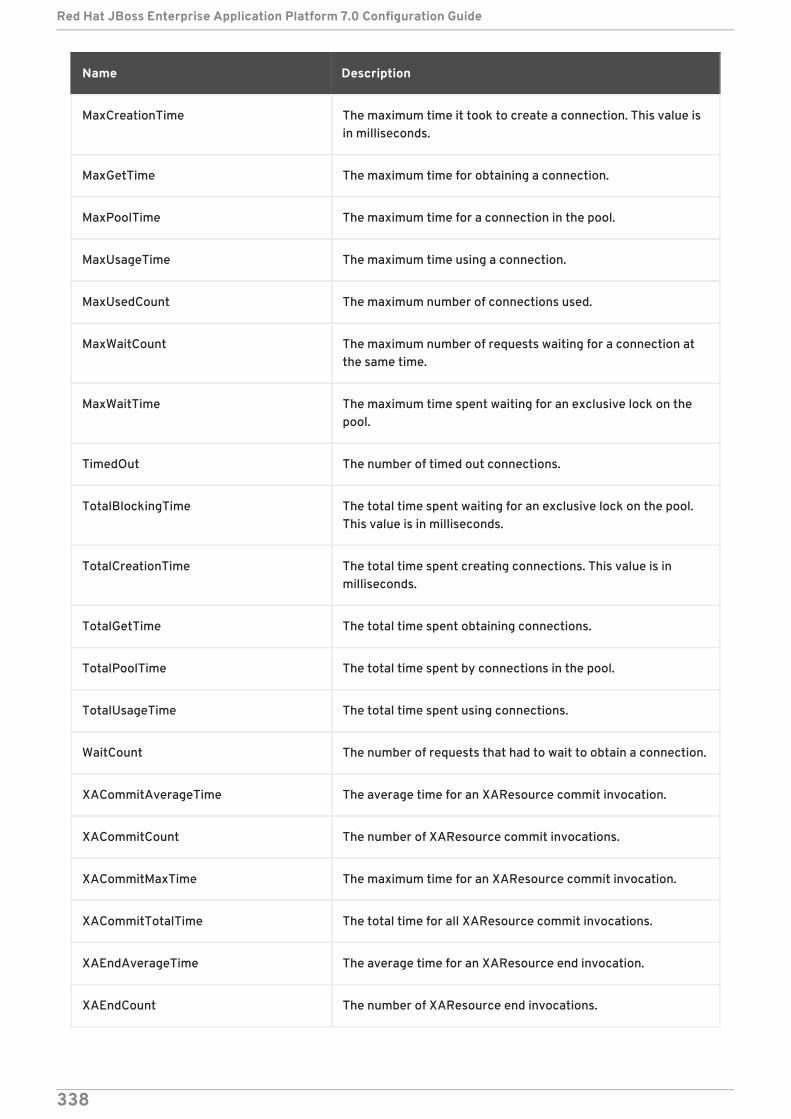
MaxCreationTime The maximum time it took to create a connection. This value isin milliseconds.
MaxGetTime The maximum time for obtaining a connection.
MaxPoolTime The maximum time for a connection in the pool.
MaxUsageTime The maximum time using a connection.
MaxUsedCount The maximum number of connections used.
MaxWaitCount The maximum number of requests waiting for a connection atthe same time.
MaxWaitTime The maximum time spent waiting for an exclusive lock on thepool.
TimedOut The number of timed out connections.
TotalBlockingTime The total time spent waiting for an exclusive lock on the pool.This value is in milliseconds.
TotalCreationTime The total time spent creating connections. This value is inmilliseconds.
TotalGetTime The total time spent obtaining connections.
TotalPoolTime The total time spent by connections in the pool.
TotalUsageTime The total time spent using connections.
WaitCount The number of requests that had to wait to obtain a connection.
XACommitAverageTime The average time for an XAResource commit invocation.
XACommitCount The number of XAResource commit invocations.
XACommitMaxTime The maximum time for an XAResource commit invocation.
XACommitTotalTime The total time for all XAResource commit invocations.
XAEndAverageTime The average time for an XAResource end invocation.
XAEndCount The number of XAResource end invocations.
Name Description
Red Hat JBoss Enterprise Application Platform 7.0 Configuration Guide
338
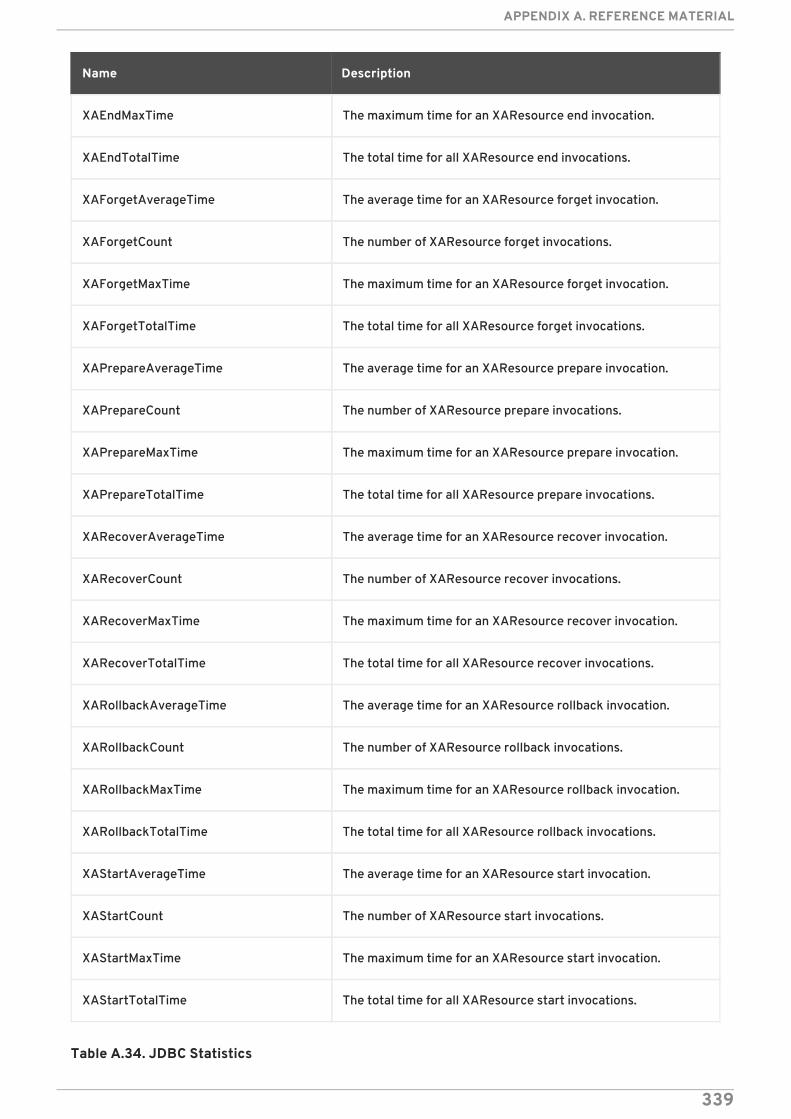
XAEndMaxTime The maximum time for an XAResource end invocation.
XAEndTotalTime The total time for all XAResource end invocations.
XAForgetAverageTime The average time for an XAResource forget invocation.
XAForgetCount The number of XAResource forget invocations.
XAForgetMaxTime The maximum time for an XAResource forget invocation.
XAForgetTotalTime The total time for all XAResource forget invocations.
XAPrepareAverageTime The average time for an XAResource prepare invocation.
XAPrepareCount The number of XAResource prepare invocations.
XAPrepareMaxTime The maximum time for an XAResource prepare invocation.
XAPrepareTotalTime The total time for all XAResource prepare invocations.
XARecoverAverageTime The average time for an XAResource recover invocation.
XARecoverCount The number of XAResource recover invocations.
XARecoverMaxTime The maximum time for an XAResource recover invocation.
XARecoverTotalTime The total time for all XAResource recover invocations.
XARollbackAverageTime The average time for an XAResource rollback invocation.
XARollbackCount The number of XAResource rollback invocations.
XARollbackMaxTime The maximum time for an XAResource rollback invocation.
XARollbackTotalTime The total time for all XAResource rollback invocations.
XAStartAverageTime The average time for an XAResource start invocation.
XAStartCount The number of XAResource start invocations.
XAStartMaxTime The maximum time for an XAResource start invocation.
XAStartTotalTime The total time for all XAResource start invocations.
Name Description
Table A.34. JDBC Statistics
APPENDIX A. REFERENCE MATERIAL
339
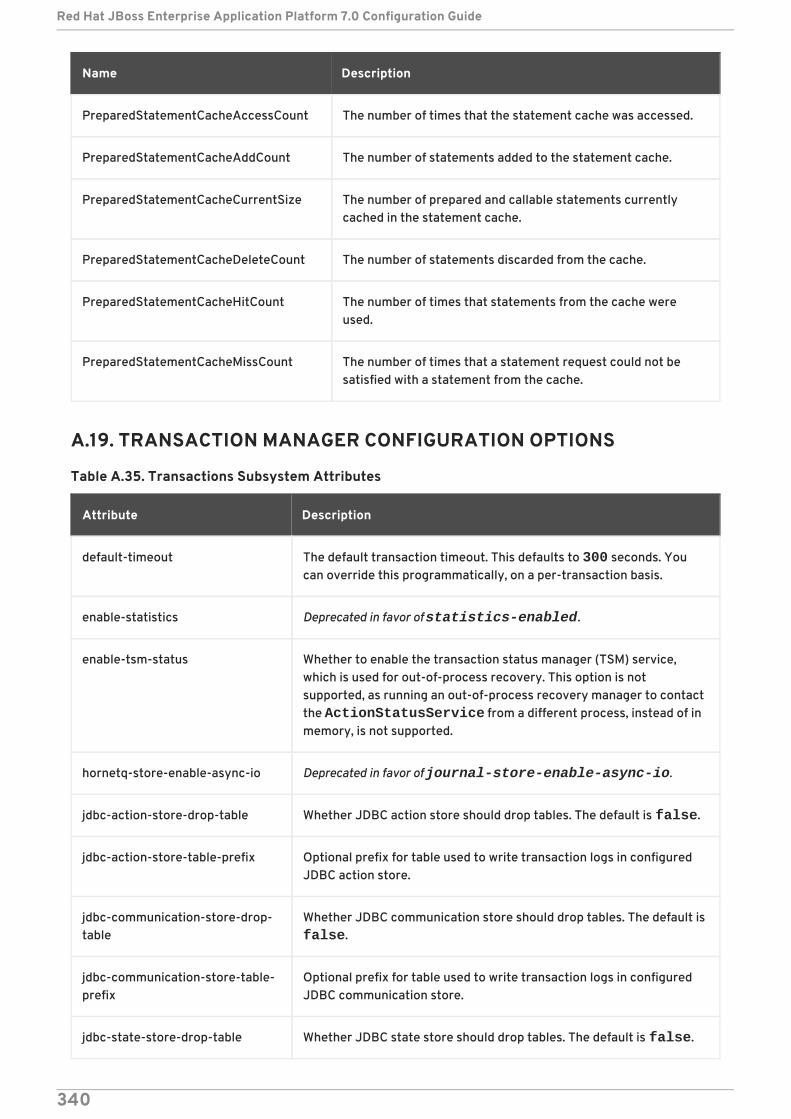
Name Description
PreparedStatementCacheAccessCount The number of times that the statement cache was accessed.
PreparedStatementCacheAddCount The number of statements added to the statement cache.
PreparedStatementCacheCurrentSize The number of prepared and callable statements currentlycached in the statement cache.
PreparedStatementCacheDeleteCount The number of statements discarded from the cache.
PreparedStatementCacheHitCount The number of times that statements from the cache wereused.
PreparedStatementCacheMissCount The number of times that a statement request could not besatisfied with a statement from the cache.
A.19. TRANSACTION MANAGER CONFIGURATION OPTIONS
Table A.35. Transactions Subsystem Attributes
Attribute Description
default-timeout The default transaction timeout. This defaults to 300 seconds. Youcan override this programmatically, on a per-transaction basis.
enable-statistics Deprecated in favor of statistics-enabled.
enable-tsm-status Whether to enable the transaction status manager (TSM) service,which is used for out-of-process recovery. This option is notsupported, as running an out-of-process recovery manager to contactthe ActionStatusService from a different process, instead of inmemory, is not supported.
hornetq-store-enable-async-io Deprecated in favor of journal-store-enable-async-io.
jdbc-action-store-drop-table Whether JDBC action store should drop tables. The default is false.
jdbc-action-store-table-prefix Optional prefix for table used to write transaction logs in configuredJDBC action store.
jdbc-communication-store-drop-table
Whether JDBC communication store should drop tables. The default is false.
jdbc-communication-store-table-prefix
Optional prefix for table used to write transaction logs in configuredJDBC communication store.
jdbc-state-store-drop-table Whether JDBC state store should drop tables. The default is false.
Red Hat JBoss Enterprise Application Platform 7.0 Configuration Guide
340
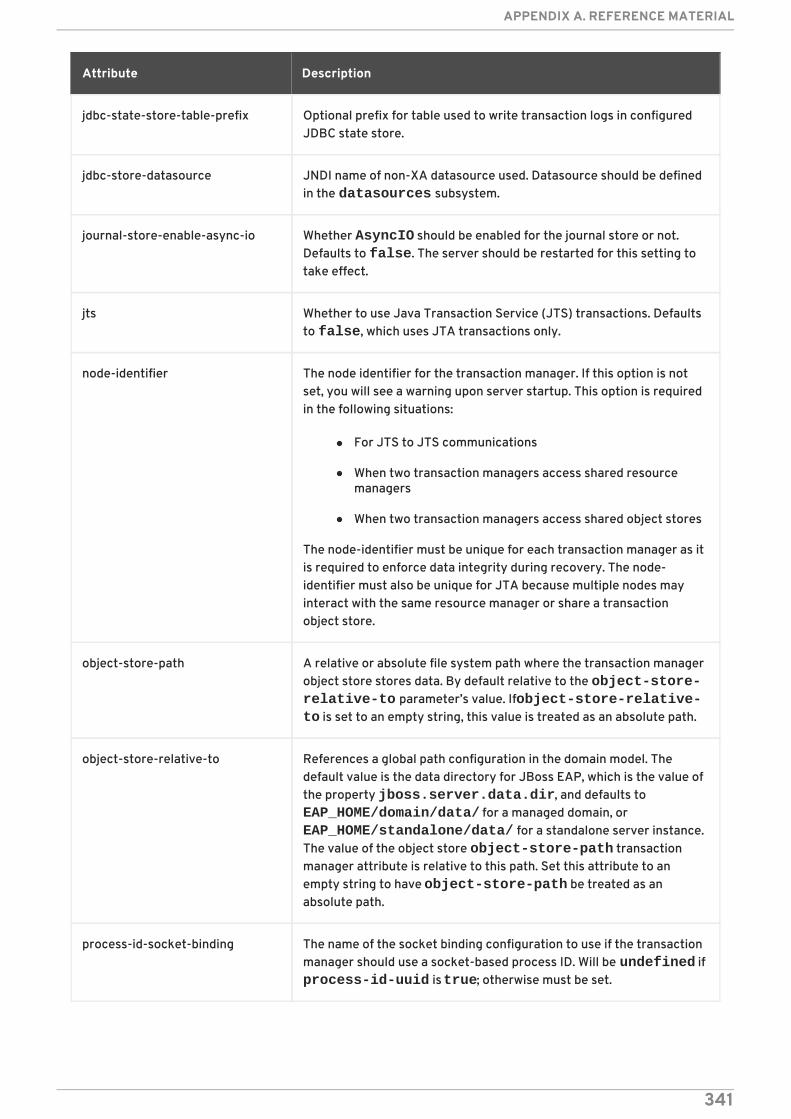
jdbc-state-store-table-prefix Optional prefix for table used to write transaction logs in configuredJDBC state store.
jdbc-store-datasource JNDI name of non-XA datasource used. Datasource should be definedin the datasources subsystem.
journal-store-enable-async-io Whether AsyncIO should be enabled for the journal store or not.Defaults to false. The server should be restarted for this setting totake effect.
jts Whether to use Java Transaction Service (JTS) transactions. Defaultsto false, which uses JTA transactions only.
node-identifier The node identifier for the transaction manager. If this option is notset, you will see a warning upon server startup. This option is requiredin the following situations:
For JTS to JTS communications
When two transaction managers access shared resourcemanagers
When two transaction managers access shared object stores
The node-identifier must be unique for each transaction manager as itis required to enforce data integrity during recovery. The node-identifier must also be unique for JTA because multiple nodes mayinteract with the same resource manager or share a transactionobject store.
object-store-path A relative or absolute file system path where the transaction managerobject store stores data. By default relative to the object-store-relative-to parameter’s value. If object-store-relative-to is set to an empty string, this value is treated as an absolute path.
object-store-relative-to References a global path configuration in the domain model. Thedefault value is the data directory for JBoss EAP, which is the value ofthe property jboss.server.data.dir, and defaults to EAP_HOME/domain/data/ for a managed domain, or EAP_HOME/standalone/data/ for a standalone server instance.The value of the object store object-store-path transactionmanager attribute is relative to this path. Set this attribute to anempty string to have object-store-path be treated as anabsolute path.
process-id-socket-binding The name of the socket binding configuration to use if the transactionmanager should use a socket-based process ID. Will be undefined if process-id-uuid is true; otherwise must be set.
Attribute Description
APPENDIX A. REFERENCE MATERIAL
341
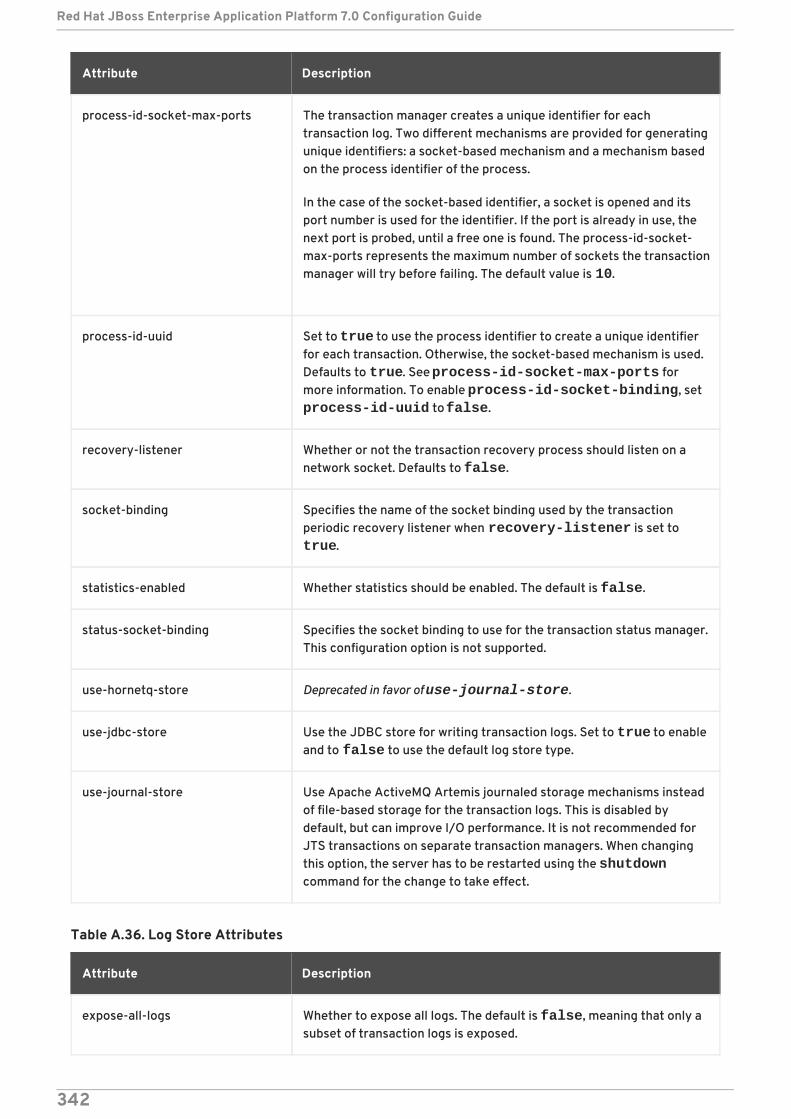
process-id-socket-max-ports The transaction manager creates a unique identifier for eachtransaction log. Two different mechanisms are provided for generatingunique identifiers: a socket-based mechanism and a mechanism basedon the process identifier of the process.
In the case of the socket-based identifier, a socket is opened and itsport number is used for the identifier. If the port is already in use, thenext port is probed, until a free one is found. The process-id-socket-max-ports represents the maximum number of sockets the transactionmanager will try before failing. The default value is 10.
process-id-uuid Set to true to use the process identifier to create a unique identifierfor each transaction. Otherwise, the socket-based mechanism is used.Defaults to true. See process-id-socket-max-ports formore information. To enable process-id-socket-binding, set process-id-uuid to false.
recovery-listener Whether or not the transaction recovery process should listen on anetwork socket. Defaults to false.
socket-binding Specifies the name of the socket binding used by the transactionperiodic recovery listener when recovery-listener is set to true.
statistics-enabled Whether statistics should be enabled. The default is false.
status-socket-binding Specifies the socket binding to use for the transaction status manager.This configuration option is not supported.
use-hornetq-store Deprecated in favor of use-journal-store.
use-jdbc-store Use the JDBC store for writing transaction logs. Set to true to enableand to false to use the default log store type.
use-journal-store Use Apache ActiveMQ Artemis journaled storage mechanisms insteadof file-based storage for the transaction logs. This is disabled bydefault, but can improve I/O performance. It is not recommended forJTS transactions on separate transaction managers. When changingthis option, the server has to be restarted using the shutdowncommand for the change to take effect.
Attribute Description
Table A.36. Log Store Attributes
Attribute Description
expose-all-logs Whether to expose all logs. The default is false, meaning that only asubset of transaction logs is exposed.
Red Hat JBoss Enterprise Application Platform 7.0 Configuration Guide
342
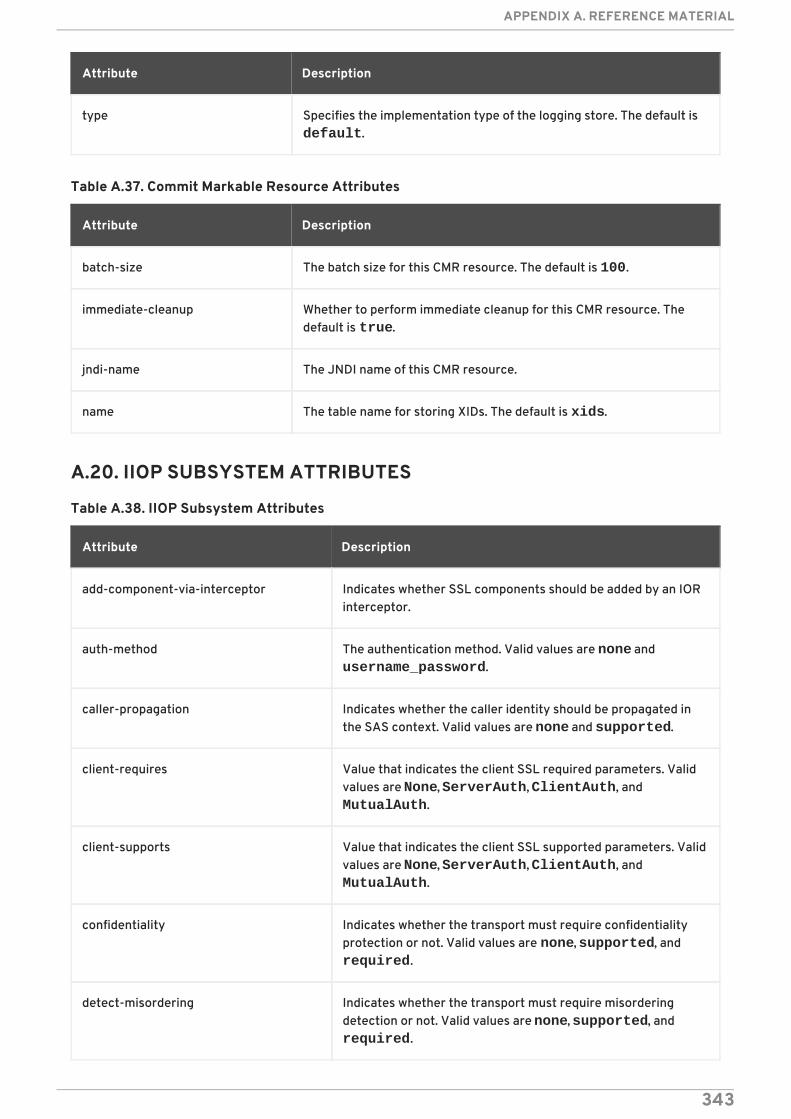
type Specifies the implementation type of the logging store. The default is default.
Attribute Description
Table A.37. Commit Markable Resource Attributes
Attribute Description
batch-size The batch size for this CMR resource. The default is 100.
immediate-cleanup Whether to perform immediate cleanup for this CMR resource. Thedefault is true.
jndi-name The JNDI name of this CMR resource.
name The table name for storing XIDs. The default is xids.
A.20. IIOP SUBSYSTEM ATTRIBUTES
Table A.38. IIOP Subsystem Attributes
Attribute Description
add-component-via-interceptor Indicates whether SSL components should be added by an IORinterceptor.
auth-method The authentication method. Valid values are none and username_password.
caller-propagation Indicates whether the caller identity should be propagated inthe SAS context. Valid values are none and supported.
client-requires Value that indicates the client SSL required parameters. Validvalues are None, ServerAuth, ClientAuth, and MutualAuth.
client-supports Value that indicates the client SSL supported parameters. Validvalues are None, ServerAuth, ClientAuth, and MutualAuth.
confidentiality Indicates whether the transport must require confidentialityprotection or not. Valid values are none, supported, and required.
detect-misordering Indicates whether the transport must require misorderingdetection or not. Valid values are none, supported, and required.
APPENDIX A. REFERENCE MATERIAL
343
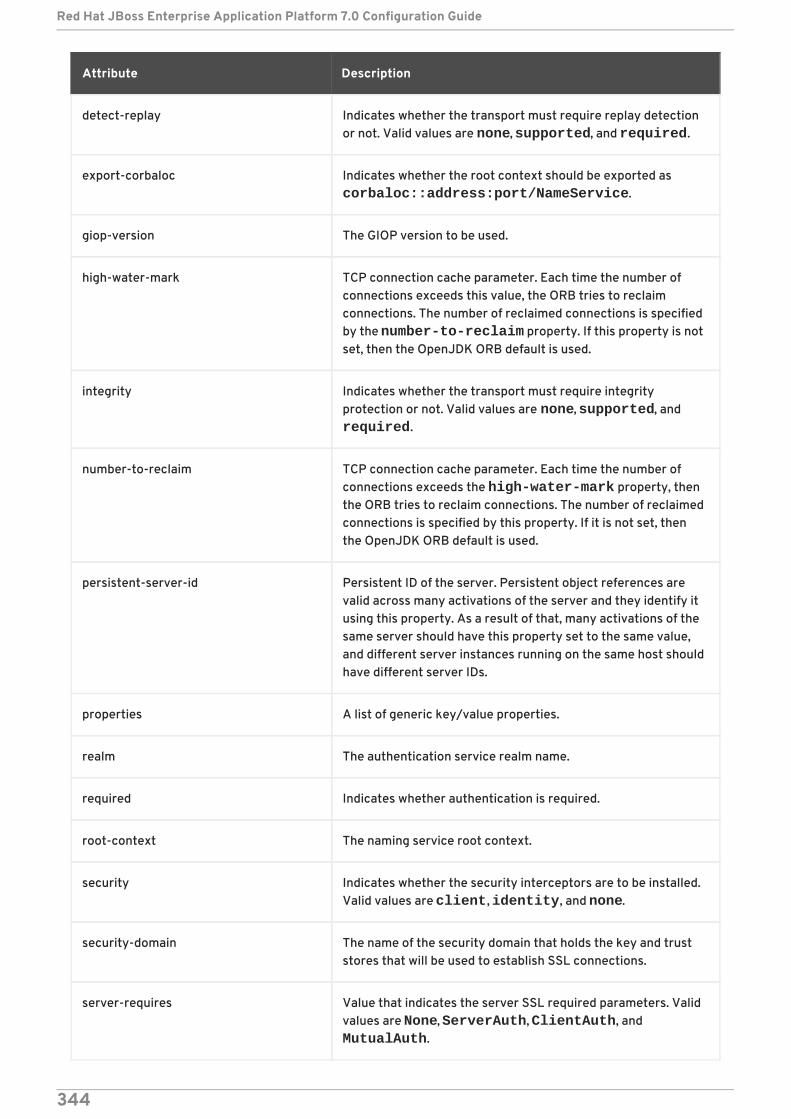
detect-replay Indicates whether the transport must require replay detectionor not. Valid values are none, supported, and required.
export-corbaloc Indicates whether the root context should be exported as corbaloc::address:port/NameService.
giop-version The GIOP version to be used.
high-water-mark TCP connection cache parameter. Each time the number ofconnections exceeds this value, the ORB tries to reclaimconnections. The number of reclaimed connections is specifiedby the number-to-reclaim property. If this property is notset, then the OpenJDK ORB default is used.
integrity Indicates whether the transport must require integrityprotection or not. Valid values are none, supported, and required.
number-to-reclaim TCP connection cache parameter. Each time the number ofconnections exceeds the high-water-mark property, thenthe ORB tries to reclaim connections. The number of reclaimedconnections is specified by this property. If it is not set, thenthe OpenJDK ORB default is used.
persistent-server-id Persistent ID of the server. Persistent object references arevalid across many activations of the server and they identify itusing this property. As a result of that, many activations of thesame server should have this property set to the same value,and different server instances running on the same host shouldhave different server IDs.
properties A list of generic key/value properties.
realm The authentication service realm name.
required Indicates whether authentication is required.
root-context The naming service root context.
security Indicates whether the security interceptors are to be installed.Valid values are client, identity, and none.
security-domain The name of the security domain that holds the key and truststores that will be used to establish SSL connections.
server-requires Value that indicates the server SSL required parameters. Validvalues are None, ServerAuth, ClientAuth, and MutualAuth.
Attribute Description
Red Hat JBoss Enterprise Application Platform 7.0 Configuration Guide
344
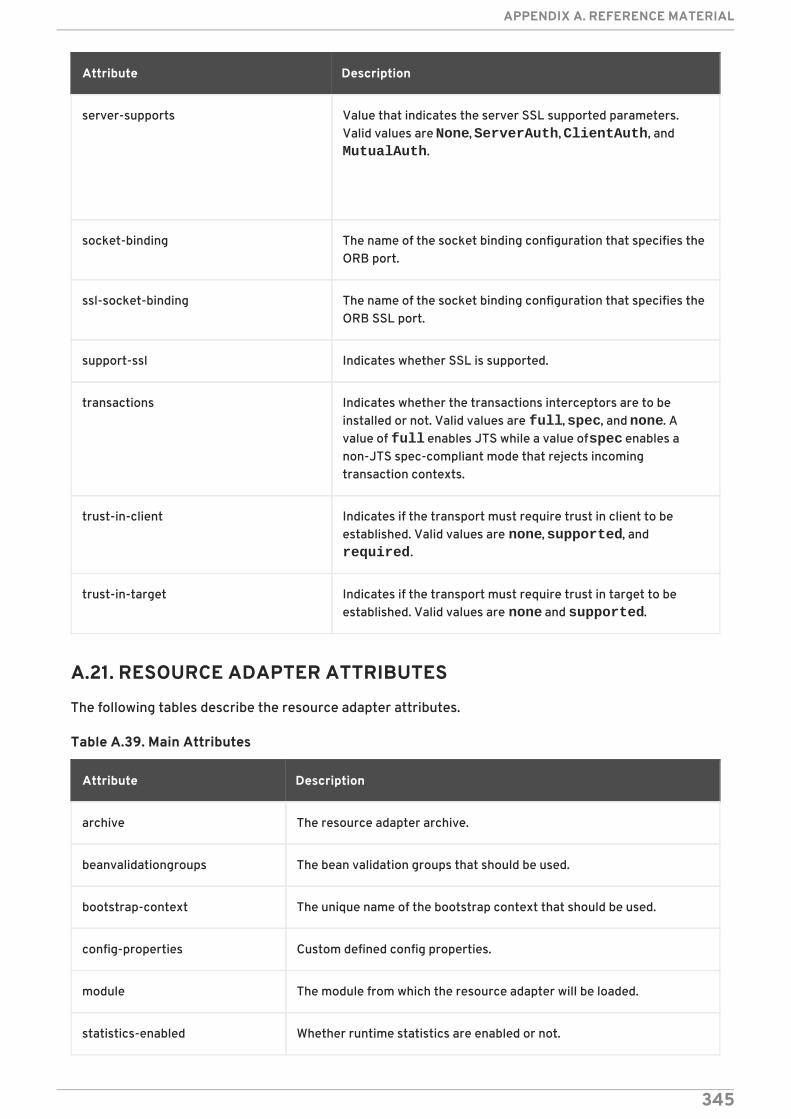
server-supports Value that indicates the server SSL supported parameters.Valid values are None, ServerAuth, ClientAuth, and MutualAuth.
socket-binding The name of the socket binding configuration that specifies theORB port.
ssl-socket-binding The name of the socket binding configuration that specifies theORB SSL port.
support-ssl Indicates whether SSL is supported.
transactions Indicates whether the transactions interceptors are to beinstalled or not. Valid values are full, spec, and none. Avalue of full enables JTS while a value of spec enables anon-JTS spec-compliant mode that rejects incomingtransaction contexts.
trust-in-client Indicates if the transport must require trust in client to beestablished. Valid values are none, supported, and required.
trust-in-target Indicates if the transport must require trust in target to beestablished. Valid values are none and supported.
Attribute Description
A.21. RESOURCE ADAPTER ATTRIBUTES
The following tables describe the resource adapter attributes.
Table A.39. Main Attributes
Attribute Description
archive The resource adapter archive.
beanvalidationgroups The bean validation groups that should be used.
bootstrap-context The unique name of the bootstrap context that should be used.
config-properties Custom defined config properties.
module The module from which the resource adapter will be loaded.
statistics-enabled Whether runtime statistics are enabled or not.
APPENDIX A. REFERENCE MATERIAL
345
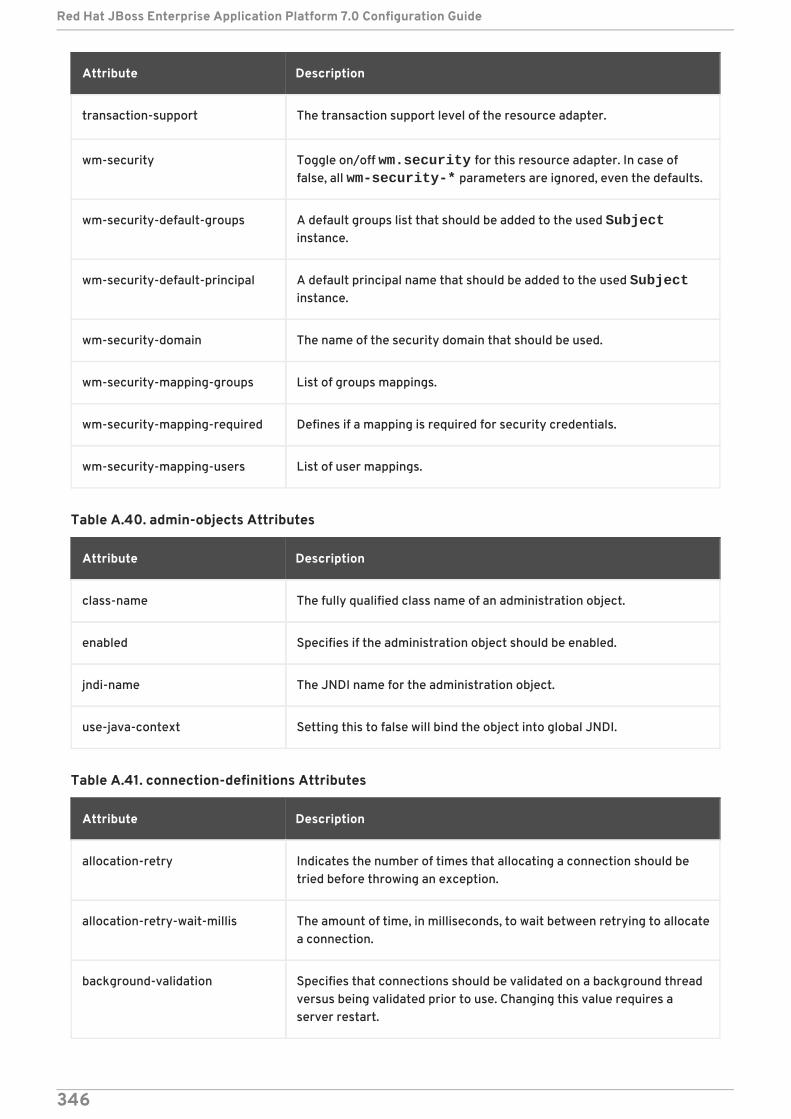
transaction-support The transaction support level of the resource adapter.
wm-security Toggle on/off wm.security for this resource adapter. In case offalse, all wm-security-* parameters are ignored, even the defaults.
wm-security-default-groups A default groups list that should be added to the used Subjectinstance.
wm-security-default-principal A default principal name that should be added to the used Subjectinstance.
wm-security-domain The name of the security domain that should be used.
wm-security-mapping-groups List of groups mappings.
wm-security-mapping-required Defines if a mapping is required for security credentials.
wm-security-mapping-users List of user mappings.
Attribute Description
Table A.40. admin-objects Attributes
Attribute Description
class-name The fully qualified class name of an administration object.
enabled Specifies if the administration object should be enabled.
jndi-name The JNDI name for the administration object.
use-java-context Setting this to false will bind the object into global JNDI.
Table A.41. connection-definitions Attributes
Attribute Description
allocation-retry Indicates the number of times that allocating a connection should betried before throwing an exception.
allocation-retry-wait-millis The amount of time, in milliseconds, to wait between retrying to allocatea connection.
background-validation Specifies that connections should be validated on a background threadversus being validated prior to use. Changing this value requires aserver restart.
Red Hat JBoss Enterprise Application Platform 7.0 Configuration Guide
346
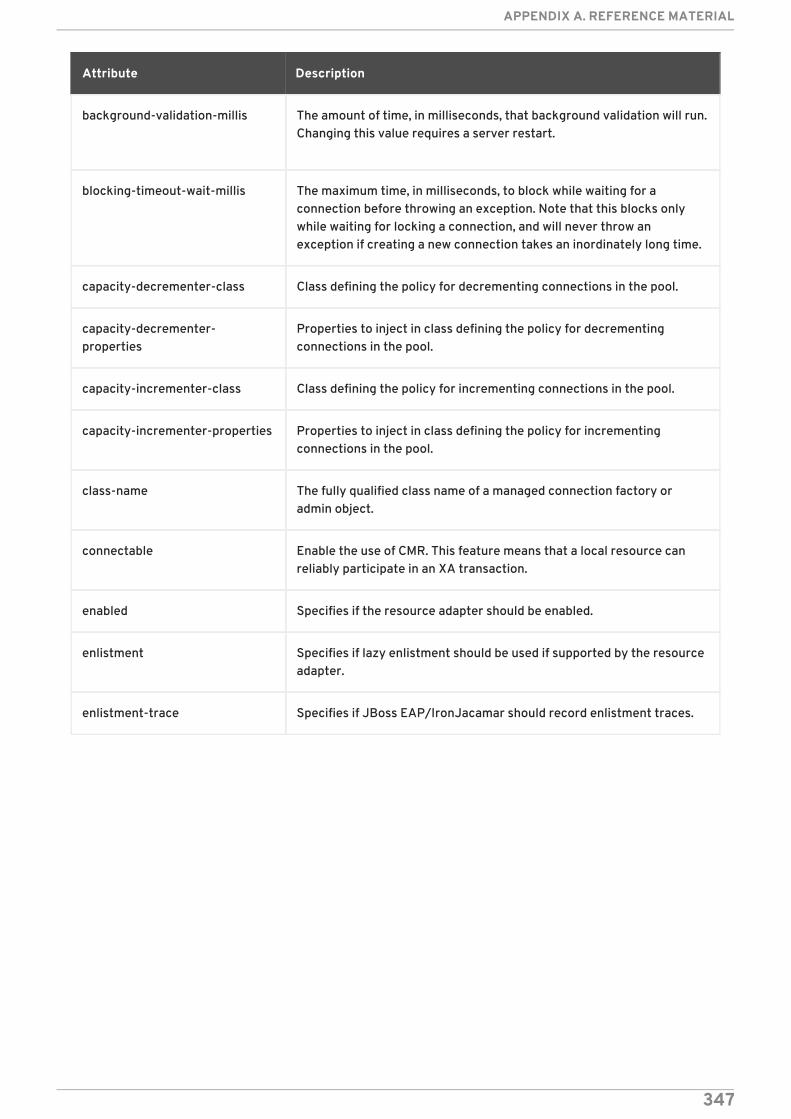
background-validation-millis The amount of time, in milliseconds, that background validation will run.Changing this value requires a server restart.
blocking-timeout-wait-millis The maximum time, in milliseconds, to block while waiting for aconnection before throwing an exception. Note that this blocks onlywhile waiting for locking a connection, and will never throw anexception if creating a new connection takes an inordinately long time.
capacity-decrementer-class Class defining the policy for decrementing connections in the pool.
capacity-decrementer-properties
Properties to inject in class defining the policy for decrementingconnections in the pool.
capacity-incrementer-class Class defining the policy for incrementing connections in the pool.
capacity-incrementer-properties Properties to inject in class defining the policy for incrementingconnections in the pool.
class-name The fully qualified class name of a managed connection factory oradmin object.
connectable Enable the use of CMR. This feature means that a local resource canreliably participate in an XA transaction.
enabled Specifies if the resource adapter should be enabled.
enlistment Specifies if lazy enlistment should be used if supported by the resourceadapter.
enlistment-trace Specifies if JBoss EAP/IronJacamar should record enlistment traces.
Attribute Description
APPENDIX A. REFERENCE MATERIAL
347
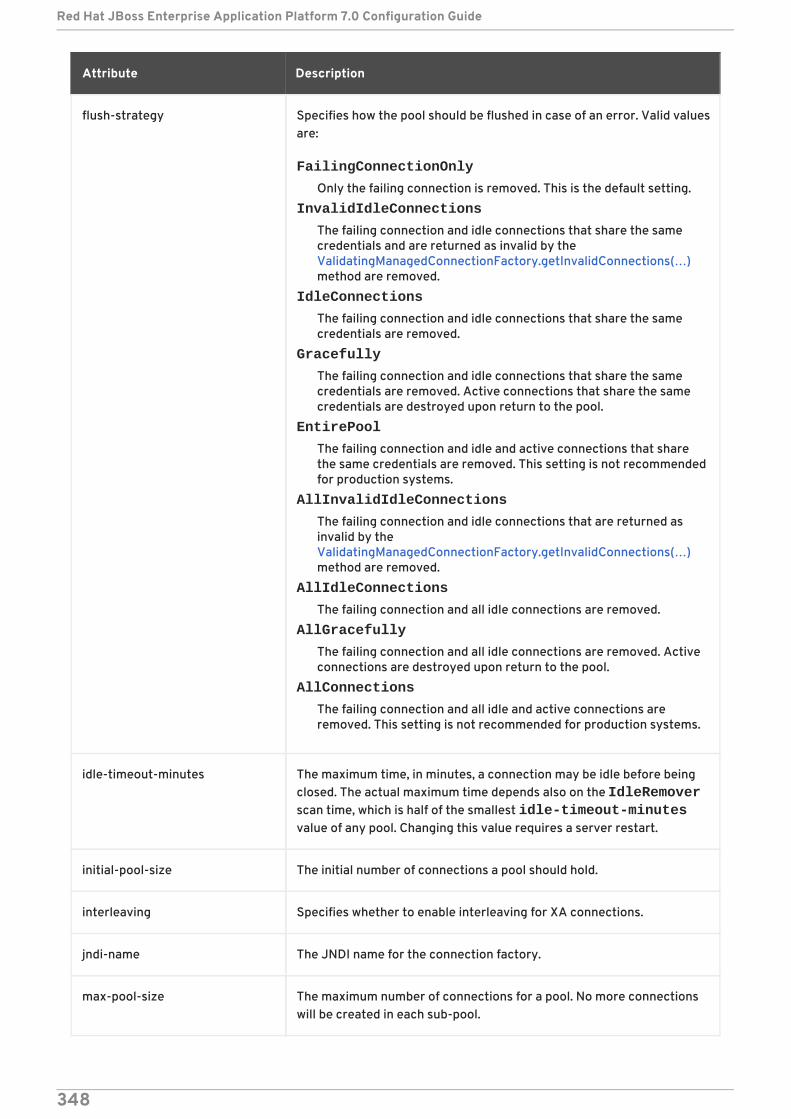
flush-strategy Specifies how the pool should be flushed in case of an error. Valid valuesare:
FailingConnectionOnly
Only the failing connection is removed. This is the default setting.
InvalidIdleConnections
The failing connection and idle connections that share the samecredentials and are returned as invalid by theValidatingManagedConnectionFactory.getInvalidConnections(… )method are removed.
IdleConnections
The failing connection and idle connections that share the samecredentials are removed.
Gracefully
The failing connection and idle connections that share the samecredentials are removed. Active connections that share the samecredentials are destroyed upon return to the pool.
EntirePool
The failing connection and idle and active connections that sharethe same credentials are removed. This setting is not recommendedfor production systems.
AllInvalidIdleConnections
The failing connection and idle connections that are returned asinvalid by theValidatingManagedConnectionFactory.getInvalidConnections(… )method are removed.
AllIdleConnections
The failing connection and all idle connections are removed.
AllGracefully
The failing connection and all idle connections are removed. Activeconnections are destroyed upon return to the pool.
AllConnections
The failing connection and all idle and active connections areremoved. This setting is not recommended for production systems.
idle-timeout-minutes The maximum time, in minutes, a connection may be idle before beingclosed. The actual maximum time depends also on the IdleRemoverscan time, which is half of the smallest idle-timeout-minutesvalue of any pool. Changing this value requires a server restart.
initial-pool-size The initial number of connections a pool should hold.
interleaving Specifies whether to enable interleaving for XA connections.
jndi-name The JNDI name for the connection factory.
max-pool-size The maximum number of connections for a pool. No more connectionswill be created in each sub-pool.
Attribute Description
Red Hat JBoss Enterprise Application Platform 7.0 Configuration Guide
348
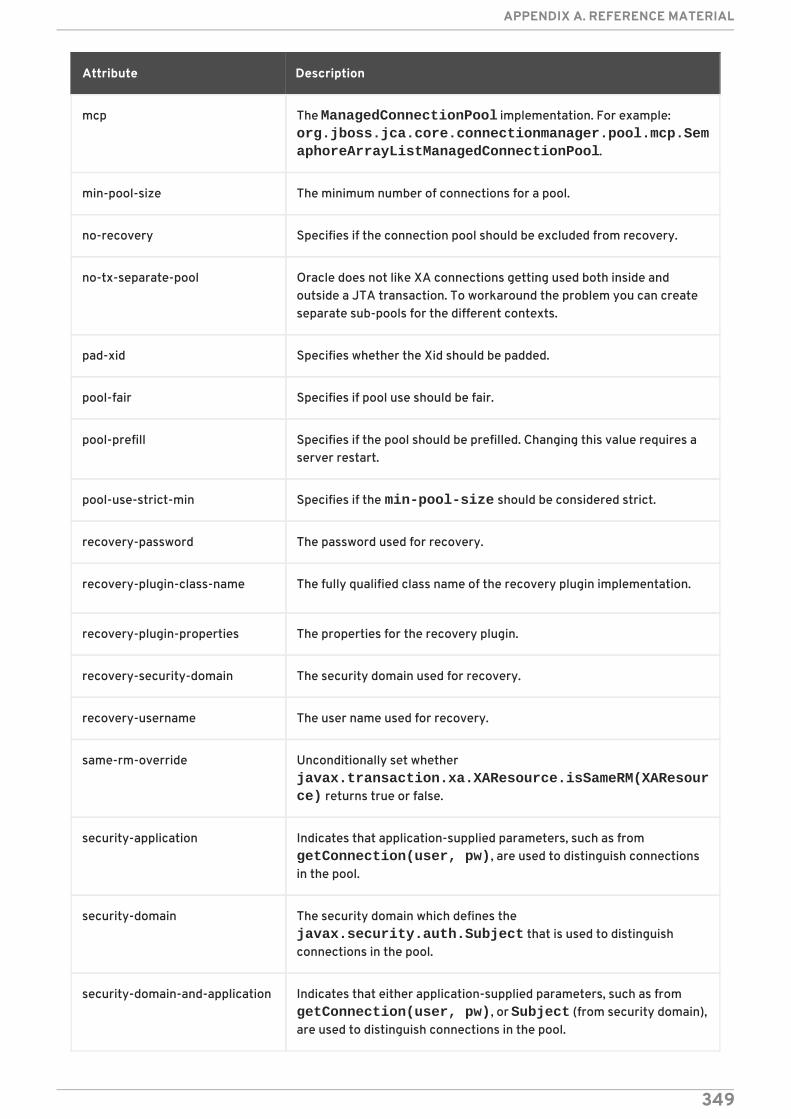
mcp The ManagedConnectionPool implementation. For example: org.jboss.jca.core.connectionmanager.pool.mcp.SemaphoreArrayListManagedConnectionPool.
min-pool-size The minimum number of connections for a pool.
no-recovery Specifies if the connection pool should be excluded from recovery.
no-tx-separate-pool Oracle does not like XA connections getting used both inside andoutside a JTA transaction. To workaround the problem you can createseparate sub-pools for the different contexts.
pad-xid Specifies whether the Xid should be padded.
pool-fair Specifies if pool use should be fair.
pool-prefill Specifies if the pool should be prefilled. Changing this value requires aserver restart.
pool-use-strict-min Specifies if the min-pool-size should be considered strict.
recovery-password The password used for recovery.
recovery-plugin-class-name The fully qualified class name of the recovery plugin implementation.
recovery-plugin-properties The properties for the recovery plugin.
recovery-security-domain The security domain used for recovery.
recovery-username The user name used for recovery.
same-rm-override Unconditionally set whether javax.transaction.xa.XAResource.isSameRM(XAResource) returns true or false.
security-application Indicates that application-supplied parameters, such as from getConnection(user, pw), are used to distinguish connectionsin the pool.
security-domain The security domain which defines the javax.security.auth.Subject that is used to distinguishconnections in the pool.
security-domain-and-application Indicates that either application-supplied parameters, such as from getConnection(user, pw), or Subject (from security domain),are used to distinguish connections in the pool.
Attribute Description
APPENDIX A. REFERENCE MATERIAL
349
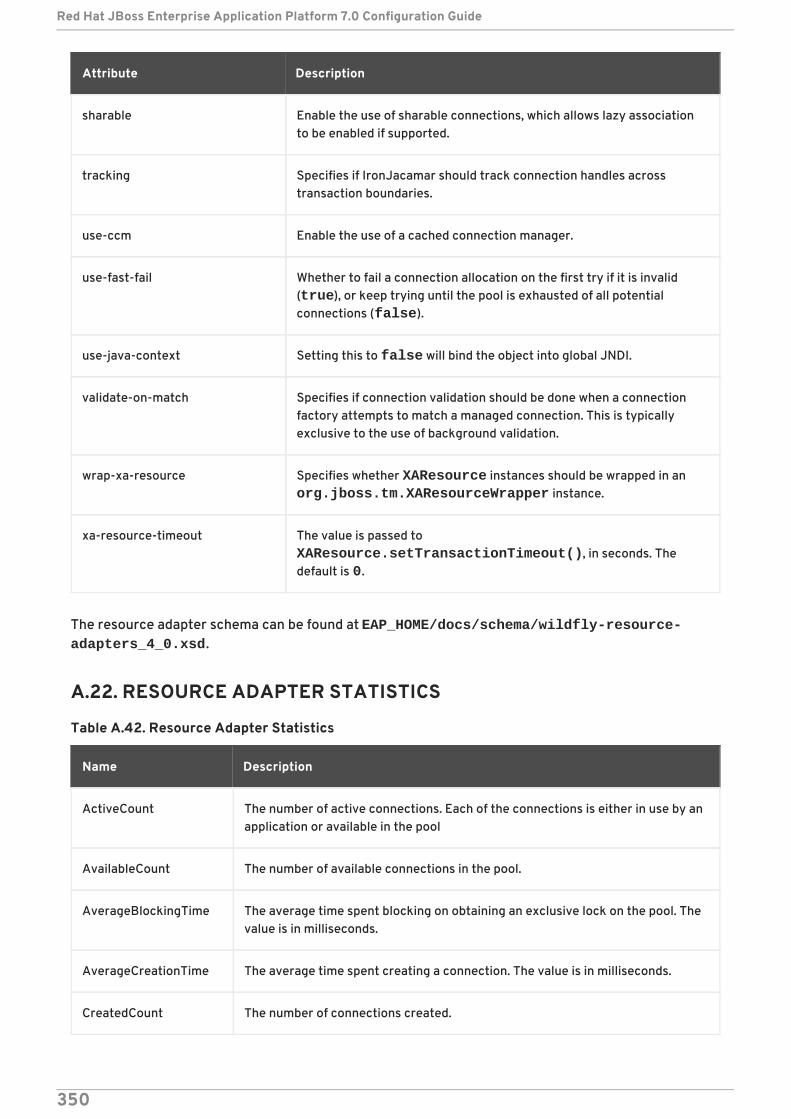
sharable Enable the use of sharable connections, which allows lazy associationto be enabled if supported.
tracking Specifies if IronJacamar should track connection handles acrosstransaction boundaries.
use-ccm Enable the use of a cached connection manager.
use-fast-fail Whether to fail a connection allocation on the first try if it is invalid(true), or keep trying until the pool is exhausted of all potentialconnections (false).
use-java-context Setting this to false will bind the object into global JNDI.
validate-on-match Specifies if connection validation should be done when a connectionfactory attempts to match a managed connection. This is typicallyexclusive to the use of background validation.
wrap-xa-resource Specifies whether XAResource instances should be wrapped in an org.jboss.tm.XAResourceWrapper instance.
xa-resource-timeout The value is passed to XAResource.setTransactionTimeout(), in seconds. Thedefault is 0.
Attribute Description
The resource adapter schema can be found at EAP_HOME/docs/schema/wildfly-resource-adapters_4_0.xsd.
A.22. RESOURCE ADAPTER STATISTICS
Table A.42. Resource Adapter Statistics
Name Description
ActiveCount The number of active connections. Each of the connections is either in use by anapplication or available in the pool
AvailableCount The number of available connections in the pool.
AverageBlockingTime The average time spent blocking on obtaining an exclusive lock on the pool. Thevalue is in milliseconds.
AverageCreationTime The average time spent creating a connection. The value is in milliseconds.
CreatedCount The number of connections created.
Red Hat JBoss Enterprise Application Platform 7.0 Configuration Guide
350
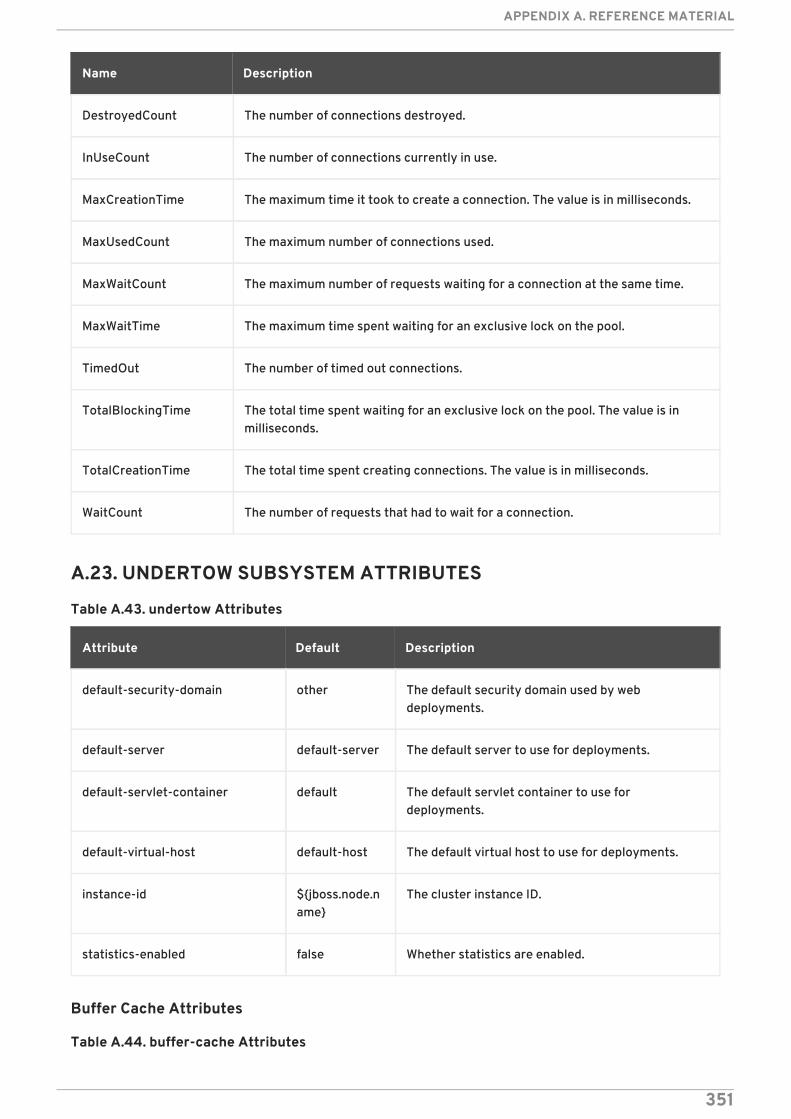
DestroyedCount The number of connections destroyed.
InUseCount The number of connections currently in use.
MaxCreationTime The maximum time it took to create a connection. The value is in milliseconds.
MaxUsedCount The maximum number of connections used.
MaxWaitCount The maximum number of requests waiting for a connection at the same time.
MaxWaitTime The maximum time spent waiting for an exclusive lock on the pool.
TimedOut The number of timed out connections.
TotalBlockingTime The total time spent waiting for an exclusive lock on the pool. The value is inmilliseconds.
TotalCreationTime The total time spent creating connections. The value is in milliseconds.
WaitCount The number of requests that had to wait for a connection.
Name Description
A.23. UNDERTOW SUBSYSTEM ATTRIBUTES
Table A.43. undertow Attributes
Attribute Default Description
default-security-domain other The default security domain used by webdeployments.
default-server default-server The default server to use for deployments.
default-servlet-container default The default servlet container to use fordeployments.
default-virtual-host default-host The default virtual host to use for deployments.
instance-id ${jboss.node.name}
The cluster instance ID.
statistics-enabled false Whether statistics are enabled.
Buffer Cache Attributes
Table A.44. buffer-cache Attributes
APPENDIX A. REFERENCE MATERIAL
351
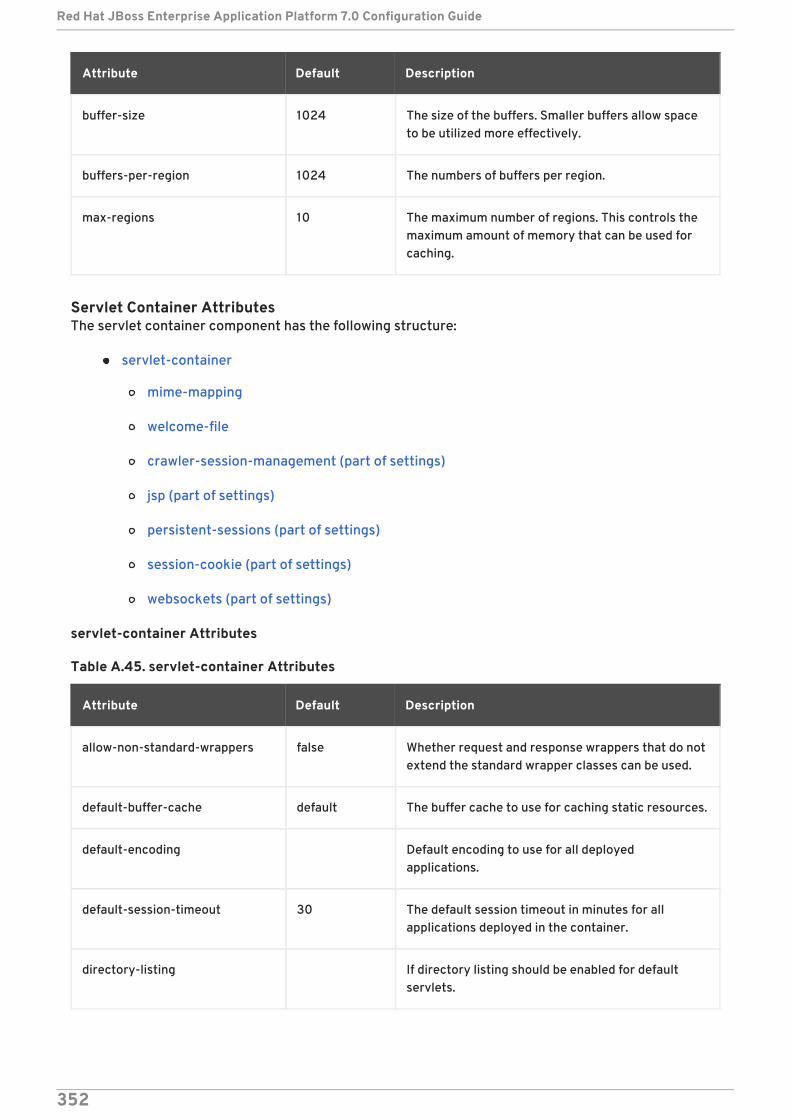
Attribute Default Description
buffer-size 1024 The size of the buffers. Smaller buffers allow spaceto be utilized more effectively.
buffers-per-region 1024 The numbers of buffers per region.
max-regions 10 The maximum number of regions. This controls themaximum amount of memory that can be used forcaching.
Servlet Container AttributesThe servlet container component has the following structure:
servlet-container
mime-mapping
welcome-file
crawler-session-management (part of settings)
jsp (part of settings)
persistent-sessions (part of settings)
session-cookie (part of settings)
websockets (part of settings)
servlet-container Attributes
Table A.45. servlet-container Attributes
Attribute Default Description
allow-non-standard-wrappers false Whether request and response wrappers that do notextend the standard wrapper classes can be used.
default-buffer-cache default The buffer cache to use for caching static resources.
default-encoding Default encoding to use for all deployedapplications.
default-session-timeout 30 The default session timeout in minutes for allapplications deployed in the container.
directory-listing If directory listing should be enabled for defaultservlets.
Red Hat JBoss Enterprise Application Platform 7.0 Configuration Guide
352
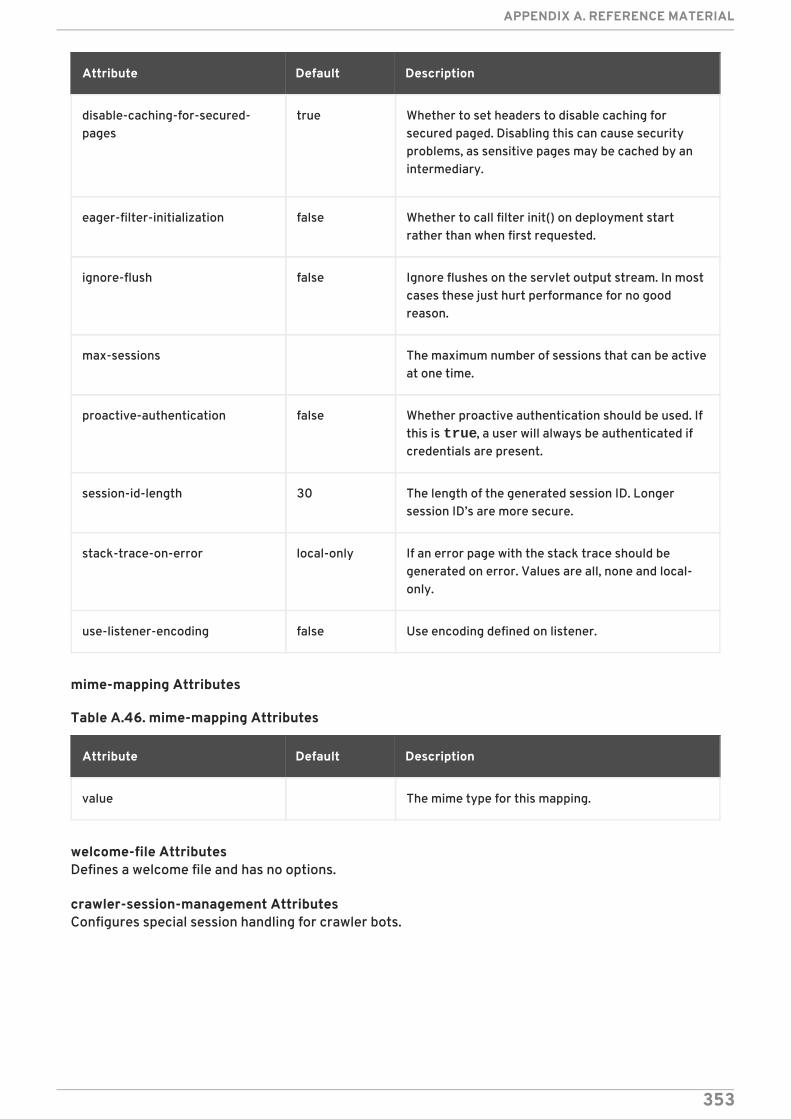
disable-caching-for-secured-pages
true Whether to set headers to disable caching forsecured paged. Disabling this can cause securityproblems, as sensitive pages may be cached by anintermediary.
eager-filter-initialization false Whether to call filter init() on deployment startrather than when first requested.
ignore-flush false Ignore flushes on the servlet output stream. In mostcases these just hurt performance for no goodreason.
max-sessions The maximum number of sessions that can be activeat one time.
proactive-authentication false Whether proactive authentication should be used. Ifthis is true, a user will always be authenticated ifcredentials are present.
session-id-length 30 The length of the generated session ID. Longersession ID’s are more secure.
stack-trace-on-error local-only If an error page with the stack trace should begenerated on error. Values are all, none and local-only.
use-listener-encoding false Use encoding defined on listener.
Attribute Default Description
mime-mapping Attributes
Table A.46. mime-mapping Attributes
Attribute Default Description
value The mime type for this mapping.
welcome-file AttributesDefines a welcome file and has no options.
crawler-session-management AttributesConfigures special session handling for crawler bots.
APPENDIX A. REFERENCE MATERIAL
353
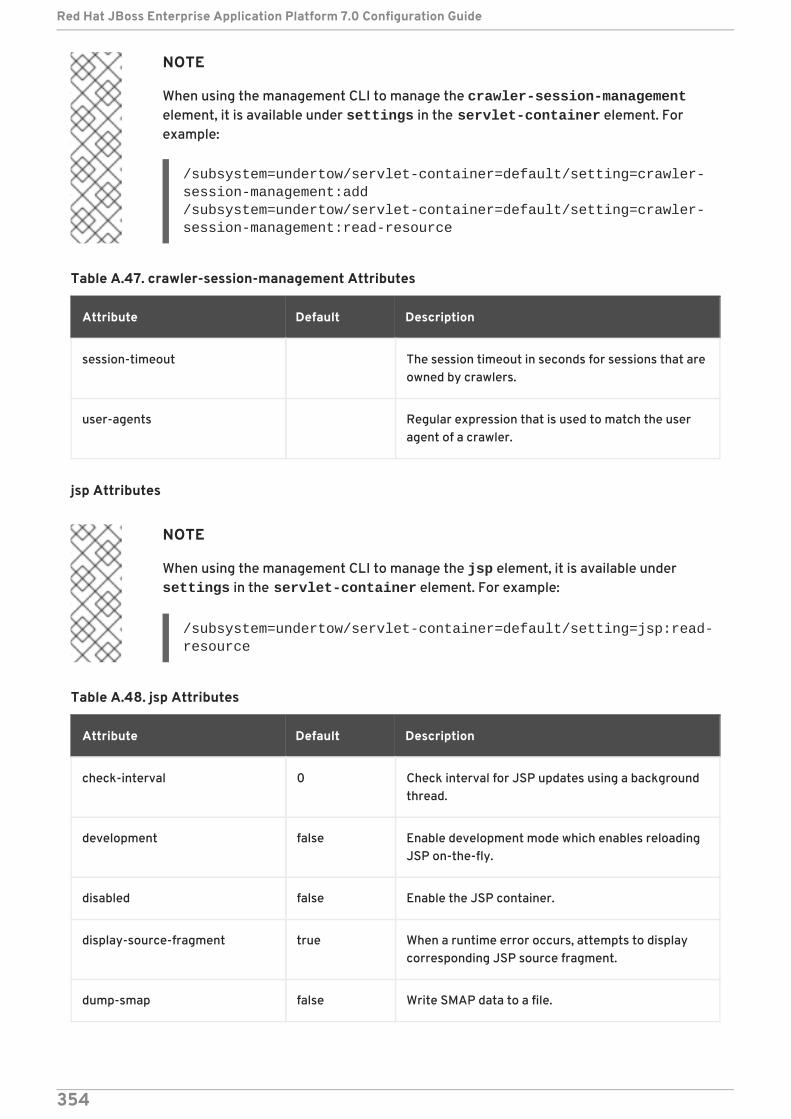
NOTE
When using the management CLI to manage the crawler-session-managementelement, it is available under settings in the servlet-container element. Forexample:
/subsystem=undertow/servlet-container=default/setting=crawler-session-management:add/subsystem=undertow/servlet-container=default/setting=crawler-session-management:read-resource
Table A.47. crawler-session-management Attributes
Attribute Default Description
session-timeout The session timeout in seconds for sessions that areowned by crawlers.
user-agents Regular expression that is used to match the useragent of a crawler.
jsp Attributes
NOTE
When using the management CLI to manage the jsp element, it is available under settings in the servlet-container element. For example:
/subsystem=undertow/servlet-container=default/setting=jsp:read-resource
Table A.48. jsp Attributes
Attribute Default Description
check-interval 0 Check interval for JSP updates using a backgroundthread.
development false Enable development mode which enables reloadingJSP on-the-fly.
disabled false Enable the JSP container.
display-source-fragment true When a runtime error occurs, attempts to displaycorresponding JSP source fragment.
dump-smap false Write SMAP data to a file.
Red Hat JBoss Enterprise Application Platform 7.0 Configuration Guide
354
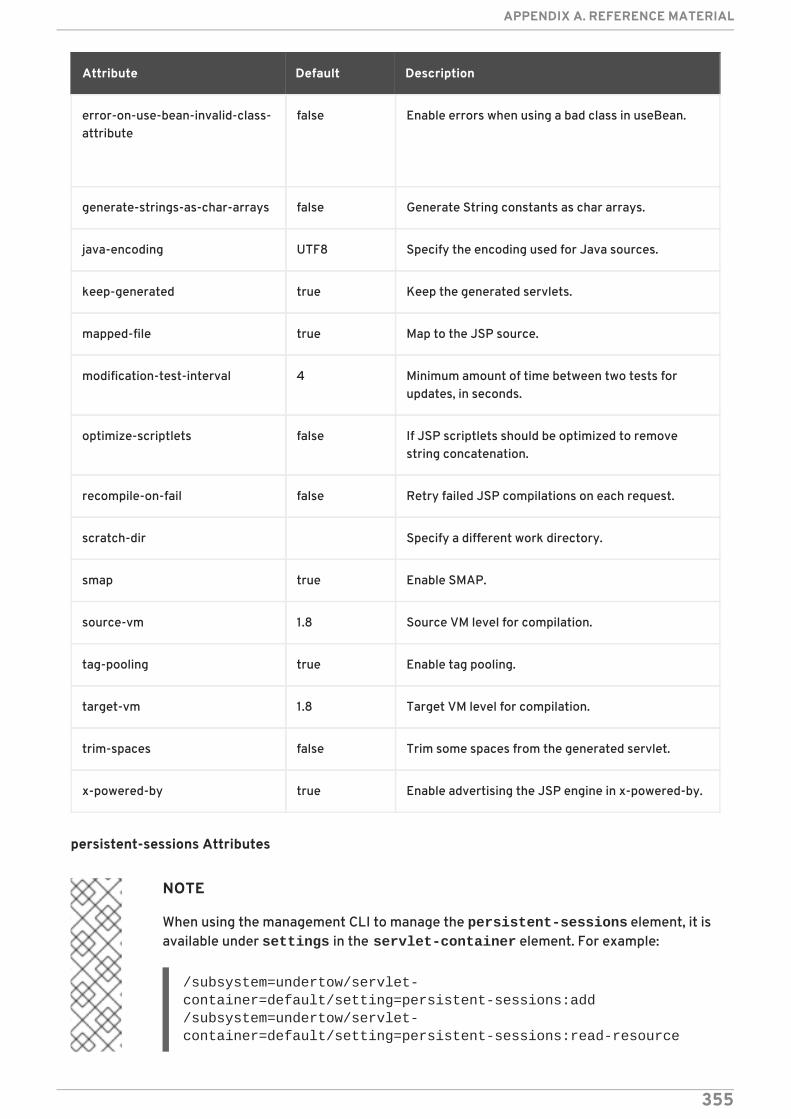
error-on-use-bean-invalid-class-attribute
false Enable errors when using a bad class in useBean.
generate-strings-as-char-arrays false Generate String constants as char arrays.
java-encoding UTF8 Specify the encoding used for Java sources.
keep-generated true Keep the generated servlets.
mapped-file true Map to the JSP source.
modification-test-interval 4 Minimum amount of time between two tests forupdates, in seconds.
optimize-scriptlets false If JSP scriptlets should be optimized to removestring concatenation.
recompile-on-fail false Retry failed JSP compilations on each request.
scratch-dir Specify a different work directory.
smap true Enable SMAP.
source-vm 1.8 Source VM level for compilation.
tag-pooling true Enable tag pooling.
target-vm 1.8 Target VM level for compilation.
trim-spaces false Trim some spaces from the generated servlet.
x-powered-by true Enable advertising the JSP engine in x-powered-by.
Attribute Default Description
persistent-sessions Attributes
NOTE
When using the management CLI to manage the persistent-sessions element, it isavailable under settings in the servlet-container element. For example:
/subsystem=undertow/servlet-container=default/setting=persistent-sessions:add/subsystem=undertow/servlet-container=default/setting=persistent-sessions:read-resource
APPENDIX A. REFERENCE MATERIAL
355
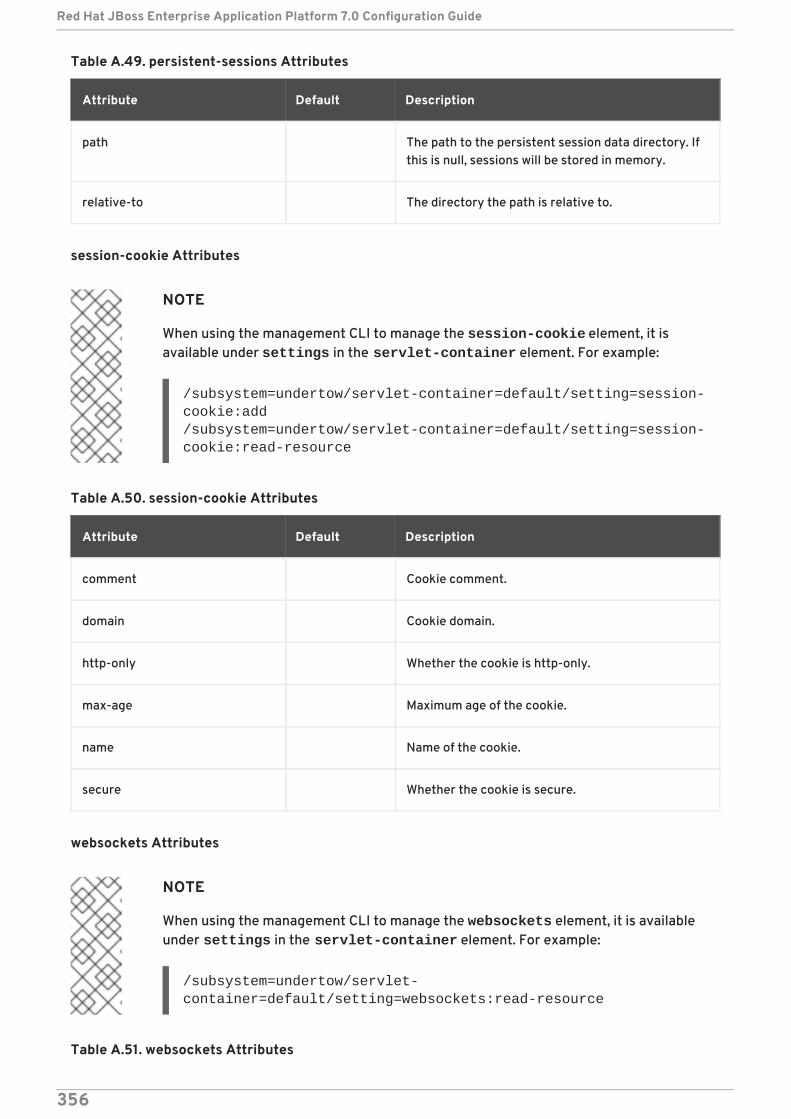
Table A.49. persistent-sessions Attributes
Attribute Default Description
path The path to the persistent session data directory. Ifthis is null, sessions will be stored in memory.
relative-to The directory the path is relative to.
session-cookie Attributes
NOTE
When using the management CLI to manage the session-cookie element, it isavailable under settings in the servlet-container element. For example:
/subsystem=undertow/servlet-container=default/setting=session-cookie:add/subsystem=undertow/servlet-container=default/setting=session-cookie:read-resource
Table A.50. session-cookie Attributes
Attribute Default Description
comment Cookie comment.
domain Cookie domain.
http-only Whether the cookie is http-only.
max-age Maximum age of the cookie.
name Name of the cookie.
secure Whether the cookie is secure.
websockets Attributes
NOTE
When using the management CLI to manage the websockets element, it is availableunder settings in the servlet-container element. For example:
/subsystem=undertow/servlet-container=default/setting=websockets:read-resource
Table A.51. websockets Attributes
Red Hat JBoss Enterprise Application Platform 7.0 Configuration Guide
356
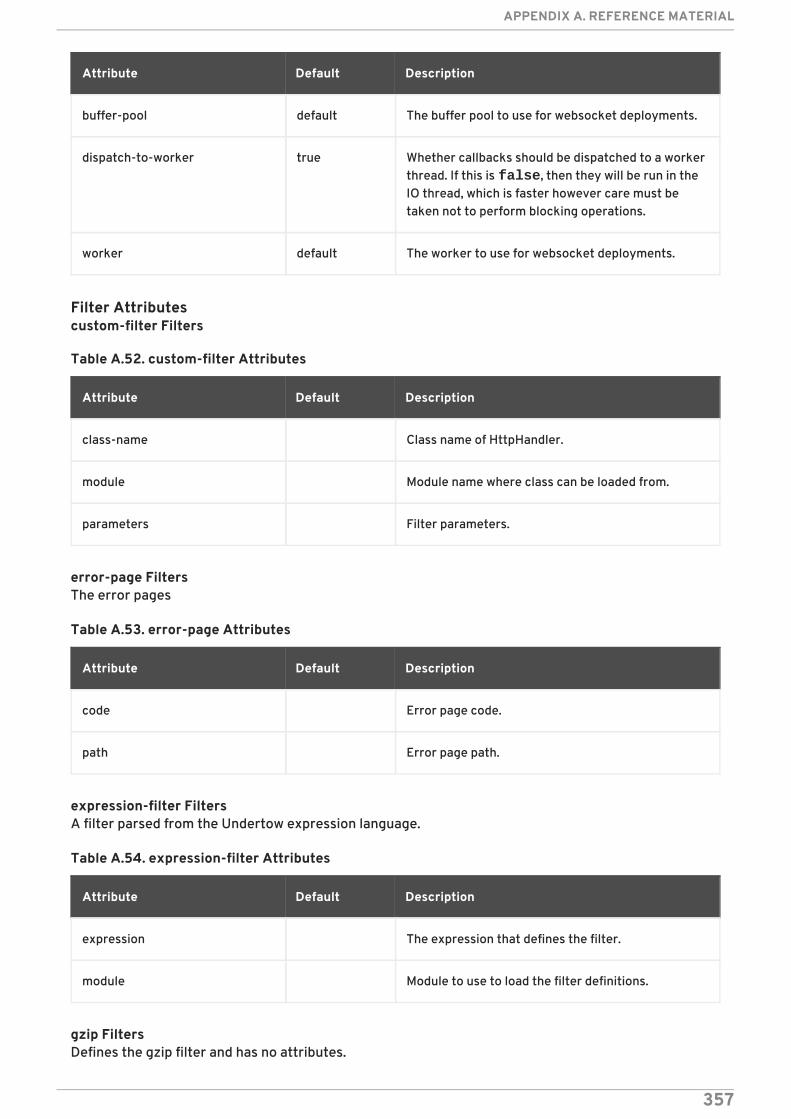
Attribute Default Description
buffer-pool default The buffer pool to use for websocket deployments.
dispatch-to-worker true Whether callbacks should be dispatched to a workerthread. If this is false, then they will be run in theIO thread, which is faster however care must betaken not to perform blocking operations.
worker default The worker to use for websocket deployments.
Filter Attributescustom-filter Filters
Table A.52. custom-filter Attributes
Attribute Default Description
class-name Class name of HttpHandler.
module Module name where class can be loaded from.
parameters Filter parameters.
error-page FiltersThe error pages
Table A.53. error-page Attributes
Attribute Default Description
code Error page code.
path Error page path.
expression-filter FiltersA filter parsed from the Undertow expression language.
Table A.54. expression-filter Attributes
Attribute Default Description
expression The expression that defines the filter.
module Module to use to load the filter definitions.
gzip FiltersDefines the gzip filter and has no attributes.
APPENDIX A. REFERENCE MATERIAL
357
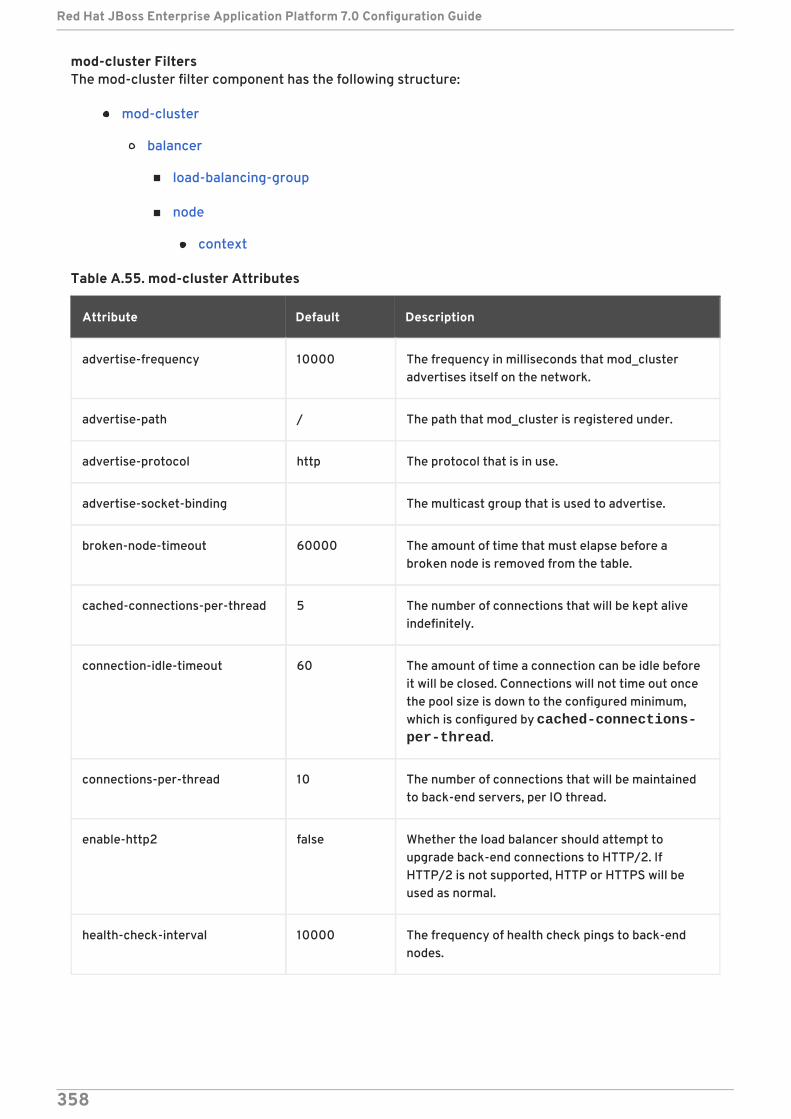
mod-cluster FiltersThe mod-cluster filter component has the following structure:
mod-cluster
balancer
load-balancing-group
node
context
Table A.55. mod-cluster Attributes
Attribute Default Description
advertise-frequency 10000 The frequency in milliseconds that mod_clusteradvertises itself on the network.
advertise-path / The path that mod_cluster is registered under.
advertise-protocol http The protocol that is in use.
advertise-socket-binding The multicast group that is used to advertise.
broken-node-timeout 60000 The amount of time that must elapse before abroken node is removed from the table.
cached-connections-per-thread 5 The number of connections that will be kept aliveindefinitely.
connection-idle-timeout 60 The amount of time a connection can be idle beforeit will be closed. Connections will not time out oncethe pool size is down to the configured minimum,which is configured by cached-connections-per-thread.
connections-per-thread 10 The number of connections that will be maintainedto back-end servers, per IO thread.
enable-http2 false Whether the load balancer should attempt toupgrade back-end connections to HTTP/2. IfHTTP/2 is not supported, HTTP or HTTPS will beused as normal.
health-check-interval 10000 The frequency of health check pings to back-endnodes.
Red Hat JBoss Enterprise Application Platform 7.0 Configuration Guide
358
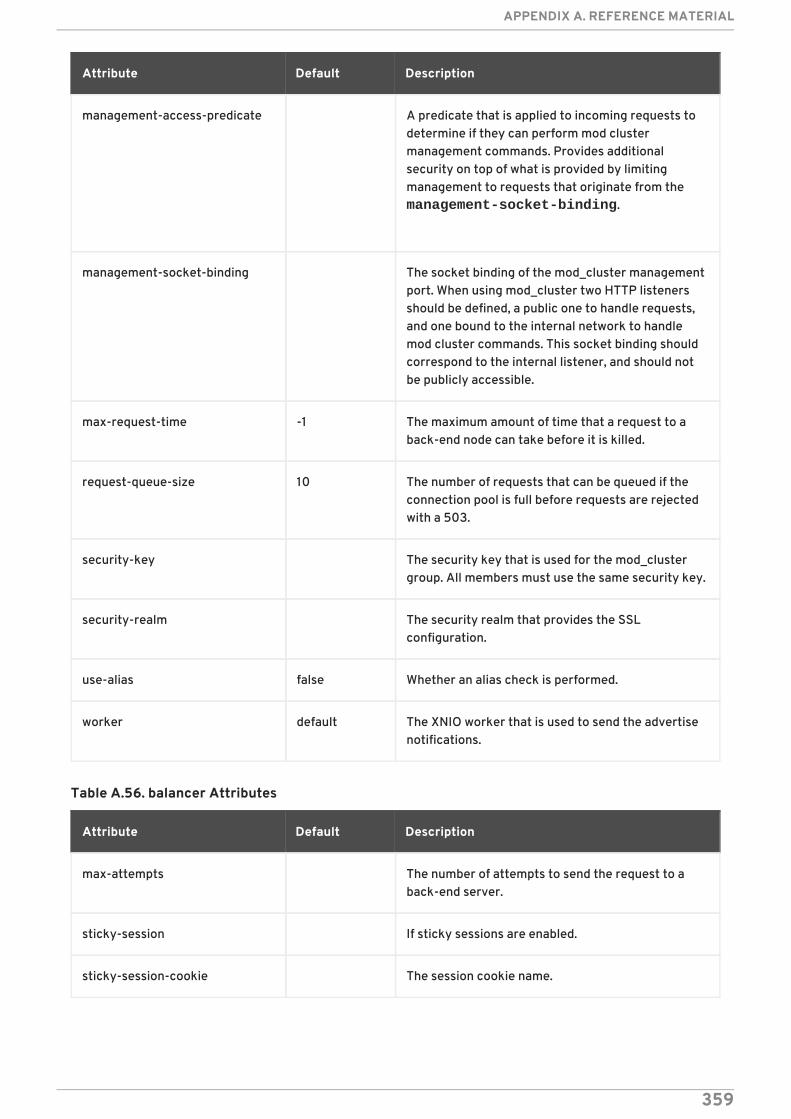
management-access-predicate A predicate that is applied to incoming requests todetermine if they can perform mod clustermanagement commands. Provides additionalsecurity on top of what is provided by limitingmanagement to requests that originate from the management-socket-binding.
management-socket-binding The socket binding of the mod_cluster managementport. When using mod_cluster two HTTP listenersshould be defined, a public one to handle requests,and one bound to the internal network to handlemod cluster commands. This socket binding shouldcorrespond to the internal listener, and should notbe publicly accessible.
max-request-time -1 The maximum amount of time that a request to aback-end node can take before it is killed.
request-queue-size 10 The number of requests that can be queued if theconnection pool is full before requests are rejectedwith a 503.
security-key The security key that is used for the mod_clustergroup. All members must use the same security key.
security-realm The security realm that provides the SSLconfiguration.
use-alias false Whether an alias check is performed.
worker default The XNIO worker that is used to send the advertisenotifications.
Attribute Default Description
Table A.56. balancer Attributes
Attribute Default Description
max-attempts The number of attempts to send the request to aback-end server.
sticky-session If sticky sessions are enabled.
sticky-session-cookie The session cookie name.
APPENDIX A. REFERENCE MATERIAL
359

sticky-session-force If this is true, then an error will be returned if therequest cannot be routed to the sticky node,otherwise it will be routed to another node.
sticky-session-path The path of the sticky session cookie.
sticky-session-remove Remove the session cookie if the request cannot berouted to the correct host.
wait-worker The number of seconds to wait for an availableworker.
Attribute Default Description
load-balancing-group Attributes
Defines a load balancing group and has no options.
Table A.57. node Attributes
Attribute Default Description
aliases The nodes aliases.
cache-connections The number of connections to keep alive indefinitely.
elected The elected count.
flush-packets If received data should be immediately flushed.
load The current load of this node.
load-balancing-group The load balancing group this node belongs to.
max-connections The maximum number of connections per IO thread.
open-connections The current number of open connections.
ping The nodes ping.
queue-new-requests If a request is received and there is no workerimmediately available should it be queued.
read The number of bytes read from the node.
request-queue-size The size of the request queue.
status The current status of this node.
Red Hat JBoss Enterprise Application Platform 7.0 Configuration Guide
360
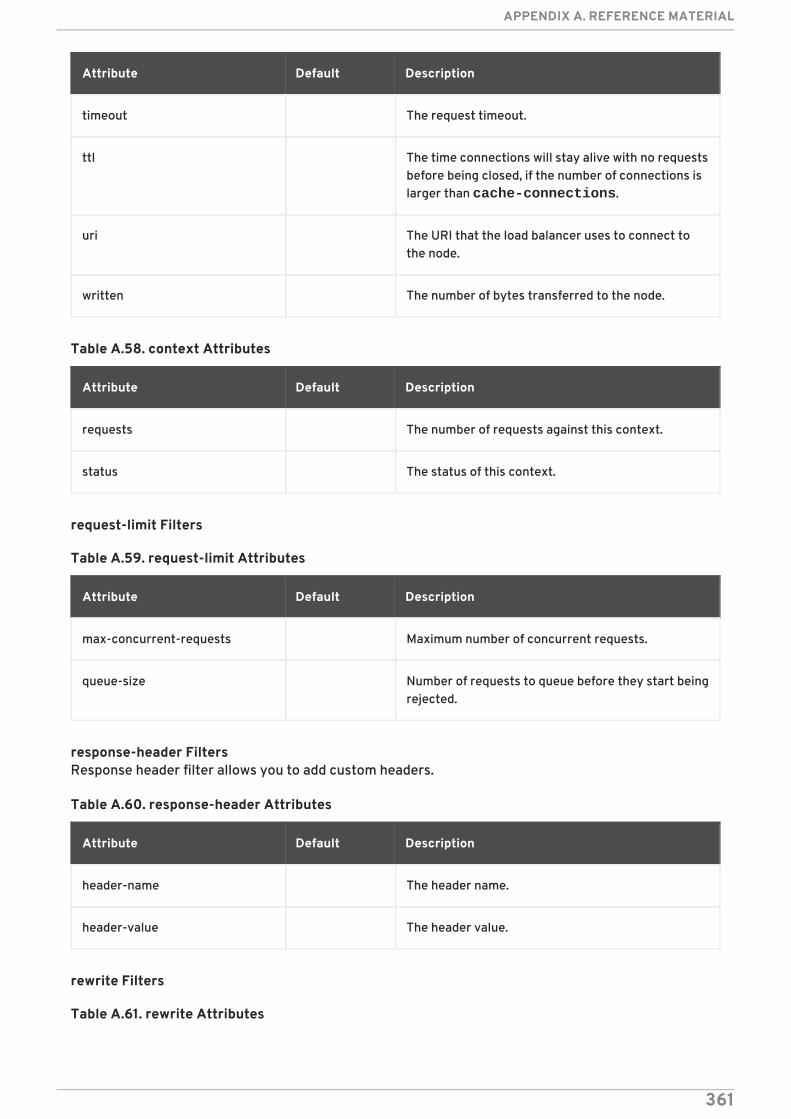
timeout The request timeout.
ttl The time connections will stay alive with no requestsbefore being closed, if the number of connections islarger than cache-connections.
uri The URI that the load balancer uses to connect tothe node.
written The number of bytes transferred to the node.
Attribute Default Description
Table A.58. context Attributes
Attribute Default Description
requests The number of requests against this context.
status The status of this context.
request-limit Filters
Table A.59. request-limit Attributes
Attribute Default Description
max-concurrent-requests Maximum number of concurrent requests.
queue-size Number of requests to queue before they start beingrejected.
response-header FiltersResponse header filter allows you to add custom headers.
Table A.60. response-header Attributes
Attribute Default Description
header-name The header name.
header-value The header value.
rewrite Filters
Table A.61. rewrite Attributes
APPENDIX A. REFERENCE MATERIAL
361
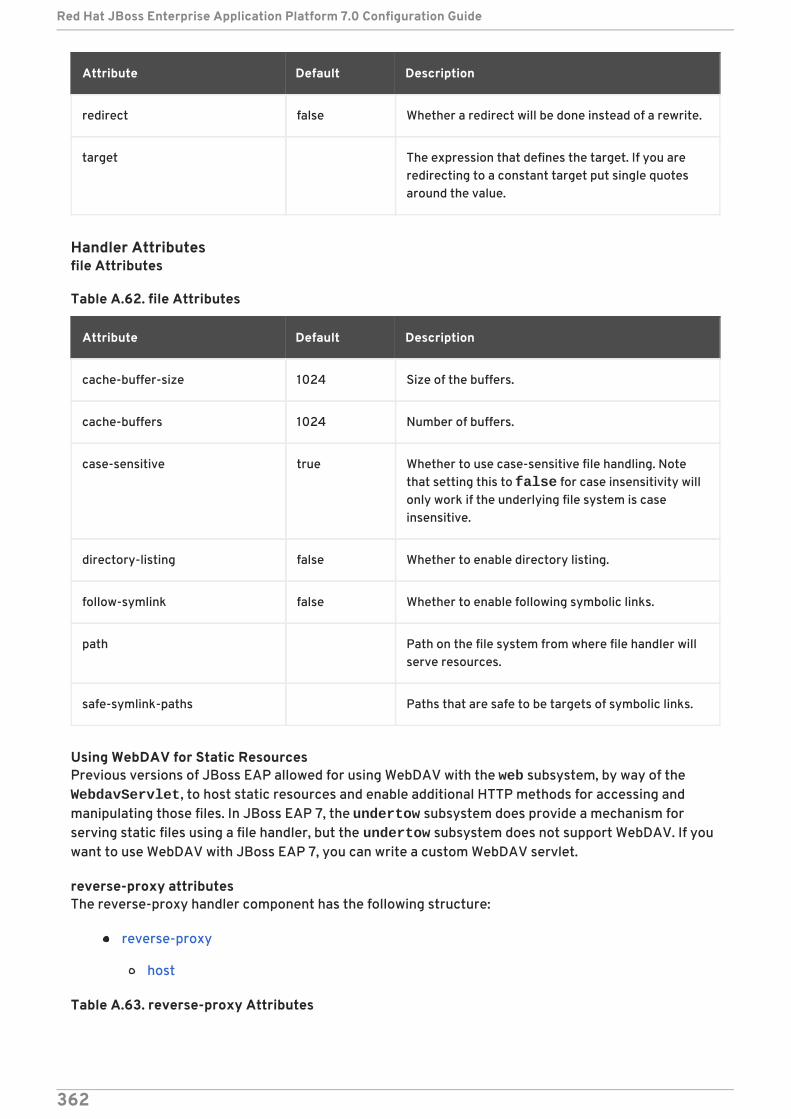
Attribute Default Description
redirect false Whether a redirect will be done instead of a rewrite.
target The expression that defines the target. If you areredirecting to a constant target put single quotesaround the value.
Handler Attributesfile Attributes
Table A.62. file Attributes
Attribute Default Description
cache-buffer-size 1024 Size of the buffers.
cache-buffers 1024 Number of buffers.
case-sensitive true Whether to use case-sensitive file handling. Notethat setting this to false for case insensitivity willonly work if the underlying file system is caseinsensitive.
directory-listing false Whether to enable directory listing.
follow-symlink false Whether to enable following symbolic links.
path Path on the file system from where file handler willserve resources.
safe-symlink-paths Paths that are safe to be targets of symbolic links.
Using WebDAV for Static ResourcesPrevious versions of JBoss EAP allowed for using WebDAV with the web subsystem, by way of the WebdavServlet, to host static resources and enable additional HTTP methods for accessing andmanipulating those files. In JBoss EAP 7, the undertow subsystem does provide a mechanism forserving static files using a file handler, but the undertow subsystem does not support WebDAV. If youwant to use WebDAV with JBoss EAP 7, you can write a custom WebDAV servlet.
reverse-proxy attributesThe reverse-proxy handler component has the following structure:
reverse-proxy
host
Table A.63. reverse-proxy Attributes
Red Hat JBoss Enterprise Application Platform 7.0 Configuration Guide
362
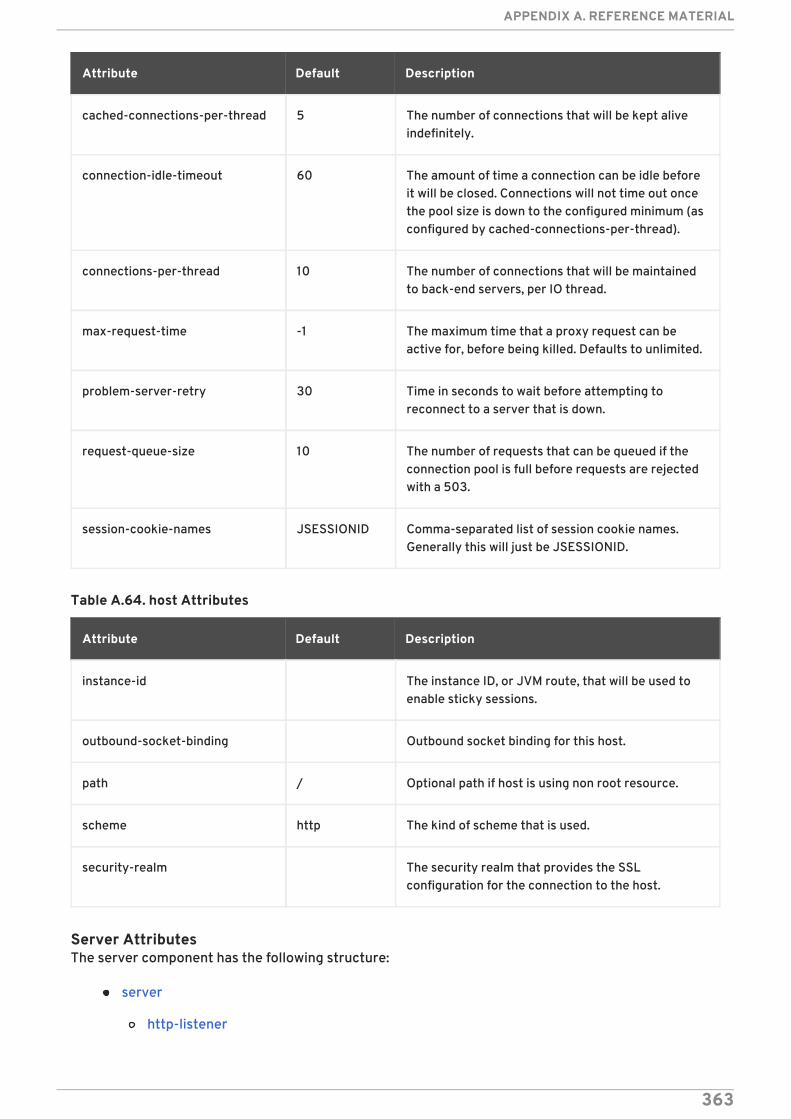
Attribute Default Description
cached-connections-per-thread 5 The number of connections that will be kept aliveindefinitely.
connection-idle-timeout 60 The amount of time a connection can be idle beforeit will be closed. Connections will not time out oncethe pool size is down to the configured minimum (asconfigured by cached-connections-per-thread).
connections-per-thread 10 The number of connections that will be maintainedto back-end servers, per IO thread.
max-request-time -1 The maximum time that a proxy request can beactive for, before being killed. Defaults to unlimited.
problem-server-retry 30 Time in seconds to wait before attempting toreconnect to a server that is down.
request-queue-size 10 The number of requests that can be queued if theconnection pool is full before requests are rejectedwith a 503.
session-cookie-names JSESSIONID Comma-separated list of session cookie names.Generally this will just be JSESSIONID.
Table A.64. host Attributes
Attribute Default Description
instance-id The instance ID, or JVM route, that will be used toenable sticky sessions.
outbound-socket-binding Outbound socket binding for this host.
path / Optional path if host is using non root resource.
scheme http The kind of scheme that is used.
security-realm The security realm that provides the SSLconfiguration for the connection to the host.
Server AttributesThe server component has the following structure:
server
http-listener
APPENDIX A. REFERENCE MATERIAL
363
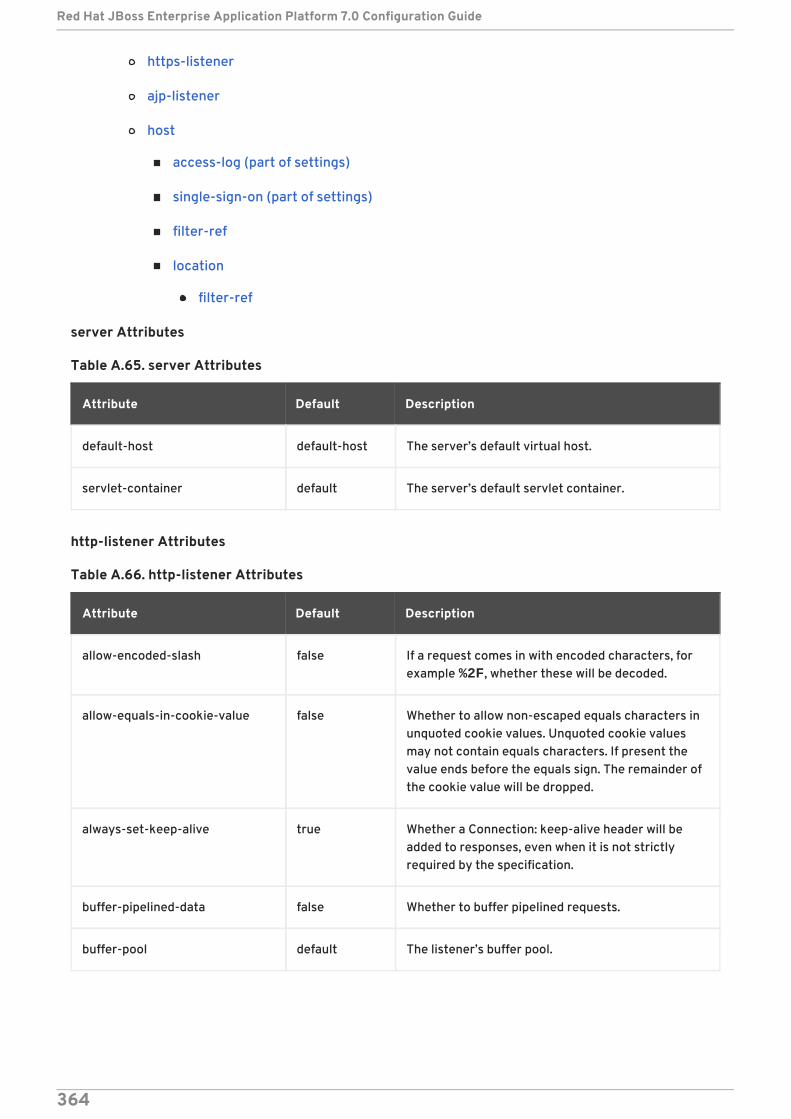
https-listener
ajp-listener
host
access-log (part of settings)
single-sign-on (part of settings)
filter-ref
location
filter-ref
server Attributes
Table A.65. server Attributes
Attribute Default Description
default-host default-host The server’s default virtual host.
servlet-container default The server’s default servlet container.
http-listener Attributes
Table A.66. http-listener Attributes
Attribute Default Description
allow-encoded-slash false If a request comes in with encoded characters, forexample %2F, whether these will be decoded.
allow-equals-in-cookie-value false Whether to allow non-escaped equals characters inunquoted cookie values. Unquoted cookie valuesmay not contain equals characters. If present thevalue ends before the equals sign. The remainder ofthe cookie value will be dropped.
always-set-keep-alive true Whether a Connection: keep-alive header will beadded to responses, even when it is not strictlyrequired by the specification.
buffer-pipelined-data false Whether to buffer pipelined requests.
buffer-pool default The listener’s buffer pool.
Red Hat JBoss Enterprise Application Platform 7.0 Configuration Guide
364
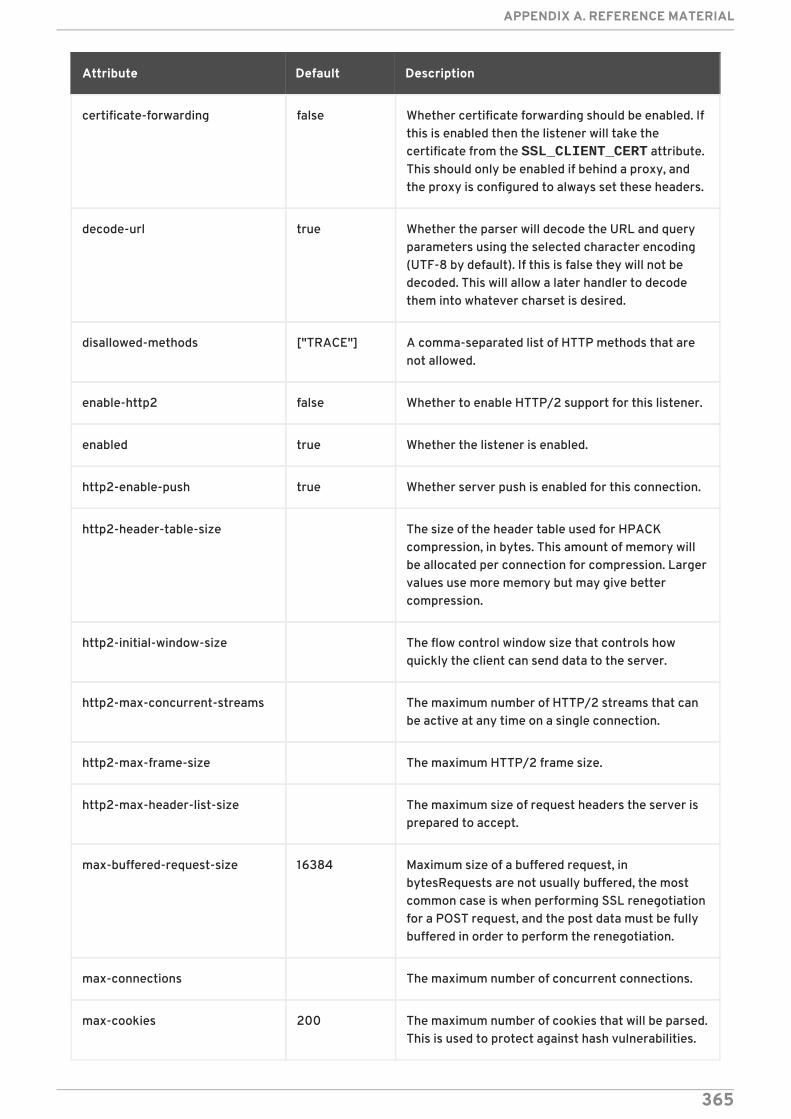
certificate-forwarding false Whether certificate forwarding should be enabled. Ifthis is enabled then the listener will take thecertificate from the SSL_CLIENT_CERT attribute.This should only be enabled if behind a proxy, andthe proxy is configured to always set these headers.
decode-url true Whether the parser will decode the URL and queryparameters using the selected character encoding(UTF-8 by default). If this is false they will not bedecoded. This will allow a later handler to decodethem into whatever charset is desired.
disallowed-methods ["TRACE"] A comma-separated list of HTTP methods that arenot allowed.
enable-http2 false Whether to enable HTTP/2 support for this listener.
enabled true Whether the listener is enabled.
http2-enable-push true Whether server push is enabled for this connection.
http2-header-table-size The size of the header table used for HPACKcompression, in bytes. This amount of memory willbe allocated per connection for compression. Largervalues use more memory but may give bettercompression.
http2-initial-window-size The flow control window size that controls howquickly the client can send data to the server.
http2-max-concurrent-streams The maximum number of HTTP/2 streams that canbe active at any time on a single connection.
http2-max-frame-size The maximum HTTP/2 frame size.
http2-max-header-list-size The maximum size of request headers the server isprepared to accept.
max-buffered-request-size 16384 Maximum size of a buffered request, inbytesRequests are not usually buffered, the mostcommon case is when performing SSL renegotiationfor a POST request, and the post data must be fullybuffered in order to perform the renegotiation.
max-connections The maximum number of concurrent connections.
max-cookies 200 The maximum number of cookies that will be parsed.This is used to protect against hash vulnerabilities.
Attribute Default Description
APPENDIX A. REFERENCE MATERIAL
365
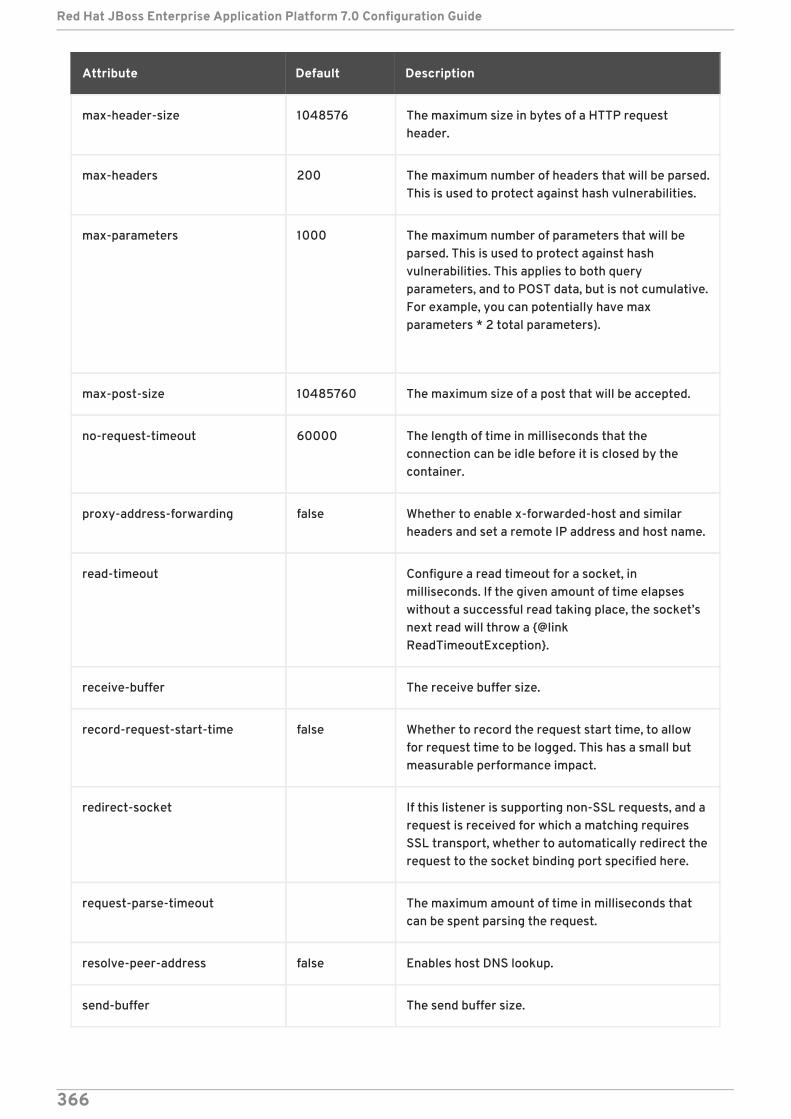
max-header-size 1048576 The maximum size in bytes of a HTTP requestheader.
max-headers 200 The maximum number of headers that will be parsed.This is used to protect against hash vulnerabilities.
max-parameters 1000 The maximum number of parameters that will beparsed. This is used to protect against hashvulnerabilities. This applies to both queryparameters, and to POST data, but is not cumulative.For example, you can potentially have maxparameters * 2 total parameters).
max-post-size 10485760 The maximum size of a post that will be accepted.
no-request-timeout 60000 The length of time in milliseconds that theconnection can be idle before it is closed by thecontainer.
proxy-address-forwarding false Whether to enable x-forwarded-host and similarheaders and set a remote IP address and host name.
read-timeout Configure a read timeout for a socket, inmilliseconds. If the given amount of time elapseswithout a successful read taking place, the socket’snext read will throw a {@linkReadTimeoutException}.
receive-buffer The receive buffer size.
record-request-start-time false Whether to record the request start time, to allowfor request time to be logged. This has a small butmeasurable performance impact.
redirect-socket If this listener is supporting non-SSL requests, and arequest is received for which a matching requiresSSL transport, whether to automatically redirect therequest to the socket binding port specified here.
request-parse-timeout The maximum amount of time in milliseconds thatcan be spent parsing the request.
resolve-peer-address false Enables host DNS lookup.
send-buffer The send buffer size.
Attribute Default Description
Red Hat JBoss Enterprise Application Platform 7.0 Configuration Guide
366
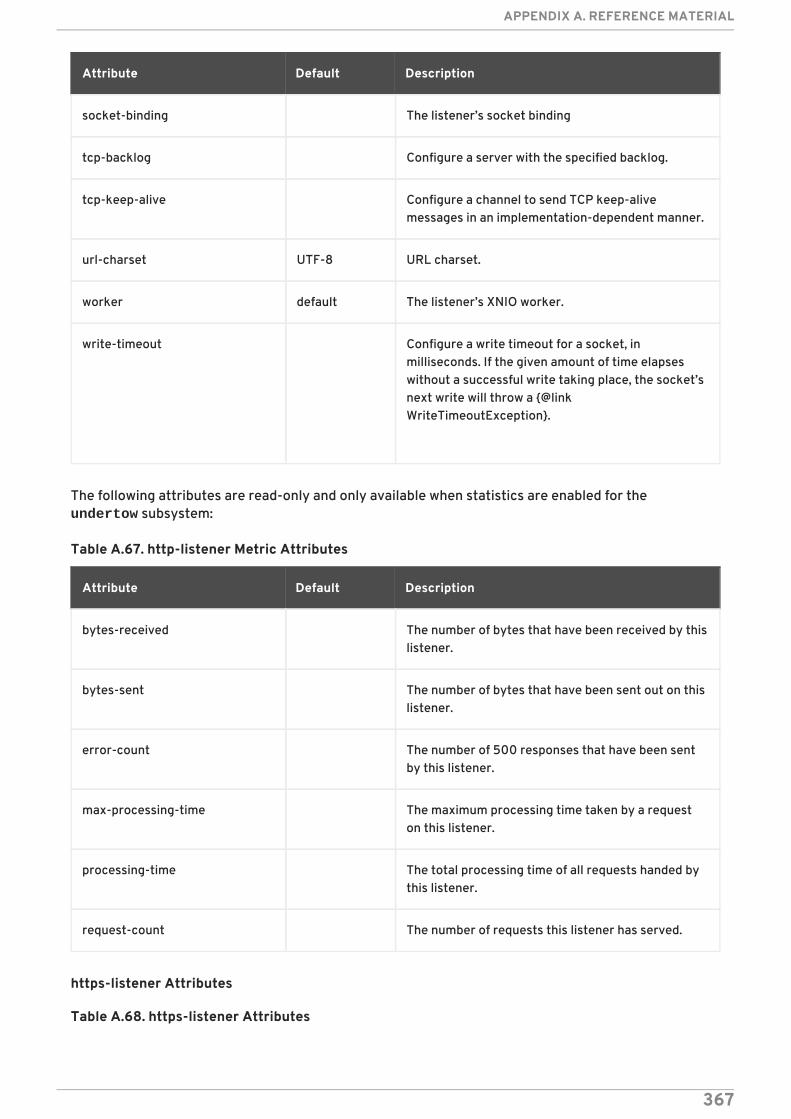
socket-binding The listener’s socket binding
tcp-backlog Configure a server with the specified backlog.
tcp-keep-alive Configure a channel to send TCP keep-alivemessages in an implementation-dependent manner.
url-charset UTF-8 URL charset.
worker default The listener’s XNIO worker.
write-timeout Configure a write timeout for a socket, inmilliseconds. If the given amount of time elapseswithout a successful write taking place, the socket’snext write will throw a {@linkWriteTimeoutException}.
Attribute Default Description
The following attributes are read-only and only available when statistics are enabled for the undertow subsystem:
Table A.67. http-listener Metric Attributes
Attribute Default Description
bytes-received The number of bytes that have been received by thislistener.
bytes-sent The number of bytes that have been sent out on thislistener.
error-count The number of 500 responses that have been sentby this listener.
max-processing-time The maximum processing time taken by a requeston this listener.
processing-time The total processing time of all requests handed bythis listener.
request-count The number of requests this listener has served.
https-listener Attributes
Table A.68. https-listener Attributes
APPENDIX A. REFERENCE MATERIAL
367
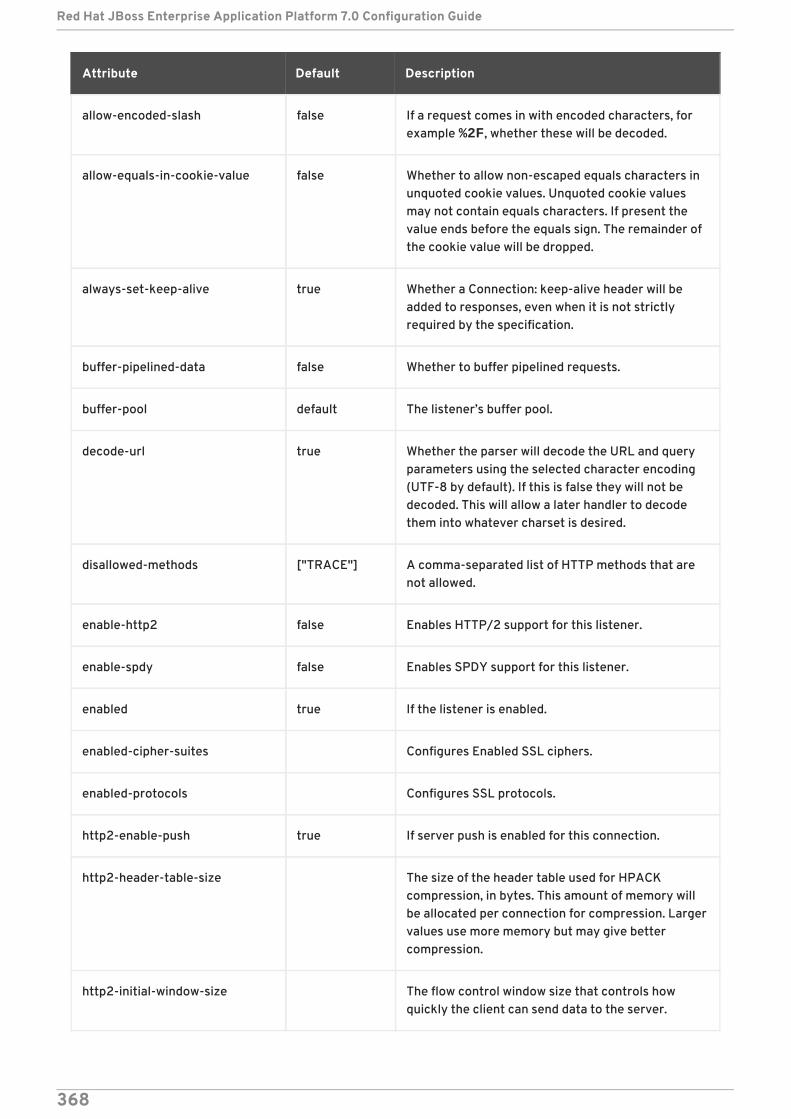
Attribute Default Description
allow-encoded-slash false If a request comes in with encoded characters, forexample %2F, whether these will be decoded.
allow-equals-in-cookie-value false Whether to allow non-escaped equals characters inunquoted cookie values. Unquoted cookie valuesmay not contain equals characters. If present thevalue ends before the equals sign. The remainder ofthe cookie value will be dropped.
always-set-keep-alive true Whether a Connection: keep-alive header will beadded to responses, even when it is not strictlyrequired by the specification.
buffer-pipelined-data false Whether to buffer pipelined requests.
buffer-pool default The listener’s buffer pool.
decode-url true Whether the parser will decode the URL and queryparameters using the selected character encoding(UTF-8 by default). If this is false they will not bedecoded. This will allow a later handler to decodethem into whatever charset is desired.
disallowed-methods ["TRACE"] A comma-separated list of HTTP methods that arenot allowed.
enable-http2 false Enables HTTP/2 support for this listener.
enable-spdy false Enables SPDY support for this listener.
enabled true If the listener is enabled.
enabled-cipher-suites Configures Enabled SSL ciphers.
enabled-protocols Configures SSL protocols.
http2-enable-push true If server push is enabled for this connection.
http2-header-table-size The size of the header table used for HPACKcompression, in bytes. This amount of memory willbe allocated per connection for compression. Largervalues use more memory but may give bettercompression.
http2-initial-window-size The flow control window size that controls howquickly the client can send data to the server.
Red Hat JBoss Enterprise Application Platform 7.0 Configuration Guide
368
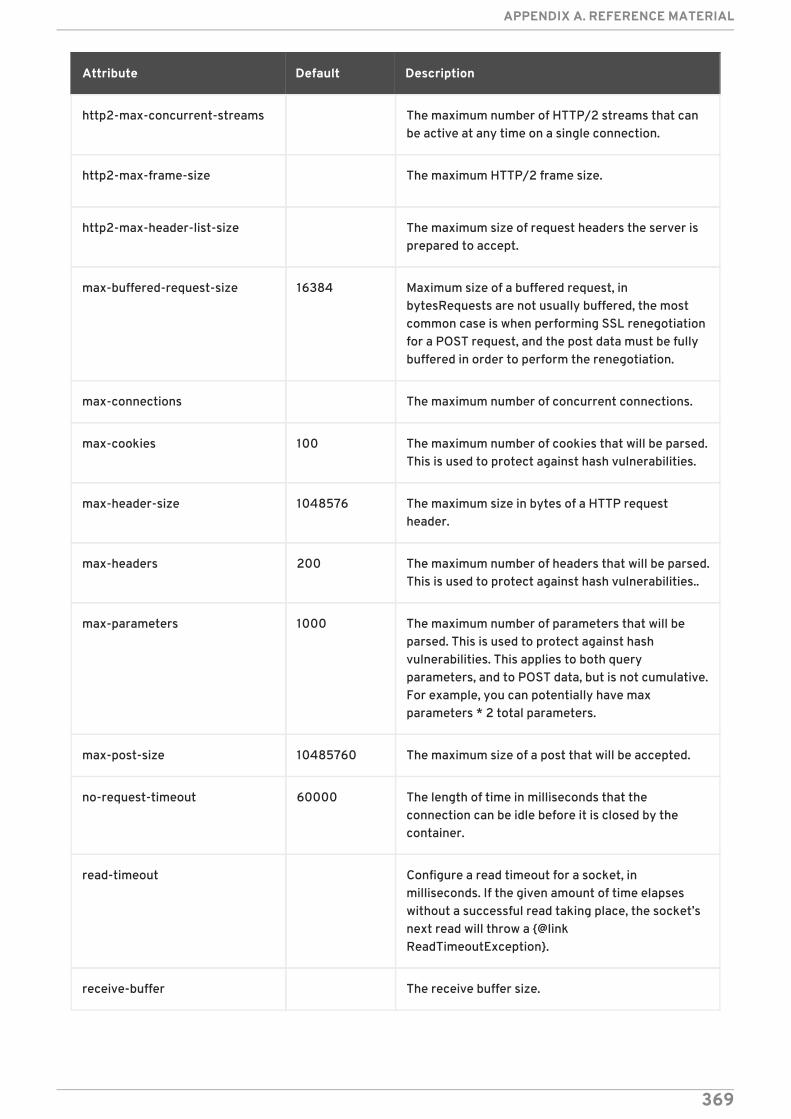
http2-max-concurrent-streams The maximum number of HTTP/2 streams that canbe active at any time on a single connection.
http2-max-frame-size The maximum HTTP/2 frame size.
http2-max-header-list-size The maximum size of request headers the server isprepared to accept.
max-buffered-request-size 16384 Maximum size of a buffered request, inbytesRequests are not usually buffered, the mostcommon case is when performing SSL renegotiationfor a POST request, and the post data must be fullybuffered in order to perform the renegotiation.
max-connections The maximum number of concurrent connections.
max-cookies 100 The maximum number of cookies that will be parsed.This is used to protect against hash vulnerabilities.
max-header-size 1048576 The maximum size in bytes of a HTTP requestheader.
max-headers 200 The maximum number of headers that will be parsed.This is used to protect against hash vulnerabilities..
max-parameters 1000 The maximum number of parameters that will beparsed. This is used to protect against hashvulnerabilities. This applies to both queryparameters, and to POST data, but is not cumulative.For example, you can potentially have maxparameters * 2 total parameters.
max-post-size 10485760 The maximum size of a post that will be accepted.
no-request-timeout 60000 The length of time in milliseconds that theconnection can be idle before it is closed by thecontainer.
read-timeout Configure a read timeout for a socket, inmilliseconds. If the given amount of time elapseswithout a successful read taking place, the socket’snext read will throw a {@linkReadTimeoutException}.
receive-buffer The receive buffer size.
Attribute Default Description
APPENDIX A. REFERENCE MATERIAL
369
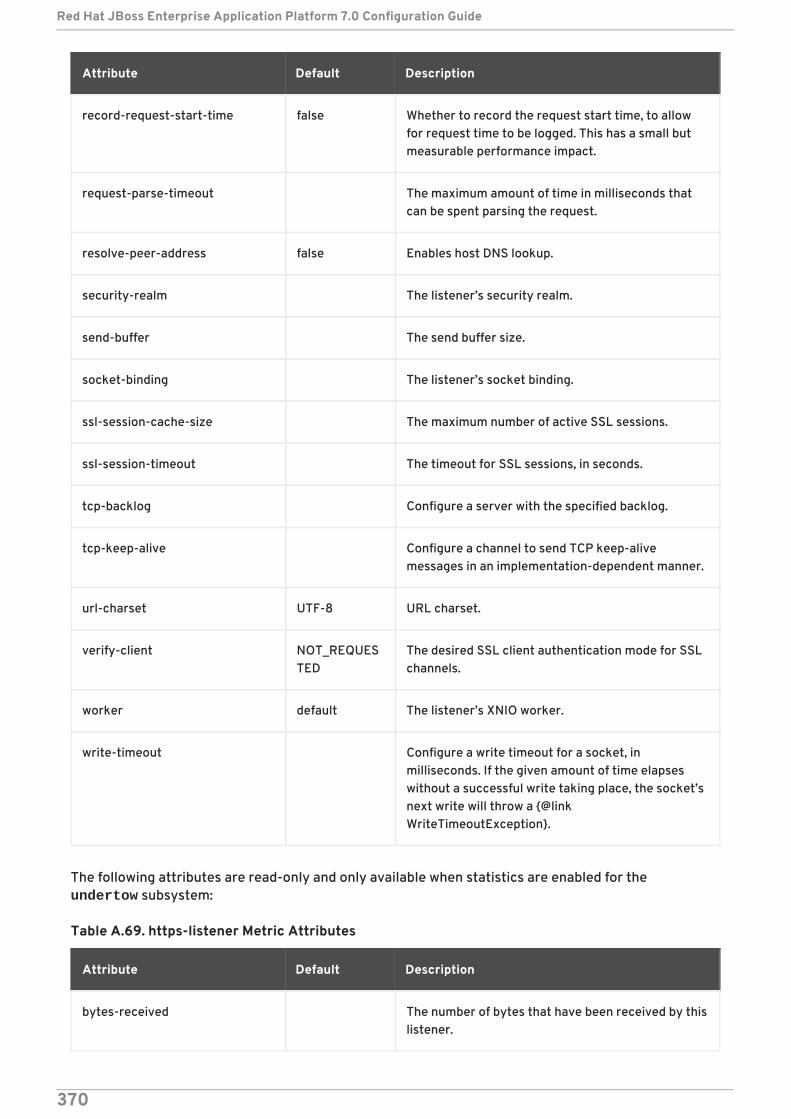
record-request-start-time false Whether to record the request start time, to allowfor request time to be logged. This has a small butmeasurable performance impact.
request-parse-timeout The maximum amount of time in milliseconds thatcan be spent parsing the request.
resolve-peer-address false Enables host DNS lookup.
security-realm The listener’s security realm.
send-buffer The send buffer size.
socket-binding The listener’s socket binding.
ssl-session-cache-size The maximum number of active SSL sessions.
ssl-session-timeout The timeout for SSL sessions, in seconds.
tcp-backlog Configure a server with the specified backlog.
tcp-keep-alive Configure a channel to send TCP keep-alivemessages in an implementation-dependent manner.
url-charset UTF-8 URL charset.
verify-client NOT_REQUESTED
The desired SSL client authentication mode for SSLchannels.
worker default The listener’s XNIO worker.
write-timeout Configure a write timeout for a socket, inmilliseconds. If the given amount of time elapseswithout a successful write taking place, the socket’snext write will throw a {@linkWriteTimeoutException}.
Attribute Default Description
The following attributes are read-only and only available when statistics are enabled for the undertow subsystem:
Table A.69. https-listener Metric Attributes
Attribute Default Description
bytes-received The number of bytes that have been received by thislistener.
Red Hat JBoss Enterprise Application Platform 7.0 Configuration Guide
370
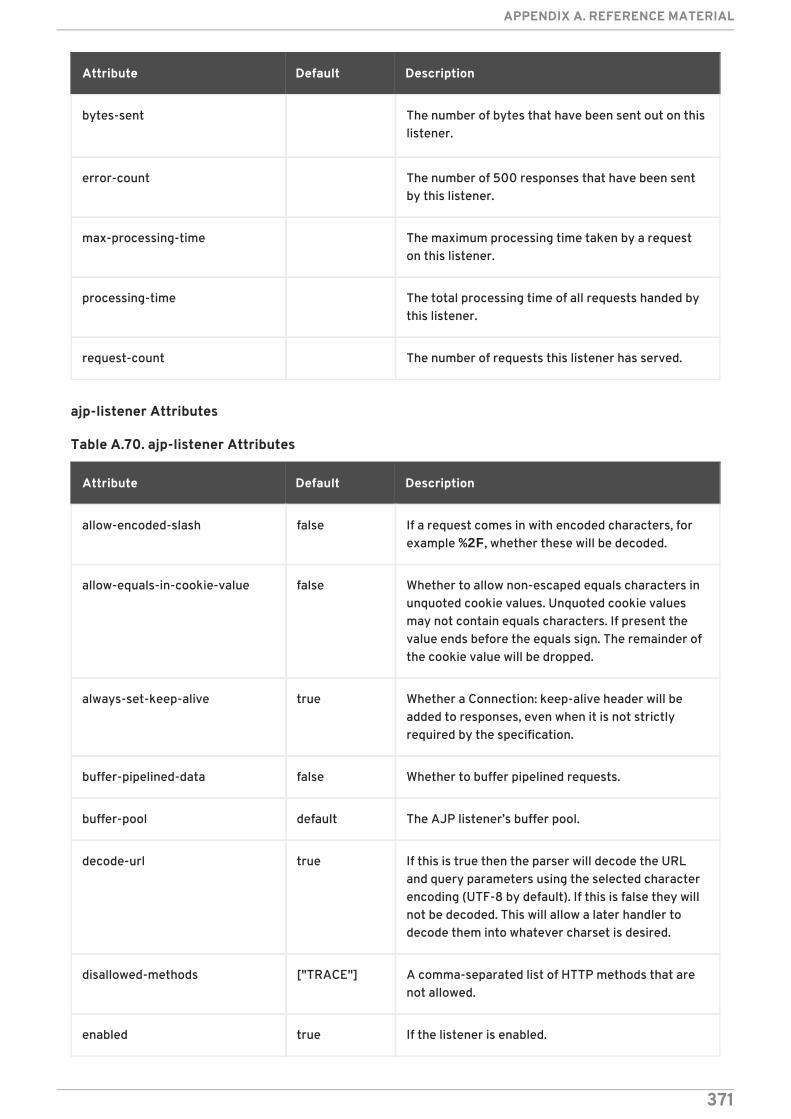
bytes-sent The number of bytes that have been sent out on thislistener.
error-count The number of 500 responses that have been sentby this listener.
max-processing-time The maximum processing time taken by a requeston this listener.
processing-time The total processing time of all requests handed bythis listener.
request-count The number of requests this listener has served.
Attribute Default Description
ajp-listener Attributes
Table A.70. ajp-listener Attributes
Attribute Default Description
allow-encoded-slash false If a request comes in with encoded characters, forexample %2F, whether these will be decoded.
allow-equals-in-cookie-value false Whether to allow non-escaped equals characters inunquoted cookie values. Unquoted cookie valuesmay not contain equals characters. If present thevalue ends before the equals sign. The remainder ofthe cookie value will be dropped.
always-set-keep-alive true Whether a Connection: keep-alive header will beadded to responses, even when it is not strictlyrequired by the specification.
buffer-pipelined-data false Whether to buffer pipelined requests.
buffer-pool default The AJP listener’s buffer pool.
decode-url true If this is true then the parser will decode the URLand query parameters using the selected characterencoding (UTF-8 by default). If this is false they willnot be decoded. This will allow a later handler todecode them into whatever charset is desired.
disallowed-methods ["TRACE"] A comma-separated list of HTTP methods that arenot allowed.
enabled true If the listener is enabled.
APPENDIX A. REFERENCE MATERIAL
371
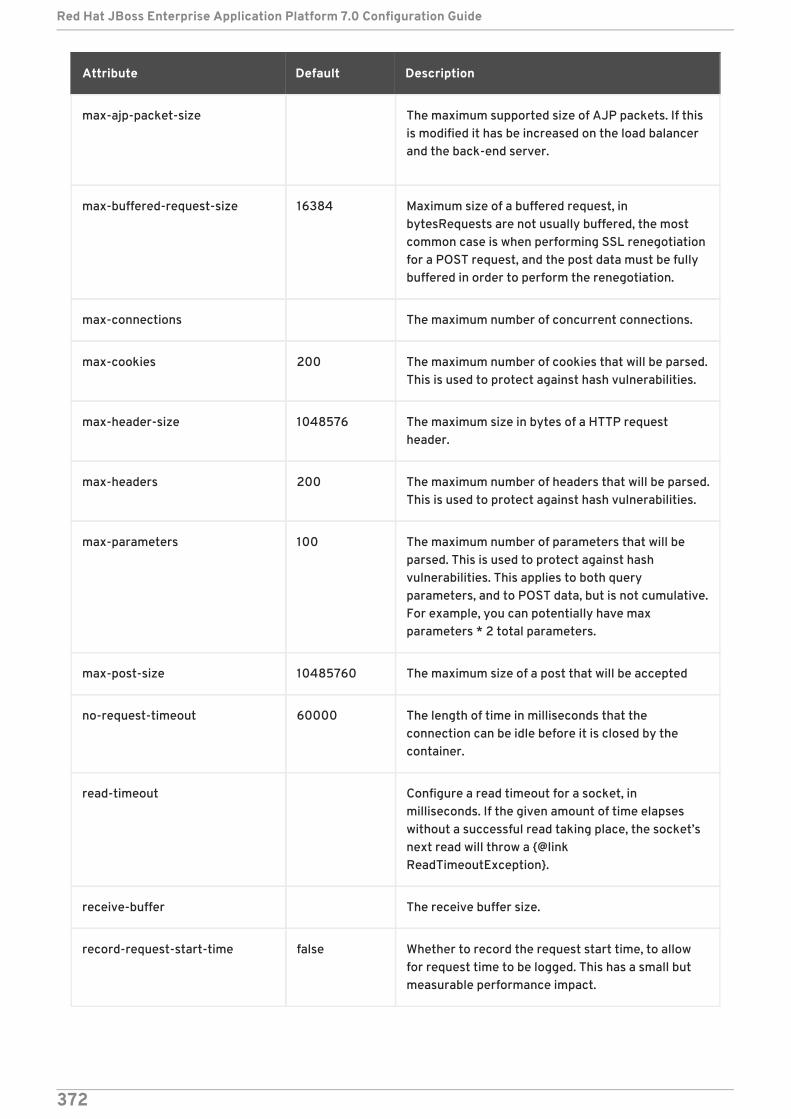
max-ajp-packet-size The maximum supported size of AJP packets. If thisis modified it has be increased on the load balancerand the back-end server.
max-buffered-request-size 16384 Maximum size of a buffered request, inbytesRequests are not usually buffered, the mostcommon case is when performing SSL renegotiationfor a POST request, and the post data must be fullybuffered in order to perform the renegotiation.
max-connections The maximum number of concurrent connections.
max-cookies 200 The maximum number of cookies that will be parsed.This is used to protect against hash vulnerabilities.
max-header-size 1048576 The maximum size in bytes of a HTTP requestheader.
max-headers 200 The maximum number of headers that will be parsed.This is used to protect against hash vulnerabilities.
max-parameters 100 The maximum number of parameters that will beparsed. This is used to protect against hashvulnerabilities. This applies to both queryparameters, and to POST data, but is not cumulative.For example, you can potentially have maxparameters * 2 total parameters.
max-post-size 10485760 The maximum size of a post that will be accepted
no-request-timeout 60000 The length of time in milliseconds that theconnection can be idle before it is closed by thecontainer.
read-timeout Configure a read timeout for a socket, inmilliseconds. If the given amount of time elapseswithout a successful read taking place, the socket’snext read will throw a {@linkReadTimeoutException}.
receive-buffer The receive buffer size.
record-request-start-time false Whether to record the request start time, to allowfor request time to be logged. This has a small butmeasurable performance impact.
Attribute Default Description
Red Hat JBoss Enterprise Application Platform 7.0 Configuration Guide
372
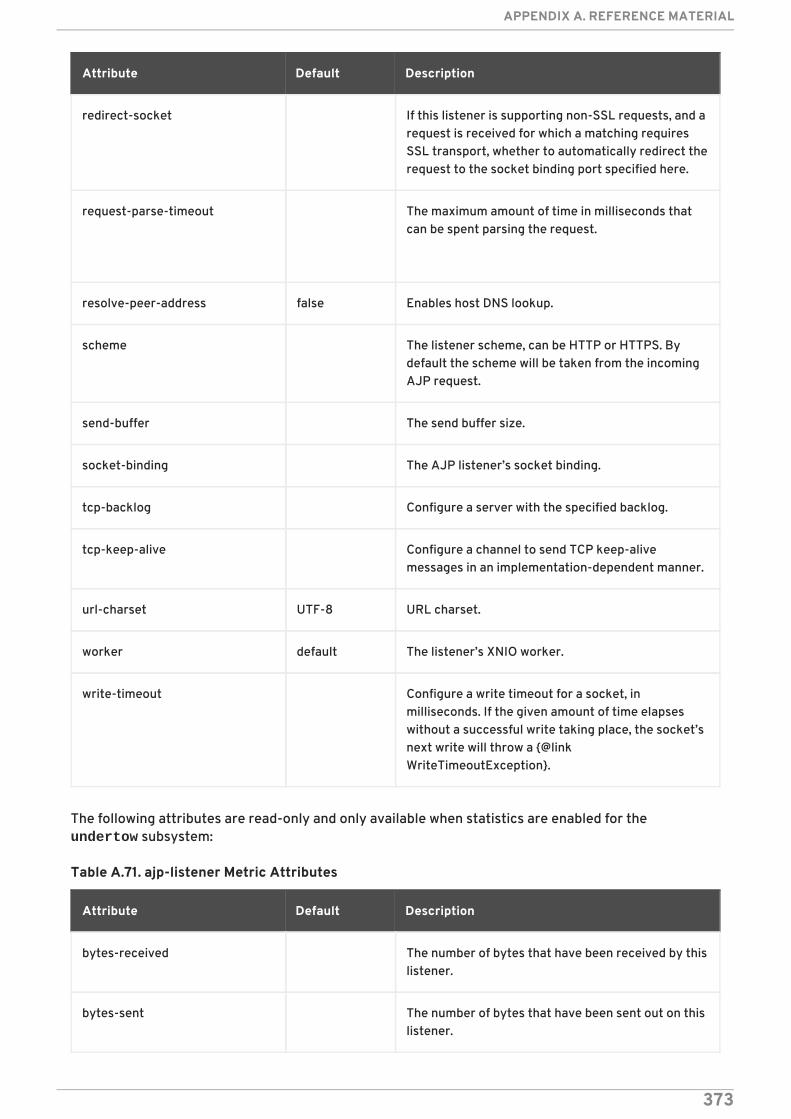
redirect-socket If this listener is supporting non-SSL requests, and arequest is received for which a matching requiresSSL transport, whether to automatically redirect therequest to the socket binding port specified here.
request-parse-timeout The maximum amount of time in milliseconds thatcan be spent parsing the request.
resolve-peer-address false Enables host DNS lookup.
scheme The listener scheme, can be HTTP or HTTPS. Bydefault the scheme will be taken from the incomingAJP request.
send-buffer The send buffer size.
socket-binding The AJP listener’s socket binding.
tcp-backlog Configure a server with the specified backlog.
tcp-keep-alive Configure a channel to send TCP keep-alivemessages in an implementation-dependent manner.
url-charset UTF-8 URL charset.
worker default The listener’s XNIO worker.
write-timeout Configure a write timeout for a socket, inmilliseconds. If the given amount of time elapseswithout a successful write taking place, the socket’snext write will throw a {@linkWriteTimeoutException}.
Attribute Default Description
The following attributes are read-only and only available when statistics are enabled for the undertow subsystem:
Table A.71. ajp-listener Metric Attributes
Attribute Default Description
bytes-received The number of bytes that have been received by thislistener.
bytes-sent The number of bytes that have been sent out on thislistener.
APPENDIX A. REFERENCE MATERIAL
373
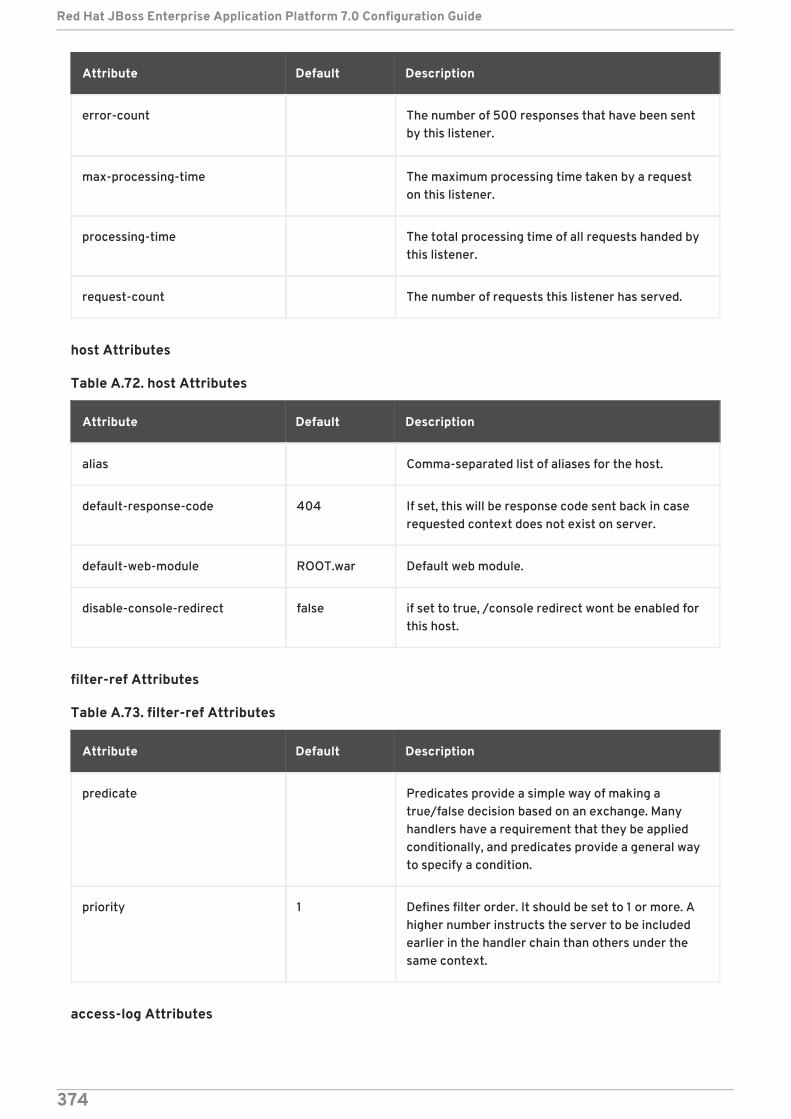
error-count The number of 500 responses that have been sentby this listener.
max-processing-time The maximum processing time taken by a requeston this listener.
processing-time The total processing time of all requests handed bythis listener.
request-count The number of requests this listener has served.
Attribute Default Description
host Attributes
Table A.72. host Attributes
Attribute Default Description
alias Comma-separated list of aliases for the host.
default-response-code 404 If set, this will be response code sent back in caserequested context does not exist on server.
default-web-module ROOT.war Default web module.
disable-console-redirect false if set to true, /console redirect wont be enabled forthis host.
filter-ref Attributes
Table A.73. filter-ref Attributes
Attribute Default Description
predicate Predicates provide a simple way of making atrue/false decision based on an exchange. Manyhandlers have a requirement that they be appliedconditionally, and predicates provide a general wayto specify a condition.
priority 1 Defines filter order. It should be set to 1 or more. Ahigher number instructs the server to be includedearlier in the handler chain than others under thesame context.
access-log Attributes
Red Hat JBoss Enterprise Application Platform 7.0 Configuration Guide
374
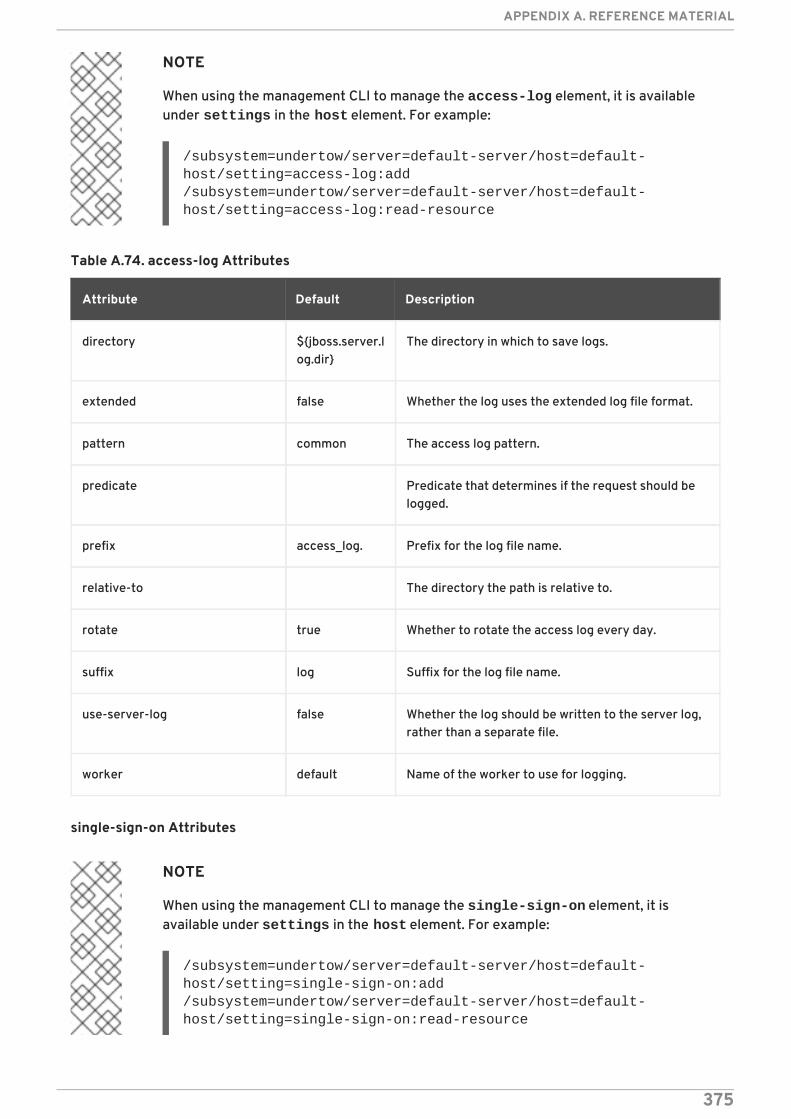
NOTE
When using the management CLI to manage the access-log element, it is availableunder settings in the host element. For example:
/subsystem=undertow/server=default-server/host=default-host/setting=access-log:add/subsystem=undertow/server=default-server/host=default-host/setting=access-log:read-resource
Table A.74. access-log Attributes
Attribute Default Description
directory ${jboss.server.log.dir}
The directory in which to save logs.
extended false Whether the log uses the extended log file format.
pattern common The access log pattern.
predicate Predicate that determines if the request should belogged.
prefix access_log. Prefix for the log file name.
relative-to The directory the path is relative to.
rotate true Whether to rotate the access log every day.
suffix log Suffix for the log file name.
use-server-log false Whether the log should be written to the server log,rather than a separate file.
worker default Name of the worker to use for logging.
single-sign-on Attributes
NOTE
When using the management CLI to manage the single-sign-on element, it isavailable under settings in the host element. For example:
/subsystem=undertow/server=default-server/host=default-host/setting=single-sign-on:add/subsystem=undertow/server=default-server/host=default-host/setting=single-sign-on:read-resource
APPENDIX A. REFERENCE MATERIAL
375
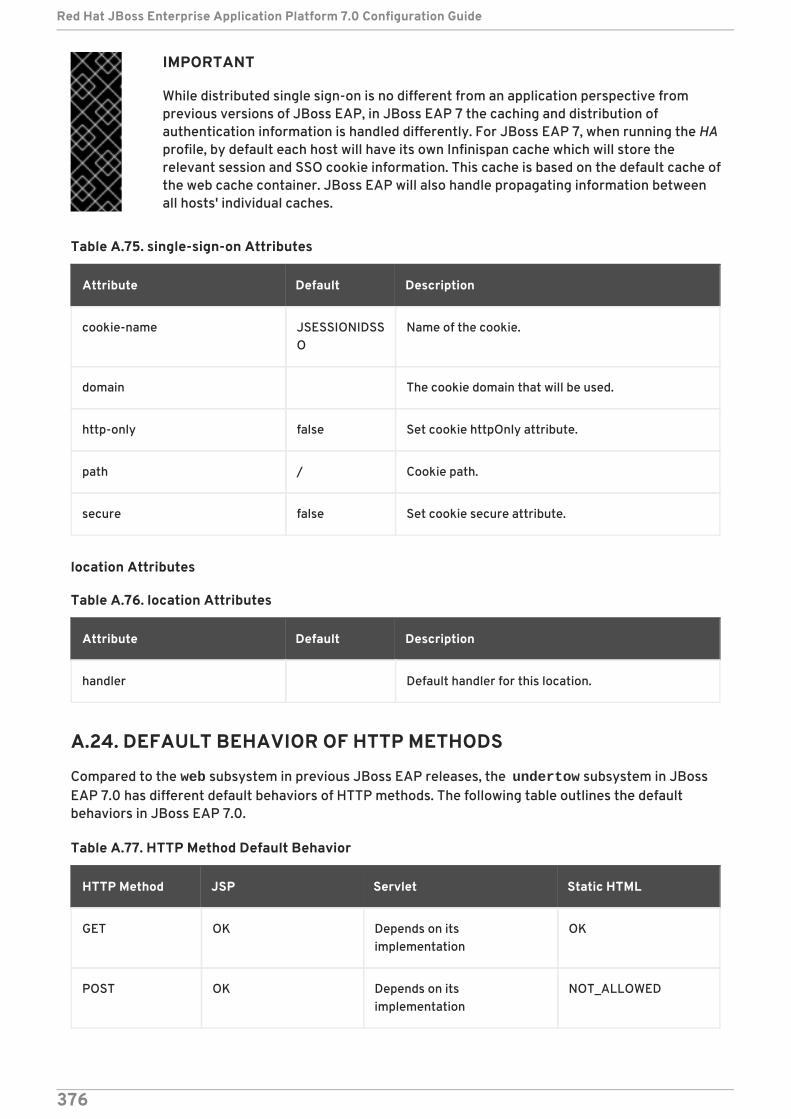
IMPORTANT
While distributed single sign-on is no different from an application perspective fromprevious versions of JBoss EAP, in JBoss EAP 7 the caching and distribution ofauthentication information is handled differently. For JBoss EAP 7, when running the HAprofile, by default each host will have its own Infinispan cache which will store therelevant session and SSO cookie information. This cache is based on the default cache ofthe web cache container. JBoss EAP will also handle propagating information betweenall hosts' individual caches.
Table A.75. single-sign-on Attributes
Attribute Default Description
cookie-name JSESSIONIDSSO
Name of the cookie.
domain The cookie domain that will be used.
http-only false Set cookie httpOnly attribute.
path / Cookie path.
secure false Set cookie secure attribute.
location Attributes
Table A.76. location Attributes
Attribute Default Description
handler Default handler for this location.
A.24. DEFAULT BEHAVIOR OF HTTP METHODS
Compared to the web subsystem in previous JBoss EAP releases, the undertow subsystem in JBossEAP 7.0 has different default behaviors of HTTP methods. The following table outlines the defaultbehaviors in JBoss EAP 7.0.
Table A.77. HTTP Method Default Behavior
HTTP Method JSP Servlet Static HTML
GET OK Depends on itsimplementation
OK
POST OK Depends on itsimplementation
NOT_ALLOWED
Red Hat JBoss Enterprise Application Platform 7.0 Configuration Guide
376
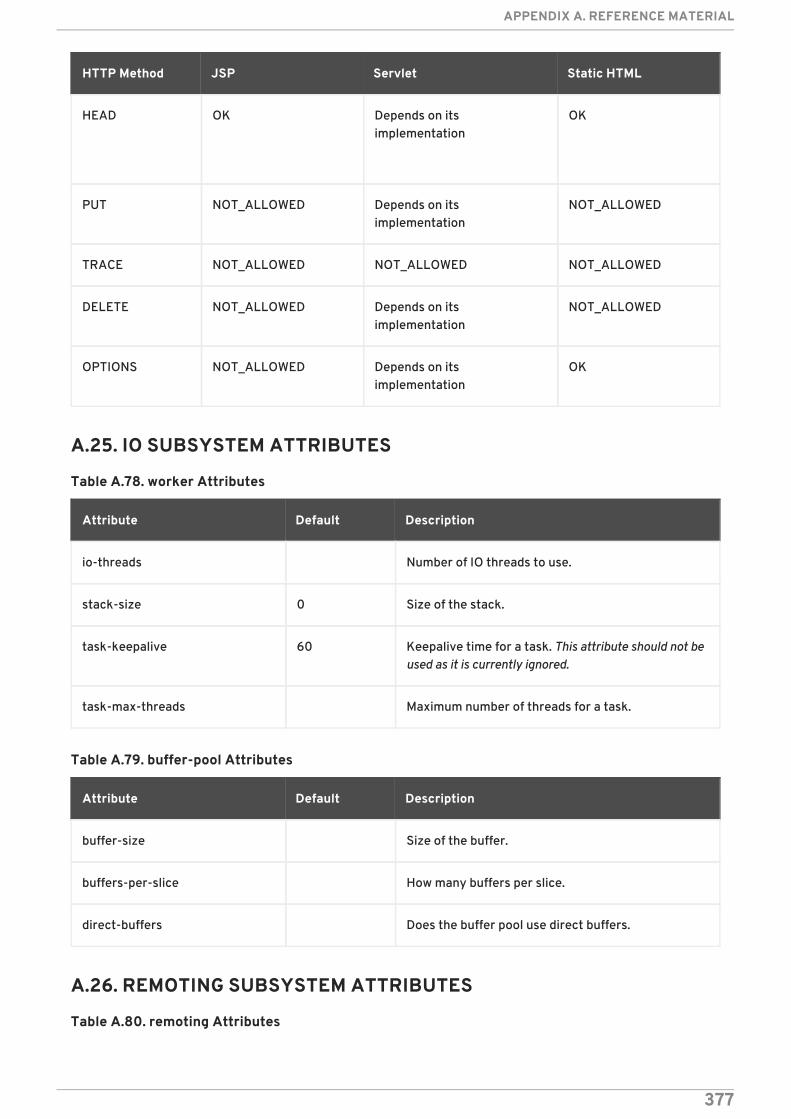
HEAD OK Depends on itsimplementation
OK
PUT NOT_ALLOWED Depends on itsimplementation
NOT_ALLOWED
TRACE NOT_ALLOWED NOT_ALLOWED NOT_ALLOWED
DELETE NOT_ALLOWED Depends on itsimplementation
NOT_ALLOWED
OPTIONS NOT_ALLOWED Depends on itsimplementation
OK
HTTP Method JSP Servlet Static HTML
A.25. IO SUBSYSTEM ATTRIBUTES
Table A.78. worker Attributes
Attribute Default Description
io-threads Number of IO threads to use.
stack-size 0 Size of the stack.
task-keepalive 60 Keepalive time for a task. This attribute should not beused as it is currently ignored.
task-max-threads Maximum number of threads for a task.
Table A.79. buffer-pool Attributes
Attribute Default Description
buffer-size Size of the buffer.
buffers-per-slice How many buffers per slice.
direct-buffers Does the buffer pool use direct buffers.
A.26. REMOTING SUBSYSTEM ATTRIBUTES
Table A.80. remoting Attributes
APPENDIX A. REFERENCE MATERIAL
377
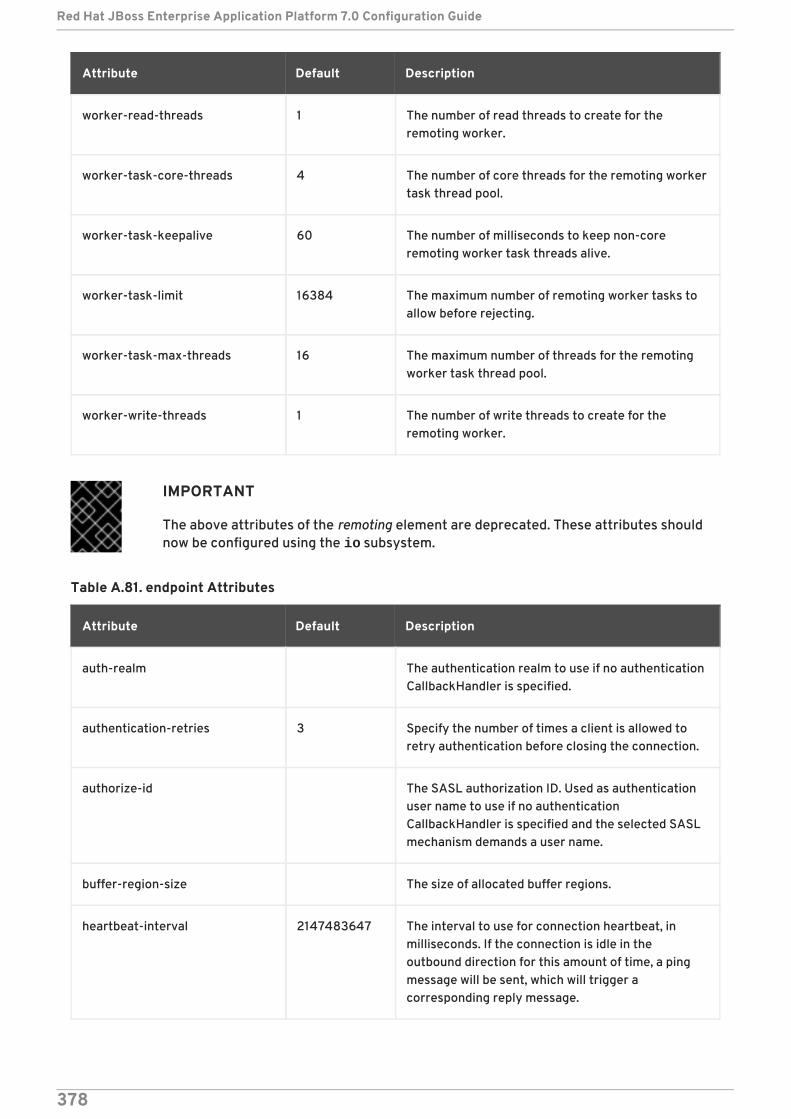
Attribute Default Description
worker-read-threads 1 The number of read threads to create for theremoting worker.
worker-task-core-threads 4 The number of core threads for the remoting workertask thread pool.
worker-task-keepalive 60 The number of milliseconds to keep non-coreremoting worker task threads alive.
worker-task-limit 16384 The maximum number of remoting worker tasks toallow before rejecting.
worker-task-max-threads 16 The maximum number of threads for the remotingworker task thread pool.
worker-write-threads 1 The number of write threads to create for theremoting worker.
IMPORTANT
The above attributes of the remoting element are deprecated. These attributes shouldnow be configured using the io subsystem.
Table A.81. endpoint Attributes
Attribute Default Description
auth-realm The authentication realm to use if no authenticationCallbackHandler is specified.
authentication-retries 3 Specify the number of times a client is allowed toretry authentication before closing the connection.
authorize-id The SASL authorization ID. Used as authenticationuser name to use if no authenticationCallbackHandler is specified and the selected SASLmechanism demands a user name.
buffer-region-size The size of allocated buffer regions.
heartbeat-interval 2147483647 The interval to use for connection heartbeat, inmilliseconds. If the connection is idle in theoutbound direction for this amount of time, a pingmessage will be sent, which will trigger acorresponding reply message.
Red Hat JBoss Enterprise Application Platform 7.0 Configuration Guide
378
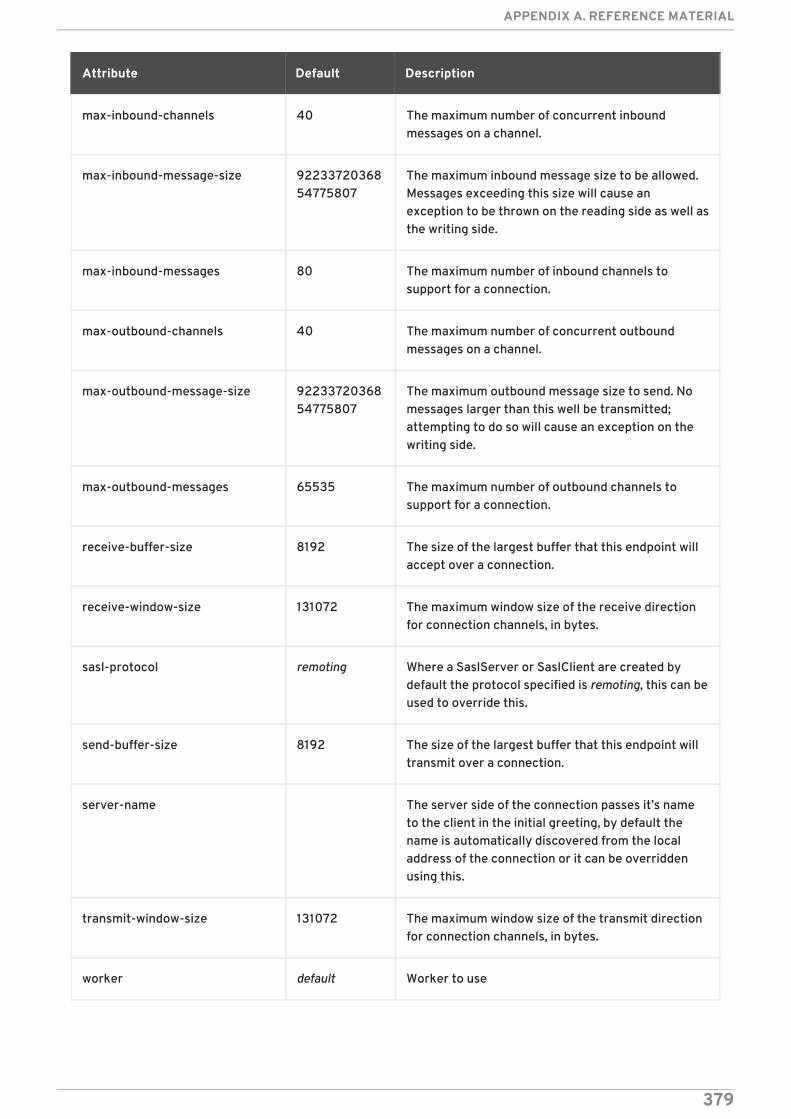
max-inbound-channels 40 The maximum number of concurrent inboundmessages on a channel.
max-inbound-message-size 9223372036854775807
The maximum inbound message size to be allowed.Messages exceeding this size will cause anexception to be thrown on the reading side as well asthe writing side.
max-inbound-messages 80 The maximum number of inbound channels tosupport for a connection.
max-outbound-channels 40 The maximum number of concurrent outboundmessages on a channel.
max-outbound-message-size 9223372036854775807
The maximum outbound message size to send. Nomessages larger than this well be transmitted;attempting to do so will cause an exception on thewriting side.
max-outbound-messages 65535 The maximum number of outbound channels tosupport for a connection.
receive-buffer-size 8192 The size of the largest buffer that this endpoint willaccept over a connection.
receive-window-size 131072 The maximum window size of the receive directionfor connection channels, in bytes.
sasl-protocol remoting Where a SaslServer or SaslClient are created bydefault the protocol specified is remoting, this can beused to override this.
send-buffer-size 8192 The size of the largest buffer that this endpoint willtransmit over a connection.
server-name The server side of the connection passes it’s nameto the client in the initial greeting, by default thename is automatically discovered from the localaddress of the connection or it can be overriddenusing this.
transmit-window-size 131072 The maximum window size of the transmit directionfor connection channels, in bytes.
worker default Worker to use
Attribute Default Description
APPENDIX A. REFERENCE MATERIAL
379
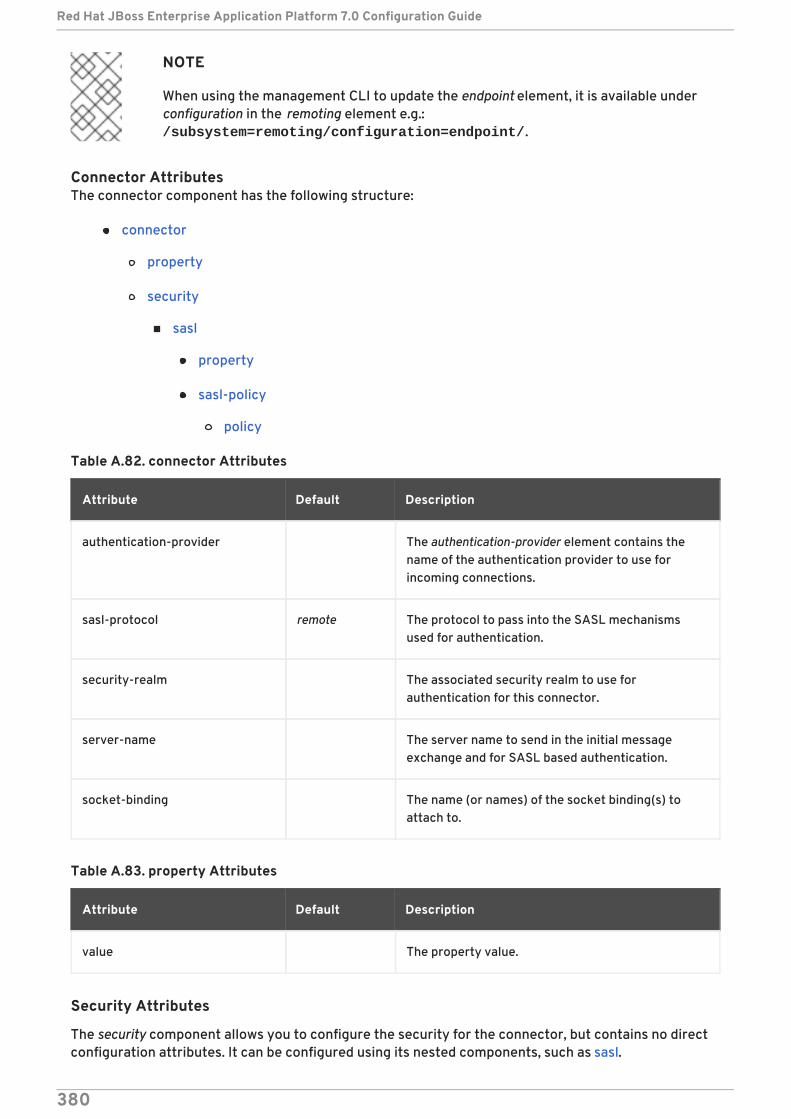
NOTE
When using the management CLI to update the endpoint element, it is available underconfiguration in the remoting element e.g.: /subsystem=remoting/configuration=endpoint/.
Connector AttributesThe connector component has the following structure:
connector
property
security
sasl
property
sasl-policy
policy
Table A.82. connector Attributes
Attribute Default Description
authentication-provider The authentication-provider element contains thename of the authentication provider to use forincoming connections.
sasl-protocol remote The protocol to pass into the SASL mechanismsused for authentication.
security-realm The associated security realm to use forauthentication for this connector.
server-name The server name to send in the initial messageexchange and for SASL based authentication.
socket-binding The name (or names) of the socket binding(s) toattach to.
Table A.83. property Attributes
Attribute Default Description
value The property value.
Security Attributes
The security component allows you to configure the security for the connector, but contains no directconfiguration attributes. It can be configured using its nested components, such as sasl.
Red Hat JBoss Enterprise Application Platform 7.0 Configuration Guide
380
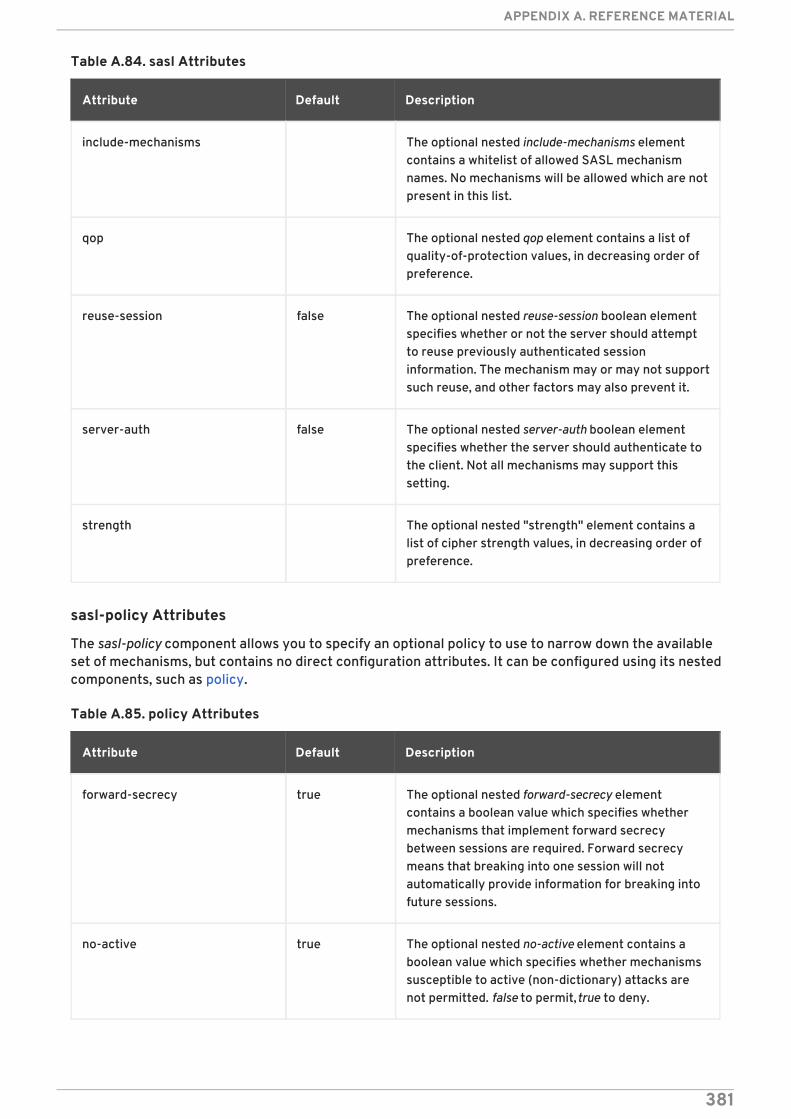
Table A.84. sasl Attributes
Attribute Default Description
include-mechanisms The optional nested include-mechanisms elementcontains a whitelist of allowed SASL mechanismnames. No mechanisms will be allowed which are notpresent in this list.
qop The optional nested qop element contains a list ofquality-of-protection values, in decreasing order ofpreference.
reuse-session false The optional nested reuse-session boolean elementspecifies whether or not the server should attemptto reuse previously authenticated sessioninformation. The mechanism may or may not supportsuch reuse, and other factors may also prevent it.
server-auth false The optional nested server-auth boolean elementspecifies whether the server should authenticate tothe client. Not all mechanisms may support thissetting.
strength The optional nested "strength" element contains alist of cipher strength values, in decreasing order ofpreference.
sasl-policy Attributes
The sasl-policy component allows you to specify an optional policy to use to narrow down the availableset of mechanisms, but contains no direct configuration attributes. It can be configured using its nestedcomponents, such as policy.
Table A.85. policy Attributes
Attribute Default Description
forward-secrecy true The optional nested forward-secrecy elementcontains a boolean value which specifies whethermechanisms that implement forward secrecybetween sessions are required. Forward secrecymeans that breaking into one session will notautomatically provide information for breaking intofuture sessions.
no-active true The optional nested no-active element contains aboolean value which specifies whether mechanismssusceptible to active (non-dictionary) attacks arenot permitted. false to permit, true to deny.
APPENDIX A. REFERENCE MATERIAL
381
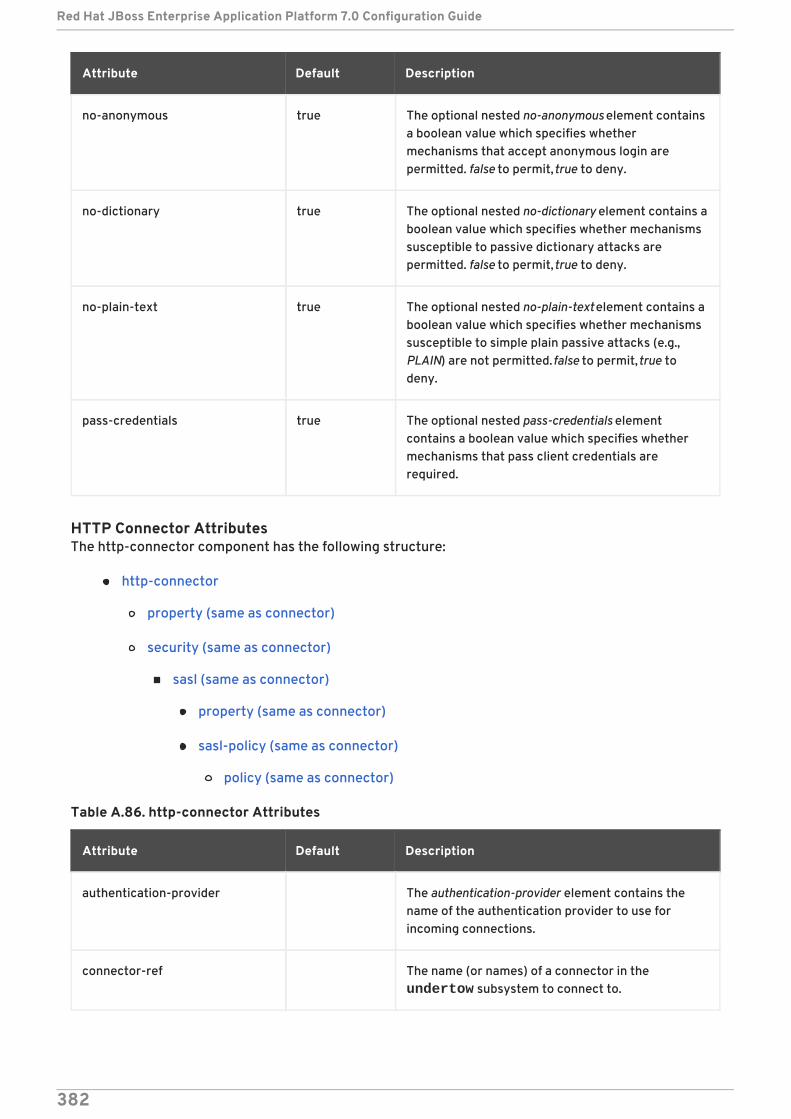
no-anonymous true The optional nested no-anonymous element containsa boolean value which specifies whethermechanisms that accept anonymous login arepermitted. false to permit, true to deny.
no-dictionary true The optional nested no-dictionary element contains aboolean value which specifies whether mechanismssusceptible to passive dictionary attacks arepermitted. false to permit, true to deny.
no-plain-text true The optional nested no-plain-text element contains aboolean value which specifies whether mechanismssusceptible to simple plain passive attacks (e.g.,PLAIN) are not permitted. false to permit, true todeny.
pass-credentials true The optional nested pass-credentials elementcontains a boolean value which specifies whethermechanisms that pass client credentials arerequired.
Attribute Default Description
HTTP Connector AttributesThe http-connector component has the following structure:
http-connector
property (same as connector)
security (same as connector)
sasl (same as connector)
property (same as connector)
sasl-policy (same as connector)
policy (same as connector)
Table A.86. http-connector Attributes
Attribute Default Description
authentication-provider The authentication-provider element contains thename of the authentication provider to use forincoming connections.
connector-ref The name (or names) of a connector in the undertow subsystem to connect to.
Red Hat JBoss Enterprise Application Platform 7.0 Configuration Guide
382
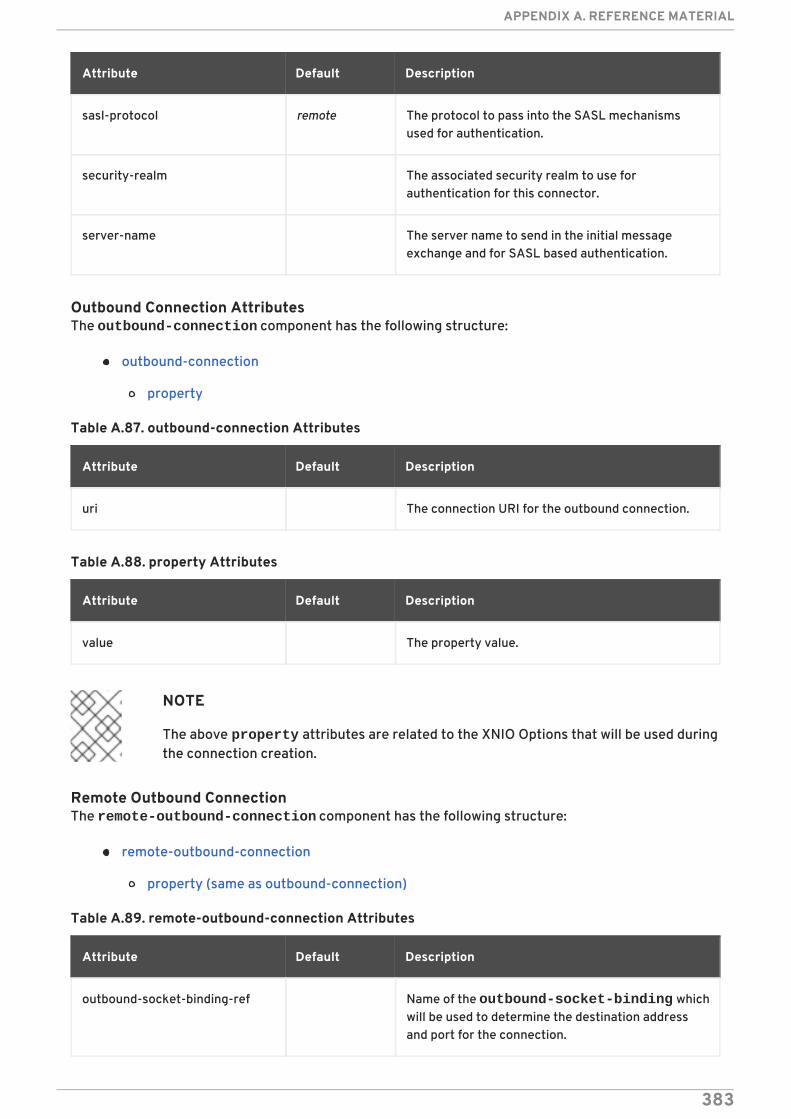
sasl-protocol remote The protocol to pass into the SASL mechanismsused for authentication.
security-realm The associated security realm to use forauthentication for this connector.
server-name The server name to send in the initial messageexchange and for SASL based authentication.
Attribute Default Description
Outbound Connection AttributesThe outbound-connection component has the following structure:
outbound-connection
property
Table A.87. outbound-connection Attributes
Attribute Default Description
uri The connection URI for the outbound connection.
Table A.88. property Attributes
Attribute Default Description
value The property value.
NOTE
The above property attributes are related to the XNIO Options that will be used duringthe connection creation.
Remote Outbound ConnectionThe remote-outbound-connection component has the following structure:
remote-outbound-connection
property (same as outbound-connection)
Table A.89. remote-outbound-connection Attributes
Attribute Default Description
outbound-socket-binding-ref Name of the outbound-socket-binding whichwill be used to determine the destination addressand port for the connection.
APPENDIX A. REFERENCE MATERIAL
383
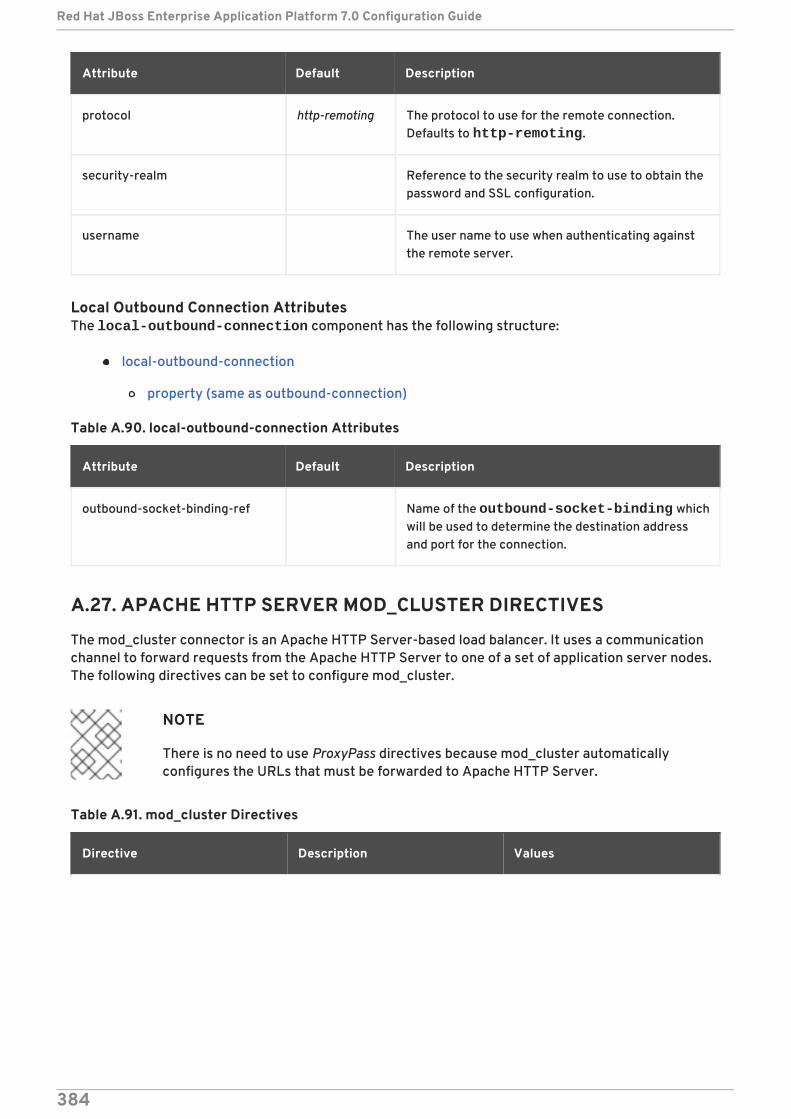
protocol http-remoting The protocol to use for the remote connection.Defaults to http-remoting.
security-realm Reference to the security realm to use to obtain thepassword and SSL configuration.
username The user name to use when authenticating againstthe remote server.
Attribute Default Description
Local Outbound Connection AttributesThe local-outbound-connection component has the following structure:
local-outbound-connection
property (same as outbound-connection)
Table A.90. local-outbound-connection Attributes
Attribute Default Description
outbound-socket-binding-ref Name of the outbound-socket-binding whichwill be used to determine the destination addressand port for the connection.
A.27. APACHE HTTP SERVER MOD_CLUSTER DIRECTIVES
The mod_cluster connector is an Apache HTTP Server-based load balancer. It uses a communicationchannel to forward requests from the Apache HTTP Server to one of a set of application server nodes.The following directives can be set to configure mod_cluster.
NOTE
There is no need to use ProxyPass directives because mod_cluster automaticallyconfigures the URLs that must be forwarded to Apache HTTP Server.
Table A.91. mod_cluster Directives
Directive Description Values
Red Hat JBoss Enterprise Application Platform 7.0 Configuration Guide
384
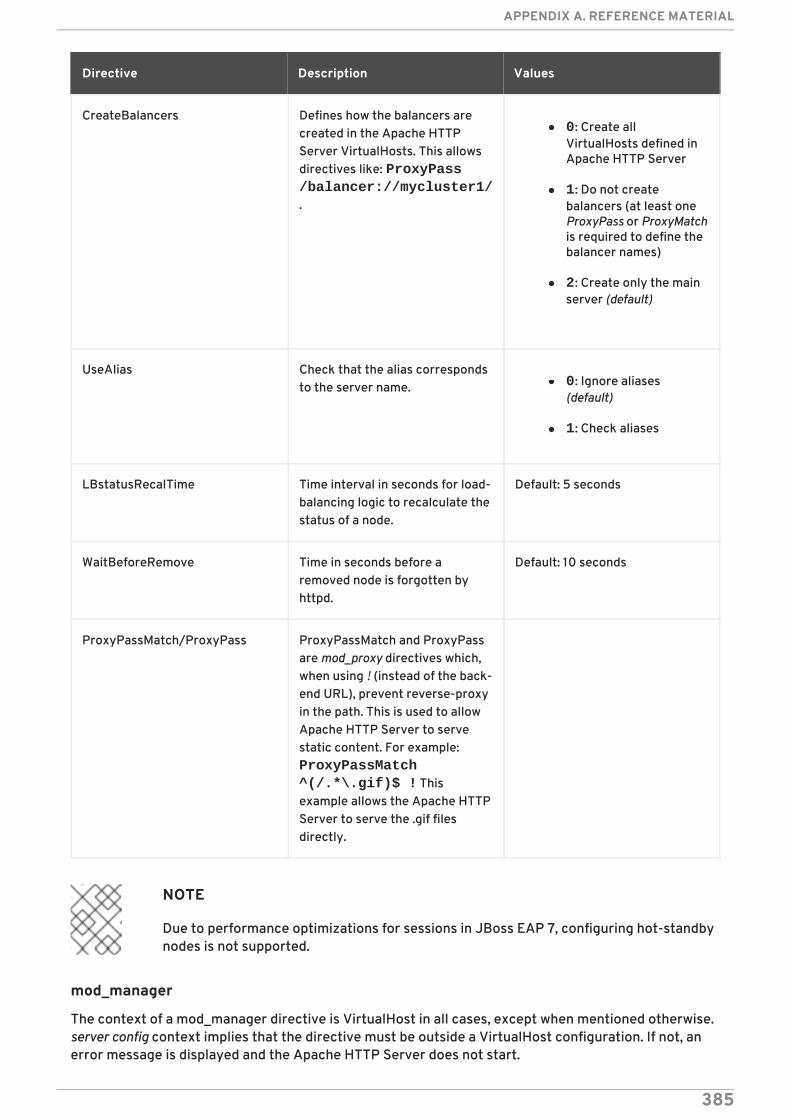
CreateBalancers Defines how the balancers arecreated in the Apache HTTPServer VirtualHosts. This allowsdirectives like: ProxyPass /balancer://mycluster1/.
0: Create allVirtualHosts defined inApache HTTP Server
1: Do not createbalancers (at least oneProxyPass or ProxyMatchis required to define thebalancer names)
2: Create only the mainserver (default)
UseAlias Check that the alias correspondsto the server name. 0: Ignore aliases
(default)
1: Check aliases
LBstatusRecalTime Time interval in seconds for load-balancing logic to recalculate thestatus of a node.
Default: 5 seconds
WaitBeforeRemove Time in seconds before aremoved node is forgotten byhttpd.
Default: 10 seconds
ProxyPassMatch/ProxyPass ProxyPassMatch and ProxyPassare mod_proxy directives which,when using ! (instead of the back-end URL), prevent reverse-proxyin the path. This is used to allowApache HTTP Server to servestatic content. For example: ProxyPassMatch ^(/.*\.gif)$ ! Thisexample allows the Apache HTTPServer to serve the .gif filesdirectly.
Directive Description Values
NOTE
Due to performance optimizations for sessions in JBoss EAP 7, configuring hot-standbynodes is not supported.
mod_manager
The context of a mod_manager directive is VirtualHost in all cases, except when mentioned otherwise.server config context implies that the directive must be outside a VirtualHost configuration. If not, anerror message is displayed and the Apache HTTP Server does not start.
APPENDIX A. REFERENCE MATERIAL
385
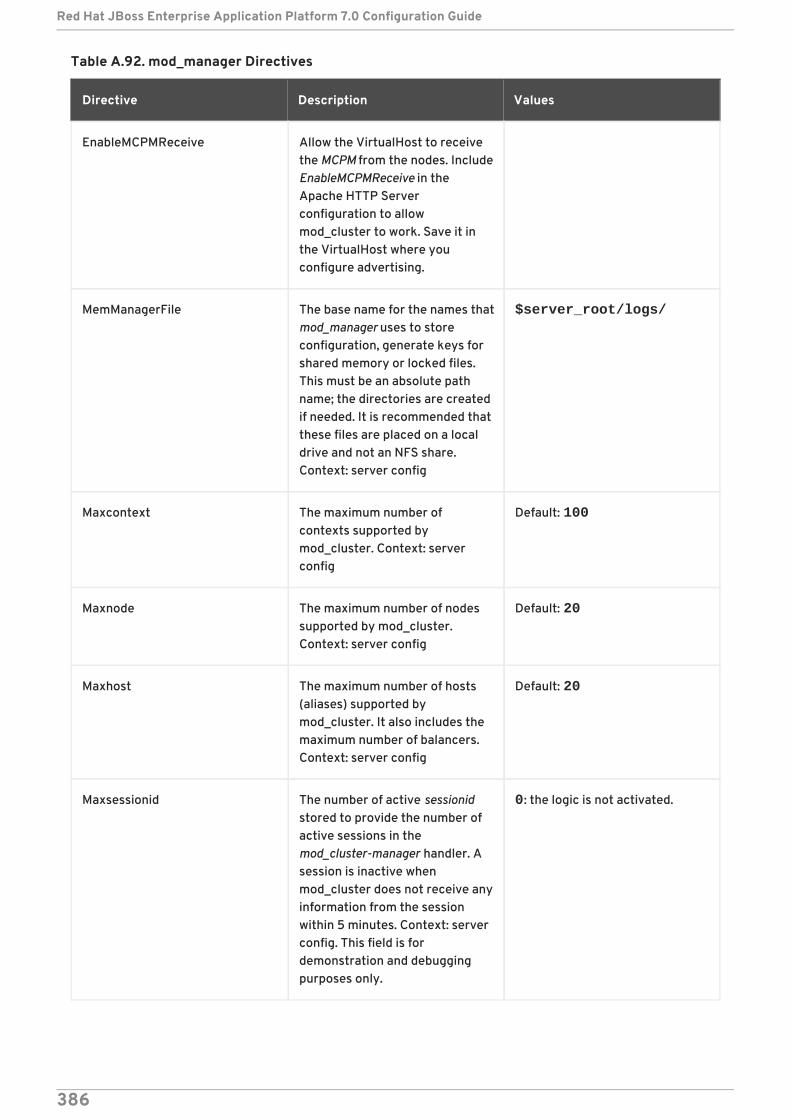
Table A.92. mod_manager Directives
Directive Description Values
EnableMCPMReceive Allow the VirtualHost to receivethe MCPM from the nodes. IncludeEnableMCPMReceive in theApache HTTP Serverconfiguration to allowmod_cluster to work. Save it inthe VirtualHost where youconfigure advertising.
MemManagerFile The base name for the names thatmod_manager uses to storeconfiguration, generate keys forshared memory or locked files.This must be an absolute pathname; the directories are createdif needed. It is recommended thatthese files are placed on a localdrive and not an NFS share.Context: server config
$server_root/logs/
Maxcontext The maximum number ofcontexts supported bymod_cluster. Context: serverconfig
Default: 100
Maxnode The maximum number of nodessupported by mod_cluster.Context: server config
Default: 20
Maxhost The maximum number of hosts(aliases) supported bymod_cluster. It also includes themaximum number of balancers.Context: server config
Default: 20
Maxsessionid The number of active sessionidstored to provide the number ofactive sessions in themod_cluster-manager handler. Asession is inactive whenmod_cluster does not receive anyinformation from the sessionwithin 5 minutes. Context: serverconfig. This field is fordemonstration and debuggingpurposes only.
0: the logic is not activated.
Red Hat JBoss Enterprise Application Platform 7.0 Configuration Guide
386
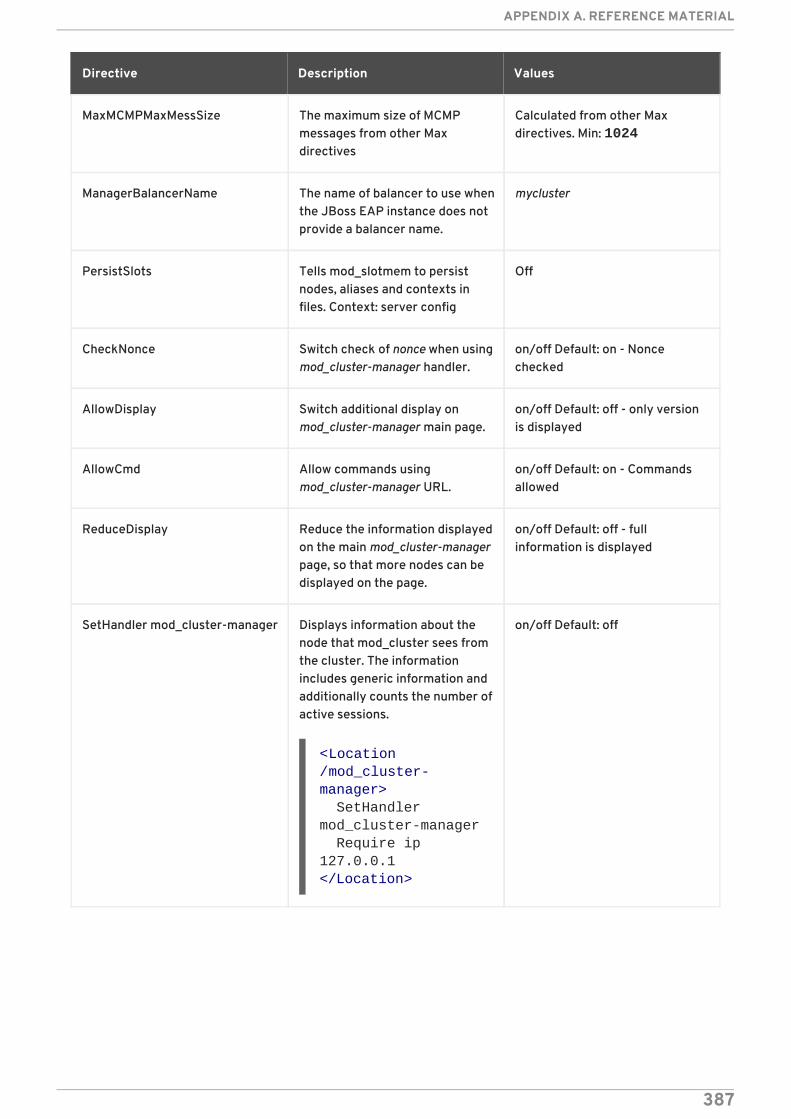
MaxMCMPMaxMessSize The maximum size of MCMPmessages from other Maxdirectives
Calculated from other Maxdirectives. Min: 1024
ManagerBalancerName The name of balancer to use whenthe JBoss EAP instance does notprovide a balancer name.
mycluster
PersistSlots Tells mod_slotmem to persistnodes, aliases and contexts infiles. Context: server config
Off
CheckNonce Switch check of nonce when usingmod_cluster-manager handler.
on/off Default: on - Noncechecked
AllowDisplay Switch additional display onmod_cluster-manager main page.
on/off Default: off - only versionis displayed
AllowCmd Allow commands usingmod_cluster-manager URL.
on/off Default: on - Commandsallowed
ReduceDisplay Reduce the information displayedon the main mod_cluster-managerpage, so that more nodes can bedisplayed on the page.
on/off Default: off - fullinformation is displayed
SetHandler mod_cluster-manager Displays information about thenode that mod_cluster sees fromthe cluster. The informationincludes generic information andadditionally counts the number ofactive sessions.
on/off Default: off
Directive Description Values
<Location /mod_cluster-manager> SetHandler mod_cluster-manager Require ip 127.0.0.1</Location>
APPENDIX A. REFERENCE MATERIAL
387
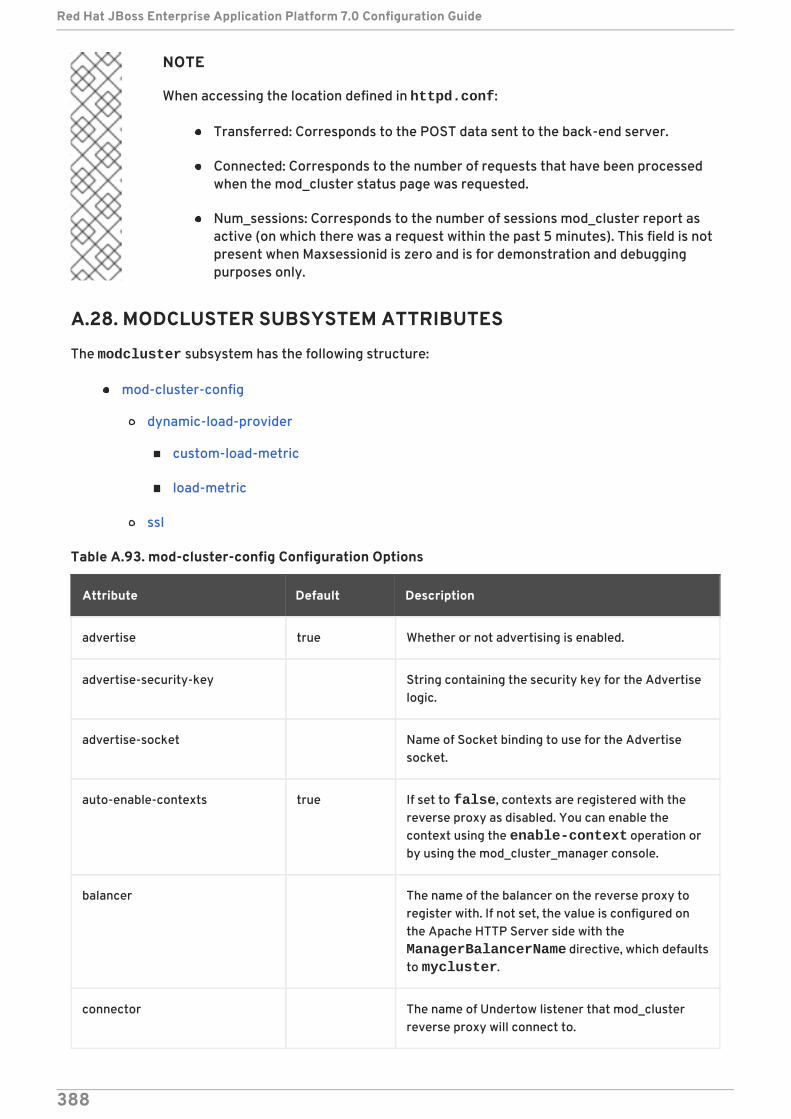
NOTE
When accessing the location defined in httpd.conf:
Transferred: Corresponds to the POST data sent to the back-end server.
Connected: Corresponds to the number of requests that have been processedwhen the mod_cluster status page was requested.
Num_sessions: Corresponds to the number of sessions mod_cluster report asactive (on which there was a request within the past 5 minutes). This field is notpresent when Maxsessionid is zero and is for demonstration and debuggingpurposes only.
A.28. MODCLUSTER SUBSYSTEM ATTRIBUTES
The modcluster subsystem has the following structure:
mod-cluster-config
dynamic-load-provider
custom-load-metric
load-metric
ssl
Table A.93. mod-cluster-config Configuration Options
Attribute Default Description
advertise true Whether or not advertising is enabled.
advertise-security-key String containing the security key for the Advertiselogic.
advertise-socket Name of Socket binding to use for the Advertisesocket.
auto-enable-contexts true If set to false, contexts are registered with thereverse proxy as disabled. You can enable thecontext using the enable-context operation orby using the mod_cluster_manager console.
balancer The name of the balancer on the reverse proxy toregister with. If not set, the value is configured onthe Apache HTTP Server side with the ManagerBalancerName directive, which defaultsto mycluster.
connector The name of Undertow listener that mod_clusterreverse proxy will connect to.
Red Hat JBoss Enterprise Application Platform 7.0 Configuration Guide
388
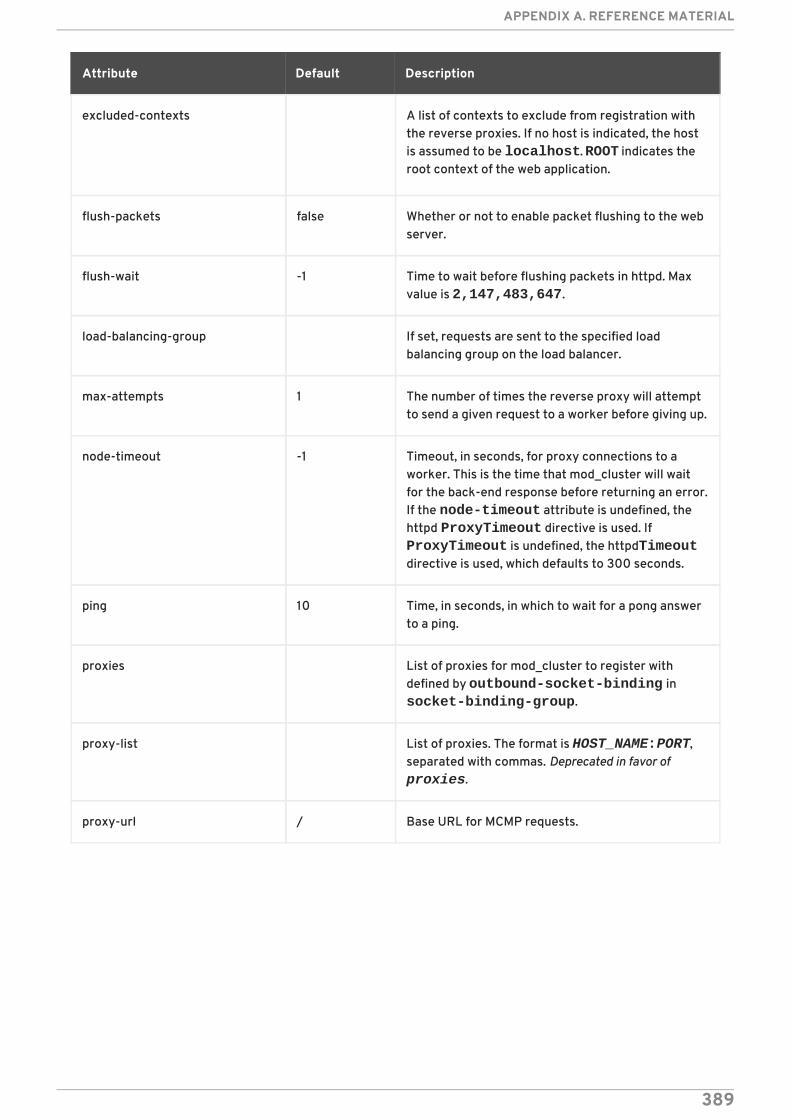
excluded-contexts A list of contexts to exclude from registration withthe reverse proxies. If no host is indicated, the hostis assumed to be localhost. ROOT indicates theroot context of the web application.
flush-packets false Whether or not to enable packet flushing to the webserver.
flush-wait -1 Time to wait before flushing packets in httpd. Maxvalue is 2,147,483,647.
load-balancing-group If set, requests are sent to the specified loadbalancing group on the load balancer.
max-attempts 1 The number of times the reverse proxy will attemptto send a given request to a worker before giving up.
node-timeout -1 Timeout, in seconds, for proxy connections to aworker. This is the time that mod_cluster will waitfor the back-end response before returning an error.If the node-timeout attribute is undefined, thehttpd ProxyTimeout directive is used. If ProxyTimeout is undefined, the httpd Timeoutdirective is used, which defaults to 300 seconds.
ping 10 Time, in seconds, in which to wait for a pong answerto a ping.
proxies List of proxies for mod_cluster to register withdefined by outbound-socket-binding in socket-binding-group.
proxy-list List of proxies. The format is HOST_NAME:PORT,separated with commas. Deprecated in favor of proxies.
proxy-url / Base URL for MCMP requests.
Attribute Default Description
APPENDIX A. REFERENCE MATERIAL
389
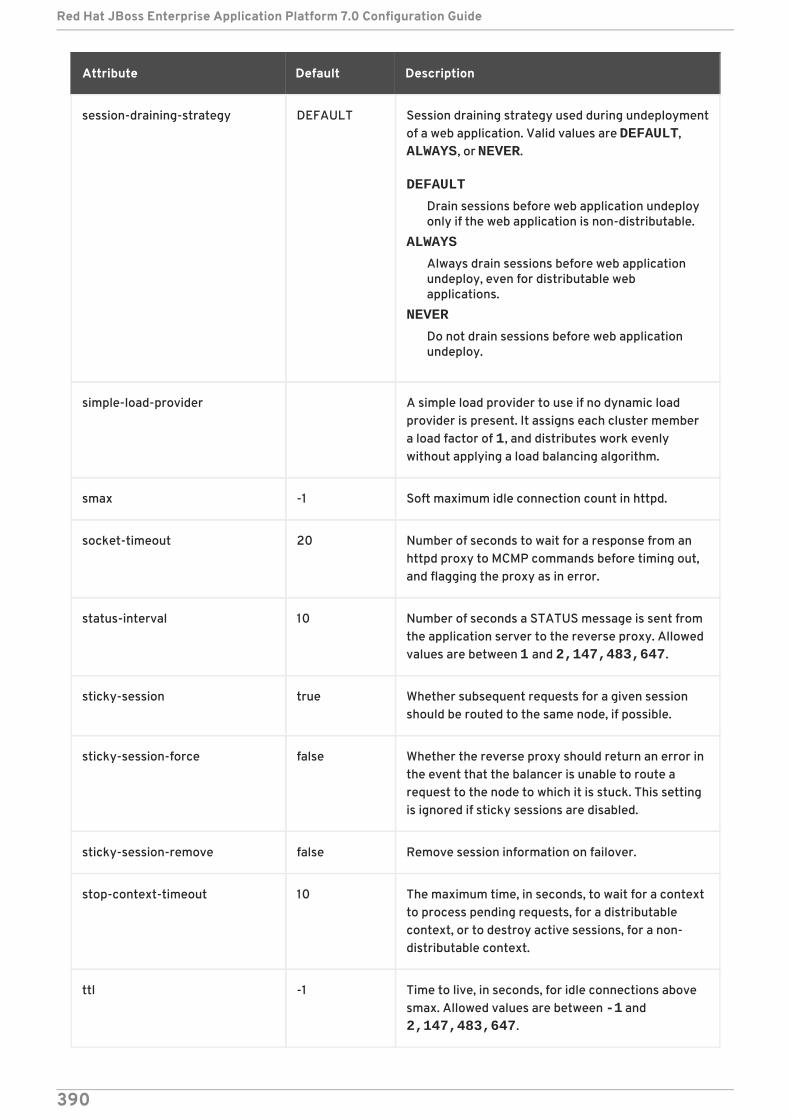
session-draining-strategy DEFAULT Session draining strategy used during undeploymentof a web application. Valid values are DEFAULT, ALWAYS, or NEVER.
DEFAULT
Drain sessions before web application undeployonly if the web application is non-distributable.
ALWAYS
Always drain sessions before web applicationundeploy, even for distributable webapplications.
NEVER
Do not drain sessions before web applicationundeploy.
simple-load-provider A simple load provider to use if no dynamic loadprovider is present. It assigns each cluster membera load factor of 1, and distributes work evenlywithout applying a load balancing algorithm.
smax -1 Soft maximum idle connection count in httpd.
socket-timeout 20 Number of seconds to wait for a response from anhttpd proxy to MCMP commands before timing out,and flagging the proxy as in error.
status-interval 10 Number of seconds a STATUS message is sent fromthe application server to the reverse proxy. Allowedvalues are between 1 and 2,147,483,647.
sticky-session true Whether subsequent requests for a given sessionshould be routed to the same node, if possible.
sticky-session-force false Whether the reverse proxy should return an error inthe event that the balancer is unable to route arequest to the node to which it is stuck. This settingis ignored if sticky sessions are disabled.
sticky-session-remove false Remove session information on failover.
stop-context-timeout 10 The maximum time, in seconds, to wait for a contextto process pending requests, for a distributablecontext, or to destroy active sessions, for a non-distributable context.
ttl -1 Time to live, in seconds, for idle connections abovesmax. Allowed values are between -1 and 2,147,483,647.
Attribute Default Description
Red Hat JBoss Enterprise Application Platform 7.0 Configuration Guide
390
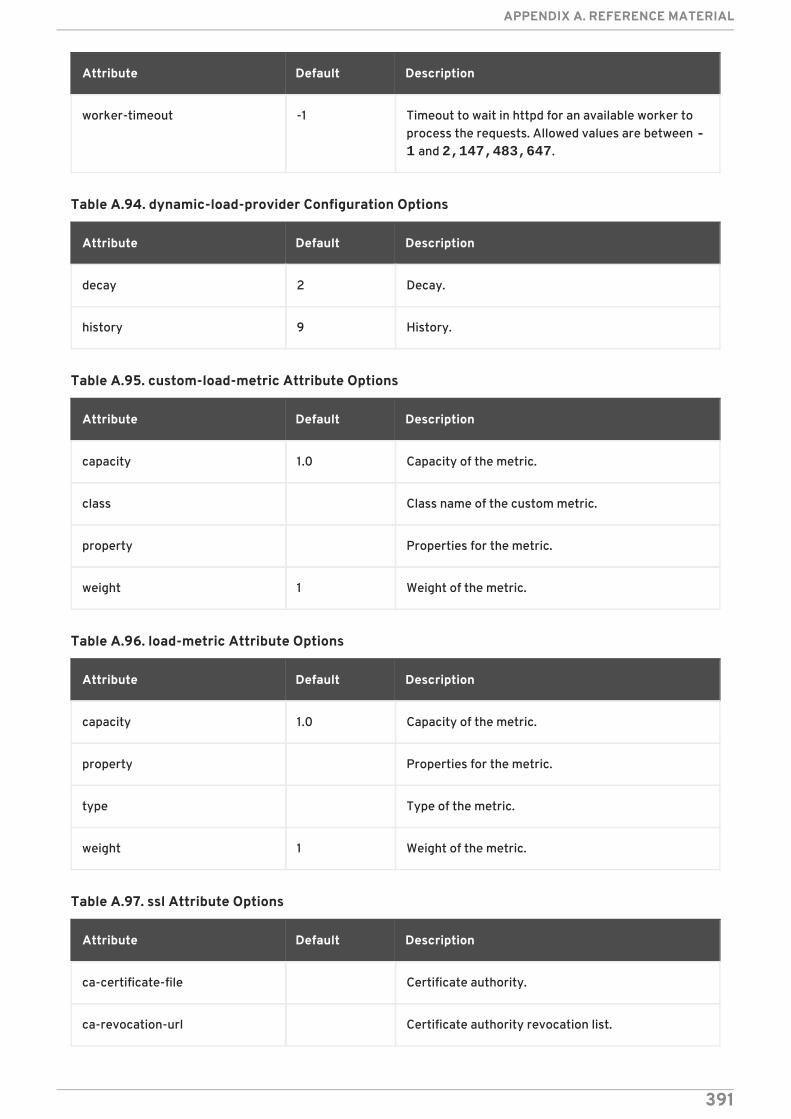
worker-timeout -1 Timeout to wait in httpd for an available worker toprocess the requests. Allowed values are between -1 and 2,147,483,647.
Attribute Default Description
Table A.94. dynamic-load-provider Configuration Options
Attribute Default Description
decay 2 Decay.
history 9 History.
Table A.95. custom-load-metric Attribute Options
Attribute Default Description
capacity 1.0 Capacity of the metric.
class Class name of the custom metric.
property Properties for the metric.
weight 1 Weight of the metric.
Table A.96. load-metric Attribute Options
Attribute Default Description
capacity 1.0 Capacity of the metric.
property Properties for the metric.
type Type of the metric.
weight 1 Weight of the metric.
Table A.97. ssl Attribute Options
Attribute Default Description
ca-certificate-file Certificate authority.
ca-revocation-url Certificate authority revocation list.
APPENDIX A. REFERENCE MATERIAL
391
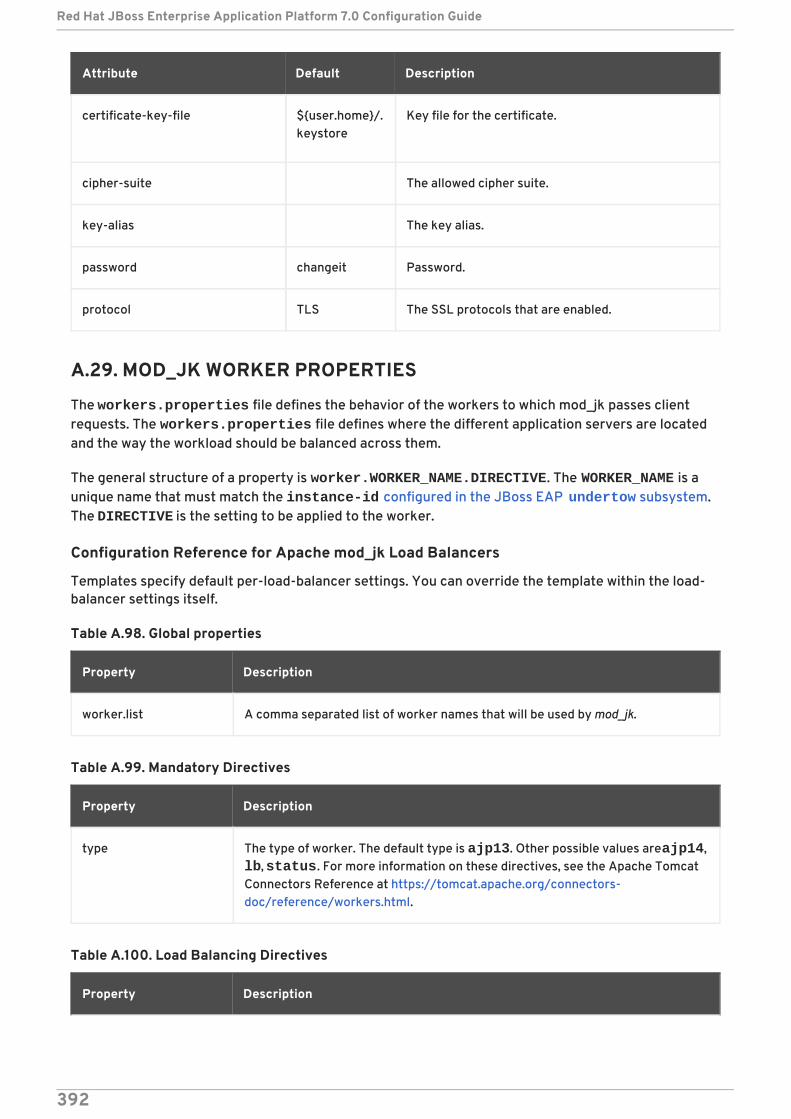
certificate-key-file ${user.home}/.keystore
Key file for the certificate.
cipher-suite The allowed cipher suite.
key-alias The key alias.
password changeit Password.
protocol TLS The SSL protocols that are enabled.
Attribute Default Description
A.29. MOD_JK WORKER PROPERTIES
The workers.properties file defines the behavior of the workers to which mod_jk passes clientrequests. The workers.properties file defines where the different application servers are locatedand the way the workload should be balanced across them.
The general structure of a property is worker.WORKER_NAME.DIRECTIVE. The WORKER_NAME is aunique name that must match the instance-id configured in the JBoss EAP undertow subsystem.The DIRECTIVE is the setting to be applied to the worker.
Configuration Reference for Apache mod_jk Load Balancers
Templates specify default per-load-balancer settings. You can override the template within the load-balancer settings itself.
Table A.98. Global properties
Property Description
worker.list A comma separated list of worker names that will be used by mod_jk.
Table A.99. Mandatory Directives
Property Description
type The type of worker. The default type is ajp13. Other possible values are ajp14,lb, status. For more information on these directives, see the Apache TomcatConnectors Reference at https://tomcat.apache.org/connectors-doc/reference/workers.html.
Table A.100. Load Balancing Directives
Property Description
Red Hat JBoss Enterprise Application Platform 7.0 Configuration Guide
392
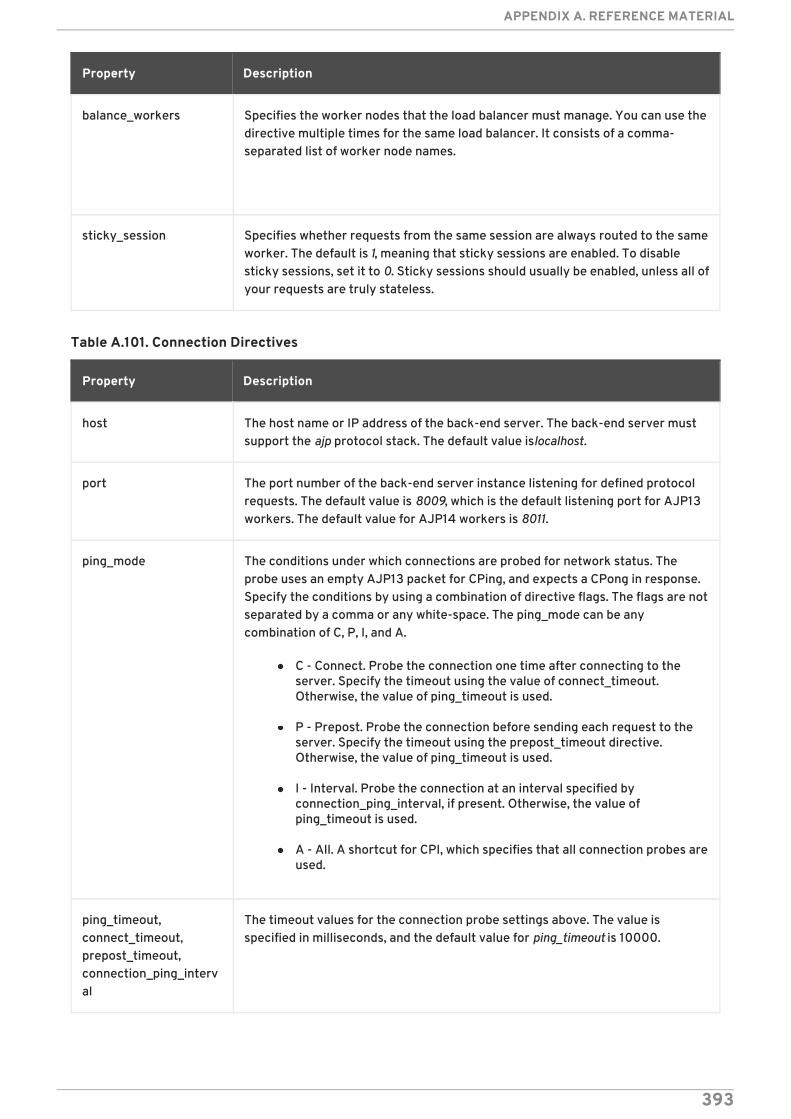
balance_workers Specifies the worker nodes that the load balancer must manage. You can use thedirective multiple times for the same load balancer. It consists of a comma-separated list of worker node names.
sticky_session Specifies whether requests from the same session are always routed to the sameworker. The default is 1, meaning that sticky sessions are enabled. To disablesticky sessions, set it to 0. Sticky sessions should usually be enabled, unless all ofyour requests are truly stateless.
Property Description
Table A.101. Connection Directives
Property Description
host The host name or IP address of the back-end server. The back-end server mustsupport the ajp protocol stack. The default value is localhost.
port The port number of the back-end server instance listening for defined protocolrequests. The default value is 8009, which is the default listening port for AJP13workers. The default value for AJP14 workers is 8011.
ping_mode The conditions under which connections are probed for network status. Theprobe uses an empty AJP13 packet for CPing, and expects a CPong in response.Specify the conditions by using a combination of directive flags. The flags are notseparated by a comma or any white-space. The ping_mode can be anycombination of C, P, I, and A.
C - Connect. Probe the connection one time after connecting to theserver. Specify the timeout using the value of connect_timeout.Otherwise, the value of ping_timeout is used.
P - Prepost. Probe the connection before sending each request to theserver. Specify the timeout using the prepost_timeout directive.Otherwise, the value of ping_timeout is used.
I - Interval. Probe the connection at an interval specified byconnection_ping_interval, if present. Otherwise, the value ofping_timeout is used.
A - All. A shortcut for CPI, which specifies that all connection probes areused.
ping_timeout,connect_timeout,prepost_timeout,connection_ping_interval
The timeout values for the connection probe settings above. The value isspecified in milliseconds, and the default value for ping_timeout is 10000.
APPENDIX A. REFERENCE MATERIAL
393
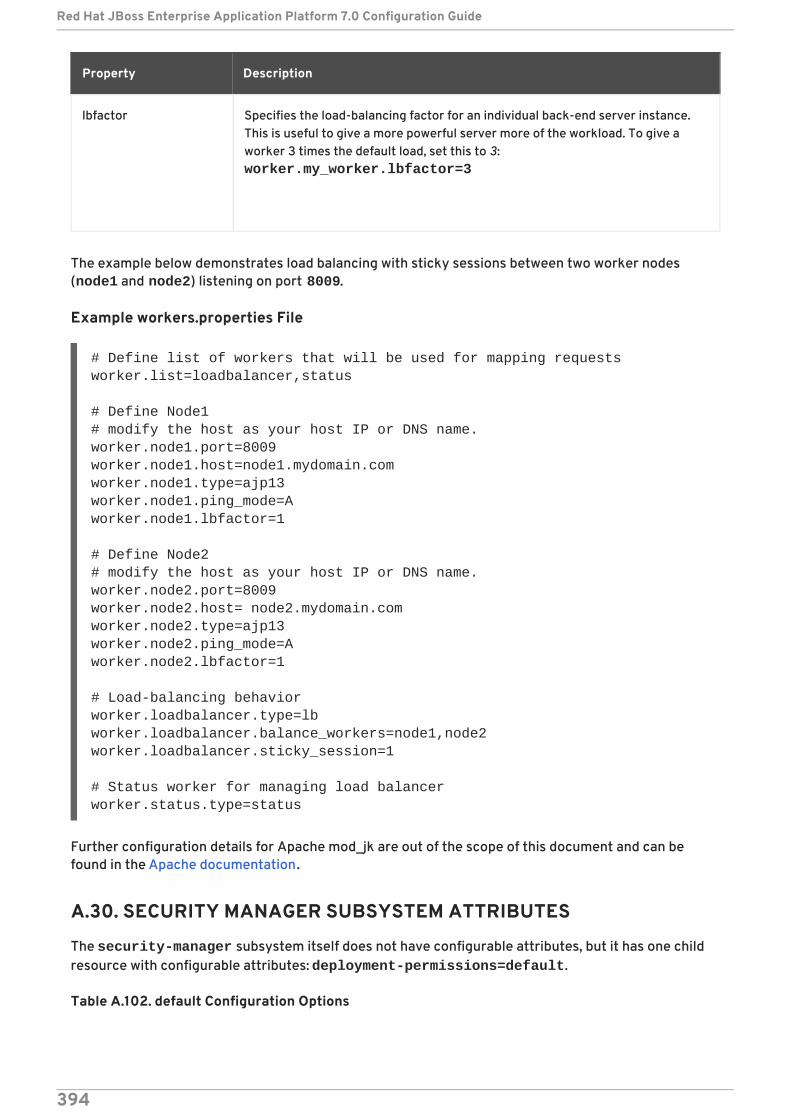
lbfactor Specifies the load-balancing factor for an individual back-end server instance.This is useful to give a more powerful server more of the workload. To give aworker 3 times the default load, set this to 3: worker.my_worker.lbfactor=3
Property Description
The example below demonstrates load balancing with sticky sessions between two worker nodes(node1 and node2) listening on port 8009.
Example workers.properties File
# Define list of workers that will be used for mapping requestsworker.list=loadbalancer,status
# Define Node1# modify the host as your host IP or DNS name.worker.node1.port=8009worker.node1.host=node1.mydomain.comworker.node1.type=ajp13worker.node1.ping_mode=Aworker.node1.lbfactor=1
# Define Node2# modify the host as your host IP or DNS name.worker.node2.port=8009worker.node2.host= node2.mydomain.comworker.node2.type=ajp13worker.node2.ping_mode=Aworker.node2.lbfactor=1
# Load-balancing behaviorworker.loadbalancer.type=lbworker.loadbalancer.balance_workers=node1,node2worker.loadbalancer.sticky_session=1
# Status worker for managing load balancerworker.status.type=status
Further configuration details for Apache mod_jk are out of the scope of this document and can befound in the Apache documentation.
A.30. SECURITY MANAGER SUBSYSTEM ATTRIBUTES
The security-manager subsystem itself does not have configurable attributes, but it has one childresource with configurable attributes: deployment-permissions=default.
Table A.102. default Configuration Options
Red Hat JBoss Enterprise Application Platform 7.0 Configuration Guide
394
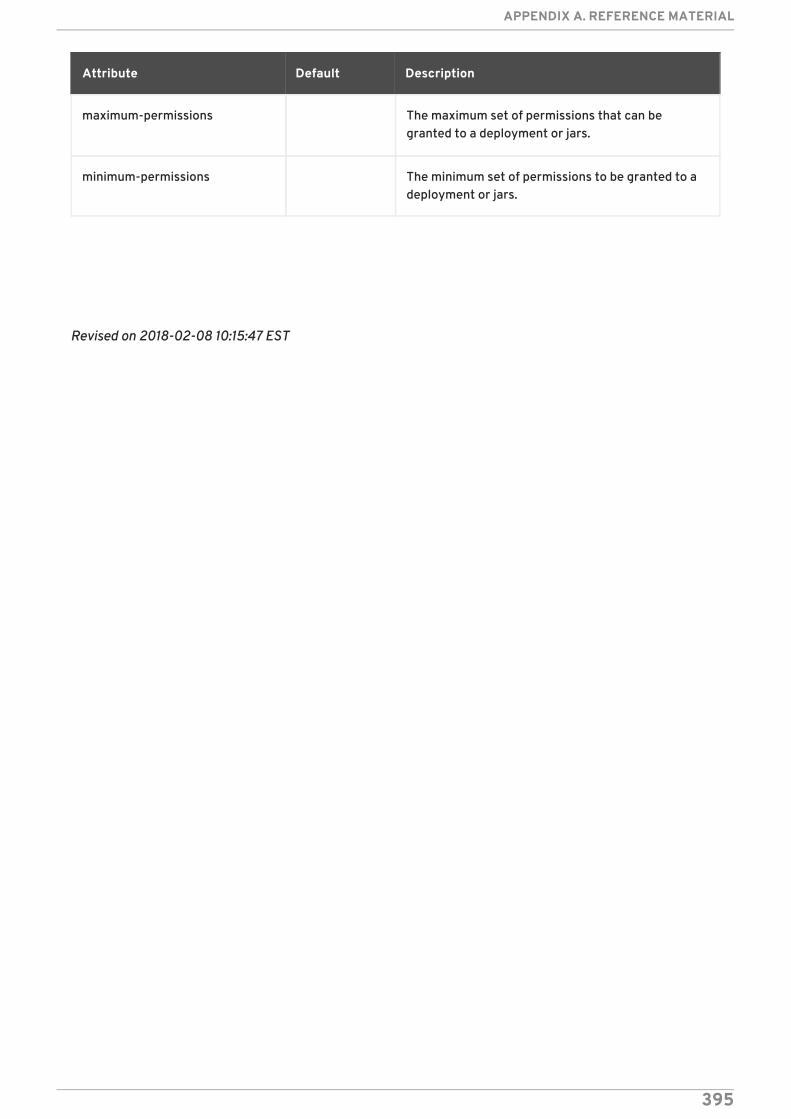
Attribute Default Description
maximum-permissions The maximum set of permissions that can begranted to a deployment or jars.
minimum-permissions The minimum set of permissions to be granted to adeployment or jars.
Revised on 2018-02-08 10:15:47 EST
APPENDIX A. REFERENCE MATERIAL
395