Embed Size (px)
Citation preview

Red Hat Gluster Storage 3.2
Deployment Guide for Public Cloud
Deploying Red Hat Gluster Storage on Public Cloud
Last Updated: 2017-09-21

Red Hat Gluster Storage 3.2 Deployment Guide for Public Cloud
Deploying Red Hat Gluster Storage on Public Cloud
Divya MuntimaduguRed Hat Customer Content [email protected]
Legal Notice
Copyright © 2017 Red Hat, Inc.
This document is licensed by Red Hat under the Creative Commons Attribution-ShareAlike 3.0Unported License. If you distribute this document, or a modified version of it, you must provideattribution to Red Hat, Inc. and provide a link to the original. If the document is modified, all RedHat trademarks must be removed.
Red Hat, as the licensor of this document, waives the right to enforce, and agrees not to assert,Section 4d of CC-BY-SA to the fullest extent permitted by applicable law.
Red Hat, Red Hat Enterprise Linux, the Shadowman logo, JBoss, OpenShift, Fedora, the Infinitylogo, and RHCE are trademarks of Red Hat, Inc., registered in the United States and othercountries.
Linux ® is the registered trademark of Linus Torvalds in the United States and other countries.
Java ® is a registered trademark of Oracle and/or its affiliates.
XFS ® is a trademark of Silicon Graphics International Corp. or its subsidiaries in the UnitedStates and/or other countries.
MySQL ® is a registered trademark of MySQL AB in the United States, the European Union andother countries.
Node.js ® is an official trademark of Joyent. Red Hat Software Collections is not formally relatedto or endorsed by the official Joyent Node.js open source or commercial project.
The OpenStack ® Word Mark and OpenStack logo are either registered trademarks/service marksor trademarks/service marks of the OpenStack Foundation, in the United States and othercountries and are used with the OpenStack Foundation's permission. We are not affiliated with,endorsed or sponsored by the OpenStack Foundation, or the OpenStack community.
All other trademarks are the property of their respective owners.
Abstract
This guide provides instructions on how to deploy Red Hat Gluster Storage on a Public Cloud.
. . . . . . . . . . . . . . . . . . . . . . . . . . . . . . . . . . . . . . . . . . . . . . . . . . . . . . . . . . . . . . . . . . . . . . . . . . . . . . . . . . . . . . . . . . . . . . . . . . . . . . . . . . . . . . . . . . . . . . . . . . . . . . . . . . . . . . . . . . . . . . . . . . . . . . . . . . . . . . . . . . . . . . . . . . . . . . . . . . . . . . . . . . . . . . . . . . . . . . . . . . . . . . . . . . . . . . . . . . . . . . . . . . . . . . . . . . . . . . . . . . . . . . . . . . . . . . . . . . . . . . . . . . . . . . . . . . . . . . . .
. . . . . . . . . . . . . . . . . . . . . . . . . . . . . . . . . . . . . . . . . . . . . . . . . . . . . . . . . . . . . . . . . . . . . . . . . . . . . . . . . . . . . . . . . . . . . . . . . . . . . . . . . . . . . . . . . . . . . . . . . . . . . . . . . . . . . . . . . . . . . . . . . . . . . . . . . . . . . . . . . . . . . . . . . . . . . . . . . . . . . . . . . . . . . . . . . . . . . . . . . . . . . . . . . . . . . . . . . . . . . . . . . . . . . . . . . . . . . . . . . . . . . . . . . . . . . . . . . . . . . . . . . . . . . . . . . . . . . . . .
. . . . . . . . . . . . . . . . . . . . . . . . . . . . . . . . . . . . . . . . . . . . . . . . . . . . . . . . . . . . . . . . . . . . . . . . . . . . . . . . . . . . . . . . . . . . . . . . . . . . . . . . . . . . . . . . . . . . . . . . . . . . . . . . . . . . . . . . . . . . . . . . . . . . . . . . . . . . . . . . . . . . . . . . . . . . . . . . . . . . . . . . . . . . . . . . . . . . . . . . . . . . . . . . . . . . . . . . . . . . . . . . . . . . . . . . . . . . . . . . . . . . . . . . . . . . . . . . . . . . . . . . . . . . . . . . . . . . . . . .
. . . . . . . . . . . . . . . . . . . . . . . . . . . . . . . . . . . . . . . . . . . . . . . . . . . . . . . . . . . . . . . . . . . . . . . . . . . . . . . . . . . . . . . . . . . . . . . . . . . . . . . . . . . . . . . . . . . . . . . . . . . . . . . . . . . . . . . . . . . . . . . . . . . . . . . . . . . . . . . . . . . . . . . . . . . . . . . . . . . . . . . . . . . . . . . . . . . . . . . . . . . . . . . . . . . . . . . . . . . . . . . . . . . . . . . . . . . . . . . . . . . . . . . . . . . . . . . . . . . . . . . . . . . . . . . . . . . . . . . .
. . . . . . . . . . . . . . . . . . . . . . . . . . . . . . . . . . . . . . . . . . . . . . . . . . . . . . . . . . . . . . . . . . . . . . . . . . . . . . . . . . . . . . . . . . . . . . . . . . . . . . . . . . . . . . . . . . . . . . . . . . . . . . . . . . . . . . . . . . . . . . . . . . . . . . . . . . . . . . . . . . . . . . . . . . . . . . . . . . . . . . . . . . . . . . . . . . . . . . . . . . . . . . . . . . . . . . . . . . . . . . . . . . . . . . . . . . . . . . . . . . . . . . . . . . . . . . . . . . . . . . . . . . . . . . . . . . . . . . . .
Table of Contents
CHAPTER 1. RED HAT STORAGE ON PUBLIC CLOUD1.1. ABOUT GLUSTERFS
CHAPTER 2. ACCESSING RED HAT GLUSTER STORAGE USING AMAZON WEB SERVICES2.1. LAUNCHING RED HAT GLUSTER STORAGE INSTANCES2.2. VERIFYING THAT RED HAT GLUSTER STORAGE INSTANCE IS RUNNING2.3. PROVISIONING STORAGE2.4. STOPPING AND RESTARTING RED HAT GLUSTER STORAGE INSTANCE
CHAPTER 3. ACCESSING RED HAT GLUSTER STORAGE USING MICROSOFT AZURE3.1. IMAGE PROFILE AND SIZING3.2. PREREQUISITES3.3. PLANNING GUIDELINES3.4. SETTING UP RED HAT GLUSTER STORAGE IN MICROSOFT AZURE IN ARM MODE3.5. CONFIGURE THE GLUSTER STORAGE CLUSTER3.6. APPENDIX - SETTING UP RED HAT GLUSTER STORAGE IN MICROSOFT AZURE IN ASM MODE3.7. APPENDIX - CREATING A CUSTOM DISK IMAGE FROM ISO3.8. APPENDIX - PERFORMANCE CATEGORIZATION
CHAPTER 4. USING RED HAT GLUSTER STORAGE IN THE GOOGLE CLOUD PLATFORM4.1. PLANNING YOUR DEPLOYMENT4.2. SETTING UP GOOGLE COMPUTE ENGINE4.3. CONVERTING QCOW2 TO .RAW FORMAT4.4. PACKAGING THE IMAGE FOR GOOGLE COMPUTE ENGINE4.5. UPLOADING THE IMAGE INTO GOOGLE CLOUD STORAGE4.6. IMPORTING THE IMAGE INTO GOOGLE COMPUTE ENGINE4.7. CREATING A VM INSTANCE TO CONFIGURE THE DISKS FOR RED HAT GLUSTER STORAGE INSTANCES
4.8. CREATING THE INITIAL DATA DISK4.9. ATTACHING AND CONFIGURING THE DATA DISK4.10. DETACHING THE DISKS FOR THE IMAGE CREATION PROCESS4.11. CREATING MULTIPLE RED HAT GLUSTER STORAGE INSTANCES USING IMAGES4.12. USING GOOGLE CLOUD DEPLOYMENT MANAGER TO DEPLOY MULTIPLE INSTANCES4.13. CONFIGURING RED HAT GLUSTER STORAGE4.14. SETTING UP CLIENTS TO ACCESS DATA4.15. APPENDIX - BUILDING RED HAT GLUSTER STORAGE COMPUTE ENGINE IMAGE FROM SCRATCH4.16. APPENDIX: CONFIGURATION FILES FOR RED HAT GLUSTER STORAGE DEPLOYMENT
APPENDIX A. REVISION HISTORY
33
45911
14
151617171827283336
39404546464747
47484951525454616163
70
Table of Contents
1

Deployment Guide for Public Cloud
2
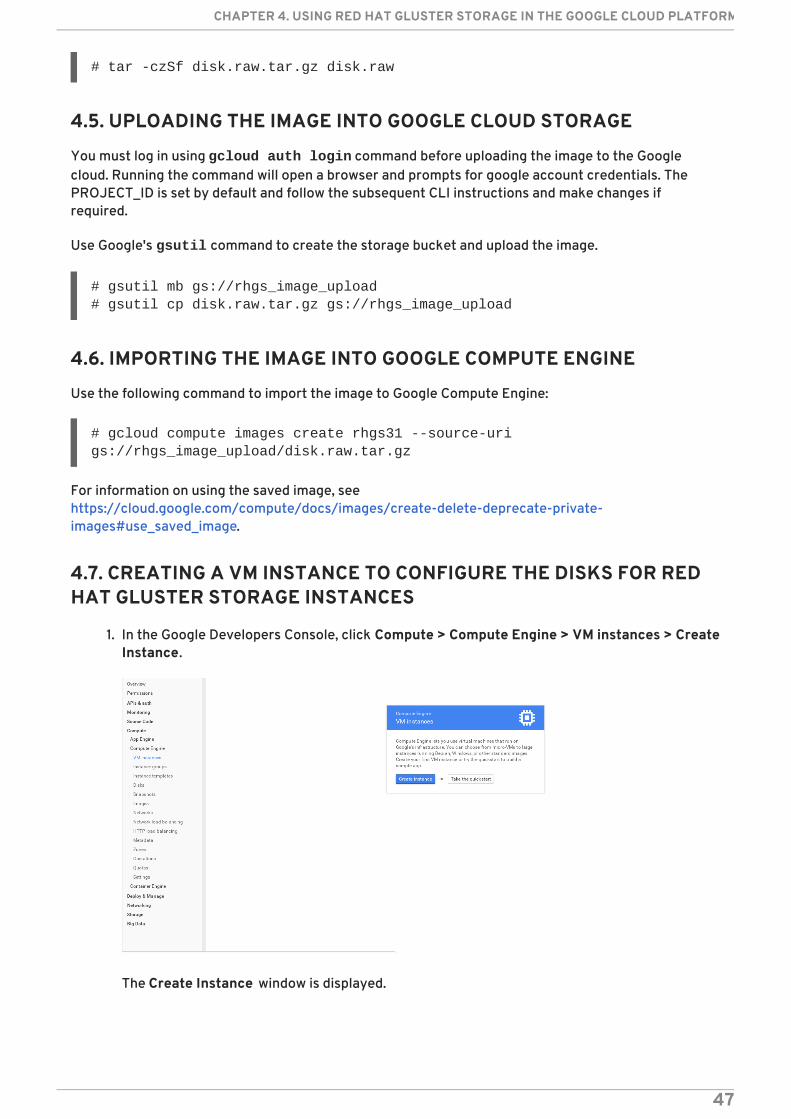
CHAPTER 1. RED HAT STORAGE ON PUBLIC CLOUDRed Hat Gluster Storage for Public Cloud packages glusterFS for deploying scalable NAS in the publiccloud. This powerful storage server provides all the features of On-Premise deployment, within a highlyavailable, scalable, virtualized, and centrally managed pool of NAS storage hosted off-premise.
Additionally, Red Hat Gluster Storage can be deployed in the public cloud using Red Hat GlusterStorage for Public Cloud, for example, within the Amazon Web Services (AWS) cloud. It delivers all thefeatures and functionality possible in a private cloud or datacenter to the public cloud by providingmassively scalable and high available NAS in the cloud.
The POSIX compatible glusterFS servers, which use XFS file system format to store data on disks, canbe accessed using industry-standard access protocols including Network File System (NFS) and ServerMessage Block (SMB) (also known as CIFS).
1.1. ABOUT GLUSTERFS
glusterFS aggregates various storage servers over network interconnects into one large parallelnetwork file system. Based on a stackable user space design, it delivers exceptional performance fordiverse workloads and is a key building block of Red Hat Gluster Storage.
CHAPTER 1. RED HAT STORAGE ON PUBLIC CLOUD
3
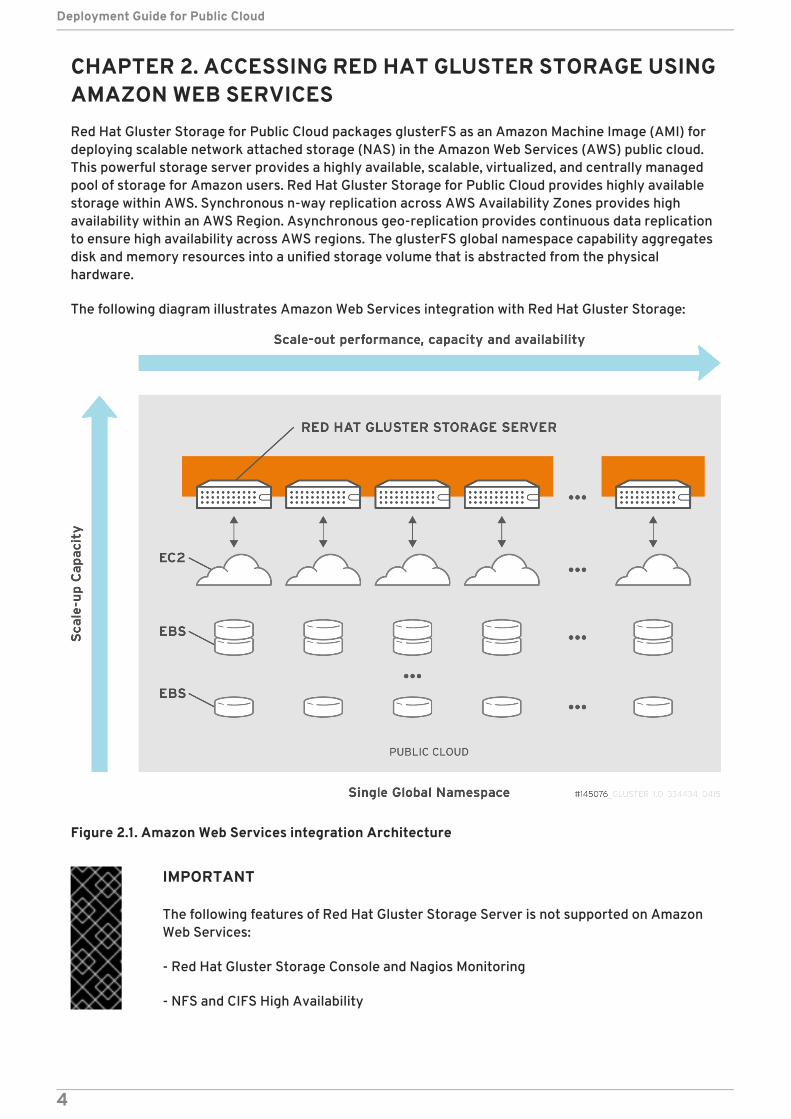
CHAPTER 2. ACCESSING RED HAT GLUSTER STORAGE USINGAMAZON WEB SERVICESRed Hat Gluster Storage for Public Cloud packages glusterFS as an Amazon Machine Image (AMI) fordeploying scalable network attached storage (NAS) in the Amazon Web Services (AWS) public cloud.This powerful storage server provides a highly available, scalable, virtualized, and centrally managedpool of storage for Amazon users. Red Hat Gluster Storage for Public Cloud provides highly availablestorage within AWS. Synchronous n-way replication across AWS Availability Zones provides highavailability within an AWS Region. Asynchronous geo-replication provides continuous data replicationto ensure high availability across AWS regions. The glusterFS global namespace capability aggregatesdisk and memory resources into a unified storage volume that is abstracted from the physicalhardware.
The following diagram illustrates Amazon Web Services integration with Red Hat Gluster Storage:
Figure 2.1. Amazon Web Services integration Architecture
IMPORTANT
The following features of Red Hat Gluster Storage Server is not supported on AmazonWeb Services:
- Red Hat Gluster Storage Console and Nagios Monitoring
- NFS and CIFS High Availability
Deployment Guide for Public Cloud
4
NOTE
For information on obtaining access to AMI, seehttps://access.redhat.com/knowledge/articles/145693.
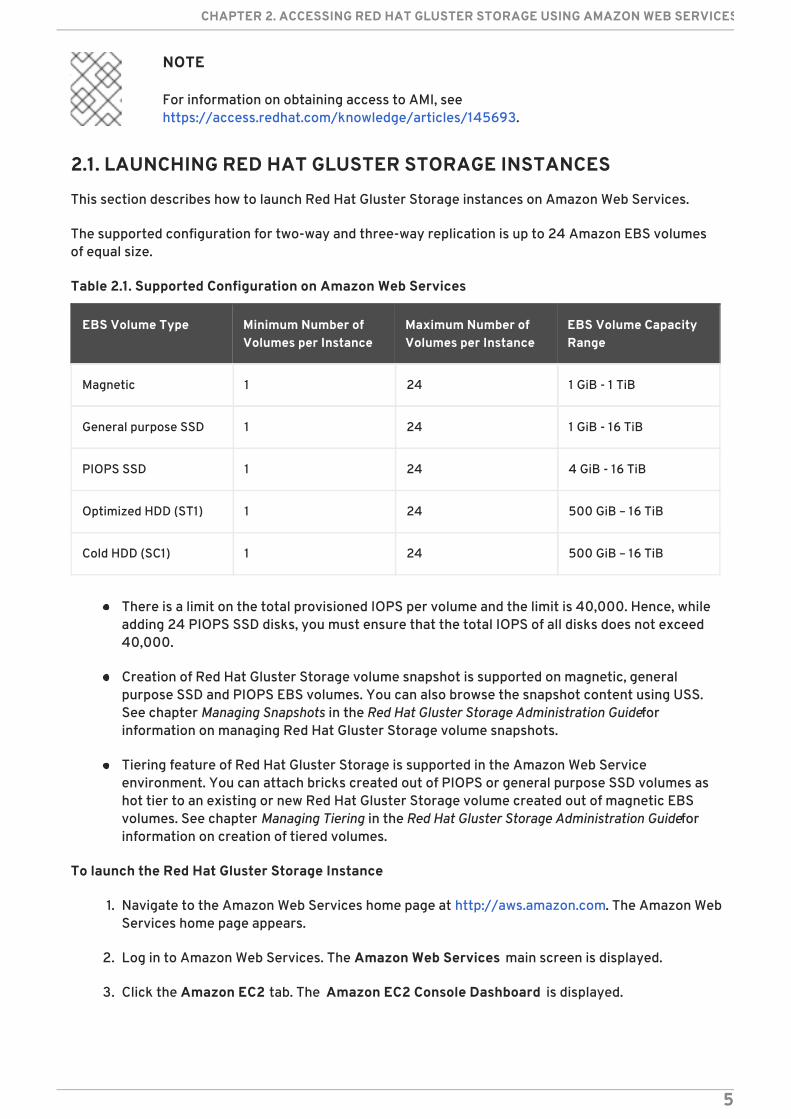
2.1. LAUNCHING RED HAT GLUSTER STORAGE INSTANCES
This section describes how to launch Red Hat Gluster Storage instances on Amazon Web Services.
The supported configuration for two-way and three-way replication is up to 24 Amazon EBS volumesof equal size.
Table 2.1. Supported Configuration on Amazon Web Services
EBS Volume Type Minimum Number ofVolumes per Instance
Maximum Number ofVolumes per Instance
EBS Volume CapacityRange
Magnetic 1 24 1 GiB - 1 TiB
General purpose SSD 1 24 1 GiB - 16 TiB
PIOPS SSD 1 24 4 GiB - 16 TiB
Optimized HDD (ST1) 1 24 500 GiB – 16 TiB
Cold HDD (SC1) 1 24 500 GiB – 16 TiB
There is a limit on the total provisioned IOPS per volume and the limit is 40,000. Hence, whileadding 24 PIOPS SSD disks, you must ensure that the total IOPS of all disks does not exceed40,000.
Creation of Red Hat Gluster Storage volume snapshot is supported on magnetic, generalpurpose SSD and PIOPS EBS volumes. You can also browse the snapshot content using USS.See chapter Managing Snapshots in the Red Hat Gluster Storage Administration Guide forinformation on managing Red Hat Gluster Storage volume snapshots.
Tiering feature of Red Hat Gluster Storage is supported in the Amazon Web Serviceenvironment. You can attach bricks created out of PIOPS or general purpose SSD volumes ashot tier to an existing or new Red Hat Gluster Storage volume created out of magnetic EBSvolumes. See chapter Managing Tiering in the Red Hat Gluster Storage Administration Guide forinformation on creation of tiered volumes.
To launch the Red Hat Gluster Storage Instance
1. Navigate to the Amazon Web Services home page at http://aws.amazon.com. The Amazon WebServices home page appears.
2. Log in to Amazon Web Services. The Amazon Web Services main screen is displayed.
3. Click the Amazon EC2 tab. The Amazon EC2 Console Dashboard is displayed.
CHAPTER 2. ACCESSING RED HAT GLUSTER STORAGE USING AMAZON WEB SERVICES
5
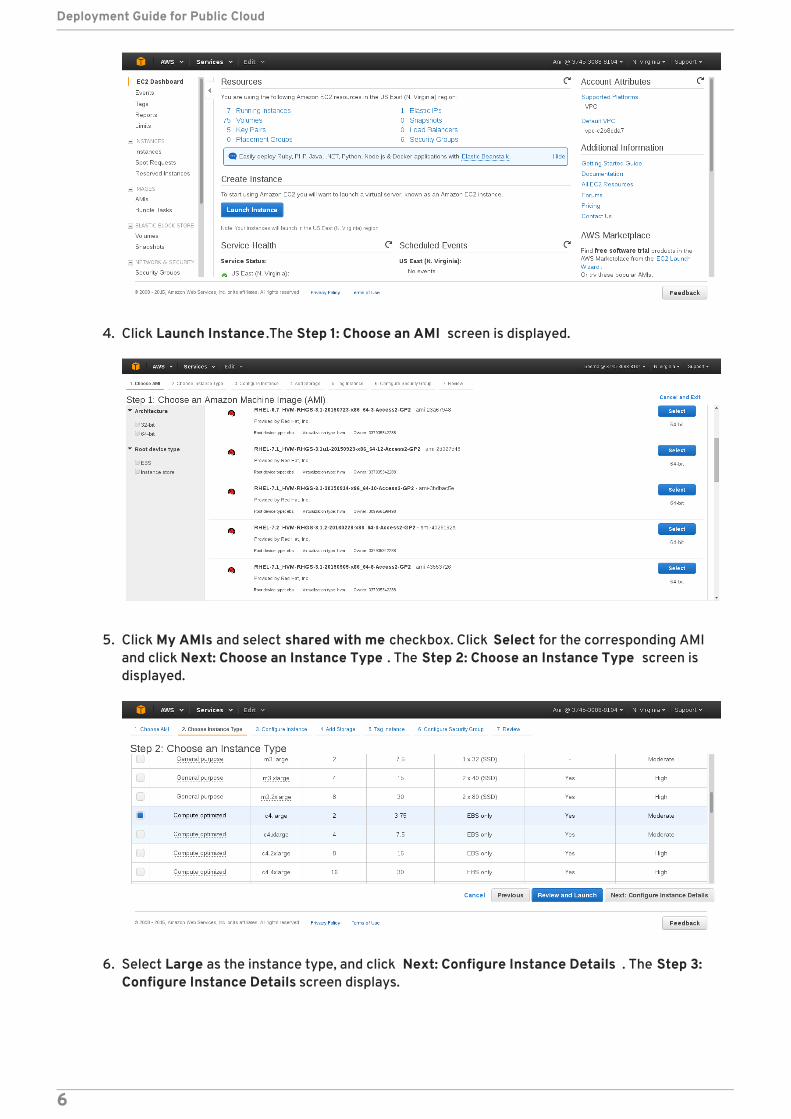
4. Click Launch Instance .The Step 1: Choose an AMI screen is displayed.
5. Click My AMIs and select shared with me checkbox. Click Select for the corresponding AMIand click Next: Choose an Instance Type . The Step 2: Choose an Instance Type screen isdisplayed.
6. Select Large as the instance type, and click Next: Configure Instance Details . The Step 3:Configure Instance Details screen displays.
Deployment Guide for Public Cloud
6
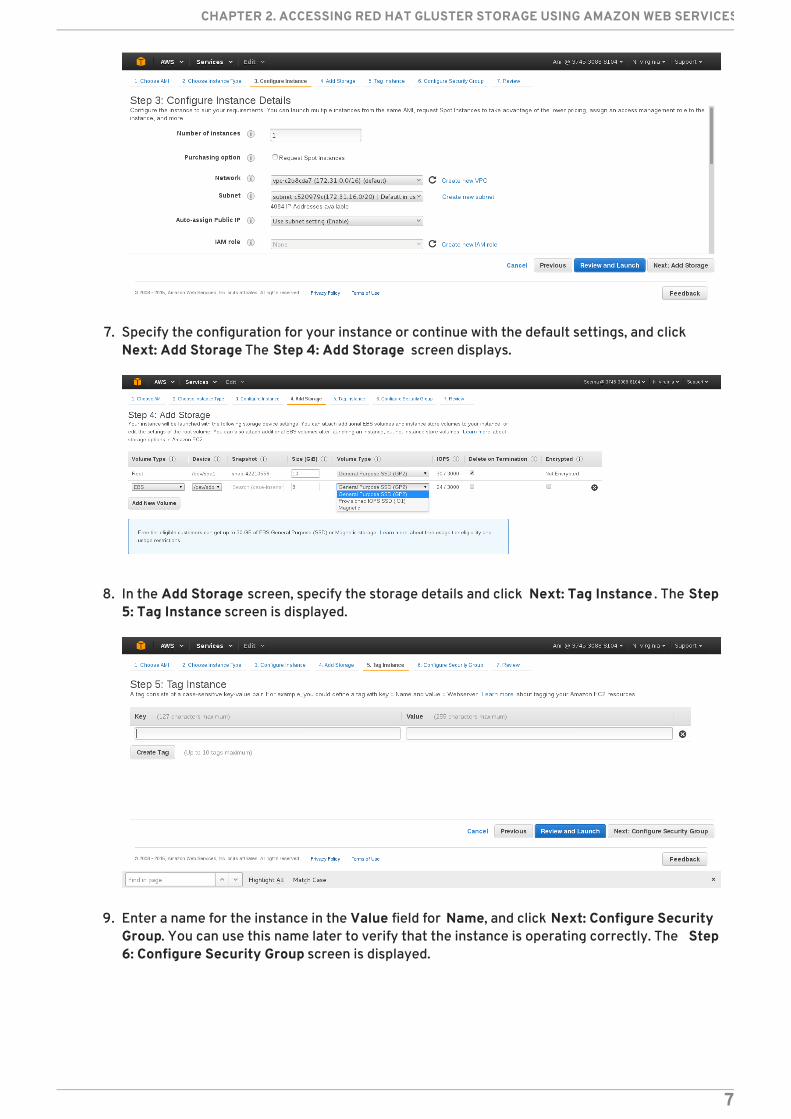
7. Specify the configuration for your instance or continue with the default settings, and clickNext: Add Storage The Step 4: Add Storage screen displays.
8. In the Add Storage screen, specify the storage details and click Next: Tag Instance . The Step5: Tag Instance screen is displayed.
9. Enter a name for the instance in the Value field for Name, and click Next: Configure SecurityGroup. You can use this name later to verify that the instance is operating correctly. The Step6: Configure Security Group screen is displayed.
CHAPTER 2. ACCESSING RED HAT GLUSTER STORAGE USING AMAZON WEB SERVICES
7
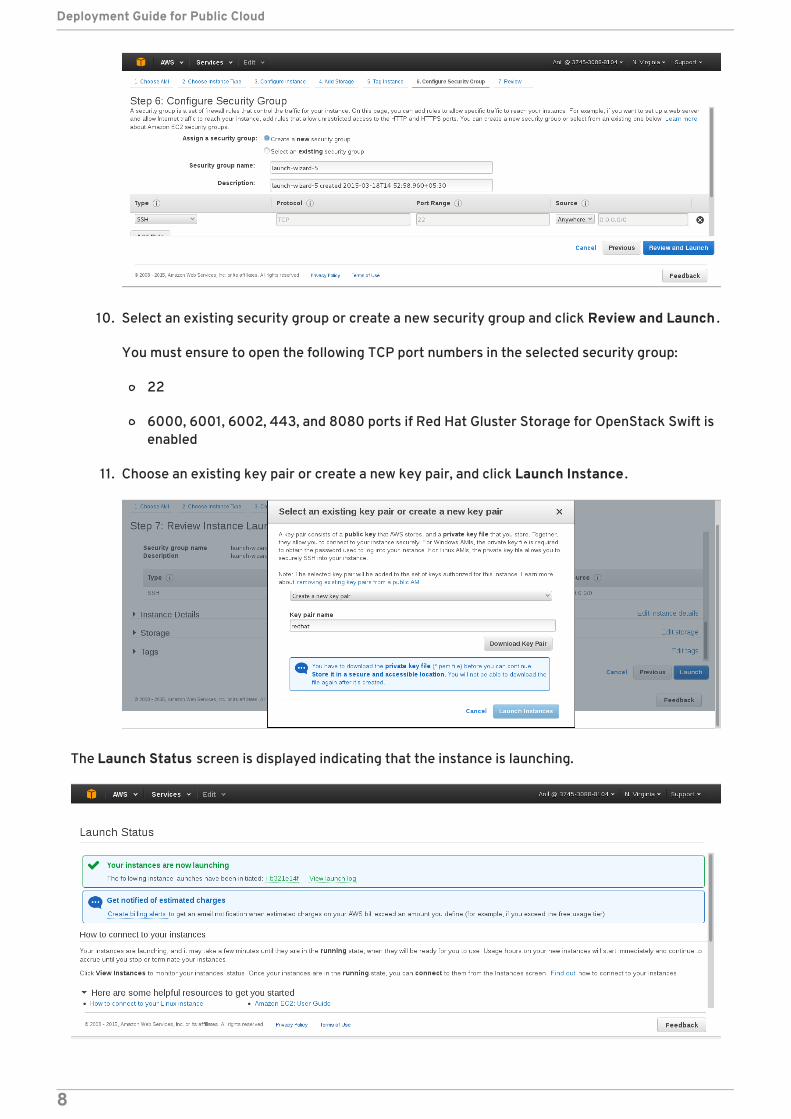
10. Select an existing security group or create a new security group and click Review and Launch .
You must ensure to open the following TCP port numbers in the selected security group:
22
6000, 6001, 6002, 443, and 8080 ports if Red Hat Gluster Storage for OpenStack Swift isenabled
11. Choose an existing key pair or create a new key pair, and click Launch Instance .
The Launch Status screen is displayed indicating that the instance is launching.
Deployment Guide for Public Cloud
8
2.2. VERIFYING THAT RED HAT GLUSTER STORAGE INSTANCE ISRUNNING
You can verify that Red Hat Gluster Storage instance is running by performing a remote login to theRed Hat Gluster Storage instance and issuing a command.
To verify that Red Hat Gluster Storage instance is running
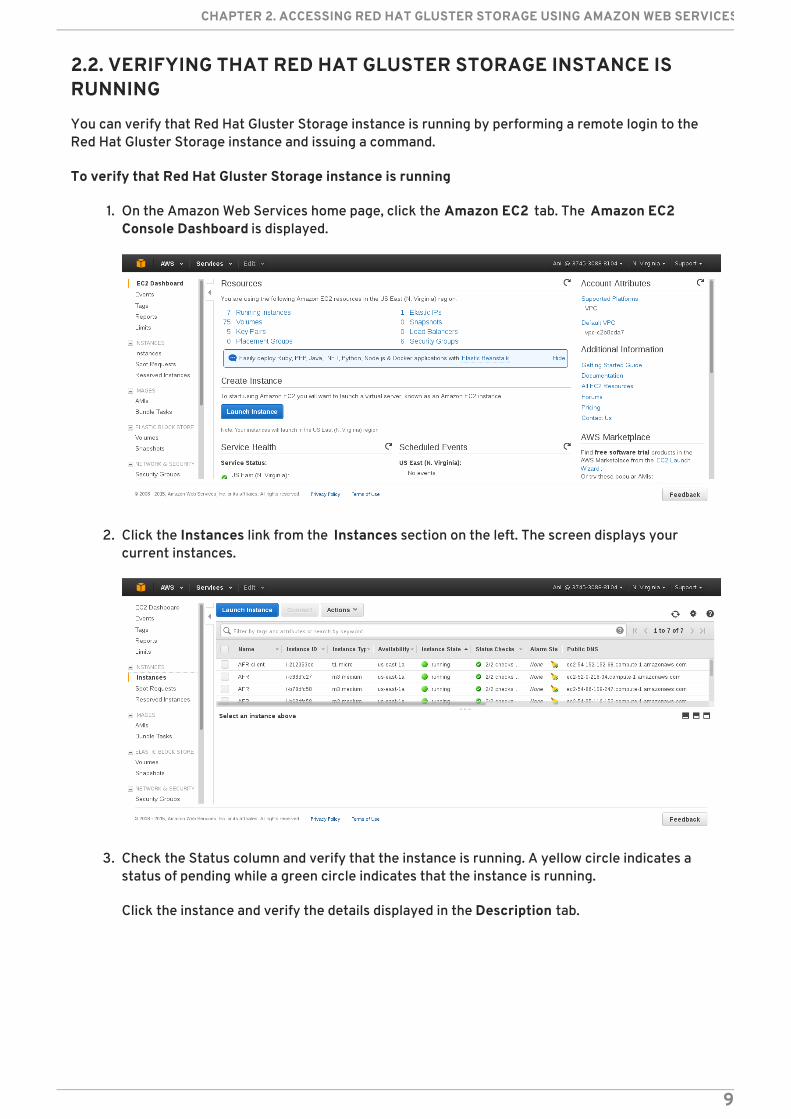
1. On the Amazon Web Services home page, click the Amazon EC2 tab. The Amazon EC2Console Dashboard is displayed.
2. Click the Instances link from the Instances section on the left. The screen displays yourcurrent instances.
3. Check the Status column and verify that the instance is running. A yellow circle indicates astatus of pending while a green circle indicates that the instance is running.
Click the instance and verify the details displayed in the Description tab.
CHAPTER 2. ACCESSING RED HAT GLUSTER STORAGE USING AMAZON WEB SERVICES
9
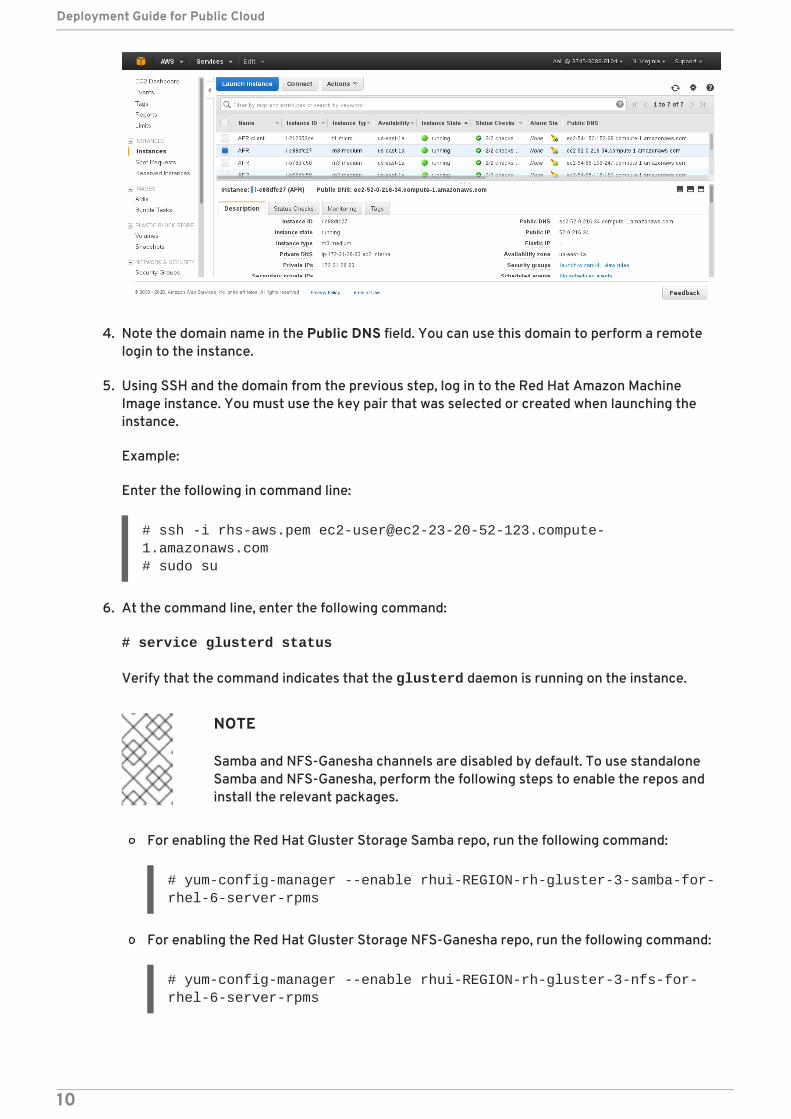
4. Note the domain name in the Public DNS field. You can use this domain to perform a remotelogin to the instance.
5. Using SSH and the domain from the previous step, log in to the Red Hat Amazon MachineImage instance. You must use the key pair that was selected or created when launching theinstance.
Example:
Enter the following in command line:
# ssh -i rhs-aws.pem [email protected]# sudo su
6. At the command line, enter the following command:
# service glusterd status
Verify that the command indicates that the glusterd daemon is running on the instance.
NOTE
Samba and NFS-Ganesha channels are disabled by default. To use standaloneSamba and NFS-Ganesha, perform the following steps to enable the repos andinstall the relevant packages.
For enabling the Red Hat Gluster Storage Samba repo, run the following command:
# yum-config-manager --enable rhui-REGION-rh-gluster-3-samba-for-rhel-6-server-rpms
For enabling the Red Hat Gluster Storage NFS-Ganesha repo, run the following command:
# yum-config-manager --enable rhui-REGION-rh-gluster-3-nfs-for-rhel-6-server-rpms
Deployment Guide for Public Cloud
10
IMPORTANT
Before using yum update to update the Amazon EC2 Red Hat Gluster Storage AMI,follow the steps listed in https://access.redhat.com/solutions/1556793 Knowledgebasearticle.
2.3. PROVISIONING STORAGE
Amazon Elastic Block Storage (EBS) is designed specifically for use with Amazon EC2 instances.Amazon EBS provides storage that behaves like a raw, unformatted, external block device. This sectionprovides step-by-step instructions to provision storage for arbitrated replicated volumes, three-wayreplicated volumes, and two-way replicated volumes.
IMPORTANT
The supported configuration for a Red Hat Gluster Storage EC2 instance is up to24 Amazon EBS volumes.
If you are provisioning storage for three-way replicated volumes or arbitratedvolumes, you must ensure to create each replica set of a volume in threedifferent zones. With this configuration, there will be no impact on the dataavailability even if two availability zones have hit an outage. Client-side quorumis enabled by default and hence unavailability of two zones would make theaccess read-only.
External snapshots, such as snapshots of a virtual machine/instance, where RedHat Gluster Storage Server is installed as a guest OS or FC/iSCSI SANsnapshots are not supported.
1. Log in to Amazon Web Services at http://aws.amazon.com and select the Amazon EC2 tab.
2. Create a physical volume (PV) by using the pvcreate command.
# pvcreate device
For example:
# pvcreate /dev/xvddPhysical volume "/dev/xvdd" successfully created.
NOTE
Here, /dev/xvdd is a storage device. This command has to be executed onall the disks if there are multiple volumes. For example:
# pvcreate /dev/xvdd /dev/xvde /dev/xvdf…
The device name and the alignment value will vary based on the device youare using.
3. Create a Volume Group (VG) from the PV using the vgcreate command:
CHAPTER 2. ACCESSING RED HAT GLUSTER STORAGE USING AMAZON WEB SERVICES
11
# vgcreate volume_group device
For example:
# vgcreate rhs_vg /dev/xvddVolume group "rhs_vg" successfully created
NOTE
Here, /dev/xvdd is a storage device. If you have multiple devices, createmultiple VGs.
IMPORTANT
Starting with Red Hat Gluster Storage 3.3, Red Hat does not recommend theaggregation of multiple EBS volumes when they are consumed by a Red HatGluster Storage instance. Follow the steps provided in this chapter to configureRed Hat Gluster Storage in an AWS environment.
4. Create a thin pool of the maximum possible size or the pool size of 0.5% of the EBS volumesize:
# lvcreate --thinpool VOLGROUP/POOLNAME -l 100%FREE --chunksize chunk_size --poolmetadatasize metadata_pool_size --zero n
The maximum possible size for a metadata LV is 16 GiB. Red Hat Gluster Storage recommendscreating the metadata device of the maximum supported size. You can allocate less than themaximum if space is a concern, but in this case you should allocate a minimum of 0.5% of thepool size.
Example 1
To create a thin pool with the maximum possible metadata device size of the maximumpossible size for your device:
# lvcreate --thinpool rhs_vg/rhs_pool -l 100%FREE --chunksize 256K --poolmetadatasize 16g --zero nUsing default stripesize 64.00 KiB.Logical volume "rhs_pool" created.
Example 2
To create 0.5% pool metadata size of the EBS volume of size of 20 GiB.
# lvcreate --thinpool rhs_vg1/rhs_pool1 -l 100%FREE --chunksize 256K --poolmetadatasize 0.1g --zero nUsing default stripesize 64.00 KiB.Rounding up size to full physical extent 104.00 MiB
5. Execute lvs command to get the maximum available device space in the EBS volume. You canuse the Lsize size listed in this command while creating logical volume. This is to ensure thatthe entire EBS volume is used and no space is wasted.
Deployment Guide for Public Cloud
12
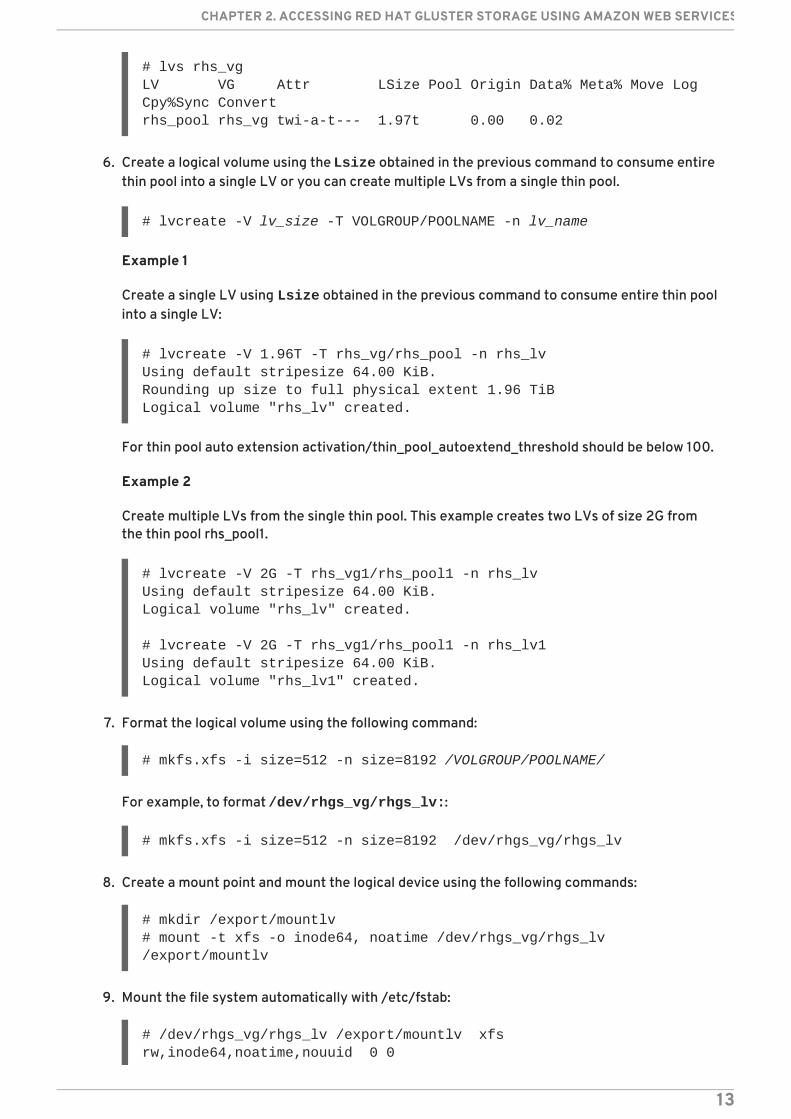
# lvs rhs_vgLV VG Attr LSize Pool Origin Data% Meta% Move Log Cpy%Sync Convertrhs_pool rhs_vg twi-a-t--- 1.97t 0.00 0.02
6. Create a logical volume using the Lsize obtained in the previous command to consume entirethin pool into a single LV or you can create multiple LVs from a single thin pool.
# lvcreate -V lv_size -T VOLGROUP/POOLNAME -n lv_name
Example 1
Create a single LV using Lsize obtained in the previous command to consume entire thin poolinto a single LV:
# lvcreate -V 1.96T -T rhs_vg/rhs_pool -n rhs_lvUsing default stripesize 64.00 KiB.Rounding up size to full physical extent 1.96 TiBLogical volume "rhs_lv" created.
For thin pool auto extension activation/thin_pool_autoextend_threshold should be below 100.
Example 2
Create multiple LVs from the single thin pool. This example creates two LVs of size 2G fromthe thin pool rhs_pool1.
# lvcreate -V 2G -T rhs_vg1/rhs_pool1 -n rhs_lvUsing default stripesize 64.00 KiB.Logical volume "rhs_lv" created.
# lvcreate -V 2G -T rhs_vg1/rhs_pool1 -n rhs_lv1Using default stripesize 64.00 KiB.Logical volume "rhs_lv1" created.
7. Format the logical volume using the following command:
# mkfs.xfs -i size=512 -n size=8192 /VOLGROUP/POOLNAME/
For example, to format /dev/rhgs_vg/rhgs_lv::
# mkfs.xfs -i size=512 -n size=8192 /dev/rhgs_vg/rhgs_lv
8. Create a mount point and mount the logical device using the following commands:
# mkdir /export/mountlv# mount -t xfs -o inode64, noatime /dev/rhgs_vg/rhgs_lv /export/mountlv
9. Mount the file system automatically with /etc/fstab:
# /dev/rhgs_vg/rhgs_lv /export/mountlv xfs rw,inode64,noatime,nouuid 0 0
CHAPTER 2. ACCESSING RED HAT GLUSTER STORAGE USING AMAZON WEB SERVICES
13
After adding the EBS volumes, you can use the mount point as a brick with existing and new volumes.If you want to create arbitrated replicated volumes or three-way replicated volumes, you must useEBS volume type comprising general purpose SSD or PIOPS SSD. For more information on creatingtwo-way replicated volumes, arbitrated replicated volumes, and three-way replicated volumes, seechapter Red Hat Gluster Storage Volumes in the Red Hat Gluster Storage Administration Guide.
2.4. STOPPING AND RESTARTING RED HAT GLUSTER STORAGEINSTANCE
When you stop and restart a Red Hat Gluster Storage instance, Amazon Web Services assigns theinstance a new IP address and hostname. This results in the instance losing its association with thevirtual hardware, causing disruptions to the trusted storage pool. To prevent errors, add the restartedRed Hat Gluster Storage instance to the trusted storage pool. See section Adding Servers to the TrustedStorage Pool in the Red Hat Gluster Storage Administration Guide.
Rebooting the Red Hat Gluster Storage instance preserves the IP address and hostname and does notlose its association with the virtual hardware. This does not cause any disruptions to the trustedstorage pool.
Deployment Guide for Public Cloud
14
CHAPTER 3. ACCESSING RED HAT GLUSTER STORAGE USINGMICROSOFT AZURERed Hat Gluster Storage is designed to provide a flexible file services layer for users and applicationsin a way that can be easily scaled to adjust to your workloads. Deployment flexibility is a key strength ofRed Hat Gluster Storage. Gluster can be deployed to virtual or physical servers in on-premiseenvironments, private clouds, and public clouds, including Microsoft Azure.
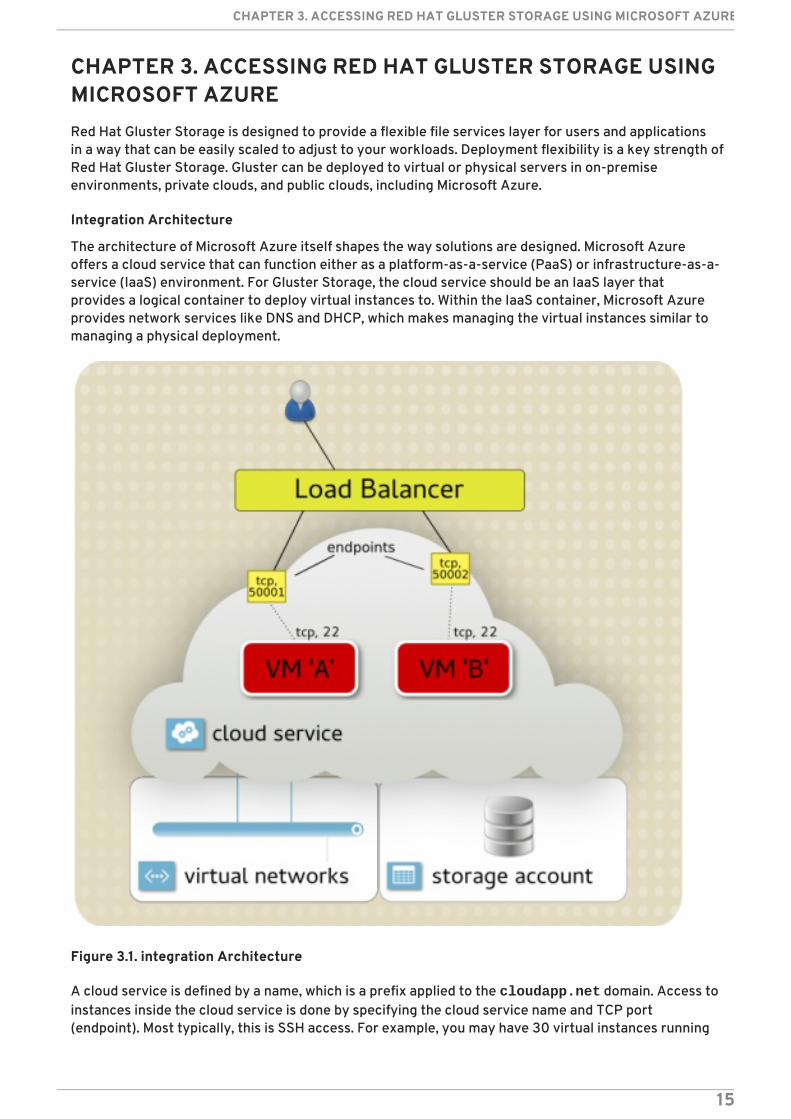
Integration Architecture
The architecture of Microsoft Azure itself shapes the way solutions are designed. Microsoft Azureoffers a cloud service that can function either as a platform-as-a-service (PaaS) or infrastructure-as-a-service (IaaS) environment. For Gluster Storage, the cloud service should be an IaaS layer thatprovides a logical container to deploy virtual instances to. Within the IaaS container, Microsoft Azureprovides network services like DNS and DHCP, which makes managing the virtual instances similar tomanaging a physical deployment.
Figure 3.1. integration Architecture
A cloud service is defined by a name, which is a prefix applied to the cloudapp.net domain. Access toinstances inside the cloud service is done by specifying the cloud service name and TCP port(endpoint). Most typically, this is SSH access. For example, you may have 30 virtual instances running
CHAPTER 3. ACCESSING RED HAT GLUSTER STORAGE USING MICROSOFT AZURE
15
inside a cloud service, so accessing them individually is done by exposing a different endpoint for eachinstance: 50,001 links to port 22 on instance A, and 50,002 links to port 22 on instance B.
A virtual network allows greater control and connectivity for instances inside a cloud service. Virtualnetworks can be configured to function purely within the Microsoft Azure infrastructure or can be usedto connect on-premise networks to cloud services through site-to-site VPN connections.
The last key architectural element is the storage account. A storage account provides access tostorage services within Microsoft Azure. The account provides a unique namespace for data andsupports a number of access protocols, including blob, table, queue, and file. Data can be storedphysically either on SSD (premium) or HDD (standard).
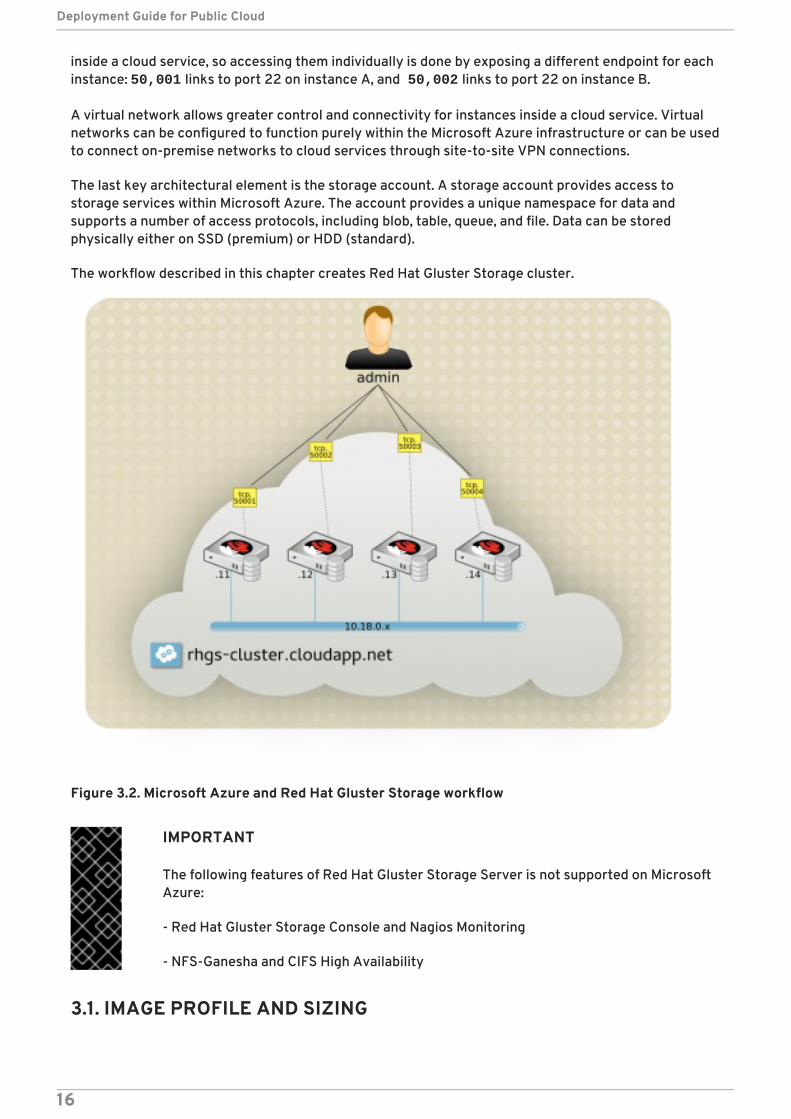
The workflow described in this chapter creates Red Hat Gluster Storage cluster.
Figure 3.2. Microsoft Azure and Red Hat Gluster Storage workflow
IMPORTANT
The following features of Red Hat Gluster Storage Server is not supported on MicrosoftAzure:
- Red Hat Gluster Storage Console and Nagios Monitoring
- NFS-Ganesha and CIFS High Availability
3.1. IMAGE PROFILE AND SIZING
Deployment Guide for Public Cloud
16
Microsoft Azure offers various virtual machine configurations to choose from, based on the projectedworkload. The example configuration assumes a Standard Tier/A2 instance.
As a guide, the tasks performed within this chapter are based on the Standard Tier/A2 instance size:
NOTE
A minimum of two cores is required for each instance of Red Hat Gluster Storage.
In addition to the operating system disk, Microsoft Azure also allocates every instance a resource disk.This is a non-persistent (ephemeral) disk, provided at runtime to the instance from the local storage onthe physical host the instance is running on. The resource disk is visible at /mnt/resource and isconfigured by the Windows Azure Linux Agent to provide swap space and temporary storage forapplications.
For each instance type, the Microsoft Azure portal shows a clear indication of the CPU core count andRAM, but it does not show the number of configurable disks that each instance supports. The number ofconfigurable data disks ranges between 1 and 32, dependent upon the instance type.
Since Red Hat Gluster Storage is a storage platform, there are some additional planning considerationswhen sizing instances:
A virtual disk has a maximum size of 1023 GB. Larger disk sizes can be accommodated byaggregating multiple 1023 GB disks together.
Once a disk has been defined, its size cannot be changed easily. Because capacity costs inMicrosoft Azure Standard Storage are based on use, not allocated space, it is recommendedthat all disks assigned to a Red Hat Gluster Storage node are 1023 GB.
Although attributes like CPU, RAM, and disk count can be easily changed after an instance iscreated, networking characteristics cannot. When planning your configuration, consider thenetwork topology and connectivity you need before the instance are created. Microsoft Azureinstance supports multiple network cards and multiple virtual networks, but these types ofadvanced networking features are only configurable using the Windows Powershell.
3.2. PREREQUISITES
Install the Microsoft Azure CLI based on the instructions listed athttps://access.redhat.com/articles/uploading-rhel-image-to-azure#install-the-azure-cross-platform-cli-on-your-azure-administration-server-6.
Migrate your subscriptions from Red Hat to Microsoft Azure based on the instructions listed athttps://access.redhat.com/articles/migrating-to-red-hat-cloud-access .
It is also possible to manage Gluster Storage using the Windows Powershell environment based on theinstructions at: https://azure.microsoft.com/en-in/documentation/articles/powershell-install-configure. But that is not listed in this chapter. All of the procedures here will use the Microsoft AzureCLI.
3.3. PLANNING GUIDELINES
The following are the guidelines for setting up Red Hat Gluster Storage on Microsoft Azure.
Designate a management server for interaction and control with Microsoft Azure services. Forsimple Gluster Storage deployments (single site, single NIC), the management platform can be
CHAPTER 3. ACCESSING RED HAT GLUSTER STORAGE USING MICROSOFT AZURE
17
a Linux server/workstation. For more complex deployments, a Windows desktop withPowershell is recommended.
Build custom images based on Red Hat Enterprise Linux 7 with the Hyper-V drivers includedwithin the initramfs file. Instances will fail to start if these drivers are not present.
Use a virtual network for your Red Hat Gluster Storage nodes.
For geo-replication, deploy a common /etc/hosts file to all nodes or use a shared DNSserver.
Pricing for standard storage is based on used capacity. It therefore makes sense to use themaximum size for data disks (1023 GB) and allocate as many as the instance supports atinstall time to minimize future administration overheads.
If NFS is the preferred way to connect to the Gluster Storage nodes, consider using a D seriesinstance that has a more modern CPU with a higher clock speed.
Use availability sets to group Gluster Storage nodes within a replication set together toenhance availability.
Use mdadm to combine disks to form a larger disk.
Use fewer, larger virtual machines to deliver the highest capacity.
For highly available data access, use a replicated GlusterFS volume with the native glusterfs client.
Use a non-default SSH port for public access to the SSH services running on each of theGluster Storage nodes (that is, use --ssh with vm create ).
3.4. SETTING UP RED HAT GLUSTER STORAGE IN MICROSOFT AZUREIN ARM MODE
This section provides step-by-step instructions to set up Red Hat Gluster Storage in Microsoft Azure inthe Azure Resource Manager mode.
NOTE
There are two deployment modes in Microsoft Azure: Azure Service Management (ASM)mode (sometimes referred to as Azure Classic) and Azure Resource Manager (ARM)mode. The procedure in this section uses ARM mode and ARM cross-platformcommand-line interface (Xplat-CLI) commands to deploy a Red Hat Gluster Storage intoMicrosoft Azure. The Xplat-CLI commands differ slightly between these two deploymentmodes. If you want to set up the Red Hat Gluster Storage in Microsoft Azure using AzureService Management (ASM) mode, refer to Section 3.6, “ Appendix - Setting up Red HatGluster Storage in Microsoft Azure in ASM Mode”.
3.4.1. Obtaining Red Hat Gluster Storage for Microsoft Azure
To download the Red Hat Gluster Storage Server files using a Red Hat Subscription or a Red HatEvaluation Subscription:
1. Visit the Red Hat Customer Service Portal at https://access.redhat.com/login and enter youruser name and password to log in.
Deployment Guide for Public Cloud
18
2. Click Downloads to visit the Software & Download Center.
3. In the Red Hat Gluster Storage Server area, click Download Software to download the latestversion of the VHD image.
4. Navigate to the directory where the file was downloaded and execute the sha256sumcommand on the file.
For example,
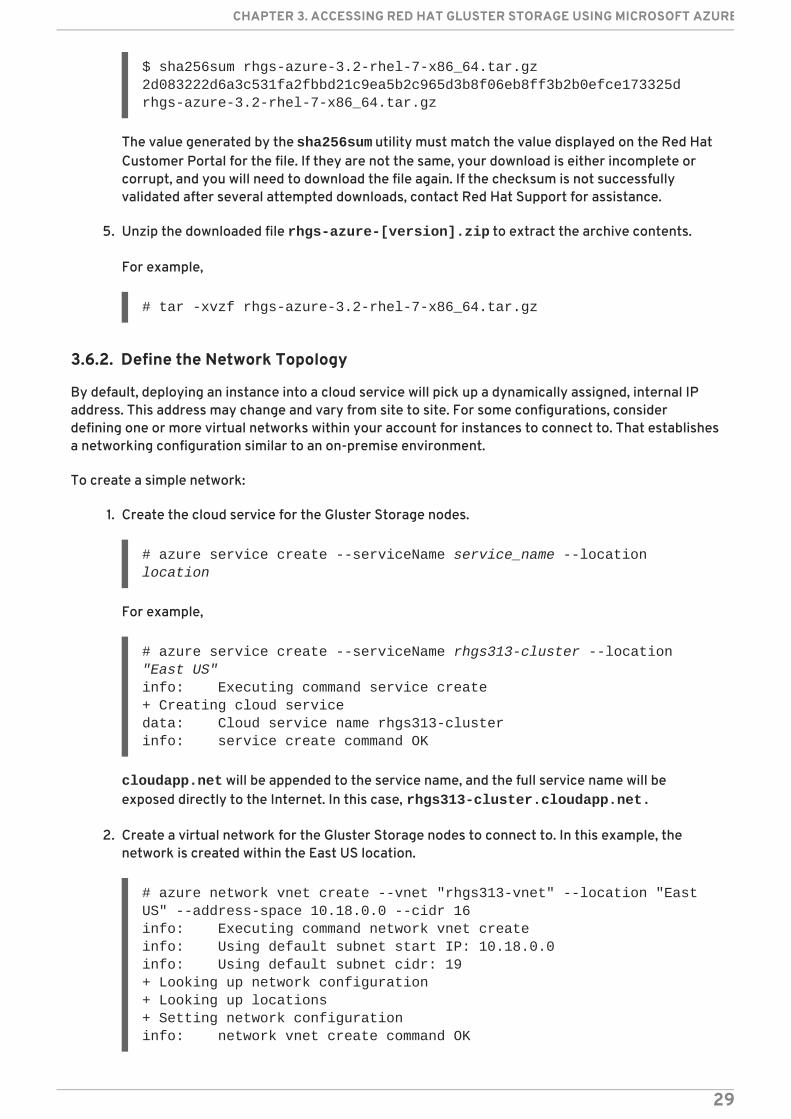
$ sha256sum rhgs-azure-3.2-rhel-7-x86_64.tar.gz2d083222d6a3c531fa2fbbd21c9ea5b2c965d3b8f06eb8ff3b2b0efce173325d rhgs-azure-3.2-rhel-7-x86_64.tar.gz
The value generated by the sha256sum utility must match the value displayed on the Red HatCustomer Portal for the file. If they are not the same, your download is either incomplete orcorrupt, and you will need to download the file again. If the checksum is not successfullyvalidated after several attempted downloads, contact Red Hat Support for assistance.
5. Unzip the downloaded file rhgs-azure-[version].zip to extract the archive contents.
For example,
# tar -xvzf rhgs-azure-3.2-rhel-7-x86_64.tar.gz
3.4.2. Setting Up New Resources in Microsoft Azure
You must install the Azure cross-platform command-line interface (Xplat-CLI) before setting up newresources in Microsoft Azure. The steps to install the Azure Xplat-CLI and set up new resources inMicrosoft Azure are provided at https://access.redhat.com/articles/2706961#install-the-azure-cross-platform-cli-2
Before you can upload the Microsoft Azure VHD, you need to have resources for the VM created inMicrosoft Azure. All of the following steps are completed from your Microsoft Azure AdministrationServer.
1. Create a resource group.
# azure group create -l [azure-region] -n [resource-group]
For example,
# azure group create -l eastus -n rhgsarminfo: Executing command group create+ Getting resource group rhgsarm+ Creating resource group rhgsarminfo: Created resource group rhgsarmdata: Id: /subscriptions/2586c64b-38b4-4527-a140-012d49dfc02c/resourceGroups/rhgsarmdata: Name: rhgsarmdata: Location: eastusdata: Provisioning State: Succeeded
CHAPTER 3. ACCESSING RED HAT GLUSTER STORAGE USING MICROSOFT AZURE
19
data: Tags: nulldata:info: group create command OK
2. Create a storage account. The following command sets up a few details that allow you toidentify the replication option you want to use. Refer to Microsoft's Account Replication Optionsarticle at https://azure.microsoft.com/en-us/documentation/articles/storage-redundancy/
# azure storage account create --sku-name [LRS, ZRS, GRS, RA-GRS] --kind [Storage, Blob Storage] -l [azure-region] -g [resource-group] [account-name]
For example,
# azure storage account create --sku-name LRS --kind Storage -l eastus -g rhgsarm rhgsstorageinfo: Executing command storage account create+ Checking availability of the storage account name+ Creating storage accountinfo: storage account create command OK
3. Get the storage account keys to use in the next step.
# azure storage account keys list -g [resource-group] [account-name]
For example,
# azure storage account keys list -g rhgsarm rhgsstorageinfo: Executing command storage account keys list+ Getting storage account keysdata: Name Key Permissionsdata: ---- ---------------------------------------------------------------------------------------- -----------data: key1 ba8zt8LSUznaGX92DV1zWhj3ikrpIQEsZXxmNQcd194JaD/NgSwueVVmPfAjOMptpu3fDR/7olT2smo/9ZON+w== Fulldata: key2 5r+wVkfzb8S6oBpZCo9vQSuVhyNLuaOcfpOR048zWnRr8kAsTs7Vp72C/IdWGGQE9IiKrFXxPaDb5GosaA3Zeg== Fullinfo: storage account keys list command OK
Microsoft Azure generates two keys, both of which allow access to your storage container.Microsoft Azure generates two keys for key regeneration purposes. During regeneration, youuse one key for secure access, while Microsoft Azure regenerates and creates a new key. Oncethere is a new key, you switch to that key and regenerate the other key the next time, and soforth. This is like changing your password for your Microsoft Azure storage container. Youshould do this periodically, but do not do it now because you just created the two keys. Forinformation on keys and key regeneration, refer to Microsoft's Storage Connection Strings.article at https://azure.microsoft.com/en-us/documentation/articles/storage-configure-connection-string/.
4. Export the key. Copy the key1 string created in the previous step and paste it in theAccountKey= file.
Deployment Guide for Public Cloud
20
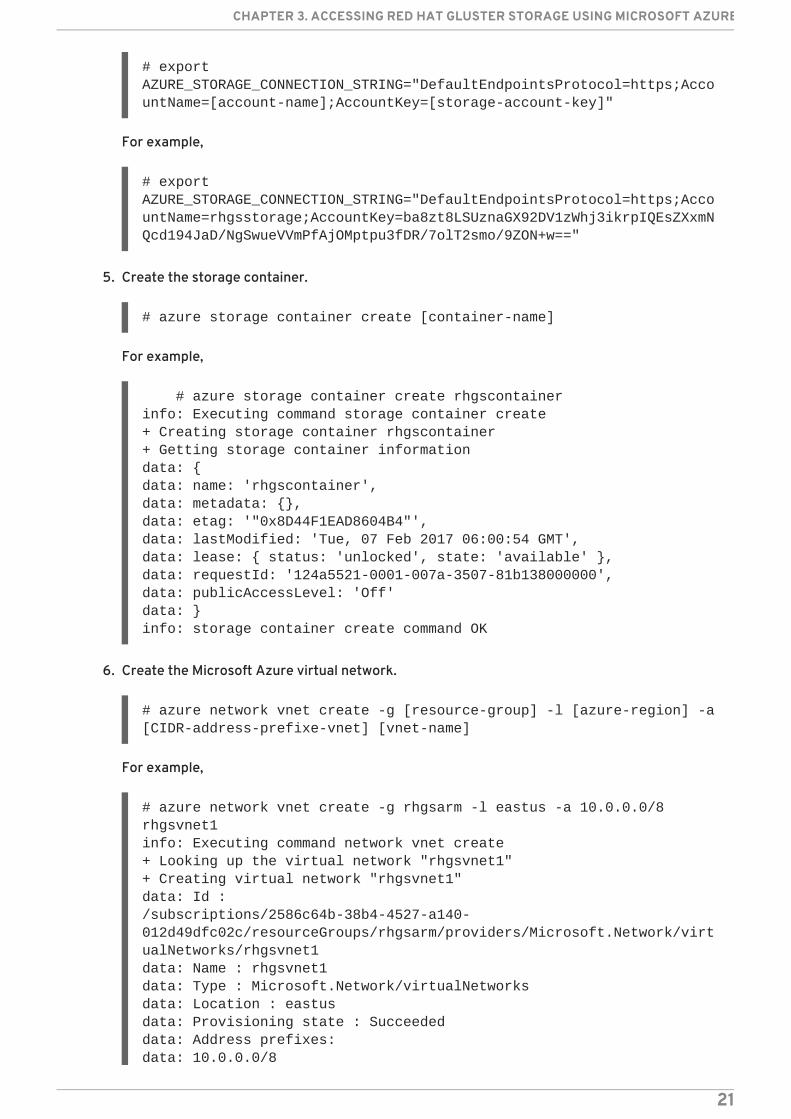
# export AZURE_STORAGE_CONNECTION_STRING="DefaultEndpointsProtocol=https;AccountName=[account-name];AccountKey=[storage-account-key]"
For example,
# export AZURE_STORAGE_CONNECTION_STRING="DefaultEndpointsProtocol=https;AccountName=rhgsstorage;AccountKey=ba8zt8LSUznaGX92DV1zWhj3ikrpIQEsZXxmNQcd194JaD/NgSwueVVmPfAjOMptpu3fDR/7olT2smo/9ZON+w=="
5. Create the storage container.
# azure storage container create [container-name]
For example,
# azure storage container create rhgscontainerinfo: Executing command storage container create+ Creating storage container rhgscontainer+ Getting storage container informationdata: {data: name: 'rhgscontainer',data: metadata: {},data: etag: '"0x8D44F1EAD8604B4"',data: lastModified: 'Tue, 07 Feb 2017 06:00:54 GMT',data: lease: { status: 'unlocked', state: 'available' },data: requestId: '124a5521-0001-007a-3507-81b138000000',data: publicAccessLevel: 'Off'data: }info: storage container create command OK
6. Create the Microsoft Azure virtual network.
# azure network vnet create -g [resource-group] -l [azure-region] -a [CIDR-address-prefixe-vnet] [vnet-name]
For example,
# azure network vnet create -g rhgsarm -l eastus -a 10.0.0.0/8 rhgsvnet1info: Executing command network vnet create+ Looking up the virtual network "rhgsvnet1"+ Creating virtual network "rhgsvnet1"data: Id :/subscriptions/2586c64b-38b4-4527-a140-012d49dfc02c/resourceGroups/rhgsarm/providers/Microsoft.Network/virtualNetworks/rhgsvnet1data: Name : rhgsvnet1data: Type : Microsoft.Network/virtualNetworksdata: Location : eastusdata: Provisioning state : Succeededdata: Address prefixes:data: 10.0.0.0/8
CHAPTER 3. ACCESSING RED HAT GLUSTER STORAGE USING MICROSOFT AZURE
21
info: network vnet create command OK
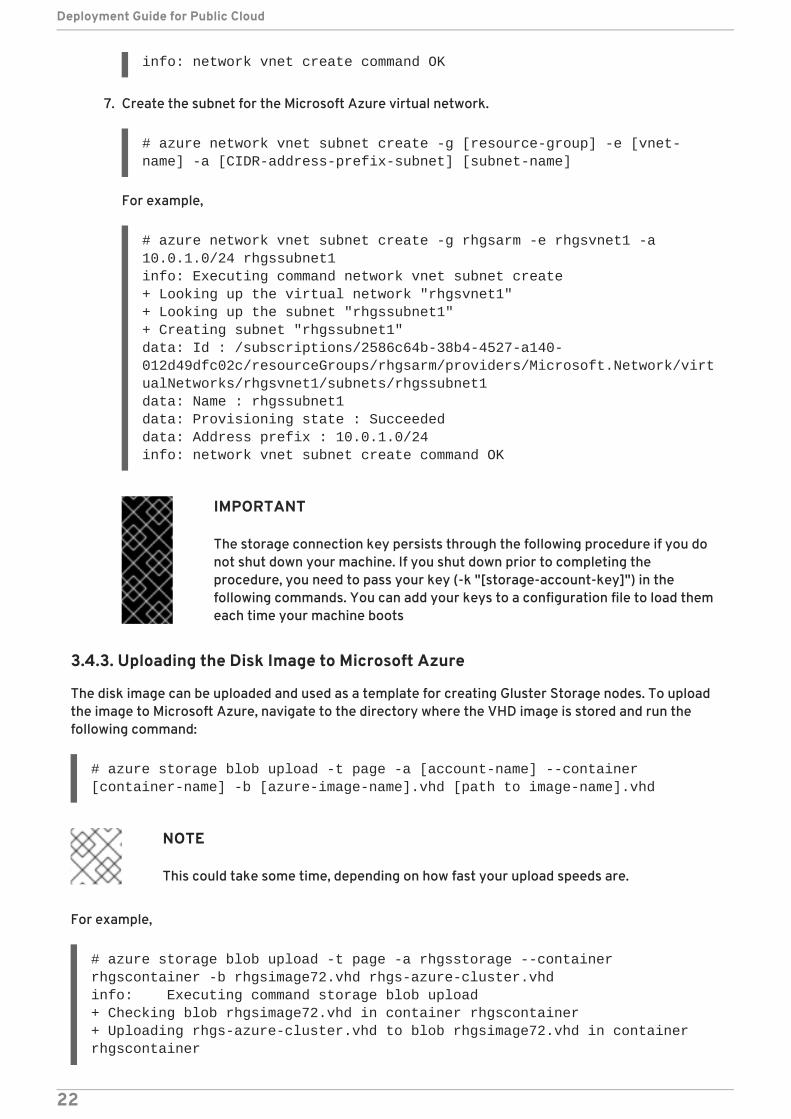
7. Create the subnet for the Microsoft Azure virtual network.
# azure network vnet subnet create -g [resource-group] -e [vnet-name] -a [CIDR-address-prefix-subnet] [subnet-name]
For example,
# azure network vnet subnet create -g rhgsarm -e rhgsvnet1 -a 10.0.1.0/24 rhgssubnet1info: Executing command network vnet subnet create+ Looking up the virtual network "rhgsvnet1"+ Looking up the subnet "rhgssubnet1"+ Creating subnet "rhgssubnet1"data: Id : /subscriptions/2586c64b-38b4-4527-a140-012d49dfc02c/resourceGroups/rhgsarm/providers/Microsoft.Network/virtualNetworks/rhgsvnet1/subnets/rhgssubnet1data: Name : rhgssubnet1data: Provisioning state : Succeededdata: Address prefix : 10.0.1.0/24info: network vnet subnet create command OK
IMPORTANT
The storage connection key persists through the following procedure if you donot shut down your machine. If you shut down prior to completing theprocedure, you need to pass your key (-k "[storage-account-key]") in thefollowing commands. You can add your keys to a configuration file to load themeach time your machine boots
3.4.3. Uploading the Disk Image to Microsoft Azure
The disk image can be uploaded and used as a template for creating Gluster Storage nodes. To uploadthe image to Microsoft Azure, navigate to the directory where the VHD image is stored and run thefollowing command:
# azure storage blob upload -t page -a [account-name] --container [container-name] -b [azure-image-name].vhd [path to image-name].vhd
NOTE
This could take some time, depending on how fast your upload speeds are.
For example,
# azure storage blob upload -t page -a rhgsstorage --container rhgscontainer -b rhgsimage72.vhd rhgs-azure-cluster.vhdinfo: Executing command storage blob upload+ Checking blob rhgsimage72.vhd in container rhgscontainer + Uploading rhgs-azure-cluster.vhd to blob rhgsimage72.vhd in container rhgscontainer
Deployment Guide for Public Cloud
22
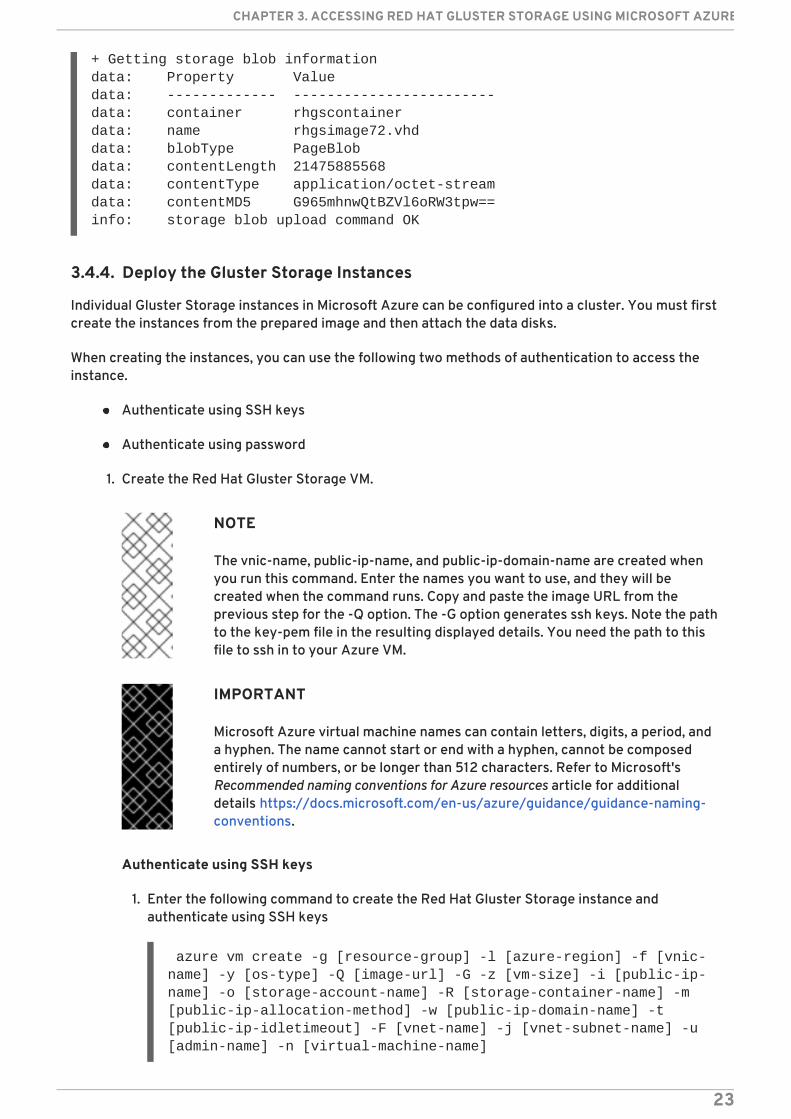
+ Getting storage blob information data: Property Value data: ------------- ------------------------data: container rhgscontainer data: name rhgsimage72.vhd data: blobType PageBlob data: contentLength 21475885568 data: contentType application/octet-streamdata: contentMD5 G965mhnwQtBZVl6oRW3tpw==info: storage blob upload command OK
3.4.4. Deploy the Gluster Storage Instances
Individual Gluster Storage instances in Microsoft Azure can be configured into a cluster. You must firstcreate the instances from the prepared image and then attach the data disks.
When creating the instances, you can use the following two methods of authentication to access theinstance.
Authenticate using SSH keys
Authenticate using password
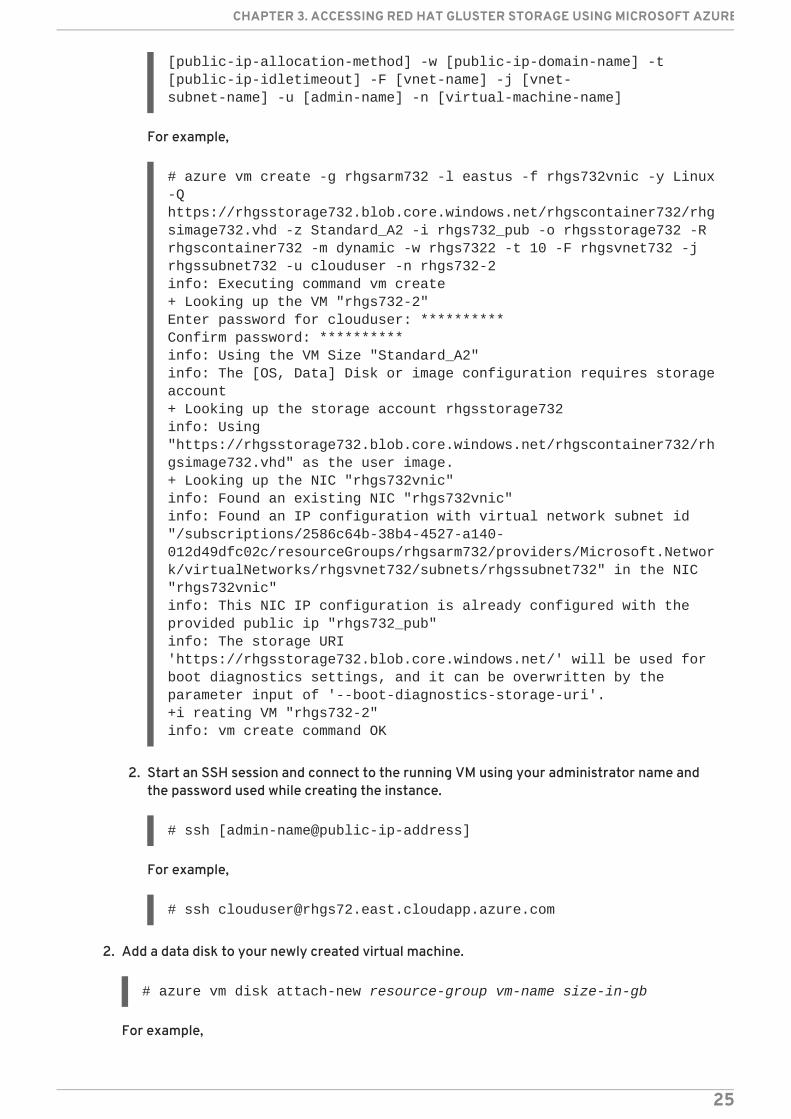
1. Create the Red Hat Gluster Storage VM.
NOTE
The vnic-name, public-ip-name, and public-ip-domain-name are created whenyou run this command. Enter the names you want to use, and they will becreated when the command runs. Copy and paste the image URL from theprevious step for the -Q option. The -G option generates ssh keys. Note the pathto the key-pem file in the resulting displayed details. You need the path to thisfile to ssh in to your Azure VM.
IMPORTANT
Microsoft Azure virtual machine names can contain letters, digits, a period, anda hyphen. The name cannot start or end with a hyphen, cannot be composedentirely of numbers, or be longer than 512 characters. Refer to Microsoft'sRecommended naming conventions for Azure resources article for additionaldetails https://docs.microsoft.com/en-us/azure/guidance/guidance-naming-conventions.
Authenticate using SSH keys
1. Enter the following command to create the Red Hat Gluster Storage instance andauthenticate using SSH keys
azure vm create -g [resource-group] -l [azure-region] -f [vnic-name] -y [os-type] -Q [image-url] -G -z [vm-size] -i [public-ip-name] -o [storage-account-name] -R [storage-container-name] -m [public-ip-allocation-method] -w [public-ip-domain-name] -t [public-ip-idletimeout] -F [vnet-name] -j [vnet-subnet-name] -u [admin-name] -n [virtual-machine-name]
CHAPTER 3. ACCESSING RED HAT GLUSTER STORAGE USING MICROSOFT AZURE
23
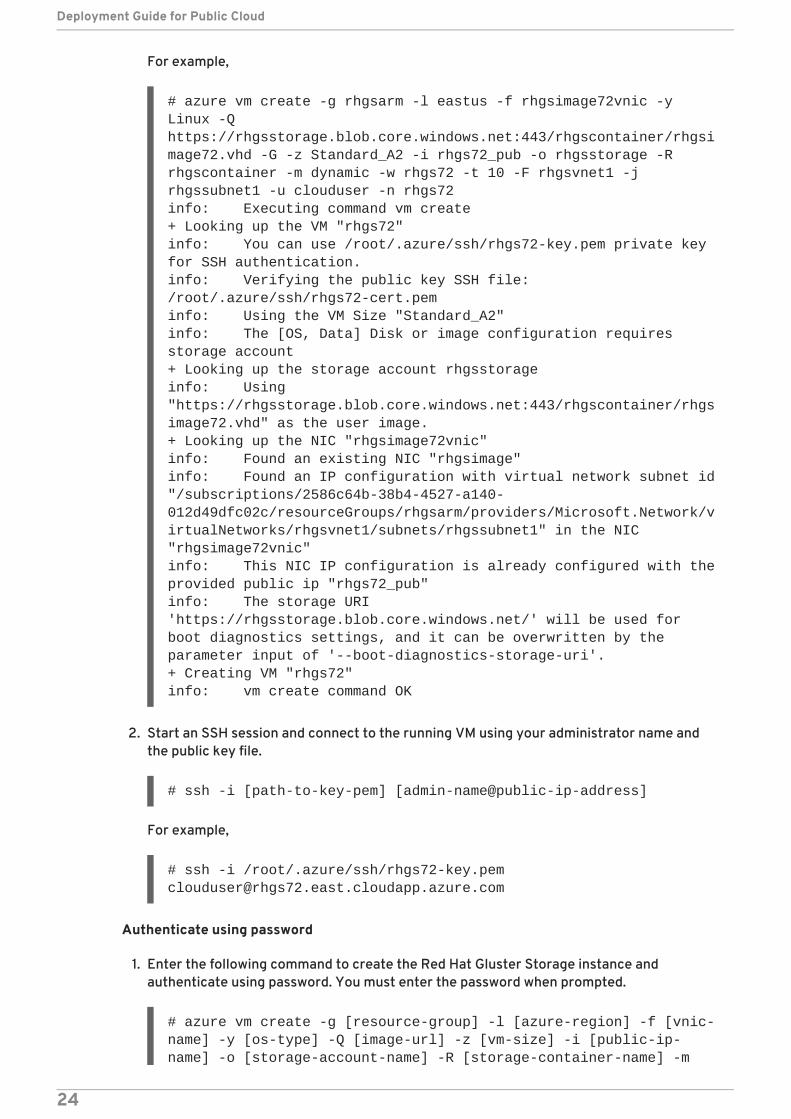
For example,
# azure vm create -g rhgsarm -l eastus -f rhgsimage72vnic -y Linux -Q https://rhgsstorage.blob.core.windows.net:443/rhgscontainer/rhgsimage72.vhd -G -z Standard_A2 -i rhgs72_pub -o rhgsstorage -R rhgscontainer -m dynamic -w rhgs72 -t 10 -F rhgsvnet1 -j rhgssubnet1 -u clouduser -n rhgs72info: Executing command vm create+ Looking up the VM "rhgs72"info: You can use /root/.azure/ssh/rhgs72-key.pem private key for SSH authentication.info: Verifying the public key SSH file: /root/.azure/ssh/rhgs72-cert.peminfo: Using the VM Size "Standard_A2"info: The [OS, Data] Disk or image configuration requires storage account+ Looking up the storage account rhgsstorage info: Using "https://rhgsstorage.blob.core.windows.net:443/rhgscontainer/rhgsimage72.vhd" as the user image.+ Looking up the NIC "rhgsimage72vnic" info: Found an existing NIC "rhgsimage"info: Found an IP configuration with virtual network subnet id "/subscriptions/2586c64b-38b4-4527-a140-012d49dfc02c/resourceGroups/rhgsarm/providers/Microsoft.Network/virtualNetworks/rhgsvnet1/subnets/rhgssubnet1" in the NIC "rhgsimage72vnic"info: This NIC IP configuration is already configured with the provided public ip "rhgs72_pub"info: The storage URI 'https://rhgsstorage.blob.core.windows.net/' will be used for boot diagnostics settings, and it can be overwritten by the parameter input of '--boot-diagnostics-storage-uri'.+ Creating VM "rhgs72" info: vm create command OK
2. Start an SSH session and connect to the running VM using your administrator name andthe public key file.
# ssh -i [path-to-key-pem] [admin-name@public-ip-address]
For example,
# ssh -i /root/.azure/ssh/rhgs72-key.pem [email protected]
Authenticate using password
1. Enter the following command to create the Red Hat Gluster Storage instance andauthenticate using password. You must enter the password when prompted.
# azure vm create -g [resource-group] -l [azure-region] -f [vnic-name] -y [os-type] -Q [image-url] -z [vm-size] -i [public-ip-name] -o [storage-account-name] -R [storage-container-name] -m
Deployment Guide for Public Cloud
24
[public-ip-allocation-method] -w [public-ip-domain-name] -t [public-ip-idletimeout] -F [vnet-name] -j [vnet-subnet-name] -u [admin-name] -n [virtual-machine-name]
For example,
# azure vm create -g rhgsarm732 -l eastus -f rhgs732vnic -y Linux -Q https://rhgsstorage732.blob.core.windows.net/rhgscontainer732/rhgsimage732.vhd -z Standard_A2 -i rhgs732_pub -o rhgsstorage732 -R rhgscontainer732 -m dynamic -w rhgs7322 -t 10 -F rhgsvnet732 -j rhgssubnet732 -u clouduser -n rhgs732-2info: Executing command vm create+ Looking up the VM "rhgs732-2" Enter password for clouduser: **********Confirm password: **********info: Using the VM Size "Standard_A2"info: The [OS, Data] Disk or image configuration requires storage account+ Looking up the storage account rhgsstorage732 info: Using "https://rhgsstorage732.blob.core.windows.net/rhgscontainer732/rhgsimage732.vhd" as the user image.+ Looking up the NIC "rhgs732vnic" info: Found an existing NIC "rhgs732vnic"info: Found an IP configuration with virtual network subnet id "/subscriptions/2586c64b-38b4-4527-a140-012d49dfc02c/resourceGroups/rhgsarm732/providers/Microsoft.Network/virtualNetworks/rhgsvnet732/subnets/rhgssubnet732" in the NIC "rhgs732vnic"info: This NIC IP configuration is already configured with the provided public ip "rhgs732_pub"info: The storage URI 'https://rhgsstorage732.blob.core.windows.net/' will be used for boot diagnostics settings, and it can be overwritten by the parameter input of '--boot-diagnostics-storage-uri'.+i reating VM "rhgs732-2" info: vm create command OK
2. Start an SSH session and connect to the running VM using your administrator name andthe password used while creating the instance.
# ssh [admin-name@public-ip-address]
For example,
# ssh [email protected]
2. Add a data disk to your newly created virtual machine.
# azure vm disk attach-new resource-group vm-name size-in-gb
For example,
CHAPTER 3. ACCESSING RED HAT GLUSTER STORAGE USING MICROSOFT AZURE
25

# azure vm disk attach-new rhgsarm rhgs72 1023info: Executing command vm disk attach-new+ Looking up the VM "rhgs72" info: New data disk location: https://rhgsstorage.blob.core.windows.net/rhgscontainer/rhgs72-20170220-121452858.vhd+ Updating VM "rhgs72" info: vm disk attach-new command OK
3. Perform the above steps of creating instances and attaching disks for all the instances.
4. Confirm that the instances have been properly created:
# azure vm list -g [resource group]
For example,
# azure vm list rhgsarminfo: Executing command vm list+ Getting virtual machines data: ResourceGroupName Name ProvisioningState PowerState Location Size data: ----------------- -------- ----------------- -------------- -------- -----------data: rhgsarm rhgs72 Succeeded VM deallocated eastus Standard_A2data: rhgsarm rhgs72-1 Succeeded VM deallocated eastus Standard_A2info: vm list command OK
# azure vm show -g rhgsarm rhgs72info: Executing command vm show+ Looking up the VM "rhgs72" + Looking up the NIC "rhgsimage72vnic" + Looking up the public ip "rhgs72_pub"Id :/subscriptions/2586c64b-38b4-4527-a140-012d49dfc02c/resourceGroups/rhgsarm/providers/Microsoft.Compute/virtualMachines/rhgs72data: ProvisioningState :Succeededdata: Name :rhgs72data: Location :eastusdata: Type :Microsoft.Compute/virtualMachines data: data: Hardware Profile:data: Size :Standard_A2 data: data: Storage Profile:data: data: OS Disk:data: OSType :Linuxdata: Name :clib438d5640249ac7c-os-1486533879443data: Caching :ReadWrite
Deployment Guide for Public Cloud
26
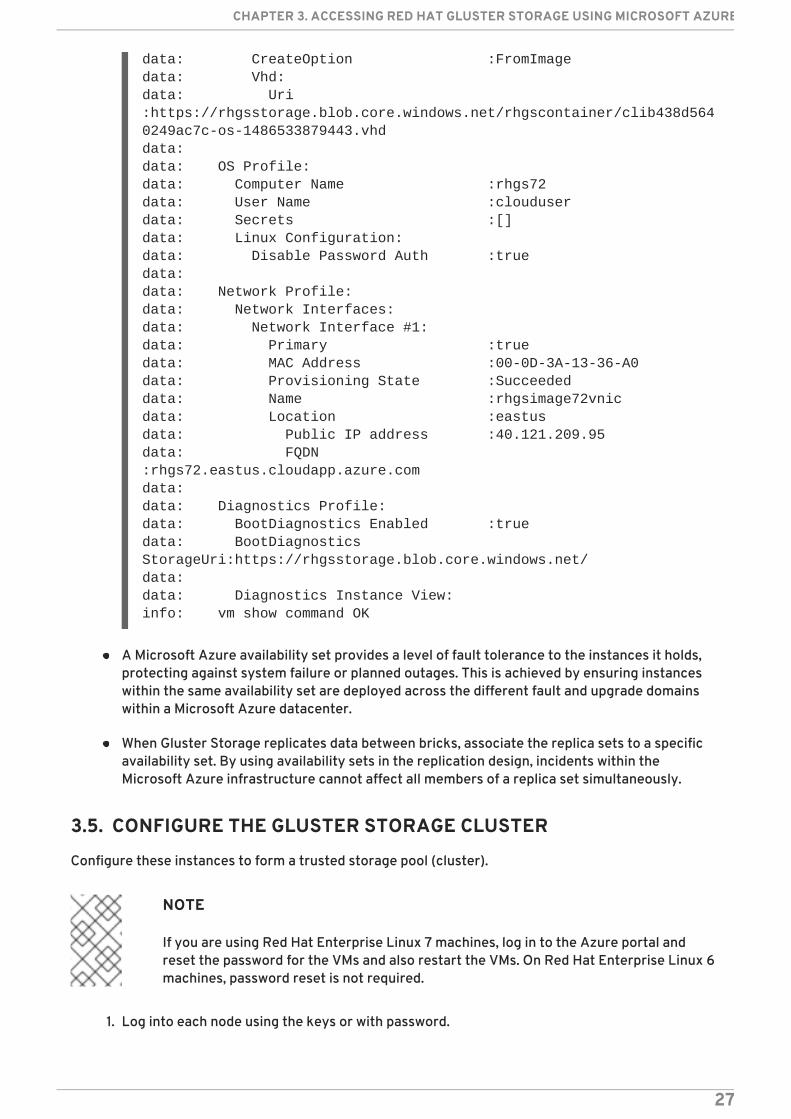
data: CreateOption :FromImagedata: Vhd:data: Uri :https://rhgsstorage.blob.core.windows.net/rhgscontainer/clib438d5640249ac7c-os-1486533879443.vhddata: data: OS Profile:data: Computer Name :rhgs72data: User Name :clouduserdata: Secrets :[]data: Linux Configuration:data: Disable Password Auth :truedata: data: Network Profile:data: Network Interfaces:data: Network Interface #1:data: Primary :truedata: MAC Address :00-0D-3A-13-36-A0data: Provisioning State :Succeededdata: Name :rhgsimage72vnicdata: Location :eastusdata: Public IP address :40.121.209.95data: FQDN :rhgs72.eastus.cloudapp.azure.comdata: data: Diagnostics Profile:data: BootDiagnostics Enabled :truedata: BootDiagnostics StorageUri:https://rhgsstorage.blob.core.windows.net/data: data: Diagnostics Instance View:info: vm show command OK
A Microsoft Azure availability set provides a level of fault tolerance to the instances it holds,protecting against system failure or planned outages. This is achieved by ensuring instanceswithin the same availability set are deployed across the different fault and upgrade domainswithin a Microsoft Azure datacenter.
When Gluster Storage replicates data between bricks, associate the replica sets to a specificavailability set. By using availability sets in the replication design, incidents within theMicrosoft Azure infrastructure cannot affect all members of a replica set simultaneously.
3.5. CONFIGURE THE GLUSTER STORAGE CLUSTER
Configure these instances to form a trusted storage pool (cluster).
NOTE
If you are using Red Hat Enterprise Linux 7 machines, log in to the Azure portal andreset the password for the VMs and also restart the VMs. On Red Hat Enterprise Linux 6machines, password reset is not required.
1. Log into each node using the keys or with password.
CHAPTER 3. ACCESSING RED HAT GLUSTER STORAGE USING MICROSOFT AZURE
27
# ssh -i [path-to-key-pem] [admin-name@public-ip-address]
or
# ssh [admin-name@public-ip-address]
For example,
# ssh -i /root/.azure/ssh/rhgs72-key.pem [email protected]
or
# ssh [email protected]
2. Register each node to Red Hat Network using the subscription-manager command, andattach the relevant Red Hat Storage subscriptions.
For information on subscribing to the Red Hat Gluster Storage 3.2 channels, refer to theInstalling Red Hat Gluster Storage chapter in the Red Hat Gluster Storage Installation Guide.
3. Update each node to ensure the latest enhancements and patches are in place.
# yum update
4. Follow the instructions in the Adding Servers to the Trusted Storage Pool chapter in the Red HatGluster Storage Administration Guide to create the trusted storage pool.
3.6. APPENDIX - SETTING UP RED HAT GLUSTER STORAGE INMICROSOFT AZURE IN ASM MODE
This section provides step-by-step instructions to set up Red Hat Gluster Storage in Microsoft Azure.
3.6.1. Obtaining Red Hat Gluster Storage for Microsoft Azure
To download the Red Hat Gluster Storage Server files using a Red Hat Subscription or a Red HatEvaluation Subscription:
1. Visit the Red Hat Customer Service Portal at https://access.redhat.com/login and enter youruser name and password to log in.
2. Click Downloads to visit the Software & Download Center.
3. In the Red Hat Gluster Storage Server area, click Download Software to download the latestversion of the VHD image.
4. Navigate to the directory where the file was downloaded and execute the sha256sumcommand on the file.
For example,
Deployment Guide for Public Cloud
28
$ sha256sum rhgs-azure-3.2-rhel-7-x86_64.tar.gz2d083222d6a3c531fa2fbbd21c9ea5b2c965d3b8f06eb8ff3b2b0efce173325d rhgs-azure-3.2-rhel-7-x86_64.tar.gz
The value generated by the sha256sum utility must match the value displayed on the Red HatCustomer Portal for the file. If they are not the same, your download is either incomplete orcorrupt, and you will need to download the file again. If the checksum is not successfullyvalidated after several attempted downloads, contact Red Hat Support for assistance.
5. Unzip the downloaded file rhgs-azure-[version].zip to extract the archive contents.
For example,
# tar -xvzf rhgs-azure-3.2-rhel-7-x86_64.tar.gz
3.6.2. Define the Network Topology
By default, deploying an instance into a cloud service will pick up a dynamically assigned, internal IPaddress. This address may change and vary from site to site. For some configurations, considerdefining one or more virtual networks within your account for instances to connect to. That establishesa networking configuration similar to an on-premise environment.
To create a simple network:
1. Create the cloud service for the Gluster Storage nodes.
# azure service create --serviceName service_name --location location
For example,
# azure service create --serviceName rhgs313-cluster --location "East US"info: Executing command service create+ Creating cloud service data: Cloud service name rhgs313-clusterinfo: service create command OK
cloudapp.net will be appended to the service name, and the full service name will beexposed directly to the Internet. In this case, rhgs313-cluster.cloudapp.net.
2. Create a virtual network for the Gluster Storage nodes to connect to. In this example, thenetwork is created within the East US location.
# azure network vnet create --vnet "rhgs313-vnet" --location "East US" --address-space 10.18.0.0 --cidr 16info: Executing command network vnet createinfo: Using default subnet start IP: 10.18.0.0info: Using default subnet cidr: 19+ Looking up network configuration + Looking up locations + Setting network configuration info: network vnet create command OK
CHAPTER 3. ACCESSING RED HAT GLUSTER STORAGE USING MICROSOFT AZURE
29

This defines a network within a single region.
Features like geo-replication within Gluster Storage require a vnet-to-vnet configuration. A vnet-to-vnet configuration connects virtual networks through VPN gateways. Each virtual network can bewithin the same region or across regions to address disaster recovery scenarios. Joining VPNstogether requires a shared key, and it is not possible to pass a shared key through the Microsoft AzureCLI. To define a vnet-to-vnet configuration, use the Windows Powershell or use the Microsoft AzureREST API.
3.6.3. Upload the Disk Image to Microsoft Azure
The disk image can be uploaded and used as a template for creating Gluster Storage nodes.
NOTE
Microsoft Azure commands must be issued from the local account configured to use thexplat-cli.
To upload the image to Microsoft Azure, navigate to the directory where the VHD image is stored andrun the following command:
# azure vm image create image_name --location location --os linux VHD_image_name
For example,
# azure vm image create rhgs-3.1.3 --location "East US" --os linux rhgs313.vhd info: Executing command vm image create+ Retrieving storage accountsinfo: VHD size : 20 GBinfo: Uploading 20973568.5 KBRequested:100.0% Completed:100.0% Running: 0 Time: 7m50s Speed: 3876 KB/sinfo: https://bauderhel7.blob.core.windows.net/vm-images/rhgs313.vhd was uploaded successfullyinfo: vm image create command OK
Once complete, confirm the image is available:
# azure vm image list | awk '$3 == "User" {print $2;}'
NOTE
The output of an instance image list will show public images as well as images specific toyour account (User), so awk is used to display only the images added under theMicrosoft Azure account.
3.6.4. Deploy the Gluster Storage Instances
Individual Gluster Storage instances in Microsoft Azure can be configured into a cluster. You must firstcreate the instances from the prepared image and then attach the data disks.
Deployment Guide for Public Cloud
30
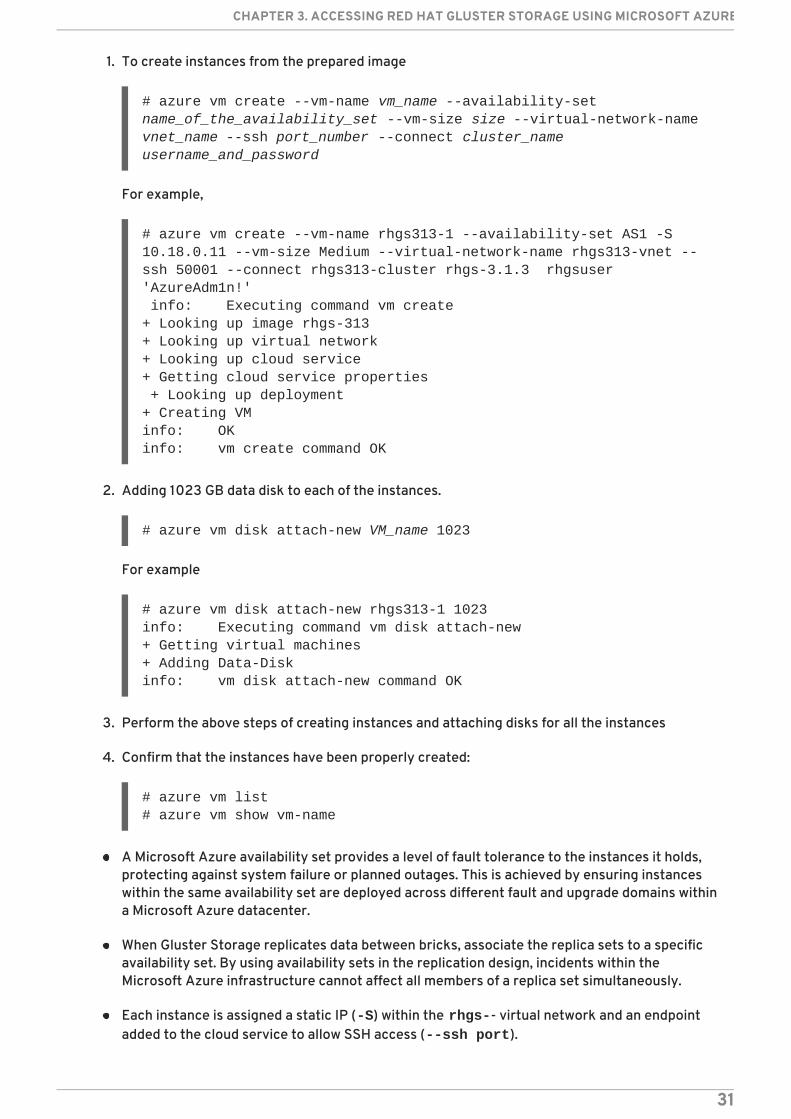
1. To create instances from the prepared image
# azure vm create --vm-name vm_name --availability-set name_of_the_availability_set --vm-size size --virtual-network-name vnet_name --ssh port_number --connect cluster_name username_and_password
For example,
# azure vm create --vm-name rhgs313-1 --availability-set AS1 -S 10.18.0.11 --vm-size Medium --virtual-network-name rhgs313-vnet --ssh 50001 --connect rhgs313-cluster rhgs-3.1.3 rhgsuser 'AzureAdm1n!' info: Executing command vm create+ Looking up image rhgs-313 + Looking up virtual network + Looking up cloud service + Getting cloud service properties + Looking up deployment + Creating VM info: OKinfo: vm create command OK
2. Adding 1023 GB data disk to each of the instances.
# azure vm disk attach-new VM_name 1023
For example
# azure vm disk attach-new rhgs313-1 1023info: Executing command vm disk attach-new+ Getting virtual machines + Adding Data-Disk info: vm disk attach-new command OK
3. Perform the above steps of creating instances and attaching disks for all the instances
4. Confirm that the instances have been properly created:
# azure vm list# azure vm show vm-name
A Microsoft Azure availability set provides a level of fault tolerance to the instances it holds,protecting against system failure or planned outages. This is achieved by ensuring instanceswithin the same availability set are deployed across different fault and upgrade domains withina Microsoft Azure datacenter.
When Gluster Storage replicates data between bricks, associate the replica sets to a specificavailability set. By using availability sets in the replication design, incidents within theMicrosoft Azure infrastructure cannot affect all members of a replica set simultaneously.
Each instance is assigned a static IP (-S) within the rhgs-- virtual network and an endpointadded to the cloud service to allow SSH access (--ssh port).
CHAPTER 3. ACCESSING RED HAT GLUSTER STORAGE USING MICROSOFT AZURE
31
There are single quotation marks (') around the password to prevent bash interpretationissues.
Example
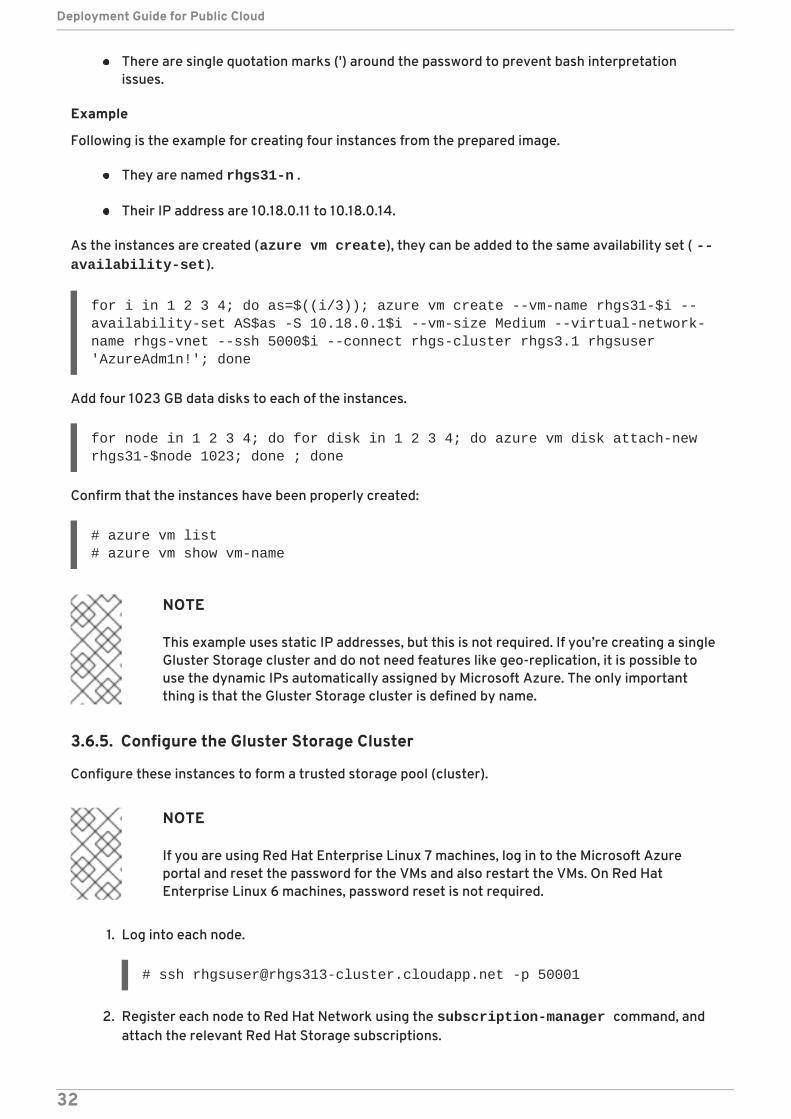
Following is the example for creating four instances from the prepared image.
They are named rhgs31-n .
Their IP address are 10.18.0.11 to 10.18.0.14.
As the instances are created (azure vm create), they can be added to the same availability set ( --availability-set).
for i in 1 2 3 4; do as=$((i/3)); azure vm create --vm-name rhgs31-$i --availability-set AS$as -S 10.18.0.1$i --vm-size Medium --virtual-network-name rhgs-vnet --ssh 5000$i --connect rhgs-cluster rhgs3.1 rhgsuser 'AzureAdm1n!'; done
Add four 1023 GB data disks to each of the instances.
for node in 1 2 3 4; do for disk in 1 2 3 4; do azure vm disk attach-new rhgs31-$node 1023; done ; done
Confirm that the instances have been properly created:
# azure vm list# azure vm show vm-name
NOTE
This example uses static IP addresses, but this is not required. If you’re creating a singleGluster Storage cluster and do not need features like geo-replication, it is possible touse the dynamic IPs automatically assigned by Microsoft Azure. The only importantthing is that the Gluster Storage cluster is defined by name.
3.6.5. Configure the Gluster Storage Cluster
Configure these instances to form a trusted storage pool (cluster).
NOTE
If you are using Red Hat Enterprise Linux 7 machines, log in to the Microsoft Azureportal and reset the password for the VMs and also restart the VMs. On Red HatEnterprise Linux 6 machines, password reset is not required.
1. Log into each node.
# ssh [email protected] -p 50001
2. Register each node to Red Hat Network using the subscription-manager command, andattach the relevant Red Hat Storage subscriptions.
Deployment Guide for Public Cloud
32
For information on subscribing to the Red Hat Gluster Storage 3.2 channels, refer to theInstalling Red Hat Gluster Storage chapter in the Red Hat Gluster Storage Installation Guide.
3. Update each node to ensure the latest enhancements and patches are in place.
# yum update
4. Follow the instructions in the Adding Servers to the Trusted Storage Pool chapter in the Red HatGluster Storage Administration Guide to create the trusted storage pool.
3.7. APPENDIX - CREATING A CUSTOM DISK IMAGE FROM ISO
Instances within Microsoft Azure are created from disk images. Gluster Storage requires a customimage, rather than one of the default Microsoft Azure-supplied images. Building custom virtualmachine images is typically done with Hyper-V, but custom images for Microsoft Azure can also bebuilt using native Linux tools.
The overall process to configure a custom image takes about 30 minutes.
1. Download the latest ISO for Gluster Storage from here:https://access.redhat.com/downloads/content/186/ver=3.1/rhel---7/3.1/x86_64/product-software
2. Using virt-manager, create a qcow2 image with two cores, 4 GB RAM, 20 GB virtio HDD, anda single NIC.
3. Boot the instance from the ISO image and complete the installation of Gluster Storage. Do notallocate swap space since the Windows Azure agent sets up an ephemeral disk at runtime forswap space.
4. Reboot the instance and log in.
5. Set a generic hostname.
On Red Hat Enterprise Linux 7:
# hostnamectl set-hostname localhost.localdomain
On Red Hat Enterprise Linux 6:
# vim /etc/sysconfig/network
NETWORKING=yesHOSTNAME=localhost.localdomain
6. Confirm that DHCP is configured in /etc/sysconfig/network-scripts/ifcfg-eth0.
DEVICE=eth0ONBOOT=yesBOOTPROTO=dhcpIPV6INIT=noTYPE=EthernetUSERCTL=noPEERDNS=yes
CHAPTER 3. ACCESSING RED HAT GLUSTER STORAGE USING MICROSOFT AZURE
33
7. Update the udev rules to avoid conflicts with Microsoft Azure and Hyper-V.
# rm -f /etc/udev/rules.d/70-persistent-net.rules# rm -f /lib/udev/rules.d/75-persistent-net-generator.rules
8. On Red Hat Enterprise Linux 7, apply the default firewall rules for Gluster Storage. Theserulesets are used for inter-node communication, the GlusterFS client, and NFS.
# firewall-cmd --zone=public --add-service=glusterfs --permanent# firewall-cmd --zone=public --add-service=nfs --add-service=rpc-bind --permanent
9. Register the virtual machine.
# subscription-manager register --auto-attach# subscription-manager repos --disable=*
10. Enable the Extras and Gluster Storage repositories. This is either rhel-6- or rhel-7-.
# subscription-manager repos --enable rhel-7-server-rpms --enable rhel-7-server-extras-rpms --enable rh-gluster-3-for-rhel-7-server-rpms
11. Update the system and install the Microsoft Azure Linux agent.
# yum update –y# yum –y install WALinuxAgent
12. Disable any swap space defined during the Gluster Storage installation. This is required on RedHat Enterprise Linux 7. Microsoft Azure allocates ephemeral storage at runtime, which is usedfor swap, so swap space does not need to be explicitly defined.
# swapoff -v /dev/rhgs/swap# sed -i '/.* swap/d' /etc/fstab
On Red Hat Enterprise Linux 6, the installer enables disk configuration to be changed, so theswap is not defined. However, if a logical volume was created, then remove the configuration ason RHEL 7.
13. Red Hat Enterprise Linux 7 only . A Linux virtual machine running in Azure requires thehv_storvsc and hv_vmbus drivers within the initramfs image. The Red Hat Enterprise Linux 6installer includes these drivers automatically, but under Red Hat Enterprise Linux 7, theinstaller only adds these drivers if Hyper-V devices are detected at installation time. Whenbuilding a virtual machine image using virt-manager, add these Hyper-V drivers manually.
1. Add the following content to /etc/dracut.conf..
2. Regenerate initramfs.
# dracut -f -v
14. Update the kernel boot settings.
Deployment Guide for Public Cloud
34
On Red Hat Enterprise Linux 7:
1. Set the GRUB_CMDLINE_LINUX variable in /etc/default/grub.
``rd.lvm.lv=rhgs/root console=ttyS0 earlyprintk=ttyS0 rootdelay=300
2. Refresh the grub2 configuration.
# grub2-mkconfig -o /boot/grub2/grub.cfg
3. Remove the rhqb, quiet, or crashkernel=auto parameters.
On Red Hat Enterprise Linux 6:
1. Update the kernel boot line in /boot/grub/menu.lst:
console=ttyS0 earlyprintk=ttyS0 rootdelay=300 numa=off
2. Remove the rhqb, quiet, or crashkernel=auto parameters.
15. Enable the Windows Azure agent to start at boot.
On Red Hat Enterprise Linux 7:.
# systemctl enable waagent
On Red Hat Enterprise Linux 6:.
# chkconfig waagent on
16. Unregister the virtual machine using Red Hat Subscription Manager.
# subscription-manager unregister
17. De-provision the instance to remove the local settings; this allows the instance to be used as adisk image within Microsoft Azure.
# yum clean all# waagent -force -deprovision# export HISTSIZE=0# poweroff
18. Dump the XML of the instance to find the filename of the virtual disk that was created, andconvert it to a Microsoft Azure compatible VHD file. In this example, the instance was initiallycreated using the qcow2 disk format.
# virsh dumpxml image-name# qemu-img convert -f qcow2 -O vpc -o subformat=fixed -O vpc rhgs313.qcow2 rhgs313.vhd
CHAPTER 3. ACCESSING RED HAT GLUSTER STORAGE USING MICROSOFT AZURE
35
3.8. APPENDIX - PERFORMANCE CATEGORIZATION
There are a number of infrastructure and architectural factors that determine the potentialperformance that Red Hat Gluster Storage within Microsoft Azure can deliver.
3.8.1. Storage Type
Microsoft Azure offers two classes of physical storage: standard and premium. Standard storage isbacked by hard disk drives, whereas premium storage is delivered by solid state drives. These classesof storage provide an IOPS target of 500 IOPS and 5,000 IOPS per disk, respectively.
A more general consideration is how the data are protected. By default, Microsoft Azure protects thedata by synchronously storing three copies of data in separate failure domains, and thenasynchronously places another three copies of the data in a secondary datacenter (a default GRSreplication scheme).
3.8.2. Bandwidth
A simple test was performed using iperf to determine the upper limit between the client and Red HatGluster Storage node. This testing showed that a single network interface can be expected to deliverbetween 600 - 700 Mbit.
3.8.3. Disk Latencies
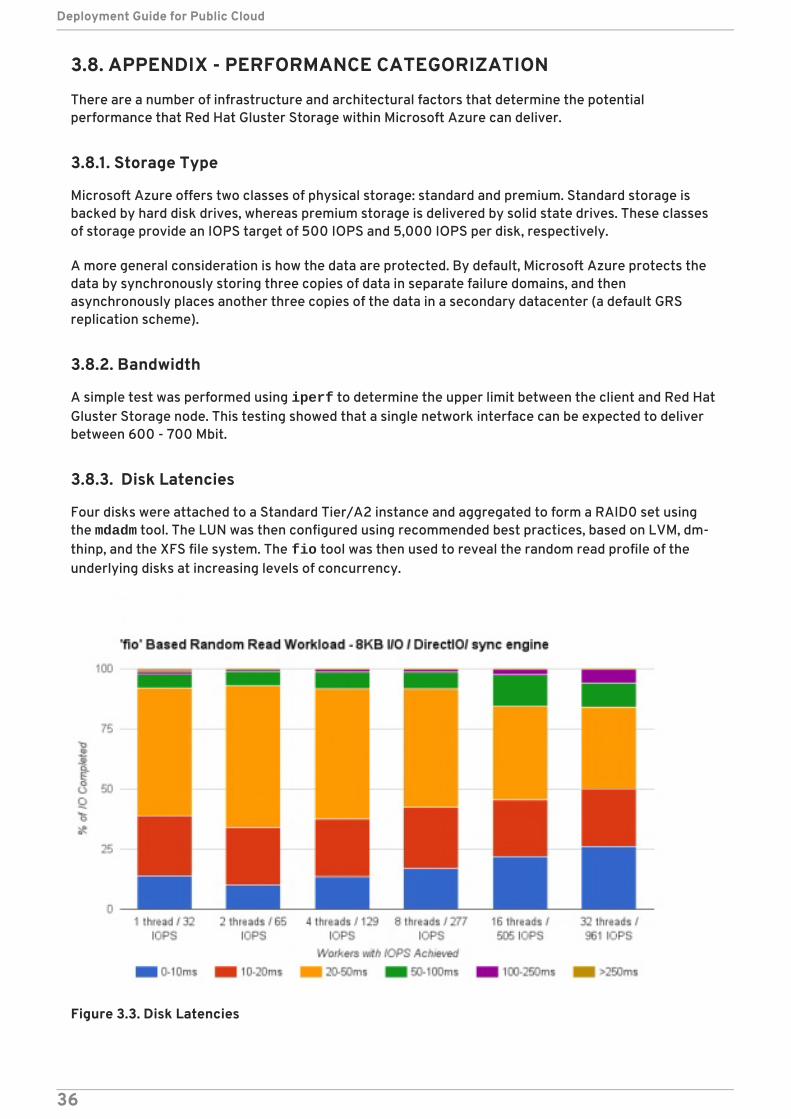
Four disks were attached to a Standard Tier/A2 instance and aggregated to form a RAID0 set usingthe mdadm tool. The LUN was then configured using recommended best practices, based on LVM, dm-thinp, and the XFS file system. The fio tool was then used to reveal the random read profile of theunderlying disks at increasing levels of concurrency.
Figure 3.3. Disk Latencies
Deployment Guide for Public Cloud
36
This benchmark does not produce a definitive result, but it indicates the potential I/O profile of theunderlying storage.
Observations
Typical latencies are in the 20 - 50 ms range.
Attaining higher IOPS requires a multi-threaded workload; that is, one thread=32 IOPS, 32threads = 961 IOPS.
Combining the virtual drives with mdadm allows the LUN to deliver IOPS beyond that of a singlevirtual disk.
3.8.4. GlusterFS
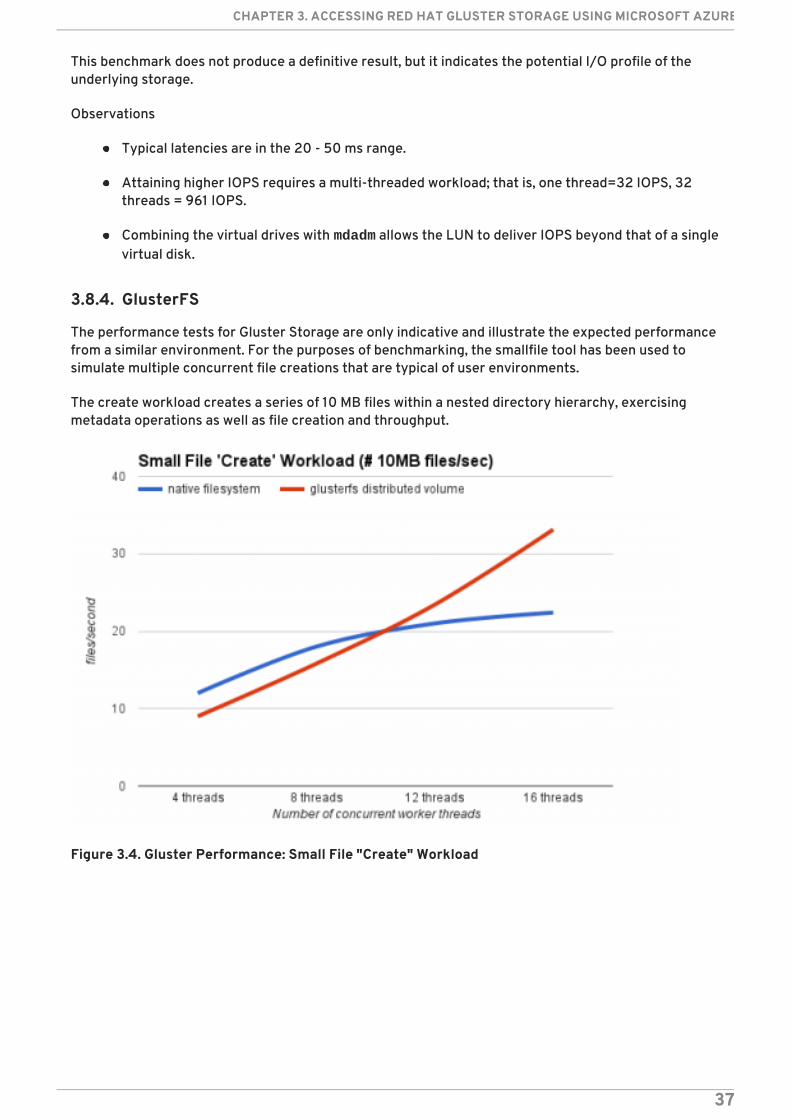
The performance tests for Gluster Storage are only indicative and illustrate the expected performancefrom a similar environment. For the purposes of benchmarking, the smallfile tool has been used tosimulate multiple concurrent file creations that are typical of user environments.
The create workload creates a series of 10 MB files within a nested directory hierarchy, exercisingmetadata operations as well as file creation and throughput.
Figure 3.4. Gluster Performance: Small File "Create" Workload
CHAPTER 3. ACCESSING RED HAT GLUSTER STORAGE USING MICROSOFT AZURE
37
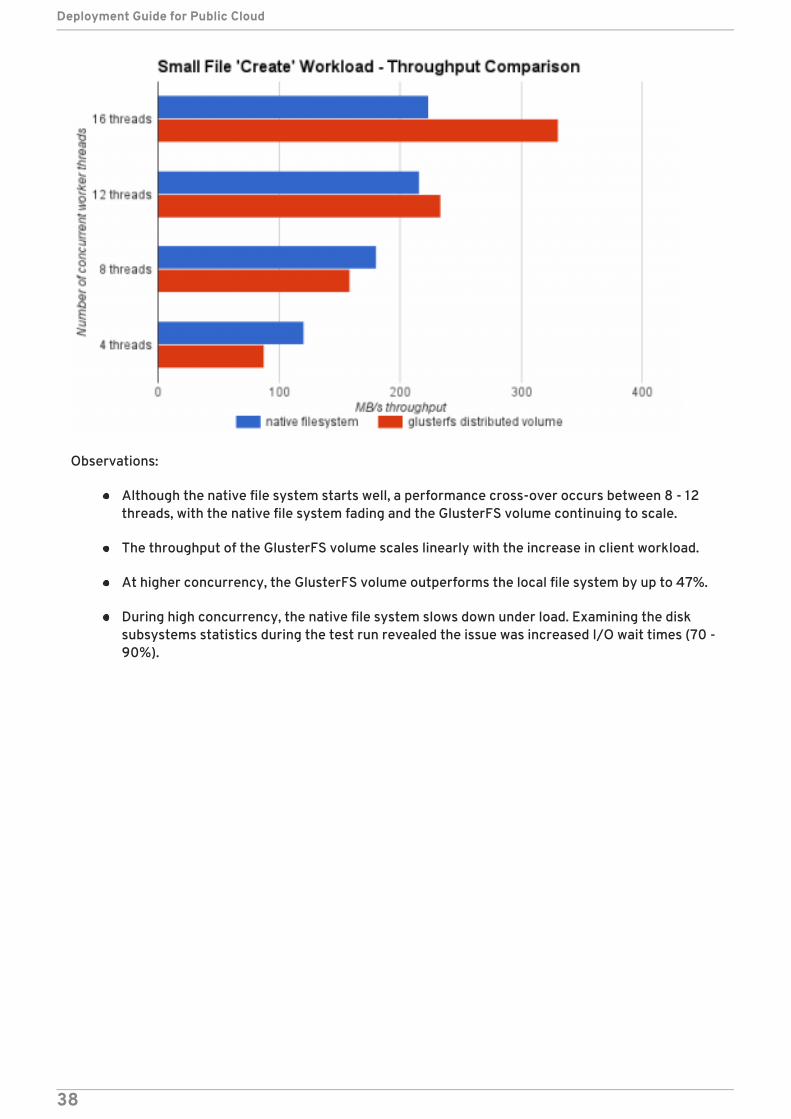
Observations:
Although the native file system starts well, a performance cross-over occurs between 8 - 12threads, with the native file system fading and the GlusterFS volume continuing to scale.
The throughput of the GlusterFS volume scales linearly with the increase in client workload.
At higher concurrency, the GlusterFS volume outperforms the local file system by up to 47%.
During high concurrency, the native file system slows down under load. Examining the disksubsystems statistics during the test run revealed the issue was increased I/O wait times (70 -90%).
Deployment Guide for Public Cloud
38
CHAPTER 4. USING RED HAT GLUSTER STORAGE IN THEGOOGLE CLOUD PLATFORMRed Hat Gluster Storage provides support to the data needs of cloud-scale applications on GoogleCloud Platform (GCP). Red Hat Gluster Storage provides software-defined file storage solution to runon GCP so that customer's applications can use traditional file interfaces with scale-out flexibility andperformance.
At the core of the Red Hat Gluster Storage design is a completely new method of architecting storage.The result is a system that has immense scalability, is highly resilient, and offers extraordinaryperformance.
Google Cloud Platform Overview
The Google Cloud Platform is Google’s public cloud offering, which provides many services to run afully integrated cloud-based environment. The Google Compute Engine is what drives and managesthe virtual machine environment. This chapter is based on this virtual machine infrastructure . Thisvirtual framework provides networking, storage, and virtual machines to scale out the Red Hat GlusterStorage environment to meet the demands of the specified workload.
For more information on Google Cloud Platform, see https://cloud.google.com, and for information onthe Google Compute Engine, see https://cloud.google.com/compute/docs.
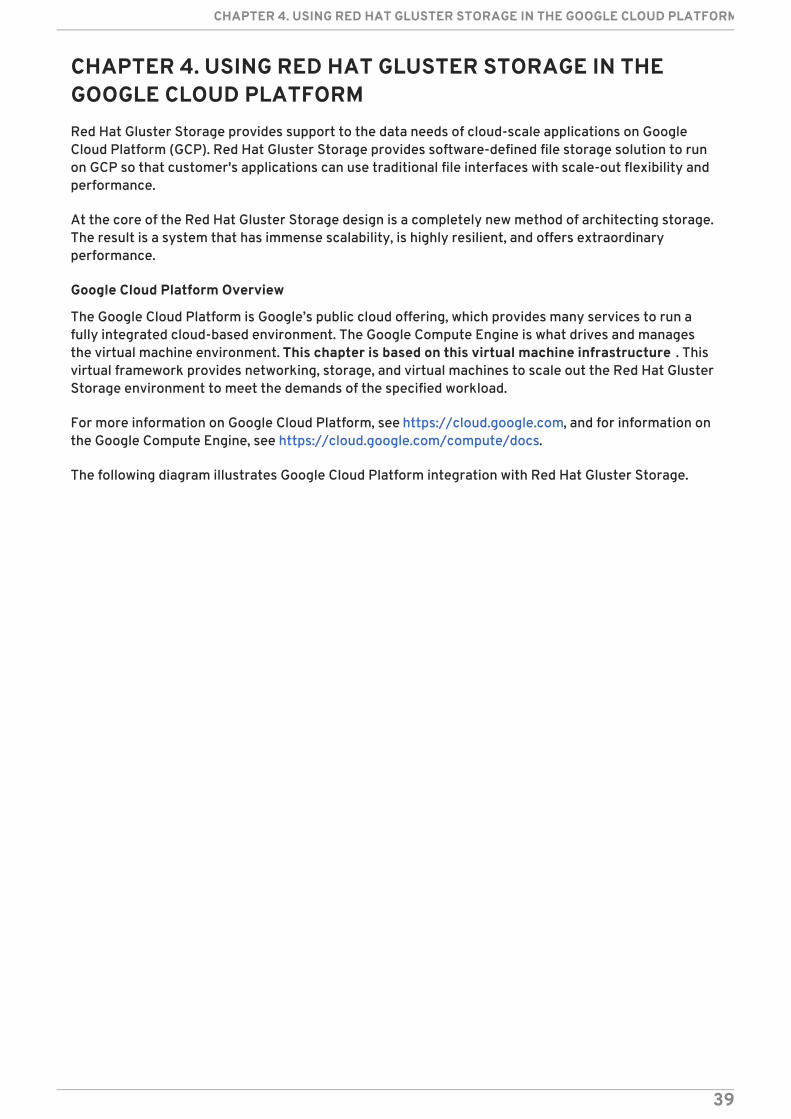
The following diagram illustrates Google Cloud Platform integration with Red Hat Gluster Storage.
CHAPTER 4. USING RED HAT GLUSTER STORAGE IN THE GOOGLE CLOUD PLATFORM
39
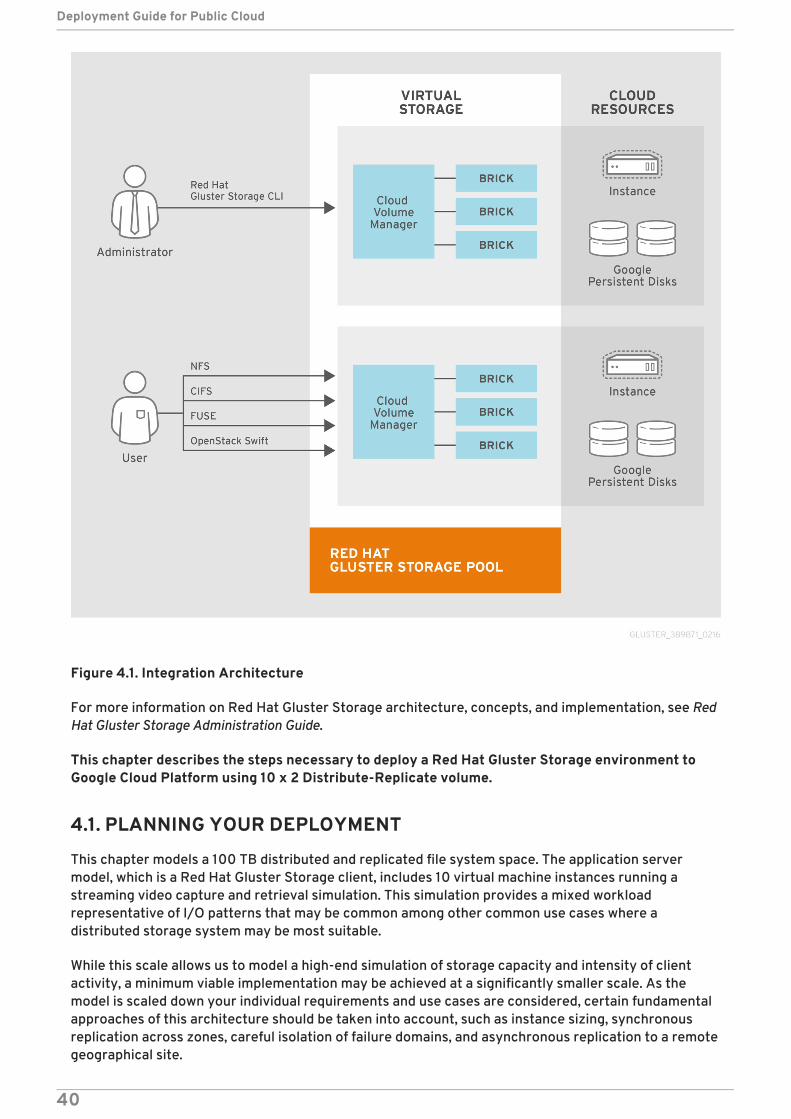
Figure 4.1. Integration Architecture
For more information on Red Hat Gluster Storage architecture, concepts, and implementation, see RedHat Gluster Storage Administration Guide.
This chapter describes the steps necessary to deploy a Red Hat Gluster Storage environment toGoogle Cloud Platform using 10 x 2 Distribute-Replicate volume.
4.1. PLANNING YOUR DEPLOYMENT
This chapter models a 100 TB distributed and replicated file system space. The application servermodel, which is a Red Hat Gluster Storage client, includes 10 virtual machine instances running astreaming video capture and retrieval simulation. This simulation provides a mixed workloadrepresentative of I/O patterns that may be common among other common use cases where adistributed storage system may be most suitable.
While this scale allows us to model a high-end simulation of storage capacity and intensity of clientactivity, a minimum viable implementation may be achieved at a significantly smaller scale. As themodel is scaled down your individual requirements and use cases are considered, certain fundamentalapproaches of this architecture should be taken into account, such as instance sizing, synchronousreplication across zones, careful isolation of failure domains, and asynchronous replication to a remotegeographical site.
Deployment Guide for Public Cloud
40
Maximum Persistent Disk Size
The original test build was limited by the maximum per-VM persistent disk size of 10 TB. Google hassince increased that limit to 64 TB. Red Hat will support persistent disks per VM up to Google's currentmaximum size of 64 TB. (Note that 64 TB is both a per-disk and a per-VM maximum, so the actual datadisk maximum will be 64 TB minus the operating system disk size.)
Other real-world use cases may involve significantly more client connections than represented in thischapter. While the particular study performed here was limited in client scale due to a focus on serverand storage scale, some basic throughput tests showed the linear scale capabilities of the storagesystem. As always, your own design should be tuned to your particular use case and tested forperformance and scale limitations.
4.1.1. Environment
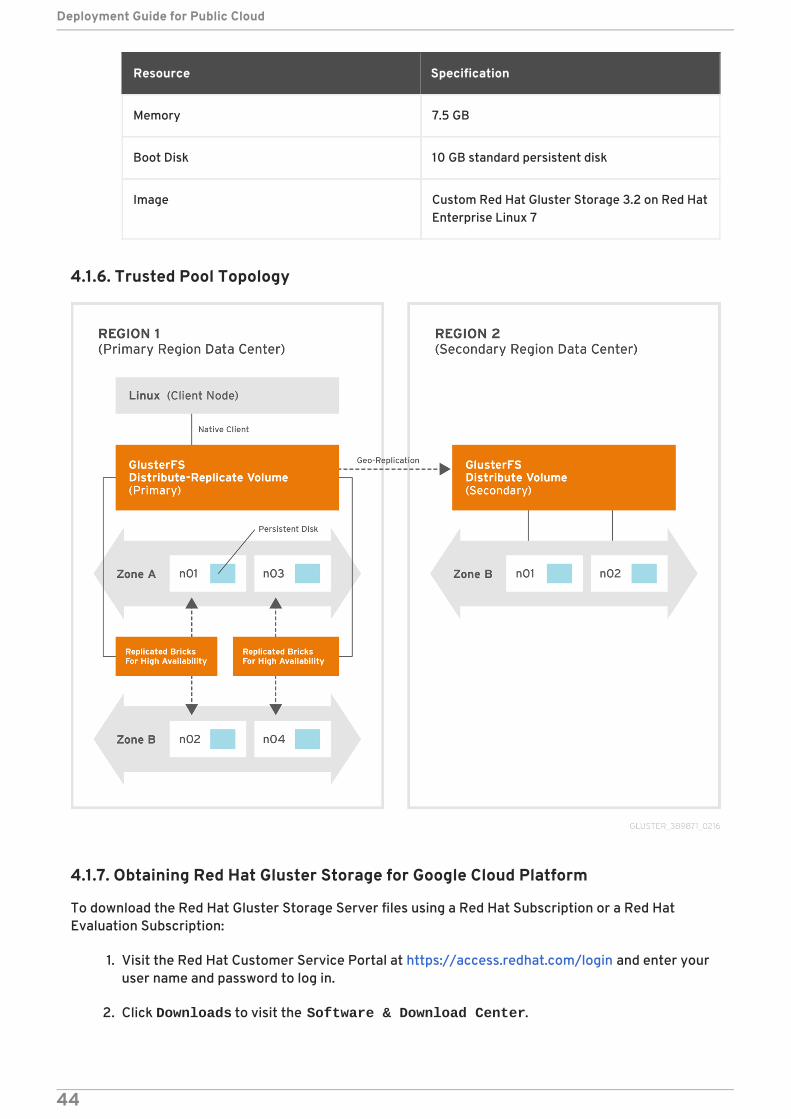
The scale target is roughly 100 TB of usable storage, with 2-way synchronous replication betweenzones in the primary pool, and additionally remote asynchronous geo-replication to a secondary pool inanother region for disaster recovery. As of this writing, the current maximum size of a Google ComputeEngine persistent disk is 10 TB, therefore our design requires 20 bricks for the primary pool and 10bricks for the secondary pool. The secondary pool will have single data copies which are notsynchronously replicated.
Note that there is also currently a per-VM limit of 10 TB of persistent disk, so the actual data disk willbe configured at 10,220 GB in order to account for the 20 GB root volume persistent disk.
All nodes will use a Red Hat Gluster Storage 3.2 on Red Hat Enterprise Linux 7 image that will bemanually created and configured with a local virtualization system, that is KVM. Red Hat GlusterStorage replica peers in the local region are placed in separate zones within each region. This allowsour synchronous replica copies to be highly available in the case of a zone outage.
The Red Hat Gluster Storage server nodes are built as n1-highmem-4 machine types. This machinetype is the minimally viable configuration based on the published resource requirements for Red HatGluster Storage. Some concession has been made for the minimum memory size based on expectedcloud use cases. The n1-highmem-8 machine type may be a more appropriate match, depending onyour application and specific needs.
4.1.2. Prerequisites
Google account
Google Cloud SDK. The Google Cloud SDK contains tools and libraries that enable you to easilycreate and manage resources on Google Cloud Platform. It will be used later to facilitate thecreation of the multiple Red Hat Gluster Storage instances . For instructions to set up andinstall the Google Cloud SDK, see https://cloud.google.com/sdk.
Subscription to access the Red Hat Gluster Storage software channels. For information onsubscribing to the Red Hat Gluster Storage 3.2 channels, refer to the Installing Red Hat GlusterStorage chapter in the Red Hat Gluster Storage Installation Guide.
4.1.3. Primary Storage Pool Configuration
Red Hat Gluster Storage configured in a 10 x 2 Distribute-Replicate volume
20 x n1-highmem-4 instances:
CHAPTER 4. USING RED HAT GLUSTER STORAGE IN THE GOOGLE CLOUD PLATFORM
41
Resource Specification
vCPU 4
Memory 26 GB
Boot Disk 20 GB standard persistent disk
Data Disk 10,220 GB standard persistent disk. Themaximum persistent disk allocation for a singleinstance is 10 TB. Therefore the maximum sizeof our data disk is necessarily 10 TB minus the20 GB size of the boot disk, or 10,220 GB.
Image Custom Red Hat Gluster Storage 3.2 on Red HatEnterprise Linux 7
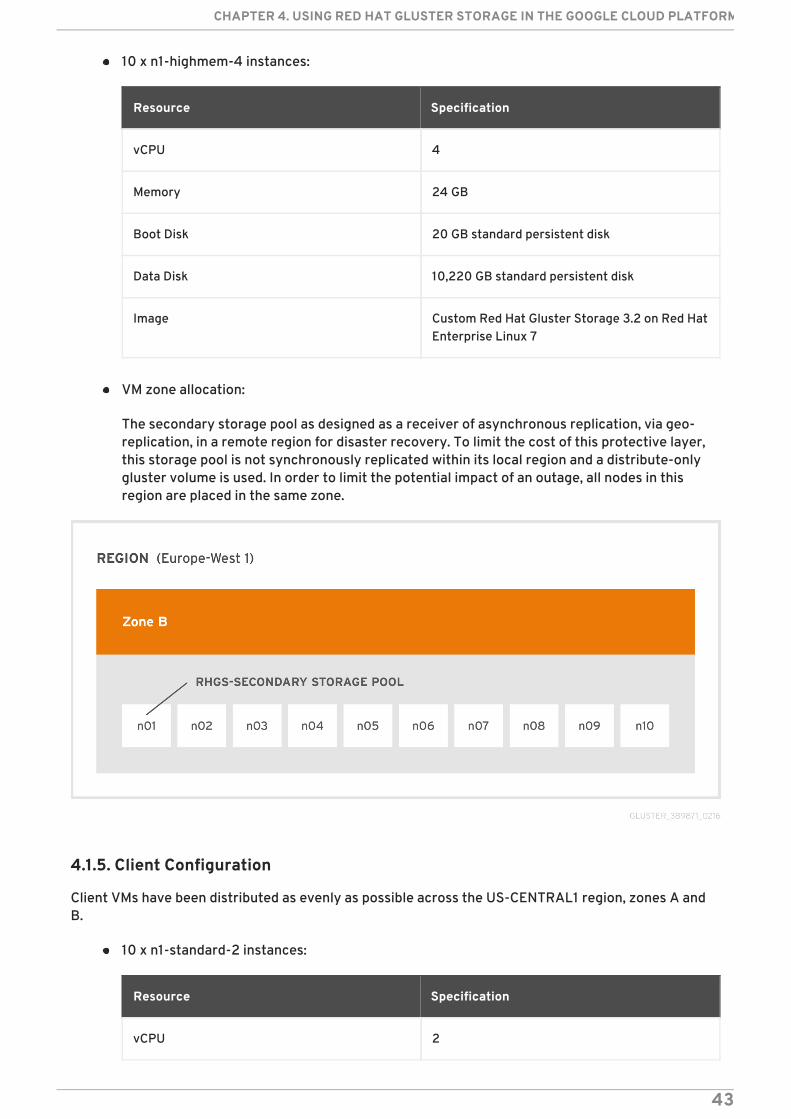
VM zone allocation:
Each Gluster synchronous replica pair is placed across zones in order to limit the impact of azone failure. A single zone failure will not result in a loss of data access. Note that the settingsynchronous replica pairs is a function of the order the bricks defined in the gluster volume create command.
4.1.4. Secondary Storage Pool Configuration
Gluster configured in a 10 x 1 Distribute volume
Deployment Guide for Public Cloud
42
10 x n1-highmem-4 instances:
Resource Specification
vCPU 4
Memory 24 GB
Boot Disk 20 GB standard persistent disk
Data Disk 10,220 GB standard persistent disk
Image Custom Red Hat Gluster Storage 3.2 on Red HatEnterprise Linux 7
VM zone allocation:
The secondary storage pool as designed as a receiver of asynchronous replication, via geo-replication, in a remote region for disaster recovery. To limit the cost of this protective layer,this storage pool is not synchronously replicated within its local region and a distribute-onlygluster volume is used. In order to limit the potential impact of an outage, all nodes in thisregion are placed in the same zone.
4.1.5. Client Configuration
Client VMs have been distributed as evenly as possible across the US-CENTRAL1 region, zones A andB.
10 x n1-standard-2 instances:
Resource Specification
vCPU 2
CHAPTER 4. USING RED HAT GLUSTER STORAGE IN THE GOOGLE CLOUD PLATFORM
43
Memory 7.5 GB
Boot Disk 10 GB standard persistent disk
Image Custom Red Hat Gluster Storage 3.2 on Red HatEnterprise Linux 7
Resource Specification
4.1.6. Trusted Pool Topology
4.1.7. Obtaining Red Hat Gluster Storage for Google Cloud Platform
To download the Red Hat Gluster Storage Server files using a Red Hat Subscription or a Red HatEvaluation Subscription:
1. Visit the Red Hat Customer Service Portal at https://access.redhat.com/login and enter youruser name and password to log in.
2. Click Downloads to visit the Software & Download Center.
Deployment Guide for Public Cloud
44
3. In the Red Hat Gluster Storage Server area, click Download Software to download the latestversion of the qcow2 image.
4.2. SETTING UP GOOGLE COMPUTE ENGINE
To set up Google Compute engine, perform the following steps:
4.2.1. SSH Keys
SSH keys must be generated and registered with the Google Compute Engine project to connect viastandard SSH. You can SSH directly to the instance public IP addresses after it is generated.
1. Generate an SSH key pair for use with Google Compute Engine using the following command:
# ssh-keygen -t rsa -f ~/.ssh/google_compute_engine
2. In the Google Developers Console, click Computer > Compute Engine > Metadata > SSH Keys> Edit.
3. Enter the output generated from ~/.ssh/google_compute_engine.pub file, and clickSave.
CHAPTER 4. USING RED HAT GLUSTER STORAGE IN THE GOOGLE CLOUD PLATFORM
45
4. To enable SSH agent to use this identity file for each new local console session, run thefollowing command on the console:
# ssh-add ~/.ssh/google_compute_engine
5. Adding the below line to your ~/.ssh/config file helps you automate this command.
IdentityFile ~/.ssh/google_compute_engine
6. You can now connect via standard SSH to the new VM instances created in your GoogleCompute Engine project.
# ssh -i ~/.ssh/google_compute_engine <username>@<instance_external_ip>
The gcloud compute config-ssh command from the Google Cloud SDK populates your~/.ssh/configfile with aliases that allows simple SSH connections by instance name.
4.2.2. Setting up Quota
The minimum persistent disk quotas listed below are required for this deployment. It may benecessary to request a quota increase from Google.
Local region (see US-CENTRAL1 illustration in Section 4.1.3, “Primary Storage PoolConfiguration”)
Total persistent disk reserved (GB) >= 206,000
CPUs >= 100
Remote region (see EUROPE-WEST1 illustration in Section 4.1.4, “Secondary Storage PoolConfiguration”)
Total persistent disk reserved (GB) >= 103,000
CPUs >=40
4.3. CONVERTING QCOW2 TO .RAW FORMAT
Convert the downloaded qcow2 image to .raw format using the following command:
# qemu-img convert image_name disk.raw
For example:
# qemu-img convert RHGS-3.2.3-9.x86_64.qcow2 disk.raw
4.4. PACKAGING THE IMAGE FOR GOOGLE COMPUTE ENGINE
Create a gzip sparse tar archive to package the image for Google Compute Engine, using the followingcommand:
Deployment Guide for Public Cloud
46
# tar -czSf disk.raw.tar.gz disk.raw
4.5. UPLOADING THE IMAGE INTO GOOGLE CLOUD STORAGE
You must log in using gcloud auth login command before uploading the image to the Googlecloud. Running the command will open a browser and prompts for google account credentials. ThePROJECT_ID is set by default and follow the subsequent CLI instructions and make changes ifrequired.
Use Google's gsutil command to create the storage bucket and upload the image.
# gsutil mb gs://rhgs_image_upload# gsutil cp disk.raw.tar.gz gs://rhgs_image_upload
4.6. IMPORTING THE IMAGE INTO GOOGLE COMPUTE ENGINE
Use the following command to import the image to Google Compute Engine:
# gcloud compute images create rhgs31 --source-uri gs://rhgs_image_upload/disk.raw.tar.gz
For information on using the saved image, seehttps://cloud.google.com/compute/docs/images/create-delete-deprecate-private-images#use_saved_image.
4.7. CREATING A VM INSTANCE TO CONFIGURE THE DISKS FOR REDHAT GLUSTER STORAGE INSTANCES
1. In the Google Developers Console, click Compute > Compute Engine > VM instances > CreateInstance.
The Create Instance window is displayed.
CHAPTER 4. USING RED HAT GLUSTER STORAGE IN THE GOOGLE CLOUD PLATFORM
47
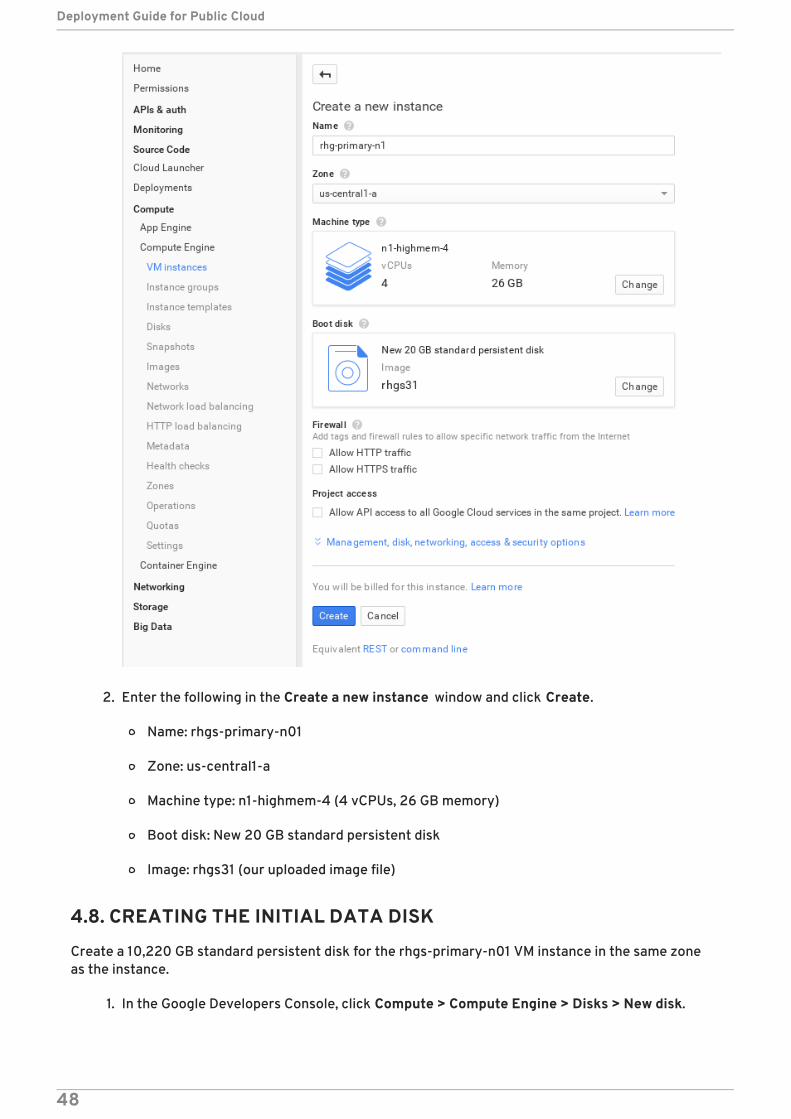
2. Enter the following in the Create a new instance window and click Create.
Name: rhgs-primary-n01
Zone: us-central1-a
Machine type: n1-highmem-4 (4 vCPUs, 26 GB memory)
Boot disk: New 20 GB standard persistent disk
Image: rhgs31 (our uploaded image file)
4.8. CREATING THE INITIAL DATA DISK
Create a 10,220 GB standard persistent disk for the rhgs-primary-n01 VM instance in the same zoneas the instance.
1. In the Google Developers Console, click Compute > Compute Engine > Disks > New disk.
Deployment Guide for Public Cloud
48
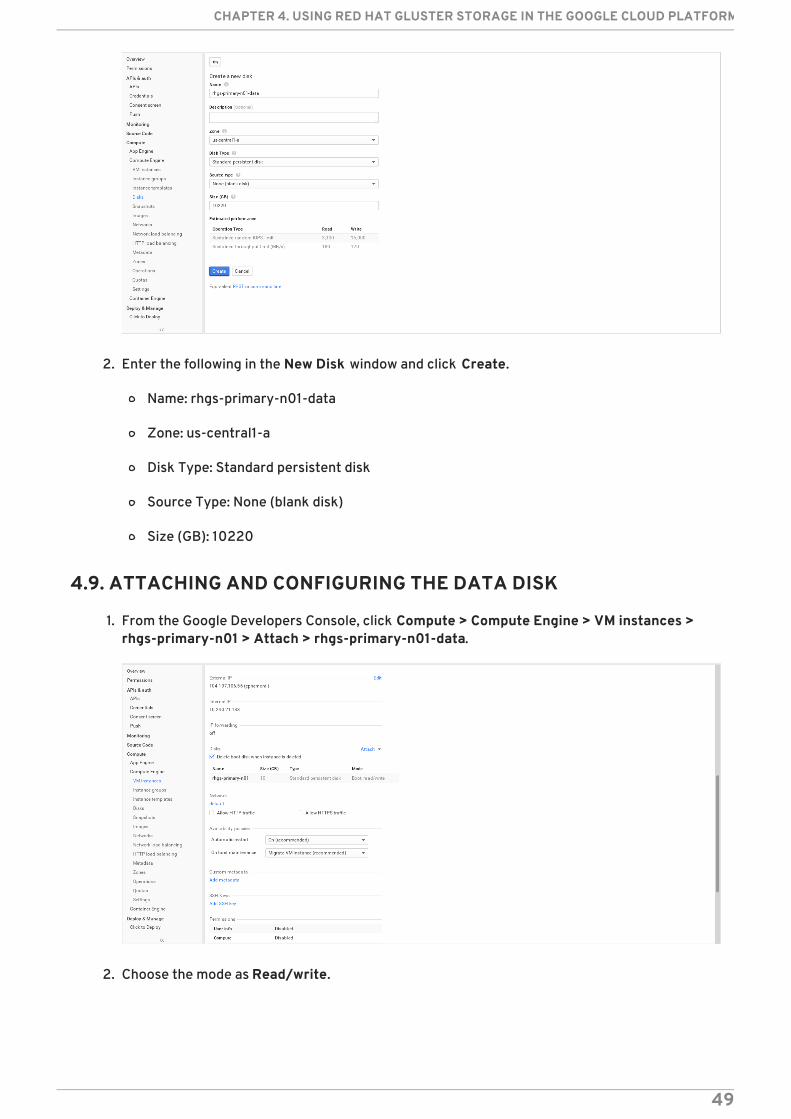
2. Enter the following in the New Disk window and click Create.
Name: rhgs-primary-n01-data
Zone: us-central1-a
Disk Type: Standard persistent disk
Source Type: None (blank disk)
Size (GB): 10220
4.9. ATTACHING AND CONFIGURING THE DATA DISK
1. From the Google Developers Console, click Compute > Compute Engine > VM instances >rhgs-primary-n01 > Attach > rhgs-primary-n01-data.
2. Choose the mode as Read/write.
CHAPTER 4. USING RED HAT GLUSTER STORAGE IN THE GOOGLE CLOUD PLATFORM
49
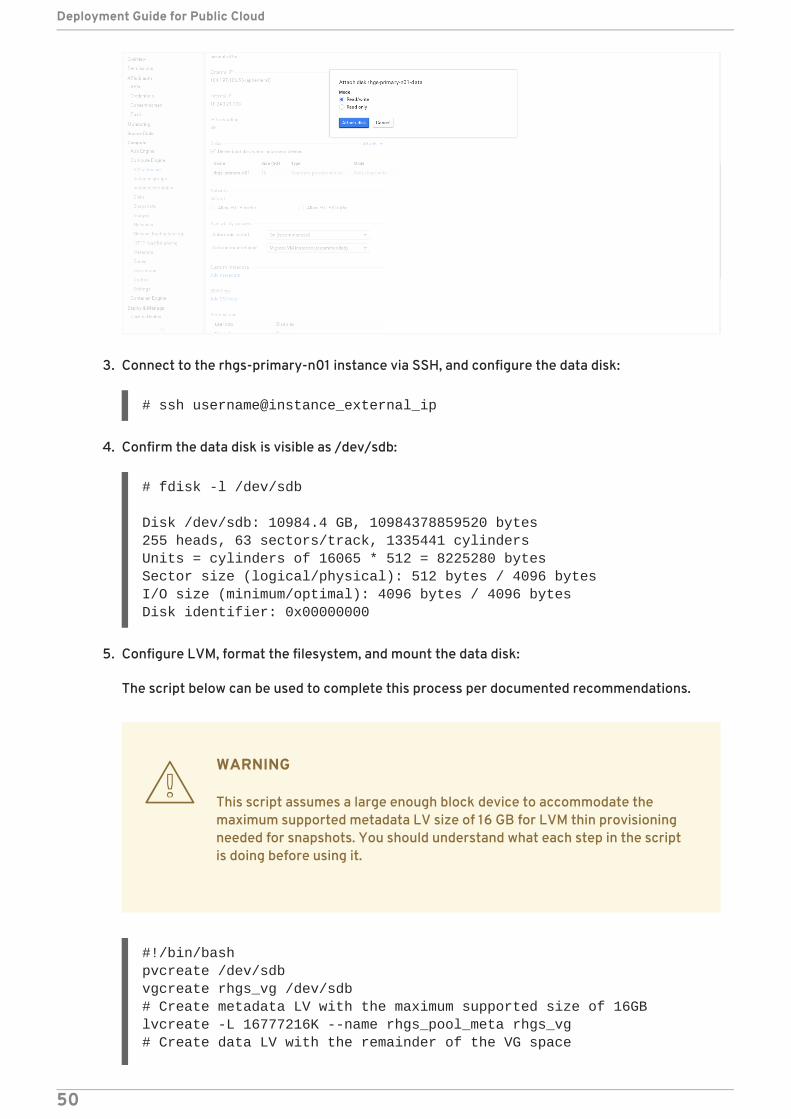
3. Connect to the rhgs-primary-n01 instance via SSH, and configure the data disk:
# ssh username@instance_external_ip
4. Confirm the data disk is visible as /dev/sdb:
# fdisk -l /dev/sdb
Disk /dev/sdb: 10984.4 GB, 10984378859520 bytes255 heads, 63 sectors/track, 1335441 cylindersUnits = cylinders of 16065 * 512 = 8225280 bytesSector size (logical/physical): 512 bytes / 4096 bytesI/O size (minimum/optimal): 4096 bytes / 4096 bytesDisk identifier: 0x00000000
5. Configure LVM, format the filesystem, and mount the data disk:
The script below can be used to complete this process per documented recommendations.
WARNING
This script assumes a large enough block device to accommodate themaximum supported metadata LV size of 16 GB for LVM thin provisioningneeded for snapshots. You should understand what each step in the scriptis doing before using it.
#!/bin/bashpvcreate /dev/sdbvgcreate rhgs_vg /dev/sdb# Create metadata LV with the maximum supported size of 16GBlvcreate -L 16777216K --name rhgs_pool_meta rhgs_vg# Create data LV with the remainder of the VG space
Deployment Guide for Public Cloud
50

lvcreate -l 100%FREE --name rhgs_pool rhgs_vg# The lvconvert command below required 4096 free extents, so reduce the LVlvreduce -f -l 4096 /dev/rhgs_vg/rhgs_pool# Convert our LVs to a thin poollvconvert --yes --thinpool rhgs_vg/rhgs_pool --poolmetadata rhgs_vg/rhgs_pool_meta# Disable zeroing of thin pool chunks for performance boostlvchange --zero n rhgs_vg/rhgs_pool# The -V flag for lvcreate does not allow a ‘100%FREE’ option like -l does.# So we’ll get the size of rhgs_pool from lvs for maximum efficiencyLVSIZE=$(lvs --units g | grep rhgs_pool | awk '{print $4}' | awk -F. '{print $1}')# Create the thin LV for the brickslvcreate -V ${LVSIZE}G -T rhgs_vg/rhgs_pool -n rhgs_lv# Create the XFS filesystem with 512B inode size and 8KB directory block size# This step may take a while...mkfs.xfs -f -i size=512 -n size=8192 -L rhgs_lv /dev/rhgs_vg/rhgs_lv# Create mountpoint and fstab entrymkdir -p /rhgs/bricksecho "LABEL=rhgs_lv /rhgs/bricks xfs rw,inode64,noatime,nouuid 1 2" >> /etc/fstabmount /rhgs/bricksdf -h /rhgs/bricks
4.10. DETACHING THE DISKS FOR THE IMAGE CREATION PROCESS
Now that the disks have been set up, they must be detached from the VM instances so that they can beused for the next step. The VM instance is deleted in the process.
In the Google Developers Console, click Compute > Compute Engine > VM instances > rhgs-primary-n01.
CHAPTER 4. USING RED HAT GLUSTER STORAGE IN THE GOOGLE CLOUD PLATFORM
51
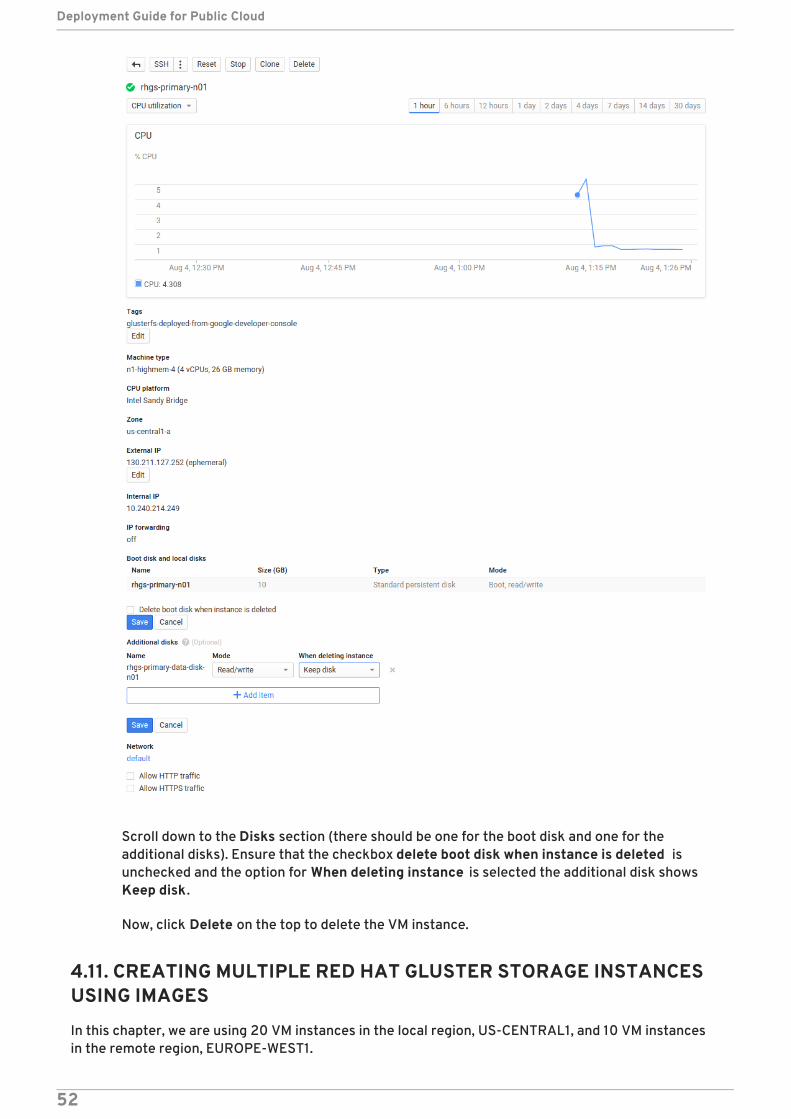
Scroll down to the Disks section (there should be one for the boot disk and one for theadditional disks). Ensure that the checkbox delete boot disk when instance is deleted isunchecked and the option for When deleting instance is selected the additional disk showsKeep disk .
Now, click Delete on the top to delete the VM instance.
4.11. CREATING MULTIPLE RED HAT GLUSTER STORAGE INSTANCESUSING IMAGES
In this chapter, we are using 20 VM instances in the local region, US-CENTRAL1, and 10 VM instancesin the remote region, EUROPE-WEST1.
Deployment Guide for Public Cloud
52
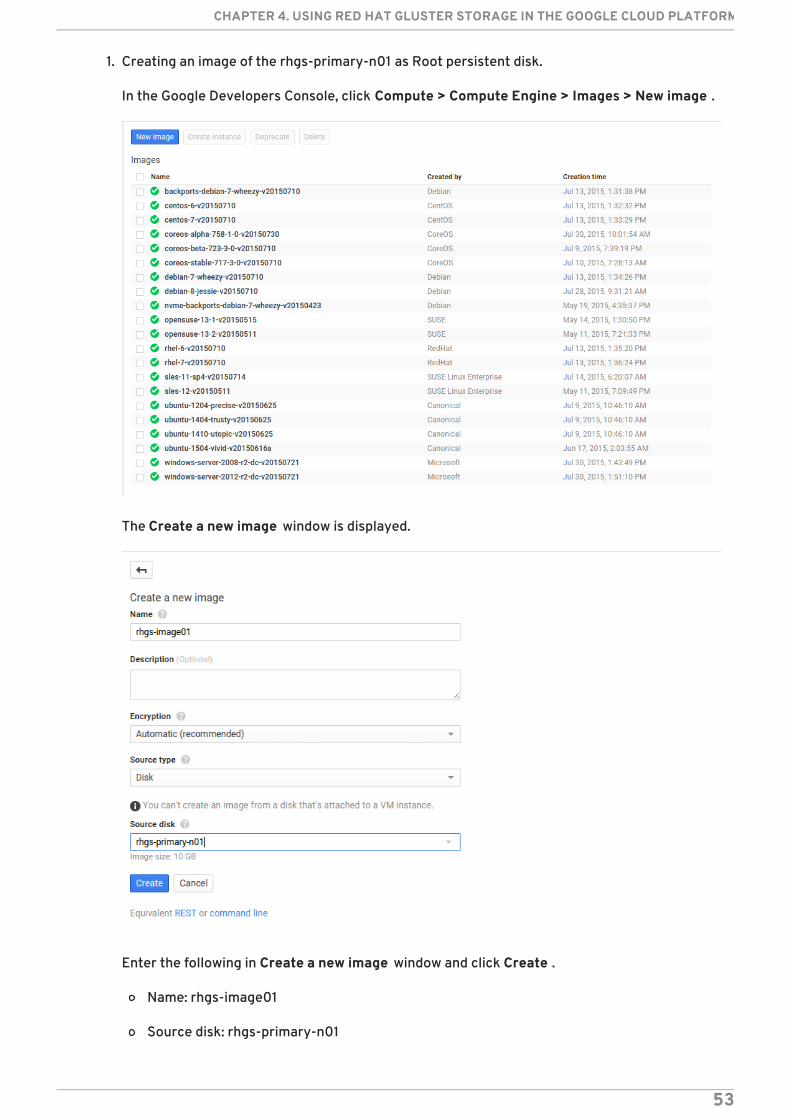
1. Creating an image of the rhgs-primary-n01 as Root persistent disk.
In the Google Developers Console, click Compute > Compute Engine > Images > New image .
The Create a new image window is displayed.
Enter the following in Create a new image window and click Create .
Name: rhgs-image01
Source disk: rhgs-primary-n01
CHAPTER 4. USING RED HAT GLUSTER STORAGE IN THE GOOGLE CLOUD PLATFORM
53

2. Creating an image of the rhgs-primary-n01-data as Data persistent disk.
In the Google Developers Console, click Compute > Compute Engine > Images > New image .
Enter the following in Create a new image window and click Create .
Name: rhgs-data-image01
Source disk: rhgs-primary-n01-data
4.12. USING GOOGLE CLOUD DEPLOYMENT MANAGER TO DEPLOYMULTIPLE INSTANCES
Using the google cloud deployment manager facilitates creation of multiple RGHS instances.
1. Log in and authenticate to Google Cloud by following the steps listed athttps://cloud.google.com/sdk/gcloud/#gcloud.auth.
2. Copy the configuration contents in the Section 4.16, “Appendix: Configuration files for Red HatGluster Storage Deployment”.
3. Run the following gcloud command:
# gcloud deployment-manager deployments create rghs --config glusterfs-config.yaml
4.13. CONFIGURING RED HAT GLUSTER STORAGE
4.13.1. Peer the Nodes
From rhgs-primary-n01, peer nodes rhgs-primary-n{02..20}:
# for i in {02..20}; do gluster peer probe rhgs-primary-n${i}; done
From rhgs-primary-n02, re-peer node rhgs-primary-n01:
Note the problem. This step is done in order to clean up the initial peering process which leaves rhgs-primary-n01 defined by its IP address in the other peers Gluster trusted pool configuration files. This isimportant because the IP addresses are ephemeral:
# gluster peer status | grep Hostname | grep -v rhgsHostname: 10.240.21.133
And correct it:
# gluster peer probe rhgs-primary-n01peer probe: success.# gluster peer status | grep Hostname | grep n01Hostname: rhgs-primary-n01
From rhgs--n01, peer nodes rhgs-secondary-n{02..10}:
Deployment Guide for Public Cloud
54
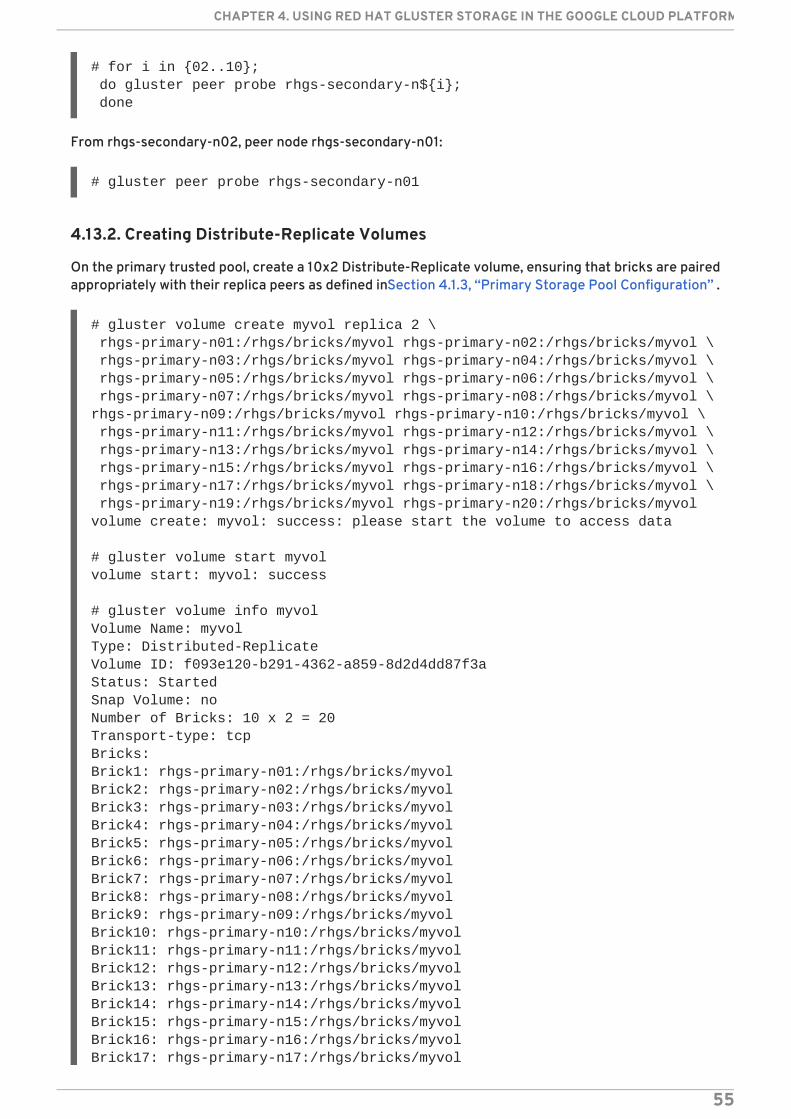
# for i in {02..10}; do gluster peer probe rhgs-secondary-n${i}; done
From rhgs-secondary-n02, peer node rhgs-secondary-n01:
# gluster peer probe rhgs-secondary-n01
4.13.2. Creating Distribute-Replicate Volumes
On the primary trusted pool, create a 10x2 Distribute-Replicate volume, ensuring that bricks are pairedappropriately with their replica peers as defined inSection 4.1.3, “Primary Storage Pool Configuration” .
# gluster volume create myvol replica 2 \ rhgs-primary-n01:/rhgs/bricks/myvol rhgs-primary-n02:/rhgs/bricks/myvol \ rhgs-primary-n03:/rhgs/bricks/myvol rhgs-primary-n04:/rhgs/bricks/myvol \ rhgs-primary-n05:/rhgs/bricks/myvol rhgs-primary-n06:/rhgs/bricks/myvol \ rhgs-primary-n07:/rhgs/bricks/myvol rhgs-primary-n08:/rhgs/bricks/myvol \rhgs-primary-n09:/rhgs/bricks/myvol rhgs-primary-n10:/rhgs/bricks/myvol \ rhgs-primary-n11:/rhgs/bricks/myvol rhgs-primary-n12:/rhgs/bricks/myvol \ rhgs-primary-n13:/rhgs/bricks/myvol rhgs-primary-n14:/rhgs/bricks/myvol \ rhgs-primary-n15:/rhgs/bricks/myvol rhgs-primary-n16:/rhgs/bricks/myvol \ rhgs-primary-n17:/rhgs/bricks/myvol rhgs-primary-n18:/rhgs/bricks/myvol \ rhgs-primary-n19:/rhgs/bricks/myvol rhgs-primary-n20:/rhgs/bricks/myvolvolume create: myvol: success: please start the volume to access data
# gluster volume start myvolvolume start: myvol: success
# gluster volume info myvolVolume Name: myvolType: Distributed-ReplicateVolume ID: f093e120-b291-4362-a859-8d2d4dd87f3aStatus: StartedSnap Volume: noNumber of Bricks: 10 x 2 = 20Transport-type: tcpBricks:Brick1: rhgs-primary-n01:/rhgs/bricks/myvolBrick2: rhgs-primary-n02:/rhgs/bricks/myvolBrick3: rhgs-primary-n03:/rhgs/bricks/myvolBrick4: rhgs-primary-n04:/rhgs/bricks/myvolBrick5: rhgs-primary-n05:/rhgs/bricks/myvolBrick6: rhgs-primary-n06:/rhgs/bricks/myvolBrick7: rhgs-primary-n07:/rhgs/bricks/myvolBrick8: rhgs-primary-n08:/rhgs/bricks/myvolBrick9: rhgs-primary-n09:/rhgs/bricks/myvolBrick10: rhgs-primary-n10:/rhgs/bricks/myvolBrick11: rhgs-primary-n11:/rhgs/bricks/myvolBrick12: rhgs-primary-n12:/rhgs/bricks/myvolBrick13: rhgs-primary-n13:/rhgs/bricks/myvolBrick14: rhgs-primary-n14:/rhgs/bricks/myvolBrick15: rhgs-primary-n15:/rhgs/bricks/myvolBrick16: rhgs-primary-n16:/rhgs/bricks/myvolBrick17: rhgs-primary-n17:/rhgs/bricks/myvol
CHAPTER 4. USING RED HAT GLUSTER STORAGE IN THE GOOGLE CLOUD PLATFORM
55

Brick18: rhgs-primary-n18:/rhgs/bricks/myvolBrick19: rhgs-primary-n19:/rhgs/bricks/myvolBrick20: rhgs-primary-n20:/rhgs/bricks/myvolOptions Reconfigured:performance.readdir-ahead: onauto-delete: disablesnap-max-soft-limit: 90snap-max-hard-limit: 256
The resulting Gluster volume topology is:
Distribute set| +-- Replica set 0| | | +-- Brick 0: rhgs-primary-n01:/rhgs/bricks/myvol| | | +-- Brick 1: rhgs-primary-n02:/rhgs/bricks/myvol| +-- Replica set 1| | | +-- Brick 0: rhgs-primary-n03:/rhgs/bricks/myvol| | | +-- Brick 1: rhgs-primary-n04:/rhgs/bricks/myvol| +-- Replica set 2| | | +-- Brick 0: rhgs-primary-n05:/rhgs/bricks/myvol| | | +-- Brick 1: rhgs-primary-n06:/rhgs/bricks/myvol| +-- Replica set 3| | | +-- Brick 0: rhgs-primary-n07:/rhgs/bricks/myvol| | | +-- Brick 1: rhgs-primary-n08:/rhgs/bricks/myvol| +-- Replica set 4| | | +-- Brick 0: rhgs-primary-n09:/rhgs/bricks/myvol| | | +-- Brick 1: rhgs-primary-n10:/rhgs/bricks/myvol| +-- Replica set 5| | | +-- Brick 0: rhgs-primary-n11:/rhgs/bricks/myvol| | | +-- Brick 1: rhgs-primary-n12:/rhgs/bricks/myvol| +-- Replica set 6| | | +-- Brick 0: rhgs-primary-n13:/rhgs/bricks/myvol| | | +-- Brick 1: rhgs-primary-n14:/rhgs/bricks/myvol| +-- Replica set 7
Deployment Guide for Public Cloud
56
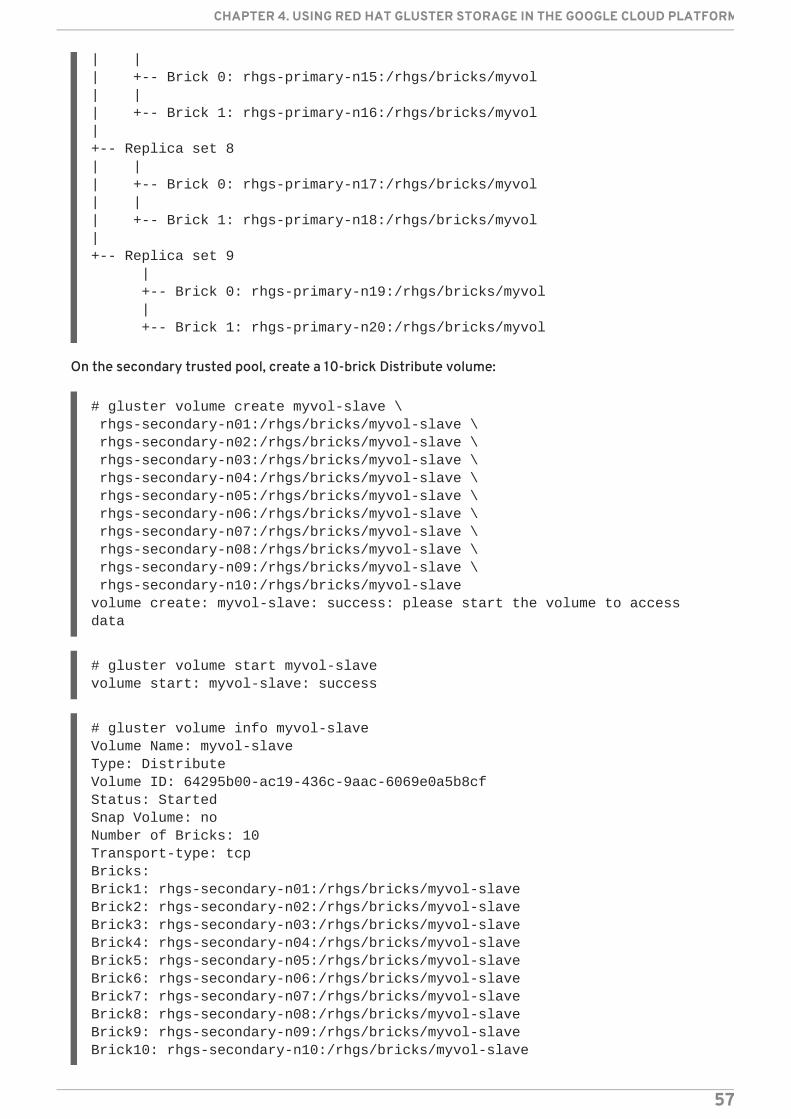
| | | +-- Brick 0: rhgs-primary-n15:/rhgs/bricks/myvol| | | +-- Brick 1: rhgs-primary-n16:/rhgs/bricks/myvol| +-- Replica set 8| | | +-- Brick 0: rhgs-primary-n17:/rhgs/bricks/myvol| | | +-- Brick 1: rhgs-primary-n18:/rhgs/bricks/myvol| +-- Replica set 9 | +-- Brick 0: rhgs-primary-n19:/rhgs/bricks/myvol | +-- Brick 1: rhgs-primary-n20:/rhgs/bricks/myvol
On the secondary trusted pool, create a 10-brick Distribute volume:
# gluster volume create myvol-slave \ rhgs-secondary-n01:/rhgs/bricks/myvol-slave \ rhgs-secondary-n02:/rhgs/bricks/myvol-slave \ rhgs-secondary-n03:/rhgs/bricks/myvol-slave \ rhgs-secondary-n04:/rhgs/bricks/myvol-slave \ rhgs-secondary-n05:/rhgs/bricks/myvol-slave \ rhgs-secondary-n06:/rhgs/bricks/myvol-slave \ rhgs-secondary-n07:/rhgs/bricks/myvol-slave \ rhgs-secondary-n08:/rhgs/bricks/myvol-slave \ rhgs-secondary-n09:/rhgs/bricks/myvol-slave \ rhgs-secondary-n10:/rhgs/bricks/myvol-slavevolume create: myvol-slave: success: please start the volume to access data
# gluster volume start myvol-slavevolume start: myvol-slave: success
# gluster volume info myvol-slaveVolume Name: myvol-slaveType: DistributeVolume ID: 64295b00-ac19-436c-9aac-6069e0a5b8cfStatus: StartedSnap Volume: noNumber of Bricks: 10Transport-type: tcpBricks:Brick1: rhgs-secondary-n01:/rhgs/bricks/myvol-slaveBrick2: rhgs-secondary-n02:/rhgs/bricks/myvol-slaveBrick3: rhgs-secondary-n03:/rhgs/bricks/myvol-slaveBrick4: rhgs-secondary-n04:/rhgs/bricks/myvol-slaveBrick5: rhgs-secondary-n05:/rhgs/bricks/myvol-slaveBrick6: rhgs-secondary-n06:/rhgs/bricks/myvol-slaveBrick7: rhgs-secondary-n07:/rhgs/bricks/myvol-slaveBrick8: rhgs-secondary-n08:/rhgs/bricks/myvol-slaveBrick9: rhgs-secondary-n09:/rhgs/bricks/myvol-slaveBrick10: rhgs-secondary-n10:/rhgs/bricks/myvol-slave
CHAPTER 4. USING RED HAT GLUSTER STORAGE IN THE GOOGLE CLOUD PLATFORM
57
Options Reconfigured:performance.readdir-ahead: onsnap-max-hard-limit: 256snap-max-soft-limit: 90auto-delete: disable
The resulting Gluster volume topology is:
Distribute set| +-- Brick 0: rhgs-secondary-n01:/rhgs/bricks/myvol-slave| +-- Brick 1: rhgs-secondary-n02:/rhgs/bricks/myvol-slave| +-- Brick 2: rhgs-secondary-n03:/rhgs/bricks/myvol-slave| +-- Brick 3: rhgs-secondary-n04:/rhgs/bricks/myvol-slave| +-- Brick 4: rhgs-secondary-n05:/rhgs/bricks/myvol-slave| +-- Brick 5: rhgs-secondary-n06:/rhgs/bricks/myvol-slave| +-- Brick 6: rhgs-secondary-n07:/rhgs/bricks/myvol-slave| +-- Brick 7: rhgs-secondary-n08:/rhgs/bricks/myvol-slave| +-- Brick 8: rhgs-secondary-n09:/rhgs/bricks/myvol-slave| +-- Brick 9: rhgs-secondary-n10:/rhgs/bricks/myvol-slave
4.13.3. Setting up Geo-Replication from the Primary to the Secondary Region
From a primary region node, establish geo-replication from the local myvol volume to the remoteregion myvol-slave volume.
1. As a prerequisite, all secondary/slave side nodes must allow root user login via SSH. The belowcommands should be run on all of nodes rhgs-secondary-n{01..10}.
# sed -i s/PermitRootLogin\ no/PermitRootLogin\ yes/ \/etc/ssh/sshd_config# service sshd restart
2. Create an SSH key pair for the root user on rhgs-primary-n01, and copy the contents of thepublic key:
# ssh-keygen# cat ~root/.ssh/id_rsa.pubssh-rsa AAAAB3NzaC1yc2EAAAABIwAAAQEAmtzZdIR+pEl16LqH0kbGQfA7sTe1iWHhV/x+5zVDb91Z+gzMVdBTBaLyugeoBlxzOeFFnc/7a9TwNSr7YWt/yKZxh+lnqq/9xcWtONUrfvLH4TEWu4dlRwCvXGsdv23lQK0YabaY9hqzshscFtSnQTmzT13LPc9drH+k7lHBu4KjA4igDvX/j41or0weneg1vcqAP9vRyh4xXgtocqBiAqJegBZ5O
Deployment Guide for Public Cloud
58
/QO1ynyJBysp7tIHF7HZuh3sFCxtqEPPsJkVJDiQZ/NqTr3hAqDzmn4USOX3FbSOvomlWa8We6tGb9nfUH6vBQGyKbWk4YOzm6E5oTzuRBGA1vCPmwpwR/cw== root@rhgs-primary-n01
3. On rhgs-secondary-n01, add the SSH public key from rhgs-primary-n01 to the root user’sauthorized_keys file:
# echo "ssh-rsa AAAAB3NzaC1yc2EAAAABIwAAAQEAmtzZdIR+pEl16LqH0kbGQfA7sTe1iWHhV/x+5zVDb91Z+gzMVdBTBaLyugeoBlxzOeFFnc/7a9TwNSr7YWt/yKZxh+lnqq7/9xcWtONUrfvLH4TEWu4dlRwCvXGsdv23lQK0YabaY9hqzshscFtSnQTmzT13LPc9drH+k7lHBu4KjA4igDvX j41or0weneg1vcqAP9vRyh4xXgtocqBiAqJegBZ5O/QO1ynyJBysp7tIHF7HZuh3sFCxtqEPPsJkVJDiQZ/NqTr3hAqDzmn4USOX3FbSOvomlWa8We6tGb9nfUH6vBQGyKbWk4YOzm6E5oTzuRBGA1vCPmwpwR/cw== root@rhgs-primary-n01" | sudo tee ~root/.ssh/authorized_keys > /dev/null
NOTE
The above SSH public key is for illustration purposes only. Use the key from yourown id_rsa.pub file on rhgs-primary-n01.
At this point, the root user on rhgs-primary-n01 should have passwordless SSH access to rhgs-secondary-n01. This is a prerequisite for setting up geo-replication.
1. Create a common pem pub file on rhgs-primary-n01:
NOTE
This must be done on the node where passwordless SSH to the secondary nodewas configured.
# gluster system:: execute gsec_create
2. Create the geo-replication session from the primary site to the secondary site. The push-pemoption is needed to perform the necessary pem-file setup on the slave nodes.
# gluster volume geo-replication myvol \rhgs-secondary-n01::myvol-slave create push-pem
# gluster volume geo-replication myvol \rhgs-secondary-n01::myvol-slave start
3. Verify the geo-replication status. After a few minutes, the initialization stage should complete,and each connection should show Active or Passive for its status.
# gluster volume geo-replication myvol rhgs-secondary-n01::myvol-slave statusMASTER NODE MASTER VOL MASTER BRICK SLAVE USER SLAVE STATUS CHECKPOINT STATUS
CHAPTER 4. USING RED HAT GLUSTER STORAGE IN THE GOOGLE CLOUD PLATFORM
59
CRAWL STATUS ------------------------------------------------------------------------------------------------------------------------------------------------------------------------------------------------------------rhgs-primary-n01 myvol /rhgs/bricks/myvol root rhgs-secondary-n10::myvol-slave Active N/A Changelog Crawl rhgs-primary-n18 myvol /rhgs/bricks/myvol root rhgs-secondary-n05::myvol-slave Passive N/A N/A rhgs-primary-n06 myvol /rhgs/bricks/myvol root rhgs-secondary-n07::myvol-slave Passive N/A N/A rhgs-primary-n02 myvol /rhgs/bricks/myvol root rhgs-secondary-n02::myvol-slave Passive N/A N/A rhgs-primary-n10 myvol /rhgs/bricks/myvol root rhgs-secondary-n09::myvol-slave Passive N/A N/A rhgs-primary-n14 myvol /rhgs/bricks/myvol root rhgs-secondary-n01::myvol-slave Passive N/A N/A rhgs-primary-n03 myvol /rhgs/bricks/myvol root rhgs-secondary-n03::myvol-slave Active N/A Changelog Crawl rhgs-primary-n09 myvol /rhgs/bricks/myvol root rhgs-secondary-n08::myvol-slave Active N/A Changelog Crawl rhgs-primary-n11 myvol /rhgs/bricks/myvol root rhgs-secondary-n10::myvol-slave Active N/A Changelog Crawl rhgs-primary-n13 myvol /rhgs/bricks/myvol root rhgs-secondary-n03::myvol-slave Active N/A Changelog Crawl rhgs-primary-n19 myvol /rhgs/bricks/myvol root rhgs-secondary-n08::myvol-slave Active N/A Changelog Crawl rhgs-primary-n17 myvol /rhgs/bricks/myvol root rhgs-secondary-n04::myvol-slave Active N/A Changelog Crawl rhgs-primary-n05 myvol /rhgs/bricks/myvol root rhgs-secondary-n06::myvol-slave Active N/A Changelog Crawl rhgs-primary-n15 myvol /rhgs/bricks/myvol root rhgs-secondary-n06::myvol-slave Active N/A Changelog Crawl rhgs-primary-n16 myvol /rhgs/bricks/myvol root rhgs-secondary-n07::myvol-slave Passive N/A N/A rhgs-primary-n07 myvol /rhgs/bricks/myvol root rhgs-secondary-n04::myvol-slave Active N/A Changelog Crawl rhgs-primary-n20 myvol /rhgs/bricks/myvol root rhgs-secondary-n09::myvol-slave Passive N/A N/A
Deployment Guide for Public Cloud
60
rhgs-primary-n12 myvol /rhgs/bricks/myvol root rhgs-secondary-n02::myvol-slave Passive N/A N/A rhgs-primary-n04 myvol /rhgs/bricks/myvol root rhgs-secondary-n01::myvol-slave Passive N/A N/A rhgs-primary-n08 myvol /rhgs/bricks/myvol root rhgs-secondary-n05::myvol-slave Passive N/A N/A
At this point, the 100 TB Gluster volume is fully ready for use, with cross-zone synchronous datareplication on the primary side and remote asynchronous data replication to a read-only volume on thesecondary side located in a separate region.
4.14. SETTING UP CLIENTS TO ACCESS DATA
NFS and SMB clients
The NFS and SMB protocols are available for use, but due to limitations in the networkconfiguration these protocols cannot be made highly available with CTDB or Pacemaker aswould be normally recommended.
Prerequisites
You must ensure to register and subscribe your system before installing Native Client. Instructions forregistering the system, is available, refer to the Creating Access to Volumeschapter in the Red HatGluster Storage Administration Guide.
4.14.1. Installing Native Client
Run the following command to install the native client:
# yum -y install glusterfs-fuse attr
4.14.2. Mounting Red Hat Gluster Storage Volumes
After installing Native Client, the Red Hat Gluster Storage volumes must be mounted to access data.Mount the myvol Gluster volume to the local directory /rhgs/client/myvol:
# mkdir -p /rhgs/client/myvol
# sh -c 'echo "rhgs-primary-n01:myvol /rhgs/client/myvol \ glusterfs defaults 0 0" >> /etc/fstab'
4.14.3. Testing Mounted Volumes
Test the mounted volume by running the following command:
# mount /rhgs/client/myvol'
4.15. APPENDIX - BUILDING RED HAT GLUSTER STORAGE COMPUTEENGINE IMAGE FROM SCRATCH
CHAPTER 4. USING RED HAT GLUSTER STORAGE IN THE GOOGLE CLOUD PLATFORM
61
It is possible to deploy an existing Red Hat Enterprise Linux public image and perform a layered installof Red Hat Gluster Storage. This creates an effective "double charge" for each Red Hat EnterpriseLinux instance.
NOTE
Google Compute Engine charges a premium fee for using a public Red Hat EnterpriseLinux image for instances in order to cover the expense of the Red Hat subscription.
When deploying a layered install, you must re-register the instances with Red Hat SubscriptionManager, thus consuming a Red Hat Enterprise Linux entitlement that you have paid for separately.After registering with Subscription Manager, however, Google Compute Engine will continue to chargethe premium fee for the instances.
To avoid this, we will build a custom image, which will not be subject to the Google Compute Enginepremium fee. For infomration on building a custom image from scratch, seehttps://cloud.google.com/compute/docs/tutorials/building-images.
4.15.1. Installing Red Hat Gluster Storage from the ISO to a RAW Disk Image File
Using your local virtualization manager, create a virtual machine with a RAW format sparse flat-filebacking the system disk. The suggested minimum disk size for the Red Hat Gluster Storage 3.2 systemdisk is 20 GB and the maximum disk size for import into Google Compute Engine is 100 GB. GoogleCompute Engine additionally requires the disk size be in whole GB increments, that is, 20 GB or 21 GB,but not 20.5 GB. The RAW disk file should have the disk.raw file name. The disk.raw file must include anMS-DOS (MBR) partition table.
For example, run the following dd command to create a 20 GB sparse file to serve as the RAW diskimage:
# dd if=/dev/zero of=disk.raw bs=1 count=0 seek=20G
Refer to the Google Compute Engine Hardware Manifest guide athttps://cloud.google.com/compute/docs/tutorials/building-images#hardwaremanifest to ensure yourvirtual machine image is compatible with the Google Compute Engine platform.
NOTE
The steps below assumes KVM/QEMU as your local virtualization platform.
Attach the Red Hat Gluster Storage ISO, available from the Red Hat Customer Portal, as a bootableCD-ROM device to the image. Boot the VM to the ISO, and perform the installation of Red Hat GlusterStorage according to the instructions available in the Red Hat Gluster Storage Installation Guide.
4.15.2. Enabling and Starting the Network Interface
To enable and start the network interface:
Enable the default eth0 network interface at boot time:
# sed -i s/ONBOOT=no/ONBOOT=yes/ /etc/sysconfig/network-scripts/ifcfg-eth0
Deployment Guide for Public Cloud
62
Start the eth0 network interface:
# ifup eth0
4.15.3. Subscribing to the Red Hat Gluster Storage Server Channels
You must register the system and enable the required channels for Red Hat Gluster Storage. Forinformation on subscribing and connecting to the appropriate pool and repositories, refer to theInstalling Red Hat Gluster Storagechapter in the Red Hat Gluster Storage Installation Guide. .
4.15.4. Updating your System
Update your systems using the following command:
# yum -y update
4.15.5. Tuning and Miscellaneous Configuration
Set the tuned profile torhgs-sequential-io using the following command:
# tuned-adm profile rhgs-sequential-io
NOTE
The rhgs-sequential-io profile is appropriate for this environment, but the rhgs-random-io profile may be more appropriate for different workloads.
Disable SElinux:
# setenforce 0
If SELinux support is required, refer to the Enabling SELinux chapter in the Red Hat Gluster StorageInstallation Guide.
4.15.6. Customizing the Virtual Machine for Google Compute Engine
The Google Compute Engine's "Build a Compute Engine Image from Scratch" documentation includesspecific instructions for configuring the kernel, network, packages, SSH, and security of the virtualmachine. It is recommended that you reference this documentation directly for updated information toensure compatibility of your image with Google Compute Engine.
Power off the instance to apply all changes and prepare the image import:
# init 0
4.16. APPENDIX: CONFIGURATION FILES FOR RED HAT GLUSTERSTORAGE DEPLOYMENT
Filename: glusterfs-config.yaml
CHAPTER 4. USING RED HAT GLUSTER STORAGE IN THE GOOGLE CLOUD PLATFORM
63
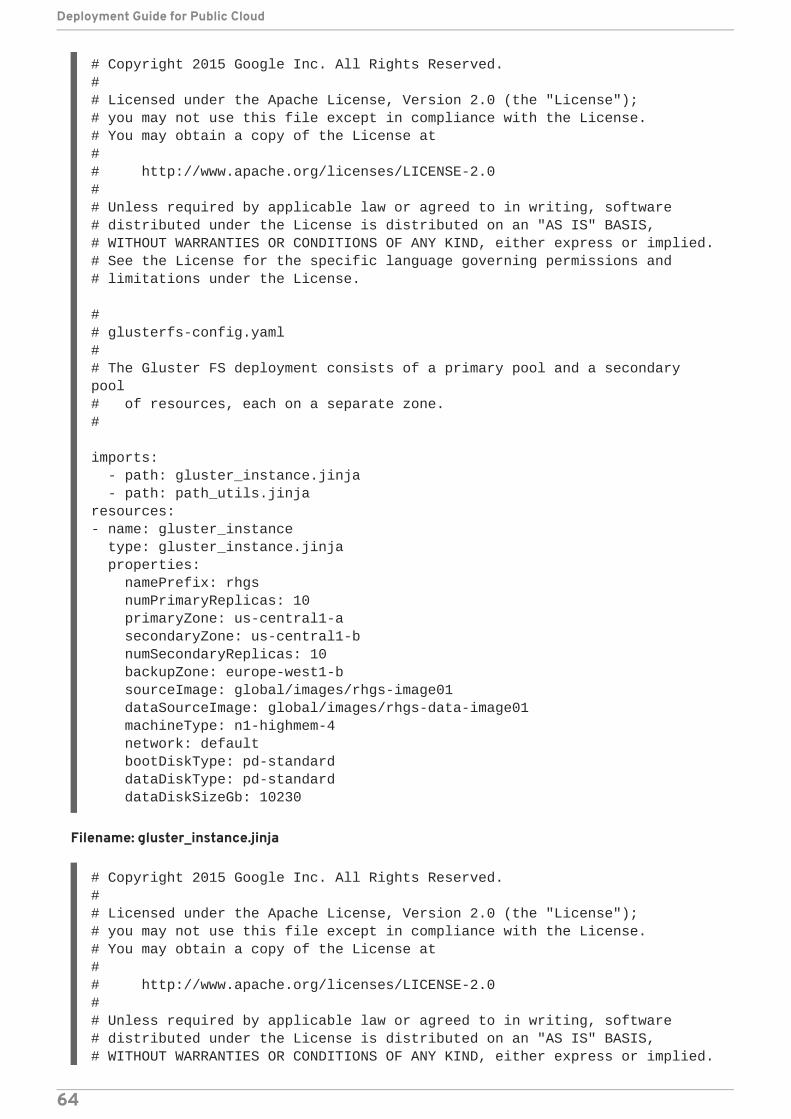
# Copyright 2015 Google Inc. All Rights Reserved.## Licensed under the Apache License, Version 2.0 (the "License");# you may not use this file except in compliance with the License.# You may obtain a copy of the License at## http://www.apache.org/licenses/LICENSE-2.0## Unless required by applicable law or agreed to in writing, software# distributed under the License is distributed on an "AS IS" BASIS,# WITHOUT WARRANTIES OR CONDITIONS OF ANY KIND, either express or implied.# See the License for the specific language governing permissions and# limitations under the License.
## glusterfs-config.yaml## The Gluster FS deployment consists of a primary pool and a secondary pool# of resources, each on a separate zone.#
imports: - path: gluster_instance.jinja - path: path_utils.jinjaresources:- name: gluster_instance type: gluster_instance.jinja properties: namePrefix: rhgs numPrimaryReplicas: 10 primaryZone: us-central1-a secondaryZone: us-central1-b numSecondaryReplicas: 10 backupZone: europe-west1-b sourceImage: global/images/rhgs-image01 dataSourceImage: global/images/rhgs-data-image01 machineType: n1-highmem-4 network: default bootDiskType: pd-standard dataDiskType: pd-standard dataDiskSizeGb: 10230
Filename: gluster_instance.jinja
# Copyright 2015 Google Inc. All Rights Reserved.## Licensed under the Apache License, Version 2.0 (the "License");# you may not use this file except in compliance with the License.# You may obtain a copy of the License at## http://www.apache.org/licenses/LICENSE-2.0## Unless required by applicable law or agreed to in writing, software# distributed under the License is distributed on an "AS IS" BASIS,# WITHOUT WARRANTIES OR CONDITIONS OF ANY KIND, either express or implied.
Deployment Guide for Public Cloud
64
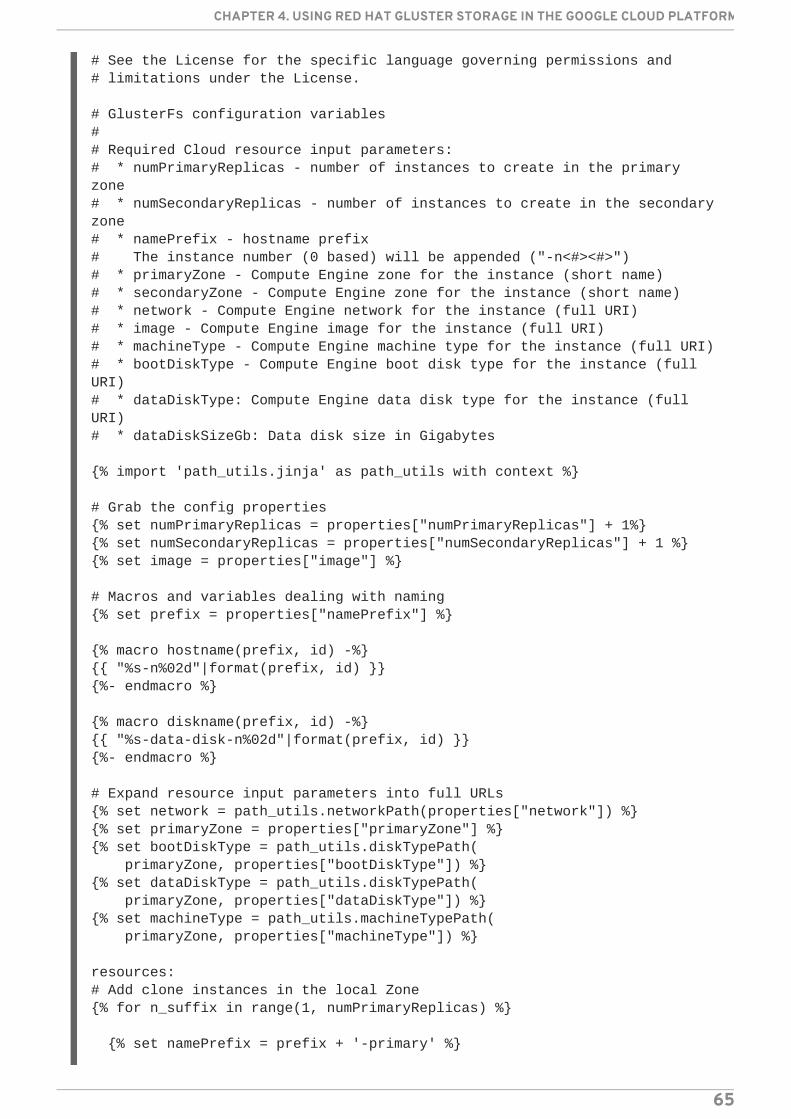
# See the License for the specific language governing permissions and# limitations under the License.
# GlusterFs configuration variables## Required Cloud resource input parameters:# * numPrimaryReplicas - number of instances to create in the primary zone# * numSecondaryReplicas - number of instances to create in the secondary zone# * namePrefix - hostname prefix# The instance number (0 based) will be appended ("-n<#><#>")# * primaryZone - Compute Engine zone for the instance (short name)# * secondaryZone - Compute Engine zone for the instance (short name)# * network - Compute Engine network for the instance (full URI)# * image - Compute Engine image for the instance (full URI)# * machineType - Compute Engine machine type for the instance (full URI)# * bootDiskType - Compute Engine boot disk type for the instance (full URI)# * dataDiskType: Compute Engine data disk type for the instance (full URI)# * dataDiskSizeGb: Data disk size in Gigabytes
{% import 'path_utils.jinja' as path_utils with context %}
# Grab the config properties{% set numPrimaryReplicas = properties["numPrimaryReplicas"] + 1%}{% set numSecondaryReplicas = properties["numSecondaryReplicas"] + 1 %}{% set image = properties["image"] %}
# Macros and variables dealing with naming{% set prefix = properties["namePrefix"] %}
{% macro hostname(prefix, id) -%}{{ "%s-n%02d"|format(prefix, id) }}{%- endmacro %}
{% macro diskname(prefix, id) -%}{{ "%s-data-disk-n%02d"|format(prefix, id) }}{%- endmacro %}
# Expand resource input parameters into full URLs{% set network = path_utils.networkPath(properties["network"]) %}{% set primaryZone = properties["primaryZone"] %}{% set bootDiskType = path_utils.diskTypePath( primaryZone, properties["bootDiskType"]) %}{% set dataDiskType = path_utils.diskTypePath( primaryZone, properties["dataDiskType"]) %}{% set machineType = path_utils.machineTypePath( primaryZone, properties["machineType"]) %}
resources:# Add clone instances in the local Zone{% for n_suffix in range(1, numPrimaryReplicas) %}
{% set namePrefix = prefix + '-primary' %}
CHAPTER 4. USING RED HAT GLUSTER STORAGE IN THE GOOGLE CLOUD PLATFORM
65
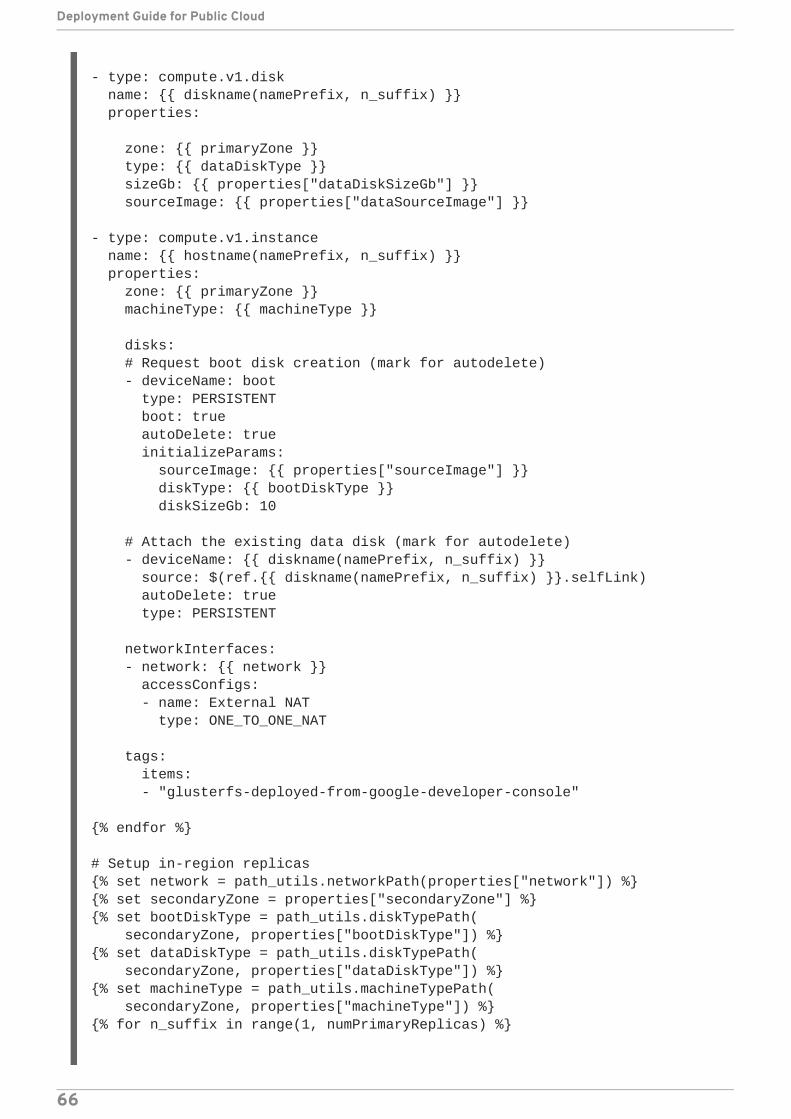
- type: compute.v1.disk name: {{ diskname(namePrefix, n_suffix) }} properties:
zone: {{ primaryZone }} type: {{ dataDiskType }} sizeGb: {{ properties["dataDiskSizeGb"] }} sourceImage: {{ properties["dataSourceImage"] }}
- type: compute.v1.instance name: {{ hostname(namePrefix, n_suffix) }} properties: zone: {{ primaryZone }} machineType: {{ machineType }}
disks: # Request boot disk creation (mark for autodelete) - deviceName: boot type: PERSISTENT boot: true autoDelete: true initializeParams: sourceImage: {{ properties["sourceImage"] }} diskType: {{ bootDiskType }} diskSizeGb: 10
# Attach the existing data disk (mark for autodelete) - deviceName: {{ diskname(namePrefix, n_suffix) }} source: $(ref.{{ diskname(namePrefix, n_suffix) }}.selfLink) autoDelete: true type: PERSISTENT
networkInterfaces: - network: {{ network }} accessConfigs: - name: External NAT type: ONE_TO_ONE_NAT
tags: items: - "glusterfs-deployed-from-google-developer-console"
{% endfor %}
# Setup in-region replicas{% set network = path_utils.networkPath(properties["network"]) %}{% set secondaryZone = properties["secondaryZone"] %}{% set bootDiskType = path_utils.diskTypePath( secondaryZone, properties["bootDiskType"]) %}{% set dataDiskType = path_utils.diskTypePath( secondaryZone, properties["dataDiskType"]) %}{% set machineType = path_utils.machineTypePath( secondaryZone, properties["machineType"]) %}{% for n_suffix in range(1, numPrimaryReplicas) %}
Deployment Guide for Public Cloud
66
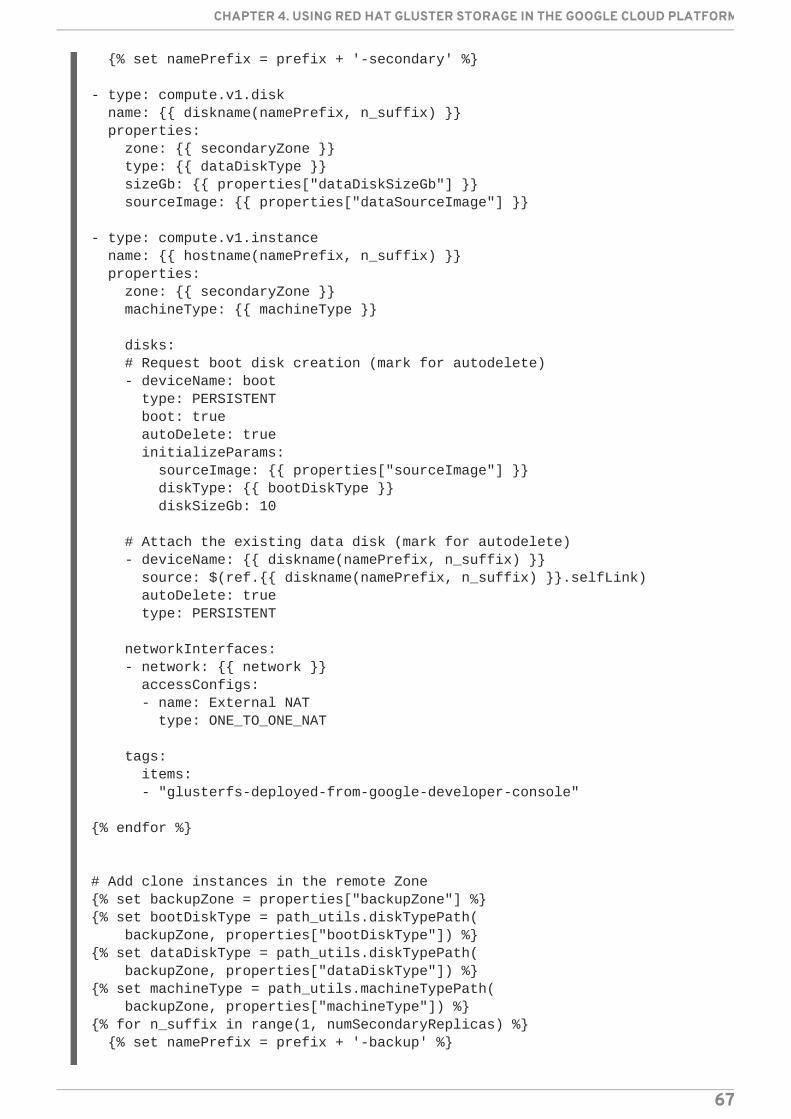
{% set namePrefix = prefix + '-secondary' %}
- type: compute.v1.disk name: {{ diskname(namePrefix, n_suffix) }} properties: zone: {{ secondaryZone }} type: {{ dataDiskType }} sizeGb: {{ properties["dataDiskSizeGb"] }} sourceImage: {{ properties["dataSourceImage"] }}
- type: compute.v1.instance name: {{ hostname(namePrefix, n_suffix) }} properties: zone: {{ secondaryZone }} machineType: {{ machineType }}
disks: # Request boot disk creation (mark for autodelete) - deviceName: boot type: PERSISTENT boot: true autoDelete: true initializeParams: sourceImage: {{ properties["sourceImage"] }} diskType: {{ bootDiskType }} diskSizeGb: 10
# Attach the existing data disk (mark for autodelete) - deviceName: {{ diskname(namePrefix, n_suffix) }} source: $(ref.{{ diskname(namePrefix, n_suffix) }}.selfLink) autoDelete: true type: PERSISTENT
networkInterfaces: - network: {{ network }} accessConfigs: - name: External NAT type: ONE_TO_ONE_NAT
tags: items: - "glusterfs-deployed-from-google-developer-console"
{% endfor %}
# Add clone instances in the remote Zone{% set backupZone = properties["backupZone"] %}{% set bootDiskType = path_utils.diskTypePath( backupZone, properties["bootDiskType"]) %}{% set dataDiskType = path_utils.diskTypePath( backupZone, properties["dataDiskType"]) %}{% set machineType = path_utils.machineTypePath( backupZone, properties["machineType"]) %}{% for n_suffix in range(1, numSecondaryReplicas) %} {% set namePrefix = prefix + '-backup' %}
CHAPTER 4. USING RED HAT GLUSTER STORAGE IN THE GOOGLE CLOUD PLATFORM
67
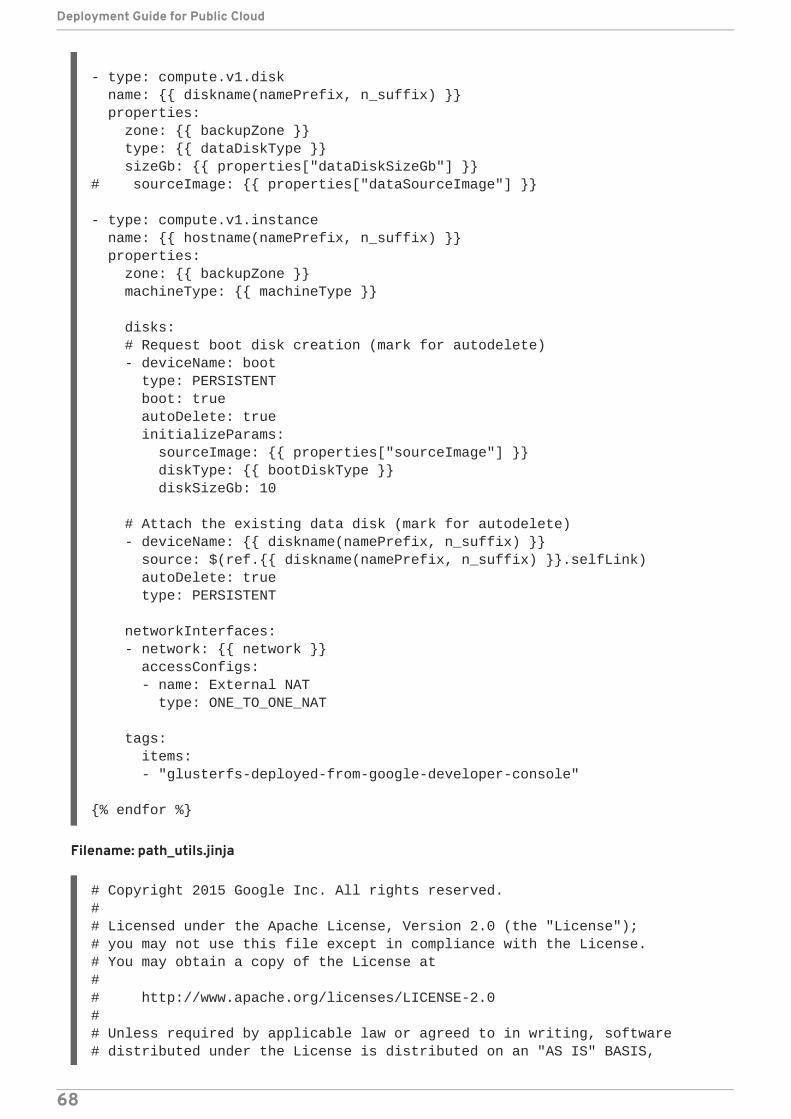
- type: compute.v1.disk name: {{ diskname(namePrefix, n_suffix) }} properties: zone: {{ backupZone }} type: {{ dataDiskType }} sizeGb: {{ properties["dataDiskSizeGb"] }}# sourceImage: {{ properties["dataSourceImage"] }}
- type: compute.v1.instance name: {{ hostname(namePrefix, n_suffix) }} properties: zone: {{ backupZone }} machineType: {{ machineType }}
disks: # Request boot disk creation (mark for autodelete) - deviceName: boot type: PERSISTENT boot: true autoDelete: true initializeParams: sourceImage: {{ properties["sourceImage"] }} diskType: {{ bootDiskType }} diskSizeGb: 10
# Attach the existing data disk (mark for autodelete) - deviceName: {{ diskname(namePrefix, n_suffix) }} source: $(ref.{{ diskname(namePrefix, n_suffix) }}.selfLink) autoDelete: true type: PERSISTENT
networkInterfaces: - network: {{ network }} accessConfigs: - name: External NAT type: ONE_TO_ONE_NAT
tags: items: - "glusterfs-deployed-from-google-developer-console"
{% endfor %}
Filename: path_utils.jinja
# Copyright 2015 Google Inc. All rights reserved.## Licensed under the Apache License, Version 2.0 (the "License");# you may not use this file except in compliance with the License.# You may obtain a copy of the License at## http://www.apache.org/licenses/LICENSE-2.0## Unless required by applicable law or agreed to in writing, software# distributed under the License is distributed on an "AS IS" BASIS,
Deployment Guide for Public Cloud
68
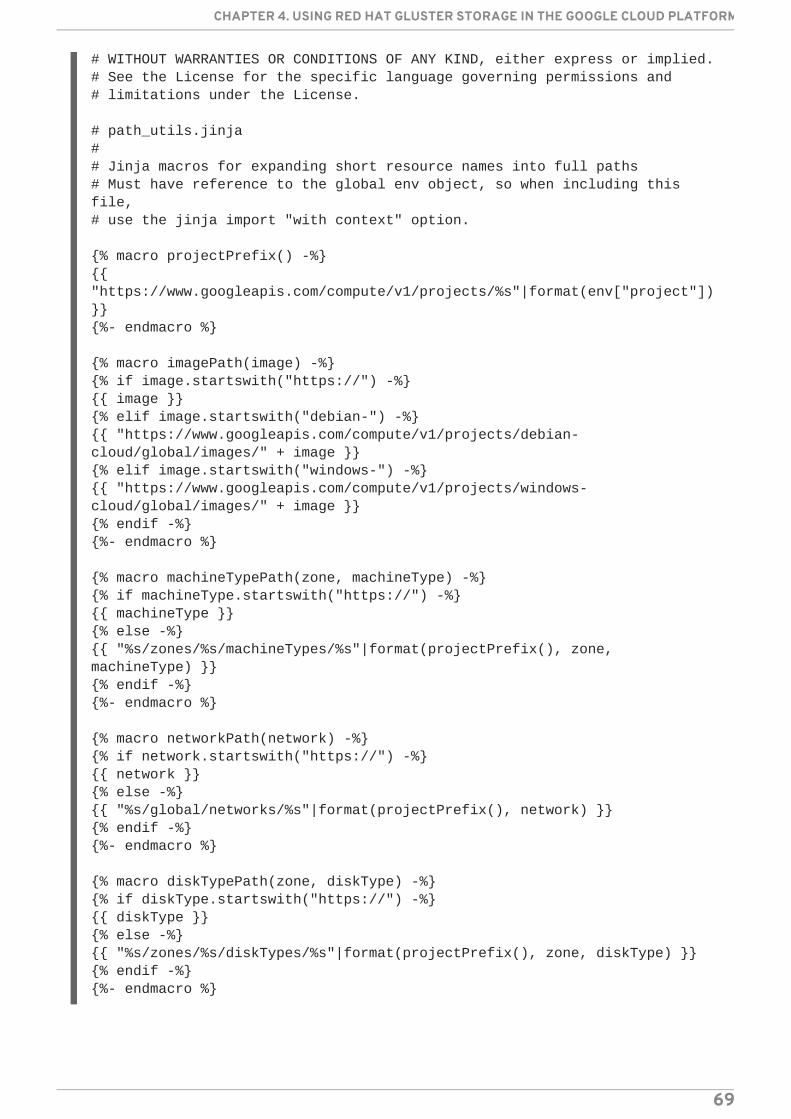
# WITHOUT WARRANTIES OR CONDITIONS OF ANY KIND, either express or implied.# See the License for the specific language governing permissions and# limitations under the License.
# path_utils.jinja## Jinja macros for expanding short resource names into full paths# Must have reference to the global env object, so when including this file,# use the jinja import "with context" option.
{% macro projectPrefix() -%}{{ "https://www.googleapis.com/compute/v1/projects/%s"|format(env["project"]) }}{%- endmacro %}
{% macro imagePath(image) -%}{% if image.startswith("https://") -%}{{ image }}{% elif image.startswith("debian-") -%}{{ "https://www.googleapis.com/compute/v1/projects/debian-cloud/global/images/" + image }}{% elif image.startswith("windows-") -%}{{ "https://www.googleapis.com/compute/v1/projects/windows-cloud/global/images/" + image }}{% endif -%}{%- endmacro %}
{% macro machineTypePath(zone, machineType) -%}{% if machineType.startswith("https://") -%}{{ machineType }}{% else -%}{{ "%s/zones/%s/machineTypes/%s"|format(projectPrefix(), zone, machineType) }}{% endif -%}{%- endmacro %}
{% macro networkPath(network) -%}{% if network.startswith("https://") -%}{{ network }}{% else -%}{{ "%s/global/networks/%s"|format(projectPrefix(), network) }}{% endif -%}{%- endmacro %}
{% macro diskTypePath(zone, diskType) -%}{% if diskType.startswith("https://") -%}{{ diskType }}{% else -%}{{ "%s/zones/%s/diskTypes/%s"|format(projectPrefix(), zone, diskType) }}{% endif -%}{%- endmacro %}
CHAPTER 4. USING RED HAT GLUSTER STORAGE IN THE GOOGLE CLOUD PLATFORM
69
APPENDIX A. REVISION HISTORY
Revision 3.2-3 Fri May 05 2017 Divya MuntimaduguFixed BZ# 1444813
Revision 3.2-2 Fri Mar 17 2017 Divya MuntimaduguIncluded details for accessing Red Hat Gluster Storage with Microsoft Azure. (BZ#1390823)Created separate book to cover the Public Cloud use case.
Revision 3.2-1 Mar 17 2017 Anjana SriramVersion for 3.2 release.
Deployment Guide for Public Cloud
70