Embed Size (px)
Citation preview

Zac Dover Steve Gordon Tim HildredDan Macpherson Dayle Parker
Red Hat Enterprise Virtualization3.2Evaluation Guide
Evaluating Red Hat Enterprise VirtualizationEdition 1
Red Hat Enterprise Virtualization 3.2 Evaluation Guide
Evaluating Red Hat Enterprise VirtualizationEdition 1
Steve [email protected]
Dayle [email protected]
Legal Notice
Copyright © 2013 Red Hat, Inc.
This document is licensed by Red Hat under the Creative Commons Attribution-ShareAlike 3.0 UnportedLicense. If you distribute this document, or a modified version of it, you must provide attribution to RedHat, Inc. and provide a link to the original. If the document is modified, all Red Hat trademarks must beremoved.
Red Hat, as the licensor of this document, waives the right to enforce, and agrees not to assert, Section4d of CC-BY-SA to the fullest extent permitted by applicable law.
Red Hat, Red Hat Enterprise Linux, the Shadowman logo, JBoss, MetaMatrix, Fedora, the Infinity Logo,and RHCE are trademarks of Red Hat, Inc., registered in the United States and other countries.
Linux ® is the registered trademark of Linus Torvalds in the United States and other countries.
Java ® is a registered trademark of Oracle and/or its affiliates.
XFS ® is a trademark of Silicon Graphics International Corp. or its subsidiaries in the United Statesand/or other countries.
MySQL ® is a registered trademark of MySQL AB in the United States, the European Union and othercountries.
Node.js ® is an official trademark of Joyent. Red Hat Software Collections is not formally related to orendorsed by the official Joyent Node.js open source or commercial project.
The OpenStack ® Word Mark and OpenStack Logo are either registered trademarks/service marks ortrademarks/service marks of the OpenStack Foundation, in the United States and other countries andare used with the OpenStack Foundation's permission. We are not affiliated with, endorsed orsponsored by the OpenStack Foundation, or the OpenStack community.
All other trademarks are the property of their respective owners.
Abstract
This book explains how to deploy a Red Hat Enterprise Virtualization Environment for evaluationpurposes.
. . . . . . . . . . . . . . . . . . . . . . . . . . . . . . . . . . . . . . . . . . . . . . . . . . . . . . . . . . . . . . . . . . . . . . . . . . . . . . . . . . . . . . . . . . . . . . . . . . . . . . . . . . . . . . . . . . . . . . . . . . . . . . . . . . . . . . . . . . . . . . . . . . . . . . . . . . . . . . . . . . . . . . . . . . . . . . . . . . . . . . . . . . . . . . . . . . . . . . . . . . . . . . . . . . . . . . . . . . . . . . . . . . . . . . . . . . . . . . . . . . . . . . . . . . . . . . . . . . . . . . . . . . . . . . . . . . . . . . . .
. . . . . . . . . . . . . . . . . . . . . . . . . . . . . . . . . . . . . . . . . . . . . . . . . . . . . . . . . . . . . . . . . . . . . . . . . . . . . . . . . . . . . . . . . . . . . . . . . . . . . . . . . . . . . . . . . . . . . . . . . . . . . . . . . . . . . . . . . . . . . . . . . . . . . . . . . . . . . . . . . . . . . . . . . . . . . . . . . . . . . . . . . . . . . . . . . . . . . . . . . . . . . . . . . . . . . . . . . . . . . . . . . . . . . . . . . . . . . . . . . . . . . . . . . . . . . . . . . . . . . . . . . . . . . . . . . . . . . . . .
. . . . . . . . . . . . . . . . . . . . . . . . . . . . . . . . . . . . . . . . . . . . . . . . . . . . . . . . . . . . . . . . . . . . . . . . . . . . . . . . . . . . . . . . . . . . . . . . . . . . . . . . . . . . . . . . . . . . . . . . . . . . . . . . . . . . . . . . . . . . . . . . . . . . . . . . . . . . . . . . . . . . . . . . . . . . . . . . . . . . . . . . . . . . . . . . . . . . . . . . . . . . . . . . . . . . . . . . . . . . . . . . . . . . . . . . . . . . . . . . . . . . . . . . . . . . . . . . . . . . . . . . . . . . . . . . . . . . . . . .
. . . . . . . . . . . . . . . . . . . . . . . . . . . . . . . . . . . . . . . . . . . . . . . . . . . . . . . . . . . . . . . . . . . . . . . . . . . . . . . . . . . . . . . . . . . . . . . . . . . . . . . . . . . . . . . . . . . . . . . . . . . . . . . . . . . . . . . . . . . . . . . . . . . . . . . . . . . . . . . . . . . . . . . . . . . . . . . . . . . . . . . . . . . . . . . . . . . . . . . . . . . . . . . . . . . . . . . . . . . . . . . . . . . . . . . . . . . . . . . . . . . . . . . . . . . . . . . . . . . . . . . . . . . . . . . . . . . . . . . .
. . . . . . . . . . . . . . . . . . . . . . . . . . . . . . . . . . . . . . . . . . . . . . . . . . . . . . . . . . . . . . . . . . . . . . . . . . . . . . . . . . . . . . . . . . . . . . . . . . . . . . . . . . . . . . . . . . . . . . . . . . . . . . . . . . . . . . . . . . . . . . . . . . . . . . . . . . . . . . . . . . . . . . . . . . . . . . . . . . . . . . . . . . . . . . . . . . . . . . . . . . . . . . . . . . . . . . . . . . . . . . . . . . . . . . . . . . . . . . . . . . . . . . . . . . . . . . . . . . . . . . . . . . . . . . . . . . . . . . . .
Table of Contents
Preface1. Document Conventions
1.1. Typographic Conventions1.2. Pull-quote Conventions1.3. Notes and Warnings
2. Getting Help and Giving Feedback2.1. Do You Need Help?2.2. We Need Feedback!
Introduction1. Introduction to Red Hat Enterprise Virtualization Evaluation Guide2. Evaluation Tracks3. Track A
3.1. Track A: Standard Setup3.2. Track A Requirements
4. Track B4.1. Track B: Minimal Setup4.2. Track B Requirements
Chapter 1. Lab 1 - Basic Setup for Installation and Configuration1.1. Lab 1 - Objectives1.2. Installing Red Hat Enterprise Virtualization Manager1.3. Installing Red Hat Enterprise Virtualization Hypervisor
1.3.1. Registering the Host on RHN and Acquiring ISO Hypervisor Images1.3.2. Preparing Optical Hypervisor Installation Media1.3.3. Install Red Hat Enterprise Virtualizaton Hosts from Optical Installation Media1.3.4. Install Red Hat Enterprise Virtualization Hypervisors
1.4. Connecting to Red Hat Enterprise Virtualization Web Administration Portal1.5. Web Administration Portal Graphical User Interface1.6. Approve the Red Hat Enterprise Virtualization Hypervisor1.7. Configure Logical Networks1.8. Configuring Storage1.9. Configuring Storage
1.9.1. Creating an NFS Data Domain1.9.2. Creating an iSCSI Data Domain1.9.3. Creating an FCP Data Domain
1.10. Attach and Populate ISO Domains1.11. Lab 1 - summary
Chapter 2. Lab 2 - Creating virtual machines2.1. Lab 2 - Objectives2.2. Creating a Red Hat Enterprise Linux virtual machine2.3. Creating Red Hat Enterprise Linux templates2.4. Creating a Template from a Red Hat Enterprise Linux Virtual Machine2.5. Sealing a Linux Virtual Machine for Deployment as a Template2.6. Creating a Template from a Red Hat Enterprise Linux Virtual Machine2.7. Cloning a Red Hat Enterprise Linux virtual machine from a template2.8. Lab 2 - Summary
Chapter 3. Lab 3 - Live migration scenarios3.1. Lab 3 - Objectives3.2. Live migration scenarios3.3. Activating live migration
66678889
101010101013141416
18181924242526262930323334353537404243
4 54545484949505152
54545454
Table of Contents
1
. . . . . . . . . . . . . . . . . . . . . . . . . . . . . . . . . . . . . . . . . . . . . . . . . . . . . . . . . . . . . . . . . . . . . . . . . . . . . . . . . . . . . . . . . . . . . . . . . . . . . . . . . . . . . . . . . . . . . . . . . . . . . . . . . . . . . . . . . . . . . . . . . . . . . . . . . . . . . . . . . . . . . . . . . . . . . . . . . . . . . . . . . . . . . . . . . . . . . . . . . . . . . . . . . . . . . . . . . . . . . . . . . . . . . . . . . . . . . . . . . . . . . . . . . . . . . . . . . . . . . . . . . . . . . . . . . . . . . . . .
. . . . . . . . . . . . . . . . . . . . . . . . . . . . . . . . . . . . . . . . . . . . . . . . . . . . . . . . . . . . . . . . . . . . . . . . . . . . . . . . . . . . . . . . . . . . . . . . . . . . . . . . . . . . . . . . . . . . . . . . . . . . . . . . . . . . . . . . . . . . . . . . . . . . . . . . . . . . . . . . . . . . . . . . . . . . . . . . . . . . . . . . . . . . . . . . . . . . . . . . . . . . . . . . . . . . . . . . . . . . . . . . . . . . . . . . . . . . . . . . . . . . . . . . . . . . . . . . . . . . . . . . . . . . . . . . . . . . . . . .
. . . . . . . . . . . . . . . . . . . . . . . . . . . . . . . . . . . . . . . . . . . . . . . . . . . . . . . . . . . . . . . . . . . . . . . . . . . . . . . . . . . . . . . . . . . . . . . . . . . . . . . . . . . . . . . . . . . . . . . . . . . . . . . . . . . . . . . . . . . . . . . . . . . . . . . . . . . . . . . . . . . . . . . . . . . . . . . . . . . . . . . . . . . . . . . . . . . . . . . . . . . . . . . . . . . . . . . . . . . . . . . . . . . . . . . . . . . . . . . . . . . . . . . . . . . . . . . . . . . . . . . . . . . . . . . . . . . . . . . .
. . . . . . . . . . . . . . . . . . . . . . . . . . . . . . . . . . . . . . . . . . . . . . . . . . . . . . . . . . . . . . . . . . . . . . . . . . . . . . . . . . . . . . . . . . . . . . . . . . . . . . . . . . . . . . . . . . . . . . . . . . . . . . . . . . . . . . . . . . . . . . . . . . . . . . . . . . . . . . . . . . . . . . . . . . . . . . . . . . . . . . . . . . . . . . . . . . . . . . . . . . . . . . . . . . . . . . . . . . . . . . . . . . . . . . . . . . . . . . . . . . . . . . . . . . . . . . . . . . . . . . . . . . . . . . . . . . . . . . . .
3.4. Moving hosts into maintenance mode3.5. Defining cluster policies3.6. Lab 3 - Summary
Chapter 4 . Lab 4 - Power User Portal4.1. Lab 4 - Objectives4.2. Adding IdM domains4.3. Adding new users in the IdM directory4.4. PowerUserRole permission assignment4.5. Assigning PowerUserRole permissions on existing virtual machines4.6. Logging in to the Power User Portal4.7. Logging in to the User Portal4.8. Creating Linux desktop virtual machines4.9. Opening virtual machine consoles4.10. Making templates from virtual machines4.11. Verifying virtual machine template permissions4.12. Lab 4 - Summary
Chapter 5. Lab 5 - Managing Multi-Level Administrators5.1. Lab 5 - Objectives5.2. Lab 5 - requirements5.3. Storage administrator definition5.4. Assigning system administrator roles to storage domains5.5. Virtual machine administrator definition5.6. User permission verification5.7. Custom role creation5.8. Lab 5 - Summary
Chapter 6. Lab 6 - High Availability scenarios6.1. Lab 6 - Objectives6.2. Lab 6 - Requirements6.3. Lab 6 - Prerequisites6.4. Power Management Configuration
6.4.1. Power management configuration6.4.2. Disabling cluster policy6.4.3. Setting up power management on a host
6.5. Virtual Machine High-Availability Configuration6.5.1. Virtual Machine High-availability Configuration
6.6. High Availability: Host-Initated Reboot6.6.1. High availability -- host initiated reboot
6.7. High Availability: Virtual Machine Interruption6.7.1. High availability -- Virtual machine interruption6.7.2. Demonstrating Virtual Machine High Availability when its Processes are Killed
6.8. High-Availability: Non-Operational Host6.8.1. High Availability - Non-operational Hosts6.8.2. Demonstrating Virtual Machine High Availability when Storage Network is Down (Host: SPM)6.8.3. Demonstrating virtual-machine high availability when storage networks are down (Host:non-SPM)
6.9. High Availability: Non-responsive host6.9.1. High availability -- non-responsive host6.9.2. Demonstrating high-availability when host connections are disrupted6.9.3. Demonstrating virtual-machine high availability of incorrectly-fenced hosts
6.10. Lab 6 - Summary
Chapter 7. Lab 7 - Adding Additional Data Centers7.1. Lab 7 - Objectives
555657
59595960616364656566676869
707070707171737375
7676767677777778808082828484858787
88889090909192
9494
Red Hat Enterprise Virtualization 3.2 Evaluation Guide
2

. . . . . . . . . . . . . . . . . . . . . . . . . . . . . . . . . . . . . . . . . . . . . . . . . . . . . . . . . . . . . . . . . . . . . . . . . . . . . . . . . . . . . . . . . . . . . . . . . . . . . . . . . . . . . . . . . . . . . . . . . . . . . . . . . . . . . . . . . . . . . . . . . . . . . . . . . . . . . . . . . . . . . . . . . . . . . . . . . . . . . . . . . . . . . . . . . . . . . . . . . . . . . . . . . . . . . . . . . . . . . . . . . . . . . . . . . . . . . . . . . . . . . . . . . . . . . . . . . . . . . . . . . . . . . . . . . . . . . . . .
. . . . . . . . . . . . . . . . . . . . . . . . . . . . . . . . . . . . . . . . . . . . . . . . . . . . . . . . . . . . . . . . . . . . . . . . . . . . . . . . . . . . . . . . . . . . . . . . . . . . . . . . . . . . . . . . . . . . . . . . . . . . . . . . . . . . . . . . . . . . . . . . . . . . . . . . . . . . . . . . . . . . . . . . . . . . . . . . . . . . . . . . . . . . . . . . . . . . . . . . . . . . . . . . . . . . . . . . . . . . . . . . . . . . . . . . . . . . . . . . . . . . . . . . . . . . . . . . . . . . . . . . . . . . . . . . . . . . . . . .
. . . . . . . . . . . . . . . . . . . . . . . . . . . . . . . . . . . . . . . . . . . . . . . . . . . . . . . . . . . . . . . . . . . . . . . . . . . . . . . . . . . . . . . . . . . . . . . . . . . . . . . . . . . . . . . . . . . . . . . . . . . . . . . . . . . . . . . . . . . . . . . . . . . . . . . . . . . . . . . . . . . . . . . . . . . . . . . . . . . . . . . . . . . . . . . . . . . . . . . . . . . . . . . . . . . . . . . . . . . . . . . . . . . . . . . . . . . . . . . . . . . . . . . . . . . . . . . . . . . . . . . . . . . . . . . . . . . . . . . .
7.2. Add Additional Data Center7.3. Installing Red Hat Enterprise Linux 6 hosts7.4. Create a New Data Center7.5. Create a New Cluster7.6. Attach New Red Hat Enterprise Linux Hosts7.7. Configure Logical Networks7.8. Configuring Storage
7.8.1. Creating an NFS Data Domain7.8.2. Creating an iSCSI Data Domain7.8.3. Creating an FCP Data Domain
7.9. Configure ISO Domain7.10. Lab 7 - Summary
Chapter 8. Lab 8 - Virtual desktops8.1. Lab 8 - Objectives8.2. Create a Windows Virtual Machine8.3. Creating Windows virtual machines from templates8.4. Create a Windows Template8.5. Assigning UserRole permissions on virtual machines8.6. Connecting to virtual machines8.7. Use Virtual Desktop Pools
8.7.1. Creating desktop pools8.7.2. Assigning UserRole permissions8.7.3. Allocating virtual desktops8.7.4. Deallocating virtual desktops
8.8. Lab 8 - Summary
Chapter 9. Lab 9 - Installing and configuring minimal setup9.1. Lab 9 - Objectives9.2. Installing Red Hat Enterprise Virtualization Manager9.3. Installing Red Hat Enterprise Virtualization Hypervisor
9.3.1. Registering the Host on RHN and Acquiring ISO Hypervisor Images9.3.2. Preparing Optical Hypervisor Installation Media9.3.3. Install Red Hat Enterprise Virtualizaton Hosts from Optical Installation Media9.3.4. Install Red Hat Enterprise Virtualization Hypervisors
9.4. Connecting to Red Hat Enterprise Virtualization Web Administration Portal9.5. Web Administration Portal Graphical User Interface9.6. Approve the Red Hat Enterprise Virtualization Hypervisor9.7. Creating Local Storage9.8. Creating local storage domains9.9. Attach and Populate ISO Domains9.10. Lab 9 - Summary
Chapter 10. Lab 10 - Advanced storage features10.1. Lab 10 - Objectives10.2. Advanced Storage Features10.3. Requirements10.4. Creating Floating Disks10.5. Associating a Floating Disk with a Virtual Machine10.6. Marking a Virtual Disk Shared10.7. Associating a Shared Virtual Disk with a Second Virtual Machine10.8. Creating a Snapshot of a Running Virtual Machine10.9. Creating a Virtual Machine from a Snapshot10.10. Associating LUNs with Virtual Machines10.11. Associating Fibre Channel (FC) LUNs with Virtual Machine10.12. Lab 10 - Summary
949799
101102103104104106108110111
112112112116118119119120120121122123124
125125125130130131132132135136138139139140141
14 3143143143143144144145145146147152152
Table of Contents
3

. . . . . . . . . . . . . . . . . . . . . . . . . . . . . . . . . . . . . . . . . . . . . . . . . . . . . . . . . . . . . . . . . . . . . . . . . . . . . . . . . . . . . . . . . . . . . . . . . . . . . . . . . . . . . . . . . . . . . . . . . . . . . . . . . . . . . . . . . . . . . . . . . . . . . . . . . . . . . . . . . . . . . . . . . . . . . . . . . . . . . . . . . . . . . . . . . . . . . . . . . . . . . . . . . . . . . . . . . . . . . . . . . . . . . . . . . . . . . . . . . . . . . . . . . . . . . . . . . . . . . . . . . . . . . . . . . . . . . . . .Revision History 154
Red Hat Enterprise Virtualization 3.2 Evaluation Guide
4

Table of Contents
5
Preface
1. Document ConventionsThis manual uses several conventions to highlight certain words and phrases and draw attention tospecific pieces of information.
In PDF and paper editions, this manual uses typefaces drawn from the Liberation Fonts set. TheLiberation Fonts set is also used in HTML editions if the set is installed on your system. If not, alternativebut equivalent typefaces are displayed. Note: Red Hat Enterprise Linux 5 and later include the LiberationFonts set by default.
1.1. Typographic ConventionsFour typographic conventions are used to call attention to specific words and phrases. Theseconventions, and the circumstances they apply to, are as follows.
Mono-spaced Bold
Used to highlight system input, including shell commands, file names and paths. Also used to highlightkeys and key combinations. For example:
To see the contents of the file my_next_bestselling_novel in your current workingdirectory, enter the cat my_next_bestselling_novel command at the shell promptand press Enter to execute the command.
The above includes a file name, a shell command and a key, all presented in mono-spaced bold and alldistinguishable thanks to context.
Key combinations can be distinguished from an individual key by the plus sign that connects each part ofa key combination. For example:
Press Enter to execute the command.
Press Ctrl+Alt+F2 to switch to a virtual terminal.
The first example highlights a particular key to press. The second example highlights a key combination:a set of three keys pressed simultaneously.
If source code is discussed, class names, methods, functions, variable names and returned valuesmentioned within a paragraph will be presented as above, in mono-spaced bold. For example:
File-related classes include filesystem for file systems, file for files, and dir fordirectories. Each class has its own associated set of permissions.
Proportional Bold
This denotes words or phrases encountered on a system, including application names; dialog box text;labeled buttons; check-box and radio button labels; menu titles and sub-menu titles. For example:
Choose System → Preferences → Mouse from the main menu bar to launch MousePreferences. In the Buttons tab, select the Left-handed mouse check box and clickClose to switch the primary mouse button from the left to the right (making the mousesuitable for use in the left hand).
To insert a special character into a gedit file, choose Applications → Accessories →
Red Hat Enterprise Virtualization 3.2 Evaluation Guide
6
Character Map from the main menu bar. Next, choose Search → Find… from theCharacter Map menu bar, type the name of the character in the Search field and clickNext. The character you sought will be highlighted in the Character Table. Double-clickthis highlighted character to place it in the Text to copy field and then click the Copybutton. Now switch back to your document and choose Edit → Paste from the gedit menubar.
The above text includes application names; system-wide menu names and items; application-specificmenu names; and buttons and text found within a GUI interface, all presented in proportional bold and alldistinguishable by context.
Mono-spaced Bold Italic or Proportional Bold Italic
Whether mono-spaced bold or proportional bold, the addition of italics indicates replaceable or variabletext. Italics denotes text you do not input literally or displayed text that changes depending oncircumstance. For example:
To connect to a remote machine using ssh, type ssh [email protected] at a shellprompt. If the remote machine is example.com and your username on that machine isjohn, type ssh [email protected] .
The mount -o remount file-system command remounts the named file system. Forexample, to remount the /home file system, the command is mount -o remount /home.
To see the version of a currently installed package, use the rpm -q package command. Itwill return a result as follows: package-version-release.
Note the words in bold italics above — username, domain.name, file-system, package, version andrelease. Each word is a placeholder, either for text you enter when issuing a command or for textdisplayed by the system.
Aside from standard usage for presenting the title of a work, italics denotes the first use of a new andimportant term. For example:
Publican is a DocBook publishing system.
1.2. Pull-quote ConventionsTerminal output and source code listings are set off visually from the surrounding text.
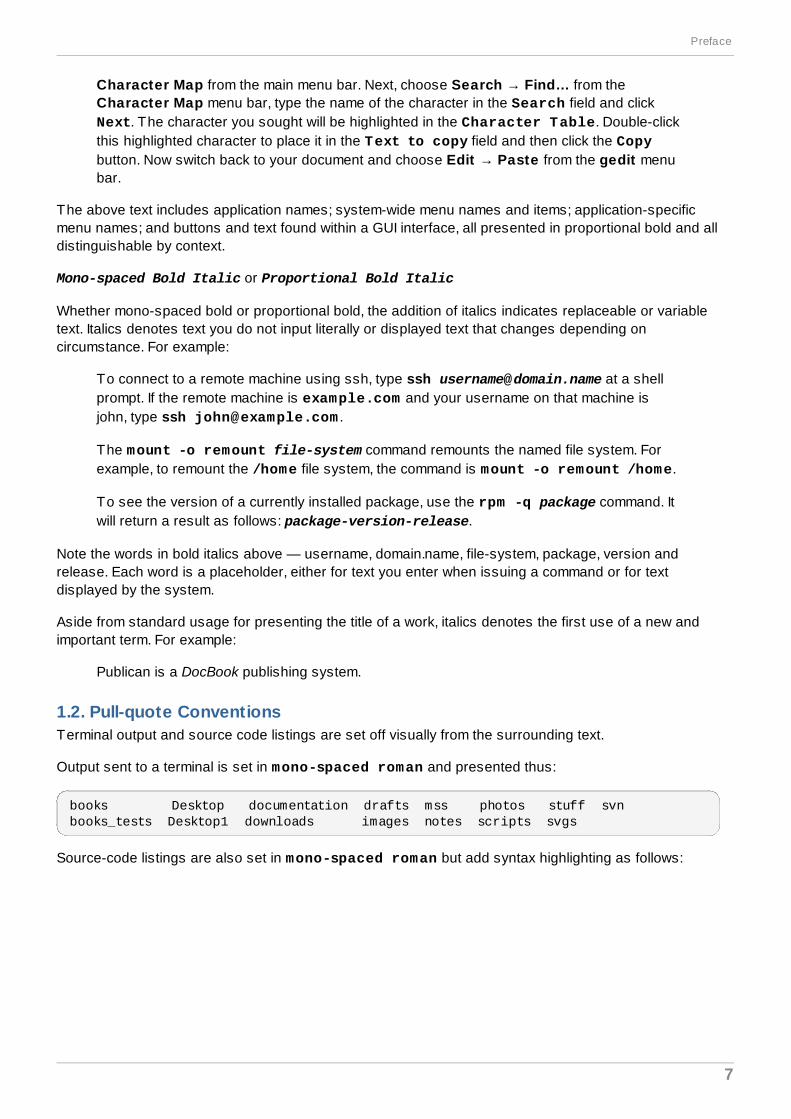
Output sent to a terminal is set in mono-spaced roman and presented thus:
books Desktop documentation drafts mss photos stuff svnbooks_tests Desktop1 downloads images notes scripts svgs
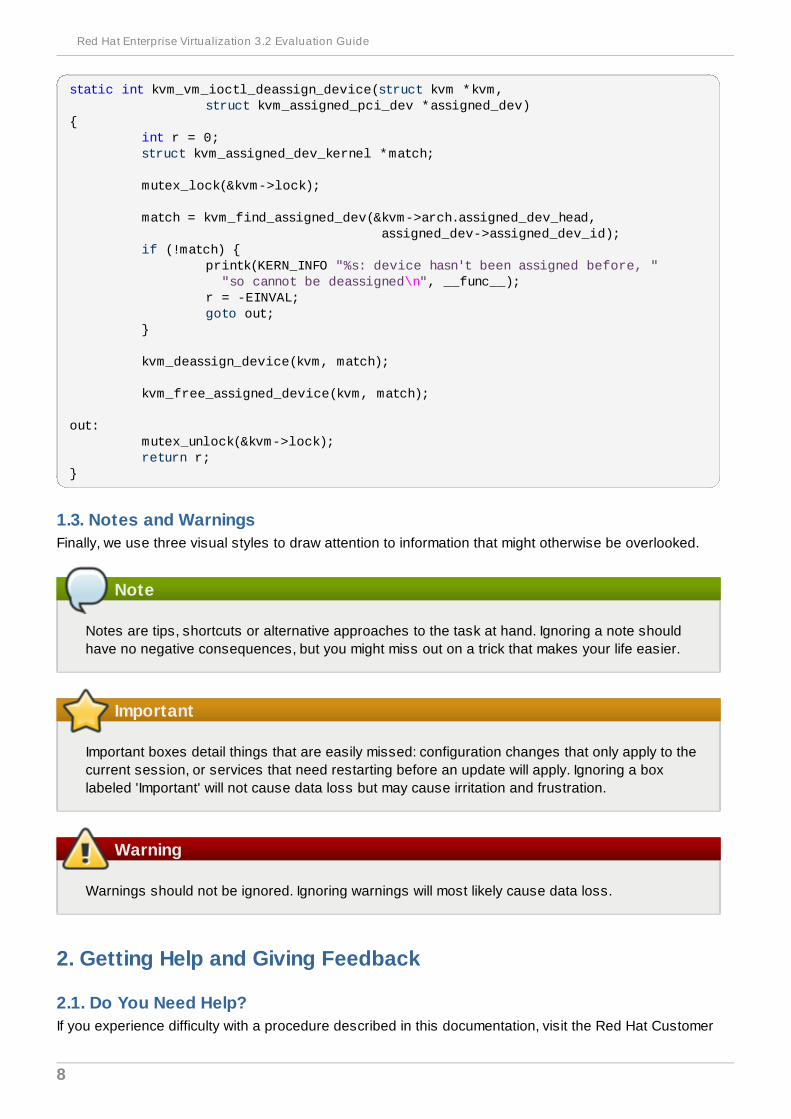
Source-code listings are also set in mono-spaced roman but add syntax highlighting as follows:
Preface
7
static int kvm_vm_ioctl_deassign_device(struct kvm *kvm, struct kvm_assigned_pci_dev *assigned_dev){ int r = 0; struct kvm_assigned_dev_kernel *match;
mutex_lock(&kvm->lock);
match = kvm_find_assigned_dev(&kvm->arch.assigned_dev_head, assigned_dev->assigned_dev_id); if (!match) { printk(KERN_INFO "%s: device hasn't been assigned before, " "so cannot be deassigned\n", __func__); r = -EINVAL; goto out; }
kvm_deassign_device(kvm, match);
kvm_free_assigned_device(kvm, match);
out: mutex_unlock(&kvm->lock); return r;}
1.3. Notes and WarningsFinally, we use three visual styles to draw attention to information that might otherwise be overlooked.
Note
Notes are tips, shortcuts or alternative approaches to the task at hand. Ignoring a note shouldhave no negative consequences, but you might miss out on a trick that makes your life easier.
Important
Important boxes detail things that are easily missed: configuration changes that only apply to thecurrent session, or services that need restarting before an update will apply. Ignoring a boxlabeled 'Important' will not cause data loss but may cause irritation and frustration.
Warning
Warnings should not be ignored. Ignoring warnings will most likely cause data loss.
2. Getting Help and Giving Feedback
2.1. Do You Need Help?If you experience difficulty with a procedure described in this documentation, visit the Red Hat Customer
Red Hat Enterprise Virtualization 3.2 Evaluation Guide
8
Portal at http://access.redhat.com. Through the customer portal, you can:
search or browse through a knowledgebase of technical support articles about Red Hat products.
submit a support case to Red Hat Global Support Services (GSS).
access other product documentation.
Red Hat also hosts a large number of electronic mailing lists for discussion of Red Hat software andtechnology. You can find a list of publicly available mailing lists at https://www.redhat.com/mailman/listinfo.Click on the name of any mailing list to subscribe to that list or to access the list archives.
2.2. We Need Feedback!If you find a typographical error in this manual, or if you have thought of a way to make this manualbetter, we would love to hear from you! Please submit a report in Bugzilla: http://bugzilla.redhat.com/against the product Red Hat Enterprise Virtualization Manager.
When submitting a bug report, be sure to mention the manual's identifier: Guides-Evaluation
If you have a suggestion for improving the documentation, try to be as specific as possible whendescribing it. If you have found an error, please include the section number and some of the surroundingtext so we can find it easily.
Preface
9
Introduction
1. Introduction to Red Hat Enterprise Virtualization EvaluationGuideThis guide gets you started on a full featured Red Hat Enterprise Virtualization deployment using yourexisting resources. From installing a hypervisor, setting up shared storage and running a fully functionalvirtual machine, see how you can implement virtualization in your own organization. The tutorials areorganized to reflect typical deployments from a small office with a few hosts, to a large enterprise withmultiple data centers, and you can even test out a single host version at home. The tracks and tutorialsare color coded to provide clear paths through this guide.
Once you have completed the tutorials (labs), arrange your own tracks for further evaluation or training.The tracks are suggested examples only. Use them to understand how to deploy Red Hat EnterpriseVirtualization, and then work with our Red Hat Enterprise Virtualization solution architects to build yourown unique environments.
Report a bug
2. Evaluation TracksDepending on your needs, use one of these tracks to evaluate Red Hat Enterprise Virtualization for yourorganization:
If you have shared storage and two physical servers to install hosts, use Track A: Standard Setup.
If you have one physical server on which to install a host, use Track B: Minimal Setup.
For both tracks, you need an evaluation license and a valid Red Hat Network subscription to:
the Red Hat Enterprise Virtualization channel
the Red Hat Enterprise Linux channel
Refer to the Red Hat Enterprise Virtualization Manager Release Notes for specific channel namescurrent to your system. Contact your sales representative if you do not have both of the above.
See Also:
Section 3.1, “Track A: Standard Setup”
Section 4.1, “Track B: Minimal Setup”
Report a bug
3. Track A
3.1. Track A: Standard SetupTrack A describes the installation and configuration of a basic Red Hat Enterprise Virtualizationenvironment. Track A requires you to have more than one host and shared storage.
Track A consists of:
four basic labs
Red Hat Enterprise Virtualization 3.2 Evaluation Guide
10
four advanced labs (optional)
The basic labs describe how to create virtual machines and assign them to users.
The advanced labs describe how to apply Red Hat Enterprise Virtualization to real-life enterpriseoperations. This includes:
protecting against hardware failure by using high-availability
assigning different levels of user permissions to virtual machines, storage, and servers to reflect theneeds of your organization
reconfiguring red hat enterprise linux servers so that they function as virtual machine hosts
provisioning virtual desktops for users
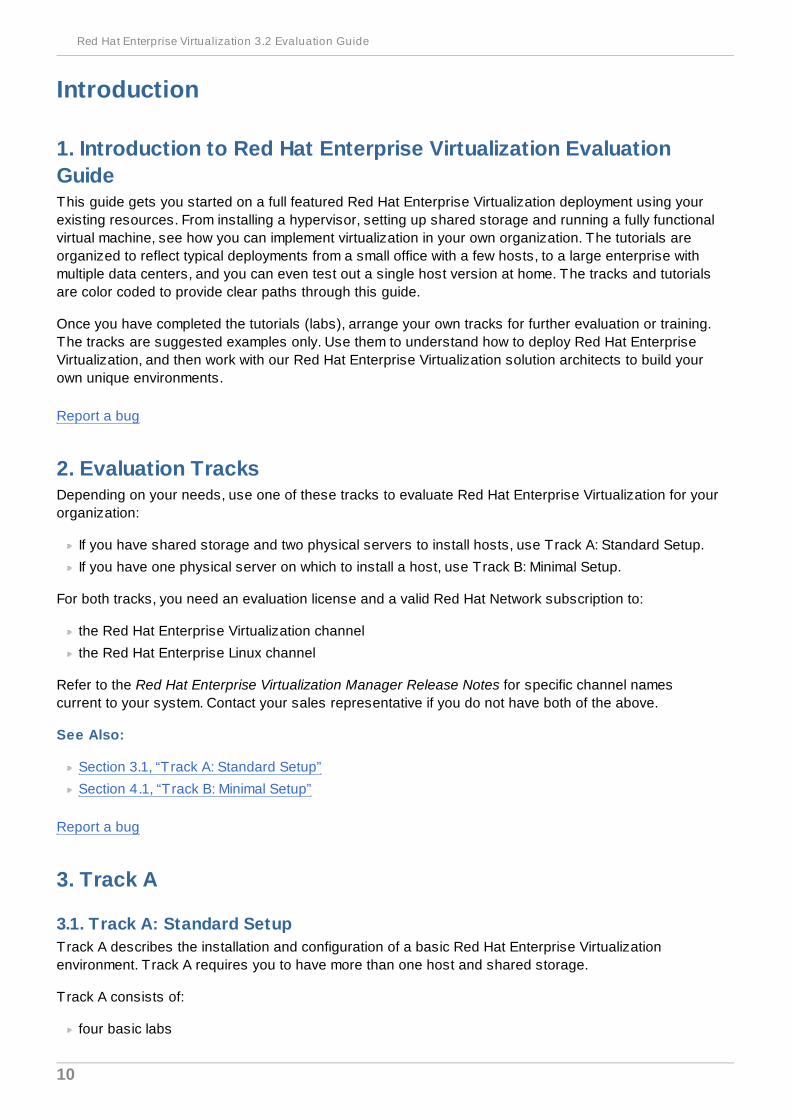
If you have three to four physical servers and one shared storage resource, set up a Red Hat EnterpriseVirtualization environment by following the labs in Track A - Standard Setup. The labs in this track arecolor coded red, so to determine if a lab is part of Track A, look for a red square in the diagram at thestart of each lab.
Figure 1. Evaluation Track A
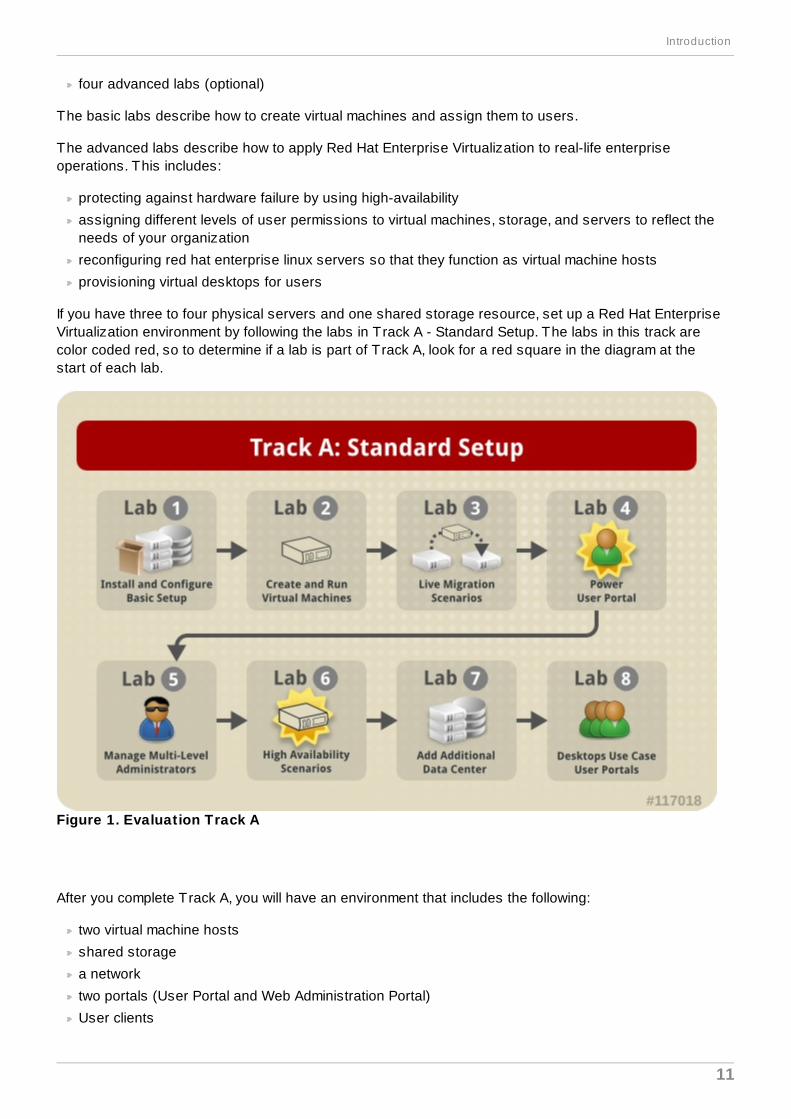
After you complete Track A, you will have an environment that includes the following:
two virtual machine hosts
shared storage
a network
two portals (User Portal and Web Administration Portal)
User clients
Introduction
11
a host running the Red Hat Enterprise Virtualization Manager
Figure 2. Red Hat Enterprise Virtualization Standard Setup
Track A - Standard Setup Labs
Install and Configure Basic Setup: Install the Red Hat Enterprise Virtualization Manager and Red HatEnterprise Virtualization Hypervisor, configure storage and define networks (75 minutes).
Create Virtual Machines: Create virtual machines and templates from the administration portal (25minutes).
Live Migration Scenarios: Configure automatic virtual machine live migration during hardwaredowntime (10 minutes).
Power User Portal: Create and manage virtual machines from the power user portal (35 minutes).
The basic labs allow you to evaluate how Red Hat Enterprise Virtualization can be deployed in yourenvironment.
The advanced labs show you how to optimize your Red Hat Enterprise Virtualization setup. Theadvanced labs have additional hardware requirements, which are listed at the start of each advancedlab.
Track A - Advanced Labs (optional)
Manage Multi-Level Administrators: Manage administrators for each component of Red HatEnterprise Virtualization (10 minutes).
High Availability Scenarios: Configure power management and high availability (30 minutes).
Add Additional Data Center: Create an additional data center with Red Hat Enterprise Linux hosts.
Red Hat Enterprise Virtualization 3.2 Evaluation Guide
12
(35 minutes)
Virtual Desktops: Access desktop pools using the SPICE connection protocol (50 minutes).
Report a bug
3.2. Track A RequirementsTo work through the labs in Track A, you must have:
an evaluation license
a valid Red Hat Network subscription to
the Red Hat Enterprise Virtualization channel
the Red Hat Enterprise Linux channel
Note
Refer to the Red Hat Enterprise Virtualization Manager Release Notes for specific channel namescurrent to your system.
Contact your sales representative if you do not have both of the above.
Before you begin Track A, ensure that you have the following:
Red Hat Enterprise Virtualization Manager Requirements
Minimum - Dual core server with 4 GB RAM, 25 GB free disk space and 1 Gbps network interface.
Recommended - Dual Sockets/Quad core server with 16 GB RAM, 50 GB free disk space on multipledisk spindles and 1 Gbps network interface.
The breakdown of the server requirements is:Red Hat Enterprise Linux 6 operating system: 1 GB RAM and 5 GB local disk space
Manager: 3 GB RAM, 3 GB local disk space and 1 Gbps network controller bandwidth
Local ISO domain: 15 GB disk space
One client for connecting to Red Hat Enterprise Virtualization Manager.A machine with Firefox 17 or higher installed on Red Hat Enterprise Linux.
Internet Explorer 9 or higher on Microsoft Windows.
Red Hat Enterprise Virtualization Hosts Requirements
Minimum - Dual Core server, 2 GB RAM and 10 GB Storage, 1 Gbps network interface
Recommended - Dual socket server, 16 GB RAM and 50 GB storage, two 1 Gbps network interfaces
Server requirements:For each host: AMD-V or Intel VT enabled, AMD64 or Intel 64 extensions, minimum 1 GB RAM, 3GB free storage and 1 Gbps network interface.
For virtual machines running on each host: 8 GB RAM to run four virtual machines.
Storage and Networking Requirements
At least one of the supported storage types (NFS, iSCSI or FCP).
At least three static IP addresses: One for the Red Hat Enterprise Virtualization Manager server andone for each server running Red Hat Enterprise Virtualization Hypervisor.
DNS service which can resolve (forward and reverse) all the IP addresses.
Introduction
13
An existing DHCP server which can allocate network addresses for the virtual machines.
Display subnet (extra Network Interface Card on both servers) to create a new display network inaddition to the default existing management network.
Virtual Machines Requirements
Installation images for creating virtual machines. These installation images will be installed on thevirtual machines you create.
Red Hat Enterprise Linux 3, 4, 5 or 6.
Microsoft Windows XP, 7, 8, 2003 or 2008.
Valid licenses or subscription entitlements for each operating system.
At least one valid user account in any of the supported directory services (IdM, AD, or RHDS).
Report a bug
4. Track B
4.1. Track B: Minimal SetupTrack B describes the installation and configuration of a minimal Red Hat Enterprise Virtualizationenvironment on a single host, using local storage.
Track B consists of:
three basic labs
two advanced labs (optional)
The basic labs describe how to create virtual machines and assign them to users.
The advanced labs include:
using the multi-level administration system to assign different levels of user permissions (this is idealfor companies with diverse employee roles)
provisioning virtual desktops for users
If you have two physical servers and no shared storage, set up a Red Hat Enterprise Virtualizationenvironment by following the labs in Track B - Minimal Setup. The labs in this track are color coded blue.To determine if a lab is part of Track B, look for a blue square in the diagram at the start of each lab.
Red Hat Enterprise Virtualization 3.2 Evaluation Guide
14
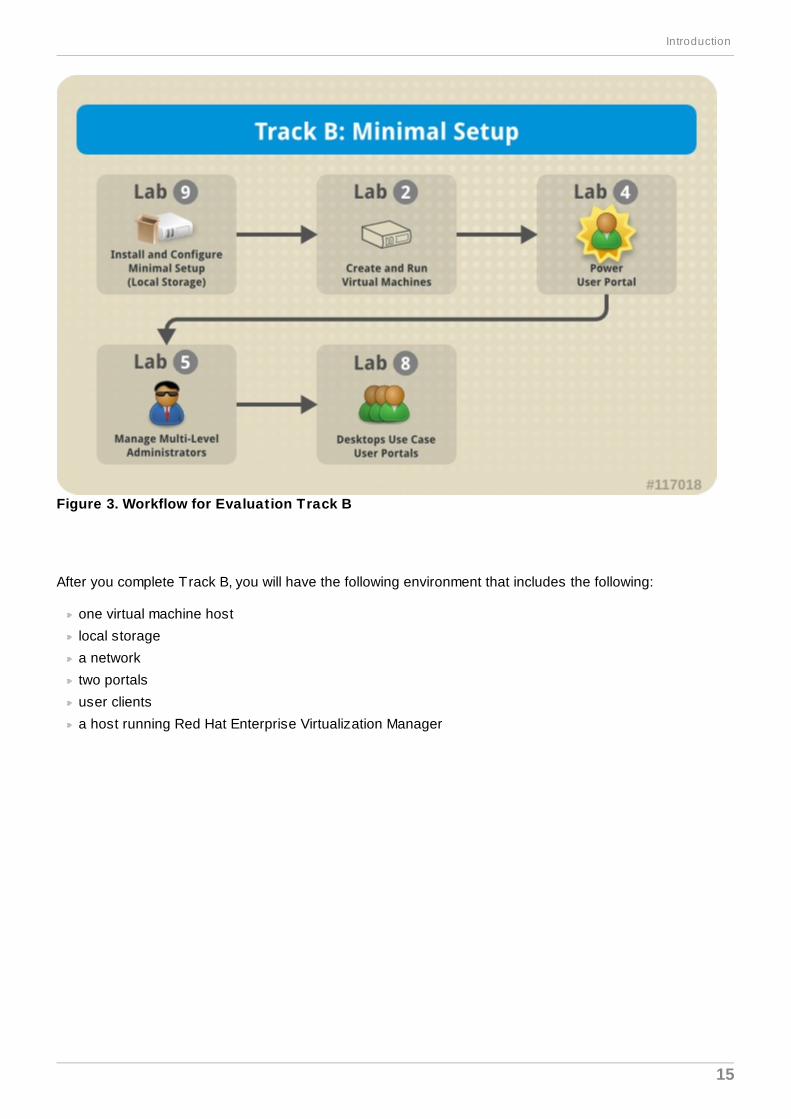
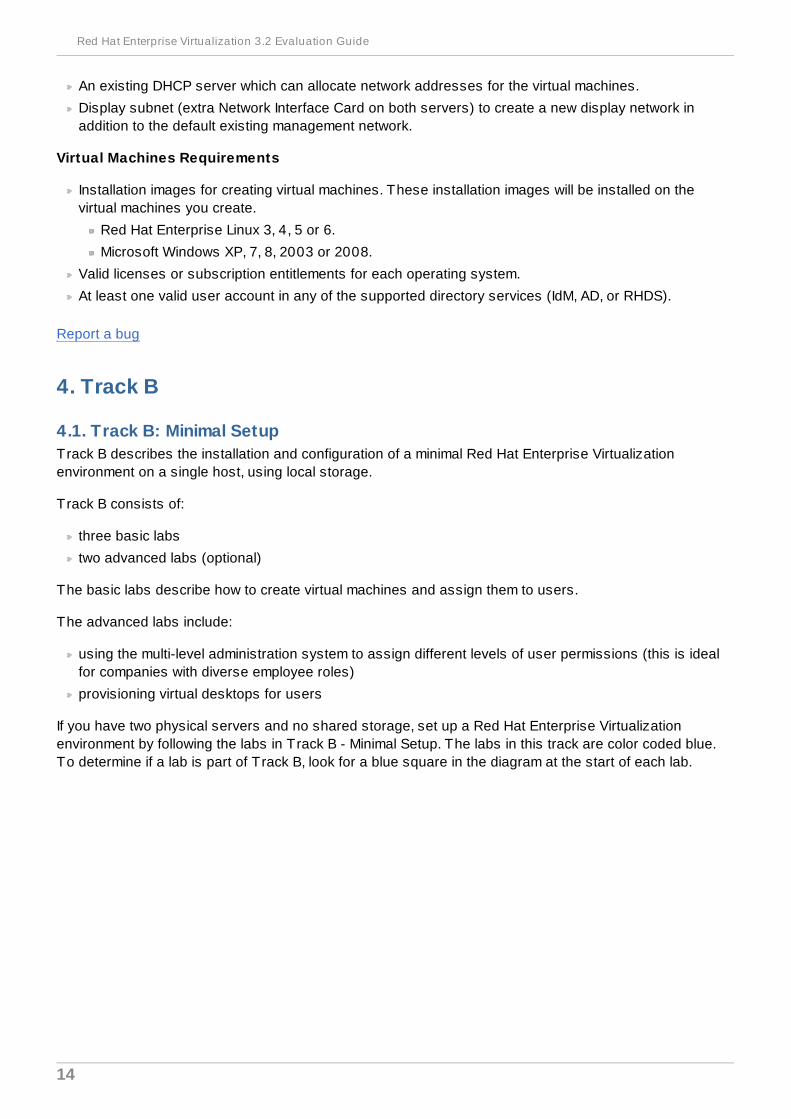
Figure 3. Workflow for Evaluation Track B
After you complete Track B, you will have the following environment that includes the following:
one virtual machine host
local storage
a network
two portals
user clients
a host running Red Hat Enterprise Virtualization Manager
Introduction
15
Figure 4 . Red Hat Enterprise Virtualization Minimal Setup
Track B - Minimal Setup Labs
Install and Configure Minimal Setup: Install the Red Hat Enterprise Virtualization Manager and RedHat Enterprise Virtualization Hypervisor using minimal hardware (60 minutes).
Create Virtual Machines: Create virtual machines and templates from the administration portal (25minutes).
Power User Portal: Create and manage virtual machines from the power user portal (35 minutes).
Track B - Advanced Lab (optional)
Manage Multi-Level Administrators: Manage administrators for each component of Red HatEnterprise Virtualization (10 minutes).
Virtual Desktops: Access desktop pools using the SPICE connection protocol (50 minutes).
Report a bug
4.2. Track B RequirementsTo work through the labs in Track B, you must have:
an evaluation license
a valid Red Hat Network subscription to
the Red Hat Enterprise Virtualization channel
the Red Hat Enterprise Linux channel
Red Hat Enterprise Virtualization 3.2 Evaluation Guide
16
Note
Refer to the Red Hat Enterprise Virtualization Manager Release Notes for specific channel namescurrent to your system.
Contact your sales representative if you do not have both of the above.
Before you begin Track B, ensure that you have the following:
Red Hat Enterprise Virtualization Manager Requirements
Minimum - Dual core server with 4 GB RAM, with 25 GB free disk space and 1 Gbps networkinterface.
Recommended - Dual Sockets/Quad core server with 16 GB RAM, 50 GB free disk space on multipledisk spindles and 1 Gbps network interface.
The breakdown of the server requirements are as below:For the Manager: 3 GB memory, 3 GB local disk space, 1 Gbps network controller bandwidth
For the Red Hat Enterprise Linux 6 operating system: 1 GB memory, 5 GB local disk space
For the local ISO domain: 15 GB disk space
One client for connecting to Red Hat Enterprise Virtualization Manager.A machine with Firefox 17 or higher installed on Red Hat Enterprise Linux.
Internet Explorer 9 or higher on Microsoft Windows.
Red Hat Enterprise Virtualization Host Requirements
Minimum - Dual Core server, 2 GB RAM and 10 GB Storage, 1 Gbps network interface.
Recommended - Dual socket server, 16 GB RAM and 50 GB storage, two 1 Gbps network interfaces.
The breakdown of the server requirements is:For each host: AMD-V or Intel VT enabled, AMD64 or Intel 64 extensions, minimum 1 GB RAM, 3GB free storage and 1 Gbps network interface.
For virtual machines running on the host: 8 GB RAM to run four virtual machines.
Storage and Networking Requirements
Two static IP addresses: One for the Red Hat Enterprise Virtualization Manager server and one forthe Red Hat Enterprise Virtualization Hypervisor.
One name (DNS) Server which can resolve (forward and reverse) all the IP addresses.
A DHCP server for the virtual machines.
Virtual Machine Requirements
Installation images for creating virtual machines. These images will be installed on the virtualmachines you create.
Red Hat Enterprise Linux 3, 4, 5 or 6.
Microsoft Windows XP, 7, 8, 2003 or 2008.
Valid licenses or subscription entitlements for each operating system.
At least one valid user account in any of the supported directory services (IdM, AD, or RHDS).
Report a bug
Introduction
17
Chapter 1. Lab 1 - Basic Setup for Installation andConfiguration
1.1. Lab 1 - Objectives
Lab 1 on Track A sets up the basic infrastructure to support virtualization, and shows you how to installand configure the hosts, storage and networks in readiness for the virtual machines. The goal of this labis an environment that is ready for you to create and provision virtual machines.
This lab is intended for Track A, and requires three servers and shared storage.
Lab 1 - Objectives
To achieve the goal of this lab, you will install and set up Red Hat Enterprise Virtualization with multiplehosts and shared storage, you will learn to configure networks and add ISOs. This lab should take youabout 75 minutes.
Install Red Hat Enterprise Virtualization Manager shows you how to install the RedHat Enterprise Virtualization Manager on a server running Red Hat Enterprise Linux. (12 minutes*)
Install Red Hat Enterprise Virtualization Hypervisor shows you how to install andconfigure Red Hat Enterprise Virtualization Hypervisors for use with Red Hat Enterprise VirtualizationManager. (20 minutes*)
Connect to Red Hat Enterprise Virtualization Manager shows you how to configure aclient machine to connect to the Red Hat Enterprise Virtualization Manager administration portal. (8minutes)
Approve the Red Hat Enterprise Virtualization Hypervisor shows you how to approvethe hosts for use from the Red Hat Enterprise Virtualization Manager. (10 minutes)
Configure Logical Networks shows you how to define networks for the storage devices and addthem to the hosts. (5 minutes)
Configure Storage shows you how to define NFS, iSCSI or FCP storage and attach the domains tothe data center. (10 minutes)
Attach and Populate ISO Domain shows you how to attach the predefined ISO domain to thedata center and upload ISO images to the repository. (10 minutes)
* The time required to download packages from the Red Hat Network depends on the bandwidth of yourconnection to RHN, therefore it has not been included in the estimated time.
Lab 1 - Configuration
Red Hat Enterprise Virtualization 3.2 Evaluation Guide
18
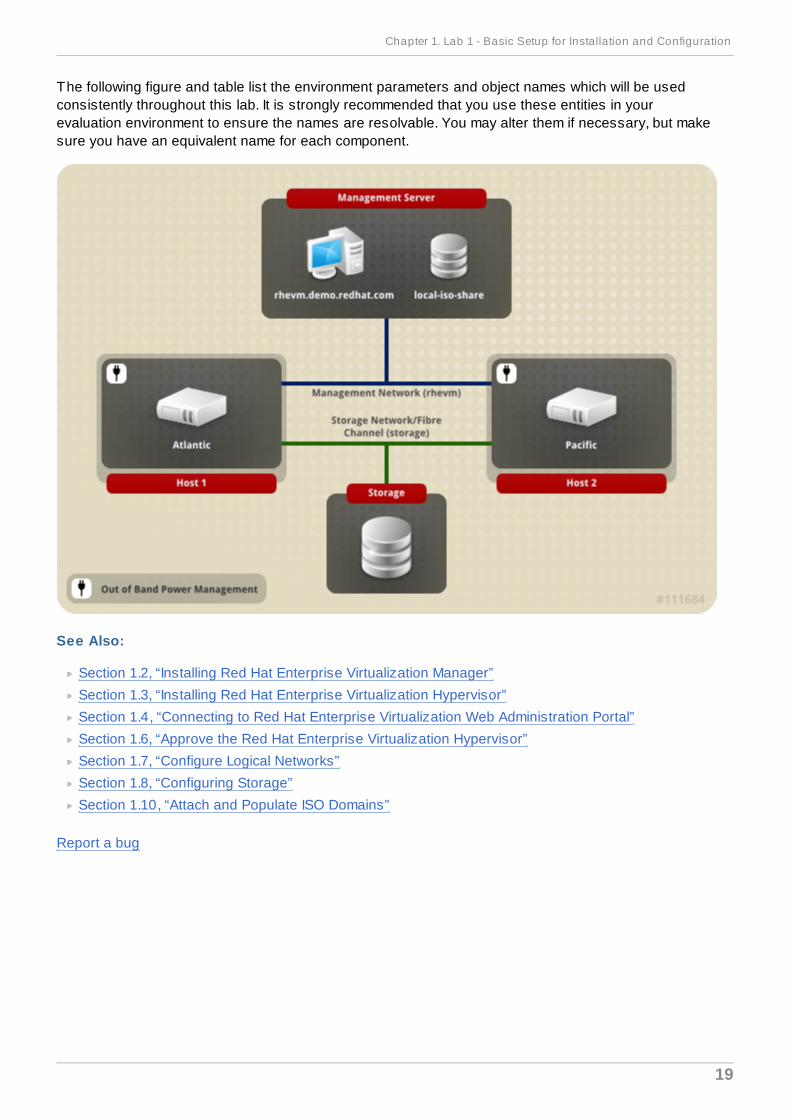
The following figure and table list the environment parameters and object names which will be usedconsistently throughout this lab. It is strongly recommended that you use these entities in yourevaluation environment to ensure the names are resolvable. You may alter them if necessary, but makesure you have an equivalent name for each component.
See Also:
Section 1.2, “Installing Red Hat Enterprise Virtualization Manager”
Section 1.3, “Installing Red Hat Enterprise Virtualization Hypervisor”
Section 1.4, “Connecting to Red Hat Enterprise Virtualization Web Administration Portal”
Section 1.6, “Approve the Red Hat Enterprise Virtualization Hypervisor”
Section 1.7, “Configure Logical Networks”
Section 1.8, “Configuring Storage”
Section 1.10, “Attach and Populate ISO Domains”
Report a bug
Chapter 1. Lab 1 - Basic Setup for Installation and Configuration
19

Figure 1.1. Install Red Hat Enterprise Virtualization Manager
The Red Hat Enterprise Virtualization Manager is the control center of the Red Hat EnterpriseVirtualization environment. It allows you to define hosts, configure data centers, add storage, definenetworks, create virtual machines, manage user permissions, and use templates from one centrallocation.
The Red Hat Enterprise Virtualization Manager must be installed on a server running Red HatEnterprise Linux 6, with minimum 4 GB RAM, 25 GB free disk space and 1 Gbps network interface.
Procedure 1.1. To install Red Hat Enterprise Virtualization Manager
1. Install Red Hat Enterprise Linux 6 on a server. When prompted for the software packages toinstall, select the default Basic Server option. See the Red Hat Enterprise Linux InstallationGuide for more details.
Important
During installation, remember to set the fully qualified domain name (FQDN) and IP for theserver.
2. If your server has not been registered with the Red Hat Network, run:
# rhn_register
To complete registration successfully you need to supply your Red Hat Network username andpassword. Follow the onscreen prompts to complete registration of the system.
After you have registered your server, update all the packages on it. Run:
# yum -y update
Red Hat Enterprise Virtualization 3.2 Evaluation Guide
20

Reboot your server for the updates to be applied.
3. Subscribe the server to the required Red Hat Network channels. See the Red Hat EnterpriseVirtualization Manager Release Notes for a list of required channels.
4. You are now ready to install the Red Hat Enterprise Virtualization Manager. Run the followingcommand:
# yum -y install rhevm
This command will download the Red Hat Enterprise Virtualization Manager installation softwareand resolve all dependencies.
5. When the packages have finished downloading, run the installer:
# rhevm-setup
6. The installer will take you through a series of interactive questions as listed in the followingexample. If you do not enter a value when prompted, the installer uses the default settings whichare stated in [ ] brackets.
Chapter 1. Lab 1 - Basic Setup for Installation and Configuration
21
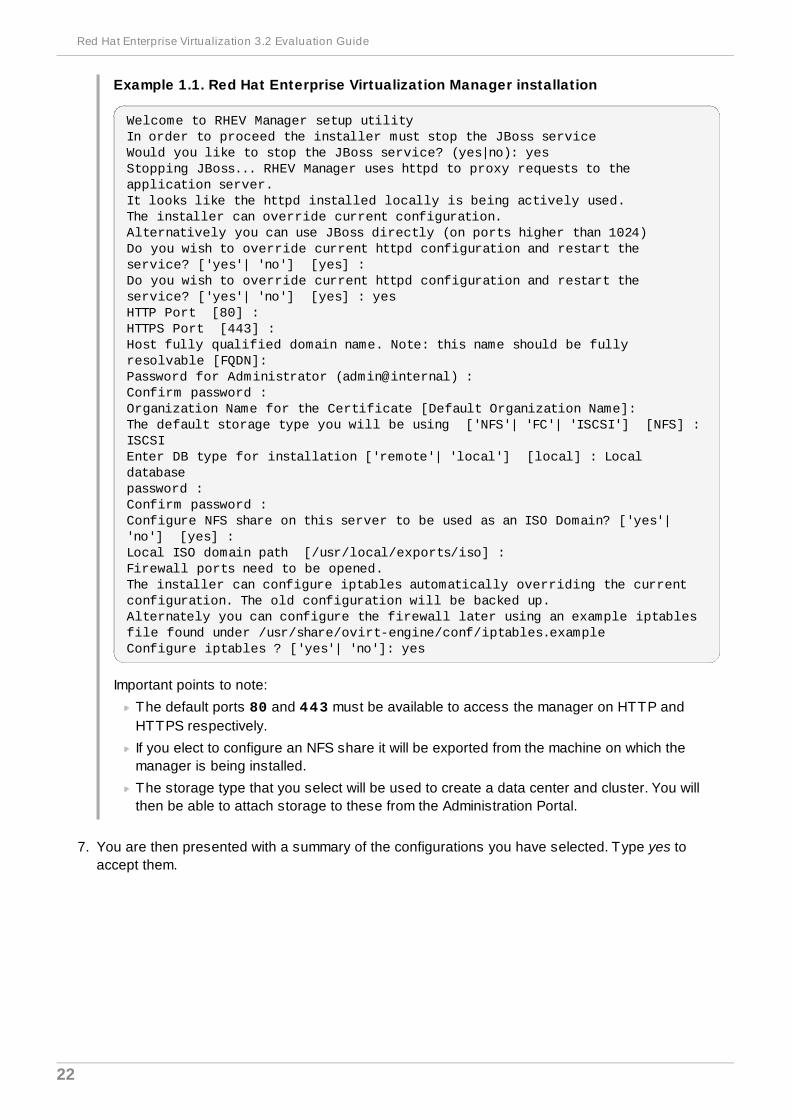
Example 1.1. Red Hat Enterprise Virtualization Manager installation
Welcome to RHEV Manager setup utilityIn order to proceed the installer must stop the JBoss serviceWould you like to stop the JBoss service? (yes|no): yesStopping JBoss... RHEV Manager uses httpd to proxy requests to the application server.It looks like the httpd installed locally is being actively used.The installer can override current configuration.Alternatively you can use JBoss directly (on ports higher than 1024)Do you wish to override current httpd configuration and restart the service? ['yes'| 'no'] [yes] : Do you wish to override current httpd configuration and restart the service? ['yes'| 'no'] [yes] : yesHTTP Port [80] : HTTPS Port [443] :Host fully qualified domain name. Note: this name should be fully resolvable [FQDN]:Password for Administrator (admin@internal) :Confirm password :Organization Name for the Certificate [Default Organization Name]:The default storage type you will be using ['NFS'| 'FC'| 'ISCSI'] [NFS] : ISCSIEnter DB type for installation ['remote'| 'local'] [local] : Local databasepassword :Confirm password :Configure NFS share on this server to be used as an ISO Domain? ['yes'| 'no'] [yes] : Local ISO domain path [/usr/local/exports/iso] : Firewall ports need to be opened.The installer can configure iptables automatically overriding the current configuration. The old configuration will be backed up.Alternately you can configure the firewall later using an example iptables file found under /usr/share/ovirt-engine/conf/iptables.exampleConfigure iptables ? ['yes'| 'no']: yes
Important points to note:
The default ports 80 and 443 must be available to access the manager on HTTP andHTTPS respectively.
If you elect to configure an NFS share it will be exported from the machine on which themanager is being installed.
The storage type that you select will be used to create a data center and cluster. You willthen be able to attach storage to these from the Administration Portal.
7. You are then presented with a summary of the configurations you have selected. Type yes toaccept them.
Red Hat Enterprise Virtualization 3.2 Evaluation Guide
22

Example 1.2. Confirm Manager installation sett ings
RHEV Manager will be installed using the following configuration:=================================================================override-httpd-config: yeshttp-port: 80https-port: 443host-fqdn: rhevm-demo.name.comauth-pass: ********org-name: Organization Namedefault-dc-type: ISCSIdb-remote-install: localdb-local-pass: ********nfs-mp: /usr/local/exports/isoconfig-nfs: yesoverride-iptables: yesProceed with the configuration listed above? (yes|no): yes
8. The installation commences. The following message displays, indicating that the installation wassuccessful.
Example 1.3. Successful installation
Installing:Configuring RHEV Manager... [ DONE ]Creating CA... [ DONE ]Editing JBoss Configuration... [ DONE ]Setting Database Configuration... [ DONE ]Setting Database Security... [ DONE ]Creating Database... [ DONE ]Updating the Default Data Center Storage Type... [ DONE ]Editing RHEV Manager Configuration... [ DONE ]Editing Postgresql Configuration... [ DONE ]Configuring the Default ISO Domain... [ DONE ]Configuring Firewall (iptables)... [ DONE ]Starting JBoss Service... [ DONE ]Configuring HTTPD... [ DONE ]
**** Installation completed successfully ******
Your Red Hat Enterprise Virtualization Manager is now up and running. You can log in to the Red HatEnterprise Virtualization Manager's web administration portal with the username admin (theadministrative user configured during installation) in the internal domain. Instructions to do so areprovided at the end of this chapter.
Important
The internal domain is automatically created upon installation, however no new users can beadded to this domain. To authenticate new users, you need an external directory service. Red HatEnterprise Virtualization supports Identity Management (IdM), Active Directory, and RHDS, andprovides a utility called rhevm-manage-domains for attaching new directories to the system.Use of this tool is covered in the Red Hat Enterprise Virtualization Installation Guide.
Chapter 1. Lab 1 - Basic Setup for Installation and Configuration
23
Report a bug
1.3. Installing Red Hat Enterprise Virtualization Hypervisor
1.3.1. Registering the Host on RHN and Acquiring ISO Hypervisor Images
Summary
The Red Hat Enterprise Virtualization Manager Red Hat Network channel contains theHypervisor packages. The Hypervisor itself is contained in the rhev-hypervisor package. Additionaltools supporting USB and PXE installations are installed as dependencies. Install the Hypervisorpackages on the system you plan to use to create Hypervisor boot media.
Select one of the two options below:
Procedure 1.2. Subscribing to RHN Entit lement Pools and Installing the Red Hat EnterpriseVirtualization Hypervisor Packages
1. Subscribing to download the Hypervisor using certificate-based RHNa. Identify Available Entitlement Pools
To subscribe the system to the Red Hat Enterprise Virtualization channels you need youmust locate the identifier for the relevant entitlement pool. Use the list action in thesubscription-manager to find these:
# subscription-manager list --available | grep -A8 "Red Hat Enterprise Virtualization"
b. Subscribe System to Entit lement PoolsUsing the pool identifiers located in the previous step, subscribe the system to Red Hat Enterprise Linux Server and Red Hat Enterprise Virtualizationentitlements. Use the subscribe parameter of the subscription-manager command,and replace POOLID with one of the pool identifiers.
# subscription-manager subscribe --pool=POOLID
2. Subscribing to download the Hypervisor using RHN Classica. Log on to Red Hat Network http://rhn.redhat.com.
b. Move the mouse cursor over the Subscriptions link at the top of the page, and then clickRegistered Systems in the menu that appears.
c. Select the system to which you are adding channels from the list on the screen by clickingthe name of the system.
d. Click Alter Channel Subscriptions in the Subscribed Channels section of thescreen.
e. Select the Red Hat Enterprise Virtualization Manager channel from the list onthe screen, then click the Change Subscription button to finalize the change.
3. Log in to the system on which the Red Hat Enterprise Virtualization Manager is installed. Log in asroot.
4. Use yum to install the rhev-hypervisor.
Red Hat Enterprise Virtualization 3.2 Evaluation Guide
24

# yum install rhev-hypervisor
Result
The Hypervisor ISO image is installed into the /usr/share/rhev-hypervisor/ directory. The livecd-iso-to-disk and livecd-iso-to-pxeboot scripts are installed to the /usr/bin/directory.
Note
All version of Red Hat Enterprise Linux 6.2 and higher allow more than one version of the ISOimage to be installed at one time. Because of this, /usr/share/rhev-hypervisor/rhev-hypervisor.iso is now a symbolic link to a uniquely-named version of the Hypervisor ISOimage, for instance /usr/share/rhev-hypervisor/rhevh-6.2-20111006.0.el6.iso.Different versions of the image can now be installed alongside each other, allowing administratorsto run and maintain a cluster on a previous version of the Hypervisor while upgrading anothercluster for testing.The symbolic links /usr/share/rhev-hypervisor/rhevh-latest6.iso and /usr/share/rhev-hypervisor/rhev-hypervisor6.iso are created. These links targetthe most-recently installed version of the Red Hat Enterprise Virtualization ISO image.
Report a bug
1.3.2. Preparing Optical Hypervisor Installation Media
Summary
Burn the Hypervisor image to a CD-ROM with the wodim command. The wodim command is part of thewodim package.
Procedure 1.3. Preparing Optical Hypervisor Installation Media
1. Verify that the wodim package is installed on the system.
Example 1.4 . Verify Installation of wodim Package
# rpm -q wodimwodim-1.1.9-11.el6.x86_64
If the package version is in the output the package is available.
If nothing is listed, install wodim:
# yum install wodim
2. Insert a blank CD-ROM or DVD into your CD or DVD writer.
3. Record the ISO file to the disc. The wodim command uses the following:
wodim dev=device image
This example uses the first CD-RW (/dev/cdrw) device available and the default hypervisorimage location, /usr/share/rhev-hypervisor/rhev-hypervisor.iso.
Chapter 1. Lab 1 - Basic Setup for Installation and Configuration
25

Example 1.5. Use of wodim Command
# wodim dev=/dev/cdrw /usr/share/rhev-hypervisor/rhev-hypervisor.iso
Result
If no errors occurred, the Hypervisor is ready to boot. Errors sometimes occur during the recordingprocess due to errors on the media itself. If this occurs insert another writable disk and repeat thecommand above.
The Hypervisor uses a program (isomd5sum ) to verify the integrity of the installation media every timethe Hypervisor is booted. If media errors are reported in the boot sequence you have a bad CD-ROM.Follow the procedure above to create a new CD-ROM or DVD.
Report a bug
1.3.3. Install Red Hat Enterprise Virtualizaton Hosts from Optical InstallationMediaNow that you have registered the host with RHN, acquired the Hypervisor images, and used theHypervisor images to create optical installation media, you will boot the system using the opticalinstallation media.
Summary
Booting the Hypervisor from optical installation media requires the system to have a correctly definedBIOS boot configuration.
1. Ensure that the system's BIOS is configured to boot from the CD-ROM or DVD-ROM drive beforeproceeding.
Note
Refer to your manufacturer's manuals for further information on modifying the system'sBIOS boot configuration.
2. Insert the Hypervisor CD-ROM in the CD-ROM or DVD-ROM drive.
3. Reboot the system.
Result
The host's screen will display the Hypervisor boot screen.
Report a bug
1.3.4. Install Red Hat Enterprise Virtualization HypervisorsRed Hat Enterprise Virtualization Hypervisor Menu navigation keys
Use the Up and Down arrow keys to navigate between selections. Your selections are highlighted inwhite.
The Tab key allows you to move between fields.
Red Hat Enterprise Virtualization 3.2 Evaluation Guide
26
Use the Spacebar to tick check boxes, which are represented by [ ] brackets. A marked check boxdisplays with an asterisk (*).
To proceed with the selected configurations, press the Enter key.
Important
Red Hat Enterprise Virtualization Hypervisor is a closed appliance, and does not allow theinstallation of custom RPMs.If you require custom RPMs, you must use Red Hat Enterprise Linux hosts. Red Hat EnterpriseLinux hosts are not closed appliances, and they allow the installation of custom RPMs.
To install Red Hat Enterprise Virtualization Hypervisors
1. Insert the Red Hat Enterprise Virtualization Hypervisor installation CD into your CD-ROM drive ofthe machine designated as a host. Reboot the machine. When the boot splash screen displays,press the Tab key and select Boot to boot from the hypervisor installation media. Press Enter.
2. On the installation confirmation screen, select Install RHEV Hypervisor and press Enter.
3. The installer automatically detects the drives attached to the system. The disk selected forbooting the hypervisor is highlighted in white. Ensure that the local disk is highlighted, otherwiseuse the arrow keys to select the correct disk. Select Continue and press Enter.
4. You are prompted to select the drive on which the hypervisor is to be installed. Ensure that thelocal disk is highlighted, otherwise use the arrow keys to select the correct disk. While multipleinstallation drives can be used, select only one for this evaluation. Select Continue and press Enter.
5. Enter a password for local console access and confirm it. Select Install and press Enter. TheRed Hat Enterprise Virtualization Hypervisor partitions the local drive, then commencesinstallation.
6. Once installation is complete, a dialog prompts you to Reboot the hypervisor. Press Enter toconfirm. Remove the installation disc.
7. After the hypervisor has rebooted, you will be taken to a login shell. Log in as the admin user withthe password you provided during installation to enter the Red Hat Enterprise VirtualizationHypervisor management console.
8. On the hypervisor management console, there are eight tabs on the left. Press the Up and Downkeys to navigate between them and Enter to access them.
a. Select the Network tab. Fill in the required fields as shown in the following example.Substitute the DNS Server address according to your environment.
Chapter 1. Lab 1 - Basic Setup for Installation and Configuration
27

Figure 1.2. Configure Hypervisor network sett ings
After you have filled in the fields, select Apply and press Enter. This saves your networksettings.
b. For this document, the eth0 device will be used to set up the management network. Select itand press Enter to access the interface configuration menu. Fill in the required fields asshown in the following example.
Figure 1.3. Configure management network interface
Under IPv4 Settings, select DHCP or Static IP addressing and press Spacebar tomark the option as enabled. If using static IP addressing you must also provide the IP Address, Netmask, and Gateway. Select Apply and press Enter.
A dialog prompts you to confirm your network settings, select OK and press Enter.
Red Hat Enterprise Virtualization 3.2 Evaluation Guide
28
c. Select the RHEV-M tab. Configure the following options:In the Management Server field, enter rhevm.demo.redhat.com .
In the Management Server Port field, enter 443.
T ick the Connect to the RHEV Manager and Validate Certificate checkbox.
The Set RHEV-M Admin Password field allows you to specify the root password forthe hypervisor, and enable SSH password authentication from the Red Hat EnterpriseVirtualization Manager. You do not have to fill in this field for this document.
Select Apply and press Enter. A dialog displays, asking you to connect the hypervisor tothe Red Hat Enterprise Virtualization Manager and validate its certificate. Select Approveand press Enter. A message will display notifying you that the Manager configuration hasbeen successfully updated.
d. Under the Red Hat Network tab, you can register the host with the Red Hat Network.This enables the host to run Red Hat Enterprise Linux virtual machines with proper RHNentitlements. However, for the purposes of this document, the evaluation subscriptions willbe used for the guests.
e. Accept all other default settings. For information on security, logging, and kernel dumpconfiguration, refer to the Red Hat Enterprise Linux 6 Hypervisor Deployment Guide. Theguide also covers non-interactive hypervisor installation.
f. Finally, select the Status tab. Select Restart and press Enter to reboot the host andapply all changes.
You have now successfully installed a Red Hat Enterprise Virtualization Hypervisor. Repeat the abovesteps for each hypervisor you wish to use. The following sections will provide instructions on how toapprove the hypervisors for use with the Red Hat Enterprise Virtualization Manager.
Report a bug
1.4. Connecting to Red Hat Enterprise Virtualization WebAdministration Portal
Chapter 1. Lab 1 - Basic Setup for Installation and Configuration
29

Figure 1.4 . Connect to the Manager administration portal
Now that you have installed the Red Hat Enterprise Virtualization Manager and hosts, you can log in tothe Manager administration portal to start configuring your virtualization environment. Use a clientrunning Firefox to access the web-based administration portal.
1. Open a browser and navigate to https://domain.example.com . Substitute domain.example.com with the URL provided during installation.
2. Under the Portals heading, click Web Admin Portal
3. If this is your first time connecting to the administration portal, Red Hat Enterprise VirtualizationManager will issue security certificates for your browser. Click the link labelled thiscertificate to trust the ca.cer certificate. A pop-up displays, click Open to launch theCertificate dialog. Click Install Certificate and select to place the certificate inTrusted Root Certification Authorities store.
4. The portal login screen displays. Enter admin as your User Name, and enter the Passwordthat you provided during installation. Ensure that your domain is set to Internal. Click Login.
You have now successfully logged in to the Red Hat Enterprise Virtualization web administration portal.Here, you can configure and manage all your virtual resources.
Report a bug
1.5. Web Administration Portal Graphical User InterfaceThe administration portal graphical interface has two modes: Tree mode and flat mode. Tree mode
Red Hat Enterprise Virtualization 3.2 Evaluation Guide
30

allows you to browse the object hierarchy of a data center, and is the recommended manner ofoperation. On the other hand, flat mode is used for objects which are not in the data centers hierarchy,for example the Users tab which does not appear in tree mode.
The functions of the administration portal GUI are described in the following figure and list:
Figure 1.5. Administration Portal Features
1. Header: This bar contains the name of the logged in user, the sign out button, the option toconfigure user roles.
2. Navigation Pane: This pane allows you to navigate between the Tree, Bookmarks and Tagstabs. In the Tree tab, tree mode allows you to see the entire system tree and provides a visualrepresentation your virtualization environment's architecture.
3. Resources Tabs: These tabs allow you to access the resources of Red Hat EnterpriseVirtualization. You should already have a Default Data Center, a Default Cluster, a Host waiting tobe approved, and available Storage waiting to be attached to the data center.
4. Results List: When you select a tab, this list displays the available resources. You can performa task on an individual item or multiple items by selecting the item(s) and then clicking the relevantaction button. If an action is not possible, the button is disabled.
5. Details Pane: When you select a resource, this pane displays its details in several subtabs.These subtabs also contain action buttons which you can use to make changes to the selectedresource.
6. Tree Pane: When you select a resource, this pane displays the details of that resource as wellas the location of the resource in the system hierarchy.
7. Events Pane: The Events pane displays the most recent events in the environment (user log in,user log out, resource additions, resource removals).
Once you are familiar with the layout of the administration portal, you can start configuring your virtualenvironment. Begin by approving your Hypervisor hosts for use, as detailed in the next section.
Report a bug
Chapter 1. Lab 1 - Basic Setup for Installation and Configuration
31

1.6. Approve the Red Hat Enterprise Virtualization HypervisorAt this point you should already have a Default data center and a Default cluster, which have beenautomatically created during the Manager installation. In addition, the Red Hat Enterprise VirtualizationHypervisors you installed earlier should have been automatically detected by the Red Hat EnterpriseVirtualization Manager and attached to the Default cluster of the Default data center.
However, before they can be used, they require a click of approval from the administration portal.Perform the following procedure for each hypervisor.
To approve the Red Hat Enterprise Virtualization Hypervisor hosts
1. Navigate to the Tree pane and click the Expand All button. Under the Default cluster, clickthe Hosts icon. The Hosts tab displays a list of available hypervisors.
2. Select your hypervisor and click the Approve button. The Edit and Approve Host dialogdisplays. Accept the defaults or make changes as necessary, then click OK.
Figure 1.6. Approve Red Hat Enterprise Virtualization Hypervisor
3. A dialog appears, indicating that you have not configured Power Management for this host. For thepurpose of this lab, click OK to continue. The host goes through a brief installation cycle. Whencomplete, the host status changes from Non Operational to Up.
Note that both the Red Hat Enterprise Virtualization Hypervisors that you have approved were attachedto the same host cluster, which means that they share the same network infrastructure, the samestorage and the same type of CPU, therefore they can migrate virtual machines from one to the other.
Red Hat Enterprise Virtualization 3.2 Evaluation Guide
32
You can learn how to create new host clusters in Advanced Lab 7 - Add Additional Data Center.
Now that you have finished configuring your physical servers for use as the Manager, Hypervisors andadministration portal client respectively, you are ready to customize and deploy virtual resourcesincluding logical networks, storage domains and virtual machines.
Report a bug
1.7. Configure Logical NetworksNow that you have a data center with hosts grouped in a cluster, you need to define and apply thenetworking layer. When you installed the system, a management network was already defined. Howevernew networks, for example data, storage or display can be added to enhance network speed andperformance. In addition, other networks can be used to segregate virtual machine traffic from themanagement networks, or isolate traffic between groups of virtual machines in the same cluster. In RedHat Enterprise Virtualization Manager, network definition, type and function are encapsulated in a logicalentity called a Logical Network.
A logical network is assigned as a required resource of a cluster in a data center, and by extension allhosts in a cluster must have the same set of logical networks implemented. The implementation itselfmay vary from host to host (IP and bonding properties). Therefore, to configure a network, you need tofirst define the network and then apply this network to each host. By default the management network(rhevm) is defined for a data center.
In this lab, you will create an additional storage network and add it to your hosts. In the following exampleyou will define additional network for the storage, which will be useful when using NAS storage like NFSor iSCSI.
Defining Logical Networks in a Cluster
1. Navigate to the Tree pane and click the Expand All button. Under System, click Default. Onthe results list, the Default data center displays.
2. On the details pane, select the Logical Networks subtab. This displays the existing logicalnetworks. At this stage only the default rhevm network is listed.
3. Click New. The New Logical Network dialog displays. Fill in the Name and Descriptionfields, clear the VM network check box, and select the Attach check box underAttach/Detach Network to/From Cluster(s) to add the Storage network to the Defaultdata center.
4. Click OK to create the new logical network.
Now that you have defined this network as a resource required by the default cluster in the data center,it is time to add this resource to the hosts in the cluster.
Adding a Network to a Host
1. Back on the Tree pane, click Default → Clusters → Default → Hosts. The Hosts tab displaysa list of available hosts.
2. For each of your installed hosts, perform the following tasks:
a. Click on the host. On the details pane, select the Network Interfaces tab.
b. A list of network interfaces available for this host displays. One of them will already have themanagement network (rhevm) configured.
c. Select the interface on which to configure the Storage network and click the Setup Host
Chapter 1. Lab 1 - Basic Setup for Installation and Configuration
33
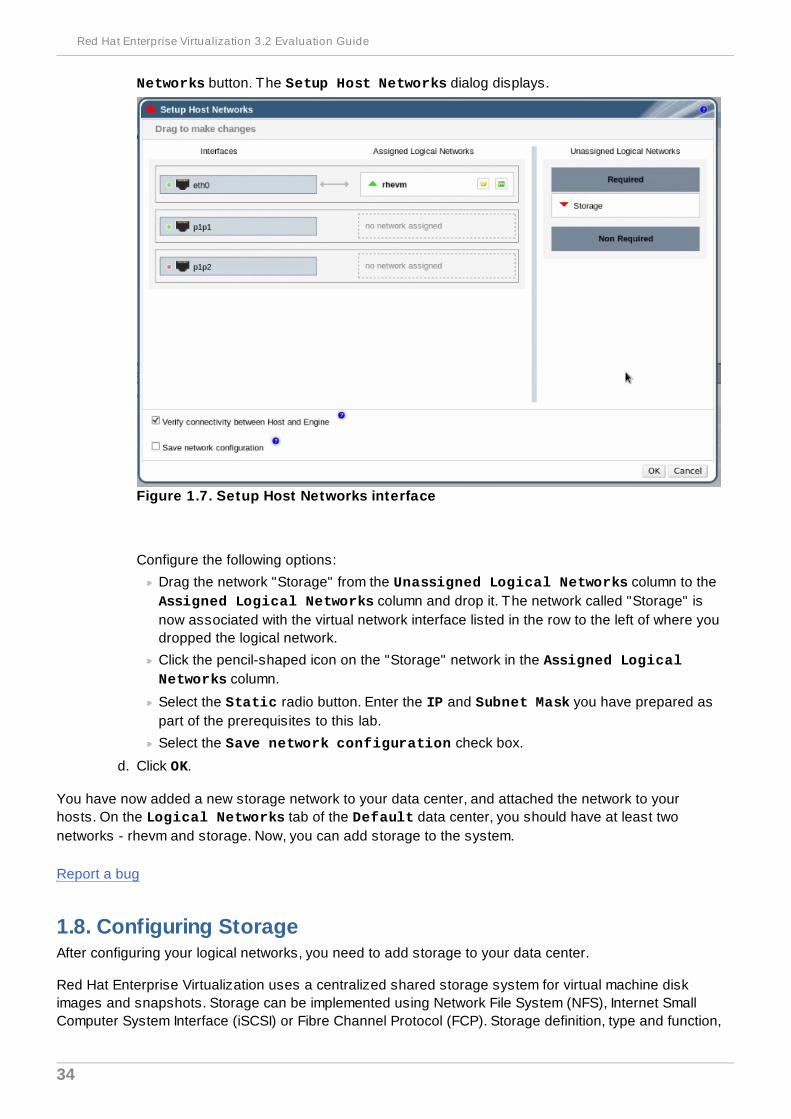
Networks button. The Setup Host Networks dialog displays.
Figure 1.7. Setup Host Networks interface
Configure the following options:
Drag the network "Storage" from the Unassigned Logical Networks column to theAssigned Logical Networks column and drop it. The network called "Storage" isnow associated with the virtual network interface listed in the row to the left of where youdropped the logical network.
Click the pencil-shaped icon on the "Storage" network in the Assigned LogicalNetworks column.
Select the Static radio button. Enter the IP and Subnet Mask you have prepared aspart of the prerequisites to this lab.
Select the Save network configuration check box.
d. Click OK.
You have now added a new storage network to your data center, and attached the network to yourhosts. On the Logical Networks tab of the Default data center, you should have at least twonetworks - rhevm and storage. Now, you can add storage to the system.
Report a bug
1.8. Configuring StorageAfter configuring your logical networks, you need to add storage to your data center.
Red Hat Enterprise Virtualization uses a centralized shared storage system for virtual machine diskimages and snapshots. Storage can be implemented using Network File System (NFS), Internet SmallComputer System Interface (iSCSI) or Fibre Channel Protocol (FCP). Storage definition, type and function,
Red Hat Enterprise Virtualization 3.2 Evaluation Guide
34
are encapsulated in a logical entity called a Storage Domain. Multiple storage domains can be usedin a Red Hat Enterprise Virtualization environment.
Note
Red Hat Enterprise Virtualization 3.1 supports passing mount options for all POSIX-compliantfilesystems. This includes GPFS, GFS, pNFS, and gluster. For more information refer to Red HatEnterprise Virtualization 3.1 Administration Guide.
For this lab you will use two types of storage domains. The first is an NFS share for ISO images ofinstallation media. You have already created this ISO domain during the Red Hat Enterprise VirtualizationManager installation.
The second storage domain will be used to hold virtual machine disk images. For this domain, you needat least one of the supported storage types. You have already set a default storage type duringinstallation. Ensure that you use the same type when creating your data domain.
Select your next step by checking the storage type you should use:
1. Navigate to the Tree pane and click the Expand All button. Under System, click Default. Onthe results list, the Default data center displays.
2. On the data center entry, the Storage Type column displays the type you should add.
3. Now that you have verified the storage type, create the storage domain:
For NFS storage, refer to Creating an NFS Data Domain.
For iSCSI storage, refer to Creating an iSCSI Data Domain.
For FCP storage, refer to Creating an FCP Data Domain.
See Also:
Section 1.9.1, “Creating an NFS Data Domain”
Section 1.9.2, “Creating an iSCSI Data Domain”
Section 1.9.3, “Creating an FCP Data Domain”
Report a bug
1.9. Configuring Storage
1.9.1. Creating an NFS Data DomainBecause you have selected NFS as your default storage type during the Manager installation, you willnow create an NFS storage domain. An NFS type storage domain is a mounted NFS share that isattached to a data center and used to provide storage for virtual machine disk images.
Chapter 1. Lab 1 - Basic Setup for Installation and Configuration
35
Important
If you are using NFS storage, you must first create and export the directories to be used asstorage domains from the NFS server. These directories must have their numerical user andgroup ownership set to 36:36 on the NFS server, to correspond to the vdsm user and kvm grouprespectively on the Red Hat Enterprise Virtualization Manager server. In addition, thesedirectories must be exported with the read write options (rw). For more information see the RedHat Enterprise Virtualization Installation Guide.
To add NFS storage
1. Navigate to the Tree pane and click the Expand All button. Under System, select the Defaultdata center and click on Storage. The available storage domains display on the results list. ClickNew Domain.
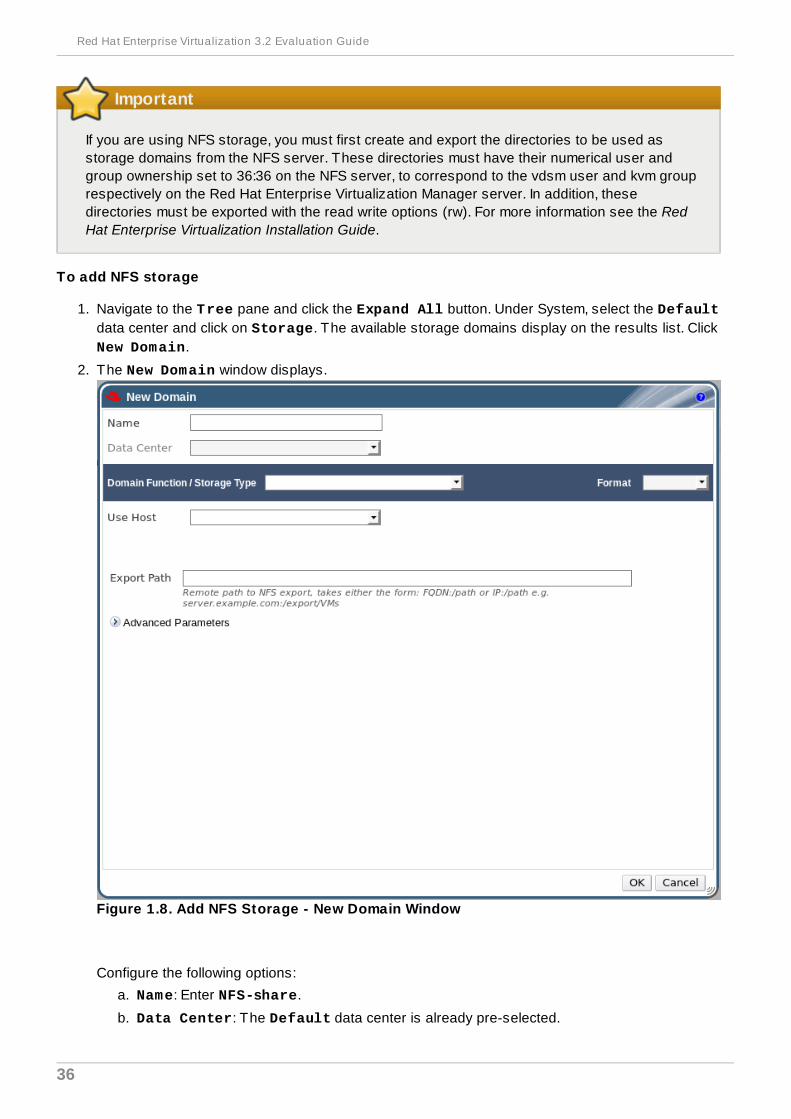
2. The New Domain window displays.
Figure 1.8. Add NFS Storage - New Domain Window
Configure the following options:
a. Name: Enter NFS-share.
b. Data Center: The Default data center is already pre-selected.
Red Hat Enterprise Virtualization 3.2 Evaluation Guide
36
c. Domain Function / Storage Type: The Data/ NFS option is already pre-selectedbecause during installation you set NFS as your data center's default storage type. Thestorage domain types which are not compatible with the Data Center will not be available.
d. Use Host: Select any of the hosts from the drop down menu. Only hosts which belong inthis data center will display in this list.
e. Export Path: Enter the IP address or a resolvable hostname of the chosen host. Theexport path should be in the format of 192.168.0.10:/Images/NFS-Share or domain.example.com:/Images/NFS-Share.
3. Click OK. The new NFS-share data domain displays on the Storage tab. It will remain with aLocked status while it is being prepared for use. When ready, it is automatically attached to thedata center.
You have created an NFS storage domain. Now, you need to attach an ISO domain to the data centerand upload installation images so you can use them to create virtual machines.
Report a bug
1.9.2. Creating an iSCSI Data DomainBecause you have selected iSCSI as your default storage type during the Manager installation, you willnow create an iSCSI storage domain. Red Hat Enterprise Virtualization platform supports iSCSI storagedomains spanning multiple pre-defined Logical Unit Numbers (LUNs).
To add iSCSI storage
1. Navigate to the Tree pane and click the Expand All button. Under System, select the Defaultdata center and click on Storage. The available storage domains display on the results list. ClickNew Domain.
2. The New Domain dialog box displays.
Chapter 1. Lab 1 - Basic Setup for Installation and Configuration
37
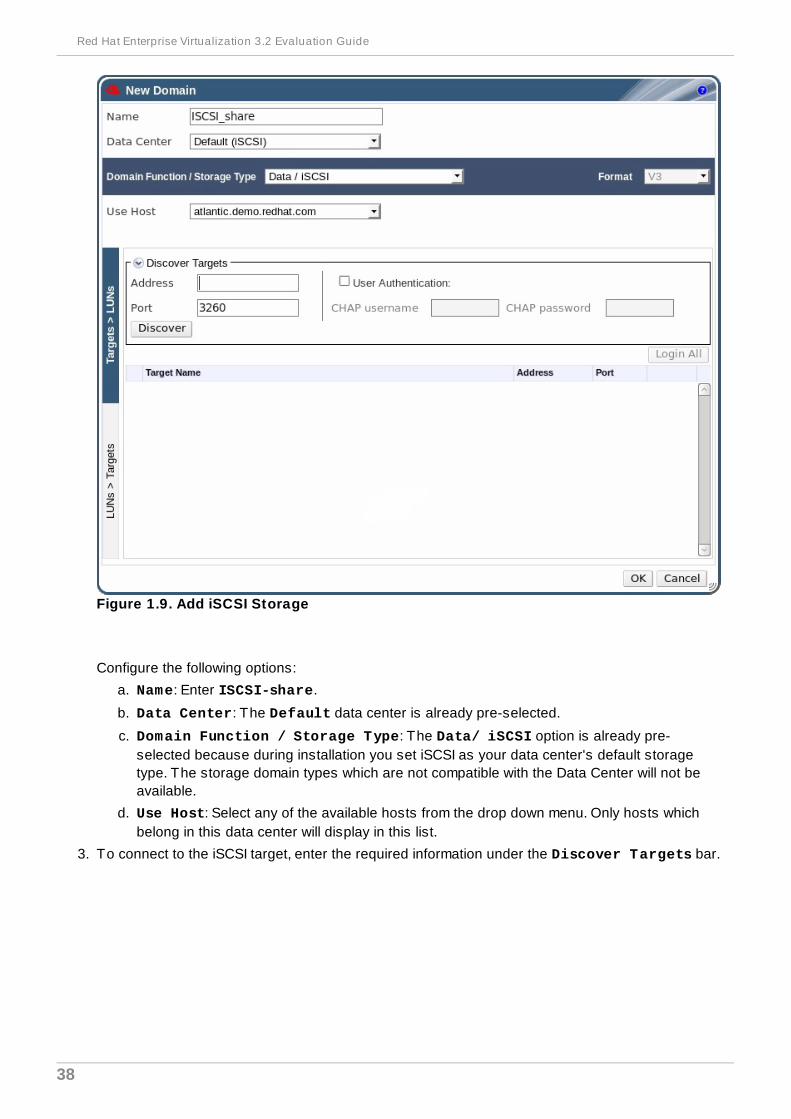
Figure 1.9. Add iSCSI Storage
Configure the following options:
a. Name: Enter ISCSI-share.
b. Data Center: The Default data center is already pre-selected.
c. Domain Function / Storage Type: The Data/ iSCSI option is already pre-selected because during installation you set iSCSI as your data center's default storagetype. The storage domain types which are not compatible with the Data Center will not beavailable.
d. Use Host: Select any of the available hosts from the drop down menu. Only hosts whichbelong in this data center will display in this list.
3. To connect to the iSCSI target, enter the required information under the Discover Targets bar.
Red Hat Enterprise Virtualization 3.2 Evaluation Guide
38
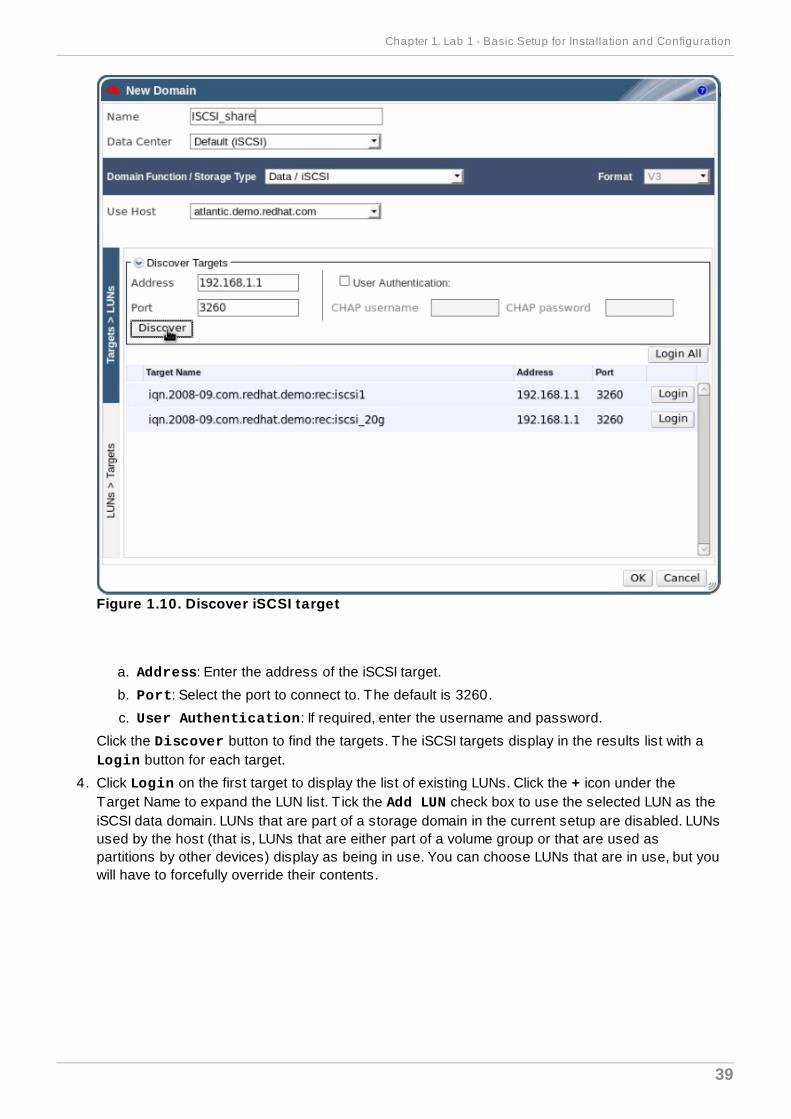
Figure 1.10. Discover iSCSI target
a. Address: Enter the address of the iSCSI target.
b. Port: Select the port to connect to. The default is 3260.
c. User Authentication: If required, enter the username and password.
Click the Discover button to find the targets. The iSCSI targets display in the results list with aLogin button for each target.
4. Click Login on the first target to display the list of existing LUNs. Click the + icon under theTarget Name to expand the LUN list. T ick the Add LUN check box to use the selected LUN as theiSCSI data domain. LUNs that are part of a storage domain in the current setup are disabled. LUNsused by the host (that is, LUNs that are either part of a volume group or that are used aspartitions by other devices) display as being in use. You can choose LUNs that are in use, but youwill have to forcefully override their contents.
Chapter 1. Lab 1 - Basic Setup for Installation and Configuration
39
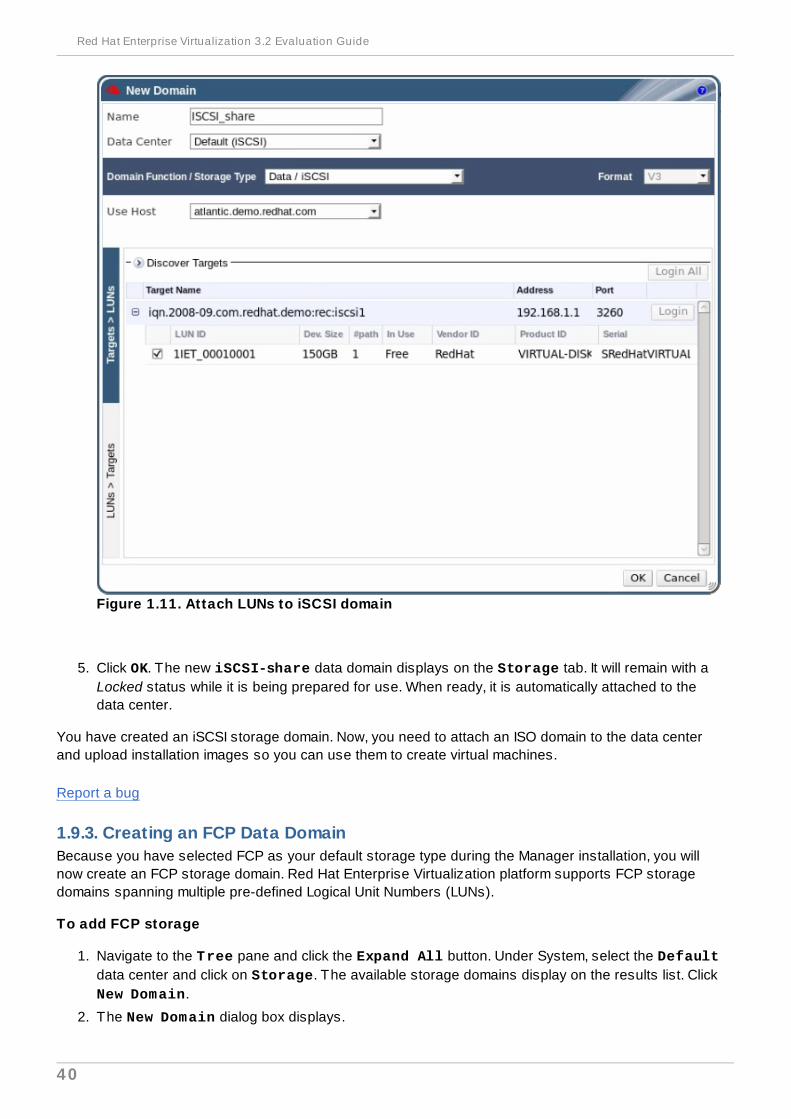
Figure 1.11. Attach LUNs to iSCSI domain
5. Click OK. The new iSCSI-share data domain displays on the Storage tab. It will remain with aLocked status while it is being prepared for use. When ready, it is automatically attached to thedata center.
You have created an iSCSI storage domain. Now, you need to attach an ISO domain to the data centerand upload installation images so you can use them to create virtual machines.
Report a bug
1.9.3. Creating an FCP Data DomainBecause you have selected FCP as your default storage type during the Manager installation, you willnow create an FCP storage domain. Red Hat Enterprise Virtualization platform supports FCP storagedomains spanning multiple pre-defined Logical Unit Numbers (LUNs).
To add FCP storage
1. Navigate to the Tree pane and click the Expand All button. Under System, select the Defaultdata center and click on Storage. The available storage domains display on the results list. ClickNew Domain.
2. The New Domain dialog box displays.
Red Hat Enterprise Virtualization 3.2 Evaluation Guide
40
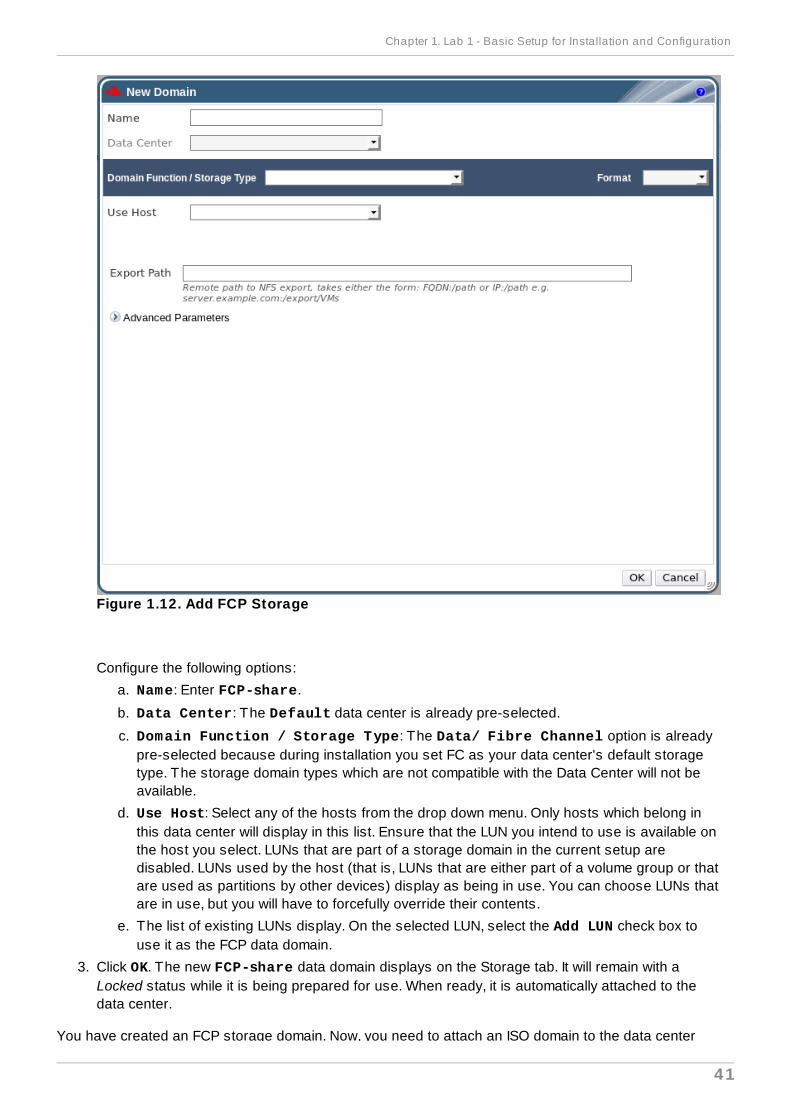
Figure 1.12. Add FCP Storage
Configure the following options:
a. Name: Enter FCP-share.
b. Data Center: The Default data center is already pre-selected.
c. Domain Function / Storage Type: The Data/ Fibre Channel option is alreadypre-selected because during installation you set FC as your data center's default storagetype. The storage domain types which are not compatible with the Data Center will not beavailable.
d. Use Host: Select any of the hosts from the drop down menu. Only hosts which belong inthis data center will display in this list. Ensure that the LUN you intend to use is available onthe host you select. LUNs that are part of a storage domain in the current setup aredisabled. LUNs used by the host (that is, LUNs that are either part of a volume group or thatare used as partitions by other devices) display as being in use. You can choose LUNs thatare in use, but you will have to forcefully override their contents.
e. The list of existing LUNs display. On the selected LUN, select the Add LUN check box touse it as the FCP data domain.
3. Click OK. The new FCP-share data domain displays on the Storage tab. It will remain with aLocked status while it is being prepared for use. When ready, it is automatically attached to thedata center.
You have created an FCP storage domain. Now, you need to attach an ISO domain to the data center
Chapter 1. Lab 1 - Basic Setup for Installation and Configuration
41
You have created an FCP storage domain. Now, you need to attach an ISO domain to the data centerand upload installation images so you can use them to create virtual machines.
Report a bug
1.10. Attach and Populate ISO DomainsYou have defined your first storage domain to store virtual guest data, now it is time to configure yoursecond storage domain, which will be used to store installation images for creating virtual machines. Youhave already created an ISO domain during the installation of the Red Hat Enterprise VirtualizationManager. To use this ISO domain, attach it to the same data center which contains the local storagedomain.
To attach the ISO domain
1. Navigate to the Tree pane and click the Expand All button. Click the Atlantic-Local datacenter. On the results list, the Atlantic-Local data center displays.
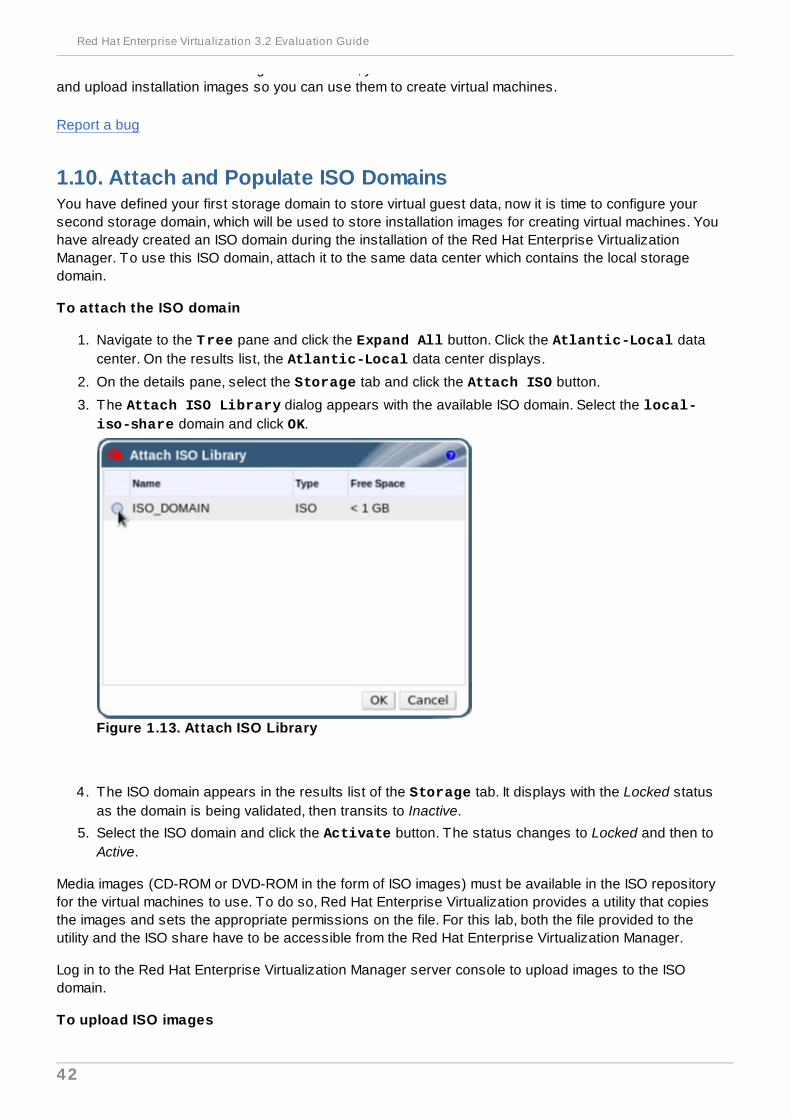
2. On the details pane, select the Storage tab and click the Attach ISO button.
3. The Attach ISO Library dialog appears with the available ISO domain. Select the local-iso-share domain and click OK.
Figure 1.13. Attach ISO Library
4. The ISO domain appears in the results list of the Storage tab. It displays with the Locked statusas the domain is being validated, then transits to Inactive.
5. Select the ISO domain and click the Activate button. The status changes to Locked and then toActive.
Media images (CD-ROM or DVD-ROM in the form of ISO images) must be available in the ISO repositoryfor the virtual machines to use. To do so, Red Hat Enterprise Virtualization provides a utility that copiesthe images and sets the appropriate permissions on the file. For this lab, both the file provided to theutility and the ISO share have to be accessible from the Red Hat Enterprise Virtualization Manager.
Log in to the Red Hat Enterprise Virtualization Manager server console to upload images to the ISOdomain.
To upload ISO images
Red Hat Enterprise Virtualization 3.2 Evaluation Guide
42
1. Create or acquire the appropriate ISO images from boot media. Ensure the path to these imagesis accessible from the Red Hat Enterprise Virtualization Manager server.
2. The next step is to upload these files. First, determine the available ISO domains by running:
# rhevm-iso-uploader list
You will be prompted to provide the admin user password which you are using to connect to theadministration portal. The tool lists the name of the ISO domain that you have already attached inthe previous lab:
ISO Storage Domain List:local-iso-share
Now you have all the information required to upload the required files. To copy your installationimages to the ISO domain, run:
# rhevm-iso-uploader upload -i local-iso-share [file1] [file2] .... [fileN]
3. After the images have been loaded, check that they are available for use in the Manageradministration portal.
a. Navigate to the Tree and click the Expand All button. Click Storage
b. On the Storage tab, click local-iso-share to display its details pane.
c. Select the Images subtab. The list of available images should be populated with the fileswhich you have uploaded. In addition, the RHEV-toolsSetup.iso and virtio-win.vfdimages should have been automatically uploaded during installation.
Now that you have successfully prepared the ISO domain for use, you have completed Lab 1 and areready to start creating virtual machines.
Report a bug
1.11. Lab 1 - summaryYou have reached your first Track A goal of setting up and configuring the infrastructure required tocreate and run virtual machines. You have successfully installed the Red Hat Enterprise VirtualizationManager and Red Hat Enterprise Virtualization Hypervisors, defined logical networks for storagedevices, attached storage domains to the data center, and prepared ISO images.
The next lab on Track A teaches you how to create Red Hat Enterprise Linux virtual machines andtemplates.
Report a bug
Chapter 1. Lab 1 - Basic Setup for Installation and Configuration
43

Red Hat Enterprise Virtualization 3.2 Evaluation Guide
44
Chapter 2. Lab 2 - Creating virtual machines
2.1. Lab 2 - ObjectivesThis lab takes you through the tasks necessary to create Red Hat Enterprise Linux virtual machines. Inaddition, you will learn how to create and use virtual machine templates. This lab should take you about25 minutes.
This lab shows you how to create a new Red Hat Enterprise Linux virtual machine, configure storageand networking, and install the operating system. (10 minutes)
You will also learn how to use the Red Hat Enterprise Linux virtual machine as a basis to create atemplate. (10 minutes)
Finally, you will learn how to clone a virtual machine from the Red Hat Enterprise Linux template. (5minutes)
See Also:
Section 2.3, “Creating Red Hat Enterprise Linux templates”
Section 2.4, “Creating a Template from a Red Hat Enterprise Linux Virtual Machine”
Section 2.5, “Sealing a Linux Virtual Machine for Deployment as a Template”
Section 2.6, “Creating a Template from a Red Hat Enterprise Linux Virtual Machine”
Section 2.7, “Cloning a Red Hat Enterprise Linux virtual machine from a template”
Report a bug
2.2. Creating a Red Hat Enterprise Linux virtual machineIn your current configuration, you should have at least one host available for running virtual machines,and the required installation images in your ISO domain. This section guides you through the creation ofa Red Hat Enterprise Linux 6 virtual server. You will perform a normal attended installation using a virtualDVD.
You have now created your first Red Hat Enterprise Linux virtual machine. Before you can use yourvirtual machine, install an operating system on it.
To create a Red Hat Enterprise Linux server
1. Navigate to the Tree pane and click Expand All. Click the VMs icon in the Default clusterunder the Default data center. On the Virtual Machines tab, click New Server.
Chapter 2. Lab 2 - Creating virtual machines
45
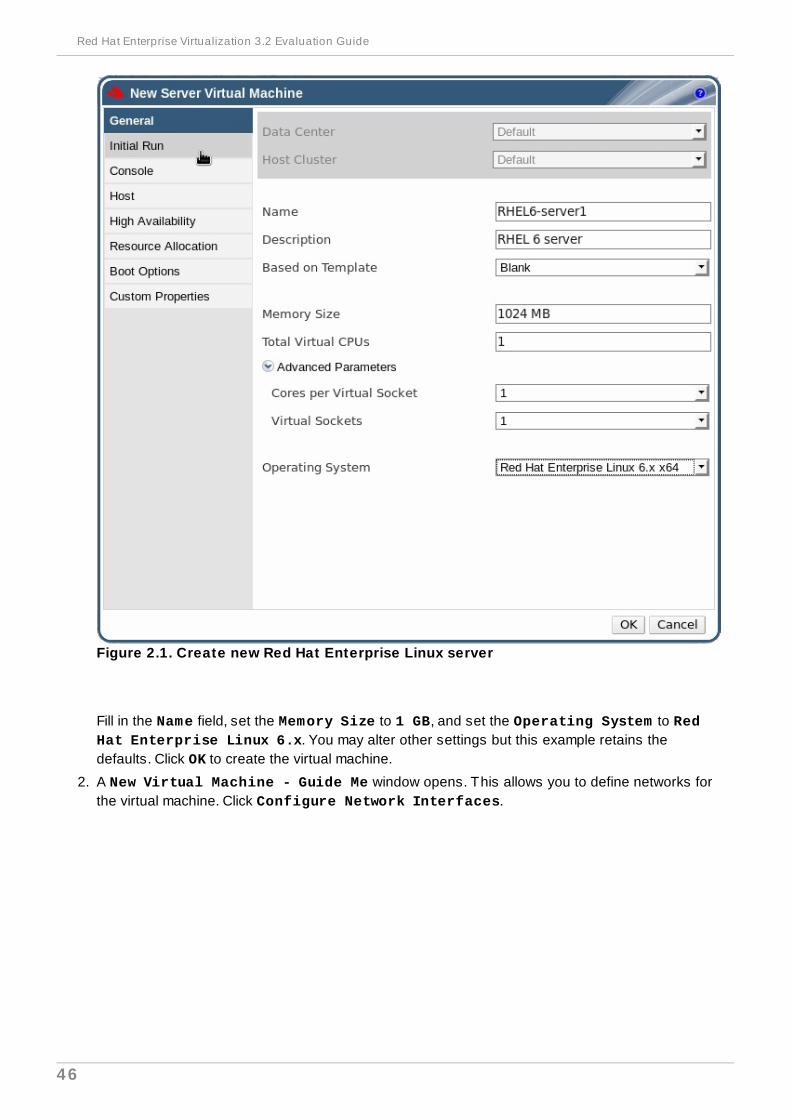
Figure 2.1. Create new Red Hat Enterprise Linux server
Fill in the Name field, set the Memory Size to 1 GB, and set the Operating System to RedHat Enterprise Linux 6.x. You may alter other settings but this example retains thedefaults. Click OK to create the virtual machine.
2. A New Virtual Machine - Guide Me window opens. This allows you to define networks forthe virtual machine. Click Configure Network Interfaces.
Red Hat Enterprise Virtualization 3.2 Evaluation Guide
46
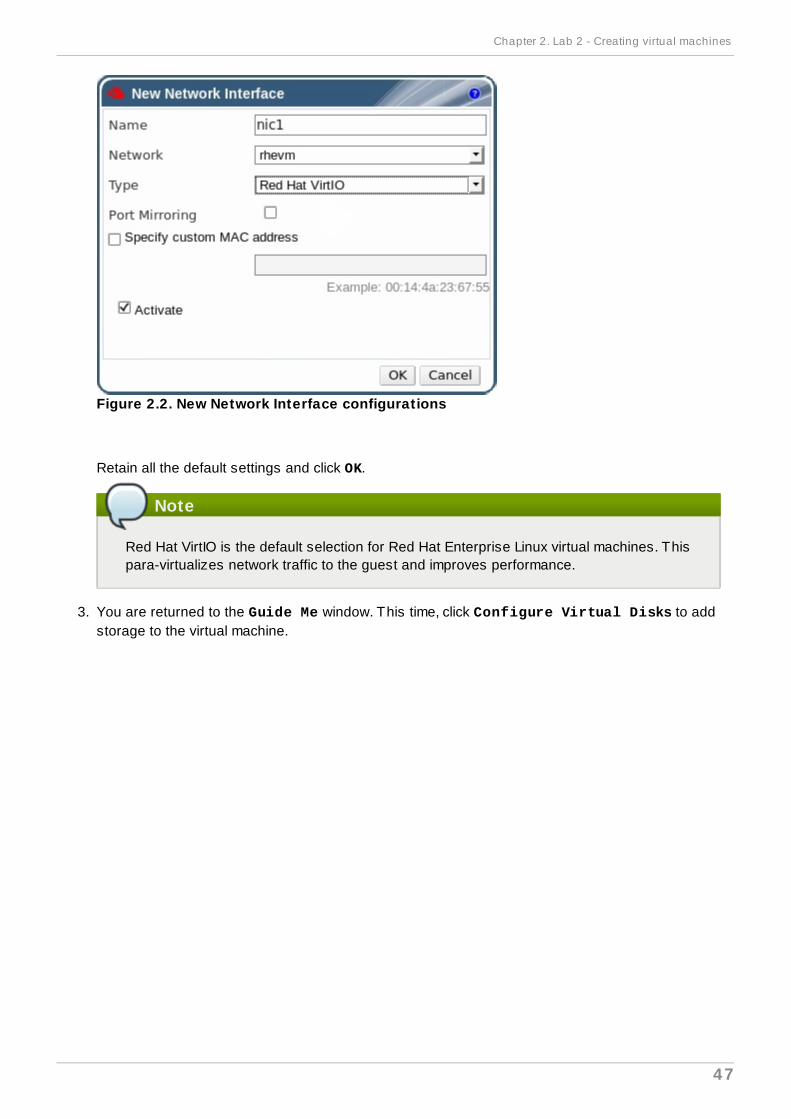
Figure 2.2. New Network Interface configurations
Retain all the default settings and click OK.
Note
Red Hat VirtIO is the default selection for Red Hat Enterprise Linux virtual machines. Thispara-virtualizes network traffic to the guest and improves performance.
3. You are returned to the Guide Me window. This time, click Configure Virtual Disks to addstorage to the virtual machine.
Chapter 2. Lab 2 - Creating virtual machines
47
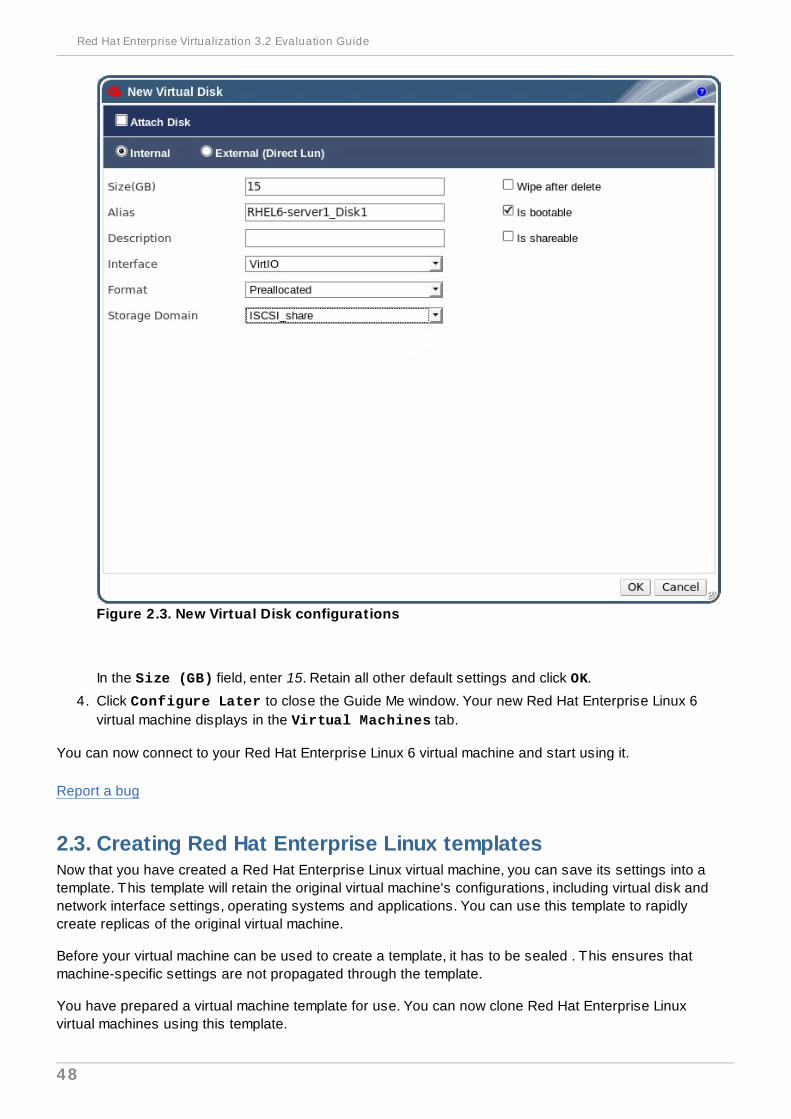
Figure 2.3. New Virtual Disk configurations
In the Size (GB) field, enter 15. Retain all other default settings and click OK.
4. Click Configure Later to close the Guide Me window. Your new Red Hat Enterprise Linux 6virtual machine displays in the Virtual Machines tab.
You can now connect to your Red Hat Enterprise Linux 6 virtual machine and start using it.
Report a bug
2.3. Creating Red Hat Enterprise Linux templatesNow that you have created a Red Hat Enterprise Linux virtual machine, you can save its settings into atemplate. This template will retain the original virtual machine's configurations, including virtual disk andnetwork interface settings, operating systems and applications. You can use this template to rapidlycreate replicas of the original virtual machine.
Before your virtual machine can be used to create a template, it has to be sealed . This ensures thatmachine-specific settings are not propagated through the template.
You have prepared a virtual machine template for use. You can now clone Red Hat Enterprise Linuxvirtual machines using this template.
Red Hat Enterprise Virtualization 3.2 Evaluation Guide
48
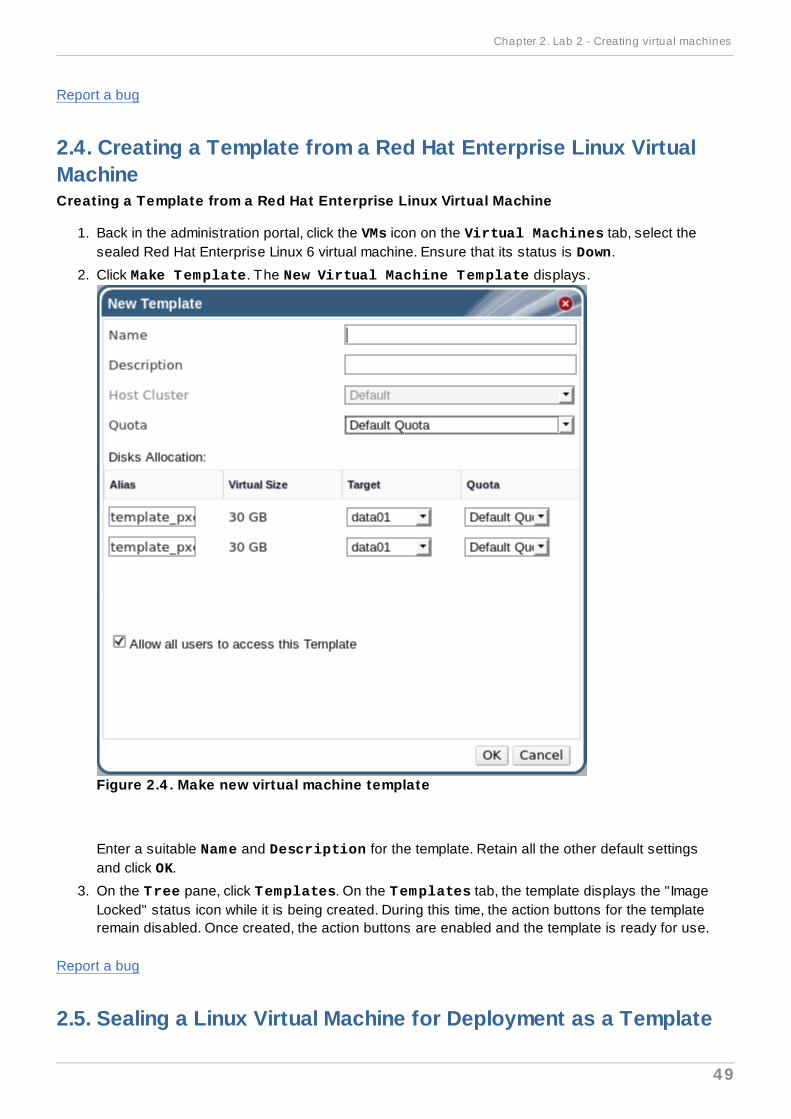
Report a bug
2.4. Creating a Template from a Red Hat Enterprise Linux VirtualMachineCreating a Template from a Red Hat Enterprise Linux Virtual Machine
1. Back in the administration portal, click the VMs icon on the Virtual Machines tab, select thesealed Red Hat Enterprise Linux 6 virtual machine. Ensure that its status is Down.
2. Click Make Template. The New Virtual Machine Template displays.
Figure 2.4 . Make new virtual machine template
Enter a suitable Name and Description for the template. Retain all the other default settingsand click OK.
3. On the Tree pane, click Templates. On the Templates tab, the template displays the "ImageLocked" status icon while it is being created. During this time, the action buttons for the templateremain disabled. Once created, the action buttons are enabled and the template is ready for use.
Report a bug
2.5. Sealing a Linux Virtual Machine for Deployment as a Template
Chapter 2. Lab 2 - Creating virtual machines
49
Summary
Generalize (seal) a Linux virtual machine before making it into a template. This prevents conflictsbetween virtual machines deployed from the template.
Procedure 2.1. Sealing a Linux Virtual Machine
1. Log in to the virtual machine. Flag the system for re-configuration by running the followingcommand as root:
# touch /.unconfigured
2. Remove ssh host keys. Run:
# rm -rf /etc/ssh/ssh_host_*
3. Set HOSTNAME=localhost.localdomain in /etc/sysconfig/network
4. Remove /etc/udev/rules.d/70-*. Run:
# rm -rf /etc/udev/rules.d/70-*
5. Remove the HWADDR= line from /etc/sysconfig/network-scripts/ifcfg-eth* .
6. Optionally delete all the logs from /var/log and build logs from /root.
7. Shut down the virtual machine. Run:
# poweroff
Result
The virtual machine is sealed and can be made into a template. You can deploy Linux virtual machinesfrom this template without experiencing configuration file conflicts.
Report a bug
2.6. Creating a Template from a Red Hat Enterprise Linux VirtualMachineTo create a template from a Red Hat Enterprise Linux virtual machine
1. Back in the administration portal, click the VMs icon on the Virtual Machines tab, select thesealed Red Hat Enterprise Linux 6 virtual machine. Ensure that its status is Down.
2. Click Make Template. The New Virtual Machine Template displays.
Red Hat Enterprise Virtualization 3.2 Evaluation Guide
50
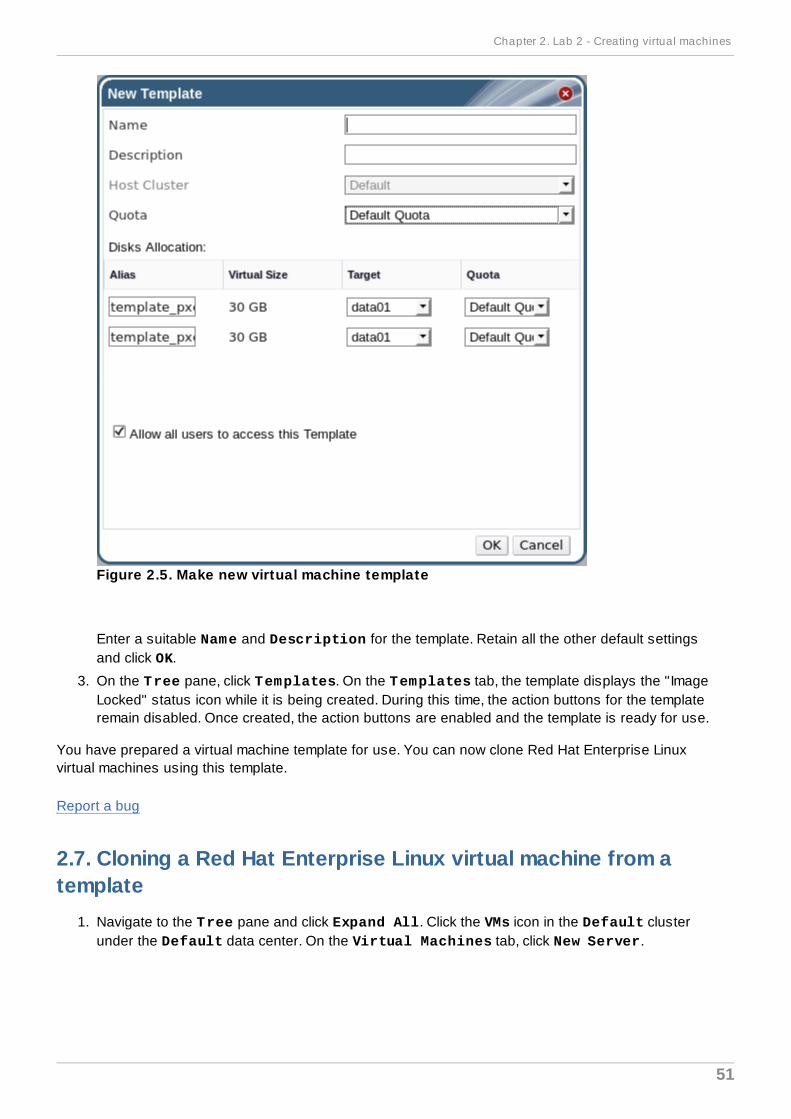
Figure 2.5. Make new virtual machine template
Enter a suitable Name and Description for the template. Retain all the other default settingsand click OK.
3. On the Tree pane, click Templates. On the Templates tab, the template displays the "ImageLocked" status icon while it is being created. During this time, the action buttons for the templateremain disabled. Once created, the action buttons are enabled and the template is ready for use.
You have prepared a virtual machine template for use. You can now clone Red Hat Enterprise Linuxvirtual machines using this template.
Report a bug
2.7. Cloning a Red Hat Enterprise Linux virtual machine from atemplate
1. Navigate to the Tree pane and click Expand All. Click the VMs icon in the Default clusterunder the Default data center. On the Virtual Machines tab, click New Server.
Chapter 2. Lab 2 - Creating virtual machines
51
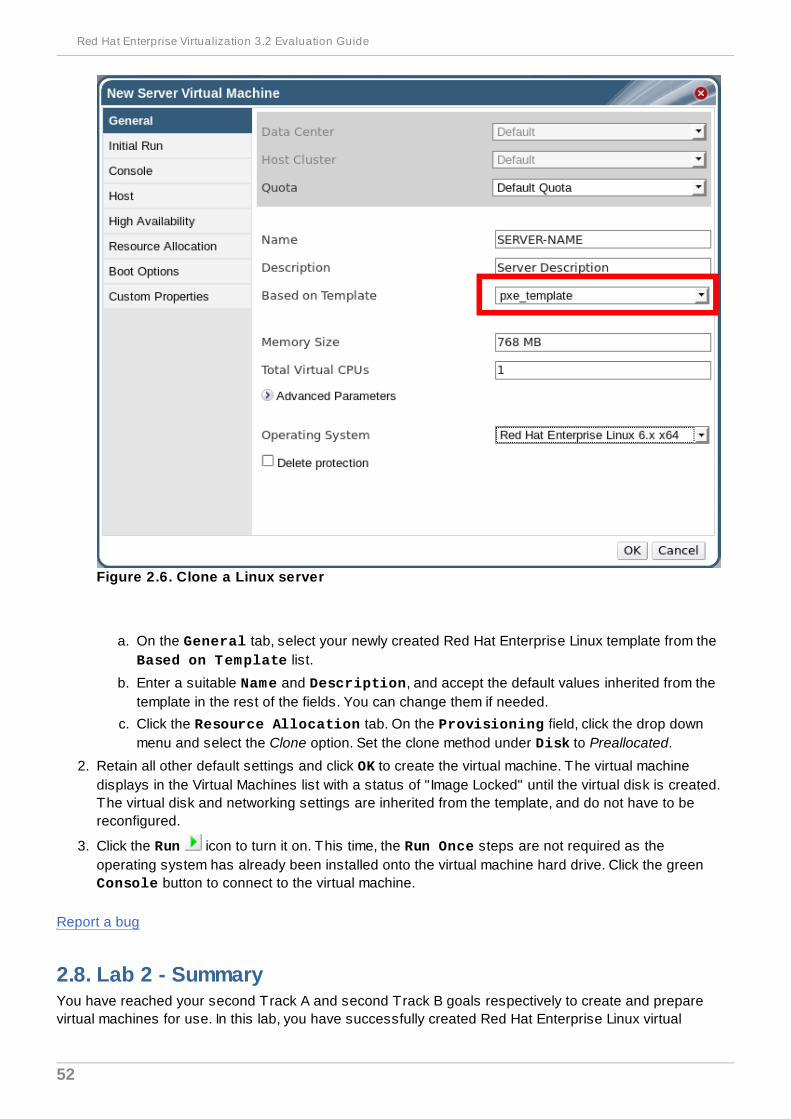
Figure 2.6. Clone a Linux server
a. On the General tab, select your newly created Red Hat Enterprise Linux template from theBased on Template list.
b. Enter a suitable Name and Description, and accept the default values inherited from thetemplate in the rest of the fields. You can change them if needed.
c. Click the Resource Allocation tab. On the Provisioning field, click the drop downmenu and select the Clone option. Set the clone method under Disk to Preallocated.
2. Retain all other default settings and click OK to create the virtual machine. The virtual machinedisplays in the Virtual Machines list with a status of "Image Locked" until the virtual disk is created.The virtual disk and networking settings are inherited from the template, and do not have to bereconfigured.
3. Click the Run icon to turn it on. This time, the Run Once steps are not required as theoperating system has already been installed onto the virtual machine hard drive. Click the greenConsole button to connect to the virtual machine.
Report a bug
2.8. Lab 2 - SummaryYou have reached your second Track A and second Track B goals respectively to create and preparevirtual machines for use. In this lab, you have successfully created Red Hat Enterprise Linux virtual
Red Hat Enterprise Virtualization 3.2 Evaluation Guide
52
machines, installed operating systems, defined storage and networks for the virtual machines, andutilized templates to deploy virtual machines.
The next lab on Track A teaches you how to activate virtual machine live migration for occasionswhen your hardware is experiencing downtime.
The next lab on Track B teaches you how to create and manage virtual machines in the Power UserPortal.
Report a bug
Chapter 2. Lab 2 - Creating virtual machines
53
Chapter 3. Lab 3 - Live migration scenarios
3.1. Lab 3 - ObjectivesThis lab takes you through the tasks of optimizing your host clusters so you can activate virtual machinelive migration when necessary. This lab should take you about 10 minutes.
It shows you how to live migrate virtual machines from host to host. (2 minutes)
It demonstrates virtual machine automatic live migration when a host is placed in maintenance mode. (3minutes)
It shows you how to define a cluster power saving policy, then demonstrates virtual machine livemigration when a host is loaded beyond its threshold. (5 minutes)
Report a bug
3.2. Live migration scenarios
Live migration enables you to move a virtual machine to another host while the machine and itsapplications are still running. You can activate automatic live migration for occasions when you performhardware maintenance or if your hosts become non-operational, and your virtual machines will bemigrated with no interruptions or delay. At the end of this lab you will have configured cluster policies andbe able to balance your hosts' workloads.
This lab is intended for Track A. It assumes that you have successfully completed Red Hat EnterpriseVirtual Machine setup and that you have at least two virtual machines running on your hosts.
Report a bug
3.3. Activating live migrationNow that you have several virtual machines running on each host, you can configure live migration. Thisprovides a backup for the virtual machines - if they are running mission critical workloads, and cannot bepowered off, you need to ensure that they must always have a host available to run on. Live migrationallows you to move virtual machines to different hosts should the host they are running on experiencescheduled or unscheduled downtime, without causing the virtual machine's operations to be suspended.
In this example, you will see how virtual machines are live migrated from one host to any of the availablehosts in the same cluster.
To live migrate virtual machines
Red Hat Enterprise Virtualization 3.2 Evaluation Guide
54
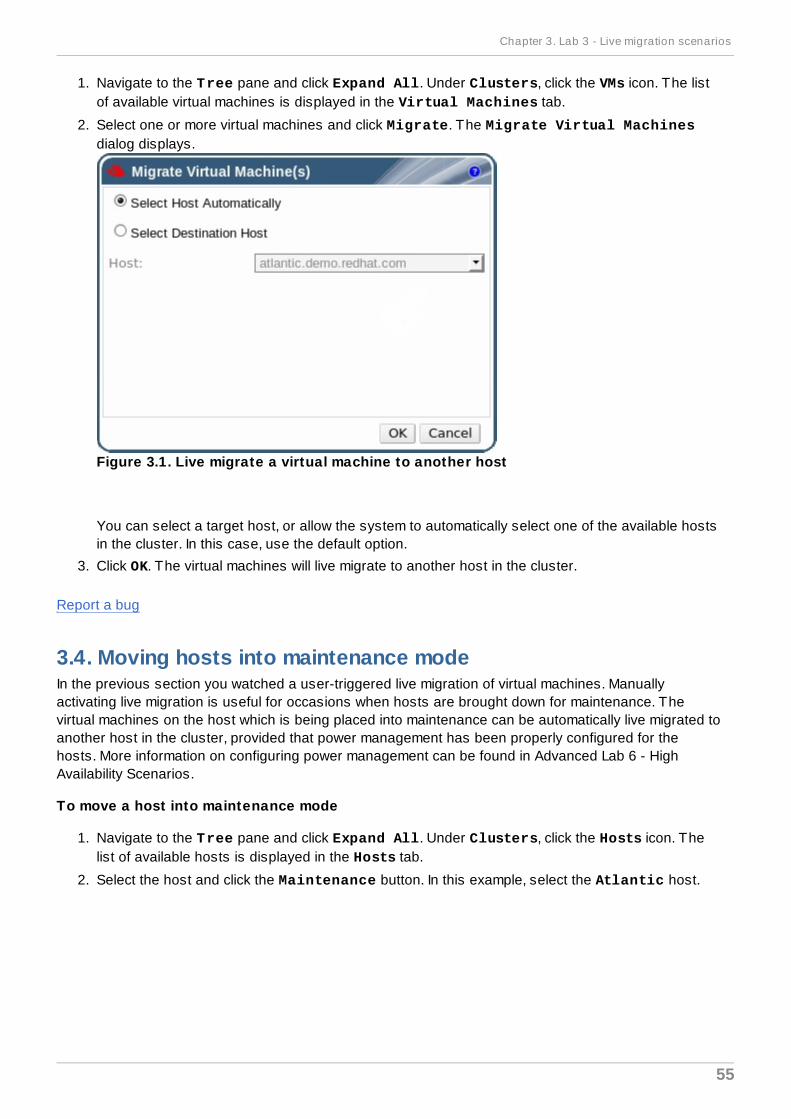
1. Navigate to the Tree pane and click Expand All. Under Clusters, click the VMs icon. The listof available virtual machines is displayed in the Virtual Machines tab.
2. Select one or more virtual machines and click Migrate. The Migrate Virtual Machinesdialog displays.
Figure 3.1. Live migrate a virtual machine to another host
You can select a target host, or allow the system to automatically select one of the available hostsin the cluster. In this case, use the default option.
3. Click OK. The virtual machines will live migrate to another host in the cluster.
Report a bug
3.4. Moving hosts into maintenance modeIn the previous section you watched a user-triggered live migration of virtual machines. Manuallyactivating live migration is useful for occasions when hosts are brought down for maintenance. Thevirtual machines on the host which is being placed into maintenance can be automatically live migrated toanother host in the cluster, provided that power management has been properly configured for thehosts. More information on configuring power management can be found in Advanced Lab 6 - HighAvailability Scenarios.
To move a host into maintenance mode
1. Navigate to the Tree pane and click Expand All. Under Clusters, click the Hosts icon. Thelist of available hosts is displayed in the Hosts tab.
2. Select the host and click the Maintenance button. In this example, select the Atlantic host.
Chapter 3. Lab 3 - Live migration scenarios
55
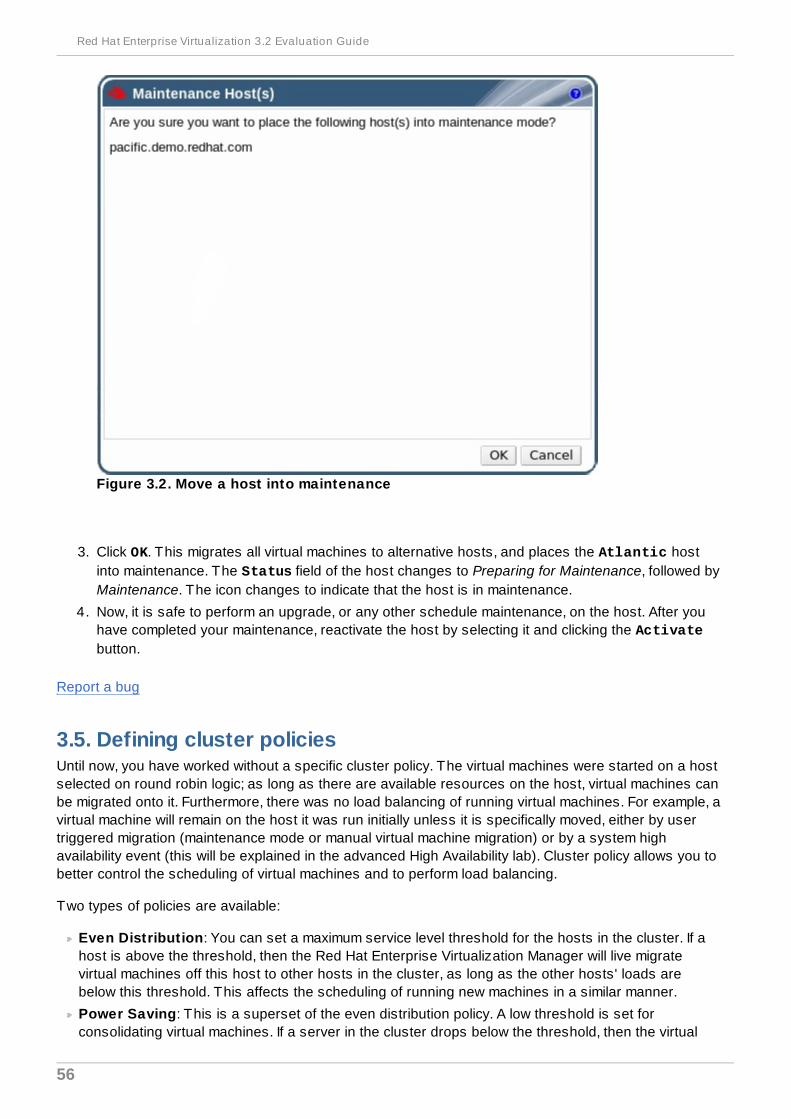
Figure 3.2. Move a host into maintenance
3. Click OK. This migrates all virtual machines to alternative hosts, and places the Atlantic hostinto maintenance. The Status field of the host changes to Preparing for Maintenance, followed byMaintenance. The icon changes to indicate that the host is in maintenance.
4. Now, it is safe to perform an upgrade, or any other schedule maintenance, on the host. After youhave completed your maintenance, reactivate the host by selecting it and clicking the Activatebutton.
Report a bug
3.5. Defining cluster policiesUntil now, you have worked without a specific cluster policy. The virtual machines were started on a hostselected on round robin logic; as long as there are available resources on the host, virtual machines canbe migrated onto it. Furthermore, there was no load balancing of running virtual machines. For example, avirtual machine will remain on the host it was run initially unless it is specifically moved, either by usertriggered migration (maintenance mode or manual virtual machine migration) or by a system highavailability event (this will be explained in the advanced High Availability lab). Cluster policy allows you tobetter control the scheduling of virtual machines and to perform load balancing.
Two types of policies are available:
Even Distribution: You can set a maximum service level threshold for the hosts in the cluster. If ahost is above the threshold, then the Red Hat Enterprise Virtualization Manager will live migratevirtual machines off this host to other hosts in the cluster, as long as the other hosts' loads arebelow this threshold. This affects the scheduling of running new machines in a similar manner.
Power Saving: This is a superset of the even distribution policy. A low threshold is set forconsolidating virtual machines. If a server in the cluster drops below the threshold, then the virtual
Red Hat Enterprise Virtualization 3.2 Evaluation Guide
56
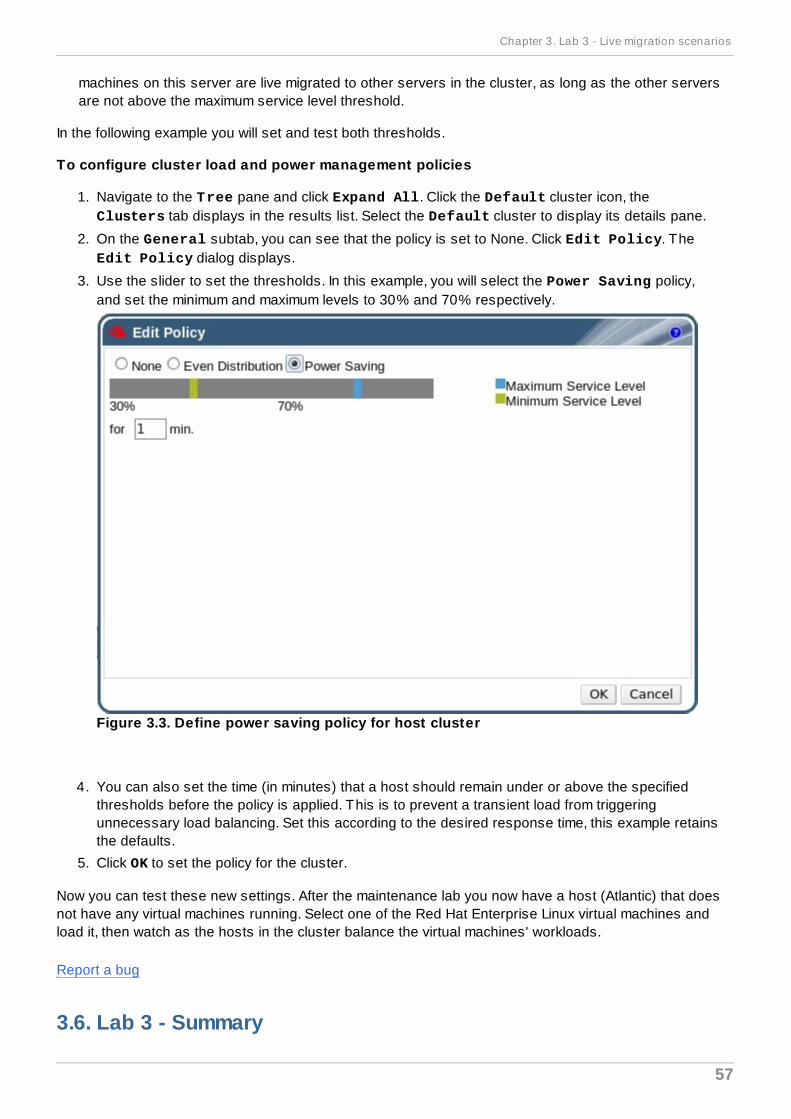
machines on this server are live migrated to other servers in the cluster, as long as the other serversare not above the maximum service level threshold.
In the following example you will set and test both thresholds.
To configure cluster load and power management policies
1. Navigate to the Tree pane and click Expand All. Click the Default cluster icon, theClusters tab displays in the results list. Select the Default cluster to display its details pane.
2. On the General subtab, you can see that the policy is set to None. Click Edit Policy. TheEdit Policy dialog displays.
3. Use the slider to set the thresholds. In this example, you will select the Power Saving policy,and set the minimum and maximum levels to 30% and 70% respectively.
Figure 3.3. Define power saving policy for host cluster
4. You can also set the time (in minutes) that a host should remain under or above the specifiedthresholds before the policy is applied. This is to prevent a transient load from triggeringunnecessary load balancing. Set this according to the desired response time, this example retainsthe defaults.
5. Click OK to set the policy for the cluster.
Now you can test these new settings. After the maintenance lab you now have a host (Atlantic) that doesnot have any virtual machines running. Select one of the Red Hat Enterprise Linux virtual machines andload it, then watch as the hosts in the cluster balance the virtual machines' workloads.
Report a bug
3.6. Lab 3 - Summary
Chapter 3. Lab 3 - Live migration scenarios
57

You have reached your third Track A goal to configure cluster policies for virtual machine live migration.In this lab, you have live migrated virtual machines when a host is brought down for maintenance, andconfigured a cluster policy to activate virtual machine live migration when the host's workload exceeds itsdefined threshold.
The next lab on Track A teaches you how to create and manage virtual machines in the Power UserPortal.
Report a bug
Red Hat Enterprise Virtualization 3.2 Evaluation Guide
58
Chapter 4. Lab 4 - Power User Portal
4.1. Lab 4 - ObjectivesThe power user portal is a trimmed-down version of the administration portal, tailored for end user selfprovisioning of virtual machines. It is simultaneously a gateway for logging in to virtual machines, andalso a platform to create virtual machines and manage resources specific to those virtual machines. Thislab illustrates the functions of the power user portal, which is available to users with PowerUserRolepermissions. At the end of this lab you will be able to create and manage virtual machines from thepower user portal.
This lab assumes that you have correctly installed and configured Red Hat Enterprise Virtualization soyou can log in to the power user portal. You should have at least two running virtual machines in yourenvironment.
To log in to the power user portal, you need a Red Hat Enterprise Linux client running Mozilla Firefox 3.5and higher (you can use your Manager server).
Lab 4 - Objectives
This lab takes you through the tasks necessary to create virtual machines from the power user portaland assign user permissions. This lab should take you about 35 minutes.
See Also:
Section 4.2, “Adding IdM domains”
Section 4.3, “Adding new users in the IdM directory”
Section 4.4, “PowerUserRole permission assignment”
Section 4.5, “Assigning PowerUserRole permissions on existing virtual machines”
Section 4.6, “Logging in to the Power User Portal”
Section 4.7, “Logging in to the User Portal”
Section 4.8, “Creating Linux desktop virtual machines”
Section 4.9, “Opening virtual machine consoles”
Section 4.10, “Making templates from virtual machines”
Section 4.11, “Verifying virtual machine template permissions”
Report a bug
4.2. Adding IdM domainsPreviously, you have logged in to the administration portal as the admin user on the internaldomain, which was automatically set up during the installation of the Red Hat Enterprise VirtualizationManager. However, to authenticate new users, you need an external directory service. The termdirectory service refers to the collection of software, hardware, and processes that store informationabout an enterprise, subscribers, or both, and make that information available to users. Red HatEnterprise Virtualization supports Identity Management (IdM), Red Hat Directory Service (RHDS), andActive Directory.
This lab assumes that you already have an existing IdM directory service. However if you need furtherassistance to install and configure IdM, see the Red Hat Enterprise Linux Enterprise IdentityManagement Guide. In this lab, you will attach an IdM domain to the Red Hat Enterprise Virtualization
Chapter 4. Lab 4 - Power User Portal
59
Manager using the rhevm-manage-domains tool, and create users in the IdM directory. Alternatively, ifyou have an Active Directory setup, you can attach it to the manager and use it for this lab.
Perform the following procedure on the Red Hat Enterprise Virtualization Manager server.
1. Log in to the Red Hat Enterprise Virtualization Manager server console.
2. Run the following command, and provide the domain administrator password when prompted:
# rhevm-manage-domains -action=add -domain=ipadomain.demo.redhat.com -user=admin -interactive
3. Restart the service for the changes to be applied across the system.
# service ovirt-engine restart
Restarting the ovirt-engine service disconnects you from the administration portal. After a fewminutes, the restart completes, and the IdM domain is added to the Red Hat EnterpriseVirtualization Manager.
Report a bug
4.3. Adding new users in the IdM directoryBefore you can add users in the Red Hat Enterprise Virtualization Manager, you must first add them theIdM directory. For this track, you need at least two users. The names used in this guide are rhevpowerand rhevuser. Perform the following procedure on the Manager server.
1. To add users you must first authenticate as the directory server administrator. Use the kinit admin command to do this, entering the administrator password when prompted.
$ kinit adminPassword for [email protected]:
2. To add a user interactively use the ipa user-add command. The command will prompt you forall values required to create the user.
$ ipa user-add First name: RHEV Last name: User User login [rhevuser]: --------------------- Added user "rhevuser" --------------------- User login: rhevuser First name: RHEV Last name: User Full name: RHEV User Display name: RHEV User Initials: RU Home directory: /home/rhevuser GECOS field: rhevuser Login shell: /bin/sh Kerberos principal: [email protected] UID: 1316000004
Red Hat Enterprise Virtualization 3.2 Evaluation Guide
60
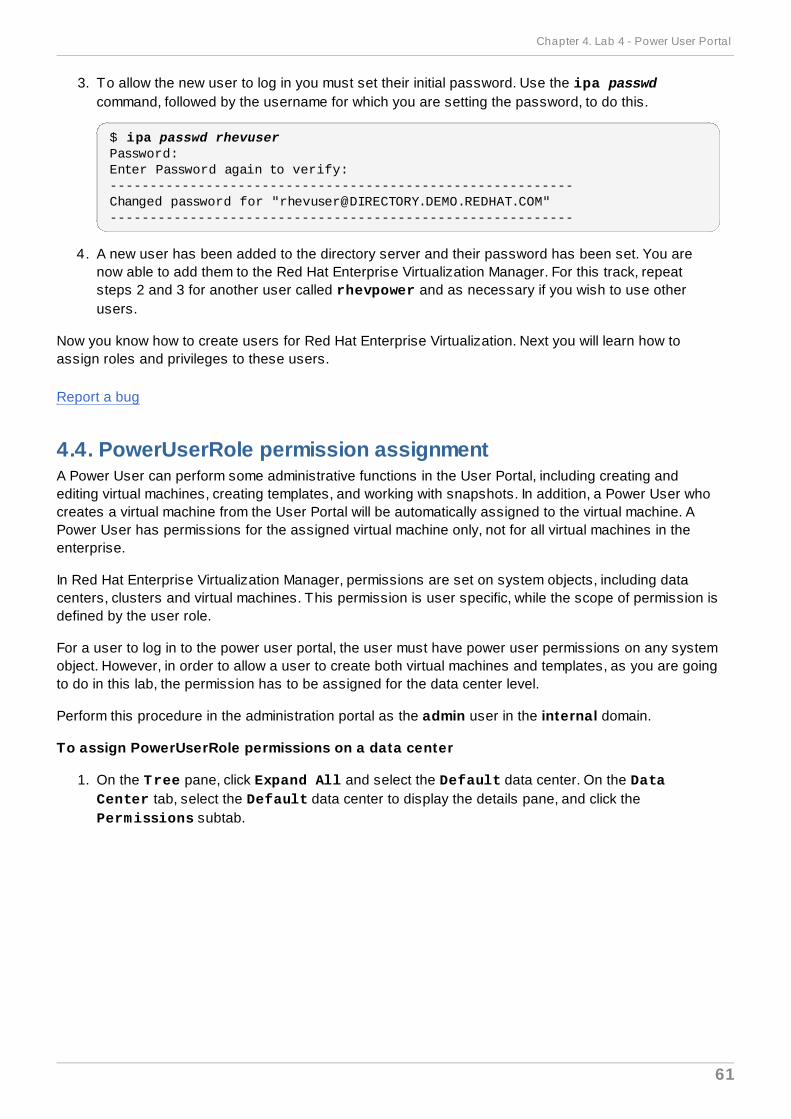
3. To allow the new user to log in you must set their initial password. Use the ipa passwdcommand, followed by the username for which you are setting the password, to do this.
$ ipa passwd rhevuserPassword: Enter Password again to verify: ----------------------------------------------------------Changed password for "[email protected]"----------------------------------------------------------
4. A new user has been added to the directory server and their password has been set. You arenow able to add them to the Red Hat Enterprise Virtualization Manager. For this track, repeatsteps 2 and 3 for another user called rhevpower and as necessary if you wish to use otherusers.
Now you know how to create users for Red Hat Enterprise Virtualization. Next you will learn how toassign roles and privileges to these users.
Report a bug
4.4. PowerUserRole permission assignmentA Power User can perform some administrative functions in the User Portal, including creating andediting virtual machines, creating templates, and working with snapshots. In addition, a Power User whocreates a virtual machine from the User Portal will be automatically assigned to the virtual machine. APower User has permissions for the assigned virtual machine only, not for all virtual machines in theenterprise.
In Red Hat Enterprise Virtualization Manager, permissions are set on system objects, including datacenters, clusters and virtual machines. This permission is user specific, while the scope of permission isdefined by the user role.
For a user to log in to the power user portal, the user must have power user permissions on any systemobject. However, in order to allow a user to create both virtual machines and templates, as you are goingto do in this lab, the permission has to be assigned for the data center level.
Perform this procedure in the administration portal as the admin user in the internal domain.
To assign PowerUserRole permissions on a data center
1. On the Tree pane, click Expand All and select the Default data center. On the DataCenter tab, select the Default data center to display the details pane, and click thePermissions subtab.
Chapter 4. Lab 4 - Power User Portal
61

Figure 4 .1. Add permission to user
2. Click Add to add an existing user. The Add Permission to User dialog displays. Under theSearch fields, select ipadomain.demo.redhat.com on the drop-down menu and enterrhevpower in the textbox. Click Go.
3. Select the check box of rhevpower to be assigned the permissions. Select the Assign roleto user drop-down list and select PowerUserRole.
Figure 4 .2. Add PowerUserRole permission
Red Hat Enterprise Virtualization 3.2 Evaluation Guide
62
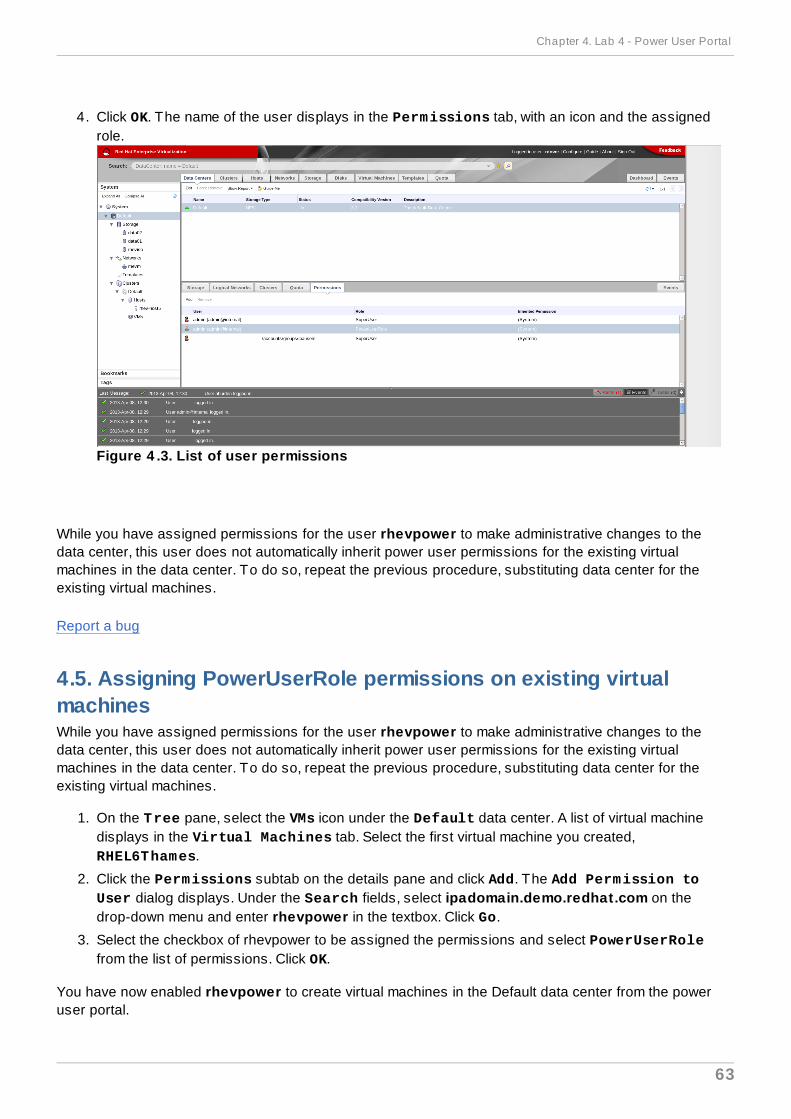
4. Click OK. The name of the user displays in the Permissions tab, with an icon and the assignedrole.
Figure 4 .3. List of user permissions
While you have assigned permissions for the user rhevpower to make administrative changes to thedata center, this user does not automatically inherit power user permissions for the existing virtualmachines in the data center. To do so, repeat the previous procedure, substituting data center for theexisting virtual machines.
Report a bug
4.5. Assigning PowerUserRole permissions on existing virtualmachinesWhile you have assigned permissions for the user rhevpower to make administrative changes to thedata center, this user does not automatically inherit power user permissions for the existing virtualmachines in the data center. To do so, repeat the previous procedure, substituting data center for theexisting virtual machines.
1. On the Tree pane, select the VMs icon under the Default data center. A list of virtual machinedisplays in the Virtual Machines tab. Select the first virtual machine you created,RHEL6Thames.
2. Click the Permissions subtab on the details pane and click Add. The Add Permission toUser dialog displays. Under the Search fields, select ipadomain.demo.redhat.com on thedrop-down menu and enter rhevpower in the textbox. Click Go.
3. Select the checkbox of rhevpower to be assigned the permissions and select PowerUserRolefrom the list of permissions. Click OK.
You have now enabled rhevpower to create virtual machines in the Default data center from the poweruser portal.
Chapter 4. Lab 4 - Power User Portal
63
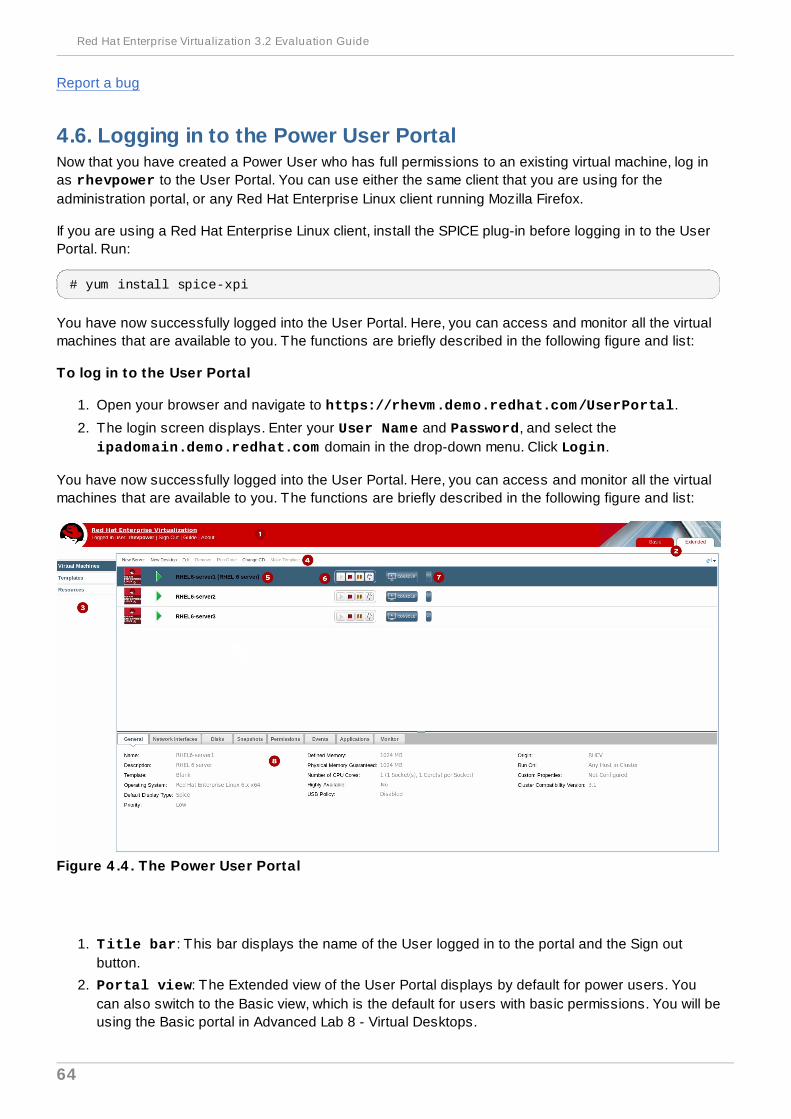
Report a bug
4.6. Logging in to the Power User PortalNow that you have created a Power User who has full permissions to an existing virtual machine, log inas rhevpower to the User Portal. You can use either the same client that you are using for theadministration portal, or any Red Hat Enterprise Linux client running Mozilla Firefox.
If you are using a Red Hat Enterprise Linux client, install the SPICE plug-in before logging in to the UserPortal. Run:
# yum install spice-xpi
You have now successfully logged into the User Portal. Here, you can access and monitor all the virtualmachines that are available to you. The functions are briefly described in the following figure and list:
To log in to the User Portal
1. Open your browser and navigate to https://rhevm.demo.redhat.com/UserPortal.
2. The login screen displays. Enter your User Name and Password, and select the ipadomain.demo.redhat.com domain in the drop-down menu. Click Login.
You have now successfully logged into the User Portal. Here, you can access and monitor all the virtualmachines that are available to you. The functions are briefly described in the following figure and list:
Figure 4 .4 . The Power User Portal
1. Title bar: This bar displays the name of the User logged in to the portal and the Sign outbutton.
2. Portal view: The Extended view of the User Portal displays by default for power users. Youcan also switch to the Basic view, which is the default for users with basic permissions. You will beusing the Basic portal in Advanced Lab 8 - Virtual Desktops.
Red Hat Enterprise Virtualization 3.2 Evaluation Guide
64
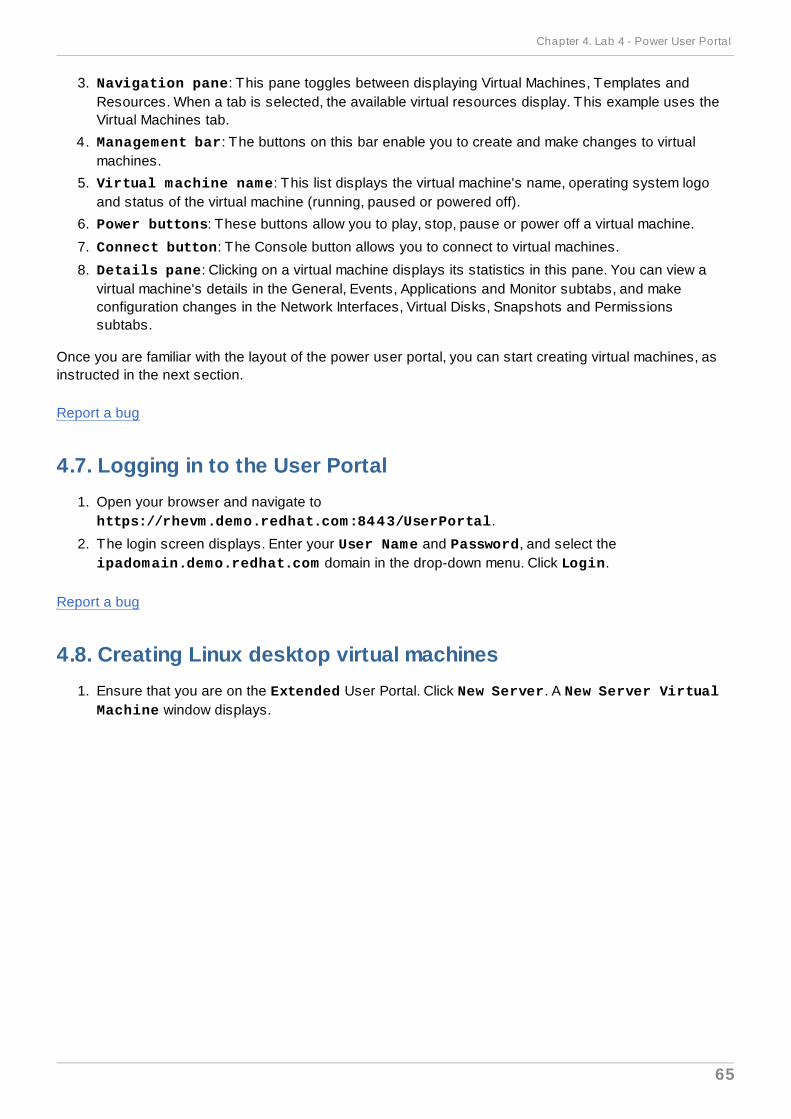
3. Navigation pane: This pane toggles between displaying Virtual Machines, Templates andResources. When a tab is selected, the available virtual resources display. This example uses theVirtual Machines tab.
4. Management bar: The buttons on this bar enable you to create and make changes to virtualmachines.
5. Virtual machine name: This list displays the virtual machine's name, operating system logoand status of the virtual machine (running, paused or powered off).
6. Power buttons: These buttons allow you to play, stop, pause or power off a virtual machine.
7. Connect button: The Console button allows you to connect to virtual machines.
8. Details pane: Clicking on a virtual machine displays its statistics in this pane. You can view avirtual machine's details in the General, Events, Applications and Monitor subtabs, and makeconfiguration changes in the Network Interfaces, Virtual Disks, Snapshots and Permissionssubtabs.
Once you are familiar with the layout of the power user portal, you can start creating virtual machines, asinstructed in the next section.
Report a bug
4.7. Logging in to the User Portal1. Open your browser and navigate to
https://rhevm.demo.redhat.com:8443/UserPortal.
2. The login screen displays. Enter your User Name and Password, and select the ipadomain.demo.redhat.com domain in the drop-down menu. Click Login.
Report a bug
4.8. Creating Linux desktop virtual machines1. Ensure that you are on the Extended User Portal. Click New Server. A New Server Virtual
Machine window displays.
Chapter 4. Lab 4 - Power User Portal
65
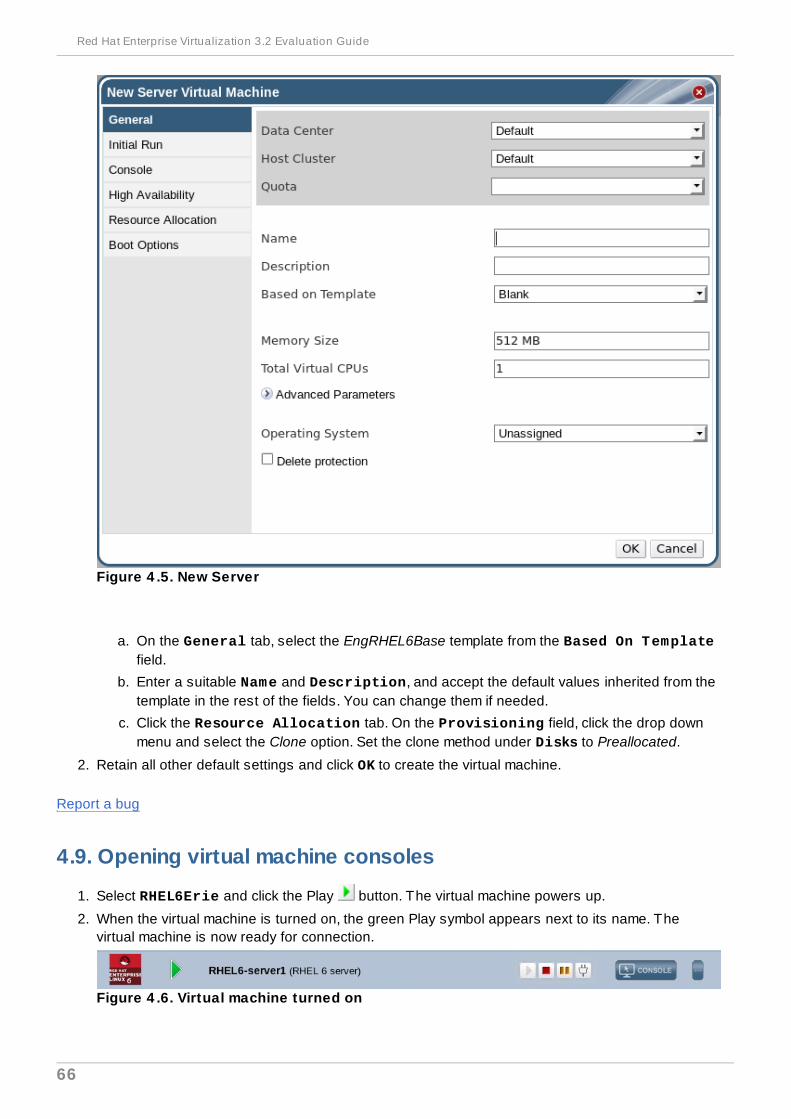
Figure 4 .5. New Server
a. On the General tab, select the EngRHEL6Base template from the Based On Templatefield.
b. Enter a suitable Name and Description, and accept the default values inherited from thetemplate in the rest of the fields. You can change them if needed.
c. Click the Resource Allocation tab. On the Provisioning field, click the drop downmenu and select the Clone option. Set the clone method under Disks to Preallocated.
2. Retain all other default settings and click OK to create the virtual machine.
Report a bug
4.9. Opening virtual machine consoles
1. Select RHEL6Erie and click the Play button. The virtual machine powers up.
2. When the virtual machine is turned on, the green Play symbol appears next to its name. Thevirtual machine is now ready for connection.
Figure 4 .6. Virtual machine turned on
Red Hat Enterprise Virtualization 3.2 Evaluation Guide
66
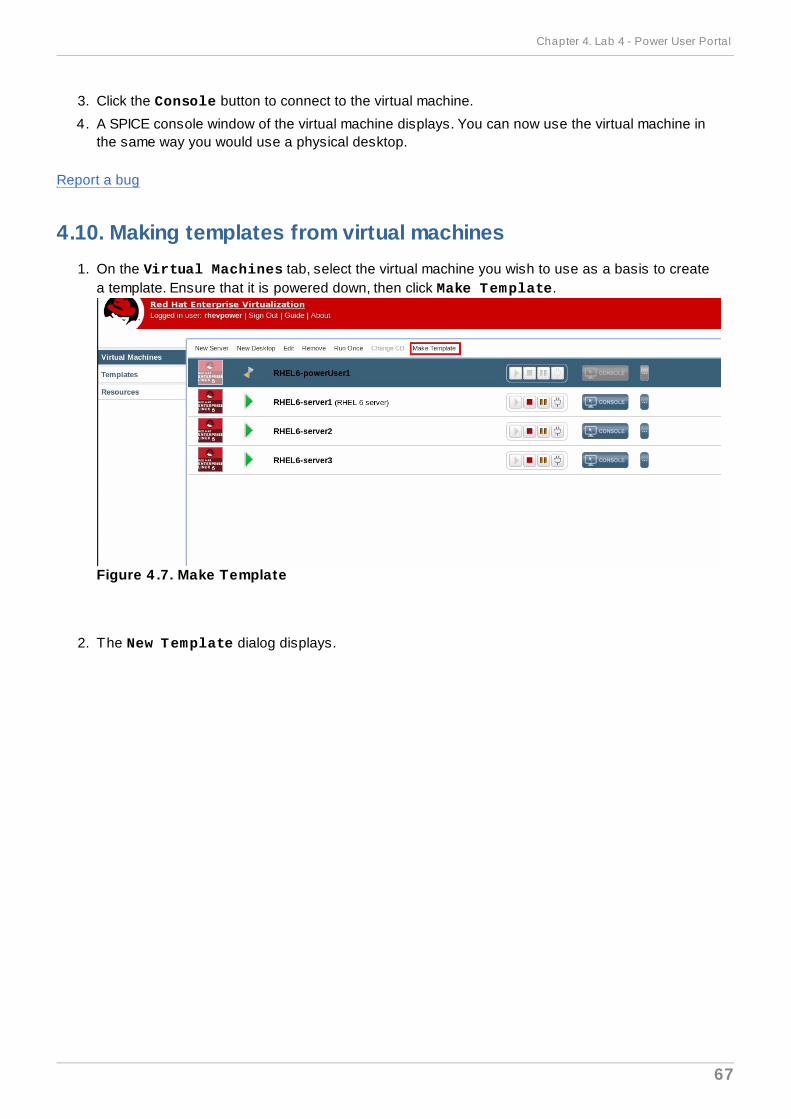
3. Click the Console button to connect to the virtual machine.
4. A SPICE console window of the virtual machine displays. You can now use the virtual machine inthe same way you would use a physical desktop.
Report a bug
4.10. Making templates from virtual machines1. On the Virtual Machines tab, select the virtual machine you wish to use as a basis to create
a template. Ensure that it is powered down, then click Make Template.
Figure 4 .7. Make Template
2. The New Template dialog displays.
Chapter 4. Lab 4 - Power User Portal
67
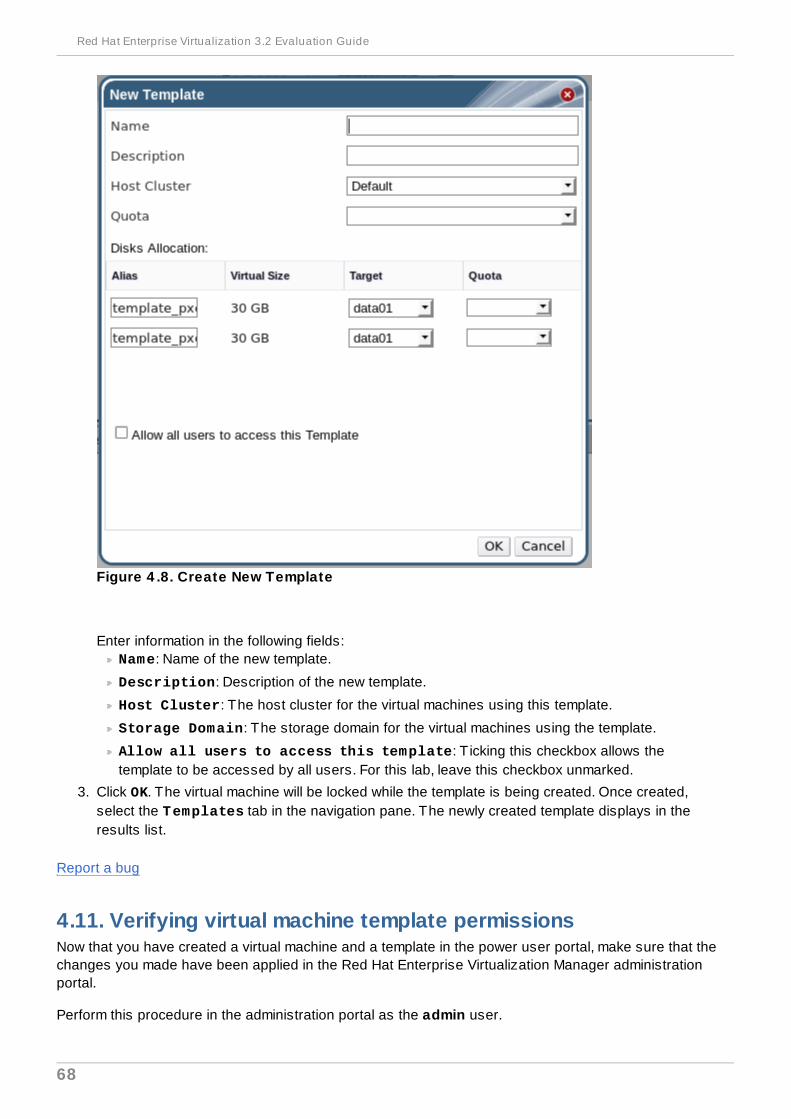
Figure 4 .8. Create New Template
Enter information in the following fields:Name: Name of the new template.
Description: Description of the new template.
Host Cluster: The host cluster for the virtual machines using this template.
Storage Domain: The storage domain for the virtual machines using the template.
Allow all users to access this template: T icking this checkbox allows thetemplate to be accessed by all users. For this lab, leave this checkbox unmarked.
3. Click OK. The virtual machine will be locked while the template is being created. Once created,select the Templates tab in the navigation pane. The newly created template displays in theresults list.
Report a bug
4.11. Verifying virtual machine template permissionsNow that you have created a virtual machine and a template in the power user portal, make sure that thechanges you made have been applied in the Red Hat Enterprise Virtualization Manager administrationportal.
Perform this procedure in the administration portal as the admin user.
Red Hat Enterprise Virtualization 3.2 Evaluation Guide
68
Virtual Machine
1. Select the Virtual Machines tab. Verify that the virtual machine you created from the UserPortal, RHEL6Erie, appears in the results list.
2. Click on the RHEL6Erie virtual machine and look at the details pane. Click on the Permissionstab and check if the user named rhevpower has inherited UserVmManager permissions for thisvirtual machine.
Template
1. Select the Templates tab. Verify that the template you created from the User Portal, appears inthe results list.
2. Click on the PrivateRHEL6 template and look at the details pane. Click on the Permissionstab. As the creator of the template, rhevpower should have inherited PowerUserRolepermissions. Meanwhile admin, as the administrative user for all components in the system,should have inherited SuperUser permissions for the template. Nobody else can use thistemplate unless they are given permissions by the existing permitted users.
3. In contrast, click on the EngRHEL6Base template, which was marked public. On thePermissions tab, Everyone has been assigned UserTemplateBasedVm permissions,meaning that all users in the system can access this template.
Report a bug
4.12. Lab 4 - SummaryYou have now completed the User Portal Lab. In this lab, you successfully created virtual machines fromthe power user portal and assigned permissions for users to access virtual machines and templates.
This is the last basic lab for Tracks A and B. You can proceed with the Advanced Labs, whichdemonstrate further features of Red Hat Enterprise Virtualization, including a flexible system to manageadministrative users, power saving policies, and methods of deploying Red Hat Enterprise Virtualizationin a large organization.
Report a bug
Chapter 4. Lab 4 - Power User Portal
69
Chapter 5. Lab 5 - Managing Multi-Level Administrators
5.1. Lab 5 - Objectives
This lab introduces you to Red Hat Enterprise Virtualization's multi-level administration system. Multi-level administration presents a hierarchy of permissions that can be configured to provide finely grainedlevels of permissions as required by your enterprise. You have already been partially introduced to thissystem when you granted permissions to users on virtual machines and data centers in the Power UserPortal chapter.
Permissions enable users to perform actions on objects, where objects are either individual objects orcontainer objects. Any permissions that apply to a container object also apply to all members of thatcontainer. For example, when a host administrator role is applied to a user on a specific host, the userwill have permissions to perform any of the available host operations, but on the assigned host only.However, if a host administrator role is applied on a data center to a user, the user will gain permissionsto perform host operations on all hosts within the cluster of the data center. If there are additional hostclusters in the data center, the user will not be able to make changes to the hosts.
This lab assumes that you have successfully completed the basic labs. You should have correctlyinstalled and configured Red Hat Enterprise Virtualization, and have several user accounts in the IdM,AD, or RHDS domain.
Report a bug
5.2. Lab 5 - requirementsIn addition to the requirements stipulated in (for Track A) or (for Track B) ensure that you have at leasttwo users in an external directory service.
Report a bug
5.3. Storage administrator definitionA Storage Administrator can manage, create and remove storage domains. This is useful in enterprisescomprising multiple storage domains, each of which requires its own system administrator. StorageAdministrators have permissions for the assigned storage domain only, not for all storage domains inthe enterprise.
To assign user permissions, log in to the Red Hat Enterprise Virtualization Manager administrationportal as the SuperUser. In this example, SuperUser permissions have been assigned to admin.
You have now assigned administrative privileges for the local-iso-domain storage domain to the
Red Hat Enterprise Virtualization 3.2 Evaluation Guide
70
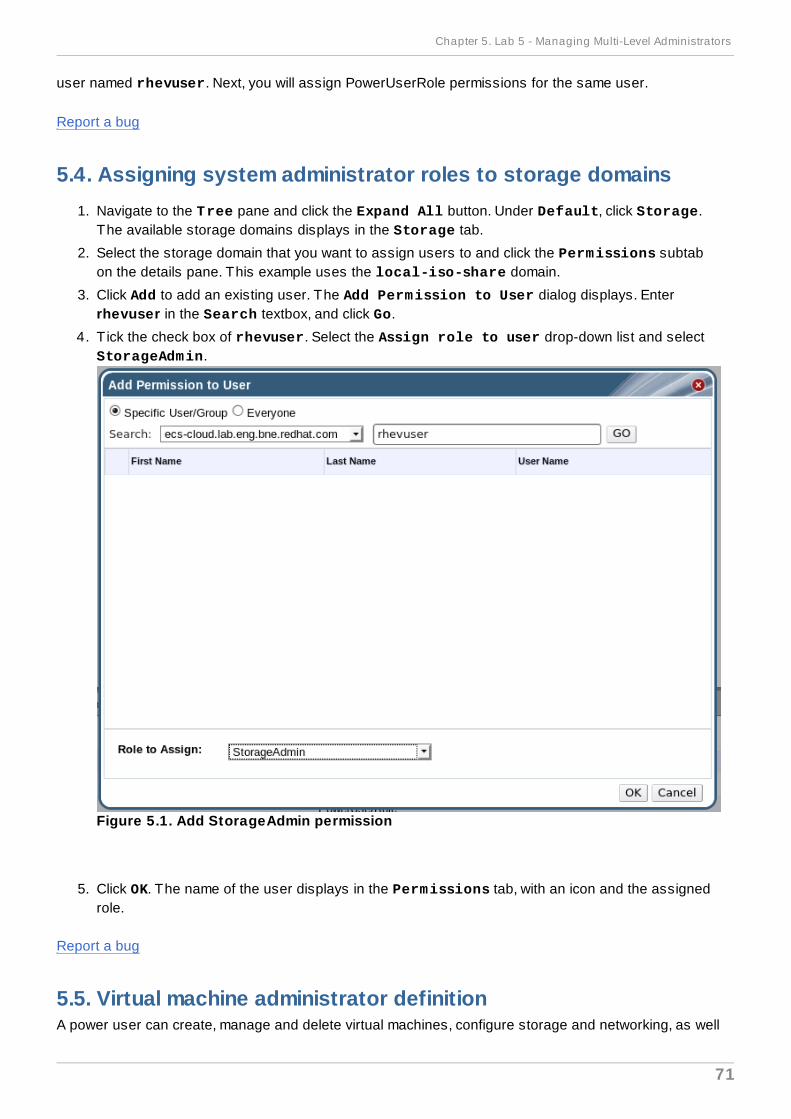
user named rhevuser. Next, you will assign PowerUserRole permissions for the same user.
Report a bug
5.4. Assigning system administrator roles to storage domains1. Navigate to the Tree pane and click the Expand All button. Under Default, click Storage.
The available storage domains displays in the Storage tab.
2. Select the storage domain that you want to assign users to and click the Permissions subtabon the details pane. This example uses the local-iso-share domain.
3. Click Add to add an existing user. The Add Permission to User dialog displays. Enterrhevuser in the Search textbox, and click Go.
4. T ick the check box of rhevuser. Select the Assign role to user drop-down list and selectStorageAdmin.
Figure 5.1. Add StorageAdmin permission
5. Click OK. The name of the user displays in the Permissions tab, with an icon and the assignedrole.
Report a bug
5.5. Virtual machine administrator definitionA power user can create, manage and delete virtual machines, configure storage and networking, as well
Chapter 5. Lab 5 - Managing Multi-Level Administrators
71
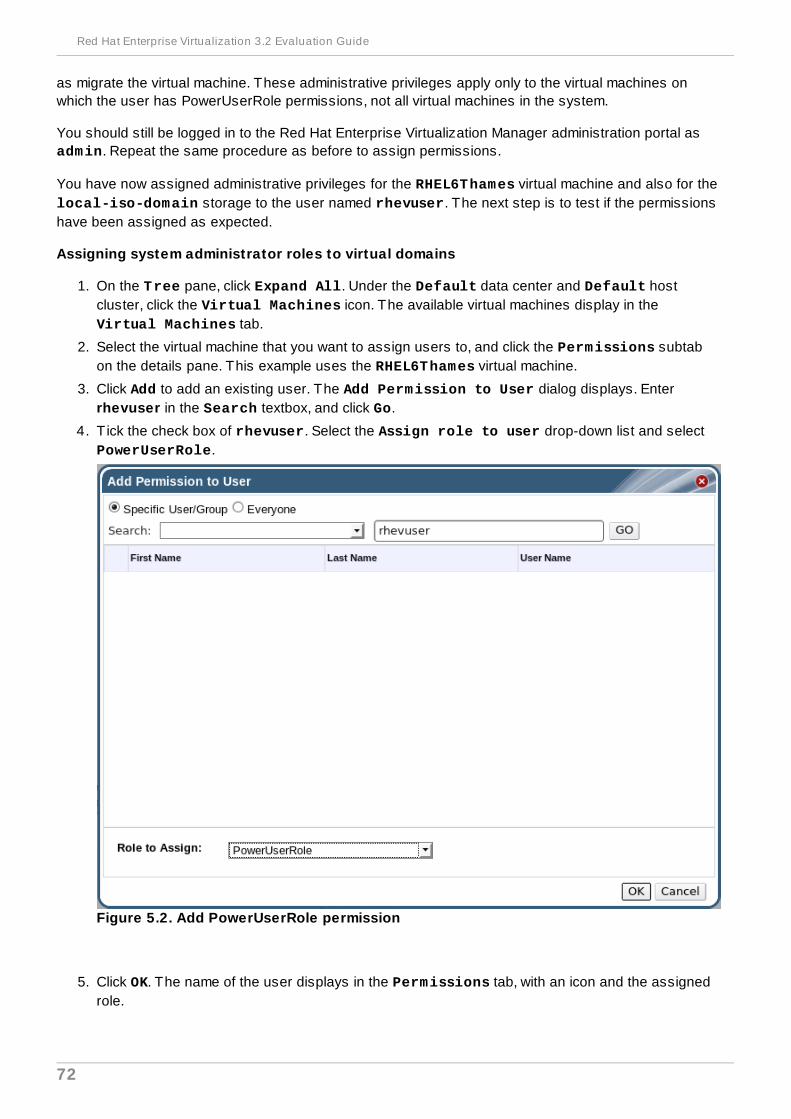
as migrate the virtual machine. These administrative privileges apply only to the virtual machines onwhich the user has PowerUserRole permissions, not all virtual machines in the system.
You should still be logged in to the Red Hat Enterprise Virtualization Manager administration portal as admin. Repeat the same procedure as before to assign permissions.
You have now assigned administrative privileges for the RHEL6Thames virtual machine and also for thelocal-iso-domain storage to the user named rhevuser. The next step is to test if the permissionshave been assigned as expected.
Assigning system administrator roles to virtual domains
1. On the Tree pane, click Expand All. Under the Default data center and Default hostcluster, click the Virtual Machines icon. The available virtual machines display in theVirtual Machines tab.
2. Select the virtual machine that you want to assign users to, and click the Permissions subtabon the details pane. This example uses the RHEL6Thames virtual machine.
3. Click Add to add an existing user. The Add Permission to User dialog displays. Enterrhevuser in the Search textbox, and click Go.
4. T ick the check box of rhevuser. Select the Assign role to user drop-down list and selectPowerUserRole.
Figure 5.2. Add PowerUserRole permission
5. Click OK. The name of the user displays in the Permissions tab, with an icon and the assignedrole.
Red Hat Enterprise Virtualization 3.2 Evaluation Guide
72
Report a bug
5.6. User permission verificationTo verify that the Storage Administrator role has been correctly assigned, sign out and log in to the RedHat Enterprise Virtualization Manager administration portal as rhevuser, then perform a few storageconfiguration options.
Next, verify that the PowerUserRole has been correctly assigned. You should still be logged in as rhevuser.
To verify StorageAdmin permissions
1. Navigate to the Tree pane and click the Expand All button. Under Default, click Storage.The available storage domains displays in the Storage tab.
2. Select local-iso-domain. On the details pane, select the Data Center tab and click theMaintenance button. The ISO storage domain is deactivated, and appears as Inactive in theStorage pane.
3. Select the Data storage domain. On the details pane, select the Data Center tab and click theMaintenance button. This time you will get an error message stating "User is not authorized toperform this action". This happened because you gave administrative permissions only for theISO domain, not the Data domain.
4. Select the ISO domain again and click the Data Center tab on the details pane. Click Activate.The domain is activated, and displays as Active in the Storage pane.
Next, verify that the PowerUserRole has been correctly assigned. You should still be logged in as rhevuser.
To verify PowerUserRole permissions
1. On the Tree pane, click Expand All. Under the Default data center and Default hostcluster, click the Virtual Machines icon. The available virtual machines display in theVirtual Machines tab.
2. Select the RHEL6Thames virtual machine and try to stop it if it is running, or play it if it is notrunning. You should succeed.
3. Select a different virtual machine, and try to do the same. This time you should get the "User is notauthorized to perform this action" message. This is because you only assigned power userpermissions for RHEL6Thames and not the second virtual machine.
As you have seen in this lab, you can configure different levels of permissions for different users onmultiple objects. This multi-level administration system is ideal for organizations with a diverse range ofusers who have different needs, and allows for enhanced security in that only specifically assignedusers will be able to make system-wide changes.
Report a bug
5.7. Custom role creationIn addition to pre-defined roles, you can also create your own custom role with permission levels forvarious objects to suit your organization's needs. You can create administrator and user roles to permitaccess and management to different levels of resources in the data center. To perform the followingprocedure, log in to the administration portal as the admin user.
Chapter 5. Lab 5 - Managing Multi-Level Administrators
73
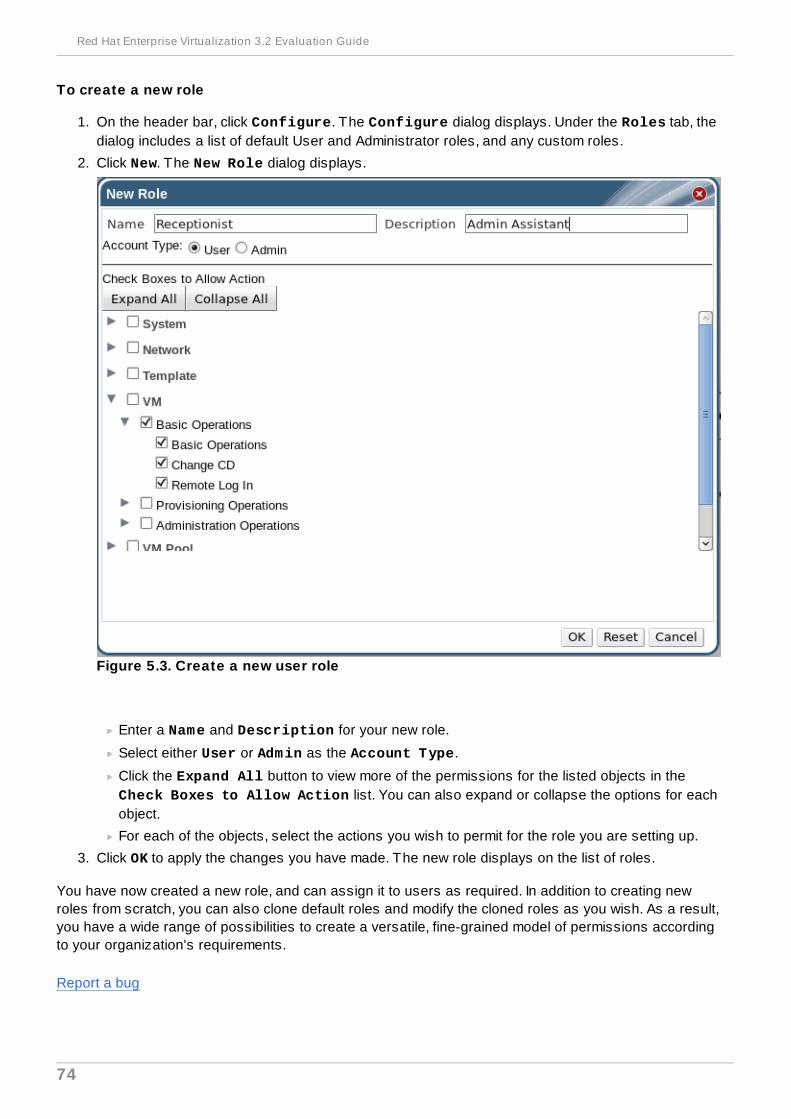
To create a new role
1. On the header bar, click Configure. The Configure dialog displays. Under the Roles tab, thedialog includes a list of default User and Administrator roles, and any custom roles.
2. Click New. The New Role dialog displays.
Figure 5.3. Create a new user role
Enter a Name and Description for your new role.
Select either User or Admin as the Account Type.
Click the Expand All button to view more of the permissions for the listed objects in theCheck Boxes to Allow Action list. You can also expand or collapse the options for eachobject.
For each of the objects, select the actions you wish to permit for the role you are setting up.
3. Click OK to apply the changes you have made. The new role displays on the list of roles.
You have now created a new role, and can assign it to users as required. In addition to creating newroles from scratch, you can also clone default roles and modify the cloned roles as you wish. As a result,you have a wide range of possibilities to create a versatile, fine-grained model of permissions accordingto your organization's requirements.
Report a bug
Red Hat Enterprise Virtualization 3.2 Evaluation Guide
74
5.8. Lab 5 - SummaryIn this lab, you have successfully assigned multiple levels of administrative permissions to users.
If you are on Track A, go to the High Availability lab. This lab teaches you how to configure powersaving and resource management policies.
If you are on Track B, go to the Virtual Desktops lab. This lab shows you how to create and allocatedesktop pools, and how to connect to virtual machines from the basic user portal.
Report a bug
Chapter 5. Lab 5 - Managing Multi-Level Administrators
75
Chapter 6. Lab 6 - High Availability scenarios
6.1. Lab 6 - ObjectivesLab 6 - Objectives
This lab takes you through the best practices of configuring and testing a reliable Red Hat EnterpriseVirtualization environment where virtual machines running critical workloads are not easily interrupted.This lab should take you about 30 minutes.
Report a bug
6.2. Lab 6 - RequirementsBefore you attempt this lab, you must have a working Red Hat Enterprise Virtualization environment. Tosuccessfully complete this lab, you must have:
An out of band power management device for each host. This lab uses the Intelligent PowerManagement Interface (IPMI) device.
Access to the administration portal and access to your hosts (for simulating failure scenarios). Youwill be instructed on how to enable remote login for your hypervisors later in this lab.
Report a bug
6.3. Lab 6 - Prerequisites
The Red Hat Enterprise Virtualization Manager offers various high availability features which can beapplied in a granular manner, from the level of a single virtual machine up to protection against multiplehost failure scenarios. In addition, you can protect your virtual machines against various failures bycombining virtual machine high availability with out of band power management, Red Hat EnterpriseVirtualization Manager's failure detection and failure recovery solutions.
This lab enables you to configure virtual machine high availability, and demonstrates its use in severalcommon enterprise scenarios. It is assumed that you have successfully completed the basic labs,meaning that you have correctly installed and configured Red Hat Enterprise Virtualization, and haveseveral running virtual machines.
In addition, to successfully complete this lab you must have a power management card for each of yourhosts. This lab uses the Intelligent Power Management Interface (IPMI) device as an example. If youhave a different device see the Red Hat Enterprise Virtualization Administration Guide.
Report a bug
Red Hat Enterprise Virtualization 3.2 Evaluation Guide
76

Report a bug
6.4. Power Management Configuration
6.4.1. Power management configuration
Configure Power Management
At this point, you should have two hosts and at least two virtual machines, however this lab uses sixvirtual machines. You can use as many virtual machines as you want, but for optimal demonstration ofhigh availability features, it is recommended that you add four new virtual machines to your environment.
Highly available virtual machine settings will only be effective if power management is enabled on thehosts. However before configuring power management, recall that you have previously defined a powersaving cluster policy. Cluster policies and high availability can be used concurrently; however to bestdemonstrate Red Hat Enterprise Virtualization's high availability features for this lab, reset the clusterpolicy. This ensures that the virtual machines remain where they are staged before each demonstration,so the migration is triggered by high availability rather than the cluster's load balancing policies.
Report a bug
6.4.2. Disabling cluster policyTo disable cluster policy
1. On the administration portal, navigate to the Tree pane. Click the Expand All button. Click theDefault cluster. The Clusters tab displays. Select the Default cluster to display its detailspane.
2. On the Policy subtab, the policy is set to Power Saving. Click Edit Policy.
Chapter 6. Lab 6 - High Availability scenarios
77
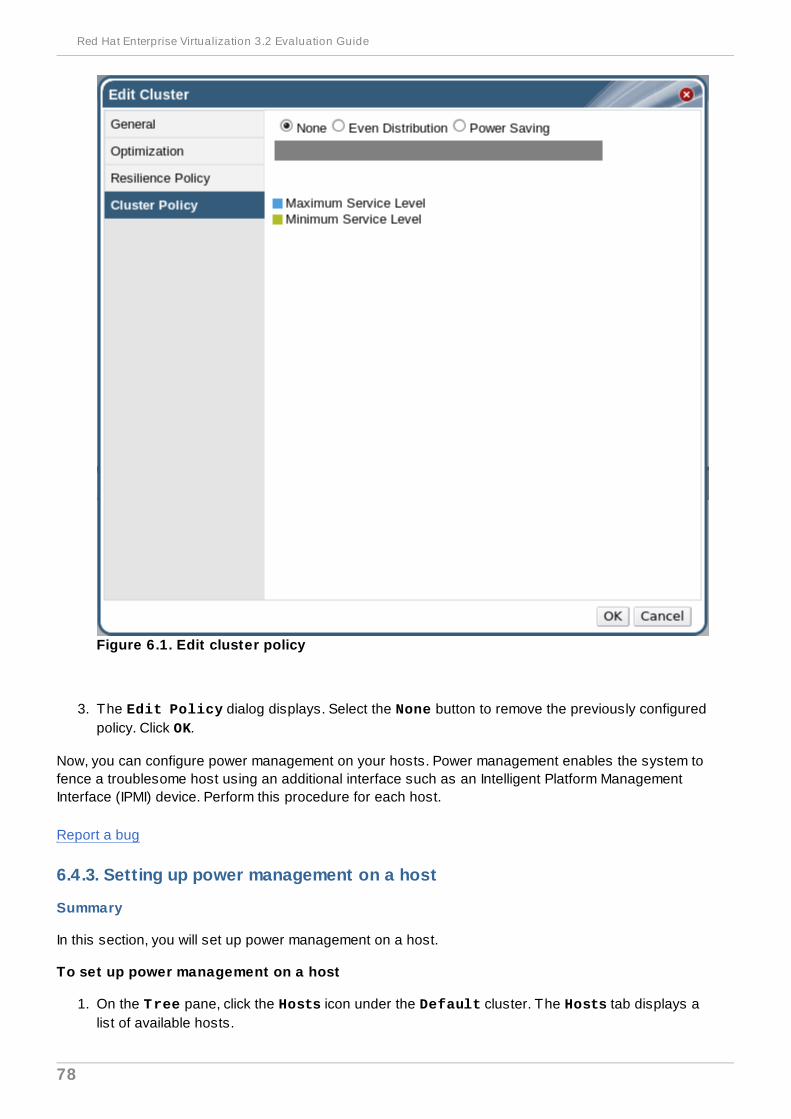
Figure 6.1. Edit cluster policy
3. The Edit Policy dialog displays. Select the None button to remove the previously configuredpolicy. Click OK.
Now, you can configure power management on your hosts. Power management enables the system tofence a troublesome host using an additional interface such as an Intelligent Platform ManagementInterface (IPMI) device. Perform this procedure for each host.
Report a bug
6.4.3. Setting up power management on a host
Summary
In this section, you will set up power management on a host.
To set up power management on a host
1. On the Tree pane, click the Hosts icon under the Default cluster. The Hosts tab displays alist of available hosts.
Red Hat Enterprise Virtualization 3.2 Evaluation Guide
78
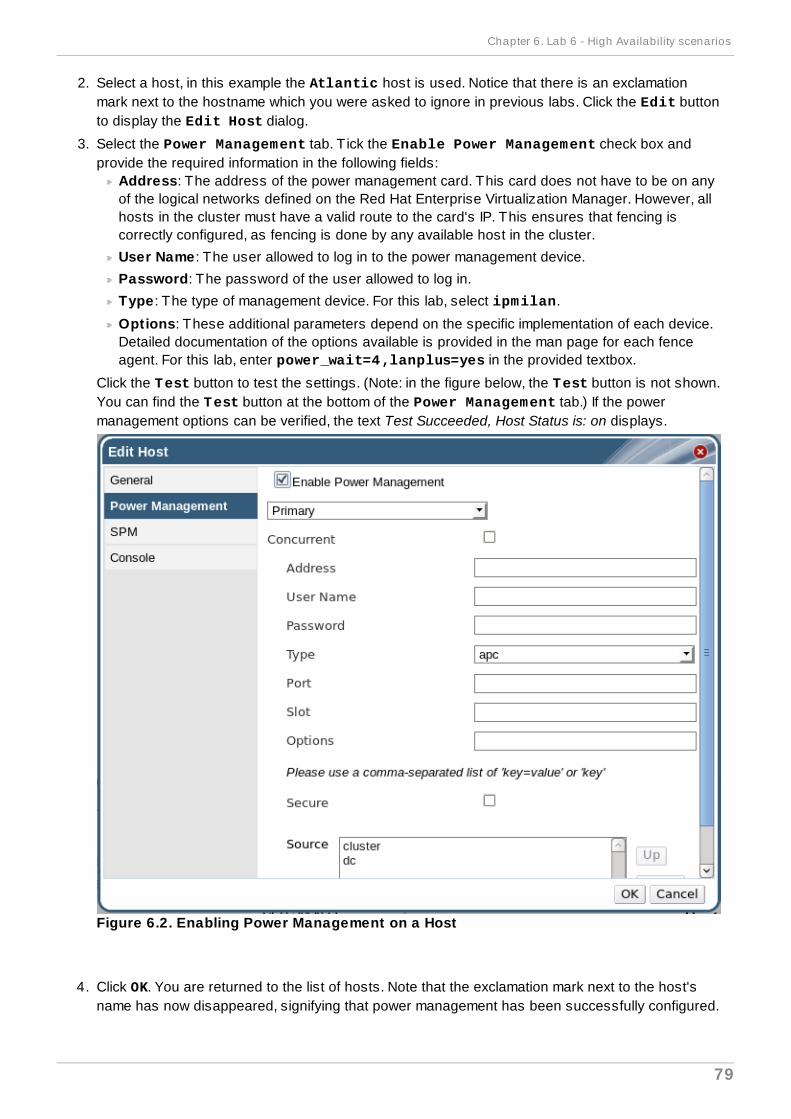
2. Select a host, in this example the Atlantic host is used. Notice that there is an exclamationmark next to the hostname which you were asked to ignore in previous labs. Click the Edit buttonto display the Edit Host dialog.
3. Select the Power Management tab. T ick the Enable Power Management check box andprovide the required information in the following fields:
Address: The address of the power management card. This card does not have to be on anyof the logical networks defined on the Red Hat Enterprise Virtualization Manager. However, allhosts in the cluster must have a valid route to the card's IP. This ensures that fencing iscorrectly configured, as fencing is done by any available host in the cluster.
User Name : The user allowed to log in to the power management device.
Password: The password of the user allowed to log in.
Type : The type of management device. For this lab, select ipmilan.
Options: These additional parameters depend on the specific implementation of each device.Detailed documentation of the options available is provided in the man page for each fenceagent. For this lab, enter power_wait=4,lanplus=yes in the provided textbox.
Click the Test button to test the settings. (Note: in the figure below, the Test button is not shown.You can find the Test button at the bottom of the Power Management tab.) If the powermanagement options can be verified, the text Test Succeeded, Host Status is: on displays.
Figure 6.2. Enabling Power Management on a Host
4. Click OK. You are returned to the list of hosts. Note that the exclamation mark next to the host'sname has now disappeared, signifying that power management has been successfully configured.
Chapter 6. Lab 6 - High Availability scenarios
79
Result
You have now configured power management for your hosts, meaning that your hosts' power status canbe verified and controlled by the Red Hat Enterprise Virtualization Manager. Power management checksthat a host is properly powered down, then restarts its virtual machines on another host in the samecluster. However, if the host's status cannot be verified, the virtual machines that were originally runningon it will not be restarted.
Report a bug
6.5. Virtual Machine High-Availability Configuration
6.5.1. Virtual Machine High-availability ConfigurationNow that you have configured power management on your hosts, they are ready to run highly availablevirtual machines. High availability means that a virtual machine will automatically be restarted if itsprocess is interrupted. This interruption occurs when a virtual machine is terminated by methods otherthan shutting down within the guest or from the administration portal. When these events occur, thehighly available virtual machine will be automatically restarted, either on its original host or another hostin the cluster.
Note
High availability can only be configured for virtual servers, not virtual desktops.
This lab uses six virtual machines, and configures three of them to be highly available. You can usedifferent names, or a different number of virtual machines - just be aware that this lab uses exampleswhich consistently refer to these allocated names. The virtual machines used in this lab are:
Highly Available Virtual Machines: RHEL6Nile, RHEL6RioGrande, RHEL6Thames
Non-Highly Available Virtual Machines: RHEL6Congo, RHEL6Erie, RHEL6Ganges
To configure High Availability for a virtual machine
1. In the Navigation pane, click the VMs tab. Select the virtual machine you wish to mark as highlyavailable. Click Edit.
2. The Edit Server Virtual Machine dialog displays. Select the High Availability taband tick the Highly Available check box. Change the Priority for Run/ MigrateQueue to High. This means that this virtual machine will take precedence in the queue of virtualmachines to be migrated.
Red Hat Enterprise Virtualization 3.2 Evaluation Guide
80
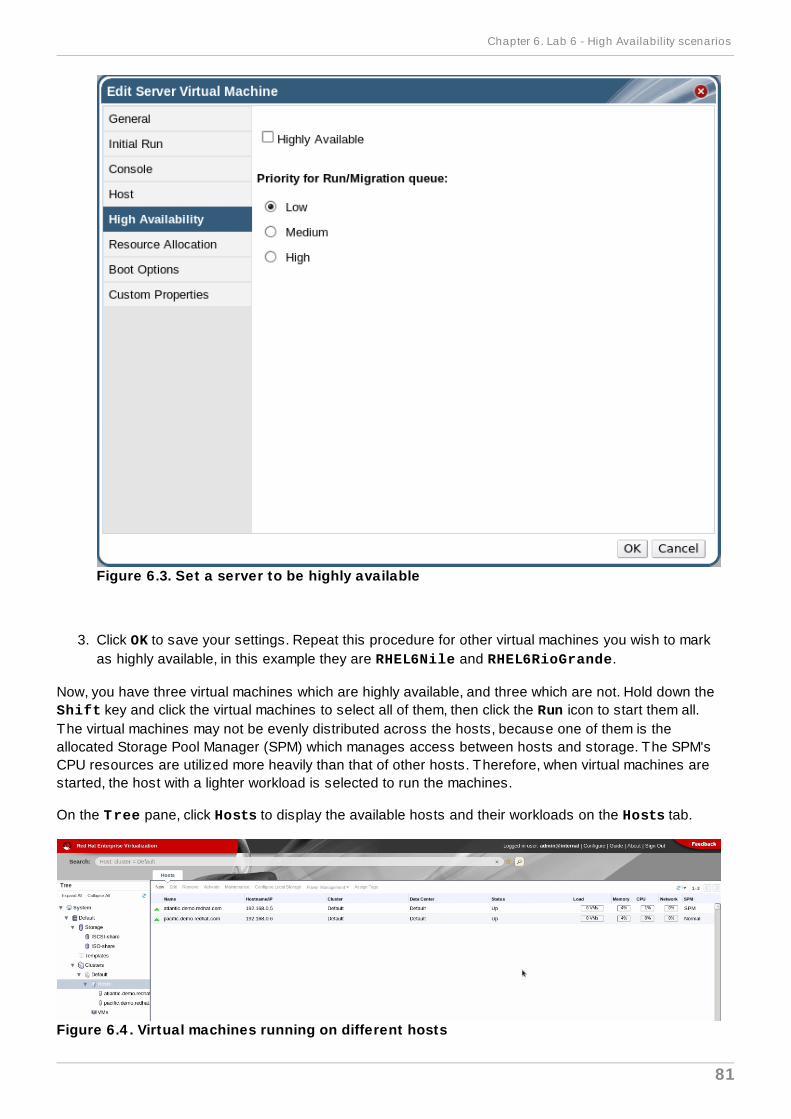
Figure 6.3. Set a server to be highly available
3. Click OK to save your settings. Repeat this procedure for other virtual machines you wish to markas highly available, in this example they are RHEL6Nile and RHEL6RioGrande.
Now, you have three virtual machines which are highly available, and three which are not. Hold down the Shift key and click the virtual machines to select all of them, then click the Run icon to start them all.The virtual machines may not be evenly distributed across the hosts, because one of them is theallocated Storage Pool Manager (SPM) which manages access between hosts and storage. The SPM'sCPU resources are utilized more heavily than that of other hosts. Therefore, when virtual machines arestarted, the host with a lighter workload is selected to run the machines.
On the Tree pane, click Hosts to display the available hosts and their workloads on the Hosts tab.
Figure 6.4 . Virtual machines running on different hosts
Chapter 6. Lab 6 - High Availability scenarios
81
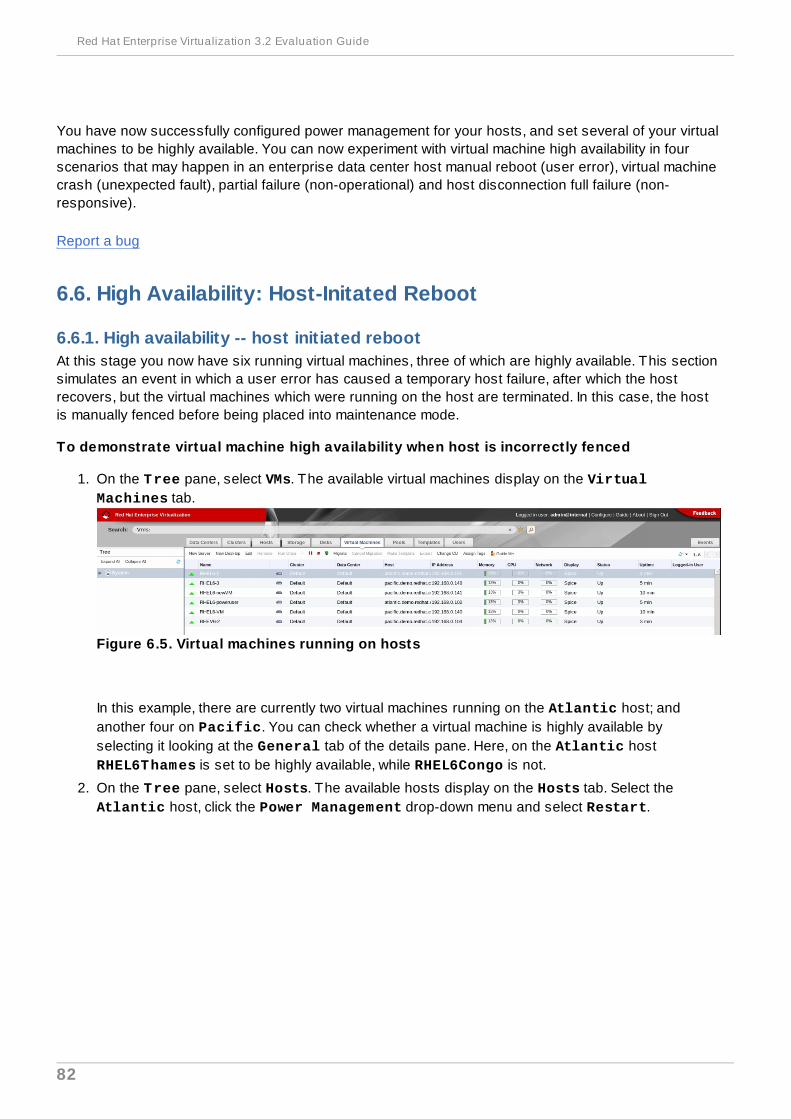
You have now successfully configured power management for your hosts, and set several of your virtualmachines to be highly available. You can now experiment with virtual machine high availability in fourscenarios that may happen in an enterprise data center host manual reboot (user error), virtual machinecrash (unexpected fault), partial failure (non-operational) and host disconnection full failure (non-responsive).
Report a bug
6.6. High Availability: Host-Initated Reboot
6.6.1. High availability -- host initiated rebootAt this stage you now have six running virtual machines, three of which are highly available. This sectionsimulates an event in which a user error has caused a temporary host failure, after which the hostrecovers, but the virtual machines which were running on the host are terminated. In this case, the hostis manually fenced before being placed into maintenance mode.
To demonstrate virtual machine high availability when host is incorrectly fenced
1. On the Tree pane, select VMs. The available virtual machines display on the VirtualMachines tab.
Figure 6.5. Virtual machines running on hosts
In this example, there are currently two virtual machines running on the Atlantic host; andanother four on Pacific. You can check whether a virtual machine is highly available byselecting it looking at the General tab of the details pane. Here, on the Atlantic host RHEL6Thames is set to be highly available, while RHEL6Congo is not.
2. On the Tree pane, select Hosts. The available hosts display on the Hosts tab. Select the Atlantic host, click the Power Management drop-down menu and select Restart.
Red Hat Enterprise Virtualization 3.2 Evaluation Guide
82
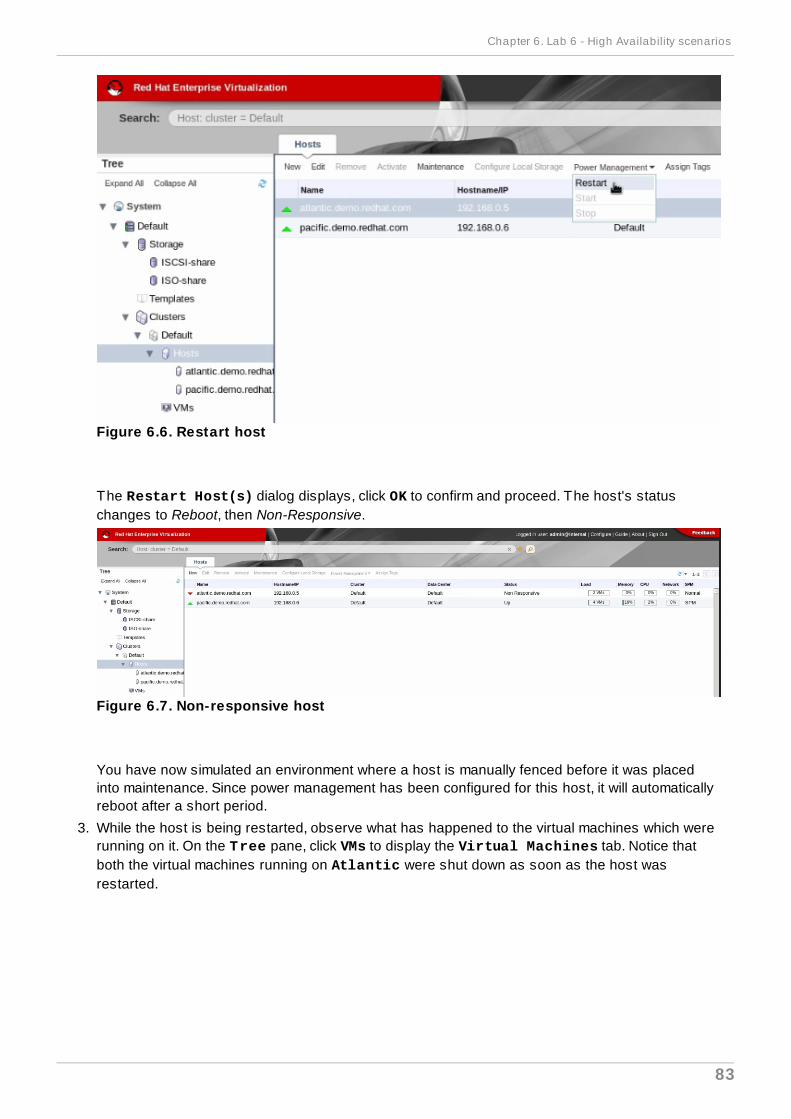
Figure 6.6. Restart host
The Restart Host(s) dialog displays, click OK to confirm and proceed. The host's statuschanges to Reboot, then Non-Responsive.
Figure 6.7. Non-responsive host
You have now simulated an environment where a host is manually fenced before it was placedinto maintenance. Since power management has been configured for this host, it will automaticallyreboot after a short period.
3. While the host is being restarted, observe what has happened to the virtual machines which wererunning on it. On the Tree pane, click VMs to display the Virtual Machines tab. Notice thatboth the virtual machines running on Atlantic were shut down as soon as the host wasrestarted.
Chapter 6. Lab 6 - High Availability scenarios
83
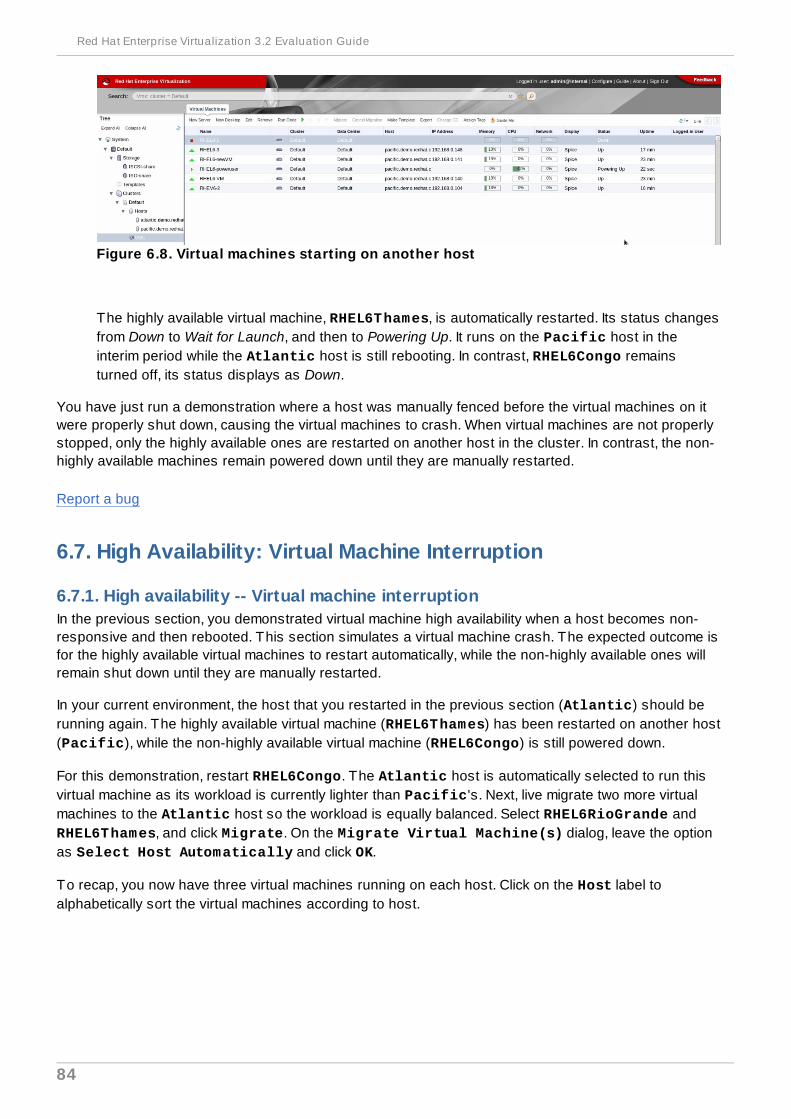
Figure 6.8. Virtual machines starting on another host
The highly available virtual machine, RHEL6Thames, is automatically restarted. Its status changesfrom Down to Wait for Launch, and then to Powering Up. It runs on the Pacific host in theinterim period while the Atlantic host is still rebooting. In contrast, RHEL6Congo remainsturned off, its status displays as Down.
You have just run a demonstration where a host was manually fenced before the virtual machines on itwere properly shut down, causing the virtual machines to crash. When virtual machines are not properlystopped, only the highly available ones are restarted on another host in the cluster. In contrast, the non-highly available machines remain powered down until they are manually restarted.
Report a bug
6.7. High Availability: Virtual Machine Interruption
6.7.1. High availability -- Virtual machine interruptionIn the previous section, you demonstrated virtual machine high availability when a host becomes non-responsive and then rebooted. This section simulates a virtual machine crash. The expected outcome isfor the highly available virtual machines to restart automatically, while the non-highly available ones willremain shut down until they are manually restarted.
In your current environment, the host that you restarted in the previous section (Atlantic) should berunning again. The highly available virtual machine (RHEL6Thames) has been restarted on another host(Pacific), while the non-highly available virtual machine (RHEL6Congo) is still powered down.
For this demonstration, restart RHEL6Congo. The Atlantic host is automatically selected to run thisvirtual machine as its workload is currently lighter than Pacific's. Next, live migrate two more virtualmachines to the Atlantic host so the workload is equally balanced. Select RHEL6RioGrande and RHEL6Thames, and click Migrate. On the Migrate Virtual Machine(s) dialog, leave the optionas Select Host Automatically and click OK.
To recap, you now have three virtual machines running on each host. Click on the Host label toalphabetically sort the virtual machines according to host.
Red Hat Enterprise Virtualization 3.2 Evaluation Guide
84
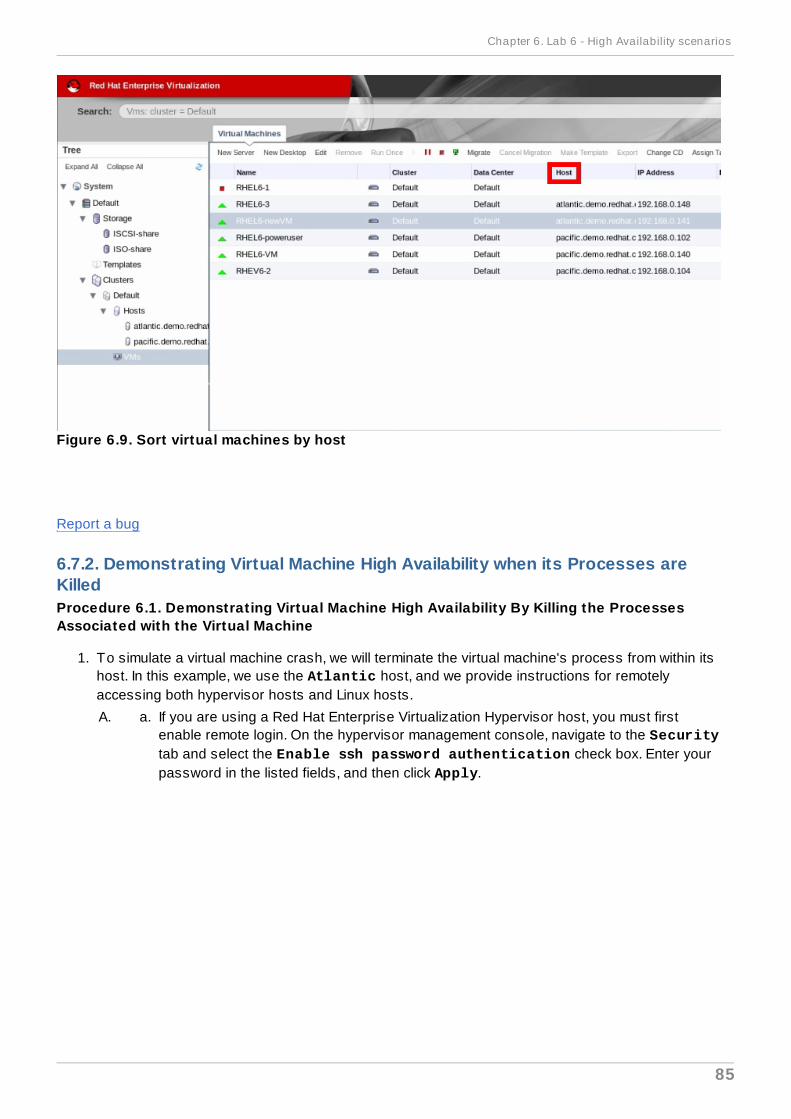
Figure 6.9. Sort virtual machines by host
Report a bug
6.7.2. Demonstrating Virtual Machine High Availability when its Processes areKilledProcedure 6.1. Demonstrating Virtual Machine High Availability By Killing the ProcessesAssociated with the Virtual Machine
1. To simulate a virtual machine crash, we will terminate the virtual machine's process from within itshost. In this example, we use the Atlantic host, and we provide instructions for remotelyaccessing both hypervisor hosts and Linux hosts.
A. a. If you are using a Red Hat Enterprise Virtualization Hypervisor host, you must firstenable remote login. On the hypervisor management console, navigate to the Securitytab and select the Enable ssh password authentication check box. Enter yourpassword in the listed fields, and then click Apply.
Chapter 6. Lab 6 - High Availability scenarios
85
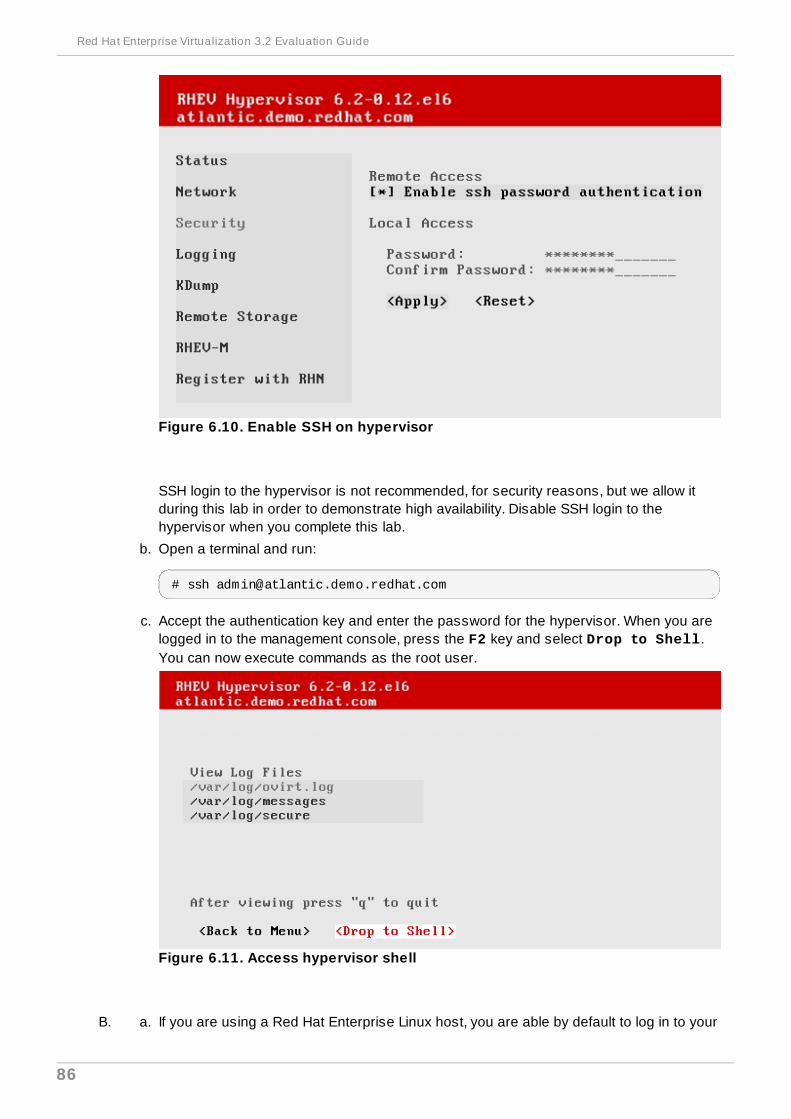
Figure 6.10. Enable SSH on hypervisor
SSH login to the hypervisor is not recommended, for security reasons, but we allow itduring this lab in order to demonstrate high availability. Disable SSH login to thehypervisor when you complete this lab.
b. Open a terminal and run:
# ssh [email protected]
c. Accept the authentication key and enter the password for the hypervisor. When you arelogged in to the management console, press the F2 key and select Drop to Shell.You can now execute commands as the root user.
Figure 6.11. Access hypervisor shell
B. a. If you are using a Red Hat Enterprise Linux host, you are able by default to log in to your
Red Hat Enterprise Virtualization 3.2 Evaluation Guide
86
host remotely. Open a terminal and run:
b. Accept the authentication key and enter the password for the host.
2. When you have established a remote connection to your host, use the vdsClient utility toaccess the Red Hat Enterprise Virtualization Manager daemon running in the host:
[root@atlantic]# vdsClient -s 0 list table
This command lists the GUID, process ID, name, and status of each virtual machine on the host.For example:
6aba36aa-d0a9-4d51-bcf3-73544bc95964 2783 RHEL6Congo Up6f8bd3cc-3c54-413a-9a28-0bd2f65eeede 3341 RHEL6RioGrande Up 4e1e0e4f-63e1-4a24-b1a6-76d7ae46e8c4 3015 RHEL6Thames Up
3. Send the termination signal to two virtual machines - one which is highly available, and one whichis not highly available. This example uses RHEL6RioGrande and RHEL6Congo.
[root@atlantic ~]# kill -9 3341[root@atlantic ~]# kill -9 2783
You have now simulated an environment in which a virtual machine has unexpectedly crashed andis inaccessible to users.
4. On the Virtual Machines tab in the administration portal, you can see that RHEL6RioGrande's status is Powering Up. Because it was marked as highly available, itinstantly restarts when it experiences a crash.
In contrast, the status of RHEL6Congo remains Down because it was not marked as highlyavailable. It remains turned off until it is manually restarted.
This demonstrates that if the virtual machine process is interrupted - whether due to user error,insufficient memory on hosts or other issues - highly available virtual machines will be restarted, whilenon-highly available ones require manual input. Therefore, if your environment has machines which mustbe accessible at all times, it is good practice to configure them as highly available, so they willautomatically restart if they experience unexpected interruptions.
Report a bug
6.8. High-Availability: Non-Operational Host
6.8.1. High Availability - Non-operational HostsNow that you have tested high availability in cases of virtual machine failure, you can examine a scenarioin which the failure occurs on the host's side.
When a host's status displays as Non-Operational, it means that the host is accessible from the RedHat Enterprise Virtualization Manager, however it cannot serve as a member of a cluster. This can bedue to a fault: for example if a logical network is down, or if storage is inaccessible to the host. It can alsobe due to configuration mismatch: for example if the host CPU type is incompatible with the cluster, or ifthe host is missing a logical network.
A non-operational host will not be able to run new virtual machines; and if there are virtual machinesrunning on the host before it becomes non-operational, they will be migrated to other hosts in the cluster.
This section demonstrates high availability when a host is non-operational because it is disconnected
Chapter 6. Lab 6 - High Availability scenarios
87
from the system's external storage resource. You can examine the outcomes of two different cases -when the host is acting as the Storage Pool Manager (SPM); and when it is not.
Before you begin these demonstrations, ensure that all your virtual machines are running. In addition,check which host has been configured as the SPM by clicking Hosts on the Tree pane. In this example,the Pacific host is the SPM.
Report a bug
6.8.2. Demonstrating Virtual Machine High Availability when Storage Network isDown (Host: SPM)Procedure 6.2. To demonstrate virtual machine high availability when storage network isdown (Host: SPM)
1. On the Hosts tab, select the Pacific host to display its details pane. Click the NetworkInterfaces subtab. You should have at least one rhevm network and one storage network, asconfigured earlier. In this example, the storage network is allocated on p1p1.
Next, on the Tree pane click ISCSI-share. On the Storage tab, select the ISCSI-sharedomain and click Edit. On the Edit Domain dialog, click the + symbol to display the iSCSItarget. Note that the storage target's submask address is the same as the storage network's, asseen under Address.
2. Now that you have determined the name and physical interface of your storage network, connectto the Pacific host via SSH. Check your available networks by running the following command:
[root@pacific ~]# ifconfig
Once you have determined the name of your storage network, run:
[root@pacific ~]# ifdown storage[root@pacific ~]# ifdown p1p1
You have now shut down the network between the Pacific host and ISCSI-share storage.On the Hosts tab, the Pacific host changes to Non Operational, then to Reboot.
3. Because the Pacific host was configured as the SPM, it is automatically rebooted. The highlyavailable virtual machines are restarted on the other available host in the cluster - in this case it isAtlantic - while the non highly available ones are suspended. However, once the Pacifichost is up and running again, the virtual machines which were originally running on it are migratedback to it in order to balance the workload between all hosts in the cluster.
You have now demonstrated high availability when the connection is disrupted between the storage andthe host which is the SPM. However, storage disconnection can also occur with a host which is notacting as the SPM. In this case, the host moves into non-operational status, and its virtual machinesmigrate to other hosts in the cluster.
Report a bug
6.8.3. Demonstrating virtual-machine high availability when storage networks aredown (Host: non-SPM)Previously, the Pacific host was running as the SPM. However, the role of SPM can be transferred,because it has to be filled by a running host. After Pacific had been rebooted, the Atlantic host gainedthe status of SPM. Therefore, in this example the Pacific host is used again, as it can now play the
Red Hat Enterprise Virtualization 3.2 Evaluation Guide
88
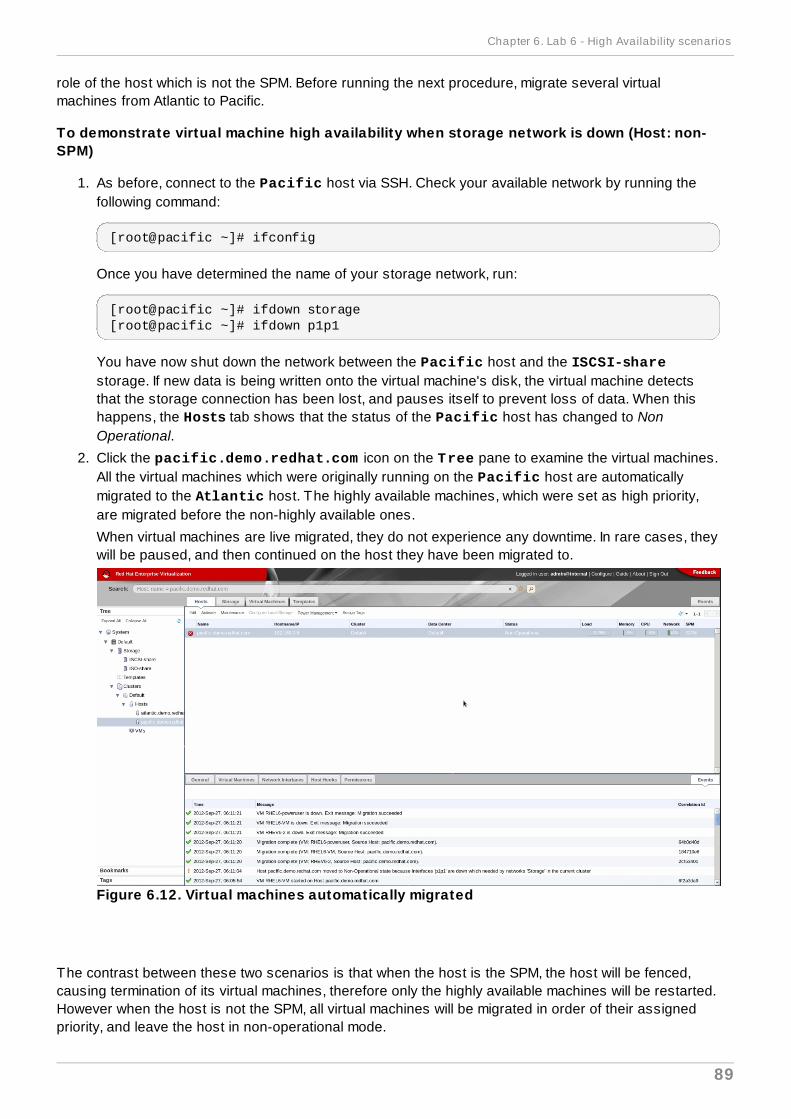
role of the host which is not the SPM. Before running the next procedure, migrate several virtualmachines from Atlantic to Pacific.
To demonstrate virtual machine high availability when storage network is down (Host: non-SPM)
1. As before, connect to the Pacific host via SSH. Check your available network by running thefollowing command:
[root@pacific ~]# ifconfig
Once you have determined the name of your storage network, run:
[root@pacific ~]# ifdown storage[root@pacific ~]# ifdown p1p1
You have now shut down the network between the Pacific host and the ISCSI-sharestorage. If new data is being written onto the virtual machine's disk, the virtual machine detectsthat the storage connection has been lost, and pauses itself to prevent loss of data. When thishappens, the Hosts tab shows that the status of the Pacific host has changed to NonOperational.
2. Click the pacific.demo.redhat.com icon on the Tree pane to examine the virtual machines.All the virtual machines which were originally running on the Pacific host are automaticallymigrated to the Atlantic host. The highly available machines, which were set as high priority,are migrated before the non-highly available ones.
When virtual machines are live migrated, they do not experience any downtime. In rare cases, theywill be paused, and then continued on the host they have been migrated to.
Figure 6.12. Virtual machines automatically migrated
The contrast between these two scenarios is that when the host is the SPM, the host will be fenced,causing termination of its virtual machines, therefore only the highly available machines will be restarted.However when the host is not the SPM, all virtual machines will be migrated in order of their assignedpriority, and leave the host in non-operational mode.
Chapter 6. Lab 6 - High Availability scenarios
89
Report a bug
6.9. High Availability: Non-responsive host
6.9.1. High availability -- non-responsive hostA host is deemed non-responsive when the Red Hat Enterprise Virtualization Manager cannotcommunicate with the Red Hat Enterprise Virtualization agent on the host. This can be either due to anetworking issue, or failure on the host side (kernel panic, power failure and such) which stops allcommunication with the host.
When a host is non-responsive, it will be fenced to ensure that virtual machines are allowed to restart onother hosts in the cluster while avoiding "split brain" -- a situation in which communication with the hostis lost while the virtual machines are still partially running. This scenario is simulated in the followingsection, where you will disconnect the host's management network while the storage connection remainsfunctional.
At this stage, the Pacific host is non-operational as its storage connection was cut in the previoussection.
Restart it for the next demonstration. On the Tree pane, select the Pacific host. Click the PowerManagement button and select Restart. Because you have fenced the host, it automatically brings thestorage and p1p1 networks up again, and allows the host to run as normal.
When the host's status changes to Up, migrate several machines onto it. This example uses RHEL6RioGrande, RHEL6Thames (both highly available machines) and RHEL6Erie. As you havedisabled cluster policy at the beginning of this lab, these virtual machines will not auto-migrate as soonas the host is back up. Therefore, they need to be manually migrated to the Pacific host.
Report a bug
6.9.2. Demonstrating high-availability when host connections are disrupted
1. On the Tree pane, click Hosts. On the Hosts tab, select the Pacific host, and click theNetwork Interfaces subtab on the details pane. Check the physical interface name of the rhevm network — in this example it is the eth0 network.
2. As before, connect to the Pacific host via SSH. Disable the management network by running:
# ifdown rhevm
You have now shut down the network connecting the Pacific host to the Red Hat EnterpriseVirtualization Manager. The next time that the Manager attempts to transmit signals to the host, ittriggers the automatic fencing operation.
3. From the Tree pane, click VMs to display the Virtual Machines tab. The highly availablevirtual machines, RHEL6RioGrande and RHEL6Thames, have restarted on the Atlantic host.Conversely, RHEL6Erie did not restart because it was not configured to be highly available.
4. Finally, go to the Tree pane and click Hosts to examine the status of the hosts. After a shortperiod, the Pacific host will be rebooted, assuming that power management was successfullyconfigured on this host.
You have just run a demonstration where a non-responsive host was automatically fenced and
Red Hat Enterprise Virtualization 3.2 Evaluation Guide
90

rebooted. As you had simulated a non-persistent network failure, the host will recover from the faultfollowing its reboot. In the interim period while it is being restarted, the highly available virtual machinesoriginally running on it are restarted on another available host in the cluster. Conversely, non-highlyavailable virtual machines need to be manually restarted.
Report a bug
6.9.3. Demonstrating virtual-machine high availability of incorrectly-fenced hosts
1. On the Tree pane, select VMs. The available virtual machines display on the VirtualMachines tab.
Figure 6.13. Virtual machines running on hosts
In this example, there are currently two virtual machines running on the Atlantic host; andanother four on Pacific. You can check whether a virtual machine is highly available byselecting it looking at the General tab of the details pane. Here, on the Atlantic host RHEL6Thames is set to be highly available, while RHEL6Congo is not.
2. On the Tree pane, select Hosts. The available hosts display on the Hosts tab. Select the Atlantic host, click the Power Management drop-down menu and select Restart.
Figure 6.14 . Restart host
The Restart Host(s) dialog displays, click OK to confirm and proceed. The host's statuschanges to Reboot, then Non-Responsive.
Chapter 6. Lab 6 - High Availability scenarios
91
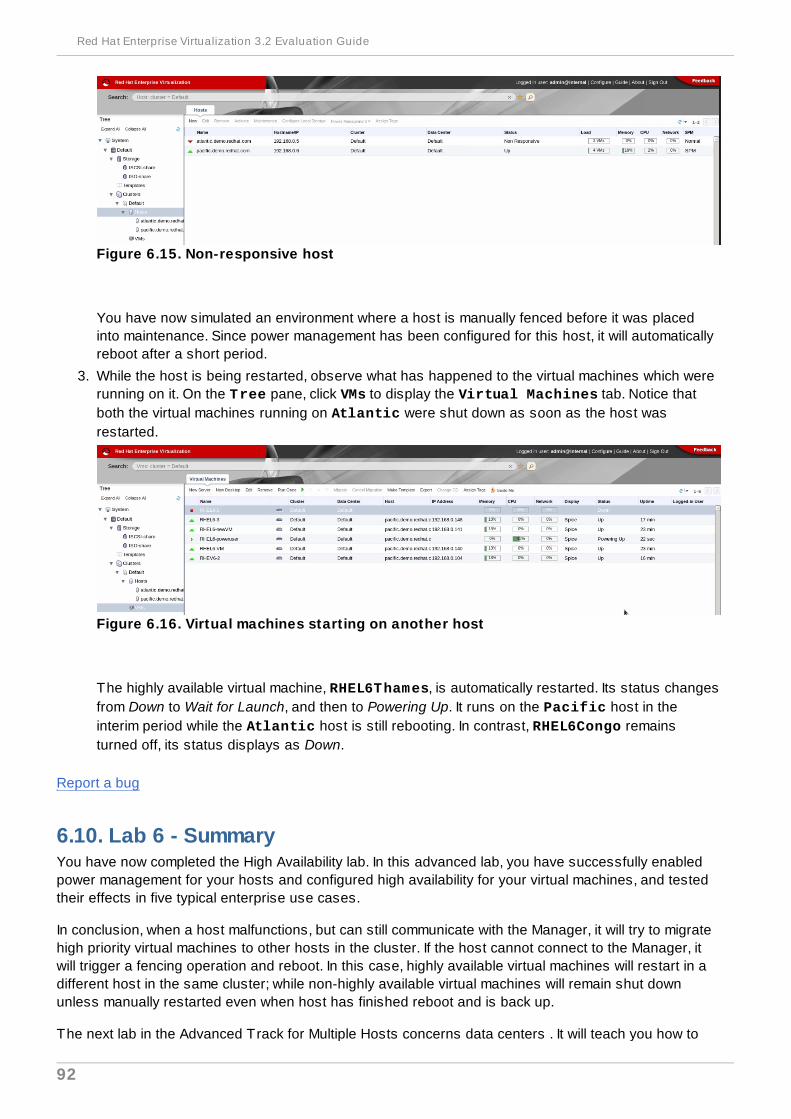
Figure 6.15. Non-responsive host
You have now simulated an environment where a host is manually fenced before it was placedinto maintenance. Since power management has been configured for this host, it will automaticallyreboot after a short period.
3. While the host is being restarted, observe what has happened to the virtual machines which wererunning on it. On the Tree pane, click VMs to display the Virtual Machines tab. Notice thatboth the virtual machines running on Atlantic were shut down as soon as the host wasrestarted.
Figure 6.16. Virtual machines starting on another host
The highly available virtual machine, RHEL6Thames, is automatically restarted. Its status changesfrom Down to Wait for Launch, and then to Powering Up. It runs on the Pacific host in theinterim period while the Atlantic host is still rebooting. In contrast, RHEL6Congo remainsturned off, its status displays as Down.
Report a bug
6.10. Lab 6 - SummaryYou have now completed the High Availability lab. In this advanced lab, you have successfully enabledpower management for your hosts and configured high availability for your virtual machines, and testedtheir effects in five typical enterprise use cases.
In conclusion, when a host malfunctions, but can still communicate with the Manager, it will try to migratehigh priority virtual machines to other hosts in the cluster. If the host cannot connect to the Manager, itwill trigger a fencing operation and reboot. In this case, highly available virtual machines will restart in adifferent host in the same cluster; while non-highly available virtual machines will remain shut downunless manually restarted even when host has finished reboot and is back up.
The next lab in the Advanced Track for Multiple Hosts concerns data centers . It will teach you how to
Red Hat Enterprise Virtualization 3.2 Evaluation Guide
92
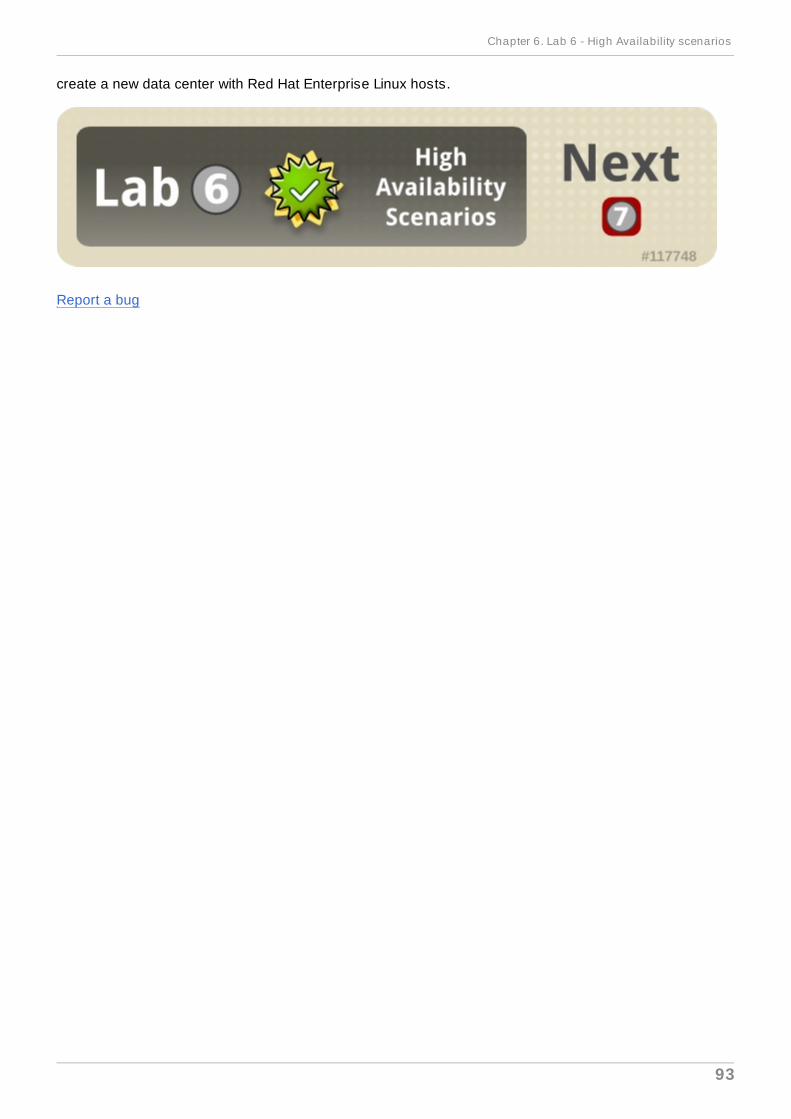
create a new data center with Red Hat Enterprise Linux hosts.
Report a bug
Chapter 6. Lab 6 - High Availability scenarios
93
Chapter 7. Lab 7 - Adding Additional Data Centers
7.1. Lab 7 - ObjectivesThis lab takes you through the tasks necessary to install and set up Red Hat Enterprise Virtualizationwith multiple hosts and shared storage. In addition, you will learn how to configure networks and addISOs in order to create virtual machines. This lab should take you about 35 minutes.
This chapter shows you how to install and configure Red Hat Enterprise Linux hosts for use with RedHat Enterprise Virtualization Manager. (10 minutes)
This chapter shows you how to create a new Data Center for the Red Hat Enterprise Linux hosts. (1minute)
This chapter shows you how to create a new host cluster for your Red Hat Enterprise Linux hosts to it.(1 minute)
This chapter shows you how to manually attach the hosts to the Red Hat Enterprise VirtualizationManager. (4 minutes)
This chapter shows you how to define new networks for the storage devices and add them to the hosts.(5 minutes)
This chapter shows you how to define NFS, iSCSI or FCP storage and attach the domains to the datacenter. (8 minutes)
This chapter shows you how to create a new ISO domain or attach the existing ISO domain to your newdata center. (6 minutes)
Report a bug
7.2. Add Additional Data Center
This lab shows you how to customize your standard Red Hat Enterprise Virtualization environment byadding an additional data center. This lab uses Red Hat Enterprise Linux hosts, but you can use RedHat Enterprise Virtualization Hypervisor hosts instead, if you prefer. In this lab, you will learn how tocreate virtual machines in your new data center.
This lab assumes that you have successfully completed all the sections in the basic setup chapter. Youshould have correctly installed and configured Red Hat Enterprise Virtualization, and have configuredshared storage and logical networks.
Lab 7 - Objectives
Red Hat Enterprise Virtualization 3.2 Evaluation Guide
94
This lab takes you through the tasks necessary to install and set up Red Hat Enterprise Virtualizationwith multiple hosts and shared storage. You will also learn how to configure networks and how to addISOs in order to create virtual machines. This lab should take you about 35 minutes.
Lab 7 - Requirements
Ensure that you have the following:
Red Hat Enterprise Linux Hosts
Minimum - Dual Core server, 2 GB RAM and 10 GB Storage, 1 Gbps network interface
Recommended - Dual socket server, 16 GB RAM and 50 GB storage, two 1 Gbps network interfaces.
The breakdown of the server requirements is:
For each host: AMD-V or Intel VT enabled, AMD64 or Intel 64 extensions, minimum 1 GB RAM, 3GB free storage and 1 Gbps network interface.
For virtual machines running on each host: minimum 1 GB RAM per virtual machine.
For each host, a valid Red Hat Network subscription to the rhel-x86_64-rhev-mgmt-agent-6channel.
Storage and Networking
One or more of the supported storage types (NFS, iSCSI and FCP).
One static IP per host which is resolvable by the DNS server.
An NFS mount point for an ISO directory if you choose to configure an ISO share external to the RedHat Enterprise Virtualization Manager Server.
Lab 7 - Configuration
The following figure and table list the environment parameters and object names which will be usedconsistently throughout this lab. It is strongly recommended that you use these entities in yourevaluation environment to ensure the names are resolvable. You may alter them if necessary, but makesure you have an equivalent name for each component.
Chapter 7. Lab 7 - Adding Additional Data Centers
95
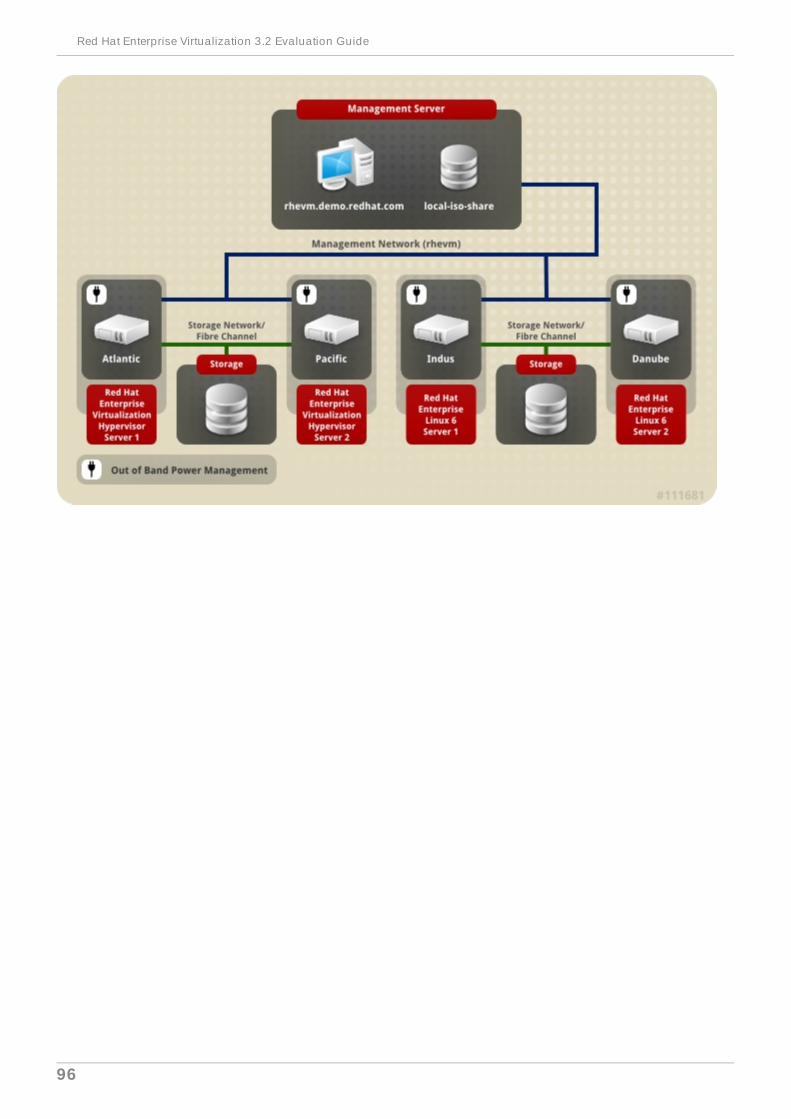
Red Hat Enterprise Virtualization 3.2 Evaluation Guide
96
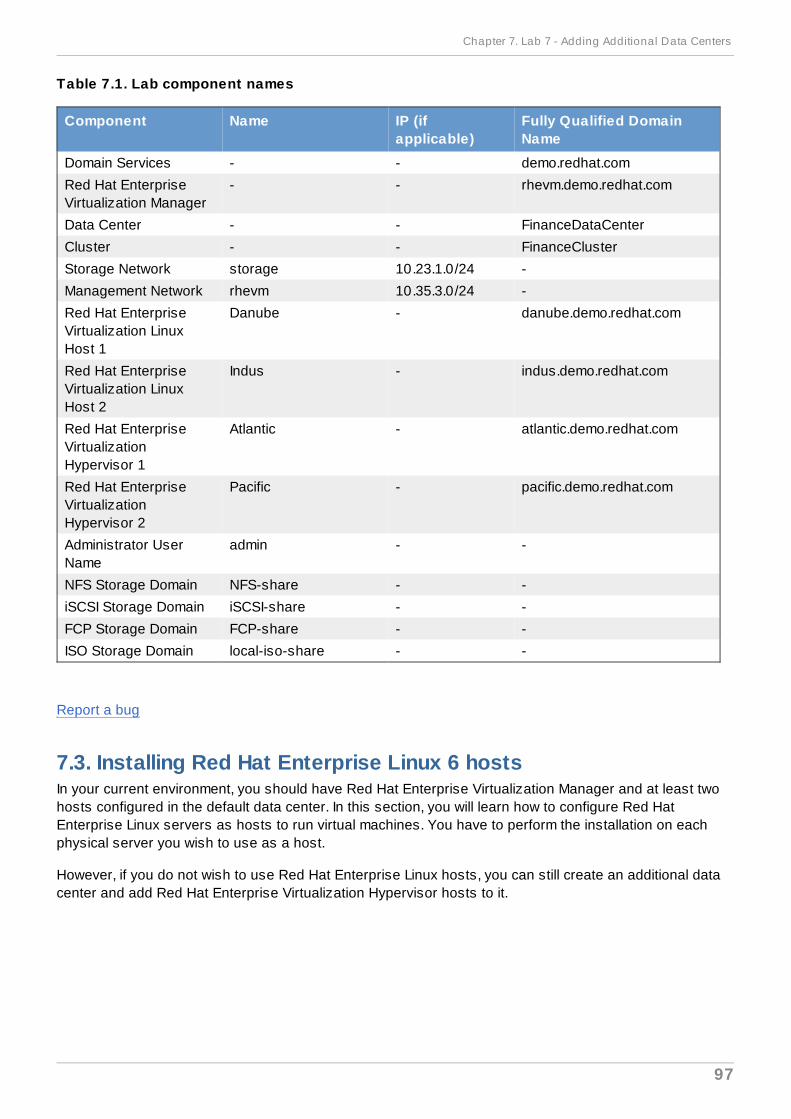
Table 7.1. Lab component names
Component Name IP (ifapplicable)
Fully Qualified DomainName
Domain Services - - demo.redhat.com
Red Hat EnterpriseVirtualization Manager
- - rhevm.demo.redhat.com
Data Center - - FinanceDataCenter
Cluster - - FinanceCluster
Storage Network storage 10.23.1.0/24 -
Management Network rhevm 10.35.3.0/24 -
Red Hat EnterpriseVirtualization LinuxHost 1
Danube - danube.demo.redhat.com
Red Hat EnterpriseVirtualization LinuxHost 2
Indus - indus.demo.redhat.com
Red Hat EnterpriseVirtualizationHypervisor 1
Atlantic - atlantic.demo.redhat.com
Red Hat EnterpriseVirtualizationHypervisor 2
Pacific - pacific.demo.redhat.com
Administrator UserName
admin - -
NFS Storage Domain NFS-share - -
iSCSI Storage Domain iSCSI-share - -
FCP Storage Domain FCP-share - -
ISO Storage Domain local-iso-share - -
Report a bug
7.3. Installing Red Hat Enterprise Linux 6 hostsIn your current environment, you should have Red Hat Enterprise Virtualization Manager and at least twohosts configured in the default data center. In this section, you will learn how to configure Red HatEnterprise Linux servers as hosts to run virtual machines. You have to perform the installation on eachphysical server you wish to use as a host.
However, if you do not wish to use Red Hat Enterprise Linux hosts, you can still create an additional datacenter and add Red Hat Enterprise Virtualization Hypervisor hosts to it.
Chapter 7. Lab 7 - Adding Additional Data Centers
97
Important
Red Hat Enterprise Virtualization Hypervisor is a closed appliance, and does not allow theinstallation of custom RPMs.If you require custom RPMs, you must use Red Hat Enterprise Linux hosts. Red Hat EnterpriseLinux hosts are not closed appliances, and they allow the installation of custom RPMs.
To install a Red Hat Enterprise Linux 6 host
1. On the machine designated as your Red Hat Enterprise Linux host, install the latest version ofRed Hat Enterprise Linux. Select only the Base package group during installation. For morecomprehensive instructions, refer to the Red Hat Enterprise Linux Installation Guide.
2. If your server has not been registered with the Red Hat Network, run the rhn_registercommand as root to register it. To complete registration successfully you will need to supplyyour Red Hat Network username and password. Follow the onscreen prompts to completeregistration of the system.
# rhn_register
3. Subscribe the server to the required channels using the Red Hat Network web interface.
a. Log on to Red Hat Network (http://rhn.redhat.com/).
b. Click Systems at the top of the page.
c. Select the system to which you are adding channels from the list presented on the screen,by clicking the name of the system.
d. Click Alter Channel Subscriptions in the Subscribed Channels section of thescreen.
e. Select the Red Hat Enterprise Virt Management Agent (v 6 x86_64) channelfrom the list presented on the screen, then click the Change Subscription button tofinalize the change.
4. Make sure the kernel and all the packages are up to date. This may take some time. Run:
# yum -y update
5. Red Hat Enterprise Virtualization platform uses a number of network ports for management andother virtualization features. Adjust your Red Hat Enterprise Linux host's firewall settings to allowaccess to the required ports by configuring iptables rules. Modify the /etc/sysconfig/iptables file so it resembles the following example:
Red Hat Enterprise Virtualization 3.2 Evaluation Guide
98
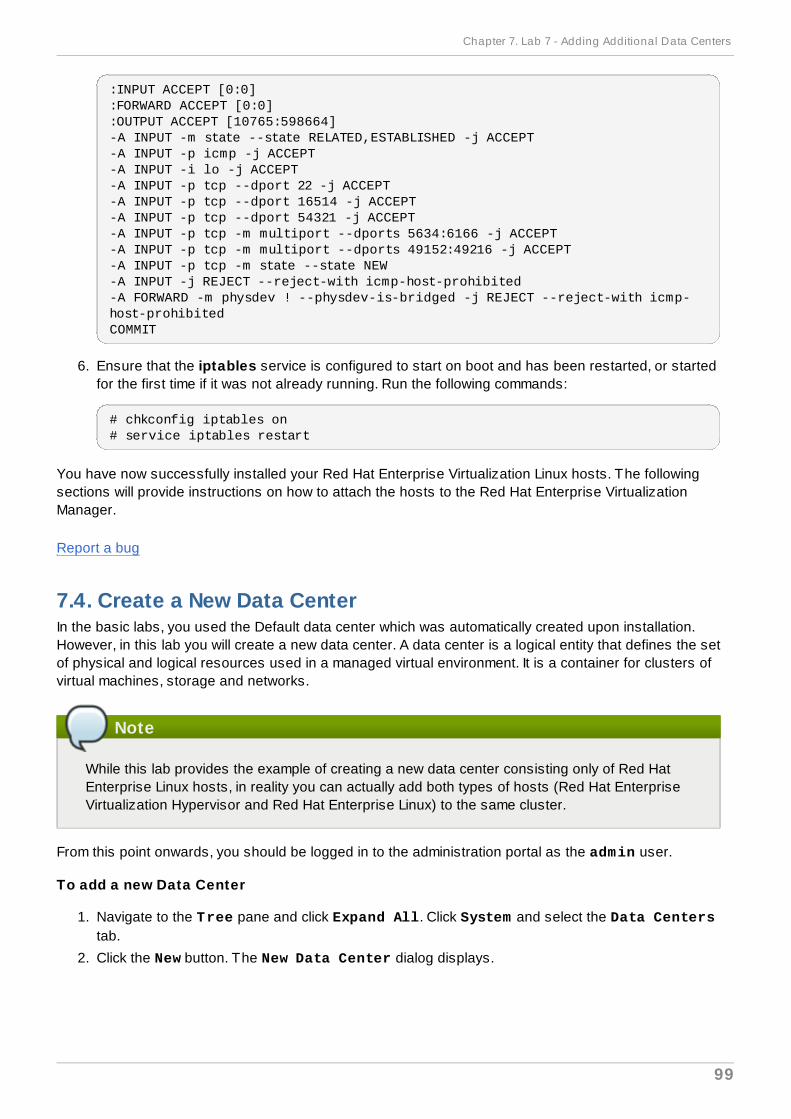
:INPUT ACCEPT [0:0]:FORWARD ACCEPT [0:0]:OUTPUT ACCEPT [10765:598664]-A INPUT -m state --state RELATED,ESTABLISHED -j ACCEPT -A INPUT -p icmp -j ACCEPT -A INPUT -i lo -j ACCEPT-A INPUT -p tcp --dport 22 -j ACCEPT-A INPUT -p tcp --dport 16514 -j ACCEPT-A INPUT -p tcp --dport 54321 -j ACCEPT-A INPUT -p tcp -m multiport --dports 5634:6166 -j ACCEPT-A INPUT -p tcp -m multiport --dports 49152:49216 -j ACCEPT -A INPUT -p tcp -m state --state NEW -A INPUT -j REJECT --reject-with icmp-host-prohibited -A FORWARD -m physdev ! --physdev-is-bridged -j REJECT --reject-with icmp-host-prohibited COMMIT
6. Ensure that the iptables service is configured to start on boot and has been restarted, or startedfor the first time if it was not already running. Run the following commands:
# chkconfig iptables on# service iptables restart
You have now successfully installed your Red Hat Enterprise Virtualization Linux hosts. The followingsections will provide instructions on how to attach the hosts to the Red Hat Enterprise VirtualizationManager.
Report a bug
7.4. Create a New Data CenterIn the basic labs, you used the Default data center which was automatically created upon installation.However, in this lab you will create a new data center. A data center is a logical entity that defines the setof physical and logical resources used in a managed virtual environment. It is a container for clusters ofvirtual machines, storage and networks.
Note
While this lab provides the example of creating a new data center consisting only of Red HatEnterprise Linux hosts, in reality you can actually add both types of hosts (Red Hat EnterpriseVirtualization Hypervisor and Red Hat Enterprise Linux) to the same cluster.
From this point onwards, you should be logged in to the administration portal as the admin user.
To add a new Data Center
1. Navigate to the Tree pane and click Expand All. Click System and select the Data Centerstab.
2. Click the New button. The New Data Center dialog displays.
Chapter 7. Lab 7 - Adding Additional Data Centers
99

Figure 7.1. New Data Center
Fill in the Name and Description fields. Select the data center Type from the drop-down menu.Data center type must be compatible with the storage type of the new data center.
3. Click OK. The New Data Center - Guide Me dialog displays. This dialog provides a context-sensitive reference for the components which have not been configured for your data center.Leave it open for now.
Figure 7.2. New Data Center - Guide Me
Red Hat Enterprise Virtualization 3.2 Evaluation Guide
100
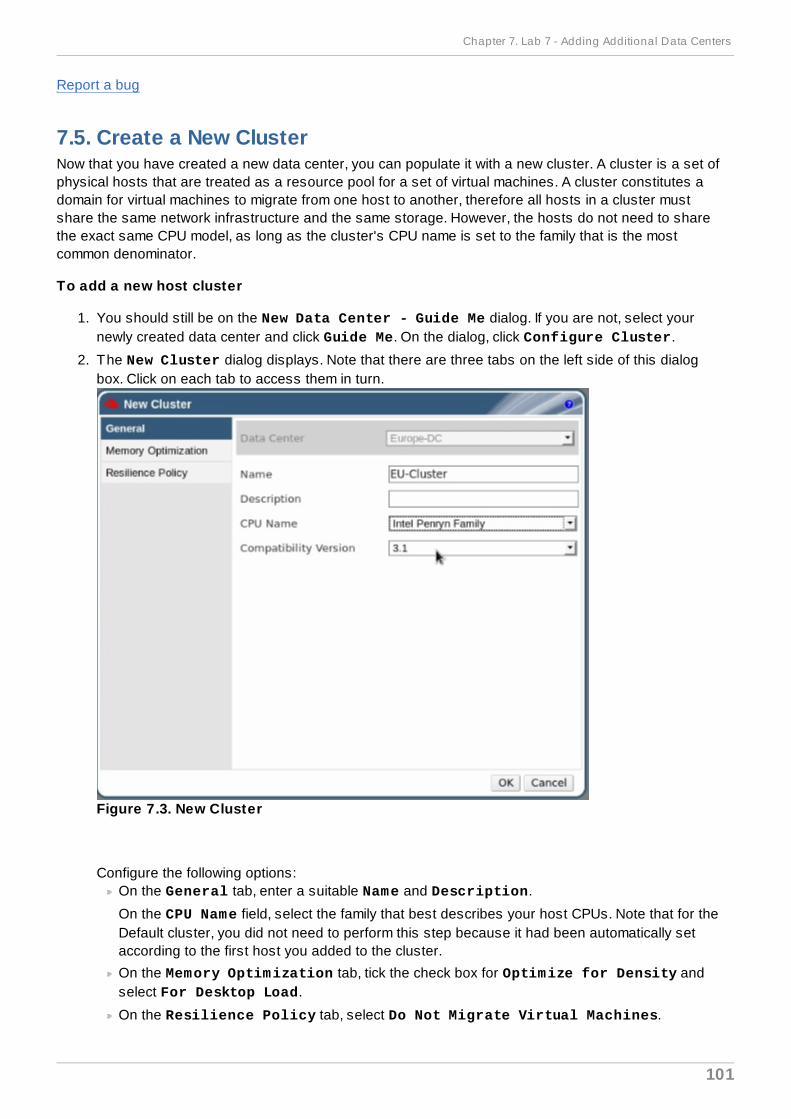
Report a bug
7.5. Create a New ClusterNow that you have created a new data center, you can populate it with a new cluster. A cluster is a set ofphysical hosts that are treated as a resource pool for a set of virtual machines. A cluster constitutes adomain for virtual machines to migrate from one host to another, therefore all hosts in a cluster mustshare the same network infrastructure and the same storage. However, the hosts do not need to sharethe exact same CPU model, as long as the cluster's CPU name is set to the family that is the mostcommon denominator.
To add a new host cluster
1. You should still be on the New Data Center - Guide Me dialog. If you are not, select yournewly created data center and click Guide Me. On the dialog, click Configure Cluster.
2. The New Cluster dialog displays. Note that there are three tabs on the left side of this dialogbox. Click on each tab to access them in turn.
Figure 7.3. New Cluster
Configure the following options:On the General tab, enter a suitable Name and Description.
On the CPU Name field, select the family that best describes your host CPUs. Note that for theDefault cluster, you did not need to perform this step because it had been automatically setaccording to the first host you added to the cluster.
On the Memory Optimization tab, tick the check box for Optimize for Density andselect For Desktop Load.
On the Resilience Policy tab, select Do Not Migrate Virtual Machines.
Chapter 7. Lab 7 - Adding Additional Data Centers
101

3. Click OK. The New Data Center - Guide Me dialog displays again. Leave it open for now.
Report a bug
7.6. Attach New Red Hat Enterprise Linux HostsYou have created a new data center and a new cluster within it, now you need to populate the clusterwith the Red Hat Enterprise Linux hosts you installed earlier. Before they can be used, they have to bemanually attached to the Red Hat Enterprise Virtualization platform. Perform the following procedure foreach host you have installed.
Note that this step is required for Red Hat Enterprise Linux hosts only, if you are using Red HatEnterprise Virtualization Hypervisors for this lab you only have to approve the hosts with a click, as youdid in the Multiple Host chapter. This time, attach the hosts to your newly created cluster.
To attach Red Hat Enterprise Linux hosts
1. You should still be on the New Data Center - Guide Me dialog. If you are not, select yournewly created data center and click Guide Me. On the dialog, click Configure Host.
2. The New Host dialog displays.
Figure 7.4 . Attach a Red Hat Enterprise Linux Host
Configure the following options:
The Data Center and Host Cluster are already pre-selected.
Red Hat Enterprise Virtualization 3.2 Evaluation Guide
102

Enter the Name and the IP Address or resolvable hostname of the host. Enter the RootPassword used to log in to the host.
If you wish to configure Out of Band (OOB) power management for this host, see theClustering Power Management section.
3. Click OK. On the Tree pane, click Expand All and select the Danube host. It displays on theHosts tab with a status of "Installing". The installation may take a few minutes as the requiredpackages are being downloaded. Once installation is complete, the status will update to Rebootand then Awaiting.
4. When the host is ready for use, its status changes to Up.
Report a bug
7.7. Configure Logical NetworksNow that you have a data center with hosts grouped in a cluster, you need to define and apply thenetworking layer. By default, the Management network is already defined for the new data center youcreated. You can define new logical networks, for example data, storage or display networks.
You have already defined a storage network for the Default data center and added it to the hosts in theDefault cluster. Now, you will repeat the same procedure for the FinanceCluster in theFinanceDataCenter.
To define logical networks in a cluster
1. Navigate to the Tree pane and click the Expand All button. Click FinanceDataCenter. Onthe results list, the FinanceDataCenter data center displays. Click on it to display the detailspane.
2. On the details pane, select the Logical Networks tab and click New. The New LogicalNetwork dialog displays. Fill in the Name and Description fields, and tick the AssignNetworks to Cluster(s) - FinanceCluster check box to automatically add the Storagenetwork to the FinanceCluster.
3. Click OK to create the new logical network.
Now that you have defined this network as a resource required by the FinanceCluster in the data center,it is time to add this resource to the hosts in the cluster.
To add network to hosts
1. Back on the Tree pane, click FinanceDataCenter → Clusters → FinanceCluster → Hosts.The Hosts tab displays a list of available hosts.
2. For each of your installed hosts, perform the following tasks:
a. Click on the host. On the details pane, select the Network Interfaces tab.
b. A list of network interfaces available for this host displays. One of them will already have themanagement network (rhevm) configured.
c. Select the interface on which to configure the Storage network and click the Setup HostNetworks button. The Setup Host Networks window displays. Configure the followingoptions:
Under Network, select storage.
Select the Static radio button. Enter the IP and Subnet Mask you have prepared aspart of the prerequisites to this lab.
T ick the Save network configuration check box.
Chapter 7. Lab 7 - Adding Additional Data Centers
103
d. Click OK.
You have now added a new storage network to your data center, and attached the network to yourhosts. On the Logical Networks tab of FinanceDataCenter, you should have at least twonetworks - rhevm and storage. Now, you can add storage to the system.
Report a bug
7.8. Configuring Storage
7.8.1. Creating an NFS Data DomainBecause you have selected NFS as your default storage type during the Manager installation, you willnow create an NFS storage domain. An NFS type storage domain is a mounted NFS share that isattached to a data center and used to provide storage for virtual machine disk images.
Important
If you are using NFS storage, you must first create and export the directories to be used asstorage domains from the NFS server. These directories must have their numerical user andgroup ownership set to 36:36 on the NFS server, to correspond to the vdsm user and kvm grouprespectively on the Red Hat Enterprise Virtualization Manager server. In addition, thesedirectories must be exported with the read write options (rw). For more information see the RedHat Enterprise Virtualization Installation Guide.
To add NFS storage
1. Navigate to the Tree pane and click the Expand All button. Under System, select the Defaultdata center and click on Storage. The available storage domains display on the results list. ClickNew Domain.
2. The New Domain window displays.
Red Hat Enterprise Virtualization 3.2 Evaluation Guide
104
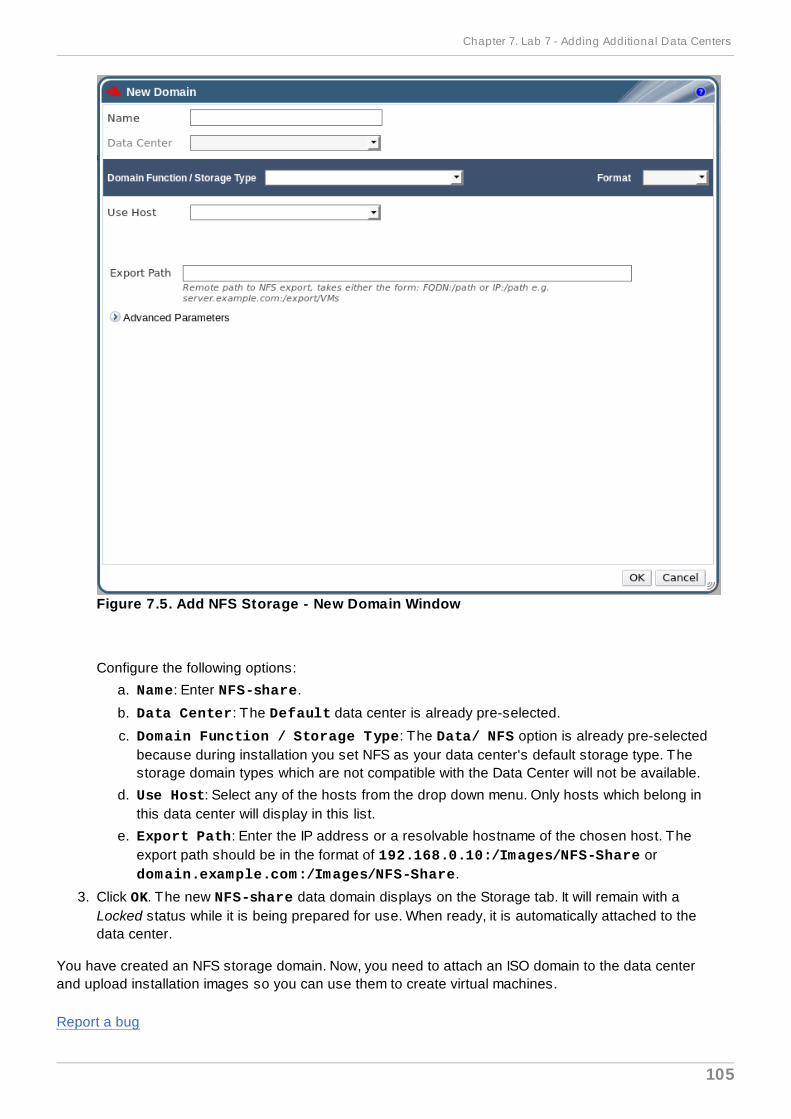
Figure 7.5. Add NFS Storage - New Domain Window
Configure the following options:
a. Name: Enter NFS-share.
b. Data Center: The Default data center is already pre-selected.
c. Domain Function / Storage Type: The Data/ NFS option is already pre-selectedbecause during installation you set NFS as your data center's default storage type. Thestorage domain types which are not compatible with the Data Center will not be available.
d. Use Host: Select any of the hosts from the drop down menu. Only hosts which belong inthis data center will display in this list.
e. Export Path: Enter the IP address or a resolvable hostname of the chosen host. Theexport path should be in the format of 192.168.0.10:/Images/NFS-Share or domain.example.com:/Images/NFS-Share.
3. Click OK. The new NFS-share data domain displays on the Storage tab. It will remain with aLocked status while it is being prepared for use. When ready, it is automatically attached to thedata center.
You have created an NFS storage domain. Now, you need to attach an ISO domain to the data centerand upload installation images so you can use them to create virtual machines.
Report a bug
Chapter 7. Lab 7 - Adding Additional Data Centers
105
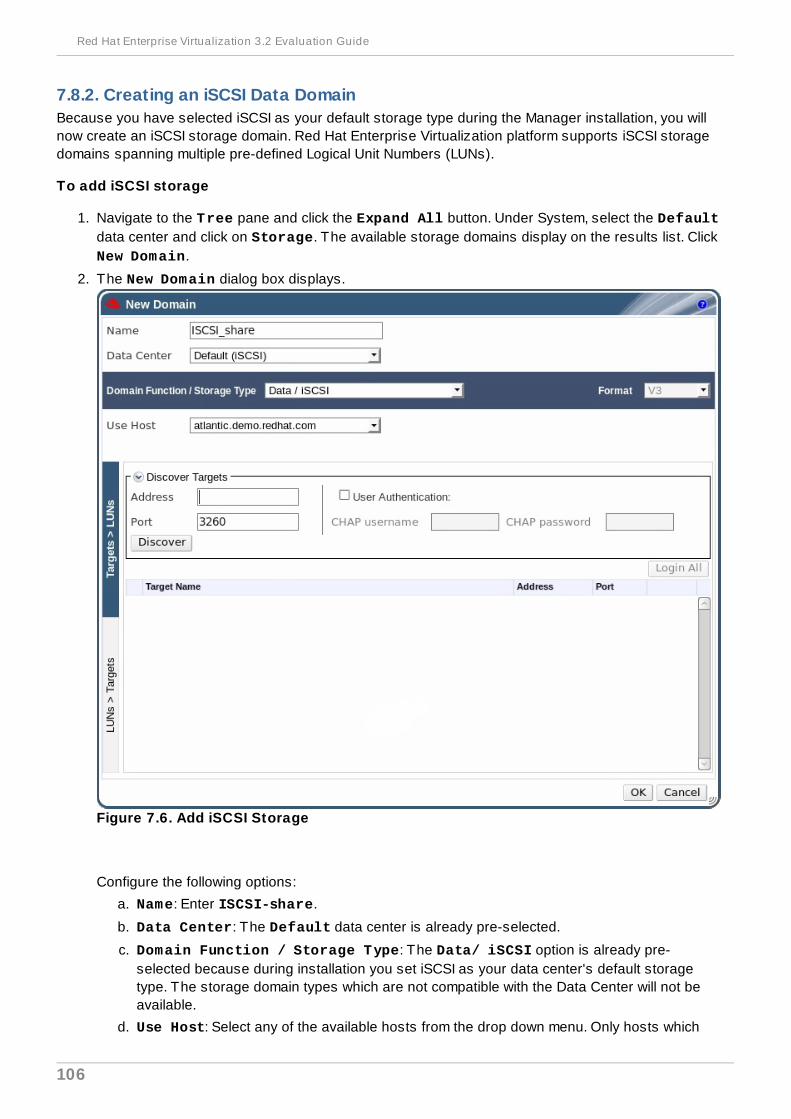
7.8.2. Creating an iSCSI Data DomainBecause you have selected iSCSI as your default storage type during the Manager installation, you willnow create an iSCSI storage domain. Red Hat Enterprise Virtualization platform supports iSCSI storagedomains spanning multiple pre-defined Logical Unit Numbers (LUNs).
To add iSCSI storage
1. Navigate to the Tree pane and click the Expand All button. Under System, select the Defaultdata center and click on Storage. The available storage domains display on the results list. ClickNew Domain.
2. The New Domain dialog box displays.
Figure 7.6. Add iSCSI Storage
Configure the following options:
a. Name: Enter ISCSI-share.
b. Data Center: The Default data center is already pre-selected.
c. Domain Function / Storage Type: The Data/ iSCSI option is already pre-selected because during installation you set iSCSI as your data center's default storagetype. The storage domain types which are not compatible with the Data Center will not beavailable.
d. Use Host: Select any of the available hosts from the drop down menu. Only hosts which
Red Hat Enterprise Virtualization 3.2 Evaluation Guide
106
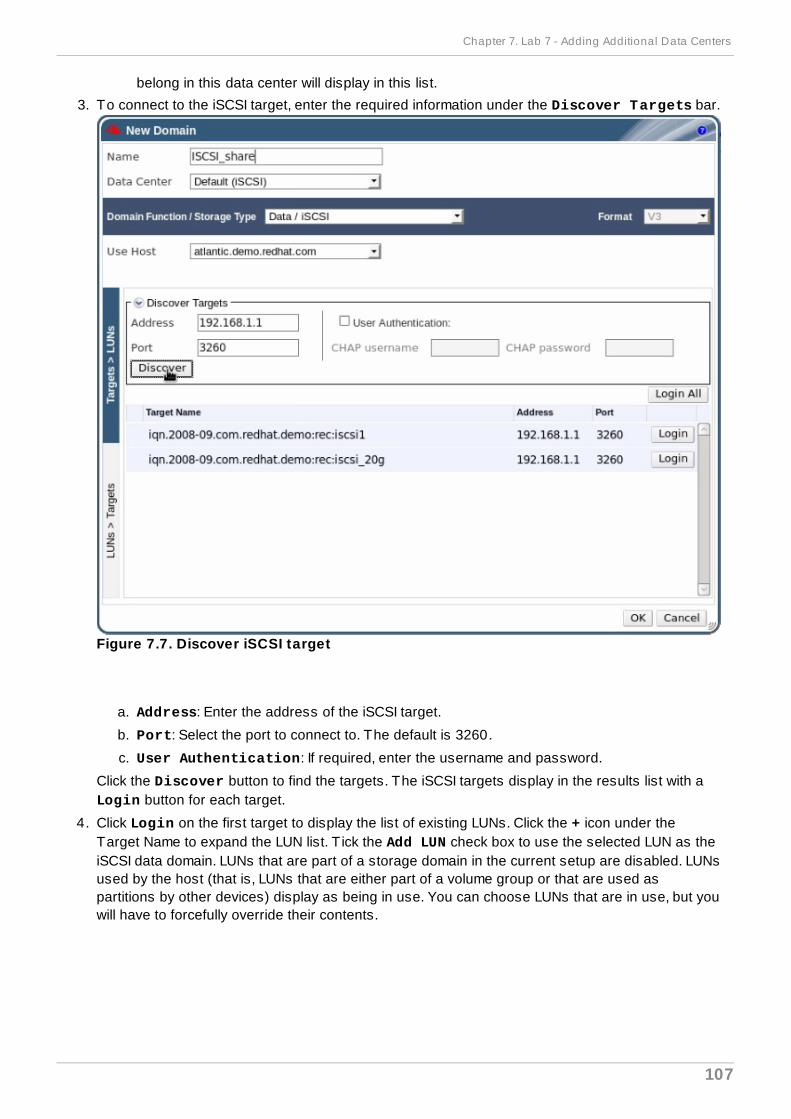
belong in this data center will display in this list.
3. To connect to the iSCSI target, enter the required information under the Discover Targets bar.
Figure 7.7. Discover iSCSI target
a. Address: Enter the address of the iSCSI target.
b. Port: Select the port to connect to. The default is 3260.
c. User Authentication: If required, enter the username and password.
Click the Discover button to find the targets. The iSCSI targets display in the results list with aLogin button for each target.
4. Click Login on the first target to display the list of existing LUNs. Click the + icon under theTarget Name to expand the LUN list. T ick the Add LUN check box to use the selected LUN as theiSCSI data domain. LUNs that are part of a storage domain in the current setup are disabled. LUNsused by the host (that is, LUNs that are either part of a volume group or that are used aspartitions by other devices) display as being in use. You can choose LUNs that are in use, but youwill have to forcefully override their contents.
Chapter 7. Lab 7 - Adding Additional Data Centers
107

Figure 7.8. Attach LUNs to iSCSI domain
5. Click OK. The new iSCSI-share data domain displays on the Storage tab. It will remain with aLocked status while it is being prepared for use. When ready, it is automatically attached to thedata center.
You have created an iSCSI storage domain. Now, you need to attach an ISO domain to the data centerand upload installation images so you can use them to create virtual machines.
Report a bug
7.8.3. Creating an FCP Data DomainBecause you have selected FCP as your default storage type during the Manager installation, you willnow create an FCP storage domain. Red Hat Enterprise Virtualization platform supports FCP storagedomains spanning multiple pre-defined Logical Unit Numbers (LUNs).
To add FCP storage
1. Navigate to the Tree pane and click the Expand All button. Under System, select the Defaultdata center and click on Storage. The available storage domains display on the results list. ClickNew Domain.
2. The New Domain dialog box displays.
Red Hat Enterprise Virtualization 3.2 Evaluation Guide
108
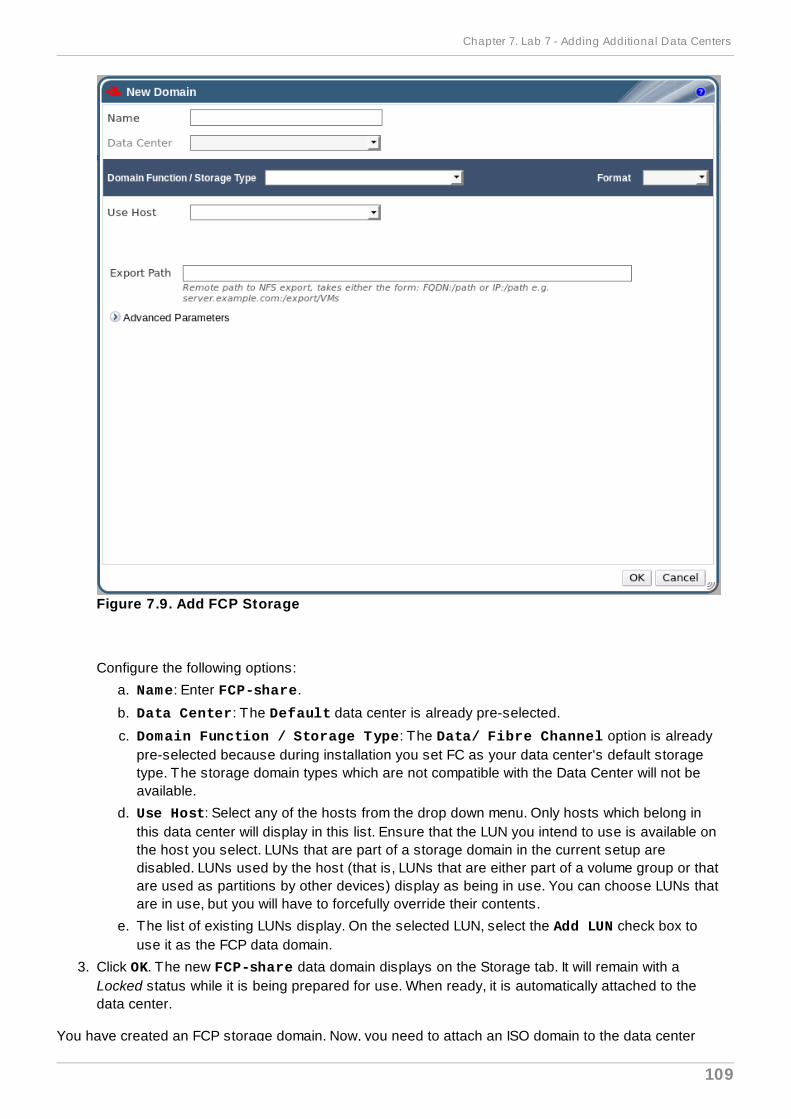
Figure 7.9. Add FCP Storage
Configure the following options:
a. Name: Enter FCP-share.
b. Data Center: The Default data center is already pre-selected.
c. Domain Function / Storage Type: The Data/ Fibre Channel option is alreadypre-selected because during installation you set FC as your data center's default storagetype. The storage domain types which are not compatible with the Data Center will not beavailable.
d. Use Host: Select any of the hosts from the drop down menu. Only hosts which belong inthis data center will display in this list. Ensure that the LUN you intend to use is available onthe host you select. LUNs that are part of a storage domain in the current setup aredisabled. LUNs used by the host (that is, LUNs that are either part of a volume group or thatare used as partitions by other devices) display as being in use. You can choose LUNs thatare in use, but you will have to forcefully override their contents.
e. The list of existing LUNs display. On the selected LUN, select the Add LUN check box touse it as the FCP data domain.
3. Click OK. The new FCP-share data domain displays on the Storage tab. It will remain with aLocked status while it is being prepared for use. When ready, it is automatically attached to thedata center.
You have created an FCP storage domain. Now, you need to attach an ISO domain to the data center
Chapter 7. Lab 7 - Adding Additional Data Centers
109
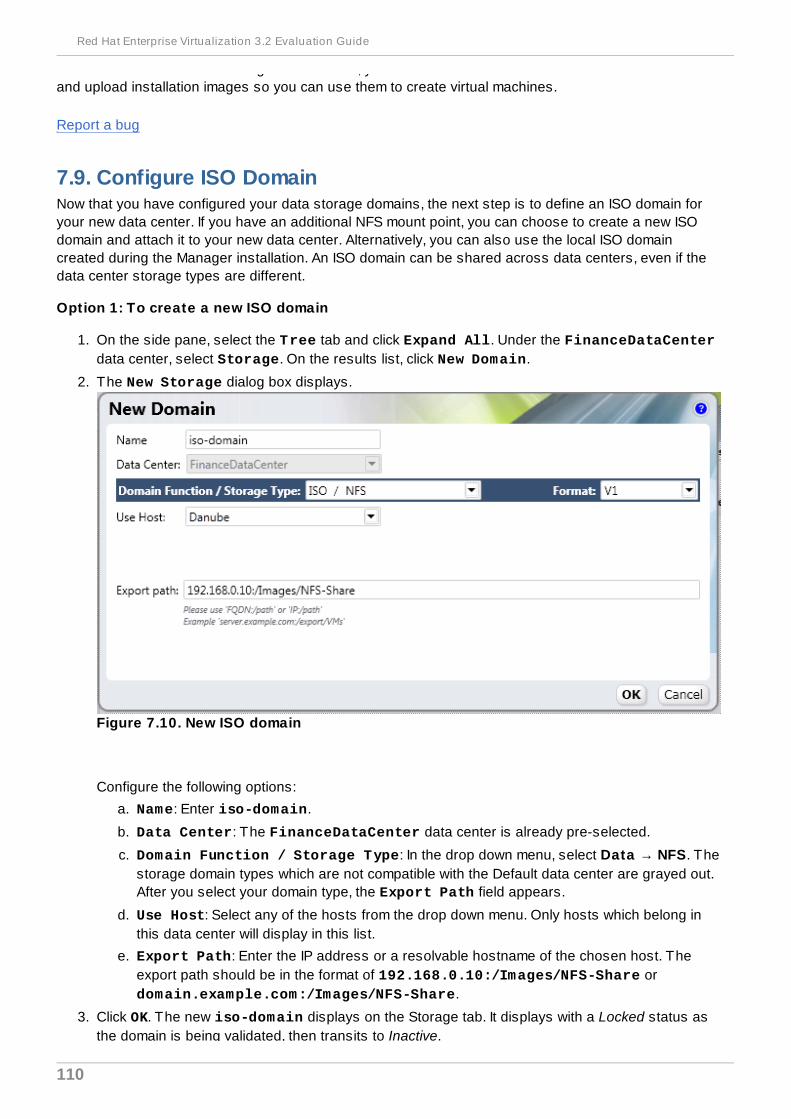
You have created an FCP storage domain. Now, you need to attach an ISO domain to the data centerand upload installation images so you can use them to create virtual machines.
Report a bug
7.9. Configure ISO DomainNow that you have configured your data storage domains, the next step is to define an ISO domain foryour new data center. If you have an additional NFS mount point, you can choose to create a new ISOdomain and attach it to your new data center. Alternatively, you can also use the local ISO domaincreated during the Manager installation. An ISO domain can be shared across data centers, even if thedata center storage types are different.
Option 1: To create a new ISO domain
1. On the side pane, select the Tree tab and click Expand All. Under the FinanceDataCenterdata center, select Storage. On the results list, click New Domain.
2. The New Storage dialog box displays.
Figure 7.10. New ISO domain
Configure the following options:
a. Name: Enter iso-domain.
b. Data Center: The FinanceDataCenter data center is already pre-selected.
c. Domain Function / Storage Type: In the drop down menu, select Data → NFS. Thestorage domain types which are not compatible with the Default data center are grayed out.After you select your domain type, the Export Path field appears.
d. Use Host: Select any of the hosts from the drop down menu. Only hosts which belong inthis data center will display in this list.
e. Export Path: Enter the IP address or a resolvable hostname of the chosen host. Theexport path should be in the format of 192.168.0.10:/Images/NFS-Share or domain.example.com:/Images/NFS-Share.
3. Click OK. The new iso-domain displays on the Storage tab. It displays with a Locked status asthe domain is being validated, then transits to Inactive.
Red Hat Enterprise Virtualization 3.2 Evaluation Guide
110
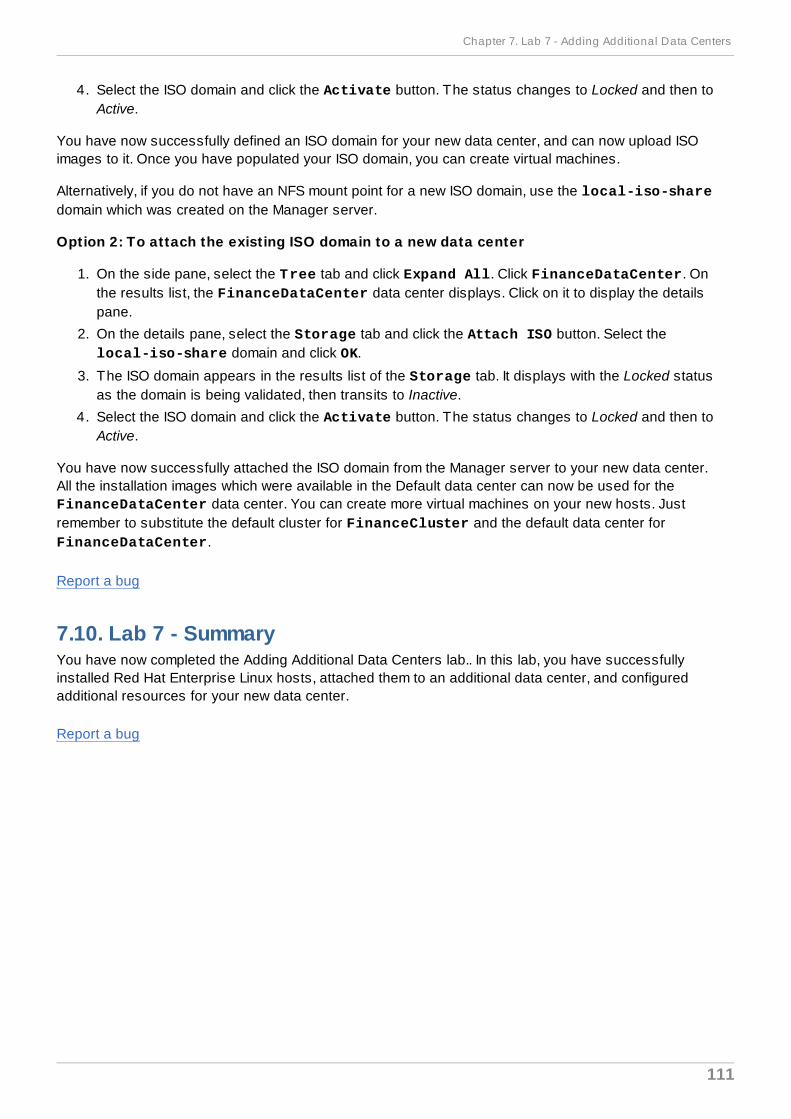
4. Select the ISO domain and click the Activate button. The status changes to Locked and then toActive.
You have now successfully defined an ISO domain for your new data center, and can now upload ISOimages to it. Once you have populated your ISO domain, you can create virtual machines.
Alternatively, if you do not have an NFS mount point for a new ISO domain, use the local-iso-sharedomain which was created on the Manager server.
Option 2: To attach the existing ISO domain to a new data center
1. On the side pane, select the Tree tab and click Expand All. Click FinanceDataCenter. Onthe results list, the FinanceDataCenter data center displays. Click on it to display the detailspane.
2. On the details pane, select the Storage tab and click the Attach ISO button. Select thelocal-iso-share domain and click OK.
3. The ISO domain appears in the results list of the Storage tab. It displays with the Locked statusas the domain is being validated, then transits to Inactive.
4. Select the ISO domain and click the Activate button. The status changes to Locked and then toActive.
You have now successfully attached the ISO domain from the Manager server to your new data center.All the installation images which were available in the Default data center can now be used for theFinanceDataCenter data center. You can create more virtual machines on your new hosts. Justremember to substitute the default cluster for FinanceCluster and the default data center forFinanceDataCenter.
Report a bug
7.10. Lab 7 - SummaryYou have now completed the Adding Additional Data Centers lab.. In this lab, you have successfullyinstalled Red Hat Enterprise Linux hosts, attached them to an additional data center, and configuredadditional resources for your new data center.
Report a bug
Chapter 7. Lab 7 - Adding Additional Data Centers
111

Chapter 8. Lab 8 - Virtual desktops
8.1. Lab 8 - ObjectivesThis lab takes you through the tasks necessary to create and then connect to a Windows virtualmachine or desktop pool with UserRole privileges. This lab should take you about 50 minutes.
This chapter shows you how to add an Active Directory domain to the Red Hat Enterprise VirtualizationManager in order to use Windows virtual desktop pools. (5 minutes)
This chapter shows you how to create a new Windows virtual machine, configure storage andnetworking, and install the operating system. (15 minutes)
This chapter shows you how to create a thin provisioned virtual machine from the Windows template andapply the sysprep configuration settings. (5 minutes)
This chapter shows you how to assign UserRole permissions for a virtual machine to a user. (2minutes)
This chapter shows you how to log in to the User Portal and connect to a virtual machine. (3 minutes)
This chapter shows you how to create a Windows desktop pool, assign UserRole permission for thedesktop pool and how to connect to a virtual machine in a pool. (10 minutes)
Report a bug
8.2. Create a Windows Virtual MachineYou already know how to create a Red Hat Enterprise Linux virtual machine from scratch. The procedurefor creating a Windows virtual machine is similar, except that it requires additional virtio drivers. Thisexample uses Windows 7, but you can also use other Windows operating systems. You will perform anormal attended installation using a virtual DVD.
To create a Windows server
1. Navigate to the Tree pane and click Expand All. Click the VMs icon in the Default clusterunder the Default data center. On the Virtual Machines tab, click New Desktop.
Red Hat Enterprise Virtualization 3.2 Evaluation Guide
112
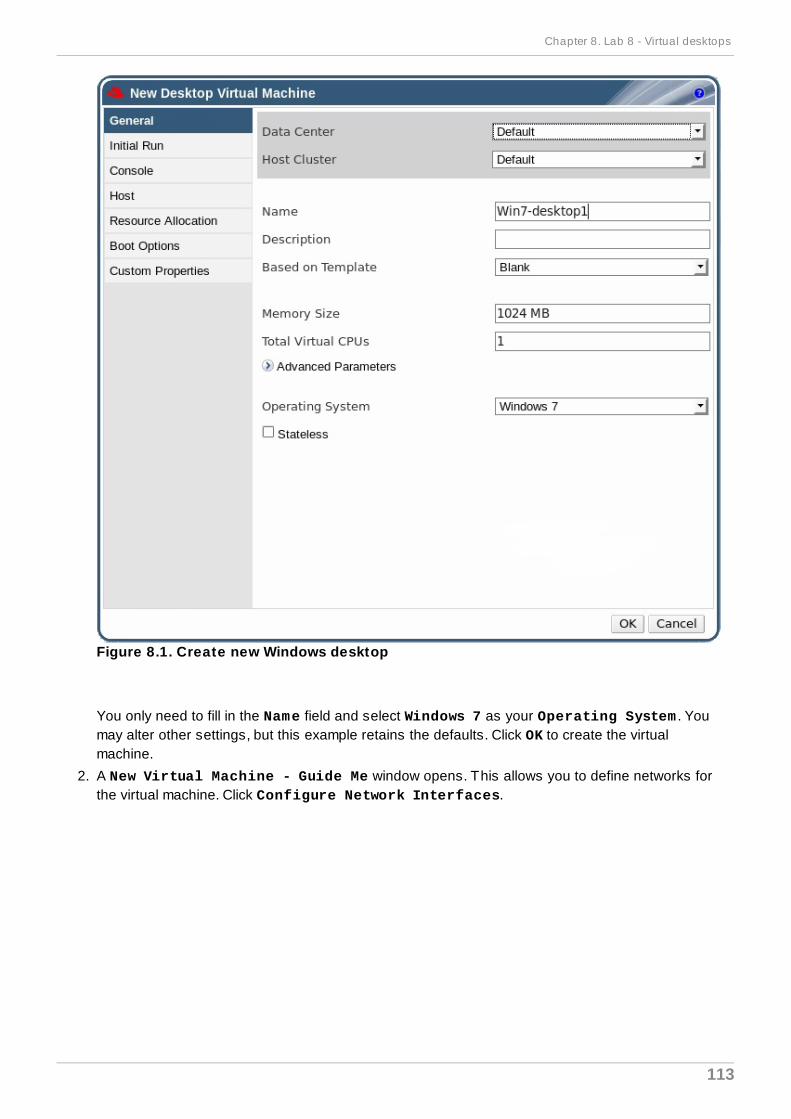
Figure 8.1. Create new Windows desktop
You only need to fill in the Name field and select Windows 7 as your Operating System . Youmay alter other settings, but this example retains the defaults. Click OK to create the virtualmachine.
2. A New Virtual Machine - Guide Me window opens. This allows you to define networks forthe virtual machine. Click Configure Network Interfaces.
Chapter 8. Lab 8 - Virtual desktops
113
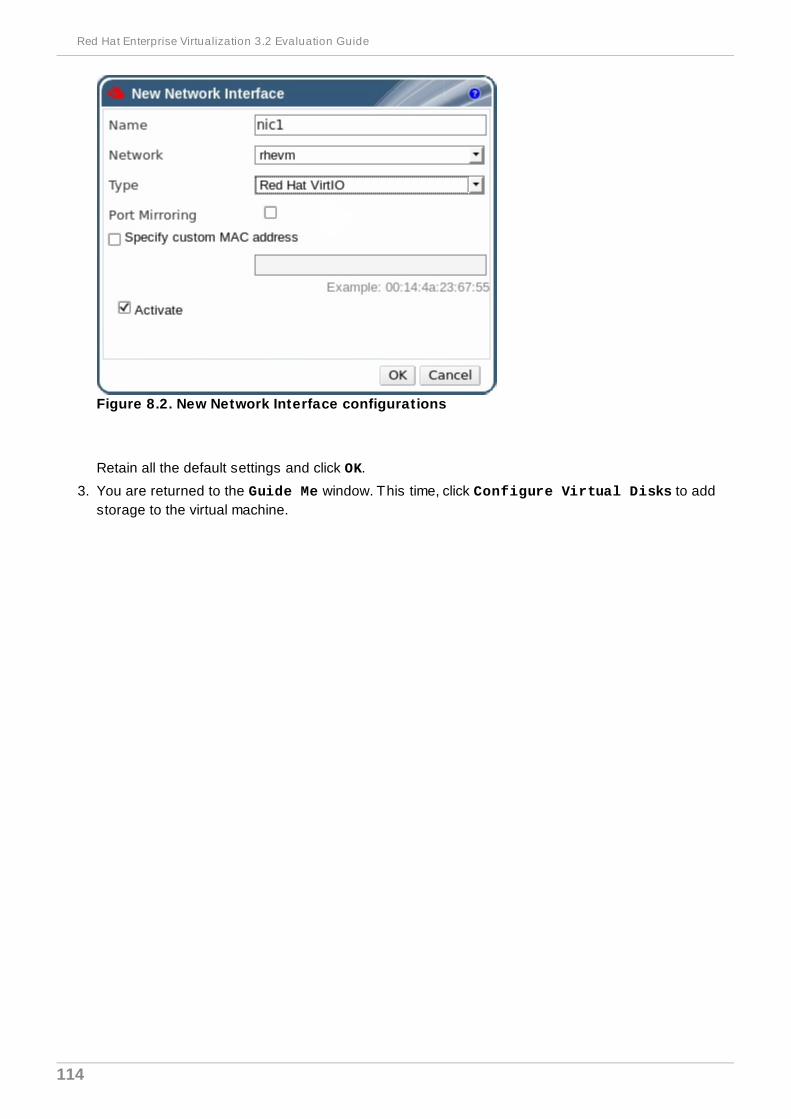
Figure 8.2. New Network Interface configurations
Retain all the default settings and click OK.
3. You are returned to the Guide Me window. This time, click Configure Virtual Disks to addstorage to the virtual machine.
Red Hat Enterprise Virtualization 3.2 Evaluation Guide
114
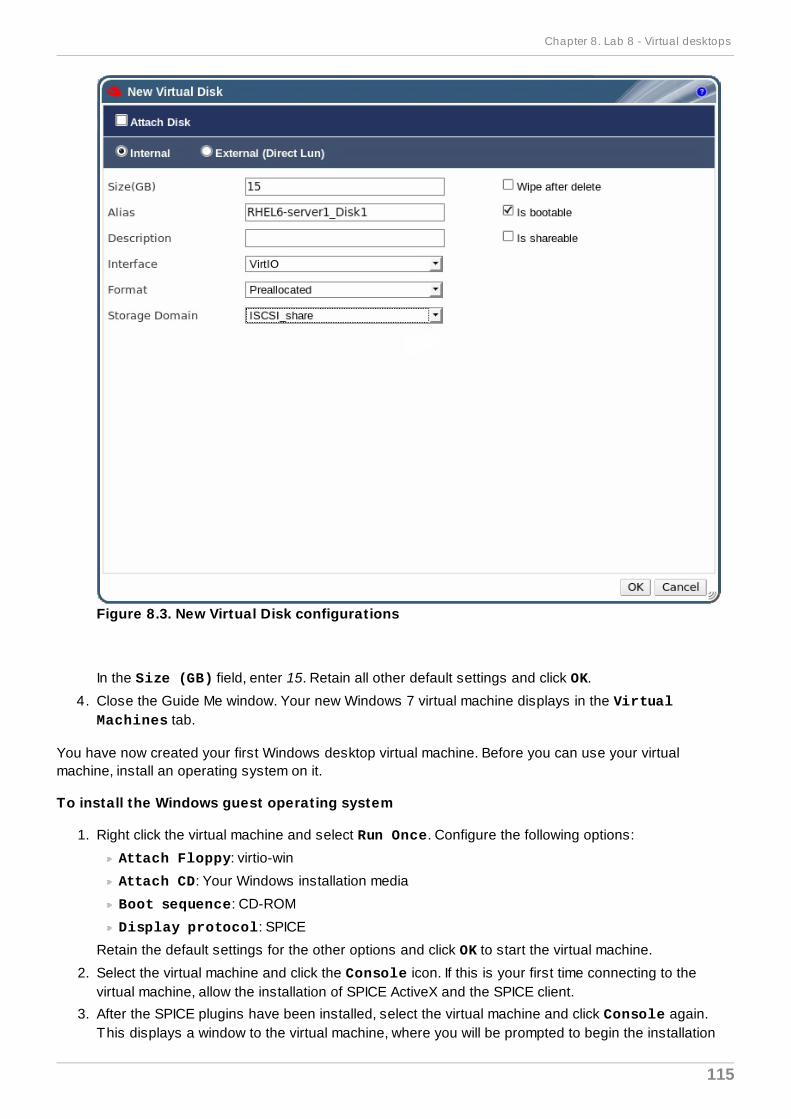
Figure 8.3. New Virtual Disk configurations
In the Size (GB) field, enter 15. Retain all other default settings and click OK.
4. Close the Guide Me window. Your new Windows 7 virtual machine displays in the VirtualMachines tab.
You have now created your first Windows desktop virtual machine. Before you can use your virtualmachine, install an operating system on it.
To install the Windows guest operating system
1. Right click the virtual machine and select Run Once. Configure the following options:
Attach Floppy: virtio-win
Attach CD: Your Windows installation media
Boot sequence: CD-ROM
Display protocol: SPICE
Retain the default settings for the other options and click OK to start the virtual machine.
2. Select the virtual machine and click the Console icon. If this is your first time connecting to thevirtual machine, allow the installation of SPICE ActiveX and the SPICE client.
3. After the SPICE plugins have been installed, select the virtual machine and click Console again.This displays a window to the virtual machine, where you will be prompted to begin the installation
Chapter 8. Lab 8 - Virtual desktops
115
process.
4. Accept the default settings and enter the required information as necessary. The only change youmust make is to manually install the VirtIO drivers from the virtual floppy disk (vfd) image. To doso, select the Custom (advanced) installation option and click Load Driver. Press Ctrl andselect:
Red Hat VirtIO Ethernet Adapter
Red Hat VirtIO SCSI Controller
5. The installation process commences, and the system will reboot itself several times.
When the virtual machine has finished installing, it is time to install RHEV-tools which providesome required features including optimizing SPICE display resolution. Press F12 to release themouse and click on the SPICE symbol on the upper left hand corner of the SPICE window. In themenu, select Change CD → RHEV-toolsSetup to attach the Guest Tools ISO to the virtualmachine.
6. On the virtual machine, locate the CD drive (usually D drive) and install the Red Hat EnterpriseVirtualization Application provisioning tool. This tool checks for RHEV-tools updates on everyreboot.
7. After the installation of the tool, wait for a few minutes. During this time, you will not see anyapparent activity because the tool runs as a service. The guest will automatically reboot to applychanges.
You have completed the installation of your Windows virtual machine. You can now log in and start usingit. In the next lab you will convert this machine into a template from which you will be able to provisionmultiple similar machines.
Report a bug
8.3. Creating Windows virtual machines from templatesIn the previous section, you created a Windows template complete with pre-configured storage,networking and operating system settings. Now, you will use this template to deploy a pre-installedvirtual machine.
To create a Windows virtual machine from a template
1. Navigate to the Tree pane and click Expand All. Click the VMs icon in the Default clusterunder the Default data center. On the Virtual Machines tab, click New Desktop.
Red Hat Enterprise Virtualization 3.2 Evaluation Guide
116
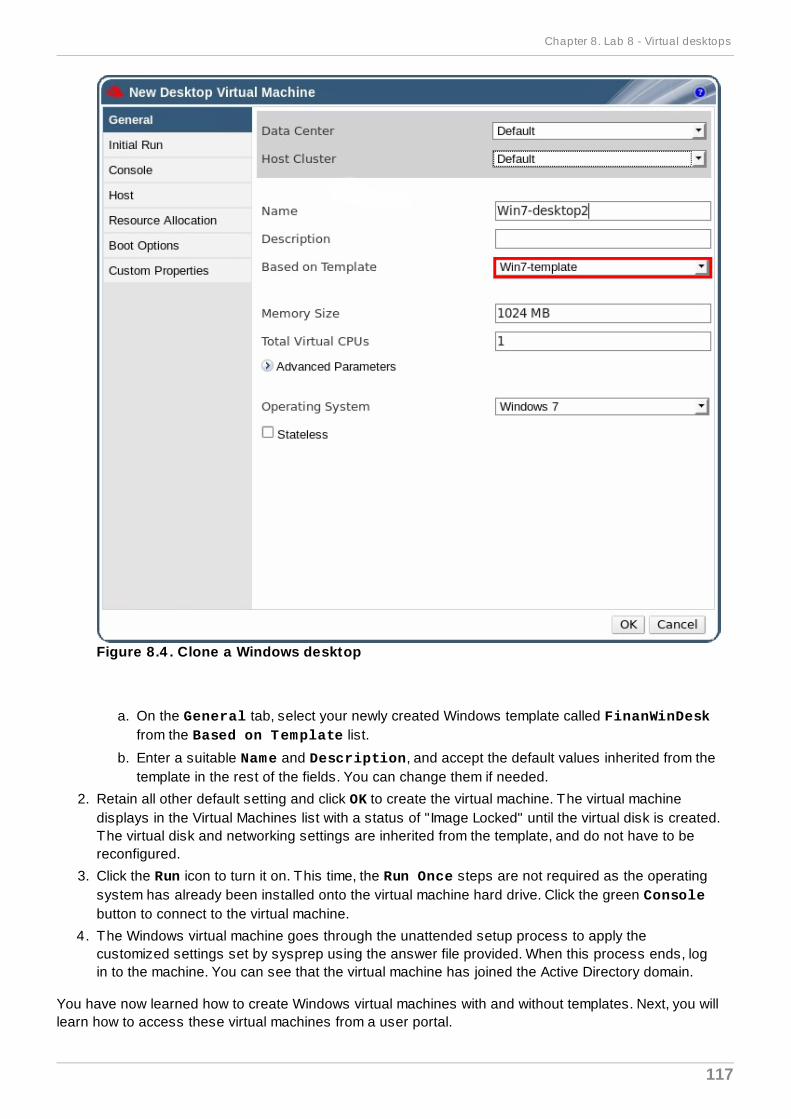
Figure 8.4 . Clone a Windows desktop
a. On the General tab, select your newly created Windows template called FinanWinDeskfrom the Based on Template list.
b. Enter a suitable Name and Description, and accept the default values inherited from thetemplate in the rest of the fields. You can change them if needed.
2. Retain all other default setting and click OK to create the virtual machine. The virtual machinedisplays in the Virtual Machines list with a status of "Image Locked" until the virtual disk is created.The virtual disk and networking settings are inherited from the template, and do not have to bereconfigured.
3. Click the Run icon to turn it on. This time, the Run Once steps are not required as the operatingsystem has already been installed onto the virtual machine hard drive. Click the green Consolebutton to connect to the virtual machine.
4. The Windows virtual machine goes through the unattended setup process to apply thecustomized settings set by sysprep using the answer file provided. When this process ends, login to the machine. You can see that the virtual machine has joined the Active Directory domain.
You have now learned how to create Windows virtual machines with and without templates. Next, you willlearn how to access these virtual machines from a user portal.
Chapter 8. Lab 8 - Virtual desktops
117
Report a bug
8.4. Create a Windows TemplateNow that you have created a Windows virtual machine, you can save its settings into a template. Thistemplate will retain the original virtual machine's configurations, including virtual disk and networkinterface settings, operating systems and applications. You can use this template to rapidly createreplicas of the original virtual machine. For this lab, name your template FinanWinDesk.
Before your virtual machine can be used to create a template, it has to be sealed with sysprep. Thisensures that machine-specific settings are not propagated through the template.
Note that the procedure below is applicable for creating Windows 7 and Windows 2008 R2 templates. Ifyou wish to seal a Windows XP template, refer to the Red Hat Enterprise Virtualization AdministrationGuide.
To seal a Windows virtual machine with sysprep
1. In the Windows virtual machine to be used as a template, open a command line terminal and typeregedit.
2. The Registry Editor window displays. On the left pane, expand HKEY_LOCAL_MACHINE →SYSTEM → SETUP.
3. On the main window, right click to add a new string value using New → String Value . Right clickon the string value file and select Modify. When the Edit String dialog box displays, fill in theprovided text boxes:
Value name: UnattendFile
Value data: a:\sysprep.inf
4. Launch sysprep from C:\Windows\System32\sysprep\sysprep.exe
Under System Cleanup Action, select Enter System Out-of-Box-Experience(OOBE).
T ick the Generalize check box if you need to change the computer's system identificationnumber (SID).
Under Shutdown Options, select Shutdown.
Click OK. The virtual machine will now go through the sealing process and shut downautomatically.
To create a template from an existing Windows machine
1. In the administration portal, click the Virtual Machines tab. Select the sealed Windows 7virtual machine. Ensure that it has a status of Down and click Make Template.
2. The New Virtual Machine Template displays. Enter information into the following fields:Name: Name of the new template.
Name your new template FinanWinDesk.
Description: Description of the new template.
Host Cluster: The Host Cluster for the virtual machines using this template.
Allow all users to access this template: Check this box to allow all users toaccess this template.
3. Click OK. In the Templates tab, the template displays the "Image Locked" status icon while it isbeing created. During this time, the action buttons for the template remain disabled. Once created,the action buttons are enabled and the template is ready for use.
Red Hat Enterprise Virtualization 3.2 Evaluation Guide
118

4. Now that you have the template, you can further modify its properties. In this example you will setits time zone and enable it to join the Active Directory. These parameters will be passed to thesysprep answers file while creating a virtual machine using this template.
On the Tree pane navigate to the data center where you have created the template. Double-clickthe template and click the sysprep tab. Fill in the Active Directory domain that you have addedpreviously, select your time zone, and click OK.
5. You have to activate the Windows operating system for each virtual machine created using thistemplate. To automate the activation process, configure sysprep with the volume license key youhave prepared for this track.
Log in to the Red Hat Enterprise Virtualization Manager's server console and run:
# rhevm-config -s ProductKeyWindow7x64=”enter your key here”# service ovirt-engine restart
You can now create new Windows machines using this template.
Report a bug
8.5. Assigning UserRole permissions on virtual machinesTo access virtual machines from the Red Hat Enterprise Virtualization User Portal, users must have therelevant permissions. Permissions are added from the Manager administration portal or the Power UserPortal. A basic user has permissions for the assigned virtual machine only, not for all virtual machines inthe system.
To assign UserRole permissions on a virtual machine
1. From the administration portal, click the Virtual Machines tab. Select the virtual machine youcreated, Win7Huron.
2. On the Details pane, navigate to the Permissions tab. Click the Add button.
3. The Add Permission to User dialog displays. Enter desktopuser in the Search textbox,and click Go. Select the check box of the user to be assigned the permissions. Scroll through theAssign role to user list and select UserRole.
4. Click OK. The user now has permissions to access the virtual desktop.
Report a bug
8.6. Connecting to virtual machinesNow that you have created a user who has basic permissions, log in as desktopuser to the UserPortal. Ensure that you have the addomain.demo.redhat.com domain selected. For instructionsrefer to the section regarding logging in to the User Portal.
The Basic User Portal displays for users who have basic permissions. Note the difference between thisportal and the one you accessed in a previous lab as a Power User. The Basic User Portal is designedfor end users with little need for performing system administration changes to the virtual machines.
To connect to a virtual machine
1. Select the virtual machine you wish to connect to and click the Play button.
2. The virtual machine powers up. When it is turned on, it will no longer be grayed out. The text
Chapter 8. Lab 8 - Virtual desktops
119
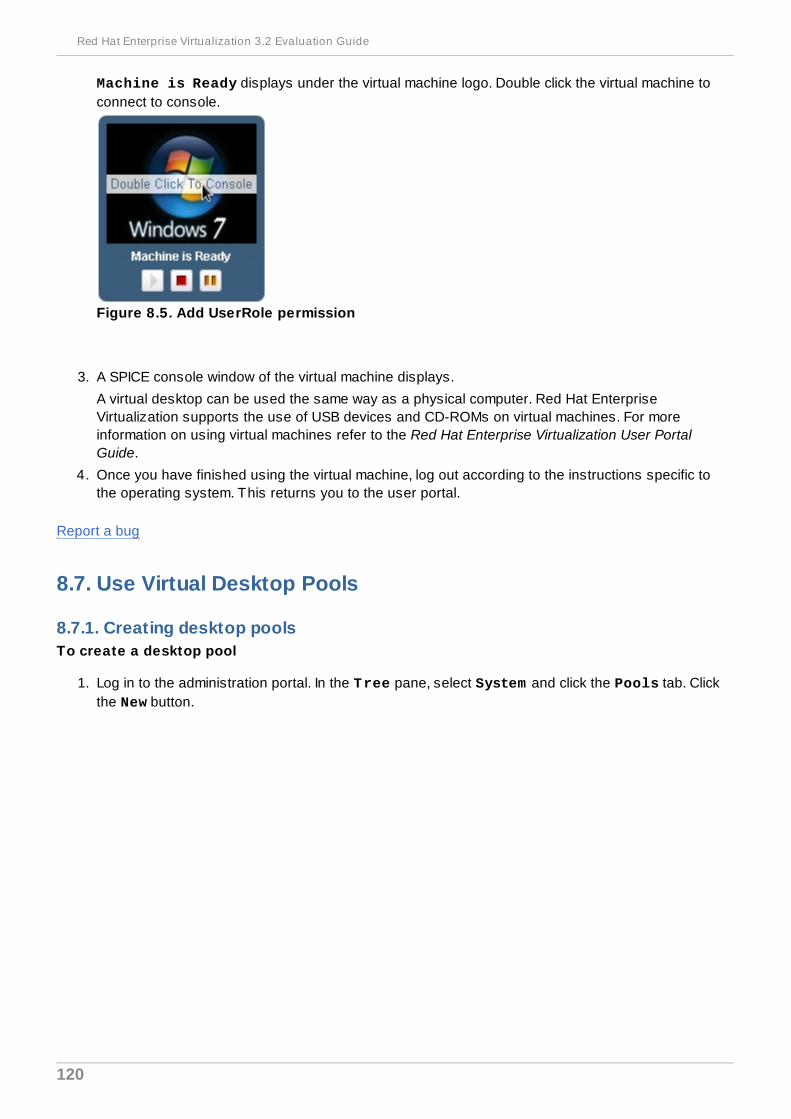
Machine is Ready displays under the virtual machine logo. Double click the virtual machine toconnect to console.
Figure 8.5. Add UserRole permission
3. A SPICE console window of the virtual machine displays.
A virtual desktop can be used the same way as a physical computer. Red Hat EnterpriseVirtualization supports the use of USB devices and CD-ROMs on virtual machines. For moreinformation on using virtual machines refer to the Red Hat Enterprise Virtualization User PortalGuide.
4. Once you have finished using the virtual machine, log out according to the instructions specific tothe operating system. This returns you to the user portal.
Report a bug
8.7. Use Virtual Desktop Pools
8.7.1. Creating desktop poolsTo create a desktop pool
1. Log in to the administration portal. In the Tree pane, select System and click the Pools tab. Clickthe New button.
Red Hat Enterprise Virtualization 3.2 Evaluation Guide
120
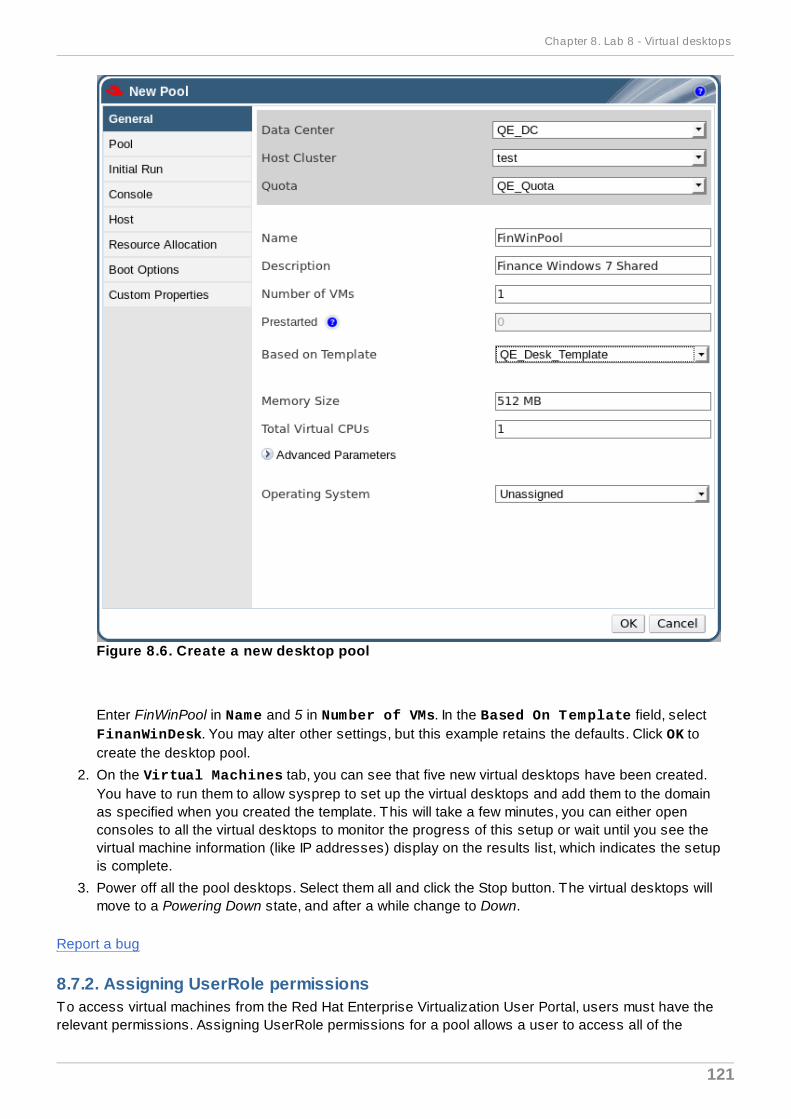
Figure 8.6. Create a new desktop pool
Enter FinWinPool in Name and 5 in Number of VMs. In the Based On Template field, selectFinanWinDesk. You may alter other settings, but this example retains the defaults. Click OK tocreate the desktop pool.
2. On the Virtual Machines tab, you can see that five new virtual desktops have been created.You have to run them to allow sysprep to set up the virtual desktops and add them to the domainas specified when you created the template. This will take a few minutes, you can either openconsoles to all the virtual desktops to monitor the progress of this setup or wait until you see thevirtual machine information (like IP addresses) display on the results list, which indicates the setupis complete.
3. Power off all the pool desktops. Select them all and click the Stop button. The virtual desktops willmove to a Powering Down state, and after a while change to Down.
Report a bug
8.7.2. Assigning UserRole permissionsTo access virtual machines from the Red Hat Enterprise Virtualization User Portal, users must have therelevant permissions. Assigning UserRole permissions for a pool allows a user to access all of the
Chapter 8. Lab 8 - Virtual desktops
121
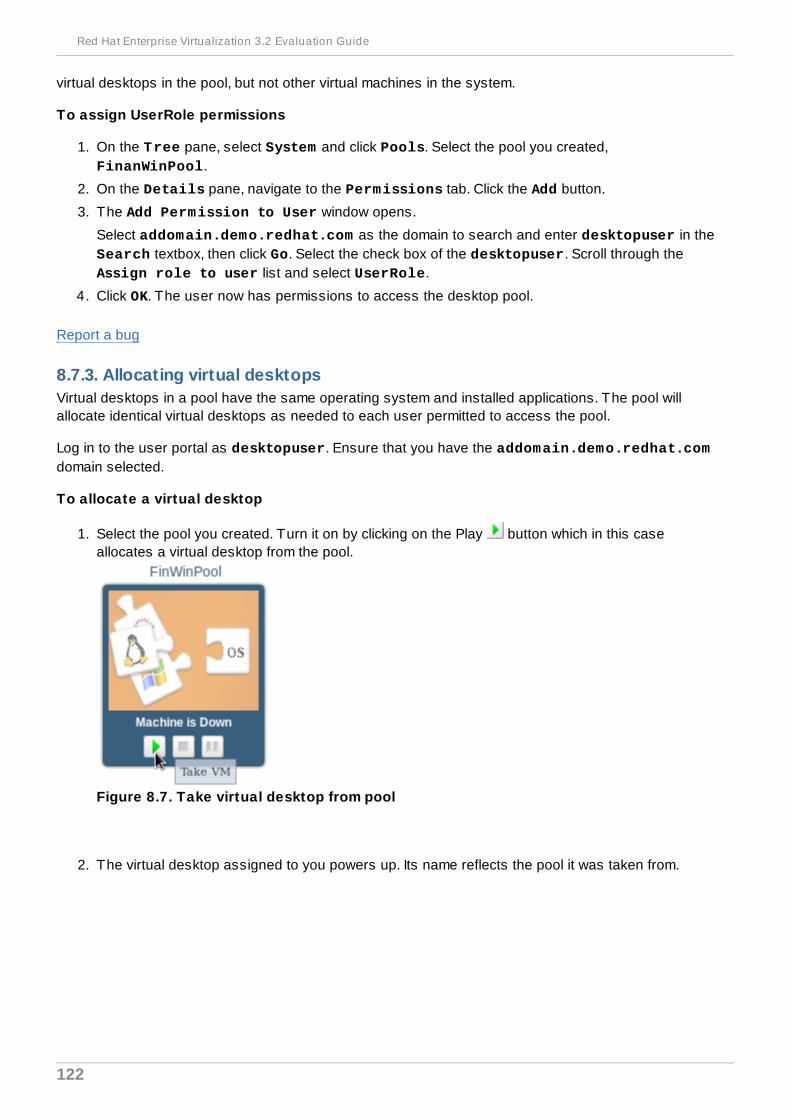
virtual desktops in the pool, but not other virtual machines in the system.
To assign UserRole permissions
1. On the Tree pane, select System and click Pools. Select the pool you created, FinanWinPool.
2. On the Details pane, navigate to the Permissions tab. Click the Add button.
3. The Add Permission to User window opens.
Select addomain.demo.redhat.com as the domain to search and enter desktopuser in theSearch textbox, then click Go. Select the check box of the desktopuser. Scroll through theAssign role to user list and select UserRole.
4. Click OK. The user now has permissions to access the desktop pool.
Report a bug
8.7.3. Allocating virtual desktopsVirtual desktops in a pool have the same operating system and installed applications. The pool willallocate identical virtual desktops as needed to each user permitted to access the pool.
Log in to the user portal as desktopuser. Ensure that you have the addomain.demo.redhat.comdomain selected.
To allocate a virtual desktop
1. Select the pool you created. Turn it on by clicking on the Play button which in this caseallocates a virtual desktop from the pool.
Figure 8.7. Take virtual desktop from pool
2. The virtual desktop assigned to you powers up. Its name reflects the pool it was taken from.
Red Hat Enterprise Virtualization 3.2 Evaluation Guide
122
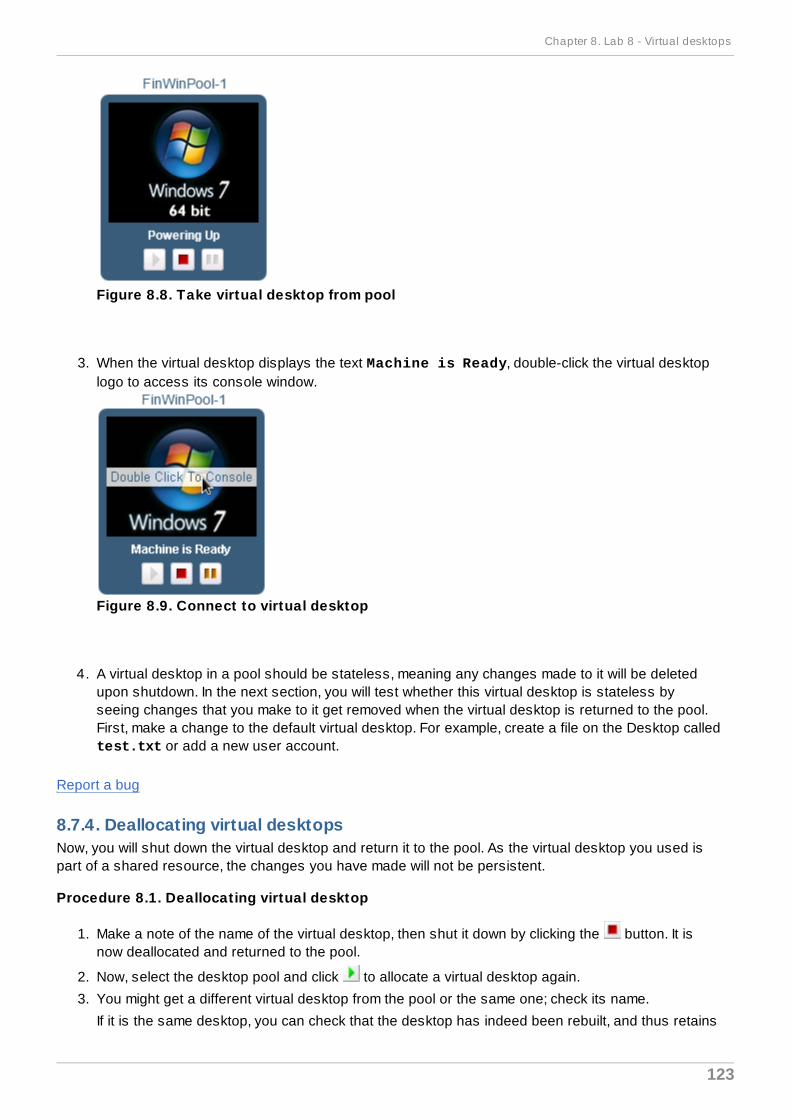
Figure 8.8. Take virtual desktop from pool
3. When the virtual desktop displays the text Machine is Ready, double-click the virtual desktoplogo to access its console window.
Figure 8.9. Connect to virtual desktop
4. A virtual desktop in a pool should be stateless, meaning any changes made to it will be deletedupon shutdown. In the next section, you will test whether this virtual desktop is stateless byseeing changes that you make to it get removed when the virtual desktop is returned to the pool.First, make a change to the default virtual desktop. For example, create a file on the Desktop calledtest.txt or add a new user account.
Report a bug
8.7.4. Deallocating virtual desktopsNow, you will shut down the virtual desktop and return it to the pool. As the virtual desktop you used ispart of a shared resource, the changes you have made will not be persistent.
Procedure 8.1. Deallocating virtual desktop
1. Make a note of the name of the virtual desktop, then shut it down by clicking the button. It isnow deallocated and returned to the pool.
2. Now, select the desktop pool and click to allocate a virtual desktop again.
3. You might get a different virtual desktop from the pool or the same one; check its name.
If it is the same desktop, you can check that the desktop has indeed been rebuilt, and thus retains
Chapter 8. Lab 8 - Virtual desktops
123
only the settings specified in the template from which it was created. To do so, log in to the virtualdesktop and verify that the changes you have made previously are lost, as expected.
Report a bug
8.8. Lab 8 - SummaryIn this lab, you have successfully created and used Windows virtual machines and desktop pools.
The next lab in the Advanced Track is Advanced Storage Features. This lab shows you how to createfloating disks, associate them with virtual machines, mark virtual disks shared, and associate sharedvirtual disks with other machines. You will also take snapshots of running virtual machines and use themto create clones of the virtual machine.
Report a bug
Red Hat Enterprise Virtualization 3.2 Evaluation Guide
124
Chapter 9. Lab 9 - Installing and configuring minimal setup
9.1. Lab 9 - ObjectivesLab 9 - Objectives
This lab takes you through the tasks necessary to install and set up Red Hat Enterprise Virtualizationon a single host and using local storage. In addition, you will learn how to add ISOs in order to createvirtual machines. This lab should take you about 60 minutes.
This chapter shows you how to install the Red Hat Enterprise Virtualization Manager on a serverrunning Red Hat Enterprise Linux. (12 minutes*)
This chapter shows you how to install and configure a Red Hat Enterprise Virtualization Hypervisor foruse with Red Hat Enterprise Virtualization Manager. (13 minutes*)
This chapter shows you how to configure a client machine to connect to the Red Hat EnterpriseVirtualization Manager administration portal. (8 minutes)
This chapter shows you how to approve the host for use from the Red Hat Enterprise VirtualizationManager. (7 minutes)
This chapter shows you how to define NFS, iSCSI or FCP storage and attach the domains to the datacenter. (10 minutes)
This chapter shows you how to attach the predefined ISO domain to the data center and upload ISOimages to the repository. (10 minutes)
* The time required to download packages from the Red Hat Network depends on the bandwidth of yourconnection to RHN, therefore it has not been included in the estimated time.
Report a bug
9.2. Installing Red Hat Enterprise Virtualization Manager
Chapter 9. Lab 9 - Installing and configuring minimal setup
125
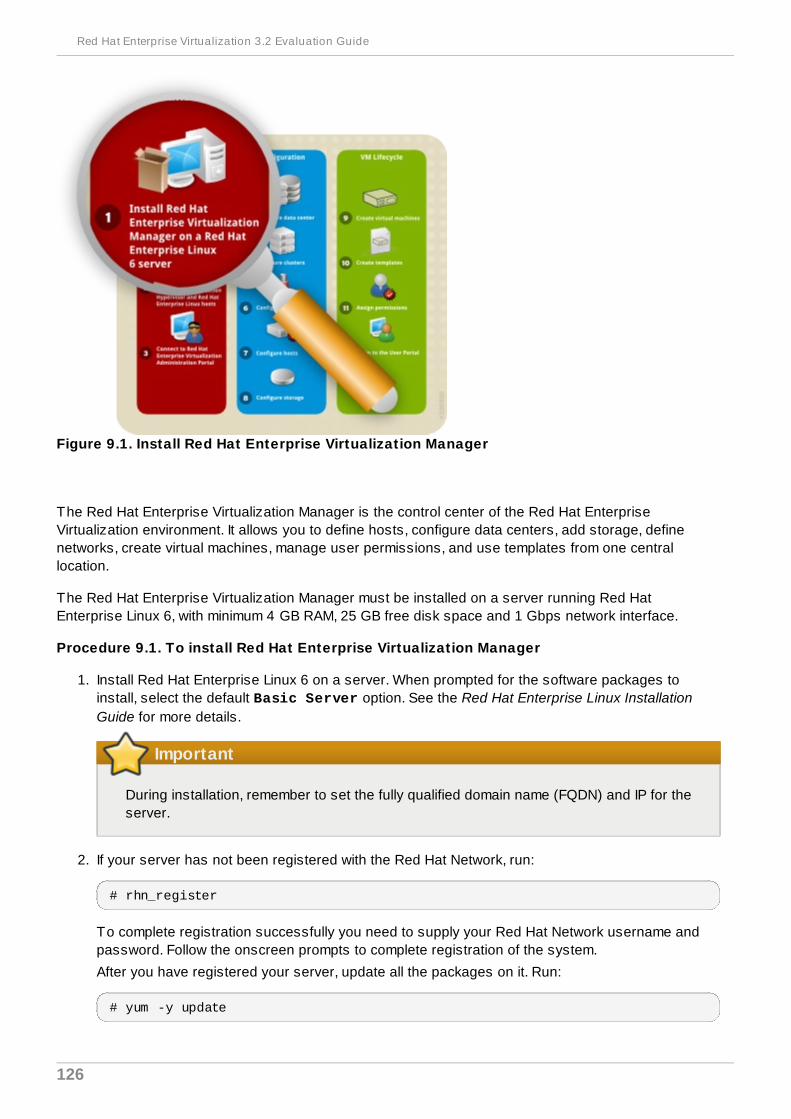
Figure 9.1. Install Red Hat Enterprise Virtualization Manager
The Red Hat Enterprise Virtualization Manager is the control center of the Red Hat EnterpriseVirtualization environment. It allows you to define hosts, configure data centers, add storage, definenetworks, create virtual machines, manage user permissions, and use templates from one centrallocation.
The Red Hat Enterprise Virtualization Manager must be installed on a server running Red HatEnterprise Linux 6, with minimum 4 GB RAM, 25 GB free disk space and 1 Gbps network interface.
Procedure 9.1. To install Red Hat Enterprise Virtualization Manager
1. Install Red Hat Enterprise Linux 6 on a server. When prompted for the software packages toinstall, select the default Basic Server option. See the Red Hat Enterprise Linux InstallationGuide for more details.
Important
During installation, remember to set the fully qualified domain name (FQDN) and IP for theserver.
2. If your server has not been registered with the Red Hat Network, run:
# rhn_register
To complete registration successfully you need to supply your Red Hat Network username andpassword. Follow the onscreen prompts to complete registration of the system.
After you have registered your server, update all the packages on it. Run:
# yum -y update
Red Hat Enterprise Virtualization 3.2 Evaluation Guide
126
Reboot your server for the updates to be applied.
3. Subscribe the server to the required Red Hat Network channels. See the Red Hat EnterpriseVirtualization Manager Release Notes for a list of required channels.
4. You are now ready to install the Red Hat Enterprise Virtualization Manager. Run the followingcommand:
# yum -y install rhevm
This command will download the Red Hat Enterprise Virtualization Manager installation softwareand resolve all dependencies.
5. When the packages have finished downloading, run the installer:
# rhevm-setup
6. The installer will take you through a series of interactive questions as listed in the followingexample. If you do not enter a value when prompted, the installer uses the default settings whichare stated in [ ] brackets.
Chapter 9. Lab 9 - Installing and configuring minimal setup
127

Example 9.1. Red Hat Enterprise Virtualization Manager installation
Welcome to RHEV Manager setup utilityIn order to proceed the installer must stop the JBoss serviceWould you like to stop the JBoss service? (yes|no): yesStopping JBoss... RHEV Manager uses httpd to proxy requests to the application server.It looks like the httpd installed locally is being actively used.The installer can override current configuration.Alternatively you can use JBoss directly (on ports higher than 1024)Do you wish to override current httpd configuration and restart the service? ['yes'| 'no'] [yes] : Do you wish to override current httpd configuration and restart the service? ['yes'| 'no'] [yes] : yesHTTP Port [80] : HTTPS Port [443] :Host fully qualified domain name. Note: this name should be fully resolvable [FQDN]:Password for Administrator (admin@internal) :Confirm password :Organization Name for the Certificate [Default Organization Name]:The default storage type you will be using ['NFS'| 'FC'| 'ISCSI'] [NFS] : ISCSIEnter DB type for installation ['remote'| 'local'] [local] : Local databasepassword :Confirm password :Configure NFS share on this server to be used as an ISO Domain? ['yes'| 'no'] [yes] : Local ISO domain path [/usr/local/exports/iso] : Firewall ports need to be opened.The installer can configure iptables automatically overriding the current configuration. The old configuration will be backed up.Alternately you can configure the firewall later using an example iptables file found under /usr/share/ovirt-engine/conf/iptables.exampleConfigure iptables ? ['yes'| 'no']: yes
Important points to note:
The default ports 80 and 443 must be available to access the manager on HTTP andHTTPS respectively.
If you elect to configure an NFS share it will be exported from the machine on which themanager is being installed.
The storage type that you select will be used to create a data center and cluster. You willthen be able to attach storage to these from the Administration Portal.
7. You are then presented with a summary of the configurations you have selected. Type yes toaccept them.
Red Hat Enterprise Virtualization 3.2 Evaluation Guide
128
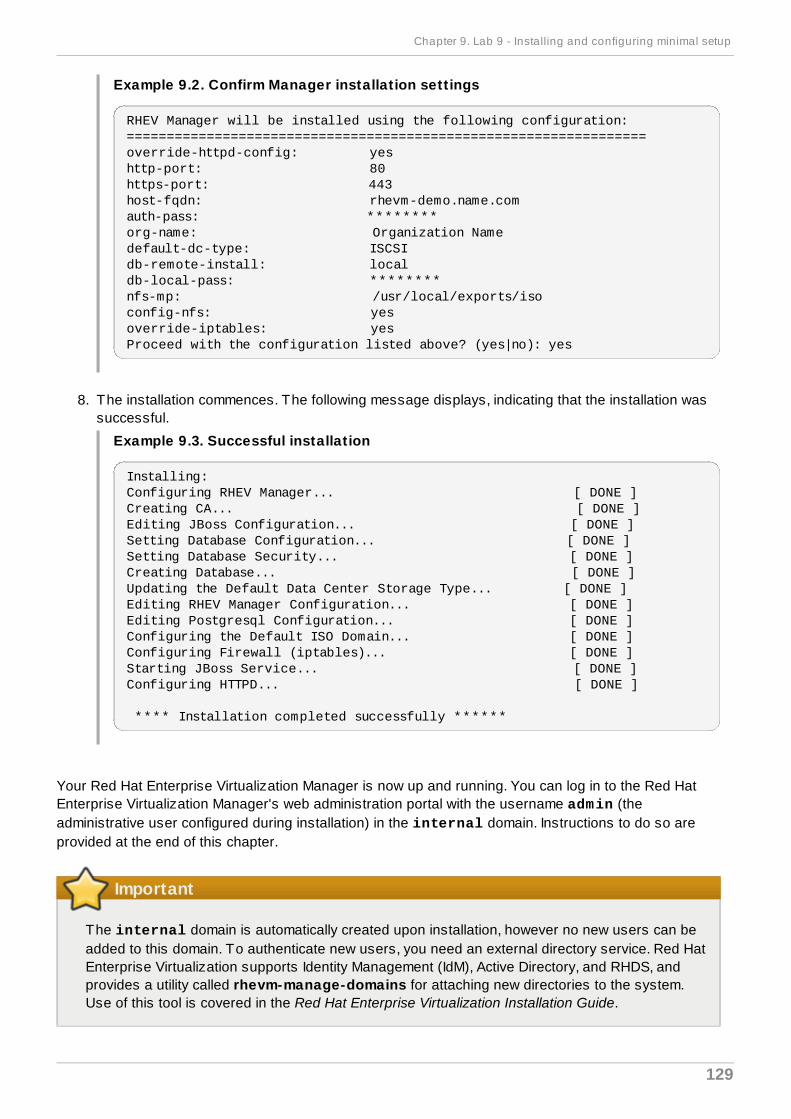
Example 9.2. Confirm Manager installation sett ings
RHEV Manager will be installed using the following configuration:=================================================================override-httpd-config: yeshttp-port: 80https-port: 443host-fqdn: rhevm-demo.name.comauth-pass: ********org-name: Organization Namedefault-dc-type: ISCSIdb-remote-install: localdb-local-pass: ********nfs-mp: /usr/local/exports/isoconfig-nfs: yesoverride-iptables: yesProceed with the configuration listed above? (yes|no): yes
8. The installation commences. The following message displays, indicating that the installation wassuccessful.
Example 9.3. Successful installation
Installing:Configuring RHEV Manager... [ DONE ]Creating CA... [ DONE ]Editing JBoss Configuration... [ DONE ]Setting Database Configuration... [ DONE ]Setting Database Security... [ DONE ]Creating Database... [ DONE ]Updating the Default Data Center Storage Type... [ DONE ]Editing RHEV Manager Configuration... [ DONE ]Editing Postgresql Configuration... [ DONE ]Configuring the Default ISO Domain... [ DONE ]Configuring Firewall (iptables)... [ DONE ]Starting JBoss Service... [ DONE ]Configuring HTTPD... [ DONE ]
**** Installation completed successfully ******
Your Red Hat Enterprise Virtualization Manager is now up and running. You can log in to the Red HatEnterprise Virtualization Manager's web administration portal with the username admin (theadministrative user configured during installation) in the internal domain. Instructions to do so areprovided at the end of this chapter.
Important
The internal domain is automatically created upon installation, however no new users can beadded to this domain. To authenticate new users, you need an external directory service. Red HatEnterprise Virtualization supports Identity Management (IdM), Active Directory, and RHDS, andprovides a utility called rhevm-manage-domains for attaching new directories to the system.Use of this tool is covered in the Red Hat Enterprise Virtualization Installation Guide.
Chapter 9. Lab 9 - Installing and configuring minimal setup
129
Report a bug
9.3. Installing Red Hat Enterprise Virtualization Hypervisor
9.3.1. Registering the Host on RHN and Acquiring ISO Hypervisor Images
Summary
The Red Hat Enterprise Virtualization Manager Red Hat Network channel contains theHypervisor packages. The Hypervisor itself is contained in the rhev-hypervisor package. Additionaltools supporting USB and PXE installations are installed as dependencies. Install the Hypervisorpackages on the system you plan to use to create Hypervisor boot media.
Select one of the two options below:
Procedure 9.2. Subscribing to RHN Entit lement Pools and Installing the Red Hat EnterpriseVirtualization Hypervisor Packages
1. Subscribing to download the Hypervisor using certificate-based RHNa. Identify Available Entitlement Pools
To subscribe the system to the Red Hat Enterprise Virtualization channels you need youmust locate the identifier for the relevant entitlement pool. Use the list action in thesubscription-manager to find these:
# subscription-manager list --available | grep -A8 "Red Hat Enterprise Virtualization"
b. Subscribe System to Entit lement PoolsUsing the pool identifiers located in the previous step, subscribe the system to Red Hat Enterprise Linux Server and Red Hat Enterprise Virtualizationentitlements. Use the subscribe parameter of the subscription-manager command,and replace POOLID with one of the pool identifiers.
# subscription-manager subscribe --pool=POOLID
2. Subscribing to download the Hypervisor using RHN Classica. Log on to Red Hat Network http://rhn.redhat.com.
b. Move the mouse cursor over the Subscriptions link at the top of the page, and then clickRegistered Systems in the menu that appears.
c. Select the system to which you are adding channels from the list on the screen by clickingthe name of the system.
d. Click Alter Channel Subscriptions in the Subscribed Channels section of thescreen.
e. Select the Red Hat Enterprise Virtualization Manager channel from the list onthe screen, then click the Change Subscription button to finalize the change.
3. Log in to the system on which the Red Hat Enterprise Virtualization Manager is installed. Log in asroot.
4. Use yum to install the rhev-hypervisor.
Red Hat Enterprise Virtualization 3.2 Evaluation Guide
130

# yum install rhev-hypervisor
Result
The Hypervisor ISO image is installed into the /usr/share/rhev-hypervisor/ directory. The livecd-iso-to-disk and livecd-iso-to-pxeboot scripts are installed to the /usr/bin/directory.
Note
All version of Red Hat Enterprise Linux 6.2 and higher allow more than one version of the ISOimage to be installed at one time. Because of this, /usr/share/rhev-hypervisor/rhev-hypervisor.iso is now a symbolic link to a uniquely-named version of the Hypervisor ISOimage, for instance /usr/share/rhev-hypervisor/rhevh-6.2-20111006.0.el6.iso.Different versions of the image can now be installed alongside each other, allowing administratorsto run and maintain a cluster on a previous version of the Hypervisor while upgrading anothercluster for testing.The symbolic links /usr/share/rhev-hypervisor/rhevh-latest6.iso and /usr/share/rhev-hypervisor/rhev-hypervisor6.iso are created. These links targetthe most-recently installed version of the Red Hat Enterprise Virtualization ISO image.
Report a bug
9.3.2. Preparing Optical Hypervisor Installation Media
Summary
Burn the Hypervisor image to a CD-ROM with the wodim command. The wodim command is part of thewodim package.
Procedure 9.3. Preparing Optical Hypervisor Installation Media
1. Verify that the wodim package is installed on the system.
Example 9.4 . Verify Installation of wodim Package
# rpm -q wodimwodim-1.1.9-11.el6.x86_64
If the package version is in the output the package is available.
If nothing is listed, install wodim:
# yum install wodim
2. Insert a blank CD-ROM or DVD into your CD or DVD writer.
3. Record the ISO file to the disc. The wodim command uses the following:
wodim dev=device image
This example uses the first CD-RW (/dev/cdrw) device available and the default hypervisorimage location, /usr/share/rhev-hypervisor/rhev-hypervisor.iso.
Chapter 9. Lab 9 - Installing and configuring minimal setup
131
Example 9.5. Use of wodim Command
# wodim dev=/dev/cdrw /usr/share/rhev-hypervisor/rhev-hypervisor.iso
Result
If no errors occurred, the Hypervisor is ready to boot. Errors sometimes occur during the recordingprocess due to errors on the media itself. If this occurs insert another writable disk and repeat thecommand above.
The Hypervisor uses a program (isomd5sum ) to verify the integrity of the installation media every timethe Hypervisor is booted. If media errors are reported in the boot sequence you have a bad CD-ROM.Follow the procedure above to create a new CD-ROM or DVD.
Report a bug
9.3.3. Install Red Hat Enterprise Virtualizaton Hosts from Optical InstallationMediaNow that you have registered the host with RHN, acquired the Hypervisor images, and used theHypervisor images to create optical installation media, you will boot the system using the opticalinstallation media.
Summary
Booting the Hypervisor from optical installation media requires the system to have a correctly definedBIOS boot configuration.
1. Ensure that the system's BIOS is configured to boot from the CD-ROM or DVD-ROM drive beforeproceeding.
Note
Refer to your manufacturer's manuals for further information on modifying the system'sBIOS boot configuration.
2. Insert the Hypervisor CD-ROM in the CD-ROM or DVD-ROM drive.
3. Reboot the system.
Result
The host's screen will display the Hypervisor boot screen.
Report a bug
9.3.4. Install Red Hat Enterprise Virtualization HypervisorsRed Hat Enterprise Virtualization Hypervisor Menu navigation keys
Use the Up and Down arrow keys to navigate between selections. Your selections are highlighted inwhite.
The Tab key allows you to move between fields.
Red Hat Enterprise Virtualization 3.2 Evaluation Guide
132

Use the Spacebar to tick check boxes, which are represented by [ ] brackets. A marked check boxdisplays with an asterisk (*).
To proceed with the selected configurations, press the Enter key.
Important
Red Hat Enterprise Virtualization Hypervisor is a closed appliance, and does not allow theinstallation of custom RPMs.If you require custom RPMs, you must use Red Hat Enterprise Linux hosts. Red Hat EnterpriseLinux hosts are not closed appliances, and they allow the installation of custom RPMs.
To install Red Hat Enterprise Virtualization Hypervisors
1. Insert the Red Hat Enterprise Virtualization Hypervisor installation CD into your CD-ROM drive ofthe machine designated as a host. Reboot the machine. When the boot splash screen displays,press the Tab key and select Boot to boot from the hypervisor installation media. Press Enter.
2. On the installation confirmation screen, select Install RHEV Hypervisor and press Enter.
3. The installer automatically detects the drives attached to the system. The disk selected forbooting the hypervisor is highlighted in white. Ensure that the local disk is highlighted, otherwiseuse the arrow keys to select the correct disk. Select Continue and press Enter.
4. You are prompted to select the drive on which the hypervisor is to be installed. Ensure that thelocal disk is highlighted, otherwise use the arrow keys to select the correct disk. While multipleinstallation drives can be used, select only one for this evaluation. Select Continue and press Enter.
5. Enter a password for local console access and confirm it. Select Install and press Enter. TheRed Hat Enterprise Virtualization Hypervisor partitions the local drive, then commencesinstallation.
6. Once installation is complete, a dialog prompts you to Reboot the hypervisor. Press Enter toconfirm. Remove the installation disc.
7. After the hypervisor has rebooted, you will be taken to a login shell. Log in as the admin user withthe password you provided during installation to enter the Red Hat Enterprise VirtualizationHypervisor management console.
8. On the hypervisor management console, there are eight tabs on the left. Press the Up and Downkeys to navigate between them and Enter to access them.
a. Select the Network tab. Fill in the required fields as shown in the following example.Substitute the DNS Server address according to your environment.
Chapter 9. Lab 9 - Installing and configuring minimal setup
133
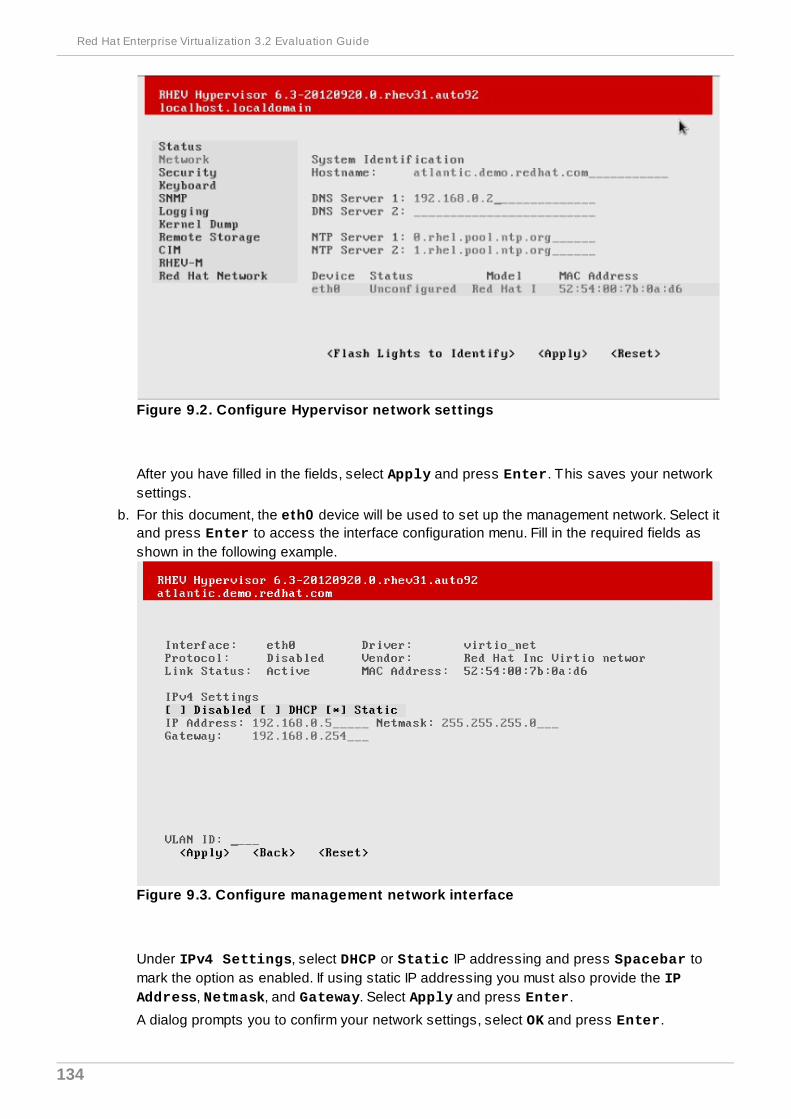
Figure 9.2. Configure Hypervisor network sett ings
After you have filled in the fields, select Apply and press Enter. This saves your networksettings.
b. For this document, the eth0 device will be used to set up the management network. Select itand press Enter to access the interface configuration menu. Fill in the required fields asshown in the following example.
Figure 9.3. Configure management network interface
Under IPv4 Settings, select DHCP or Static IP addressing and press Spacebar tomark the option as enabled. If using static IP addressing you must also provide the IP Address, Netmask, and Gateway. Select Apply and press Enter.
A dialog prompts you to confirm your network settings, select OK and press Enter.
Red Hat Enterprise Virtualization 3.2 Evaluation Guide
134

c. Select the RHEV-M tab. Configure the following options:In the Management Server field, enter rhevm.demo.redhat.com .
In the Management Server Port field, enter 443.
T ick the Connect to the RHEV Manager and Validate Certificate checkbox.
The Set RHEV-M Admin Password field allows you to specify the root password forthe hypervisor, and enable SSH password authentication from the Red Hat EnterpriseVirtualization Manager. You do not have to fill in this field for this document.
Select Apply and press Enter. A dialog displays, asking you to connect the hypervisor tothe Red Hat Enterprise Virtualization Manager and validate its certificate. Select Approveand press Enter. A message will display notifying you that the Manager configuration hasbeen successfully updated.
d. Under the Red Hat Network tab, you can register the host with the Red Hat Network.This enables the host to run Red Hat Enterprise Linux virtual machines with proper RHNentitlements. However, for the purposes of this document, the evaluation subscriptions willbe used for the guests.
e. Accept all other default settings. For information on security, logging, and kernel dumpconfiguration, refer to the Red Hat Enterprise Linux 6 Hypervisor Deployment Guide. Theguide also covers non-interactive hypervisor installation.
f. Finally, select the Status tab. Select Restart and press Enter to reboot the host andapply all changes.
You have now successfully installed a Red Hat Enterprise Virtualization Hypervisor. Repeat the abovesteps for each hypervisor you wish to use. The following sections will provide instructions on how toapprove the hypervisors for use with the Red Hat Enterprise Virtualization Manager.
Report a bug
9.4. Connecting to Red Hat Enterprise Virtualization WebAdministration Portal
Chapter 9. Lab 9 - Installing and configuring minimal setup
135

Figure 9.4 . Connect to the Manager administration portal
Now that you have installed the Red Hat Enterprise Virtualization Manager and hosts, you can log in tothe Manager administration portal to start configuring your virtualization environment. Use a clientrunning Firefox to access the web-based administration portal.
1. Open a browser and navigate to https://domain.example.com . Substitute domain.example.com with the URL provided during installation.
2. Under the Portals heading, click Web Admin Portal
3. If this is your first time connecting to the administration portal, Red Hat Enterprise VirtualizationManager will issue security certificates for your browser. Click the link labelled thiscertificate to trust the ca.cer certificate. A pop-up displays, click Open to launch theCertificate dialog. Click Install Certificate and select to place the certificate inTrusted Root Certification Authorities store.
4. The portal login screen displays. Enter admin as your User Name, and enter the Passwordthat you provided during installation. Ensure that your domain is set to Internal. Click Login.
You have now successfully logged in to the Red Hat Enterprise Virtualization web administration portal.Here, you can configure and manage all your virtual resources.
Report a bug
9.5. Web Administration Portal Graphical User InterfaceThe administration portal graphical interface has two modes: Tree mode and flat mode. Tree mode
Red Hat Enterprise Virtualization 3.2 Evaluation Guide
136
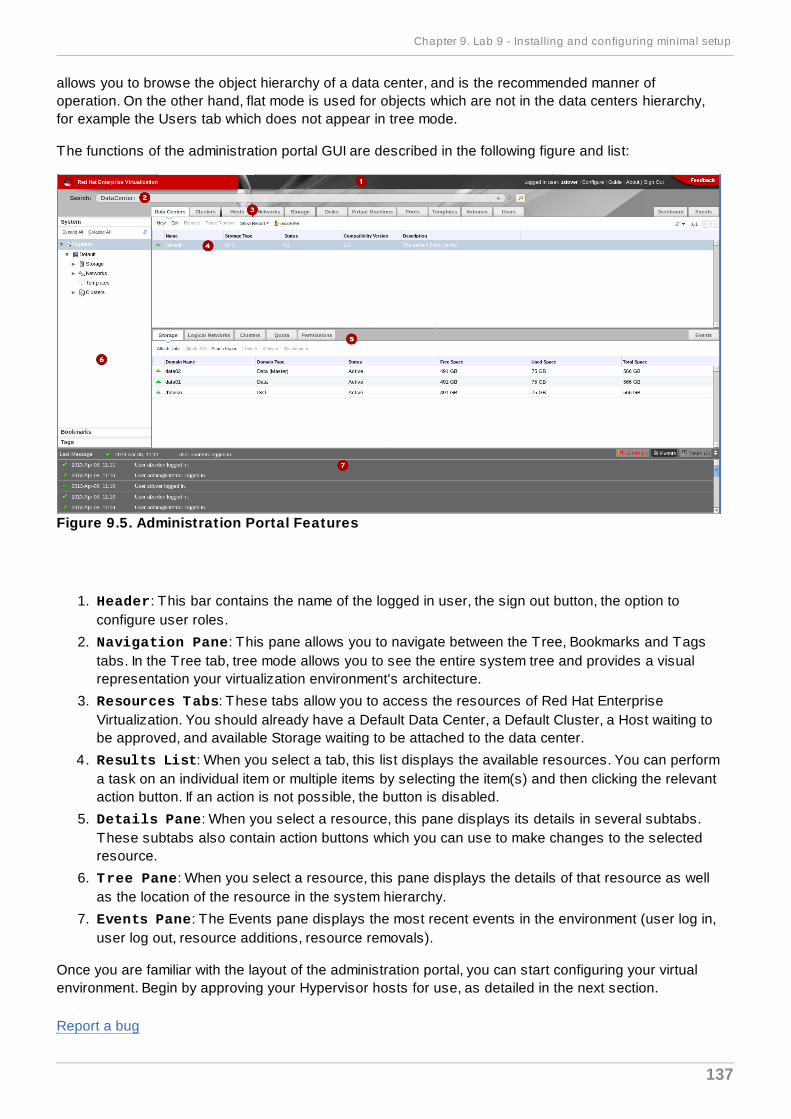
allows you to browse the object hierarchy of a data center, and is the recommended manner ofoperation. On the other hand, flat mode is used for objects which are not in the data centers hierarchy,for example the Users tab which does not appear in tree mode.
The functions of the administration portal GUI are described in the following figure and list:
Figure 9.5. Administration Portal Features
1. Header: This bar contains the name of the logged in user, the sign out button, the option toconfigure user roles.
2. Navigation Pane: This pane allows you to navigate between the Tree, Bookmarks and Tagstabs. In the Tree tab, tree mode allows you to see the entire system tree and provides a visualrepresentation your virtualization environment's architecture.
3. Resources Tabs: These tabs allow you to access the resources of Red Hat EnterpriseVirtualization. You should already have a Default Data Center, a Default Cluster, a Host waiting tobe approved, and available Storage waiting to be attached to the data center.
4. Results List: When you select a tab, this list displays the available resources. You can performa task on an individual item or multiple items by selecting the item(s) and then clicking the relevantaction button. If an action is not possible, the button is disabled.
5. Details Pane: When you select a resource, this pane displays its details in several subtabs.These subtabs also contain action buttons which you can use to make changes to the selectedresource.
6. Tree Pane: When you select a resource, this pane displays the details of that resource as wellas the location of the resource in the system hierarchy.
7. Events Pane: The Events pane displays the most recent events in the environment (user log in,user log out, resource additions, resource removals).
Once you are familiar with the layout of the administration portal, you can start configuring your virtualenvironment. Begin by approving your Hypervisor hosts for use, as detailed in the next section.
Report a bug
Chapter 9. Lab 9 - Installing and configuring minimal setup
137
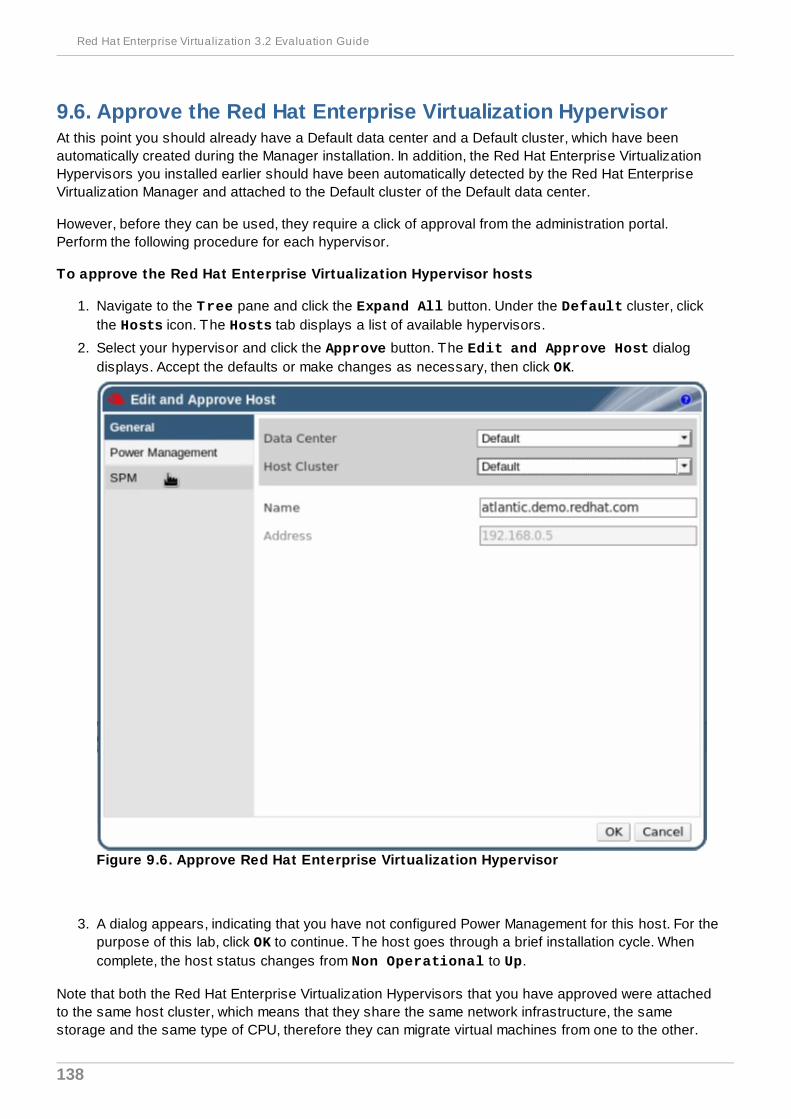
9.6. Approve the Red Hat Enterprise Virtualization HypervisorAt this point you should already have a Default data center and a Default cluster, which have beenautomatically created during the Manager installation. In addition, the Red Hat Enterprise VirtualizationHypervisors you installed earlier should have been automatically detected by the Red Hat EnterpriseVirtualization Manager and attached to the Default cluster of the Default data center.
However, before they can be used, they require a click of approval from the administration portal.Perform the following procedure for each hypervisor.
To approve the Red Hat Enterprise Virtualization Hypervisor hosts
1. Navigate to the Tree pane and click the Expand All button. Under the Default cluster, clickthe Hosts icon. The Hosts tab displays a list of available hypervisors.
2. Select your hypervisor and click the Approve button. The Edit and Approve Host dialogdisplays. Accept the defaults or make changes as necessary, then click OK.
Figure 9.6. Approve Red Hat Enterprise Virtualization Hypervisor
3. A dialog appears, indicating that you have not configured Power Management for this host. For thepurpose of this lab, click OK to continue. The host goes through a brief installation cycle. Whencomplete, the host status changes from Non Operational to Up.
Note that both the Red Hat Enterprise Virtualization Hypervisors that you have approved were attachedto the same host cluster, which means that they share the same network infrastructure, the samestorage and the same type of CPU, therefore they can migrate virtual machines from one to the other.
Red Hat Enterprise Virtualization 3.2 Evaluation Guide
138
You can learn how to create new host clusters in Advanced Lab 7 - Add Additional Data Center.
Now that you have finished configuring your physical servers for use as the Manager, Hypervisors andadministration portal client respectively, you are ready to customize and deploy virtual resourcesincluding logical networks, storage domains and virtual machines.
Report a bug
9.7. Creating Local StorageAt this point, you have installed your Red Hat Enterprise Virtualization Hypervisor and approved it foruse with the Red Hat Enterprise Virtualization Manager. Now, you have to set up the host to providelocal storage for the virtual machine disk images. Note that setting up local storage is suitable for a smallenvironment, such as this evaluation setup. If you were deploying Red Hat Enterprise Virtualizationacross a large organization, it is recommended that you use shared storage as described in the sectionregarding configuring storage. However, for this lab, use the following procedure to add storage to yoursystem.
To create a local storage domain
1. Navigate to the Tree pane and click the Expand All button. Under the Default cluster, clickthe Hosts icon. The Hosts tab displays a list of available hypervisors.
2. Place the host into maintenance mode by clicking the Maintenance button. The Status field ofthe host changes to Preparing for Maintenance, followed by Maintenance. The icon changes toindicate that the host is in maintenance.
3. Click Configure Local Storage. The Configure Local Storage window opens. On theGeneral tab, specify the path to your local storage domain. For this lab, enter /data/images/rhev. Retain all the other default settings, and click OK.
4. Your local storage domain is created, and attached to the automatically created Atlantic-Local data center and Atlantic-Local cluster.
You have created a data storage domain. Now, you need to attach an ISO domain to the data center andupload installation images so you can use them to create virtual machines.
Report a bug
9.8. Creating local storage domains1. Navigate to the Tree pane and click the Expand All button. Under the Default cluster, click
the Hosts icon. The Hosts tab displays a list of available hypervisors.
2. Place the host into maintenance mode by clicking the Maintenance button. The Status field ofthe host changes to Preparing for Maintenance, followed by Maintenance. The icon changes toindicate that the host is in maintenance.
3. Click Configure Local Storage. The Configure Local Storage window opens. On theGeneral tab, specify the path to your local storage domain. For this lab, enter /data/images/rhev. Retain all the other default settings, and click OK.
4. Your local storage domain is created, and attached to the automatically created Atlantic-Local data center and Atlantic-Local cluster.
Report a bug
Chapter 9. Lab 9 - Installing and configuring minimal setup
139
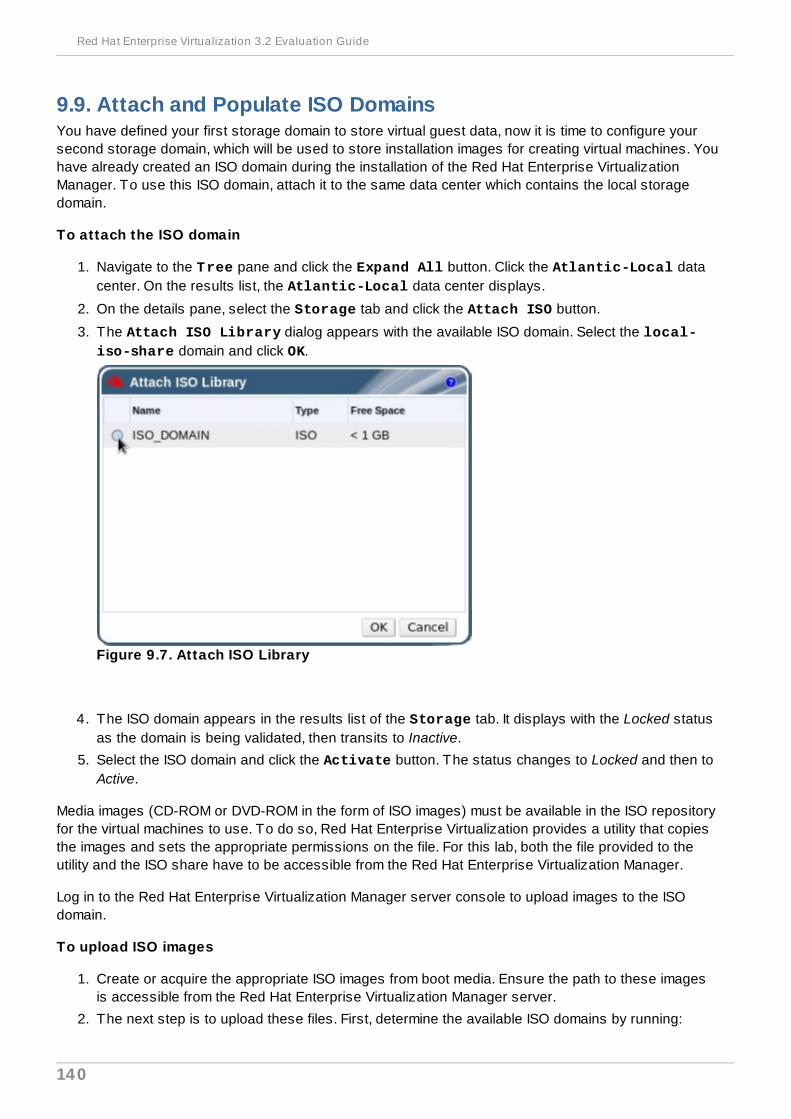
9.9. Attach and Populate ISO DomainsYou have defined your first storage domain to store virtual guest data, now it is time to configure yoursecond storage domain, which will be used to store installation images for creating virtual machines. Youhave already created an ISO domain during the installation of the Red Hat Enterprise VirtualizationManager. To use this ISO domain, attach it to the same data center which contains the local storagedomain.
To attach the ISO domain
1. Navigate to the Tree pane and click the Expand All button. Click the Atlantic-Local datacenter. On the results list, the Atlantic-Local data center displays.
2. On the details pane, select the Storage tab and click the Attach ISO button.
3. The Attach ISO Library dialog appears with the available ISO domain. Select the local-iso-share domain and click OK.
Figure 9.7. Attach ISO Library
4. The ISO domain appears in the results list of the Storage tab. It displays with the Locked statusas the domain is being validated, then transits to Inactive.
5. Select the ISO domain and click the Activate button. The status changes to Locked and then toActive.
Media images (CD-ROM or DVD-ROM in the form of ISO images) must be available in the ISO repositoryfor the virtual machines to use. To do so, Red Hat Enterprise Virtualization provides a utility that copiesthe images and sets the appropriate permissions on the file. For this lab, both the file provided to theutility and the ISO share have to be accessible from the Red Hat Enterprise Virtualization Manager.
Log in to the Red Hat Enterprise Virtualization Manager server console to upload images to the ISOdomain.
To upload ISO images
1. Create or acquire the appropriate ISO images from boot media. Ensure the path to these imagesis accessible from the Red Hat Enterprise Virtualization Manager server.
2. The next step is to upload these files. First, determine the available ISO domains by running:
Red Hat Enterprise Virtualization 3.2 Evaluation Guide
140

# rhevm-iso-uploader list
You will be prompted to provide the admin user password which you are using to connect to theadministration portal. The tool lists the name of the ISO domain that you have already attached inthe previous lab:
ISO Storage Domain List:local-iso-share
Now you have all the information required to upload the required files. To copy your installationimages to the ISO domain, run:
# rhevm-iso-uploader upload -i local-iso-share [file1] [file2] .... [fileN]
3. After the images have been loaded, check that they are available for use in the Manageradministration portal.
a. Navigate to the Tree and click the Expand All button. Click Storage
b. On the Storage tab, click local-iso-share to display its details pane.
c. Select the Images subtab. The list of available images should be populated with the fileswhich you have uploaded. In addition, the RHEV-toolsSetup.iso and virtio-win.vfdimages should have been automatically uploaded during installation.
Now that you have successfully prepared the ISO domain for use, you have completed Lab 1 and areready to start creating virtual machines.
Report a bug
9.10. Lab 9 - SummaryCongratulations, you have achieved the first goal of Track B! You now have an infrastructure ready tocreate and run virtual machines. To recap, you have successfully installed the Red Hat EnterpriseVirtualization Manager and Red Hat Enterprise Virtualization Hypervisor, attached storage domains tothe data center, and prepared ISO images.
The next lab on Track B teaches you how to create Red Hat Enterprise Linux virtual machines andtemplates.
The subsequent labs for this track are also used for Track A: Standard Setup. Therefore, mostexamples, instructions and screenshots are specific to Track A. When you use the instructions in thefollowing labs, substitute the instances of default data center and default cluster with Atlantic-Local datacenter and Atlantic-Local cluster respectively.
Chapter 9. Lab 9 - Installing and configuring minimal setup
141

Report a bug
Red Hat Enterprise Virtualization 3.2 Evaluation Guide
142
Chapter 10. Lab 10 - Advanced storage features
10.1. Lab 10 - ObjectivesIn this lab, you will learn about the advanced storage features supported by Red Hat EnterpriseVirtualization.
These include:
Floating Disks
Shared Disks
Creating snapshots of running virtual machines
Creating virtual machines from snapshots
Associating LUNs with virtual machines
Associating Fibre Channel (FC) LUNs with virtual machines
Report a bug
10.2. Advanced Storage FeaturesRed Hat Enterprise Virtualization has a number of advanced storage features. In this lab, you will exploresome of these advanced storage features.
You will create a floating disk, associate it with a virtual machine, mark the virtual disk shared, andassociate the shared virtual disk with a second machine.
You will also take a snapshot of a running virtual machine and use it to create a clone of the virtualmachine.
Report a bug
10.3. RequirementsThis lab assumes that you have successfully completed the basic labs of Section 1, Track A: StandardSetup or Section 2: Track B, Minimal Setup. This lab assumes that you have correctly installed andconfigured Red Hat Enterprise Virtualization and that you are able to use it to create virtual machines.
Report a bug
10.4. Creating Floating DisksSummary
The first task you will undertake in the Advanced Storage Lab is the creation of a floating disk.
Procedure 10.1. Creating Floating Disks
1. Click the Disks tab in the navigation pane.
Chapter 10. Lab 10 - Advanced storage features
143
2. Click the Add button in the top left of the navigation pane. The Add Virtual Disk windowopens.
3. Enter 10 in the Size(GB) field.
4. Enter Disk1 in the Alias field.
5. Enter Description placeholder in the Description field.
6. Leave all other settings at their defaults.
7. Click OK at the bottom right of the Add Virtual Disk window.
Result
You have created the floating disk Disk1. Now that you have created the floating disk Disk1, you willassociate it with a machine.
Disks on Multiple Storage Domains
Red Hat Enterprise Virtualization allows you to have disks on multiple storage domains. In the AddVirtual Disk window, select the data domain you want your disk to be on. Using this method, you canattach disks from different storage domains to your guest machine.
Report a bug
10.5. Associating a Floating Disk with a Virtual MachineSummary
You have just created a floating disk. Now you will associate it with a virtual machine.
Procedure 10.2. Associating a Floating Disk with a Virtual Machine
1. Click the Virtual Machines tab in the navigation pane.
2. Select RHEL6Thames from the list. The details pane displays the virtual disks associated with thevirtual machine RHEL6Thames.
3. Click Add in the top left of the details pane. The Add Virtual Disk window opens.
4. Select the Attach Disk check box. A list of disks appears.
5. Select the check box associated with Disk1.
6. Click OK at the bottom right of the Add Virtual Disk window.
Result
You have now associated a floating disk with the virtual machine named RHEL6Thames. Next you willmark the disk shared, so that it can be associated with a second virtual machine.
Report a bug
10.6. Marking a Virtual Disk SharedSummary
You have just associated a floating disk with a virtual machine. Now you will mark the disk shared, sothat it can be associated with a second virtual machine.
Red Hat Enterprise Virtualization 3.2 Evaluation Guide
144
Procedure 10.3. Marking a disk shared
1. Click the Virtual Machines tab in the navigation pane.
2. Click RHEL6Thames in the navigation pane.
3. Click the Virtual Disks tab in the details pane.
4. Click Disk1 in the list in the details pane.
5. Click Edit in the upper left of the details pane. The Edit Virtual Disk window opens.
6. Check the is shareable check box on the right of the Edit Virtual Disk window.
7. Click OK in the bottom right of the Edit Virtual Disk window.
Result
You have now marked a virtual disk shared. In the next task in this lab, you will associate the disk youjust marked shared with a second virtual machine.
Report a bug
10.7. Associating a Shared Virtual Disk with a Second VirtualMachineSummary
You have just marked a virtual disk shared. You will now associate the marked disk with a second virtualmachine.
Procedure 10.4 . Associating a Shared Virtual Disk with a Second Virtual Machine
1. Click the Virtual Machines tab.
2. Select RHEL6Ganges. The details pane displays the disks associated with the virtual machine.
3. Click Add in the top left of the details pane. The Add Virtual Disk window opens.
4. Select the Attach Disk check box. A list of disks appears in the Add Virtual Disk window.
5. Select the check box associated with Disk1.
6. Click OK at the bottom right of the Add Virtual Disk window.
Result
You have now associated a shared virtual disk with a second virtual machine.
Report a bug
10.8. Creating a Snapshot of a Running Virtual Machine
Note
Before you perform the Snapshotting tasks in this lab, you must create a virtual machine named RHEL6Nile.
Summary
Chapter 10. Lab 10 - Advanced storage features
145

In Lab 10, you have created a floating disk, associated it with a virtual machine, flagged it shared, andassociated it with a second virtual machine. Now you will create a snapshot of a running virtual machine.
Procedure 10.5. Creating a Snapshot of a Running Virtual Machine
1. Click the Virtual Machines tab in the navigation pane.
2. Select RHEL6Nile in the navigation pane.
3. Ensure that RHEL6Nile is running. If it has a status of Down, click the green Play button at thetop of the navigation pane.
4. Click the Snapshots tab in the details pane.
5. Click Create in the upper left of the details pane.
6. After a short time, the snapshot you just created will appear in the details pane.
Result
You have now created a snapshot of a running virtual machine. Next, you will use the snapshot you havejust created to create a virtual machine based on this snapshot.
Report a bug
10.9. Creating a Virtual Machine from a SnapshotSummary
You have created a snapshot from a virtual machine. Now you can use that snapshot to create anothervirtual machine.
Procedure 10.6. Creating a virtual machine from a snapshot
1. Use the Virtual Machines resource tab, tree mode, or the search function to find and selectthe virtual machine in the results list. Ensure the status is Powered Down.
2. Click the Snapshots tab in the details pane to list the available snapshots for the virtualmachines.
3. Select a snapshot in the list displayed and click Clone to open the Clone VM from Snapshotwindow.
4. Enter the Name and Description of the virtual machine to be created.
Red Hat Enterprise Virtualization 3.2 Evaluation Guide
146
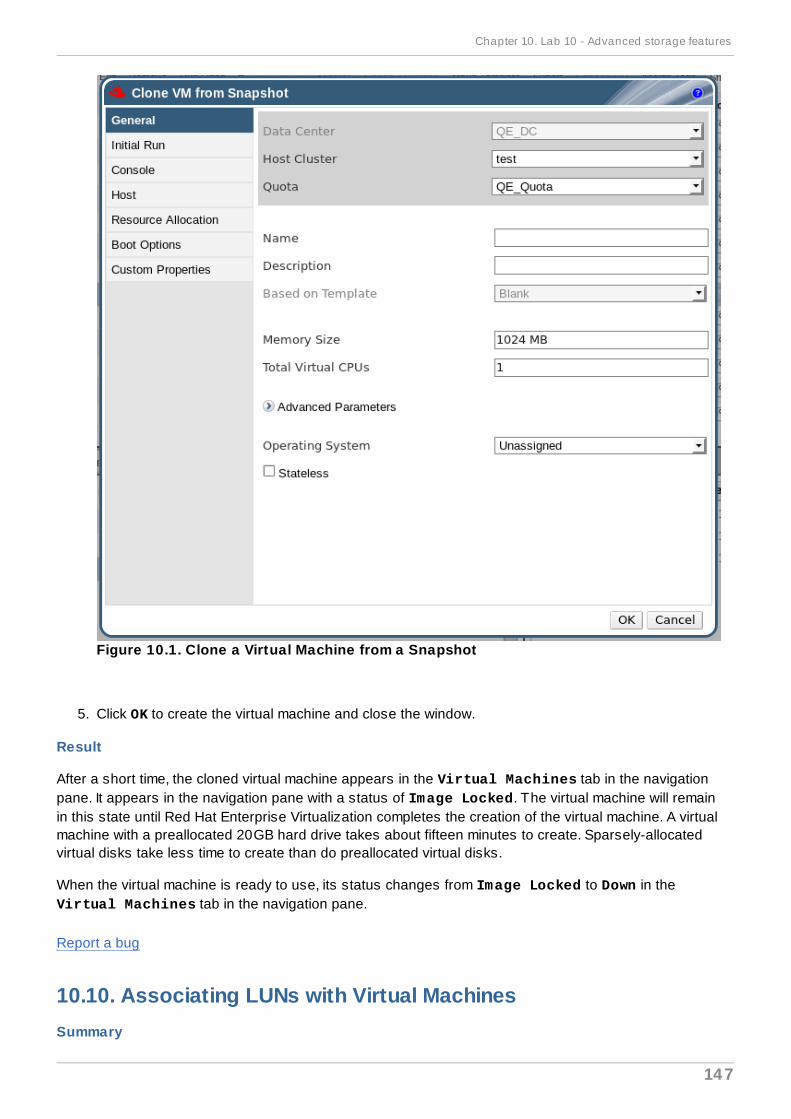
Figure 10.1. Clone a Virtual Machine from a Snapshot
5. Click OK to create the virtual machine and close the window.
Result
After a short time, the cloned virtual machine appears in the Virtual Machines tab in the navigationpane. It appears in the navigation pane with a status of Image Locked. The virtual machine will remainin this state until Red Hat Enterprise Virtualization completes the creation of the virtual machine. A virtualmachine with a preallocated 20GB hard drive takes about fifteen minutes to create. Sparsely-allocatedvirtual disks take less time to create than do preallocated virtual disks.
When the virtual machine is ready to use, its status changes from Image Locked to Down in theVirtual Machines tab in the navigation pane.
Report a bug
10.10. Associating LUNs with Virtual MachinesSummary
Chapter 10. Lab 10 - Advanced storage features
147
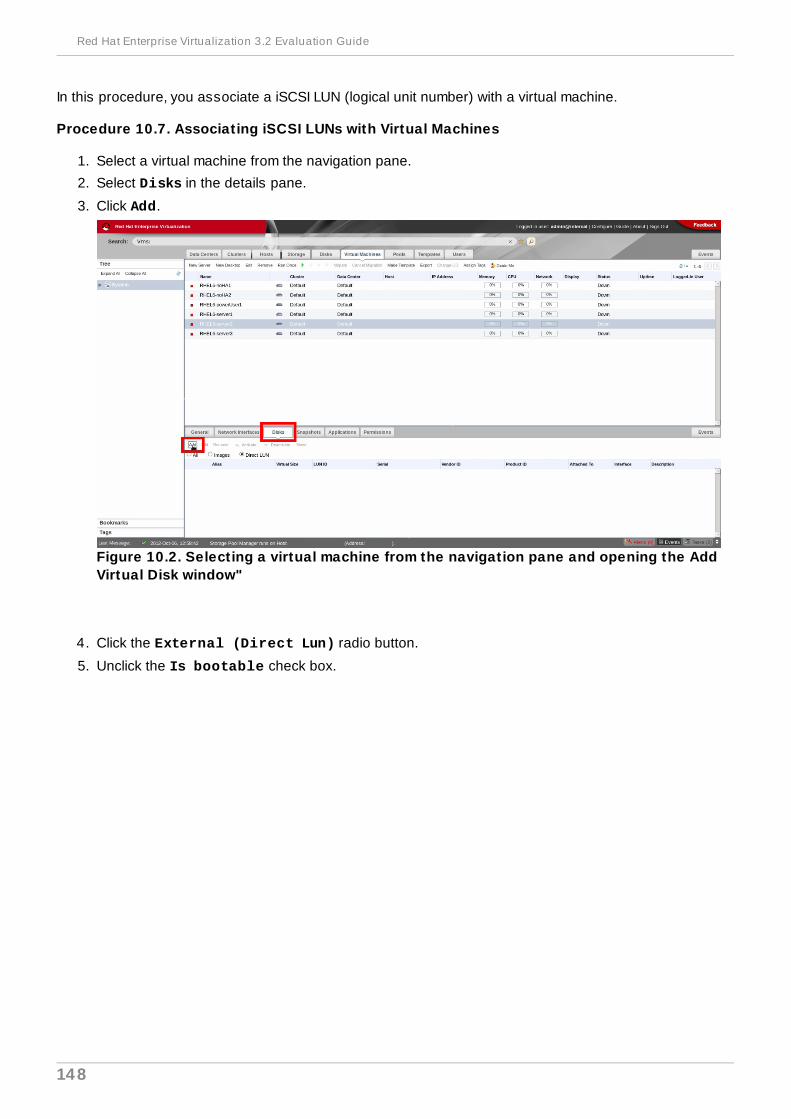
In this procedure, you associate a iSCSI LUN (logical unit number) with a virtual machine.
Procedure 10.7. Associating iSCSI LUNs with Virtual Machines
1. Select a virtual machine from the navigation pane.
2. Select Disks in the details pane.
3. Click Add.
Figure 10.2. Selecting a virtual machine from the navigation pane and opening the AddVirtual Disk window"
4. Click the External (Direct Lun) radio button.
5. Unclick the Is bootable check box.
Red Hat Enterprise Virtualization 3.2 Evaluation Guide
148
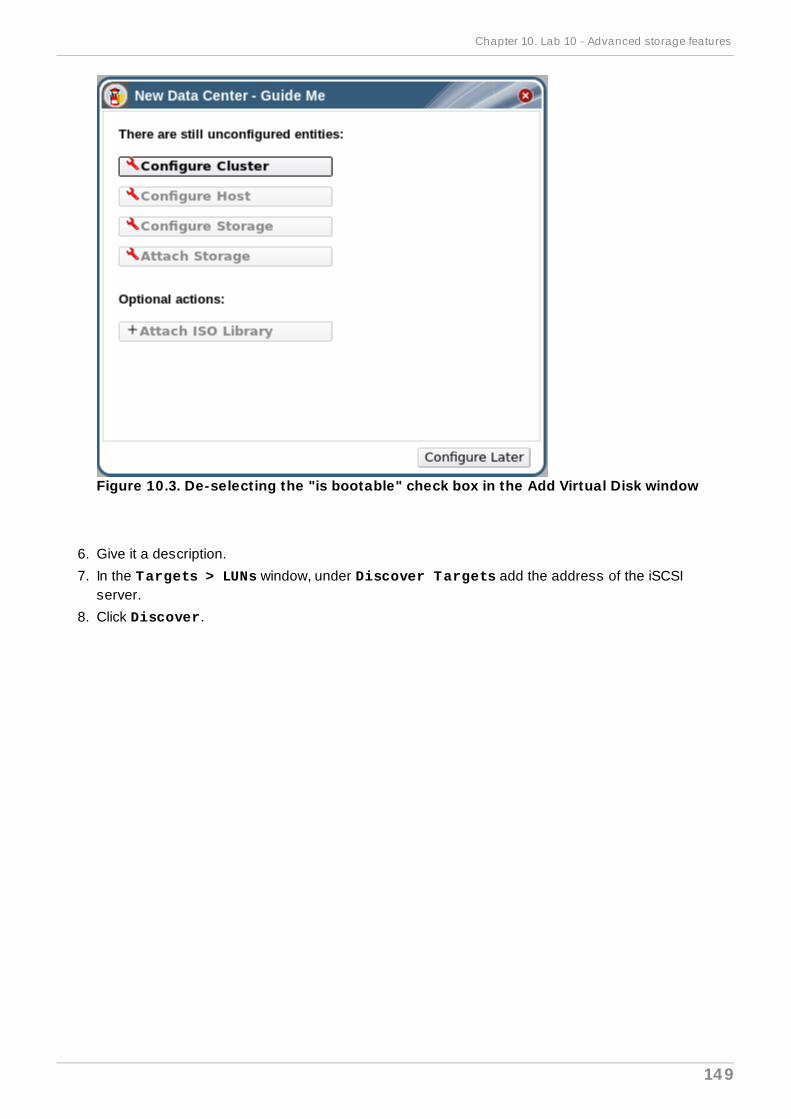
Figure 10.3. De-selecting the "is bootable" check box in the Add Virtual Disk window
6. Give it a description.
7. In the Targets > LUNs window, under Discover Targets add the address of the iSCSIserver.
8. Click Discover.
Chapter 10. Lab 10 - Advanced storage features
149
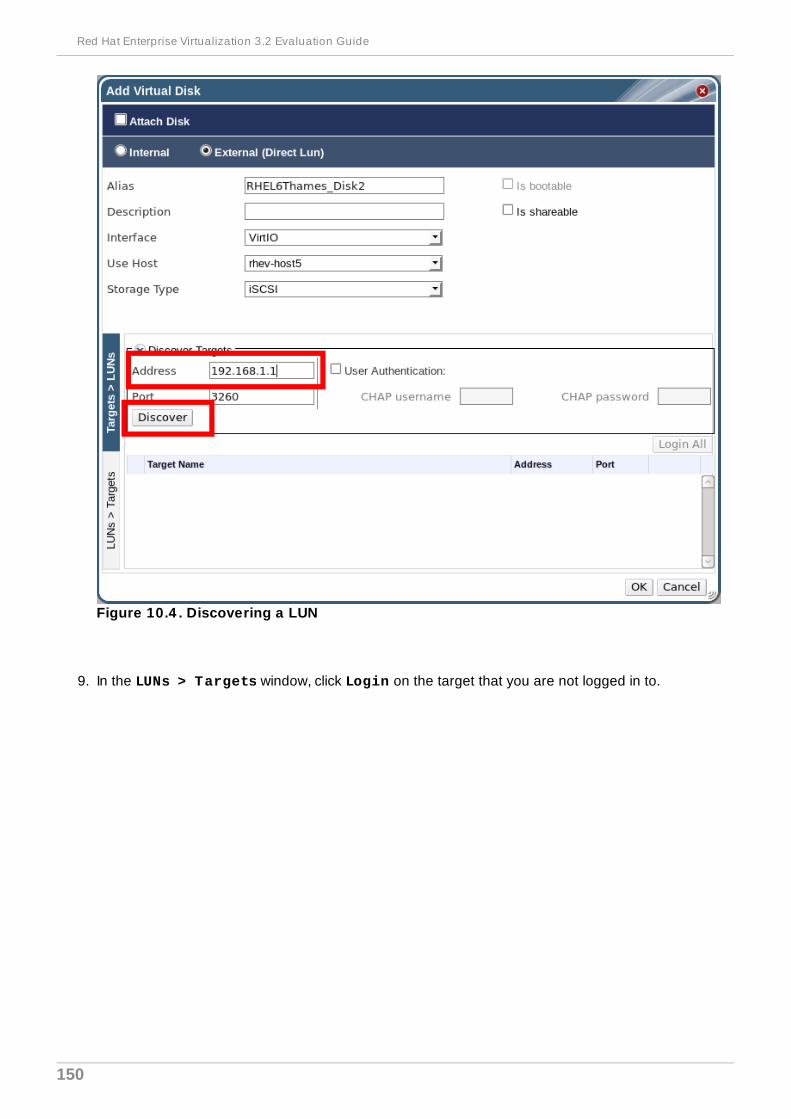
Figure 10.4 . Discovering a LUN
9. In the LUNs > Targets window, click Login on the target that you are not logged in to.
Red Hat Enterprise Virtualization 3.2 Evaluation Guide
150

Figure 10.5. Logging in to a Discovered LUN
10. Click the plus to the left of the target you just logged in to. A list of LUN IDs displays.
11. Click the radio button to the left of the LUN ID of the target.
Chapter 10. Lab 10 - Advanced storage features
151
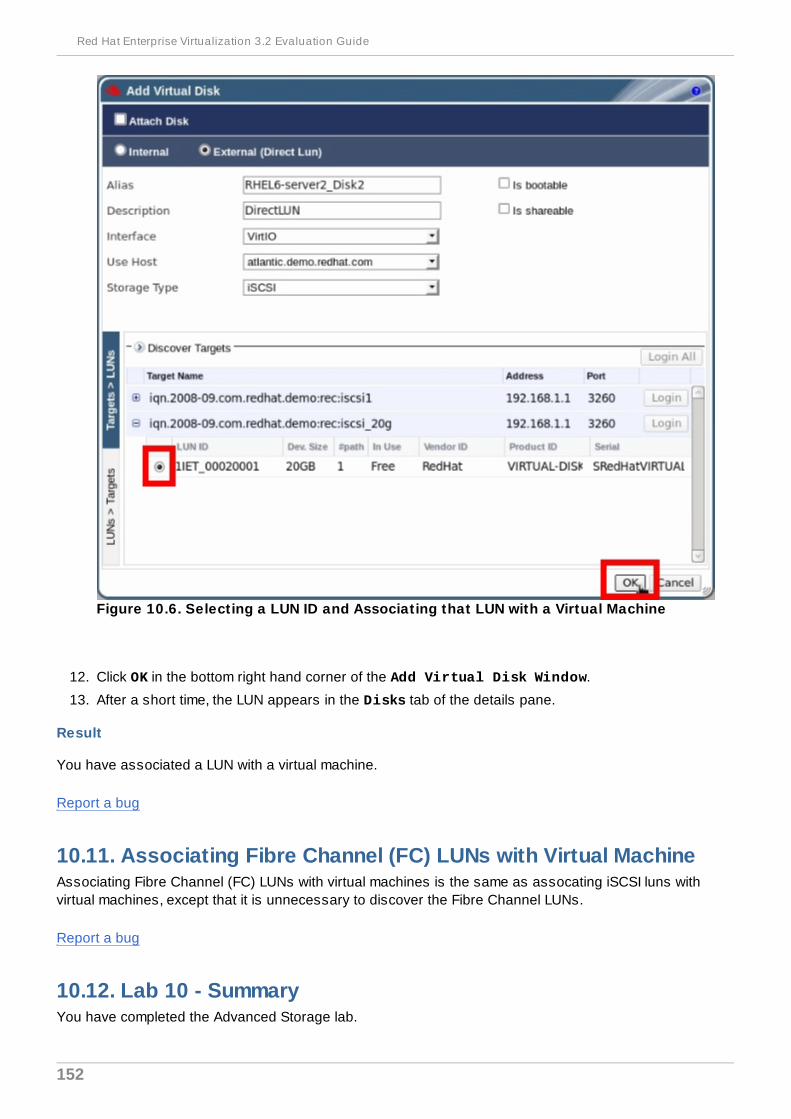
Figure 10.6. Selecting a LUN ID and Associating that LUN with a Virtual Machine
12. Click OK in the bottom right hand corner of the Add Virtual Disk Window.
13. After a short time, the LUN appears in the Disks tab of the details pane.
Result
You have associated a LUN with a virtual machine.
Report a bug
10.11. Associating Fibre Channel (FC) LUNs with Virtual MachineAssociating Fibre Channel (FC) LUNs with virtual machines is the same as assocating iSCSI luns withvirtual machines, except that it is unnecessary to discover the Fibre Channel LUNs.
Report a bug
10.12. Lab 10 - SummaryYou have completed the Advanced Storage lab.
Red Hat Enterprise Virtualization 3.2 Evaluation Guide
152

Report a bug
Chapter 10. Lab 10 - Advanced storage features
153
Revision HistoryRevision 1-64 .4 00 2013-10-31 Rüdiger Landmann
Rebuild with publican 4.0.0
Revision 1-64 Mon 20 May 2013 Zac DoverChanged "rhev-hypervisor-advanced" to "rhev-hypervisor".
Revision 1-63 Thu 09 May 2013 Zac DoverPublishing for 3.2
Revision 1-62 Wed 17 Apr 2013 Zac DoverBeta 2
Revision 1-61 Tue 26 Mar 2013 Cheryn TanUpdated RHN information, IdM rebranding.
Revision 1-60 Mon 25 Mar 2013 Zac DoverStaging Beta 1
Revision 1-59 Fri 08 Mar 2013 Zac DoverBZ#889107 again
Revision 1-58 Wed 06 Mar 2013 Zac DoverStaging to move a number of bugs from MODIFIED to ON_QA
Revision 1-57 Tue 05 Mar 2013 Zac DoverAttempting to stage for BETA-1
Revision 1-56 Tue 05 Mar 2013 Zac DoverRemoving "Configuring Windows clients to access the administration portal"
Revision 1-55 Tue 05 Mar 2013 Zac DoverBeta 1 brew - Fixing the Chapter offset
Revision 1-54 Mon 04 Mar 2013 Zac DoverBeta 1 brew
Revision 1-53 Fri 01 Mar 2013 Zac DoverBZ#888497
Revision 1-51 Thu 28 Feb 2013 Zac DoverBZ#915681BZ#888497BZ#857546BZ#756262
Revision 1-50 Mon 20 Jan 2013 Zac DoverBZ#885255 - adding "-provider=ActiveDirectory" to the rhevm-manage-domains command in "Adding
Red Hat Enterprise Virtualization 3.2 Evaluation Guide
154

Active Directory Domains"Branched from 3.1 docs
Revision History
155