Embed Size (px)
Citation preview
Red Hat Enterprise Linux 6
Virtualization HostConfiguration and
Guest Installation GuideVirtualization Documentation

Virtualization Host Configuration and Guest Installation Guide
Red Hat Enterprise Linux 6 Virtualization Host Configuration andGuest Installation GuideVirtualization DocumentationEdition 0.2
Author
Copyright © 2011 Red Hat, Inc.
The text of and illustrations in this document are licensed by Red Hat under a Creative CommonsAttribution–Share Alike 3.0 Unported license ("CC-BY-SA"). An explanation of CC-BY-SA is availableat http://creativecommons.org/licenses/by-sa/3.0/. In accordance with CC-BY-SA, if you distribute thisdocument or an adaptation of it, you must provide the URL for the original version.
Red Hat, as the licensor of this document, waives the right to enforce, and agrees not to assert,Section 4d of CC-BY-SA to the fullest extent permitted by applicable law.
Red Hat, Red Hat Enterprise Linux, the Shadowman logo, JBoss, MetaMatrix, Fedora, the InfinityLogo, and RHCE are trademarks of Red Hat, Inc., registered in the United States and other countries.
Linux® is the registered trademark of Linus Torvalds in the United States and other countries.
Java® is a registered trademark of Oracle and/or its affiliates.
XFS® is a trademark of Silicon Graphics International Corp. or its subsidiaries in the United Statesand/or other countries.
MySQL® is a registered trademark of MySQL AB in the United States, the European Union and othercountries.
All other trademarks are the property of their respective owners.
1801 Varsity Drive Raleigh, NC 27606-2072 USA Phone: +1 919 754 3700 Phone: 888 733 4281 Fax: +1 919 754 3701
This guide covers KVM packages, compatibility and restrictions. Also included are host configurationdetails and instructions for installing guests of different types, PCI device assignment and SR-IOV.
iii
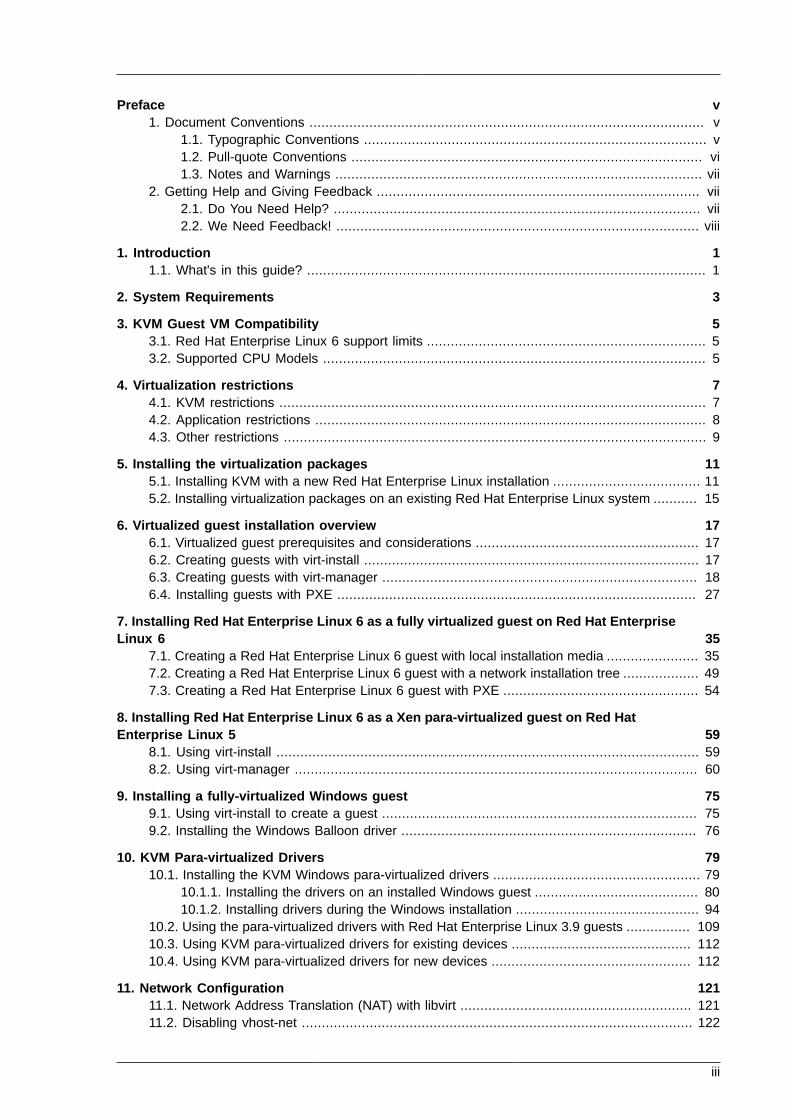
Preface v1. Document Conventions ................................................................................................... v
1.1. Typographic Conventions ...................................................................................... v1.2. Pull-quote Conventions ........................................................................................ vi1.3. Notes and Warnings ............................................................................................ vii
2. Getting Help and Giving Feedback ................................................................................. vii2.1. Do You Need Help? ............................................................................................ vii2.2. We Need Feedback! ........................................................................................... viii
1. Introduction 11.1. What's in this guide? .................................................................................................... 1
2. System Requirements 3
3. KVM Guest VM Compatibility 53.1. Red Hat Enterprise Linux 6 support limits ...................................................................... 53.2. Supported CPU Models ................................................................................................ 5
4. Virtualization restrictions 74.1. KVM restrictions ........................................................................................................... 74.2. Application restrictions .................................................................................................. 84.3. Other restrictions .......................................................................................................... 9
5. Installing the virtualization packages 115.1. Installing KVM with a new Red Hat Enterprise Linux installation ..................................... 115.2. Installing virtualization packages on an existing Red Hat Enterprise Linux system ........... 15
6. Virtualized guest installation overview 176.1. Virtualized guest prerequisites and considerations ........................................................ 176.2. Creating guests with virt-install .................................................................................... 176.3. Creating guests with virt-manager ............................................................................... 186.4. Installing guests with PXE .......................................................................................... 27
7. Installing Red Hat Enterprise Linux 6 as a fully virtualized guest on Red Hat EnterpriseLinux 6 35
7.1. Creating a Red Hat Enterprise Linux 6 guest with local installation media ....................... 357.2. Creating a Red Hat Enterprise Linux 6 guest with a network installation tree ................... 497.3. Creating a Red Hat Enterprise Linux 6 guest with PXE ................................................. 54
8. Installing Red Hat Enterprise Linux 6 as a Xen para-virtualized guest on Red HatEnterprise Linux 5 59
8.1. Using virt-install .......................................................................................................... 598.2. Using virt-manager ..................................................................................................... 60
9. Installing a fully-virtualized Windows guest 759.1. Using virt-install to create a guest ............................................................................... 759.2. Installing the Windows Balloon driver .......................................................................... 76
10. KVM Para-virtualized Drivers 7910.1. Installing the KVM Windows para-virtualized drivers .................................................... 79
10.1.1. Installing the drivers on an installed Windows guest ......................................... 8010.1.2. Installing drivers during the Windows installation .............................................. 94
10.2. Using the para-virtualized drivers with Red Hat Enterprise Linux 3.9 guests ................ 10910.3. Using KVM para-virtualized drivers for existing devices ............................................. 11210.4. Using KVM para-virtualized drivers for new devices .................................................. 112
11. Network Configuration 12111.1. Network Address Translation (NAT) with libvirt .......................................................... 12111.2. Disabling vhost-net .................................................................................................. 122
Virtualization Host Configuration and Guest Installation Guide
iv
11.2.1. Checksum correction for older DHCP clients .................................................. 12311.3. Bridged networking with libvirt ................................................................................. 123
12. PCI device assignment 12712.1. Adding a PCI device with virsh ................................................................................ 12812.2. Adding a PCI device with virt-manager .................................................................... 13012.3. PCI device assignment with virt-install ..................................................................... 134
13. SR-IOV 13713.1. Introduction ............................................................................................................ 13713.2. Using SR-IOV ......................................................................................................... 13813.3. Troubleshooting SR-IOV .......................................................................................... 142
14. KVM guest timing management 143
15. Network booting with libvirt 14715.1. Preparing the boot server ........................................................................................ 147
15.1.1. Setting up a PXE boot server on a private libvirt network ................................ 14715.2. Booting a guest using PXE ..................................................................................... 148
15.2.1. Using bridged networking ............................................................................. 14815.2.2. Using a private libvirt network ....................................................................... 148
A. Revision History 151
v
Preface
1. Document ConventionsThis manual uses several conventions to highlight certain words and phrases and draw attention tospecific pieces of information.
In PDF and paper editions, this manual uses typefaces drawn from the Liberation Fonts1 set. TheLiberation Fonts set is also used in HTML editions if the set is installed on your system. If not,alternative but equivalent typefaces are displayed. Note: Red Hat Enterprise Linux 5 and later includesthe Liberation Fonts set by default.
1.1. Typographic ConventionsFour typographic conventions are used to call attention to specific words and phrases. Theseconventions, and the circumstances they apply to, are as follows.
Mono-spaced Bold
Used to highlight system input, including shell commands, file names and paths. Also used to highlightkeycaps and key combinations. For example:
To see the contents of the file my_next_bestselling_novel in your currentworking directory, enter the cat my_next_bestselling_novel command at theshell prompt and press Enter to execute the command.
The above includes a file name, a shell command and a keycap, all presented in mono-spaced boldand all distinguishable thanks to context.
Key combinations can be distinguished from keycaps by the hyphen connecting each part of a keycombination. For example:
Press Enter to execute the command.
Press Ctrl+Alt+F2 to switch to the first virtual terminal. Press Ctrl+Alt+F1 toreturn to your X-Windows session.
The first paragraph highlights the particular keycap to press. The second highlights two keycombinations (each a set of three keycaps with each set pressed simultaneously).
If source code is discussed, class names, methods, functions, variable names and returned valuesmentioned within a paragraph will be presented as above, in mono-spaced bold. For example:
File-related classes include filesystem for file systems, file for files, and dir fordirectories. Each class has its own associated set of permissions.
Proportional Bold
This denotes words or phrases encountered on a system, including application names; dialog box text;labeled buttons; check-box and radio button labels; menu titles and sub-menu titles. For example:
Choose System → Preferences → Mouse from the main menu bar to launch MousePreferences. In the Buttons tab, click the Left-handed mouse check box and click
1 https://fedorahosted.org/liberation-fonts/
Preface
vi
Close to switch the primary mouse button from the left to the right (making the mousesuitable for use in the left hand).
To insert a special character into a gedit file, choose Applications → Accessories→ Character Map from the main menu bar. Next, choose Search → Find… from theCharacter Map menu bar, type the name of the character in the Search field and clickNext. The character you sought will be highlighted in the Character Table. Double-click this highlighted character to place it in the Text to copy field and then click the
Copy button. Now switch back to your document and choose Edit → Paste from thegedit menu bar.
The above text includes application names; system-wide menu names and items; application-specificmenu names; and buttons and text found within a GUI interface, all presented in proportional bold andall distinguishable by context.
Mono-spaced Bold Italic or Proportional Bold Italic
Whether mono-spaced bold or proportional bold, the addition of italics indicates replaceable orvariable text. Italics denotes text you do not input literally or displayed text that changes depending oncircumstance. For example:
To connect to a remote machine using ssh, type ssh [email protected] ata shell prompt. If the remote machine is example.com and your username on thatmachine is john, type ssh [email protected].
The mount -o remount file-system command remounts the named filesystem. For example, to remount the /home file system, the command is mount -oremount /home.
To see the version of a currently installed package, use the rpm -q packagecommand. It will return a result as follows: package-version-release.
Note the words in bold italics above — username, domain.name, file-system, package, version andrelease. Each word is a placeholder, either for text you enter when issuing a command or for textdisplayed by the system.
Aside from standard usage for presenting the title of a work, italics denotes the first use of a new andimportant term. For example:
Publican is a DocBook publishing system.
1.2. Pull-quote ConventionsTerminal output and source code listings are set off visually from the surrounding text.
Output sent to a terminal is set in mono-spaced roman and presented thus:
books Desktop documentation drafts mss photos stuff svnbooks_tests Desktop1 downloads images notes scripts svgs
Source-code listings are also set in mono-spaced roman but add syntax highlighting as follows:
package org.jboss.book.jca.ex1;
import javax.naming.InitialContext;
Notes and Warnings
vii
public class ExClient{ public static void main(String args[]) throws Exception { InitialContext iniCtx = new InitialContext(); Object ref = iniCtx.lookup("EchoBean"); EchoHome home = (EchoHome) ref; Echo echo = home.create();
System.out.println("Created Echo");
System.out.println("Echo.echo('Hello') = " + echo.echo("Hello")); }}
1.3. Notes and WarningsFinally, we use three visual styles to draw attention to information that might otherwise be overlooked.
Note
Notes are tips, shortcuts or alternative approaches to the task at hand. Ignoring a note shouldhave no negative consequences, but you might miss out on a trick that makes your life easier.
Important
Important boxes detail things that are easily missed: configuration changes that only apply tothe current session, or services that need restarting before an update will apply. Ignoring a boxlabeled 'Important' will not cause data loss but may cause irritation and frustration.
Warning
Warnings should not be ignored. Ignoring warnings will most likely cause data loss.
2. Getting Help and Giving Feedback
2.1. Do You Need Help?
If you experience difficulty with a procedure described in this documentation, visit the Red HatCustomer Portal at http://access.redhat.com. Through the customer portal, you can:
• search or browse through a knowledgebase of technical support articles about Red Hat products.
• submit a support case to Red Hat Global Support Services (GSS).
Preface
viii
• access other product documentation.
Red Hat also hosts a large number of electronic mailing lists for discussion of Red Hat software andtechnology. You can find a list of publicly available mailing lists at https://www.redhat.com/mailman/listinfo. Click on the name of any mailing list to subscribe to that list or to access the list archives.
2.2. We Need Feedback!
If you find a typographical error in this manual, or if you have thought of a way to make this manualbetter, we would love to hear from you! Please submit a report in Bugzilla: http://bugzilla.redhat.com/against the product Red Hat Enterprise Linux 6.
When submitting a bug report, be sure to mention the manual's identifier: doc-Virtualization_Host_Configuration_and_Guest_Installation_Guide
If you have a suggestion for improving the documentation, try to be as specific as possible whendescribing it. If you have found an error, please include the section number and some of thesurrounding text so we can find it easily.

Chapter 1.
1
Introduction
1.1. What's in this guide?This guide provides information on system requirements and restrictions, package details, hostconfiguration and detailed instructions for installing different types of guests.

2
Chapter 2.
3
System RequirementsThis chapter lists system requirements for successfully running virtualized guest machines, referred toas VMs on Red Hat Enterprise Linux 6. Virtualization is available for Red Hat Enterprise Linux 6 on theIntel 64 and AMD64 architecture.
The KVM hypervisor is provided with Red Hat Enterprise Linux 6.
For information on installing the virtualization packages, see Chapter 5, Installing the virtualizationpackages.
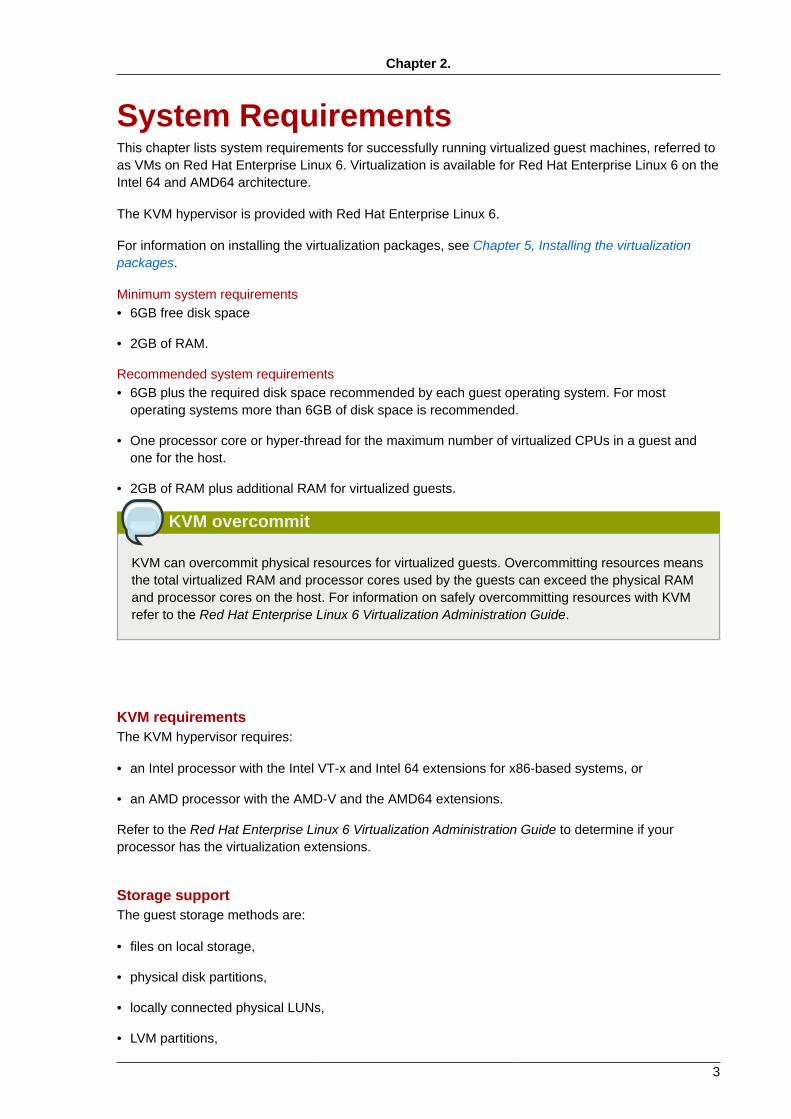
Minimum system requirements• 6GB free disk space
• 2GB of RAM.
Recommended system requirements• 6GB plus the required disk space recommended by each guest operating system. For most
operating systems more than 6GB of disk space is recommended.
• One processor core or hyper-thread for the maximum number of virtualized CPUs in a guest andone for the host.
• 2GB of RAM plus additional RAM for virtualized guests.
KVM overcommit
KVM can overcommit physical resources for virtualized guests. Overcommitting resources meansthe total virtualized RAM and processor cores used by the guests can exceed the physical RAMand processor cores on the host. For information on safely overcommitting resources with KVMrefer to the Red Hat Enterprise Linux 6 Virtualization Administration Guide.
KVM requirementsThe KVM hypervisor requires:
• an Intel processor with the Intel VT-x and Intel 64 extensions for x86-based systems, or
• an AMD processor with the AMD-V and the AMD64 extensions.
Refer to the Red Hat Enterprise Linux 6 Virtualization Administration Guide to determine if yourprocessor has the virtualization extensions.
Storage supportThe guest storage methods are:
• files on local storage,
• physical disk partitions,
• locally connected physical LUNs,
• LVM partitions,

Chapter 2. System Requirements
4
• NFS shared file systems,
• iSCSI,
• GFS2 clustered file systems,
• Fibre Channel-based LUNs, and
• SRP devices (SCSI RDMA Protocol), the block export protocol used in Infiniband and 10GbEiWARP adapters.
Chapter 3.
5
KVM Guest VM CompatibilityTo verify whether your processor supports the virtualization extensions and for information on enablingthe virtualization extensions if they are disabled, refer to the Red Hat Enterprise Linux VirtualizationAdministration Guide.
3.1. Red Hat Enterprise Linux 6 support limitsRed Hat Enterprise Linux 6 servers have certain support limits.
The following URLs explain the processor and memory amount limitations for Red Hat EnterpriseLinux:
• For host systems: http://www.redhat.com/rhel/compare/
• For hypervisors: http://www.redhat.com/rhel/virtualization/compare/
The following URL is a complete chart showing supported operating systems and host and guestcombinations:
• http://www.redhat.com/rhel/server/virtualization_support.html#virt_matrix
3.2. Supported CPU ModelsRed Hat Enterprise Linux 6 supports the use of the following QEMU CPU model definitions:
Opteron_G3AMD Opteron 23xx (Gen 3 Class Opteron)
Opteron_G2AMD Opteron 22xx (Gen 2 Class Opteron)
Opteron_G1AMD Opteron 240 (Gen 1 Class Opteron)
NehalemIntel Core i7 9xx (Nehalem Class Core i7)
PenrynIntel Core 2 Duo P9xxx (Penryn Class Core 2)
ConroeIntel Celeron_4x0 (Conroe/Merom Class Core 2)
cpu64-rhel5Red Hat Enterprise Linux 5 supported QEMU Virtual CPU version (cpu64-rhel5)
cpu64-rhel6Red Hat Enterprise Linux 6 supported QEMU Virtual CPU version (cpu64-rhel6)

6

Chapter 4.
7
Virtualization restrictionsThis chapter covers additional support and product restrictions of the virtualization packages in RedHat Enterprise Linux 6.
4.1. KVM restrictionsThe following restrictions apply to the KVM hypervisor:
Maximum VCPUs per guestVirtualized guests support up to a maximum of 64 virtualized CPUs in Red Hat Enterprise Linux 6.
Constant TSC bitSystems without a Constant Time Stamp Counter require additional configuration. Refer toChapter 14, KVM guest timing management for details on determining whether you have aConstant Time Stamp Counter and configuration steps for fixing any related issues.
Memory overcommitKVM supports memory overcommit and can store the memory of guests in swap. A guest will runslower if it is swapped frequently. Red Hat Knowledgebase1 has an article on safely and efficientlydetermining the size of the swap partition. When KSM is used for memory overcommitting, makesure that the swap size follows the recommendations described in this article.
CPU overcommitIt is not recommended to have more than 10 virtual CPUs per physical processor core. Customersare encouraged to use a capacity planning tool in order to determine the CPU overcommit ratio.Estimating an ideal ratio is difficult as it is highly dependent on each workload. For instance, aguest may consume 100% CPU on one use case, and multiple guests may be completely idle onanother.
Red Hat does not support running more VCPUs to a single guest than the amount of overallphysical cores that exist on the system. While Hyperthreads can be considered as cores, theirperformance can also vary from one scenario to the next, and they should not be expected toperform as well as regular cores.
Refer to the Red Hat Enterprise Linux Virtualization Administration Guide for tips andrecommendations on overcommitting CPUs.
Virtualized SCSI devicesSCSI emulation is not supported with KVM in Red Hat Enterprise Linux.
Virtualized IDE devicesKVM is limited to a maximum of four virtualized (emulated) IDE devices per guest.
Para-virtualized devicesPara-virtualized devices, which use the virtio drivers, are PCI devices. Presently, guests arelimited to a static definition of 221 PCI devices. Some PCI devices are critical for the guest to runand these devices cannot be removed. The default, required devices are:
• the host bridge,
• the ISA bridge and usb bridge (The usb and isa bridges are the same device),
1 http://kbase.redhat.com/faq/docs/DOC-15252
Chapter 4. Virtualization restrictions
8
• the graphics card (using either the Cirrus or qxl driver), and
• the memory balloon device.
Migration restrictionsLive migration is only possible between hosts with the same CPU type (that is, Intel to Intel orAMD to AMD only).
For live migration, both hosts must have the same value set for the No eXecution (NX) bit, eitheron or off for both hosts.
Storage restrictionsGuest should not be given write access to whole disks or block devices (for example, /dev/sdb).Virtualized guests with access to block devices may be able to access other block devices on thesystem or modify volume labels which can be used to compromise the host system. Use partitions(for example, /dev/sdb1) or LVM volumes to prevent this issue.
SR-IOV restrictionsSR-IOV is only thoroughly tested with the following devices (other SR-IOV devices may work buthave not been tested at the time of release):
Intel® 82576NS Gigabit Ethernet Controller (igb driver)
Intel® 82576EB Gigabit Ethernet Controller (igb driver)
Neterion X3100 Series 10GbE PCIe (vxge driver)
Intel® 82599ES 10 Gigabit Ethernet Controller (ixgbe driver)
Intel® 82599EB 10 Gigabit Ethernet Controller (ixgbe driver)
For live migration, both hosts must have the same value set for the No eXecution (NX) bit, eitheron or off for both hosts.
PCI device assignment restrictionsPCI device assignment (attaching PCI devices to guests) requires host systems to have AMDIOMMU or Intel VT-d support to enable device assignment of PCI-e devices.
For parallel/legacy PCI, only single devices behind a PCI bridge are supported.
Multiple PCIe endpoints connected through a non-root PCIe switch require ACS support in thePCIe bridges of the PCIe switch. This restriction can be disabled in /etc/libvirt/qemu.conf,setting relaxed_acs_check=1
Red Hat Enterprise Linux 6 has limited PCI configuration space access by guest device drivers.This limitation could cause drivers that are dependent on PCI configuration space to failconfiguration.
Red Hat Enterprise Linux 6.2 introduces interrupt remapping as a requirement for PCI deviceassignment. If your platform does not provide support for interrupt remapping, the KVM check forthis support can be circumvented with the following command: echo 1 > /sys/module/kvm/parameters/allow_unsafe_assigned_interrupts
4.2. Application restrictionsThere are aspects of virtualization which make virtualization unsuitable for certain types ofapplications.
Other restrictions
9
Applications with high I/O throughput requirements should use the para-virtualized drivers for fullyvirtualized guests. Without the para-virtualized drivers certain applications may be unpredictable underheavy I/O loads.
The following applications should be avoided for their high I/O requirement reasons:
• kdump server
• netdump server
You should carefully evaluate applications and tools that heavily utilize I/O or those that require real-time performance. Consider the para-virtualized drivers or PCI device assignment for increased I/Operformance. Refer to Chapter 10, KVM Para-virtualized Drivers for more information on the para-virtualized drivers for fully virtualized guests. Refer to Chapter 12, PCI device assignment for moreinformation on PCI device assignment.
Applications still suffer a small performance loss from running in virtualized environments. Theperformance benefits of virtualization through consolidating to newer and faster hardware should beevaluated against the potential application performance issues associated with using virtualization.
4.3. Other restrictionsFor the list of all other restrictions and issues affecting virtualization read the Red Hat Enterprise Linux6 Release Notes. The Red Hat Enterprise Linux 6 Release Notes cover the present new features,known issues and restrictions as they are updated or discovered.

10
Chapter 5.
11
Installing the virtualization packagesBefore you can use virtualization, the virtualization packages must be installed on your computer.Virtualization packages can be installed either during the host installation sequence or after hostinstallation using the yum command and the Red Hat Network (RHN).
The KVM hypervisor uses the default Red Hat Enterprise Linux kernel with the kvm kernel module.
5.1. Installing KVM with a new Red Hat Enterprise LinuxinstallationThis section covers installing virtualization tools and virtualization packages as part of a fresh Red HatEnterprise Linux installation.
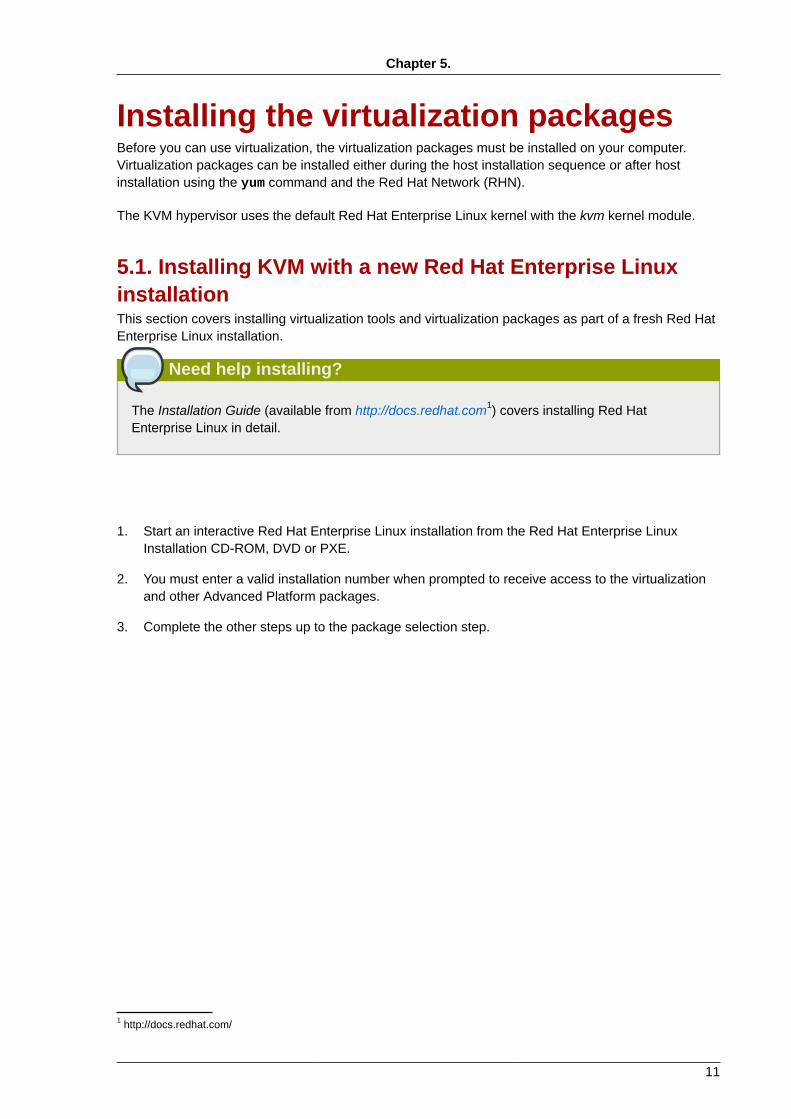
Need help installing?
The Installation Guide (available from http://docs.redhat.com1) covers installing Red HatEnterprise Linux in detail.
1. Start an interactive Red Hat Enterprise Linux installation from the Red Hat Enterprise LinuxInstallation CD-ROM, DVD or PXE.
2. You must enter a valid installation number when prompted to receive access to the virtualizationand other Advanced Platform packages.
3. Complete the other steps up to the package selection step.
1 http://docs.redhat.com/
Chapter 5. Installing the virtualization packages
12
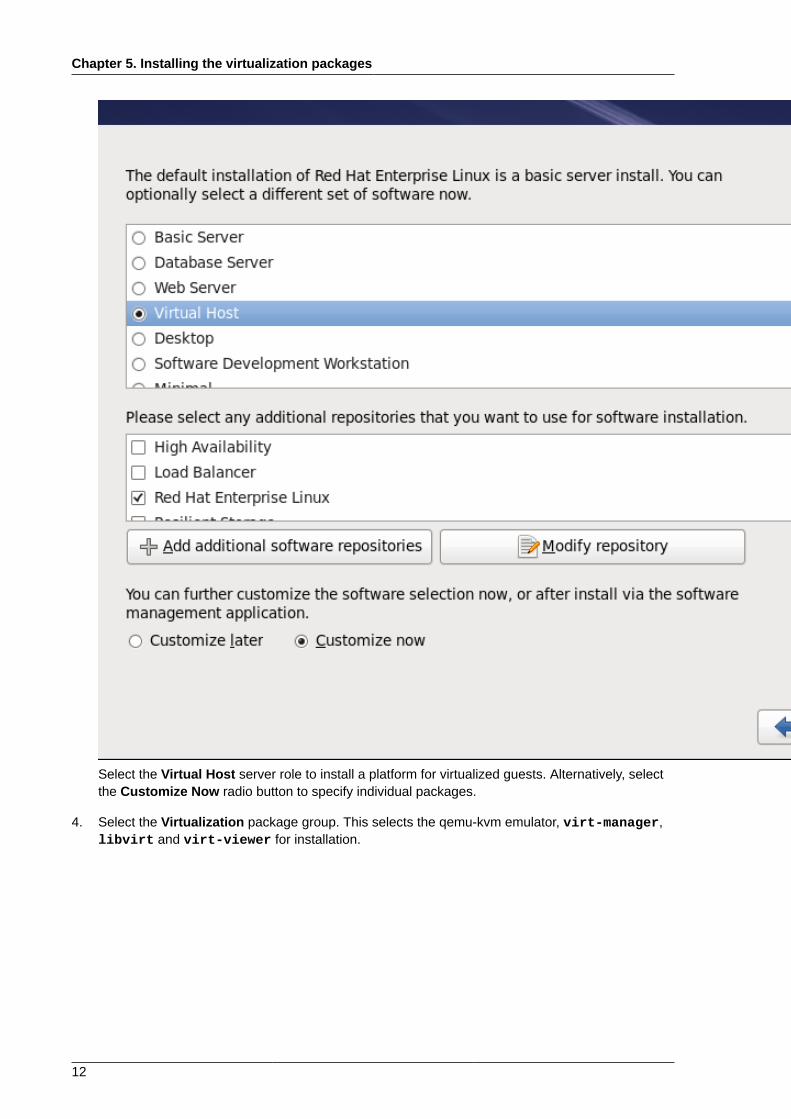
Select the Virtual Host server role to install a platform for virtualized guests. Alternatively, selectthe Customize Now radio button to specify individual packages.
4. Select the Virtualization package group. This selects the qemu-kvm emulator, virt-manager,libvirt and virt-viewer for installation.
Installing KVM with a new Red Hat Enterprise Linux installation
13
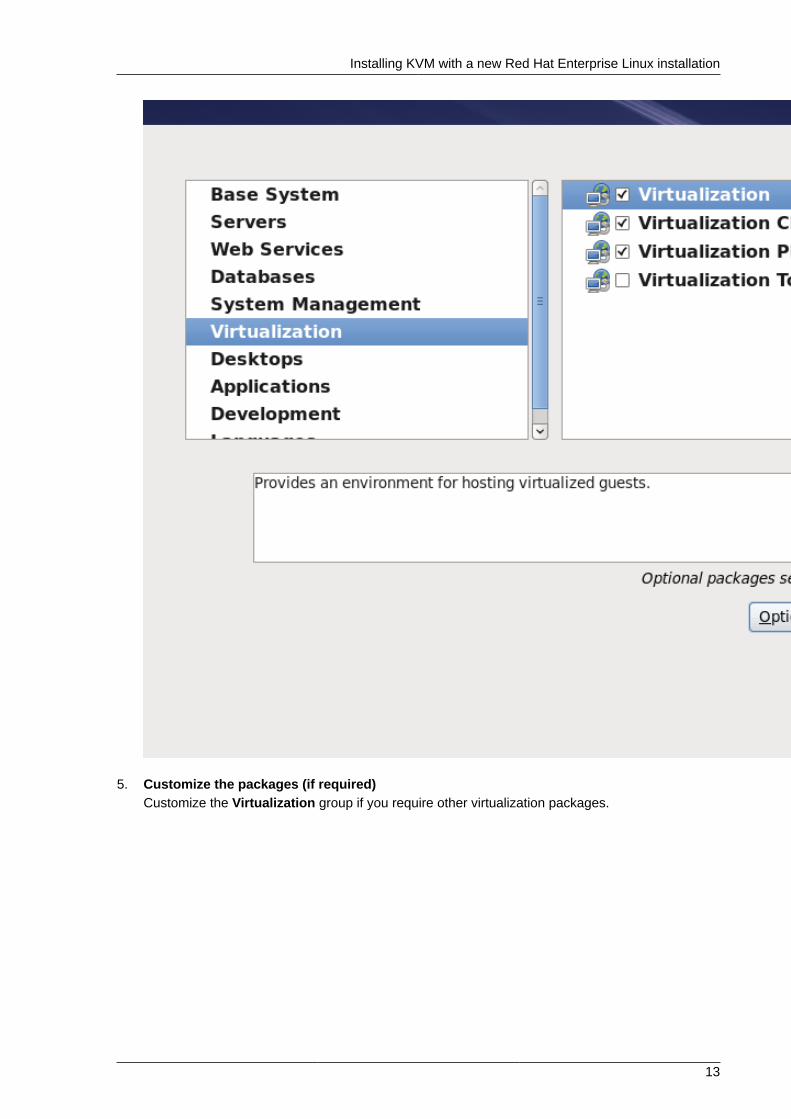
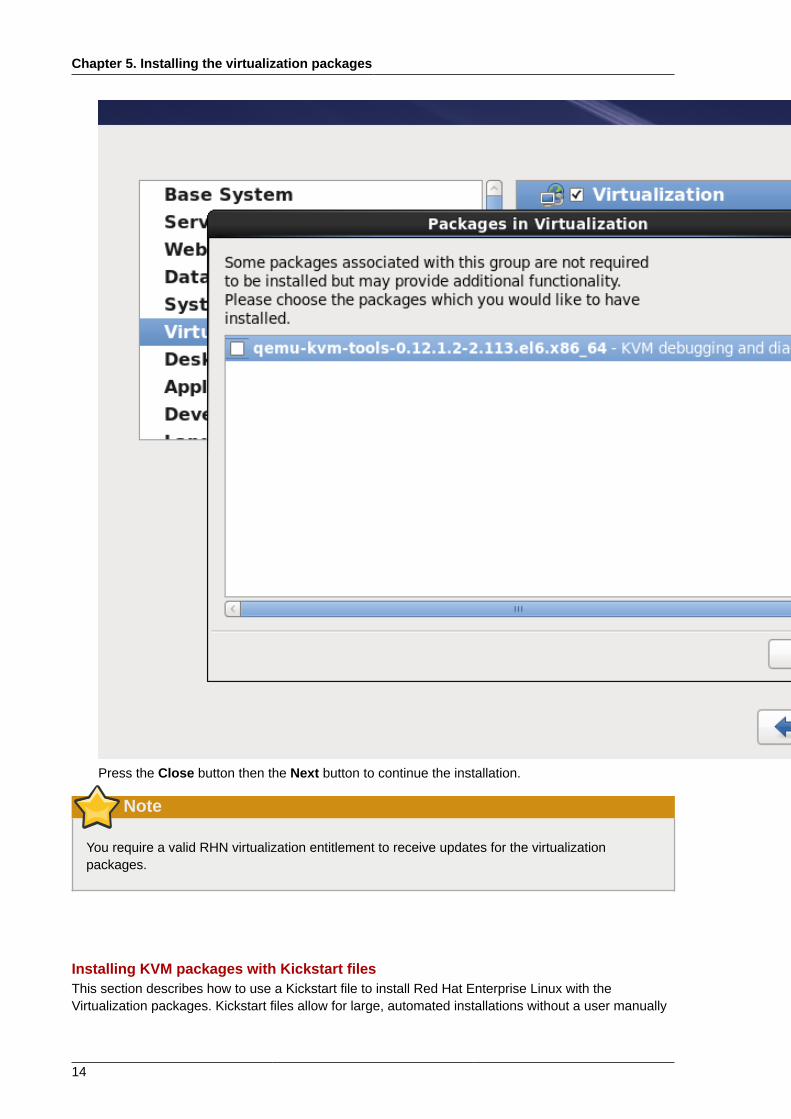
5. Customize the packages (if required)Customize the Virtualization group if you require other virtualization packages.
Chapter 5. Installing the virtualization packages
14
Press the Close button then the Next button to continue the installation.
Note
You require a valid RHN virtualization entitlement to receive updates for the virtualizationpackages.
Installing KVM packages with Kickstart filesThis section describes how to use a Kickstart file to install Red Hat Enterprise Linux with theVirtualization packages. Kickstart files allow for large, automated installations without a user manually

Installing virtualization packages on an existing Red Hat Enterprise Linux system
15
installing each individual host system. The steps in this section will assist you in creating and using aKickstart file to install Red Hat Enterprise Linux with the virtualization packages.
In the %packages section of your Kickstart file, append the following package groups:
@virtualization@virtualization-client@virtualization-platform@virtualization-tools
More information on Kickstart files can be found on Red Hat's website, http://docs.redhat.com, in theInstallation Guide.
5.2. Installing virtualization packages on an existing RedHat Enterprise Linux systemThis section describes the steps for installing the KVM hypervisor on a working Red Hat EnterpriseLinux 6 or newer system.
To install the packages, your machines must be registered. To register an unregistered installation ofRed Hat Enterprise Linux, run the rhn_register command and follow the prompts.
If you do not have a valid Red Hat subscription, visit the Red Hat online store2 to obtain one.
Installing the virtualization packages with yumTo use virtualization on Red Hat Enterprise Linux you require at least the qemu-kvm and qemu-imgpackages. These packages provide the user-level KVM emulator and disk image manager on the hostRed Hat Enterprise Linux system.
To install the qemu-kvm and qemu-img packages, run the following command:
# yum install qemu-kvm qemu-img
Several additional virtualization management packages are also available:
Recommended virtualization packagespython-virtinst
Provides the virt-install command for creating virtual machines.
libvirtThe libvirt package provides the server and host side libraries for interacting with hypervisors andhost systems. The libvirt package provides the libvirtd daemon that handles the library calls,manages virtualized guests and controls the hypervisor.
libvirt-pythonThe libvirt-python package contains a module that permits applications written in the Pythonprogramming language to use the interface supplied by the libvirt API.
virt-managervirt-manager, also known as Virtual Machine Manager, provides a graphical tool foradministering virtual machines. It uses libvirt-client library as the management API.
2 https://www.redhat.com/wapps/store/catalog.html
Chapter 5. Installing the virtualization packages
16
libvirt-clientThe libvirt-client package provides the client-side APIs and libraries for accessing libvirt servers.The libvirt-client package includes the virsh command line tool to manage and control virtualizedguests and hypervisors from the command line or a special virtualization shell.
Install all of these recommended virtualization packages with the following command:
# yum install virt-manager libvirt libvirt-python python-virtinst libvirt-client
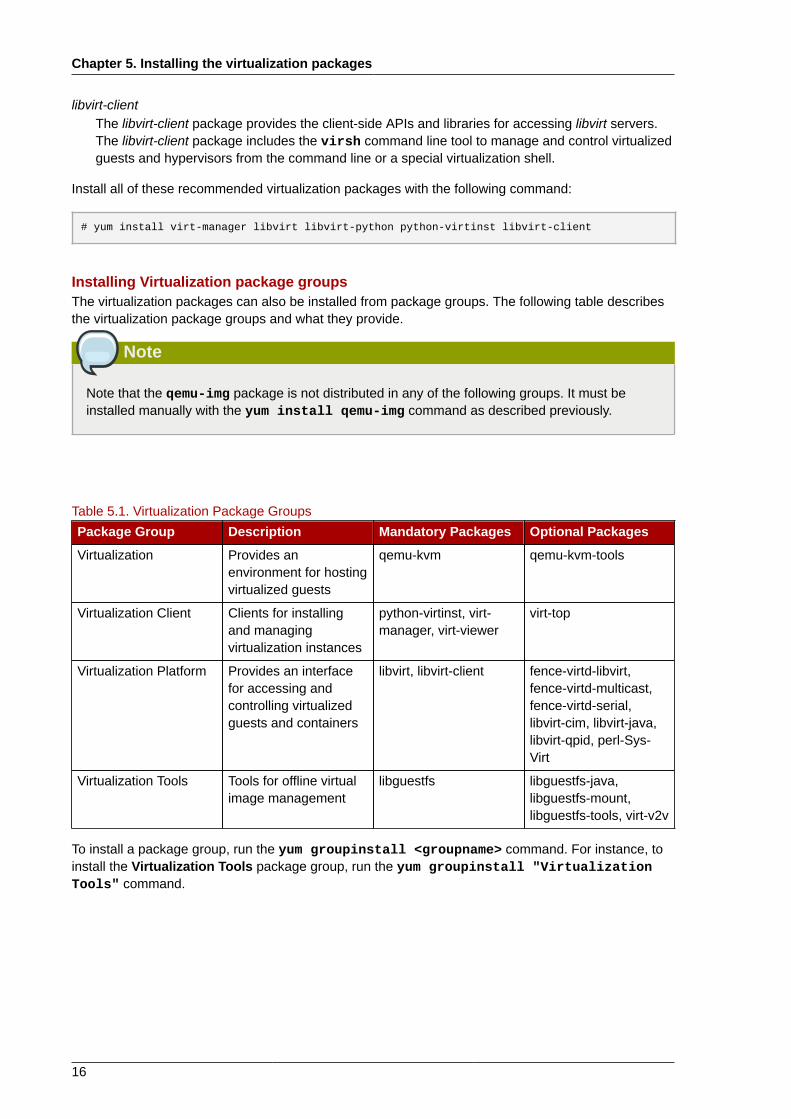
Installing Virtualization package groupsThe virtualization packages can also be installed from package groups. The following table describesthe virtualization package groups and what they provide.
Note
Note that the qemu-img package is not distributed in any of the following groups. It must beinstalled manually with the yum install qemu-img command as described previously.
Table 5.1. Virtualization Package Groups
Package Group Description Mandatory Packages Optional Packages
Virtualization Provides anenvironment for hostingvirtualized guests
qemu-kvm qemu-kvm-tools
Virtualization Client Clients for installingand managingvirtualization instances
python-virtinst, virt-manager, virt-viewer
virt-top
Virtualization Platform Provides an interfacefor accessing andcontrolling virtualizedguests and containers
libvirt, libvirt-client fence-virtd-libvirt,fence-virtd-multicast,fence-virtd-serial,libvirt-cim, libvirt-java,libvirt-qpid, perl-Sys-Virt
Virtualization Tools Tools for offline virtualimage management
libguestfs libguestfs-java,libguestfs-mount,libguestfs-tools, virt-v2v
To install a package group, run the yum groupinstall <groupname> command. For instance, toinstall the Virtualization Tools package group, run the yum groupinstall "VirtualizationTools" command.
Chapter 6.
17
Virtualized guest installation overviewAfter you have installed the virtualization packages on the host system you can create guest operatingsystems. This chapter describes the general processes for installing guest operating systems onvirtual machines. You can create guests using the New button in virt-manager or use the commandline interface virt-install. Both methods are covered by this chapter.
Detailed installation instructions are available in the following chapters for specific versions of Red HatEnterprise Linux and Microsoft Windows.
6.1. Virtualized guest prerequisites and considerationsVarious factors should be considered before creating any virtualized guests. Not only should therole of a virtualized guest be considered before deployment, but regular ongoing monitoring andassessment based on variable factors (load, amount of clients) should be performed. Some factorsinclude:
• Performance - Virtualized guests should be deployed and configured based on their intendedtasks. Some guest systems (for instance, guests running a database server) may require specialperformance considerations. Guests may require more assigned CPUs or memory based on theirrole, and projected system load.
• Input/output requirements and types of input/output - Some guests may have a particularly high I/O requirement or may require further considerations or projections based on the type of I/O (forinstance, typical disk block size access, or the amount of clients).
• Storage - Some guests may require higher priority access to storage, to faster disk types, or mayrequire exclusive access to areas of storage. The amount of storage used by guests should also beregularly monitored and taken into account when deploying and maintaining storage.
• Networking and network infrastructure - Depending upon your environment, some guests couldrequire faster network links than other guests. Bandwidth or latency are often factors whendeploying and maintaining guests, especially as requirements or load changes.
6.2. Creating guests with virt-installYou can use the virt-install command to create virtualized guests from the command line.virt-install is used either interactively or as part of a script to automate the creation of virtualmachines. Using virt-install with Kickstart files allows for unattended installation of virtualmachines.
The virt-install tool provides a number of options that can be passed on the command line. Notethat you need root privileges in order for virt-install commands to complete successfully. To seea complete list of options run the following command:
# virt-install --help
The virt-install man page also documents each command option and important variables.
qemu-img is a related command which may be used before virt-install to configure storageoptions.
An important option is the --vnc option which opens a graphical window for the guest's installation.
Chapter 6. Virtualized guest installation overview
18
Example 6.1. Using virt-install to install a RHEL 5 guestThe following example creates a Red Hat Enterprise Linux 5 guest:
# virt-install \ --name=guest1-rhel5-64 \ --file=/var/lib/libvirt/images/guest1-rhel5-64.dsk \ --file-size=8 \ --nonsparse --vnc \ --vcpus=2 --ram=2048 \ --location=http://example1.com/installation_tree/RHEL5.6-Server-x86_64/os \ --network bridge=br0 \ --os-type=linux \ --os-variant=rhel5.4
Note
When installing a Windows guest with virt-install, the --os-type=windows option isrecommended. This option prevents the CD-ROM from disconnecting when rebooting duringthe installation procedure. The --os-variant option further optimizes the configuration for aspecific guest operating system.
Refer to man virt-install for more examples.
6.3. Creating guests with virt-managervirt-manager, also known as Virtual Machine Manager, is a graphical tool for creating andmanaging virtualized guests.
Procedure 6.1. Creating a virtualized guest with virt-manager1. Open virt-manager
Start virt-manager. Launch the Virtual Machine Manager application from the Applicationsmenu and System Tools submenu. Alternatively, run the virt-manager command as root.
2. Optional: Open a remote hypervisorSelect the hypervisor and press the Connect button to connect to the remote hypervisor.
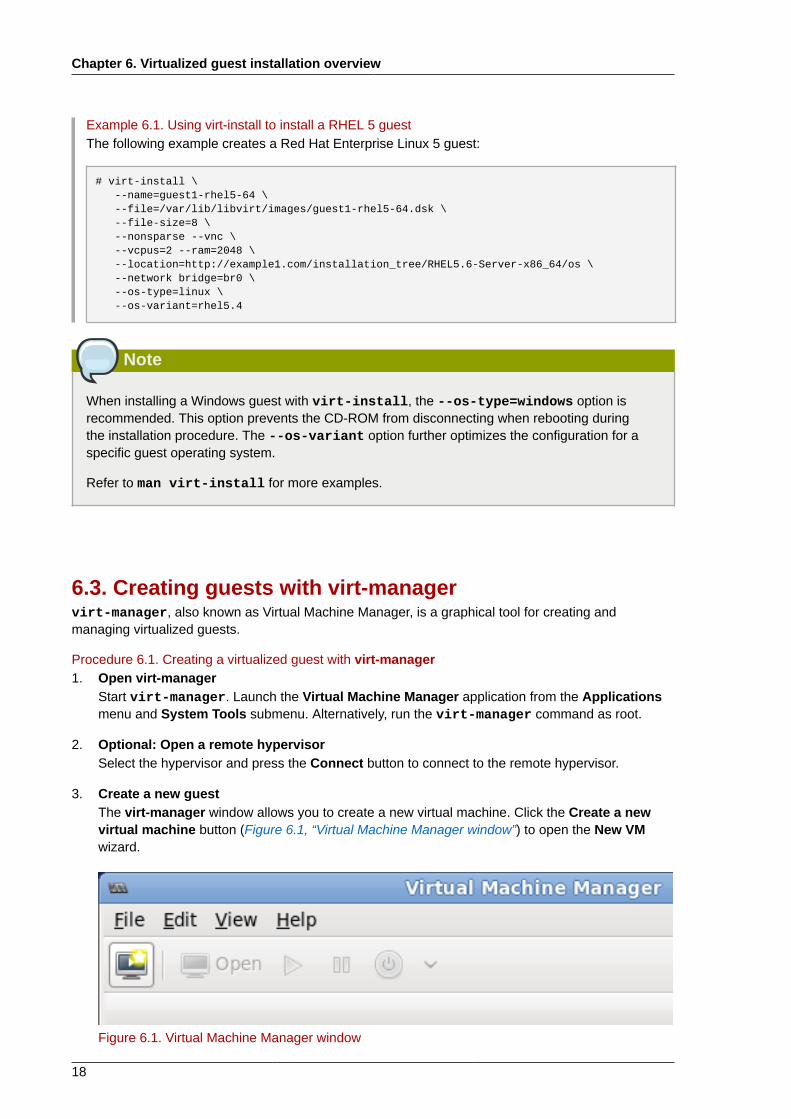
3. Create a new guestThe virt-manager window allows you to create a new virtual machine. Click the Create a newvirtual machine button (Figure 6.1, “Virtual Machine Manager window”) to open the New VMwizard.
Figure 6.1. Virtual Machine Manager window
Creating guests with virt-manager
19
4. New VM wizardThe New VM wizard breaks down the guest creation process into five steps:
1. Naming the guest and choosing the installation type
2. Locating and configuring the installation media
3. Configuring memory and CPU options
4. Configuring the guest's storage
5. Configuring networking, architecture, and other hardware settings
Ensure that virt-manager can access the installation media (whether locally or over thenetwork).
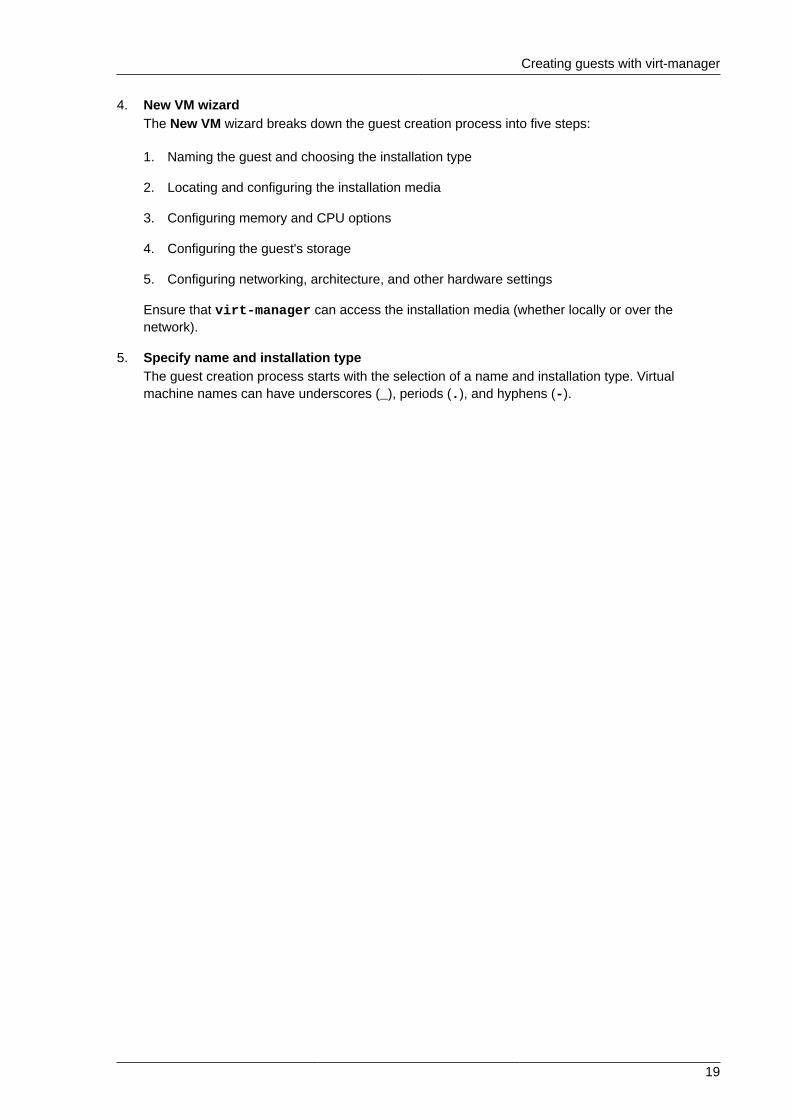
5. Specify name and installation typeThe guest creation process starts with the selection of a name and installation type. Virtualmachine names can have underscores (_), periods (.), and hyphens (-).
Chapter 6. Virtualized guest installation overview
20
Figure 6.2. Name guest and select installation method
Type in a virtual machine name and choose an installation type:
Local install media (ISO image or CDROM)This method uses a CD-ROM, DVD, or image of an installation disk (e.g. .iso).

Creating guests with virt-manager
21
Network Install (HTTP, FTP, or NFS)Network installing involves the use of a mirrored Red Hat Enterprise Linux or Fedorainstallation tree to install a guest. The installation tree must be accessible through eitherHTTP, FTP, or NFS.
Network Boot (PXE)This method uses a Preboot eXecution Environment (PXE) server to install the guest. Settingup a PXE server is covered in the Deployment Guide. To install via network boot, the guestmust have a routable IP address or shared network device. For information on the requirednetworking configuration for PXE installation, refer to Section 6.4, “Installing guests with PXE”.
Import existing disk imageThis method allows you to create a new guest and import a disk image (containing a pre-installed, bootable operating system) to it.
Click Forward to continue.
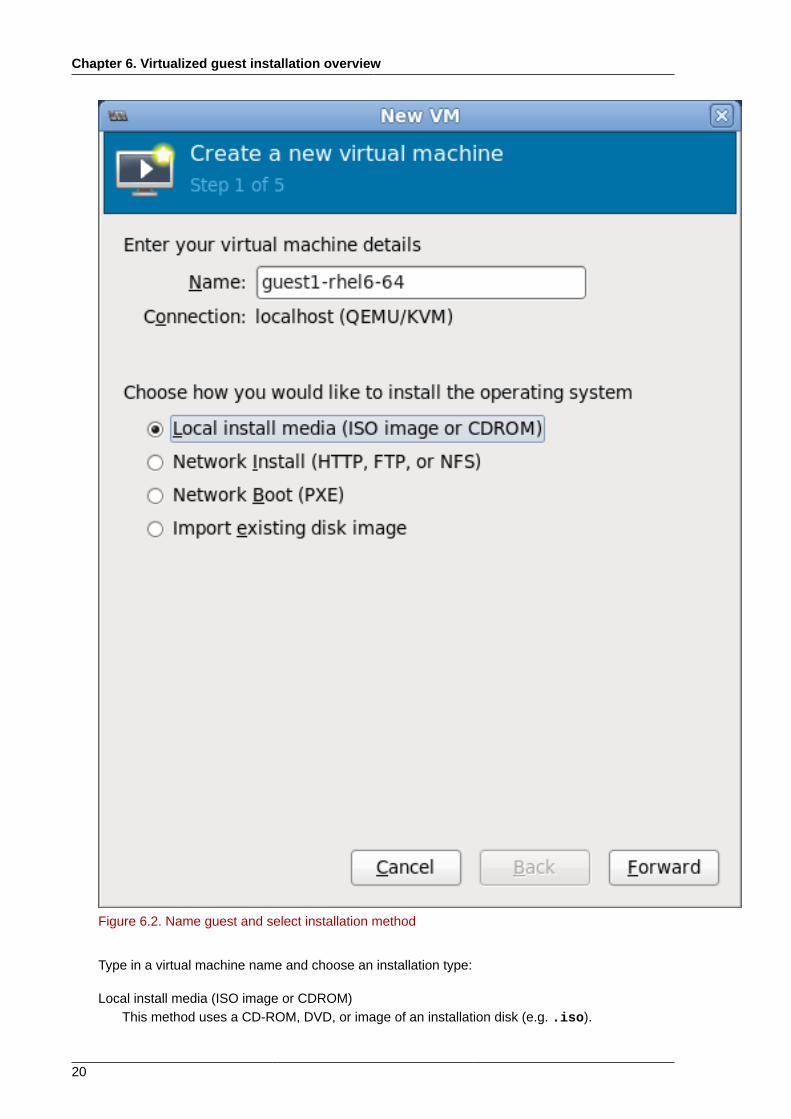
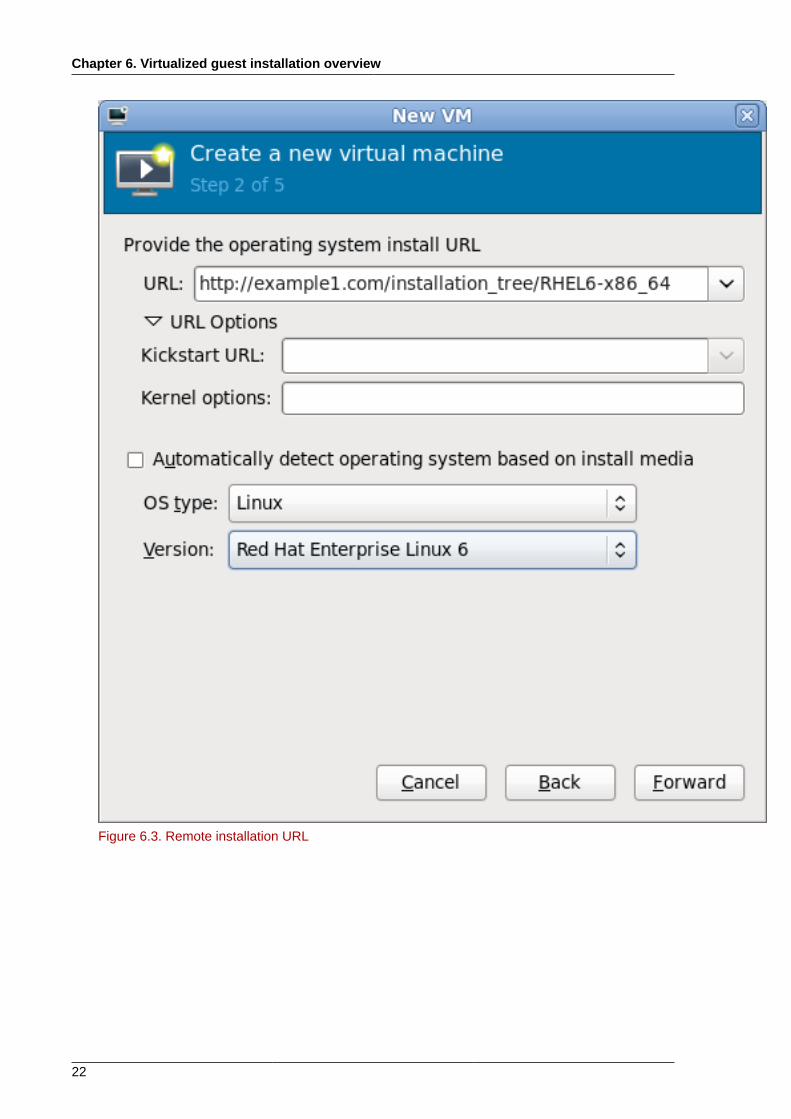
6. Configure installationNext, configure the OS type and Version of the installation. Depending on the method ofinstallation, provide the install URL or existing storage path.
Chapter 6. Virtualized guest installation overview
22
Figure 6.3. Remote installation URL
Creating guests with virt-manager
23
Figure 6.4. Local ISO image installation
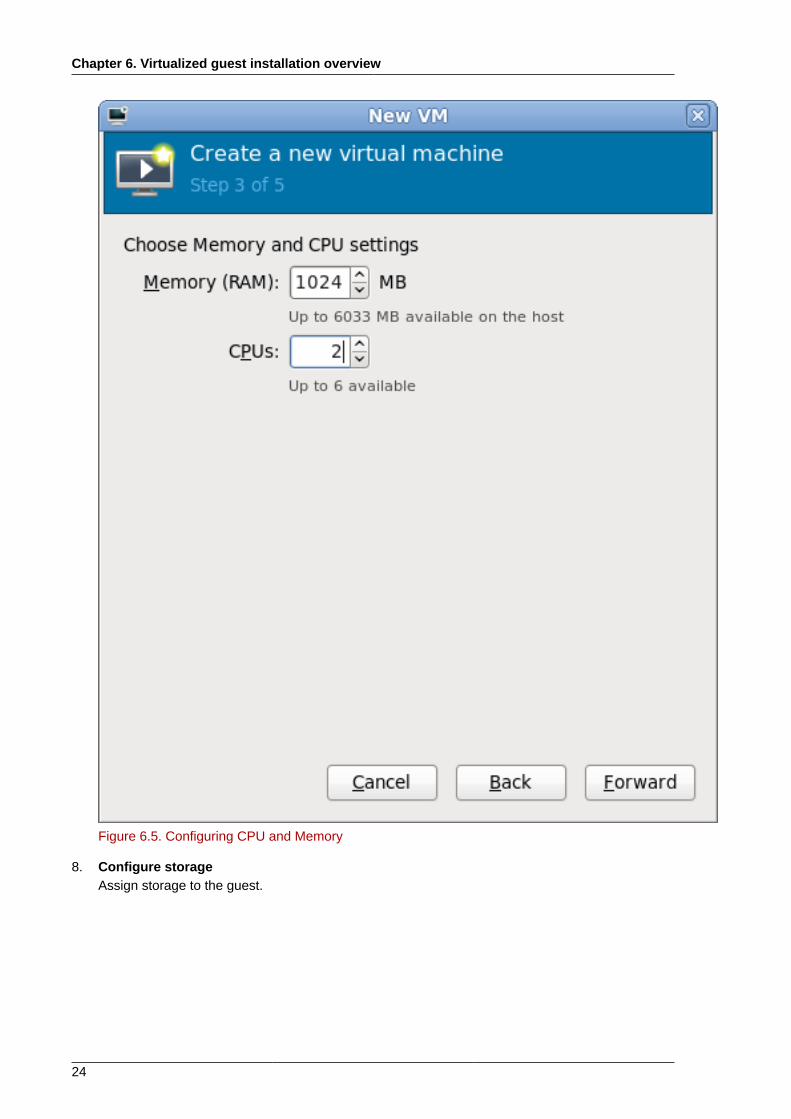
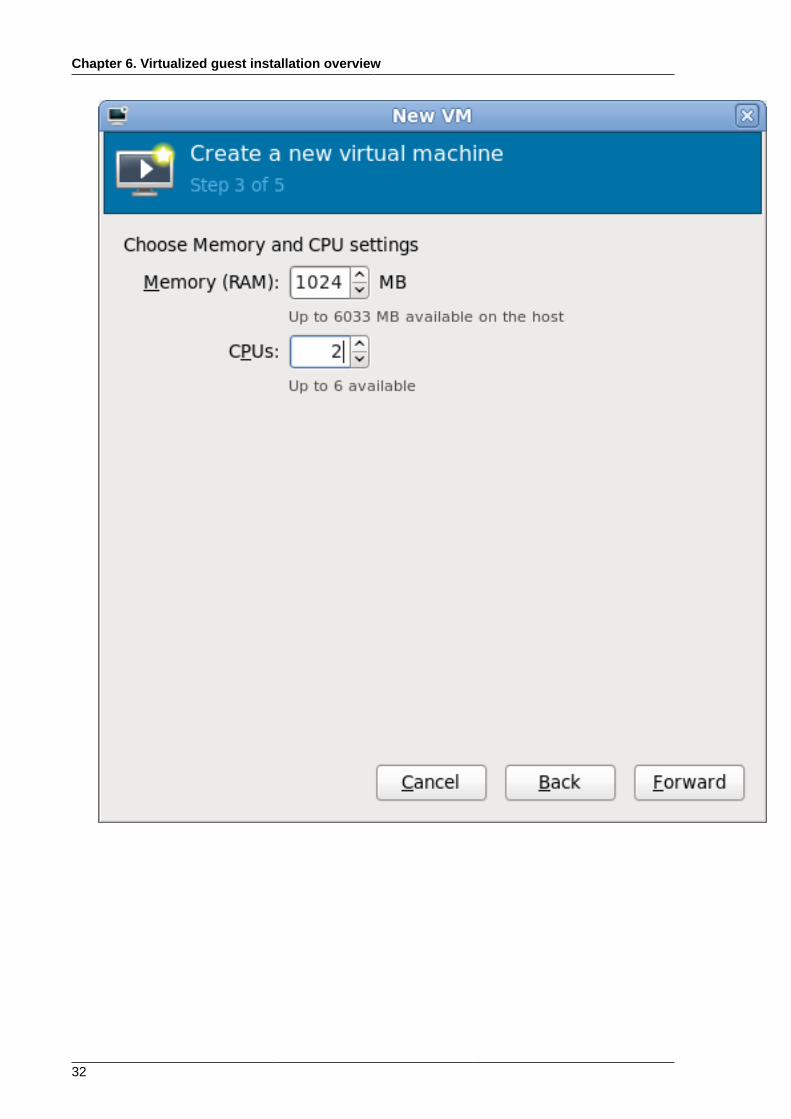
7. Configure CPU and memoryThe next step involves configuring the number of CPUs and amount of memory to allocate to thevirtual machine. The wizard shows the number of CPUs and amount of memory you can allocate;configure these settings and click Forward.
Chapter 6. Virtualized guest installation overview
24
Figure 6.5. Configuring CPU and Memory
8. Configure storageAssign storage to the guest.
Creating guests with virt-manager
25
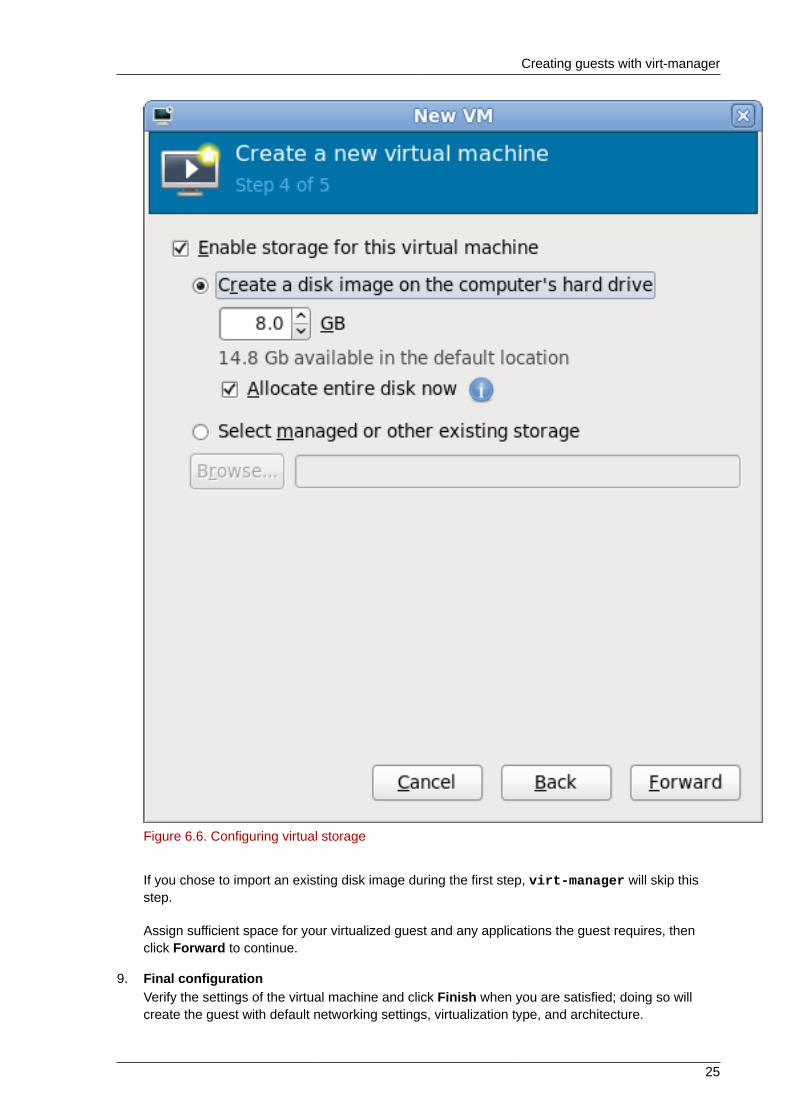
Figure 6.6. Configuring virtual storage
If you chose to import an existing disk image during the first step, virt-manager will skip thisstep.
Assign sufficient space for your virtualized guest and any applications the guest requires, thenclick Forward to continue.
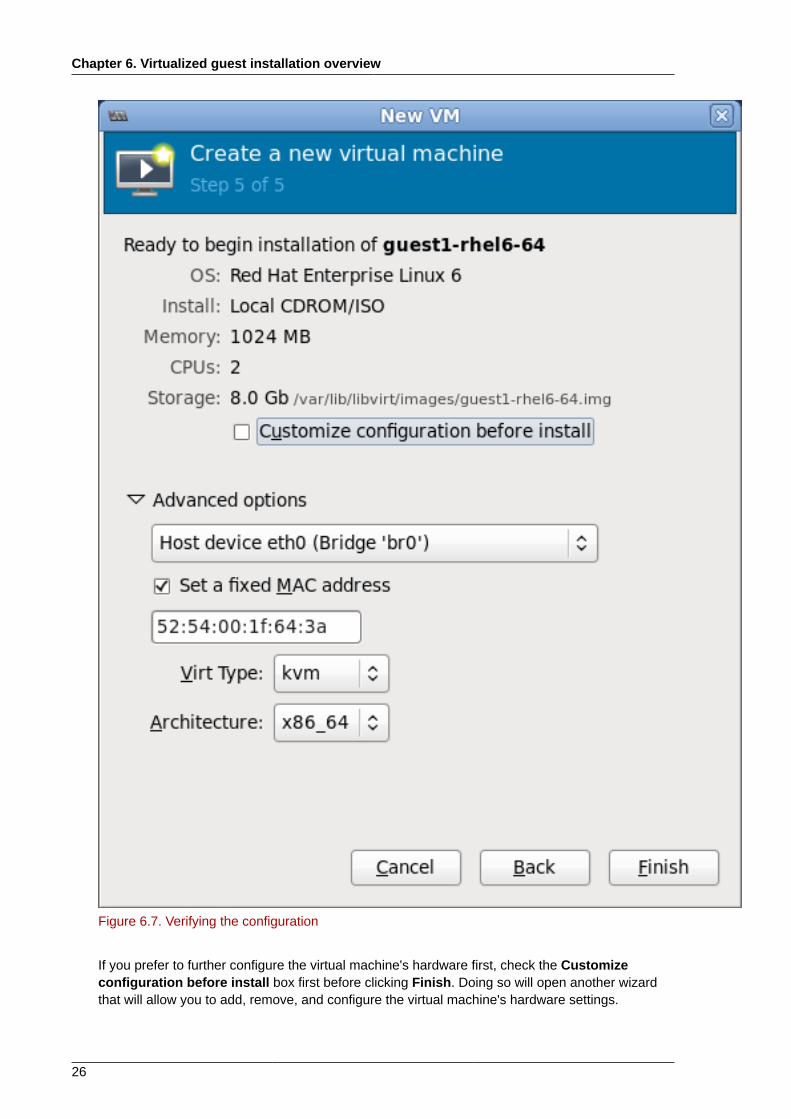
9. Final configurationVerify the settings of the virtual machine and click Finish when you are satisfied; doing so willcreate the guest with default networking settings, virtualization type, and architecture.
Chapter 6. Virtualized guest installation overview
26
Figure 6.7. Verifying the configuration
If you prefer to further configure the virtual machine's hardware first, check the Customizeconfiguration before install box first before clicking Finish. Doing so will open another wizardthat will allow you to add, remove, and configure the virtual machine's hardware settings.
Installing guests with PXE
27
After configuring the virtual machine's hardware, click Apply. virt-manager will then create theguest with your specified hardware settings.
6.4. Installing guests with PXEThis section covers the steps required to install guests with PXE. PXE guest installation requires ashared network device, also known as a network bridge. The procedures below covers creating abridge and the steps required to utilize the bridge for PXE installation.
1. Create a new bridgea. Create a new network script file in the /etc/sysconfig/network-scripts/ directory.
This example creates a file named ifcfg-installation which makes a bridge namedinstallation.
# cd /etc/sysconfig/network-scripts/# vim ifcfg-installationDEVICE=installationTYPE=BridgeBOOTPROTO=dhcpONBOOT=yesDELAY=0
Warning
The line, TYPE=Bridge, is case-sensitive. It must have uppercase 'B' and lower case'ridge'.
b. Start the new bridge by restarting the network service. The ifup installation commandcan start the individual bridge but it is safer to test the entire network restarts properly.
# service network restart
c. There are no interfaces added to the new bridge yet. Use the brctl show command to viewdetails about network bridges on the system.
# brctl showbridge name bridge id STP enabled interfacesinstallation 8000.000000000000 novirbr0 8000.000000000000 yes
The virbr0 bridge is the default bridge used by libvirt for Network Address Translation(NAT) on the default Ethernet device.
2. Add an interface to the new bridgeEdit the configuration file for the interface. Add the BRIDGE parameter to the configuration file withthe name of the bridge created in the previous steps.
# Intel Corporation Gigabit Network ConnectionDEVICE=eth1BRIDGE=installation
Chapter 6. Virtualized guest installation overview
28
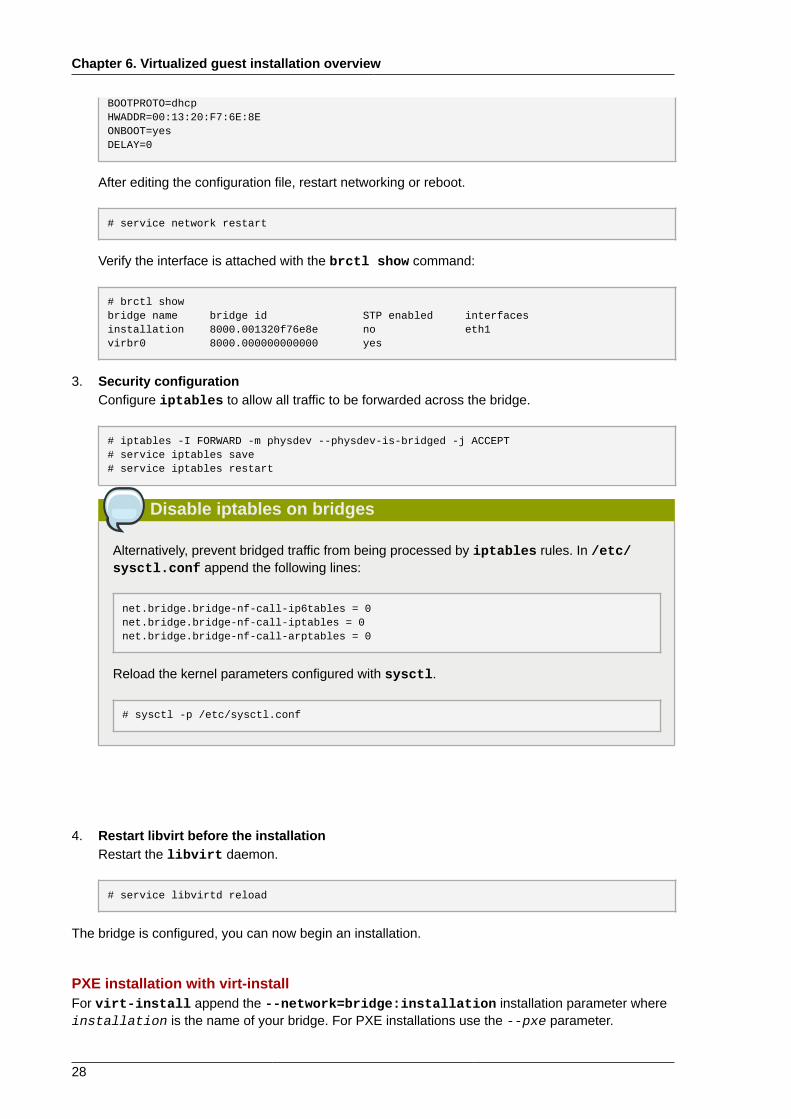
BOOTPROTO=dhcpHWADDR=00:13:20:F7:6E:8EONBOOT=yesDELAY=0
After editing the configuration file, restart networking or reboot.
# service network restart
Verify the interface is attached with the brctl show command:
# brctl showbridge name bridge id STP enabled interfacesinstallation 8000.001320f76e8e no eth1virbr0 8000.000000000000 yes
3. Security configurationConfigure iptables to allow all traffic to be forwarded across the bridge.
# iptables -I FORWARD -m physdev --physdev-is-bridged -j ACCEPT# service iptables save# service iptables restart
Disable iptables on bridges
Alternatively, prevent bridged traffic from being processed by iptables rules. In /etc/sysctl.conf append the following lines:
net.bridge.bridge-nf-call-ip6tables = 0net.bridge.bridge-nf-call-iptables = 0net.bridge.bridge-nf-call-arptables = 0
Reload the kernel parameters configured with sysctl.
# sysctl -p /etc/sysctl.conf
4. Restart libvirt before the installationRestart the libvirt daemon.
# service libvirtd reload
The bridge is configured, you can now begin an installation.
PXE installation with virt-installFor virt-install append the --network=bridge:installation installation parameter whereinstallation is the name of your bridge. For PXE installations use the --pxe parameter.
Installing guests with PXE
29
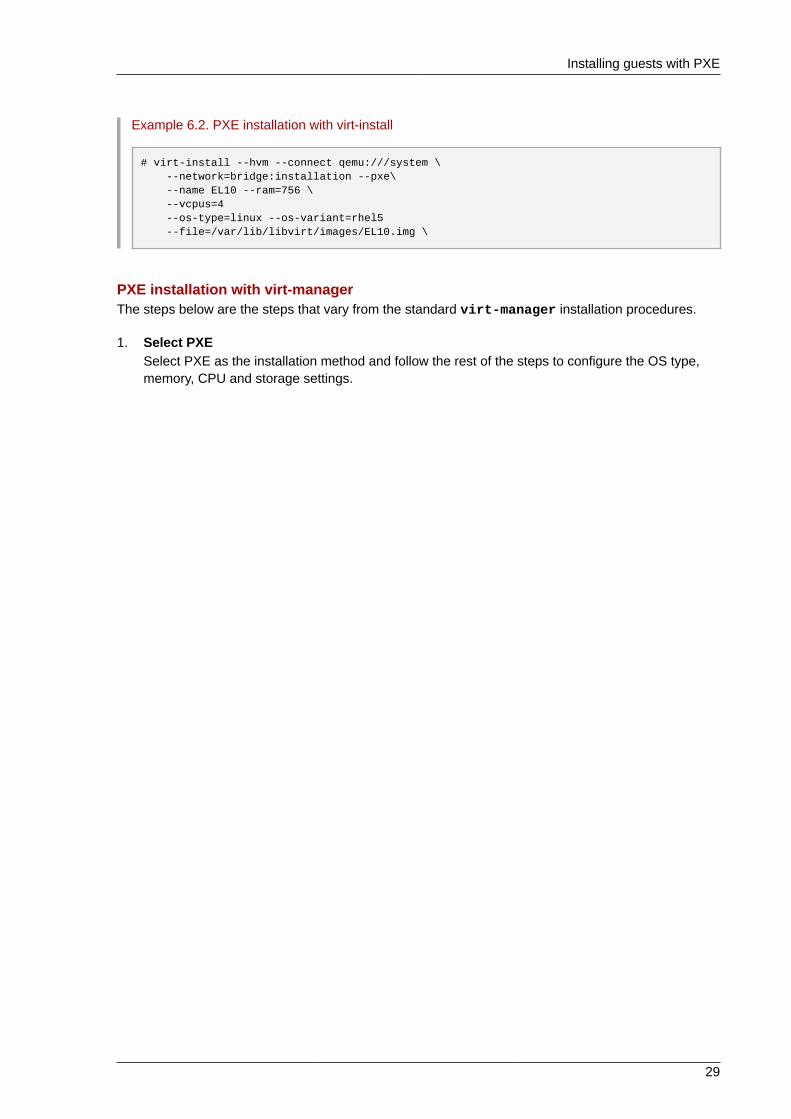
Example 6.2. PXE installation with virt-install
# virt-install --hvm --connect qemu:///system \ --network=bridge:installation --pxe\ --name EL10 --ram=756 \ --vcpus=4 --os-type=linux --os-variant=rhel5 --file=/var/lib/libvirt/images/EL10.img \
PXE installation with virt-managerThe steps below are the steps that vary from the standard virt-manager installation procedures.
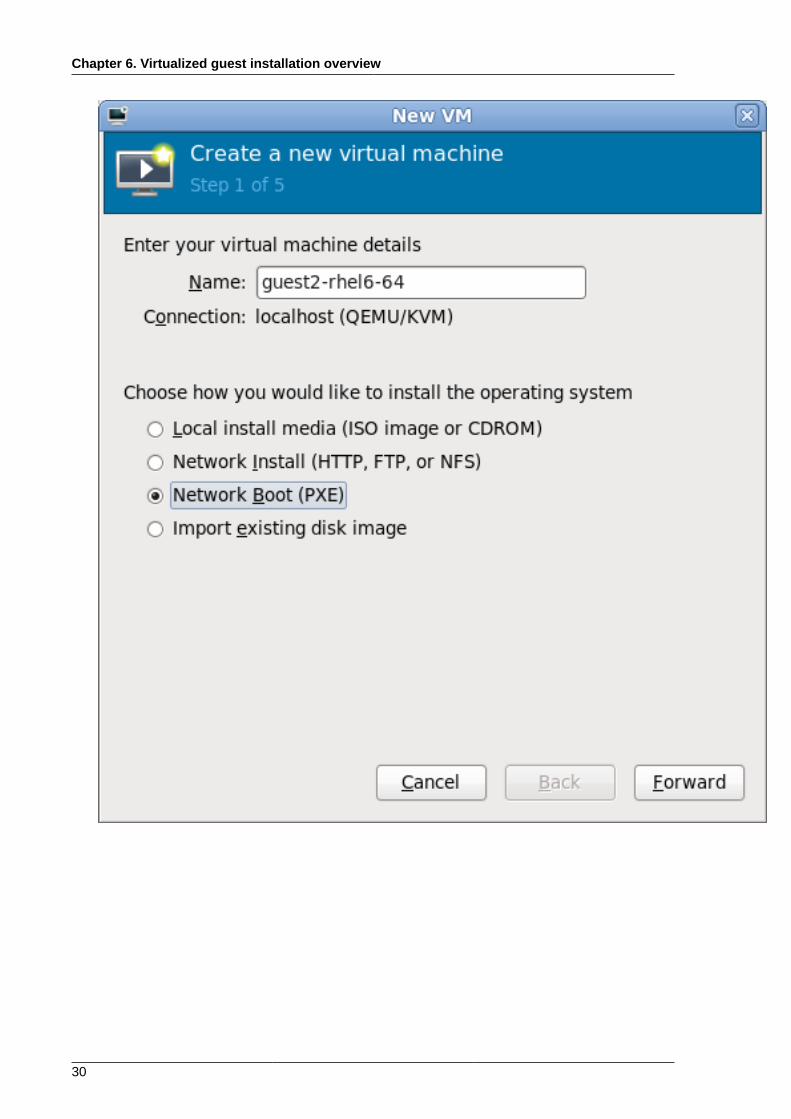
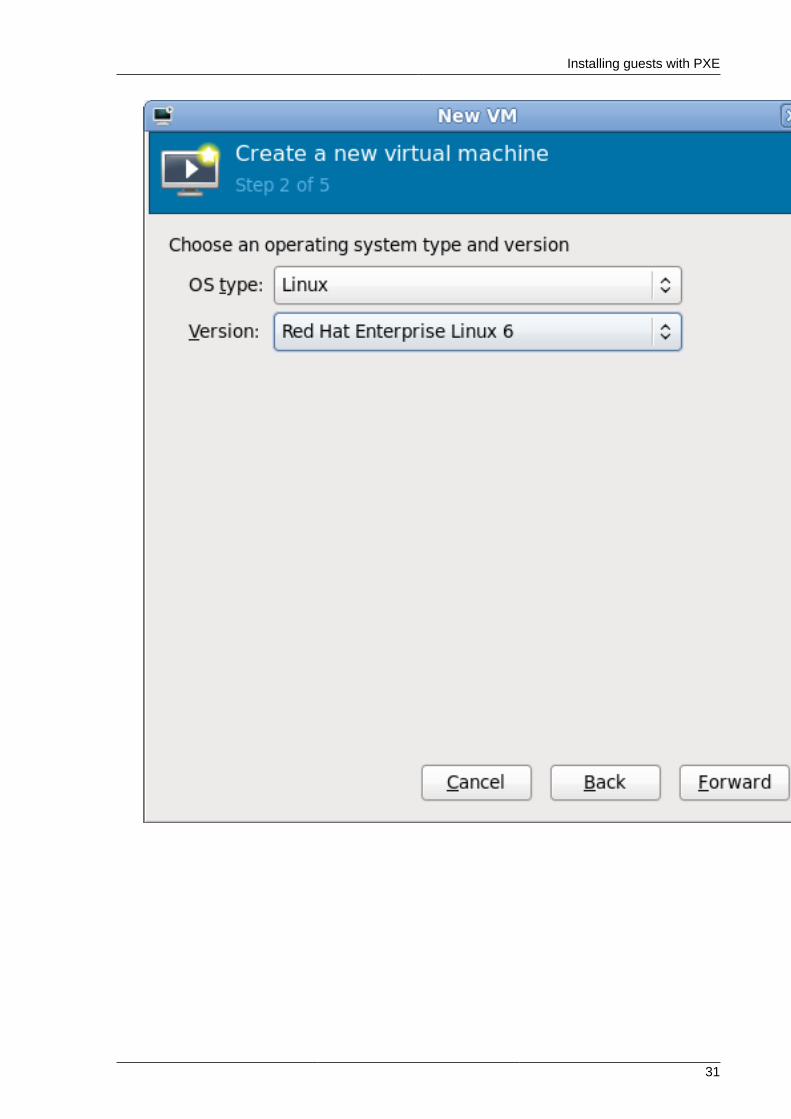
1. Select PXESelect PXE as the installation method and follow the rest of the steps to configure the OS type,memory, CPU and storage settings.
Chapter 6. Virtualized guest installation overview
30
Installing guests with PXE
31
Chapter 6. Virtualized guest installation overview
32
Installing guests with PXE
33
2. Start the installationThe installation is ready to start.
Chapter 6. Virtualized guest installation overview
34
A DHCP request is sent and if a valid PXE server is found the guest installation processes will start.
Chapter 7.
35
Installing Red Hat Enterprise Linux 6as a fully virtualized guest on Red HatEnterprise Linux 6This chapter covers how to install Red Hat Enterprise Linux 6 as a fully virtualized guest on a Red HatEnterprise Linux 6 host.
These procedures assume that the KVM hypervisor and all other required packages are installed andthe host is configured for virtualization.
Note
For more information on installing the virtualization packages, refer to Chapter 5, Installing thevirtualization packages.
7.1. Creating a Red Hat Enterprise Linux 6 guest with localinstallation mediaThis procedure covers creating a virtualized Red Hat Enterprise Linux 6 guest with a locally storedinstallation DVD or DVD image. DVD images are available from rhn.redhat.com1 for Red HatEnterprise Linux 6.
Procedure 7.1. Creating a Red Hat Enterprise Linux 6 guest with virt-manager1. Optional: Preparation
Prepare the storage environment for the virtualized guest. For more information on preparingstorage, refer to the Red Hat Enterprise Linux 6 Virtualization Administration Guide.
Note
Various storage types may be used for storing virtualized guests. However, for a guest to beable to use migration features the guest must be created on networked storage.
Red Hat Enterprise Linux 6 requires at least 1GB of storage space. However, Red Hatrecommends at least 5GB of storage space for a Red Hat Enterprise Linux 6 installation and forthe procedures in this guide.
2. Open virt-manager and start the wizardOpen virt-manager by executing the virt-manager command as root or opening Applications -> System Tools -> Virtual Machine Manager.
1 http://rhn.redhat.com
Chapter 7. Installing Red Hat Enterprise Linux 6 as a fully virtualized guest on Red Hat Enterprise Linux 6
36
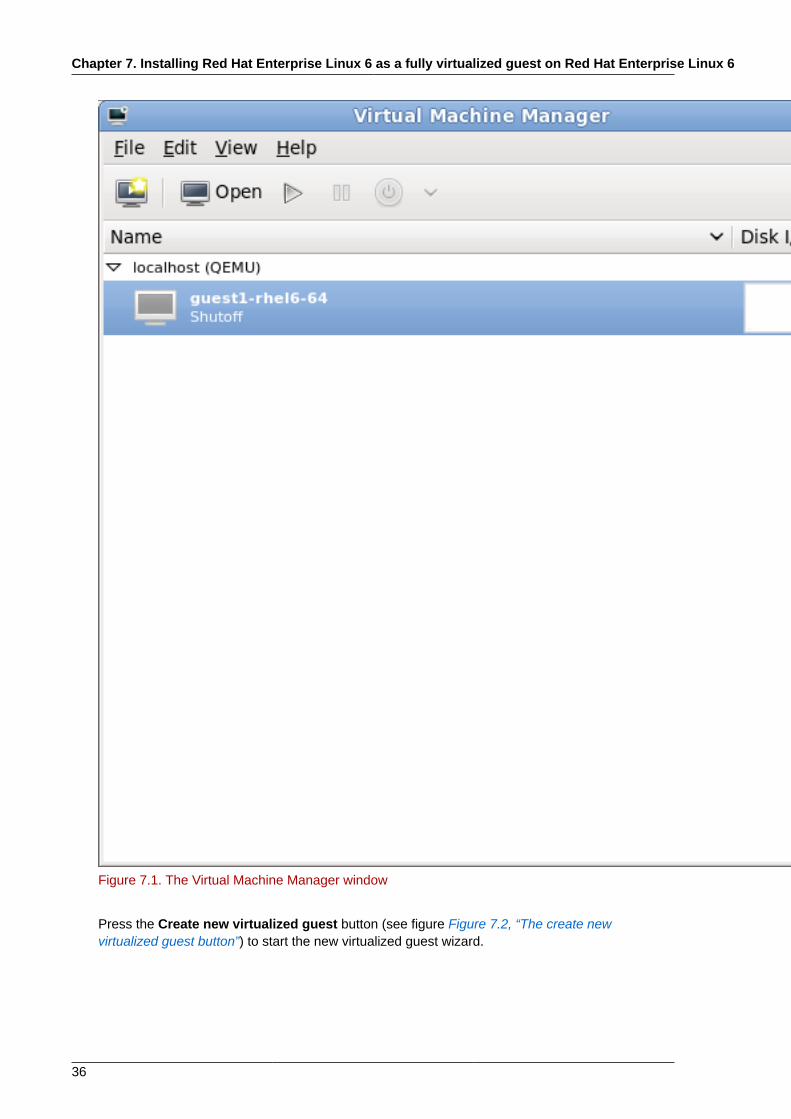
Figure 7.1. The Virtual Machine Manager window
Press the Create new virtualized guest button (see figure Figure 7.2, “The create newvirtualized guest button”) to start the new virtualized guest wizard.

Creating a Red Hat Enterprise Linux 6 guest with local installation media
37
Figure 7.2. The create new virtualized guest button
The New VM window opens.
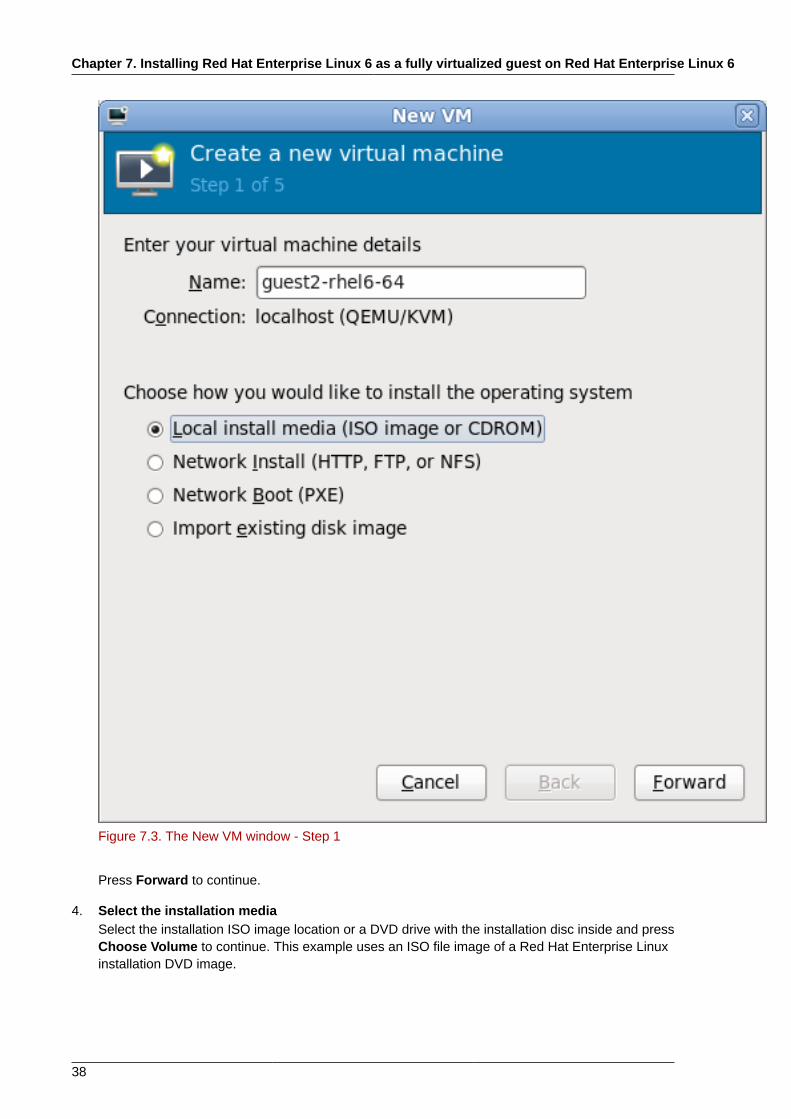
3. Name the virtualized guestGuest names can contain letters, numbers and the following characters: '_', '.' and '-'. Guestnames must be unique for migration.
Choose the Local install media (ISO image or CDROM) radio button.
Chapter 7. Installing Red Hat Enterprise Linux 6 as a fully virtualized guest on Red Hat Enterprise Linux 6
38
Figure 7.3. The New VM window - Step 1
Press Forward to continue.
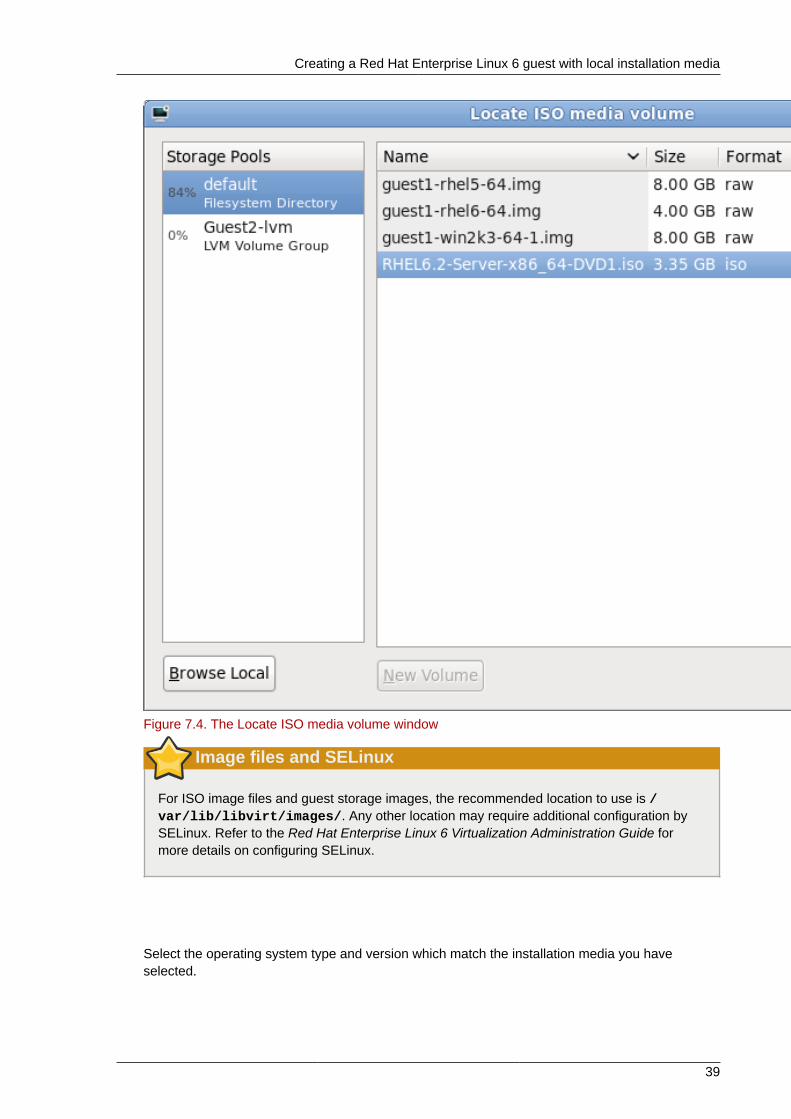
4. Select the installation mediaSelect the installation ISO image location or a DVD drive with the installation disc inside and pressChoose Volume to continue. This example uses an ISO file image of a Red Hat Enterprise Linuxinstallation DVD image.
Creating a Red Hat Enterprise Linux 6 guest with local installation media
39
Figure 7.4. The Locate ISO media volume window
Image files and SELinux
For ISO image files and guest storage images, the recommended location to use is /var/lib/libvirt/images/. Any other location may require additional configuration bySELinux. Refer to the Red Hat Enterprise Linux 6 Virtualization Administration Guide formore details on configuring SELinux.
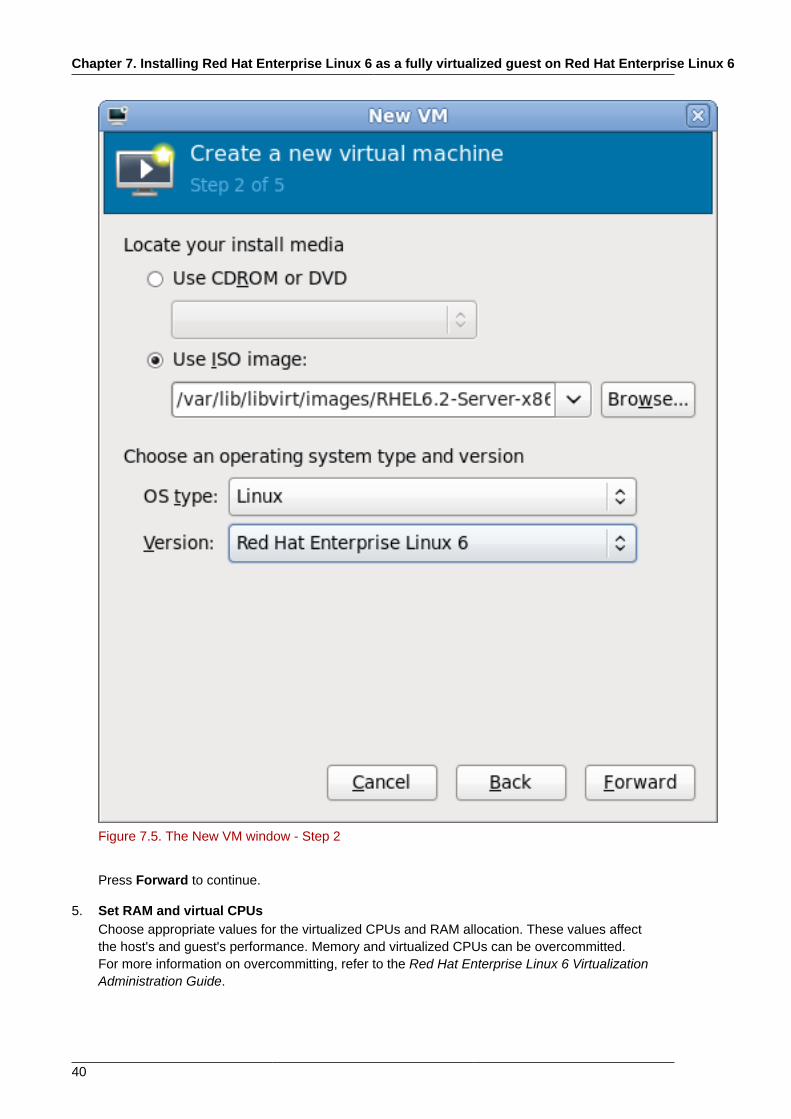
Select the operating system type and version which match the installation media you haveselected.
Chapter 7. Installing Red Hat Enterprise Linux 6 as a fully virtualized guest on Red Hat Enterprise Linux 6
40
Figure 7.5. The New VM window - Step 2
Press Forward to continue.
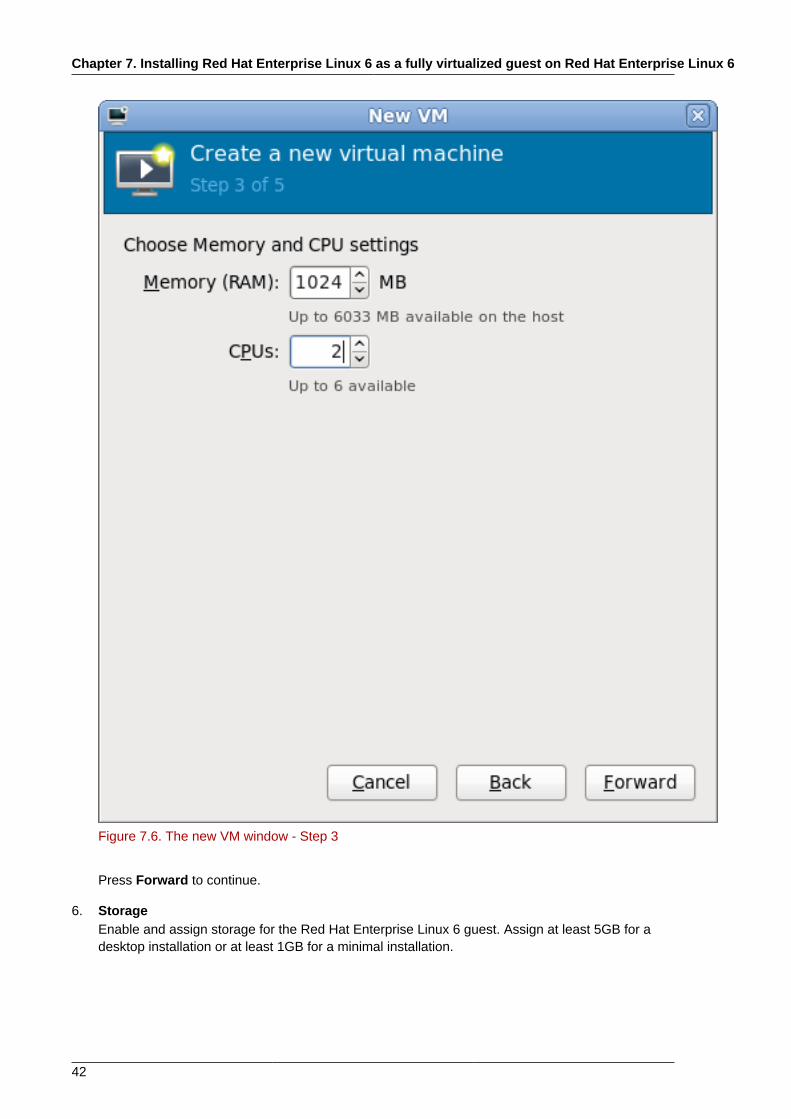
5. Set RAM and virtual CPUsChoose appropriate values for the virtualized CPUs and RAM allocation. These values affectthe host's and guest's performance. Memory and virtualized CPUs can be overcommitted.For more information on overcommitting, refer to the Red Hat Enterprise Linux 6 VirtualizationAdministration Guide.

Creating a Red Hat Enterprise Linux 6 guest with local installation media
41
Virtualized guests require sufficient physical memory (RAM) to run efficiently and effectively. RedHat supports a minimum of 512MB of RAM for a virtualized guest. Red Hat recommends at least1024MB of RAM for each logical core.
Assign sufficient virtual CPUs for the virtualized guest. If the guest runs a multithreadedapplication, assign the number of virtualized CPUs the guest will require to run efficiently.
You cannot assign more virtual CPUs than there are physical processors (or hyper-threads)available on the host system. The number of virtual CPUs available is noted in the Up to Xavailable field.
Chapter 7. Installing Red Hat Enterprise Linux 6 as a fully virtualized guest on Red Hat Enterprise Linux 6
42
Figure 7.6. The new VM window - Step 3
Press Forward to continue.
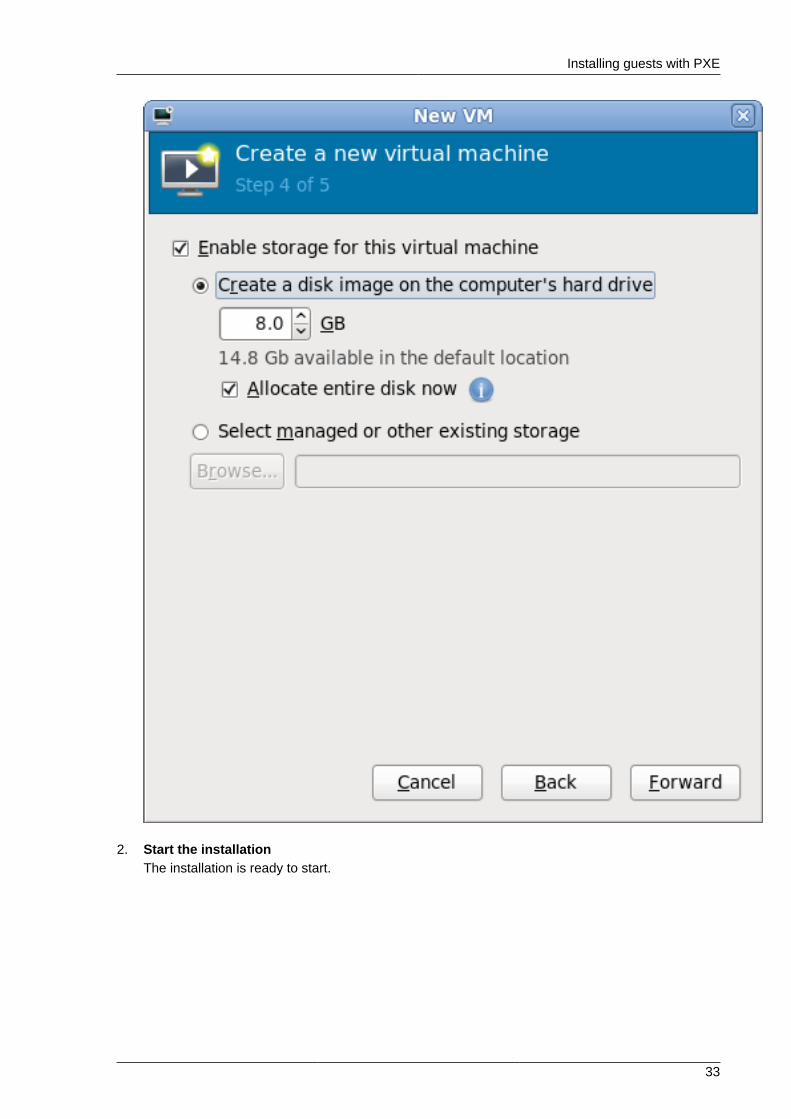
6. StorageEnable and assign storage for the Red Hat Enterprise Linux 6 guest. Assign at least 5GB for adesktop installation or at least 1GB for a minimal installation.
Creating a Red Hat Enterprise Linux 6 guest with local installation media
43
Migration
Live and offline migrations require guests to be installed on shared network storage. Forinformation on setting up shared storage for guests refer to the Red Hat Enterprise LinuxVirtualization Administration Guide.
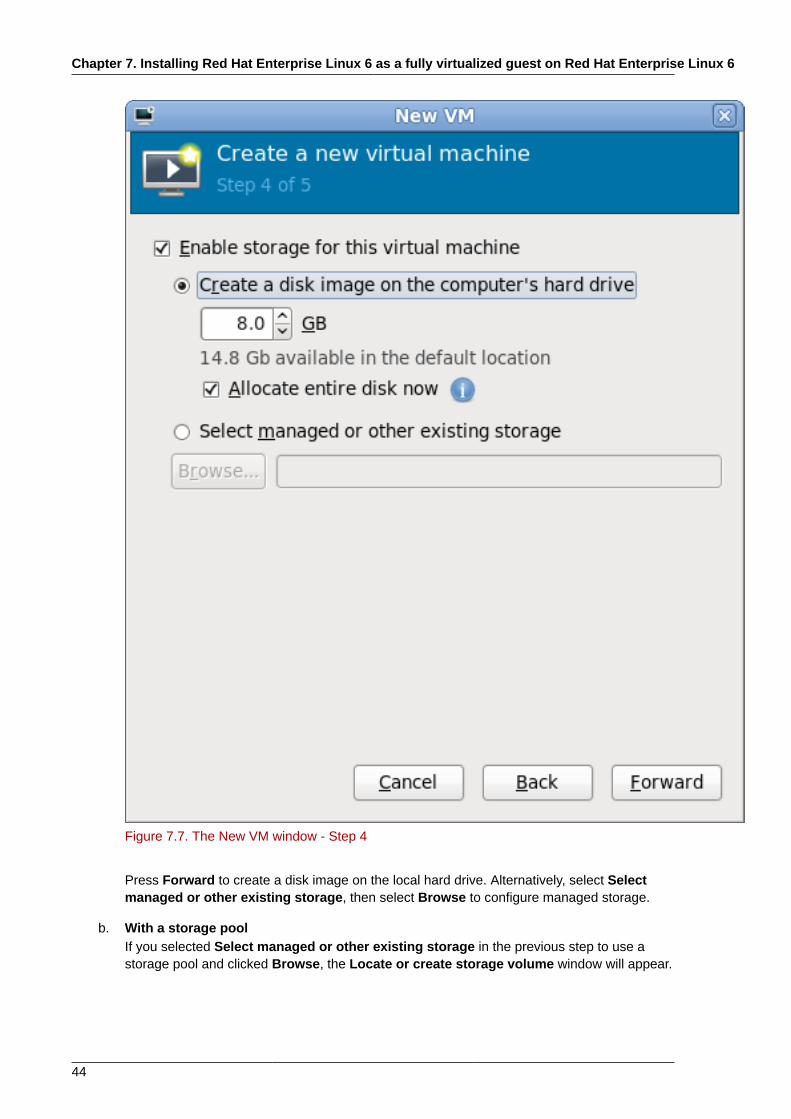
a. With the default local storageSelect the Create a disk image on the computer's hard drive radio button to create afile-based image in the default storage pool, the /var/lib/libvirt/images/ directory.Enter the size of the disk image to be created. If the Allocate entire disk now check box isselected, a disk image of the size specified will be created immediately. If not, the disk imagewill grow as it becomes filled.
Chapter 7. Installing Red Hat Enterprise Linux 6 as a fully virtualized guest on Red Hat Enterprise Linux 6
44
Figure 7.7. The New VM window - Step 4
Press Forward to create a disk image on the local hard drive. Alternatively, select Selectmanaged or other existing storage, then select Browse to configure managed storage.
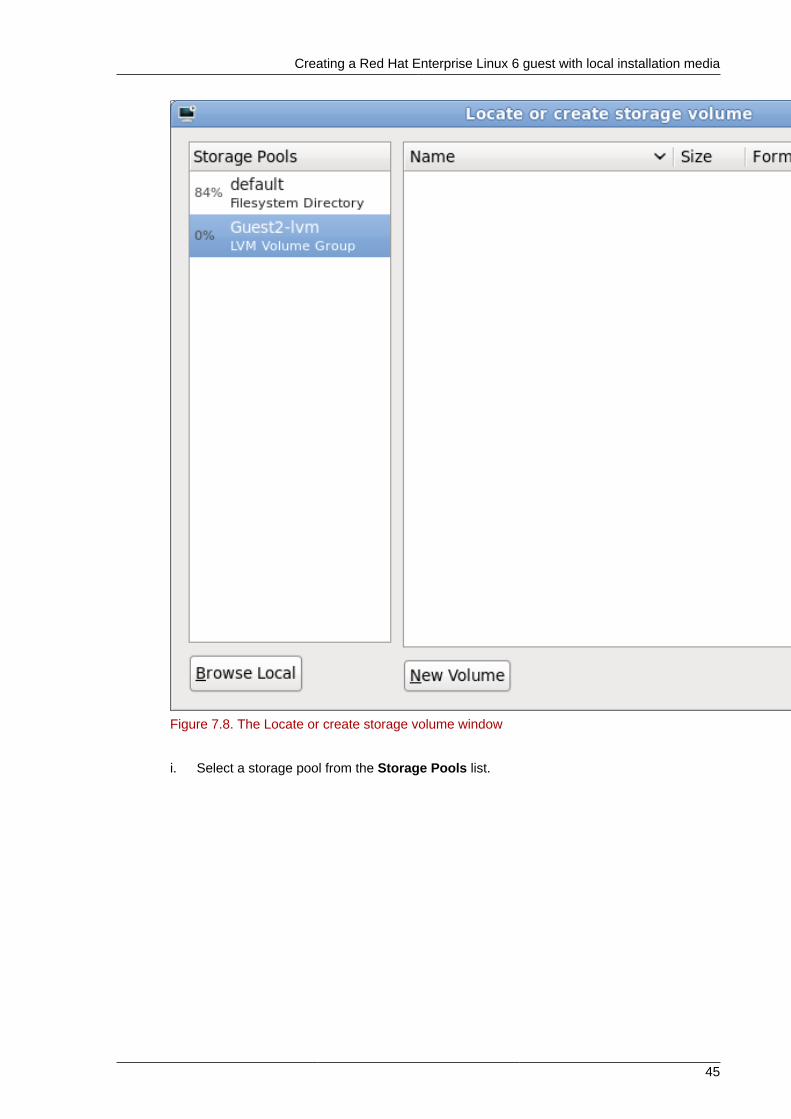
b. With a storage poolIf you selected Select managed or other existing storage in the previous step to use astorage pool and clicked Browse, the Locate or create storage volume window will appear.
Creating a Red Hat Enterprise Linux 6 guest with local installation media
45
Figure 7.8. The Locate or create storage volume window
i. Select a storage pool from the Storage Pools list.

Chapter 7. Installing Red Hat Enterprise Linux 6 as a fully virtualized guest on Red Hat Enterprise Linux 6
46
ii. Optional: Press the New Volume button to create a new storage volume. The Add aStorage Volume screen will appear. Enter the name of the new storage volume.
Figure 7.9. The Add a Storage Volume window
Press Finish to continue.
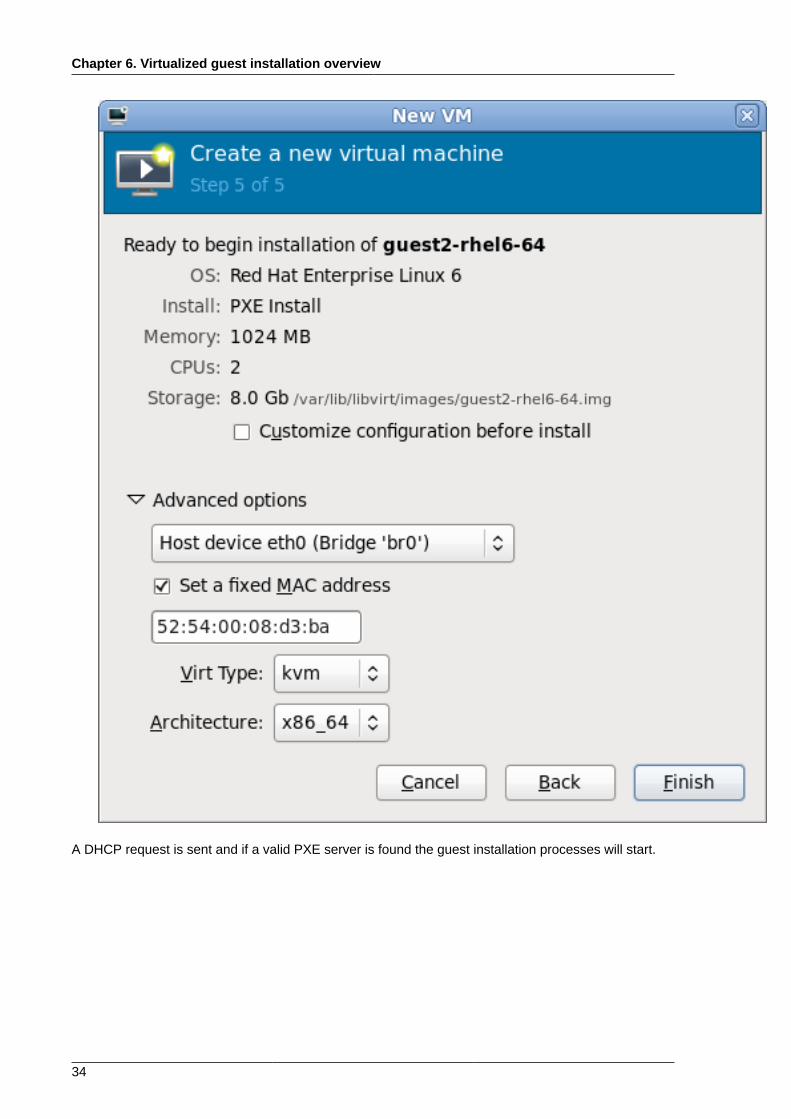
7. Verify and finishVerify there were no errors made during the wizard and everything appears as expected.
Select the Customize configuration before install check box to change the guest's storage ornetwork devices, to use the para-virtualized drivers or, to add additional devices.
Press the Advanced options down arrow to inspect and modify advanced options. For a standardRed Hat Enterprise Linux 6 none of these options require modification.
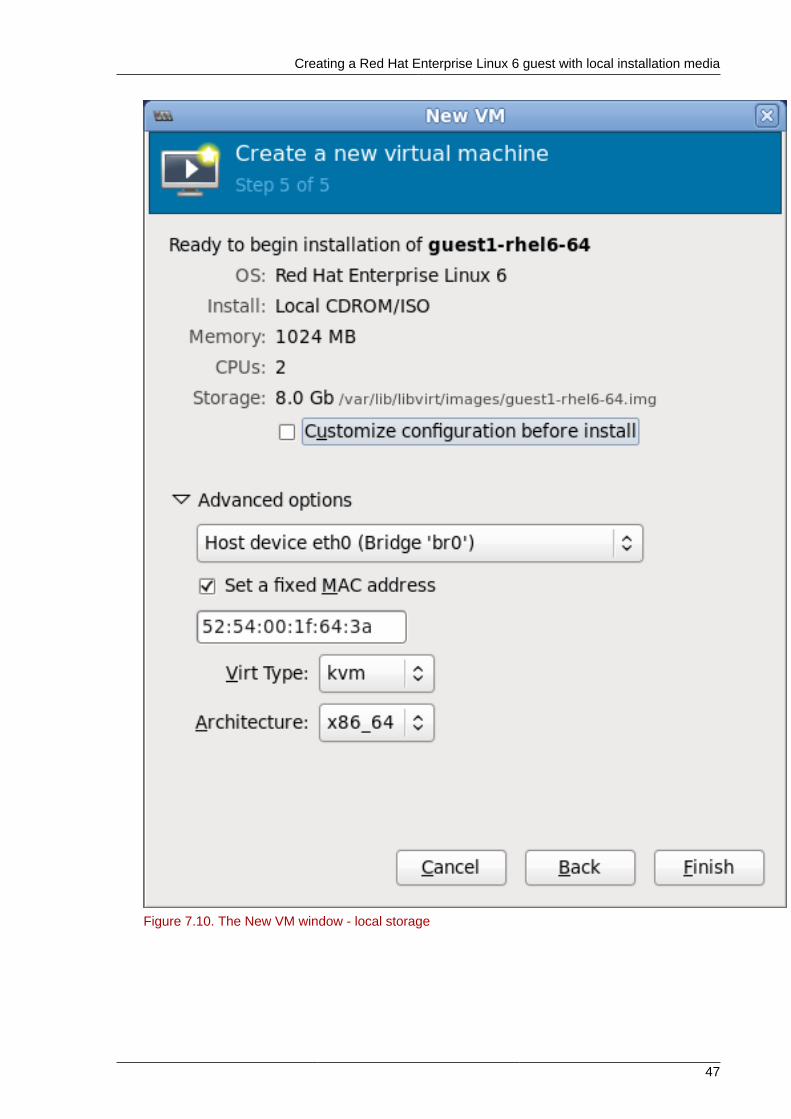
Creating a Red Hat Enterprise Linux 6 guest with local installation media
47
Figure 7.10. The New VM window - local storage
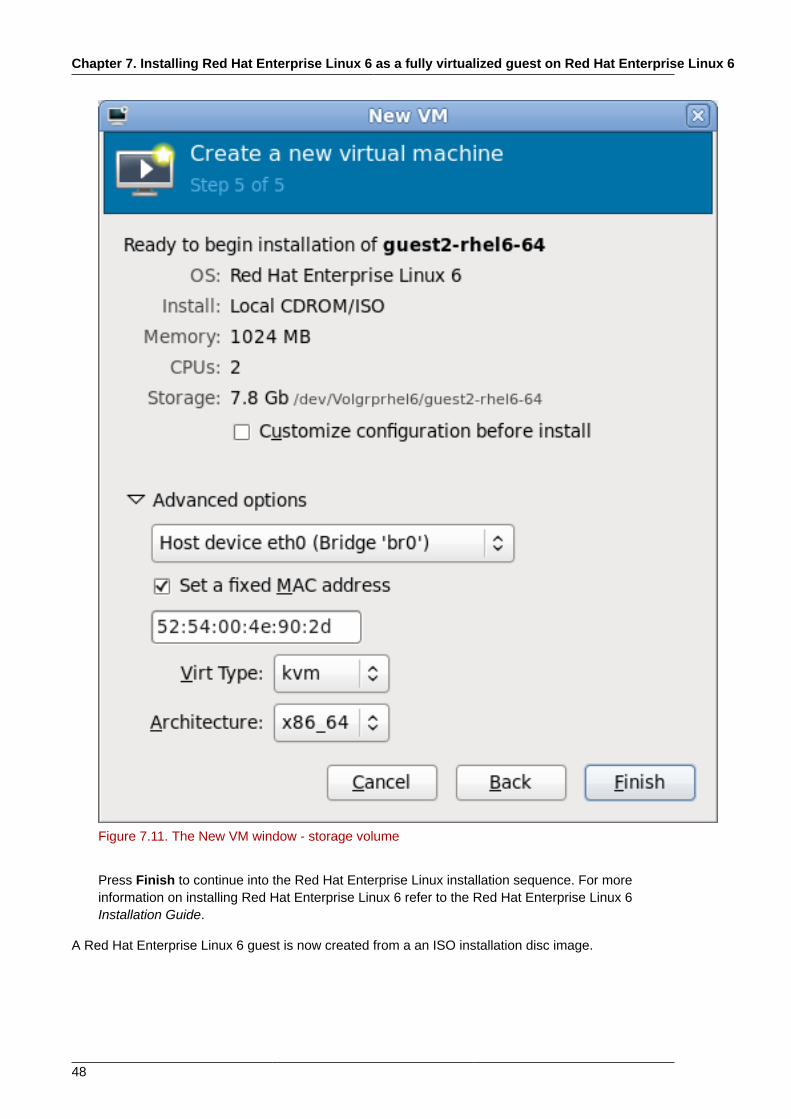
Chapter 7. Installing Red Hat Enterprise Linux 6 as a fully virtualized guest on Red Hat Enterprise Linux 6
48
Figure 7.11. The New VM window - storage volume
Press Finish to continue into the Red Hat Enterprise Linux installation sequence. For moreinformation on installing Red Hat Enterprise Linux 6 refer to the Red Hat Enterprise Linux 6Installation Guide.
A Red Hat Enterprise Linux 6 guest is now created from a an ISO installation disc image.
Creating a Red Hat Enterprise Linux 6 guest with a network installation tree
49
7.2. Creating a Red Hat Enterprise Linux 6 guest with anetwork installation tree
Procedure 7.2. Creating a Red Hat Enterprise Linux 6 guest with virt-manager1. Optional: Preparation
Prepare the storage environment for the virtualized guest. For more information on preparingstorage, refer to the Red Hat Enterprise Linux 6 Virtualization Administration Guide.
Note
Various storage types may be used for storing virtualized guests. However, for a guest to beable to use migration features the guest must be created on networked storage.
Red Hat Enterprise Linux 6 requires at least 1GB of storage space. However, Red Hatrecommends at least 5GB of storage space for a Red Hat Enterprise Linux 6 installation and forthe procedures in this guide.
2. Open virt-manager and start the wizardOpen virt-manager by executing the virt-manager command as root or opening Applications -> System Tools -> Virtual Machine Manager.

Chapter 7. Installing Red Hat Enterprise Linux 6 as a fully virtualized guest on Red Hat Enterprise Linux 6
50
Figure 7.12. The main virt-manager window
Press the create new virtualized guest button (see figure Figure 7.13, “The create newvirtualized guest button”) to start the new virtualized guest wizard.

Creating a Red Hat Enterprise Linux 6 guest with a network installation tree
51
Figure 7.13. The create new virtualized guest button
The Create a new virtual machine window opens.
3. Name the virtualized guestGuest names can contain letters, numbers and the following characters: '_', '.' and '-'. Guestnames must be unique for migration.
Choose the installation method from the list of radio buttons.
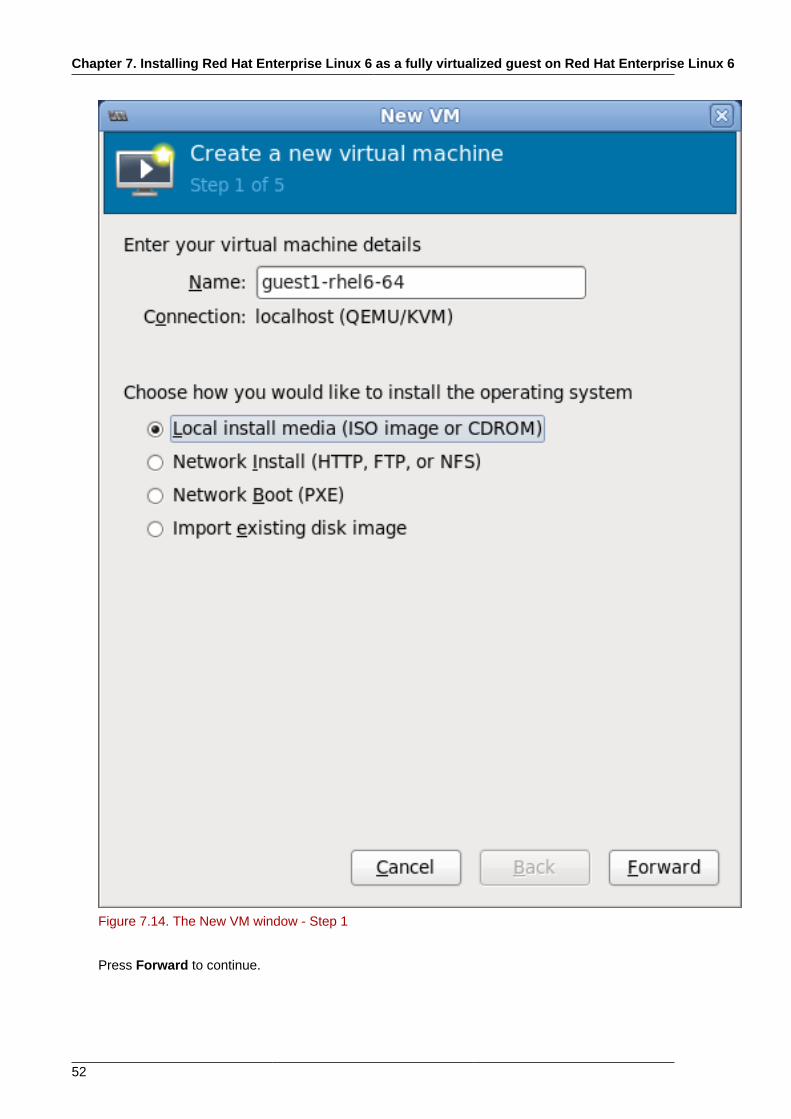
Chapter 7. Installing Red Hat Enterprise Linux 6 as a fully virtualized guest on Red Hat Enterprise Linux 6
52
Figure 7.14. The New VM window - Step 1
Press Forward to continue.
Creating a Red Hat Enterprise Linux 6 guest with a network installation tree
53
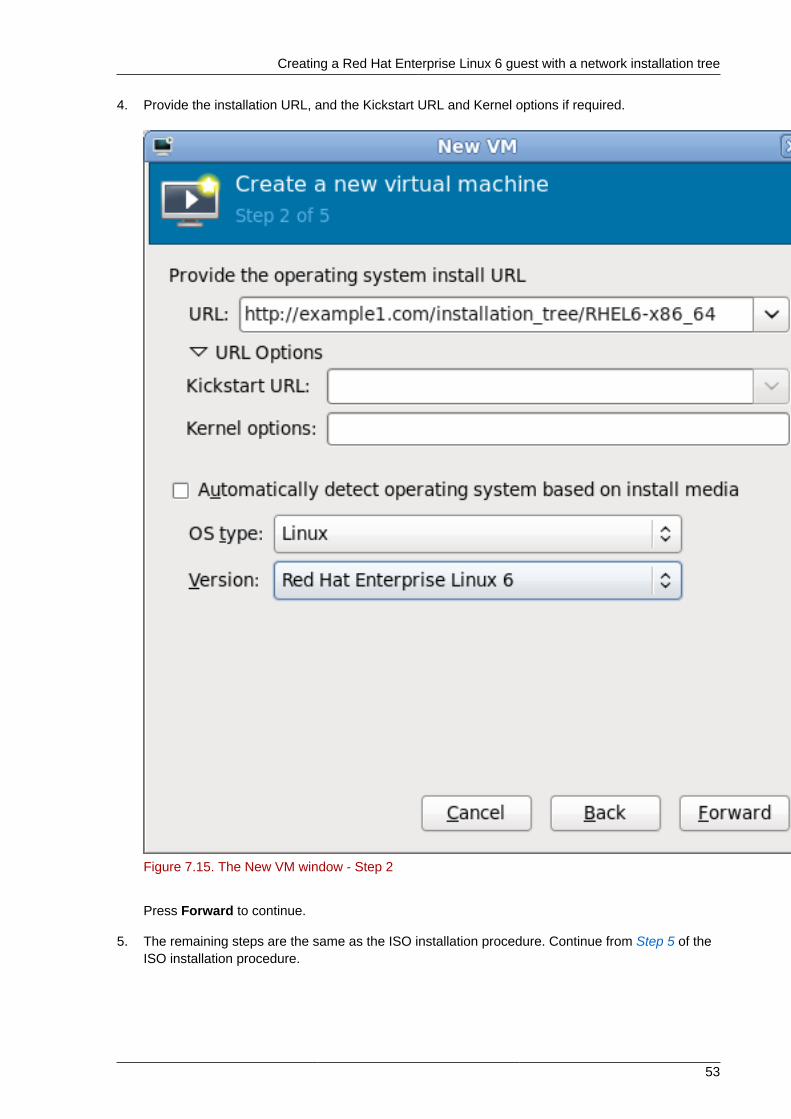
4. Provide the installation URL, and the Kickstart URL and Kernel options if required.
Figure 7.15. The New VM window - Step 2
Press Forward to continue.
5. The remaining steps are the same as the ISO installation procedure. Continue from Step 5 of theISO installation procedure.
Chapter 7. Installing Red Hat Enterprise Linux 6 as a fully virtualized guest on Red Hat Enterprise Linux 6
54
7.3. Creating a Red Hat Enterprise Linux 6 guest with PXE
Procedure 7.3. Creating a Red Hat Enterprise Linux 6 guest with virt-manager1. Optional: Preparation
Prepare the storage environment for the virtualized guest. For more information on preparingstorage, refer to the Red Hat Enterprise Linux 6 Virtualization Administration Guide.
Note
Various storage types may be used for storing virtualized guests. However, for a guest to beable to use migration features the guest must be created on networked storage.
Red Hat Enterprise Linux 6 requires at least 1GB of storage space. However, Red Hatrecommends at least 5GB of storage space for a Red Hat Enterprise Linux 6 installation and forthe procedures in this guide.
2. Open virt-manager and start the wizardOpen virt-manager by executing the virt-manager command as root or opening Applications -> System Tools -> Virtual Machine Manager.
Creating a Red Hat Enterprise Linux 6 guest with PXE
55
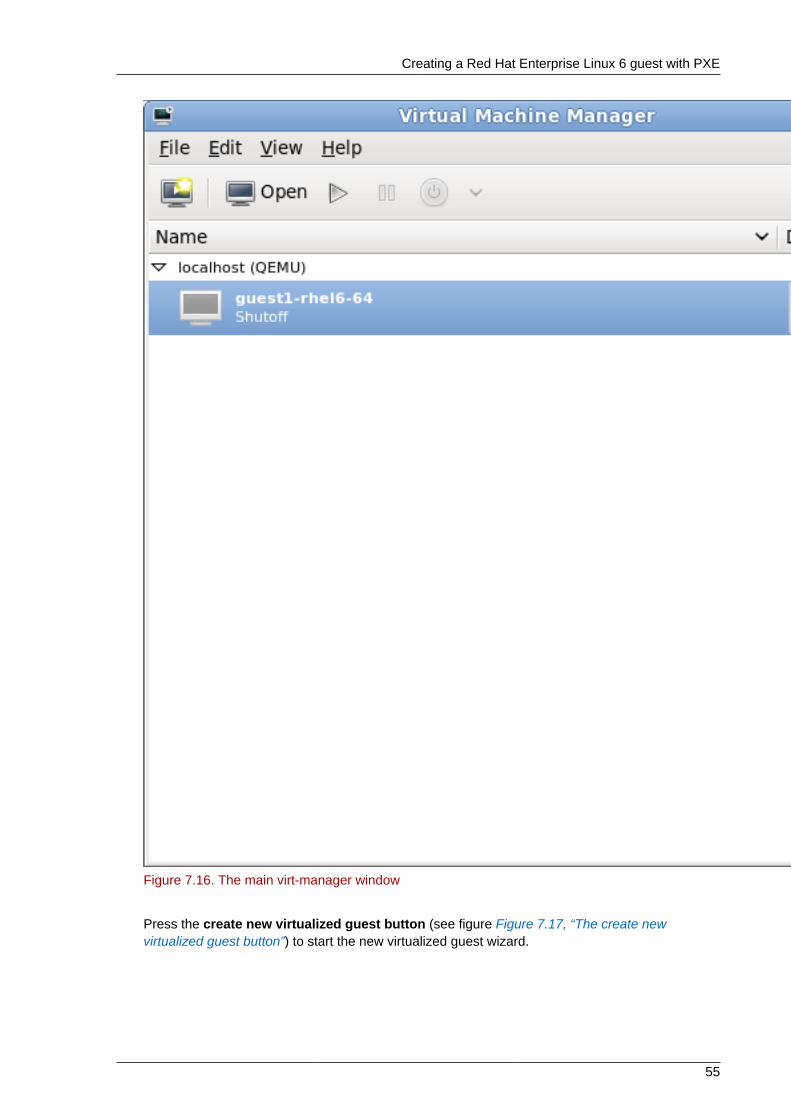
Figure 7.16. The main virt-manager window
Press the create new virtualized guest button (see figure Figure 7.17, “The create newvirtualized guest button”) to start the new virtualized guest wizard.

Chapter 7. Installing Red Hat Enterprise Linux 6 as a fully virtualized guest on Red Hat Enterprise Linux 6
56
Figure 7.17. The create new virtualized guest button
The New VM window opens.
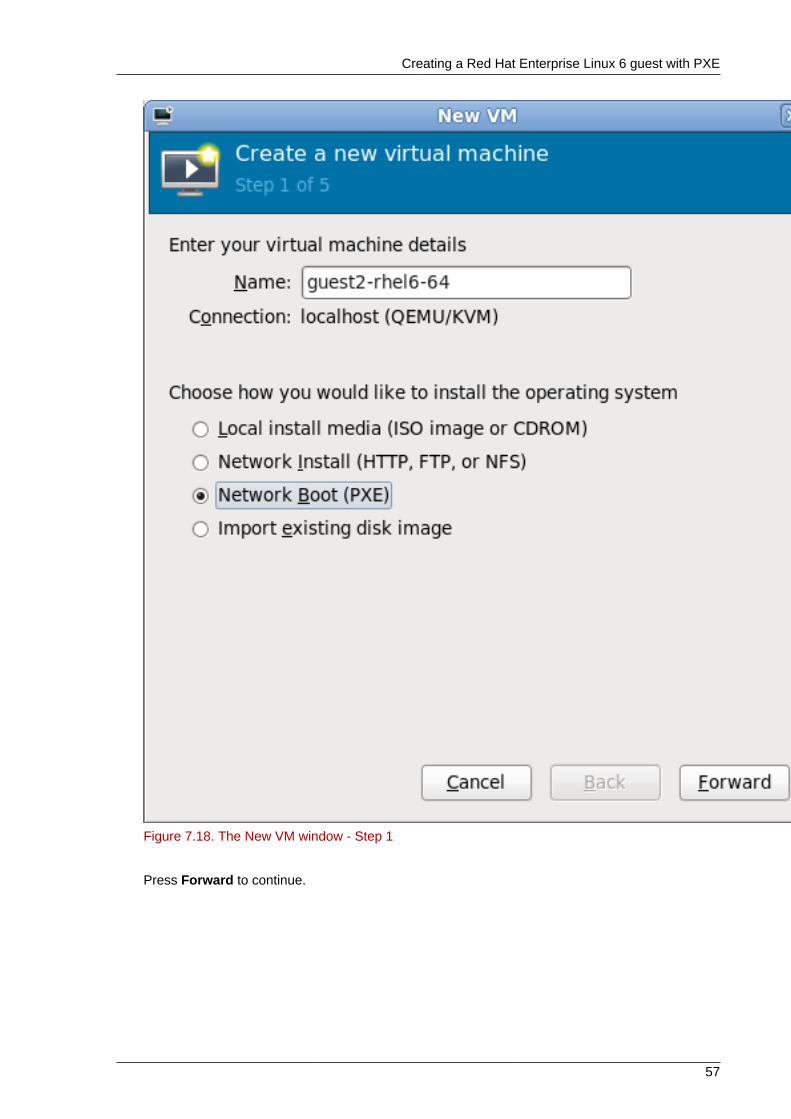
3. Name the virtualized guestGuest names can contain letters, numbers and the following characters: '_', '.' and '-'. Guestnames must be unique for migration.
Choose the installation method from the list of radio buttons.
Creating a Red Hat Enterprise Linux 6 guest with PXE
57
Figure 7.18. The New VM window - Step 1
Press Forward to continue.
Chapter 7. Installing Red Hat Enterprise Linux 6 as a fully virtualized guest on Red Hat Enterprise Linux 6
58
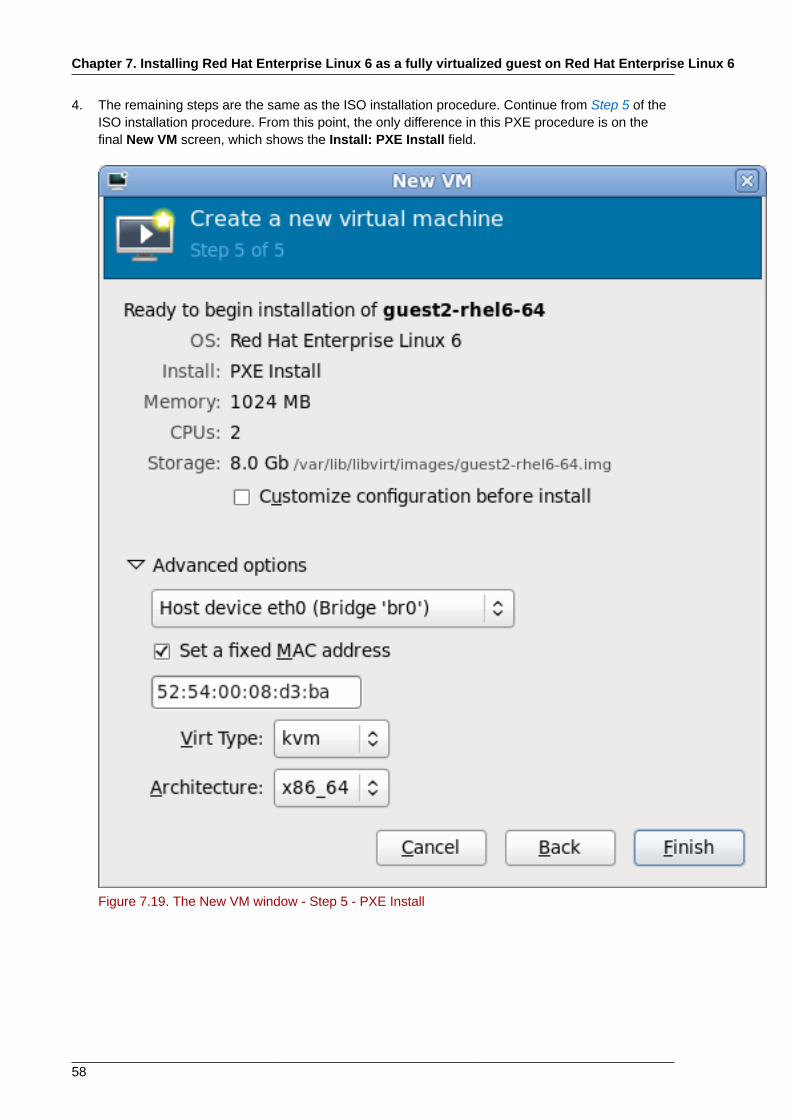
4. The remaining steps are the same as the ISO installation procedure. Continue from Step 5 of theISO installation procedure. From this point, the only difference in this PXE procedure is on thefinal New VM screen, which shows the Install: PXE Install field.
Figure 7.19. The New VM window - Step 5 - PXE Install
Chapter 8.
59
Installing Red Hat Enterprise Linux 6 asa Xen para-virtualized guest on Red HatEnterprise Linux 5This section describes how to install Red Hat Enterprise Linux 6 as a Xen para-virtualized guest onRed Hat Enterprise Linux 5. Para-virtualization is only available for Red Hat Enterprise Linux 5 hosts.Red Hat Enterprise Linux 6 uses the PV-opts features of the Linux kernel to appear as a compatibleXen para-virtualized guest.
Important note on para-virtualization
Para-virtualization only works with the Xen hypervisor. Para-virtualization does not work with theKVM hypervisor. This procedure is for Red Hat Enterprise Linux 5.4 or newer.
8.1. Using virt-installThis section covers creating a Xen para-virtualized Red Hat Enterprise Linux 6 guest on a Red HatEnterprise Linux 5 host using the virt-install command. For instructions on virt-manager,refer to the procedure in Section 8.2, “Using virt-manager”.
This method installs Red Hat Enterprise Linux 6 from a remote server hosting the network installationtree. The installation instructions presented in this section are similar to installing from the minimalinstallation live CD-ROM.
Chapter 8. Installing Red Hat Enterprise Linux 6 as a Xen para-virtualized guest on Red Hat Enterprise Linux 5
60
Automating with virt-install
Guests can be created with the command line virt-install tool. The name of the guest inthe example is rhel6pv-64, the disk image file is rhel6pv-64.img and a local mirror of theRed Hat Enterprise Linux 6 installation tree is http://example.com/installation_tree/RHEL6-x86/. Replace those values with values for your system and network.
# virt-install --name=rhel6pv-64 \--disk path=/var/lib/xen/images/rhel6pv-64.img,size=6,sparse=false \--vnc --paravirt --vcpus=2 --ram=2048 \--location=http://example.com/installation_tree/RHEL6-x86/
Red Hat Enterprise Linux can be installed without a graphical interface or manual input. Use aKickstart file to automate the installation process. This example extends the previous examplewith a Kickstart file, located at http://example.com/kickstart/ks.cfg, to fully automatethe installation.
# virt-install --name=rhel6pv-64 \--disk path=/var/lib/xen/images/rhel6pv-64.img,size=6,sparse=false \--vnc --paravirt --vcpus=2 --ram=2048 \--location=http://example.com/installation_tree/RHEL6-x86/ \-x "ks=http://example.com/kickstart/ks.cfg"
The graphical console opens showing the initial boot phase of the guest.
After your guest has completed its initial boot, the standard installation process for Red Hat EnterpriseLinux 6 starts.
Refer to the Red Hat Enterprise Linux 6 Installation Guide for more information on installing Red HatEnterprise Linux 6.
8.2. Using virt-manager
Procedure 8.1. Creating a Xen para-virtualized Red Hat Enterprise Linux 6 guest with virt-manager1. Open virt-manager
Start virt-manager. Launch the Virtual Machine Manager application from the Applicationsmenu and System Tools submenu. Alternatively, run the virt-manager command as root.
2. Select the hypervisorSelect the Xen hypervisor connection. Note that presently the KVM hypervisor is named qemu.
Connect to a hypervisor if you have not already done so. Open the File menu and select the AddConnection... option. Refer to the Red Hat Enterprise Linux Virtualization Administration Guidefor further details about adding a remote connection.
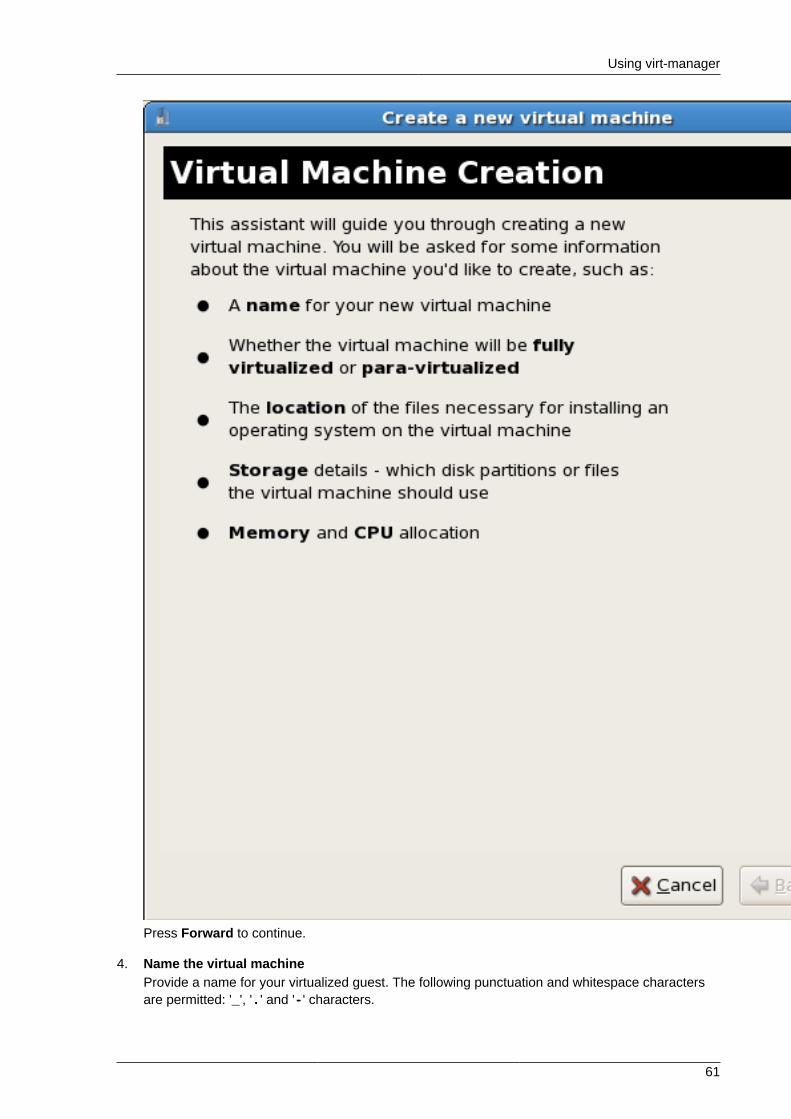
3. Start the new virtual machine wizardOnce a hypervisor connection is selected the New button becomes available. Pressing the Newbutton starts the virtual machine creation wizard, which explains the steps that follow.
Using virt-manager
61
Press Forward to continue.
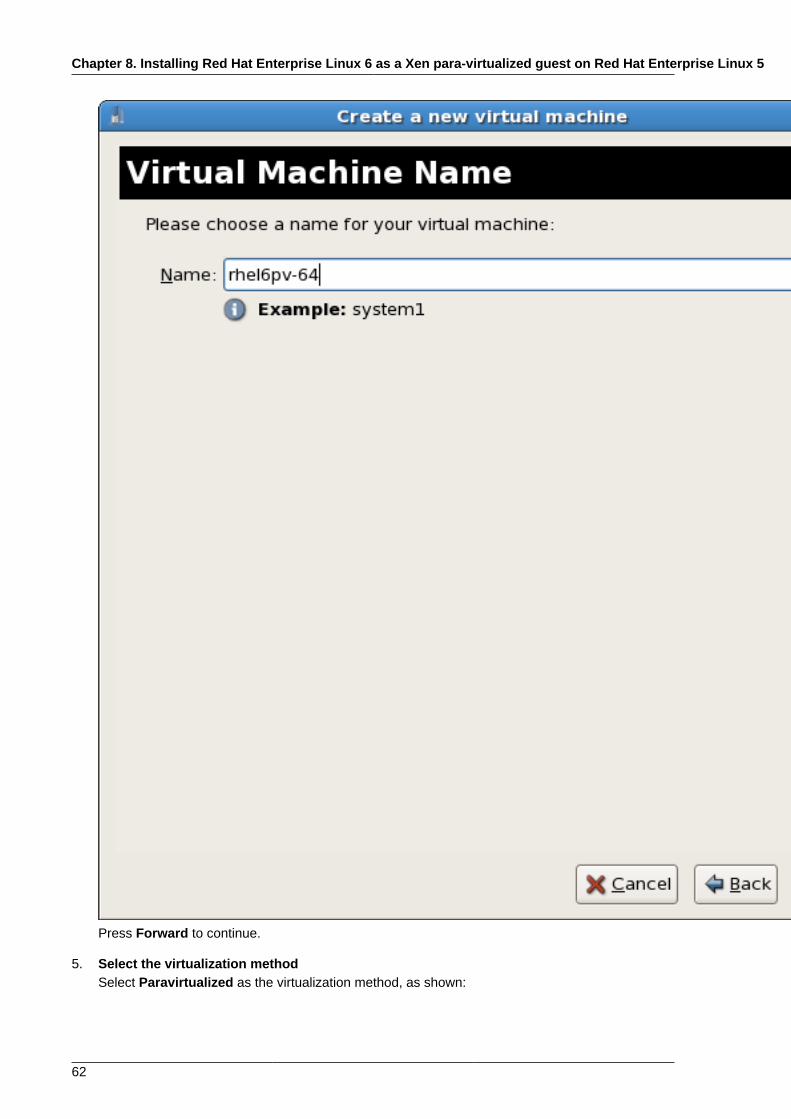
4. Name the virtual machineProvide a name for your virtualized guest. The following punctuation and whitespace charactersare permitted: '_', '.' and '-' characters.
Chapter 8. Installing Red Hat Enterprise Linux 6 as a Xen para-virtualized guest on Red Hat Enterprise Linux 5
62
Press Forward to continue.
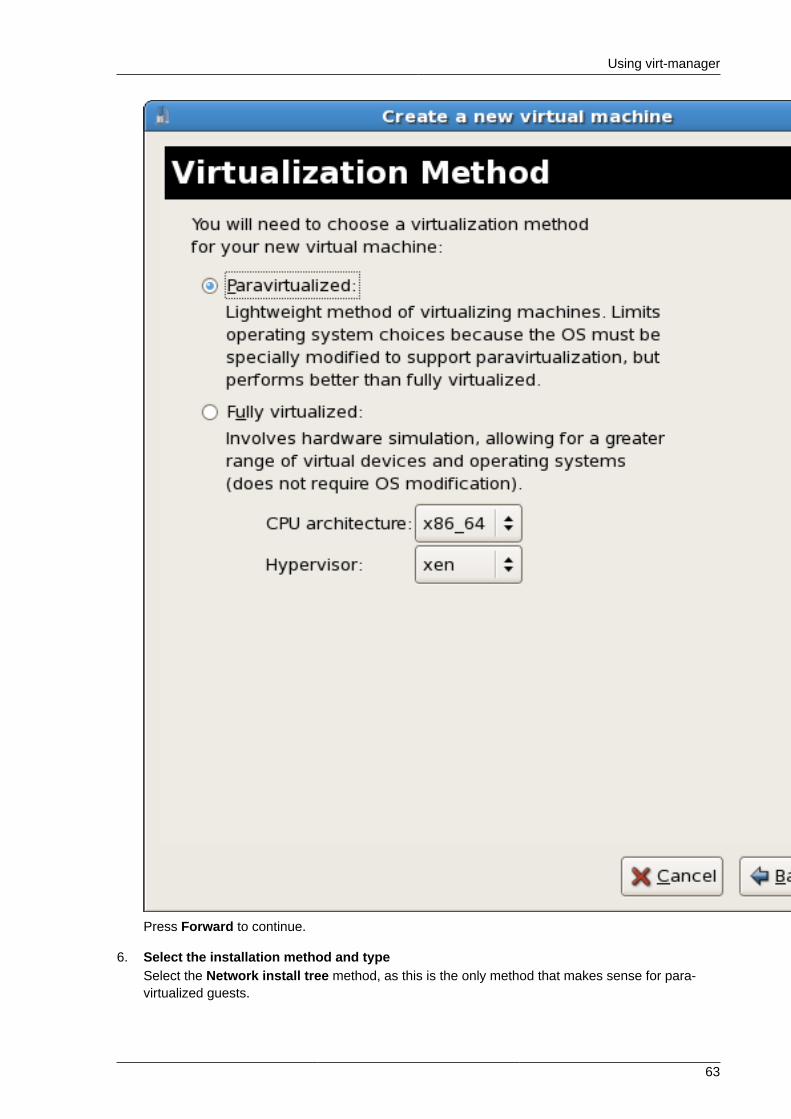
5. Select the virtualization methodSelect Paravirtualized as the virtualization method, as shown:
Using virt-manager
63
Press Forward to continue.
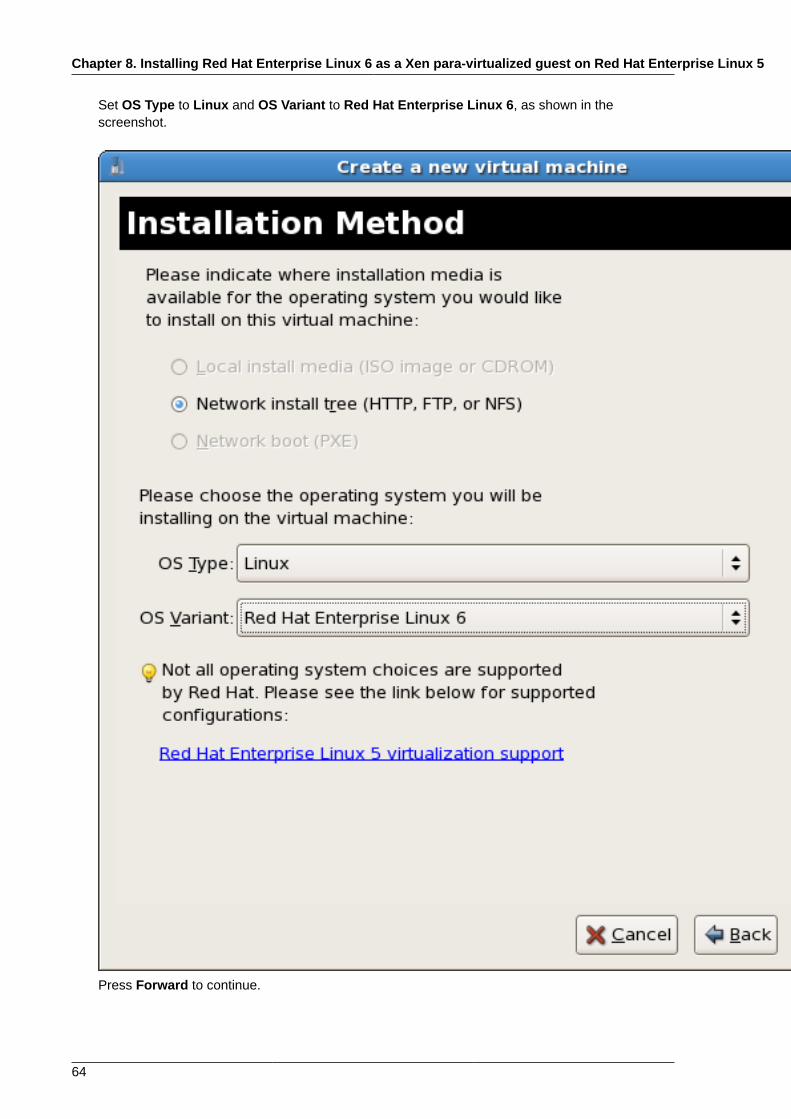
6. Select the installation method and typeSelect the Network install tree method, as this is the only method that makes sense for para-virtualized guests.
Chapter 8. Installing Red Hat Enterprise Linux 6 as a Xen para-virtualized guest on Red Hat Enterprise Linux 5
64
Set OS Type to Linux and OS Variant to Red Hat Enterprise Linux 6, as shown in thescreenshot.
Press Forward to continue.
Using virt-manager
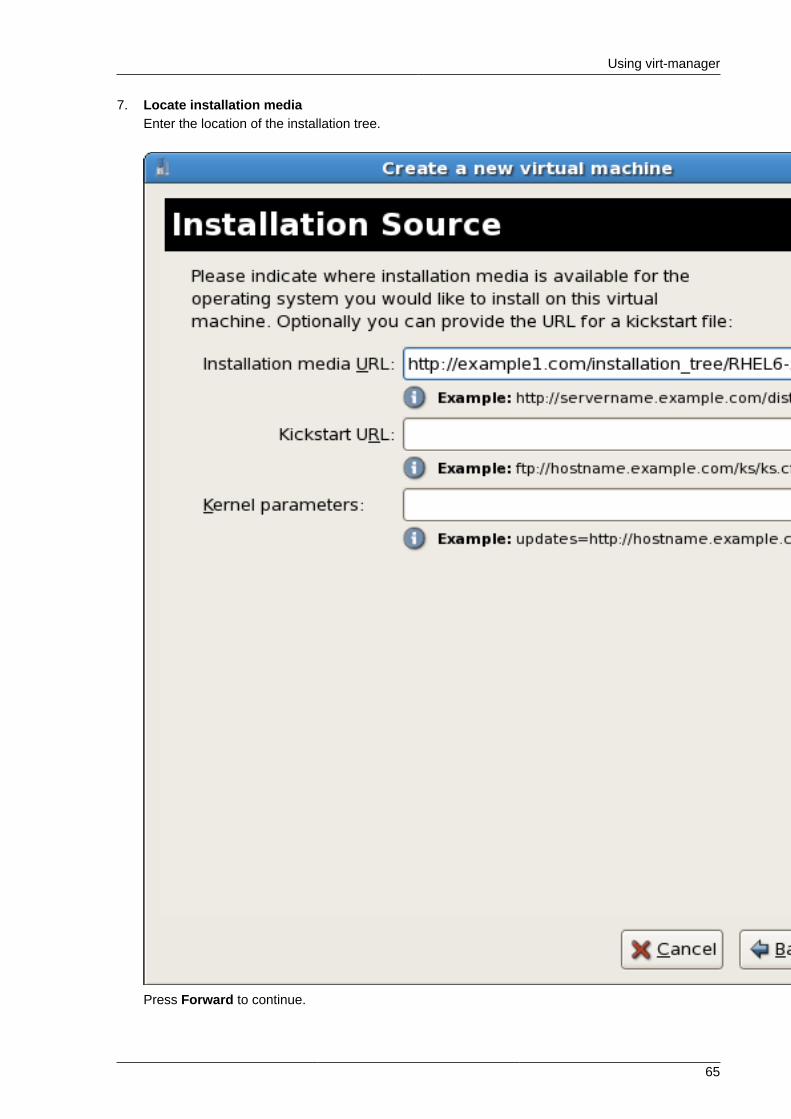
65
7. Locate installation mediaEnter the location of the installation tree.
Press Forward to continue.

Chapter 8. Installing Red Hat Enterprise Linux 6 as a Xen para-virtualized guest on Red Hat Enterprise Linux 5
66
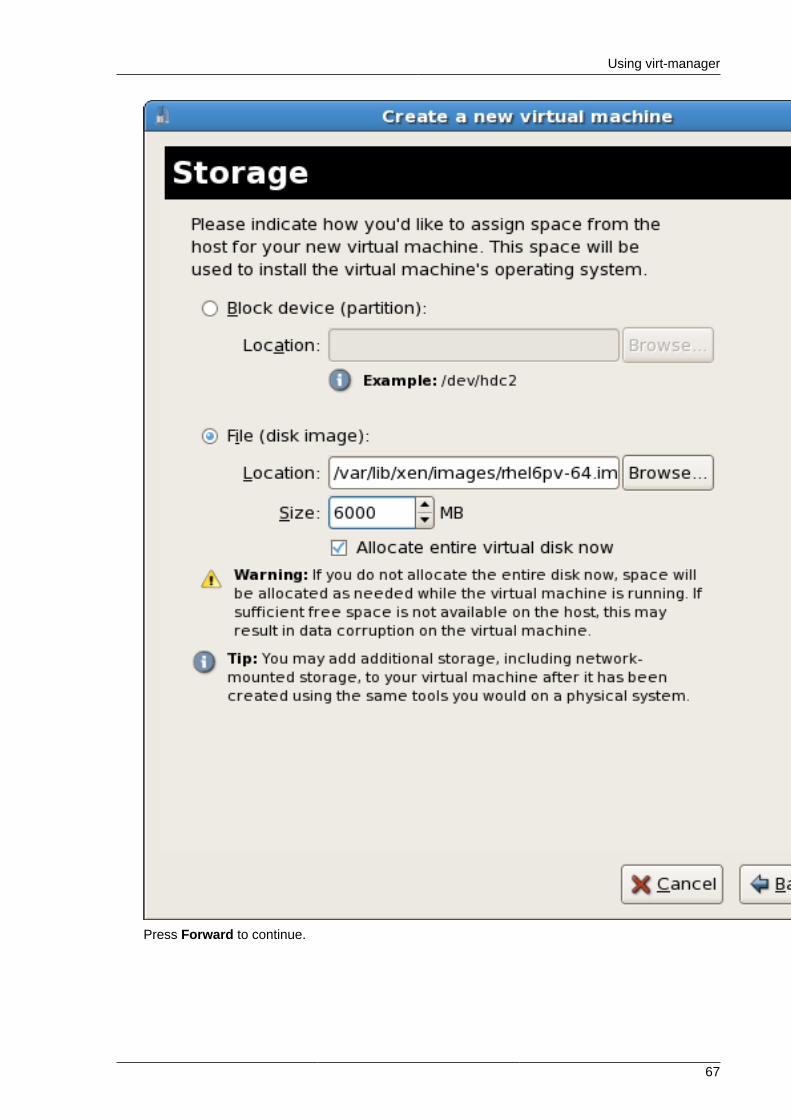
8. Storage setup
Image files and SELinux
Xen file-based images should be stored in the /var/lib/xen/images/ directory. Anyother location may require additional configuration for SELinux. Refer to the Red HatEnterprise Linux 6 Virtualization Administration Guide for more information on configuringSELinux.
Assign a physical storage device (Block device) or a file-based image (File). Assign sufficientspace for your virtualized guest and any applications the guest requires.
Using virt-manager
67
Press Forward to continue.
Chapter 8. Installing Red Hat Enterprise Linux 6 as a Xen para-virtualized guest on Red Hat Enterprise Linux 5
68
Migration
Live and offline migrations require guests to be installed on shared network storage. Forinformation on setting up shared storage for guests refer to the Virtualization AdministrationGuide chapter on Storage Pools.1
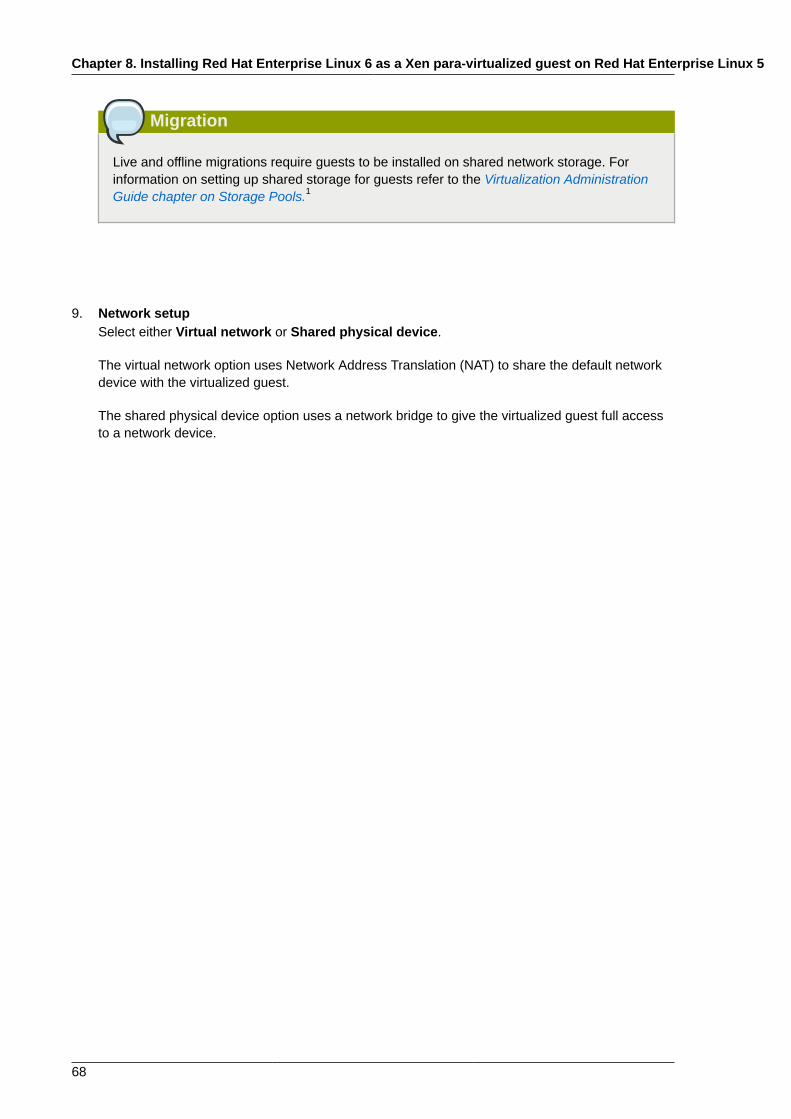
9. Network setupSelect either Virtual network or Shared physical device.
The virtual network option uses Network Address Translation (NAT) to share the default networkdevice with the virtualized guest.
The shared physical device option uses a network bridge to give the virtualized guest full accessto a network device.
Using virt-manager
69
Press Forward to continue.
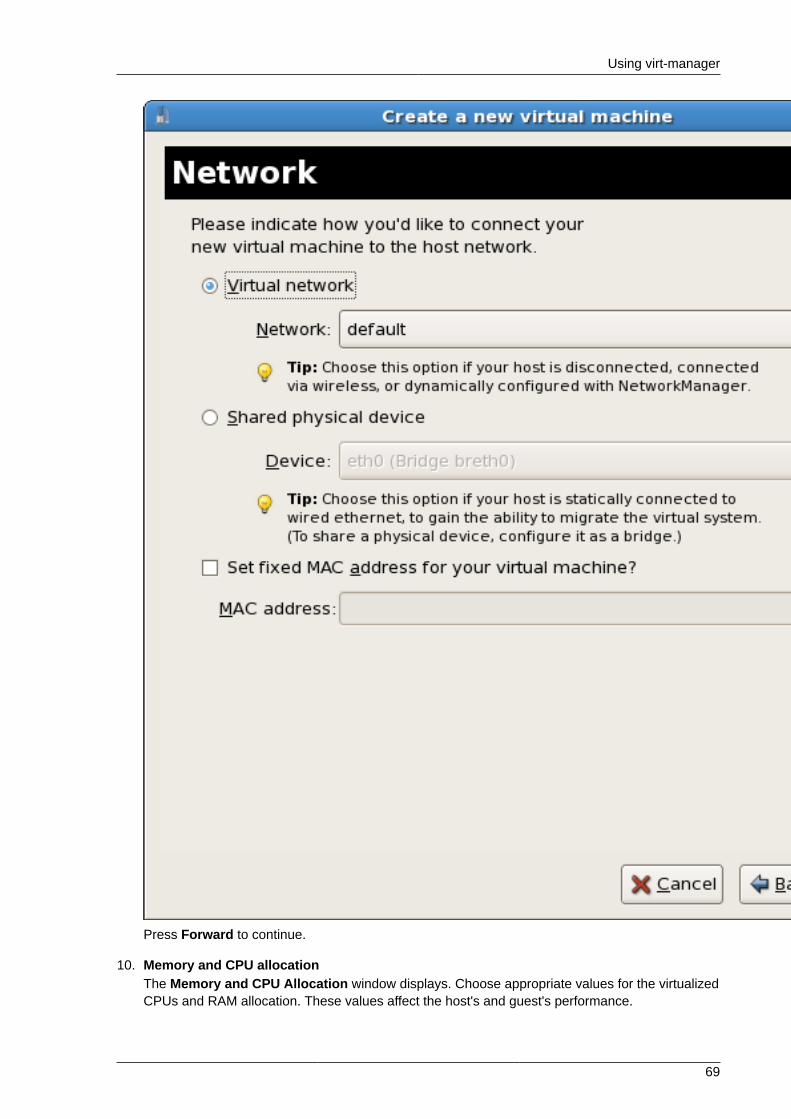
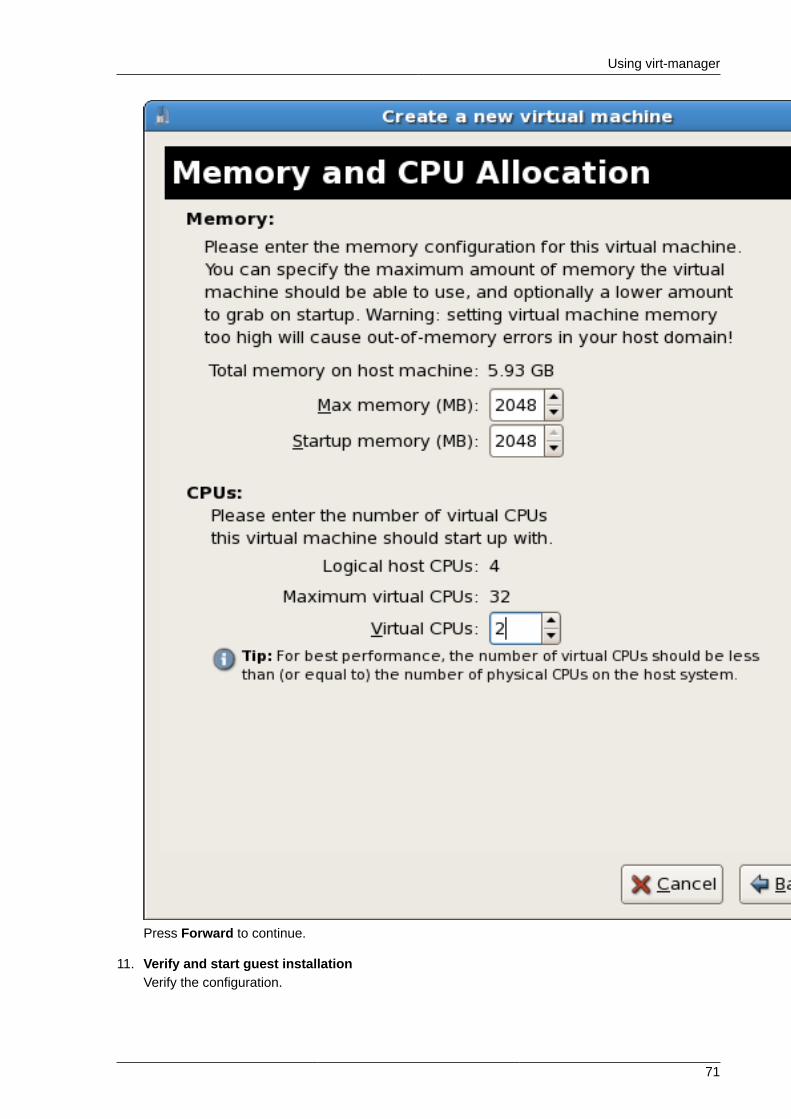
10. Memory and CPU allocationThe Memory and CPU Allocation window displays. Choose appropriate values for the virtualizedCPUs and RAM allocation. These values affect the host's and guest's performance.

Chapter 8. Installing Red Hat Enterprise Linux 6 as a Xen para-virtualized guest on Red Hat Enterprise Linux 5
70
Virtualized guests require sufficient physical memory (RAM) to run efficiently and effectively.Choose a memory value which suits your guest operating system and application requirements.Remember, Xen guests use physical RAM. Running too many guests or leaving insufficientmemory for the host system results in significant usage of virtual memory and swapping. Virtualmemory is significantly slower which causes degraded system performance and responsiveness.Ensure you allocate sufficient memory for all guests and the host to operate effectively.
Assign sufficient virtual CPUs for the virtualized guest. If the guest runs a multithreadedapplication, assign the number of virtualized CPUs the guest will require to run efficiently. Do notassign more virtual CPUs than there are physical processors (or hyper-threads) available on thehost system. It is possible to over allocate virtual processors, however, over allocating VCPUs hasa significant, negative effect on Xen guest and host performance.
Using virt-manager
71
Press Forward to continue.
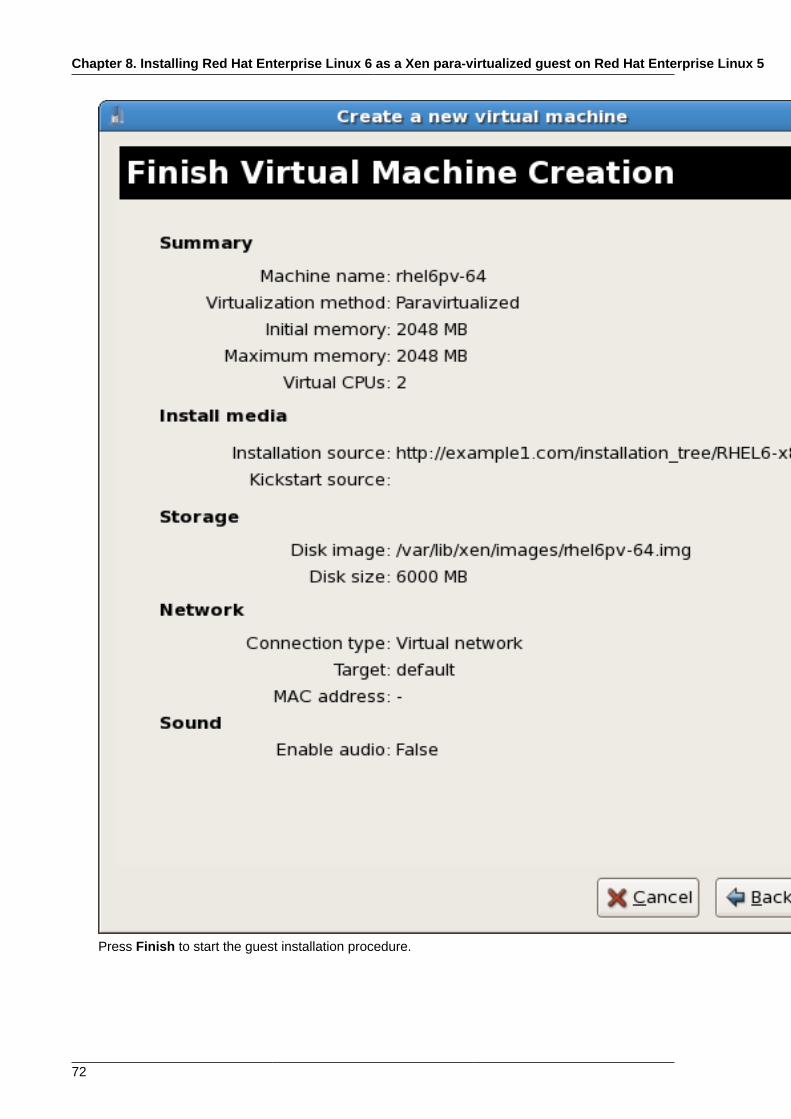
11. Verify and start guest installationVerify the configuration.
Chapter 8. Installing Red Hat Enterprise Linux 6 as a Xen para-virtualized guest on Red Hat Enterprise Linux 5
72
Press Finish to start the guest installation procedure.

Using virt-manager
73
12. Installing Red Hat Enterprise LinuxComplete the Red Hat Enterprise Linux installation sequence. The installation sequence iscovered by the Red Hat Enterprise Linux 6 Installation Guide. Refer to Red Hat Documentation2
for the Red Hat Enterprise Linux 6 Installation Guide.

74
Chapter 9.
75
Installing a fully-virtualized WindowsguestThis chapter describes how to create a fully virtualized Windows guest using the command-line(virt-install), launch the operating system's installer inside the guest, and access the installerthrough virt-viewer.
To install a Windows operating system on the guest, use the virt-viewer tool. This tool allowsyou to display the graphical console of a virtual machine (via the VNC protocol). In doing so, virt-viewer allows you to install a fully virtualized guest's operating system through that operatingsystem's installer (e.g. the Windows XP installer).
Installing a Windows operating system involves two major steps:
1. Creating the guest (using either virt-install or virt-manager)
2. Installing the Windows operating system on the guest (through virt-viewer)
Note that this chapter does not describe how to install a Windows operating system on a fully-virtualized guest. Rather, it only covers how to create the guest and launch the installer within theguest. For information on how to install a Windows operating system, refer to the relevant Microsoftinstallation documentation.
9.1. Using virt-install to create a guestThe virt-install command allows you to create a fully-virtualized guest from a terminal, i.e.without a GUI.
Important
Before creating the guest, consider first if the guest needs to use KVM Windows para-virtualizeddrivers. If it does, keep in mind that you can do so during or after installing the Windows operatingsystem on the guest. For more information about para-virtualized drivers, refer to Chapter 10,KVM Para-virtualized Drivers.
For instructions on how to install KVM para-virtualized drivers, refer to Section 10.1, “Installing theKVM Windows para-virtualized drivers”.
It is possible to create a fully-virtualized guest with only a single command. To do so, simply run thefollowing program (replace the values accordingly):
# virt-install \ --name=guest-name \ --network network=default \ --disk path=path-to-disk,size=disk-size \ --cdrom=path-to-install-disk \ --vnc --ram=1024
The path-to-disk must be a device (for example, /dev/sda3) or image file (/var/lib/libvirt/images/name.img). It must also have enough free space to support the disk-size.
Chapter 9. Installing a fully-virtualized Windows guest
76
Important
All image files are stored in /var/lib/libvirt/images/ by default. Other directory locationsfor file-based images are possible, but may require SELinux configuration. If you run SELinux inenforcing mode, refer to the Red Hat Enterprise Linux 6 Virtualization Administration Guide formore information on SELinux.
You can also run virt-install interactively. To do so, use the --prompt command, as in:
# virt-install --prompt
Once the fully-virtualized guest is created, virt-viewer will launch the guest and run the operatingsystem's installer. Refer to to the relevant Microsoft installation documentation for instructions on howto install the operating system.
9.2. Installing the Windows Balloon driverThe Windows Balloon driver allows you to dynamically change the amount of memory assigned toa Windows guest, without the need for pausing or rebooting the guest. A kernel driver is required toenable this feature. This section describes how to install the driver.
1. Install the virtio-win package, either directly from RHN or through the yum packaging system.
Note
The virtio-win package can be found here in RHN: https://rhn.redhat.com/rhn/software/packages/details/Overview.do?pid=602010. It requires access to one of the followingchannels:
• RHEL Client Supplementary (v. 6)
• RHEL Server Supplementary (v. 6)
• RHEL Workstation Supplementary (v. 6)
Alternatively, run the yum install virtio-win command on the host.
2. Mount the /usr/share/virtio-win/virtio-win.iso file as a CD-ROM to the Windowsvirtual machine.
3. Copy the Balloon\ directory from the mounted CD-ROM to the system drive (C:\).
4. Download the devcon.exe utility for your system architecture by following the instructions atthis URL: http://social.technet.microsoft.com/wiki/contents/articles/how-to-obtain-the-current-version-of-device-console-utility-devcon-exe.aspx. Then, copy it to C:\Balloon\2k8\x86 or C:\Balloon\2k8\x64, depending on your system architecture.

Installing the Windows Balloon driver
77
5. Open a command terminal. Navigate to the location of the devcon utility and run the followingcommand:
devcon install BALLOON.inf "PCI\VEN_1AF4&DEV_1002&SUBSYS_00051AF4&REV_00"
6. Restart Windows for changes to take effect.

78
Chapter 10.
79
KVM Para-virtualized DriversPara-virtualized drivers are available for virtualized Windows guests running on KVM hosts. Thesepara-virtualized drivers are included in the virtio package. The virtio package supports block (storage)devices and network interface controllers.
Para-virtualized drivers enhance the performance of fully virtualized guests. With the para-virtualizeddrivers guest I/O latency decreases and throughput increases to near bare-metal levels. It isrecommended to use the para-virtualized drivers for fully virtualized guests running I/O heavy tasksand applications.
The KVM para-virtualized drivers are automatically loaded and installed on the following:
• Red Hat Enterprise Linux 4.8 and newer
• Red Hat Enterprise Linux 5.3 and newer
• Red Hat Enterprise Linux 6 and newer
• Some versions of Linux based on the 2.6.27 kernel or newer kernel versions.
Versions of Red Hat Enterprise Linux in the list above detect and install the drivers, additionalinstallation steps are not required.
In Red Hat Enterprise Linux 3 (3.9 and above), manual installation is required.
Note
PCI devices are limited by the virtualized system architecture. Out of the 32 PCI devices for aguest, 4 are always defined for a KVM guest, and are not removable. This means there are up to28 PCI slots available for additional devices per guest. Each PCI device in a guest can have up to8 functions.
Using KVM para-virtualizaed drives, the following Microsoft Windows versions are expected to runsimilarly to bare-metal-based systems.
• Windows XP (32-bit only)
• Windows Server 2003 (32-bit and 64-bit versions)
• Windows Server 2008 (32-bit and 64-bit versions)
• Windows 7 (32-bit and 64-bit versions)
10.1. Installing the KVM Windows para-virtualized driversThis section covers the installation process for the KVM Windows para-virtualized drivers. The KVMpara-virtualized drivers can be loaded during the Windows installation or installed after the guest isinstalled.
You can install the para-virtualized drivers on your guest by one of the following methods:• hosting the installation files on a network accessible to the guest,
• using a virtualized CD-ROM device of the driver installation disk .iso file, or
Chapter 10. KVM Para-virtualized Drivers
80
• using a virtualized floppy device to install the drivers during boot time (for Windows guests).
This guide describes installation from the para-virtualized installer disk as a virtualized CD-ROMdevice.
1. Download the driversThe virtio-win package contains the para-virtualized block and network drivers for all supportedWindows guests.
Note
The virtio-win package can be found here in RHN: https://rhn.redhat.com/rhn/software/packages/details/Overview.do?pid=602010. It requires access to one of the followingchannels:
• RHEL Client Supplementary (v. 6)
• RHEL Server Supplementary (v. 6)
• RHEL Workstation Supplementary (v. 6)
Download and install the virtio-win package on the host with the yum command.
# yum install virtio-win
The list of virtio-win packages that are supported on Windows operating systems, and the currentcertified package version, can be found at the following URL: windowsservercatalog.com1.
Note that the Red Hat Enterprise Virtualization Hypervisor and Red Hat Enterprise Linux arecreated on the same code base so the drivers for the same version (for example, Red HatEnterprise Virtualization Hypervisor 3.0 and Red Hat Enterprise Linux 6) are supported for bothenvironments.
The virtio-win package installs a CD-ROM image, virtio-win.iso, in the /usr/share/virtio-win/ directory.
2. Install the para-virtualized driversIt is recommended to install the drivers on the guest before attaching or modifying a device to usethe para-virtualized drivers.
For block devices storing root file systems or other block devices required for booting the guest,the drivers must be installed before the device is modified. If the drivers are not installed on theguest and the driver is set to the virtio driver the guest will not boot.
10.1.1. Installing the drivers on an installed Windows guestThis procedure covers installing the para-virtualized drivers with a virtualized CD-ROM after Windowsis installed.
Follow Procedure 10.1, “Installing from the driver CD-ROM image with virt-manager” to add a CD-ROM image with virt-manager and then install the drivers.

Installing the drivers on an installed Windows guest
81
Procedure 10.1. Installing from the driver CD-ROM image with virt-manager1. Open virt-manager and the guest
Open virt-manager, select your virtualized guest from the list by double clicking the guestname.
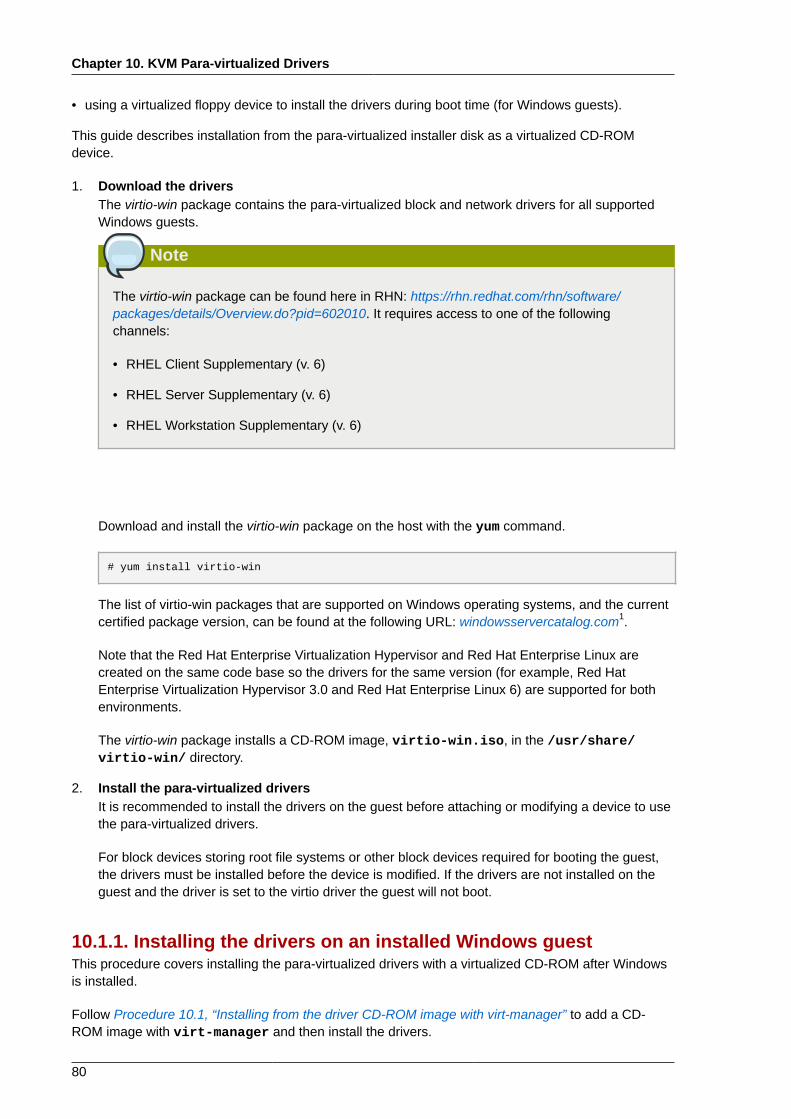
2. Open the hardware windowClick the blue Information button at the top to view guest details. Then click the Add Hardwarebutton at the bottom of the window.
3. Select the device typeThis opens a wizard for adding the new device. Select Storage from the dropdown menu.
Chapter 10. KVM Para-virtualized Drivers
82
Click the Forward button to proceed.
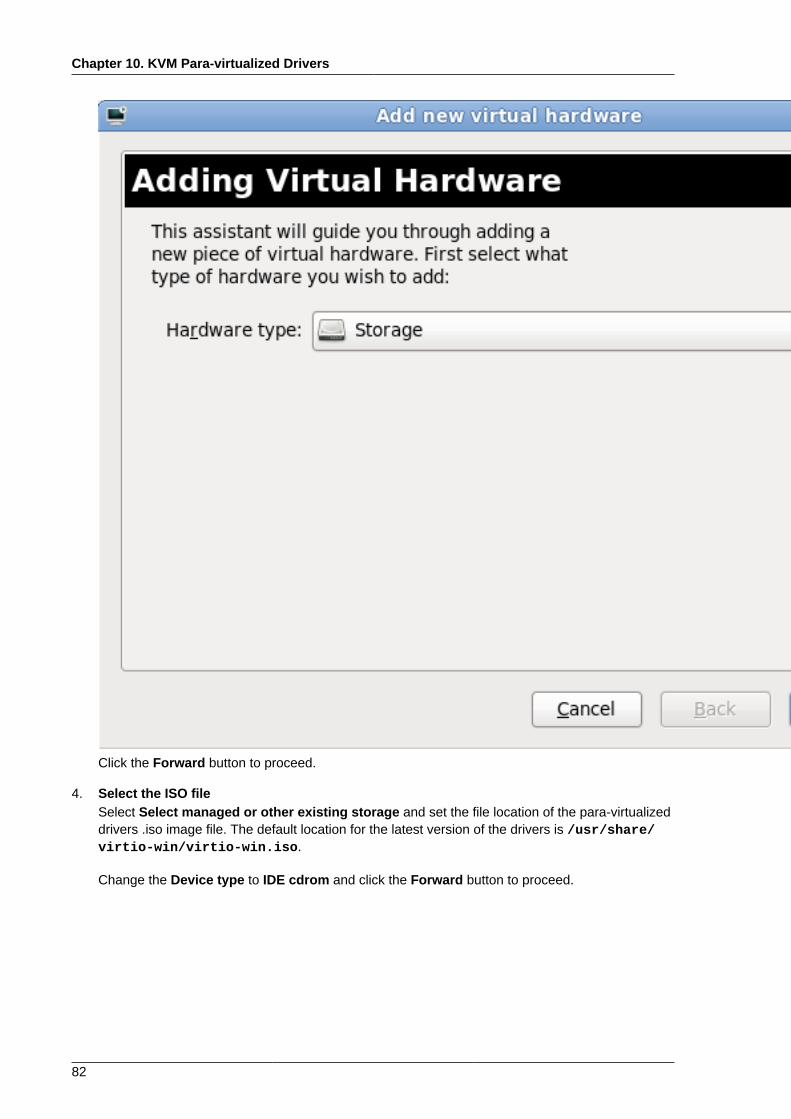
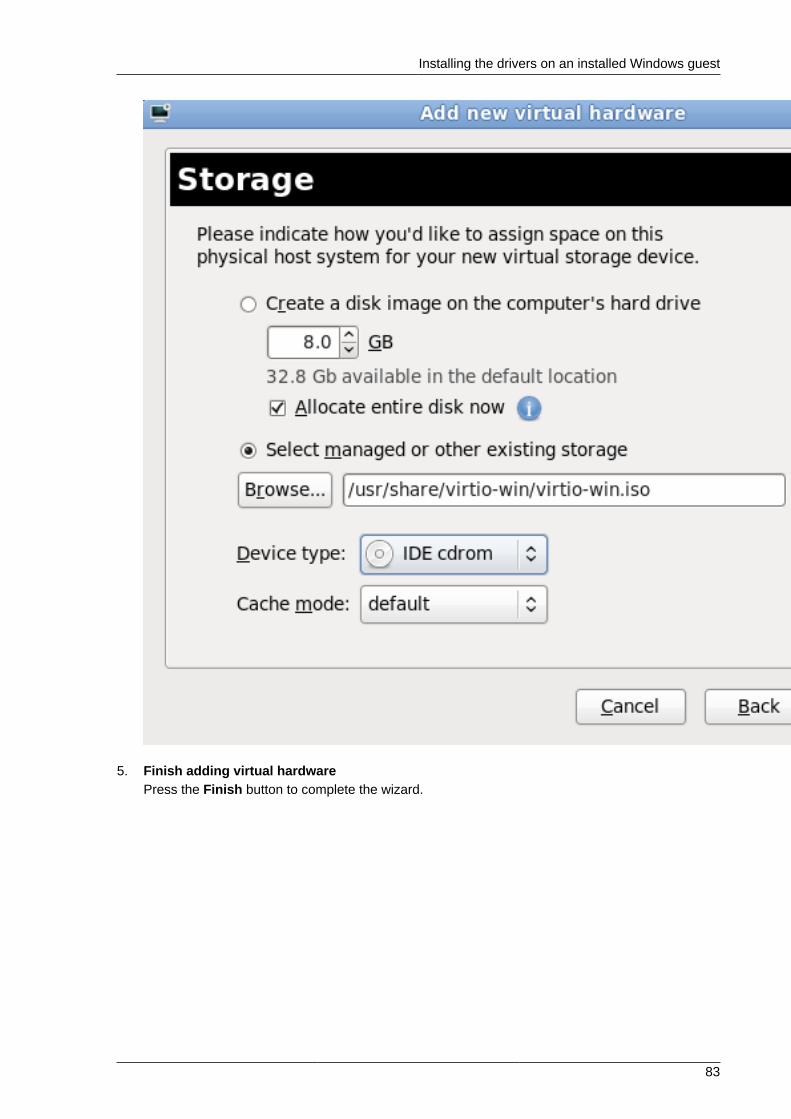
4. Select the ISO fileSelect Select managed or other existing storage and set the file location of the para-virtualizeddrivers .iso image file. The default location for the latest version of the drivers is /usr/share/virtio-win/virtio-win.iso.
Change the Device type to IDE cdrom and click the Forward button to proceed.
Installing the drivers on an installed Windows guest
83
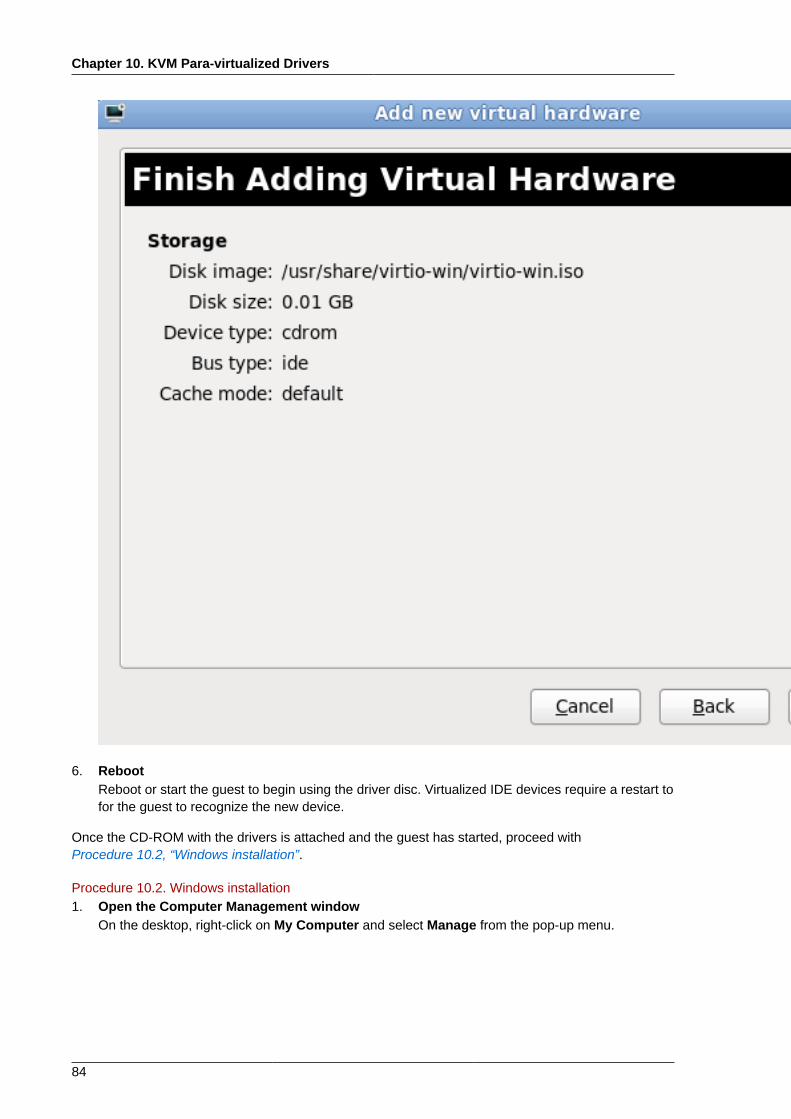
5. Finish adding virtual hardwarePress the Finish button to complete the wizard.
Chapter 10. KVM Para-virtualized Drivers
84
6. RebootReboot or start the guest to begin using the driver disc. Virtualized IDE devices require a restart tofor the guest to recognize the new device.
Once the CD-ROM with the drivers is attached and the guest has started, proceed withProcedure 10.2, “Windows installation”.
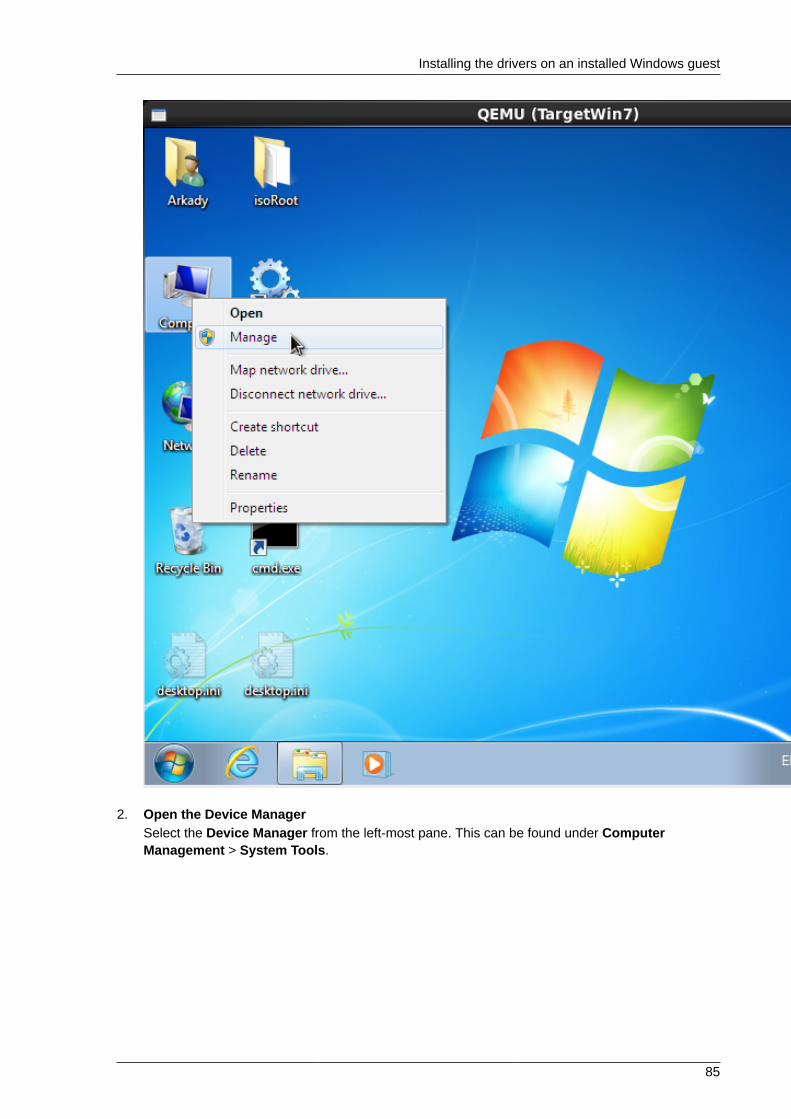
Procedure 10.2. Windows installation1. Open the Computer Management window
On the desktop, right-click on My Computer and select Manage from the pop-up menu.
Installing the drivers on an installed Windows guest
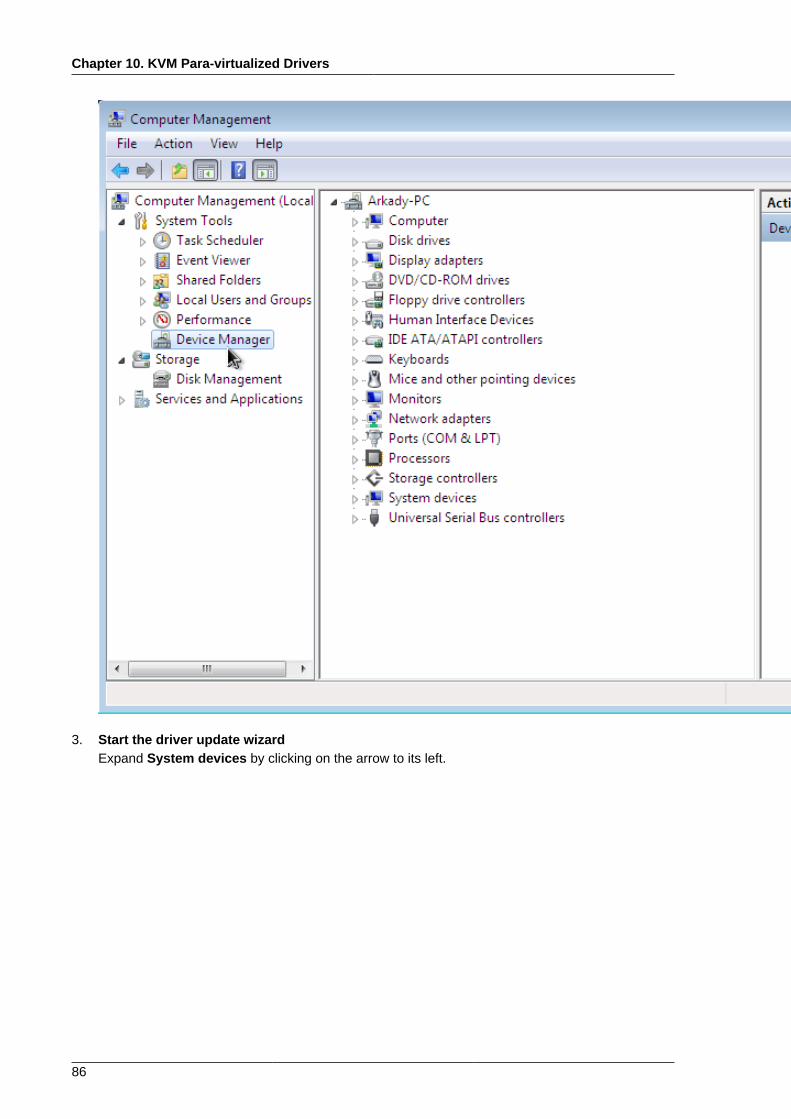
85
2. Open the Device ManagerSelect the Device Manager from the left-most pane. This can be found under ComputerManagement > System Tools.
Chapter 10. KVM Para-virtualized Drivers
86
3. Start the driver update wizardExpand System devices by clicking on the arrow to its left.
Installing the drivers on an installed Windows guest
87
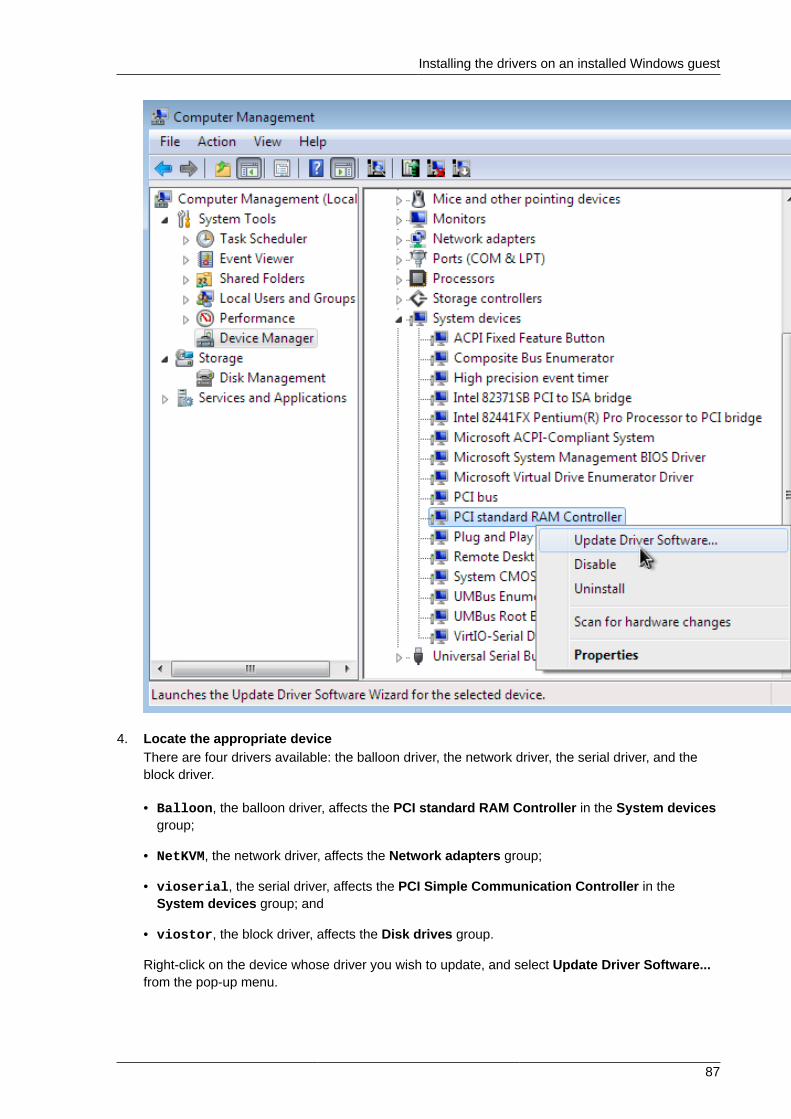
4. Locate the appropriate deviceThere are four drivers available: the balloon driver, the network driver, the serial driver, and theblock driver.
• Balloon, the balloon driver, affects the PCI standard RAM Controller in the System devicesgroup;
• NetKVM, the network driver, affects the Network adapters group;
• vioserial, the serial driver, affects the PCI Simple Communication Controller in theSystem devices group; and
• viostor, the block driver, affects the Disk drives group.
Right-click on the device whose driver you wish to update, and select Update Driver Software...from the pop-up menu.
Chapter 10. KVM Para-virtualized Drivers
88
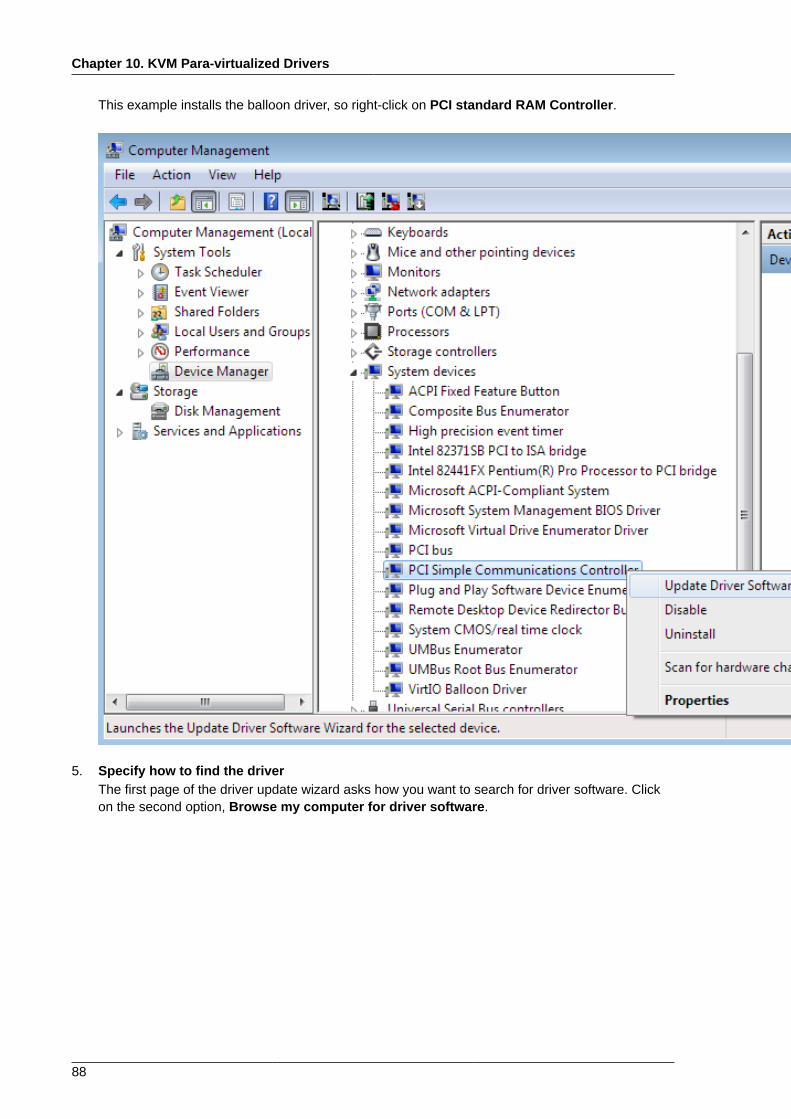
This example installs the balloon driver, so right-click on PCI standard RAM Controller.
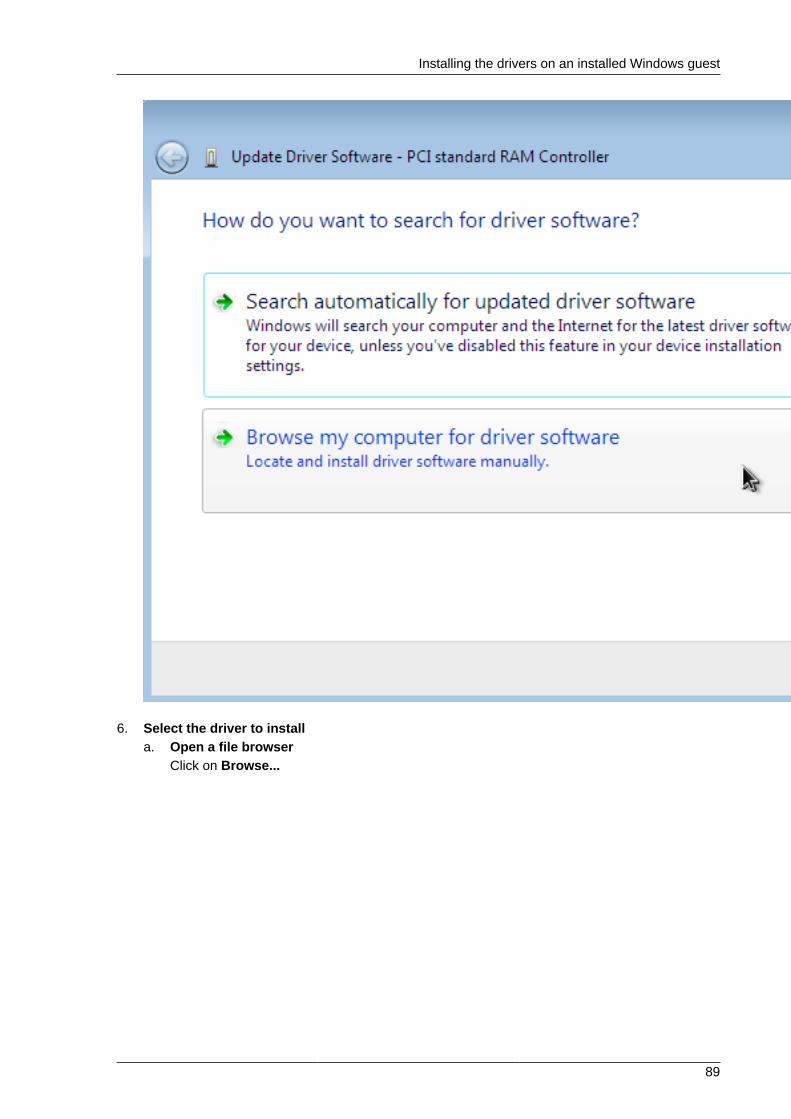
5. Specify how to find the driverThe first page of the driver update wizard asks how you want to search for driver software. Clickon the second option, Browse my computer for driver software.
Installing the drivers on an installed Windows guest
89
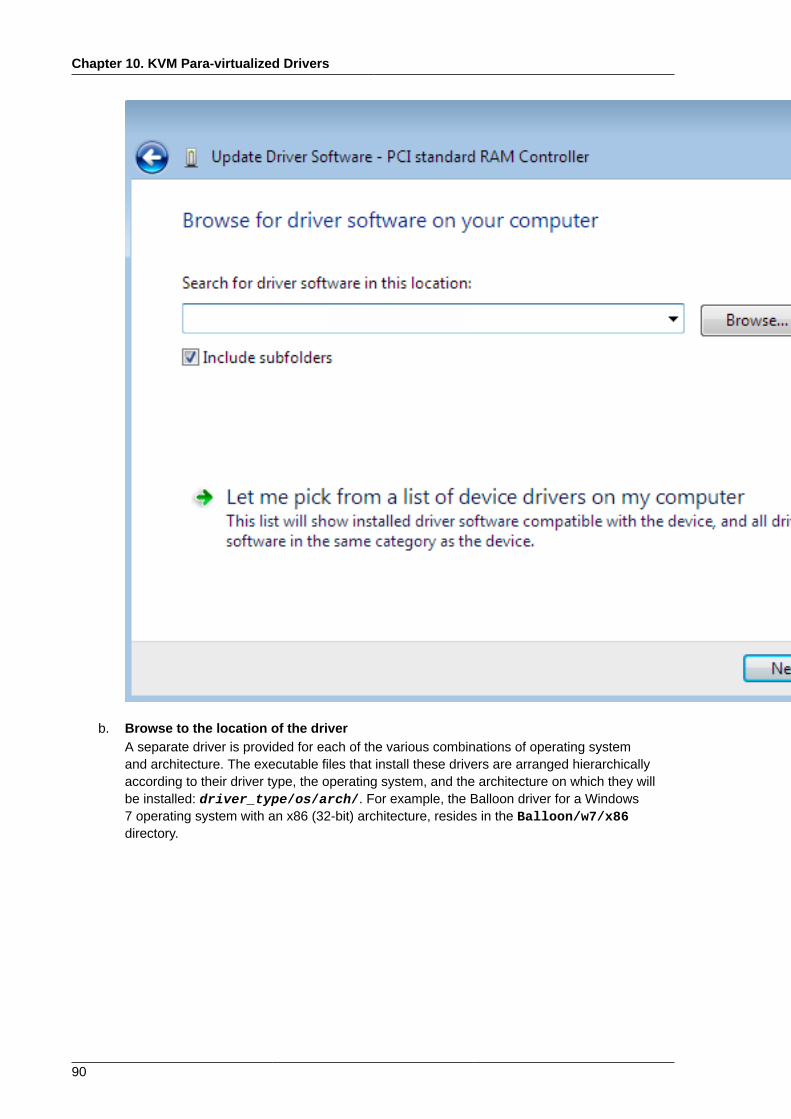
6. Select the driver to installa. Open a file browser
Click on Browse...
Chapter 10. KVM Para-virtualized Drivers
90
b. Browse to the location of the driverA separate driver is provided for each of the various combinations of operating systemand architecture. The executable files that install these drivers are arranged hierarchicallyaccording to their driver type, the operating system, and the architecture on which they willbe installed: driver_type/os/arch/. For example, the Balloon driver for a Windows7 operating system with an x86 (32-bit) architecture, resides in the Balloon/w7/x86directory.
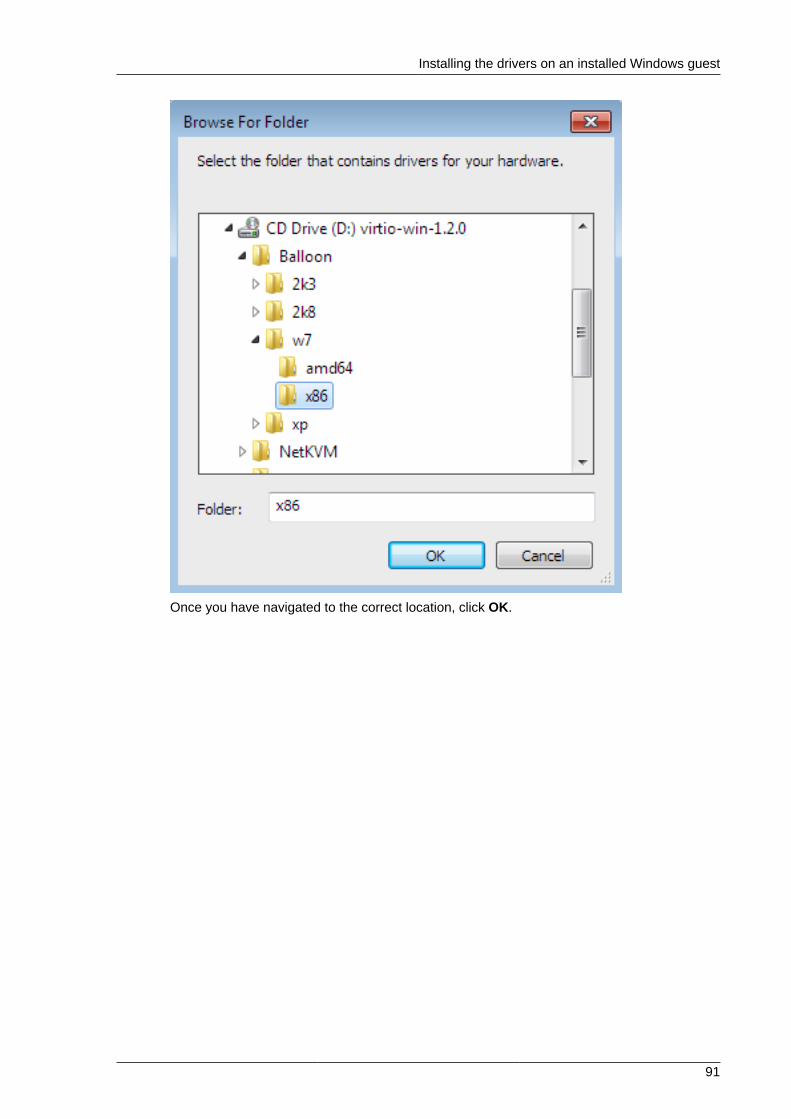
Installing the drivers on an installed Windows guest
91
Once you have navigated to the correct location, click OK.

Chapter 10. KVM Para-virtualized Drivers
92
c. Click Next to continue
The following screen is displayed while the driver installs:
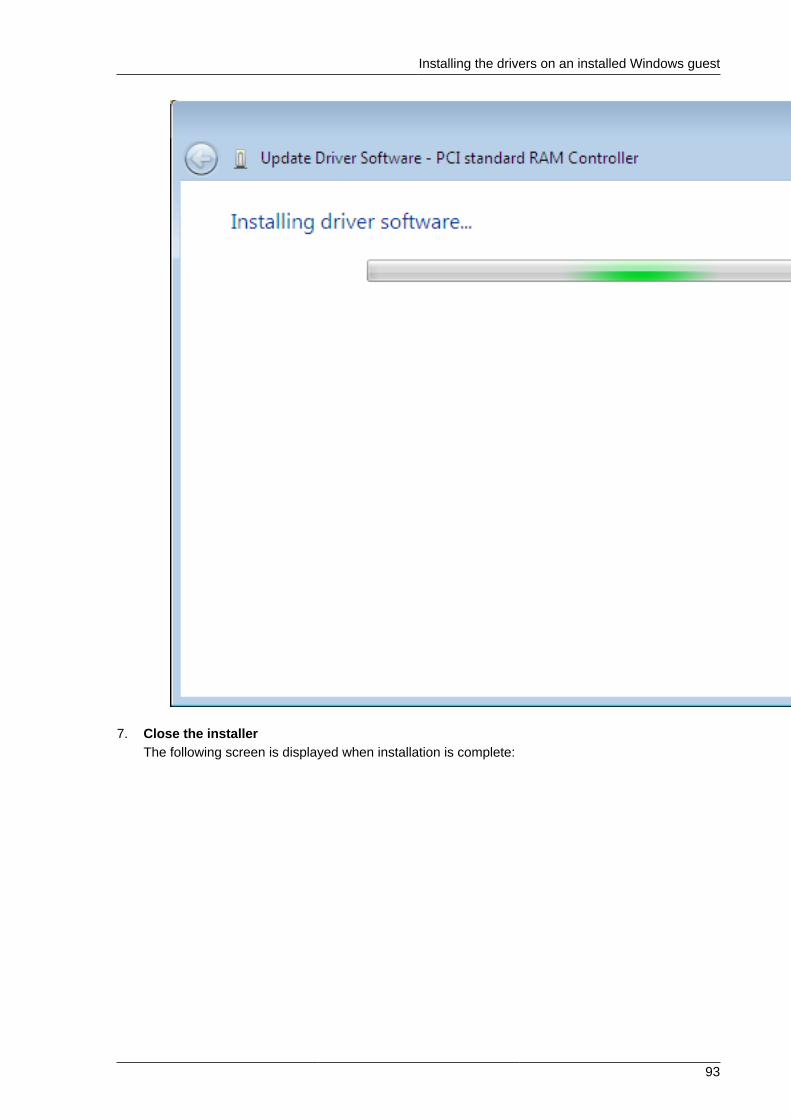
Installing the drivers on an installed Windows guest
93
7. Close the installerThe following screen is displayed when installation is complete:

Chapter 10. KVM Para-virtualized Drivers
94
Click Close to close the installer.
8. RebootReboot the guest to complete the driver installation.
Change an existing device to use the para-virtualized drivers or install a new device using the para-virtualized drivers.
10.1.2. Installing drivers during the Windows installationThis procedure covers installing the para-virtualized drivers during a Windows installation.
This method allows a Windows guest to use the para-virtualized (virtio) drivers for the defaultstorage device.
1. Install the virtio-win package:
Installing drivers during the Windows installation
95
# yum install virtio-win
Note
The virtio-win package can be found here in RHN: https://rhn.redhat.com/rhn/software/packages/details/Overview.do?pid=602010. It requires access to one of the followingchannels:
• RHEL Client Supplementary (v. 6)
• RHEL Server Supplementary (v. 6)
• RHEL Workstation Supplementary (v. 6)
Creating guests
Create the guest, as normal, without starting the guest. Follow one of the procedures below.
2. Creating the guestSelect one of the following guest-creation methods, and follow the instructions.
a. Creating the guest with virshThis method attaches the para-virtualized driver floppy disk to a Windows guest before theinstallation.
If the guest is created from an XML definition file with virsh use the virsh definecommand not the virsh create command.
i. Create, but do not start, the guest. Refer to the Red Hat Enterprise Linux VirtualizationAdministration Guide for details on creating guests with the virsh command.
ii. Add the driver disk as a virtualized floppy disk with the virsh command. This examplecan be copied and used if there are no other virtualized floppy devices attached to thevirtualized guest.
# virsh attach-disk guest1 /usr/share/virtio-win/virtio-win.vfd fda --type floppy
You can now continue with Step 3.
b. Creating the guest with virt-manager and changing the disk typei. At the final step of the virt-manager guest creation wizard, check the Customize
configuration before install checkbox.
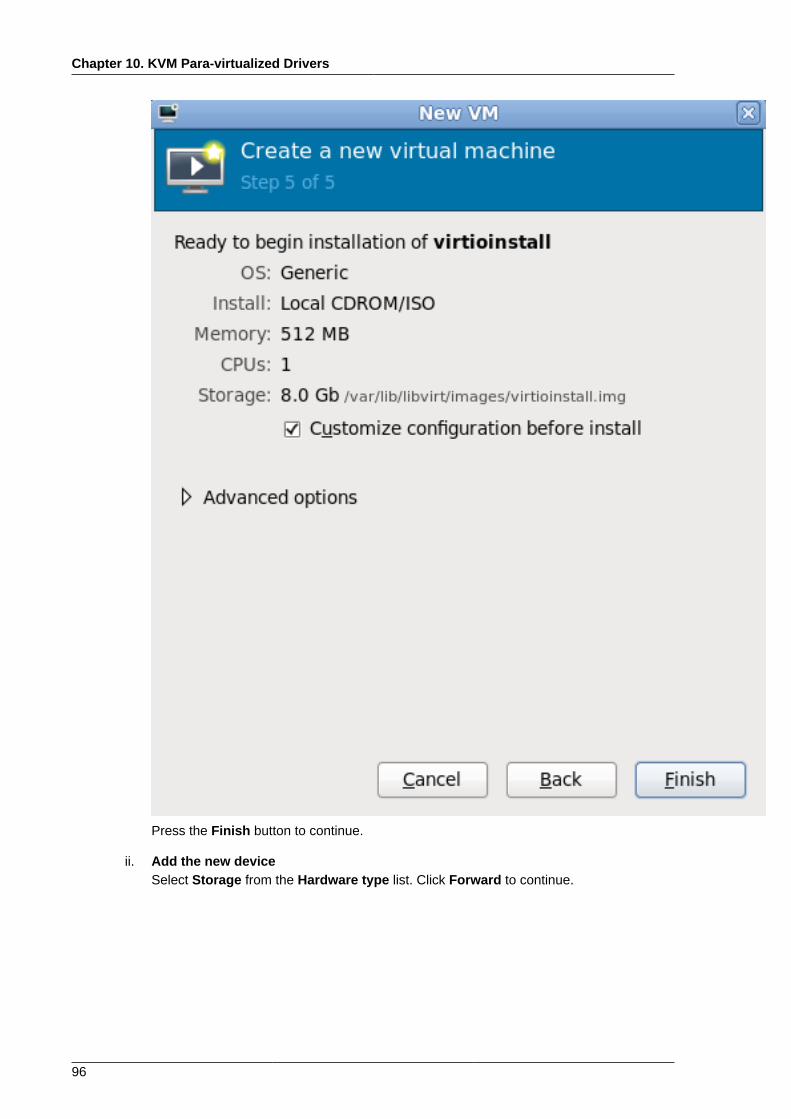
Chapter 10. KVM Para-virtualized Drivers
96
Press the Finish button to continue.
ii. Add the new deviceSelect Storage from the Hardware type list. Click Forward to continue.
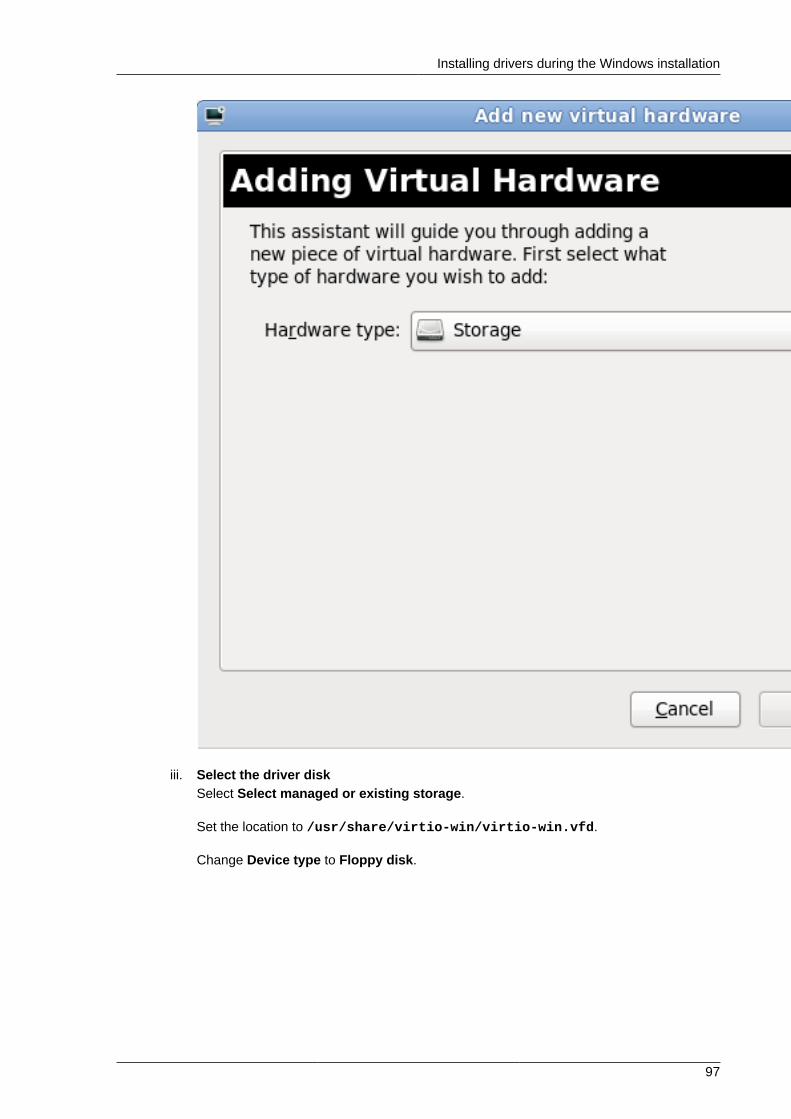
Installing drivers during the Windows installation
97
iii. Select the driver diskSelect Select managed or existing storage.
Set the location to /usr/share/virtio-win/virtio-win.vfd.
Change Device type to Floppy disk.
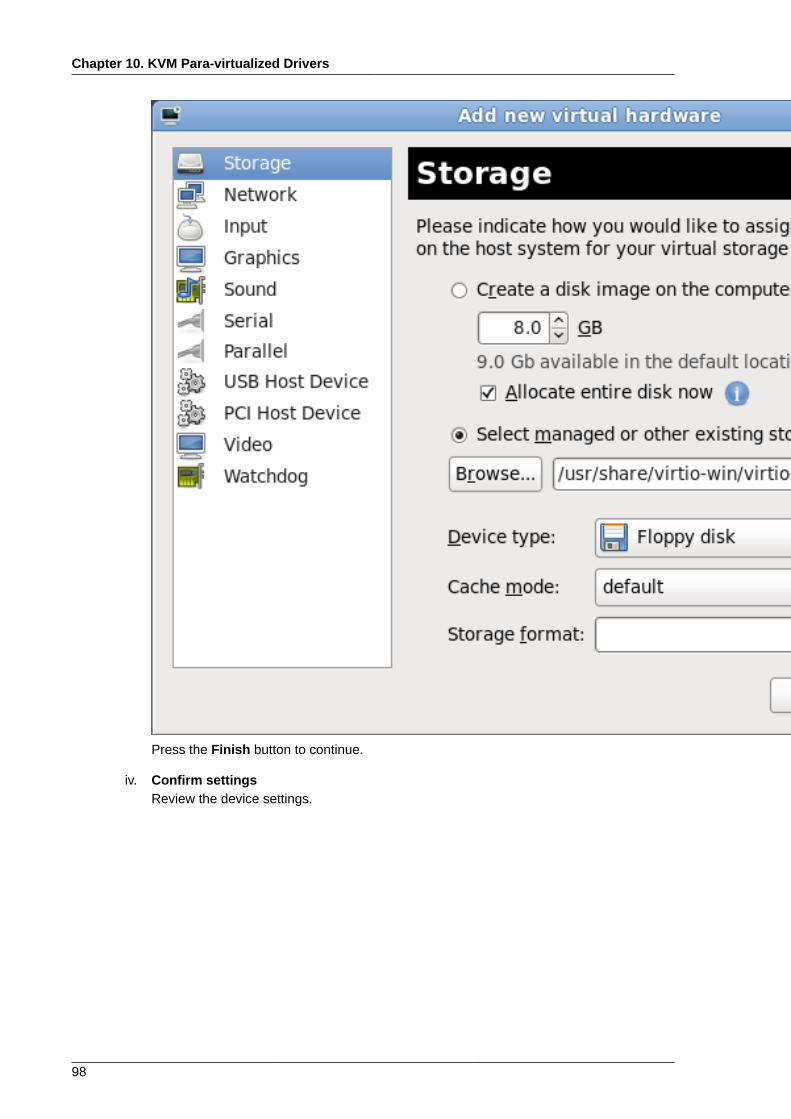
Chapter 10. KVM Para-virtualized Drivers
98
Press the Finish button to continue.
iv. Confirm settingsReview the device settings.
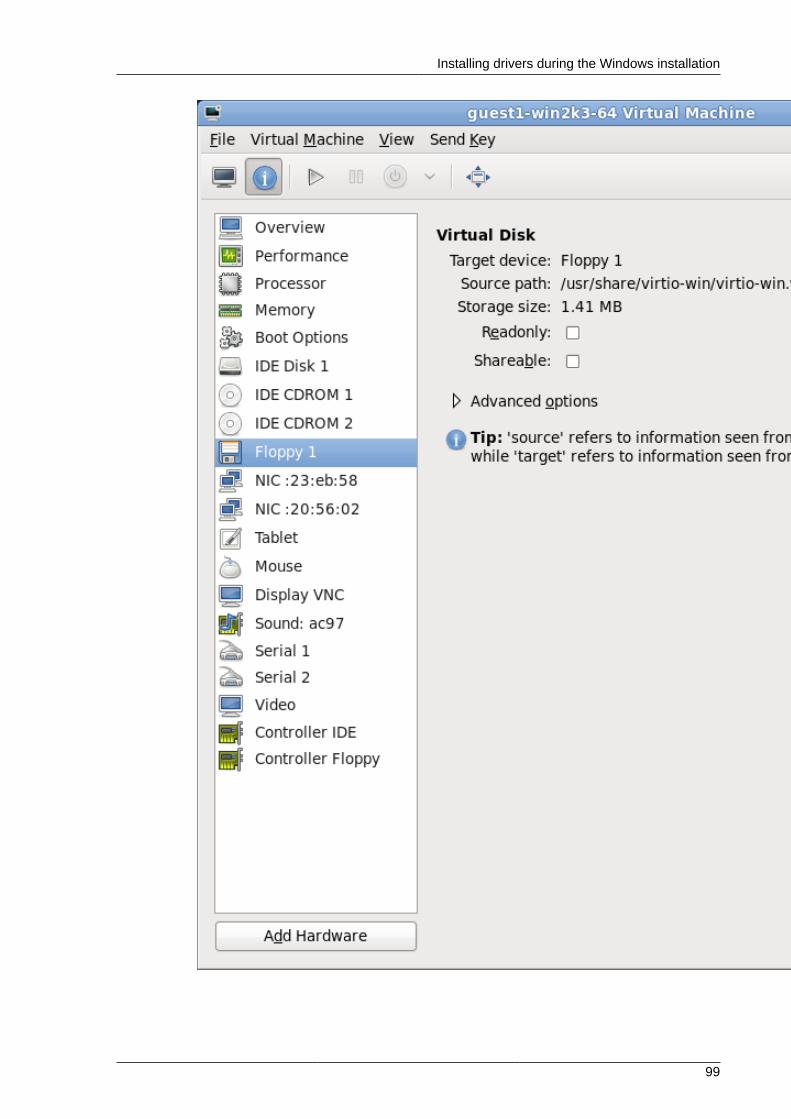
Installing drivers during the Windows installation
99
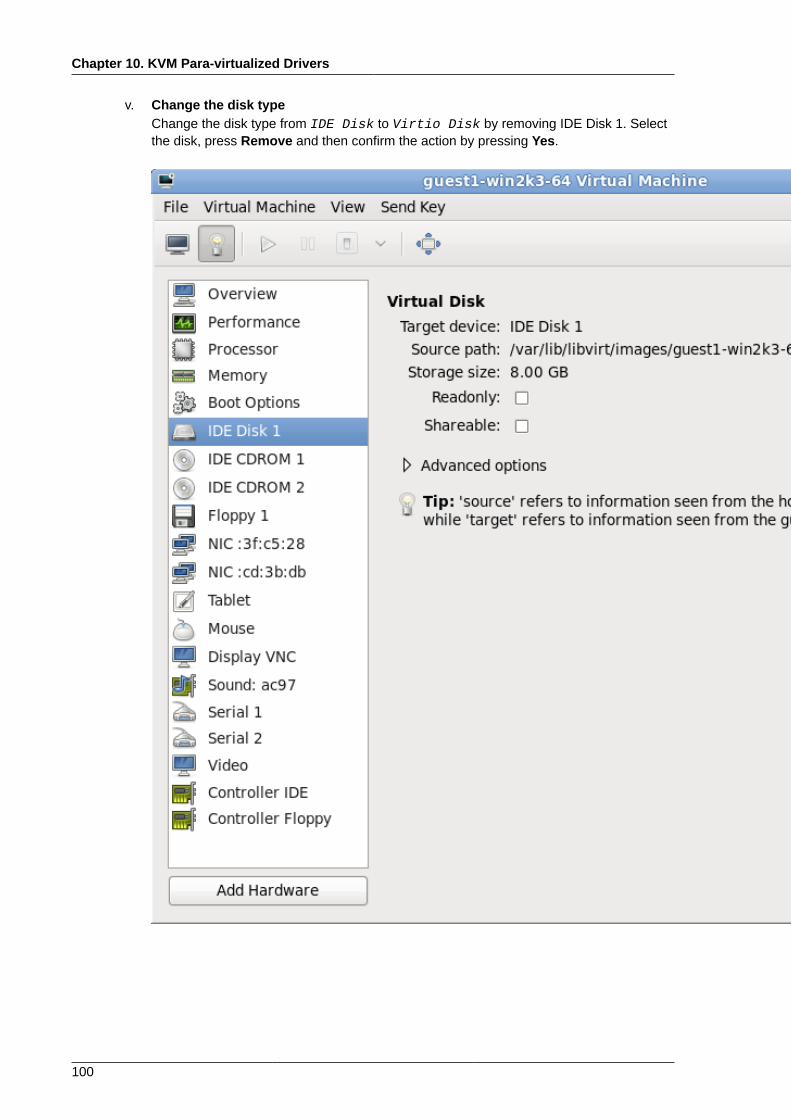
Chapter 10. KVM Para-virtualized Drivers
100
v. Change the disk typeChange the disk type from IDE Disk to Virtio Disk by removing IDE Disk 1. Selectthe disk, press Remove and then confirm the action by pressing Yes.
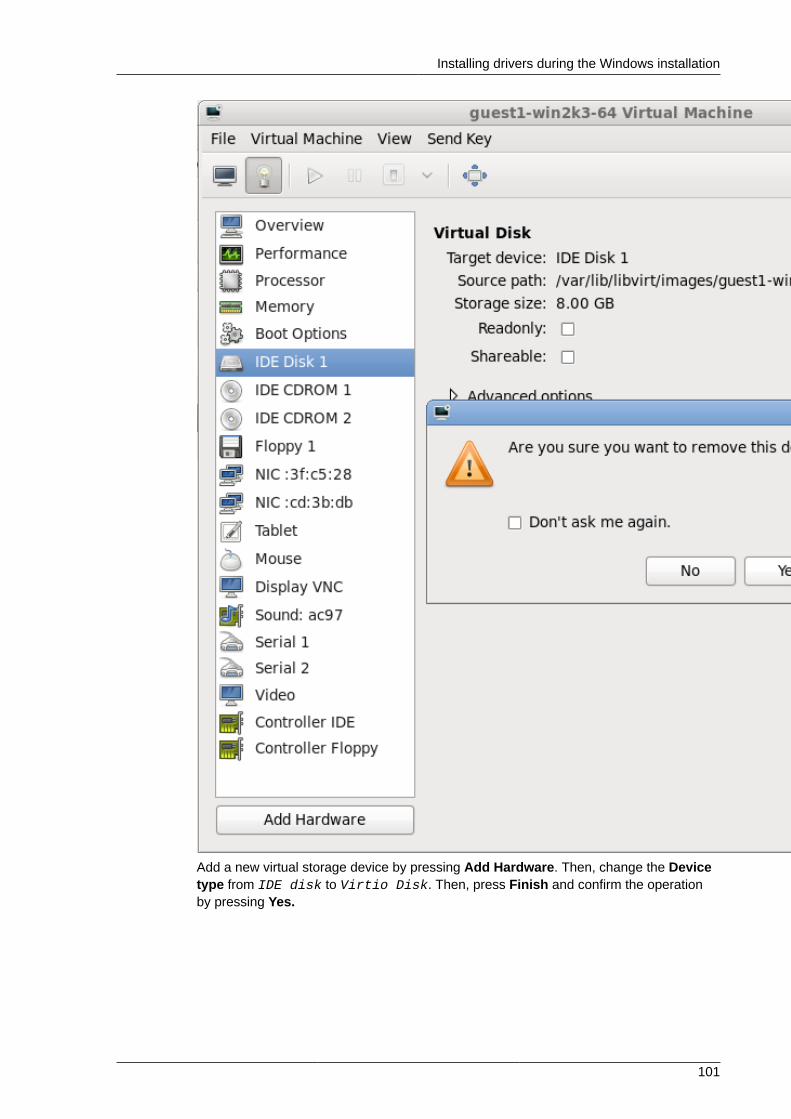
Installing drivers during the Windows installation
101
Add a new virtual storage device by pressing Add Hardware. Then, change the Devicetype from IDE disk to Virtio Disk. Then, press Finish and confirm the operationby pressing Yes.
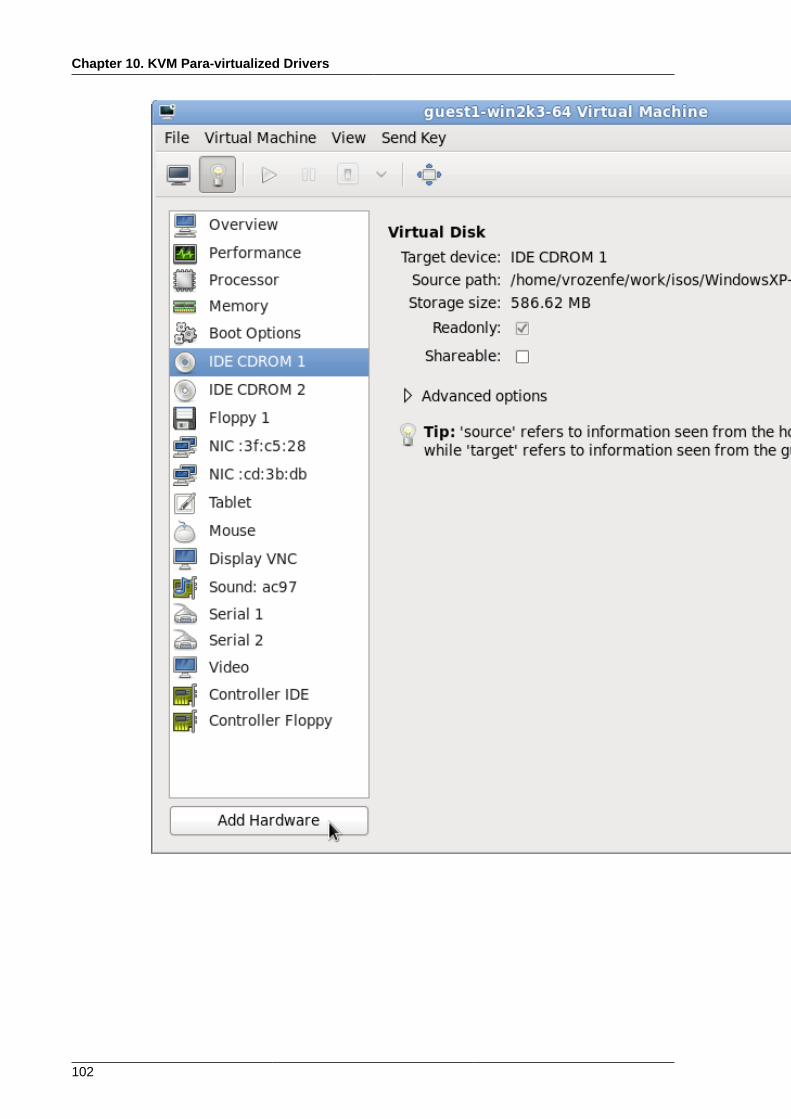
Chapter 10. KVM Para-virtualized Drivers
102
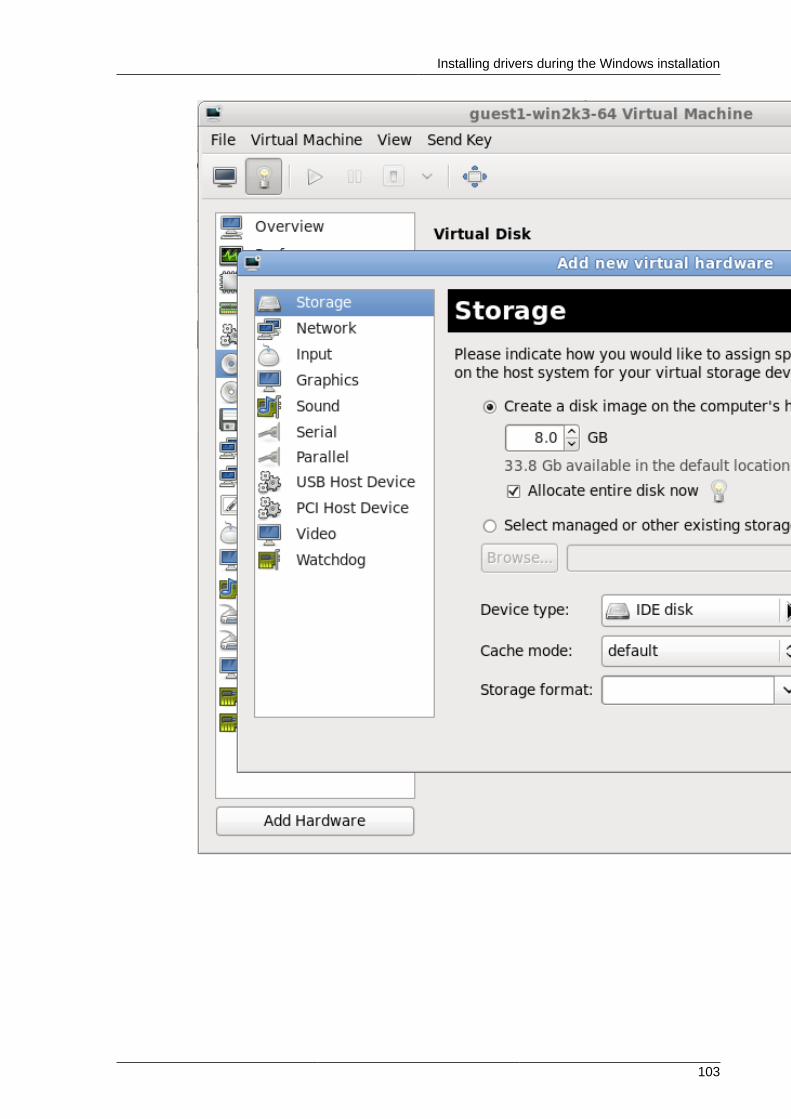
Installing drivers during the Windows installation
103
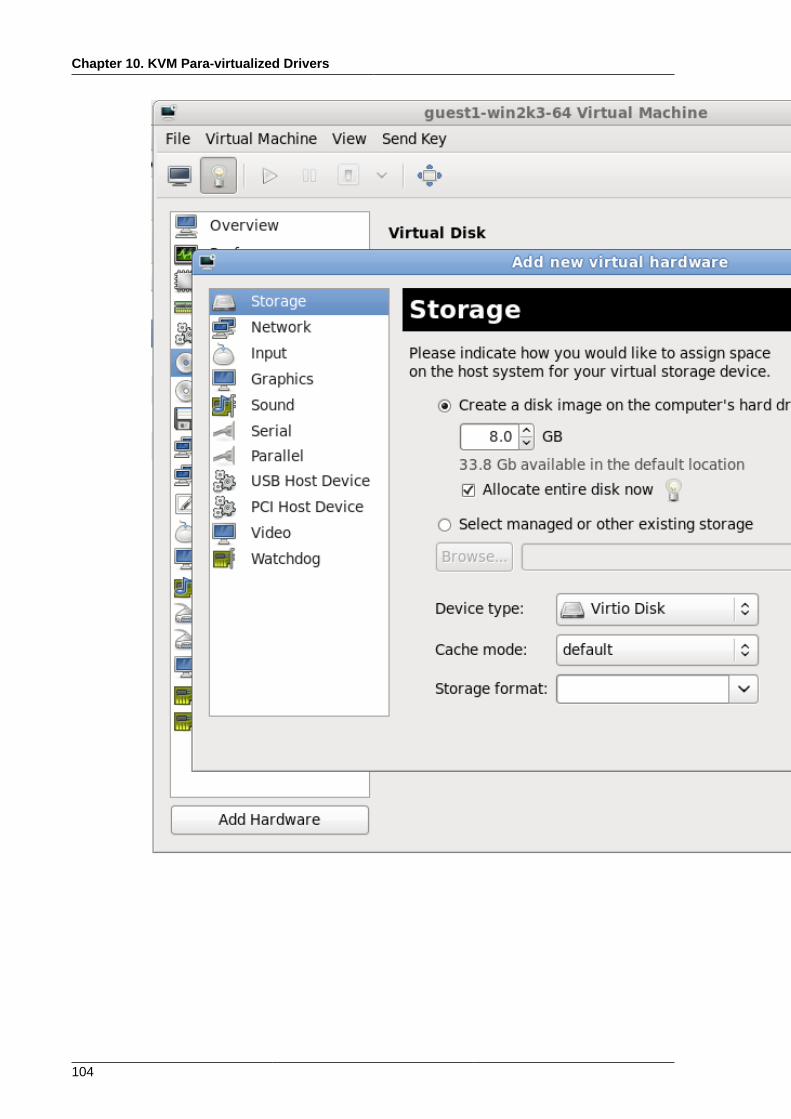
Chapter 10. KVM Para-virtualized Drivers
104
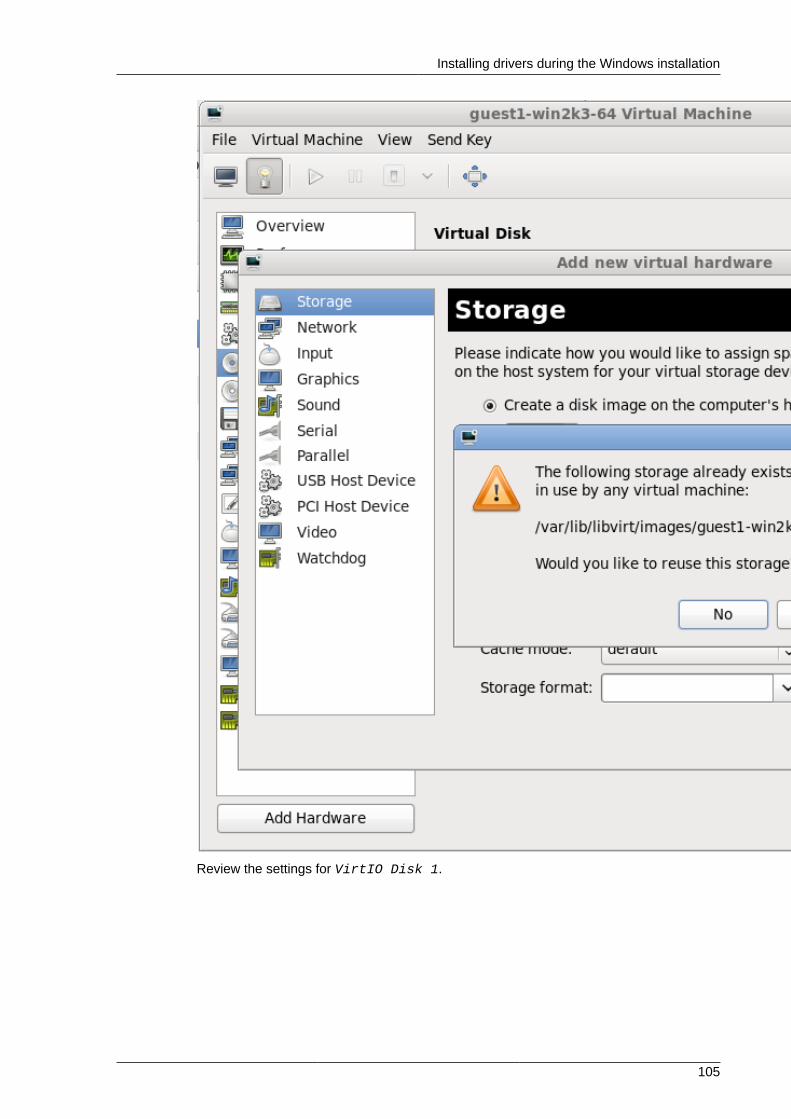
Installing drivers during the Windows installation
105
Review the settings for VirtIO Disk 1.
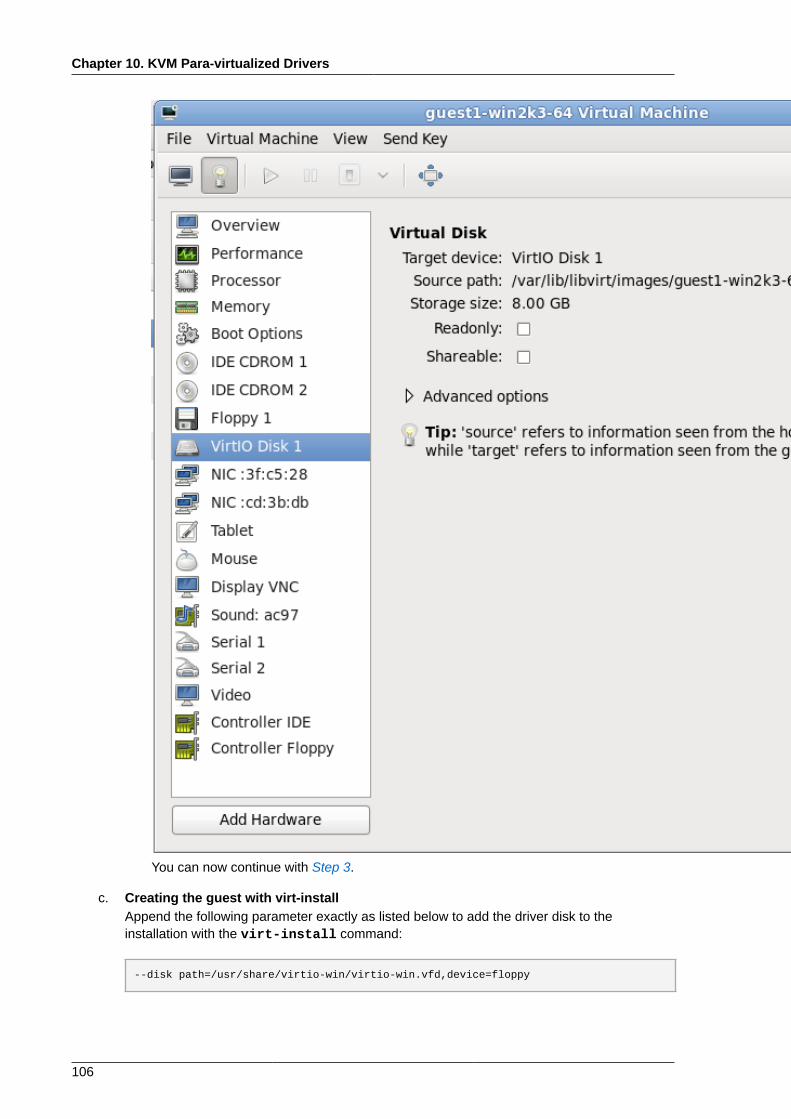
Chapter 10. KVM Para-virtualized Drivers
106
You can now continue with Step 3.
c. Creating the guest with virt-installAppend the following parameter exactly as listed below to add the driver disk to theinstallation with the virt-install command:
--disk path=/usr/share/virtio-win/virtio-win.vfd,device=floppy

Installing drivers during the Windows installation
107
According to the version of Windows you are installing, append one of the following options tothe virt-install command:
--os-variant winxp
--os-variant win2003
--os-variant win7
You can now continue with Step 3.
3. Additional steps for driver installationDuring the installation, additional steps are required to install drivers, depending on the type ofWindows guest.
a. Windows Server 2003 and Windows XPBefore the installation blue screen repeatedly press F6 for third party drivers.
Press S to install additional
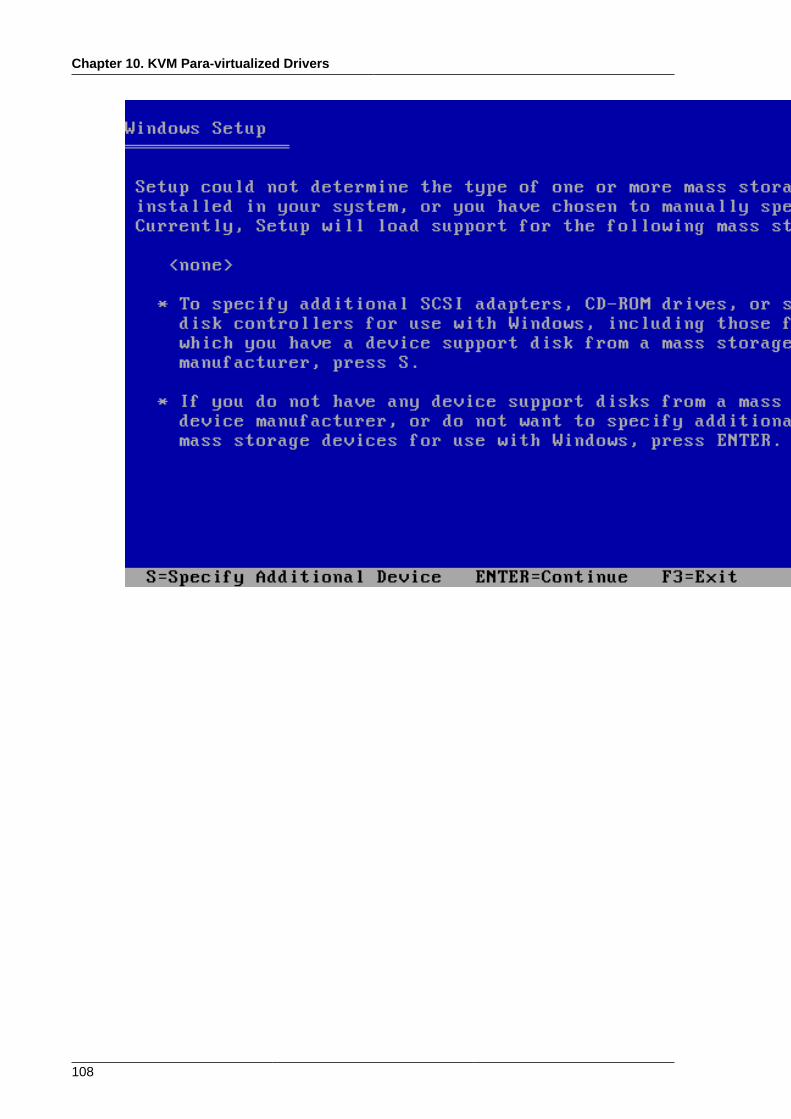
Chapter 10. KVM Para-virtualized Drivers
108
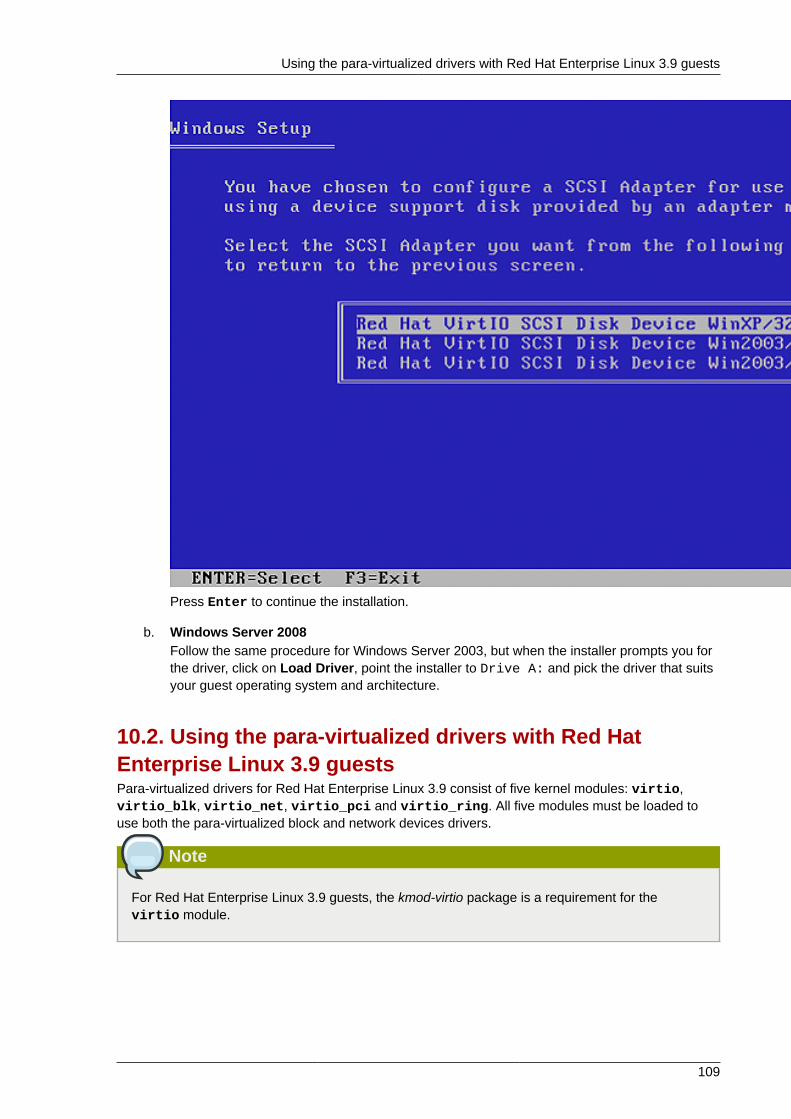
Using the para-virtualized drivers with Red Hat Enterprise Linux 3.9 guests
109
Press Enter to continue the installation.
b. Windows Server 2008Follow the same procedure for Windows Server 2003, but when the installer prompts you forthe driver, click on Load Driver, point the installer to Drive A: and pick the driver that suitsyour guest operating system and architecture.
10.2. Using the para-virtualized drivers with Red HatEnterprise Linux 3.9 guestsPara-virtualized drivers for Red Hat Enterprise Linux 3.9 consist of five kernel modules: virtio,virtio_blk, virtio_net, virtio_pci and virtio_ring. All five modules must be loaded touse both the para-virtualized block and network devices drivers.
Note
For Red Hat Enterprise Linux 3.9 guests, the kmod-virtio package is a requirement for thevirtio module.
Chapter 10. KVM Para-virtualized Drivers
110
Note
To use the network device driver only, load the virtio, virtio_net and virtio_pcimodules. To use the block device driver only, load the virtio, virtio_ring, virtio_blkand virtio_pci modules.
Modified initrd files
The virtio package modifies the initrd RAM disk file in the /boot directory. The original initrd fileis saved to /boot/initrd- kernel-version .img.virtio.orig. The original initrd file isreplaced with a new initrd RAM disk containing the virtio driver modules. The initrd RAM diskis modified to allow the guest to boot from a storage device using the para-virtualized drivers.To use a different initrd file, you must ensure that drivers are loaded with the sysinit script(Loading the para-virtualized drivers with the sysinit script) or when creating new initrd RAM disk(Adding the para-virtualized drivers to the initrd RAM disk).
Loading the para-virtualized drivers with the sysinit scriptThis procedure covers loading the para-virtualized driver modules during the boot sequence on a RedHat Enterprise Linux 3.9 or newer guest with the sysinit script. Note that the guest cannot use thepara-virtualized drivers for the default boot disk if the modules are loaded with the sysinit script.
The drivers must be loaded in the following order:
1. virtio
2. virtio_ring
3. virtio_pci
4. virtio_blk
5. virtio_net
virtio_net and virtio_blk are the only drivers whose order can be changed. If other drivers areloaded in a different order, they will not work.
Next, configure the modules. Locate the following section of the /etc/rc.d/rc.sysinit file.
if [ -f /etc/rc.modules ]; then /etc/rc.modulesfi
Append the following lines after that section:
if [ -f /etc/rc.modules ]; then /etc/rc.modulesfi
Using the para-virtualized drivers with Red Hat Enterprise Linux 3.9 guests
111
modprobe virtiomodprobe virtio_ring # Comment this out if you do not need block drivermodprobe virtio_blk # Comment this out if you do not need block drivermodprobe virtio_net # Comment this out if you do not need net drivermodprobe virtio_pci
Reboot the guest to load the kernel modules.
Adding the para-virtualized drivers to the initrd RAM diskThis procedure covers loading the para-virtualized driver modules with the kernel on a Red HatEnterprise Linux 3.9 or newer guest by including the modules in the initrd RAM disk. The mkinitrd toolconfigures the initrd RAM disk to load the modules. Specify the additional modules with the --withparameter for the mkinitrd command. Append following set of parameters, in the exact order, whenusing the mkinitrd command to create a custom initrd RAM disk:
--with virtio --with virtio_ring --with virtio_blk --with virtio_net --with virtio_pci
AMD64 and Intel 64 issuesUse the x86_64 version of the virtio package for AMD64 systems.
Use the ia32e version of the virtio package for Intel 64 systems. Using the x86_64 version of thevirtio may cause a 'Unresolved symbol' error during the boot sequence on Intel 64 systems.
Network performance issuesIf you experience low performance with the para-virtualized network drivers, verify the setting for theGSO and TSO features on the host system. The para-virtualized network drivers require that the GSOand TSO options are disabled for optimal performance.
Verify the status of the GSO and TSO settings, use the command on the host (replacing interfacewith the network interface used by the guest):
# ethtool -k interface
Disable the GSO and TSO options with the following commands on the host:
# ethtool -K interface gso off# ethtool -K interface tso off
Para-virtualized driver swap partition issueAfter activating the para-virtualized block device driver the swap partition may not be available. Thisissue is may be caused by a change in disk device name. To fix this issue, open the /etc/fstab fileand locate the lines containing swap partitions, for example:
/dev/hda3 swap swap defaults 0 0
The para-virtualized drivers use the /dev/vd* naming convention, not the /dev/hd* namingconvention. To resolve this issue modify the incorrect swap entries in the /etc/fstab file to use the/dev/vd* convention, for the example above:
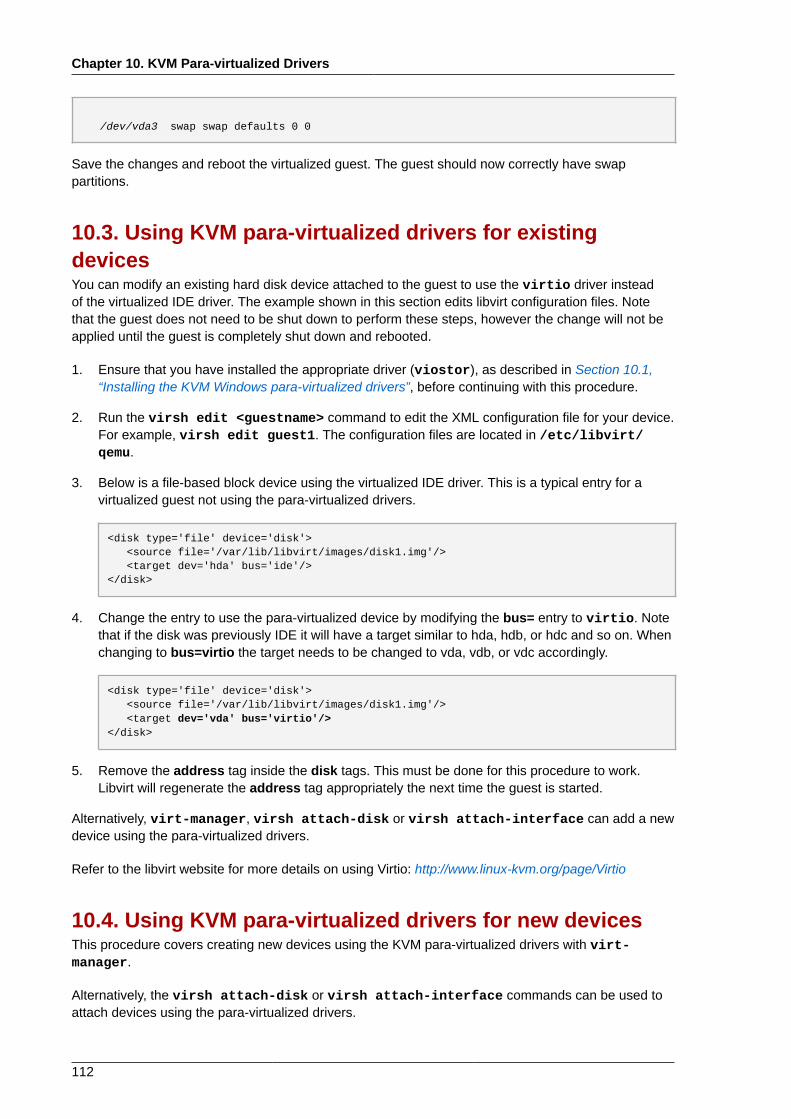
Chapter 10. KVM Para-virtualized Drivers
112
/dev/vda3 swap swap defaults 0 0
Save the changes and reboot the virtualized guest. The guest should now correctly have swappartitions.
10.3. Using KVM para-virtualized drivers for existingdevicesYou can modify an existing hard disk device attached to the guest to use the virtio driver insteadof the virtualized IDE driver. The example shown in this section edits libvirt configuration files. Notethat the guest does not need to be shut down to perform these steps, however the change will not beapplied until the guest is completely shut down and rebooted.
1. Ensure that you have installed the appropriate driver (viostor), as described in Section 10.1,“Installing the KVM Windows para-virtualized drivers”, before continuing with this procedure.
2. Run the virsh edit <guestname> command to edit the XML configuration file for your device.For example, virsh edit guest1. The configuration files are located in /etc/libvirt/qemu.
3. Below is a file-based block device using the virtualized IDE driver. This is a typical entry for avirtualized guest not using the para-virtualized drivers.
<disk type='file' device='disk'> <source file='/var/lib/libvirt/images/disk1.img'/> <target dev='hda' bus='ide'/></disk>
4. Change the entry to use the para-virtualized device by modifying the bus= entry to virtio. Notethat if the disk was previously IDE it will have a target similar to hda, hdb, or hdc and so on. Whenchanging to bus=virtio the target needs to be changed to vda, vdb, or vdc accordingly.
<disk type='file' device='disk'> <source file='/var/lib/libvirt/images/disk1.img'/> <target dev='vda' bus='virtio'/></disk>
5. Remove the address tag inside the disk tags. This must be done for this procedure to work.Libvirt will regenerate the address tag appropriately the next time the guest is started.
Alternatively, virt-manager, virsh attach-disk or virsh attach-interface can add a newdevice using the para-virtualized drivers.
Refer to the libvirt website for more details on using Virtio: http://www.linux-kvm.org/page/Virtio
10.4. Using KVM para-virtualized drivers for new devicesThis procedure covers creating new devices using the KVM para-virtualized drivers with virt-manager.
Alternatively, the virsh attach-disk or virsh attach-interface commands can be used toattach devices using the para-virtualized drivers.

Using KVM para-virtualized drivers for new devices
113
Install the drivers first
Ensure the drivers have been installed on the Windows guest before proceeding to install newdevices. If the drivers are unavailable the device will not be recognized and will not work.
Procedure 10.3. Starting the new device wizard1. Open the virtualized guest by double clicking on the name of the guest in virt-manager.
2. Open the Information tab by pressing the i information button.
Figure 10.1. The information tab button
3. In the information tab, press the Add Hardware button.
4. In the Adding Virtual Hardware tab select Storage or Network for the type of device. The storageand network device wizards are covered in procedures Procedure 10.4, “Adding a storage deviceusing the para-virtualized storage driver” and Procedure 10.5, “Adding a network device using thepara-virtualized network driver”
Procedure 10.4. Adding a storage device using the para-virtualized storage driver1. Select hardware type
Select Storage as the Hardware type.
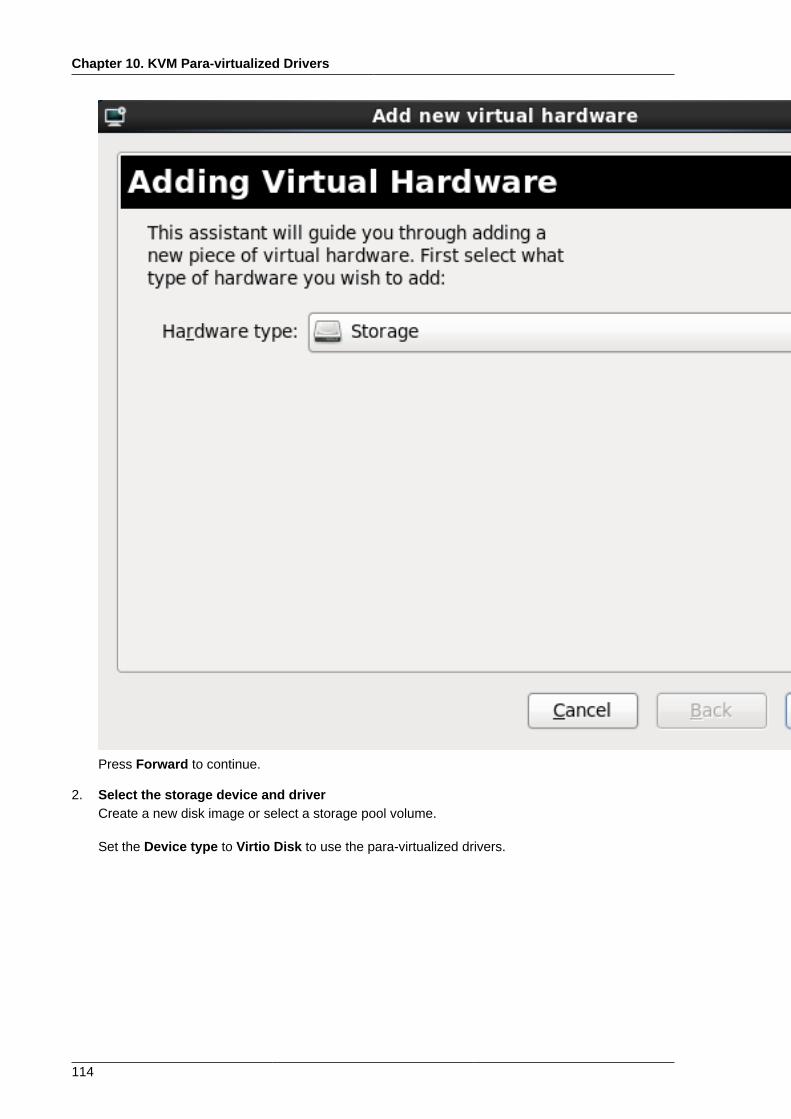
Chapter 10. KVM Para-virtualized Drivers
114
Press Forward to continue.
2. Select the storage device and driverCreate a new disk image or select a storage pool volume.
Set the Device type to Virtio Disk to use the para-virtualized drivers.
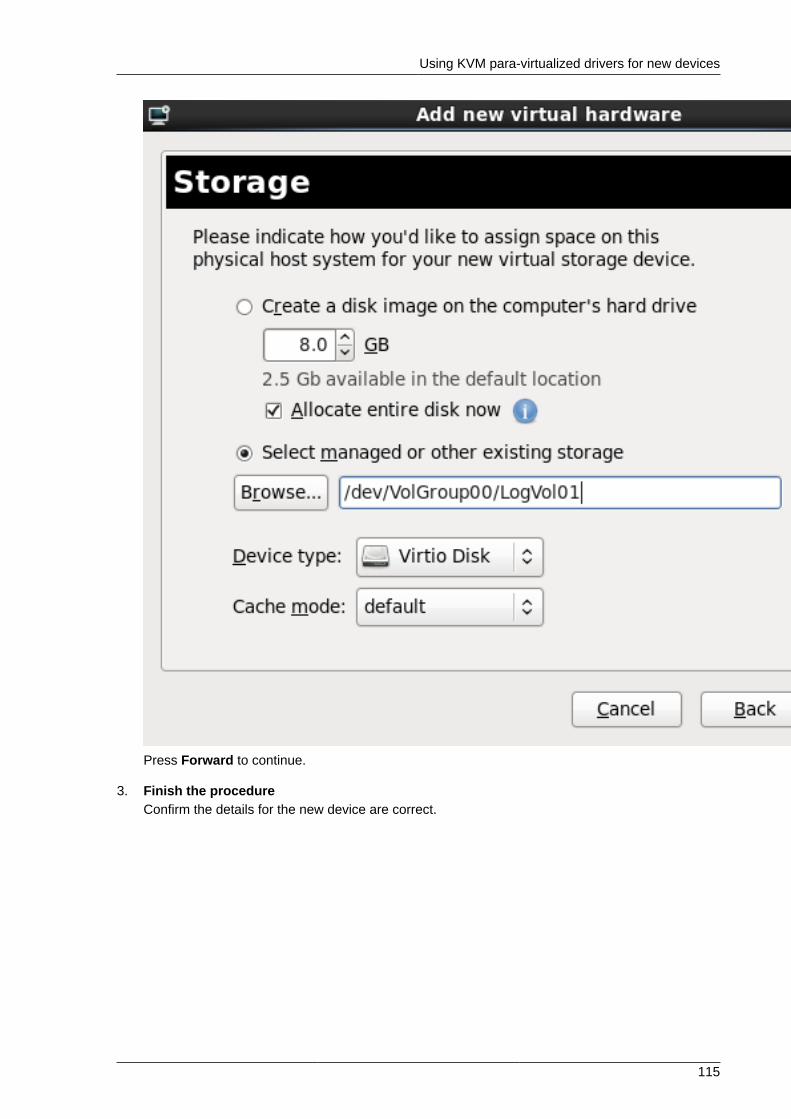
Using KVM para-virtualized drivers for new devices
115
Press Forward to continue.
3. Finish the procedureConfirm the details for the new device are correct.
Chapter 10. KVM Para-virtualized Drivers
116
Press Finish to complete the procedure.
Procedure 10.5. Adding a network device using the para-virtualized network driver1. Select hardware type
Select Network as the Hardware type.
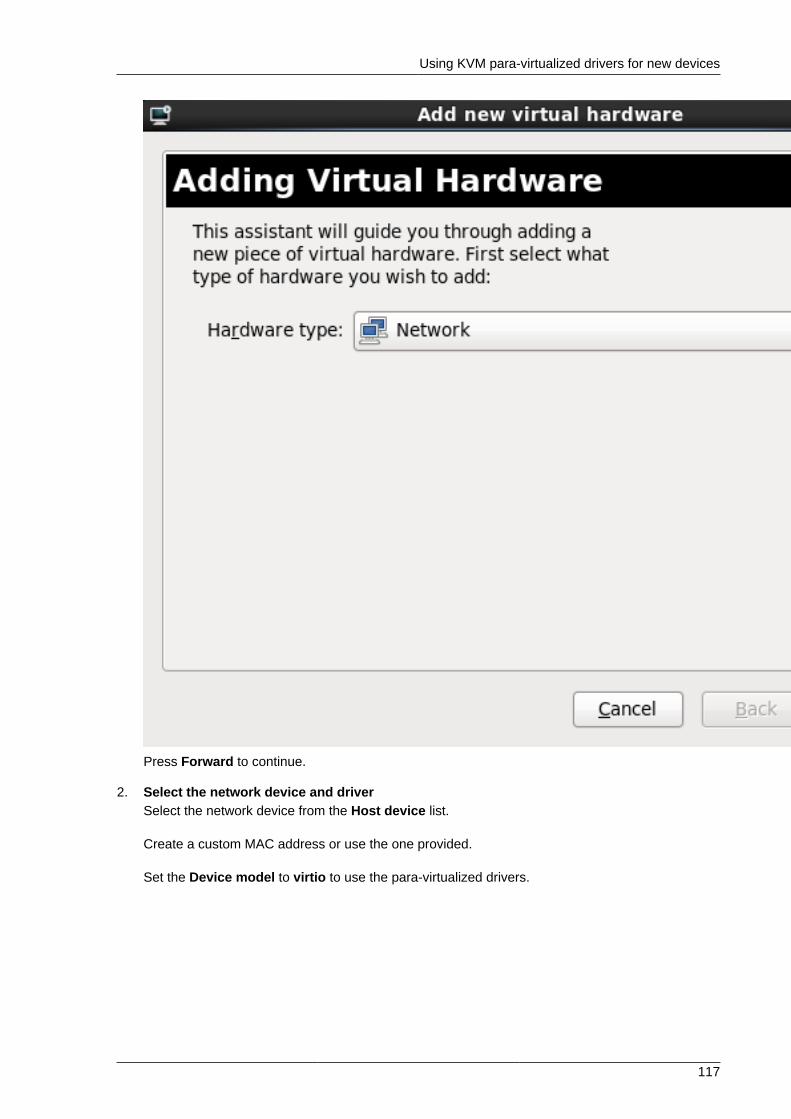
Using KVM para-virtualized drivers for new devices
117
Press Forward to continue.
2. Select the network device and driverSelect the network device from the Host device list.
Create a custom MAC address or use the one provided.
Set the Device model to virtio to use the para-virtualized drivers.
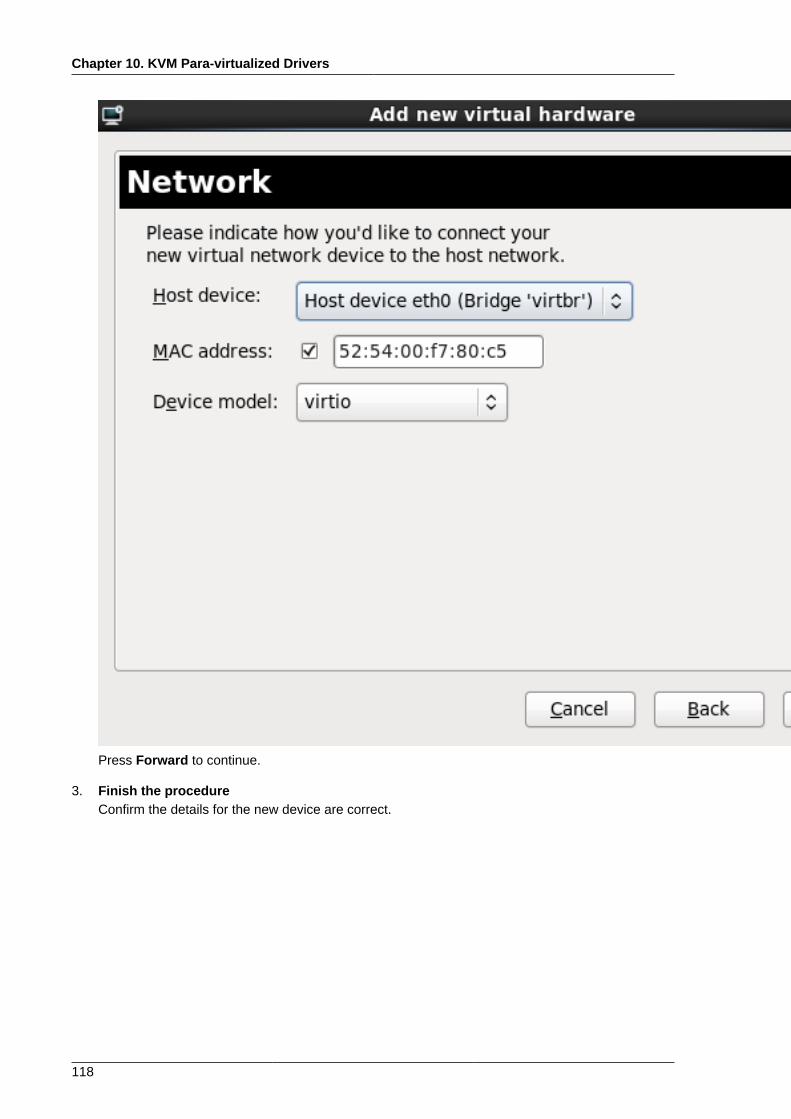
Chapter 10. KVM Para-virtualized Drivers
118
Press Forward to continue.
3. Finish the procedureConfirm the details for the new device are correct.

Using KVM para-virtualized drivers for new devices
119
Press Finish to complete the procedure.
Once all new devices are added, reboot the guest. Windows guests may may not recognise thedevices until the guest is rebooted.

120
Chapter 11.
121
Network ConfigurationThis chapter provides an introduction to the common networking configurations used by libvirt basedguest VMs. For additional information consult the libvirt network architecture documentation: http://libvirt.org/intro.html.
Red Hat Enterprise Linux 6 supports the following networking setups for virtualization:
• virtual networks using Network Address Translation (NAT)
• directly allocated physical devices using PCI device assignment
• directly allocated virtual functions using PCIe SR-IOV
• bridged networks
You must enable NAT, network bridging or directly share a PCIe device to allow external hosts accessto network services on virtualized guests.
11.1. Network Address Translation (NAT) with libvirtOne of the most common methods for sharing network connections is to use Network AddressTranslation (NAT) forwarding (also know as virtual networks).
Host configurationEvery standard libvirt installation provides NAT based connectivity to virtual machines as thedefault virtual network. Verify that it is available with the virsh net-list --all command.
# virsh net-list --allName State Autostart -----------------------------------------default active yes
If it is missing, the example XML configuration file can be reloaded and activated:
# virsh net-define /usr/share/libvirt/networks/default.xml
The default network is defined from /usr/share/libvirt/networks/default.xml
Mark the default network to automatically start:
# virsh net-autostart defaultNetwork default marked as autostarted
Start the default network:
# virsh net-start defaultNetwork default started
Once the libvirt default network is running, you will see an isolated bridge device. This device doesnot have any physical interfaces added. The new device uses NAT and IP forwarding to connect to thephysical network. Do not add new interfaces.
# brctl showbridge name bridge id STP enabled interfaces
Chapter 11. Network Configuration
122
virbr0 8000.000000000000 yes
libvirt adds iptables rules which allow traffic to and from guests attached to the virbr0 devicein the INPUT, FORWARD, OUTPUT and POSTROUTING chains. libvirt then attempts to enable theip_forward parameter. Some other applications may disable ip_forward, so the best option is toadd the following to /etc/sysctl.conf.
net.ipv4.ip_forward = 1
Guest configurationOnce the host configuration is complete, a guest can be connected to the virtual network based onits name. To connect a guest to the 'default' virtual network, the following could be used in the XMLconfiguration file (such as /etc/libvirtd/qemu/myguest.xml) for the guest:
<interface type='network'> <source network='default'/></interface>
Note
Defining a MAC address is optional. A MAC address is automatically generated if omitted.Manually setting the MAC address may be useful to maintain consistency or easy referencethroughout your environment, or to avoid the very small chance of a conflict.
<interface type='network'> <source network='default'/> <mac address='00:16:3e:1a:b3:4a'/></interface>
11.2. Disabling vhost-netThe vhost-net module is a kernel-level backend for virtio networking that reduces virtualizationoverhead by moving virtio descriptor conversion tasks out of the qemu user space and into thevhost-net driver. It is enabled by default when virtio is not in use, and when no other hardwareacceleration for virtual networking is in place. It is disabled by default in all other situations, becausesome workloads can experience a degradation in performance when vhost-net is in use.
Specifically, when UDP traffic is sent from a host machine to a guest on that host, performancedegradation can occur if the guest machine processes incoming data at a rate slower than the hostmachine sends it. In this situation, enabling vhost-net causes the UDP socket's receive buffer tooverflow more quickly, which results in greater packet loss. It is therefore better to disable vhost-netin this situation to slow the traffic, and improve overall performance.
To disable vhost-net, edit the <interface> sub-element in your guest's XML configuration file anddefine the network as follows:
<interface type="network"> ... <model type="virtio"/> <driver name="qemu"/> ...
Checksum correction for older DHCP clients
123
</interface>
Because virtio is enabled, vhost-net will not be used.
11.2.1. Checksum correction for older DHCP clientsThe vhost-net module avoids using checksum computations in host to guest communication, andnotifies guests that incoming packets do not include the checksum.
Some DHCP clients do not work correctly on guest machines running Red Hat Enterprise Linuxversions earlier than 6.0 because of this "missing" checksum value. When used with other DHCPclients on the same host that were not started by libvirt, the DHCP client assumes that the checksumvalue for these packets is incorrect rather than missing, and discards those packets.
To work around this problem, you can create an iptables CHECKSUM target to compute and fill in thechecksum value in packets that lack checksums, for example:
iptables -A POSTROUTING -t mangle -p udp --dport 68 -j CHECKSUM --checksum-fill
This iptables rule is programmed automatically on the host when the server is started by libvirt, so nofurther action is required.
11.3. Bridged networking with libvirtBridged networking (also known as physical device sharing) is used for dedicating a physical deviceto a virtual machine. Bridging is often used for more advanced setups and on servers with multiplenetwork interfaces.
Disable NetworkManagerNetworkManager does not support bridging. NetworkManager must be disabled to use networking withthe network scripts (located in the /etc/sysconfig/network-scripts/ directory).
# chkconfig NetworkManager off# chkconfig network on# service NetworkManager stop# service network start
Note
Instead of turning off NetworkManager, add "NM_CONTROLLED=no" to the ifcfg-* scripts usedin the examples.
Host configurationCreate or edit the following two network configuration files. These steps can be repeated (with differentnames) for additional network bridges.
1. Change to the network scripts directoryChange to the /etc/sysconfig/network-scripts directory:
# cd /etc/sysconfig/network-scripts
Chapter 11. Network Configuration
124
2. Modify a network interface to make a bridgeEdit the network script for the network device you are adding to the bridge. In this example,/etc/sysconfig/network-scripts/ifcfg-eth0 is used. This file defines eth0, thephysical network interface which is set as part of a bridge:
DEVICE=eth0# change the hardware address to match the hardware address your NIC usesHWADDR=00:16:76:D6:C9:45ONBOOT=yesBRIDGE=br0
Tip
You can configure the device's Maximum Transfer Unit (MTU) by appending an MTU variableto the end of the configuration file.
MTU=9000
3. Create the bridge scriptCreate a new network script in the /etc/sysconfig/network-scripts directory calledifcfg-br0 or similar. The br0 is the name of the bridge, this can be anything as long as thename of the file is the same as the DEVICE parameter, and that it matches the bridge name usedin step 2.
DEVICE=br0TYPE=BridgeBOOTPROTO=dhcpONBOOT=yesDELAY=0
Warning
The line, TYPE=Bridge, is case-sensitive. It must have uppercase 'B' and lower case 'ridge'.
4. Restart the networkAfter configuring, restart networking or reboot.
# service network restart
5. Configure iptablesConfigure iptables to allow all traffic to be forwarded across the bridge.
# iptables -I FORWARD -m physdev --physdev-is-bridged -j ACCEPT# service iptables save
Bridged networking with libvirt
125
# service iptables restart
Disable iptables on bridges
Alternatively, prevent bridged traffic from being processed by iptables rules. In /etc/sysctl.conf append the following lines:
net.bridge.bridge-nf-call-ip6tables = 0net.bridge.bridge-nf-call-iptables = 0net.bridge.bridge-nf-call-arptables = 0
Reload the kernel parameters configured with sysctl.
# sysctl -p /etc/sysctl.conf
6. Verify the bridgeVerify the new bridge is available with the bridge control command (brctl).
# brctl showbridge name bridge id STP enabled interfacesvirbr0 8000.000000000000 yesbr0 8000.000e0cb30550 no eth0
A Shared physical device is now available through virt-manager and libvirt. Guests can nowconnect to this device for full network access.
Note, the bridge is completely independent of the virbr0 bridge. Do not attempt to attach a physicaldevice to virbr0. The virbr0 bridge is only for Network Address Translation (NAT) connectivity.
Guest configurationOnce the host configuration is complete, a guest can be connected to the virtual network based onits name. To connect a guest to the bridged virtual network, the following could be used in the XMLconfiguration file (such as /etc/libvirtd/qemu/myguest.xml) for the guest:
<interface type='bridge'> <source bridge='br0'/></interface>

126
Chapter 12.
127
PCI device assignmentThis chapter covers using PCI device assignment with KVM.
Certain hardware platforms allow virtualized guests to directly access various hardware devices andcomponents. This process in virtualization is known as device assignment. Device assignment is alsoknown as PCI passthrough.
The KVM hypervisor supports attaching PCI devices on the host system to virtualized guests. PCIdevice assignment allows guests to have exclusive access to PCI devices for a range of tasks. PCIdevice assignment allows PCI devices to appear and behave as if they were physically attached to theguest operating system. PCI device assignment can improve the I/O performance of devices attachedto virtualized guests.
Device assignment is supported on PCI Express devices, except graphics cards. Parallel PCI devicesmay be supported as assigned devices, but they have severe limitations due to security and systemconfiguration conflicts.
Note
The Red Hat Enterprise Linux 6.0 release comes with limitations for operating system driversof KVM guests to have full access to a device's standard and extended configuration space.The Red Hat Enterprise Linux 6.0 limitations have been significantly reduced in the Red HatEnterprise Linux 6.1 release and enable a much larger set of PCI Express devices to besuccessfully assigned to KVM guests.
Secure device assignment also requires interrupt remapping support. If a platform does not supportinterrupt remapping, device assignment will fail. To use device assignment without interrupt remappingsupport in a development environment, set the allow_unsafe_assigned_interrupts KVMmodule parameter to 1.
PCI device assignment is only available on hardware platforms supporting either Intel VT-d or AMDIOMMU. These Intel VT-d or AMD IOMMU extensions must be enabled in BIOS for PCI deviceassignment to function.
Red Hat Enterprise Linux 6.0 and newer supports hot plugging PCI device assignment devices intovirtualized guests.
PCI devices are limited by the virtualized system architecture. Out of the 32 PCI devices for a guest, 4are always defined for a KVM guest, and are not removable. This means there are up to 28 PCI slotsavailable for additional devices per guest. Each PCI device in a guest can have up to 8 functions.
Procedure 12.1. Preparing an Intel system for PCI device assignment1. Enable the Intel VT-d extensions
The Intel VT-d extensions provides hardware support for directly assigning a physical devices toguest.
The VT-d extensions are required for PCI device assignment with Red Hat Enterprise Linux. Theextensions must be enabled in the BIOS. Some system manufacturers disable these extensionsby default.
These extensions are often called various terms in BIOS which differ from manufacturer tomanufacturer. Consult your system manufacturer's documentation.
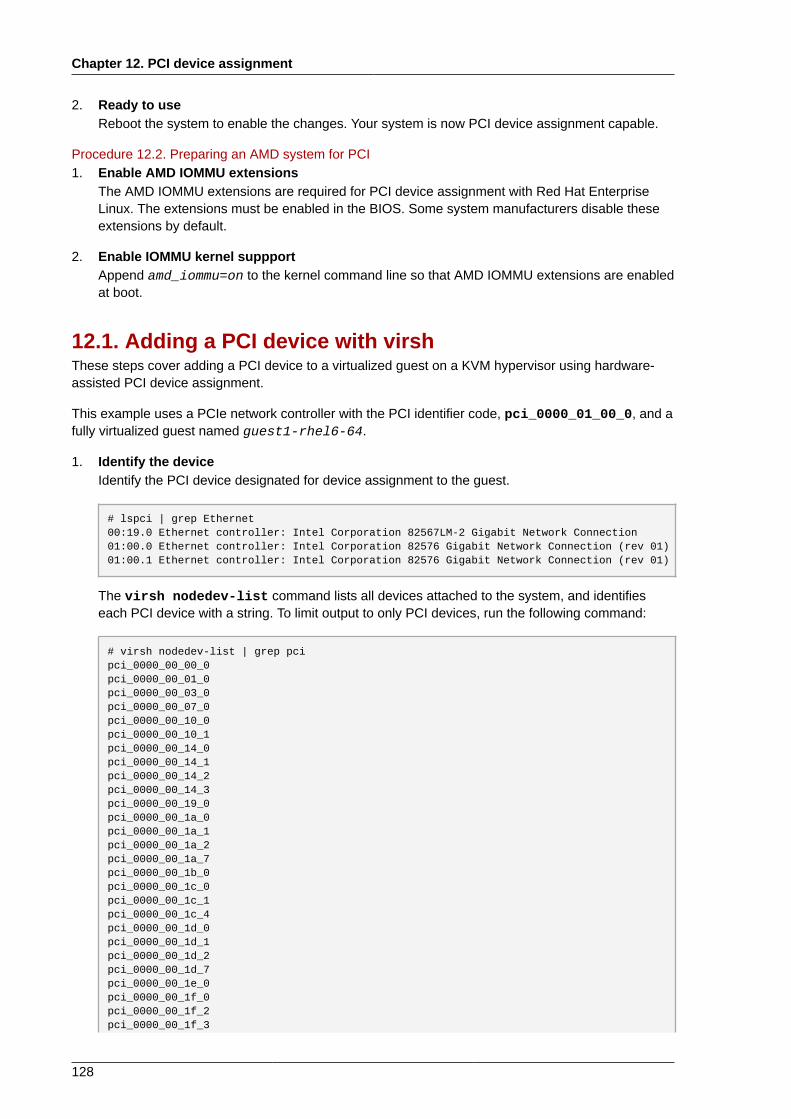
Chapter 12. PCI device assignment
128
2. Ready to useReboot the system to enable the changes. Your system is now PCI device assignment capable.
Procedure 12.2. Preparing an AMD system for PCI1. Enable AMD IOMMU extensions
The AMD IOMMU extensions are required for PCI device assignment with Red Hat EnterpriseLinux. The extensions must be enabled in the BIOS. Some system manufacturers disable theseextensions by default.
2. Enable IOMMU kernel suppportAppend amd_iommu=on to the kernel command line so that AMD IOMMU extensions are enabledat boot.
12.1. Adding a PCI device with virshThese steps cover adding a PCI device to a virtualized guest on a KVM hypervisor using hardware-assisted PCI device assignment.
This example uses a PCIe network controller with the PCI identifier code, pci_0000_01_00_0, and afully virtualized guest named guest1-rhel6-64.
1. Identify the deviceIdentify the PCI device designated for device assignment to the guest.
# lspci | grep Ethernet00:19.0 Ethernet controller: Intel Corporation 82567LM-2 Gigabit Network Connection01:00.0 Ethernet controller: Intel Corporation 82576 Gigabit Network Connection (rev 01)01:00.1 Ethernet controller: Intel Corporation 82576 Gigabit Network Connection (rev 01)
The virsh nodedev-list command lists all devices attached to the system, and identifieseach PCI device with a string. To limit output to only PCI devices, run the following command:
# virsh nodedev-list | grep pcipci_0000_00_00_0pci_0000_00_01_0pci_0000_00_03_0pci_0000_00_07_0pci_0000_00_10_0pci_0000_00_10_1pci_0000_00_14_0pci_0000_00_14_1pci_0000_00_14_2pci_0000_00_14_3pci_0000_00_19_0pci_0000_00_1a_0pci_0000_00_1a_1pci_0000_00_1a_2pci_0000_00_1a_7pci_0000_00_1b_0pci_0000_00_1c_0pci_0000_00_1c_1pci_0000_00_1c_4pci_0000_00_1d_0pci_0000_00_1d_1pci_0000_00_1d_2pci_0000_00_1d_7pci_0000_00_1e_0pci_0000_00_1f_0pci_0000_00_1f_2pci_0000_00_1f_3
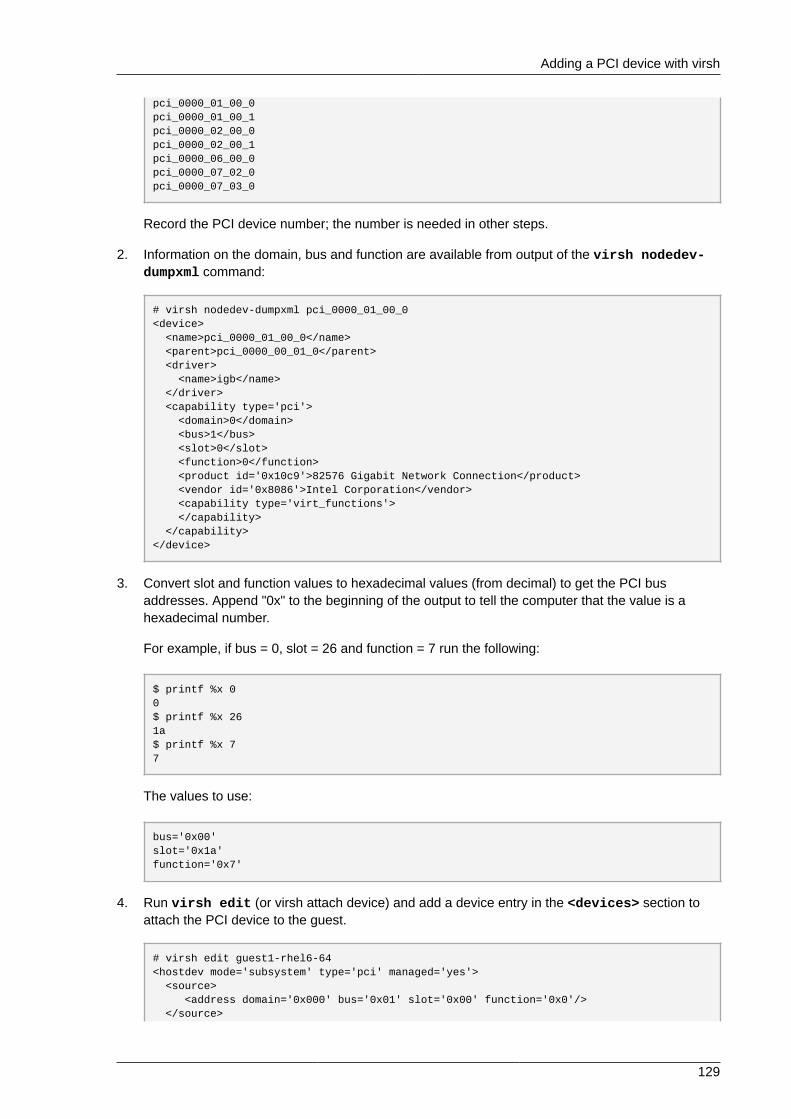
Adding a PCI device with virsh
129
pci_0000_01_00_0pci_0000_01_00_1pci_0000_02_00_0pci_0000_02_00_1pci_0000_06_00_0pci_0000_07_02_0pci_0000_07_03_0
Record the PCI device number; the number is needed in other steps.
2. Information on the domain, bus and function are available from output of the virsh nodedev-dumpxml command:
# virsh nodedev-dumpxml pci_0000_01_00_0<device> <name>pci_0000_01_00_0</name> <parent>pci_0000_00_01_0</parent> <driver> <name>igb</name> </driver> <capability type='pci'> <domain>0</domain> <bus>1</bus> <slot>0</slot> <function>0</function> <product id='0x10c9'>82576 Gigabit Network Connection</product> <vendor id='0x8086'>Intel Corporation</vendor> <capability type='virt_functions'> </capability> </capability></device>
3. Convert slot and function values to hexadecimal values (from decimal) to get the PCI busaddresses. Append "0x" to the beginning of the output to tell the computer that the value is ahexadecimal number.
For example, if bus = 0, slot = 26 and function = 7 run the following:
$ printf %x 00$ printf %x 261a$ printf %x 77
The values to use:
bus='0x00'slot='0x1a'function='0x7'
4. Run virsh edit (or virsh attach device) and add a device entry in the <devices> section toattach the PCI device to the guest.
# virsh edit guest1-rhel6-64<hostdev mode='subsystem' type='pci' managed='yes'> <source> <address domain='0x000' bus='0x01' slot='0x00' function='0x0'/> </source>
Chapter 12. PCI device assignment
130
</hostdev>
5. Set a sebool to allow the management of the PCI device from the guest:
$ setsebool -P virt_use_sysfs 1
6. Start the guest system:
# virsh start guest1-rhel6-64
The PCI device should now be successfully attached to the guest and accessible to the guestoperating system.
12.2. Adding a PCI device with virt-managerPCI devices can be added to guests using the graphical virt-manager tool. The following procedureadds a 2 port USB controller to a virtualized guest.
1. Open the hardware settingsOpen the virtual machine and click the Add Hardware button to add a new device to the guest.
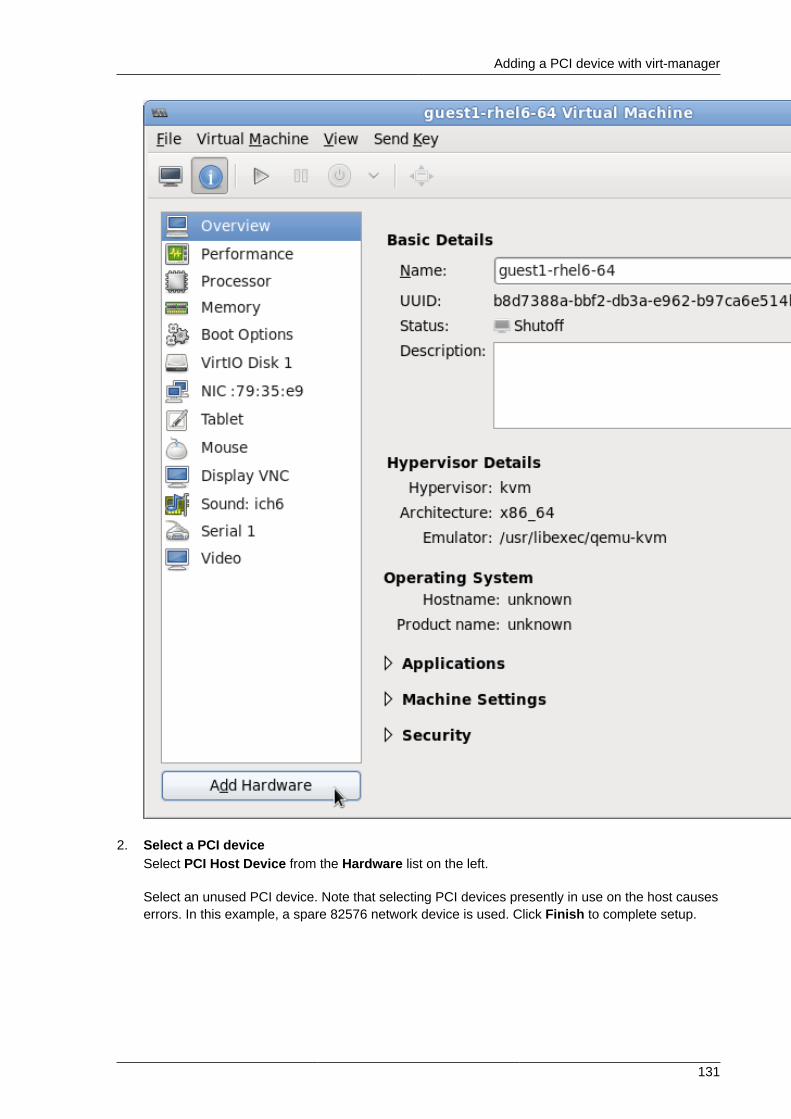
Adding a PCI device with virt-manager
131
2. Select a PCI deviceSelect PCI Host Device from the Hardware list on the left.
Select an unused PCI device. Note that selecting PCI devices presently in use on the host causeserrors. In this example, a spare 82576 network device is used. Click Finish to complete setup.
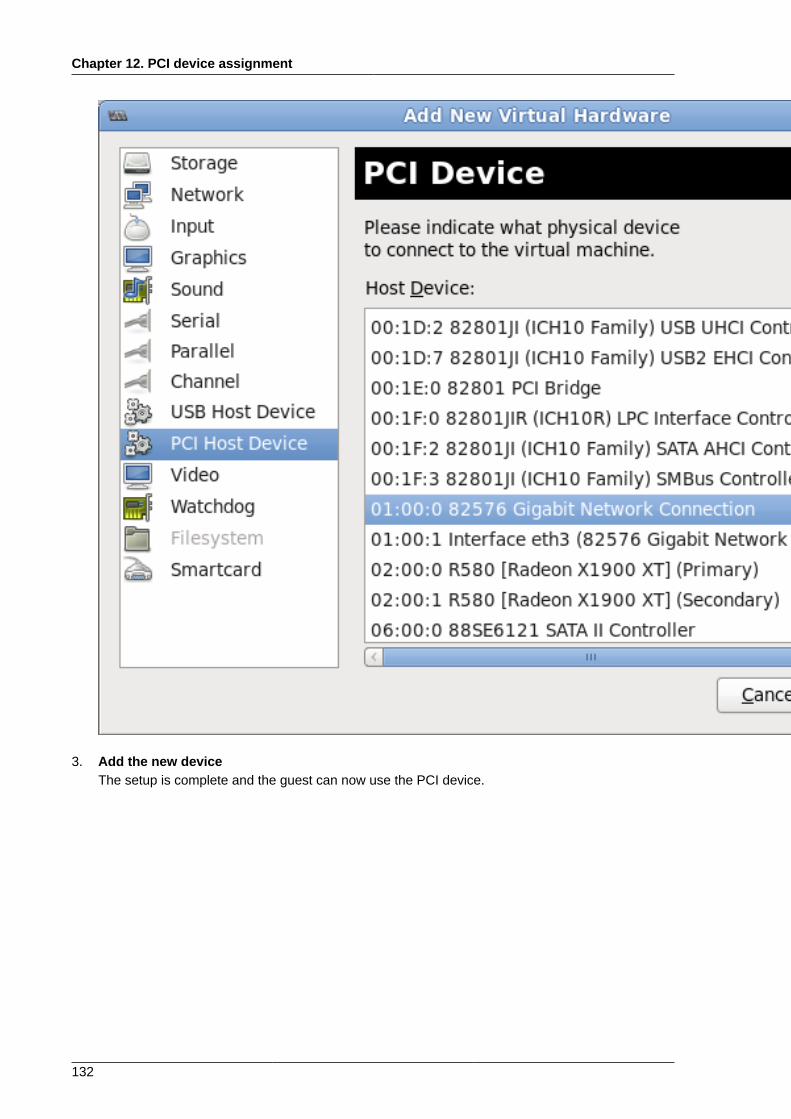
Chapter 12. PCI device assignment
132
3. Add the new deviceThe setup is complete and the guest can now use the PCI device.
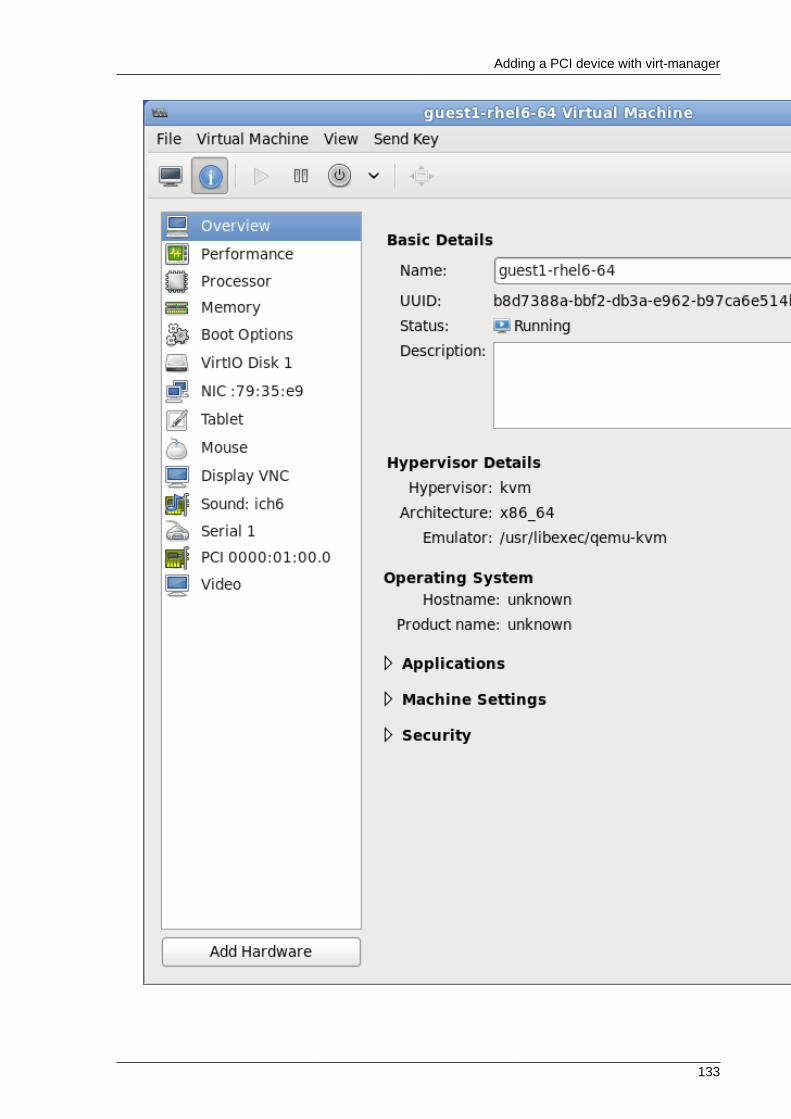
Adding a PCI device with virt-manager
133
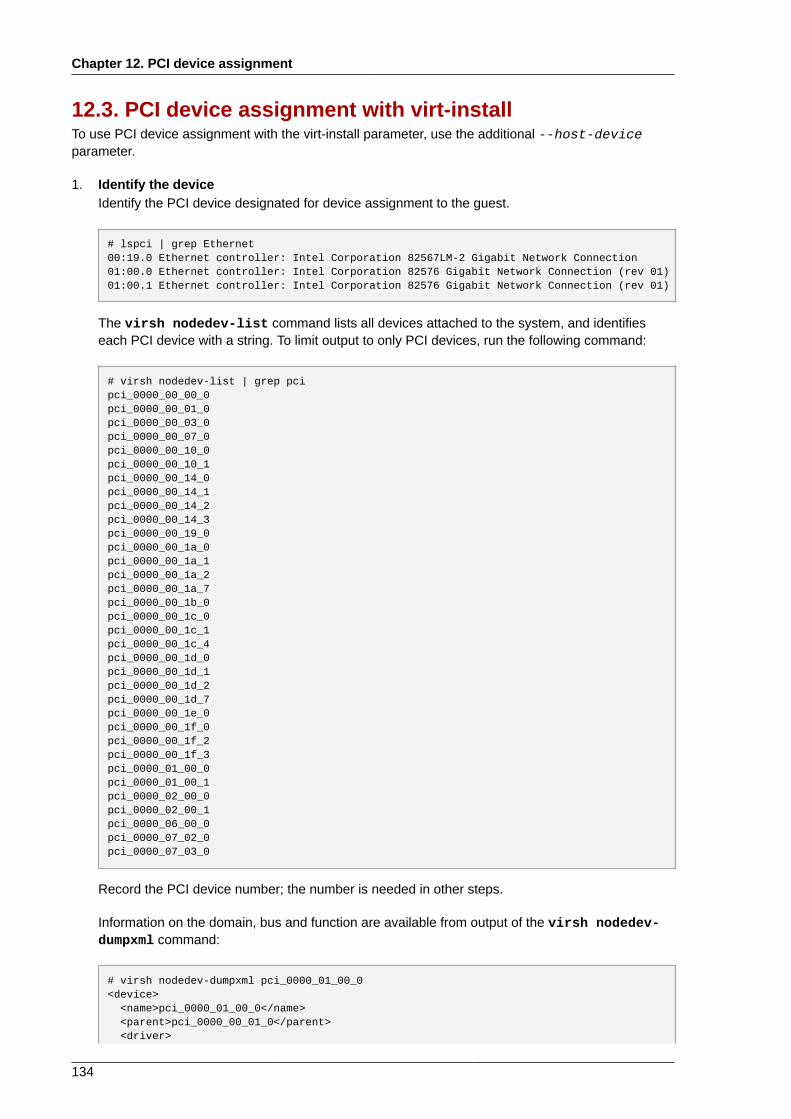
Chapter 12. PCI device assignment
134
12.3. PCI device assignment with virt-installTo use PCI device assignment with the virt-install parameter, use the additional --host-deviceparameter.
1. Identify the deviceIdentify the PCI device designated for device assignment to the guest.
# lspci | grep Ethernet00:19.0 Ethernet controller: Intel Corporation 82567LM-2 Gigabit Network Connection01:00.0 Ethernet controller: Intel Corporation 82576 Gigabit Network Connection (rev 01)01:00.1 Ethernet controller: Intel Corporation 82576 Gigabit Network Connection (rev 01)
The virsh nodedev-list command lists all devices attached to the system, and identifieseach PCI device with a string. To limit output to only PCI devices, run the following command:
# virsh nodedev-list | grep pcipci_0000_00_00_0pci_0000_00_01_0pci_0000_00_03_0pci_0000_00_07_0pci_0000_00_10_0pci_0000_00_10_1pci_0000_00_14_0pci_0000_00_14_1pci_0000_00_14_2pci_0000_00_14_3pci_0000_00_19_0pci_0000_00_1a_0pci_0000_00_1a_1pci_0000_00_1a_2pci_0000_00_1a_7pci_0000_00_1b_0pci_0000_00_1c_0pci_0000_00_1c_1pci_0000_00_1c_4pci_0000_00_1d_0pci_0000_00_1d_1pci_0000_00_1d_2pci_0000_00_1d_7pci_0000_00_1e_0pci_0000_00_1f_0pci_0000_00_1f_2pci_0000_00_1f_3pci_0000_01_00_0pci_0000_01_00_1pci_0000_02_00_0pci_0000_02_00_1pci_0000_06_00_0pci_0000_07_02_0pci_0000_07_03_0
Record the PCI device number; the number is needed in other steps.
Information on the domain, bus and function are available from output of the virsh nodedev-dumpxml command:
# virsh nodedev-dumpxml pci_0000_01_00_0<device> <name>pci_0000_01_00_0</name> <parent>pci_0000_00_01_0</parent> <driver>
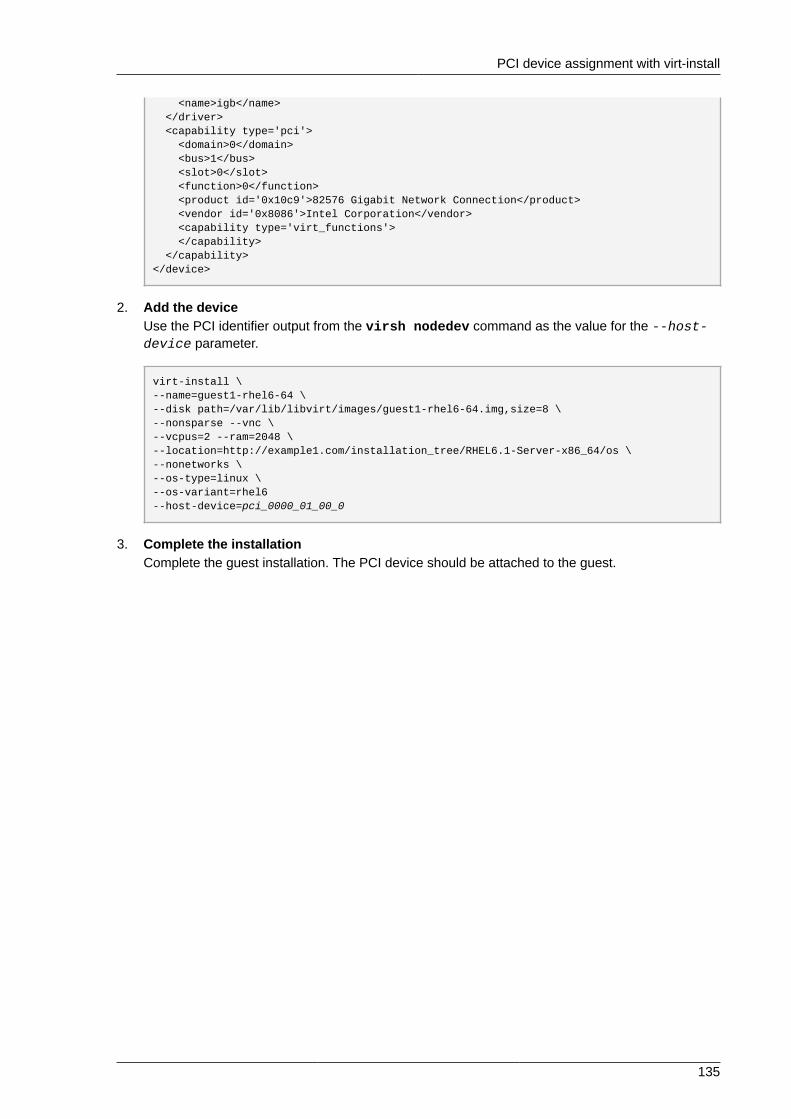
PCI device assignment with virt-install
135
<name>igb</name> </driver> <capability type='pci'> <domain>0</domain> <bus>1</bus> <slot>0</slot> <function>0</function> <product id='0x10c9'>82576 Gigabit Network Connection</product> <vendor id='0x8086'>Intel Corporation</vendor> <capability type='virt_functions'> </capability> </capability></device>
2. Add the deviceUse the PCI identifier output from the virsh nodedev command as the value for the --host-device parameter.
virt-install \--name=guest1-rhel6-64 \--disk path=/var/lib/libvirt/images/guest1-rhel6-64.img,size=8 \--nonsparse --vnc \--vcpus=2 --ram=2048 \--location=http://example1.com/installation_tree/RHEL6.1-Server-x86_64/os \--nonetworks \--os-type=linux \--os-variant=rhel6--host-device=pci_0000_01_00_0
3. Complete the installationComplete the guest installation. The PCI device should be attached to the guest.

136
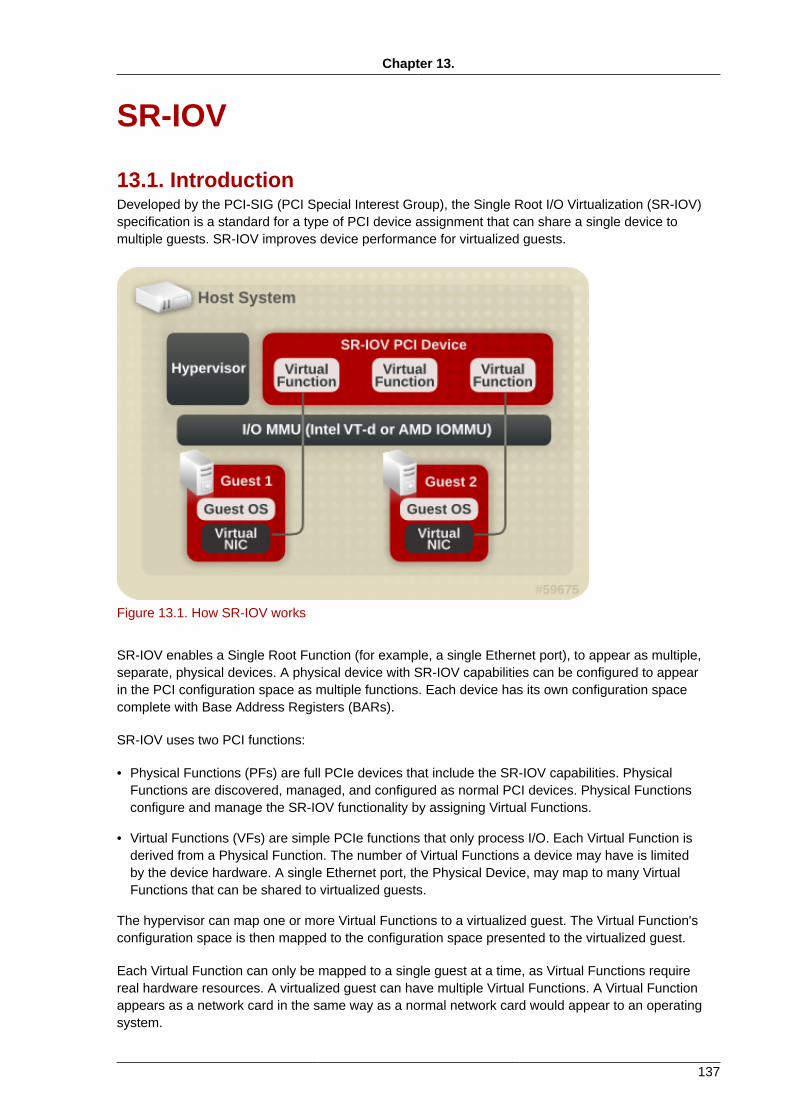
Chapter 13.
137
SR-IOV
13.1. IntroductionDeveloped by the PCI-SIG (PCI Special Interest Group), the Single Root I/O Virtualization (SR-IOV)specification is a standard for a type of PCI device assignment that can share a single device tomultiple guests. SR-IOV improves device performance for virtualized guests.
Figure 13.1. How SR-IOV works
SR-IOV enables a Single Root Function (for example, a single Ethernet port), to appear as multiple,separate, physical devices. A physical device with SR-IOV capabilities can be configured to appearin the PCI configuration space as multiple functions. Each device has its own configuration spacecomplete with Base Address Registers (BARs).
SR-IOV uses two PCI functions:
• Physical Functions (PFs) are full PCIe devices that include the SR-IOV capabilities. PhysicalFunctions are discovered, managed, and configured as normal PCI devices. Physical Functionsconfigure and manage the SR-IOV functionality by assigning Virtual Functions.
• Virtual Functions (VFs) are simple PCIe functions that only process I/O. Each Virtual Function isderived from a Physical Function. The number of Virtual Functions a device may have is limitedby the device hardware. A single Ethernet port, the Physical Device, may map to many VirtualFunctions that can be shared to virtualized guests.
The hypervisor can map one or more Virtual Functions to a virtualized guest. The Virtual Function'sconfiguration space is then mapped to the configuration space presented to the virtualized guest.
Each Virtual Function can only be mapped to a single guest at a time, as Virtual Functions requirereal hardware resources. A virtualized guest can have multiple Virtual Functions. A Virtual Functionappears as a network card in the same way as a normal network card would appear to an operatingsystem.
Chapter 13. SR-IOV
138
The SR-IOV drivers are implemented in the kernel. The core implementation is contained in the PCIsubsystem, but there must also be driver support for both the Physical Function (PF) and VirtualFunction (VF) devices. With an SR-IOV capable device one can allocate VFs from a PF. The VFsappear as PCI devices which are backed on the physical PCI device by resources (queues, andregister sets).
Advantages of SR-IOVSR-IOV devices can share a single physical port with multiple virtualized guests.
Virtual Functions have near-native performance and provide better performance than para-virtualizeddrivers and emulated access. Virtual Functions provide data protection between virtualized guests onthe same physical server as the data is managed and controlled by the hardware.
These features allow for increased virtualized guest density on hosts within a data center.
SR-IOV is better able to utilize the bandwidth of devices with multiple guests.
13.2. Using SR-IOVThis section covers attaching Virtual Function to a guest as an additional network device.
SR-IOV requires Intel VT-d support.
Procedure 13.1. Attach an SR-IOV network device1. Enable Intel VT-d in BIOS and in the kernel
Skip this step if Intel VT-d is already enabled and working.
Enable Intel VT-d in BIOS if it is not enabled already. Refer to Procedure 12.1, “Preparing an Intelsystem for PCI device assignment” for procedural help on enabling Intel VT-d in BIOS and thekernel.
2. Verify supportVerify if the PCI device with SR-IOV capabilities are detected. This example lists an Intel 82576network interface card which supports SR-IOV. Use the lspci command to verify if the devicewas detected.
# lspci03:00.0 Ethernet controller: Intel Corporation 82576 Gigabit Network Connection (rev 01)03:00.1 Ethernet controller: Intel Corporation 82576 Gigabit Network Connection (rev 01)
Note that the output has been modified to remove all other devices.
3. Start the SR-IOV kernel modulesIf the device is supported the driver kernel module should be loaded automatically by the kernel.Optional parameters can be passed to the module using the modprobe command. The Intel82576 network interface card uses the igb driver kernel module.
# modprobe igb [<option>=<VAL1>,<VAL2>,]# lsmod |grep igbigb 87592 0dca 6708 1 igb
Using SR-IOV
139
4. Activate Virtual FunctionsThe max_vfs parameter of the igb module allocates the maximum number of Virtual Functions.The max_vfs parameter causes the driver to spawn, up to the value of the parameter in, VirtualFunctions. For this particular card the valid range is 0 to 7.
Remove the module to change the variable.
# modprobe -r igb
Restart the module with the max_vfs set to 1 or any number of Virtual Functions up to themaximum supported by your device.
# modprobe igb max_vfs=7
5. Make the Virtual Functions persistentThe modprobe command /etc/modprobe.d/igb.conf options igb max_vfs=7
6. Inspect the new Virtual FunctionsUsing the lspci command, list the newly added Virtual Functions attached to the Intel 82576network device.
# lspci | grep 825760b:00.0 Ethernet controller: Intel Corporation 82576 Gigabit Network Connection (rev 01)0b:00.1 Ethernet controller: Intel Corporation 82576 Gigabit Network Connection (rev 01)0b:10.0 Ethernet controller: Intel Corporation 82576 Virtual Function (rev 01)0b:10.1 Ethernet controller: Intel Corporation 82576 Virtual Function (rev 01)0b:10.2 Ethernet controller: Intel Corporation 82576 Virtual Function (rev 01)0b:10.3 Ethernet controller: Intel Corporation 82576 Virtual Function (rev 01)0b:10.4 Ethernet controller: Intel Corporation 82576 Virtual Function (rev 01)0b:10.5 Ethernet controller: Intel Corporation 82576 Virtual Function (rev 01)0b:10.6 Ethernet controller: Intel Corporation 82576 Virtual Function (rev 01)0b:10.7 Ethernet controller: Intel Corporation 82576 Virtual Function (rev 01)0b:11.0 Ethernet controller: Intel Corporation 82576 Virtual Function (rev 01)0b:11.1 Ethernet controller: Intel Corporation 82576 Virtual Function (rev 01)0b:11.2 Ethernet controller: Intel Corporation 82576 Virtual Function (rev 01)0b:11.3 Ethernet controller: Intel Corporation 82576 Virtual Function (rev 01)0b:11.4 Ethernet controller: Intel Corporation 82576 Virtual Function (rev 01)0b:11.5 Ethernet controller: Intel Corporation 82576 Virtual Function (rev 01)
The identifier for the PCI device is found with the -n parameter of the lspci command. ThePhysical Functions corresponds to 0b:00.0 and 0b:00.1. All the Virtual Functions haveVirtual Function in the description.
7. Verify devices exist with virshThe libvirt service must recognize the device before adding a device to a guest. libvirtuses a similar notation to the lspci output. All punctuation characters, ; and ., in lspci outputare changed to underscores (_).
Use the virsh nodedev-list command and the grep command to filter the Intel 82576network device from the list of available host devices. 0b is the filter for the Intel 82576 networkdevices in this example. This may vary for your system and may result in additional devices.
# virsh nodedev-list | grep 0bpci_0000_0b_00_0pci_0000_0b_00_1pci_0000_0b_10_0pci_0000_0b_10_1
Chapter 13. SR-IOV
140
pci_0000_0b_10_2pci_0000_0b_10_3pci_0000_0b_10_4pci_0000_0b_10_5pci_0000_0b_10_6pci_0000_0b_11_7pci_0000_0b_11_1pci_0000_0b_11_2pci_0000_0b_11_3pci_0000_0b_11_4pci_0000_0b_11_5
The serial numbers for the Virtual Functions and Physical Functions should be in the list.
8. Get device details with virshThe pci_0000_0b_00_0 is one of the Physical Functions and pci_0000_0b_10_0 is the firstcorresponding Virtual Function for that Physical Function. Use the virsh nodedev-dumpxmlcommand to get advanced output for both devices.
# virsh nodedev-dumpxml pci_0000_0b_00_0<device> <name>pci_0000_0b_00_0</name> <parent>pci_0000_00_01_0</parent> <driver> <name>igb</name> </driver> <capability type='pci'> <domain>0</domain> <bus>11</bus> <slot>0</slot> <function>0</function> <product id='0x10c9'>Intel Corporation</product> <vendor id='0x8086'>82576 Gigabit Network Connection</vendor> </capability> </device>
# virsh nodedev-dumpxml pci_0000_0b_10_0 <device> <name>pci_0000_0b_10_0</name> <parent>pci_0000_00_01_0</parent> <driver> <name>igbvf</name> </driver> <capability type='pci'> <domain>0</domain> <bus>11</bus> <slot>16</slot> <function>0</function> <product id='0x10ca'>Intel Corporation</product> <vendor id='0x8086'>82576 Virtual Function</vendor> </capability> </device>
This example adds the Virtual Function pci_0000_0b_10_0 to the guest in Step 10. Note thebus, slot and function parameters of the Virtual Function, these are required for adding thedevice.
9. Detach the Virtual FunctionsDevices attached to a host cannot be attached to guests. Red Hat Enterprise Linux automaticallyattaches new devices to the host. Detach the Virtual Function from the host so that the VirtualFunction can be used by the guest. Detaching a Physical Function causes errors when the same
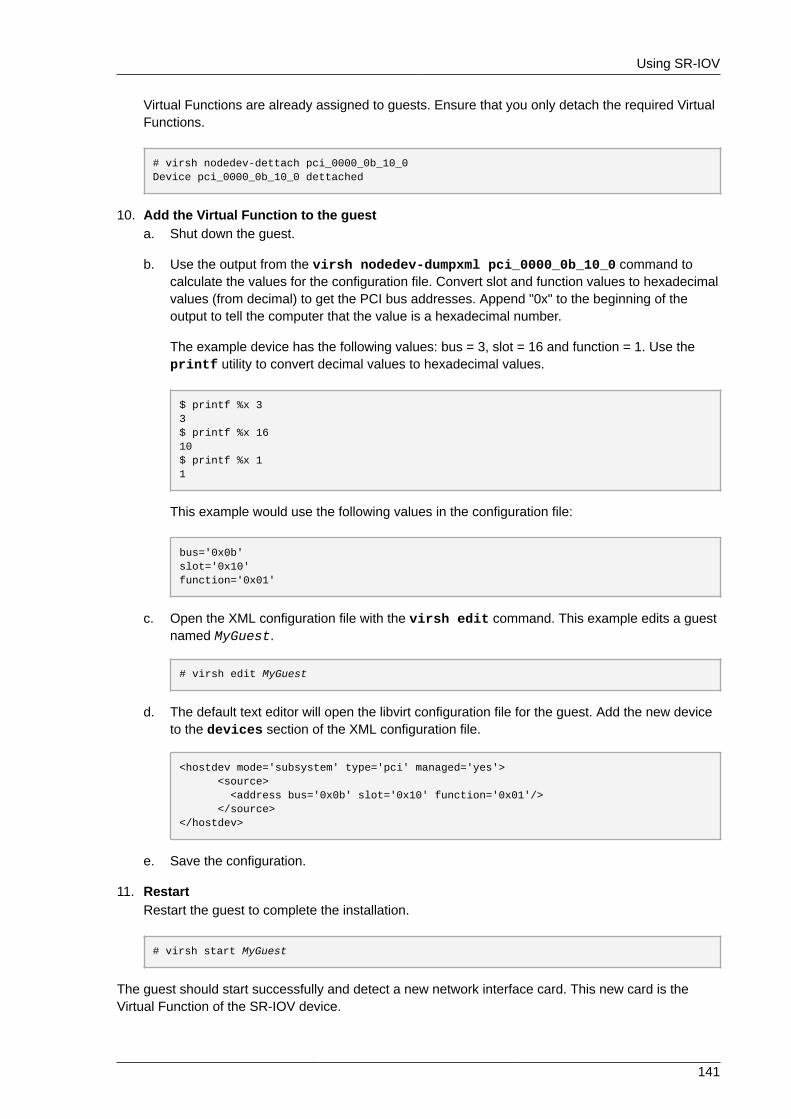
Using SR-IOV
141
Virtual Functions are already assigned to guests. Ensure that you only detach the required VirtualFunctions.
# virsh nodedev-dettach pci_0000_0b_10_0Device pci_0000_0b_10_0 dettached
10. Add the Virtual Function to the guesta. Shut down the guest.
b. Use the output from the virsh nodedev-dumpxml pci_0000_0b_10_0 command tocalculate the values for the configuration file. Convert slot and function values to hexadecimalvalues (from decimal) to get the PCI bus addresses. Append "0x" to the beginning of theoutput to tell the computer that the value is a hexadecimal number.
The example device has the following values: bus = 3, slot = 16 and function = 1. Use theprintf utility to convert decimal values to hexadecimal values.
$ printf %x 33$ printf %x 1610$ printf %x 11
This example would use the following values in the configuration file:
bus='0x0b'slot='0x10'function='0x01'
c. Open the XML configuration file with the virsh edit command. This example edits a guestnamed MyGuest.
# virsh edit MyGuest
d. The default text editor will open the libvirt configuration file for the guest. Add the new deviceto the devices section of the XML configuration file.
<hostdev mode='subsystem' type='pci' managed='yes'> <source> <address bus='0x0b' slot='0x10' function='0x01'/> </source></hostdev>
e. Save the configuration.
11. RestartRestart the guest to complete the installation.
# virsh start MyGuest
The guest should start successfully and detect a new network interface card. This new card is theVirtual Function of the SR-IOV device.
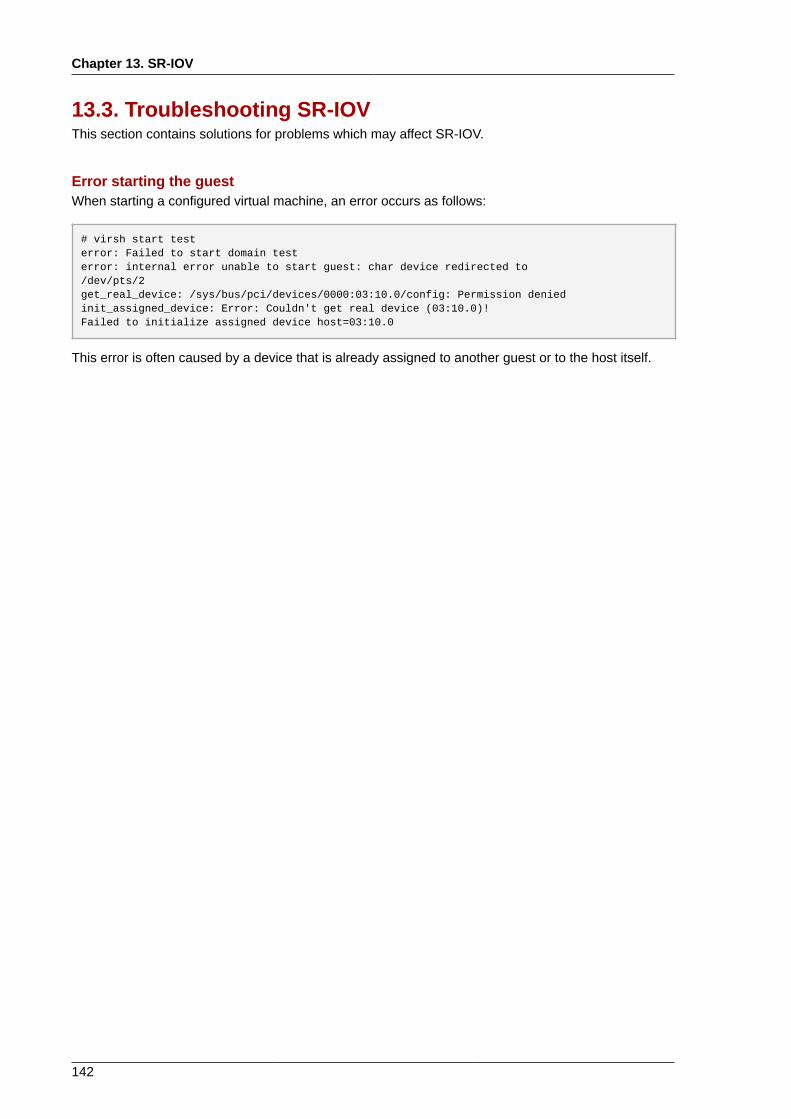
Chapter 13. SR-IOV
142
13.3. Troubleshooting SR-IOVThis section contains solutions for problems which may affect SR-IOV.
Error starting the guestWhen starting a configured virtual machine, an error occurs as follows:
# virsh start testerror: Failed to start domain testerror: internal error unable to start guest: char device redirected to/dev/pts/2get_real_device: /sys/bus/pci/devices/0000:03:10.0/config: Permission deniedinit_assigned_device: Error: Couldn't get real device (03:10.0)!Failed to initialize assigned device host=03:10.0
This error is often caused by a device that is already assigned to another guest or to the host itself.
Chapter 14.
143
KVM guest timing managementVirtualization involves several intrinsic challenges for time keeping in guests. Interrupts cannot alwaysbe delivered simultaneously and instantaneously to all guest virtual CPUs, because interrupts in virtualmachines are not true interrupts; they are injected into the guest by the host machine. The host maybe running another guest virtual CPU, or a different process, meaning that the precise timing typicallyrequired by interrupts may not always be possible.
Guests without accurate time keeping may experience issues with network applications andprocesses, as session validity, migration, and other network activities rely on timestamps to remaincorrect.
KVM avoids these issues by providing guests with a para-virtualized clock (kvm-clock). However, it isstill vital to test timing before attempting activities that may be affected by time keeping inaccuracies.
kvm-clock
Red Hat Enterprise Linux 5.5 and newer, and Red Hat Enterprise Linux 6.0 and newer, use kvm-clock as their default clock source. Running without kvm-clock requires special configuration,and is not recommended.
NTP
The Network Time Protocol (NTP) daemon should be running on the host and the guests. Enablethe ntpd service:
# service ntpd start
Add the ntpd service to the default startup sequence:
# chkconfig ntpd on
Using the ntpd service will minimize the effects of clock skew as long as the skew is less than orequal to 500 millionths of a second (0.0005 seconds).
Constant Time Stamp Counter (TSC)Modern Intel and AMD CPUs provide a constant Time Stamp Counter (TSC). The count frequency ofthe constant TSC does not vary when the CPU core itself changes frequency, for example, to complywith a power saving policy. A CPU with a constant TSC frequency is necessary in order to use theTSC as a clock source for KVM guests.
Your CPU has a constant Time Stamp Counter if the constant_tsc flag is present. To determine ifyour CPU has the constant_tsc flag run the following command:
$ cat /proc/cpuinfo | grep constant_tsc

Chapter 14. KVM guest timing management
144
If any output is given your CPU has the constant_tsc bit. If no output is given follow the instructionsbelow.
Configuring hosts without a constant Time Stamp CounterSystems without a constant TSC frequency cannot use the TSC as a clock source for virtualmachines, and require additional configuration. Power management features interfere with accuratetime keeping and must be disabled for guests to accurately keep time with KVM.
Note
These instructions are for AMD revision F CPUs only.
If the CPU lacks the constant_tsc bit, disable all power management features (BZ#5131381).Each system has several timers it uses to keep time. The TSC is not stable on the host, whichis sometimes caused by cpufreq changes, deep C state, or migration to a host with a fasterTSC. Deep C sleep states can stop the TSC. To prevent the kernel using deep C states appendprocessor.max_cstate=1 to the kernel boot options in the grub.conf file on the host:
title Red Hat Enterprise Linux (2.6.32-36.x86-64) root (hd0,0) kernel /vmlinuz-2.6.32-36.x86-64 ro root=/dev/VolGroup00/LogVol00 rhgb quiet \ processor.max_cstate=1
Disable cpufreq (only necessary on hosts without the constant_tsc) by editing the /etc/sysconfig/cpuspeed configuration file and change the MIN_SPEED and MAX_SPEED variablesto the highest frequency available. Valid limits can be found in the /sys/devices/system/cpu/cpu*/cpufreq/scaling_available_frequencies files.
Required parameters for Red Hat Enterprise Linux guestsFor certain Red Hat Enterprise Linux guests, additional kernel parameters are required. Theseparameters can be set by appending them to the end of the /kernel line in the /boot/grub/grub.conf fileof the guest.
The table below lists versions of Red Hat Enterprise Linux and the parameters required on thespecified systems.
Red Hat Enterprise Linuxversion
Additional guest kernel parameters
6.0 AMD64/Intel 64 with thepara-virtualized clock
Additional parameters are not required
6.0 AMD64/Intel 64 without thepara-virtualized clock
notsc lpj=n
5.5 AMD64/Intel 64 with thepara-virtualized clock
divider=102
5.5 AMD64/Intel 64 without thepara-virtualized clock
divider=10 notsc lpj=n
1 https://bugzilla.redhat.com/show_bug.cgi?id=513138
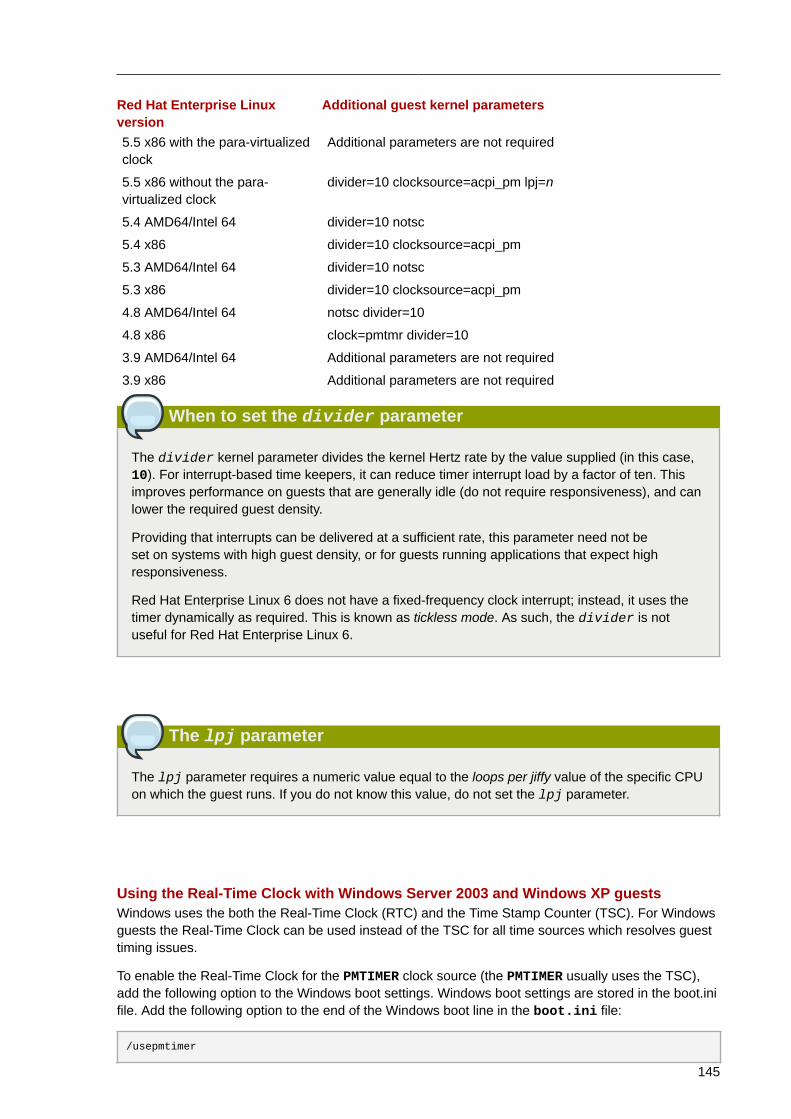
145
Red Hat Enterprise Linuxversion
Additional guest kernel parameters
5.5 x86 with the para-virtualizedclock
Additional parameters are not required
5.5 x86 without the para-virtualized clock
divider=10 clocksource=acpi_pm lpj=n
5.4 AMD64/Intel 64 divider=10 notsc
5.4 x86 divider=10 clocksource=acpi_pm
5.3 AMD64/Intel 64 divider=10 notsc
5.3 x86 divider=10 clocksource=acpi_pm
4.8 AMD64/Intel 64 notsc divider=10
4.8 x86 clock=pmtmr divider=10
3.9 AMD64/Intel 64 Additional parameters are not required
3.9 x86 Additional parameters are not required
When to set the divider parameter
The divider kernel parameter divides the kernel Hertz rate by the value supplied (in this case,10). For interrupt-based time keepers, it can reduce timer interrupt load by a factor of ten. Thisimproves performance on guests that are generally idle (do not require responsiveness), and canlower the required guest density.
Providing that interrupts can be delivered at a sufficient rate, this parameter need not beset on systems with high guest density, or for guests running applications that expect highresponsiveness.
Red Hat Enterprise Linux 6 does not have a fixed-frequency clock interrupt; instead, it uses thetimer dynamically as required. This is known as tickless mode. As such, the divider is notuseful for Red Hat Enterprise Linux 6.
The lpj parameter
The lpj parameter requires a numeric value equal to the loops per jiffy value of the specific CPUon which the guest runs. If you do not know this value, do not set the lpj parameter.
Using the Real-Time Clock with Windows Server 2003 and Windows XP guestsWindows uses the both the Real-Time Clock (RTC) and the Time Stamp Counter (TSC). For Windowsguests the Real-Time Clock can be used instead of the TSC for all time sources which resolves guesttiming issues.
To enable the Real-Time Clock for the PMTIMER clock source (the PMTIMER usually uses the TSC),add the following option to the Windows boot settings. Windows boot settings are stored in the boot.inifile. Add the following option to the end of the Windows boot line in the boot.ini file:
/usepmtimer
Chapter 14. KVM guest timing management
146
For more information on Windows boot settings and the usepmtimer option, refer to Available switchoptions for the Windows XP and the Windows Server 2003 Boot.ini files3.
Using the Real-Time Clock with Windows Vista, Windows Server 2008 and Windows 7guestsWindows uses the both the Real-Time Clock (RTC) and the Time Stamp Counter (TSC). For Windowsguests the Real-Time Clock can be used instead of the TSC for all time sources which resolves guesttiming issues.
The boot.ini file is no longer used from Windows Vista and newer. Windows Vista, WindowsServer 2008 and Windows 7 use the Boot Configuration Data Editor (bcdedit.exe) to modify theWindows boot parameters.
This procedure is only required if the guest is having time keeping issues. Time keeping issues maynot affect guests on all host systems.
1. Open the Windows guest.
2. Open the Accessories menu of the start menu. Right click on the Command Promptapplication, select Run as Administrator.
3. Confirm the security exception, if prompted.
4. Set the boot manager to use the platform clock. This should instruct Windows to use the PM timerfor the primary clock source. The system UUID ({default} in the example below) should bechanged if the system UUID is different than the default boot device.
C:\Windows\system32>bcdedit /set {default} USEPLATFORMCLOCK onThe operation completed successfully
This fix should improve time keeping for Windows Vista, Windows Server 2008 and Windows 7guests.
3 http://support.microsoft.com/kb/833721
Chapter 15.
147
Network booting with libvirtGuests can be booted with PXE enabled. PXE allows guests to boot and load their configuration offthe network itself. This section demonstrates some basic configuration steps to configure PXE guestswith libvirt.
Note
This section does not cover the creation of boot images or PXE servers. It is used to explain howto configure libvirt, in a private or bridged network, to boot a guest with PXE booting enabled.
Warning
These procedures are provided only as an example. Make sure you have sufficient backupsbefore proceeding.
15.1. Preparing the boot serverTo perform the steps in this chapter you will need:
• A PXE Server (DHCP and TFTP) - This can be a libvirt internal server, manually-configured dhcpdand tftpd, dnsmasq, a server configured by Cobbler, or other server.
• Boot images - for example, PXELINUX configured manually or by Cobbler.
15.1.1. Setting up a PXE boot server on a private libvirt networkThis example uses the default network. Perform the following steps:
1. Place the PXE boot images and configuration in /var/lib/tftp.
2. Run the following commands:
# virsh net-destroy default# virsh net-edit default
3. Edit the <ip> element in the configuration file for the default network to look like the following.Note that the IP addresses and subnet masks displayed in this output are only examples, andshould be replaced with settings to match your environment.
<ip address='192.168.122.1' netmask='255.255.255.0'> <tftp root='/var/lib/tftp' /> <dhcp> <range start='192.168.122.2' end='192.168.122.254' /> <bootp file='BOOT_FILENAME' /> </dhcp> </ip>
Chapter 15. Network booting with libvirt
148
BOOT_FILENAME in the previous output should be replaced with the file name you are using toboot the guest.
4. Boot the guest using PXE (refer to Section 15.2, “Booting a guest using PXE”.
15.2. Booting a guest using PXEThis section demonstrates how to boot a guest with PXE. Note that this is an example only, and yourspecific settings will be different to those listed here.
15.2.1. Using bridged networking
1. Ensure bridging is enabled. Have a PXE boot server available in your network.
2. Boot a guest with PXE booting enabled. You can use the virt-install command to create anew guest with PXE booting enabled, as shown in the following example command:
virt-install --pxe --network bridge=breth0 --prompt
Alternatively, ensure that the guest network is configured to use your bridged network, and thatthe XML guest configuration file has a <boot dev='network'/> element inside the <os> element,as shown in the following. Note that settings such as MAC addresses and interfaces in this outputare only examples:
<os> <type arch='x86_64' machine='rhel6.2.0'>hvm</type> <boot dev='network'/> <boot dev='hd'/></os> <interface type='bridge'> <mac address='52:54:00:5a:ad:cb'/> <source bridge='breth0'/> <target dev='vnet0'/> <alias name='net0'/> <address type='pci' domain='0x0000' bus='0x00' slot='0x03' function='0x0'/> </interface>
15.2.2. Using a private libvirt network
1. Configure PXE booting on libvirt as shown in Section 15.1.1, “Setting up a PXE boot server on aprivate libvirt network”.
2. Boot a guest using libvirt with PXE booting enabled. You can use the virt-install commandto create/install a new guest using PXE:
virt-install --pxe --network network=default --prompt
Alternatively, ensure that the guest network is configured to use your bridged network, and that theXML guest configuration file has a <boot dev='network'/> element inside the <os> element, asshown in the following. Note that settings such as MAC addresses and interfaces in this output areonly examples:

Using a private libvirt network
149
<os> <type arch='x86_64' machine='rhel6.2.0'>hvm</type> <boot dev='network'/> <boot dev='hd'/></os> and make sure it is connected to the private network (also just an example): <interface type='network'> <mac address='52:54:00:66:79:14'/> <source network='default'/> <target dev='vnet0'/> <alias name='net0'/> <address type='pci' domain='0x0000' bus='0x00' slot='0x03' function='0x0'/> </interface>

150

151
Appendix A. Revision HistoryRevision0.2-78
Friday December 02 2011 Laura Bailey [email protected]
Release for GA of Red Hat Enterprise Linux 6.2
Revision0.2-66
Wed Sep 14 2011 Scott Radvan [email protected]
BZ#734639
Revision0.2-62
Wed Sep 14 2011 Scott Radvan [email protected]
BZ#736497
Revision0.2-60
Thu Sep 01 2011 Scott Radvan [email protected]
Add changes from SME review - BZ#734651.
Revision0.2-59
Thu Sep 01 2011 Scott Radvan [email protected]
Add changes from SME review - BZ#734647 and BZ#734653.
Revision0.2-03
Mon May 30 2011 Scott Radvan [email protected]
Add SR-IOV, Para Virt drivers and Full 6 install on 6.
Revision0.2-02
Mon May 30 2011 Scott Radvan [email protected]
Initial push to internal preview site.
Revision0.2-01
Sat May 28 2011 Scott Radvan [email protected]
Configure layout, import introductory text.
Revision 0-1 Mon Apr 4 2011 Scott Radvan [email protected] creation of book by publican.

152