Embed Size (px)
Citation preview
Red Hat 3scale API Management 2.7
Operating 3scale
How to automate the deployment of your API Gateway using Chef, production tips,and more.
Last Updated: 2020-05-08


Red Hat 3scale API Management 2.7 Operating 3scale
How to automate the deployment of your API Gateway using Chef, production tips, and more.
Legal Notice
Copyright © 2020 Red Hat, Inc.
The text of and illustrations in this document are licensed by Red Hat under a Creative CommonsAttribution–Share Alike 3.0 Unported license ("CC-BY-SA"). An explanation of CC-BY-SA isavailable athttp://creativecommons.org/licenses/by-sa/3.0/. In accordance with CC-BY-SA, if you distribute this document or an adaptation of it, you mustprovide the URL for the original version.
Red Hat, as the licensor of this document, waives the right to enforce, and agrees not to assert,Section 4d of CC-BY-SA to the fullest extent permitted by applicable law.
Red Hat, Red Hat Enterprise Linux, the Shadowman logo, the Red Hat logo, JBoss, OpenShift,Fedora, the Infinity logo, and RHCE are trademarks of Red Hat, Inc., registered in the United Statesand other countries.
Linux ® is the registered trademark of Linus Torvalds in the United States and other countries.
Java ® is a registered trademark of Oracle and/or its affiliates.
XFS ® is a trademark of Silicon Graphics International Corp. or its subsidiaries in the United Statesand/or other countries.
MySQL ® is a registered trademark of MySQL AB in the United States, the European Union andother countries.
Node.js ® is an official trademark of Joyent. Red Hat is not formally related to or endorsed by theofficial Joyent Node.js open source or commercial project.
The OpenStack ® Word Mark and OpenStack logo are either registered trademarks/service marksor trademarks/service marks of the OpenStack Foundation, in the United States and othercountries and are used with the OpenStack Foundation's permission. We are not affiliated with,endorsed or sponsored by the OpenStack Foundation, or the OpenStack community.
All other trademarks are the property of their respective owners.
Abstract
This guide documents development operations with Red Hat 3scale API Management 2.7.
. . . . . . . . . . . . . . . . . . . . . . . . . . . . . . . . . . . . . . . . . . . . . . . . . . . . . . . . . . . . . . . . . . . . . . . . . . . . . . . . . . . . . . . . . . . . . . . . . . . . . . . . . . . . . . . . . . . . . . . . . . . . . . . . . . . . . . . . . . . . . . . . . . . . . . . . . . . . . . . . . . . . . . . . . . . . . . . . . . . . . . . . . . . . . . . . . . . . . . . . . . . . . . . . . . . . . . . . . . . . . . . . . . . . . . . . . . . . . . . . . . . . . . . . . . . . . . . . . . . . . . . . . . . . . . . . . . . . . . . .
. . . . . . . . . . . . . . . . . . . . . . . . . . . . . . . . . . . . . . . . . . . . . . . . . . . . . . . . . . . . . . . . . . . . . . . . . . . . . . . . . . . . . . . . . . . . . . . . . . . . . . . . . . . . . . . . . . . . . . . . . . . . . . . . . . . . . . . . . . . . . . . . . . . . . . . . . . . . . . . . . . . . . . . . . . . . . . . . . . . . . . . . . . . . . . . . . . . . . . . . . . . . . . . . . . . . . . . . . . . . . . . . . . . . . . . . . . . . . . . . . . . . . . . . . . . . . . . . . . . . . . . . . . . . . . . . . . . . . . . .
Table of Contents
CHAPTER 1. 3SCALE OPERATIONS AND SCALING GUIDE1.1. REDEPLOYING APICAST1.2. SCALING UP 3SCALE ON-PREMISE
1.2.1. Scaling up storage1.2.1.1. Method 1: Backing up and swapping persistent volumes1.2.1.2. Method 2: Backing up and redeploying 3scale
1.2.2. Scaling up performance1.2.3. Configuring 3scale on-premise deployments1.2.4. Scaling via the OCP command line interface1.2.5. Vertical and horizontal hardware scaling1.2.6. Scaling up routers
1.3. OPERATIONS TROUBLESHOOTING1.3.1. Configuring 3scale audit logging on OpenShift1.3.2. Enabling audit logging1.3.3. Configuring EFK logging1.3.4. Accessing your logs1.3.5. Checking job queues1.3.6. Preventing monotonic growth
CHAPTER 2. USING THE 3SCALE TOOLBOX2.1. INSTALLING THE TOOLBOX
2.1.1. Installing the toolbox container image2.1.2. Installing unsupported toolbox versions
2.2. USING SUPPORTED TOOLBOX COMMANDS2.3. IMPORTING SERVICES2.4. COPYING SERVICES2.5. COPYING SERVICE SETTINGS ONLY2.6. IMPORTING OPENAPI DEFINITIONS
2.6.1. Optional flags2.7. MANAGING REMOTE ACCESS CREDENTIALS
2.7.1. Listing remote access credentials2.7.2. Adding remote access credentials2.7.3. Removing remote access credentials2.7.4. Renaming remote access credentials
2.8. APPLICATION PLANS2.8.1. Creating a new application plan2.8.2. Creating or updating application plans2.8.3. Listing application plans2.8.4. Showing application plans2.8.5. Deleting application plans2.8.6. Export/import application plans
2.8.6.1. Exporting an application plan to a file2.8.6.2. Importing an application plan from a file2.8.6.3. Importing an application plan from URL
2.9. METRICS2.9.1. Creating metrics2.9.2. Creating or updating metrics2.9.3. Listing metrics2.9.4. Deleting metrics
2.10. METHODS2.10.1. Creating methods
6677778889999
1010101111
131313131414151516171717181818181819
2021212122222323232425252626
Table of Contents
1
. . . . . . . . . . . . . . . . . . . . . . . . . . . . . . . . . . . . . . . . . . . . . . . . . . . . . . . . . . . . . . . . . . . . . . . . . . . . . . . . . . . . . . . . . . . . . . . . . . . . . . . . . . . . . . . . . . . . . . . . . . . . . . . . . . . . . . . . . . . . . . . . . . . . . . . . . . . . . . . . . . . . . . . . . . . . . . . . . . . . . . . . . . . . . . . . . . . . . . . . . . . . . . . . . . . . . . . . . . . . . . . . . . . . . . . . . . . . . . . . . . . . . . . . . . . . . . . . . . . . . . . . . . . . . . . . . . . . . . . .
. . . . . . . . . . . . . . . . . . . . . . . . . . . . . . . . . . . . . . . . . . . . . . . . . . . . . . . . . . . . . . . . . . . . . . . . . . . . . . . . . . . . . . . . . . . . . . . . . . . . . . . . . . . . . . . . . . . . . . . . . . . . . . . . . . . . . . . . . . . . . . . . . . . . . . . . . . . . . . . . . . . . . . . . . . . . . . . . . . . . . . . . . . . . . . . . . . . . . . . . . . . . . . . . . . . . . . . . . . . . . . . . . . . . . . . . . . . . . . . . . . . . . . . . . . . . . . . . . . . . . . . . . . . . . . . . . . . . . . . .
2.10.2. Creating or updating methods2.10.3. Listing methods2.10.4. Deleting methods
2.11. CREATING SERVICES2.11.1. Creating a new service2.11.2. Creating or updating services2.11.3. Listing services2.11.4. Showing services2.11.5. Deleting services
2.12. ACTIVEDOCS2.12.1. Creating new ActiveDocs2.12.2. Creating or updating ActiveDocs2.12.3. Listing ActiveDocs2.12.4. Deleting ActiveDocs
2.13. PROXY CONFIGURATIONS2.13.1. Listing proxy configuration2.13.2. Showing proxy configurations2.13.3. Promoting proxy configurations
2.14. COPYING A POLICY REGISTRY (CUSTOM POLICIES)2.15. APPLICATIONS
2.15.1. Listing applications2.15.2. Creating applications2.15.3. Showing applications2.15.4. Creating or updating applications2.15.5. Deleting applications
2.16. TROUBLESHOOTING SSL ISSUES2.16.1. Installing trusted certificates
CHAPTER 3. AUTOMATING API LIFECYCLE WITH 3SCALE TOOLBOX3.1. OVERVIEW OF THE API LIFECYCLE STAGES
3.1.1. API provider cycle3.1.2. API consumer cycle
3.2. DEPLOYING THE SAMPLE JENKINS CI/CD PIPELINES3.2.1. Sample Jenkins CI/CD pipelines3.2.2. Setting up your 3scale Hosted environment3.2.3. Setting up your 3scale On-premises environment3.2.4. Deploying Red Hat Single Sign-On for OpenID Connect3.2.5. Installing the 3scale toolbox and enabling access3.2.6. Deploying the API backends3.2.7. Deploying self-managed APIcast instances3.2.8. Installing and deploying the sample pipelines3.2.9. Limitations of API lifecycle automation with 3scale toolbox
3.3. CREATING PIPELINES USING THE 3SCALE JENKINS SHARED LIBRARY3.4. CREATING PIPELINES USING A JENKINSFILE
CHAPTER 4. CAPABILITIES: PROVISIONING 3SCALE SERVICES AND CONFIGURATIONS VIA THEOPERATOR
4.1. PREREQUISITES4.2. DEPLOYING CAPABILITIES-RELATED CUSTOM RESOURCES
4.2.1. Creating an API4.2.2. Adding a plan4.2.3. Adding a metric4.2.4. Setting a limit
262727282829293030303031323233333333343434353536373737
3939394141
4243434546464748484951
56565656585859
Red Hat 3scale API Management 2.7 Operating 3scale
2

. . . . . . . . . . . . . . . . . . . . . . . . . . . . . . . . . . . . . . . . . . . . . . . . . . . . . . . . . . . . . . . . . . . . . . . . . . . . . . . . . . . . . . . . . . . . . . . . . . . . . . . . . . . . . . . . . . . . . . . . . . . . . . . . . . . . . . . . . . . . . . . . . . . . . . . . . . . . . . . . . . . . . . . . . . . . . . . . . . . . . . . . . . . . . . . . . . . . . . . . . . . . . . . . . . . . . . . . . . . . . . . . . . . . . . . . . . . . . . . . . . . . . . . . . . . . . . . . . . . . . . . . . . . . . . . . . . . . . . . .
. . . . . . . . . . . . . . . . . . . . . . . . . . . . . . . . . . . . . . . . . . . . . . . . . . . . . . . . . . . . . . . . . . . . . . . . . . . . . . . . . . . . . . . . . . . . . . . . . . . . . . . . . . . . . . . . . . . . . . . . . . . . . . . . . . . . . . . . . . . . . . . . . . . . . . . . . . . . . . . . . . . . . . . . . . . . . . . . . . . . . . . . . . . . . . . . . . . . . . . . . . . . . . . . . . . . . . . . . . . . . . . . . . . . . . . . . . . . . . . . . . . . . . . . . . . . . . . . . . . . . . . . . . . . . . . . . . . . . . . .
4.2.5. Adding a Mapping Rule4.2.6. Creating binding
4.3. DEPLOYING OPTIONAL TENANTS CUSTOM RESOURCE4.4. DELETING CREATED CUSTOM RESOURCES
CHAPTER 5. 3SCALE BACKUP AND RESTORE5.1. PREREQUISITES5.2. PERSISTENT VOLUMES5.3. CONSIDERATIONS5.4. USING DATA SETS
5.4.1. Defining system-mysql5.4.2. Defining system-storage5.4.3. Defining zync-database5.4.4. Defining backend-redis5.4.5. Defining system-redis
5.5. BACKUP PROCEDURES5.5.1. Backing up system-mysql5.5.2. Backing up system-storage5.5.3. Backing up zync-database5.5.4. Backing up backend-redis5.5.5. Backing up system-redis5.5.6. Backing up OpenShift secrets and ConfigMaps
5.5.6.1. OpenShift secrets5.5.6.2. ConfigMaps
5.6. PROCEDURES TO RESTORE DATABASES5.6.1. Restoring a template-based deployment5.6.2. Restoring an operator-based deployment5.6.3. Restoring system-mysql5.6.4. Restoring system-storage5.6.5. Restoring zync-database5.6.6. Ensuring information consistency between Backend and System
5.6.6.1. Managing the deployment configuration for backend-redis5.6.6.2. Managing the deployment configuration for system-redis
5.6.7. Restoring backend-worker5.6.8. Restoring system-app5.6.9. Creating equivalent Zync routes
CHAPTER 6. TROUBLESHOOTING6.1. COMMON ISSUES
6.1.1. Integration issues6.1.1.1. APIcast Hosted6.1.1.2. APIcast self-managed
6.1.2. Production issues6.1.2.1. Availability issues
6.1.3. Post-deploy issues6.2. TROUBLESHOOTING 101
6.2.1. 1. Can we connect?6.2.2. 2. Is it me or is it them?6.2.3. 3. Is it a DNS issue?6.2.4. 4. Is it an SSL issue?
6.3. TROUBLESHOOTING CHECKLISTS6.3.1. API6.3.2. API Gateway > API
596061
62
63636363636464646565656565656666676767676769696969717172747474
76767676777878798080818181
838484
Table of Contents
3
6.3.3. API gateway6.3.3.1. 1. Is the API gateway up and running?6.3.3.2. 2. Are there any errors in the gateway logs?
6.3.4. API gateway > 3scale6.3.4.1. 1. Can the API gateway reach 3scale?6.3.4.2. 2. Is the API gateway resolving 3scale addresses correctly?6.3.4.3. 3. Is the API gateway calling 3scale correctly?
6.3.5. 3scale6.3.5.1. 1. Is 3scale available?6.3.5.2. 2. Is 3scale returning an error?6.3.5.3. 3. Use the 3scale debug headers6.3.5.4. 4. Check the integration errors
6.3.6. Client API gateway6.3.6.1. 1. Is the API gateway reachable from the public internet?6.3.6.2. 2. Is the API gateway reachable by the client?
6.3.7. Client6.3.7.1. 1. Test the same call using a different client6.3.7.2. 2. Inspect the traffic sent by client
6.4. OTHER ISSUES6.4.1. ActiveDocs issues
6.4.1.1. 1. Use petstore.swagger.io6.4.1.2. 2. Check that firewall allows connections from ActiveDocs proxy6.4.1.3. 3. Call the API with incorrect credentials6.4.1.4. 4. Compare calls
6.5. APPENDIX6.5.1. Logging in NGINX
6.5.1.1. Enabling debugging log6.5.2. 3scale error codes
84848484858586878787878787888888888888888888888989898989
Red Hat 3scale API Management 2.7 Operating 3scale
4

Table of Contents
5

CHAPTER 1. 3SCALE OPERATIONS AND SCALING GUIDEThis section describes operations and scaling tasks of a Red Hat 3scale API Management 2.7 installation.
Prerequisites
An installed and initially configured 3scale On-premises instance on a supported OpenShiftversion.
NOTE
This document is not intended for local installations on laptops or similar end userequipment.
To carry out 3scale operations and scaling tasks, perform the steps outlined in the following sections:
Section 1.1, “Redeploying APIcast”
Section 1.2, “Scaling up 3scale on-premise”
Section 1.3, “Operations troubleshooting”
Additional resources
OpenShift Documentation
1.1. REDEPLOYING APICAST
You can test and promote system changes through the 3scale Admin Portal.
Prerequisites
A deployed instance of 3scale On-premises.
You have chosen your APIcast deployment method.
By default, APIcast deployments on OpenShift, both embedded and on other OpenShift clusters, areconfigured to allow you to publish changes to your staging and production gateways through the 3scaleAdmin Portal.
To redeploy APIcast on OpenShift:
Procedure
1. Make system changes.
2. In the Admin Portal, deploy to staging and test.
3. In the Admin Portal, promote to production.
By default, APIcast retrieves and publishes the promoted update once every 5 minutes.
If you are using APIcast on the Docker containerized environment or a native installation, configure yourstaging and production gateways, and indicate how often the gateway retrieves published changes.
Red Hat 3scale API Management 2.7 Operating 3scale
6
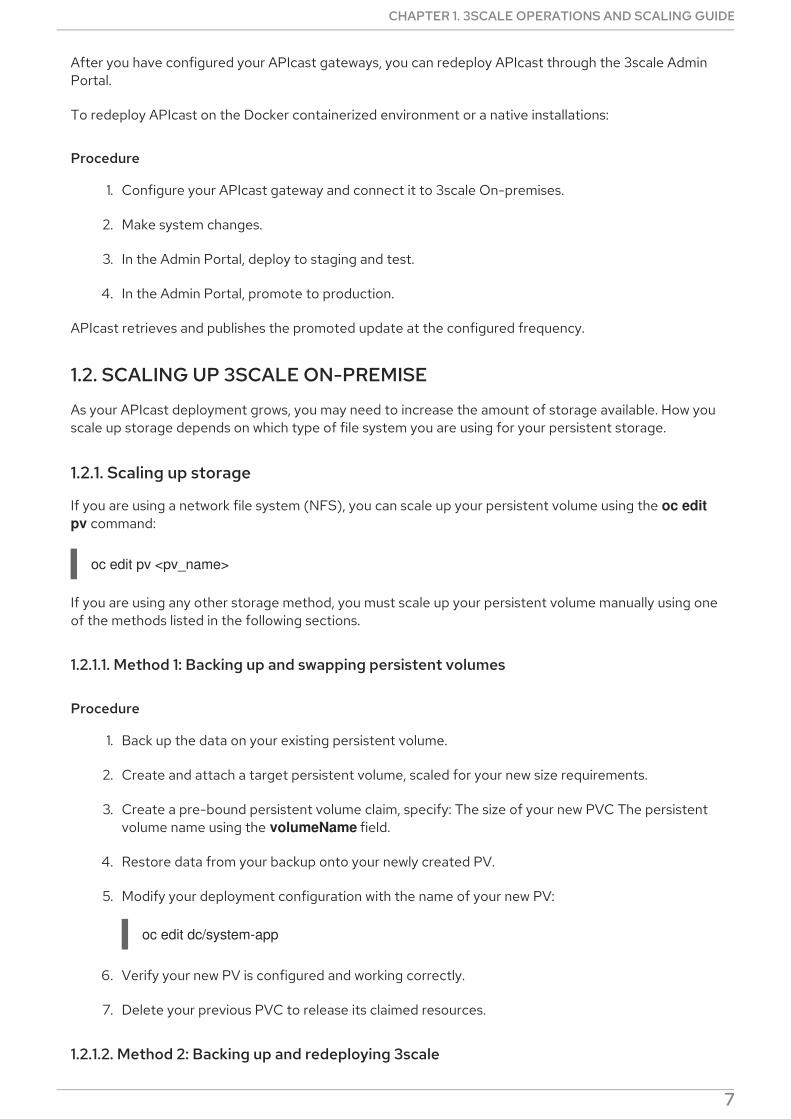
After you have configured your APIcast gateways, you can redeploy APIcast through the 3scale AdminPortal.
To redeploy APIcast on the Docker containerized environment or a native installations:
Procedure
1. Configure your APIcast gateway and connect it to 3scale On-premises.
2. Make system changes.
3. In the Admin Portal, deploy to staging and test.
4. In the Admin Portal, promote to production.
APIcast retrieves and publishes the promoted update at the configured frequency.
1.2. SCALING UP 3SCALE ON-PREMISE
As your APIcast deployment grows, you may need to increase the amount of storage available. How youscale up storage depends on which type of file system you are using for your persistent storage.
1.2.1. Scaling up storage
If you are using a network file system (NFS), you can scale up your persistent volume using the oc edit pv command:
oc edit pv <pv_name>
If you are using any other storage method, you must scale up your persistent volume manually using oneof the methods listed in the following sections.
1.2.1.1. Method 1: Backing up and swapping persistent volumes
Procedure
1. Back up the data on your existing persistent volume.
2. Create and attach a target persistent volume, scaled for your new size requirements.
3. Create a pre-bound persistent volume claim, specify: The size of your new PVC The persistentvolume name using the volumeName field.
4. Restore data from your backup onto your newly created PV.
5. Modify your deployment configuration with the name of your new PV:
oc edit dc/system-app
6. Verify your new PV is configured and working correctly.
7. Delete your previous PVC to release its claimed resources.
1.2.1.2. Method 2: Backing up and redeploying 3scale
CHAPTER 1. 3SCALE OPERATIONS AND SCALING GUIDE
7
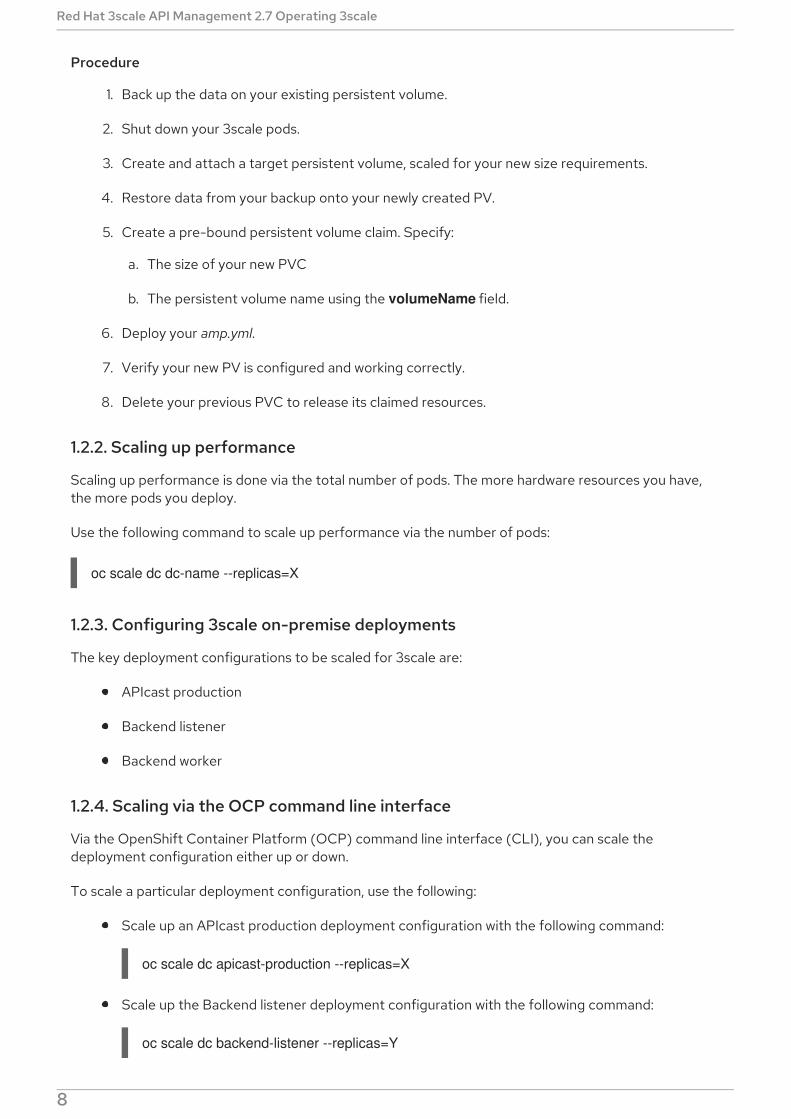
Procedure
1. Back up the data on your existing persistent volume.
2. Shut down your 3scale pods.
3. Create and attach a target persistent volume, scaled for your new size requirements.
4. Restore data from your backup onto your newly created PV.
5. Create a pre-bound persistent volume claim. Specify:
a. The size of your new PVC
b. The persistent volume name using the volumeName field.
6. Deploy your amp.yml.
7. Verify your new PV is configured and working correctly.
8. Delete your previous PVC to release its claimed resources.
1.2.2. Scaling up performance
Scaling up performance is done via the total number of pods. The more hardware resources you have,the more pods you deploy.
Use the following command to scale up performance via the number of pods:
oc scale dc dc-name --replicas=X
1.2.3. Configuring 3scale on-premise deployments
The key deployment configurations to be scaled for 3scale are:
APIcast production
Backend listener
Backend worker
1.2.4. Scaling via the OCP command line interface
Via the OpenShift Container Platform (OCP) command line interface (CLI), you can scale thedeployment configuration either up or down.
To scale a particular deployment configuration, use the following:
Scale up an APIcast production deployment configuration with the following command:
oc scale dc apicast-production --replicas=X
Scale up the Backend listener deployment configuration with the following command:
oc scale dc backend-listener --replicas=Y
Red Hat 3scale API Management 2.7 Operating 3scale
8
Scale up the Backend worker deployment configuration with the following command:
oc scale dc backend-worker --replicas=Z
1.2.5. Vertical and horizontal hardware scaling
You can increase the performance of your 3scale deployment on OpenShift by adding resources. Youcan add more compute nodes as pods to your OpenShift cluster, as horizontal scaling or you can allocatemore resources to existing compute nodes as vertical scaling.
Horizontal scaling
You can add more compute nodes as pods to your OpenShift. If the additional compute nodes matchthe existing nodes in your cluster, you do not have to reconfigure any environment variables.
Vertical scaling
You can allocate more resources to existing compute nodes. If you allocate more resources, you mustadd additional processes to your pods to increase performance.
NOTE
Avoid the use of computing nodes with different specifications and configurations in your3scale deployment.
1.2.6. Scaling up routers
As traffic increases, ensure your Red Hat OCP routers can adequately handle requests. If your routersare limiting the throughput of your requests, you must scale up your router nodes.
1.3. OPERATIONS TROUBLESHOOTING
This section explains how to configure 3scale audit logging to display on OpenShift, and how to access3scale logs and job queues on OpenShift.
1.3.1. Configuring 3scale audit logging on OpenShift
This enables all logs to be in one place for querying by Elasticsearch, Fluentd, and Kibana (EFK) loggingtools. These tools provide increased visibility on changes made to your 3scale configuration, who madethese changes, and when. For example, this includes changes to billing, application plans, APIconfiguration, and more.
Prerequisites
A 3scale 2.7 deployment.
Procedure
Configure audit logging to stdout to forward all application logs to standard OpenShift pod logs.
Some considerations:
By default, audit logging to stdout is disabled when 3scale is deployed on-premises; you needto configure this feature to have it fully functional.
CHAPTER 1. 3SCALE OPERATIONS AND SCALING GUIDE
9
Audit logging to stdout is not available for 3scale hosted.
1.3.2. Enabling audit logging
3scale uses a features.xml configuration file to enable some global features. To enable audit logging to stdout, you must mount this file from a ConfigMap to replace the default file. The OpenShift pods thatdepend on features.xml are system-app and system-sidekiq.
Prerequisites
You must have cluster administrator access on OpenShift.
Procedure
1. Enter the following command to enable audit logging to stdout:
oc patch configmap system -p '{"data": {"features.yml": "features: &default\n logging:\n audits_to_stdout: true\n\nproduction:\n <<: *default\n"}}'
2. Export the following environment variable:
export PATCH_SYSTEM_VOLUMES='{"spec":{"template":{"spec":{"volumes":[{"emptyDir":{"medium":"Memory"},"name":"system-tmp"},{"configMap":{"items":[{"key":"zync.yml","path":"zync.yml"},{"key":"rolling_updates.yml","path":"rolling_updates.yml"},{"key":"service_discovery.yml","path":"service_discovery.yml"},{"key":"features.yml","path":"features.yml"}],"name":"system"},"name":"system-config"}]}}}}'
3. Enter the following command to apply the updated deployment configuration to the relevantOpenShift pods:
oc patch dc system-app -p $PATCH_SYSTEM_VOLUMESoc patch dc system-sidekiq -p $PATCH_SYSTEM_VOLUMES
1.3.3. Configuring EFK logging
When you have enabled audit logging to stdout to forward 3scale application logs to OpenShift, you canuse EFK logging tools to monitor your 3scale applications.
For details on how to configure EFK logging on OpenShift, see the following:
Deploying EFK on OCP 3.11
Deploying EFK on OCP 4.1
1.3.4. Accessing your logs
Each component’s deployment configuration contains logs for access and exceptions. If you encounterissues with your deployment, check these logs for details.
Follow these steps to access logs in 3scale:
Procedure
Red Hat 3scale API Management 2.7 Operating 3scale
10

1. Find the ID of the pod you want logs for:
oc get pods
2. Enter oc logs and the ID of your chosen pod:
oc logs <pod>
The system pod has two containers, each with a separate log. To access a container’s log,specify the --container parameter with the system-provider and system-developer pods:
oc logs <pod> --container=system-provideroc logs <pod> --container=system-developer
1.3.5. Checking job queues
Job queues contain logs of information sent from the system-sidekiq pods. Use these logs to check ifyour cluster is processing data. You can query the logs using the OpenShift CLI:
oc get jobs
oc logs <job>
1.3.6. Preventing monotonic growth
To prevent monotonic growth, 3scale schedules by default, automatic purging of the following tables:
user_sessions - clean up is triggered once a week, deletes records older than two weeks.
audits - clean up is triggered once a day, deletes records older than three months.
log_entries - clean up triggered once a day, deletes records older than six months.
event_store_events - clean up is triggered once a week, deletes records older than a week.
With the exception of the above listed tables, the alerts table requires manual purging by the databaseadministrator.
Database type SQL command
MySQL
PostgreSQL
Oracle
For other tables not specified in this section, the database administrator must manually clean the tables
DELETE FROM alerts WHERE timestamp < NOW() - INTERVAL 14 DAY;
DELETE FROM alerts WHERE timestamp < NOW() - INTERVAL '14 day';
DELETE FROM alerts WHERE timestamp <= TRUNC(SYSDATE) - 14;
CHAPTER 1. 3SCALE OPERATIONS AND SCALING GUIDE
11
For other tables not specified in this section, the database administrator must manually clean the tablesthat the system does not automatically purge.
Red Hat 3scale API Management 2.7 Operating 3scale
12

CHAPTER 2. USING THE 3SCALE TOOLBOXThe 3scale toolbox is a Ruby client that enables you to manage 3scale services from the command line.
IMPORTANT
The 3scale toolbox does not support all API as a Product (APIaaP) features. For moredetails, see the Known issues in the 3scale Release Notes .
2.1. INSTALLING THE TOOLBOX
The officially supported method of installing the 3scale toolbox is using the 3scale toolbox containerimage.
2.1.1. Installing the toolbox container image
Prerequisites
See the 3scale toolbox image in the Red Hat Container Catalog .
You must have a Red Hat registry service account.
The examples in this topic assume that you have Docker installed and the daemon running.
Procedure
1. Log in to the Red Hat container registry:
2. Pull the toolbox container image:
3. Verify the installation:
Additional resources
For details on installing the toolbox image with OpenShift, Podman, or Docker, see theinstructions on getting the image in the Red Hat Container Catalog .
See also the instructions for installing the 3scale toolbox on Kubernetes . You must use thecorrect image name and the oc command instead of kubectl on OpenShift.
2.1.2. Installing unsupported toolbox versions
$ docker login registry.redhat.ioUsername: ${REGISTRY-SERVICE-ACCOUNT-USERNAME}Password: ${REGISTRY-SERVICE-ACCOUNT-PASSWORD}Login Succeeded!
$ docker pull registry.redhat.io/3scale-amp2/toolbox-rhel7:3scale2.7
$ docker run registry.redhat.io/3scale-amp2/toolbox-rhel7:3scale2.7 3scale help
CHAPTER 2. USING THE 3SCALE TOOLBOX
13
Procedure
You can install unsupported toolbox versions on Fedora Linux, Ubuntu Linux, Windows, ormacOS by downloading and installing the latest .rpm, .deb, .msi or .pkg file from GitHub .
2.2. USING SUPPORTED TOOLBOX COMMANDS
Use the 3scale toolbox to manage your API from the command line tool (CLI).
NOTE
The update command has been deprecated and replaced by the copy command. Red Hatdiscourages the use of deprecated features.
The following commands are supported:
COMMANDS account account super command activedocs activedocs super command application application super command application-plan application-plan super command copy copy super command help show help import import super command method method super command metric metric super command policy-registry policy-registry super command proxy-config proxy-config super command remote remotes super command service services super command update [DEPRECTATED] update super command
OPTIONS -c --config-file=<value> 3scale toolbox configuration file (default: $HOME/.3scalerc.yaml) -h --help show help for this command -k --insecure Proceed and operate even for server connections otherwise considered insecure -v --version Prints the version of this command --verbose Verbose mode
2.3. IMPORTING SERVICES
Import services from a CSV file by specifying the following fields in this order (you also need to includethese headers in your CSV file):
You will need the following information:
3scale admin account: {3SCALE_ADMIN}
domain your 3scale instance is running on: {DOMAIN_NAME} (if you are using hosted APICast
service_name,endpoint_name,endpoint_http_method,endpoint_path,auth_mode,endpoint_system_name,type
Red Hat 3scale API Management 2.7 Operating 3scale
14

domain your 3scale instance is running on: {DOMAIN_NAME} (if you are using hosted APICastthis is 3scale.net)
access key of your account: {ACCESS_KEY}
CSV file of services (examples/import_example.csv)
Import the services by running:
Example
This example uses a Docker volume to mount the resource file in the container. It assumes that the file isavailable in the current $PWD folder.
2.4. COPYING SERVICES
Create a new service based on an existing one from the same account or from another account. Whenyou copy a service, the relevant ActiveDocs are also copied.
You need the following information:
service id you want to copy: {SERVICE_ID}
3scale admin account: {3SCALE_ADMIN}
domain your 3scale instance is running on: {DOMAIN_NAME} (if you are using hosted APICastthis is 3scale.net)
access key of your account: {ACCESS_KEY}
access key of the destination account if you are copying to a different account: {DEST_KEY}
name for the new service: {NEW_NAME}
Example
NOTE
If the service to be copied has custom policies, make sure that their respective custompolicy definitions already exist in the destination where the service is to be copied. Tolearn more about copying custom policy definitions check out the Section 2.14, “Copying apolicy registry (custom policies)”
2.5. COPYING SERVICE SETTINGS ONLY
$ docker run -v $PWD/examples/import_example.csv:/tmp/import_example.csv registry.redhat.io/3scale-amp2/toolbox-rhel7:3scale2.7 3scale import csv --destination=https://{ACCESS_KEY}@{3SCALE_ADMIN}-admin.{DOMAIN_NAME} --file=/tmp/import_example.csv
$ docker run registry.redhat.io/3scale-amp2/toolbox-rhel7:3scale2.7 3scale copy service {SERVICE_ID} --source=https://{ACCESS_KEY}@{3SCALE_ADMIN}-admin.{DOMAIN_NAME} --destination=https://{DEST_KEY}@{3SCALE_ADMIN}-admin.{DOMAIN_NAME} --target_system_name={NEW_NAME}
CHAPTER 2. USING THE 3SCALE TOOLBOX
15
Bulk copy (also known as updating) the service settings, proxy settings, metrics, methods, applicationplans, application plan limits and mapping rules from one service to another which already exists.
You will need the following information:
service id you want to copy: {SERVICE_ID}
service id of the destination: {DEST_ID}
3scale admin account: {3SCALE_ADMIN}
domain your 3scale instance is running on: {DOMAIN_NAME} (if you are using hosted APICastthis is 3scale.net)
access key of your account: {ACCESS_KEY}
access key of the destination account: {DEST_KEY}
And can use the following optional flags:
-f remove existing target service mapping rules before copying
-r copy only mapping rules to target service
NOTE
The update command has been deprecated and replaced by the copy command.
Red Hat discourages the use of deprecated features.
Example
2.6. IMPORTING OPENAPI DEFINITIONS
To create a new service or to update an existing service, use the definitions from a local file or accesscredentials. If that service name already exists, it will be updated. Conversely, if the service name doesnot exist, it will be created.
The default service name for the import is taken from info.title in the OpenAPI definition. You canoverride this service name using --target_system_name=<NEW NAME>. If that service name alreadyexists, it will be updated. Conversely, if the service name does not exist, it will be created.
The following rules apply to every import:
Definitions are validated as OpenAPI 2.0.
All mapping rules in the 3scale service are deleted.
In order to be replaced, all method names must be identical to methods defined in the OpenAPIdefinition (operation.operationId) by using exact pattern matching.
$ docker run registry.redhat.io/3scale-amp2/toolbox-rhel7:3scale2.7 3scale update [opts] service --source=https://{ACCESS_KEY}@{3SCALE_ADMIN}-admin.{DOMAIN_NAME} --destination=https://{DEST_KEY}@{3SCALE_ADMIN}-admin.{DOMAIN_NAME} {SERVICE_ID} {DEST_ID}
Red Hat 3scale API Management 2.7 Operating 3scale
16
Only methods included in the OpenAPI definition are modified.
All methods that were present only in the OpenAPI definition are attached to the Hits metric.
All mapping rules from the OpenAPI definition are imported.
View these in API > Integration.
NOTE
While there is no security requirement in swagger specifications, the service is consideredas an OpenAPI. Toolbox will add a default_credentials policy, which is also known as an anonymous_policy, if it is not already in the policy chain. The default_credentials policywill be configured with the userkey provided in optional parameter --default-credentials-userkey.
Example
2.6.1. Optional flags
-d --destination=<value>
3scale target instance in format: http[s]://<authentication>@3scale_domain.
-t --target_system_name=<value>
Target system name.
2.7. MANAGING REMOTE ACCESS CREDENTIALS
To facilitate work with remote 3scale instances, define in a config file the remote web addresses (URLs)with authentication that you will use for accessing those instances. Refer to them by a short name in any3scale toolbox command.
The default location for the config file is $HOME/.3scalerc.yaml but you can specify another locationusing the THREESCALE_CLI_CONFIG environment variable or the --config-file <config_file> option.
You can specify remotes using either an access_token or a provider_key:
http[s]://<access_token>@<3scale-instance-domain>
http[s]://<provider_key>@<3scale-instance-domain>
2.7.1. Listing remote access credentials
Shows the list of existing remotes (name, URL and authentication key).
Example
$ docker run registry.redhat.io/3scale-amp2/toolbox-rhel7:3scale2.7 3scale import openapi [opts] --destination=https://{DEST_KEY}@{3SCALE_ADMIN}-admin.{DOMAIN_NAME}
3scale remote list [--config-file <config_file>]
CHAPTER 2. USING THE 3SCALE TOOLBOX
17
2.7.2. Adding remote access credentials
Adds a remote with short name <name> at <url>.
Example
2.7.3. Removing remote access credentials
Removes the remote woth short name <name>.
Example
2.7.4. Renaming remote access credentials
Renames remote with short name <old_name> to <new_name>.
Example
2.8. APPLICATION PLANS
Use the 3scale toolbox to create, update, list, delete, show, or export/import application plans in yourDeveloper Portal.
2.8.1. Creating a new application plan
Use the following steps to create a new application plan:
You have to provide the application plan name.
To override the system-name, use the optional parameter.
$ docker run registry.redhat.io/3scale-amp2/toolbox-rhel7:3scale2.7 3scale remote listinstance_a https://example_a.net 123456789instance_b https://example_b.net 987654321
3scale remote add [--config-file <config_file>] <name> <url>
$ docker run registry.redhat.io/3scale-amp2/toolbox-rhel7:3scale2.7 3scale remote add instance_a https://123456789@example_a.net
3scale remote remove [--config-file <config_file>] <name>
$ docker run registry.redhat.io/3scale-amp2/toolbox-rhel7:3scale2.7 3scale remote remove instance_a
3scale remote rename [--config-file <config_file>] <old_name> <new_name>
$ docker run registry.redhat.io/3scale-amp2/toolbox-rhel7:3scale2.7 3scale remote rename instance_a instance_b
Red Hat 3scale API Management 2.7 Operating 3scale
18
If an application plan with the same name already exists, you will see an error message.
Set as default the application plan by using the --default flag.
Create a published application plan by using the --publish flag.
By default, it will be hidden.
Create a disabled application plan by using the --disabled flag.
By default, it will be enabled.
NOTE
The service positional argument is a service reference and can be either service id or service system_name.
The toolbox uses either one.
The following command creates a new application plan:
Use the following options while creating application plans:
Options --approval-required=<value> The application requires approval: true or false --cost-per-month=<value> Cost per month -d --default This will make the default application plan --disabled This will disable all methods and metrics in the application plan --end-user-required=<value> End user required: true or false -p --published This will publish the application plan --setup-fee=<value> Set-up fee -t --system-name=<value> This will set application plan system name --trial-period-days=<value> The trial period in days
Options for application-plan -c --config-file=<value> 3scale toolbox configuration file (default: $HOME/.3scalerc.yaml) -h --help show help for this command -k --insecure Proceed and operate even for server connections otherwise considered insecure -v --version This will print the version of this command --verbose Verbose mode
2.8.2. Creating or updating application plans
Use the following steps to create a new application plan if it does not exist, or to update an existing one:
Update the default application plan by using the --default flag.
Update the published application plan by using the --publish flag.
Update the hidden application plan by using the --hide flag.
3scale application-plan create [opts] <remote> <service> <plan-name>
CHAPTER 2. USING THE 3SCALE TOOLBOX
19
Update the disabled application plan by using the --disabled flag.
Update the enabled application plan by using the --enabled flag.
NOTE
The service positional argument is a service reference and can be either service id or service system_name.
The toolbox uses either one.
The plan positional argument is a plan reference and can be either plan id or plansystem_name.
The toolbox uses either one.
The following command updates the application plan:
Use the following options while updating application plans:
Options --approval-required=<value> The application requires approval: true or false --cost-per-month=<value> Cost per month --default This will make the default application plan --disabled This will disable all methods and metrics in the application plan --enabled This will enable the application plan --end-user-required=<value> End user required: true or false --hide This will hide the application plan -n --name=<value> This will set the plan name -p --publish This will publish the application plan --setup-fee=<value> Set-up fee --trial-period-days=<value> The trial period in days
Options for application-plan -c --config-file=<value> 3scale toolbox configuration file (default: $HOME/.3scalerc.yaml) -h --help show help for this command -k --insecure Proceed and operate even for server connections otherwise considered insecure -v --version This will print the version of this command --verbose Verbose mode
2.8.3. Listing application plans
The following command lists the application plan:
Use the following options while listing application plans:
3scale application-plan create [opts] <remote> <service> <plan>
3scale application-plan list [opts] <remote> <service>
Red Hat 3scale API Management 2.7 Operating 3scale
20

Options for application-plan -c --config-file=<value> 3scale toolbox configuration file (default:$HOME/.3scalerc.yaml) -h --help show help for this command -k --insecure Proceed and operate even for server connections otherwise considered insecure -v --version This will print the version of this command --verbose Verbose mode
2.8.4. Showing application plans
The following command shows the application plan:
Use the following options while showing application plans:
Options for application-plan -c --config-file=<value> 3scale toolbox configuration file (default: $HOME/.3scalerc.yaml) -h --help show help for this command -k --insecure Proceed and operate even for server connections otherwise considered insecure -v --version This will print the version of this command --verbose Verbose mode
2.8.5. Deleting application plans
The following command deletes the application plan:
Use the following options while deleting application plans:
Options for application-plan -c --config-file=<value> 3scale toolbox configuration file (default: $HOME/.3scalerc.yaml) -h --help show help for this command -k --insecure Proceed and operate even for server connections otherwise considered insecure -v --version This will print the version of this command --verbose Verbose mode
2.8.6. Export/import application plans
You can export or import a single application plan to or from yaml content.
Note the following: * Limits defined in the application plan are included. * Pricing rules defined in theapplication plan are included. * Metrics/methods referenced by limits and pricing rules are included. *Features defined in the application plan are included. * Service can be referenced by id or system_name. * Application Plan can be referenced by id or system_name.
3scale application-plan show [opts] <remote> <service> <plan>
3scale application-plan delete [opts] <remote> <service> <plan>
CHAPTER 2. USING THE 3SCALE TOOLBOX
21

2.8.6.1. Exporting an application plan to a file
The following command exports the application plan:
Example
This example uses a Docker volume to mount the exported file in the container for output to the current$PWD folder.
NOTE
Specific to the export command:
Read only operation on remote service and application plan.
Command output can be stdout or file.
If not specified by -f option, by default, yaml content will be written on stdout.
Use the following options while exporting application plans:
Options -f --file=<value> Write to file instead of stdout
Options for application-plan -c --config-file=<value> 3scale toolbox configuration file (default: $HOME/.3scalerc.yaml) -h --help show help for this command -k --insecure Proceed and operate even for server connections otherwise considered insecure -v --version Prints the version of this command --verbose Verbose mode
2.8.6.2. Importing an application plan from a file
The following command imports the application plan:
Example
This example uses a Docker volume to mount the imported file in the container from the current $PWDfolder.
3scale application-plan export [opts] <remote> <service_system_name> <plan_system_name>
$ docker run -u root -v $PWD:/tmp registry.redhat.io/3scale-amp2/toolbox-rhel7:3scale2.7 3scale application-plan export --file=/tmp/plan.yaml remote_name service_name plan_name
3scale application-plan import [opts] <remote> <service_system_name>
$ docker run -v $PWD/plan.yaml:/tmp/plan.yaml registry.redhat.io/3scale-amp2/toolbox-rhel7:3scale2.7 3scale application-plan import --file=/tmp/plan.yaml remote_name service_name
Red Hat 3scale API Management 2.7 Operating 3scale
22
2.8.6.3. Importing an application plan from URL
NOTE
Specific to import command:
Command input content can be stdin, file or URL format.
If not specified by -f option, by default, yaml content will be read from stdin.
If application plan cannot be found in remote service, it will be created.
Optional param -p, --plan to override remote target application plan id or system_name.
If not specified by -p option, by default, application plan will be referenced byplan attribute system_name from yaml content.
Any metric or method from yaml content that cannot be found in remote service,will be created.
Use the following options while importing application plans:
Options -f --file=<value> Read from file or url instead of stdin -p --plan=<value> Override application plan reference
Options for application-plan -c --config-file=<value> 3scale toolbox configuration file (default: $HOME/.3scalerc.yaml) -h --help show help for this command -k --insecure Proceed and operate even for server connections otherwise considered insecure -v --version Prints the version of this command --verbose Verbose mode
2.9. METRICS
Use the 3scale toolbox to create, update, list, and delete metrics in your Developer Portal.
2.9.1. Creating metrics
Use the following steps for creating metrics:
You have to provide the metric name.
To override the system-name, use the optional parameter.
If metrics with the same name already exist, you will see an error message.
Create a disabled metric by using the --disabled flag.
3scale application-plan import -f http[s]://domain/resource/path.yaml remote_name service_name
CHAPTER 2. USING THE 3SCALE TOOLBOX
23

By default, it will be enabled.
NOTE
The service positional argument is a service reference and can be either service id or service system_name.
The toolbox uses either one.
The following command creates metrics:
Use the following options while creating metrics:
Options --description=<value> This will set a metric description --disabled This will disable this metric in all application plans -t --system-name=<value> This will set the application plan system name --unit=<value> Metric unit: default hit
Option for metric -c --config-file=<value> 3scale toolbox configuration file (default: $HOME/.3scalerc.yaml) -h --help show help for this command -k --insecure Proceed and operate even for server connections otherwise considered insecure -v --version This will print the version of this command --verbose Verbose mode
2.9.2. Creating or updating metrics
Use the following steps to create new metrics if they do not exist, or to update an existing one:
If metrics with the same name already exist, you will see an error message.
Update a disabled metric by using the --disabled flag.
Update to enabled metric by using the --enabled flag.
NOTE
The service positional argument is a service reference and can be either service id or service system_name.
The toolbox uses either one.
The metric positional argument is a metric reference and can be either metric idor metric system_name.
The toolbox uses either one.
The following commmand updates metrics:
3scale metric create [opts] <remote> <service> <metric-name>
Red Hat 3scale API Management 2.7 Operating 3scale
24

Use the following options while updating metrics:
Options --description=<value> This will set a metric description --disabled This will disable this metric in all application plans --enabled This will enable this metric in all application plans -n --name=<value> This will set the metric name --unit=<value> Metric unit: default hit
Options for metric -c --config-file=<value> 3scale toolbox configuration file (default: $HOME/.3scalerc.yaml) -h --help show help for this command -k --insecure Proceed and operate even for server connections otherwise considered insecure -v --version This will print the version of this command --verbose Verbose mode
2.9.3. Listing metrics
The following command lists metrics:
Use the following options while listing metrics:
Options for metric -c --config-file=<value> 3scale toolbox configuration file (default: $HOME/.3scalerc.yaml) -h --help show help for this command -k --insecure Proceed and operate even for server connections otherwise considered insecure -v --version This will print the version of this command --verbose Verbose mode
2.9.4. Deleting metrics
The following command deletes metrics:
Use the following options while deleting metrics:
Options for metric -c --config-file=<value> 3scale toolbox configuration file (default: $HOME/.3scalerc.yaml) -h --help show help for this command -k --insecure Proceed and operate even for server connections otherwise considered insecure -v --version This will print the version of this command --verbose Verbose mode
3scale metric apply [opts] <remote> <service> <metric>
3scale metric list [opts] <remote> <service>
3scale metric delete [opts] <remote> <service> <metric>
CHAPTER 2. USING THE 3SCALE TOOLBOX
25

2.10. METHODS
Use the 3scale toolbox to create, apply, list, and delete methods in your Developer Portal.
2.10.1. Creating methods
You have to provide the method name.
To override the system-name, use the optional parameter.
If a method with the same name already exists, you will see an error message.
Create a disabled method by --disabled flag.
By default, it will be enabled.
NOTE
The service positional argument is a service reference and can be either service id or service system_name.
The toolbox uses either one.
The following command creates a method:
Use the following options while creating methods:
Option --description=<value> This will set a method description --disabled This will disable this method in all application plans -t --system-name=<value> This will set the method system name
Options for method -c --config-file=<value> 3scale toolbox configuration file (default: $HOME/.3scalerc.yaml) -h --help show help for this command -k --insecure Proceed and operate even for server connections otherwise considered insecure -v --version This will print the version of this command --verbose Verbose mode
2.10.2. Creating or updating methods
Use the following steps for creating new methods if they do not exist, or to update an existing ones:
If a method with the same name already exists, command will fail.
Update to disabled method by using --disabled flag.
Update to enabled method by using --enabled flag.
3scale method create [opts] <remote> <service> <method-name>
Red Hat 3scale API Management 2.7 Operating 3scale
26
NOTE
The service positional argument is a service reference and can be either service id or service system_name.
The toolbox uses either one.
The method positional argument is a method reference and can be eithermethod id or method system_name.
The toolbox uses either one.
The following command updates a method:
Use the following options while updating methods:
Options --description=<value> This will set a method description --disabled This will disable this method in all application plans --enabled This will enable this method in all application plans -n --name=<value> This will set the method name
Options for method -c --config-file=<value> 3scale toolbox configuration file (default: $HOME/.3scalerc.yaml) -h --help This will show help for this command -k --insecure Proceed and operate even for server connections otherwise considered insecure -v --version This will print the version of this command --verbose Verbose mode
2.10.3. Listing methods
The following command lists methods:
Use the following options while listing methods:
Options for method -c --config-file=<value> 3scale toolbox configuration file (default: $HOME/.3scalerc.yaml) -h --help show help for this command -k --insecure Proceed and operate even for server connections otherwise considered insecure -v --version This will print the version of this command --verbose Verbose mode
2.10.4. Deleting methods
3scale method apply [opts] <remote> <service> <method>
3scale method list [opts] <remote> <service>
CHAPTER 2. USING THE 3SCALE TOOLBOX
27
The following command deletes methods:
Use the following options while deleting methods:
Options for method -c --config-file=<value> 3scale toolbox configuration file (default: $HOME/.3scalerc.yaml) -h --help show help for this command -k --insecure Proceed and operate even for server connections otherwise considered insecure -v --version This will print the version of this command --verbose Verbose mode
2.11. CREATING SERVICES
Use the 3scale toolbox to create, apply, list, show, or delete services in your Developer Portal.
2.11.1. Creating a new service
The following command creates a new service:
Use the following options while creating services:
Options -a --authentication-mode=<value> Specify authentication mode of the service ('1' for API key, '2' for App Id / App Key, 'oauth' for OAuth mode, 'oidc' for OpenID Connect) -d --deployment-mode=<value> Specify the deployment mode of the service --description=<value> Specify the description of the service -s --system-name=<value> Specify the system-name of the service --support-email=<value> Specify the support email of the service
Options for service -c --config-file=<value> 3scale toolbox configuration file (default: $HOME/.3scalerc.yaml) -h --help show help for this command -k --insecure Proceed and operate even for server connections otherwise considered insecure -v --version Prints the version of this command --verbose Verbose mode
3scale method delete [opts] <remote> <service> <metric>
3scale service create [options] <remote> <service-name>
Red Hat 3scale API Management 2.7 Operating 3scale
28

2.11.2. Creating or updating services
Use the following to create new services if they do not exist, or to update an existing one:
NOTE
service-id_or_system-name positional argument is a service reference.
It can be either service id, or service system_name.
Toolbox will automatically figure this out.
This command is idempotent.
The following command updates services:
Use the following options while updating services:
Options -a --authentication-mode=<value> Specify authentication mode of the service ('1' for API key, '2' for App Id / App Key, 'oauth' for OAuth mode, 'oidc' for OpenID Connect) -d --deployment-mode=<value> Specify the deployment mode of the service --description=<value> Specify the description of the service -n --name=<value> Specify the name of the metric --support-email=<value> Specify the support email of the service
Options for services -c --config-file=<value> 3scale toolbox configuration file (default: $HOME/.3scalerc.yaml) -h --help show help for this command -k --insecure Proceed and operate even for server connections otherwise considered insecure -v --version Prints the version of this command --verbose Verbose mode
2.11.3. Listing services
The following command lists services:
Use the following options while listing services:
Options for services -c --config-file=<value> 3scale toolbox configuration file (default: $HOME/.3scalerc.yaml)
3scale service apply <remote> <service-id_or_system-name>
3scale service list <remote>
CHAPTER 2. USING THE 3SCALE TOOLBOX
29
-h --help show help for this command -k --insecure Proceed and operate even for server connections otherwise considered insecure -v --version Prints the version of this command --verbose Verbose mode
2.11.4. Showing services
The following command shows services:
Use the following options while showing services:
Options for services -c --config-file=<value> 3scale toolbox configuration file (default: $HOME/.3scalerc.yaml) -h --help show help for this command -k --insecure Proceed and operate even for server connections otherwise considered insecure -v --version Prints the version of this command --verbose Verbose mode
2.11.5. Deleting services
The following command deletes services:
Use the following options while deleting services:
Options for services -c --config-file=<value> 3scale toolbox configuration file (default: $HOME/.3scalerc.yaml) -h --help show help for this command -k --insecure Proceed and operate even for server connections otherwise considered insecure -v --version Prints the version of this command --verbose Verbose mode
2.12. ACTIVEDOCS
Use the 3scale toolbox to create, update, list, or delete ActiveDocs in your Developer Portal.
2.12.1. Creating new ActiveDocs
To create a new ActiveDocs from your OpenAPI / Swagger compliant API defintion:
1. Add your API defintion to 3scale, optionally giving it a name:
3scale service show <remote> <service-id_or_system-name>
3scale service delete <remote> <service-id_or_system-name>
3scale activedocs create <remote> <activedocs-name> <spec>
Red Hat 3scale API Management 2.7 Operating 3scale
30

Use the following options while creating ActiveDocs:
Options -d --description=<value> Specify the description of the ActiveDocs -i --service-id=<value> Specify the Service ID associated to the ActiveDocs -p --published Specify it to publish the ActiveDoc on the Developer Portal. Otherwise it will be hidden -s --system-name=<value> Specify the system-name of the ActiveDocs --skip-swagger-validations Specify it to skip validation of the Swagger specification
Options for ActiveDocs -c --config-file=<value> 3scale toolbox configuration file (default: $HOME/.3scalerc.yaml) -h --help show help for this command -k --insecure Proceed and operate even for server connections otherwise considered insecure -v --version Prints the version of this command --verbose Verbose mode
2. Publish the definition in your Developer Portal.
2.12.2. Creating or updating ActiveDocs
Use the following command to create new ActiveDoc if they do not exist, or to update existingActiveDocs with a new API definition:
Use the following options while updating ActiveDocs:
Options -d --description=<value> Specify the description of the ActiveDocs --hide Specify it to hide the ActiveDocs on the Developer Portal -i --service-id=<value> Specify the Service ID associated to the ActiveDocs --openapi-spec=<value> Specify the swagger spec. Can be a file, an URL or '-' to read from stdin. This option is mandatory when applying the ActiveDoc for the first time -p --publish Specify it to publish the ActiveDocs on the Developer Portal. Otherwise it will be hidden -s --name=<value> Specify the name of the ActiveDocs --skip-swagger-validations Specify it to skip validation of the Swagger specification
3scale activedocs apply <remote> <activedocs_id_or_system_name>
CHAPTER 2. USING THE 3SCALE TOOLBOX
31

Options for ActiveDocs -c --config-file=<value> 3scale toolbox configuration file (default: $HOME/.3scalerc.yaml) -h --help show help for this command -k --insecure Proceed and operate even for server connections otherwise considered insecure -v --version Prints the version of this command --verbose Verbose mode
2.12.3. Listing ActiveDocs
To get information about all ActiveDocs in the developer portal, including
id
name
system name
description
published (which means it can be shown in the developer portal)
creation date
latest updated date
The following command lists all defined ActiveDocs:
Use the following options while listing ActiveDocs:
Options for ActiveDocs -c --config-file=<value> 3scale toolbox configuration file (default: $HOME/.3scalerc.yaml) -h --help show help for this command -k --insecure Proceed and operate even for server connections otherwise considered insecure -v --version Prints the version of this command --verbose Verbose mode
2.12.4. Deleting ActiveDocs
The following command removes ActiveDocs:
Use the following options while deleting ActiveDocs:
Options for ActiveDocs -c --config-file=<value> 3scale toolbox configuration file
3scale activedocs list <remote>
3scale activedocs delete <remote> <activedocs-id_or-system-name>
Red Hat 3scale API Management 2.7 Operating 3scale
32

(default: $HOME/.3scalerc.yaml) -h --help show help for this command -k --insecure Proceed and operate even for server connections otherwise considered insecure -v --version Prints the version of this command --verbose Verbose mode
2.13. PROXY CONFIGURATIONS
Use the 3scale toolbox to list, show, promote all defined proxy configurations in your Developer Portal.
2.13.1. Listing proxy configuration
The following command lists proxy configurations:
Use the following options while listing proxy configurations:
Options for proxy-config -c --config-file=<value> 3scale toolbox configuration file (default: /home/msoriano/.3scalerc.yaml) -h --help show help for this command -k --insecure Proceed and operate even for server connections otherwise considered insecure -v --version Prints the version of this command --verbose Verbose mode
2.13.2. Showing proxy configurations
The following command shows proxy configurations:
Use the following options while showing proxy configurations:
Options for proxy-config -c --config-file=<value> 3scale toolbox configuration file (default: /home/msoriano/.3scalerc.yaml) -h --help show help for this command -k --insecure Proceed and operate even for server connections otherwise considered insecure -v --version Prints the version of this command --verbose Verbose mode
2.13.3. Promoting proxy configurations
The following command promotes the latest staging proxy configuration to the production environment:
Use the following options while promoting the latest staging proxy configurations to the production
3scale proxy-config list <remote> <service> <environment>
3scale proxy-config show <remote> <service> <environment>
3scale proxy-config promote <remote> <service>
CHAPTER 2. USING THE 3SCALE TOOLBOX
33
Use the following options while promoting the latest staging proxy configurations to the productionenvironment:
Options for proxy-config -c --config-file=<value> 3scale toolbox configuration file (default: /home/msoriano/.3scalerc.yaml) -h --help show help for this command -k --insecure Proceed and operate even for server connections otherwise considered insecure -v --version Prints the version of this command --verbose Verbose mode
2.14. COPYING A POLICY REGISTRY (CUSTOM POLICIES)
Use the toolbox command to copy a policy registry from a 3scale source account to a target accountwhen:
missing custom policies are being created in target account.
matching custom policies are being updated in target account.
this copy command is idempotent.
NOTE
Missing custom policies are defined as custom policies that exist in sourceaccount and do not exist in an account tenant.
Matching custom policies are defined as custom policies that exists in bothsource and target account.
The following command copies a policy registry:
Option for policy-registry -c --config-file=<value> 3scale toolbox configuration file (default: $HOME/.3scalerc.yaml) -h --help show help for this command -k --insecure Proceed and operate even for server connections otherwise considered insecure -v --version Prints the version of this command --verbose Verbose mode
2.15. APPLICATIONS
Use the 3scale toolbox to list, create, show, apply, or delete applications Developer Portal.
2.15.1. Listing applications
The following command lists applications:
3scale policy-registry copy [opts] <source_remote> <target_remote>
Red Hat 3scale API Management 2.7 Operating 3scale
34
Use the following options while listing applications:
OPTIONS --account=<value> Filter by account --plan=<value> Filter by application plan. Service option required. --service=<value> Filter by service
2.15.2. Creating applications
Use the create command to create one application linked to a given 3scale account and application plan.
The required positional paramaters are as follows:
<service> reference. It can be either service id, or service system_name.
<account> reference. It can be one of the following:
Account id
username, email, or user_id of the admin user of the account
provider_key
<application plan> reference. It can be either plan id, or plan system_name.
<name> application name.
The following command creates applications:
Use the following options while creating applications:
Options --application-id=<value> App ID or Client ID (for OAuth and OpenID Connect authentication modes) of the application to be created. --application-key=<value> App Key(s) or Client Secret (for OAuth and OpenID Connect authentication modes) of the application to be created. --description=<value> Application description --redirect-url=<value> OpenID Connect redirect url --user-key=<value> User Key (API Key) of the application to be created.
2.15.3. Showing applications
The following command shows applications:
3scale application list [opts] <remote>
3scale application create [opts] <remote> <account> <service> <application-plan> <name>
CHAPTER 2. USING THE 3SCALE TOOLBOX
35

Application parameters allow:
User_key - API key
App_id - from app_id/app_key pair or Client ID for OAuth and OpenID Connect (OIDC)authentication modes
Application internal id
2.15.4. Creating or updating applications
Use the following command to create new applications if they do not exist, or to update existingapplications:
Application parameters allow:
User_key - API key
App_id - from app_id/app_key pair or Client ID for OAuth and OIDC authentication modes
Application internal id
account optional argument is required when application is not found and needs to be created. Itcan be one of the following:
Account id
username, email, or user_id of the administrator user of the 3scale account
provider_key
name cannot be used as unique identifier because application name is not unique in 3scale.
Resume a suspended application by --resume flag.
Suspends an application - changes the state to suspended by the --suspend flag.
Use the following options while updating applications:
OPTIONS --account=<value> Application's account. Required when creating --application-key=<value> App Key(s) or Client Secret (for OAuth and OpenID Connect authentication modes) of the application to be created. Only used when application does not exist. --description=<value> Application description --name=<value> Application name --plan=<value> Application's plan. Required when creating
3scale application show [opts] <remote> <application>
3scale application apply [opts] <remote> <application>
Red Hat 3scale API Management 2.7 Operating 3scale
36
--redirect-url=<value> OpenID Connect redirect url --resume Resume a suspended application --service=<value> Application's service. Required when creating --suspend Suspends an application (changes the state to suspended) --user-key=<value> User Key (API Key) of the application to be created.
2.15.5. Deleting applications
The following command deletes an application:
Application parameters allow:
User_key - API key
App_id - from app_id/app_key pair or Client ID for OAuth and OIDC authentication modes
Application internal id
2.16. TROUBLESHOOTING SSL ISSUES
This section explains how to resolve issues with Secure Sockets Layer/Transport Layer Security(SSL/TLS).
2.16.1. Installing trusted certificates
If you are experiencing issues related to self-signed SSL certificates, you can download and use remotehost certificates as described in this section. For example, typical errors include SSL certificate problem: self signed certificate or self signed certificate in certificate chain.
Procedure
1. Download the remote host certificate using openssl. For example:
2. Ensure that the certificate is working correctly using curl. For example:
If the certificate is working correctly, you will no longer get the SSL error.
3. Add the SSL_CERT_FILE environment variable to your 3scale commands. For example:
3scale application delete [opts] <remote> <application>
$ echo | openssl s_client -showcerts -servername self-signed.badssl.com -connect self-signed.badssl.com:443 2>/dev/null | sed -ne '/-BEGIN CERTIFICATE-/,/-END CERTIFICATE-/p' > self-signed-cert.pem
$ SSL_CERT_FILE=self-signed-cert.pem curl -v https://self-signed.badssl.com
$ docker run --env "SSL_CERT_FILE=/tmp/self-signed-cert.pem" -v $PWD/self-signed-cert.pem:/tmp/self-signed-cert.pem egistry.redhat.io/3scale-amp2/toolbox-rhel7:3scale2.7 3scale service list https://{ACCESS_KEY}@{3SCALE_ADMIN}-admin.{DOMAIN_NAME}
CHAPTER 2. USING THE 3SCALE TOOLBOX
37
This example uses a Docker volume to mount the certificate file in the container. It assumes thatthe file is available in the current $PWD folder.
An alternative approach would be to create your own toolbox image using the 3scale toolboximage as the base image and then install your own trusted certificate store.
Additional resources
For more details on SSL certificates, see the Red Hat Certificate System documentation .
For more details on using containers, see the Red Hat
For more details on using Docker, see https://docs.docker.com/.
Red Hat 3scale API Management 2.7 Operating 3scale
38
CHAPTER 3. AUTOMATING API LIFECYCLE WITH 3SCALETOOLBOX
This topic explains the concepts of the API lifecycle with Red Hat 3scale API Management and showshow API providers can automate the deployment stage using Jenkins ContinuousIntegration/Continuous Deployment (CI/CD) pipelines with 3scale toolbox commands. It describes howto deploy the sample Jenkins CI/CD pipelines, how to create a custom Jenkins pipeline using the 3scaleshared library, and how create a custom pipeline from scratch:
Section 3.1, “Overview of the API lifecycle stages”
Section 3.2, “Deploying the sample Jenkins CI/CD pipelines”
Section 3.3, “Creating pipelines using the 3scale Jenkins shared library”
Section 3.4, “Creating pipelines using a Jenkinsfile”
3.1. OVERVIEW OF THE API LIFECYCLE STAGES
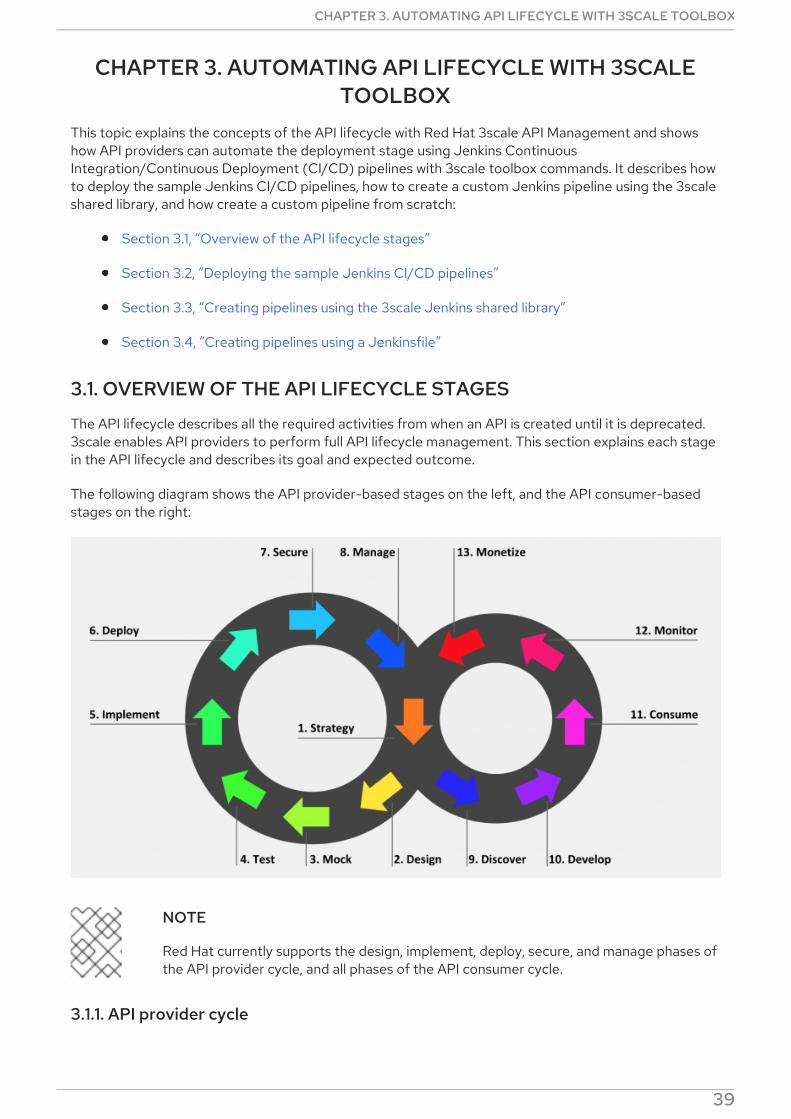
The API lifecycle describes all the required activities from when an API is created until it is deprecated.3scale enables API providers to perform full API lifecycle management. This section explains each stagein the API lifecycle and describes its goal and expected outcome.
The following diagram shows the API provider-based stages on the left, and the API consumer-basedstages on the right:
NOTE
Red Hat currently supports the design, implement, deploy, secure, and manage phases ofthe API provider cycle, and all phases of the API consumer cycle.
3.1.1. API provider cycle
The API provider cycle stages are based on specifying, developing, and deploying your APIs. The
CHAPTER 3. AUTOMATING API LIFECYCLE WITH 3SCALE TOOLBOX
39
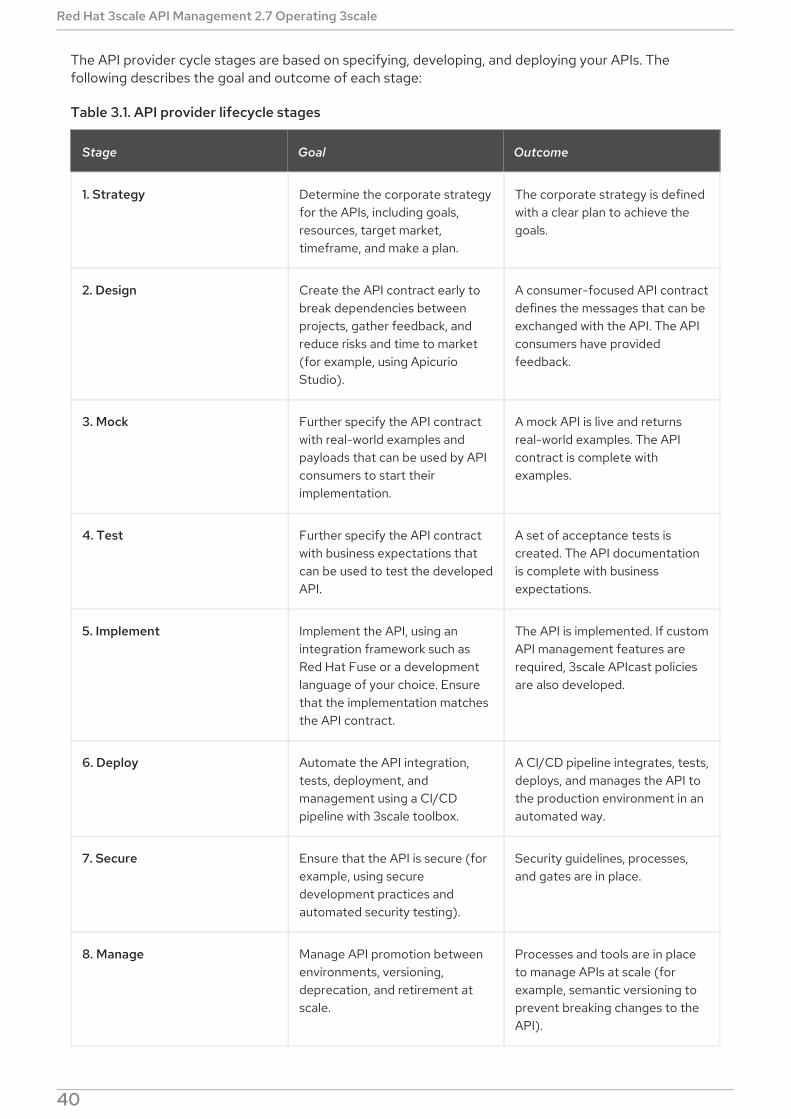
The API provider cycle stages are based on specifying, developing, and deploying your APIs. Thefollowing describes the goal and outcome of each stage:
Table 3.1. API provider lifecycle stages
Stage Goal Outcome
1. Strategy Determine the corporate strategyfor the APIs, including goals,resources, target market,timeframe, and make a plan.
The corporate strategy is definedwith a clear plan to achieve thegoals.
2. Design Create the API contract early tobreak dependencies betweenprojects, gather feedback, andreduce risks and time to market(for example, using ApicurioStudio).
A consumer-focused API contractdefines the messages that can beexchanged with the API. The APIconsumers have providedfeedback.
3. Mock Further specify the API contractwith real-world examples andpayloads that can be used by APIconsumers to start theirimplementation.
A mock API is live and returnsreal-world examples. The APIcontract is complete withexamples.
4. Test Further specify the API contractwith business expectations thatcan be used to test the developedAPI.
A set of acceptance tests iscreated. The API documentationis complete with businessexpectations.
5. Implement Implement the API, using anintegration framework such asRed Hat Fuse or a developmentlanguage of your choice. Ensurethat the implementation matchesthe API contract.
The API is implemented. If customAPI management features arerequired, 3scale APIcast policiesare also developed.
6. Deploy Automate the API integration,tests, deployment, andmanagement using a CI/CDpipeline with 3scale toolbox.
A CI/CD pipeline integrates, tests,deploys, and manages the API tothe production environment in anautomated way.
7. Secure Ensure that the API is secure (forexample, using securedevelopment practices andautomated security testing).
Security guidelines, processes,and gates are in place.
8. Manage Manage API promotion betweenenvironments, versioning,deprecation, and retirement atscale.
Processes and tools are in placeto manage APIs at scale (forexample, semantic versioning toprevent breaking changes to theAPI).
Red Hat 3scale API Management 2.7 Operating 3scale
40
3.1.2. API consumer cycle
The API consumer cycle stages are based on promoting, distributing, and refining your APIs forconsumption. The following describes the goal and outcome of each stage:
Table 3.2. API consumer lifecycle stages
Stage Goal Outcome
9. Discover Promote the API to third-partydevelopers, partners, and internalusers.
A developer portal is live and up-to-date documentation iscontinuously pushed to thisdeveloper portal (for example,using 3scale ActiveDocs).
10. Develop Guide and enable third-partydevelopers, partners, and internalusers to develop applicationsbased on the API.
The developer portal includesbest practices, guides, andrecommendations. APIdevelopers have access to a mockand test endpoint to develop theirsoftware.
11. Consume Handle the growing APIconsumption and manage the APIconsumers at scale.
Staged application plans areavailable for consumption, andup-to-date prices and limits arecontinuously pushed. APIconsumers can integrate API keyor client ID/secret generationfrom their CI/CD pipeline.
12. Monitor Gather factual and quantifiedfeedback about API health,quality, and developerengagement (for example, ametric for Time to first HelloWorld!).
A monitoring system is in place.Dashboards show KPIs for the API(for example, uptime, requestsper minute, latency, and so on).
13. Monetize Drive new incomes at scale (thisstage is optional).
For example, when targeting alarge number of small APIconsumers, monetization isenabled and consumers are billedbased on usage in an automatedway.
3.2. DEPLOYING THE SAMPLE JENKINS CI/CD PIPELINES
API lifecycle automation with 3scale toolbox focuses on the deployment stage of the API lifecycle andenables you to use CI/CD pipelines to automate your API management solution. This topic explains howto deploy the sample Jenkins pipelines that call the 3scale toolbox:
Section 3.2.1, “Sample Jenkins CI/CD pipelines”
Section 3.2.2, “Setting up your 3scale Hosted environment”
CHAPTER 3. AUTOMATING API LIFECYCLE WITH 3SCALE TOOLBOX
41
Section 3.2.3, “Setting up your 3scale On-premises environment”
Section 3.2.4, “Deploying Red Hat Single Sign-On for OpenID Connect”
Section 3.2.5, “Installing the 3scale toolbox and enabling access”
Section 3.2.6, “Deploying the API backends”
Section 3.2.7, “Deploying self-managed APIcast instances”
Section 3.2.8, “Installing and deploying the sample pipelines”
Section 3.2.9, “Limitations of API lifecycle automation with 3scale toolbox”
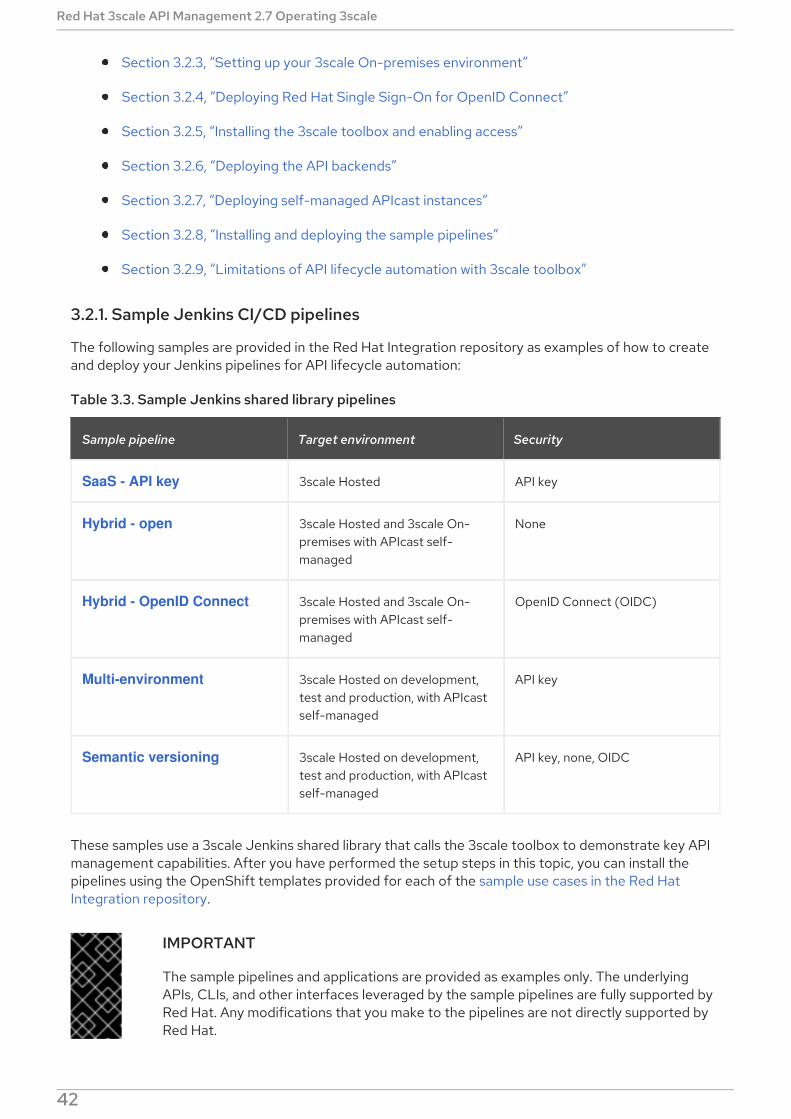
3.2.1. Sample Jenkins CI/CD pipelines
The following samples are provided in the Red Hat Integration repository as examples of how to createand deploy your Jenkins pipelines for API lifecycle automation:
Table 3.3. Sample Jenkins shared library pipelines
Sample pipeline Target environment Security
SaaS - API key 3scale Hosted API key
Hybrid - open 3scale Hosted and 3scale On-premises with APIcast self-managed
None
Hybrid - OpenID Connect 3scale Hosted and 3scale On-premises with APIcast self-managed
OpenID Connect (OIDC)
Multi-environment 3scale Hosted on development,test and production, with APIcastself-managed
API key
Semantic versioning 3scale Hosted on development,test and production, with APIcastself-managed
API key, none, OIDC
These samples use a 3scale Jenkins shared library that calls the 3scale toolbox to demonstrate key APImanagement capabilities. After you have performed the setup steps in this topic, you can install thepipelines using the OpenShift templates provided for each of the sample use cases in the Red HatIntegration repository.
IMPORTANT
The sample pipelines and applications are provided as examples only. The underlyingAPIs, CLIs, and other interfaces leveraged by the sample pipelines are fully supported byRed Hat. Any modifications that you make to the pipelines are not directly supported byRed Hat.
Red Hat 3scale API Management 2.7 Operating 3scale
42

3.2.2. Setting up your 3scale Hosted environment
Setting up a 3scale Hosted environment is required by all of the sample Jenkins CI/CD pipelines.
NOTE
The SaaS - API key, Multi-environment, and Semantic versioning sample pipelines use3scale Hosted only. The Hybrid - open and Hybrid - OIDC pipelines also use 3scale On-premises. See also Section 3.2.3, “Setting up your 3scale On-premises environment” .
Prerequisites
You must have a Linux workstation.
You must have a 3scale Hosted environment.
You must have an OpenShift 3.11 cluster. OpenShift 4 is currently not supported.
For more information about supported configurations, see the Red Hat 3scale APIManagement Supported Configurations page.
Ensure that wildcard routes have been enabled on the OpenShift router, as explained in theOpenShift documentation.
Procedure
1. Log in to your 3scale Hosted Admin Portal console.
2. Generate a new access token with write access to the Account Management API.
3. Save the generated access token for later use. For example:
4. Save the name of your 3scale tenant for later use. This is the string before -admin.3scale.net inyour Admin Portal URL. For example:
5. Navigate to Audience > Accounts > Listing in the Admin Portal.
6. Click Developer.
7. Save the Developer Account ID. This is the last part of the URL after /buyers/accounts/. Forexample:
3.2.3. Setting up your 3scale On-premises environment
Setting up a 3scale on-premises environment is required by the Hybrid - open and Hybrid - OIDCsample Jenkins CI/CD pipelines only.
NOTE
export SAAS_ACCESS_TOKEN=123...456
export SAAS_TENANT=my_username
export SAAS_DEVELOPER_ACCOUNT_ID=123...456
CHAPTER 3. AUTOMATING API LIFECYCLE WITH 3SCALE TOOLBOX
43

NOTE
If you wish to use these Hybrid sample pipelines, you must set up a 3scale On-premisesenvironment and a 3scale Hosted environment. See also Section 3.2.2, “Setting up your3scale Hosted environment”.
Prerequisites
You must have a Linux workstation.
You must have a 3scale on-premises environment. For details on installing 3scale on-premisesusing a template on OpenShift, see the 3scale installation documentation.
You must have an OpenShift 3.11 cluster. OpenShift 4 is currently not supported.
For more information about supported configurations, see the Red Hat 3scale APIManagement Supported Configurations page.
Ensure that wildcard routes have been enabled on the OpenShift router, as explained in theOpenShift documentation.
Procedure
1. Log in to your 3scale On-premises Admin Portal console.
2. Generate a new access token with write access to the Account Management API.
3. Save the generated access token for later use. For example:
4. Save the name of your 3scale tenant for later use:
5. Define your wildcard routes:
NOTE
You must set the value of OPENSHIFT_ROUTER_SUFFIX to the suffix of yourOpenShift router (for example, app.openshift.test).
6. Add the wildcard routes to your existing 3scale on-premises instance:
export SAAS_ACCESS_TOKEN=123...456
export ONPREM_ADMIN_PORTAL_HOSTNAME="$(oc get route system-provider-admin -o jsonpath='{.spec.host}')"
export OPENSHIFT_ROUTER_SUFFIX=app.openshift.test # Replace me!
export APICAST_ONPREM_STAGING_WILDCARD_DOMAIN=onprem-staging.$OPENSHIFT_ROUTER_SUFFIX
export APICAST_ONPREM_PRODUCTION_WILDCARD_DOMAIN=onprem-production.$OPENSHIFT_ROUTER_SUFFIX
oc create route edge apicast-wildcard-staging --service=apicast-staging --
Red Hat 3scale API Management 2.7 Operating 3scale
44
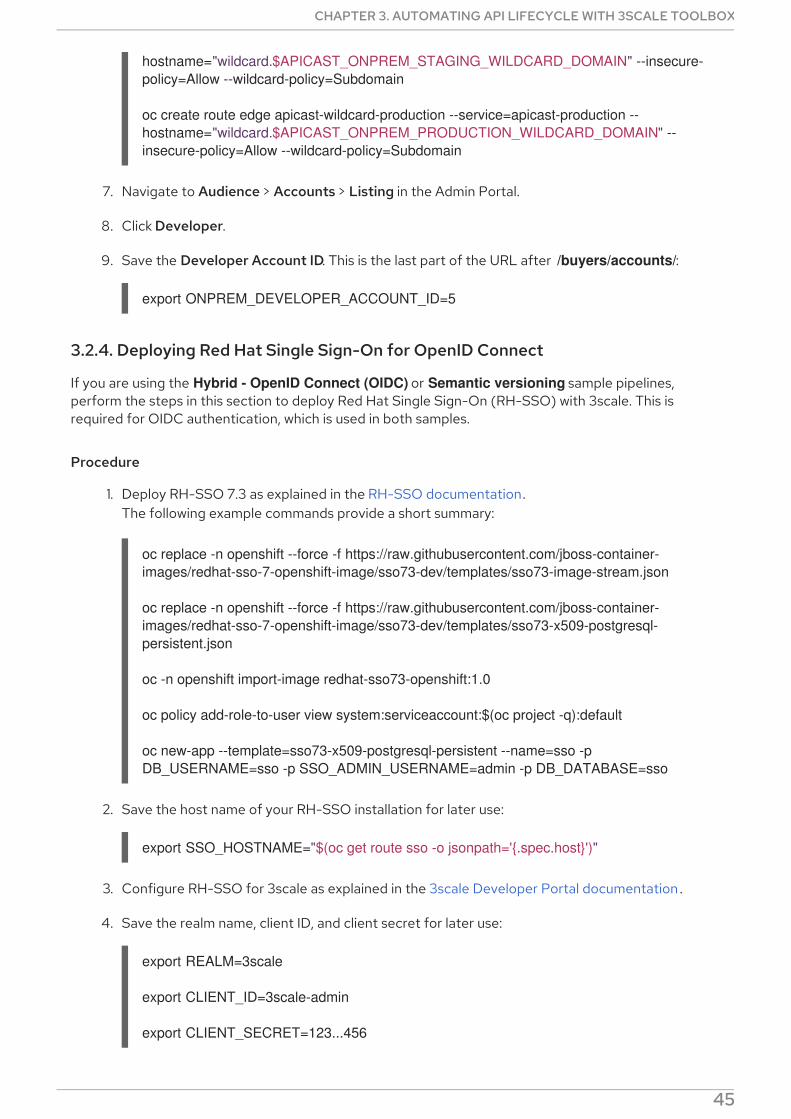
7. Navigate to Audience > Accounts > Listing in the Admin Portal.
8. Click Developer.
9. Save the Developer Account ID. This is the last part of the URL after /buyers/accounts/:
3.2.4. Deploying Red Hat Single Sign-On for OpenID Connect
If you are using the Hybrid - OpenID Connect (OIDC) or Semantic versioning sample pipelines,perform the steps in this section to deploy Red Hat Single Sign-On (RH-SSO) with 3scale. This isrequired for OIDC authentication, which is used in both samples.
Procedure
1. Deploy RH-SSO 7.3 as explained in the RH-SSO documentation.The following example commands provide a short summary:
2. Save the host name of your RH-SSO installation for later use:
3. Configure RH-SSO for 3scale as explained in the 3scale Developer Portal documentation .
4. Save the realm name, client ID, and client secret for later use:
hostname="wildcard.$APICAST_ONPREM_STAGING_WILDCARD_DOMAIN" --insecure-policy=Allow --wildcard-policy=Subdomain
oc create route edge apicast-wildcard-production --service=apicast-production --hostname="wildcard.$APICAST_ONPREM_PRODUCTION_WILDCARD_DOMAIN" --insecure-policy=Allow --wildcard-policy=Subdomain
export ONPREM_DEVELOPER_ACCOUNT_ID=5
oc replace -n openshift --force -f https://raw.githubusercontent.com/jboss-container-images/redhat-sso-7-openshift-image/sso73-dev/templates/sso73-image-stream.json
oc replace -n openshift --force -f https://raw.githubusercontent.com/jboss-container-images/redhat-sso-7-openshift-image/sso73-dev/templates/sso73-x509-postgresql-persistent.json
oc -n openshift import-image redhat-sso73-openshift:1.0
oc policy add-role-to-user view system:serviceaccount:$(oc project -q):default
oc new-app --template=sso73-x509-postgresql-persistent --name=sso -p DB_USERNAME=sso -p SSO_ADMIN_USERNAME=admin -p DB_DATABASE=sso
export SSO_HOSTNAME="$(oc get route sso -o jsonpath='{.spec.host}')"
export REALM=3scale
export CLIENT_ID=3scale-admin
export CLIENT_SECRET=123...456
CHAPTER 3. AUTOMATING API LIFECYCLE WITH 3SCALE TOOLBOX
45

3.2.5. Installing the 3scale toolbox and enabling access
This section describes how to install the toolbox, create your remote 3scale instance, and provision thesecret used to access the Admin Portal.
Procedure
1. Install the 3scale toolbox locally as explained in Chapter 2, Using the 3scale toolbox .
2. Run the appropriate toolbox command to create your 3scale remote instance:
3scale Hosted
3scale On-premises
3. Run the following OpenShift command to provision the secret containing your 3scale AdminPortal and access token:
3.2.6. Deploying the API backends
This section shows how to deploy the example API backends provided with the sample pipelines. Youcan substitute your own API backends as needed when creating and deploying your own pipelines
Procedure
1. Deploy the example Beer Catalog API backend for use with the following samples:
SaaS - API key
Hybrid - open
Hybrid - OIDC
2. Save the Beer Catalog API host name for later use:
3scale remote add 3scale-saas "https://$SAAS_ACCESS_TOKEN@$SAAS_TENANT-admin.3scale.net/"
3scale remote add 3scale-onprem "https://$ONPREM_ACCESS_TOKEN@$ONPREM_ADMIN_PORTAL_HOSTNAME/"
oc create secret generic 3scale-toolbox -n "$TOOLBOX_NAMESPACE" --from-file="$HOME/.3scalerc.yaml"
oc new-app -n "$TOOLBOX_NAMESPACE" -i openshift/redhat-openjdk18-openshift:1.4 https://github.com/microcks/api-lifecycle.git --context-dir=/beer-catalog-demo/api-implementation --name=beer-catalog
oc expose -n "$TOOLBOX_NAMESPACE" svc/beer-catalog
export BEER_CATALOG_HOSTNAME="$(oc get route -n "$TOOLBOX_NAMESPACE" beer-catalog -o jsonpath='{.spec.host}')"
Red Hat 3scale API Management 2.7 Operating 3scale
46

3. Deploy the example Red Hat Event API backend for use with the following samples:
Multi-environment
Semantic versioning
4. Save the Event API host name for later use:
3.2.7. Deploying self-managed APIcast instances
This section is for use with APIcast self-managed instances in 3scale Hosted environments. It applies toall of the sample pipelines except SaaS - API key.
Procedure
1. Define your wildcard routes:
2. Deploy the APIcast self-managed instances in your project:
oc new-app -n "$TOOLBOX_NAMESPACE" -i openshift/nodejs:10 'https://github.com/nmasse-itix/rhte-api.git#085b015' --name=event-api
oc expose -n "$TOOLBOX_NAMESPACE" svc/event-api
export EVENT_API_HOSTNAME="$(oc get route -n "$TOOLBOX_NAMESPACE" event-api -o jsonpath='{.spec.host}')"
export APICAST_SELF_MANAGED_STAGING_WILDCARD_DOMAIN=saas-staging.$OPENSHIFT_ROUTER_SUFFIX
export APICAST_SELF_MANAGED_PRODUCTION_WILDCARD_DOMAIN=saas-production.$OPENSHIFT_ROUTER_SUFFIX
oc create secret generic 3scale-tenant --from-literal=password=https://$SAAS_ACCESS_TOKEN@$SAAS_TENANT-admin.3scale.net
oc create -f https://raw.githubusercontent.com/3scale/apicast/v3.5.0/openshift/apicast-template.yml
oc new-app --template=3scale-gateway --name=apicast-staging -p CONFIGURATION_URL_SECRET=3scale-tenant -p CONFIGURATION_CACHE=0 -p RESPONSE_CODES=true -p LOG_LEVEL=info -p CONFIGURATION_LOADER=lazy -p APICAST_NAME=apicast-staging -p DEPLOYMENT_ENVIRONMENT=sandbox -p IMAGE_NAME=registry.redhat.io/3scale-amp2/apicast-gateway-rhel7:3scale2.7
oc new-app --template=3scale-gateway --name=apicast-production -p CONFIGURATION_URL_SECRET=3scale-tenant -p CONFIGURATION_CACHE=60 -p RESPONSE_CODES=true -p LOG_LEVEL=info -p CONFIGURATION_LOADER=boot -p APICAST_NAME=apicast-production -p DEPLOYMENT_ENVIRONMENT=production -p IMAGE_NAME=registry.redhat.io/3scale-amp2/apicast-gateway-rhel7:3scale2.7
oc scale dc/apicast-staging --replicas=1
oc scale dc/apicast-production --replicas=1
CHAPTER 3. AUTOMATING API LIFECYCLE WITH 3SCALE TOOLBOX
47

3.2.8. Installing and deploying the sample pipelines
After you have set up the required environments, you can install and deploy the sample pipelines usingthe OpenShift templates provided for each of the sample use cases in the Red Hat Integrationrepository. For example, this section shows the SaaS - API Key sample only.
Procedure
1. Use the provided OpenShift template to install the Jenkins pipeline:
2. Deploy the sample as follows:
Additional resource
Sample use cases in the Red Hat Integration repository
3.2.9. Limitations of API lifecycle automation with 3scale toolbox
The following limitations apply in this release:
OpenShift support
The sample pipelines are supported on OpenShift 3.11 only. OpenShift 4 is currently not supported.For more information about supported configurations, see the Red Hat 3scale API ManagementSupported Configurations page.
Updating applications
You can use the 3scale application apply toolbox command for applications to both createand update applications. Create commands support account, plan, service, and applicationkey.
Update commands do not support changes to account, plan, or service. If changes arepassed, the pipelines will be triggered, no errors will be shown, but those fields will not beupdated.
Copying services
When using the 3scale copy service toolbox command to copy a service with custom policies, youmust copy the custom policies first and separately.
oc create route edge apicast-staging --service=apicast-staging --hostname="wildcard.$APICAST_SELF_MANAGED_STAGING_WILDCARD_DOMAIN" --insecure-policy=Allow --wildcard-policy=Subdomain
oc create route edge apicast-production --service=apicast-production --hostname="wildcard.$APICAST_SELF_MANAGED_PRODUCTION_WILDCARD_DOMAIN" --insecure-policy=Allow --wildcard-policy=Subdomain
oc process -f saas-usecase-apikey/setup.yaml \ -p DEVELOPER_ACCOUNT_ID="$SAAS_DEVELOPER_ACCOUNT_ID" \ -p PRIVATE_BASE_URL="http://$BEER_CATALOG_HOSTNAME" \ -p NAMESPACE="$TOOLBOX_NAMESPACE" |oc create -f -
oc start-build saas-usecase-apikey
Red Hat 3scale API Management 2.7 Operating 3scale
48

API as a Product
The 3scale toolbox does not support all API as a Product (APIaaP) features. For more details, see theKnown issues in the 3scale Release Notes .
3.3. CREATING PIPELINES USING THE 3SCALE JENKINS SHAREDLIBRARY
This section provides best practices for creating a custom Jenkins pipeline that uses the 3scale toolbox.It explains how to write a Jenkins pipeline in Groovy that uses the 3scale Jenkins shared library to callthe toolbox based on an example application. For more details, see Jenkins shared libraries.
IMPORTANT
Red Hat supports the Jenkins pipeline samples provided in the Red Hat Integrationrepository.
Any modifications made to these pipelines are not directly supported by Red Hat. Custompipelines that you create for your environment are not supported.
Prerequisites
Section 3.2, “Deploying the sample Jenkins CI/CD pipelines” .
You must have an OpenAPI specification file for your API. For example, you can generate thisusing Apicurio Studio.
Procedure
1. Add the following to the beginning of your Jenkins pipeline to reference the 3scale sharedlibrary from your pipeline:
2. Declare a global variable to hold the ThreescaleService object so that you can use it from thedifferent stages of your pipeline.
3. Create the ThreescaleService with all the relevant information:
#!groovy
library identifier: '3scale-toolbox-jenkins@master', retriever: modernSCM([$class: 'GitSCMSource', remote: 'https://github.com/rh-integration/3scale-toolbox-jenkins.git'])
def service = null
stage("Prepare") { service = toolbox.prepareThreescaleService( openapi: [ filename: "swagger.json" ], environment: [ baseSystemName: "my_service" ], toolbox: [ openshiftProject: "toolbox", destination: "3scale-tenant", secretName: "3scale-toolbox" ], service: [:], applications: [
CHAPTER 3. AUTOMATING API LIFECYCLE WITH 3SCALE TOOLBOX
49
openapi.filename is the path to the file containing the OpenAPI specification.
environment.baseSystemName is used to compute the final system_name, based on environment.environmentName and the API major version from the OpenAPIspecification info.version.
toolbox.openshiftProject is the OpenShift project in which Kubernetes jobs will be created.
toolbox.secretName is the name of the Kubernetes secret containing the 3scale toolboxconfiguration file, as shown in Section 3.2.5, “Installing the 3scale toolbox and enablingaccess”.
toolbox.destination is the name of the 3scale toolbox remote instance.
applicationPlans is a list of application plans to create by using a .yaml file or by providingapplication plan property details.
4. Add a pipeline stage to provision the service in 3scale:
5. Add a stage to create the application plans:
6. Add a global variable and a stage to create the test application:
7. Add a stage to run your integration tests. When using APIcast Hosted instances, you must fetchthe proxy definition to extract the staging public URL:
[ name: "my-test-app", description: "This is used for tests", plan: "test", account: "<CHANGE_ME>" ] ], applicationPlans: [ [ systemName: "test", name: "Test", defaultPlan: true, published: true ], [ systemName: "silver", name: "Silver" ], [ artefactFile: "https://raw.githubusercontent.com/my_username/API-Lifecycle-Mockup/master/testcase-01/plan.yaml"], ] )
echo "toolbox version = " + service.toolbox.getToolboxVersion() }
stage("Import OpenAPI") { service.importOpenAPI() echo "Service with system_name ${service.environment.targetSystemName} created !"}
stage("Create an Application Plan") { service.applyApplicationPlans()}
stage("Create an Application") { service.applyApplication()}
stage("Run integration tests") { def proxy = service.readProxy("sandbox")
Red Hat 3scale API Management 2.7 Operating 3scale
50

8. Add a stage to promote your API to production:
Additional resources
Section 3.4, “Creating pipelines using a Jenkinsfile”
Chapter 2, Using the 3scale toolbox
3.4. CREATING PIPELINES USING A JENKINSFILE
This section provides best practices for writing a custom Jenkinsfile from scratch in Groovy that usesthe 3scale toolbox.
IMPORTANT
Red Hat supports the Jenkins pipeline samples provided in the Red Hat Integrationrepository.
Any modifications made to these pipelines are not directly supported by Red Hat. Custompipelines that you create for your environment are not supported. This section is providedfor reference only.
Prerequisites
Section 3.2, “Deploying the sample Jenkins CI/CD pipelines” .
You must have an OpenAPI specification file for your API. For example, you can generate thisusing Apicurio Studio.
Procedure
1. Write a utility function to call the 3scale toolbox. The following creates a Kubernetes job thatruns the 3scale toolbox:
sh """set -e +x curl -f -w "ListBeers: %{http_code}\n" -o /dev/null -s ${proxy.sandbox_endpoint}/api/beer -H 'api-key: ${service.applications[0].userkey}' curl -f -w "GetBeer: %{http_code}\n" -o /dev/null -s ${proxy.sandbox_endpoint}/api/beer/Weissbier -H 'api-key: ${service.applications[0].userkey}' curl -f -w "FindBeersByStatus: %{http_code}\n" -o /dev/null -s ${proxy.sandbox_endpoint}/api/beer/findByStatus/ available -H 'api-key: ${service.applications[0].userkey}' """}
stage("Promote to production") { service.promoteToProduction()}
#!groovy
def runToolbox(args) { def kubernetesJob = [ "apiVersion": "batch/v1",
CHAPTER 3. AUTOMATING API LIFECYCLE WITH 3SCALE TOOLBOX
51

Kubernetes object template
This function uses a Kubernetes object template to run the 3scale toolbox, which you can adjustto your needs. It sets the 3scale toolbox CLI arguments and writes the resulting Kubernetes jobdefinition to a YAML file, cleans up any previous run of the toolbox, creates the Kubernetes job,
"kind": "Job", "metadata": [ "name": "toolbox" ], "spec": [ "backoffLimit": 0, "activeDeadlineSeconds": 300, "template": [ "spec": [ "restartPolicy": "Never", "containers": [ [ "name": "job", "image": "registry.redhat.io/3scale-amp2/toolbox-rhel7:3scale2.7", "imagePullPolicy": "Always", "args": [ "3scale", "version" ], "env": [ [ "name": "HOME", "value": "/config" ] ], "volumeMounts": [ [ "mountPath": "/config", "name": "toolbox-config" ], [ "mountPath": "/artifacts", "name": "artifacts" ] ] ] ], "volumes": [ [ "name": "toolbox-config", "secret": [ "secretName": "3scale-toolbox" ] ], [ "name": "artifacts", "configMap": [ "name": "openapi" ] ] ] ] ] ] ]
kubernetesJob.spec.template.spec.containers[0].args = args
sh "rm -f -- job.yaml" writeYaml file: "job.yaml", data: kubernetesJob
sh """set -e oc delete job toolbox --ignore-not-found sleep 2 oc create -f job.yaml sleep 20 # Adjust the sleep duration to your server velocity """
def logs = sh(script: "set -e; oc logs -f job/toolbox", returnStdout: true) echo logs return logs}
Red Hat 3scale API Management 2.7 Operating 3scale
52
and waits:
You can adjust the wait duration to your server velocity to match the time that a pod needsto transition between the Created and the Running state. You can refine this step using apolling loop.
The OpenAPI specification file is fetched from a ConfigMap named openapi.
The 3scale Admin Portal hostname and access token are fetched from a secret named 3scale-toolbox, as shown in Section 3.2.5, “Installing the 3scale toolbox and enablingaccess”.
The ConfigMap will be created by the pipeline in step 3. However, the secret was alreadyprovisioned outside the pipeline and is subject to Role-Based Access Control (RBAC) forenhanced security.
2. Define the global environment variables to use with 3scale toolbox in your Jenkins pipelinestages. For example:
3scale Hosted
3scale On-premises
When using self-managed APIcast or an on-premises installation of 3scale, you must declaretwo more variables:
The variables are described as follows:
targetSystemName: The name of the service to be created.
targetInstance: This matches the name of the 3scale remote instance created inSection 3.2.5, “Installing the 3scale toolbox and enabling access” .
privateBaseURL: The endpoint host of your API backend.
testUserKey: The user API key used to run the integration tests. It can be hardcoded asshown or generated from an HMAC function.
developerAccountId: The ID of the target account in which the test application will becreated.
publicStagingBaseURL: The public staging base URL of the service to be created.
publicProductionBaseURL: The public production base URL of the service to be created.
3. Add a pipeline stage to fetch the OpenAPI specification file and provision it as a ConfigMap onOpenShift as follows:
def targetSystemName = "saas-apikey-usecase"def targetInstance = "3scale-saas"def privateBaseURL = "http://echo-api.3scale.net"def testUserKey = "abcdef1234567890"def developerAccountId = "john"
def publicStagingBaseURL = "http://my-staging-api.example.test"def publicProductionBaseURL = "http://my-production-api.example.test"
CHAPTER 3. AUTOMATING API LIFECYCLE WITH 3SCALE TOOLBOX
53

4. Add a pipeline stage that uses the 3scale toolbox to import the API into 3scale:
3scale Hosted
3scale On-premises
When using self-managed APIcast or an on-premises installation of 3scale, you must alsospecify the options for the public staging and production base URLs:
5. Add pipeline stages that use the toolbox to create a 3scale application plan and an application:
node() { stage("Fetch OpenAPI") { sh """set -e curl -sfk -o swagger.json https://raw.githubusercontent.com/microcks/api-lifecycle/master/beer-catalog-demo/api-contracts/beer-catalog-api-swagger.json oc delete configmap openapi --ignore-not-found oc create configmap openapi --from-file="swagger.json" """ }
stage("Import OpenAPI") { runToolbox([ "3scale", "import", "openapi", "-d", targetInstance, "/artifacts/swagger.json", "--override-private-base-url=${privateBaseURL}", "-t", targetSystemName ])}
stage("Import OpenAPI") { runToolbox([ "3scale", "import", "openapi", "-d", targetInstance, "/artifacts/swagger.json", "--override-private-base-url=${privateBaseURL}", "-t", targetSystemName, "--production-public-base-url=${publicProductionBaseURL}", "--staging-public-base-url=${publicStagingBaseURL}" ])}
stage("Create an Application Plan") { runToolbox([ "3scale", "application-plan", "apply", targetInstance, targetSystemName, "test", "-n", "Test Plan", "--default" ])}
stage("Create an Application") { runToolbox([ "3scale", "application", "apply", targetInstance, testUserKey, "--account=${developerAccountId}", "--name=Test Application", "--description=Created by Jenkins", "--plan=test", "--service=${targetSystemName}" ])}
stage("Run integration tests") { def proxyDefinition = runToolbox([ "3scale", "proxy", "show", targetInstance, targetSystemName, "sandbox" ]) def proxy = readJSON text: proxyDefinition proxy = proxy.content.proxy
sh """set -e echo "Public Staging Base URL is ${proxy.sandbox_endpoint}" echo "userkey is ${testUserKey}" curl -vfk ${proxy.sandbox_endpoint}/beer -H 'api-key: ${testUserKey}'
Red Hat 3scale API Management 2.7 Operating 3scale
54
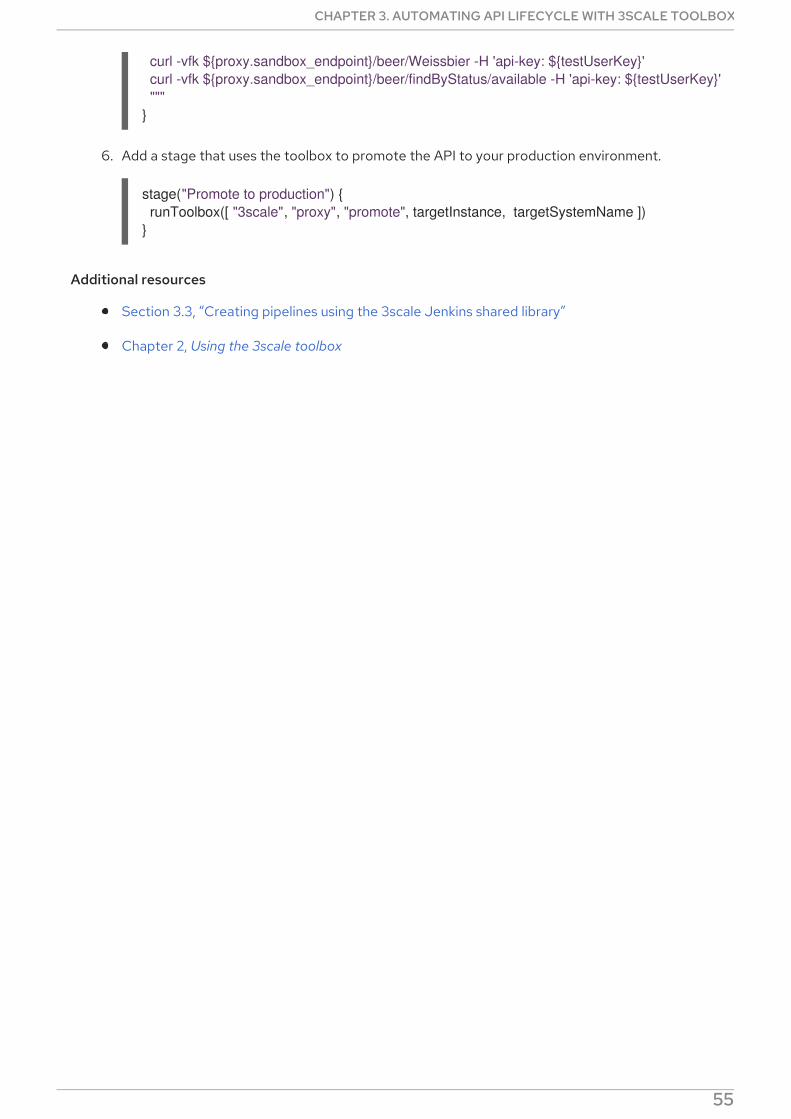
6. Add a stage that uses the toolbox to promote the API to your production environment.
Additional resources
Section 3.3, “Creating pipelines using the 3scale Jenkins shared library”
Chapter 2, Using the 3scale toolbox
curl -vfk ${proxy.sandbox_endpoint}/beer/Weissbier -H 'api-key: ${testUserKey}' curl -vfk ${proxy.sandbox_endpoint}/beer/findByStatus/available -H 'api-key: ${testUserKey}' """}
stage("Promote to production") { runToolbox([ "3scale", "proxy", "promote", targetInstance, targetSystemName ])}
CHAPTER 3. AUTOMATING API LIFECYCLE WITH 3SCALE TOOLBOX
55
CHAPTER 4. CAPABILITIES: PROVISIONING 3SCALESERVICES AND CONFIGURATIONS VIA THE OPERATOR
This document contains information about 3scale operator for Capabilities, which involves provisioning3scale services and configurations via the 3scale operator through the OpenShift Container Platformuser interface.
IMPORTANT
3scale operator for Capabilities is a Technology Preview feature only. TechnologyPreview features are not supported with Red Hat production service level agreements(SLAs) and might not be functionally complete. Red Hat does not recommend usingthem in production. These features provide early access to upcoming product features,enabling customers to test functionality and provide feedback during the developmentprocess. For more information about the support scope of Red Hat Technology Previewfeatures, see Technology Preview Features Support Scope .
4.1. PREREQUISITES
A 3scale 2.7 On-Premises instance
You must have the 3scale operator installed.
OpenShift Container Platform 4.x
A user account with administrator privileges in the OpenShift cluster.
Note: OCP 4 supports deployment of 3scale using the operator only.
For more information about supported configurations, see the Red Hat 3scale APIManagement Supported Configurations page.
WARNING
When using the 3scale operator to update API configurations in 3scale, the customresource definitions (CRDs) are the source of truth. If changes are made in theAdmin user interface, they will not persist and eventually be overridden by thedefinition in the CRD.
4.2. DEPLOYING CAPABILITIES-RELATED CUSTOM RESOURCES
Using Openshift Container Platform in your newly created tenant, you will configure APIs, metrics andmapping rules.
4.2.1. Creating an API
The following procedure creates an API with the label api: api01.
Procedure
Red Hat 3scale API Management 2.7 Operating 3scale
56
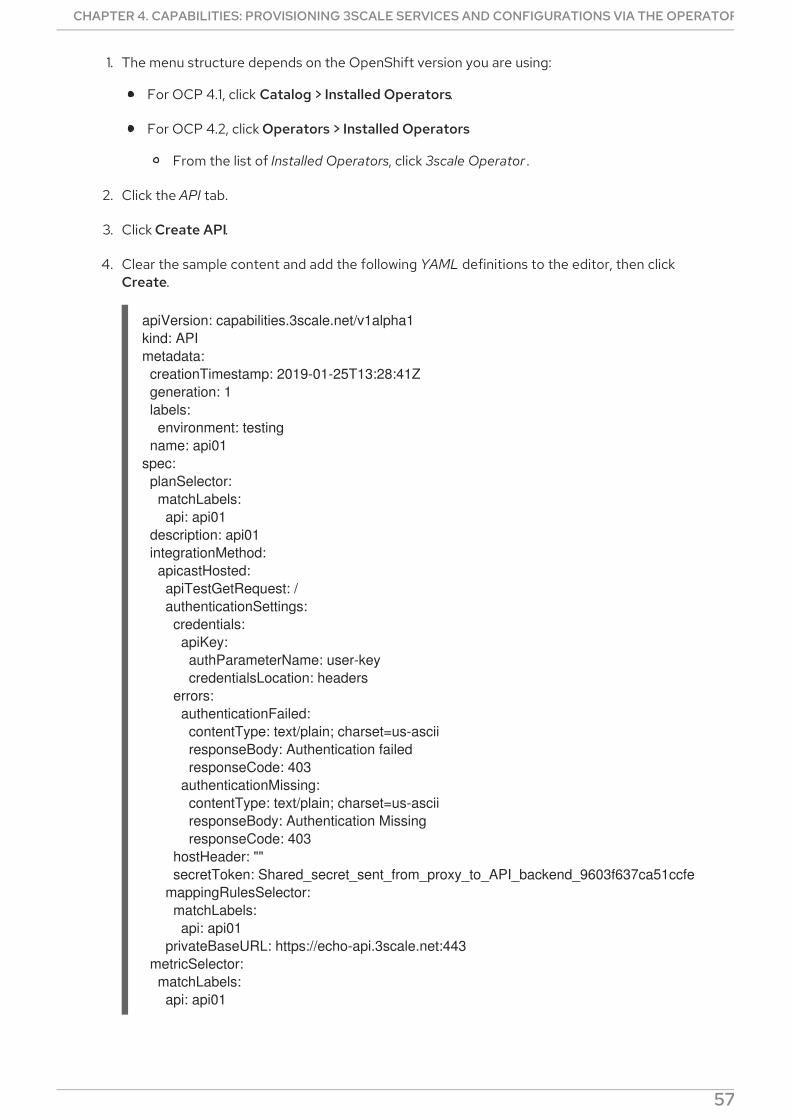
1. The menu structure depends on the OpenShift version you are using:
For OCP 4.1, click Catalog > Installed Operators.
For OCP 4.2, click Operators > Installed Operators
From the list of Installed Operators, click 3scale Operator .
2. Click the API tab.
3. Click Create API.
4. Clear the sample content and add the following YAML definitions to the editor, then clickCreate.
apiVersion: capabilities.3scale.net/v1alpha1kind: APImetadata: creationTimestamp: 2019-01-25T13:28:41Z generation: 1 labels: environment: testing name: api01spec: planSelector: matchLabels: api: api01 description: api01 integrationMethod: apicastHosted: apiTestGetRequest: / authenticationSettings: credentials: apiKey: authParameterName: user-key credentialsLocation: headers errors: authenticationFailed: contentType: text/plain; charset=us-ascii responseBody: Authentication failed responseCode: 403 authenticationMissing: contentType: text/plain; charset=us-ascii responseBody: Authentication Missing responseCode: 403 hostHeader: "" secretToken: Shared_secret_sent_from_proxy_to_API_backend_9603f637ca51ccfe mappingRulesSelector: matchLabels: api: api01 privateBaseURL: https://echo-api.3scale.net:443 metricSelector: matchLabels: api: api01
NOTE
CHAPTER 4. CAPABILITIES: PROVISIONING 3SCALE SERVICES AND CONFIGURATIONS VIA THE OPERATOR
57

NOTE
All the selectors, (metric, plan, mappingrules) use a specific label api: api01. Youcan change this by adding more labels and configuring the selectors to covercomplex scenarios.
4.2.2. Adding a plan
The following procedure adds a plan with the label api: api01.
Procedure
1. The menu structure depends on the OpenShift version you are using:
For OCP 4.1, click Catalog > Installed Operators.
For OCP 4.2, click Operators > Installed Operators
From the list of Installed Operators, click 3scale Operator .
2. Click the Plan tab.
3. Click Create Plan.
4. Clear the sample content and add the following YAML definitions to the editor, then clickCreate.
apiVersion: capabilities.3scale.net/v1alpha1kind: Planmetadata: labels: api: api01 name: plan01spec: approvalRequired: false default: true costs: costMonth: 0 setupFee: 0 limitSelector: matchLabels: api: api01 trialPeriod: 0
4.2.3. Adding a metric
The following procedure adds a metric called metric01.
Procedure
1. The menu structure depends on the OpenShift version you are using:
For OCP 4.1, click Catalog > Installed Operators.
For OCP 4.2, click Operators > Installed Operators
Red Hat 3scale API Management 2.7 Operating 3scale
58

From the list of Installed Operators, click 3scale Operator .
2. Click the Metric tab.
3. Click Create Metric.
4. Clear the sample content and add the following YAML definitions to the editor, then clickCreate.
apiVersion: capabilities.3scale.net/v1alpha1kind: Metricmetadata: labels: api: api01 name: metric01spec: description: metric01 unit: hit incrementHits: false
4.2.4. Setting a limit
The following procedure sets a limit with a limit of 10 hits per day for the metric.
Procedure
1. The menu structure depends on the OpenShift version you are using:
For OCP 4.1, click Catalog > Installed Operators.
For OCP 4.2, click Operators > Installed Operators
From the list of Installed Operators, click 3scale Operator .
2. Click the Limit tab.
3. Click Create Limit.
4. Clear the sample content and add the following YAML definitions to the editor, then clickCreate.
apiVersion: capabilities.3scale.net/v1alpha1kind: Limitmetadata: labels: api: api01 name: plan01-metric01-day-10spec: description: Limit for metric01 in plan01 maxValue: 10 metricRef: name: metric01 period: day
4.2.5. Adding a Mapping Rule
CHAPTER 4. CAPABILITIES: PROVISIONING 3SCALE SERVICES AND CONFIGURATIONS VIA THE OPERATOR
59
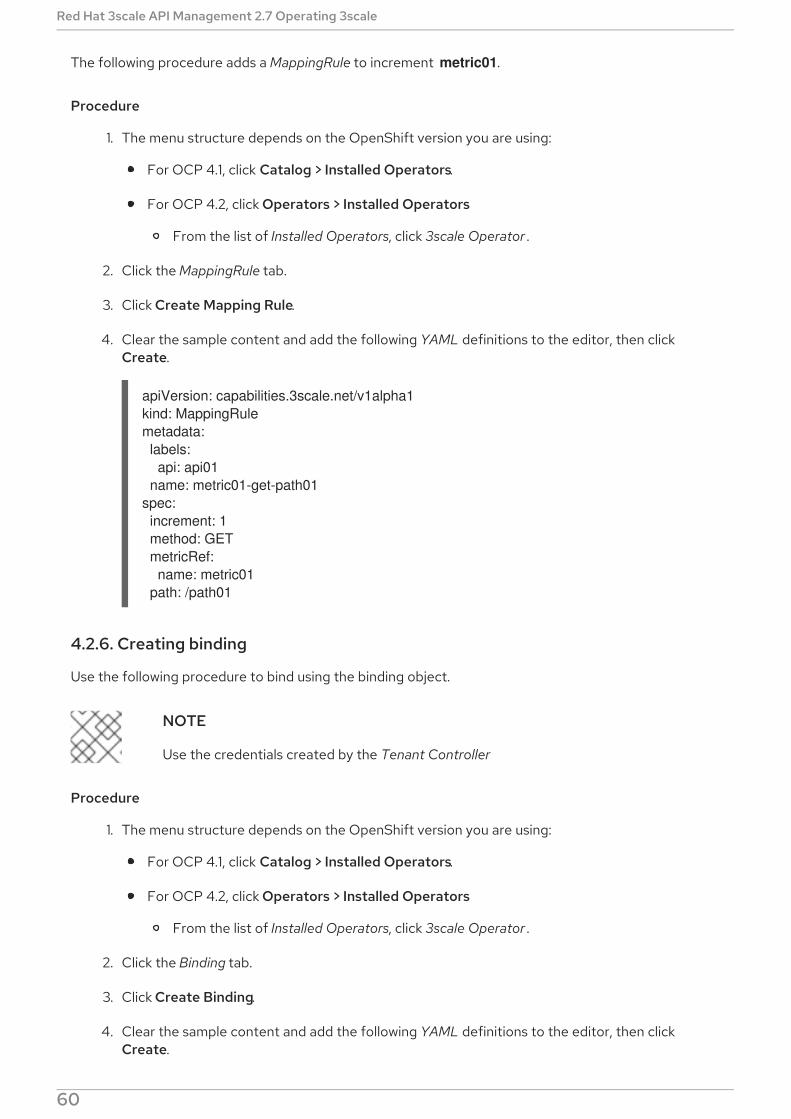
The following procedure adds a MappingRule to increment metric01.
Procedure
1. The menu structure depends on the OpenShift version you are using:
For OCP 4.1, click Catalog > Installed Operators.
For OCP 4.2, click Operators > Installed Operators
From the list of Installed Operators, click 3scale Operator .
2. Click the MappingRule tab.
3. Click Create Mapping Rule.
4. Clear the sample content and add the following YAML definitions to the editor, then clickCreate.
apiVersion: capabilities.3scale.net/v1alpha1kind: MappingRulemetadata: labels: api: api01 name: metric01-get-path01spec: increment: 1 method: GET metricRef: name: metric01 path: /path01
4.2.6. Creating binding
Use the following procedure to bind using the binding object.
NOTE
Use the credentials created by the Tenant Controller
Procedure
1. The menu structure depends on the OpenShift version you are using:
For OCP 4.1, click Catalog > Installed Operators.
For OCP 4.2, click Operators > Installed Operators
From the list of Installed Operators, click 3scale Operator .
2. Click the Binding tab.
3. Click Create Binding.
4. Clear the sample content and add the following YAML definitions to the editor, then clickCreate.
Red Hat 3scale API Management 2.7 Operating 3scale
60
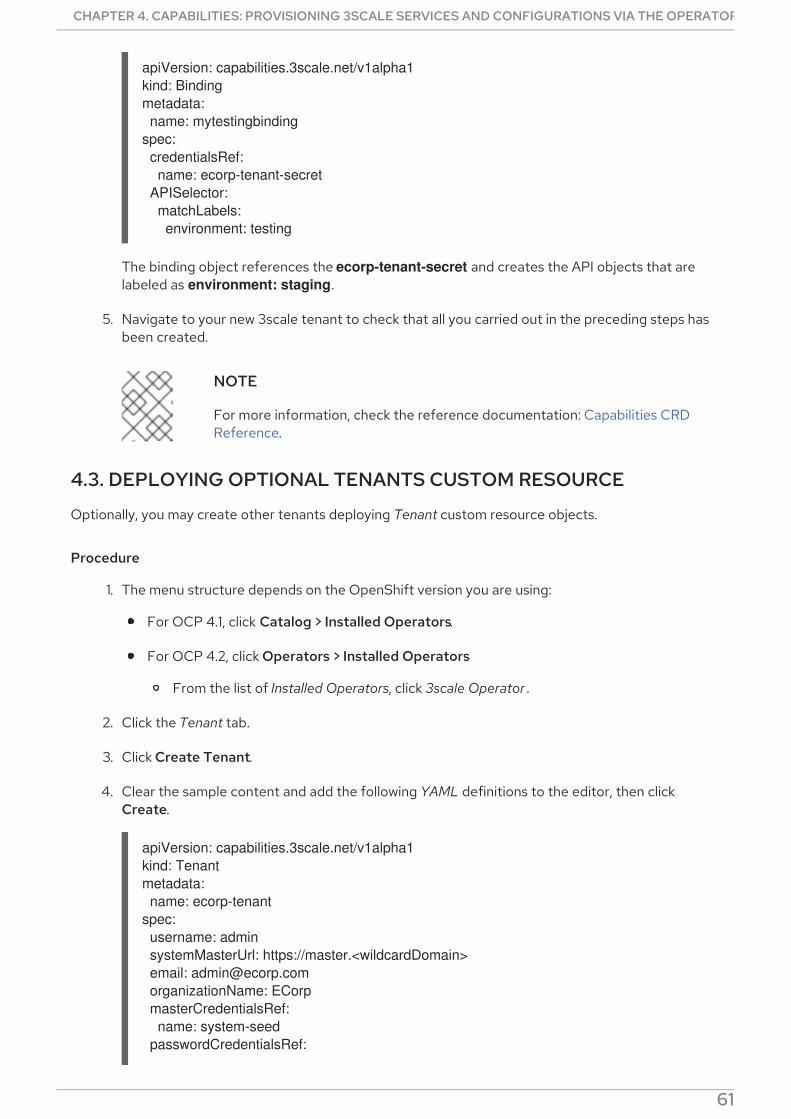
apiVersion: capabilities.3scale.net/v1alpha1kind: Bindingmetadata: name: mytestingbindingspec: credentialsRef: name: ecorp-tenant-secret APISelector: matchLabels: environment: testing
The binding object references the ecorp-tenant-secret and creates the API objects that arelabeled as environment: staging.
5. Navigate to your new 3scale tenant to check that all you carried out in the preceding steps hasbeen created.
NOTE
For more information, check the reference documentation: Capabilities CRDReference.
4.3. DEPLOYING OPTIONAL TENANTS CUSTOM RESOURCE
Optionally, you may create other tenants deploying Tenant custom resource objects.
Procedure
1. The menu structure depends on the OpenShift version you are using:
For OCP 4.1, click Catalog > Installed Operators.
For OCP 4.2, click Operators > Installed Operators
From the list of Installed Operators, click 3scale Operator .
2. Click the Tenant tab.
3. Click Create Tenant.
4. Clear the sample content and add the following YAML definitions to the editor, then clickCreate.
apiVersion: capabilities.3scale.net/v1alpha1kind: Tenantmetadata: name: ecorp-tenantspec: username: admin systemMasterUrl: https://master.<wildcardDomain> email: [email protected] organizationName: ECorp masterCredentialsRef: name: system-seed passwordCredentialsRef:
CHAPTER 4. CAPABILITIES: PROVISIONING 3SCALE SERVICES AND CONFIGURATIONS VIA THE OPERATOR
61
name: ecorp-admin-secret tenantSecretRef: name: ecorp-tenant-secret namespace: operator-test
Tenant provider_key and admin domain URL will be stored in a secret. You can specify the secretlocation by using tenantSecretRef tenant spec key.
NOTE
For more information about the Tenant Custom Resource fields and possiblevalues, refer to the Tenant CRD Reference documentation.
4.4. DELETING CREATED CUSTOM RESOURCES
The following procedure details how to delete the custom resources.
Procedure
1. The menu structure depends on the OpenShift version you are using:
For OCP 4.1, click Catalog > Installed Operators.
For OCP 4.2, click Operators > Installed Operators
From the list of Installed Operators, click 3scale Operator .
2. Click the tab for the resource you wish to delete.
a. You will see the resource listed if one has previously been created.
3. Click the name to see the overview.
4. Click Action > Delete.
5. Confirm the deletion by clicking Delete or Cancel to return to the previous screen.
Alternatively, to delete the 3scale operator, its associated roles and service accounts, do the following.
Procedure
1. The menu structure depends on the OpenShift version you are using:
For OCP 4.1, click Catalog > Installed Operators.
For OCP 4.2, click Operators > Installed Operators
From the list of Installed Operators, click 3scale Operator .
2. Click Action > Delete Cluster Service Version.
3. Confirm the deletion by clicking Delete or Cancel to return to the previous screen.
Red Hat 3scale API Management 2.7 Operating 3scale
62
CHAPTER 5. 3SCALE BACKUP AND RESTOREThis section provides you, as the administrator of a Red Hat 3scale API Management installation, theinformation needed to:
Set up the backup procedures for persistent data
Perform a restore from backup of the persistent data
In case of a failure with one or more of the MySQL databases, you will be able to restore 3scale correctlyto its previous operational state.
5.1. PREREQUISITES
A 3scale 2.7 instance. For more information about how to install 3scale, see Installing 3scale onOpenShift.
An OpenShift Container Platform 4 user account with one of the following roles in theOpenShift cluster:
cluster-admin
admin
edit
For more information about supported configurations, see the Red Hat 3scale API ManagementSupported Configurations page.
NOTE
A user with an edit cluster role locally binded in the namespace of a 3scale installation canperform backup and restore procedures.
5.2. PERSISTENT VOLUMES
In a 3scale deployment on OpenShift, all persistent data is stored either in a storage service in thecluster (not currently used), a persistent volume (PV) provided to the cluster by the underlyinginfrastructure, or a storage service external to the cluster, either in the same data center or elsewhere.
5.3. CONSIDERATIONS
The backup and restore procedures for persistent data vary depending on the storage used, to ensurethe backups and restores preserve data consistency, for example, that a partial write, or a partialtransaction is not captured. That is, it is not sufficient to backup the underlying PV for a database, butinstead the databases backup mechanisms should be used.
Also, some parts of the data are synchronized between different components. One copy is consideredthe source of truth for the data set, and the other is a copy that is not modified locally, but synchronizedfrom the source of truth. In these cases, upon restore, the source of truth should be restored and thenthe copies in other components synchronized from it.
5.4. USING DATA SETS
CHAPTER 5. 3SCALE BACKUP AND RESTORE
63
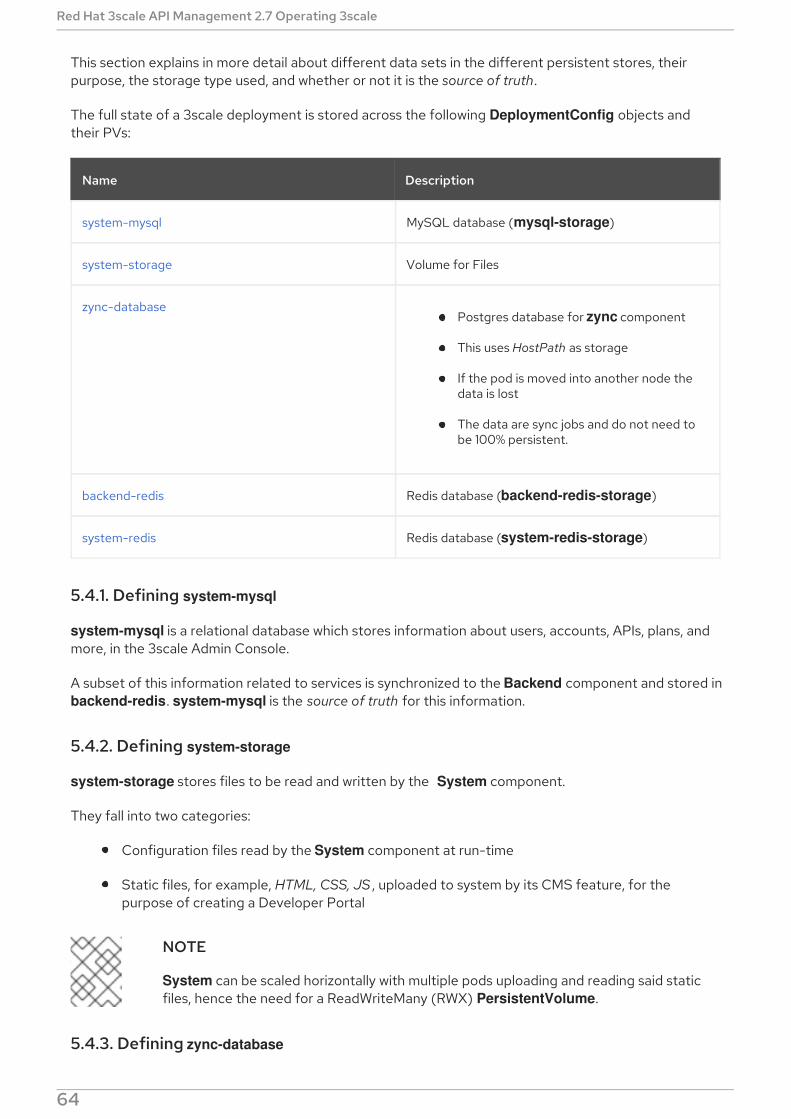
This section explains in more detail about different data sets in the different persistent stores, theirpurpose, the storage type used, and whether or not it is the source of truth.
The full state of a 3scale deployment is stored across the following DeploymentConfig objects andtheir PVs:
Name Description
system-mysql MySQL database (mysql-storage)
system-storage Volume for Files
zync-databasePostgres database for zync component
This uses HostPath as storage
If the pod is moved into another node thedata is lost
The data are sync jobs and do not need tobe 100% persistent.
backend-redis Redis database (backend-redis-storage)
system-redis Redis database (system-redis-storage)
5.4.1. Defining system-mysql
system-mysql is a relational database which stores information about users, accounts, APIs, plans, andmore, in the 3scale Admin Console.
A subset of this information related to services is synchronized to the Backend component and stored inbackend-redis. system-mysql is the source of truth for this information.
5.4.2. Defining system-storage
system-storage stores files to be read and written by the System component.
They fall into two categories:
Configuration files read by the System component at run-time
Static files, for example, HTML, CSS, JS , uploaded to system by its CMS feature, for thepurpose of creating a Developer Portal
NOTE
System can be scaled horizontally with multiple pods uploading and reading said staticfiles, hence the need for a ReadWriteMany (RWX) PersistentVolume.
5.4.3. Defining zync-database
Red Hat 3scale API Management 2.7 Operating 3scale
64

A zync-database is a relational database which stores information related to the synchronization ofidentities between 3scale and an Identity provider (IdP). This information is not duplicated in othercomponents and is the sole source of truth.
5.4.4. Defining backend-redis
backend-redis contains multiple data sets used by the Backend component:
Usages: This is API usage information aggregated by Backend. It is used by Backend for rate-limiting decisions and by System to display analytics information in the UI or via API.
Config: This is configuration information about services, rate-limits, and more, that issynchronized from System via an internal API. This is not the source of truth of this information,however System and system-mysql is.
AuthKeys: Storage of OAuth keys created directly in Backend. This is the source of truth forthis information.
Queues: This is queues of background jobs to be executed by worker processes. These areephemeral and are deleted once processed.
5.4.5. Defining system-redis
system-redis contains queues for jobs to be processed in background. These are ephemeral and aredeleted once processed.
5.5. BACKUP PROCEDURES
The following commands are used to back up and archive system databases.
5.5.1. Backing up system-mysql
Execute MySQL Backup Command:
oc rsh $(oc get pods -l 'deploymentConfig=system-mysql' -o json | jq -r '.items[0].metadata.name') bash -c 'export MYSQL_PWD=${MYSQL_ROOT_PASSWORD}; mysqldump --single-transaction -hsystem-mysql -uroot system' | gzip > system-mysql-backup.gz
5.5.2. Backing up system-storage
Archive the system-storage files to another storage:
oc rsync $(oc get pods -l 'deploymentConfig=system-app' -o json | jq '.items[0].metadata.name' -r):/opt/system/public/system ./local/dir
5.5.3. Backing up zync-database
Instructions to create a backup of zync-database depend on the type of deployment you haveconfigured for 3scale.
Template-based deployments
CHAPTER 5. 3SCALE BACKUP AND RESTORE
65
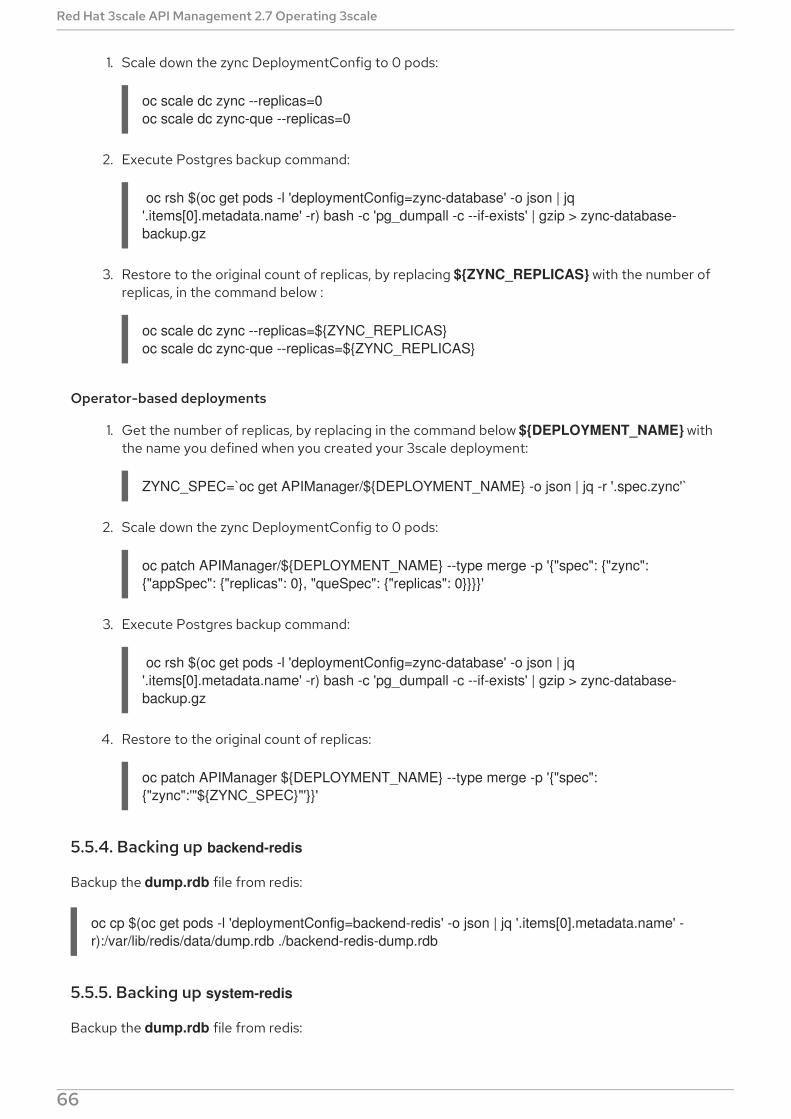
1. Scale down the zync DeploymentConfig to 0 pods:
oc scale dc zync --replicas=0oc scale dc zync-que --replicas=0
2. Execute Postgres backup command:
oc rsh $(oc get pods -l 'deploymentConfig=zync-database' -o json | jq '.items[0].metadata.name' -r) bash -c 'pg_dumpall -c --if-exists' | gzip > zync-database-backup.gz
3. Restore to the original count of replicas, by replacing ${ZYNC_REPLICAS} with the number ofreplicas, in the command below :
oc scale dc zync --replicas=${ZYNC_REPLICAS}oc scale dc zync-que --replicas=${ZYNC_REPLICAS}
Operator-based deployments
1. Get the number of replicas, by replacing in the command below ${DEPLOYMENT_NAME} withthe name you defined when you created your 3scale deployment:
ZYNC_SPEC=`oc get APIManager/${DEPLOYMENT_NAME} -o json | jq -r '.spec.zync'`
2. Scale down the zync DeploymentConfig to 0 pods:
oc patch APIManager/${DEPLOYMENT_NAME} --type merge -p '{"spec": {"zync": {"appSpec": {"replicas": 0}, "queSpec": {"replicas": 0}}}}'
3. Execute Postgres backup command:
oc rsh $(oc get pods -l 'deploymentConfig=zync-database' -o json | jq '.items[0].metadata.name' -r) bash -c 'pg_dumpall -c --if-exists' | gzip > zync-database-backup.gz
4. Restore to the original count of replicas:
oc patch APIManager ${DEPLOYMENT_NAME} --type merge -p '{"spec": {"zync":'"${ZYNC_SPEC}"'}}'
5.5.4. Backing up backend-redis
Backup the dump.rdb file from redis:
oc cp $(oc get pods -l 'deploymentConfig=backend-redis' -o json | jq '.items[0].metadata.name' -r):/var/lib/redis/data/dump.rdb ./backend-redis-dump.rdb
5.5.5. Backing up system-redis
Backup the dump.rdb file from redis:
Red Hat 3scale API Management 2.7 Operating 3scale
66

oc cp $(oc get pods -l 'deploymentConfig=system-redis' -o json | jq '.items[0].metadata.name' -r):/var/lib/redis/data/dump.rdb ./system-redis-dump.rdb
5.5.6. Backing up OpenShift secrets and ConfigMaps
The following is the list of commands for OpenShift secrets and ConfigMaps:
5.5.6.1. OpenShift secrets
oc get secrets system-seed -o json --export > system-seed.jsonoc get secrets system-database -o json --export > system-database.jsonoc get secrets backend-internal-api -o json --export > backend-internal-api.jsonoc get secrets system-events-hook -o json --export > system-events-hook.jsonoc get secrets system-app -o json --export > system-app.jsonoc get secrets system-recaptcha -o json --export > system-recaptcha.jsonoc get secrets system-redis -o json --export > system-redis.jsonoc get secrets zync -o json --export > zync.jsonoc get secrets system-master-apicast -o json --export > system-master-apicast.json
5.5.6.2. ConfigMaps
oc get configmaps system-environment -o json --export > system-environment.jsonoc get configmaps apicast-environment -o json --export > apicast-environment.jsonoc get configmaps smtp -o json --export > smtp.json
5.6. PROCEDURES TO RESTORE DATABASES
You can use the following commands to restore system databases after a system failure has occurred.
5.6.1. Restoring a template-based deployment
Use the following steps to restore a template-based deployment.
Procedure
1. Restore ConfigMaps before creating deploying template:
oc apply -f smtp.json
2. Template parameters will be read from copied secrets and configmaps:
oc new-app --file /opt/amp/templates/amp.yml \ --param APP_LABEL=$(cat system-environment.json | jq -r '.metadata.labels.app') \ --param TENANT_NAME=$(cat system-seed.json | jq -r '.data.TENANT_NAME' | base64 -d) \ --param SYSTEM_DATABASE_USER=$(cat system-database.json | jq -r '.data.DB_USER' | base64 -d) \ --param SYSTEM_DATABASE_PASSWORD=$(cat system-database.json | jq -r '.data.DB_PASSWORD' | base64 -d) \ --param SYSTEM_DATABASE=$(cat system-database.json | jq -r '.data.URL' | base64 -d | cut -d '/' -f4) \
CHAPTER 5. 3SCALE BACKUP AND RESTORE
67
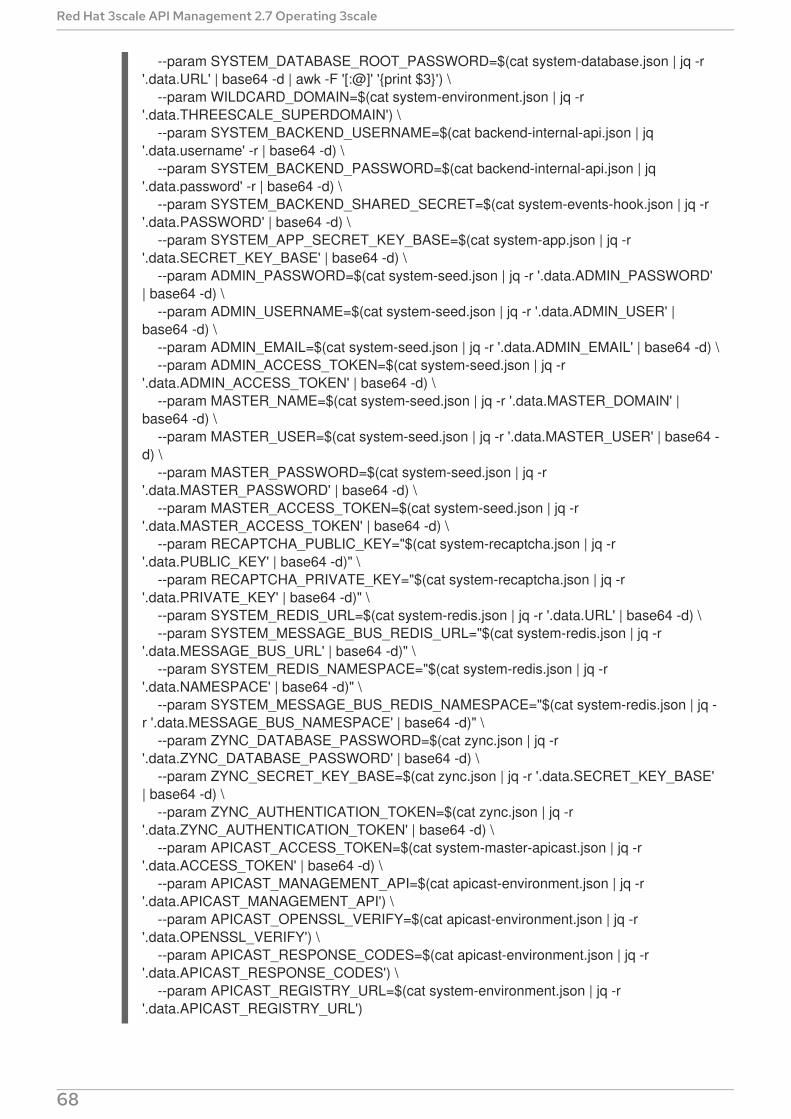
--param SYSTEM_DATABASE_ROOT_PASSWORD=$(cat system-database.json | jq -r '.data.URL' | base64 -d | awk -F '[:@]' '{print $3}') \ --param WILDCARD_DOMAIN=$(cat system-environment.json | jq -r '.data.THREESCALE_SUPERDOMAIN') \ --param SYSTEM_BACKEND_USERNAME=$(cat backend-internal-api.json | jq '.data.username' -r | base64 -d) \ --param SYSTEM_BACKEND_PASSWORD=$(cat backend-internal-api.json | jq '.data.password' -r | base64 -d) \ --param SYSTEM_BACKEND_SHARED_SECRET=$(cat system-events-hook.json | jq -r '.data.PASSWORD' | base64 -d) \ --param SYSTEM_APP_SECRET_KEY_BASE=$(cat system-app.json | jq -r '.data.SECRET_KEY_BASE' | base64 -d) \ --param ADMIN_PASSWORD=$(cat system-seed.json | jq -r '.data.ADMIN_PASSWORD' | base64 -d) \ --param ADMIN_USERNAME=$(cat system-seed.json | jq -r '.data.ADMIN_USER' | base64 -d) \ --param ADMIN_EMAIL=$(cat system-seed.json | jq -r '.data.ADMIN_EMAIL' | base64 -d) \ --param ADMIN_ACCESS_TOKEN=$(cat system-seed.json | jq -r '.data.ADMIN_ACCESS_TOKEN' | base64 -d) \ --param MASTER_NAME=$(cat system-seed.json | jq -r '.data.MASTER_DOMAIN' | base64 -d) \ --param MASTER_USER=$(cat system-seed.json | jq -r '.data.MASTER_USER' | base64 -d) \ --param MASTER_PASSWORD=$(cat system-seed.json | jq -r '.data.MASTER_PASSWORD' | base64 -d) \ --param MASTER_ACCESS_TOKEN=$(cat system-seed.json | jq -r '.data.MASTER_ACCESS_TOKEN' | base64 -d) \ --param RECAPTCHA_PUBLIC_KEY="$(cat system-recaptcha.json | jq -r '.data.PUBLIC_KEY' | base64 -d)" \ --param RECAPTCHA_PRIVATE_KEY="$(cat system-recaptcha.json | jq -r '.data.PRIVATE_KEY' | base64 -d)" \ --param SYSTEM_REDIS_URL=$(cat system-redis.json | jq -r '.data.URL' | base64 -d) \ --param SYSTEM_MESSAGE_BUS_REDIS_URL="$(cat system-redis.json | jq -r '.data.MESSAGE_BUS_URL' | base64 -d)" \ --param SYSTEM_REDIS_NAMESPACE="$(cat system-redis.json | jq -r '.data.NAMESPACE' | base64 -d)" \ --param SYSTEM_MESSAGE_BUS_REDIS_NAMESPACE="$(cat system-redis.json | jq -r '.data.MESSAGE_BUS_NAMESPACE' | base64 -d)" \ --param ZYNC_DATABASE_PASSWORD=$(cat zync.json | jq -r '.data.ZYNC_DATABASE_PASSWORD' | base64 -d) \ --param ZYNC_SECRET_KEY_BASE=$(cat zync.json | jq -r '.data.SECRET_KEY_BASE' | base64 -d) \ --param ZYNC_AUTHENTICATION_TOKEN=$(cat zync.json | jq -r '.data.ZYNC_AUTHENTICATION_TOKEN' | base64 -d) \ --param APICAST_ACCESS_TOKEN=$(cat system-master-apicast.json | jq -r '.data.ACCESS_TOKEN' | base64 -d) \ --param APICAST_MANAGEMENT_API=$(cat apicast-environment.json | jq -r '.data.APICAST_MANAGEMENT_API') \ --param APICAST_OPENSSL_VERIFY=$(cat apicast-environment.json | jq -r '.data.OPENSSL_VERIFY') \ --param APICAST_RESPONSE_CODES=$(cat apicast-environment.json | jq -r '.data.APICAST_RESPONSE_CODES') \ --param APICAST_REGISTRY_URL=$(cat system-environment.json | jq -r '.data.APICAST_REGISTRY_URL')
Red Hat 3scale API Management 2.7 Operating 3scale
68
5.6.2. Restoring an operator-based deployment
Use the following steps to restore operator-based deployments.
Procedure
1. Restore secrets before creating an APIManager resource:
oc apply -f system-seed.jsonoc apply -f system-database.jsonoc apply -f backend-internal-api.jsonoc apply -f system-events-hook.jsonoc apply -f system-app.jsonoc apply -f system-recaptcha.jsonoc apply -f system-redis.jsonoc apply -f zync.jsonoc apply -f system-master-apicast.json
2. Restore ConfigMaps before creating an APIManager resource:
oc apply -f smtp.jsonoc apply -f system-environment.jsonoc apply -f apicast-environment.json
5.6.3. Restoring system-mysql
1. Copy the MySQL dump to the system-mysql pod:
oc cp ./system-mysql-backup.gz $(oc get pods -l 'deploymentConfig=system-mysql' -o json | jq '.items[0].metadata.name' -r):/var/lib/mysql
2. Decompress the Backup File:
oc rsh $(oc get pods -l 'deploymentConfig=system-mysql' -o json | jq -r '.items[0].metadata.name') bash -c 'gzip -d ${HOME}/system-mysql-backup.gz'
3. Restore the MySQL DB Backup file:
oc rsh $(oc get pods -l 'deploymentConfig=system-mysql' -o json | jq -r '.items[0].metadata.name') bash -c 'export MYSQL_PWD=${MYSQL_ROOT_PASSWORD}; mysql -hsystem-mysql -uroot system < ${HOME}/system-mysql-backup'
5.6.4. Restoring system-storage
Restore the Backup file to system-storage:
oc rsync ./local/dir/system/ $(oc get pods -l 'deploymentConfig=system-app' -o json | jq '.items[0].metadata.name' -r):/opt/system/public/system
5.6.5. Restoring zync-database
Instructions to restore zync-database depend on the deployment type applied for 3scale.
CHAPTER 5. 3SCALE BACKUP AND RESTORE
69

Template-based deployments
1. Scale down the zync DeploymentConfig to 0 pods:
oc scale dc zync --replicas=0oc scale dc zync-que --replicas=0
2. Copy the Zync database dump to the zync-database pod:
oc cp ./zync-database-backup.gz $(oc get pods -l 'deploymentConfig=zync-database' -o json | jq '.items[0].metadata.name' -r):/var/lib/pgsql/
3. Decompress the backup file:
oc rsh $(oc get pods -l 'deploymentConfig=zync-database' -o json | jq -r '.items[0].metadata.name') bash -c 'gzip -d ${HOME}/zync-database-backup.gz'
4. Restore the PostgreSQL DB backup file:
oc rsh $(oc get pods -l 'deploymentConfig=zync-database' -o json | jq -r '.items[0].metadata.name') bash -c 'psql -f ${HOME}/zync-database-backup'
5. Restore to the original count of replicas, by replacing ${ZYNC_REPLICAS} with the number ofreplicas, in the commands below:
oc scale dc zync --replicas=${ZYNC_REPLICAS}oc scale dc zync-que --replicas=${ZYNC_REPLICAS}
Operator-based deployments
1. Store the number of replicas, by replacing ${DEPLOYMENT_NAME} with the name you definedwhen you created your 3scale deployment:
ZYNC_SPEC=`oc get APIManager/${DEPLOYMENT_NAME} -o json | jq -r '.spec.zync'`
2. Scale down the zync DeploymentConfig to 0 pods:
oc patch APIManager/${DEPLOYMENT_NAME} --type merge -p '{"spec": {"zync": {"appSpec": {"replicas": 0}, "queSpec": {"replicas": 0}}}}'
3. Copy the Zync database dump to the zync-database pod:
oc cp ./zync-database-backup.gz $(oc get pods -l 'deploymentConfig=zync-database' -o json | jq '.items[0].metadata.name' -r):/var/lib/pgsql/
4. Decompress the backup file:
oc rsh $(oc get pods -l 'deploymentConfig=zync-database' -o json | jq -r '.items[0].metadata.name') bash -c 'gzip -d ${HOME}/zync-database-backup.gz'
5. Restore the PostgreSQL DB backup file:
Red Hat 3scale API Management 2.7 Operating 3scale
70
oc rsh $(oc get pods -l 'deploymentConfig=zync-database' -o json | jq -r '.items[0].metadata.name') bash -c 'psql -f ${HOME}/zync-database-backup'
6. Restore to the original count of replicas:
oc patch APIManager ${DEPLOYMENT_NAME} --type merge -p '{"spec": {"zync":'"${ZYNC_SPEC}"'}}'
5.6.6. Ensuring information consistency between Backend and System
After restoring backend-redis a sync of the Config information from System should be forced toensure the information in Backend is consistent with that in System, which is the source of truth.
5.6.6.1. Managing the deployment configuration for backend-redis
These steps are intended for running instances of backend-redis.
1. Edit the redis-config configmap:
oc edit configmap redis-config
2. Comment SAVE commands in the redis-config configmap:
#save 900 1 #save 300 10 #save 60 10000
3. Set appendonly to no in the redis-config configmap:
appendonly no
4. Redeploy backend-redis to load the new configurations:
oc rollout latest dc/backend-redis
5. Check the status of the rollout to ensure it has finished:
oc rollout status dc/backend-redis
6. Rename the dump.rdb file:
oc rsh $(oc get pods -l 'deploymentConfig=backend-redis' -o json | jq '.items[0].metadata.name' -r) bash -c 'mv ${HOME}/data/dump.rdb ${HOME}/data/dump.rdb-old'
7. Rename the appendonly.aof file:
oc rsh $(oc get pods -l 'deploymentConfig=backend-redis' -o json | jq '.items[0].metadata.name' -r) bash -c 'mv ${HOME}/data/appendonly.aof ${HOME}/data/appendonly.aof-old'
CHAPTER 5. 3SCALE BACKUP AND RESTORE
71

8. Move the Backup file to the POD:
oc cp ./backend-redis-dump.rdb $(oc get pods -l 'deploymentConfig=backend-redis' -o json | jq '.items[0].metadata.name' -r):/var/lib/redis/data/dump.rdb
9. Redeploy backend-redis to load the backup:
oc rollout latest dc/backend-redis
10. Check the status of the rollout to ensure it has finished:
oc rollout status dc/backend-redis
11. Edit the redis-config configmap:
oc edit configmap redis-config
12. Uncomment SAVE commands in the redis-config configmap:
save 900 1 save 300 10 save 60 10000
13. Set appendonly to yes in the redis-config configmap:
appendonly yes
14. Redeploy backend-redis to reload the default configurations:
oc rollout latest dc/backend-redis
15. Check the status of the rollout to ensure it has finished:
oc rollout status dc/backend-redis
5.6.6.2. Managing the deployment configuration for system-redis
These steps are intended for running instances of system-redis.
1. Edit the redis-config configmap:
oc edit configmap redis-config
2. Comment SAVE commands in the redis-config configmap:
#save 900 1 #save 300 10 #save 60 10000
3. Set appendonly to no in the redis-config configmap:
Red Hat 3scale API Management 2.7 Operating 3scale
72
appendonly no
4. Redeploy system-redis to load the new configurations:
oc rollout latest dc/system-redis
5. Check the status of the rollout to ensure it has finished:
oc rollout status dc/system-redis
6. Rename the dump.rdb file:
oc rsh $(oc get pods -l 'deploymentConfig=system-redis' -o json | jq '.items[0].metadata.name' -r) bash -c 'mv ${HOME}/data/dump.rdb ${HOME}/data/dump.rdb-old'
7. Rename the appendonly.aof file:
oc rsh $(oc get pods -l 'deploymentConfig=system-redis' -o json | jq '.items[0].metadata.name' -r) bash -c 'mv ${HOME}/data/appendonly.aof ${HOME}/data/appendonly.aof-old'
8. Move the Backup file to the POD:
oc cp ./system-redis-dump.rdb $(oc get pods -l 'deploymentConfig=system-redis' -o json | jq '.items[0].metadata.name' -r):/var/lib/redis/data/dump.rdb
9. Redeploy system-redis to load the backup:
oc rollout latest dc/system-redis
10. Check the status of the rollout to ensure it has finished:
oc rollout status dc/system-redis
11. Edit the redis-config configmap:
oc edit configmap redis-config
12. Uncomment SAVE commands in the redis-config configmap:
save 900 1 save 300 10 save 60 10000
13. Set appendonly to yes in the redis-config configmap:
appendonly yes
14. Redeploy system-redis to reload the default configurations:
CHAPTER 5. 3SCALE BACKUP AND RESTORE
73
oc rollout latest dc/system-redis
15. Check the status of the rollout to ensure it has finished:
oc rollout status dc/system-redis
5.6.7. Restoring backend-worker
1. Restore to the latest version of backend-worker:
oc rollout latest dc/backend-worker
2. Check the status of the rollout to ensure it has finished:
oc rollout status dc/backend-worker
5.6.8. Restoring system-app
1. Restore to the latest version of system-app:
oc rollout latest dc/system-app
2. Check the status of the rollout to ensure it has finished:
oc rollout status dc/system-app
5.6.9. Creating equivalent Zync routes
To perform the creation of equivalent routes by Zync, force the resynchronization of all 3scale APIs andtenants that OpenShift routes with Zync:
oc exec -t $(oc get pods -l 'deploymentConfig=system-sidekiq' -o json | jq '.items[0].metadata.name' -r) bash -- -c "bundle exec rake zync:resync:domains"
You will see the following output containing information about notifications to system:
No valid API key has been set, notifications will not be sentActiveMerchant MODE set to 'production'[Core] Using http://backend-listener:3000/internal/ as URLOpenIdAuthentication.store is nil. Using in-memory store.[EventBroker] notifying subscribers of Domains::ProviderDomainsChangedEvent 59a554f6-7b3f-4246-9c36-24da988ca800[EventBroker] notifying subscribers of ZyncEvent caa8e941-b734-4192-acb0-0b12cbaab9caEnqueued ZyncWorker#d92db46bdba7a299f3e88f14 with args: ["caa8e941-b734-4192-acb0-0b12cbaab9ca", {:type=>"Provider", :id=>1, :parent_event_id=>"59a554f6-7b3f-4246-9c36-24da988ca800", :parent_event_type=>"Domains::ProviderDomainsChangedEvent", :tenant_id=>1}][EventBroker] notifying subscribers of Domains::ProviderDomainsChangedEvent 9010a199-2af1-4023-9b8d-297bd618096f…
New routes are created for all the existing tenants and services, after forcing Zync to reevaluate them.
Red Hat 3scale API Management 2.7 Operating 3scale
74

New routes are created for all the existing tenants and services, after forcing Zync to reevaluate them.Route creation might take some minutes depending on the number of services and tenants.
CHAPTER 5. 3SCALE BACKUP AND RESTORE
75
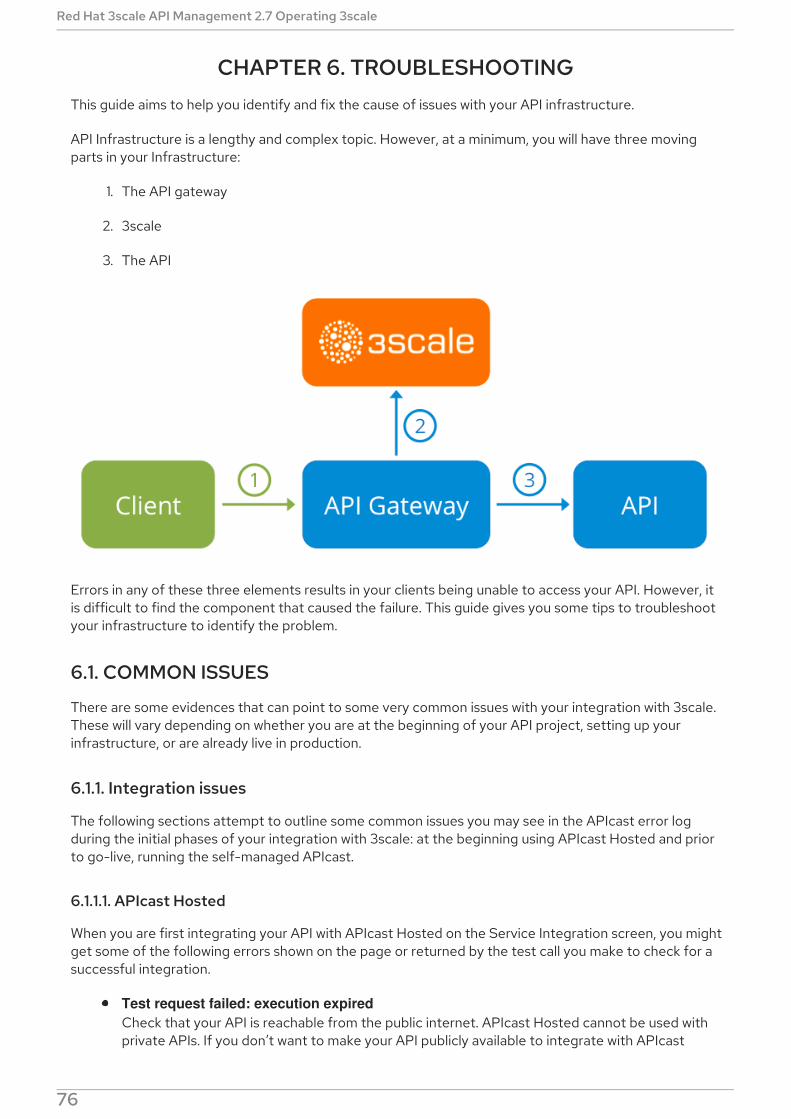
CHAPTER 6. TROUBLESHOOTINGThis guide aims to help you identify and fix the cause of issues with your API infrastructure.
API Infrastructure is a lengthy and complex topic. However, at a minimum, you will have three movingparts in your Infrastructure:
1. The API gateway
2. 3scale
3. The API
Errors in any of these three elements results in your clients being unable to access your API. However, itis difficult to find the component that caused the failure. This guide gives you some tips to troubleshootyour infrastructure to identify the problem.
6.1. COMMON ISSUES
There are some evidences that can point to some very common issues with your integration with 3scale.These will vary depending on whether you are at the beginning of your API project, setting up yourinfrastructure, or are already live in production.
6.1.1. Integration issues
The following sections attempt to outline some common issues you may see in the APIcast error logduring the initial phases of your integration with 3scale: at the beginning using APIcast Hosted and priorto go-live, running the self-managed APIcast.
6.1.1.1. APIcast Hosted
When you are first integrating your API with APIcast Hosted on the Service Integration screen, you mightget some of the following errors shown on the page or returned by the test call you make to check for asuccessful integration.
Test request failed: execution expiredCheck that your API is reachable from the public internet. APIcast Hosted cannot be used withprivate APIs. If you don’t want to make your API publicly available to integrate with APIcast
Red Hat 3scale API Management 2.7 Operating 3scale
76
Hosted, you can set up a private secret between APIcast Hosted and your API to reject any callsnot coming from the API gateway.
The accepted format is 'protocol://address(:port)'`Remove any paths at the end of your API’s private base URL. You can add these in the"mapping rules" pattern or at the beginning of the "API test GET request".
Test request failed with HTTP code XXX
405: Check that the endpoint accepts GET requests. APIcast only supports GET requests totest the integration.
403: Authentication parameters missing: If your API already has some authentication inplace, APIcast will be unable to make a test request.
403: Authentication failed: If this is not the first service you have created with 3scale, checkthat you have created an application under the service with credentials to make the testrequest. If it is the first service you are integrating, ensure that you have not deleted the testaccount or application that you created on signup.
6.1.1.2. APIcast self-managed
After you have successfully tested the integration with APIcast self-managed, you might want to hostthe API gateway yourself. Following are some errors you may encounter when you first install your self-managed gateway and call your API through it.
upstream timed out (110: Connection timed out) while connecting to upstreamCheck that there are no firewalls or proxies between the API Gateway and the public Internetthat would prevent your self-managed gateway from reaching 3scale.
failed to get list of services: invalid status: 403 (Forbidden)
Check that the Access Token that you used in the THREESCALE_PORTAL_ENDOINT value iscorrect and that it has the Account Management API scope. Verify it with a curl command: curl -v "https://example-admin.3scale.net/admin/api/services.json?access_token=<YOUR_ACCESS_TOKEN>"
It should return a 200 response with a JSON body. If it returns an error status code, check theresponse body for details.
service not found for host apicast.example.com
This error indicates that the Public Base URL has not been configured properly. You shouldensure that the configured Public Base URL is the same that you use for the request to self-managed APIcast. After configuring the correct Public Base URL:
Ensure that APIcast is configured for "production" (default configuration for standalone
2018/06/04 08:04:49 [emerg] 14#14: [lua] configuration_loader.lua:134: init(): failed to load configuration, exiting (code 1) 2018/06/04 08:04:49 [warn] 22#22: *2 [lua] remote_v2.lua:163: call(): failed to get list of services: invalid status: 403 (Forbidden) url: https://example-admin.3scale.net/admin/api/services.json , context: ngx.timer ERROR: /opt/app-root/src/src/apicast/configuration_loader.lua:57: missing configuration
2018/06/04 11:06:15 [warn] 23#23: *495 [lua] find_service.lua:24: find_service(): service not found for host apicast.example.com, client: 172.17.0.1, server: _, request: "GET / HTTP/1.1", host: "apicast.example.com"
CHAPTER 6. TROUBLESHOOTING
77

Ensure that APIcast is configured for "production" (default configuration for standaloneAPIcast if not overriden with THREESCALE_DEPLOYMENT_ENV variable). Ensure thatyou promote the configuration to production.
Restart APIcast, if you have not configured auto-reloading of configuration using APICAST_CONFIGURATION_CACHE and APICAST_CONFIGURATION_LOADERenvironment variables.
Following are some other symptoms that may point to an incorrect APIcast self-managed integration:
Mapping rules not matched / Double counting of API calls: Depending on the way you havedefined the mapping between methods and actual URL endpoints on your API, you might findthat sometimes methods either don’t get matched or get incremented more than once perrequest. To troubleshoot this, make a test call to your API with the 3scale debug header. Thiswill return a list of all the methods that have been matched by the API call.
Authentication parameters not found: Ensure your are sending the parameters to the correctlocation as specified in the Service Integration screen. If you do not send credentials as headers,the credentials must be sent as query parameters for GET requests and body parameters for allother HTTP methods. Use the 3scale debug header to double-check the credentials that arebeing read from the request by the API gateway.
6.1.2. Production issues
It is rare to run into issues with your API gateway after you have fully tested your setup and have beenlive with your API for a while. However, here are some of the issues you might encounter in a liveproduction environment.
6.1.2.1. Availability issues
Availability issues are normally characterised by upstream timed out errors in your nginx error.log;example:
If you are experiencing intermittent 3scale availability issues, following may be the reasons for this:
You are resolving to an old 3scale IP that is no longer in use.The latest version of the API gateway configuration files defines 3scale as a variable to force IPresolution each time. For a quick fix, reload your NGINX instance. For a long-term fix, ensurethat instead of defining the 3scale backend in an upstream block, you define it as a variablewithin each server block; example:
When you refer to it:
upstream timed out (110: Connection timed out) while connecting to upstream, client: X.X.X.X, server: api.example.com, request: "GET /RESOURCE?CREDENTIALS HTTP/1.1", upstream: "http://Y.Y.Y.Y:80/RESOURCE?CREDENTIALS", host: "api.example.com"
server { # Enabling the Lua code cache is strongly encouraged for production use. Here it is enabled . . . set $threescale_backend "https://su1.3scale.net:443";
location = /threescale_authrep {
Red Hat 3scale API Management 2.7 Operating 3scale
78
You are missing some 3scale IPs from your whitelist. Following is the current list of IPs that3scale resolves to:
75.101.142.93
174.129.235.69
184.73.197.122
50.16.225.117
54.83.62.94
54.83.62.186
54.83.63.187
54.235.143.255The above issues refer to problems with perceived 3scale availability. However, you mightencounter similar issues with your API availability from the API gateway if your API is behindan AWS ELB. This is because NGINX, by default, does DNS resolution at start-up time andthen caches the IP addresses. However, ELBs do not ensure static IP addresses and thesemight change frequently. Whenever the ELB changes to a different IP, NGINX is unable toreach it.
The solution for this is similar to the above fix for forcing runtime DNS resolution.
1. Set a specific DNS resolver such as Google DNS, by adding this line at the top of the http section: resolver 8.8.8.8 8.8.4.4;.
2. Set your API base URL as a variable anywhere near the top of the server section. set $api_base "http://api.example.com:80";
3. Inside the location / section, find the proxy_pass line and replace it with proxy_pass $api_base;.
6.1.3. Post-deploy issues
If you make changes to your API such as adding a new endpoint, you must ensure that you add a newmethod and URL mapping before downloading a new set of configuration files for your API gateway.
The most common problem when you have modified the configuration downloaded from 3scale will becode errors in the Lua, which will result in a 500 - Internal server error such as:
internal; set $provider_key "YOUR_PROVIDER_KEY";
proxy_pass $threescale_backend/transactions/authrep.xml?provider_key=$provider_key&service_id=$service_id&$usage&$credentials&log%5Bcode%5D=$arg_code&log%5Brequest%5D=$arg_req&log%5Bresponse%5D=$arg_resp;}
curl -v -X GET "http://localhost/"* About to connect() to localhost port 80 (#0)* Trying 127.0.0.1... connected> GET / HTTP/1.1
CHAPTER 6. TROUBLESHOOTING
79
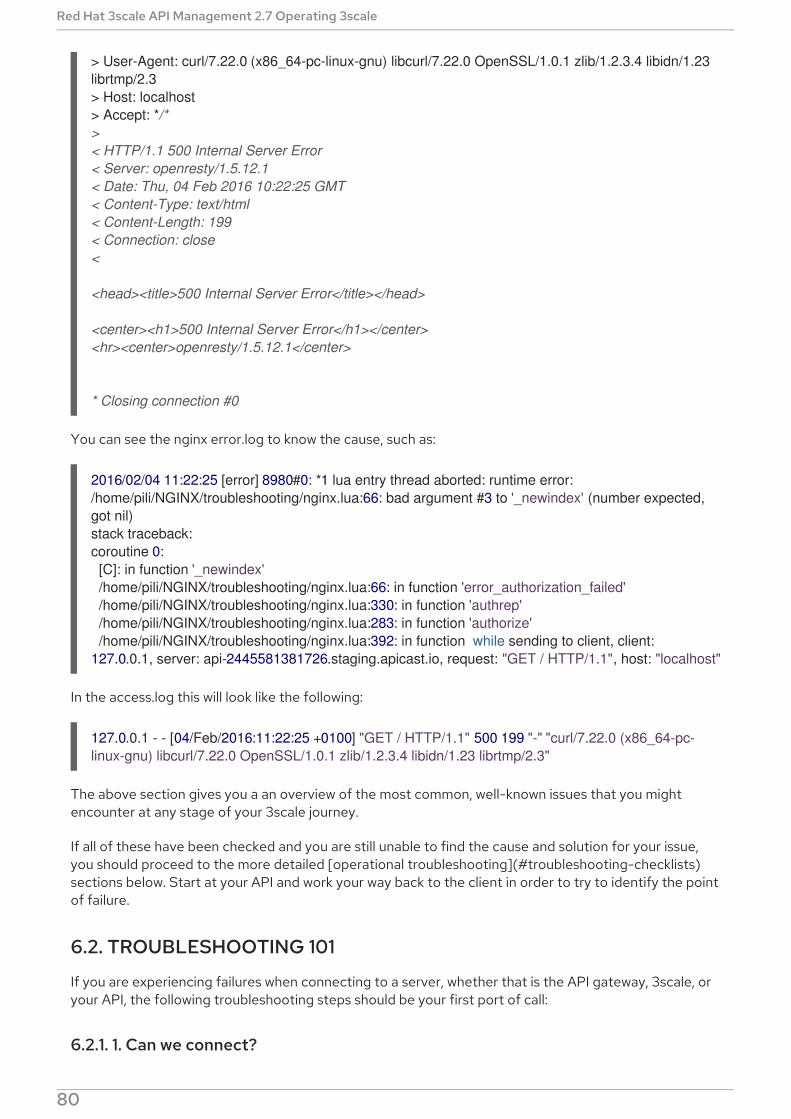
You can see the nginx error.log to know the cause, such as:
In the access.log this will look like the following:
The above section gives you a an overview of the most common, well-known issues that you mightencounter at any stage of your 3scale journey.
If all of these have been checked and you are still unable to find the cause and solution for your issue,you should proceed to the more detailed [operational troubleshooting](#troubleshooting-checklists)sections below. Start at your API and work your way back to the client in order to try to identify the pointof failure.
6.2. TROUBLESHOOTING 101
If you are experiencing failures when connecting to a server, whether that is the API gateway, 3scale, oryour API, the following troubleshooting steps should be your first port of call:
6.2.1. 1. Can we connect?
> User-Agent: curl/7.22.0 (x86_64-pc-linux-gnu) libcurl/7.22.0 OpenSSL/1.0.1 zlib/1.2.3.4 libidn/1.23 librtmp/2.3> Host: localhost> Accept: */*>< HTTP/1.1 500 Internal Server Error< Server: openresty/1.5.12.1< Date: Thu, 04 Feb 2016 10:22:25 GMT< Content-Type: text/html< Content-Length: 199< Connection: close<
<head><title>500 Internal Server Error</title></head>
<center><h1>500 Internal Server Error</h1></center><hr><center>openresty/1.5.12.1</center>
* Closing connection #0
2016/02/04 11:22:25 [error] 8980#0: *1 lua entry thread aborted: runtime error: /home/pili/NGINX/troubleshooting/nginx.lua:66: bad argument #3 to '_newindex' (number expected, got nil)stack traceback:coroutine 0: [C]: in function '_newindex' /home/pili/NGINX/troubleshooting/nginx.lua:66: in function 'error_authorization_failed' /home/pili/NGINX/troubleshooting/nginx.lua:330: in function 'authrep' /home/pili/NGINX/troubleshooting/nginx.lua:283: in function 'authorize' /home/pili/NGINX/troubleshooting/nginx.lua:392: in function while sending to client, client: 127.0.0.1, server: api-2445581381726.staging.apicast.io, request: "GET / HTTP/1.1", host: "localhost"
127.0.0.1 - - [04/Feb/2016:11:22:25 +0100] "GET / HTTP/1.1" 500 199 "-" "curl/7.22.0 (x86_64-pc-linux-gnu) libcurl/7.22.0 OpenSSL/1.0.1 zlib/1.2.3.4 libidn/1.23 librtmp/2.3"
Red Hat 3scale API Management 2.7 Operating 3scale
80
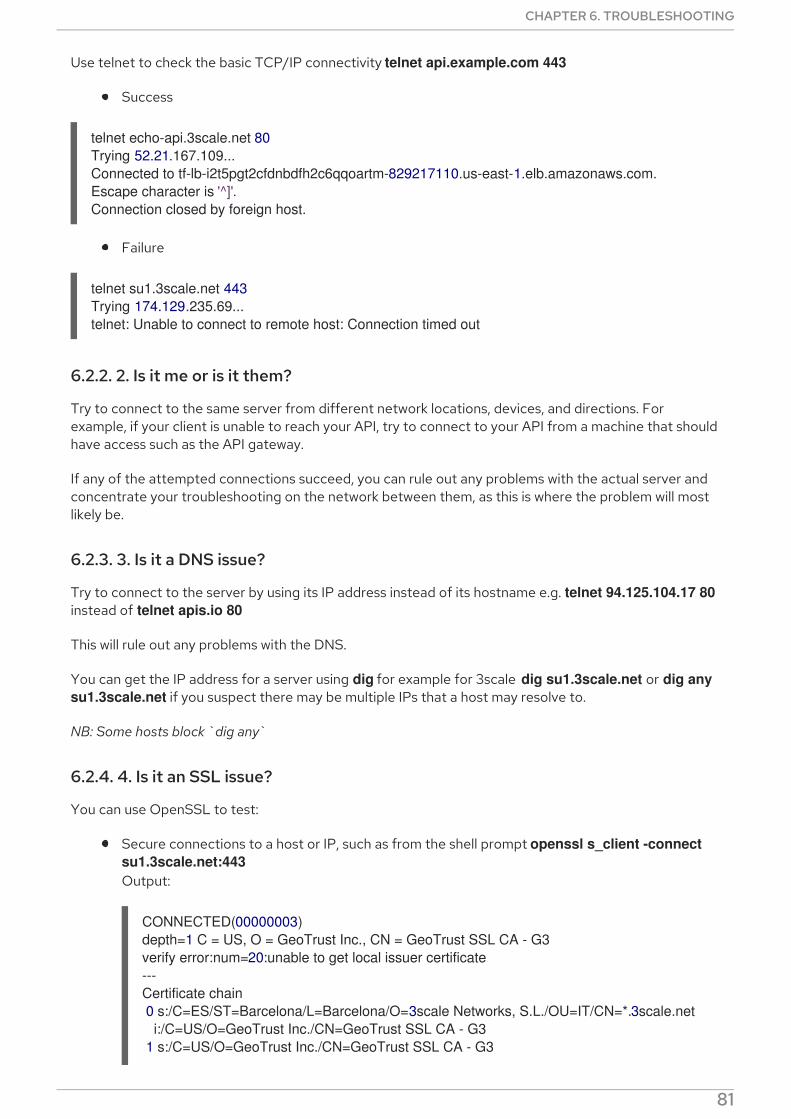
Use telnet to check the basic TCP/IP connectivity telnet api.example.com 443
Success
Failure
6.2.2. 2. Is it me or is it them?
Try to connect to the same server from different network locations, devices, and directions. Forexample, if your client is unable to reach your API, try to connect to your API from a machine that shouldhave access such as the API gateway.
If any of the attempted connections succeed, you can rule out any problems with the actual server andconcentrate your troubleshooting on the network between them, as this is where the problem will mostlikely be.
6.2.3. 3. Is it a DNS issue?
Try to connect to the server by using its IP address instead of its hostname e.g. telnet 94.125.104.17 80instead of telnet apis.io 80
This will rule out any problems with the DNS.
You can get the IP address for a server using dig for example for 3scale dig su1.3scale.net or dig any su1.3scale.net if you suspect there may be multiple IPs that a host may resolve to.
NB: Some hosts block `dig any`
6.2.4. 4. Is it an SSL issue?
You can use OpenSSL to test:
Secure connections to a host or IP, such as from the shell prompt openssl s_client -connect su1.3scale.net:443Output:
telnet echo-api.3scale.net 80Trying 52.21.167.109...Connected to tf-lb-i2t5pgt2cfdnbdfh2c6qqoartm-829217110.us-east-1.elb.amazonaws.com.Escape character is '^]'.Connection closed by foreign host.
telnet su1.3scale.net 443Trying 174.129.235.69...telnet: Unable to connect to remote host: Connection timed out
CONNECTED(00000003)depth=1 C = US, O = GeoTrust Inc., CN = GeoTrust SSL CA - G3verify error:num=20:unable to get local issuer certificate---Certificate chain 0 s:/C=ES/ST=Barcelona/L=Barcelona/O=3scale Networks, S.L./OU=IT/CN=*.3scale.net i:/C=US/O=GeoTrust Inc./CN=GeoTrust SSL CA - G3 1 s:/C=US/O=GeoTrust Inc./CN=GeoTrust SSL CA - G3
CHAPTER 6. TROUBLESHOOTING
81
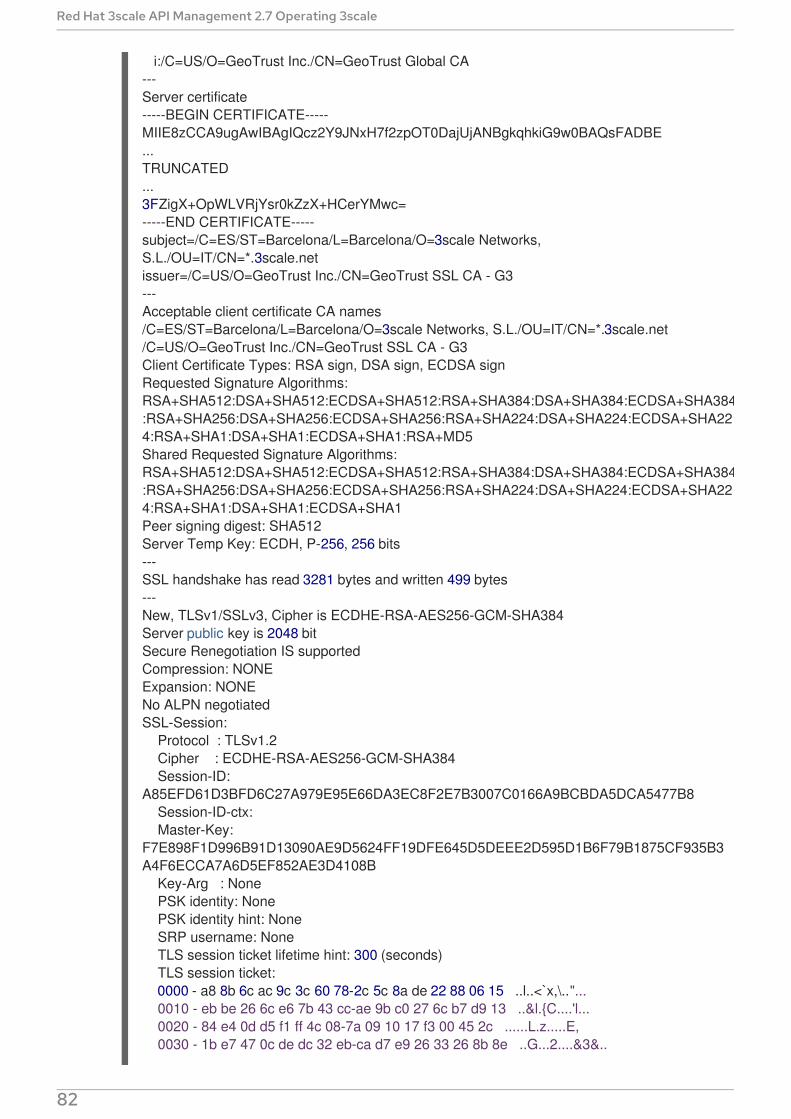
i:/C=US/O=GeoTrust Inc./CN=GeoTrust Global CA---Server certificate-----BEGIN CERTIFICATE-----MIIE8zCCA9ugAwIBAgIQcz2Y9JNxH7f2zpOT0DajUjANBgkqhkiG9w0BAQsFADBE...TRUNCATED...3FZigX+OpWLVRjYsr0kZzX+HCerYMwc=-----END CERTIFICATE-----subject=/C=ES/ST=Barcelona/L=Barcelona/O=3scale Networks, S.L./OU=IT/CN=*.3scale.netissuer=/C=US/O=GeoTrust Inc./CN=GeoTrust SSL CA - G3---Acceptable client certificate CA names/C=ES/ST=Barcelona/L=Barcelona/O=3scale Networks, S.L./OU=IT/CN=*.3scale.net/C=US/O=GeoTrust Inc./CN=GeoTrust SSL CA - G3Client Certificate Types: RSA sign, DSA sign, ECDSA signRequested Signature Algorithms: RSA+SHA512:DSA+SHA512:ECDSA+SHA512:RSA+SHA384:DSA+SHA384:ECDSA+SHA384:RSA+SHA256:DSA+SHA256:ECDSA+SHA256:RSA+SHA224:DSA+SHA224:ECDSA+SHA224:RSA+SHA1:DSA+SHA1:ECDSA+SHA1:RSA+MD5Shared Requested Signature Algorithms: RSA+SHA512:DSA+SHA512:ECDSA+SHA512:RSA+SHA384:DSA+SHA384:ECDSA+SHA384:RSA+SHA256:DSA+SHA256:ECDSA+SHA256:RSA+SHA224:DSA+SHA224:ECDSA+SHA224:RSA+SHA1:DSA+SHA1:ECDSA+SHA1Peer signing digest: SHA512Server Temp Key: ECDH, P-256, 256 bits---SSL handshake has read 3281 bytes and written 499 bytes---New, TLSv1/SSLv3, Cipher is ECDHE-RSA-AES256-GCM-SHA384Server public key is 2048 bitSecure Renegotiation IS supportedCompression: NONEExpansion: NONENo ALPN negotiatedSSL-Session: Protocol : TLSv1.2 Cipher : ECDHE-RSA-AES256-GCM-SHA384 Session-ID: A85EFD61D3BFD6C27A979E95E66DA3EC8F2E7B3007C0166A9BCBDA5DCA5477B8 Session-ID-ctx: Master-Key: F7E898F1D996B91D13090AE9D5624FF19DFE645D5DEEE2D595D1B6F79B1875CF935B3A4F6ECCA7A6D5EF852AE3D4108B Key-Arg : None PSK identity: None PSK identity hint: None SRP username: None TLS session ticket lifetime hint: 300 (seconds) TLS session ticket: 0000 - a8 8b 6c ac 9c 3c 60 78-2c 5c 8a de 22 88 06 15 ..l..<`x,\.."... 0010 - eb be 26 6c e6 7b 43 cc-ae 9b c0 27 6c b7 d9 13 ..&l.{C....'l... 0020 - 84 e4 0d d5 f1 ff 4c 08-7a 09 10 17 f3 00 45 2c ......L.z.....E, 0030 - 1b e7 47 0c de dc 32 eb-ca d7 e9 26 33 26 8b 8e ..G...2....&3&..
Red Hat 3scale API Management 2.7 Operating 3scale
82
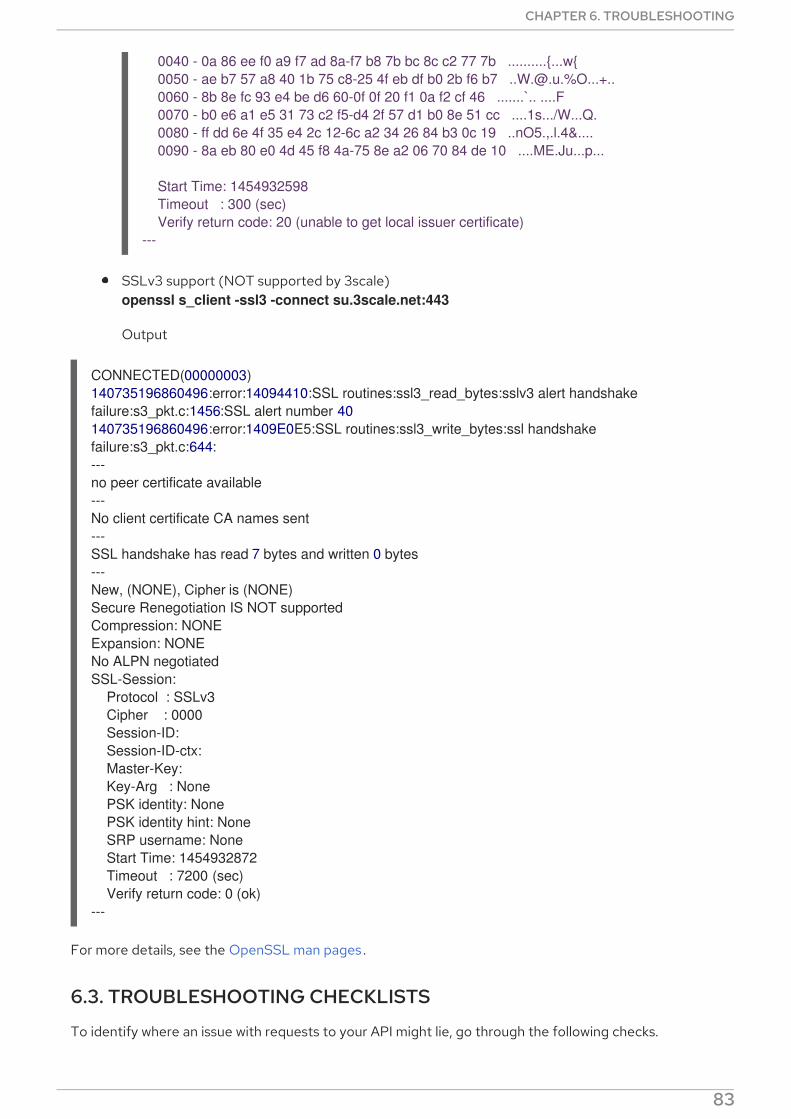
SSLv3 support (NOT supported by 3scale)openssl s_client -ssl3 -connect su.3scale.net:443
Output
For more details, see the OpenSSL man pages .
6.3. TROUBLESHOOTING CHECKLISTS
To identify where an issue with requests to your API might lie, go through the following checks.
0040 - 0a 86 ee f0 a9 f7 ad 8a-f7 b8 7b bc 8c c2 77 7b ..........{...w{ 0050 - ae b7 57 a8 40 1b 75 c8-25 4f eb df b0 2b f6 b7 [email protected].%O...+.. 0060 - 8b 8e fc 93 e4 be d6 60-0f 0f 20 f1 0a f2 cf 46 .......`.. ....F 0070 - b0 e6 a1 e5 31 73 c2 f5-d4 2f 57 d1 b0 8e 51 cc ....1s.../W...Q. 0080 - ff dd 6e 4f 35 e4 2c 12-6c a2 34 26 84 b3 0c 19 ..nO5.,.l.4&.... 0090 - 8a eb 80 e0 4d 45 f8 4a-75 8e a2 06 70 84 de 10 ....ME.Ju...p...
Start Time: 1454932598 Timeout : 300 (sec) Verify return code: 20 (unable to get local issuer certificate)---
CONNECTED(00000003)140735196860496:error:14094410:SSL routines:ssl3_read_bytes:sslv3 alert handshake failure:s3_pkt.c:1456:SSL alert number 40140735196860496:error:1409E0E5:SSL routines:ssl3_write_bytes:ssl handshake failure:s3_pkt.c:644:---no peer certificate available---No client certificate CA names sent---SSL handshake has read 7 bytes and written 0 bytes---New, (NONE), Cipher is (NONE)Secure Renegotiation IS NOT supportedCompression: NONEExpansion: NONENo ALPN negotiatedSSL-Session: Protocol : SSLv3 Cipher : 0000 Session-ID: Session-ID-ctx: Master-Key: Key-Arg : None PSK identity: None PSK identity hint: None SRP username: None Start Time: 1454932872 Timeout : 7200 (sec) Verify return code: 0 (ok)---
CHAPTER 6. TROUBLESHOOTING
83
6.3.1. API
To confirm that the API is up and responding to requests, make the same request directly to your API(not going through the API gateway). You should ensure that you are sending the same parameters andheaders as the request that goes through the API gateway. If you are unsure of the exact request that isfailing, capture the traffic between the API gateway and your API.
If the call succeeds, you can rule out any problems with the API, otherwise you should troubleshoot yourAPI further.
6.3.2. API Gateway > API
To rule out any network issues between the API gateway and the API, make the same call as before — directly to your API — from your API gateway server.
If the call succeeds, you can move on to troubleshooting the API gateway itself.
6.3.3. API gateway
There are a number of steps to go through to check that the API gateway is working correctly.
6.3.3.1. 1. Is the API gateway up and running?
Log in to the machine where the gateway is running. If this fails, your gateway server might be down.
After you have logged in, check that the NGINX process is running. For this, run ps ax | grep nginx or htop.
NGINX is running if you see nginx master process and nginx worker process in the list.
6.3.3.2. 2. Are there any errors in the gateway logs?
Following are some common errors you might see in the gateway logs, for example in error.log:
API gateway can’t connect to API
API gateway cannot connect to 3scale
6.3.4. API gateway > 3scale
Once you are sure the API gateway is running correctly, the next step is troubleshooting the connectionbetween the API gateway and 3scale.
upstream timed out (110: Connection timed out) while connecting to upstream, client: X.X.X.X, server: api.example.com, request: "GET /RESOURCE?CREDENTIALS HTTP/1.1", upstream: "http://Y.Y.Y.Y:80/RESOURCE?CREDENTIALS", host: "api.example.com"
2015/11/20 11:33:51 [error] 3578#0: *1 upstream timed out (110: Connection timed out) while connecting to upstream, client: 127.0.0.1, server: , request: "GET /api/activities.json?user_key=USER_KEY HTTP/1.1", subrequest: "/threescale_authrep", upstream: "https://54.83.62.186:443/transactions/authrep.xml?provider_key=YOUR_PROVIDER_KEY&service_id=SERVICE_ID&usage[hits]=1&user_key=USER_KEY&log%5Bcode%5D=", host: "localhost"
Red Hat 3scale API Management 2.7 Operating 3scale
84
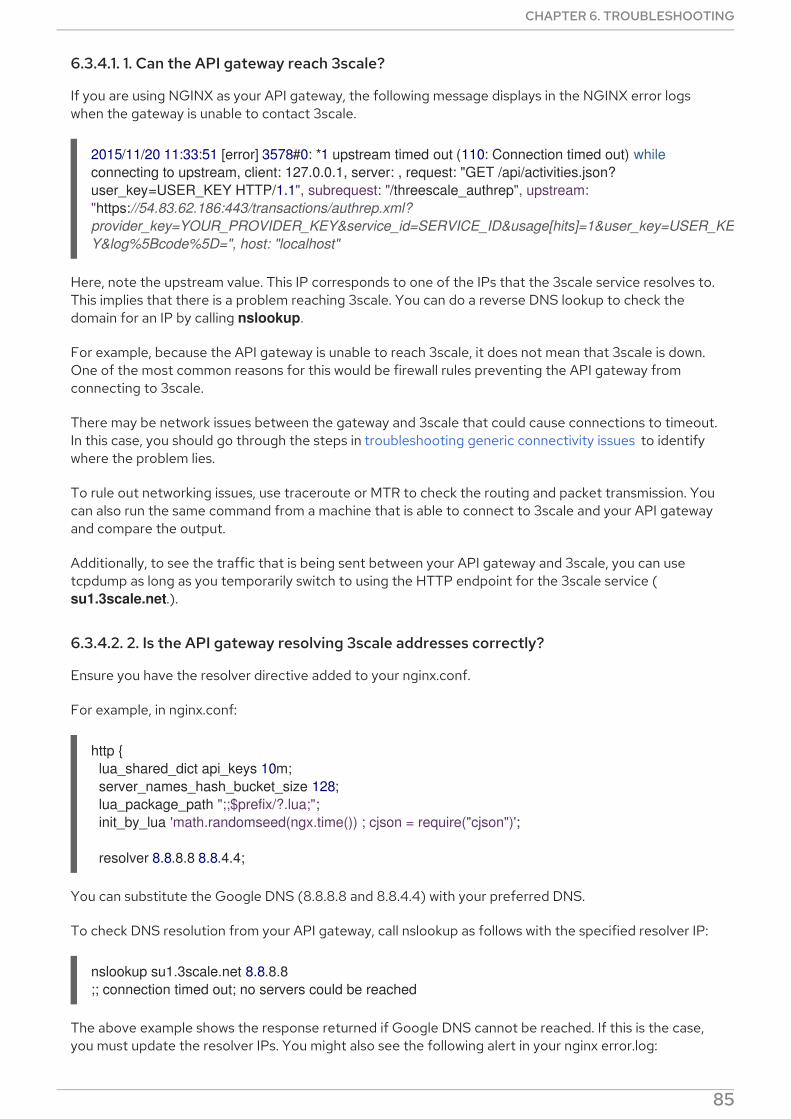
6.3.4.1. 1. Can the API gateway reach 3scale?
If you are using NGINX as your API gateway, the following message displays in the NGINX error logswhen the gateway is unable to contact 3scale.
Here, note the upstream value. This IP corresponds to one of the IPs that the 3scale service resolves to.This implies that there is a problem reaching 3scale. You can do a reverse DNS lookup to check thedomain for an IP by calling nslookup.
For example, because the API gateway is unable to reach 3scale, it does not mean that 3scale is down.One of the most common reasons for this would be firewall rules preventing the API gateway fromconnecting to 3scale.
There may be network issues between the gateway and 3scale that could cause connections to timeout.In this case, you should go through the steps in troubleshooting generic connectivity issues to identifywhere the problem lies.
To rule out networking issues, use traceroute or MTR to check the routing and packet transmission. Youcan also run the same command from a machine that is able to connect to 3scale and your API gatewayand compare the output.
Additionally, to see the traffic that is being sent between your API gateway and 3scale, you can usetcpdump as long as you temporarily switch to using the HTTP endpoint for the 3scale service ( su1.3scale.net.).
6.3.4.2. 2. Is the API gateway resolving 3scale addresses correctly?
Ensure you have the resolver directive added to your nginx.conf.
For example, in nginx.conf:
You can substitute the Google DNS (8.8.8.8 and 8.8.4.4) with your preferred DNS.
To check DNS resolution from your API gateway, call nslookup as follows with the specified resolver IP:
The above example shows the response returned if Google DNS cannot be reached. If this is the case,you must update the resolver IPs. You might also see the following alert in your nginx error.log:
2015/11/20 11:33:51 [error] 3578#0: *1 upstream timed out (110: Connection timed out) while connecting to upstream, client: 127.0.0.1, server: , request: "GET /api/activities.json?user_key=USER_KEY HTTP/1.1", subrequest: "/threescale_authrep", upstream: "https://54.83.62.186:443/transactions/authrep.xml?provider_key=YOUR_PROVIDER_KEY&service_id=SERVICE_ID&usage[hits]=1&user_key=USER_KEY&log%5Bcode%5D=", host: "localhost"
http { lua_shared_dict api_keys 10m; server_names_hash_bucket_size 128; lua_package_path ";;$prefix/?.lua;"; init_by_lua 'math.randomseed(ngx.time()) ; cjson = require("cjson")';
resolver 8.8.8.8 8.8.4.4;
nslookup su1.3scale.net 8.8.8.8;; connection timed out; no servers could be reached
CHAPTER 6. TROUBLESHOOTING
85
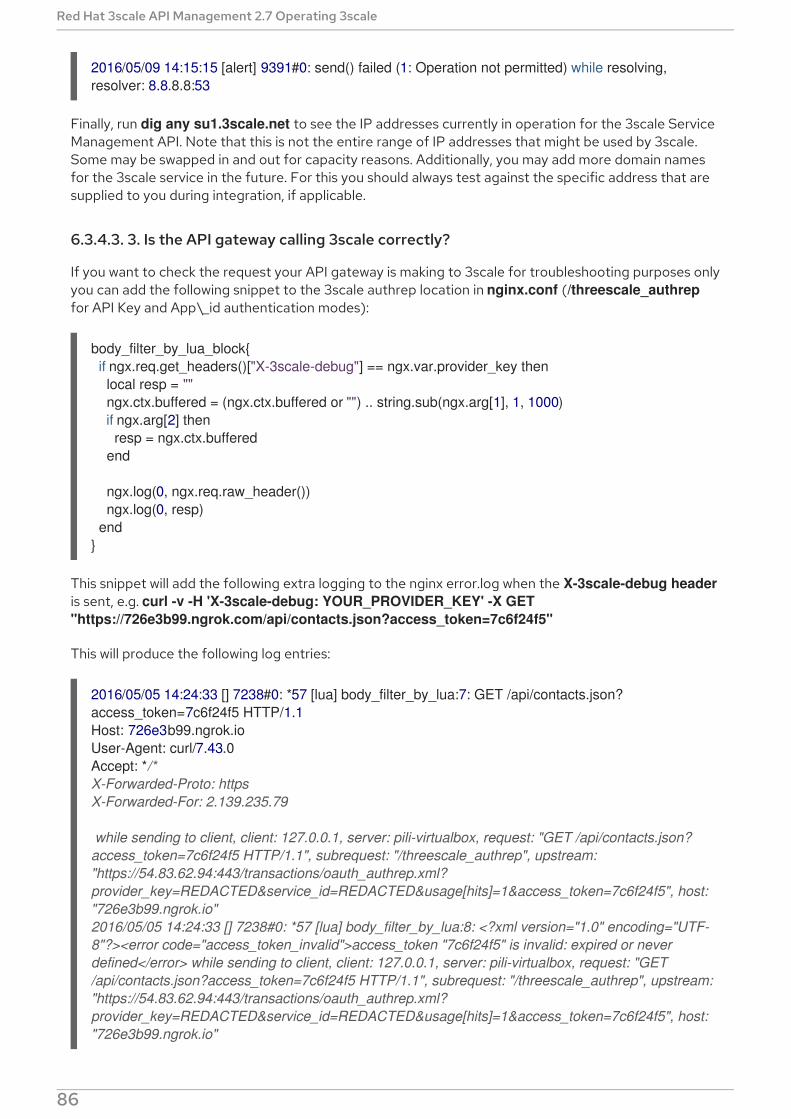
Finally, run dig any su1.3scale.net to see the IP addresses currently in operation for the 3scale ServiceManagement API. Note that this is not the entire range of IP addresses that might be used by 3scale.Some may be swapped in and out for capacity reasons. Additionally, you may add more domain namesfor the 3scale service in the future. For this you should always test against the specific address that aresupplied to you during integration, if applicable.
6.3.4.3. 3. Is the API gateway calling 3scale correctly?
If you want to check the request your API gateway is making to 3scale for troubleshooting purposes onlyyou can add the following snippet to the 3scale authrep location in nginx.conf (/threescale_authrepfor API Key and App\_id authentication modes):
This snippet will add the following extra logging to the nginx error.log when the X-3scale-debug headeris sent, e.g. curl -v -H 'X-3scale-debug: YOUR_PROVIDER_KEY' -X GET "https://726e3b99.ngrok.com/api/contacts.json?access_token=7c6f24f5"
This will produce the following log entries:
2016/05/09 14:15:15 [alert] 9391#0: send() failed (1: Operation not permitted) while resolving, resolver: 8.8.8.8:53
body_filter_by_lua_block{ if ngx.req.get_headers()["X-3scale-debug"] == ngx.var.provider_key then local resp = "" ngx.ctx.buffered = (ngx.ctx.buffered or "") .. string.sub(ngx.arg[1], 1, 1000) if ngx.arg[2] then resp = ngx.ctx.buffered end
ngx.log(0, ngx.req.raw_header()) ngx.log(0, resp) end}
2016/05/05 14:24:33 [] 7238#0: *57 [lua] body_filter_by_lua:7: GET /api/contacts.json?access_token=7c6f24f5 HTTP/1.1Host: 726e3b99.ngrok.ioUser-Agent: curl/7.43.0Accept: */*X-Forwarded-Proto: httpsX-Forwarded-For: 2.139.235.79
while sending to client, client: 127.0.0.1, server: pili-virtualbox, request: "GET /api/contacts.json?access_token=7c6f24f5 HTTP/1.1", subrequest: "/threescale_authrep", upstream: "https://54.83.62.94:443/transactions/oauth_authrep.xml?provider_key=REDACTED&service_id=REDACTED&usage[hits]=1&access_token=7c6f24f5", host: "726e3b99.ngrok.io"2016/05/05 14:24:33 [] 7238#0: *57 [lua] body_filter_by_lua:8: <?xml version="1.0" encoding="UTF-8"?><error code="access_token_invalid">access_token "7c6f24f5" is invalid: expired or never defined</error> while sending to client, client: 127.0.0.1, server: pili-virtualbox, request: "GET /api/contacts.json?access_token=7c6f24f5 HTTP/1.1", subrequest: "/threescale_authrep", upstream: "https://54.83.62.94:443/transactions/oauth_authrep.xml?provider_key=REDACTED&service_id=REDACTED&usage[hits]=1&access_token=7c6f24f5", host: "726e3b99.ngrok.io"
Red Hat 3scale API Management 2.7 Operating 3scale
86
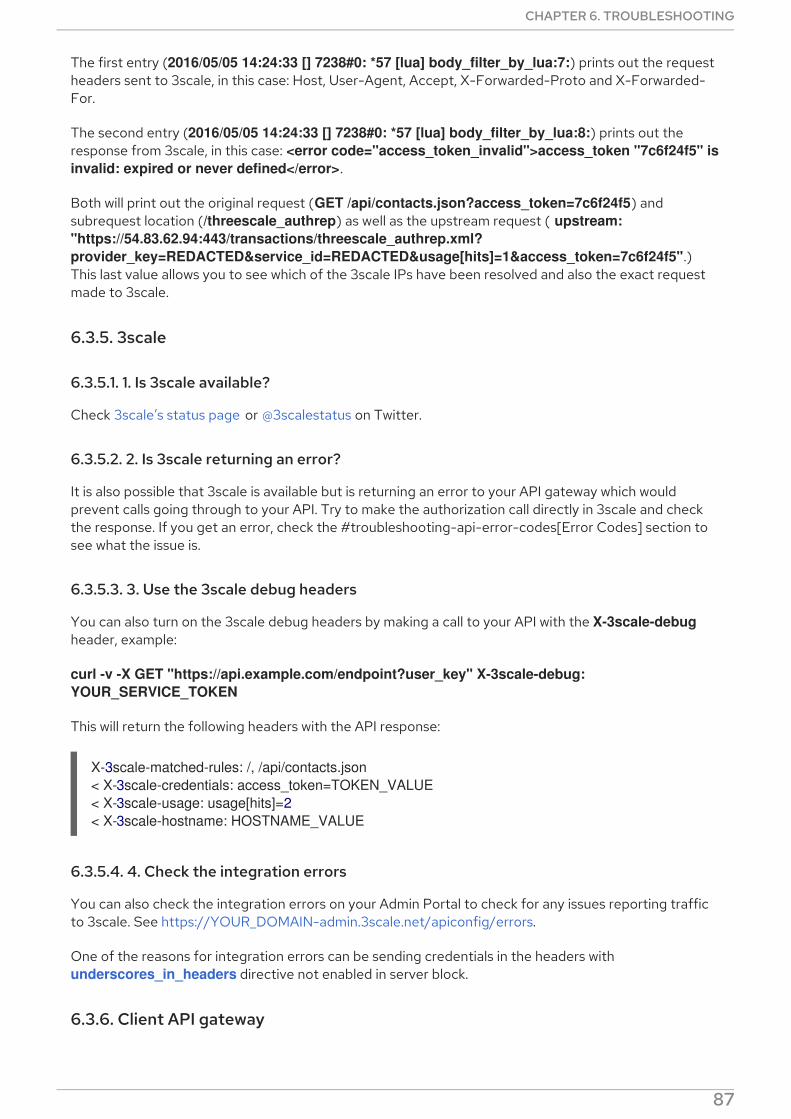
The first entry (2016/05/05 14:24:33 [] 7238#0: *57 [lua] body_filter_by_lua:7:) prints out the requestheaders sent to 3scale, in this case: Host, User-Agent, Accept, X-Forwarded-Proto and X-Forwarded-For.
The second entry (2016/05/05 14:24:33 [] 7238#0: *57 [lua] body_filter_by_lua:8:) prints out theresponse from 3scale, in this case: <error code="access_token_invalid">access_token "7c6f24f5" is invalid: expired or never defined</error>.
Both will print out the original request (GET /api/contacts.json?access_token=7c6f24f5) andsubrequest location (/threescale_authrep) as well as the upstream request ( upstream: "https://54.83.62.94:443/transactions/threescale_authrep.xml?provider_key=REDACTED&service_id=REDACTED&usage[hits]=1&access_token=7c6f24f5".)This last value allows you to see which of the 3scale IPs have been resolved and also the exact requestmade to 3scale.
6.3.5. 3scale
6.3.5.1. 1. Is 3scale available?
Check 3scale’s status page or @3scalestatus on Twitter.
6.3.5.2. 2. Is 3scale returning an error?
It is also possible that 3scale is available but is returning an error to your API gateway which wouldprevent calls going through to your API. Try to make the authorization call directly in 3scale and checkthe response. If you get an error, check the #troubleshooting-api-error-codes[Error Codes] section tosee what the issue is.
6.3.5.3. 3. Use the 3scale debug headers
You can also turn on the 3scale debug headers by making a call to your API with the X-3scale-debugheader, example:
curl -v -X GET "https://api.example.com/endpoint?user_key" X-3scale-debug: YOUR_SERVICE_TOKEN
This will return the following headers with the API response:
6.3.5.4. 4. Check the integration errors
You can also check the integration errors on your Admin Portal to check for any issues reporting trafficto 3scale. See https://YOUR_DOMAIN-admin.3scale.net/apiconfig/errors.
One of the reasons for integration errors can be sending credentials in the headers with underscores_in_headers directive not enabled in server block.
6.3.6. Client API gateway
X-3scale-matched-rules: /, /api/contacts.json< X-3scale-credentials: access_token=TOKEN_VALUE< X-3scale-usage: usage[hits]=2< X-3scale-hostname: HOSTNAME_VALUE
CHAPTER 6. TROUBLESHOOTING
87

6.3.6.1. 1. Is the API gateway reachable from the public internet?
Try directing a browser to the IP address (or domain name) of your gateway server. If this fails, ensurethat you have opened the firewall on the relevant ports.
6.3.6.2. 2. Is the API gateway reachable by the client?
If possible, try to connect to the API gateway from the client using one of the methods outlined earlier(telnet, curl, etc.) If the connection fails, the problem lies in the network between the two.
Otherwise, you should move on to troubleshooting the client making the calls to the API.
6.3.7. Client
6.3.7.1. 1. Test the same call using a different client
If a request is not returning the expected result, test with a different HTTP client. For example, if you arecalling an API with a Java HTTP client and you see something wrong, cross-check with cURL.
You can also call the API through a proxy between the client and the gateway to capture the exactparameters and headers being sent by the client.
6.3.7.2. 2. Inspect the traffic sent by client
Use a tool like Wireshark to see the requests being made by the client. This will allow you to identify ifthe client is making calls to the API and the details of the request.
6.4. OTHER ISSUES
6.4.1. ActiveDocs issues
Sometimes calls that work when you call the API from the command line fail when going throughActiveDocs.
To enable ActiveDocs calls to work, we send these out through a proxy on our side. This proxy will addcertain headers that can sometimes cause issues on the API if they are not expected. To identify if this isthe case, try the following steps:
6.4.1.1. 1. Use petstore.swagger.io
Swagger provides a hosted swagger-ui at petstore.swagger.io which you can use to test your Swaggerspec and API going through the latest version of swagger-ui. If both swagger-ui and ActiveDocs fail inthe same way, you can rule out any issues with ActiveDocs or the ActiveDocs proxy and focus thetroubleshooting on your own spec. Alternatively, you can check the swagger-ui GitHub repo for anyknown issues with the current version of swagger-ui.
6.4.1.2. 2. Check that firewall allows connections from ActiveDocs proxy
We recommend to not whitelist IP address for clients using your API. The ActiveDocs proxy uses floatingIP addresses for high availability and there is currently no mechanism to notify of any changes to theseIPs.
6.4.1.3. 3. Call the API with incorrect credentialsOne way to identify whether the ActiveDocs proxy is working correctly is to call your API with invalid
Red Hat 3scale API Management 2.7 Operating 3scale
88
One way to identify whether the ActiveDocs proxy is working correctly is to call your API with invalidcredentials. This will help you to confirm or rule out any problems with both the ActiveDocs proxy andyour API gateway.
If you get a 403 code back from the API call (or from the code you have configured on your gateway forinvalid credentials), the problem lies with your API because the calls are reaching your gateway.
6.4.1.4. 4. Compare calls
To identify any differences in headers and parameters between calls made from ActiveDocs versusoutside of ActiveDocs, it can sometimes be helpful to run your calls through some service (APItools onpremise, Runscope, etc.) that allows you to inspect and compare your HTTP calls before sending themto your API. This will allow you to identify any potential headers and/or parameters in the request thatcould be causing issues on your side.
6.5. APPENDIX
6.5.1. Logging in NGINX
For a comprehensive guide on this, see the NGINX Logging and Monitoring docs.
6.5.1.1. Enabling debugging log
To find out more about enabling debugging log, see the NGINX debugging log documentation .
6.5.2. 3scale error codes
To double-check the error codes that are returned by the 3scale Service Management API endpoints,see the 3scale API Documentation page by following these steps:
1. Click the question mark (?) icon, which is in the upper-right corner of the Admin Portal.
2. Choose 3scale API Docs.
The following is a list HTTP response codes returned by 3scale, and the conditions under which they arereturned:
400: Bad request. This can be because of:
Invalid encoding
Payload too large
Content type is invalid (for POST calls). Valid values for the Content-Type header are: application/x-www-form-urlencoded, multipart/form-data, or empty header.
403:
Credentials are not valid
Sending body data to 3scale for a GET request
404: Non-existent entity referenced, such as applications, metrics, etc.
409:
CHAPTER 6. TROUBLESHOOTING
89

Usage limits exceeded
Application is not active
Application key is invalid or missing (for app_id/app_key authentication method)
Referrer is not allowed or missing (when referrer filters are enabled and required)
422: Missing required parameters
Most of these error responses will also contain an XML body with a machine readable error category anda human readable explanation.
When using the standard API gateway configuration, any return code different from 200 provided by3scale can result in a response to the client with one of the following codes:
403
404
Red Hat 3scale API Management 2.7 Operating 3scale
90