Embed Size (px)
Citation preview

Records and Information Management IT - Enterprise Content Management
SPIDR II
Global FeaturesReference Guide
April 2013

Page 2
Table of Contents
Content Page
SPIDR II New Features 3Document Distribution Flow _________________________________________________4Feature of Distribution _____________________________________________________ 5Document Distribution E-Mail Notification ______________________________________ 6File Distribution Report _____________________________________________________7Outlook Integration _______________________________________________________ 8Address Book Management _________________________________________________ 9E-mail Template Management _______________________________________________11Questions/Feedback/Issue Reporting _________________________________________ 12
Page 3
The following new features are being introduced in SPIDR II effective….
1. Document Distribution2. File Distribution Report3. Outlook Integration4. Address Book Management5. E-mail Template Management
SPIDR II - New Features

Page 4
Document Distribution Flow
Distributing Documents from SPIDR II
Wa
term
ark
Wa
term
ark
No
Wa
term
ark
No
Wa
term
ark
Process Flow Diagram
1. Enter search criteria to run a
query
2. From Search results, select docs
and click Add to Clipboard
3. Click on the Clipboard icon to view Clipboard
6. System sends email notification to recipient(s) with link
to document(s)
5. From the Distribute page, fill out the email form
and click Send
4. From the Clipboard page, select docs and click Distribute
1. Enter search criteria to run a
query
2. From Search Results, click Apply Watermark to enter text. Click on the
Adobe Icon to preview watermark.
3. Select docs and click Add to Clipboard
4. Click on the Clipboard icon to view Clipboard
5. From the Clipboard page, select docs and click Distribute
6. From the Distribute page, fill out the email form
and click Send
7. System sends email notification to recipient(s) with link
to document(s)
To send documents with different watermark text, repeat steps 1 – 3 until you have added all documents to clipboard. Be sure to toggle between Apply Watermark and Reset Watermark button to apply new watermark text.
Page 5
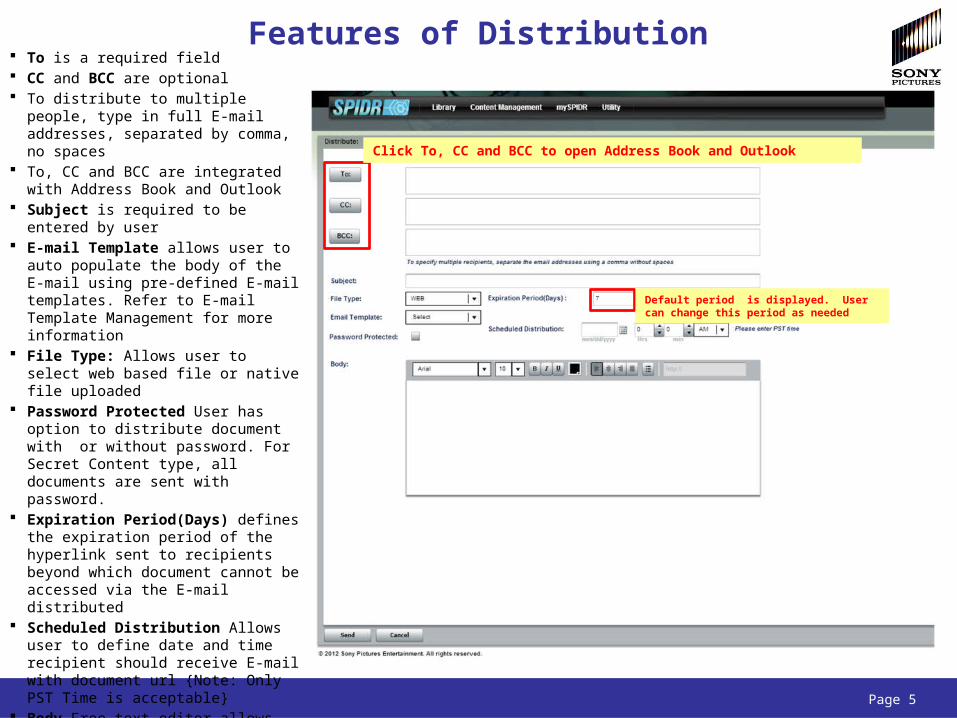
To is a required field CC and BCC are optional To distribute to multiple people, type
in full E-mail addresses, separated by comma, no spaces
To, CC and BCC are integrated with Address Book and Outlook
Subject is required to be entered by user
E-mail Template allows user to auto populate the body of the E-mail using pre-defined E-mail templates. Refer to E-mail Template Management for more information
File Type: Allows user to select web based file or native file uploaded
Password Protected User has option to distribute document with or without password. For Secret Content type, all documents are sent with password.
Expiration Period(Days) defines the expiration period of the hyperlink sent to recipients beyond which document cannot be accessed via the E-mail distributed
Scheduled Distribution Allows user to define date and time recipient should receive E-mail with document url {Note: Only PST Time is acceptable}
Body Free text editor allows user to edit the body of E-mail
Features of Distribution
Click To, CC and BCC to open Address Book and Outlook
Default period is displayed. User can change this period as needed
Page 6
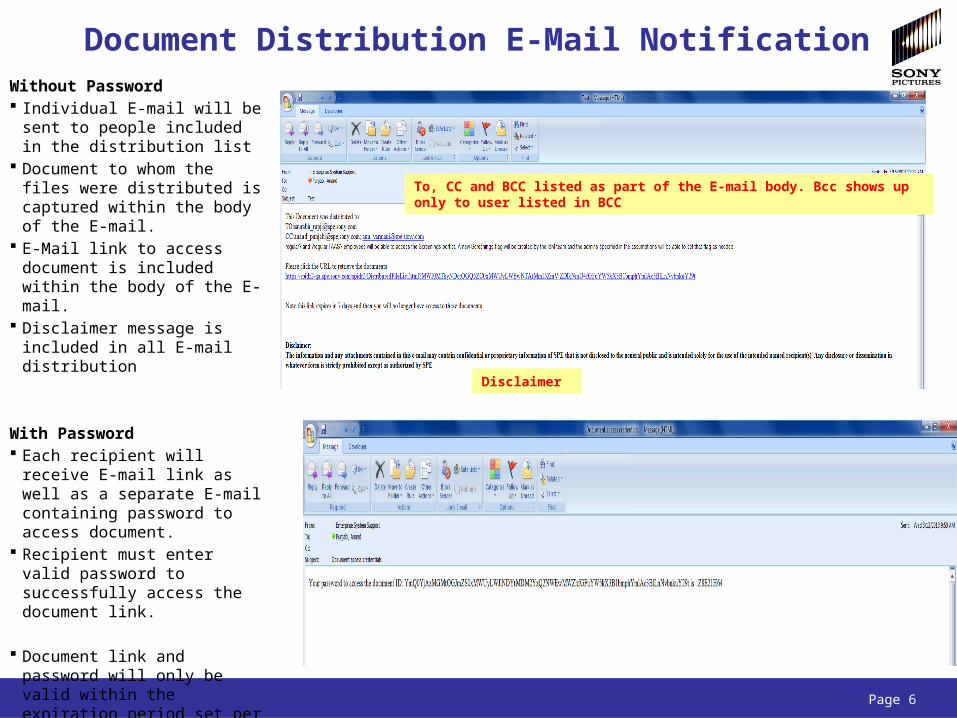
Without Password Individual E-mail will be sent
to people included in the distribution list
Document to whom the files were distributed is captured within the body of the E-mail.
E-Mail link to access document is included within the body of the E-mail.
Disclaimer message is included in all E-mail distribution
With Password Each recipient will receive E-
mail link as well as a separate E-mail containing password to access document.
Recipient must enter valid password to successfully access the document link.
Document link and password will only be valid within the expiration period set per distribution
Document Distribution E-Mail Notification
To, CC and BCC listed as part of the E-mail body. Bcc shows up only to user listed in BCC
Disclaimer

Page 7
File Distribution Report tracks the files that are distributed from SPIDR II including E-mail Date, Sender E-mail Address, Recipient E-mail Address, Extract Date, Title, File Name and Watermark text.
From the global navigation, select Library -> Reports
Select File Distribution Report tab
Enter search criteria to run the query
Report Results will appear Adjust the divider to view
Search Criteria and Results on the same page
Extract Date tracks the date and time when each and every recipient opens the document url link that was distributed to them
File Distribution Report

Page 8
SPIDR II is now integrated with Outlook SPE Address Book.
Integration is available to users in two areas:
– Document Distribution Screen– Add New Member to Group in
Address Book
Document Distribution Screen– Click on To, CC or BCC to open
Contacts selection screen– Select Outlook Contacts Radio
Button– Search by either First Name/Last
Name or Company – Click on Search button to
continue– Pop up requesting Username and
Password appears– Enter your IDM credentials to
retrieve contacts from Outlook
Add New Member to Group in Address Book
– Select Address Book from Utility in Global Navigation
– Select Group Address Book– Select New Group– Select Add Member– Contacts Screen opens up where
user can access Outlook to add contacts
Outlook Integration
Click To, CC and BCC to open Address Book and Outlook
IDM User Name and Password

Page 9
Address Book Management allows user to define their address book and leverage it during distribution.
–Address Book can be accessed via the Utility drop down on the Global Navigation
Individual Address Book Search for a contact by either First Name, Last Name or Company Name. Individual Address Book allows user to create, edit, copy, delete and export (to Excel) contacts. Deleting a contact from Individual Address Book deletes that contact from all groups in Group Address Book– Click on New Contact to open New Contact Screen– Within the Individual Contact form, one of the three fields is required: Last Name, First Name or Company.– All other fields are optional
Address Book Management

Page 10
Group Address Book Group Address Book allows users to
define Groups that can be leverage during distribution
Users can create, edit, delete and export to Excel group contacts– Click on New Group to create a New group,
pop up allows you to define group name, comments and Add members to a group.
– Add members opens up contacts screen popup allowing users to add from individual contacts, combine groups and import outlook contacts
If E-mail is provided for an Individual contact and added to the group address book, group address book will display E-mail as either
–Last Name <E-mail address>–First Name <E-mail address>–Last Name, First Name <E-mail address> or,–Company <E-mail address>
If E-mail is not provided for an Individual contact and added to the group address book, group address book will display E-mail as either
–Last Name <>–First Name <>–Last Name, First Name <> or,–Company <>
Address Book Management

Page 11
E-mail Template Management allows users to define e-mail templates that can be leveraged during distribution.
Two key features of e-mail templates include: 1. Content Owners can set default standard templates that can be utilized by all users of the content type. 2. Individual users can define their own templates From Global Navigation, select Utility > E-Mail Template On the E-mail templates page, templates highlighted in red are default templates defined by Content owner. Templates listed in black ones are user defined templates.
– Select New Template to open Create template screen. User can input name, description and body of the E-mail template– Content owner can flag a default standard template by selecting the check box below the Body . – Only content owner can edit and delete default standard templates
These templates can be used to auto populate the body of the E-mail during document distribution
E-mail Template Management

Page 12
If you have any questions regarding the SPIDR II orrequire the SPIDR II team to provide training, please contact:
Global Service Desk (GSD) via E-mail at [email protected]
Calling from the US: (310) 244-2188 or (877) SPE-SONY (773-7669) Calling from Europe: +44(0)20-7533-1439 or +800-SONY-1111
Questions/Training Required