Embed Size (px)
Citation preview
Recording Lectures and Tutorials using Camtasia Relay & Ink2Go
Centre for Development of Teaching and Learning (CDTL) National University of Singapore email: [email protected]
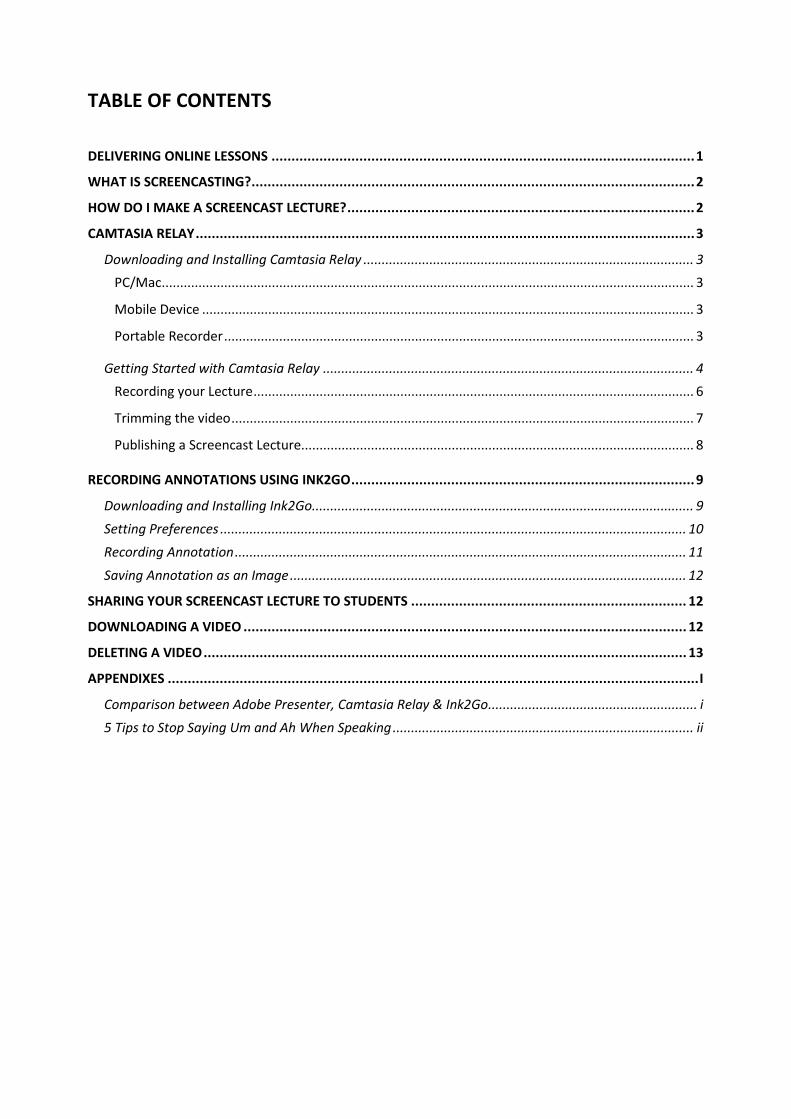
TABLE OF CONTENTS DELIVERING ONLINE LESSONS .......................................................................................................... 1
WHAT IS SCREENCASTING? ............................................................................................................... 2
HOW DO I MAKE A SCREENCAST LECTURE? ....................................................................................... 2
CAMTASIA RELAY ............................................................................................................................. 3
Downloading and Installing Camtasia Relay .......................................................................................... 3 PC/Mac ................................................................................................................................................. 3
Mobile Device ...................................................................................................................................... 3
Portable Recorder ................................................................................................................................ 3
Getting Started with Camtasia Relay ..................................................................................................... 4 Recording your Lecture ........................................................................................................................ 6
Trimming the video .............................................................................................................................. 7
Publishing a Screencast Lecture........................................................................................................... 8
RECORDING ANNOTATIONS USING INK2GO ...................................................................................... 9
Downloading and Installing Ink2Go ........................................................................................................ 9 Setting Preferences ............................................................................................................................... 10 Recording Annotation ........................................................................................................................... 11
Saving Annotation as an Image ............................................................................................................ 12
SHARING YOUR SCREENCAST LECTURE TO STUDENTS ..................................................................... 12
DOWNLOADING A VIDEO ............................................................................................................... 12
DELETING A VIDEO ......................................................................................................................... 13
APPENDIXES ..................................................................................................................................... I
Comparison between Adobe Presenter, Camtasia Relay & Ink2Go ......................................................... i 5 Tips to Stop Saying Um and Ah When Speaking .................................................................................. ii
1 Recording Lectures and Tutorials using Camtasia Relay & Ink2Go Charina Ong email: [email protected] Centre for Development of Teaching and Learning
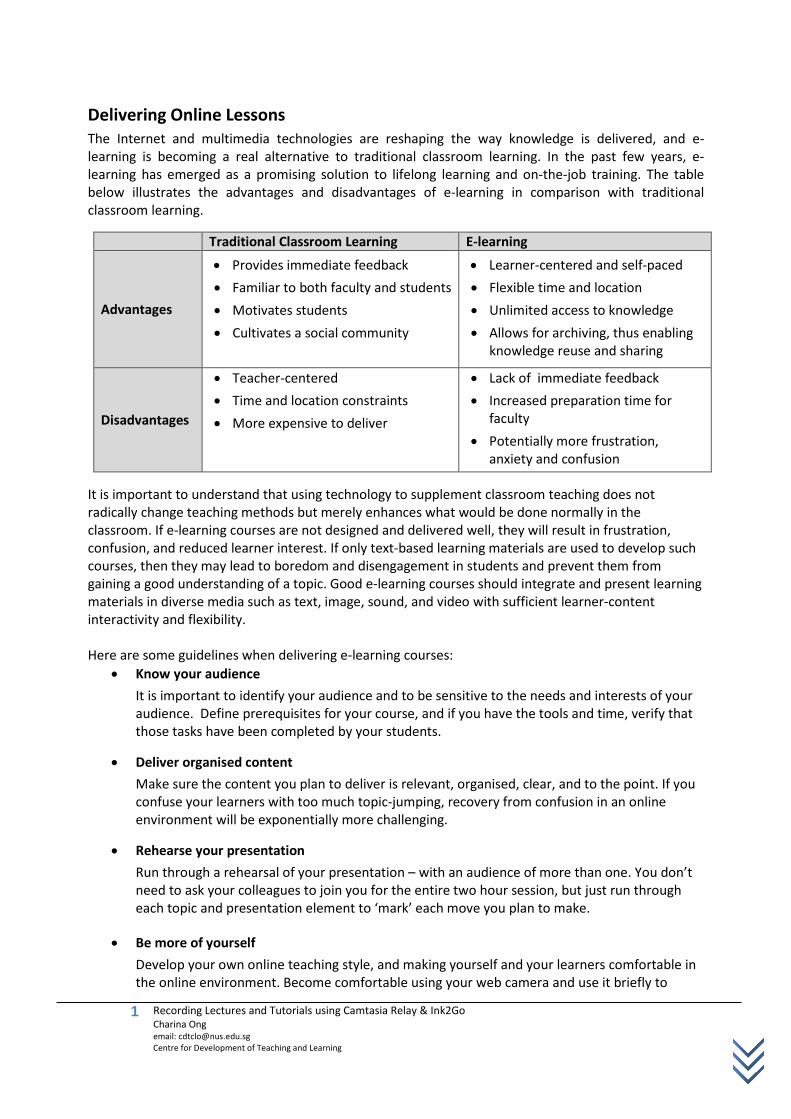
Delivering Online Lessons The Internet and multimedia technologies are reshaping the way knowledge is delivered, and e-learning is becoming a real alternative to traditional classroom learning. In the past few years, e-learning has emerged as a promising solution to lifelong learning and on-the-job training. The table below illustrates the advantages and disadvantages of e-learning in comparison with traditional classroom learning.
Traditional Classroom Learning E-learning
Advantages
• Provides immediate feedback • Familiar to both faculty and students • Motivates students • Cultivates a social community
• Learner-centered and self-paced • Flexible time and location • Unlimited access to knowledge • Allows for archiving, thus enabling
knowledge reuse and sharing
Disadvantages
• Teacher-centered • Time and location constraints • More expensive to deliver
• Lack of immediate feedback • Increased preparation time for
faculty • Potentially more frustration,
anxiety and confusion It is important to understand that using technology to supplement classroom teaching does not radically change teaching methods but merely enhances what would be done normally in the classroom. If e-learning courses are not designed and delivered well, they will result in frustration, confusion, and reduced learner interest. If only text-based learning materials are used to develop such courses, then they may lead to boredom and disengagement in students and prevent them from gaining a good understanding of a topic. Good e-learning courses should integrate and present learning materials in diverse media such as text, image, sound, and video with sufficient learner-content interactivity and flexibility. Here are some guidelines when delivering e-learning courses:
• Know your audience It is important to identify your audience and to be sensitive to the needs and interests of your audience. Define prerequisites for your course, and if you have the tools and time, verify that those tasks have been completed by your students.
• Deliver organised content Make sure the content you plan to deliver is relevant, organised, clear, and to the point. If you confuse your learners with too much topic-jumping, recovery from confusion in an online environment will be exponentially more challenging.
• Rehearse your presentation Run through a rehearsal of your presentation – with an audience of more than one. You don’t need to ask your colleagues to join you for the entire two hour session, but just run through each topic and presentation element to ‘mark’ each move you plan to make.
• Be more of yourself Develop your own online teaching style, and making yourself and your learners comfortable in the online environment. Become comfortable using your web camera and use it briefly to
2 Recording Lectures and Tutorials using Camtasia Relay & Ink2Go Charina Ong email: [email protected] Centre for Development of Teaching and Learning
introduce yourself, and to bring a personal feel to the room. Provide your audience with some suggestions and ground rules for how to interact in your classroom.
• Deliver meaningful fun Use multimedia, flash animations and games that are specifically designed to augment the learning experience and help meet the goals of your class.
What is Screencasting? A screencast is a digital video recording that captures actions taking place on a computer screen. It is also known as a video screen capture and often contains voice-over narration. Screencast lectures are useful to:
• Demonstrate how something works (e.g. how to use specific operating systems, software applications or lab experiment)
• Answer often-asked questions, just in time help
• Allow users to refresh their knowledge as often as they wish with the help of 'play-stop-pause-rewind' functionality.
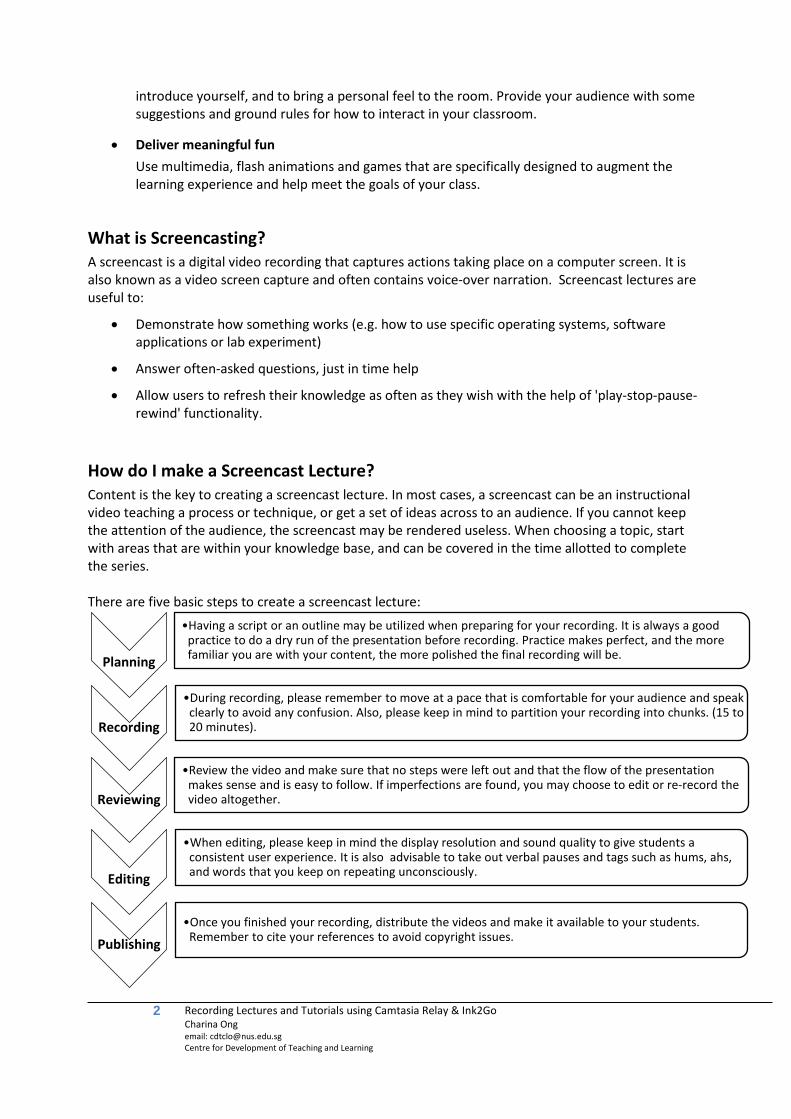
How do I make a Screencast Lecture? Content is the key to creating a screencast lecture. In most cases, a screencast can be an instructional video teaching a process or technique, or get a set of ideas across to an audience. If you cannot keep the attention of the audience, the screencast may be rendered useless. When choosing a topic, start with areas that are within your knowledge base, and can be covered in the time allotted to complete the series. There are five basic steps to create a screencast lecture:
Planning
•Having a script or an outline may be utilized when preparing for your recording. It is always a good practice to do a dry run of the presentation before recording. Practice makes perfect, and the more familiar you are with your content, the more polished the final recording will be.
Recording
•During recording, please remember to move at a pace that is comfortable for your audience and speak clearly to avoid any confusion. Also, please keep in mind to partition your recording into chunks. (15 to 20 minutes).
Reviewing
•Review the video and make sure that no steps were left out and that the flow of the presentation makes sense and is easy to follow. If imperfections are found, you may choose to edit or re-record the video altogether.
Editing
•When editing, please keep in mind the display resolution and sound quality to give students a consistent user experience. It is also advisable to take out verbal pauses and tags such as hums, ahs, and words that you keep on repeating unconsciously.
Publishing •Once you finished your recording, distribute the videos and make it available to your students.
Remember to cite your references to avoid copyright issues.
3 Recording Lectures and Tutorials using Camtasia Relay & Ink2Go Charina Ong email: [email protected] Centre for Development of Teaching and Learning
Camtasia Relay Camtasia Relay is a lecture recording application that allows you to capture any movement on the screen with audio narration.
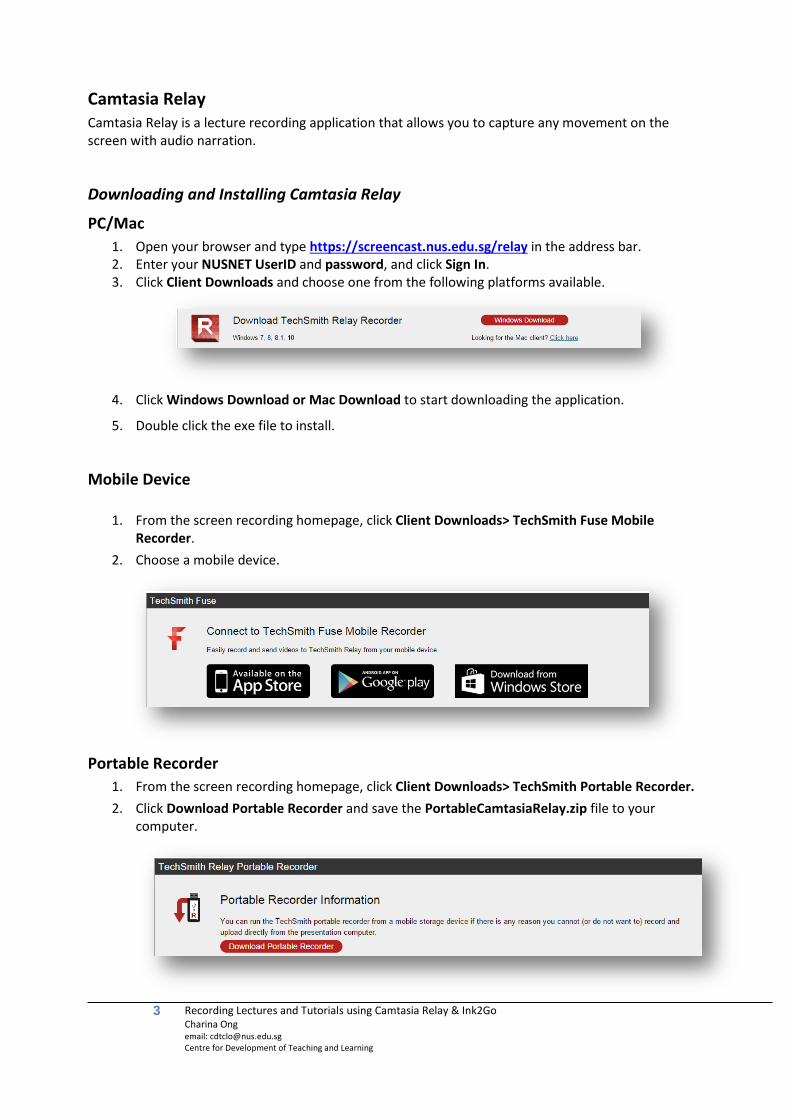
Downloading and Installing Camtasia Relay
PC/Mac 1. Open your browser and type https://screencast.nus.edu.sg/relay in the address bar. 2. Enter your NUSNET UserID and password, and click Sign In. 3. Click Client Downloads and choose one from the following platforms available.
4. Click Windows Download or Mac Download to start downloading the application.
5. Double click the exe file to install.
Mobile Device
1. From the screen recording homepage, click Client Downloads> TechSmith Fuse Mobile Recorder.
2. Choose a mobile device.
Portable Recorder 1. From the screen recording homepage, click Client Downloads> TechSmith Portable Recorder. 2. Click Download Portable Recorder and save the PortableCamtasiaRelay.zip file to your
computer.
4 Recording Lectures and Tutorials using Camtasia Relay & Ink2Go Charina Ong email: [email protected] Centre for Development of Teaching and Learning
3. Locate and open the saved .zip file. 4. Copy all files from the .zip file onto the mobile storage device. All files from the .zip folder need
to be copied to the root of the device.
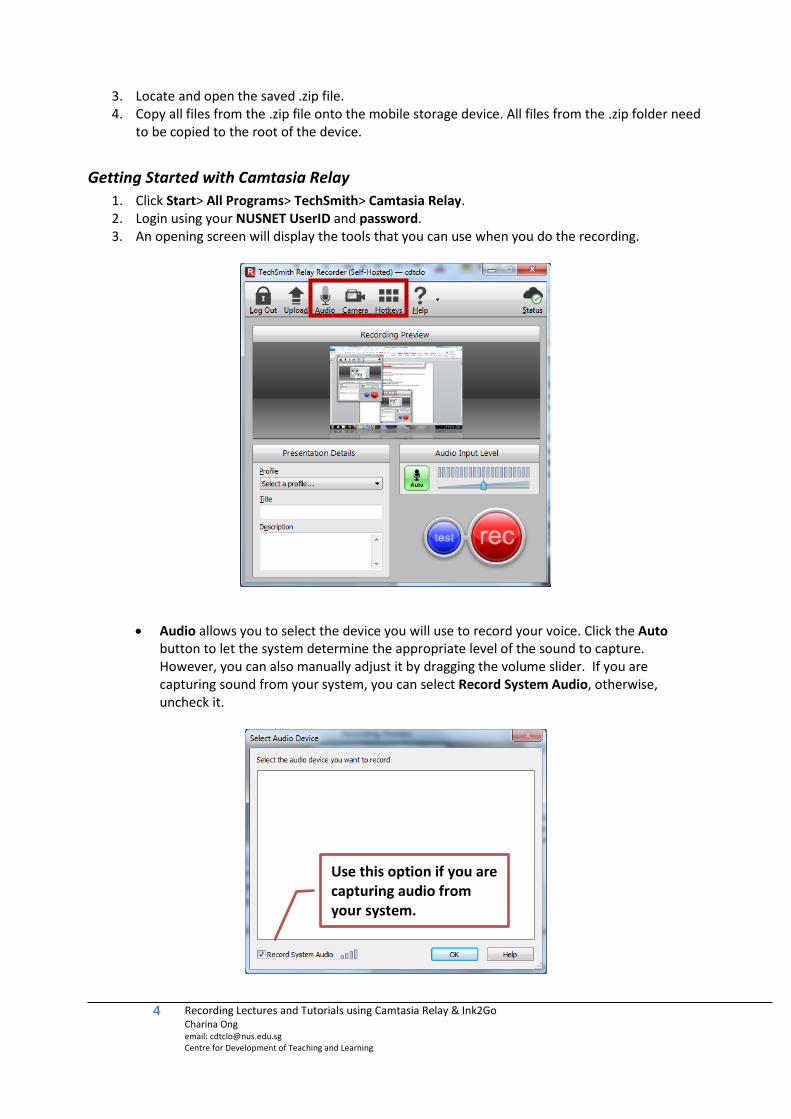
Getting Started with Camtasia Relay 1. Click Start> All Programs> TechSmith> Camtasia Relay. 2. Login using your NUSNET UserID and password. 3. An opening screen will display the tools that you can use when you do the recording.
• Audio allows you to select the device you will use to record your voice. Click the Auto button to let the system determine the appropriate level of the sound to capture. However, you can also manually adjust it by dragging the volume slider. If you are capturing sound from your system, you can select Record System Audio, otherwise, uncheck it.
Use this option if you are capturing audio from your system.
5 Recording Lectures and Tutorials using Camtasia Relay & Ink2Go Charina Ong email: [email protected] Centre for Development of Teaching and Learning
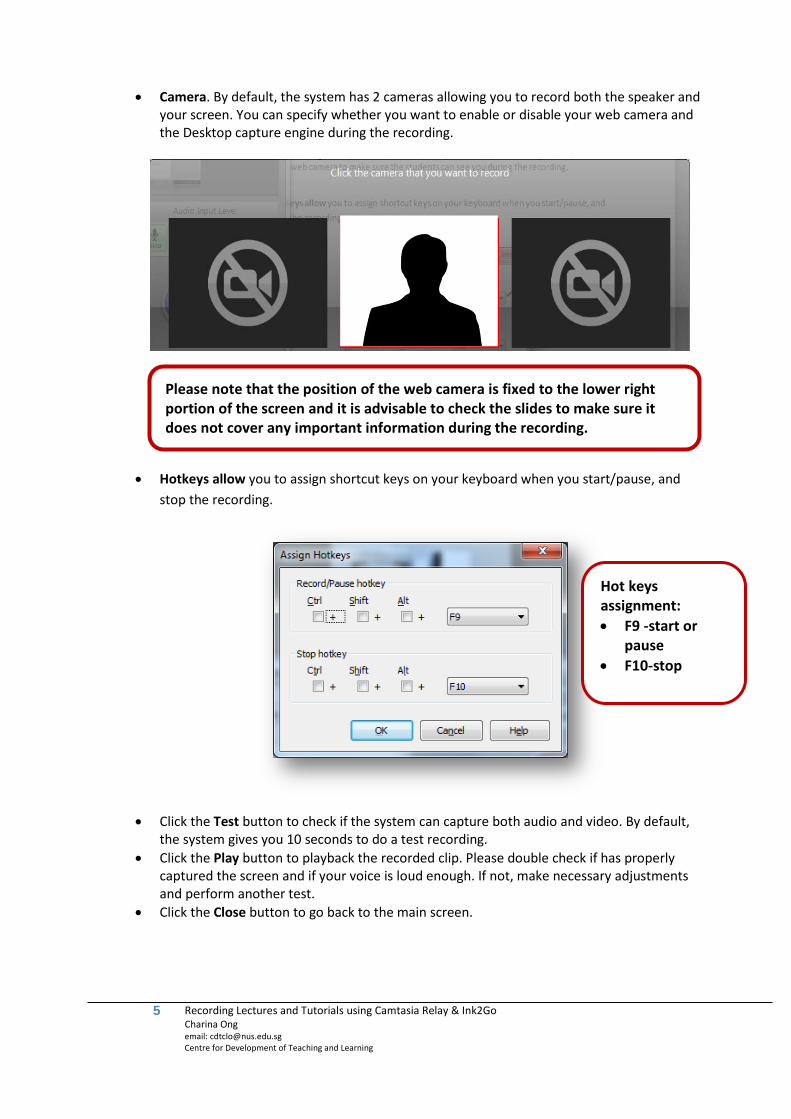
• Camera. By default, the system has 2 cameras allowing you to record both the speaker and your screen. You can specify whether you want to enable or disable your web camera and the Desktop capture engine during the recording.
• Hotkeys allow you to assign shortcut keys on your keyboard when you start/pause, and stop the recording.
• Click the Test button to check if the system can capture both audio and video. By default, the system gives you 10 seconds to do a test recording.
• Click the Play button to playback the recorded clip. Please double check if has properly captured the screen and if your voice is loud enough. If not, make necessary adjustments and perform another test.
• Click the Close button to go back to the main screen.
Hot keys assignment: • F9 -start or
pause • F10-stop
Please note that the position of the web camera is fixed to the lower right portion of the screen and it is advisable to check the slides to make sure it does not cover any important information during the recording.
6 Recording Lectures and Tutorials using Camtasia Relay & Ink2Go Charina Ong email: [email protected] Centre for Development of Teaching and Learning
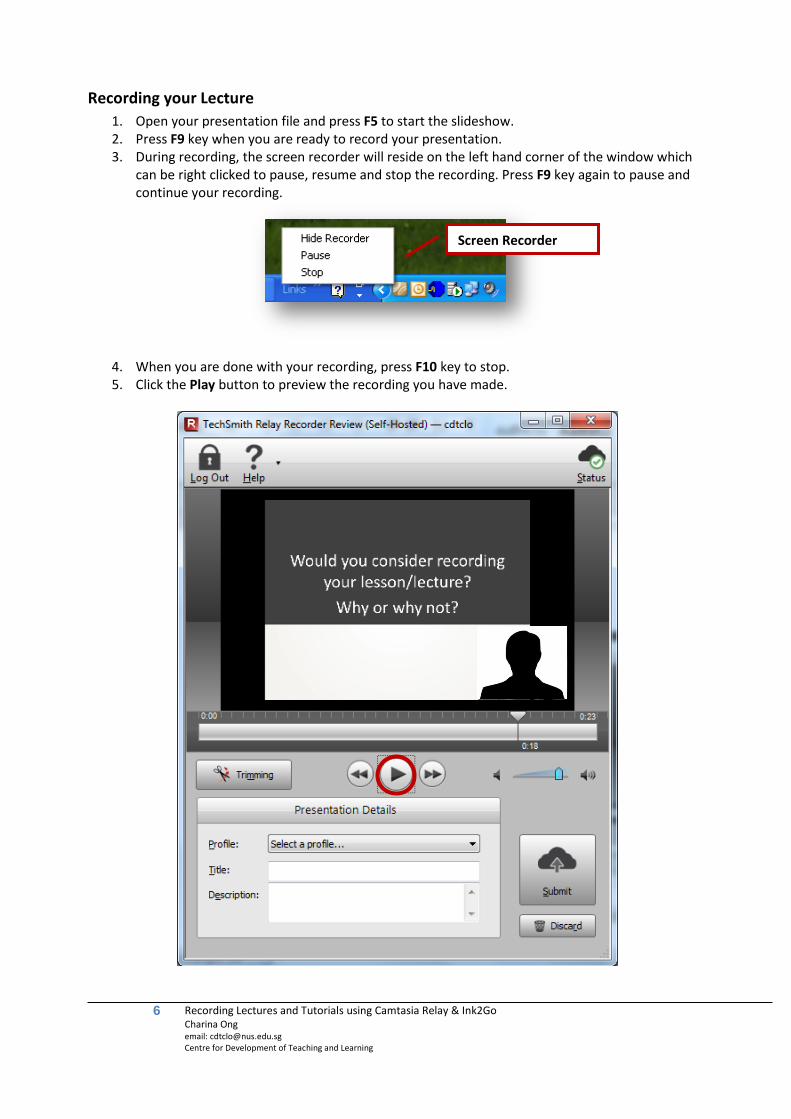
Recording your Lecture 1. Open your presentation file and press F5 to start the slideshow. 2. Press F9 key when you are ready to record your presentation. 3. During recording, the screen recorder will reside on the left hand corner of the window which
can be right clicked to pause, resume and stop the recording. Press F9 key again to pause and continue your recording.
4. When you are done with your recording, press F10 key to stop. 5. Click the Play button to preview the recording you have made.
Screen Recorder
7 Recording Lectures and Tutorials using Camtasia Relay & Ink2Go Charina Ong email: [email protected] Centre for Development of Teaching and Learning
Trimming the video You can perform minimal editing on the final screen recording, by trimming out unnecessary pauses at the start and at the end of the recording. To remove unnecessary parts of the video:
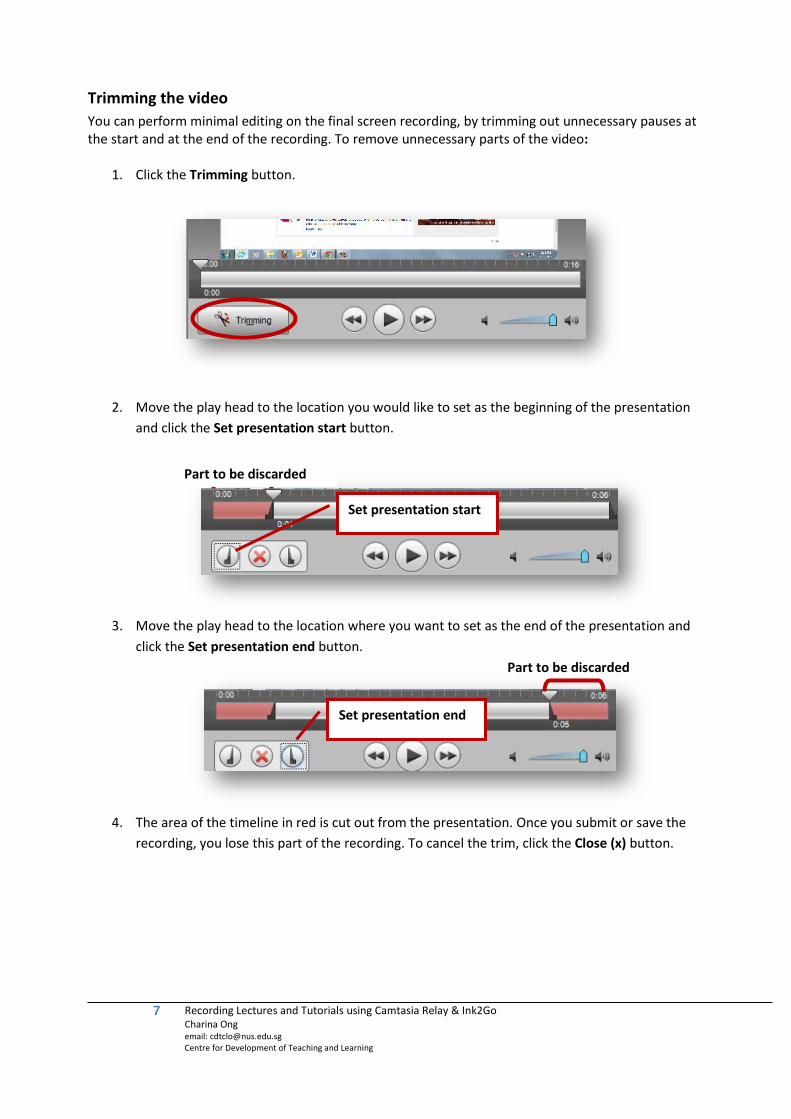
1. Click the Trimming button.
2. Move the play head to the location you would like to set as the beginning of the presentation and click the Set presentation start button.
3. Move the play head to the location where you want to set as the end of the presentation and
click the Set presentation end button.
4. The area of the timeline in red is cut out from the presentation. Once you submit or save the
recording, you lose this part of the recording. To cancel the trim, click the Close (x) button.
Set presentation start
Set presentation end
Part to be discarded
Part to be discarded
8 Recording Lectures and Tutorials using Camtasia Relay & Ink2Go Charina Ong email: [email protected] Centre for Development of Teaching and Learning
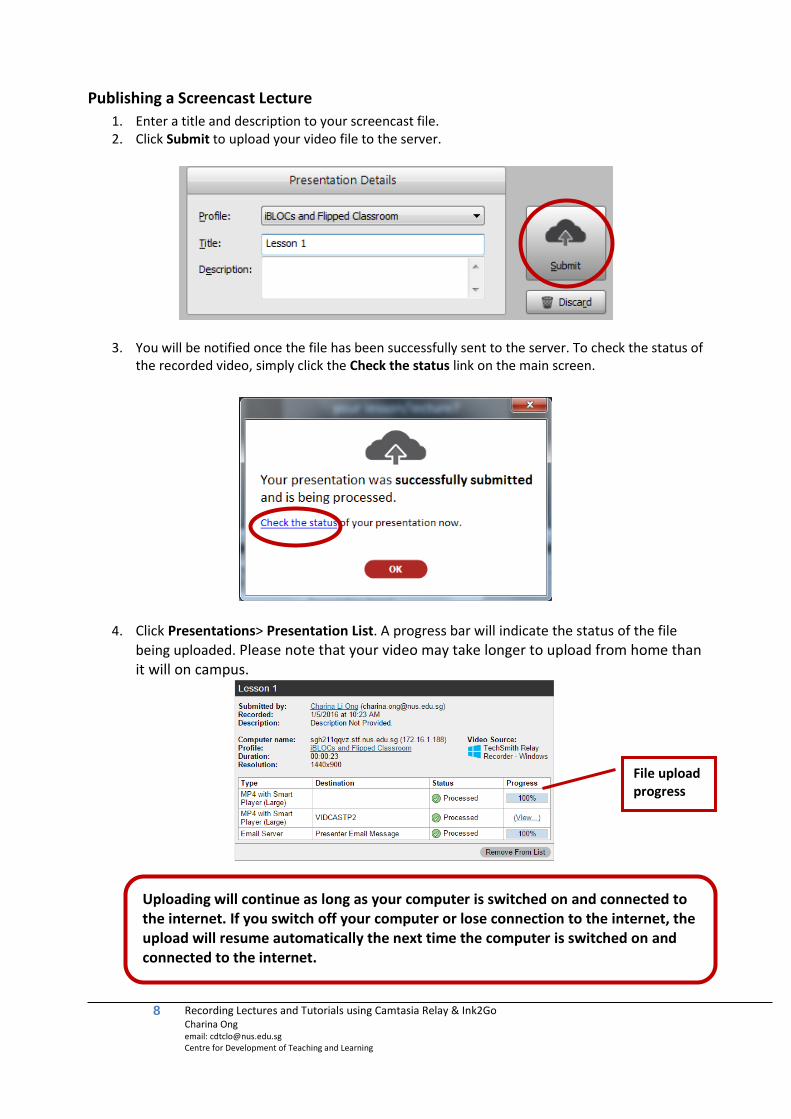
Publishing a Screencast Lecture 1. Enter a title and description to your screencast file. 2. Click Submit to upload your video file to the server.
3. You will be notified once the file has been successfully sent to the server. To check the status of the recorded video, simply click the Check the status link on the main screen.
4. Click Presentations> Presentation List. A progress bar will indicate the status of the file being uploaded. Please note that your video may take longer to upload from home than it will on campus.
File upload progress
Uploading will continue as long as your computer is switched on and connected to the internet. If you switch off your computer or lose connection to the internet, the upload will resume automatically the next time the computer is switched on and connected to the internet.
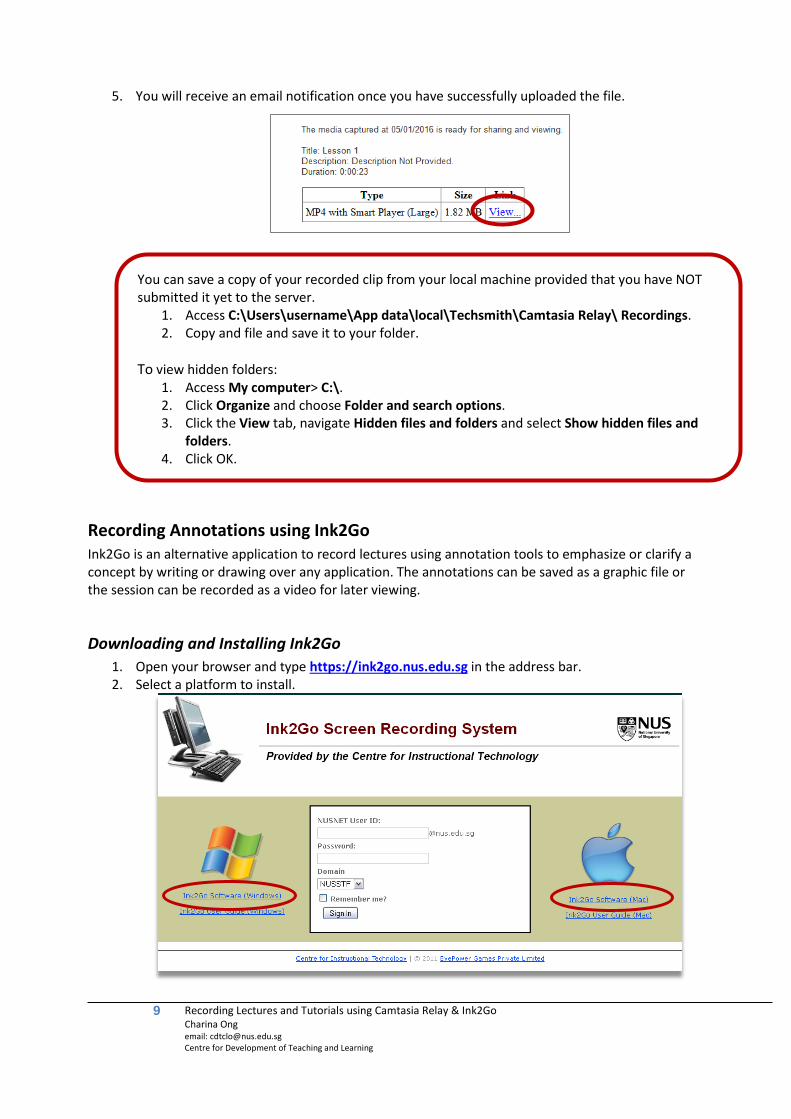
9 Recording Lectures and Tutorials using Camtasia Relay & Ink2Go Charina Ong email: [email protected] Centre for Development of Teaching and Learning
5. You will receive an email notification once you have successfully uploaded the file.
Recording Annotations using Ink2Go Ink2Go is an alternative application to record lectures using annotation tools to emphasize or clarify a concept by writing or drawing over any application. The annotations can be saved as a graphic file or the session can be recorded as a video for later viewing.
Downloading and Installing Ink2Go 1. Open your browser and type https://ink2go.nus.edu.sg in the address bar. 2. Select a platform to install.
You can save a copy of your recorded clip from your local machine provided that you have NOT submitted it yet to the server.
1. Access C:\Users\username\App data\local\Techsmith\Camtasia Relay\ Recordings. 2. Copy and file and save it to your folder.
To view hidden folders:
1. Access My computer> C:\. 2. Click Organize and choose Folder and search options. 3. Click the View tab, navigate Hidden files and folders and select Show hidden files and
folders. 4. Click OK.
10 Recording Lectures and Tutorials using Camtasia Relay & Ink2Go Charina Ong email: [email protected] Centre for Development of Teaching and Learning
3. Enter your NUSNET UserID and password when prompted. 4. Choose a folder to save the application 5. Double click the exe file to start the installation.
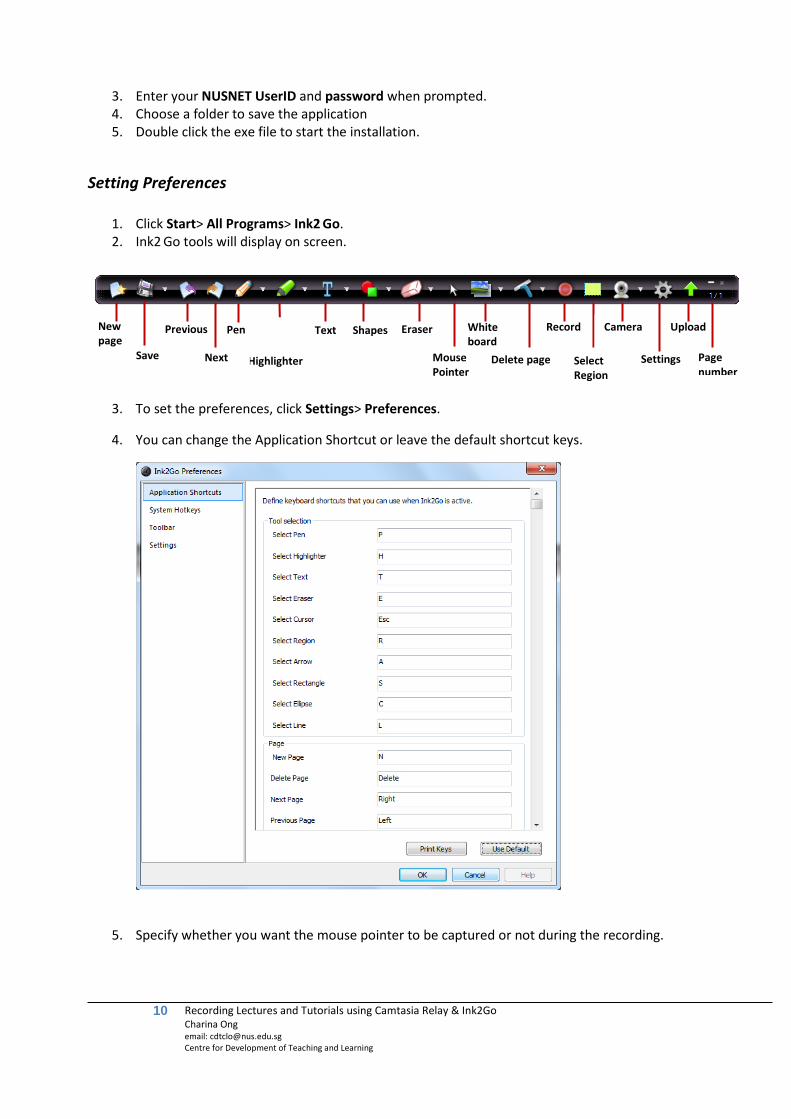
Setting Preferences
1. Click Start> All Programs> Ink2 Go. 2. Ink2 Go tools will display on screen.
3. To set the preferences, click Settings> Preferences.
4. You can change the Application Shortcut or leave the default shortcut keys.
5. Specify whether you want the mouse pointer to be captured or not during the recording.
Highlighter Delete page
New page
Save
Previous
Next
Pen Eraser
Mouse Pointer
White board
Record
Select Region
Camera
Page number
Shapes Text
Settings
Upload
11 Recording Lectures and Tutorials using Camtasia Relay & Ink2Go Charina Ong email: [email protected] Centre for Development of Teaching and Learning
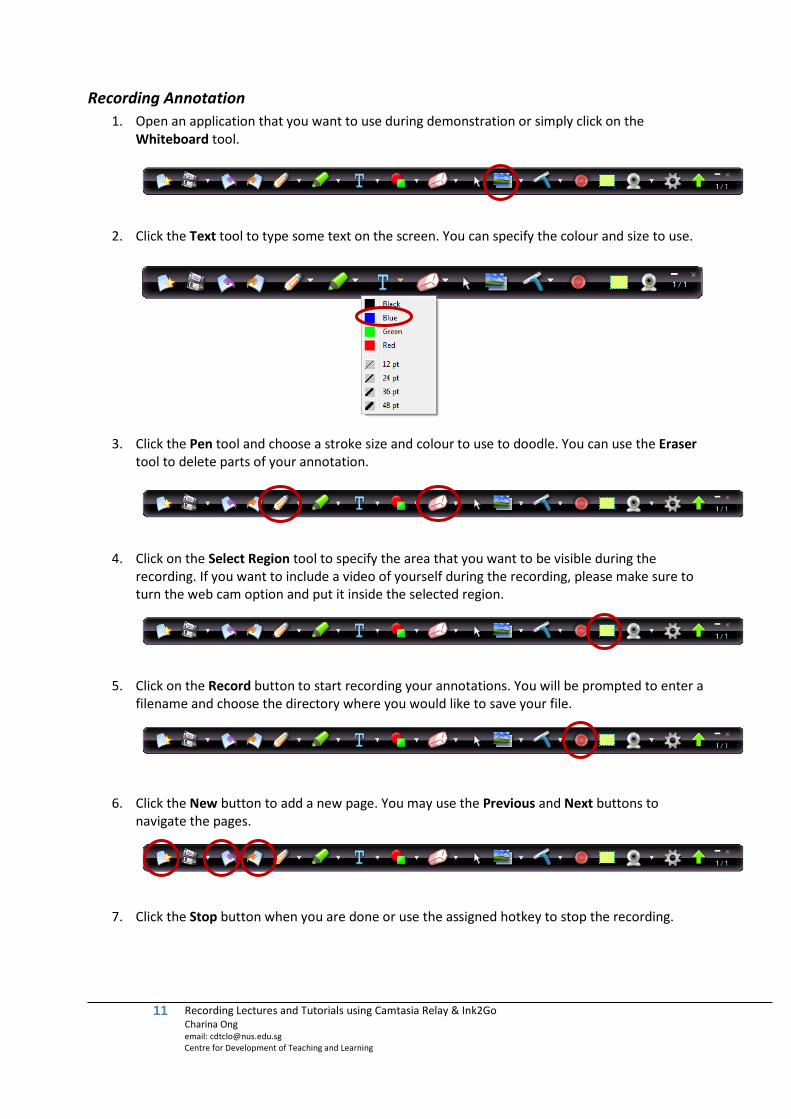
Recording Annotation 1. Open an application that you want to use during demonstration or simply click on the
Whiteboard tool.
2. Click the Text tool to type some text on the screen. You can specify the colour and size to use.
3. Click the Pen tool and choose a stroke size and colour to use to doodle. You can use the Eraser tool to delete parts of your annotation.
4. Click on the Select Region tool to specify the area that you want to be visible during the recording. If you want to include a video of yourself during the recording, please make sure to turn the web cam option and put it inside the selected region.
5. Click on the Record button to start recording your annotations. You will be prompted to enter a filename and choose the directory where you would like to save your file.
6. Click the New button to add a new page. You may use the Previous and Next buttons to navigate the pages.
7. Click the Stop button when you are done or use the assigned hotkey to stop the recording.

12 Recording Lectures and Tutorials using Camtasia Relay & Ink2Go Charina Ong email: [email protected] Centre for Development of Teaching and Learning
Saving Annotation as an Image 1. Go to the page where you want to save the annotation and then click the Save button.
2. Choose the directory where you would like to save your file. 3. Enter a filename and the file format (jpeg, png, gif, or bitmap) and then click Save.
Sharing your Screencast Lecture to students 1. Login to IVLE using your NUSNET UserID and password. 2. Click Resource Banks> Multimedia Bank 3. Click Create Folder. 4. Enter a title and then click Save. 5. To share the web link to your students, click Files from Multimedia Bank. 6. Select Web Links> Add Media Web Link.
7. Enter a title and the media URL. 8. Under the Link to Multimedia, select your module. 9. Click Save. 10. Click the link to test.
Downloading a Video 1. From the Workspace, click Others> Screencast. 2. On the left navigation, select Camtasia Relay or Ink2Go. 3. A list of the recorded lectures will be displayed on screen, select the file that you would like to
download and click the DL button.
4. Save the zip file into your local machine. 5. Extract the zip file from your local drive to view the MP4 and SWF format. Students can copy
the MP4 file straight to their portable media player.
13 Recording Lectures and Tutorials using Camtasia Relay & Ink2Go Charina Ong email: [email protected] Centre for Development of Teaching and Learning
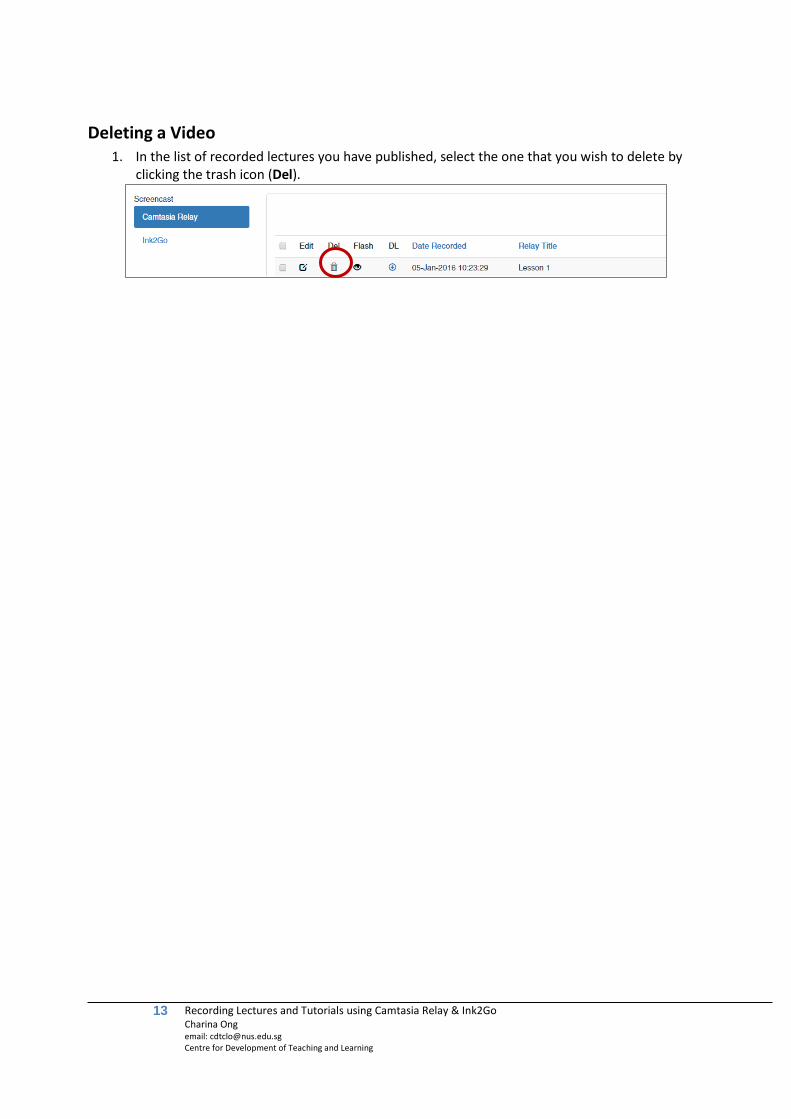
Deleting a Video 1. In the list of recorded lectures you have published, select the one that you wish to delete by
clicking the trash icon (Del).
i Recording Lectures and Tutorials using Camtasia Relay & Ink2Go Charina Ong email: [email protected] Centre for Development of Teaching and Learning
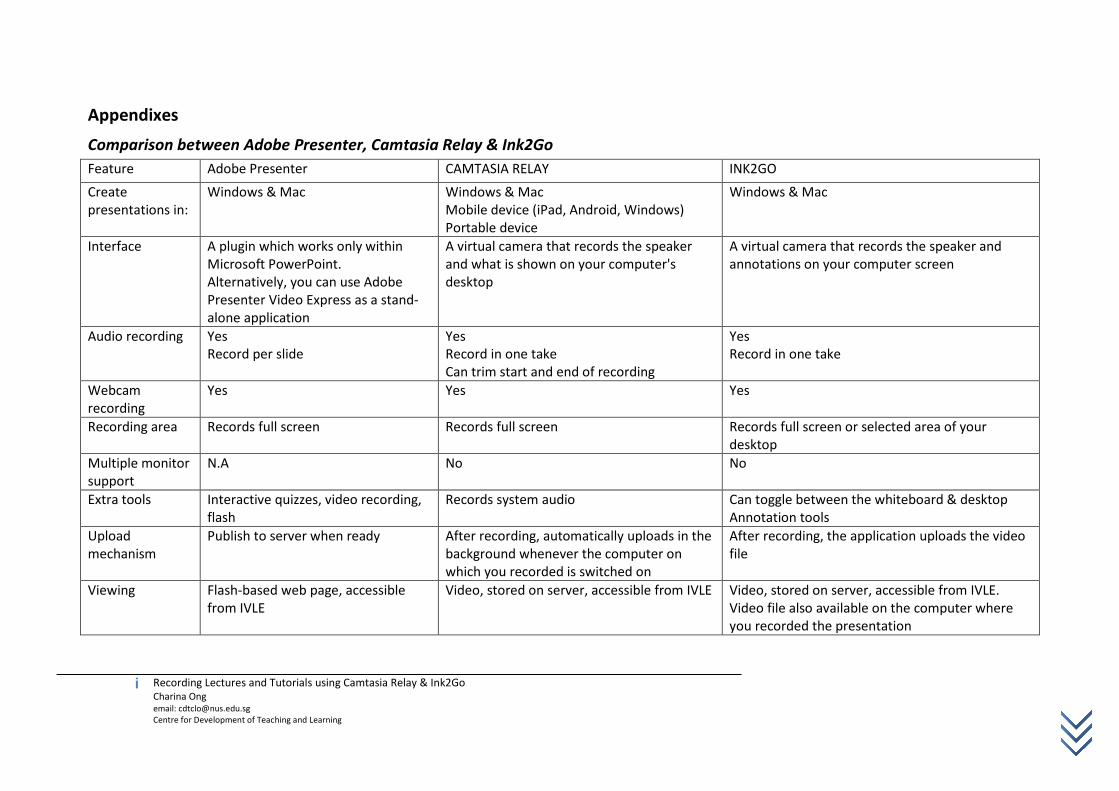
Appendixes Comparison between Adobe Presenter, Camtasia Relay & Ink2Go Feature Adobe Presenter CAMTASIA RELAY INK2GO
Create presentations in:
Windows & Mac
Windows & Mac Mobile device (iPad, Android, Windows) Portable device
Windows & Mac
Interface A plugin which works only within Microsoft PowerPoint. Alternatively, you can use Adobe Presenter Video Express as a stand-alone application
A virtual camera that records the speaker and what is shown on your computer's desktop
A virtual camera that records the speaker and annotations on your computer screen
Audio recording Yes Record per slide
Yes Record in one take Can trim start and end of recording
Yes Record in one take
Webcam recording
Yes Yes Yes
Recording area Records full screen Records full screen Records full screen or selected area of your desktop
Multiple monitor support
N.A No No
Extra tools Interactive quizzes, video recording, flash
Records system audio Can toggle between the whiteboard & desktop Annotation tools
Upload mechanism
Publish to server when ready
After recording, automatically uploads in the background whenever the computer on which you recorded is switched on
After recording, the application uploads the video file
Viewing Flash-based web page, accessible from IVLE
Video, stored on server, accessible from IVLE Video, stored on server, accessible from IVLE. Video file also available on the computer where you recorded the presentation

ii Recording Lectures and Tutorials using Camtasia Relay & Ink2Go Charina Ong email: [email protected] Centre for Development of Teaching and Learning
5 Tips to Stop Saying Um and Ah When Speaking One of the common problems when delivering a talk is how to avoid verbal pauses. This includes “ums and uhs” , “like,” “you know,” and among others. You can find below some suggestions on how to get past the ums so your message comes through loud and clear:
1. Be Aware This is the important first step. Many people simply have no idea they rely on verbal pauses until they hear themselves on a recording. The first step in overcoming any addition is to recognize and acknowledge that you have one. And truly, people who say um and uh too much are addicted to their crutch words. Having this awareness will get you that much closer to stopping it.
2. Practice Out Loud If you have a tendency to um and uh, the reason is often because you have an idea of what you want to say next, but you’re not totally certain. So you insert a verbal filler to fill the space while you figure out the next word. Practicing out loud will get you to the point where you are completely comfortable with what you’re saying, and therefore not have the need to um or uh (or at least greatly reduce it). If you can, record yourself while practicing so you can hear where you tend to um and uh the most.
3. Work From Detailed Notes and Not a Script You’d think a word-for-word script would make it easier to stop the ums… and it can. But only if you have experience making a script sound natural. Otherwise you’ll sound like you’re reading. That’s the opposite extreme of um and uh and sounds just as bad. Use detailed notes and be sure of the points you want to make.
4. Focus During your Presentation Listen to yourself as you present your speech. Do not think about anything else other than what you are saying, how you are saying it and your audience: IN THAT MOMENT. People will um and uh when they are distracted from their planned comments. For example, shut down your email, Facebook, and other instant message features so you won’t be visually interrupted (sometimes just the sound of those things can distract you enough to trigger an um.) Don’t try to multi-task while leading a call or doing any type of presentation. Focus and pay attention to the moment.
5. Connect with your Audience Here’s a fun test to do the next time you’re practicing with a friend: try to say um while making direct eye contact. It’s nearly impossible. Why? Because you are having a conversation and um isn’t a word. Um doesn’t fit and doesn’t make sense. While you’re having a 1:1 conversation, you would likely avoid um and uh. Make your presentations much more conversational and your um and uh will disappear. On a recorded lecture where you can’t see your audience members, you could post a photograph of your ideal client or audience member where you can see it to remind yourself you’re talking to actual human beings and not just to your computer screen. -
Reference: http://feliciaslattery.com/blog/effective-communications/improve-your-speaking-skills-5-tips-to-stop-saying-um-and-ah-when-speaking-on-a-teleseminar-webinar-or-in-person/