Embed Size (px)
Citation preview
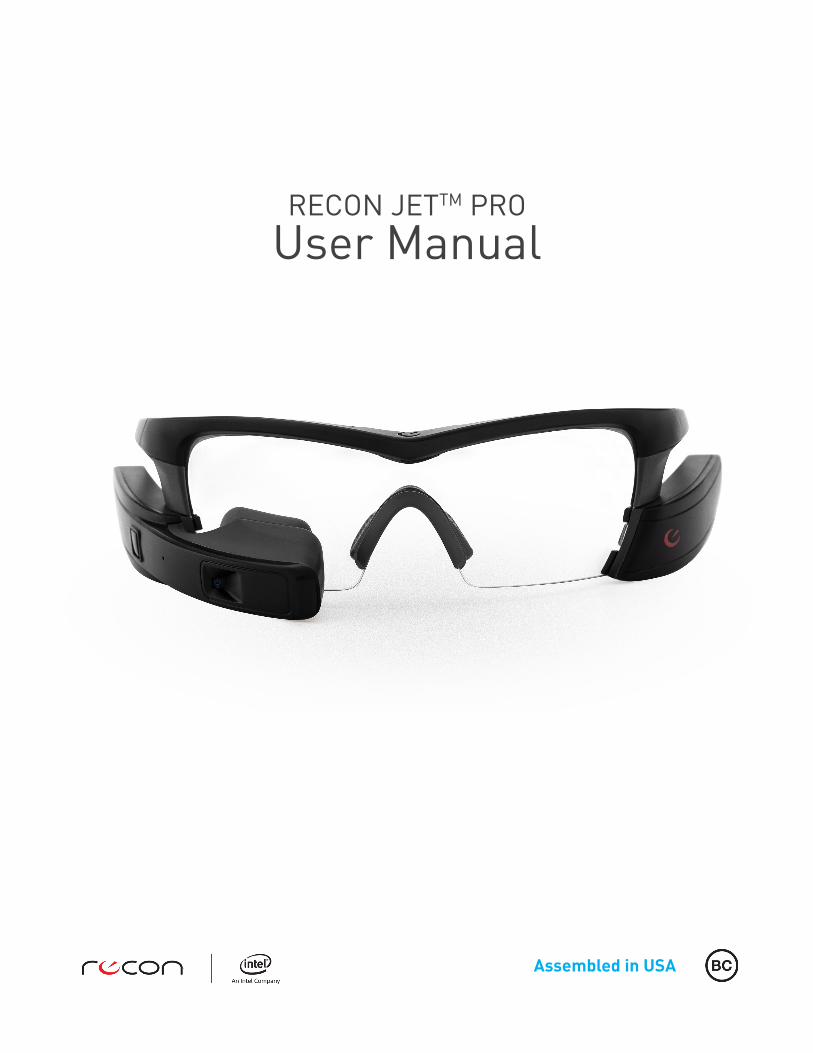
RECON JETTM PROUser Manual
Assembled in USA

I
WARNINGS
IMPORTANT SAFETY INFORMATION READ BEFORE USING RECON JET™ PRO
Recon Instruments smart glasses are not for direct observation of the sun and not for protection against artificial light sources, e.g. solaria.
Except for lens filter category 0, all other lens tints must not be used for driving in twilight or under condition of dull light or at night.
Jet Pro blocks part of your normal field of vision. Do not use while driving. If you use Jet Pro in the workplace to operate mobile equipment, use Jet Pro with special care such as spotters and protected driving areas, and be aware that your field of vision is partially blocked.
Lens filter category 4 lenses are not suitable for driving and road use.
Recon Jet Pro may create blind spots in your visual field. Exercise appropriate caution during use.
II
CONTENTS
SAFETY INFORMATION I
WELCOME 1
JET PRO SYSTEM FEATURES (ENGINE) 1
WHAT’S IN THE BOX 1
SETTING UP JET PRO 2
ADJUSTING THE EAR STEMS . . . . . . . . . . . . . . . . . . . . . . . . . . . . . . . . . . . . . . . . . . . . . . . . . . . . . . . . . . . . . . . . . . . . . . . .3
ADJUSTING THE NOSEPIECE . . . . . . . . . . . . . . . . . . . . . . . . . . . . . . . . . . . . . . . . . . . . . . . . . . . . . . . . . . . . . . . . . . . . . . . .3
ADJUSTING THE DISPLAY . . . . . . . . . . . . . . . . . . . . . . . . . . . . . . . . . . . . . . . . . . . . . . . . . . . . . . . . . . . . . . . . . . . . . . . . . . .3
PARTS ASSEMBLY 4
BATTERY . . . . . . . . . . . . . . . . . . . . . . . . . . . . . . . . . . . . . . . . . . . . . . . . . . . . . . . . . . . . . . . . . . . . . . . . . . . . . . . . . . . . . . . . .4
LENS . . . . . . . . . . . . . . . . . . . . . . . . . . . . . . . . . . . . . . . . . . . . . . . . . . . . . . . . . . . . . . . . . . . . . . . . . . . . . . . . . . . . . . . . . . . .4
NOSEPIECE . . . . . . . . . . . . . . . . . . . . . . . . . . . . . . . . . . . . . . . . . . . . . . . . . . . . . . . . . . . . . . . . . . . . . . . . . . . . . . . . . . . . . . .5
MAINTENANCE 6
EYEWEAR AND COSMETIC SURFACES . . . . . . . . . . . . . . . . . . . . . . . . . . . . . . . . . . . . . . . . . . . . . . . . . . . . . . . . . . . . . . . .6
STORING YOUR DEVICE . . . . . . . . . . . . . . . . . . . . . . . . . . . . . . . . . . . . . . . . . . . . . . . . . . . . . . . . . . . . . . . . . . . . . . . . . . . . .6
TECHNICAL SPECS 6
TROUBLESHOOTING 14
ADB . . . . . . . . . . . . . . . . . . . . . . . . . . . . . . . . . . . . . . . . . . . . . . . . . . . . . . . . . . . . . . . . . . . . . . . . . . . . . . . . . . . . . . . . . . . .14
BATTERY . . . . . . . . . . . . . . . . . . . . . . . . . . . . . . . . . . . . . . . . . . . . . . . . . . . . . . . . . . . . . . . . . . . . . . . . . . . . . . . . . . . . . . . .14
SUPPORT 15
WARRANTY 15
BATTERY DISPOSAL INFORMATION 16
COMPLIANCE INFORMATION 17
1
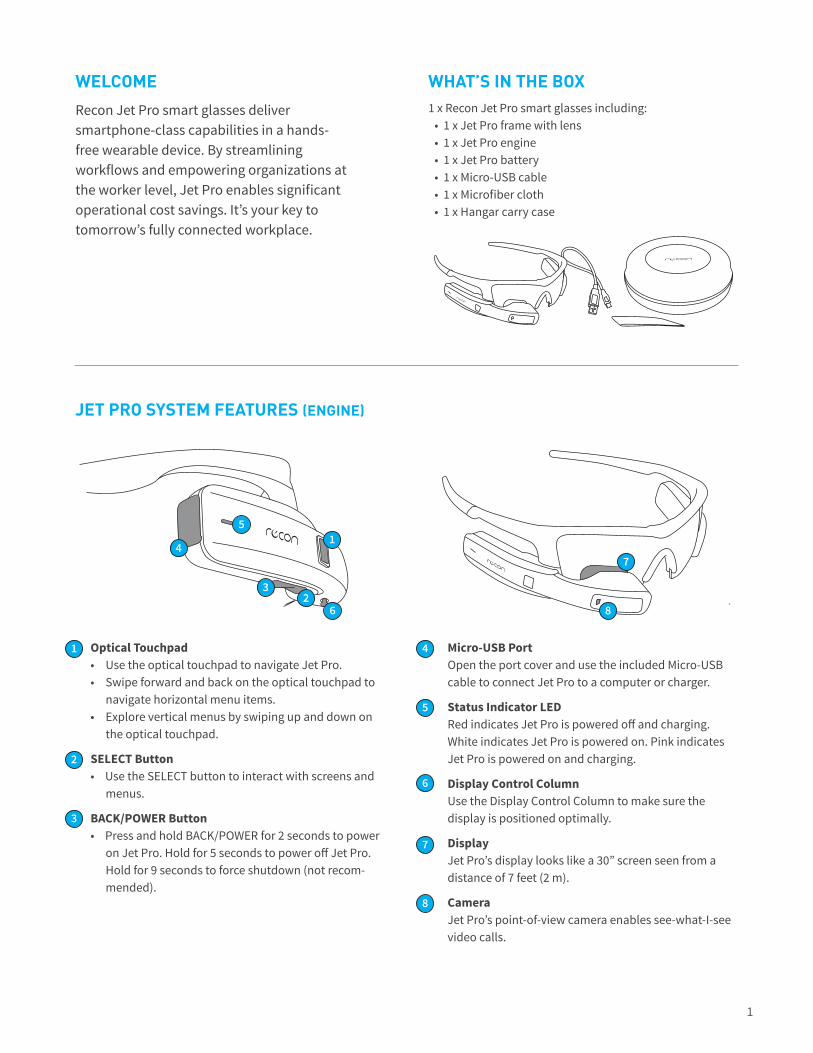
WELCOME
Recon Jet Pro smart glasses deliver smartphone-class capabilities in a hands-free wearable device. By streamlining workflows and empowering organizations at the worker level, Jet Pro enables significant operational cost savings. It’s your key to tomorrow’s fully connected workplace.
WHAT’S IN THE BOX1 x Recon Jet Pro smart glasses including:
• 1 x Jet Pro frame with lens• 1 x Jet Pro engine• 1 x Jet Pro battery• 1 x Micro-USB cable• 1 x Microfiber cloth • 1 x Hangar carry case
Optical Touchpad• Use the optical touchpad to navigate Jet Pro.• Swipe forward and back on the optical touchpad to
navigate horizontal menu items.• Explore vertical menus by swiping up and down on
the optical touchpad.
SELECT Button• Use the SELECT button to interact with screens and
menus.
BACK/POWER Button• Press and hold BACK/POWER for 2 seconds to power
on Jet Pro. Hold for 5 seconds to power off Jet Pro. Hold for 9 seconds to force shutdown (not recom-mended).
JET PRO SYSTEM FEATURES (ENGINE)
Micro-USB Port Open the port cover and use the included Micro-USB cable to connect Jet Pro to a computer or charger.
Status Indicator LED Red indicates Jet Pro is powered off and charging. White indicates Jet Pro is powered on. Pink indicates Jet Pro is powered on and charging.
Display Control Column Use the Display Control Column to make sure the display is positioned optimally.
Display Jet Pro’s display looks like a 30” screen seen from a distance of 7 feet (2 m).
Camera Jet Pro’s point-of-view camera enables see-what-I-see video calls.
1
1
2
2
3
3
4
4
5
5
6
6
7
7
8
8

2
SETTING UP JET PRO
1. REMOVE THE BATTERY PROTECTOR TAB Hold Jet Pro with one hand and pull the tab straight up with the other.
2. CHARGE JET PRO Use the included Micro-USB cable to connect Jet Pro to a computer or charger. The status indicator LED will turn red to indicate that Jet Pro is charging. To fully charge Jet Pro, leave it connected for approximately one hour.
WARNING:• Do not attempt to charge Jet Pro with the battery and/or
engine removed.• Be sure to cover Jet Pro’s Micro-USB port after charging to
prevent moisture from entering Jet Pro.
6. POWER OFF JET PRO To power off Jet Pro, press and hold the BACK/POWER button until “Shutting Down” appears on the screen. This should take about 5 seconds.
To force a shutdown (not recommended), press and hold BACK/POWER for 9 seconds.
WARNING: Do not attempt to remove Jet Pro’s battery or engine prior to a complete shutdown. This may damage your Jet Pro permanently.
3. POWER ON JET PRO To power on Jet Pro, press and hold the BACK/POWER button for 2 seconds. Jet Pro’s status indicator LED will turn white. After about five seconds, the screen will turn on.
3
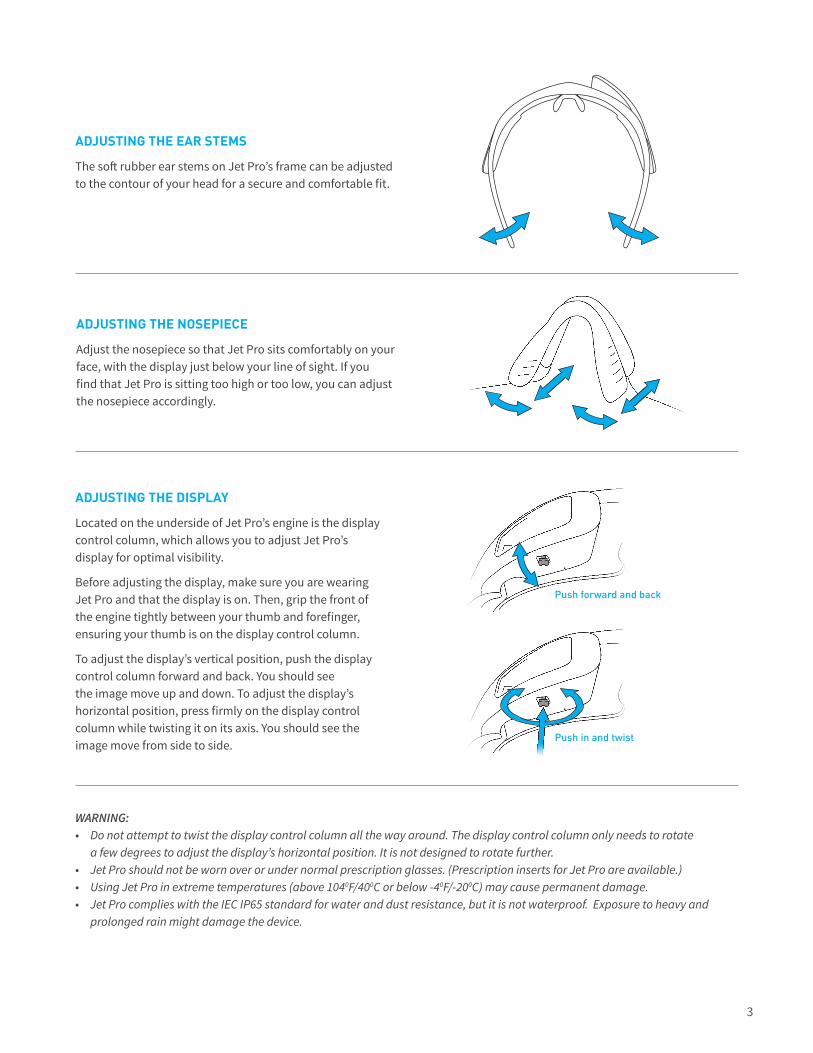
ADJUSTING THE DISPLAY
Located on the underside of Jet Pro’s engine is the display control column, which allows you to adjust Jet Pro’s display for optimal visibility.
Before adjusting the display, make sure you are wearing Jet Pro and that the display is on. Then, grip the front of the engine tightly between your thumb and forefinger, ensuring your thumb is on the display control column.
To adjust the display’s vertical position, push the display control column forward and back. You should see the image move up and down. To adjust the display’s horizontal position, press firmly on the display control column while twisting it on its axis. You should see the image move from side to side.
ADJUSTING THE NOSEPIECE
Adjust the nosepiece so that Jet Pro sits comfortably on your face, with the display just below your line of sight. If you find that Jet Pro is sitting too high or too low, you can adjust the nosepiece accordingly.
ADJUSTING THE EAR STEMS
The soft rubber ear stems on Jet Pro’s frame can be adjusted to the contour of your head for a secure and comfortable fit.
WARNING: • Do not attempt to twist the display control column all the way around. The display control column only needs to rotate
a few degrees to adjust the display’s horizontal position. It is not designed to rotate further.• Jet Pro should not be worn over or under normal prescription glasses. (Prescription inserts for Jet Pro are available.)• Using Jet Pro in extreme temperatures (above 1040F/400C or below -40F/-200C) may cause permanent damage.• Jet Pro complies with the IEC IP65 standard for water and dust resistance, but it is not waterproof. Exposure to heavy and
prolonged rain might damage the device.
Push in and twist
Push forward and back
4
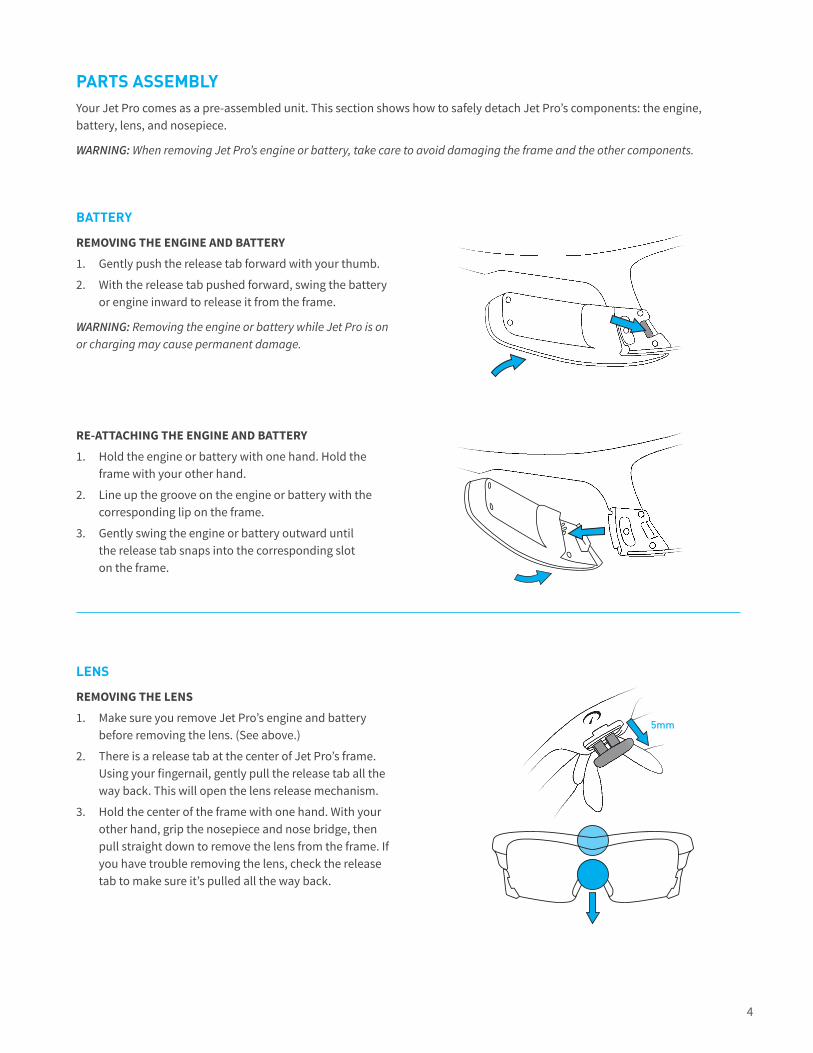
PARTS ASSEMBLYYour Jet Pro comes as a pre-assembled unit. This section shows how to safely detach Jet Pro’s components: the engine, battery, lens, and nosepiece.
WARNING: When removing Jet Pro’s engine or battery, take care to avoid damaging the frame and the other components.
BATTERY
REMOVING THE ENGINE AND BATTERY
1. Gently push the release tab forward with your thumb.
2. With the release tab pushed forward, swing the battery or engine inward to release it from the frame.
WARNING: Removing the engine or battery while Jet Pro is on or charging may cause permanent damage.
RE-ATTACHING THE ENGINE AND BATTERY
1. Hold the engine or battery with one hand. Hold the frame with your other hand.
2. Line up the groove on the engine or battery with the corresponding lip on the frame.
3. Gently swing the engine or battery outward until the release tab snaps into the corresponding slot on the frame.
LENS
REMOVING THE LENS
1. Make sure you remove Jet Pro’s engine and battery before removing the lens. (See above.)
2. There is a release tab at the center of Jet Pro’s frame. Using your fingernail, gently pull the release tab all the way back. This will open the lens release mechanism.
3. Hold the center of the frame with one hand. With your other hand, grip the nosepiece and nose bridge, then pull straight down to remove the lens from the frame. If you have trouble removing the lens, check the release tab to make sure it’s pulled all the way back.
5mm
5
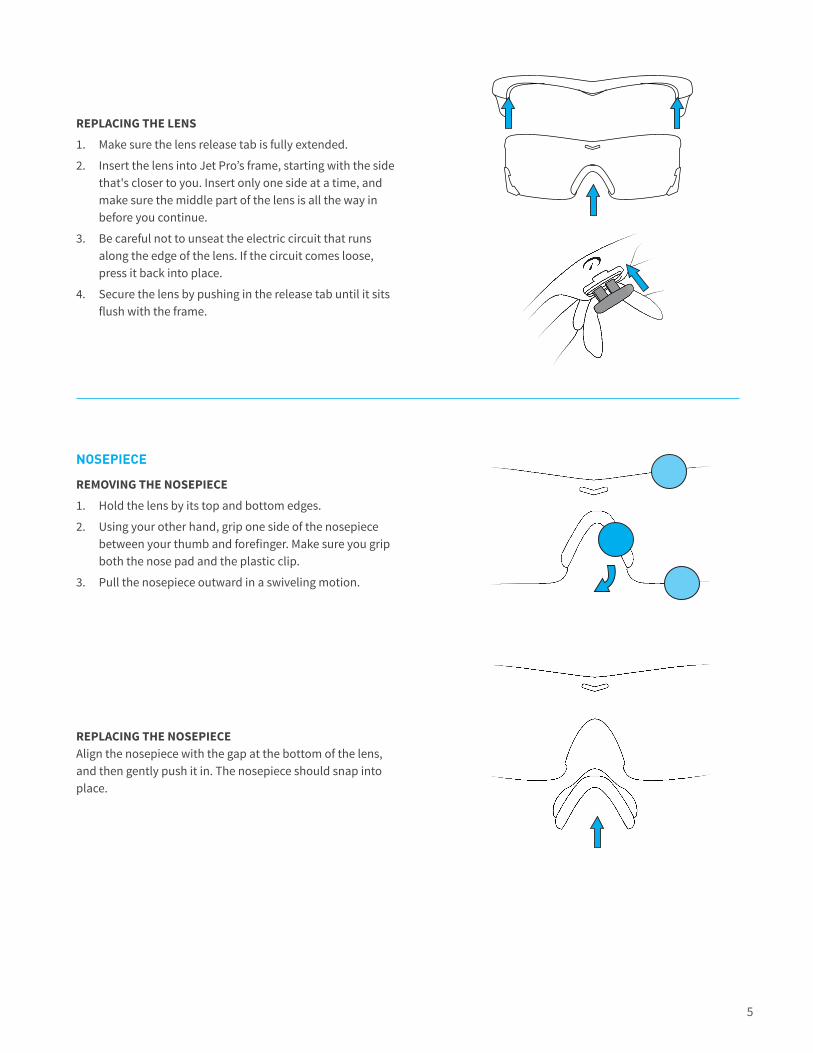
NOSEPIECE
REMOVING THE NOSEPIECE
1. Hold the lens by its top and bottom edges.
2. Using your other hand, grip one side of the nosepiece between your thumb and forefinger. Make sure you grip both the nose pad and the plastic clip.
3. Pull the nosepiece outward in a swiveling motion.
REPLACING THE NOSEPIECE Align the nosepiece with the gap at the bottom of the lens, and then gently push it in. The nosepiece should snap into place.
REPLACING THE LENS
1. Make sure the lens release tab is fully extended.
2. Insert the lens into Jet Pro’s frame, starting with the side that's closer to you. Insert only one side at a time, and make sure the middle part of the lens is all the way in before you continue.
3. Be careful not to unseat the electric circuit that runs along the edge of the lens. If the circuit comes loose, press it back into place.
4. Secure the lens by pushing in the release tab until it sits flush with the frame.
6
MAINTENANCERecon Jet Pro is supplied with a woven microfiber cloth specially designed for storage and cleaning purposes.
EYEWEAR AND COSMETIC SURFACES
Eyewear and cosmetic surfaces should be wiped with the supplied microfiber cloth and cleaned with fresh water. Avoid harsh detergents or cleaning fluids. After cleaning Jet Pro, let it dry in a well-ventilated place or gently blot it dry using the supplied cloth.
ELECTRICAL CONTACTS (COPPER PINS AND PADS)
If water or moisture gets on the electrical contacts between the lens and the battery and/or engine, power off Jet Pro, remove the battery and/or engine, and dab the contacts dry with a tissue or soft cloth. Store Jet Pro with the battery and/or engine removed to allow the moisture to dry off.
Periodic cleaning of the contacts with rubbing alcohol will ensure there is no buildup of contaminants. If you notice corrosion, you can clean it off using rubbing alcohol and a soft cloth or cotton swab.
Note: Be sure to inspect the contacts before charging, as well.
STORING YOUR DEVICE
Before storing Jet Pro for an extended period of time, make sure the battery is fully charged and detached from the frame. This will help prolong the life of the battery. Always store Jet Pro in a cool, dry place. The ideal long-term storage temperature for Jet Pro is between 50°F and 68°F (10°C and 20°C).
WARNING: • Storing Jet Pro in suboptimal conditions may shorten the battery's life span and, in some cases, damage Jet Pro permanently.• Always store Jet Pro in its original case. Failure to do so may cause the frame to warp.
TECHNICAL SPECS
OS ReconOS
SoC 1GHz dual-core
RAM 1GB
Flash storage 8GB
Connectivity GPS, Bluetooth 4.0 + BLE, ANT+, Wi-Fi (802.11a/b/g/n 2.4GHz), Micro USB 2.0
ControlsTwo-button rocker, optical touchpad, voice (partner SW enabled), gesture (partner SW enabled)
Camera 720p video (1.2MP still)
Display 428x240 micro LCD
Audio Mono speaker, front-facing microphone
Battery Swappable (2-5 hours per battery1)
1 Results have been estimated or simulated using internal Intel analysis or architecture simulation or modeling, and provided to you for informational purposes. Any differences in your system hardware, software or configuration may affect your actual performance.
7
TROUBLESHOOTINGADB
For help with ADB, please visit the Intel Developer Zone at https://software.intel.com/en-us/recon/jet-pro.
BATTERY
CHARGING USING A COMPUTER
1. Make sure your computer is turned on and is not in standby mode.
2. Connect Jet Pro to your computer using the included Micro-USB cable.
3. Make sure Jet Pro’s status indicator LED is red. This indicates that Jet Pro is charging.
4. Charge Jet Pro until the status indicator LED goes dark. This indicates that Jet Pro is fully charged.
5. If your computer does not recognize your Jet Pro, try disconnecting and then reconnecting the Micro-USB cable.
NOTE: Under optimal conditions, Jet Pro can achieve an 80% charge after being connected to your computer for one hour. The charging time may vary depending on your computer configuration.
WARNING: • Using a Micro-USB cable other than the one provided may shorten battery life and, in some cases, may damage Jet Pro permanently.• Do not attempt to charge Jet Pro with the battery and/or engine removed. This will cause permanent damage.• Do not let Jet Pro overheat. This may cause thermal runway or explosions.• Do not charge Jet Pro in excessively hot or cold environments (below 32°F/0°C or above 104°F/40°C).• After charging Jet Pro, close the USB protection cap tightly to prevent water damage. If the battery looks damaged or inflated, stop
using Jet Pro immediately.
CHARGING USING AN AC WALL CHARGER
Alternatively, you can charge Jet Pro using an AC wall charger with an output of 1A and 5V.
SUPPORTFor service and support, please visit www.reconinstruments.com/support-services.
WARRANTYFind the terms and conditions of Jet Pro’s warranty at www.reconinstruments.com/warranty.
BATTERY DISPOSAL INFORMATION
In the EU, this symbol means that this product must not be disposed of with household waste. It is your responsibility to bring it to a designated collection point for the recycling of waste electrical and electronic equipment. For more information, please contact your local waste collection center or your point of purchase of this product.
Jet Pro is powered by a lithium-ion battery. If you are done using the device, it should be taken to a recycling center for proper and safe disposal.
Visit the following link for Jet battery disposal information: www.reconinstruments.desk.com/customer/portal/articles/843025
8
COMPLIANCE INFORMATION
FCC Compliance Class B Digital Device
This equipment has been tested and found to comply with the limits for a Class B digital
device, pursuant to part 15 of the FCC Rules. These limits are designed to provide reasonable protection against harmful interference in a residential installation. This equipment generates uses and can radiate radio frequency energy and, if not installed and used in accordance with the instructions, may cause harmful interference to radio communications. However, there is no guarantee that interference will not occur in a particular installation. If this equipment does cause harmful interference to radio or television reception, which can be determined by turning the equipment off and on, the user is encouraged to try to correct the interference by one or more of the following measures:
• Reorient or relocate the receiving antenna.
• Increase the separation between the equipment and receiver.
• Connect the equipment into an outlet on a circuit different from that to which the receiver is connected.
• Consult the dealer or an experienced radio/TV technician for help.
Changes or modifications not expressly approved by the party responsible for compliance could void the user’s authority to operate the equipment.
FCC Declaration of Conformity
Jet Pro (FCC ID: ZW5009) complies with FCC standard CRF 47 Part 15 subpart B and subpart C – section 15.249. Operation is subject to the following two conditions:
• This device may not cause harmful interference, and
• This device must accept any interference received, including interference that may cause undesired operation.
European Conformity Compliance
This product complies with the Low Voltage Directive 2006/95/EC; EMC Directive 2004/108/
EC, EU Directive R&TTE Directive 1999/5/EC, and RoHS Directive 2011/65/EU. Point of contact: Intel Corporation, Atn: Corporate Quality, 2200 Mission College Blvd., Santa Clara, CA 95054 USA [email protected].
Industry Canada Compliance
Jet Pro was certified with IC number 9717A-009. This digital apparatus does not exceed the Class B limits for radio noise emissions from digital apparatus set out in the interference causing equipment standard entitled: “Digital Apparatus,” ICES-003 of the Canadian Department of Communications.
Jet Pro a été certifié avec le numéro IC 9717A-009. Cet appareil numérique respecte les limites bruits radioélec-triques applicables aux appareils numériques de Classe B prescrites dans la norme sur le matériel brouilleur: "Appar-eils Numériques", NMB-003 édictee par le Ministre Canadi-an des Communications.
This device complies with Industry Canada licence-exempt RSS standard(s). Operation is subject to the following two conditions: (1) this device may not cause interference, and (2) this device must accept any interference, including interference that may cause undesired operation of the device.
Le présent appareil est conforme aux CNR d’Industrie Canada applicables aux appareils radio exempts de licence. L’exploitation est autorisée aux deux conditions suivantes : (1) l’appareil ne doit pas produire de brouillage, et (2) l’utilisateur de l’appareil doit accepter tout brouillage radioélectrique subi, même si le brouillage est susceptible d’en compromettre le fonctionnement.
Industry Canada ICES-003 Compliance Label: CAN ICES-3 (B)/NMB-3(B)
Japanese Radio Law and Japanese Business Law Compliance
Jet Pro (R: 202-SMC093, T: D 14-0053 202) is granted pursuant to the Japanese Radio Law
(ordinance of MPT No. 37,1981) and the Japanese Business Law (Article 56, Paragraph 1).
Australia and New Zealand Radiocommunication Compliance
The RCM indicates a device’s compliance with applicable ACMA (Australian Communications and Media Authority) technical standards-that is, for telecommunications, radiocommunications, EMC and EME-and with applicable state and territory electrical equipment safety requirements.
9
MFI COPY RIGHT INFO “Made for iPhone” means that an electronic accessory has been designed to connect specifically to iPhone and has been certified by the developer to meet Apple’s performance standards. Apple is not responsible for the operation of this device or its compliance with safety and regulatory standards. Please note that the use of this accessory with an iPhone may affect wireless performance.
iPhone is a trademark of Apple Inc., registered in the U.S. and other countries.
ANDROID COPY RIGHT INFO Android™ is a trademark of Google Inc.
ANT+ CERTIFICATION This product is ANT+TM certified.
BLUETOOTH SMART READY COPYRIGHT INFO The Bluetooth® word mark and logos are registered trademarks owned by Bluetooth SIG, Inc. and any use of
such marks by Recon Instruments is under license. Other trademarks and trade names are those of their respective owners.
WIFI COPY RIGHT INFO The term Wi-Fi® is a registered trademark of the Wi-Fi Alliance®.