Embed Size (px)
Citation preview
August, 2009
Have an IMPACT in your tanks
1
RECOIL UPGRADE SET FOR KING TIGER
Read instructions carefully before assembly
Tools Required
1. Small Phillips tip screw driver
2. Hobby cutting knife
3. Pin vise, 2mm drill bit
4. Small hand file
5. Liquid thread lock
This kit is not for beginners.
This kit works only for Tamiya King Tiger recoil unit.
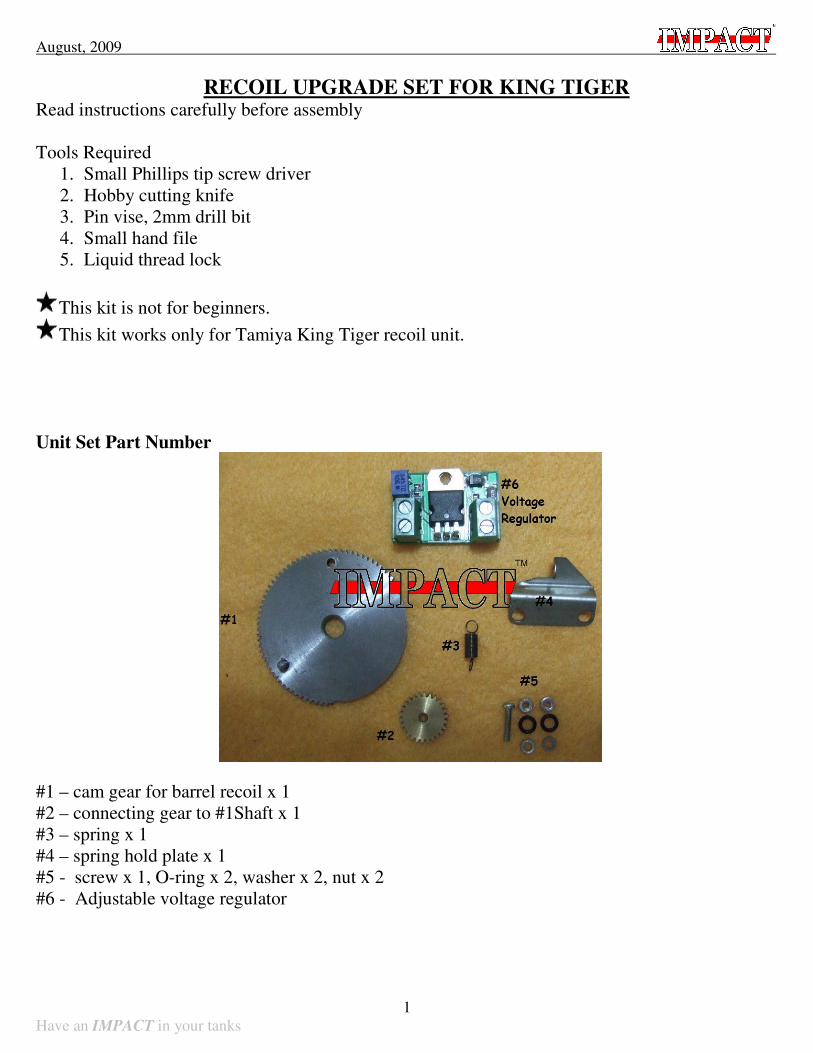
Unit Set Part Number
#1 – cam gear for barrel recoil x 1
#2 – connecting gear to #1Shaft x 1
#3 – spring x 1
#4 – spring hold plate x 1
#5 - screw x 1, O-ring x 2, washer x 2, nut x 2
#6 - Adjustable voltage regulator
August, 2009
Have an IMPACT in your tanks
2
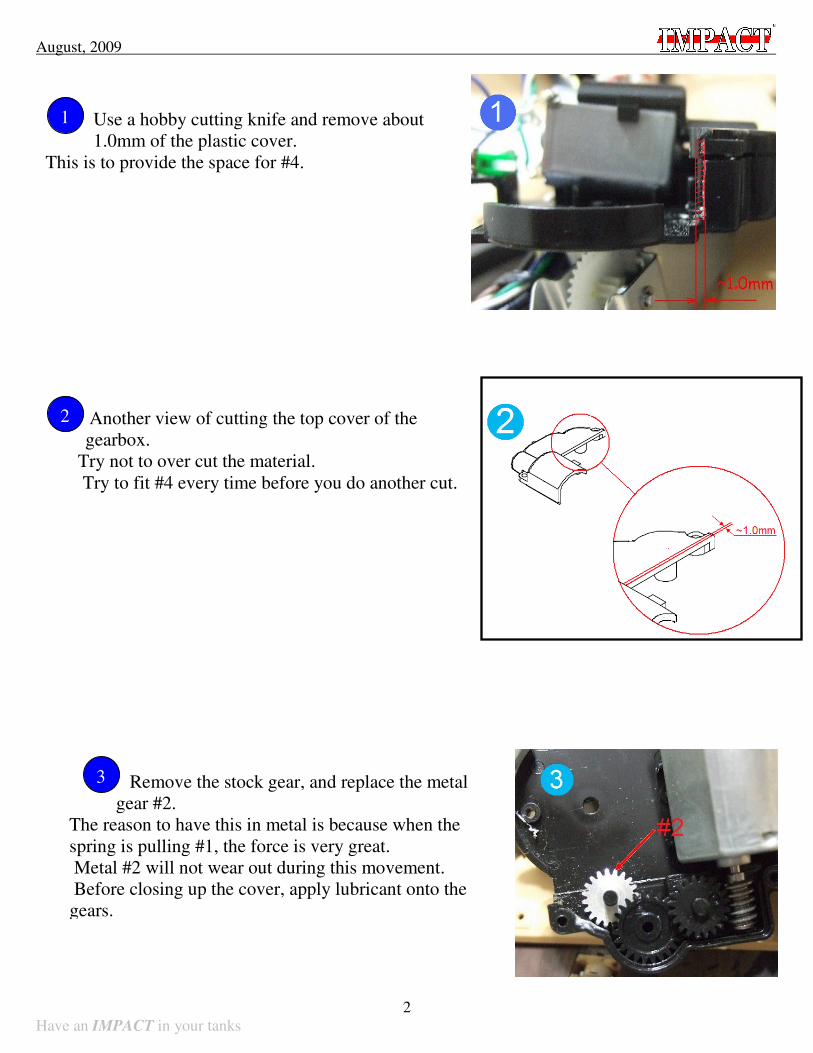
Use a hobby cutting knife and remove about
1.0mm of the plastic cover.
This is to provide the space for #4.
1
Another view of cutting the top cover of the
gearbox.
Try not to over cut the material.
Try to fit #4 every time before you do another cut.
2
Remove the stock gear, and replace the metal
gear #2.
The reason to have this in metal is because when the
spring is pulling #1, the force is very great.
Metal #2 will not wear out during this movement.
Before closing up the cover, apply lubricant onto the
gears.
3
August, 2009
Have an IMPACT in your tanks
3
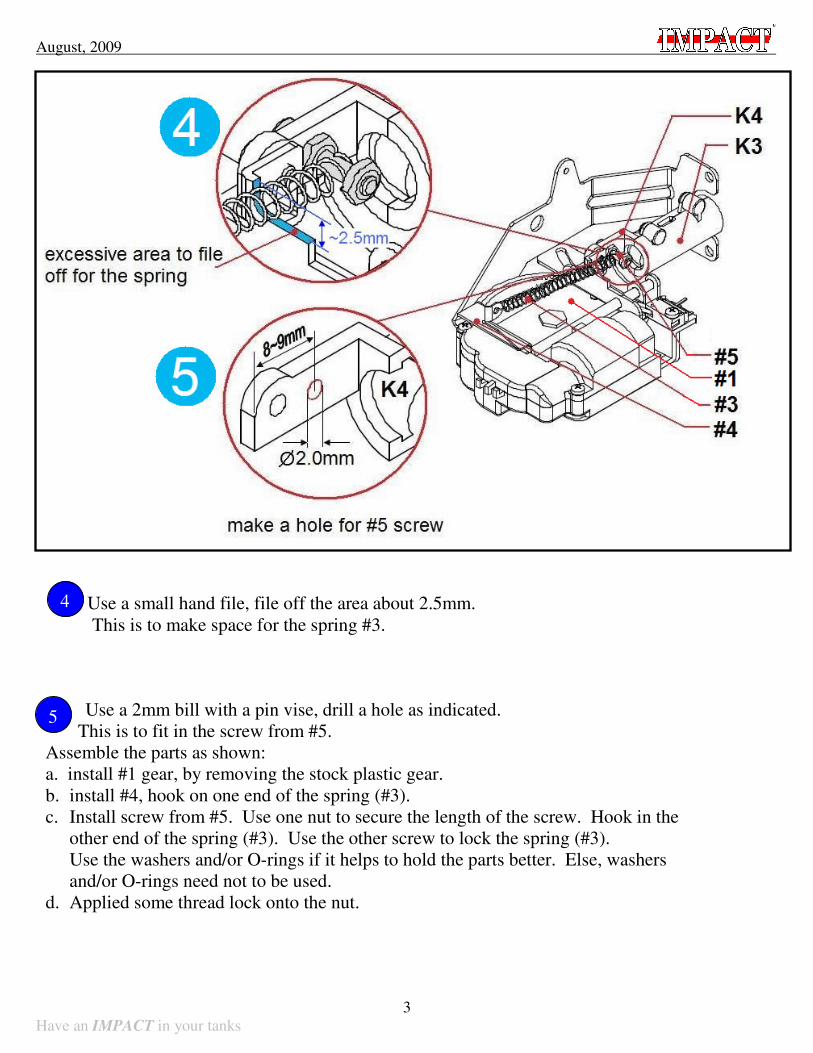
Use a small hand file, file off the area about 2.5mm.
This is to make space for the spring #3.
4
Use a 2mm bill with a pin vise, drill a hole as indicated.
This is to fit in the screw from #5.
Assemble the parts as shown:
a. install #1 gear, by removing the stock plastic gear.
b. install #4, hook on one end of the spring (#3).
c. Install screw from #5. Use one nut to secure the length of the screw. Hook in the
other end of the spring (#3). Use the other screw to lock the spring (#3).
Use the washers and/or O-rings if it helps to hold the parts better. Else, washers
and/or O-rings need not to be used.
d. Applied some thread lock onto the nut.
5
August, 2009
Have an IMPACT in your tanks
4
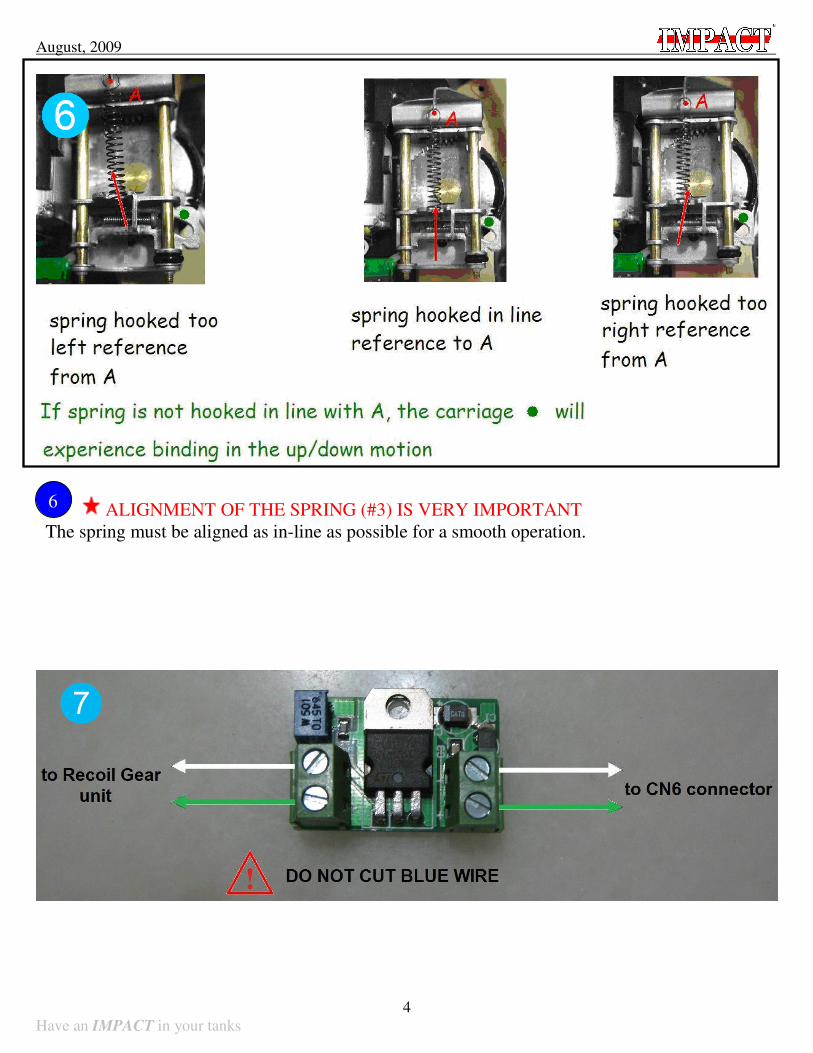
ALIGNMENT OF THE SPRING (#3) IS VERY IMPORTANT
The spring must be aligned as in-line as possible for a smooth operation.
6
August, 2009
Have an IMPACT in your tanks
5
7
7
Before the recoil unit can be fully installed back into the tank. It must be tested to ensure
the action is smooth.
a. Tidied up your work area first.
b. At this time, the barrel is not installed back into the recoil unit yet.
c. Connect the tank’s battery and power it up with its controller.
d. Fire the tank to see if the recoil unit is working smoothly.
e. If there is any jam, check and align any parts and redo the installation again.
f. Fire and cycle the recoil unit at least 50times for a zero jam operation.
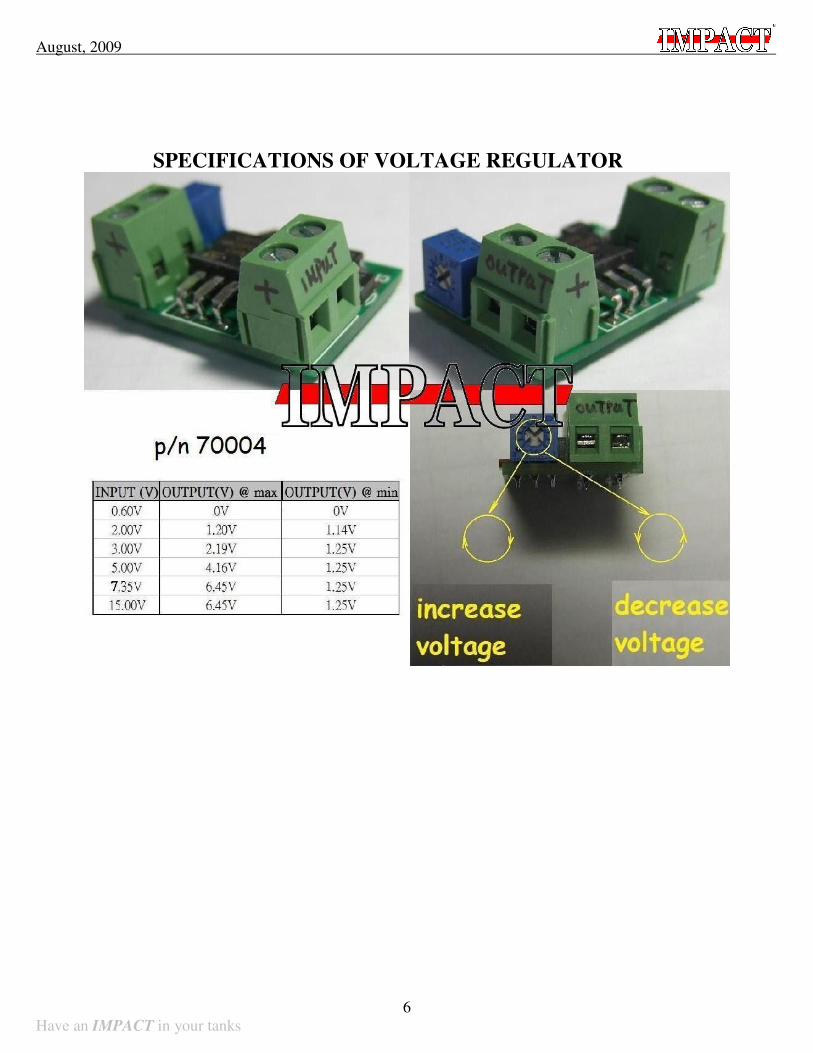
g. The speed of barrel’s movement back to original its original position can be adjusted at the
Voltage Regulator.
h. When there is no jam, apply sufficient lubricant to all moving parts.
i. The unit can now be fully install into the tank.
8
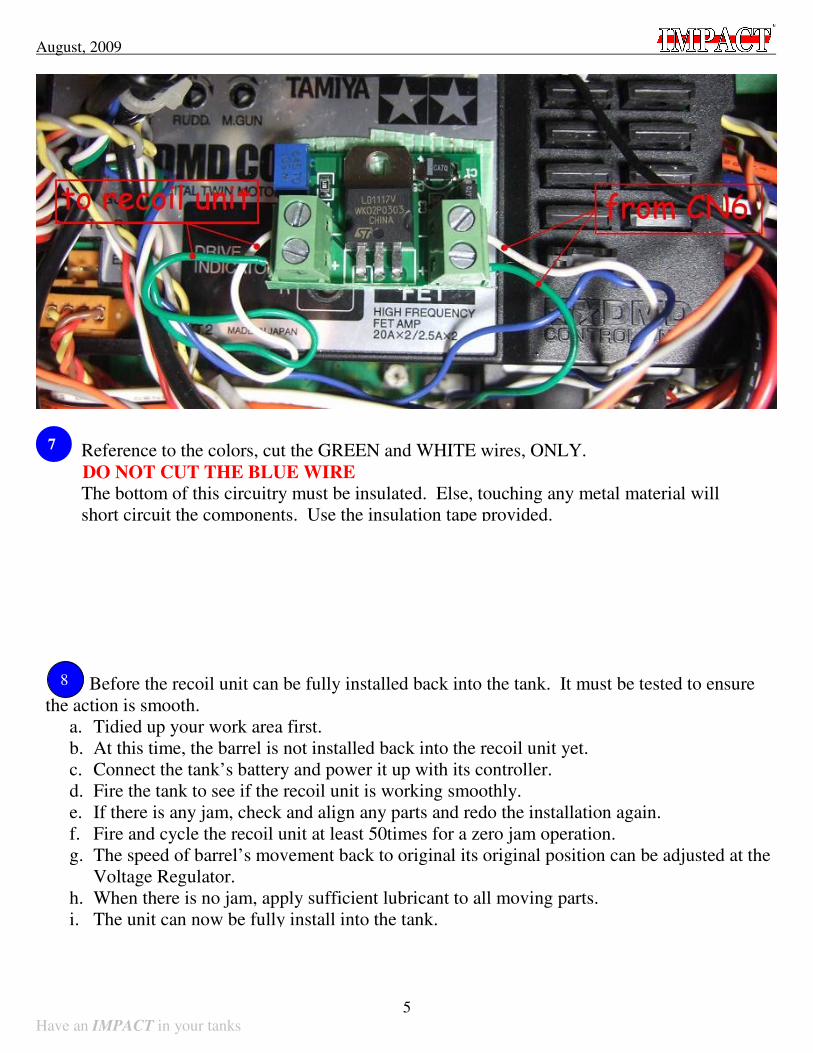
Reference to the colors, cut the GREEN and WHITE wires, ONLY.
DO NOT CUT THE BLUE WIRE
The bottom of this circuitry must be insulated. Else, touching any metal material will
short circuit the components. Use the insulation tape provided.
August, 2009
Have an IMPACT in your tanks
6
SPECIFICATIONS OF VOLTAGE REGULATOR


![[Armor] - [Schiffer] - [Military History] - The 'King Tiger](https://img.pdfslide.us/doc/110x75/577cc08c1a28aba711907069/armor-schiffer-military-history-the-king-tiger.jpg)