Embed Size (px)
Citation preview

Rechargeable Stereo Wireless HeadsetAuriculares Inalámbricos Estéreo Recargables
Model #TV920 | Modelo #TV920
Questions? Preguntas?
Instruction ManualPlease save for future reference.
Manual de InstruccionesPor favor guarde para futura referencia.
English: page 2 / Español: página 18
1-877-736-6760 / www.unisar.com

Thank you for purchasing the Unisar® TV Listener® J3. This infrared wireless stereo headsetsystem will enable you to listen to your television, stereo, computer, or any other audiodevice at a volume that is comfortable for you without disturbing others in the room. Itis intended for use if you have difficulty hearing, if you simply want to watch televisionat a different volume than others in the room, or if you want to watch television whilesomeone else is sleeping.
Please review the installation choices that are in this manual and determine which features your television or audio device has before setting up your TV Listener J3.Please save this manual for future reference.
If you have any questions, please contact our Customer Service Department at1-877-736-6760 Mon-Fri from 9:00AM-5:00PM Eastern Time, or e-mail us [email protected].
Table of Contents
How It Works / page 4
Setting Up the System / page 4
Operating the System / page 10
Tips for Using Your TV Listener J3 / page 12
Care and Cleaning / page 12
Troubleshooting / page 13
Technical Specifications / page 15
Limited Product Warranty / page 15
Also Available / page 16
En Español / página 18
Warning
Please read all safety and operating instructions carefully and completely before usingthis product.
1. For your well-being, medical experts advise against playing any audio deviceat a high volume for continuous and extended play. If you hear a ringing in yourears, reduce the volume immediately or discontinue use.
2. To reduce the risk of fire or electrical shock, do not expose this product to wateror moisture.
3. To prevent overheating, keep this product away from heat sources such asradiators, stoves, fireplaces, or direct sunlight.
4. Use only the AC adapter provided with the transmitter. Use of any other adaptermay damage the unit and void the warranty.
5. Plug the AC adapter into standard household current only (120 volt AC outlet).
6. Avoid damage to the adapter cords. Route cords so that they are not likely tobe walked on or pinched by items placed upon or against them.
7. Use only AAA rechargeable batteries with the headset.
8. Do NOT use alkaline batteries or you will severly damage the unit.
9. Dispose of batteries properly and safely.
10. Unplug the AC adapter and remove batteries during long periods of non-use.
11. Do NOT disassemble.
{2} {3}
InfraredLight Rays
Transmitter
Headset

Installation of the TransmitterThe following are the five different ways to connect the TV Listener J3. Your installationwill depend on the type of equipment you have.
1. STEREO INSTALLATION – for equipment with two audio output jacks (stereo televi-sions, DVD players, cable boxes). Refer to Pg. 6.
2. MONO INSTALLATION – for equipment with only one audio output jack (mono televi-sions, DVD players, cable boxes). Refer to Pg. 6.
3. SMALL HEADPHONE JACK INSTALLATION – for equipment with a small headphonejack (most CD players, portable stereos, MP3 players). Refer to Pg. 7.
4. LARGE HEADPHONE JACK INSTALLATION – for equipment with a large headphonejack (some home stereo systems). Refer to Pg. 8.
5. MICROPHONE INSTALLATION – for equipment that does not have any audio outputjacks. Refer to Pg. 8.
How It Works
The TV Listener J3 works just like your remote control, sending an invisible infraredsignal from your television or any other audio device to the deluxe stereo headset.Unlike radio frequency devices, infrared is not subject to interference from cordlessphones, wireless networks, microwaves, etc. You adjust the volume on the wireless,lightweight headset to suit your personal needs. Multiple headsets can be usedwith one transmitter.
Setting Up the System
Charge the batteries in the headset for 16 hours prior to first use.
TV Listener J3 ComponentsCheck that you have all the following components before installation.
RCA 3.5mm stereo adapter
RCA 3.5mm mono adapter
6.3mm stereo headphone adapter
Microphone adapter
AC adapter
{4} {5}
Transmitter (connects to your TV or other audio device)
Wireless Headset
Infrared Rays
HeadphoneAdapter
AC Adapter Jack
Power Switch
InfraredSensors
BatteryCompartments
Infrared Sensors
PowerIndicator
Light
PowerSwitch
VolumeControl
ChargingAdapter
ChargingIndicator LightCharging
Jack
2 AAA rechargeable batteries

Follow these instructions if your equipment only has one audio output jack (monotelevisions, DVD players, cable boxes).
1. Connect the audio cord on the back of the transmitter (A) to the RCA 3.5mmmono adapter (E).
2. Plug the other end of the adapter into the audio output jack on your equipment.
If you are connecting to your television, use the audio jack located on the back.Do NOT use the audio jacks on the front as these are audio input jacks. Be sure toplug the adapter into the audio output and not the video output.
If you are connecting to a device that is connected to your television (DVD player,VCR, cable box, home theater system), this device must stay on when using theTV Listener. The VCR must also be set to the same channel as the television.
3. Plug the AC adapter (C) into the jack marked “DC IN” on the back of the trans-mitter and plug the adapter into an electrical outlet. For long periods of non-use,we suggest unplugging the AC adapter.
SMALL HEADPHONE JACK INSTALLATION
Follow these instructions if your equipment has a small headphone jack (CD players,portable stereos, computers, MP3 players).
1. Connect the audio cord on the back of the transmitter (A) directly into the head-phone jack on your equipment.
2. Plug the AC adapter (C) into the jack marked “DC IN” on the back of the trans-mitter and plug the adapter into an electrical outlet. For long periods of non-use,we suggest unplugging the AC adapter.
STEREO INSTALLATION
Follow these instructions if your equipment has two audio output jacks (stereotelevisions, DVD players, cable boxes).
1. Connect the audio cord on the back of the transmitter (A) to the RCA 3.5mmstereo adapter (D).
2. Plug the red end of the adapter into the right audio output jack and the whiteend into the left audio output jack on your equipment.
If you are connecting to your television, use the audio jacks located on the back.Do NOT use the audio jacks on the front as these are audio input jacks. Be sure toplug the adapter into the audio output and not the video output.
If you are connecting to a device that is connected to your television (DVD player,VCR, cable box, home theater system), this device must stay on when using theTV Listener. The VCR must also be set to the same channel as the television.
3. Plug the AC adapter (C) into the jack marked “DC IN ” on the back of the trans-mitter and plug the adapter into an electrical outlet. For long periods of non-use,we suggest unplugging the AC adapter.
MONO INSTALLATIONFig. 2
Fig. 3
{6} {7}
Fig. 1
white - LEFT
red - RIGHT

LARGE HEADPHONE JACK INSTALLATION
Follow these instructions if your equipment has a large headphone jack (homestereo systems).
1. Connect the audio cord on the back of the transmitter (A) to the 6.3mm stereoheadphone adapter (F).
2. Plug the other end of the adapter into the headphone jack on your audio device.
3. Plug the AC adapter (C) into the jack marked “DC IN” on the back of the trans-mitter and plug the adapter into an electrical outlet. For long periods of non-use,we suggest unplugging the AC adapter.
MICROPHONE INSTALLATION
Follow these instructions if your equipment does not have any audio output jacks.
1. Connect the audio cord on the back of the transmitter (A) to the microphoneadapter (G).
2. Affix the microphone mounting piece directly over the speaker on your televisionor audio device by exposing the adhesive strip. Insert the microphone into themounting piece.
3. You will have to set your audio device to a very low volume. You can also changethe volume on the headset by adjusting the placement of the microphone.
4. Plug the AC adapter (C) into the jack marked “DC IN” on the back of the trans-mitter and plug the adapter into an electrical outlet. For long periods of non-use,we suggest unplugging the AC adapter.
Headset Battery InstallationIMPORTANT: Charge the batteries for 16 hours prior to first use. You must only userechargeable batteries (included). Do NOT use alkaline batteries or you willseverely damage the unit.
The wireless headset (B) requires two rechargeable AAA batteries (included). Toaccess the battery compartment on each ear piece, take off the ear pads (refer toFig. 6). To remove the ear pads, gently pull them off the headset. Insert one recharge-able AAA battery in each side matching positive (+) to positive (+) and negative (-) tonegative (-). Do NOT use alkaline batteries. To replace the ear pads, snap them backon by lining up the prongs with the corresponding openings on the headset.
Charge the batteries for 16 hours prior to first use. Be sure the headset is turned off andthe transmitter is plugged in to an electrical outlet and turned on. Plug the chargingadapter from the back of the transmitter into the jack marked “CHG” on the right ear-piece ( ) of the headset (refer to Fig. 7). The green charging indicator light on theheadset will illuminate. On a full charge, the battery life is approximately 15 hours.Recharge when the volume begins to weaken. Do not charge for more than 24 con-secutive hours as it will shorten the life of the batteries.
For long periods of non-use we suggest removing the batteries.
The batteries need to be replaced when they last much less than the expected time(approximately 15 hours) after proper charging. Be sure to replace ONLY withrechargeable AAA batteries. Do NOT mix alkaline and rechargeable batteries.
Fig. 4
{8} {9}
Fig. 5
Fig. 6
Ear PadAAA Battery
5. Adjust the volume to a comfortable listening level using the volume control dial. Ifthe headset is out of the range of the transmitter or the infrared sensors in theheadset are being blocked, no sound will come through the headset.
6. We recommend turning the transmitter and headset off after each use exceptwhen charging the headset when the headset should be off and the transmittershould be on.
Regardless of what type of equipment you have and which installation instructions youfollow, when you connect the transmitter the sound will be heard either (1) throughyour headset and television speakers, or (2) just through your headset. The followinginstructions will apply to all five types of installation.
1. The sound from your television is heard from your headset and your televisionspeakers. If you want the sound to be heard only from the headset, you will needto mute the television sound. If you simply turn the volume down all the way, youmay reduce the signal going to the television audio output jacks which will affectthe sound coming through your headset. To mute the television sound, press Muteon your remote control. Or, if your TV has a speaker switch on the back panel, setthis switch to “OFF”.
If pressing “Mute” on your remote also turns off the sound from your headset, yourTV may have speaker options that you can access with your television's remotecontrol. Please refer to your television instruction manual to locate this control andset it to “OFF”.
2. The sound from your television will only be heard through your headset and willnot be heard from the television speakers. If you want the sound to be heard fromthe headset and the television speakers, connect the transmitter to your DVDplayer, VCR, or cable box or use the microphone adapter (refer to Pg. 8).
NOTE: If you hear static or a radio signal from your headset, it may be due to the elec-tric current to the transmitter. Unplug the AC adapter from the electrical outlet andplug it into a surge protector. Then plug the surge protector into the electrical outlet.
If you are using your TV Listener J3 with an LCD or plasma television and are experienc-ing static, connect the transmitter to your cable box instead of your television. Movethe transmitter as far from your television as possible while making sure it is still in theline of sight of the headset.
There is no limit to the number of headsets that can be used with a single transmitter.Please call us at 1-800-430-0222 to find out where you can purchase additional head-sets.
Operating the System
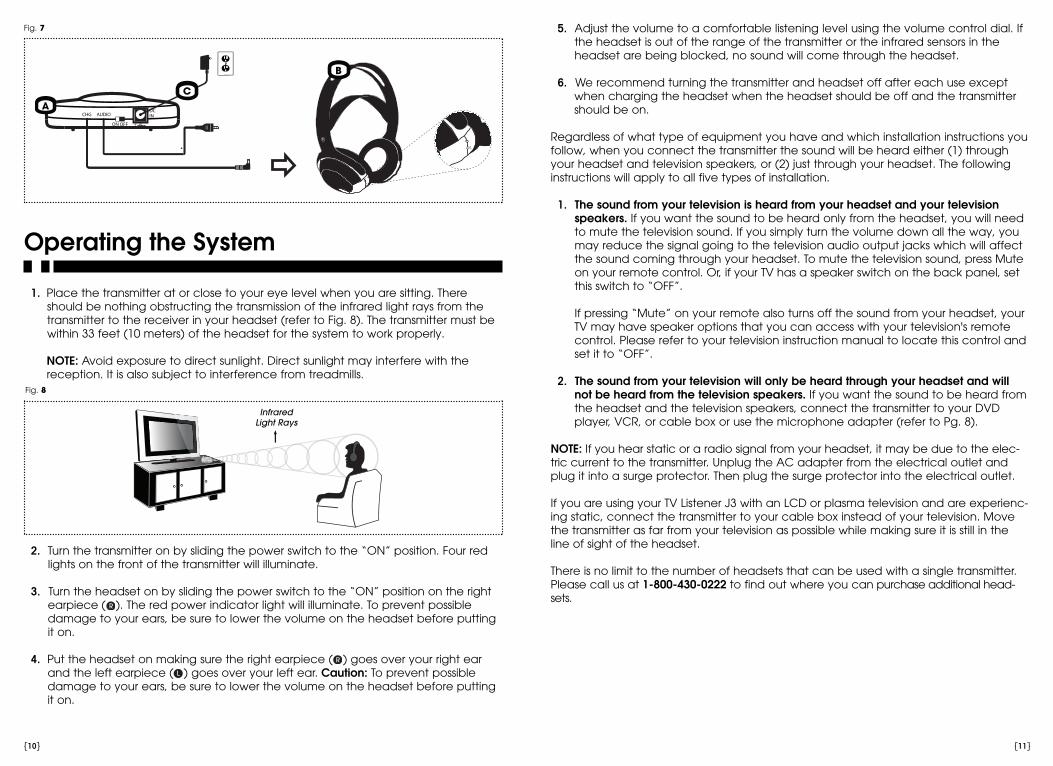
1. Place the transmitter at or close to your eye level when you are sitting. Thereshould be nothing obstructing the transmission of the infrared light rays from thetransmitter to the receiver in your headset (refer to Fig. 8). The transmitter must bewithin 33 feet (10 meters) of the headset for the system to work properly.
NOTE: Avoid exposure to direct sunlight. Direct sunlight may interfere with thereception. It is also subject to interference from treadmills.
2. Turn the transmitter on by sliding the power switch to the “ON” position. Four redlights on the front of the transmitter will illuminate.
3. Turn the headset on by sliding the power switch to the “ON” position on the rightearpiece ( ). The red power indicator light will illuminate. To prevent possibledamage to your ears, be sure to lower the volume on the headset before puttingit on.
4. Put the headset on making sure the right earpiece ( ) goes over your right earand the left earpiece ( ) goes over your left ear. Caution: To prevent possibledamage to your ears, be sure to lower the volume on the headset before puttingit on.
{10} {11}
Fig. 8
InfraredLight Rays
Fig. 7

AC adapter is notconnected or electricaloutlet is out of order.
Transmitter is not turned on.
Batteries in headset arelow or improperly installed.
Transmitter and/or headsetare not on.
Batteries in headset arelow or improperly installed.
Headset is not in lineof sight of transmitter.
No audio output fromaudio device.
Transmitter is not properlyplugged into audio device.
Headset and transmitterare too far apart.
Check connectionor change to another elec-trical outlet.
Make sure power switchis set to “ON” position.
Check or charge batteries.Use only AAA rechargeablebatteries. Do NOT usealkaline batteries.
Make sure both units are on.
Check or charge batteries.Use only AAA rechargeablebatteries. Do NOT usealkaline batteries.
Make sure nothing isobstructing the transmissionof the infrared light raysfrom transmitter to headset.
Check sound on youraudio device.
Check connections. Makesure adapter is plugged into the audio output jack(not input).
Bring them closer together.Maximum range is 33 feet(10 meters).
Four red lights ontransmitter do notilluminate.
Power indicator lighton headset does notilluminate.
No sound from headset.
{12} {13}
PROBLEM POSSIBLE CAUSE SOLUTION
Troubleshooting
If you believe your TV Listener J3 is not operating properly, please refer to theTroubleshooting Guide below. Improper installation of the transmitter is the leadingcause of malfunctions. If you are unable to solve the problem after checking theTroubleshooting Guide, please follow the instructions for microphone installation (referto Pg. 8). If you can hear your audio device from the headset using the microphone,the problem may be due to improper installation or issues with your television or audiodevice. If you can not hear anything from the headset when using the microphone,please contact our Customer Service Department at 1-877-736-6760 Mon-Fri from9:00AM-5:00PM Eastern Time, or e-mail us at [email protected].
Tips for Using Your TV Listener J3
• If you are using your TV Listener J3 with an LCD or plasma television and are experi-encing static, connect the transmitter to your cable box instead of your television.Follow the instructions for Stereo Installation on Pg. 6. Also, move the transmitter sothat it is not directly in front of your television. Move the transmitter as far from thetelevision as possible while making sure it is still in the line of sight of the headset.
• If you hear static or a radio signal from your headset, it may be due to the electriccurrent to the transmitter. Unplug the AC adapter from the electrical outlet and plugit into a surge protector. Then plug the surge protector into the electrical outlet.
• When connecting to your television or other audio equipment, be sure to use theaudio OUTPUT jacks. If you are connecting to your television, these jacks are locatedon the back of the television. Do NOT use the audio jacks on the front as these areaudio input jacks.
• When charging your headset, make sure the transmitter is turned on and the head-set is turned off.
• Only use rechargeable batteries. Do NOT use alkaline batteries or you will severelydamage the hedset.
• If your headset is not working, check the batteries first. Make sure the batteries arecharged and properly installed. Also, be sure the transmitter is turned on.
Care & Cleaning
Disconnect the transmitter and remove all batteries from the headset before cleaning.Clean the exterior of the units with a soft, dry or slightly damp cloth. Do NOT spray withcleaning products or solvents. Do NOT submerge in water or any other liquid.

Technical Specifications
Power Supply � 12V, 200mA AC adapter for transmitter2 rechargeable AAA batteries for headset
Maximum Operating Distance � 33 feet (10 meters)Battery Life � Over 15 hoursTransmission Mode � Infrared 850 nanometersFrequency Modulation � 2.3 MHz (left); 2.8 MHz (right)Frequency Response � 40 Hz–12000 HzDistortion � 1% THDSignal to Noise Ratio � 40 dB
Limited Product Warranty
Unisar Inc., the distributor of the TV Listener® J3 (Model #TV920), warrants to the originalowner of this product that this product is free from defects in materials and workman-ship for a period of six (6) months from the date of the original purchase. If this productfails to function properly when used as directed under normal conditions within thesix-month period, Unisar Inc. will either repair or replace the product, at its option, freeof charge, when it is returned in its original packaging, postage prepaid, with proof ofpurchase. Unisar Inc. will bear the cost of repairing or replacing the product andshipping it back to you within the United States. Repair or replacement of the defectiveproduct is subject to verification of the malfunction or defect when delivered to:
Unisar® Service Center51-02 21 Street, Floor 7
Long Island City, NY 11101
NOTE: The warrantor expressly disclaims liability for incidental, consequential, or specialdamages of any nature. This warranty does not cover: 1) A defect that has beencaused by repair or modification by any person other than a Unisar technician; 2) Adefect caused by negligence, accident, or misuse of the product; 3) A defect causedby incorrect installation of and/or defective batteries; 4) Battery life; 5) A defectcaused by the use of any adapter not provided by the warrantor; or 6) Damageresulting from improper operation.
LEGAL RIGHTS VARY FROM STATE TO STATE.
NOTE: This warranty is valid only for products sold in the United States. If you havepurchased this product outside of the United States, please see your local retailer ordistributor for service.
If you have any questions, please contact our Customer Service Department at 1-877-736-6760 Mon-Fri from 9:00AM-5:00PM Eastern Time, or e-mail us [email protected].
{14} {15}
RoHS
Increase volume level.
Bring them closer together.Maximum range is 33 feet(10 meters).
Make sure nothing isobstructing the transmissionof the infrared light raysfrom transmitter to headset.
Place transmitter at or close to your eye levelwhen you are sitting.
Make sure infrared sensorsare not being blocked byclothing, hair, hands, etc.
Position unit away fromdirect sunlight.
Check or charge batteries.Use only AAA rechargeablebatteries. Do NOT usealkaline batteries.
Plug AC adapter intosurge protector and thenplug surge protectorinto electrical outlet.
Plug the transmitter intoyour cable box instead ofyour television. Move trans-mitter so it is not directly infront of the TV.
Make sure there isn'tanything obstructing thetransmission of the infraredlight rays from transmitter to headset.
Plug AC adapter intosurge protector and thenplug surge protectorinto electrical outlet.
Check connections. Makesure you have not connect-ed the stereo adapter intoa mono output.
Sound from headsetis low or poor.
There is static comingfrom headset.
There is a radio signalcoming from headset.
There is sound coming from only one side of theheadset.
Volume on headset istoo low.
Headset and transmitterare too far apart.
Headset is not in line ofsight of transmitter.
Transmitter is not placedproperly.
Infrared sensors inheadset are obstructed.
Interference from sunlight.
Batteries in headsetare low.
Electric current to transmitteris causing static.
LCD or plasma television iscausing static.
Headset is not in line ofsight of transmitter.
Electric current to transmitteris causing the radio signal.
Audio cord is not properlyplugged into audiodevice.

Also Available
TV Listener J3 Extra HeadsetModel #TV920-HS
Allows multiple people to use your TVListener J3 at the same time. No limit to thenumber of headsets that can be used witha single transmitter. Volume control on theheadset allows each user to adjust the volume to his/her own needs.
Portable miniFRIDGEModel #MF104
Keeps your food and beverages coldor hot. Compact and lightweight.Convenient for nursery, bedroom, office, or car. Holds baby bottles, snacks, or even six 12-ounce cans. Removable shelf. Includes home AC adapter and car adapter.
Call 1-800-430-0222 for the store nearest you.{16} {17}
TM
TM
TM
TM
Call 1-800-430-0222 for the store nearest you.
AlwaysClean PacifierModel #BR120
Closes when dropped! Unique shield auto-matically closes when the paciifer isdropped keeping it sanitary for your baby.Silicone orthodontic nipple. 0-6 months.
kickTrakPrenatal Kick & Movement CounterModel #BK100
Count your way to a healthy baby. Yourunborn baby’s movement is an excellentindicator of her well-being. Makes countingand keeping a record of these movementseasy and convenient with just a simpleclick of a button.

Gracias por comprar el TV Listener® J3 de Unisar®. Este sistema infrarrojo de auricularesinalámbricos estéreo le permitirá oír su televisor, equipo de sonido estéreo, computa-dor o cualquier otro aparato de audio, con un volumen que sea cómodo para usted,sin molestar a otros que estén en la habitación. Está diseñado para que lo use si esque usted tiene dificultad para oír, o si simplemente desea mirar la televisión a un vol-umen diferente de los demás en la habitación, o si desea mirar la televisión mientrasalguien más está durmiendo.
Por favor revise las opciones de instalación que se explican en este manual y averigüequé características tiene su televisor o equipo de audio, antes de instalar su TVListener J3. Por favor conserve este manual para referencia futura.
Si usted tiene alguna pregunta, por favor contacte a nuestro Departamento deServicio al Cliente al 1-877-736-6760 de Lunes a Viernes de 9:00AM a 5:00PM hora delEste, o envíenos un correo electrónico a [email protected].
Índice de Contenidos
Cómo Funciona / página 20
Instalación del Sistema / página 20
Operación del Sistema / página 26
Consejos Para Usar Su TV Listener J3 / página 28
Cuidados y Limpieza / página 28
Solución de Problemas / página 28
Especificaciones Técnicas / página 31
Garantía Limitada del Producto / página 31
También Disponibles / página 33
{19}
Advertencia
Antes de usar el producto, por favor lea atentamente todas las instrucciones sobreseguridad y operación.
1. Para su bienestar, los expertos médicos aconsejan que no se use ningún aparatode audio con volumen alto durante un largo tiempo. Si oye un silbido en los oídos,reduzca inmediatamente el volumen o deje de usar el aparato.
2. Para reducir el riesgo de incendio o de choque eléctrico, no exponga esteproducto al agua ni a la humedad.
3. Para evita que se sobrecaliente, mantenga este producto lejos de fuentes decalor como radiadores, estufas, chimeneas o de la luz directa del sol.
4. Use sólo el adaptador de corriente alterna que se proporciona con eltransmisor. Si usa cualquier otro adaptador podría dañar el aparato y hacerperder la garantía.
5. Conecte el adaptador de corriente alterna sólo a un tomacorriente normal decasa (tomacorriente de 120 voltios de corriente alterna).
6. Evite daños a los cables del adaptador. Coloque los cables de modo tal queno haya probabilidades de que alguien los pise o que sean pellizcados por ele-mentos colocados encima o contra ellos.
7. Para la unidad de auriculares sólo utilice baterías AAA recargables.
8. NO utilice baterías alcalinas o dañará seriamente la unidad.
9. Elimine las baterías apropiadamente y con seguridad.
10. Cuando no los vaya a usar por un largo tiempo, desconecte el adaptador decorriente alterna y retire las baterías.
11. NO desarme el aparato.
{18}
Rayos de LuzInfrarroja
El Transmisor
La Unidad deAuriculares

Instalación del TransmissorHay cinco formas diferentes de conectar el TV Listener J3, dependiendo del tipo deequipo que usted tenga.
1. INSTALACIÓN ESTÉREO – para equipos con dos conectores de salida de audio(televisores, reproductores de DVD o decodificadores de cable que tienenestéreo). Consulte la Pág. 22.
2. INSTALACIÓN MONOFÓNICA – para equipos con un solo conector de salida deaudio (televisores, reproductores de DVD o decodificadores de cable monofóni-cos). Consulte la Pág. 22.
3. INSTALACIÓN PARA CONECTOR PEQUEÑO DE AUDÍFONO – para equipos con unconector pequeño de audífono (la mayoría de reproductores de CD, estéreosportátiles, reproductores de MP3). Consulte la Pág. 23.
4. INSTALACIÓN PARA CONECTOR GRANDE DE AUDÍFONO – para equipos con unconector grande de audífono (algunos sistemas de estéreo para el hogar).Consulte la Pág. 24.
5. INSTALACIÓN PARA MICRÓFONO – para equipos que no tienen ningún conector desalida de audio. Consulte la Pág. 24.
{21}
El adaptador estéreode 3.5mm tipo RCA
El adaptador monofónicode 3.5mm tipo RCA
El adaptador audífonoestéreo de 6.3mm
El adaptador de micrófono
El adaptador de corriente alterna
2 baterías AAA recargables
Cómo Funciona
El TV Listener J3 funciona igual que su control remoto, enviando una señal infrarrojainvisible desde su televisor o desde cualquier equipo de sonido hacia los auricularesestéreo de lujo. A diferencia de los aparatos de radiofrecuencia, el infrarrojo no sufrela interferencia de teléfonos inalámbricos, redes inalámbricas, microondas, etc. Ustedpuede ajustar el volumen en la liviana unidad inalámbrica de auriculares, de acuerdocon su necesidad. Se pueden utilizar varias unidades de auriculares con un solo transmisor.
Instalación del Sistema
Cargue las baterías en la auriculares durante 16 horas antes del primer uso.
Componentes del TV Listener J3Antes de la instalación revise que tenga todos los componentes.
{20}
El Transmisor (conecta a su televisor o otro aparato de audio)
La Unidad de Auriculares Inalámbricas
Rayos de InfrarrojaAdaptador
de Audífono
Enchufe delAdaptador de
Corriente Alterna
SensoresInfrarrojos
Compartimientosde las Baterías Sensores
Infrarrojos
Luz Indicadorde Energía
Controlde Volumen
Adaptadorde Carga
Enchufede Carga
Luz Indicadorde Carga
Interruptorde Energía
Interruptorde Energía

Siga estas instrucciones si su equipo tiene un solo conector de salida de audio (televi-sores, reproductores de DVD o decodificadores de cable que sean monofónicos).
1. Conecte el cable de audio en la parte posterior del transmisor (A) al adaptadormonofónico de 3.5mm tipo RCA (E).
2. Enchufe el otro extremo del adaptador al conector de salida de audio desu equipo.
Si está conectando a su televisor, use los conectores de audio ubicados en laparte posterior. NO use los conectores de audio de la parte frontal porque sonconectores de entrada de audio. Asegúrese de conectar el adaptador en lasalida de audio, no en la salida de video.
Si usted está conectando a un aparato que está conectado a su televisor (repro-ductor de DVD, videocasetera, decodificador de cable, home theater system),entonces ese aparato debe mantenerse encendido cuando use el TV Listener. Lavideocasetera (VCR) debe estar sintonizada en el mismo canal que su televisor.
3. Enchufe el adaptador de corriente alterna (C) en el conector marcado “DC IN12V” en la parte posterior del transmisor y enchufe el adaptador a un tomacorri-ente. En caso de períodos largos sin uso, sugerimos desenchufar el adaptadorde corriente alterna.
INSTALACIÓN PARA CONECTOR PEQUEÑO DE AUDÍFONO
Siga estas instrucciones si su equipo tiene un conector pequeño de audífono(reproductores de CD, estéreos portátiles, computadoras, reproductores de MP3).
1. Conecte el cable de audio en la parte posterior del transmisor (A) directamenteal conector de audífono en su equipo.
2. Enchufe el adaptador de corriente alterna (C) en el conector marcado “DC IN12V” en la parte posterior del transmisor y enchufe el adaptador a un tomacorri-ente. En caso de períodos largos sin uso, sugerimos desenchufar el adaptadorde corriente alterna.
INSTALACIÓN ESTÉREO
Siga estas instrucciones si su equipo tiene dos conectores para salida de audio(televisores, reproductores de DVD o decodificadores de cable que tengan estéreo).
1. Conecte el cable de audio en la parte posterior del transmisor (A) al adaptadorestéreo de 3.5mm tipo RCA (D).
2. Enchufe el extremo rojo del adaptador en el conector derecho de salidadeaudio, y el extremo blanco en el conector izquierdo de salida de audio desu equipo.
Si está conectando a su televisor, use los conectores de audio ubicados en laparte posterior. NO use los conectores de audio de la parte frontal porque sonconectores de entrada de audio. Asegúrese de conectar el adaptador en lasalida de audio, no en la salida de video.
Si usted está conectando a un aparato que está conectado a su televisor (repro-ductor de DVD, videocasetera, decodificador de cable, home theater system),entonces ese aparato debe mantenerse encendido cuando use el TV Listener. Lavideocasetera (VCR) debe estar sintonizada en el mismo canal que su televisor.
3. Enchufe el adaptador de corriente alterna (C) en el conector marcado “DC IN12V” en la parte posterior del transmisor y enchufe el adaptador a un tomacorri-ente. En caso de períodos largos sin uso, sugerimos desenchufar el adaptador decorriente alterna.
INSTALACIÓN MONOFÓNICAFig. 2
{23}
Fig. 1
{22}
blanco - IZQUIERDO
rojo - DERECHO
Fig. 3

INSTALACIÓN PARA CONECTOR GRANDE DE AUDÍFONO
Siga estas instrucciones si su equipo tiene un conector grande para audífono (sistemasde estéreo para el hogar).
1. Conecte el cable de audio en la parte posterior del transmisor (A) al adaptadorde audífono estéreo de 6.3mm (F).
2. Enchufe el otro extremo del adaptador en el conector de audífono en su aparatode audio.
3. Enchufe el adaptador de corriente alterna (C) en el conector marcado “DC IN12V” en la parte posterior del transmisor y enchufe el adaptador a un tomacorri-ente. En caso de períodos largos sin uso, sugerimos desenchufar el adaptador decorriente alterna
.INSTALACIÓN PARA MICRÓFONO
Siga estas instrucciones si su equipo no tiene ningún conector para salida de audio.
1. Conecte el cable de audio en la parte posterior del transmisor (A) al adaptadorde micrófono (G).
2. Coloque la pieza de montaje del micrófono directamente sobre el parlante de sutelevisor o aparato de audio. Realize esta operación exponiendo la tira adhesiva.Inserte el micrófono en la pieza de montaje.
3. Tendrá que poner muy bajo el volumen de su aparato de audio. Tambiénpuede cambiar el volumen de la unidad de auriculares, ajustando la colocacióndel micrófono.
4. Enchufe el adaptador de corriente alterna (C) en el conector marcado “DC IN12V” en la parte posterior del transmisor y enchufe el adaptador a un tomacorri-ente. En caso de períodos largos sin uso, sugerimos desenchufar el adaptador decorriente alterna.
Instalación de las Baterías en la Unidad de AuricularesIMPORTANTE: Cargue las baterías durante 16 horas antes del primer uso. Sólo debe uti-lizar baterías recargables (incluidas). NO utilice baterías alcalinas o dañará seri-amente la unidad.
La unidad de auriculares inalámbrica (B) requiere dos baterías AAA recargables(incluidas). Para acceder al compartimiento de la batería en cada auricular, remuevalas almohadillas (consulte Fig. 6). Para remover las almohadillas, quítelas con cuidado.Inserte una batería AAA recargable a cada lado y haga coincidir positivo (+) conpositivo (+) negativo (-) con negativo (-). NO utilice baterías alcalinas. Para colocar denuevo las almohadillas, ajústelas en los auriculares e inserte los dientes en las aberturascorrespodientes del auricular.
Cargue las baterías durante 16 horas antes del primer uso. Asegúrese que a unidadde auriculares es apagada y el transmisor es encendido. Enchufe un extremo deladaptador de carga en la parte posterior del transmisor en el conector marcado“CHG” en el auricular derecho ( ) (consulte Fig. 7). En la unidad de auriculares seencenderá la luz verde indicadora de cargue. La vida de las baterías es más de 15horas. Recargue los auriculares cuando el volumen comience a debilitarse. No car-gue las baterías por más de 24 horas consecutivas, porque este procedimiento acortala vida de las baterías.
En caso de períodos largos sin uso, sugerimos retirar las baterías.
Las baterías deben ser reemplazadas cuando no duran el tiempo esperado despuésde haber sido cargadas (aproximadamente 15 horas). Asegúrese de reemplazarlasSOLAMENTE con baterías AAA recargables. NO mezcle baterías alcalinas y recar-gables.
{25}
Fig. 5
{24}
Fig. 4
Fig. 6
La AlmohadillaAAA Batería

Operación del Sistema
1. Coloque el transmisor al nivel de sus ojos o cerca del mismo, cuando esté senta-do. No debe haber nada que obstruya la transmisión de los rayos de luz infrarrojadesde el transmisor hasta el receptor en su unidad de auriculares (consulte Fig. 8).Para que el sistema funcione correctamente, el transmisor debe estar a menosde 10 metros (33 pies) de la unidad de auriculares.
NOTE: Evite que reciba directamente la luz del sol. La luz del sol directa podríainterferir la recepción. También puede sufrir interferencia de las cintas para ejerci-cios.
2. Encienda el transmisor al deslizar el interruptor de energía a la posición de“ON” (Encendido). En el frente del transmisor se encenderán cuatro luces rojas.
3. Encienda la unidad de auriculares al deslizar el interruptor de energía a la posi-ción de “ON” (Encendido) en el auricular derecho ( ). El indicadora de energíaroja se encenderá. Para evitar un posible daño a sus oídos, asegúrese de bajar elvolumen en la unidad de auriculares antes de colocársela.
4. Colóquese la unidad de auriculares, asegurándose que el auricular derecho ( )vaya sobre su oreja derecha, y que el auricular izquierdo ( ) vaya sobre su orejaizquierda. Precaución: Para evitar un posible daño a sus oídos, asegúrese de bajar
el volumen en la unidad de auriculares antes de colocársela.
5. Use el dial de control de volumen para ajustar el volumen a un nivel confortablepara escuchar. Si la unidad de auriculares se encuentra fuera del alcance deltransmisor, o si es que los sensores infrarrojos de la unidad de auriculares están blo-queados, no se escuchará ningún sonido a través de los auriculares.
6. Recomendamos apagar el transmisor y el auricular depués de cada uso, exeptocuando cargue el auricular ya que éste debe estar apagado y el transmisor debeestar encendido.
Para cualquier tipo de equipo que tenga y para cualquier instrucción de instalaciónque siga, cuando conecte el transmisor se deberá oír el sonido, (1) sea a través de launidad de auriculares y de los parlantes del televisor, o (2) sino sólo a través de launidad de auriculares. Las siguientes instrucciones sirven para cualquiera de los cincotipos de instalación.
1. El sonido de su televisor se oye por medio de la unidad de auriculares y por losparlantes de su televisor. Si desea que el sonido se escuche sólo por medio de launidad de auriculares, entonces es necesario poner en "mute" el sonido del televi-sor. Si usted simplemente baja el volumen al mínimo, podría reducir la señal queva a los conectores de salida de audio del televisor lo cual afectará al sonidoque llega por medio de su unidad de auriculares. Para apagar el sonido del tele-visor presione “Mute” en su control remoto. O si su televisor tiene en la parte pos-terior un interruptor para el parlante, póngalo en “OFF”.
Si al presionar "Mute" en su control remoto también se apaga el sonido de suunidad de auriculares, entonces su televisor podría tener opciones para parlantesque usted puede manejar con el control remoto del televisor. Por favor consulteel manual de instrucciones de su televisor para que encuentre este interruptor ypóngalo en “OFF”.
2. El sonido de su televisor se oirá solamente a través de la unidad de auricularesy no se oirá por los parlantes del televisor. Si desea que el sonido se oiga pormedio de la unidad de auriculares y también por los parlantes del televisor,conecte el transmisor a su reproductor de DVD, o a su videocasetera (VCR), o asu decodificador de cable o use el adaptador de micrófono (consulte la Pág. 24).
NOTA: Si escucha estática o una señal de radio en su unidad de auriculares, podríadeberse a la corriente eléctrica en el transmisor. Desconecte el adaptador del toma-corriente de corriente alterna y enchúfelo a un protector contra descargas. Luegoenchufe el protector contra descargas al tomacorriente.
Si usted usa su TV Listener J3 con un LCD o televisores plasma y experimenta estática,conecte el transmisor a su caja de cable en vez de su televisor. Lleve el transmisor tanlejos de su televisor como sea posible, pero asegúrese de que el transmisor continuaalineado con el auricular de manera visible.
No hay límite en la cantidad de unidades de auriculares que se pueden usar conun solo transmisor. Por favor llámenos al 1-800-430-0222 para averiguar dónde puedeadquirir unidades adicionales de auriculares.
Fig. 8
Rayos deLuz Infrarroja
{26} {27}
Fig. 7

{29}
PROBLEMA POSIBLE CAUSAS SOLUCIÓN
Las cuatro luces rojas deltransmisor no se iluminan.
La luz indicadora deencendido de launidad de auricularesno se ilumina.
No hay sonido en launidad de auriculares.
El adaptador de corrientealterna no está correcta-mente conectado o eltomacorriente eléctrico nofunciona.
El transmisor no estáencendido.
Las baterías en la unidadde auriculares están bajaso incorrectamente instaladas.
El transmisor y/o launidad de auriculares noestán encendidos.
Las baterías en la unidadde auriculares estánbajas o incorrectamenteinstaladas.
La unidad de auricularesno en está en la línea devista del transmisor.
Verifique la conexioneo cambie a otrotomacorriente eléctrico.
Asegúrese que elinterruptor de encendidoesté” en la posición“ON” (Encendido).
Verifique o cargue lasbaterías. Sólo utilicebaterías AAA recargables.NO utilice bateríasalcalinas.
Asegúrese que ambasunidades estén encendidas.
Verifique o cargue lasbaterías. Sólo utilicebaterías AAA recargables.NO utilice baterías alcalinas.
Asegúrese que no hayanada obstruyendo latransmisión de los rayosde luz infrarroja desde eltransmisor hacia la unidadde auriculares.
Solución de Problemas
Si usted cree que su TV Listener J3 no está funcionando bien, por favor consulte abajola Guía de Solución de Problemas. La instalación inadecuada del transmisor es la prin-cipal causa de fallas en el funcionamiento. Si usted no puede resolver el problemadespués de consultar la Guía de Solución de Problemas, por favor siga las instruc-ciones para instalar el micrófono (consulte la Pág. 24). Si usted puede oír su aparatode audio desde la unidad de auriculares usando el micrófono, entonces el problemapodría ser causado por una instalación defectuosa o por problemas con su televisoro aparato de audio. Si usted no puede oír nada por la unidad de auriculares cuandouse el micrófono, por favor contáctese con nuestro Departamento de Servicio alCliente al teléfono 1-877-736-6760 de Lunes a Viernes de 9:00AM a 5:00PM hora delEste, o envíenos un correo electrónico a [email protected].
Consejos Para Usar Su TV Listener J3
• Si usted usa su TV Listener J3 con un LCD o televisores plasma y experimenta estáti-ca, conecte el transmisor a su caja de cable en vez de su televisor. Siga la instruc-ciones para Instalación Esteréo en la Pág. 22. También coloque el tranmisor deforma que no esté en frente de su televisor. Lleve el transmisor tan lejos de su televi-sor como sea posible, pero asegúrese de que el transmisor continua alineado con elauricular de manera visible.
• Si escucha estática o una señal de radio en su unidad de auriculares, podríadeberse a la corriente eléctrica en el transmisor. Desconecte el adaptador deltomacorriente de corriente alterna y enchúfelo a un protector contra descargas.Luego enchufe el protector contra descargas al tomacorriente.
• Al conectar a su televisor o otro aparato de audio, asegúrese usar el conector paraSALIDA de audio. Si está conectando a su televisor, use los conectores de audio ubi-cados en la parte posterior. NO use los conectores de audio de la parte frontalporque son conectores de entrada de audio.
• Al cargar su unidad de auriculares, asegúrese que el transmisor es encendido y launidad de auriculares es apagada.
• Sólo utilice baterías recargables. NO utilice baterías alcalinas o dañará seriamentela unidad.
• Si su unidad de auriculares no trabaja, verifique primero las baterías. Asegúrese lasbaterías son cargadas y instaladas aapropiadamente. Asimismo asegúrese de queel transmisor está encendido.
Cuidados y Limpieza
Desconecte el transmisor y retire las baterías de la unidad de auriculares antes delimpiarla. Limpie la superficie exterior de las unidades con un trapo seco suave oligeramente húmedo. NO rociar con productos de limpieza o solventes. NO sumerjaen agua o en ningún otro líquido.
{28}

{31}
Especificaciones Técnicas
Fuente de Alimentación � Adaptador de 12V, 200mA de corriente alterna para el transmisor2 baterías AAA recargables para la unidad de auriculares
Máxima Distancia Operativa � 10 metros (33 pies)Vida de la Batería � Hasta 50 horasModo de Transmisión � Infrarrojo a 850 nanómetrosModulación de Frecuencia � 2,3 MHz (izquierdo); 2,8 MHz (derecho)Respuesta de Frecuencia � 40 Hz–12000 HzDistorsión � 1% THD (distorsión armónica total)Relación Señal a Ruido � 40 dB
La LCD o televisores plas-ma está causando estáti-ca.
La unidad de auricularesno en está en la línea devista del transmisor.
La corriente eléctricaen el transmisor estácausando la señal deradio.
El cable de audio no estácorrectamente enchufadoal aparato de audio.
Conect el transmisor a sucaja de cable en vez de sutelevisor. Coloque el tran-misor de forma que no estéen frente de su televisor.
Asegúrese que no hayanada obstruyendo latransmisión de los rayosde luz infrarroja desde eltransmisor hacia la unidadde auriculares.
Enchufe el adaptador decorriente alterna a un pro-tector contra descargas yluego enchufe el protectorcontra descargas al toma-corriente.
Compruebe las conexiones.Asegúrese no ha conecta-do el adaptador estéreo enuna mono salida.
Hay una señal de radioque proviene de la unidadde auriculares.
El sonido viene sólode un lado de la unidadde auriculares.
RoHS
{30}
El sonido de la unidadde auriculares es bajoo defectuoso.
Hay estática queproviene de la unidadde auriculares.
No hay salida deaudio desde el aparatode audio.
El cable de audio no estácorrectamente enchufadoal aparato de audio.
La unidad de auricularesy el transmisor estándemasiado alejados.
El volumen el la unidad deauriculares es demasiadobajo.
La unidad de auricularesy el transmisor estándemasiado alejados.
La unidad de auricularesno en está en la línea devista del transmisor.
El transmisor no estácorrectamente colocado.
Los sensores infrarrojos dela unidad de auricularesestan obstruido.
Interferencia de la luzdel sol.
Las baterías de la unidadde auriculares están bajas.
La corriente eléctricaen el transmisor estácausando estática.
Revise el sonido de launidad de audio.
Compruebe las conexiones.Asegúrese de conectar eladaptador en la salida deaudio (no entrada deaudio).
Acérquelos más. El alcancemáximo es de 10 metros (33pies).
Incremente el nivel delvolumen.
Acérquelos más. El alcancemáximo es de 10 metros (33pies).
Asegúrese que no hayanada obstruyendo latransmisión de los rayosde luz infrarroja desde eltransmisor hacia la unidadde auriculares.
Coloque el transmisor cercao a nivel de sus ojos cuandoesté sentado.
Asegúrese que los sensoresinfrarrojos de la unidadde auriculares no estanbloqueado por la ropa,el pelo, las manos, etc.
Coloque el transmisor lejosde la luz directa del sol.
Verifique o cargue lasbaterías. Sólo utilice baterías AAA recargables.NO utilice baterías alcalinas.
Enchufe el adaptador decorriente alterna a un pro-tector contra descargas yluego enchufe el protectorcontra descargas al toma-corriente.

También Disponibles
{33}
Unidad Extra de Auriculares para el TV Listener J3Modelo #TV920-HS
Permite que varias personas usen su TVListener J3 al mismo tiempo. No hay límitepara la cantidad de unidades de auricularesque se pueden usar con un solo transmisor. Elcontrol de volumen en la unidad de auricu-lares permite que cada usuario adjuste elvolumen según sus necesidades.
Mini-Refrigerador PortátilModelo #MF104
Mantiene sus alimentos y bebidas fríoso calientes. Compacto y ligero. Convenientepara la guardería, el dormitorio, la oficina oel auto. Sostiene biberones, bocadillos yhasta 6 latas de 12 onzas. Bandejadesmontable. Incluye adaptador hogareñode CA y adaptador para auto.
Llame 1-800-430-0222 para la tienda más cercana.{32}
Garantía Limitada del Producto
Unisar Inc., el distribuidor del TV Listener® J3 (Modelo #TV920), le garantiza al propi-etario original de este producto que este está libre de defectos en materiales y manode obra por un período de seis (6) meses a partir de la fecha de compra original. Sieste producto no funciona correctamente cuando se lo use de acuerdo con lasinstrucciones bajo condiciones normales dentro del período de seis meses, Unisar Inc.reparará o reemplazará el producto, a su opción, sin cargo alguno, cuando seadevuelto en su envase original, franqueo postal prepago, con prueba de compra.Unisar Inc. afrontará el costo de reparar o reemplazar el producto y enviarlo de vueltaa usted dentro de los Estados Unidos. La reparación o reemplazo del productodefectuoso está sujeta a verificación del mal funcionamiento o defecto cuando seaentregado a:
Unisar® Service Center51-02 21 Street, Floor 7
Long Island City, NY 11101
NOTA: El garante expresamente renuncia a toda responsabilidad por los daños inci-dentales, indirectos o especiales de cualquier naturaleza. Esta garantía no cubre:1) Un defecto que haya sido causado por reparación o modificación de cualquierpersona que no fuese un técnico de Unisar; 2) Un defecto causado por negligencia,accidente o mal uso del producto; 3) Un defecto causado por instalación incorrectade y/o baterías defectuosas; 4) Vida de las baterías; 5) Un defecto causado por eluso de cualquier adaptador no suministrado por el garante; o 6) Daño resultante deoperación incorrecta.
LOS DERECHOS LEGALES VARÍAN DE UN ESTADO A OTRO.
NOTA: Esta garantía es válida sólo para productos vendidos en los Estados Unidos. Siusted compró este producto fuera de los Estados Unidos, sírvase visitar al concesion-ario o distribuidor más cercano para obtener servicio.
Si desea hacer preguntas, por favor contacte a nuestro Departamento de Servicioal Cliente al 1-877-736-6760 de Lunes a Viernes de 9:00AM a 5:00PM hora del Este, oenvíenos un correo electrónico a [email protected].

Llame 1-800-430-0222 para la tienda más cercana.{34} {35}
Pacificador AlwaysCleanModelo #BR120
Se cierra al dejarlo caer! Su escudo único secierra automáticamente cuando el chupetese deja caer manteniéndolo limpio para subebé. Pezón ortodóncico de siliconas. De 0 a6 meses.
kickTrakModelo #BK100
Ayude a proteger a su bebé antes de quenazca. El movimiento de su bebé es un exce-lente indicador de su bienestar. Almacenará10 sesiones en su memoria para que ustedpueda evaluar fácil y cómodamente elmovimiento de su bebé en forma continua.
TM
TM

If you have any questions, please contact our Customer ServiceDepartment at 1-877-736-6760 Mon-Fri from 9:00AM-5:00PMEastern Time, or e-mail us at [email protected].
Si usted tiene alguna pregunta, por favor contacte a nuestroDepartamento de Servicio al Cliente al 1-877-736-6760 de Lunes aViernes de 9:00AM a 5:00PM hora del Este, o envíenos por correoelectrónico al [email protected].
Unisar Inc.51-02 21st Street, Long Island City, NY 11101 USA1.877.736.6760 | [email protected] | www.unisar.com
Made in China | Hecho en China
©2010 Peter J. Listro Associates, Ltd. All rights reserved. Unisar® and TV Listener® are registered trademarks of Peter J. Listro Associates, Ltd.Todos los derechos reservados. Unisar® y TV Listener® son marcas registradas de Peter J. Listro Associates, Ltd.