Embed Size (px)
Citation preview

QUICK REFERENCE GUIDE
Receiving a Single Asset with Split Funding
Revised December 4, 2015
Receive a Single Asset with Split FundingThis topic describes how to receive a single asset with split funding.
Note: Please be aware that you may have different circumstances for different lines on a single Purchase Order. For example, the first PO line may be for a single quantity and a single funding source, while the second PO Line may be for a single quantity and multiple funding sources. Each process is slightly different, so it is important to verify the status of each line before proceeding with the receipt.
For more information on the asset receiving decision process and how to determine which process to follow, please refer to the “Receiving Assets Decision Process” topic.
Steps to complete:
Step 1: Click on the AM Status “Pending” Link on the Maintain Receipts page
Step 2: Click on the Next Asset ID button on the Asset Management Information page
Step 3: Optionally, Enter Tag Numbers on the Asset Management Information page
Step 4: Verify Location and Optionally Enter Additional Asset Information on Details tab
Step 5: Assign the Same Asset ID Number to Each Distribution Record
Step 6: Optionally, Interface Receipt if Payment Expected Same Day
Step 1: Click on the AM Status “Pending” Link on the Maintain Receipts page
Begin the receiving process as you would normally. On the Maintain Receipts page, you will click on the “Pending” link in the AM Status column.
1. Navigation Links: Purchasing, Receipts, Add/Update Receipts.
2. Complete the Receiving page to begin your receipt as you would normally.
3. At the Select Purchase Order page, enter criteria to locate and select the Purchase Order to be received. Click the OK button. The Maintain Receipts page displays.
1 | P a g e - Q u i c k R e f e r e n c e G u i d e
If the receipt is for an asset, there will be a “Pending” link in the AM Status column in the Receipt Lines detail for the line you are receiving.
Important! If the purchase should not create an asset in the Asset Management Module, the correction must be made on the Purchaser Order. The Profile ID and AM Unit fields on the PO line must be removed from the Asset Information tab of the Distribution page.
4. Click the “Pending” link for the PO line you want to receive. The Asset Management Information page displays.
2 | P a g e - Q u i c k R e f e r e n c e G u i d e

Step 2: Click on the Next Asset ID button on the Asset Management Information pageNext, you’ll need to tell SWIFT to assign the next available Asset ID number to the asset.
1. On the Asset Management Information page, click on the View All link in the Distribution Information section to view all the distribution records or use the arrow keys to view the distributions one at a time.
2. Click on the Next Asset ID button to have SWIFT assign the next available Asset ID number in your Business Unit to this asset.
3 | P a g e - Q u i c k R e f e r e n c e G u i d e

4 | P a g e - Q u i c k R e f e r e n c e G u i d e

3. A Message displays asking if you want to assign Asset ID’s to all of the rows. Click the Yes button.
4. Another Message displays asking if you want to accept “AUTO-ASSIGN” for the temporary value of the Asset ID field. This value will be replaced with the next available Asset ID when you save the receipt. Click the OK button.
The Asset ID fields now contain “AUTO-ASSIGN”.
5 | P a g e - Q u i c k R e f e r e n c e G u i d e

Step 3: Optionally, enter Tag Numbers on the Asset Management Information page
If your agency uses Tag Numbers, you can enter the Tag Number at this time.
1. Optionally, enter a Tag Number following the instructions below.
Make sure to enter the same Tag Number for each Distribution record.
Field Name Field Description
Tag Number If your agency uses asset tags, you can enter a Tag Number now or it can be entered later in the Asset Management Module after the asset has been generated (refer to the “Creating (or Updating) Assets with Basic Add” topic in the Asset Management (AM1-Part 2) User Guide).
Tag Numbers must be unique within a Business Unit.
The field length is 12 characters
6 | P a g e - Q u i c k R e f e r e n c e G u i d e

Step 4: Verify Location and Optionally, Enter Additional Asset Information on Details tab
This is a good time to verify the Location where the asset will be placed “In Service” in the Asset Management Module. You can also enter additional asset information.
1. Click on the More Details tab to verify the Location. Accept the current Location or click on the Lookup and select a different Location.
Note: This is a very good time to double-check the Location to ensure it is correct before the asset is generated into the Asset Management Module.
2. Optionally, enter additional asset information as described below. This information can also be entered later in the Asset Management Module. (Refer to the “Creating (or Updating) Assets with Basic Add” topic in Asset Management (AM1-Part 2) User Guide.)
Field Name Field Description
VIN The VIN field is only available for Fleet Assets. Enter a VIN (Vehicle Identification Number) for the asset.
The field length is 18 characters.
Custodian Enter the Employee ID of the Custodian. The Employee ID entered must exist in the system.
MFG ID Click on the Lookup and select a Manufacturer ID.
7 | P a g e - Q u i c k R e f e r e n c e G u i d e

Field Name Field Description
Model Enter Model information for the asset. The field length is 30 characters.
Step 5: Assign the Same Asset ID to Each Distribution Line
A different Asset ID will be assigned to each Distribution Line. You must edit the assigned numbers so that the same Asset ID is used for all distribution lines.
1. After completing your entries on the Asset Management Information page, click on the OK button to return to the Maintain Receipts page.
2. Click on the Save button on the Maintain Receipts page so that the Asset IDs are assigned.
8 | P a g e - Q u i c k R e f e r e n c e G u i d e

3. Click the Pending link in the AM Status column to return to the Asset Management Information page. Notice that unique Asset IDs are assigned to each Distribution Line. You must edit the assigned values so that each Distribution Line has the same Asset ID.
9 | P a g e - Q u i c k R e f e r e n c e G u i d e
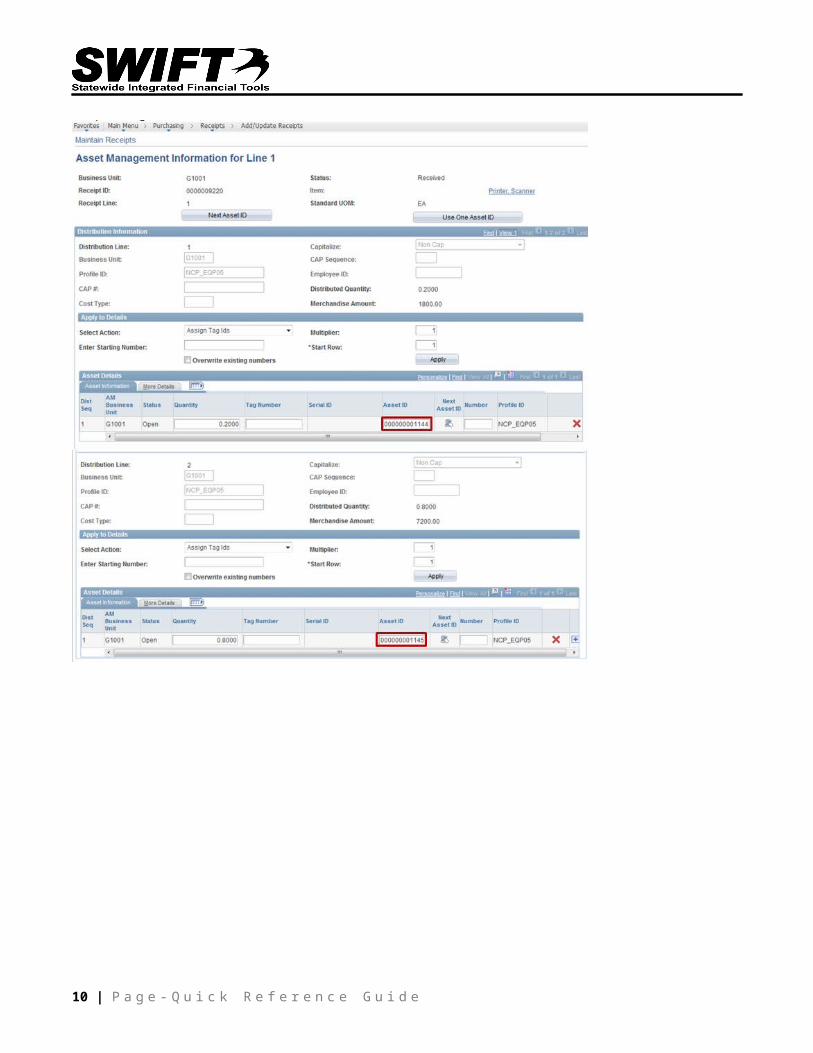
4. Copy the Asset ID from the first Distribution Line into the other lines so that they all match.
5. Click on the OK button to return to the Maintain Receipts page.
6. Click on the Save button to save your changes.
10 | P a g e - Q u i c k R e f e r e n c e G u i d e

Step 6: Optionally, Interface Receipt if Payment Expected Same Day
If you think that the invoice may be paid on the same day as the purchase is received, you should click on the
Interface Receipt checkbox so that the receiving information for the asset reaches the Asset Management
Module before the Voucher information. When in doubt, you should click on the Interface Receipt checkbox.
This is referred to as the “Manual Receiver Push Process”.
1. On the Maintain Receipts page, click on the Interface Receipt checkbox to ensure that the receiving information reaches the Asset Management Module before the voucher information.
2. Click on the Save button.
3. A Message displays indicating that the receipt information has been scheduled to process.
4. Click the OK button.
11 | P a g e - Q u i c k R e f e r e n c e G u i d e

An asset will be created in the Asset Management Module with information entered on the Purchase Order and Receipt. The asset will have a status of “Received (Not in Service)”. When you use the Search for an Asset page to find the asset, a line for each source of funding can display in the results, depending on the search criteria that that was used. (Refer to the “Using the Search for an Asset page” topic in the Asset Management (AM1-Part 2) User Guide).
After the voucher has been entered, the asset Status will be updated to “In Service”.
12 | P a g e - Q u i c k R e f e r e n c e G u i d e