Embed Size (px)
Citation preview
Receiver for Java 10
© 2012 Citrix Systems, Inc. All rights reserved. Terms of Use | Trademarks | Privacy Statement
Contents
Receiver for Java 10 5
Readme for Citrix Receiver for Java 10.0 7
Receiver for Java Feature Overview 10
Seamless Support 12
Connection Center 13
Receiver for Java Requirements 14
Deploying the Receiver for Java 15
To unpack the Receiver for Java package 16
Deploying Receiver for Java Through Web Interface 18
To configure fallback to Receiver for Java 19
Customizing the Receiver for Java Deployment 20
Using Private Root Certificates with Receiver for Java 22
Getting Started with the Sample HTML Files 23
Customizing the desktop.html File 25
To customize and use desktop.html 27
Customizing the seamless1.html File 29
To customize and use seamless1.html 30
Using Signed Java Applets 32
Example: To make a desktop for a server available to users 33
Configuring the Receiver for Java 34
To set the receiver language 35
To change the network protocol for the Receiver for Java 36
Configuring Server Browsing 37
To specify a business recovery server group 38
To change the client name 39
Passing Parameters to Applications 40
To pass a parameter to an application 41
To set the size and number of colors used for the session window 42
Showing and Hiding the Status Bar and Settings Button 43
2
To enable Session Reliability 44
Controlling Auto-Reconnect and Session Termination 45
Specifying Keyboard and Mouse Preferences 47
Supported Keyboard Layouts 50
Specifying Japanese IME Preferences 53
Specifying Hotkey Functions 54
To change the hotkey sequence from the default 56
User Device Mapping 57
Mapping Receiver Printers 59
ICAPrinterDrivers.txt File 60
To configure printers manually 61
Examples of Configuring Printers Manually 63
To enable receiver audio mapping 65
Connecting Through a Proxy Server 66
To enable proxy auto detection 67
Integrating the Receiver with the Secure Gateway or SSL Relay 69
To enable SSL and TLS 70
Configuring the Receiver for Use with Your Security Solution 71
Importing Root Certificates 73
Certificate Revocation List Checking 75
Certificate Chains 76
Connecting to a Server Across a Firewall 77
To specify ICA encryption 78
Configuring Kerberos Authentication 79
To configure the receiver for Kerberos logon 80
Locating Receiver Configuration and Device Files 81
Improving Performance of the Receiver for Java 83
Improving Performance over a Low-Bandwidth Connection 85
Limitations of the Receiver for Java 87
Working with Linux and Solaris 89
Working with the Mac OS X 90
Working with Windows Internet Explorer 91
Using the Receiver for Java on Japanese Operation Systems 92
Using Client-side IME Input Mode on Mac OS X 94
Parameters for the Receiver for Java 95
Security Integration Parameters 97
User Interface Parameters 99
3

Client Audio Mapping Parameters 101
Receiver Printer Mapping Parameters 102
Client Drive Mapping Parameters 103
Performance Tuning Parameters 104
4
5
Receiver for Java 10
Citrix Receiver for Java is a Java applet that provides access to applications running on aserver farm from any computer device with Windows Internet Explorer 8 or Firefox 3.5. Theapplet is a download-and-run, zero-install client, optimized for use in Web environmentswhere it is not possible or desirable to install software on the user device.
The receiver has the following advantages:
● You do not need to install any software on any user device. Users require only InternetExplorer 8 or Firefox 3.5, with Java SE Runtime Environment (JRE) 6 Update 18.
● At the most basic level of functionality, the applet is approximately 542KB in size,providing a faster download than any other receiver.
The applet resides on a Web server and is deployed using an HTML page with a customizable<applet> tag. Users run the receiver by opening the HTML page using one of the supportedbrowsers with Java support. When the page opens, the Java applet is automaticallydownloaded to the user device. The applet then runs and connects to the server orpublished application specified in the <applet> tag.
Unlike the ActiveX Client or Win32 Web Client, which are downloaded once and then savedfor future use by the user device, the applet is not stored permanently on the user'ssystem. However, Java environments provide a separate cache for Java applets, which youconfigure in the plug-in control panel.
What's NewThe following items are new with Receiver for Java 10:
● Supports for Citrix XenApp 6 on Windows Server 2008 R2
● Supports Windows Internet Explorer 8 or Firefox 3.5
In This SectionReadme for Citrix Receiver for Java 10.0 For known issues in this release, see
Readme for Citrix Receiver for Java 10.0.
Receiver for Java Features andRequirements
Find an overview of the receiver as well asthe requirements for this release.
Deploying the Receiver for Java Obtain the receiver files and becomefamiliar with their contents and how theywork.
Configuring the Receiver for Java Configure the receiver by customizing thereceiver .html files.
Limitations of the Receiver for Java Learn the limitations of the receiver withincertain operating systems.
Parameters for the Receiver for Java Use these parameters to provide additionalfeatures and customization.
Receiver for Java 10
6
7
Readme for Citrix Receiver for Java 10.0
Readme Version: 1.0
Contents● Finding Documentation
● Getting Support
● Installation Issues
● Other Known Issues
Finding DocumentationTo access complete and up-to-date product information, in Citrix eDocs, expand the topicsfor your product.
Licensing Documentation
To access licensing documentation, go tohttp://support.citrix.com/proddocs/topic/technologies/lic-library-node-wrapper.html.
Getting SupportCitrix provides technical support primarily through Citrix Solutions Advisors. Contact yoursupplier for first-line support or use Citrix Online Technical Support to find the nearestCitrix Solutions Advisor.
Citrix offers online technical support services on the Citrix Support Web site. The Supportpage includes links to downloads, the Citrix Knowledge Center, Citrix Consulting Services,and other useful support pages.
Issues Resolved in this ReleaseSigning certificate expired August 6, 2010
The signing certificate included with the previously posted Citrix Receiver for Java 10packages expired August 6, 2010. Updated packages with a three year certification are
available as of July 28, 2010. Download the latest packages to %Program Files%\Citrix\WebInterface\Version\Clients\Java (or for 64-bit computers, %Program FILES (x86)%\Citrix\WebInterface\Version\Clients\Java), moving the older Receiver files to another location. Expandthe new packages into the empty folder.
Users cannot resize the window of published applications in multiple hop sessions
Users cannot resize the window of published applications in multiple hop sessions (a sessionwithin a session). [#218726]
All sessions and applications within a second session in a multiple hop scenario close
All sessions and applications within a second session in a multiple hop scenario are closed ifany one session or application in that second session are closed by right-clicking theapplication in the task bar. [#218729]
ALT+TAB not working with multi-hop seamless applications
Users are not able to use ALT+TAB to switch between different application windows in thefirst and second sessions in cases of multiple hop sessions, when the Java client is used forthe first session and a native client for the second session. [#220557]
Known IssuesPrinters do not get mapped when connecting to server running XenApp 6
Printers do not get mapped when connecting to a server running XenApp 6. This happensbecause Windows Server 2008 R2 does not include PCL4 and PCL5c drivers. To resolve this,follow these steps:
1. Configure a Windows 2008 64-bit print server and publish two shared print queues usingthe following in-box drivers:
● HP Color LaserJet 4500
● HP LaserJet Series II2. On a computer running Windows Server 2008 R2, log on as an administrator and connect
to each of these print queues. The necessary drivers download and install from theprint servers. [# 229812]
Audio files do not play with Windows Media Player when published on a Windows Server2008 or Windows Server 2008 R2 computer
Audio files do not play with Windows Media Player as a published application or in a desktopsession from a server running Windows Server 2008 or Windows Server 2008 R2. Other mediaplayers are not affected and may be used if available to the user as a published applicationor in a desktop session. [# 215564]
Session time zone does not synchronize with the user device time zone
The session time zone does not synchronize with the user device time zone. The time zonefrom the server is used, rather than the time zone from the user device. As a result, thetime shown in the notification area reflects the server time zone. [#215566]
Readme for Citrix Receiver for Java 10.0
8
Session Sharing feature does not work properly with Windows Internet Explorer 8
When used with Windows Internet Explorer 8, Receiver for Java’s Session Sharing featuredoes not work properly. Internet Explorer 8, by default, uses separate, self-containedprocesses for each tab and window. As a result, multiple receiver connection centers open,unable to detect each other, rather than multiple applications sharing a single connectioncenter. To avoid this situation, in the registry of the user device, inHKEY_CURRENT_USER\Software\Microsoft\Internet Explorer\Main, add the new DWORD,TabProcGrowth, set to 0. [SR#60099632]
Caution: Editing the Registry incorrectly can cause serious problems that may require youto reinstall your operating system. Citrix cannot guarantee that problems resulting fromthe incorrect use of Registry Editor can be solved. Use Registry Editor at your own risk.Be sure to back up the registry before you edit it.
http://www.citrix.com
Readme for Citrix Receiver for Java 10.0
9
10
Receiver for Java Feature Overview
Ensuring the Availability of the Proper JavaEnvironment
Citrix Receiver for Java requires Java SE Runtime Environment (JRE) 6 Update 18.
The Microsoft Java Virtual Machine (JVM) is no longer supported. Note that within adeployment comprising Web Interface, the Client for Java 8 is deployed for use with theMicrosoft JVM.
SSL SupportSecure Sockets Layer (SSL) support, provided by the Java Secure Socket Extension (JSSE), isembedded in JRE 6 Update 18. Therefore, fewer packages are downloaded to the clientdevice for SSL support. The cryptojN.jar library is no longer required and the sslN.jarlibrary is reduced from 187KB to 28KB.
CRL CheckingCertificate Revocation List (CRL) checking is supported. When connecting to a serverrunning XenApp using SSL or TLS, and CRL checking is enabled, the receiver checks whetheror not the server’s certificate is revoked. This feature improves the cryptographicauthentication and overall security of the connection to the server running XenApp.
Kerberos AuthenticationKerberos authentication is supported when the client is running on Windows XP, WindowsVista, or Windows 7, with the necessary trust relationship between client and server ActiveDirectory domains.
Kerberos logon requires Citrix XenApp 6 or XenApp 5 and works only between clients andservers that belong to the same or to trusted Windows Server 2003, Windows Server 2008,or Windows Server 2008 R2 domains. Servers must also be trusted for delegation, an optionyou configure through the Active Directory Users and Computers management tool.
Important: Kerberos support requires XML Service DNS address resolution to be enabledfor the server farm, or reverse DNS resolution to be enabled for the Active Directorydomain.
You can configure Kerberos-enabled UNIX and Microsoft Windows domains to allow usersworking on UNIX client devices to access XenApp using their UNIX Kerberos credentials.
Kerberos authentication is not supported when the client is running on Mac OS X clientdevices. For further information, see http://developer.apple.com.
NTLM Proxy AuthenticationWindows NT LAN Manager (NTLM) proxy authentication is supported when the client isconfigured to access XenApp through a proxy server. The client must be running onWindows and connecting through a proxy server that supports NTLM (such as MicrosoftInternet Security & Acceleration Server).
Session ReliabilitySession reliability enables sessions to remain open and on screen when network connectivityis interrupted, therefore allowing client users to view the application while the networkconnection is restored. This feature is useful for mobile users with wireless connections.
Mac OS X Japanese SupportThe client is now supported on Japanese Mac OS X.
ICA BrowsingICA browsing is applicable when deploying the client without the Web Interface. Support forICA browsing is no longer provided in the core archive; it is provided as a separate archive(JICA-browserN.jar).
Universal Print Driver SupportThe Universal Print Driver (UPD) is a standard Windows print driver that encapsulates printjobs in Printer Control Language 4 (PCL4) format. A client-based interpreter renders theprint job using the client device’s local print driver and printing services. The UPDgenerates smaller print jobs, which can significantly improve performance when printingover WAN or dial-up connections. Using UPD also increases security on the server becausethe number of drivers used is restricted.
Receiver for Java supports only UPD1 (UPD2 and UPD3 support printing in color and athigher resolutions).
Receiver for Java Feature Overview
11
12
Seamless Support
Seamless support is provided as an option on Citrix Receiver for Java. It has three mainaspects:
● Seamless windows
● Session sharing
● Connection Center, a tool that enables users to manipulate both seamless andnon-seamless connections
To provide seamless support on Receiver for Java, Citrix recommends deploying thereceiver through the Web Interface, because this provides the most effective interface forthe features provided. You can deploy Receiver for Java using the sample HTML pagesprovided with the client package, but this requires more work on your part.
Note: Seamless desktops are not supported.
Seamless WindowsSeamless windows means that each remote application appears in a separate resizablewindow on the Receiver for Java desktop. Users can resize the application window,minimize it, and copy and paste text between published applications and applicationsrunning locally on the user device. Copy/paste also works for non-text objects when usedbetween applications sharing a session.
Note: Seamless windows are supported on Mac OS X Version 10.3 (Panther). However, ifReceiver for Java is configured for seamless mode and run on earlier versions of Mac OS Xplatforms, a non-seamless session is launched.
Dynamic Session Reconfiguration
For seamless windows, Receiver for Java detects and requests the server to update theunderlying session size when the local desktop size changes. The receiver cannot detectchanges to the local color depth.
Session SharingSession sharing allows seamless application launches to share a single connection ratherthan creating a new connection for each application. This reduces the system overhead andtherefore improves response times for users who have several applications open at thesame time. Applications launched in existing sessions also launch more quickly, because anew connection and associated resources do not need to be created.
13
Connection Center
The Connection Center includes a notification area and the Connections and Settingsoptions.
The notification area is similar to the notification area on computers running Windows.Notification icons appear in the notification area for certain published applications. Theseicons provide information and access to application settings.
The Connections and Settings options launch separate dialog boxes.
The Connections dialog box allows users to:
● Disconnect a session
● Switch between full screen and seamless mode
● View properties such as the encryption setting and the user name
● Log off a server session
● Close a published application
The Settings dialog box allows users to:
● Configure Receiver for Java settings such as general settings, printer and drivemapping, firewall settings, bitmap cache options, and hotkey configuration

14
Receiver for Java Requirements
To run the Citrix Receiver for Java, the user device must have the following:
● A Web browser with Java 2, Standard Edition Version 1.6.18, configured to acceptsigned Java applets.
● Network access to the Web server that stores the Receiver for Java files.
Supporting Java EnvironmentsA large number of Java-enabled environments are available, and their functionality variesfrom platform to platform. To validate proper functionality of the Receiver for Java, Citrixselects a representative group of platforms for testing.
For English and other European languages, Receiver for Java has been tested with WindowsInternet Explorer 8 and Firefox 3.5 on:
● Windows 7
● Windows XP Service Pack 3 (Professional and Home Editions)
● Windows Vista
Supporting Citrix ProductsReceiver for Java supports the following Citrix products:
● Citrix XenApp 6 for Windows Server 2008 R2
● Citrix XenApp 5 for Windows Server 2008
● Citrix XenApp 5 for Windows Server 2003
● Citrix XenDesktop 4
15
Deploying the Receiver for Java
To deploy Citrix Receiver for Java, you need:
● A copy of the receiver package. You can download the package from the Citrix Web(http://www.citrix.com)site or copy it in decompressed form from the Citrix XenAppinstallation media. Citrix recommends that you obtain the latest version of the receiverfrom the Web site.
On the Web site, the receiver package is available in two formats:
● .zip, primarily for Windows systems.
● .tar.gz, primarily for UNIX systems.Both have identical contents.
● A means of decompressing and unpacking the .zip or .tar.gz package, if you downloadthis from the Web site. If you are copying files from the XenApp installation media youdo not need to decompress them.
● Administrator access to a Web server.
Note: If deploying the receiver using the Web Interface, you can configure the receiverdeployment options using the Delivery Services Console.
16
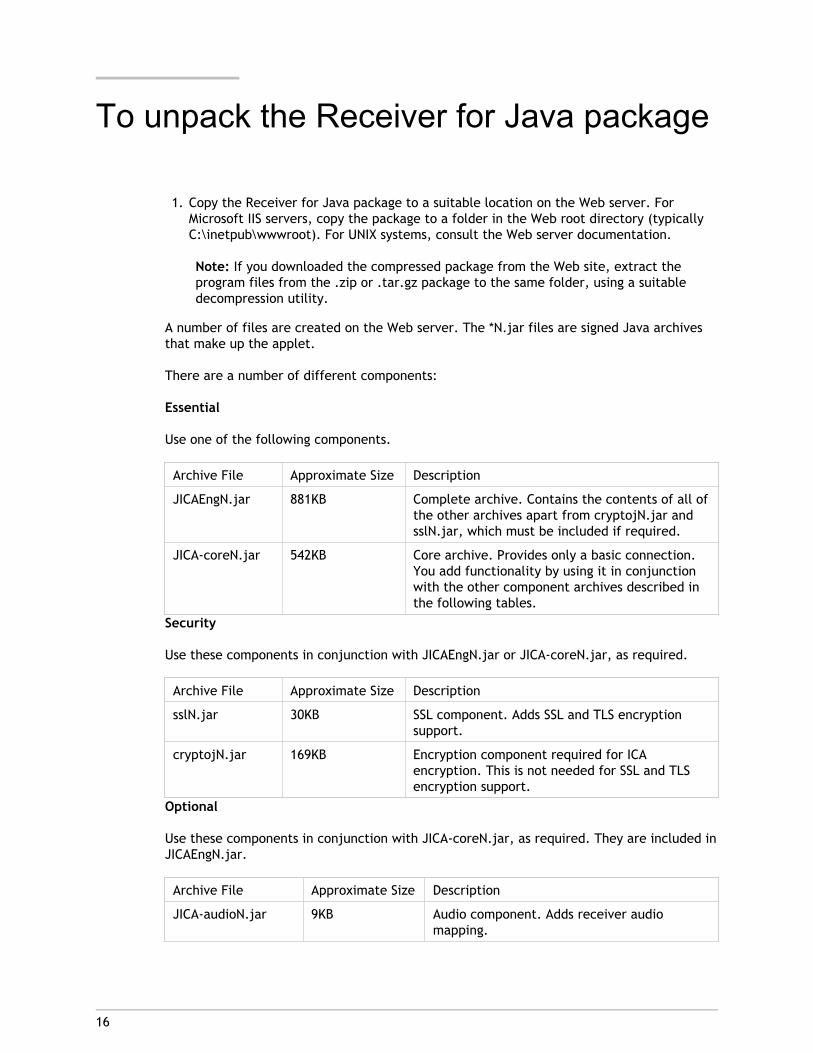
To unpack the Receiver for Java package
1. Copy the Receiver for Java package to a suitable location on the Web server. ForMicrosoft IIS servers, copy the package to a folder in the Web root directory (typicallyC:\inetpub\wwwroot). For UNIX systems, consult the Web server documentation.
Note: If you downloaded the compressed package from the Web site, extract theprogram files from the .zip or .tar.gz package to the same folder, using a suitabledecompression utility.
A number of files are created on the Web server. The *N.jar files are signed Java archivesthat make up the applet.
There are a number of different components:
Essential
Use one of the following components.
Archive File Approximate Size Description
JICAEngN.jar 881KB Complete archive. Contains the contents of all ofthe other archives apart from cryptojN.jar andsslN.jar, which must be included if required.
JICA-coreN.jar 542KB Core archive. Provides only a basic connection.You add functionality by using it in conjunctionwith the other component archives described inthe following tables.
Security
Use these components in conjunction with JICAEngN.jar or JICA-coreN.jar, as required.
Archive File Approximate Size Description
sslN.jar 30KB SSL component. Adds SSL and TLS encryptionsupport.
cryptojN.jar 169KB Encryption component required for ICAencryption. This is not needed for SSL and TLSencryption support.
Optional
Use these components in conjunction with JICA-coreN.jar, as required. They are included inJICAEngN.jar.
Archive File Approximate Size Description
JICA-audioN.jar 9KB Audio component. Adds receiver audiomapping.
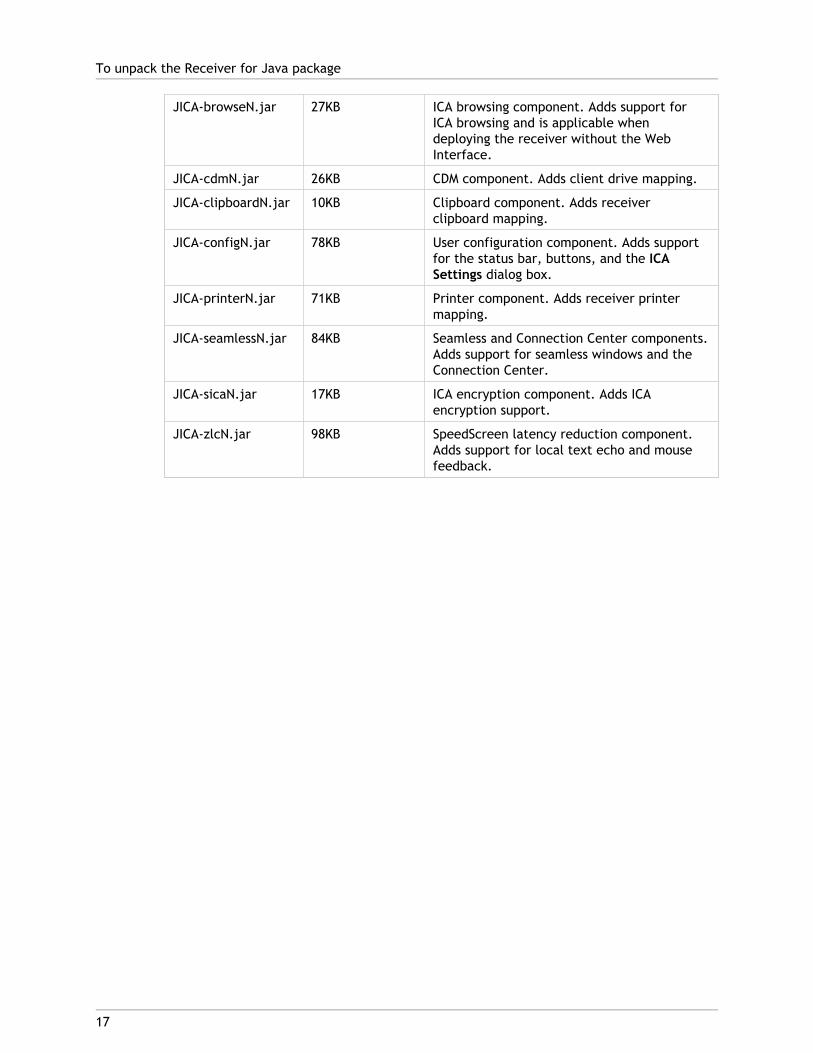
JICA-browseN.jar 27KB ICA browsing component. Adds support forICA browsing and is applicable whendeploying the receiver without the WebInterface.
JICA-cdmN.jar 26KB CDM component. Adds client drive mapping.
JICA-clipboardN.jar 10KB Clipboard component. Adds receiverclipboard mapping.
JICA-configN.jar 78KB User configuration component. Adds supportfor the status bar, buttons, and the ICASettings dialog box.
JICA-printerN.jar 71KB Printer component. Adds receiver printermapping.
JICA-seamlessN.jar 84KB Seamless and Connection Center components.Adds support for seamless windows and theConnection Center.
JICA-sicaN.jar 17KB ICA encryption component. Adds ICAencryption support.
JICA-zlcN.jar 98KB SpeedScreen latency reduction component.Adds support for local text echo and mousefeedback.
To unpack the Receiver for Java package
17
18
Deploying Receiver for Java ThroughWeb Interface
You can deploy Citrix Receiver for Java through Web Interface as a primary delivery modefor use as a fallback if your users are unable to run other receivers.
Because Receiver for Java offers the broadest range of support in terms of userenvironments, devices, operating systems, and Web browsers, it can be used as a fallbackoption for scenarios where a native client cannot be used. You can configure the clientdetection and deployment process to offer Receiver for Java to users who do not have anative client or are unable to download and deploy a receiver from the Citrix XenApp Website.
You must ensure that Receiver for Java is available in the %Program Files%\Citrix\WebInterface\Version\Clients\Java directory for the XenApp Web site in order to be able todeploy it to your users. If Web Interface is running on a 64-bit computer, use %ProgramFILES (x86)%\Citrix\Web Interface\Version\Clients\Java. If you have copied the receiver tothis location, Internet Information Services (IIS) must be reset. For directions on resettingIIS, see www.Microsoft.com.
Note: In Web Interface 5.0 and earlier, the Java folder was named Icajava.
19
To configure fallback to Receiver for Java
1. FromStart menu, click All Programs > Citrix > Management Consoles > Citrix WebInterface Management.
2. In the left pane of the Citrix Web Interface Management console, click XenApp WebSites and select your site in the results pane.
3. From the Action menu, click Client Deployment.
4. For sites that offer only online applications, select Native client and click Properties.
Note: You do not need to make Receiver for Java available to users in order toprovide the fallback functionality.
5. Click Fallback Behavior.
6. Specify the circumstances under which users without a native receiver are offeredReceiver for Java by choosing one of the following options:
● If you want users without a native receiver to download and deploy an appropriateCitrix receiver, select Deploy a native client. This is the default setting.
● If you want users without a native receiver to be offered Receiver for Java and onlybe prompted to download and deploy a native receiver if they cannot use Receiverfor Java, select Deploy a native client and allow user to choose between this andthe Client for Java.
● If you want users without a native receiver to be prompted to download and deployan appropriate receiver in addition to being offered Receiver for Java, selectAutomatically fall back to the Client for Java.
20
Customizing the Receiver for JavaDeployment
You can configure the components included in the deployment of Citrix Receiver for Java.
The size of Receiver for Java is determined by the packages you include. The fewerpackages selected, the smaller the size (it can be as small as 540 KB). If you want to limitthe size of the receiver for users on low bandwidth connections, you can deploy only aminimum set of components. Alternatively, you can allow users to select which componentsthey require.
Note: Some components that you make available in Receiver for Java may require furtherconfiguration on users’ devices or on the server.
1. In the Manage Client Deployment dialog box, select Native client or Client for Javaand Properties.
2. Click Client for Java to select from the packages described in the following table.
Package Description
Audio Enables resources running on the server to play soundsthrough sound devices installed on users’ computers. Youcan control the amount of bandwidth used by the receiveraudio mapping on the server.
Clipboard Enables users to copy text and graphics between onlineresources and applications running locally on theirdevices.
Local text echo Accelerates the display of the input text on users’devices.
SSL/TLS Secures communication using Secure Sockets Layer (SSL)and TLS (Transport Layer Security). SSL/TLS providesserver authentication, encryption of the data stream, andmessage integrity checks.
Encryption Provides strong encryption to increase the privacy of Citrixreceiver connections.
Client drive mapping Enables users to access their local drives from within asession. When users connect to the server, their clientdrives, such as floppy disks, network drives, and opticaldrives, are mounted automatically. Users can access theirlocally stored files, work with them during their sessions,and save them again on a local drive or on a drive on theserver.
To enable this setting, users must also configure clientdrive mapping in the Receiver for Java Settings dialogbox.
Printer mapping Enables users to print to their local or network printersfrom within a session.
Configuration UI Enables the Receiver for Java Settings dialog box. Thisdialog box is utilized by users to configure Receiver forJava.
Customizing the Receiver for Java Deployment
21
22
Using Private Root Certificates withReceiver for Java
If you configured Secure Gateway or the SSL Relay service with a server certificate obtainedfrom a private certificate authority (for example, if you issue your own certificates usingMicrosoft Certificate Services), you must import the root certificate into the Java keystoreon each user’s device. See the Sun Developer Network (http://java.sun.com/) for detailsabout importing certificates into the keystore using the Java keytool.
23
Getting Started with the Sample HTMLFiles
Citrix Receiver for Java comes with sample HTML pages that you can customize to specifythe correct archives for the user's browser.
Each sample HTML page is described, together with instructions for customizing the page.To use seamless windows and the Connection Center, read the instructions about how toedit seamless1.html, but also keep the desktop.html instructions close for reference. If youdo not want to use this functionality, read the instructions for editing desktop.html.
To access the Connection Center, session sharing, and seamless windows functionality,Citrix strongly recommends that you use the Web Interface, which automates the steps thatyou otherwise need to implement yourself.
Seven sample HTML files are supplied in the receiver package (in the \Examples folder):
index.html
This page contains links to and descriptions of the six launching pages:
● desktop.html, application.html, and autoproxy.html. If you do not want toimplement seamless windows and the Connection Center, use these pages.
● seamless1.html, seamless2.html, and seamless3.html. To implement seamlesswindows and the Connection Center, use these pages.
desktop.html
This page launches a desktop session to a server. To make a connection with this page,specify an address for the server.
application.html
This page launches a connection, with 128-bit ICA encryption enabled, to a publishedapplication. Specify the name of the published application and the name of a server touse for server location.
autoproxy.html
This page launches a connection to a published application through a proxy server, usingproxy auto detection. Specify the name of the published application and the name of aserver to use for the server location.
seamless1.html, seamless2.html, and seamless3.html
These pages start remote applications using the Connection Center and seamlesswindows. The only difference between the three files is that they each start a differentapplication. The applications are launched using an existing ICA session when possible.When session sharing is not possible, a new ICA session is created. You specify the nameof a published application and the name of a server to use for the server location.

Getting Started with the Sample HTML Files
24
25
Customizing the desktop.html File
Desktop.html contains the following <applet> tag:
<applet name="javaclient" codebase="../" code="com.citrix.JICA" archive="JICA-coreN.jar,JICA-configN.jar" width="640" height="480"> <param name="Address" value="plateau"> <param name="End" value="end.html"></applet>
The <applet> tag is used to configure the receiver. Some parameters are specified insidethe <applet> tag:
Applet name
This is an optional, unique name for the applet. Use this name to refer to the appletwhen writing scripts. In desktop.html, the applet name javaclient is used by a script thatdisplays a warning message if the user tries to close the Web browser window when anICA session is running. It is also needed for proxy auto configuration (PAC) file support.
Codebase
The path from the HTML page to the receiver archives. Change this path if it is notcorrect for your deployment.
Code
The name of the class file that is executed. For the receiver without the ConnectionCenter, this is always com.citrix.JICA.
Archive
Specify signed archives here. Separate multiple archives with commas.
Note: If, for example, you want users to be able to map drives and printers, specifythe necessary archives here.
Width
The width of the applet, in pixels.
Height
The height of the applet, in pixels.
All other parameters are specified using <param> tags, located between the <applet> and</applet> tags. Use the <param> tags in the form:

<param name="parametername" value="valuename">
where parametername is the name of the parameter you are specifying and valuename isthe value you are defining.
Customizing the desktop.html File
26
27
To customize and use desktop.html
1. Open desktop.html in a plain text editor and find the <applet> tag section:
<applet name="javaclient" codebase="../" code="com.citrix.JICA" archive="JICA-coreN.jar,JICA-configN.jar” width="640" height="480"> <param name="Address" value="plateau"> <param name="End" value="end.html"></applet>
This is the section that launches the receiver.
2. Change the Address value to the address of a server on your local network.
3. Change the relative path specified for the codebase if it is not correct for yourdeployment.
4. Publish the sample HTML pages using your Web server. See the Web serverdocumentation for more information about how to do this.
5. On the user device, open a Web browser and open the URL for the sample HTML pages.The Index.html page opens.
6. Click the link for Minimal Desktop. The applet appears.
7. To connect to the server, click Connect or Click to connect. To configure the clientusing the ICA Settings dialog box, click Settings.
You can edit application.html and autoproxy.html in the same way.
To change the warning message displayed when auser tries to close an active session
If you try to close the Web browser window when using a session created with one of theexample Web pages, a warning message appears. The message is defined in this section ofthe HTML pages:
function onBeforeUnload() { var connected = document.javaclientname.isConnected(); if (connected) { alerted = true; return "Closing this window will disconnect your ICA session";

}}
where javaclientname is the name of the applet.
1. To change the message displayed, edit the text in the HTML pages.
To customize and use desktop.html
28
29
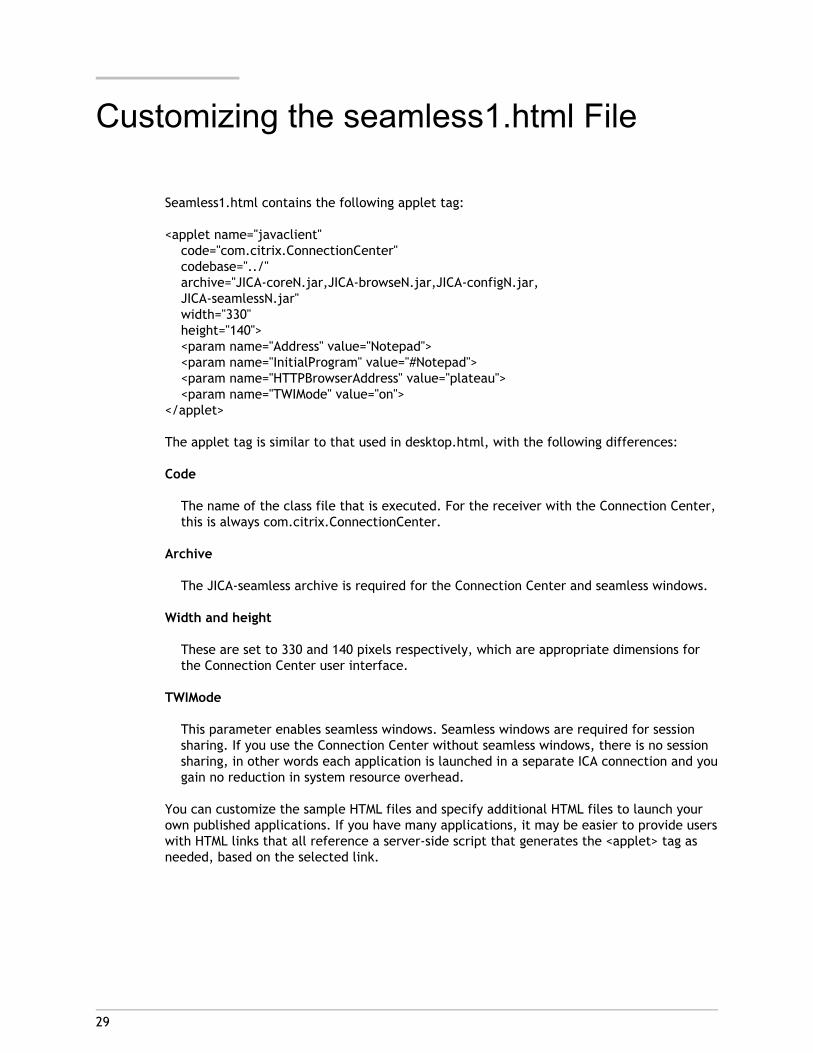
Customizing the seamless1.html File
Seamless1.html contains the following applet tag:
<applet name="javaclient" code="com.citrix.ConnectionCenter" codebase="../" archive="JICA-coreN.jar,JICA-browseN.jar,JICA-configN.jar, JICA-seamlessN.jar" width="330" height="140"> <param name="Address" value="Notepad"> <param name="InitialProgram" value="#Notepad"> <param name="HTTPBrowserAddress" value="plateau"> <param name="TWIMode" value="on"></applet>
The applet tag is similar to that used in desktop.html, with the following differences:
Code
The name of the class file that is executed. For the receiver with the Connection Center,this is always com.citrix.ConnectionCenter.
Archive
The JICA-seamless archive is required for the Connection Center and seamless windows.
Width and height
These are set to 330 and 140 pixels respectively, which are appropriate dimensions forthe Connection Center user interface.
TWIMode
This parameter enables seamless windows. Seamless windows are required for sessionsharing. If you use the Connection Center without seamless windows, there is no sessionsharing, in other words each application is launched in a separate ICA connection and yougain no reduction in system resource overhead.
You can customize the sample HTML files and specify additional HTML files to launch yourown published applications. If you have many applications, it may be easier to provide userswith HTML links that all reference a server-side script that generates the <applet> tag asneeded, based on the selected link.
30
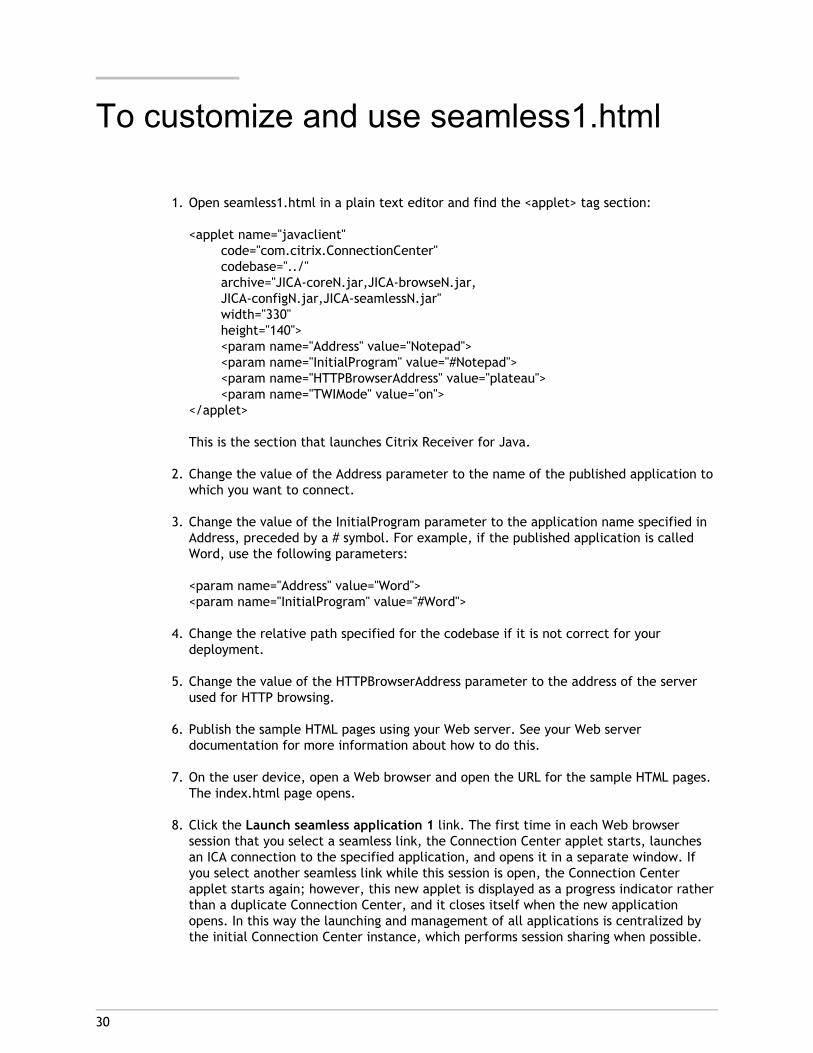
To customize and use seamless1.html
1. Open seamless1.html in a plain text editor and find the <applet> tag section:
<applet name="javaclient" code="com.citrix.ConnectionCenter" codebase="../" archive="JICA-coreN.jar,JICA-browseN.jar, JICA-configN.jar,JICA-seamlessN.jar" width="330" height="140"> <param name="Address" value="Notepad"> <param name="InitialProgram" value="#Notepad"> <param name="HTTPBrowserAddress" value="plateau"> <param name="TWIMode" value="on"></applet>
This is the section that launches Citrix Receiver for Java.
2. Change the value of the Address parameter to the name of the published application towhich you want to connect.
3. Change the value of the InitialProgram parameter to the application name specified inAddress, preceded by a # symbol. For example, if the published application is calledWord, use the following parameters:
<param name="Address" value="Word"><param name="InitialProgram" value="#Word">
4. Change the relative path specified for the codebase if it is not correct for yourdeployment.
5. Change the value of the HTTPBrowserAddress parameter to the address of the serverused for HTTP browsing.
6. Publish the sample HTML pages using your Web server. See your Web serverdocumentation for more information about how to do this.
7. On the user device, open a Web browser and open the URL for the sample HTML pages.The index.html page opens.
8. Click the Launch seamless application 1 link. The first time in each Web browsersession that you select a seamless link, the Connection Center applet starts, launchesan ICA connection to the specified application, and opens it in a separate window. Ifyou select another seamless link while this session is open, the Connection Centerapplet starts again; however, this new applet is displayed as a progress indicator ratherthan a duplicate Connection Center, and it closes itself when the new applicationopens. In this way the launching and management of all applications is centralized bythe initial Connection Center instance, which performs session sharing when possible.

9. Select Connections to view the Connections dialog box. Double-clicking a window nodeon the Connections tree brings that window to the front. If the window is minimized,double-clicking the node has no effect. Right-clicking a window node displays theapplication’s System menu. Closing the Connection Center window disconnects allconnected sessions, after prompting the user for confirmation.
To customize and use seamless1.html
31
32
Using Signed Java Applets
Due to security restrictions imposed by Java, many Java environments do not permit usersto connect to other computers on the network when using Java applets.
When a Java applet attempts to make a connection to the server specified in the HTMLpage, the Java security manager detects the attempt to connect to another computer andcancels the operation. The result of this security restriction is that, under normalconditions, a user device can connect to a server only if the server is also the same deviceas the Web server that contains the applet class files.
To overcome this restriction, Citrix Receiver for Java uses signed archives. The signatureconfirms that the files being downloaded came from Citrix and have not been altered sincethe signature was applied. You must ensure that users’ Web browsers are configured toaccept signed Java applets.
When attempting a connection to the server, the user is prompted with the Citrix signedcertificate. When the user accepts the signature, the connection is permitted.
33
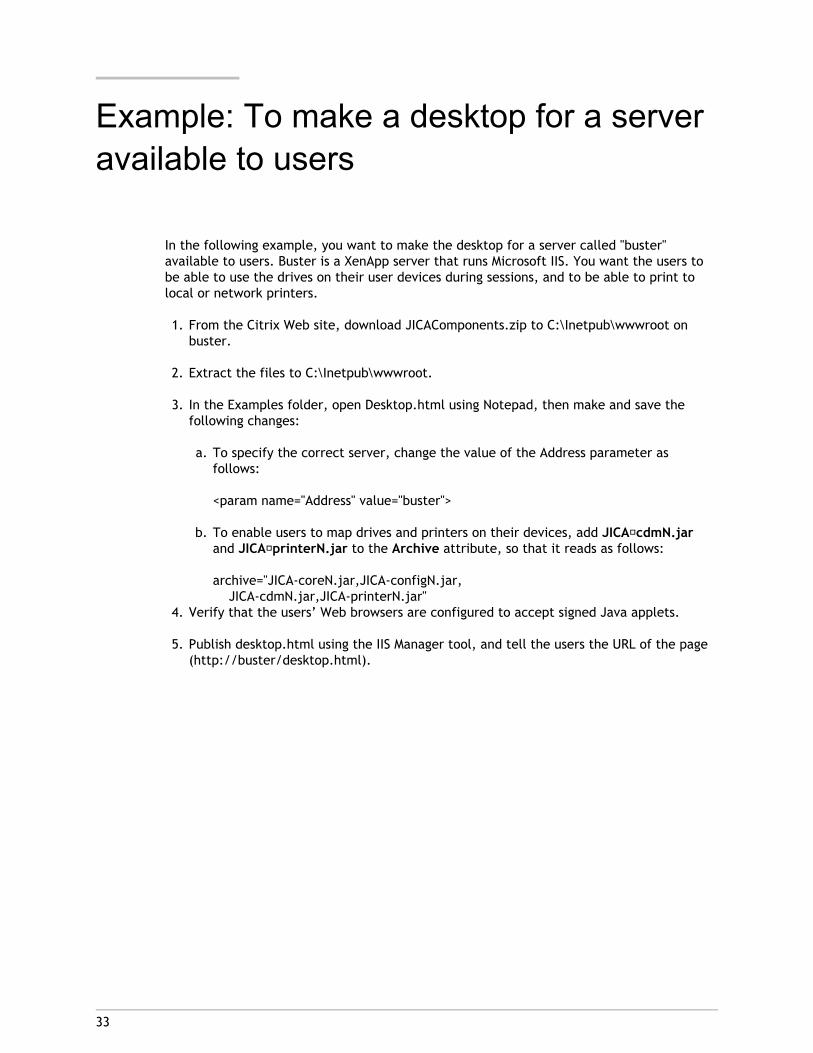
Example: To make a desktop for a serveravailable to users
In the following example, you want to make the desktop for a server called "buster"available to users. Buster is a XenApp server that runs Microsoft IIS. You want the users tobe able to use the drives on their user devices during sessions, and to be able to print tolocal or network printers.
1. From the Citrix Web site, download JICAComponents.zip to C:\Inetpub\wwwroot onbuster.
2. Extract the files to C:\Inetpub\wwwroot.
3. In the Examples folder, open Desktop.html using Notepad, then make and save thefollowing changes:
a. To specify the correct server, change the value of the Address parameter asfollows:
<param name="Address" value="buster">
b. To enable users to map drives and printers on their devices, add JICA‑cdmN.jarand JICA‑printerN.jar to the Archive attribute, so that it reads as follows:
archive="JICA-coreN.jar,JICA-configN.jar, JICA-cdmN.jar,JICA-printerN.jar"
4. Verify that the users’ Web browsers are configured to accept signed Java applets.
5. Publish desktop.html using the IIS Manager tool, and tell the users the URL of the page(http://buster/desktop.html).
34
Configuring the Receiver for Java
Citrix Receiver for Java can be configured using:
● An HTML page.
● The ICA Settings dialog box.
To display the ICA Settings dialog box, click the Settings button. In seamless mode, theSettings button is on the Connection Center. If the receiver is not in seamless mode,the Settings button is on the status bar.
You can prevent users from configuring their own settings by removing the Settingsbutton or the status bar, as described in Status Bar and Settings Button.
● The Web Interface.
The Web Interface automatically generates the necessary Web pages to launch thereceiver. See Web Interface for details about how to use the Web Interface to configurethe receiver
Note: You can only configure drive mapping through the ICA Settings dialog box.Youcannot configure drive mapping on an HTML page or through the Web Interfacebecause this is a violation of receiver security.
35
To set the receiver language
Citrix Receiver for Java allows you to specify which language is used to display the userinterface. By default, a session uses the language specified for the user device to displaythe user interface. If you specify a language code that is not recognized or not supported,English is used.
1. Specify the following parameter in the HTML page:
<param name="Language" value="yourlanguage">
where yourlanguage is the two-letter abbreviation for the language you want to use.
The standard two-letter abbreviations are:
● English = en
● French = fr
● German = de
● Spanish = es
● Japanese = jaFor example, to use Japanese as the language on a non-Japanese device whenconnecting to the server named CitrixServer, create an applet tag:
<applet code="com.citrix.JICA" archive="JICAEngN.jar" width="1024" height="768"> <param name="Address" value="CitrixServer"> <param name="Language" value="ja"></applet>
If you use languages other than English, ensure that your Web server sends HTML fileswith the correct Content-Type and Charset, to avoid possible corruption of the appletparameter strings. Configuration details depend on the server software in use.
When troubleshooting suspected problems with parameter string encoding, copy thestrings outside the applet tag and check that they display correctly in the Web browser.
36
To change the network protocol for theReceiver for Java
The network protocol setting allows you to control the way Citrix Receiver for Javasearches for servers and how it communicates with them.
The protocols are:
TCP/IP + HTTP
The receiver uses the HTTP protocol to search for servers. The receiver communicateswith the server using ICA protocol over TCP/IP. This is the default protocol.
SSL/TLS + HTTPS
The receiver uses the HTTPS protocol to search for a list of servers. The receivercommunicates with the server using the SSL or TLS protocols.
1. To change the protocol to SSL/TLS+HTTPS, add the following parameter to the HTMLpage:
<param name= "SSLEnable" value="on">
37
Configuring Server Browsing
Server browsing is the mechanism by which Citrix Receiver discovers an appropriate serverto host a given application. Depending on the server configuration, this can involve takingload balancing into account so that the user’s application is run on the least loaded server.
The default browser server address is ica. You must set specific server addresses for XenAppcomputers unless your networking environment is configured with a DNS record for ica. Thereceiver uses the HTTP or HTTPS protocol respectively to contact the servers.
Example: Specifying the Browser ServerIn the following example, the HTTPBrowserAddress parameter is specified to be the serverWizard. This browser server is responsible for locating an appropriate server to run thepublished application Notepad.
<html> <body> <applet code="com.citrix.JICA" archive="JICAEngN.jar" width="640" height="480" <param name="HTTPBrowserAddress" value="Wizard"> <param name="Address" value="Notepad"> <param name="InitialProgram" value="#Notepad"> </applet> </body></html>
Note: If you are using the JICA-coreN.jar archive, you must specify the JICA-browserN.jararchive to enable server browsing.
38
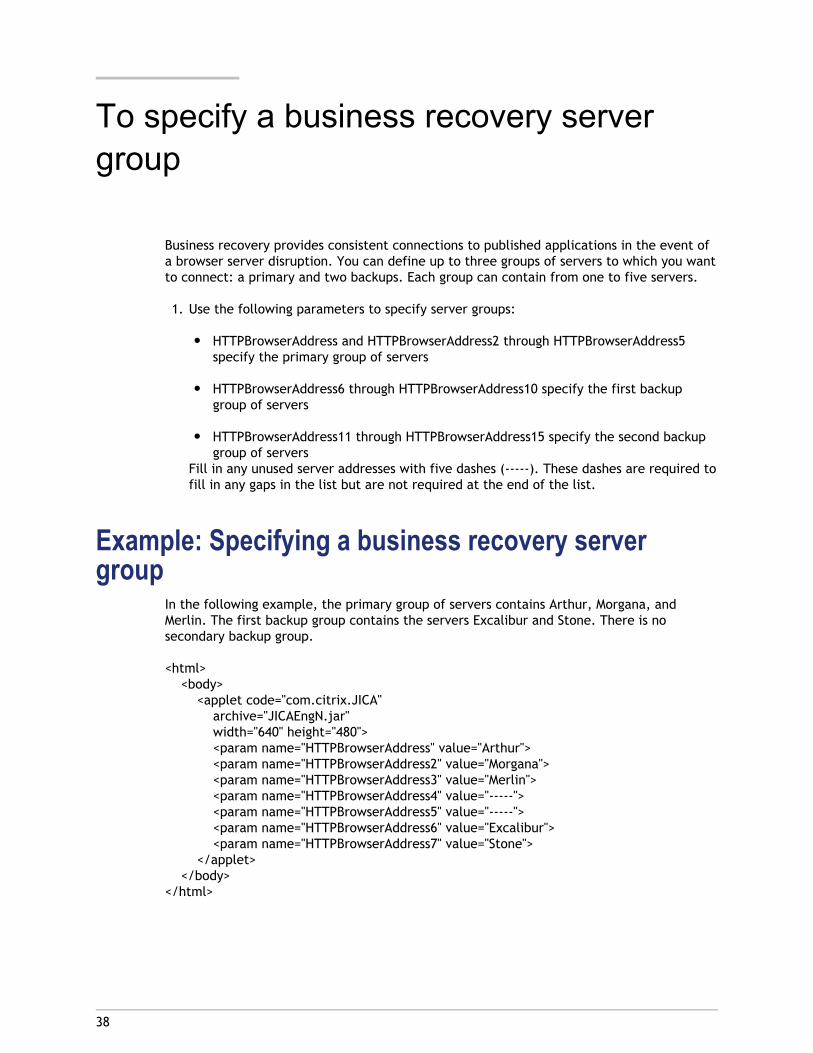
To specify a business recovery servergroup
Business recovery provides consistent connections to published applications in the event ofa browser server disruption. You can define up to three groups of servers to which you wantto connect: a primary and two backups. Each group can contain from one to five servers.
1. Use the following parameters to specify server groups:
● HTTPBrowserAddress and HTTPBrowserAddress2 through HTTPBrowserAddress5specify the primary group of servers
● HTTPBrowserAddress6 through HTTPBrowserAddress10 specify the first backupgroup of servers
● HTTPBrowserAddress11 through HTTPBrowserAddress15 specify the second backupgroup of servers
Fill in any unused server addresses with five dashes (-----). These dashes are required tofill in any gaps in the list but are not required at the end of the list.
Example: Specifying a business recovery servergroup
In the following example, the primary group of servers contains Arthur, Morgana, andMerlin. The first backup group contains the servers Excalibur and Stone. There is nosecondary backup group.
<html> <body> <applet code="com.citrix.JICA" archive="JICAEngN.jar" width="640" height="480"> <param name="HTTPBrowserAddress" value="Arthur"> <param name="HTTPBrowserAddress2" value="Morgana"> <param name="HTTPBrowserAddress3" value="Merlin"> <param name="HTTPBrowserAddress4" value="-----"> <param name="HTTPBrowserAddress5" value="-----"> <param name="HTTPBrowserAddress6" value="Excalibur"> <param name="HTTPBrowserAddress7" value="Stone"> </applet> </body></html>
39
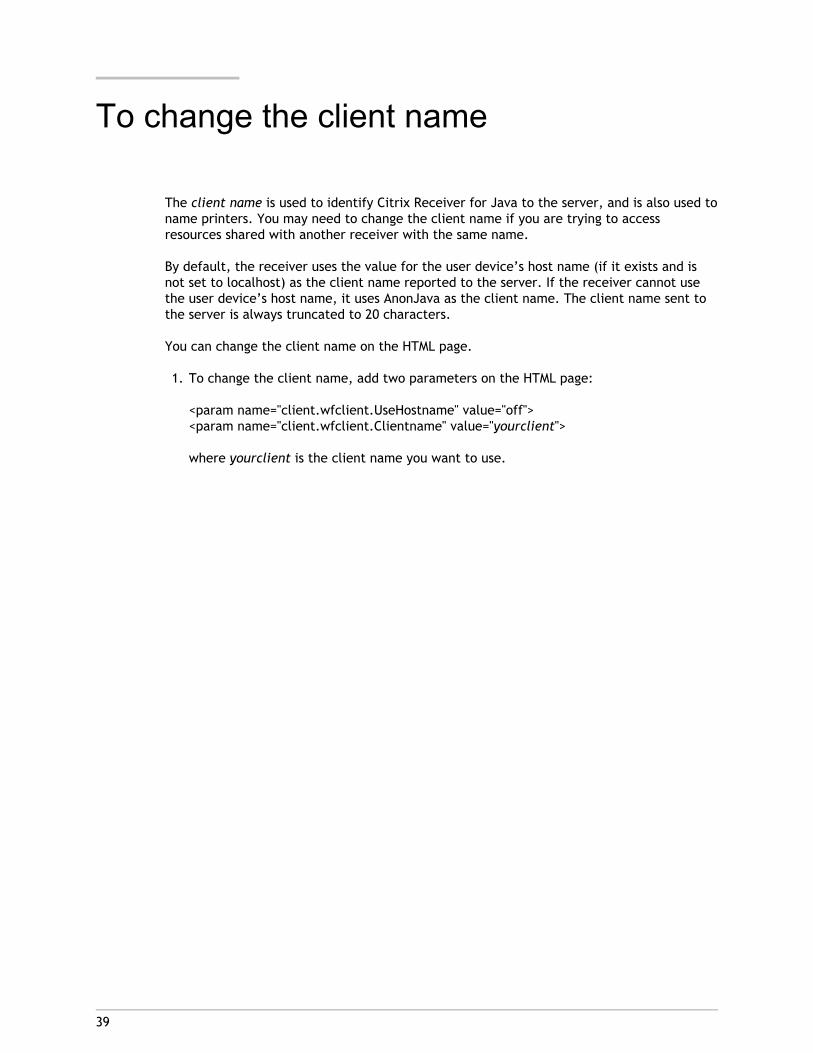
To change the client name
The client name is used to identify Citrix Receiver for Java to the server, and is also used toname printers. You may need to change the client name if you are trying to accessresources shared with another receiver with the same name.
By default, the receiver uses the value for the user device’s host name (if it exists and isnot set to localhost) as the client name reported to the server. If the receiver cannot usethe user device’s host name, it uses AnonJava as the client name. The client name sent tothe server is always truncated to 20 characters.
You can change the client name on the HTML page.
1. To change the client name, add two parameters on the HTML page:
<param name="client.wfclient.UseHostname" value="off"><param name="client.wfclient.Clientname" value="yourclient">
where yourclient is the client name you want to use.
40
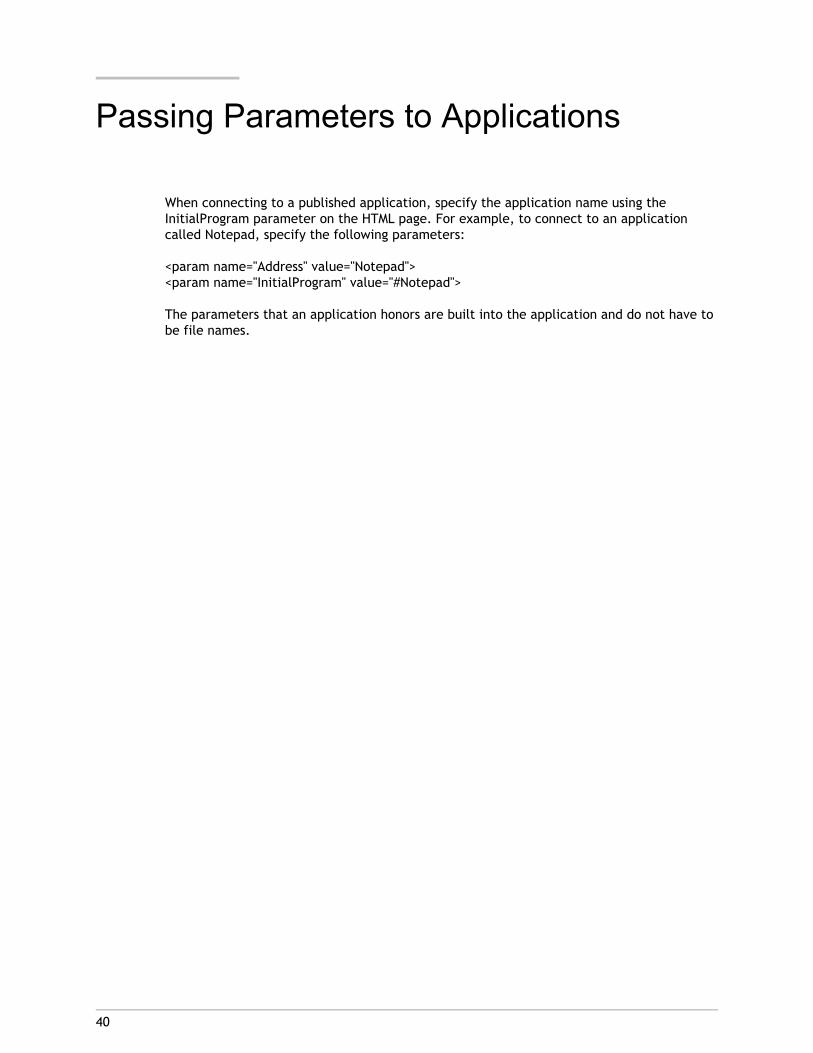
Passing Parameters to Applications
When connecting to a published application, specify the application name using theInitialProgram parameter on the HTML page. For example, to connect to an applicationcalled Notepad, specify the following parameters:
<param name="Address" value="Notepad"><param name="InitialProgram" value="#Notepad">
The parameters that an application honors are built into the application and do not have tobe file names.
41
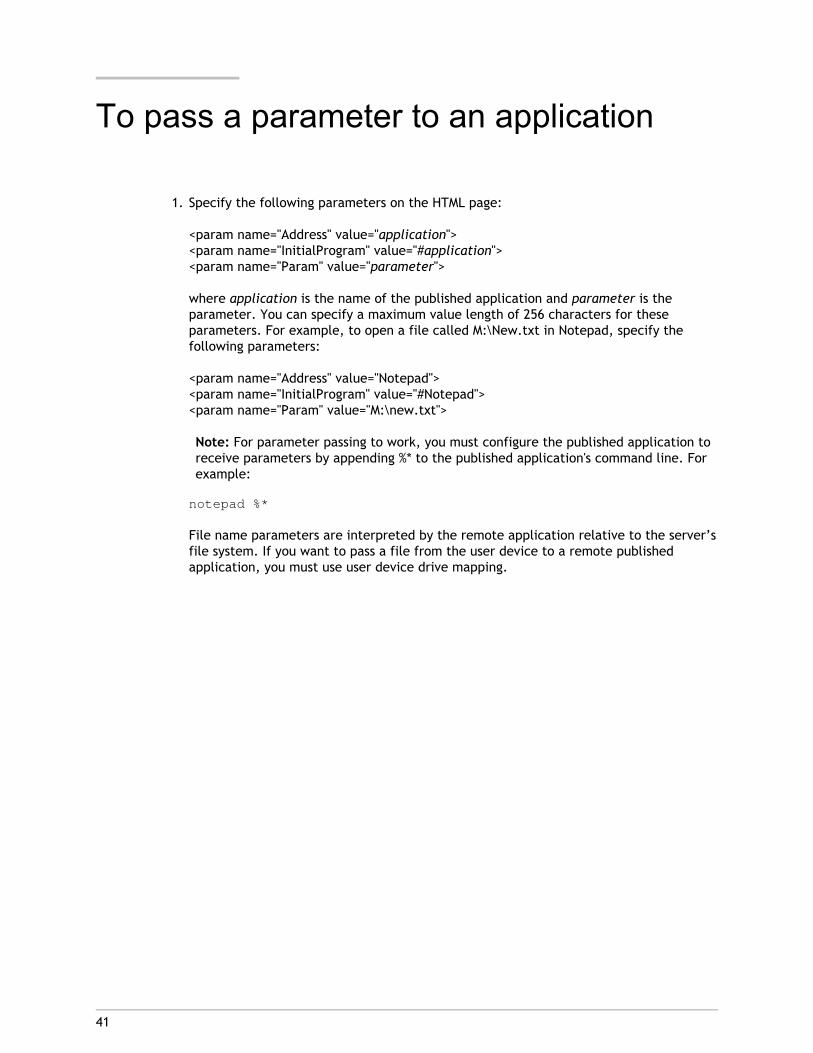
To pass a parameter to an application
1. Specify the following parameters on the HTML page:
<param name="Address" value="application"><param name="InitialProgram" value="#application"><param name="Param" value="parameter">
where application is the name of the published application and parameter is theparameter. You can specify a maximum value length of 256 characters for theseparameters. For example, to open a file called M:\New.txt in Notepad, specify thefollowing parameters:
<param name="Address" value="Notepad"><param name="InitialProgram" value="#Notepad"><param name="Param" value="M:\new.txt">
Note: For parameter passing to work, you must configure the published application toreceive parameters by appending %* to the published application's command line. Forexample:
notepad %*
File name parameters are interpreted by the remote application relative to the server’sfile system. If you want to pass a file from the user device to a remote publishedapplication, you must use user device drive mapping.
42
To set the size and number of colors usedfor the session window
Just as you can set the dimensions of the applet panel in which sessions run using the Widthand Height attributes of the <applet> tag, you can also specify the size of the remotesession by using the DesiredHRes and DesiredVRes parameters. If you do not specify theselast two parameters, the remote session fits into the applet area available when any borderand status bar are added.
The number of colors used in the session window is defined with a parameter on the HTMLpage.
1. Specify the following parameter in the HTML page:
<param name="DesiredColor" value="2|4|8">
where 2 specifies 256 colors, 4 specifies thousands of colors, and 8 specifies millions ofcolors. You cannot configure the receiver to use only 16 colors, but it can displayapplications published in 16 color mode; these are run in 256 colors.
43
Showing and Hiding the Status Bar andSettings Button
You can display or hide the status bar and Settings button using parameters on the HTMLpage. Both are displayed by default; however, if you do not want users to makeconfiguration changes, you may hide the Settings button. If you decide that maximumscreen real estate is a priority, you may hide the status bar.
When the receiver is in seamless mode, the status bar is not visible and the user accessesthe Settings dialog box from the Connection Center.
To hide the status bar1. Specify the following parameter on the HTML page:
<param name="ShowStatusBar" value="no">
To hide the Settings button1. Specify the following parameter on the HTML page:
<param name="ShowSettingsButton" value="no">
Note: To display the Settings button and status bar when using the componentarchives, you must include the JICA-config archive. This functionality is included inthe complete archive.
44
To enable Session Reliability
Session Reliability enables sessions to remain open and on the screen when networkconnectivity is interrupted, therefore allowing Citrix Receiver for Java users to view theapplication until the network connection is restored. This feature is especially useful formobile users with wireless connections.
For session reliability and SSL support through Secure Gateway, Secure Gateway Version 3 isrequired.
1. Specify the following parameter on the HTML page:
<param name="CGPAddress" value="hostname:port">
Rather than specifying the hostname, type an asterisk (*) to use the Address parametervalue as the host (session reliability server).
The port value is optional. If you do not specify a port value, the default 2598 is used.If a connection on port 2598 fails, the receiver tries to establish a standard (non-sessionreliability) connection on port 1494.

45
Controlling Auto-Reconnect and SessionTermination
You can control how Citrix Receiver for Java behaves when starting or ending a session byspecifying parameters on the HTML page.
Note: The information in this topic does not apply if you are using the Connection Center.Sessions always start automatically and, if the network connection is lost, an attempt isalways made to reconnect.
To change how Receiver for Java connects to theserver
1. Specify the following parameter on the HTML page:
<param name="Start" value="Manual|Auto">
If you set this parameter to Manual (the default), the user must click to connect to aserver. If you set it to Auto, the message "Connecting to server" appears as the HTMLpage is displayed and the user is automatically connected to the server. If no parameteris identified, the default is used.
To change what happens when a session ends1. Specify the following parameter on the HTML page:
<param name="End" value="Manual|Auto|Terminate|URL">
where:
● Manual displays the startup splash screen when the session ends, and the message"Connection Terminated - Click to connect." To reconnect, the user clicks anywhereon the splash screen.
● Auto displays the Reconnecting dialog box when the session ends for any reason.The number in the dialog box counts down to 0 and the client reconnects.
● Terminate displays either "Connection Terminated" or "Connection Error" when thesession ends, depending on whether the user chose to end the session or whether ornot there is a problem that caused the session to end.
● URL displays the splash screen and redirects in two seconds to the specified URL.You can specify the URL of any Web page.
The HTML examples supplied with the receiver include the End parameter. The valuespecified is a URL to a page called End.html. The applet tag section of each of theexamples has this parameter:
<param name="End" value="end.html">
When you end the session, the receiver redirects to end.html, which contains a scriptto close the browser window. You can edit end.html to customize it.
To change the time-out period for automaticreconnection
The default time-out period is five seconds.
1. Specify the following parameter on the HTML page:
<param name="ReconnectDelay" value="delay">
where delay is the delay in seconds. Specifying this parameter does not affect the delaybefore connection to an HTML page if you specified a URL for the End parameter.
Note: If the Start and End parameters are both set to Auto, the startup splash screenis displayed and you must click on it to connect.
Controlling Auto-Reconnect and Session Termination
46

47
Specifying Keyboard and MousePreferences
The Citrix Receiver for Java lets you specify what type of keyboard to use in sessions. Bydefault, if you do not specify a keyboard preference, the session uses the default layout forthe connected XenApp server. The receiver supports the use of any keyboard supported bythe server to which the user is connecting.
When using the Receiver for Java with applications that require a 3-button mouse, themiddle button of a 3-button mouse can be emulated by clicking both buttons of a 2-buttonmouse at the same time.
To specify a keyboard other than the server’s default1. Specify the following parameter on the HTML page:
<param name="user.wfclient.keyboardlayout" value="layout">
where layout is a value from the server’s list of supported keyboards. A list of thesupported keyboards is provided in Supported Keyboard Layouts.
For example, to specify a Danish keyboard, create an HTML page like the following:
<html> <body> <applet code="com.citrix.JICA" archive="JICAEngN.jar" width="640" height="480"> <param name="Address" value="CitrixServer"> <param name="user.wfclient.keyboardlayout" value="Danish"> </applet> </body> </html>
The receiver supports the following keyboard types to distinguish between subtypes ofthe Japanese keyboard layout:
"(Default)""IBM PC/XT or compatible keyboard""101 Keyboard (Japanese)""106 Keyboard (Japanese)""NEC PC-9800 on PC98-NX (Japanese)""NEC PC-9800 on PC98-NX 2 (Japanese)""NEC PC-9800 Windows 95 and 98 (Japanese)""NEC PC-9800 Windows NT (Japanese)""Japanese Keyboard for 106 (Japanese)""DEC LK411-JJ Keyboard (Japanese)""DEC LK411-AJ Keyboard (Japanese)"
Note: If you are using a 109 key Japanese keyboard, specify the keyboard type as 106Keyboard (Japanese).
Specifying Keyboard and Mouse Preferences
48

To specify a Japanese keyboard type1. Specify the following parameter on the HTML page:
<param name="user.wfclient.keyboardtype" value="101 Keyboard (Japanese) | 106 Keyboard (Japanese)">
For example, to specify a Japanese 106 key keyboard, create an HTML page like thefollowing:
<html> <body> <applet code="com.citrix.JICA" archive="JICAEngN.jar" width="640" height="480"> <param name="Address" value="CitrixServer"> <param name="user.wfclient.keyboardtype" value="106 Keyboard (Japanese)"> </applet> </body></html>
Specifying Keyboard and Mouse Preferences
49

50
Supported Keyboard Layouts
The supported keyboard layouts are:
"(Server Default)"
"Albanian" "Belarusian"
"Belgian Dutch"
"Belgian French"
"Brazilian (ABNT)"
"British"
"Bulgarian (Latin)"
"Bulgarian"
"Canadian English (Multilingual)"
"Canadian French (Multilingual)"
"Canadian French"
"Croatian"
"Czech (QWERTY)"
"Czech"
"Danish"
"Dutch"
"Estonian"
"Finnish"
"French"
"German (IBM)"
"German"
"Greek (220) Latin"
"Greek (220)"
"Greek (319) Latin"
"Greek (319)"
"Greek Latin"
"Greek"
"Hungarian 101-Key"
"Hungarian"
"Icelandic"
"Irish"
"Italian (142)"
"Italian"
"Japanese (client and server IME)"
"Japanese (client IME only)"
"Japanese (server IME only)"
"Korean" "Latin American"
"Latvian (QWERTY)"
"Latvian"
"Lithuanian"
"Norwegian"
"Polish (214)"
"Polish (Programmers)"
"Portuguese"
"Romanian"
"Russian (Typewriter)"
"Russian"
"Serbian (Cyrillic)"
"Serbian (Latin)"
"Slovak (QWERTY)"
"Slovak"
"Slovenian"
Supported Keyboard Layouts
51

"Spanish Variation"
"Spanish"
"Swedish"
"Swiss French"
"Swiss German"
"Taiwan"
"Turkish (F)"
"Turkish (Q)"
"Ukrainian"
"United Kingdom"
"US"
"US-Dvorak for Right hand"
"US-Dvorak for left hand"
"US-Dvorak"
"US-International"
Supported Keyboard Layouts
52
53
Specifying Japanese IME Preferences
Citrix Receiver for Java provides a choice of options for using a Japanese Input MethodEditor (IME). Users can configure these options using the ICA Settings dialog box.Alternatively, you can set the keyboard layout parameter in the <applet> tag; this overridesthe users’ settings.
You can choose between using an IME on the user device or an IME on the server.
With an IME on the user device, users can choose their preferred IME that they haveinstalled and they do not have to deal with one IME for local applications and anotherpotentially different IME with a different dictionary for server-side applications. When usingan IME on the user device, the user composes the text in a separate window instead of atthe insertion point.
With an IME on the server, the user composes the text at the insertion point.
To use an IME on the user device for connections toservers running Windows Server 2003
1. Specify the following parameter on the HTML page:
<param name="user.wfclient.keyboardlayout"value="Japanese (client IME only)">
To use a server-side IME1. Specify the following parameter on the HTML page:
<param name="user.wfclient.keyboardlayout"value="Japanese (server IME only)">
54
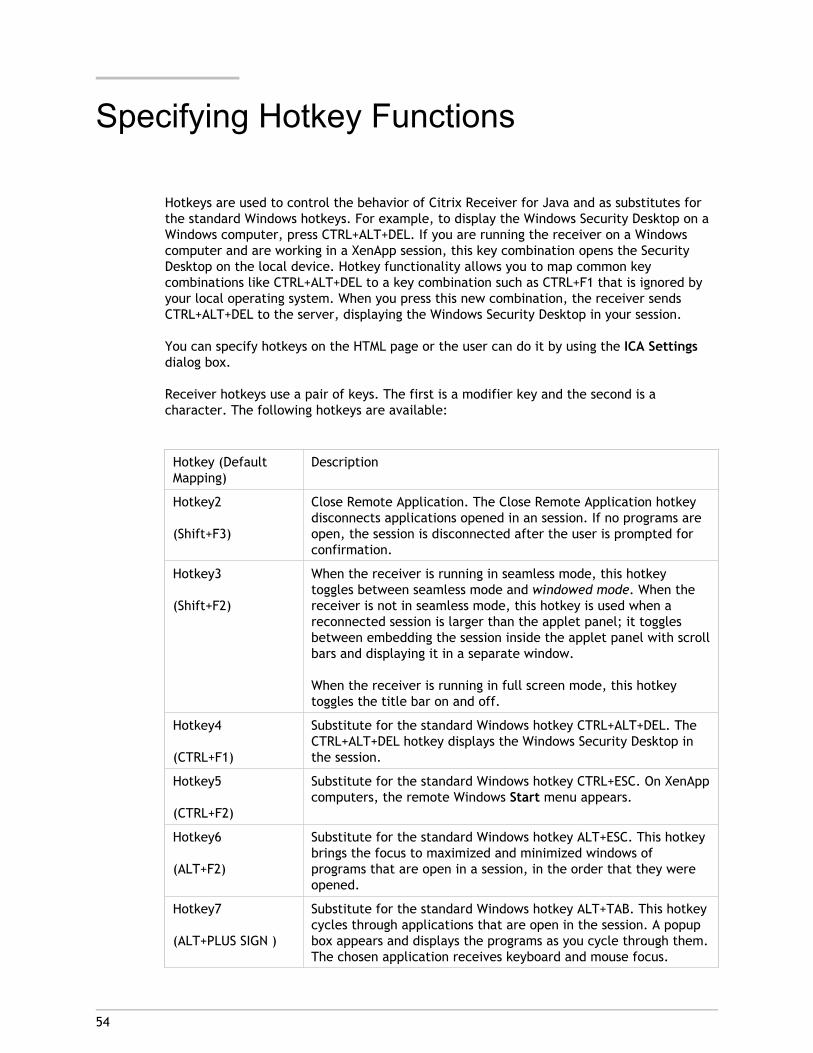
Specifying Hotkey Functions
Hotkeys are used to control the behavior of Citrix Receiver for Java and as substitutes forthe standard Windows hotkeys. For example, to display the Windows Security Desktop on aWindows computer, press CTRL+ALT+DEL. If you are running the receiver on a Windowscomputer and are working in a XenApp session, this key combination opens the SecurityDesktop on the local device. Hotkey functionality allows you to map common keycombinations like CTRL+ALT+DEL to a key combination such as CTRL+F1 that is ignored byyour local operating system. When you press this new combination, the receiver sendsCTRL+ALT+DEL to the server, displaying the Windows Security Desktop in your session.
You can specify hotkeys on the HTML page or the user can do it by using the ICA Settingsdialog box.
Receiver hotkeys use a pair of keys. The first is a modifier key and the second is acharacter. The following hotkeys are available:
Hotkey (DefaultMapping)
Description
Hotkey2
(Shift+F3)
Close Remote Application. The Close Remote Application hotkeydisconnects applications opened in an session. If no programs areopen, the session is disconnected after the user is prompted forconfirmation.
Hotkey3
(Shift+F2)
When the receiver is running in seamless mode, this hotkeytoggles between seamless mode and windowed mode. When thereceiver is not in seamless mode, this hotkey is used when areconnected session is larger than the applet panel; it togglesbetween embedding the session inside the applet panel with scrollbars and displaying it in a separate window.
When the receiver is running in full screen mode, this hotkeytoggles the title bar on and off.
Hotkey4
(CTRL+F1)
Substitute for the standard Windows hotkey CTRL+ALT+DEL. TheCTRL+ALT+DEL hotkey displays the Windows Security Desktop inthe session.
Hotkey5
(CTRL+F2)
Substitute for the standard Windows hotkey CTRL+ESC. On XenAppcomputers, the remote Windows Start menu appears.
Hotkey6
(ALT+F2)
Substitute for the standard Windows hotkey ALT+ESC. This hotkeybrings the focus to maximized and minimized windows ofprograms that are open in a session, in the order that they wereopened.
Hotkey7
(ALT+PLUS SIGN )
Substitute for the standard Windows hotkey ALT+TAB. This hotkeycycles through applications that are open in the session. A popupbox appears and displays the programs as you cycle through them.The chosen application receives keyboard and mouse focus.
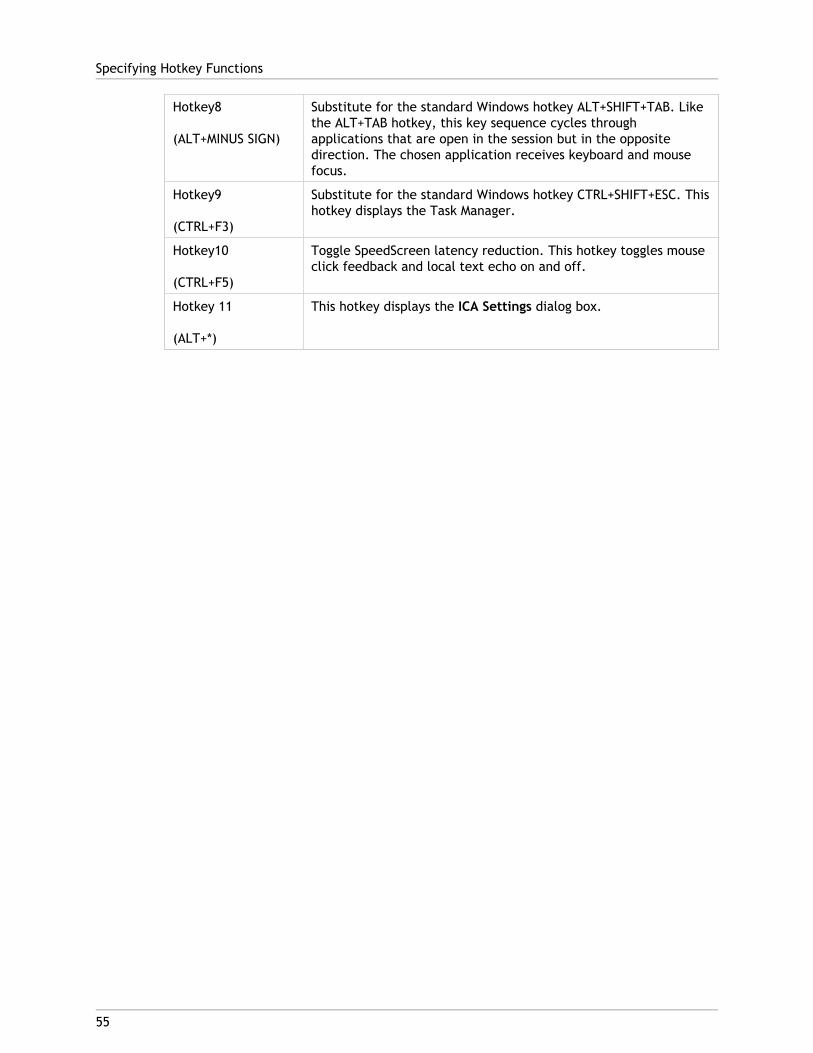
Hotkey8
(ALT+MINUS SIGN)
Substitute for the standard Windows hotkey ALT+SHIFT+TAB. Likethe ALT+TAB hotkey, this key sequence cycles throughapplications that are open in the session but in the oppositedirection. The chosen application receives keyboard and mousefocus.
Hotkey9
(CTRL+F3)
Substitute for the standard Windows hotkey CTRL+SHIFT+ESC. Thishotkey displays the Task Manager.
Hotkey10
(CTRL+F5)
Toggle SpeedScreen latency reduction. This hotkey toggles mouseclick feedback and local text echo on and off.
Hotkey 11
(ALT+*)
This hotkey displays the ICA Settings dialog box.
Specifying Hotkey Functions
55
56
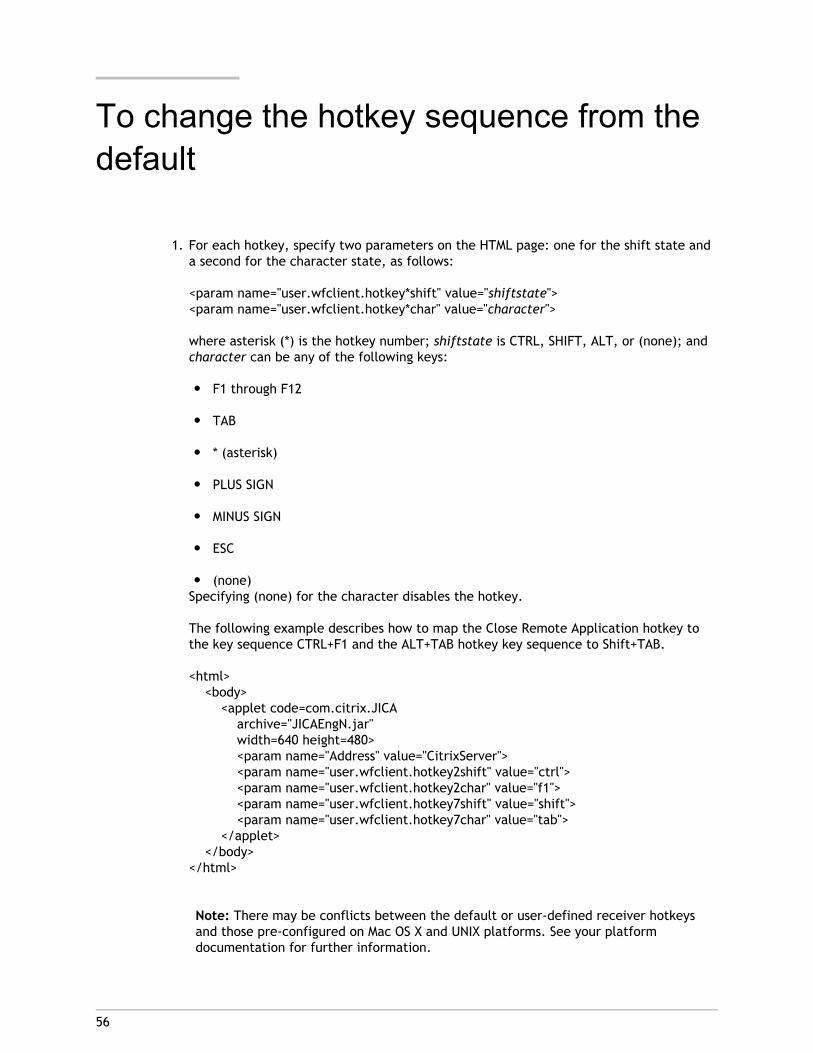
To change the hotkey sequence from thedefault
1. For each hotkey, specify two parameters on the HTML page: one for the shift state anda second for the character state, as follows:
<param name="user.wfclient.hotkey*shift" value="shiftstate"><param name="user.wfclient.hotkey*char" value="character">
where asterisk (*) is the hotkey number; shiftstate is CTRL, SHIFT, ALT, or (none); andcharacter can be any of the following keys:
● F1 through F12
● TAB
● * (asterisk)
● PLUS SIGN
● MINUS SIGN
● ESC
● (none)Specifying (none) for the character disables the hotkey.
The following example describes how to map the Close Remote Application hotkey tothe key sequence CTRL+F1 and the ALT+TAB hotkey key sequence to Shift+TAB.
<html> <body> <applet code=com.citrix.JICA archive="JICAEngN.jar" width=640 height=480> <param name="Address" value="CitrixServer"> <param name="user.wfclient.hotkey2shift" value="ctrl"> <param name="user.wfclient.hotkey2char" value="f1"> <param name="user.wfclient.hotkey7shift" value="shift"> <param name="user.wfclient.hotkey7char" value="tab"> </applet> </body></html>
Note: There may be conflicts between the default or user-defined receiver hotkeysand those pre-configured on Mac OS X and UNIX platforms. See your platformdocumentation for further information.

57
User Device Mapping
Citrix Receiver for Java supports user device mapping for connections to servers. Userdevice mapping allows a remote application running on the server to access printers anddisk drives attached to the local user device. The applications and system resources appearto the user at the user device as if they are running locally. Ensure that user devicemapping is supported on your server before using these features.
Client Drive MappingClient drive mapping can make any specified directory on the user device available to theuser during sessions. When a server is configured to allow client drive mapping, users canaccess their locally stored files, work with them during their sessions, and then save themagain either on a local drive or on a drive on the server.
The user’s home directory is automatically mapped at the start of a session. Only the homedirectory is mapped automatically. All other directories must be configured manually. Userscan configure drive mapping using the Drive Mapping tab on the ICA Settings dialog box.
When drive mapping is configured, the receiver attempts to use it for all connections. If theserver does not support drive mapping, or if the Java environment is configured not toallow access to local drives, drive mapping is not available.
Note: When drive mapping is enabled and the receiver accesses a mapped drive for thefirst time, a dialog box appears on the user device. The dialog box informs the user thatthe receiver is attempting to access a mapped drive and the user must click Yes to allowthe receiver to access the drive.
Drive mapping can be configured only by the user through the ICA Settings dialog box.Configuration settings are stored in the Appsrv.ini file. You cannot configure client drivemapping on an HTML page or through the Web Interface because this is a violation of thereceiver’s security.
To make client drive mapping available to users when using the core archives, you mustinclude the JICA-cdm archive. If you do not, the Drive Mapping tab does not appear in theICA Settings dialog box.
To deploy client drive mapping settings to multiple users, you can configure client drivemapping on one device and copy the Appsrv.ini file to the correct location on the users'devices.
Limitations of Mapped DrivesOnce configured, mapped drives are transparent and appear the same as other networkdrives on the server. However, due to the way Java accesses file systems, the followingfunctions are not available on mapped drives:

● Locking files that are in use by an application. To prevent file corruption, warn usersnot to access the same file with two or more applications at the same time.
● Setting file attributes.
● Setting date and time on files created or edited on mapped drives.
● Reporting drive capacity and usage. Users must use the operating system of their localcomputer to determine the capacity of mapped drives.
User Device Mapping
58
59
Mapping Receiver Printers
Printers are auto-detected by default. To make Citrix Receiver for Java printer mappingavailable to users, specify the JICA‑printer archive in the <applet > tag or use the fullarchive. If you do not, the Printer Mapping functionality is not available and the relevanttab does not appear in the ICA Settings dialog box.
Note: Printers are not auto-detected on Mac OS X platforms. You can configure printersmanually using the ICA Settings dialog box (described in the online help).
Detecting Printers AutomaticallyThe receiver automatically detects all printers available to the user device, including USBprinters, and makes them available to the session.
Note: Mac OS X provides a J2SE 1.4.x environment but does not provide the Java PrintService API, so printers are not auto-detected.
For PostScript-capable printers, a generic Postscript driver is configured on the server, andthe resulting PostScript output is sent directly to the printer.
For non-PostScript printers, the Universal Print Driver (UPD) is configured whichencapsulates print jobs in Printer Control Language 4 (PCL4) format. A receiver-basedinterpreter renders the print job using the user device’s local print driver and printingservices.
To modify printer settings, users select the Printer Mapping tab on the ICA Settings dialogbox. If a print job requires color or advanced printing options such as duplex printing, usersshould configure an appropriate native driver. If they configure both a native driver and aUPD driver, the server uses the native driver if it is available; otherwise, it uses the UPDdriver.
Users cannot delete auto-detected printers unless the Java environment detects that theyare no longer available.
60
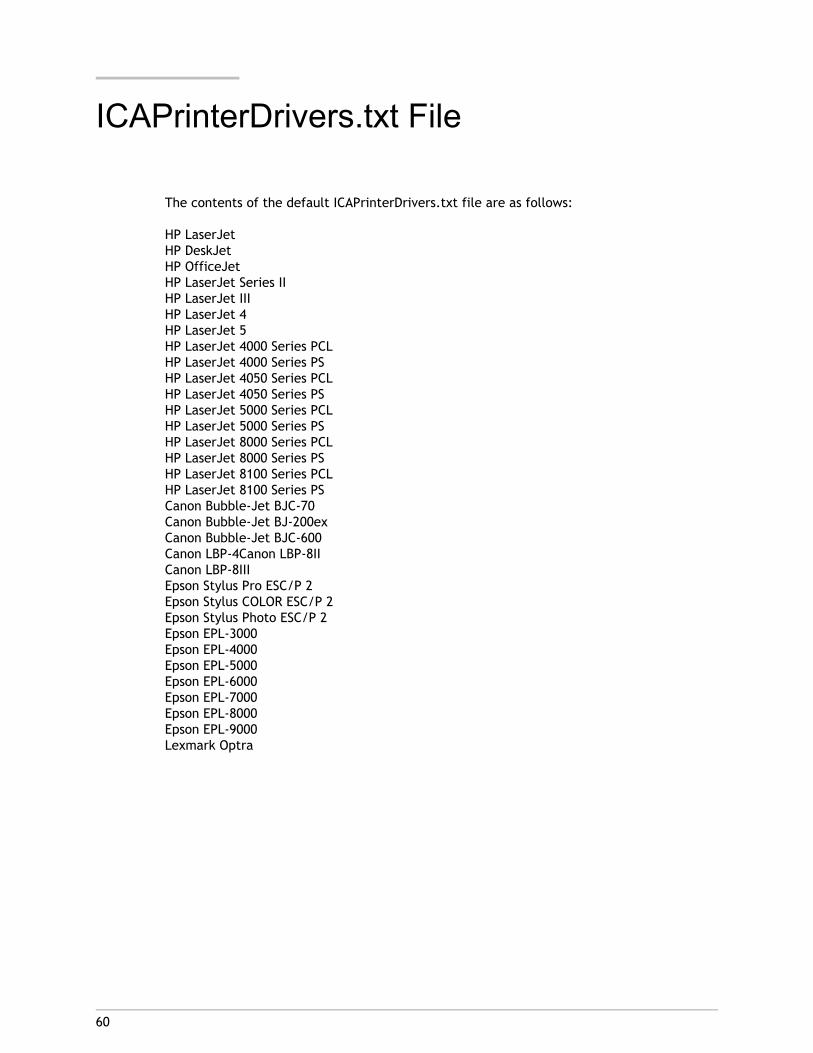
ICAPrinterDrivers.txt File
The contents of the default ICAPrinterDrivers.txt file are as follows:
HP LaserJetHP DeskJetHP OfficeJetHP LaserJet Series II HP LaserJet III HP LaserJet 4 HP LaserJet 5 HP LaserJet 4000 Series PCL HP LaserJet 4000 Series PS HP LaserJet 4050 Series PCL HP LaserJet 4050 Series PSHP LaserJet 5000 Series PCL HP LaserJet 5000 Series PS HP LaserJet 8000 Series PCL HP LaserJet 8000 Series PS HP LaserJet 8100 Series PCL HP LaserJet 8100 Series PS Canon Bubble-Jet BJC-70 Canon Bubble-Jet BJ-200exCanon Bubble-Jet BJC-600 Canon LBP-4Canon LBP-8II Canon LBP-8III Epson Stylus Pro ESC/P 2 Epson Stylus COLOR ESC/P 2 Epson Stylus Photo ESC/P 2 Epson EPL-3000 Epson EPL-4000 Epson EPL-5000 Epson EPL-6000 Epson EPL-7000 Epson EPL-8000 Epson EPL-9000 Lexmark Optra

61
To configure printers manually
When you configure printers manually users find those printers mapped to their sessions andready for use when they log on. When they log off, their printer mappings are deleted fromthe server. The printers are automatically mapped again the next time they log on.
Note: You cannot configure USB printers manually.
1. Specify the printer name, the port name, and the driver, using the followingparameters in the HTML page:
<param name="user.localclientprinters" value="printername"><param name="user.printername.port" value="portname"><param name="user.printername.driver" value="drivername">
where:
printername
The name by which you want to identify the printer.
portname
Specifies a file name, port name, or printer IP address (or network name and printqueue).
drivername
Specifies the printer driver. This name is case-sensitive and must exactly match thedriver name on the server.
Note: When mapping printers attached to a Macintosh computer, you can specify onlya file name, not a port name or printer IP address.
When printing to a file, the output file is composed of printer machine code. This filecan be sent to a printer using a platform-specific utility. For example, use a commandprompt on Windows platforms to send the file to a printer by copying the file to aprinter port.
When printing to a port, specify the port. A typical port on Windows systems is LPT1.On Linux or UNIX systems, the port is similar to /dev/lp0. Check your operating systemdocumentation for more information.
When printing to a network printer, specify the printer’s IP address or network nameand print queue (ipaddress:printqueuename or networkname:printqueuename).
To check the driver list on a server1. From the Start menu, click Devices and Printers.
2. Click Add a printer.
3. In the Add Printer wizard, click Add a network, wireless or Bluetooth printer.
The list under Printers contains the printer driver names.
To assign a default printer for a session1. Specify the following parameter:
<param name="user.printername.comment" value="WFCDefault">
where printername is the name of the printer. If the server is set to connect only to theuser’s default printer, this sets the manually configured printer to be the defaultprinter.
Note: The server must have the correct printer driver installed, as specified either inthe ICA Settings dialog box or on the HTML page using the Driver parameter. If thecorrect driver is not installed, the printer is not configured. In this case, you mustinstall the correct printer driver on the server.
You can change the list of drivers that appears in the ICA Settings dialog box by editingthe ICAPrinterDrivers.txt file. This plain-text file is included in the Citrix Receiver forJava package and is located in the same directory as the receiver archives.
When editing the ICAPrinterDrivers.txt file, add or remove driver names by deleting oradding names to the file, one driver name per line. You can add the driver names in anyorder.
To configure printers manually
62
63
Examples of Configuring PrintersManually
The following examples demonstrate configuring a printer by specifying parameters on theHTML page.
Example: Manually Configuring Individual PrintersThis HTML page is suitable for use only with a Windows-based user device. In this example,the printer’s name is LocalPrinter1. It is connected to the receiver's LPT1 port and has adriver named HP LaserJet.
<html> <body> <applet code="com.citrix.JICA" archive="JICAEngN.jar" width="640" height="480"> <param name="Address" value="CitrixServer"> <param name="user.localclientprinters" value="LocalPrinter1"> <param name="user.LocalPrinter1.port" value="lpt1:"> <param name="user.LocalPrinter1.driver" value="HP LaserJet"> </applet> </body></html>
In this example, the printer’s name is NetPrinter1 and has a driver named HP LaserJet. Theprinter is a network printer that exists on a network print server with an IP address of192.168.1.24 and a print queue named FLOOR2_LJ.
<html> <body> <applet code="com.citrix.JICA" archive="JICAEngN.jar" width="640" height="480"> <param name="Address" value="CitrixServer"> <param name="user.localclientprinters" value="NetPrinter1"> <param name="user.NetPrinter1.port" value="192.168.1.24:FLOOR2_LJ"> <param name="user.NetPrinter1.driver" value="HP LaserJet"> </applet> </body></html>
Example: Manually Configuring Multiple PrintersThis example shows how you would configure two individual printers. Note how the twoprinter names, LocalPrinter1 and NetPrinter1, are both specified in theuser.localclientprinters parameter.
<html> <body> <applet code="com.citrix.JICA" archive="JICAEngN.jar" width="640" height="480"> <param name="Address" value="CitrixServer"> <param name="user.localclientprinters" value="LocalPrinter1,NetPrinter1"> <param name="user.LocalPrinter1.port" value="lpt1:"> <param name="user.LocalPrinter1.driver" value="HP LaserJet"> <param name="user.NetPrinter1.port" value="192.168.1.24:FLOOR2_LJ"> <param name="user.NetPrinter1.driver" value="HP LaserJet 400 Series PS"> </applet> </body></html>
Examples of Configuring Printers Manually
64
65
To enable receiver audio mapping
Citrix Receiver for Java audio mapping enables applications running on the server to playsounds through a sound device installed on the user device. To make receiver audiomapping available to users, you must enable it using a parameter on the HTML page.
Important: Starting the receiver while an audio application is running on your desktopcan disable audio mapping. Do not run audio applications while starting the receiver
To make receiver audio mapping available to users, specify the JICA‑audio archive in the<applet > tag or use the full archive. If you do not, the Audio Mapping functionality is notavailable.
1. Add the following parameter to the HTML page:
<param name="ClientAudio" value="on">
You control the amount of bandwidth used by receiver audio mapping by configuringthe ICA Audio policy settings on the Delivery Services Console.
Note: If audio is set to use Low - for low-speed connections, receiver audio mappingfor the user device is disabled.
66
Connecting Through a Proxy Server
The Citrix Receiver for Java supports both SOCKS and Secure proxy protocols.
Configure the receiver to work with a proxy server by specifying parameters on the HTMLpage, through the ICA Settings dialog box, or through the Web Interface.
Some proxy servers require authentication when a connection is requested. Specify a proxylogon name and password on the HTML page when configuring the receiver. Ifauthentication is required and you do not specify the details on the HTML page, users areprompted to enter the proxy logon name and password when they open a connection.
Note: The receiver supports Basic proxy authentication and NTLM proxy authenticationwhen connecting to a Secure proxy, and user name/password authentication whenconnecting to a SOCKS proxy. Proxy authentication therefore does not work with proxyservers configured to use other authentication schemes such as Kerberos and Digest.
Microsoft ISA ServerIf your deployment includes a Microsoft ISA Server note that, by default, Microsoft ISAServer forbids client connections to Citrix XenApp on ports 1494 and 2598. Modify theMicrosoft ISA Server settings as detailed in the Citrix Knowledge Base article: ConfiguringMicrosoft ISA Server to Allow Outbound ICA Connections (CTX104998).
NTLM Proxy AuthenticationNTLM proxy authentication is supported when the receiver is configured to access XenAppthrough a proxy server. The receiver must be running on Windows, connecting through aproxy server that supports NTLM (such as Microsoft Internet Security & Acceleration Server).
67
To enable proxy auto detection
Proxy auto detection obtains proxy details from the local Web browser settings. It is usefulif you are deploying Citrix Receiver for Java in an organization with many proxy servers or ifyou cannot determine which proxy server will be used when you configure the receiver.Proxy auto detection can be used with:
● Internet Explorer 8.0 or later for Windows using Java SE Runtime Environment (JRE) 6Update 18.
● Firefox 3.5
1. Specify the following parameter in the HTML file:
<param name="ProxyType" value="auto">
To obtain the proxy server settings from a PAC fileA PAC file is a JavaScript file that is served from a local Web server and used toautomatically configure the proxy settings of Web browsers. You cannot specify this methodof proxy configuration through the ICA Settings dialog box.
1. Specify the following parameters in the HTML file:
<param name="ProxyType" value="script"><param name="ProxyAutoConfigURL" value="http://webserver.example.com/myproxies.pac">
where http://webserver.example.com/myproxies.pac is the URL for the PAC file.
To specify the proxy server details manuallyIf you are configuring the proxy manually, confirm the proxy server details with yoursecurity administrator. ICA connections cannot be made if these details are incorrect.
1. Specify the following details using parameters in the HTML file:
● The address of the proxy server.
● The port number of the proxy server (if not 1080 for SOCKS or 8080 for Secureproxy).
● The protocol of the proxy server: SOCKS proxy or Secure proxy.
● In the case of a SOCKS proxy, the protocol version number. Alternatively, you canomit the version number; Citrix Receiver for Java then tries SOCKS Version 5 andfall back to SOCKS Version 4 if necessary.
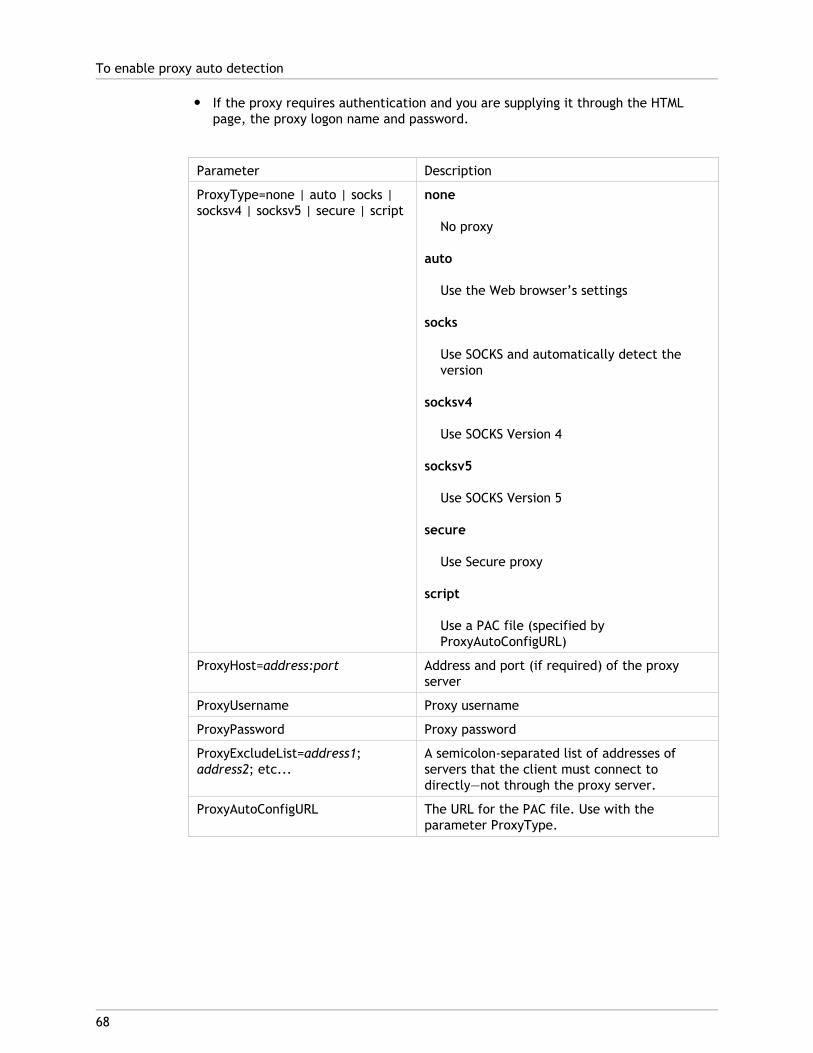
● If the proxy requires authentication and you are supplying it through the HTMLpage, the proxy logon name and password.
Parameter Description
ProxyType=none | auto | socks |socksv4 | socksv5 | secure | script
none
No proxy
auto
Use the Web browser’s settings
socks
Use SOCKS and automatically detect theversion
socksv4
Use SOCKS Version 4
socksv5
Use SOCKS Version 5
secure
Use Secure proxy
script
Use a PAC file (specified byProxyAutoConfigURL)
ProxyHost=address:port Address and port (if required) of the proxyserver
ProxyUsername Proxy username
ProxyPassword Proxy password
ProxyExcludeList=address1;address2; etc...
A semicolon-separated list of addresses ofservers that the client must connect todirectly—not through the proxy server.
ProxyAutoConfigURL The URL for the PAC file. Use with theparameter ProxyType.
To enable proxy auto detection
68
69
Integrating the Receiver with the SecureGateway or SSL Relay
You can integrate Citrix Receiver for Java with the Secure Gateway or with an SSL relayservice. The receiver supports both SSL and TLS protocols:
● SSL provides strong encryption to increase the privacy of your ICA connections andcertificate-based server authentication to ensure that the server you are connecting tois a genuine server.
● TLS is the latest, standardized version of the SSL protocol. The Internet EngineeringTaskforce (IETF) renamed it TLS when they took over responsibility for the developmentof SSL as an open standard. TLS secures data communications by providing serverauthentication, encryption of the data stream, and message integrity checks. Becausethere are only minor technical differences between SSL Version 3.0 and TLS Version 1.0,the certificates you use for SSL in your XenApp installation also work with TLS. Someorganizations, including US government organizations, require the use of TLS to securedata communications.
70
To enable SSL and TLS
SSL and TLS are configured in the same way, use the same certificates, and are enabledwith the same parameter. You configure SSL and TLS using parameters on the HTML page orwith the Web Interface.
When SSL and TLS are enabled, each time you initiate a connection Citrix Receiver for Javatries to use TLS first, then tries SSL. If it cannot connect with SSL, the connection fails andan error message appears. You can force receivers to connect only with TLS. Thecomprehensive set of root certificates stored in the Java plug-in keystore is automaticallyused. Where the user device is running Microsoft Windows, Microsoft Internet Explorer, andJava 1.6.16, the receiver also uses root certificates stored in the Windows keystore.
1. If you have not already done so, include the sslN.jar archive in the archive parameter inthe applet tag on the HTML page. This archive is not included in the complete JICAEngarchive and you must include it before SSL or TLS encryption can be used.
2. Configure the Web server so that the HTML page specifying the applet can be deliveredto the Web browser only through an SSL/TLS (https://) connection.
Caution: Security is seriously compromised if this step is omitted.
3. Enable SSL by adding the following parameter to the HTML page:
<param name="SSLEnable" value="on">

71
Configuring the Receiver for Use withYour Security Solution
You must perform further configuration if:
● You require the Citrix Receiver for Java to use TLS only.
● You are using a Secure Gateway server that is configured to run in relay mode.
● You are not using the default Cipher Suite. You may need to use the COM or GOV ciphersuites to comply with your organization’s security regulations. If you are not sure,contact your security administrator.
● Your organization has its own certification authority. You may need to importalternative root certificates to comply with your organization’s security regulations. Ifyou are not sure, contact your security administrator. Before importing a rootcertificate, it is important to verify the authenticity of the certificate. Yourorganization should have a procedure in place for users to check the root certificate asthey import it.
● Your organization uses root certificates stored in the Microsoft Windows keystore.Where the user device is running Microsoft Windows, Microsoft Internet Explorer, andJava 1.6.16, the receiver is able to use root certificates stored in the Windows keystore(in addition to the root certificates in the Java keystore). Java must be configuredaccordingly.
To force TLS connectionsTo force receivers to connect only with TLS, you must specify TLS on the Secure Gatewayserver or SSL relay service.
1. Specify the following parameter in the HTML page:
<param name="SecureChannelProtocol" value="TLS"
To specify a Secure Gateway server that is configuredto run in Relay mode
1. Add the following parameter to the HTML page:
<param name="SSLProxyHost" value="address:port">
where address is the fully qualified domain name of the Secure Gateway server and thesame domain name specified in the server certificate. If the server port is not 443,specify the port.
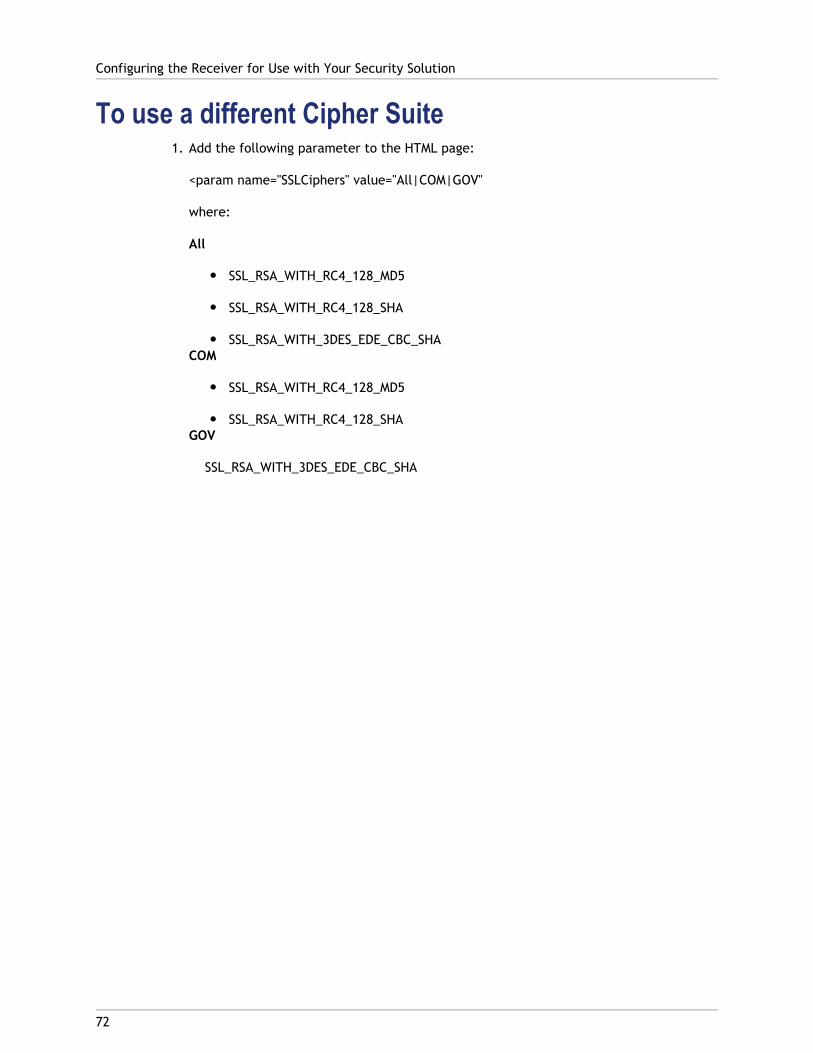
To use a different Cipher Suite1. Add the following parameter to the HTML page:
<param name="SSLCiphers" value="All|COM|GOV"
where:
All
● SSL_RSA_WITH_RC4_128_MD5
● SSL_RSA_WITH_RC4_128_SHA
● SSL_RSA_WITH_3DES_EDE_CBC_SHACOM
● SSL_RSA_WITH_RC4_128_MD5
● SSL_RSA_WITH_RC4_128_SHAGOV
SSL_RSA_WITH_3DES_EDE_CBC_SHA
Configuring the Receiver for Use with Your Security Solution
72
73
Importing Root Certificates
In addition to the default root certificates provided by the JRE and the Windows keystore,you can import your own root certificates.
By default, the maximum key length is limited to 2048 bits. If you require support for keylengths up to 4096 bits, download the Java Cryptography Extension (JCE) UnlimitedStrength Jurisdiction Policy File on each user device. The file can be downloaded from therelevant site.
To import root certificates with Java KeytoolYou can import your own root certificates using the Java keytool utility. The rootcertificates you import are stored in the JRE keystore. Use the Java keytool utility toimport certificates for each user device. It is not possible to import certificates using theJava Control Panel.
1. Use the following sample at a command prompt to import a root certificate:
keytool -import -trustcacerts -alias myrootcert -file c:\bin\rootcert.cer -keystore c:\Program Files\Java\jre6\lib\security\cacerts
where C:\Program Files\Java\jre6\ is the JRE directory.
The keystore parameter is mandatory. The default password for the Java keystore ischangeit.
2. Use the following command to change the password:
keytool -storepasswd -keystore c:\Program Files\Java\jre6\lib\security\cacerts
where ‘c:\Program Files\Java\jre6\’ is the JRE directory.
To use root certificates in the Windows KeystoreTo allow the receiver to use root certificates in the Windows keystore, you must configureJava.
To use root certificates stored in the Windows keystore, the user device must be runningMicrosoft Windows, Microsoft Internet Explorer, and Java 1.6.16. The receiver uses theseroot certificates in addition to root certificates in the Java keystore.
1. From the Java Control Panel, select the Advanced tab. Within the Security settings,ensure Use certificates and keys in browser keystore is selected.

2. To add your own root certificates to the Windows keystore, double-click the requiredcertificate file and follow the certificate installation instructions.
Note: Root certificates in the Windows keystore are available for use by allapplications, not just the receiver. If this is not acceptable, disable the Usecertificates and keys in browser keystore security option. This ensures the receiveruses root certificates in the Java keystore only.
Importing Root Certificates
74
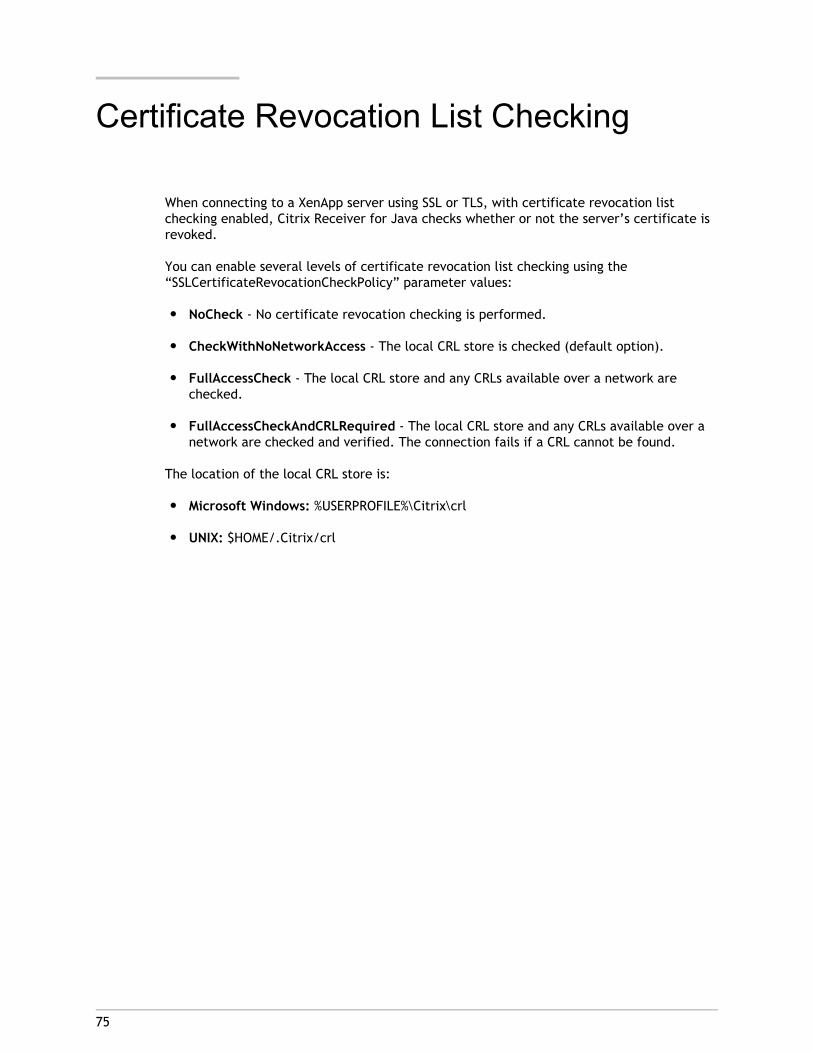
75
Certificate Revocation List Checking
When connecting to a XenApp server using SSL or TLS, with certificate revocation listchecking enabled, Citrix Receiver for Java checks whether or not the server’s certificate isrevoked.
You can enable several levels of certificate revocation list checking using the“SSLCertificateRevocationCheckPolicy” parameter values:
● NoCheck - No certificate revocation checking is performed.
● CheckWithNoNetworkAccess - The local CRL store is checked (default option).
● FullAccessCheck - The local CRL store and any CRLs available over a network arechecked.
● FullAccessCheckAndCRLRequired - The local CRL store and any CRLs available over anetwork are checked and verified. The connection fails if a CRL cannot be found.
The location of the local CRL store is:
● Microsoft Windows: %USERPROFILE%\Citrix\crl
● UNIX: $HOME/.Citrix/crl

76
Certificate Chains
The Sun Java virtual machine provides two certificate validation engines: SunX509 andSunPKIX. You select the required validation engine in the java.security file (for example,C:\Program Files\Java\Jre6\Lib\Security\Java.security) using the“ssl.TrustManagerFactory.algorithm” parameter:
ssl.TrustManagerFactory.algorithm=[SunX509|PKIX]
where C:\Program Files\Java\Jre6 is the JRE directory
The validation engine selection determines the certificate chain length:
● SunX509 allows certificate chains of up to three certificates
● PKIX allows certificate chains of up to five certificates
PKIX is often the choice of validation engine within government deployments. However, thechoice of certificate validation engine is dependent on your organization’s security policy.
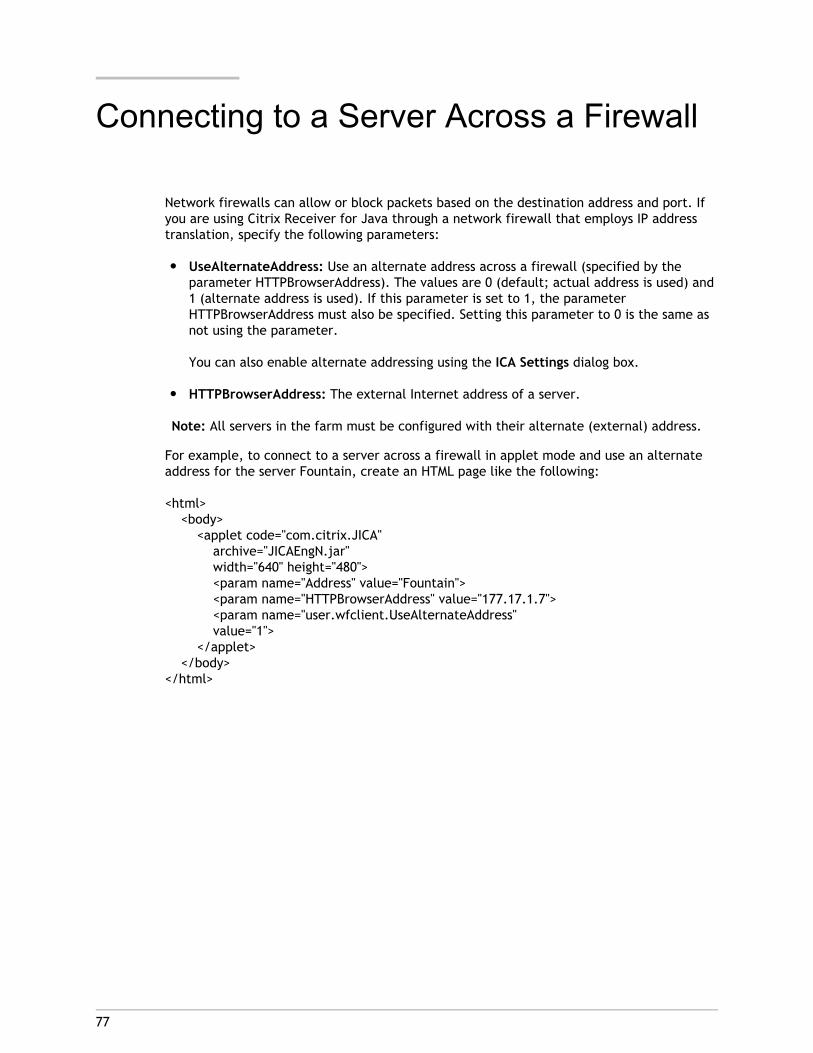
77
Connecting to a Server Across a Firewall
Network firewalls can allow or block packets based on the destination address and port. Ifyou are using Citrix Receiver for Java through a network firewall that employs IP addresstranslation, specify the following parameters:
● UseAlternateAddress: Use an alternate address across a firewall (specified by theparameter HTTPBrowserAddress). The values are 0 (default; actual address is used) and1 (alternate address is used). If this parameter is set to 1, the parameterHTTPBrowserAddress must also be specified. Setting this parameter to 0 is the same asnot using the parameter.
You can also enable alternate addressing using the ICA Settings dialog box.
● HTTPBrowserAddress: The external Internet address of a server.
Note: All servers in the farm must be configured with their alternate (external) address.
For example, to connect to a server across a firewall in applet mode and use an alternateaddress for the server Fountain, create an HTML page like the following:
<html> <body> <applet code="com.citrix.JICA" archive="JICAEngN.jar" width="640" height="480"> <param name="Address" value="Fountain"> <param name="HTTPBrowserAddress" value="177.17.1.7"> <param name="user.wfclient.UseAlternateAddress" value="1"> </applet> </body></html>
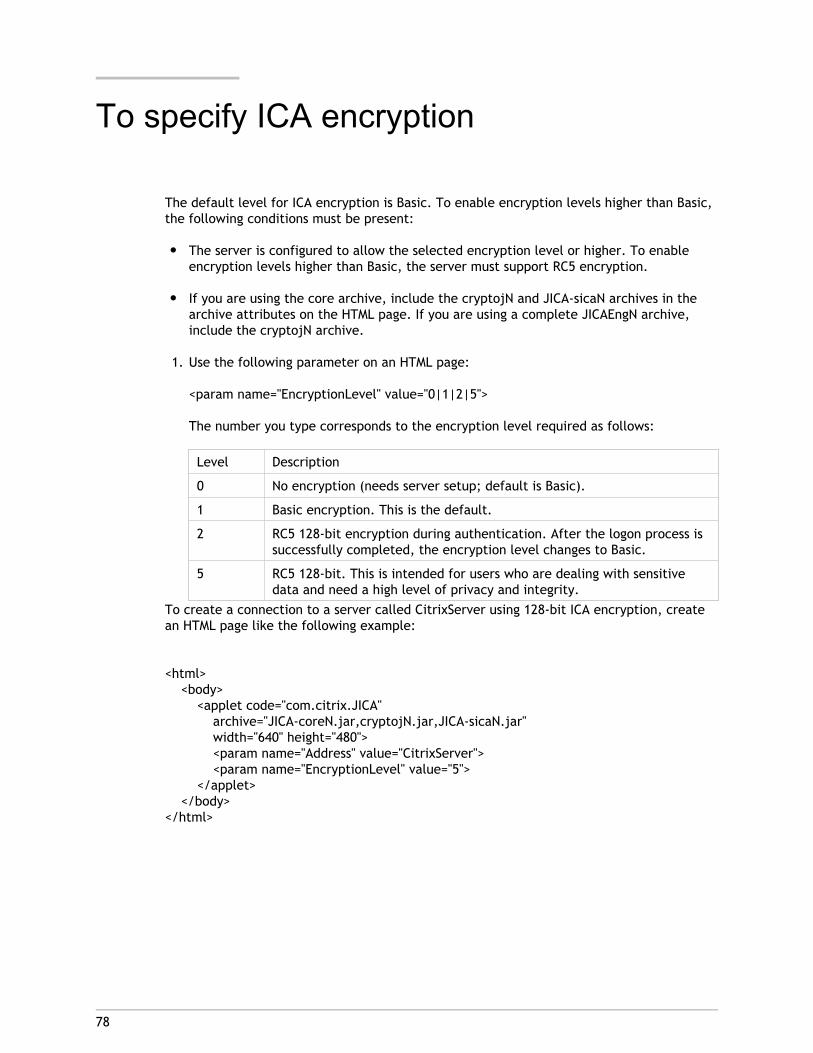
78
To specify ICA encryption
The default level for ICA encryption is Basic. To enable encryption levels higher than Basic,the following conditions must be present:
● The server is configured to allow the selected encryption level or higher. To enableencryption levels higher than Basic, the server must support RC5 encryption.
● If you are using the core archive, include the cryptojN and JICA-sicaN archives in thearchive attributes on the HTML page. If you are using a complete JICAEngN archive,include the cryptojN archive.
1. Use the following parameter on an HTML page:
<param name="EncryptionLevel" value="0|1|2|5">
The number you type corresponds to the encryption level required as follows:
Level Description
0 No encryption (needs server setup; default is Basic).
1 Basic encryption. This is the default.
2 RC5 128-bit encryption during authentication. After the logon process issuccessfully completed, the encryption level changes to Basic.
5 RC5 128-bit. This is intended for users who are dealing with sensitivedata and need a high level of privacy and integrity.
To create a connection to a server called CitrixServer using 128-bit ICA encryption, createan HTML page like the following example:
<html> <body> <applet code="com.citrix.JICA" archive="JICA-coreN.jar,cryptojN.jar,JICA-sicaN.jar" width="640" height="480"> <param name="Address" value="CitrixServer"> <param name="EncryptionLevel" value="5"> </applet> </body></html>
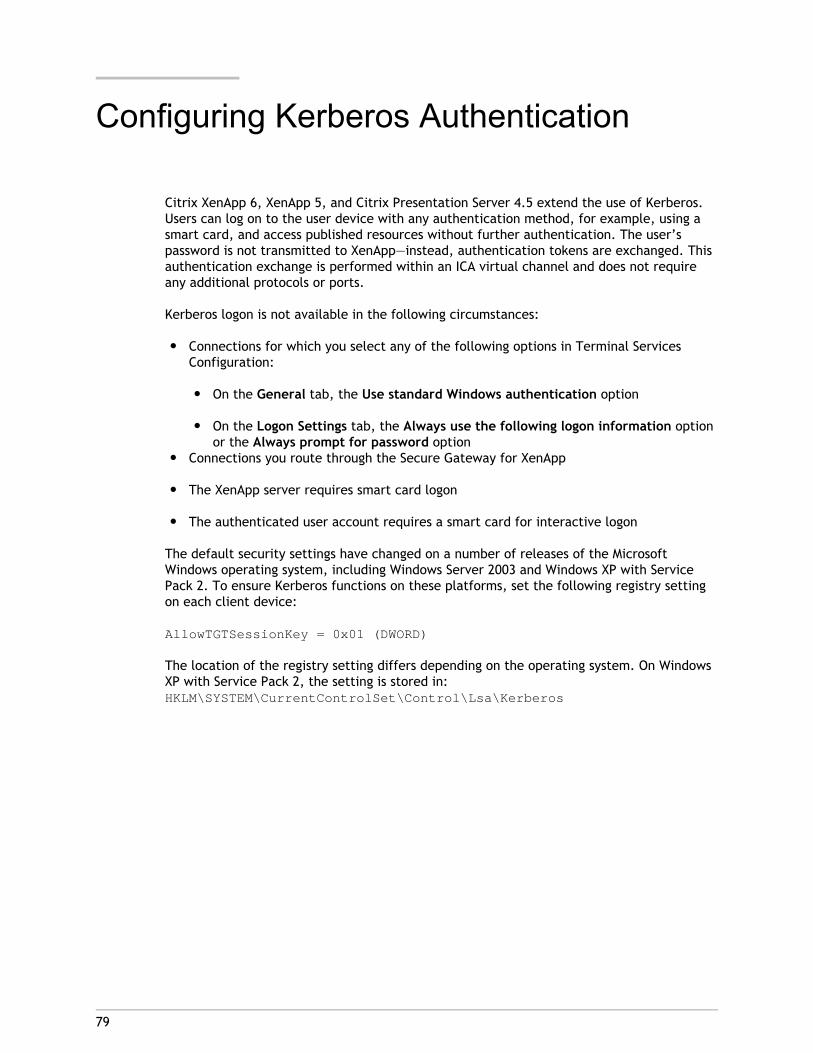
79
Configuring Kerberos Authentication
Citrix XenApp 6, XenApp 5, and Citrix Presentation Server 4.5 extend the use of Kerberos.Users can log on to the user device with any authentication method, for example, using asmart card, and access published resources without further authentication. The user’spassword is not transmitted to XenApp—instead, authentication tokens are exchanged. Thisauthentication exchange is performed within an ICA virtual channel and does not requireany additional protocols or ports.
Kerberos logon is not available in the following circumstances:
● Connections for which you select any of the following options in Terminal ServicesConfiguration:
● On the General tab, the Use standard Windows authentication option
● On the Logon Settings tab, the Always use the following logon information optionor the Always prompt for password option
● Connections you route through the Secure Gateway for XenApp
● The XenApp server requires smart card logon
● The authenticated user account requires a smart card for interactive logon
The default security settings have changed on a number of releases of the MicrosoftWindows operating system, including Windows Server 2003 and Windows XP with ServicePack 2. To ensure Kerberos functions on these platforms, set the following registry settingon each client device:
AllowTGTSessionKey = 0x01 (DWORD)
The location of the registry setting differs depending on the operating system. On WindowsXP with Service Pack 2, the setting is stored in:HKLM\SYSTEM\CurrentControlSet\Control\Lsa\Kerberos
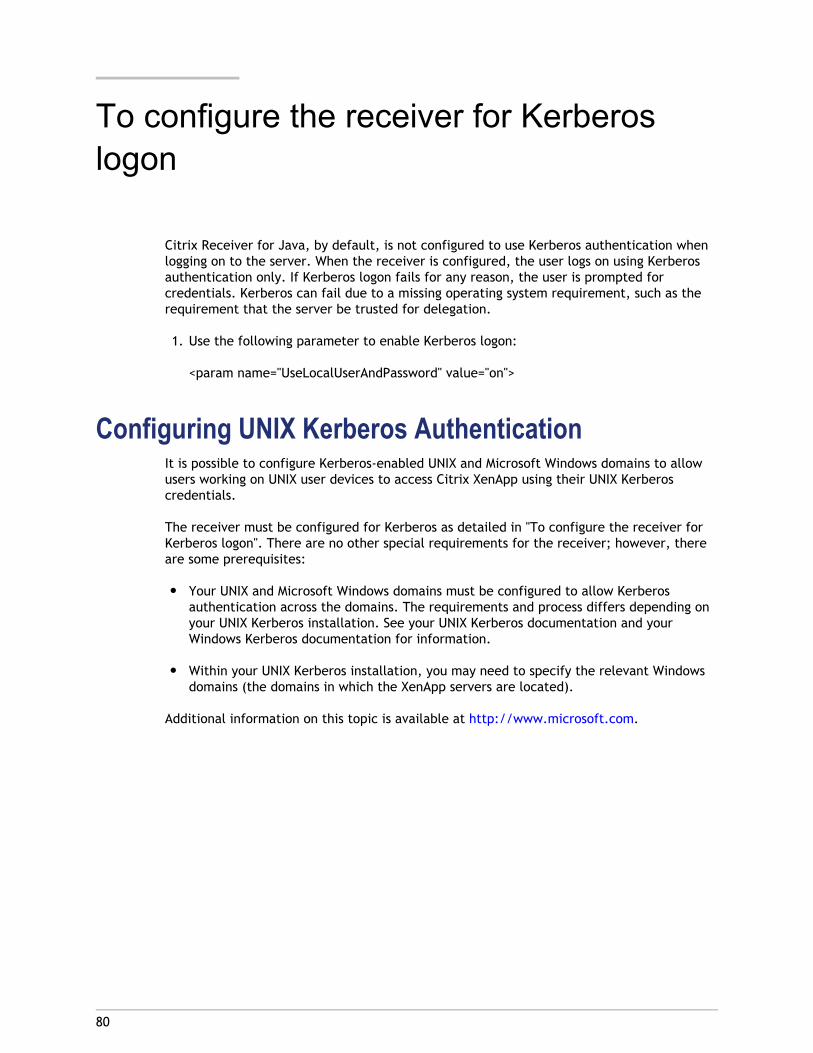
80
To configure the receiver for Kerberoslogon
Citrix Receiver for Java, by default, is not configured to use Kerberos authentication whenlogging on to the server. When the receiver is configured, the user logs on using Kerberosauthentication only. If Kerberos logon fails for any reason, the user is prompted forcredentials. Kerberos can fail due to a missing operating system requirement, such as therequirement that the server be trusted for delegation.
1. Use the following parameter to enable Kerberos logon:
<param name="UseLocalUserAndPassword" value="on">
Configuring UNIX Kerberos AuthenticationIt is possible to configure Kerberos-enabled UNIX and Microsoft Windows domains to allowusers working on UNIX user devices to access Citrix XenApp using their UNIX Kerberoscredentials.
The receiver must be configured for Kerberos as detailed in "To configure the receiver forKerberos logon". There are no other special requirements for the receiver; however, thereare some prerequisites:
● Your UNIX and Microsoft Windows domains must be configured to allow Kerberosauthentication across the domains. The requirements and process differs depending onyour UNIX Kerberos installation. See your UNIX Kerberos documentation and yourWindows Kerberos documentation for information.
● Within your UNIX Kerberos installation, you may need to specify the relevant Windowsdomains (the domains in which the XenApp servers are located).
Additional information on this topic is available at http://www.microsoft.com.
81
Locating Receiver Configuration andDevice Files
Citrix Receiver for Java configuration is stored in three places:
● The HTML page, stored on a Web server
● The ICA file, from a server running the Web Interface or from a standard Web server
● The Appsrv.ini file, stored on the user device
Most parameters specified on the HTML page take precedence over those specified in theICA file. Similarly, parameters specified in the ICA file take precedence over those in theappsrv.ini file. Note that some parameters can be specified only in the .ini file.
The location of the Appsrv.ini configuration file depends on the user device operatingsystem. The locations for some common operating system are:
Windows:
%USERPROFILE%\Citrix
UNIX and Linux:
$HOME/.citrix
Mac OS X:
<User's home directory>/.citrix
Files Stored on the User DeviceFile Description
Appsrv.ini Stores settings from the Settings user interface, exceptreceiver name.
Wfcname.ini Stores the receiver name. The file is stored in the samedirectory as Appsrv.ini.
*.jfn If local text echo is enabled, glyphs are cached in files with the.jfn suffix. These files are stored in the same directory asAppsrv.ini.
Graphical objects(Citrix proprietaryformat)
If bitmap caching is enabled, cached graphics are stored in theCache subdirectory (which appears in the directory in whichthe Appsrv.ini file is stored).
*.crl If certificate revocation checking (CRL) is enabled, CRL filesare stored in Crl or Crl/Cache.
Users can place CRLs in the Crl directory. The receiver cachesCRLs in the Crl/Cache directory.
CRLs are not deleted from the Crl directory (whereas CRLs maybe deleted from the Crl/Cache directory when they expire).
The CRL directories appear in the directory in which the fileAppsrv.ini is stored.
CTX.DAT The file contains data that is used to identify the user devicefor Terminal Services licensing purposes. The receiver attemptsto create the file in the following locations, in the followingorder:
● UNIX platforms only: /usr/local
● Windows platforms only: C:\ through Z:\
● All platforms: directory specified by the Java systemproperty <java.home>
● All platforms: directory specified by the Java systemproperty <user.home>
If the receiver is unable to create the file, the network IPaddress is used to identify the user device. This may lead tothe receiver consuming multiple client access licenses in aDynamic Host Configuration Protocol environment.
Locating Receiver Configuration and Device Files
82
83
Improving Performance of the Receiverfor Java
Reducing System Overhead With Session SharingIf you are not using seamless windows, consider moving to this mode of working to gain theperformance benefits of session sharing. These include a reduction in system overhead forboth user device and server and quicker application launching.
Compressing Data to Reduce the Amount of DataTransferred Over the Network
Data compression reduces the amount of data that needs to be transferred over thenetwork. However, additional processor resources are required to compress anddecompress the data. If your connection is bandwidth-limited, enabling data compressionimproves performance.
You can specify two levels of data compression, standard and maximum. Maximum datacompression uses more processor power and memory and may reduce performance on slowdevices. Data compression is enabled by default.
To enable maximum data compression, specify the following parameters on the HTML page:
<param name="Compress" value="on"><param name="MaximumCompression" value="on">
To disable data compression specify the following parameter on the HTML page:
<param name="Compress" value="off">
Caching Bitmap Images to Increase Their RenderingSpeed
Bitmap caching stores commonly used images on a local disk. If the connection isbandwidth-limited, using bitmap caching increases performance. If the client is on ahigh-speed LAN, you do not need bitmap caching.
You can configure bitmap caching using parameters on the HTML page or the user can do itthrough the ICA Settings dialog box.

To enable bitmap caching for a connection specify the following parameter on the HTMLpage:
<param name="PersistentCacheEnabled" value="on">
The bitmap cache directory is stored in the directory specified by the standard Java systemproperty user.home. The location of the user.home directory depends on the Javaenvironment or Web browser you are using. If necessary, use the ICA Settings dialog box tochange the bitmap cache directory.
Queuing Mouse Movements to Reduce Mouse EventsSent to the Server
When queuing is enabled, the client sends mouse movement updates less frequently to theserver. This prevents the connection from becoming overburdened with excessive mouseevents, which would degrade performance. Disabling queuing makes the ICA session moreresponsive to mouse movements. By default, mouse queuing is disabled.
To change the update period for mouse movement queuing, specify the followingparameter on the HTML page:
<param name="MouseTimer" value="period">
where period is the update period you are using, in milliseconds. To disable mousemovement queuing, set the period to zero.
Providing Instant Onscreen Feedback to User Input byUsing SpeedScreen Latency Reduction
SpeedScreen latency reduction improves performance over high latency connections byproviding instant feedback to the user in response to typed data or mouse clicks.
SpeedScreen latency reduction is available only when it is enabled on the server to whichthe user device connects.
SpeedScreen latency reduction is not available on the Japanese receiver
Improving Performance of the Receiver for Java
84
85
Improving Performance over aLow-Bandwidth Connection
If you are using a low-bandwidth connection, such as a modem or cellular telephone, foryour sessions, you can make a number of changes to your Citrix Receiver for Javaconfiguration and the way you use the receiver that will improve performance:
● Reduce the receiver download size. If you do not require the entire functionality ofthe receiver, specify only the archives necessary to provide the functions you require.Reducing the size of the applet can greatly reduce the download time.
● Change the receiver configuration. On devices with limited processing power, orwhere limited bandwidth is available, there is a trade-off between performance andfunctionality. The receiver provides both the user and administrator with the ability tochoose an acceptable mixture of rich functionality and interactive performance. Makingone or more of the following changes can reduce the bandwidth that the connectionrequires and improve performance:
● Enable maximum data compression. Compression reduces the size of the data thatis transferred over the connection.
● Enable the bitmap cache. Bitmap caching stores commonly used images locally onthe user device so that they do not have to be transferred over the connectionevery time they are needed.
● Queue mouse movements. When queuing is enabled, the receiver sends mouseupdates to the server less frequently. Increasing the queuing period may improveperformance on a low-bandwidth connection.
● Enable SpeedScreen latency reduction. SpeedScreen latency reduction improvesperformance over high latency connections by providing instant feedback to theuser in response to typed data or mouse clicks.
● Reduce the window size. Change the window size to the minimum size users cancomfortably use.
● Reduce the number of colors. Reduce the number of colors to 256.
● Disable receiver audio mapping. If users do not need sound, disable receiver audiomapping or remove the JICA-audio archive.
● Disable clipboard mapping. If users do not need to copy and paste text, do notinclude the JICA-clipboard archive.
● Disable client drive mapping. If users do not need to map drives, do not includethe JICA-cdm archive.
● Disable printing. If users do not need to map printers, do not include theJICA-printer archive.
● Disable server browsing. If providing connections to desktops only (not publishedapplications), do not include the JICA-browse archive.
● Change the way you use the receiver. Users on a low-bandwidth connection shouldconsider the following to preserve performance:
● Avoid accessing large files using client drive mapping. When you access a largefile with client drive mapping, the file is transferred over the connection. On slowconnections, this may take a long time.
● Avoid printing large documents on local client printers. When you print adocument on a locally mapped printer, the print file is transferred over theconnection. On slow connections, this may take a long time.
● Avoid playing multimedia content. Playing multimedia content uses a lot ofbandwidth and can cause reduced performance.
● Use the latest receiver and server software. Citrix is continually enhancing andimproving performance with each release, and many performance features require thelatest receiver and server software in order to function.
Improving Performance over a Low-Bandwidth Connection
86
87
Limitations of the Receiver for Java
User Device Drive MappingA remote application generates an error message because it cannot lock a file.
Due to Java limitations, Java programs cannot lock files. This means that files cannot belocked on mapped local drives.
To avoid generating error messages, disable the Safelock option on the HTML page:
<param name="Safelock" value="off">
When Safelock is disabled, if a remote application attempts to lock a file on a mappeddrive, the receiver will report success. However, this does not mean that the file is locked;you must take precautions to ensure that another application does not write to or deletethe same file, because this could result in data corruption.
Mouse Pointer SupportIn shadowed sessions, the mouse pointer does not move when shadowing users move theirmouse pointer.
Seamless WindowsOn some platforms, the outline drag-box that appears when you move or resize seamlesswindows can cause unattractive repaint effects. If you experience this, you can eitherspecify a solid drag-box type or eliminate the drag-box entirely by setting the parameterTWIDragBoxType to solid or none respectively.
Server Names with non-ASCII CharactersFor user device operating systems to contact servers, the host name and domain name mustbe compliant with the Domain Naming System (DNS). That is, the names must contain onlyupper- and lower-case ASCII a to z, digits 0 to 9, and dash (-). This may not be necessarywhen user device operating systems and the DNS server support multinational characters.
Published application names can comprise any characters because these are alwaysresolved by the ICA browser. Note that any ICA browser addresses have the same DNSrestrictions as the server names described above.
On some systems, you may not be able to connect to a server if its name does not conformto this requirement (that is, a server with a Japanese name or a name containing othernon-ASCII characters).

To avoid this, do one of the following:
● Conform to the DNS requirement and use only ASCII characters in server names.
● Specify ICA browser addresses as IP addresses and do not enable DNS resolution for theserver. If you do both of these things, the servers can have names that do not complywith the DNS requirement; however, SSL does not work in this scenario because DNSnames are required for certificate validation. In addition, the Web Interface does notwork because DNS is used to resolve the hostname part of the Web Interface URL.
Universal Print Driver and PCL4● Horizontal lines in text and images sometimes appear jagged in landscape mode
● Print output near the page edge is sometimes clipped when you are using small pagemargins
To avoid these problems, use the appropriate native printer driver instead of the UPD.Configure the driver using the Settings dialog box and ensure that it is available on theserver.
Limitations of the Receiver for Java
88
89
Working with Linux and Solaris
Loss of Keyboard FocusOn Linux and Solaris platforms, the applet in embedded or non-seamless mode can losekeyboard focus after opening a receiver dialog box. The keyboard focus is successfullypassed to the dialog box when the dialog box is opened, but it is lost when the dialog box isclosed.
For Solaris, the workaround is to give keyboard focus to another application’s window, thengive it back to the browser window containing the embedded receiver applet. For Linux,click in the applet to restore keyboard focus.
Clipboard Support on X11● Clipboard support on the Citrix Receiver for Java works only with applications that use
the X11 CLIPBOARD selection. Specifically, Motif and Gnome applications are fine, butKDE applications do not work. Xterm can be configured with X11 resources to use theCLIPBOARD selection. For example:
XTerm*VT100.Translations: #override \n\~Ctrl ~Meta <Btn2Up>:\insert-selection(PRIMARY,CLIPBOARD,CUT_BUFFER0)\n\<BtnUp>: select-end(PRIMARY,CLIPBOARD,CUT_BUFFER0)\n
GNU Emacs can also be configured to use CLIPBOARD with the following Emacs lisp:
(setq x-select-enable-clipboard t)
● The xclipboard utility (present on most X11 systems) may be of use in transferring databetween the PRIMARY and CLIPBOARD selections.
90
Working with the Mac OS X
● To right-click when connected to a Citrix XenApp computer with a Macintosh, press thecommand key and click the mouse button.
● Characters generated using the Option keys on a Macintosh may not be supported bythe current Windows font in your session. If the character produced is not the expectedcharacter, choose a Windows font in the session that supports the character. Afterproducing the desired character, you can return to the usual font.
● Citrix Receiver for Java cannot load when the Java archive files are hosted on a Webserver that requires cookies or authentication before serving the files. Ensure that theWeb server does not require authentication to serve these files.
This issue also affects the HTML help and .ica files.
In particular, .asp or .jsp applications that manage session state using cookies areaffected.
● Arbitrary mouse pointers are not supported on Mac OS X.
91
Working with Windows Internet Explorer
Displaying Dead Key CharactersTo display dead key characters, press a dead key, then press the SPACEBAR twice.
Enabling Java Environments when Logged on asAdministrator
For Windows Server 2008 R2, the default security settings when you log on withadministrator privileges are:
● Internet = Medium-high
● Local Intranet = Medium-low
● Trusted Sites = Medium
If you log on as an administrator and use Citrix Receiver for Java over the Internet, enableJava environments for the High security level through Internet Explorer’s Internet Options.
● Follow the instructions given in Microsoft Knowledge Base article 182569.
● Accept the Internet site that provides the Java applet as a trusted site. The defaultsecurity level for a trusted site is Medium, therefore the Java environment is enabled,and you can use the client.
92
Using the Receiver for Java on JapaneseOperation Systems
Typing Japanese Characters in Shadowing SessionsIf you shadow another session, use the server Input Method Editor (IME). By default, theserver-side IME is used, but if you have been using the IME on the user device, change yourkeyboard layout setting.
From the ICA Settings dialog box, choose the General tab, followed by either (ServerDefault) or Japanese (server IME only) from the Keyboard Layout options.
Alternatively, you can choose Japanese (client and server IME) and use the server IMEduring shadowing.
Typing the Long Vowel Sound Symbol (—) in KanaInput Mode
When using the server IME to type Japanese characters in Kana input mode, press SHIFT+—to enter the long vowel symbol. This is not necessary when using the client IME.
Typing Japanese Characters in Applications Using theIME on the User Device
If you use the IME on the user device, displayed characters may be corrupted when you areusing certain applications. If this happens, use the server IME instead.
Web Interface on Windows Unicode SettingsIf you are using the Web Interface for XenApp, installed on a Microsoft Windows server, todeploy the Citrix Receiver for Java, Citrix recommends that you configure the WebInterface to deploy Version 8 or later clients. This ensures all ICA files are encoded inUnicode.
Configure this setting using the Delivery Services Console. When specifying the launch clientsettings, set the client version support option to version 8 or later clients.
If this option is not selected, ICA files are encoded using Microsoft Windows Codepage 932.Although this is acceptable in many circumstances, users will not be able to launchpublished applications if the application name includes certain characters, such as a longtilde.
Hotkey Support for Japanese KeyboardsOn certain hardware platforms, some Java environments may have problems with thespecial Japanese modifier keys, such as Hankaku, Zenkaku, and Hiragana, which are used tocontrol the IME on the server.
If you experience this problem, first ensure that you have the Java SE Runtime Environment(JRE) 6 Update 18 environment for your platform. If the problem persists, you can interactwith the IME by clicking the IME buttons using your mouse.
Alternatively, define hotkeys to simulate the effect of the IME keys. For example, you candefine F1 as the Katakana key. This technique for mapping hotkeys is similar to that usedfor defining special key combinations for the client, such as using CTRL+F1 to send the keycombination CTRL+ALT+DEL.
Define Japanese hotkeys in the same way as English hotkeys: either in the <applet> tag orby using the ICA Settings dialog box, as described in Specifying Hotkey Functions.
The full set of possible Japanese hotkeys is:
HotkeyMuHenkanCharHotkeyMuHenkanShift
HotkeyPrevKouhoCharHotkeyPrevKouhoShift
HotkeyKatakanaCharHotkeyKatakanaShift
HotkeyHankakuCharHotkeyHankakuShift
HotkeyKanjiBangoCharHotkeyKanjiBangoShift
HotkeyNextKouhoCharHotkeyNextKouhoShift
HotkeyAllKouhoCharHotkeyAllKouhoShift
HotkeyHiraganaCharHotkeyHiraganaShift
HotkeyRomajiCharHotkeyRomajiShift
HotkeyEisuCharHotkeyEisuShift
Using the Receiver for Java on Japanese Operation Systems
93
94
Using Client-side IME Input Mode on MacOS X
Using ATOKWhen using the client on Japanese Mac OS X with the ATOK IME, use ATOK17. CitrixReceiver for Java is not supported with ATOK16. Alternatively, use the default Kotoeri IME.
Displaying the First Character TypedWhen using an IME on a user device running Mac OS X, if the first character you type is a fullwidth Roman (a-z) character, it is not displayed.
To display the first character, either:
● Use the server-side IME to input full width Roman characters.
● Type one or more kana characters before typing a full width Roman character.
Changing the Input ModeKey combinations using the Apple (Alt) key can switch focus to the application menu bar,which results in the first character you type not being recognized.
When using an IME on a user device running Mac OS X, use the kana and eisu keys to switchthe IME input mode.
Typing Characters After Reconnecting Using the IMEon the User Device
If you reconnect to a session from a different browser or with a different window sizesetting from the original session, you may see a dialog box warning you that the video modefor the existing session cannot change. You cannot input characters using the IME on theuser device until you close the dialog box by clicking OK.
Sometimes this dialog box is displayed behind the application window. If you cannot typecharacters using the IME on the user device after reconnecting, even if you do not see adialog box, try minimizing the application window in the browser window to see whetherthe warning dialog box appears. Close the dialog box by clicking OK, then restore theapplication window.
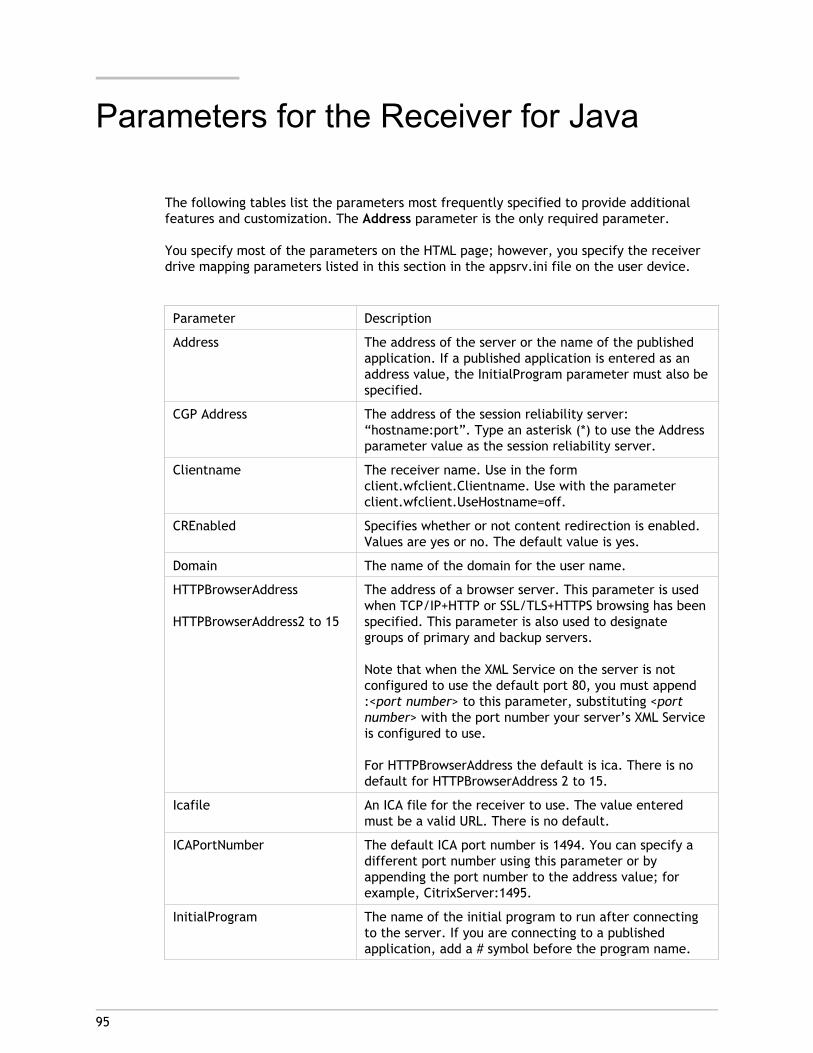
95
Parameters for the Receiver for Java
The following tables list the parameters most frequently specified to provide additionalfeatures and customization. The Address parameter is the only required parameter.
You specify most of the parameters on the HTML page; however, you specify the receiverdrive mapping parameters listed in this section in the appsrv.ini file on the user device.
Parameter Description
Address The address of the server or the name of the publishedapplication. If a published application is entered as anaddress value, the InitialProgram parameter must also bespecified.
CGP Address The address of the session reliability server:“hostname:port”. Type an asterisk (*) to use the Addressparameter value as the session reliability server.
Clientname The receiver name. Use in the formclient.wfclient.Clientname. Use with the parameterclient.wfclient.UseHostname=off.
CREnabled Specifies whether or not content redirection is enabled.Values are yes or no. The default value is yes.
Domain The name of the domain for the user name.
HTTPBrowserAddress
HTTPBrowserAddress2 to 15
The address of a browser server. This parameter is usedwhen TCP/IP+HTTP or SSL/TLS+HTTPS browsing has beenspecified. This parameter is also used to designategroups of primary and backup servers.
Note that when the XML Service on the server is notconfigured to use the default port 80, you must append:<port number> to this parameter, substituting <portnumber> with the port number your server’s XML Serviceis configured to use.
For HTTPBrowserAddress the default is ica. There is nodefault for HTTPBrowserAddress 2 to 15.
Icafile An ICA file for the receiver to use. The value enteredmust be a valid URL. There is no default.
ICAPortNumber The default ICA port number is 1494. You can specify adifferent port number using this parameter or byappending the port number to the address value; forexample, CitrixServer:1495.
InitialProgram The name of the initial program to run after connectingto the server. If you are connecting to a publishedapplication, add a # symbol before the program name.
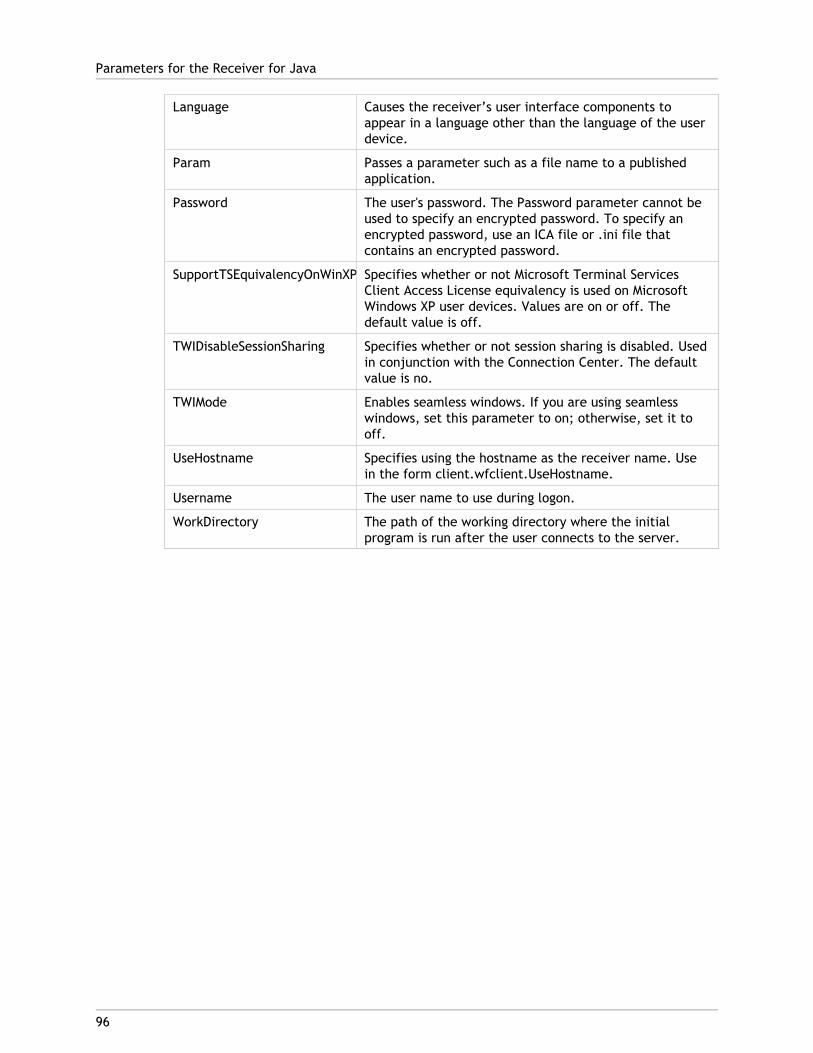
Language Causes the receiver’s user interface components toappear in a language other than the language of the userdevice.
Param Passes a parameter such as a file name to a publishedapplication.
Password The user's password. The Password parameter cannot beused to specify an encrypted password. To specify anencrypted password, use an ICA file or .ini file thatcontains an encrypted password.
SupportTSEquivalencyOnWinXP Specifies whether or not Microsoft Terminal ServicesClient Access License equivalency is used on MicrosoftWindows XP user devices. Values are on or off. Thedefault value is off.
TWIDisableSessionSharing Specifies whether or not session sharing is disabled. Usedin conjunction with the Connection Center. The defaultvalue is no.
TWIMode Enables seamless windows. If you are using seamlesswindows, set this parameter to on; otherwise, set it tooff.
UseHostname Specifies using the hostname as the receiver name. Usein the form client.wfclient.UseHostname.
Username The user name to use during logon.
WorkDirectory The path of the working directory where the initialprogram is run after the user connects to the server.
Parameters for the Receiver for Java
96
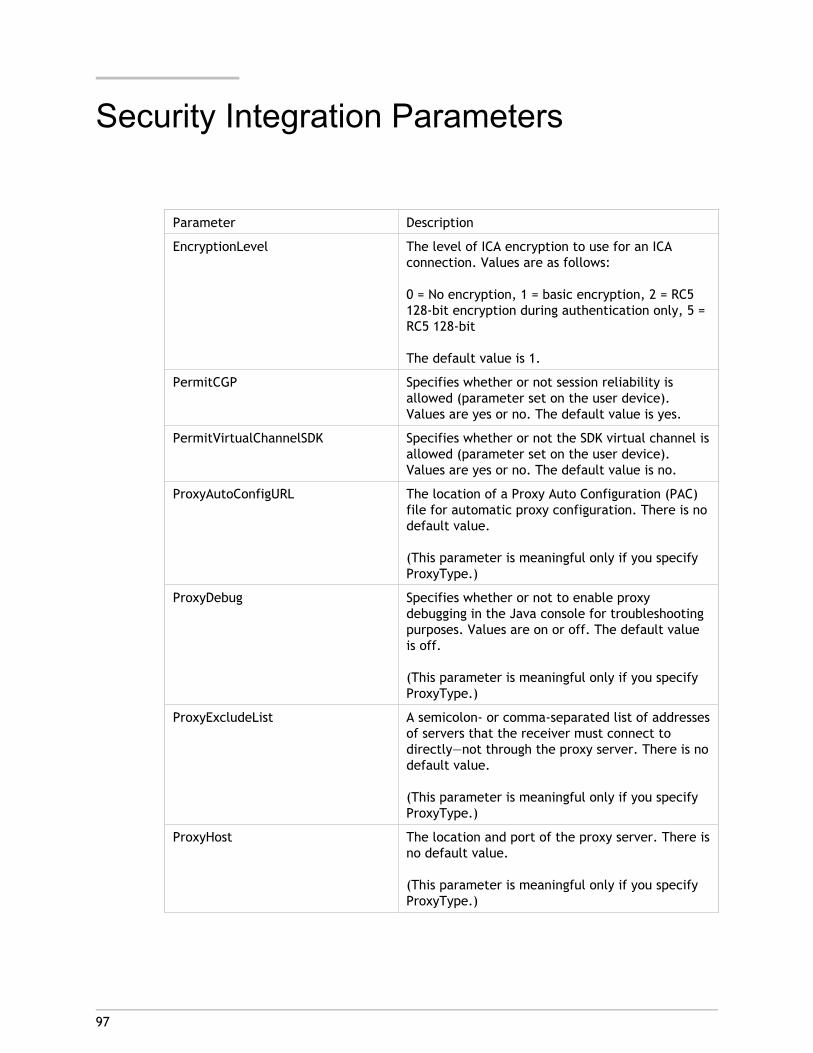
97
Security Integration Parameters
Parameter Description
EncryptionLevel The level of ICA encryption to use for an ICAconnection. Values are as follows:
0 = No encryption, 1 = basic encryption, 2 = RC5128-bit encryption during authentication only, 5 =RC5 128-bit
The default value is 1.
PermitCGP Specifies whether or not session reliability isallowed (parameter set on the user device).Values are yes or no. The default value is yes.
PermitVirtualChannelSDK Specifies whether or not the SDK virtual channel isallowed (parameter set on the user device).Values are yes or no. The default value is no.
ProxyAutoConfigURL The location of a Proxy Auto Configuration (PAC)file for automatic proxy configuration. There is nodefault value.
(This parameter is meaningful only if you specifyProxyType.)
ProxyDebug Specifies whether or not to enable proxydebugging in the Java console for troubleshootingpurposes. Values are on or off. The default valueis off.
(This parameter is meaningful only if you specifyProxyType.)
ProxyExcludeList A semicolon- or comma-separated list of addressesof servers that the receiver must connect todirectly—not through the proxy server. There is nodefault value.
(This parameter is meaningful only if you specifyProxyType.)
ProxyHost The location and port of the proxy server. There isno default value.
(This parameter is meaningful only if you specifyProxyType.)
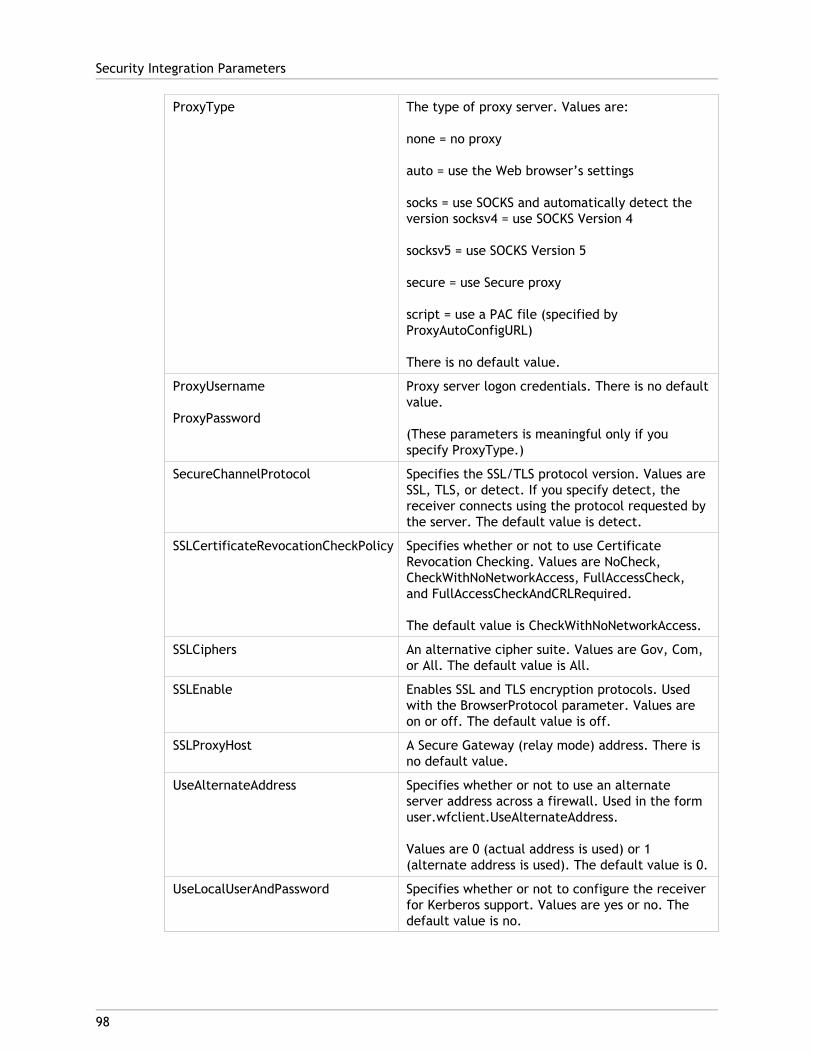
ProxyType The type of proxy server. Values are:
none = no proxy
auto = use the Web browser’s settings
socks = use SOCKS and automatically detect theversion socksv4 = use SOCKS Version 4
socksv5 = use SOCKS Version 5
secure = use Secure proxy
script = use a PAC file (specified byProxyAutoConfigURL)
There is no default value.
ProxyUsername
ProxyPassword
Proxy server logon credentials. There is no defaultvalue.
(These parameters is meaningful only if youspecify ProxyType.)
SecureChannelProtocol Specifies the SSL/TLS protocol version. Values areSSL, TLS, or detect. If you specify detect, thereceiver connects using the protocol requested bythe server. The default value is detect.
SSLCertificateRevocationCheckPolicy Specifies whether or not to use CertificateRevocation Checking. Values are NoCheck,CheckWithNoNetworkAccess, FullAccessCheck,and FullAccessCheckAndCRLRequired.
The default value is CheckWithNoNetworkAccess.
SSLCiphers An alternative cipher suite. Values are Gov, Com,or All. The default value is All.
SSLEnable Enables SSL and TLS encryption protocols. Usedwith the BrowserProtocol parameter. Values areon or off. The default value is off.
SSLProxyHost A Secure Gateway (relay mode) address. There isno default value.
UseAlternateAddress Specifies whether or not to use an alternateserver address across a firewall. Used in the formuser.wfclient.UseAlternateAddress.
Values are 0 (actual address is used) or 1(alternate address is used). The default value is 0.
UseLocalUserAndPassword Specifies whether or not to configure the receiverfor Kerberos support. Values are yes or no. Thedefault value is no.
Security Integration Parameters
98
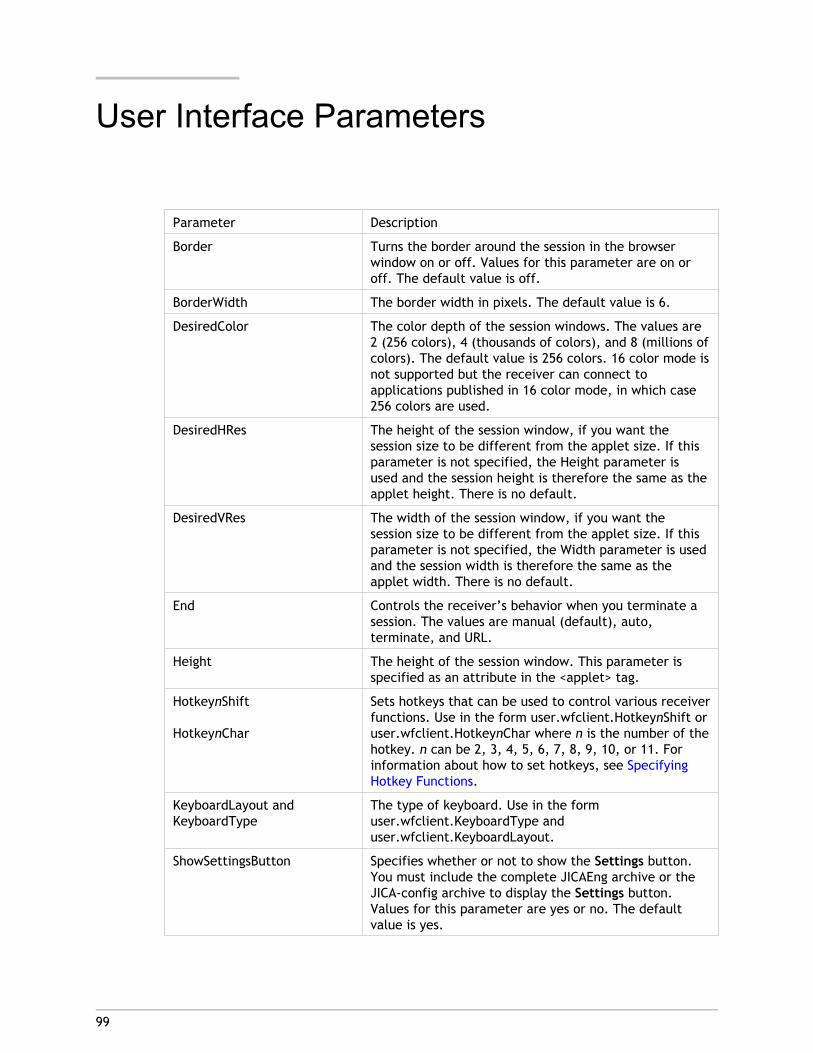
99
User Interface Parameters
Parameter Description
Border Turns the border around the session in the browserwindow on or off. Values for this parameter are on oroff. The default value is off.
BorderWidth The border width in pixels. The default value is 6.
DesiredColor The color depth of the session windows. The values are2 (256 colors), 4 (thousands of colors), and 8 (millions ofcolors). The default value is 256 colors. 16 color mode isnot supported but the receiver can connect toapplications published in 16 color mode, in which case256 colors are used.
DesiredHRes The height of the session window, if you want thesession size to be different from the applet size. If thisparameter is not specified, the Height parameter isused and the session height is therefore the same as theapplet height. There is no default.
DesiredVRes The width of the session window, if you want thesession size to be different from the applet size. If thisparameter is not specified, the Width parameter is usedand the session width is therefore the same as theapplet width. There is no default.
End Controls the receiver’s behavior when you terminate asession. The values are manual (default), auto,terminate, and URL.
Height The height of the session window. This parameter isspecified as an attribute in the <applet> tag.
HotkeynShift
HotkeynChar
Sets hotkeys that can be used to control various receiverfunctions. Use in the form user.wfclient.HotkeynShift oruser.wfclient.HotkeynChar where n is the number of thehotkey. n can be 2, 3, 4, 5, 6, 7, 8, 9, 10, or 11. Forinformation about how to set hotkeys, see SpecifyingHotkey Functions.
KeyboardLayout andKeyboardType
The type of keyboard. Use in the formuser.wfclient.KeyboardType anduser.wfclient.KeyboardLayout.
ShowSettingsButton Specifies whether or not to show the Settings button.You must include the complete JICAEng archive or theJICA-config archive to display the Settings button.Values for this parameter are yes or no. The defaultvalue is yes.
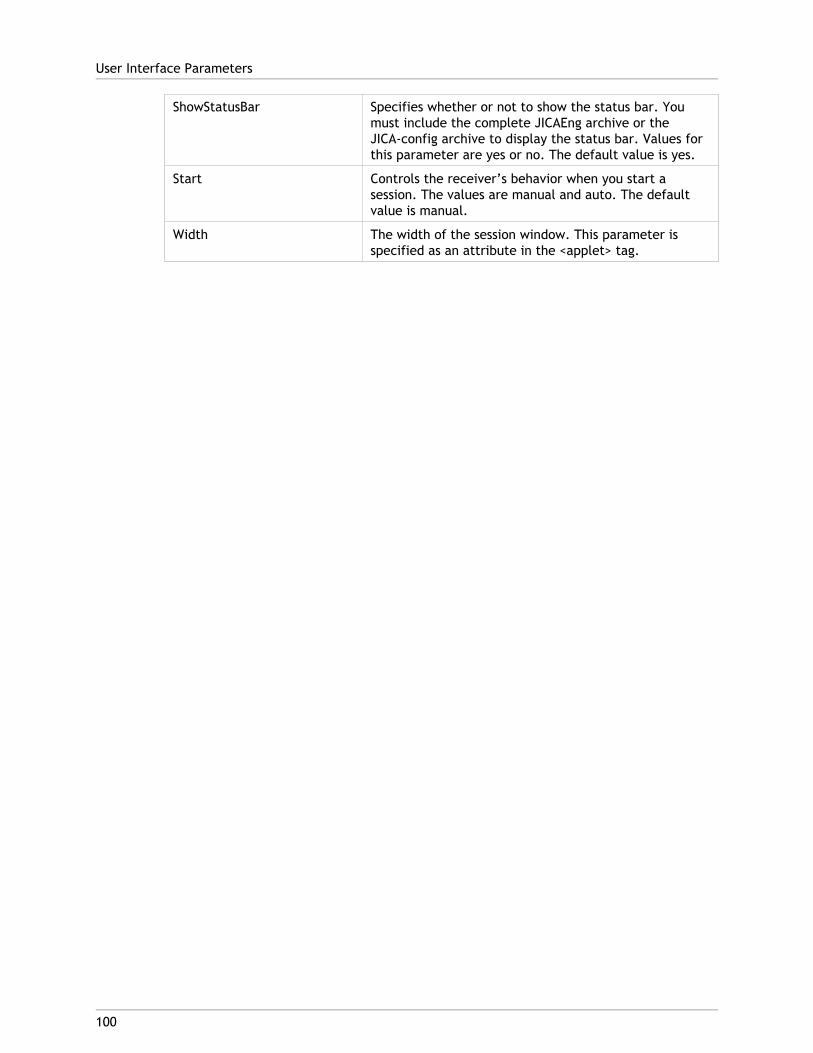
ShowStatusBar Specifies whether or not to show the status bar. Youmust include the complete JICAEng archive or theJICA-config archive to display the status bar. Values forthis parameter are yes or no. The default value is yes.
Start Controls the receiver’s behavior when you start asession. The values are manual and auto. The defaultvalue is manual.
Width The width of the session window. This parameter isspecified as an attribute in the <applet> tag.
User Interface Parameters
100

101
Client Audio Mapping Parameters
Parameter Description
ClientAudio Enables receiver audio. The values are on and off. Thedefault is off.
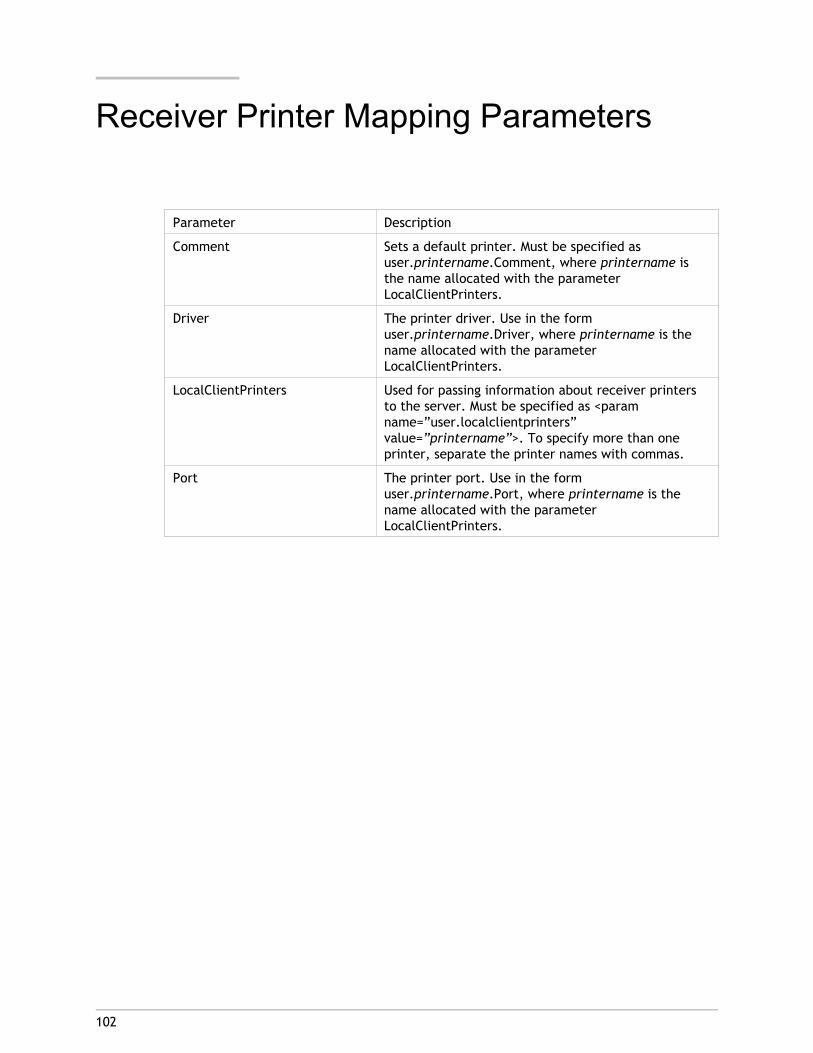
102
Receiver Printer Mapping Parameters
Parameter Description
Comment Sets a default printer. Must be specified asuser.printername.Comment, where printername isthe name allocated with the parameterLocalClientPrinters.
Driver The printer driver. Use in the formuser.printername.Driver, where printername is thename allocated with the parameterLocalClientPrinters.
LocalClientPrinters Used for passing information about receiver printersto the server. Must be specified as <paramname=”user.localclientprinters”value=”printername”>. To specify more than oneprinter, separate the printer names with commas.
Port The printer port. Use in the formuser.printername.Port, where printername is thename allocated with the parameterLocalClientPrinters.
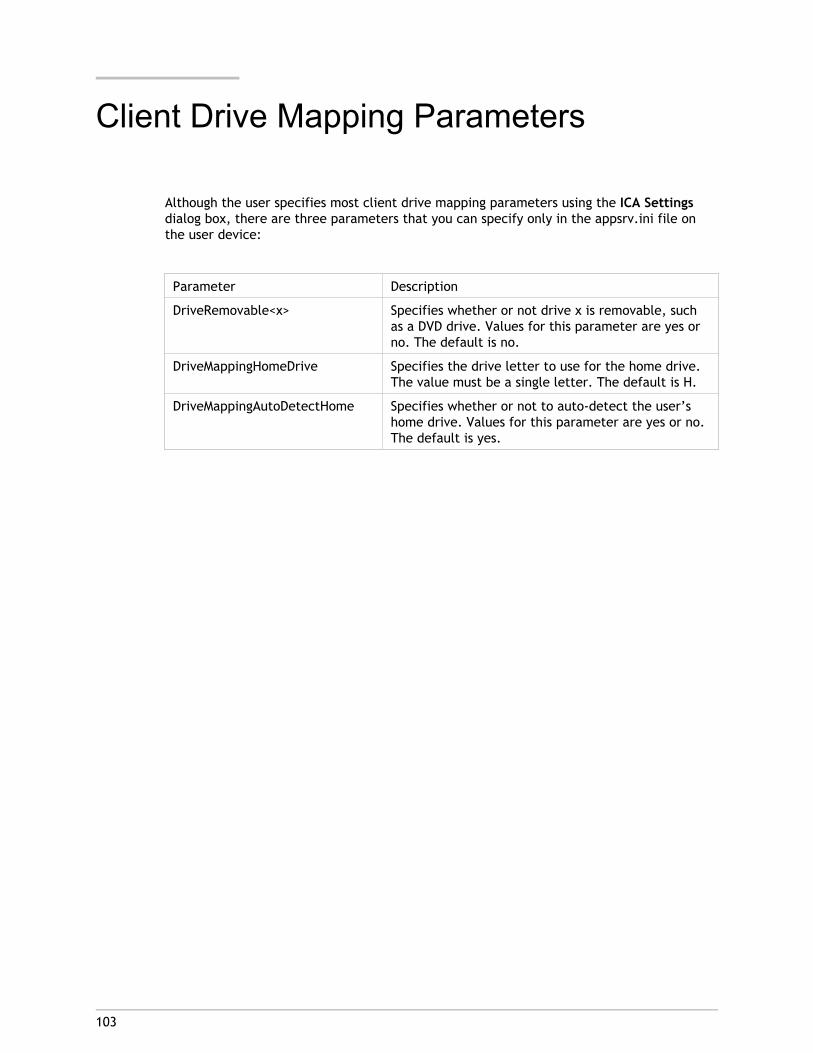
103
Client Drive Mapping Parameters
Although the user specifies most client drive mapping parameters using the ICA Settingsdialog box, there are three parameters that you can specify only in the appsrv.ini file onthe user device:
Parameter Description
DriveRemovable<x> Specifies whether or not drive x is removable, suchas a DVD drive. Values for this parameter are yes orno. The default is no.
DriveMappingHomeDrive Specifies the drive letter to use for the home drive.The value must be a single letter. The default is H.
DriveMappingAutoDetectHome Specifies whether or not to auto-detect the user’shome drive. Values for this parameter are yes or no.The default is yes.
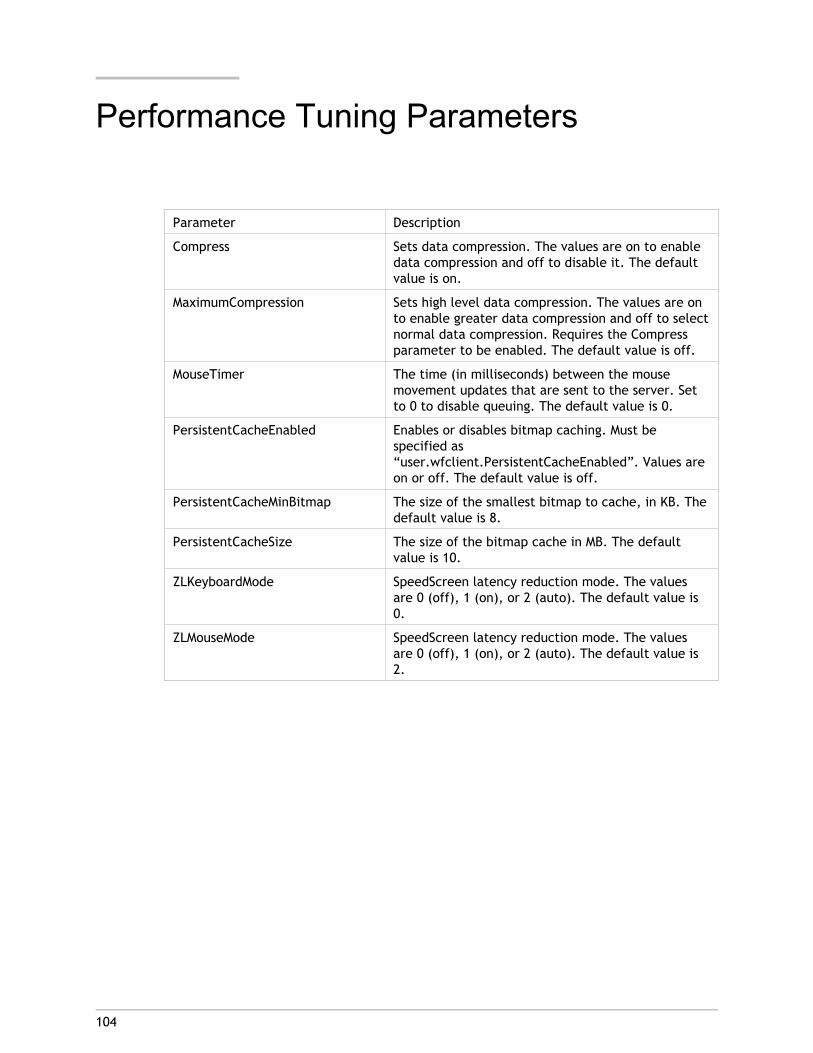
104
Performance Tuning Parameters
Parameter Description
Compress Sets data compression. The values are on to enabledata compression and off to disable it. The defaultvalue is on.
MaximumCompression Sets high level data compression. The values are onto enable greater data compression and off to selectnormal data compression. Requires the Compressparameter to be enabled. The default value is off.
MouseTimer The time (in milliseconds) between the mousemovement updates that are sent to the server. Setto 0 to disable queuing. The default value is 0.
PersistentCacheEnabled Enables or disables bitmap caching. Must bespecified as“user.wfclient.PersistentCacheEnabled”. Values areon or off. The default value is off.
PersistentCacheMinBitmap The size of the smallest bitmap to cache, in KB. Thedefault value is 8.
PersistentCacheSize The size of the bitmap cache in MB. The defaultvalue is 10.
ZLKeyboardMode SpeedScreen latency reduction mode. The valuesare 0 (off), 1 (on), or 2 (auto). The default value is0.
ZLMouseMode SpeedScreen latency reduction mode. The valuesare 0 (off), 1 (on), or 2 (auto). The default value is2.