Embed Size (px)
Citation preview

RECALL CAMPAIGN 16V-333: ISOFIX CHILD RESTRAINT SYSTEM ANCHORSPlease perform the procedure outlined in this Service Information on all affected vehicles before customer delivery. In the event the customer has already taken delivery of the vehicle, please perform the procedure the next time the vehicle is in the shop.
This Service Information bulletin supersedes SI B41 01 16 dated November 2016.
MODEL
SITUATIONBMW AG is conducting a Voluntary Safety Recall involving the ISOFIX child restraint system anchors.
There is a potential for the ISOFIX (also known as LATCH - Lower Anchors and Tethers for Children) bracket to break while in use when specifically used with ISOFIX-type rigid-style connector child restraint systems. This rigid-style connector is mainly used in Europe but it is available in the US.
This issue is unlikely to occur using LATCH-type flexible-style connector child restraint systems which represent the majority of child restraint systems used in the US.
AFFECTED VEHICLESThis Recall Campaign involves certain F25 (X3) vehicles produced from July 2010 to April 15, 2016 and F26 (X4) vehicles produced from April 2014 to April 15, 2016.
Vehicles which require this Recall Campaign to be completed will show it as “Open” when checked either in the "Service Menu" of DCSnet (Dealer Communication System) or with the Key Reader.
Approximately 188,670 vehicles are affected in the US.
CAUSEWhen specifically used with ISOFIX-type rigid-style connector child restraint systems, the lower anchor bars could become damaged over the lifetime of the vehicle.
CORRECTIONNote: Prior to performing the ISOFIX recall, please review the informational video on the welding process.
SI B41 01 16Body Equipment
January 2017Technical Service
F25 (X3) F26 (X4)
Page 1 of 5
1/9/2017https://www.bmwtis.net/tiscode/cgi-bin/bulletin.aspx?sie_path=/tsb/bulletins/htm_store/389...

To find this 9 minute video in TIS, please use the “Google Search” button that appears on the TIS homepage, and type “ISOFIX video” in the search field.
Alternatively you can access this video under “videos” in Group 41.
A reinforcing bracket (4) will be welded to the lower anchor bars and the vehicle body.
PROCEDURERefer to the attached procedure to be performed by an approved body shop/collision center.
Due to the volume of vehicles that may need repair, it may be necessary to set up an efficient process to handle several vehicles at a time. For example, set up a streamlined process which allows for repairing multiple vehicles simultaneously (i.e. sending batches of vehicles to the body shop in an organized production fashion).
Please contact the Body Shop you do business with and suggest the following:
1. That one person prepares 4 to 5 vehicles in the Body Shop by removing the rear seats, the side bolsters and the luggage compartment floor trim, as per instructions.
2. A welder prepares the area and welds the ISOFIX reinforcement bracket as per the repair instructions.
3. The person who disassembles the seats and bolsters re-assembles them.
4. The felts can be pre-cut using the supplied template (located in repair instruction attachment)
5. The ISOFIX brackets can be prepared by removing galvanized finish (wire wheel).
PARTS INFORMATIONPlease monitor the Parts DCS for Dealer ordering.
WARRANTY INFORMATIONNote: For questions regarding labor times, please review the time study video in TIS, under videos in Group 41. Use in conjunction with time study log.
Reimbursement for this Recall will be via normal claim entry utilizing the following information:
Scenario A – Entire repair performed under sublet by a CCRC or body shop, maximum amounts as listed below:
Part Number Description Quantity
41 00 2 697 433 ISOFIX Bracket 4
52 20 2 697 913 Felt 4
Defect Code: 00 41 76 01 00
Repair labor cost reimbursement: R&I,
Page 2 of 5
1/9/2017https://www.bmwtis.net/tiscode/cgi-bin/bulletin.aspx?sie_path=/tsb/bulletins/htm_store/389...
Or:
Scenario B – The authorized BMW center’s workshop Completely performs this Repair
Completion “before” vehicle delivery to the customer or the vehicle is already in the workshop
Or:
Completion after vehicle delivery to the customer
And, when claiming the above labor operations:
Additional time to prep vehicle for welding (Scenario B only)
Note*: Use Defect Code “85 82 03 99 NA” for claiming labor operation 41 99 000 only.
Work time labor operation code 41 99 000 is not considered a Main labor operation. Also, since the “work time” FRU allowance to be claimed is specified, a separate punch time is not required.
And:
Sublet – Bulk Materials
Sublet Code 3 $260.00 Repair and Refinish (Maximum amount $260.00)
Labor Operation: Labor Allowance: Description:
00 64 560 17 FRUAccessing and reworking ISOFIX mounting brackets as outlined in the repair attachment (Plus work).
Labor Operation: Labor Allowance: Description:
00 64 054 19FRUAccessing and reworking ISOFIX mounting brackets as outlined in the repair attachment (Main work).
Defect Code: 85 82 03 99 NA* Additional FRU Allowance for ISOFIX Scenario B
Labor Operation: Labor Allowance: Description:
41 99 000 1FRU Prepare vehicle for welding
Page 3 of 5
1/9/2017https://www.bmwtis.net/tiscode/cgi-bin/bulletin.aspx?sie_path=/tsb/bulletins/htm_store/389...

Or:
Scenario C – Split Repair between a BMW authorized center’s workshop (Mechanical) and a CCRC/body shop
Completion “before” vehicle delivery to the customer or the vehicle is already in the workshop
Or:
Completion after vehicle delivery to the customer
And
ATTACHMENTSView PDF attachment B41 01 16 Repair Procedure.
View PDF attachment B410116Q&A.
View PDF attachment ISOFIX Recall FAQ.
View PDF attachment ISOFIX Time Study Log.
View PDF attachment Recall Notice B410116.
Sublet Code 4 $20.00 Repair material cost reimbursement (Maximum amount $20.00)
Labor Operation: Labor Allowance: Description:
00 64 628 7 FRU
R&R Rear seat backrests (Includes seat bottom and bolsters), disconnection/reconnection of battery (Center workshop portion) (Plus work)
Labor Operation: Labor Allowance: Description:
00 64 113 9 FRU
R&R Rear seat backrests (Includes seat bottom and bolsters), disconnection/reconnection of battery (Center workshop portion) (Main work).
Sublet Code 3 $130.00 Repair labor and material cost reimbursement: (Maximum amount $130.00) (CCRC/body shop portion)
Page 4 of 5
1/9/2017https://www.bmwtis.net/tiscode/cgi-bin/bulletin.aspx?sie_path=/tsb/bulletins/htm_store/389...

[ Copyright ©2017 BMW of North America, Inc. ]
Page 5 of 5
1/9/2017https://www.bmwtis.net/tiscode/cgi-bin/bulletin.aspx?sie_path=/tsb/bulletins/htm_store/389...

SAFETY RECALL NOTICE
To: All Center Operators, Sales Managers, Service Manager, Parts Manager and Warranty Processor
RE: Recall Campaign 16V-XXX: ISOFIX Bracket B41 01 16
BMW Group is conducting a Voluntary Safety Recall (effective May 19, 2016) involving Model Year 2010-2016 BMW X3 SAVs and X4 SACs produced from July 2010 through April 2016. Owners will be notified by First Class mail about the Recall and will be instructed to bring their vehicles in for a free repair when parts are available. Please be reminded that it is a violation of federal law (The Safety Act) for you to sell, lease or deliver any new motor vehicle covered by this notification until the recall repair has been performed. This means that centers may not legally deliver new motor vehicles to consumers until they are fixed or use/sell replacement equipment/parts subject to this recall. Note also that substantial civil penalties apply to violations of the Safety Act. Also, you should not sell, lease or deliver any Certified Pre-Owned or used vehicles subject to a safety recall until the repair is completed. Please follow any special instructions that we provide to you for the return or disposition of recall parts. We appreciate all your assistance with this Recall.

SI B410116 Repair Procedure May 2016
1. Remove upper and lower rear seats. Follow Repair Instruction “RA 52 26 020 Removing and installing/replacing both backrests”. Which includes the removal of the left and right side seat sections (bolsters).
Note: The lower seat belts must NOT be removed. Note: Do Not replace lower seat belt anchor bolts. They can be reused.
2. Remove luggage compartment floor and storage trays. Follow Repair Instruction “51 47 102 Removing and installing/replacing luggage compartment floor trim panel”
3. Disconnect negative battery cable and cover terminal. Refer to ISTA, “1200…Instructions for welding work (overload protection of control units)” Note: When reconnecting battery always observe proper tightening torque. Battery Negative (M6) = 5Nm

SI B410116 Repair Procedure May 2016
4. Fold back carpet and carpet underlayment as shown.
Note: Cover any exposed screw threads to prevent welding spatter from damaging threads.
5. Cover floor with welding blanket to protect carpet and underlayment. Note: Ensure no vehicle wiring is exposed to welding spatter.
6. Cover the rear of the front seat with a welding blanket.

SI B410116 Repair Procedure May 2016
7. Cover rear luggage compartment floor with welding blanket or spark deflection paper (3M).
Note: It is imperative that the interior of the vehicle is NOT damaged by sparks or welding spatter during this process.
8. Protect roof liner from welding spatter.
9. Install aluminized foil around ISOFIX anchors.

SI B410116 Repair Procedure May 2016
10. Keep the areas shown exposed for surface preparation.
11. Remove paint in the areas shown. Note: Leave the end of the ISOFIX anchor untouched. Tape off the anchor, approximately 25mm from the end.
12. Remove paint from the designated areas using an abrasive belt. Only remove paint coating, DO NOT remove any metal.
Note: Do not use an aggressive grinding process. Damage to ISOFIX anchor may occur.
.
13. Prepare ISOFIX anchor for welding. Note: Area at left is example of properly prepared area. Paint on end of anchor is intact.

SI B410116 Repair Procedure May 2016
14. Install reinforcement bracket as shown. Secure bracket with suitable clamp.
Note: It may be necessary to remove galvanized coating on reinforcement bracket to ensure a quality weld.
15. First, weld the left side of the bracket, progress to the top of the bracket as shown. Then continue to weld the left side of the remaining brackets as to allow time to cool.
16. Then, weld the right side of the bracket. Continue to weld the right side of the remaining brackets to allow time to cool.
SI B410116 Repair Procedure May 2016
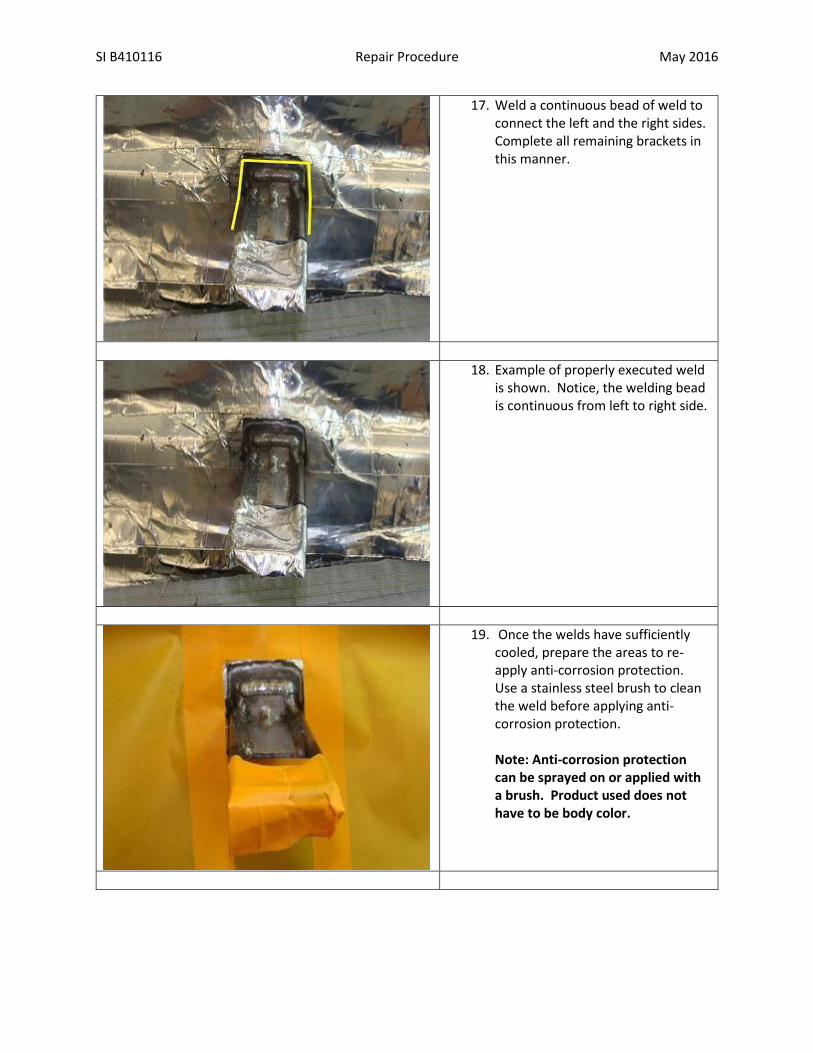
17. Weld a continuous bead of weld to connect the left and the right sides. Complete all remaining brackets in this manner.
18. Example of properly executed weld is shown. Notice, the welding bead is continuous from left to right side.
19. Once the welds have sufficiently cooled, prepare the areas to re-apply anti-corrosion protection. Use a stainless steel brush to clean the weld before applying anti-corrosion protection. Note: Anti-corrosion protection can be sprayed on or applied with a brush. Product used does not have to be body color.

SI B410116 Repair Procedure May 2016
20. Apply anti-corrosion protection as shown.
21. Cut supplied felt pads to the dimensions shown. Note: Picture at left, not to scale.
22. After anti-corrosion protection has dried sufficiently, install felt pads.

SI B410116 Repair Procedure May 2016
23. Lower view of felt installation.
24. Reconnect battery observing proper procedures.
Note: When reconnecting battery always observe proper tightening torque. Battery Negative (M6) = 5Nm
25. Install lower seat belt anchor points (1). Note: Observe proper tightening torque (38Nm).
Note: Do NOT replace lower seat belt anchor bolts. They can be reused.

SI B410116 Repair Procedure May 2016
26. Once the battery is reconnected, reassemble vehicle in the reverse order of disassembly. Refer to “Remove upper and lower rear seats. Follow Repair Instruction “RA 52 26 020 Removing and installing/replacing both backrests”. Repair is complete.

ISOFIX Recall SI B41 01 16
Frequently Asked Questions regarding the ISOFIX repair
Q1. What reference materials are available for the ISOFIX repair?
A. There are several resources available. There are two videos in TIS, in Group 41. One is the
overview of the process and the other is a time study video. This is in addition to the repair
process which is attached to SI B41 01 16. Also, ISTA should be accessed for seat removal,
battery disconnection and basic welding precautions. It is strongly recommended to review
all available materials prior to attempting this repair.
Q2. How much welding is involved in this repair?
A. The majority of this job consists of component removal and preparation for welding. These
repairs can be performed by any technician with a minimum level of training. However, the
welding portion of this repair takes approximately 10 minutes to weld four ISOFIX
reinforcement brackets to the vehicle. This requires someone proficient at MIG welding.
Q3. What level of welding proficiency is needed to perform this repair?
A. We don’t recommend any specific welding certification (Although ICAR training is a good
idea). Any welder with a moderate level of proficiency will suffice (providing all conditions
are met – refer to ISOFIX video in TIS, Group 41). If you are not confident with your level of
welding proficiency, do not attempt this repair.
Q4. Can I do this repair at my Center?
A. Yes, this repair can be done at an Authorized BMW Center in its entirety providing that
there are personnel proficient at MIG welding. Also, the proper safety and welding
equipment must be available as outlined in the ISOFIX video (in TIS). If attempting to
perform the repair “in house”, make sure all of the available materials are reviewed and all
points can be met (MIG Welder, Welding blankets, spark paper, foil tape etc.). If you are not
confident with your level of welding proficiency, do not attempt this repair.
Q5. What if I don’t not have personnel that can perform the welding process?
A. You can contact your local body shop or BMW Certified Collision Repair Center (CCRC).
Make sure that you make available all of the necessary resource materials to make sure the
repair is completed as per the procedure outlined in SI B41 01 16. Another option would be
to contract with a portable welding service. Vehicles can be prepped in advance and the
welding can be subcontracted.
Q6. What is the allowable time for the ISOFIX repair?
A. Refer to the Warranty section of SI B41 01 16 for the recommended Warranty time. There
are several scenarios which are outlined. The repair can be done entirely at the center,
entirely at the body shop (or CCRC), or the repair can be split between the two.

Q7. Can the ISOFIX repair be performed within the allotted time?
A. Yes, it is possible to perform the repair in the allotted time. As with any repair done
frequently, the technician gains proficiency and improves efficiency with each repair.
There is a time study available in TIS videos, under Group 41. This video demonstrates a
technician performing the complete repair using no power tools, and with no assistance. In
addition to that video, there is a time study log attached to SI B41 01 16. To improve
efficiency, we have some recommendations on how to expedite some of the processes.
These are also mentioned in this F.A.Q., refer to question 8.
Q8. How can the repair process be expedited?
A. Since this repair will most likely be done frequently, here are some recommendation to
expedite the repair process:
• The felts can be “pre-cut” to save time.
• Multiple vehicles can be scheduled and set up using an “assembly line” process and then
welded in batches.
• ISOFIX brackets can be prepared in advance by removing galvanized coating with a wire
wheel.
• Templates can be created to facilitate masking (for paint) and vehicle protection
(welding blankets).
Q9. Is it necessary to clear fault codes after battery disconnection/reconnection?
A. No, it is not necessary to clear fault codes resulting from battery disconnection. If the
vehicle is in stock, it’s part of the QC1. For customer vehicles, it’s not necessary to reset
these faults. These faults do not affect vehicle operation and no warning lights or Check
Control Messages will be illuminated.
Q10. What about resetting the clock?
A. Resetting the vehicle clock only takes a few seconds, and some vehicles update
automatically.
Q11. Is it required to add cavity wax into the area behind the ISOFIX anchors?
A. With regard to cavity wax, the area in question (behind the ISOFIX anchors) is not exposed
to the elements, it is a closed area not subject to moisture. Our testing indicates that cavity
wax is not needed and is therefore not part of the process.

Vid
eo
Re
fere
nce
(n
um
be
r)Operation
Ap
pro
xim
ate
Se
gm
en
t T
ime
Cu
mu
lati
ve
Ela
pse
d T
ime
(ro
un
de
d)
Ap
pro
xim
ate
FR
U
(ro
un
de
d)
Cu
mu
lati
ve
FR
U R
ou
nd
ed
Comments
Video 1 Remove luggage floor, seat bolster, upper and lower seat.
Disconnect battery. 11:29:00 11:29:00 2 FRU 2 FRU
Note: No power tools are used and one
person is performing this recall with no
assistance.
Video 2
Moving wire harness (EKP/Seat heater). Fold back carpet. Tape
seat belt latches forward. Install spark deflection paper. 7:30 18:59:00 1.25 FRU 3.25 FRU
Use spark deflection paper as a backing
for the welding blankets. This prevents
any fiberglass from transferring to
interior components. (Faster cleanup
time and paper is reusable)
Video 3 Installation of welding blankets 13:43 32:41:00 2.3 FRU 5.55 FRU
Video 4 Continued installation of welding blankets. Installation of foil
tape (to connect blankets and prevent gaps) 17:45 50:26:00 2.75 FRU 8.3 FRU
An oppportunity to create templates
for welding blankets to expedite
installation.
Video 5
Preparation of ISOFIX brackets and cleaning of paint from
ISOFIX anchors. 13:11 1:03:36 2.2 FRU 10.5 FRU
Prep of brackets can be done in
advance (wire wheel) to remove
galvanized coating. Be sure to remove
paint completely in designated areas.
Failure to do so will result in poor
quality weld, excessive smoking and
increased welding spatter.
Video 6 Clamping of ISOFIX brackets to ISOFIX anchors 1:58 1:05:33 .3 FRU 11 FRU

Video 7
Welding Pocess - Welding brackets to anchors. 8:50 1:14:22 1.5 FRU 12.5 FRU
Actual welding time less than 10
minutes. Rest of job is entry level
work.
Video 8Post welding process, wire brushing (removal of slag), cleaning
and preparation for paint (taping). 8:25 1:22:48 1.4 FRU 13.9 FRU
Can create template for masking of
anchors to expedite painting process.
Can save several minutes here.
Video 9
Spray painting of completed welds on anchors 1:18 1:24:05 .2 FRU 14 FRU
While paint is drying remove all
blankets and paper/tape.
Video 10Removal of Welding blankets 7:51 1:31:57 1.3 FRU 15.3 FRU
This should be done while paint dries
(time saving opportunity)
Video 11Preparation and installation of felts (cutting using template) 2:40 1:34:36 .5 FRU 15.8 FRU
Felts can be prepared in advance to
save time
Video 12Reinstallation of rear carpet (and removal of tape). Installation
of wire harness. 1:36 1:36:11 .25 FRU 16 FRU
Video 13 Installation of rear seat (upper portion) and lower seat belt
anchors (includes torque wrench usage) 9:36 1:45:46 1.5 FRU 17.5 FRU
Torque wrench used, have ready in
advance (do not replace lower seat belt
anchor bolts).
Video 14Reinstallation of seat bolsters (left and right), and upper seat
bolster trim 3:35 1:49:21 .5 FRU 18 FRU
Video 15
Reinstallation of rear seat (lower), reconnection of battery and
reinstallation luggage floor (includes torqueing of battery
terminal). Job complete. 2:36 1:51:56 .5 FRU 18.5 FRU Job complete in under 19 FRU.

Model Year 2011-16 BMW X3 SAV, X4 SAC ISOFIX Child Restraint System Anchors
Safety Recall 16V-xxx
Q1. Which BMW models are affected by this Safety Recall? Certain Model Year 2011-2016 BMW X3 SAVs and X4 SACs produced from July 2010 through April 2016. Q2. How many BMW vehicles in the US are affected by this Safety Recall? Approximately 188,670 BMW vehicles in the US are affected. Q3. What is the specific issue? This safety recall involves the lower anchor bars for use in attaching child restraint systems. When specifically used with ISOFIX-type rigid-style connector child restraint systems, the lower anchor bars could become damaged over the lifetime of the vehicle. This rigid-style connector is mainly used in Europe but it is available in the US. See the image below illustrating the rigid-style connectors. This condition is unlikely This issue is unlikely to occur using LATCH-type flexible-style connector child restraint systems which represent the majority of child restraint systems used in the US. Q4. What can happen as a result of this issue? If the lower anchor bar(s) become damaged during vehicle operation, this would increase the risk of injury to a child in a child restraint system attached to the lower anchor bars in a crash. Q5. How did BMW become aware of this issue? BMW became aware of this issue through its quality control procedures. Q6. Why are other X3 and X4 vehicles not included in this Safety Recall? Other vehicles produced outside the production period of July 2010 through April 2016 were manufactured with a different configuration of lower anchor bar.

Model Year 2011-16 BMW X3 SAV, X4 SAC ISOFIX Child Restraint System Anchors
Safety Recall 16V-xxx
Q7. Can I determine if this issue exists in my vehicle? This issue has only been known to occur with an ISOFIX-type rigid-style connector child restraint system. Therefore, if you use the LATCH-type flexible-style connector, your vehicle is unlikely to experience this condition. This issue could be noticed when attempting to attach a child restraint system if the lower anchor bar is loose. It could also be noticed during vehicle operation if the child restraint system appears to be loose. If you notice the above, place your hand between the seat back and seat cushion to locate the lower anchor bar. It is a small metal bar in a rectangular shape. Once located, make an attempt to move it back and forth to determine if it is loose. Please contact an authorized BMW Center to have your vehicle inspected and, if necessary, repaired. Q8. Can I continue to drive my vehicle? Yes. However, when you receive a letter asking you to have this service performed by an authorized BMW center, please do so as soon as possible. If you are not the only driver of this vehicle, please advise all other drivers of this important information. Q9. How will my vehicle be repaired? A reinforcing bracket will be welded to the lower anchor bars and the vehicle body. Q10. Is BMW aware of any injuries involving the vehicles associated with this issue? No. Q11. How will I be informed of this Safety Recall? If your vehicle is affected, you will receive a letter in July via First Class mail advising you of this recall and requesting that you schedule an appointment with an authorized BMW center for service and repair.
To ensure BMW of North America, LLC has your most recent contact and vehicle information, please register your vehicle at http://www.bmwusa.com/myBMW. Registration is free, and will give you access to factory initiated campaigns and other information specific to your BMW vehicle.
Q12. How long will the repair take? This repair may take several hours; however, additional time may be required depending upon your BMW center’s schedule. The repair will be performed free of charge by your authorized BMW center.

Model Year 2011-16 BMW X3 SAV, X4 SAC ISOFIX Child Restraint System Anchors
Safety Recall 16V-xxx
Q13. Do I have to wait for my letter in order to have my vehicle serviced? Yes. BMW is in the process of implementing this program to ensure that the necessary parts, tools and procedures are available at its authorized BMW centers, prior to instructing you to take your vehicle in for repair.