Embed Size (px)
Citation preview
Reborn Card
NET
User’s Manual
Ver 1.1 2015/01/20

1
Table of Contents
Notice Before Installation: ................................................................ 2 System Requirements ........................................................................ 2 1. First Installation ....................................................................... 3 2. Hardware Setup ........................................................................ 3 3. Express Installation .................................................................. 5 4. How to setup FDISK ................................................................ 9
4.1 Attribution ....................................................................... 9 4.2 Name ............................................................................. 10 4.3 Size ................................................................................ 10 4.4 File System: ................................................................... 10 4.5 Restore Period ............................................................... 11 4.6 Buffer: ........................................................................... 11
5. Install Operating System ........................................................ 12 5.1 Boot Menu: .................................................................... 12
6 Option Menu .......................................................................... 15 6.1 Password ........................................................................ 15 6.2 Tools .............................................................................. 16 6.2.1 Settings .......................................................................... 16 6.2.2 Disk Info ........................................................................ 18 6.2.3 FDISK ........................................................................... 18 6.2.4 Net Clone SETUP ......................................................... 19
7 HDD Clone ............................................................................ 20 7.1 Net COPY running steps ............................................... 20 7.2 Net Clone Logon Menu ................................................. 20 7.3 SEND DATA ................................................................ 22 7.4 SEND COMMAND ...................................................... 24
8 Upgrade .................................................................................. 27 9 Uninstall ................................................................................. 28 10 About ................................................................................. 29 11 Hotkey................................................................................ 29

2
Notice Before Installation:
1. Please backup important data and uninstall other similar recovery
program.
2. A standard partition format is necessary. (Using other Multi-boot
partition program will cause install failure.)
3. Please enable built-in Network Card in BIOS and activate Boot ROM
option to support PXE function.
4. To optimize the NET card, please adjust the following Windows
settings before installing Install.exe.
4.1 Make sure there is no virus in Windows.
4.2 Make sure Windows has completed all update and then turn off
Windows Auto Updating.
4.3 Disable Anti-virus program before installation. Enable
Anti-virus program again after installation completed.
4.4 Run Windows Scandisk and Defrag.
4.5 Setup 【Computer Name】and【Network IP or DHCP】.
4.6 Disable Windows Power Sleep option.
System Requirements
1. Pentium III and above compatible PC.
2. 80GB and above Hard Disk.
3. Minimum 20G of free hard disk space, recommended 32G.
4. BIOS must be able to support Hard Disk size over 8.4GB
5. 512MB of Memory
6. One free PCI Express slot.
7. Color monitor
Operating System Support Instant Restore Mode
Support Windows XP/Win7/Win8/Win10
Backup Restore Mode
Support XP/Win7/Win8/ Win10/LINUX
No Restore Mode
Support XP/Win7/Win8/ Win10/LINUX

3
1. First Installation
The Reborn Card NET version may be installed
three different ways.
Express Installation: Supplies an instant restore for Windows
XP/Win7/Win8 operating systems. All of the original data on the hard
disk may be preserved. The default setting after Express install is
Instant Restoration by every reboot. Express Installation can only be
used when a Windows operating system has been pre-installed on the
hard drive.
Custom Installation: Supports multi-boot functions by using the
built-in FDISK utility. Each partition may be setup with the preferred
restore type and restore interval. When choosing this installation type,
all data and partitions will be destroyed and the hard disk will need to
be repartitioned and formatted.
Keep C: By selecting this installation, only data on partition C will
be kept. All other partitions will be deleted. Note that this installation
does not support Win7 and Win8.
Note! Before using Express installation, remember to run
SCANDISK and DISK DEFRAGMENTER utilities provided by Windows for best performance. Also disable any anti-virus programs to avoid any possible conflicts.
2. Hardware Setup
Turn off the computer and remove the casing. Insert the Reborn Card into PCI Express slot. Be careful to plug in correct direction. Secure the computer casing. Turn the Power on. As the computer boots, you will see [Reborn Card NET Hardware version:Vx.x ][Press CTRL+H to hardware setup] on the screen. Next you will see the first time installation menu. If the screen does not show the first time installation menu,

4
please reboot your system and press [Ctrl+H] to go into the Reborn Card hardware settings and change hardware mode.
2.1 Hardware Password: Setting hardware password to avoid unauthorized access and change. The default password is NET. (Password can be setup up to 10 charactors.)
2.2 Hardware executing mode:
The different hardware modes are to meet different types of
computers. Adjust hardware mode once the Reborn Card is not
active. Mode A ~ E: Adjust a suitable hardware mode to meet Card’s
activation sequence in BIOS PXE(Server): An additional function created for those PC
which cannot support Network PXE. NetPXE program is needed to run in windows on another PC in order to proceed NETCOPY. PXE ROM must also be setup as the first booting device.
PXE + Mode A ~ D: Apply built-in PXE ROM to proceed NETCOPY. PXE ROM must appear and setup as the last booting device. Please make sure the Network is in good connection. Unconnected Network will cause the program failure. PXE+Mode A is the default setting.
2.3 Hotkey hint : (Disable/Enable) Enable this option will see Ctrl+H message on bootup
2.4 Auto Installation : (Disable/Enable) Enable this option will auto Enter NETCOPY or Windows, depends on your settings.
2.5 Mouse Driver : (Mouse 1/Mouse 2 /Disable)

5
This option allows you to enchance Motherboard compatibility. Some motherboard cannot allow Mouse to run in DOS and thus cause PC hang. By disable Mouse in DOS can help installation.
2.6 PXE driver : (Driver1 / Driver 2) When all hardware modes have been tried and still cannot run NETCOPY. Adjust another PXE Driver might help.
2.7 Hardware Detection : (Disable/Enable/Wait 20sec.) Enable this will check your hardware in every booting, such as CPU, Motherboard, RAM. If there is a change on these items, a warning will be given.
3. Express Installation
1) Turn off the computer and remove the casing. Insert the Reborn
Card into PCI Express slot. Secure the computer casing. Turn
on the computer and insert the Reborn Card install CD to start
install.
2) Next you will see the menu of Install Setup. Select [Express
Installation] [Custom Installation] or [Keep C] to start.
6
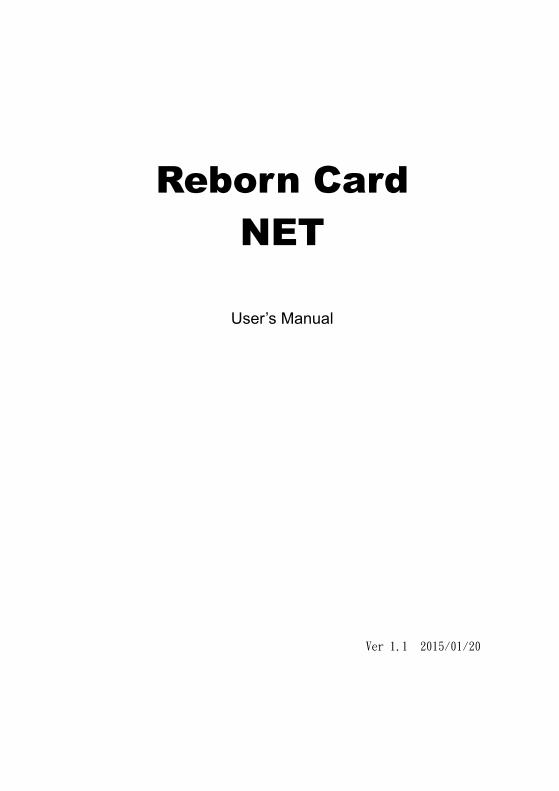
3) During the installation, please do not restart or power off your
computer.
4) When [Install completed] shows up, remove the install CD
and press Enter key to restart the computer.
5) If you install by [Express Installation], you will only have three
seconds to press F10 to enter Setup menu and change the
preferred settings. After save the preferred settings, reboot and
press [Ctrl+Enter], enter the Supervisor Password to enter
Windows by Supervisor Mode. The default password is
[ENTER] key. Once operating system is up, insert Reborn Card
install CD into the CD drive. Double click install.exe to install
Reborn Card setup.

7
6) If install by [Custom Installation], the system will reboot into
FDISK setup menu. Please refer Section 4: How to setup
FDISK to complete the hard disk partitioning and press [ESC]
key to save and exit. Then you can start to install Operating
System and execute Install.exe in every partition. Please refer
Section .5: Install Operating System)
7) After executing install.exe, you will see the following menu.
8) Enable the check box of “install kernel driver, and click Next to
continue.
9) After executing Install.exe, a [Shadow Space] tray icon will
display in the Windows taskbar. This “Buffer Monitor” utility
installed enables the user to receive status of buffer left for use
by the card until a restart operation is needed.
8
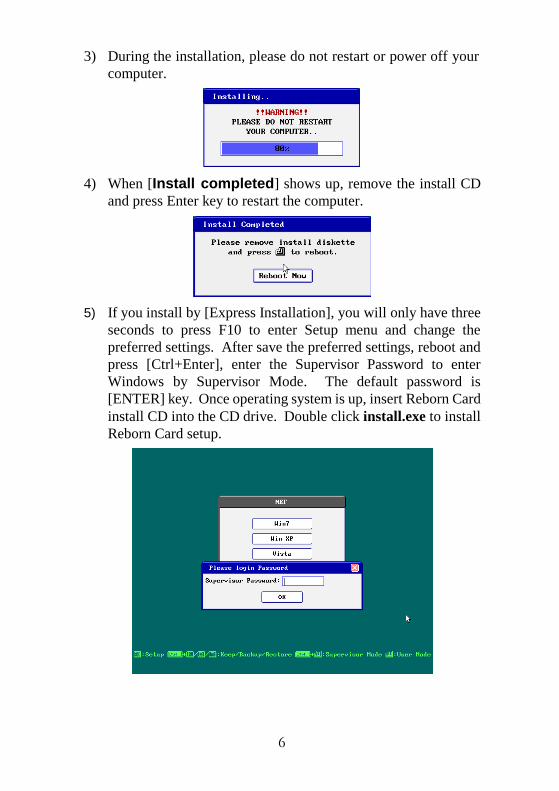
When the free space is less than 200MB or less than a pre-set
space in advanced setting, the system will warn you with a
beeping sound. Please save all files and restart the computer
immediately or operate Restore function to release the new
buffer zone.
10) When you are in Supervisor Mode, the system will pop up the
following figure to warn you when Windows is up.
Supervisor Mode
The Supervisor Mode is where the Reborn Card is not active
and is allowing full Read/Write access to all partitions on the
hard disk drive. All of the changes are permanent. This Mode
is only accessible from MIS or administrators. To enter
Supervisor Mode, press [Ctrl+Enter] when you are at the boot
menu of “Reborn Card”. The supervisor Password will be
required to enter in this mode. The default supervisor
password is [ENTER] key.
User Mode:
The User Mode is where the Reborn Card is active and is
governing the access writes to the partitions on the disk drive.
Any changes under this mode will be restored to its original
settings after the PC is re-booted by the preset schedule.
Note! The relativity of Supervisor Mode and User mode is only
existed when the attribution of boot partition is set to (A): system partition for instant recovery.

9
4. How to setup FDISK
The Reborn Card supports multiple operating systems
installed on one hard drive when using [Custom
Installation]. Each operating system is in a different
physical partition, allowing multi-booting up to 40 partitions.
4.1 Attribution
(1) A: System Partition for Instant Restoration:
Within this partition type, all changes will be instantly
restored to its original state with a simple reboot. Various
restore schedules are provided, including every reboot,
daily, weekly, monthly, a given date and manually. Supports
Windows XP/Win7/Win8/Win10.
(2) B: System Partition for Backup Restoration:
Setup this partition type, you can backup data manually, or
restore the original data with preset schedules. It supports
almost all operating systems in the market.
(3) C: System Partition for No Restoration:
No protection or backup function is provided for this

10
partition type. Any changes done in this partition are
permanent and will remain. It supports almost all operating
system in the market. It is mainly for networking
environments.
(4) S: Shared Data Partition:
This partition type will be visible with every partition you
choose to boot from. It is Excellent for sharing data
between different operating systems.
(5) P: Private Data Partition:
This partition type will only be visible for the boot partition
with the same name in the setup menu. It will be invisible
when booting from any other partitions. This is excellent
for constantly changing data that is exclusive to one
operating system. For example, if the name of boot
partition is [WinXP], then the name of its private data
partition must be [WinXP] as well.
4.2 Name
Identify of the partition in Reborn Card boot menu. Maximum
length is 10 characters
4.3 Size
Setup preferred partition size.
Enter the preferred size or press [PageUp/PageDown] to adjust.
4.4 File System:
Choose appropriate file system for each operating system
FAT32: Support WinXP/Win7/Win8/Win10
NTFS/HPFS: Supports WinXP/Vista/Win7/Win8/Win10.
LINUX: Supports LINUX file system.
LINUX/SW: Supports LINUX Swap file system.

11
4.5 Restore Period
Set up restore time for System / data recovery.
Disable: Shuts down Instant Restore function
Every: The system will be instantly restored to its
original state with every reboot.
Daily: The system will be instantly restored to its original
state at the first boot of every day.
Weekly: The system will be auto restored to its original
status at the first boot of every Sunday.
Monthly: The system will be auto restored to its original
state at the first boot of date 1st every month.
Manually: Every access writes to the hard disk will be
kept temporarily. The system will be restored to its
original status by pressing [Ctrl+R] and the restore or
supervisor password.
A Given date(1st
~31st
): The system will be auto restored
to its original status at the first boot of a specified date.
Auto-Clear: Data partition will be auto cleared with every
re-boot. Only supports FAT16 and FAT32 file systems.
With System: Private data partition will follow the
restore period of its boot partition.
4.6 Buffer:
For Instant Restoration type: Maximum buffer size is 8000MB and Minimum is 50MB.
Default value is 6000MB.
Move the cursor to the selected option and adjust the size by
PageUP/PageDown.
For Backup Restoration type: It requires a buffer zone that is equal in size to the protected
partition. The buffer zone will be automatically reserved within
the remaining unpartitioned hard disk space.
For No Restoration type or Data partition: No buffer is required.

12
Note! When the settings in the FDISK are saved, the partition size will not be able to change. Please think twice before saving and exiting.
5. Install Operating System
5.1 Boot Menu:
After completed FDISK setup, press [ESC] key to save and
exit. PC will automatically restart and will show the Reborn
Card boot menu as follow.
5.1.1 How to Install for DOS and Windows Move the light bar to the selected partition and follow the steps
below to start OS installation.
Note! Please prepare a boot CD or Diskette and format all
system and data partitions.

13
5.1.2 For boot partition set to attribution (A) Windows Operating System installation steps for
[Instant Restoration Partition]:
After rebooting your computer, the Reborn Card boot
menu will appear showing all the partitions you setup. At
that time you can choose a partition and install the
operating System. Follow the steps listed below:
Step 1. Start PC with boot CD.
Step 2. Select the desired partition with [Ctrl+Enter] and
login using the Supervisor Password (default
Password is [ENTER] key).
Step 3. Format C:
Step 4. Start installing desired operating system.
Note! During installation, windows will reboot
several times. Make sure all the install procedures
are done in the Supervisor Mode.
Step 5. Install Reborn Card Setup Driver in Windows.
Make sure you are in Supervisor Mode first.
Step 6. Insert Reborn Card install CD in CD drive.
Step 7. Double click Install.exe to start installation.
Buffer Monitor utility installed enables the user to
receive status about the amount of free resources
left for use by the card until a restart operation is
needed.
Installing other applications and programs: To install other applications and programs (Office
2010..etc.), please press [Ctrl+Enter] to go into desired
partition under Supervisor Mode to begin installation.
5.1.3 For boot partition set to attribution (B) Operating System installation steps for <Backup
Restoration Partition>
Step 1. Start PC with boot CD.
Step 2. Select the desired partition with [Enter] key.
Step 3. Format C:
Step 4. Start installing OS.

14
Step 5. Reboot computer.
Step 6. Select the same partition again with [Ctrl+B]
keys and login with Supervisor Password (default
Password is ENTER key) to backup the current
partition’s data → Done
Note! To restore the Backup Restoration partition,
please select the partition with [Ctrl+R] keys and login with Supervisor Password. It will restore the system to its current backup.
5.1.4 For boot partition set to attribution (C) Attribution C is no Restoration Partition. In this
partition, the operating system installing procedure is
same as if no card were installed. No protection is
provided under this partition.
Step 1. Start PC with boot CD.
Step 2. Select this partition with [Enter] key
Step 3. Format C:
Step 4. Start installing OS.
Step 5. Reboot computer.
15
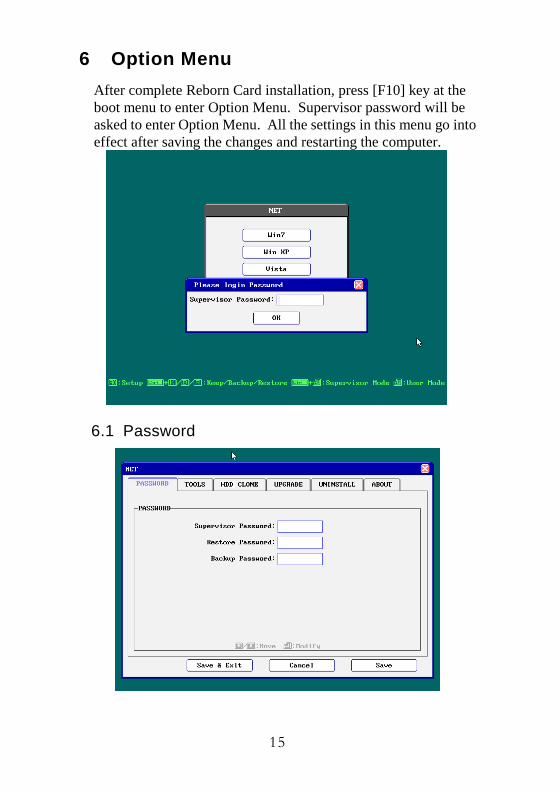
6 Option Menu
After complete Reborn Card installation, press [F10] key at the
boot menu to enter Option Menu. Supervisor password will be
asked to enter Option Menu. All the settings in this menu go into
effect after saving the changes and restarting the computer.
6.1 Password

16
The default Supervisor Password is [ENTER] key. UP to 10
characters are available. Press F1 will display the password.
The supervisor password will be used to enter <Option Menu>,
<Supervisor Mode>, or executing <Keep> <Backup> and
<Restore> functions. Please REMEMBER to write this
Password down and NEVER lost it or you will need to reinstall
everything!
6.2 Tools
6.2.1 Settings
1. Boot Menu: Show/Hide(default)
Show: Show boot menu
Hide: Do not show boot menu
2. Logon Hotkey Hint: Show(default)/Hide
Show: Show hotkeys on boot menu

17
Hide: Do not show hotkey.
3. Loading Timeout: Disable/3-99 seconds/3second(default)
Disable: Do not auto enter the boot partition.
Setup the waiting time at the boot menu. After the waiting time,
system will auto boot to the partition that the light-bar is on.
4. Default Select: Disable / boot partition name
Disable: Do not assign a default boot partition.
Boot Partition Name: When booting, the light-bar will
automatically select the desired partition. This function can apply
with Loading Timeout to auto enter the boot partition.
5. Assign Bootup Partition: Disable / boot partition name
Disable: Do not assign a boot partition.
Boot partition name: Pre-set a desired partition to boot. The
light-bar will not be able to move when a boot partition is assigned.
6. Instant Restoration Keep Mode: Enable(Default)/Disable
Disable: Shuts down Keep mode function
Enable: Enable Keep Mode allows users to save the changes
temporarily in the next boot by pressing Ctrl+K. This function can
only be used when the restore type is set to instant Restoration and
when restore interval is set to “Every time”.
7. Bootup option: BIOS / C only
BIOS: the boot sequence will follow the setting in the BIOS.
C only: Computer boots from C. Enabling this setting will protect
your hard disk information from being destroyed in case the Reborn
Card is removed without going through the formal uninstall
procedure first. If the card is removed or undetected for some
reason, the system will warn you by beeping and the computer will
be unbootable.
8. Keyboard lock on Boot Menu: Enable/Disable(Default)
Disable: Do not lock keyboard
Enable: Keyboard is locked on Boot Menu. This function can be
used when operating Remote Control.
9. Auto Power Off: Disable(default)/1~60 minutes
Disable: Do not auto power off computer.

18
1 to 60 minutes: Setup the idle time of the boot menu. When the
boot menu reaches the predetermined time without entering any
boot partition, the computer will be shut down automatically.
6.2.2 Disk Info
Please refer to Section 4. How to setup FDISK.
6.2.3 FDISK

19
To change the partition size requires you to use FDISK again in
Tools menu. All data in hard disk will be destroyed if FDISK is
used.
6.2.4 Net Clone SETUP
A. Auto Standby: Disable / Enable
Disable:Disable auto connect.
Enable:Reborn Card auto detects the connection and allows
card to search for sending or receiving computers when
powering on the machine.
B. Computer Name: Computer Name after NET COPY. If you leave it blank, the
LOGIN NAME will show [?] while running NET COPY.
C. Group name: NET COPY Group name used during login. Only computers in
this selected group can login. Many groups can be set for
separation purposes. (similar to a VLAN)
D. IP Address: Local IP Address setting
E. IPv6 Address: Reserved for future setup

20
7 HDD Clone
Net Clone allows you to maintain 200 PCs at the same time. You can
use this function to transfer hard drive data through a master computer
to the rest computer over network.
7.1 Net CLONE running steps
Step 1. [F10]
For Sending computer, get to Reborn Card Boot menu, enter
[option] menu by pressing [F10].
Step 2. [F10]> [HDD CLONE]> [Net CLONE]
For Sending computer, run [Net Clone]. Select [Sending],
then refer to section 7.2 Net Clone Logon.
Step 3. For receiving computers, run [Net Clone]. Select
[receiving]. Then refer to section 7.2 Net Clone Logon.
7.2 Net Clone Logon Menu
For Sending computer, press [F10] and get into Option menu.
Run [NET CLONE] and you will see the following figure.

21
7.2.1 Receiving: Target computer for receiving data from Sending Computer.
7.2.2 Sending: Source Computer used to send data to receiving computers.

22
7.3 SEND DATA

23
7.3.1 Parameter data and all Partition:
Copies and sends all data and the Reborn Card information
to receiving Computers. Highly recommended for first time
installation.
7.3.2 Parameter data:
Copies only Reborn Card information to receiving
computers. Recommend usage: Reborn Card software
version upgrades.
7.3.3 Partition:
Copy selected Partition to receiving computers.
Recommended usage: When data of the selected Partition
been updated (Time saving). Time saving feature: Run Disk
Defragmenter before transmitting. Screen will show the disk
information while transmitting. Press「F5」can abort
transmitting.

24
7.4 SEND COMMAND

25
7.4.1 Collect ID for Wake up on LAN: Record the Ethernet LAN Card ID of standby receiving
computers. This function is for the following two purposes:
(1) Auto IP utility
(2) Wake up On Lan by remote control
7.4.2 Use Multicast Packet
Multicast Packet is recommended to use when the network
surrounding supports.
7.4.3 Data/Time adjustment: Match the receiving computers data and time as the sending
computer.
7.4.4 Keyboard Lock: Lock keyboards of all the receiving computers so nobody
can access them during transmission.
7.4.5 IP Allocate Setup Computer Name, IP Address, and NET COPY Group.
The following settings can be setup one by one manually or
auto allocated. After completed the following settings, press
ESC and select [Complete Setup & Exit] or select [Auto
Allocate] to start IP allocating.
A. User ID: Send / Receive
Identify the target and source machine
B. Computer Name: Computer Name after NET COPY
Setup the sending computer name and the receiving
computer name. If setup the Computer Name of the
sending computer to be ABC, the receiving computer
will be ABC1, ABC2, ABC3…after using [Auto
Allocate] option.
C. IP Address: Setup the IP address of the sending computer and
receiving computers. If setup the IP address of the
sending computer to be 192.168.1.1, the receiving
computer will be 192.168.1.2, 192.168.1.3,
192.168.1.4,… after using [Auto Allocate] option.
D. NET COPY Group:

26
Group name used during login. Only computers in this
selected group can login. Many groups can be set for
separation purposes. If setup the NET COPY Group to be
A, the receiving computer will be in the same group A
after using [Auto Allocate] option.

27
7.4.6 All computer Restart: Restart the standby receiving computers along with the
sending computer.
7.4.7 All computer Power off: Power off the standby receiving computers along with the
sending computers.
8 Upgrade
1. Get to the Reborn Card boot Menu.
2. Place new installation CD into CD Rom.
3. Press [F10]>[Upgrade]
4. After it is finished, the system will reboot.
5. Go into Windows in Supervisor Mode.
6. Place previous installation CD into CD Rom. Run
Install.exe to uninstall the previous setup in Windows.
7. The system will reboot.
8. Go into Windows in Supervisor Mode again.
9. Put new installation CD in CD Rom. Run Install.exe to
install the new driver into Windows.

28
10. The system will reboot one more time.
11. Finished upgrading to the new version.
9 Uninstall
To uninstall Reborn Card functions from this computer. 1. Place Reborn Card Installation CD into CD ROM.
2. In Windows, double click Install.exe in Supervisor Mode
3. System reboots. Press [F10] during booting. Input Supervisor
password and select [Uninstall].
4. Uninstall completed. You can now power off the system.

29
10 About
Information about Reborn Card NET version.
11 Hotkey
(1) F10 Enters the “Option Menu”
(2) Ctrl+Enter Enters “Supervisor Mode”
(3) Enter Enters “User Mode”
(4) Ctrl+B Executes the partition’s “Backup” Function.
(5) Ctrl+R Executes the partition’s “Restore” Function.
(6) Ctrl+K Enters “Keep Mode” and saves the changes
temporarily in the next boot.


![CREATING A [LEGACY & EFI] PXE SERVER USING PXELINUX Legacy & EFI PXE boot support, using Fedora 20 as end-to-end example](https://img.pdfslide.us/doc/110x75/56649cfe5503460f949cf3b5/creating-a-legacy-efi-pxe-server-using-pxelinux-legacy-efi-pxe-boot-support.jpg)


![Creating a [legacy & EFI] PXE server using pxelinux](https://img.pdfslide.us/doc/110x75/5681674d550346895ddbfdb1/creating-a-legacy-efi-pxe-server-using-pxelinux.jpg)