Embed Size (px)
Citation preview
23
Introduction
Rear Seat Entertainment SystemThank you for choosing the new Mercedes-Benz Rear Seat Entertainment System!
The Rear Seat Entertainment System consists of two monitors with integrated CD/DVD players. This makes it possible for the rear seat passengers to watch a DVD during the journey. The rear passen-gers listen to the audio using headphones so that the driver is not distracted from the traffic situation.
Familiarise yourself with your Rear Seat Entertainment System first, and read these Operating Instructions before you start us-ing the Rear Seat Entertainment System.
Mercedes-Benz is continuously updating its Rear Seat Entertainment System to the state of the art and therefore reserves the right to introduce changes in design, equipment and technical features. For this reason, you cannot use the information, figures and descriptions contained in these Operating Instructions as a basis for claims.
Please keep these Operating Instructions together with the vehicle Owner's Manual.
Should you have any further questions, please contact a Mercedes-Benz Service Centre.
Mercedes-Benz Accessories GmbH
A Daimler Company
24
Contents
Safety .................................................. 25Symbols used ....................................... 25General safety precautions ................... 26Problem-free use .................................. 26
Overview ............................................ 27Control elements .................................. 27Remote control ..................................... 28Display .................................................. 29Switching between mediums ................ 29
Controls in detail ............................... 30Fitting ................................................... 30Switching on/off................................... 30Headphones.......................................... 30Basic settings ....................................... 31DVD MENU ........................................... 32AUDIO MENU........................................ 33SCREEN MENU ..................................... 34LANGUAGE MENU ................................ 34CD/DVD inserting/ejecting................. 34Region code.......................................... 35Operating the functions of the CD/DVD .................................... 35Playing MP3 files................................... 37Displaying image files (JPEG) ................ 38Connecting external devices................. 39
Replacing the battery and care........ 40Changing batteries ............................... 40Care...................................................... 40
What should I do if... ......................... 41Screen icons........................................ 41Malfunctions......................................... 41
Technical data ................................... 42Display.................................................. 42DVD player ........................................... 42Remote control ..................................... 42IR headphones..................................... 42
25
Safety
Symbols used
1. These items explain individual operat-ing steps to you.
Screen displays are printed in this font.
• Bullet lists present you with selections.
GWarning
A warning notice draws your attention to pos-sible hazards to your health or life.
HEnvironmental note
Daimler AG has committed itself to a compre-hensive protection of the environment.
The objectives are for the natural resources which form the basis of our existence on this planet to be used sparingly and in a manner which takes the requirements of both nature and humanity into account.
Important
Text marked in this way alerts you to the risk of possible material damage or malfunctions.
Note
Information marked in this way contains useful tips and additional details.
26
Safety
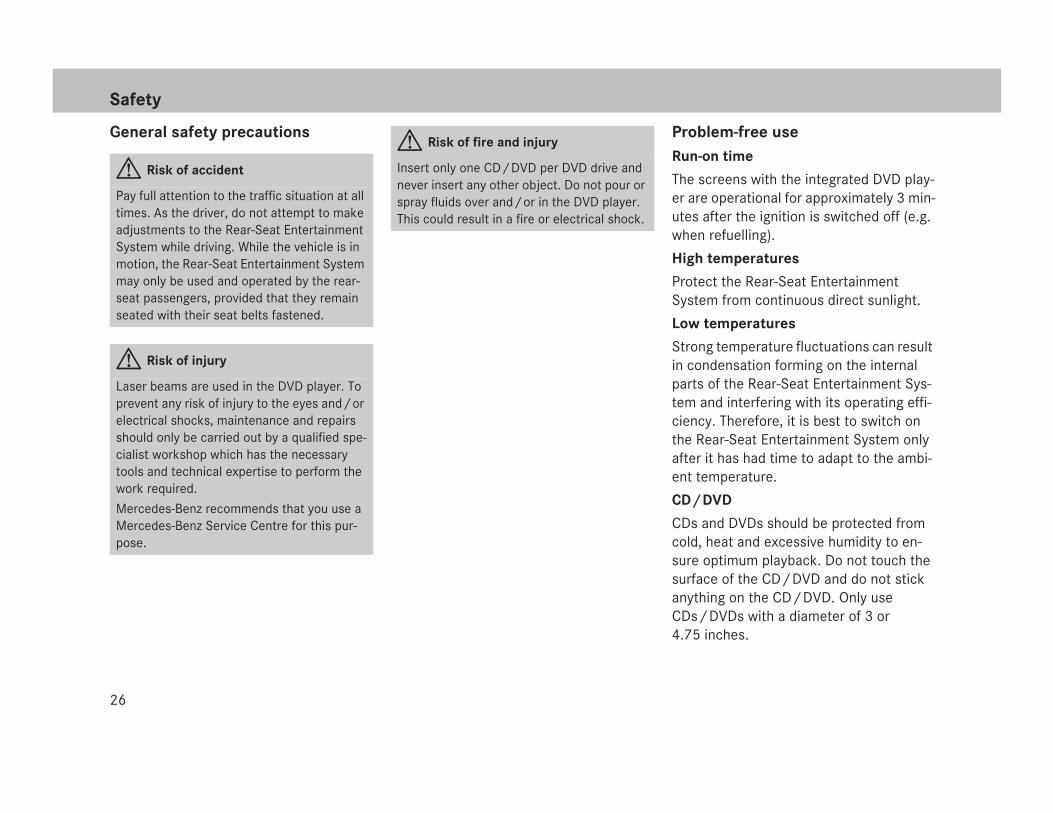
General safety precautions Problem-free useRun-on time
The screens with the integrated DVD play-er are operational for approximately 3 min-utes after the ignition is switched off (e.g. when refuelling).
High temperatures
Protect the Rear-Seat EntertainmentSystem from continuous direct sunlight.
Low temperatures
Strong temperature fluctuations can result in condensation forming on the internal parts of the Rear-Seat Entertainment Sys-tem and interfering with its operating effi-ciency. Therefore, it is best to switch on the Rear-Seat Entertainment System only after it has had time to adapt to the ambi-ent temperature.
CD/DVD
CDs and DVDs should be protected from cold, heat and excessive humidity to en-sure optimum playback. Do not touch the surface of the CD/DVD and do not stick anything on the CD/DVD. Only use CDs/DVDs with a diameter of 3 or 4.75 inches.
GRisk of accident
Pay full attention to the traffic situation at all times. As the driver, do not attempt to make adjustments to the Rear-Seat Entertainment System while driving. While the vehicle is in motion, the Rear-Seat Entertainment System may only be used and operated by the rear-seat passengers, provided that they remain seated with their seat belts fastened.
GRisk of injury
Laser beams are used in the DVD player. To prevent any risk of injury to the eyes and/or electrical shocks, maintenance and repairs should only be carried out by a qualified spe-cialist workshop which has the necessary tools and technical expertise to perform the work required.
Mercedes-Benz recommends that you use a Mercedes-Benz Service Centre for this pur-pose.
GRisk of fire and injury
Insert only one CD/DVD per DVD drive and never insert any other object. Do not pour or spray fluids over and/or in the DVD player. This could result in a fire or electrical shock.
27
Overview
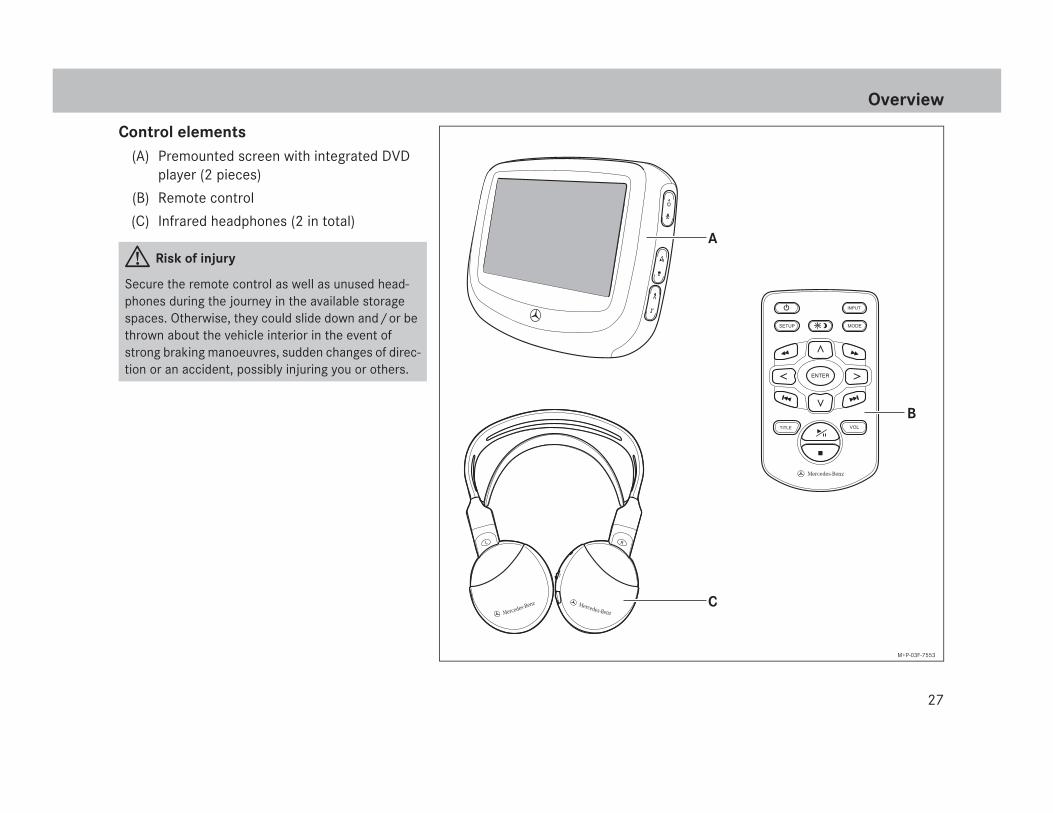
Control elements(A) Premounted screen with integrated DVD
player (2 pieces)
(B) Remote control
(C) Infrared headphones (2 in total)
GRisk of injury
Secure the remote control as well as unused head-phones during the journey in the available storage spaces. Otherwise, they could slide down and/or be thrown about the vehicle interior in the event of strong braking manoeuvres, sudden changes of direc-tion or an accident, possibly injuring you or others.
SETUP MODE
VOL
A
B
C
M+P-03F-7553
28
Overview
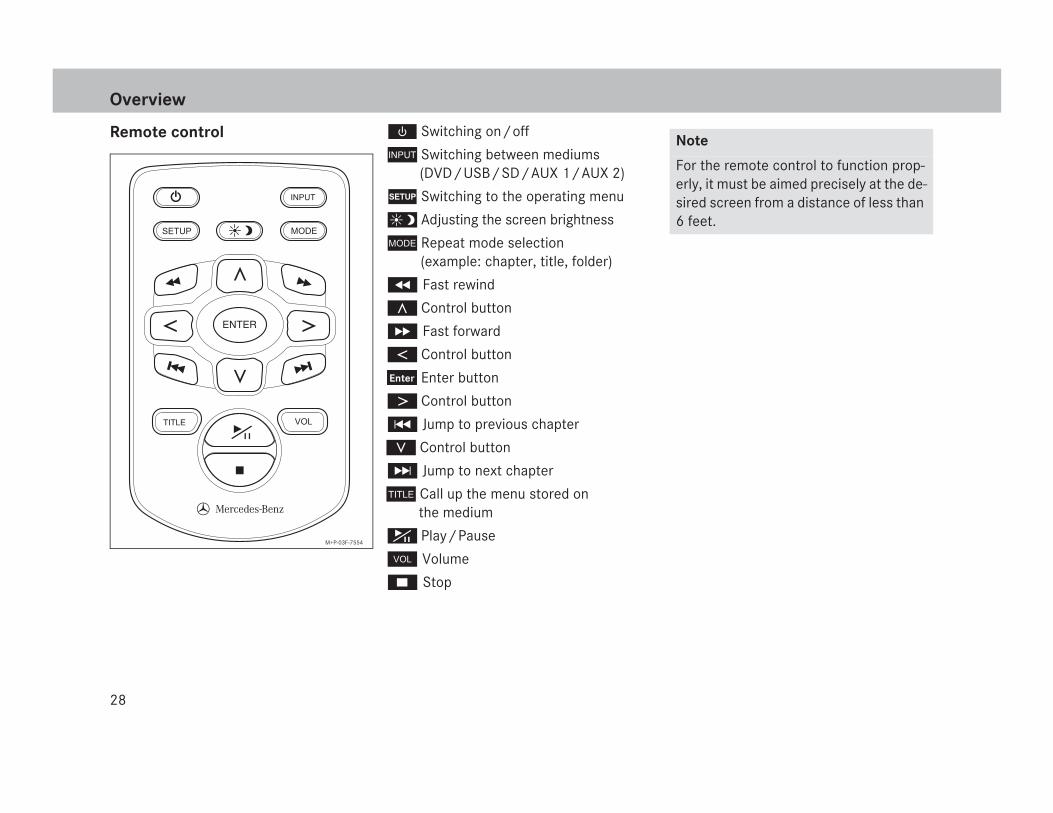
Remote control
SETUP MODE
VOL
M+P-03F-7554
Switching on/off
Switching between mediums(DVD/USB/SD/AUX 1/AUX 2)
Switching to the operating menu
Adjusting the screen brightness
Repeat mode selection (example: chapter, title, folder)
8 Fast rewind
Control button
9 Fast forward
Control button
Enter button
Control button
0 Jump to previous chapter
Control button
ß Jump to next chapter
Call up the menu stored on the medium
Play/Pause
Volume
a Stop
Note
For the remote control to function prop-erly, it must be aimed precisely at the de-sired screen from a distance of less than 6 feet.
29
Overview
Screen
3
1 2
10
12131415
11
45
6789
M+P-03F-7565
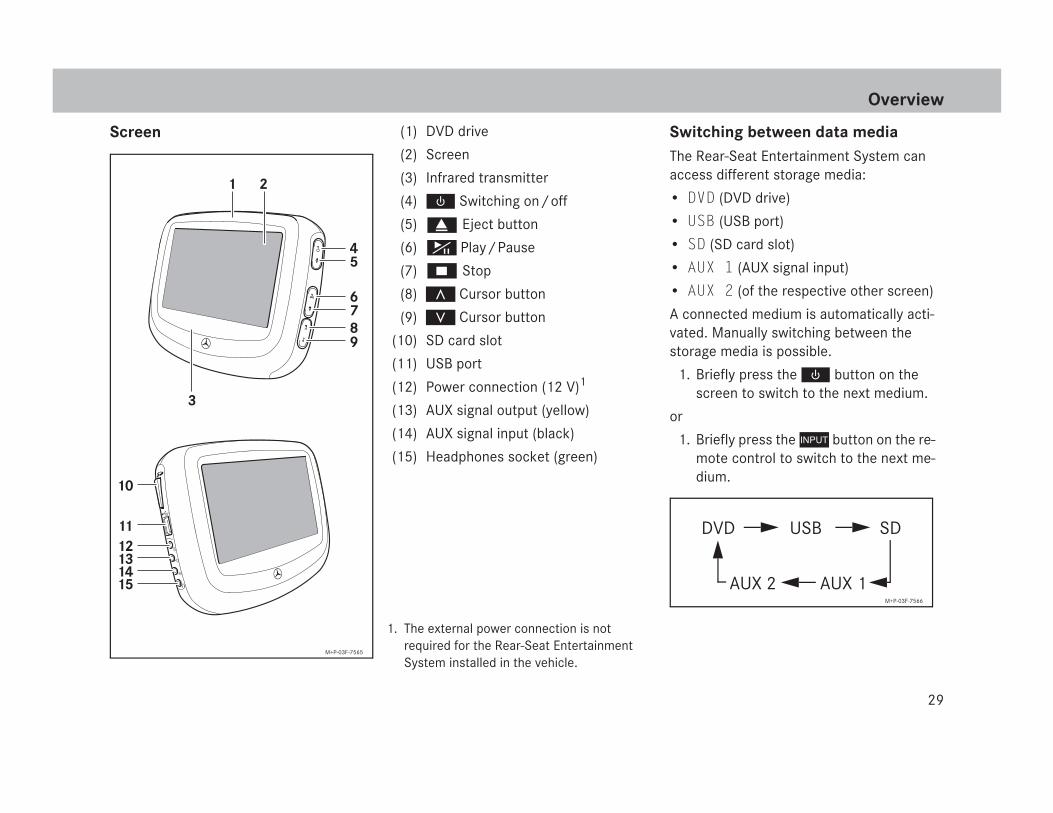
(1) DVD drive
(2) Screen
(3) Infrared transmitter
(4) Switching on/off
(5) g Eject button
(6) Play/Pause
(7) a Stop
(8) Cursor button
(9) Cursor button
(10) SD card slot
(11) USB port
(12) Power connection (12 V)1
(13) AUX signal output (yellow)
(14) AUX signal input (black)
(15) Headphones socket (green)
Switching between data mediaThe Rear-Seat Entertainment System can access different storage media:
• DVD (DVD drive)
• USB (USB port)
• SD (SD card slot)
• AUX 1 (AUX signal input)
• AUX 2 (of the respective other screen)
A connected medium is automatically acti-vated. Manually switching between the storage media is possible.
1. Briefly press the button on the screen to switch to the next medium.
or
1. Briefly press the button on the re-mote control to switch to the next me-dium.
1. The external power connection is notrequired for the Rear-Seat Entertainment System installed in the vehicle.
M+P-03F-7566
DVD USB SD
AUX 2 AUX 1
30
Controls in detail
FittingThe Rear-Seat Entertainment System must be installed by a qualified specialist work-shop. Mercedes-Benz recommends that you use a Mercedes-Benz Service Centre for this purpose.
Switching on/offSwitching on
1. Press the button on the desired screen.
Or
1. Aim the remote control at the desired screen and press the button on the remote control.
The basic display appears.
Switching off
1. Press the button on the desired screen for approx. 2 seconds.
Or
1. Aim the remote control at the desired screen and press the button on the remote control.
The selected screen is switched off.
Headphones
Adjusting the IR headphones
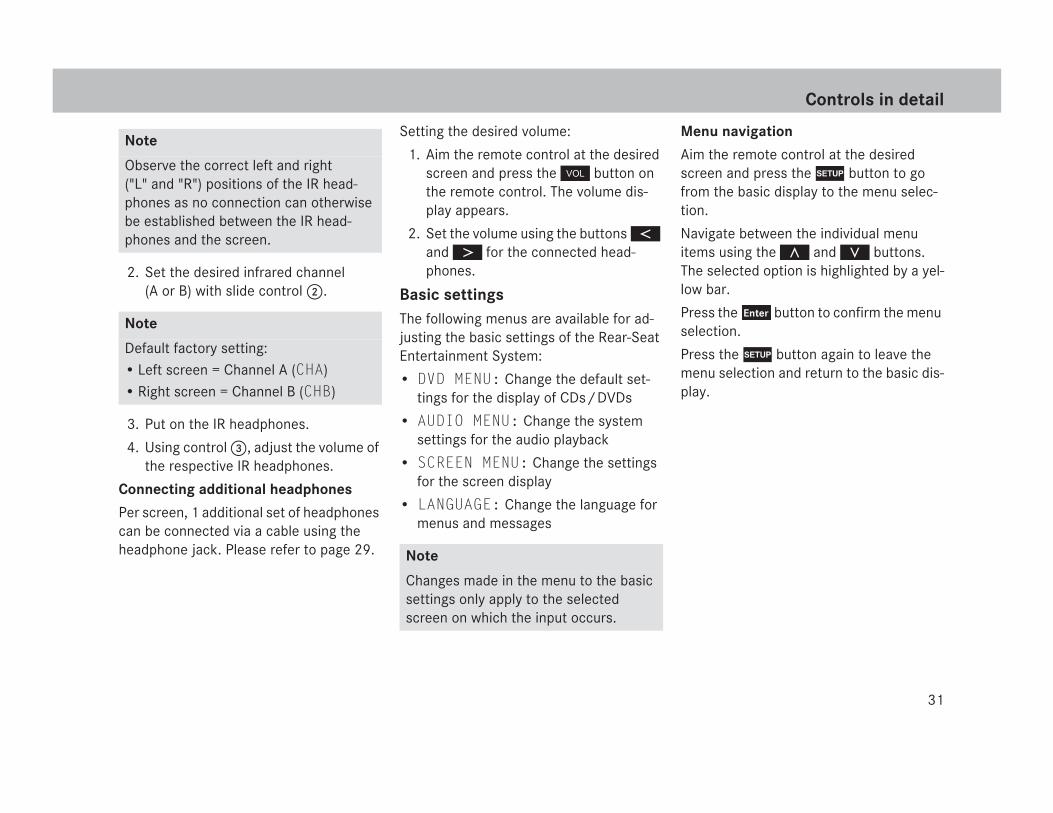
1. To activate the IR headphones, tilt both earpieces inward. The IR head-phones are switched on and LED 1 lights up.
M+P-03F-5973
Note
Both screens are automatically switched off approximately 3 minutes after the ig-nition is switched off (e.g. when refuel-ling.
GRisk of injury
Before putting the headphones on, make sure that the volume has been set to minimum, as your hearing could otherwise be damaged.
12
3
M+P-03F-7567
31
Controls in detail
2. Set the desired infrared channel (A or B) with slide control 2.
3. Put on the IR headphones.
4. Using control 3, adjust the volume of the respective IR headphones.
Connecting additional headphones
Per screen, 1 additional set of headphones can be connected via a cable using the headphone jack. Please refer to page 29.
Setting the desired volume:
1. Aim the remote control at the desired screen and press the button on the remote control. The volume dis-play appears.
2. Set the volume using the buttons and for the connected head-phones.
Basic settingsThe following menus are available for ad-justing the basic settings of the Rear-Seat Entertainment System:
• DVD MENU: Change the default set-tings for the display of CDs/DVDs
• AUDIO MENU: Change the system settings for the audio playback
• SCREEN MENU: Change the settings for the screen display
• LANGUAGE: Change the language for menus and messages
Menu navigation
Aim the remote control at the desired screen and press the button to go from the basic display to the menu selec-tion.
Navigate between the individual menu items using the and buttons. The selected option is highlighted by a yel-low bar.
Press the button to confirm the menu selection.
Press the button again to leave the menu selection and return to the basic dis-play.
Note
Observe the correct left and right ("L" and "R") positions of the IR head-phones as no connection can otherwise be established between the IR head-phones and the screen.
Note
Default factory setting:• Left screen = Channel A (CHA)• Right screen = Channel B (CHB)
Note
Changes made in the menu to the basic settings only apply to the selected screen on which the input occurs.
32
Controls in detail
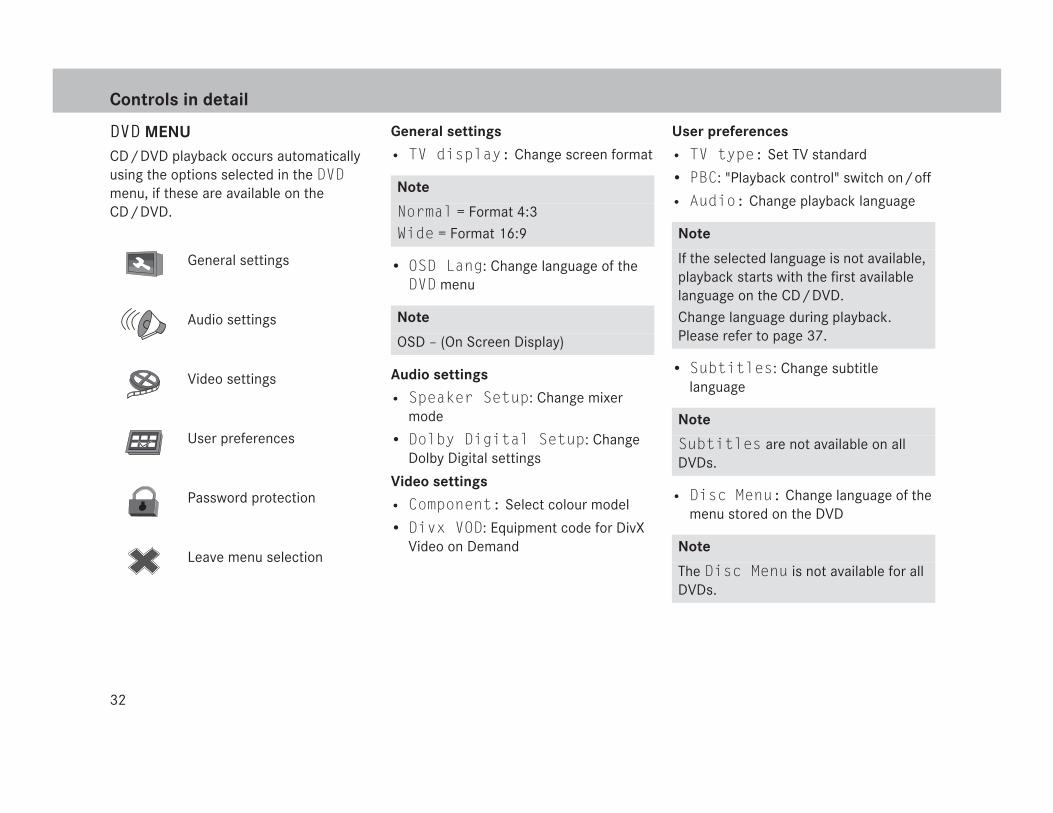
DVD MENUCD/DVD playback occurs automatically using the options selected in the DVD menu, if these are available on the CD/DVD.
General settings
• TV display: Change screen format
• OSD Lang: Change language of the DVD menu
Audio settings
• Speaker Setup: Change mixer mode
• Dolby Digital Setup: Change Dolby Digital settings
Video settings
• Component: Select colour model
• Divx VOD: Equipment code for DivX Video on Demand
User preferences
• TV type: Set TV standard
• PBC: "Playback control" switch on/off
• Audio: Change playback language
• Subtitles: Change subtitlelanguage
• Disc Menu: Change language of the menu stored on the DVD
General settings
Audio settings
Video settings
User preferences
Password protection
Leave menu selection
Note
Normal = Format 4:3Wide = Format 16:9
Note
OSD – (On Screen Display)
Note
If the selected language is not available, playback starts with the first available language on the CD/DVD.Change language during playback. Please refer to page 37.
Note
Subtitles are not available on all DVDs.
Note
The Disc Menu is not available for all DVDs.
33
Controls in detail
• Parental: Change parental control setting
Some DVDs have a locking function as-signed to the entire CD/DVD or only to certain scenes. This allows playback of content to be prevented if it is unsuita-ble for children.
The ratings from 1 to 8 are country-specific:
1 = Suitable for all ages
to
8 = Suitable for adults only
• DRM: Equipment code for DivX Video on Demand
• Default: Restore default factory settings
Password protection
• Password Mode: Switch password protection on/off
• Password: Change password
Edit the current digit (counting up/down) using the buttons and .
Move to the next/previous digit using the buttons and .
Press the button to switch at the end of the line to the next line.
Press the button to confirm the password change.
AUDIO MENU• BAS: Adjust the bass
• TRE: Adjust the treble
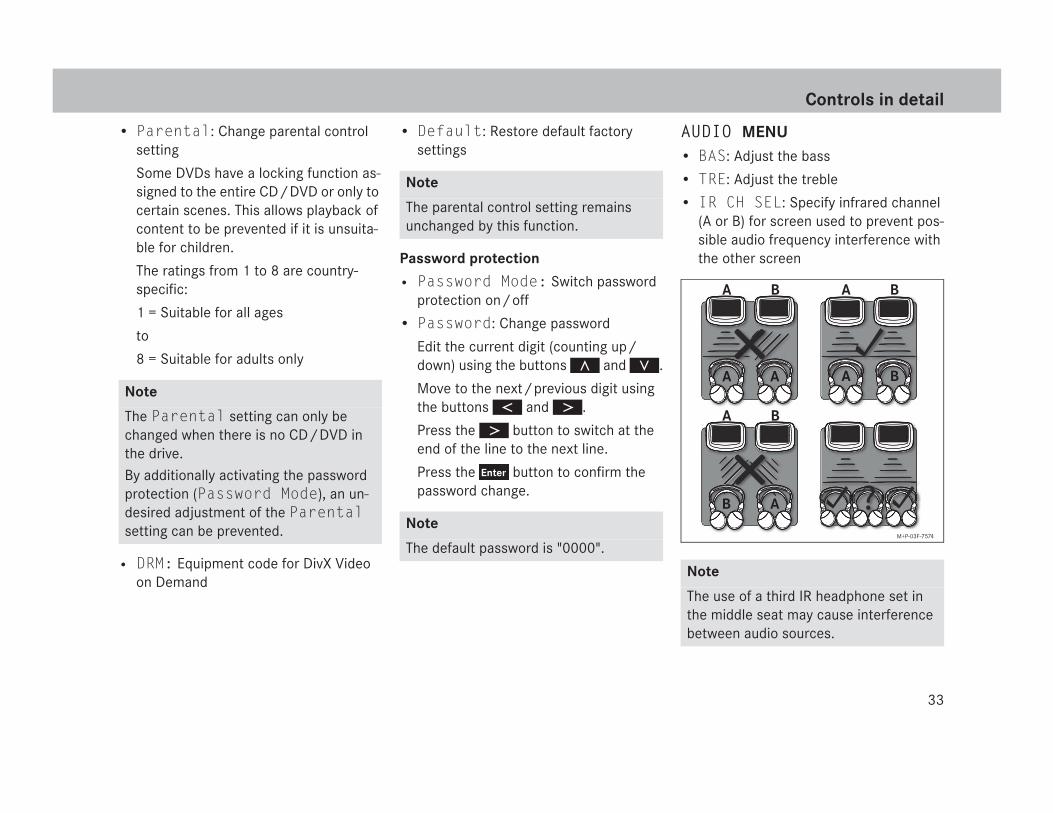
• IR CH SEL: Specify infrared channel (A or B) for screen used to prevent pos-sible audio frequency interference with the other screen
Note
The Parental setting can only be changed when there is no CD/DVD in the drive.By additionally activating the password protection (Password Mode), an un-desired adjustment of the Parental setting can be prevented.
Note
The parental control setting remains unchanged by this function.
Note
The default password is "0000".
Note
The use of a third IR headphone set in the middle seat may cause interference between audio sources.
A
A A
B
A B
AB
A B
A B
M+P-03F-7574
34
Controls in detail
• VOLUME RESET: Activate/deactivate the volume reset function when switch-ing on
The system volume for headphones connected via cable is reset automati-cally to a medium value when switching on the respective screen when VOLUME RESET is set.
SCREEN MENUThe CONTRAST, SATURATION, SHARPNESS, BRIGHTNESS and HUE of the screen display can be adjusted in this menu.
LANGUAGE MENUThe operating language of the Rear-Seat Entertainment System can be set in this menu.
Screen brightnessPress the button to adjust the screen brightness, for example, for night viewing. There are 5 setting levels.
Inserting/ejecting a CD/DVD Inserting
Insert the CD/DVD with the label facing forward and push it into the DVD drive with light pressure.
The CD/DVD is read and played back automatically.
Ejecting
Press the button on the screen.
Note
Set the IR headphones to the infrared channel used as well. Please refer to page 30.
Note
If there is already a CD/DVD in the DVD player, it will automatically start playing the CD/DVD back when the DVD player is switched on.
35
Controls in detail
Operating the functions of the CD/DVD
Play
Press the button.
Pause
1. Press the button.
2. End pause: Press the button again.
Fast-rewind
1. Press the 8 button repeatedly until the de-sired rewind speed is reached (rewind 2x, 4x, 6x, 8x, 16x or 32x).
2. To play at normal speed, press the button.
Fast-forward
1. Press the 9 button repeatedly until the de-sired fast-forward speed is reached (fast-for-ward 2x, 4x, 6x, 8x, 16x or 32x).
2. To play at normal speed, press the button.
Note
For the remote control to function properly, it must be aimed precisely at the desired screen from a distance of less than 6 feet.
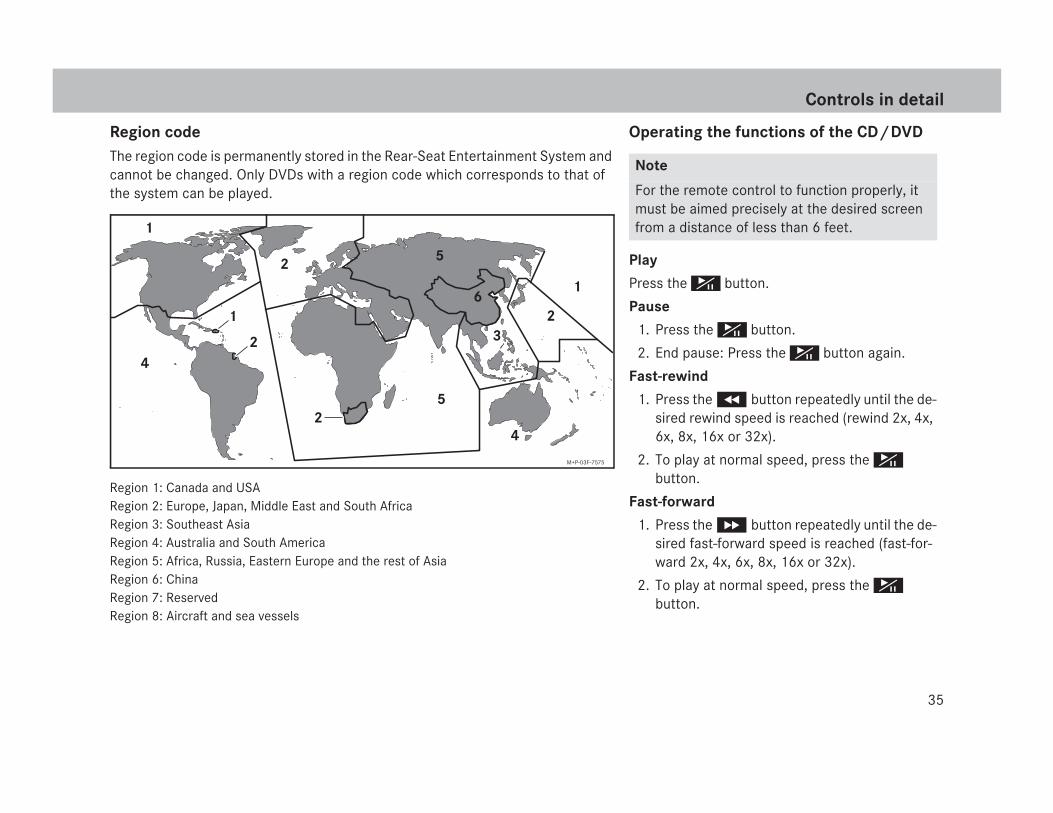
Region codeThe region code is permanently stored in the Rear-Seat Entertainment System and cannot be changed. Only DVDs with a region code which corresponds to that of the system can be played.
Region 1: Canada and USARegion 2: Europe, Japan, Middle East and South AfricaRegion 3: Southeast AsiaRegion 4: Australia and South AmericaRegion 5: Africa, Russia, Eastern Europe and the rest of AsiaRegion 6: ChinaRegion 7: ReservedRegion 8: Aircraft and sea vessels
1
6
5
5
1
2
4
3
2
4
1
2
2
M+P-03F-7575
36
Controls in detail
Previous or next section/chapter
Press the 0 or ß button repeatedly until the desired section/chapter is reached.
Stop
1. Press the a button.
Playback is interrupted.
2. Press the button.
The disc is played again from the same position where playback was previous-ly interrupted.
Or:
Press the a button twice.
Playback is cancelled.
Repeat chapter/title
1. Press the button during play-back.
The currently selected repeat mode is displayed.
2. Press the button again to select the repeat mode.
To switch off:
To switch off repeat, press the button until Off is displayed.
The display automatically disappears after 2 seconds.
Display of the lapsed or remainingplayback time
1. During playback initially press the button, then press thebutton.
The playback time is displayed.
2. Press the button again to switch the display.
To switch off:
To hide the playback time, press the button until Off is displayed.
The display automatically disappears after 2 seconds.
Subtitles
To change the language:
1. Press the button during play-back.
The currently selected language is dis-played.
2. Press the button again to select a different language.
To switch off:
To hide the subtitles, press the button until Off is displayed.
The display automatically disappears after 2 seconds.
Note
On some DVDs, you cannot fast-forward through certain scenes.
Note
Some DVDs only allow access to this function via the menu stored on the DVD.
37
Controls in detail
To change the language
1. Press the button during play-back.
The currently selected language is dis-played.
2. Press the button again to select a different language.
The display automatically disappears after 2 seconds.
Call up the menu stored on the DVD
1. Press the button.
The menu stored on the DVD is dis-played.
2. Press the , , and buttons to select the desired option.
3. Press the button to confirm the selection
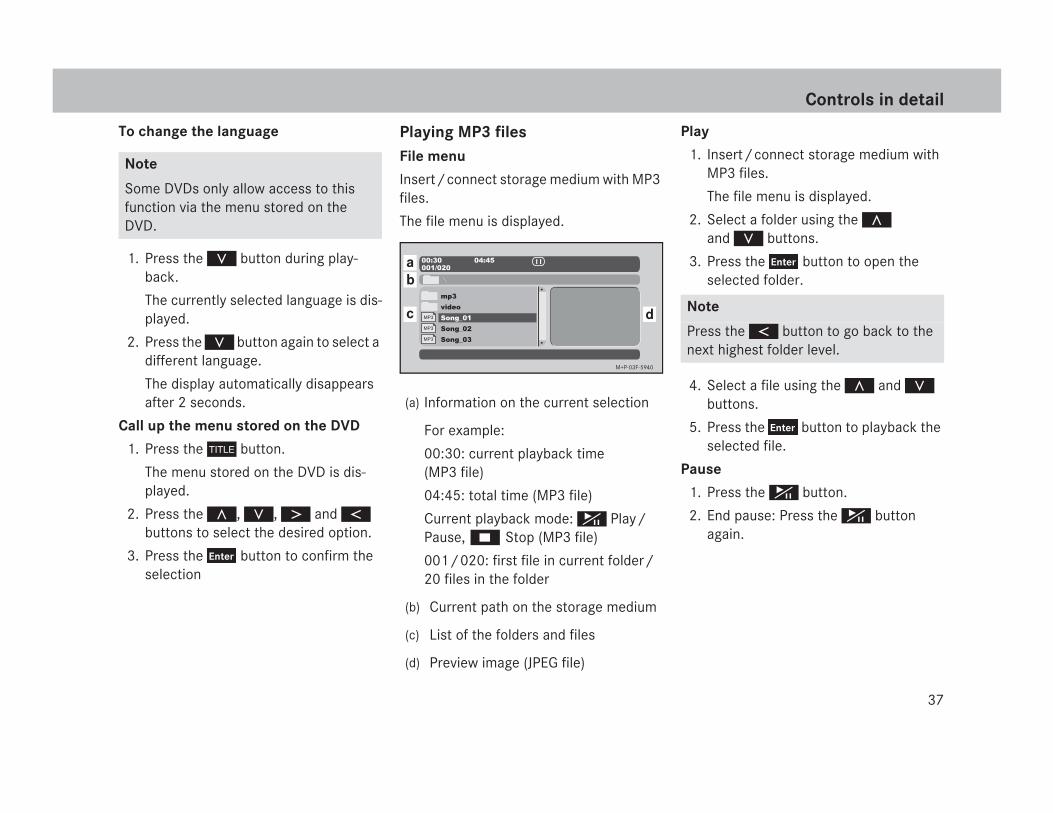
Playing MP3 filesFile menu
Insert/connect storage medium with MP3 files.
The file menu is displayed.
Play
1. Insert/connect storage medium with MP3 files.
The file menu is displayed.
2. Select a folder using the and buttons.
3. Press the button to open the selected folder.
4. Select a file using the and buttons.
5. Press the button to playback the selected file.
Pause
1. Press the button.
2. End pause: Press the button again.
Note
Some DVDs only allow access to this function via the menu stored on the DVD.
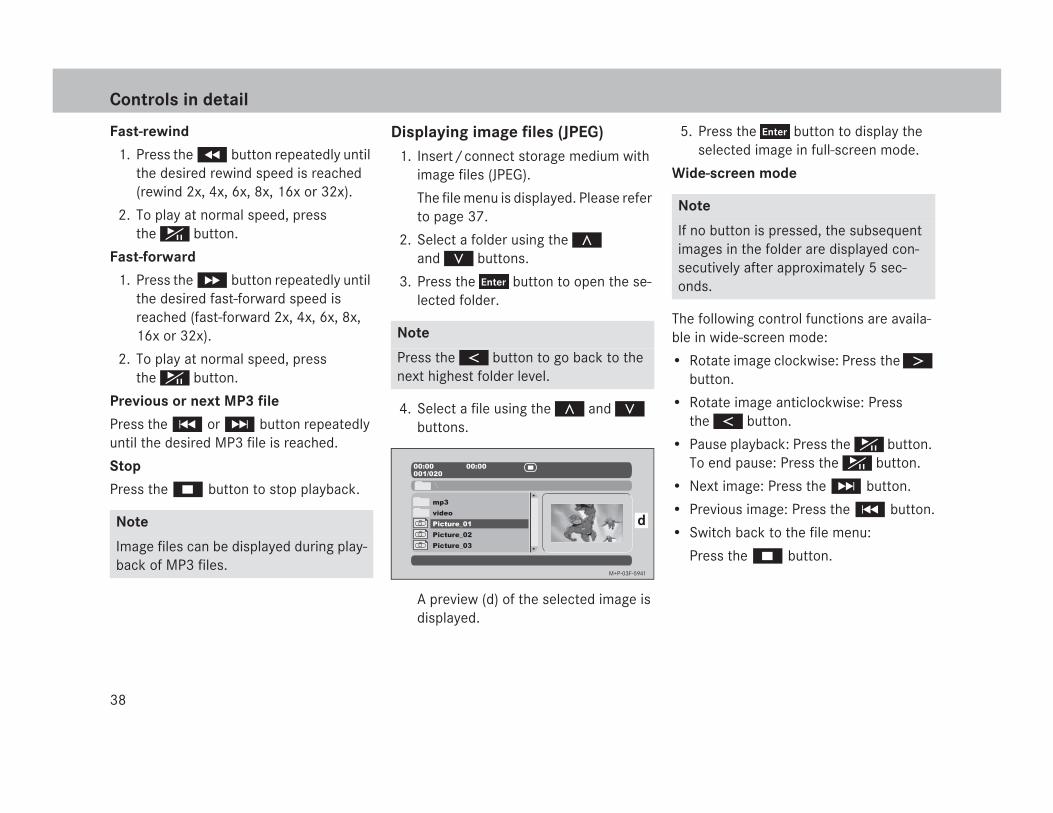
(a) Information on the current selection
For example:
00:30: current playback time(MP3 file)
04:45: total time (MP3 file)
Current playback mode: Play/Pause, a Stop (MP3 file)
001/020: first file in current folder/20 files in the folder
(b) Current path on the storage medium
(c) List of the folders and files
(d) Preview image (JPEG file)
00:30
mp3
video
Song_01
Song_02
Song_03
MP3
MP3
MP3
04:45001/020
ab
c d
M+P-03F-5940
Note
Press the button to go back to the next highest folder level.
38
Controls in detail
Fast-rewind
1. Press the 8 button repeatedly until the desired rewind speed is reached (rewind 2x, 4x, 6x, 8x, 16x or 32x).
2. To play at normal speed, press the button.
Fast-forward
1. Press the 9 button repeatedly until the desired fast-forward speed is reached (fast-forward 2x, 4x, 6x, 8x, 16x or 32x).
2. To play at normal speed, press the button.
Previous or next MP3 file
Press the 0 or ß button repeatedly until the desired MP3 file is reached.
Stop
Press the a button to stop playback.
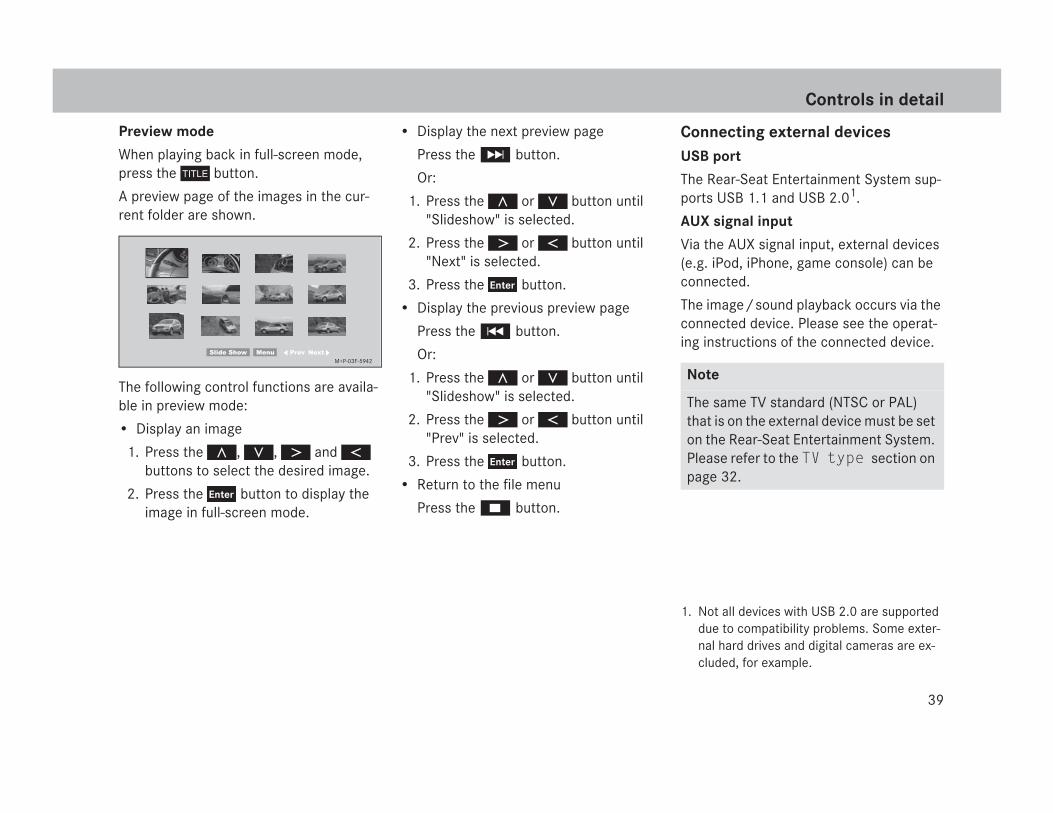
Displaying image files (JPEG)1. Insert/connect storage medium with
image files (JPEG).
The file menu is displayed. Please refer to page 37.
2. Select a folder using the and buttons.
3. Press the button to open the se-lected folder.
4. Select a file using the and buttons.
A preview (d) of the selected image is displayed.
5. Press the button to display the selected image in full-screen mode.
Wide-screen mode
The following control functions are availa-ble in wide-screen mode:
• Rotate image clockwise: Press the button.
• Rotate image anticlockwise: Press the button.
• Pause playback: Press the button. To end pause: Press the button.
• Next image: Press the ß button.
• Previous image: Press the 0 button.
• Switch back to the file menu:
Press the a button.
Note
Image files can be displayed during play-back of MP3 files.
Note
Press the button to go back to the next highest folder level.
00:00
mp3
video
Picture_01
Picture_02
Picture_03
00:00001/020
d
M+P-03F-5941
Note
If no button is pressed, the subsequent images in the folder are displayed con-secutively after approximately 5 sec-onds.
39
Controls in detail
Preview mode
When playing back in full-screen mode, press the button.
A preview page of the images in the cur-rent folder are shown.
The following control functions are availa-ble in preview mode:
• Display an image
1. Press the , , and buttons to select the desired image.
2. Press the button to display the image in full-screen mode.
• Display the next preview page
Press the ß button.
Or:
1. Press the or button until "Slideshow" is selected.
2. Press the or button until "Next" is selected.
3. Press the button.
• Display the previous preview page
Press the 0 button.
Or:
1. Press the or button until "Slideshow" is selected.
2. Press the or button until "Prev" is selected.
3. Press the button.
• Return to the file menu
Press the a button.
Connecting external devicesUSB port
The Rear-Seat Entertainment System sup-ports USB 1.1 and USB 2.01.
AUX signal input
Via the AUX signal input, external devices (e.g. iPod, iPhone, game console) can be connected.
The image/sound playback occurs via the connected device. Please see the operat-ing instructions of the connected device.
Slide Show Menu Prev Next
M+P-03F-5942
1. Not all devices with USB 2.0 are supported due to compatibility problems. Some exter-nal hard drives and digital cameras are ex-cluded, for example.
Note
The same TV standard (NTSC or PAL) that is on the external device must be set on the Rear-Seat Entertainment System. Please refer to the TV type section on page 32.
40
Replacing batteries and care
Changing batteries
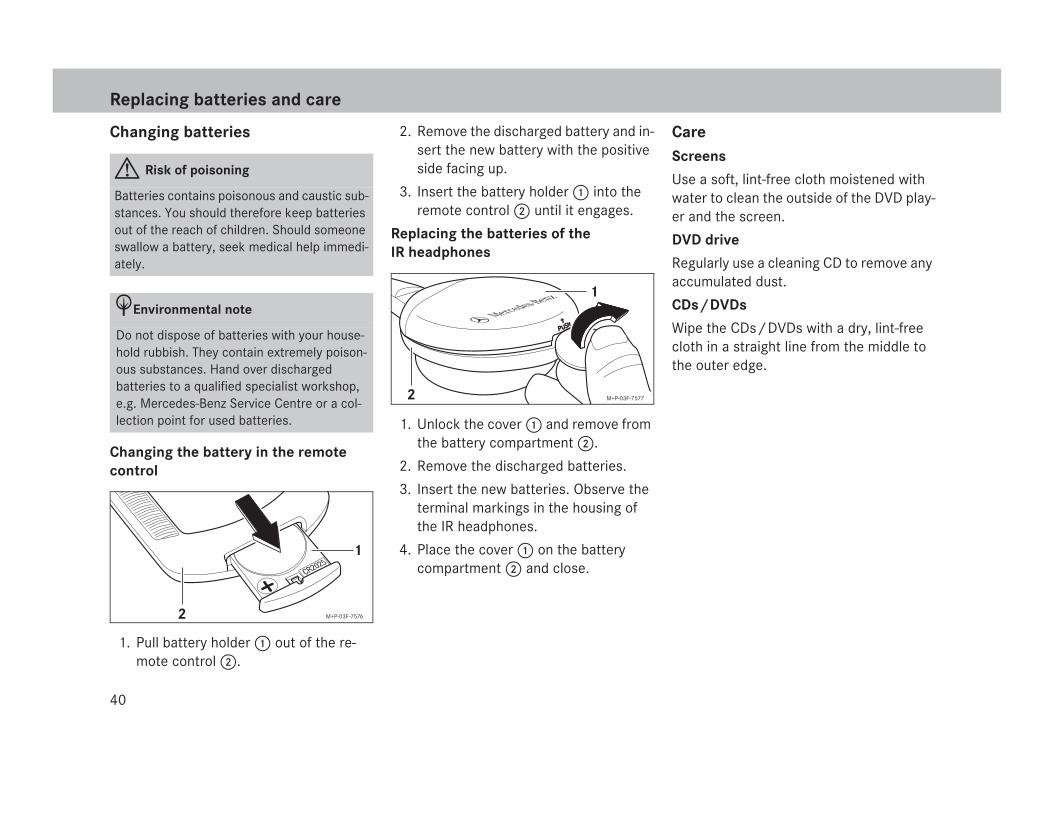
Changing the battery in the remote control
1. Pull battery holder 1 out of the re-mote control 2.
2. Remove the discharged battery and in-sert the new battery with the positive side facing up.
3. Insert the battery holder 1 into the remote control 2 until it engages.
Replacing the batteries of the IR headphones
1. Unlock the cover 1 and remove from the battery compartment 2.
2. Remove the discharged batteries.
3. Insert the new batteries. Observe the terminal markings in the housing of the IR headphones.
4. Place the cover 1 on the battery compartment 2 and close.
CareScreens
Use a soft, lint-free cloth moistened with water to clean the outside of the DVD play-er and the screen.
DVD drive
Regularly use a cleaning CD to remove any accumulated dust.
CDs/DVDs
Wipe the CDs/DVDs with a dry, lint-free cloth in a straight line from the middle to the outer edge.
GRisk of poisoning
Batteries contains poisonous and caustic sub-stances. You should therefore keep batteries out of the reach of children. Should someone swallow a battery, seek medical help immedi-ately.
HEnvironmental note
Do not dispose of batteries with your house-hold rubbish. They contain extremely poison-ous substances. Hand over discharged batteries to a qualified specialist workshop, e.g. Mercedes-Benz Service Centre or a col-lection point for used batteries.
2
1
M+P-03F-7576
2
1
M+P-03F-7577

41
What should I do if...
Screens symbol
MalfunctionsBelow is a list of frequently asked ques-tions so that minor problems do not spoil any of the many entertainment features in-cluded with your Rear-Seat Entertainment System. Should you have any further ques-tions, please contact a Mercedes-Benz Service Centre.
What should I do if "Wrong Region" is displayed when a DVD starts?
• This message indicates that the DVD does not contain the same region code as the DVD player (Please refer to page 35).
This DVD cannot be played.
What should I do if the remote control does not function properly?
• The remote control is not aimed at the screens, or it is too far from the screens.
Aim the remote control from a distance of less than 2 m directly at the screens.
• The battery voltage is too low.
Replace the battery.
• The brightness of the ambient light (e.g. sunlight) is interfering with the recep-tion of the signals sent out by the re-mote control.
Move the vehicle to a shaded area.
What should I do if the disc is notrecognised by the DVD drive?
• The DVD drive is dirty.
Clean the DVD drive using a cleaning CD.
What should I do if the screens remain black?
• The DVD player is switched off.
Switch the DVD player on.
• An external device is connected to the DVD player and switched off.
Switch on the external device, or dis-connect it from the unit.
• The vehicle's ignition has been switched off for more than 3 minutes.
Switch on the vehicle's ignition.
• The screens remain black although the ignition has been switched on.
Have the fuses checked by aMercedes-Benz Service Centre.
The command transmitted from the remote control cannot be carried out.
42
Technical data
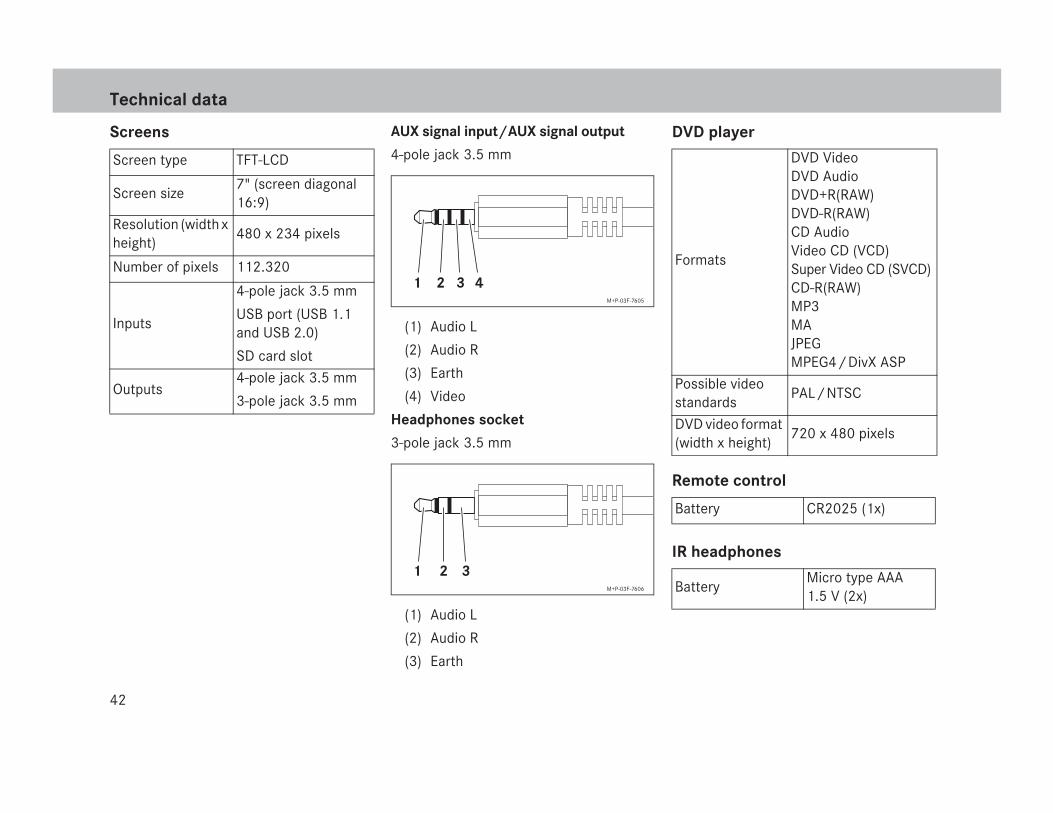
AUX signal input/AUX signal output
4-pole jack 3.5 mm
(1) Audio L
(2) Audio R
(3) Earth
(4) Video
Headphones socket
3-pole jack 3.5 mm
(1) Audio L
(2) Audio R
(3) Earth
Screens
Screen type TFT-LCD
Screen size7" (screen diagonal 16:9)
Resolution (width x height)
480 x 234 pixels
Number of pixels 112.320
Inputs
4-pole jack 3.5 mm
USB port (USB 1.1 and USB 2.0)
SD card slot
Outputs4-pole jack 3.5 mm
3-pole jack 3.5 mm
1 2 3 4M+P-03F-7605
1 2 3M+P-03F-7606
DVD player
Formats
DVD Video DVD Audio DVD+R(RAW) DVD-R(RAW) CD Audio Video CD (VCD) Super Video CD (SVCD) CD-R(RAW) MP3 MA JPEG MPEG4/DivX ASP
Possible video standards
PAL/NTSC
DVD video format (width x height)
720 x 480 pixels
Remote control
Battery CR2025 (1x)
IR headphones
BatteryMicro type AAA 1.5 V (2x)