Embed Size (px)
Citation preview
RealPresence® CloudAXIS™ Suite Administrators’ Guide Software 1.3.1
Polycom, Inc. 1
ADMINISTRATOR’S GUIDE
RealPresence® Platform Director™
Software 1.5.0 | February 2014 | 3725-66008-001 Rev A
RealPresence® Platform Director™ Administrator’s Guide Version 1.5.0
Polycom, Inc. 2
Copyright ©2014, Polycom, Inc. All rights reserved. No part of this document may be reproduced, translated into another language or format, or transmitted in any form or by any means, electronic or mechanical, for any purpose, without the express written permission of Polycom, Inc.
6001 America Center Drive San Jose, CA 95002 USA
Trademarks
Polycom®, the Polycom logo and the names and marks associated with Polycom products are trademarks and/or service marks of Polycom, Inc. and are registered and/or common law marks in the United States and various other countries. All other trademarks are property of their respective owners. No portion hereof may be reproduced or transmitted in any form or by any means, for any purpose other than the recipient's personal use, without the express written permission of Polycom.
End User License Agreement
By installing, copying, or otherwise using this product, you acknowledge that you have read, understand and agree to be bound by the terms and conditions of the End User License Agreement for this product.
Patent Information
The accompanying product may be protected by one or more U.S. and foreign patents and/or pending patent applications held by Polycom, Inc.
Open Source Software Used in this Product
This product may contain open source software. You may receive the open source software from Polycom up to three (3) years after the distribution date of the applicable product or software at a charge not greater than the cost to Polycom of shipping or distributing the software to you. To receive software information, as well as the open source software code used in this product, contact Polycom by email at [email protected].
Disclaimer
While Polycom uses reasonable efforts to include accurate and up-to-date information in this document, Polycom makes no warranties or representations as to its accuracy. Polycom assumes no liability or responsibility for any typographical or other errors or omissions in the content of this document.
Limitation of Liability
Polycom and/or its respective suppliers make no representations about the suitability of the information contained in this document for any purpose. Information is provided “as is” without warranty of any kind and is subject to change without notice. The entire risk arising out of its use remains with the recipient. In no event shall Polycom and/or its respective suppliers be liable for any direct, consequential, incidental, special, punitive, or other damages whatsoever (including without limitation, damages for loss of business profits, business interruption, or loss of business information), even if Polycom has been advised of the possibility of such damages.
Customer Feedback
We are striving to improve our documentation quality and we appreciate your feedback. Email your opinions and comments to [email protected].
Visit the Polycom Support Center for End User License Agreements, software downloads, product documents, product licenses, troubleshooting tips, service requests, and more.
Polycom, Inc. 3
Contents
About This Guide ...................................................................................................... 6
Conventions Used in this Guide ..................................................................................................... 6 Terms and Writing Conventions ..................................................................................................... 6 Information Elements ....................................................................................................................... 7 Typographic Conventions ............................................................................................................... 7 What’s in this Guide? ....................................................................................................................... 8 Help and Technical Support ............................................................................................................ 9
Polycom Support .............................................................................................................................. 9 Reference Documentation ............................................................................................................. 10 Documentation Feedback .............................................................................................................. 10
Getting Started ........................................................................................................ 11
RealPresence Platform Director Requirements .......................................................................... 11 Hardware Requirements ................................................................................................................ 11 Data Center Requirements ............................................................................................................ 12 Software License Requirements .................................................................................................... 12 Web Browser Requirements .......................................................................................................... 13
RealPresence Platform Director Architecture ............................................................................. 13 RealPresence Platform Director Description ............................................................................... 14 RealPresence Platform Software Description ............................................................................. 15
RealPresence DMA, Virtual Edition ................................................................................................ 15 RealPresence Resource Manager, Virtual Edition ........................................................................ 15 RealPresence Collaboration Server,Virtual Edition ....................................................................... 15 RealPresence Access Director, Virtual Edition .............................................................................. 15 RealPresence CloudAXIS Suite Services Portal ........................................................................... 15 RealPresence CloudAXIS Suite Experience Portal ....................................................................... 16
RealPresence Platform Director Deployment ....................................................... 17
Deploy the RealPresence Platform Director ................................................................................ 17 Access RealPresence Platform Director ...................................................................................... 18
Troubleshoot the FQDN ................................................................................................................. 20 Manage Your Account Credentials ............................................................................................... 20
Edit Your Profile ............................................................................................................................. 20 Change Your Password ................................................................................................................. 21 Sign Out ......................................................................................................................................... 22
Home Page .............................................................................................................. 23
RealPresence Platform Director Dashboard ................................................................................ 23 Summary ........................................................................................................................................ 23 Most Used Service Groups ............................................................................................................ 23 Critical Alarms ................................................................................................................................ 24 Instances with Critical Alarms ........................................................................................................ 25
RealPresence® Platform Director™ Administrator’s Guide Version 1.5.0
Polycom, Inc. 4
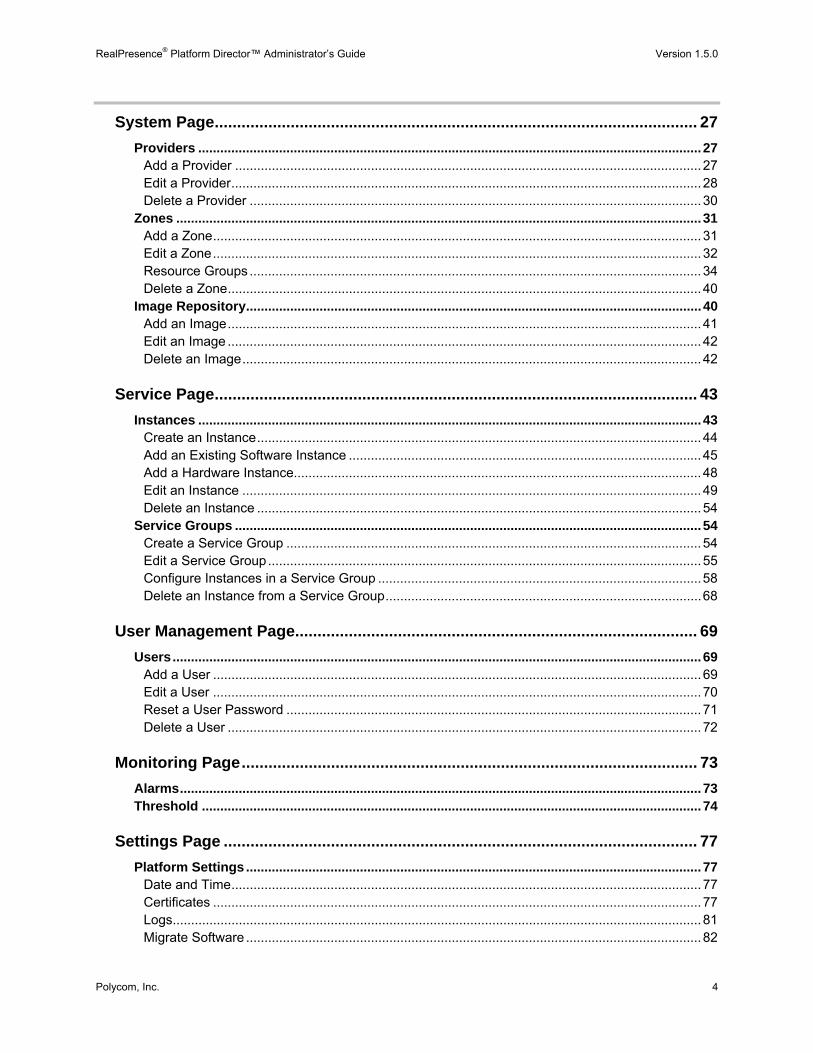
System Page ............................................................................................................ 27
Providers ......................................................................................................................................... 27 Add a Provider ............................................................................................................................... 27 Edit a Provider ................................................................................................................................ 28 Delete a Provider ........................................................................................................................... 30
Zones ............................................................................................................................................... 31 Add a Zone ..................................................................................................................................... 31 Edit a Zone ..................................................................................................................................... 32 Resource Groups ........................................................................................................................... 34 Delete a Zone ................................................................................................................................. 40
Image Repository ............................................................................................................................ 40 Add an Image ................................................................................................................................. 41 Edit an Image ................................................................................................................................. 42 Delete an Image ............................................................................................................................. 42
Service Page ............................................................................................................ 43
Instances ......................................................................................................................................... 43 Create an Instance ......................................................................................................................... 44 Add an Existing Software Instance ................................................................................................ 45 Add a Hardware Instance............................................................................................................... 48 Edit an Instance ............................................................................................................................. 49 Delete an Instance ......................................................................................................................... 54
Service Groups ............................................................................................................................... 54 Create a Service Group ................................................................................................................. 54 Edit a Service Group ...................................................................................................................... 55 Configure Instances in a Service Group ........................................................................................ 58 Delete an Instance from a Service Group ...................................................................................... 68
User Management Page .......................................................................................... 69
Users ................................................................................................................................................ 69 Add a User ..................................................................................................................................... 69 Edit a User ..................................................................................................................................... 70 Reset a User Password ................................................................................................................. 71 Delete a User ................................................................................................................................. 72
Monitoring Page ...................................................................................................... 73
Alarms .............................................................................................................................................. 73 Threshold ........................................................................................................................................ 74
Settings Page .......................................................................................................... 77
Platform Settings ............................................................................................................................ 77 Date and Time ................................................................................................................................ 77 Certificates ..................................................................................................................................... 77 Logs ................................................................................................................................................ 81 Migrate Software ............................................................................................................................ 82
RealPresence® Platform Director™ Administrator’s Guide Version 1.5.0
Polycom, Inc. 5
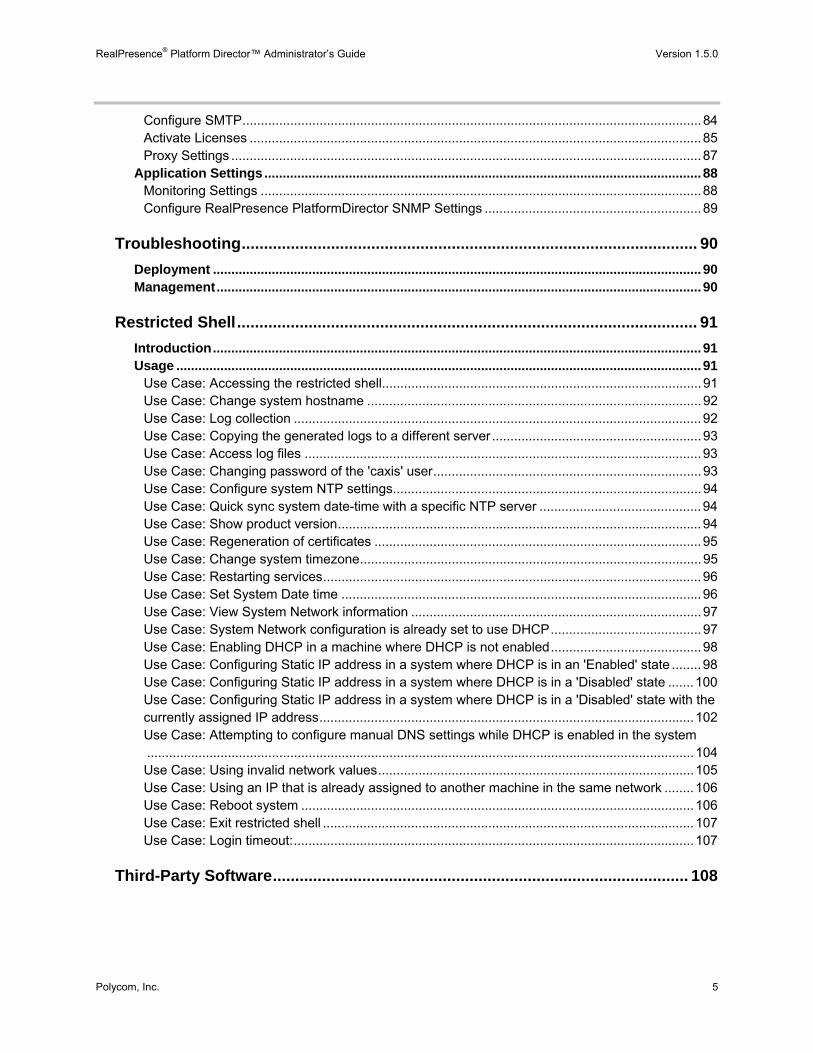
Configure SMTP ............................................................................................................................. 84 Activate Licenses ........................................................................................................................... 85 Proxy Settings ................................................................................................................................ 87
Application Settings ....................................................................................................................... 88 Monitoring Settings ........................................................................................................................ 88 Configure RealPresence PlatformDirector SNMP Settings ........................................................... 89
Troubleshooting ...................................................................................................... 90
Deployment ..................................................................................................................................... 90 Management .................................................................................................................................... 90
Restricted Shell ....................................................................................................... 91
Introduction ..................................................................................................................................... 91 Usage ............................................................................................................................................... 91
Use Case: Accessing the restricted shell ....................................................................................... 91 Use Case: Change system hostname ........................................................................................... 92 Use Case: Log collection ............................................................................................................... 92 Use Case: Copying the generated logs to a different server ......................................................... 93 Use Case: Access log files ............................................................................................................ 93 Use Case: Changing password of the 'caxis' user ......................................................................... 93 Use Case: Configure system NTP settings.................................................................................... 94 Use Case: Quick sync system date-time with a specific NTP server ............................................ 94 Use Case: Show product version ................................................................................................... 94 Use Case: Regeneration of certificates ......................................................................................... 95 Use Case: Change system timezone ............................................................................................. 95 Use Case: Restarting services ....................................................................................................... 96 Use Case: Set System Date time .................................................................................................. 96 Use Case: View System Network information ............................................................................... 97 Use Case: System Network configuration is already set to use DHCP ......................................... 97 Use Case: Enabling DHCP in a machine where DHCP is not enabled ......................................... 98 Use Case: Configuring Static IP address in a system where DHCP is in an 'Enabled' state ........ 98 Use Case: Configuring Static IP address in a system where DHCP is in a 'Disabled' state ....... 100 Use Case: Configuring Static IP address in a system where DHCP is in a 'Disabled' state with the currently assigned IP address ...................................................................................................... 102 Use Case: Attempting to configure manual DNS settings while DHCP is enabled in the system ..................................................................................................................................................... 104 Use Case: Using invalid network values ...................................................................................... 105 Use Case: Using an IP that is already assigned to another machine in the same network ........ 106 Use Case: Reboot system ........................................................................................................... 106 Use Case: Exit restricted shell ..................................................................................................... 107 Use Case: Login timeout: ............................................................................................................. 107
Third-Party Software ............................................................................................. 108

Polycom, Inc. 6
About This Guide
This administrators’ guide uses a number of conventions that will aid you in understanding the purpose, functions, and capabilities of the Polycom® RealPresence® Platform Director.
Conventions Used in this Guide This administrators’ guide contains terms, graphical elements, and typographic conventions. Familiarizing yourself with these terms, elements, and conventions will help you perform RealPresence Platform Director tasks.
Terms and Writing Conventions This administrator’s guide contains various Polycom and telecommunications industry terms and acronyms, graphical icons and elements, and typographical conventions. Understanding these conventions will help you perform RealPresence Platform Director tasks.
The following terms and acronyms are found in this administrator’s guide:
● Apache Tomcat – An open source web server and application container to run the Services Portal application.
● FQDN – Fully Qualified Domain Name. Example of an FQDN: dma.example.com
● Image – RealPresence Platform subcomponents are provided as OVA files which are uploaded to RealPresence Platform Director as images to create product instances.
● nginx – An HTTP server used to render static content and delegate requests to Apache Tomcat
● NTP – Network Time Protocol Server. The NTP server sets the time and date settings for the Services Portal
● Provider – Providers supply the RealPresence Platform Director with a virtualized infrastructure for creating instances. VMware and OpenStack are currently the only available Providers.
● Resource Group – A group of computer,storage,network resources used to deploy instances. The group available in a Zone.
● Service Group – An organized collection of VMs and different Instances to define a video collaboration suite.
● vCenter – VMware’s virtualization platform used to deploy and manage the RealPresence Platform Director, RealPresence Platform components, and RealPresence CloudAXIS Suite components
● Virtual Edition – RealPresence CloudAXIS Suite components as software-based VMs
● VM – Virtual machine
● Zone – An abstraction of a physical location, including a provider, data center, host/cluster, resource pool, data storage, and network resource
RealPresence® Platform Director™ Administrator’s Guide Version 1.5.0
Polycom, Inc. 7
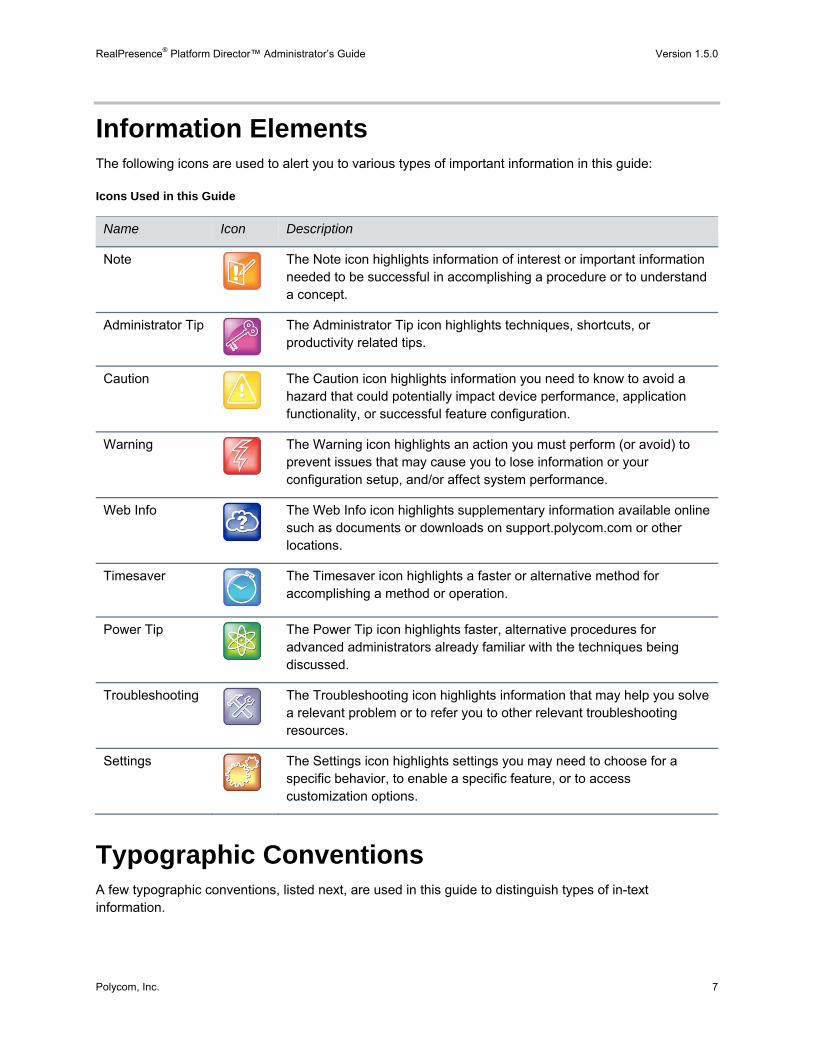
Information Elements The following icons are used to alert you to various types of important information in this guide:
Icons Used in this Guide
Name Icon Description
Note
The Note icon highlights information of interest or important information needed to be successful in accomplishing a procedure or to understand a concept.
Administrator Tip
The Administrator Tip icon highlights techniques, shortcuts, or productivity related tips.
Caution
The Caution icon highlights information you need to know to avoid a hazard that could potentially impact device performance, application functionality, or successful feature configuration.
Warning
The Warning icon highlights an action you must perform (or avoid) to prevent issues that may cause you to lose information or your configuration setup, and/or affect system performance.
Web Info
The Web Info icon highlights supplementary information available online such as documents or downloads on support.polycom.com or other locations.
Timesaver
The Timesaver icon highlights a faster or alternative method for accomplishing a method or operation.
Power Tip
The Power Tip icon highlights faster, alternative procedures for advanced administrators already familiar with the techniques being discussed.
Troubleshooting
The Troubleshooting icon highlights information that may help you solve a relevant problem or to refer you to other relevant troubleshooting resources.
Settings
The Settings icon highlights settings you may need to choose for a specific behavior, to enable a specific feature, or to access customization options.
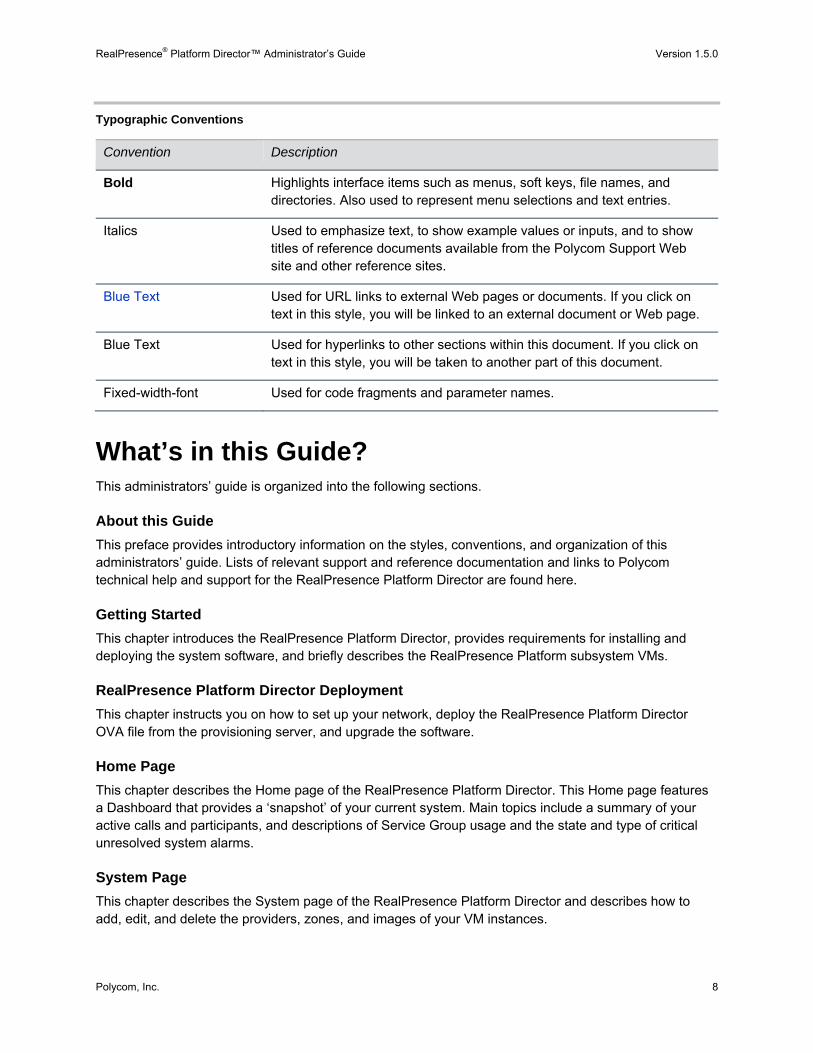
Typographic Conventions A few typographic conventions, listed next, are used in this guide to distinguish types of in-text information.
RealPresence® Platform Director™ Administrator’s Guide Version 1.5.0
Polycom, Inc. 8
Typographic Conventions
Convention Description
Bold Highlights interface items such as menus, soft keys, file names, and directories. Also used to represent menu selections and text entries.
Italics Used to emphasize text, to show example values or inputs, and to show titles of reference documents available from the Polycom Support Web site and other reference sites.
Blue Text Used for URL links to external Web pages or documents. If you click on text in this style, you will be linked to an external document or Web page.
Blue Text Used for hyperlinks to other sections within this document. If you click on text in this style, you will be taken to another part of this document.
Fixed-width-font Used for code fragments and parameter names.
What’s in this Guide? This administrators’ guide is organized into the following sections.
About this Guide
This preface provides introductory information on the styles, conventions, and organization of this administrators’ guide. Lists of relevant support and reference documentation and links to Polycom technical help and support for the RealPresence Platform Director are found here.
Getting Started
This chapter introduces the RealPresence Platform Director, provides requirements for installing and deploying the system software, and briefly describes the RealPresence Platform subsystem VMs.
RealPresence Platform Director Deployment
This chapter instructs you on how to set up your network, deploy the RealPresence Platform Director OVA file from the provisioning server, and upgrade the software.
Home Page
This chapter describes the Home page of the RealPresence Platform Director. This Home page features a Dashboard that provides a ‘snapshot’ of your current system. Main topics include a summary of your active calls and participants, and descriptions of Service Group usage and the state and type of critical unresolved system alarms.
System Page
This chapter describes the System page of the RealPresence Platform Director and describes how to add, edit, and delete the providers, zones, and images of your VM instances.
RealPresence® Platform Director™ Administrator’s Guide Version 1.5.0
Polycom, Inc. 9
Service Page
This chapter describes how to manage instances and service groups, and explains the steps involved in adding new and existing instances.
User Management Page
This chapter describes the User Management page of the RealPresence Platform Director. User roles are described, and instructions on how to manage RealPresence Platform Director users by adding, editing, and deleting users and their profiles are provided.
Monitoring Page
This chapter describes the Monitoring page where you can monitor the system health of your component instances and view the state of RealPresence Platform Director alarms and alarm thresholds.
Settings Page
This chapter describes the various RealPresence Platform Director and application settings and how to set and change them.
Troubleshooting
This chapter provides possible symptoms, problems, and corrective actions to take to solve any potential system problems.
Restricted Shell
This appendix provides detail on the RealPresence Platform Director’s restricted shell environment, and the functionality of the RealPresence Platform Director’s administrative user interface, through sample Use Cases.
Third-Party Software
This appendix provides the copyright statements for third-party software products that have been incorporated into the RealPresence Platform Director.
Help and Technical Support Help and technical support for the RealPresence Platform Director is available at the Polycom Support Center. The following sections provide links for service and specific products and their documentation.
Polycom Support
For product support or service, contact your Polycom reseller or visit http://support.polycom.com/PolycomService/support/us/support/network/cloudaxis_suite/realpresence_cl

RealPresence® Platform Director™ Administrator’s Guide Version 1.5.0
Polycom, Inc. 10
oudaxis_suite.html for software downloads, product document, product licenses, troubleshooting tips, service requests, and more.
Reference Documentation The following support and reference documentation is available for the RealPresence Platform Director at http://support.polycom.com:
● RealPresence® Platform Director Software 1.5.0 Release Notes
● RealPresence® Platform Director Software 1.5.0 Administrators’ Guide
For details on each of the RealPresence Platform subsystem components that may be used with the RealPresence Platform Director, visit the Polycom Support website (www.polycom.com/support) for links to:
● Polycom® RealPresence® DMA® 7000
● Polycom® RealPresence® Resource Manager
● Polycom® RealPresence® Access Director™
● Polycom® RealPresence® Collaboration Server
For details on all Polycom® RealPresence® CloudAXIS™ Suite products, visit http://support.polycom.com/PolycomService/support/us/support/network/cloudaxis_suite/realpresence_cloudaxis_suite.html.
You can find Request for Comments (RFC) documents by entering the RFC number at http://www.ietf.org/rfc.html.
VMware support and reference documentation is available at
https://www.vmware.com/support/pubs/vsphere-esxi-vcenter-server-pubs.html and
https://my.vmware.com/web/vmware.
OpenStack information and reference documentation is available at
http://www.openstack.org.
For other references, look for the Web Info icon throughout this Administrators’ Guide.
Documentation Feedback We are striving to improve the quality of our documentation, and we appreciate your feedback. Please send your email to [email protected].
Polycom, Inc. 11
Getting Started
This chapter lists the minimum requirements needed for RealPresence Platform Director activities and provides a worksheet for you to complete before beginning RealPresence Platform Director deployment and configuration.
RealPresence Platform Director provides the flexibility to deploy the RealPresence® Platform and RealPresence® CloudAXIS™ Suite using general purpose hardware in an organization’s data center or in the cloud. RealPresence Platform Director deployment involves VM-based platform manifestations of such RealPresence Platform products as the Polycom RealPresence Collaboration Server, Virtual Edition, the Polycom RealPresence DMA, Virtual Edition, the Polycom RealPresence Resource Manager, Virtual Edition, the Polycom RealPresence Access Director, Virtual Edition, and the RealPresence CloudAXIS Suite Services Portal and Experience Portal.
RealPresence Platform Director Requirements The RealPresence Platform Director helps you to deploy and monitor the Polycom RealPresence Platform and RealPresence CloudAXIS Suite that enable universal access to enterprise-grade video collaboration to any business (B2B) or consumer (B2C) at the highest quality, reliability, and security. Deployment of the RealPresence Platform Director is dependent on meeting the minimum prerequisites and requirements needed for normal RealPresence Platform Director operation.
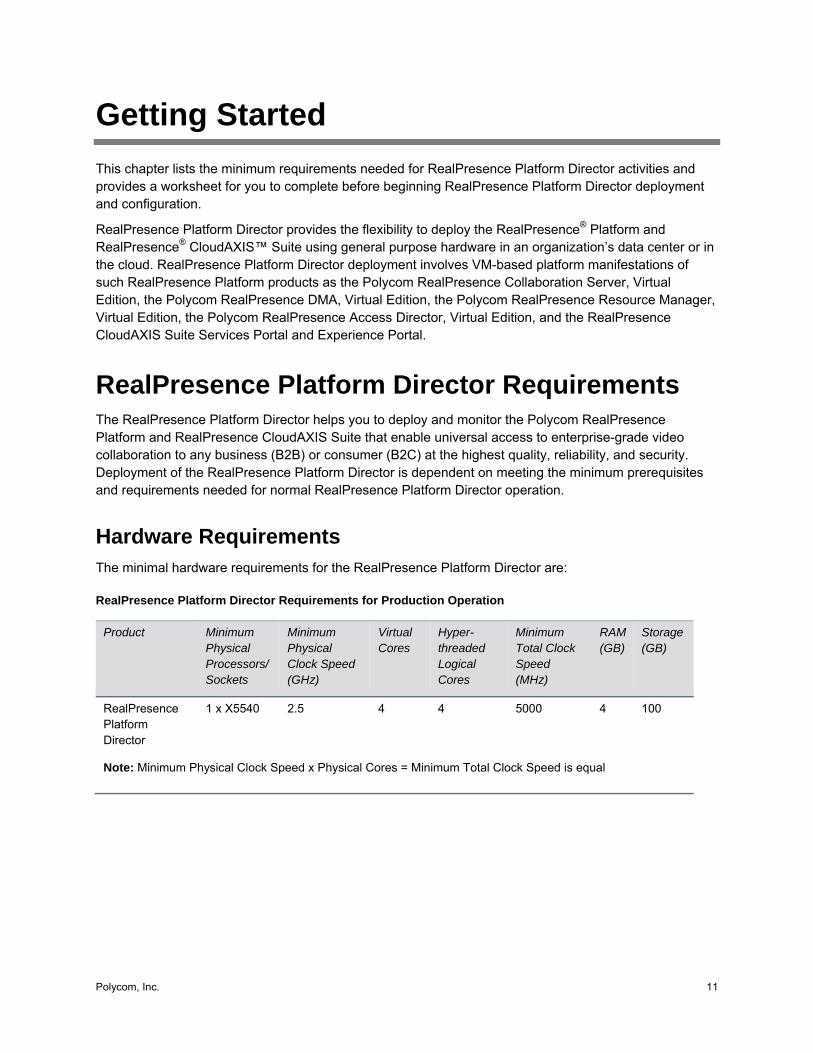
Hardware Requirements The minimal hardware requirements for the RealPresence Platform Director are:
RealPresence Platform Director Requirements for Production Operation
Product Minimum Physical Processors/ Sockets
Minimum Physical Clock Speed (GHz)
Virtual Cores
Hyper- threaded Logical Cores
Minimum Total Clock Speed (MHz)
RAM (GB)
Storage (GB)
RealPresence Platform Director
1 x X5540 2.5 4 4 5000 4 100
Note: Minimum Physical Clock Speed x Physical Cores = Minimum Total Clock Speed is equal
RealPresence® Platform Director™ Administrator’s Guide Version 1.5.0
Polycom, Inc. 12
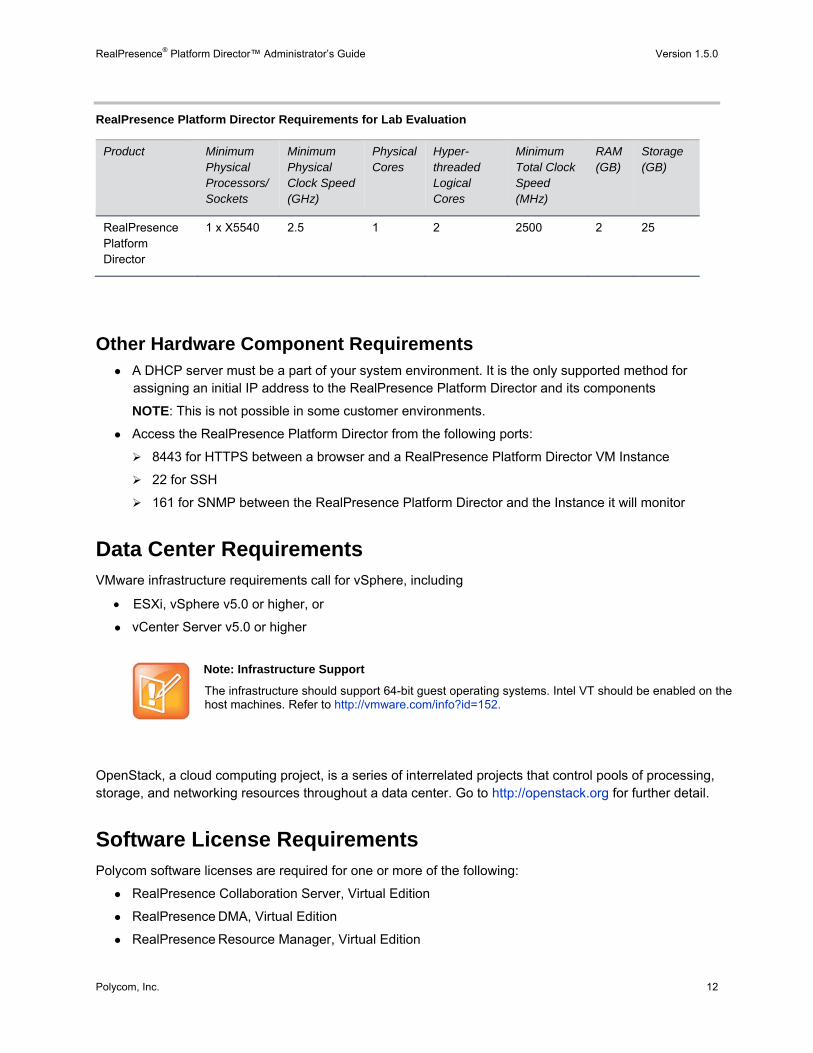
RealPresence Platform Director Requirements for Lab Evaluation
Product Minimum Physical Processors/ Sockets
Minimum Physical Clock Speed (GHz)
Physical Cores
Hyper- threaded Logical Cores
Minimum Total Clock Speed (MHz)
RAM (GB)
Storage (GB)
RealPresence Platform Director
1 x X5540 2.5 1 2 2500 2 25
Other Hardware Component Requirements ● A DHCP server must be a part of your system environment. It is the only supported method for
assigning an initial IP address to the RealPresence Platform Director and its components
NOTE: This is not possible in some customer environments.
● Access the RealPresence Platform Director from the following ports:
8443 for HTTPS between a browser and a RealPresence Platform Director VM Instance
22 for SSH
161 for SNMP between the RealPresence Platform Director and the Instance it will monitor
Data Center Requirements VMware infrastructure requirements call for vSphere, including
ESXi, vSphere v5.0 or higher, or
● vCenter Server v5.0 or higher
Note: Infrastructure Support
The infrastructure should support 64-bit guest operating systems. Intel VT should be enabled on the host machines. Refer to http://vmware.com/info?id=152.
OpenStack, a cloud computing project, is a series of interrelated projects that control pools of processing, storage, and networking resources throughout a data center. Go to http://openstack.org for further detail.
Software License Requirements Polycom software licenses are required for one or more of the following:
● RealPresence Collaboration Server, Virtual Edition
● RealPresence DMA, Virtual Edition
● RealPresence Resource Manager, Virtual Edition

RealPresence® Platform Director™ Administrator’s Guide Version 1.5.0
Polycom, Inc. 13
● RealPresence Access Director, Virtual Edition
● RealPresence® Platform Director™
● RealPresence® CloudAXIS Suite Services Portal and the Experience Portal components of your RealPresence Platform Director
These licenses are necessary to enable your subsystems with the capabilities you purchased. See the documentation for each individual component for license information.
Web Browser Requirements At this time, the RealPresence Platform Director supports the following web browsers:
● Microsoft Internet Explorer® 10.0 or higher
● Mozilla Firefox® v27.0 or later
● Google Chrome™ v32.0 or later
Note: Optimal Browsers
RealPresence Platform Director is optimized for Chrome and Firefox.
RealPresence Platform Director Architecture RealPresence Platform Director in the Polycom RealPresence Suite provides the flexibility to deploy, manage, and monitor the RealPresence Platform and RealPresence CloudAXIS Suite using general purpose hardware in your organization’s Data Center or in the cloud. RealPresence Platform Director can support deployments on any virtualized data center. In this software release, deployments are supported on VMware and OpenStack.
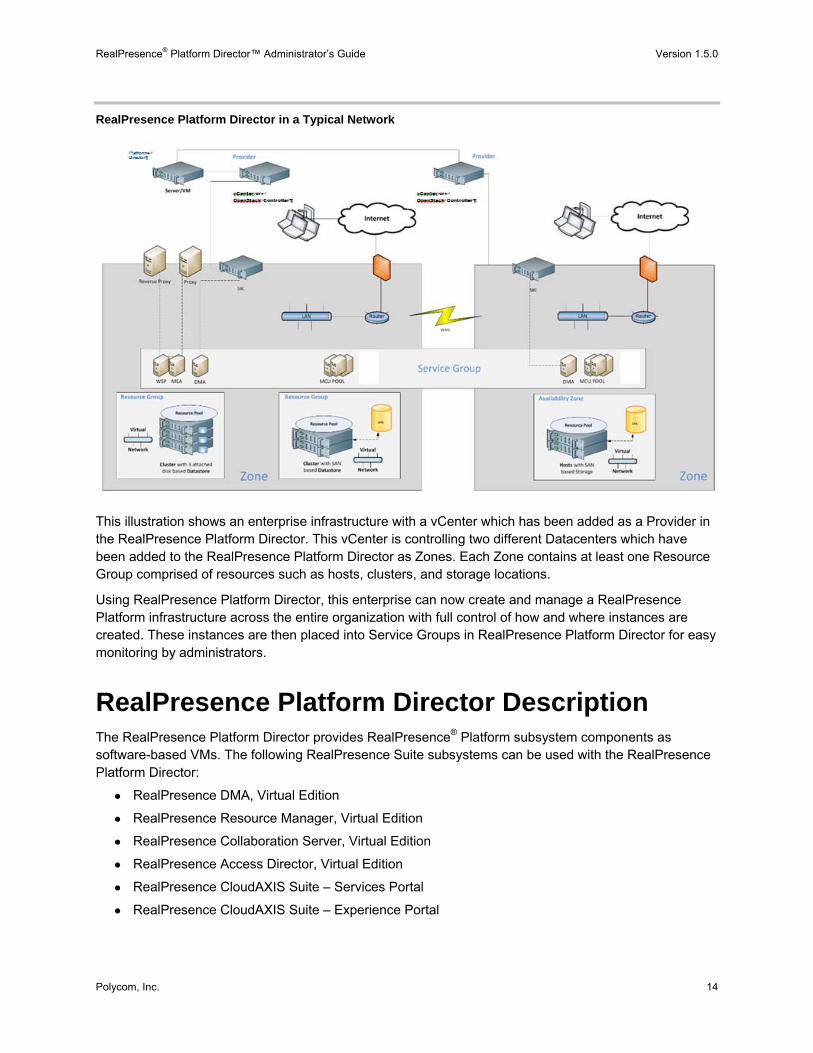
The following graphic illustrates a deployment scenario where an organization’s Data Centers are spread globally.
RealPresence® Platform Director™ Administrator’s Guide Version 1.5.0
Polycom, Inc. 14
RealPresence Platform Director in a Typical Network
This illustration shows an enterprise infrastructure with a vCenter which has been added as a Provider in the RealPresence Platform Director. This vCenter is controlling two different Datacenters which have been added to the RealPresence Platform Director as Zones. Each Zone contains at least one Resource Group comprised of resources such as hosts, clusters, and storage locations.
Using RealPresence Platform Director, this enterprise can now create and manage a RealPresence Platform infrastructure across the entire organization with full control of how and where instances are created. These instances are then placed into Service Groups in RealPresence Platform Director for easy monitoring by administrators.
RealPresence Platform Director Description The RealPresence Platform Director provides RealPresence® Platform subsystem components as software-based VMs. The following RealPresence Suite subsystems can be used with the RealPresence Platform Director:
● RealPresence DMA, Virtual Edition
● RealPresence Resource Manager, Virtual Edition
● RealPresence Collaboration Server, Virtual Edition
● RealPresence Access Director, Virtual Edition
● RealPresence CloudAXIS Suite – Services Portal
● RealPresence CloudAXIS Suite – Experience Portal

RealPresence® Platform Director™ Administrator’s Guide Version 1.5.0
Polycom, Inc. 15
RealPresence Platform Software Description The RealPresence Platform Director provides the flexibility to deploy RealPresence Platform and RealPresence CloudAXIS Suite components as software-based VM instances. RealPresence Platform Director currently supports the deployment of RealPresence Platform and RealPresence CloudAXIS Suite components on VMware hypervisors and OpenStack. These software components are uploaded as .OVA templates to the RealPresence Platform Director and are used to create the VM instances.
RealPresence DMA, Virtual Edition The RealPresence DMA, Virtual Edition, a network-based application, can manage a mixed pool of RMXs and software MCUs and distribute multipoint video calls across conference platforms. Go to http://support.polycom.com for the currently supported RealPresence DMA product release number.
RealPresence Resource Manager, Virtual Edition The RealPresence Resource Manager, Virtual Edition is an integrated scheduling and device management platform for video conferencing. This platform:
● Manages the conferencing system, including system software and devices
● Sets up and maintains conferencing schedules
● Maintains and supports a directory of the system devices.
Go to http://support.polycom.comfor the currently supported RealPresence Resource Manager product release number.
RealPresence Collaboration Server,Virtual Edition The RealPresence Collaboration Server, Virtual Edition is Polycom’s software-based Multipoint Control Unit (MCU). Go to http://support.polycom.com for the currently supported RealPresence Collaboration Server product release number.
RealPresence Access Director, Virtual Edition The RealPresence Access Director, Virtual Edition provides remote, guest, and business-to-business users with the ability to securely and transparently access video services from anywhere. Go to http://support.polycom.com for the currently supported RealPresence Access Director product release number.
RealPresence CloudAXIS Suite Services Portal The RealPresence CloudAXIS Suite Services Portal enables users to create and participate in online video conference meetings. Users create meetings by logging into the Services Portal, selecting the type of meeting they want to create, setting the meeting parameters, and entering a list of participants to invite. The Services Portal also provides administrative capabilities for creating and managing users and for configuring the components that enable the online video conference meetings.
RealPresence® Platform Director™ Administrator’s Guide Version 1.5.0
Polycom, Inc. 16
The Services Portal is also referred to as the SP in the user interface.
RealPresence CloudAXIS Suite Experience Portal The RealPresence CloudAXIS Suite Experience Portal is the meeting conferencing interface. It provides users with this meeting interface, and enables users to interact with features such as content sharing, group chat, and privacy settings.
The Experience Portal is also referred to as the EP in the user interface.
Polycom, Inc. 17
RealPresence Platform Director Deployment
The RealPresence Platform Director requires deployment in a data center. After deployment, RealPresence Platform Director can be configured to manage and deploy RealPresence Platform components as well as such RealPresence CloudAXIS Suite components as the Services Portal and Experience Portal.
Deploy the RealPresence Platform Director Before you begin, confirm that you meet the prerequisites listed in RealPresence Platform Director Requirements, and then deploy the RealPresence Platform Director .OVA file to your datacenter.
To deploy the RealPresence Platform Director:
1 Obtain the .OVA file.
2 Deploy the .OVA file in your data center.
Note that when a RealPresence Platform Director instance boots up, it will attempt to obtain an IP address via DHCP. The instance IP address and the MAC address can be determined by accessing the Instance information.
User Tip: Instance IP Assignment
Polycom recommends that the Instance IP assignment be made permanent by modifying your DHCP server’s configuration to map the current IP address or another preferred address of your choosing to the Instance MAC address. Then, reboot the Instance (if necessary) to enable it to obtain a new address. Always restart Apache Tomcat whenever the IP is changed.
Polycom also recommends that you modify your DNS server settings to assign a domain name to the Instance based on the permanent IP address you have selected.
If DHCP is not available in your environment, the RealPresence Platform Director’s IP address and networking settings may alternatively be configured via the console.
To configure via the console:
1 Access the RealPresence Platform Director console.
2 Log in using caxis for both your username and password.
3 Enter show_network_info to view the current network settings.
4 Enter change_network_settings to modify the current network settings.
5 Run the command change_hostname.
6 Verify that the hostname is registered to the DNS.
RealPresence® Platform Director™ Administrator’s Guide Version 1.5.0
Polycom, Inc. 18
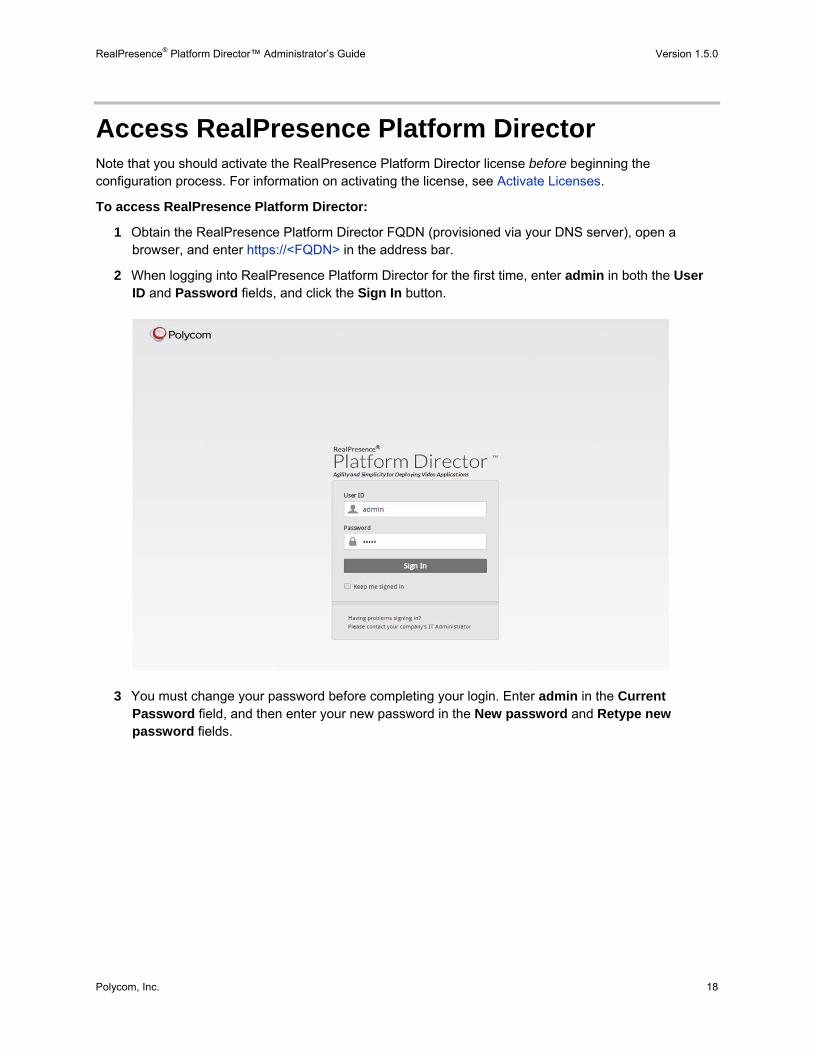
Access RealPresence Platform Director Note that you should activate the RealPresence Platform Director license before beginning the configuration process. For information on activating the license, see Activate Licenses.
To access RealPresence Platform Director:
1 Obtain the RealPresence Platform Director FQDN (provisioned via your DNS server), open a browser, and enter https://<FQDN> in the address bar.
2 When logging into RealPresence Platform Director for the first time, enter admin in both the User ID and Password fields, and click the Sign In button.
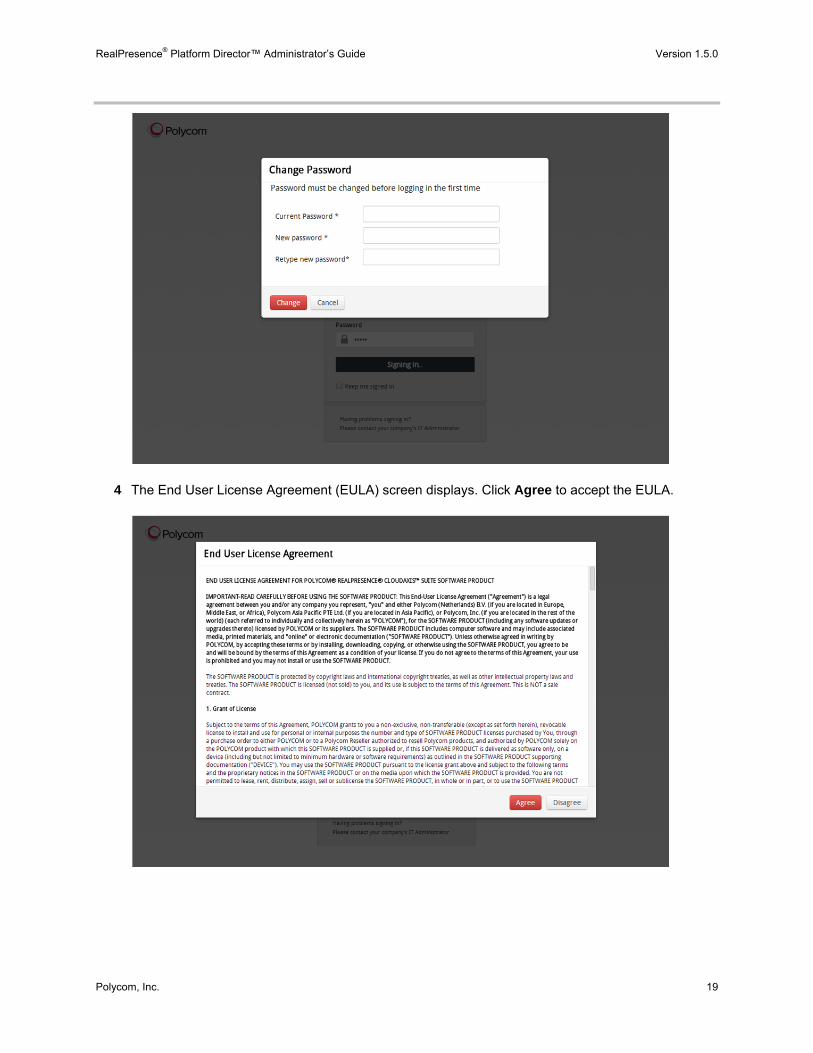
3 You must change your password before completing your login. Enter admin in the Current Password field, and then enter your new password in the New password and Retype new password fields.
RealPresence® Platform Director™ Administrator’s Guide Version 1.5.0
Polycom, Inc. 19
4 The End User License Agreement (EULA) screen displays. Click Agree to accept the EULA.
RealPresence® Platform Director™ Administrator’s Guide Version 1.5.0
Polycom, Inc. 20
Troubleshoot the FQDN If the RealPresence Platform Director URL does not respond, open the RealPresence Platform Director login screen and confirm that the Apache Tomcat server is running.
To check the Apache Tomcat server:
1 Use either your vSphere console or connect via an SSH client to the RealPresence Platform Director FQDN to access the RealPresence Platform Director console.
2 Log in using caxis for both your UserID and Password.
3 Get the Apache status by entering services tomcat6 status.
4 Do one of the following:
Ask to reboot the instance
Start the server if it is not running
Restart the server if it is running and you are still having problems with the link
Startup server: services tomcat6 start
Restart server: services tomcat6 restart
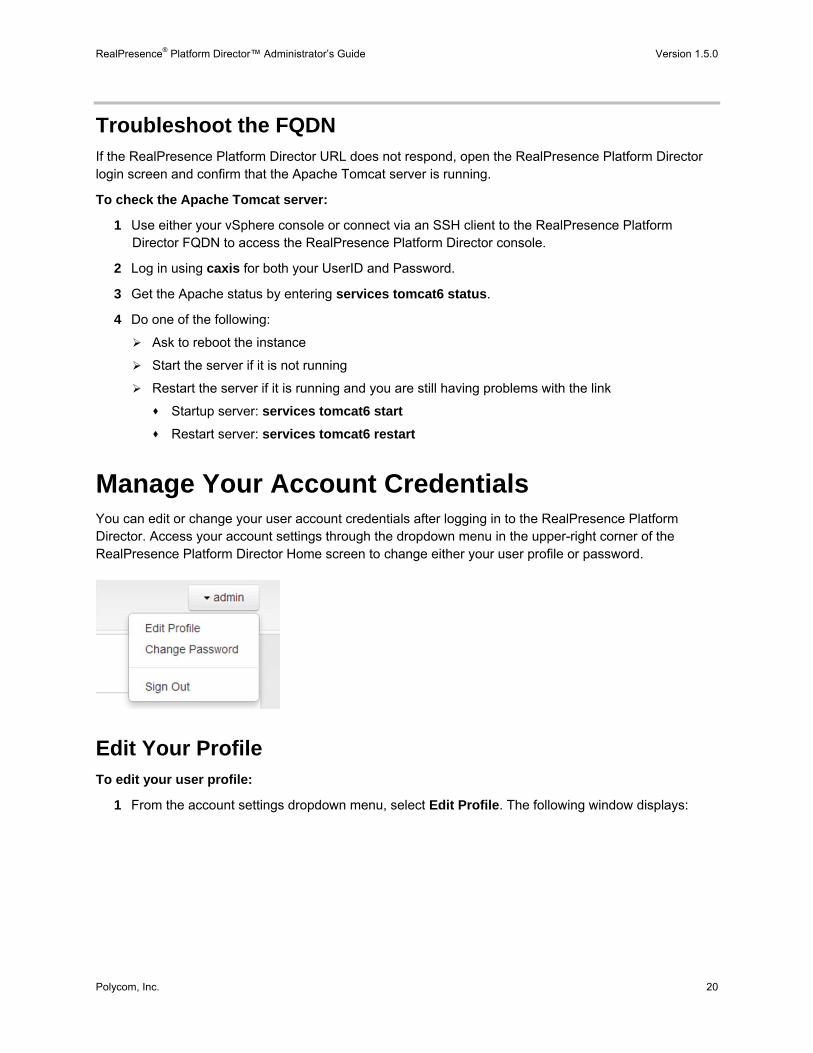
Manage Your Account Credentials You can edit or change your user account credentials after logging in to the RealPresence Platform Director. Access your account settings through the dropdown menu in the upper-right corner of the RealPresence Platform Director Home screen to change either your user profile or password.
Edit Your Profile To edit your user profile:
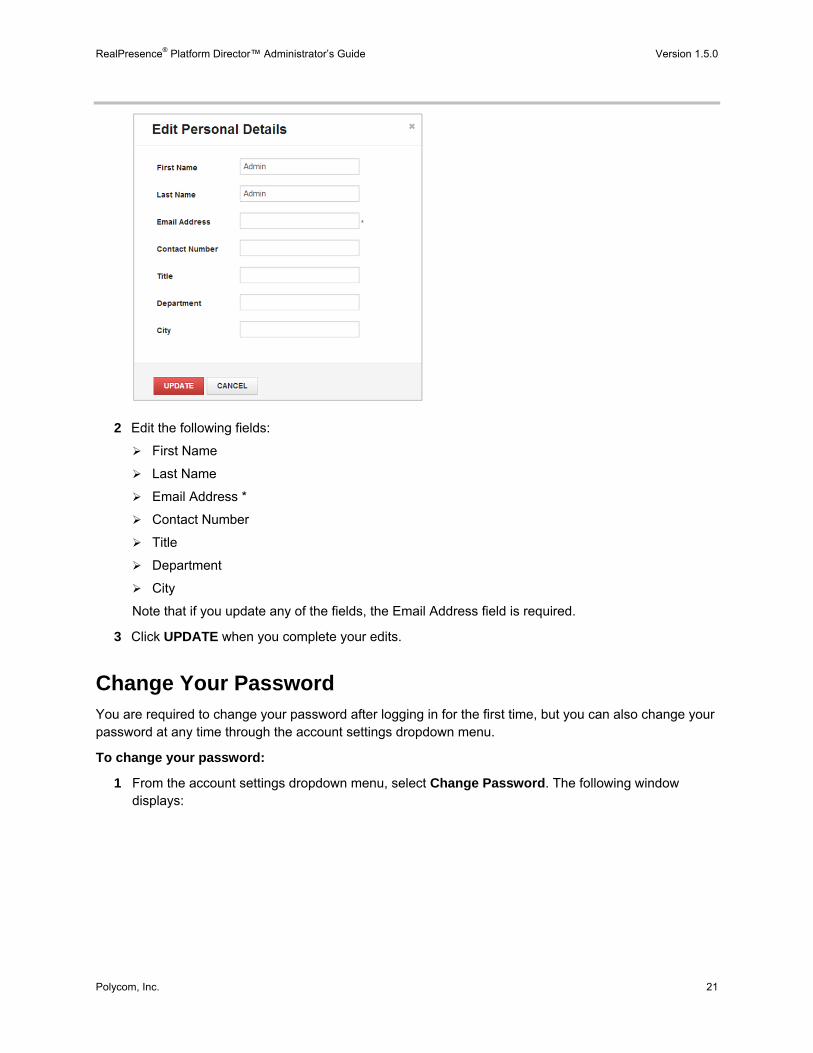
1 From the account settings dropdown menu, select Edit Profile. The following window displays:
RealPresence® Platform Director™ Administrator’s Guide Version 1.5.0
Polycom, Inc. 21
2 Edit the following fields:
First Name
Last Name
Email Address *
Contact Number
Title
Department
City
Note that if you update any of the fields, the Email Address field is required.
3 Click UPDATE when you complete your edits.
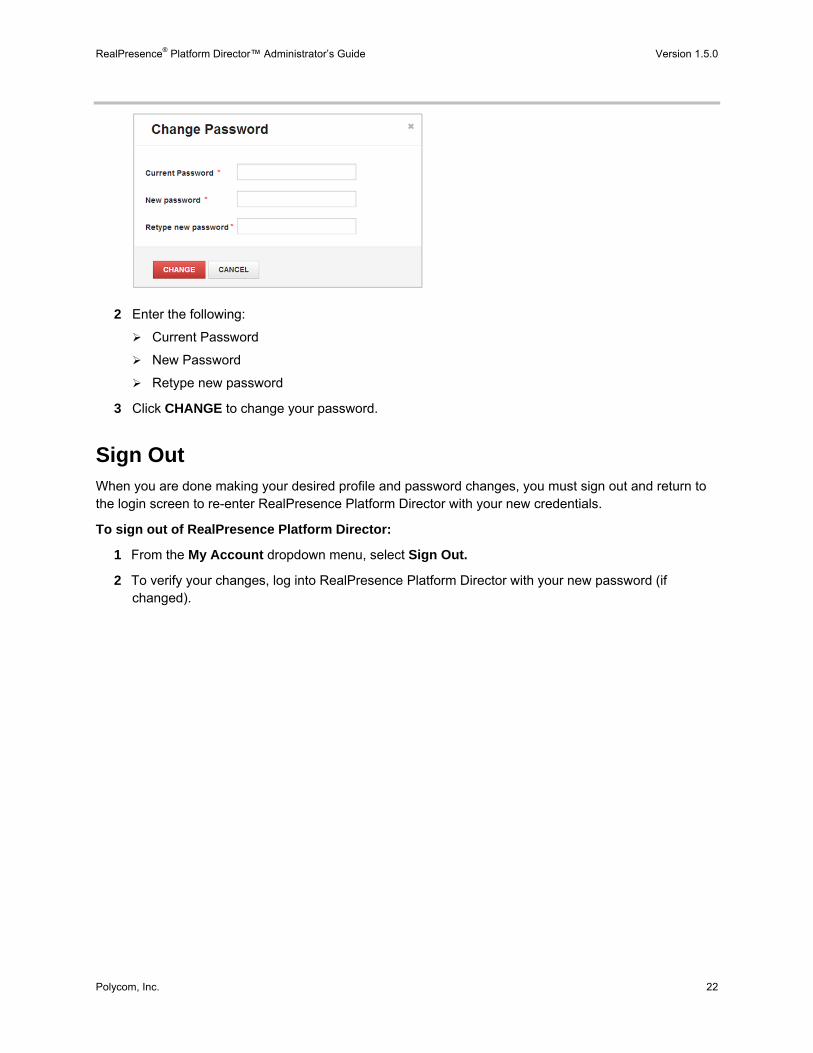
Change Your Password You are required to change your password after logging in for the first time, but you can also change your password at any time through the account settings dropdown menu.
To change your password:
1 From the account settings dropdown menu, select Change Password. The following window displays:
RealPresence® Platform Director™ Administrator’s Guide Version 1.5.0
Polycom, Inc. 22
2 Enter the following:
Current Password
New Password
Retype new password
3 Click CHANGE to change your password.
Sign Out When you are done making your desired profile and password changes, you must sign out and return to the login screen to re-enter RealPresence Platform Director with your new credentials.
To sign out of RealPresence Platform Director:
1 From the My Account dropdown menu, select Sign Out.
2 To verify your changes, log into RealPresence Platform Director with your new password (if changed).

Polycom, Inc. 23
Home Page
RealPresence Platform Director Dashboard The Home page of the RealPresence Platform Director features a Dashboard that provides a snapshot of your current system.
Summary The Summary section of the Dashboard is a summarization of current active conference calls and participants, including the percentage of ports in use.
Most Used Service Groups The Most used Service Groups section lists the Service Groups that are currently experiencing the highest amount of system usage.
RealPresence® Platform Director™ Administrator’s Guide Version 1.5.0
Polycom, Inc. 24
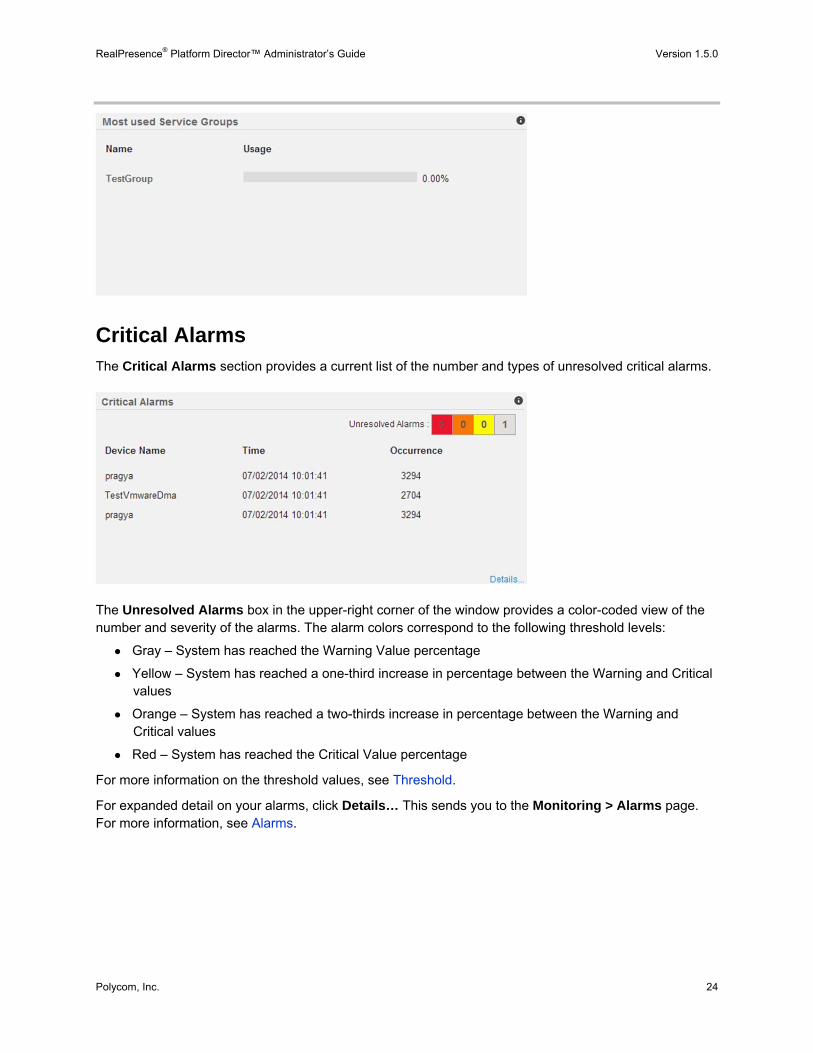
Critical Alarms The Critical Alarms section provides a current list of the number and types of unresolved critical alarms.
The Unresolved Alarms box in the upper-right corner of the window provides a color-coded view of the number and severity of the alarms. The alarm colors correspond to the following threshold levels:
● Gray – System has reached the Warning Value percentage
● Yellow – System has reached a one-third increase in percentage between the Warning and Critical values
● Orange – System has reached a two-thirds increase in percentage between the Warning and Critical values
● Red – System has reached the Critical Value percentage
For more information on the threshold values, see Threshold.
For expanded detail on your alarms, click Details… This sends you to the Monitoring > Alarms page. For more information, see Alarms.

RealPresence® Platform Director™ Administrator’s Guide Version 1.5.0
Polycom, Inc. 25
Instances with Critical Alarms The Instances with Critical Alarms section lists the specific instances within your system that are experiencing Critical Alarms.
For expanded detail on your critical alarms, click Details… This sends you to Service > Instances page. For more information, see Instances.
RealPresence® Platform Director™ Administrator’s Guide Version 1.5.0
Polycom, Inc. 26

Polycom, Inc. 27
System Page
Providers RealPresence Platform Director can work with an organization’s vCenter to create, manage, and monitor virtual RealPresence Instances. You must add the vCenter to RealPresence Platform Director as a Provider, which includes access URL to the VMware Data Center or OpenStack and user account credentials to access the data center to create new instances and manage existing ones.
Add a Provider You must add at least one Provider to use RealPresence Platform Director.
To add a Provider:
1 Click SYSTEM > Providers. The PROVIDERS page displays:
2 Click + PROVIDER. The Add a Provider window displays:
RealPresence® Platform Director™ Administrator’s Guide Version 1.5.0
Polycom, Inc. 28
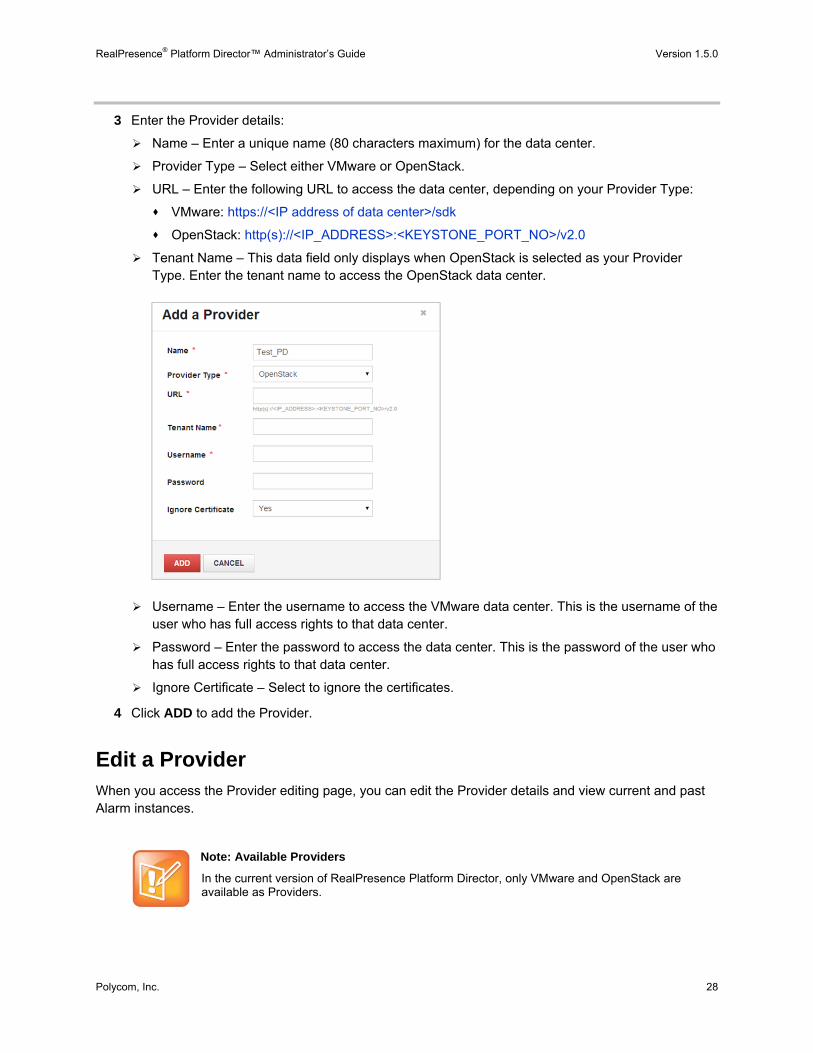
3 Enter the Provider details:
Name – Enter a unique name (80 characters maximum) for the data center.
Provider Type – Select either VMware or OpenStack.
URL – Enter the following URL to access the data center, depending on your Provider Type:
VMware: https://<IP address of data center>/sdk
OpenStack: http(s)://<IP_ADDRESS>:<KEYSTONE_PORT_NO>/v2.0
Tenant Name – This data field only displays when OpenStack is selected as your Provider Type. Enter the tenant name to access the OpenStack data center.
Username – Enter the username to access the VMware data center. This is the username of the user who has full access rights to that data center.
Password – Enter the password to access the data center. This is the password of the user who has full access rights to that data center.
Ignore Certificate – Select to ignore the certificates.
4 Click ADD to add the Provider.
Edit a Provider When you access the Provider editing page, you can edit the Provider details and view current and past Alarm instances.
Note: Available Providers
In the current version of RealPresence Platform Director, only VMware and OpenStack are available as Providers.
RealPresence® Platform Director™ Administrator’s Guide Version 1.5.0
Polycom, Inc. 29
Provider Details
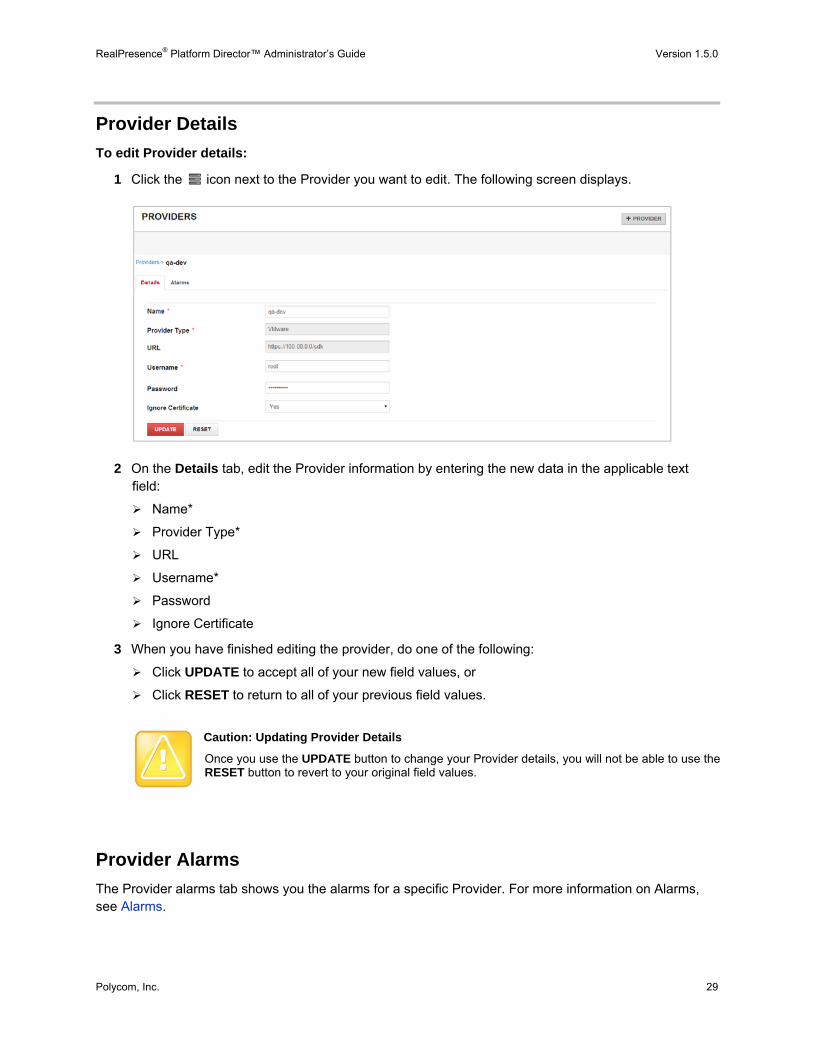
To edit Provider details:
1 Click the icon next to the Provider you want to edit. The following screen displays.
2 On the Details tab, edit the Provider information by entering the new data in the applicable text field:
Name*
Provider Type*
URL
Username*
Password
Ignore Certificate
3 When you have finished editing the provider, do one of the following:
Click UPDATE to accept all of your new field values, or
Click RESET to return to all of your previous field values.
Caution: Updating Provider Details
Once you use the UPDATE button to change your Provider details, you will not be able to use the RESET button to revert to your original field values.
Provider Alarms
The Provider alarms tab shows you the alarms for a specific Provider. For more information on Alarms, see Alarms.
RealPresence® Platform Director™ Administrator’s Guide Version 1.5.0
Polycom, Inc. 30
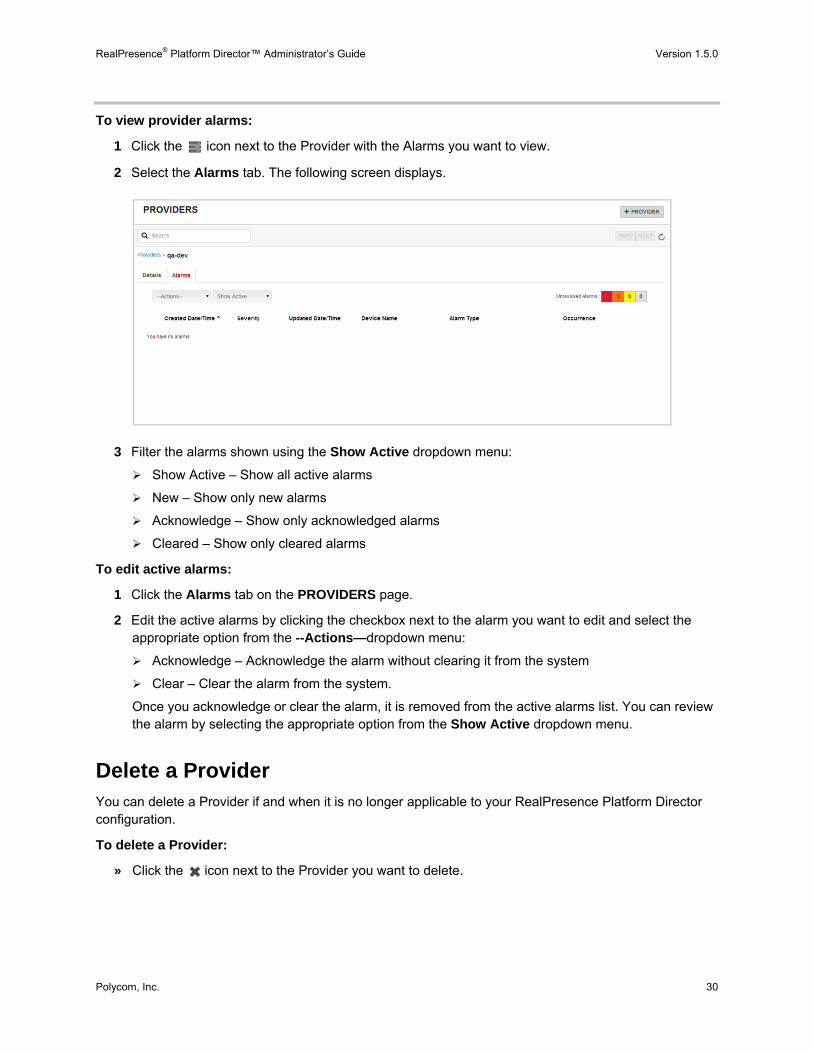
To view provider alarms:
1 Click the icon next to the Provider with the Alarms you want to view.
2 Select the Alarms tab. The following screen displays.
3 Filter the alarms shown using the Show Active dropdown menu:
Show Active – Show all active alarms
New – Show only new alarms
Acknowledge – Show only acknowledged alarms
Cleared – Show only cleared alarms
To edit active alarms:
1 Click the Alarms tab on the PROVIDERS page.
2 Edit the active alarms by clicking the checkbox next to the alarm you want to edit and select the appropriate option from the --Actions—dropdown menu:
Acknowledge – Acknowledge the alarm without clearing it from the system
Clear – Clear the alarm from the system.
Once you acknowledge or clear the alarm, it is removed from the active alarms list. You can review the alarm by selecting the appropriate option from the Show Active dropdown menu.
Delete a Provider You can delete a Provider if and when it is no longer applicable to your RealPresence Platform Director configuration.
To delete a Provider:
» Click the icon next to the Provider you want to delete.
RealPresence® Platform Director™ Administrator’s Guide Version 1.5.0
Polycom, Inc. 31
Zones Zones provide a description of a specific location: a city, a data center, or even a building and give the administrator a view of the whole network, including any past or current alarms. The administrator must specify Resource Groups, comprised of the the computer, storage, and network resources to be used in this Zone, that can be used by the Instances created in this Zone. A Resource Group decides which resources on the Provider are used when an Instance is in this Zone. This helps to manage the resources allocated to the RealPresence Platform Director in different locations from different vCenters.
Add a Zone Zones are a description of a physical location, including a provider, data center, host/cluster, resource pool, data storage, and network resource. You must add at least one Zone to use RealPresence Platform Director.
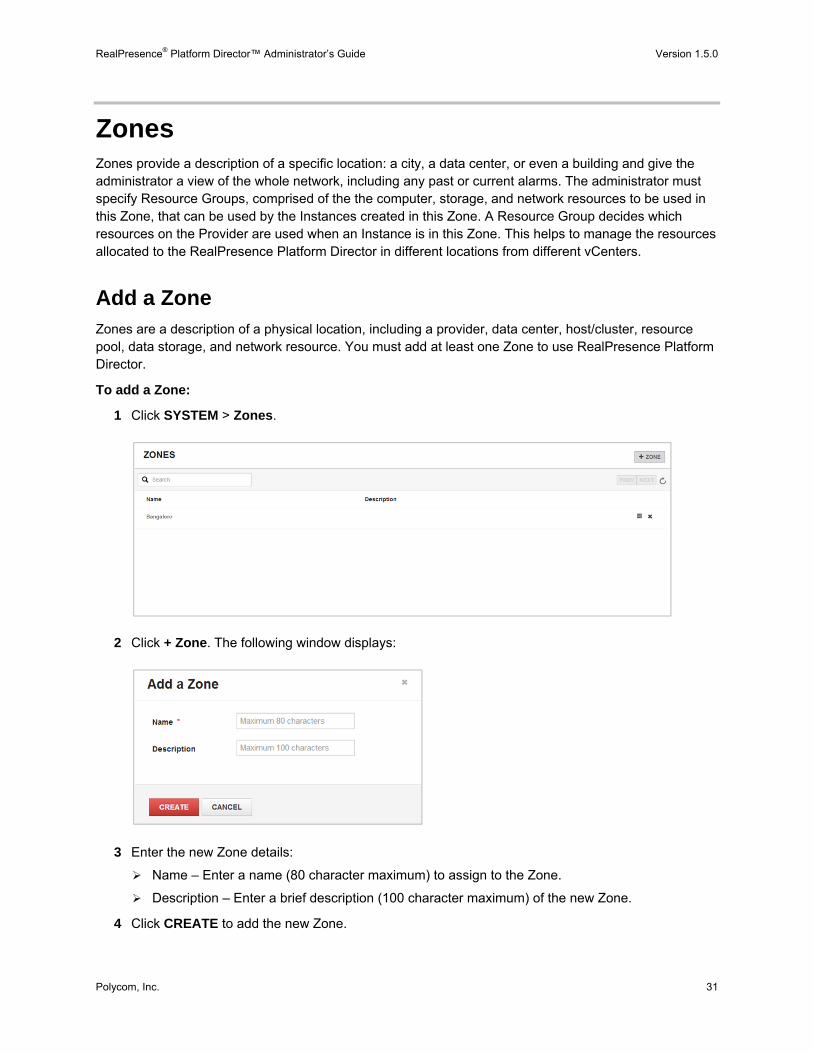
To add a Zone:
1 Click SYSTEM > Zones.
2 Click + Zone. The following window displays:
3 Enter the new Zone details:
Name – Enter a name (80 character maximum) to assign to the Zone.
Description – Enter a brief description (100 character maximum) of the new Zone.
4 Click CREATE to add the new Zone.
RealPresence® Platform Director™ Administrator’s Guide Version 1.5.0
Polycom, Inc. 32
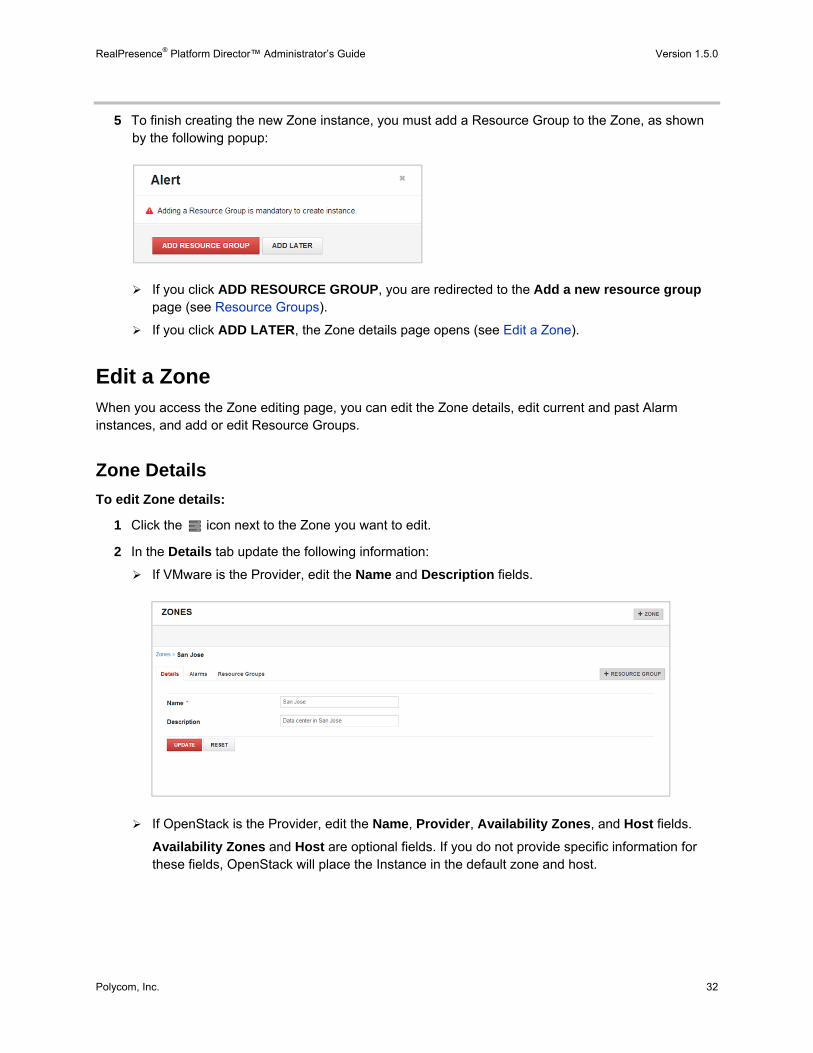
5 To finish creating the new Zone instance, you must add a Resource Group to the Zone, as shown by the following popup:
If you click ADD RESOURCE GROUP, you are redirected to the Add a new resource group page (see Resource Groups).
If you click ADD LATER, the Zone details page opens (see Edit a Zone).
Edit a Zone When you access the Zone editing page, you can edit the Zone details, edit current and past Alarm instances, and add or edit Resource Groups.
Zone Details
To edit Zone details:
1 Click the icon next to the Zone you want to edit.
2 In the Details tab update the following information:
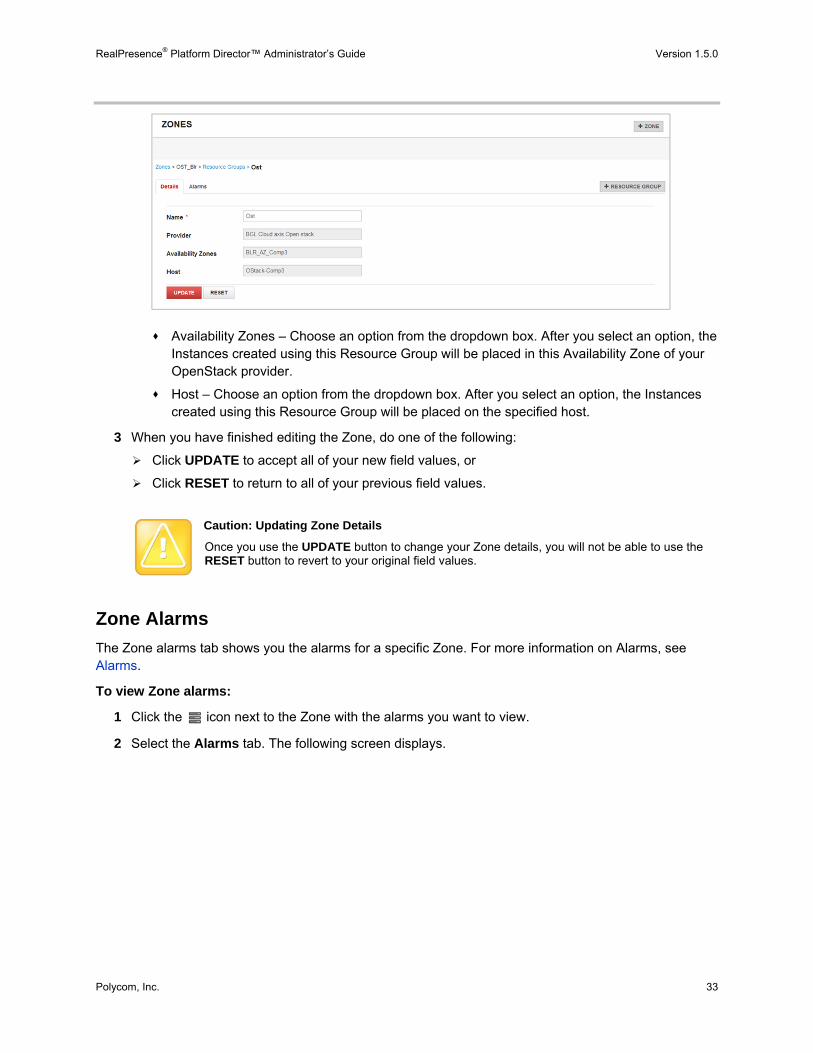
If VMware is the Provider, edit the Name and Description fields.
If OpenStack is the Provider, edit the Name, Provider, Availability Zones, and Host fields.
Availability Zones and Host are optional fields. If you do not provide specific information for these fields, OpenStack will place the Instance in the default zone and host.
RealPresence® Platform Director™ Administrator’s Guide Version 1.5.0
Polycom, Inc. 33
Availability Zones – Choose an option from the dropdown box. After you select an option, the Instances created using this Resource Group will be placed in this Availability Zone of your OpenStack provider.
Host – Choose an option from the dropdown box. After you select an option, the Instances created using this Resource Group will be placed on the specified host.
3 When you have finished editing the Zone, do one of the following:
Click UPDATE to accept all of your new field values, or
Click RESET to return to all of your previous field values.
Caution: Updating Zone Details
Once you use the UPDATE button to change your Zone details, you will not be able to use the RESET button to revert to your original field values.
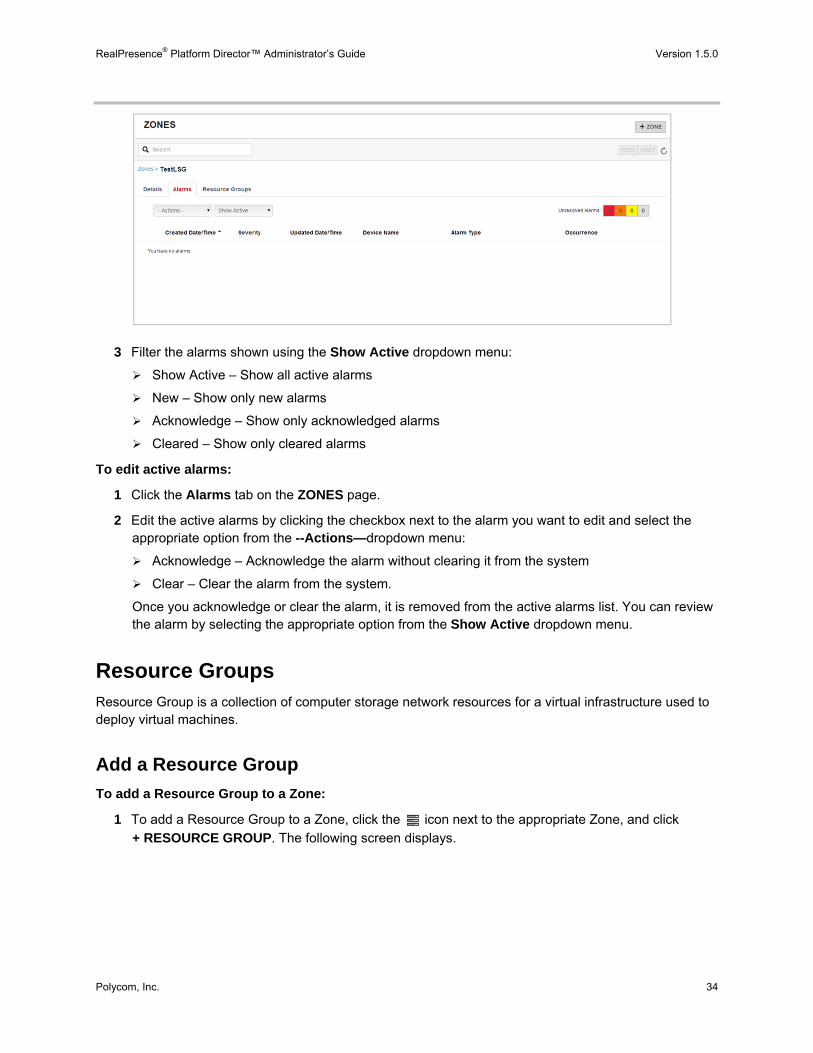
Zone Alarms
The Zone alarms tab shows you the alarms for a specific Zone. For more information on Alarms, see Alarms.
To view Zone alarms:
1 Click the icon next to the Zone with the alarms you want to view.
2 Select the Alarms tab. The following screen displays.
RealPresence® Platform Director™ Administrator’s Guide Version 1.5.0
Polycom, Inc. 34
3 Filter the alarms shown using the Show Active dropdown menu:
Show Active – Show all active alarms
New – Show only new alarms
Acknowledge – Show only acknowledged alarms
Cleared – Show only cleared alarms
To edit active alarms:
1 Click the Alarms tab on the ZONES page.
2 Edit the active alarms by clicking the checkbox next to the alarm you want to edit and select the appropriate option from the --Actions—dropdown menu:
Acknowledge – Acknowledge the alarm without clearing it from the system
Clear – Clear the alarm from the system.
Once you acknowledge or clear the alarm, it is removed from the active alarms list. You can review the alarm by selecting the appropriate option from the Show Active dropdown menu.
Resource Groups Resource Group is a collection of computer storage network resources for a virtual infrastructure used to deploy virtual machines.
Add a Resource Group
To add a Resource Group to a Zone:
1 To add a Resource Group to a Zone, click the icon next to the appropriate Zone, and click
+ RESOURCE GROUP. The following screen displays.

RealPresence® Platform Director™ Administrator’s Guide Version 1.5.0
Polycom, Inc. 35
Enter a unique Name and select a Provider. After you select a Provider, the window expands for you to add additional resource information.
2 In the Computer Resource section, select a required option from each of the three dropdown boxes:
Data Center – Select a data center.
Host/Cluster – Select the IP address of your desired Host or Cluster.
Resource Pool – Select your resource pool. This dropdown box is not selectable if the IP address in Host/Cluster is not found.
3 In the Storage Resource section, the + STORAGE button displays after you make a selection in Host/Cluster. Click this button to open the following window:
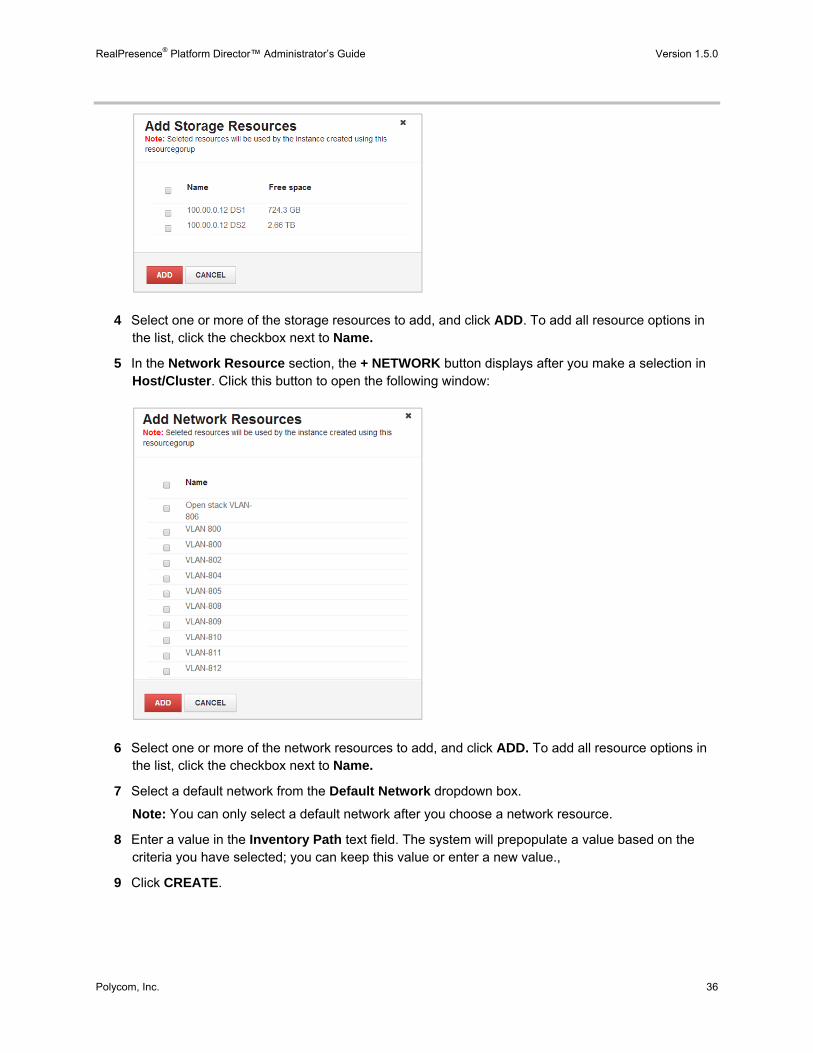
RealPresence® Platform Director™ Administrator’s Guide Version 1.5.0
Polycom, Inc. 36
4 Select one or more of the storage resources to add, and click ADD. To add all resource options in the list, click the checkbox next to Name.
5 In the Network Resource section, the + NETWORK button displays after you make a selection in Host/Cluster. Click this button to open the following window:
6 Select one or more of the network resources to add, and click ADD. To add all resource options in the list, click the checkbox next to Name.
7 Select a default network from the Default Network dropdown box.
Note: You can only select a default network after you choose a network resource.
8 Enter a value in the Inventory Path text field. The system will prepopulate a value based on the criteria you have selected; you can keep this value or enter a new value.,
9 Click CREATE.

RealPresence® Platform Director™ Administrator’s Guide Version 1.5.0
Polycom, Inc. 37
Edit a Resource Group
To edit a Resource Group:
1 Click the Resource Groups tab on the ZONES page. The following screen displays.
2 Click the icon next to the Resource Group you want to edit.
3 Click on the Details tab. From this page, you can edit the Resource Group details or threshold percentages.
On the Details subtab, you can edit the following Resource Group details, as shown on the following:
Name – Update or change the Resource Group name
Storage Resource – Add or remove Storage Resources
Network Resource – Add or remove Network Resources
Default Network – Update or change the Default Network if other options are available
The other detail options are not editable. For more information, see Resource Groups.
RealPresence® Platform Director™ Administrator’s Guide Version 1.5.0
Polycom, Inc. 38
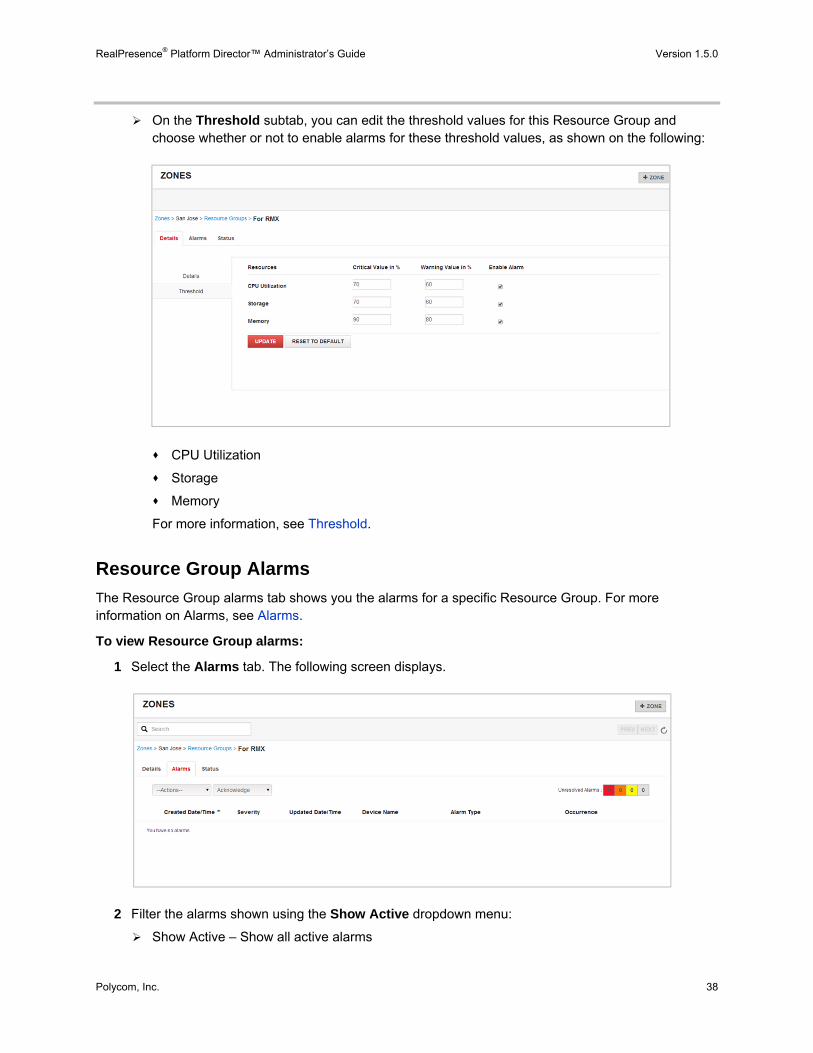
On the Threshold subtab, you can edit the threshold values for this Resource Group and choose whether or not to enable alarms for these threshold values, as shown on the following:
CPU Utilization
Storage
Memory
For more information, see Threshold.
Resource Group Alarms
The Resource Group alarms tab shows you the alarms for a specific Resource Group. For more information on Alarms, see Alarms.
To view Resource Group alarms:
1 Select the Alarms tab. The following screen displays.
2 Filter the alarms shown using the Show Active dropdown menu:
Show Active – Show all active alarms
RealPresence® Platform Director™ Administrator’s Guide Version 1.5.0
Polycom, Inc. 39
New – Show only new alarms
Acknowledge – Show only acknowledged alarms
Cleared – Show only cleared alarms
To edit active alarms:
1 Select the Alarms tab on the Resource Groups page.
2 Edit the active alarms by clicking the checkbox next to the alarm you want to edit and select the appropriate option from the --Actions—dropdown menu:
Acknowledge – Acknowledge the alarm without clearing it from the system
Clear – Clear the alarm from the system.
Once you acknowledge or clear the alarm, it is removed from the active alarms list. You can review the alarm by selecting the appropriate option from the Show Active dropdown menu.
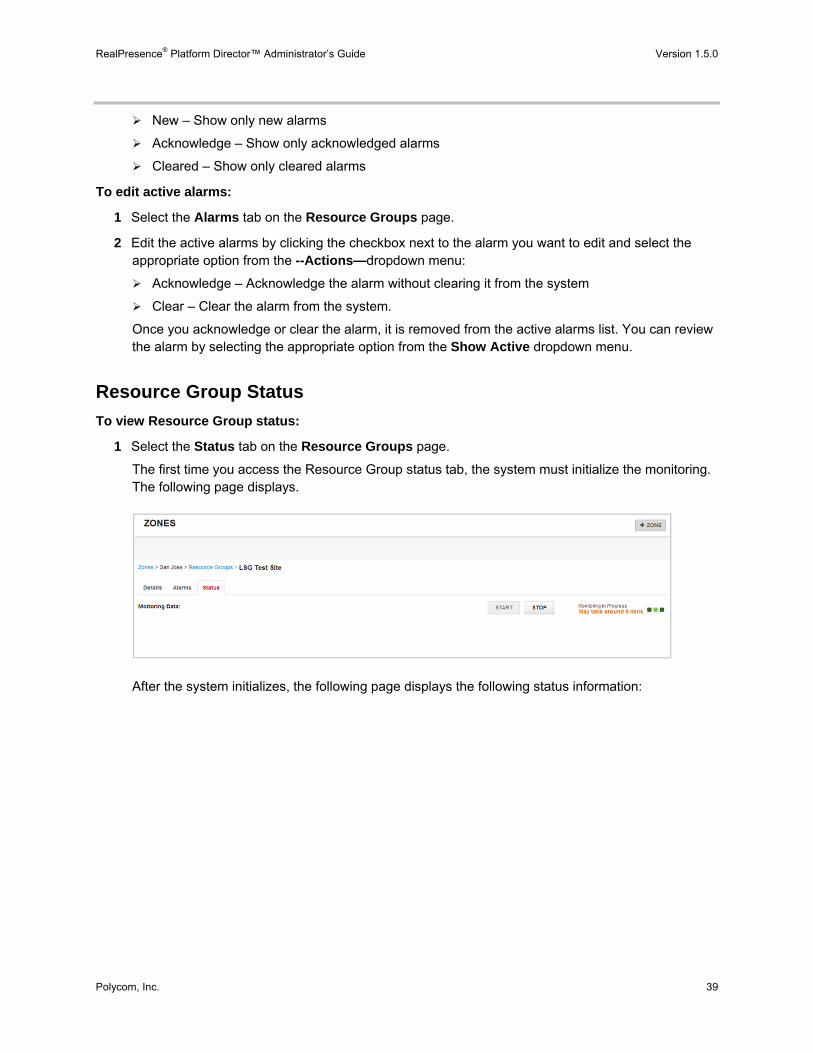
Resource Group Status
To view Resource Group status:
1 Select the Status tab on the Resource Groups page.
The first time you access the Resource Group status tab, the system must initialize the monitoring. The following page displays.
After the system initializes, the following page displays the following status information:
RealPresence® Platform Director™ Administrator’s Guide Version 1.5.0
Polycom, Inc. 40
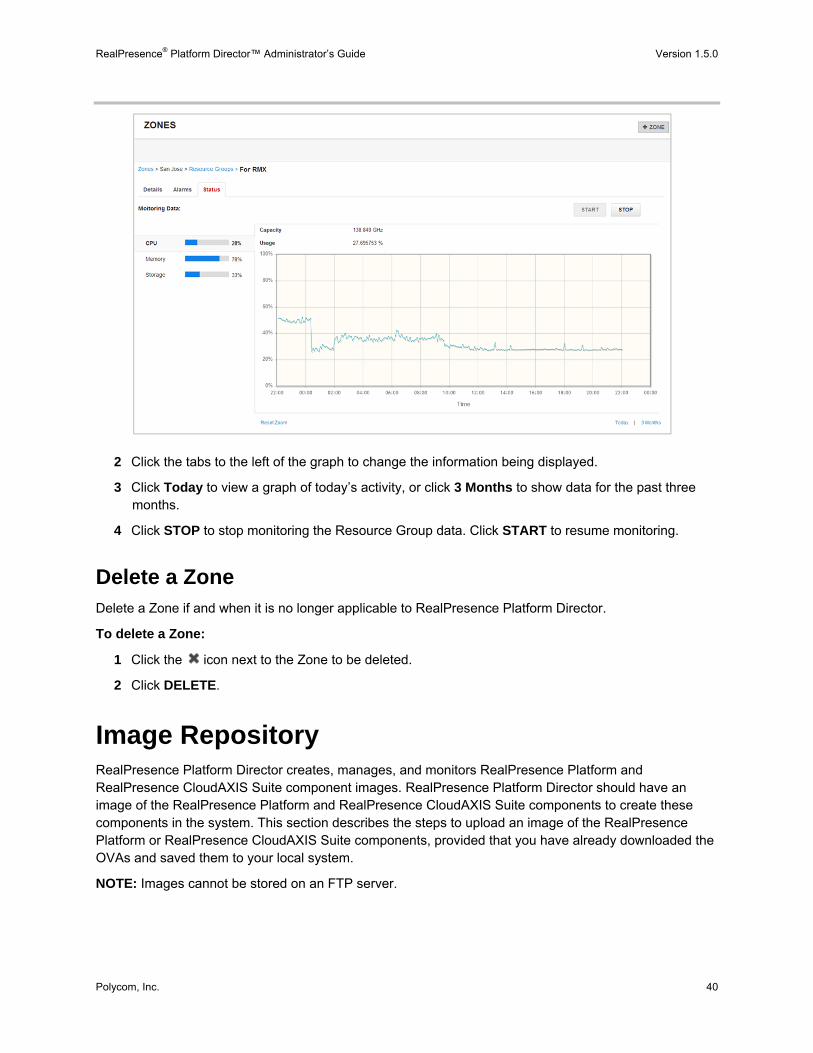
2 Click the tabs to the left of the graph to change the information being displayed.
3 Click Today to view a graph of today’s activity, or click 3 Months to show data for the past three months.
4 Click STOP to stop monitoring the Resource Group data. Click START to resume monitoring.
Delete a Zone Delete a Zone if and when it is no longer applicable to RealPresence Platform Director.
To delete a Zone:
1 Click the icon next to the Zone to be deleted.
2 Click DELETE.
Image Repository RealPresence Platform Director creates, manages, and monitors RealPresence Platform and RealPresence CloudAXIS Suite component images. RealPresence Platform Director should have an image of the RealPresence Platform and RealPresence CloudAXIS Suite components to create these components in the system. This section describes the steps to upload an image of the RealPresence Platform or RealPresence CloudAXIS Suite components, provided that you have already downloaded the OVAs and saved them to your local system.
NOTE: Images cannot be stored on an FTP server.
RealPresence® Platform Director™ Administrator’s Guide Version 1.5.0
Polycom, Inc. 41
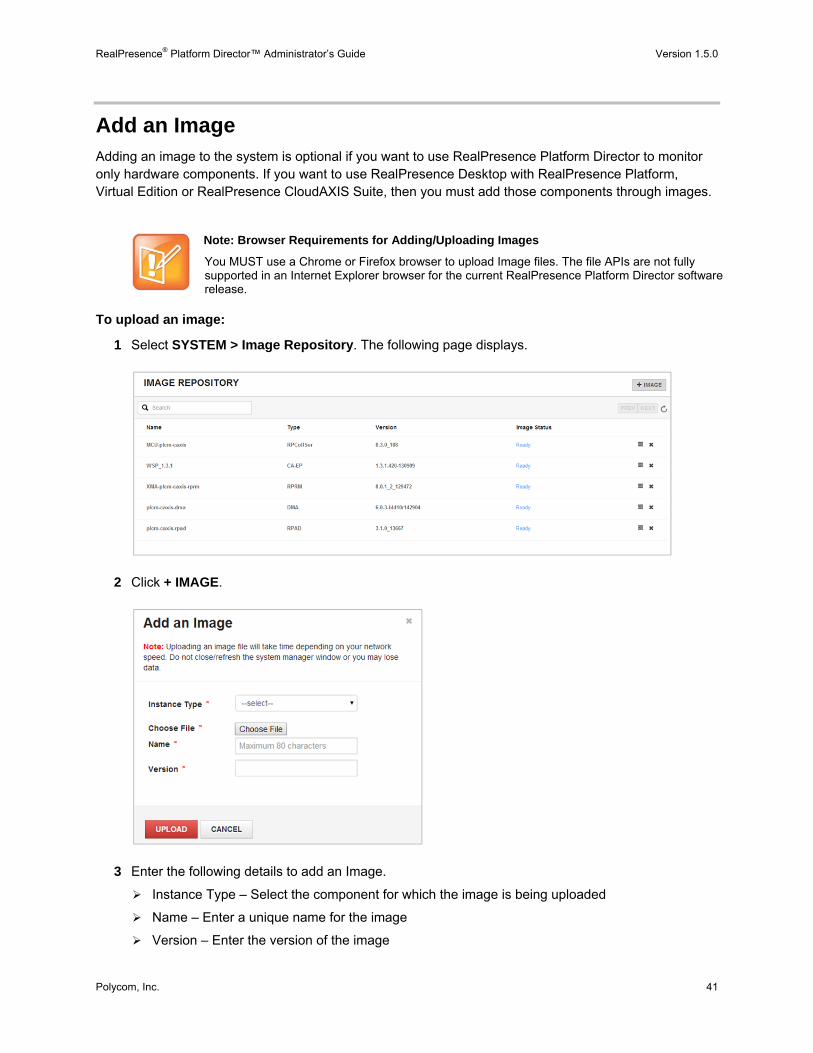
Add an Image Adding an image to the system is optional if you want to use RealPresence Platform Director to monitor only hardware components. If you want to use RealPresence Desktop with RealPresence Platform, Virtual Edition or RealPresence CloudAXIS Suite, then you must add those components through images.
Note: Browser Requirements for Adding/Uploading Images
You MUST use a Chrome or Firefox browser to upload Image files. The file APIs are not fully supported in an Internet Explorer browser for the current RealPresence Platform Director software release.
To upload an image:
1 Select SYSTEM > Image Repository. The following page displays.
2 Click + IMAGE.
3 Enter the following details to add an Image.
Instance Type – Select the component for which the image is being uploaded
Name – Enter a unique name for the image
Version – Enter the version of the image
RealPresence® Platform Director™ Administrator’s Guide Version 1.5.0
Polycom, Inc. 42
4 Click the Choose File button.
5 Navigate to the component OVA, and select Open.
6 Click UPLOAD.
Note: Upload Image
Only one image can be uploaded at a time. While the image is uploading, do not log out of RealPresence Platform Director or close the browser; if either of these two actions occur, the upload will be cancelled and you will have to redo the upload.
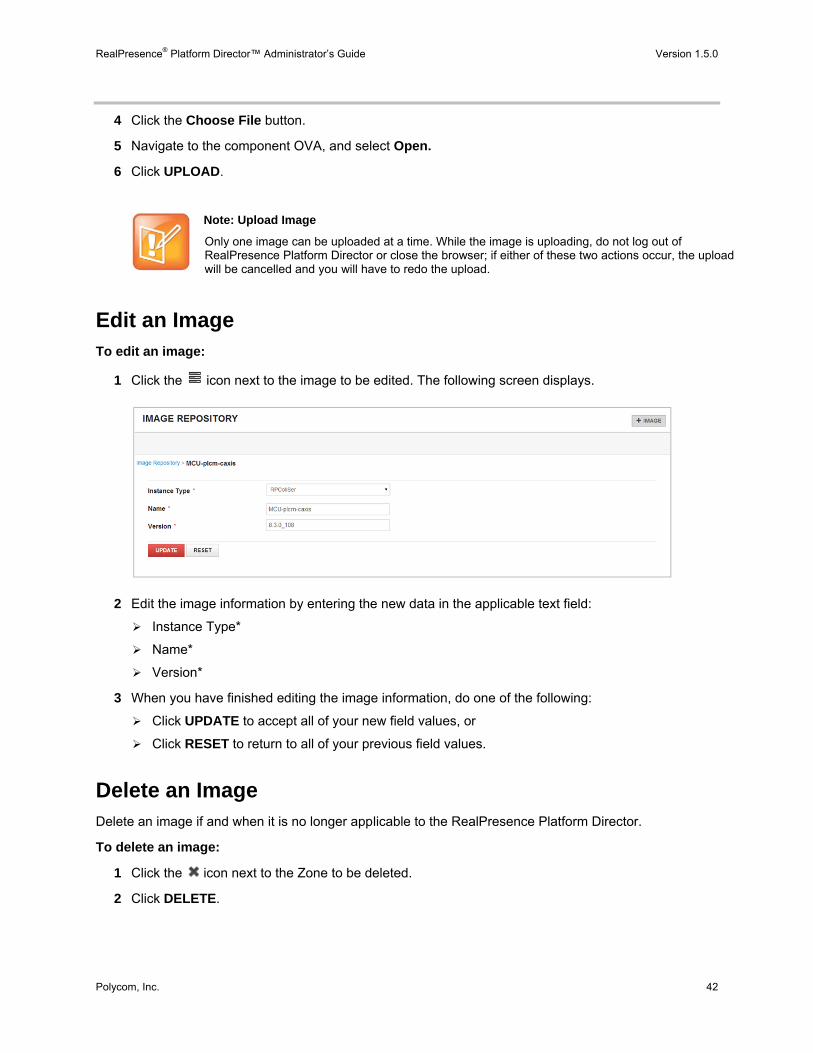
Edit an Image To edit an image:
1 Click the icon next to the image to be edited. The following screen displays.
2 Edit the image information by entering the new data in the applicable text field:
Instance Type*
Name*
Version*
3 When you have finished editing the image information, do one of the following:
Click UPDATE to accept all of your new field values, or
Click RESET to return to all of your previous field values.
Delete an Image Delete an image if and when it is no longer applicable to the RealPresence Platform Director.
To delete an image:
1 Click the icon next to the Zone to be deleted.
2 Click DELETE.
Polycom, Inc. 43
Service Page
RealPresence Platform Director can create, deploy, manage, and monitor new instances of RealPresence Platform and RealPresence CloudAXIS Suite components. Any existing virtual instances of these components are also managed by RealPresence Platform Director along with any hardware instances of the RealPresence Platform components. This flexibility enables an administrator to manage all of their instances in one place.
A Service Group is an organized collection of different hardware and software Instances (such as RPCollSer, CA-SP, CA-EP,, DMA, etc.) Each group is configured to provide video collaboration services. With a Service Group, you can manage multiple types of instances on a single window.
Important Instance monitoring information includes:
● System monitoring information is provided for any RealPresence Platform Director Instance as long as the status of the SNMP agent is Running.
● Instances have to be in a Running state to be monitored; if the Instances are powered off, they cannot be monitored.
● RealPresence CloudAXIS Suite component Instances cannot be monitored because they do not have the active SNMP agents that can provide data.
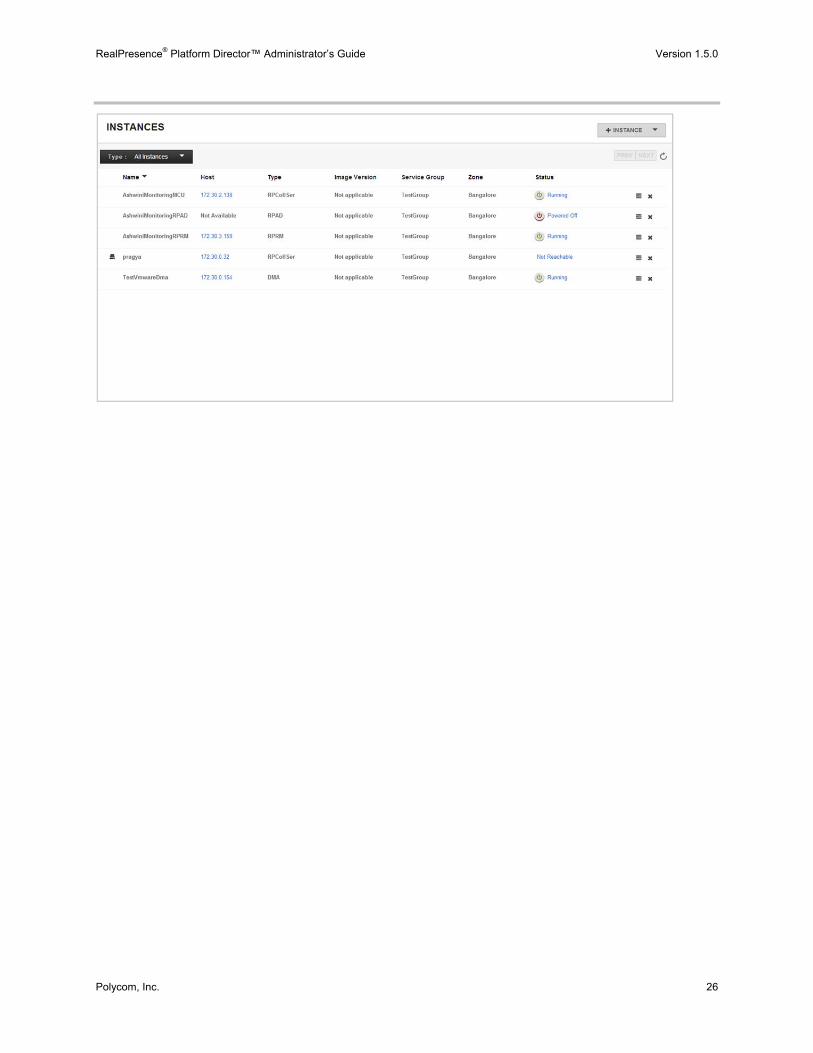
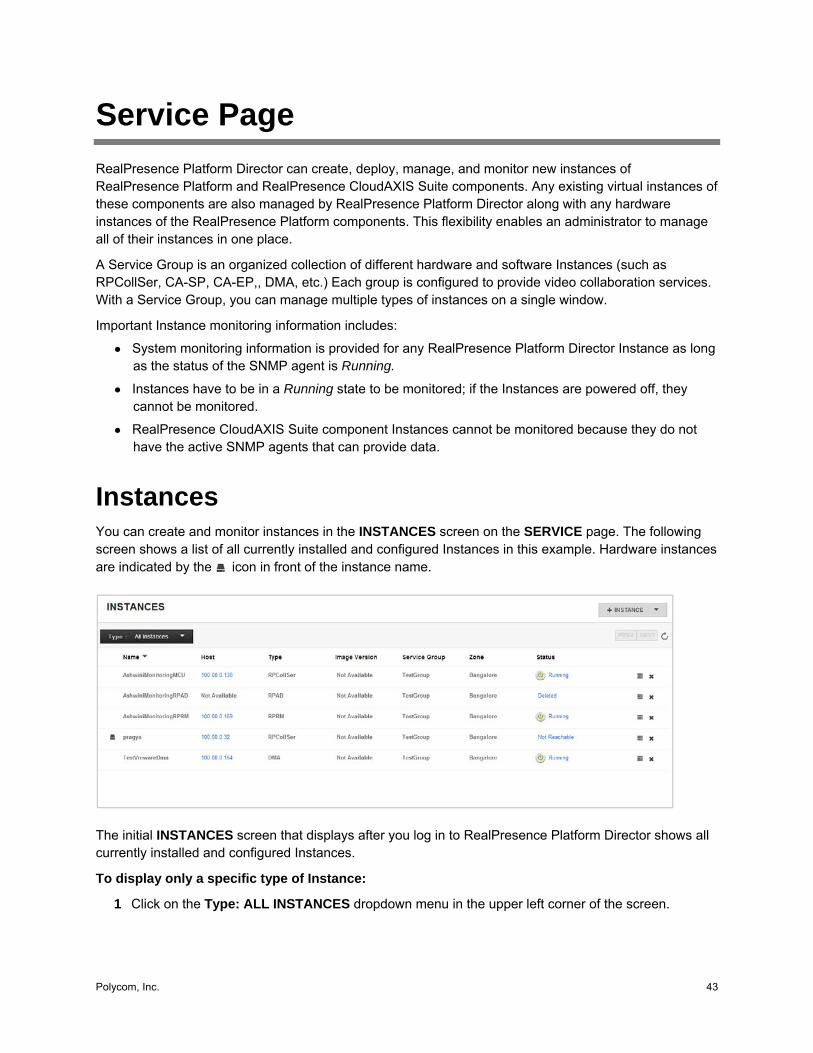
Instances You can create and monitor instances in the INSTANCES screen on the SERVICE page. The following screen shows a list of all currently installed and configured Instances in this example. Hardware instances are indicated by the icon in front of the instance name.
The initial INSTANCES screen that displays after you log in to RealPresence Platform Director shows all currently installed and configured Instances.
To display only a specific type of Instance:
1 Click on the Type: ALL INSTANCES dropdown menu in the upper left corner of the screen.
RealPresence® Platform Director™ Administrator’s Guide Version 1.5.0
Polycom, Inc. 44
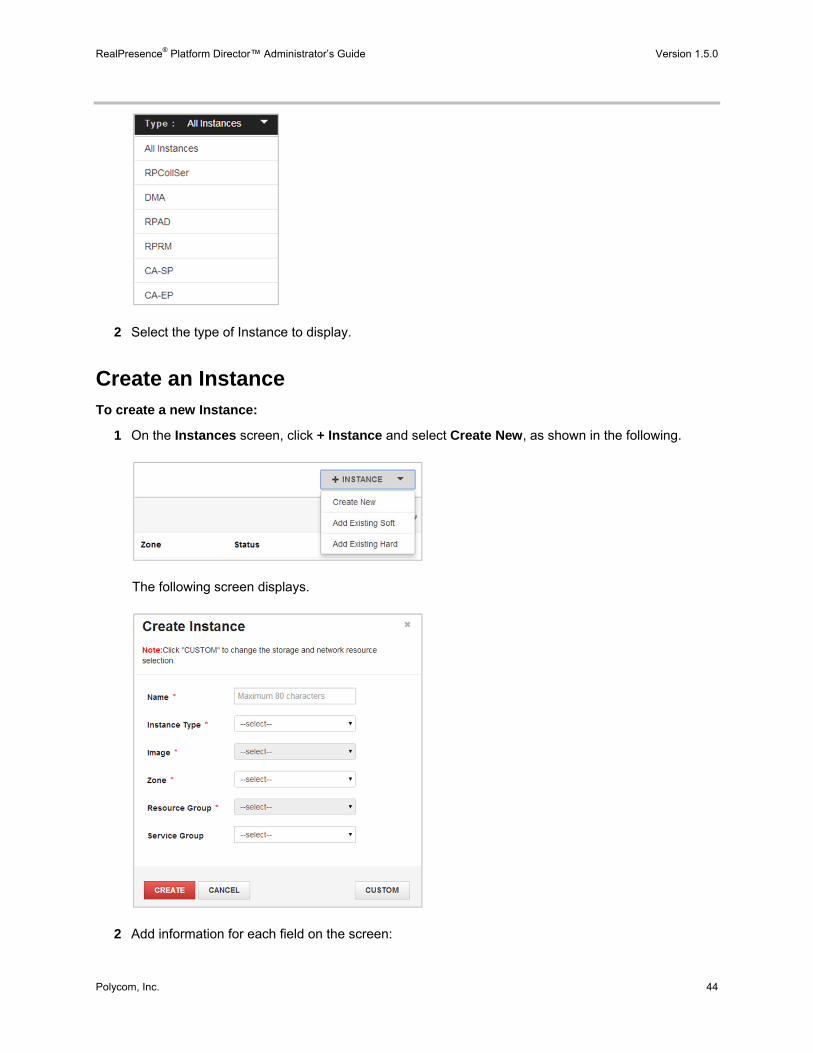
2 Select the type of Instance to display.
Create an Instance To create a new Instance:
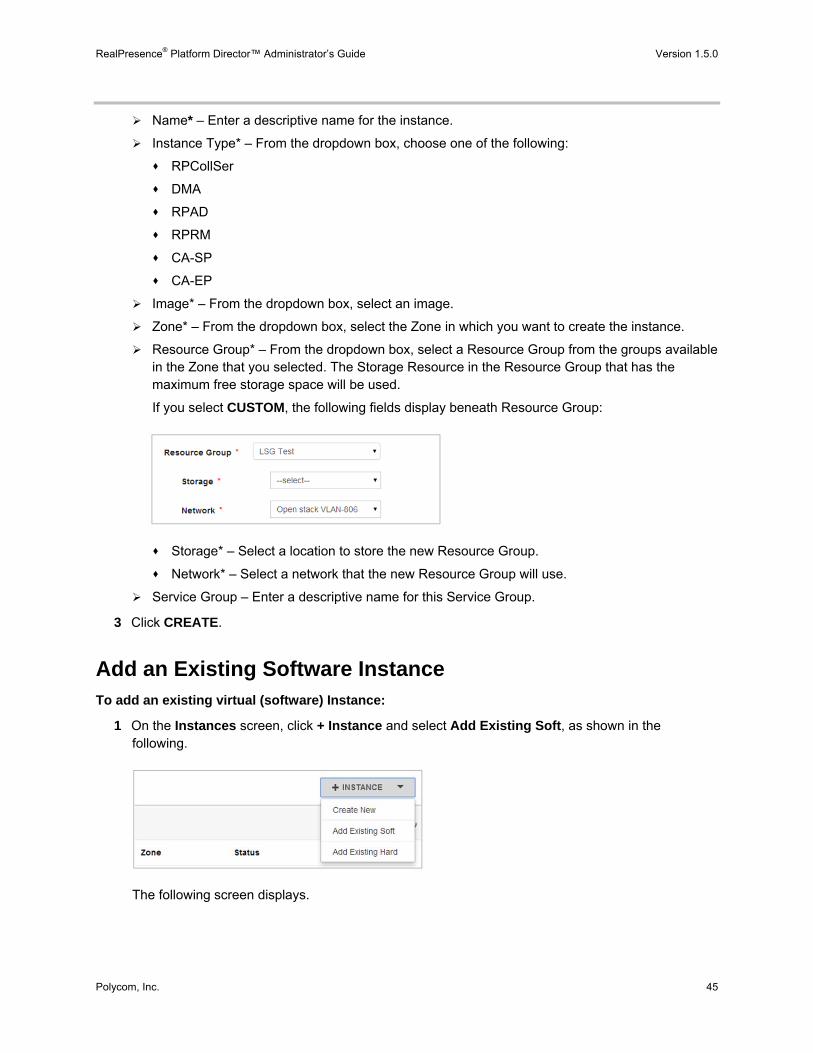
1 On the Instances screen, click + Instance and select Create New, as shown in the following.
The following screen displays.
2 Add information for each field on the screen:
RealPresence® Platform Director™ Administrator’s Guide Version 1.5.0
Polycom, Inc. 45
Name* – Enter a descriptive name for the instance.
Instance Type* – From the dropdown box, choose one of the following:
RPCollSer
DMA
RPAD
RPRM
CA-SP
CA-EP
Image* – From the dropdown box, select an image.
Zone* – From the dropdown box, select the Zone in which you want to create the instance.
Resource Group* – From the dropdown box, select a Resource Group from the groups available in the Zone that you selected. The Storage Resource in the Resource Group that has the maximum free storage space will be used.
If you select CUSTOM, the following fields display beneath Resource Group:
Storage* – Select a location to store the new Resource Group.
Network* – Select a network that the new Resource Group will use.
Service Group – Enter a descriptive name for this Service Group.
3 Click CREATE.
Add an Existing Software Instance To add an existing virtual (software) Instance:
1 On the Instances screen, click + Instance and select Add Existing Soft, as shown in the following.
The following screen displays.
RealPresence® Platform Director™ Administrator’s Guide Version 1.5.0
Polycom, Inc. 46
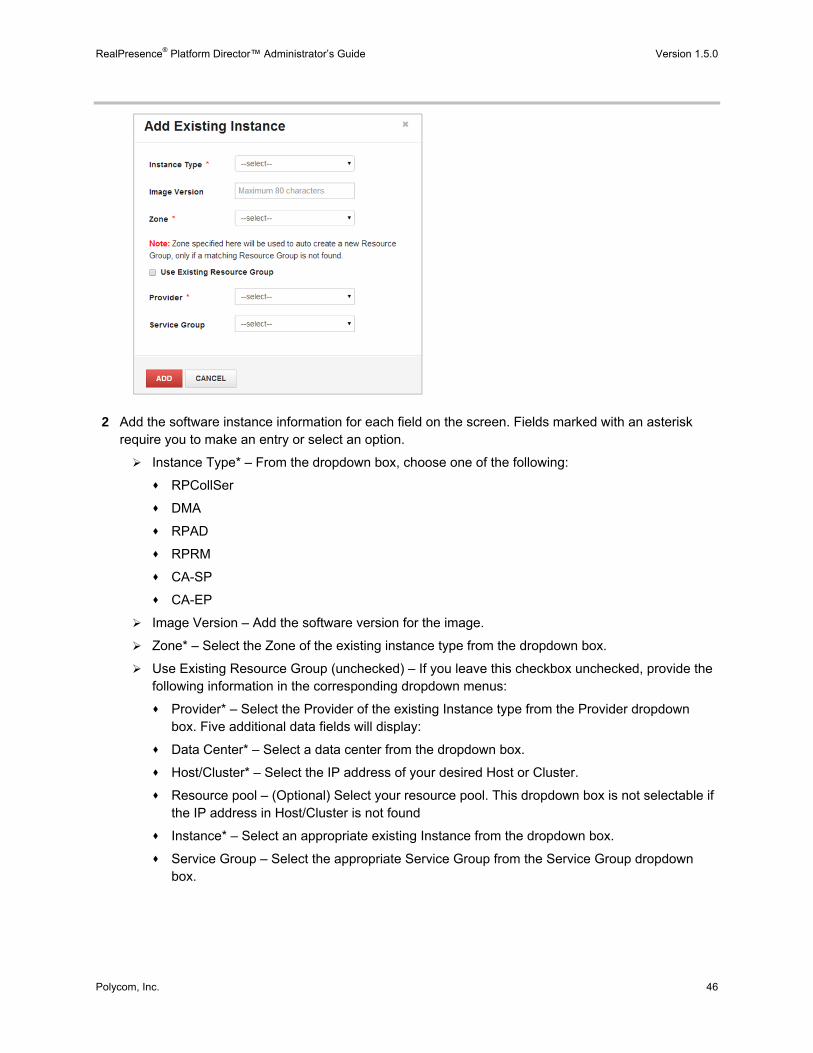
2 Add the software instance information for each field on the screen. Fields marked with an asterisk require you to make an entry or select an option.
Instance Type* – From the dropdown box, choose one of the following:
RPCollSer
DMA
RPAD
RPRM
CA-SP
CA-EP
Image Version – Add the software version for the image.
Zone* – Select the Zone of the existing instance type from the dropdown box.
Use Existing Resource Group (unchecked) – If you leave this checkbox unchecked, provide the following information in the corresponding dropdown menus:
Provider* – Select the Provider of the existing Instance type from the Provider dropdown box. Five additional data fields will display:
Data Center* – Select a data center from the dropdown box.
Host/Cluster* – Select the IP address of your desired Host or Cluster.
Resource pool – (Optional) Select your resource pool. This dropdown box is not selectable if the IP address in Host/Cluster is not found
Instance* – Select an appropriate existing Instance from the dropdown box.
Service Group – Select the appropriate Service Group from the Service Group dropdown box.
RealPresence® Platform Director™ Administrator’s Guide Version 1.5.0
Polycom, Inc. 47
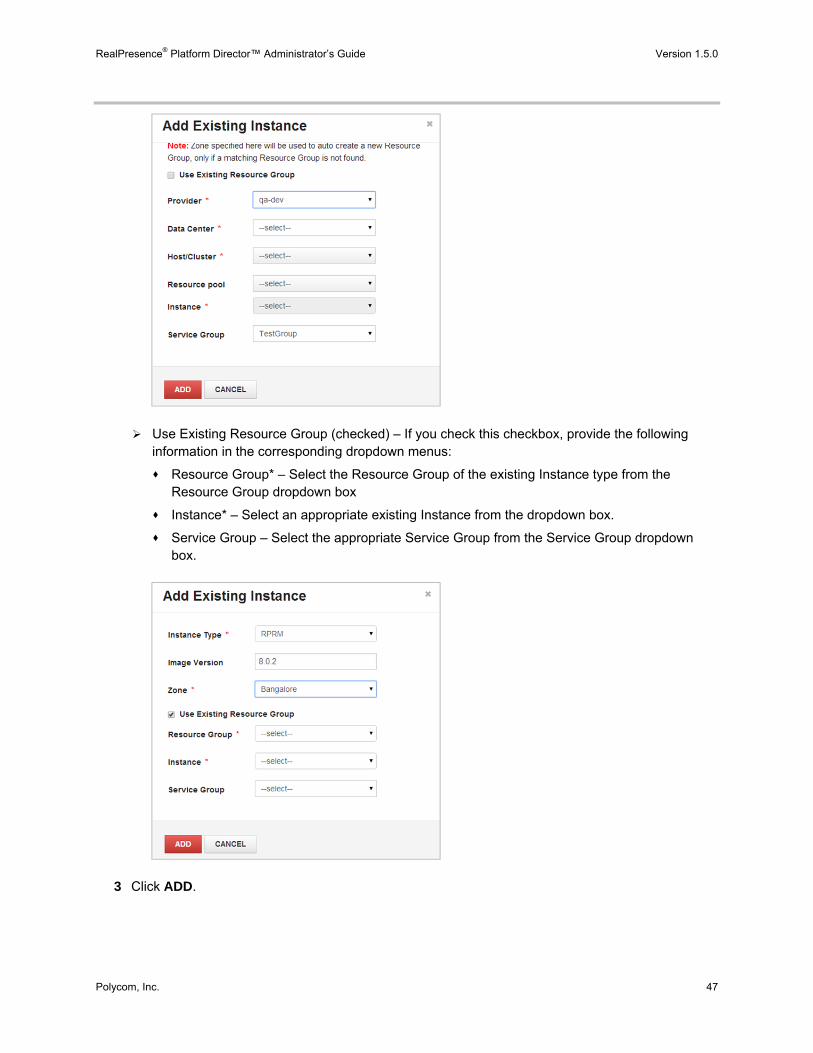
Use Existing Resource Group (checked) – If you check this checkbox, provide the following information in the corresponding dropdown menus:
Resource Group* – Select the Resource Group of the existing Instance type from the Resource Group dropdown box
Instance* – Select an appropriate existing Instance from the dropdown box.
Service Group – Select the appropriate Service Group from the Service Group dropdown box.
3 Click ADD.
RealPresence® Platform Director™ Administrator’s Guide Version 1.5.0
Polycom, Inc. 48
Add a Hardware Instance To add a hardware Instance:
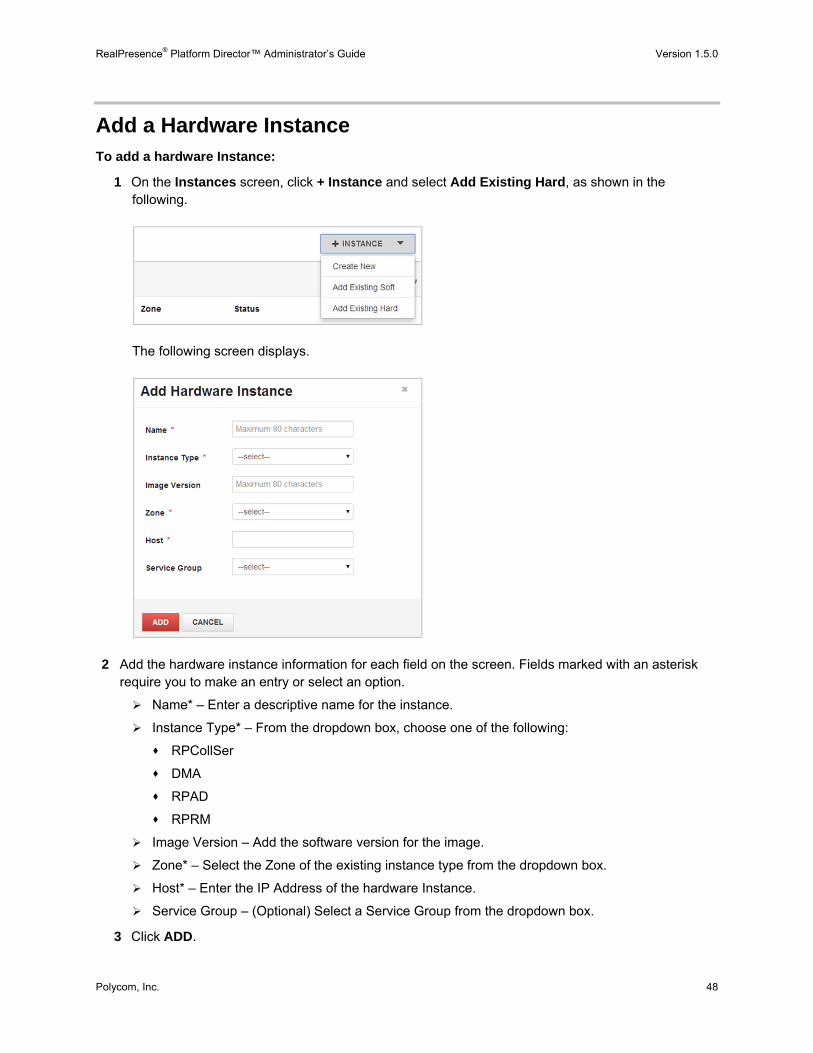
1 On the Instances screen, click + Instance and select Add Existing Hard, as shown in the following.
The following screen displays.
2 Add the hardware instance information for each field on the screen. Fields marked with an asterisk require you to make an entry or select an option.
Name* – Enter a descriptive name for the instance.
Instance Type* – From the dropdown box, choose one of the following:
RPCollSer
DMA
RPAD
RPRM
Image Version – Add the software version for the image.
Zone* – Select the Zone of the existing instance type from the dropdown box.
Host* – Enter the IP Address of the hardware Instance.
Service Group – (Optional) Select a Service Group from the dropdown box.
3 Click ADD.
RealPresence® Platform Director™ Administrator’s Guide Version 1.5.0
Polycom, Inc. 49
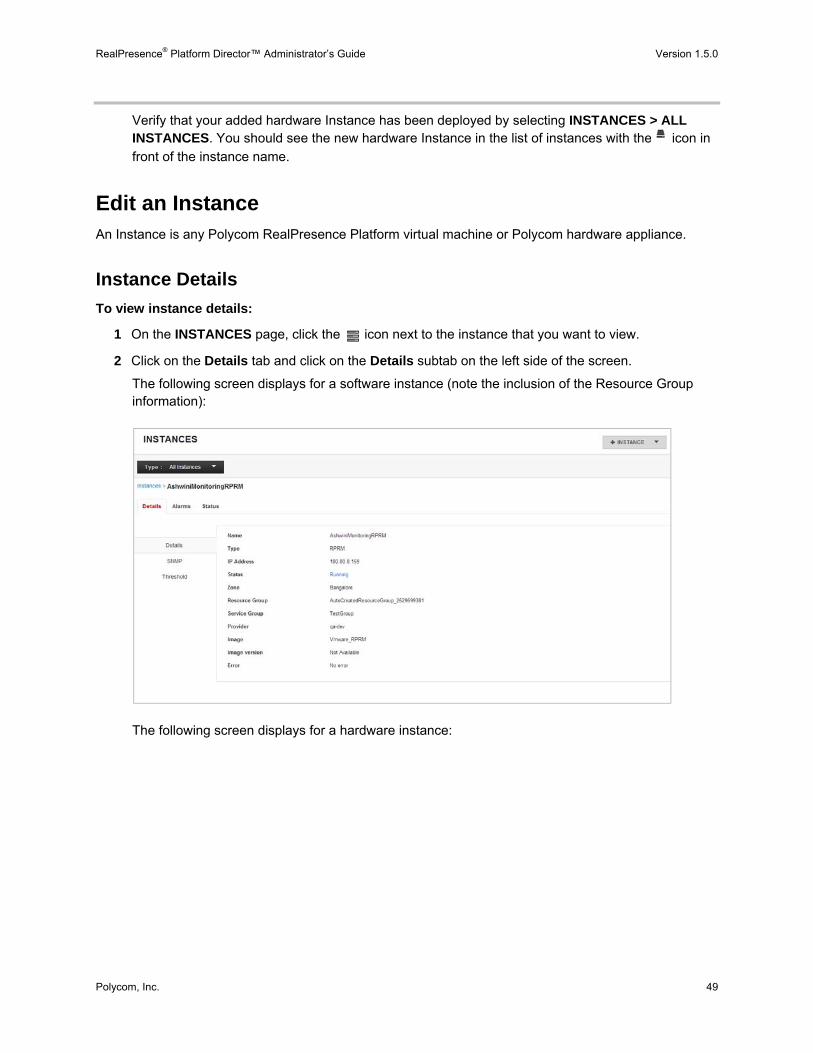
Verify that your added hardware Instance has been deployed by selecting INSTANCES > ALL INSTANCES. You should see the new hardware Instance in the list of instances with the icon in
front of the instance name.
Edit an Instance An Instance is any Polycom RealPresence Platform virtual machine or Polycom hardware appliance.
Instance Details
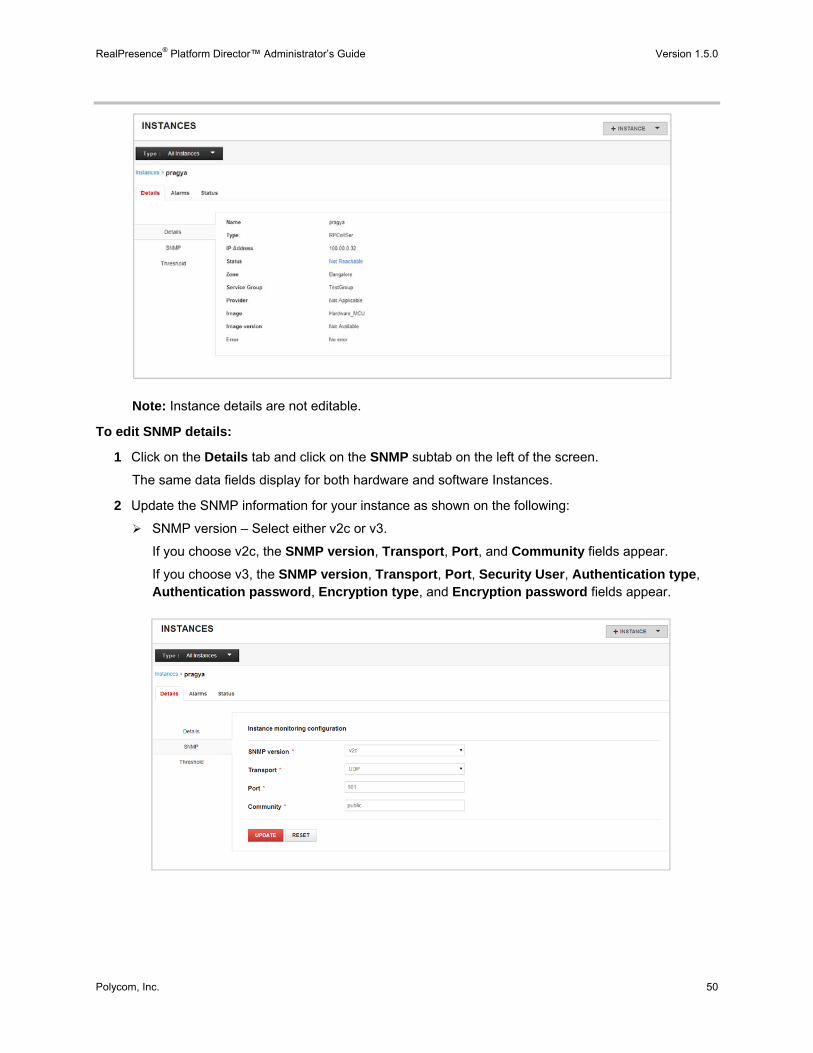
To view instance details:
1 On the INSTANCES page, click the icon next to the instance that you want to view.
2 Click on the Details tab and click on the Details subtab on the left side of the screen.
The following screen displays for a software instance (note the inclusion of the Resource Group information):
The following screen displays for a hardware instance:
RealPresence® Platform Director™ Administrator’s Guide Version 1.5.0
Polycom, Inc. 50
Note: Instance details are not editable.
To edit SNMP details:
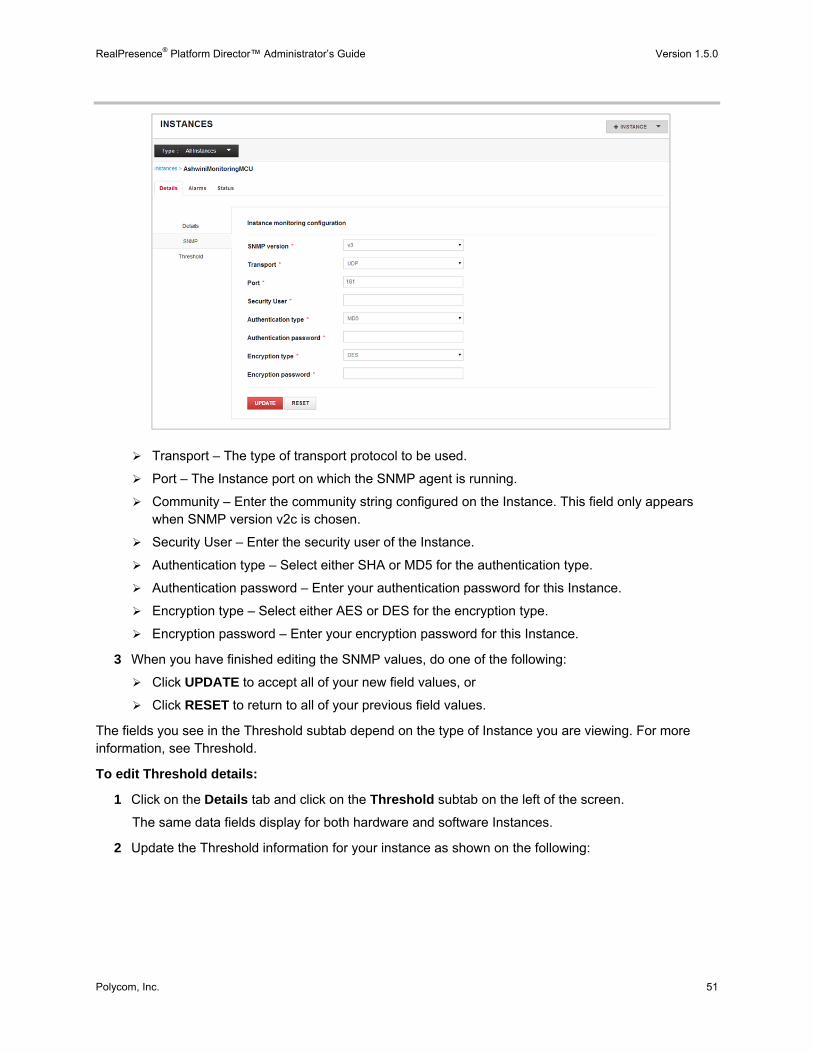
1 Click on the Details tab and click on the SNMP subtab on the left of the screen.
The same data fields display for both hardware and software Instances.
2 Update the SNMP information for your instance as shown on the following:
SNMP version – Select either v2c or v3.
If you choose v2c, the SNMP version, Transport, Port, and Community fields appear.
If you choose v3, the SNMP version, Transport, Port, Security User, Authentication type, Authentication password, Encryption type, and Encryption password fields appear.
RealPresence® Platform Director™ Administrator’s Guide Version 1.5.0
Polycom, Inc. 51
Transport – The type of transport protocol to be used.
Port – The Instance port on which the SNMP agent is running.
Community – Enter the community string configured on the Instance. This field only appears when SNMP version v2c is chosen.
Security User – Enter the security user of the Instance.
Authentication type – Select either SHA or MD5 for the authentication type.
Authentication password – Enter your authentication password for this Instance.
Encryption type – Select either AES or DES for the encryption type.
Encryption password – Enter your encryption password for this Instance.
3 When you have finished editing the SNMP values, do one of the following:
Click UPDATE to accept all of your new field values, or
Click RESET to return to all of your previous field values.
The fields you see in the Threshold subtab depend on the type of Instance you are viewing. For more information, see Threshold.
To edit Threshold details:
1 Click on the Details tab and click on the Threshold subtab on the left of the screen.
The same data fields display for both hardware and software Instances.
2 Update the Threshold information for your instance as shown on the following:
RealPresence® Platform Director™ Administrator’s Guide Version 1.5.0
Polycom, Inc. 52
3 When you have finished editing the Threshold values, do one of the following:
Click UPDATE to accept all of your new field values, or
Click RESET TO DEFAULT to return to the default field values.
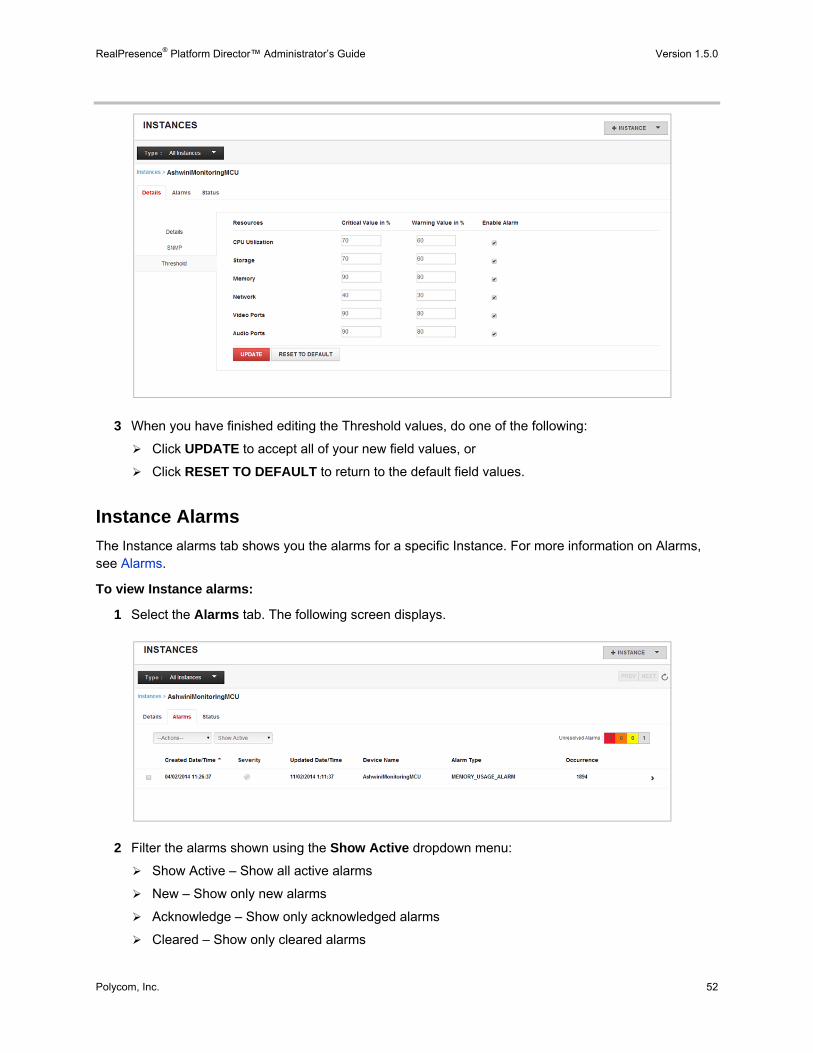
Instance Alarms
The Instance alarms tab shows you the alarms for a specific Instance. For more information on Alarms, see Alarms.
To view Instance alarms:
1 Select the Alarms tab. The following screen displays.
2 Filter the alarms shown using the Show Active dropdown menu:
Show Active – Show all active alarms
New – Show only new alarms
Acknowledge – Show only acknowledged alarms
Cleared – Show only cleared alarms
RealPresence® Platform Director™ Administrator’s Guide Version 1.5.0
Polycom, Inc. 53
To edit active alarms:
1 Select the Alarms tab on the Instances page.
2 Edit the active alarms by clicking the checkbox next to the alarm you want to edit and select the appropriate option from the --Actions—dropdown menu:
Acknowledge – Acknowledge the alarm without clearing it from the system
Clear – Clear the alarm from the system.
Once you acknowledge or clear the alarm, it is removed from the active alarms list. You can review the alarm by selecting the appropriate option from the Show Active dropdown menu.
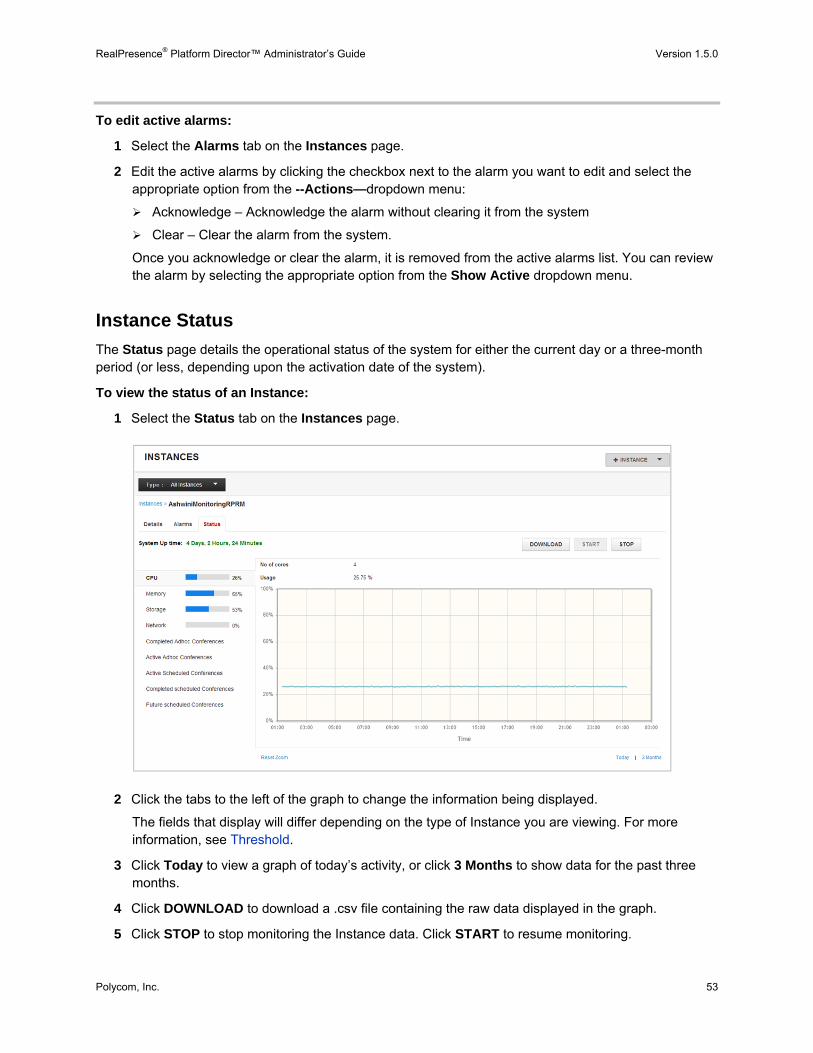
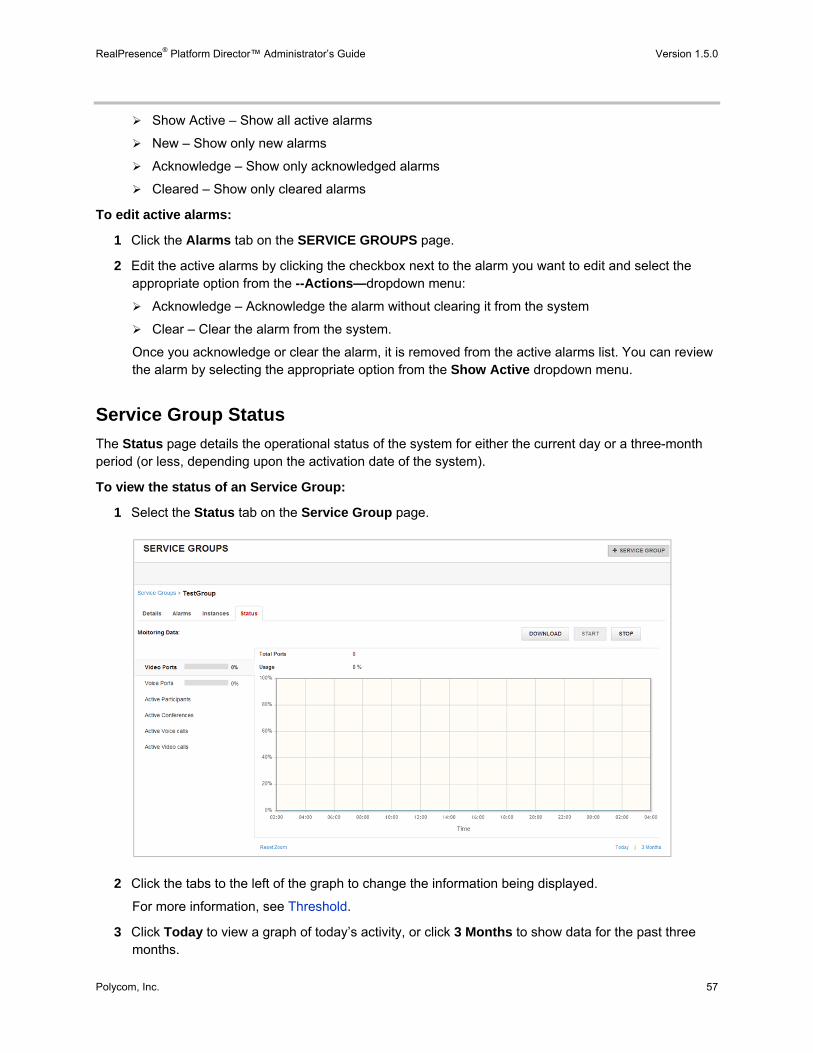
Instance Status
The Status page details the operational status of the system for either the current day or a three-month period (or less, depending upon the activation date of the system).
To view the status of an Instance:
1 Select the Status tab on the Instances page.
2 Click the tabs to the left of the graph to change the information being displayed.
The fields that display will differ depending on the type of Instance you are viewing. For more information, see Threshold.
3 Click Today to view a graph of today’s activity, or click 3 Months to show data for the past three months.
4 Click DOWNLOAD to download a .csv file containing the raw data displayed in the graph.
5 Click STOP to stop monitoring the Instance data. Click START to resume monitoring.
RealPresence® Platform Director™ Administrator’s Guide Version 1.5.0
Polycom, Inc. 54
Delete an Instance You can delete an Instance if and when it is no longer applicable to your RealPresence Platform Director configuration.
To delete an Instance:
» Click the icon next to the Instance you want to delete.
Service Groups A Service Group is a group of Instances that are configured to work together to provide video collaboration service.
Caution: Incorrect Service Group Data
If unrelated sets of Instances are added into a Service Group, the monitoring data may be incorrect. Choose only Instances that are configured to work with each other.
Create a Service Group To add a new Service Group:
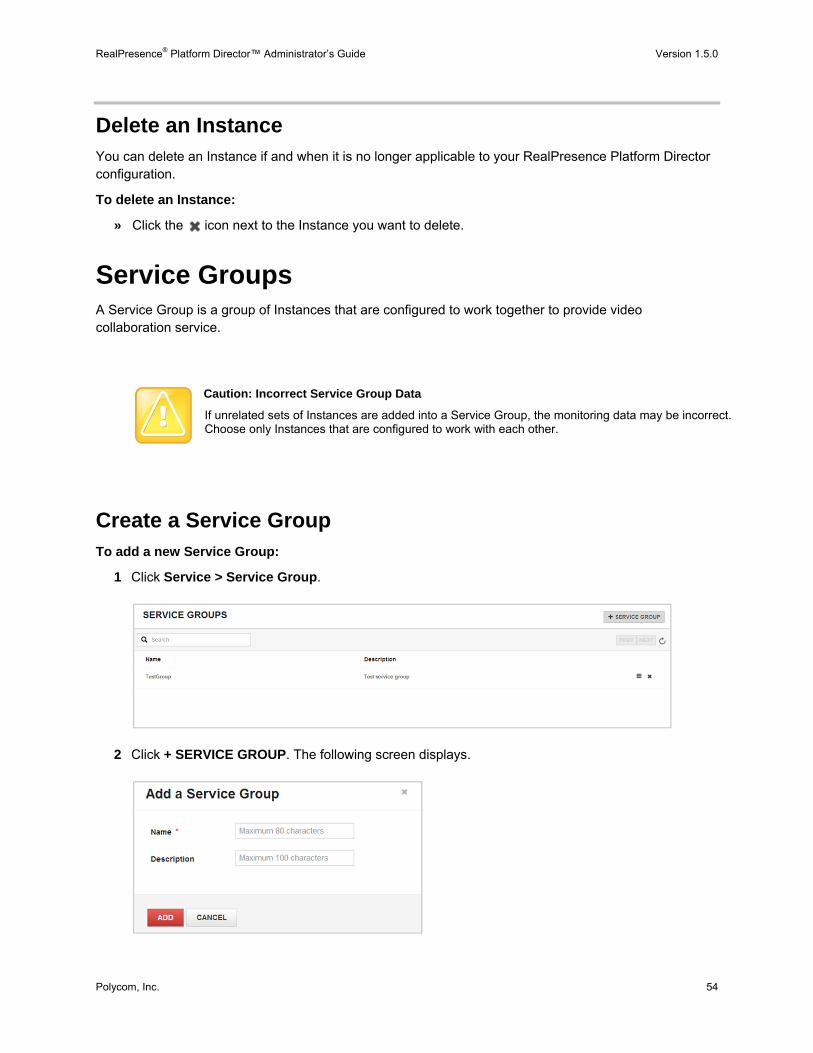
1 Click Service > Service Group.
2 Click + SERVICE GROUP. The following screen displays.
RealPresence® Platform Director™ Administrator’s Guide Version 1.5.0
Polycom, Inc. 55
3 Enter a name (maximum of 80 characters) for your new Service Group, and enter a description (if desired) for that Service Group.
4 Click ADD.
Edit a Service Group
Service Group Details
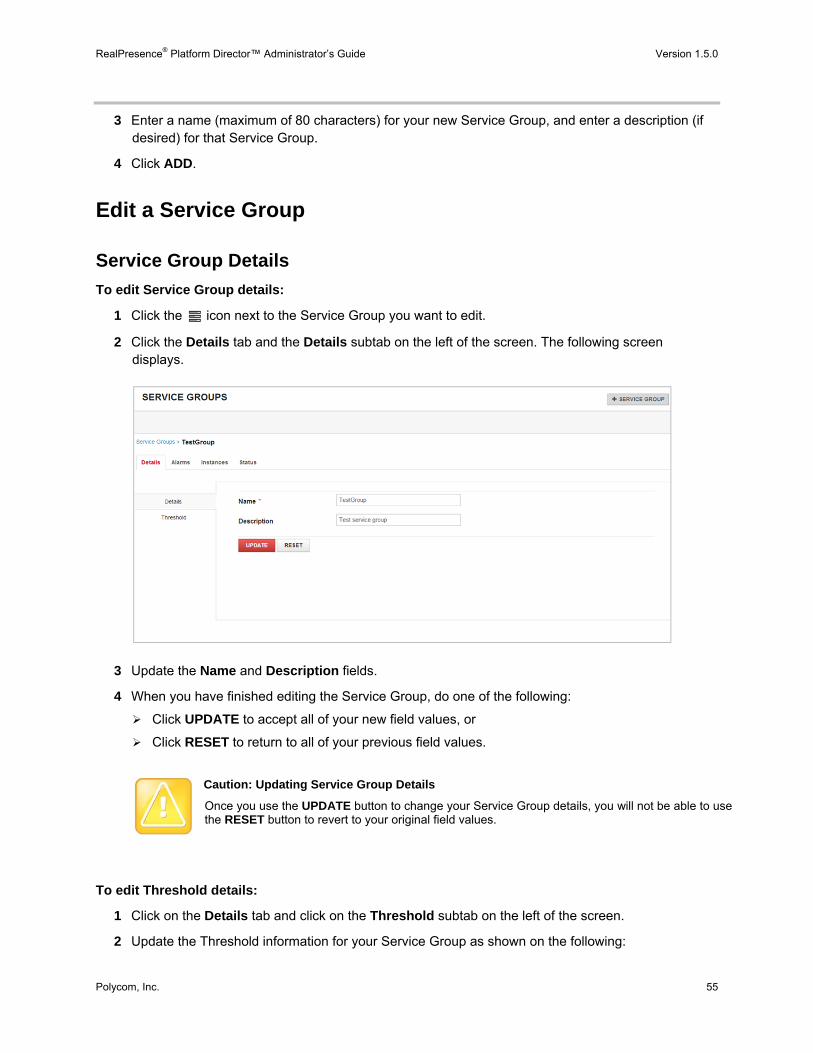
To edit Service Group details:
1 Click the icon next to the Service Group you want to edit.
2 Click the Details tab and the Details subtab on the left of the screen. The following screen displays.
3 Update the Name and Description fields.
4 When you have finished editing the Service Group, do one of the following:
Click UPDATE to accept all of your new field values, or
Click RESET to return to all of your previous field values.
Caution: Updating Service Group Details
Once you use the UPDATE button to change your Service Group details, you will not be able to use the RESET button to revert to your original field values.
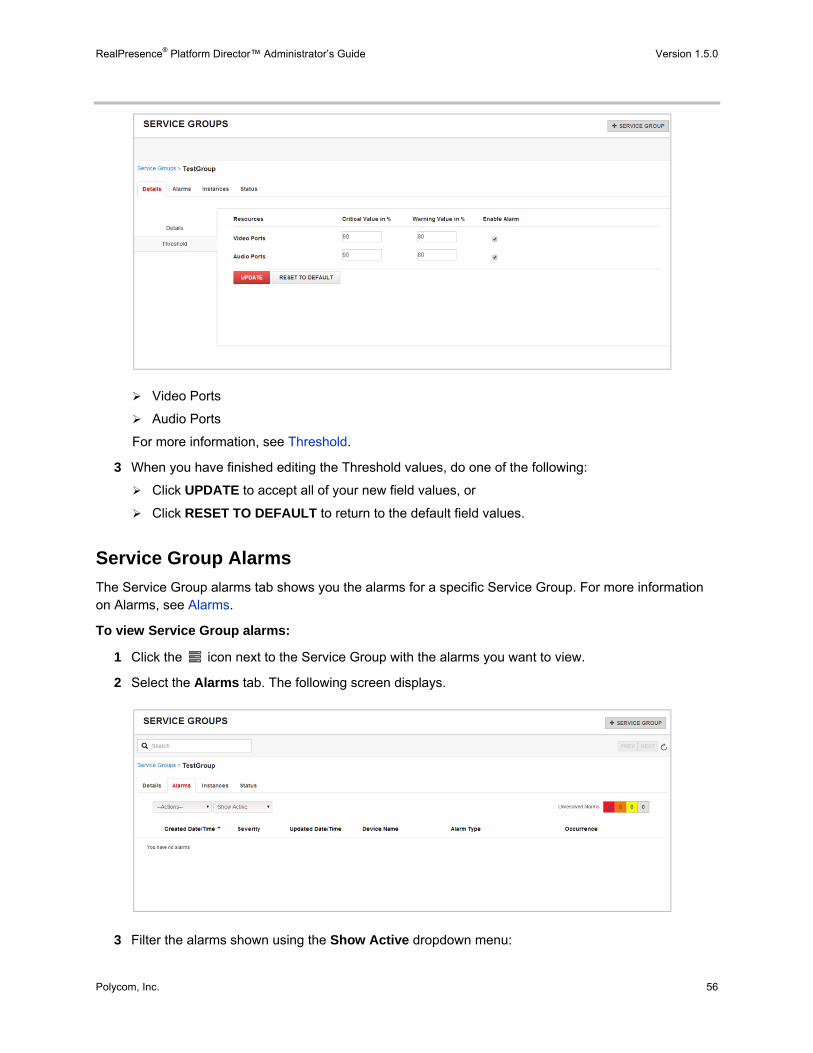
To edit Threshold details:
1 Click on the Details tab and click on the Threshold subtab on the left of the screen.
2 Update the Threshold information for your Service Group as shown on the following:
RealPresence® Platform Director™ Administrator’s Guide Version 1.5.0
Polycom, Inc. 56
Video Ports
Audio Ports
For more information, see Threshold.
3 When you have finished editing the Threshold values, do one of the following:
Click UPDATE to accept all of your new field values, or
Click RESET TO DEFAULT to return to the default field values.
Service Group Alarms
The Service Group alarms tab shows you the alarms for a specific Service Group. For more information on Alarms, see Alarms.
To view Service Group alarms:
1 Click the icon next to the Service Group with the alarms you want to view.
2 Select the Alarms tab. The following screen displays.
3 Filter the alarms shown using the Show Active dropdown menu:
RealPresence® Platform Director™ Administrator’s Guide Version 1.5.0
Polycom, Inc. 57
Show Active – Show all active alarms
New – Show only new alarms
Acknowledge – Show only acknowledged alarms
Cleared – Show only cleared alarms
To edit active alarms:
1 Click the Alarms tab on the SERVICE GROUPS page.
2 Edit the active alarms by clicking the checkbox next to the alarm you want to edit and select the appropriate option from the --Actions—dropdown menu:
Acknowledge – Acknowledge the alarm without clearing it from the system
Clear – Clear the alarm from the system.
Once you acknowledge or clear the alarm, it is removed from the active alarms list. You can review the alarm by selecting the appropriate option from the Show Active dropdown menu.
Service Group Status
The Status page details the operational status of the system for either the current day or a three-month period (or less, depending upon the activation date of the system).
To view the status of an Service Group:
1 Select the Status tab on the Service Group page.
2 Click the tabs to the left of the graph to change the information being displayed.
For more information, see Threshold.
3 Click Today to view a graph of today’s activity, or click 3 Months to show data for the past three months.
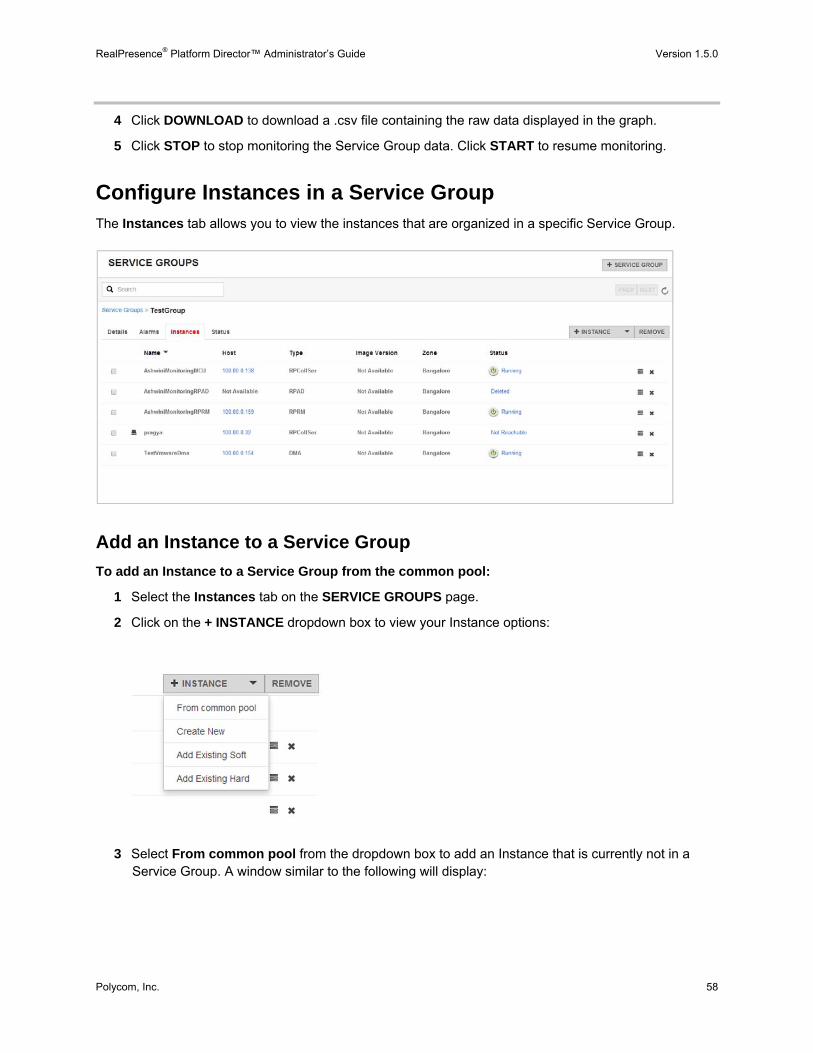
RealPresence® Platform Director™ Administrator’s Guide Version 1.5.0
Polycom, Inc. 58
4 Click DOWNLOAD to download a .csv file containing the raw data displayed in the graph.
5 Click STOP to stop monitoring the Service Group data. Click START to resume monitoring.
Configure Instances in a Service Group The Instances tab allows you to view the instances that are organized in a specific Service Group.
Add an Instance to a Service Group
To add an Instance to a Service Group from the common pool:
1 Select the Instances tab on the SERVICE GROUPS page.
2 Click on the + INSTANCE dropdown box to view your Instance options:
3 Select From common pool from the dropdown box to add an Instance that is currently not in a Service Group. A window similar to the following will display:
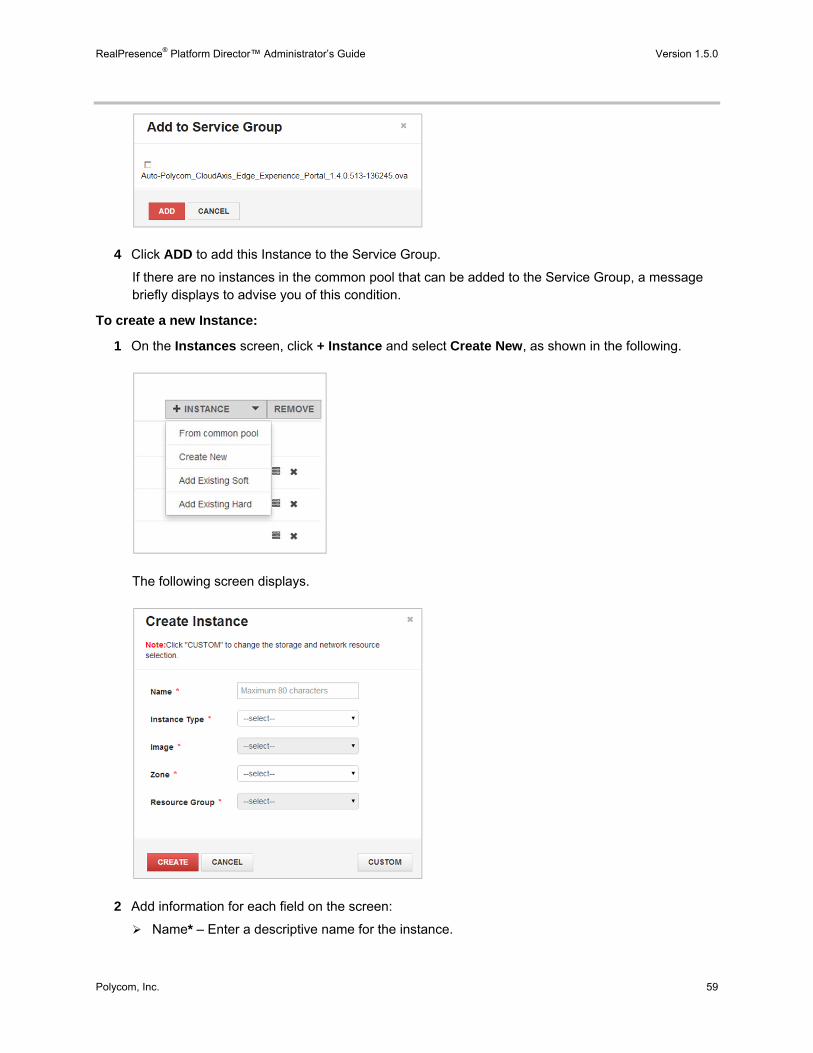
RealPresence® Platform Director™ Administrator’s Guide Version 1.5.0
Polycom, Inc. 59
4 Click ADD to add this Instance to the Service Group.
If there are no instances in the common pool that can be added to the Service Group, a message briefly displays to advise you of this condition.
To create a new Instance:
1 On the Instances screen, click + Instance and select Create New, as shown in the following.
The following screen displays.
2 Add information for each field on the screen:
Name* – Enter a descriptive name for the instance.
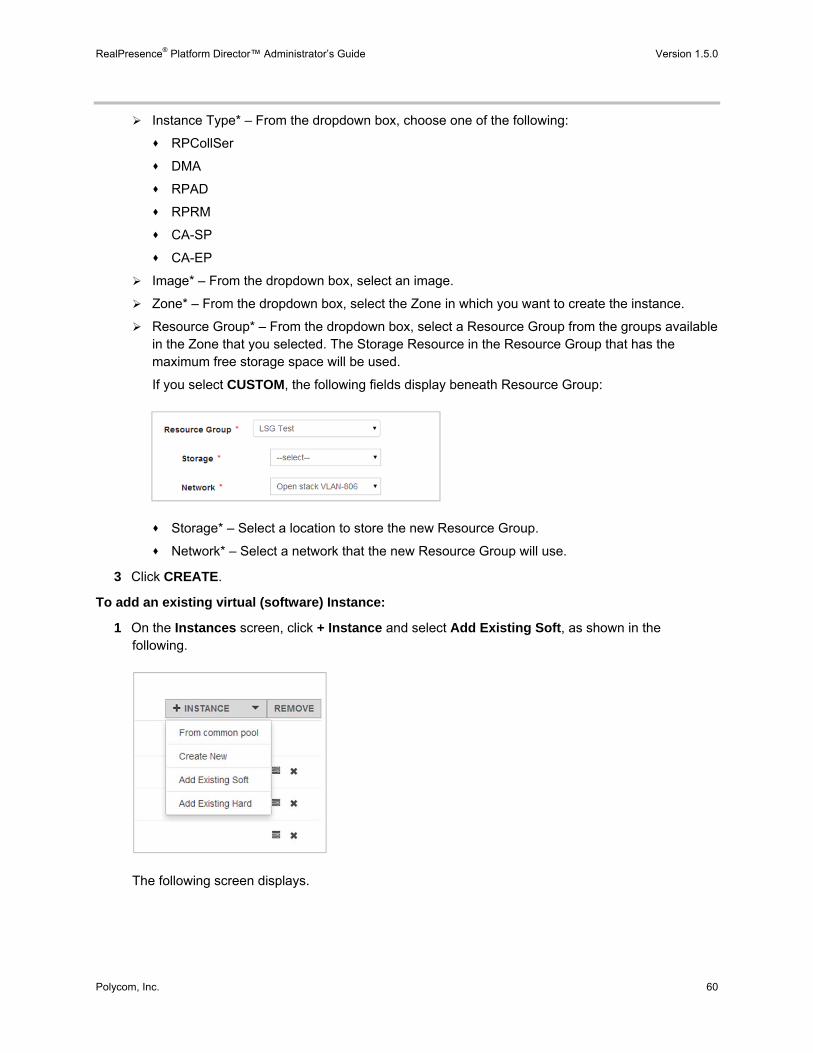
RealPresence® Platform Director™ Administrator’s Guide Version 1.5.0
Polycom, Inc. 60
Instance Type* – From the dropdown box, choose one of the following:
RPCollSer
DMA
RPAD
RPRM
CA-SP
CA-EP
Image* – From the dropdown box, select an image.
Zone* – From the dropdown box, select the Zone in which you want to create the instance.
Resource Group* – From the dropdown box, select a Resource Group from the groups available in the Zone that you selected. The Storage Resource in the Resource Group that has the maximum free storage space will be used.
If you select CUSTOM, the following fields display beneath Resource Group:
Storage* – Select a location to store the new Resource Group.
Network* – Select a network that the new Resource Group will use.
3 Click CREATE.
To add an existing virtual (software) Instance:
1 On the Instances screen, click + Instance and select Add Existing Soft, as shown in the following.
The following screen displays.
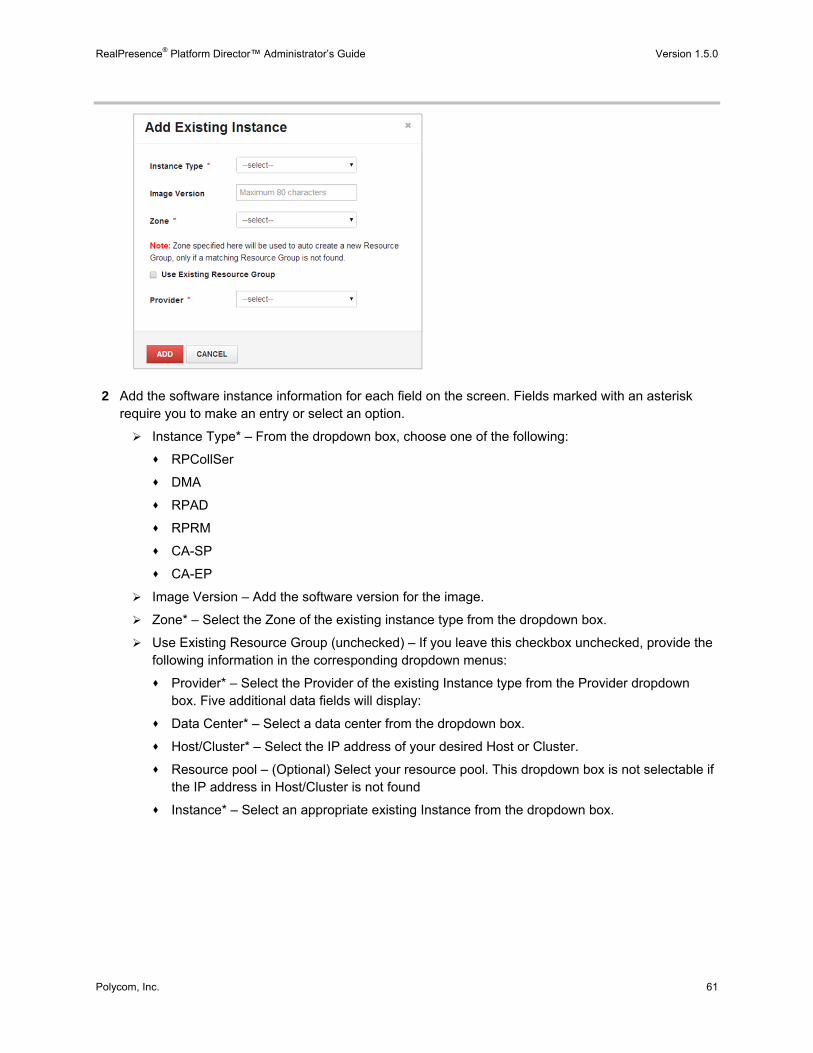
RealPresence® Platform Director™ Administrator’s Guide Version 1.5.0
Polycom, Inc. 61
2 Add the software instance information for each field on the screen. Fields marked with an asterisk require you to make an entry or select an option.
Instance Type* – From the dropdown box, choose one of the following:
RPCollSer
DMA
RPAD
RPRM
CA-SP
CA-EP
Image Version – Add the software version for the image.
Zone* – Select the Zone of the existing instance type from the dropdown box.
Use Existing Resource Group (unchecked) – If you leave this checkbox unchecked, provide the following information in the corresponding dropdown menus:
Provider* – Select the Provider of the existing Instance type from the Provider dropdown box. Five additional data fields will display:
Data Center* – Select a data center from the dropdown box.
Host/Cluster* – Select the IP address of your desired Host or Cluster.
Resource pool – (Optional) Select your resource pool. This dropdown box is not selectable if the IP address in Host/Cluster is not found
Instance* – Select an appropriate existing Instance from the dropdown box.
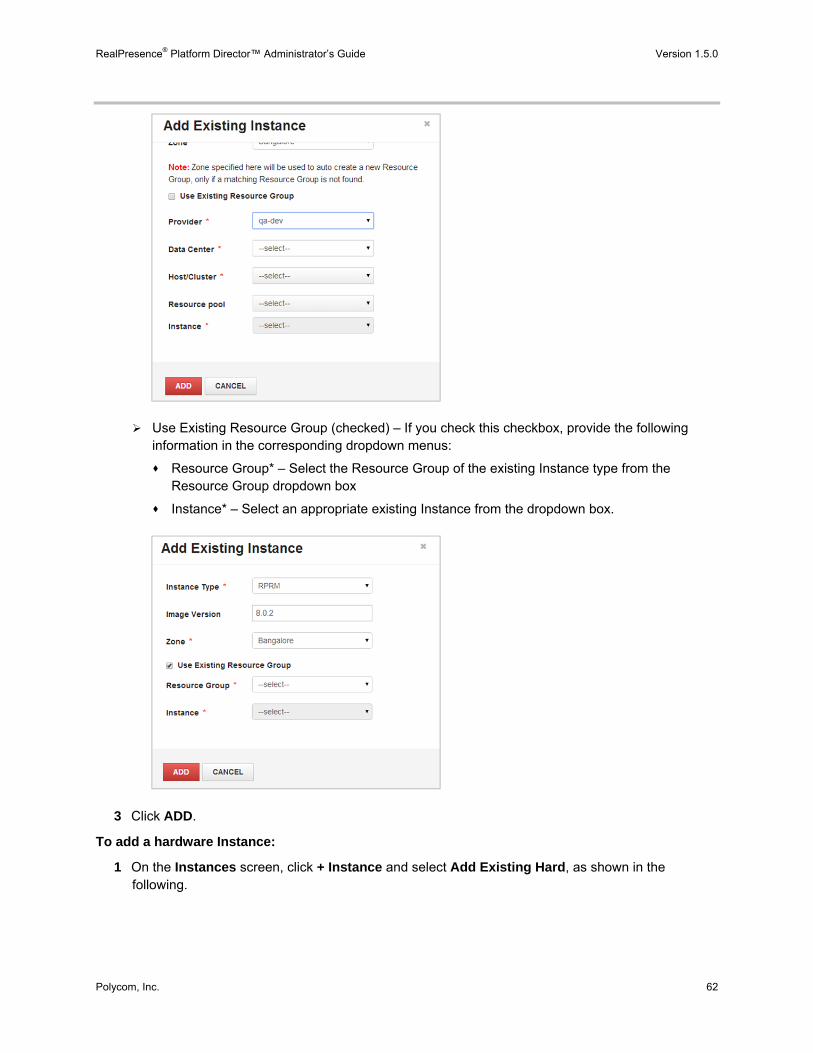
RealPresence® Platform Director™ Administrator’s Guide Version 1.5.0
Polycom, Inc. 62
Use Existing Resource Group (checked) – If you check this checkbox, provide the following information in the corresponding dropdown menus:
Resource Group* – Select the Resource Group of the existing Instance type from the Resource Group dropdown box
Instance* – Select an appropriate existing Instance from the dropdown box.
3 Click ADD.
To add a hardware Instance:
1 On the Instances screen, click + Instance and select Add Existing Hard, as shown in the following.
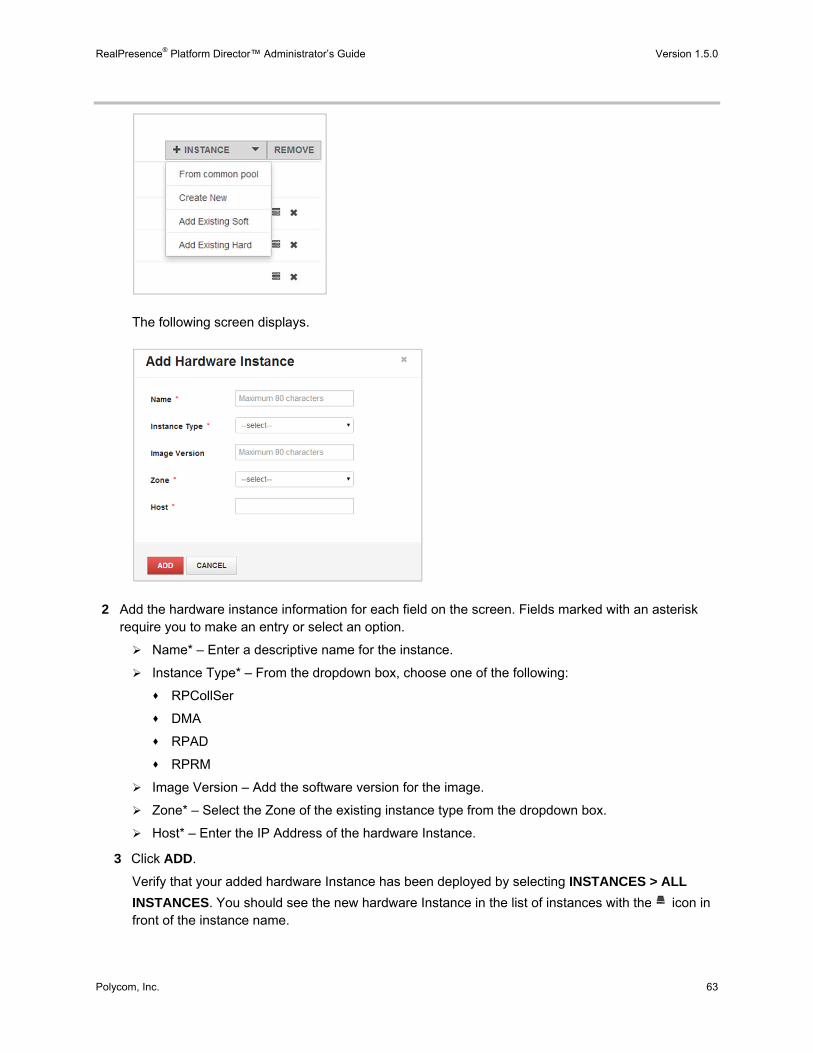
RealPresence® Platform Director™ Administrator’s Guide Version 1.5.0
Polycom, Inc. 63
The following screen displays.
2 Add the hardware instance information for each field on the screen. Fields marked with an asterisk require you to make an entry or select an option.
Name* – Enter a descriptive name for the instance.
Instance Type* – From the dropdown box, choose one of the following:
RPCollSer
DMA
RPAD
RPRM
Image Version – Add the software version for the image.
Zone* – Select the Zone of the existing instance type from the dropdown box.
Host* – Enter the IP Address of the hardware Instance.
3 Click ADD.
Verify that your added hardware Instance has been deployed by selecting INSTANCES > ALL
INSTANCES. You should see the new hardware Instance in the list of instances with the icon in front of the instance name.

RealPresence® Platform Director™ Administrator’s Guide Version 1.5.0
Polycom, Inc. 64
Edit an Instance in a Service Group
You can view the complete profile of an Instance in a Service Group, including details on the SNMP versions, alarms, and monitored statuses of the Instance.
Instance Details
To view instance details:
1 On the Service Group > [Group Name] > Instances page, click the icon next to the instance
that you want to view.
2 Click on the Details tab and click on the Details subtab on the left side of the screen.The following screen displays.
Note: Instance details are not editable.
To edit SNMP details:
1 Click on the Details tab and click on the SNMP subtab on the left of the screen.
The same data fields display for both hardware and software Instances.
2 Update the SNMP information for your instance as shown on the following:
SNMP version – Select either v2c or v3.
If you choose v2c, the SNMP version, Transport, Port, and Community fields appear.
If you choose v3, the SNMP version, Transport, Port, Security User, Authentication type, Authentication password, Encryption type, and Encryption password fields appear.
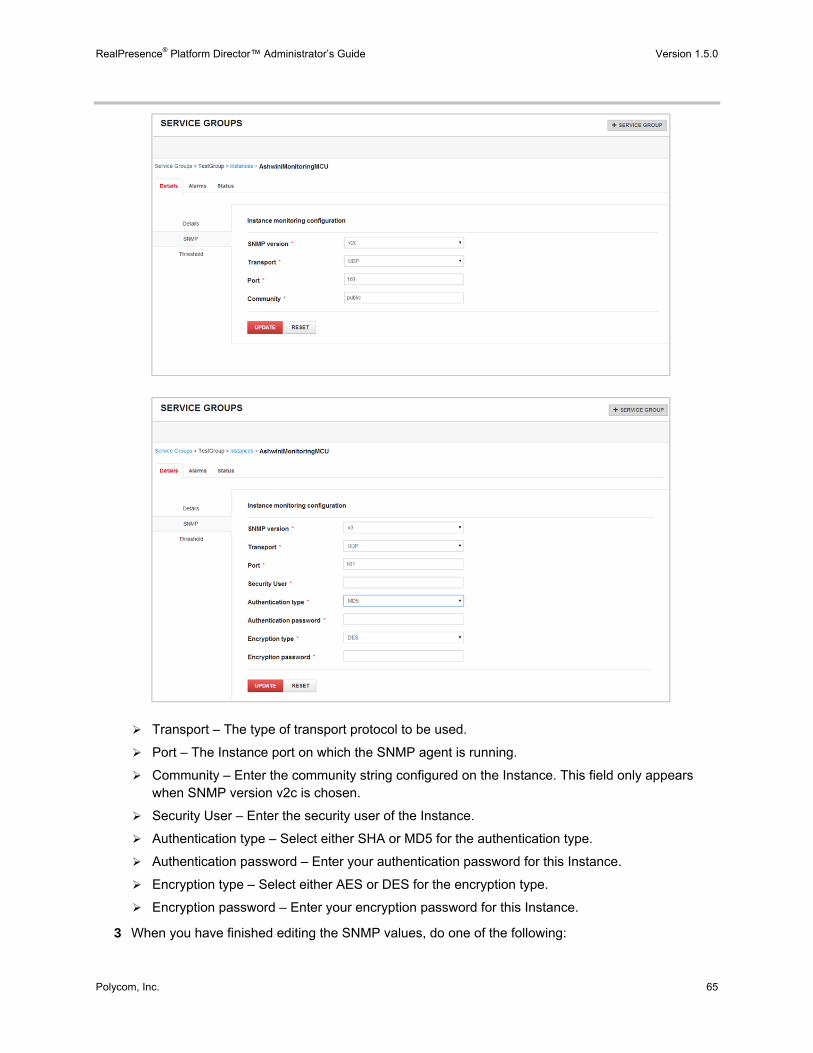
RealPresence® Platform Director™ Administrator’s Guide Version 1.5.0
Polycom, Inc. 65
Transport – The type of transport protocol to be used.
Port – The Instance port on which the SNMP agent is running.
Community – Enter the community string configured on the Instance. This field only appears when SNMP version v2c is chosen.
Security User – Enter the security user of the Instance.
Authentication type – Select either SHA or MD5 for the authentication type.
Authentication password – Enter your authentication password for this Instance.
Encryption type – Select either AES or DES for the encryption type.
Encryption password – Enter your encryption password for this Instance.
3 When you have finished editing the SNMP values, do one of the following:
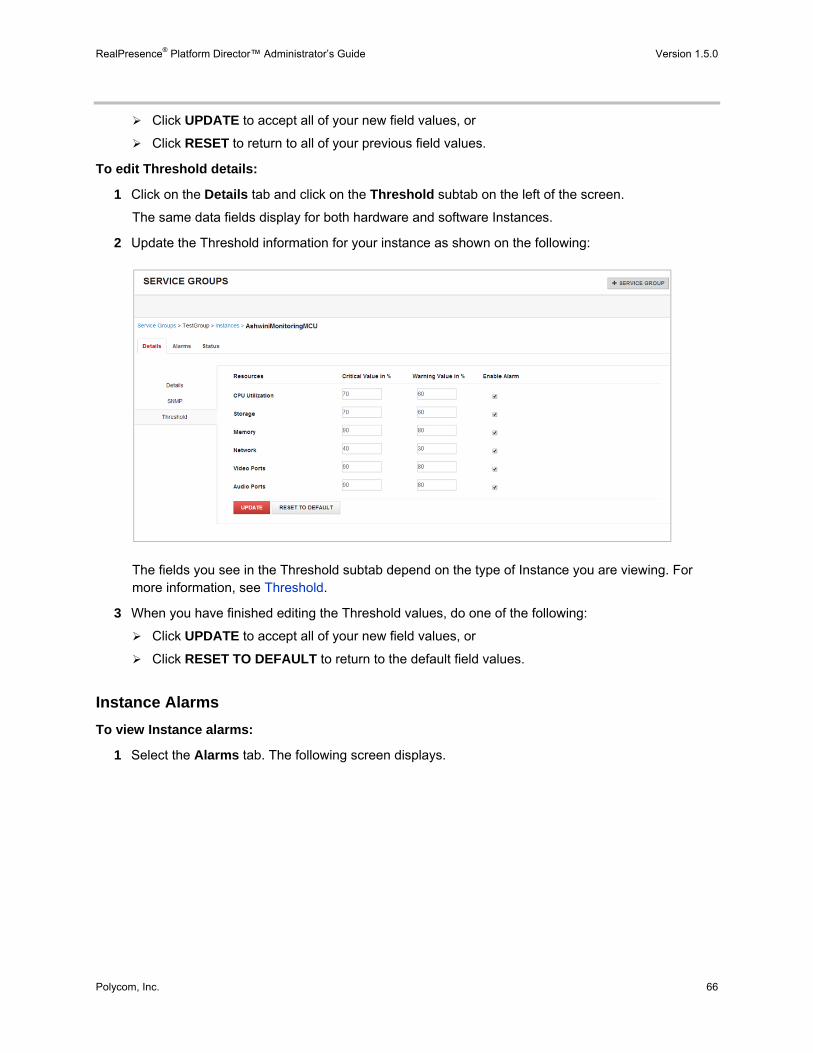
RealPresence® Platform Director™ Administrator’s Guide Version 1.5.0
Polycom, Inc. 66
Click UPDATE to accept all of your new field values, or
Click RESET to return to all of your previous field values.
To edit Threshold details:
1 Click on the Details tab and click on the Threshold subtab on the left of the screen.
The same data fields display for both hardware and software Instances.
2 Update the Threshold information for your instance as shown on the following:
The fields you see in the Threshold subtab depend on the type of Instance you are viewing. For more information, see Threshold.
3 When you have finished editing the Threshold values, do one of the following:
Click UPDATE to accept all of your new field values, or
Click RESET TO DEFAULT to return to the default field values.
Instance Alarms
To view Instance alarms:
1 Select the Alarms tab. The following screen displays.
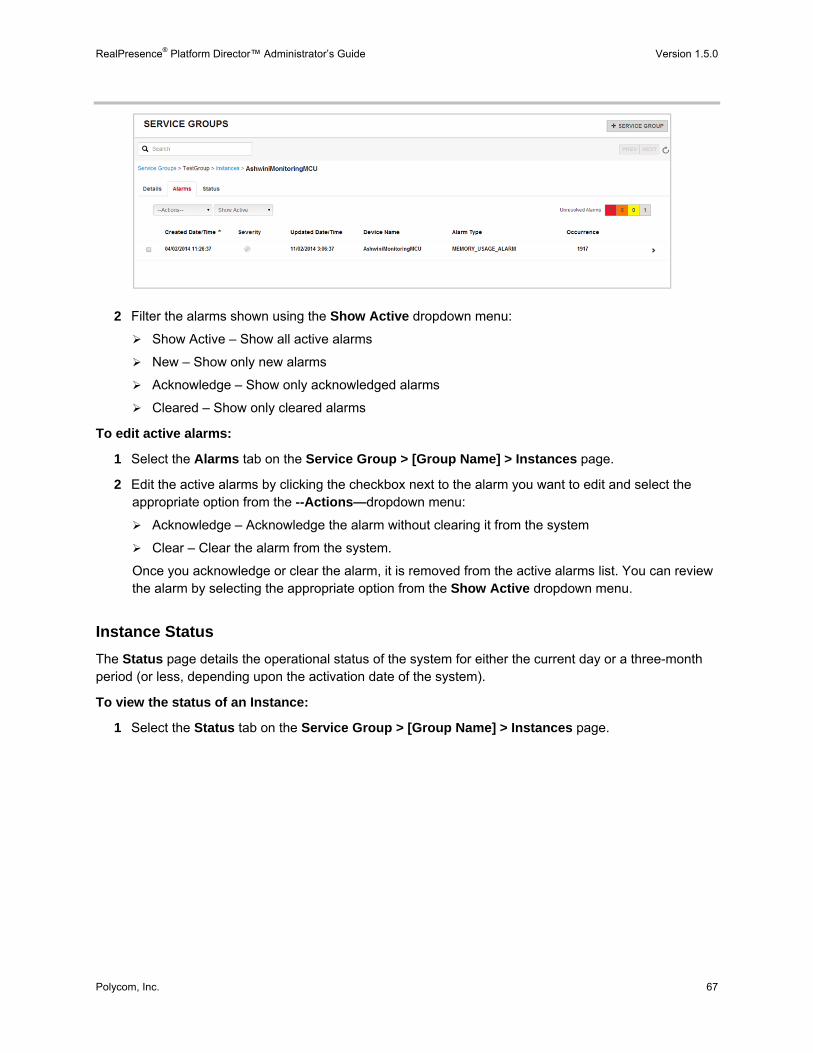
RealPresence® Platform Director™ Administrator’s Guide Version 1.5.0
Polycom, Inc. 67
2 Filter the alarms shown using the Show Active dropdown menu:
Show Active – Show all active alarms
New – Show only new alarms
Acknowledge – Show only acknowledged alarms
Cleared – Show only cleared alarms
To edit active alarms:
1 Select the Alarms tab on the Service Group > [Group Name] > Instances page.
2 Edit the active alarms by clicking the checkbox next to the alarm you want to edit and select the appropriate option from the --Actions—dropdown menu:
Acknowledge – Acknowledge the alarm without clearing it from the system
Clear – Clear the alarm from the system.
Once you acknowledge or clear the alarm, it is removed from the active alarms list. You can review the alarm by selecting the appropriate option from the Show Active dropdown menu.
Instance Status
The Status page details the operational status of the system for either the current day or a three-month period (or less, depending upon the activation date of the system).
To view the status of an Instance:
1 Select the Status tab on the Service Group > [Group Name] > Instances page.
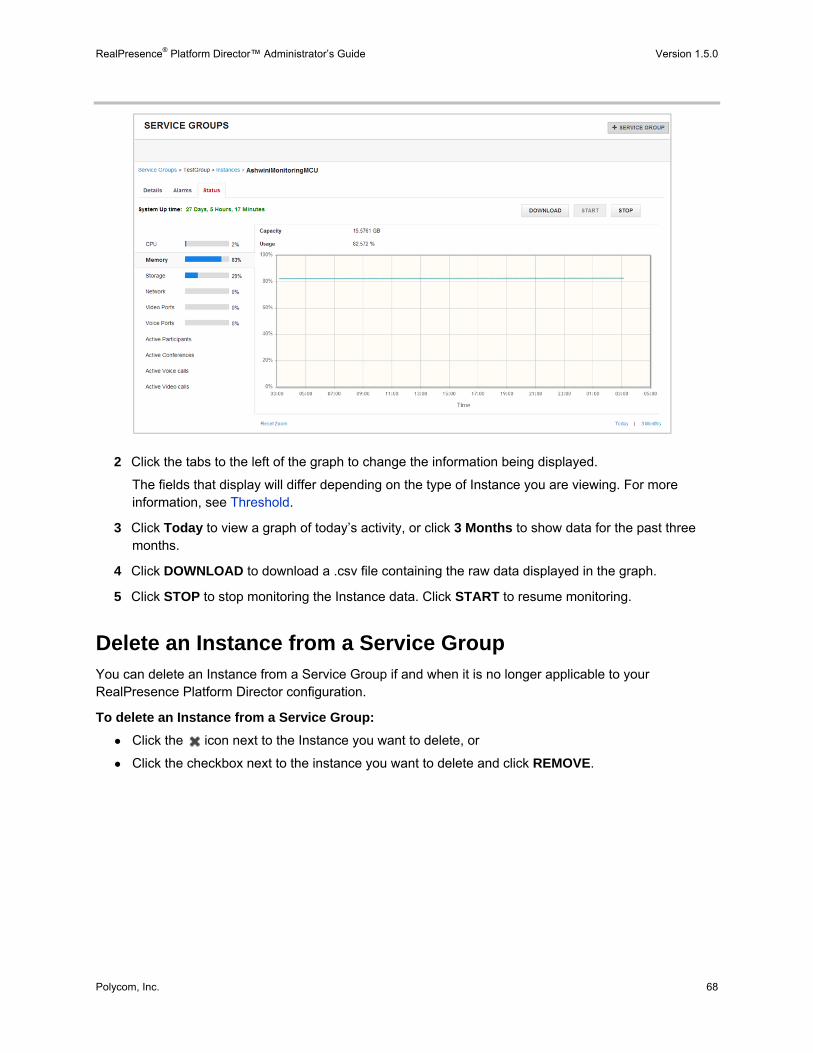
RealPresence® Platform Director™ Administrator’s Guide Version 1.5.0
Polycom, Inc. 68
2 Click the tabs to the left of the graph to change the information being displayed.
The fields that display will differ depending on the type of Instance you are viewing. For more information, see Threshold.
3 Click Today to view a graph of today’s activity, or click 3 Months to show data for the past three months.
4 Click DOWNLOAD to download a .csv file containing the raw data displayed in the graph.
5 Click STOP to stop monitoring the Instance data. Click START to resume monitoring.
Delete an Instance from a Service Group You can delete an Instance from a Service Group if and when it is no longer applicable to your RealPresence Platform Director configuration.
To delete an Instance from a Service Group:
● Click the icon next to the Instance you want to delete, or
● Click the checkbox next to the instance you want to delete and click REMOVE.
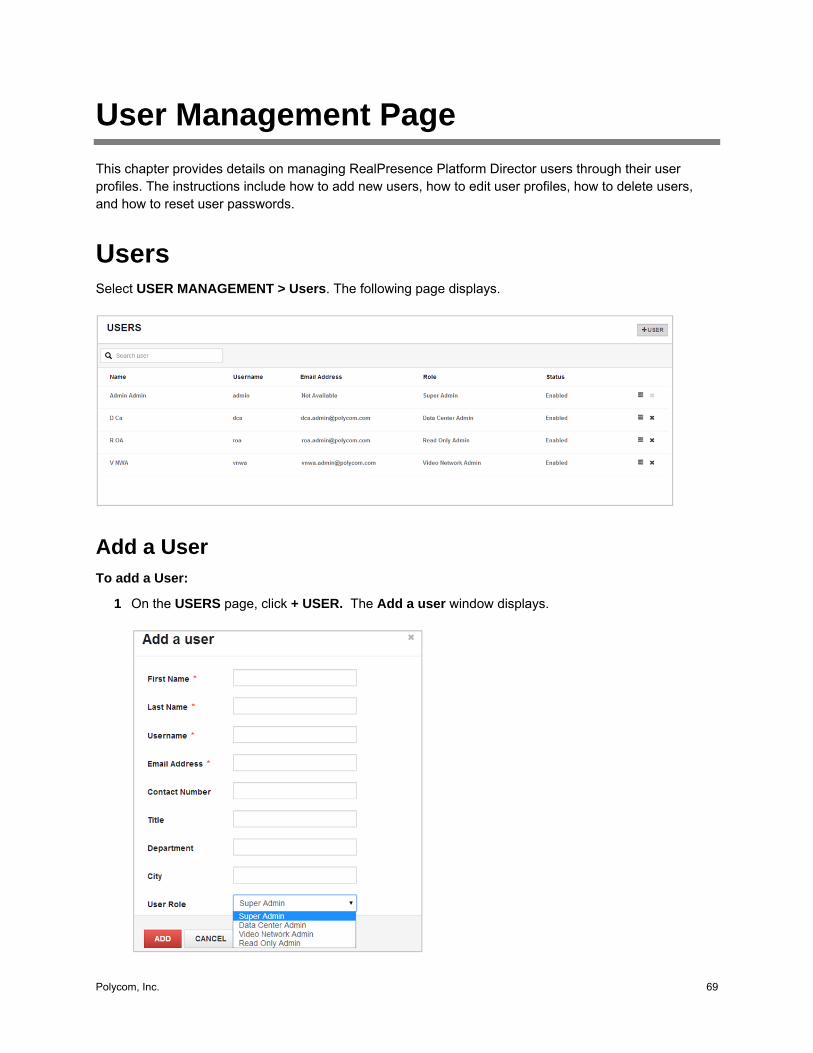
Polycom, Inc. 69
User Management Page
This chapter provides details on managing RealPresence Platform Director users through their user profiles. The instructions include how to add new users, how to edit user profiles, how to delete users, and how to reset user passwords.
Users Select USER MANAGEMENT > Users. The following page displays.
Add a User To add a User:
1 On the USERS page, click + USER. The Add a user window displays.
RealPresence® Platform Director™ Administrator’s Guide Version 1.5.0
Polycom, Inc. 70
2 Fill in the following text fields (fields marked with * are required):
First Name*
Last Name*
Username*
Email Address*
Contact Number
Title
Department
City
User Role
Super Admin – This user role has the highest privileges and permits the administrator to do all system configurations. Super admin is the default user when the system is up you have used the “admin” username to log in.
Data Center Admin – This user role is intended for an administrator who can choose to add, edit, and remove resources being used inside a Zone to make sure that there are enough resources for the Instances to use.
Video Network Admin – This user role is intended for an administrator responsible for maintaining a Service Group. The administrator can add images and create or delete instances from Service Groups on an as-needed basis.
Read Only Admin – This user role allows an administrator to read, but not edit, the system configuration. It is intended for someone responsible for monitoring the system and reporting issues.
Note: User Management Access
Only Super Admins have access to the User Management functions, and thus only Super Admins can add, update, read, or delete Users.
3 Click ADD to create the new user.
Edit a User To edit a User:
1 On the USERS page, click the icon next to the user you want to edit. The following page displays.

RealPresence® Platform Director™ Administrator’s Guide Version 1.5.0
Polycom, Inc. 71
2 On the Details tab, enter any data changes for the required (*) fields and any of the other optional fields. You also have the option to enable or disable the user by clicking or clearing the Enable User checkbox.
3 Click SAVE when you complete all edits.
Reset a User Password To reset a user password:
1 On the USERS page, click the icon next to the user you want to edit.
2 Click the Reset Password tab. The following page displays.
3 Enter the new password in the Password* and Confirm Password* fields.
4 Click UPDATE to accept the new password.
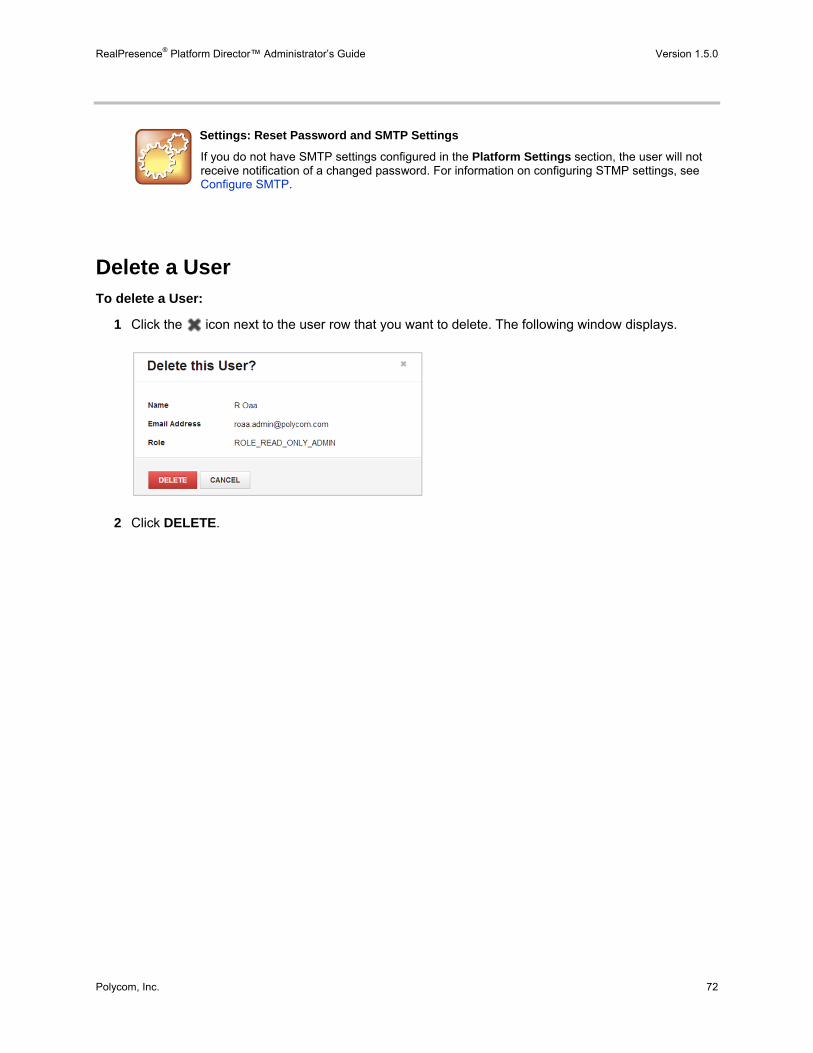
RealPresence® Platform Director™ Administrator’s Guide Version 1.5.0
Polycom, Inc. 72
Settings: Reset Password and SMTP Settings
If you do not have SMTP settings configured in the Platform Settings section, the user will not receive notification of a changed password. For information on configuring STMP settings, see Configure SMTP.
Delete a User To delete a User:
1 Click the icon next to the user row that you want to delete. The following window displays.
2 Click DELETE.

Polycom, Inc. 73
Monitoring Page
RealPresence Platform Director, in addition to managing RealPresence Platform component Instances, also monitors the system health of those Instances. The MONITORING page allows you to view the state of RealPresence Platform Director alarms and configure alarm thresholds.
Alarms The ALARMS page shows the current state of the alarms monitored by RealPresence Platform Director. The initial ALARMS screen that displays shows all alarms across Instances, Resource Groups, Service Groups, Zones, and Providers.
The Unresolved Alarms box in the upper-right corner of the Alarms window provides a color-coded view of the number and severity of the alarms. The alarm colors correspond to the following threshold levels:
● Gray – System has reached the Warning Value percentage
● Yellow – System has reached a one-third increase in percentage between the Warning and Critical values
● Orange – System has reached a two-thirds increase in percentage between the Warning and Critical values
● Red – System has reached the Critical Value percentage
For more information on the threshold values, see Threshold.
To display only a specific type of Alarm:
1 Click on the Type : ALL ALARMS dropdown menu in the upper left corner of the ALARMS screen.
2 Select the type of Alarm to display.
To view alarms:
1 Select the Alarms page. The following screen displays.
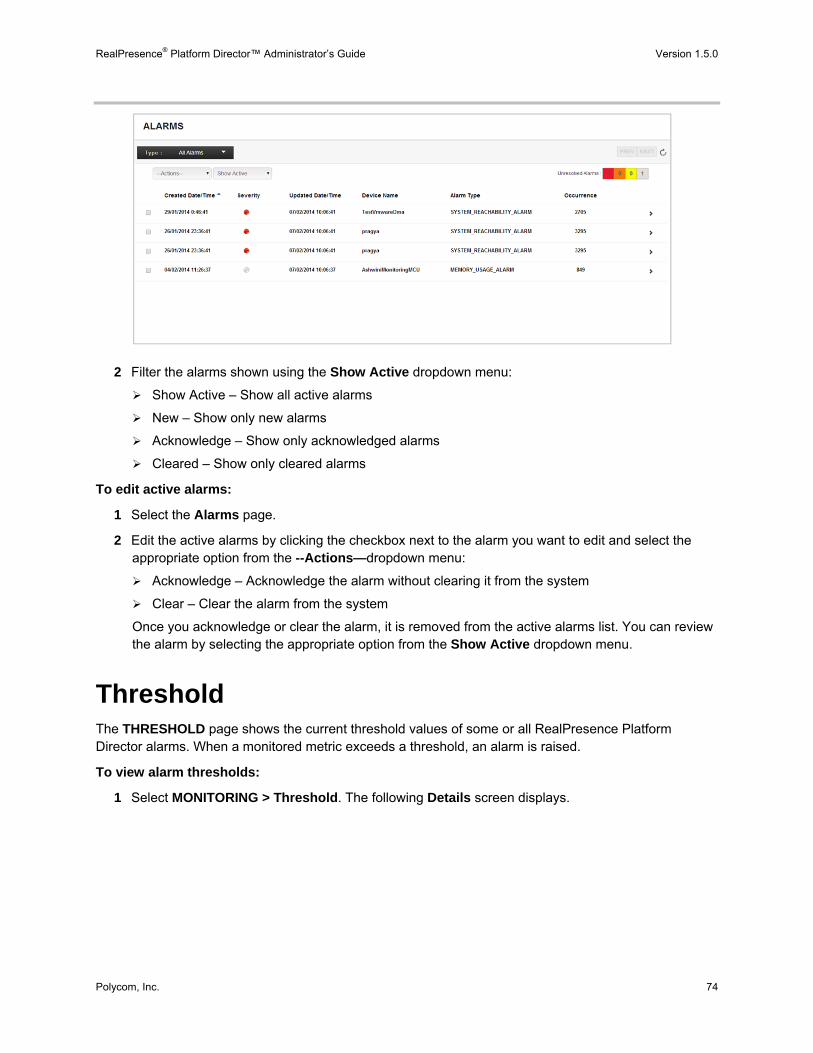
RealPresence® Platform Director™ Administrator’s Guide Version 1.5.0
Polycom, Inc. 74
2 Filter the alarms shown using the Show Active dropdown menu:
Show Active – Show all active alarms
New – Show only new alarms
Acknowledge – Show only acknowledged alarms
Cleared – Show only cleared alarms
To edit active alarms:
1 Select the Alarms page.
2 Edit the active alarms by clicking the checkbox next to the alarm you want to edit and select the appropriate option from the --Actions—dropdown menu:
Acknowledge – Acknowledge the alarm without clearing it from the system
Clear – Clear the alarm from the system
Once you acknowledge or clear the alarm, it is removed from the active alarms list. You can review the alarm by selecting the appropriate option from the Show Active dropdown menu.
Threshold The THRESHOLD page shows the current threshold values of some or all RealPresence Platform Director alarms. When a monitored metric exceeds a threshold, an alarm is raised.
To view alarm thresholds:
1 Select MONITORING > Threshold. The following Details screen displays.
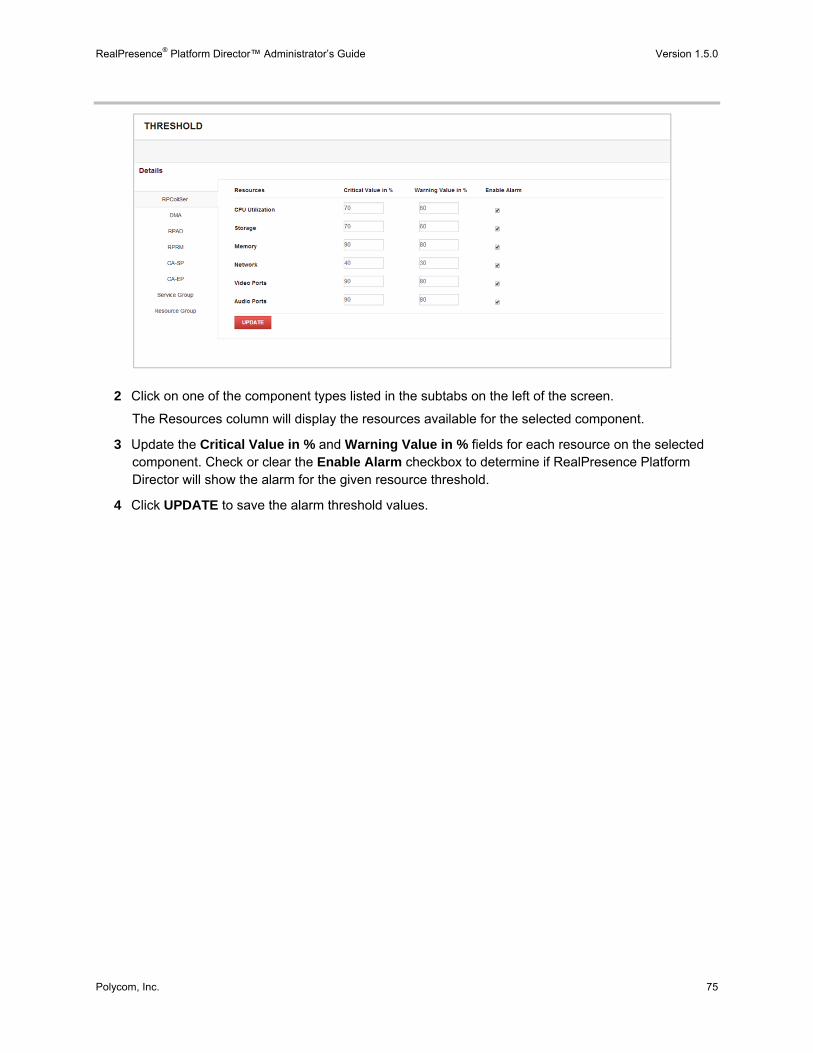
RealPresence® Platform Director™ Administrator’s Guide Version 1.5.0
Polycom, Inc. 75
2 Click on one of the component types listed in the subtabs on the left of the screen.
The Resources column will display the resources available for the selected component.
3 Update the Critical Value in % and Warning Value in % fields for each resource on the selected component. Check or clear the Enable Alarm checkbox to determine if RealPresence Platform Director will show the alarm for the given resource threshold.
4 Click UPDATE to save the alarm threshold values.


Polycom, Inc. 77
Settings Page
In the Settings page of RealPresence Platform Director, you can set specific settings for the platform and for specific applications.
Platform Settings This section describes the settings you can update for the RealPresence Platform Director system.
Date and Time RealPresence Platform Director uses a Network Time Protocol (NTP) Server to set the system date and time.
To set the date and time:
1 Select PLATFORM SETTINGS > DATE TIME. The following window displays.
2 Update or view the following settings:
NTP Server – The NTP server IP address or FQDN to synchronize the time on the RealPresence Platform Director system
Time Zone – The time zone (UTC) of the RealPresence Platform Director (not a configurable field)
Date & Time – The current date and time for RealPresence Platform Director (not a configurable field)
3 Click UPDATE.
Certificates RealPresence Platform Director requires a secure connection. When a secure connection is established, the browser receives a self-signed certificate or a certificate signed by a third party Certificate Authority (CA) verifying the identity of the RealPresence Platform Director.
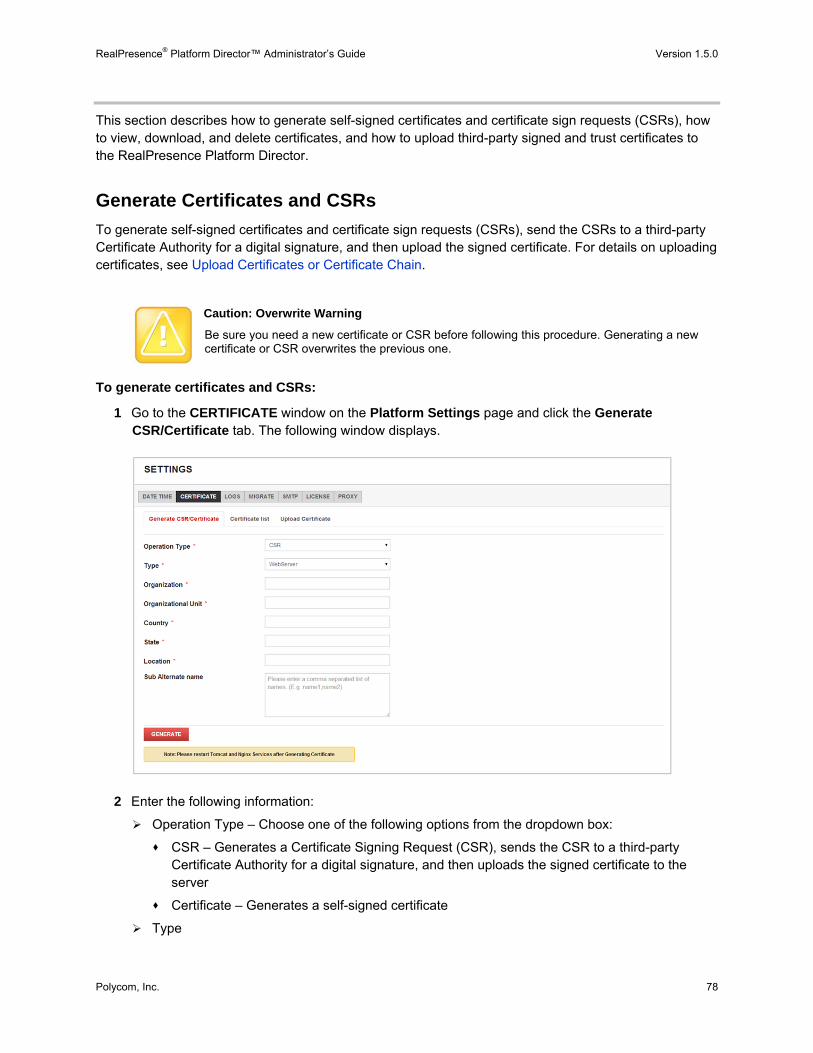
RealPresence® Platform Director™ Administrator’s Guide Version 1.5.0
Polycom, Inc. 78
This section describes how to generate self-signed certificates and certificate sign requests (CSRs), how to view, download, and delete certificates, and how to upload third-party signed and trust certificates to the RealPresence Platform Director.
Generate Certificates and CSRs
To generate self-signed certificates and certificate sign requests (CSRs), send the CSRs to a third-party Certificate Authority for a digital signature, and then upload the signed certificate. For details on uploading certificates, see Upload Certificates or Certificate Chain.
Caution: Overwrite Warning
Be sure you need a new certificate or CSR before following this procedure. Generating a new certificate or CSR overwrites the previous one.
To generate certificates and CSRs:
1 Go to the CERTIFICATE window on the Platform Settings page and click the Generate CSR/Certificate tab. The following window displays.
2 Enter the following information:
Operation Type – Choose one of the following options from the dropdown box:
CSR – Generates a Certificate Signing Request (CSR), sends the CSR to a third-party Certificate Authority for a digital signature, and then uploads the signed certificate to the server
Certificate – Generates a self-signed certificate
Type
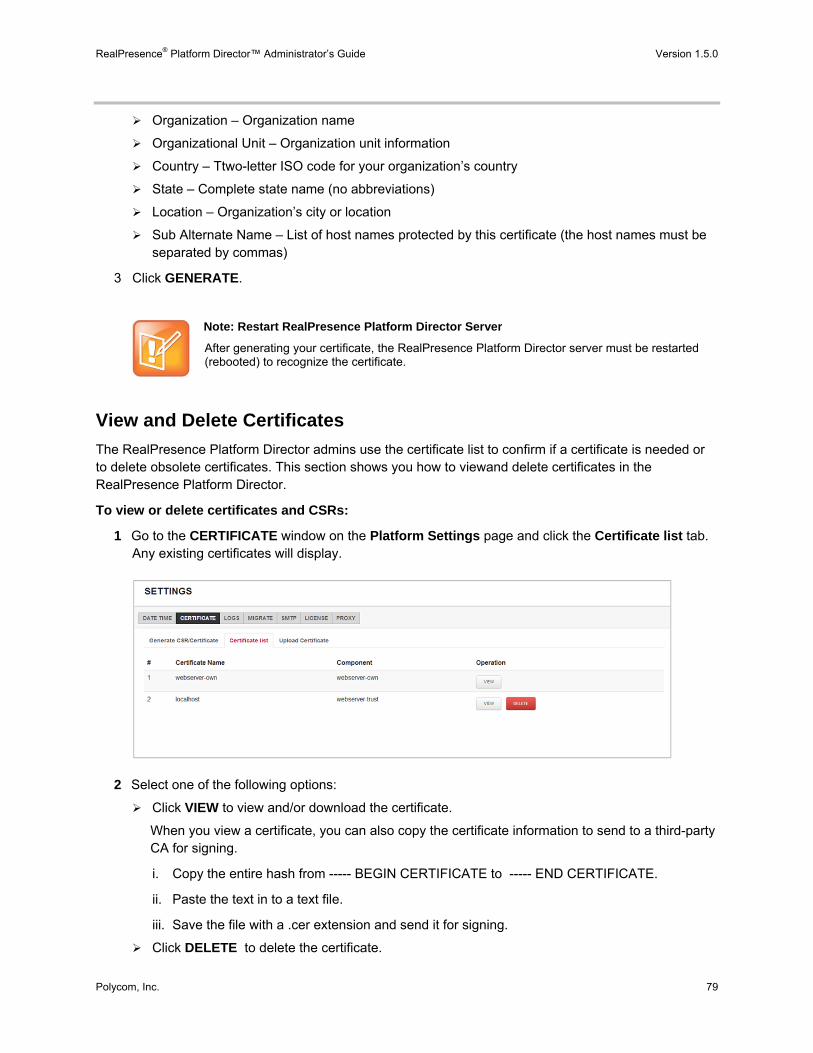
RealPresence® Platform Director™ Administrator’s Guide Version 1.5.0
Polycom, Inc. 79
Organization – Organization name
Organizational Unit – Organization unit information
Country – Ttwo-letter ISO code for your organization’s country
State – Complete state name (no abbreviations)
Location – Organization’s city or location
Sub Alternate Name – List of host names protected by this certificate (the host names must be separated by commas)
3 Click GENERATE.
Note: Restart RealPresence Platform Director Server
After generating your certificate, the RealPresence Platform Director server must be restarted (rebooted) to recognize the certificate.
View and Delete Certificates
The RealPresence Platform Director admins use the certificate list to confirm if a certificate is needed or to delete obsolete certificates. This section shows you how to viewand delete certificates in the RealPresence Platform Director.
To view or delete certificates and CSRs:
1 Go to the CERTIFICATE window on the Platform Settings page and click the Certificate list tab. Any existing certificates will display.
2 Select one of the following options:
Click VIEW to view and/or download the certificate.
When you view a certificate, you can also copy the certificate information to send to a third-party CA for signing.
i. Copy the entire hash from ----- BEGIN CERTIFICATE to ----- END CERTIFICATE.
ii. Paste the text in to a text file.
iii. Save the file with a .cer extension and send it for signing.
Click DELETE to delete the certificate.
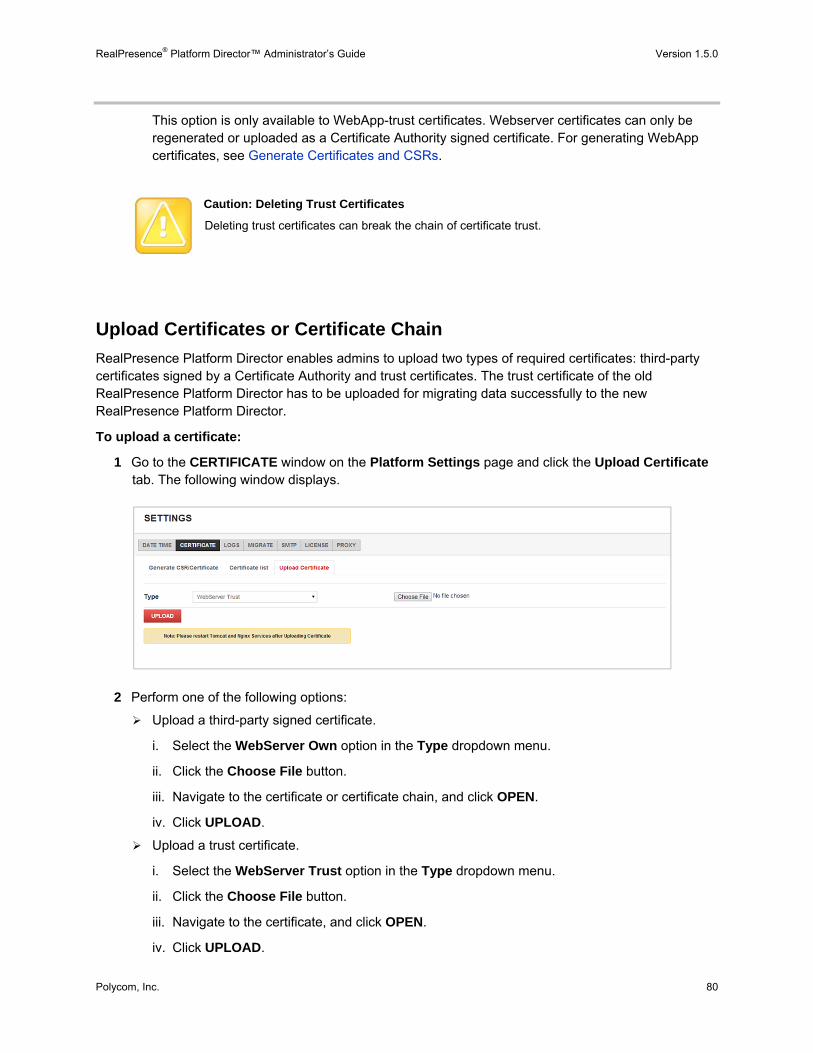
RealPresence® Platform Director™ Administrator’s Guide Version 1.5.0
Polycom, Inc. 80
This option is only available to WebApp-trust certificates. Webserver certificates can only be regenerated or uploaded as a Certificate Authority signed certificate. For generating WebApp certificates, see Generate Certificates and CSRs.
Caution: Deleting Trust Certificates
Deleting trust certificates can break the chain of certificate trust.
Upload Certificates or Certificate Chain
RealPresence Platform Director enables admins to upload two types of required certificates: third-party certificates signed by a Certificate Authority and trust certificates. The trust certificate of the old RealPresence Platform Director has to be uploaded for migrating data successfully to the new RealPresence Platform Director.
To upload a certificate:
1 Go to the CERTIFICATE window on the Platform Settings page and click the Upload Certificate tab. The following window displays.
2 Perform one of the following options:
Upload a third-party signed certificate.
i. Select the WebServer Own option in the Type dropdown menu.
ii. Click the Choose File button.
iii. Navigate to the certificate or certificate chain, and click OPEN.
iv. Click UPLOAD.
Upload a trust certificate.
i. Select the WebServer Trust option in the Type dropdown menu.
ii. Click the Choose File button.
iii. Navigate to the certificate, and click OPEN.
iv. Click UPLOAD.
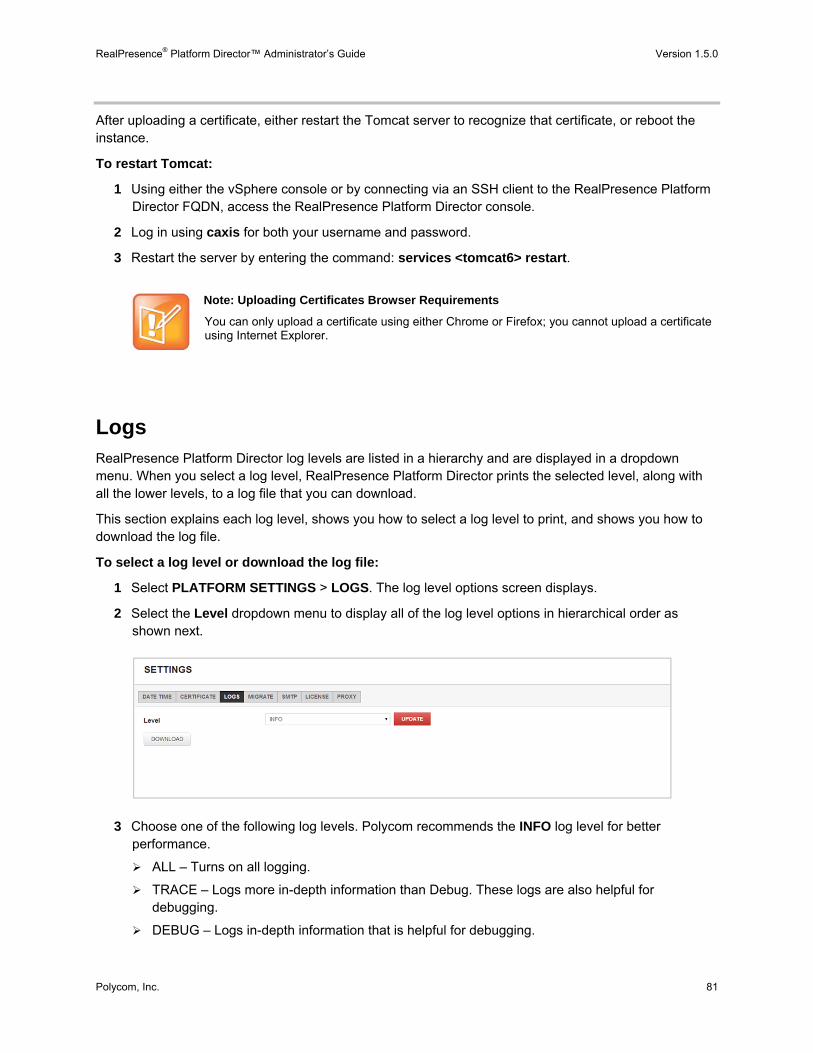
RealPresence® Platform Director™ Administrator’s Guide Version 1.5.0
Polycom, Inc. 81
After uploading a certificate, either restart the Tomcat server to recognize that certificate, or reboot the instance.
To restart Tomcat:
1 Using either the vSphere console or by connecting via an SSH client to the RealPresence Platform Director FQDN, access the RealPresence Platform Director console.
2 Log in using caxis for both your username and password.
3 Restart the server by entering the command: services <tomcat6> restart.
Note: Uploading Certificates Browser Requirements
You can only upload a certificate using either Chrome or Firefox; you cannot upload a certificate using Internet Explorer.
Logs RealPresence Platform Director log levels are listed in a hierarchy and are displayed in a dropdown menu. When you select a log level, RealPresence Platform Director prints the selected level, along with all the lower levels, to a log file that you can download.
This section explains each log level, shows you how to select a log level to print, and shows you how to download the log file.
To select a log level or download the log file:
1 Select PLATFORM SETTINGS > LOGS. The log level options screen displays.
2 Select the Level dropdown menu to display all of the log level options in hierarchical order as shown next.
3 Choose one of the following log levels. Polycom recommends the INFO log level for better performance.
ALL – Turns on all logging.
TRACE – Logs more in-depth information than Debug. These logs are also helpful for debugging.
DEBUG – Logs in-depth information that is helpful for debugging.
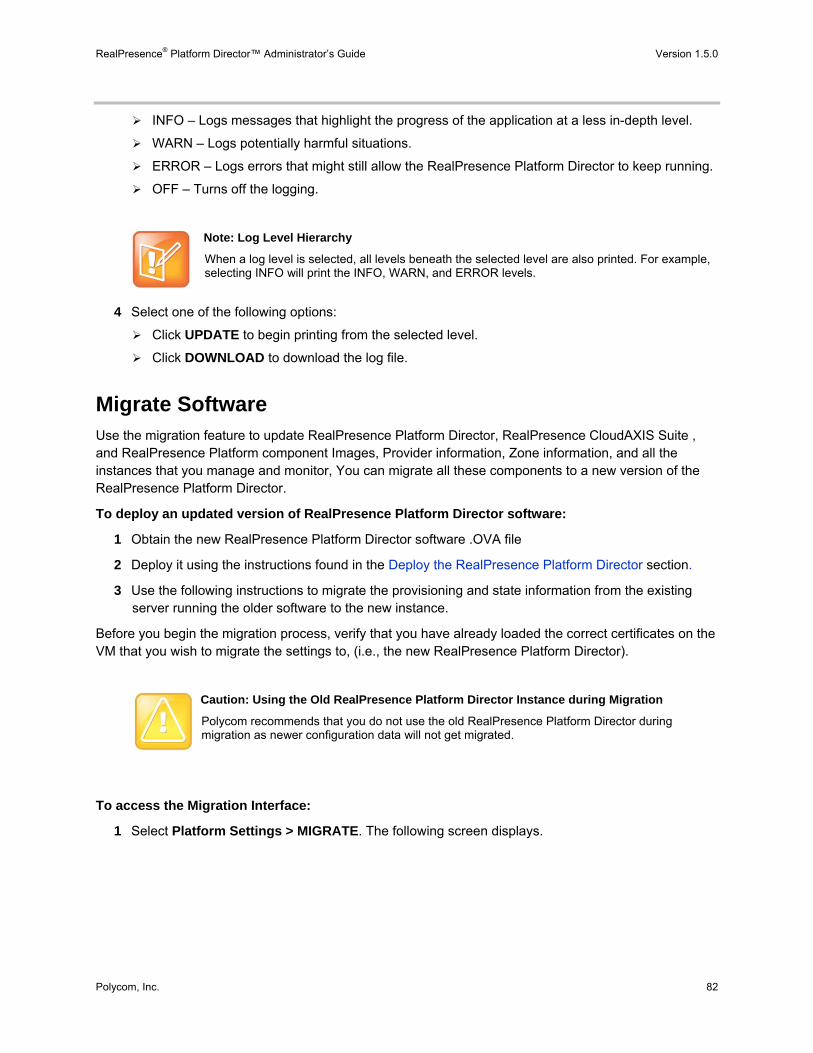
RealPresence® Platform Director™ Administrator’s Guide Version 1.5.0
Polycom, Inc. 82
INFO – Logs messages that highlight the progress of the application at a less in-depth level.
WARN – Logs potentially harmful situations.
ERROR – Logs errors that might still allow the RealPresence Platform Director to keep running.
OFF – Turns off the logging.
Note: Log Level Hierarchy
When a log level is selected, all levels beneath the selected level are also printed. For example, selecting INFO will print the INFO, WARN, and ERROR levels.
4 Select one of the following options:
Click UPDATE to begin printing from the selected level.
Click DOWNLOAD to download the log file.
Migrate Software Use the migration feature to update RealPresence Platform Director, RealPresence CloudAXIS Suite , and RealPresence Platform component Images, Provider information, Zone information, and all the instances that you manage and monitor, You can migrate all these components to a new version of the RealPresence Platform Director.
To deploy an updated version of RealPresence Platform Director software:
1 Obtain the new RealPresence Platform Director software .OVA file
2 Deploy it using the instructions found in the Deploy the RealPresence Platform Director section.
3 Use the following instructions to migrate the provisioning and state information from the existing server running the older software to the new instance.
Before you begin the migration process, verify that you have already loaded the correct certificates on the VM that you wish to migrate the settings to, (i.e., the new RealPresence Platform Director).
Caution: Using the Old RealPresence Platform Director Instance during Migration
Polycom recommends that you do not use the old RealPresence Platform Director during migration as newer configuration data will not get migrated.
To access the Migration Interface:
1 Select Platform Settings > MIGRATE. The following screen displays.
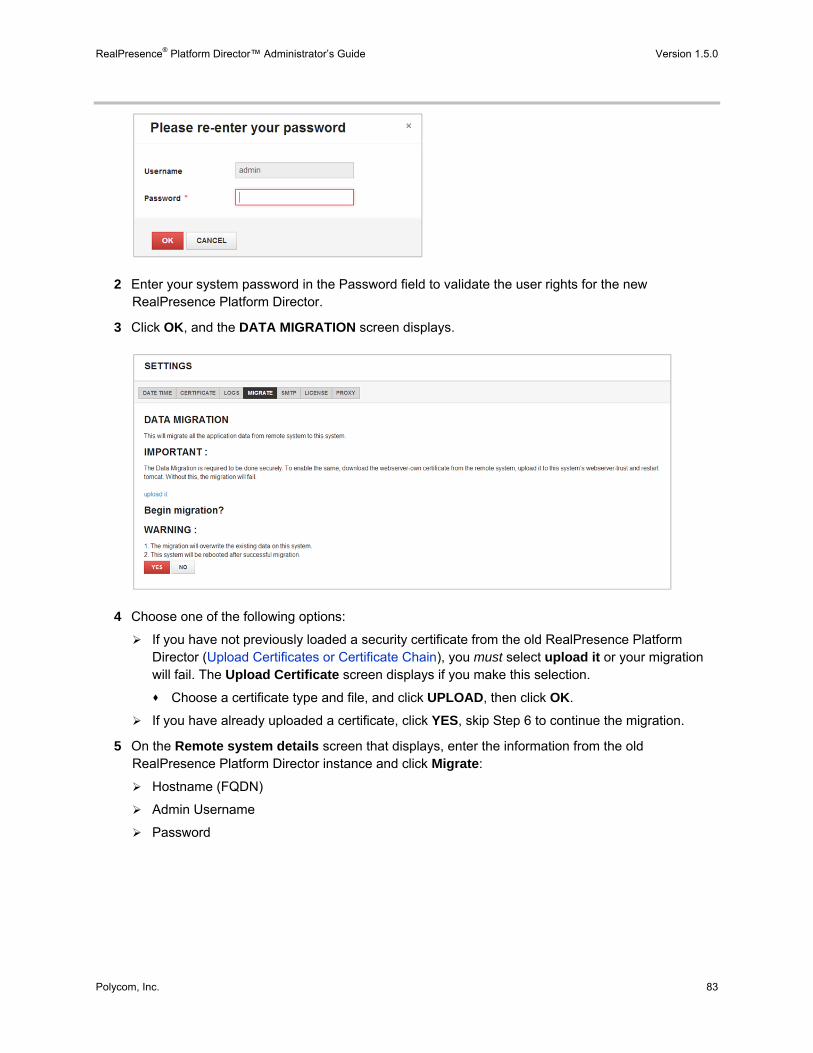
RealPresence® Platform Director™ Administrator’s Guide Version 1.5.0
Polycom, Inc. 83
2 Enter your system password in the Password field to validate the user rights for the new RealPresence Platform Director.
3 Click OK, and the DATA MIGRATION screen displays.
4 Choose one of the following options:
If you have not previously loaded a security certificate from the old RealPresence Platform Director (Upload Certificates or Certificate Chain), you must select upload it or your migration will fail. The Upload Certificate screen displays if you make this selection.
Choose a certificate type and file, and click UPLOAD, then click OK.
If you have already uploaded a certificate, click YES, skip Step 6 to continue the migration.
5 On the Remote system details screen that displays, enter the information from the old RealPresence Platform Director instance and click Migrate:
Hostname (FQDN)
Admin Username
Password

RealPresence® Platform Director™ Administrator’s Guide Version 1.5.0
Polycom, Inc. 84
6 Wait for the User Interface to indicate that the information from the old RealPresence Platform Director instance has been successfully imported.
When this import has finished, the current RealPresence Platform Director will do an internal configuration before rebooting itself.
7 When the RealPresence Platform Director VM has restarted, log in with the admin credentials from the old RealPresence Platform Director and verify that the settings are correct.
Note: Verifying Migration
Once the data is successfully migrated, make sure that the DNS records are updated to point to the new RealPresence Platform Director.
Configure SMTP To access SMTP settings:
1 Select PLATFORM SETTINGS > SMTP to update or set your SMTP email settings.
2 Enter your email server information and email ID. Click the Send eMail checkbox if you wish to receive emails from RealPresence Platform Director.
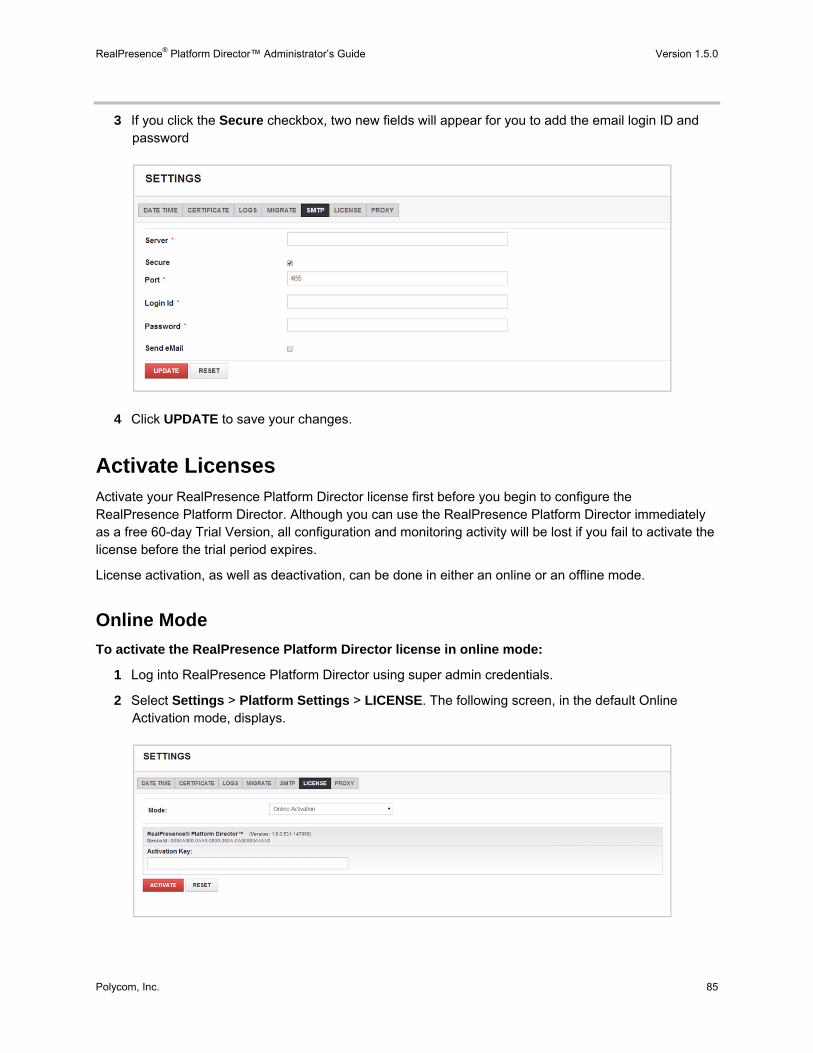
RealPresence® Platform Director™ Administrator’s Guide Version 1.5.0
Polycom, Inc. 85
3 If you click the Secure checkbox, two new fields will appear for you to add the email login ID and password
4 Click UPDATE to save your changes.
Activate Licenses Activate your RealPresence Platform Director license first before you begin to configure the RealPresence Platform Director. Although you can use the RealPresence Platform Director immediately as a free 60-day Trial Version, all configuration and monitoring activity will be lost if you fail to activate the license before the trial period expires.
License activation, as well as deactivation, can be done in either an online or an offline mode.
Online Mode
To activate the RealPresence Platform Director license in online mode:
1 Log into RealPresence Platform Director using super admin credentials.
2 Select Settings > Platform Settings > LICENSE. The following screen, in the default Online Activation mode, displays.
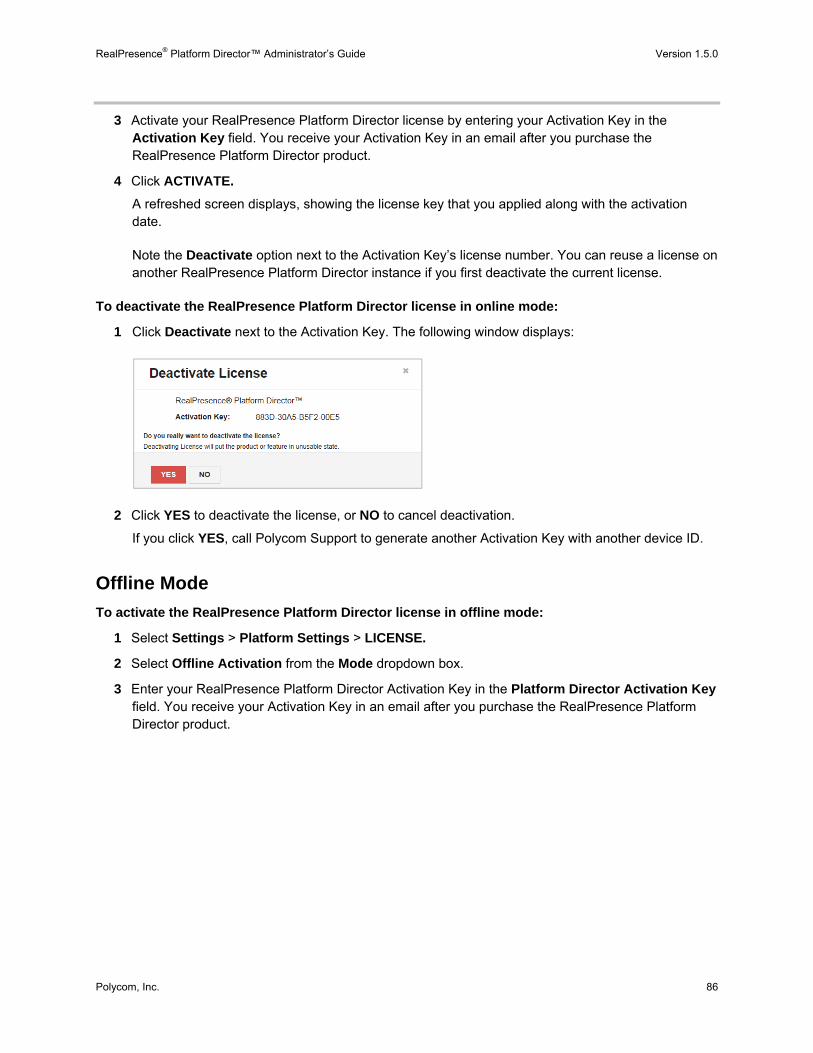
RealPresence® Platform Director™ Administrator’s Guide Version 1.5.0
Polycom, Inc. 86
3 Activate your RealPresence Platform Director license by entering your Activation Key in the Activation Key field. You receive your Activation Key in an email after you purchase the RealPresence Platform Director product.
4 Click ACTIVATE.
A refreshed screen displays, showing the license key that you applied along with the activation date.
Note the Deactivate option next to the Activation Key’s license number. You can reuse a license on another RealPresence Platform Director instance if you first deactivate the current license.
To deactivate the RealPresence Platform Director license in online mode:
1 Click Deactivate next to the Activation Key. The following window displays:
2 Click YES to deactivate the license, or NO to cancel deactivation.
If you click YES, call Polycom Support to generate another Activation Key with another device ID.
Offline Mode
To activate the RealPresence Platform Director license in offline mode:
1 Select Settings > Platform Settings > LICENSE.
2 Select Offline Activation from the Mode dropdown box.
3 Enter your RealPresence Platform Director Activation Key in the Platform Director Activation Key field. You receive your Activation Key in an email after you purchase the RealPresence Platform Director product.
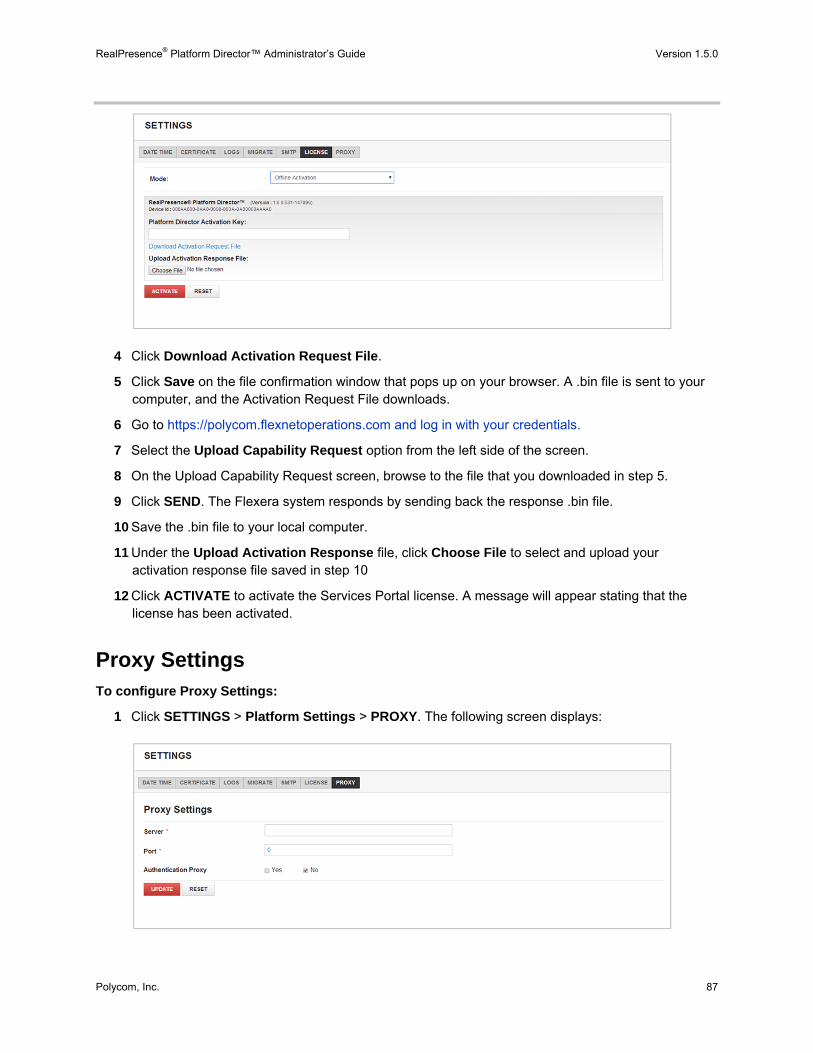
RealPresence® Platform Director™ Administrator’s Guide Version 1.5.0
Polycom, Inc. 87
4 Click Download Activation Request File.
5 Click Save on the file confirmation window that pops up on your browser. A .bin file is sent to your computer, and the Activation Request File downloads.
6 Go to https://polycom.flexnetoperations.com and log in with your credentials.
7 Select the Upload Capability Request option from the left side of the screen.
8 On the Upload Capability Request screen, browse to the file that you downloaded in step 5.
9 Click SEND. The Flexera system responds by sending back the response .bin file.
10 Save the .bin file to your local computer.
11 Under the Upload Activation Response file, click Choose File to select and upload your activation response file saved in step 10
12 Click ACTIVATE to activate the Services Portal license. A message will appear stating that the license has been activated.
Proxy Settings To configure Proxy Settings:
1 Click SETTINGS > Platform Settings > PROXY. The following screen displays:
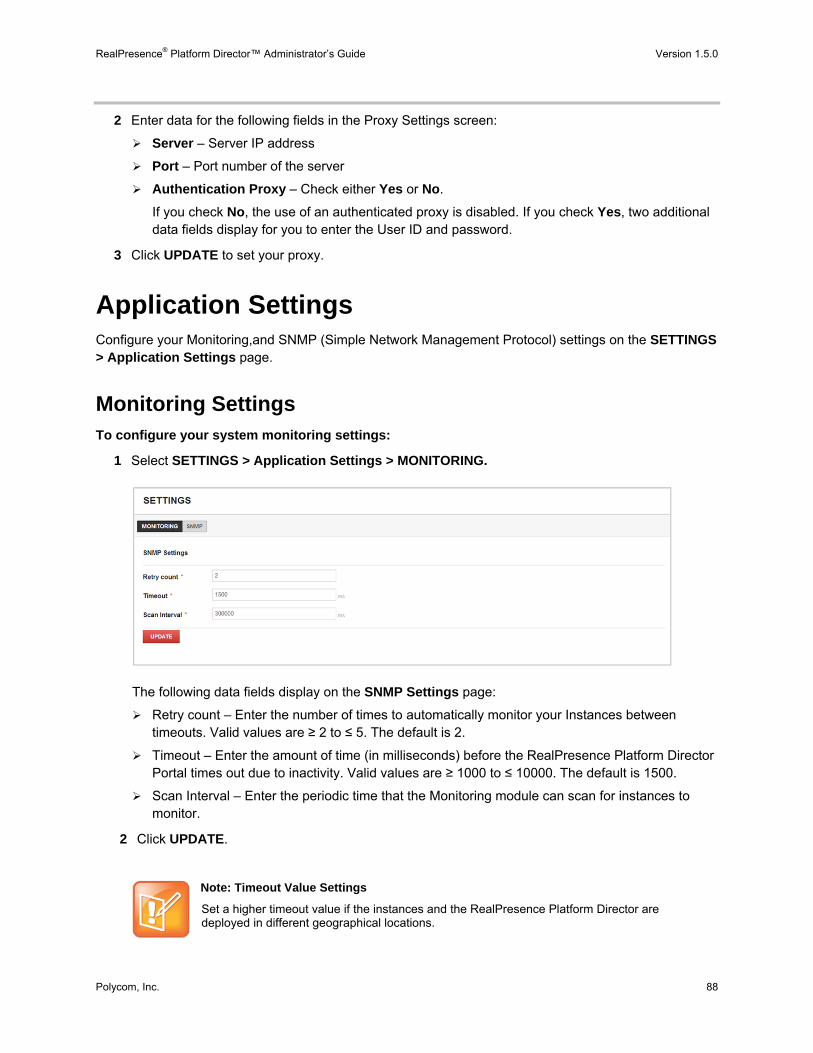
RealPresence® Platform Director™ Administrator’s Guide Version 1.5.0
Polycom, Inc. 88
2 Enter data for the following fields in the Proxy Settings screen:
Server – Server IP address
Port – Port number of the server
Authentication Proxy – Check either Yes or No.
If you check No, the use of an authenticated proxy is disabled. If you check Yes, two additional data fields display for you to enter the User ID and password.
3 Click UPDATE to set your proxy.
Application Settings Configure your Monitoring,and SNMP (Simple Network Management Protocol) settings on the SETTINGS > Application Settings page.
Monitoring Settings To configure your system monitoring settings:
1 Select SETTINGS > Application Settings > MONITORING.
The following data fields display on the SNMP Settings page:
Retry count – Enter the number of times to automatically monitor your Instances between timeouts. Valid values are ≥ 2 to ≤ 5. The default is 2.
Timeout – Enter the amount of time (in milliseconds) before the RealPresence Platform Director Portal times out due to inactivity. Valid values are ≥ 1000 to ≤ 10000. The default is 1500.
Scan Interval – Enter the periodic time that the Monitoring module can scan for instances to monitor.
2 Click UPDATE.
Note: Timeout Value Settings
Set a higher timeout value if the instances and the RealPresence Platform Director are deployed in different geographical locations.
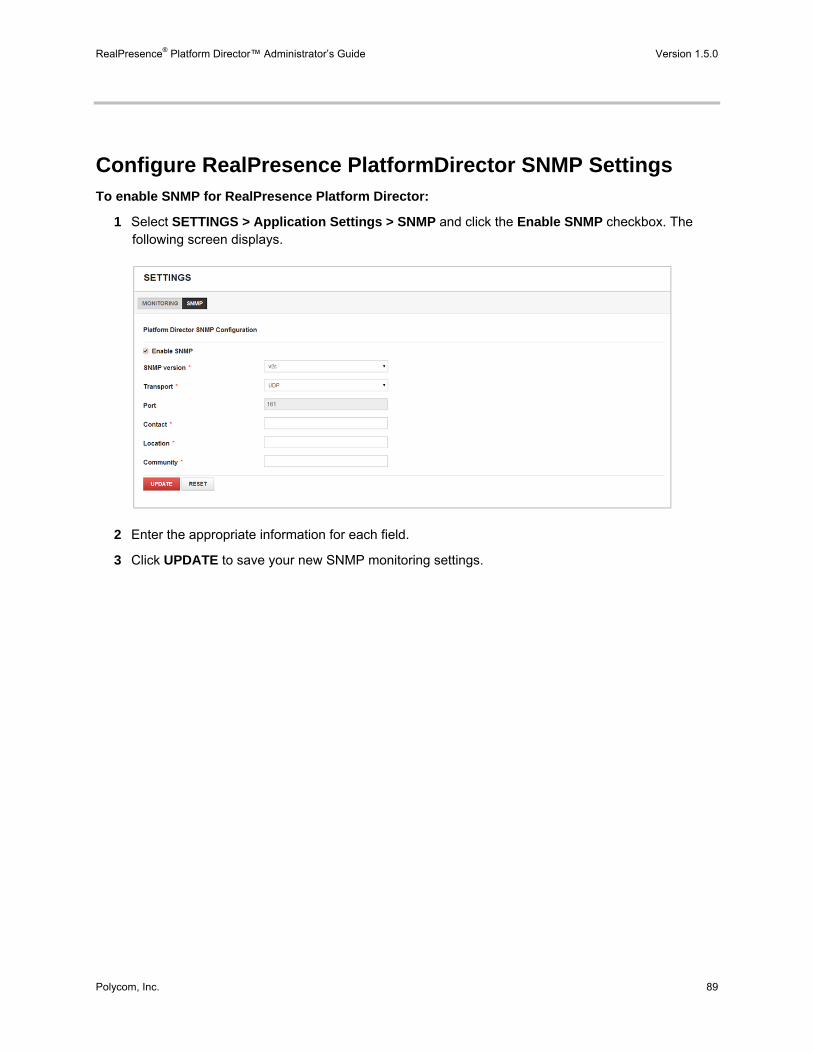
RealPresence® Platform Director™ Administrator’s Guide Version 1.5.0
Polycom, Inc. 89
Configure RealPresence PlatformDirector SNMP Settings To enable SNMP for RealPresence Platform Director:
1 Select SETTINGS > Application Settings > SNMP and click the Enable SNMP checkbox. The following screen displays.
2 Enter the appropriate information for each field.
3 Click UPDATE to save your new SNMP monitoring settings.
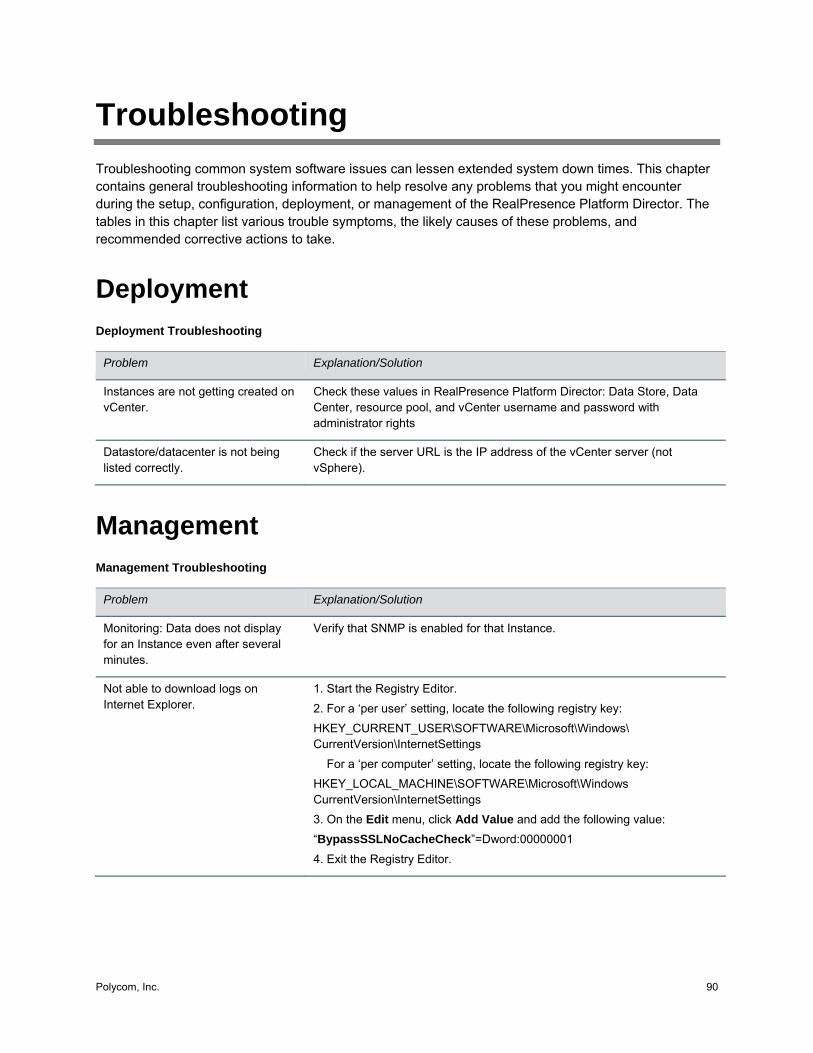
Polycom, Inc. 90
Troubleshooting
Troubleshooting common system software issues can lessen extended system down times. This chapter contains general troubleshooting information to help resolve any problems that you might encounter during the setup, configuration, deployment, or management of the RealPresence Platform Director. The tables in this chapter list various trouble symptoms, the likely causes of these problems, and recommended corrective actions to take.
Deployment
Deployment Troubleshooting
Problem Explanation/Solution
Instances are not getting created on vCenter.
Check these values in RealPresence Platform Director: Data Store, Data Center, resource pool, and vCenter username and password with administrator rights
Datastore/datacenter is not being listed correctly.
Check if the server URL is the IP address of the vCenter server (not vSphere).
Management
Management Troubleshooting
Problem Explanation/Solution
Monitoring: Data does not display for an Instance even after several minutes.
Verify that SNMP is enabled for that Instance.
Not able to download logs on Internet Explorer.
1. Start the Registry Editor.
2. For a ‘per user’ setting, locate the following registry key:
HKEY_CURRENT_USER\SOFTWARE\Microsoft\Windows\ CurrentVersion\InternetSettings
For a ‘per computer’ setting, locate the following registry key:
HKEY_LOCAL_MACHINE\SOFTWARE\Microsoft\Windows CurrentVersion\InternetSettings
3. On the Edit menu, click Add Value and add the following value:
“BypassSSLNoCacheCheck”=Dword:00000001
4. Exit the Registry Editor.
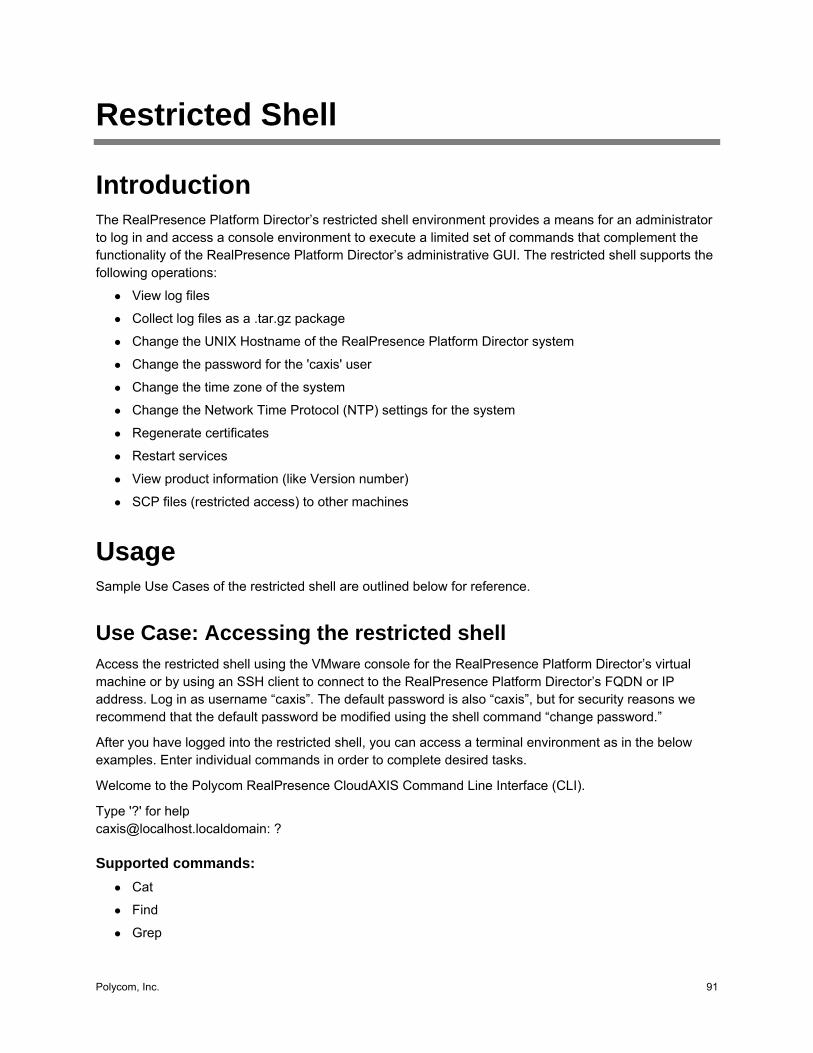
Polycom, Inc. 91
Restricted Shell
Introduction The RealPresence Platform Director’s restricted shell environment provides a means for an administrator to log in and access a console environment to execute a limited set of commands that complement the functionality of the RealPresence Platform Director’s administrative GUI. The restricted shell supports the following operations:
● View log files
● Collect log files as a .tar.gz package
● Change the UNIX Hostname of the RealPresence Platform Director system
● Change the password for the 'caxis' user
● Change the time zone of the system
● Change the Network Time Protocol (NTP) settings for the system
● Regenerate certificates
● Restart services
● View product information (like Version number)
● SCP files (restricted access) to other machines
Usage Sample Use Cases of the restricted shell are outlined below for reference.
Use Case: Accessing the restricted shell Access the restricted shell using the VMware console for the RealPresence Platform Director’s virtual machine or by using an SSH client to connect to the RealPresence Platform Director’s FQDN or IP address. Log in as username “caxis”. The default password is also “caxis”, but for security reasons we recommend that the default password be modified using the shell command “change password.”
After you have logged into the restricted shell, you can access a terminal environment as in the below examples. Enter individual commands in order to complete desired tasks.
Welcome to the Polycom RealPresence CloudAXIS Command Line Interface (CLI).
Type '?' for help [email protected]: ?
Supported commands:
● Cat
● Find
● Grep
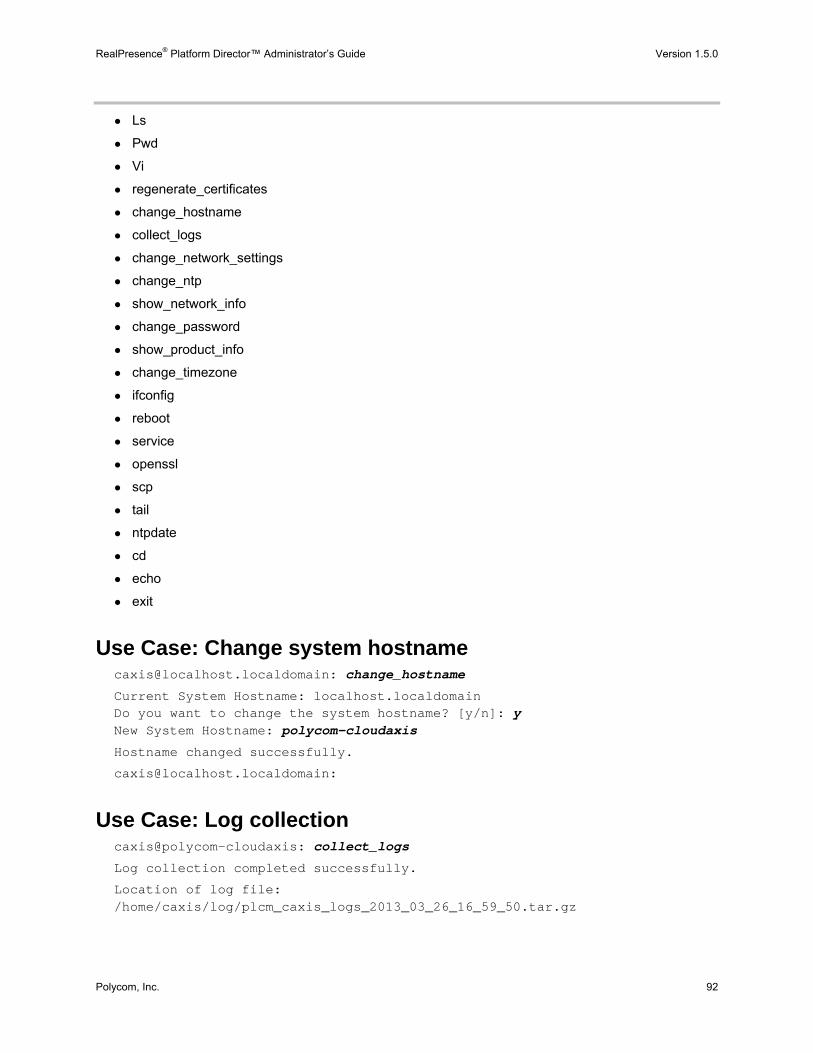
RealPresence® Platform Director™ Administrator’s Guide Version 1.5.0
Polycom, Inc. 92
● Ls
● Pwd
● Vi
● regenerate_certificates
● change_hostname
● collect_logs
● change_network_settings
● change_ntp
● show_network_info
● change_password
● show_product_info
● change_timezone
● ifconfig
● reboot
● service
● openssl
● scp
● tail
● ntpdate
● cd
● echo
● exit
Use Case: Change system hostname [email protected]: change_hostname
Current System Hostname: localhost.localdomain Do you want to change the system hostname? [y/n]: y New System Hostname: polycom-cloudaxis
Hostname changed successfully.
Use Case: Log collection caxis@polycom-cloudaxis: collect_logs
Log collection completed successfully.
Location of log file: /home/caxis/log/plcm_caxis_logs_2013_03_26_16_59_50.tar.gz
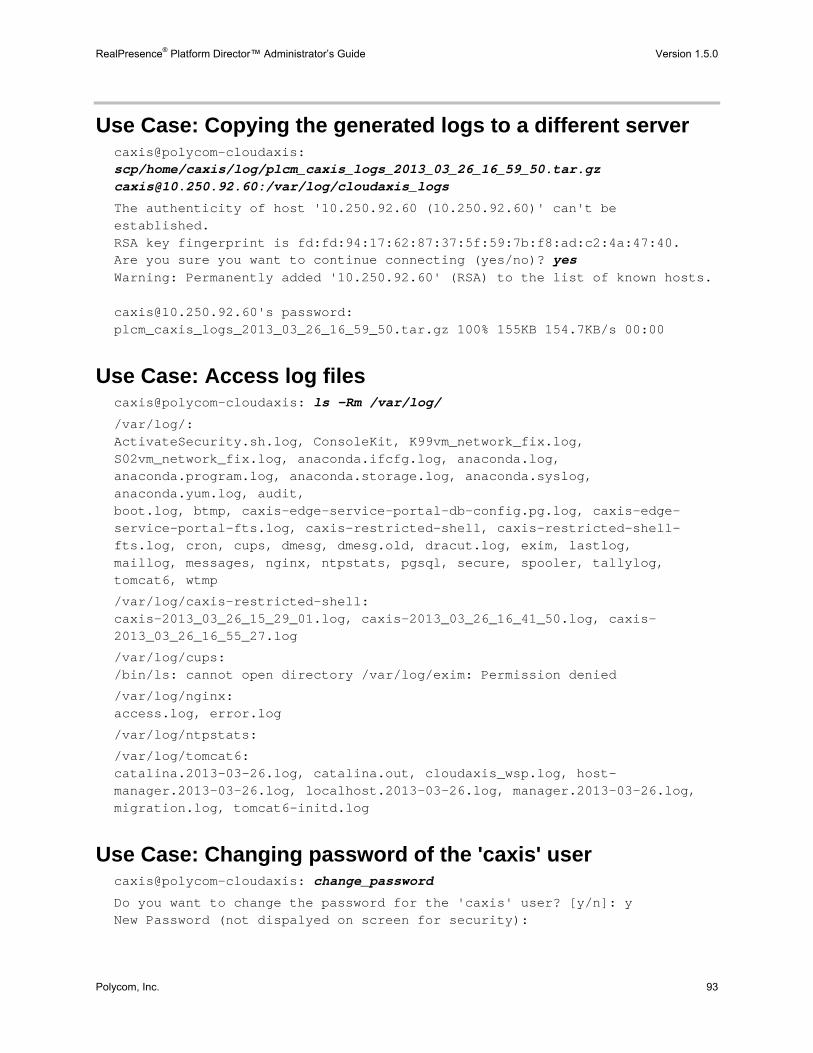
RealPresence® Platform Director™ Administrator’s Guide Version 1.5.0
Polycom, Inc. 93
Use Case: Copying the generated logs to a different server caxis@polycom-cloudaxis: scp/home/caxis/log/plcm_caxis_logs_2013_03_26_16_59_50.tar.gz [email protected]:/var/log/cloudaxis_logs
The authenticity of host '10.250.92.60 (10.250.92.60)' can't be established. RSA key fingerprint is fd:fd:94:17:62:87:37:5f:59:7b:f8:ad:c2:4a:47:40. Are you sure you want to continue connecting (yes/no)? yes Warning: Permanently added '10.250.92.60' (RSA) to the list of known hosts. [email protected]'s password: plcm_caxis_logs_2013_03_26_16_59_50.tar.gz 100% 155KB 154.7KB/s 00:00
Use Case: Access log files caxis@polycom-cloudaxis: ls -Rm /var/log/
/var/log/: ActivateSecurity.sh.log, ConsoleKit, K99vm_network_fix.log, S02vm_network_fix.log, anaconda.ifcfg.log, anaconda.log, anaconda.program.log, anaconda.storage.log, anaconda.syslog, anaconda.yum.log, audit, boot.log, btmp, caxis-edge-service-portal-db-config.pg.log, caxis-edge-service-portal-fts.log, caxis-restricted-shell, caxis-restricted-shell-fts.log, cron, cups, dmesg, dmesg.old, dracut.log, exim, lastlog, maillog, messages, nginx, ntpstats, pgsql, secure, spooler, tallylog, tomcat6, wtmp
/var/log/caxis-restricted-shell: caxis-2013_03_26_15_29_01.log, caxis-2013_03_26_16_41_50.log, caxis-2013_03_26_16_55_27.log
/var/log/cups: /bin/ls: cannot open directory /var/log/exim: Permission denied
/var/log/nginx: access.log, error.log
/var/log/ntpstats:
/var/log/tomcat6: catalina.2013-03-26.log, catalina.out, cloudaxis_wsp.log, host-manager.2013-03-26.log, localhost.2013-03-26.log, manager.2013-03-26.log, migration.log, tomcat6-initd.log
Use Case: Changing password of the 'caxis' user caxis@polycom-cloudaxis: change_password
Do you want to change the password for the 'caxis' user? [y/n]: y New Password (not dispalyed on screen for security):
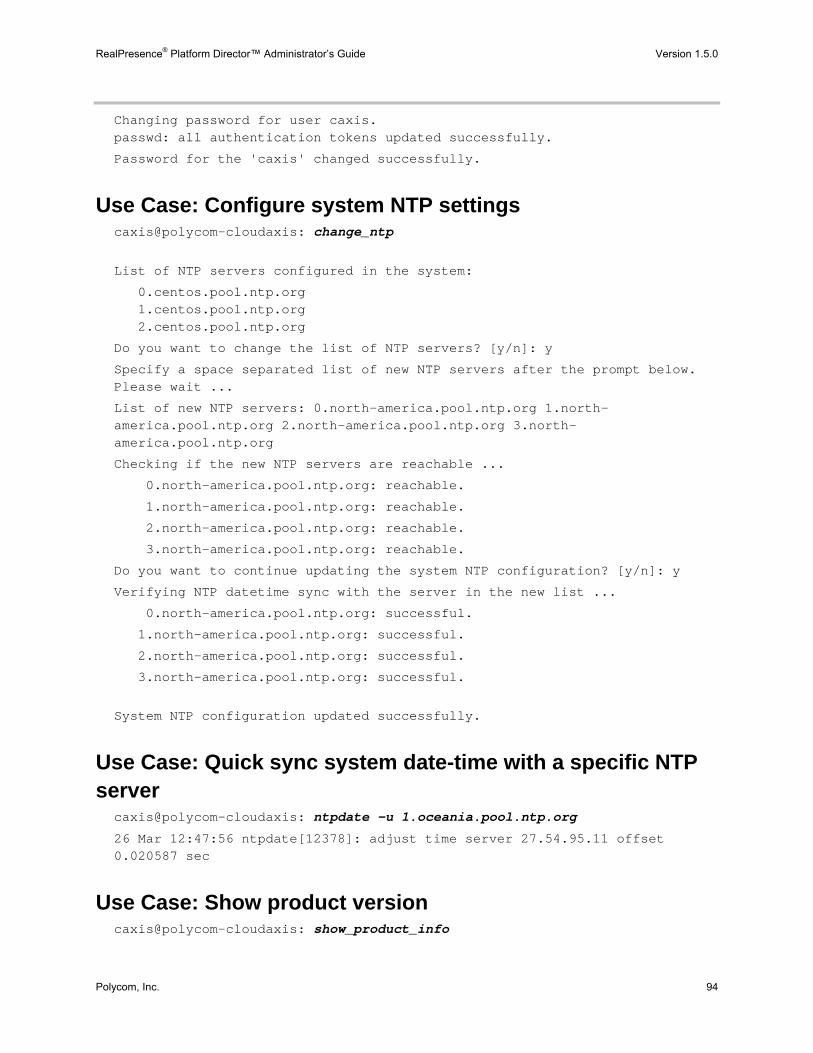
RealPresence® Platform Director™ Administrator’s Guide Version 1.5.0
Polycom, Inc. 94
Changing password for user caxis. passwd: all authentication tokens updated successfully.
Password for the 'caxis' changed successfully.
Use Case: Configure system NTP settings caxis@polycom-cloudaxis: change_ntp
List of NTP servers configured in the system:
0.centos.pool.ntp.org 1.centos.pool.ntp.org 2.centos.pool.ntp.org
Do you want to change the list of NTP servers? [y/n]: y
Specify a space separated list of new NTP servers after the prompt below. Please wait ...
List of new NTP servers: 0.north-america.pool.ntp.org 1.north-america.pool.ntp.org 2.north-america.pool.ntp.org 3.north-america.pool.ntp.org
Checking if the new NTP servers are reachable ...
0.north-america.pool.ntp.org: reachable.
1.north-america.pool.ntp.org: reachable.
2.north-america.pool.ntp.org: reachable.
3.north-america.pool.ntp.org: reachable.
Do you want to continue updating the system NTP configuration? [y/n]: y
Verifying NTP datetime sync with the server in the new list ...
0.north-america.pool.ntp.org: successful.
1.north-america.pool.ntp.org: successful.
2.north-america.pool.ntp.org: successful.
3.north-america.pool.ntp.org: successful.
System NTP configuration updated successfully.
Use Case: Quick sync system date-time with a specific NTP server
caxis@polycom-cloudaxis: ntpdate -u 1.oceania.pool.ntp.org
26 Mar 12:47:56 ntpdate[12378]: adjust time server 27.54.95.11 offset 0.020587 sec
Use Case: Show product version caxis@polycom-cloudaxis: show_product_info
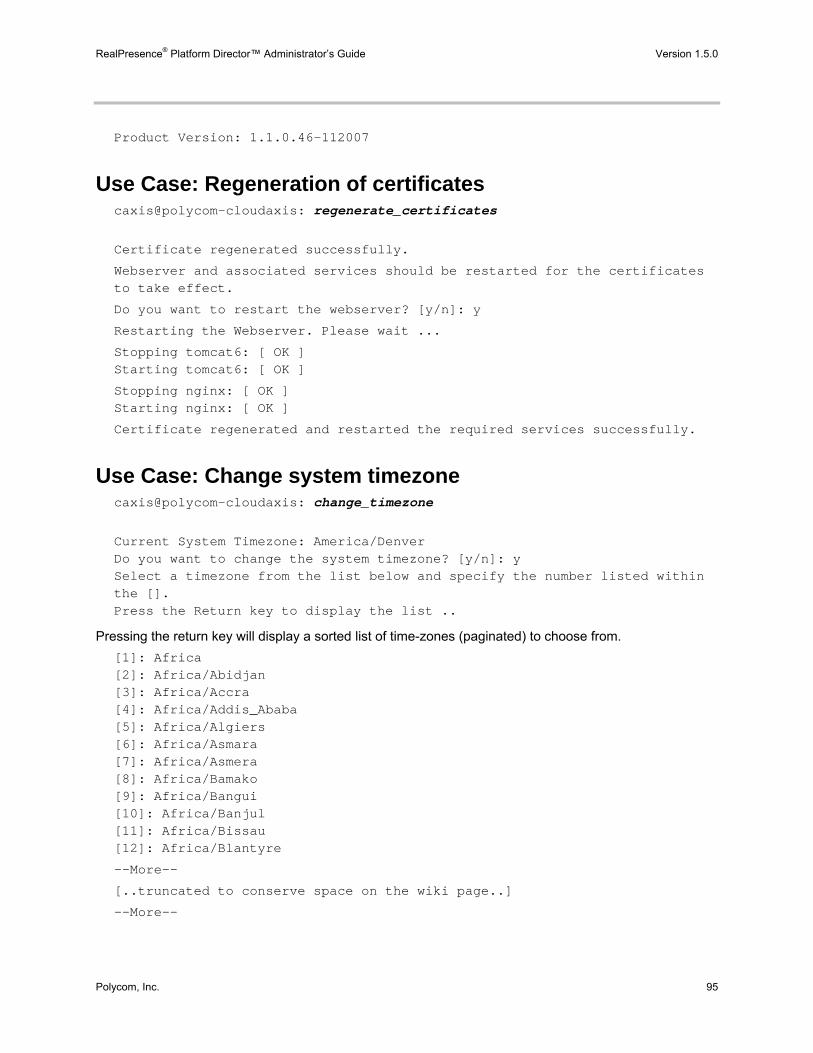
RealPresence® Platform Director™ Administrator’s Guide Version 1.5.0
Polycom, Inc. 95
Product Version: 1.1.0.46-112007
Use Case: Regeneration of certificates caxis@polycom-cloudaxis: regenerate_certificates
Certificate regenerated successfully.
Webserver and associated services should be restarted for the certificates to take effect.
Do you want to restart the webserver? [y/n]: y
Restarting the Webserver. Please wait ...
Stopping tomcat6: [ OK ] Starting tomcat6: [ OK ]
Stopping nginx: [ OK ] Starting nginx: [ OK ]
Certificate regenerated and restarted the required services successfully.
Use Case: Change system timezone caxis@polycom-cloudaxis: change_timezone
Current System Timezone: America/Denver Do you want to change the system timezone? [y/n]: y Select a timezone from the list below and specify the number listed within the []. Press the Return key to display the list ..
Pressing the return key will display a sorted list of time-zones (paginated) to choose from.
[1]: Africa [2]: Africa/Abidjan [3]: Africa/Accra [4]: Africa/Addis_Ababa [5]: Africa/Algiers [6]: Africa/Asmara [7]: Africa/Asmera [8]: Africa/Bamako [9]: Africa/Bangui [10]: Africa/Banjul [11]: Africa/Bissau [12]: Africa/Blantyre
--More--
[..truncated to conserve space on the wiki page..]
--More--
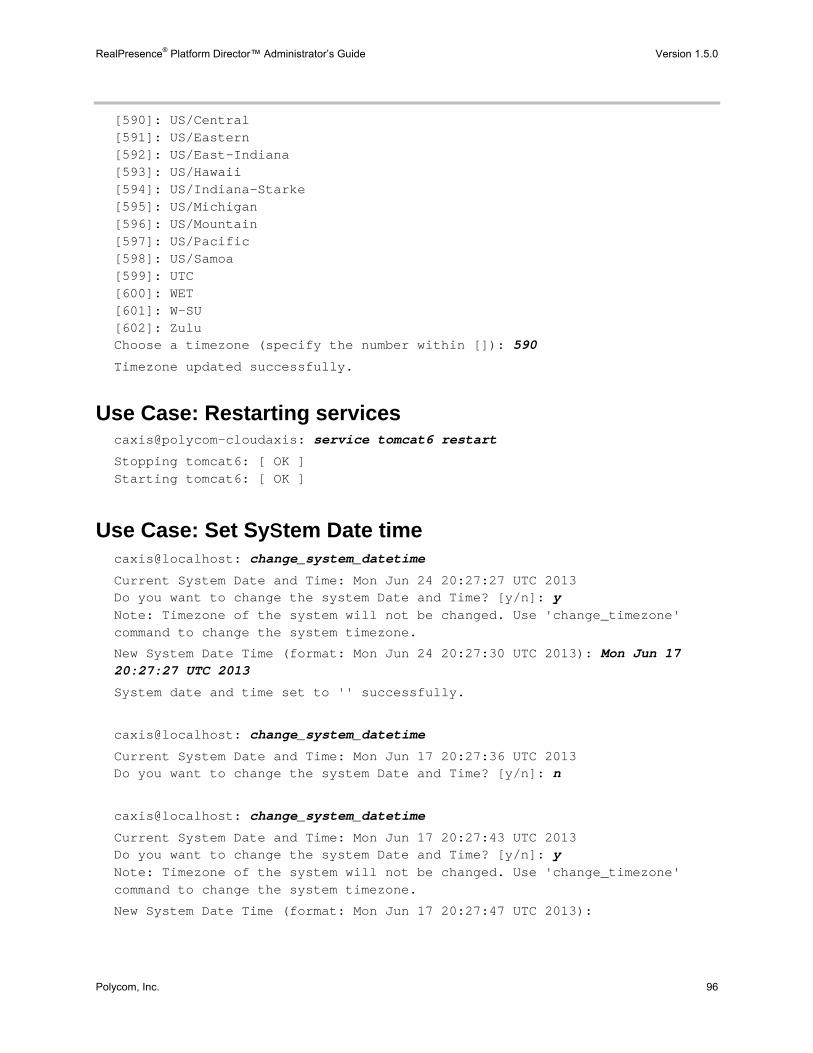
RealPresence® Platform Director™ Administrator’s Guide Version 1.5.0
Polycom, Inc. 96
[590]: US/Central [591]: US/Eastern [592]: US/East-Indiana [593]: US/Hawaii [594]: US/Indiana-Starke [595]: US/Michigan [596]: US/Mountain [597]: US/Pacific [598]: US/Samoa [599]: UTC [600]: WET [601]: W-SU [602]: Zulu Choose a timezone (specify the number within []): 590
Timezone updated successfully.
Use Case: Restarting services caxis@polycom-cloudaxis: service tomcat6 restart
Stopping tomcat6: [ OK ] Starting tomcat6: [ OK ]
Use Case: Set System Date time caxis@localhost: change_system_datetime
Current System Date and Time: Mon Jun 24 20:27:27 UTC 2013 Do you want to change the system Date and Time? [y/n]: y Note: Timezone of the system will not be changed. Use 'change_timezone' command to change the system timezone.
New System Date Time (format: Mon Jun 24 20:27:30 UTC 2013): Mon Jun 17 20:27:27 UTC 2013
System date and time set to '' successfully.
caxis@localhost: change_system_datetime
Current System Date and Time: Mon Jun 17 20:27:36 UTC 2013 Do you want to change the system Date and Time? [y/n]: n
caxis@localhost: change_system_datetime
Current System Date and Time: Mon Jun 17 20:27:43 UTC 2013 Do you want to change the system Date and Time? [y/n]: y Note: Timezone of the system will not be changed. Use 'change_timezone' command to change the system timezone.
New System Date Time (format: Mon Jun 17 20:27:47 UTC 2013):
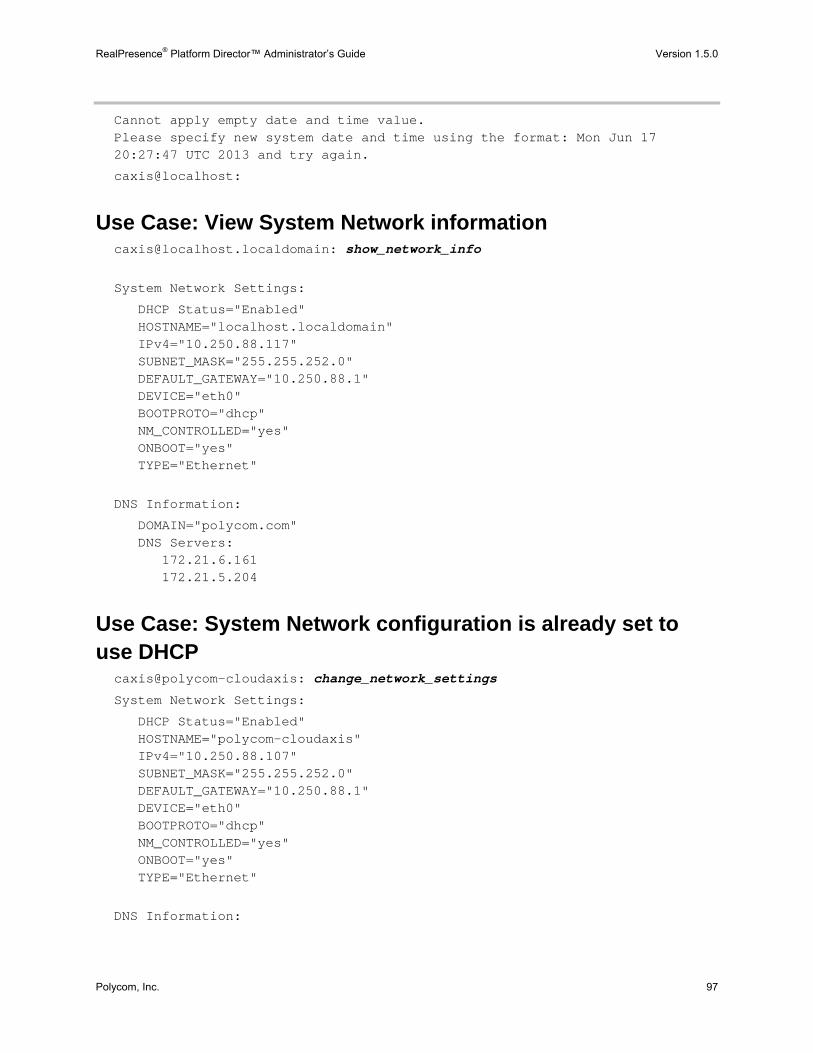
RealPresence® Platform Director™ Administrator’s Guide Version 1.5.0
Polycom, Inc. 97
Cannot apply empty date and time value. Please specify new system date and time using the format: Mon Jun 17 20:27:47 UTC 2013 and try again.
caxis@localhost:
Use Case: View System Network information [email protected]: show_network_info
System Network Settings:
DHCP Status="Enabled" HOSTNAME="localhost.localdomain" IPv4="10.250.88.117" SUBNET_MASK="255.255.252.0" DEFAULT_GATEWAY="10.250.88.1" DEVICE="eth0" BOOTPROTO="dhcp" NM_CONTROLLED="yes" ONBOOT="yes" TYPE="Ethernet"
DNS Information:
DOMAIN="polycom.com" DNS Servers: 172.21.6.161 172.21.5.204
Use Case: System Network configuration is already set to use DHCP
caxis@polycom-cloudaxis: change_network_settings
System Network Settings:
DHCP Status="Enabled" HOSTNAME="polycom-cloudaxis" IPv4="10.250.88.107" SUBNET_MASK="255.255.252.0" DEFAULT_GATEWAY="10.250.88.1" DEVICE="eth0" BOOTPROTO="dhcp" NM_CONTROLLED="yes" ONBOOT="yes" TYPE="Ethernet"
DNS Information:
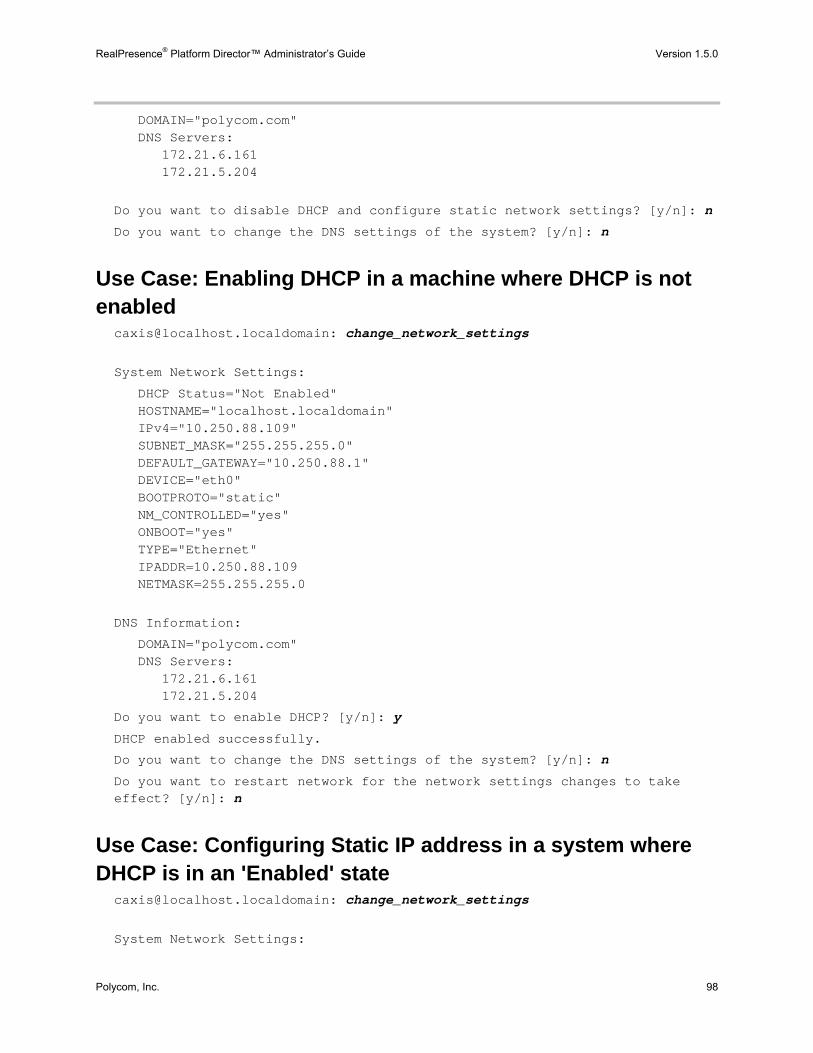
RealPresence® Platform Director™ Administrator’s Guide Version 1.5.0
Polycom, Inc. 98
DOMAIN="polycom.com" DNS Servers: 172.21.6.161 172.21.5.204
Do you want to disable DHCP and configure static network settings? [y/n]: n
Do you want to change the DNS settings of the system? [y/n]: n
Use Case: Enabling DHCP in a machine where DHCP is not enabled
[email protected]: change_network_settings
System Network Settings:
DHCP Status="Not Enabled" HOSTNAME="localhost.localdomain" IPv4="10.250.88.109" SUBNET_MASK="255.255.255.0" DEFAULT_GATEWAY="10.250.88.1" DEVICE="eth0" BOOTPROTO="static" NM_CONTROLLED="yes" ONBOOT="yes" TYPE="Ethernet" IPADDR=10.250.88.109 NETMASK=255.255.255.0
DNS Information:
DOMAIN="polycom.com" DNS Servers: 172.21.6.161 172.21.5.204
Do you want to enable DHCP? [y/n]: y
DHCP enabled successfully.
Do you want to change the DNS settings of the system? [y/n]: n
Do you want to restart network for the network settings changes to take effect? [y/n]: n
Use Case: Configuring Static IP address in a system where DHCP is in an 'Enabled' state
[email protected]: change_network_settings
System Network Settings:

RealPresence® Platform Director™ Administrator’s Guide Version 1.5.0
Polycom, Inc. 99
DHCP Status="Enabled" HOSTNAME="localhost.localdomain" IPv4="10.250.88.109" SUBNET_MASK="255.255.255.0" DEFAULT_GATEWAY="10.250.88.1" DEVICE="eth0" BOOTPROTO="dhcp" NM_CONTROLLED="yes" ONBOOT="yes" TYPE="Ethernet"
DNS Information:
DOMAIN="" DNS Servers:
Do you want to disable DHCP and configure static network settings? [y/n]: y
Static IP Address: 10.250.88.107
Static Subnet Mask Address: 255.255.255.0
Gateway Address: 10.250.88.1
DHCP is disabled and static network settings configured successfully.
Do you want to change the DNS settings of the system? [y/n]: y
Search Domain: polycom.com
Primay DNS Address: 172.21.6.161
Secondary DNS Address: 172.21.5.204
Do you prefer to configure the Tertiary DNS Address? [y/n]: n
Updating the DNS setting in the system. Please wait ...
DNS configuration updated successfully.
Do you want to restart network for the network settings changes to take effect? [y/n]: y
Note: You may lose connectivity if you are logged in via a SSH connection and if the IP address of the system changes as part of network restart.
Restarting network interface for the DHCP changes to take effect. You may experience intermittent connectivity failure while the system network inteface is being restarted ... Shutting down interface eth0:
-- Network Connectivity to 10.250.88.109 is lost here as the new IP address would have come to effect --
-- Connecting to new IP - 10.250.88.107 - via a SSH connection --
ssh 10.250.88.107 -l caxis
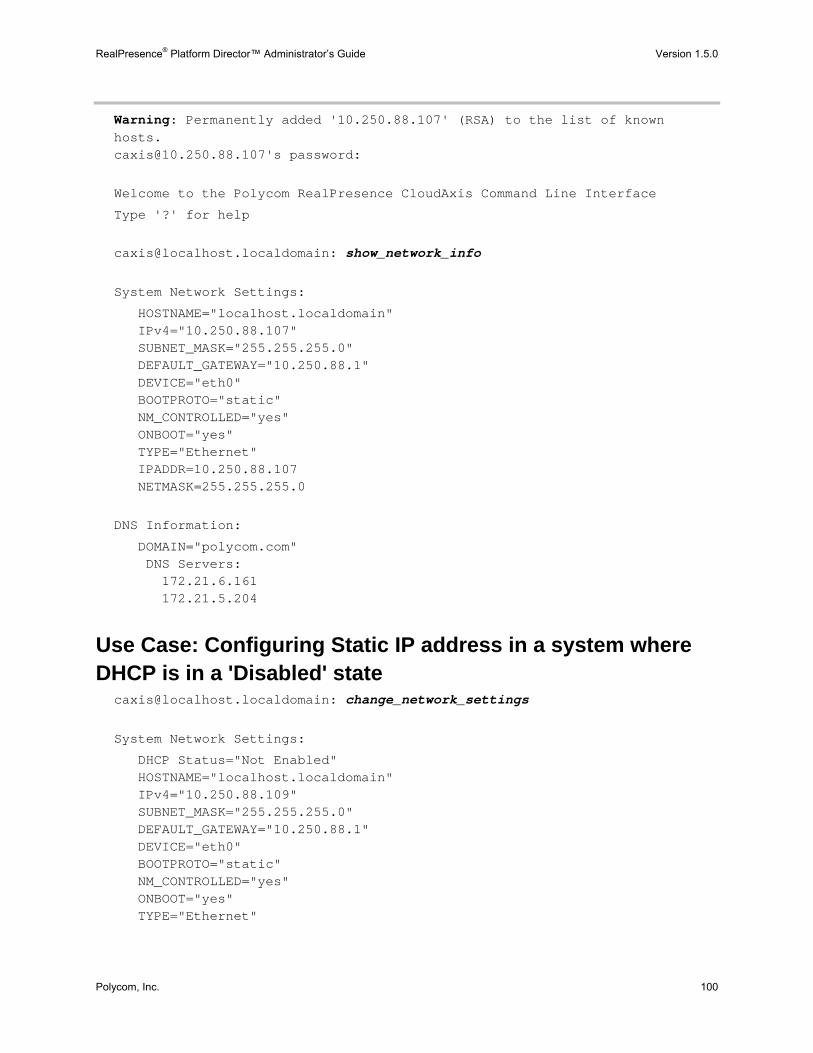
RealPresence® Platform Director™ Administrator’s Guide Version 1.5.0
Polycom, Inc. 100
Warning: Permanently added '10.250.88.107' (RSA) to the list of known hosts. [email protected]'s password:
Welcome to the Polycom RealPresence CloudAxis Command Line Interface
Type '?' for help
[email protected]: show_network_info
System Network Settings:
HOSTNAME="localhost.localdomain" IPv4="10.250.88.107" SUBNET_MASK="255.255.255.0" DEFAULT_GATEWAY="10.250.88.1" DEVICE="eth0" BOOTPROTO="static" NM_CONTROLLED="yes" ONBOOT="yes" TYPE="Ethernet" IPADDR=10.250.88.107 NETMASK=255.255.255.0
DNS Information:
DOMAIN="polycom.com" DNS Servers: 172.21.6.161 172.21.5.204
Use Case: Configuring Static IP address in a system where DHCP is in a 'Disabled' state
[email protected]: change_network_settings
System Network Settings:
DHCP Status="Not Enabled" HOSTNAME="localhost.localdomain" IPv4="10.250.88.109" SUBNET_MASK="255.255.255.0" DEFAULT_GATEWAY="10.250.88.1" DEVICE="eth0" BOOTPROTO="static" NM_CONTROLLED="yes" ONBOOT="yes" TYPE="Ethernet"
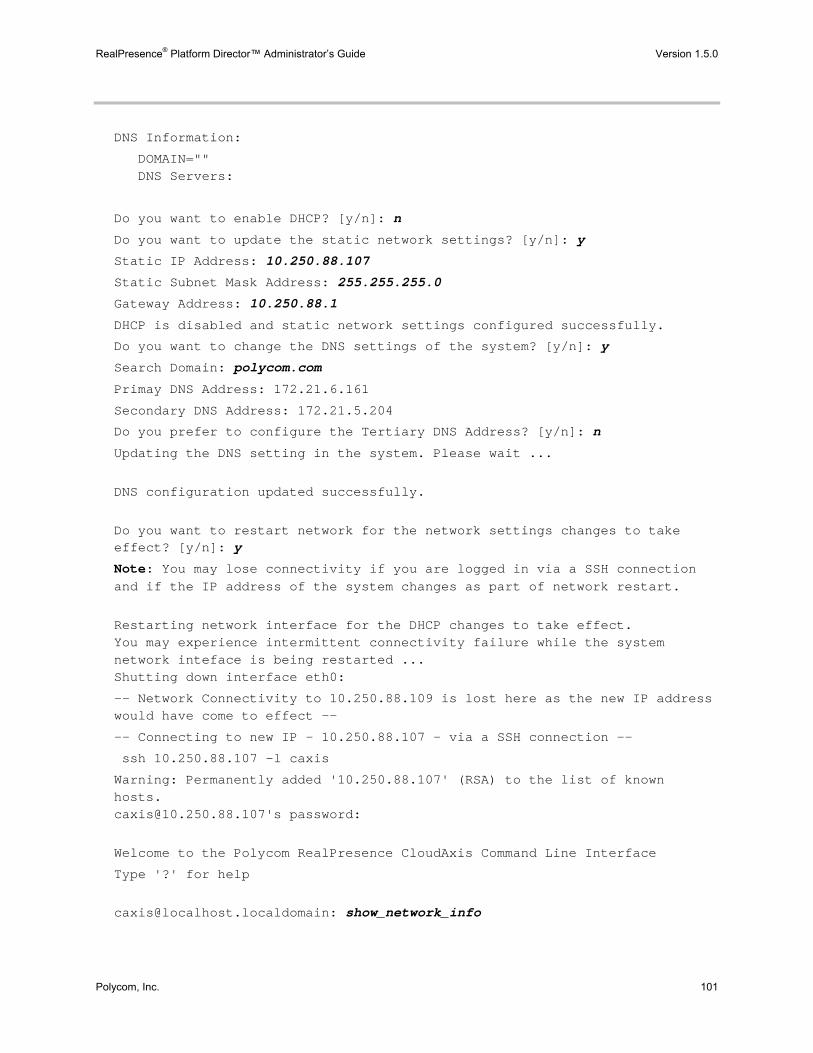
RealPresence® Platform Director™ Administrator’s Guide Version 1.5.0
Polycom, Inc. 101
DNS Information:
DOMAIN="" DNS Servers:
Do you want to enable DHCP? [y/n]: n
Do you want to update the static network settings? [y/n]: y
Static IP Address: 10.250.88.107
Static Subnet Mask Address: 255.255.255.0
Gateway Address: 10.250.88.1
DHCP is disabled and static network settings configured successfully.
Do you want to change the DNS settings of the system? [y/n]: y
Search Domain: polycom.com
Primay DNS Address: 172.21.6.161
Secondary DNS Address: 172.21.5.204
Do you prefer to configure the Tertiary DNS Address? [y/n]: n
Updating the DNS setting in the system. Please wait ...
DNS configuration updated successfully.
Do you want to restart network for the network settings changes to take effect? [y/n]: y
Note: You may lose connectivity if you are logged in via a SSH connection and if the IP address of the system changes as part of network restart.
Restarting network interface for the DHCP changes to take effect. You may experience intermittent connectivity failure while the system network inteface is being restarted ... Shutting down interface eth0:
-- Network Connectivity to 10.250.88.109 is lost here as the new IP address would have come to effect --
-- Connecting to new IP - 10.250.88.107 - via a SSH connection --
ssh 10.250.88.107 -l caxis
Warning: Permanently added '10.250.88.107' (RSA) to the list of known hosts. [email protected]'s password:
Welcome to the Polycom RealPresence CloudAxis Command Line Interface
Type '?' for help
[email protected]: show_network_info
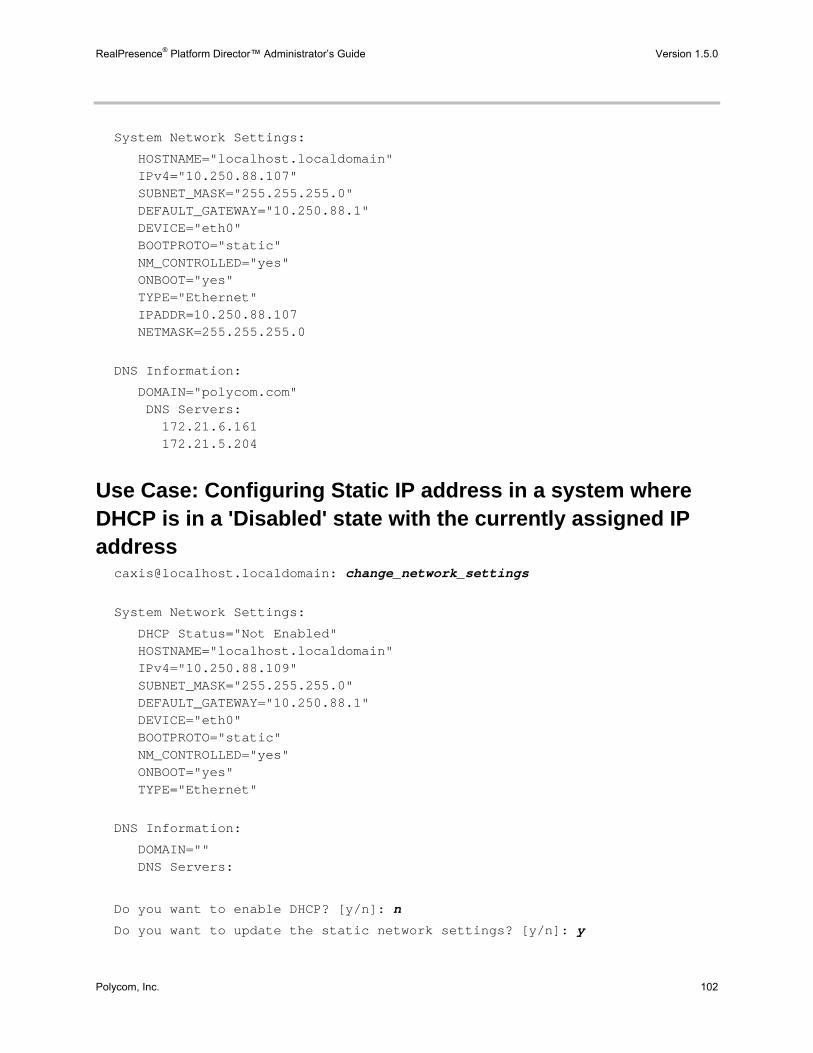
RealPresence® Platform Director™ Administrator’s Guide Version 1.5.0
Polycom, Inc. 102
System Network Settings:
HOSTNAME="localhost.localdomain" IPv4="10.250.88.107" SUBNET_MASK="255.255.255.0" DEFAULT_GATEWAY="10.250.88.1" DEVICE="eth0" BOOTPROTO="static" NM_CONTROLLED="yes" ONBOOT="yes" TYPE="Ethernet" IPADDR=10.250.88.107 NETMASK=255.255.255.0
DNS Information:
DOMAIN="polycom.com" DNS Servers: 172.21.6.161 172.21.5.204
Use Case: Configuring Static IP address in a system where DHCP is in a 'Disabled' state with the currently assigned IP address
[email protected]: change_network_settings
System Network Settings:
DHCP Status="Not Enabled" HOSTNAME="localhost.localdomain" IPv4="10.250.88.109" SUBNET_MASK="255.255.255.0" DEFAULT_GATEWAY="10.250.88.1" DEVICE="eth0" BOOTPROTO="static" NM_CONTROLLED="yes" ONBOOT="yes" TYPE="Ethernet"
DNS Information:
DOMAIN="" DNS Servers:
Do you want to enable DHCP? [y/n]: n
Do you want to update the static network settings? [y/n]: y
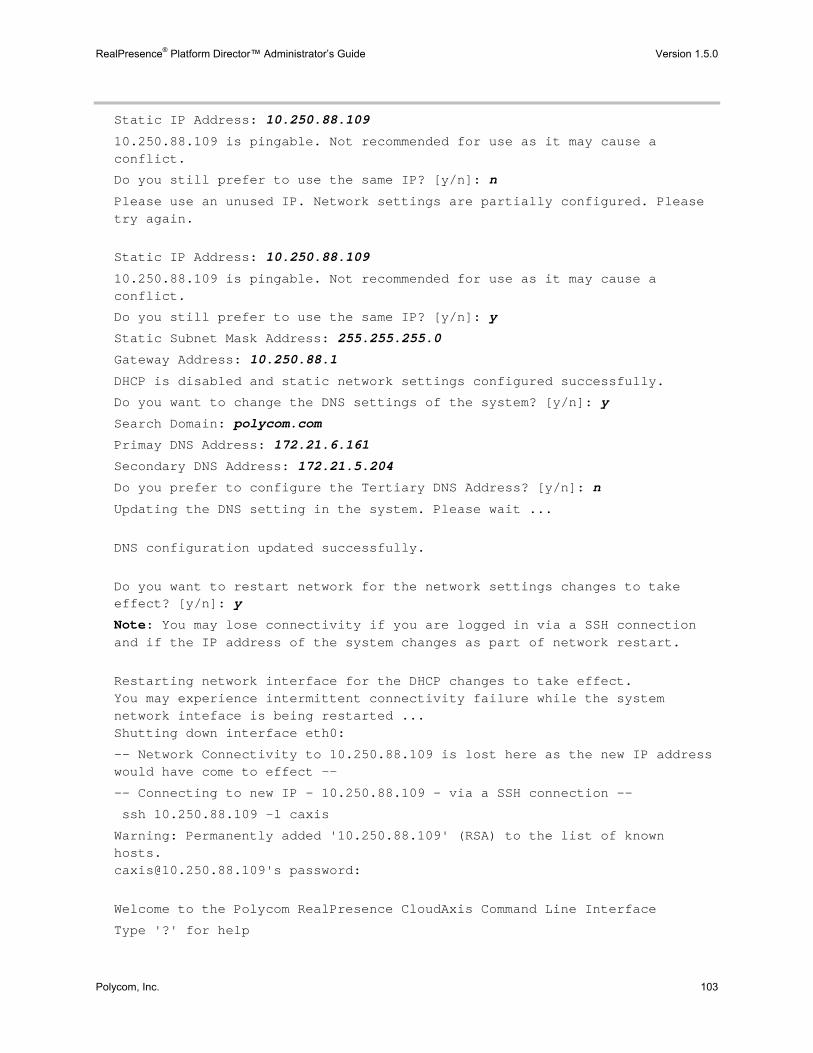
RealPresence® Platform Director™ Administrator’s Guide Version 1.5.0
Polycom, Inc. 103
Static IP Address: 10.250.88.109
10.250.88.109 is pingable. Not recommended for use as it may cause a conflict.
Do you still prefer to use the same IP? [y/n]: n
Please use an unused IP. Network settings are partially configured. Please try again.
Static IP Address: 10.250.88.109
10.250.88.109 is pingable. Not recommended for use as it may cause a conflict.
Do you still prefer to use the same IP? [y/n]: y
Static Subnet Mask Address: 255.255.255.0
Gateway Address: 10.250.88.1
DHCP is disabled and static network settings configured successfully.
Do you want to change the DNS settings of the system? [y/n]: y
Search Domain: polycom.com
Primay DNS Address: 172.21.6.161
Secondary DNS Address: 172.21.5.204
Do you prefer to configure the Tertiary DNS Address? [y/n]: n
Updating the DNS setting in the system. Please wait ...
DNS configuration updated successfully.
Do you want to restart network for the network settings changes to take effect? [y/n]: y
Note: You may lose connectivity if you are logged in via a SSH connection and if the IP address of the system changes as part of network restart.
Restarting network interface for the DHCP changes to take effect. You may experience intermittent connectivity failure while the system network inteface is being restarted ... Shutting down interface eth0:
-- Network Connectivity to 10.250.88.109 is lost here as the new IP address would have come to effect --
-- Connecting to new IP - 10.250.88.109 - via a SSH connection --
ssh 10.250.88.109 -l caxis
Warning: Permanently added '10.250.88.109' (RSA) to the list of known hosts. [email protected]'s password:
Welcome to the Polycom RealPresence CloudAxis Command Line Interface
Type '?' for help
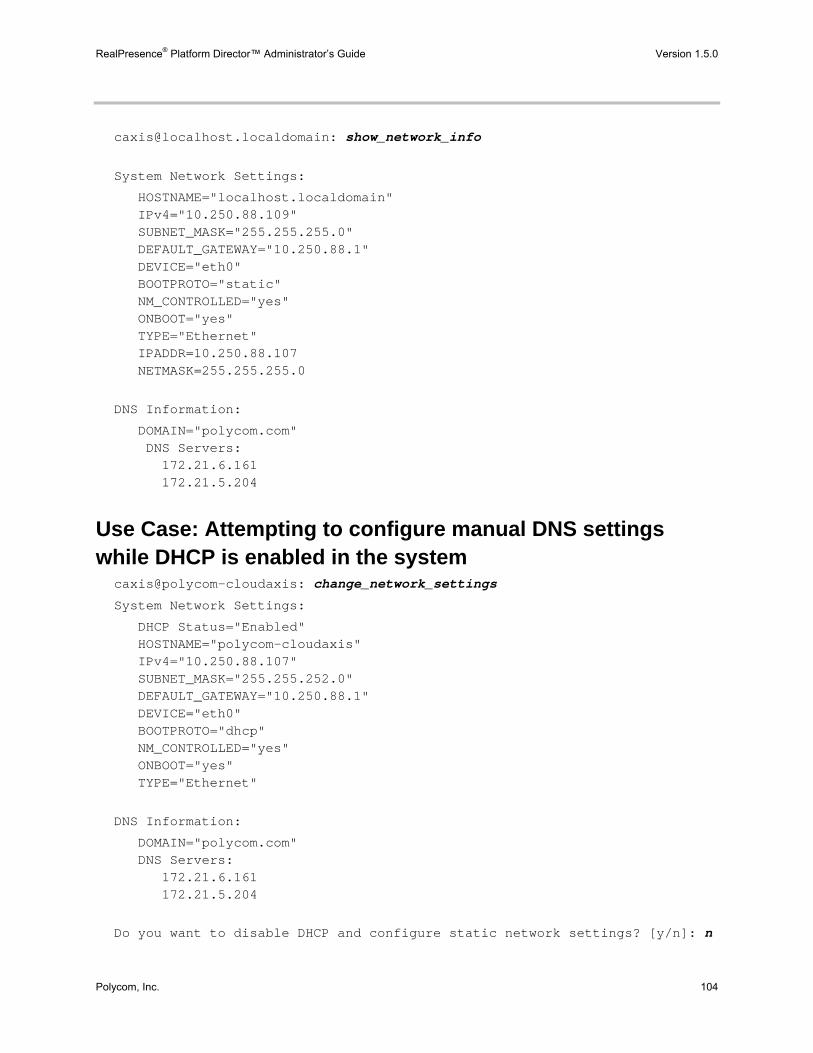
RealPresence® Platform Director™ Administrator’s Guide Version 1.5.0
Polycom, Inc. 104
[email protected]: show_network_info
System Network Settings:
HOSTNAME="localhost.localdomain" IPv4="10.250.88.109" SUBNET_MASK="255.255.255.0" DEFAULT_GATEWAY="10.250.88.1" DEVICE="eth0" BOOTPROTO="static" NM_CONTROLLED="yes" ONBOOT="yes" TYPE="Ethernet" IPADDR=10.250.88.107 NETMASK=255.255.255.0
DNS Information:
DOMAIN="polycom.com" DNS Servers: 172.21.6.161 172.21.5.204
Use Case: Attempting to configure manual DNS settings while DHCP is enabled in the system
caxis@polycom-cloudaxis: change_network_settings
System Network Settings:
DHCP Status="Enabled" HOSTNAME="polycom-cloudaxis" IPv4="10.250.88.107" SUBNET_MASK="255.255.252.0" DEFAULT_GATEWAY="10.250.88.1" DEVICE="eth0" BOOTPROTO="dhcp" NM_CONTROLLED="yes" ONBOOT="yes" TYPE="Ethernet"
DNS Information:
DOMAIN="polycom.com" DNS Servers: 172.21.6.161 172.21.5.204
Do you want to disable DHCP and configure static network settings? [y/n]: n
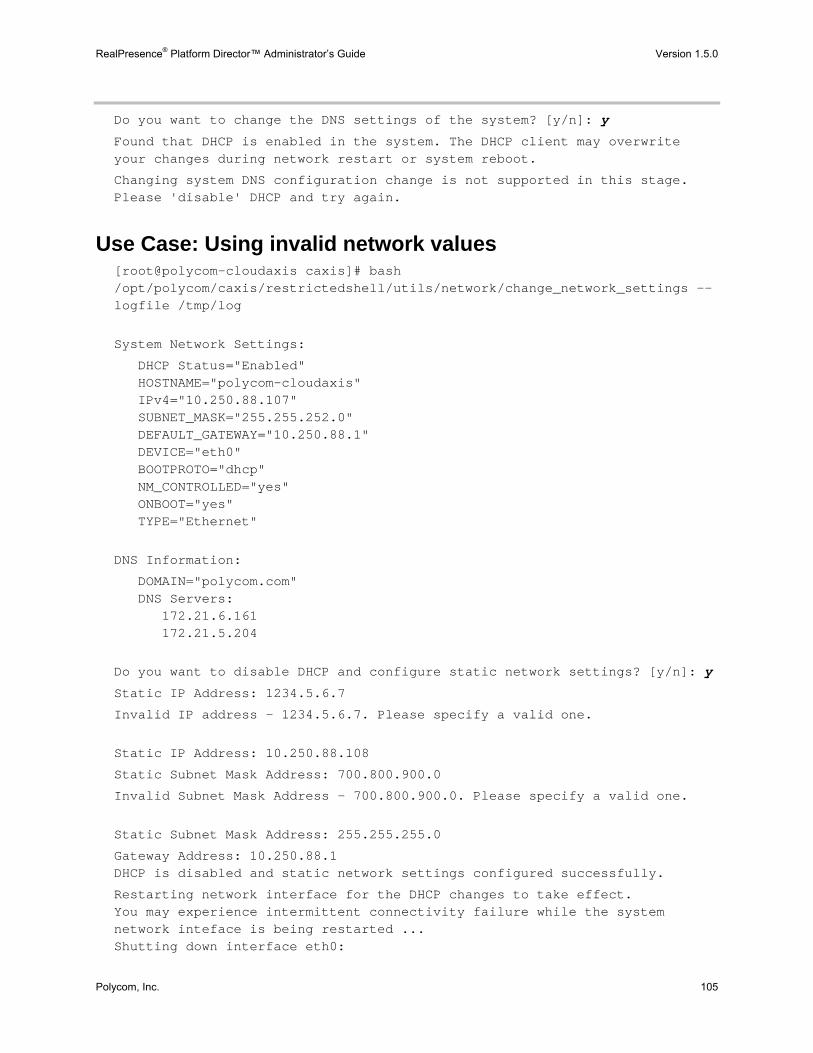
RealPresence® Platform Director™ Administrator’s Guide Version 1.5.0
Polycom, Inc. 105
Do you want to change the DNS settings of the system? [y/n]: y
Found that DHCP is enabled in the system. The DHCP client may overwrite your changes during network restart or system reboot.
Changing system DNS configuration change is not supported in this stage. Please 'disable' DHCP and try again.
Use Case: Using invalid network values [root@polycom-cloudaxis caxis]# bash /opt/polycom/caxis/restrictedshell/utils/network/change_network_settings --logfile /tmp/log
System Network Settings:
DHCP Status="Enabled" HOSTNAME="polycom-cloudaxis" IPv4="10.250.88.107" SUBNET_MASK="255.255.252.0" DEFAULT_GATEWAY="10.250.88.1" DEVICE="eth0" BOOTPROTO="dhcp" NM_CONTROLLED="yes" ONBOOT="yes" TYPE="Ethernet"
DNS Information:
DOMAIN="polycom.com" DNS Servers: 172.21.6.161 172.21.5.204
Do you want to disable DHCP and configure static network settings? [y/n]: y
Static IP Address: 1234.5.6.7
Invalid IP address - 1234.5.6.7. Please specify a valid one.
Static IP Address: 10.250.88.108
Static Subnet Mask Address: 700.800.900.0
Invalid Subnet Mask Address - 700.800.900.0. Please specify a valid one.
Static Subnet Mask Address: 255.255.255.0
Gateway Address: 10.250.88.1 DHCP is disabled and static network settings configured successfully.
Restarting network interface for the DHCP changes to take effect. You may experience intermittent connectivity failure while the system network inteface is being restarted ... Shutting down interface eth0:
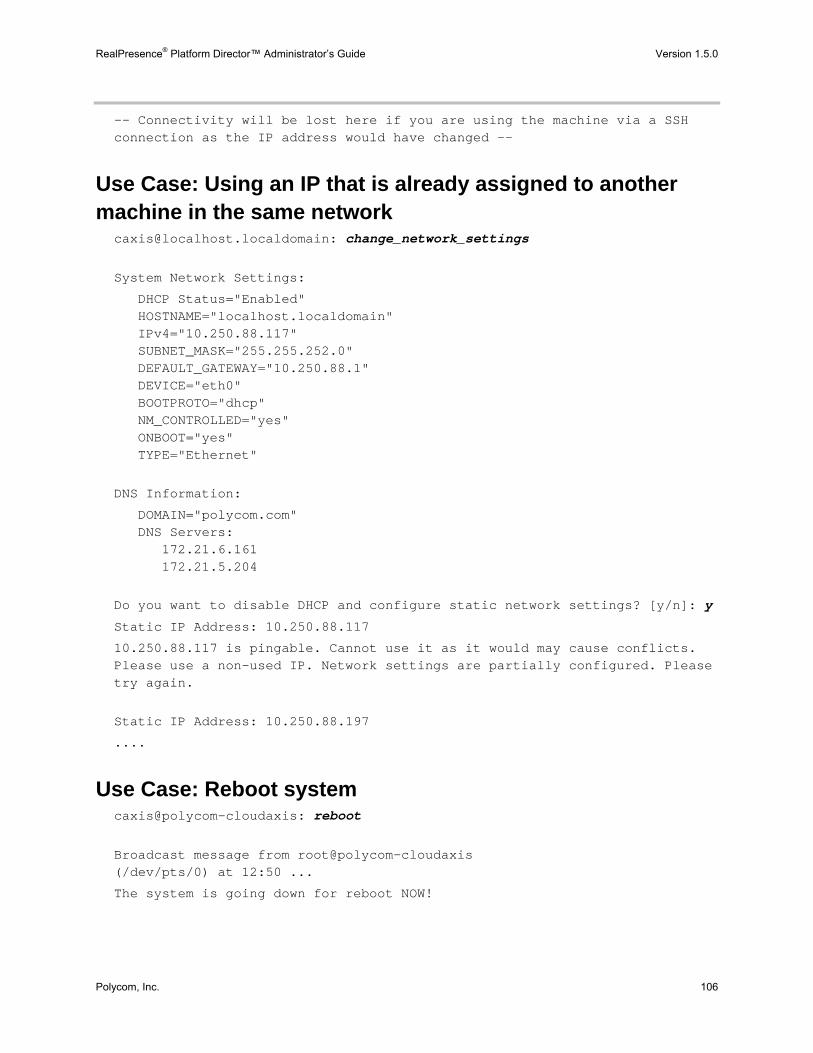
RealPresence® Platform Director™ Administrator’s Guide Version 1.5.0
Polycom, Inc. 106
-- Connectivity will be lost here if you are using the machine via a SSH connection as the IP address would have changed --
Use Case: Using an IP that is already assigned to another machine in the same network
[email protected]: change_network_settings
System Network Settings:
DHCP Status="Enabled" HOSTNAME="localhost.localdomain" IPv4="10.250.88.117" SUBNET_MASK="255.255.252.0" DEFAULT_GATEWAY="10.250.88.1" DEVICE="eth0" BOOTPROTO="dhcp" NM_CONTROLLED="yes" ONBOOT="yes" TYPE="Ethernet"
DNS Information:
DOMAIN="polycom.com" DNS Servers: 172.21.6.161 172.21.5.204
Do you want to disable DHCP and configure static network settings? [y/n]: y
Static IP Address: 10.250.88.117
10.250.88.117 is pingable. Cannot use it as it would may cause conflicts. Please use a non-used IP. Network settings are partially configured. Please try again.
Static IP Address: 10.250.88.197
....
Use Case: Reboot system caxis@polycom-cloudaxis: reboot
Broadcast message from root@polycom-cloudaxis (/dev/pts/0) at 12:50 ...
The system is going down for reboot NOW!
RealPresence® Platform Director™ Administrator’s Guide Version 1.5.0
Polycom, Inc. 107
Use Case: Exit restricted shell caxis@polycom-cloudaxis: exit
Use Case: Login timeout:
Timeout. Logging off user.
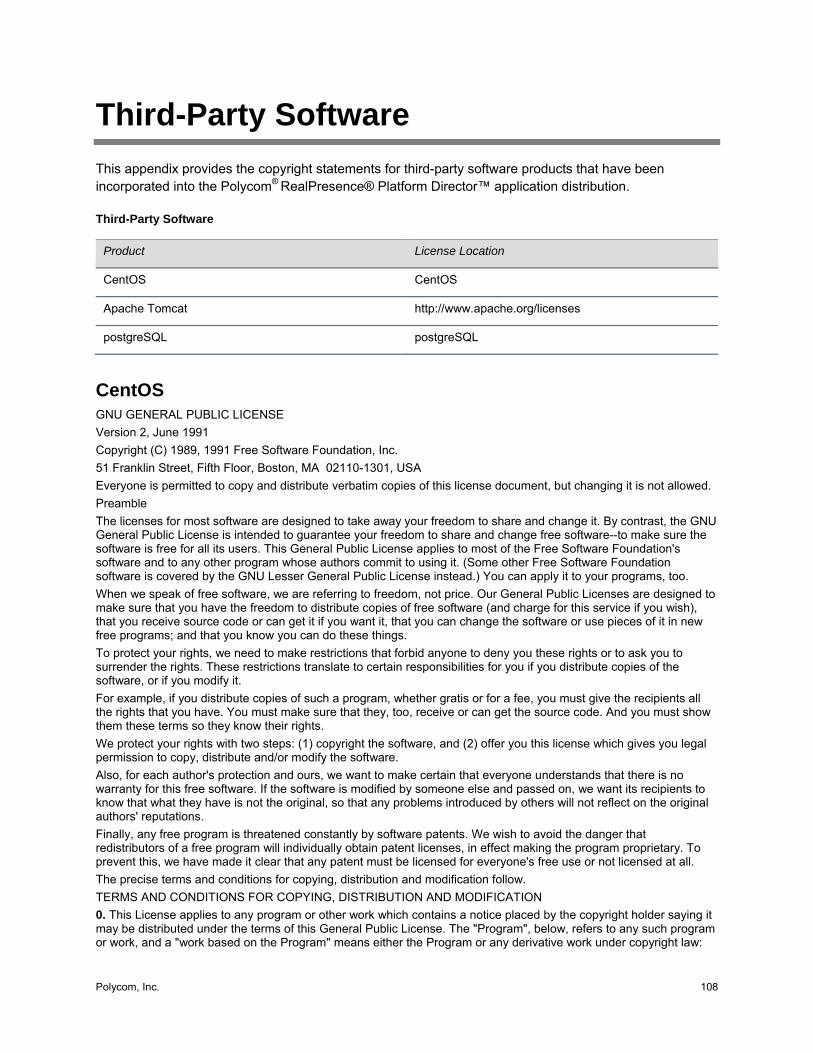
Polycom, Inc. 108
Third-Party Software
This appendix provides the copyright statements for third-party software products that have been incorporated into the Polycom® RealPresence® Platform Director™ application distribution.
Third-Party Software
Product License Location
CentOS CentOS
Apache Tomcat http://www.apache.org/licenses
postgreSQL postgreSQL
CentOS GNU GENERAL PUBLIC LICENSE
Version 2, June 1991
Copyright (C) 1989, 1991 Free Software Foundation, Inc.
51 Franklin Street, Fifth Floor, Boston, MA 02110-1301, USA
Everyone is permitted to copy and distribute verbatim copies of this license document, but changing it is not allowed.
Preamble
The licenses for most software are designed to take away your freedom to share and change it. By contrast, the GNU General Public License is intended to guarantee your freedom to share and change free software--to make sure the software is free for all its users. This General Public License applies to most of the Free Software Foundation's software and to any other program whose authors commit to using it. (Some other Free Software Foundation software is covered by the GNU Lesser General Public License instead.) You can apply it to your programs, too.
When we speak of free software, we are referring to freedom, not price. Our General Public Licenses are designed to make sure that you have the freedom to distribute copies of free software (and charge for this service if you wish), that you receive source code or can get it if you want it, that you can change the software or use pieces of it in new free programs; and that you know you can do these things.
To protect your rights, we need to make restrictions that forbid anyone to deny you these rights or to ask you to surrender the rights. These restrictions translate to certain responsibilities for you if you distribute copies of the software, or if you modify it.
For example, if you distribute copies of such a program, whether gratis or for a fee, you must give the recipients all the rights that you have. You must make sure that they, too, receive or can get the source code. And you must show them these terms so they know their rights.
We protect your rights with two steps: (1) copyright the software, and (2) offer you this license which gives you legal permission to copy, distribute and/or modify the software.
Also, for each author's protection and ours, we want to make certain that everyone understands that there is no warranty for this free software. If the software is modified by someone else and passed on, we want its recipients to know that what they have is not the original, so that any problems introduced by others will not reflect on the original authors' reputations.
Finally, any free program is threatened constantly by software patents. We wish to avoid the danger that redistributors of a free program will individually obtain patent licenses, in effect making the program proprietary. To prevent this, we have made it clear that any patent must be licensed for everyone's free use or not licensed at all.
The precise terms and conditions for copying, distribution and modification follow.
TERMS AND CONDITIONS FOR COPYING, DISTRIBUTION AND MODIFICATION
0. This License applies to any program or other work which contains a notice placed by the copyright holder saying it may be distributed under the terms of this General Public License. The "Program", below, refers to any such program or work, and a "work based on the Program" means either the Program or any derivative work under copyright law:
RealPresence® Platform Director™ Administrator’s Guide Version 1.5.0
Polycom, Inc. 109
that is to say, a work containing the Program or a portion of it, either verbatim or with modifications and/or translated into another language. (Hereinafter, translation is included without limitation in the term "modification".) Each licensee is addressed as "you".
Activities other than copying, distribution and modification are not covered by this License; they are outside its scope. The act of running the Program is not restricted, and the output from the Program is covered only if its contents constitute a work based on the Program (independent of having been made by running the Program). Whether that is true depends on what the Program does.
1. You may copy and distribute verbatim copies of the Program's source code as you receive it, in any medium, provided that you conspicuously and appropriately publish on each copy an appropriate copyright notice and disclaimer of warranty; keep intact all the notices that refer to this License and to the absence of any warranty; and give any other recipients of the Program a copy of this License along with the Program.
You may charge a fee for the physical act of transferring a copy, and you may at your option offer warranty protection in exchange for a fee.
2. You may modify your copy or copies of the Program or any portion of it, thus forming a work based on the Program, and copy and distribute such modifications or work under the terms of Section 1 above, provided that you also meet all of these conditions:
a) You must cause the modified files to carry prominent notices stating that you changed the files and the date of any change.
b) You must cause any work that you distribute or publish, that in whole or in part contains or is derived from the Program or any part thereof, to be licensed as a whole at no charge to all third parties under the terms of this License.
c) If the modified program normally reads commands interactively when run, you must cause it, when started running for such interactive use in the most ordinary way, to print or display an announcement including an appropriate copyright notice and a notice that there is no warranty (or else, saying that you provide a warranty) and that users may redistribute the program under these conditions, and telling the user how to view a copy of this License. (Exception: if the Program itself is interactive but does not normally print such an announcement, your work based on the Program is not required to print an announcement.)
These requirements apply to the modified work as a whole. If identifiable sections of that work are not derived from the Program, and can be reasonably considered independent and separate works in themselves, then this License, and its terms, does not apply to those sections when you distribute them as separate works. But when you distribute the same sections as part of a whole which is a work based on the Program, the distribution of the whole must be on the terms of this License, whose permissions for other licensees extend to the entire whole, and thus to each and every part regardless of who wrote it.
Thus, it is not the intent of this section to claim rights or contest your rights to work written entirely by you; rather, the intent is to exercise the right to control the distribution of derivative or collective works based on the Program.
In addition, mere aggregation of another work not based on the Program with the Program (or with a work based on the Program) on a volume of a storage or distribution medium does not bring the other work under the scope of this License.
3. You may copy and distribute the Program (or a work based on it, under Section 2) in object code or executable form under the terms of Sections 1 and 2 above provided that you also do one of the following:
a) Accompany it with the complete corresponding machine-readable source code, which must be distributed under the terms of Sections 1 and 2 above on a medium customarily used for software interchange; or,
b) Accompany it with a written offer, valid for at least three years, to give any third party, for a charge no more than your cost of physically performing source distribution, a complete machine-readable copy of the corresponding source code, to be distributed under the terms of Sections 1 and 2 above on a medium customarily used for software interchange; or,
c) Accompany it with the information you received as to the offer to distribute corresponding source code. (This alternative is allowed only for noncommercial distribution and only if you received the program in object code or executable form with such an offer in accord with Subsection b above.)
The source code for a work means the preferred form of the work for making modifications to it. For an executable work, complete source code means all the source code for all modules it contains, plus any associated interface definition files, plus the scripts used to control compilation and installation of the executable. However, as a special exception, the source code distributed need not include anything that is normally distributed (in either source or binary form) with the major components (compiler, kernel, and so on) of the operating system on which the executable runs, unless that component itself accompanies the executable.
RealPresence® Platform Director™ Administrator’s Guide Version 1.5.0
Polycom, Inc. 110
If distribution of executable or object code is made by offering access to copy from a designated place, then offering equivalent access to copy the source code from the same place counts as distribution of the source code, even though third parties are not compelled to copy the source along with the object code.
4. You may not copy, modify, sublicense, or distribute the Program except as expressly provided under this License. Any attempt otherwise to copy, modify, sublicense or distribute the Program is void, and will automatically terminate your rights under this License. However, parties who have received copies, or rights, from you under this License will not have their licenses terminated so long as such parties remain in full compliance.
5. You are not required to accept this License, since you have not signed it. However, nothing else grants you permission to modify or distribute the Program or its derivative works. These actions are prohibited by law if you do not accept this License. Therefore, by modifying or distributing the Program (or any work based on the Program), you indicate your acceptance of this License to do so, and all its terms and conditions for copying, distributing or modifying the Program or works based on it.
6. Each time you redistribute the Program (or any work based on the Program), the recipient automatically receives a license from the original licensor to copy, distribute or modify the Program subject to these terms and conditions. You may not impose any further restrictions on the recipients' exercise of the rights granted herein. You are not responsible for enforcing compliance by third parties to this License.
7. If, as a consequence of a court judgment or allegation of patent infringement or for any other reason (not limited to patent issues), conditions are imposed on you (whether by court order, agreement or otherwise) that contradict the conditions of this License, they do not excuse you from the conditions of this License. If you cannot distribute so as to satisfy simultaneously your obligations under this License and any other pertinent obligations, then as a consequence you may not distribute the Program at all. For example, if a patent license would not permit royalty-free redistribution of the Program by all those who receive copies directly or indirectly through you, then the only way you could satisfy both it and this License would be to refrain entirely from distribution of the Program.
If any portion of this section is held invalid or unenforceable under any particular circumstance, the balance of the section is intended to apply and the section as a whole is intended to apply in other circumstances.
It is not the purpose of this section to induce you to infringe any patents or other property right claims or to contest validity of any such claims; this section has the sole purpose of protecting the integrity of the free software distribution system, which is implemented by public license practices. Many people have made generous contributions to the wide range of software distributed through that system in reliance on consistent application of that system; it is up to the author/donor to decide if he or she is willing to distribute software through any other system and a licensee cannot impose that choice.
This section is intended to make thoroughly clear what is believed to be a consequence of the rest of this License.
8. If the distribution and/or use of the Program is restricted in certain countries either by patents or by copyrighted interfaces, the original copyright holder who places the Program under this License may add an explicit geographical distribution limitation excluding those countries, so that distribution is permitted only in or among countries not thus excluded. In such case, this License incorporates the limitation as if written in the body of this License.
9. The Free Software Foundation may publish revised and/or new versions of the General Public License from time to time. Such new versions will be similar in spirit to the present version, but may differ in detail to address new problems or concerns.
Each version is given a distinguishing version number. If the Program specifies a version number of this License which applies to it and "any later version", you have the option of following the terms and conditions either of that version or of any later version published by the Free Software Foundation. If the Program does not specify a version number of this License, you may choose any version ever published by the Free Software Foundation.
10. If you wish to incorporate parts of the Program into other free programs whose distribution conditions are different, write to the author to ask for permission. For software which is copyrighted by the Free Software Foundation, write to the Free Software Foundation; we sometimes make exceptions for this. Our decision will be guided by the two goals of preserving the free status of all derivatives of our free software and of promoting the sharing and reuse of software generally.
NO WARRANTY
11. BECAUSE THE PROGRAM IS LICENSED FREE OF CHARGE, THERE IS NO WARRANTY FOR THE PROGRAM, TO THE EXTENT PERMITTED BY APPLICABLE LAW. EXCEPT WHEN OTHERWISE STATED IN WRITING THE COPYRIGHT HOLDERS AND/OR OTHER PARTIES PROVIDE THE PROGRAM "AS IS" WITHOUT WARRANTY OF ANY KIND, EITHER EXPRESSED OR IMPLIED, INCLUDING, BUT NOT LIMITED TO, THE IMPLIED WARRANTIES OF MERCHANTABILITY AND FITNESS FOR A PARTICULAR PURPOSE. THE ENTIRE RISK AS TO THE QUALITY AND PERFORMANCE OF THE PROGRAM IS WITH YOU. SHOULD THE PROGRAM PROVE DEFECTIVE, YOU ASSUME THE COST OF ALL NECESSARY SERVICING, REPAIR OR CORRECTION.
RealPresence® Platform Director™ Administrator’s Guide Version 1.5.0
Polycom, Inc. 111
12. IN NO EVENT UNLESS REQUIRED BY APPLICABLE LAW OR AGREED TO IN WRITING WILL ANY COPYRIGHT HOLDER, OR ANY OTHER PARTY WHO MAY MODIFY AND/OR REDISTRIBUTE THE PROGRAM AS PERMITTED ABOVE, BE LIABLE TO YOU FOR DAMAGES, INCLUDING ANY GENERAL, SPECIAL, INCIDENTAL OR CONSEQUENTIAL DAMAGES ARISING OUT OF THE USE OR INABILITY TO USE THE PROGRAM (INCLUDING BUT NOT LIMITED TO LOSS OF DATA OR DATA BEING RENDERED INACCURATE OR LOSSES SUSTAINED BY YOU OR THIRD PARTIES OR A FAILURE OF THE PROGRAM TO OPERATE WITH ANY OTHER PROGRAMS), EVEN IF SUCH HOLDER OR OTHER PARTY HAS BEEN ADVISED OF THE POSSIBILITY OF SUCH DAMAGES.
END OF TERMS AND CONDITIONS
How to Apply These Terms to Your New Programs
If you develop a new program, and you want it to be of the greatest possible use to the public, the best way to achieve this is to make it free software which everyone can redistribute and change under these terms.
To do so, attach the following notices to the program. It is safest to attach them to the start of each source file to most effectively convey the exclusion of warranty; and each file should have at least the "copyright" line and a pointer to where the full notice is found.
One line to give the program's name and an idea of what it does.
Copyright (C) yyyy name of author
This program is free software; you can redistribute it and/or modify it under the terms of the GNU General Public License as published by the Free Software Foundation; either version 2 of the License, or (at your option) any later version.
This program is distributed in the hope that it will be useful, but WITHOUT ANY WARRANTY; without even the implied warranty of MERCHANTABILITY or FITNESS FOR A PARTICULAR PURPOSE. See the GNU General Public License for more details.
You should have received a copy of the GNU General Public License along with this program; if not, write to the Free Software Foundation, Inc., 51 Franklin Street, Fifth Floor, Boston, MA 02110-1301, USA.
Also add information on how to contact you by electronic and paper mail. If the program is interactive, make it output a short notice like this when it starts in an interactive mode:
Gnomovision version 69, Copyright (C) year name of author
Gnomovision comes with ABSOLUTELY NO WARRANTY; for details type `show w'.
This is free software, and you are welcome to redistribute it under certain conditions; type `show c' for details.
The hypothetical commands `show w' and `show c' should show the appropriate parts of the General Public License. Of course, the commands you use may be called something other than `show w' and `show c'; they could even be mouse-clicks or menu items--whatever suits your program.
You should also get your employer (if you work as a programmer) or your school, if any, to sign a "copyright disclaimer" for the program, if necessary. Here is a sample; alter the names:
Yoyodyne, Inc., hereby disclaims all copyright interest in the program `Gnomovision' (which makes passes at compilers) written by James Hacker.
signature of Ty Coon, 1 April 1989
Ty Coon, President of Vice
This General Public License does not permit incorporating your program into proprietary programs. If your program is a subroutine library, you may consider it more useful to permit linking proprietary applications with the library. If this is what you want to do, use the GNU Lesser General Public License instead of this License.
Apache Tomcat Apache License
Version 2.0, January 2004
http://www.apache.org/licenses/
TERMS AND CONDITIONS FOR USE, REPRODUCTION, AND DISTRIBUTION
1. Definitions.
"License" shall mean the terms and conditions for use, reproduction, and distribution as defined by Sections 1 through 9 of this document.
"Licensor" shall mean the copyright owner or entity authorized by the copyright owner that is granting the License.
RealPresence® Platform Director™ Administrator’s Guide Version 1.5.0
Polycom, Inc. 112
"Legal Entity" shall mean the union of the acting entity and all other entities that control, are controlled by, or are under common control with that entity. For the purposes of this definition, "control" means (i) the power, direct or indirect, to cause the direction or management of such entity, whether by contract or otherwise, or (ii) ownership of fifty percent (50%) or more of the outstanding shares, or (iii) beneficial ownership of such entity.
"You" (or "Your") shall mean an individual or Legal Entity exercising permissions granted by this License.
"Source" form shall mean the preferred form for making modifications, including but not limited to software source code, documentation source, and configuration files.
"Object" form shall mean any form resulting from mechanical transformation or translation of a Source form, including but not limited to compiled object code, generated documentation, and conversions to other media types.
"Work" shall mean the work of authorship, whether in Source or Object form, made available under the License, as indicated by a copyright notice that is included in or attached to the work (an example is provided in the Appendix below).
"Derivative Works" shall mean any work, whether in Source or Object form, that is based on (or derived from) the Work and for which the editorial revisions, annotations, elaborations, or other modifications represent, as a whole, an original work of authorship. For the purposes of this License, Derivative Works shall not include works that remain separable from, or merely link (or bind by name) to the interfaces of, the Work and Derivative Works thereof.
"Contribution" shall mean any work of authorship, including the original version of the Work and any modifications or additions to that Work or Derivative Works thereof, that is intentionally submitted to Licensor for inclusion in the Work by the copyright owner or by an individual or Legal Entity authorized to submit on behalf of the copyright owner. For the purposes of this definition, "submitted" means any form of electronic, verbal, or written communication sent to the Licensor or its representatives, including but not limited to communication on electronic mailing lists, source code control systems, and issue tracking systems that are managed by, or on behalf of, the Licensor for the purpose of discussing and improving the Work, but excluding communication that is conspicuously marked or otherwise designated in writing by the copyright owner as "Not a Contribution."
"Contributor" shall mean Licensor and any individual or Legal Entity on behalf of whom a Contribution has been received by Licensor and subsequently incorporated within the Work.
2. Grant of Copyright License.
Subject to the terms and conditions of this License, each Contributor hereby grants to You a perpetual, worldwide, non-exclusive, no-charge, royalty-free, irrevocable copyright license to reproduce, prepare Derivative Works of, publicly display, publicly perform, sublicense, and distribute the Work and such Derivative Works in Source or Object form.
3. Grant of Patent License.
Subject to the terms and conditions of this License, each Contributor hereby grants to You a perpetual, worldwide, non-exclusive, no-charge, royalty-free, irrevocable (except as stated in this section) patent license to make, have made, use, offer to sell, sell, import, and otherwise transfer the Work, where such license applies only to those patent claims licensable by such Contributor that are necessarily infringed by their Contribution(s) alone or by combination of their Contribution(s) with the Work to which such Contribution(s) was submitted. If You institute patent litigation against any entity (including a cross-claim or counterclaim in a lawsuit) alleging that the Work or a Contribution incorporated within the Work constitutes direct or contributory patent infringement, then any patent licenses granted to You under this License for that Work shall terminate as of the date such litigation is filed.
4. Redistribution.
You may reproduce and distribute copies of the Work or Derivative Works thereof in any medium, with or without modifications, and in Source or Object form, provided that You eet the following conditions:
(a) You must give any other recipients of the Work or Derivative Works a copy of this License; and
(b) You must cause any modified files to carry prominent notices stating that You changed the files; and
(c) You must retain, in the Source form of any Derivative Works that You distribute, all copyright, patent, trademark, and attribution notices from the Source form of the Work, excluding those notices that do not pertain to any part of the Derivative Works; and
d) If the Work includes a "NOTICE" text file as part of its distribution, then any Derivative Works that You distribute must include a readable copy of the attribution notices contained within such NOTICE file, excluding those notices that do not pertain to any part of the Derivative Works, in at least one of the following places: within a NOTICE text file distributed as part of the Derivative Works; within the Source form or documentation, if provided along with the Derivative Works; or, within a display generated by the Derivative Works, if and wherever such third-party notices normally appear. The contents of the NOTICE file are for informational purposes only and do not modify the License. You may add Your own attribution notices within Derivative Works that You distribute, alongside or as an addendum
RealPresence® Platform Director™ Administrator’s Guide Version 1.5.0
Polycom, Inc. 113
to the NOTICE text from the Work, provided that such additional attribution notices cannot be construed as modifying the License.
You may add Your own copyright statement to Your modifications and may provide additional or different license terms and conditions for use, reproduction, or distribution of Your modifications, or for any such Derivative Works as a whole, provided Your use, reproduction, and distribution of the Work otherwise complies with the conditions stated in this License.
5. Submission of Contributions.
Unless You explicitly state otherwise, any Contribution intentionally submitted for inclusion in the Work by You to the Licensor shall be under the terms and conditions of this License, without any additional terms or conditions. Notwithstanding the above, nothing herein shall supersede or modify the terms of any separate license agreement you may have executed with Licensor regarding such Contributions.
6. Trademarks.
This License does not grant permission to use the trade names, trademarks, service marks, or product names of the Licensor, except as required for reasonable and customary use in describing the origin of the Work and reproducing the content of the NOTICE file.
7. Disclaimer of Warranty.
Unless required by applicable law or agreed to in writing, Licensor provides the Work (and each Contributor provides its Contributions) on an "AS IS" BASIS, WITHOUT WARRANTIES OR CONDITIONS OF ANY KIND, either express or implied, including, without limitation, any warranties or conditions of TITLE, NON-INFRINGEMENT, MERCHANTABILITY, or FITNESS FOR A PARTICULAR PURPOSE. You are solely responsible for determining the appropriateness of using or redistributing the Work and assume any risks associated with Your exercise of permissions under this License.
8. Limitation of Liability.
In no event and under no legal theory, whether in tort (including negligence), contract, or otherwise, unless required by applicable law (such as deliberate and grossly negligent acts) or agreed to in writing, shall any Contributor be liable to You for damages, including any direct, indirect, special, incidental, or consequential damages of any character arising as a result of this License or out of the use or inability to use the Work (including but not limited to damages for loss of goodwill, work stoppage, computer failure or malfunction, or any and all other commercial damages or losses), even if such Contributor has been advised of the possibility of such damages.
9. Accepting Warranty or Additional Liability.
While redistributing the Work or Derivative Works thereof, You may choose to offer, and charge a fee for, acceptance of support, warranty, indemnity, or other liability obligations and/or rights consistent with this License. However, in accepting such obligations, You may act only on Your own behalf and on Your sole responsibility, not on behalf of any other Contributor, and only if You agree to indemnify, defend, and hold each Contributor harmless for any liability incurred by, or claims asserted against, such Contributor by reason of your accepting any such warranty or additional liability.
END OF TERMS AND CONDITIONS
APPENDIX: How to apply the Apache License to your work.
To apply the Apache License to your work, attach the following boilerplate notice, with the fields enclosed by brackets "[]" replaced with your own identifying information. (Don't include the brackets!) The text should be enclosed in the appropriate comment syntax for the file format. We also recommend that a file or class name and description of purpose be included on the same "printed page" as the copyright notice for easier identification within third-party archives.
Copyright [yyyy] [name of copyright owner]
Licensed under the Apache License, Version 2.0 (the "License"); you may not use this file except in compliance with the License. You may obtain a copy of the License at
http://www.apache.org/licenses/LICENSE-2.0
Unless required by applicable law or agreed to in writing, software distributed under the License is distributed on an "AS IS" BASIS, WITHOUT WARRANTIES OR CONDITIONS OF ANY KIND, either express or implied. See the License for the specific language governing permissions and limitations under the License.
postgreSQL PostgreSQL is released under the PostgreSQL License, a liberal Open Source license, similar to the BSD or MIT licenses.
RealPresence® Platform Director™ Administrator’s Guide Version 1.5.0
Polycom, Inc. 114
PostgreSQL Database Management System (formerly known as Postgres, then as Postgres95) Portions Copyright (c) 1996-2013, The PostgreSQL Global Development Group Portions Copyright (c) 1994, The Regents of the University of California Permission to use, copy, modify, and distribute this software and its documentation for any purpose, without fee, and without a written agreement is hereby granted, provided that the above copyright notice and this paragraph and the following two paragraphs appear in all copies.
IN NO EVENT SHALL THE UNIVERSITY OF CALIFORNIA BE LIABLE TO ANY PARTY FOR DIRECT, INDIRECT, SPECIAL, INCIDENTAL, OR CONSEQUENTIAL DAMAGES, INCLUDING LOST PROFITS, ARISING OUT OF THE USE OF THIS SOFTWARE AND ITS DOCUMENTATION, EVEN IF THE UNIVERSITY OF CALIFORNIA HAS BEEN ADVISED OF THE POSSIBILITY OF SUCH DAMAGE.
THE UNIVERSITY OF CALIFORNIA SPECIFICALLY DISCLAIMS ANY WARRANTIES, INCLUDING, BUT NOT LIMITED TO, THE IMPLIED WARRANTIES OF MERCHANTABILITY AND FITNESS FOR A PARTICULAR PURPOSE. THE SOFTWARE PROVIDED HEREUNDER IS ON AN "AS IS" BASIS, AND THE UNIVERSITY OF CALIFORNIA HAS NO OBLIGATIONS TO PROVIDE MAINTENANCE, SUPPORT, UPDATES, ENHANCEMENTS, OR MODIFICATIONS.