Embed Size (px)
Citation preview

A Dell Technical White Paper
Real Time Storage Configuration Using PERC9 on Dell 13th Generation PowerEdge Servers This Dell technical white paper provides information about PERC9 real time storage configuration using supported iDRAC8 interfaces.
Dell Engineering January 2015
Authors
Texas Roemer
Punita Punita
Anish Kurunthil

2 Storage Real Time Configuration in Dell PowerEdge 13th Generation Servers
Contents
Executive Summary .......................................................................................................................................................................... 3
Dell 13th generation of PowerEdge servers feature the integrated Dell Remote Access Controller with Lifecycle
Controller (iDRAC8) along with PowerEdge RAID Controller (PERC9). This new combination provides real time
configuration for key storage operations which allows an agent-free, no-reboot method for configuring storage.
This white paper provides a general overview of real time storage configuration with customer facing use case
examples using supported iDRAC8 interfaces (iDRAC GUI, RACADM and WSMAN). .......................................................... 3
1 Introduction ................................................................................................................................................................................ 4
1.1 Existing Solution .............................................................................................................................................................. 4
1.2 Real-Time Configuration ............................................................................................................................................... 4
1.3 RAID Commands Supported by Real Time ................................................................................................................ 4
1.4 RAID Command Not Supported by Real Time .......................................................................................................... 5
1.5 Prerequisites ..................................................................................................................................................................... 5
2 Use Cases .................................................................................................................................................................................... 8
2.1 Use WSMAN to Assign Dedicated HotSpare in Real Time ....................................................................................... 8
2.2 Use RACADM to Create a VirtualDisk in Real Time ................................................................................................. 20
2.3 Use iDRAC GUI to Delete One VirtualDisk and Assign Dedicated HotSpare to Existing VirtualDisk ............. 29
3 Storage Real Time Configuration in Dell PowerEdge 13th Generation Servers
Executive Summary
Dell 13th generation of PowerEdge servers feature the integrated Dell Remote Access Controller with Lifecycle
Controller (iDRAC8) along with PowerEdge RAID Controller (PERC9). This new combination provides real time
configuration for key storage operations which allows an agent-free, no-reboot method for configuring storage. This
white paper provides a general overview of real time storage configuration with customer facing use case examples
using supported iDRAC8 interfaces (iDRAC GUI, RACADM and WSMAN).

4 Storage Real Time Configuration in Dell PowerEdge 13th Generation Servers
1 Introduction
Storage configuration typically requires either an OS agent (Open Management Storage Services, part of
the OpenManage Server Assistant or OMSA) or a server reboot into the controller’s firmware interface. In
today’s business environment, neither approach is convenient for datacenter operations. OS agents
require accessing the OS and potentially interfering with workloads, tenants, or other owners of the
platform. Rebooting the server introduces downtime to the platform. To avoid these problems, iDRAC8
now supports real time configuration for storage operations.
1.1 Existing Solution
Prior to PowerEdge 12th generation platforms, storage configurations using iDRAC interfaces required a
reboot to apply the configuration changes. This not only took more time to apply the configuration but
also required shutting down applications running on the host. With real time configuration, storage
configuration can be applied without a host reboot, saving time and without affect workloads running on
the host.
1.2 Real-Time Configuration
In Dell PowerEdge 13th generation platforms, iDRAC8 supports PERC9 which will allow administrators to
perform real time storage configuration through the sideband interface on the management controller.
The sideband interface allows storage configuration in two steps. In the first step, configuration/attribute is
set (pending operation) and in the second step a job is created to apply the pending
configuration/attributes. With 13th generation platforms and PERC9, administrators can select the real time
update option while creating a job, enabling configuration changes without host reboot. This is unlike
PowerEdge 12th generation servers which require a reboot to apply the configuration.
Administrators may prefer to set multiple configurations (stacked operation) and then create one common
job for the entire configuration. For example, a single target config job can be created to run in real time
to apply multiple storage configurations - reset the controller, create a VD, and assign a dedicated
hotspare.
The use case section below details a number of potential real-time storage configuration scenarios using
iDRAC8 interfaces (WSMAN, RACADM and GUI).
1.3 RAID Commands Supported by Real Time

5 Storage Real Time Configuration in Dell PowerEdge 13th Generation Servers
Create Virtual Disk
Delete Virtual Disk
Reset Controller Configuration
Clear Foreign Configuration
Import Foreign Configuration
Initialze Virtual Disk (Fast and Full)
Consistency Check for Virtual Disk
Start/Stop Patrol Read
Assign/Unassign Global and Dedicate Hotspares
Blink/Unblink Physical Disk/Virtual Disk
Local Key Management (Create Security Key, Change Security Key, Delete Security Key)
Controller Attributes
Virtual Disk Attributes
Convert drive to RAID (Note: Only supported on iDRAC8 2.10.10 or newer)
Convert drive to NonRAID Note: Only supported on iDRAC8 2.10.10 or newer)
For detailed information on each RAID command, refer to the iDRAC homepage and then search for the
iDRAC interface you want to use to perform the RAID action.
Link to iDRAC homepage:
http://www.delltechcenter.com/iDRAC
1.4 RAID Command Not Supported by Real Time
Encrypt(lock)virtual disks
1.5 Prerequisites
Make sure that the following prerequisites are met before performing a real time configuration:
13th generation of Dell PowerEdge server with any iDRAC8 license installed.

6 Storage Real Time Configuration in Dell PowerEdge 13th Generation Servers
Host must be powered on and in an idle state. It should be out of POST, F2 or USC to run real time
configuration.
Controller must be PERC9 with 9.1 or newer firmware to support real time configuration. If
needed, you can check to see if your controller supports real time capability using any iDRAC
interface (iDRAC GUI, RACADM or WSMAN). Look for parameter “Realtime Capability” and if you
see a value of “capable” or “1”, real time configuration is supported.
Example: To verify real time configuration support by the controller using RACADM, l look for the
parameter “Realtime Capability” which should show a value of “Capable”.
racadm>>storage get controllers -o
racadm storage get controllers -o
RAID.Integrated.1-1
Status = Ok
DeviceDescription = Integrated RAID Controller 1
RollupStatus = Ok
Name = PERC H330 Mini (Embedded)
FirmwareVersion = 25.2.1.0037
DriverVersion = Information Not Available
RebuildRate = 1
BgiRate = 2
CheckConsistencyRate = 3
ReconstructRate = 4
PatrolReadRate = 30
PatrolReadMode = Manual
PatrolReadState = Stopped
CheckConsistencyMode = Stop On Error
LoadBalanceSetting = Auto
CopybackMode = ON with SMART
PreservedCache = Not Present
CacheMemorySize = 0 MB
PersistHotspare = Disabled
SpindownUnconfiguredDrives = Disabled

7 Storage Real Time Configuration in Dell PowerEdge 13th Generation Servers
SpindownHotspare = Disabled
Timeintervalforspindown = 30 (Minutes)
SecurityStatus = Encryption Capable
EncryptionMode = None
SasAddress = 0x5C81F660C029B200
PciDeviceId = 0x5f
PciSubdeviceId = 0x1f4b
PciVendorId = 0x1000
PciSubvendorId = 0x1028
PciBus = 0x3
PciDevice = 0x0
PciFunction = 0x0
BusWidth = Unknown
SlotLength = Unknown
SlotType = Unknown
MaxCapableSpeed = 12.0 Gb/s
LearnMode = Not supported
T10PICapability = Capable
SupportRAID10UnevenSpans = Supported
SupportEnhancedAutoForeignImport = Supported
EnhancedAutoImportForeignConfig = Enabled
SupportControllerBootMode = Supported
ControllerBootMode = Continue Boot On Error
RealtimeConfigurationCapability = Capable
CurrentControllerMode = RAID

8 Storage Real Time Configuration in Dell PowerEdge 13th Generation Servers
2 Use Cases
This section addresses use case examples that acustomer administrator might face in their work
environment, using different supported iDRAC interfaces. For each use case listed, it will utilize one of the
supported iDRAC interfaces but you can use any one of the supported iDRAC interfaces to complete the
use case.
2.1 Use WSMAN to Assign Dedicated HotSpare in
Real Time
Use Case: My server configuration is: PowerEdge R630 with PERC H730 Mini, RAID 1 already created using
drives 0 and 1 with Windows operating system installed. I want to assign a dedicated hot spare to the RAID
1 but I don’t want to bring down the OS or reboot the server since it is currently running as a DHCP / DNS
server.
Solution: Use WSMAN interface to assign a dedicated hot spare in real-time without rebooting the server.
1. Validate that the controller supports real time configuration byrunning an enum on
DCIM_ControllerView. - Verify a value of “1” for the property RealtimeCapability, which signifies real
time support..
Example of WSMAN Command and Output:
winrm e http://schemas.dell.com/wbem/wscim/1/cim-schema/2/root/dcim/DCIM_ControllerView -u:root -p:calvin -
r:https://192.168.0.120/wsman -SkipCNCheck -SkipCACheck-encoding:utf-8 -a:basic
DCIM_ControllerView
Bus = 2
CacheSizeInMB = 1024
CachecadeCapability = 0
ControllerFirmwareVersion = 25.2.1.0037
Device = 0
DeviceCardDataBusWidth = Unknown
DeviceCardManufacturer = DELL
DeviceCardSlotLength = 2

9 Storage Real Time Configuration in Dell PowerEdge 13th Generation Servers
DeviceCardSlotType = Unknown
DeviceDescription = Integrated RAID Controller 1
DriverVersion = 6.600.21.08
EncryptionCapability = 1
EncryptionMode = 0
FQDD = RAID.Integrated.1-1
Function = 0
InstanceID = RAID.Integrated.1-1
KeyID = null
LastSystemInventoryTime = 20140917175359.000000+000
LastUpdateTime = 20140917185101.000000+000
MaxAvailablePCILinkSpeed = Generation 3
MaxPossiblePCILinkSpeed = Generation 3
PCIDeviceID = 5D
PCISlot = 1
PCISubDeviceID = 1F49
PCISubVendorID = 1028
PCIVendorID = 1000
PatrolReadState = 1
PrimaryStatus = 1
ProductName = PERC H730 Mini
RealtimeCapability = 1
RollupStatus = 1
SASAddress = 5C81F660DEE70500
SecurityStatus = 1
SlicedVDCapability = 1
SupportControllerBootMode = 1
SupportEnhancedAutoForeignImport = 1
SupportRAID10UnevenSpans = 1

10 Storage Real Time Configuration in Dell PowerEdge 13th Generation Servers
T10PICapability = 1
2. Run an enum on DCIM_VirtualDiskView class to see the RAID 1 already created. You will see
RAIDTypes = 4 (RAID 1) and PhysicalDiskIDs show disk 0 and 1 which was used to create the VD.
Example of WSMAN command and output:
winrm e http://schemas.dmtf.org/wbem/wscim/1/cim-schema/2/root/dcim/DCIM_VirtualDiskView -u:root -p:calvin -
r:https://192.168.0.120/wsman -SkipCNCheck -SkipCACheck-encoding:utf-8 -a:basic
DCIM_VirtualDiskView
BlockSizeInBytes = 512
BusProtocol = 5
Cachecade = 0
DeviceDescription = Virtual Disk 0 on Integrated RAID Controller 1
DiskCachePolicy = 256
FQDD = Disk.Virtual.0:RAID.Integrated.1-1
InstanceID = Disk.Virtual.0:RAID.Integrated.1-1
LastSystemInventoryTime = 20140917175110.000000+000
LastUpdateTime = 20140917185101.000000+000
LockStatus = 0
MediaType = 2
Name = RAID ONE
ObjectStatus = 0
OperationName = None
OperationPercentComplete = 0
PendingOperations = 0
PhysicalDiskIDs = Disk.Bay.0:Enclosure.Internal.0-1:RAID.Integrated.1-1, Disk.Bay.1:Enclosure.Internal.0-
1:RAID.Integrated.1-1
PrimaryStatus = 1
RAIDStatus = 2
RAIDTypes = 4
ReadCachePolicy = 32
RemainingRedundancy = 1
11 Storage Real Time Configuration in Dell PowerEdge 13th Generation Servers
RollupStatus = 1
SizeInBytes = 119453777920
SpanDepth = 1
SpanLength = 2
StartingLBAinBlocks = 0
StripeSize = 128
T10PIStatus = 0
VirtualDiskTargetID = 0
WriteCachePolicy = 2
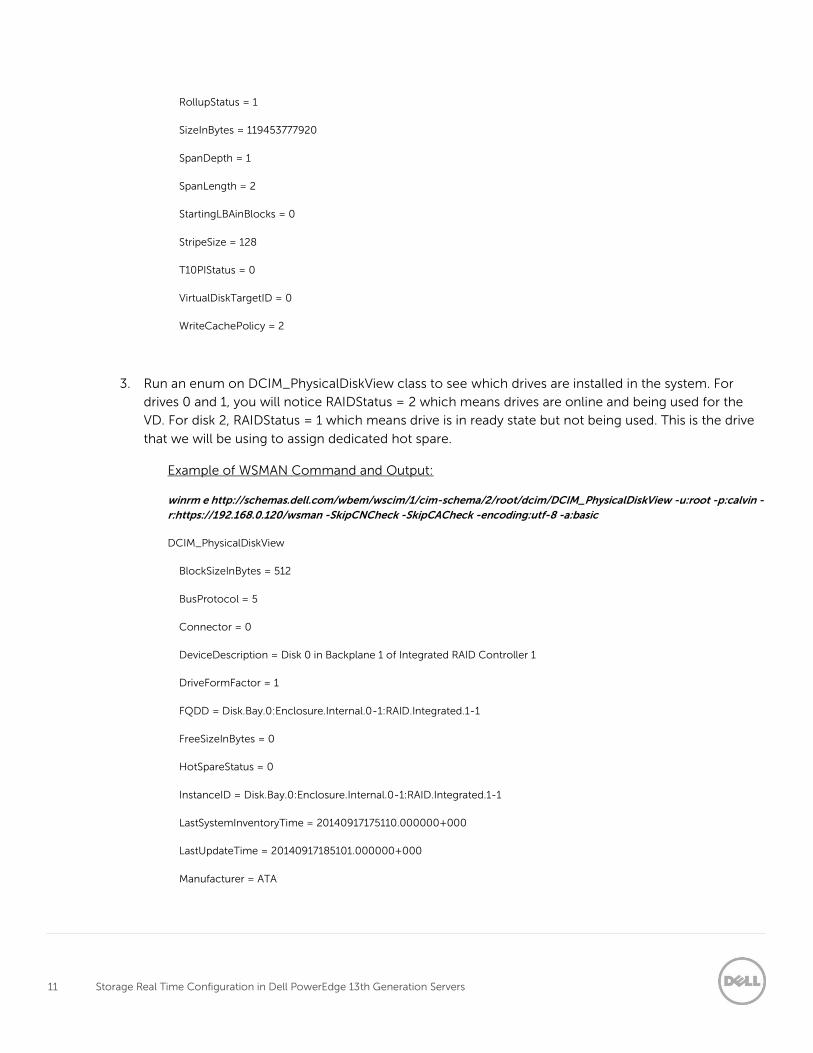
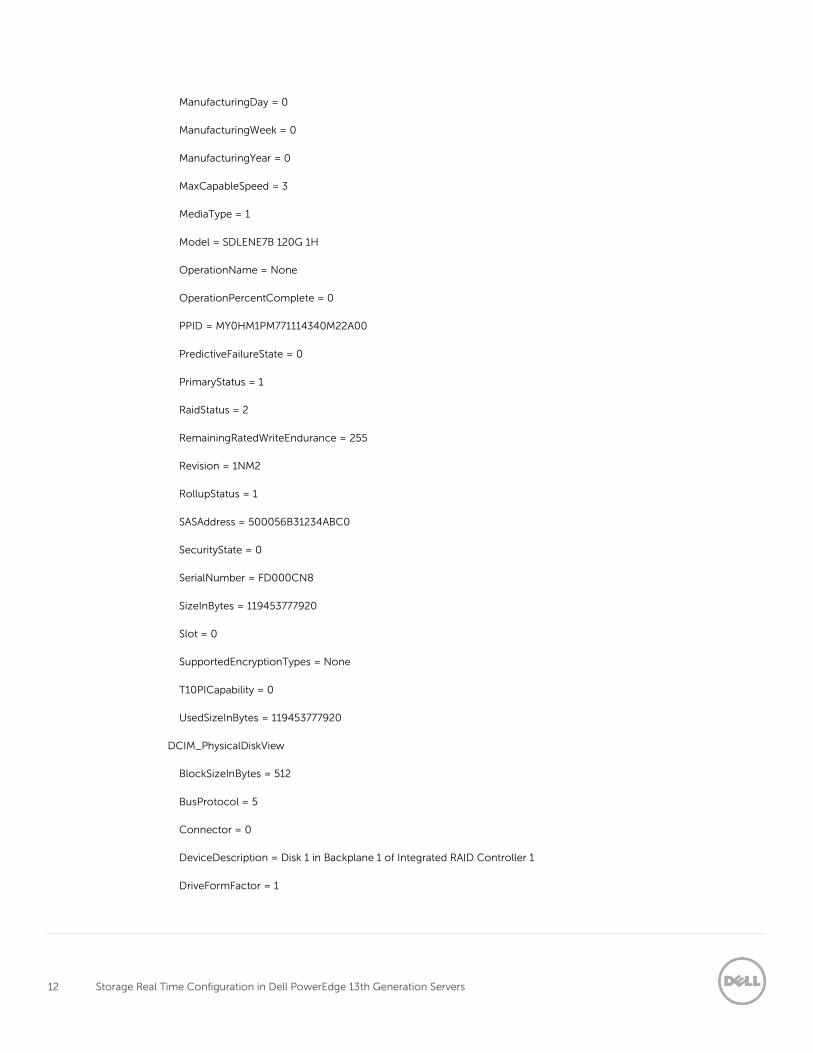
3. Run an enum on DCIM_PhysicalDiskView class to see which drives are installed in the system. For
drives 0 and 1, you will notice RAIDStatus = 2 which means drives are online and being used for the
VD. For disk 2, RAIDStatus = 1 which means drive is in ready state but not being used. This is the drive
that we will be using to assign dedicated hot spare.
Example of WSMAN Command and Output:
winrm e http://schemas.dell.com/wbem/wscim/1/cim-schema/2/root/dcim/DCIM_PhysicalDiskView -u:root -p:calvin -
r:https://192.168.0.120/wsman -SkipCNCheck -SkipCACheck -encoding:utf-8 -a:basic
DCIM_PhysicalDiskView
BlockSizeInBytes = 512
BusProtocol = 5
Connector = 0
DeviceDescription = Disk 0 in Backplane 1 of Integrated RAID Controller 1
DriveFormFactor = 1
FQDD = Disk.Bay.0:Enclosure.Internal.0-1:RAID.Integrated.1-1
FreeSizeInBytes = 0
HotSpareStatus = 0
InstanceID = Disk.Bay.0:Enclosure.Internal.0-1:RAID.Integrated.1-1
LastSystemInventoryTime = 20140917175110.000000+000
LastUpdateTime = 20140917185101.000000+000
Manufacturer = ATA
12 Storage Real Time Configuration in Dell PowerEdge 13th Generation Servers
ManufacturingDay = 0
ManufacturingWeek = 0
ManufacturingYear = 0
MaxCapableSpeed = 3
MediaType = 1
Model = SDLENE7B 120G 1H
OperationName = None
OperationPercentComplete = 0
PPID = MY0HM1PM771114340M22A00
PredictiveFailureState = 0
PrimaryStatus = 1
RaidStatus = 2
RemainingRatedWriteEndurance = 255
Revision = 1NM2
RollupStatus = 1
SASAddress = 500056B31234ABC0
SecurityState = 0
SerialNumber = FD000CN8
SizeInBytes = 119453777920
Slot = 0
SupportedEncryptionTypes = None
T10PICapability = 0
UsedSizeInBytes = 119453777920
DCIM_PhysicalDiskView
BlockSizeInBytes = 512
BusProtocol = 5
Connector = 0
DeviceDescription = Disk 1 in Backplane 1 of Integrated RAID Controller 1
DriveFormFactor = 1

13 Storage Real Time Configuration in Dell PowerEdge 13th Generation Servers
FQDD = Disk.Bay.1:Enclosure.Internal.0-1:RAID.Integrated.1-1
FreeSizeInBytes = 0
HotSpareStatus = 0
InstanceID = Disk.Bay.1:Enclosure.Internal.0-1:RAID.Integrated.1-1
LastSystemInventoryTime = 20140917175110.000000+000
LastUpdateTime = 20140917185101.000000+000
Manufacturer = ATA
ManufacturingDay = 0
ManufacturingWeek = 0
ManufacturingYear = 0
MaxCapableSpeed = 3
MediaType = 1
Model = SDLENE7B 120G 1H
OperationName = None
OperationPercentComplete = 0
PPID = MY0HM1PM771114340M4CA00
PredictiveFailureState = 0
PrimaryStatus = 1
RaidStatus = 2
RemainingRatedWriteEndurance = 255
Revision = 1NM2
RollupStatus = 1
SASAddress = 500056B31234ABC1
SecurityState = 0
SerialNumber = FD000CQ2
SizeInBytes = 119453777920
Slot = 1
SupportedEncryptionTypes = None
T10PICapability = 0

14 Storage Real Time Configuration in Dell PowerEdge 13th Generation Servers
UsedSizeInBytes = 119453777920
DCIM_PhysicalDiskView
BlockSizeInBytes = 512
BusProtocol = 5
Connector = 0
DeviceDescription = Disk 2 in Backplane 1 of Integrated RAID Controller 1
DriveFormFactor = 1
FQDD = Disk.Bay.2:Enclosure.Internal.0-1:RAID.Integrated.1-1
FreeSizeInBytes = 119453777920
HotSpareStatus = 0
InstanceID = Disk.Bay.2:Enclosure.Internal.0-1:RAID.Integrated.1-1
LastSystemInventoryTime = 20140917175110.000000+000
LastUpdateTime = 20140917185101.000000+000
Manufacturer = ATA
ManufacturingDay = 0
ManufacturingWeek = 0
ManufacturingYear = 0
MaxCapableSpeed = 3
MediaType = 1
Model = SDLENE7B 120G 1H
OperationName = None
OperationPercentComplete = 0
PPID = MY0HM1PM771114340M4MA00
PredictiveFailureState = 0
PrimaryStatus = 1
RaidStatus = 1
RemainingRatedWriteEndurance = 255
Revision = 1NM2
RollupStatus = 1
15 Storage Real Time Configuration in Dell PowerEdge 13th Generation Servers
SASAddress = 500056B31234ABC2
SecurityState = 0
SerialNumber = FD000CQC
SizeInBytes = 119453777920
Slot = 2
SupportedEncryptionTypes = None
T10PICapability = 0
UsedSizeInBytes = 0
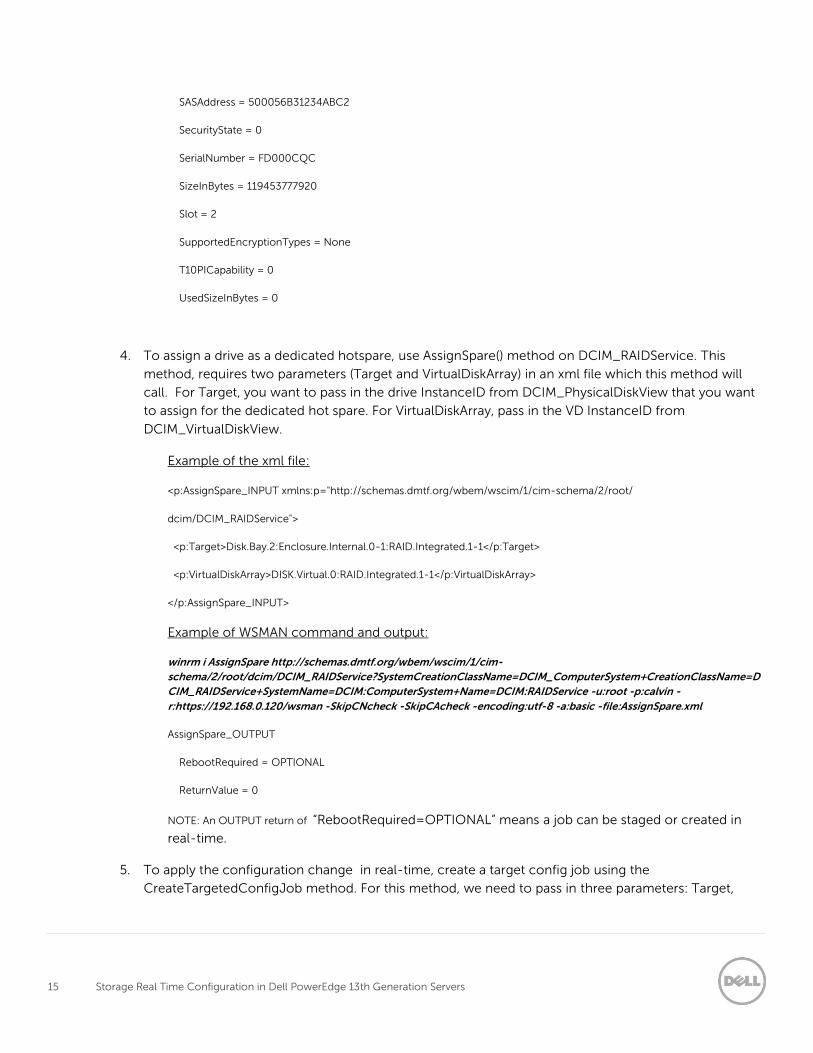
4. To assign a drive as a dedicated hotspare, use AssignSpare() method on DCIM_RAIDService. This
method, requires two parameters (Target and VirtualDiskArray) in an xml file which this method will
call. For Target, you want to pass in the drive InstanceID from DCIM_PhysicalDiskView that you want
to assign for the dedicated hot spare. For VirtualDiskArray, pass in the VD InstanceID from
DCIM_VirtualDiskView.
Example of the xml file:
<p:AssignSpare_INPUT xmlns:p="http://schemas.dmtf.org/wbem/wscim/1/cim-schema/2/root/
dcim/DCIM_RAIDService">
<p:Target>Disk.Bay.2:Enclosure.Internal.0-1:RAID.Integrated.1-1</p:Target>
<p:VirtualDiskArray>DISK.Virtual.0:RAID.Integrated.1-1</p:VirtualDiskArray>
</p:AssignSpare_INPUT>
Example of WSMAN command and output:
winrm i AssignSpare http://schemas.dmtf.org/wbem/wscim/1/cim-
schema/2/root/dcim/DCIM_RAIDService?SystemCreationClassName=DCIM_ComputerSystem+CreationClassName=D
CIM_RAIDService+SystemName=DCIM:ComputerSystem+Name=DCIM:RAIDService -u:root -p:calvin -
r:https://192.168.0.120/wsman -SkipCNcheck -SkipCAcheck -encoding:utf-8 -a:basic -file:AssignSpare.xml
AssignSpare_OUTPUT
RebootRequired = OPTIONAL
ReturnValue = 0
NOTE: An OUTPUT return of “RebootRequired=OPTIONAL” means a job can be staged or created in
real-time.
5. To apply the configuration change in real-time, create a target config job using the
CreateTargetedConfigJob method. For this method, we need to pass in three parameters: Target,

16 Storage Real Time Configuration in Dell PowerEdge 13th Generation Servers
ScheduledStartTime and Realtime. For Target, you need to pass in the controller InstanceID from
DCIM_ControllerView class. For ScheduledStartTime, we are going to pass in “TIME_NOW” for the
value since we want this configuration change to be applied immediately. For Realtime, we are going
to pass in “1” for a value which means the server will not reboot and perform the configuration
changes in real time,
Example of WSMAN Command and Output:
winrm i CreateTargetedConfigJob http://schemas.dell.com/wbem/wscim/1/cim-
schema/2/root/dcim/DCIM_RAIDService?SystemCreationClassName=DCIM_ComputerSystem+CreationClassName=D
CIM_RAIDService+SystemName=DCIM:ComputerSystem+Name=DCIM:RAIDService -u:root -p:calvin -
r:https://192.168.0.120/wsman -SkipCNcheck -SkipCAcheck -encoding:utf-8 -a:basic @{Target="RAID.Integrated.1-
1";ScheduledStartTime="TIME_NOW";Realtime="1"}
CreateTargetedConfigJob_OUTPUT
Job
EndpointReference
Address = http://schemas.xmlsoap.org/ws/2004/08/addressing/role/anonymous
ReferenceParameters
ResourceURI = http://schemas.dell.com/wbem/wscim/1/cim-schema/2/DCIM_
LifecycleJob
SelectorSet
Selector: InstanceID = JID_109846482878, __cimnamespace = root/dcim
ReturnValue = 4096
6. Job ID should be returned once you invoke CreateTargetedConfigJob method. Take this job ID and
execute get command on DCIM_LifeCycleJob class. You should already see a job status of “Running”.
Continue to query this job status until you see a “Completed” status (this shouldn’t take more than two
minutes to show Completed job status).
Example of WSMAN Command and Output:
winrm get http://schemas.dell.com/wbem/wscim/1/cim-
schema/2/root/dcim/DCIM_LifecycleJob?InstanceID=JID_109846482878 -u:root -p:calvin -
r:https://192.168.0.120/wsman -SkipCNCheck -SkipCACheck -encoding:utf-8 -a:basic
DCIM_LifecycleJob
ElapsedTimeSinceCompletion = null
InstanceID = JID_109846482878
JobStartTime = TIME_NOW
JobStatus = Running

17 Storage Real Time Configuration in Dell PowerEdge 13th Generation Servers
JobUntilTime = TIME_NA
Message = Job in progress.
MessageArguments = NA
MessageID = PR20
Name = Config:RAID:RAID.Integrated.1-1
PercentComplete = 50
winrm get http://schemas.dell.com/wbem/wscim/1/cim-
schema/2/root/dcim/DCIM_LifecycleJob?InstanceID=JID_109846482878 -u:root -p:calvin -
r:https://192.168.0.120/wsman -SkipCNCheck -SkipCACheck -encoding:utf-8 -a:basic
DCIM_LifecycleJob
ElapsedTimeSinceCompletion = 0
InstanceID = JID_109846482878
JobStartTime = TIME_NOW
JobStatus = Completed
JobUntilTime = TIME_NA
Message = Job completed successfully.
MessageArguments = NA
MessageID = PR19
Name = Config:RAID:RAID.Integrated.1-1
PercentComplete = 100
7. Once the job is marked completed, run an enum on DCIM_VirtualDiskView class and verify
PhysicalDiskIDs property. You will now see disk 2 listed along with disk 0 and 1. You can also run an
enum on DCIM_PhysicalDiskView class and HotSpareStatus property will now have a value of “1”
which means dedicated for disk 2.
Example of WSMAN Command and Output:
winrm e http://schemas.dmtf.org/wbem/wscim/1/cim-schema/2/root/dcim/DCIM_VirtualDiskView -u:root -p:calvin -
r:https://192.168.0.120/wsman -SkipCNCheck -SkipCACheck -encoding:utf-8 -a:basic -skipRevocationCheck
DCIM_VirtualDiskView
BlockSizeInBytes = 512
BusProtocol = 5
Cachecade = 0

18 Storage Real Time Configuration in Dell PowerEdge 13th Generation Servers
DeviceDescription = Virtual Disk 0 on Integrated RAID Controller 1
DiskCachePolicy = 256
FQDD = Disk.Virtual.0:RAID.Integrated.1-1
InstanceID = Disk.Virtual.0:RAID.Integrated.1-1
LastSystemInventoryTime = 20140917201742.000000+000
LastUpdateTime = 20140917185101.000000+000
LockStatus = 0
MediaType = 2
Name = RAID ONE
ObjectStatus = 0
OperationName = None
OperationPercentComplete = 0
PendingOperations = 0
PhysicalDiskIDs = Disk.Bay.0:Enclosure.Internal.0-1:RAID.Integrated.1-1, Disk.Bay
.1:Enclosure.Internal.0-1:RAID.Integrated.1-1, Disk.Bay.2:Enclosure.Internal.0-1:RAID
.Integrated.1-1
PrimaryStatus = 1
RAIDStatus = 2
RAIDTypes = 4
ReadCachePolicy = 32
RemainingRedundancy = 1
RollupStatus = 1
SizeInBytes = 119453777920
SpanDepth = 1
SpanLength = 2
StartingLBAinBlocks = 0
StripeSize = 128
T10PIStatus = 0
VirtualDiskTargetID = 0

19 Storage Real Time Configuration in Dell PowerEdge 13th Generation Servers
WriteCachePolicy = 2
winrm e http://schemas.dell.com/wbem/wscim/1/cim-schema/2/root/dcim/DCIM_PhysicalDiskView -u:root -p:calvin -
r:https://192.168.0.120/wsman -SkipCNCheck -SkipCACheck -encoding:utf-8 -a:basic
DCIM_PhysicalDiskView
BlockSizeInBytes = 512
BusProtocol = 5
Connector = 0
DeviceDescription = Disk 0 in Backplane 1 of Integrated RAID Controller 1
DriveFormFactor = 1
FQDD = Disk.Bay.0:Enclosure.Internal.0-1:RAID.Integrated.1-1
FreeSizeInBytes = 0
HotSpareStatus = 1
InstanceID = Disk.Bay.2:Enclosure.Internal.0-1:RAID.Integrated.1-1
LastSystemInventoryTime = 20140917175110.000000+000
LastUpdateTime = 20140917185101.000000+000
Manufacturer = ATA
ManufacturingDay = 0
ManufacturingWeek = 0
ManufacturingYear = 0
MaxCapableSpeed = 3
MediaType = 1
Model = SDLENE7B 120G 1H
OperationName = None
OperationPercentComplete = 0
PPID = MY0HM1PM771114340M22A00
PredictiveFailureState = 0
PrimaryStatus = 1
RaidStatus = 1
RemainingRatedWriteEndurance = 255
Revision = 1NM2

20 Storage Real Time Configuration in Dell PowerEdge 13th Generation Servers
RollupStatus = 1
SASAddress = 500056B31234ABC0
SecurityState = 0
SerialNumber = FD000CN8
SizeInBytes = 119453777920
Slot = 0
SupportedEncryptionTypes = None
T10PICapability = 0
UsedSizeInBytes = 119453777920
8. Finally, check the configuration results by invoking GetConfigResults method on the target config job.
You should see a “CHANGE” entry along with NewValue “Dedicated” and “Success” status.
Example of WSMAN Command and Output:
winrm i GetConfigResults "http://schemas.dell.com/wbem/wscim/1/cim-
schema/2/DCIM_LCRecordLog?InstanceID=DCIM:LifecycleLog+__cimnamespace=root/dcim" -u:root -p:calvin -
r:https://192.168.0.120/wsman -encoding:utf-8 -a:basic -SkipCNcheck -SkipCAcheck@{JobID=" JID_109846482878"}
GetConfigResults_OUTPUT
ConfigResults = <ConfigResults><JobID> JID_109846482878</JobID><FQDD>RAID.Integrated.1-1</FQDD><Operation
name="CHANGE"><DisplayValue>Solid State Disk 0:1:2</DisplayValue><Name>Solid State Disk
0:1:2</Name><Detail><OldValue>No</OldValue><NewValue>Dedicated</NewValue></Detail><Status>Success</Status><
ErrorCode>0</ErrorCode></Operation></ConfigResults>
ReturnValue = 0
2.2 Use RACADM to Create a VirtualDisk in Real Time
Use Case: My server configuration is: PowerEdge R630 with PERC H730 Mini, RAID 1 already created using
drives 0 and 1 with Windows operating system installed. RAID 1 also has a dedicated hot spare assigned
using disk 2. My issue is I want to back up data in the OS but I don’t want to use the drives with the
operating system and I can’t shut down the server since its being used as an NTP server.
Solution: To solve this issue, hot plug two drives and create a RAID 0 in real-time. Once the creation of
RAID 0 is complete, it will automatically show up in the OS and can then be initialized and formatted. The
following example, uses the RACADM interface to create a RAID 0 in real-time without rebooting the
server.

21 Storage Real Time Configuration in Dell PowerEdge 13th Generation Servers
1. Verify disk management in the operating system, which shows that only one disk (disk 0) exists which
contains the OS.
OS Screenshot Example:
2. Validate the controller supports real time configuration. Run “racadm storage get controllers –o” and
verify RealtimeConfigurationCapability = Capable.
Example of RACADM Command and Output:
racadm>>racadm storage get controllers -o
racadm storage get controllers -o
RAID.Integrated.1-1
Status = Ok
DeviceDescription = Integrated RAID Controller 1

22 Storage Real Time Configuration in Dell PowerEdge 13th Generation Servers
RollupStatus = Ok
Name = PERC H730 Mini (Embedded)
FirmwareVersion = 25.2.1.0037
DriverVersion = 6.600.21.08
RebuildRate = 1
BgiRate = 4
CheckConsistencyRate = 2
ReconstructRate = 3
PatrolReadRate = 30
PatrolReadMode = Manual
PatrolReadState = Stopped
CheckConsistencyMode = Stop On Error
LoadBalanceSetting = Auto
CopybackMode = ON with SMART
PreservedCache = Not Present
CacheMemorySize = 1024 MB
PersistHotspare = Disabled
SpindownUnconfiguredDrives = Disabled
SpindownHotspare = Disabled
Timeintervalforspindown = 30 (Minutes)
SecurityStatus = Encryption Capable
EncryptionMode = None
SasAddress = 0x5C81F660DEE70500
PciDeviceId = 0x5d
PciSubdeviceId = 0x1f49
PciVendorId = 0x1000
PciSubvendorId = 0x1028
PciBus = 0x0
PciDevice = 0x0

23 Storage Real Time Configuration in Dell PowerEdge 13th Generation Servers
PciFunction = 0x0
BusWidth = Unknown
SlotLength = Unknown
SlotType = Unknown
MaxCapableSpeed = 12.0 Gb/s
LearnMode = Not supported
T10PICapability = Capable
SupportRAID10UnevenSpans = Supported
SupportEnhancedAutoForeignImport = Supported
EnhancedAutoImportForeignConfig = Disabled
SupportControllerBootMode = Supported
ControllerBootMode = Continue Boot On Error
RealtimeConfigurationCapability = Capable
CurrentControllerMode = RAID
3. Run “racadm storage get vdisks –o” which should return RAID 1 that already exists.
Example RACADM Command and Output:
racadm>>storage get vdisks -o
racadm storage get vdisks -o
Disk.Virtual.0:RAID.Integrated.1-1
Status = Ok
DeviceDescription = Virtual Disk 0 on Integrated RAID Controller 1
Name = RAID ONE
RollupStatus = Ok
State = Online
OperationalState = Not applicable
Layout = Raid-1
Size = 111.25 GB
SpanDepth = 1

24 Storage Real Time Configuration in Dell PowerEdge 13th Generation Servers
AvailableProtocols = SATA
MediaType = SSD
ReadPolicy = Read Ahead
WritePolicy = Write Back
StripeSize = 64K
DiskCachePolicy = Default
BadBlocksFound = NO
Secured = NO
RemainingRedundancy = 1
EnhancedCache = Not Applicable
T10PIStatus = Disabled
BlockSizeInBytes = 512
4. Hot plug two drives into drive bays 8 and 9. Now run “racadm storage get pdisks” which will return
these drives along with the other three drives that were used to create RAID 1 with a dedicated hot
spare. Let’s now verify the drives are in “Ready” state. Take one of the drive FQDDs and run “racadm
storage get pdisks: Disk.Bay.8:Enclosure.Internal.0-1:RAID.Integrated.1-1 –p State” which should
return “State = Ready”. Make sure to repeat this command for the other drive that was hot plugged
which should also return “State = Ready”.
Example of RACADM command and output:
racadm>>racadm storage get pdisks
racadm storage get pdisks
Disk.Bay.0:Enclosure.Internal.0-1:RAID.Integrated.1-1
Disk.Bay.1:Enclosure.Internal.0-1:RAID.Integrated.1-1
Disk.Bay.2:Enclosure.Internal.0-1:RAID.Integrated.1-1
Disk.Bay.8:Enclosure.Internal.0-1:RAID.Integrated.1-1
Disk.Bay.9:Enclosure.Internal.0-1:RAID.Integrated.1-1
racadm>>racadm storage get pdisks:Disk.Bay.8:Enclosure.Internal.0-1:RAID.Integrated.1-1 -p State
racadm storage get pdisks:Disk.Bay.8:Enclosure.Internal.0-1:RAID.Integrated.1-1 -p State
Disk.Bay.8:Enclosure.Internal.0-1:RAID.Integrated.1-1

25 Storage Real Time Configuration in Dell PowerEdge 13th Generation Servers
State = Ready
racadm>>racadm storage get pdisks:Disk.Bay.9:Enclosure.Internal.0-1:RAID.Integrated.1-1 -p State
racadm storage get pdisks:Disk.Bay.9:Enclosure.Internal.0-1:RAID.Integrated.1-1 -p State
Disk.Bay.9:Enclosure.Internal.0-1:RAID.Integrated.1-1
State = Ready
5. Using the two drive FQDDs that were hot plugged, create a RAID 0 by running “racadm storage
createvd:RAID.Integrated.1-1 –rl r0 –pdkey:Disk.Bay.8:Enclosure.Internal.0-1:RAID.Integrated.1-
1,Disk.Bay.9:Enclosure.Internal.0-1:RAID.Integrated.1-1”.
RACADM Example Command and Output:
racadm>>racadm storage createvd:RAID.Integrated.1-1 -rl r0 -pdkey:Disk.Bay.8:Enclosure.Internal.0-
1:RAID.Integrated.1-1,Disk.Bay.9:Enclosure.Internal.0-1:RAID.Integrated.1-1
racadm storage createvd:RAID.Integrated.1-1 -rl r0 -pdkey:Disk.Bay.8:Enclosure.Internal.0-1:RAID.Integrated.1-
1,Disk.Bay.9:Enclosure.Internal.0-1:RAID.Integrated.1-1
STOR094 : The storage configuration operation is successfully completed
and the change is in pending state.
To apply the configuration operation immediately, create a configuration job
using the --realtime option.
To apply the configuration after restarting
the server, create a configuration job using the -r option.
To create the necessary real-time and restart jobs, run the jobqueue command.
For more information about jobqueue command, run the
'racadm help jobqueue' command.
6. In the output, you will notice it returns using “--realtime” or “–r” which means the configuration job
can be performed in real-time or a staged job creation. To run this configuration job in real-time, ,we
will be using “—realtime”. Also we want this configuration job to run immediately so we will be using
“TIME_NOW” for scheduled start time (-s). Run “racadm jobqueue create RAID.Integrated.1-1 –s
TIME_NOW –realtime” which will create a configuration job for the set pending VD. Take this job ID
and query the status which you should see as “Running”. Continue to query the job ID until you see
“Completed” status(this should take more than two minutes to show completed status).
RACADM Example Command and Output:

26 Storage Real Time Configuration in Dell PowerEdge 13th Generation Servers
racadm>>racadm jobqueue create RAID.Integrated.1-1 -s TIME_NOW --realtime
racadm jobqueue create RAID.Integrated.1-1 -s TIME_NOW --realtime
RAC1024: Successfully scheduled a job.
Verify the job status using "racadm jobqueue view -i JID_xxxxx" command.
Commit JID = JID_110005275595
racadm>>racadm jobqueue view -i JID_110005275595
racadm jobqueue view -i JID_110005275595
---------------------------- JOB -------------------------
[Job ID=JID_110005275595]
Job Name=Configure: RAID.Integrated.1-1
Status=Completed
Start Time=[Now]
Expiration Time=[Not Applicable]
Message=[PR19: Job completed successfully.]
Percent Complete=[100]
----------------------------------------------------------
7. Using the configuration job ID, run “racadm lclog viewconfigresult –j JID_110005275595” to validate
the configuration results.
RACADM Example Command and Output:
racadm>>racadm lclog viewconfigresult -j JID_110005275595
racadm lclog viewconfigresult -j JID_110005275595
SeqNumber = 12592
FQDD = RAID.Integrated.1-1
DisplayValue = Virtual Disk 1
Name = Virtual Disk 1
Status = Success

27 Storage Real Time Configuration in Dell PowerEdge 13th Generation Servers
8. Run “racadm storage get vdisks –o” which should now return RAID 1 along with newly created RAID
0”.
RACADM Example Command and Output:
racadm>>storage get vdisks -o
racadm storage get vdisks -o
Disk.Virtual.0:RAID.Integrated.1-1
Status = Ok
DeviceDescription = Virtual Disk 0 on Integrated RAID Controller 1
Name = RAID ONE
RollupStatus = Ok
State = Online
OperationalState = Not applicable
Layout = Raid-1
Size = 111.25 GB
SpanDepth = 1
AvailableProtocols = SATA
MediaType = SSD
ReadPolicy = Read Ahead
WritePolicy = Write Back
StripeSize = 64K
DiskCachePolicy = Default
BadBlocksFound = NO
Secured = NO
RemainingRedundancy = 1
EnhancedCache = Not Applicable
T10PIStatus = Disabled
BlockSizeInBytes = 512
Disk.Virtual.1:RAID.Integrated.1-1

28 Storage Real Time Configuration in Dell PowerEdge 13th Generation Servers
Status = Ok
DeviceDescription = Virtual Disk 1 on Integrated RAID Controller 1
Name = Virtual Disk 1
RollupStatus = Ok
State = Online
OperationalState = Not applicable
Layout = Raid-0
Size = 222.50 GB
SpanDepth = 1
AvailableProtocols = SATA
MediaType = SSD
ReadPolicy = No Read Ahead
WritePolicy = Write Through
StripeSize = 64K
DiskCachePolicy = Enabled
BadBlocksFound = NO
Secured = NO
RemainingRedundancy = 0
EnhancedCache = Not Applicable
T10PIStatus = Disabled
BlockSizeInBytes = 512
9. Finally, check disk management which should now display the new disk (disk 2) that was just created.
Screenshot Example:

29 Storage Real Time Configuration in Dell PowerEdge 13th Generation Servers
2.3 Use iDRAC GUI to Delete One VirtualDisk and
Assign Dedicated HotSpare to Existing VirtualDisk
Use Case: My server configuration is: PowerEdge R630 with PERC H730 Mini with two virtual disks already
created. RAID 1 using drives 0 and 1 with Windows operating system installed. RAID 0 using drives 2, 8 and
9 which are being used to store data. I want to assign a dedicated hot spare to RAID 1 but I don’t have any
extra available drives. I no longer need the RAID 0 for storing data so I can delete it, then use one of the
drives to assign as a dedicated hot spare for RAID 1. The issue is I can’t power down the server because the
OS is running HyperV and multiple virtual machines are running and being used.
Solution: To solve this issue, use the iDRAC GUI interface to delete RAID 0 VD and assign a dedicated hot
spare in real-time without a host reboot.
1. Verify disk management in the operating system, disk 0 is the VD with OS installed, disk 2 is the disk
used for storing data.
OS Screenshot Example:

30 Storage Real Time Configuration in Dell PowerEdge 13th Generation Servers
2. Launch the iDRAC GUI using any browser, go to Storage / Virtual Disks / Properties Tab which should
show both RAID 0 and RAID 1.
iDRAC GUI Example:

31 Storage Real Time Configuration in Dell PowerEdge 13th Generation Servers
3. Go to Storage / Virtual Disks / Manage Tab and for RAID 0, from the “Virtual Disk Actions” drop down
box, select “Delete” which will prompt you with a system alert pop-up message warning you that this
will delete the VD. Select “Ok” to continue (image 1). Next select “Add to Pending Operations” from the
“Apply Operations Mode” drop down box and click the “Apply” button (image 2). You will be prompted
with an information pop-up message stating this will be added to pending opertaions. Select the
“Pending Operations” button (image 3). It will now display another information pop-up message
showing the pending operations that have been set so far (Delete Virtual Disk); select “Close” button
(image 4).
iDRAC GUI Examples(images 1 through 4):

32 Storage Real Time Configuration in Dell PowerEdge 13th Generation Servers
33 Storage Real Time Configuration in Dell PowerEdge 13th Generation Servers
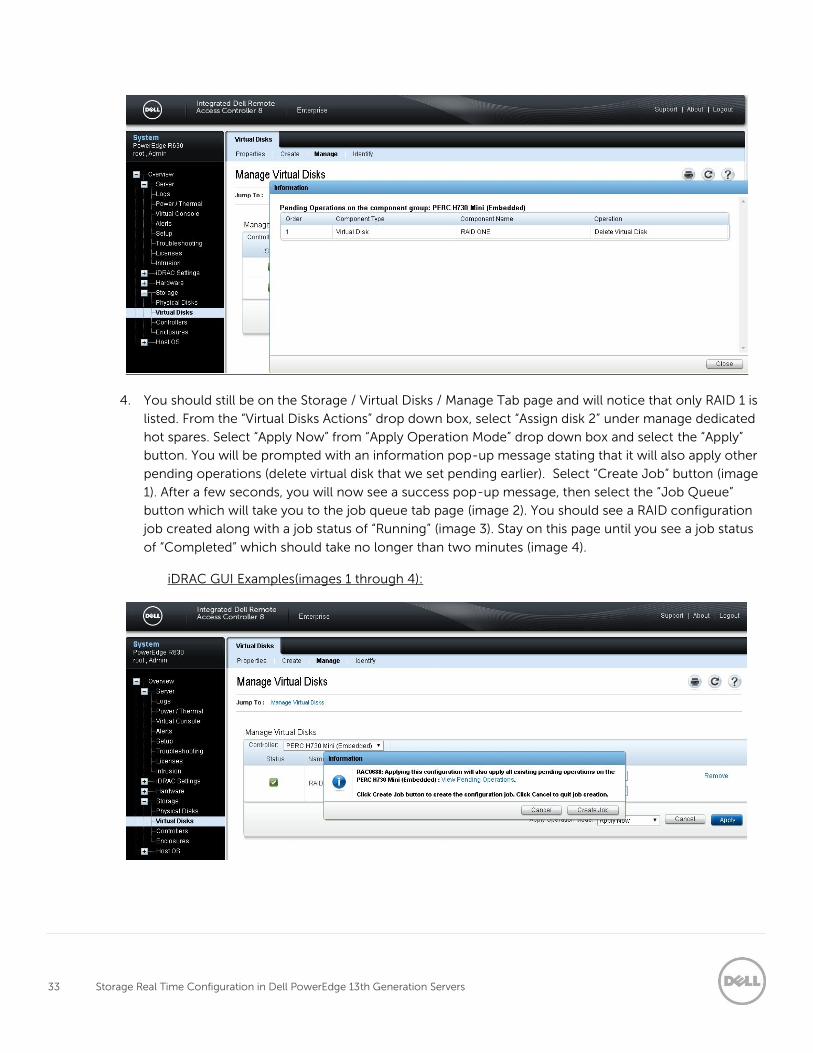
4. You should still be on the Storage / Virtual Disks / Manage Tab page and will notice that only RAID 1 is
listed. From the “Virtual Disks Actions” drop down box, select “Assign disk 2” under manage dedicated
hot spares. Select “Apply Now” from “Apply Operation Mode” drop down box and select the “Apply”
button. You will be prompted with an information pop-up message stating that it will also apply other
pending operations (delete virtual disk that we set pending earlier). Select “Create Job” button (image
1). After a few seconds, you will now see a success pop-up message, then select the “Job Queue”
button which will take you to the job queue tab page (image 2). You should see a RAID configuration
job created along with a job status of “Running” (image 3). Stay on this page until you see a job status
of “Completed” which should take no longer than two minutes (image 4).
iDRAC GUI Examples(images 1 through 4):

34 Storage Real Time Configuration in Dell PowerEdge 13th Generation Servers
5. Go to Storage / Virtual Disks / Properties Tab and for RAID 1, expand the VD to see detailed
information (image 1). Select “View Physical Disks” which will take you to Storage / Physical Disks /
Properties tab. You should see disk 0 and 1 as “Online” and disk 2 as “Ready” and Hot Spare as
“Dedicated” (image 2).

35 Storage Real Time Configuration in Dell PowerEdge 13th Generation Servers
iDRAC GUI Examples(images 1 and 2):
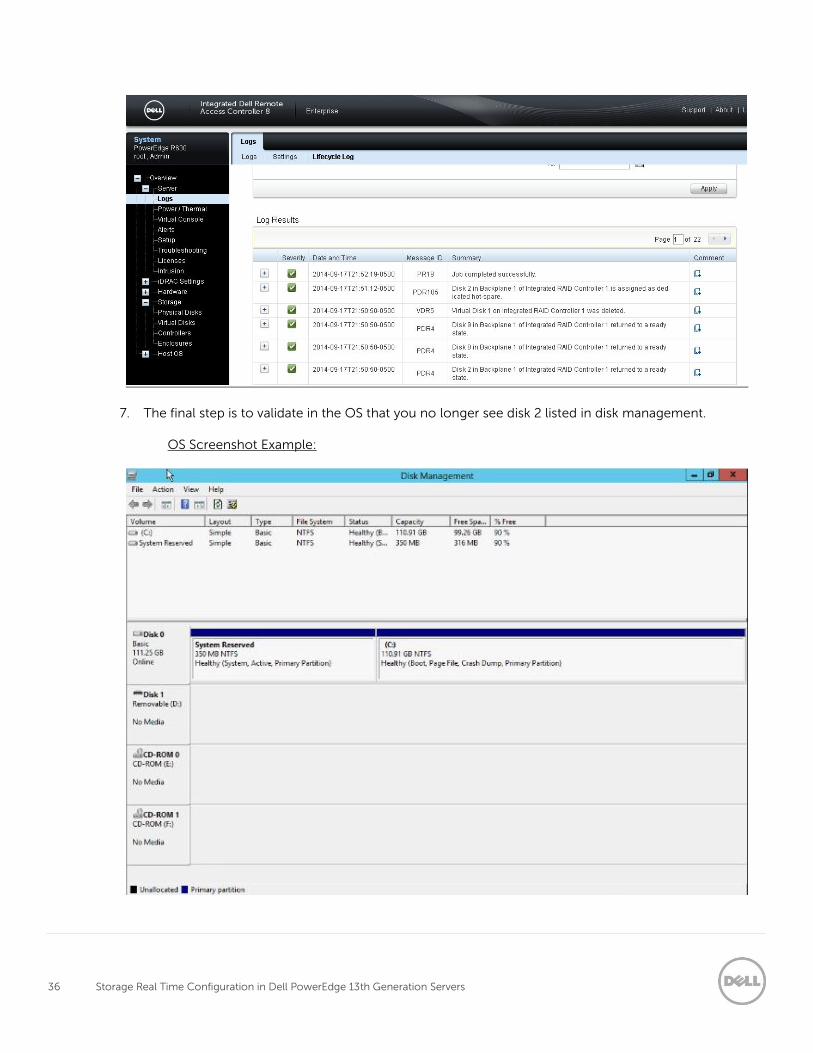
6. Validate the Lifecycle logs for the configuration changes just applied. Go to Logs / Lifecycle Log which
should show entries for drives ready, delete virtual disk, assign dedicated hot spare and job ID
completed successfully.
iDRAC GUI Example:
36 Storage Real Time Configuration in Dell PowerEdge 13th Generation Servers
7. The final step is to validate in the OS that you no longer see disk 2 listed in disk management.
OS Screenshot Example:

37 Storage Real Time Configuration in Dell PowerEdge 13th Generation Servers