Embed Size (px)
Citation preview
www.Lohmann-Rauscher.com.au
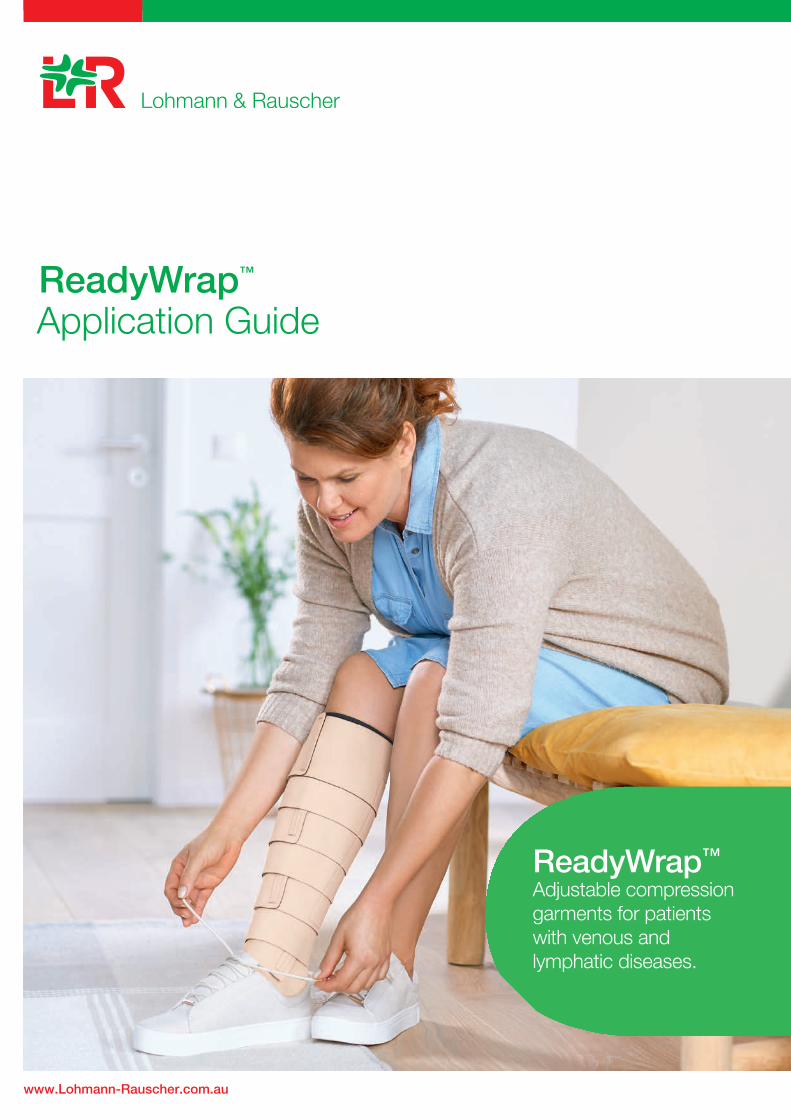
ReadyWrap™ Application Guide
ReadyWrap™ Adjustable compression garments for patients with venous and lymphatic diseases.

Thank you for choosing ReadyWrap™
ReadyWrap is a low-stretch adjustable compression wrap designed for self-management of indicated conditions.
Care InstructionsWashing■ Hand wash in warm water with mild detergent■ Rinse thoroughly in warm water■ Do not use fabric softener or bleach■ Do not dry clean
Drying■ Lay on a towel and squeeze your ReadyWrap to remove excess water■ Be sure that the VELCRO® brand fasteners do not contact your towel■ Lay flat on a dry towel to finish drying■ Do not iron
Application of Lower Limb ReadyWrap garments Many prefer to apply their lower extremity ReadyWrap garment whilst sitting in a chair or standing, particularly if the garments are being applied by a clinician or carer. Another option is to apply your garments while ‘long’ sitting (with legs stretched out in front). If applying full leg coverage, please fit the ReadyWrap Knee garment last so that it can easily be adjusted.
We encourage you to find a method which works best for you.
ReadyWrap Liner For comfort and protection each ReadyWrap lower limb garment (excluding ReadyWrap Toe) is supplied with a ReadyWrap Liner. ReadyWrap Liners;
■ are designed to be used under ReadyWrap garments to protect the skinand for patient comfort
■ provide no therapeutic compression.
Instructions For Use (IFU) Please refer to the IFU leaflet included with all ReadyWrap garments for full instructions, including indications, intended uses, precautions, care and warranty information.
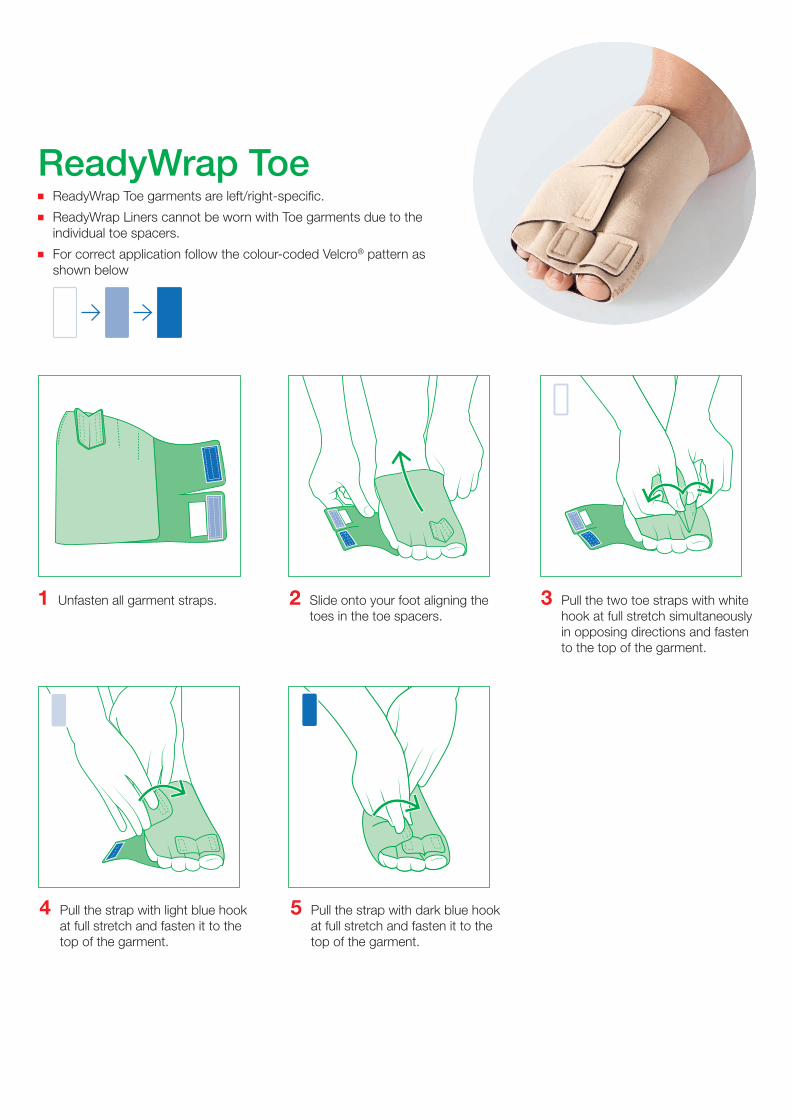
ReadyWrap Toe■ ReadyWrap Toe garments are left/right-specific.
■ ReadyWrap Liners cannot be worn with Toe garments due to the individual toe spacers.
■ For correct application follow the colour-coded Velcro® pattern as shown below
1 Unfasten all garment straps. 2 Slide onto your foot aligning the toes in the toe spacers.
3 Pull the two toe straps with white hook at full stretch simultaneously in opposing directions and fasten to the top of the garment.
4 Pull the strap with light blue hook at full stretch and fasten it to the top of the garment.
5 Pull the strap with dark blue hook at full stretch and fasten it to the top of the garment.

ReadyWrap Foot■ ReadyWrap Foot garments are left/right-specific.
■ For correct application follow the colour-coded Velcro® pattern as shown below
B
A
C
D
1 Slide the ReadyWrap Liner onto your leg.
2 Unfasten all garment straps. 3 Align the garment onto your foot so the strap with white hook is nearest to toes and the strap with light blue hook is at your ankle.
B
A
C
D
B
A
C
D
B
A
C
D
B
A
C
D
4 Place heel into the heel opening. (Garment tag should be above your heel on the garment’s exterior.)
5 Place the strap closest to toes without the hook A against the top of your foot. While holding that strap down, pull the opposite strap with white hook B over top at full stretch and fasten to the top of the garment.
6 Place the ankle strap without the hook C against your ankle. While holding that strap down, pull the strap with light blue hook D over top at full stretch and fasten to the top of the garment.
B
A
C
D
B
A
C
D
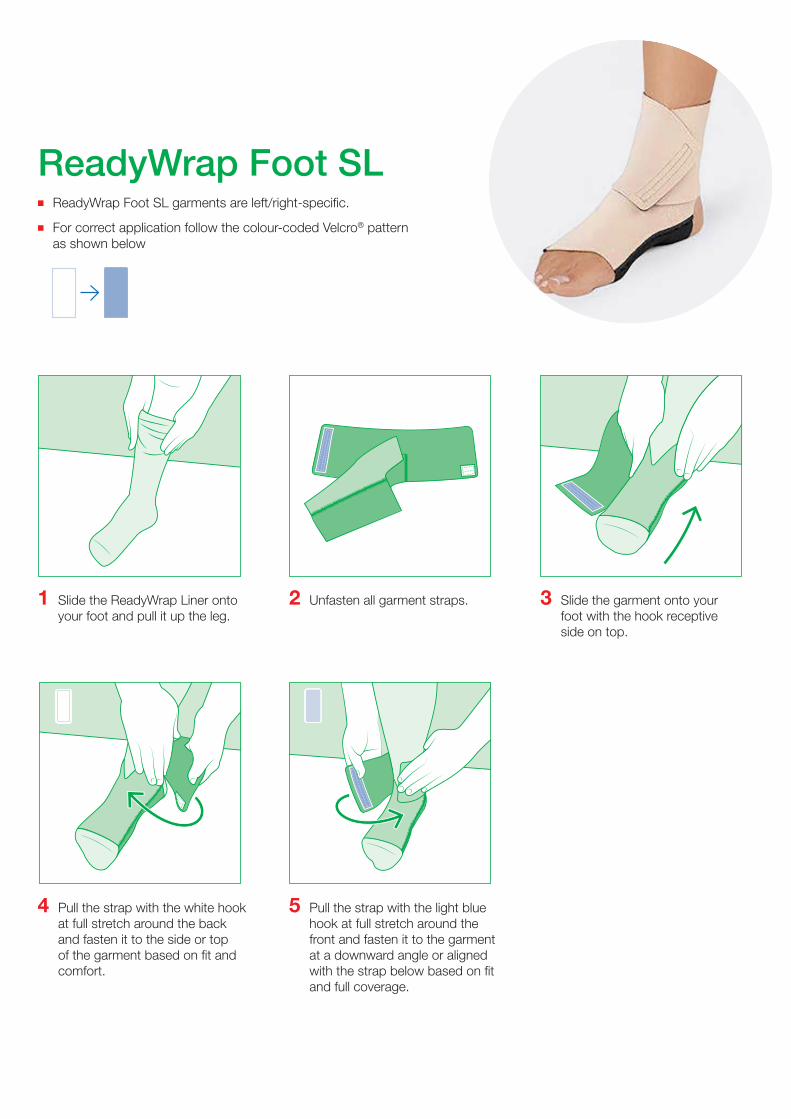
ReadyWrap Foot SL■ ReadyWrap Foot SL garments are left/right-specific.
■ For correct application follow the colour-coded Velcro® pattern as shown below
1 Slide the ReadyWrap Liner onto your foot and pull it up the leg.
2 Unfasten all garment straps. 3 Slide the garment onto your foot with the hook receptive side on top.
4 Pull the strap with the white hook at full stretch around the back and fasten it to the side or top of the garment based on fit and comfort.
5 Pull the strap with the light blue hook at full stretch around the front and fasten it to the garment at a downward angle or aligned with the strap below based on fit and full coverage.
B
A
C
D
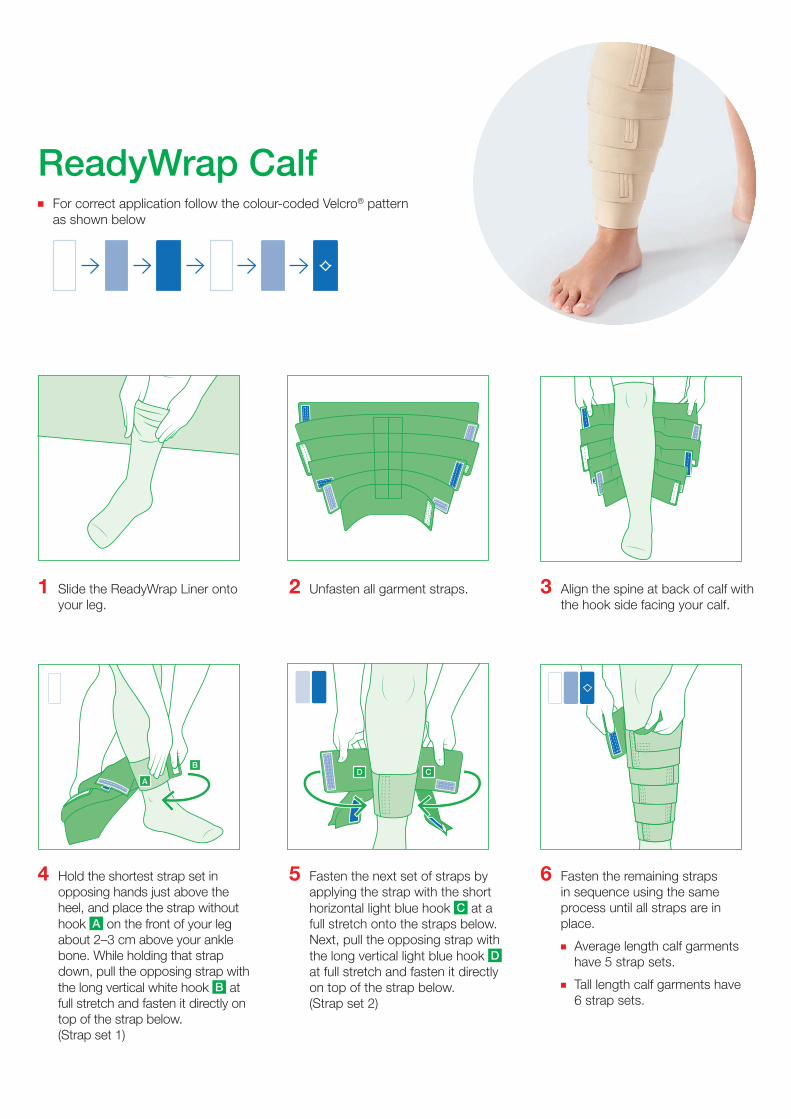
ReadyWrap Calf■ For correct application follow the colour-coded Velcro® pattern
as shown below
A
B
CD
1 Slide the ReadyWrap Liner onto your leg.
2 Unfasten all garment straps. 3 Align the spine at back of calf with the hook side facing your calf.
A
B
CD
A
B
CD
A
B
CD
A
B
CD
4 Hold the shortest strap set in opposing hands just above the heel, and place the strap without hook A on the front of your leg about 2–3 cm above your ankle bone. While holding that strap down, pull the opposing strap with the long vertical white hook B at full stretch and fasten it directly on top of the strap below. (Strap set 1)
5 Fasten the next set of straps by applying the strap with the short horizontal light blue hook C at a full stretch onto the straps below. Next, pull the opposing strap with the long vertical light blue hook D at full stretch and fasten it directly on top of the strap below. (Strap set 2)
6 Fasten the remaining straps in sequence using the same process until all straps are in place.
■ Average length calf garments have 5 strap sets.
■ Tall length calf garments have 6 strap sets.
A
B
CD
A
B
CD

ReadyWrap Thigh■ For correct application follow the colour-coded Velcro® pattern
as shown below
AB
CD
1 Slide the ReadyWrap Liner onto your leg.
2 Unfasten all garment straps. 3 Align the spine on the back of the thigh with the hook side facing your thigh.
AB
CD
AB
CD
AB
CD
AB
CD
4 Hold the shortest set of straps in opposing hands just above the knee and place the strap without hook A on the front of your thigh about 5 cm above your knee. While holding that strap down, pull the opposing strap with the white hook B at full stretch and fasten it directly on top of the strap below.
5 Fasten the next set of straps by applying the strap with the short horizontal light blue hook C at full stretch onto the straps below. Next, pull the opposing strap with the long vertical light blue hook D at full stretch and fasten it directly on top of the strap below.
6 Fasten the remaining straps in sequence using the same process until all straps are in place. Fasten the final narrow straps in either order based on thigh shape and preference:■ For “Straight-Shape” thighs, fasten
them on top using same process as above.
■ For “V-Shape” thighs, fasten them in a “V” or “cross” design.
■ Average length thigh garments have 5 strap sets. Tall length thigh garments have 6 strap sets.
AB
CD
AB
CD
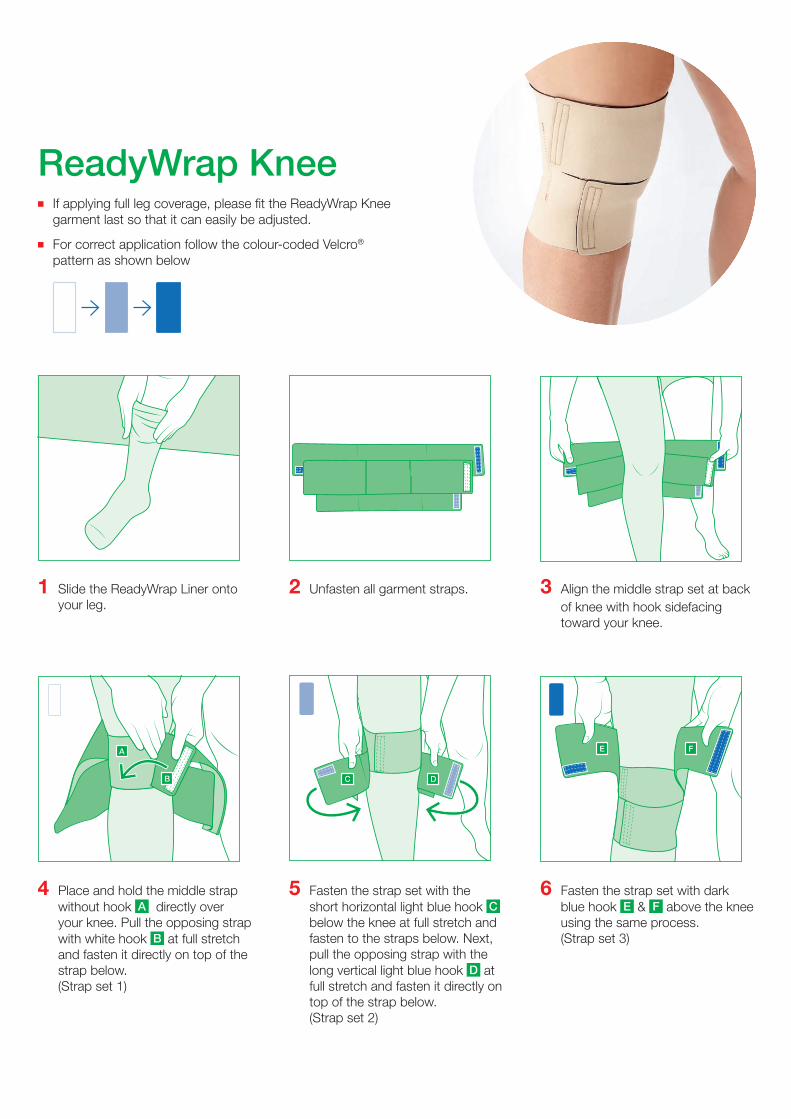
ReadyWrap Knee■ If applying full leg coverage, please fit the ReadyWrap Knee
garment last so that it can easily be adjusted.
■ For correct application follow the colour-coded Velcro® pattern as shown below
A
B
C
E
D
F
1 Slide the ReadyWrap Liner onto your leg.
2 Unfasten all garment straps. 3 Align the middle strap set at back of knee with hook sidefacing toward your knee.
A
B
C
E
D
F
A
B
C
E
D
F
A
B
C
E
D
F
A
B
C
E
D
F
4 Place and hold the middle strap without hook A directly over your knee. Pull the opposing strap with white hook B at full stretch and fasten it directly on top of the strap below. (Strap set 1)
5 Fasten the strap set with the short horizontal light blue hook C below the knee at full stretch and fasten to the straps below. Next, pull the opposing strap with the long vertical light blue hook D at full stretch and fasten it directly on top of the strap below. (Strap set 2)
6 Fasten the strap set with dark blue hook E & F above the knee using the same process. (Strap set 3)
A
B
C
E
D
F
A
B
C
E
D
F

ReadyWrap Gauntlet■ ReadyWrap Gauntlet garments are left/right-specific.
■ When applying in combination with ReadyWrap Arm, apply the arm garment first.
■ For correct application follow the colour-coded Velcro® pattern as shown below
1 Unfasten all garment straps. 2 Slide your hand into the gauntlet with your thumb in thumb space and palm facing away from the garment.
3 Fasten the small thumb strap with white hook.
4 Fasten the small strap with the white hook on the palm of the hand to close the garment.
5 Pull the strap with the light blue hook at full stretch ensuring it is aligned with the opposing side of the gauntlet and fasten it on the garment.
6 Pull the strap with the dark blue hook at full stretch and fasten it on the garment.
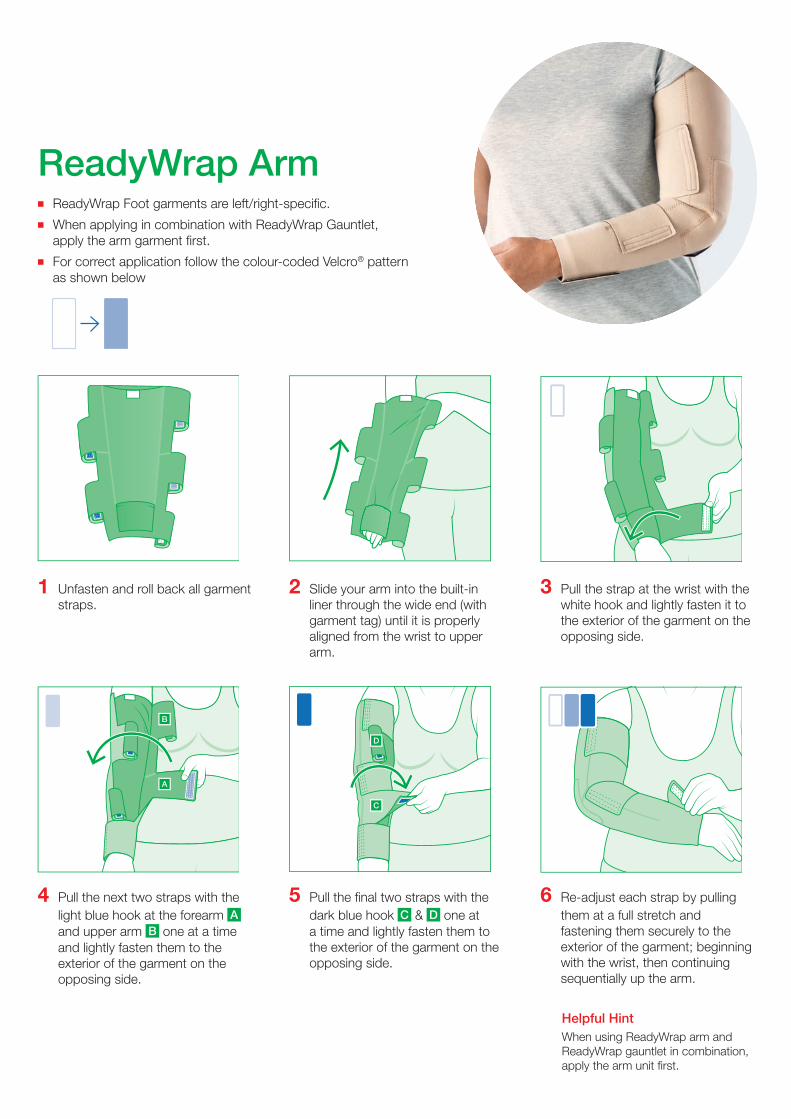
ReadyWrap Arm■ ReadyWrap Foot garments are left/right-specific.
■ When applying in combination with ReadyWrap Gauntlet, apply the arm garment first.
■ For correct application follow the colour-coded Velcro® pattern as shown below
A
C
B
D
1 Unfasten and roll back all garment straps.
2 Slide your arm into the built-in liner through the wide end (with garment tag) until it is properly aligned from the wrist to upper arm.
3 Pull the strap at the wrist with the white hook and lightly fasten it to the exterior of the garment on the opposing side.
A
C
B
D
A
C
B
D
A
C
B
D
A
C
B
D
4 Pull the next two straps with the light blue hook at the forearm A and upper arm B one at a time and lightly fasten them to the exterior of the garment on the opposing side.
5 Pull the final two straps with the dark blue hook C & D one at a time and lightly fasten them to the exterior of the garment on the opposing side.
6 Re-adjust each strap by pulling them at a full stretch and fastening them securely to the exterior of the garment; beginning with the wrist, then continuing sequentially up the arm.
A
C
B
D
B
A
C
D
Helpful HintWhen using ReadyWrap arm and ReadyWrap gauntlet in combination, apply the arm unit first.
Lohmann & Rauscher Pty Ltd · 321 Ferntree Gully Road · Mount Waverley, Victoria 3149, Australia · Customer Service: 1300 572 869
Lohmann & Rauscher Limited · 21 Queen Street · Auckland 1010 · New Zealand · Customer Service: 0800 572 869
LR02
07 0
420
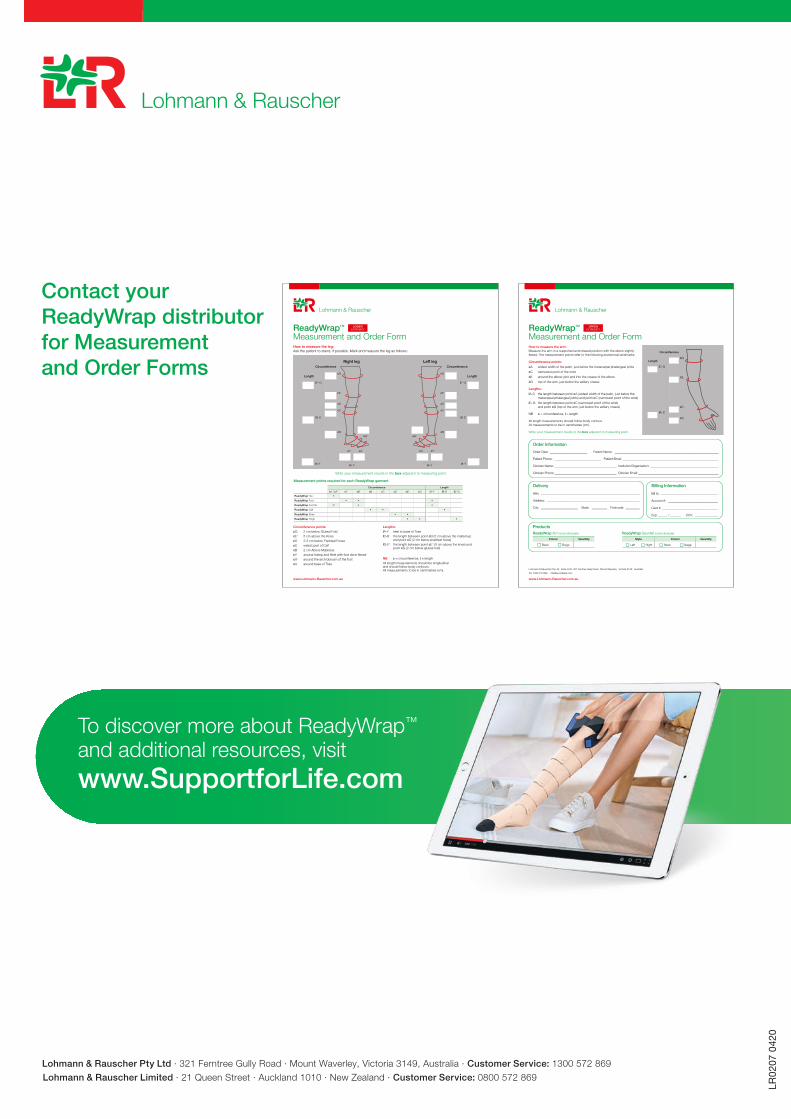
To discover more about ReadyWrap™ and additional resources, visit www.SupportforLife.com
Contact your ReadyWrap distributor for Measurement and Order Forms
Products
Colour Quantity
Black Beige
ReadyWrap Arm (sold individually)
Style Colour Quantity
Left Right Black Beige
ReadyWrap Gauntlet (sold individually)
Lohmann & Rauscher Pty Ltd. Suite G.03, 321 Ferntree Gully Road, Mount Waverley Victoria 3149 Australia
Tel: 1300 572 869 [email protected]
LR01
88a
0220
www.Lohmann-Rauscher.com.au
ReadyWrapTM Measurement and Order Form
UPPEREXTREMITY
ReadyWrap™
Measuring the upper limb.
How to measure the arm:Measure the arm in a supported and relaxed position with the elbow slightly flexed. The measurement points refer to the following anatomical landmarks:
Circumference points: cA widest width of the Palm, just below the
metacarpal phalangeal jointscC narrowest point of the WristcE around the Elbow joint and into the crease
of the elbowcG top of the Arm, just below the axillary crease
Lengths:lA-C the length between point cA (widest width
of the palm, just below the metacarpal phalangeal joints) and point cC (narrowest point of the wrist)
lC-G the length between point cC (narrowest point of the wrist) and point cG (top of the arm, just below the axillary crease)
NB c = circumference, l = length All length measurements should follow body contour.All measurements to be in centimetres.
Write your measurement results inthe box adjacent to measuring point
Length
Circumference
cG
lC-G
lA-C
cE
cC
cA
Delivery: to orderer directly to patient
Client no.
Sender
Phone
Date of Measurement
Your reference or that of your patient’s: Ms. Mr.
Name / Last Name
Street
Postal Code / Place
Phone
Order Date
Order Information
Order Date: ________________________ Patient Name: ___________________________________________________________________
Patient Phone: ______________________________ Patient Email: ______________________________________________________________
Clinician Name: ________________________________________ Institution/Organisation: ____________________________________________
Clinician Phone: ________________________________________ Clinician Email: ____________________________________________________
How to measure the arm:Measure the arm in a supported and relaxed position with the elbow slightly flexed. The measurement points refer to the following anatomical landmarks:
Circumference points:
cA widest width of the palm, just below the metacarpal phalangeal joints
cC narrowest point of the wrist
cE around the elbow joint and into the crease of the elbow
cG top of the arm, just below the axillary crease
Lengths:
lA-C the length between point cA (widest width of the palm, just below the metacarpal phalangeal joints) and point cC (narrowest point of the wrist)
lC-G the length between point cC (narrowest point of the wrist) and point cG (top of the arm, just below the axillary crease)
NB c = circumference, l = length
All length measurements should follow body contour. All measurements to be in centimetres (cm).
Write your measurement results in the box adjacent to measuring point
Billing Information
Bill to: _____________________________________
Account #: ________________________________
Card #: ____________________________________
Exp: ______ / _______ CCV: _______________
Delivery
Attn: ________________________________________________________________
Address: ____________________________________________________________
City: ________________________ State: __________ Postcode: _________
Submit completed order form to Cosmac Healthcare. Email: [email protected] Phone: 1300 723 092
www.Lohmann-Rauscher.com.au
ReadyWrapTM Measurement and Order Form
LOWEREXTREMITY
ReadyWrap™
Measuring the lower limb.
Circumference points: cG 2 cm below Gluteal Fold cE1 5 cm above the KneecD 2-3 cm below Popliteal Fossa cC widest part of Calf cB 2 cm Above Malleolus cY around Instep and Heel with
foot dorsi-flexedcA around base of Toes
Lengths:lA-Y heel to base of Toes lB-D the length between point cB
(2 cm above the malleolus) and point cD (2 cm below popliteal fossa)
IE1-G the length between point cE1 (5 cm above the knee) and point cG (2 cm below gluteal fold)
NB c = circumference, l = lengthAll length measurements should be longitudinal and should follow body contours. All measurements to be in centi metres.
Right leg
Length
Circumference
lA-Y
cG
lE1-G
lB-D
lA-Y
cE1
cD
cC
cB
cY cA
cA1
Left leg
Length
Circumference
lA-Y
cG
lE1-G
lB-D
lA-Y
cE1
cD
cC
cB
cYcA
How to measure the leg: Ask the patient to stand, if possible. Mark and measure the leg as follows
Write your measurement results inthe box adjacent to measuring point
Delivery: to orderer directly to patient
Client no.
Sender
Phone
Date of Measurement
Your reference or that of your patient’s: Ms. Mr.
Name / Last Name
Street
Postal Code / Place
Phone
Order Date
cA1
Circumference points:cG 2 cm below Gluteal FoldcE1 5 cm above the KneecD 2-3 cm below Popliteal FossacC widest part of CalfcB 2 cm Above MalleoluscY around Instep and Heel with foot dorsi-flexedcA1 around the arch/dorsum of the foot cA around base of Toes
How to measure the leg:Ask the patient to stand, if possible. Mark and measure the leg as follows:
Write your measurement results in the box adjacent to measuring point
NB c = circumference, l = lengthAll length measurements should be longitudinal and should follow body contours. All measurements to be in centimetres (cm).
Lengths:lA-Y heel to base of ToeslD-B the length between point cB (2 cm above the malleolus)
and point cD (2 cm below popliteal fossa)IG-E1 the length between point cE1 (5 cm above the knee) and
point cG (2 cm below gluteal fold)
Measurement points required for each ReadyWrap garment
Circumference Length
cA / cA1* cY cB cB cC cD cE1 cG lA-Y lB-D lE1-G
ReadyWrap Toe •
ReadyWrap Foot • • •
ReadyWrap Foot SL •* • •
ReadyWrap Calf • • •
ReadyWrap Knee • •
ReadyWrap Thigh • • •