Embed Size (px)
Citation preview
" " REACHINSTALLATION INSTRUCTIONS
3/4.83/4.8L SKIRTED VITREOUS CHINA ONE-PIECE TOILET
S-TRAP 305mm K-3983T/K-3983T-SS-TRAP 400mm K-4012T/K-4012T-S
, 2013
Copyright Kohler China Ltd., 2013
�
�
�
Please read these instructions carefully to familiarizeyourself with the required tools, materials, and installationsequences. Follow the sections that pertain to yourparticular installation. This will help you avoid costlymistakes. In addition to proper installation, read alloperating and safety instructions.
All information in these instructions is based upon thelatest product information available at the time ofpublication. Kohler China reserves the right to makechanges in product characteristics, packaging, oravailability at any time without notice.
These instructions contain important care, cleaning, andwarranty information -
.please leave instructions for the
consumer
�
�
� -
ORDERING INFORMATION
.....................K-3983T
Includes
..................................K-4088T
..................K-3983T-S
Includes
..................................K-4087T
.....................K-4012T
Includes
..................................K-4088T
..................K-4012T-S
Includes
..................................K-4087T
REACH 3/4.8L One-piece Toilet 305mm
REACH 3/4.8L One-piece Toilet 305mm
REACH 3/4.8L One-piece Toilet 400mm
REACH 3/4.8L One-piece Toilet 400mm
REACH
REACH Quiet-Close
REACH
REACH Quiet-Close
Toilet Seat
(Hidden Hinge Base)
Toilet Seat
(Hidden Hinge Base)
Toilet Seat
(Hidden Hinge Base)
Toilet Seat
(Hidden Hinge Base)
3/4.8 305mm ...................................K-3983T
.............................................................K-4088T
3/4.8 305mm ................................K-3983T-S
.............................................................K-4087T
3/4.8 400mm....................................K-4012T
.............................................................K-4088T
3/4.8 400mm ................................K-4012T-S
.............................................................K-4087T
( )
( )
( )
( )
NOTES
�
�
�
�
�
�
�
�
Observe all local plumbing and building codes.Shut off the water supply.Seat post holes are on 140mm centers.Ensure that the new drain has the correct roughing-indimension. This toilet has a 305/400mm roughing-indimension. .Closet flange must be 305/400mm on-center from wall.Carefully inspect the new fixture for any sign of damage.For new construction, refer to the dimensions in
for locating the shut-off valve.Fixture dimensions are nominal and conform to tolerancesestablished by ASME Standards (A112.19.2-2008).
See Roughing-in
installation step
�
�
�
�
�
�
�
�
140mm
305/400mm( )
305/400mm
ASME (A112.19.2-2008)
WARNING: Risk of personal injury or productdamage
WARNING: Risk of external leakage
: Handle vitreous china products very carefully.Vitreous china can break and chip if you overtightenbolts and nuts.
. The fill valvenut has been factory-tightened to design specifications.If re-tightening is required, wrench tighten one turnpast finger tight .
-1-1203790-T01-A
-2-
TOOLS AND MATERIALS REQUIRED (Not
supplied)
�
�
�
�
�
�
�
�
�
�
�
254mm (10") adjustable wrench
305mm (12") pipe wrench
Metal file (file cut)
Tape measure
Tubing cutter
Level
Hacksaw
Putty knife
Screwdriver
Toilet gasket (wax seal)
Toilet supply shut-off valve, 10mm(3/8 ) recommended
If the existing toilet does not have a supply shut-off
valve below the tank, install one before installing the new
toilet.
"
NOTICE:
�
�
�
�
�
�
�
�
�
�
�
254mm
305mm
10mm
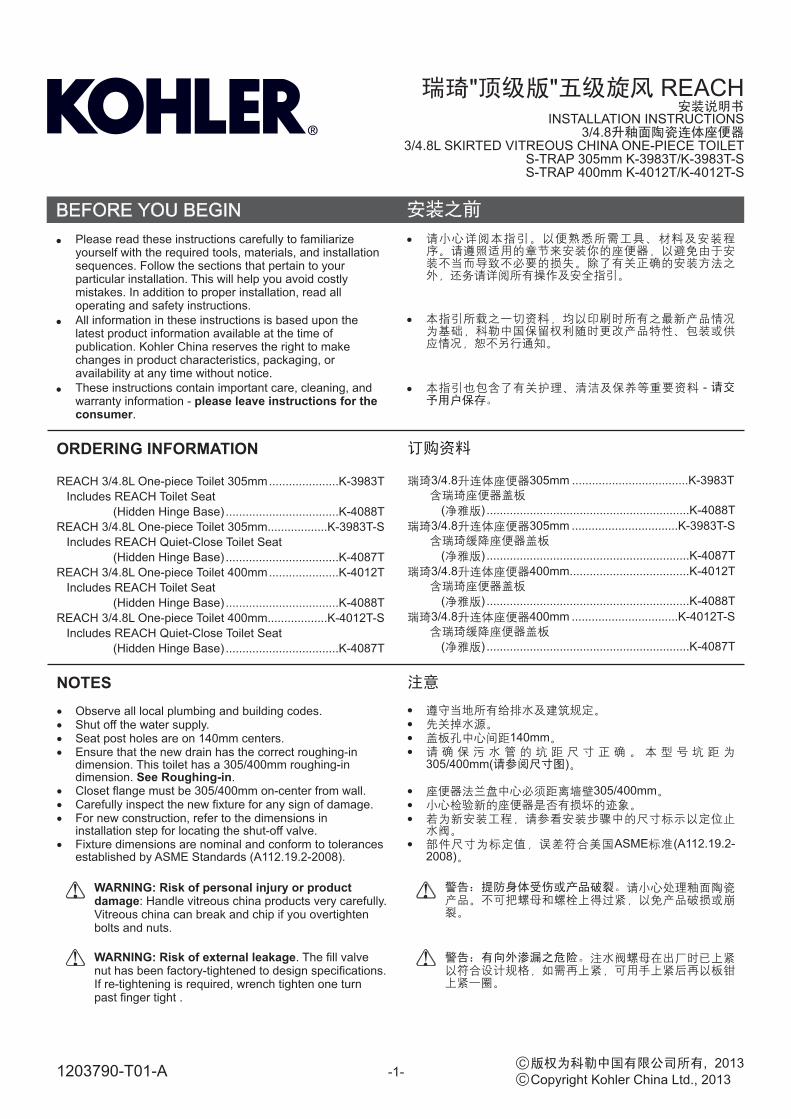
Unit: mm:
Reference Value
K-3983T/K-3983T-S
FRONT OF BOWL
OF OUTLETCL305
Finished Wall
Supply
366
724
361
394
200
160
722
340
275
1203790-T01-A
-3-
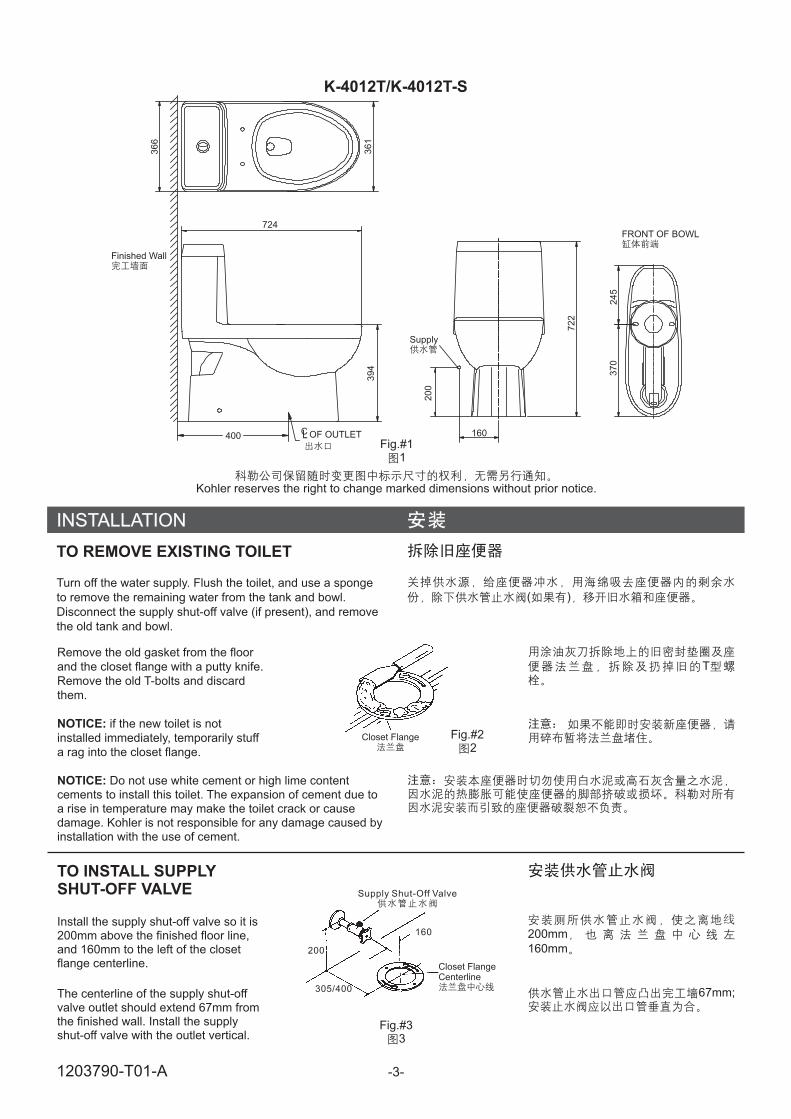
TO REMOVE EXISTING TOILET
Turn off the water supply. Flush the toilet, and use a sponge
to remove the remaining water from the tank and bowl.
Disconnect the supply shut-off valve (if present), and remove
the old tank and bowl.
( )
Fig.#11
INSTALLATION
K-4012T/K-4012T-S
Kohler reserves the right to change marked dimensions without prior notice.
Fig.#22
Remove the old gasket from the floor
and the closet flange with a putty knife.
Remove the old T-bolts and discard
them.
if the new toilet is not
installed immediately, temporarily stuff
a rag into the closet flange.
NOTICE:
T
NOTICE: Do not use white cement or high lime contentcements to install this toilet. The expansion of cement due toa rise in temperature may make the toilet crack or causedamage. Kohler is not responsible for any damage caused byinstallation with the use of cement.
Closet Flange
mm
67mm;
200mm
160
Fig.#33
TO INSTALL SUPPLYSHUT-OFF VALVE
Install the supply shut-off valve so it is200mm above the finished floor line,and 160mm to the left of the closetflange centerline.
The centerline of the supply shut-offvalve outlet should extend 67mm fromthe finished wall. Install the supplyshut-off valve with the outlet vertical.
Supply Shut-Off Valve
Closet FlangeCenterline
160
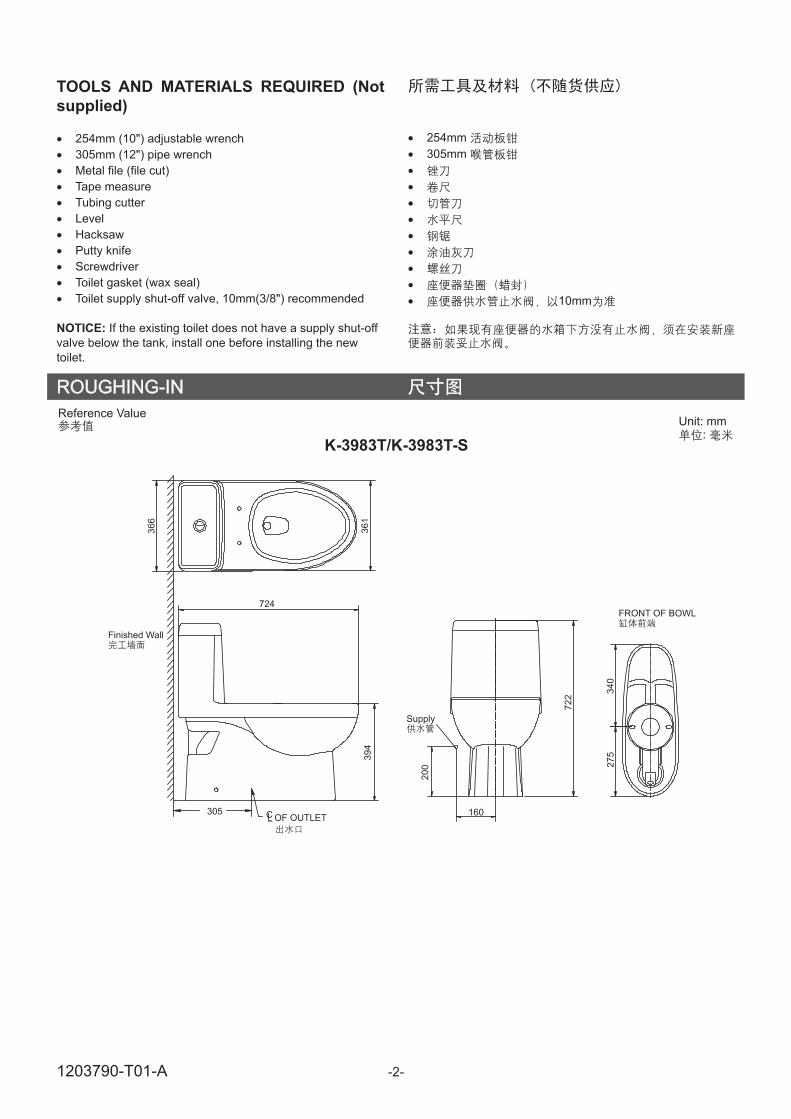
305/400
200
OF OUTLETCL400
FRONT OF BOWL
Finished Wall
Supply
366
724
361
394
200
160
722
245
370
1203790-T01-A
-4-
10mm
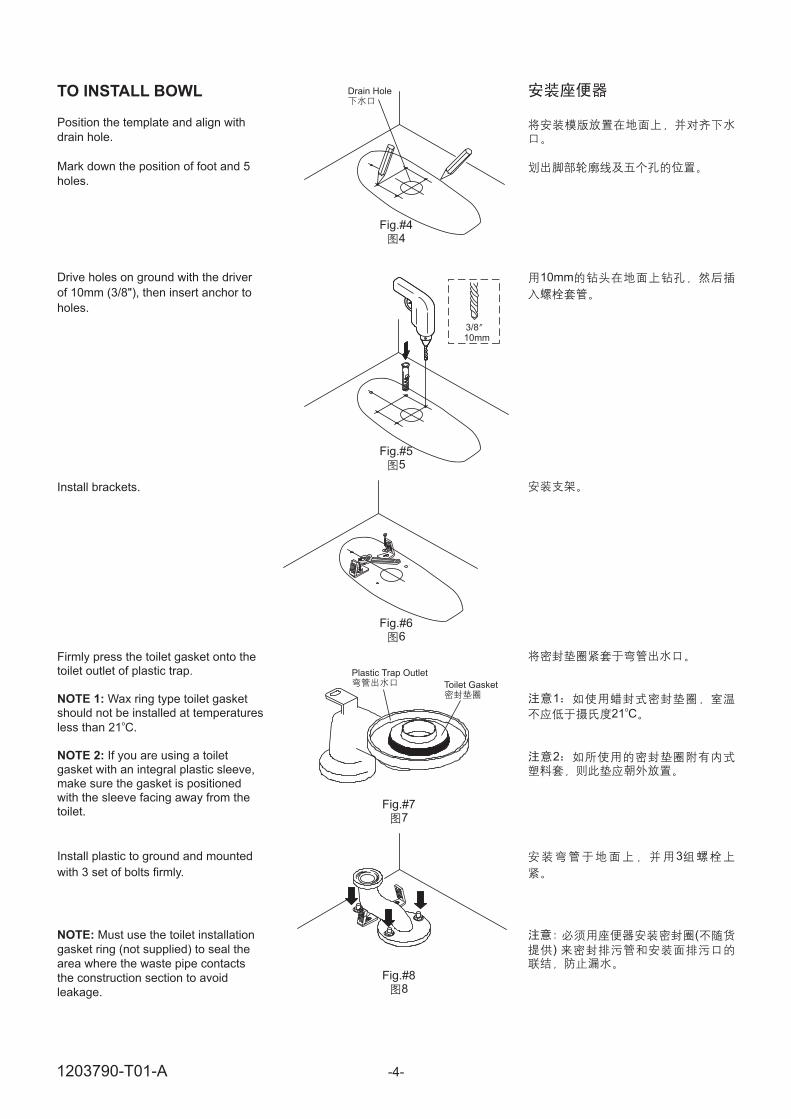
TO INSTALL BOWL
Position the template and align with
drain hole.
Mark down the position of foot and 5
holes.
Drive holes on ground with the driver
of 10mm (3/8"), then insert anchor to
holes.
Fig.#77
Firmly press the toilet gasket onto thetoilet outlet of plastic trap.
Wax ring type toilet gasketshould not be installed at temperatures
less than 21 C.
If you are using a toiletgasket with an integral plastic sleeve,make sure the gasket is positionedwith the sleeve facing away from thetoilet.
NOTE 1:
NOTE 2:
o
1
21
2
oC
Install brackets.
Plastic Trap Outlet
Toilet Gasket
Fig.#88
Install plastic to ground and mounted
with 3 set of bolts firmly.
3
NOTE: Must use the toilet installation
gasket ring (not supplied) to seal the
area where the waste pipe contacts
the construction section to avoid
leakage.
(
)
Fig.#44
Fig.#55
Drain Hole
3/810mm
Fig.#66
1203790-T01-A
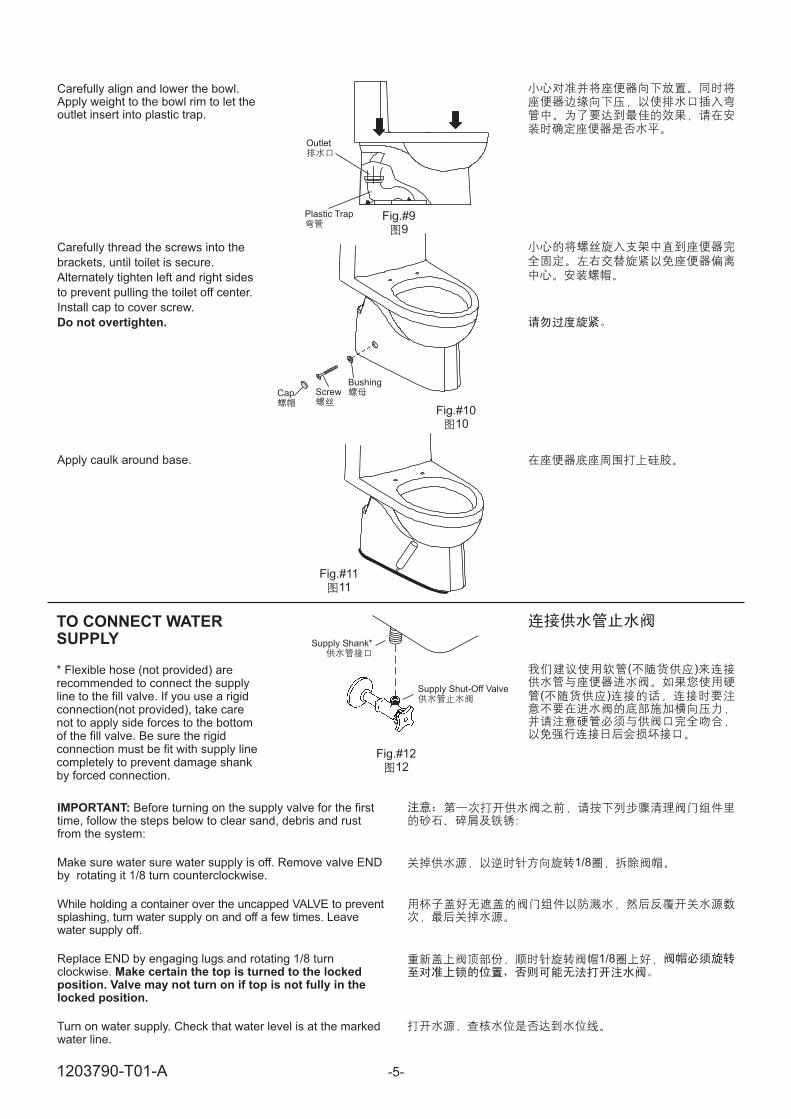
Fig.#99
Fig.#1010
Carefully align and lower the bowl.Apply weight to the bowl rim to let theoutlet insert into plastic trap.
Carefully thread the screws into the
brackets, until toilet is secure.
Alternately tighten left and right sides
to prevent pulling the toilet off center.
Install cap to cover screw.
Do not overtighten.
Outlet
Plastic Trap
Cap ScrewBushing
Fig.#1111
Apply caulk around base.
TO CONNECT WATERSUPPLY
* Flexible hose (not provided) arerecommended to connect the supplyline to the fill valve. If you use a rigidconnection(not provided), take carenot to apply side forces to the bottomof the fill valve. Be sure the rigidconnection must be fit with supply linecompletely to prevent damage shankby forced connection.
( )
( )
Supply Shank*
Supply Shut-Off Valve
Fig.#1212
IMPORTANT:
Make certain the top is turned to the lockedposition. Valve may not turn on if top is not fully in thelocked position.
Before turning on the supply valve for the firsttime, follow the steps below to clear sand, debris and rustfrom the system:
Make sure water sure water supply is off. Remove valve ENDby rotating it 1/8 turn counterclockwise.
While holding a container over the uncapped VALVE to preventsplashing, turn water supply on and off a few times. Leavewater supply off.
Replace END by engaging lugs and rotating 1/8 turnclockwise.
Turn on water supply. Check that water level is at the markedwater line.
1/8
1/8
-5-1203790-T01-A

Install the tank lid and the seat. Usethe supplied hardware pack for seat.Periodically check for leaks for severaldays following the installation.
Connect the push button and flushvalve.
Fig.#1313
Fig.#1414
-6-
FILL VALVE ADJUSTMENTFill float with ballast
Adjust the cam clockwise or counter-clockwise until the water level is at themarked water line.
Test flush the toilet.
Check all connections for leakage forseveral days.
Set the tank cover in place on the tank.
PUSH BUTTON INSTALLATION
NOTE: Remove the package and screw out the nut. Make the
button through the tank cover as shown. Be noted that the
button shall be kept level. Arrange big and small flush buttons
according to the label of water consumption on the tank.
Tighten the nut from beneath the tank cover.
Fig.#1515
1203790-T01-A
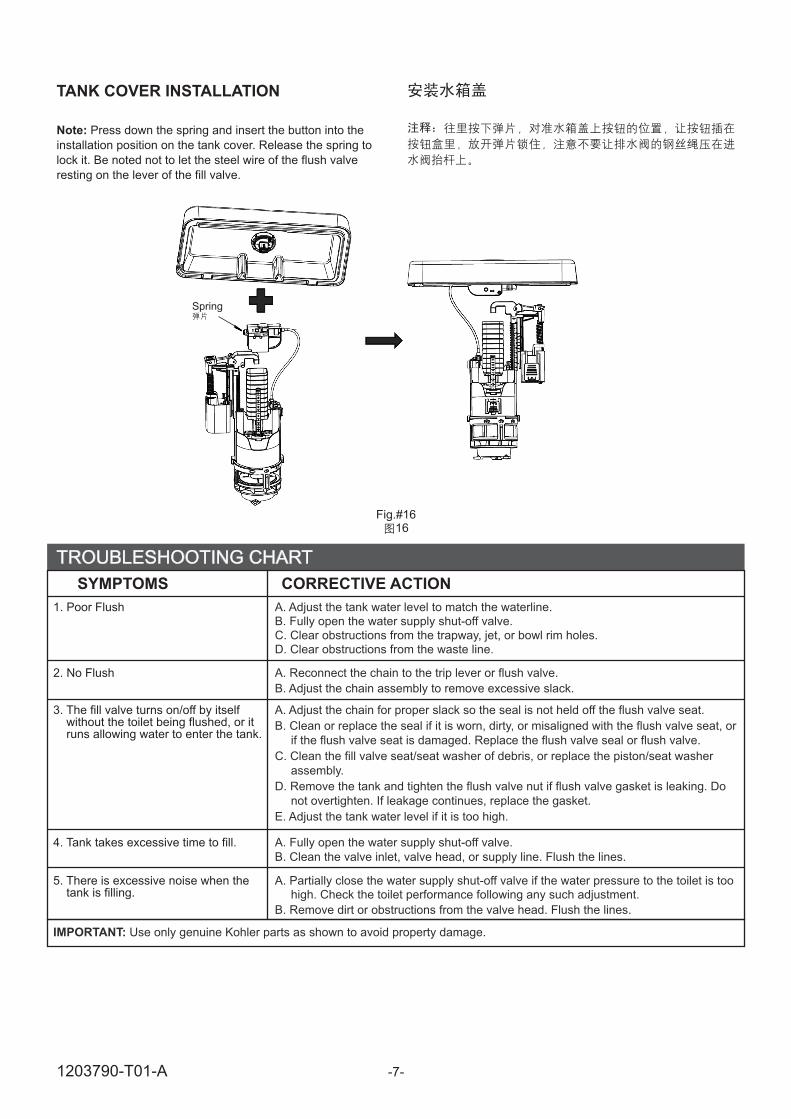
TANK COVER INSTALLATION
Note: Press down the spring and insert the button into the
installation position on the tank cover. Release the spring to
lock it. Be noted not to let the steel wire of the flush valve
resting on the lever of the fill valve.
Fig.#1616
-7-
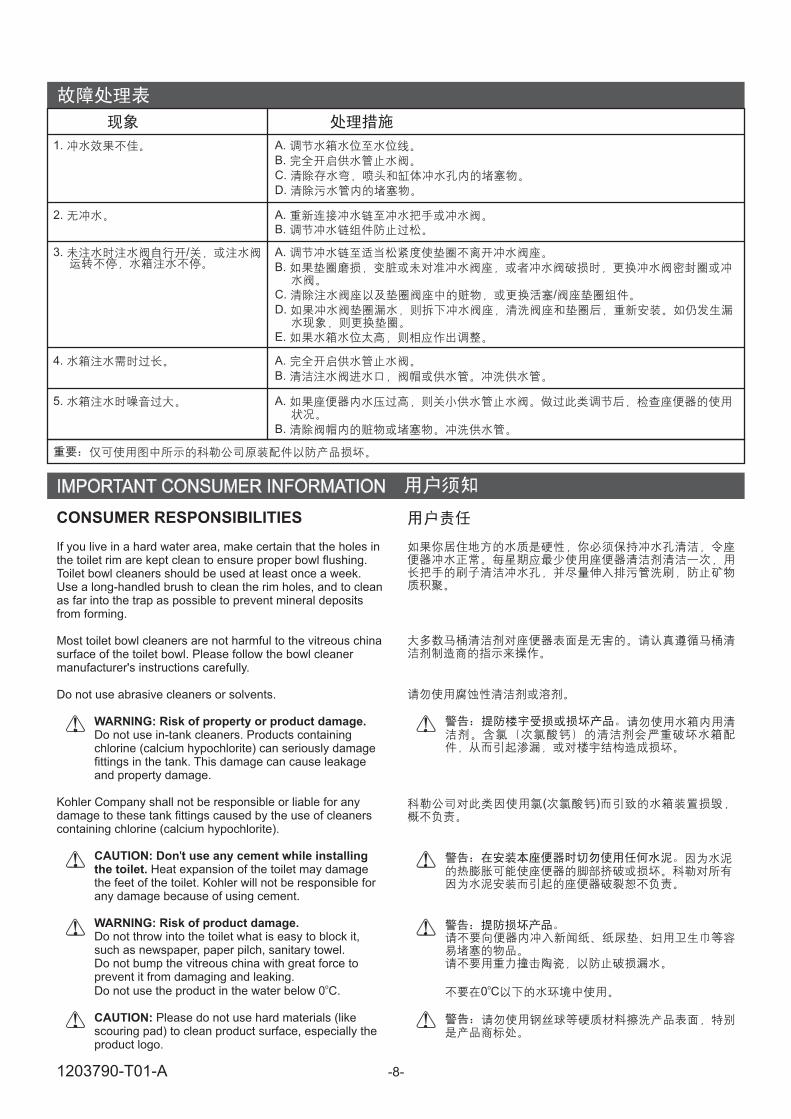
SYMPTOMS CORRECTIVE ACTION
1. Poor Flush A. Adjust the tank water level to match the waterline.
B. Fully open the water supply shut-off valve.
C. Clear obstructions from the trapway, jet, or bowl rim holes.
D. Clear obstructions from the waste line.
A. Adjust the chain for proper slack so the seal is not held off the flush valve seat.
B. Clean or replace the seal if it is worn, dirty, or misaligned with the flush valve seat, or
if the flush valve seat is damaged. Replace the flush valve seal or flush valve.
C. Clean the fill valve seat/seat washer of debris, or replace the piston/seat washer
assembly.
D. Remove the tank and tighten the flush valve nut if flush valve gasket is leaking. Do
not overtighten. If leakage continues, replace the gasket.
E. Adjust the tank water level if it is too high.
2. No Flush
IMPORTANT: Use only genuine Kohler parts as shown to avoid property damage.
4. Tank takes excessive time to fill.
5. There is excessive noise when thetank is filling.
3. The fill valve turns on/off by itselfwithout the toilet being flushed, or itruns allowing water to enter the tank.
A. Reconnect the chain to the trip lever or flush valve.
B. Adjust the chain assembly to remove excessive slack.
A. Fully open the water supply shut-off valve.
B. Clean the valve inlet, valve head, or supply line. Flush the lines.
A. Partially close the water supply shut-off valve if the water pressure to the toilet is toohigh. Check the toilet performance following any such adjustment.
B. Remove dirt or obstructions from the valve head. Flush the lines.
Spring
1203790-T01-A
-8-
1. A.
B.
C.
D.
A.
B.
C. /
D.
E.
2.
4.
5.
3. /
A.
B.
A.
B.
A.
B.
( )
0 Co
CONSUMER RESPONSIBILITIES
If you live in a hard water area, make certain that the holes inthe toilet rim are kept clean to ensure proper bowl flushing.Toilet bowl cleaners should be used at least once a week.Use a long-handled brush to clean the rim holes, and to cleanas far into the trap as possible to prevent mineral depositsfrom forming.
Most toilet bowl cleaners are not harmful to the vitreous chinasurface of the toilet bowl. Please follow the bowl cleanermanufacturer's instructions carefully.
Do not use abrasive cleaners or solvents.
Do not use in-tank cleaners. Products containingchlorine (calcium hypochlorite) can seriously damagefittings in the tank. This damage can cause leakageand property damage.
Kohler Company shall not be responsible or liable for anydamage to these tank fittings caused by the use of cleanerscontaining chlorine (calcium hypochlorite).
WARNING: Risk of property or product damage.
'
Please do not use hard materials (likescouring pad) to clean product surface, especially theproduct logo.
CAUTION:
CAUTION: Don t use any cement while installingthe toilet.
WARNING: Risk of product damage.
Heat expansion of the toilet may damagethe feet of the toilet. Kohler will not be responsible forany damage because of using cement.
Do not throw into the toilet what is easy to block it,such as newspaper, paper pilch, sanitary towel.Do not bump the vitreous china with great force toprevent it from damaging and leaking.Do not use the product in the water below 0 C.
o
1203790-T01-A