Embed Size (px)
Citation preview
RCCR CLEAN CAB LOCOMOTIVE RADIO
Owner’s Manual
Ritron Pub. 14500073 Rev. B 11/05/09 © 2009 Ritron, Inc. All rights reserved. Ritron, Patriot, Jobcom, OutPost, GateGuard, Quiet Call, Quick Assist, and RadioNexus are registered trademarks of Ritron, Inc. Quick Talk and Liberty are trademarks of Ritron, Inc.
Call 800-USA-1-USA
For the right Wireless Solutions for your communication needs. P.O. Box 1998 · Carmel, Indiana 46082-1998 · 317-846-1201 · Fax: 317-846-4978
Email: [email protected] · www.ritron.com

Table of Contents
Introduction .............................................................................................1
OPERATING THE RADIO
Channel Zone Set-Up........................................................................3 AAR Channel Selection ...................................................................4 DTMF Tones ......................................................................................6 Single Tone .......................................................................................7 DTMF or Single Tone Dispatch .......................................................8 Transmit and Busy Indication .........................................................8 Volume ..............................................................................................9 PTT (Push-to-Talk) ...........................................................................9 Brightness Control ..........................................................................9 Home Channel Selection ...............................................................10 Revert to Last TX-RX Channel Pair ..............................................11 Error Messages ..............................................................................11
INVALID .................................................................................11 ANTENNA ..............................................................................11
RADIO CONNECTORS
RCCR Connectors – Rear Panel ...................................................12 RCCR Connectors – Side Panel ...................................................13 RCCR Connectors – Remote Head ...............................................14
PROGRAMMING THE RADIO
Getting Started ................................................................................15 Connecting to the Computer ...............................................15 The Programmer Screen .....................................................15 Programmer Menus Open File ...............................................................................16 Save File ................................................................................16 Print Radio Data ...................................................................17 Print Custom Frequency Data .............................................17 Print Home Channel Data ....................................................18 Read Radio ............................................................................18 Program Radio ......................................................................19 Update Firmware ..................................................................19 NXDN ......................................................................................20 AAR Frequencies .................................................................20 Help ........................................................................................20 Volume .............................................................................................21 Timers ..............................................................................................22 Options ............................................................................................23 Keypad ............................................................................................24 Radio ID ...........................................................................................25 Home Channels ..............................................................................26 Custom Frequencies ......................................................................28 NXDN ................................................................................................29 Align .................................................................................................30
APPENDIX
RF Exposure Statement .................................................................31 AAR Channels ................................................................................34 RCCR Radio Specifications ..........................................................36 RITRON, Inc. Limited Warranty......................................................38
--------------------------------------------------------------------------------------------------------------- Ritron RCCR Clean Cab User Manual 1
Ritron, Inc. (800)-USA-1-USA [email protected]
Introduction The Ritron RCCR radio is designed specifically for Clean Cab locomotive operation and meets all AAR specifications for fit, form and function. The location of all connectors is consistent with AAR standards to allow the easy replacement of a Clean Cab radio without re-routing existing cables.
The RCCR radio is available in two models:
RCCR-151 A single-piece radio with the control head attached to the main radio.
RCCR-152 A two-piece radio with the control head detached from the main radio.
The RCCR-152 control head is connected to the main radio via an AAR standard 19-pin connector cable. The female mating connector on the main radio can be located on either the rear or the front of the radio to allow maximum flexibility during installation. A small plate covers the unused connector location. The male mating connector is located on the back of the RCCR-152 control head. The control head is designed to mount in the standard AAR opening in the locomotive throttle stand or overhead.
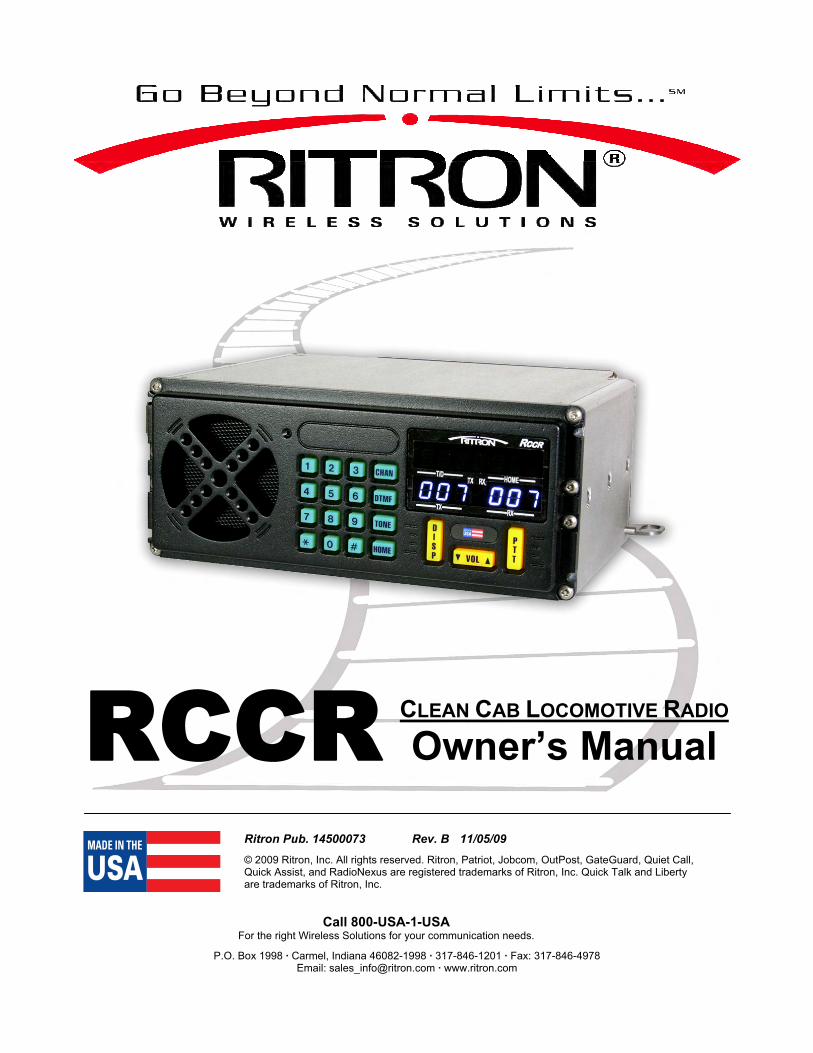
LED display with large white Carry Front panel Area for ID 0.4” characters, red TX lamp, strap microphone engraving and yellow Busy lamp
RCCR CONTROL HEAD FRONT VIEW
T/D TX RX
TX RX
DISP
PTT▼VOL▲ 0 #
7 8 9
4 5 6
1 2 3
HOME
TONE
DTMF
CHAN HOME
Front panel speaker Green illuminated numeric/function
keypad
Yellow illuminated control keypad

--------------------------------------------------------------------------------------------------------------- Ritron RCCR Clean Cab User Manual 2
Ritron, Inc. (800)-USA-1-USA [email protected]
RCCR-152 – RADIO REAR VIEW The 19-Pin female connector can be installed in either location. RCCR-152 – RADIO FRONT VIEW
DESIGNED & MANUFACTURED IN CARMEL, INDIANA 46032 U.S.A.WWW.RITRON.COM
800-USA.1.USA
OPERATING THE RADIO -----------------------------------------------------------------------------------------
--------------------------------------------------------------------------------------------------------------- Ritron RCCR Clean Cab User Manual 3
Ritron, Inc. (800)-USA-1-USA [email protected]
Channel Zone Set-Up
The RCCR -151 Locomotive Radio can be set-up using the front panel keypad such that any or all of the available Channel Zones are enabled for normal radio operation. The available zones are:
Home Channel Zone (1 – 500) Wideband Channel Zone (AAR03 – 97) Narrowband Channel Zone (AAR005 – 097) Narrowband Offset Zone (AAR104 – 197) Digital Channel Zone (AAR302 – 488)
IMPORTANT!
DO NOT pause more than 2 seconds between keypad presses prior to the completion of set-up, otherwise the radio will automatically resume normal operation and the operator must begin at Step 1. To enable Channel Zones using the front panel keypad:
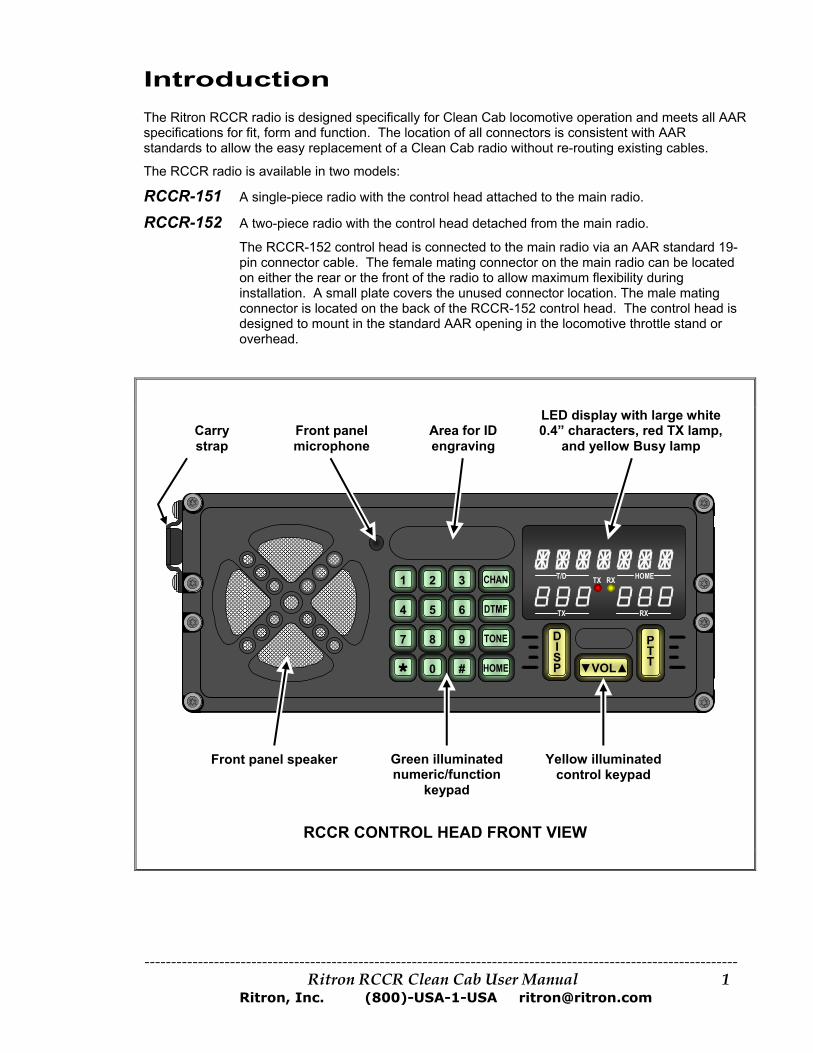
1. Press CHAN - # - 6 – 2 – 7 – 7 – 6 - 9
2. “CH PLAN” will be displayed on the top row of the LED Display.
3. Referring the table below, press the keypad digits to enable the corresponding channel zone(s) you wish to enable.
1 – Home Channel Zone (1 – 500) 2 – Wideband Channel Zone (AAR03 – 97) 3 – Narrowband Channel Zone (AAR005 – 097) 4 – Narrowband Offset Zone (AAR104 – 197) 5 – Digital Channel Zone (AAR302 – 488)
4. After last digit is pressed, wait 2 seconds and the radio will automatically resume to normal operation.
5. If a channel from a list that is not enabled is entered using the front keypad, “INVALID” will be displayed momentarily (2 sec), and then the last valid channel entered will be displayed.
The following example illustrates a Channel Zone Set-Up to enable only the Narrowband Channel Zone (3) and Digital Channel Zone (5).
T/D HOME TX RX
TX RX
# 6 2 7 7 6 9 3 5CHAN
Press CHAN - # - 6 – 2 – 7 – 7 – 6 – 9 ► CH PLAN is displayed ► Press 3 – 5

OPERATING THE RADIO -----------------------------------------------------------------------------------------
--------------------------------------------------------------------------------------------------------------- Ritron RCCR Clean Cab User Manual 4
Ritron, Inc. (800)-USA-1-USA [email protected]
AAR Channel Selection CHAN
The CHAN button is used in conjunction with the numeric keypad to select AAR channels:
• 03 - 97 for Wide Band (25 kHz) operation • 005 - 097 for Narrow Band (12.5 kHz) operation • 104 - 197 for Narrow Band (12.5 kHz), 7.5 kHz Offset operation • 302 – 488 for Digital (6.25 kHz) operation
Refer to chart “AAR Channels” on page 31 for the complete list of AAR frequencies available with the CHAN button. Note that wide band channels 05-97 are the same frequency as the corresponding narrow band channels 005-097, only the operating bandwidth is different. 7.5 kHz offset, narrow band channels 104-197 operate the transmitter and the receiver on a frequency 7.5 kHz higher than the selected AAR channel. For example, wide band channel 12 and narrow band channel 012 both operate at 160.290 MHz while narrow band offset channel 112 operates 7.5 kHz above channels 12 and 012 at 160.2975 MHz.
Mixed Bandwidth When entering AAR channel pairs the TX and RX frequencies must use the same bandwidth. It is not possible to enter a mixed wide/narrow band TX/RX pair. For example, if the TX frequency is entered to operate Wide Band and the RX frequency is entered to operate Narrow Band the radio will not allow it and revert to the last valid channel entry.
Invalid Channel Entries If an invalid AAR channel entry is attempted “INVALID” will momentarily show across the top of the display and no changes will be made. When selecting an AAR channel, the maximum delay between digit entries is 2 seconds (programmable, factory value). If the 2 seconds between digits is exceeded the radio will:
• Revert back to the last valid entry if digits entered up to the point of the delay were not valid. • Operate on the channels specified by the digits entered up to the point of the delay if they are
valid. For example, you intend to enter channel 11 for TX and 21 for RX but delay after entering the 3rd digit. The radio will be set to operate on 112 TX and 112 RX because the 3 digits entered (112) are a valid Quick Entry channel.
Non-AAR Channels Valid AAR channels are 03-97, 005-097, 104-197 and 302-488 per chart “AAR Channels” on page 31. Any other channel entry must be made via a HOME channel. See the section “Home Channel Selection” for details on the programming and use of HOME channels.
CTCSS or DCS Tone Squelch AAR channel selection using the CHAN button is carrier squelch only. If CTCSS or DCS is required the channel must be selected via a HOME channel entry. See the section “Home Channels” for details on the programming and use of HOME channels.
DTMF Sequences or Single-Tone If a DTMF sequence or a Single-Tone is displayed at the time an AAR Channel entry is made, it will be retained after the new channel is selected. See sections “DTMF Tones”, “Single-Tone” and “DISP Button” for instructions on the use of DTMF sequences and Single-Tones.

OPERATING THE RADIO -----------------------------------------------------------------------------------------
--------------------------------------------------------------------------------------------------------------- Ritron RCCR Clean Cab User Manual 5
Ritron, Inc. (800)-USA-1-USA [email protected]
CHAN Button Disable The CHAN button can be disabled using the Ritron RCCR programmer. When disabled the HOME button must be used for channel selection.
To enter a Wide Band AAR frequency pair press:
1
2
CHAN
CHAN
7
4
T/D HOME TX RX
TX RX
1. CHAN button
2. Digit 1 of the 2-digit AAR channel for TX
3. Digit 2 of the 2-digit AAR channel for TX
4. Digit 1 of the 2-digit AAR channel for RX Resulting Display
5. Digit 2 of the 2-digit AAR channel for RX
6. CHAN button or wait 2 seconds
To enter a Narrow Band AAR frequency pair press:
T/D HOME TX RX
TX RX
2
CHAN
7
4
0
1
1
1. CHAN button
2. Digit 1 of the 3-digit AAR channel for TX
3. Digit 2 of the 3-digit AAR channel for TX
4. Digit 3 of the 3-digit AAR channel for TX Resulting Display
5. Digit 1 of the 3-digit AAR channel for RX
6. Digit 2 of the 3-digit AAR channel for RX
7. Digit 3 of the 3-digit AAR channel for RX
For Quick Entry of an AAR frequency pair with the same TX/RX press:
T/D HOME TX RX
TX RX 1
2
CHAN
CHAN
0
1. CHAN button
2. Digit 1 of the AAR channel
3. Digit 2 of the AAR channel
4. Digit 3 of the AAR channel (if narrowband) Resulting Display
5. CHAN button or wait 2 seconds

OPERATING THE RADIO -----------------------------------------------------------------------------------------
--------------------------------------------------------------------------------------------------------------- Ritron RCCR Clean Cab User Manual 6
Ritron, Inc. (800)-USA-1-USA [email protected]
DTMF Tones DTMF
DTMF tones can be transmitted directly by pressing the numeric keypad, or the DTMF Button can be used in conjunction with the numeric keypad to create a DTMF sequence of up to 3-digits. A DTMF sequence entered using the DTMF button is stored and displayed, and can then be transmitted by simply pressing the DISP dispatch button. DTMF tones are heard on the front-panel speaker whenever they are being transmitted.
DTMF Disable prevents use of the DTMF button to create a DTMF sequence, but does not prevent sending DTMF directly using the numeric keypad.
* Disable or # Disable prevents DTMF characters * or # from being sent directly whenever the numeric keypad is pressed.
Keypad Disable prevents DTMF from being sent directly whenever the numeric keypad is pressed, but still allows you to create a DTMF sequence using the DTMF button.
RCCR Programmer Options that Affect DTMF Operation
Dispatch Sequence allows a DTMF
Sequence of up to 3-digits otherwise a single-digit is all that is allowed.
DTMF Single-Digit • Sets a single-digit for DISP dispatch button
operation. • “Dispatch Sequence” selection on the RCCR
programmer must be unchecked. • The DTMF single-digit will be transmitted when
entered. • The DTMF single-digit entered will be preceded
by a “D”, appearing in the upper left side of the display in the area designated “―T/D―”.
• The DTMF single-digit will be retained when the Channel is changed.
DTMF Sequence • Allows a DTMF sequence of up to 3-digits for DISP dispatch button operation. • “Dispatch Sequence” selection on the RCCR programmer must be checked. • The DTMF dispatch sequence entered will appear in the upper left side of the display in the
area designated “―T/D―”. • To transmit the DTMF sequence, press the DISP dispatch button. • The DTMF dispatch sequence will be retained when the Channel is changed.
To enter a Single-Digit DTMF for dispatch press:
T/D HOME TX RX
TX RX
1. DTMF button
2. Desired DTMF digit. Radio will transmit the DTMF digit
Resulting Display
DTMF
8
OPERATING THE RADIO -----------------------------------------------------------------------------------------
--------------------------------------------------------------------------------------------------------------- Ritron RCCR Clean Cab User Manual 7
Ritron, Inc. (800)-USA-1-USA [email protected]
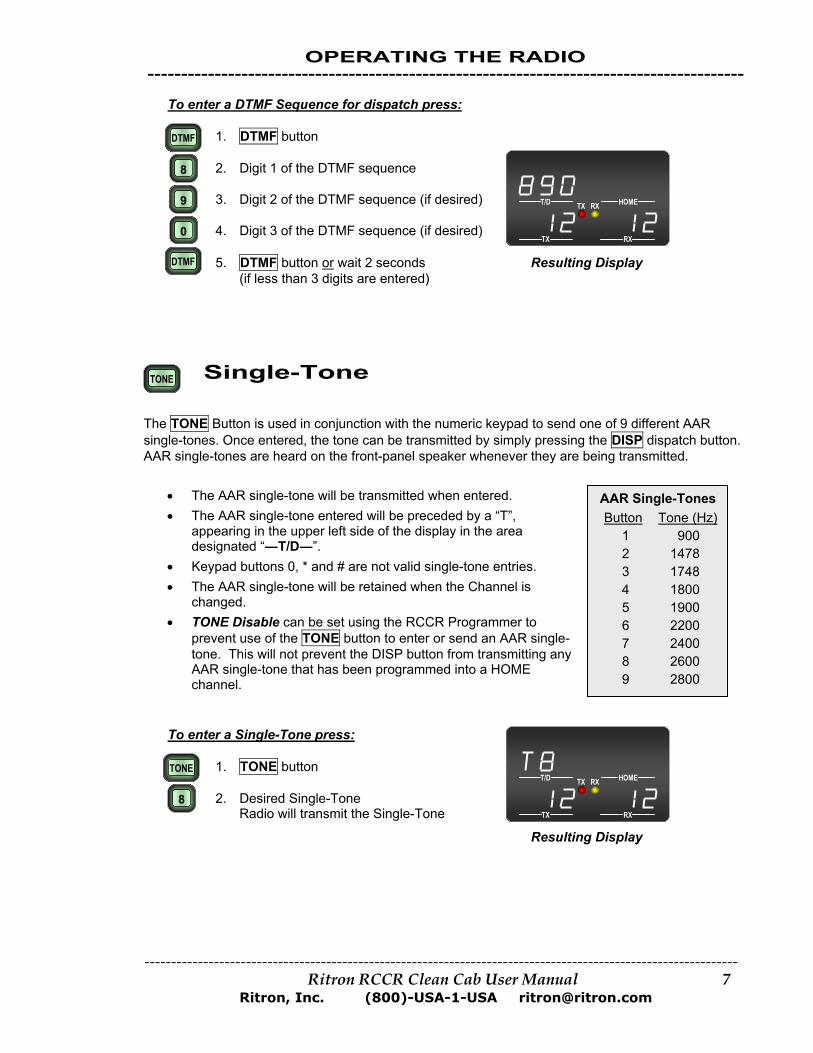
To enter a DTMF Sequence for dispatch press:
9
0
DTMF
DTMF
8
1. DTMF button
T/D HOME TX RX
TX RX
2. Digit 1 of the DTMF sequence
3. Digit 2 of the DTMF sequence (if desired)
4. Digit 3 of the DTMF sequence (if desired)
5. DTMF button or wait 2 seconds Resulting Display (if less than 3 digits are entered)
Single-Tone
TONE
The TONE Button is used in conjunction with the numeric keypad to send one of 9 different AAR single-tones. Once entered, the tone can be transmitted by simply pressing the DISP dispatch button. AAR single-tones are heard on the front-panel speaker whenever they are being transmitted.
6 2200 7 2400 8 2600 9 2800
5 1900 4 1800 3 1748 2 1478
AAR Single-Tones Button Tone (Hz)
1 900
• The AAR single-tone will be transmitted when entered. • The AAR single-tone entered will be preceded by a “T”,
appearing in the upper left side of the display in the area designated “―T/D―”.
• Keypad buttons 0, * and # are not valid single-tone entries. • The AAR single-tone will be retained when the Channel is
changed. • TONE Disable can be set using the RCCR Programmer to
prevent use of the TONE button to enter or send an AAR single-tone. This will not prevent the DISP button from transmitting any AAR single-tone that has been programmed into a HOME channel.
To enter a Single-Tone press:
T/D HOME TX RX
TX RX
8
TONE 1. TONE button
2. Desired Single-Tone Radio will transmit the Single-Tone
Resulting Display
OPERATING THE RADIO -----------------------------------------------------------------------------------------
--------------------------------------------------------------------------------------------------------------- Ritron RCCR Clean Cab User Manual 8
Ritron, Inc. (800)-USA-1-USA [email protected]
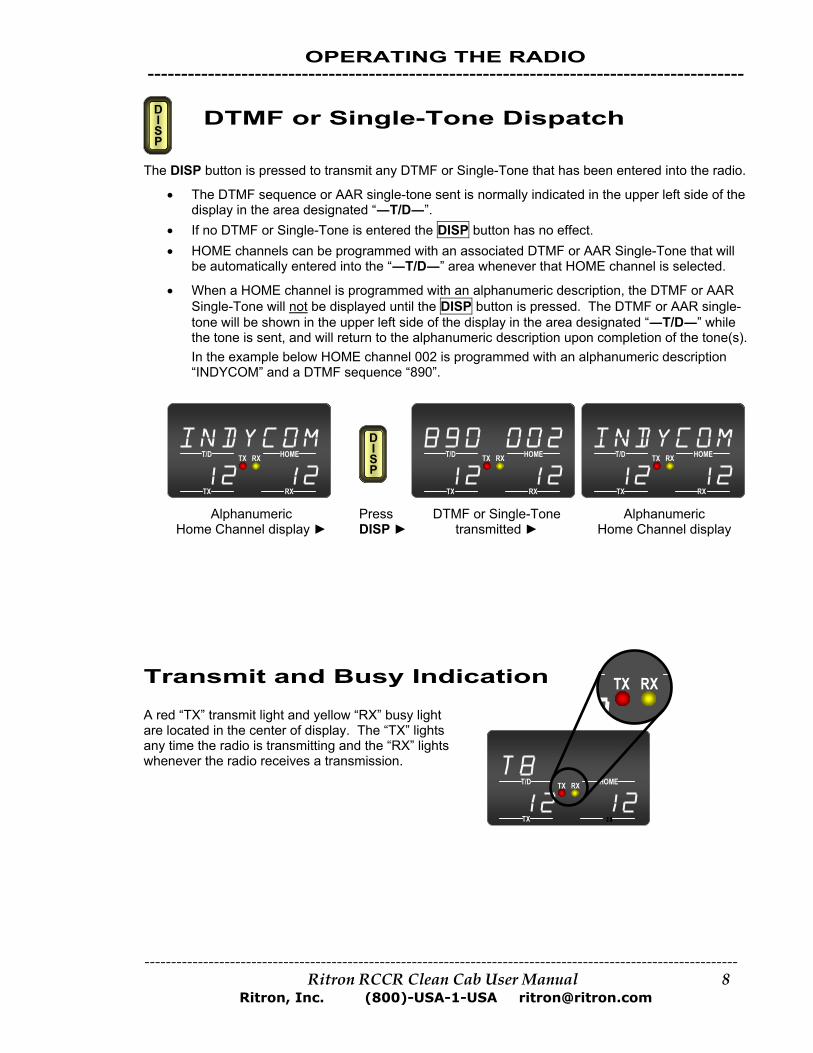
DTMF or Single-Tone Dispatch
D I S P
The DISP button is pressed to transmit any DTMF or Single-Tone that has been entered into the radio.
• The DTMF sequence or AAR single-tone sent is normally indicated in the upper left side of the display in the area designated “―T/D―”.
• If no DTMF or Single-Tone is entered the DISP button has no effect. • HOME channels can be programmed with an associated DTMF or AAR Single-Tone that will
be automatically entered into the “―T/D―” area whenever that HOME channel is selected.
• When a HOME channel is programmed with an alphanumeric description, the DTMF or AAR Single-Tone will not be displayed until the DISP button is pressed. The DTMF or AAR single-tone will be shown in the upper left side of the display in the area designated “―T/D―” while the tone is sent, and will return to the alphanumeric description upon completion of the tone(s). In the example below HOME channel 002 is programmed with an alphanumeric description “INDYCOM” and a DTMF sequence “890”.
Alphanumeric Press DTMF or Single-Tone Alphanumeric Home Channel display ► DISP ► transmitted ► Home Channel display
Transmit and Busy Indication
A red “TX” transmit light and yellow “RX” busy light are located in the center of display. The “TX” lights any time the radio is transmitting and the “RX” lights whenever the radio receives a transmission.
T/D HOMETX RX
RX
T/D HOME TX RX
TX RX
DISP
T/D HOMETX RX
TX TX RX
T/D HOME TX RX
TX il
TX RX

OPERATING THE RADIO -----------------------------------------------------------------------------------------
--------------------------------------------------------------------------------------------------------------- Ritron RCCR Clean Cab User Manual 9
Ritron, Inc. (800)-USA-1-USA [email protected]
Volume ▼VOL▲
The VOL button is a toggle switch used to incrementally increase or decrease the front-panel speaker volume. Pressing the right side of the VOL button will increase speaker volume while pressing the left side will decrease volume. As the volume is changed the display will indicate the volume level and a tone will be heard. Volume can be set to a value between 1 and 20. The volume level can be adjusted by pressing the VOL button for each increment, or by holding the VOL button down to automatically increment.
T/D HOMETX RX
TX RX
Volume Display
• When pressing the VOL button, any “―T/D―” or “―HOME―” indications on the display will
be momentarily replaced by the Volume Level and will reappear when the VOL button is released.
• The RCCR PC programmer can be used to set a minimum allowable volume. For example, if the radio is set for a minimum volume of 3 the VOL button will never be able to lower the volume below level 3.
• The VOL button does not change the handset speaker audio. Handset volume is at a fixed level that can be set using the RCCR PC programmer.
• The RCCR PC programmer can set the AUX volume to a fixed level, or allow it to be adjusted by the VOL button.
PTT (Push-to-Talk)
PTT
The PTT button is pressed to transmit voice message from the front-panel microphone. The red “TX” lamp in the center of the display will illuminate whenever the PTT button is pressed to indicate that the transmitter is active. The radio will transmit on the channel indicated in the “―TX―” area on the lower left side of the display.
It is important to monitor the channel before transmitting to avoid interference with other radio users. If the “―TX―” and “―RX―” are set to the same channel and you hear a received voice signal in the front-panel speaker, you should wait for the received signal to go away before pressing the PTT button. The yellow “RX” busy lamp in the center of the display is another indication that a signal is received.
Brightness Control
Display brightness is automatically adjusted depending on the ambient light in the locomotive cab, dimming in low light and increasing intensity in high light. The keypad is automatically backlit in low light conditions.

OPERATING THE RADIO -----------------------------------------------------------------------------------------
--------------------------------------------------------------------------------------------------------------- Ritron RCCR Clean Cab User Manual 10
Ritron, Inc. (800)-USA-1-USA [email protected]
Home Channel Selection HOME
The HOME button is used in conjunction with the numeric keypad to select up to 500 HOME channels.
Each HOME channel can be custom programmed for:
• Transmit frequency and bandwidth • Receive frequency and bandwidth • CTCSS or DCS encode and/or decode • DTMF or Single-Tone dispatch code • 7-character alphanumeric description
A HOME channel is selected by pressing the HOME button and then entering a 1, 2 or 3-digit HOME channel number using the numeric keypad. Once entered, the transmit and receive channels will be displayed in the areas designated “―TX―” and “―RX―”. The HOME channel number will be displayed in the area designated “―HOME―” unless an alphanumeric description has been assigned, in which case the description will be appear on the top row across the entire width of the display. If an invalid HOME channel entry is attempted “INVALID” will momentarily show across the top of the display and no changes will be made.
The following example illustrates a HOME channel number 124 programmed for AAR channel 12 transmit and AAR channel 47 receive with a DTMF dispatch code of 890.
To select a HOME channel press:
1
2
HOME
HOME
4
T/D HOMETX RX
TX RX
1. HOME button
2. Digit 1 of the HOME channel
3. Digit 2 of the HOME channel (if required)
4. Digit 3 of the HOME channel (if required) Resulting Display
5. HOME button or wait 2 seconds (if less than 3 digits are entered)
T/D HOMETX RX
TX RX
If an alphanumeric description “INDYCOM” is programmed in the example above, the resulting display would be:
Resulting Display

OPERATING THE RADIO -----------------------------------------------------------------------------------------
--------------------------------------------------------------------------------------------------------------- Ritron RCCR Clean Cab User Manual 11
Ritron, Inc. (800)-USA-1-USA [email protected]
Revert to Last TX/RX Channel Pair
A special feature of the HOME button allows the radio to toggle between the last 2 TX-RX channel pairs entered by pressing the HOME button and then the # button. This can be channel pairs that were entered via the CHAN button or the HOME button. This is convenient for railroads that operate on 2 primary TX-RX pairs to allow the user to quickly change between the two.
To toggle between the last two TX-RX channel pairs press:
HOME 1. HOME button
2. # button #
Error Messages
Error messages are displayed when certain radio malfunctions are detected to alert the user of potential problems with the unit.
INVALID
This error message will appear momentarily any time an invalid channel entry is made. If an invalid AAR CHAN button entry or HOME channel entry is attempted “INVALID” will momentarily show across the top of the display and no changes will be made.
T/D HOME TX RX
TX RX
ANTENNA
If an antenna VSWR greater than 3:1 is detected while the radio is transmitting “ANTENNA” will show across the top of the display. The display will revert back to normal once the transmitter is released, or if the high VSWR condition is corrected. The radio will still transmit into the antenna with VSWR conditions greater than 3:1, albeit at reduced RF output levels. If the “ANTENNA” error should appear check the antenna connection to the radio, the antenna cable, and the antenna itself for damage.
T/D HOME TX RX
TX RX
RADIO CONNECTORS -----------------------------------------------------------------------------------------
--------------------------------------------------------------------------------------------------------------- Ritron RCCR Clean Cab User Manual 12
Ritron, Inc. (800)-USA-1-USA [email protected]
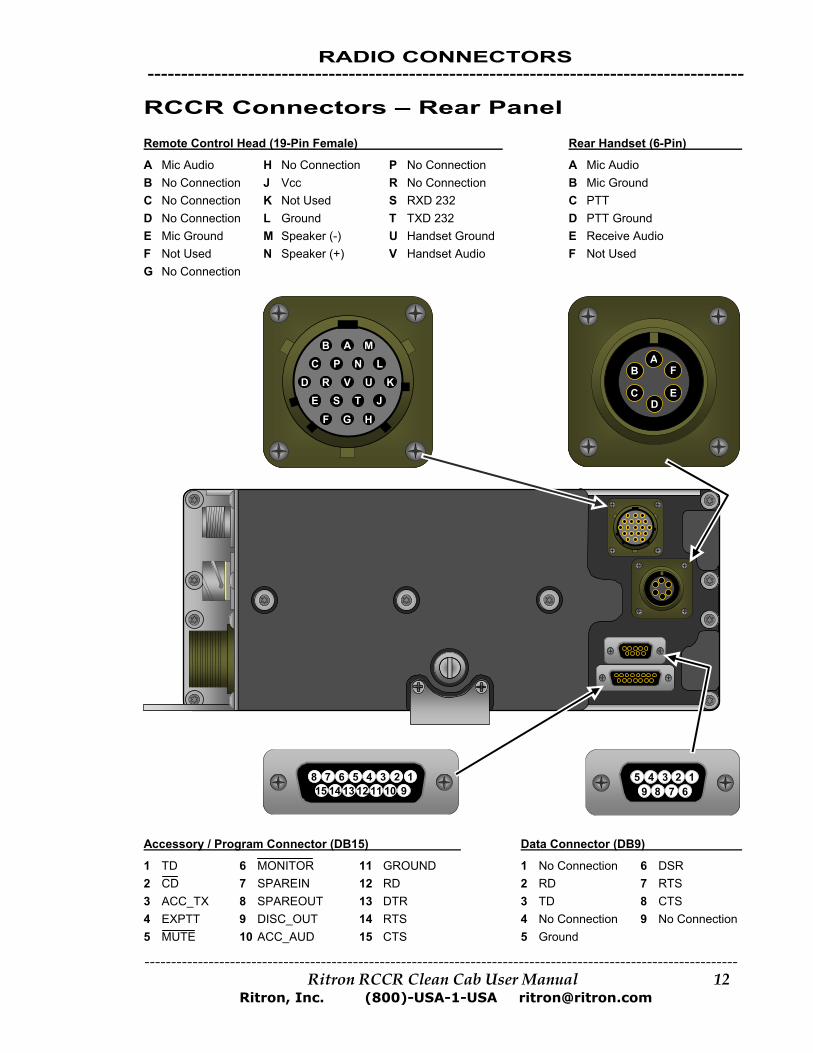
RCCR Connectors – Rear Panel Remote Control Head (19-Pin Female) Rear Handset (6-Pin)
A Mic Audio H No Connection P No Connection A Mic Audio B No Connection J Vcc R No Connection B Mic Ground C No Connection K Not Used S RXD 232 C PTT D No Connection L Ground T TXD 232 D PTT Ground E Mic Ground M Speaker (-) U Handset Ground E Receive Audio F Not Used N Speaker (+) V Handset Audio F Not Used G No Connection
ABC
D E
F G
JK
LM
NP
RS T
U
AB
C D
E
FV
5 4 3 2 1 9 8 7 6 15 14 13 12 11 10 9
8 7 6 5 4 3 2 1
Accessory / Program Connector (DB15) Data Connector (DB9)
1 TD 6 MONITOR 11 GROUND 1 No Connection 6 DSR 2 CD 7 SPAREIN 12 RD 2 RD 7 RTS 3 ACC_TX 8 SPAREOUT 13 DTR 3 TD 8 CTS 4 EXPTT 9 DISC_OUT 14 RTS 4 No Connection 9 No Connection 5 MUTE 10 ACC_AUD 15 CTS 5 Ground
FH

RADIO CONNECTORS -----------------------------------------------------------------------------------------
--------------------------------------------------------------------------------------------------------------- Ritron RCCR Clean Cab User Manual 13
Ritron, Inc. (800)-USA-1-USA [email protected]
RCCR Connectors – Side Panel
Antenna Connector (SO-239)
Auxiliary Connector (12-Pin) A Remote Mic H Audio Ground B Mic Ground J 13.6VDC Ground Power Connector (4-Pin) C Remote PTT K Not Used A +72 VDC D PTT Ground L Not Used B -13.6 VDC Ground E Remote Audio M External Speaker (+) C -72 VDC F +13.6 VDC N External Speaker (-) D +13.6 VDC
B A C
D E F H J K L
M N
A B
D C

RADIO CONNECTORS -----------------------------------------------------------------------------------------
--------------------------------------------------------------------------------------------------------------- Ritron RCCR Clean Cab User Manual 14
Ritron, Inc. (800)-USA-1-USA [email protected]
RCCR Connectors – Remote Head
AML
K J
H G
ED
CB
PN
U T S
R
A B
C D
E
FV
F
Remote Control Head (19-Pin Male) Remote Head Handset (6-Pin)
A Mic Audio H No Connection P No Connection A Mic Audio B No Connection J Vcc R No Connection B Mic Ground C No Connection K Not Used S RXD 232 C PTT D No Connection L Ground T TXD 232 D PTT Ground E Mic Ground M Speaker (-) U Handset Ground E Receive Audio F Not Used N Speaker (+) V Handset Audio F Not Used G No Connection

PROGRAMMING THE RADIO -----------------------------------------------------------------------------------------
--------------------------------------------------------------------------------------------------------------- Ritron RCCR Clean Cab User Manual 15
Ritron, Inc. (800)-USA-1-USA [email protected]
f
Getting Started The RCCR radio is programmed through the DB-15 connector located on the rear of the radio. Ritron model RCCR-PAC programming cable connects the radio to the serial communications port of the computer. The RCCR programmer is a Windows based software package used to set all radio operating parameters.
Connecting to the Computer
The RCCR radio is connected to the serial communications port oyour computer using the PC/Radio cable assembly included in theRITRON model RCCR-PCPK-1.0 Programmer Kit. If you do not have the PC/Radio cable assembly it can be purchased from RITRON. The DB-15 to DB-9 cable is RITRON PN# RCCR-PAC.
Once the PC/Radio cable assembly has been connected to the computer, the correct COM Port must be selected from the COM Port menu item under the Radio menu on the RCCR PMain
rogrammer screen.
The Programmer Screen
The programmer screen pictured below will appear whenever the RITRON RCCR Programmer is first opened. This is the starting point of any programming operation you wish to perform.
If an RCCR radio is connected to the computer when the programmer is first opened the radio’s programming will be automatically read in and displayed. If a radio is not connected the Radio Definition File named RCCR_default.rdf will be read in. See “Open File” and “Save File” topics in this manual for information on the use of Radio Definition Files.
The pull-down menus File and Radio at the top left of the screen are used to open and save Radio Definition Files for recurring use, and to read and write data to the RCCR radio.
Menu item Help will open a programmer help file, while menu item AAR Frequencies will open a file containing a full list of AAR channels. Both files are in pdf format and require that Adobe Acrobat Reader be installed on your computer hard drive to view them. They cannot be edited and are for reference only.
RCCR Programmer Screen
The Customer ID field allows you to enter up to 25 characters of text to help identify the radio or Radio Definition FIle. A row of tabs, located below the pull-down menus, are used to access the many programmable attributes of the RCCR radio.
PROGRAMMING THE RADIO -----------------------------------------------------------------------------------------
--------------------------------------------------------------------------------------------------------------- Ritron RCCR Clean Cab User Manual 16
Ritron, Inc. (800)-USA-1-USA [email protected]
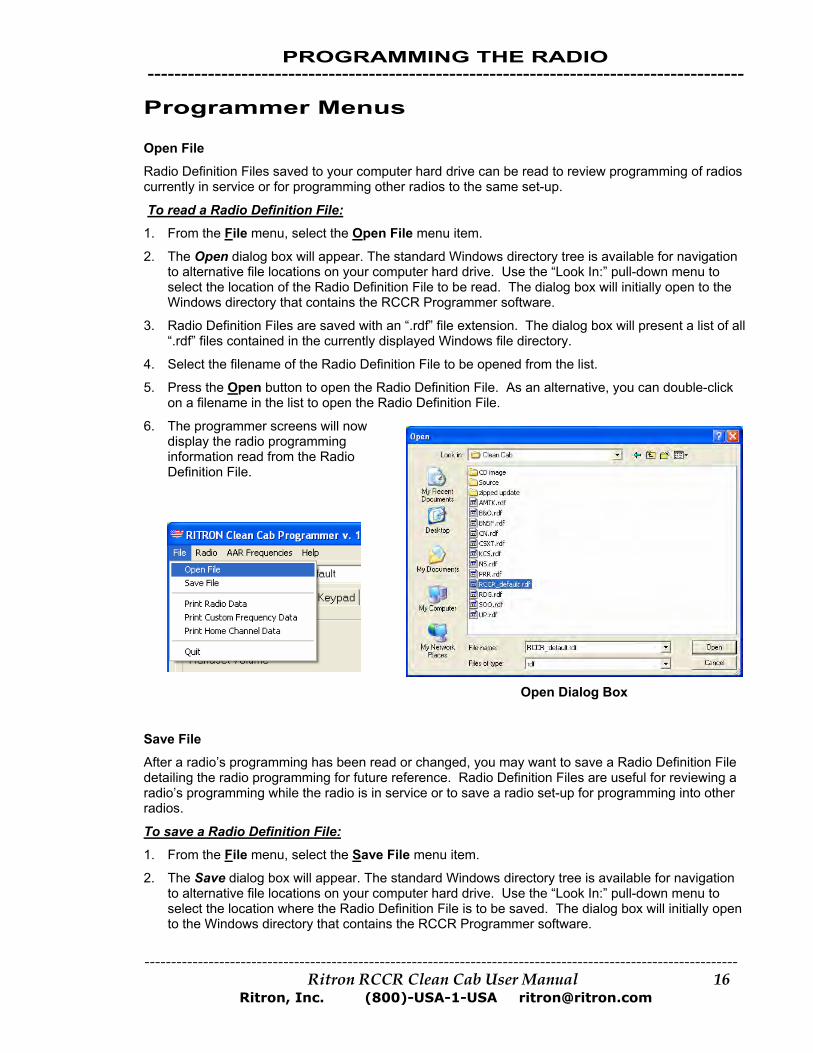
Programmer Menus Open File
Radio Definition Files saved to your computer hard drive can be read to review programming of radios currently in service or for programming other radios to the same set-up.
To read a Radio Definition File:
1. From the File menu, select the Open File menu item.
2. The Open dialog box will appear. The standard Windows directory tree is available for navigation to alternative file locations on your computer hard drive. Use the “Look In:” pull-down menu to select the location of the Radio Definition File to be read. The dialog box will initially open to the Windows directory that contains the RCCR Programmer software.
3. Radio Definition Files are saved with an “.rdf” file extension. The dialog box will present a list of all “.rdf” files contained in the currently displayed Windows file directory.
4. Select the filename of the Radio Definition File to be opened from the list.
5. Press the Open button to open the Radio Definition File. As an alternative, you can double-click on a filename in the list to open the Radio Definition File.
6. The programmer screens will now display the radio programming information read from the Radio Definition File.
Open Dialog Box
Save File
After a radio’s programming has been read or changed, you may want to save a Radio Definition File detailing the radio programming for future reference. Radio Definition Files are useful for reviewing a radio’s programming while the radio is in service or to save a radio set-up for programming into other radios.
To save a Radio Definition File:
1. From the File menu, select the Save File menu item.
2. The Save dialog box will appear. The standard Windows directory tree is available for navigation to alternative file locations on your computer hard drive. Use the “Look In:” pull-down menu to select the location where the Radio Definition File is to be saved. The dialog box will initially open to the Windows directory that contains the RCCR Programmer software.

PROGRAMMING THE RADIO -----------------------------------------------------------------------------------------
--------------------------------------------------------------------------------------------------------------- Ritron RCCR Clean Cab User Manual 17
Ritron, Inc. (800)-USA-1-USA [email protected]
3. Radio Definition Files will be saved with an “.rdf” file extension. The dialog box will present a list of all “.rdf” program files contained in the currently displayed Windows file directory. When creating a filename make sure it is unique and not contained in the list of existing files because the programmer will simply overwrite the existing file if the filename is the same.
4. Enter a unique filename into the “File name” box. You must enter the “.rdf” extension after the filename or the programmer will not be able to read the file at a later time.
NOTE: The Radio Definition File named RCCR_default.rdf is read into the programmer automatically when the programmer is first started. This file must be located in the same Windows directory that contains the RCCR Programmer software. Edit and save this file to create your own unique radio personality that is displayed every time the RCCR Programmer software is started.
5. Press the Save button to save the Radio Definition File to your computer hard drive.
Print Radio Data
You can print out a pre-formatted report of the radio programming or a Radio Definition File.
Print Dialog Box
To print a radio programming report:
1. Read the radio or open a Radio Definition File.
2. From the File menu, select the Print Radio Data menu item.
3. The Print dialog box will appear to allow setting of printer options. The default printer as defined in the Windows printer set-up of your computer will be automatically selected.
4. The report will always detail the radio’s programming as it appears on the screen. To be sure the report reflects the actual radio programming, be sure to Read Radio or Program Radio just before printing the report.
Print Custom Frequency Data
You can print out a pre-formatted list of all Custom frequencies contained in the radio programming or in a Radio Definition File. A list of all AAR standard frequencies can be printed by selecting the AAR Frequencies menu selection to open and print the associated pdf file.
To print a radio frequency list:
1. Read the radio or open a Radio Definition File.
2. From the File menu, select the Print Frequency Data menu item.
3. The Print dialog box will appear. The default printer as defined in the Windows printer set-up of your computer will be automatically selected.
4. The report will always detail the radio’s programming as it appears on the Custom Frequencies list. To be sure the report reflects the actual radio programming, be sure to Read Radio or Program Radio just before printing the report.
PROGRAMMING THE RADIO -----------------------------------------------------------------------------------------
--------------------------------------------------------------------------------------------------------------- Ritron RCCR Clean Cab User Manual 18
Ritron, Inc. (800)-USA-1-USA [email protected]
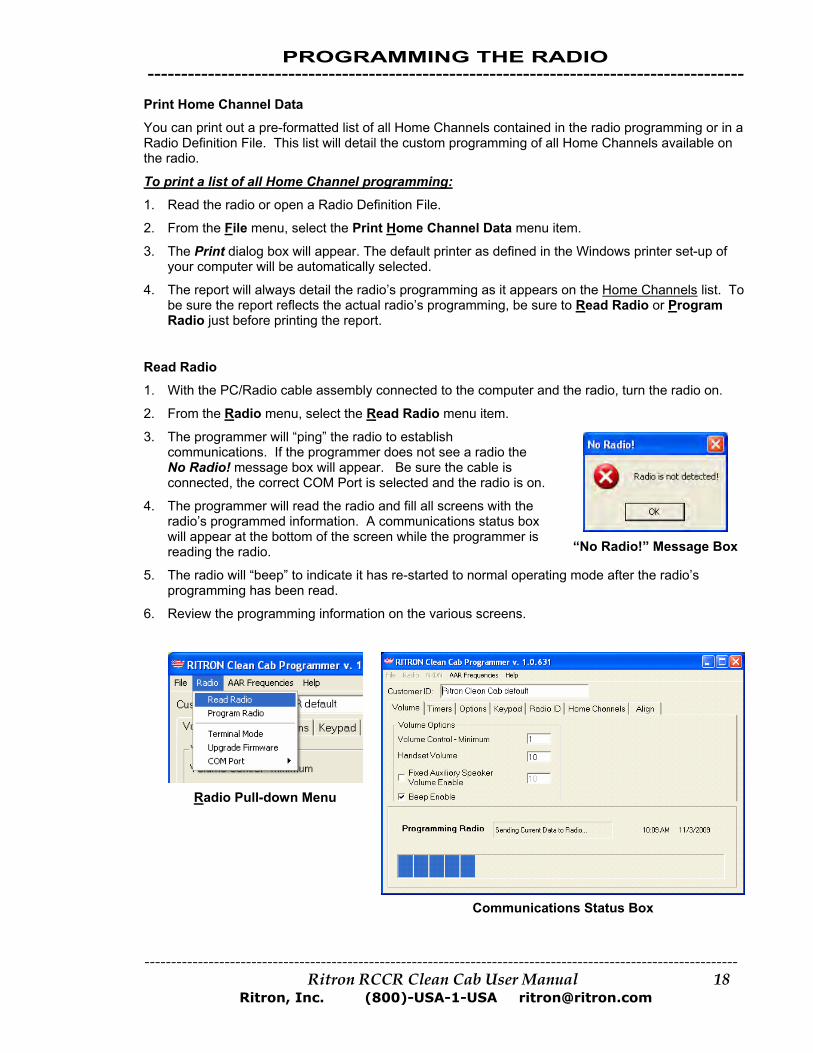
Print Home Channel Data
You can print out a pre-formatted list of all Home Channels contained in the radio programming or in a Radio Definition File. This list will detail the custom programming of all Home Channels available on the radio.
To print a list of all Home Channel programming:
1. Read the radio or open a Radio Definition File.
2. From the File menu, select the Print Home Channel Data menu item.
3. The Print dialog box will appear. The default printer as defined in the Windows printer set-up of your computer will be automatically selected.
4. The report will always detail the radio’s programming as it appears on the Home Channels list. To be sure the report reflects the actual radio’s programming, be sure to Read Radio or Program Radio just before printing the report.
Read Radio
1. With the PC/Radio cable assembly connected to the computer and the radio, turn the radio on.
2. From the Radio menu, select the Read Radio menu item.
3. The programmer will “ping” the radio to establish communications. If the programmer does not see a radio the No Radio! message box will appear. Be sure the cable is connected, the correct COM Port is selected and the radio is o
The
n.
4. programmer will read the radio and fill all screens with the
5. ” to indicate it has re-started to normal operating mode after the radio’s
6. mation on the various screens.
radio’s programmed information. A communications status boxwill appear at the bottom of the screen while the programmer is reading the radio.
The radio will “beep
“No Radio!” Message Box
programming has been read.
Review the programming infor
Radio Pull-down Menu
Communications Status Box

PROGRAMMING THE RADIO -----------------------------------------------------------------------------------------
--------------------------------------------------------------------------------------------------------------- Ritron RCCR Clean Cab User Manual 19
Ritron, Inc. (800)-USA-1-USA [email protected]
Program Radio
1. With the PC/Radio cable assembly connected to the computer and the radio, apply DC power to the radio.
2. Read the radio or open a Radio Definition File (.rdf).
3. Edit the information on the programmer screens to the desired radio programming.
4. Review the information on all the programmer screens before starting the programming process.
5. From the Radio menu, select the Program Radio menu item.
6. The programmer will “ping” the radio to establish communications. If the programmer does not see a radio the No Radio! message box will appear. Be sure the cable is connected, the correct COM Port is selected and that the radio is on.
7. Once communication with the radio is established, the information from the various programmer screens will be programmed into the radio. A communications status box will appear at the bottom of the screen while programming is in process.
8. The radio will “beep” to indicate it has re-started to normal operating mode with the new programmed information after the radio programming process is complete.
Update Firmware
Periodically, updates to the radio firmware are available from RITRON. This may be to correct a problem, add new features, enhance performance, or customize radio operation. Updating the firmware does not change the radio programming.
1. With the PC/Radio cable assembly connected to the computer and the radio, apply DC power to the radio.
2. From the Radio menu, select the Update Firmware menu item.
3. The programmer will “ping” the radio to establish communications. If the programmer does not see a radio the No Radio! message box will appear. Be sure the cable is connected, the correct COM Port is selected, and that the radio is on.
4. The Select firmware file to Upload dialog box will appear. On the right side of the screen the standard Windows directory tree is available for navigation to alternative file locations on your computer hard drive. Select the location of the firmware file to be read. The dialog box will initially open to the Windows directory that contains the RCCR Programmer software.
5. Radio firmware files use an “.s19” file extension. On the left side of the dialog box will appear a list of all “.s19” firmware files in the currently displayed Windows file directory.
6. Select the firmware file to be opened from the list.
7. Press the OK button to open the radio firmware file. As an alternative, you can double-click on a filename in the list on the left side of the screen to open the radio firmware file.
NOTE: If the radio firmware file selected is not valid for the radio you are attempting to update, the Wrong File! message box will appear. Verify that the selected firmware file is correct before attempting to update the radio firmware.
8. The programmer will update the radio to the new firmware revision. A communications status box will appear at the bottom of the screen while the programmer is updating the radio.
9. The radio must be powered down and restarted after the firmware update is complete.
PROGRAMMING THE RADIO -----------------------------------------------------------------------------------------
--------------------------------------------------------------------------------------------------------------- Ritron RCCR Clean Cab User Manual 20
Ritron, Inc. (800)-USA-1-USA [email protected]
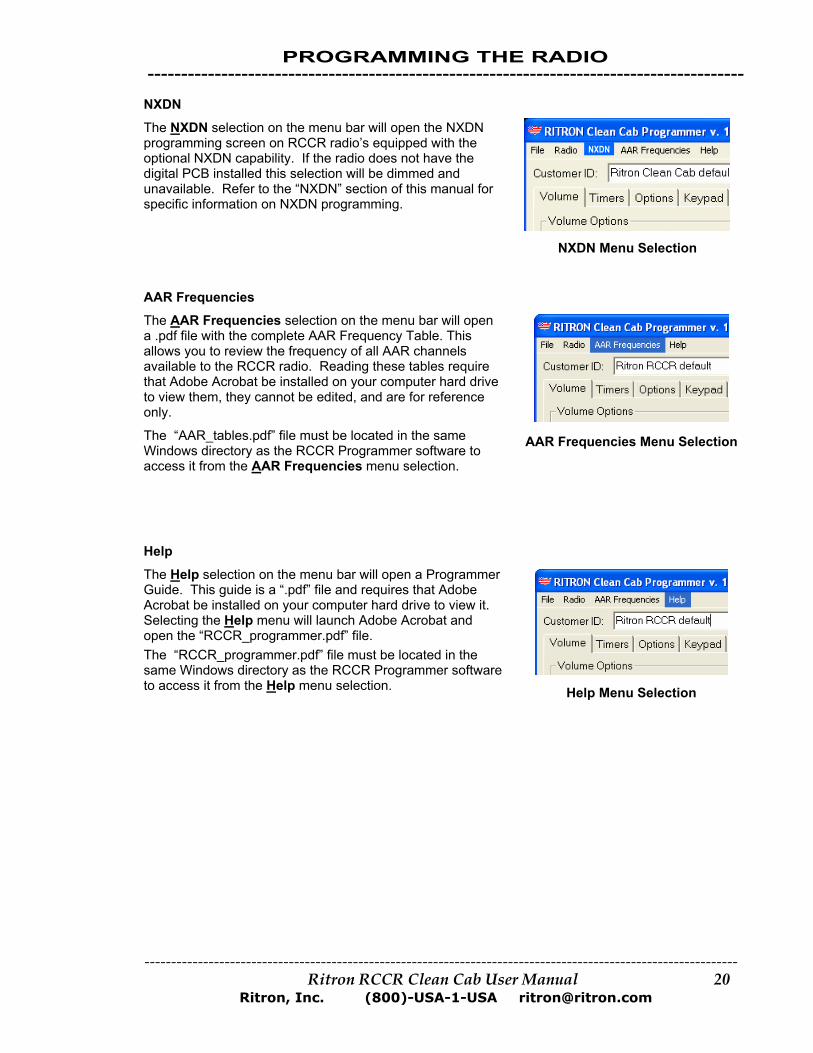
NXDN
The NXDN selection on the menu bar will open the NXDN programming screen on RCCR radio’s equipped with the optional NXDN capability. If the radio does not have the digital PCB installed this selection will be dimmed and unavailable. Refer to the “NXDN” section of this manual for specific information on NXDN programming.
NXDN
NXDN Menu Selection
AAR Frequencies
The AAR Frequencies selection on the menu bar will open a .pdf file with the complete AAR Frequency Table. This allows you to review the frequency of all AAR channels available to the RCCR radio. Reading these tables require that Adobe Acrobat be installed on your computer hard drive to view them, they cannot be edited, and are for reference only.
AAR Frequencies Menu SelectionThe “AAR_tables.pdf” file must be located in the same Windows directory as the RCCR Programmer software to access it from the AAR Frequencies menu selection.
Help
The Help selection on the menu bar will open a Programmer Guide. This guide is a “.pdf” file and requires that Adobe Acrobat be installed on your computer hard drive to view it. Selecting the Help menu will launch Adobe Acrobat and open the “RCCR_programmer.pdf” file.
Help Menu Selection
The “RCCR_programmer.pdf” file must be located in the same Windows directory as the RCCR Programmer software to access it from the Help menu selection.
PROGRAMMING THE RADIO -----------------------------------------------------------------------------------------
--------------------------------------------------------------------------------------------------------------- Ritron RCCR Clean Cab User Manual 21
Ritron, Inc. (800)-USA-1-USA [email protected]
he
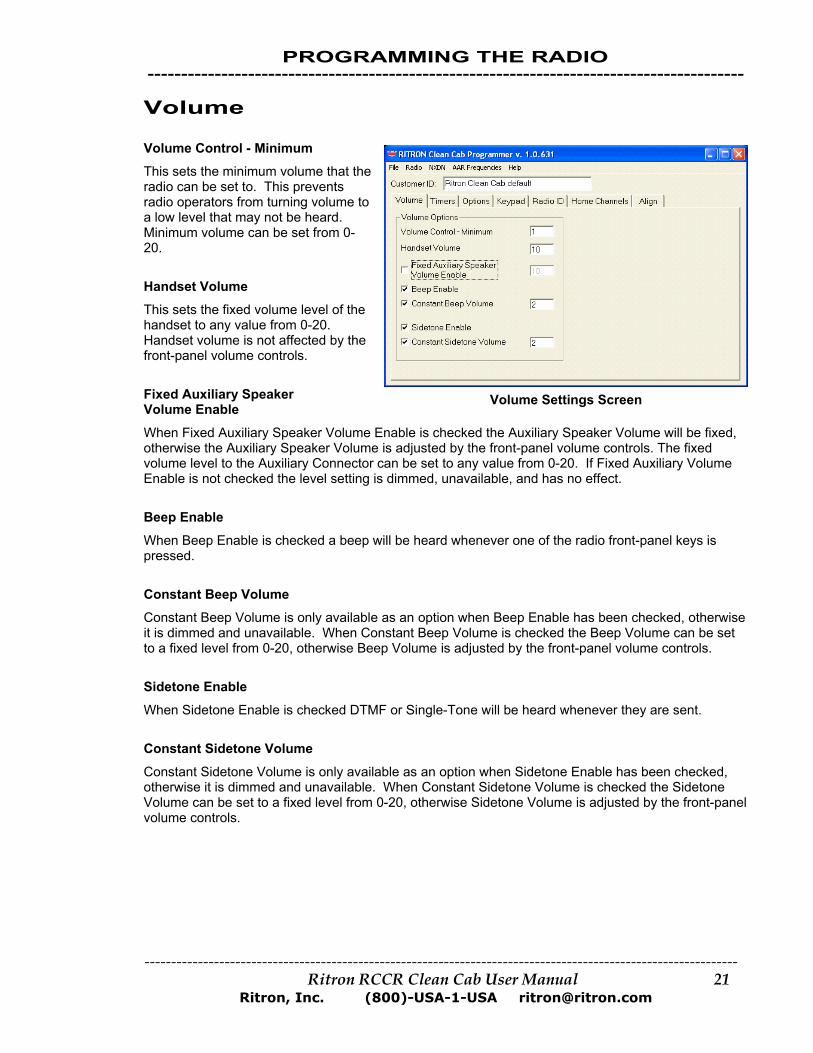
Volume Volume Control - Minimum
Volume Settings Screen
This sets the minimum volume that tradio can be set to. This prevents radio operators from turning volume to a low level that may not be heard. Minimum volume can be set from 0-20.
Handset Volume
This sets the fixed volume level of the handset to any value from 0-20. Handset volume is not affected by the front-panel volume controls.
Fixed Auxiliary Speaker Volume Enable
When Fixed Auxiliary Speaker Volume Enable is checked the Auxiliary Speaker Volume will be fixed, otherwise the Auxiliary Speaker Volume is adjusted by the front-panel volume controls. The fixed volume level to the Auxiliary Connector can be set to any value from 0-20. If Fixed Auxiliary Volume Enable is not checked the level setting is dimmed, unavailable, and has no effect.
Beep Enable
When Beep Enable is checked a beep will be heard whenever one of the radio front-panel keys is pressed.
Constant Beep Volume
Constant Beep Volume is only available as an option when Beep Enable has been checked, otherwise it is dimmed and unavailable. When Constant Beep Volume is checked the Beep Volume can be set to a fixed level from 0-20, otherwise Beep Volume is adjusted by the front-panel volume controls.
Sidetone Enable
When Sidetone Enable is checked DTMF or Single-Tone will be heard whenever they are sent.
Constant Sidetone Volume
Constant Sidetone Volume is only available as an option when Sidetone Enable has been checked, otherwise it is dimmed and unavailable. When Constant Sidetone Volume is checked the Sidetone Volume can be set to a fixed level from 0-20, otherwise Sidetone Volume is adjusted by the front-panel volume controls.

PROGRAMMING THE RADIO -----------------------------------------------------------------------------------------
--------------------------------------------------------------------------------------------------------------- Ritron RCCR Clean Cab User Manual 22
Ritron, Inc. (800)-USA-1-USA [email protected]
Timers
Timers Setting Screen
DTMF/Tone Timers (mS)
Minimum Duration
Sets the minimum time a DTMF Tone is sent with the numeric keypad, regardless of how long the key is pressed.
Maximum Duration
Sets the maximum time a DTMF Tone is sent with the numeric keypad, regardless of how long the key is pressed.
Pre-Time Duration
Sets the delay before a DTMF Tone is sent after a key on the numeric keypad is pressed. This allows time for the transmitter to power up and the receiving radios to lock onto the signal.
Hang Time Duration
Sets the length of time the transmitter will remain active after a DTMF Tone is sent using the numeric keypad. This allows time for multiple digit entries without the transmitter dropping between digits.
Dispatch Timers (mS)
Individual Tone Duration
Sets the length of time each DTMF or Single-Tone is sent when using the DISP button to send dispatch tones. For some models this selection will be dimmed and unavailable.
Inter-Tone Interval
This sets the delay between digits when a DTMF sequence is sent using the DISP button. For some models this selection will be dimmed and unavailable.
Other Timers
TX Timeout Timer (sec.)
When checked, the transmitter cannot continuously transmit for a period of time greater than the programmed time. The TX Timeout Timer can be set for 1-255 seconds.
Keypad Entry Timer (mS)
Sets the maximum length of time allowed between digits when making keypad entries.
PROGRAMMING THE RADIO -----------------------------------------------------------------------------------------
--------------------------------------------------------------------------------------------------------------- Ritron RCCR Clean Cab User Manual 23
Ritron, Inc. (800)-USA-1-USA [email protected]
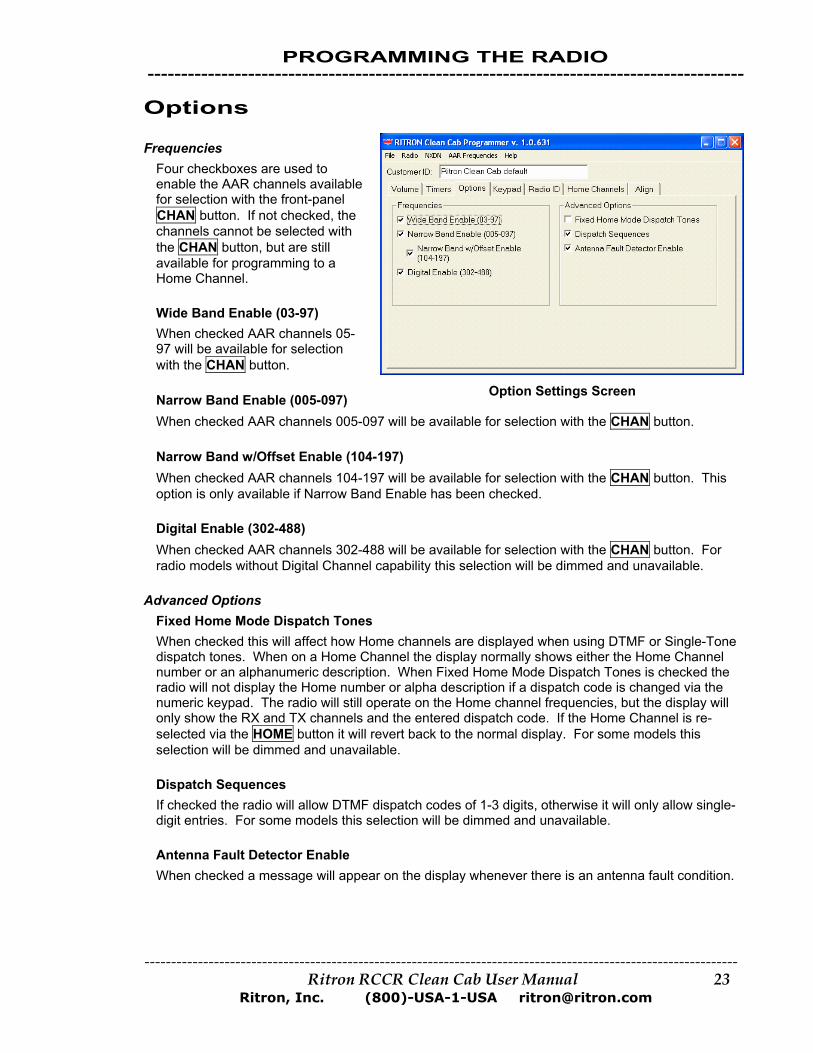
Options Frequencies
Four checkboxes are used to enable the AAR channels available for selection with the front-panel CHAN button. If not checked, the channels cannot be selected with the CHAN button, but are still available for programming to a Home Channel. Wide Band Enable (03-97) When checked AAR channels 05-97 will be available for selection with the CHAN button. Option Settings Screen Narrow Band Enable (005-097) When checked AAR channels 005-097 will be available for selection with the CHAN button. Narrow Band w/Offset Enable (104-197) When checked AAR channels 104-197 will be available for selection with the CHAN button. This option is only available if Narrow Band Enable has been checked. Digital Enable (302-488) When checked AAR channels 302-488 will be available for selection with the CHAN button. For radio models without Digital Channel capability this selection will be dimmed and unavailable.
Advanced Options Fixed Home Mode Dispatch Tones When checked this will affect how Home channels are displayed when using DTMF or Single-Tone dispatch tones. When on a Home Channel the display normally shows either the Home Channel number or an alphanumeric description. When Fixed Home Mode Dispatch Tones is checked the radio will not display the Home number or alpha description if a dispatch code is changed via the numeric keypad. The radio will still operate on the Home channel frequencies, but the display will only show the RX and TX channels and the entered dispatch code. If the Home Channel is re-selected via the HOME button it will revert back to the normal display. For some models this selection will be dimmed and unavailable. Dispatch Sequences If checked the radio will allow DTMF dispatch codes of 1-3 digits, otherwise it will only allow single-digit entries. For some models this selection will be dimmed and unavailable. Antenna Fault Detector Enable When checked a message will appear on the display whenever there is an antenna fault condition.

PROGRAMMING THE RADIO -----------------------------------------------------------------------------------------
--------------------------------------------------------------------------------------------------------------- Ritron RCCR Clean Cab User Manual 24
Ritron, Inc. (800)-USA-1-USA [email protected]
Keypad Most front panel keypad buttons can be disabled by un-checking the associated box.
Keypad Settings Screen
Channel
If the CHAN button is disabled all channel entries must be made via pre-programmed Home Channels using the HOME button.
Home
If the Home button is disabled all channel entries must be made using the CHAN button and are limited to AAR channels.
Tone
If the Tone button is disabled the radio will be unable to send Single-Tone dispatch tones unless they have been pre-programmed into a Home channel, where they can be sent with the DISP button.
DTMF
If the DTMF button is disabled the radio will be unable to send DTMF dispatch sequences unless they have been pre-programmed into a Home channel, where they can be sent with the DISP button. This will not prevent DTMF tones from being sent using the numeric keypad.
Keypad (all)
If the numeric keypad is disabled it will not send DTMF tones when pressed. The keypad can still be used to enter channels via the CHAN or HOME buttons, or dispatch sequences using the DTMF or TONE buttons.
“*” Key
If the “*” key is disabled it will not send DTMF tones when pressed. It will still be available for entering DTMF sequences using the DTMF button.
“#” Key If the “#” key is disabled it will not send DTMF tones when pressed. It will still be available for entering DTMF sequences using the DTMF button and for “Revert to Last TX-RX Channel Pair” feature using the HOME button.

PROGRAMMING THE RADIO -----------------------------------------------------------------------------------------
--------------------------------------------------------------------------------------------------------------- Ritron RCCR Clean Cab User Manual 25
Ritron, Inc. (800)-USA-1-USA [email protected]
Radio ID The Radio ID screen displays general information about the radio. Information displayed in the Radio Identification and Radio Frequency Data fields are pre-programmed at the factory and cannot be changed.
Radio ID Screen
Radio Identification Firmware Revision: The firmware revision currently programmed into the radio.
Case Serial Number: The radio case serial number when it leaves the factory.
Date of Manufacture: The year and week the radio was tested in the factory.
FCC ID: The FCC Identifier for Equipment Certification.
IC ID: The Industry Canada Identifier for Equipment Certification.
Radio Frequency Data Minimum Frequency: The minimum guaranteed operating frequency of the radio.
Maximum Frequency: The maximum guaranteed operating frequency of the radio.
Alignment Frequency: Frequency at which the radio was factory tested.

PROGRAMMING THE RADIO -----------------------------------------------------------------------------------------
--------------------------------------------------------------------------------------------------------------- Ritron RCCR Clean Cab User Manual 26
Ritron, Inc. (800)-USA-1-USA [email protected]
Home Channels The Ritron RCCR radio can be programmed with up to 500 Home Channels that are accessed with the HOME button. Home Channels can be programmed to receive and transmit on any frequency from the AAR Table or from the Custom Frequency list. Home Channels can also be programmed for CTCSS or DCS encoding and decoding, and can have a DTMF or Single-Tone dispatch code assigned on some models.
The Home Channel programming screen contains a scrolling list of Home Channels 001-500.
NOTE: Only Home Channels that have been programmed will be available to the radio user with the HOME button. If the Home Channel number appears blank on the Home Channel list it cannot be accessed by the radio user.
To program a Home Channel:
1. Press the Home Channels tab to display the scrolling Home Channel list. 2. Select the Home Channel to be programmed from the scrolling Home Channel list. 3. The program data for the selected channel will be displayed on the right side of the screen. 4. Enter all program data for the selected channel. Data will appear on the Home Channel list as it
is entered.
5. Any Home Channel may be removed from the list by first selecting the channel, and then pressing the Delete Channel button.
6. Home Channel program data is checked when you leave the Home Channel screen or select Program Radio from the Radio menu. If a programming error is detected (i.e. invalid Custom Frequency, no RX frequency entered) a message box will alert you to the error and allow you to go back and correct the entry.
All Home Channels 001-500 can be programmed for:
Home Name Home Name is an alpha-numeric description for the corresponding Home Channel. The Home Name may use up to 7 characters including 0-9, A-Z, *, #, -, and _. Display Home Name When checked, any description entered in the Home Name field will show up on the display whenever the Home Channel is selected instead of the Home Channel number. TX and RX Frequency Enter the TX and RX frequencies to be used on this Home Channel. This can be any one of the AAR frequencies, or any Custom Frequency 500-599 that has been programmed into the radio.
Home Channel Screen with an Analog Home Channel displayed

PROGRAMMING THE RADIO -----------------------------------------------------------------------------------------
--------------------------------------------------------------------------------------------------------------- Ritron RCCR Clean Cab User Manual 27
Ritron, Inc. (800)-USA-1-USA [email protected]
Analog Home Channels can be programmed for:
TX and RX Tone Each Home Channel can be programmed for a unique CTCSS or DCS TX code that will be continuously sent whenever the transmitter is active, and/or RX code that will quiet the receiver unless the code is detected. Using the drop-down, scrolling menus you can choose from a list of 51 CTCSS codes, 104 DCS codes, or None. TX and RX Invert DCS When checked, it inverts the polarity of the DCS TX and/or RX codes. These selections are only available if a DCS code is used. Dispatch Code Each Home Channel can be programmed with an assigned DTMF or Single-Tone Dispatch Code. This Dispatch Code will be automatically entered into the radio every time the Home Channel is selected. DTMF codes can be 1-3 digits while Single-Tone codes can be 1 digit only. For models that do not allow Dispatch Code programming on a Home Channel this selection will be dimmed and unavailable.
Digital Home Channels can be programmed for:
TX and RX RAN The TX and RX RAN (Radio Access Number) is a unique number used to help mute unwanted transmissions on the same RF frequency. This number can be between 0 and 63. RAN 0 = no RAN. Dest ID The Destination ID is a unique Unit or Group ID number that allows the RCCR to call a specific individual unit or group depending on the Call Type selection. RX Group RX Group is a unique Group ID number for the RCCR that specifies a specific group in the NXDN system.
Home Channel Screen with a Digital Home Channel displayed
Squelch Type To mute unwanted transmissions, the radio’s squelch mode can be set for RAN, ID, RAN+ID, or Off.
RAN To unmute the radio, the transmitted TX RAN must match the receiving radio’s RX RAN. ID To unmute the radio, the transmitted Destination ID must match the receiving radio’s
Unit ID or Group ID number depending on the Call Type. RAN+ID To unmute the radio, both the TX and RX RAN’s and the Destination and RX Group ID’s
must match. Off The radio will unmute with any transmission on the channel.
Call Type The Home Channel can be programmed to transmit either an Individual or Group Call.
PROGRAMMING THE RADIO -----------------------------------------------------------------------------------------
--------------------------------------------------------------------------------------------------------------- Ritron RCCR Clean Cab User Manual 28
Ritron, Inc. (800)-USA-1-USA [email protected]
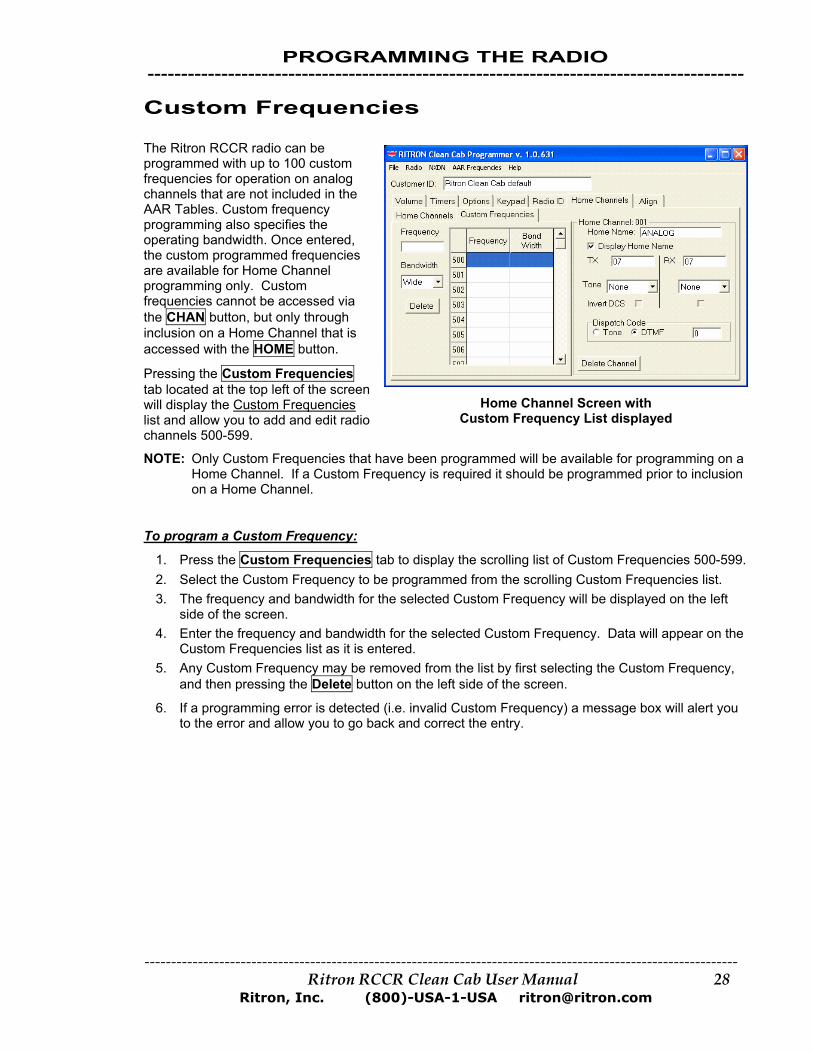
Custom Frequencies The Ritron RCCR radio can be programmed with up to 100 custom frequencies for operation on analog channels that are not included in the AAR Tables. Custom frequency programming also specifies the operating bandwidth. Once entered, the custom programmed frequencies are available for Home Channel programming only. Custom frequencies cannot be accessed via the CHAN button, but only through inclusion on a Home Channel that is accessed with the HOME button.
Home Channel Screen with Custom Frequency List displayed
Pressing the Custom Frequencies tab located at the top left of the screen will display the Custom Frequencies list and allow you to add and edit radio channels 500-599.
NOTE: Only Custom Frequencies that have been programmed will be available for programming on a Home Channel. If a Custom Frequency is required it should be programmed prior to inclusion on a Home Channel.
To program a Custom Frequency:
1. Press the Custom Frequencies tab to display the scrolling list of Custom Frequencies 500-599. 2. Select the Custom Frequency to be programmed from the scrolling Custom Frequencies list. 3. The frequency and bandwidth for the selected Custom Frequency will be displayed on the left
side of the screen. 4. Enter the frequency and bandwidth for the selected Custom Frequency. Data will appear on the
Custom Frequencies list as it is entered. 5. Any Custom Frequency may be removed from the list by first selecting the Custom Frequency,
and then pressing the Delete button on the left side of the screen.
6. If a programming error is detected (i.e. invalid Custom Frequency) a message box will alert you to the error and allow you to go back and correct the entry.
PROGRAMMING THE RADIO -----------------------------------------------------------------------------------------
--------------------------------------------------------------------------------------------------------------- Ritron RCCR Clean Cab User Manual 29
Ritron, Inc. (800)-USA-1-USA [email protected]
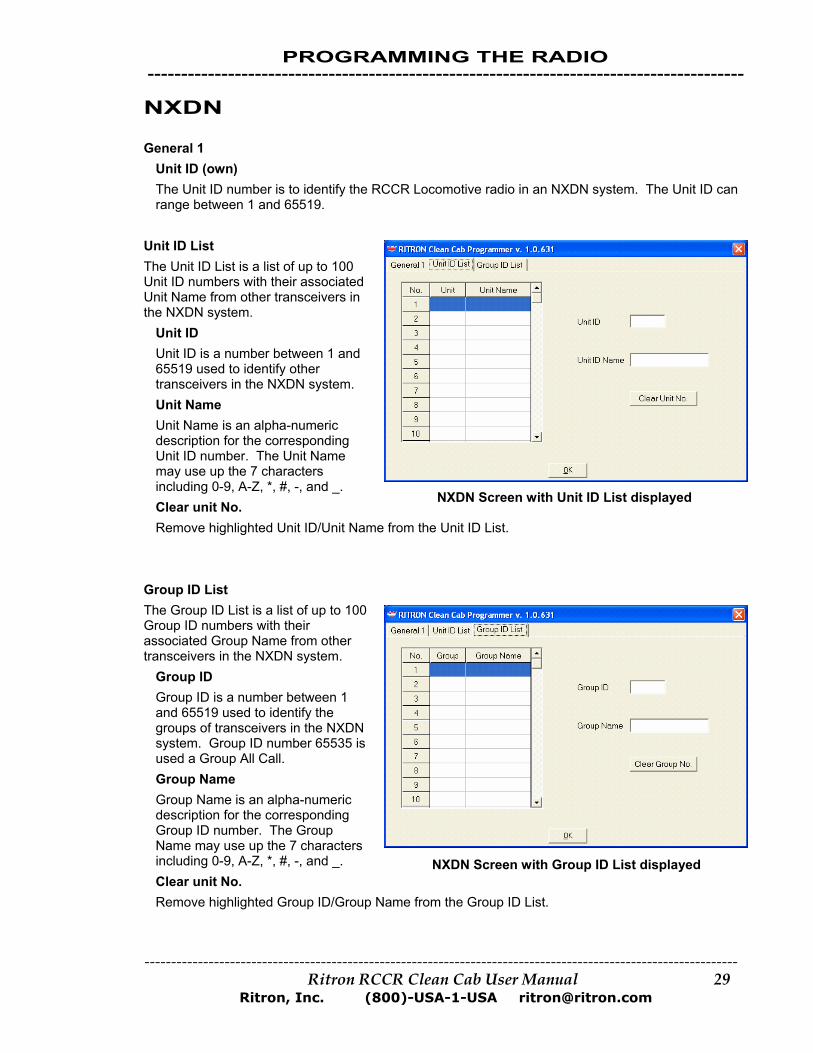
NXDN General 1
Unit ID (own) The Unit ID number is to identify the RCCR Locomotive radio in an NXDN system. The Unit ID can range between 1 and 65519.
Unit ID List
NXDN Screen with Unit ID List displayed
The Unit ID List is a list of up to 100 Unit ID numbers with their associated Unit Name from other transceivers in the NXDN system.
Unit ID Unit ID is a number between 1 and 65519 used to identify other transceivers in the NXDN system. Unit Name Unit Name is an alpha-numeric description for the corresponding Unit ID number. The Unit Name may use up the 7 characters including 0-9, A-Z, *, #, -, and _. Clear unit No. Remove highlighted Unit ID/Unit Name from the Unit ID List.
Group ID List The Group ID List is a list of up to 100 Group ID numbers with their associated Group Name from other transceivers in the NXDN system.
NXDN Screen with Group ID List displayed
Group ID Group ID is a number between 1 and 65519 used to identify the groups of transceivers in the NXDN system. Group ID number 65535 is used a Group All Call. Group Name Group Name is an alpha-numeric description for the corresponding Group ID number. The Group Name may use up the 7 characters including 0-9, A-Z, *, #, -, and _. Clear unit No. Remove highlighted Group ID/Group Name from the Group ID List.

PROGRAMMING THE RADIO -----------------------------------------------------------------------------------------
--------------------------------------------------------------------------------------------------------------- Ritron RCCR Clean Cab User Manual 30
Ritron, Inc. (800)-USA-1-USA [email protected]
Align
Align Screen
Test and alignment of RCCR radio is accomplished using the RCCR Programmer. All adjustments can be made via the Align screen without disassembly of the radio. Factory testing characterizes the radio performance across the specified frequency range and sets a calibration factor. This results in consistent performance, regardless of frequency. Typically, the radio has been tested near the middle of the specified operating frequency band with the resulting values stored in the radio. The radio was then tested near or at the highest specified frequency. The difference between the resulting values was stored as a “slope” value, a Δvalue / Δfrequency ratio.
The radio cannot be tuned on a specific frequency or channel using the RCCR Programmer Align screen. The Align screen will display the frequency to be used for tuning.
The “slope” value cannot be changed using the RCCR Programmer for any of the tunable attributes. Instead, the programmer will allow tuning at the “Alignment Frequency” displayed on the Tune Radio screen and rely on the factory “slope” setting to apply the adjusted value appropriately at all other frequencies.
All factory testing is performed at the radio’s nominal operating voltage of +13.8 VDC.
IMPORTANT
The RCCR radio has been fully tested at the factory and should not require adjustment. An authorized RF service technician must perform test and alignment of an RCCR radio. Do not attempt service of the radio if not completely familiar with the operation of frequency synthesized radios.

APPENDIX -----------------------------------------------------------------------------------------
--------------------------------------------------------------------------------------------------------------- Ritron RCCR Clean Cab User Manual 31
Ritron, Inc. (800)-USA-1-USA [email protected]
RF ENERGY EXPOSURE AWARENESS AND CONTROL INFORMATION, AND OPERATIONAL
INSTRUCTIONS FOR FCC AND INDUSTRY CANADA (IC) OCCUPATIONAL USE REQUIREMENTS
BEFORE USING YOUR MOBILE 2-WAY RADIO READ THIS IMPORTANT RF ENERGY
AWARENESS AND CONTROL INFORMATION AND OPERATIONAL INSTRUCTIONS TO ENSURE COMPLIANCE WITH THE FCC’S RF EXPOSURE GUIDELINES.
NOTICE: This radio is intended for use in occupational/controlled conditions, where users have full knowledge of their exposure and can exercise control over their exposure to meet FCC and IC limits. This radio device is NOT authorized for general population, consumer, or any other use.
This 2-way radio uses electromagnetic energy in the radio frequency (RF) spectrum to provide communications between two or more users over a distance.
It uses radio frequency (RF) energy or radio waves to send and receive calls. RF energy is one form of electromagnetic energy. Other forms include, but are not limited to, electric power, sunlight and x-rays. RF energy, however, should not be confused with these other forms of electromagnetic energy, which when used improperly can cause biological damage. Very high levels of x-rays, for example, can damage tissues and genetic material.
Experts in science, engineering, medicine, health, and industry work with organizations to develop standards for exposure to RF energy. These standards provide recommended levels of RF exposure for both workers and the general public. These recommended RF exposure levels include substantial margins of protection. All 2-way radios marketed in North America are designed, manufactured and tested to ensure they meet government established RF exposure levels. In addition, manufacturers also recommend specific operating instructions to users of 2-way radios. These instructions are important because they inform users about RF energy exposure and provide simple procedures on how to control it. Please refer to the following websites for more information on what RF energy exposure is and how to control your exposure to assure compliance with established RF exposure limits. http://www.fcc.gov/oet/rfsafety/rf-faqs.html http://www.osha.gov/SLTC/radiofrequencyradiation/index.html http://www.ic.gc.ca/epic/site/smt-gst.nsf/vwapj/rss102e.pdf/$FILE/rss102e.pdf Federal Communications Commission/Industry Canada Regulations
The FCC and IC rules require manufacturers to comply with the RF energy exposure limits for mobile 2-way radios before they can be marketed in the U.S. When 2-way radios are used as a consequence of employment, the FCC and IC require users to be fully aware of and able to control their exposure to meet occupational requirements. Exposure awareness can be facilitated by the use of a label directing users to specific user awareness information.
Your Ritron 2-way radio has an RF exposure product label. Also, this Ritron RCCR-151/152 user manual includes information and operating instructions required to control your RF exposure and to satisfy compliance requirements.

APPENDIX -----------------------------------------------------------------------------------------
--------------------------------------------------------------------------------------------------------------- Ritron RCCR Clean Cab User Manual 32
Ritron, Inc. (800)-USA-1-USA [email protected]
Compliance with RF Exposure Standards Your Ritron two-way radio is designed and tested to comply with a number of national and international standards and guidelines (listed below) regarding human exposure to radio frequency electromagnetic energy. This radio complies with the IEEE and ICNIRP exposure limits for occupational/controlled RF exposure environment at duty factors of up to 50% talk and 50% listen and is authorized by the FCC and IC for occupational use. In terms of measuring RF energy for compliance with the exposure guidelines, your radio antenna radiates measurable RF energy only while it is transmitting (during talking), not when it is receiving (listening) or in standby mode. Your Ritron two-way radio complies with the following RF energy exposure standards and guidelines:
• United States Federal Communications Commission, Code of Federal Regulations; 47 CFR §§ 2 sub-part J.
• American National Standards Institute (ANSI) / Institute of Electrical and Electronic Engineers (IEEE) C95. 1-1992.
• Institute of Electrical and Electronic Engineers (IEEE) C95.1-1999 Edition. Copyright Telecommunications Industry Association
• Industry Canada RSS-102 Radio Frequency Exposure Compliance of Radiocommunication Apparatus (All Frequency Bands)
RF Exposure Compliance and Control Guidelines and Operating Instructions
To control exposure to yourself and others and ensure compliance with the occupational/controlled environment exposure limits always adhere to the following procedures.
Guidelines:
• User awareness instructions should accompany device when transferred to other users. • Do not use this device if the operational requirements described herein are not met.
Instructions:
• Transmit no more than the rated duty factor of 50% of the time. To transmit (talk), push the Push-To-Talk (PTT) button. To receive calls, release the PTT button. Transmitting 50% of the time, or less, is important because this radio generates measurable RF energy exposure only when transmitting (in terms of measuring for standards compliance).
• Transmit only when people outside the vehicle are at least the recommended minimum lateral distance away, as shown in Table 1, from a properly installed according to installation instructions, externally-mounted antenna.
NOTE – Table 1 lists the recommended minimum lateral distance for bystanders in an uncontrolled environment from transmitting types of antennas (i.e., monopoles over a ground plane, or dipoles) at several different ranges of rated radio power for mobile radios installed in a vehicle.
Table 1. Rated Power and Recommended Lateral Distance
Rated Power of Vehicle-installed Mobile Two-way Radio
Recommended Minimum Lateral Distance from Transmitting Antenna
Less than 10 Watts 24.4 inches (62 cm)
10 to 25 Watts 38.7 inches (98.3 cm)
25 to 50 Watts 54.6 inches (138.7 cm)

APPENDIX -----------------------------------------------------------------------------------------
--------------------------------------------------------------------------------------------------------------- Ritron RCCR Clean Cab User Manual 33
Ritron, Inc. (800)-USA-1-USA [email protected]
Mobile Antennas
• Install antennas on the top of the vehicle taking into account the recommended minimum lateral distances in table 1. These mobile antenna installation guidelines are limited to metal body motor vehicles or vehicles with appropriate ground planes. The antenna installation should additionally be in accordance with:
a.) The requirements of the antenna manufacturer/supplier. b.) Instructions in the Radio Installation Manual, including minimum antenna cable lengths. c.) The installation manual should provide specific information of how to install the
antennas to facilitate recommended operating distances to all potentially exposed persons.
• This device has been designed to operate with a standard VHF quarterwave whip antenna over a conducting ground plane and having a maximum gain of 2.1 dBi. Antennas other than a VHF quarterwave or having gain greater than 2.1 dBi are strictly prohibited for use with this device. The required antenna impedance is 50 ohms resistive.
• To reduce potential radio interference to other users, the antenna type and its gain should be so chosen that the equivalent isotropically radiated power (EIRP) is not more than that permitted for successful communications.
Approved Accessories
• This radio has been tested and meets the FCC and IC RF exposure guidelines when used with the Ritron accessories supplied or designated for this product. Use of other accessories may not ensure compliance with the RF exposure guidelines, and may violate FCC and IC regulations.
• For a list of Ritron approved accessories see this user manual, or visit the following website which lists approved accessories: www.ritron,com
Contact Information
For additional information on exposure requirements or other information, see:
Ritron, Inc. 505 West Carmel Drive Carmel, IN 46032 PH: (317) 846-1201 FAX: (317) 846-4978 Email: [email protected]: www.ritron.com

APPENDIX -----------------------------------------------------------------------------------------
--------------------------------------------------------------------------------------------------------------- Ritron RCCR Clean Cab User Manual 34
Ritron, Inc. (800)-USA-1-USA [email protected]
AAR Channels --------------Channels-------------- Wide Narrow Digital 25 kHz 12.5 kHz 6.25 kHz Frequency (MHz) * 03 159.930 * 04 160.050 * 104 302 160.1775 * 05 005 303 160.185 * 105 304 160.1925 * 06 006 305 160.200 * 106 306 160.2075 07 007 307 160.215 107 308 160.2225 08 008 309 160.230 108 310 160.2375 09 009 311 160.245 109 312 160.2525 10 010 313 160.260 110 314 160.2675 11 011 315 160.275 111 316 160.2825 12 012 317 160.290 112 318 160.2975 13 013 319 160.305 113 320 160.3125 14 014 321 160.320 114 322 160.3275 15 015 323 160.335 115 324 160.3425 16 016 325 160.350 116 326 160.3575 17 017 327 160.365 117 328 160.3725 18 018 329 160.380 118 330 160.3875 19 019 331 160.395 119 332 160.4025 20 020 333 160.410 120 334 160.4175 21 021 335 160.425 121 336 160.4325 22 022 337 160.440 122 338 160.4475 23 023 339 160.455 123 340 160.4625 24 024 341 160.470 124 342 160.4775 25 025 343 160.485 125 344 160.4925 * Denotes Canadian Channels
------------- Channels ------------- Wide Narrow Digital 25 kHz 12.5 kHz 6.25 kHz Frequency (MHz) 26 026 345 160.500 126 346 160.5075 27 027 347 160.515 127 348 160.5225 28 028 349 160.530 128 350 160.5375 29 029 351 160.545 129 352 160.5525 30 030 353 160.560 130 354 160.5675 31 031 355 160.575 131 356 160.5825 32 032 357 160.590 132 358 160.5975 33 033 359 160.605 133 360 160.6125 34 034 361 160.620 134 362 160.6275 35 035 363 160.635 135 364 160.6425 36 036 365 160.650 136 366 160.6575 37 037 367 160.665 137 368 160.6725 38 038 369 160.680 138 370 160.6875 39 039 371 160.695 139 372 160.7025 40 040 373 160.710 140 374 160.7175 41 041 375 160.725 141 376 160.7325 42 042 377 160.740 142 378 160.7475 43 043 379 160.755 143 380 160.7625 44 044 381 160.770 144 382 160.7775 45 045 383 160.785 145 384 160.7925 46 046 385 160.800 146 386 160.8075 47 047 387 160.815 147 388 160.8225 48 048 389 160.830 148 390 160.8375 49 049 391 160.845 149 392 160.8525
APPENDIX -----------------------------------------------------------------------------------------
--------------------------------------------------------------------------------------------------------------- Ritron RCCR Clean Cab User Manual 35
Ritron, Inc. (800)-USA-1-USA [email protected]
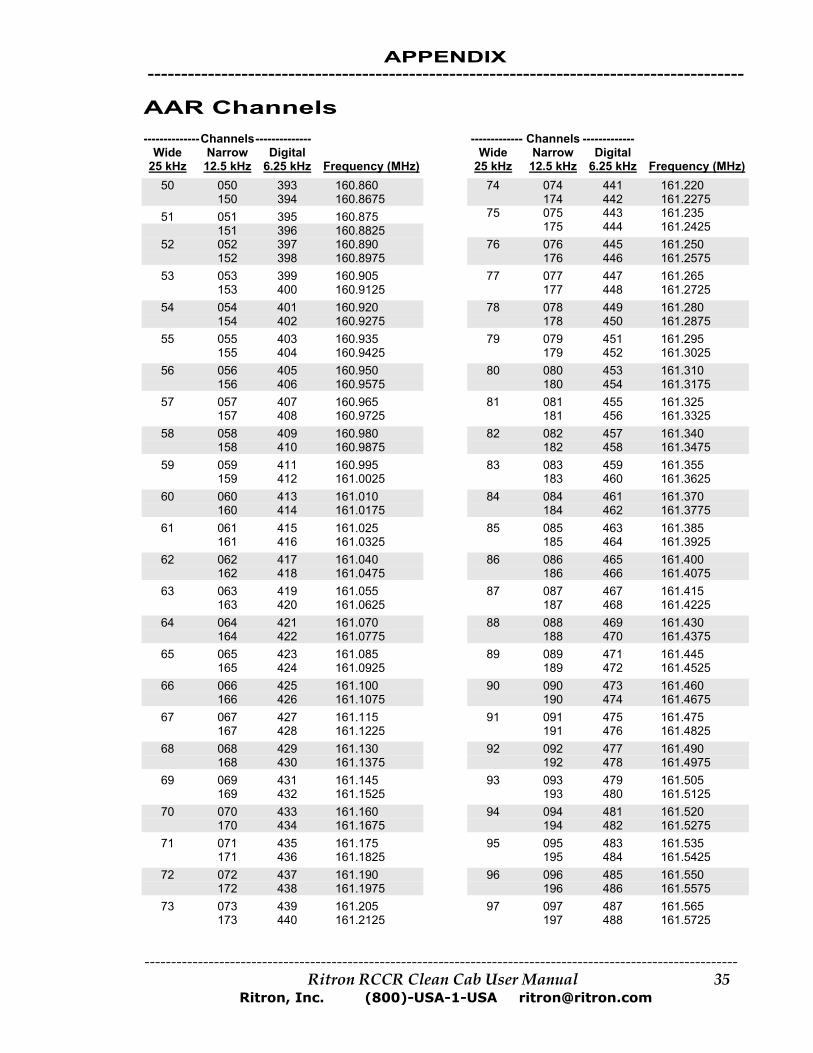
AAR Channels --------------Channels-------------- Wide Narrow Digital 25 kHz 12.5 kHz 6.25 kHz Frequency (MHz) 50 050 393 160.860 150 394 160.8675 51 051 395 160.875 151 396 160.8825 52 052 397 160.890 152 398 160.8975 53 053 399 160.905 153 400 160.9125 54 054 401 160.920 154 402 160.9275 55 055 403 160.935 155 404 160.9425 56 056 405 160.950 156 406 160.9575 57 057 407 160.965 157 408 160.9725 58 058 409 160.980 158 410 160.9875 59 059 411 160.995 159 412 161.0025 60 060 413 161.010
160 414 161.0175 61 061 415 161.025 161 416 161.0325 62 062 417 161.040 162 418 161.0475 63 063 419 161.055 163 420 161.0625 64 064 421 161.070 164 422 161.0775 65 065 423 161.085 165 424 161.0925 66 066 425 161.100 166 426 161.1075 67 067 427 161.115 167 428 161.1225 68 068 429 161.130 168 430 161.1375 69 069 431 161.145 169 432 161.1525 70 070 433 161.160 170 434 161.1675 71 071 435 161.175 171 436 161.1825 72 072 437 161.190 172 438 161.1975 73 073 439 161.205 173 440 161.2125
------------- Channels ------------- Wide Narrow Digital 25 kHz 12.5 kHz 6.25 kHz Frequency (MHz) 74 074 441 161.220 174 442 161.2275 75 075 443 161.235 175 444 161.2425 76 076 445 161.250 176 446 161.2575 77 077 447 161.265 177 448 161.2725 78 078 449 161.280 178 450 161.2875 79 079 451 161.295 179 452 161.3025 80 080 453 161.310 180 454 161.3175 81 081 455 161.325 181 456 161.3325 82 082 457 161.340 182 458 161.3475 83 083 459 161.355 183 460 161.3625 84 084 461 161.370 184 462 161.3775 85 085 463 161.385 185 464 161.3925 86 086 465 161.400 186 466 161.4075 87 087 467 161.415 187 468 161.4225 88 088 469 161.430 188 470 161.4375 89 089 471 161.445 189 472 161.4525 90 090 473 161.460 190 474 161.4675 91 091 475 161.475 191 476 161.4825 92 092 477 161.490 192 478 161.4975 93 093 479 161.505 193 480 161.5125 94 094 481 161.520 194 482 161.5275 95 095 483 161.535 195 484 161.5425 96 096 485 161.550 196 486 161.5575 97 097 487 161.565 197 488 161.5725
APPENDIX -----------------------------------------------------------------------------------------
--------------------------------------------------------------------------------------------------------------- Ritron RCCR Clean Cab User Manual 36
Ritron, Inc. (800)-USA-1-USA [email protected]
RCCR Radio Specifications
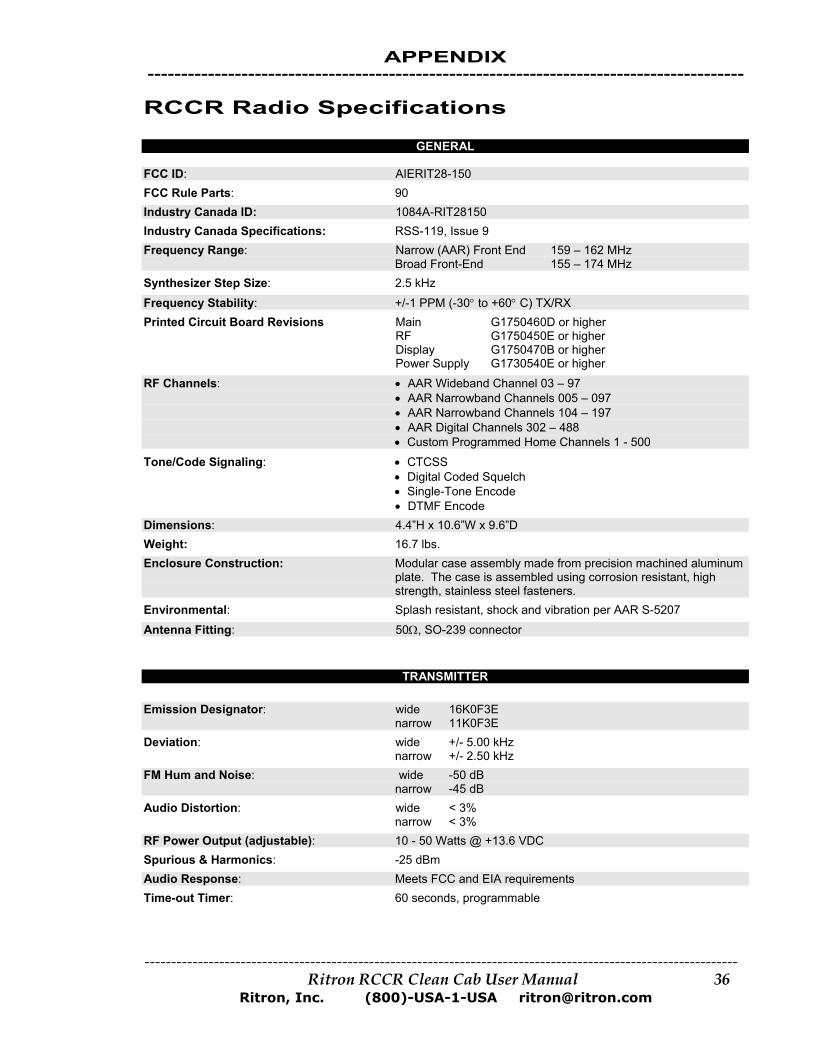
GENERAL FCC ID: AIERIT28-150 FCC Rule Parts: 90 Industry Canada ID: 1084A-RIT28150 Industry Canada Specifications: RSS-119, Issue 9 Frequency Range: Narrow (AAR) Front End 159 – 162 MHz Broad Front-End 155 – 174 MHz Synthesizer Step Size: 2.5 kHz Frequency Stability: +/-1 PPM (-30° to +60° C) TX/RX Printed Circuit Board Revisions Main G1750460D or higher RF G1750450E or higher Display G1750470B or higher Power Supply G1730540E or higher RF Channels: • AAR Wideband Channel 03 – 97 • AAR Narrowband Channels 005 – 097 • AAR Narrowband Channels 104 – 197 • AAR Digital Channels 302 – 488 • Custom Programmed Home Channels 1 - 500
Tone/Code Signaling: • CTCSS • Digital Coded Squelch • Single-Tone Encode • DTMF Encode Dimensions: 4.4”H x 10.6”W x 9.6”D Weight: 16.7 lbs. Enclosure Construction: Modular case assembly made from precision machined aluminum
plate. The case is assembled using corrosion resistant, high strength, stainless steel fasteners.
Environmental: Splash resistant, shock and vibration per AAR S-5207 Antenna Fitting: 50Ω, SO-239 connector
TRANSMITTER Emission Designator: wide 16K0F3E narrow 11K0F3E Deviation: wide +/- 5.00 kHz narrow +/- 2.50 kHz FM Hum and Noise: wide -50 dB narrow -45 dB Audio Distortion: wide < 3% narrow < 3% RF Power Output (adjustable): 10 - 50 Watts @ +13.6 VDC Spurious & Harmonics: -25 dBm Audio Response: Meets FCC and EIA requirements Time-out Timer: 60 seconds, programmable

APPENDIX -----------------------------------------------------------------------------------------
--------------------------------------------------------------------------------------------------------------- Ritron RCCR Clean Cab User Manual 37
Ritron, Inc. (800)-USA-1-USA [email protected]
RECEIVER Sensitivity: wide 0.25 µV (-119 dBm) typical (12 dB SINAD) narrow 0.25 µV (-119 dBm) typical L.O. Injection: High side (RX frequency + 43.65 MHz) Adjacent Channel (EIA): wide -80 dB narrow -70 dB Spurious Rejection: wide -90 dB narrow -90 dB Image Rejection (EIA): wide -80 dB narrow -80 dB Intermodulation (EIA): wide -80 dB narrow -80 dB CTCSS/DCS Decode Deviation: wide 500 – 850 Hz narrow 350 – 500 Hz FM Hum and Noise: wide -50 dB narrow -45 dB Noise Squelch Sensitivity: Programmable, factory set for 0.3 -0.35 µV Frequency Response: 300 – 3000 Hz, de-emphasized Audio Output 12 Watts into 4Ω, with less than 3 % THD Receiving System: Dual conversion superheterodyne I.F. System: 1st ............ 43.65 MHz 2nd ........... 450 kHz CTCSS/DCS Decode Time: per EIA Standards
POWER REQUIREMENTS +72 VDC IN +13.6 VDC IN Minimum Supply Voltage: +58 VDC +10.9 VDC Maximum Supply Voltage: +85 VDC +15.5 VDC Standby Current: 230 mA 1 A Receive Current (1/2 volume): 340 mA 1.6 A Transmit Current: 2.1 A @ 50 Watts 10 A @ 50 Watt
APPENDIX -----------------------------------------------------------------------------------------
--------------------------------------------------------------------------------------------------------------- Ritron RCCR Clean Cab User Manual 38
Ritron, Inc. (800)-USA-1-USA [email protected]
RITRON, INC. LIMITED WARRANTY
WHAT THIS WARRANTY COVERS: RITRON, INC. ("RITRON") provides the following warranty against defects in materials and/or workmanship in the RITRON Clean Cab radio under normal use and service during the applicable warranty period (as stated below). "Accessories" means antennas, cables, handsets, speaker/microphones and items contained in the programming and programming/service kits.
WHAT IS COVERED FOR HOW LONG WHAT RITRON WILL DO
RCCR-151 2 years* During the first two years after date of purchase, RITRON will repair or RCCR-152 2 years* replace the defective product, at RITRON's option, parts and labor included at no charge.
Accessories 90 days* *After date of purchase WHAT THIS WARRANTY DOES NOT COVER: • Any technical information provided with the covered product or any other RITRON products;
• Installation, maintenance or service of the product, unless this is covered by a separate written agreement with RITRON;
• Any products not furnished by RITRON which are attached or used with the covered product, or defects or damage from the use of the covered product with equipment that is not covered (such as defects or damage from the use of a control head not manufactured by Ritron);
• Defects or damage, resulting from: - misuse, abuse, improper maintenance, alteration, modification, neglect, accident or act of God, - the use of covered products other than in normal and customary manner or, - improper testing or installation;
• Defects or damages from unauthorized disassembly, repair or modification, or where unauthorized disassembly, repair or modification prevents inspection and testing necessary to validate warranty claims;
• Defects or damages in which the serial number has been removed, altered or defaced.
IMPORTANT: This warranty sets forth the full extent of RITRON’s express responsibilities regarding the covered products, and is given in lieu of all other express warranties. What RITRON has agreed to do above is your sole and exclusive remedy. No person is authorized to make any other warranty to you on behalf of RITRON. Warranties implied by state law, such as implied warranties of merchantability and fitness for a particular purpose, are limited to the duration of this limited warranty as it applies to the covered product. Incidental and consequential damages are not recoverable under this warranty (this includes loss of use or time, inconvenience, business interruption, commercial loss, lost profits or savings). Some states do not allow the exclusion or limitation of incidental or consequential damages, or limitation on how long an implied warranty lasts, so the above limitations or exclusions may not apply to you. Because each covered product system is unique, RITRON disclaims liability for range, coverage, or operation of the system as a whole under this warranty. WHO IS COVERED BY THIS WARRANTY: This warranty is given only to the purchaser or lessee of covered products when acquired for use, not resale. This warranty is not assignable or transferable. HOW TO GET WARRANTY SERVICE: To receive warranty service, you must deliver or send the defective product, delivery costs and insurance prepaid, within the applicable warranty period, to RITRON, INC., 505 West Carmel Drive, Carmel, Indiana 46032-7564, Attention: Warranty Department. Please provide a written explanation of the defect in as much detail as you can along with your name address, email and phone number. You must retain your sales or lease receipt (or other written evidence of the date of purchase) and deliver it along with the product. If RITRON chooses to repair or replace a defective product, RITRON may replace the product or any part or component with reconditioned product, parts or components. Replacements are covered for the balance of the original applicable warranty period. All replaced covered products, parts or components become RITRON’s property. RIGHTS TO SOFTWARE RETAINED : Title and all rights or licenses to patents, copyrights, trademarks and trade secrets in any RITRON software contained in covered products are and shall remain in RITRON. RITRON nevertheless grants you a limited non-exclusive, transferable right to use the RITRON software only in conjunction with covered products. No other license or right to the RITRON software is granted or permitted. YOUR RIGHTS UNDER STATE LAW: This warranty gives you specific legal rights, and you may also have other rights which vary from state to state. WHERE THIS WARRANTY IS VALID: THIS WARRANTY IS VALID ONLY WITHIN THE UNITED STATES, THE DISTRICT OF COLUMBIA AND PUERTO RICO.